

Page 1

GPS Multisport Watch
307/347/367
Quick Start Guide
Make sure to read the Notices sheet and online User’s Guide
before using the product to ensure safe use.
Buttons
1 Charging the Watch 2 Setting Up the Watch and App
Use the included USB charging clip to charge
the watch.
Connect the USB charging clip to the watch.
1
Back
Start/Stop
Up
Enter
Down
Wearing Your Watch
Wear the product snugly
around your wrist as shown.
Tighten the watch if your
pulse is not measured
correctly while exercising.
Connect the USB cable to your PC or the
2
optional AC adapter.
Make sure the watch is fully charged before you
remove the clip.
Page 2
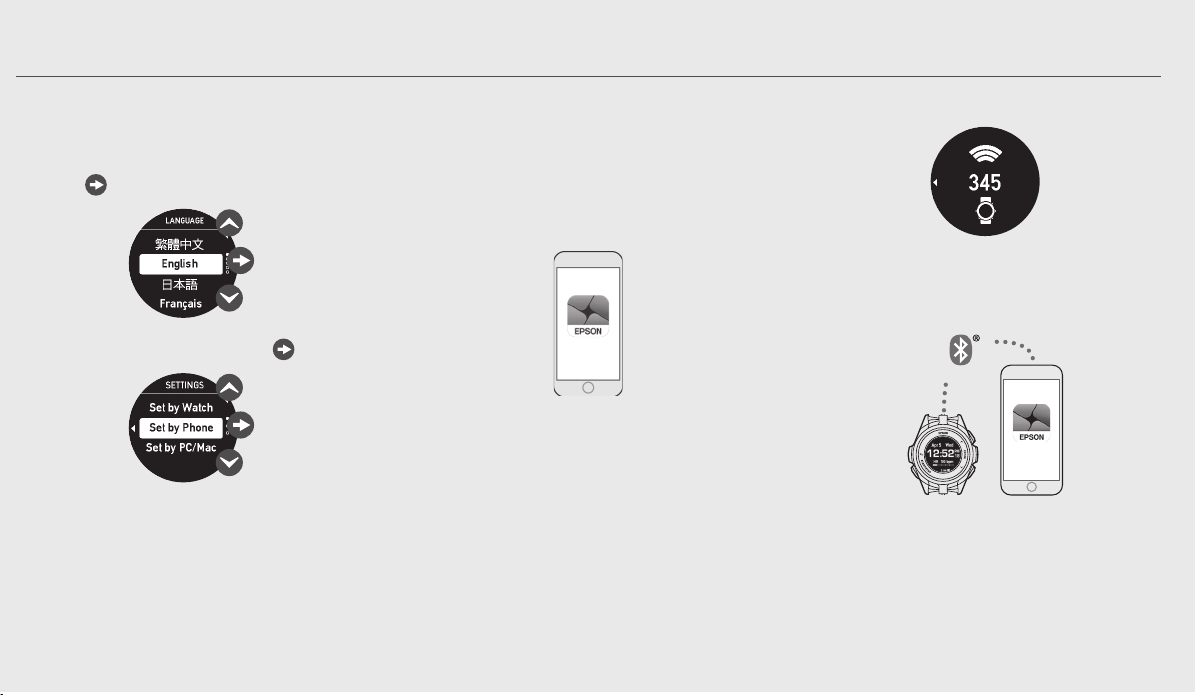
The Settings screen appears on the watch after
you remove the USB charging clip.
Download and install the Epson View app
3
from your smartphone’s app store.
Note the code that appears on the watch.
5
On the watch, select your language and
1
press Enter.
Select Set by Phone and press Enter.
2
Note: You can also use a PC to congure the
watch or you can congure the watch on
its own. See the online User’s Guide for more
information.
Launch the Epson View app and create
4
an account or log in. After you nish this
process, the initial Settings screen appears
on your smartphone.
Note: Once you have completed the initial
setup, you can use the Epson View app to
customize the workout screens, change
settings, and link to third-party tness apps.
You can also customize the dashboard to
show bike, swim, and other workout modes
by selecting Edit on the dashboard screen.
Select your product from the list on your
6
smartphone, then follow the instructions to
pair your watch and your phone.
The Time screen appears on the watch when
the process is complete.
Note: You can pair the watch with your
smartphone at any time by selecting My
Watch in the Epson View app.
Page 3

3 Using Your Watch
Selecting a Workout Mode
Press down on the Time screen to display
1
the workout mode screen.
Note: You can press Start/Stop on the
Time screen to quickly start a run.
Press up or down to select the
2
desired activity.
The following workout modes are available:
Run, Walk, Bike, Treadmill, Pool and Open
Water Swim, Triathlon, and Indoor Bike and
Indoor Run.
Press Start/Stop while outdoors with no
3
obstacles overhead to start GPS calibration.
You can start your workout when the
Measurement screen appears.
For increased GPS accuracy, wait at least 15
minutes before starting your workout. You
only need to perform this extended GPS
calibration the rst time you use the watch
or if you do not use it for a few months.
Note: If you see the message below, do one
of the following:
• Move to an area with no obstructions
overhead and then press
restart GPS calibration.
back to
• Press Enter to start the workout.
Distance traveled will be estimated until
the GPS signal is fully acquired.
Starting a Workout
Press Start/Stop on the Measurement
screen to start a workout.
Note: You can press Enter during a
workout to start and record a new lap.
Press up or down during a workout to
change the measurements that appear. See
the online User’s Guide for more information.
Note: See the online User’s Guide for details
on using the notication and music control
features and on the VO2 max, Recovery Time,
and Training Eect estimates.
Page 4

3 Using Your Watch (Continued) Updating the Firmware Caring for Your Watch Where to Get Help
Saving a Workout
Press Start/Stop to pause the workout.
1
Select Save and then press Enter.
2
Press up and down to scroll through
3
the workout summary.
Press Enter to return to the Time screen.
4
Viewing Your Workout History
On the Time screen, press Enter and
1
select History.
Select the desired workout and then press
2
Enter. The workout data appears.
Press up and down to scroll through
3
the workout summary.
Note: To return to the Time screen, press
and hold back.
Page 5

Checking Daily Activity Data
Additional Tips
Press
distance traveled, number of steps, calories
burned, and sleep time for the current day.
up on the Time screen to display the
• To turn the watch on or o, press and hold
Start/Stop.
• To return to the Time Screen at any time, press
and hold back.
• To start a new lap during a workout, press
Enter.
• To turn on the backlight during a workout,
press back.
You can update your watch’s rmware from the
Epson View app. Select My Watch, then select
the arrow next to the rmware version to update
your watch.
To check the version of the rmware on your
watch, press
then select Settings > System > Ver. Info.
Enter on the Time screen and
Your ProSense product is made from materials
commonly used in watches and other consumer
products. Since you may wear your product
over extended periods, including when you
are exercising and sweating, it is important that
you take care of your skin and your product
according to these instructions. Prolonged
wearing of your product without proper care
could lead to skin irritation or rash.
Please follow the precautions below to ensure
full enjoyment and benet of your ProSense
product:
• Keep your product and skin clean.
• Keep your product and skin dry.
• Give skin a rest and some air.
Proper wear and care of your product is an
important part of your enjoyment of this
product. Make sure to see the online User’s Guide
for more detailed information on caring for your
product.
Page 6

Internet Support
am
Visit www.epson.com/support (U.S.) or
www.epson.ca/support (Canada) and search
for your product to nd solutions to common
problems. You can get tips, usage information,
and FAQs, download utilities, view the User’s
Guide, or e-mail Epson.
Telephone Support
Call (800) 241-5789, (562) 276-4394 (U.S.), or
(905) 709-3839 (Canada). Support hours are
6 am to 8 pm, Pacic Time, Monday through Friday,
and 7
hours of support are subject to change without
notice. Toll or long distance charges may apply.
to 4 pm, Pacic Time, Saturday. Days and
EPSON is a registered trademark and EPSON Exceed Your Vision
is a registered logomark of Seiko Epson Corporation.
The Bluetooth wordmark is owned by Bluetooth SIG, Inc.
General Notice: Other product names used herein are for
identication purposes only and may be trademarks of their
respective owners. Epson disclaims any and all rights in those
marks.
This information is subject to change without notice.
© 2017 Epson America, Inc., 6/17
Printed in Japan CPD-54155
 Loading...