

Page 1

ProSense 307/347/367 User's Guide
Page 2

Page 3

Contents
ProSense 307/347/367 User's Guide .......................................................................................................... 7
Introduction to Your Product...................................................................................................................... 8
Setting Up the Product.............................................................................................................................. 16
Product Box Contents .......................................................................................................................... 8
Optional Accessories and Replacement Parts ..................................................................................... 9
Notations Used in the Documentation .................................................................................................. 9
Product Buttons.................................................................................................................................. 10
Screen Icons ...................................................................................................................................... 11
Heart Rate Zone Icons ....................................................................................................................... 13
Smartphone Notification Icons ........................................................................................................... 15
Charging the Watch............................................................................................................................ 16
Battery Level Display..................................................................................................................... 20
Turning the Watch On or Off............................................................................................................... 24
Configuring Your Watch ..................................................................................................................... 24
Configuring the Watch Using the Buttons ...................................................................................... 24
Configuring the Watch Using a Smartphone.................................................................................. 26
Acquiring a GPS Signal...................................................................................................................... 28
Connecting the Device to a Smartphone Using Bluetooth.................................................................. 29
Measuring Your Heart Rate................................................................................................................ 30
Calculating Your Stride Length........................................................................................................... 32
Enabling Smartphone Notifications .................................................................................................... 32
Adjusting the Device Display.............................................................................................................. 34
Adjusting the Watch Face and Background Settings..................................................................... 34
Adjusting the Backlight Settings .................................................................................................... 35
Adjusting the Sound and Vibration Settings ....................................................................................... 36
Locking and Unlocking the Watch Buttons ......................................................................................... 37
Measuring and Reviewing Workouts....................................................................................................... 38
Measuring Workouts .......................................................................................................................... 38
Displayable Workout Measurements............................................................................................. 38
Starting Workout Measurement..................................................................................................... 41
3
Page 4

Stopping Workout Measurement and Saving the Data.................................................................. 43
Recording Laps ............................................................................................................................. 44
Recording Laps During a Run, Walk, or Bike Workout.............................................................. 45
Recording Laps During a Pool Swim Workout .......................................................................... 46
Recording Laps During an Open Water or Indoor Bike Workout............................................... 46
Pausing and Resuming Workout Measurement ............................................................................ 47
Changing Workout Type During Triathlon Measurement............................................................... 48
Monitoring Current Workout Data .................................................................................................. 48
Customizing Workout Measurements with Epson View................................................................. 49
Estimating VO2Max....................................................................................................................... 49
Controlling Music Playback ................................................................................................................ 50
Using the Stopwatch .......................................................................................................................... 51
Reviewing Workout Data.................................................................................................................... 52
Viewing Workout Data History on Your Watch............................................................................... 52
Measuring and Reviewing Daily Activities .............................................................................................. 54
Activity Measurement and Data Collection......................................................................................... 54
Starting Activity Measurement............................................................................................................ 54
Activity Data Displayed on Your Device......................................................................................... 55
Activities Available for Each Heart Rate Mode............................................................................... 58
Configuring a Target Number of Steps............................................................................................... 58
Configuring a Target Number of Calories to Burn............................................................................... 60
Reviewing Activity Data on Your Watch ............................................................................................. 60
Reviewing Activity Data Using the Epson View App........................................................................... 61
Watch Menu Settings ................................................................................................................................ 62
Time Screen Menus ........................................................................................................................... 62
Measurement Screen Menus ............................................................................................................. 63
Caring for Your Watch .............................................................................................................................. 66
Cleaning Your Watch ......................................................................................................................... 66
Battery Life ......................................................................................................................................... 67
Solving Problems ...................................................................................................................................... 68
Solving Problems Using Your Watch.................................................................................................. 68
Solutions to Watch Screen Problems ............................................................................................ 68
4
Page 5

Solutions to Watch Charging Problems ......................................................................................... 69
Solutions to Watch Settings Problems........................................................................................... 69
Solutions to GPS Signal Problems ................................................................................................ 70
Solving Problems Using Epson View ................................................................................................. 70
Solutions to Problems Using Epson View...................................................................................... 71
Restarting the Watch.......................................................................................................................... 71
Resetting the Watch ........................................................................................................................... 72
Checking the Firmware Version of Your Watch.................................................................................. 72
Updating Your Watch's Firmware from the Epson View App.............................................................. 73
Updating Your Watch's Firmware from Your Computer...................................................................... 75
Where to Get Help.............................................................................................................................. 75
Technical Specifications .......................................................................................................................... 77
Device Specifications ......................................................................................................................... 77
Optional Accessory Specifications ..................................................................................................... 79
Viewing Safety and Approval Specifications ...................................................................................... 79
Notices ....................................................................................................................................................... 81
Notes on Electromagnetic Waves ...................................................................................................... 81
Copyright Notice................................................................................................................................. 83
Binding Arbitration and Class Waiver ................................................................................................. 83
Trademarks........................................................................................................................................ 86
Copyright Attribution........................................................................................................................... 87
5
Page 6

Page 7

ProSense 307/347/367 User's Guide
Welcome to the ProSense 307/347/367 User's Guide.
If you prefer a User's Guide in a different file format, go to epson.com/support (U.S.) or epson.ca/support
(Canada), select your product, and select the Manuals and Warranty tab.
7
Page 8

Introduction to Your Product
Refer to these sections to learn more about your product and this manual.
Product Box Contents
Optional Accessories and Replacement Parts
Notations Used in the Documentation
Product Buttons
Screen Icons
Heart Rate Zone Icons
Smartphone Notification Icons
Product Box Contents
Save all the packaging in case you need to ship your product. Always use the original packaging (or
equivalent) when shipping.
Make sure your product box included all of these parts:
1 ProSense 307, ProSense 347, or ProSense 367 watch
2 USB charging clip
Parent topic: Introduction to Your Product
8
Page 9
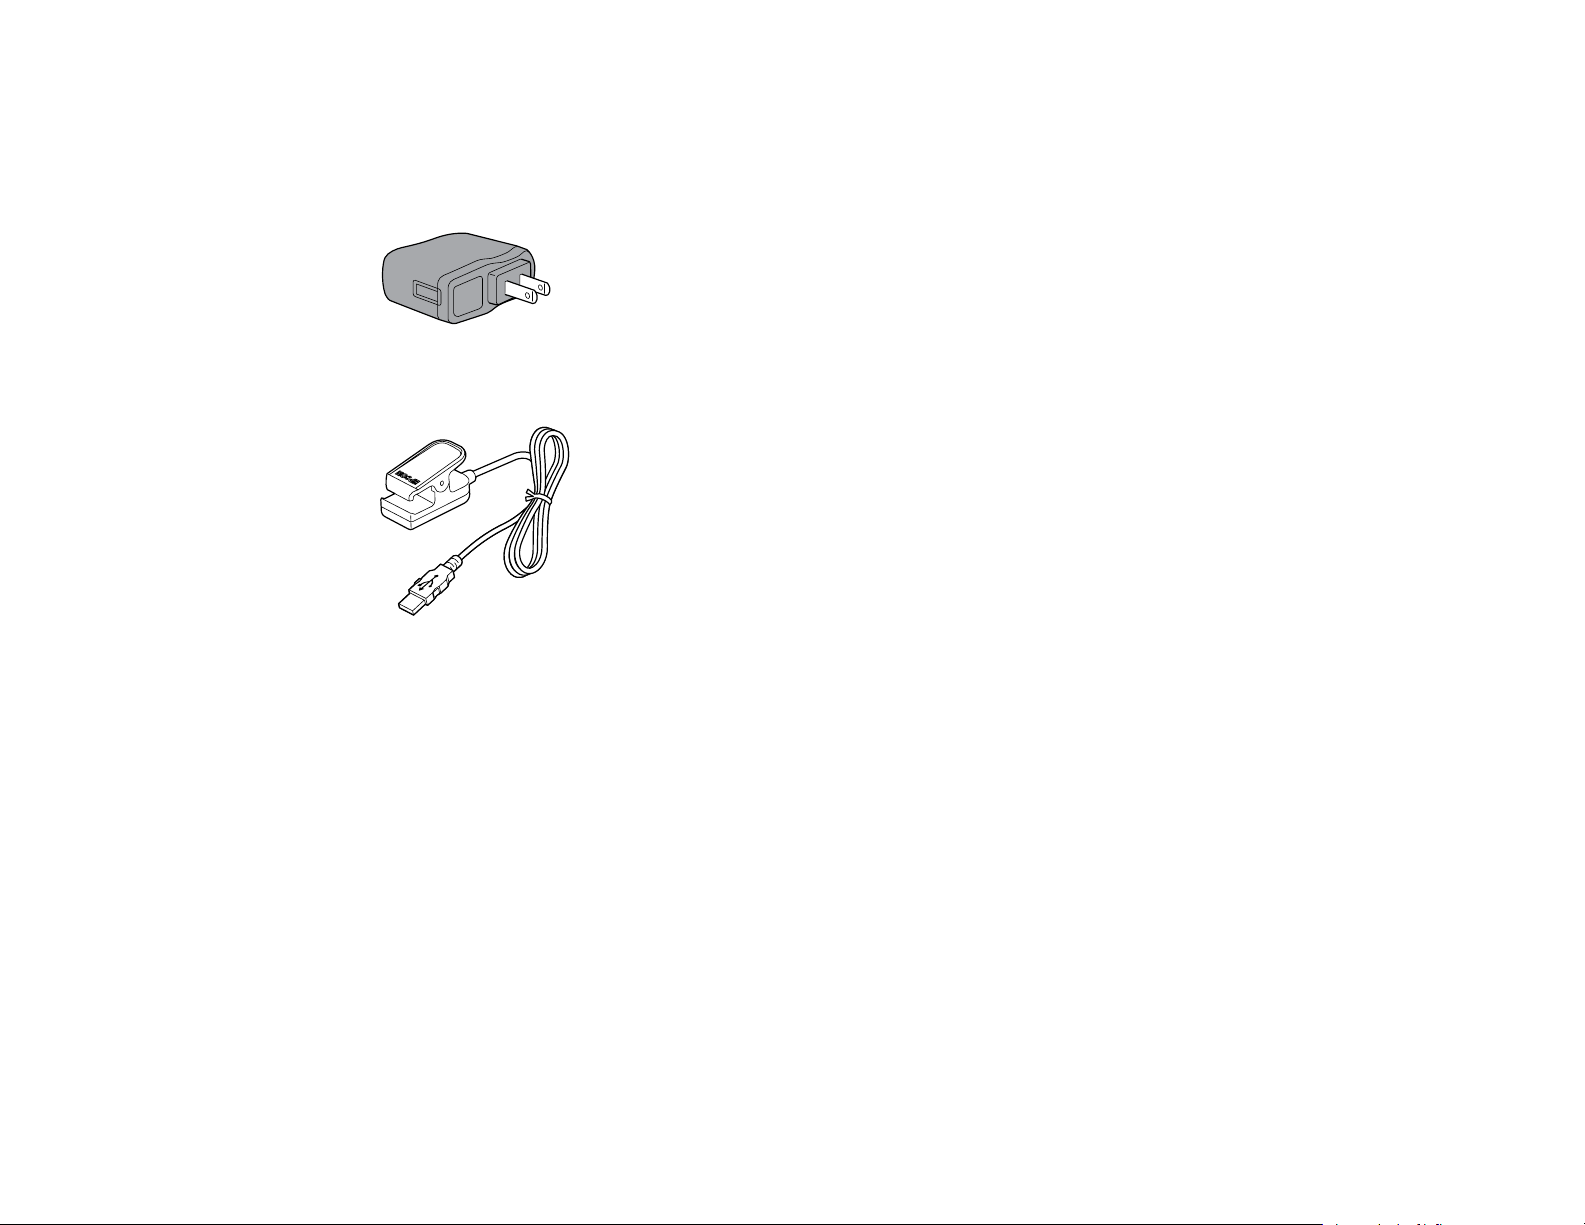
Optional Accessories and Replacement Parts
Epson offers the following optional accessories and replacement parts for your product:
• AC adapter, model SFAC04 (part number: E12E204001)
• USB charging clip, model WPCLP01 (part number: E12E220202)
Parent topic: Introduction to Your Product
Notations Used in the Documentation
Follow the guidelines in these notations as you read your documentation:
• Warnings must be followed carefully to avoid bodily injury.
• Cautions must be observed to avoid damage to your equipment.
• Notes contain important information about your product.
Parent topic: Introduction to Your Product
9
Page 10
Product Buttons
1
2
3
4
Back button
Press to display the previous screen.
Start/Stop button
Hold for 2 seconds to turn the power on or off.
Press to start, pause, or restart workout measurements.
Up button
Press to highlight the option above the current option.
Hold for 2 seconds to lock or unlock the product buttons.
On the Time screen, press to display the Activity screen.
On the Measurement and Activity screens, press to switch between available information screens.
Enter button
Press to select the highlighted option.
On the Time screen, press to display the Menu screen.
On the Measurement screen, press to record laps.
On the Activity screen, press to display your activity history.
10
Page 11
5
Parent topic: Introduction to Your Product
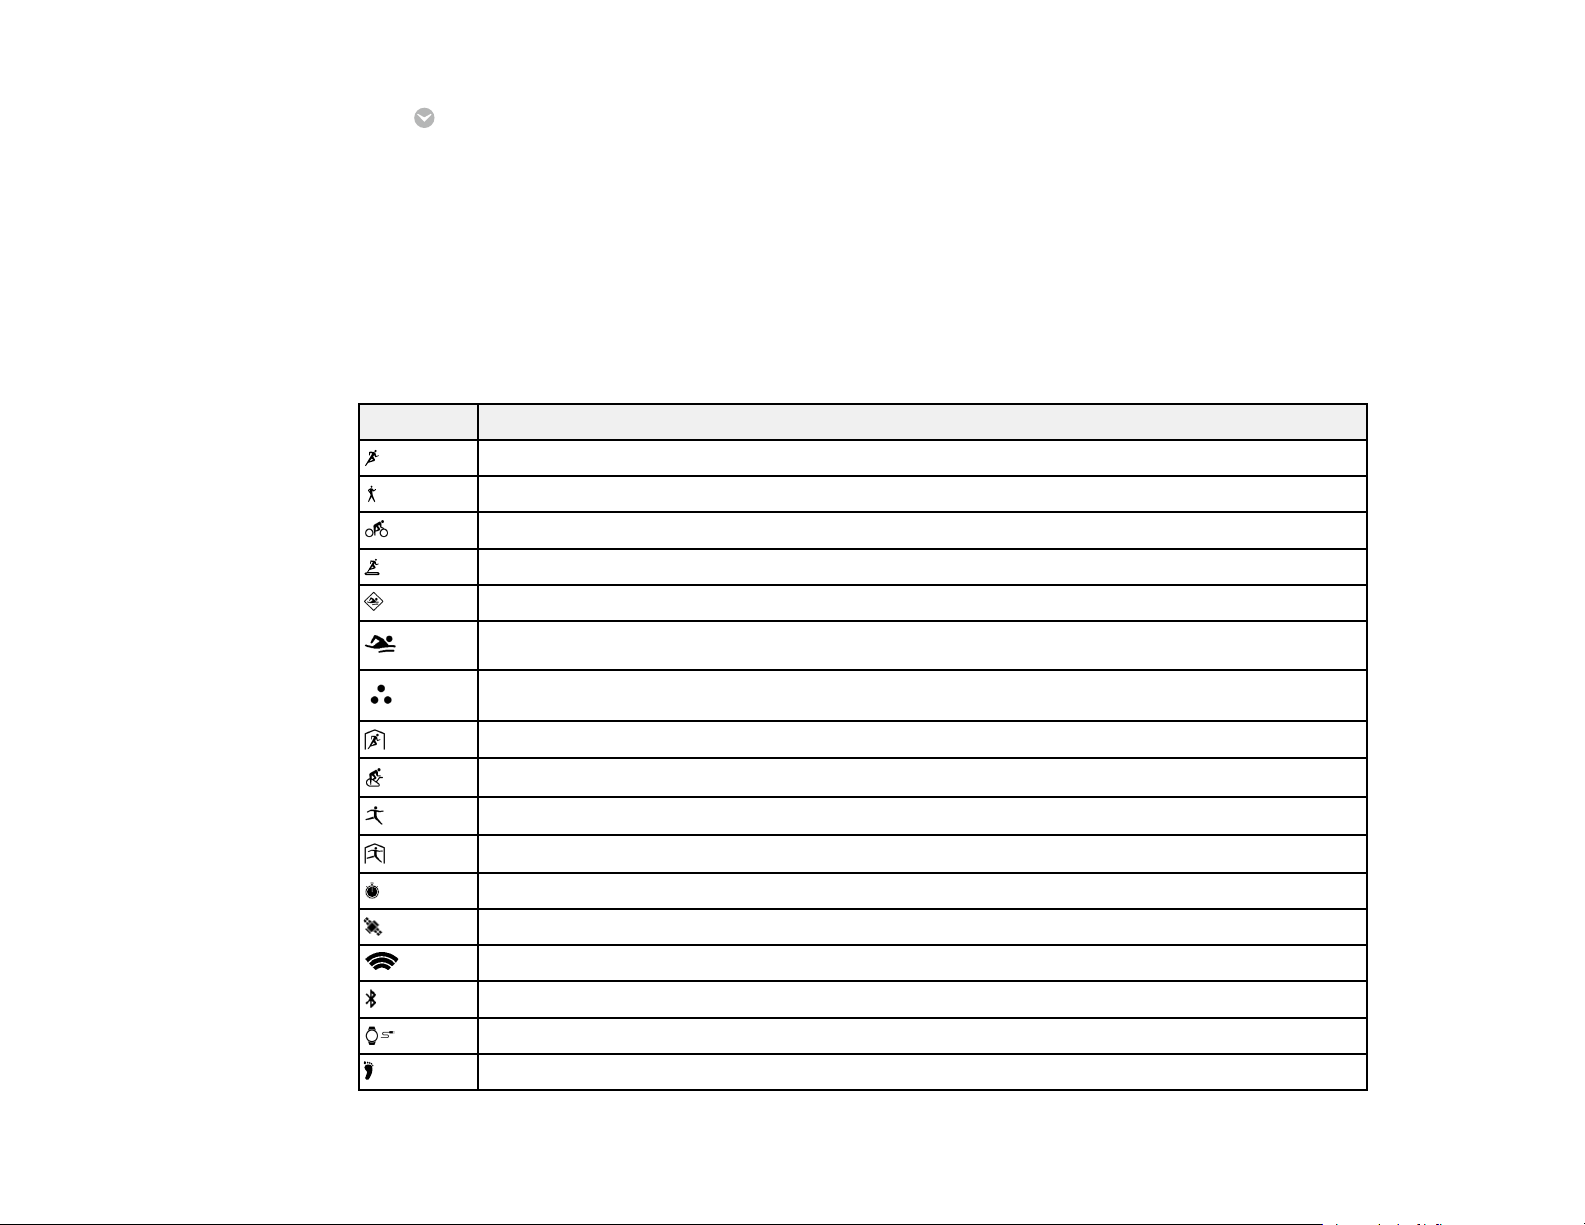
Screen Icons
The icons in the table here may appear on your device display screen.
Icon Description
Down button
Press to highlight the option below the current option.
On the Time screen, press to display the Activity Selection screen.
On the Measurement and Activity screens, press to switch between available information screens.
Run mode
Walk mode
Bike mode
Treadmill mode
Pool swimming mode
Open water swimming mode
Triathlon mode
Indoor running mode
Indoor biking mode
Other outdoor activity mode
Other indoor activity mode
Stopwatch mode
GPS connected (watch is locating a GPS signal when the icon is flashing)
Searching for Bluetooth device
Connecting to Bluetooth device
Connected to USB device
Number of steps
11
Page 12
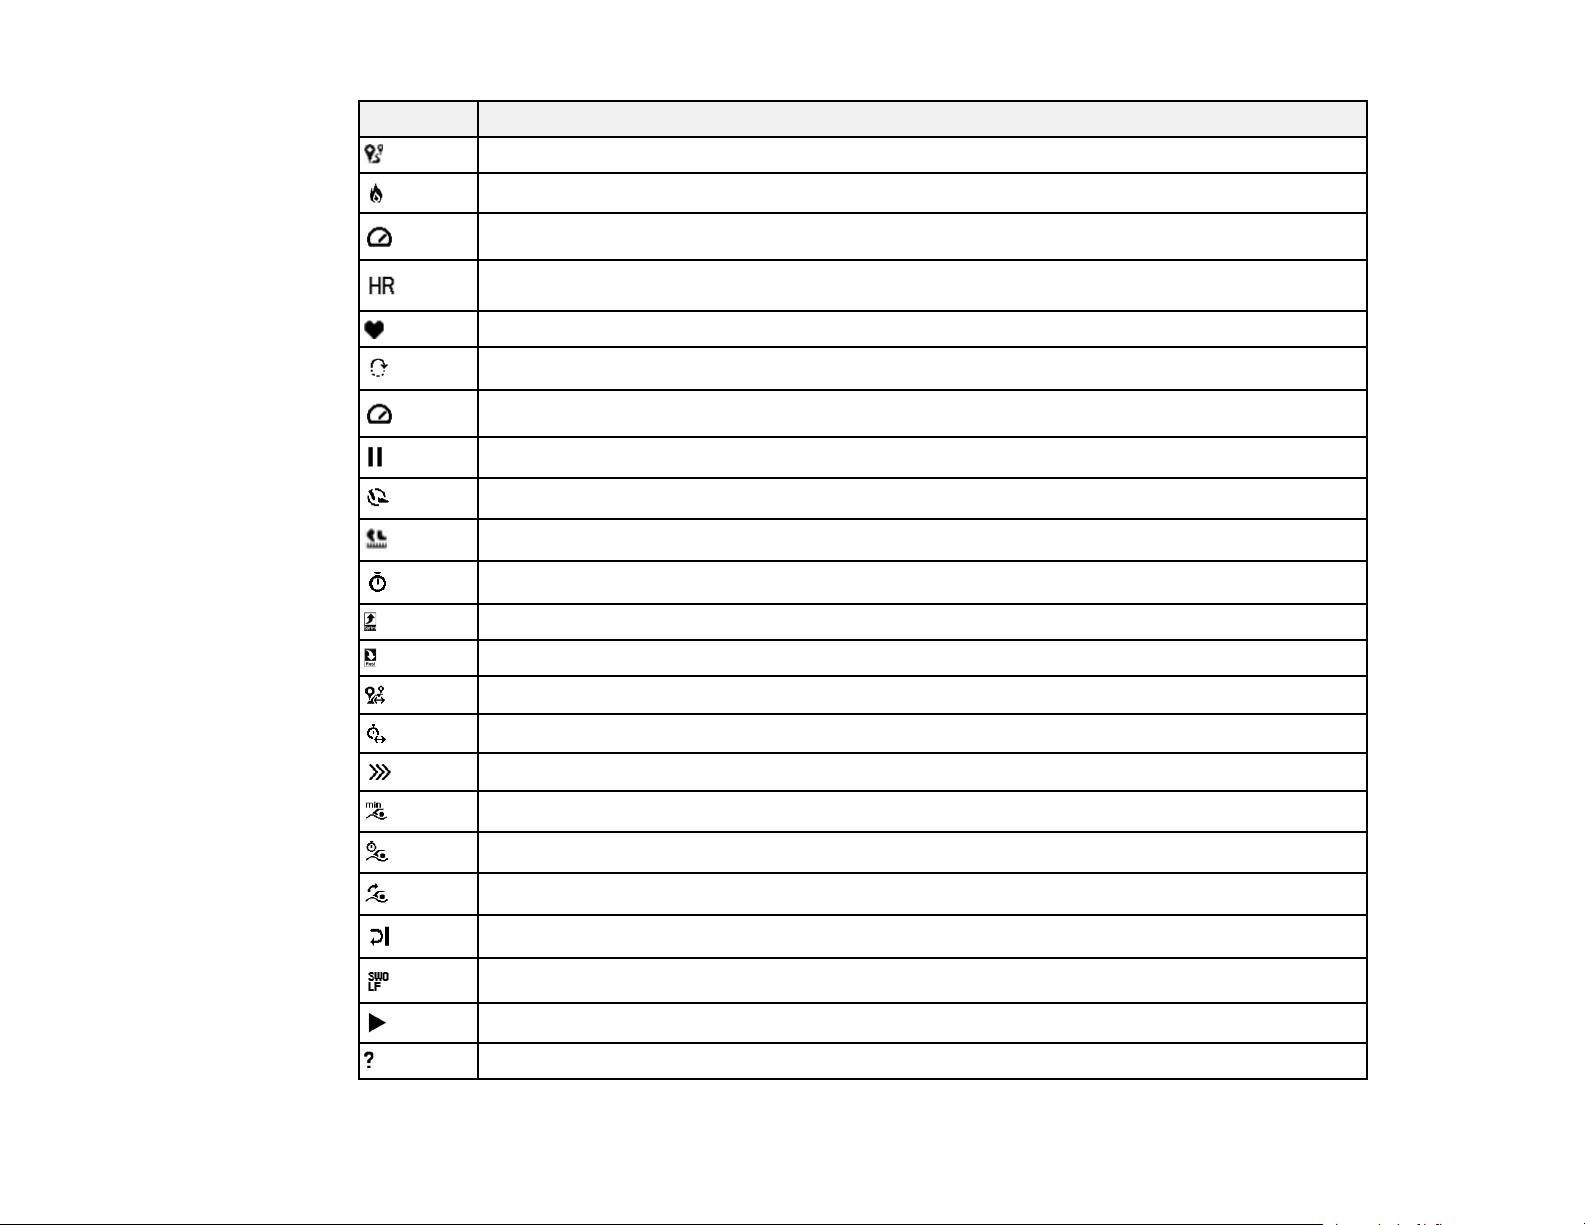
Icon Description
Distance
Calories burned
Speed
Measuring heart rate
Heart rate
Laps
Pace
Pause
Cadence
Stride
Time
Sprint interval
Rest interval
Distance difference
Time difference
Triathlon transition
Swim stroke rate
Swim stroke time
Swim stroke count
Swim turns/laps
Swim SWOLF score (lap time + lap stroke count)
Start/resume measurement
Measurement failed
12
Page 13
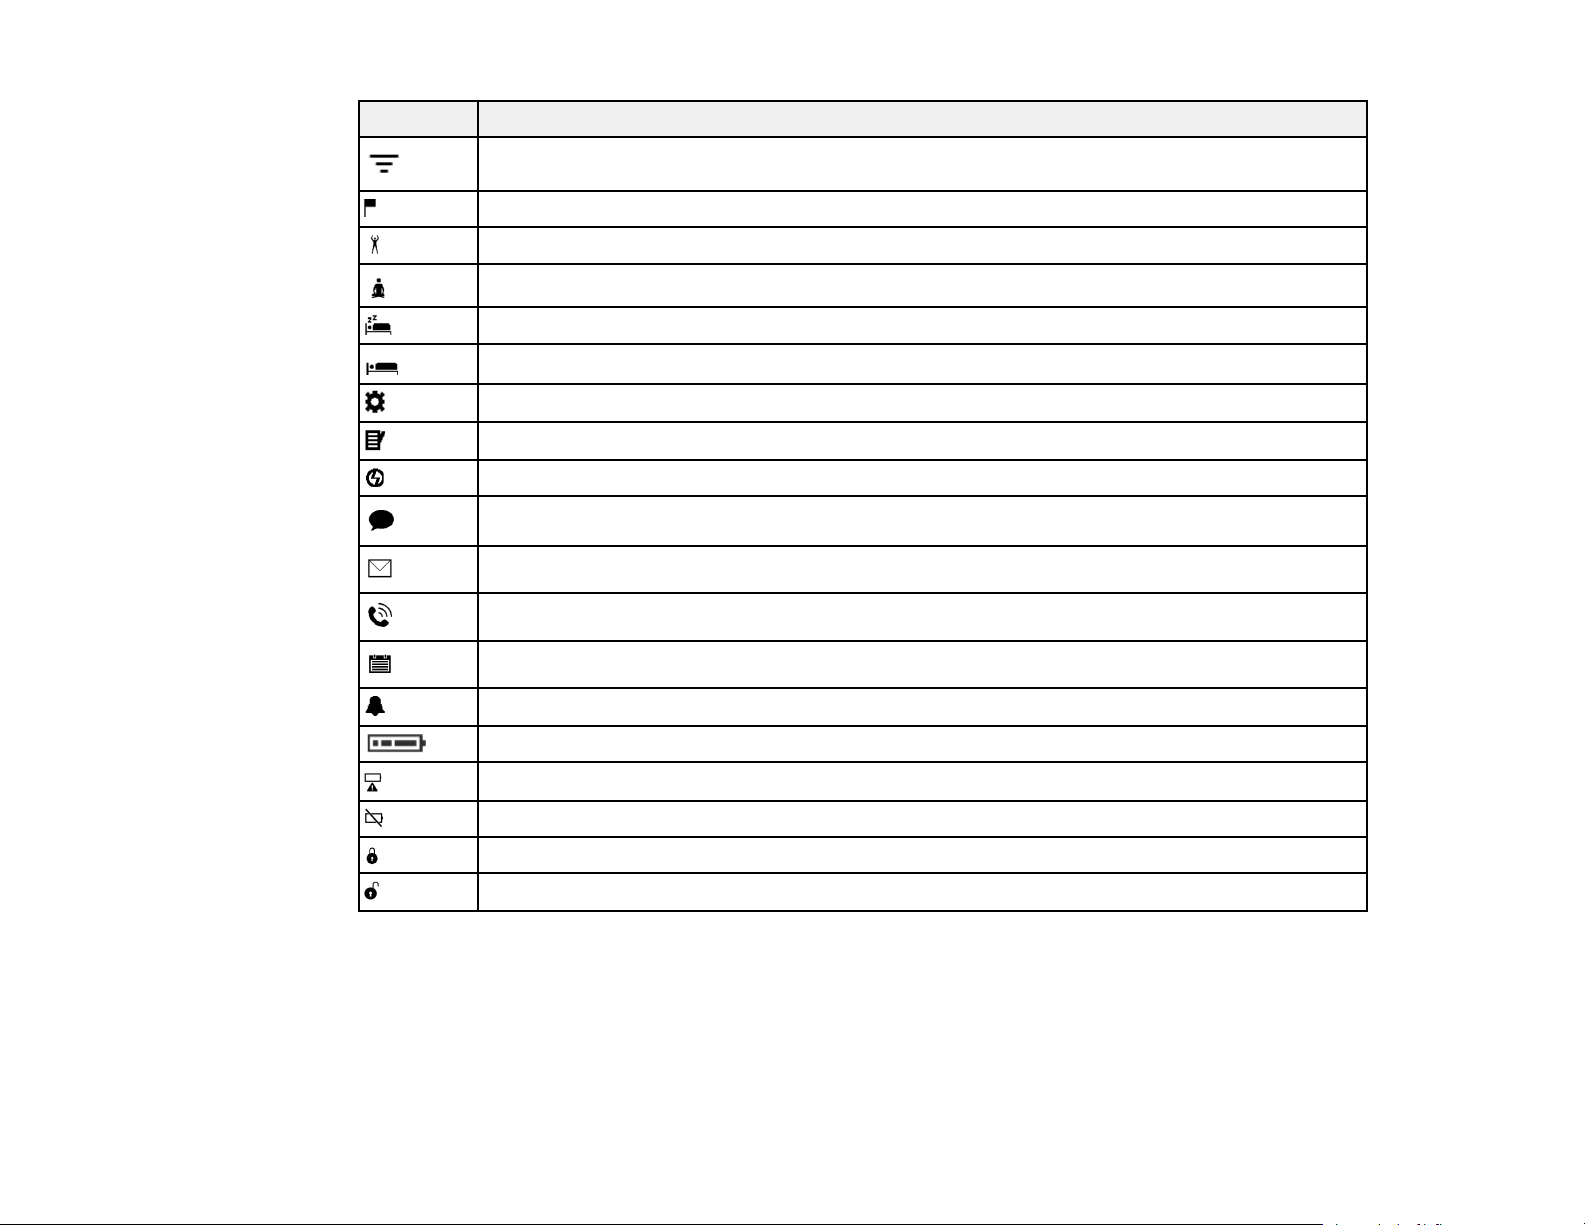
Icon Description
Exercise intensity
Activity target
High heart rate (normal activities)
Low heart rate (normal activities)
Deep sleep
Light sleep
Settings
Activity history
Verification
Facebook or other social media notification
Email notification
Phone notification
Calendar notification
Alarm
Battery level
Low battery warning
Charging error
Buttons locked
Buttons unlocked
Parent topic: Introduction to Your Product
Heart Rate Zone Icons
The icons in the table may appear on your watch screen when monitoring your heart rate during a
workout.
13
Page 14
Icon Description
Heart Rate Zone 1
Gentle exercise intensity, such as walking at a slow pace
Heart Rate Zone 2
Moderate exercise intensity, such as walking quickly or jogging
Heart Rate Zone 3
Endurance exercise intensity, such as low-intensity running
Heart Rate Zone 4
Strengthening exercise intensity, such as moderate-intensity running
Heart Rate Zone 5
Highest exercise intensity, such as high-intensity running or sprinting
Parent topic: Introduction to Your Product
14
Page 15
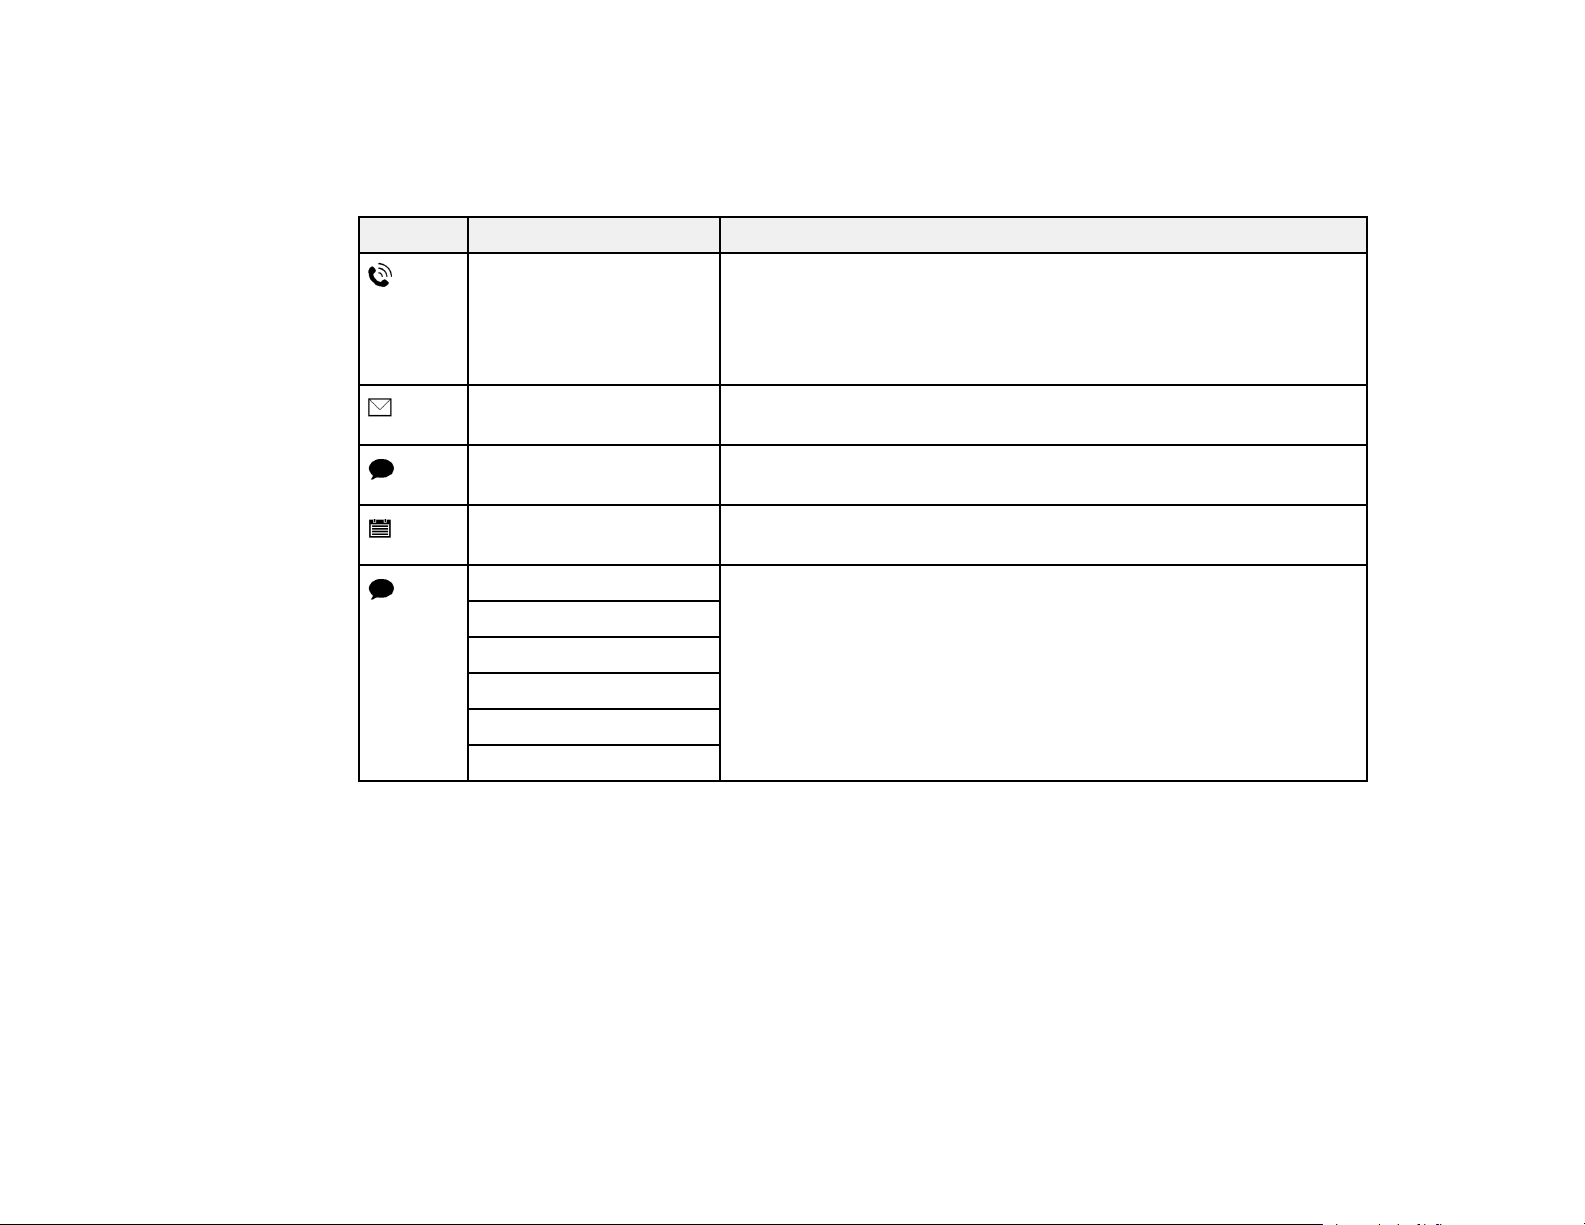
Smartphone Notification Icons
The icons in the table here may appear on your watch display screen when your watch is paired with
your smartphone and you receive a phone, email or other service notification.
Icon Text Description
Calling or Missed Call Your watch displays the first 10 characters of the caller's name if
Mail Your watch displays the first 10 characters of the sender's email
Text Your watch displays the first 10 characters of the sender's text
Schedule Displays a scheduled event if your watch is set up to trigger a
Facebook Your watch displays the first 10 characters of the notification text
Twitter
LINE
Weibo
your watch's display language is English and the caller's contact
information is saved in your smartphone. If your watch is set to
another language or the contact isn't saved, the caller's phone
number is displayed.
address and subject.
message.
schedule notification.
if your watch's display language is English. If your watch is set to
another language, only the notification icon appears on your
watch.
WeChat
Other
Parent topic: Introduction to Your Product
15
Page 16

Setting Up the Product
Follow the instructions in these sections to set up your product for use.
Charging the Watch
Turning the Watch On or Off
Configuring Your Watch
Acquiring a GPS Signal
Connecting the Device to a Smartphone Using Bluetooth
Measuring Your Heart Rate
Calculating Your Stride Length
Enabling Smartphone Notifications
Adjusting the Device Display
Adjusting the Sound and Vibration Settings
Locking and Unlocking the Watch Buttons
Charging the Watch
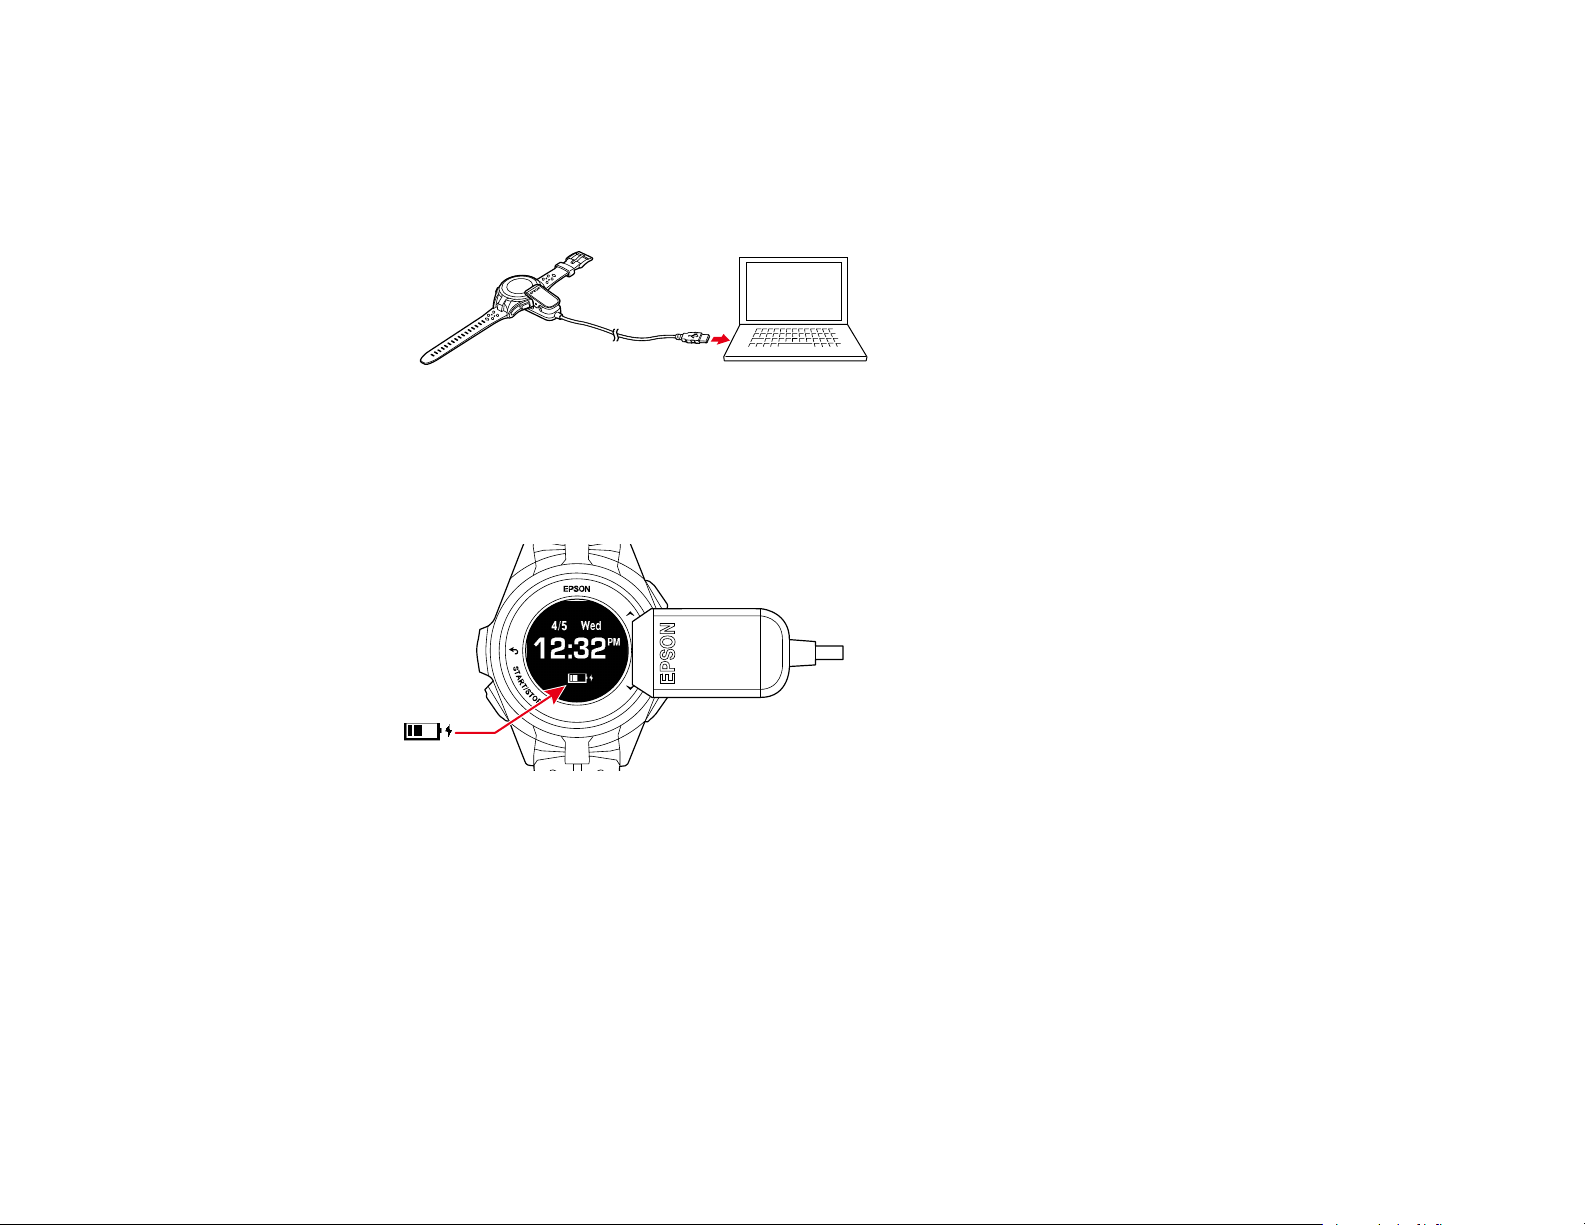
Before using your watch, you need to charge its battery using the USB charging clip and either the
optional AC adapter or a computer with a USB port capable of charging external devices.
It takes approximately 2.5 to 3.5 hours to fully charge your watch, depending on your charging method.
Charge your watch in an environment with a temperature from 41 to 95 °F (5 to 35 °C).
Note: If you charge your watch in an environment outside the required temperature range, you see this
screen on your watch:
16
Page 17
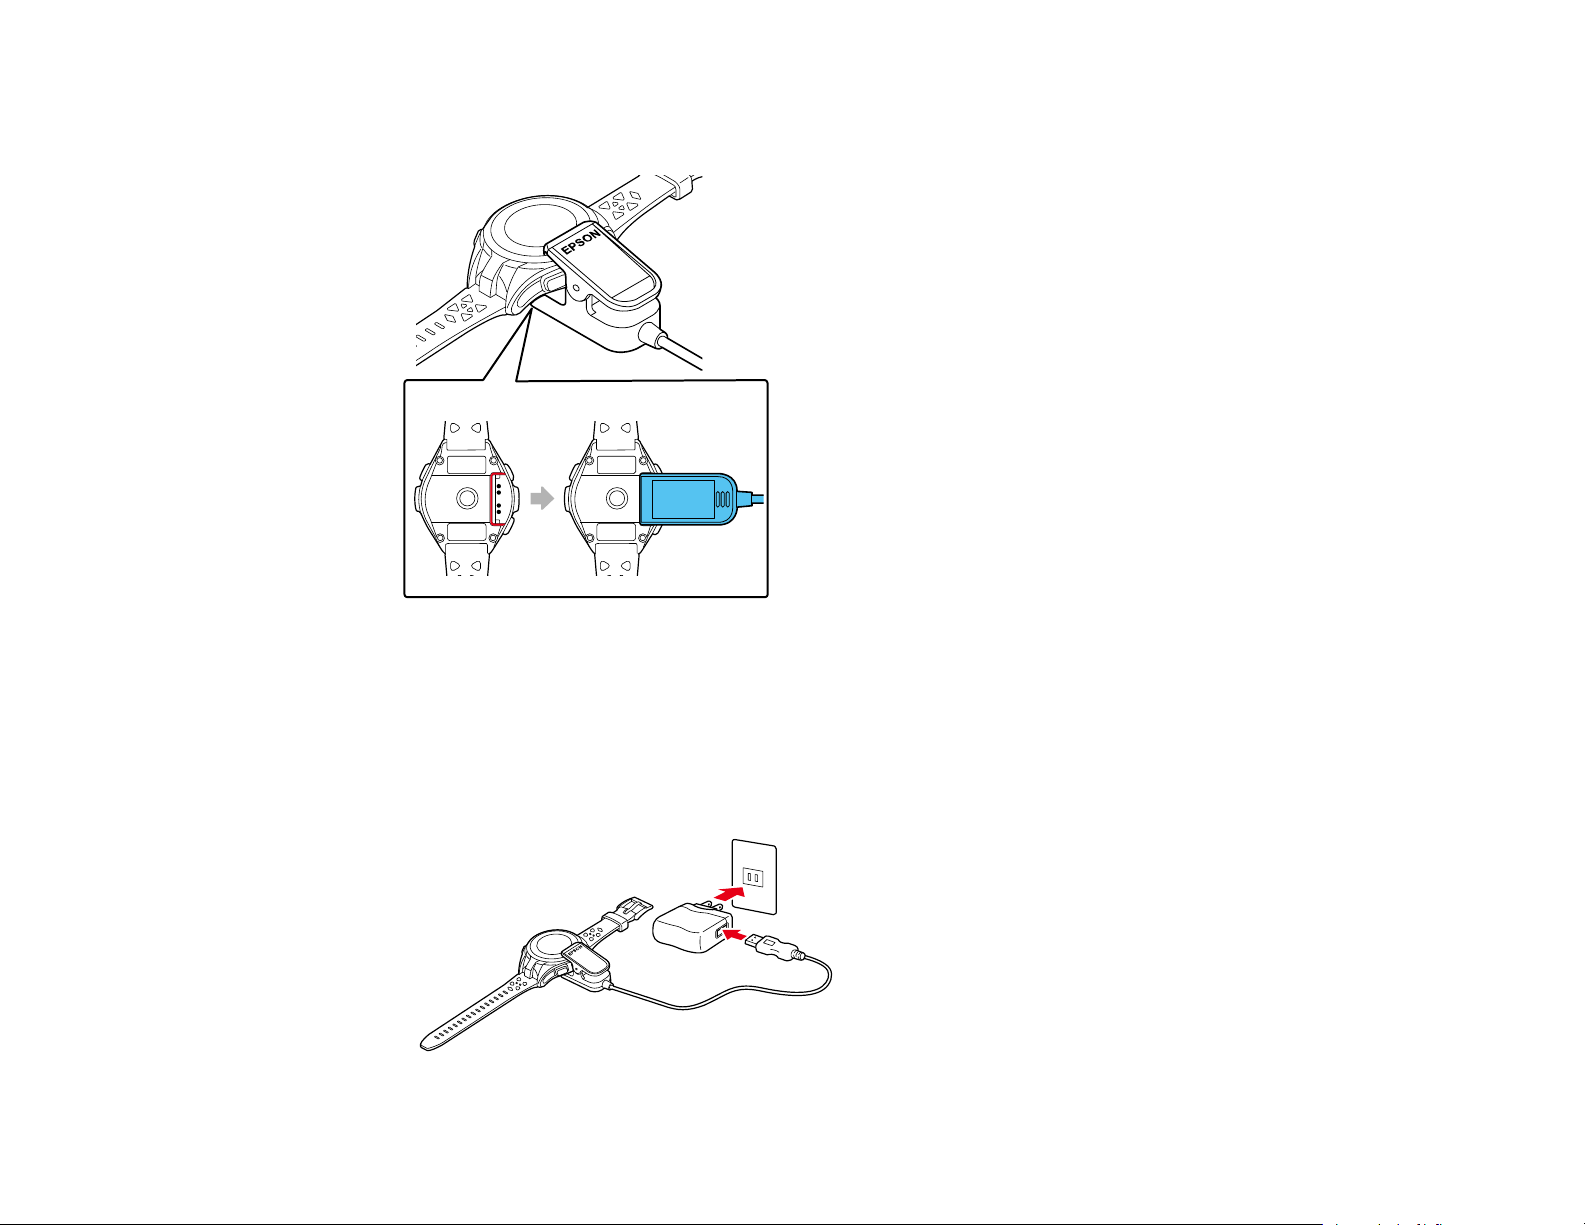
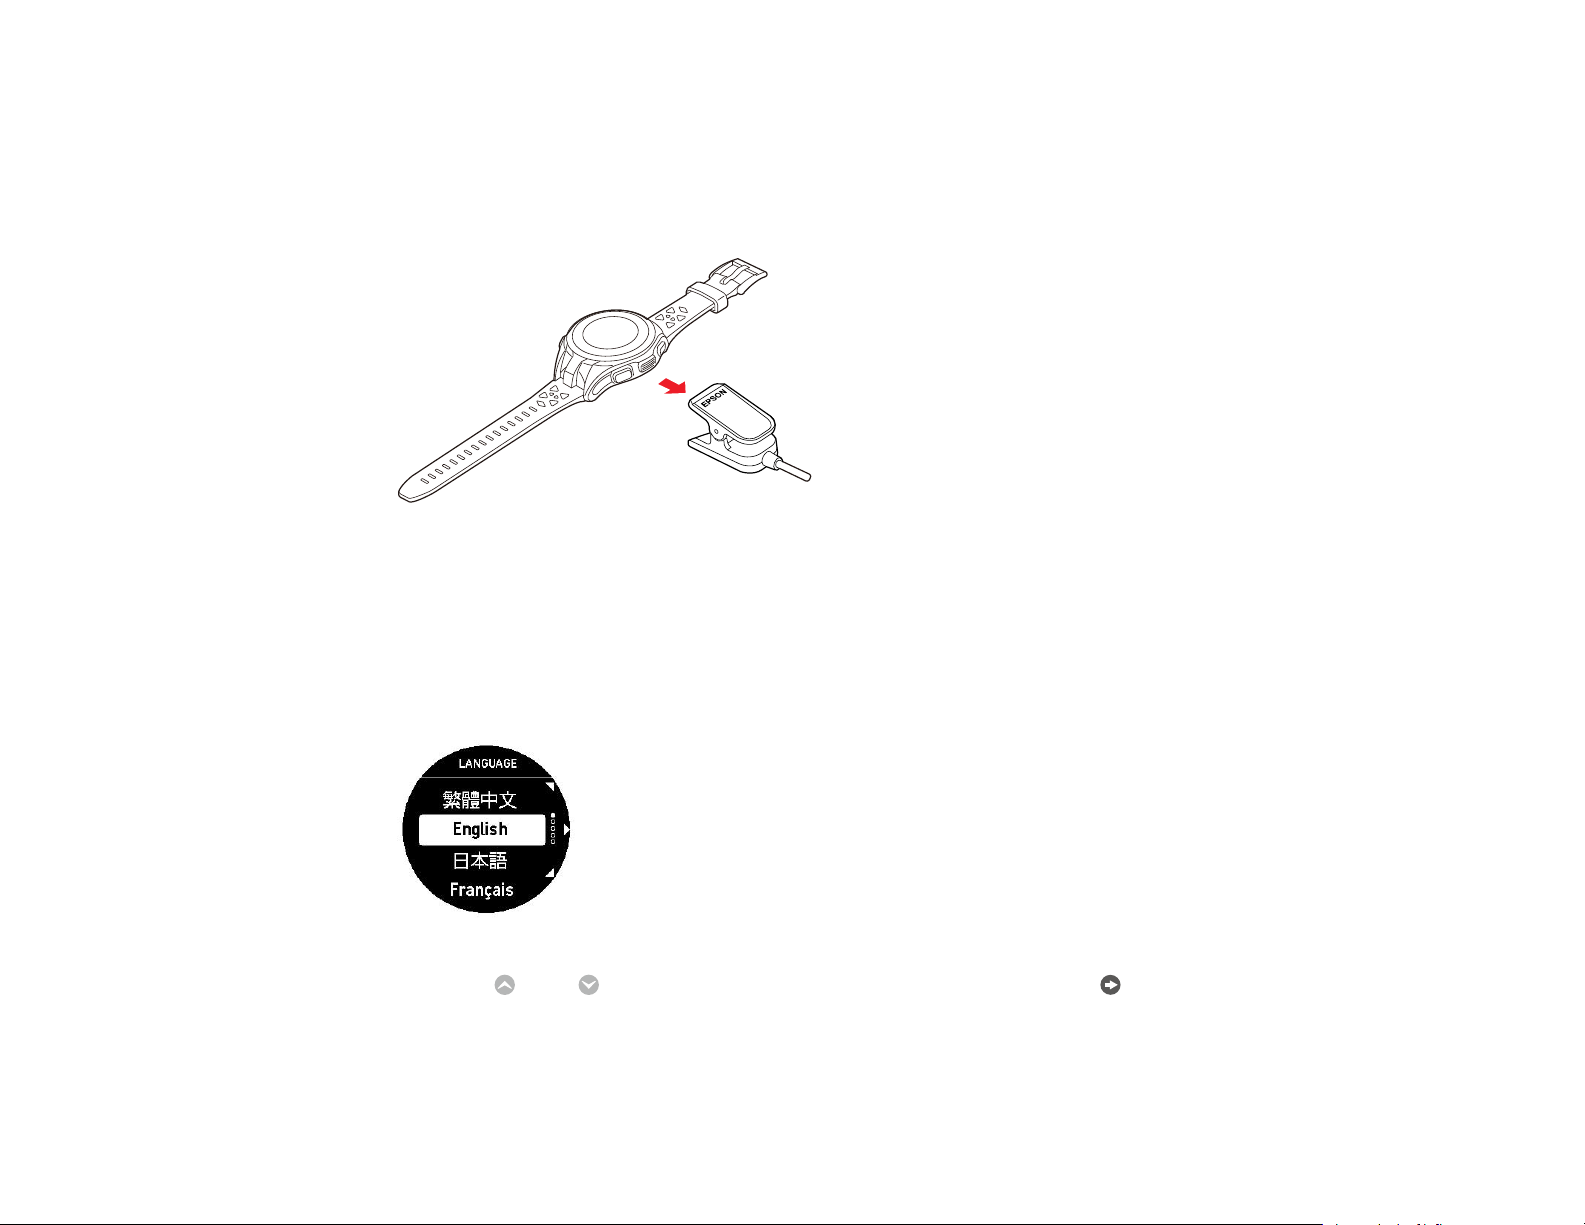
1. Attach the USB charging clip to your watch as shown below. The charging clip should fit into the
groove at the back of your watch.
Caution: Do not attach the USB charging clip to your watch if either the clip or your watch are wet or
dirty. This may cause corrosion, communication failures, or other problems.
2. Connect the USB charging clip to one of the following devices:
• AC adapter: Connect the USB charging clip to the USB port on the optional AC adapter and plug
the AC adapter into an electrical outlet.
17
Page 18
Caution: Only use the optional AC adapter that is compatible with your product to charge your
watch, or the watch may not charge or operate correctly.
• Computer: Connect the USB charging clip to a USB port on your computer that is capable of
charging external devices.
Note: USB charging from a computer port may not work with all computers. Do not connect the
USB charging clip to a USB hub or other intermediate device.
Charging begins and you see a screen displaying the battery level on your watch.
If you connected your watch to a computer where you have already installed the Epson View
Uploader software, the software starts automatically on your computer. Close the software window
as necessary.
18
Page 19
3. When charging is complete and the watch screen displays the message Completed, you can open
the clip fully and disconnect the USB charging clip from your watch.
Note: Do not disconnect the USB charging clip before your watch is fully charged or the battery icon
may not accurately display the remaining level of power in the battery.
Note: If you continue to charge the watch after the battery level reaches 100%, the watch engages
an overcharge prevention feature to protect your watch.
4. Disconnect the USB cable from the AC adapter or your computer, and unplug the AC adapter if you
used it.
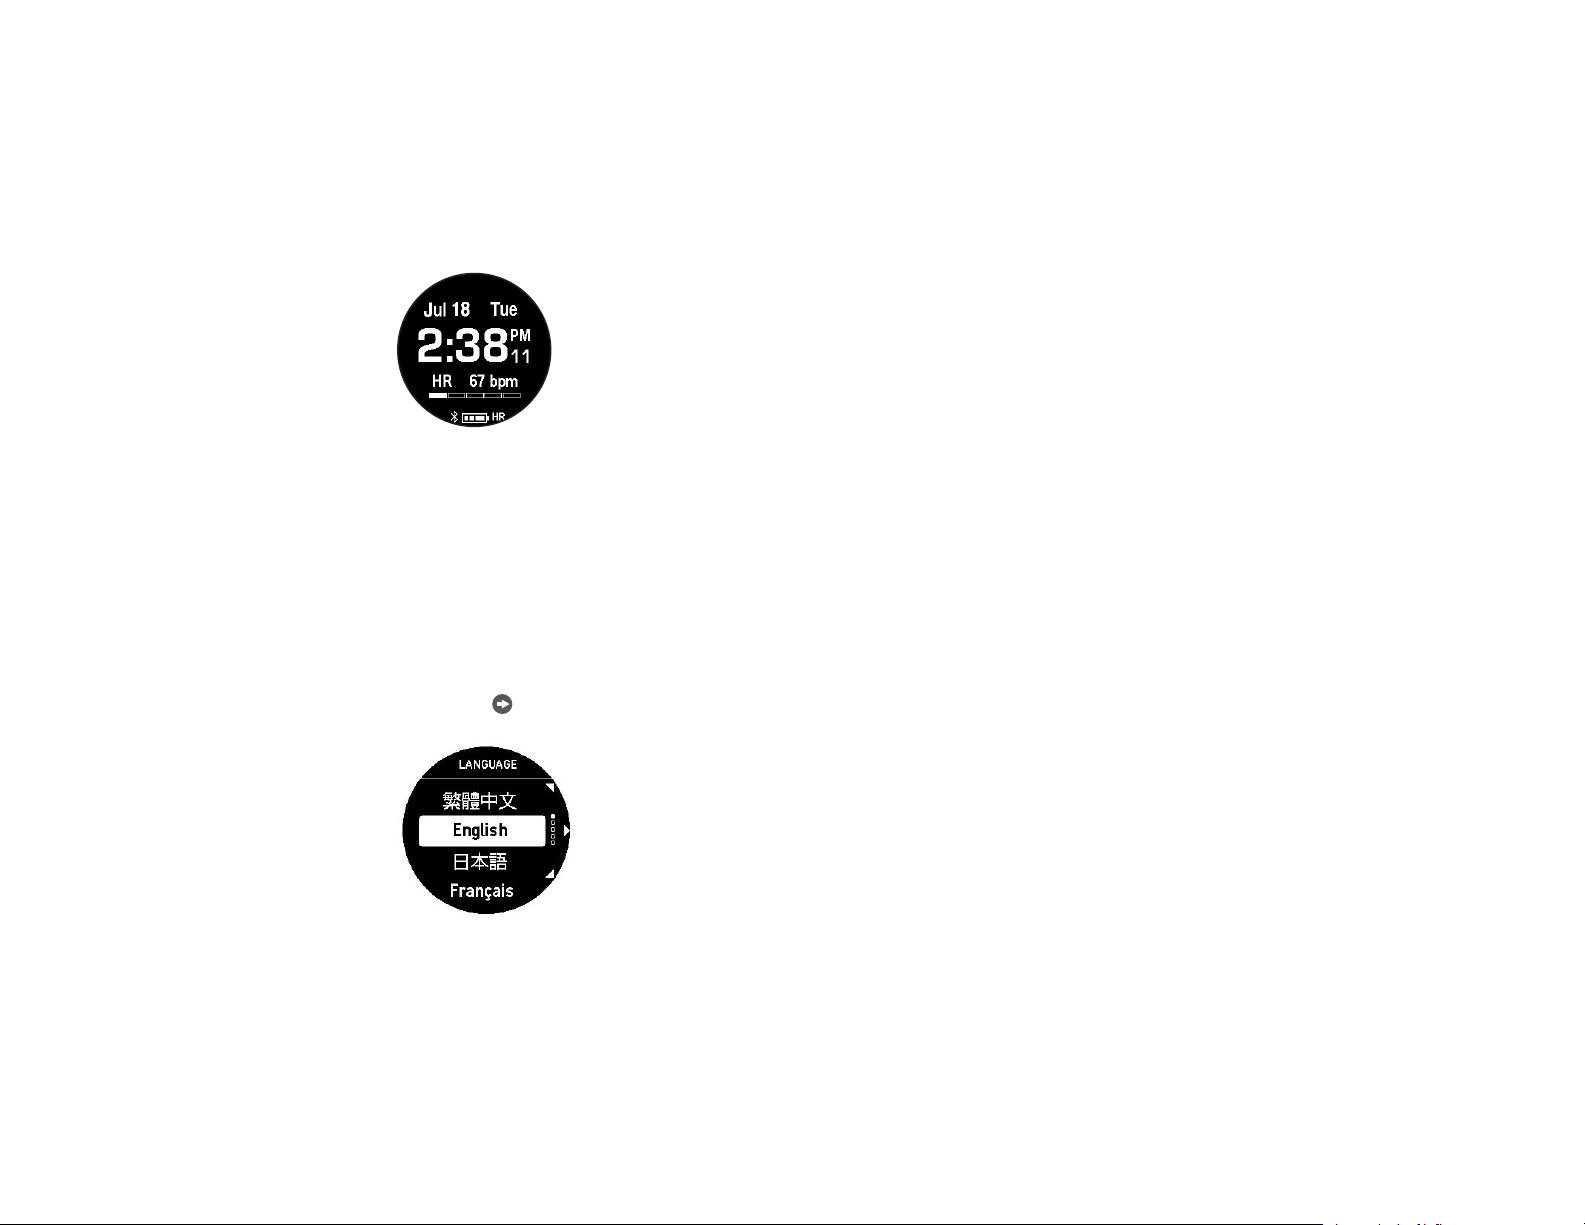
If this is the first time you have charged your watch, you see the Language screen:
5. Press the Up or Down button to select your language and press the Enter button.
19
Page 20

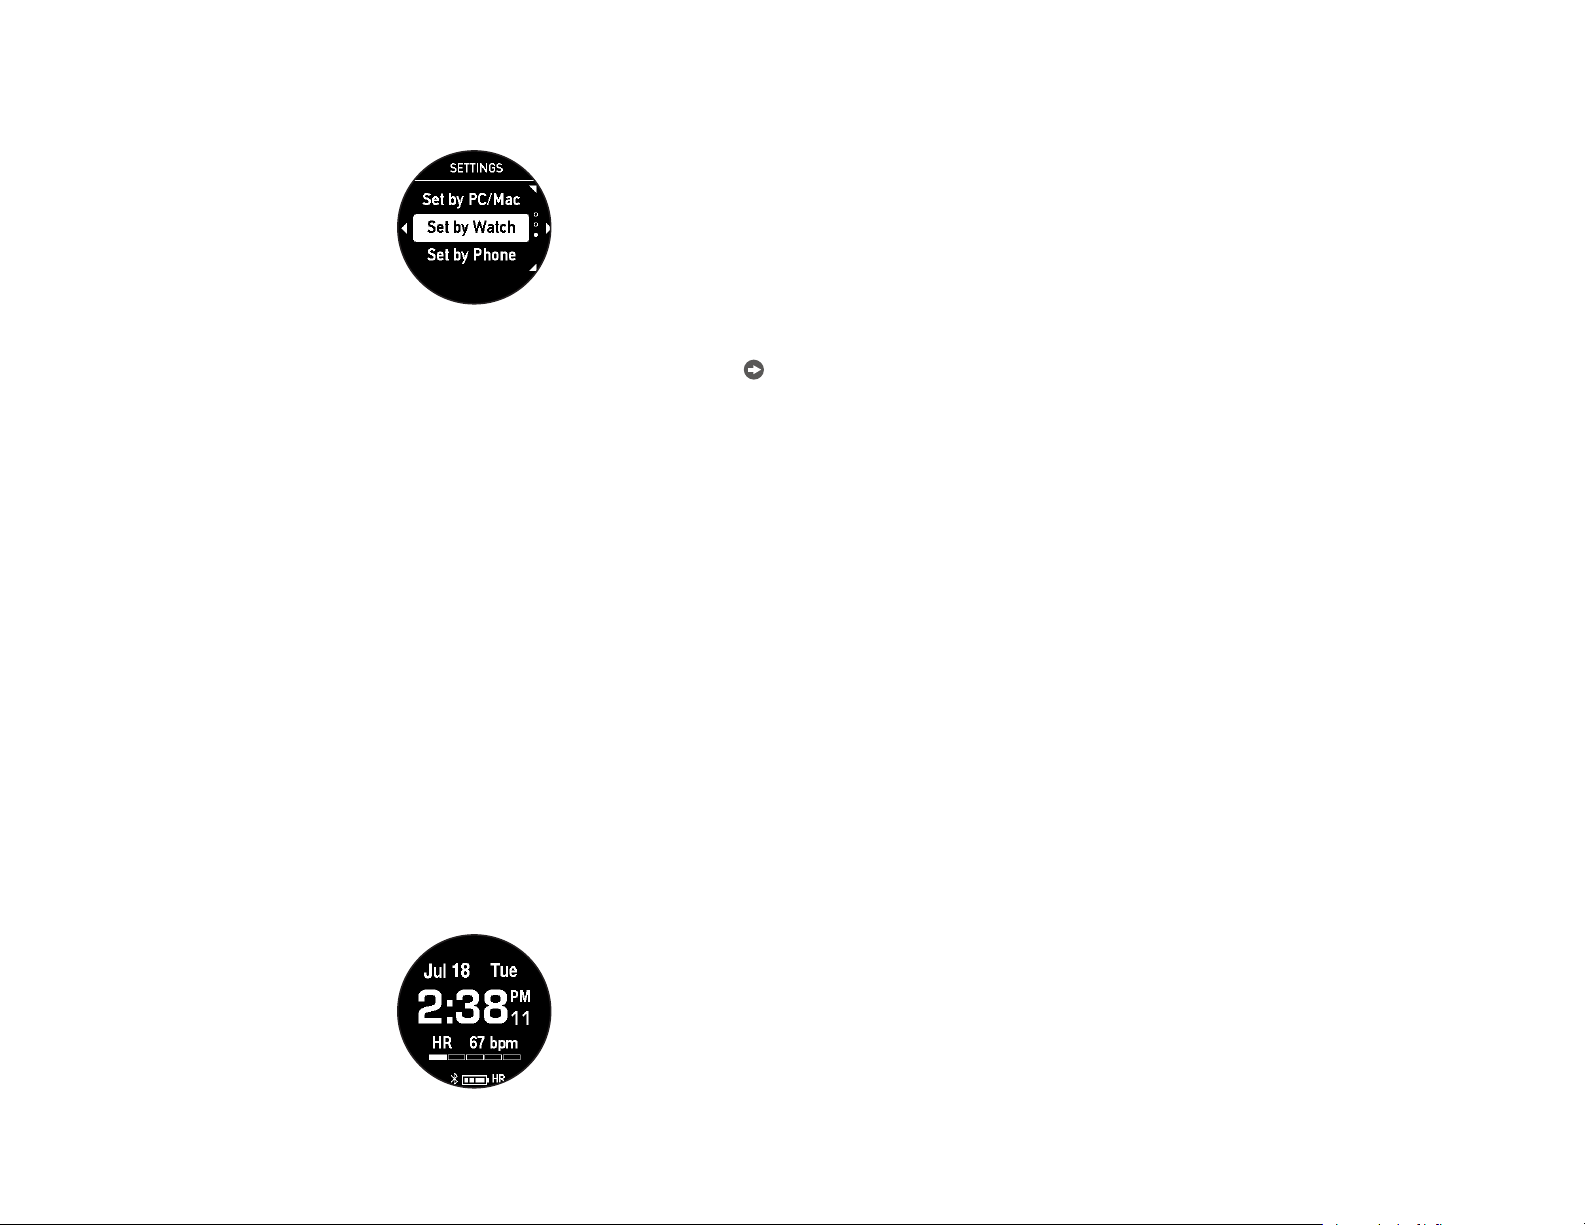
You see the Settings screen:
6. Configure your watch using one of the available methods.
Battery Level Display
Parent topic: Setting Up the Product
Related concepts
Battery Life
Related references
Solutions to Watch Charging Problems
Related topics
Configuring Your Watch
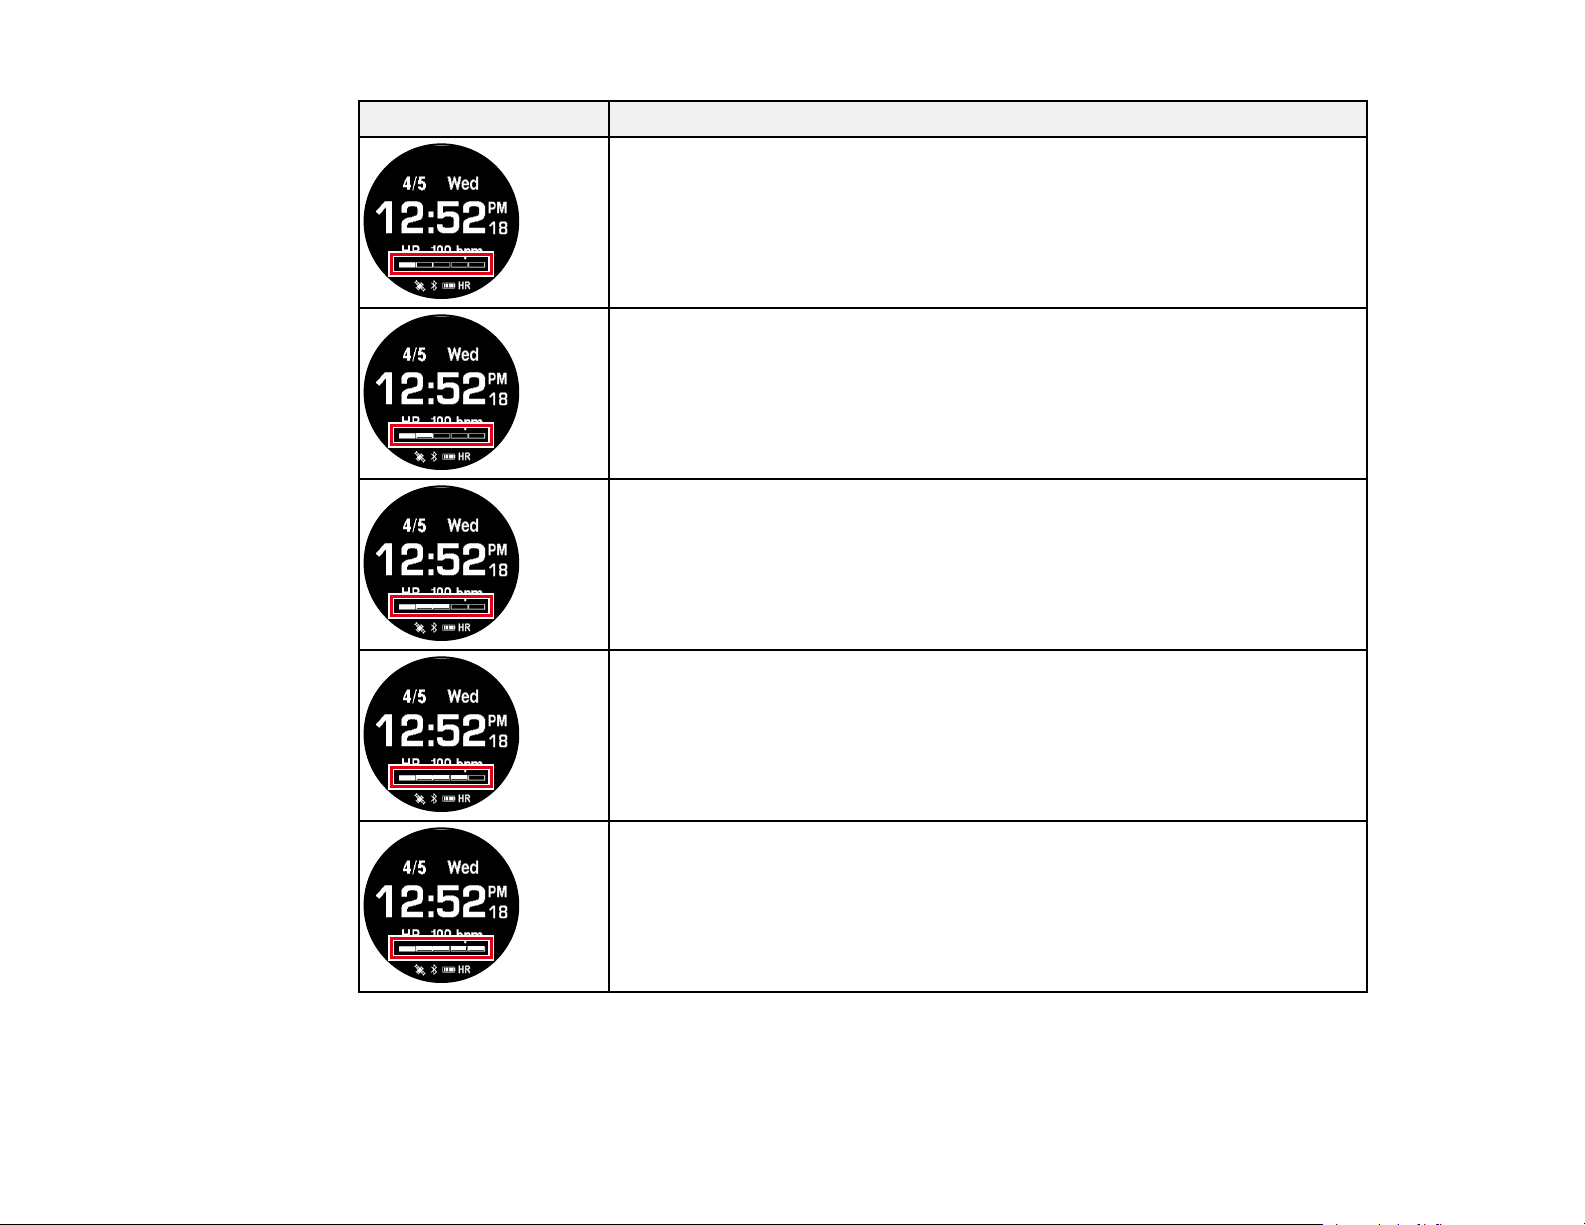
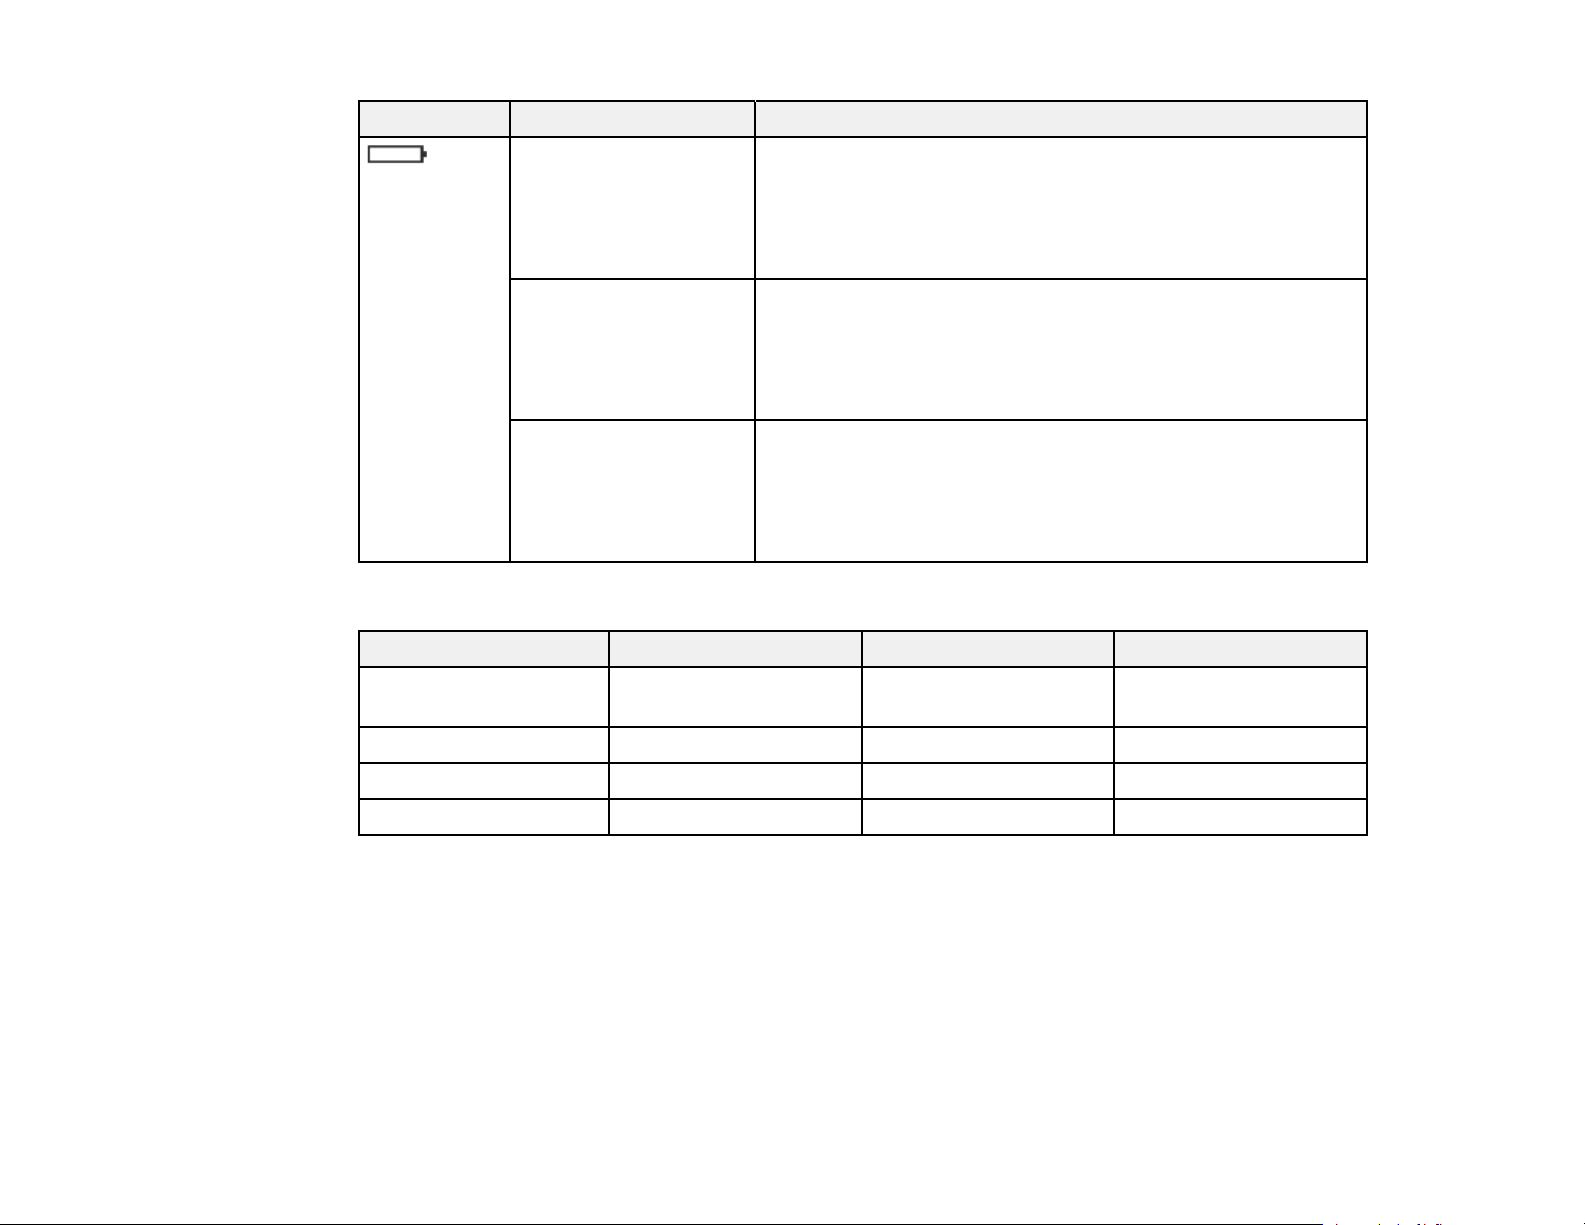
Battery Level Display
The battery icon on your device screen displays the remaining level of power in the battery.
When the battery is low, you see this screen:
(Press any button to return to the Time screen.)
When the battery is too low, the screen may go blank.
20
Page 21
Caution: Charge your device at least once every 6 months when you are not using the device; long-term
storage of the device with a low battery may degrade battery performance.
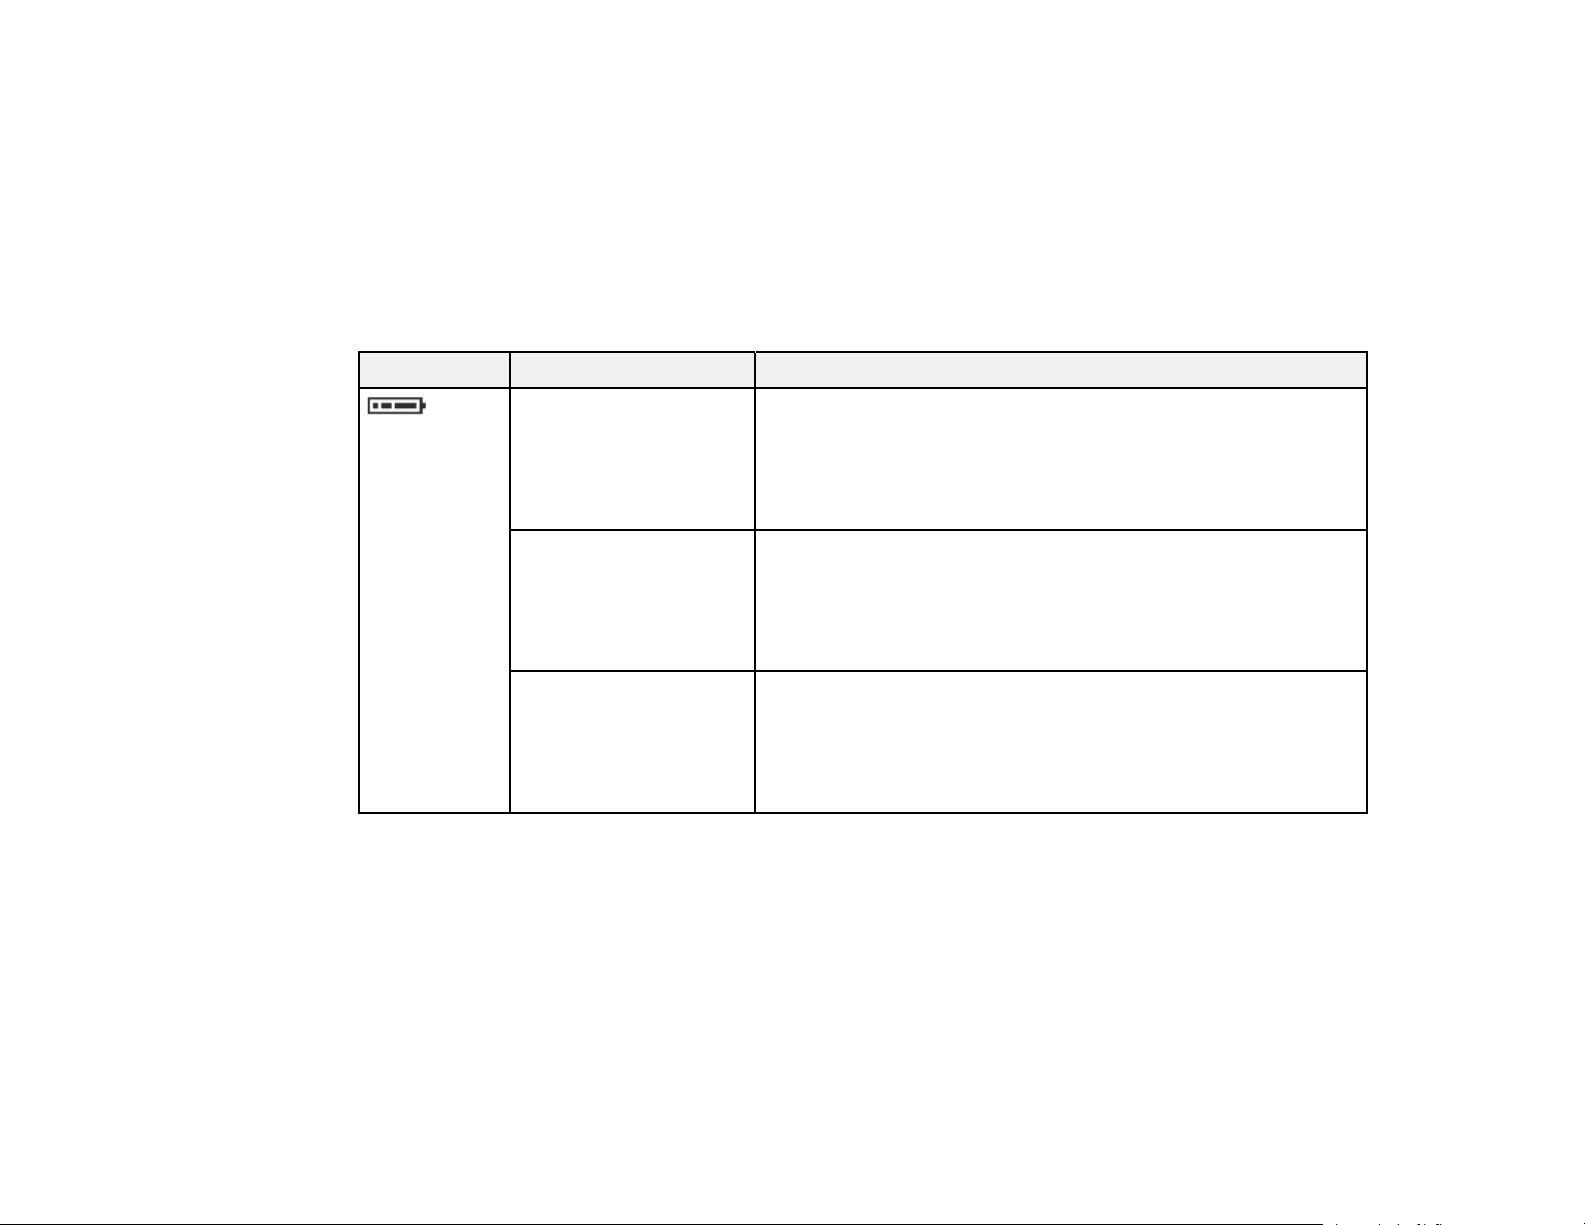
The operating time for the battery varies depending on the device settings you are using, as described in
the tables here.
Note: The Light setting is Off in all of the estimates shown.
Continuous workout time left (approximate)
Battery icon Operating time Settings used
ProSense 307:
8 to 16 hours
ProSense 347/367:
18 to 36 hours
ProSense 307:
10 to 20 hours
ProSense 347/367:
21 to 42 hours
ProSense 307:
12 to 24 hours
ProSense 347/367:
25 to 50 hours
Update Frequency: Per Second
Meas. HR setting: On
Update Frequency: Per Second or Wrist turn
Meas. HR setting: On or Off
Update Frequency: Wrist turn
Meas. HR setting: Off
21
Page 22
Battery icon Operating time Settings used
ProSense 307:
3 to 8 hours
ProSense 347/367:
7 to 18 hours
ProSense 307:
4 to 10 hours
ProSense 347/367:
8 to 21 hours
ProSense 307:
5 to 12 hours
ProSense 347/367:
10 to 25 hours
ProSense 307:
1.5 to 3 hours
ProSense 347/367:
3.5 to 7 hours
ProSense 307:
Update Frequency: Per Second
Meas. HR setting: On
Update Frequency: Per Second or Wrist turn
Meas. HR setting: On or Off
Update Frequency: Wrist turn
Meas. HR setting: Off
Update Frequency: Per Second
Meas. HR setting: On
Update Frequency: Per Second or Wrist turn
2 to 4 hours
ProSense 347/367:
4 to 8 hours
ProSense 307:
2.5 to 5 hours
ProSense 347/367:
5 to 10 hours
Meas. HR setting: On or Off
Update Frequency: Wrist turn
Meas. HR setting: Off
22
Page 23
Battery icon Operating time Settings used
ProSense 307:
0 to 1.5 hours
Update Frequency: Per Second
Meas. HR setting: On
ProSense 347/367:
0 to 3.5 hours
ProSense 307:
0 to 2 hours
Update Frequency: Per Second or Wrist turn
Meas. HR setting: On or Off
ProSense 347/367:
0 to 4 hours
ProSense 307:
0 to 2.5 hours
Update Frequency: Wrist turn
Meas. HR setting: Off
ProSense 347/367:
0 to 5 hours
Continuous time display left; approximate
Setting 30 days 7 days 5 days
Daily Activity Tracking Off On (Meas. HR setting:
Auto)
On (Meas. HR setting:
Continuous)
Auto Sleep Mode On On On
Auto Search Off Off Off
Bluetooth Off On On
Note: Operation time also varies depending on the operating environment's effects on GPS reception.
Parent topic: Charging the Watch
Related concepts
Battery Life
Related references
Solutions to Watch Charging Problems
23
Page 24
Turning the Watch On or Off
To turn on the watch, press and hold the Start/Stop button for at least 2 seconds.
The watch also turns on automatically when you connect the USB charging clip connected to a power
source.
At the Time screen, press and hold the Start/Stop button for at least 2 seconds and select Yes to turn
it off.
Parent topic: Setting Up the Product
Configuring Your Watch
Before using your watch, you need to configure it for use by selecting basic settings. Follow the
instructions in these sections to configure your watch.
Configuring the Watch Using the Buttons
Configuring the Watch Using a Smartphone
Parent topic: Setting Up the Product
Configuring the Watch Using the Buttons
You can configure your watch using the watch buttons.
Note: You can change these settings after you complete initial setup from the Settings menu on the My
Watch screen in the Epson View app. For more information on using the Epson View app, see the online
help.
24
Page 25

1. After charging your watch and selecting the language of the screens, you see the Settings screen.
2. Press the Enter button to select Set by Watch.
3. Press the Up or Down button to highlight the options you want for the following settings, and
press the Enter button to select them.
• Height
• Weight
• Gender
• Current date
• DST (Daylight Savings Time)
• Time Zone
• Current time
Note: If you need to edit any selected settings, press the Back button.
4. When you see this screen, you can select to set the current time automatically or manually.
• Select Set by GPS to set the time automatically
25
Page 26
Note: To set the time automatically, you must be outdoors with no obstacles overhead.
• Select Manual to set the time manually
5. When you finish selecting settings, select Completed.
You see the Time screen:
Parent topic: Configuring Your Watch
Related references
Time Screen Menus
Configuring the Watch Using a Smartphone
You can configure your watch using the Epson View app on your smartphone.
1. After charging your watch or resetting it, you see the Language screen. Select your language and
press the Enter button.
26
Page 27
You see this screen:
2. Select Set by Phone and press the Enter button.
A screen displaying a code appears on the watch screen. Make a note of the code.
3. Download the Epson View app from your smartphone's app store.
4. Do one of the following:
• Launch the app and follow the on-screen instructions to create an account.
• Log in to your existing Epson View account.
You see the Initial Settings screen on your smartphone.
5. Select your watch model from the list on your smartphone.
6. Follow the on-screen instructions to pair your watch and your smartphone.
7. Follow the on-screen instructions to configure these settings:
• Height
• Weight
• Gender
• Current date
• Current time
When you finish setting the time and see this screen on your watch, configuration is complete:
27
Page 28

Parent topic: Configuring Your Watch
Acquiring a GPS Signal
To ensure the accuracy of the measurements taken by your watch, you must position yourself to acquire
a strong GPS signal. GPS positioning allows your watch to receive a GPS signal and timing information
so it can correctly track your routes, distance, pace, and other workout and activity data.
For increased GPS accuracy, wait at least 15 minutes before starting your workout. You only need to
perform this extended GPS calibration the first time you use the watch or if you do not use it for a few
months.
Note: To reduce the time it takes to locate the GPS signal, you can use the AGPS feature in the Epson
View app on your smartphone. If you keep your watch connected to your smartphone, your watch
automatically downloads GPS updates once an hour.
When positioning yourself to acquire a GPS signal, avoid the following environments:
• Inside buildings or rooms, or underground areas or tunnels
• Near high-voltage wires, television towers, tall buildings, tall trees, or overhead electrical wires for
trains or buses
• Locations with concentrated electronic interference, such as construction sites and heavy traffic
• Under water or floating on water
If you have issues acquiring a signal, move into as open an area as possible. If you still cannot acquire a
signal, select Skip on the GPS screen to start your workout. Distance traveled will be estimated based
on your stride until the GPS signal is fully acquired.
Parent topic: Setting Up the Product
Related references
Solutions to GPS Signal Problems
28
Page 29

Connecting the Device to a Smartphone Using Bluetooth
You can connect your device to a smartphone using Bluetooth. Before you begin, be sure to download
the Epson View app on your smartphone.
Note: Do not directly connect to your watch from the Bluetooth settings on your smartphone. The Epson
View app will pair your smartphone with your watch.
1. At the Time screen, press the Enter button.
You see a screen like this:
2. Select Bluetooth.
3. Select Pairing.
Your device displays a code number you will use for pairing.
4. Start the Epson View app on your smartphone and select Pairing
Note the code that appears on your watch.
5. Select your product from the list on your smartphone, then follow the instructions to pair your watch
and your phone.
29
Page 30

When your device and smartphone are successfully paired, you see a Bluetooth icon at the bottom
of the Time screen on your device. (If the icon is flashing, pairing is not completed.)
Note: If you need to disable the Bluetooth connection, set the Bluetooth > On/Off option to Off. If you
need to unpair the device and smartphone, set the Bluetooth > Forget Device option to Forget Device.
Parent topic: Setting Up the Product
Related references
Time Screen Menus
Measuring Your Heart Rate
Your watch includes a sensor on the back to detect your heart rate.
Caution: The sensor light causes no adverse effects on your skin, but you should not look directly at the
light.
Wear the product snugly around your wrist as shown. Tighten the watch if your heart rate is not
measured correctly.
Note: Do not wear the product too tight. You should still be able to fit your little finger under the watch
band. If you feel any discomfort, loosen the wristband.
30
Page 31

Note: Do not wear the watch on the underside of your wrist or covering the ulna bone.
Once the watch has detected your heart rate, it displays your heart rate, heart rate zone, and the HR
icon on the Time screen.
Note: When using your watch in Pool Swim or Open Water mode, it does not display your heart rate in
real time.
You can also press the Up button to display the Heart Rate screen.
31
Page 32

Note: If you see ––– on the display or the HR icon is flashing, the watch has not detected your heart
rate. Make sure you are wearing the watch correctly and try again. If your heart rate often reads less
than 120 beats while running or 70 beats while walking, you may have a naturally low heart rate. This
can cause incorrect heart rate measurements. Set the HR Measurement option to Settings 2 in the
Epson View app to correct the issue.
Parent topic: Setting Up the Product
Related references
Time Screen Menus
Solutions to Watch Settings Problems
Displayable Workout Measurements
Activity Data Displayed on Your Device
Calculating Your Stride Length
Your watch automatically calculates your stride length so it can accurately measure distance and pace
data in locations with poor GPS signal reception, such as indoors or in tunnels.
The first time you use your watch, run or walk outdoors in an open area for approximately 10 minutes.
You can also run or walk between tall buildings or trees for at least 30 minutes. This allows your watch to
learn your normal stride length. You should only need to perform this step once.
Note: Do not cross your arms or hold onto the treadmill handles or the stride sensor may not detect your
movement.
Parent topic: Setting Up the Product
Enabling Smartphone Notifications
Your watch can notify you with sounds or vibrations when you receive phone, email, or other notifications
on your smartphone. You need to enable notifications in the Epson View app before you can use this
feature.
Note: On Android, you need to leave the Epson View app running in the background on your
smartphone to receive notifications on your watch.
1. Open the Epson View app on your smartphone.
32
Page 33

2. Select My Watch at the bottom of the app screen.
3. Select Settings.
4. Select Notifications.
5. Tap the slider to enable notifications.
Note: On Android, you need to select See here for access to notifications and allow Epson View
access to your smartphone's notification data. Make sure you return to the Epson View app after you
change your Android system settings.
6. Select any additional notifications settings in the Epson View app as necessary.
7. Return to the Settings screen.
33
Page 34

8. Select Transfer Settings to Watch at the bottom of the app screen.
Parent topic: Setting Up the Product
Adjusting the Device Display
You can adjust the display on your device to suit your environment and other preferences.
Adjusting the Watch Face and Background Settings
Adjusting the Backlight Settings
Parent topic: Setting Up the Product
Related references
Time Screen Menus
Adjusting the Watch Face and Background Settings
You can adjust the device screen to display one of a variety of digital or analog watch faces. You can
also select the color of the screen background.
1. At the Time screen, press the Enter button.
2. Select Settings.
You see a screen like this:
3. Select Display.
4. Select Watch Face.
5. Select one of the available watch face designs.
6. Select Background.
7. Select a Black (default) or White background for the device screen.
Parent topic: Adjusting the Device Display
34
Page 35

Adjusting the Backlight Settings
You can adjust the backlight settings on your device to suit your preferences in various conditions.
1. At the Time screen, press the Enter button.
2. Select Settings.
You see a screen like this:
3. Select Display.
4. Select Light.
5. Turn the backlight feature on or off for the following settings, depending on your preferences:
• Wrist turn: Backlight turns on whenever you turn your wrist. (Default setting is on.)
• Button Push: Backlight turns on whenever you press a device button. (Default setting is on.)
• Workout: Backlight turns on for the duration of your workout when you select All Time. (Default
setting is off.)
Note: Using backlight reduces your maximum workout time by approximately 2 hours. When set
to off, backlight may come on during workouts if you turned on backlight for other activities.
Backlight turns off momentarily during workouts if an event triggers a vibration in your device.
• Notifications: Backlight turns on during the following notification events (default setting is on):
• Completing a lap
• Pausing or resuming a workout
• Completing a target distance or time in Training mode
35
Page 36

• Receiving a smartphone notification
Note: Backlighting turns off automatically after a predetermined time, except when you have
selected Workout > All Time during workouts.
Parent topic: Adjusting the Device Display
Adjusting the Sound and Vibration Settings
You can adjust the sounds and vibrations emitted by your device during a variety of events. You can
select the following options or turn off the option:
• Tones & Vib (default setting) to hear tones and feel vibrations
• Sound to hear only tones
• Vib. to feel only vibrations
1. At the Time screen, press the Enter button.
2. Select Settings.
You see a screen like this:
3. Select Tones & Vib..
4. If you turned on the Alarm feature, select Alarm to choose how you want the alarm to notify you.
5. If you want to be notified by sound or vibration for any of the following events, select Notifications
and choose how you want to be notified:
• You complete a lap using the AT Lap feature
• You pause or resume a workout using the AT Pause feature
• You complete a lap and have reached a distance or time target using Training mode
• You receive phone, email, or other smartphone notifications
36
Page 37

• You receive a smartphone notification when you have paused or resumed a workout
6. If you want to be notified by sound or vibration for any of the following workout events, select alerts
and choose how you want to be notified:
• The device connected to GPS and displays the Measurement screen
• You started a workout
• You complete a lap using the AT Lap feature
• You pause or resume a workout by selecting Pause
• You reach a distance or time target in Training mode
7. If you want to turn off the tones emitted by the device when you press the device buttons, select
Button Tones and select off (default setting is off).
Parent topic: Setting Up the Product
Locking and Unlocking the Watch Buttons
You can lock the buttons on your watch to prevent it from responding if you press the buttons
accidentally.
Press and hold the Up button for at least 2 seconds. The lock icon appears at the top of the screen.
When the watch is locked, press and hold the Up button for at least 2 seconds to unlock it.
Note: You can lock the buttons only while displaying the Time or Workout measurement screen.
Parent topic: Setting Up the Product
37
Page 38

Measuring and Reviewing Workouts
Follow the instructions in these sections to measure workouts with your watch and review the workout
data it collects.
Measuring Workouts
Controlling Music Playback
Using the Stopwatch
Reviewing Workout Data
Measuring Workouts
Follow the instructions in these sections to measure workouts with your watch.
Displayable Workout Measurements
Starting Workout Measurement
Stopping Workout Measurement and Saving the Data
Recording Laps
Pausing and Resuming Workout Measurement
Changing Workout Type During Triathlon Measurement
Monitoring Current Workout Data
Customizing Workout Measurements with Epson View
Estimating VO2 Max
Parent topic: Measuring and Reviewing Workouts
Displayable Workout Measurements
You can display a variety of workout measurements on your device in these workout modes:
• Run mode
• Walk mode
• Treadmill mode
• Bike mode
• Pool Swim mode
• Open Water mode
38
Page 39

Note: You can configure the measurement display settings from the Workout Settings menu in the
Epson View app.
The workout measurements available depends in the workout mode you are using, as listed in these
tables.
Run, Walk, Treadmill, and Bike Mode Workout Information
Modes Description
Total time from the start of measurement
Total distance from the start of measurement
Current time
Total calories burned from the start of measurement
Total number of steps from the start of measurement
Current number of steps per minute
Current heart rate per minute
Average heart rate from the start of measurement
Maximum heart rate from the start of measurement
Current stride
Total distance from start of lap measurement
Total time from start of lap measurement
Current pace in time per mile/kilometer
Current target time; displayed only when the Training setting is set to Target Time
Estimated distance completed at the end of the configured time; displayed only when
the Training setting is set to Target Time
Target distance selected and total distance from the start of measurement; displayed
only when the Training setting is set to Target Dist.
Estimated time at completion of selected target distance; displayed only when the
Training setting is set to Target Dist.
Target heart rate selected and current heart rate; displayed on the workout screen only
when the Training setting is set to Target HR
39
Page 40

Modes Description
Target pace selected and current pace in time per mile/kilometer; displayed only when
the Training setting is set to Target Pace
Interval information, including sprint and rest intervals; displayed only when the
Training setting is set to Interval
When you select a target distance, displays selected distance and current distance.
When you select a target time, displays selected time and elapsed time.
Difference from selected pace and distance; displayed only when the Training setting
is set to Race
Target speed selected and current average speed; displayed only when the Training
setting is set to Target Speed
Swim and Open Water Mode Workout Information
Modes Description
Total distance from the start of measurement
Total time from start of measurement
Current time
Current heart rate per minute
Total time from start of lap measurement
Total distance from start of lap measurement
Current pace for 100 yards or 100 meters
Target time selected and total time since start of measurement; displayed only when
the Training setting is set to Target Time
Estimated distance completed at the end of the configured time; displayed only when
the Training setting is set to Target Time
Target distance selected and total distance from the start of measurement; displayed
only when the Training setting is set to Target Dist.
40
Page 41

Modes Description
Estimated time at completion of selected target distance; displayed only when the
Training setting is set to Target Dist.
Interval information, including sprint and rest intervals; displayed only when the
Training setting is set to Interval
When you select a target time, displays selected time and elapsed time.
Parent topic: Measuring Workouts
Related tasks
Customizing Workout Measurements with Epson View
Monitoring Current Workout Data
Related topics
Reviewing Workout Data
Starting Workout Measurement
Before using your watch to measure a workout, you need to select a workout mode and locate the
watch's GPS signal.
1. At the Time screen, press the Down button.
You see the Activity selection screen.
2. Press the Up or Down button to select one of these workout modes and press the Start/Stop
button.
• Run mode
• Walk mode
• Treadmill mode
• Bike mode
• Indoor Bike mode
• Pool Swim mode
• Open Water mode
• Other 1
41
Page 42

• Other 2
Note: Not all workout modes appear by default. You can configure the workout modes that appear
from the Workout Settings menu in the Epson View app. For information on using the Epson View
app, see the online help.
Your watch locates the GPS signal and displays the Measurement screen when it is finished (except
in Treadmill, Pool Swim, or Indoor Bike mode).
Note: If you must start a workout before GPS location is complete, press the Start/Stop button.
Your watch continues locating and begins measuring your workout with the built-in stride sensor.
The watch will not record some measurements that require GPS signals, such as your workout
route, until GPS location is complete.
3. Press the Start/Stop button to start workout measurement.
42
Page 43

If your watch displays the Locating GPS Failed message, GPS location has failed:
Move to an outdoor area with no overhead obstructions and press the Back button to try again.
Parent topic: Measuring Workouts
Related references
Time Screen Menus
Measurement Screen Menus
Related tasks
Stopping Workout Measurement and Saving the Data
Pausing and Resuming Workout Measurement
Monitoring Current Workout Data
Customizing Workout Measurements with Epson View
Related topics
Recording Laps
Reviewing Workout Data
Stopping Workout Measurement and Saving the Data
You can save up to 248 sessions of workout data.
Note: You can save up to 99 hours for each lap. If you exceed this time, workout measurement stops.
1. At the Measurement screen, press the Start/Stop button to pause workout measurement.
2. Press the Enter button or wait 3 seconds.
43
Page 44

Your watch displays the Stop screen.
3. Press the Up or Down button to select Save and press the Enter button.
Your watch saves your workout data and displays the history screen.
4. Press the Up or Down button to display each available screen of workout data.
5. Press the Enter button to return to the Time screen.
Note: If you want to clear the current workout data when viewing the Stop screen, select Delete > Yes.
Parent topic: Measuring Workouts
Related tasks
Starting Workout Measurement
Pausing and Resuming Workout Measurement
Related topics
Reviewing Workout Data
Recording Laps
Follow the instructions in these sections to measure workouts with your device.
44
Page 45

Recording Laps During a Run, Walk, or Bike Workout
Recording Laps During a Pool Swim Workout
Recording Laps During an Open Water or Indoor Bike Workout
Parent topic: Measuring Workouts
Related references
Measurement Screen Menus
Recording Laps During a Run, Walk, or Bike Workout
You can record laps during your workout in Run, Walk, or Bike mode either automatically or
manually.
• At the Measurement screen, press the Enter button to begin recording a lap manually.
• To record laps automatically, select AT Lap from the Settings screen, and select a time or distance at
which to begin recording laps. When your workout reaches that time or distance, your device
automatically begins recording laps.
When your device records a lap, it displays the Lap screen for a few seconds.
The Lap screen displays the lap number, lap time, and split time for the current lap.
45
Page 46

Parent topic: Recording Laps
Recording Laps During a Pool Swim Workout
You can record laps during your workout in Pool Swim mode either automatically or manually.
• At the Measurement screen, press the Enter button to begin recording a lap manually. If you need
to rest during a lap, press the Enter button.
• To record laps automatically, select AT Lap from the Settings screen, and select a time or distance at
which to begin recording laps. When your workout reaches that time or distance, your device
automatically begins recording laps. If you need to rest during a lap, simply stand in the pool to
automatically switch to resting mode, then either just resume swimming or press the Enter button.
When your device records a lap, it displays the Lap screen for a few seconds.
Note: The device may not record the lap correctly if you turn with a weak kick or have very little change
in your arm movement on the turn.
Parent topic: Recording Laps
Recording Laps During an Open Water or Indoor Bike Workout
You can manually record laps during your workout in Open Water or Indoor Bike mode.
46
Page 47

At the Measurement screen, press the Enter button to begin recording a lap.
Parent topic: Recording Laps
Pausing and Resuming Workout Measurement
During your workout, you can start, pause, and resume workout measurements as necessary.
At the Measurement screen, press the Start/Stop button to pause workout measurement. Press the
Start/Stop button again within 3 seconds to resume workout measurement.
47
Page 48

If you pause your workout measurement for more than 3 seconds, your watch displays the Stop screen.
Press the Up or Down button to select Resume and press the Enter button to resume workout
measurement.
Parent topic: Measuring Workouts
Related tasks
Starting Workout Measurement
Stopping Workout Measurement and Saving the Data
Changing Workout Type During Triathlon Measurement
During a workout in Triathlon mode, you can switch the workout mode or start transition timing as you
reach those stages in triathlon activities.
Note: You can select your workout mode order and choose whether or not to measure triathlon time in
the Epson View app.
At the Measurement screen, hold down the Enter button to change the workout mode or transition.
Hold down the Enter button again to scroll through the modes or transitions.
Parent topic: Measuring Workouts
Monitoring Current Workout Data
During your workout, you can monitor the current workout data your watch has collected.
48
Page 49

At the Measurement screen, press the Up or Down button to display the current workout data
screens.
Note: You can configure the measurement display settings from the Workout Settings menu in the
Epson View app. For information on using the Epson View app, see the online help.
Parent topic: Measuring Workouts
Related references
Displayable Workout Measurements
Customizing Workout Measurements with Epson View
You can use the Epson View app on your smartphone to customize the workout measurement settings
to suit your preferences.
Note: For information on using the Epson View app, see the online help.
Parent topic: Measuring Workouts
Estimating VO2Max
Your watch calculates the estimated maximum quantity of oxygen that your body can process, called
VO2max. This estimate can be an indicator of your fitness level and should increase with improved
athletic performance.
Your watch uses your heart rate and GPS measurements to accurately calculate the VO2max under the
following conditions:
• Your profile information must be set up correctly.
VO2max is only measured in Run Mode.
• Your watch is connected to GPS and you run with the watch for at least 10 minutes.
49
Page 50

• You turned on heart rate measurement and the AT Pause setting is turned off.
• Your running pace is 16 min/mile (10 min/km) or faster.
• You are running at an elevated heart rate at moderate intensity.
Your watch cannot accurately estimate the VO2max if the following occurs:
• You stop running before 10 minutes have elapsed.
• Your heart rate cannot be measured.
• Your running speed slowed to a walk or you stopped for a traffic signal, and your heart rate dropped
too low for estimation.
Parent topic: Measuring Workouts
Related references
Measurement Screen Menus
Related tasks
Measuring Your Heart Rate
Controlling Music Playback
You can play audio on your smartphone and control it with your watch via a Bluetooth connection.
Note: On Android, you need to leave the Epson View app running in the background on your
smartphone to use the audio playback controls.
1. At the Time screen, press and hold the Back button for at least 2 seconds.
You see a screen like this:
2. Do the following to play audio and control playback as necessary:
• To start or stop playing the current track, press the Enter button.
50
Page 51

• To play the next track, press and hold the Up button for at least two seconds.
• To play the previous track, press and hold the Down button for at least two seconds.
• To adjust the volume, press the Up button to raise it or the Down button to lower it.
• To exit audio playback and return to the Time screen, press and hold the Back button for at
least 2 seconds.
Parent topic: Measuring and Reviewing Workouts
Using the Stopwatch
You can use the stopwatch on your watch to measure time without saving any of the information as
workout data.
1. At the Time screen, press the Down button.
2. Press the Down button to highlight Stopwatch and press the Enter button.
3. Press the Start/Stop button.
You see the Stopwatch screen:
4. To start measuring time, press the Start/Stop button.
51
Page 52

5. Do the following to control the stopwatch as necessary:
• To stop measuring time, press the Start/Stop button.
• To reset the stopwatch when paused, press the Enter button.
• To record up to 10 laps while using the stopwatch, press the Enter button to start lap
measurement.
• To exit the stopwatch and return to the Time screen, press the Back button.
Parent topic: Measuring and Reviewing Workouts
Reviewing Workout Data
Follow the instructions in these sections to review the workout data you have collected with your watch.
Viewing Workout Data History on Your Watch
Parent topic: Measuring and Reviewing Workouts
Viewing Workout Data History on Your Watch
You can view the history of your workout data on your watch and delete it as necessary.
1. At the Time screen, press the Enter button.
You see this screen:
2. Press the Up or Down button to select History and press the Enter button.
52
Page 53

You see a workout history screen like this:
3. Press the Up or Down button to select a workout date and press the Enter button.
You see the workout data for that date on a screen like this:
4. Press the Up or Down button to view each of the available workout data screens.
Note: If you want to delete the currently displayed workout data from your watch, press the Enter
button, select Delete, and press the Enter button.
5. When you finish viewing your workout data history, press and hold the Back button for at least 2
seconds to return to the Time screen.
Note: You can also view workout history data in the Epson View app. For information, see the online
help.
Parent topic: Reviewing Workout Data
Related references
Displayable Workout Measurements
53
Page 54

Measuring and Reviewing Daily Activities
Follow the instructions in these sections to measure daily activities with your watch and review the
activity data it collects.
Activity Measurement and Data Collection
Starting Activity Measurement
Configuring a Target Number of Steps
Configuring a Target Number of Calories to Burn
Reviewing Activity Data on Your Watch
Reviewing Activity Data Using the Epson View App
Activity Measurement and Data Collection
Your watch records activity data that you can then view on your watch, or view using the Epson View
app on your smartphone. You can view activity data for the current day or a 7-day activity chart for the
previous week.
Note: Daily activity data starts at 12:01 AM each day.
You can also set a target number of steps and calories to burn, and check your progress toward
reaching the target on your watch.
Parent topic: Measuring and Reviewing Daily Activities
Starting Activity Measurement
Before you begin a daily activity, you can enable activity measurement and select the type of activity you
want to measure on your device.
1. At the Time screen, press the Enter button.
You see a screen like this:
54
Page 55

2. Press the Up or Down button to select Settings > Activity >Meas. Activity > On.
Your device enables activity monitoring and displays this screen when it is finished:
3. Select one of the following as the Meas. HR setting:
• Auto mode measures heart rate intermittently (not available for certain activities).
• Continuous mode reports heart rate every second during an activity.
4. Press and hold the Back button for at least 2 seconds to return to the Time screen.
Activity Data Displayed on Your Device
Activities Available for Each Heart Rate Mode
Parent topic: Measuring and Reviewing Daily Activities
Activity Data Displayed on Your Device
You can view the following activity data screens on your device.
Screen Data displayed
Summary 1: Current heart rate
2: Current number of steps
3: Current calories burned
You can configure what appears on the Summary
screen in the Epson View app.
55
Page 56

Screen Data displayed
Heart rate 1: Heart rate zone
2: Current heart rate
Steps 1: Progress toward target number of steps
2: Current number of steps
3: Estimated distance
Calories burned 1: Progress toward target number of calories
2: Current calories burned
Exercise* 1: Current exercise time
Exercise time is calculated by your device from
time spent engaging in any activity.
56
Page 57

Screen Data displayed
Sleep* 1: Light sleep time
2: Deep sleep time
To record sleep time, enable waking and sleep
times in the Epson View app. In order to track your
sleep patterns correctly, your watch will ask you if
you are awake if you get up in the night. Select
Yes to confirm you are awake or No if you are
going back to sleep.
Recovery time 1: Estimated recovery time; if less than 1 hour,
zero is displayed
VO2max 1: Estimated VO2max value
2: Estimated race time based on VO2max value
* Automatically calculated from heart rate and activity data.
Note the following about sleep time calculations:
• The device does not include naps or sleep times shorter than 1 hour as sleep time.
• The device only calculates sleep time during the time period you configured for sleep in the Epson
View app.
Parent topic: Starting Activity Measurement
Related tasks
Reviewing Activity Data on Your Watch
57
Page 58

Reviewing Activity Data Using the Epson View App
Activities Available for Each Heart Rate Mode
You can select either Auto or Continuous as the Meas. HR (heart rate measurement mode) setting for
the activities and durations listed here.
Activity Continuous mode Auto mode
Steps Measured Measured
Distance Measured Measured
Calories burned Measured Measured
Exercise Measured Measured
Sleep time Measured Not measured
Heart rate measurement Every second Energy-saving rate; measures
every second when active, or for
2 minutes of every 10 minute
period when inactive
Maximum heart rate activity
measurement
Parent topic: Starting Activity Measurement
5 days 7 days
Configuring a Target Number of Steps
You can configure a target number of steps you want to reach in a day and check your progress in
reaching that target on your watch screen. The default target number is 10000 steps per day.
Note: You can also configure a target number of steps using the Epson View app on your smartphone.
1. At the Time screen, press the Enter button.
58
Page 59

You see a screen like this:
2. Press the Up or Down button to select Settings > Activity > Step Target.
You see this screen:
3. Press the Up or Down button to select the number of steps you want to target and press the
Enter button.
You see the Activity screen:
4. Press and hold the Back button for at least 2 seconds to return to the Time screen.
Parent topic: Measuring and Reviewing Daily Activities
59
Page 60

Configuring a Target Number of Calories to Burn
You can configure a target number of calories that you want to burn in a day and check your progress in
reaching that target on your watch screen. You can set the target number of calories in the Epson View
app.
Note: For information on using the Epson View app, see the online help.
Parent topic: Measuring and Reviewing Daily Activities
Reviewing Activity Data on Your Watch
You can view the activity data you have collected on your watch while your activity is in progress or view
a 7-day activity chart for the previous week.
1. At the Time screen, press the Up button.
You see a screen like this, showing data for your current activity:
2. To view a 7-day activity chart for the previous week, press the Enter button.
You see a screen like this:
3. Press the Up or Down button to view each available activity data screen.
60
Page 61

4. Do one of the following when you are finished:
• When viewing the Daily Activity screen, press and hold the Back button for at least 2 seconds to
return to the Time screen.
• When viewing the 7-day activity chart, press the Back button to return to the Daily Activity
screen. Then press and hold the Back button for at least 2 seconds to return to the Time
screen.
Parent topic: Measuring and Reviewing Daily Activities
Related references
Activity Data Displayed on Your Device
Activities Available for Each Heart Rate Mode
Related tasks
Configuring a Target Number of Steps
Configuring a Target Number of Calories to Burn
Reviewing Activity Data Using the Epson View App
Reviewing Activity Data Using the Epson View App
You can review the activity data you have collected using the Epson View app on your smartphone. You
can view activity data while your activity is in progress or view a 7-day activity chart for the previous
week.
Note: For information on using the Epson View app, see the online help.
Parent topic: Measuring and Reviewing Daily Activities
Related references
Activity Data Displayed on Your Device
Activities Available for Each Heart Rate Mode
Related tasks
Configuring a Target Number of Steps
Configuring a Target Number of Calories to Burn
Reviewing Activity Data on Your Watch
61
Page 62

Watch Menu Settings
See these sections to view the available settings on the watch menus.
Time Screen Menus
Measurement Screen Menus
Time Screen Menus
You can select these settings by pressing Enter the button on the Time screen.
Menu Settings Options/Description
Bluetooth On
Off
Pairing Puts watch into pairing mode
Forget Device Ends the Bluetooth connection with your
Turns Bluetooth on or off to connect with
your smartphone
smartphone
62
Page 63

Menu Settings Options/Description
Settings Activity Sets up a target number of steps or turns
activity measurement on or off
Vibration Sets up alarms, notifications, alerts, and
button tones you want to use for
smartphone functions and various
milestones in your workouts; you can use
the Epson View app to configure alarms
Display Sets the watch face, background, and
backlight for the display and
enables/disables sleep mode
System Configures or displays general device
information
Set time sets the time manually or
automatically using synchronization
Reset resets all device settings to their
defaults, resets the stride sensor, and
deletes all workout and activity data
Ver. Info displays the device's firmware
version information
Alarm On
Off
Edit
History — Displays workout history information
Turn off — Turns the device off
Parent topic: Watch Menu Settings
Measurement Screen Menus
You can select these settings by pressing the Enter button on the Measurement screen or when a
measurement is paused. Then select the Settings menu.
Enables/disables wake-up alarms and lets
you configure alarm times
63
Page 64

Modes Settings Options/Description
AT Lap Automatically records laps when you
reach a pre-configured time or distance;
you can use the Epson View app to
configure lap times or distances
AT Pause Automatically pauses/resumes workout
measurement when you stop and resume
workout activity
Training Sets up alerts for when you reach pre-
configured targets for training; you can
use the Epson View app to configure
training targets
Target Time
Target Dist.
Target HR
Target Pace
Target Speed (Bike mode only)
Interval
Race
Metronome Sets your device to emit rhythmic sounds
to assist in pacing your workout
Meas. HR Turns heart rate measuring on or off; turn
off heart rate measuring when you are not
using the heart rate information to
conserve battery life
Waypoint Registers the current location as a
waypoint in your workout so your device
can notify you of your progress toward the
waypoint and alert you upon arrival; works
outdoors only
64
Page 65

Modes Settings Options/Description
Auto Scroll Changes the display to scroll
automatically based on your movement or
by time
Wrist turn
Time
Refresh Changes the frequency with which the
screen updates during your workout
based on your movements or by time
Wrist turn
Every second
Pool length Sets the length of the pool, between 20 to
150 yards/meters
AT Rest Automatically detects a rest during
swimming and when you resume
swimming so you do not have to manually
pause swim workout measurement
Stroke style Automatically detects the swim stroke you
are using or lets you set the swim stroke
manually
Parent topic: Watch Menu Settings
Auto
Manual
The following stroke styles are available
when you select Manual:
• Freestyle
• Breaststroke
• Butterfly
• Backstroke
65
Page 66

Caring for Your Watch
Follow the instructions in these sections to properly maintain your watch.
Cleaning Your Watch
Battery Life
Cleaning Your Watch
Clean your watch after each use as described here. If you have problems charging your watch, you can
also clean the contact points on your watch and the USB charging clip.
Caution: During cleaning, do not press on the glass or buttons too hard to avoid damaging them and
causing the watch to malfunction. Do not use benzine, thinner, alcohol, harsh detergent, or any other
organic solvent or you may damage your product.
1. After each use, clean your watch by wiping it gently with water and drying it completely using a dry
cloth. You can also clean the watch band with mild, diluted detergent.
Note: The color of the wristband may naturally fade or lose elasticity after years of use.
66
Page 67

2. If you experience charging problems, use a damp cotton swab to clean the contact points on your
watch and the USB charging clip as shown here.
Caution: Do not attach the USB charging clip to your watch while the contact points are wet or dirty,
or they may corrode and cause communication failures or watch malfunctions.
Parent topic: Caring for Your Watch
Battery Life
The built-in rechargeable battery in your watch has an average service life of four years, depending on
usage conditions. The battery is not user-replaceable.
If the battery does not retain a charge as long as it used to, it has likely reached the end of its service life.
Contact Epson Support to replace the battery.
Parent topic: Caring for Your Watch
67
Page 68

Solving Problems
See the solutions in these sections if you have issues using your watch.
Solving Problems Using Your Watch
Solving Problems Using Epson View
Restarting the Watch
Resetting the Watch
Checking the Firmware Version of Your Watch
Updating Your Watch's Firmware from the Epson View App
Updating Your Watch's Firmware from Your Computer
Where to Get Help
Solving Problems Using Your Watch
Check the solutions in these sections if you have any problems using your watch.
Solutions to Watch Screen Problems
Solutions to Watch Charging Problems
Solutions to Watch Settings Problems
Solutions to GPS Signal Problems
Parent topic: Solving Problems
Solutions to Watch Screen Problems
If you experience problems with your watch screen, try the following solutions:
• If the screen is blank, the battery may be running low or exhausted, or you may not have charged the
battery yet. Charge the battery before using your watch and whenever the battery runs low.
• If the screen turns blue or turns off while you are using your watch, try restarting your watch.
• If the screen does not change when you press a button on your watch, the battery may be running low.
Charge the battery. If the watch still does not respond to commands, try restarting the watch.
• If the inside of the glass becomes cloudy, condensation may have occurred temporarily due to abrupt
changes in temperature. Temporary condensation does not harm your watch and you can continue
using it. If condensation persists for a long time, water may have entered your watch; contact Epson
Support for help.
Parent topic: Solving Problems Using Your Watch
68
Page 69

Related references
Time Screen Menus
Measurement Screen Menus
Related tasks
Charging the Watch
Restarting the Watch
Measuring Your Heart Rate
Solutions to Watch Charging Problems
If you experience problems charging the battery in your watch, try the following solutions:
• If the watch does not charge when you attach the USB charging clip, check the following:
• Make sure you fully charge the watch. Partially charging the watch can affect battery life.
• Make sure the USB charging clip is attached correctly.
• Clean the contact points on your watch and the USB charging clip and attach the clip again.
• If the battery was exhausted when you attached the USB charging clip, the charging screen may not
appear for 1 or 2 minutes. Wait for the screen to appear.
• Make sure you are using a compatible USB charger or USB port.
• If you still cannot charge your watch's battery, detach the USB charging clip and contact Epson
Support for help.
• If the watch and the USB charging clip become hot during charging, stop charging the watch, detach
the USB charging clip, and contact Epson Support for help.
• If you see an error screen indicating a charging error, stop charging the watch and move to an
environment with a temperature within the operating temperature range.
Parent topic: Solving Problems Using Your Watch
Related tasks
Charging the Watch
Solutions to Watch Settings Problems
If you experience problems with the settings on your watch, try the following solutions:
• If the clock information disappears from the screen, the watch may have entered sleep mode and
turned off the time display. Press any button on the watch to wake it up. If the display does not turn on,
charge the watch's battery.
69
Page 70

• If the time is set incorrectly, reset the time.
• If measurement stops while exercising, you may be moving slowly. In this case, turn off the AT Pause
setting.
• If heart rate measurement stops, check to make sure that you are wearing the watch correctly. If your
body surface is cold, cover your wrist with clothing or wipe sweat away beneath the watch to stabilize
heart rate measurement.
Parent topic: Solving Problems Using Your Watch
Solutions to GPS Signal Problems
If you experience problems acquiring or maintaining a GPS connection, try the following solutions:
• If you cannot locate a GPS signal, take the watch outdoors for at least 15 minutes. Make sure there
are no overhead obstructions, stand still, and try acquiring a GPS signal again. The GPS signal may
be interrupted by tall buildings, tall trees, or mountainsides, so try to move into as open an area as
possible.
• Make sure your watch is paired with your smartphone. Your watch will automatically download your
GPS location information from your smartphone.
• If you still cannot acquire a signal, select Skip on the GPS screen to start your workout. Distance
traveled will be estimated based on your stride until the GPS signal is fully acquired.
Parent topic: Solving Problems Using Your Watch
Related tasks
Acquiring a GPS Signal
Solving Problems Using Epson View
Check the solutions in these sections if you have any problems using the Epson View app on your
smartphone.
Solutions to Problems Using Epson View
Parent topic: Solving Problems
70
Page 71

Solutions to Problems Using Epson View
If you experience problems using the Epson View app on your smartphone or the Epson View Uploader
on your computer, try the following solutions:
• If you see an error screen while your watch is communicating with your smartphone or computer, do
not move your watch or the USB charging clip during communications. Remove and reattach the USB
charging clip and try communicating with your smartphone or computer again.
• If your computer does not recognize your watch, check the USB connection. Also clean the contact
points on the watch and the USB charging clip, then try restarting your watch.
If you still have problems using Epson View app or the Epson View Uploader, see the online help.
Parent topic: Solving Problems Using Epson View
Related tasks
Cleaning Your Watch
Charging the Watch
Restarting the Watch
If you experience problems with your watch, you may need to restart it. Restarting your watch retains
your data and settings, except the activity data for the current day.
To restart your watch, press the following buttons simultaneously:
• Back
• Start/Stop
• Up
• Down
71
Page 72

The screen disappears for a moment and the watch restarts.
Parent topic: Solving Problems
Resetting the Watch
If you need to delete all the data and settings from your watch's memory, you can reset the watch.
Note: You may want to upload your workout and activity data to your smartphone using the Epson View
app before resetting your watch.
1. Press the Enter button.
You see a screen like this:
2. Press the Up or Down button to select Settings > System > Reset > Yes.
Your watch resets. When it is finished, it restarts and displays the Language screen.
3. Now you can configure your watch again.
Parent topic: Solving Problems
Related references
Time Screen Menus
Checking the Firmware Version of Your Watch
You can check the firmware version of your watch by displaying it on the watch screen.
1. Press the Enter button.
72
Page 73

You see this screen:
2. Press the Up or Down button to select Settings > System > Ver. Info.
Your watch screen displays the firmware version information.
3. Press and hold the Back button for at least 2 seconds to return to the Time screen.
Parent topic: Solving Problems
Related references
Time Screen Menus
Updating Your Watch's Firmware from the Epson View App
If you experience problems with your watch, you may need to update the firmware using the Epson View
app.
Before updating the firmware, you may also want to backup your workout and activity data to your
smartphone using the Epson View app; the firmware update may reset the data and settings stored in
your watch's memory.
73
Page 74

1. Select My Watch at the bottom of the app screen.
2. Select your current firmware version underneath the Firmware heading.
3. Do one of the following:
• AC adapter: Connect the USB charging clip to the USB port on the optional AC adapter and plug
the AC adapter into an electrical outlet.
Caution: Only use the optional AC adapter that is compatible with your product to charge your
watch, or the watch may not charge or operate correctly.
• Computer: Connect the USB charging clip to a USB port on your computer that is capable of
charging external devices.
74
Page 75

Note: USB charging from a computer port may not work with all computers. Do not connect the
USB charging clip to a USB hub or other intermediate device.
4. Follow the on-screen instructions on your smartphone to update your watch's firmware.
Parent topic: Solving Problems
Updating Your Watch's Firmware from Your Computer
If you experience problems with your watch, you may need to update the firmware using your computer.
Before updating the firmware, you may also want to backup your workout and activity data to your
smartphone using the Epson View app; the firmware update may reset the data and settings stored in
your watch's memory.
1. To download the latest version of your watch's firmware, visit epson.com/support (U.S.) or
epson.ca/support (Canada) and select your product.
2. Attach the USB charging clip to your watch and to the USB port on the computer on which you
downloaded the watch firmware.
3. Run the downloaded firmware file and follow the on-screen instructions to update the watch's
firmware.
Note: If the firmware updater does not start, make sure the USB charging clip is attached correctly
and that you do not have multiple instances of the firmware updater running on your computer.
Parent topic: Solving Problems
Where to Get Help
If you need to contact Epson for technical support services, use the following support options.
75
Page 76

Internet Support
Visit Epson's support website at epson.com/support (U.S.) or epson.ca/support (Canada), and select
your product for solutions to common problems. You can download utilities and documentation, get
FAQs and troubleshooting advice, or e-mail Epson with your questions.
Speak to a Support Representative
Call (800) 241-5789 or (562) 276-4394 (U.S) or (905) 709-3839 (Canada).
Support hours are 6 AM to 8 PM, Pacific Time, Monday through Friday and 7 AM to 4 PM, Pacific Time,
Saturday.
Days and hours of support are subject to change without notice. Toll or long distance charges may
apply.
Before you call, have the following information ready:
• Product name
• Product serial number
• Proof of purchase (such as a store receipt) and date of purchase
• Computer configuration
• Smartphone model and OS version
• Description of the problem
Parent topic: Solving Problems
76
Page 77

Technical Specifications
These sections list the technical specifications of your product.
Device Specifications
Optional Accessory Specifications
Viewing Safety and Approval Specifications
Device Specifications
Device thickness ProSense 307:
Weight ProSense 307:
0.52 inch (13.4 mm)
ProSense 347/ProSense 367:
0.62 inch (15.7 mm)
Approximately 1.8 ounces (51 g)
ProSense 347:
Approximately 2.2 ounces (62 g)
ProSense 367:
Approximately 2.3 ounces (64 g)
77
Page 78

Continuous operating time ProSense 307:
8 to 24 hours (approximate continuous workout time)
ProSense 347/ProSense 367:
17 to 50 hours (approximate continuous workout time)
ProSense 307:
3 to 30 days (approximate continuous time display)
ProSense 347/ProSense 367:
6 to 60 days (approximate continuous time display)
Note: Operating time varies depending on GPS signal reception
quality and device settings. Operating time is significantly reduced
when the GPS signal reception is poor, such as indoors. Settings
that affect battery life include backlight settings.
Charging time Approximately 3 hours
Charging method Rated voltage: 5 V (+/– 5%)
Current: 500mA (2.5 W USB port)
Water resistance ProSense 307:
Up to 5 bars of pressure
ProSense 347/ProSense 367:
Up to 10 bars of pressure
Communication Wireless: Bluetooth
Wired: USB 2.0
Notification function Buzzer and vibration
Operating temperature 23 to 122 °F (–5 to 50 °C)
Charging temperature 41 to 95 °F (5 to 35 °C)
Storage temperature 14 to 140 °F (–10 to 60 °C)
78
Page 79

Display ranges Distance/Lap distance: 0 to 999.99 miles or km
Pace/Lap pace/Average pace: 1 second to 45 minutes per mile (1
second to 30 minutes per kilometer)
Time/Lap time: 0:0:0 to 13:00:00
Cadence/Average Cadence: 0 to 255 spm
Stride length/Average stride length: 0 to 100 inches (0 to 255 cm)
Steps: 0 to 999,999 steps
Calories burned: 0 to 9999 kcal
Heart rate: 30 to 240 bpm
Estimated finishing time: 0:00:00 to 11:59:59 PM
Estimated finishing distance: 0 to 999.999 miles or km
Parent topic: Technical Specifications
Optional Accessory Specifications
USB Charging Clip
Model number WPCLP01 (part number: E12E220202)
Operating temperature 41 to 95 °F (5 to 35 °C)
AC Adapter
Model number SFAC04 (part number: E12E204001)
Input voltage 100 VAC, 50/60 Hz
Output frequency 5 VDC, 1.0 A
Parent topic: Technical Specifications
Viewing Safety and Approval Specifications
You can view your watch's safety and approval specifications on the watch screen.
1. At the Time screen, press the Enter button.
79
Page 80

You see this screen:
2. Press the Up or Down button to select Certification and press the Enter button.
You see your watch's certification information.
3. Hold the Back button for at least 2 seconds to return to the Time screen.
Parent topic: Technical Specifications
80
Page 81

Notices
Check these sections for important notices about your product.
Note: Epson offers a recycling program for end of life Epson products. Please go to this site (U.S) or this
site (Canada) for information on how to return your Epson products for proper disposal.
Notes on Electromagnetic Waves
Copyright Notice
Binding Arbitration and Class Waiver
Trademarks
Copyright Attribution
Notes on Electromagnetic Waves
This device is equipped with Bluetooth Smart technology. This function enables wireless communication
of measurement data between the device and the HR monitor or a smartphone.
This device has been classified as a low electronic data communication system based on Radio Law.
Therefore, this device does not require a radio station license. The following acts may be punishable by
law.
• Disassembling or remodeling the device
• Removing the verification or certification number for the device
VCCI Class B Information Technology Device
This device is a class B information technology device. This device is designed for home use, but
interference could occur when using in close proximity to radios or television aerials.
81
Page 82

Frequency
This device uses the frequency band from 2.402 to 2.480 GHz. Other wireless devices may use the
same frequency. Note the following points to avoid wireless interference with other wireless devices.
Precautions When Performing Wireless Communication
This device operates on the 2.4 GHz band.
This device operates in the same frequency bandwidth as industrial, scientific, and medical devices such
as microwave ovens and mobile object identification (RF-ID) systems (licensed radio stations, and
amateur, unlicensed low-power radio stations [hereinafter referred to as "other radio stations"]) used in
factory production lines.
1. Before using this device, make sure there are no other radio stations being used in the vicinity.
2. If this device causes RF interference between the device and other radio stations, promptly move to a
different location, stop using the device, and contact your local reseller by referring to "Contacting us
about this product" to ask for advice on preventing interference, such as setting up partitions.
3. In addition, when harmful radio wave interference occurs between the device and "other radio
stations", and refer to "Contacting us about this product" to contact our service center.
Warning:
• If you notice any skin irritation or other adverse reactions, stop using the device immediately and seek
medical attention.
• In areas in which usage is restricted, such as on airplanes and in hospitals, follow the rules and
regulations provided (such as in-flight announcements).
• Do not bring the device into an operating room, intensive care unit, or other such environment. Do not
use the device near medical equipment; radio waves from the device may interfere with electronic
medical equipment causing the equipment to malfunction and cause an accident.
• Radio waves from the device may interfere with surgically implanted medical devices such as a
cardiac pacemaker. If you have a surgically implanted medical device, follow the instructions and
warnings supplied with your device.
Parent topic: Notices
82
Page 83

Copyright Notice
All rights reserved. No part of this publication may be reproduced, stored in a retrieval system, or
transmitted in any form or by any means, electronic, mechanical, photocopying, recording, or otherwise,
without the prior written permission of Seiko Epson Corporation. The information contained herein is
designed only for use with this Epson product. Epson is not responsible for any use of this information as
applied to other products.
Neither Seiko Epson Corporation nor its affiliates shall be liable to the purchaser of this product or third
parties for damages, losses, costs, or expenses incurred by purchaser or third parties as a result of:
accident, misuse, or abuse of this product or unauthorized modifications, repairs, or alterations to this
product, or (excluding the U.S.) failure to strictly comply with Seiko Epson Corporation's operating and
maintenance instructions.
Seiko Epson Corporation shall not be liable for any damages or problems arising from the use of any
options or any consumable products other than those designated as Original Epson Products or Epson
Approved Products by Seiko Epson Corporation.
Seiko Epson Corporation shall not be held liable for any damage resulting from electromagnetic
interference that occurs from the use of any interface cables other than those designated as Epson
approved Products by Seiko Epson Corporation.
This information is subject to change without notice.
Parent topic: Notices
Binding Arbitration and Class Waiver
1. DISPUTES, BINDING INDIVIDUAL ARBITRATION, AND WAIVER OF CLASS ACTIONS AND
CLASS ARBITRATIONS
1.1 Disputes. The terms of this Section 1 shall apply to all Disputes between you and Epson. The term
"Dispute" is meant to have the broadest meaning permissible under law and includes any dispute, claim,
controversy or action between you and Epson arising out of or relating to this Agreement, Epson
branded products (hardware and including any related software), or other transaction involving you and
Epson, whether in contract, warranty, misrepresentation, fraud, tort, intentional tort, statute, regulation,
ordinance, or any other legal or equitable basis. "DISPUTE" DOES NOT INCLUDE IP CLAIMS, or more
specifically, a claim or cause of action for (a) trademark infringement or dilution, (b) patent infringement,
(c) copyright infringement or misuse, or (d) trade secret misappropriation (an "IP Claim"). You and Epson
also agree, notwithstanding Section 1.6,that a court, not an arbitrator, may decide if a claim or cause of
action is for an IP Claim.
1.2 Binding Arbitration. You and Epson agree that all Disputes shall be resolved by binding arbitration
according to this Agreement. ARBITRATION MEANS THAT YOU WAIVE YOUR RIGHT TO A JUDGE
83
Page 84

OR JURY IN A COURT PROCEEDING AND YOUR GROUNDS FOR APPEAL ARE LIMITED.
Pursuant to this Agreement, binding arbitration shall be administered by JAMS, a nationally recognized
arbitration authority, pursuant to its code of procedures then in effect for consumer related disputes, but
excluding any rules that permit joinder or class actions in arbitration (for more detail on procedure, see
Section 1.6 below). You and Epson understand and agree that (a) the Federal Arbitration Act (9 U.S.C.
§1, et seq.) governs the interpretation and enforcement of this Section 1, (b) this Agreement
memorializes a transaction in interstate commerce, and (c) this Section 1 shall survive termination of this
Agreement.
1.3 Pre-Arbitration Steps and Notice. Before submitting a claim for arbitration, you and Epson agree to
try, for sixty (60) days, to resolve any Dispute informally. If Epson and you do not reach an agreement to
resolve the Dispute within the sixty (60) days), you or Epson may commence an arbitration. Notice to
Epson must be addressed to: Epson America, Inc., ATTN: Legal Department, 3840 Kilroy Airport Way,
Long Beach, CA 90806 (the "Epson Address"). The Dispute Notice to you will be sent to the most recent
address Epson has in its records for you. For this reason, it is important to notify us if your address
changes by emailing us at EAILegal@ea.epson.com or writing us at the Epson Address above. Notice of
the Dispute shall include the sender's name, address and contact information, the facts giving rise to the
Dispute, and the relief requested (the "Dispute Notice"). Following receipt of the Dispute Notice, Epson
and you agree to act in good faith to resolve the Dispute before commencing arbitration.
1.4 Small Claims Court. Notwithstanding the foregoing, you may bring an individual action in the small
claims court of your state or municipality if the action is within that court's jurisdiction and is pending only
in that court.
1.5 WAIVER OF CLASS ACTIONS AND CLASS ARBITRATIONS. YOU AND EPSON AGREE THAT
EACH PARTY MAY BRING DISPUTES AGAINST THE OTHER PARTY ONLY IN AN INDIVIDUAL
CAPACITY, AND NOT AS A PLAINTIFF OR CLASS MEMBER IN ANY CLASS OR
REPRESENTATIVE PROCEEDING, INCLUDING WITHOUT LIMITATION FEDERAL OR STATE
CLASS ACTIONS, OR CLASS ARBITRATIONS. CLASS ACTION LAWSUITS, CLASS-WIDE
ARBITRATIONS, PRIVATE ATTORNEY-GENERAL ACTIONS, AND ANY OTHER PROCEEDING
WHERE SOMEONE ACTS IN A REPRESENTATIVE CAPACITY ARE NOT ALLOWED.
ACCORDINGLY, UNDER THE ARBITRATION PROCEDURES OUTLINED IN THIS SECTION, AN
ARBITRATOR SHALL NOT COMBINE OR CONSOLIDATE MORE THAN ONE PARTY'S CLAIMS
WITHOUT THE WRITTEN CONSENT OF ALL AFFECTED PARTIES TO AN ARBITRATION
PROCEEDING.
1.6 Arbitration Procedure. If you or Epson commences arbitration, the arbitration shall be governed by
the rules of JAMS that are in effect when the arbitration is filed, excluding any rules that permit arbitration
on a class or representative basis (the "JAMS Rules"), available at http://www.jamsadr.com or by calling
1-800-352-5267, and under the rules set forth in this Agreement. All Disputes shall be resolved by a
single neutral arbitrator, and both parties shall have a reasonable opportunity to participate in the
selection of the arbitrator. The arbitrator is bound by the terms of this Agreement. The arbitrator, and not
any federal, state or local court or agency, shall have exclusive authority to resolve all disputes arising
84
Page 85

out of or relating to the interpretation, applicability, enforceability or formation of this Agreement,
including any claim that all or any part of this Agreement is void or voidable. Notwithstanding this broad
delegation of authority to the arbitrator, a court may determine the limited question of whether a claim or
cause of action is for an IP Claim, which is excluded from the definition of "Disputes" in Section 1.1
above. The arbitrator shall be empowered to grant whatever relief would be available in a court under
law or in equity. The arbitrator may award you the same damages as a court could, and may award
declaratory or injunctive relief only in favor of the individual party seeking relief and only to the extent
necessary to provide relief warranted by that party's individual claim. In some instances, the costs of
arbitration can exceed the costs of litigation and the right to discovery may be more limited in arbitration
than in court. The arbitrator's award is binding and may be entered as a judgment in any court of
competent jurisdiction.
You may choose to engage in arbitration hearings by telephone. Arbitration hearings not conducted by
telephone shall take place in a location reasonably accessible from your primary residence, or in Orange
County, California, at your option.
a) Initiation of Arbitration Proceeding. If either you or Epson decides to arbitrate a Dispute, both parties
agree to the following procedure:
(i) Write a Demand for Arbitration. The demand must include a description of the Dispute and the amount
of damages sought to be recovered. You can find a copy of a Demand for Arbitration at
http://www.jamsadr.com ("Demand for Arbitration").
(ii) Send three copies of the Demand for Arbitration, plus the appropriate filing fee, to: JAMS, 500 North
State College Blvd., Suite 600 Orange, CA 92868, U.S.A.
(iii) Send one copy of the Demand for Arbitration to the other party (same address as the Dispute
Notice), or as otherwise agreed by the parties.
b) Hearing Format. During the arbitration, the amount of any settlement offer made shall not be disclosed
to the arbitrator until after the arbitrator determines the amount, if any, to which you or Epson is entitled.
The discovery or exchange of non-privileged information relevant to the Dispute may be allowed during
the arbitration.
c) Arbitration Fees. Epson shall pay, or (if applicable) reimburse you for, all JAMS filings and arbitrator
fees for any arbitration commenced (by you or Epson) pursuant to provisions of this Agreement.
d) Award in Your Favor. For Disputes in which you or Epson seeks $75,000 or less in damages exclusive
of attorney's fees and costs, if the arbitrator's decision results in an award to you in an amount greater
than Epson's last written offer, if any, to settle the Dispute, Epson will: (i) pay you $1,000 or the amount
of the award, whichever is greater; (ii) pay you twice the amount of your reasonable attorney's fees, if
any; and (iii) reimburse you for any expenses (including expert witness fees and costs) that your attorney
reasonably accrues for investigating, preparing, and pursuing the Dispute in arbitration. Except as
agreed upon by you and Epson in writing, the arbitrator shall determine the amount of fees, costs, and
expenses to be paid by Epson pursuant to this Section 1.6d).
85
Page 86

e) Attorney's Fees. Epson will not seek its attorney's fees and expenses for any arbitration commenced
involving a Dispute under this Agreement. Your right to attorney's fees and expenses under Section
1.6d) above does not limit your rights to attorney's fees and expenses under applicable law;
notwithstanding the foregoing, the arbitrator may not award duplicative awards of attorney's fees and
expenses.
1.7 Opt-out. You may elect to opt-out (exclude yourself) from the final, binding, individual
arbitration procedure and waiver of class and representative proceedings specified in this
Agreement by sending a written letter to the Epson Address within thirty (30) days of your assent
to this Agreement (including without limitation the purchase, download, installation of the
Software or other applicable use of Epson Hardware, products and services) that specifies (i)
your name, (ii) your mailing address, and (iii) your request to be excluded from the final, binding
individual arbitration procedure and waiver of class and representative proceedings specified in
this Section 1. In the event that you opt-out consistent with the procedure set forth above, all
other terms shall continue to apply, including the requirement to provide notice prior to litigation.
1.8 Amendments to Section 1. Notwithstanding any provision in this Agreement to the contrary, you
and Epson agree that if Epson makes any future amendments to the dispute resolution procedure and
class action waiver provisions (other than a change to Epson's address) in this Agreement, Epson will
obtain your affirmative assent to the applicable amendment. If you do not affirmatively assent to the
applicable amendment, you are agreeing that you will arbitrate any Dispute between the parties in
accordance with the language of this Section 1 (or resolve disputes as provided for in Section 1.7, if you
timely elected to opt-out when you first assented to this Agreement).
1.9 Severability. If any provision in this Section 1 is found to be unenforceable, that provision shall be
severed with the remainder of this Agreement remaining in full force and effect. The foregoing shall not
apply to the prohibition against class or representative actions as provided in Section 1.5. This
means that if Section 1.5 is found to be unenforceable, the entire Section 1 (but only Section 1)
shall be null and void.
Parent topic: Notices
Trademarks
EPSON®is a registered trademark, EPSON Exceed Your Vision is a registered logomark, and ProSense
is a trademark of Seiko Epson Corporation.
Google®is a registered trademark and AndroidTMis a trademark of Google Inc.
The Bluetooth wordmark is owned by Bluetooth SIG, Inc.
86
Page 87

Parent topic: Notices
Copyright Attribution
© 2017 Epson America, Inc.
10/17
CPD-54160
Parent topic: Notices
87
 Loading...