

Page 1
Page 2

®
Photo!2
®
Photo File Uploader
Digital Camera Utility Program
All rights reserved. No part of this publication may be reproduced, stored in a retrieval system, or transmitted in any form or by any means,
electronic, mechanical, photocopying, recording, or otherwise, without the prior written permission of SEIKO EPSON CORPORATION. No
patent liability is as sumed with re s p e ct to the use of the information contain e d herein. Neither is any liability assumed for damages resulting
from the use of the information contained herein.
Neither SEIKO EPSON CORPORATION nor its affiliates shall be liable to the purchaser of this product or third parties for damages, losses,
costs, or expenses incurred by purchaser or third parties as a result of: accident, misuse, or abuse of this product or unauthorized modifications,
repairs, or alterations to this product.
SEIKO EPSON CORPORATION and its affiliates shall not be liable against any damages or problems arising from the use of any options or any
consumable products other than those designated as Original EPSON Products or EPSON Approved Products by SEIKO EPSON
CORPORATION.
EPSON is a registered trademark of SEIKO EPSON CORPORATION.
Microsoft and Windows are registered trademarks of Microsoft Corporation in the United States of America and other countries.
IBM and PS/2 are registered trademarks of International Business Machines Corporation.
Macintosh is a regi ster ed trademark of Apple Computer, I nc .
General Notice: Other product names used herein are for identification purposes only and may be trademarks of their respective companies.
Copyright © 1998 by SEIKO EPSON CORPORATION, Nagano, Japan.
s
User’s Guide
Page 3

ii
Page 4

Contents
Introduction
Features . . . . . . . . . . . . . . . . . . . . . . . . . . . . 0-1
About This Guide . . . . . . . . . . . . . . . . . . . . . . 0-1
System Requirements . . . . . . . . . . . . . . . . . . . . 0-2
PCs . . . . . . . . . . . . . . . . . . . . . . . . . . . . 0-2
Macintosh Computers . . . . . . . . . . . . . . . . . 0-2
Chapte r 1
Installing the Software in Your PC . . . . . . . . . . . . 1-1
Installing EPSON Photo!2 software . . . . . . . . . 1-2
Installing EPSON Photo File Uploader . . . . . . . 1-2
Installing other software . . . . . . . . . . . . . . . . 1-3
Installing the Software in Your Macintosh . . . . . . . . 1-3
Installing EPSON Photo!2 software . . . . . . . . . . 1-4
Installing EPSON Photo File Uploader . . . . . . . 1-4
Installing other software . . . . . . . . . . . . . . . . 1-5
Chapte r 2
Connecting the Camera to Your Computer . . . . . . . . 2-1
Connecting to a PC . . . . . . . . . . . . . . . . . . . 2-2
Connecting to a Macintosh . . . . . . . . . . . . . . . 2-3
Accessing EPSON Photo!2 . . . . . . . . . . . . . . . . . 2-4
For Windows users . . . . . . . . . . . . . . . . . . . 2-5
For Macintosh users . . . . . . . . . . . . . . . . . . . 2-5
Installing the Software
Using EPSON Photo!2
Working with EPSON Photo!2 . . . . . . . . . . . . . . . 2-6
Getting help . . . . . . . . . . . . . . . . . . . . . . . 2-7
Closing EPSON Photo!2 . . . . . . . . . . . . . . . . . 2-7
Getting status and progress information . . . . . . . 2-7
Using the Camera Menu . . . . . . . . . . . . . . . . . . 2-7
Selecting photos . . . . . . . . . . . . . . . . . . . . . 2-8
Transferring photos . . . . . . . . . . . . . . . . . . . 2-9
Saving photos to a folder . . . . . . . . . . . . . . . . 2-9
Transferring pictures to your documents . . . . . . . 2-10
Erasing selected pictures from your camera . . . . . 2-12
Getting photo information . . . . . . . . . . . . . . . 2-13
Viewing your photos . . . . . . . . . . . . . . . . . . 2-13
Enhancing your photos . . . . . . . . . . . . . . . . . 2-13
Rotating your photos . . . . . . . . . . . . . . . . . . 2-14
Using the Folder Menu . . . . . . . . . . . . . . . . . . . 2-14
Selecting photos . . . . . . . . . . . . . . . . . . . . . 2-15
Transferring photos . . . . . . . . . . . . . . . . . . . 2-15
Transferring pictures to your documents . . . . . . . 2-16
Finding the folder containing your photos . . . . . . 2-16
Uploading and copying photos . . . . . . . . . . . . 2-16
Erasing files from a folder . . . . . . . . . . . . . . . 2-17
Getting photo information . . . . . . . . . . . . . . . 2-17
Viewing your photos . . . . . . . . . . . . . . . . . . 2-18
Enhancing your photos . . . . . . . . . . . . . . . . . 2-18
Rotating your photos . . . . . . . . . . . . . . . . . . 2-18
iii
Page 5

Using the Controls Menu . . . . . . . . . . . . . . . . . . 2-18
Controlling the camera from your computer . . . . . 2-19
Taking pictures from your computer . . . . . . . . . 2-20
Erasing photos . . . . . . . . . . . . . . . . . . . . . . 2-21
Using the Setup Menu . . . . . . . . . . . . . . . . . . . . 2-22
Changing the computer connection . . . . . . . . . . 2-22
Changing camera settings . . . . . . . . . . . . . . . 2-23
About button . . . . . . . . . . . . . . . . . . . . . . . 2-24
Chapte r 3
Using EPSON Photo File Uploader . . . . . . . . . . . . 3-1
Uploading images from your PC . . . . . . . . . . . 3-2
Uploading images from your Macintosh . . . . . . . 3-4
Making Screen Copies . . . . . . . . . . . . . . . . . 3-6
Using EPSON Program Uploader . . . . . . . . . . . . . 3-9
Connecting the camera . . . . . . . . . . . . . . . . . 3-9
Uploading programs . . . . . . . . . . . . . . . . . . 3-10
Removing programs . . . . . . . . . . . . . . . . . . . 3-11
Chapte r 4
Software Problems . . . . . . . . . . . . . . . . . . . . . . 4-1
Glossary
Index
Using the Uploader Utilities
Troubleshooting
iv
Page 6
Introduction
Features
The EPSON digital camera so ftw are suite, including
EPSON Pho t o! 2 and EPSON Phot o Fi le U ploader, is the
perfect compa nion for your EPSON digit al camera.
Using your di git al c am era and software, you can capture
images in col or, grayscale, or black and w hit e, and save
them to disk as files.
o
The software suppo rts t he following EPSON digital
cameras: EP SON PhotoPC 70 0, PhotoPC 60 0
o
EPSON Pho to! 2 dir e ctly controls all of the fea tures of
your EPSON d igital camera, an d is t he st andard
cross-platform interface for other application
programs.
o
EPSON Pho to File Uploader allo w s you to up load,
save, and ex p ort images into other ap plications.
o
EPSON Program Upload e r all ows you to upload or
delete optional programs from the computer to the
camera.
o
You can conv ert your files into various formats, suc h
as JPEG and TIFF , for u se w ith you r fa vori te de skto p
publishing and image-edit ing so ftw are.
About This Guide
The informatio n in t his guide is divided into four
chapters, with a glossary and index also provided for
your reference.
o
Chapter 1 contains information on installing the
software. Be sure to read this chapter first.
o
Chapter 2 pro v id es you with a complete descr ipt ion
of EPSON Photo!2.
o
Chapter 3 explains how to upload images and
programs to y ou r EPSON digital c am era.
o
Chapter 4 explains how to solve problems you may
have while using the software.
Notes contain important info rm a tion and useful tips on
operating your digital camera and software.
To set up and use the digital camera itself, see your
User’s Guide. Online help can also provid e yo u w it h
informatio n about settings in EPSON Photo!2.
Introductio n
1
Page 7

System Requirements
Hard disk d rive with at least 30MB free space
Monitor with m inim um resolution of 640 × 480
PCs
IBM®-compatible PC with 386 or higher pro ces sor (with
Windows NT
Serial port with standard RS-232C interface and a
communication speed of 19200 bps or higher
8MB RAM (wi th Windows NT, at least 16MB is required )
Hard disk d rive w it h at least 30MB free space
VGA monito r with at least 16-color display
Microsoft
Workgroups
Windows N T Ve rsio n 3. 51 o r lat er
®
, 486 or higher pr oc esso r is required)
®
Windows 3.1 or later, Microsoft Windows for
®
3.11 or later, W indows 95, Window s 98, or
Macintosh Computers
Macintosh with a Power PC processor
Serial port with a communicat ion speed of 19200 bps
or higher
16MB RAM
Macintosh Syst em 7.1 or later (System 7.5 or later is
required t o ac cess optional Com pactFlash Card m em ory
directly from the Macintosh)
2
Introduction
Page 8

Chapter 1
Installing the Software
1
This chapter sh ows you to how to install the c am era
software in your computer. It covers the following:
Installing the So ftw are in Your PC
Installing the So ftw are in Your Macintos h
Installing the Software in Your PC
There are two C D -ROMs packed w ith your camera; on e
is for Windows and the other is for Macintosh. Each
contains EPSON Photo!2, EPS ON Photo File Uploader,
and other optional software.
Depending o n th e co unt ry of purchase, you r CD- R OM
may come as th e m ultiple-language v ersion. If so, you
can install the language appropr iate fo r yo ur system.
Be sure to use the CD for Windows when installing the
software in you r PC , and fo llo w the ste ps in this section.
For Macintosh installation, see page 1-3.
Note:
Be sure to install EPSON Photo!2 first. You cannot install
other software before EPSON Photo!2 is installed.
Installing the Software
1-1
Page 9

Installing EPSON Photo!2 software
EPSON Pho to! 2 so ftw are lets you transfer your pictures
from the camera to your computer, and place them into
documents. You can also use this software to take
pictures and change camera set tings f rom yo ur computer.
3. You will see the list of sof twa re in t he li st box. Clic k t o
check or unchec k the nam es of the software you want
to install. The checked software will be installed in
your PC. You ca n see a description of the softwa re in
the online hel p or the User’s Guide that comes with
your CD-ROM.
Note:
When you install EPSON Photo!2, the EPSON Program
Uploader utility is also installed automatically.
Follow the ste ps in thi s section to install your EPSON
Photo!2 soft w are.
1. Turn on your co mputer, and ins ert th e cam era software
CD shipped with your camera in the CD-ROM drive.
2. For Windo ws 95, Wi nd ow s 98, or NT 4.0:
When you insert the CD, an introductory screen
appears on your monitor automatically. Cli ck t he
Add Soft wa r e ic on.
For Windo ws 3. 1 or N T 3. 5x:
Click the Fil e Manager icon in the Main m enu . Then
click the CD- ROM drive icon, and double-click CD
Setup.exe.
1-2
Installing the Software
4. Click Setup icon. Then follow the instructions on the
screen.
5. When you finish installing E PS ON Photo!2, click the
OK button.
After instal ling EPSON Ph oto!2, fo llo w the instructio ns
on the screen to in stall other software in you r PC .
Installing EPSON Photo File Uploader
EPSON Pho to File Uploader softwa re let s yo u convert
digital images to EP SON Photo file format and transfer
them from the computer to your camera. You can then
display the imag es on the camera’s LCD sc reen or on a
television monitor.
Follow the steps in this section to install the EP SON
Photo File Up loa der so ftw are for Windows.
Page 10

1. Check “EPSON Photo File Uploader” in the list box
you find at the start of EPSON Photo!2 installation;
explained in step 3 of the previous section. EPSON
Photo File Uploader setup program starts after
installing EP SON Photo!2 in your PC.
If you are starting t he installation from the beginning,
see the previous se ction from step 1 through step 4,
then click the Setup icon. Make sure EPSON Photo!2
is already installed.
2. Follow the instructions on the screen.
1. Check the names of the other software yo u w ant t o
install in the list bo x which appears at the st art of
EPSON Ph oto!2 installation; explained in step 3 of
“Installin g EPS ON Photo!2 software” on page 1-2.
The setup pro gram for other software starts after
insta l ling EP S ON Photo!2 and/or EPSON Ph ot o F ile
Uploader in you r PC.
If you are starting t he installation from the beginning,
see the step 1 through step 4 in “Installing EPSON
Photo!2 soft wa re”. Make sure EPSO N Photo!2 is
already installed.
1
3. When you finis h inst alling EPSON Photo File
Uploader , click the OK button.
After instal ling EPSON Photo Fi le U pl oader, follow the
instruction s on the screen to install other software in
your PC.
Installing other software
Your camera comes with other software allowing you to
enhance the use of you r came ra. Fol low the steps in this
section.
2. Follow the instructions on the screen.
3. When you finis h inst alling the softwar e, clic k t he OK
button.
Installing the Software in Your Macintosh
There are two C D -ROMs packed w ith your camera; on e
is for Windows and the other is for Macintosh. Each
contains EPSON Photo!2, EPS ON Photo File Uploader,
and other software.
Be sure to use the CD for Macintosh when installing the
software in your co mputer, and follow the steps in th is
section. For W indo w s inst allation, see page 1- 1.
Installing the Software
1-3
Page 11

Note:
Be sure to install EPSON Photo!2 first. You cannot install
other software before EPSON Photo!2 is installed.
Installing EPSON Photo!2 software
EPSON Pho to! 2 so ftw are lets you transfer your pictures
from the camera to your computer, and place them into
documents. You can also use this software to take
pictures and change camera set tings f rom yo ur computer.
Follow the ste ps below to install EPSO N Photo!2
software in you r Ma cintosh.
1. Turn on the computer, and insert the camera software
CD shipped with your camera in the CD-ROM drive.
Installing EPSON Photo File Uploader
EPSON Pho to File Uploader softwa re let s yo u convert
digital images to EP SON Photo file format and transfer
them from the computer to your camera. You can then
display the imag es on the camera’s LCD sc reen or on a
television monitor.
Follow the ste ps below to install EPSO N Photo File
Uploader softw are in your Macintosh.
1. Turn on the computer, and insert the camera software
CD shipped with your camera in the CD-ROM drive.
2. Double-click the CD-ROM ico n.
3. Double-clic k t he File Uploader folder.
2. Double-click the CD-ROM ico n.
3. Double-clic k t he E P SON Photo!2 folder. Depending
on the country of pur cha se, th e EPS ON Photo!2
folder may con tain m ultiple-language versions of the
software. Double-click the folder of your preferred
language.
4. Double-clic k t he P hoto!2 Installer - Part 1 icon to
start the installation program. Follow the instructions
on the screen.
1-4
Installing the Software
Depending o n th e co unt ry of purchase, the File
Uploader folder may contain mult ip l e-l ang ua ge
versions of the so ftw are. Dou ble-click the folder of
your prefer red language.
4. Drag the contents of the folder to the folder on your
hard drive w h ere you want to install the so ftw are.
Page 12

Installing other software
Your camera comes with other software allowing you to
enhance the us e of you r camera. For installation , foll ow
these steps:
1. Turn on the computer, and insert the camera software
CD shipped with your camera in the CD-ROM drive.
2. Double-click the CD-ROM ico n.
3. Double-clic k t he fo lder that contains the softw are you
want to install.
Depending o n the sof twa re, th e So ftw are f older may
contain multi ple-language versio ns of the sof twa re.
Double-click the folder of your pr eferred language .
4. Double-clic k t he Installer icon t o start the installation
program. Then follow the instructions on the screen.
1
Installing the Software
1-5
Page 13

1-6
Installing the Software
Page 14

Chapter 2
Using EPSON Photo!2
After you have t aken pictures, you can c onnect the
camera to you r co m pu te r and t ransfer the images . Th en
you can use them in yo ur letters, presentatio ns, or just
about anything you create on your comput er. This
chapter tells you how, inclu ding:
Connecting the camera to your computer
Tran sferring pictures to your computer
Erasing pictu res f rom t he camera
Using pictures in your documents
Uploading EPSON Photo images to the camera
Connecting the Camera to Your
Computer
Before you start, m ake sure the camera is finished
processing, and locate the serial cables that came wit h
your camer a. If you are connecting the c am era to a PC,
you will only need t he lo ng cable. If you are con nec ti ng
the camera to a Macintosh, you will need both the long
and short cabl es. Batt ery power can be saved using the
optional AC adap te r whenever you connect the camera
to your comp ut er.
Note:
When the camer a is connected to your comp ute r, you cannot
use an y of the con t rol buttons or t he shutte r button on the
camera. You can only operate the camera through your
computer.
The camera’s automatic shut-off feature remains in effect
when the camera is conne cted to your comp uter. Shut-off
takes place after 5 minutes of inactivity. To turn the
camera back on, close and reopen the lens cover, or use
any of the software camera co nt rols on your com puter.
2
Using EPSON Photo!2
2-1
Page 15
Connecting to a PC
Follow these step s to co nnect the camera to a PC:
1. Make sure the cam era and your comp uter are turned
off. Also make sure the LCD monitor is turned off.
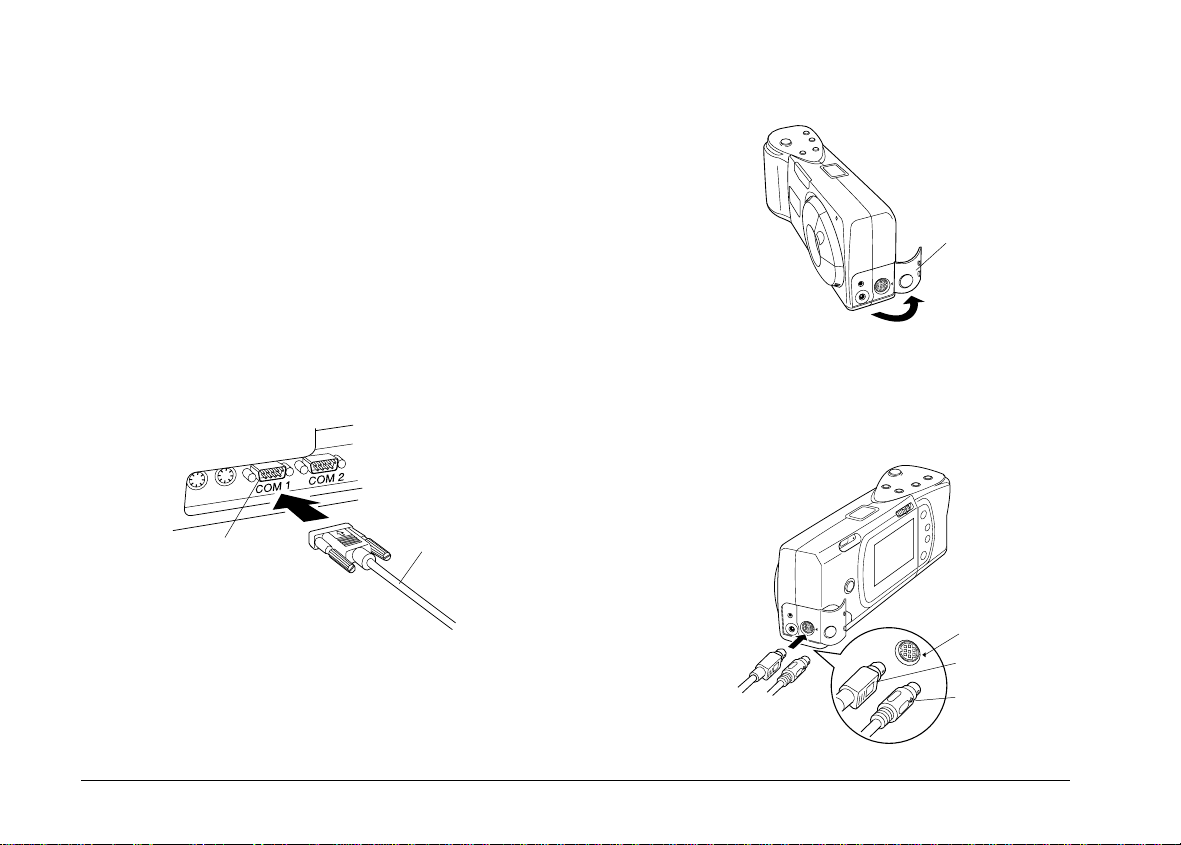
2. Locate a se rial port on the back of you r computer. You
may have tw o ser ial p orts labelled COM1 and
COM2, or with icons. If you have two serial ports
available, use port 1 to connect your camera.
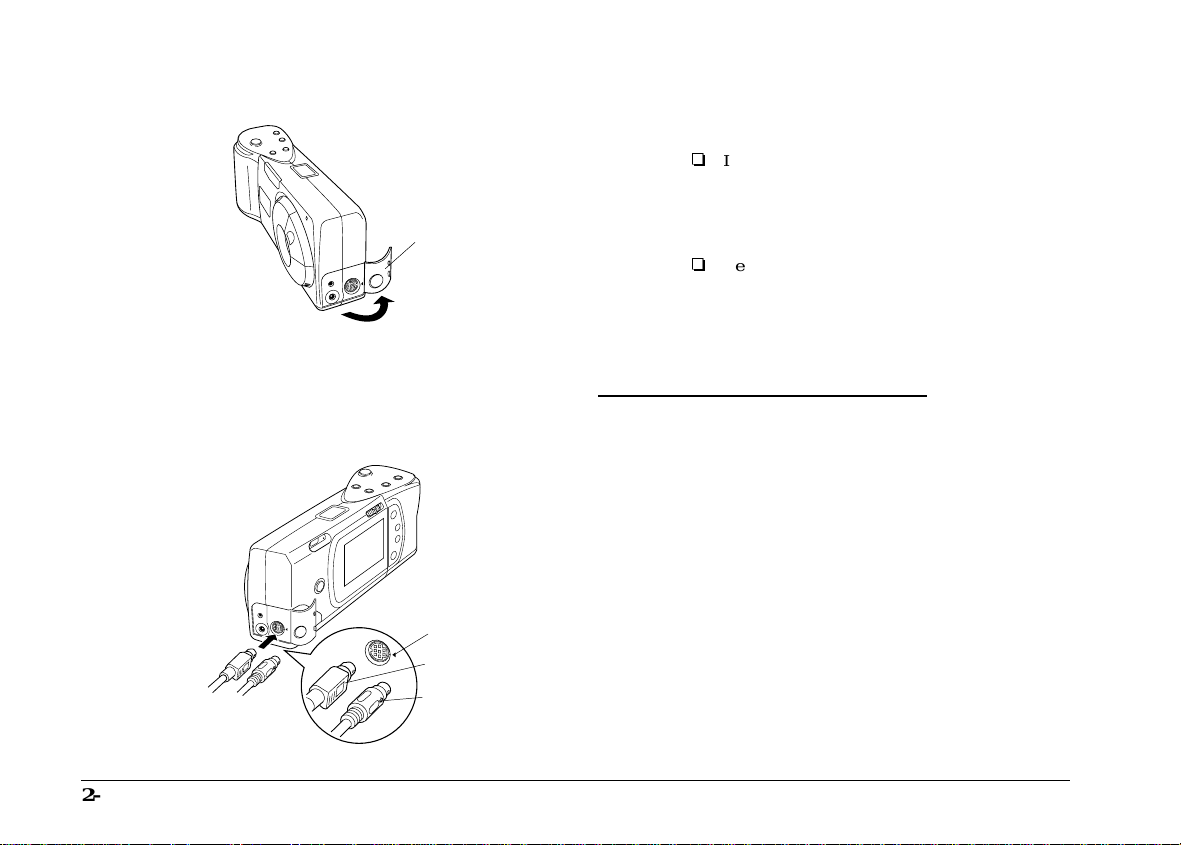
4. Open the connector cover on the side of the camera.
connector cover
3. Line up the seri al connector on the ca ble w it h one
of the serial por ts on yo ur c om p ut er, and insert the
connec tor. Then tigh ten the screw s .
serial port on computer
2-2
Using EPSON Photo!2
serial cable
(long cable)
5. Depending o n the ty pe o f cable you have, line up
either the arrow or the flat surface of the cable
connector w ith th e m ark on the camera’s serial port.
Then insert the connec tor.
mark
flat surface
or
arrow surface
Page 16
6. Turn on the camera and your computer system.
Caution:
Keep th e entire computer syste m away from poten tial
c
source s of elec tromagnetic int erferenc e, such as
loudspeakers or base units of cordless telephones.
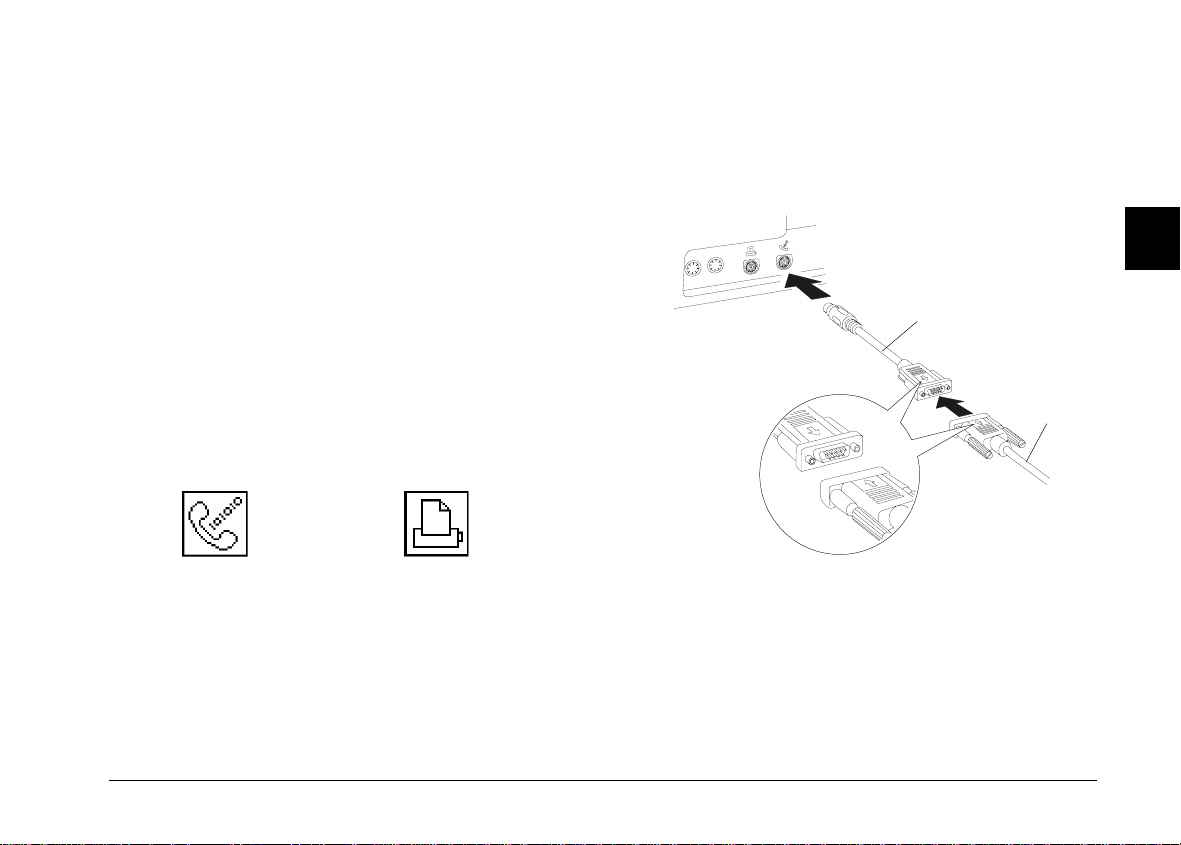
Connecting to a Macintosh
3. Connect the long ser ial cable to the short Maci ntosh
adapter cab le, th en tight en the screws. Li ne up th e
serial connector on the short cabl e wi th eit her the
modem o r th e printer port on yo ur computer, an d
insert the connect o r.
2
Follow these step s to co nnect the camera to a Macinto sh:
1. Make sure the cam era and your comp uter are turned
off. Also make sure the LCD monitor is turned off.
2. Locate the modem port and the printer port on the
back of your computer. The ports should be labelled
with icons.
modem port
printer port
Macintosh adapter cable
serial cable
Using EPSON Photo!2
2-3
Page 17
4. Open the connector cover on the side of the camera.
connector cover
5. Depending o n the ty pe o f cable you have, line up
either the arrow or the flat surface of the long cable
connector w ith th e m ark on the camera’s serial port.
Then insert the connec tor.
mark
flat surface
or
arrow surface
6. Turn on the camera and your computer system.
Caution:
o
c
If you c on nected the came ra to a serial port t hat
you use for another device a nd A ppl eTalk is
turned on, turn off AppleTalk. The computer may
not recognize the camera if AppleTalk is turned on.
o
Keep th e entire c omputer system aw ay from
potential sources of electromagnetic interference,
such as loudspeakers or the base units of cordless
telephones.
Accessing EPSON Photo!2
Once you r camera and com puter are co nnected and
turned on, you are ready to start working with the
EPSON Photo!2 software that came with you r cam era.
This software allow s yo u t o down loa d your photos to
your computer so you can use the m in you r do cu m ent s.
If you have not inst al led EPSON Photo!2 yet , do so now ,
following the inst ru ct io ns in Chapter 1. Then follo w the
instructions in this sectio n to access the softwar e .
2-4
Using EPSON Photo!2
Page 18

Note:
If you do not set your camera’s clock before connecting it to the
computer, the camera’s time and date will be set to that of the
computer’s automatically after opening EPSON Photo!2.
For Windows users
To open EPSON Photo!2 directly, sim ply double-clic k it s
icon in the EPSO N Photo!2 progra m g roup (for Wind ows
3.1x and NT 3.51) or click its icon in the E PSON Photo!2
folder (for Windows 95, Windo ws 98, and N T 4. 0).
To access EP SON Photo!2 fr om an ap plication program
that supports t he TWAIN imag e acquisition stand ard,
choose
EPSON PhotoPC 700/600
source on your ap pli cation’s File menu , then acqu ire t he
image.
To access EP SON Photo!2 fr om an ap plication that
supports OLE2 (object linking and embedding), choose
EPSON PhotoPC 700/600 Object
menu and clic k OK.
as the TWAIN data
on the Insert Object
For Macintosh users
To open EPSON Photo!2 directly, sim ply double-clic k
its icon, locate d in the EPSON Photo!2 folder.
To access EP SON Photo!2 fr om an ap plication program
that supports t he TWAIN imag e acquisition stand ard,
choose
PhotoPC 700/ 600
from your application’s File menu, then acquire th e
image.
Note:
The precise way to access EPSON Photo!2 from TWAIN- or
OLE2-co m pl ia nt appl i c ations varies de pe nding on your
software. Refer to your software manual for detailed
instructions on selecting TWAIN data sources or inserting
OLE objects.
as the TWAIN data source
2
Using EPSON Photo!2
2-5
Page 19

Working with EPSON Photo!2
When you open EPSON Photo!2, an in tr odu ctory screen
appears br ief ly in t he E PSON Photo!2 window, then the
Camera menu appears, indicating yo ur camera and
computer are co nnec t ed pr op erly.
menu
tabs
status bar
If the Setup menu appears in place of the Camera menu,
your camera and computer may not be properly
connected. M ake su re yo ur camera is corre ctly c onn ecte d
to your comp ut er, and click the
If you still cann ot op en the Camera menu, see p age 2- 22
for instructions on using the Setup menu to establish the
proper connection.
progress meter
Test Connection
Help button
Close button
button.
Note:
While the camera and the computer are communicating, star
icons move across the camera’s display panel. Avoid opening or
using othe r ap pl ic a ti ons during this tim e; ot herwise
communication may be interrupted.
Click the menu tabs along the top of the EPSON Photo!2
window to open the follo w ing m enus:
Camera
The Camera m e nu d isp lays small thumbnail images of
all the photos sto red in the cam era, so you can easily
select which im ages you want to transf er to the computer
or erase from the cam era.
If an optional C ompactFlash Card is installed in the
camera, the Cam era menu displays the im a ges st o red in
the card instead of the imag es stor ed in the camera’s
internal me m ory. If you want the images stored in the
camera to be displayed, simply take o ut the
CompactFlash Card from the c am e ra.
Folder
The Folder me nu disp lays thumbnail im a ges of photos
that have been sa v ed to a folder. From this me nu yo u c an
select thum bnai ls and transfer photos to you r
appl ication, or erase t hem from the folder. Al so, you can
upload ima ges f rom yo ur computer to y ou r cam era.
2-6
Using EPSON Photo!2
Page 20

Controls
The Controls me nu allows you to see a live preview on
your computer screen, take photos from your computer,
and change some of the cam era settings.
Status bar
The status bar tel ls you what operatio n EPSON Photo! 2
is performing.
Setup
The Setup menu allows you to make the communication
settings needed to connect the computer to the camera.
From this men u yo u can also make the came ra ’s internal
time, date, and ident if ic at ion set tings.
Getting help
Click
related to the items on that menu.
on any of the EPSO N Pho to! 2 m enus for help
Help
Closing EPSON Photo!2
You can close EP SON Photo!2 by clicking Close on any of
the menus.
Getting status and progress information
In addition to the Help and Close buttons, E PS ON
Photo !2 displays the status ba r and progress mete r at all
times no matter which menu is displayed.
Progress meter
The progress m eter shows the progress of lengthy
operations, suc h as downloading im ages from the
camera.
Using the Camera Menu
When you open E PS ON Photo!2, the Camera menu
appears an d EPSON Photo!2 s tart s d ow nloading
thumbnail im ages of the photos stored in yo ur camera.
The images are downloaded in the order that they were
taken and are disp layed in the image sel ectio n w indow.
You can change the do w nloading order by clicking the
blank thumbnail frames of the photos yo u w ant to see
first.
If an optional C ompactFlash Card is installed in the
camera, the Cam era menu displays the im a ges st o red in
the card instead of the imag es stor ed in the camera’s
internal memory.
2
Using EPSON Photo!2
2-7
Page 21

Note:
If you see a mess age indicating the camer a is not connected
properly, check the serial po rt is work ing, and confirm the por t
settings on yo ur co m put er usi ng t he Se tup menu as describ e d
on page 2-22.
photo transfer
button
image selection window
photo save
button
Selecting photos
You can use the
Select All
in your camera at once, or you c an select individual
photos by clicking the thumbnai l im ages in the image
selection window. Blue frames appear around selected
images. You can click the
EPSON Pho to! 2 is still downloading yo ur images, so they
appear in the ima ge selection window pre-selected and
ready to be tra nsf erred to your appli cation, or to a folder.
You can se l ect individual photos or gr oups of photos in a
number of ways d epe nding on your system, as described
in this table:
Windows Macintosh
Selecting a single
thumbnail
Selecting multiple
thumbnails
Selecting a
continuous range
of thumbnails
Cancelling the
selection of a
single thumbnail in
a selected gr o up
Click Click
CTRL + click COMMAND + click
Click the first image in
the range. Then SHIFT
+ click the last image
in the range.
CTRL + click COMMAND + click
button to select all the photos
Select All
button even while
Click the first image in
the range. Then SHIFT
+ click the last image
in the range.
2-8
Using EPSON Photo!2
Page 22

Transferring photos
Saving photos to a folder
The name and function of the photo transfer button
located in the top right corner of the Camera menu varies
depending on whether EPSON P hoto!2 is opened
directly, or from a TWAIN- or OLE2-compliant
applicati on. Th e f oll ow ing table describes the
characterist ics of the p hoto transf er button depending on
how EPSON Photo!2 is opened.
TWAIN OLE Stand Alone
Button
Name
Button
Function
Notes
Get Photos Get Photo Save To Folder
Transfers
selected photos
from the
camera to your
application.
Some TWAIN
applications will
only accept one
image at a time.
Transfers a
selected photo
from the
camera to your
application.
Only one
image can be
transferred at a
time.
Displays a dialog
box that allows
you to save
selected photos as
EPSON Photo files
in JPEG format.
File names are
created
automatically.
The name and function of the photo save button located
below the ph oto transfer button on th e Ca mera menu
varies depending on whether EPSON Ph oto!2 is opened
directly, or from a TWAIN- or OLE2-compliant
applicati on. Th e f oll ow ing table describes the
characteristics of the photo save button depending on
how EPSON Photo!2 is opened.
TWAIN OLE Stand Alone
Button
Name
Button
Function
Notes
Save To Folder Save To Folder Export Photos
Displays a dialog
box that allows
you to save
selected photos
as EPSON Photo
files in JPEG
format.
File names are
created
automatically.
Displays a dialog
box that allows
you to save
selected photos
as EPSON Photo
files in JPEG
format.
File names are
created
automatically.
Displays a dialog
box that allows
you to name and
save photos in
JPEG, BMP, or
PCX format. On
the Macintosh
the PICT format is
also supported.
If you assign a
single file name
to more than one
photo, a counter
is added to each
file sharing the
same name.
2
Using EPSON Photo!2
2-9
Page 23

Transferring pictures to your documents
After you sele ct pic t ures in the image selection window,
you can insert th em int o yo ur documents . Yo u can use
your pictures in m any di ff erent types of applications,
such as word processors, presentation programs,
spreadshe ets, d atabase managers, pa ge layout and
desktop publis hing packages.
To enhance your pho tos, sim p ly click on the
button before you start t ransferring. For mor e
Photo
details, see page 2-13.
You can also cha nge t he o rientation of your photo s in
90 degree in c remen ts, using th e
For more information, see page 2-14 .
If your applica tion su pp or ts OLE2 or TWAIN, EPSON
Photo!2 allows you to directly transfer your photos from
your camer a to you r do cu m ent s. If y ou r app lic at io n does
not support OLE2 or TWAIN, you need to save your
photos as JPEG, BMP, or PCX files , and then op en them
from your application. On the Macint o sh, you can also
save photos as PICT files.
Rotate Photo
Enhance
buttons.
Inserting photos directly into documents
You can use two methods to add pictures directly to your
documents:
o
Photo transfer button
o
Drag-and-d rop (Windows on l y )
Transferring pictures with the photo transfer button
You can use this method to transfer pictures to Windows
applications sup po rting O LE2 ( obj ect linking and
embedding) , or Windows and Macinto sh ap plications
supporting TWAIN. Some examples of applicat i o ns
supporti ng OLE2 are Microsoft Word 6.0 & 7.0 and
WordPerfec t
supporting TWAI N are H o tS ho ts , Photo sho p,
PictureP ublisher and Photostyler.
If you are not sure whether your app lication support s
OLE2 or TWAIN, give it a try. If it does not work, you
can always insert the photo by first saving it in EPSON
Photo!2 as a JPEG, BMP, or PCX file and opening it from
your applic ation. On the Macintosh, you can also save
the photo as a PI CT file.
Following is a typical procedure for directly transferring
a photo to an OLE2- or TWAIN-compliant application:
®
6.1. Some ex am ples of applicatio ns
2-10
1. Start your word p roc essor or other applicat ion .
Using EPSON Photo!2
Page 24

2. Open the document or file where yo u w ant to use
the picture.
1. Make sure EP SO N Photo!2 is open and t he picture
you want to use is in the im age selection window .
3. Position the cursor where you wa nt to inser t the picture.
4. For OLE2-co m pliant applicat io ns, cho ose
from the Insert menu and double-click
PhotoP C 700/600 Object
box.
For TWAIN-c ompliant applicat ion s, select
PhotoP C 700/600
Macintosh) as the TWAIN data source, then acquire
the image.
Note:
The precise w ay t o ac c es s EPSON Photo !2 va ri es
depending on the application. Please refer to your software
manual for detailed instructions.
5. Select the picture you want use. Then click the photo
transfer butto n. A c op y of the pic tu re ap pears in your
document.
(or
in the Object Type list
PhotoPC 700/600
Object
EPSON
EPSON
for
Transferring a picture with drag-and-drop
(Windows only)
You can use this method to transfer a picture to any
Windows application supporting OLE2 (object linking
and embedding).
2. Start your word p roc essor or other applicat ion .
3. Open the document or file where yo u w ant to use
the picture.
4. Arrange you r screen so that both the application
wind ow and the EPSON Photo!2 w i n dow can b e s e e n.
5. Select the picture you want to use.
6. Drag the picture from the im age selection window
to your document. After a few secon d s yo u w ill see
the dr op cursor. If your applicatio n does not suppo rt
drag-and-drop, the drop cursor wil l not appear.
7. Posi tion the drop cursor where you want th e picture
and release the mouse button. A copy of the picture
appears in your document.
2
Inserting a picture by importing
If your applica ti on p rog ram do es no t su pp or t OLE2 o r
TWAIN, you need to export your photos to a folder, and
open them from your application. If your application
cannot use JPEG files, you need to convert the picture’s
file type to BMP or PCX. (O n the Macintosh, you can also
convert the file type to PICT.) Follow these steps to insert
a picture by imp or ti ng:
Using EPSON Photo!2
2-11
Page 25

1. Open EPSON Photo!2 by clicking its icon.
2. Select the picture you want to use in the image
sele ction window.
3. Click the
in which you can select a folder, spe cif y a fi le nam e,
select a file format, and save the photos.
4. Start your app lication.
5. Open the document or file where yo u w ant to use the
picture.
6. Position the cursor where you wa nt to inser t the picture.
7. Choose the
The command may have a different name in your
application . I t may app ear on the File menu, t he
Insert menu, or another menu.
Export Ph otos
Insert Picture
button. A dialog bo x app e ars
or
Import File
command.
File names
When you tran sfer a picture to you r co m puter using the
Save To Fo lder
EPSON Photo file in JPEG format, and names it with the
date and order in which it was taken .
When you tran sfer a picture to you r co m puter using the
Export Photos
and save it as a JPEG, BMP, or PCX file. On the
Macintosh you can also choose the PIC T file for m at.
button, EPSON Ph oto!2 saves it as an
button, you can nam e the fil e you rself
Erasing selected pictures from your
camera
You can use the Camera menu’s Erase Photos button to
erase selec te d im ages from your cam era, as described
below:
After you choos e the co m m and, yo u see a box where
you can enter the fil e nam e o f yo ur p icture or choose
from a list of files.
8. Enter the file na me or use th e list to l o cate a nd selec t
your picture.
9. Click OK. The picture appears in your document.
2-12
Using EPSON Photo!2
1. Select the images you want to erase.
2. Click the
asking you to confi rm that you wan t to erase these
photos.
3. Click
Erase Photos
. The images you se lected are erased.
Yes
button. A dialog bo x app e ars
Page 26

If any of the photo s are lo cked, a dialog bo x app ears
asking you wh ether yo u want to leave the photos in
your camera or erase them. Click
photos in your camera, or click No to erase them.
to leave the
Yes
Getting photo information
You can see an enlarged view of any thu m bnail image in
the selection window by clicking the P hoto Inf o bu tton
on the Camera m e nu . Th e selected thumbnail image can
be seen in double-size, along with following information:
Date and time the photo was taken
Image size
Zoom rate
Image Qualit y ( Fine, Super-fine, or Standard)
Flash state
Macro state
Locked state
Camera model
Camera ID
You can also see t his enlarged vie w an d inf ormation by
clicking the image with the right mouse button when
running Windows, or on the Macintosh by clicking the
image while the contr ol ke y is pressed. The Photo In fo
button is disabl ed w hen m u lt iple images are se lected.
Viewing your photos
You can see a much larger view of an y th um bnail image
in the selection window, by clicking the View Photo
button or double- cl icking on the thumbnail. The photo’s
number in the cam era and its dimensions are displ ayed
above the image view area.
The si ze of the ph ot o will be on e-half t h e width and
height of your mon itor’s screen resoluti on. Fo r ex am pl e,
if your monitor is set to 800 × 600 mode, the view of the
photo will be 400 × 300 in normal m ode and 400 × 150 in
panorama mo d e.
Note:
The View Photo button is disabled when multiple thumbnails
are selected.
Enhancing your photos
To increase contrast, color balance, saturation, edge
enhancemen t, and to reduce color smu dge in your
photos, click the
transferring your photos.
You can only use this feature when you transfer your
photo s using the E xport Photos but ton, Get Photo(s)
buttons, or OLE d rag-and-drop.
Photo Enhance
button before you start
2
Using EPSON Photo!2
2-13
Page 27

You should note that when using this feature,
transferrin g ta kes a lo nger time.
Rotating your photos
Use the
the orientation of your photos. The photos rotate in a
clockwise or co unter-clockwis e direction in 90 degree
increment s.
Rotate Photo
buttons when you w ant to ch ange
Using the Folder Menu
When you clic k th e
and thumbn ails of images in the selected folder appear in
the image selectio n w indo w . The name of the selected
folder is displ ayed below the window.
The images displayed in the Folder me nu’ s selection
window can be transf erred to applications using the
methods described on pa ge 2- 15.
tab, the Folder menu opens
Folder
When you clic k a
rotates and the progress mete r indicates progress. The
selected th um bnails are updated to vi sually reflect their
new orientation. Wh en yo u us e th e Save to Folder,
Export P hoto and Ge t Photo( s ) b ut tons, or OL E
drag-and-dro p, t he or ient ation of the image transf erred
from the camera matches the thumbnail.
Note:
The rotat i on o f a ph oto on the Camera Tab men u does
not change the photo’s o riginal orientation in the cam era.
It simply specif ies t he target orientation whe n ret rieved
from the camera .
2-14
Using EPSON Photo!2
Rotate Photo
button, the picture
The major difference bet ween th e F older menu and the
Camera menu is that the Folder menu does not have a
photo save bu tto n, but does have a Browse bu t ton and
an Upload Ph otos but ton. T he Browse button allow s yo u
to open a dialog box to find the folder containing the
images you want to download or save. The Upload
Photos button allows you to upload images saved in
EPSO N Photo file for mat from your c ompute r to your
camera.
Page 28

photo transfer
button
Transferring photos
Upload/Copy
Photos button
As on the Camera menu, the name and function of the
Folder menu ’s pho to transf er bu t ton v ari es depending on
how you open your EPSON Photo!2 software. See the
summary table on the next page.
Browse button
image selection window
Selecting photos
To select an image, click on it in the selec tion w indow.
The frame arou nd t he im a ge t urns blue. To select all the
photos at once, Click the
Select All
You can use the same methods to select multiple images
on the Folder menu as you can on the Cam era menu. See
page 2-8 for details.
button.
Button
Name
Button
Function
Notes
TWAIN OLE Stand Alone
Get Photos Get Photo Export Photos
Transfers
selected photos
to your
application.
Some TWAIN
applications will
only accept
one image at a
time.
Transfers a
selected photo
to your
application.
Only one image
can be
transferred at a
time.
Displays a dialog
box that allows
you to name and
save photos in
JPEG, BMP, or
PCX format. On
the Macintosh the
PICT format is also
supported.
If you assign a
single file name to
more than one
photo, a counter
is added to each
file sharing the
same name.
Using EPSON Photo!2
2
2-15
Page 29

Transferring pictures to your documents
Finding the folder containing your photos
After you sele ct pic tures in the Folder me nu’ s im a ge
selection window, you can insert them int o you r
documents. You can use yo ur pictures in many different
types of applicat io ns, such as word proce sso rs,
presentation programs, spreadsheets, database
managers, page layout and desktop publishing packages.
To enhance your pho tos, sim p ly click on the
button before you start t ransferring. For mor e
Photo
details, see page 2-18.
You can also cha nge t he o rientation of your photo s in
90 degree increments using the
For more information, see page 2-18 .
If your applica tion su pp or ts OLE2 or TWAIN, you can
directly transfer your photos. If it does not, you need to
save your photos in a file form at you r application can
use, and open the file from the application.
You can use the same methods to transfer and insert
your photos as described in the Cam era menu section o n
page 2-10. Howev er, from the Fold er m enu , im ages are
not transferre d from you r camera but from the fol der
where you downloaded the images.
Rotate Photo
Enhance
buttons.
Click the
you to locate the folder containing the images you
downloaded from you r camera. Select the folder where
you stored the photo s and c lick OK.
Browse
button to open a di alog box that allows
Uploading and copying photos
Click the
selected photos to the camera or optional CompactFlash
memory card installed in your c om p ut er, or to copy
photos to another fo lder. When you click t his button, the
following di alo g box appears.
Upload/Co py P h otos
button to upload
2-16
Using EPSON Photo!2
Page 30

Uploaded o r co pied images are added to the cam era, to
the memory card, or to another folder in the order they
appear in the Folder menu’s image selection window.
Note:
Image files that were not orig in ally downloaded from the
camera using the Save To Folder button or converted to
EPSON Photo file format using the EPSON Photo File
Uploader utility cannot be uploaded or copied using this
button. For instructions on using EPSON Photo File Uploader
to convert files to EPSON Photo file format, see "Using
EPSON Photo File Uploader" on page 3-1.
Erasing files from a folder
Click the
from a folder. A d ialo g bo x ap pears asking you to
confirm you want to erase these pictures.
If any of the photo s are lo cked, a dialog bo x app ears
asking you whether you want to leave the photos in the
fol der or er ase th em . Click
folder, or clic k No to erase them.
Erase Files
button to erase selected pictures
to leave the photos in the
Yes
Getting photo information
You can see an enlarged view of any thu m bnail image in
the selection window by clicking the P hoto Inf o bu tton
on the Folder menu. The sel e cted thumbnail image can
be seen in double-size, along with the following
information:
2
Date and time the photo was taken
Image size
Zoom rate
Resolution (F ine, Super-fine , or St andard)
Flash state
Macro state
Locked state
Camera model
Camera ID
File name
You can also see t his enlarged vie w an d inf ormation by
clicking the image with the right mouse button when
running Windows, or on the Macintosh by clicking the
image while the contr ol ke y is pressed. The Photo In fo
button is disabl ed w hen m u lt iple images are se lected.
Using EPSON Photo!2
2-17
Page 31

Viewing your photos
You can see a much larger view of an y th um bnail image
in the selection window by clicking the View Photo
button or double- cl icking on the thumbnail. The file
name and its dim ensions are displayed above the im age
view area.
The si ze of the ph ot o will be on e-half t h e width and
height of your mon itor’s screen resoluti on. Fo r ex am pl e,
if your monitor is set to 800 × 600 mode, the view of the
photo will be 400 × 300 in normal m ode and 400 × 150 in
panorama mo d e.
Note:
The View Photo button is disabled when multiple thumbnails
are selected.
Enhancing your photos
To increase contrast, color balance, saturation, and edge
enhancemen t, and to reduce color smu dge in your
photos, click the
transferring your photos.
You can use this feature when you transf er yo ur photos
using Export Photos button, Get Photo(s) button, or OLE
drag-and-drop.
Photo Enhance
button before you start
You shoul d not e t hat when you use t his f eat ure,
transferrin g ta kes a lo nger time.
Rotating your photos
Use the
the orientation of your photos. The photos rotate in a
clockwise or co unter-clockwis e direction in 90 degree
increment s.
When you clic k a
rotates and the progress mete r indicates progress. The
selected th um bnails are updated to vi sually reflect their
new orientati on. When you use Save to Folder, Export
Photo and Get Photo(s) buttons, or OLE drag-and-drop,
the orientation of the image tr ansf err ed fr om the ca m era
matches the thumbnail.
Rotate Photo
buttons when you w ant to ch ange
Rotate Photo
button, the picture
Using the Controls Menu
When you clic k th e
appears. The Controls men u allows you to see a liv e
preview on your co m pu ter screen, take photos from
your computer, and change came ra se tti ngs.
Contro ls
tab, the Control s m e nu
2-18
Using EPSON Photo!2
Page 32

When your camera is not connected to the computer, this
menu is not acc essible. Make sure yo ur camera is
properly connect ed to the com put er, follo wi ng the
instructions on page 2-22.
Controlling the camera from your
computer
The Control Optio ns box contains a displa y panel and
settings that correspond to the control buttons on the top
of your camera. You can change c am e ra settings by usin g
the controls in this box , just as you would use the control
buttons on the top of the camera. Wh en t he camera is
connected to the computer, the only control you can use
on the camera it self is the power switc h.
The display panel on the computer and the disp lay panel
on the camera are updated whenever the image quality
setting, flash mode, or picture count changes.
Selecting the image quality setting
Use the arro w in the Mode box to sel ect an im age control
setting:
PhotoPC 600 PhotoPC 700
Standard 640 × 480 pixels 640 × 480 pixels
Fine 1024 × 768 pixels 1280 × 960 pixels
Super Fine 1024 × 768 pixels 1280 × 960 pixels
Monochrome
Fine
Monochrome
Super Fine
You can switch freely between these settings and mix
pictures of varying image quality in the camera. Keep in
mind that the camera’s picture capacity will vary
accordingly. See your camera’s
information on the im a ge quality settings.
1024 × 768 pixels 1280 × 960 pixels
1024 × 768 pixels 1280 × 960 pixels
User’s Guide
for more
2
Using EPSON Photo!2
2-19
Page 33

Selecting the flash mode
Use the arrow in the Flash box to select a flash mode
setting:
Off
Automatic
Forced
Taking pictures from your computer
When the camera is co nnec t ed to your c omp uter, yo u ca n
take pictures and use the camera features th rou gh
EPSON Pho t o!2 software on your co m pu t er. The only
control you ca n use on the camera itse lf is the power
switch.
See your camera ’s
flash modes.
User’s Guide
Setting the self timer
Check the
See your camera ’s
using the self timer.
Self Timer
check box to activate the self timer.
User’s Guide
Selecting macro mode
Check the
See your camera ’s
mode.
2-20
Using EPSON Photo!2
check box to select macro mode.
Macro
User’s Guide
for more detai ls on the
for more inform at io n on
for details on the macro
When you ta k e pi ctures from your computer, you can
use the camera’s v iewfinder to set up you r sho t, or you
can see a live preview of th e sho t on your co mpu t er
screen before you cap ture it. This live preview fea ture
works somew hat like a video camera, exc ept the image
moves more slo wl y. See the next section for details on
using the liv e pr ev iew fe at ure.
Displaying a live preview on your screen
Position the camera facing the subject. You may want to
use a tripod to give you m ax im um f lex ibility in setting
up your shots. Click the Start button in the Liv e Preview
box on the Contro ls m enu to display your im age in the
Live Prev iew wi ndo w. To sto p the liv e preview, clic k the
button in the Liv e Preview box, or se lec t another
Stop
menu tab.
Page 34

Note:
o
The live prev iew feat u re consumes much batte ry p ower, so
use of the optional AC adapter i s recomme n ded. See your
camera’s User’s Guide for more information on using the
AC adapter.
o
You cannot turn off the camera when you are using live
preview. Click the
on the Controls menu to turn off the live preview feature,
and then turn off the camera.
button in the Live Preview box
Stop
Activating the shutter
To take a picture from your computer, simply click the
Take a Picture
light beside the viewfinder on your cam era flashes red
and the came ra beeps. When the lig ht stops flas hing and
turns green, th e image is saved and you ca n ta ke ano t her
picture.
button on the Controls menu. The status
Erasing photos
2
Setting the auto-stop timer
EPSON Photo!2 up dates the live pr ev iew im age every
few seconds for the am ount of time sp ec ifi ed in the
Auto-Stop Tim e r list. The settings avai lable for the
auto-stop timer are:
30 Seconds
1 Minute (default setting)
3 Minutes
5 Minutes
This feature helps to save battery life.
To erase the last pictur e you too k, click the
button.
To erase all t he photos in your ca m e ra, click the
button.
A message appears asking you to confirm you are sure
you want to erase the selected im age. Click
execute the erase, or No to cancel your job.
Using EPSON Photo!2
Erase Last
Erase All
to
Yes
2-21
Page 35

Using the Setup Menu
Changing the computer connection
When you clic k th e
The Setup menu allows you to change computer
connection setting s and t o mak e other camera settings,
such as the date and time.
tab, the Setup menu appears.
Setup
You can change settings for communication betwee n
your comput er and camera wit h t he Port and Speed
options. You can al so test t he co nnection and establis h
communic ation by cli cking the
Connection inf or m at ion appears in the Co m puter
Connection windo w .
Note:
Do not change the Port and Speed settings from Auto unless
you know the confi guration of the serial por t yo u w ant to use .
If you change t he Port and Speed se ttings, you may lo se the
connection b etw ee n the cam er a and your computer.
Test Co nn ection
Computer Connection window
The window in the Comp uter Connection box displays
the current status of the camera and its connection to the
computer. If there is a problem w ith the connection,
EPSON Pho to! 2 pr ovides information in th is w indow to
help you solve the problem.
If you get an error me ssage in the Comput er Co nnection
window:
1. Make sure that bo th Por t an d Speed are set to Auto.
2. Make sure that the cable is connecte d correctly, as
described on page 2-1.
button.
2-22
Using EPSON Photo!2
Page 36

3. Make sure the cam era is turned on and th e bat te ries
have enough power.
4. Make sure the se rial port used to connect t he camera
is enabled an d properly configured on your
computer.
5. Click the
connecti on between your cam e ra and the compute r.
Test Connection
button to confirm the
Test Connection button
Click the
on the camera’ s stat us and its connectio n to th e
computer. This information ap pears in the Computer
Connection windo w .
Test Connection
button to update information
Speed
The Speed option allows you to change the speed at
which EPSON Photo!2 communicates with the camera.
When Auto is selected, EPSON Photo!2 automatically
selects the fastest possible communication speed.
The speed choices for Wind o ws are A ut o , 19 200, 38400,
57600, 115200, and 230400 bps. (The 230400 bps speed is
only availab le if you are using Windows 95, Windows 98,
or NT and your PC is equ ipped with a high-spe ed serial
port and driver.) For Macintosh, the choices are Auto,
19200, 38400, 57600, 115200, and 230400 bps. (The 115200
and 230400 bp s speeds are only av ailable if you are using
System 7.5.3 or higher.)
2
Port
The Port option allow s you to cha nge t he c om m u nication
port used t o co n nect the camera to the computer. Whe n
Auto is selected, EPSON Pho to! 2 au tom at ic ally selects
the port used to connect the camera and the computer.
The port choices for Windows are Auto and any
available COM port, such as COM1, COM2, and so on.
For Macinto sh, t he choices are Aut o, Modem Port, and
Printer Port .
Changing camera settings
You can see the c am era’s internal tim e and d a te se tti ngs
in the Time and Date fields, and you can change thes e
settings using the Set Time button. The camera’s internal
identificati on setting can be changed within the Came ra
ID edit box.
Using EPSON Photo!2
2-23
Page 37

Setting the clock
Your camera can record the t im e and date of your
pictures automaticall y. When you transfer pictures from
the camera to your computer, you can see exactly when
each shot was taken.
In order to have the time and date recorded, you need to
set the camera’s clock using the camera’s LCD monitor,
or by using the Set Tim e fea ture described below. The
camera’s clock wil l continue t o ke e p t ime accurately until
you repla ce the batteries. See page 1-10 for instruct io ns
on setting the camera’s clock using the LCD monitor.
Follow these step s to set the cam era’s clock from your
computer:
1. Click the
Date dialo g box appears. The camera’s tim e and date
settings are sho wn . If yo u hav e not made the time
and date settin gs in yo ur camera, the comp ut er’s
time and date se ttin gs are shown.
Set Time
button. The Set Camera Time and
2. Use the arrows to change the time and date. If you
want to set your camera to your computer’s time and
date, click the
3. Click OK. EPSON P hoto!2 up dates the tim e and d ate
in your ca m era.
Copy From Computer
button.
Changing the camera ID
If you want to change the name that is used to iden ti fy
the camera when it is connected to a computer, simply
type a new name into the Camera ID edit box. The
camera name ap pears on the introduc tory screen when
you start EPSON Photo!2 and in th e A bou t dialog box.
You can also see yo ur camera ID by clic king on the
Photo In fo
button.
About button
Click the
showing the camera ID and firmware ve rsion. Click
to return to the Setup menu.
button to see an introductory screen
About
OK
2-24
Using EPSON Photo!2
Page 38

Chapter 3
Using the Uploader Utilities
Your camera comes with two u plo ad er utility program s
that allow you to upload image s and optional program s
from your computer to your camera. This chap te r
explains how, inc luding:
Uploading images to the camera
Making scree n co pies
Uploading softw are programs
Using EPSON Photo File Uploader
The EPSON Photo File Upload er so ftw are included on
the CD-ROM shi pp ed w it h you r ca m e ra allows you to
convert any JPEG or BMP imag e to EPS ON Photo file
format, and upload it to your camera or to a
CompactFlash memory c ard.
3
You can also use thi s soft wa re to make and save “screen
captures” of everything displayed on the computer screen.
Use this feature to turn any of the documents you create, for
example PowerPoint presentations, into image files that you
can upload to the camera or to a memory card.
You can uploa d images in the following sizes:
PhotoPC 600 : 640 × 480 pixel, 1024 × 768 pixel or
1024 × 384 pix e l
PhotoPC 700 : 640 × 480 pixel, 1280 × 960 pixel or
1280 × 480 pix e l
Using the Uploader Utilities
3-1
Page 39

Note:
EPSON Photo File Uploader automat ically converts images
from th eir ori ginal siz e to which ever of these three sizes you
choose.
To use EPSON Photo File Uploade r, you need t o in st all
the program in your computer along with the EPSON
Photo!2 softwar e. If you have not yet installed these
programs, do so no w, following the instruc t ion s on p age
1-1.
Uploading images from your PC
Follow these st ep s to upload images to you r ca m era
from PCs runni ng Windows 3.1x, Wi ndo ws 95, Windows
98, or Windows N T v ersions 3.51 or 4.0 :
1. Make sure the camera is connected to the computer,
and that both the computer and th e cam era are
turned on. Also ma ke sure EPSON Photo! 2 is no t
open and the LCD monitor is turned off.
2. Open your EPS ON Photo File Uploa der program.
The EPSON Photo File Uploader window appear s
with the Upload To Camera menu displayed.
3. Select a file type fr om t he File Type list, and select t he
folder containing the images you want to upload
from the Drive list and Folder list. The n dou ble-click
your select ed f old er. File names appear in t he File
Name box.
Note:
To upload images from a network drive, you may need to
map the drive before opening EPSON Photo File Uploader.
3-2
Using the Up loader Utilities
Page 40

4. Select the images you want to upload in the File Name
list. Then click the -> button. If you want to upload
the images in th e list all at once, simply click the >>
button.
The selected fi les ap pear in the Selected Files List in
the order they w ill be uploaded. If you wan t to
change your selection, click the <- bu tto n to rem o v e
selected files or click the << button to remove all the
files from the Sel ected Files List. These function
buttons are disable d wh en several files are selected.
5. For each file in the S elec t ed Files List, select an image
size from the Im age S ize box.
If you want to rearrange the uploading order, select
the image yo u w ant t o rea rrange, then click the ↑ or ↓
Sort arrows.
During the uploading process , EP SO N Pho t o Fil e
Uploader con vert s yo ur f iles to EPSON Photo f ile
format with the ima ge sizes you specifie d.
6 If you want to save cop ies o f the co nverted files
on your com puter, check the Save file to check box
before uploading the photos. Click Browse, then
select the folder where you want to save the files.
7. Click OK. The folder you selected is di spl ayed to
the right of the Browse button.
Using the Uploader Utilities
3
3-3
Page 41

If you want to upload photos to your camera, click the
Select ca mera button. The Select Camera Type
window ap pea rs. H ighlight your camera type and
click Sel ec t, then click the Start button to start
uploading the p hoto s.
Note:
If you want to preview a selected image and confirm its
size, check the
If you checked the Save fi l e to check box in the EPSON
Photo File Uplo ader window, the converted im ages
are also saved to the folder you specified.
Preview
check box.
Uploading images from your Macintosh
Follow these st ep s to upload images from you r
Macintosh to your camera:
1. Make sure the camera is connected to the computer,
and that both the computer and th e cam era are
turned on. Also ma ke sure EPSON Photo! 2 is no t
open and the LCD monitor is turned off.
2. Double-click the EPSON Photo File Uploader ic on .
The EPSON Photo File Uploader window appear s.
3-4
Using the Up loader Utilities
Page 42

3. Click the Add button . T he Select Files dialo g box
appears. Do uble-click the folder containing the
images you want to upload, then select each file
you want to upload and click Select.
When you finis h selecting image f iles, click Done to
close the Selec t Files dialog box. The selected im ages
appear in the Selected Files List in th e ord er t hey w ill
be uploaded.
If you want to remov e fil es fr om t his list, select the
files and clic k Remove.
4. For each file in the S elec t ed Files List, select an image
size from the Im age S ize box.
3
During the uploading process , EP SO N Pho t o Fil e
Uploader con vert s yo ur f iles to EPSON Photo f ile
format in the image sizes you specified.
Using the Uploader Utilities
3-5
Page 43

6 If you want to save cop ies o f the co nverted files
on your com puter, check the Save file to check box
before uploading the photos. Click Browse, then
select the folder where you want to save the files.
7. Click OK. The folder you selected is di spl ayed to
the right of the Browse button.
If you want to upload photos to your camera, click the
Select ca mera button. The Select Camera Type
window ap pea rs. H ighlight your camera type and
click Sel ec t, then click the Start button to start
uploading the p hoto s.
Note:
If you want to preview a selected image and confirm its
size, check the
If you checked the Save fi l e to check box in the EPSON
Photo File Uplo ader window, the converted im ages
are also saved to the folder you specified.
Preview
check box.
Making Screen Copies
If you want to up loa d a d oc um ent to your came ra t hat
is not saved as a st andard image file, you can turn the
document int o an im age file by makin g a copy, or
“scree n capture, ” of y our computer deskto p w i t h t h e
document open o n it. W indo w s users can make screen
captu r es from wit h in the EPSON Ph ot o F ile Uploader
utility; Macint o sh users need to use th e standard
Macintosh screen shot function.
For Windows users
Follow these step s to m ake sc reen captures:
1. Make sure the camera is connected to the computer,
and that both the computer and th e cam era are
turned on. Also ma ke sure EPSON Photo! 2 is no t
open and the LCD monitor is turned off.
2. Open your EPS ON Photo File Upload er p rog ram .
The EPSON Photo File Uploader window appear s.
3-6
Using the Up loader Utilities
Page 44

File Name Box
3. Click the Scr ee n Capture menu tab. The Screen
Capture menu appears.
4. Select the folder containing the images you want to
upload from the Drive list and Folder list. Then
double-click the folder where you want to save the
screen captur e. File names appear in the Fil e N am e
Box.
If you need to creat e a new folder for the images,
click the New Folde r but t on , and name a folder.
Note:
To select a folder located on a network drive, you may
need to map the drive before opening EPSON Photo
File Uploader.
5. Specify the key c ombination you want to use for
screen captures using the Ho t Key settings box.
Check the ALT, CTRL, or SHIFT check box, then select a
key from the hot key list. The def au lt hot key is the
F5 key.
6. Click Start to register the key co mbination. When
the key combination is registered, the Start button
will change to a Stop button. The key combination
remains registered only for the current session.
Pressing the Stop button erases the hot key
combinatio n.
7. Start your application and open the file you want
to capture, then press the hot key combination you
selected.
You can make as many screen captures as you like;
simply open each file you want to capture and press
your screen capture key combination again.
Note:
File names are created automat ically.
3
Using the Uploader Utilities
3-7
Page 45

8. When you are fin ished making screen c aptures, close
your applic atio n and click the Stop button in the
Screen Capture m enu. The key combination you
selected is er ased.
1. Make sure the camera is connected to the computer,
and that both the computer and th e cam era are
turned on. Also ma ke sure EPSON Photo! 2 is no t
open and the LCD monitor is turned off.
If you want to uploa d you r sc reen captures to the camera
right away, click the Uploa d To Cam era menu tab. The
screen capt ure files appear in th e File Name list. Fol low
the uploading directions from step 4 on page 3- 3 t o
upload the sc reen captures.
For Macintosh users
EPSON Phot o Fil e U plo ader for the Macintosh do es no t
have a screen sh ot fea ture. H ow ev er, you can make
screen shots using your Macintosh sy st em soft ware, th en
use EPSON Photo File Uploader to upload the screen
shots to your cam era.
The instruct ions below are representative of many
Macintosh computers, but the proce dur e m ay be
different depen ding on your Macintosh. See your
computer manual for detaile d instructions on makin g
screen shots.
Follow these step s to m ake screen shots of your
Macintosh desktop:
2. Open the EPSON Photo!2 folder and double-click
the EPSON Photo File Uploader icon. The EPSON
Photo File Uploader window appears.
3. Start your application and open the file you want to
capture, then press SHIFT+COMMAND+3 o n your
computer keyboard. Your Macintosh names and
saves the screen shot on your hard drive.
You can make as ma ny sc reen shots as you like;
simply rep eat th is step.
4. When you are fin ished making screen shots, close
your applic at io n.
To upload your scr een shots to the camera, click the
EPSON Photo File Uploader window to make it active,
then follow the up lo ading instructions f rom st ep 3 on
page 3-5.
3-8
Using the Up loader Utilities
Page 46

Using EPSON Program Uploader
The EPSON Program Uploader utility allows you to
upload up to five optional programs from your PC or
Macintosh to your camera.
Note:
o
When you install your EPSON Photo!2 software,
EPSON Program Uploader is inst all ed automa tically. To
install EPSON Photo!2, see page 1-1.
o
When uploading optional programs, the number of
pictures you can stor e in your camera ’s in te rn al memory
decreases.
o
You can also upload optional programs from
CompactFlash memory cards. See your User’s Guide for
instructions.
The highlighted region provides helpful information to
the user regard ing the o per ation and us e of the optional
program utility software.
Connecting the camera
If the camera is not properly connected to the computer,
an error dial og bo x appears. Chec k th e cable connectio n
and make sure the camera is turne d on.
Port:
The Port option allows you to change the
communi cation por t us ed to connect the camera t o
the computer. When Au to is selected, EPSON
Photo!2 automatically selects the port used to connect
the camera and the computer.
The port choices for Windows are Auto and any
available COM port, such as COM1, COM2, and so
on. For Macintos h, the cho ices are Auto, Modem
Port, and Printer Port.
3
Using the Uploader Utilities
3-9
Page 47

Speed:
The Speed option allo w s you to cha nge the speed at
which EPSON Photo!2 communicates with the
camera. When Auto is selected, EPSON Photo!2
automatically selects the fastest possi ble
communication speed.
The speed choices for Wind o ws are A ut o , 19 200, 38400,
57600, 115200 , and 230400 bps. (The 23 0400 bps speed
is only available if you are using Windows 95,
Windows 98, or NT and your PC is equipped with a
high-speed serial port and driver.) For Macintosh, th e
choice s are A uto, 19200, 38400, 57600, 115200, and
230400 bps . (T he 115200 and 230400 bps speeds ar e
only availa ble if you are using System 7.5.3 or higher.)
After you make the camera connection, click OK. EPSON
Photo!2 Uploader box appears.
2. If there are any pho tos in t he camera’s internal
memory , tran sfer the ones you want to you r
computer or to a CompactFla sh Card, then erase all
the photos from the camera.
Caution:
If any images are left in the camera’s memory
c
when yo u u pl oad an opti onal progra m, the
camera may not work properly.
3. Click or doub le- cli ck t he EPSON Program Uploader
icon in the EPSON Photo!2 program group or folder.
The EPSON Program Upload er window appears .
Note:
If the camera is not properly connected to the computer, an
error dialog box appears. See the previous section for the
proper conne c ti o n to the cam era.
Uploading programs
Follow th ese step s to uploa d o ptional p r ograms to the
camera:
1. Make sure the camera is co nnec t ed to the compu t er,
and that both the computer and th e cam era are
turned on. Also ma ke sure EPSON Photo! 2 is no t
open and the LCD monitor is turned off.
3-10
Using the Uploader Utilities
4. Click Bro ws e to select the folder that contains the
programs you want to upload.
5. Select the pro gram s you want to upload f rom th e
Applications in Folder list.
Page 48

6. Click Upload. EPSON P rogram Upload er begins
uploading the selected programs.
When the uploading process is finished, the uploaded
programs appear in the Applications in Camera list.
7. Click Close to close the program.
Now you can us e th e pro grams in your camera. See your
User’s Guide
for instructions on opening the prog ram s.
Removing programs
Follow these step s to rem o v e op tiona l pro grams from the
camera:
2. Click or doub le- cli ck t he EPSON Program Uploader
icon in the EPSON program group or folder. The
EPSON Program Uplo ader window ap pears.
Note:
If the camera is not properly connected to the computer, an
error di al og box appears . Se e page 3-9 to make pr oper
connection.
3. Click the progra m s you wa nt to rem ove in the
Applica ti ons in Camera lis t.
4. Click Remove . A confirmation m essage appears.
5. Click OK. The selected program s are removed from
the camera and f rom the A pplications in Camera list.
3
Note:
You can also remove programs by using the Software menu
in the camera’s LCD monitor menus. See your User’s Guide
for instructions .
1. Make sure the camera is co nnec t ed to the compu t er,
and that both the computer and th e cam era are
turned on. Also ma ke sure EPSON Photo! 2 is no t
open and the LCD monitor is turned off.
6. Click Close to close the program.
Using the Uploader Utilities
3-11
Page 49

3-12
Using the Uploader Utilities
Page 50

Chapter 4
Troubleshooting
Your camera ’s sof tware should be easy to use, and any
problems you m ay have should be easy to solve.
See the following section to solve proble m s wi th EPSON
Photo !2, EPSON Phot o F i le Uploader, a n d ot h er soft ware
programs.
Software Problems
The EPSON Photo!2 Setup menu appears instead of
the Camera menu when you connect the camera to
your computer and open EPSON Photo!2.
Make sure the c able is connected correctly, as described
on page 2-1.
Make sure the cam e ra is tu rned on and the batteries
have enough power.
Check the seri al port sett ings on the Setup menu of
your EPSON Photo!2 software. You may need to
change the Port and S peed serial conne ctio n sett ings
to Auto.
Check the port to whi ch yo ur camera is connected
is properly conf igu red and that the Base I/O por t
address and the Interrupt Request Number (IRQ)
assigned to the port are not in conflict with other
devices.
If you are a Macint os h user and the camera is sharing a
serial port with another device, ma ke sure AppleTalk
is turned off.
An error message appears when you are using
EPSON Photo!2 with the camera connected to the
computer.
Make sure the c able is connected correctly, as
described on page 2-1.
Make sure the cam era is turned on and th e bat teries
have enough power.
Check the seri al port sett ings on the Setup menu of
your EPSON Photo!2 software. You may need to
change the Port and S peed serial conne ctio n sett ings
to Auto.
4
Troubleshooting
4-1
Page 51

Avoid openi ng or wo rking with applications unrelated
to the photo transfer process whi le the ca m era and
computer are communicat ing .
Note:
While the camera and computer are communicating, star
icons move across the camera’s display panel.
4-2
Troubleshooting
Page 52

Glossary
applicatio n
A software program that h elps y ou ca rry out a par ticular ta sk,
such as word processing or financial planning.
bit
Short for binary digit. The smallest unit of data in computer
processing. A bit can represent two values, on and off, or 1 and 0.
black and wh ite
Images represented only by the intensity of luminosity.
BMP
A Wi ndow s file format for st oring imag e data.
bps (bits per second)
A measure of data transmission speed.
default
A value or setting that takes effect when the equipment is turned
on, reset, or initialized. Also known as a factory setting.
drag-and-dro p
Method for moving an on-screen object by holding the pointer
over the object, pressing and holding the mouse button, dragging
the mouse, then releasing the mouse button to drop the object in
a new location.
grayscale
Images represented with various shades of gray in addition to
black and white.
interface
The connection between the computer and the camera.
JPEG
A file format for storing color and grayscale images in
compressed files. Data in JPEG files receives greater
compression than TIFF and other form ats.
OLE
A way to transfer and share information between
Windows-based applications.
PCX
A file format for storing color and grayscale images.
PICT
A file f o rmat widely used for M acintos h graphics.
pixel
Short for picture element. Each image is composed of a
number of pixels. Pixels are also counted in units of dots.
Glossary
1
Page 53

port
An interface channel through which data is transmitted between
devices.
resolution
Indication of h ow finely an image is resolved in to pixels.
Measured in dots per inch (dpi ), pixels per inch (ppi), or samples
per inch (spi).
thumbnails
Small representations of images.
TWAIN
A type of interface protocol that makes input peripherals,
such as scanners or digital cameras, easier to access directly
from application programs.
2
Glossary
Page 54

Index
A
Abou t button, 2- 24
Activating the shutter, 2-21
Adjusting camera settings
flash, 2-20
image quality , 2- 19
macro, 2-20
self timer, 2-20
Auto shut-off, 2-1
Auto -stop tim er, 2-21
B
Browse bu tt o n, 2-1 5, 2-16
C
Cables, serial, 2-2
Camera ID, 2-13, 2-17, 2-24
Camera menu, 2-6, 2-7–14
Clock setting, 2-24
Close button, 2-7
CompactFlash Cards
installing programs from, 3-10–11
uploading ph o t os to, 2- 16–17
Computer connection settings, 2-22–23
Connecting the camera
to a Macint osh, 2-2–3
to a PC, 2-3–4
Controlling the camera from the computer, 2-19–20
Contr ols menu , 2-7, 2-18–21
Copying photos, 2-16–17
D
Date and time, se tting, 2- 24
E
Enhancing photos, 2-13, 2-18
EPSON Photo Fil e U ploader
installing, 1- 2–3, 1-4
making screen copies, 3-6–8
uploading image s , 3- 2– 6
EPSON Photo! 2 sof tware
accessing, 2-4–5
closing, 2-7
installing, 1- 2, 1-4
using, 2-6–24
EPSON Program Uploader, 3-9–11
Erasing photos
from a camera, 2-12–13, 2- 21
from a folder, 2-17
Index
1
Page 55

F
File names, 2-1 2
Finding the folder containing your photos, 2-16
Flash settings, 2-20
Folder men u, 2-6, 2-1 4– 18
G
Getting photo information, 2-13, 2-17
H
Help, EPSON Photo!2, 2-7
I
Image quality settings, 2-19
Image selection window, 2-7, 2-8, 2-14, 2-15
Inserting a picture by importing, 2-11–12
Installing
optional program s in the camera, 3-10–11
the software in your Macintosh, 1-3–5
the software in your PC, 1-1–3
L
Live preview, 2-20–21
M
Macro mode setting, 2-20
Making screen copies, 3-6–8
Menus, EP SON Photo!2, 2-6–7
P
Phot o transfer button, 2- 8–9, 2-15
Pictures
erasing, 2-12–13, 2-17, 2-21
inserting by importing, 2-11–12
selecting, 2-8, 2-15
taking from the computer, 2-20
transferring from a camera to your document, 2-10–11
transferring from a folder to your document, 2-15–16
Port option, 2-23, 3-9
Ports, serial, 2-2–4
Preview option, EPSON Photo File Uploader, 3-4, 3-6
Problems, software, Chapter 4
Progress meter, 2-7
R
Removing, programs, 3-11
Rotatin g ph o tos , 2-14, 2-18
S
Saving selected photos to a folder, 2-9–11
Screen Capture menu, 3-7–8
Selecting imag es, EPSON P hoto!2, 2-8, 2-15
Self timer settings, 2-20
Setup menu, 2-7, 2-22–24
Shutter, activating from the computer, 2-21
Speed option, 2-23, 3-10
Status bar, 2-7
System requirements, 2
2
Index
Page 56

T
Taking pictures from y our computer, 2-20–21
Test Connection button, 2-22, 2-23
Transferring
pictures from a camera to your documents, 2-10–12
pictures from a folder to your documents, 2-15–16
Troubleshooting, Chapter 4
U
Upload/Copy Photos button, 2-15, 2-16–17
Upload To Camera menu, 3-2–4
Uploader utilities
EPSON Photo File Uploader, 3-1–8
EPSON Program Uploader, 3-9–11
Uploading
images, 3-2–6
photos, 2-16–17
programs to the camera, 3-10–11
V
Viewing photos, 2-13, 2-18
Index
3
Page 57

 Loading...