

Page 1
(3621ý/;ðêíí
Line spacing: 1/6 inch, 1/8 inch, or programmable in
1/216-inch increments
Paper feed speed: 79 milliseconds per 1/6-inch line
2.78 inches/sec. for continuous paper
Buffer: Approximately 4 KB
Internal fonts and character tables
Bitmap fonts: EPSON NLQ Roman
EPSON NLQ Sans Serif
EPSON Draft
Draft condensed
Character tables: 1 italic and 8 graphics character tables
Roman
Sans Serif
Draft
Draft Condensed
12
Micro Adjust
Paper Park
PauseLF/FFFont
3sec
3ULQWHUý6SHFLILFDWLRQVý
Printing
Printing method: 9-pin dot matrix
Print speed:
3ULQWLQJýPRGH &KDUDFWHUýVL]HV 0D[LPXPýSULQWLQJýVSHHG
'UDIW ìíýFSL ëëíýFSV
'UDIW ìëýFSL ëçéýFSV
'UDIWýFRQGHQVHG мжпмэFSL ìååýFSV
'UDIWýFRQGHQVHG ëíýFSL ëëíýFSV
'UDIWýHPSKDVL]HG ìíýFSL ììíýFSV
'UDIWýGRXEOHýZLGWK èýFSL ììíýFSV
1/4 ìíýFSL ééýFSV
1/4 ìëýFSL èêýFSV
1/4ýGRXEOHýZLGWK èýFSL ëëýFSV
FSLгэFKDUDFWHUVэSHUэLQFKэээээээээээFSVгэFKDUDFWHUVэSHUэVHFRQG
Resolution:
3ULQWLQJýPRGH
'UDIW ìëíýGSL æëýGSL 1Rý
'UDIWýFRQGHQVHG ëéíýGSL æëýGSL 1R
'UDIWýHPSKDVL]HG ìëíýGSL æëýGSL <HV
1/4 ëéíýGSL ìééýGSL 1R
%LWýLPDJH çíýGSL æëýGSL <HV
%LWýLPDJH æëýGSL æëýGSL <HV
%LWýLPDJH åíýGSL æëýGSL <HV
%LWýLPDJH äíýGSL æëýGSL <HV
%LWýLPDJH ìëíýGSL æëýGSL <HV
%LWýLPDJH ìëíýGSL æëýGSL 1R
%LWýLPDJH ëéíýGSL æëýGSL 1R
Printing
direction:
+RUL]RQWDO
GHQVLW\
Bidirectional with logic-seeking for draft
with monochrome ribbon. Unidirectional
for NLQ text, bit image, and color printing.
9HUWLFDOý
GHQVLW\
$GMDFHQWý
GRWVýSULQW
Character sets: 13 international character sets
Paper
Single sheets (CSF):
Width 210 mm (8.5 inches)
Length 297 mm (11.0 inches)
Thickness 0.065 to 0.14 mm (0.0025 to 0.0055 inches)
Weight 64 to 90 g/m
Quality Bond paper, plain paper, recycled paper
Single sheets (manual insertion):
Width 182 to 257 mm (7.2 to 10.1 inches)
Length 182 to 364 mm (7.2 to 14.3 inches)
Thickness 0.065 to 0.14 mm (0.0025 to 0.0055 inches)
Weight 52 to 90 g/m
Quality Bond paper, plain paper, recycled paper
Note:
Use 90 g/m
2
paper under normal temperature and humidity
conditions only.
Continuous paper:
Width 102 to 254 mm (4 to 10 inches)
Copies Three sheets (one original plus two copies)
Thickness 0.065 to 0.25 mm (0.0025 to 0.0098 inches)
total
Weight 52.3 to 82 g/m
40 to 58.2 g/m
multi-part forms
❏ Use only two- or three-part carbonless multi-part
forms fed with the tractor.
❏ When using side-crimped multi-part forms, raise the
paper guide to keep the printing position accurate.
❏ When using the push tractor, the printing position for
the last page may not be accurate because the page
comes off the tractor.
2
(18 to 24 lb)
2
(14 to 24 lb)
2
(14 to 22 lb) for one sheet
2
(12 to 15 lb) per sheet in
,QNý-HWý3ULQWHUV йоллодй (3621э/;ркннрм
Page 2
(3621ý/;ðêíí
Labels:
Width 102 to 254 mm (4 to 10 inches) width for
backing sheet
63.5 × 23.8 mm (2.50 × 0.94 inches)
minimum for a label
Thickness 0.07 to 0.09 mm (0.0028 to 0.0035 inches)
for backing sheet
0.16 to 0.19 mm (0.0063 to 0.0075 inches)
total
2
Weight 64 g/m
(17 lb) for label only
❏ Use only continuous type labels and use them only
with the tractor.
❏ Never feed labels backward through the printer; they
can easily peel off the backing and jam the printer.
❏ Use labels only under normal temperature and
humidity conditions.
Envelopes (manual insertion):
Size
No. 6: 166 × 92 mm (6.5 × 3.6 inches)
No. 10: 240 × 104 mm (9.5 × 4.1 inches)
Thickness 0.16 to 0.48 mm (0.0063 to 0.019 inches)
Weight 45 to 90 g/m
2
(12 to 24 lb)
Quality Bond paper, plain paper, air mail
❏ Use envelopes only under normal temperature and
humidity conditions.
❏ Insert envelopes long side first; use the manual feed
slot only.
❏ Difference in thickness within printable area must be
less than 0.25 mm (0.01 inches).
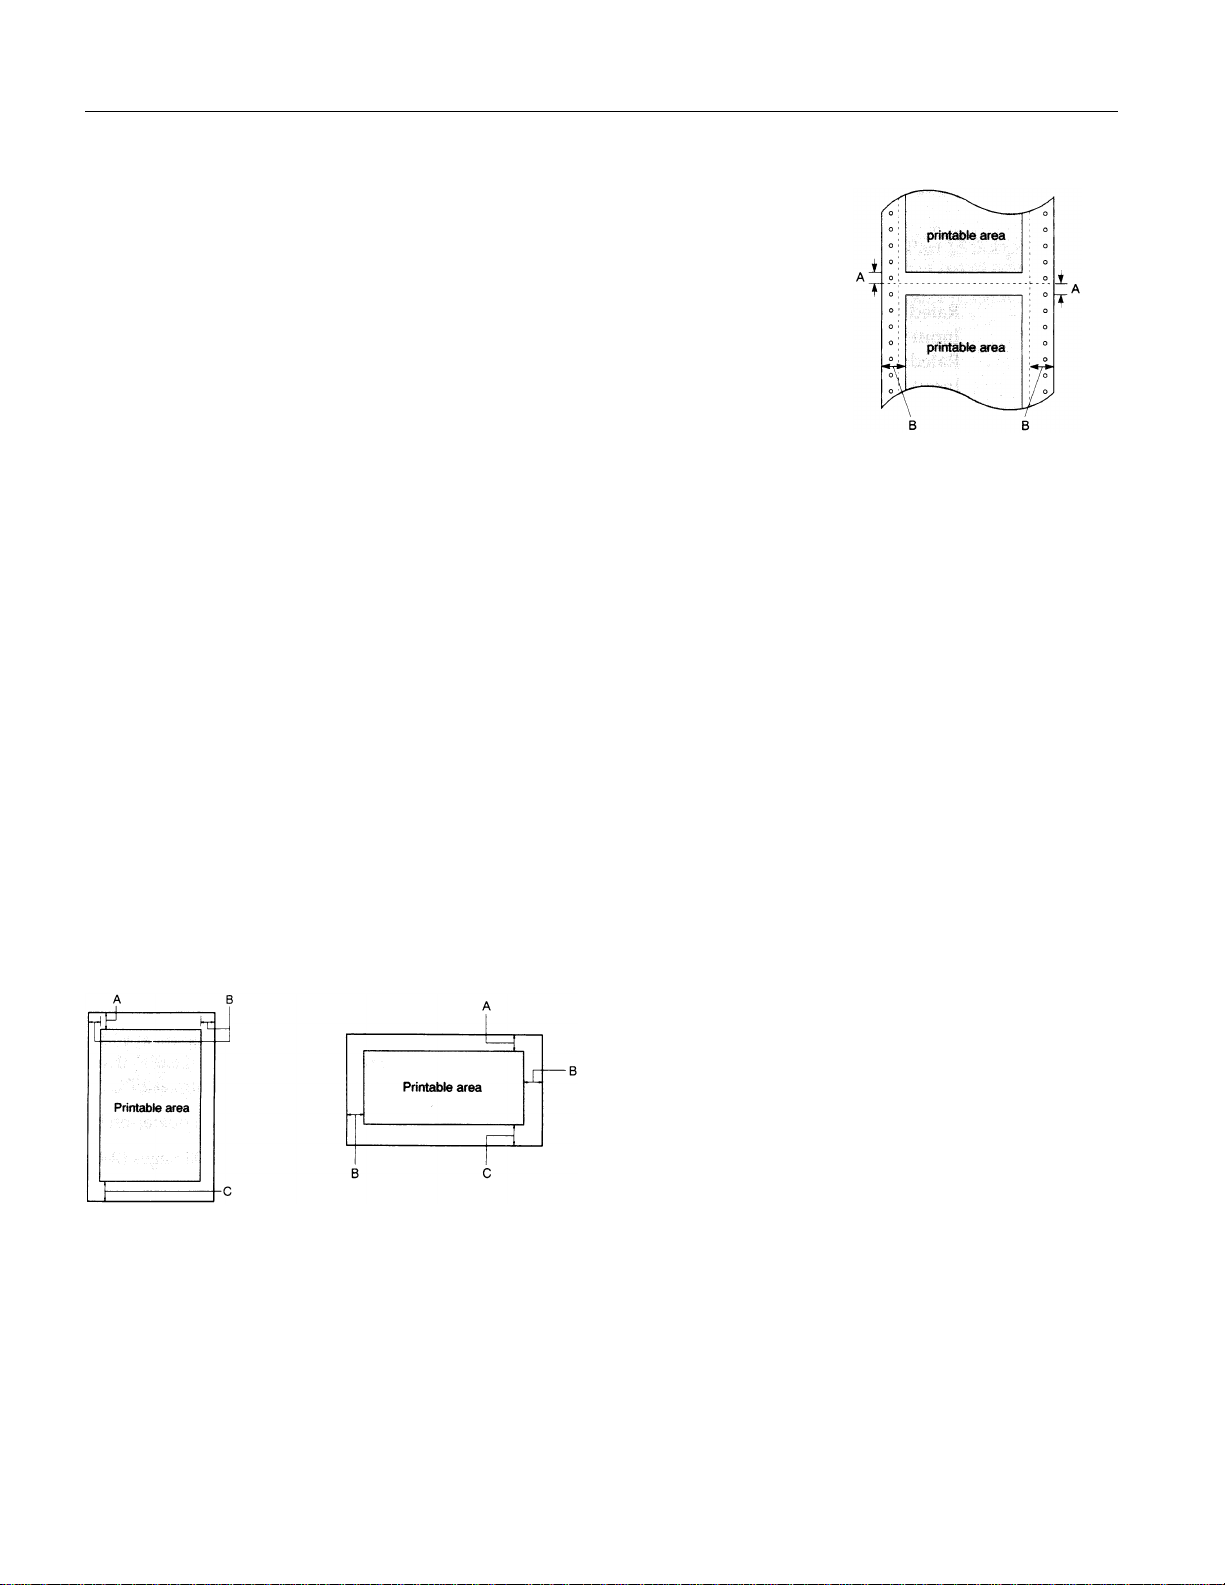
Printable area:
Single sheets Envelopes
(paper feeder and
manual insertion)
Continuous paper
$ 7KHýPLQLPXPýWRSýDQG
ERWWRPэPDUJLQVэхDERYH
DQGэEHORZэWKHэSHUIRUDWLRQф
DUHэдпнэPPэхнпкиэLQFKHVфп
% 7KHýPLQLPXPýOHIWýDQGý
ULJKWэPDUJLQVэDUHэмкпнэPP
хнпимэLQFKHVфпэ+RZHYHUс
WKHэPD[LPXPэSULQWDEOH
ZLGWKэLVэлнкэPPэхеэLQFKHVфп
Mechanical
Paper-feed
methods:
Ribbon: Black ribbon cartridge (#8750)
MTBF: 4,000 power-on hours
Lifetime print
capacity:
Print head life: 200 million strokes/wire (black)
Friction
Push tractor
Push-pull tractor (with optional pull
tractor unit)
Pull tractor (C800301)
Cut-sheet feeder (option C806371)
Life expectancy at 14 dots/character:
3 million characters
Color ribbon cartridge (S015073)
Life expectancy at 14 dots/character:
Black - 1 million characters
Magenta, Cyan - 0.7 million characters
Yellow - 0.5 million characters
75,000 pages (A4 or letter)
100 million strokes/wire (color)
Dimensions and weight:
Width 356 mm (14 inches)
Height 125 mm (4.9 inches)
Depth 275 mm (10.8 inches)
Weight 5.0 kg (11 lb)
Electrical
Rated voltage: AC 120 V
$ 7KHэPLQLPXPэWRSэPDUJLQэLVэипкэPPэхнплэLQFKHVфп
% 7KHэPLQLPXPэOHIWэDQGэULJKWэPDUJLQVэDUHэкпнэPPэхнпмлэLQFKHVфпэ
+RZHYHUсэWKHэPD[LPXPэSULQWDEOHэZLGWKэLVэлнкэPPэхеэLQFKHVфп
& 7KHэPLQLPXPэERWWRPэPDUJLQэLVэдпнэPPэхнпкиэLQFKHVфп
Input voltage
range:
Rated frequency
AC 103.5 to 132 V
50 to 60 Hz
range:
Input frequency
49.5 to 60.5 Hz
range:
(3621э/;ркннрл йоллодй ,QNý-HWý3ULQWHUV
Page 3
(3621ý/;ðêíí
Rated current: 1.0 A
Power
consumption:
Approx. 30 W (during self-test printing in
draft mode at 10 cpi)
Environmental
Temperature: Operation: 5 to 35° C (41 to 95° F)
Storage: –20 to 55° C (–4 to 131° F)
Humidity (without condensation):
Operation: 30 to 80% RH
Storage: 5 to 85% RH
Safety approvals
Safety standards: UL1950 with D3, CSA22.2 No. 950 with D3
R.F.I.: FCC Part 15 Subpart B class B
,QWHUIDFHý6SHFLI LFDWLRQV
Your printer is equipped with an EIA-232 serial interface and
a Centronics
switches automatically to the appropriate interface when it
receives data.
Parallel interface specifications
®
-compatible parallel interface. The printer
Synchronization: Asynchronous
Handshaking: DTR protocol, XON/XOFF protocol
ETX/ACK protocol (selectable)
Parity check: Odd, even, or no parity bit (selectable)
Connector: EIA standard, 25-pin, D-SUB, female
connector
Serial pin assignments:
The following table lists the serial connector pin assignments
and describes their respective interface signals.
3LQý1Rï 6LJQDO 'LUHFWLRQ 'HVFULSWLRQ
ì 3URWHFWLYHý*URXQGýõ)*ô 3ULQWHU©VýFKDVVLVýJURXQG
ë 7UDQVPLWWHGýGDWD
õ7;'î6'ô
ê 5HFHLYHGýGDWDýõ5;'î5'ô ,Q 3ULQWHUýKDVýUHFHLYHG
é 5HTXHVWýWRý6HQG
õ576î56ô
è &OHDUýWRý6HQGýõ&76î&6ô ,Q ,JQRUHG
æ 6LJQDOý*URXQGýõ6*ô 5HWXUQýSDWKýIRUýGDWD
ìì 5HYHUVHý&KDQQHO 2XW &RQQHFWHGýWRý3LQýëí
ëí 'DWDý7HUPLQDOý5HDG\
õ'75î(5ô
2XW 3ULQWHUýKDVýWUDQVPLWWHG
VHULDOýGDWD
VHULDOýGDWD
2XW $OZD\VýSRVLWLYHý
FRQWUROýVLJQDOV
2XW 3RVLWLYHýZKHQýWKHýSULQWHU
LVýUHDG\ýWRýDFFHSWýGDWDñ
DQGýQHJDWLYHýZKHQýWKH
SULQWHUýLVýQRWýUHDG\
The parallel interface has the following characteristics.
Data format: 8-bit parallel
Synchronization:
Handshake
STROBE pulse
BUSY and
ACKNLG signals
timing:
Signal level: TTL compatible
Connector: 36-pin 57-30360 Amphenol connector or
equivalent
Serial interface specifications
The serial interface has the following characteristics.
Bit rate: 300, 600, 1200, 2400, 4800, 9600, 19200 bps
(selectable)
Word length: Data format 7 or 8-bit (selectable)
Start bit 1 bit
Parity bit 0 or 1 bit (selectable)
Stop bit 1 bit (transmitting),
1 bit or more (receiving)
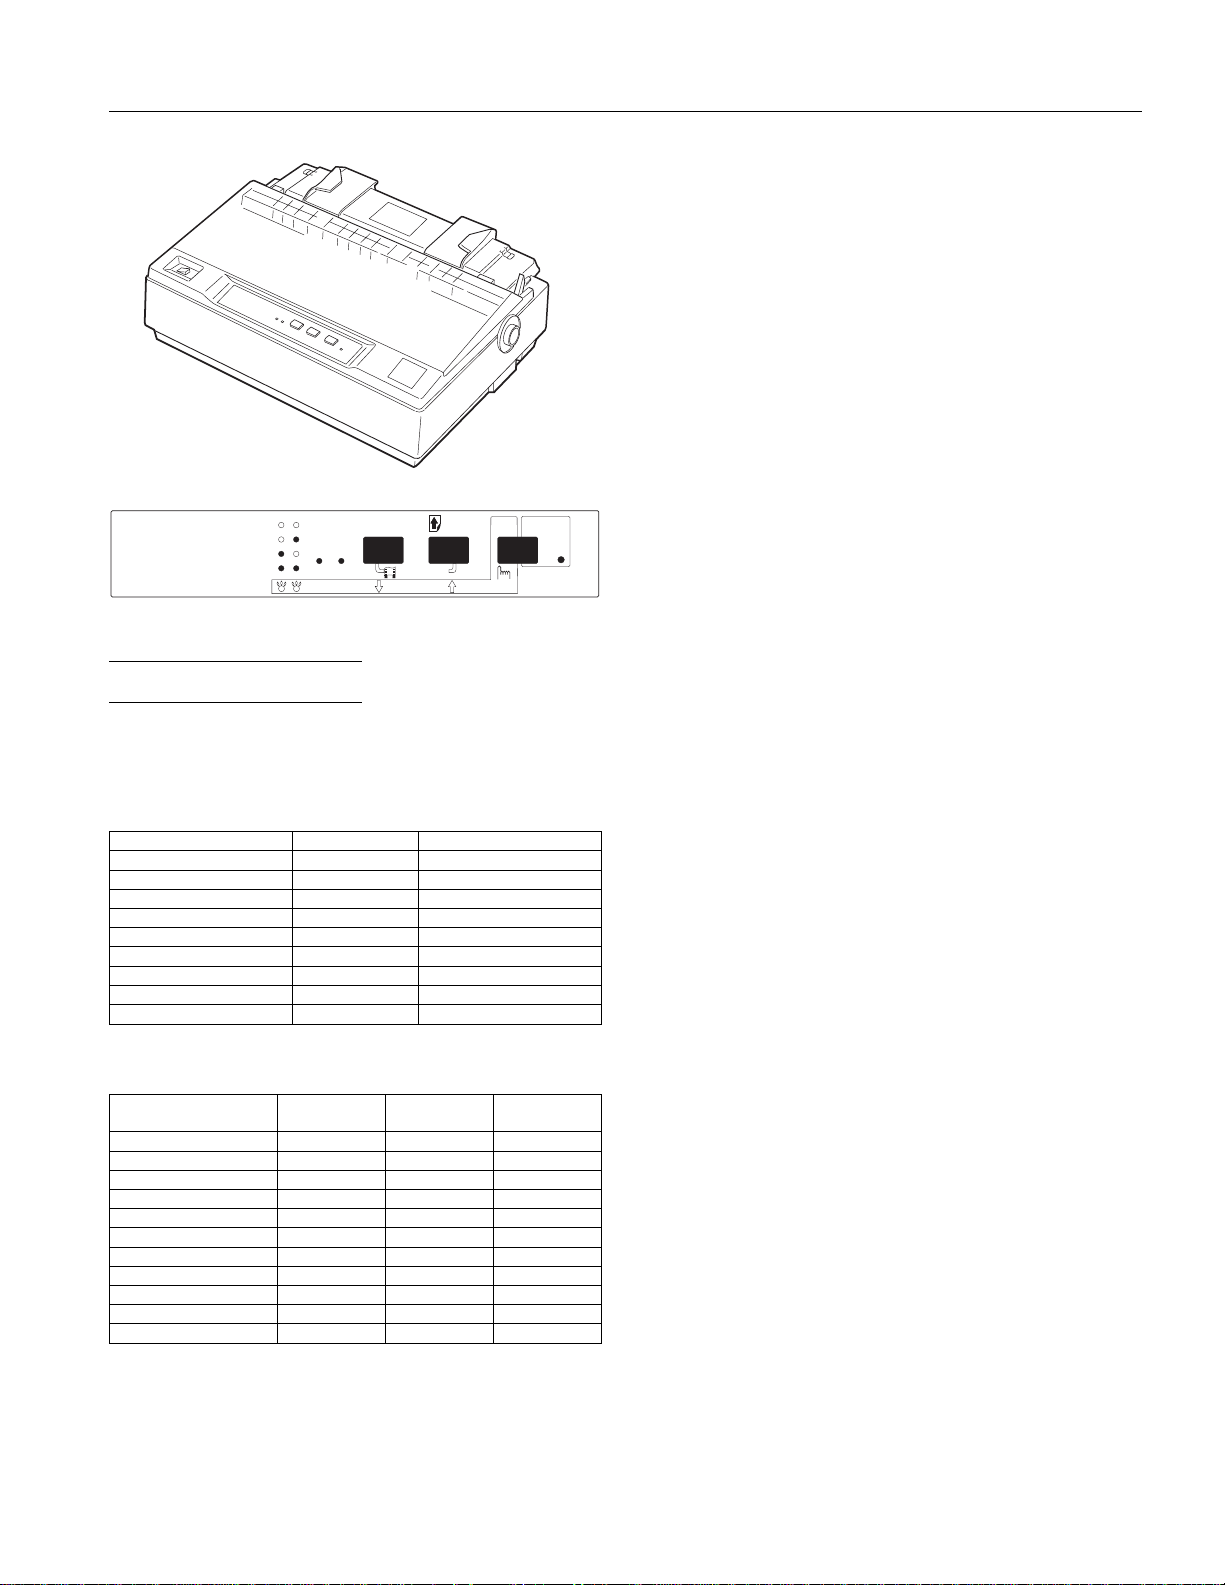
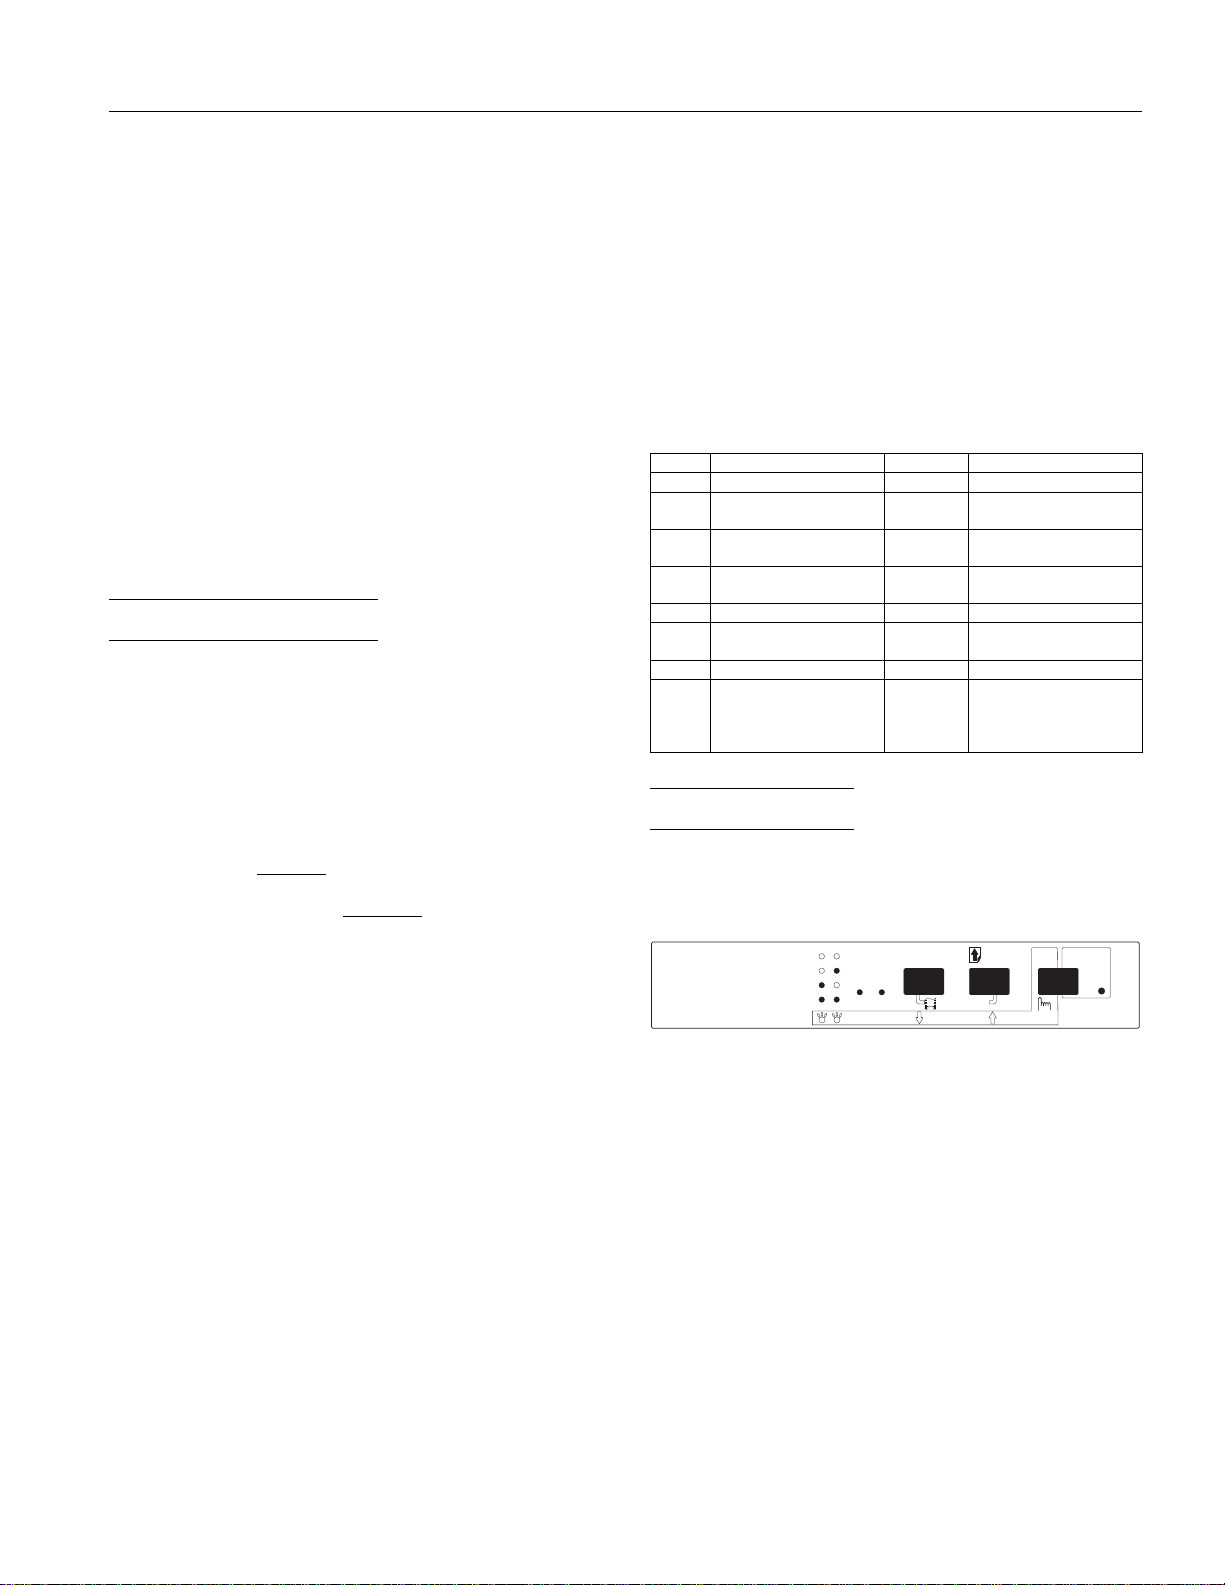
7KHý&RQWUROý3DQHO
The printer control panel gives you easy control over most
common printer operations. It consists of indicator lights and
buttons.
Roman
Sans Serif
Draft
Draft Condensed
12
Micro Adjust
Paper Park
PAUSE light
On when printing is paused. When the printer is out of
paper, the light flashes and the beeper sounds three times.
The light also flashes when you can tear off the last sheet at
the edge of the printer cover. Additionally, the PAUSE light
comes on and the beeper sounds five times if an error occurs.
FONT 1 and FONT 2 lights
Indicates the current font setting. These three lights go on
and off when you press the FONT button. The font menu on
the control panel tells you which font is selected.
FONT button
Press this button to cycle through the font choices on the font
menu. The FONT lights indicate the current selection.
PauseLF/FFFont
3sec
,QNý-HWý3ULQWHUV йоллодй (3621э/;ркннрк
Page 4
(3621ý/;ðêíí
LF/FF button
Press this button briefly to feed the paper forward one line.
Hold this button down to eject a single sheet or to advance
continuous paper to the next top-of-form position. You can
also use this button to eject a page. You can also use this
button to run a self-test to make sure the printer is working
correctly. To start the self-test, hold down the LF/FF button
while you turn on your printer.
PAUSE button
Press this button to stop printing temporarily. Press it again
to resume printing.
PAPER PARK
Press the FONT and LF/FF buttons together to feed
continuous paper backward to the paper park position. See
“Printing with the push tractor.”
MICRO ADJUST button
Feeds paper backward to adjust the loading position. See
“Adjusting the loading position.”
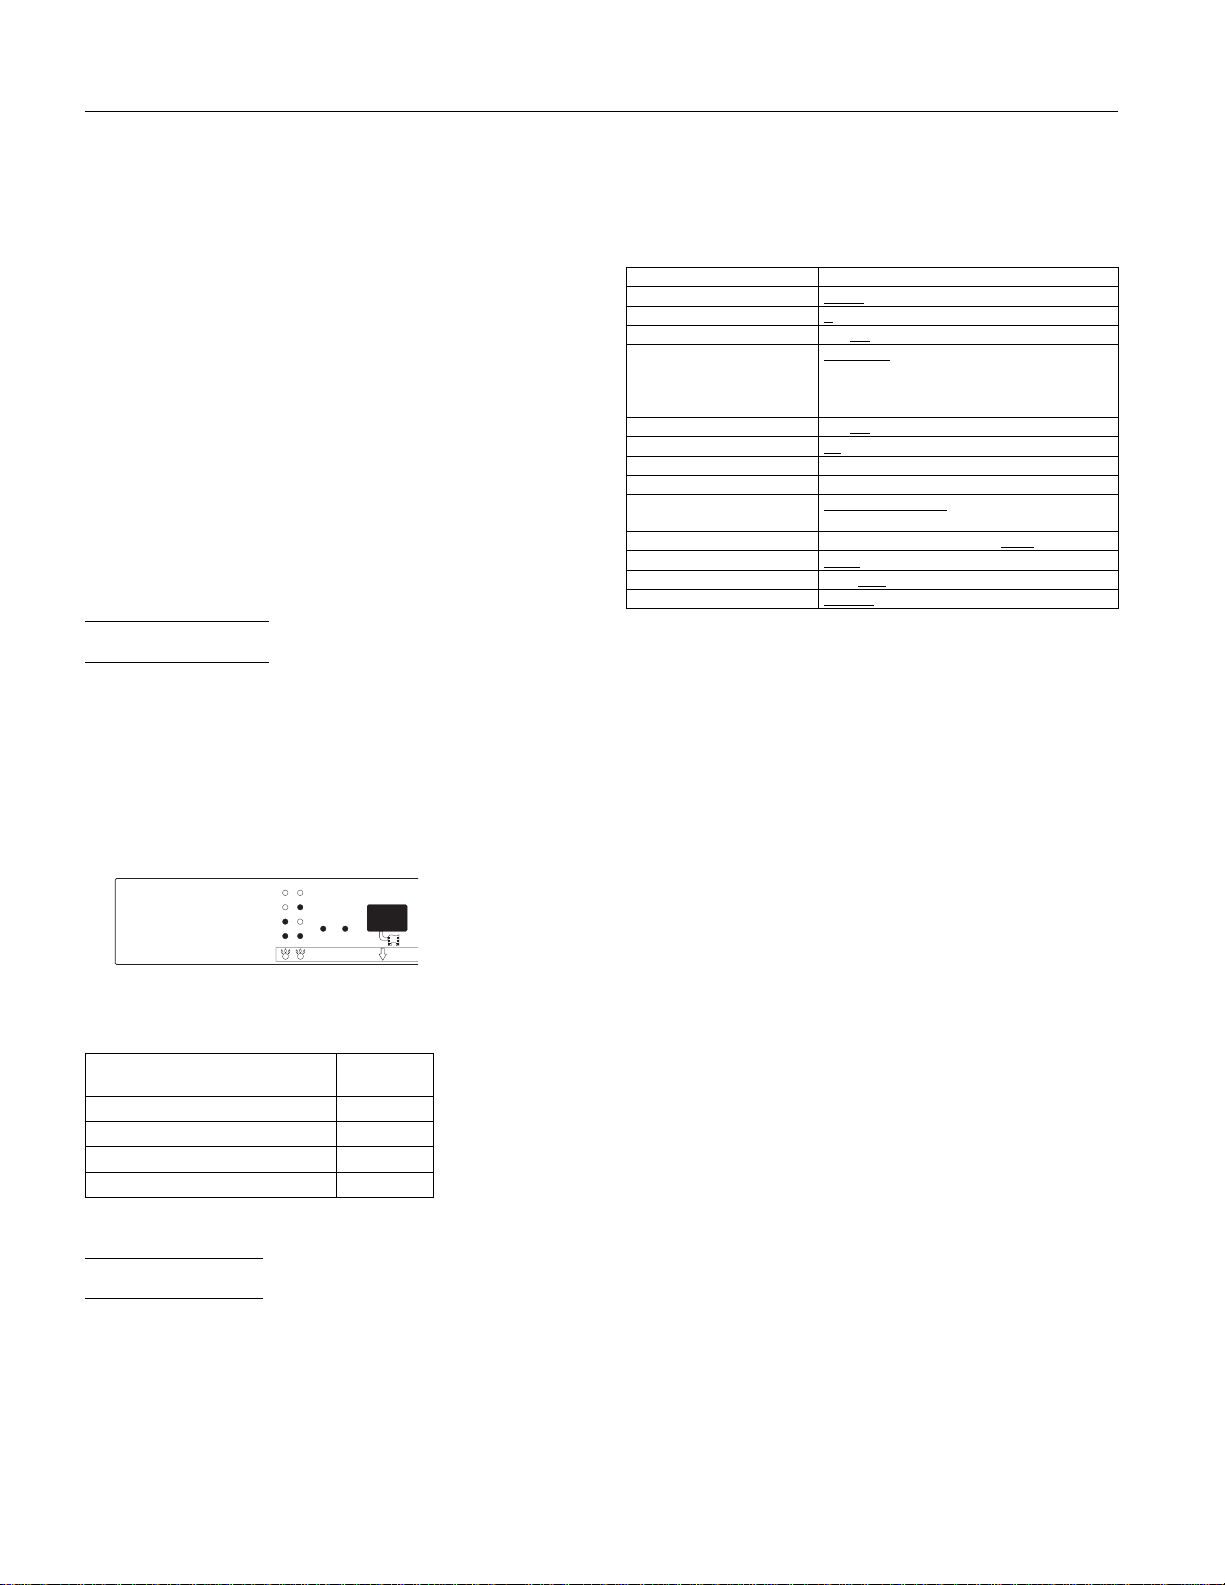
&KDUDFWHUý)RQWV
To choose one of the four internal fonts listed on the control
panel, press the FONT button. The two FONT lights come on
(1 ) or go off (2 ) to indicate the active font. Press the button
repeatedly to cycle through all selections.
Your selection stays in effect until you change it or turn off
the printer. Any font you select with your software overrides
any you selected at the control panel.
Roman
Sans Serif
Draft
Draft Condensed
Micro Adjust
The table below lists the available fonts and shows how the
FONT lights appear for each selection.
Font
12
Pap
The factory default settings are designed to meet the needs of
most users, so you may not need to change them. The table
below lists all the features you can select in the
default-settings mode.
)XQFWLRQ 2SWLRQV
&KDUDFWHUýVSDFLQJ
6KDSHýRIý]HUR
ìýLQFKýVNLSðRYHUðSHUIRUDWLRQ 2Qñý
&KDUDFWHUýWDEOH
$XWRýOLQHýIHHG 2Qñý
3DJHýOHQJWK
$XWRýWHDUýRII 2Qñý2II
7UDFWRU 6LQJOHñý'RXEOH
,QWHUIDFH
6HULDOý,î)ýELWýUDWHý кннсэзннсэмлннсэлйннсэйеннсэ
6HULDOэ,о)эSDULW\эELWэ
6HULDOэ,о)эGDWDэOHQJWKэ æýELWñý
6HULDOý,î)ý(7;î$&.ý
сэмлэFSL
ìíýFSL
сэноээхZLWKэVODVKф
í
2II
86$ý,WDOLF
,WDOLFсэ'HQPDUNэ,WDOLFсэ6ZHGHQэ,WDOLFсэ,WDO\
,WDOLFсэ6SDLQэмэ,WDOLFсэ3&йкжсэеинсэезнсэезмс
езксэезисэ%5$6&,,сэ$ELFRPS
ìì
$XWRэхмнэVHFпэZDLWф
3DUDOOHOñý6HULDO
1RQH
'LVDEOH
ñý)UDQFHý,WDOLFñý*HUPDQ\ý,WDOLFñý8.
2II
сэмлсэеписэжнозэLQFKHV
сэ$XWRэхкнэVHFпэZDLWфс
ñý2GGñý(YHQ
åýELW
ñý(QDEOH
äçíí
сэмдлннэESV
Note:
Most software programs control the character table and auto line
feed. If your software program controls these features, you may
never need to set them with the control panel.
Default settings descriptions
Character spacing
When you select 10 cpi, the printer prints 10 characters per
inch (cpi). When you select 12 cpi, it prints 12 characters per
inch.
Shape of zero
The printer prints the zero character with a slash (0/) when
the setting is on, or no slash when the setting is off. The
slashed zero makes it easy to distinguish between an
uppercase O and a zero.
Skip-over-perforation
)RQW
(SVRQý5RPDQýõ1/4ô
(SVRQý6DQVý6HULIýõ1/4ô
(SVRQý'UDIW
(SVRQý'UDIWý&RQGHQVHG
1
э эRQэээээээ2э эRII
)217э/LJKWV
ээээээмэээээээл
1 ##2
2 ##1
1 ##1
2 ##2
When this feature is on and you are using continuous paper,
the printer leaves a 1-inch (25.4-mm) margin between the last
printable line on one page and the first printable line on the
next page. This causes the printer to skip over the perforation
between continuous sheets.
Most software takes care of the top and bottom margins. Do
not turn on skip-over-perforation unless your software does
not provide these margins.
3ULQWHUý6HWWLQJV
Character table
Character tables contain the characters and symbols used by
Your printer comes with a series of internal settings that
control a variety of printer functions, such as print direction
different languages. The printer prints text with the selected
character table.
and auto line feed. Because these settings take effect each
time you turn on the printer, they are called default settings.
(3621э/;ркннрй йоллодй ,QNý-HWý3ULQWHUV
Page 5

(3621ý/;ðêíí
Auto line feed
When the auto line feed feature is on, each carriage return
(CR) code is accompanied by a line feed (LF) code. If your
printed text is unexpectedly double-spaced, set this feature to
off. If text lines print on top of each other, set it to on.
Page length
This option is available only when you use continuous paper
with the tractor. You can set the page length to 8.5, 11, 12, or
70/6 inches (the length of A4 paper).
Auto tear off
When you use continuous paper with the push tractor, this
feature advances the paper perforation to the tear-off
position when you can easily tear off the printed pages.
When the printer receives data, it automatically reverses the
paper to the top-of-form position and starts printing, so you
can use all of the next sheet. When you use the tractor to
print on labels, set this feature to off.
Tractor
When you use the tractor as a pull or push tractor, leave this
option set to Single. If you install an optional tractor and use
both tractors as push-pull tractor, set it to Double.
Interface
When this feature is set to Auto, the printer determines
which interface receives data and then switches to that
interface until the end of the print job (when no data is
received from the selected interface for the amount of time
specified by the Auto interface wait time).
Set this option to Parallel only if you want the printer to
ignore data from the serial interface. Set it to Serial if you
want the printer to ignore data from the parallel interface.
Bit rate, parity bit, data length, and ETX/ACK
These options are available only when the interface is set to
Serial.
Changing the default settings
Because software settings always override the printer’s
default settings, use your software program to control the
printer, if possible. See your software manual for more
information. To change the printer’s default settings, follow
the steps below:
1. Make sure the printer is turned off and paper is loaded in
the paper feeder.
2. Hold down the FONT button and turn on the printer to
enter the default-settings mode.
The printer loads a sheet of paper and prints a brief
summary and instructions. It instructs you to select the
language that you want messages printed in (English,
French, German, Italian, or Spanish).
3. Press the FONT button until the FONT lights indicate the
language of your choice; then press the LF/FF button to
make your selection.
)217э/LJKWV
эээээмээээээээл /DQJXDJH
2 ##1
2 ##)
1 ##2
1 ##1
1 ##)
)
ýý ýIODVKLQJñý1ý ýRQñý2ý ýRII
(QJOLVK
)UHQFK
*HUPDQ
,WDOLDQ
6SDQLVK
After you press the LF/FF button, the printer prints the
current default settings and the next instruction in the
language you selected. Wait until printing is finished,
then go to the next step.
4. Press the FONT button now to print help text that guides
you through the operations. (Once you are experienced
with the Printer Setting mode, you can skip this step by
pressing LF/FF instead.) The printed instructions include
submenu tables that list all of the settings you can change
and show you how the control panel lights appear for
each selection.
5. At this point you are in the table shown below. To move to
the feature you want to change, press the FONT button
until the lights indicate the appropriate selection.
)217
)217
ëýOLJKW
3$86(
OLJKW 6HWWLQJ
&KDUDFWHUýVSDFLQJ
6KDSHýRIý]HUR
6NLSðRYHUðSHUIRUDWLRQ
&KDUDFWHUýWDEOH
$XWRýOLQHýIHHG
3DJHýOHQJWK
$XWRýWHDUýRII
7UDFWRU
,QWHUIDFH
%LWýUDWH
3DULW\ýELW
'DWDýOHQJWK
(7;î$&.
ìýOLJKW
)22
)12
2)2
1)2
))2
)21
)11
2)1
1)1
))1
22)
)2)
12)
ýý)ýý ýIODVKLQJñý1ý ýRQñý2ý ýRII
For example, if you want to change the interface setting,
press the FONT button until FONT 1 is on, FONT 2 is
flashing, and the PAUSE light is on.
6. Next, press the PAUSE button to change the setting. The
printer automatically enters a submenu for that setting.
As you move from setting to setting, the FONT lights turn
on (1), off (2), and flash ()) to show your selection, as
indicated in the following table.
,QNý-HWý3ULQWHUV йоллодй (3621э/;ркннри
Page 6

(3621ý/;ðêíí
7. When the control panel lights match your desired setting,
press PAUSE.
'HIDXOWðVHWWLQJVý
PHQX 6HWWLQJV мээээлээээ3$86(э
&KDUDFWHU
VSDFLQJ
6KDSHýRIý]HUR í
6NLSðRYHUð
SHUIRUDWLRQ
&KDUDFWHUýWDEOH ,WDOLFý8ï6ï$
$XWRýOLQHýIHHG 2II
&RQWLQXRXVðSDSHU
SDJHýOHQJWK
7HDUýRII 2II
7UDFWRU 6LQJOH
,QWHUIDFH $XWRэVHOHFWLRQэхмнэPVэZDLWф
ìíýFSL
ìëýFSL
ноээхZLWKэVODVKф
2II
2Q
,WDOLFý)UDQFH
,WDOLFý*HUPDQ\
,WDOLFý8ï.ï
,WDOLFý'HQPDUNýì
,WDOLFý6ZHGHQ
,WDOLFý,WDO\
,WDOLFý6SDLQýì
3&йкжэх86$сэ6WDQGDUGэ(XURSHф
3&еинэх0XOWLOLQJXDOф
3&езнэх3RUWXJXHVHф
3&åçì
3&езкэх&DQDGLDQр)UHQFKф
3&езиэх1RUZHJLDQф
%5$6&,,ýõ%UD]LOLDQý3RUWXJXHVHôóó
$ELFRPSýõ%UD]LOLDQý3RUWXJXHVHôóó
2Q
ììýLQFKHV
ìëýLQFKHV
åïèýLQFKHV
жнозэLQFKHV
2Q
'RXEOH
$XWRэVHOHFWLRQэхкнэPVэZDLWф
3DUDOOHO
6HULDO
2 ##2 ##2
1 ##1 ##1
2 ##2 ##2
1 ##1 ##1
2 ##2 ##2
1 ##1 ##1
2 ##2 ##2
1 ##2 ##2
) ##2 ##2
2 ##1 ##2
1 ##1 ##2
) ##1 ##2
2 ##) ##2
) ##) ##2
2 ##2 ##1
1 ##2 ##1
) ##2 ##1
2 ##1 ##1
1 ##1 ##1
) ##1 ##1
2 ##) ##1
1 ##) ##1
2 ##2 ##2
1 ##1 ##1
1 ##2 ##2
2 ##1 ##2
1 ##1 ##2
2 ##2 ##1
2 ##2 ##2
1 ##1 ##1
2 ##2 ##2
1 ##1 ##1
1 ##2 ##2
2 ##1 ##2
1 ##1 ##2
2 ##2 ##1
'HIDXOWðVHWWLQJVý
PHQX 6HWWLQJV мээээлээээ3$86(э
%LWýUDWH êííýESV
çííýESV
млннэESV
лйннэESV
йеннэESV
дзннэESV
мдлннэESV
3DULW\ýELW 1RQH
2GG
(YHQ
'DWDýOHQJWK æýELW
åýELW
(7;î$&. 2II
2Q
1 ##2 ##2
2 ##1 ##2
1 ##1 ##2
2 ##2 ##1
1 ##2 ##1
2 ##1 ##1
1 ##1 ##1
1 ##2 ##2
2 ##1 ##2
1 ##1 ##2
2 ##2 ##2
1 ##1 ##1
2 ##2 ##2
1 ##1 ##1
7. When the control panel lights match your desired setting,
press PAUSE.
8. Repeat steps 5 and 7 to make all of your changes.
9. To exit the default-settings mode, turn the printer off.
Note:
❏ You may exit the default-settings mode any time by turning off
the printer. Any changes you have made remain in effect until
you change them again.
❏ If you want to check the new default settings, enter the
default-settings mode again and print the current settings.
After you check them, turn the printer off to exit without
making changes.
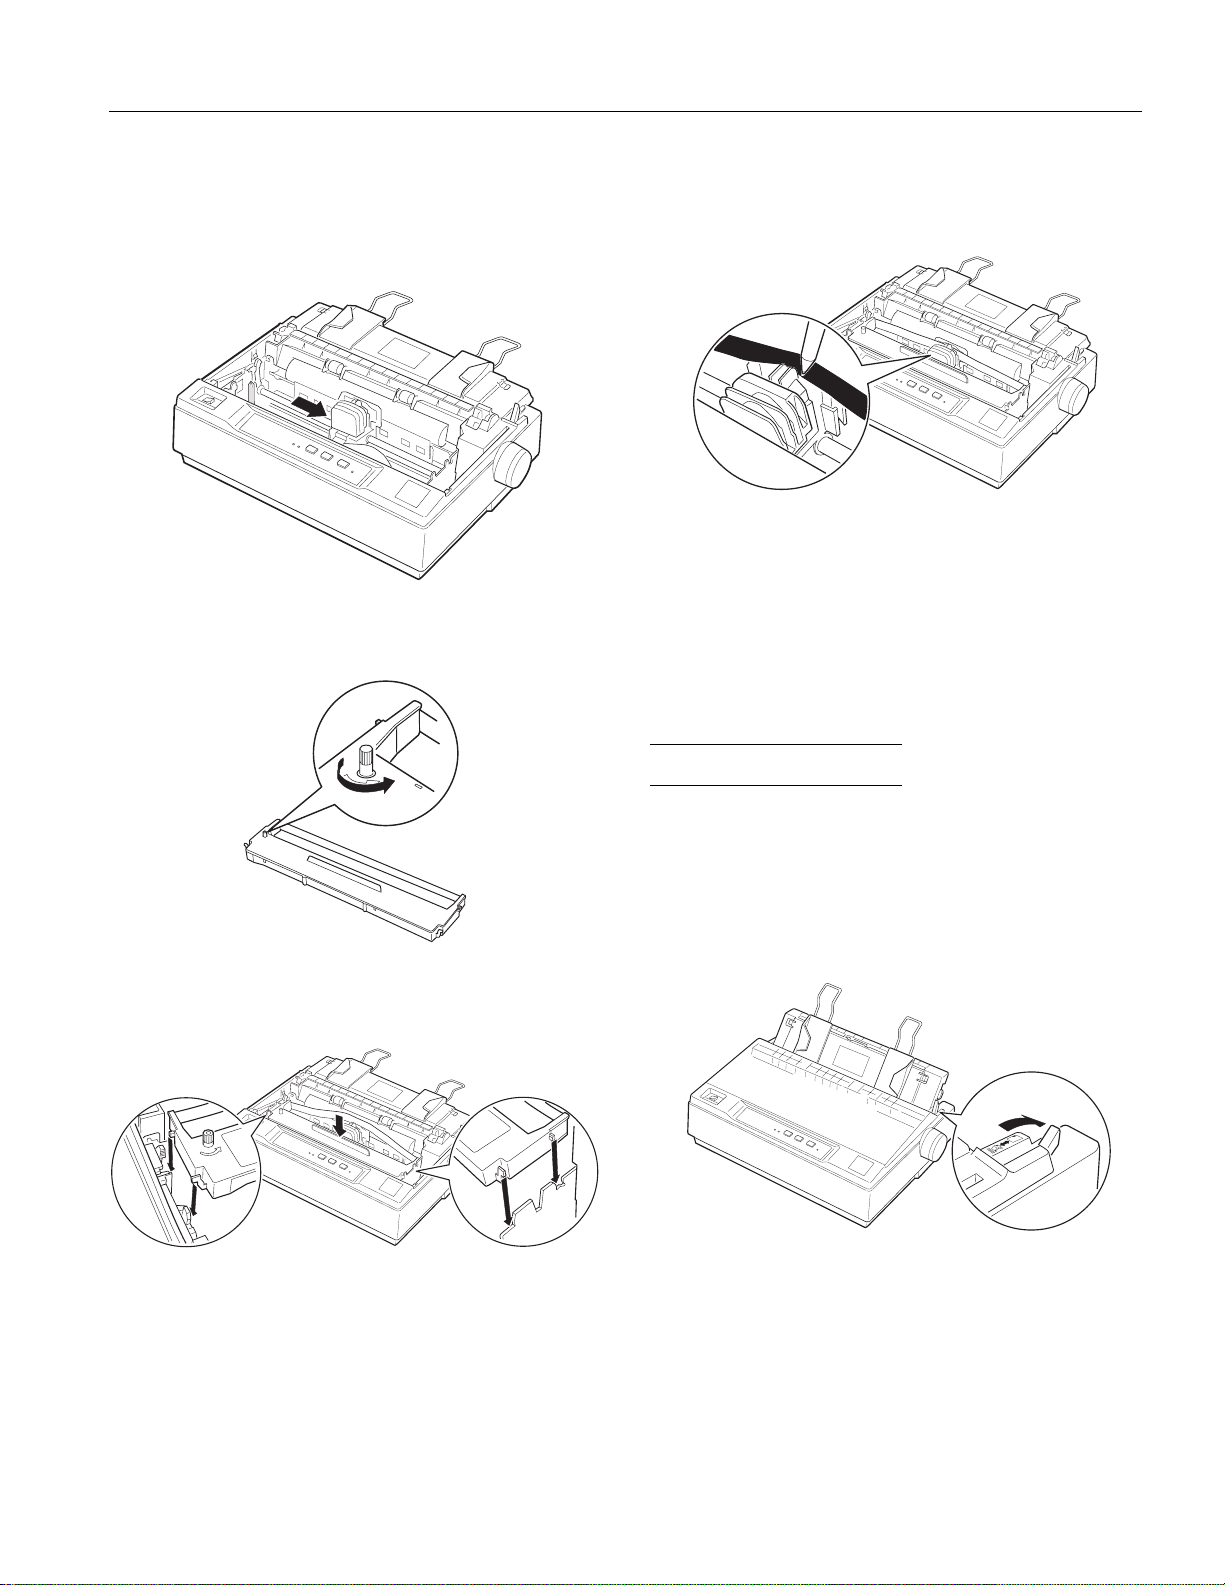
,QVWDOOLQJýWKHý5LEERQý&DUWULGJHý
Before installing the ribbon cartridge, make sure the printer
is not plugged into an electrical outlet.
1. Open the printer cover to the upright position, then pull it
up to remove it.
(3621э/;ркннрз йоллодй ,QNý-HWý3ULQWHUV
Page 7
(3621ý/;ðêíí
Warning:
Z
Never move the print head while the printer is turned on; this
can damage the printer. Also, if you have just used the printer,
let the print head cool for a few minutes before you touch it.
2. Slide the print head to the middle of the printer.
3. Turn the ribbon-tightening knob in the direction of the
arrow to remove any slack from the ribbon so it is easier
to install.
5. Use a pointed object, such as a ball point pen, to guide the
ribbon between the print head and ribbon guide. Turn the
ribbon tightening knob to help feed the ribbon into place;
it should not be twisted or creased.
6. Slide the print head from side to side to make sure it moves
smoothly.
7. Re-install and close the printer cover.
When the printing becomes faint, you need to replace the
ribbon cartridge. To remove the old ribbon cartridge, first
move the print head to the center of the printer. Then remove
the cartridge by lifting the posts on either side and taking it
out of the printer.
4. Insert the ribbon cartridge into the printer as shown; then
press both sides of the cartridge firmly to fit the plastic
hooks into the printer slots.
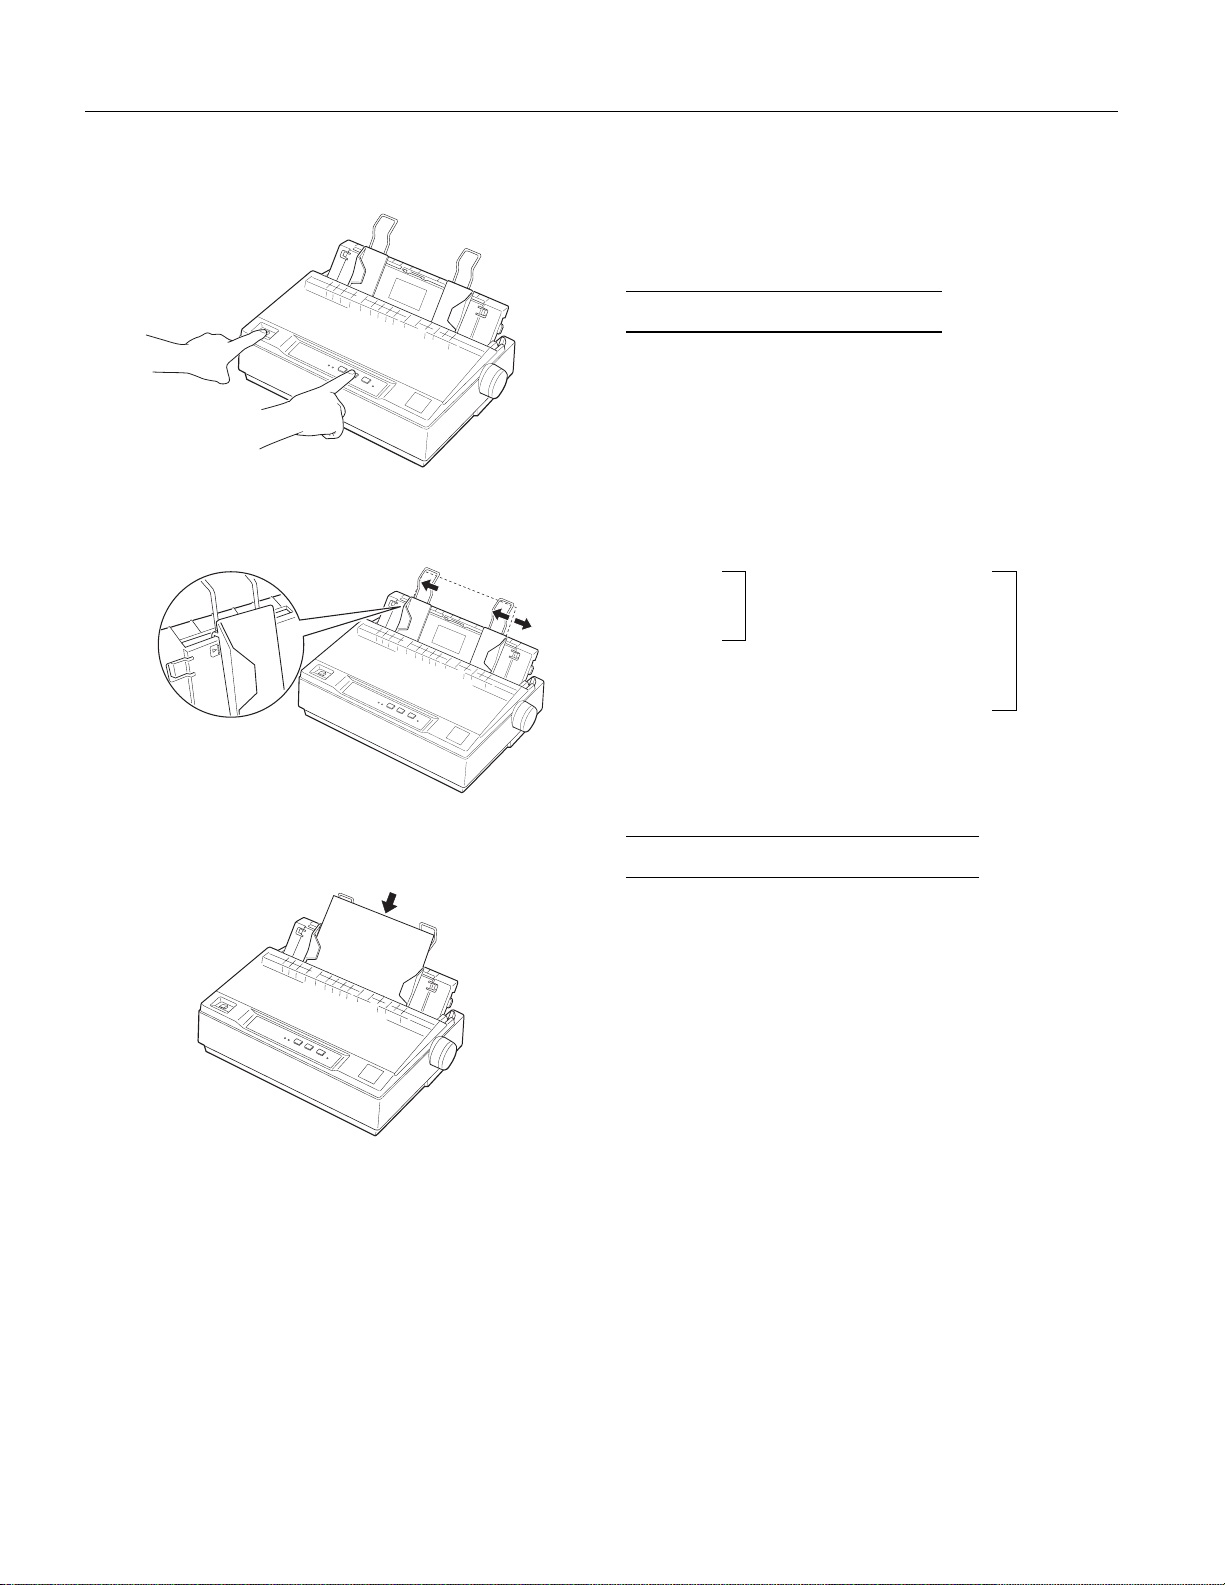
5XQQLQJýWKHý6HOIý7HVWý
The built-in self test function demonstrates that the printer is
working properly. You can run the test with either
continuous paper or single sheets; this section describes the
easier way, with single sheets.
1. Make sure the printer is turned off and the paper-release
lever is pushed back to the single-sheet position. Raise the
paper guide upright.
Caution:
F
You should use paper at least 210 mm or 8 1/4 inches wide to
run the self test; otherwise, the print head prints directly on
the platen.
,QNý-HWý3ULQWHUV йоллодй (3621э/;ркннрж
Page 8
(3621ý/;ðêíí
2. While holding down the LF/FF button, turn on the printer.
The PAUSE light flashes.
3. Slide the left edge guide until it locks in place at the guide
mark. Next, adjust the right edge guide to match the
width of your paper.
6. To end the self test, make sure the printer is not printing.
Press LF/FF to eject the sheet; then turn off the printer.
The printer prints characters in each font in the order the
fonts appear on the control panel
6SHFLI\LQJýWKHý3ULQWHUý7\SHý
Most software programs let you specify the type of printer
you use so that the program can take full advantage of the
printer’s features. Many of these programs provide an
installation or setup menu that presents a list of printers.
To take full advantage of your printer’s features, choose
LX-300. If LX-300 is not listed, contact your software
manufacturer for an update that includes the LX-300. Until
you receive an update, choose another printer as close to the
top of the list as possible.
LX-300 LX-810
JX-80 Color LX-850 Not color
EX-800 LX-800
LX-80/86
FX-850
FX-86e/800
If none of these printers is listed among your program’s
options, select the first one available from the following:
any FX printer, EPSON printer, and Draft printer.
4. Slide a sheet of paper down firmly between the edge
guides until it meets resistance. The printer loads the
sheet automatically and begins to print.
Caution:
F
Always close the printer cover while the printer is printing.
The printer cover helps the paper feed.
5. To stop printing temporarily, press the PAUSE button.
$GMXVWLQJýWKHý/RDGLQJý3RVLWLRQ
The loading position is the position of the paper when the
printer loads it. If printing is too high or low on the page,
change the loading position with the micro-feed feature.
1. With paper loaded, hold down the PAUSE button until the
printer beeps once and the FONT lights begin to flash.
2. Press the LF/FF button to feed the paper forward, or press
the FONT button to feed the paper backward. (Press either
button as many times as necessary until you reach the
desired position.)
3. To complete the adjustment, press the PAUSE button or
send data from your computer.
(3621э/;ркннре йоллодй ,QNý-HWý3ULQWHUV
Page 9

(3621ý/;ðêíí
3ULQWLQJýRQý&RQWLQXRXVý3DSHUý
Your printer can handle continuous paper with a width of
101 mm (4.0 inches) to 254 mm (10.0 inches). Depending on
where you position the tractor, you can use it as a pull tractor
or a push tractor. These guidelines can help you decide
where to position the tractor:
❏ Do you want to switch between printing on single sheets
and continuous paper without removing the paper
supply? Will you tear off continuous paper
sheet-by-sheet? Use the tractor in the push tractor
position. (The printer comes with the tractor installed in
this position.) See the following section for instructions.
❏ Are you printing on labels, multi-part forms, or other
documents that require a precise print position? Use the
tractor as a pull tractor as described on the next page.
Printing with the push tractor
1. Make sure the printer is turned off. Remove the paper
guide and pull the paper-release lever forward to the
continuous paper position.
3. Slide the left sprocket unit using the scale on the printer as
a guide. The printer prints to the right of the position
marked 0. Push the sprocket lock lever back to lock it in
place. Then slide the right sprocket unit to match the
width of your paper, but do not lock it. Move the paper
support so it is midway between the sprocket units.
10
5
0
4. Make sure your paper has a clean, straight leading edge.
Open the sprocket covers. Fit the first holes of the paper
over the sprocket pins and then close the sprocket covers.
Slide the right sprocket unit to remove any slack in the
paper and lock it in place. Now the paper is in the
paper-park position.
2. Release the sprocket units by pulling the sprocket locks
forward.
5. To separate the incoming paper from the printed paper,
attach the paper guide by holding it horizontally and
fitting its notches over the printer’s mounting posts as
shown below. Then slide the paper guide toward the front
of the printer until you feel it click.
,QNý-HWý3ULQWHUV йоллодй (3621э/;ркннрд
Page 10
(3621ý/;ðêíí
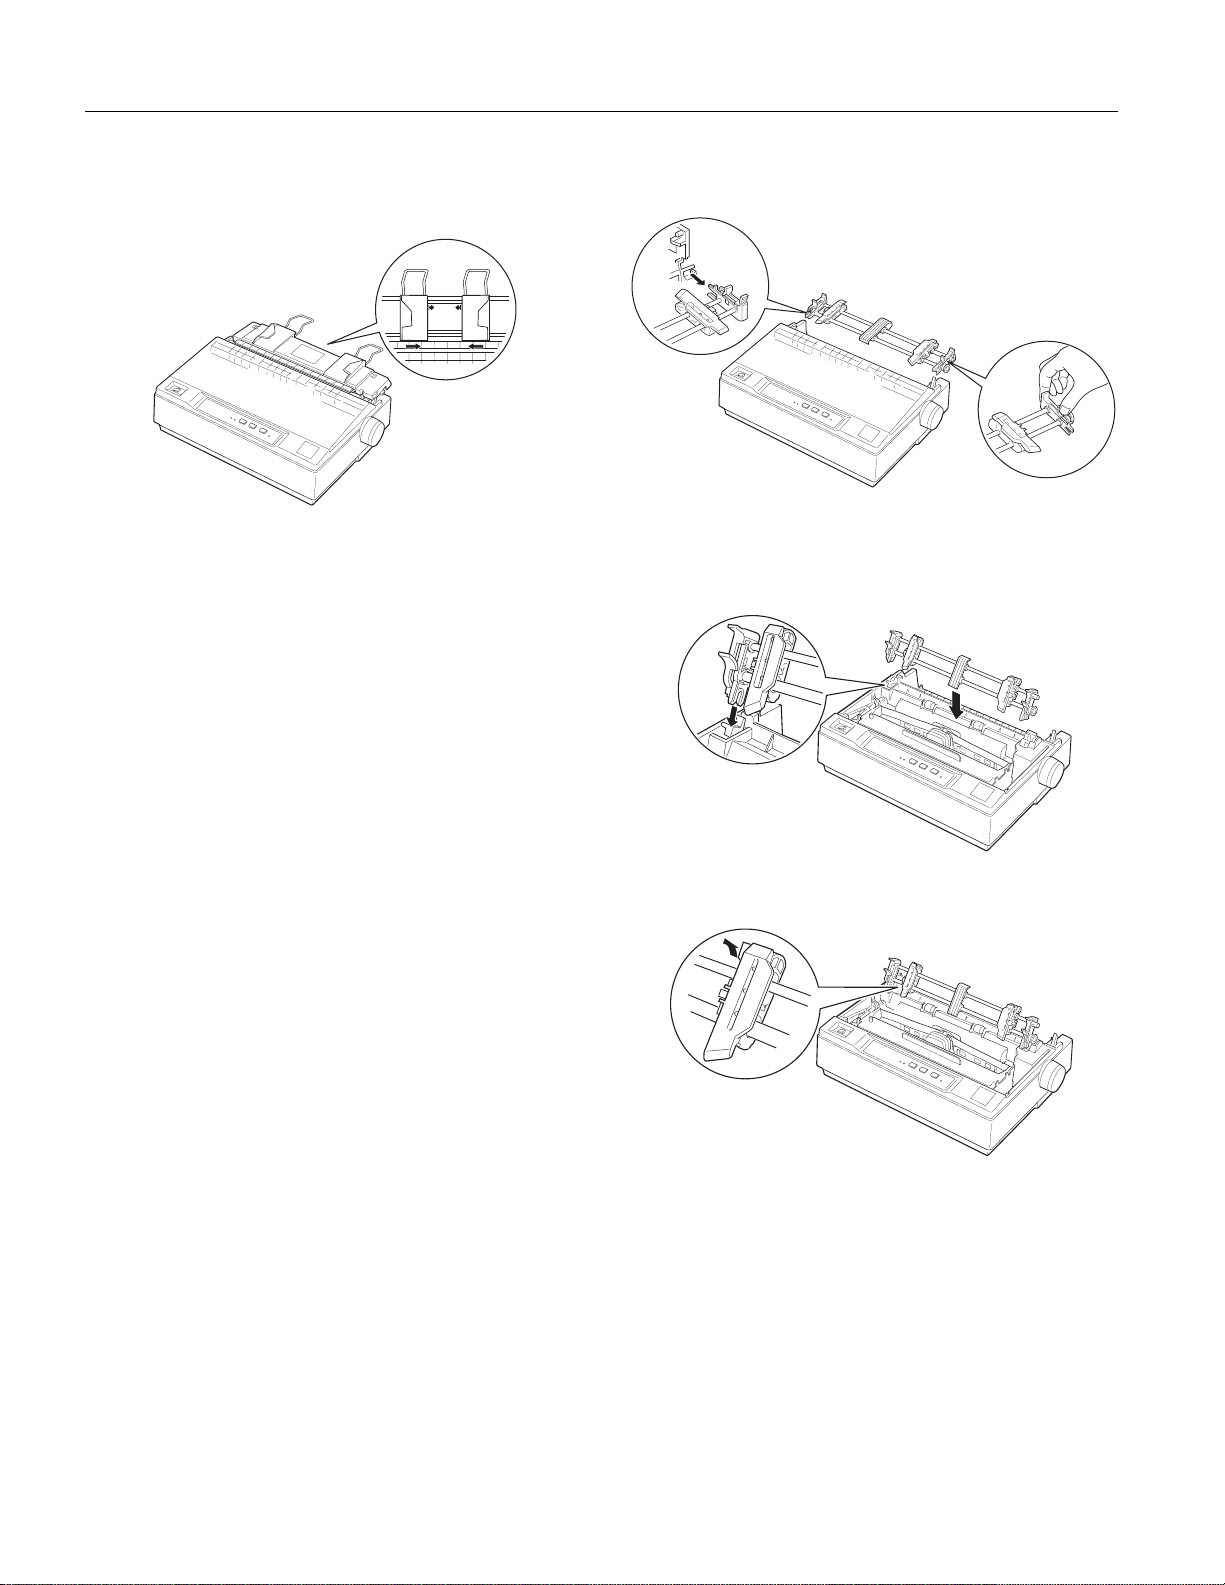
6. Slide the left edge guide to the center until it stops at the
guide mark. Then slide the right edge guide to the
opposite guide mark.
7. Turn on the printer. The PAUSE light flashes briefly, then
stays on.
8. Make sure the printer cover is closed. Press the LF/FF
button to feed the paper to the loading position. When the
printer receives data, it begins printing automatically.
9. When you finish printing (the printer receives no data for
three seconds) the printer feeds the perforation of the
continuous paper to the edge of the printer cover so that
you can tear off the last sheet. The PAUSE light flashes.
2. Squeeze the tractor’s lock tabs gently and pull the tractor
away from the printer.
3. Lift the tractor forward to the mounting slot at the top of
the printer and tilt it into place as shown below. When
you push the tractor onto the posts, you should feel the
notches snap into place.
Note:
Set the Auto tear off feature in the Printer Setting mode to on.
Otherwise, the printer does not feed the perforation to the edge of
the printer cover.
If the perforation and the edge of the printer cover do not match,
adjust the paper position by following the steps in “Adjusting the
loading position,” while the
When you send more data, the paper automatically feeds
back to the loading position. If you want to change the
position where printing begins on the page, adjust the
loading position.
PAUSE
light is flashing.
Printing with the pull tractor
Caution:
F
When using the pull tractor, set the Auto tear off feature in the
Printer Setting mode to off; otherwise the paper may jam.
1. Turn the printer off; then remove the paper guide. Pull the
paper-release lever forward to the continuous paper
position.
4. Release the sprocket units by pulling the sprocket locks
forward.
(3621э/;ркннрмн йоллодй ,QNý-HWý3ULQWHUV
Page 11
(3621ý/;ðêíí
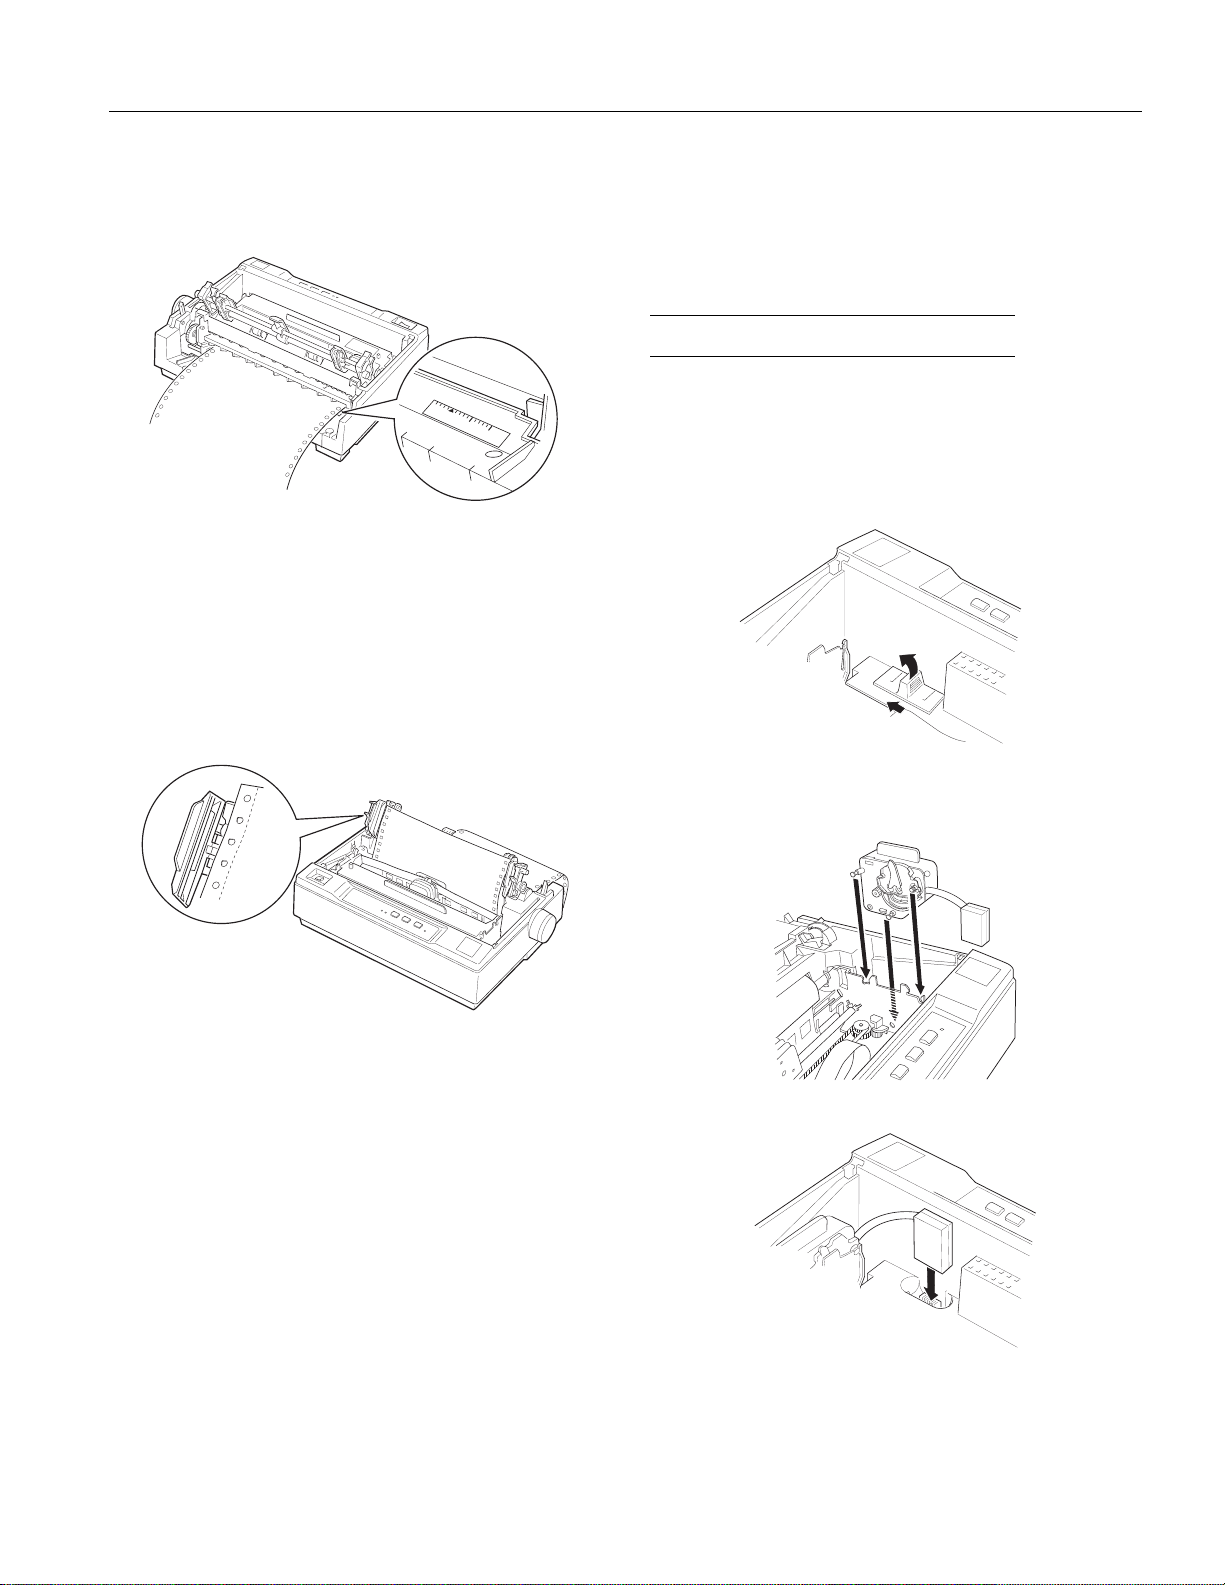
5. Insert the paper into the paper slot as shown below and
pull it up. Use the scale on the printer as a guide. Position
the paper using the scale on the printer as a guide. The
printer prints to the right of the position marked 0.
0
5
10
6. Slide the left sprocket unit so that its sprockets match the
position of the holes in the paper and lock the unit in
place. Then slide the right sprocket unit to match the
width of your paper, but do not lock it. Move the paper
support midway between the two sprocket units.
7. Make sure your paper has a clean, straight leading edge.
Open the sprocket covers. Fit the first four holes of the
paper over the sprocket pins and then close the sprocket
covers. Slide the right sprocket unit to remove any slack in
the paper and lock it in place.
If you want to change the position where printing begins on
the page, press LF/FF to advance the page to the next
top-of-form position, and then adjust the loading position.
To eject the paper, tear off the paper entering the printer;
then press the LF/FF button to feed the paper forward.
,QVWDOOLQJýWKHý&RORUý8SJUDGHý.LWý
The optional color upgrade kit (C832081) includes a color
ribbon cartridge and a motor unit. Here’s how to install the
kit:
1. Turn off the printer and remove the printer cover. Slide the
connector cover on the printer and pull it out as shown
below.
2. Install the motor unit in the right hand corner of the
printer, with the gear facing the center of the printer. Push
it down firmly to fit the metal pins into the slots.
8. To separate the incoming paper from the printed paper,
attach the paper guide by holding it horizontally and
fitting its notches over the printer’s mounting posts. Then
slide the paper guide toward the back of the printer until
3. Insert the motor unit plug into the connector on the printer.
you feel it click.
9. Slide the left edge guide to the center until it stops at the
guide mark. Then slide the right edge guide to the
opposite guide mark.
10.Attach the printer cover and adjust the paper position
with the paper-feed knob. Turn the knob until the
perforation between pages is just above the print head.
Then turn on the printer. The PAUSE light flashes briefly,
then stays off.
11.Make sure the printer cover is closed. When the printer
receives data, it begins printing automatically.
4. Slide the print head to the middle of the printer; then slide
the plastic part on the color ribbon to the center of the
cartridge.
,QNý-HWý3ULQWHUV йоллодй (3621э/;ркннрмм
Page 12

(3621ý/;ðêíí
5. Turn the ribbon-tightening knob in the direction of the
arrow to remove any slack in the ribbon.
6. Insert the ribbon cartridge into the printer as shown; then
press both sides of the cartridge firmly to fit the plastic
hooks into the printer slots.
,QIRUPDWLRQý5HIHUHQFHý/LVW
Engineering Change Notices
None
Product Support Bulletins
None
Technical Information Bulletins
None
Related Documentation
TM-LX300 EPSON LX-300 Service Manual
PL-LX300 EPSON LX-300 Parts Price List
4002661 EPSON LX-300 User’s Guide
7. Turn the ribbon-tightening knob to help feed the ribbon
into place; it should not be twisted or creased.
8. Replace the printer cover.
After you install the color ribbon cartridge, run the self test.
If the top or bottom edge of the characters in the self test is a
different color from the rest, adjust the ribbon angle. Check
the characters printed in red. If the top edge is blue, move the
color ribbon adjustment lever forward. If the bottom edge is
yellow, move the lever backward. Then print another self test
to check your adjustment. Repeat this process until the
ribbon is properly adjusted.
Note:
When you print using the color ribbon, the print speed is reduced.
(3621э/;ркннрмл йоллодй ,QNý-HWý3ULQWHUV
 Loading...