

Page 1
EPSON
®
Page 2

®
EPSON
EQUITY™ LT™-286
User’s Guide
Y17499100100
Page 3

IMPORTANT NOTICE
DISCLAIMER OF WARRANTY’
Epson America makes no representations or warranties, either express or implied,
by or with respect to anything in this manual, and shall not be liable for any
implied warranties of merchantability and fitness for a particular purpose or for any
indirect, special, or consequential damages. Some states do not allow the exclusion
of incidental or consequential damages, so this exclusion may not apply to you.
COPYRIGHT NOTICE
All rights reserved. No part of this publication may be reproduced, stored in a
retrieval system, or transmitted, in any form or by any means, electronic,
mechanical, photocopying, recording, or otherwise, without the prior written
permission of Epson America, Inc. No patent liability is assumed with respect to
the use of information contained herein. While every precaution has been taken in
the preparation of this publication, Epson America assumes no responsibility for
errors or omissions. Nor is any liability assumed for damages resulting from the use
of the information contained herein. Further, this publication and features
described herein are subject to change without notice.
TRADEMARKS
AT and XT are trademarks and IBM is a registered trademark of International
Business Machines Corporation.
Centronics is a registered trademark of Centronics Data Corporation.
Epson is a registered trademark of Seiko Epson Corporation.
Equity and LT are trademarks of Epson America, Inc.
GW-BASIC, Microsoft, Microsoft Word, and MS-DOS are registered trademarks
of Microsoft Corporation.
Hayes is a registered trademark of Hayes Microcomputer Products, Inc.
Lotus and 1-2-3 are registered trademarks of Lotus Development Corporation.
XTREE is a registered trademark of Executive Systems, Inc.
Copyright 0 1988 by Epson America, Inc.
Torrance, California
ii
Q50188028
Page 4

FCC COMPLIANCE STATEMENT FOR AMERICAN USERS
This equipment generates and uses radio frequency energy and if not installed
and used properly, that is, in strict accordance with the manufacturer’s
instructions, may cause interference to radio and television reception. It has
been type tested and found to comply with the limits for a Class B computing
device in accordance with the specifications in Subpart J of Part 15 of FCC
rules, which are designed to provide reasonable protection against such
interference in a residential installation. However, there is no guarantee that
interference will not occur in a particular installation. If this equipment does
cause interference to radio and television reception, which can be determined
by turning the equipment off and on, you are encouraged to try to correct the
interference by one or more of the following measures:
l Reorient the receiving antenna
l Relocate the computer with respect to the receiver
l Move the computer away from the receiver
l Plug the computer into a different outlet so that the computer and
receiver are on different branch circuits.
If necessary, consult your dealer or an experienced radio/television technician
for additional suggestions. You may find the following booklet prepared by the
Federal Communications Commission helpful:
“Television Interference Handbook”
This booklet is available from the U.S. Government Printing Office,
Washington DC 20402. Stock No. 004-000-00450-7
Note: If the interference stops, it was probably caused by the
computer or its peripheral devices. To further isolate the problem:
Disconnect the peripheral devices and their input/output cables one at a
time. If the interference stops, it is caused by either the peripheral
device or its I/O cable. These devices usually require shielded I/O cables.
For Epson peripheral devices, you can obtain the proper shielded cable
from your dealer. For non-Epson peripheral devices contact the
manufacturer or dealer for assistance.
WARNING:
This equipment has been certified to comply with the limits for a Class B
computer device, pursuant to Subpart J of Part 15 of FCC Rules. Only
peripherals (computer input/output devices, terminals, printers, etc.)
certified to comply with the Class B limits may be attached to this computer.
Operation with non-certified peripherals is likely to result in interference to
radio and TV reception.
The connection of a non-shielded equipment interface cable to this
equipment will invalidate the FCC Certification of this device and may cause
interference levels that exceed the limits established by the FCC for this
equipment.
Page 5

Contents
Introduction
How To Use This Manual
Where To Get Help
Setting Up Your System
1 Unpacking
2 Connecting the AC Adapter
3 Charging the Battery
4 Connecting a Printer
5
Setting the DIP Switches
6
Inserting the Startup/Operating 1 Diskette
7 Starting the System
8 Copying System Diskettes
Running the Setup Program
Starting the Setup Program
Memory
Display
Coprocessor
Mass Storage
Backlight Period
Gray Scale
Leaving the Setup Program
...................................................
....................................
..........................................
....................................
................................................
..........................
....................................
....................................
Connecting to the Parallel Interface
Connecting to the Serial Interface
.................................
Keyboard DIP Switches
Back Panel DIP Switches
.......................................
Turning On the Computer
Adjusting Screen Contrast and Brightness ......
Initial Screen Display
.........................................................
.........................................................
...................................................
...................................................
.............................................
......................................................
...........................
...........................
........................
..............................
..............................
..............................
.................................
.................................
............
...............
............
1
3
4
1-1
1-1
1-2
1-3
1-4
1-4
1-7
1-8
1-9
1-12
1-14
1-15
1-16
1-17
1-18
1-19
2-1
2-2
2-3
2-4
2-6
2-7
2-9
2-10
2-13
Preparing the Hard Disk for Use
Creating a Primary Partition
Creating an Extended Partition
Formatting the Primary Partition
.................................
........................
...........................
...........................
3-1
3-3
3-5
3-7
Page 6

Formatting the Extended Partition
........................
Copying the MS-DOS Files to the Hard Disk
Modifying the AUTOEXEC.BAT File
Booting From the Hard Disk
.................................
.....................
............
3-9
3-10
3-11
3-12
Using the Equity LT-286
Using the AC Adapter
Using the Battery
LED Indicators
.............................................
................................................
Opening and Closing the Screen
Using the Handle
.............................................
Selecting Execution Speed
.................................
.......................................
...........................
.................................
Special Keys on the Equity LT-286 Keyboard
Using the Function Key Template
Using Diskettes
How Diskettes Work
................................................
....................................
........................
Choosing Diskettes for the Equity LT-286
Caring for Diskettes
Inserting and Removing Diskettes
Making Backup Copies
Write-Protecting Diskettes
Using the Hard Disk Drive
Caring for the Hard Disk
....................................
.....................
.................................
..............................
.................................
..............................
Protecting the Data on Your Hard Disk..
Improving Hard Disk Performance
Turning Off the Hard Disk
.................................
.....................
Turning Off the Hard Disk
Before Starting the Computer
.....................
Turning Off the Hard Disk
After Starting the Computer
Resetting the Computer
Turning Off the Computer
....................................
.................................
.....................
............
............
.............
4-1
4-1
4-2
4-3
4-4
4-6
4-7
4-8
4-10
4-11
4-11
4-11
4-13
4-14
4-15
4-15
4-16
4-16
4-17
4-17
4-17
4-19
4-19
4-20
4-21
Using MS-DOS With Your Equity LT-286
Starting MS-DOS
Exiting MS-DOS
Changing the Current Drive
.............................................
.............................................
.................................
The MS-DOS Command Format
Entering MS-DOS Commands
..............................
vi
............
...........................
5-1
5-2
5-2
5-2
5-3
5-4
Page 7

Storing Data
Using Directories
The Current Directory
Listing the Contents of a Directory
Using Pathnames
Creating Directories
Changing Directories
Copying From one Directory to Another
Deleting a Directory
Formatting Diskettes
Formatting a 1.44MB Diskette
Formatting a 720KB Diskette
Copying Data
Using the DISKCOPY Command
Using the COPY Command
Using the BACKUP Command
Deleting Data
Using the Epson HELP Utility
Using the Epson MENU Utility
MENU Utility Options
Using the XTREE Utility
Running XTREE
Cautions
Using an AUTOEXEC.BAT File
Creating an AUTOEXEC.BAT File
Starting an Application Program
Using the LIGHTON Utility
...................................................
.............................................
.................................
.......................................
....................................
....................................
....................................
..........................................
...........................
...................................................
...........................
................................................
..............................
...........................
.................................
....................................
..........................................
...................................................
...........................
...........................
..............................
..................
............
........................
.....................
........................
..................
5-5
5-6
5-7
5-8
5-9
5-11
5-11
5-12
5-13
5-13
5-14
5-15
5-16
5-16
5-18
5-20
5-21
5-22
5-24
5-24
5-25
5-26
5-27
5-28
5-29
5-30
5-30
Appendixes
A Connecting an External Color Monitor
B Troubleshooting
The Computer Won’t Start
The LCD Screen Is Blank
The Monitor Screen Is Blank
The Computer Locks Up
Low Battery Problems
.............................................
....................................
....................................
.......................................
..................
.................................
..............................
A-1
B-1
B-1
B-2
B-3
B-4
B-4
vii
Page 8

Diskette Problems
Hard Disk Problems
.............................................
..........................................
B-5
B-6
C
Power-On Diagnostics
System Device Check
Clock and CMOS RAM Check
RAM Check
...................................................
.......................................
.......................................
...........................
Keyboard Controller and Keyboard Check
Video and Video Controller Check
Diskette Drive Seek Check
.................................
Hard Disk Controller and Hard Disk Check
D
Performing System Diagnostics
Starting System Diagnostics
Modifying the DEVICE LIST
Selecting a Test
................................................
Resuming From an Error
System Board Check
Memory Check
Keyboard Check
................................................
.............................................
....................................
..........................................
...........................
.................................
..............................
Monochrome Display Adapter and CRT Check
Monochrome Adapter Check
Attribute Check
Character Set Check
Video Check
Sync Check
..........................................
....................................
.............................................
................................................
Run All Above Checks
...........................
.................................
Color Graphics Adapter and CRT
Color Graphics Adapter Check
Attribute Check
Character Set Check
..........................................
....................................
40-Column Character Set Check
320x200 Graphics Mode Check
640x200 Graphics Mode Check
Screen Paging Pheck
Color Video Check
Sync Check
................................................
Run All Above Checks
....................................
.......................................
.................................
............... C-3
........................
............ C-4
......... D-8
........................
........................
.....................
........................
........................
C-1
C-1
C-2
C-2
C-3
C-4
D-1
D-1
D-2
D-4
D-5
D-6
D-6
D-7
D-9
D-9
D-9
D-10
D-10
D-10
D-11
D-11
D-12
D-12
D-13
D-13
D-14
D-15
D-16
D-16
D-17
Page 9

Floppy Disk Drive and Controller Check
Sequential Seek Check
Random Seek Check
Write, Read Check
Speed Check
.............................................
Disk Change Check
Run All Above Checks
Math Coprocessor (80287) Check
.................................
....................................
.......................................
....................................
.................................
........................
Parallel Port (Printer Interface) Check
Serial Port (RS-232C Port) Check
Alternate Serial Port Check
Dot-Matrix Printer Check
.................................
.................................
........................
Hard Disk Drive and Controller Check
Seek Check
Write, Read Check
Read, Verify Check
Run All Above Tests
Alternate Parallel Port Check
................................................
.......................................
.......................................
....................................
..............................
Parallel Port (on Video Adapter) Check
Exiting System Diagnostics
Error Codes and Messages
.................................
....................................
.................. D-17
D-18
D-18
D-19
D-19
D-20
D-20
D-21
..................
D-21
D-22
D-23
D-24
.................. D-25
D-25
D-26
D-26
D-27
D-27
.................. D-28
D-28
D-29
E Specifications
Main Unit
Interfaces
Keyboard
Mass Storage
Display
Power Supply
......................................................
......................................................
......................................................
...................................................
.........................................................
...................................................
Power Requirements
Physical Dimensions
Environmental Requirements
Options
Glossary
Index
.........................................................
................................................
......................................................
................................................
..........................................
..........................................
..............................
Glossary 1
Index 1
E-1
E-1
E-1
E-1
E-2
E-2
E-2
E-3
E-3
E-3
E-4
ix
Page 10

Introduction
Your Epson® Equity™ LT™-286 portable computer is a compact,
high-performance system you can use just about anywhere: at the
office, at home, or on the road. Its rechargeable battery lets you use
it in remote locations when you don’t have access to an electrical
outlet. With the AC adapter connected, you can use the computer
as long as you like and recharge the battery in the process.
The Equity LT-286 comes with the following:
l An 80286 microprocessor
l 640KB (kilobytes) of internal memory
l
One 20 or 40MB (megabyte) hard disk
l
One 1.44MB 3 1/2-inch diskette drive
l
A high-contrast paper-white backlit LCD (liquid crystal
display) screen
l
Built-in serial, parallel, and video interfaces.
The 80286 microprocessor inside your Equity LT-286 can run at an
execution speed of either 12 MHz or 8 MHz. Ordinarily you’ll want
to use the 12 MHz speed to get faster performance from your
computer. A few application programs may require the 8 MHz
speed; a switch above the keyboard allows you to change speeds
without resetting the computer. The Equity LT-286 also has a
built-in socket for an 80287 math coprocessor, which can be
installed by an authorized Epson dealer or Customer Care Center.
The built-in serial and parallel interfaces allow you to attach almost
any peripheral device, such as a printer or external modem, to your
Equity LT-286.
If you have a CGA-compatible color monitor, you can connect it
to the computer to take advantage of the color and the larger
display. If you have an external 5 1/4-inch diskette drive, you can
also connect that to the computer so that you can easily exchange
data with computers that use 5 1/4-inch diskette drives.
Introduction 1
Page 11

The following optional equipment should be available from your
Epson dealer:
l 300/1200-baud H
l 1200/2400-baud Hayes-compatible auto-dial internal modem
l
2MB memory expansion modules-one or two can be installed
ayes@-compatible auto-dial internal modem
by an authorized Epson dealer or Customer Care Center
l Expansion chassis
l Soft carrying case.
Either of the internal modem options allows you to communicate
with other computers over telephone lines. The expansion chassis
contains two expansion slots, which can accommodate standard
8-bit and 16-bit option cards.
Your Equity LT-286 comes with MS-DOS? version 3.3, by
Microsoft@’ and the GW-BASIC® programming language. You’ll
find reference manuals for both MS-DOS and GW-BASIC packed
in the box with the computer. You can use virtually any application
program designed for the IBM@ Personal Computer, PC XT,” or
PC AT” on your Equity LT-286.
In addition to MS-DOS and GW-BASIC, Epson has included three
time-saving utilities that make MS-DOS easier to use: HELP,
MENU, and XTREE® The HELP program lets you display
information on the screen about any MS-DOS command. MENU
provides an easier way to run the most common MS-DOS
commands. XTREE is a disk management utility that simplifies all
file and directory operations.
2
Introduction
Page 12

How To Use This Manual
This user’s manual explains how to set up and care for your Equity
LT-286. It also describes how to use your computer and run
diagnostic checks.
The eight steps in Chapter 1 explain how to set up your computer
and prepare it for use. On the inside back cover is a foldout
illustration of the computer parts; you may want to refer to this
while you set up the computer.
Chapter 2 tells you how to run the setup program. The setup
program gives the computer information about what kind of
equipment you have installed and how that equipment is
configured. You need to run setup once, when you first begin
working with your computer. Afterward, you need to run setup
only if you change the configuration.
Chapter 3 explains the procedures for preparing your hard disk.
Unless your dealer has already set up the disk for you, you must
follow the steps described in this chapter before using your hard
disk.
Chapter 4 describes general operating procedures and explains how
to use and care for your disks and disk drives.
Chapter 5 provides basic instructions for using MS-DOS with your
computer. You can find more detailed information about MS-DOS
in the MS-DOS Reference Manual.
Appendix A explains how to attach an external color monitor to
your Equity LT-286. To install other options, see the instructions
that come with the option. For dealer-installed options, contact an
authorized Epson dealer or Customer Care Center. (See the next
section, “Where To Get Help,” for details.)
If you encounter any problems while using your Equity LT-286,
check the troubleshooting guidelines in Appendix B.
Appendix C provides information on the power-on diagnostics,
which you need if your computer has trouble starting up.
Introduction 3
Page 13

Appendix D outlines the system diagnostic checks you can perform
on your computer. If you are having trouble with any part of the
hardware, you may want to run some or all of these diagnostic
checks.
Appendix E lists the Equity LT-286 hardware specifications.
At the back of the manual is a glossary of computer terms used in
this manual.
Where To Get Help
Customer support and service for Epson products is provided by a
network of authorized Epson dealers and Customer Care Centers
throughout the United States. Epson America provides training,
replacement parts, product information, and toll-free support to our
dealers and Customer Care Centers.
Therefore, we ask that you contact the business where you
purchased your Epson product to request assistance. If the people
there do not have the answer to your question, they can obtain it
through our toll-free dealer/Customer Care Center hotline.
We are confident that this policy will provide you with the
assistance you need. If you need to find an authorized Epson dealer
or Customer Care Center in your area, please call our Consumer
Information number at 1-800-922-8911.
4 Introduction
Page 14
Chapter 1
Setting Up Your System
Setting up your Epson Equity LT-286 portable computer is easy.
Just follow the steps in this chapter. They describe how to attach
the AC adapter, start MS-DOS, and copy the system diskettes that
come with your Equity LT-286.
After you have followed these steps, turn to Chapter 2 for
information about the setup program. You must run this program to
give your computer the information it needs to get started. Then
follow the instructions in Chapter 3 to prepare your hard disk.
Do not turn on the computer, printer, or any peripherals until the
instructions tell you to. Otherwise, you may damage some part of
your equipment.
Unpacking
As you unpack the components, be sure to inspect each
1
item. If anything is missing or damaged, consult your Epson dealer.
Setting Up Your System
1-1
Page 15

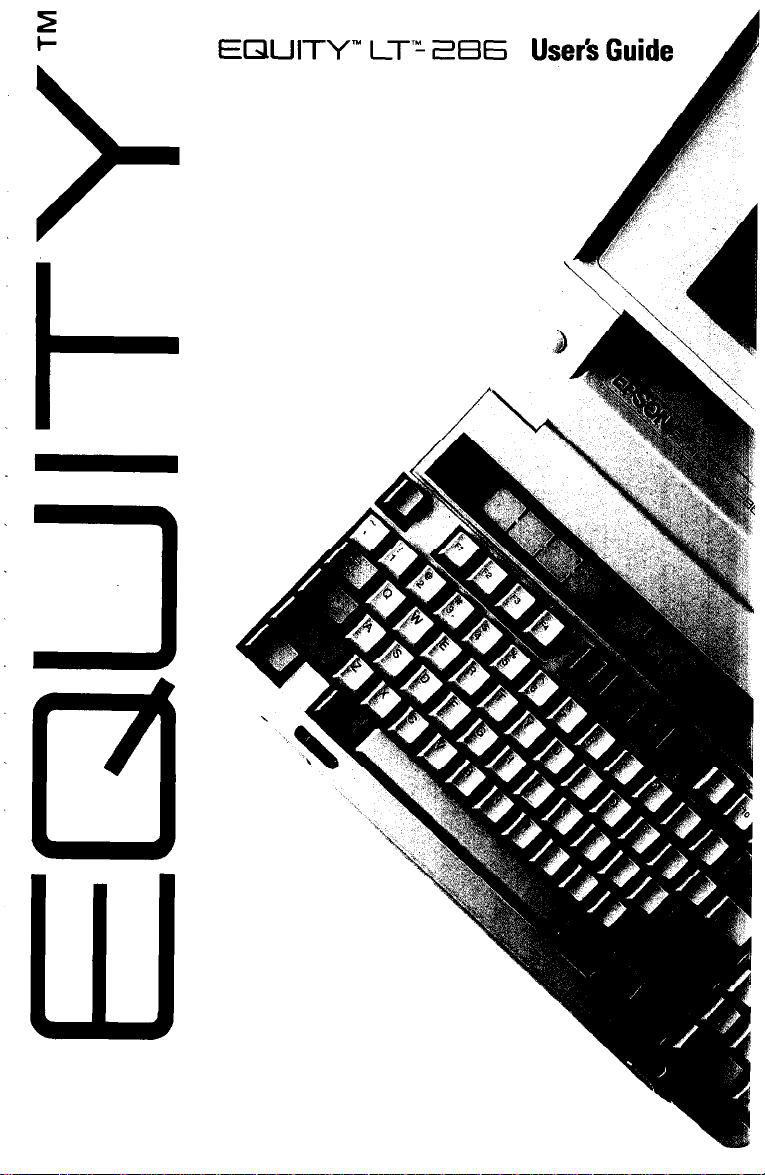
In addition to this manual, you should have the following items:
l The main unit
l
The AC adapter and power cord
l
Three diskettes: Startup/Operating 1, Operating 2, and
Reference
l
An MS-DOS manual and a GW-BASIC manual
l
Two function key templates
You’ll also find a registration card with the main unit. Fill out this
card now and mail it to Epson. With your registration card on file,
Epson can send you update information.
Be sure to keep your packing materials. They provide the best
protection possible for your computer if you need to ship it later.
Connecting the AC Adapter
2
1.
Follow these steps to connect the AC adapter:
Make sure the computer’s power switch (located on the back
panel of the computer) is turned off.
2.
Insert the round end of the adapter cable into the connector
marked AC ADAPTER on the back panel of the computer.
1-2
Setting Up Your System
Page 16
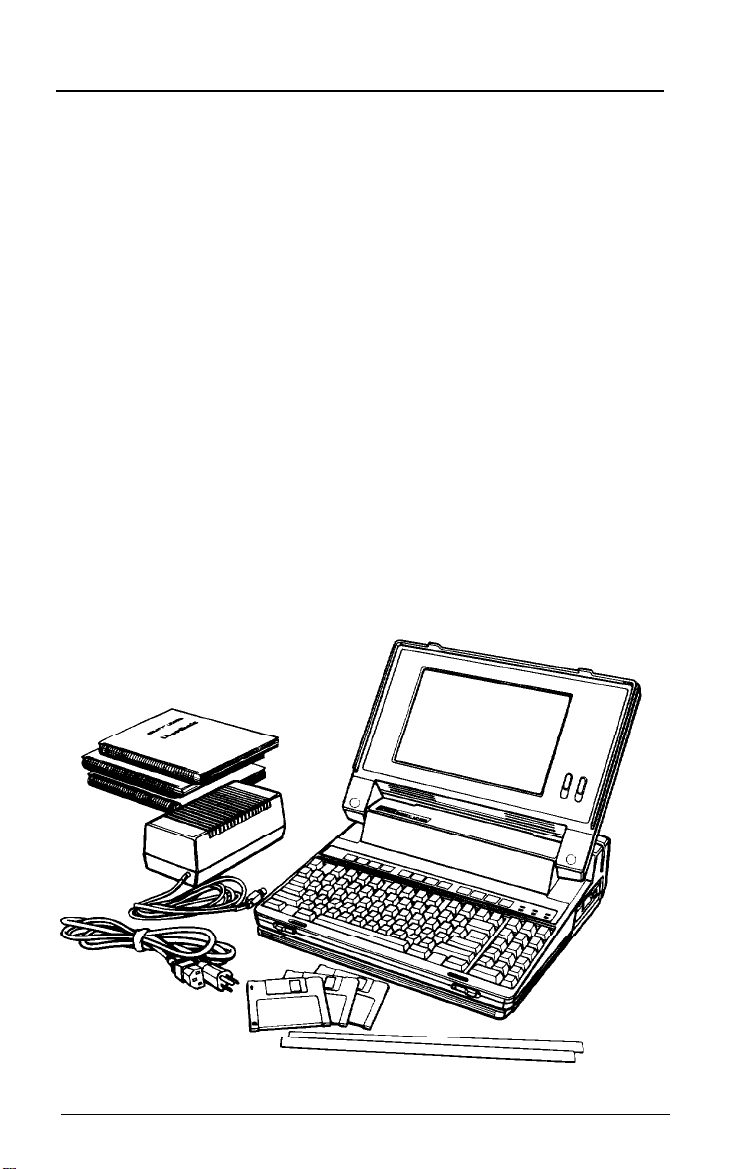
3.
Connect the computer’s power cord to the adapter’s input
socket.
4. Plug the other end of the power cord into a grounded, 120-volt,
AC wall outlet.
Be sure to read “Using the AC Adapter” in Chapter 4 for
information on powering the computer with the AC adapter.
Note
The AC adapter cable has been
being accidentally
the AC adapter, grasp the cable with your thumb on the flat part
of the connector, Then pull it away from the computer, Do not
try to unplug the adapter by pulling on the cord.
disconnected from the computer. To
designed to prevent it from
unplug
Charging the Battery
3
The Equity LT-286
(NiCad) battery pack that powers the computer when you are not
using the AC adapter. Before you use the computer the first time,
you must charge the battery.
When you plugged in the AC adapter in step 2, it started charging
the battery. This happens whenever the adapter is connected to the
computer and plugged into an electrical outlet. Let the battery
contains a rechargeable nickel cadmium
Setting Up Your System
1-3
Page 17

charge for at least five minutes before you start using the computer
the first time, and leave the AC adapter connected while you use
the computer.
Be sure to read “Using the Battery” in Chapter 4 for information on
using the computer with the battery. It explains how to charge the
battery fully; you should do this as soon as possible with your new
computer.
Connecting a Printer
The Equity LT-286 has both parallel and serial interfaces
4
(ports). You can easily connect a printer or plotter that has either
type of interface. Just follow the instructions below. Of course,
Epson offers a full range of printer products; consult your dealer for
more information.
Connecting to the Parallel Interface
The computer’s Centronics®-compatible parallel interface uses a
25-pin, D-shaped female connector. Most Epson printers have
parallel interfaces.
To connect a printer to the computer, you need an IBMcompatible printer cable. If you’re not sure which one you need,
consult your Epson dealer. Once you have a printer cable, follow
these steps to connect your printer to the parallel interface on the
computer:
1.
Place the printer next to your computer.
2.
Before you connect the printer, make sure the power switches
on the computer and printer are off. (The power switch for your
computer is located on the back of the machine, on the left side
as you face the keyboard.)
1-4
Setting Up Your
System
Page 18
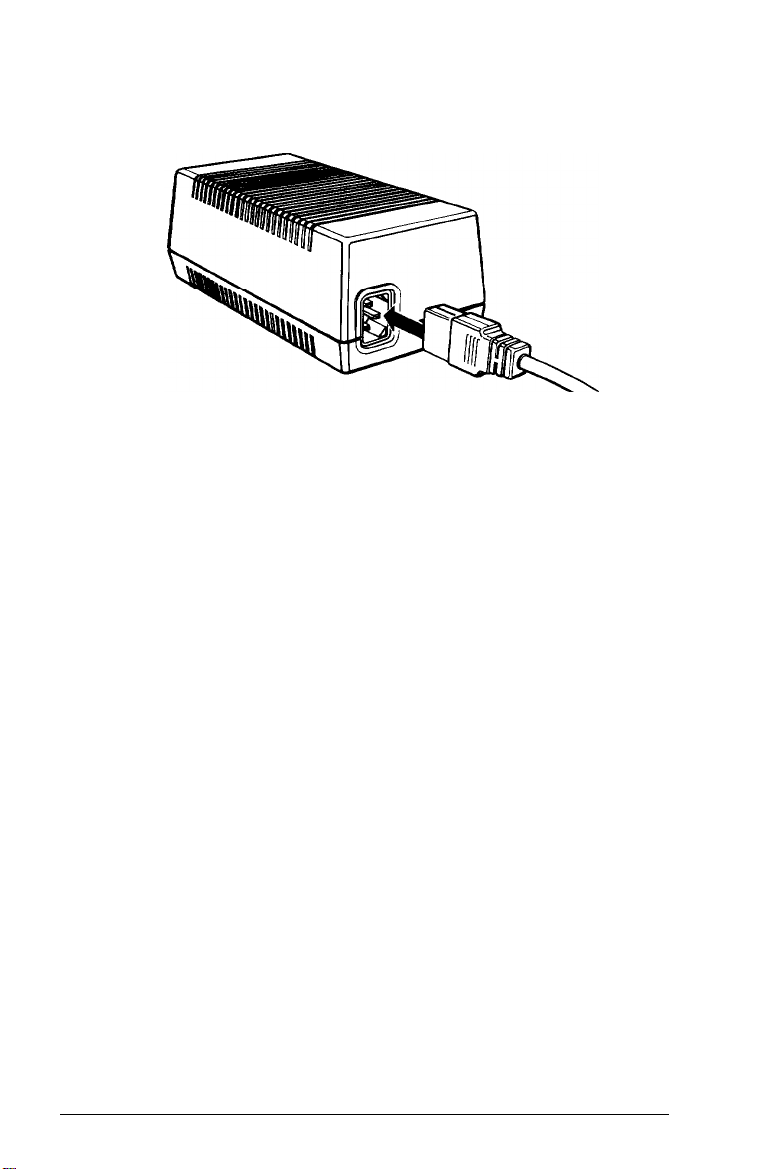
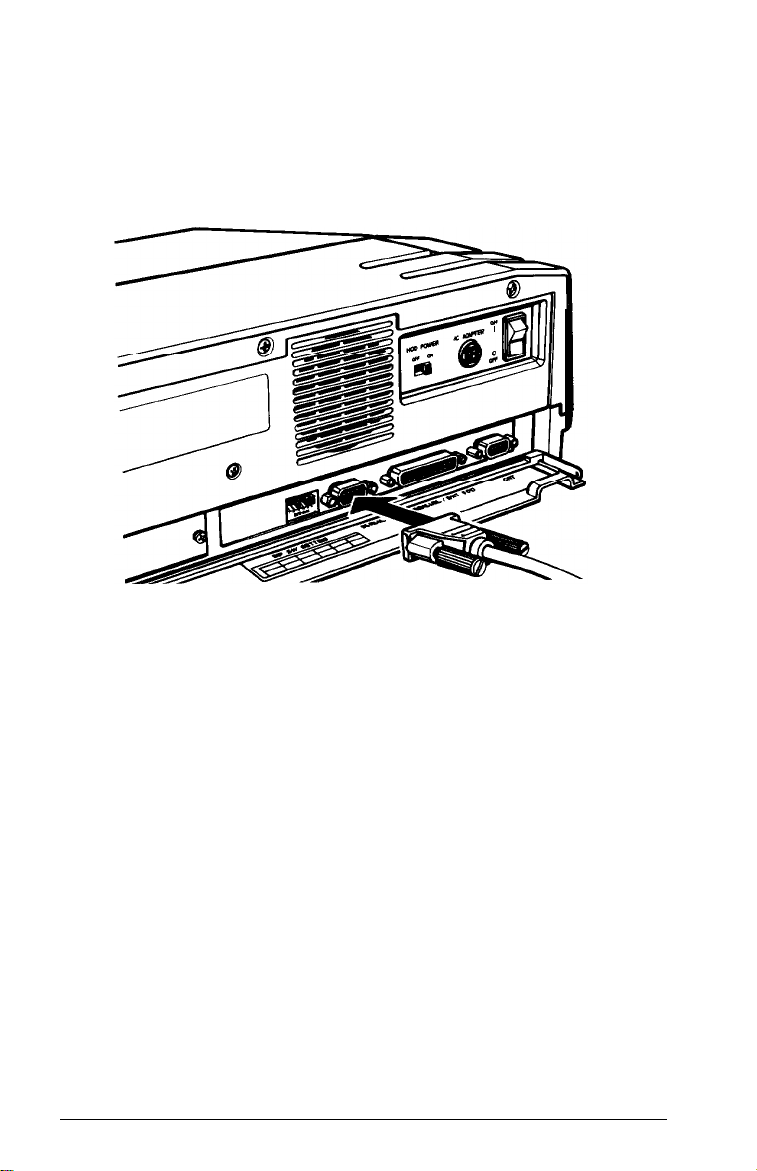
3. Open the computer’s interface cover, as shown below.
4. One end of the printer cable has a 25-pin, D-shaped male
connector. (See your printer manual if you’re not sure which
end this is.) Connect this end to the parallel connector on the
back panel of the computer, as shown below. If the plug has
retaining screws, tighten them by hand or with a screwdriver.
Setting
Up Your System
1-5
Page 19
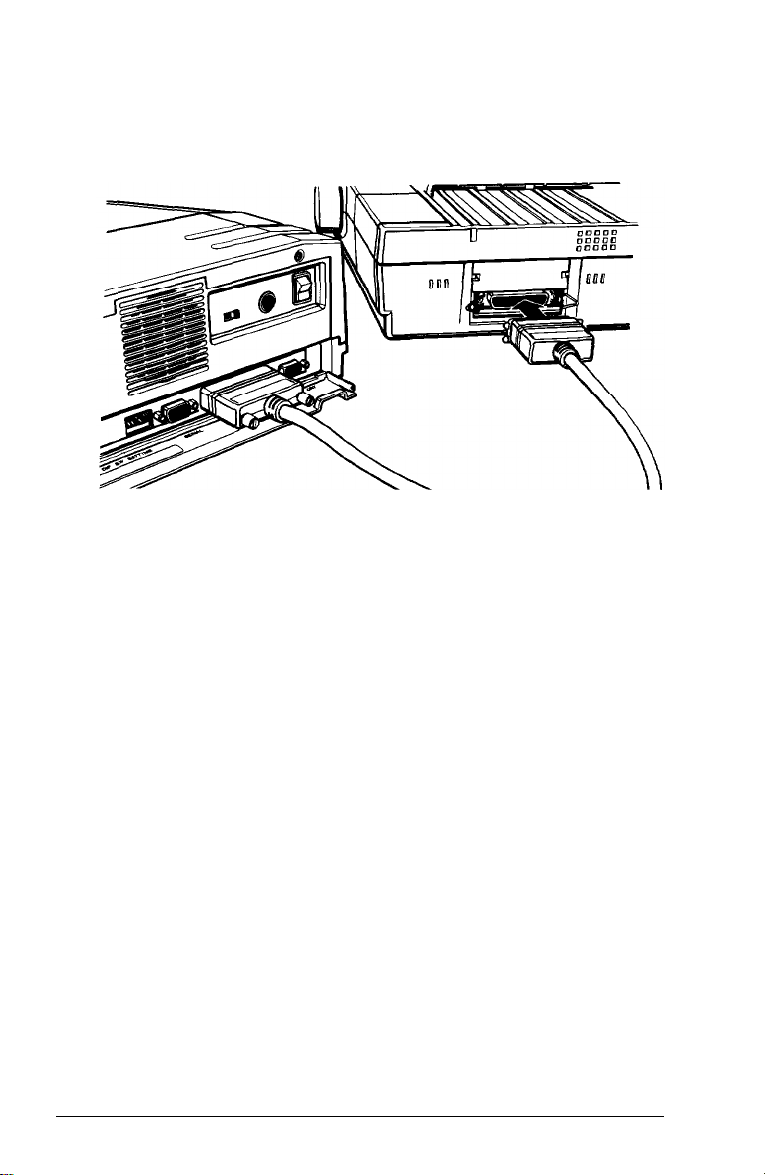
5.
Connect the other end of the cable to the printer as shown in
the following illustration. To secure the cable, squeeze the clips
at each side of the printer connector and push them into place.
6.
Plug the printer’s power cable into an electrical outlet.
Before starting your computer, be sure to set DIP switch 1 on
7.
the back panel to the off position, as described on page 1-8 in
“Setting the DIP Switches.” This tells your computer that a
printer is connected to the parallel interface.
Note
If you plan to use an external 5 1/4-inch diskette drive with your
Equity LT-286, you must connect the external drive to the
parallel interface, Therefore, you cannot have both a parallel
printer and the diskette drive connected at the same time. If
you’re using an external 5 1/4-inch diskette drive, you need to
set DIP switch 1 on the back panel to the on position. See
“Setting the DIP Switches,” on page 1-8,
1-6
Setting Up Your System
Page 20
Connecting to the Serial Interface
If you have a printer or other peripheral device that uses a serial
interface, connect it to the serial (RS-232C) interface on the back
of the computer.
The Equity LT-286 uses a 9-pin, D-shaped male connector, so be
sure you have a compatible cable or an adapting cable that converts
the 9-pin output to the standard 25-pin output. To connect a serial
device, follow the steps above for connecting a parallel device.
You need to make sure the serial port is set up so it functions
properly. If you are using the port for a serial printer, you must also
redirect printer output from the parallel port to the serial port. Use
the MS-DOS MODE command (or the Epson MENU program) to
make these changes. See your MS-DOS manual for instructions.
Setting
Up Your System
1-7
Page 21

Note
If you plan to connect a color monitor or an external 5 1/4-inch
diskette drive to your computer, do so at this point. For
instructions on connecting the monitor, see Appendix A.
For instructions on connecting an external diskette drive, see
the instructions that came with the drive you purchased.
If you connect either of these devices to your Equity LT-286, be
sure to set the computer’s DIP switches correctly before using the
computer. See “Setting the DIP Switches,‘+ below.
Setting the DIP Switches
The Equity LT-286 has two sets of DIP switches. These are
5
small, on/off switches that provide your computer with information
about itself each time you turn the computer
either on (up) or off (down). To change a setting, use a hard, thin
object, such as a small screwdriver.
One set of DIP switches is located just above the keyboard; the
other is on the back panel of the computer. The set above the
keyboard has four switches that control the LCD screen. The set on
the back panel has six switches that control the diskette drive, the
parallel and serial interface configuration, the character set, and the
presence or absence of an external video controller card.
on. A DIP switch is
Read this section to make sure the current DIP switch settings
match your system setup.
NoteNote
The DIP switches on the back panel should be changed onlyThe DIP switches on the back panel should be changed only
while the computer is turned off. Otherwise, the new settings dowhile the computer is turned off. Otherwise, the new settings do
not take effect until the computer is turned off and then onnot take effect until the computer is turned off and then on
again. (There is one exception: switch 4 on the back panel mayagain. (There is one exception: switch 4 on the back panel may
be changed while the computer is running.)be changed while the computer is running.)
The DIP switches above the keyboard may be changed while the
The DIP switches above the keyboard may be changed while the
computer is running. However, do not change these switchescomputer is running. However, do not change these switches
while running the setup program.while running the setup program.
1-8
Setting Up
Your
System
Page 22
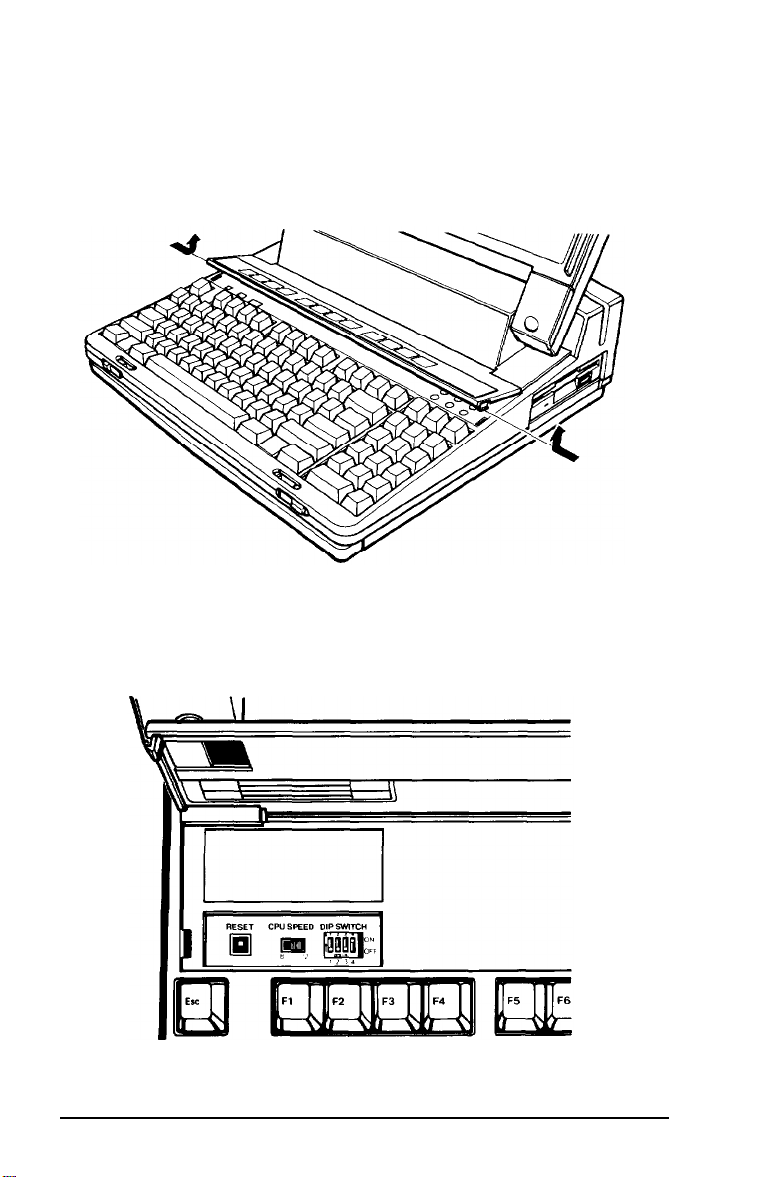
Keyboard DIP Switches
The DIP switches above the keyboard are numbered 1 through 4.
To access these switches, lift the panel above the keyboard by
pressing inward on both sides of the cover as you lift it up:
The system functions controlled by the keyboard DIP switches,
shown below, are listed in Table l-l.
Setting Up Your System
1-9
Page 23
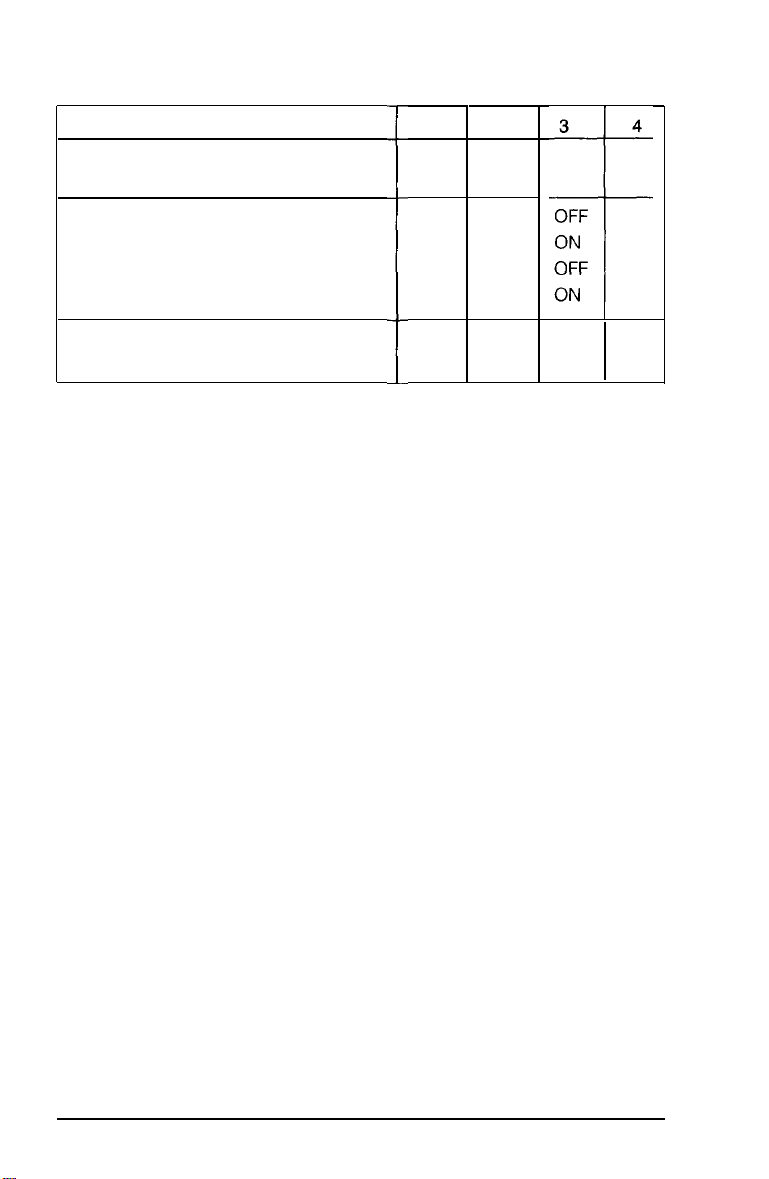
Table 1-1. Keyboard DIP switch functions
1
LCD reverse
LCD normal*
Gray-scale mode 0 (black/white)*
Gray-scale mode 1
Gray-scale mode 2
Gray-scale mode 3 (user-defined)
Select LCD*
Select external monitor
*Default settings
Switch 1, LCD reverse or normal-This switch tells your
computer whether to display text on the screen in normal or
reverse mode. In normal mode, black characters are displayed on a
white background. In reverse mode, white characters are displayed
on a black background.
Switches 2 and 3, gray-scale mode-These two switches select one
of four available gray-scale modes. The gray-scale mode governs the
way color information is displayed on your LCD screen. In mode 0,
everything is displayed in black and white. For most of your work
with the Equity LT-286, you probably want to use mode 0. In
modes 1 and 2, information that appears in color on a color
monitor appears in various shades of gray on your LCD screen.
Modes 1 and 2 differ from each other only in the specific
assignment of colors to gray tones. The gray tone assignments
are shown in Table 1-2.
ON
OFF
:
2
OFF
OFF
ON
ON
3
OFF
ON
OFF
ON
-1
4
ON
OFF
1-10
Setting Up Your System
Page 24

Table 1-2: Gray-scale
mocks
1
and 2
Color
Black
Blue
Green
Cyan
Red
Magenta
Brown
White
Gray
Light blue
Light green
Light cyan
Light red
Light magenta
Yellow
Bright white
Note: 0 is the darkest gray tone; 7 is the lightest
Mode 1 gray tone Mode 2 gray tone
0 0
1 1
4 2
5 3
2 4
3 5
6
7 7
0 0
1 1
4
5
2
3
6 6
7 7
6
2
3
4
5
Mode 3 is user-defined. If you select mode 3, you may assign colors
to gray tones in whatever way best suits your needs. To specify a
mode-3 gray scale, use the setup program, as described in Chapter 2.
Switch 4, LCD or monitor selection-This switch tells the
computer whether to display text and graphics on the LCD screen
or on a color monitor that you have connected to the computer. If
you have connected a color monitor, set this switch to off.
Otherwise, leave it on.
Setting Up Your System
1-11
Page 25
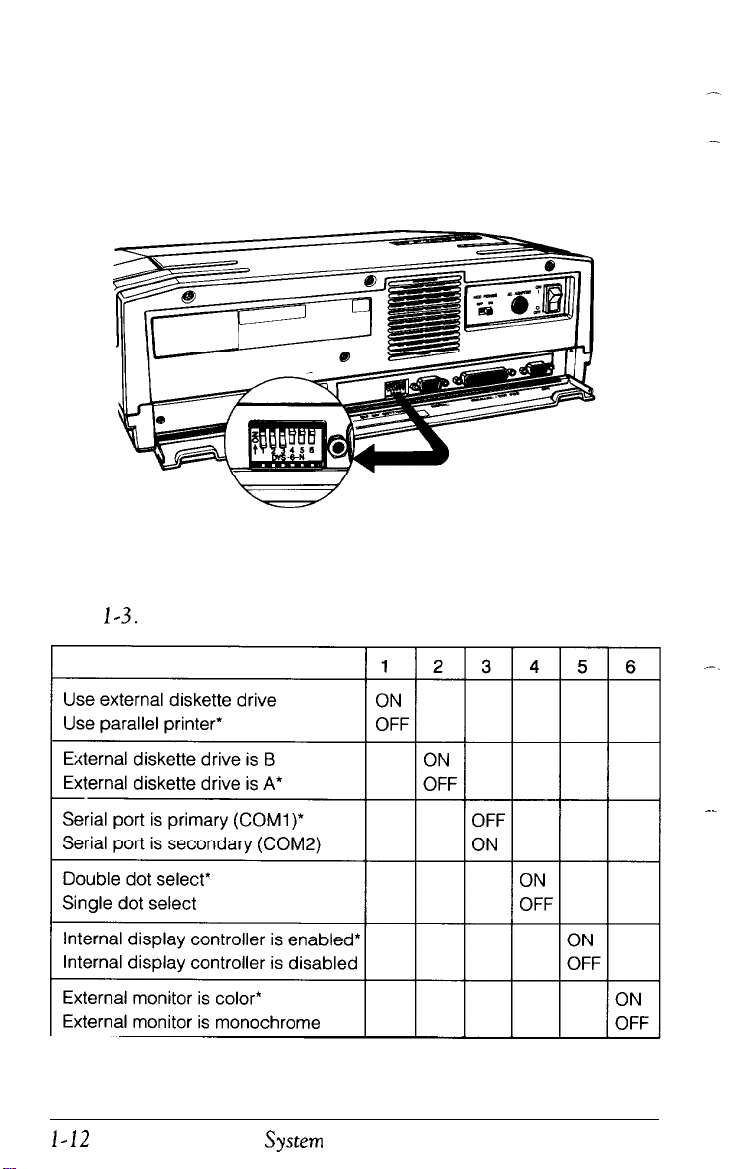
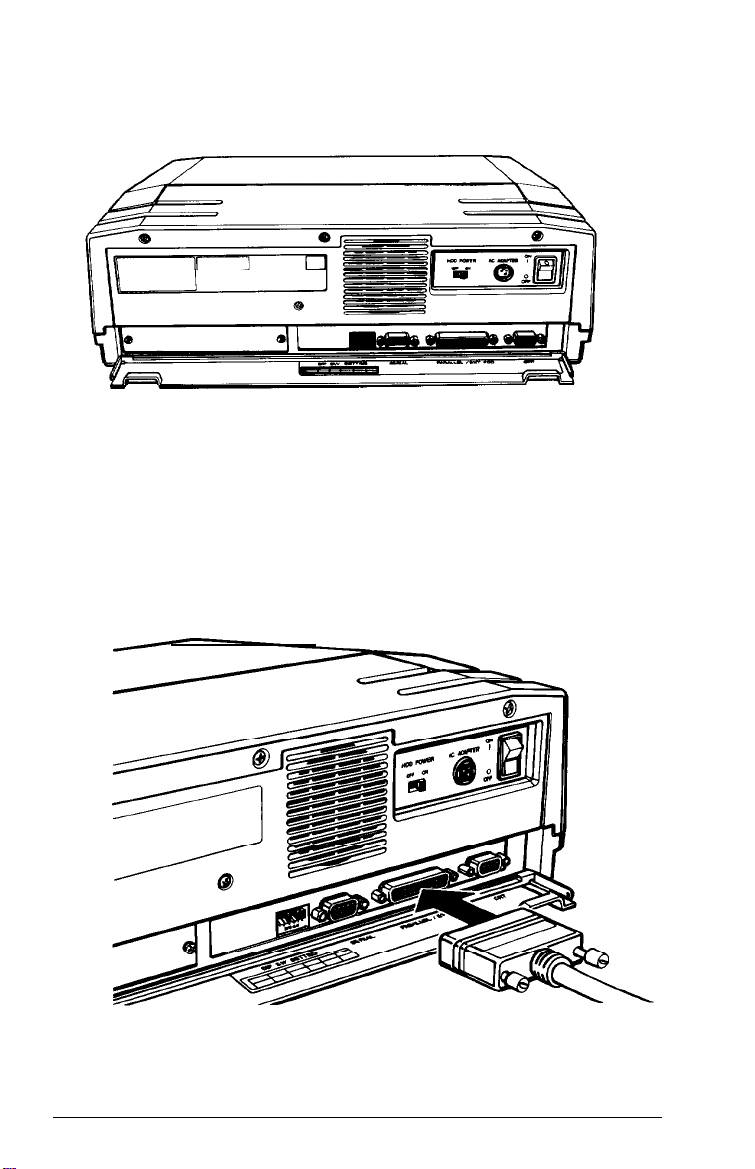
Back Panel DIP Switches
The second set of DIP switches is located near the middle of the
back panel. These switches are numbered 1 through 6. To access
these switches, open the back panel of the computer as shown
below.
The system functions controlled by these switches are listed in
Table 1-3 and described below.
Table
1-3.
Buck panel DIP switch functions
*Default settings
1-12
Setting Up Your
__
System
Page 26

Switch 1, use of parallel port-This switch tells your computer
whether a diskette drive or a parallel printer is connected to the
parallel port. If you have connected a parallel printer to this port,
set switch 1 off. If you have connected an external 5 1/4-inch
diskette drive to the port, set switch 1 on.
WARNING
Failure to set switch 1 correctly may result in damage to your
system.
Switch 2, external drive assignment-If you have connected an
external diskette drive to the computer, switch 2 determines
whether MS-DOS and your application programs access the drive
as drive A or drive B. If this switch is on, the built-in 3 1/2-inch
diskette drive is drive A and the external 5 1/4-inch diskette drive
is drive B. If this switch is off, the internal drive is B and the
external drive is A.
Certain copy-protected application programs require that an
original program diskette be in drive A when the program is started.
If you are running such a program and the original diskette is 5 1/4inch, be sure to set switch 2 off. Under all other circumstances, it is
best to leave it on.
Switch 3, primary or secondary serial port-This switch tells
the computer whether the serial connector on the back of the
computer is configured as a primary port (COM1) or a secondary
port (COM2). If this switch is off, MS-DOS recognizes this
connector as COM1; if it is on, MS-DOS recognizes it as COM2.
If you have not installed an internal modem in your Equity LT-286,
you probably want to leave switch 3 off. If you have installed an
internal modem, and you want the modem’s own serial port to be
COM1, set this switch on.
Switch 4, double-dot/single-dot select-This switch controls the
intensity with which characters are displayed on the screen. Set
this switch on for bold (double-dot) characters or off for light
(single-dot) characters.
Setting Up Your System
1-13
Page 27
Switch 5, enable or disable internal display controller-If you
have attached an optional expansion chassis and you are using an
external video controller card (such as an Enhanced Graphics
Adapter) in the expansion chassis, set this switch off. Otherwise,
set it on.
Switch 6, external monitor type-Switch 6 is important only if
you are using an external monitor attached to a video controller
card in an expansion chassis and you have set switch 5 off. If your
external monitor displays color, set this switch on. If your external
monitor is monochrome, set this switch off.
Note
If switch 5 is on, the computer ignores the setting of switch 6.
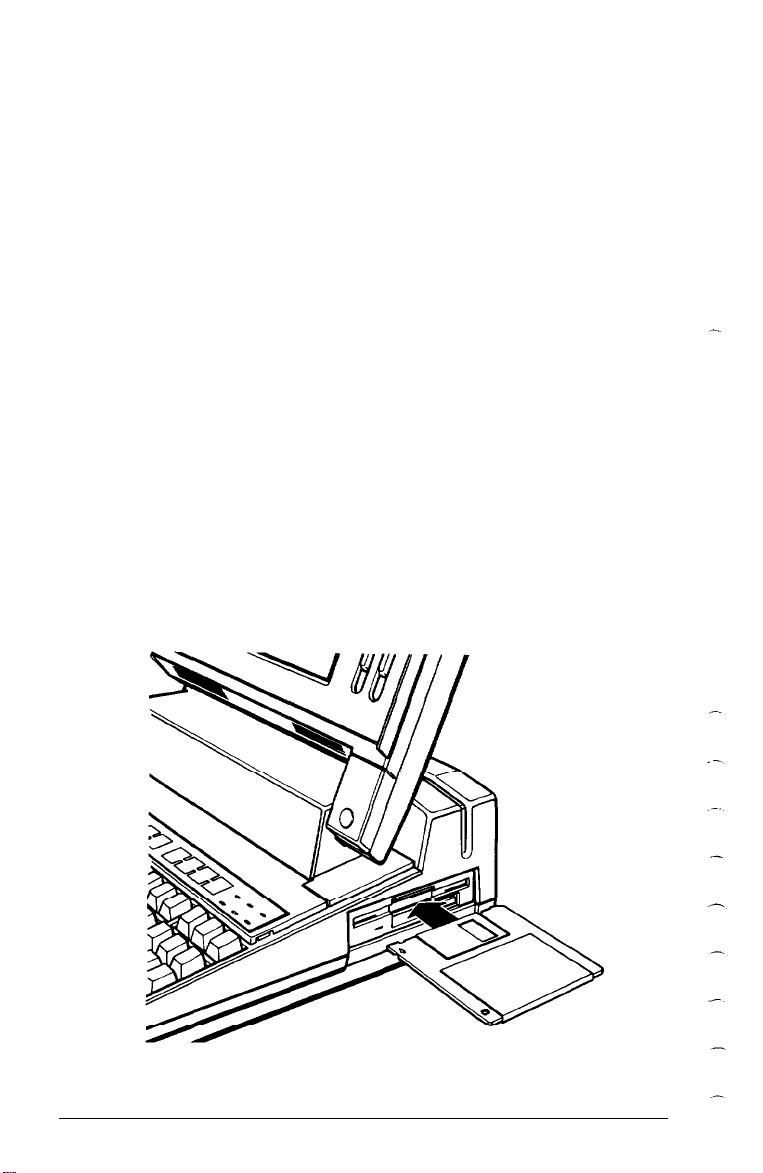
Inserting the Startup/Operating 1 Diskette
Follow these steps to insert the Startup/Operating 1 diskette:
6
1.
Hold the diskette with the printed label facing up and the
arrow pointing into the diskette drive, as shown in the
following illustration.
1-14
Setting
Up Your System
Page 28

2.
Insert the diskette in the drive so that it clicks into place.
When the diskette is all the way in, the release button pops out.
For more information on inserting, removing, and caring for
diskettes, see Chapter 4.
Starting the System
After you have completed steps 1 through 6, you’re ready to
7
turn on the power and start using your Equity LT-286 computer.
But before you turn it on, read the following safety rules to avoid
accidentally damaging your computer or injuring yourself:
Do not attempt to dismantle any part of the computer. If there
is a hardware problem you cannot solve after reading Appendix
B on troubleshooting or after performing the system diagnostics
described in Appendix D, consult your Epson dealer.
Never turn off or reset your computer while a disk drive LED
(light-emitting diode) is illuminated. Doing so can destroy data
stored on the disk or make the whole disk unusable. The disk
drive LEDs are located above the keyboard on the right side.
The LED marked HDD indicates that the hard disk drive is in
use. The LED marked FDD indicates that the built-in diskette
drive is in use.
Always wait at least five seconds after you switch off the power
before switching it back on. Turning the power off and on
rapidly can damage the computer’s circuitry.
Do not leave a beverage on top of or next to your system or any
of its components. Spilled liquid can damage the circuitry of
your components.
Setting Up Your System
1-15
Page 29
Turning On the Computer
After you have charged the battery (by connecting the AC adapter
to the computer) for at least five minutes, you can turn on your
computer. Be sure to leave the AC adapter connected while you use
the computer for the first time.
To turn on your computer, follow these steps:
1.
Turn on any peripheral devices, such as a printer, an external
diskette drive, or a color monitor.
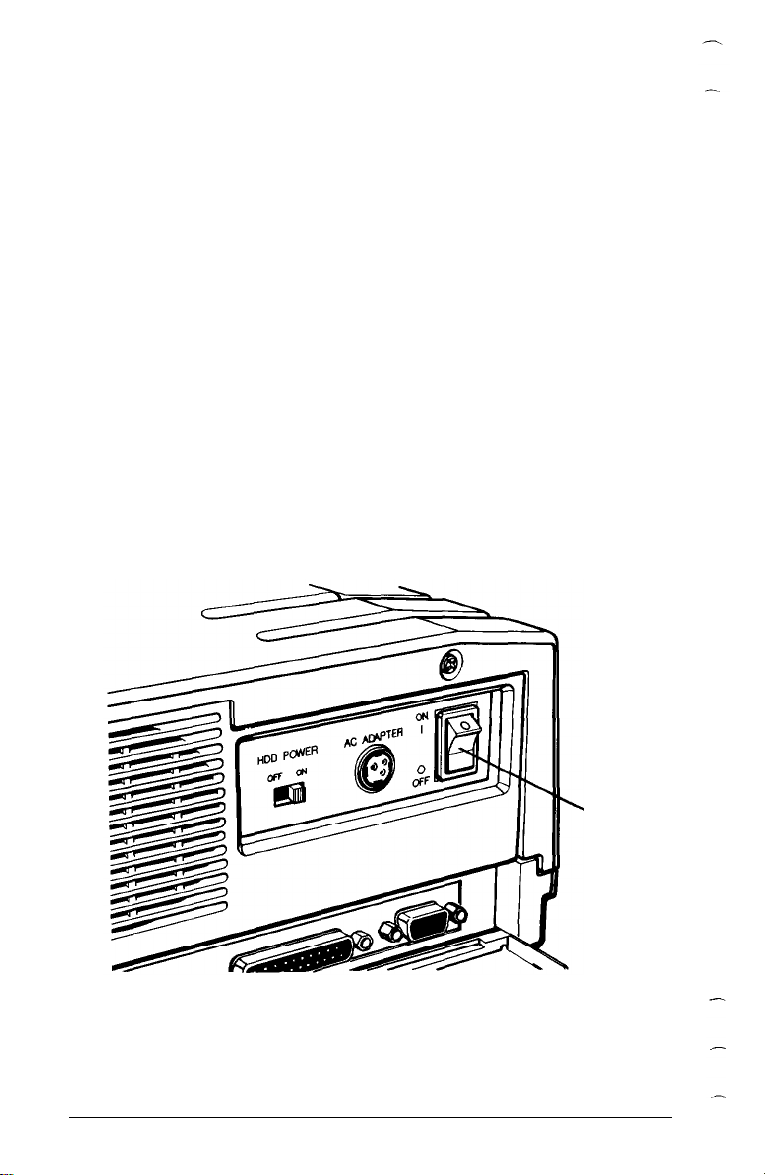
2.
Make sure your computer’s hard disk switch, located on the
back panel, is turned on. It is best to leave this switch on at all
times.
3. If you have not done so already, insert the Startup/Operating 1
diskette.
4. Turn on the computer by pressing the power switch on the
back panel.
1-16
Setting Up Your
Power
Switch
System
Page 30
The Power/Speed indicator above the keyboard lights up, and
after a few seconds the computer begins to perform an internal self
test. This is a diagnostic program the computer runs whenever you
turn it on. The power-on self test checks the RAM (random access
memory), keyboard, system board, and peripherals before the
computer begins normal operation.
For a complete description of the power-on diagnostics, see
Appendix C.
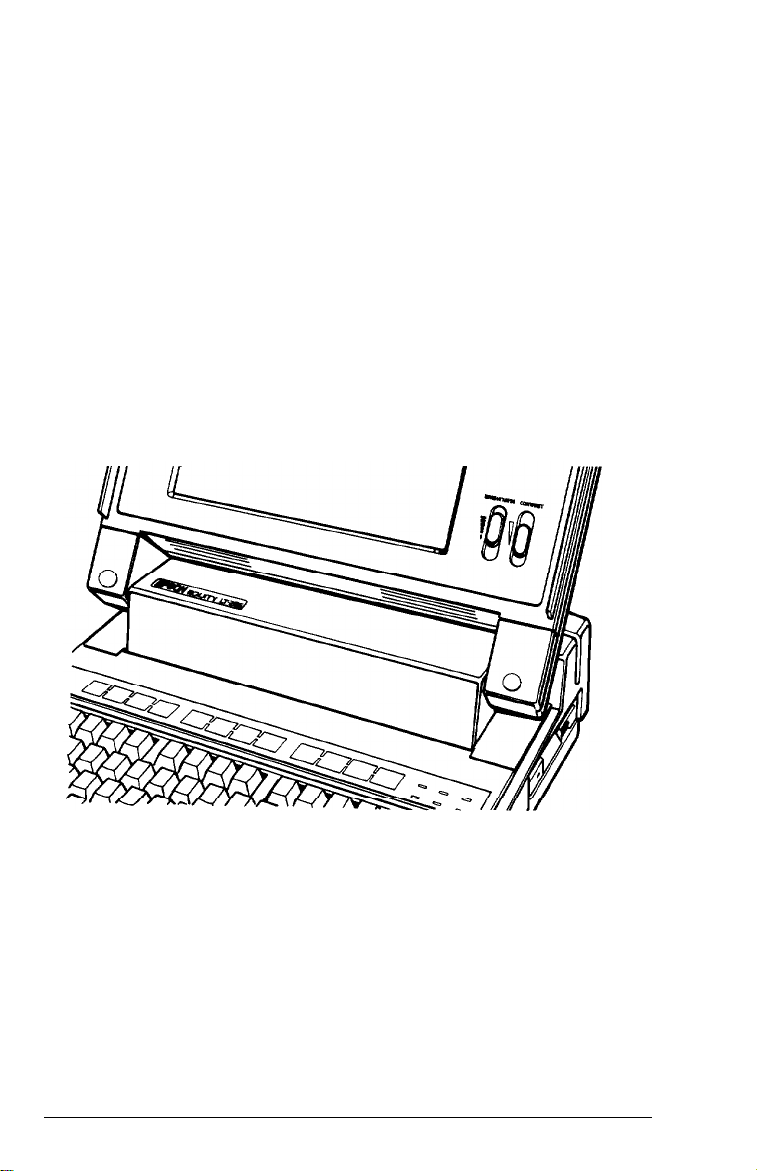
Adjusting Screen Contrast and Brightness
If you cannot see text on the screen clearly, use the switches on
the right side of the screen to adjust the screen’s contrast and
brightness. The switches are shown below:
The contrast switch determines how bright the characters appear
against the background. To increase the contrast, move the switch
up. To decrease it, move the switch down.
To make the backlighting brighter, move the brightness switch up.
To decrease the backlighting, move the switch down. To conserve
the battery’s charge when you’re running the computer on the
battery, do not make the screen brighter than necessary to read the
text clearly.
Setting Up Your
System
1-17
Page 31

Initial Screen Display
After the computer completes its self test, a message tells you how
much random access memory (RAM) is available:
000640 KB Ok
The computer then boots (starts up) the MS-DOS operating
system. The screen displays a date prompt similar to this:
Current date is Sat 09-03-88
Enter new date (mm-dd-yy):
Type today’s date, in the format shown above, and press Enter. You
can use either hyphens or slashes to separate the month, day, and
year.
The screen then displays the time:
Current time is 09:10:33.49
Enter new time:
Type the current time in the format shown above, and press Enter.
You don’t need to enter the seconds. For PM times, use a number
between 12 and 23 to designate the hour.
Note
You need to enter the current date and time only the first time
you start your computer. Afterward, your computer’s built-in,
battery-powered clock keeps track of the date and time
automatically. If you ever want to change the date or time for
any reason, use the MS-DOS
DATE
and TIME commands
(described in your MS-LXX manual).
The screen displays the MS-DOS version number and copyright
information. Then the MS-DOS command prompt appears:
This means the operating system is ready for you to enter a
command. The command prompt identifies the current operating
drive: A, B, or C. The prompt appears on the screen whenever you
1-18
Setting Up Your System
Page 32

load MS-DOS, complete an MS-DOS command, or exit an
application program.
NoteNote
Your computer is designed to conserve energy
screen when there is no activity at the keyboard for a certainscreen when there is no activity at the keyboard for a certain
period of
to illuminate it again.to illuminate it again.
time. If the screen goes dark, press one of the Shift keys
by
darkening the
Copying System Diskettes
Now that you have set up your system and loaded MS-DOS,
8
it is important that you make copies of your system diskettes right
away. Use only the copies (usually called working copies) for daily
operation; store the originals in a safe place.
To copy your system diskettes, you need three blank, 720KB,
double-sided, double-density, 3 1/2-inch diskettes. Follow these
steps:
1.
Write-protect your original system diskettes. This protects the
diskettes from accidentally being erased or copied over. The
write-protect device is a small switch on the lower-right corner
on the
back of the diskette.
the switch down toward the edge of the diskette so there
is a hole where the switch used to be. (For more detailed
instructions, see “Write-Protecting Diskettes,” in Chapter 4.)
To
write-protect a diskette, slide
2.
Insert the Startup/Operating 1 diskette in the diskette drive if it
is not
there
already.
3.
Type DISKCOPY
message:
and press Enter. The screen displays this
Insert SOURCE diskette in drive A
Press any key when ready . . .
Setting Up Your System
1-19
Page 33

4. Drive A already contains the diskette you want to copy (the
source diskette), so just press any key. The DISKCOPY
program copies most of the files on the diskette to the
computer’s memory. (Because the 720KB MS-DOS diskette
holds more data than fits in the computer’s 640KB of memory,
the computer must copy the diskette in two passes. MS-DOS
prompts you when you need to change diskettes.)
The screen then displays this message:
Insert TARGET diskette in drive A:
Press any key when ready . . .
5. Remove the Startup/Operating 1 diskette from drive A by
pressing the release button, and insert the blank diskette (the
target diskette) in the drive. Then press any key.
If the diskette in drive A has not been formatted, the
DISKCOPY program formats it. Then the program begins
copying the data from the computer’s memory to the formatted
diskette. When it has copied all the files from memory, the
screen displays this message:
Insert SOURCE diskette in drive A:
Press any key when ready . . .
6. Remove the target diskette from the drive and insert the
original Startup/Operating 1 diskette. Then press any key.
The DISKCOPY program copies the rest of the files from the
original diskette to the computer’s memory and then displays
this message:
Insert TARGET diskette in drive A:
Press any key when ready . . .
1-20
Setting Up Your System
Page 34

7.
Remove the Startup/Operating 1 diskette from drive A and
insert the target diskette in the drive, then press any key. The
program copies the remaining files from the computer’s memory
to the target diskette.
When the copy is complete, you see this prompt:
Copy another diskette (Y/N)?
8.
Press Y so you can make a copy of the Operating 2 diskette.
Follow the instructions above and the prompts on the screen to
copy the Operating 2 diskette.
9.
When the
reappears, press Y again, and follow the instructions above to
copy the Reference diskette.
10. When you finish copying all three system diskettes, answer N to
the
Copy another diskette (Y/N)?
Copy another diskette (Y/N)?
prompt.
prompt
Setting Up Your
System
1-21
Page 35

Chapter 2
Running the Setup Program
If this is the first time your Equity LT-286 has been used, you need
to run the setup program on the Reference diskette to give the
computer information about the way it is set up. This is a simple
procedure that you must do at least once. You may need to do it
again later if you want to change a setting.
The setup program lets you specify the following:
The amount of random access memory (RAM) in your
computer
The type of display you’re using
Whether or not you have installed an 80287 math coprocessor
Whether or not you have installed an external 5 1/4-inch
diskette drive
What type of hard disk drive you have
The backlight period for your LCD screen
The mapping of colors to gray tones for gray-scale mode 3.
The settings you specify with the setup program are recorded in a
special area of memory called CMOS RAM. This memory is backed
up by a battery, so it cannot be erased when you turn off or reset the
computer. Whenever you turn on the computer, it reads the
settings stored in CMOS RAM. If there are any differences
between those settings and the settings of your DIP switches, the
computer prompts you to rerun the setup program.
Running
the
Setup Program
2-1
Page 36

Starting the Setup Program
To start the setup program, follow these steps:
1.
Insert your working copy of the Reference diskette in drive A.
2. Turn on or reset the computer. Press Enter twice to respond
to the date and time prompts. The setup program loads
automatically and displays the Reference diskette’s operation
menu:
OPERATION MENU
1-
Setup
2 -
System diagnostics
0- Exit to DOS for more utilities
Enter selection number:
3.
Press 1 to
menu appears on the screen:
select
Setup
and then press Enter. The setup main
SETUP Utility
Lsaloct
2-2
function, Enter exit
Running the Setup Program
version 4.00
Coprocessor
Mass
Backlight period
Gray
storage
scale
program
Copyright
(c)
SEIKO EPSON CORP.
1988
Page 37

To select an option on this menu, use the & and ? keys to
4.
highlight the option. Then press Enter. (The L and 1‘ keys are
located on the numeric keypad, at the lower-right comer of
your keyboard.)
Memory
The setup program assumes that your Equity LT-286 is equipped
with 640KB of main memory and no expansion memory. If this
information is correct, you do not need to make any changes to the
Memory
To change the memory information recorded by the setup program
or to confirm that the current settings are correct, highlight
Memory
portion of the setup program.
and press Enter. The following display appears:
Exit
+
Memory
Display
Coprocessor
Mass storage
Backlight period
Gray scale
If the current settings are correct, press ? to return to the main
setup menu.
Running the Setup Program
2-3
Page 38

To change the main memory setting, highlight Main. Then press
Enter one or more times until the correct value appears.
To change the expansion memory setting, highlight Expansion.
Then press the + key (either the gray + on the right side of the
keyboard or the white + next to the backspace key) until the
correct value appears.
For example, if you have installed a 2MB memory expansion
module, press the + key until 2048KB appears. If you have installed
two 2MB expansion modules, press the + key until 4096KB
appears.
When you have finished making changes to the memory settings,
highlight SAVE SETTINGS and press Enter.
Display
The setup program assumes that you are using either the built-in
LCD screen in its normal 80-column mode or a color monitor
(attached to the CRT connector) in 80-column mode. If this
information is correct, you do not need to make any changes to the
Display
portion of the setup program.
To change the display information recorded by the setup program
or to confirm that the current settings are correct, highlight
Display
and press Enter. The following screen appears:
I
Exit
Memory
+
Display
Coprocessor
Mass storage
Backlight period
Gray scale
2-4
Running the
Setup Program
Page 39

If the current settings are correct, press ? to return to the main
setup menu.
To change the display information, highlight
col
and press Enter. The following menu appears:
Color/graph.
Exit
Memory
+
Display
Coprocessor
Mass storage
Backlight period
Gray scale
+ Color/graph. 80 col
* Special options *
** SAVE SETTINGS **
Color/graph. 40 col
Monochrome
The choices are as follows:
Color/graph. 80 col-In this mode, the Equity LT-286
displays text at a width of eighty characters per line and can
display graphics. This is the standard setting.
80
80 col
Color/graph. 40 col-In this mode, the Equity LT-286
displays text at a width of forty characters per line and can
display graphics. Use this setting if you want the computer to
start up with wider characters. (Your application programs
may still change the display from the 40-column mode to the
80-column mode, but the computer will start in the 40-column
mode each time you turn it on or reset it.)
Monochrome 80 col-Choose this setting only if you have a
monochrome monitor attached to a monochrome display
adapter in an expansion chassis and you want the computer’s
initial display to appear on the monochrome monitor.
Running the Setup Program
2-5
Page 40

l Special options-Choose this setting if you have an
EGA (Enhanced Graphics Adapter) or VGA (Video Graphics
Array) display adapter in an expansion chassis and you want
the computer’s initial display to appear on the monitor
connected to that adapter.
To select a display option, highlight the option and press Enter.
Then highlight SAVE SETTINGS and press Enter again. The main
setup menu reappears.
Coprocessor
The setup program assumes that you have not installed an 80287
math coprocessor. If this is the case, you do not need to make any
changes to the
If you have installed an 80287 coprocessor, highlight
Coprocessor
Coprocessor
and press Enter. The following display appears:
portion of the setup program.
Exit
Memory
Display
4
Coprocessor
Mass storage
Backlight period
Gray scale
*** SAVE SETTINGS ***
Highlight the 80287 option and press Enter once, to indicate
that you have installed an 80287 coprocessor. Then highlight
SAVE SETTINGS and
2-6
Running the Setup Program
press Enter.
Page 41

Mass Storage
I>
The setup program assumes that your computer has an internal
1.44MB 3 1/2-inch floppy disk drive, an internal 20MB hard disk,
and that you are not using an external 5 1/4-inch diskette drive. If
this is true, you do not need to make any changes to the Mass
storage
To change the mass storage information recorded by the setup
program or to confirm that the current settings are correct,
highlight
appears:
portion of the setup program.
Mass storage
and press Enter. The following display
ExitExit
MemoryMemory
DisplayDisplay
CoprocessorCoprocessor
++
Mass storageMass storage
Backlight period
Gray scale
B
-A
Drive
B(external):
- -
Drive C
******
If you are using an external 5 1/4-inch diskette drive, highlight
Drive B (external).
external diskette drive you have installed. As you continue to press
S
AVE SETTIN
Then press Enter to select the type of
1 1
None
: Type
II
2(20MB)
GS *******
Enter, the display cycles through the available options: 360 KB,
1.2 MB, and None. Select the appropriate option for your system.
Your hard disk is most likely a Type 2,20MB disk. If it is not,
highlight Drive c and press Enter. Then press Enter to select the
type of drive you have installed. As you continue to press Enter,
the display cycles through the available options: Type 3 (40MB),
Type 4
appropriate option for your system.
(40MB) , None, and Type 2 (20MB).
Running
Select
the
Setup Program
the
2-7
Page 42

If you are using an external 5 1/4-inch diskette
DIP switch 2 on the back panel off, your computer recognizes the
external diskette drive as A and the internal drive as B. In this case,
you need to confirm or adjust the setup settings for both Drive A
and
Drive B.
setup main menu, you may see the following display:
When you first select
Mass storage from the
drive
and have set
Exit
Memory
Display
Coprocessor
+
Mass storage
Backlight period
Gray scale
Drive B(internal): None (BAD SETTING)
Drive C
: Type 2(20MB)
******* SAVE SETTINGS ********
Do not be concerned about the message
merely to remind you to adjust the settings for both of your diskette
drives.
When you have entered the correct setup information for both
diskette drives, highlight SAVE SETTINGS and press Enter. The
main setup menu reappears.
2-8
Running the Setup Program
BAD
SETTING
. This is
Page 43

Backlight Period
In order to conserve the battery’s charge when you are running your
computer without the AC adapter, your screen is designed to go
blank after a preset period of inactivity. Initially, that period is two
minutes. If you don’t press any key on the keyboard for two
minutes, the screen’s backlighting is automatically turned off. To
turn it on again, press any key. To do this without disturbing a
program running on your computer, press Shift, Ctrl, or Alt.
You can change the period of time the computer waits before
darkening the screen to any value between 30 seconds and five
minutes, in half-minute increments. You can also disable the
automatic screen darkening feature by selecting an unlimited
backlight period. To change the backlight period, highlight
Backlight period
press Enter. The following display appears:
on the setup program’s main menu, then
Exit
Memory
Display
Coprocessor
Mass storage
'Backlight period
Gray scale
I
** SAVE SETTINGS **
Press the + key to increase the backlight period or the -key to
decrease it. To disable automatic screen darkening, keep pressing
the + key until the display reads
No time limit.
Running the Setup Program
2-9
Page 44

&*
en
certain memory-resident programs are running, the
screen’s backlighting cannot be restored after it has been turned
off. If you find that the screen’s backlighting does not come back
on when you press a key, you may want to set the backlight
period to Not time limit. Another way to avoid this problem is
to use the Epson LIGHTON utility. See chapter 5 for details on
the LIGHTON utility.
When you have selected the backlighting period, highlight SAVE
SETTINGS and press Enter. The main menu reappears.
Gray Scale
The Gray scale option on the setup menu allows you to define
the correspondence between colors and gray tones in gray-scale
mode 3 (see Chapter 1). If you are not planning to use gray-scale
mode 3, you do not need to set the Gray scale portion of the
setup program.
To define gray-scale mode 3, highlight Gray scale on the setup
main menu and press Enter. The following display appears:
SETUP Utility
return to main menu,
Enter change gray scale
2-10
Running the Setup Program
version 4.00
Backlight period
+
I select option,
Copyright (c) SEIKO EPSON CORP.
Exit
Memory
Display
Coprocessor
Mass
storage
Gray
scale
+ -
select attribute,
1988
H
Page 45

In the submenu (the lower box), a black, gray, or white tone
appears next to the word
Black.
That tone is currently associated
with the color black. If you are satisfied with that tone, press the +
key to move to the next color. If you want to use a different gray
tone for black, press Enter. The following display appears:
ZTUP Utility
(Attributes
BFKGROUND
I
b123456789ABCDEF
return to previous menu, 1 select option,
scale
0
version 4.00
image)
Copyright
)I
Coprocessor
Mass
storage
Backlight period
(c)
SEIKO EPSON COW.
Gray
Scale
Gray
Scale
Gray Scale 3m
Gray Scale
Gray Scale
Gray Scale
Gray Scale
Enter change
1
2
4
5
6
7
m
m
m
m
1988
gray
Use ‘? and 1 to highlight the gray tone that you would like to use
for black, then press Enter. The submenu shown in the preceding
figure then reappears, showing your latest gray tone selection for
the color black.
Next, press the + key. The name of another color appears, along
with the gray tone currently associated with that color. To assign a
different gray tone to that color, press Enter and follow the
procedure described in the last paragraph. To move to the next
color, press the + key again.
Running the Setup Program
2-11
Page 46

As you build a gray scale for mode 3, the setup program displays all
possible combinations of foreground and background tones in a grid
at the left side of the screen. In this grid, the numbers and letters in
the column at the left represent foreground tones. The numbers
and letters in the row at the top of the grid represent background
tones. Here is what the numbers and letters stand for:
Foreground
0 - Black
1 - Blue
Background
0 - Black
1 - Blue
2 - Green 2 - Green
3 - Cyan
3 - Cyan
4 - Red 4 - Red
5 - Magenta
6 - Brown 6 - Brown
7 - White 7 - White
8 - Gray 8 - Blinking black
9 - Light blue 9 - Blinking blue
A- Light green A - Blinking green
B - Light cyan B - Blinking cyan
C - Light red C - Blinking red
D - Light magenta D - Blinking magenta
E - Yellow E - Blinking brown
F - Bright white F - Blinking white
For example, to see how a red character might look on a blue
background, you would find the intersection of row 4 and
column 1. The character displayed there is an example of how
that color combination will appear in gray-scale mode 3, given
the current settings.
5 - Magenta
When you finish assigning gray tones to colors, highlight
SAVE SETTINGS and press Enter. The main menu reappears.
2-12
Running the
Setup Program
Page 47

Leaving the Setup Program
?
until
When you finish using the setup program, press
Exit
highlighted and then press Enter. The screen displays a list of the
current setup program settings and a menu:
is
SETUP Utility version 4.00
Memory size
Display type
Coprocessor
Mass storage
Backlight period
return to main menu, L
menu,
F1
change
aelect
Copyright
Main
Expansion
Drive
A(internal): 1.44
Drive
B(external): None
Drive C:
option,
SEIKO EPSON CORP.
(c)
640 KB
0KN
color/graph. 80 col
80287 not
MB
Type 2(20MB)
3.0 minutes
Enter
return to main
installed
Check the list to make sure all the information is correct:
l
If any setting is incorrect, highlight
Change settings
press Enter. The main setup menu appears again and you can
correct the setting.
l
If you did not make any changes or if you want to cancel the
changes you made, highlight
Exit without saving
then press Enter. The Reference diskette’s operation menu
appears. Press 0 and then Enter to exit to MS-DOS. Then
remove your Reference diskette and insert your working copy of
the Startup/Operating 1 diskette.
1988
and
and
Running the Setup Program
2-13
Page 48

.
If you have modified the gray-scale settings, press F1. The
screen displays the current gray-scale assignments. If you want
to make any changes, highlight
Change settings
and press
Enter. The main setup menu appears again, and you can make
any necessary changes.
When the settings are the way you want them, remove the
Reference diskette and insert your working copy of the Startup/
Operating 1 diskette in drive A. Then highlight
and press Enter. At this point, the program resets the computer
using
press Enter twice to respond to the date and time prompts, the A>
prompt reappears on the screen.
If the computer displays a setup error message while it is starting up,
run the setup program again and check all your settings.
the new configuration, and MS-DOS is reloaded. After you
EXIT AND SAVE
2-14
Running
the
Setup Program
Page 49

Chapter 3
Preparing the Hard Disk for Use
Before using your hard disk for the first time, you need to follow the
steps described in this chapter to partition and format the disk.
These steps prepare the disk to store MS-DOS and your data and
program files.
WARNING
The steps described in this chapter erase any data currently
stored on the hard disk. Therefore, do nut perform these steps if
your hard disk has already been prepared for use or has data
stored on it. These instructions apply only to a new hard disk.
The hard disk in your computer has a much larger capacity than
your diskette drive. A 20MB hard disk, for example, can store more
than 20 million characters. This is equivalent to approximately 15
1.44MB diskettes. Using a hard disk reduces the number of
diskettes you need and eliminates much of the diskette-swapping
you do when you use diskettes. The computer is also able to read
and write data on the hard disk much more quickly than it can on a
diskette.
You generally do most of your work on the hard disk and use the
diskette drive for tasks such as installing new software, exchanging
data with other computers, and making backup copies of your
programs and data files.
Backing up the hard disk is particularly important. Although the
hard disk is very reliable, it is essential to back up all your hard disk
files onto diskettes periodically, in case you accidentally lose some
data. You can use BACKUP or MENU to back up your hard disk
files. These commands are described in Chapter 5 and in the
MS-DOS Reference Manual.
Preparing the Hard Disk for Use
3-1
Page 50

There are three essential steps involved in preparing the hard disk
for use:
l
Creating one or more partitions for the MS-DOS operating
system
l
Formatting the MS-DOS partition(s)
l
Copying files from the Operating 2 and Reference diskettes to
the hard disk.
Partitioning the disk prepares it to receive the MS-DOS system
files. You use the FDISK program to perform this step.
Formatting a partition prepares the partition to receive data. You
use the FORMAT command to perform this step.
You use the COPY command to copy essential MS-DOS programs
and Epson-supplied utility programs from your Operating 2 and
Reference diskettes to your hard disk.
Note
The instructions in this chapter assume that MS-DOS is the
only operating system you are going to use on your hard
disk. If
you’re going to use another operating system in addition to
MS-DOS,
you
may
need to create an additional
partition. For
information about how to do this, consult the chapter an FDISK
in your
MS-DOS
manual. If you want to set up your hard disk to
run another operating system only, consult the manual fur that
operating system.
With MS-DOS version 3.3, you can create one or more partitions
on the hard disk. You must create a primary partition, which is
where MS-DOS is stored and from which your computer loads the
operating system. Additionally, you can create an extended
partition, which you can use to store additional programs or data.
If you have a 20MB hard disk, you probably need only one
partition. If you have a 40MB hard disk, however, it is best to
create an extended partition in addition to the primary partition.
3-2 Preparing the Hard Disk for Use
Page 51

MS-DOS cannot use more than 32MB in a single partition, so
creating an extended partition allows you to use the extra 8MB of
space.
The primary partition automatically becomes drive C. If you create
an extended partition (on either a 20MB or a 40MB hard disk), you
can make it just one drive or break it into multiple drives. Each
drive in the extended partition is assigned a drive letter, beginning
with D, and you can define how much space you want each drive to
have.
In the following procedures you’ll enter MS-DOS commands and
use the working copies of your Startup/Operating 1, Operating 2,
and Reference diskettes. If you are new to computers and MS-DOS,
this may be the first time you have used an operating system. The
steps are simple, and you should not have any problems; however, if
you do have questions, see Chapter 5 for basic information about
using MS-DOS or see your MS-DOS manual for more detailed
information about the operating system.
Creating a Primary Partition
The steps below describe how to create a primary partition of the
maximum size: 20MB on a 20MB hard disk or 32MB on a 40MB
hard disk. If you want the primary partition to be smaller, see the
instructions for FDISK in your MS-DOS manual.
1. Make sure the computer is turned off.
2. Make sure the switch marked HDD POWER on the back of the
computer is turned on.
3. Insert your working copy of the Startup/Operating 1 diskette
into the diskette drive.
4. Turn on the computer.
5. Press Enter twice to accept the date and time shown (or enter
the date and time if they are incorrect).
Preparing the Hard Disk for Use
3-3
Page 52

6.
At the
A>
prompt, type
displays the FDISK Options menu.
7.
Press 1
to select
press Enter. The screen displays the following menu:
FDISK
the
Create DOS Partition
and press Enter. The screen
option and
Create DOS Partition
Current Fixed Disk Drive: 1
1. Create Primary DOS partition
2. Create Extended DOS partition
Enter choice: [1]
Press ESC to return to FDISK Options
8. Press 1, then press Enter. The screen displays the following:
Create Primary DOS Partition
Current Fixed Disk Drive: 1
Do you wish to use the maximum size
for a DOS partition and make the DOS
partition active (Y/N)......? [Y]
Press ESC to return to FDISK Options
9. Press Y, then press Enter. The screen displays the following
message:
System will now restart
Insert DOS diskette in drive A:
Press any key when ready . . .
10. Without removing the Startup/Operating 1 diskette, press any
key
to
restart the system.
11. Press Enter twice to accept the date and time shown.
The system now recognizes the MS-DOS partition and the A>
prompt reappears.
3-4
Preparing the Hard Disk for Use
Page 53

Creating an Extended Partition
This section describes how to create an extended partition of 8MB,
designated as drive D. If you completed the steps described in the
previous section, you should already have a primary partition of
32MB if you have a 40MB hard disk. The primary partition is
designated as drive C.
After you have formatted the partitions, your computer operates as
if it had two separate hard disks-a 32MB drive C and an 8MB
drive D. If you prefer a different arrangement-for example, a
20MB drive C and a 20MB drive D-or if you want to split your
20MB hard disk into two partitions, see the instructions for FDISK
in your MS-DOS Reference Manual. The MS-DOS manual also
describes how to create multiple drives in the extended partition.
Note
Splitting a hard disk into two logical drives does not require
you to run the setup program to change the configuration
information. The setup program is concerned only with the
number of physical disk drives in your system.
Follow these steps to create an extended partition on the hard disk
and designate it as drive D:
1.
Insert the working copy of your Startup/Operating 1 diskette in
drive A if it is not there already.
2.
At the A> prompt, type FDISK and press Enter.
3. Press 1 to select the Create DOS Partition option and
press Enter.
4. Press2
and press Enter. The screen displays a message similar to this:
to select
Create Extended
DOS
Partition
Total disk space is 1023 cylinders.
Maximum space available for partition
is 252 cylinders.
Enter partition size...........[252]
Preparing the Hard Disk for Use
3-5
Page 54

5.
Press Enter to accept the partition size. The screen
message:
displays the
Extended DOS partition created
You also see information about the partitions you have created.
6.
Press ESC to return to the FDISK Options menu. FDISK
automatically takes you to the
Create Logical DOS
Drive (s) option and displays a message similar to this:
No logical drives defined
Total partition size is 252 cylinders.
Maximum space available for logical
drive is 252 cylinders.
Enter logical drive size......[252]
Press Enter to accept the logical drive size. FDISK creates a
7.
logical drive for the extended partition and designates it
drive D.
8.
Press ESC. The screen displays the following message and
prompts:
System will now restart
Insert DOS diskette in drive A:
Press any key when ready . . .
9.
Without removing your Startup/Operating 1 diskette from
drive A, press any key to restart the system.
10.
Press Enter twice to accept the date and time shown.
The system now recognizes the primary partition as drive C and the
extended partition as drive D. The A> prompt reappears.
Note
Once you have created the partitions, you must format each one.
Formatting prepares the partition to receive programs and other
data. The
and extended partition.
3-6
next two sections describe
Preparing
the
Hard
Disk for Use
how to format a pr
imary
Page 55

Formatting the Primary Partition
Now that you have created drive C, the primary partition, you must
format it. You can use the SELECT command to do this. SELECT
automatically does the following:
l
Formats the primary partition
l
Allows you to assign a name (a volume label) to the partition
l Copies the MS-DOS Startup/Operating 1 files to the partition
l
Creates an AUTOEXEC.BAT file in the primary partition to
ensure that your computer boots MS-DOS correctly from
drive C.
If you have an extended partition, use the FORMAT command
to format drive D (and any additional drives in the extended
partition). See “Formatting the Extended Partition,” the next
section in this chapter.
After you have formatted drive C, you can boot the operating
system automatically from the hard disk every time you turn on or
reset your computer. You won’t have to insert an MS-DOS system
diskette in drive A to load the operating system.
To format drive C, follow these steps:
1.
Insert your working copy of the Startup/Operating 1 diskette
into the diskette drive.
2. If you don’t see the
A>
prompt, type
A:
and press Enter.
3. At the A> prompt, type the following and press Enter:
SELECT A: C:\DOS 001 US
Note
001 and US are the country code and keyboard code for the
United States. If you want to substitute other codes,
MS-DOS manual.
Preparing the Hard Disk for Use
see your
3-7
Page 56

The screen displays the following message:
SELECT is used to install DOS the
first time.
SELECT erases everything
on the specified target and then
installs DOS.
Do you want to continue (Y/N)?
4. Press Y. The screen displays the following message:
WARNING, ALL DATA ON NON-REMOVABLE
DISK DRIVE C: WILL BE LOST!
Proceed with Format (Y/N)?
5.
Press Y, then press Enter. MS-DOS begins formatting the
primary partition. The screen continuously displays the
changing head and cylinder numbers of the drive.
Because the formatting process takes a few minutes, your
screen may go dark. Just press any key to make the
information on the screen visible again,
When the procedure is complete, the screen displays the
following message:
Format complete
System transferred
Volume label (11 characters, ENTER for
none)
3-8
Preparing
the
Hard
Disk for Use
Page 57

6. It is a good idea to enter a name (a volume label) for the
partition to protect it from being accidentally reformatted
later. If you want to name the drive, type a name of up to 11
characters, then press Enter. If you prefer not to name it, just
press Enter.
The screen first displays disk space information. Then it
displays the following message:
Reading source file (s) . . .
When all the files have been copied, the A> prompt reappears. The
SELECT procedure is complete. Now you can format the extended
partition, if you have one, using the procedure below.
Formatting the Extended Partition
If you have an extended partition (drive D), you need to format it
also. Follow this procedure:
1.
Insert your working copy of the Startup/Operating 1 diskette
into the diskette drive.
2. If you don’t see the
Enter:
A:
3. At the A> prompt, type the following and press Enter:
FORMAT D:
A>
prompt, type the following and press
Preparing the Hard Disk fur Use
3-9
Page 58

4. The screen displays this message and prompt:
WARNING, ALL DATA ON NON-REMOVABLE
DISK DRIVE D: WILL BE LOST!
Proceed with Format (Y/N)?
5. Press Y and Enter to begin formatting the extended partition.
The screen continuously displays the changing head and
cylinder numbers. When the partition has been formatted, the
screen displays the following message:
Format complete
It also shows information about the total disk space available
on drive D. The
A>
prompt then reappears.
Copying the MS-DOS Files to the Hard Disk
Once you have formatted your partition(s), you need to copy the
files on your Operating 2 and Reference diskettes to drive C. Follow
the steps below.
1.
Remove the Startup/Operating 1 diskette from drive A and
insert the Operating 2 diskette in the drive.
2. You should still see the
A>
prompt. If not, type
A:
and press
Enter.
3. At the A> prompt, type the following and press Enter:
COPY *.* C:\DOS
MS-DOS copies all the files from the diskette to your hard disk.
As each file is copied, its name appears on the screen.
4. After copying, remove the Operating 2 diskette from drive A
and insert the Reference diskette. Type the following and press
Enter:
COPY *.* C:\DOS
5. When you are finished copying, store your diskettes in a safe
place.
3-10
Preparing the Hard Disk for Use
Page 59

Modifying the AUTOEXEC.BAT File
The SELECT procedure described above creates a file named
AUTOEXEC.BAT on your hard disk. This file contains
instructions that are executed by MS-DOS every time you boot
your system from the hard disk. These instructions do the following:
l
Tell MS-DOS where to find its essential system files
l
Allow you to verify that the date and time are correctly set or
change the date and time if necessary
l
Install the appropriate keyboard information for the country in
which you’re using your computer.
Together, these instructions ensure that your system starts up
properly each time you boot it from the hard disk. The instruction
that installs the keyboard information, however, has the side effect
of interfering with the mechanism that restores the backlighting
to your screen after the backlight period has elapsed. To correct
this problem, you need to make a simple modification to the
AUTOEXEC.BAT file created by SELECT. To do so, follow these
steps:
1. Type COPY AUTOEXEC.BAT + CON AUTOEXEC.BAT
and press Enter.
2. Type LIGHTON and press Enter.
3. Press the F6 key and then Enter.
WARNING
It is essential to modify the AUTOEXEC.BAT file created by
SELECT. If you do not, you will not be able to restore the
backlighting to your screen after the backlight period elapses.
Preparing
the Hard Disk for Use
3-11
Page 60

Booting From the Hard Disk
Now you can boot your system (load MS-DOS) from drive C. Just
make sure there is no diskette in drive A when you turn on or reset
your computer.
Turn off the computer, wait at least five seconds, then turn it back
on. After the computer completes its power-on self test, the screen
displays the date prompt. Press Enter twice to accept the date and
time shown.
The C> prompt appears, indicating that the system has successfully
loaded MS-DOS from your hard disk.
From now on, each time you turn on or reset your computer, it
automatically loads MS-DOS from the hard disk. Just make sure
drive A is empty.
3-12
Preparing the Hard Disk for Use
Page 61

Chapter 4
Using the Equity LT-286
This chapter describes some basic procedures for using your Equity
LT-286 computer.
Using the AC Adapter
The Equity LT-286 can be powered by its internal battery pack or
by the AC adapter. When you connect the AC adapter to the
computer and to an electrical outlet, the power to the computer is
supplied from the outlet. At the same time, the AC adapter
recharges the battery. Use the AC adapter whenever you have
access to an electrical outlet; that way you’ll preserve the battery’s
charge.
You can connect or disconnect the AC adapter while you are using
the computer without interrupting any operation. For example, if
you are not using the adapter and the Power/Speed light starts
flashing (see below), you can connect the AC adapter without first
turning off the computer. (You should do this immediately if the
Power/Speed light starts to flash, to avoid losing data.)
Because the adapter can operate at voltages from 100 to 240 volts,
you can use your Equity LT-286 in countries other than the United
States, provided you have the appropriate adapter plug.
Use the AC adapter to recharge the battery as described in the next
section.
Using the Equity LT-286
4-1
Page 62

Using the Battery
The battery pack inside the Equity LT-286 contains eight NiCad
(nickel cadmium) batteries that power the computer when the AC
adapter is not connected. The battery pack is rechargeable, and you
should never have to replace it.
You need to recharge the battery pack at the following times:
l
Before using the computer for the first time
l
If the battery has not been used for a long time
l
If the Power/Speed indicator light starts flashing (see “LED
Indicators,” below).
After the Power/Speed light starts to flash, you have a maximum
of 10 minutes before the battery charge is completely gone. If you
continue using the computer without connecting the adapter,
power runs out and you may lose data.
To recharge the battery, connect the AC adapter to the computer
and to an electrical outlet. You can charge the battery whether the
computer is on or off. For the maximum charge, leave the AC
adapter connected for 12 hours. The battery pack cannot be
overcharged, so don’t worry if you leave it connected for more than
12 hours.
Remember the following when you are charging the battery:
l
Use only the AC adapter that comes with the Equity LT-286.
Using a different one can damage the computer.
l
It is best to charge the battery for at least eight hours. If you
charge the battery for only short periods, it can run low sooner.
The length of time the battery can provide power after being
charged depends on how you are using the computer. A fully
charged battery provides approximately one hour and fifteen
minutes of use for simple operations. If you are working with a
program that makes extensive use of the hard disk or if you are
using an external diskette drive, you may need to recharge the
battery sooner.
4-2
Using the Equity LT-286
Page 63

To maximize the charge time your battery supplies, you should
completely discharge and then recharge the battery from time to
time. To do this, let the battery drain all the way down. When the
Power/Speed LED starts to flash, save your work in progress (if
any) and exit any program you are using. Leave the computer on,
but do not use it. After about ten minutes, all LEDs should go dark,
indicating the battery has been discharged. Then give the battery a
full 12-hour charge.
LED Indicators
Above the keyboard on the right side are six LED (light-emitting
diode) indicators that provide information about the computer’s
operation.
The Power/Speed LED is on whenever the computer is on. The
color of this LED indicates the computer’s current execution speed.
If the microprocessor is running at 12 MHz, the light is green; if it is
running at 8 MHz, the light is orange.
The Power/Speed LED serves another important function: it
indicates when the battery charge is low. If this light is flashing, you
should attach the AC adapter as soon as possible to avoid losing
data or save your data files and turn off the computer if AC power is
unavailable. (See “Using the Battery,” above.)
Using the Equity LT-286 4-3
Page 64

The HDD (Hard Disk Drive) LED is on when your computer is
reading data from or writing data to your hard disk.
The FDD (Floppy Disk Drive) LED is on when your computer is
reading data from or writing data to your diskette drive.
Do not turn off your computer when either the
HDD
LED
or
the
FDD LED is illuminated. Also, do not turn off the HDD switch
when the HDD LED
the
FDD
LED is illuminated. If you do, you may lose dam.
The Num Lock, Caps Lock, and Scroll Lock LEDs indicate
whether the corresponding key functions are enabled. See “Special
Keys on the Equity LT-286 Keyboard,” below.
is
illuminated or remove a diskette when
Opening and Closing the Screen
When you are not using the computer or you want to move it, turn
it off and close the screen, as shown below. Be sure the screen locks
into the bottom part of the computer.
4-4 Using the Equity LT-286
Page 65

When you want to open the screen, slide the latch release buttons
on both sides (shown below) away from the center. Then lift the
screen back. You can position the screen at a variety of viewing
angles.
Note
To prevent damage to the system, you cannot open the Equity
LT-286 while it is standing uptight on its back panel. Set the
computer in a horizontal position before opening it.
If you close the screen while the computer is running, the screen’s
backlighting is automatically turned off to conserve battery charge.
When you reopen the screen, the backlighting comes back on
automatically, unless the backlight period has elapsed. If the screen
is dark when you reopen it, press any key.
You may close and reopen the screen while a program is running
without affecting the program in any way.
Using the Equity LT-286 4-5
Page 66

Using the Handle
as
The Equity LT-286 h
handle, pull it out from the bottom of the computer, as shown
below.
Be sure the screen is closed whenever you carry the computer by its
handle.
a convenient carrying handle. To use the
WARNING
To avoid accidental damage to your Equity LT-286, always store
the computer in a horizontal position. Do not leave it standing
upright on its back panel.
4-6
Using the Equity LT-286
Page 67

Selecting Execution Speed
The Equity LT-286
12 MHz. At the higher speed, the computer performs all tasks more
quickly. You can select the slower speed to run application
programs that have specific timing requirements.
Do
not
change
program.
Always complete
can operate at two execution speeds: 8 MHz and
the execution speed while you are running a
your current
operation
and
exit the
program first. However, it is not necessary to turn the computer
off before changing
To change the speed, move the CPU SPEED switch located above
the keyboard.
execution speed.
Using the Equity LT-286
4-7
Page 68

Special Keys on the Equity LT-286 Keyboard
The illustration below shows the Equity LT-286 keyboard.
I
-m
Certain keys on your keyboard serve special functions when your
computer is running application programs. For instructions on how
to use keys for specific software functions, consult the manual that
came with the program you’re running.
The Num Lock, Scroll Lock, and Caps Lock keys work as toggles;
press them once to turn on a function and again to turn it off.
When a function is on, the corresponding LED on the upper-right
comer of the keyboard is illuminated. When a function is off, the
LED is off.
Table 4-1 describes special keys on the Equity LT-286 keyboard.
4-8
Using the Equity LT-286
Page 69

Table 4-1. Special keys
Key
i++Tab
Caps Lock
Shift
Ctrl
Alt Works with other keys to enter alternate character
t
Backspace Moves the cursor back one space, deleting the
+I
Enter
Ins
Purpose
Moves the cursor one tab to the right in normal
mode and one tab to the left in shift mode.
Changes the letter keys from lowercase to
uppercase; changes back to lowercase when
pressed again. The numeric/symbol keys on the top
row of the keyboard are not affected.
Changes the letter keys from lowercase to
uppercase while held down and changes other keys
from their normal characters or functions to their
alternate characters or functions. When the Caps
Lock LED is illuminated, changes letter keys from
uppercase to lowercase.
Works with other keys to perform special functions,
such as editing operations in MS-DOS and
GW-BASIC.
codes.
character to the left.
Ends a line of keyboard input or executes a
command.
Turns the insert function on and off.
Del
Home, End,
PgUp, PgDn
T+lt
Num Lock
Esc
F1 - F12
Print Screen
Deletes the character at the cursor.
Control cursor location within application programs.
Changes the function of the cursor keys. For
example, when the Num Lock function is on and
you press 1 , you get the number 2.
In some application programs, cancels the current
command line or operation.
Perform special functions within application
programs.
Prints text on the screen to the printer.
Using the Equity LT-286 4-9
Page 70

Key
Purpose
SYS Rq
Scroll Lock
Pause
Break
Generates the system request function (not used in
MS-DOS).
In some application programs, controls scrolling.
In some application programs, suspends the current
operation.
In some application programs, terminates the
current operation.
Using the Function Key Template
The twelve keys marked F1 through F12 at the top of your
keyboard are used in different ways in different application
programs. Your Equity LT-286 comes with two function key
templates. Use a pencil to label the template with the functions of
each key. You can use both sides of the function key templates and
erase your labels later if you need to. To insert a template, lift the
flap above the function keys and then slide the template into the
template window as shown below:
--
I
4-10
Using the Equity LT-286
Page 71

Using Diskettes
Diskette drives allow you to store data on diskettes and retrieve and
use stored data. The Equity LT-286 has a 1.44MB 3 1/2-inch
diskette drive; it also supports an optional external 5 1/4-inch
diskette drive. This section explains how diskettes work and tells
you how to do the following:
l Choose diskettes
l Care for diskettes
l Make backup copies
l Write-protect diskettes.
How Diskettes Work
The diskettes you use are made of plastic coated with a magnetic
material and enclosed in a protective plastic case. Information is
recorded in magnetic patterns on both surfaces of the diskette.
Because data is stored magnetically, you can retrieve, record over,
and erase data, just as you play, record, and erase music on cassette
tapes.
When you insert a diskette in a drive, a metal shutter above the
access area moves aside, exposing the diskette surface. When your
computer reads data from or writes data to the diskette, it causes
the diskette to spin within its plastic casing. Then a small read/
write head positioned above and below the two diskette surface
locates the appropriate position on the diskette and carries out the
desired operation.
Choosing Diskettes for the Equity LT-286
Be sure to buy high-quality diskettes to use in your Equity LT-286.
You can use two kinds of diskettes:
l
3 1/2-inch 720KB, soft-sectored, double-sided, double-density,
135 TPI diskettes
l
3 1/2-inch 1.44MB, soft-sectored, double-sided, high-density,
135 TPI diskettes.
Using the Equity LT-286
4-11
Page 72

720KB diskettes can store the equivalent of about 300 pages of text.
1.44MB diskettes can store twice as much information as 720KB
diskettes, but the 3 1/2-inch diskette drives on some computers are
not able to use these high-capacity diskettes. If you are planning to
exchange data with a computer that has a 720KB diskette drive,
you should use 720KB diskettes in your Equity LT-286.
If you have an external 5 1/4-inch 360KB diskette drive, use 5 1/4inch, double-sided, double-density, soft-sectored, 48 TPI diskettes
in this drive. These diskettes can hold about 150 pages of text.
They are compatible with those used on the IBM PC, XT, and AT,
so you can use diskettes prepared by one computer on the other.
If you have an external 5 1/4-inch 1.2MB (high-capacity) diskette
drive, use 5 1/4-inch, double-sided, high-density, soft-sectored, 96
TPI diskettes in this drive. These diskettes can hold the equivalent
of about 500 pages of text and are compatible with the high-
capacity diskette drives used on some models of the IBM AT.
Because of their size difference, you cannot use a 3 1/2-inch diskette
in a 5 1/4-inch drive or vice versa. If you have both types of drives,
however, you can copy individual files or groups of files from one
drive to the other with the COPY and XCOPY commands. See
Chapter 5 or your MS-DOS manual for information about the
COPY and XCOPY commands.
You need to format new diskettes before you can use them.
Formatting prepares a diskette to receive data. Formatting also
erases any data previously stored on a diskette, so be sure to format
only new blank diskettes or diskettes that contain data you want to
erase. See Chapter 5 for information about formatting diskettes.
Note
Double-sided, double-density 3 1/2-inch diskettes must be
formatted to store 720KB of data. Double-sided, high-density
3 1/2-inc
4-12
h diskettes must be formatted co store
Using the Equity LT-286
1.44MB of
data.
Page 73

Caring for Diskettes
3 1/2-inch diskettes are sturdy and reliable but not indestructible.
To avoid damaging your diskettes and losing data, take these
precautions:
Do not remove a diskette or turn off the computer while the
diskette drive LED is on. This light indicates that the computer
is copying data to or from a diskette. If you interrupt this
process, you may destroy data.
Remove all diskettes before you turn off the computer.
Keep diskettes away from dust and dirt. Small particles of dust
or dirt can scratch the magnetic surface and destroy data. Dust
can also ruin the read/write heads in a diskette drive.
Keep diskettes away from magnetic fields. (Remember, diskettes
store data magnetically; strong magnetic fields can scramble
that data.) Don’t set your diskettes on such common magnetic
sources as electrical appliances, telephones, television sets, and
loudspeakers.
Keep diskettes in a moderate environment. They work best at
room temperature and in normal humidity. Never leave
diskettes sitting in the sun or in extreme cold or heat. The
temperature in a car in the middle of summer or winter can
cause severe damage.
Do not expose a diskette’s magnetic surface by sliding the metal
shutter. Never touch a diskette’s magnetic surface. The oil on
your fingertips can damage it.
Do not place anything on top of your diskettes, and make sure
they do not get bent.
Never wipe, brush, or try to clean diskettes in any way.
Store diskettes properly in diskette containers.
Using the Equity LT-286
4-13
Page 74

If you use an external 5 1/4-inch diskette drive, be especially careful
with your 5 1/4-inch diskettes. Because they are more flexible, and
because they do not have a metal shutter protecting their magnetic
surfaces, they are more easily damaged than 3 1/2-inch diskettes.
Always keep 5 1/4-inch diskettes in their protective envelopes
when you are not using them.
Inserting and Removing Diskettes
To insert a diskette into the drive, hold it with the label facing up
and the arrow on the left side pointing into the computer:
Slide the diskette into the drive until you feel it click into place.
To remove a diskette, press the release button on the diskette drive.
When the diskette pops out of the drive, pull it out and store it
properly in a diskette container.
4-14
Using the Equity LT-286
Page 75

WARNING
Never remove a diskette or turn off the computer while the drive
indicator light is an. This might cause lass of data. Also, be sure
to remove all diskettes before you turn off the computer,
Making Backup Copies
Copy all diskettes that contain programs, as you did the master
system diskettes that come with the Equity LT-286. After you make
your copies, store the originals in a safe place away from your
working diskettes and use only the copies.
Chapter 1 describes how to make backup copies of your system
diskettes. For general instructions on copying diskettes or hard disk
files, see Chapter 5 or your MS-DOS manual.
Write-Protecting Diskettes
You can write-protect a diskette to prevent its data from being
altered. When a diskette is write-protected, you can copy data from
it, but you cannot store new data, modify existing data, erase files,
or format the diskette.
The write-protect mechanism is a small switch on the lower-right
corner on the back of the diskette. To write-protect the diskette,
slide the switch down toward the edge of the diskette so there is a
hole where the switch used to be.
Write-protected
I
.
Write-protect
switch
Using the Equity LT-286
\
4-15
Page 76

To remove the write protection, move the switch up toward the
center of the diskette so the hole is covered.
Using the Hard Disk Drive
Unlike a diskette, a hard disk is rigid and fixed in place. It is sealed
in a protective environment free of dust and dirt, so you cannot see
it. A hard disk stores data the same way as a diskette, but it works
much faster and has a much larger storage capacity.
You can do almost all your work on the hard disk and copy your
files to diskettes whenever you need to make backups or transfer
data to another computer system. However, to ensure that you
always have plenty of space available, keep only files you use
regularly on the hard disk. Store your other files on diskettes.
Note
You must prepare a new hard
time. Make sure you have completed all the procedures in
Chapter 3 to prepare it.
disk before using it
for the first
Caring for the Hard Disk
To avoid damaging your hard disk, take these precautions:
Keep your computer away from magnetic fields, such as
electrical appliances, telephones, and loudspeakers.
Keep your computer in a moderate environment. Hard disks
work best at room temperature and in normal humidity.
Never turn off the computer’s power or the HDD POWER
switch when the HDD LED is on. This light indicates that the
computer is currently copying data to or from the hard disk. If
you interrupt this process, you may lose data.
Never attempt to open the hard disk unit. The disk itself is
enclosed in an airtight container to protect it from dust.
4-16
Using the Equity LT-286
Page 77

Protecting the Data on Your Hard Disk
Although the hard disk is very reliable, it is essential to back up
your hard disk files onto diskettes in case you lose some data
accidentally.
Make backup copies of all your system and application program
diskettes before copying the program files to the hard disk. Copy
your data files frequently to keep your backup diskettes up to date.
Use the Epson MENU utility or the MS-DOS BACKUP command
to back up your hard disk files. Use the MENU utility or the
MS-DOS DISKCOPY command to make copies of your system
and program diskettes. For instructions on using these backup
utilities, see Chapter 5 or your MS-DOS manual.
Improving Hard Disk Performance
Your Reference diskette includes two utilities, called HDCACHE
and FASTOPEN, that can improve your hard disk’s performance.
For information about using these programs, see your MS-DOS
manual.
Turning Off the Hard Disk
Your computer’s hard disk has its own power switch. To avoid drive
access problems, it is best to leave this switch on at all times.
However, if you are running the computer without the AC adapter,
you may want to turn the hard disk off when you are not using it to
conserve battery charge. The hard disk drive consumes more of the
battery’s charge than a diskette drive. (Note that even if the hard
disk power switch is on, the hard disk isn’t on unless the computer
is on.)
Using the Equity LT-286
4-17
Page 78

The hard disk switch is labeled HDD POWER and is located on the
back of the computer, next to the AC adapter socket:
Power
switch
You can turn off the hard disk either before you turn on the
computer or after:
l
If you do not plan to use the hard disk at all, turn it off before
you turn on the computer.
l
If you need to load MS-DOS or an application program or to
access files on the hard disk, leave the hard disk switch on
when you turn on the computer, then turn it off later as
described below.
4-18
Using the Equity LT-286
Page 79

Turning Off the Hard Disk Before Starting the Computer
If you are not going to use the hard disk at all, turn off the switch
before turning on the computer. Insert a working copy of your
Startup/Operating 1 diskette in drive A so that MS-DOS is loaded
from that drive. When you turn on the computer, the screen
displays this error message:
1780 - Disk 0 failure
(Resume = "F1" key)
Do not be concerned by this message; just press F1 to continue.
Then use the computer as if it had no hard disk drive. That is, you
perform all operations on the diskette in the diskette drive.
When you start the computer with the hard disk drive turned off,
you cannot access the hard disk even if you subsequently turn it on.
MS-DOS displays an error message if you issue any command
involving drive C. To make your hard disk accessible again, save
your data, exit the program you are running, then turn the
computer off. Wait at least five seconds, then turn the hard disk
switch on. Remove any diskette from drive A and turn the
computer back on.
Turning Off the Hard Disk After Starting the Computer
If you want to use the hard disk at any time during your working
session, start the computer with the hard disk switch turned on.
After you have loaded your application program into memory, you
may then be able to turn the hard disk drive off (if you do not need
to use it). When you want to save your work to a file on the hard
disk, you can then turn the hard disk switch back on again.
Note
Some application programs may not work with the hard disk
drive turned off unless they are started from a diskette instead of
from the hard disk. If you need to run a program of this kind and
you need to turn the hard disk off to conserve battery power, use
the diskette that came with the program and run it from drive A.
Using the Equity LT-286
4-19
Page 80

The following example shows the proper procedure for turning the
hard disk off while the computer is on. The example assumes that
you have started the computer with the hard disk on and have
loaded MS-DOS from the hard disk.
1.
At the MS-DOS C> prompt, type A: and press Enter to log
onto drive A.
2.
If you want to load an application program from the hard disk,
do it now. Be sure to type c : in front of the name of the
program. You must do this before you turn off the hard disk.
You may also want to copy any files you will be using from
drive C to drive A.
3.
After you log onto drive A and copy any necessary files, you
can turn off the hard disk.
NoteNote
If you are still lugged onto drive C when you turn off the
hard disk, the next
will
display
disk back on, then log onto drive A.disk back on, then log onto drive A.
Continue running your application program, using drive A.
4.
an error message. If this happens, turn the hard
time you enter a
command, the screen
5.
When you want to save your data on the hard disk, turn it on.
Wait about ten seconds to allow the disk to reach operational
speed, then enter the command for saving your data to drive C.
Resetting the Computer
You can reset the computer to reload the operating system or to
restart a program. You may need to reset the computer if an error
occurs and the computer does not respond to anything you type.
However, resetting erases all data in the computer’s temporary
memory (RAM) that you have not stored, so reset the computer
only as a last resort.
4-20
Using the Equity LT-286
Page 81

With some programs, you can recover from an error condition by
holding down the Ctrl key and pressing C or holding down the Ctrl
key and pressing Break. Because these two methods may not erase
all data in RAM, you should try them before resetting the computer
as described below.
WARNINGWARNING
Do not reset the computer to exit a program unless you have to.
Some application programs classify and store new data whenever
you exit the program properly. If you reset the computer while
such a program is running, you may lose data.such a program is running, you may lose data.
There are three ways to reset the computer. Because each is more
powerful than the last, try them in the order listed here:
1.
If you are using MS-DOS, hold down Ctrl and Alt while you
press the Del key. The screen goes blank for a moment, and
then MS-DOS is reloaded. (Be sure to remove any diskette
from drive A when you do this, so that MS-DOS can be
reloaded from the hard disk.) If this does not correct the
problem, try the second method.
2.
Press the RESET button, above the left side of the keyboard.
This method works even when the keyboard does not respond
to your commands. If this does not correct the problem, try the
third method.
3.
Remove any diskette from the diskette drive and turn off all
peripherals. Then turn off the computer. Wait five seconds,
then switch the power back on.
Turning Off the Computer
Before turning off your computer, save your data, exit the program
you are using, and remove all diskettes from the diskette drives.
Turn off your monitor and peripherals first, then turn off the
computer. You do not have to turn off the hard disk.
Using the Equity LT-286
4-21
Page 82

Chapter 5
Using MS-DOS With Your Equity LT-286
Your Equity LT-286 comes with version 3.3 of MS-DOS. MS-DOS
manages the routine work of your computer system, such as keeping
the computer’s memory organized, controlling the screen display,
accepting keyboard input, and directing external communications.
To communicate with the operating system, you use MS-DOS
commands. How much you need to know about MS-DOS depends
on how you plan to use your computer. If you use it only for
running application programs, the few MS-DOS commands you
need are introduced in this chapter. If you use advanced features or
create your own programs, see your MS-DOS manual for a
complete description of MS-DOS.
This chapter describes the following MS-DOS functions:
Starting MS-DOS
Exiting MS-DOS
Changing the current drive
The MS-DOS command format
Entering MS-DOS commands
Storing data
Using directories
Formatting diskettes
Copying data
Deleting data
Using the Epson HELP utility
Using the Epson MENU utility
Using the XTREE utility
Using MS-DOS With Your Equity LT-286
5-1
Page 83

l Using an AUTOEXEC.BAT file
l
Starting an application program
l Using the LIGHTON utility.
Starting MS-DOS
Before you can run an MS-DOS application program, MS-DOS
must be running in memory. If you have prepared your hard disk
according to the procedures described in Chapter 3, MS-DOS is
loaded automatically from your hard disk whenever you turn on
your computer (provided you do not have a diskette in the diskette
drive).
When the date and time prompts appear, press Enter to accept the
date and time shown. The screen then displays the MS-DOS
command prompt, C>.
Exiting MS-DOS
Before you turn off the computer, make sure the MS-DOS
command prompt (either
remove your diskettes, turn off any peripherals, and then turn off
the computer.
C>
or
A>)
appears on the screen. Then
Changing the Current Drive
MS-DOS identifies your hard disk as drive C. Your 3 1/2-inch
diskette drive is identified as drive A. If you have an external
5 1/4-inch diskette drive, that drive is recognized as drive B.
Note
If you wish, you may reverse the drive identifiers for the internal
3 1/2-inch and the external 5 1/4-inch diskette drives by setting
DIP switch 2 on the back panel in the on position. See “Setting
the DIP Switches,” in Chapter 1.
5-2
Using MS-DOS With Your Equity LT-286
Page 84

The C> prompt that appears when you load MS-DOS from the
hard disk tells you that drive C, your hard disk, is the current drive.
The current drive, also called the default drive, is the drive that
MS-DOS uses for all commands unless you specify a different drive.
For example, if the current drive is drive C and you type the name
of a program, MS-DOS searches drive C for the program whose
name you typed.
If you want to run a program or find a data file on a different drive,
you must specify the name of that drive. You can do this either by
logging onto that drive (making it the current drive) or by
including the drive letter with the filename.
To log onto another drive, type the name of the drive followed by a
colon. Then press Enter. For example, if the current drive is C and
you want to log onto drive A, type A: and press Enter. Your screen
now displays the
drive A. Drive A continues to be the current drive until you log
onto a different drive or turn off or reset your computer.
To access a program or file on another drive without first logging
onto that drive, specify the drive identifier (the name of the drive
followed by a colon) along with the filename. For example, if you
are logged onto drive C and you want to run a program called WP
that is stored on drive A, type A : WP and press Enter. MS-DOS
runs the program on drive A but remains logged onto drive C.
A>
prompt, showing that you are operating from
The MS-DOS Command Format
To enter an MS-DOS command, you need to type the command in
the correct format.
The MS-DOS command format consists of the command name,
parameters, and delimiters. The command name tells MS-DOS the
task you want to perform. Parameters are items that identify the
data to be processed (such as a filename) and change the way a
command works. Delimiters are characters such as spaces or
commas that separate command names and parameters.
Using MS-DOS With Your Equity LT-286 5-3
Page 85

Some commands also have optional switches you can use. A switch
is a type of parameter that alters the effect of a command.
Pathnames may be required in a command if you are specifying files
that are not on the current drive or directory. A pathname tells
MS-DOS where to find a file, and consists of one or more directory
names separated by backslashes. See “Using Pathnames,” later in
this chapter.
There are two kinds of MS-DOS commands: internal and external.
Internal commands are commands that are built into MS-DOS and
can be used at any time once MS-DOS is loaded into memory.
External commands are stored on your system diskettes as program
files. To run an external command, MS-DOS must be able to locate
the file on a system diskette or on your hard disk. If the file is not
stored in the current drive and directory, you may need to use a
pathname when you enter an external command.
See your MS-DOS manual for more information on the command
format and for detailed descriptions of each command.
Entering MS-DOS Commands
_-
You can enter an MS-DOS command whenever you see the
MS-DOS command prompt. Type the command name and any
necessary parameters and delimiters, and then press Enter to
execute the command. You can type command names in either
uppercase or lowercase letters.
If you make a mistake when typing a command and you notice it
before you press Enter, you can do one of two things:
l
Use the backspace key to back up and correct the error
l
Press ESC to cancel the command line.
If you press Enter when a command line has an error in it, the
screen displays an error message. Usually, the command prompt
reappears so you can try again. Type the correct command and
press Enter.
5-4
Using MS-DOS With Your Equity LT-286
-_
Page 86

Storing Data
All your work and programs are stored in files on your hard disk or
diskettes. A data file contains information, such as words, numbers,
or pictures. A program contains instructions that the computer can
understand and execute.
The kind of file you create depends on the MS-DOS commands or
application program you use to create it. Because each program you
use may create data files in its own particular format, you are likely
to encounter problems if you try to read a file with a program other
than the one that created the file.
Each file must have a unique filename so that MS-DOS can find it
when you need to retrieve it. The filename consists of two parts,
the name and the extension.
The name can be up to eight characters in length. You can use any
characters except for blank spaces and the following symbols:
“\/[]:I<>+=;.?
It is a good idea to choose a name that describes the contents of
the file.
The extension is optional and can be up to three characters long.
You can use the extension to describe the type of data contained in
the file-for example, TXT for a text file. When you use an
extension, separate it from the filename with a period, like this:
DATA.TXT
Many application programs automatically add extensions to the
data files you create, so you don’t have to specify the extension
when you name a file. Lotus 1-2-3® Release 2, for example,
automatically uses the extension .WK1 for worksheet files.
Microsoft Word® uses .DOC for its word processing files. Such
default extensions help an application program distinguish its own
data files from files created by other programs. If you have programs
that use default extensions, you should avoid using those particular
extensions in other contexts.
Using MS-DOS With Your Equity LT-286 5-5
Page 87

You can type the name and the extension in either lowercase or
uppercase letters, but do not use uppercase or lowercase letters to
distinguish between files. After you type the filename, MS-DOS
converts all lowercase letters to capitals.
Using Directories
MS-DOS organizes files by storing them in directories. This makes it
easy for you to find and manage your files. Directories also list
specific information about each file, including the filename, the size
of the file, and the date and time you last modified the file.
When you formatted your hard disk, MS-DOS created a single
directory for the disk. This directory is called the root directory.
Because the hard disk has room for hundreds of files, MS-DOS
allows you to create additional directories, called subdirectories.
Subdirectories allow you to organize your hard disk so that files of
similar type or purpose are kept together. Without subdirectories, it
would be difficult to keep track of all the files on your hard disk.
You can create subdirectories on your diskettes as well as on your
hard disk. But you may not need to create them on diskettes,
because diskettes hold fewer files.
The subdirectory structure of a hard disk can be represented with a
tree-like diagram, like this:
Root Directory ( \ )
LEDGER
A
ACCOUNTS
SALES
WORDPROC
A
BUSINESS
STORIES
PERSONAL
I
LETTERS
5-6 Using MS-DOS With Your Equity LT-286
Page 88

In this example, the original directory (the root directory) has two
subdirectories, named LEDGER and WORDPROC. Each of these
subdirectories has subdirectories of its own. LEDGER has two,
named ACCOUNTS and SALES; WORDPROC also has two,
named BUSINESS and PERSONAL. Finally, the PERSONAL
subdirectory of WORDPROC also has two subdirectories, named
STORIES and LETTERS.
On your own hard disk, you can create a subdirectory structure that
is more complex than this one. Or you may prefer to keep things
simpler. Organize your disk to suit your own needs; you can modify
the structure as your needs change.
In creating subdirectories, note the following points:
l
Any directory can have any number of subdirectories (except
the root directory, which can have a total of no more than 512
files and subdirectories).
l
Subdirectories are named in the same way that files are. The
name can include as many as eight characters (letters or
numbers), and you can add an optional extension consisting
of up to three characters.
l
The root directory does not have a name; it is identified by a
backslash ( \ ) .
The Current Directory
MS-DOS always recognizes one directory as the current, or default,
directory, just as it always recognizes one drive as being the current,
or default, drive. The current directory is the directory in which
MS-DOS performs your commands, unless you tell it to do
otherwise. If you want to run a program or access a data file that
is not stored in the current directory, you can either change
directories (making a different directory current) or include a
pathname in your command.
Using MS-DOS With Your Equity LT-286 5-7
Page 89

Six basic directory operations are described on the following pages:
l
Listing the contents of a directory
l Using pathnames
l Creating directories
l Changing directories
l
Copying from one directory to another
l Deleting a directory.
You may also want to read about XTREE, a utility provided by
Epson that makes it easier to perform these functions, as well as
others. You can use XTREE to generate a visual diagram of your
subdirectory structure, to move quickly between directories, to add
and remove directories, and so on. XTREE is described later in this
chapter.
Listing the Contents of a Directory
To list the files in the current directory, type DIR and press Enter.
MS-DOS lists the names of the files in the current directory on the
current drive. If you are logged onto drive C but want to see a
directory of the files on the diskette in drive A, type
Enter.
press
DIR A: and
5-8
Using MS-DOS With Your Equity LT-286
Page 90

A directory listing looks like this:
Volume in drive A has no label
Directory of A:\
HELP
SETFC
SETMODE
MENU
TXT
EXE
EXE
EXE
SETXCOPY EXE
SETATTR
SETRPLCE EXE
SETRSTOR EXE
SETBCKUP EXE
DU
HELP COM
COMMAND COM
GRAPH24 COM
GWBASIC
SETPRINT EXE
EPSON
16 File(s)
To list the files in a different directory on the current drive, type
the pathname of that directory. For example, to list the contents of
the LEDGER subdirectory while logged onto drive C, type DIR
72103
18848
23536
16176
19952
EXE
14400
14448
22336
21024
EXE 23600
3654
25276
10807
EXE
86192
5168
366
TXT
289792
5-24-88 9:42a
3-03-88 1:26p
1-28-88 4:09p
1-17-88 10:25a
1-16-88 6:15p
12-17-87 5:13p
12-17-87 5:12p
12-17-87 5:12p
12-17-87 5:11p
12-17-87 5:10p
12-09-87 1:14p
12-03-87 6:45p
9-24-87 10:21a
12-04-86 7:55p
8-08-86 9:05a
10-04-85 12:00p
bytes free
\LEDGER and press Enter. (Pathnames are described below.)
Using Pathnames
Whenever you want to access a file that is not in the current
directory, you must specify the file’s pathname. A full pathname
consists of one or more directory names separated by backslashes
and followed by the filename. The pathname tells MS-DOS where
your file is stored.
Using MS-DOS With Your Equity LT-286 5-9
Page 91

For instance, in the example shown on the previous page, if you
had a file named APRIL.TXT stored in the subdirectory named
LETTERS, the full pathname of that file would be:
The pathname tells MS-DOS where to look for a directory or file.
In this case, the pathname tells MS-DOS to start at the root
directory and go through two subdirectories (WORDPROC and
PERSONAL) to find the LETTERS subdirectory. Once in the
LETTERS subdirectory, MS-DOS finds the file called APRIL.TXT.
The backslash that starts this pathname tells MS-DOS to begin at
the root directory. If you omit the backslash at the beginning of the
pathname, MS-DOS begins, not at the root directory but at the
current directory. Thus, for example, if the current directory is
PERSONAL and you want MS-DOS to find the file APRIL.TXT,
which is stored in the subdirectory LETTERS, you can specify the
pathname like this:
LETTERS\APRIL.TXT
Because this pathname does not begin with a backslash, MS-DOS
starts in the current directory (PERSONAL), moves to the
subdirectory LETTERS, then finds the file APRIL.TXT. If you did
begin with the backslash, MS-DOS would not find the file, because
it is a subdirectory of PERSONAL, not of the root directory.
5-10 Using MS-DOS With Your Equity LT-286
Page 92

Creating Directories
The MKDIR command lets you create directories. To create the
directory LEDGER under your root directory, for example, you
would type the following and press Enter:
MKDIR \LEDGER
You can abbreviate the name of this command to MD. For example,
to create a SALES directory under the LEDGER directory, you
could type the following and press Enter:
MD \LEDGER\SALES
To check that the LEDGER directory is a subdirectory of the root
directory, type DIR \ and press Enter.
The screen displays a list of files in the root directory, along with
the names of any subdirectories of the root directory:
LEDGER
WORDPROC
COMMAND
CONFIG
COM
SYS
AUTOEXEC BAT
<DIR>
<DIR>
25307 3-17-87 12:00a
209
309
9-14-88 10:17a
9-14-88 10:32a
9-14-88 10:48a
9-14-88 12:11p
3 File(s) 18625536 bytes free
The subdirectories are identified by the letters
you type DIR \ after creating the subdirectory LEDGER, you
should find the entry LEDGER <DIR>, as well as the names of all
the root directory files.
<
DIR
>. Thus,
when
Changing Directories
To make a different directory the current directory, type CHDIR (or
CD) followed by the pathname of the directory that you want to be
current. This is called changing directories. For example, to change
from any directory to the directory LEDGER (which is a
subdirectory of the root directory), type the following and press
Enter:
CD \LEDGER
Using MS-DOS With Your Equity LT-286
5-11
Page 93

The backslash identifies the LEDGER directory as a subdirectory of
the root directory. Once you are in a directory, you can access any
of the files it contains without typing the full pathname.
To change to a subdirectory of the current directory, you do not
need to type the backslash. For example, if SALES is a subdirectory
of LEDGER, then to change to the SALES directory while you are
in LEDGER, you can type the following and press Enter:
CD SALES
To change from any directory to its parent directory (the directory
of which it is a subdirectory), type the following and press Enter:
CD . .
The two periods are a special symbol that represents the parent
directory.
To return to the root directory from any subdirectory, type the
following and press Enter:
CD \
Copying From One Directory to Another
The COPY command lets you copy files from one directory to
another. To use this command, you must specify the name of the
file you want to copy, as well as the directory to which you want to
copy the file.
For example, if you are in the LETTERS directory (see the diagram
on page 5-6) and want to copy the file APRIL.TXT to the
BUSINESS directory, type the following and press Enter:
copy APRIL.TXT \WORDPROC\BUSINESS
The command has three parts: the word COPY, the name of the
file you want to copy (APRIL.TXT), and the name of the directory
to which you want to copy this file ( \ WORDPROC\BUSINESS).
You must include spaces or commas between each of the three
parts. The space characters or commas are the delimiters in this
command.
5-12
Using MS-DOS With Your Equity LT-286
Page 94

Note
You can also copy files using XTREE, MENU, or the MS-DOS
XCOPY command. See the sections later in this chapter on
using XTREE and MENU, and see your MS-DOS manual for
information about using XCOPY.
Deleting a Directory
If you no longer need a directory, you can remove it with the
RMDIR command (which can be abbreviated RD). Before
removing a directory, however, you must either delete any files it
contains or move them to a different directory. You cannot delete a
directory that is not empty. (To delete files from a directory, use the
DEL or ERASE command. See “Deleting Data,” below.)
To delete an empty directory, such as the ACCOUNTS directory
under LEDGER, type the following and press Enter:
RD \LEDGER\ACCOUNTS
Formatting Diskettes
Before you can store data on a new diskette, you must format it.
Formatting prepares the diskette so that MS-DOS can store data on
it. You need to do this only once, before you use the diskette for the
first time.
You can also reformat previously used diskettes. Be aware, however,
that reformatting erases all data on the diskette. Always be sure you
no longer need any files on a diskette before reformatting it.
You can format two kinds of 3 1/2-inch diskettes. Double-sided,
double-density diskettes can be formatted to hold 720KB of data.
Double-sided, high-density diskettes can be formatted to hold
1.44MB. You may ordinarily prefer to use high-density diskettes,
since they hold more information. But if you need to transfer files
to another computer that cannot read 1.44MB diskettes, you can
purchase double-density diskettes and use the 720KB format.
Using MS-DOS With Your Equity LT-286
5-13
Page 95

Note
Be sure to purchase the appropriate type of 3 1/2-inch diskettes
for the format you want to use, Double-den&y diskettes may be
formatted only for 720KB; high-density diskettes may be
formatted only for 1.44MB.
Formatting a 1.44MB Diskette
To format a 1.44MB diskette:
1.
If necessary, log onto drive C. If you are not in the directory
where the file FORMAT.COM is stored, change to that
directory. For example, if FORMAT.COM is stored in a
subdirectory named DOS, type CD
2.
When you see the C> prompt, type the following and press
\DOS
Enter:
FORMAT A:
You see this prompt:
Insert new diskette for drive A:
and strike ENTER when ready
and press Enter.
3.
Insert the diskette you want to format into drive A and press
Enter.
When the diskette is formatted, you see this message:
4.
Format complete
1447664 bytes total disk space
1447664 bytes available on disk
Format another (Y/N)?
At this point, you can either format another diskette by
pressing Y and Enter, or return to the MS-DOS command
prompt by pressing N and Enter.
5-14
Using MS-DOS With Your Equity LT-286
Page 96

Formatting a 720-KB Diskette
To format a 720KB diskette:
1.
If necessary, log onto drive C. If you are not in the directory
where the file FORMAT.COM is stored, use the CD command
to change to that directory.
2. When you see the C> prompt, type the following and press
Enter:
FORMAT A: /N:9 /T:80
You see this prompt:
Insert new diskette for drive A:
and strike ENTER when ready
3. Insert the diskette you want to format into drive A and press
Enter.
4. When the diskette is formatted, you see this message:
Format complete
730112 bytes total disk space
730112 bytes available on disk
Format another (Y/N)?
At this point, you can either format another diskette by
pressing Y and Enter, or return to the MS-DOS command
prompt by pressing N and Enter.
Note
An easy way to perform the functions described above is through
the MENU utility, See the section on MENU later in this
chapter.
Using MS-DOS With Your Equity LT-286
5-15
Page 97

Copying Data
It is very important to keep backup diskettes containing copies of
the files you create. You can copy data and program files several
ways:
l
You can use the DISKCOPY command to make an exact
duplicate of a diskette
l
You can use the COPY command to copy individual files
l
You can use the BACKUP command to back up the files on a
hard disk or diskette in a special format.
The COPY command is easier to use when you have only a few files
to back up. The BACKUP command has some advantages when
you want to back up many files at once.
Note
An easy way to perform the functions listed above is through the
MENU and XTREE programs. See the sections on MENU and
XTREE later in this chapter. You can also use the MS-DOS
XCOPY command to copy whole subdirectories of fifes; see your
MS-DOS manual for details.
Using the DISKCOPY Command
The DISKCOPY command lets you copy an exact image of one
diskette onto another diskette. The two diskettes must be of the
same size and type; that is, you cannot use DISKCOPY to copy
data from a 3 1/2-inch diskette onto a 5 1/2-inch diskette or to copy
data from a 1.44MB diskette to a 720KB diskette. You also cannot
use DISKCOPY to copy data between a hard disk and a diskette.
To use DISKCOPY, follow these steps:
1.
Make sure your original diskette (the one you are copying from)
is write-protected. (See Chapter 4 for instructions.)
5-16
Using MS-DOS With Your Equity LT-286
Page 98

2.
Log onto drive C (your hard disk) if you are not there already.
If necessary, use the CD command to change to the directory
containing the file DISKCOPY.COM.
3.
At the C> prompt, type the following and press Enter:
DISKCOPY A: A:
MS-DOS displays this message:
Insert SOURCE diskette in drive A:
Press any key when ready . . .
Insert the diskette you want to copy from (your source diskette)
4.
in the diskette drive and press any key. DISKCOPY starts to
copy the contents of the diskette to the computer’s memory.
When the memory is full, the screen displays this message:
Insert TARGET diskette in drive A:
Press any key when ready . . .
5.
Remove the diskette from drive A and insert the blank diskette
(your target diskette) in the drive. Press any key. DISKCOPY
checks to see if the new diskette is formatted. If it is not,
DISKCOPY formats the diskette. The copy operation begins
when the format is complete.
6.
When DISKCOPY has copied the files from memory to the
target diskette, it prompts you to reinsert the source diskette so
it can copy the remaining data to the computer’s memory.
Insert the source diskette in drive A and press any key.
Once DISKCOPY has copied the rest of the source diskette’s
7.
files to the computer’s memory, the screen prompts you to
reinsert the target diskette so that the remaining data can be
copied from memory to the target diskette. Insert the target
diskette and press any key.
8.
When the copy is complete, you see this message:
Copy another diskette (Y/N)?
Press Y and Enter to copy another diskette or N and Enter to
return to the MS-DOS command prompt.
Using MS-DOS With Your Equity LT-286
5-17
Page 99

Using the COPY Command
You can use the COPY command to copy files in several ways:
l You can copy individual files from a diskette or the hard disk to
another diskette or hard disk
l You can copy a group of files using wildcard characters
(wildcard characters are explained below)
l
You can copy one or more files and give them new names
l
You can combine or merge files into one file.
A few simple rules apply to all uses of COPY:
l
You must tell MS-DOS where to find the source file and where
to store the target file.
l
If an existing file on the target diskette or directory has the
same name as the file you are copying, the copy automatically
replaces the existing file. There is no warning that the existing
file is being replaced, so be careful that you do not accidentally
erase a file that you want to keep.
l If you are copying to a diskette, the diskette must be formatted.
To use the COPY command, type COPY at the command prompt,
followed by the drive identifiers and necessary filenames. Then
press Enter to execute the command.
For example, to copy a file named REPORT from the diskette in
drive A to the hard disk (drive C), using the same name for the
copy as for the original file, type the following and press Enter:
COPY A:REPORT C:
If you want to copy this file from the diskette in drive A to the hard
disk, but want to change the name of the copy from REPORT to
FACTS, type this command and press Enter:
COPY A:REPORT C:FACTS
5-18
Using MS-DOS With Your Equity LT-286
Page 100

To make a copy of this file on the diskette in drive A and assign the
name FACTS to the copy, type the following and press Enter:
COPY A:REPORT A:FACTS
Note that in this case you must assign a new name to the copy,
since MS-DOS does not allow two files in the same directory to
have the same name.
For any of the previous examples, if you omit the drive identifier
(A: or C:), the COPY
example, if the current drive is C and you want to copy the file
REPORT from drive A to drive C, leaving the name of the file
unchanged, you can enter the command as follows:
command uses the current drive. For
COPY A:REPORT
MS-DOS writes the copy to drive C because drive C is the current
drive. You can save a few keystrokes by omitting the drive identifier
of the current drive, but it is equally correct (and safer) to include
all the drive identifiers.
An easy way to copy a group of files at once is by using wildcard
characters in the filenames. A wildcard character is a character
that stands for some other single character or group of characters.
MS-DOS recognizes two wildcard characters: * and ?. The asterisk
represents any group of characters, and the question mark
represents any single character.
For example, to copy all the files on the diskette in drive A to the
current directory on the hard disk, type the following and press
Enter:
COPY A:*.* C:
To copy all files with names that begin with the four letters MEMO
and end with any single character, type the following and press
Enter:
COPY A:MEMO? C:
Using MS-DOS With Your Equity LT-286
5-19
 Loading...