

Page 1

®
24-pin Dot Matrix Printer
All rights reserved. No part of this publication may be reproduced, stored in a retrieval
system, or transmitted in any form or by any means, electronic, mechanical, photocopying,
recording, or otherwise, without the prior written permission of SEIKO EPSON
CORPORATIO N. The information contained h erein is designed only for use with th is EPSON
printer. EPSON is not responsible for any use of this information as applied to other printers.
Neither SEIKO EPSON CORPORATION nor its affiliates shall be liable to the purchaser of
this product or third parties for damages, losses, costs, or expenses incurred by the purchaser
or third parties as a result of: accident, misuse, or abuse of this product or unauthorized
modifications, repairs, or alterations to this product, or (excluding the U.S.) failure to strictly
comply with SEIKO EPSON CORPORATION’s operating and maintenance instructions.
SEIKO EPSON C ORPORATION shall not be liable fo r any damages or problems arising from
the use of any options or any consumable products other than those designated as Original
EPSON Products or EPSON Approved Products by SEIKO EPSON CORPORATION.
EPSON and EPSON ESC/P are registered trademarks and EPSON ESC/P2 is a trademark
of SEIKO EPSON CORPORATION.
Microsoft, Windows, and Windows NT are registered trademarks of Microsoft Corporation.
IBM is a registered trademark of International Business Machines Corporation.
General Notice: Other product names used herein are for identification purposes only and
may be trademarks of their respective owners. EPSON disclaims any and all rights in those
marks.
Copyright © 2002 by SEIKO EPSON CORPORATION, Nagano, Japan.
Reference Guide
Page 2

Page 3

Contents
Chapter 1 Paper Handling
Selecting a Paper Source. . . . . . . . . . . . . . . . . . . . . . . . . . . . . . . . . . . . .2
Paper source and paper types. . . . . . . . . . . . . . . . . . . . . . . . . . . .2
Setting the paper release lever . . . . . . . . . . . . . . . . . . . . . . . . . . .3
Adjusting the Paper-Thickness Lever. . . . . . . . . . . . . . . . . . . . . . . . . .3
Loading Continuous Paper . . . . . . . . . . . . . . . . . . . . . . . . . . . . . . . . . .5
Positioning the continuous paper supply. . . . . . . . . . . . . . . . . .5
Loading continuous paper with the tractor . . . . . . . . . . . . . . . .6
Using the tear-off function . . . . . . . . . . . . . . . . . . . . . . . . . . . . .10
Loading Single Sheets. . . . . . . . . . . . . . . . . . . . . . . . . . . . . . . . . . . . . .12
Loading Special Paper . . . . . . . . . . . . . . . . . . . . . . . . . . . . . . . . . . . . .14
Multipart forms. . . . . . . . . . . . . . . . . . . . . . . . . . . . . . . . . . . . . . .14
Labels . . . . . . . . . . . . . . . . . . . . . . . . . . . . . . . . . . . . . . . . . . . . . . .15
Switching Between Continuous Paper and Single Sheets. . . . . . . .17
Switching to single sheets . . . . . . . . . . . . . . . . . . . . . . . . . . . . . .17
Switching to continuous paper. . . . . . . . . . . . . . . . . . . . . . . . . .18
Using the Micro Adjust Function . . . . . . . . . . . . . . . . . . . . . . . . . . . .19
Adjusting the tear-off position . . . . . . . . . . . . . . . . . . . . . . . . . .19
Adjusting the top-of-form position . . . . . . . . . . . . . . . . . . . . . .20
Chapter 2 Printer Software
About Your Printer Software. . . . . . . . . . . . . . . . . . . . . . . . . . . . . . . .24
Using the Printer Driver with Windows Me, 98, and 95 . . . . . . . . .24
Accessing the printer driver from Windows applications . . .25
Accessing the printer driver from the Start menu. . . . . . . . . .26
Changing the printer driver settings. . . . . . . . . . . . . . . . . . . . .27
Using the Printer Driver with Windows XP, 2000 and NT 4.0. . . .28
Accessing the printer driver from Windows applications . . .28
Accessing the printer driver from the Start menu. . . . . . . . . .30
Changing the printer driver settings. . . . . . . . . . . . . . . . . . . . .32
Printer Driver Settings Overview . . . . . . . . . . . . . . . . . . . . . . . . . . . .33
iii
Page 4

Using EPSON Status Monitor 3 . . . . . . . . . . . . . . . . . . . . . . . . . . . . . 34
Setting up EPSON Status Monitor 3. . . . . . . . . . . . . . . . . . . . . 35
Accessing EPSON Status Monitor 3 . . . . . . . . . . . . . . . . . . . . . 36
Chapter 3 Control Panel
Buttons and Lights . . . . . . . . . . . . . . . . . . . . . . . . . . . . . . . . . . . . . . . . 38
Selecting a Font. . . . . . . . . . . . . . . . . . . . . . . . . . . . . . . . . . . . . . . . . . . 40
About Your Printer’s Default Settings. . . . . . . . . . . . . . . . . . . . . . . . 41
Understanding default settings. . . . . . . . . . . . . . . . . . . . . . . . . 41
Changing default settings . . . . . . . . . . . . . . . . . . . . . . . . . . . . . 47
Lock-Out Mode. . . . . . . . . . . . . . . . . . . . . . . . . . . . . . . . . . . . . . . . . . . 49
Turning on or off the lock-out mode . . . . . . . . . . . . . . . . . . . . 49
Changing the lock-out mode setting . . . . . . . . . . . . . . . . . . . . 49
Chapter 4 Troubleshooting
Using the Error Indicators. . . . . . . . . . . . . . . . . . . . . . . . . . . . . . . . . . 52
Problems and Solutions. . . . . . . . . . . . . . . . . . . . . . . . . . . . . . . . . . . . 53
Power supply problems . . . . . . . . . . . . . . . . . . . . . . . . . . . . . . . 54
Paper loading or feeding problems . . . . . . . . . . . . . . . . . . . . . 55
Printing position problems . . . . . . . . . . . . . . . . . . . . . . . . . . . . 60
Printing or printout quality problems . . . . . . . . . . . . . . . . . . . 62
Correcting USB Problems . . . . . . . . . . . . . . . . . . . . . . . . . . . . . . . . . . 68
Clearing a Paper Jam . . . . . . . . . . . . . . . . . . . . . . . . . . . . . . . . . . . . . . 71
Aligning Vertical Lines in Your Printout . . . . . . . . . . . . . . . . . . . . . 72
Printing a Self Test . . . . . . . . . . . . . . . . . . . . . . . . . . . . . . . . . . . . . . . . 73
Printing Hex Dump . . . . . . . . . . . . . . . . . . . . . . . . . . . . . . . . . . . . . . . 75
Contacting Customer Support . . . . . . . . . . . . . . . . . . . . . . . . . . . . . . 76
Chapter 5 Options and Consumables
Ribbon Cartridge . . . . . . . . . . . . . . . . . . . . . . . . . . . . . . . . . . . . . . . . 118
Genuine EPSON ribbon cartridge. . . . . . . . . . . . . . . . . . . . . . 118
Replacing the ribbon cartridge . . . . . . . . . . . . . . . . . . . . . . . . 118
Print Server . . . . . . . . . . . . . . . . . . . . . . . . . . . . . . . . . . . . . . . . . . . . . 122
iv
Page 5

Appendix A Product Information
Safety Instructions. . . . . . . . . . . . . . . . . . . . . . . . . . . . . . . . . . . . . . . .124
Warnings, cautions, and notes . . . . . . . . . . . . . . . . . . . . . . . . .124
Hot parts caution symbol . . . . . . . . . . . . . . . . . . . . . . . . . . . . .124
Important safety instructions . . . . . . . . . . . . . . . . . . . . . . . . . .124
For United Kingdom users . . . . . . . . . . . . . . . . . . . . . . . . . . . .126
Printer Parts . . . . . . . . . . . . . . . . . . . . . . . . . . . . . . . . . . . . . . . . . . . . .128
Printer Specifications . . . . . . . . . . . . . . . . . . . . . . . . . . . . . . . . . . . . .129
Mechanical. . . . . . . . . . . . . . . . . . . . . . . . . . . . . . . . . . . . . . . . . .129
Electronic . . . . . . . . . . . . . . . . . . . . . . . . . . . . . . . . . . . . . . . . . . .131
Electrical. . . . . . . . . . . . . . . . . . . . . . . . . . . . . . . . . . . . . . . . . . . .133
Environmental . . . . . . . . . . . . . . . . . . . . . . . . . . . . . . . . . . . . . .133
Paper. . . . . . . . . . . . . . . . . . . . . . . . . . . . . . . . . . . . . . . . . . . . . . .133
Printable area . . . . . . . . . . . . . . . . . . . . . . . . . . . . . . . . . . . . . . .142
Standards and Approvals. . . . . . . . . . . . . . . . . . . . . . . . . . . . . . . . . .143
Command Lists . . . . . . . . . . . . . . . . . . . . . . . . . . . . . . . . . . . . . . . . . .144
EPSON ESC/P 2 control codes. . . . . . . . . . . . . . . . . . . . . . . . .144
IBM PPDS Emulation Control Codes . . . . . . . . . . . . . . . . . . .145
Cleaning the Printer . . . . . . . . . . . . . . . . . . . . . . . . . . . . . . . . . . . . . .146
Transporting the Printer. . . . . . . . . . . . . . . . . . . . . . . . . . . . . . . . . . .147
Glossary
Index
v
Page 6

vi
Page 7

Chapter 1
Paper Handling
Selecting a Paper Source. . . . . . . . . . . . . . . . . . . . . . . . . . . . . . . . . . . . .2
Paper source and paper types. . . . . . . . . . . . . . . . . . . . . . . . . . . .2
Setting the paper release lever . . . . . . . . . . . . . . . . . . . . . . . . . . .3
Adjusting the Paper-Thickness Lever. . . . . . . . . . . . . . . . . . . . . . . . . .3
Loading Continuous Paper . . . . . . . . . . . . . . . . . . . . . . . . . . . . . . . . . .5
Positioning the continuous paper supply. . . . . . . . . . . . . . . . . .5
Loading continuous paper with the tractor . . . . . . . . . . . . . . . .6
Using the tear-off function . . . . . . . . . . . . . . . . . . . . . . . . . . . . .10
Loading Single Sheets. . . . . . . . . . . . . . . . . . . . . . . . . . . . . . . . . . . . . .12
Loading Special Paper . . . . . . . . . . . . . . . . . . . . . . . . . . . . . . . . . . . . .14
Multipart forms. . . . . . . . . . . . . . . . . . . . . . . . . . . . . . . . . . . . . . .14
Labels . . . . . . . . . . . . . . . . . . . . . . . . . . . . . . . . . . . . . . . . . . . . . . .15
Switching Between Continuous Paper and Single Sheets. . . . . . . .17
Switching to single sheets . . . . . . . . . . . . . . . . . . . . . . . . . . . . . .17
Switching to continuous paper. . . . . . . . . . . . . . . . . . . . . . . . . .18
Using the Micro Adjust Function . . . . . . . . . . . . . . . . . . . . . . . . . . . .19
Adjusting the tear-off position . . . . . . . . . . . . . . . . . . . . . . . . . .19
Adjusting the top-of-form position . . . . . . . . . . . . . . . . . . . . . .20
1
1
1
1
1
1
1
1
1
Paper Handling 1
1
1
1
Page 8
Selecting a Paper Source
Your printer can print on single sheets, continuous paper,
multipart forms, and labels.
Caution:
Do not use paper that is folded, creased, curled, torn, stained, or
c
stamped. Always use new, clean paper that meets the paper
specifications. See “Paper” on page 133 for more detailed
information.
Your printer can accommodate several paper types through two
paper sources: paper guide or tractor. You should select the paper
source depending on the type of paper you are using. You can
select the paper source by setting the paper release lever. See
“Printer Parts” on page 128 for more information.
Paper source and paper types
Basically, there are two paper types and two paper sources. The
table below shows the relationship between paper sources and
paper types, as well as paper loading and ejecting orientation.
Paper path Paper source
Continuous paper * Tractor Tractor
Single sheets ** Paper guide Manual feed
* Continuous paper includes labels and multipart forms.
** Single sheets include labels and single-sheet multipart forms.
2 Paper Handling
selection
Page 9
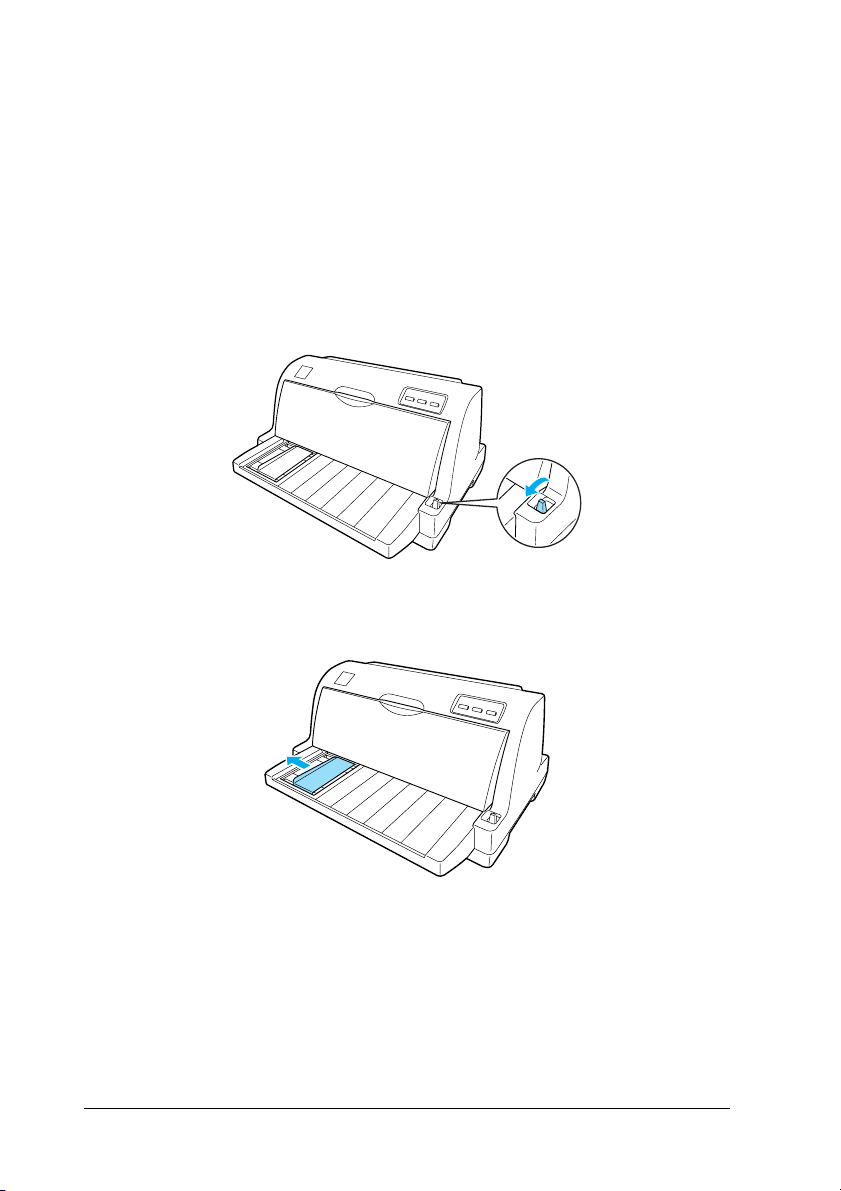
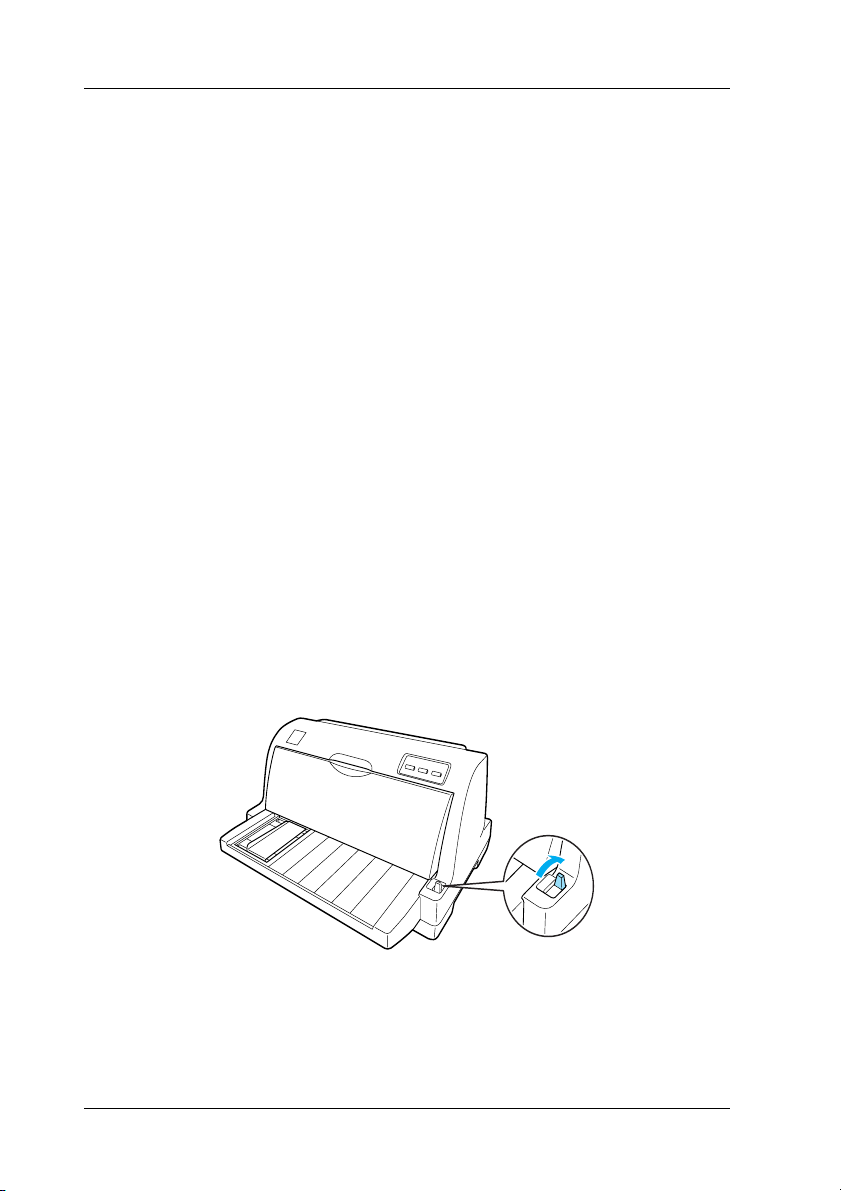
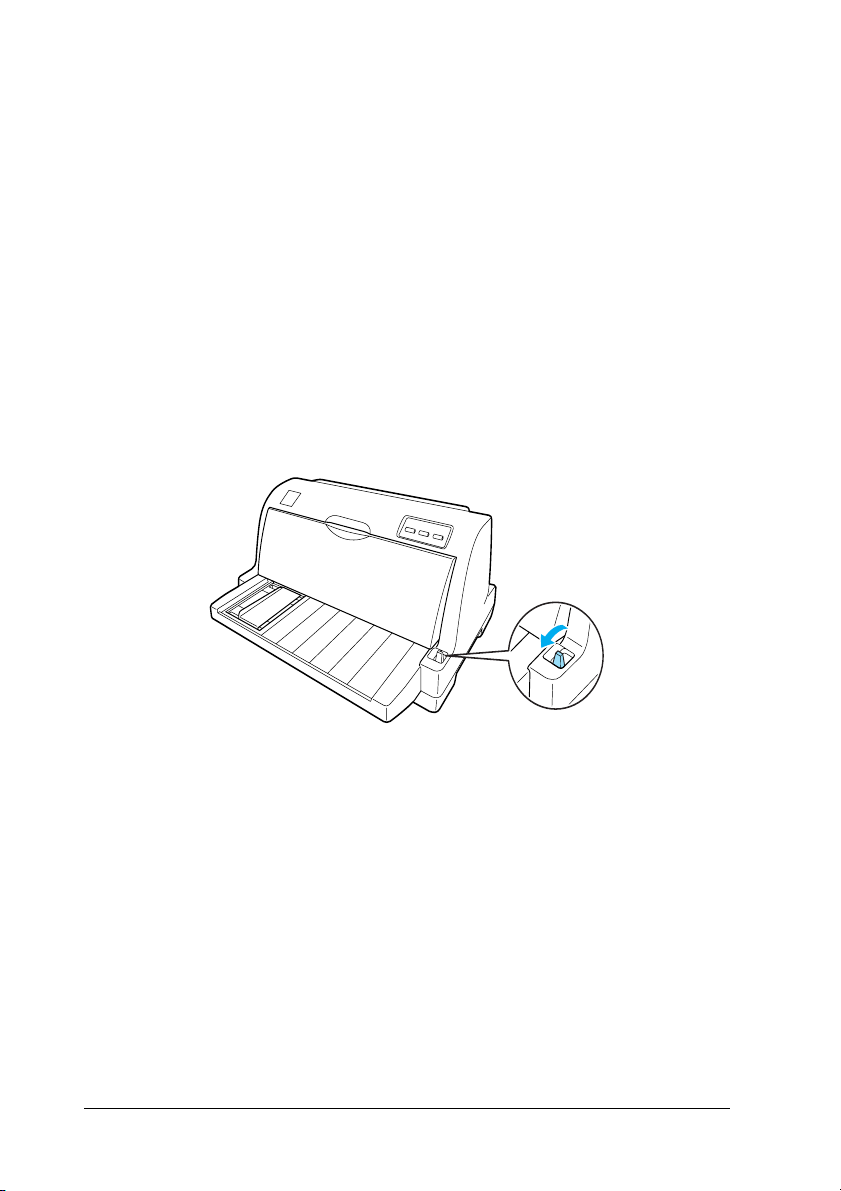
Setting the paper release lever
Set the paper release lever to select the paper-feeding method you
want the printer to use. The paper release lever has two positions:
for tractor feeding and for single-sheet feeding, as explained
below.
Single-sheet feeding position - to use the paper guide.
Tractor feeding position - to use the tractor.
Adjusting the Paper-Thickness Lever
1
1
1
1
1
1
1
1
You can get the best printing quality by adjusting the
paper-thickness lever according to the thickness of the paper you
are using.
Paper Handling 3
1
1
1
1
Page 10
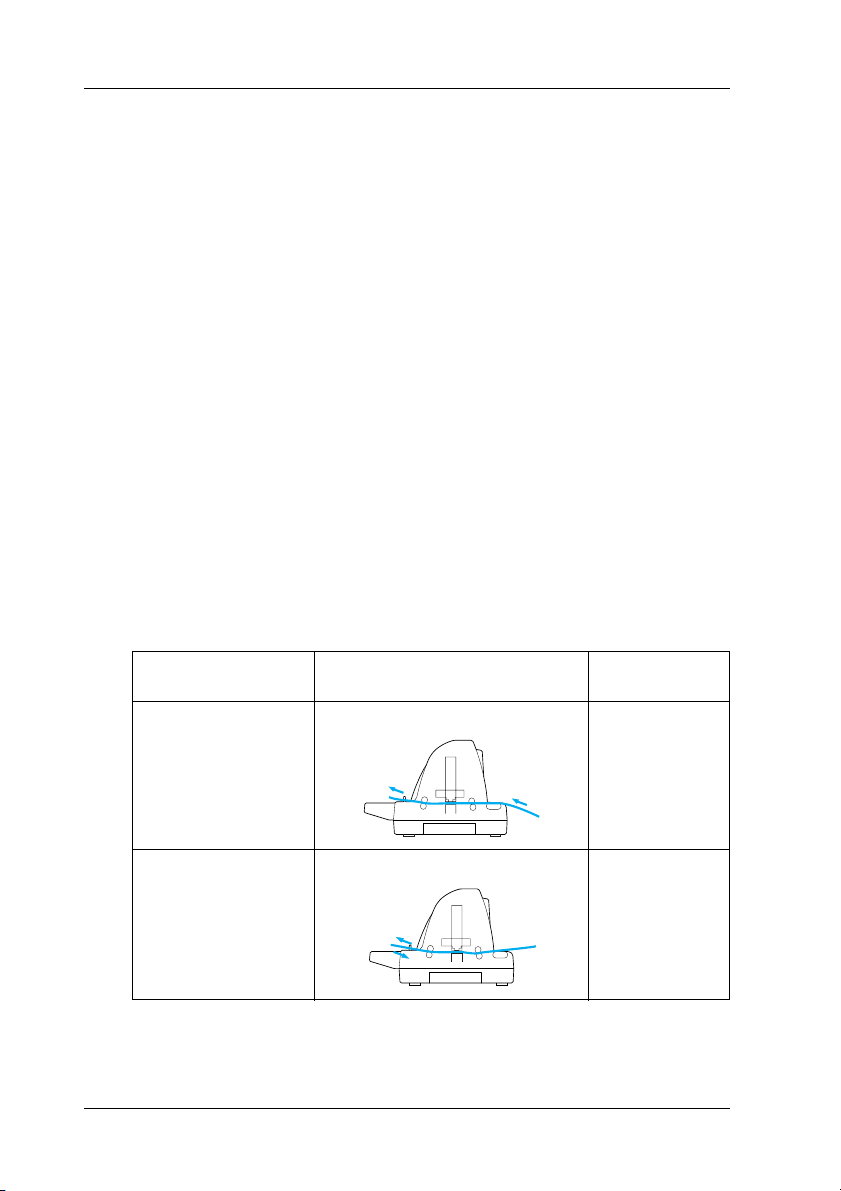
The higher the number you set the paper-thickness lever to, the
wider the space between the platen and print head. If your
printout appears faint or characters seem skipped or missing, this
setting may be too high. On the other hand, if the setting is too
low, your printout may appear smudged, the paper may not feed
correctly, or the ribbon may become damaged.
The following table provides guidelines for selecting the
appropriate lever position for the type of paper you are using.
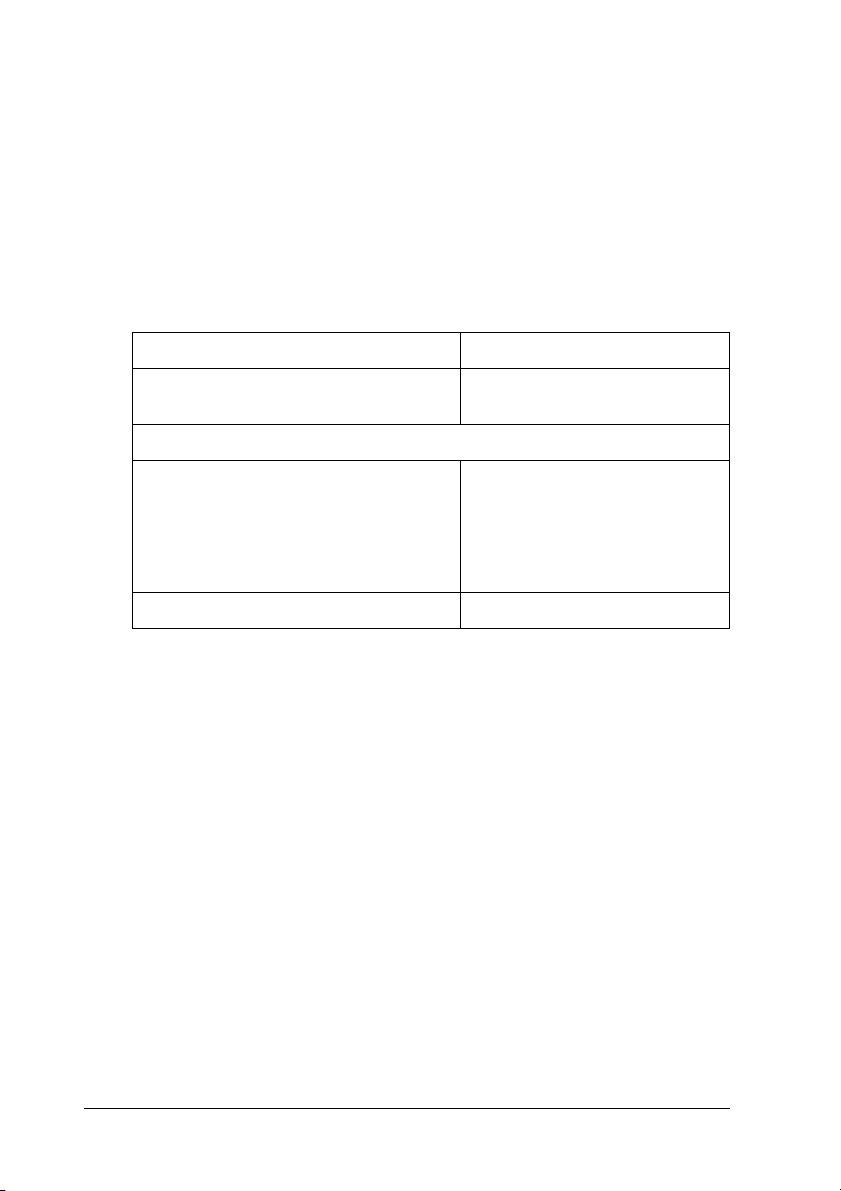
Paper type Paper-thickness lever position
Ordinary paper
(single sheets or continuous paper)
Multipart forms (carbonless)
2 parts (original + 1 copy)
3 parts (original + 2 copies)
4 parts (original + 3 copies)
5 parts (original + 4 copies)
Labels 2
0
1
2
3
5
4 Paper Handling
Page 11
Loading Continuous Paper
Your printer can print on continuous paper from 101.6 to 254 mm
(4.0 to 10.0 inches) wide. See “Continuous paper” on page 134 for
detailed continuous paper specifications. You can load
continuous paper from the tractor unit.
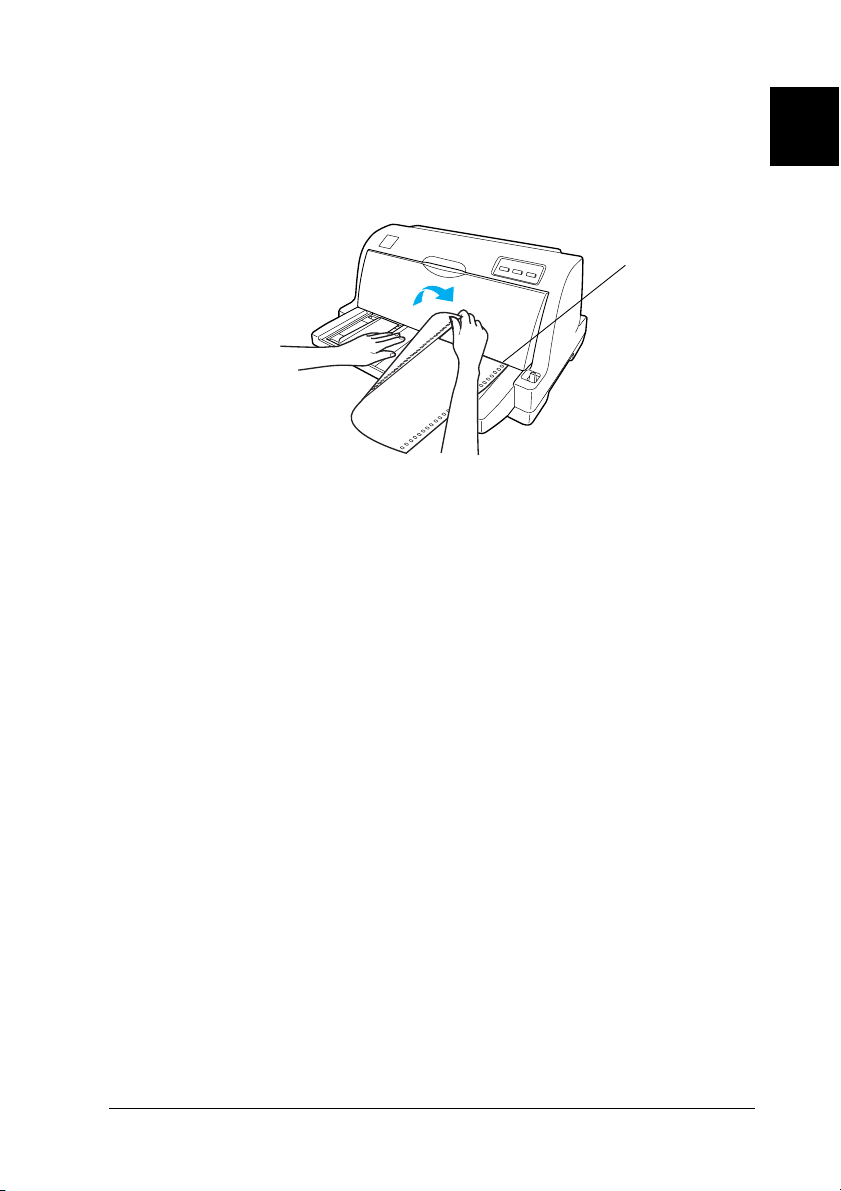
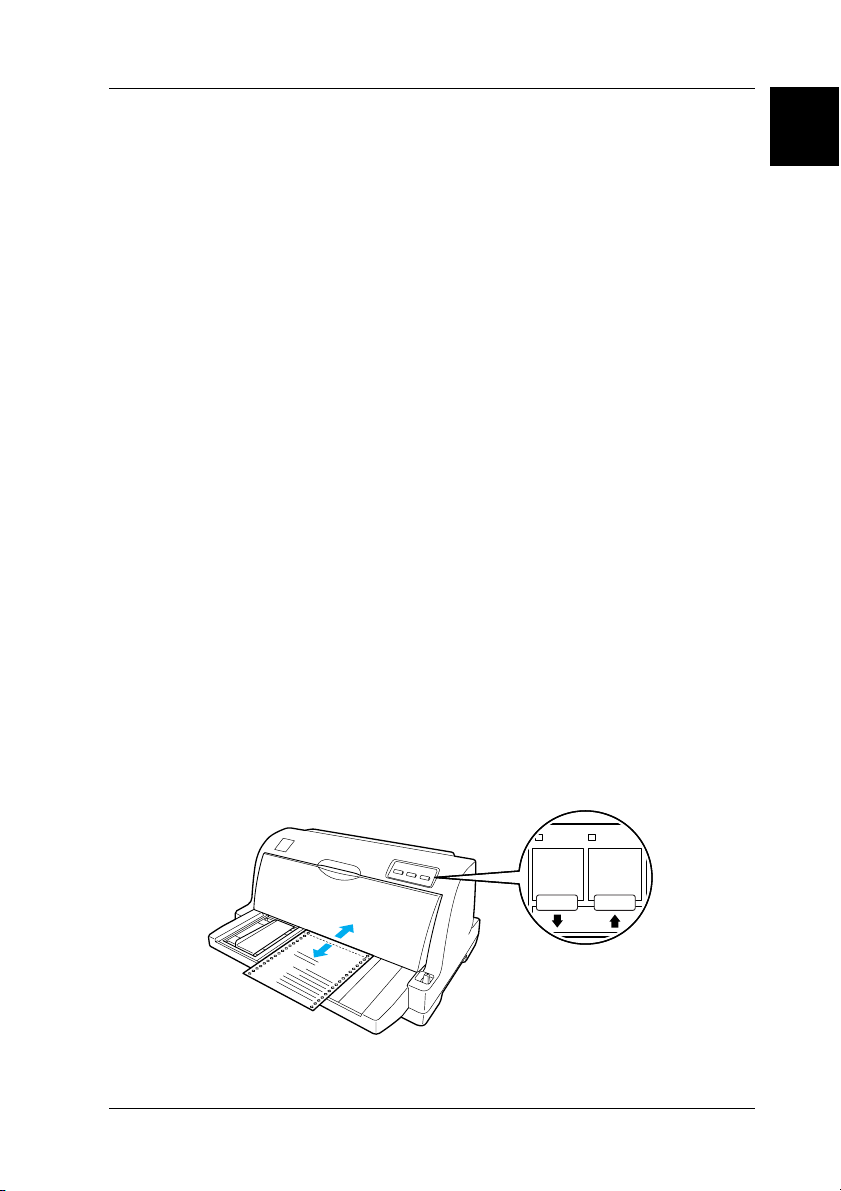
Positioning the continuous paper supply
1
1
1
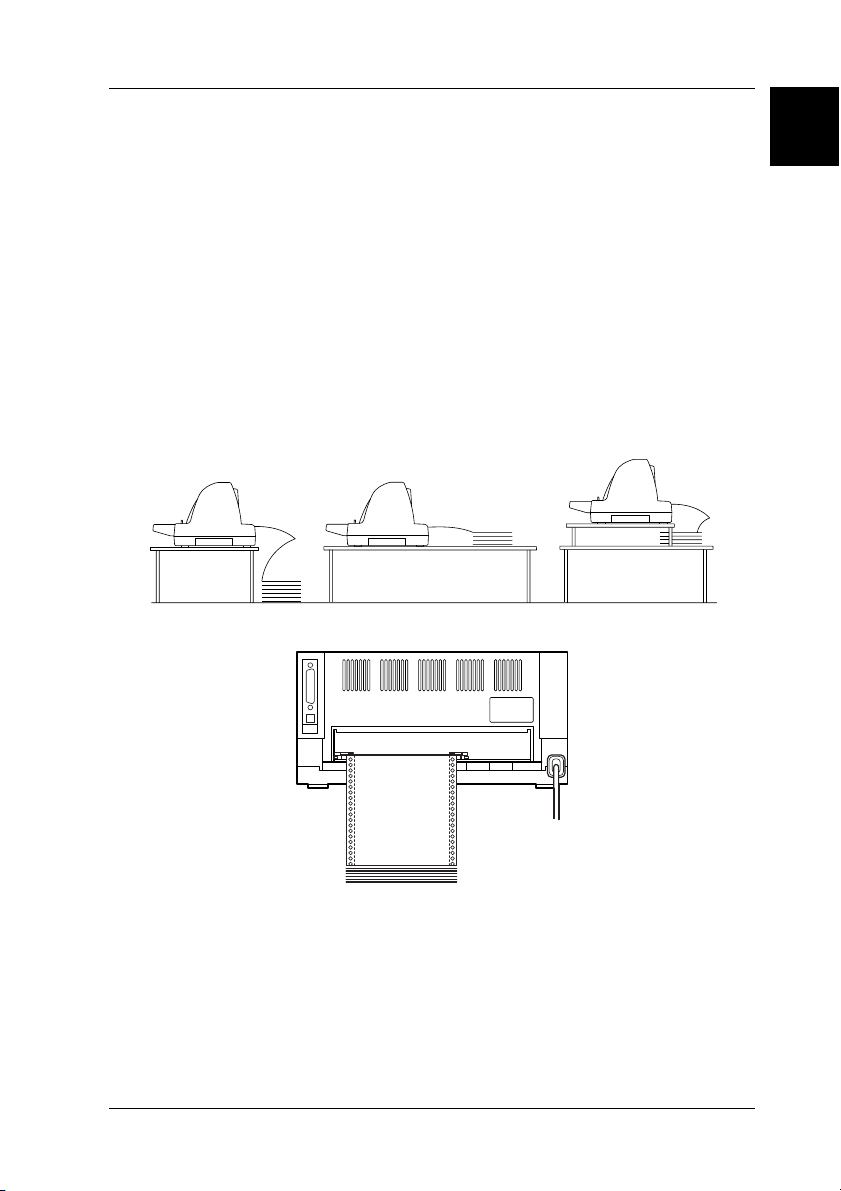
When you load continuous paper, make sure to line up the paper
supply with the tractor so the paper feeds smoothly into the
printer as shown below.
1
1
1
1
1
1
1
1
Paper Handling 5
1
Page 12
Loading continuous paper with the tractor
When using continuous paper, it is a good idea to set the Auto
tear-off function in the default-setting mode to on. For more
information, see “About Your Printer’s Default Settings” on page
41.
1. Make sure that the paper release lever is set to the tractor
feeding position.
2. Slide the edge guide all the way to the left.
6 Paper Handling
Page 13
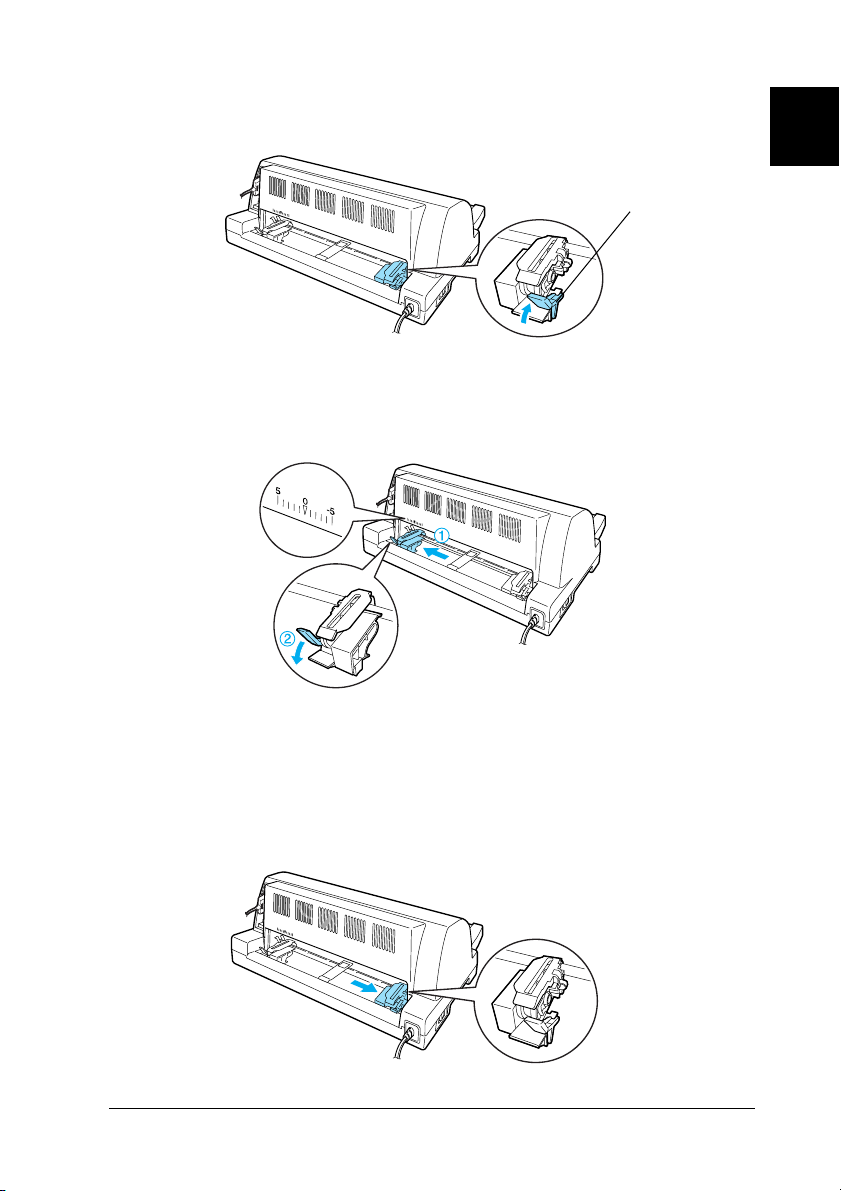
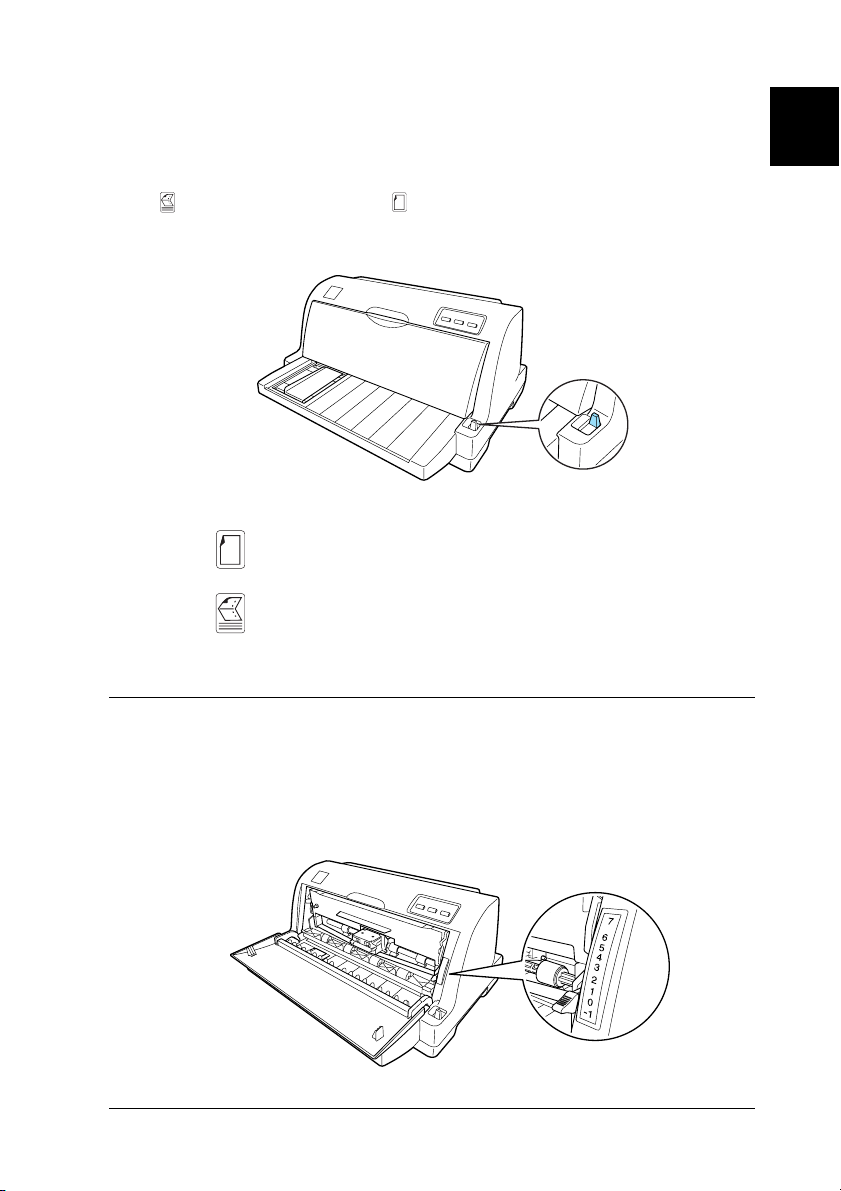
3. Facing the back of the printer, release the sprocket lock levers
by pushing them up.
sprocket lock lever
1
1
1
4. Position the left sprocket so that the sprocket pins are to the
left of the arrow mark (0 position) on the back of the printer.
Then push down the lock lever to lock the sprocket in place.
Note:
Printing starts at the arrow mark (0 position) on the back of the
printer.The unprintable area is to the left of the arrow mark.
5. Slide the right sprocket to roughly match the width of your
paper, but do not lock it.
1
1
1
1
1
1
1
1
Paper Handling 7
1
Page 14
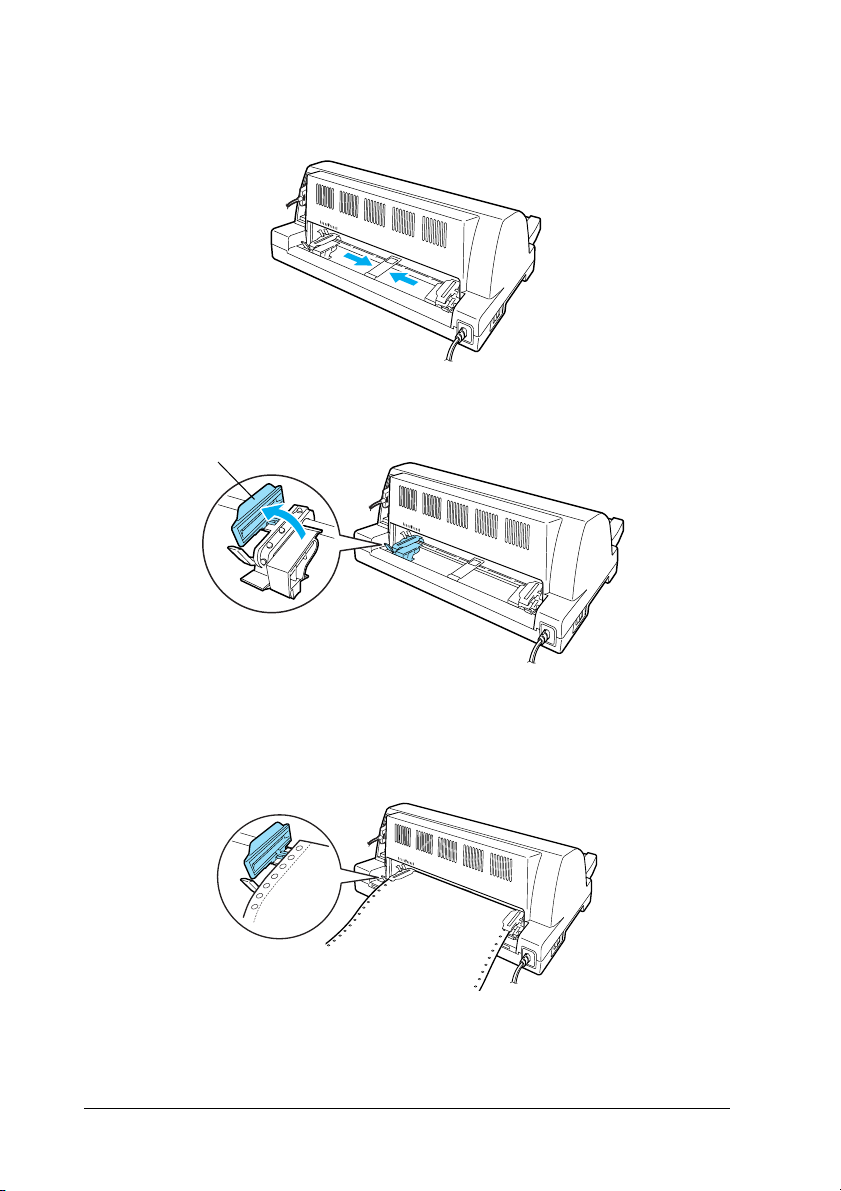
6. Slide the center paper support to the middle of the two
sprockets.
7. Open the sprocket covers of the both sprockets.
sprocket cover
8. Fit the first two holes of the continuous paper over the
sprocket pins on both sides. Be sure to position your paper
supply so that the printable side faces up.
8 Paper Handling
Page 15
Caution:
Make sure the first sheet of your continuous paper has a
c
clean, straight edge so that it can feed smoothly into the
printer.
1
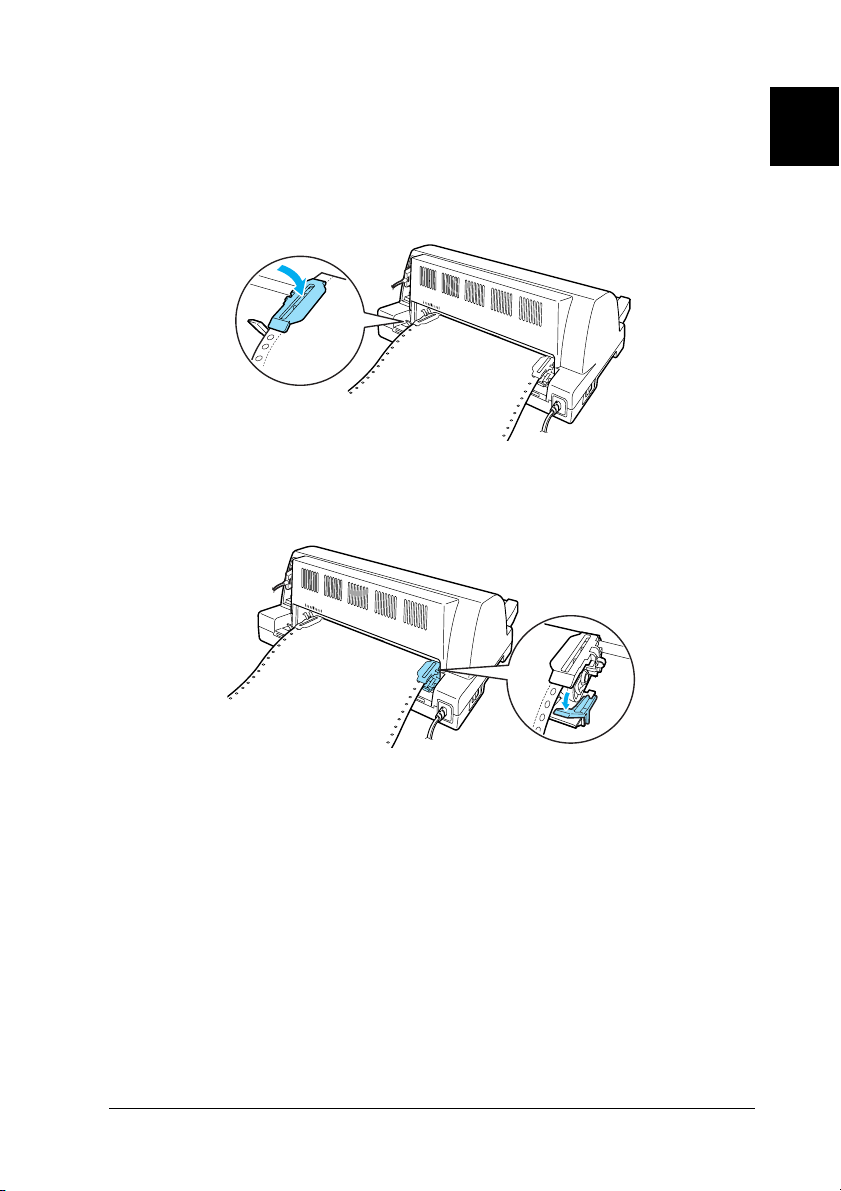
9. Close the sprocket covers.
10. Slide the right sprocket to remove any slack in the paper. Then
push down the sprocket lock lever to lock the sprocket in place.
Note:
Before turning the printer on, install the ribbon cartridge.
Otherwise, paper jams may occur.
11. Turn on the printer if it is turned off. The printer is ready to
start printing.
1
1
1
1
1
1
1
1
1
1
Paper Handling 9
1
Page 16

Note:
❏ Always make sure there is at least one more sheet than required;
continuous paper may not feed properly if it is not fed through the
sprockets.
❏ Do not pull the loaded paper out of the tractor unit while the printer
is on. Doing so may cause paper jams or printer malfunctions, also
the top-of-form position setting may become misadjusted.
❏ Do not pull out paper that is not ejected completely after pressing
the Load/Eject button. Doing so may cause paper jams or printer
malfunctions, also the top-of-form position setting may become
misadjusted.
❏ If the first line on your page appears too high or low, you can change
its position by using the Micro Adjust function as described in
“Adjusting the top-of-form position” on page 20.
Using the tear-off function
You can use the tear-off function to advance your continuous
paper to the printer’s tear-off edge automatically when you finish
printing. You can then easily tear off the printed sheets. When you
resume printing, the printer automatically feeds the paper back
to the top-of-form position so that you can save the paper
normally lost between documents.
To use the tear-off function, turn on the Auto tear-off function and
select the appropriate page length for continuous paper in the
default-setting mode. See “Changing default settings” on pa ge 4 7
for instructions on how to change the default settings.
If the perforation between pages is not aligned with the tear-off
edge, you can adjust the position of the perforation using the
Micro Adjust function. See “Adjusting the tear-off position” on
page 19 for more information.
When Auto tear-off is on, the printer automatically advances the
paper to the tear-off position whenever it receives a full page of
data or a form feed command followed by no more data.
The steps below describe how to use Auto tear-off function.
10 Paper Handling
Page 17
1. When printing is finished, the printer advances the
perforation of the final printed page to the tear-off position.
Tear off all printed pages using the tear-off edge of the printer
cover.
tear-off edge
Note:
If your paper’s perforation is not properly aligned with the tear-off
edge, you can adjust the tear-off position using the Micro Adjust
function as described in “Adjusting the tear-off position” on page
19.
2. When you resume printing, the printer feeds the paper back
to the top-of-form position and begins printing.
1
1
1
1
1
1
1
Removing continuous paper
Follow these steps to remove continuous paper from the printer:
1. When the auto tear-off function is on, the printer advances the
paper to the tear-off position automatically.
2. Tear off the printed pages.
3. Press the Load/Eject button to feed the continuous paper
backward out of the printer and into the standby position.
4. To completely remove continuous paper from the printer,
open the sprocket covers. Remove the paper from the tractor
unit, and then close the sprocket covers.
Paper Handling 11
1
1
1
1
1
Page 18
Loading Single Sheets
Your printer can print on single sheets of paper from 90 to 257
mm (3.5 to 10.1 inches) wide. See “Single sheets” on page 134 for
detailed single-sheet paper specifications.
Note:
If you load long paper (for example, legal size paper), leave enough space
at the back of the printer so that the paper is not obstructed.
Follow these steps to load single sheets from the paper guide.
1. Make sure the paper guide and the ribbon cartridge are
attached as described in the Setup Sheet. Then close the tractor
unit sprocket covers located on the back of your printer and
push down the sprocket lock levers to lock the sprockets in
place.
Note:
Before turning the printer on, install the ribbon cartridge.
Otherwise, paper jams may occur.
2. Turn on the printer.
3. Make sure that the paper release lever is set to the single-sheet
feeding position.
12 Paper Handling
Page 19
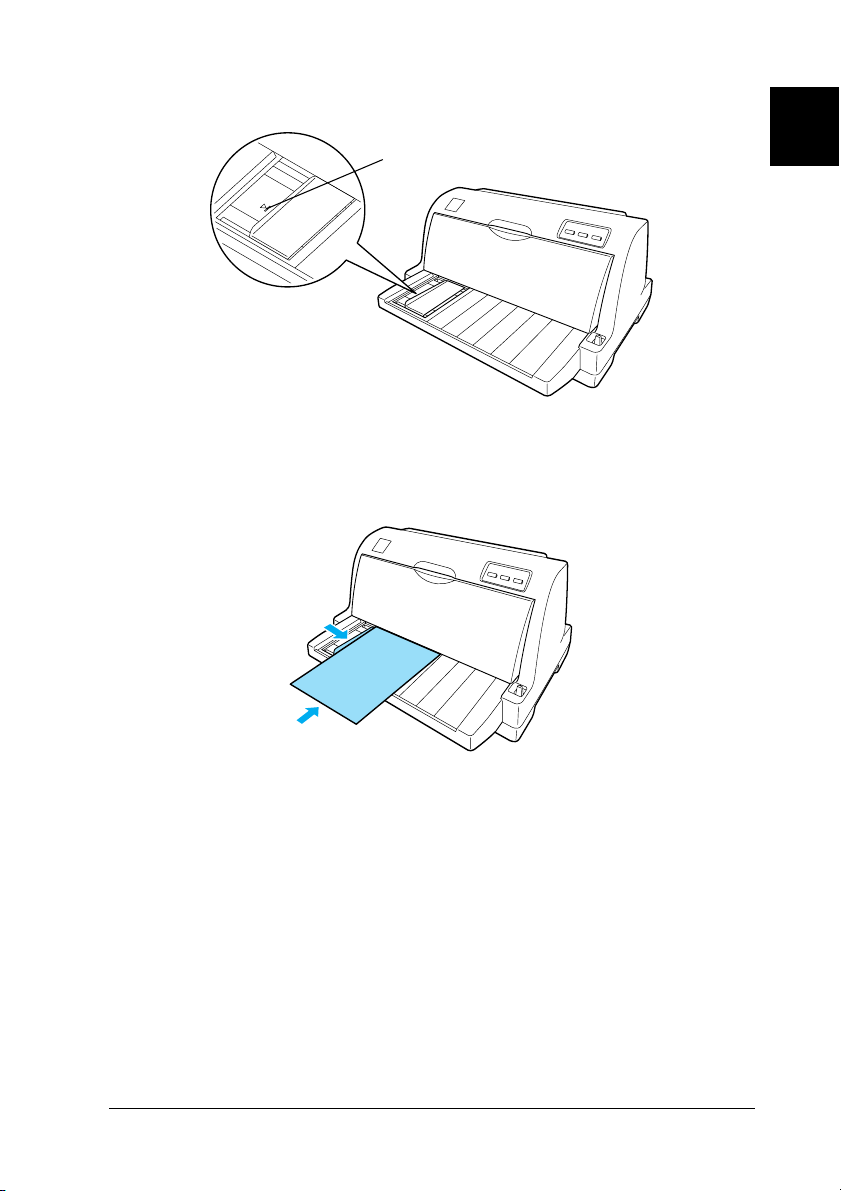
4. Slide the edge guide until it rests against the guide mark.
guide mark
5. While aligning the left side of a sheet of paper with the edge
guide, insert it into the printer until it meets resistance. Be sure
to load paper printable side up and the top of the paper first.
1
1
1
1
1
1
1
1
After a few seconds, the printer automatically advances the paper
to the loading position. The printer is ready to start printing.
Note:
❏ If the paper feed roller rotates but the printer does not load the paper,
completely remove the paper and then insert it all the way into the
printer again.
❏ If the paper feeds before you can adjust its position properly, increase
the Manual feed wait time in the default-setting mode. See
“Changing default settings” on page 47 for more information.
Paper Handling 13
1
1
1
1
Page 20

❏ If you need to adjust the position of the paper after it is loaded, see
“Adjusting the top-of-form position” on page 20 and follow the
instructions.
❏ Do not pull out paper that is not ejected completely after pressing
the Load/Eject button. Doing so may cause paper jams or printer
malfunctions, also the top-of-form position setting may become
misadjusted.
After printing a sheet, the printer ejects it onto the paper guide
and the Paper Out and Pause lights come on. If you are printing
a multiple-page document, remove the printed sheet and insert a
new sheet into the paper guide. The printer automatically
advances the paper and resumes printing.
Note:
If the printer does not eject the printed sheet, press the Load/Eject
button.
Loading Special Paper
Multipart forms
Your printer can print on both single-sheet and continuous
multipart forms. It can use multipart forms with up to five parts
including the original.
Caution:
❏ Use only carbonless or carbon-backed multipart forms.
c
❏ When using multipart forms with a line of glue at the top of
the form, load the forms with the glued side first.
Before printing, set the paper-thickness lever to the appropriate
position for your multipart forms referring to the table in
“Adjusting the Paper-Thickness Lever” on page 3.
14 Paper Handling
Page 21

You can load single-sheet multipart forms from the paper guide.
For instructions, see “Loading Single Sheets” on page 12. You can
load continuous multipart forms in the same way as you load
ordinary continuous paper. For instructions, see “Loading
Continuous Paper” on page 5.
Caution:
When printing on multipart forms, make sure that your software
c
settings keep the printing entirely within the printable area of the
forms. Printing on the edge of a multipart form can damage the
print head. For information about the printable area, see
“Printable area” on page 142.
1
1
1
1
Labels
You can use two types of labels: single-sheet and continuous
forms. Do not use labels on shiny single-sheet backing, because
the backing sheet tends to slip and may not feed properly.
Follow these steps to load labels:
Caution:
Use labels only under normal operating conditions because labels
c
are especially sensitive to temperature and humidity.
1. Make sure of the following:
❏ Your software settings keep the printing entirely within
the printable area. For information about the printable
area, see “Printable area” on page 142.
Caution:
Printing on the edge of a label can damage the print head.
c
❏ The auto tear-off function is turned off in the
default-setting mode.
2. Load labels as described in “Loading Single Sheets” on page
12 or “Loading Continuous Paper” on page 5.
1
1
1
1
1
1
1
1
Paper Handling 15
Page 22
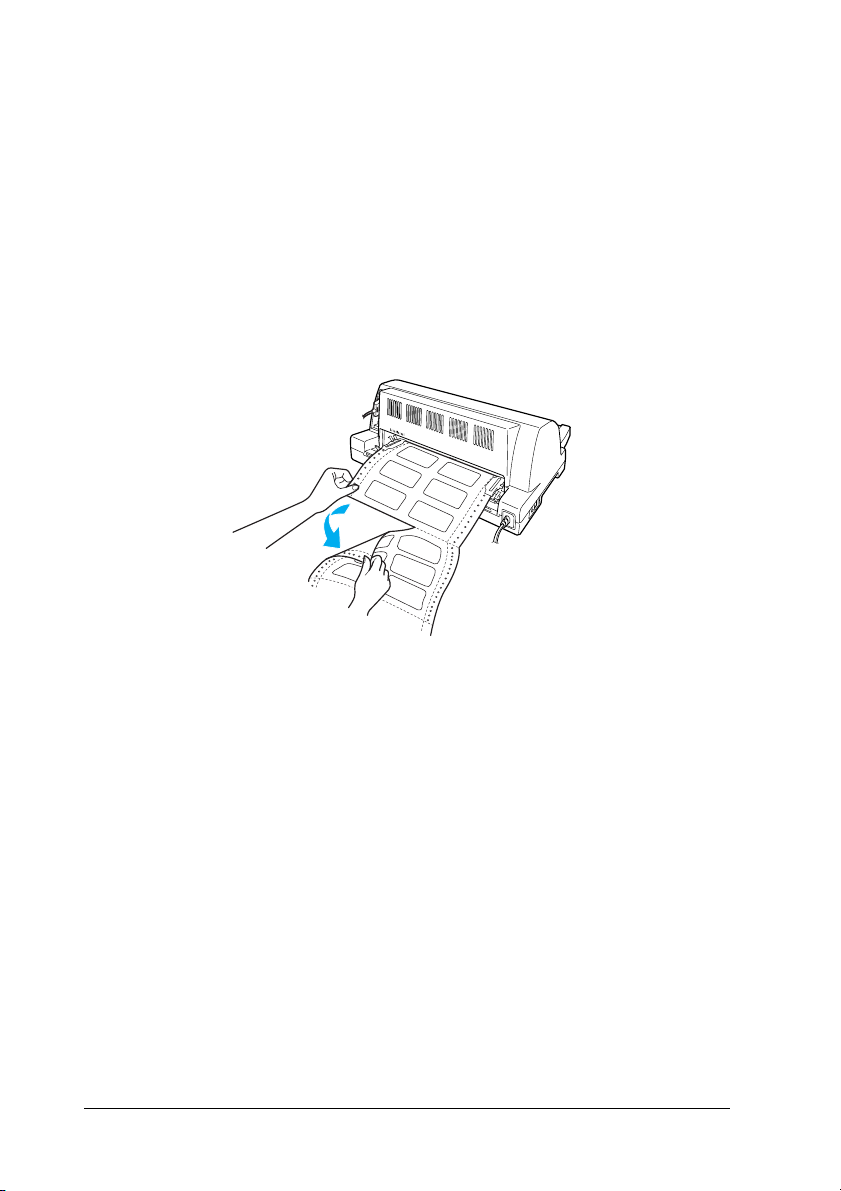
To tear off and eject labels
When using continuous forms, always tear off and eject labels as
described below.
Caution:
Never feed labels backward using the Load/Eject button. Labels
c
can easily peel off their backing and jam the printer.
1. At the back of your printer, tear off the last label form that has
entered the printer. See the illustration below.
2. Press the LF/FF button to eject the last label form forward.
Caution:
Do not leave labels loaded in the printer between print jobs; they
c
tend to curl and may come off their backing sheet and jam the
printer when you resume printing.
16 Paper Handling
Page 23

Switching Between Continuous Paper and
Single Sheets
You can easily switch between continuous paper and single sheets
without removing the continuous paper from the tractor.
Switching to single sheets
Follow these steps to switch from continuous paper to single
sheets:
1
1
1
1. When the Auto tear-off function is turned on, the printer
advances the paper to the tear-off position automatically.
2. Tear off the printed pages.
Caution:
❏ Always tear off paper before feeding it backwards; feeding
c
too many sheets backwards can cause a paper jam.
❏ Never feed labels backward using the Load/Eject
button. Labels can easily peel off their backing and jam
the printer. For information on removing labels from the
paper path, see “To tear off and eject labels” on page 16.
3. Press the Load/Eject button to feed the continuous paper
back to the standby position. The paper is still attached to the
tractor, but is no longer in the paper path.
4. Set the paper release lever to the single-sheet feeding position.
1
1
1
1
1
1
1
1
Now you can load single sheets from the paper guide. See
“Loading Single Sheets” on page 12 for more information.
Paper Handling 17
1
Page 24
Switching to continuous paper
Follow these steps to switch from single sheets to continuous
paper:
1. If necessary, press the Load/Eject button to eject the last
printed single sheet.
2. Make sure continuous paper is loaded in the printer as
described in “Loading continuous paper with the tractor” on
page 6.
3. Set the paper release lever to the tractor feeding position.
The printer automatically advances the continuous paper from
the standby position to the loading position when it receives data.
18 Paper Handling
Page 25
Using the Micro Adjust Function
Power
LF/FF Load/Eject
Micro Adjust
Paper Out
The Micro Adjust function allows you to move the paper
forward or backward in 0.141 mm (1/180-inch) increments so
that you can make precise adjustments to the top-of-form and
tear-off positions.
1
1
Adjusting the tear-off position
If your paper perforation is not aligned with the tear-off edge, you
can use the Micro Adjust function to move the perforation to the
tear-off position.
Follow these steps to adjust the tear-off position:
Note:
Your tear-off position setting remains in effect until you change it, even
if you turn off the printer.
1. Make sure the paper is at the current tear-off position.
2. Hold down the Pause button for about three seconds. The
Pause light begins flashing and the printer enters the Micro
Adjust mode.
3. Press the LF/FF D button to feed paper forward, or press the
Load/Eject U button to feed paper backward, until the paper
perforation is aligned with the tear-off edge of the printer
cover.
1
1
1
1
1
1
1
1
1
1
Paper Handling 19
Page 26

Note:
The printer has a minimum and a maximum tear-off position. If you
try to adjust the tear-off position beyond these limits, the printer
beeps and stops moving the paper.
4. Tear off the printed pages.
5. Press the Pause button to exit the Micro Adjust mode.
When you resume printing, the printer automatically feeds the
paper back to the top-of-form position and begins printing.
Adjusting the top-of-form position
The top-of-form position is the position on the page where the
printer starts printing. If your printing appears too high or low
on the page, you can use the Micro Adjust function to adjust the
top-of-form position.
Follow these steps to adjust the top-of-form position:
Note:
❏ Your top-of-form position setting remains in effect until you change
it, even if you turn off the printer.
❏ The top margin setting made in some application software overrides
the top-of-form position setting you make with the Micro Adjust
function. If necessary, adjust the top-of-form position in your
software.
1. Make sure the printer is turned on.
2. Press the Pause button to stop printing. The Pause light
comes on.
3. Load paper. Press the Load/Eject button to advance
continuous paper to the current top-of-form position. If
necessary, lift up the printer cover so you can see the paper
position.
20 Paper Handling
Page 27

4. Hold down the Pause button for about three seconds. The
Pause light starts flashing and the printer enters the Micro
Adjust mode.
5. Press the LF/FF D button to move the top-of-form position
down on the page, or press the Load/Eject U button to move
the top-of-form position up on the page.
1
1
Note:
❏ The printer has a minimum and a maximum top-of-form
position. If you try to adjust it beyond these limits, the printer
beeps and stops moving the paper.
❏ When the paper reaches the default top-of-form position, the
printer also beeps and stops moving the paper briefly. You can
use the default setting as a reference point when adjusting the
top-of-form position.
6. After you set the top-of-form position, press the Pause button
to exit the Micro Adjust mode.
1
1
1
1
1
1
1
1
Paper Handling 21
1
1
Page 28

22 Paper Handling
Page 29

Chapter 2
Printer Software
About Your Printer Software. . . . . . . . . . . . . . . . . . . . . . . . . . . . . . . .24
Using the Printer Driver with Windows Me, 98, and 95 . . . . . . . . .24
Accessing the printer driver from Windows applications . . .25
Accessing the printer driver from the Start menu. . . . . . . . . .26
Changing the printer driver settings. . . . . . . . . . . . . . . . . . . . .27
Using the Printer Driver with Windows XP, 2000 and NT 4.0. . . .28
Accessing the printer driver from Windows applications . . .28
Accessing the printer driver from the Start menu. . . . . . . . . .30
Changing the printer driver settings. . . . . . . . . . . . . . . . . . . . .32
Printer Driver Settings Overview . . . . . . . . . . . . . . . . . . . . . . . . . . . .33
Using EPSON Status Monitor 3. . . . . . . . . . . . . . . . . . . . . . . . . . . . . .34
Setting up EPSON Status Monitor 3 . . . . . . . . . . . . . . . . . . . . .35
Accessing EPSON Status Monitor 3. . . . . . . . . . . . . . . . . . . . . .36
2
2
2
2
2
2
2
2
Printer Software 23
2
2
2
2
Page 30

About Your Printer Software
The EPSON printer software that comes with your printer
includes the printer driver software and EPSON Status Monitor 3.
The printer driver is software that allows your computer to
control the printer. You need to install the printer driver so your
Windows software applications can take full advantage of the
printer’s capabilities.
EPSON Status Monitor 3 allows you to monitor the status of your
printer, alerts you when errors occur, and provides you with
troubleshooting tips. EPSON Status Monitor 3 is automatically
installed when you install the printer driver.
Note:
❏ Before proceeding, make sure you have installed the printer driver
on your computer as described in the Setup Sheet.
❏ Only LQ-630 is displayed as the printer name in the printer driver,
even if the printer is an LQ-630S model. Select LQ-630 when
installing or using the printer driver, even if the printer being
installed or used is an LQ-630S.
Using the Printer Driver with Windows Me, 98,
and 95
You can access the printer driver from your Windows
applications or from the Start menu.
❏ When you access the printer driver from a Windows
application, any settings you make apply only to the
application you are using. See “Accessing the printer driver
from Windows applications” on page 25 for more
information.
24 Printer Software
Page 31

❏ When you access the printer driver from the Start menu, the
printer driver settings you make apply to all your
applications. See “Accessing the printer driver from the Start
menu” on page 26 for more information.
2
See “Changing the printer driver settings” on page 27 to check
and change printer driver settings.
Note:
While many Windows applications override the settings made with the
printer driver, some do not, so you must verify that the printer driver
settings match your requirements.
Accessing the printer driver from Windows
applications
Follow these steps to access the printer driver from a Windows
application:
1. Select Print Setup or Print from the File menu of your
application software. The Print or Print Setup dialog box
appears.
2
2
2
2
2
2
2
2
Printer Software 25
2
2
2
Page 32

2. Make sure that your printer is selected and then click Printer,
Setup, Properties, or Options. (You may need to click a
combination of these buttons.) The Properties window
appears, and you see the Paper, Graphics, and Device Options
menu. These menus contain the printer driver settings.
3. To view a menu, click the corresponding tab at the top of the
window. See “Changing the printer driver settings” on page
27 to change the settings.
Accessing the printer driver from the Start menu
Follow these steps to access the printer driver from the Start
menu:
1. Click Start, then point to Settings.
2. Click Printers.
3. Right-click your printer icon, and click Properties. The screen
displays the Properties dialog box, which contains the Paper,
Graphics, Device Options, and Utility menus. These menus
display the printer driver settings.
26 Printer Software
Page 33

4. To view a menu, click the corresponding tab at the top of the
window. See “Changing the printer driver settings” on page
27 to change the settings.
2
Changing the printer driver settings
You can change the printer driver settings from the printer’s
Properties dialog box. For an overview of the available settings,
see “Printer Driver Settings Overview” on page 33. You can also
view online help by right-clicking items in the driver and selecting
What’s this?
2
2
2
2
2
2
2
2
When you finish making printer driver settings, click OK to apply
the settings, or click Restore Defaults to return the settings to
their default values.
Once you have checked your printer driver settings and made any
necessary changes, you are ready to print.
Printer Software 27
2
2
2
Page 34

Using the Printer Driver with Windows XP, 2000
and NT 4.0
You can access the printer driver from your Windows
applications or from the Start menu.
❏ When you access the printer driver from a Windows
application, any settings you make apply only to the
application you are using. See “Accessing the printer driver
from Windows applications” on page 28 for more
information.
❏ When you access the printer driver from the Start menu, the
printer driver settings you make apply to all your
applications. See “Accessing the printer driver from the Start
menu” on page 30 for more information.
To check and change printer driver settings, see “Changing the
printer driver settings” on page 32.
Note:
While many Windows applications override the settings made with the
printer driver, some do not, so you must verify that the printer driver
settings match your requirements.
Accessing the printer driver from Windows
applications
Follow these steps to access the printer driver from a Windows
application:
Note:
The examples in the following section are from the Windows 2000
operating system. They may vary in appearance from what actually
appears on your screen.
28 Printer Software
Page 35

1. Select Print Setup or Print fr om t he Fi le m en u o f yo ur ap pl ic at io n
software. The Print or Print Setup dialog box appears.
2. Make sure that your printer is selected and then right-click
your printer icon and select Printing Preferences (Windows
XP or 2000) or click Printer, Setup, Properties, or Options
(Windows NT 4.0). (You may need to click a combination of
these buttons.) The Document Properties dialog box, which
contains the Layout and Paper/Quality menus (Windows XP
or 2000), or the Page Setup and Advanced menus (Windows
NT 4.0) appears. These menus contain the printer driver
settings.
2
2
2
2
2
2
2
2
Printer Software 29
2
2
2
2
Page 36

3. To view a menu, click the corresponding tab at the top of the
window. See “Changing the printer driver settings” on page
32 to change the settings.
Accessing the printer driver from the Start menu
Follow these steps to access the printer driver from the Start
menu:
Note:
The screen shots used in this procedure are from the Windows 2000
operating system. They may vary in appearance from what actually
appears on your screen.
1. For Windows 2000 or NT 4.0, click Start, point to Settings,
then click Printers. For Windows XP Professional edition, click
Start and then click Printers and Faxes. For Windows XP
Home edition, point to Control Panel first, then click Printers
and Faxes.
30 Printer Software
Page 37

2. Right-click your printer icon, and click Printing Preferences
(for Windows XP or 2000), Document Defaults (for
Windows NT 4.0). The Printing Preferences dialog box or the
Document Properties dialog box, which contains the Layout
and Paper/Quality menus (Windows XP or 2000) or the Page
Setup and Advanced menus (Windows NT 4.0) appears.
These menus display the printer driver settings.
2
2
2
2
2
2
When you click Properties, the printer software window
appears, which includes menus used to make the printer
driver settings.
Printer Software 31
2
2
2
2
2
2
Page 38

3. To view a menu, click the corresponding tab at the top of the
window. See “Changing the printer driver settings” on page
32 to change the settings.
Changing the printer driver settings
Your printer driver has two menus from which you can change
the printer driver settings: Layout menu and Paper/Quality
menu (Windows XP or 2000) or Page Setup menu and Advanced
menu (Windows NT 4.0). You can also change settings on the
Utility menu in the printer software. For an overview of the
available settings, see “Printer Driver Settings Overview” on page
33. You can also view online help by right-clicking items in the
driver and selecting What’s this?
When you finish making your printer driver settings, click OK to
apply the settings, or click Cancel to cancel your changes.
Once you have checked your printer driver settings and changed
them if necessary, you are ready to print.
32 Printer Software
Page 39

Printer Driver Settings Overview
The following tables show the Windows printer driver settings.
Note that not every setting is available in all versions of Windows.
Printer settings
2
2
Settings Explanations
Paper size Select the size of the paper you want to use. If you do
Orientation Select Portrait or Landscape.
Paper Source Select the paper source you want to use.
Resolution/
Graphics
Resolution
Dithering You can leave this option set to Fine, which is the default
Intensity/
Intensity Control
Print quality Select a print quality option from the Print quality list. If
EPSON Status
Monitor 3
Monitoring
Preferences
Paper/
Output
not see your paper size, use the scroll bar to scroll through
the list. If your paper size is not included in the list, click
Custom or User Defined Size and enter the paper size in
the dialog box that appears.
Select the printing resolution you want. The higher the
resolution you select, the more detailed your printout will
be; however, increasing the resolution slows printing.
setting, or select another dithering pattern depending
on the kind of printout you want.
Move the slider to make your printout lighter or darker.
you turn on Hi-speed, you will enter bi-directional printing
mode and printing speed will increase. Turning Hi-speed
off will return the printer to uni-directional printing mode.
Printing speed will decrease, but printing precision will
improve. Printing with the default settings uses the
settings stored in the printer.
You can access EPSON Status Monitor 3 when you click
this button. To monitor the printer, make sure the Monitor
the printing status check box is selected.
Click this button to open the Monitoring Preferences
dialog box where you can make settings for EPSON
Status Monitor 3.
Check the Paper Size, Orientation, and Paper Source
settings you made on the Page Setup menu and change
them if necessary. Select the setting and then choose an
option from the Change Setting list box.
2
2
2
2
2
2
2
2
2
2
Printer Software 33
Page 40

Settings Explanations
Halftone Click this button to set the brightness and contrast, input
the RGB gamma, or make other settings. The Halftone
Color Adjustment dialog box appears. For details, click
Help in this dialog box.
Monitoring settings
Settings Explanations
EPSON Status
Monitor 3
Monitoring
Preferences
You can access EPSON Status Monitor 3 when you
click this button. To monitor the printer, make sure the
Monitor the printing status check box is selected.
Click this button to open the Monitoring Preferences
dialog box where you can make settings for EPSON
Status Monitor 3. See “Setting up EPSON Status Monitor
3” on page 35 for more information.
Using EPSON Status Monitor 3
EPSON Status Monitor 3 that comes with your printer is available
for Windows Me, 98, 95, XP, 2000 or NT 4.0. It allows you to
monitor your printer’s status, alerts you when printer errors
occur, and provides troubleshooting instructions when needed.
EPSON Status Monitor 3 is available only when:
❏ The printer is connected directly to the host computer via the
parallel port [LPT1] or the USB port.
❏ Your system is configured to support bidirectional
communication.
EPSON Status Monitor 3 is installed when you install the printer
driver as described in the Setup Sheet.
34 Printer Software
Page 41

Note:
If you install the driver using Add Printer in the Printers folder, or using
the “Point and Print” method, EPSON Status Monitor 3 may not
function properly. If you want to use EPSON Status Monitor 3, reinstall
the driver as described in the Setup Sheet.
Before using EPSON Status Monitor 3, be sure to read the
README file on the driver disk. This file contains the latest
information on the utility.
2
2
2
Setting up EPSON Status Monitor 3
Follow these steps to set up EPSON Status Monitor 3:
1. Open the Utility menu as described in “Using the Printer
Driver with Windows Me, 98, and 95” on page 24 or “Using
the Printer Driver with Windows XP, 2000 and NT 4.0” on
page 28.
2. Click Monitoring Preferences. The Monitoring Preferences
dialog box appears.
2
2
2
2
2
2
2
2
Printer Software 35
2
Page 42

3. The following settings are available:
Select Notification Displays the error item check box ON/OFF status.
Clear this check box to do not display the error
notification.
Select Shortcut
icon
Receive error
notification for
shared printers
Allow monitoring of
shared printer
The selected icon is displayed in the system tray
on the taskbar on the computer screen. The
setting’s example is shown on the right window.
By clicking the shortcut icon, you can access
EPSON Status Monitor 3 easily.
Error notification for a shared printer can be
received when this check box is selected.
When this check box is selected, a shared printer
can be monitored by other PCs.
Note:
Click Default to revert all items to the default settings.
Accessing EPSON Status Monitor 3
Do one of the following to access EPSON Status Monitor 3:
❏ Double-click the printer-shaped shortcut icon on the taskbar.
To add a shortcut icon to the taskbar, go to the Utility menu
and follow the instructions.
❏ Open the Utility menu, then click the EPSON Status Monitor
3 icon. To find out how to open the Utility menu, See“Using
the Printer Driver with Windows Me, 98, and 95” on page 24
or “Using the Printer Driver with Windows XP, 2000 and NT
4.0” on page 28.
When you access EPSON Status Monitor 3 as described above, the
following printer status dialog box appears.
You can view printer status information in this window.
36 Printer Software
Page 43

Chapter 3
Control Panel
Buttons and Lights . . . . . . . . . . . . . . . . . . . . . . . . . . . . . . . . . . . . . . . .38
Selecting a Font . . . . . . . . . . . . . . . . . . . . . . . . . . . . . . . . . . . . . . . . . . .40
About Your Printer’s Default Settings . . . . . . . . . . . . . . . . . . . . . . . .41
Understanding default settings . . . . . . . . . . . . . . . . . . . . . . . . .41
Changing default settings . . . . . . . . . . . . . . . . . . . . . . . . . . . . . .47
Lock-Out Mode . . . . . . . . . . . . . . . . . . . . . . . . . . . . . . . . . . . . . . . . . . .49
Turning on or off the lock-out mode. . . . . . . . . . . . . . . . . . . . .49
Changing the lock-out mode setting . . . . . . . . . . . . . . . . . . . . .49
3
3
3
3
3
3
3
3
Control Panel 37
3
3
3
3
Page 44

Buttons and Lights
Power
Paper Out Pause
LF/FF Load/Eject
Micro Adjust
1 LF/FF button
❏ Feeds paper line by line when pressed shortly.
❏ Ejects a single sheet or advances continuous paper
to the next top-of-form position when held down
for a few seconds.
2 Micro Adjust
When you hold down the Pause button for three
seconds, the printer enters the Micro Adjust mode. In
this mode, you can adjust the top-of-form and tear-off
positions by pressing the LF/FFD and Load/EjectU
buttons. See “Using the Micro Adjust Function” on
page 19.
3 Load/Eject button
❏ Loads a single sheet of paper.
❏ Ejects a single sheet of paper if a sheet is loaded.
❏ Loads continuous paper from the standby
position.
3sec
❏ Feeds continuous paper backward to the standby
38 Control Panel
position if a sheet is loaded.
Page 45

4 Pause button
❏ Stops printing temporarily, and resumes printing
when pressed again.
❏ When held down for three seconds, enters the
Micro Adjust mode. When pressed again, exits the
Micro Adjust mode.
Pause light
❏ On when the printer is paused.
❏ Flashes when the printer is in the Micro Adjust
mode.
5 Paper out light
❏ On when no paper is loaded in the selected paper
source or paper is not loaded correctly.
❏ Flashes when paper has not been fully ejected.
6 Power light
❏ On when the printer turns on.
❏ Flashes when a fatal error occurs.
3
3
3
3
3
3
3
3
Control Panel 39
3
3
3
3
Page 46

Selecting a Font
You can select the printer’s fonts, pitch, and size by using the
default-setting mode. See “Changing default settings” on pa ge 4 7
for instructions on how to change the default settings.
Note:
❏ The available pitch or size depends on the font you select. See the
table below for more information.
Bitmap font
Font Pitch
Draft 10, 12, 15
Roman 10, 12, 15, PS
Sans Serif 10, 12, 15, PS
Courier 10, 12, 15
Prestige 10, 12
Script 10
OCR-B 10
Orator 10
Orator-S 10
Script C Proportional
Scalable font
Font Size
Roman 10.5 pt, 8 pt to 32 pt (every 2 pt)
Sans Serif 10.5 pt, 8 pt to 32 pt (every 2 pt)
Roman T 10.5 pt, 8 pt to 32 pt (every 2 pt)
Sans Serif H 10.5 pt, 8 pt to 32 pt (every 2 pt)
❏ Settings you make in application programs usually override settings
you make in the default-setting mode. For best results, use your
application to select a font and make other settings.
40 Control Panel
Page 47

About Your Printer’s Default Settings
The default settings control many printer functions. While you
can often set these functions through your software or printer
driver, you may sometimes need to change a default setting from
the printer’s control panel using the default-setting mode.
3
3
For a detailed description of the settings you can change in the
default-setting mode, see “Understanding default settings” on
page 41. For instructions on changing the settings, see “Changing
default settings” on page 47.
Understanding default settings
This section describes the settings and options available in the
default-setting mode. These settings are shown in the following
table and explained in detail after the table.
To access and change a setting, see “Changing default settings”
on page 47.
Default-setting mode
Setting Options (default in bold)
Page length for tractor Length in inches: 3, 3.5, 4, 5.5, 6, 7, 8, 8.5,
11, 70/6, 12, 14, 17
Skip over perforation Off, On
Auto tear-off Off, On
Auto line feed Off, On
Print direction Bi-D, Uni-D, Auto
Software ESC/P2, IBM PPDS
0 slash 0, (the zero character with a slash)
High speed draft Off, On
I/F (interface) mode Auto, Parallel,* Serial,** USB
Auto I/F (interface) wait time 10 seconds, 30 seconds
Parallel I/F (interface)
bidirectional mode*
Off, On
3
3
3
3
3
3
3
3
3
3
Control Panel 41
Page 48

Setting Options (default in bold)
Baud rate** 19200BPS, 9600BPS, 4800BPS, 2400BPS,
Parity** None, Odd, Even, Ignore
Data length** 8bit, 7bit
Packet mode Auto, Off
Auto CR (carriage return)* Off, On
A.G.M*** Off, On
Character table Standard model: italic, PC437, PC850,
International character set for
italic table****
Pitch 10 cpi, 12 cpi, 15 cpi, 17 cpi, Proportional
Font Draft, Roman, Sans Serif, Courier, Prestige,
Manual feed wait time 0.5 second, 1 second, 1.5 seconds, 2
Buzzer Off, On
Multipart forms with cut-paper
tab binding
1200BPS, 600BPS, 300BPS
PC860, PC863, PC865, PC861, BRASCII,
Abicomp, Roman8, ISO Latin 1, PC858,
ISO 8859-15
All other models: Italic, PC437, PC850,
PC437 Greek, PC853, PC855, PC852,
PC857, PC864, PC866, PC869, MAZOWIA,
Code MJK, ISO 8859-7, ISO Latin 1T,
Bulgaria, PC 774, Estonia, ISO 8859-2,
PC 866 LAT., PC 866UKR, PC APTEC,
PC708, PC720, PCAR 864, PC860, PC865,
PC861, PC863, BRASCII, Abicomp,
Roman8, ISO Latin 1, PC858, ISO8859-15,
PC 771
Italic U.S.A., Italic France, Italic Germany,
Italic U.K., Italic Denmark 1, Italic Sweden,
Italic Italy, Italic Spain 1
Script, OCR-B, Orator, Orator-S, Script C,
Roman T, Sans Serif H
seconds
Off, On
* For LQ-630 only
** For LQ-630S Only
*** This setting is available only in IBM PPDS emulation mode.
**** The options available for this setting vary depending on the country.
42 Control Panel
Page 49

Page length for tractor
This setting allows you to set the page length (in inches) for the
continuous paper loaded on the tractor.
3
Skip over perforation
This feature is available only when continuous paper is selected
as the paper source. When you turn on this feature, the printer
provides a one-inch (25.4 mm) margin between the last line
printed on one page and the first line printed on the next page.
Because most application program margin settings override
margin settings from the control panel, you should use this setting
only if you cannot set your top and bottom margins using your
application.
Auto tear-off
When auto tear-off is on and you are using continuous paper, the
printer automatically advances the paper perforation to the
tear-off position, where you can easily tear off the printed page(s).
When the printer receives data again, it automatically moves the
paper back to the top-of-form position and starts printing, so you
can use all of the next page. When using continuous paper, it is a
good idea to set the Auto tear-off function.
Auto line feed
When auto line feed is on, the printer accompanies each carriage
return (CR) code received with a line feed (LF) code.
Print direction
You can select auto print direction, bidirectional printing (Bi-D),
or unidirectional printing (Uni-D). Printing is normally
bidirectional; however, unidirectional printing allows for precise
vertical printing alignment.
3
3
3
3
3
3
3
3
3
Software
When you select ESC/P2, the printer operates in the EPSON
ESC/P2 mode. When you select IBM PPDS, the printer emulates
an IBM printer.
Control Panel 43
3
3
Page 50

0 slash
Select the zero character with a slash ( ) (this feature is on) or
without a slash (0) (this feature is off). The slash allows you to
easily distinguish between the uppercase letter “O” and a zero.
High speed draft
When high speed draft is on, the printer prints up to 300 cps
(characters per second) at 10 cpi (characters per inch), or 360 cps
at 12 cpi. When it is off, the printer prints 225 cps at 10 cpi, or 270
cps at 12 cpi.
I/F (interface) mode
For LQ-630 users, you can choose AUTO (automatic), Parallel, or
USB for the interface mode. For LQ-630S users, you can choose
AUTO (automatic), Serial, or USB for the interface mode. When
you select Auto, the printer automatically selects the interface that
is receiving data, and uses that interface until the end of the print
job. The Auto setting allows you to share the printer among
multiple computers without changing the interface mode.
If only one computer is connected to the printer, you can select
Parallel, Serial or USB, depending on which interface your
computer uses.
Auto I/F (interface) wait time
When the printer is in the auto interface mode and it receives no
data from the currently selected interface for the amount of time
specified with this setting, it determines which interface is
receiving data and switches to that interface. You can specify
either 10 seconds or 30 seconds for the auto interface wait time.
Parallel I/F (interface) bidirectional mode (For LQ-630 only)
The Parallel Interface bidirectional transfer mode is used when
this feature is on. If bidirectional transfer mode is unnecessary,
turn this off.
44 Control Panel
Page 51

Baud rate (For LQ-630S only)
Use this option to set the data transfer rate (baud) for the serial
interface. The baud rate is measured in bits per second (bps). See
your computer manual and software documentation for the
proper setting.
Parity (For LQ-630S only)
When this option is set to None, parity checking is disabled. The
parity bit, if used, provides a basic form of error detection. See
your computer manual and software documentation for the
proper setting.
Data length (For LQ-630S only)
Set the data length of the serial interface to 7 bit or 8 bit. See your
computer manual and software documentation for the proper
setting.
3
3
3
3
3
Packet mode
Be sure to select Auto when printing from Windows applications
using the printer driver included in the CD-ROM that comes with
the printer. In case you encounter any communication troubles
when printing from applications based on other operating
systems such as DOS, turn off this mode.
Auto CR (carriage return)
This setting is available only in IBM PPDS emulation mode. When
auto carriage return is on, each line feed (LF) code or ESC J code
is accompanied by a carriage return (CR) code so the printer
moves the next printing position to the left margin. When this
setting is off, you must send a CR code after the line feed code to
move the printing position to the left margin.
A.G.M. (IBM)
Turn on the alternate graphic mode (A.G.M.) to make the ESC 3,
ESC A, ESC J, ESC K, ESC L, ESC Y, ESC Z, and ESC * commands
in IBM PPDS emulation mode work the same way as in ESC/P 2
mode.
The A.G.M. feature is available only in IBM PPDS emulation
mode.
3
3
3
3
3
3
3
Control Panel 45
Page 52

Character table
You can select from among 13 to 36 standard character tables,
depending on the country of purchase. See “Default-setting
mode” on page 41 for more information.
International character set for italic table
You can select among several international character sets for the
italic character table. Each character set contains eight characters
that vary depending on the country or language, so you can
customize the italic table to suit your printing needs.
Pitch
You can select the character pitch from 10 cpi, 12 cpi, 15 cpi, 17
cpi, 20 cpi or Proportional.
Font
You can select the following fonts: Draft, Roman, Sans Serif,
Courier, Prestige, Script, OCR-B, Orator, Orator-S, Script C,
Roman T, and Sans Serif H.
Manual feed wait time
This setting allows you to set the amount of wait time between
when paper is inserted into the paper guide and it is fed. If the
paper feeds before you can adjust its position properly, you
should increase the wait time.
Buzzer (beeper)
The printer beeps when an error occurs. See “Using the Error
Indicators” on page 52 for more information on printer errors. If
you do not want the printer to beep when an error occurs, turn
off this setting.
Multipart forms with cut-paper tab binding
When using multipart forms with cut-paper tab bindings that are
4 inches or wider but less than 9.4 inches wide, turn on this
setting.When this setting is on, the print head avoids the binding
area along the right and left edges of multipart forms during
paper feeding. This makes paper feeding easier and prevents
paper jams.
46 Control Panel
Page 53

Changing default settings
Follow these steps to enter the default-setting mode and change
the printer’s default settings:
Note:
❏ To print the language selection and default-setting mode
instructions, you need five sheets of A4 or letter size single-sheet
paper or five pages of continuous paper that is at least 279 mm (11
inches) long and 210 mm (8.3 inches) wide. See “Loading
Continuous Paper” on page 5 and “Loading Single Sheets” on page
12 for instructions on loading continuous paper and single sheets.
❏ If you use single sheets, you need to load a new sheet of paper each
time the printer ejects a printed sheet from the paper guide.
1. When using continuous paper, make sure paper is loaded and
the printer is turned off.
Caution:
Whenever you turn off the printer, wait at least five seconds
c
before turning it back on; otherwise, you may damage the
printer.
2. Turn on the printer while holding down the Load/Eject and
Pause buttons.
3
3
3
3
3
3
3
3
The printer enters the default-setting mode. When using
continuous paper, the printer prints the language selection
instructions (one page).
3. When using single-sheet paper, load paper to the printer. The
printer prints the language selection instructions (one page).
4. Press the LF/FF button several times until the Power, Paper
Out and Pause lights indicate the language you want, as
described in the language selection instructions.
Control Panel 47
3
3
3
3
Page 54

5. Press the Load/Eject button to print the default-setting mode
instructions (four pages) in the language you selected.
The printed instructions list the settings you can change,
describe how to change them, and show you how the control
panel lights help you make settings. Use these instructions to
change the printer’s default settings from the control panel.
Note:
The arrows in the instructions indicate the printer’s current
settings.
6. When you finish making settings, turn off the printer and exit
the default-setting mode.
Note:
You may exit the default-setting mode by turning off the printer at
any time. Any settings you have made remain in effect until you
change them again.
48 Control Panel
Page 55

Lock-Out Mode
You can restrict the use of buttons on the control panel by using
the lock-out mode. In the basic setting, you can only use the Pause
and Load/Eject buttons, when the lock-out mode is on.
3
3
Turning on or off the lock-out mode
You can turn on or off the lock-out mode easily by using buttons
on the control panel.
Follow these steps to turn on the lock-out mode:
1. Make sure the printer is turned off.
2. Turn on the printer while holding down both the LF/FF and
Pause buttons more than five seconds. The printer beeps
twice, indicating that the lock-out mode has been turned on.
When the lock-out mode is on, the Pause and Paper Out lights
flash simultaneously when the locked buttons are pushed.
To turn off the lock-out mode, repeat steps 1 and 2. The printer
beeps once, indicating that the lock-out mode has been turned off.
See “Changing the lock-out mode setting” on page 49 for
instructions on how to change the functions to be locked.
Changing the lock-out mode setting
You can select the printer functions to be locked while the lock-out
mode is on according to your needs.
3
3
3
3
3
3
3
3
Note:
To print the language selection and panel lock-out mode instructions,
you need three sheets of A4 or letter size single-sheet paper or three pages
of continuous paper that is at least 279 mm (11 inches) long and 210
mm (8.3 inches) wide. See “Loading Continuous Paper” on page 5 and
“Loading Single Sheets” on page 12 for instructions on loading
continuous paper and single sheets.
Control Panel 49
3
3
Page 56

Follow these steps to change the lock-out mode setting:
1. When using continuous paper, make sure paper is loaded and
the printer is turned off.
Caution:
Whenever you turn off the printer, wait at least five seconds
c
before turning it back on; otherwise, you may damage the
printer.
2. Turn on the printer while holding down both the Load/Eject
and LF/FF buttons more than five seconds.
The printer enters the lock-out setting mode. When using
continuous paper, the printer prints the language selection
instructions (one page).
3. When using single-sheet paper, load paper in the printer. The
printer prints the language selection instructions (one page).
4. Make desired changes to the setting according to the
instructions.
5. Turn off the printer and exit the lock-out setting mode.
See “Turning on or off the lock-out mode” on page 49 for
instructions on how to turn the lock-out mode on after you change
the lock-out mode setting.
50 Control Panel
Page 57

Chapter 4
Troubleshooting
Using the Error Indicators . . . . . . . . . . . . . . . . . . . . . . . . . . . . . . . . . .52
Problems and Solutions . . . . . . . . . . . . . . . . . . . . . . . . . . . . . . . . . . . .53
Power supply problems. . . . . . . . . . . . . . . . . . . . . . . . . . . . . . . .54
Paper loading or feeding problems . . . . . . . . . . . . . . . . . . . . . .55
Printing position problems . . . . . . . . . . . . . . . . . . . . . . . . . . . . .60
Printing or printout quality problems. . . . . . . . . . . . . . . . . . . .62
Correcting USB Problems. . . . . . . . . . . . . . . . . . . . . . . . . . . . . . . . . . .68
Clearing a Paper Jam. . . . . . . . . . . . . . . . . . . . . . . . . . . . . . . . . . . . . . .71
Aligning Vertical Lines in Your Printout. . . . . . . . . . . . . . . . . . . . . .72
Printing a Self Test. . . . . . . . . . . . . . . . . . . . . . . . . . . . . . . . . . . . . . . . .73
Printing Hex Dump. . . . . . . . . . . . . . . . . . . . . . . . . . . . . . . . . . . . . . . .75
Contacting Customer Support. . . . . . . . . . . . . . . . . . . . . . . . . . . . . . .76
4
4
4
4
4
4
4
4
Troubleshooting 51
4
4
4
4
Page 58

Using the Error Indicators
You can identify many common printer problems using the lights
on the control panel. If your printer stops working and one or
more control panel lights are on or flashing or the printer beeps,
use the following table to diagnose and fix the problem. If you
cannot fix your printer problem using this table, see “Problems
and Solutions” on page 53.
State of panel
lights
n Power
n Pause
n Paper Out
n Power
n Pause
f Paper Out
n Power
n Pause
o Paper Out
f Power
f Pause
f Paper Out
Beep
pattern
••• No paper is loaded in the selected paper
••• Paper is not loaded correctly.
••• Continuous paper is not fully ejected.
••• Single sheet paper is not fully ejected.
••• The paper release lever is set to the wrong
••••• An unknown printer error has occurred.
Problem
Solution
source.
Load paper in the selected paper source; the
Paper Out and Pause lights go off and the
printer resumes printing.
Remove and reload your paper correctly, then
press the Pause button. See “Loading
Continuous Paper” o n page 5, “Loading Single
Sheets” on page 12, or “Loading Special
Paper” on page 14 for paper-loading
instructions.
Tear off the paper and press the Load/Eject
button to eject the paper.
Press the Load/Eject button to eject the sheet.
position.
Set the paper release lever to the position for
the paper source y ou want to use. If paper from
another paper source is currently in the paper
path, press the Load/Eject button to eject the
paper; then move the paper release lever to
the desired position.
Turn off the printer and leave it off for several
minutes; then turn it on again. If the error
reoccurs, contact your dealer.
52 Troubleshooting
Page 59

n Power
f Pause
o Paper Out
– The print head is overheated.
Wait for a few minutes; the printer resumes
printing automatically once the print head
cools.
4
n = on, o = off, f = flashing
••• = short series of beeps (three beeps), ••••• = long series of beeps (five beeps)
Problems and Solutions
Most problems you may encounter while operating your printer
have simple solutions. Use the information in this section to find
the source of and solution to printer problems that occur.
Determine the type of problem that occurred, and see the
appropriate section below:
“Power supply problems” on page 54
“Paper loading or feeding problems” on page 55
“Printing position problems” on page 60
“Printing or printout quality problems” on page 62
You can also use the self test to determine whether the printer or
the computer is causing the problem. See “Printing a Self Test” on
page 73 for instructions on printing a self test. To pinpoint
communication problems, experienced users may want to use the
printer’s hex dump mode described in “Printing Hex Dump” on
page 75.
To clear a paper jam, see “Clearing a Paper Jam” on page 71.
4
4
4
4
4
4
4
4
4
4
Troubleshooting 53
4
Page 60

Power supply problems
The control panel lights come on briefly but then go off and stay
off.
Cause What to do
The printer’s voltage rating does
not match the voltage of your
electrical outlet.
The printer does not work and the control panel lights are off.
Cause What to do
The printer is turned off. Turn on the printer. The Power light
Check the printer and the outlet
voltage ratings. If the voltages do not
match, unplug the printer
immediately and contact your dealer.
Warning:
Do not reconnect the power cord to
w
an electrical outlet with the wrong
voltage for your printer.
comes on.
The power cord is not properly
plugged into the electrical outlet;
or if your power cord is not
permanently attached to your
printer, the power cord is not
properly plugged into the printer.
The electrical outlet is controlled
by an outside switch or automatic
timer.
The electrical outlet does not
work.
54 Troubleshooting
Turn off the printer and make sure
the power cord is firmly plugged into
the electrical outlet and the printer.
Then turn on the power switch.
Use a different outlet.
Plug another electrical device, such
as a lamp, into the outlet to check if
the outlet is working properly. If it is
not, use a different outlet.
Page 61

Paper loading or feeding problems
Single sheets
4
The printer does not load single-sheet paper or does not feed it
properly.
Cause What to do
Continuous paper is in the
paper path.
The paper source is set to
tractor feeding.
The paper feed roller rotates but the printer does not feed the
paper.
Cause What to do
The paper source is set to
tractor feeding.
Paper feeding is crooked or the paper jams.
Cause What to do
The paper guide is not
properly installed.
The edge guide is not
positioned correctly.
Press the Load/Eject button to remove the
continuous paper. Set the paper release lever
to the single-sheet feeding position and
insert a new sheet. See “Switching to single
sheets” on page 17 for more information.
Set the paper release lever to the single-sheet
feeding position. See “Setting the paper
release lever” on page 3.
Set the paper release lever to the single-sheet
feeding position. See “Setting the paper
release lever” on page 3.
Remove the paper guide and install it as
described in the Setup Sheet.
Move the edge guide so that they match the
width of your paper.
4
4
4
4
4
4
4
4
4
You may not be using the
right type of paper for the
printer.
Be sure you are using the right type of paper.
See “Paper” on page 133.
Troubleshooting 55
4
4
Page 62

The paper is old or
creased.
Use only new, clean sheets of paper.
Note:
If paper is jammed in the paper path, see
“Clearing a Paper Jam” on page 71.
The paper-thickness lever
is set incorrectly.
Set the paper-thickness lever to match the
thickness of your paper. See “Adjusting the
Paper-Thickness Lever” on page 3.
The printer does not fully eject the paper.
Cause What to do
You may not be able to
fully eject your paper
using the LF/FF button.
Your paper may be too
long.
Use the Load/Eject button to eject the
paper.
Make sure the page length of your paper is
within the specified range. See the
single-sheet paper specifications in “Single
sheets” on page 134. Also check and adjust
the paper size setting in your application or
the printer driver.
When the printer ejects the paper, the Paper Out light flashes
and the Power and Pause lights come on.
Cause What to do
The printer has not fully
ejected your paper.
Remove the paper by hand; the Paper Out
light goes out. If you are printing a
multiple-page document, insert a new sheet
of paper into the paper guide. The Pause
light goes out and the printer automatically
loads the paper and resumes printing.
56 Troubleshooting
Page 63

Continuous paper
The printer does not load continuous paper or does not feed it
properly.
Cause What to do
The paper source is set to
single-sheet feeding.
The paper has come off the
tractor.
When you send data or press the Load/Eject button, the paper
feed roller rotates but the printer does not feed the paper.
Cause What to do
The paper source is set to
single-sheet feeding.
The paper has come off the
tractor.
Set the paper release lever to the tractor
feeding position. See “Setting the paper
release lever” on page 3 for more
information.
Reattach the paper to the tractor as
described in “Loading Continuous
Paper” on page 5.
Set the paper release lever to the tractor
feeding position. See “Setting the paper
release lever” on page 3 for more
information.
Reattach the paper to the tractor as
described in “Loading Continuous
Paper” on page 5.
4
4
4
4
4
4
4
4
The paper has been fed back to
the standby position.
Paper feeding is crooked or the paper jams.
Cause What to do
The paper supply is
obstructed.
The paper supply is not
aligned with the printer.
Press the Load/Eject button to load the
paper.
Make sure the paper supply is not
obstructed by a cable or some other
object.
Make sure you align your paper supply
with the paper loaded in the tractor so
the paper feeds smoothly into the
printer. See “Positioning the continuous
paper supply” on page 5.
4
4
4
4
Troubleshooting 57
Page 64

The paper supply is too far
away from the printer.
Make sure that your paper supply is
within 1 meter (3 feet) of the printer.
The holes on the sides of the
paper are misaligned.
The paper-thickness lever is
set incorrectly.
Your paper may be the wrong
size or thickness for the
printer.
The sprocket units are
positioned incorrectly for the
width of paper you are using.
Check that the holes on the sides of the
paper are aligned with each other. Also
make sure the sprocket units are locked
and their covers are closed.
Set the paper-thickness lever to match
the thickness of your paper. See
“Adjusting the Paper-Thickness Lever”
on page 3.
Make sure that the paper size and
thickness are within the specified
ranges. See “Paper” on page 133 for
information on the continuous paper
specifications.
Adjust the position of the sprockets to
remove any slack along the width of the
paper.
Note:
If paper is jammed in the paper path, see
“Clearing a Paper Jam” on page 71 for
instructions.
The printer does not eject your continuous paper properly.
Cause What to do
You may be trying to feed too
much paper backward.
If you are using normal continuous
paper, tear off the last printed page and
press the Load/Eject button to feed the
paper backward. If you are using labels,
tear off the paper entering the printer,
and then press the LF/FF button to feed
the labels forward.
Your paper may be too long or
too short.
58 Troubleshooting
Make sure the page length of your paper
is within the specified range. See
“Paper” on page 133 for information on
the continuous paper specification.
Page 65

The paper size setting in your
application or the printer
driver may not match the size
of the paper you are using.
Check the paper size setting in your
application or the printer driver.
4
The printer’s page length
setting for the tractor may not
match the size of the
continuous paper you are
using.
Paper is jammed inside the
printer.
Check Page length for tractor of the
printer’s default settings. See “Changing
default settings” on page 47 for more
information.
Clear the paper jam as described in
“Clearing a Paper Jam” on page 71.
4
4
4
4
4
4
4
4
Troubleshooting 59
4
4
4
Page 66

Printing position problems
Wrong top-of-form position
Your printing appears too high or low on the page.
Cause What to do
The paper size setting in your
application software or printer
driver does not match the size
of the paper you are using.
Check the paper size setting in your
application or printer driver.
The printer’s page length
setting for the tractor does not
match the size of the
continuous paper you are
using.
The top margin or top-of-form
position setting is incorrect.
The printer driver settings you
want to use are not selected in
your software.
Pull the loaded paper out of
the tractor unit while the
printer is on. Or pull out paper
that is not ejected completely
after pressing the Load/Eject
button.
Change Page length for tractor setting
using the printer’s default-setting mo de.
See “Changing default settings” on page
47 for more information.
Check and adjust the margin or
top-of-form position settings in your
application software. See “Printable
area” on page 142 for more information.
You can also adjust the top-of-form
position using the Micro Adjust
function. However, settings made in
Windows applications override settings
made in the Micro Adjust mode. See
“Adjusting the top-of-form position” on
page 20 for more information.
Choose the correct printer driver setting
from the Windows desktop or in your
application before printing.
Turn the printer off and remove the
loaded paper, then turn the printer on
and reload the paper.
60 Troubleshooting
Page 67

Wrong tear-off position
The printer prints on (or too far away from) the perforation of
your continuous paper.
Cause What to do
The tear-off position setting is
incorrect.
The printer you want to use is
not selected in your software.
The paper size setting in your
application or printer driver
does not match the size of the
paper you are using.
The printer’s page length
setting for the tractor does not
match the size of the pa per you
are using.
Pull the loaded paper out of
the tractor unit while the
printer is on. Or pull out paper
that is not ejected completely
after pressing the Load/Eject
button.
Adjust the tear-off position using the
Micro Adjust function. See “Adjusting
the tear-off position” on page 19 for
more information.
Choose the correct printer from the
Windows desktop or in your application
before printing.
Check the paper size setting in your
application or printer driver.
Change Page length for tractor setting
using the printer’s default-setting. See
“Changing default settings” on page 47
for more information.
Turn the printer off and remove the
loaded paper, then turn the printer on
and reload the paper.
4
4
4
4
4
4
4
4
4
Troubleshooting 61
4
4
4
Page 68

Printing or printout quality problems
The Pause light is off but the printer does not print.
Cause What to do
The interface cable is not
plugged in securely.
Check that both ends of the cable
between the printer and the computer
are plugged in securely. If the cable is
connected correctly, run a self test as
described in “Printing a Self Test” on
page 73.
Your interface cable does not
meet the printer and/or
computer specifications.
Your software is not properly
set up for your printer.
Use an interface cable that meets the
requirements of both the printer and
computer. See the Setup Sheet and your
computer documentation.
Make sure that your printer is properly
selected in your application software. If
necessary, install or reinstall the printer
driver software. Refer to the Setup Sheet
for detailed instruction.
The Paper Out and Pause lights are on and the printer does not
print.
Cause What to do
The printer is out of paper for
the selected paper source.
Paper on the paper guide is
positioned too far to the left,
right or inside for the paper
sensor to detect it.
Make sure the correct paper source is
selected by the paper release lever, and
load paper in the current paper source.
Press the Pause button to resume
printing.
Move the paper a little to the right, left
or inside. When it is positioned
properly, the Paper Out and Pause
lights go off.
62 Troubleshooting
Page 69

The printer sounds like it is printing, but nothing prints.
Cause What to do
The ribbon cartridge is not
installed properly.
The ribbon is worn out. Replace the ribbon cartridge as
Reinstall the ribbon cartridge as
described in “Replacing the ribbon
cartridge” on page 118.
described in “Replacing the ribbon
cartridge” on page 118.
4
4
4
The paper source is not
selected correctly.
The printer makes a strange noise and stops abruptly.
Cause What to do
The paper is jammed. Clear the paper jam as described in
The ribbon is jammed because
it has too much slack or it is
worn out.
The printer stops printing and the Pause light flashes and the
Power light is on.
Cause What to do
The print head is overheated. Wait for a few minutes; the printer
Part of the printout is missing, or dots are missing in random
positions.
Cause What to do
The ribbon cartridge is not
installed properly.
Select the desired paper source. See
“Selecting a Paper Source” on page 2 for
more information.
“Clearing a Paper Jam” on page 71.
Remove any slack from the ribbon by
turning the ribbon-tightening knob, or
replace the ribbon cartridge. See
“Replacing the ribbon cartridge” on
page 118 for more information.
resumes printing automatically once the
print head cools.
Reinstall the ribbon cartridge as
described in “Replacing the ribbon
cartridge” on page 118.
4
4
4
4
4
4
4
4
4
Troubleshooting 63
Page 70

There is too much slack in the
ribbon or the ribbon has come
loose.
Remove any slack in the ribbon by
turning the ribbon-tightening knob, or
replace the ribbon cartridge as described
in “Replacing the ribbon cartridge” on
page 118.
Lines of dots are missing in the printout as shown below.
Cause What to do
The ribbon cartridge is not
installed correctly, and the
ribbon is twisting or
slackening.
The print head is damaged. Stop printing and contact your dealer to
Stop printing and reinstall the ribbon
cartridge as described “Replacing the
ribbon cartridge” on page 118.
have the print head replaced.
Warning:
Never try to replace the print head
w
yourself because other parts of the
printer must be checked at the same
time.
The characters are shortened vertically or the line spacing is
entirely closed.
Cause What to do
The proper setting has not
been made for the multipart
forms with cut-paper tab
binding.
Set the multipart forms with cut-paper
tab binding setting in the default-setting
mode to on.
64 Troubleshooting
Page 71

Incorrect characters are printed.
Cause What to do
Your printer and the computer
may not be communicating
correctly.
Make sure that you use the correct
interface cable and that the
communications protocol is correct.
Refer to the Setup Sheet and your
computer documentation. If you
installed the optional interface card, also
see the Administrator’s Manual
packaged with it.
4
4
4
Your printer is connected via a
serial interface and the setting
of the flow control is incorrect.
(For LQ-630S only)
The wrong character table is
selected in your software.
The font or characters set in your application software cannot be
printed.
Cause What to do
Your application software is
not correctly configured for
your printer.
The printer does not print the font you selected in the default
settings.
Cause What to do
Software settings override
settings you make in the
default settings.
Change the flow control setting in your
printer driver. To change the flow
control setting, click the Details tab in
the printer driver's properties window,
then click the Port Settings button.
Select Xon / Xoff as the Flow control
setting in the dialog box that appears.
Select the correct character table in your
software or the printer’s default settings.
Note that the character table setting in
your software overrides the settings
made in the default-setting mode.
Make sure that your app lication software
is correctly configured for your printer.
See your application documentation.
Use your software to select the font.
4
4
4
4
4
4
4
4
4
Troubleshooting 65
Page 72

Printing starts too high or too low on the page.
Cause What to do
The paper size settings in your
application software do not
match the size of the paper
loaded in the printer.
Change the paper size settings in your
application software or printer driver to
match the size of the paper you are
using.
The top margin or loading
position setting is incorrect.
Top margin and loading
position settings made in your
Windows applications
override settings you make in
the SelecType mode.
Pull the loded paper out of the
tractor unit while the printer is
on. Or pull out paper
not ejected completely after
pressing the Load/Eject
button.
that is
Check and adjust the top margin and
loading position settings in your
software, or adjust the top-of-form
position using the Micro Adjust
function. See “Printable area” on page
142 and “Adjusting the top-of-form
position” on page 20 for more
information. However, settings made in
Windows applications override settings
made on the control panel.
Use your application software to make
these settings.
Note:
If you want to eliminate the top margin and
print at the very top of the page, adjust the
top margin in your Windows application
little by little until text is printed at the very
top of the page.
Turn the printer off and remove the
loaded paper, then turn the printer on
and reload the paper.
66 Troubleshooting
Page 73

All the text is printed on the same line.
Cause What to do
No line feed command is sent
at the end of each line of text.
The printout has extra blank lines between lines of text.
Cause What to do
Two line feed commands are
being sent at the end of each
line of text.
Turn on the auto line feed option in the
default-settings mode, so that the
printer automatically adds a line feed
code to each carriage return. See
“Changing default settings” on page 47
for more information.
Turn off the auto line feed option in the
default-settings mode. See “Changing
default settings” on page 47 for more
information.
4
4
4
4
4
The line space setting in your
application software is
incorrect.
The length of the printing on the page does not match your paper
length.
Cause What to do
The paper size setting in your
application or the printer
driver may not match the size
of the paper you are using.
The printer’s page length
setting for the tractor may not
match the size of the
continuous paper you are
using.
Adjust the line space setting in your
application software.
Check the paper size setting in your
application or the printer driver.
Check Page length for tractor of the
printer’s default settings. See “Changing
default settings” on page 47 for more
information.
4
4
4
4
4
4
4
Troubleshooting 67
Page 74

Printing starts lower on the page than you expect, or the bottom
of a page is printed at the top of the next page.
Cause What to do
The lines-per-page, top and
bottom margin, or form length
setting is incorrect.
Adjust these settings in your application
software, as follows:
If your application software has a
lines-per-page setting, set it to 66 for
letter size paper or 70 for A4 size paper.
If your software does not have a
lines-per-page setting, try decreasing
the top margin or increasing the bottom
margin, or both, until you get the results
you want. Adjust the form length setting
if your software has this option.
Vertical printed lines are not aligned.
Cause What to do
Bidirectional printing, which
is the printer’s standard
printing mode, may be out of
alignment.
Use the printer’s bidirectional
adjustment mode to correct this
problem. See “Aligning Vertical Lines in
Your Printout” on page 72 for more
information.
Correcting USB Problems
If you are having difficulty using your printer with a USB
connection, read the information in this section.
Ma ke su re t ha t y ou r c om pu te r i s a Wi nd ows Me, 98 , X P, or 20 00
pre-installed model
Your computer must be a Windows Me, 98, XP, or 2000
pre-installed model. You may not be able to install or run the USB
printer driver on a computer which is not equipped with a USB
port or which has been upgraded from Windows 95 to Windows
Me, 98, XP, or 2000.
For details about your computer, contact your dealer.
68 Troubleshooting
Page 75

Make sure that EPSON USB Printer Devices appears on the
Device Manager menu (for Windows Me and 98 only)
If you canceled the plug-and-play driver installation before the
procedure was complete, either the USB printer device driver or
the printer driver may be incorrectly installed.
Follow these steps to check the installation and reinstall the
drivers:
1. Turn the printer on, and plug the USB cable into the printer
and the computer.
4
4
4
2. Right-click the My Computer icon on your desktop, then
click Properties.
3. Click the Device Manager tab.
If your drivers are correctly installed, EPSON USB Printer
Devices should appear on the Device Manager menu.
If EPSON USB Printer Devices does not appear on the Device
Manager menu, click the plus (+) sign beside Other devices
to view the installed devices.
4
4
4
4
4
4
4
4
Troubleshooting 69
4
Page 76

If USB Printer appears under Other devices, the USB printer
device driver is not installed correctly. If EPSON LQ-630
appears, the printer driver is not installed correctly.
If neither USB Printer nor EPSON LQ-630 appears under
Other devices, click Refresh or unplug the USB cable from
the printer, then plug it into the printer again.
4. Under Other devices, select USB Printer or EPSON LQ-630
and click Remove. Then, click OK.
5. When the following dialog box appears, click OK. Then click
OK again to close the System Properties dialog box.
6. Turn off the printer and restart your computer. Then, reinstall
the drivers from the beginning, following the instructions in
the Setup Sheet.
70 Troubleshooting
Page 77

Printer does not work correctly with the USB cable
If your printer does not work correctly with the USB cable, try one
or more of these solutions:
❏ Make sure that the cable you are using is a standard, shielded
USB cable.
❏ If you are using a USB hub, connect the printer to the first tier
of the hub, or connect the printer directly to the computer’s
USB port.
❏ For Windows Me and 98, try reinstalling the USB printer
device driver and the printer software. First, uninstall EPSON
Printer Software using the Add/Remove Programs utility in
the Control Panel, then uninstall EPSON USB Printer Devices.
Next, reinstall the software as described in the Setup Sheet. If
EPSON USB Printer Devices is not registered in the
Add/Remove Programs list, access the CD-ROM and
double-click epusbun.exe in WinMe or Win98 folder. Then
follow the on-screen instructions.
4
4
4
4
4
4
4
4
Clearing a Paper Jam
Follow these steps to clear a paper jam:
Caution:
Do not pull out the jammed paper when the printer is on.
c
1. Turn off the printer.
2. Open the printer cover.
4
4
4
4
Troubleshooting 71
Page 78

3. If continuous paper is jammed in the printer, tear off the fresh
supply at the back of the printer.
4. Open the paper bail and remove the paper. Remove any
remaining pieces of paper.
If the paper is stuck where the printer ejects it, gently pull the
paper out of the printer.
5. Close the paper bail and printer cover, then turn on the
printer. Make sure the Paper Out and Pause lights are off.
Aligning Vertical Lines in Your Printout
If you notice that the vertical lines in your printout are not
properly aligned, you can use the printer’s bidirectional
adjustment mode to correct this problem.
During bidirectional adjustment, the printer prints three sheets of
alignment patterns, Draft, Bit Image, and LQ (letter quality).
Select the best alignment pattern from each sheet to align vertical
lines.
Follow the steps below to perform bidirectional adjustment.
Note:
❏ To print the instruction sheet and alignment patterns, you need four
sheets of A4 size single-sheet paper or 10-inch (recommended)
continuous paper. (See “Loading Continuous Paper” on page 5 or
“Loading Single Sheets” on page 12 for paper-loading instructions.)
❏ If you use single-sheet paper, be sure to load a new sheet of paper
each time the printer ejects a printed sheet. Otherwise, you cannot
proceed to the next step.
1. When using continuous paper, make sure paper is loaded and
the printer is turned off.
Caution:
Whenever you turn off the printer, wait at least five seconds
c
before turning it back on; otherwise you may damage the
printer.
72 Troubleshooting
Page 79

2. While holding down the Pause button, turn on the printer.
The printer enters the bidirectional adjustment mode. When
using continuous paper, the printer prints the instruction
sheet and the first set of alignment patterns.
3. When using single-sheet paper, load paper in the printer. The
printer prints the instruction sheet and the first set of
alignment patterns.
4. As described in the instructions, compare the alignment
patterns and select the number of the pattern with the best
alignment using the LF/FF D and Load/Eject U buttons. The
Power, Pause and Paper Out lights show the pattern
number which is selected at that time.
5. Press the Pause button. The printer prints the next set of
alignment patterns.
6. Repeat steps 3 and 4 to select and enter the number of the
pattern with the best alignment for each of the remaining sets.
7. Turn off the printer to exit the bidirectional adjustment mode.
Printing a Self Test
Running the printer’s self test helps you determine whether the
printer or the computer is causing the problem:
4
4
4
4
4
4
4
4
❏ If the self test results are satisfactory, the printer is working
properly and the problem is probably caused by your printer
driver settings, application settings, computer, or interface
cable. (Be sure to use a shielded interface cable.)
❏ If the self test does not print properly, there is a problem with
the printer. See “Problems and Solutions” on page 53 for
possible causes and solutions to the problem.
You can print the self test using either single sheets or continuous
paper. See “Loading Continuous Paper” on page 5 or “Loading
Single Sheets” on page 12 for paper-loading instructions.
Follow these steps to perform a self test:
Troubleshooting 73
4
4
4
4
Page 80

1. When using continuous paper, make sure paper is loaded,
and the paper release lever is set to the correct position. Then
turn off the printer.
Caution:
Whenever you turn off the printer, wait at least five seconds
c
before turning it back on; otherwise you may damage the
printer.
2. To run the test using the Draft font, turn on the printer while
holding down the LF/FF button. To run the test using the
printer’s letter-quality fonts, turn on the printer while holding
down the Load/Eject button. Either self test can help you
determine the source of your printing problem; however, the
draft self test prints faster than the letter-quality test.
3. When using single-sheet paper, load paper in the printer.
After a few seconds, the printer loads the paper automatically
and begins printing the self test. A series of characters is
printed.
Note:
To temporarily stop the self test, press the Pause button. To resume
the test, press the Pause button again.
4. To end the self test, press the Pause button to stop printing.
If paper remains in the printer, press the Load/Eject button
to eject the printed page. Then turn off the printer.
Caution:
Do not turn off the printer while it is printing the self test. Always
c
press the Pause button to stop printing and the Load/Eject
button to eject the printed page before you turn off the printer.
74 Troubleshooting
Page 81

Printing Hex Dump
If you are an experienced user or a programmer, print a
hexadecimal dump to isolate communication problems between
the printer and your software program. In hex dump mode, the
printer prints all data it receives from the computer as
hexadecimal values.
4
4
Follow these steps to print a hex dump:
Note:
The hex dump feature is designed for a connection with DOS-based PC.
1. When using continuous paper, make sure that the paper is
loaded and the printer is turned off.
2. To enter hex dump mode, turn on the printer while holding
down both the LF/FF and Load/Eject buttons.
3. When using A4 (210 × 297 mm, 8.3 × 11.7 inches) or wider
(such as letter size paper) single-sheet paper, load paper in
the printer.
4. Open a software program and send a print job to the printer.
Your printer prints all the codes it receives in hexadecimal
format.
By comparing the characters printed in the right column with
the printout of the hexadecimal codes, you can check the
codes being received by the printer. If characters are printable,
they appear in the right column as ASCII characters.
Nonprintable codes, such as control codes, are represented by
dots.
5. To exit the hex dump mode, press the Pause button and eject
the printed page(s), and turn off the printer.
4
4
4
4
4
4
4
4
4
Troubleshooting 75
4
Page 82

Contacting Customer Support
If your EPSON product is not operating properly and you cannot
solve the problem using the troubleshooting information in your
product documentation, contact customer support services for
assistance. If customer support for your area is not listed below,
contact the dealer where you purchased your product.
Customer support will be able to help you much more quickly if
you give them the following information:
❏ Product serial number
(The serial number label is usually on the back of the product.)
❏ Product model
❏ Product software version
(Click About, Version Info, or similar button in the product
software.)
❏ Brand and model of your computer
❏ Your computer operating system name and version
❏ Names and versions of the software applications you
normally use with your product
Select your country:
“Germany” on
page 77
“Yugoslavia”
on page 101
“Sweden” on
page 100
“United
Kingdom” on
page 90
“Belgium” on
page 96
76 Troubleshooting
“Hungary” on
page 99
“Austria” on
page 95
“Greece” on
page 101
“Republic of
Ireland” on
page 91
“Poland” on
page 110
“France” on
page 77
“Slovac
Republic” on
page 100
“Netherlands”
on page 95
“Italy” on
page 91
“Denmark” on
page 96
“Norway” on
page 100
“Spain” on
page 86
“Czek.
Republic” on
page 100
“Turkey” on
page 102
“Croatia” on
page 97
Page 83

“Cyprus” on
page 109
“Macedonia”
on page 97
“Luxemburg”
on page 98
“Portugal” on
page 94
“Bulgaria” on
page 111
“Switzerland”
on page 99
“Finland” on
page 96
“Romania” on
page 111
4
“Slovenia” on
page 98
“Israel” on
page 112
“Argentina”
on page 113
“Brazil” on
page 114
“Estonia” on
page 111
“Middle East”
on page 112
“Chile” on
page 114
“Colombia”
on page 114
Germany
EPSON Deutschland GmbH
Service & Support
0180-5234110
Monday to Friday: 9 a.m. to 9 p.m.
Saturday to Sunday: 10 a.m. to 4 a.m.
“Latvia” on
page 111
“South Africa”
on page 112
“Costa Rica”
on page 115
“Mexico” on
page 115
“Peru” on
page 115
“Venezuela”
on page 116
“Lithuania” on
page 112
“Bosnia
Herzgovina”
on page 113
“USA (Latin
America)”
on page
116
“USA” on
page 116
4
4
4
4
4
4
4
4
Public holidays: 10 a.m. to 4 p.m.
(0,12 E per minute)
www.epson.de/support/
France
Support Technique EPSON France,
4
4
4
Troubleshooting 77
Page 84

0 892 899 999 (0,34 E/minute)
Ouvert du lundi au samedi de 9h00 à 20h00 sans interruption
http://www.epson.fr/support/selfhelp/french.htm
accéder à l'AIDE EN LIGNE.
http://www.epson.fr/support/services/index.shtml
accéder aux SERVICES du support technique.
Centres de maintenance
AJACCIO CIM
Le Stiletto - Lot N° 5
20090 AJACCIO
AMIENS
FMA
13, rue Marc Sangnier 8000 AMIENS
ANNECY (td)
MAINTRONIC
Parc des Glaisins
Immeuble Prosalp
14, rue Pré Paillard
74940 ANNECY Le Vieux
AVIGNON
MAINTRONIC
Anthéa, rue du Mourelet
ZI de Courtine III
84000 AVIGNON
Tél : 04.95.23.73.73
Fax : 04.95.23.73.70
Tél : 03.22.22.05.04
Fax : 03.22.22.05.01
Tél : 04.50.10.21.30
Fax : 04.50.10.21.31
Tél : 04.32.74.33.50
Fax : 04.32.74.05.89
pour
pour
BASTIA (td)
CIM
Immeuble Albitreccia
Avenue du Maichione
20200 LUPINO
78 Troubleshooting
Tél : 04.95.30.65.01
Fax : 04.95.30.65.01
Page 85

BORDEAUX
FMA
Parc d'activités Chemin Long
Allée James Watt - Immeuble Space 3
33700 MERIGNAC
BORDEAUX
MAINTRONIC
11/19 rue Edmond Besse
Immeuble Rive Gauche
33300 BORDEAUX
BOURGES (td)
BEGELEC
18, avenue du 11 Novembre
18000 BOURGES
Tél : 05.56.34.85.16
Fax : 05.56.47.63.18
Tél : 05.57.10.67.67
Fax : 05.56.69.98.10
Tél : 02.48.67.00.38
Fax : 02.48.67.98.88
4
4
4
4
4
BREST
FMA
8, rue Fernand Forest
29850 GOUESNOU
CAEN
TMS
17, rue des Métiers
14123 CORMELLES LE ROYAL
CLERMONT
FMA
14, rue Léonard de Vinci
Bât H - ZI La Pardieu
63000 CLERMONT FERRAND
CROISSY SUR SEINE
BEGELEC
ZA Claude Monet
5 rue Hans List
Bât F
78290 CROISSY SUR SEINE
Tél : 02.98.42.01.29
Fax : 02.98.02.17.24
Tél : 02.31.84.80.82
Fax : 02.31.84.80.83
Tél : 04.73.28.59.60
Fax : 04.73.28.59.65
Tél : 01 30 09 20 55
Fax : 01 34 80 17 24
4
4
4
4
4
4
4
Troubleshooting 79
Page 86

DIJON
FMA
60, rue du 14 Juillet
Parc des Grands Crus
21300 CHENOVE
Tél : 03.80.51.17.17
Fax : 03.80.51.23.00
GRENOBLE (td)
FMA
2 rue Mayencin
38400 ST MARTIN D'HERES
GRENOBLE
MAINTRONIC
Les Akhesades Bât B.
Rue Irène Joliot Curie
38320 EYBENS
HEROUVILLE ST CLAIR
BEGELEC
ZI de la Sphère
558 rue Léon Foucault
14200 HEROUVILLE ST CLAIR
LE HAVRE
FMA
33, bd de Lattre de Tassigny
76600 LE HAVRE
LE MANS
BEGELEC
117, rue de l'Angevinière
72000 LE MANS
Tél : 04.38.37.01.19
Fax : 04.76.44.78.92
Tél : 04.76.25.87.87
Fax : 04.76.25.88.10
Tél : 02 31 53 66 83
Fax : 02 31 53 66 84
Tél : 02.32.74.27.44
Fax : 02.35.19.05.35
Tél : 02.43.77.18.20
Fax : 02.43.77.18.28
LILLE
FMA
99 rue Parmentier - Bât A
59650 VILLENEUVE D’ASCQ
80 Troubleshooting
Tél : 03.20.71.47.30
Fax : 03.20.61.07.90
Page 87

LILLE
MAINTRONIC
Synergie Park
9, avenue Pierre et Marie Curie
59260 LEZENNES
LIMOGES
MAINTRONIC
43 rue Cruveilher
87000 LIMOGES
Tél : 03.20.19.04.10
Fax : 03.20.19.04.19
Tél : 05.55.10.36.75
Fax : 05.55.77.44.00
4
4
4
LYON
FMA
136, chemin Moulin Carron
69130 ECULLY
LYON
MAINTRONIC
9, allée du Général Benoist
ZAC du Chêne
69500 BRON
LYON Centre
MAINTRONIC
4, quai Jules Courmont
69002 LYON
MARSEILLE
FMA
305 ZA de Mourepiane
467, Chemin du Littoral
13322 MARSEILLE CX 13
MARSEILLE
MAINTRONIC
Bât D1 - Actiparc II
Chemin de St LAMBERT
13821 LA PENNE SUR HUVEAUNE
Tél : 04.78.35.38.65
Fax : 04.78.35.24.99
Tél : 04.72.14.95.00
Fax : 04.78.41.81.96
Tél : 04.72.56.94.85
Fax : 04.72.56.94.89
Tél : 04.91.03.13.43
Fax : 04.91.03.13.72
Tél : 04.91.87.83.93
Fax : 04.91.87.83.94
4
4
4
4
4
4
4
4
Troubleshooting 81
4
Page 88

METZ
FMA
104 rue de Pont à Mousson
57950 MONTIGNY LES METZ
Tél : 03 87 66 92 00
Fax : 03 87 66 18 22
METZ
MAINTRONIC
TECHNOPOLE 2000
6, rue Thomas Edison
57070 METZ
MONTPELLIER
MAINTRONIC
Parc Ateliers Technologiques
2, avenue Einstein
34000 MONTPELLIER
MULHOUSE
FMA
106, rue des Bains
68390 SAUSHEIM
NANCY
FMA
3 rue du Bois Chêne le Loup
54500 VANDOEUVRE CEDEX
NANTES
FMA
1105 avenue Jacques Cartier
Bât B4
44800 ST HERBLAIN
Tél : 03.87.76.98.30
Fax : 03.87.76.31.15
Tél : 04.67.15.66.80
Fax : 04.67.22.50.91
Tél : 03.89.61.77.88
Fax : 03.89.31.05.25
Tél : 03.83.44.44.00
Fax : 03.83.44.10.20
Tél : 02.28.03.10.73
Fax : 02.28.03.10.71
NANTES
MAINTRONIC
5 rue du Tertre
44470 CARQUEFOU
82 Troubleshooting
Tél : 02 51 85 22 70
Fax : 02 51 85 22 71
Page 89

NICE
FMA
329, avenue des PUGETS
Bât A.2 - Le Réal
06700 ST LAURENT DU VAR
NICE
MAINTRONIC
Les terriers Nord
Immeuble Les Sporades
500, allée des Terriers
06600 ANTIBES
Tél : 04.93.14.01.70
Fax : 04.93.14.01.73
Tél : 04.92.91.90.90
Fax : 04.93.33.98.63
4
4
4
4
NIORT
MAINTRONIC 49 rue du Fief d'Amourettes
79000 NIORT
ORLEANS
FMA
ZA des Vallées
45770 SARAN
PARIS 11
FMA
10 rue des Goncourt
75011 PARIS
PARIS 12
BEGELEC
182, rue de Charenton
75012 PARIS
PARIS 13
MAINTRONIC
Immeuble Berlier
15, rue JB Berlier
75013 PARIS
ème
ème
ème
Tél : 05 49 24 18 71
Fax : 05 49 24 15 85
Tél : 02 38 73 16 00
Fax : 02 38 43 85 77
Tél : 01 47 00 95 95
Fax : 01 47 00 95 96
Tél : 01.44.68.83.01
Fax : 01.44.68.83.02
Tél : 01.44.06.99.44
Fax : 01.44.24.05.06
4
4
4
4
4
4
4
Troubleshooting 83
4
Page 90

PARIS 14
FMA
63, rue de Gergovie
75014 PARIS
ème
Tél : 01.45.45.57.65
Fax : 01.45.39.48.86
PARIS EST (td)
BEGELEC
3, allée Jean Image
77200 TORCY
PARIS NORD
FMA
30, av. du vieux Chemin de St Denis
92390 VILLENEUVE LA GARENNE
PARIS SUD
BEGELEC
Immeuble Femto
1, avenue de Norvège
91953 LES ULIS
PAU
MAINTRONIC
375, bd Cami Sallié
64000 PAU
REIMS
FMA
Parc technologique H. Farman
12, allée Fonck
51100 REIMS
Tél : 01.60.06.02.02
Fax : 01.60.06.02.60
Tél : 01.40.85.98.08
Fax : 01.47.92.00.85
Tél : 01.64.46.44.01
Fax : 01.69.28.83.22
Tél : 05.59.40.24.00
Fax : 05.59.40.24.25
Tél : 03.26.97.80.07
Fax : 03.26.49.00.95
RENNES
FMA
59 bd d'Armorique
Square de la Mettrie
35700 RENNES
84 Troubleshooting
Tél : 02.23.20.25.25
Fax : 02.23.20.04.15
Page 91

RENNES
MAINTRONIC
Parc d’affaires de la Bretèche
Bât 2
35760 RENNES ST GREGOIRE
ROUEN
BEGELEC
Technopole des Bocquets
Immeuble le Dulong
75 Allée Paul Langevin
76230 BOIS GUILLAUME
Tél : 02.99.23.62.23
Fax : 02.99.23.62.20
Tél : 02 35 12 41 66
Fax : 02 35 12 41 67
4
4
4
4
STRASBOURG
FMA
Parc d’activités Point Sud
3C rue du Fort
67118 GEISPOSHEIM
STRASBOURG
MAINTRONIC
ESPACE EUROPEEN DE L'ENTREPRISE
13 avenue de l'Europe
67300 SCHILTIGHEIM
TOULON (td)
FMA
64 route de Capelane
ZA la Capelane
Parc Burotel
83140 SIX FOURS
TOULOUSE
FMA
Buroplus - BP 365
31313 LABEGE CEDEX
TOULOUSE
MAINTRONIC
7, avenue de l’Europe
31520 RAMONVILLE ST AGNE
Tél : 03.88.55.38.18
Fax : 03.88.55.41.55
Tél : 03 90 22 79 40
Fax : 03 90 20 89 14
Tél : 04.94.63.02.87
Fax : 04.94.63.42.55
Tél : 05.61.00.54.22
Fax : 05.61.00.52.01
Tél : 05.61.73.11.41
Fax : 05.61.73.80.06
4
4
4
4
4
4
4
4
Troubleshooting 85
Page 92

TOURS
BEGELEC
25, rue des Granges Galand
ZI des Granges Galand
37550 ST AVERTIN
Tél : 02.47.25.10.60
Fax : 02.47.25.10.72
TROYES (td)
BEGELEC
15, rue des Epingliers
10120 St ANDRE LES VERGERS
VALENCIENNES
BEGELEC (td)
14C rue Pierre Mathieu
59410 ANZIN
Tél : 03.25.49.78.96
Fax :03.25.49.78.97
Tél : 03 27 19 19 05
Fax : 03 27 19 19 06
Spain
EPSON IBÉRICA, S.A.
Avda. Roma 18-26, 08290 Cerdanyola, Barcelona, España
Tel.: 34.93.5821500
Fax: 34.93.5821555
CENTRO DE ATENCIÓN AL CLIENTE
Tel.: 902 40 41 42
Fax: 93 582 15 16
E-mail: soporte@epson.es
www.epson.es
www.epson.es/support/
SERVICIOS OFICIALES DE ASISTENCIA TÉCNICA EPSON
POBLACION PROVINCIA EMPRESA TELEFONO FAX DIRECCION CP
86 Troubleshooting
Page 93

ALBACETE ALBACETE DEPARTAMENT
ALICANTE ALICANTE RPEI 96/
ALMERIA ALMERIA MASTER KIT S.A. 950/
OVIEDO ASTURIAS COMERCIAL
OVIEDO ASTURIAS LABEL
BADAJOZ BADAJOZ INFOMEC S.C. 924/
BADAJOZ BADAJOZ PAITRON
MÉRIDA BADAJOZ PAITRON
PALMA DE M. BALEARES BALEAR DE
MAHÓN BALEARES INFORMÁTICA
BARCELONA BARCELONA BS MICROTEC
BARCELONA BARCELONA MICROVIDEO 93/
CERDANYOLA BARCELONA OFYSAT S.L. 93/
BARCELONA BARCELONA RIFÉ
SANT BOI BARCELONA SELTRON S.L. 93/
MANRESA BARCELONA TELESERVICIO 93/
BURGOS BURGOS MANHARD, S.L. 947/
O TÉCNICO
INFORMÁTICO
S.A.L.
EPROM, S.A.
MICROHARD,
S.L.
BADAJOZ
MÉRIDA
INSTALACIONES
Y MANT. S.L
MAHÓN, S.L.
MANT.
INFORMÁTIC
S.L.
ELECTRÓNICA,
S.A.
967/
50.69.10
510.20.53
62.13.77
98/
523.04.59
98/
511.37.53
24.19.19
902/
24.20.24
924/
37.16.06
971/
24.64.55
971/
35.33.23
93/
243.13.23
265.15.75
580.87.87
93/
453.12.40
652.97.70
873.56.23
22.11.09
967/50.69.09 C/ FRANCISCO
96/511.41.80 C/ EDUARDO
950/62.13.72 CAMINO LA
98/527.30.19 AV. DE LAS
98/511.37.53 C/. FERNÁNDEZ
924/22.90.36 C/ VICENTE
924/24.18.97 AV. Mª
924/37.15.91 C/ PUERTO RICO, 206800
971/24.51.02 C/ MANACOR, 82
971/35.12.12 C/. SAN
93/340.38.24 C/. PALENCIA, 45 08027
93/265.44.58 AVDA
93/580.89.96 C/ FONTETES, 3-5,
93/323.64.70 C/ ARIBAU, 81 08036
93/630.81.04 C/ INDUSTRIA,
93/877.00.34 AV. TUDELA, 44 08240
947/22.09.19 AVDA
PIZARRO, 13
BAJOS
LANGUCHA, 17
BAJOS
GOLETA, 2ª
TRAV.NAVE 4
SEGADAS, 5
BAJOS
DE OVIEDO, 38,
BJO.
DELGADO
ALGABA, 10
AUXILIADORA, 7
A BAJOS
CLEMENTE, 78
(SES VINYES)
DIAGONAL, 296
Local 1
44-46
CASTILLA-LEÓN,
46
02004
03006
04007
33006
33012
06010
06011
07006
07707
08013
08290
08830
09006
4
4
4
4
4
4
4
4
4
4
4
4
Troubleshooting 87
Page 94

CÁCERES CÁCERES PAITRON
PTO.SANTA.Mª.CÁDIZ ELSE
JEREZ CÁDIZ NEW SERVICE,
LAS PALMAS CANARIAS MEILAND 928/
LAS PALMAS CANARIAS G.B. CANARIAS
SANTANDER CANTABRIA INFORTEC, S.C. 942/
CASTELLÓNCASTELLÓN INFORSAT, S.L. 964/
ALCAZAR CIUDAD REAL GRUPO DINFOR
CIUDAD REAL CIUDAD REAL GRUPO DINFOR
CÓRDOBA CÓRDOBA SETESUR
GIRONA GIRONA PROJECTES
GRANADA GRANADA INTELCO
SAN SEBASTIAN GUIPUZCOA ELECTRÓNICA
HUELVA HUELVA INTERDATA 959/
LA CORUÑALA CORUÑA HARDTEC
LOGROÑO LA RIOJA REYMAR, S.L. 941/
LEÓNLEÓN MACOISAT, S.L. 987/
LEÓNLEÓN PROSYSTEM 987/
TORREFARRERA LLEIDA RICOMACK,
CÁCERES
INFORMÁTICA,
S.L.
S.L.
SERVICIOS, S.L.
ALCÁZAR
C. REAL
ANDALUCIA,
S.L.
COM-TECH, S.L.
ASISTENCIA
TÉCNICA, S.L.
GUIPUZCOANA
GALICIA
S.A.
902/
21.40.21
902/
19.75.63
956/
18.38.38
29.22.30
902/
11.47.54
23.54.99
22.94.01
926/
54.55.62
926/
25.42.25
957/
43.80.09
972/
24.11.35
958/
13.21.79
943/
46.86.40
54.38.82
981/
23.79.54
24.26.11
26.25.50
22.11.97
973/
75.15.33
927/21.39.99 C/ GABINO
956/56.05.12 AV. RIO SAN
956/18.55.85 C/ ASTA, 18 11404
928/23.38.92 C/ NÉSTOR DE LA
902/08.28.38 C/. DR. JUAN
942/23.98.42 C/. JIMÉNEZ DÍAZ, 139007
964/22.94.05 C/ CRONISTA
926/54.57.67 C/ DR.
926/23.04.94 C/. TOLEDO, 34 13003
957/43.92.04 C/. ESCRITOR
972/40.11.85 PLAZA DE LA
958/13.22.09 C/ PRIMAVERA, 2018008
943/45.57.01 C/ BALLENEROS,
959/54.37.07 C/. CONDE DE
981/24.76.92 AV. LOS MALLOS,
941/25.03.12 C/. ALBIA DE
987/26.29.52 AV. FERNÁNDEZ
987/24.88.97 C/. JUAN DE LA
973/75.16.21 POL. IND. DEL
MURIEL, 1
PEDRO, 59, URB.
VALDELAGMANA
TORRE, 3 OFIC.1
DOMINGUEZ
PEREZ, 6 URB.
SEBADAL
REVEST, 30 BAJOS
BONARDELL, 37
TOMÁS SÁNCHEZ,
3
ASUNCION, 35
4 BAJOS
LÓPEZ MUÑOZ, 32
87, BJO. B
CASTRO, 10
LADREDA, 27,
BJO.
COSA, 14
SEGRIÀ, S/N
10001
11500
35006
35008
12005
13600
14014
17005
20011
21006
15007
26003
24005
24009
25126
88 Troubleshooting
Page 95

LUGO LUGO LABEL
MADRID MADRID GRUPO PENTA,
MADRID MADRID MICROMA, S.A. 91/
MADRID MADRID SETECMAN, S.L. 91/
MADRID MADRID BS MICROTEC
MADRID MADRID TEDUIN, S.A. 91/
MÁLAGA MÁLAGA COVITEL
MÁLAGA MÁLAGA CENTRO DE
MELILLA MÁLAGA NODO
MURCIA MURCIA RED TECNICA
PAMPLONA NAVARRA INFORMÉTRICA
VIGO PONTEVEDRA SERVICIOS
VIGO PONTEVEDRA DUPLEX, S.L. 986/
SALAMANCA SALAMANCA EPROM-1 923/
SEVILLA SEVILLA AMJ
TARRAGONA TARRAGONA TGI
VALENCIA VALENCIA ATRON
MICROHARD,
S.L.
S.A.
MADRID, S.L.
MÁLAGA
REPARACIONES
INFORMATICAS
INFORMÁTICA
EUROPEA, S.L.
IRUÑA , S.L.
INFORMÁTICOS
DEL ATLÁNTICO,
S.L
TECNOLAN, S.L.
(TECNOLOGIA I
GESTIÓ
INFORM. S.L.)
INGENIEROS,
S.A.
982/
20.37.15
91/
543.73.03
304.68.00
571.54.06
91/
713.07.21
327.53.00
95/
231.62.50
95/
260.26.60
95/
267.53.14
968/
27.18.27
948/
27.98.12
986/
26.62.80
41.17.72
18.58.28
95/
491.57.91
977/
23.56.11
96/
385.00.00
982/20.37.15 C/. ESCULTOR
91/543.53.04 C/ BLASCO DE
91/327.39.72 C/ STA. LEONOR, 6128037
91/572.22.40 C/ INFANTA
91/713.07.23 C/. SANCHO
91/327.05.00 C/ALBALÁ, 10 28037
95/233.98.50 C/ CERAMISTAS,
95/260.27.89 C/. FLAUTA
95/267.91.37 C/. QUEROL, 22 52004
968/27.02.47 AV. RONDA DE
948/27.92.89 ERMITAGAÑA, 1
986/26.77.51 C/ PÁRROCO
986/41.17.72 C/. CONDESA
923/18.69.98 C/ COLOMBIA, 3237003
95/491.52.14 AV. CJAL.
977/21.25.12 AV. FRANCESC
96/384.92.07 C/ HÉROE
ASOREI, 1, BJOS.
GARAY, 63
MERCEDES , 31 1º
DÁVILA, 21,
LOCAL
8. P. IND. SAN
RAFAEL
MÁGICA,
S/N.N-6,
P.ALAMEDA
LEVANTE, 43, BJO.
BAJOS
JOSÉ OTERO, 3
CASA BÁRCENA,
5
ALBERTO JNEZ.
BEC., 6, AC. D
MACIÀ, 8 D
BAIXOS
ROMEU, 8 B
27004
28015
28020
28028
29006
29006
30008
31008
36206
36204
41009
43002
46008
4
4
4
4
4
4
4
4
4
4
4
4
Troubleshooting 89
Page 96

VALENCIA VALENCIA GINSA
VALLADOLID VALLADOLID ARAQUE PRINT,
BILBAO VIZCAYA DATA SERVICE,
BILBAO VIZCAYA TECNIMAC 94/
ZARAGOZA ZARAGOZA OFYSAT, S.L. 976/
ZARAGOZA ZARAGOZA INSTRUMENTACI
INFORMÁTICA,
S.A.
S.L.
S.L.
ÓN Y
COMPONENTES
, S.A.
United Kingdom
EPSON (UK) Ltd.
Campus 100, Maylands Avenue,
Hemel Hempstead, Hertfordshire HP2 7TJ
United Kingdom
96/
362.21.15
983/
20.76.12
94/
446.79.86
410.63.00
30.40.10
976/
01.33.00
96/393.26.96 C/ ERNESTO
983/30.95.05 BAILARÍN
94/446.79.87 C/ MATICO, 29 48007
94/470.24.23 C/. MONTE
976/32.03.73 C/ ANTONIO
976/01.09.77 ED. EXPO
FERRER, 16 B
VICENTE
ESCUDERO, 2
INCHORTA, 1
SANGENÍS, 16
ZARAGOZA,CRTA
.MADRID, S/N
KM. 315, N-3, PTA.
1
46021
47005
48003
50050
50014
Tel.: +44 (0) 1442 261144
Fax: +44 (0) 1422 227227
www.epson.co.uk
Stylus Products Warranty & Support
08705 133 640
Scanner Products Warranty & Support
08702 413 453
Sales
90 Troubleshooting
Page 97

0800 220 546
Republic of Ireland
Stylus Products Warranty & Support
01 679 9016
Other Products Warranty & Support
01 679 9015
Sales
1 800 409 132
www.epson.co.uk
Italy
EPSON Italia S.p.a.
Via M. Viganò de Vizzi, 93/95
20092 Cinisello Balsamo (MI)
Tel. 02.660.321
4
4
4
4
4
4
4
4
Fax. 02.612.36.22
Assistenza e Servizio Clienti
TECHNICAL HELPDESK
02.268.300.58
www.epson.it
4
4
4
4
Troubleshooting 91
Page 98

ELENCO CENTRI ASSISTENZA AUTORIZZATI EPSON
AEM SERVICE S.R.L.
Via Verolengo, 20
00167 ROMA
Tel : 06-66018020
Fax : 06-66018052
A.T.E.S. ELETTRONICA
S.R.L.
Via Lulli, 28/b
10148 TORINO
Tel : 011-2202525
Fax : 011-2204280
A.T.S. S.N.C.
Via della Repubblica,
35 a/b/c
40127 BOLOGNA
Tel : 051-515313
Fax : 051-513241
A.T.S. S.N.C.
Via dell'Artigianato, 4
09125 CAGLIARI
Tel: 070-2110244
Fax: 070-2110260
ELECTRONIC
ASSISTANCE CENTRE
Via Bazzini, 17
20131 MILANO
Tel : 02-70631407
Fax : 02-70631301
ELETTRONICA
CAROLINA ALOISIO &
C. S.A.S.
Via Generale
Arimondi, 99
90143 PALERMO
Tel : 091-308118
Fax : 091-6263484
GSE S.R.L.
Via Rimassa, 183r
13129 GENOVA
Tel : 010-5536076
Fax : 010-5536113
HARD SERVICE S.R.L.
Z.A.3 Via del
progresso, 2
35010 PERAGA DI
VIGONZA (PD)
Tel : 049-8933951
Fax : 049-8933948
QUAIZ S.N.C.
Via San Paolo, 5/h
Loc. Badia a Settimo
50018 SCANDICCI (FI)
Tel : 055-720561
Fax : 055-720180
QUICK COMPUTER
SERVICE
Viale Louise Pasteur,
23 a/b/c
70124 BARI
Tel : 080-5044351
Fax : 080-5618810
QUICK COMPUTER
SERVICE
Via P. Manerba, 12
71100 FOGGIA
Tel : 0881-331123
Fax : 0881-339133
RAVEZZI ANGELO
HARDWARE SERVICE
Via Avogadro, 6/10
47037 RIMINI
Tel : 0541-373686
Fax : 0541-374844
C.A.M.U. S.N.C.
Via Grandi, 4
33170 PORDENONE
Tel : 0434-572949
Fax : 0434-573005
92 Troubleshooting
INFORMAINT S.N.C.
Via Prunizzedda, 94
07100 SASSARI
Tel / Fax: 079-290953
REGA ELETTRONICA
S.N.C.
Via Gentileschi, 25/27
56123 PISA
Tel : 050-560151
Fax : 050-560135
Page 99

COMPUTER
ASSISTANCE S.A.S.
1a Traversa Via del
Gallitello
85100 POTENZA
Tel: 0971-489973
Fax: 0971-476892
INFORMAINT S.N.C.
Filiale di Olbia
Via Monte Pasubio, 22
07026 OLBIA
Tel: 0789-23786
Fax: 0789-203891
S.T.E. S.N.C. di
Ciarrocchi A.& C.
Via Settimo Torinese, 5
65016 MONTESILVANO
(PE)
Tel : 085-4453664
Fax : 085-4456860
4
4
COMPUTER LAB S.N.C.
Via Quaranta, 29
20141 MILANO
Tel : 02-5391224
Fax : 02-5695198
COMPUTER LAB S.N.C.
Via Pelizza da
Volpedo, 1
20092 CINISELLO
BALSAMO (MI)
Tel : 02-6174175
Fax : 02-6127926
COMPUTER LAB S.N.C.
Via F.lli Calvi, 4
24122 BERGAMO
Tel : 035-4243216
Fax : 035-238424
COMPUTER SERVICE 2
S.N.C.
Via Divisione Acqui, 70
25127 BRESCIA
Tel : 030-3733325
Fax: 030-3733130
JAM S.R.L.
Piazza Principale, 9
39040 ORA
(BOLZANO)
Tel : 0471-810502
Fax : 0471-811051
LYAN S.N.C.
Via Vercelli, 35 S.S. 230
13030 VERCELLI Loc.
Caresanablot
Tel : 0161/235254
Fax : 0161/235255
LYAN S.N.C.
Via Camillo Riccio, 72
10135 TORINO
Tel: 011-3471161
Fax: 011-3470338
MEDIEL S.N.C.
Via Ugo Bassi, 34
98123 MESSINA
Tel : 090-695962 /
695988
Fax : 090-694546
*
AUER
TECMATICA S.R.L.
Via S. Bargellini, 4
00157 ROMA
Tel : 06-4395264
Fax : 06-43534628
TECNOASSIST S.N.C.
Via Roma, 44/d
22046 MERONE (CO)
Tel : 031-618605
Fax : 031-618606
TECNOASSIST S.N.C.
Via C. Cattaneo, 9
21013 GALLARATE
(VA)
Tel : 0331-791560
Fax : 0331-793882
TECNOASSIST S.N.C.
Via F.lli Rosselli 20
20016 PERO - Loc.
Cerchiate (MI)
Tel : 02-33913363
Fax : 02-33913364
4
4
4
4
4
4
4
4
4
Troubleshooting 93
4
Page 100

COMPUTER SERVICE 2
S.N.C.
Via V.Guindani, 10
26100 CREMONA
Tel/Fax : 0372-435861
MEDIEL S.N.C. filiale di
Catania
Via Novara, 9
95125 CATANIA (CT)
Tel : 095-7169125
Fax : 095-7160889
TECNO STAFF S.R.L.
Via Vivaldi, 19
00199 ROMA
Tel : 06-8606173
Fax : 06-86200117
COMPUTER SERVICE 2
S.N.C.
Via P. Savani, 12/C
43100 PARMA
Tel : 0521-941887
Fax : 0521-940757
COMPUTER SERVICE 2
S.N.C.
Via Mantovana,
127/D
37137 VERONA
Tel : 045/8622929
Fax : 045/8625007
CONERO DATA S.A.S.
Via della Repubblica, 7
60020 SIROLO (AN)
Tel/Fax : 071-9331175
DATA SERVICE S.R.L.
Via S. Allende, 22a
50018 SCANDICCI (FI)
Tel : 055-250752
Fax : 055-254111
MEDIEL S.R.L.
Via S. Caterina, 14
89121 REGGIO
CALABRIA
Tel : 0965-654711
Fax: 0965-654996
MICROTECNICA
S.N.C.
Via Lepanto, 83
80125 NAPOLI
Tel : 081-2394460
Fax : 081-5935521
PRINTER SERVICE S.R.L.
Fil. Cosenza
Via Londra, 3
87036 RENDE (CS)
Tel: 0984-837872
Fax: 0984-830348
PRINTER SERVICE S.R.L.
Via U. Boccioni, 25/27
88048 S.Eufemia
LAMEZIA TERME (CZ)
Tel : 0968-419276
Fax : 0968-419109
TECNO STAFF S.R.L.
Via A.Manzoni,
263/265
06087 PONTE
S.GIOVANNI (PG)
Tel : 075-5997381
Fax : 075-5999623
TUSCIA TECNO STAFF
S.R.L.
Via Cardarelli, 14
01100 VITERBO
Tel : 0761-270603
Fax : 0761-274594
Portugal
EPSON Portugal, S.A.
Rua Gregório Lopes Lote 1514 Restelo
94 Troubleshooting
 Loading...