


Copyrights and Trademarks
Copyrights
No part of this publication may be reproduced, stored in a
retrieval system, or transmitted in any form or by any means,
electronic, mechanical, photocopying, recording, or otherwise,
without the prior written permission of Seiko Epson Corporation.
The information contained herein is designed only for use with
this Epson printer. Epson is not responsible for any use of this
information as applied to other printers.
Neither Seiko Epson Corporation nor its affiliates shall be liable
to the purchaser of this product or third parties for damages,
losses, costs, or expenses incurred by the purchaser or third
parties as a result of: accident, misuse, or abuse of this product or
unauthorized modifications, repairs, or alterations to this
product, or (excluding the U.S.) failure to strictly comply with
Seiko Epson Corporation’s operating and maintenance
instructions.
Seiko Epson Corporation shall not be liable for any damages or
problems arising from the use of any options or any consumable
products other than those designated as Original Epson Products
or Epson Approved Products by Seiko Epson Corporation.
Trademarks
EPSON® and EPSON ESC/P® are registered trademarks of Seiko
Epson Corporation.
®
Microsoft
trademarks of Microsoft Corporation.
, Windows®, and Windows NT® are registered
1

IBM® is a registered trademark of International Business
Machines Corporation.
General Notice: Other product names used herein are for identification
purposes only and may be trademarks of their respective owners. Epson
disclaims any and all rights in those marks.
Copyright © 2007 Seiko Epson Corporation. All rights reserved.
2

Safety Instructions
Warnings, Cautions, and Notes
Warnings
must be followed carefully to avoid bodily injury.
w
Cautions
must be observed to avoid damage to your equipment.
c
Notes
contain important information and useful tips on the operation of your
printer.
Hot Parts Caution Symbol
K This symbol is placed on the print head and other parts to
indicate that they may be hot. Never touch those parts just after
the printer has been used. Let them cool for a few minutes before
touching them.
Important Safety Instructions
Read all of these safety instructions before using the printer. In
addition, follow all warnings and instructions marked on the
printer itself.
When setting up the printer
❏ Do not place the printer on an unstable surface or near a
radiator or heat source.
❏ Place the printer on a flat, stable surface. The printer will not
operate properly if it is tilted or placed at an angle.
3

❏ Do not place this product on a soft, unstable surface like a bed
or a sofa, or a small, enclosed area, as this restricts ventilation.
❏ Do not block or cover the slots and openings in the printer’s
cabinet, and do not insert objects through the slots.
❏ Use only the type of power source indicated on the printer’s
label. If you are not sure of the power supply specifications in
your area, contact your local power company or consult your
dealer.
❏ Connect all equipment to properly grounded electrical
outlets. Avoid using outlets on the same circuit as
photocopiers or air control systems that regularly switch on
and off.
❏ Do not use a damaged or frayed power cord.
❏ The power cord should be placed to avoid abrasions, cuts,
fraying, crimping, kinking, and other damage.
❏ If you use an extension cord with the printer, make sure the
total ampere rating of all devices plugged into the extension
cord does not exceed the cord’s ampere rating. Also, make
sure the total ampere of all devices plugged into the electrical
outlet does not exceed the electrical outlet’s ampere rating.
❏ Use only the power cord that comes with this product. Use of
another cord may result in fire or electric shock.
❏ This product’s power cord is for use with this product only.
Use with other equipment may result in fire or electric shock.
When maintaining the printer
❏ Unplug the printer before cleaning it, and always clean it with
a piece of damp cloth only.
❏ Do not spill liquid onto the printer.
4

❏ Except as specifically explained in this guide, do not attempt
to service the printer yourself.
❏ Unplug the printer and refer servicing to qualified service
personnel under the following conditions:
i. If the power cord or plug is damaged.
ii. If liquid has entered the printer.
iii. If the printer has been dropped or the cabinet damaged.
iv. If the printer does not operate normally or exhibits a
distinct change in performance.
❏ Do not use aerosol blowers which contain flammable gas
inside or around this product. Doing so may cause fire.
❏ Adjust only those controls that are covered by the operating
instructions.
❏ If you plan to use the printer in Germany, observe the
following:
To provide adequate short-circuit protection and
over-current protection for this printer, the building
installation must be protected by a 16-amp circuit breaker.
Bei Anschluss des Druckers an die Stromversorgung muss
sichergestellt werden, dass die Gebaudeinstallation mit einer
16 A-Sicherung abgesichert ist.
When Handling the paper
❏ Because labels are sensitive to temperature and humidity, use
them only under normal operating conditions described
below:
Temperature: 15 to 25°C (59 to 77°F)
5

Humidity: 30 to 60% RH
❏ Do not leave labels loaded in the printer between jobs; they
may curl around the platen and jam when you resume
printing.
❏ Do not load paper that is curled or has been folded.
When operating the printer
❏ Adjust only those controls that are covered in the user
documentation. Improper adjustment of other controls may
result in damage requiring extensive repair by a qualified
technician.
❏ Whenever you turn off the printer, wait at least five seconds
before turning it back on; otherwise, you may damage the
printer.
❏ Do not turn off the printer while it is printing the self test.
Always press the Pause button to stop printing and then turn
off the printer.
❏ Do not reconnect the power cord to an electrical outlet that
has the wrong voltage for your printer.
❏ Never replace the print head yourself; you may damage the
printer. Also, other parts of the printer must be checked when
the print head is replaced.
❏ You need to move the print head by hand to replace the ribbon
cartridge. If you have just used the printer, the print head may
be hot; let it cool for a few minutes before touching it.
6

For United Kingdom users
Use of options
Epson (UK) Limited shall not be liable against any damages or
problems arising from the use of any options or consumable
products other than those designated as Original Epson Products
or Epson Approved Products by Epson (UK) Limited.
Safety information
Warning:
This appliance must be earthed. Refer to the rating plate for
w
voltage and check that the appliance voltage corresponds to the
supply voltage.
Important:
The wires in the mains lead fitted to this appliance are coloured in
accordance to the following code:
Green and yellow — Earth
Blue — Neutral
Brown — Live
If you have to fit a plug:
As the colours of the mains lead of this appliance may not match
coloured markings used to identify the terminals in a plug, please
proceed as follows:
The green and yellow wire must be connected to the terminal in
the plug which is marked with the letter E or the Earth symbol
(G).
The blue wire must be connected to the terminal in the plug
marked with the letter N.
7

The brown wire must be connected to the terminal in the plug
marked with the letter L.
If damage occurs to the plug, replace the cord set or consult a
qualified electrician.
Replace fuses only with a fuse of the correct size and rating.
For United Kingdom, Singapore, and Hong Kong users
Replace fuses only with fuses of the correct size and rating.
Safety requirements
Mains plug:
Use a 3-pin mains plug that is registered with the Safety
Authority.
Flexible cord:
Use a double insulated flexible cord that is certified* to the
relevant IEC or BS standards.
Appliance connector:
Use an appliance connector certified* to the relevant IEC or BS
Standards.
* certified by member of IECEE CB Scheme.
8

Contents
Copyrights and Trademarks . . . . . . . . . . . . . . . . . . . . . . . . . . . . . . . . .1
Copyrights . . . . . . . . . . . . . . . . . . . . . . . . . . . . . . . . . . . . . . . . . . . .1
Trademarks . . . . . . . . . . . . . . . . . . . . . . . . . . . . . . . . . . . . . . . . . . .1
Safety Instructions . . . . . . . . . . . . . . . . . . . . . . . . . . . . . . . . . . . . . . . . . .3
Warnings, Cautions, and Notes . . . . . . . . . . . . . . . . . . . . . . . . . .3
Hot Parts Caution Symbol. . . . . . . . . . . . . . . . . . . . . . . . . . . . . . .3
Important Safety Instructions. . . . . . . . . . . . . . . . . . . . . . . . . . . .3
For United Kingdom users . . . . . . . . . . . . . . . . . . . . . . . . . . . . . .7
For United Kingdom, Singapore, and Hong Kong users . . . . .8
Features . . . . . . . . . . . . . . . . . . . . . . . . . . . . . . . . . . . . . . . . . . . . . . . . . .13
Printing on Continuous Paper. . . . . . . . . . . . . . . . . . . . . . . . . . . . . . .15
Printing with the push tractor . . . . . . . . . . . . . . . . . . . . . . . . . .15
Removing a printed document from the push tractor . . . . . .19
Switching back to single sheets . . . . . . . . . . . . . . . . . . . . . . . . .20
Printing with the pull tractor . . . . . . . . . . . . . . . . . . . . . . . . . . .20
Adjusting the top-of-form position . . . . . . . . . . . . . . . . . . . . . .25
Advancing the paper to the tear-off edge. . . . . . . . . . . . . . . . .27
Printing on Single Sheets . . . . . . . . . . . . . . . . . . . . . . . . . . . . . . . . . . .30
Loading single sheets. . . . . . . . . . . . . . . . . . . . . . . . . . . . . . . . . .31
Printing on Special Paper . . . . . . . . . . . . . . . . . . . . . . . . . . . . . . . . . . .32
Adjusting the paper thickness lever . . . . . . . . . . . . . . . . . . . . .33
Multipart forms. . . . . . . . . . . . . . . . . . . . . . . . . . . . . . . . . . . . . . .34
Labels . . . . . . . . . . . . . . . . . . . . . . . . . . . . . . . . . . . . . . . . . . . . . . .34
Envelopes. . . . . . . . . . . . . . . . . . . . . . . . . . . . . . . . . . . . . . . . . . . .35
About Your Printer Software. . . . . . . . . . . . . . . . . . . . . . . . . . . . . . . .37
Using the Printer Driver with Windows Me and 98 . . . . . . . . . . . .37
Accessing the printer driver from Windows applications . . .38
Accessing the printer driver from the Start menu. . . . . . . . . .40
Changing the printer driver settings . . . . . . . . . . . . . . . . . . . . .41
Using the Printer Driver with Windows Vista, XP, 2000, and Windows
NT 4.0 . . . . . . . . . . . . . . . . . . . . . . . . . . . . . . . . . . . . . . . . . . . . . . . . .42
Accessing the printer driver from Windows applications . . .43
Accessing the printer driver from the Start menu. . . . . . . . . .45
Changing the printer driver settings . . . . . . . . . . . . . . . . . . . . .47
9

Printer Driver Settings Overview . . . . . . . . . . . . . . . . . . . . . . . . . . . 48
Using EPSON Status Monitor 3 . . . . . . . . . . . . . . . . . . . . . . . . . . . . . 53
Setting up EPSON Status Monitor 3. . . . . . . . . . . . . . . . . . . . . 54
Accessing EPSON Status Monitor 3 . . . . . . . . . . . . . . . . . . . . . 56
Installing EPSON Status Monitor 3 . . . . . . . . . . . . . . . . . . . . . 57
Setting Up Your Printer on a Network . . . . . . . . . . . . . . . . . . . . . . . 58
Sharing the printer . . . . . . . . . . . . . . . . . . . . . . . . . . . . . . . . . . . 58
Setting up your printer as a shared printer . . . . . . . . . . . . . . . 59
Setting for the clients. . . . . . . . . . . . . . . . . . . . . . . . . . . . . . . . . . 63
Installing the printer driver from the CD-ROM . . . . . . . . . . . 76
Canceling Printing . . . . . . . . . . . . . . . . . . . . . . . . . . . . . . . . . . . . . . . . 78
Uninstalling the Printer Software . . . . . . . . . . . . . . . . . . . . . . . . . . . 79
Uninstalling the printer driver and EPSON Status Monitor 379
Using the Control Panel . . . . . . . . . . . . . . . . . . . . . . . . . . . . . . . . . . . 85
Control Panel Buttons and Lights. . . . . . . . . . . . . . . . . . . . . . . 85
Selecting a built-in font. . . . . . . . . . . . . . . . . . . . . . . . . . . . . . . . 87
About Your Printer’s Default Settings. . . . . . . . . . . . . . . . . . . . . . . . 88
Changing default settings . . . . . . . . . . . . . . . . . . . . . . . . . . . . . 95
Using the Error Indicators. . . . . . . . . . . . . . . . . . . . . . . . . . . . . . . . . . 97
Problems and Solutions. . . . . . . . . . . . . . . . . . . . . . . . . . . . . . . . . . . . 99
Power Supply. . . . . . . . . . . . . . . . . . . . . . . . . . . . . . . . . . . . . . . 100
Printing . . . . . . . . . . . . . . . . . . . . . . . . . . . . . . . . . . . . . . . . . . . . 100
Paper Handling . . . . . . . . . . . . . . . . . . . . . . . . . . . . . . . . . . . . . 106
Options . . . . . . . . . . . . . . . . . . . . . . . . . . . . . . . . . . . . . . . . . . . . 109
Correcting USB Problems . . . . . . . . . . . . . . . . . . . . . . . . . . . . . . . . . 112
Printing a Self Test . . . . . . . . . . . . . . . . . . . . . . . . . . . . . . . . . . . . . . . 116
Contacting Customer Support . . . . . . . . . . . . . . . . . . . . . . . . . . . . . 119
Technical Support Web Site. . . . . . . . . . . . . . . . . . . . . . . . . . . 119
Installing and Using Options . . . . . . . . . . . . . . . . . . . . . . . . . . . . . . 121
Cut-sheet feeder. . . . . . . . . . . . . . . . . . . . . . . . . . . . . . . . . . . . . 121
Pull tractor unit . . . . . . . . . . . . . . . . . . . . . . . . . . . . . . . . . . . . . 125
Roll paper holder. . . . . . . . . . . . . . . . . . . . . . . . . . . . . . . . . . . . 126
Color upgrade kit . . . . . . . . . . . . . . . . . . . . . . . . . . . . . . . . . . . 128
Print server . . . . . . . . . . . . . . . . . . . . . . . . . . . . . . . . . . . . . . . . . 132
Replacing the Ribbon Cartridge. . . . . . . . . . . . . . . . . . . . . . . . . . . . 132
Genuine EPSON ribbon cartridge. . . . . . . . . . . . . . . . . . . . . . 132
Replacing the ribbon cartridge . . . . . . . . . . . . . . . . . . . . . . . . 133
Printer Parts. . . . . . . . . . . . . . . . . . . . . . . . . . . . . . . . . . . . . . . . . . . . . 137
Printer Specifications . . . . . . . . . . . . . . . . . . . . . . . . . . . . . . . . . . . . . 139
10

Mechanical. . . . . . . . . . . . . . . . . . . . . . . . . . . . . . . . . . . . . . . . . .139
Electronic . . . . . . . . . . . . . . . . . . . . . . . . . . . . . . . . . . . . . . . . . . .141
Electrical. . . . . . . . . . . . . . . . . . . . . . . . . . . . . . . . . . . . . . . . . . . .144
Environmental . . . . . . . . . . . . . . . . . . . . . . . . . . . . . . . . . . . . . .144
Paper. . . . . . . . . . . . . . . . . . . . . . . . . . . . . . . . . . . . . . . . . . . . . . .144
Recommended Printable Area . . . . . . . . . . . . . . . . . . . . . . . . .147
Paper alignment . . . . . . . . . . . . . . . . . . . . . . . . . . . . . . . . . . . . .150
Command Lists . . . . . . . . . . . . . . . . . . . . . . . . . . . . . . . . . . . . . . . . . .150
EPSON ESC/P 2 control codes. . . . . . . . . . . . . . . . . . . . . . . . .150
IBM 2390 Plus emulation control codes . . . . . . . . . . . . . . . . .152
Standards and approvals . . . . . . . . . . . . . . . . . . . . . . . . . . . . . . . . . .154
Safety Approvals . . . . . . . . . . . . . . . . . . . . . . . . . . . . . . . . . . . .154
CE marking . . . . . . . . . . . . . . . . . . . . . . . . . . . . . . . . . . . . . . . . .154
Cleaning the Printer . . . . . . . . . . . . . . . . . . . . . . . . . . . . . . . . . . . . . .155
Transporting the Printer. . . . . . . . . . . . . . . . . . . . . . . . . . . . . . . . . . .156
Glossary . . . . . . . . . . . . . . . . . . . . . . . . . . . . . . . . . . . . . . . . . . . . . . . .159
11

12

Getting to Know Your Printer
Features
Your EPSON® LQ-300+II 24-pin dot matrix printer provides
high-quality printing and superior performance in a compact
design. Its features include:
❏ A variety of paper paths to suit your printing needs.
❏ The ability to handle a wide range of paper types, including
continuous paper, multipart forms (with one original and up
to three copies), labels, single sheets, and envelopes.
❏ High-speed printing of up to 300 cps (characters per second)
at 10 cpi (characters per inch).
Your printer comes packaged with the printer driver and other
software, including the EPSON Status Monitor 3 utility for
Microsoft
EPSON Status Monitor 3 utility lets you check the status of your
printer quickly and easily.
®
Windows® Vista, XP, Me, 98, 2000, or NT 4.0. The
13

14

Paper Handling
Printing on Continuous Paper
Your printer can handle continuous paper from 101.6 mm (4.0
inches) to 254 mm (10.0 inches) wide. Depending on where you
position the tractor, you can use it as a pull tractor or a push
tractor. The following guidelines can help you decide where to
position the tractor:
❏ Do you want to switch between printing on single sheets and
continuous paper without removing the paper supply? Will
you tear off continuous paper sheet-by-sheet? Use the tractor
in the push tractor position. (The printer comes with the
tractor installed in this position.) See the following section.
❏ Are you printing on labels, multipart forms, or other
documents that require a precise print position? Use the
tractor as a pull tractor. See “Printing with the pull tractor”
on page 20 for instructions.
Printing with the push tractor
When using the push tractor, it is a good idea to set the Auto tear
off feature in the Default Setting mode to On. See “About Your
Printer’s Default Settings” on page 88.
Follow these steps to load continuous paper using the push
tractor:
15
1. Make sure the printer is turned off. Remove the printer cover
and the paper guide and place the paper release lever in the
continuous paper position.
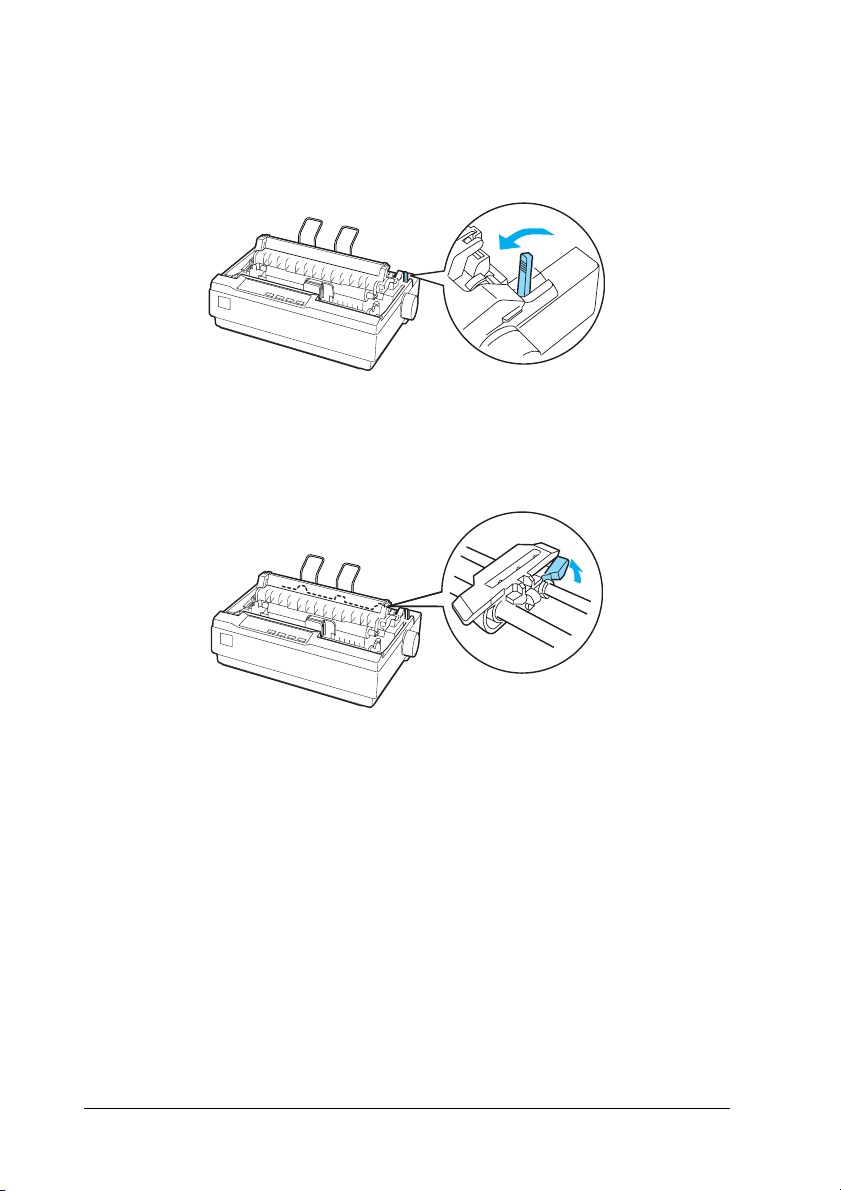
2. Release the sprocket units by pulling the sprocket locks
forward.
16
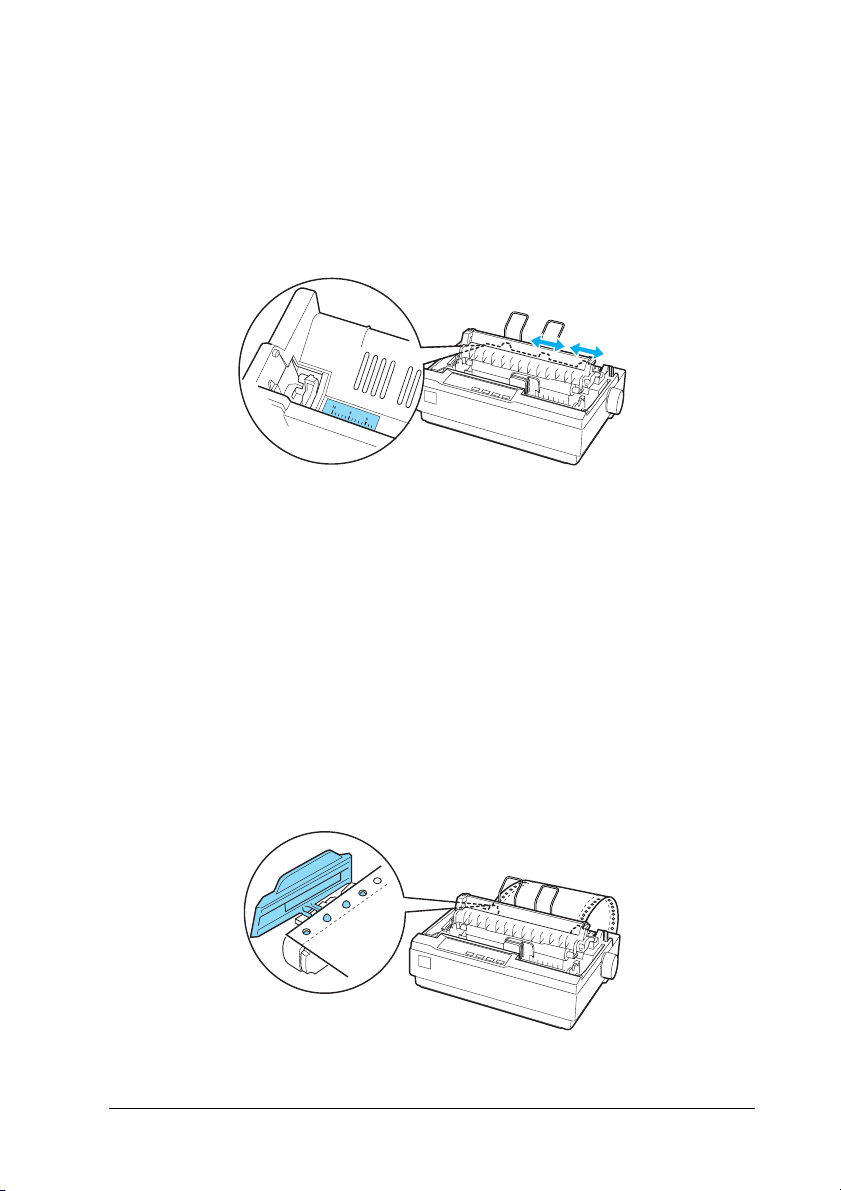
3. Slide the left sprocket unit using the scale on the printer as a
guide. The printer prints to the right of the position marked
0. Push the sprocket lock lever back to lock it in place. Then
slide the right sprocket unit to match the width of your paper,
but do not lock it. Move the paper support so it is midway
between the sprocket units.
4. Make sure your paper has a clean, straight leading edge. Open
the sprocket covers. Fit the first holes of the paper over the
sprocket pins and then close the sprocket covers. Slide the
right sprocket unit to remove any slack in the paper and lock
it in place. Now the paper is in the paper-park position.
Caution:
Use the paper feed knob on the right side of the printer only
c
to clear paper jams and only when the printer is turned off.
Otherwise, you may damage the printer or cause it to lose the
top-of-form position.
17
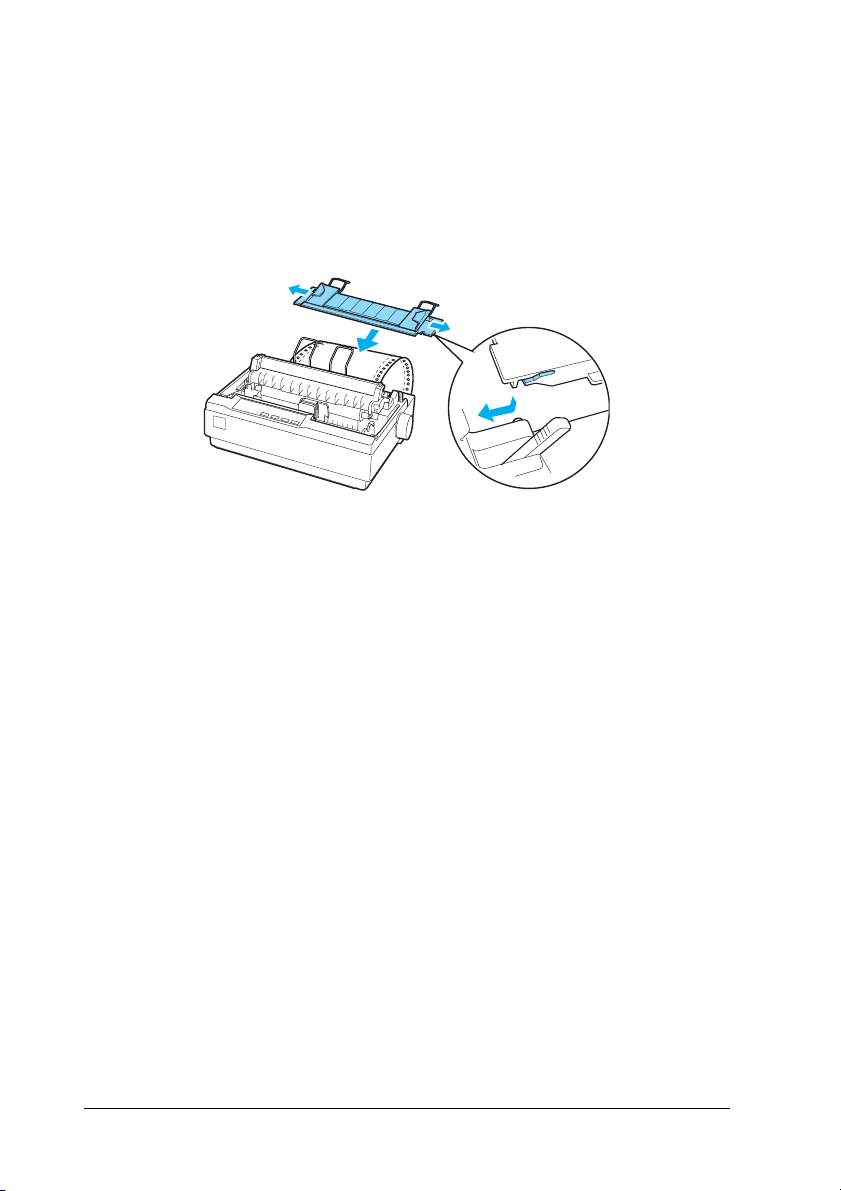
5. To separate the incoming paper from the printed paper, attach
the paper guide by holding it horizontally and fitting its
notches over the printer’s mounting posts as shown below.
Then slide the paper guide toward the front of the printer until
you feel it click and adjust the edge guides to the width of the
paper.
6. Turn on the printer.
7. Make sure the printer cover is closed. Press the LF/FF button
to feed the paper to the loading position. When the printer
receives data, it begins printing automatically.
8. After you finish printing, follow the steps in the next section
to tear off your printed document. If the first printed line on
your page appears too high or low, you can change its position
by using the Micro Adjust feature. See “Adjusting the
top-of-form position” on page 25.
Caution:
Never use the paper feed knob to adjust the top-of-form position;
c
this may damage the printer or cause it to lose the top-of-form
position.
When you send more data, the paper automatically feeds back to
the loading position.
18
Removing a printed document from the push tractor
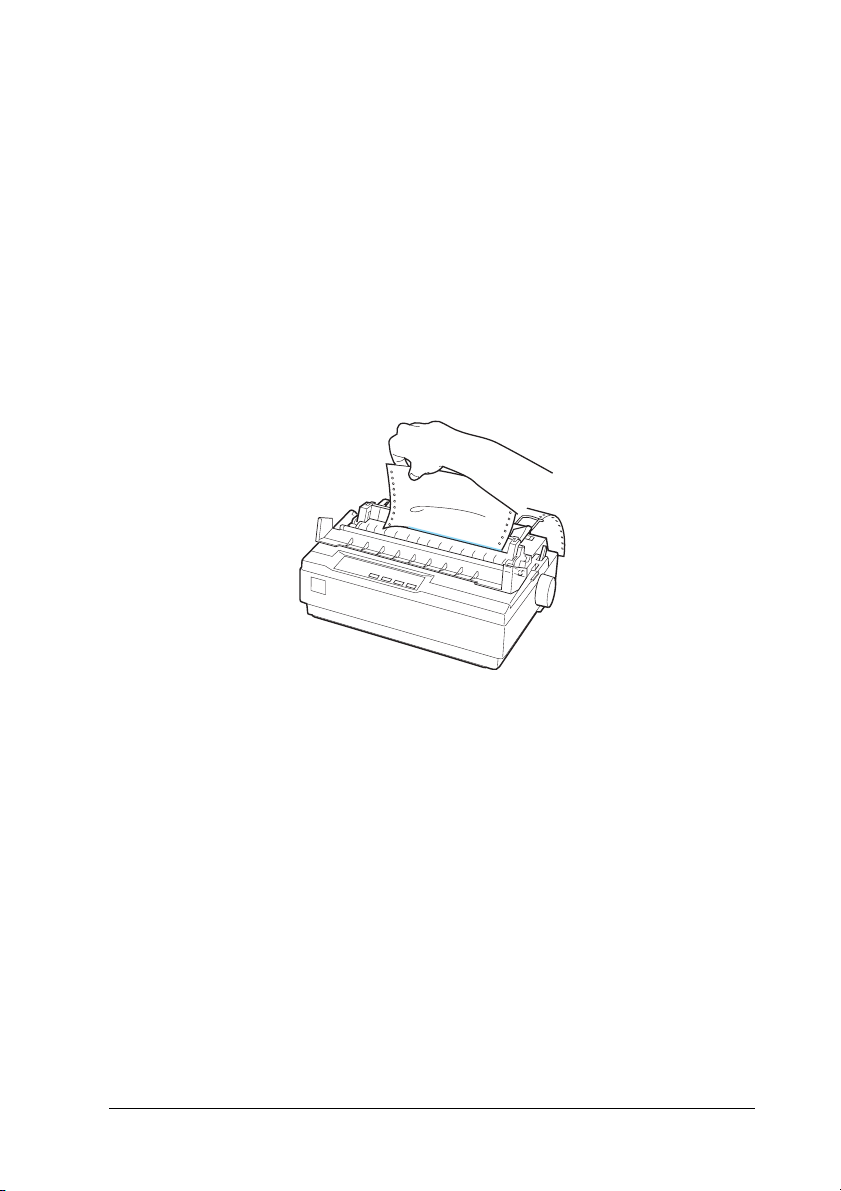
Follow these steps to remove the printed document:
1. Press the Tear Off (Font) button. Make sure the Tear Off
(Font) lights are flashing. (This indicates that your paper is at
the current tear-off position.)
2. Open the paper guide cover, then tear off the printed
document using the tear-off edge of the paper tension unit.
Note:
If your paper’s perforation is not properly aligned with the tear-off
edge, you can adjust the tear-off position using the Micro Adjust
feature. See “Adjusting the tear-off position” on page 28.
Caution:
Never use the paper feed knob to adjust the tear-off position;
c
this may damage the printer or cause it to lose the tear-off
position.
3. Close the paper guide cover.
When you resume printing, the printer automatically feeds
the paper back to the top-of-form position and starts printing.
19

To feed continuous paper to the standby position where you can
remove the paper, press the Load/Eject button. Then open the
sprocket covers of the tractor and remove the paper.
Caution:
Always tear off your printed document before you press the
c
Load/Eject button. Reverse feeding several pages at a time may
cause a paper jam.
Switching back to single sheets
To switch to single sheets, press the Load/Eject button; the
printer feeds the paper backwards into the standby position.
Then, follow the steps in “Loading single sheets” on page 31.
Caution:
Always tear off your printed document before you press the
c
Load/Eject button. Reverse feeding several pages at a time may
cause a paper jam.
Printing with the pull tractor
To load continuous paper using the pull tractor, you must move
the tractor to the pull tractor position, as described in steps 1
through 3 in this procedure. If your tractor is already installed in
this position, make sure the printer is turned off and skip to step 6.
Caution:
❏ Use the paper feed knob on the right side of the printer only
c
to clear paper jams and only when the printer is off.
Otherwise, you may damage the printer or cause it to lose the
top-of-form position.
❏ When using the pull tractor, set the Auto tear off feature in
the Default Setting mode to Off; otherwise, the paper may
jam.
20
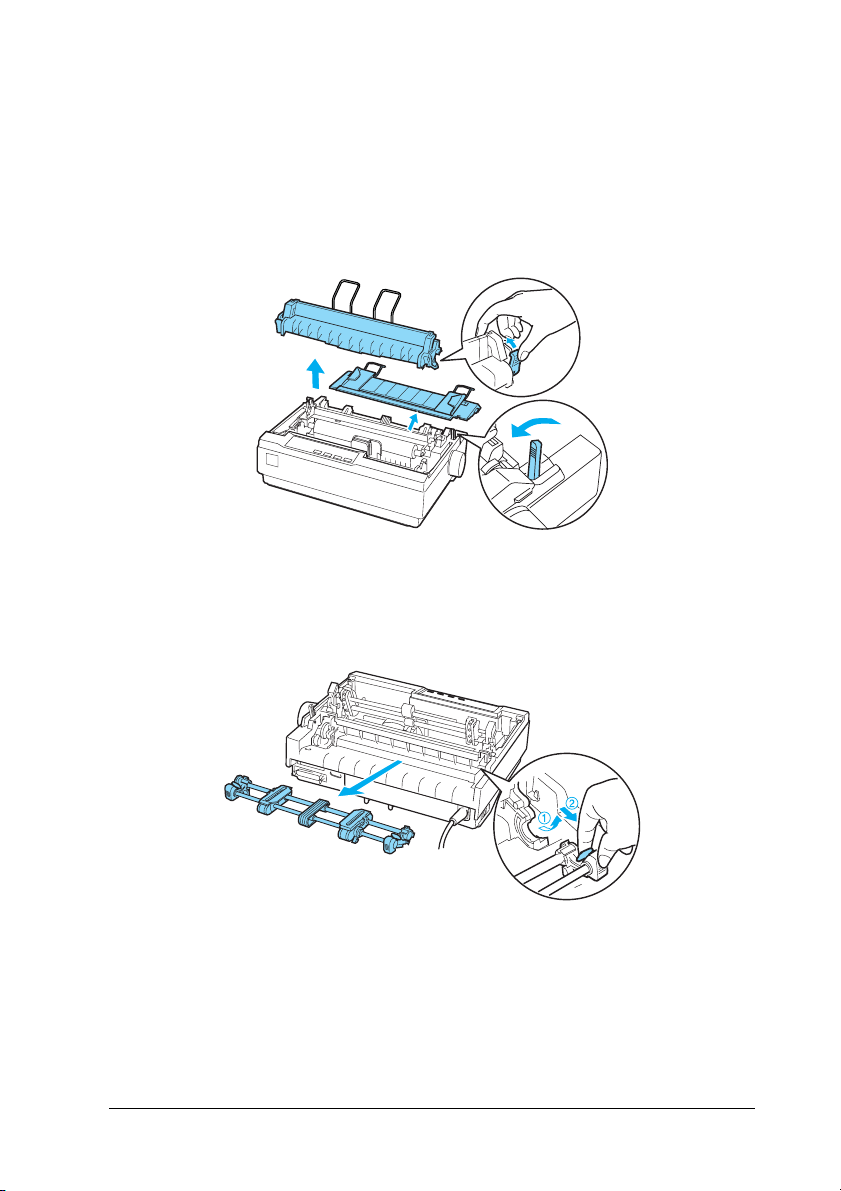
1. Turn the printer off; then remove the printer cover and the
paper guide. Next, remove the paper tension unit by
squeezing the paper tension unit’s lock tabs gently and
pulling the paper tension unit away from the printer. Finally,
pull the paper release lever forward to the continuous paper
position.
2. Squeeze the tractor’s lock tabs gently on both sides, and then
rotate the tractor up to pull it away from the printer.
21
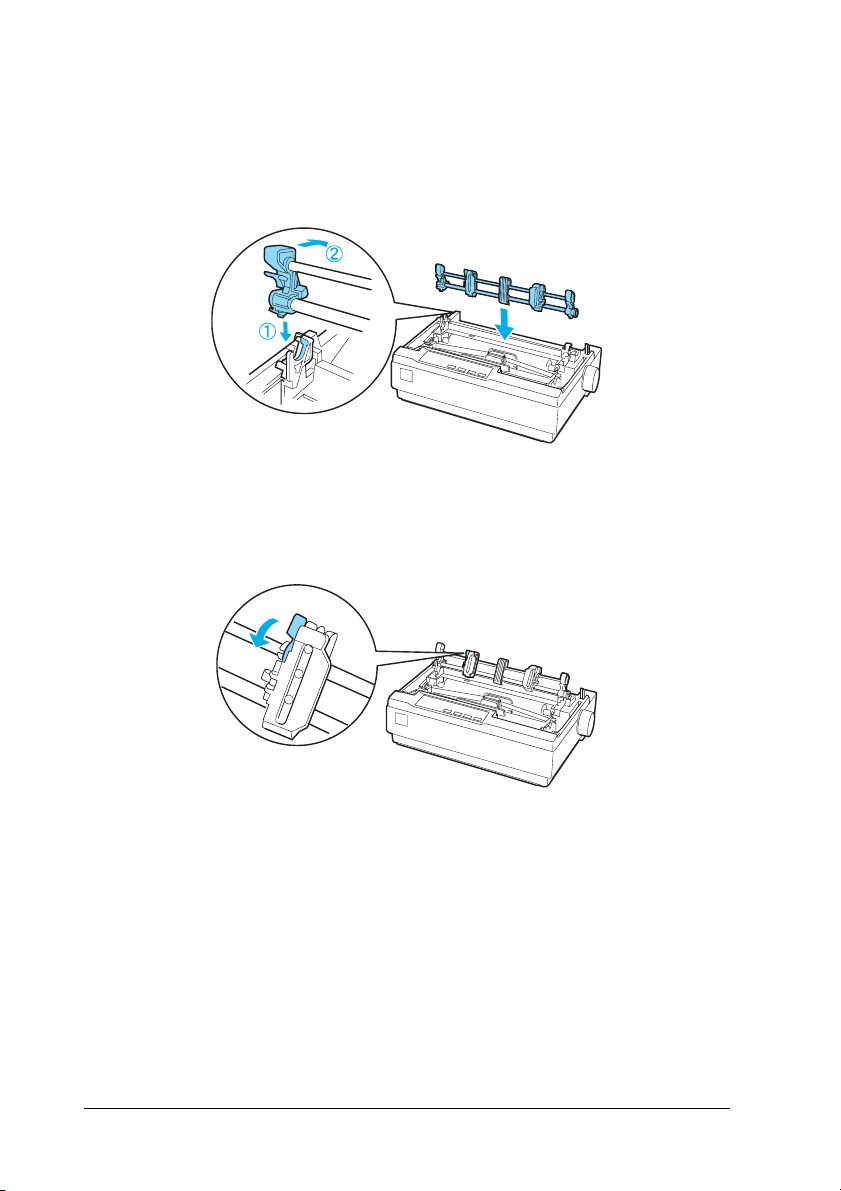
3. Move the tractor forward to the mounting slot at the top of
the printer and tilt it into place as shown below. When you
push the tractor onto the posts, you should feel the notches
snap into place.
4. Release the sprocket units by pulling the sprocket locks
forward.
22

5. Insert the paper into the bottom paper slot or into the rear
paper slot as shown below, and pull it up. Position the paper
using the scale on the printer as a guide. The printer prints to
the right of the position marked 0.
6. Slide the left sprocket unit so that its sprockets match the
position of the holes in the paper and lock the unit in place.
Then slide the right sprocket unit to match the width of your
paper, but do not lock it. Move the paper support midway
between the two sprocket units.
7. Make sure your paper has a clean, straight leading edge. Open
the sprocket covers. Fit the first holes of the paper over the
sprocket pins and then close the sprocket covers. Slide the
right sprocket unit to remove any slack in the paper and then
lock it in place.
23
Note:
Remove any remaining slack by gently pulling the paper from the
rear or bottom.
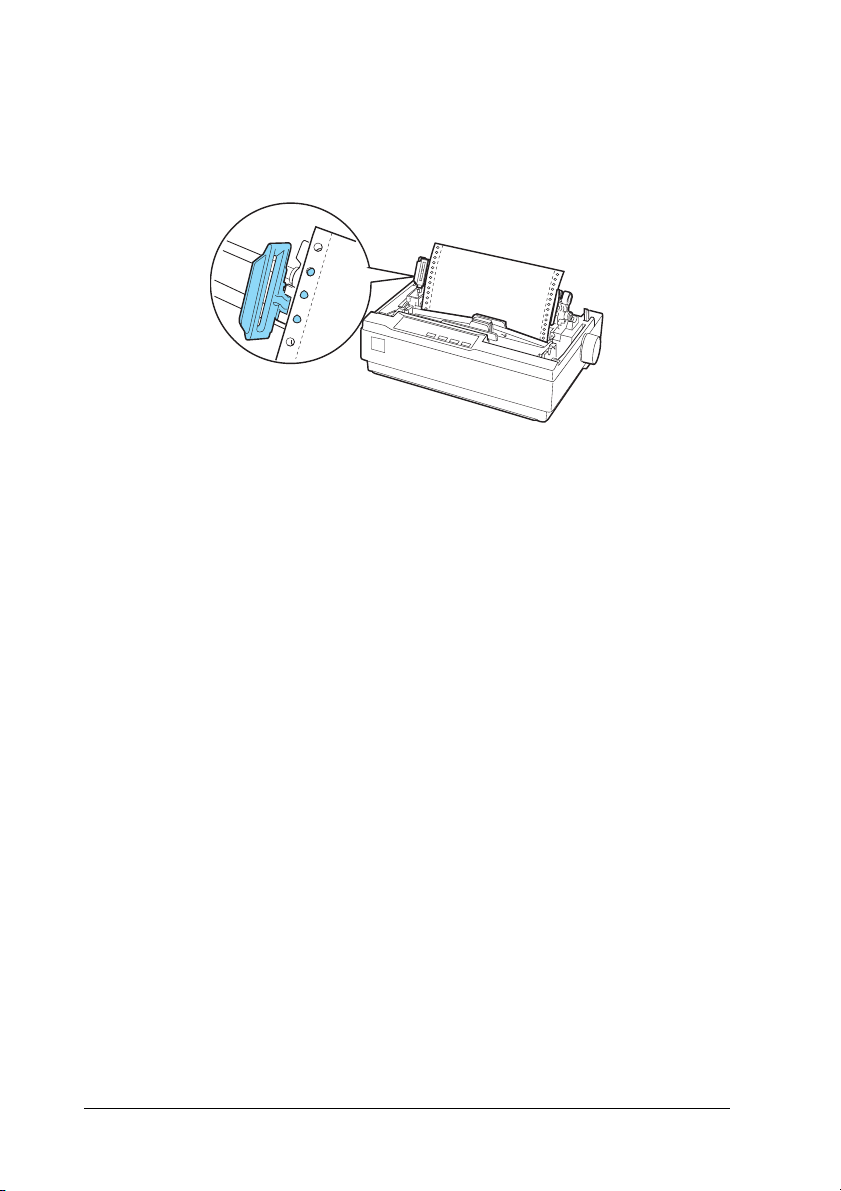
8. To separate the incoming paper from the printed paper, attach
the paper guide. Hold it horizontally and fit its notches over
the printer’s mounting posts. Then slide the paper guide
toward the back of the printer until you feel it click and adjust
the edge guides to the width of the paper.
9. Attach the printer cover and adjust the paper position with
the paper feed knob. Turn the knob until the perforation
between pages is just above the print head. Then turn on the
printer.
10. Make sure the printer cover is closed, but with the paper guide
cover open. When the printer receives data, it begins printing
automatically.
If you want to change the position where printing begins on the
page, press LF/FF to advance the page to the next top-of-form
position, and then see Adjusting the top-of-form position in the
next section to adjust the loading position.
To eject the paper, tear off the paper entering the printer; then
press the LF/FF button to feed the paper forward.
24

Adjusting the top-of-form position
The top-of-form position is the position on the page where the
printer starts printing. If your printing appears too high or low
on the page, you can use the micro adjust feature to adjust the
top-of-form position. Follow these steps:
Caution:
Never use the paper feed knob to adjust the top-of-form position;
c
this may damage the printer or cause it to lose the top-of-form
position.
Note:
❏ Your top-of-form position setting remains in effect until you change
it, even if you turn off the printer.
❏ The top margin setting made in some application software overrides
the top-of-form position setting you make with the Micro Adjust
feature. If necessary, adjust the top-of-form position in your
software.
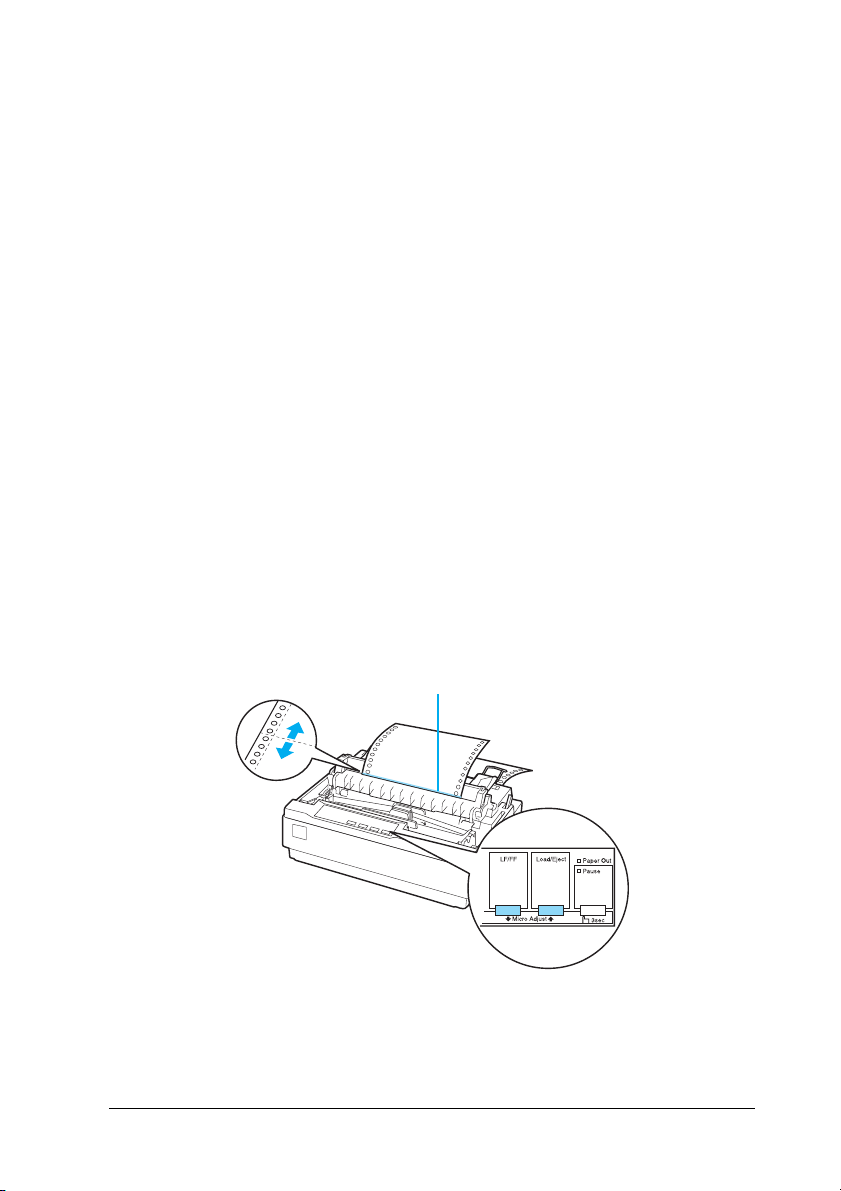
1. Make sure the printer is turned on.
2. If necessary, load paper as described in this chapter.
3. Remove the printer cover.
4. Hold down the Pause button for about three seconds. The
Pause light starts flashing and the printer enters the Micro
Adjust mode.
25
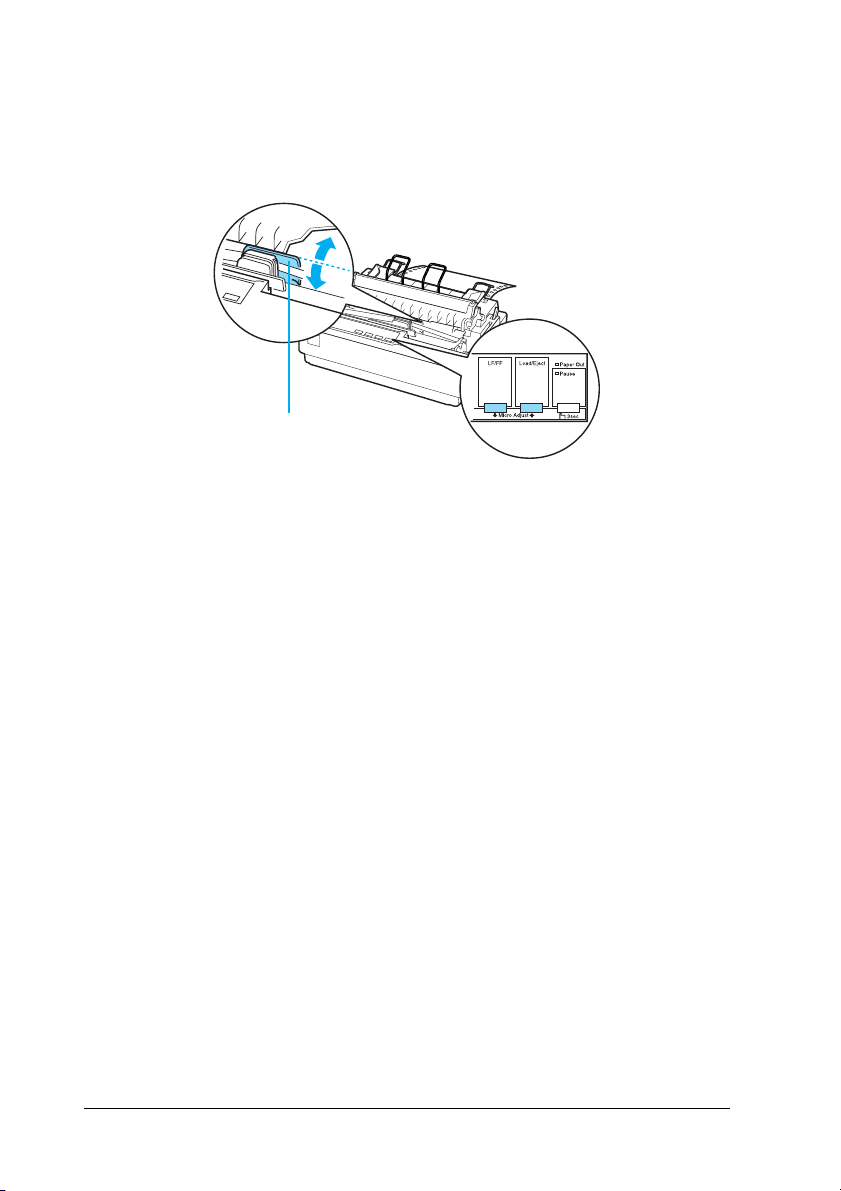
5. Press the LF/FF D button to move the top-of-form position up
on the page, or press the Load/Eject U button to move the
top-of-form position down on the page.
*
* plastic ribbon cover
Note:
❏ The printer has a minimum and a maximum top-of-form
position. If you try to adjust it beyond these limits, the printer
beeps and stops moving the paper.
26
❏ When the paper reaches the default top-of-form position, the
printer also beeps and stops moving the paper briefly. You can
use the default position as a reference point when adjusting the
top-of-form position.
To adjust the top-of-form position for continuous paper
loaded on the pull tractor, see the following example:
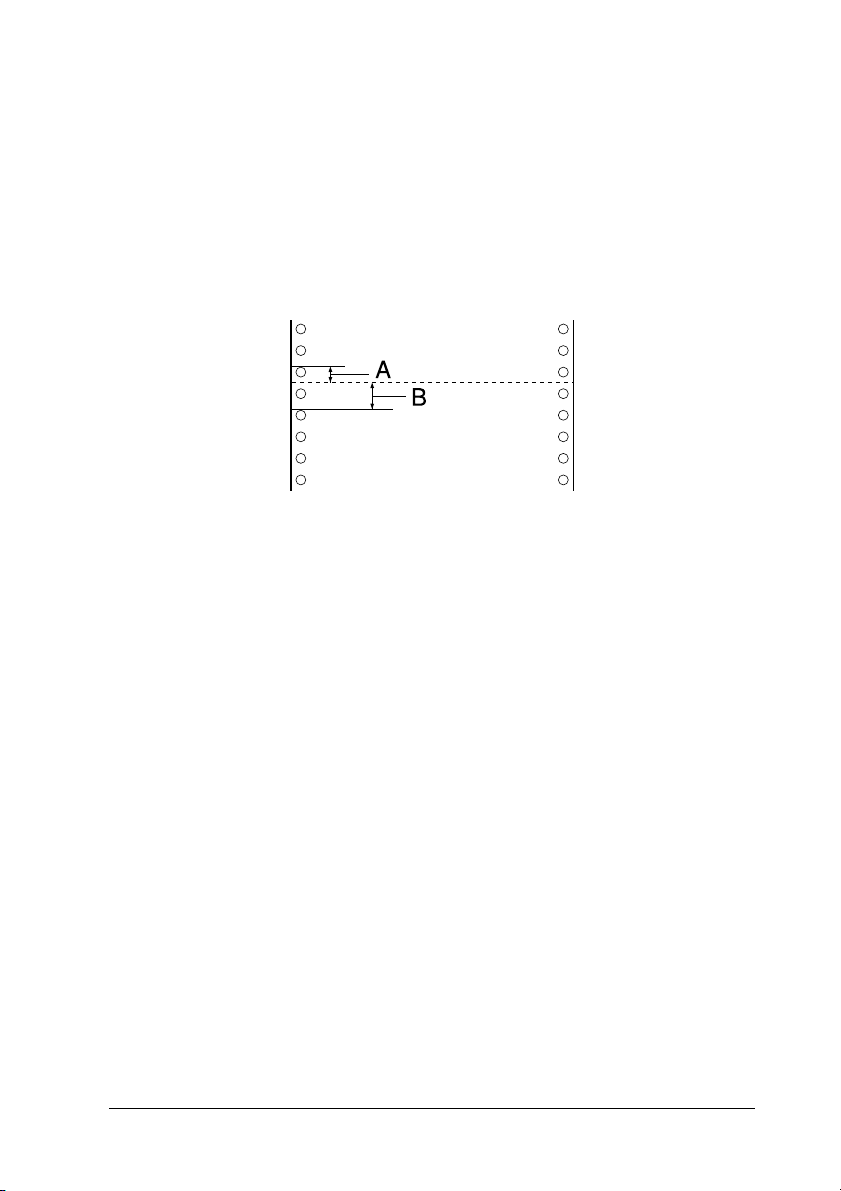
First mark a point 2.5 mm (0.1 inch) above the paper’s
perforation; then position the paper so that the mark is even
with the top edge of the plastic ribbon cover. This gives you
an 8.5 mm (0.33 inch) margin on the next page, meaning the
printer starts printing 8.5 mm (0.33 inch) below the
perforation. If you mark a point 2.5 mm (0.1 inch) above the
perforation, you get a 8.5 mm (0.33 inch) margin on the next
page.
A 2.5 mm (0.1 inch)
B 8.5 mm (0.33 inch)
6. After you set the top-of-form position, press the Pause button
to exit the Micro Adjust mode.
Advancing the paper to the tear-off edge
If you use the push tractor, you can use the tear-off feature to
advance your continuous paper to the printer’s tear-off edge
when you finish printing. You can then easily tear off the printed
document. When you resume printing, the printer automatically
feeds the paper back to the top-of-form position so that you can
save the paper normally lost between documents.
27

As described below, you can use the tear-off feature in two ways:
manually, by pressing the printer’s Tear Off (Font) button, or
automatically, by turning on the auto tear-off mode.
Caution:
Never use the tear-off feature (as described below) to feed
c
continuous paper with labels backwards; they may come off their
backing sheet and jam the printer.
Using the Tear Off button
After the printer finishes printing your document, check that the
Tear Off (Font) lights are not flashing. Then press the Tear Off
(Font) button. The printer advances the paper to the tear-off edge.
Note:
If the Tear Off (Font) lights are flashing, the paper is in the tear-off
position. If you press the Tear Off (Font) button again, the printer feeds
your paper to the next top-of-form position.
Advancing the paper to the tear-off position automatically
To automatically advance your printed documents to the tear-off
position, you need to turn on the auto tear-off mode and select
the appropriate page length for continuous paper in the Default
Setting mode. For instructions, see “Changing default settings”
on page 95.
When auto tear-off is on, the printer automatically advances the
paper to the tear-off position whenever it receives a full page of
data or a form feed command followed by no more data.
Adjusting the tear-off position
If your paper’s perforation is not aligned with the tear-off edge,
you can use the Micro Adjust feature to move the perforation to
the tear-off position.
Follow these steps to adjust the tear-off position:
28
Caution:
Never use the paper feed knob to adjust the tear-off position; this
c
may damage the printer or cause it to lose the tear-off position.
Note:
Your tear-off position setting remains in effect until you change it, even
if you turn off the printer.
1. Make sure the Tear Off (Font) lights are flashing (the paper
is at the current tear-off position). You may need to press the
Tear Off (Font) button to advance the paper to the tear-off
position.
2. Open the paper guide cover.
3. Hold down the Pause button for about three seconds. The
Pause light begins to flash and the printer enters the Micro
Adjust mode.
4. Press the LF/FF D button to feed the paper backwards, or press
the Load/Eject U button to feed the paper forwards, until the
paper perforation is aligned with the tear-off edge.
* tear-off edge
*
29

Note:
The printer has a minimum and a maximum tear-off position. If you
try to adjust the tear-off position beyond these limits, the printer
beeps and stops moving the paper.
5. After you set the tear-off position, press the Pause button to
exit the Micro Adjust mode.
6. Tear off the printed pages.
When you resume printing, the printer automatically feeds the
paper back to the top-of-form position and begins printing.
Printing on Single Sheets
You can load single-sheet paper one sheet at a time using the
paper guide of the printer. Your single-sheet paper may be from
100 to 257 mm (3.9 to 10.1 inches) wide.
Before printing on single-sheet multipart forms, envelopes, or
other special paper, be sure to the set the paper thickness lever to
the appropriate position. See “Printing on Special Paper” on page
32 for details.
Note:
❏ To load a stack of single-sheet paper, use the optional cut-sheet
feeder. See “Installing and Using Options” on page 121.
❏ For detailed specifications on the types of single-sheet paper you can
use, See “Printer Specifications” on page 139.
❏ You can use the paper guide to load single-sheet carbonless
multipart forms that are fastened at the top by line gluing.
❏ Insert multipart forms in the paper guide, bound edge first and
printable side down.
30
 Loading...