

Page 1
Introduction to the LCD Projector
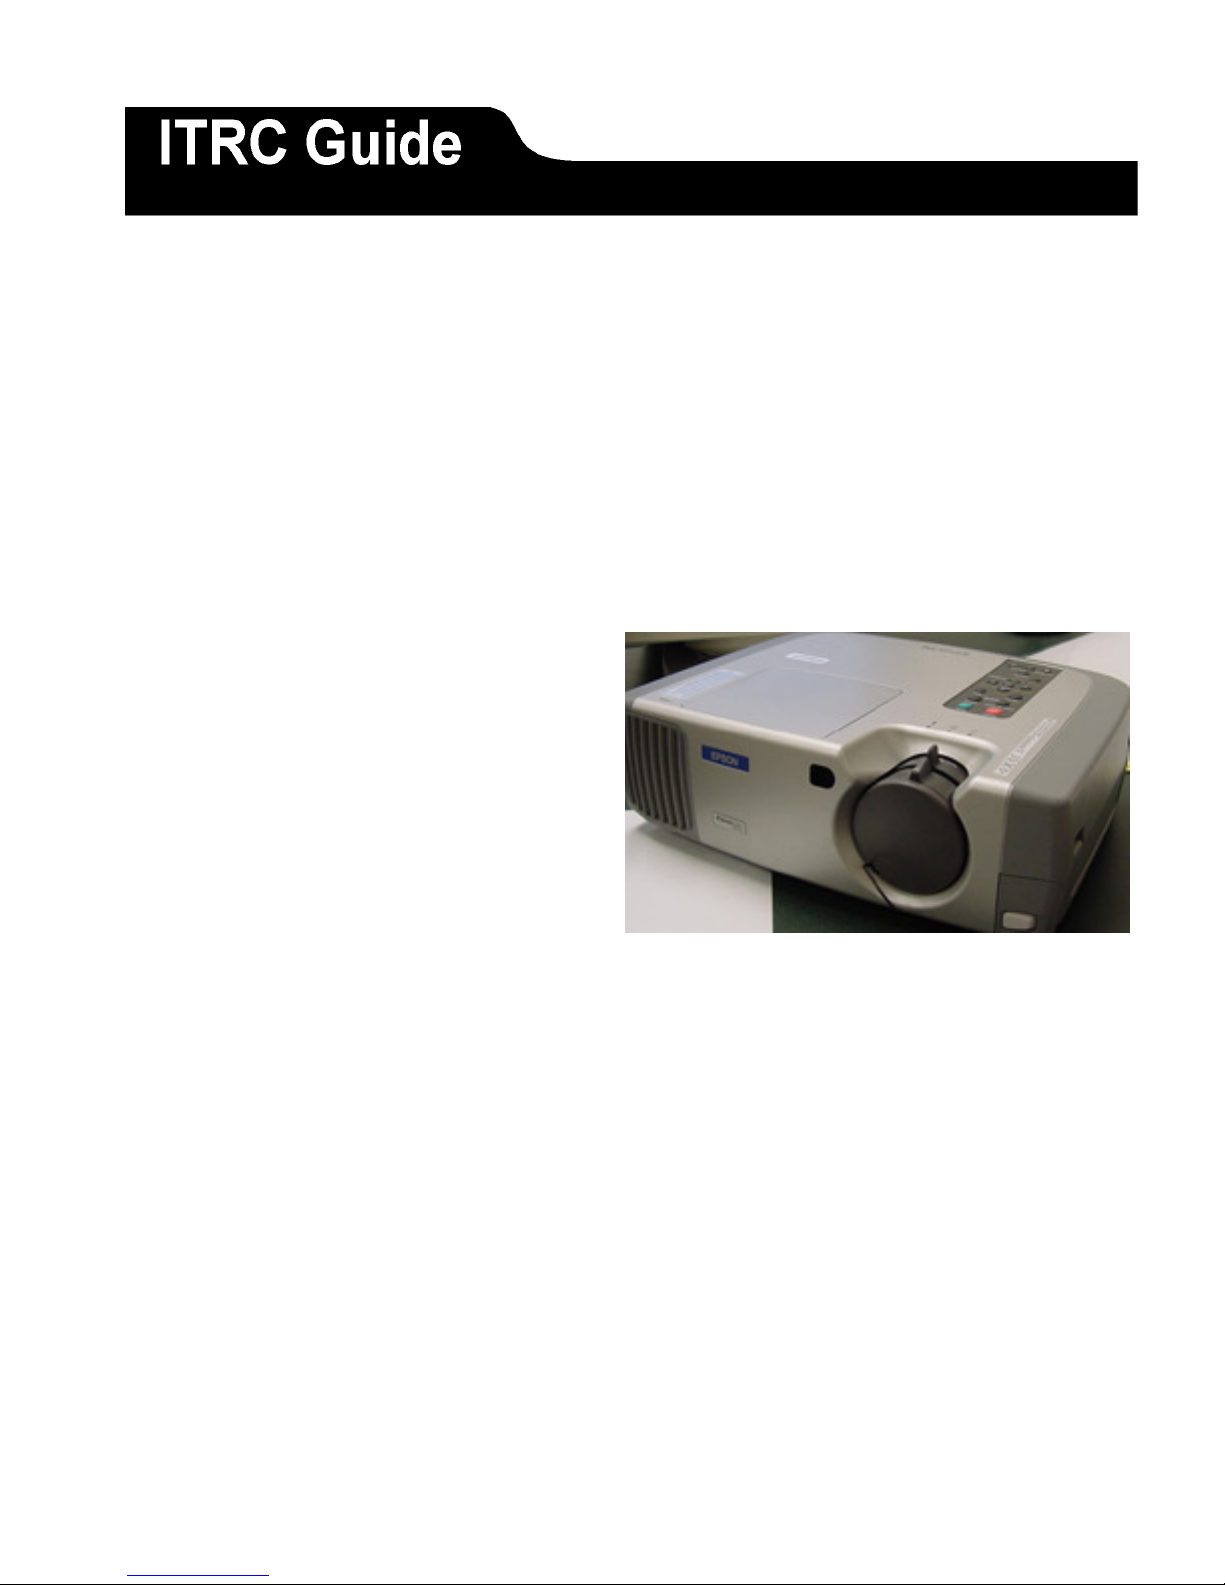
Introduction
The Epson LCD projector is a highly versatile presentation tool. The projector can utilize
up to two computer sources, and up to three video sources, which can be easily switched
from one source to another.
The purpose of this document is to assist the novice user in using the Epson PowerLite
600p/800p/810p Multimedia Projector. This document will cover the following areas:
• Setting up the Projector
• Using the Control Panel Options
• Focusing and Changing Image Sizes
• Connecting Additional Audio and Video Devices
• Shutting Down the LCD Projector
• Warning Lights
Page 1 of 10 Last Modified: 3/22/2010
Page 2
Using the LCD Projector
Setting Up
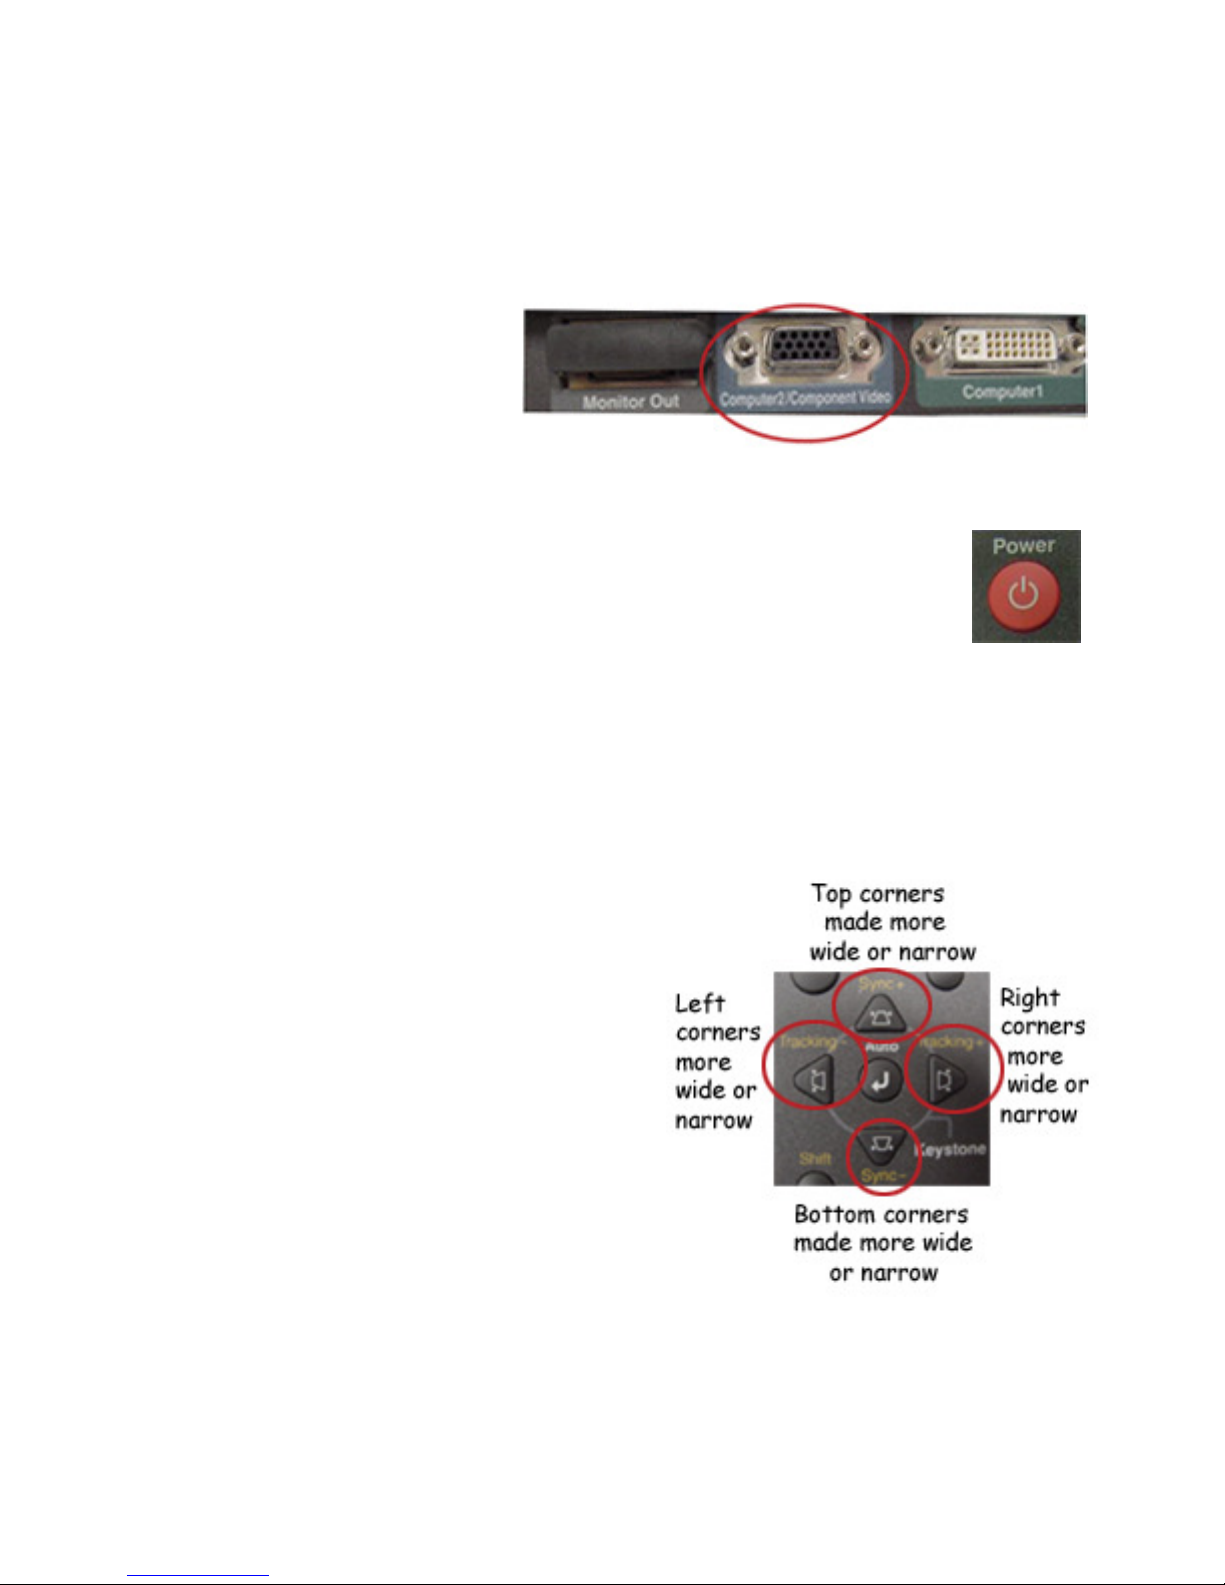
1. Place the projector on a stable flat surface 3-40 feet from the screen.
2. Connect the computer
cable to the Computer
2/Component Video port
on the back of the
projector as shown in this
picture, and the video-
out or monitor port of your computer.
3. Connect the end of the power cord to the power inlet on the back of the projector,
and the other end to a grounded electrical outlet.
4. Remove the lens cap.
5. Press the red power button on top of the projector. The Power light
will flash for about 30 seconds before the image appears
6. Turn on your computer. If you see a new hardware wizard telling you it
has found a plug-and-play monitor, press cancel. If the message is about USB
audio, click Next and follow screen directions.
a. At this point, the computer screen should be projected onto the overhead
screen.
b. If you are using a video source, and not a computer, press play on the
video source.
7. Focus the image using the rings on the lens. You may also make the image larger
or smaller by using the Wide/Tele ring.
8. Raise the image by extending the
projector’s foot, found on the bottom,
front of the projector. The release
button for the foot is found on the lower
right side of the lens. If the projected
image is unleveled, use the back
adjustable foot. This is located on the
back of the projector, on the left side,
when viewing the back of the projector.
9. Use the keystone options to adjust the
image if it appears trapezoidal.
10. Adjust the screen image by using the
menu option described in Appendix A.
Page 2 of 10 Last Modified: 3/22/2010
Page 3
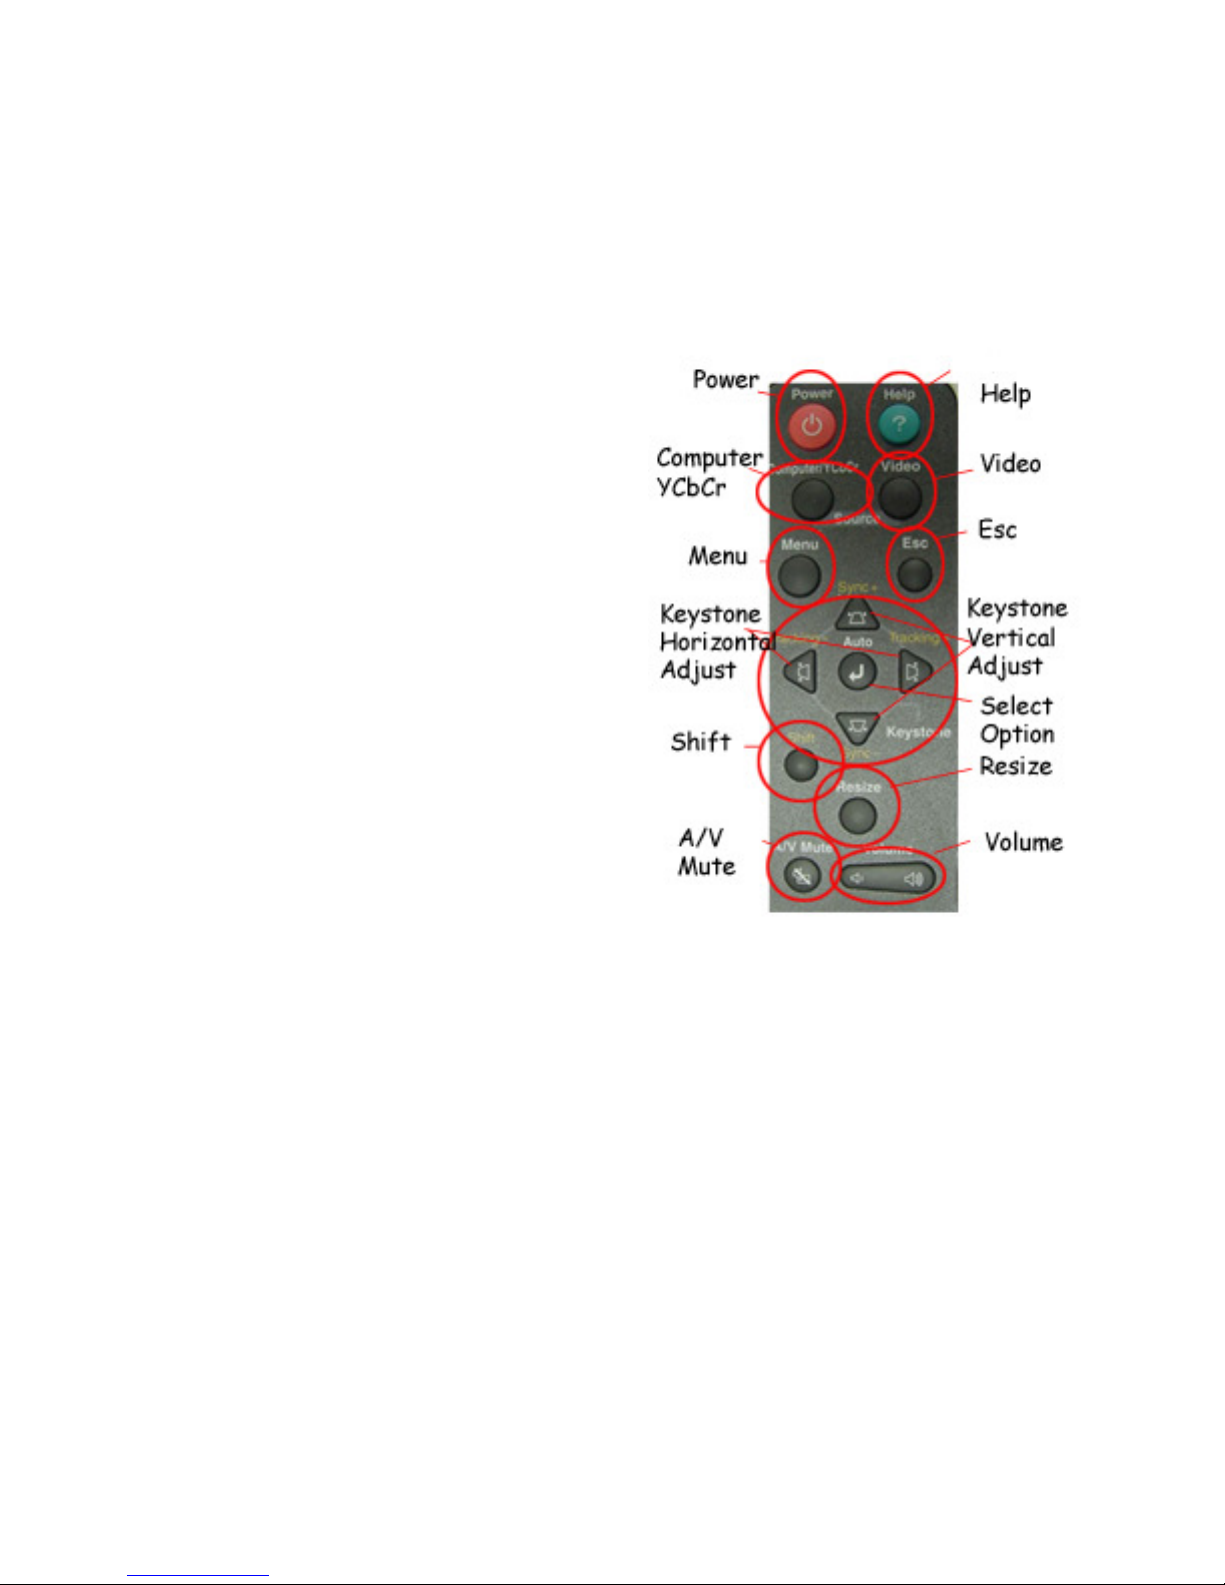
Using the Control Panel Options
The control panel options are located on top of the projector above the lens. All of the
functions of the LCD projector can be controlled from the control panel. The following
list describes the functions of each button of the control panel.
Power:
Help:
• To turn on, push the red Power button.
The light will flash for about 30
seconds before the image appears.
• To turn off, push the red Power
button. You will see a confirmation
message. Press Power again to turn
off the projector.
• After turning off the power to the
projector, wait until the fan turns off
before unplugging it. Once the power
light stops flashing, and stays on, it is
safe to unplug the projector.
Push the Help button on the projector to
get...
• Help for the image
• Help for the sound
• Language selection
Computer/YCbCr:
If the projector is connected to more that
one computer or video source, press Computer/YCbCr to switch between computer
sources and/or video.
Video:
If the projector is connected to more than one video source, press the Video button to
switch between standard video and S-Video.
Menu:
Press Menu to display the 8 items of the menu screen. See Appendix A for a
description of the 8 menu items.
Esc:
When you are finished viewing menu options, press Esc to return to the main menu.
Also, press Esc to leave the menu entirely.
Page 3 of 10 Last Modified: 3/22/2010
Page 4

Keystone:
If the LCD Projector is not directly in line with the projection surface, the image may
appear trapezoidal. This can be adjusted using the Keystone features on the control
panel.
• Sync+ and Sync-: Adjusts the vertical image displayed.
Can make the display larger or smaller. This is useful if
the projector is projecting at an angle up or down.
• Tracking+ and Tracking-: Adjusts the horizontal image
displayed. Can make the display larger or smaller. This
is useful if the projector is not placed directly in front of
the projection surface.
Auto:
Press this button to select an item from the menu. This button can also be pushed to
reset the projector’s tracking, sync, and position settings.
Shift:
Hold down Shift and the Tracking+ or Tracking- to eliminate vertical stripes. Hold
down Shift and the Sync+ or Sync- to increase or decrease the sharpness of the
image.
Resize:
If only part of the image is displayed, press the Resize button to compress the screen
image. Continue pressing the button to pan around the screen in the original
resolution. If projecting from video equipment, pressing Resize switches the aspect
ration between 4:3 and 16:9. If zoomed in on the image, Resize will return it to the
original display size.
A/V Mute:
This button will turn off the picture or will mute the volume.
Volume:
These buttons will increase or decrease the intensity of the volume.
Page 4 of 10 Last Modified: 3/22/2010
Page 5

Focus and Changing the Image Size
Use the rings on the lens to focus the image,
or to make the image appear larger or
smaller on the projection surface.
Wide/Tele:
Moving this ring of the lens right or left
will make the projection image larger or
smaller on the projection surface.
Focus:
The frontal ring of the lens has an
adjustment that will move left or right to
focus the image on the projection
surface.
Additional Audio and Video Devices
There are a number of ports on the back of the projector. These ports can be used to
connect additional audio and video features to display in your presentation. VCRs,
DVDs, camcorders, digital cameras, or laser disk players can be connected directly to
the projector, and projected on the viewing surface. Composite video (NTSC, PAL,
Page 5 of 10 Last Modified: 3/22/2010
Page 6

and SECAM formats), S-Video, and Component Video (DVD, M-II, BetaCam) can
also be supported. You can also connect to different audio sources to enhance the
audio presentation. The following list summarizes the ports available on the
projector.
Ports-
USB Ports:
This will allow you to use the projector’s remote control as a wireless mouse.
Connect one end of the cable to the projector’s USB port and the other end to the
External USB port on your computer. The LCD Projector’s USB capabilities will
also transmit audio into the projector’s speakers.
Mouse:
This will allow you to use the remote control as a wireless mouse. If your computer
has a round PS/2 port for an external mouse, you will use a PS/2 Cable to connect the
computer to the LCD Projector’s Mouse port. Connect one end of the cable to the
projector’s Mouse port, and the other end to the External mouse port on your
computer
Computer 1:
This will allow you to connect a second computer to the projector. Connect one end
of the DVI (Digital Visual Interface)-analog cable to the Computer 1 port of the
projector. Connect the other end of the cable to the computer’s video port. You must
correctly set the Comp 1 Input option from the projector’s Setting menu.
Computer 2/ Component Video:
This is required to connect the projector to your computer. Connect one end of the
computer cable to the projector’s Computer 2/Component Video port, and the other
end to your computer’s Monitor port. If you are using a component video source,
you may also plug the video into the Computer 2/Component Video port. A
component video differs from a composite video in the number of channels each
operates from. A composite video signal contains all the information needed for the
color picture in a single channel of information, while a component video signal
contains information from 3 channels. Much higher program production quality is
possible in the component domain because analog compression is used to place the
three channels of component information into the single channel of composite
information. Once compression take place it is extremely difficult to get back the
original quality of the component signal.
Audio 1:
Amplify your computer’s audio: Connect one end of audio cable to the Audio 1 jack,
and the other end to the computer’s Headphone or Audio Out jack.
Audio 2:
See directions in Video for how to incorporate audio from an outside video source.
Page 6 of 10 Last Modified: 3/22/2010
Page 7

Video:
RCA A/V Cable: Connect the projector to an external video player. Connect A/V
cable (with yellow plug) to the Video-out jack on your video source. Connect the
audio parts of the cable into the Audio jacks (red and white) under Audio 2 on the
projector, and to the corresponding jacks on your video source.
S-Video:
Insert one end of the S-Video cable into the S-Video connector, and the other end into
the S-Video output port of the video source. Use the A/V cable if needed to connect
RCA audio.
Audio Out:
This will allow you to connect the projector’s speakers to external speakers. Connect
an RCA-to-3.5 mm stereo audio cable’s 3.5 mm stereo miniplug into the projector’s
audio out jack. Connect the RCA plugs to the jacks of the speaker or PA system.
Monitor Out:
This will allow you to connect your desktop computer to the projector in order to
view both the projected image and the computer screen. Disconnect the monitor
cable from your computer and connect it to the projector’s Monitor Out port. This
will also require connection of a computer cable into the projector’s Computer
2/Component Video port. Connect the other end of the cable into your computer’s
video port.
Page 7 of 10 Last Modified: 3/22/2010
Page 8

Shutting Down the LCD Projector
To turn off, push the red
Power button. You will see
a confirmation message.
Press Power again to turn off
the projector.
Note: After turning off the
power to the projector, wait
until the fan turns off before
unplugging it. Once the
Power Light stops flashing,
and stays on, it is safe to
unplug the projector.
Warning Lights
Next to the Power Light are two additional warning lights. Take notice if any of these
lights appear.
If the Lamp Warning Light is flashing, notify the ITRC that the lamp needs to be
changed.
If the Temperature Status Light is flashing orange, notify the ITRC to clean the air
filter. If the Temperature Status Light is flashing red, turn off the lamp immediately,
and allow the fan to run to cool down the temperature.
Further Information
If you are having trouble with audio or video, first select the Help option on the remote
or on the projector’s control panel. For specific questions or for troubleshooting, see the
User’s Guide. On the Internet you can reach Epson’s support page at
http://support.epson.com or http://www.presentersonline.com. You can also contact the
ITRC by phone (282-5880) or email at itrc@isu.edu. The ITRC suggests attending a
workshop on the operation of the LCD projector. For information regarding ITRC
workshops dates and registration, visit the ITRC website, at http://www.isu.edu/itrc/.
.
Page 8 of 10 Last Modified: 3/22/2010
Page 9

Appendix A
The Menu Settings
Press menu to display the 8 items of the menu screen.
• Video:
o Position: repositions the image
o Tracking: in analog computer images, removes unwanted vertical lines
o Sync: corrects fuzziness
o Brightness: lightens or darkens entire image
o Contrast: adjusts difference between light and dark areas
o Color: adjusts color intensity
o Tint: adjusts the balance of green to magenta
o Sharpness
o Color Mode: adjusts vividness of the image color
o Resolution: leave on auto unless the projector is unable to sync up with the
computer
o Video Signal: leave on auto
o Noise Reduction: reduces visual “noise” when using test and video images
• Audio: use to select audio source or adjust volume or balance
o Audio Input: Audio 1 selected for computer sound, Audio 2 for video sound, and
USB to amplify computer sound through USB cable
o Volume:
o Treble:
o Bass:
• Effect: add pointers and other annotations to the image. Effect customizes these.
o Pointer/Stamp: define shape and size for pointers
o Spotlight: choose large, medium, or small spotlight
o Bar: define color, width, horizontal/vertical for three different bars
o Pointer Speed: low, medium, high speed
• Setting: disable sleep mode, adjust image shape, customize features
o V and H-Keystone: correct shape of uneven image
o P in P: select source used by picture-in-picture
o No-Signal Msg: Select screen color to display when no signal is received by
projector
o Prompt: leave this ON.
o A/V Mute: Selects screen color or image when you press A/V Mute button
o Comp 1 Input: Select format for input to the Computer 1 port.
o Comp 2/YCbCr Input: Select format for input to Computer 2/Component Video
port
o Sleep Mode: Projector turns off lamp if no input received in 30 minutes: Turn on
or off.
• User’s Logo: Transfer any image from computer or video source to the projector to use
as your startup screen
Page 9 of 10 Last Modified: 3/22/2010
Page 10

• Advanced
o Language: Select from 9 languages to be used for menus
o Startup Screen: Display your captured image or logo when the projector starts
o Color Adjustment: Adjusts the color temperature (between 5000 and 10,000 K)
of the projected image
o Rear Proj.: turn on to project from behind onto a transparent screen
o Ceiling: turn on when projector is mounted upside-down from the ceiling
o COM Port: switches between serial (RS-232C) and USB communication for
programming/projector control.
• About: view information about display settings of the computer and hours lamp has been
used
o Lamp: shows hours of lamp usage
o Reset lamp timer: lifespan of lamp is about 1500 hours. Reset when change the
lamp.
o Video Source:
o Input signal:
o Frequency:
o SYNC Polarity:
o SYNC Mode:
o Resolution:
o Refresh Rate:
• Reset All: return all projector settings to their default values
Copyright © 2010 by ITRC
This document may be reproduced for individual or nonprofit use. Users acknowledge that the manual, and all
copyright and other intellectual and proprietary rights therein, are and at all times shall remain the valuable property of
Idaho State University
Campus Box 8064
Pocatello, ID 83209
208.282.5880
the author. Users agree to respect and not to alter, remove or conceal any copyright, trademark, trade name or other
proprietary marking that may appear in the manual. Please send comments to itrc@isu.edu. For more information
about the ITRC, visit our Website at http://www.isu.edu/itrc.
Page 10 of 10 Last Modified: 3/22/2010
 Loading...