

Page 1
1
5
10
11
10
LABELWORKS PX
LW-PX300
User’s Guide
Read this document carefully to use this product safely
and correctly. If your product is faulty, please read
the included warranty card and contact the store you
purchased it from. If you require further assistance,
contact your local K-Sun customer support center.
English
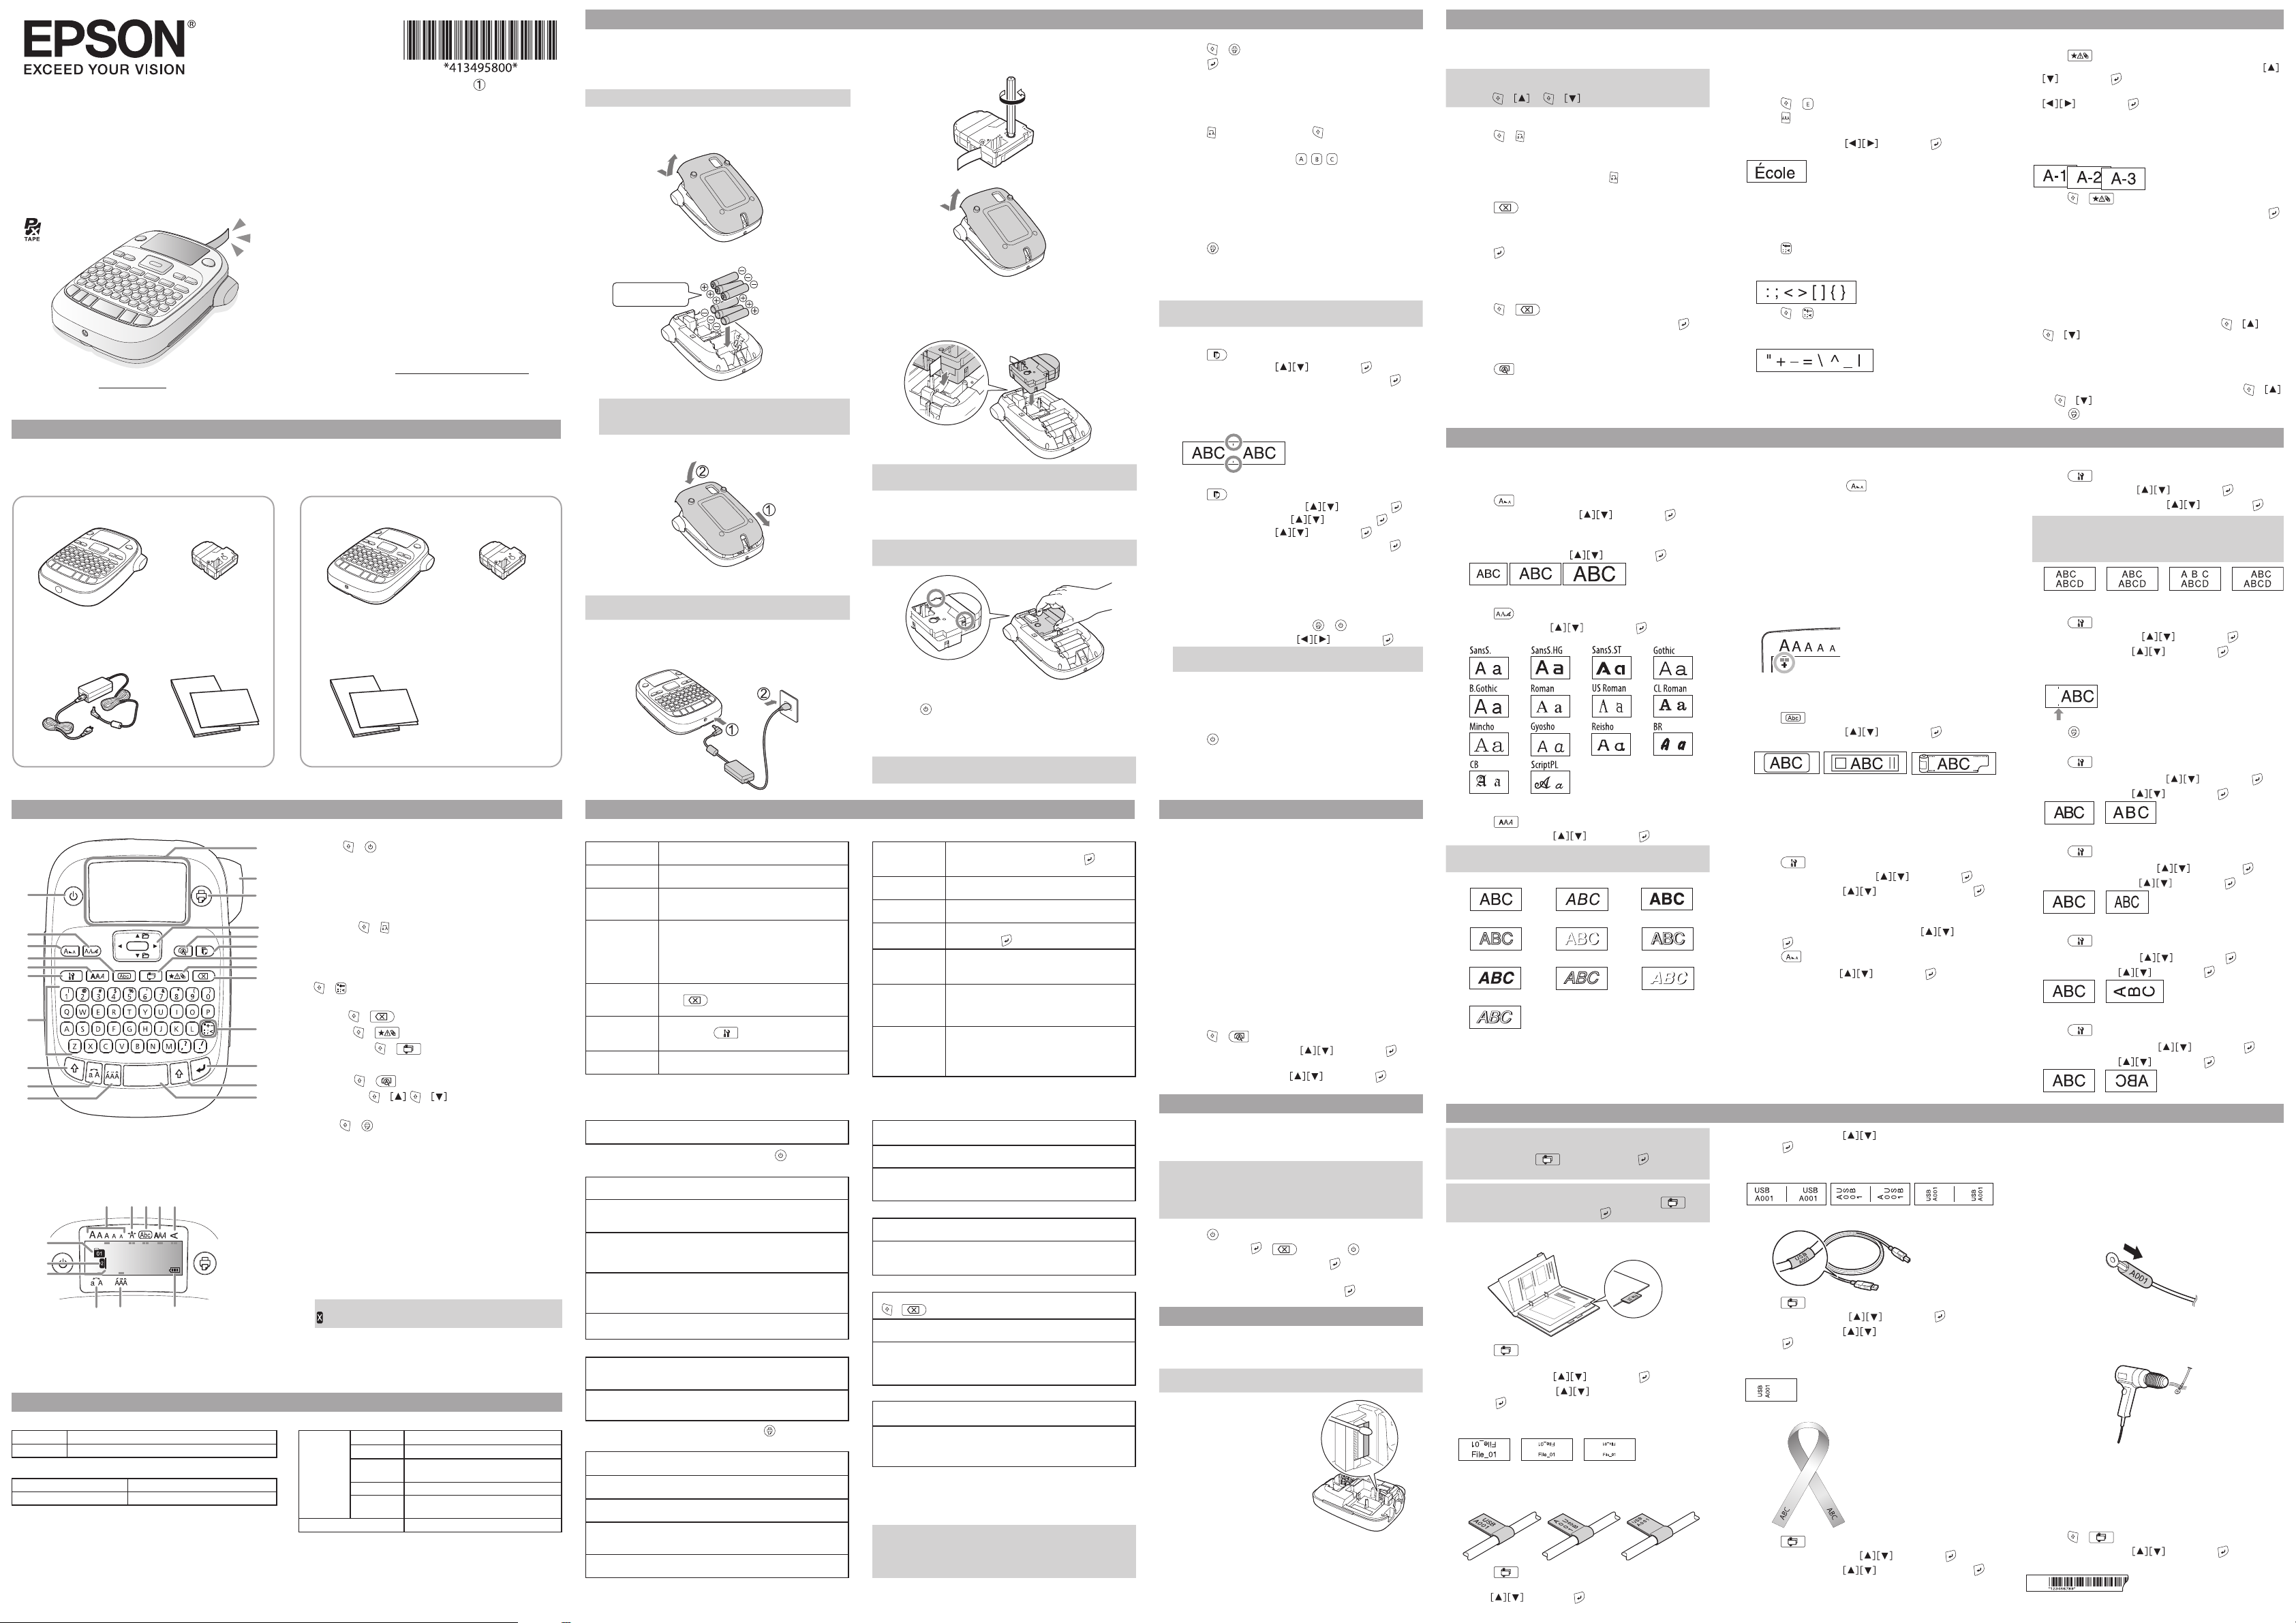
Included Items
Before using the printer, check that you have all the items below.
Contact your place of purchase if anything is missing or damaged.
Full kit Lite kit
PX tape cartridge
(with rubber guard attached)
LW-PX300
AC adapter
Documents
Part Names and Functions
1
2
3
4
5
6
7
8
9
J Display
You can check settings on the display. Indicators show
whether or not settings are enabled.
2
3
4
9
8
67
Specications
J Body
Dimensions Approx. 110 (W) x 170 (D) x 56 (H) (mm)
Weight Approx. 400g (excluding batteries, tape cartridge)
J Usage conditions
Operating temperature 10 to 35 degrees C
Storage temperature -10 to 55 degrees C
J Supported tape width
6 mm, 9 mm, 12 mm, 18 mm
Printed in China
©Seiko Epson Corporation 2017. All rights reserved.
Please also visit us at http://labelworks.epson.com for
help and support. You can download the latest version of
this User’s Guide from the website.
1. Power, + : To "Print density" menu.
23
2. Font
4. Frame
22
6. Setting
21
8. Shift
9. Caps Lock
20
19
10. Accent
18
17
12. Shi ft
16
14. Punctuation: A choice of marks.
15
15. Delete,
14
16. Symbol,
17. Special label, + : To "Bar code" menu.
18. Print copies
13
19. Preview,
12
20. Cursor keys
11
21. Print,
22. Cut Button 23. Display
1. Font size
3. Frame
5. Ver tical
7. Accent mark options
9. Cursor: Indicates the position where the operation is
10. Head mark: Indicates what line it is in. Appears when
11. Text number mark: Indicates the number of the
AC adapter Typ e APT0615Z2-1
Battery AA alkaline battery x 6
PX tape cartridge
LW-PX300
Documents
3. Font size
5. Style
7. Character keys
+ : Capitalizes the entered characters.
11. Spa ce
13. Select/Enter
+ : The other choice of marks.
sAdding a punctuation mark to the label
+ : Deletes text.
+ :
To "Sequence number" menu.
+ : The "Display" menu.
To the previous or next text.
performed. This is the place where you enter text or
delete symbols, etc.
multiple lines exist.
MEMO
: If this appears, you cannot print anything.
current text counted from the beginning.
J Power supply
+ , + :
+ : Feeds the tape.
2. Font width
4. Font style
6. Battery level (as a guide)
8. Upper case/lower case
Manufacturer
Input AC100-240V, 0.3A, 50- 60Hz
Output DC6. 5V, 1.5A
Total output
power
Seiko Epson Corp.
(dedicated adapter, power cable only)
10W
Before use
1. Preparing the power supply
This product operates on batteries or with the dedicated
AC adapter.
Using on batteries
Prepare six AA alkaline batteries.
c
If the rubber guard is attached, remove it. Attach the
rubber guard after inserting batteries.
1. Remove the cover on the rear.
2. Insert the batteries.
Do not reverse
polarity.
MEMO
When continuing to install a tape cartridge, leave the
cover o and go to Step 2.
3. Close the cover. Close it until it snaps into place.
Using with the AC adapter (APT0615Z2-1)
Make sure to use the specied AC adapter
c
(APT0615Z2-1).
1. Connect the AC adapter rmly into the power socket
of the product.
2. Plug the AC adapter into the outlet.
Troubleshooting
J Messages
In ser t Tape No tape cartridge is installed. Turn the power
Check tape!
Check tape
cartridge
Check battery Possible causes for this message are:
Too many lines Text entered is too long.
Text too long
Seq. num. only 1
J Problems
Does not operate normally.
Initialize this product if it does not operate normally such as the
power cannot be turned on or o, or the display is interrupted.
No image comes out even though has been
pressed.
Are the batteries correctly set?
Check if all the batteries are correctly set.
Did the batteries run out?
Replace the batteries with new ones, or use the dedicated AC
adapter (APT0615Z2-1).
Is the AC adapter securely connected?
Connect the AC adapter and the power cable rmly to the
power socket of the product, the AC adapter connector and the
outlet.
Are you using an AC adapter other than the dedicated one?
Using an AC adapter other than the dedicated one (APT0615Z2-1)
is very dangerous, and may cause overheating or damage to the
electric circuits.
Is the display level appropriate?
Adjust the display level.
Display has turned o.
Did you enable the auto power-o function?
The power turns o automatically if no operation is made for
more than 5 minutes.
Did you try to carry out a function incorrectly?
If buttons are operated incorrectly, the display turns o for a
moment.
Nothing is printed even though has been
pressed.
Is text entered?
Nothing is printed if no text is entered.
Any message on the display?
Read the message and take the appropriate action.
Did the tape run out?
Install a new tape car tridge.
Did the batteries run out?
Replace the batteries with new ones, or use the dedicated AC
adapter (APT0615Z2-1).
Is the cover on the rear open?
Set the tape cartridge correctly and close the cover completely.
o and install a tape cartridge correctly.
A tape car tridge which cannot be used in this
product has been set. Check the tape car tridge.
A tape car tridge which cannot be used in
this product has been set. Check the tape
cartridge.
• No power remaining or inserted in the
wrong way
• Mixed with other types or old ones
If so, set the batteries correctly or replace
them with new ones.
Press
the cursor.
Entered tex t is too long for the specied tape
length. Press and adjust the tape length
or make text shorter.
Sequence numbers have already been set.
Sequence numbers can be used for one part only.
to delete the lines indicated by
2. Installing a tape cartridge
If the rubber guard is attached, remove it. Attach the
rubber guard after installing the tape cartridge.
1. Remove the slack of the ink ribbon.
2. Remove the cover on the rear.
3. Set the tape cartridge.
Press it rmly until it snaps into place.
When installing a new tape or the tip of the tape is
longer than usual, put the tape through the "Tape
Guide" slot.
• Do not press the "Cut Button" before the tape stops.
c
• Do not pull the tape out with your ngers.
4. Close the cover on the rear.
Close it until it snaps into place.
How to remove the tape cartridge
Hold the tape cartridge by the tabs, and lift it
c
straight up.
3. Turning the power on
1. Press .
When changing the language of messages on the
display sDisplay Settings ("Display" menu)
4. Feeding the tape
Do not press the "Cut Button" before the tape
c
stops.
Text will be
deleted. OK?
Fill every digit Entered values for barcodes are wrong. Check
Load wider tape Unable to print on the current tape. Use a
Txt is too long
Continue?
Overheated! The printhead is too hot. Turn the power o
Cover open!
Powering o.
Motor error! An error occurred in the motor operation.
Characters are not printed properly.
Is the tape cartridge correc tly set?
Set the tape cartridge correctly.
Is the printhead dirt y?
Clean the printhead.
Did the batteries run out?
Replace them with new ones, or use the dedicated AC adapter
(APT0615Z2-1).
Printing ends in the middle of text.
Did the tape run out?
Install a new tape car tridge.
Did the batteries run out?
Replace them with new ones, or use the dedicated AC adapter
(APT0615Z2-1).
Created text has gone.
Did you delete the text?
If + are pressed, the text on the display will be deleted.
Did you initialize the product?
If the product is initialized, all the created text will be deleted.
Did you remove the batteries or the AC adapter when the
product was in operation?
If the AC adapter or the batteries are removed during operation,
the text may be deleted.
Cannot attach the label.
Did you peel the backing paper?
Attach the label after peeling the backing paper.
Are you attaching it on a dirty place or on a place with a rough
sur face?
The label may not adhere due to the material of the attachment
location or the environmental conditions.
MEMO
If none of the above has solved the problem or the
symptom is other than the above, contact the K-Sun
customer support center.
When creating a label with a special form,
current tex t will be deleted. Press to delete
the text and show the special form.
the entries about values, digits, etc.
wider tape.
Entered tex t is too long for the specied tape
length. Press
and take out the tape car tridge. Wait for a
while before start printing again.
If you open the cover on the rear without
turning the power o, a message is
displayed and then the power is turned o
automatically.
Turn the power o once, then turn it back on.
If the same message appears, turn the power
o and contac t the K-Sun customer support
center.
to print in the correct length.
After setting a tape cartridge, make sure to feed tape.
1. Press
2. Press
3. Cut the tape.
+ .
.
Cut it by pressing the "Cut Button".
5. Creating a label
Example: ABC
1. Press
2. Press the following keys:
Refer below for other operations and the labels you
can create with this product.
sEditing characters, Useful functions, Creating a
label with a special form
while holding down to enter text in
capital letters.
, ,
"ABC" appears on the display.
6. Printing labels
1. Press .
The length of the label to print and the number of
prints appear, and printing starts.
2. When the tape stops, press the "Cut Button" to cut
the tape.
Do not press the "Cut Button" before printing is
c
complete.
Printing multiple copies
1. Press .
2. Select "Copies" with
3. Enter a value with number buttons and press
4. When the tape stops, press the "Cut Button" to cut
the tape.
A "cut mark" will be printed. Cut the tape with
scissors.
Cutting labels one at a time
1. Press
2. Select "Set cut mode" with
3. Select "Each label" with
4. Select "Copies" with
5. Enter a value with number buttons and press
Printing starts.
6. When "Press cut button" displays on the display,
press the "Cut Button".
Printing starts for the second label.
.
, and press .
.
, and press .
, and press .
, and press .
.
Adjusting print density
1. When the power is o, press + .
2. Adjust print density with
MEMO
In general, please set the value to the default; "0".
, and press .
7. Attaching labels
1. Peel o the backing paper.
2. Attach the label and rub it rmly.
J Turn the power o after use
1. Press .
Batteries:
Take them out if not in use for a long time.
AC adapter:
Disconnect from the outlet and the product.
Display Settings ("Display" menu)
The following are the settings to make operation easier.
Backlight
Turns the backlight of the display on or o.
Backlight: On/O
Contrast
Adjusts the density of the fonts on the display.
Value: -5 to +5
Language
Selects the language of the settings and messages on
the display.
Language: English/Spanish/French/Portuguese-Br/
Portuguese-EU/ Italian/Dutch/German
inch:cm
Selects the unit to indicate the length.
Value: inch/cm
Procedure
1. Press
2. Select a setting item with
3. When the options of the selected item appear,
+ .
select your choice with
, and press .
, and press .
Initializing this product
The product may stop functioning due to static
electricity or other causes.
initialize the product if it does not operate normally such
as the display is interrupted.
initialize the product. Take extreme care before
c
initializing it.
All the created text will be deleted. The settings
you made for character input will return to the
default.
1. Press
2. Press and hold
3. When a message appears, press
The product will be initialized.
To abort: Press any button other than
.
+ , and press .
.
.
Cleaning
When the exterior is dirty
Wipe the dirt o with a soft cloth. If it is very dirty, use a
cloth wrung out of water.
Never use chemicals or solvents such as benzine,
c
thinner, or alcohol, or use a chemical duster.
When the printhead is dirty
If the print becomes faint or
some parts are missing, there
may be some dirt on the
printhead.
Clean the print head with a
cotton swab moistened with
medical alcohol (commercially
available ethanol).
Editing characters
Press character keys and enter text.
sPart Names and Functions
Text is entered from the cursor position. sDisplay
To keep the already entered text, rst move the
c
cursor to a number to which no text is entered yet
with + or + , then enter text.
J Switching upper case or lower case
1. Press + .
The setting is indicated on the display. Characters
are set to upper case or lower case.
To capitalize partially: Enter with
J Deleting characters
1. Press .
Deletes one character backward.
J Breaking lines
1. Press .
Breaks the line from the character next to the
cursor.
J Deleting text
1. Press + .
2. When a conrmation message appears, press
Text will be deleted.
J Conrming text
1. Press .
Text appears on the display.
You can check the text and the length of the label.
But the print image cannot be conrmed.
pressed.
.
Useful functions
This section explains various functions that will help you
create labels.
J Changing the font size
1. Press .
2. Select a line layout with
"Auto": Applies the same font size. No need to
proceed to Step 3.
3. Select a font size with
J Changing the font
1. Press .
2. Select a font with
The font used for the entire text will change.
J Applying a font style
1. Press .
2. Select a style with
Styles applied to small or elaborate characters may
c
not be able to print clearly.
Normal
Outline
B+I
S+O+I
, and press .
, and press .
, and press .
, and press .
Italic
Shadow
O+I
Bold
S+O
S+I
Creating a label with a special form
To create labels with a special form, a message
c
conrming that the text will be deleted may
appear when is pressed. Press to delete
the current text and to show the special form.
MEMO
To exit the following special form mode, press ,
then select the "9.Exit" and press .
J Creating an folder tab label
1. Press .
2. Select from "1.Tab:Medium", "2.Tab:Small" or
"3.Tab:Large" with
3. Select a value with
press .
Maximum length: 12.5cm (5.0 inch)
4. Enter text.
J Creating a label for cables
Flag labels wrapping a cable
1. Press .
2.
Select from "4.Flag:Hori.", "5.Flag:Vert." or "6.Flag:Edge"
with , and press .
, and press .
or enter label length, and
J Adding characters with an accent mark
to the label
If there is a choice of characters with an accent mark, they
are indicated on the display.
Example: École
1. Press
2. Press
3. Select an item with
Characters with an accent mark
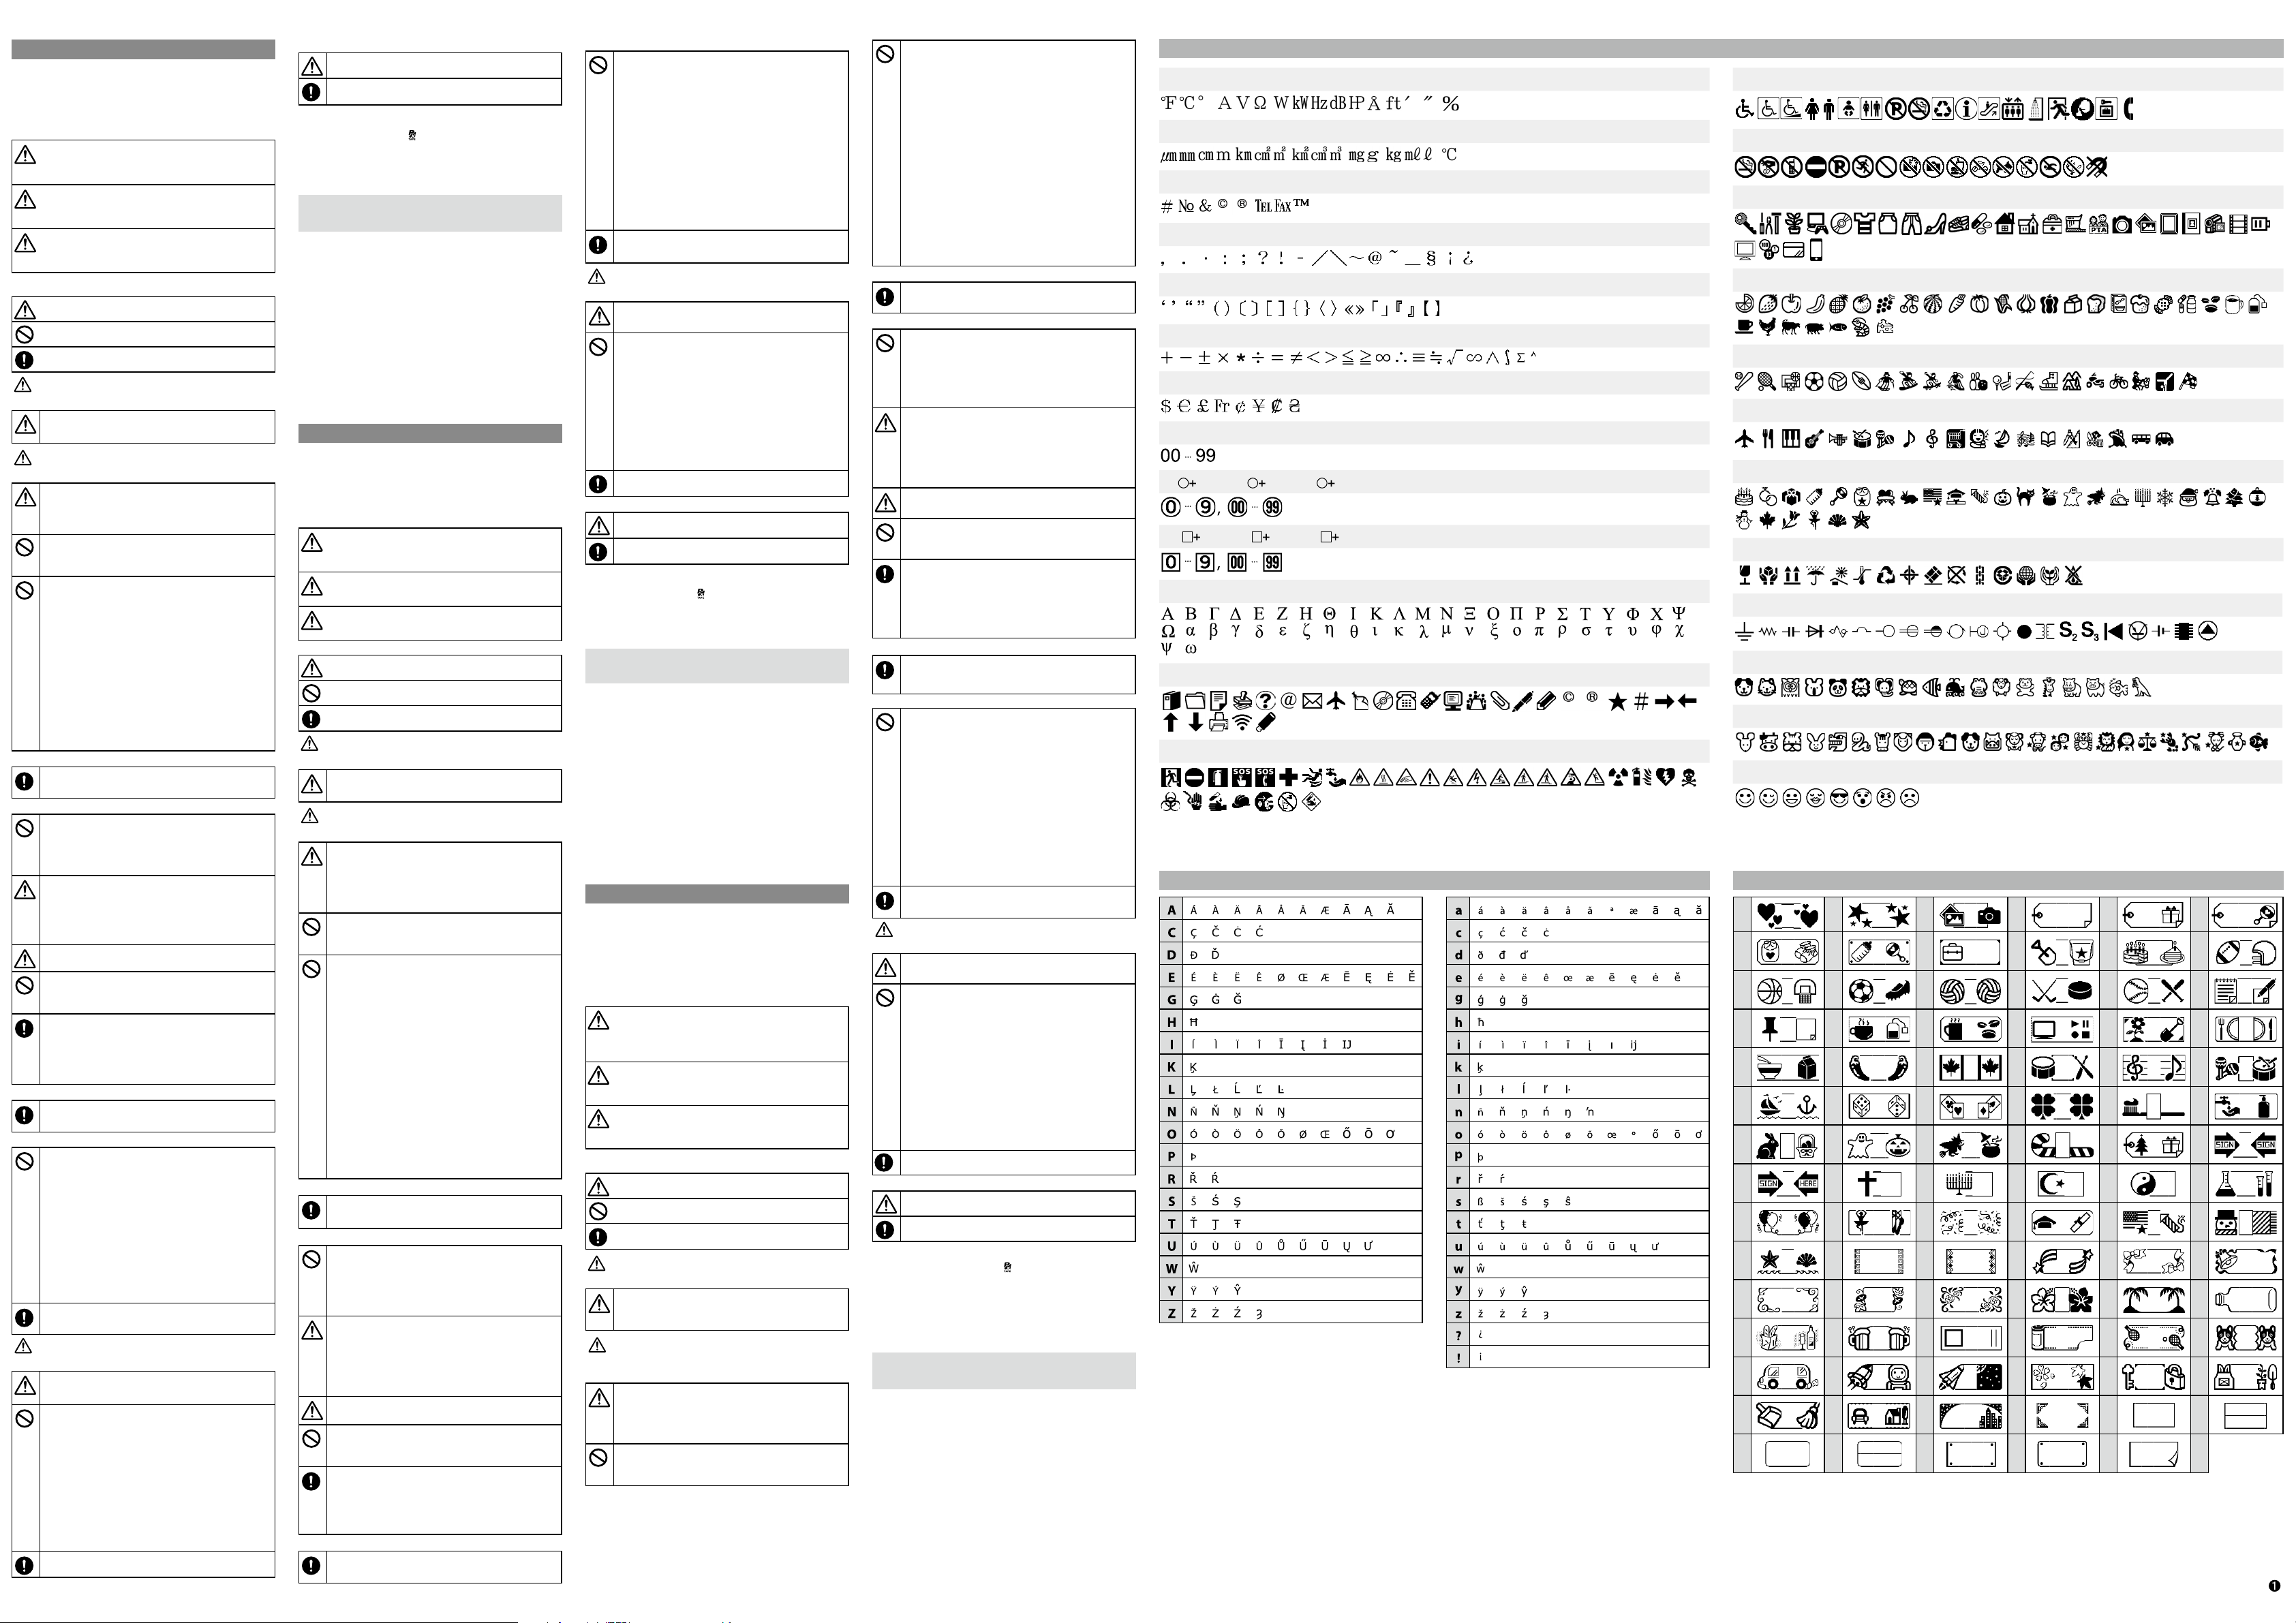
sSymbol List on the back of this sheet
J Adding a punctuation mark to the label
Select from the following two methods.
1. Press
Available marks
1. Press + .
Available marks
J Using extra large font
You can create labels with characters larger than the
largest font size set with .
1. Perform the following settings.
2. Enter text.
J Adding a frame
1. Press .
2. Select an item with
Available frames
sSymbol List on the back of this sheet
J Specifying the label length
If the font size is set to "Auto", the font size will adjust
automatically allowing you to create labels of a specied
length.
1. Press
2. Select "Label length" with
3. Select a value with
4. Select a text alignment setting with
5. Press
6. Select "Auto" with
7. Enter text.
3. Select a value with
4. Enter text.
Labels wrapping a cable
1. Press .
2. Select "7.Wrap" with
3. Select a value with
4. Enter text.
J Creating a ribbon
1. Press .
2. Select "8.Ribbon" with
3. Select a value with
4. Enter text.
+ .
.
A choice of characters with an accent mark appears.
, and press .
Go on and enter the next character.
.
Each press shows the next mark.
Each press shows the next mark.
• The number of lines: "1 Line"
• Font size: "Auto"
• Font: "SansS.", "SansS.HG", "CL Roman", "BR"
• Contents: Uppercase letters, numbers, marks
except comma, space, pictograms
• Font style: "Normal"
• "Frame": "O"
If the label can use the extra large font, the +
indicator appears on the display.
, and press .
Entering the frame No. to select does the same.
.
, and press .
or enter it, and press .
Maximum length: 40cm (15.0 inch)
"Auto": Adjusts to the proper length automatically.
, and
press .
.
, and press .
or enter label length, and
press .
Maximum length: 12.5cm (5.0 inch)
, and press .
or enter label length, and
press .
Maximum length: 12.5cm (5.0 inch)
, and press .
or enter it, and press .
Length range: 20-40 cm (8.0-15.0 inch)
J Adding a symbol to the label
1. Press .
2. When the category appears, select an item with
, and press .
3. When symbols appear, select a symbol with
, and press .
Available symbols
sSymbol List on the back of this sheet
J Creating labels with serial numbers
(Sequence number)
1. Press + .
2.
Enter a number/alphabet for the rst label, and press
The number/alphabet increases by one whenever
printing is done.
J Creating pieces of text
You can create multiple pieces of text continuously. Up to
50 pieces can be created at a time.
You can check which piece of text you are creating with
the text number mark displayed at the beginning.
Creating another piece of text
1. Select the next text number mark with + or
+ .
You can create another piece of text. Do the same
for the next pieces.
Printing a selected piece of text
1. Select a piece of text you want to print with +
or + .
2. Press
J Changing the layout
1. Press .
2. Select "Layout" with
3. Select a layout option with
MEMO
To apply the "Justify" layout option, change the "Char.
spacing" setting to "Wide".
sAdjusting the space between characters
J Changing the label margin
1. Press .
2. Select "Margins" with
3. Select an item with
4. Press .
J Adjusting the space between characters
1. Press .
2. Select "Char. spacing" with
3. Select an item with
J Making the width of font narrower
1. Press .
2. Select "Char. width" with
3. Select "Narrow" with
J Lining up characters vertically
1. Press .
2. Select "Vertical" with
3. Select "On" with
J Using mirror writing for the label
1. Press .
2. Select "Mirror print" with
3. Select "On" with
J How to use Heat Shrink Tube
This printer prints on two sizes of heat shrink tube, 203
(1/8") and 205 (3/16").
If printing on heat shrink tube is light, turn up the print
density. sBefore use
1. Set the dedicated tape.
2. Enter text, and then print on the tube.
3. Put a wire through the tube.
4. Direct hot air from an industrial-use heat gun onto
J Creating a label including a barcode
• Enter barcodes according to their standards.
• Check the printed labels with your barcode reader to
ensure they can be correctly read.
• Supported barcode: CODE39, CODE128, ITF, CODABAR,
UPC-A, UPC-E, EAN-8, EAN-13
1. Press
2. Select an item with
3. After setting the barcode, enter the code.
.
, and press .
, and press .
, and press .
, and press .
"None
": A "cut mark" will be printed. Cut the tape
with scissors.
, and press .
, and press .
, and press .
, and press .
, and press .
, and press .
, and press .
, and press .
the entire surface of the tube, shrinking it to the
wire. Refer to the manual of your heat gun to use it
properly with heat shrink tube.
+ .
, and press .
.
Page 2
English
For your sa fety, read the att ached document s carefully to us e this product
correc tly. After you have rea d all instructio ns, keep this manua l handy for
future re ference and to make yo ur concerns clear.
Items bel ow indicate safe ty precaution s to protect user s, their
surroundings and their property from possible injury or damage.
Precaut ionary notati ons are categori zed as follows accor ding to personal
injury a nd damage to the equi pment if the instr uctions are igno red or the
equipment is misused.
DANGER
This sym bol indicates inf ormation that, i f ignored, could p ossibly
result in se rious or fatal pe rsonal injury. Take ex tra caution in
performing procedures with DANGER headings.
WARNING
This sym bol indicates inf ormation that, i f ignored, could p ossibly
result in se rious persona l injury or even dea th due to incorrec t
handling.
CAUTION
This sym bol indicates inf ormation that, i f ignored, could p ossibly
result in p ersonal injur y or ph ysical damag e due to incorrect
handling.
The foll owing describe s the meaning of each s ymbol used in th e
precautions.
This indicates an important reminder.
This indi cates a prohibite d item.
This indi cates a mandator y procedure.
DANGER
When handling batteries
If liquid l eaking from an alk aline batter y gets into your eyes , do
not rub you r eyes but immediate ly wash them well wi th clean
water and co ntact a doctor. O therwise, it may c ause blindness .
WARNING
When using the AC adapter and power cable
The cords included with this product contain chemicals, including
lead, kn own to the State of Cali fornia to cause bir th defects o r
other reproductive harm. Wash hands after handling. (This
notice is pr ovided in accordan ce with Propositi on 65 in Cal. Health
& Safet y Code §25249.5 and follow ing.)
Do not use any AC a dapter or power ca ble other than the
dedicat ed AC adapter and powe r cable. Do not use t he AC adapter
with othe r than the specie d voltage also. Ot herwise, dama ge,
overheat ing, re or elect ric shock may occur.
Take the follow ing precautions w hen handling the AC a dapter
and power c able.
• Make sure to avoid o ctopus wiring .
• Make sure the pl ug is not dusty bef ore inserting i t into an outlet.
• Insert the p lug rmly into the ou tlet.
• Do not hold th e plug with wet hands .
• Do not pull the p ower cable when d isconnecting
the plug. B e sure to hold the plu g when disconnec ting it.
• Do not make any mo dication to the AC ad apter or power cab le.
• Do not apply s trong shocks to o r put a heavy obje ct on the AC
adapter o r power cable.
• Do not bend or t wist the AC adapte r or power cable for cibly.
• Do not place th e AC adapter or power ca ble near a heater.
• Do not use any dam aged AC adapter or po wer cable.
• Do not touch th e plug during thund erstorms.
• Do not unplug t he AC adapter while th e product is in ope ration.
• Do not use the AC ad apter in a small, conn ed space, or cover it
with a clot h.
When handling batteries
Keep bat teries out of reach o f children. They a re extremely
dangero us if swallowed. Co ntact a docto r immediately if
swallowed.
When using this product
Do not app ly any strong force or s hocks to the pro duct such
as standi ng on, dropping or h itting it. Oth erwise, the pro duct
may be broke n, which may result in re or electric sh ock. If it is
damaged , turn o the power im mediately, unplug t he AC adapter
and remove t he batteries, a nd then contact th e K-Sun customer
suppor t center. Continuous us e may result in re or el ectric shock .
Take care not to spi ll any beverage such a s tea, coee or juice
onto the pro duct, or to spray a erosol insect icide. It may cause
malfunc tion, re, or ele ctric shock . If any liquid has bee n spilled
on the pro duct, turn o the p ower, unplug the AC adapt er and
remove the b atteries imme diately, and then cont act the K-Sun
custome r support center. Con tinuous use may resu lt in re or
electric shock.
Do not touc h the printhead be cause it become s very hot.
Other wise, there is a risk o f burns.
Do not ope n any covers other than t he cover designate d by this
manual. D oing so may result in r e or electric sh ock. Always use
the produ ct as instruct ed in this manual. O therwise, dama ge or
injury may occur.
If any of the fo llowing abnorm alities is obser ved, turn o the
power imm ediately, unplug th e AC adapter and remove t he
batter ies, and then conta ct the K-Sun custom er support cente r.
• If smoke, str ange odours or un expected no ises come from the
product
• If liquid or fo reign object s get inside the prod uct
• If the produc t has been dropp ed or damaged
When handling the cutter
Do not touc h the exit slot (wher e labels come out) du ring printing
or when usi ng the cutter, other wise there is a ris k of injury.
Others
Do not use o r store the produc t, batteries , AC adapter, power
cable, or t ape cartrid ges in the followin g places.
• In direct sunlight.
• Where it may be come extreme ly hot such as in a vehicl e with the
windows closed.
• Where it may be come extreme ly hot such as near a hea ter or the
tempera ture becomes ver y unstable such a s near the exhaust
duct of an a ir conditioner.
• Where the pro duct may get wet du e to a shower or rain such as
in a bathro om or outdoors.
• In a dusty pla ce or where the prod uct may be expos ed to smoke
or steam su ch as near the kitche n or a humidier.
• On an unstab le place such as on a shak y table or on an inc lined
place.
• Where it migh t be subjected to v ibration or shoc k.
• Near high-v oltage power lin es or something th at generates a
magnetic eld.
Keep the pl astic bags used to co ntain the produc t or this manual
out of reac h of children. Child ren may suocate if t hey swallow
them or put t heir heads into the b ags.
CAUTION
When handling batteries
If liquid l eaks from a bat tery, wipe it o with a c loth and replace it
with a new on e. If the liquid come s in contact with yo ur skin, wash
it away with w ater immediatel y.
If the bat teries are used in correctly, they ma y cause leakage,
overheat ing, explosion , erosion, or damag e to the product, w hich
may result in re or injury.
• Do not use new on es and old batter ies together, or mix d ierent
types of batteries.
• Use only AA Alk aline batteri es. Rechargeab le batteries c annot
be used.
• Use batteri es in the correct d irections.
• Take the batteri es out immediatel y when they have no powe r
remaining.
• Take the batterie s out if you do not use th e product for a lo ng
time.
• Do not heat bat teries or throw th em in re or water.
• Do not pinch th e batteries wit h metal tweeze rs or use any
pointed s harp metal obje ct such as the tip of a me chanical pen
or ball- point pen when t aking the batte ries out.
When disp osing of used bat teries, make sure to f ollow the
regulations.
When using this product
To ensure safe ty, unplug this prod uct before leav ing it unused.
Before cl eaning, make sure to u nplug the AC adapter f rom the
outlet, and remove the batteries.
J When handling tape cartridges
• Make sure to use a de dicated PX Ta pe.
• Some typ es of tape cannot b e cut by the cutter. For th e details, refer t o
the tape's manual.
• Do not drop it or d isassemble it. D oing so may cause dam age.
• Avoid using a tap e cartridge w ithout remainin g tape. Doing so may c ause
overheating of the printhead, which may result in damage or malfunction.
MEMO
Tape cartr idges contain ink ri bbons in them. Wh en disposing tap e
cartr idges, make sure to fo llow the local re gulations for disp osal.
J Other cautions
Notes on usage
• Take care not to cut your ngers when cut ting the label wit h scissors.
• Do not atta ch a label on human bo dies, living thin gs, public facil ities or
other people’s belongings.
About the printed labels
• Dependin g on the environmen t labels are used in an d the nature of the
objec t labels are atta ched to, the follow ing issues may occur:
Label: Discoloration, faded characters, peeling
Adhesive side: Adhesive residue, staining, damage
• Carefully c heck the suitabi lity of the label f or the intended purpose
before u se.
K-Sun takes no r esponsibilit y for any damage or los s due to the above
mentioned causes.
Español
Para su seg uridad, lea atent amente los docume ntos que se adjunta n
para pod er usar este produ cto de manera cor recta. Tras haber l eído las
instrucciones, guarde este manual a mano para futuras consultas.
A continuación se indican precauciones de seguridad para proteger a los
usuarios, su entorno y pertenencias ante cualquier lesión o daño.
Los avisos s e categorizan co mo sigue según las p osibles lesion es
person ales y daños materi ales si se ignoran l as instruccione s o se utiliza el
equipo indebidamente.
PELIGRO
Este símb olo indica infor mación que, si se ig nora, podría pr ovocar
lesiones personales serias o mortales. Tenga especial cuidado al
realizar acciones categorizadas bajo PELIGRO.
ADVERTENCIA
Este símb olo indica infor mación que, si se ig nora, podría pr ovocar
lesiones personales serias o mortales por un manejo incorrecto.
PRECAUCIÓN
Este símb olo indica infor mación que, si se ig nora, podría pr ovocar
lesiones personales o daños materiales por un manejo incorrecto.
A continuación se describen los símbolos utilizados en las precauciones.
Este símb olo indica la info rmación de un "Aviso imp ortante".
Este símb olo indica una ad vertencia por un a acción "Prohibi da".
Este símb olo indica una acc ión "Obligatori a".
PELIGRO
Manejo de las pilas
Si le entrar a en los ojos líquid o procedente de una p ila alcalina,
no se frote l os ojos; lávelos inme diatamente con ab undante agua
limpia y con sulte a un médico. Si no, p odría quedars e ciego.
ADVERTENCIA
Uso de un adaptador de CA y un cable de corriente
Los cable s que se incluyen con e ste producto con tienen
produc tos químicos, entr e los que se incluye el p lomo, indicado
por el estado de California como causante de defectos de
nacimiento u otros daños reproductivos. Lávese las manos
después de tocarlos. (Este aviso se proporciona de acuerdo con
la Proposi ción 65 del código de s alud y segurida d de California
§25249.5 y siguie ntes.)
No utilice u n adaptador de CA o c able de corrient e diferentes a
los espe cicados. Tampoco u tilice el adaptad or de CA con una
tensión di ferente a la espec icada. Si no, pod rían producirs e
daños, sobrecalentamiento, incendio o descargas eléctricas.
Tome estas pre cauciones al man ejar el adaptad or de CA y el cable
de corriente.
• Evite enchufar muchos dispositivos a un solo enchufe.
• No conecte n unca un enchufe ll eno de polvo en una tom a de
corriente.
• Introduzc a el enchufe rmem ente en la toma.
• No sujete el en chufe con manos húme das.
• Al desenc hufar, no tire del cab le de corriente. A segúrese de suj etar el
enchufe al desconectarlo.
• No haga ningun a modicación e n el adaptador de C A o el cable
de corriente.
• No golpee e l adaptador de CA o e l cable de corrien te ni ponga
un objeto pesado sobre ellos.
• No doble ni re tuerza viole ntamente el adapt ador de CA o el
cable de corriente.
• No coloque e l adaptador de CA o e l cable de corrien te junto a
un radiador.
• No utilice un ad aptador de CA o un ca ble de corriente da ñados.
• No toque el en chufe si éste empie za a hacer ruidos e xtraños.
• No desenchufe el adaptador de CA cuando el producto está
encendido.
• No utilice el ad aptador de CA en un l ugar pequeño ni l o cubra
con un trap o o similar.
Manejo de las pilas
Mantenga l as pilas fuera del a lcance de los niños . Es muy
peligro so, ya que podrían t ragarlas. Si las tr agasen, póngas e
inmedia tamente en contac to con un médico.
Al usar este producto
No golpee ni apriete fuertemente el producto, como pisándolo,
dejándolo caer o golpeándolo. El producto podría romperse,
provocan do un incendio o des cargas eléctr icas. Si el produ cto
se daña, apáguelo inmediatamente, desenchufe el adaptador
de CA y reti re las pilas. Luego p óngase en contac to con el centro
de atenció n al cliente de K-Sun. Si co ntinúa usándolo, p odría
provocar u n incendio o desca rgas eléctric as.
Tenga cuidado de no derramar ninguna bebida sobre el producto,
como té, caf é o zumos, ni de pulve rizar ningún aer osol como
insect icidas. Podrían p rovocar anomalí as, incendio o desc argas
eléctricas. Si se ha derramado líquido sobre el producto,
apáguel o, desenchufe el a daptador de CA y re tire las pilas
inmedia tamente. Luego p óngase en contac to con el centro
de atenció n al cliente de K-Sun. Si co ntinúa usándolo, p odría
provocar u n incendio o desca rgas eléctric as.
No toque e l cabezal de impr esión ya que se cal ienta y podría
quemarse.
No abra nin guna tapa que no se a la tapa designad a en este manual.
Si lo hace, po dría provocar un i ncendio o descar gas eléctric as.
Utilice sie mpre el produc to tal y como se indic a en este manual. Si
no, podr ían producirse d años o lesiones.
Si obser va alguna de esta s anomalías, apag ue inmediatame nte
el produc to, desenchufe e l adaptador de C A y retire las pilas.
Luego pó ngase en contact o con el centro de atenci ón al cliente
de K-Sun.
• Si del producto sale humo u olores o ruidos extraños.
• Si entra líqui do u objetos extr años en el produc to
• Si cae o se daña el p roducto
Al usar el cortador
Mantenga los dedos fuera de la ranura de salida, por donde salen
las etiqu etas, durante la imp resión o al usar el co rtador. Si no,
podría cortarse los dedos.
Otros
No utilice n i guarde el produc to, pilas, adapt ador de CA, cabl e de
corrien te o cartuchos de ci nta, en los siguien tes lugares:
• A la luz del sol.
•
gares donde pueda hacer mucho calor, como en un
En lu
vehículo con las ventanas cerradas.
• En lugares don de pueda hacer muc ho calor, como junto a un
radiador, o donde la temperatura sea muy inestable, como junto
al conducto de escape de un aire acondicionado.
En lug
•
ares dond e el producto pue da mojarse por la d ucha o la
lluvia, co mo en el baño o al aire li bre.
• En un lugar pol voriento o donde el p roducto pued a estar
expues to a humo o vapor, como cerc a de la cocina o un
humidicador.
En un lu
•
gar inest able, como en una me sa tambaleante o un
lugar inclinado.
• Donde pueda estar sujeto a golpes o vibraciones.
•
a de líneas d e alta corriente o al go que genere un cam po
Cerc
magnético.
Mantenga l as bolsas de plás tico utilizada s con este produc to o
manual fu era del alcance d e los niños. Podría n ahogarse si las
tragan o se l as ponen en la cab eza.
PRECAUCIÓN
Manejo de las pilas
Si de la pila s ale algún líquido , límpielo con un tra po y cámbiela
por una nue va. Si toca el líqui do con las manos, lável as con agua
inmediatamente.
Si las pilas s e usan de manera inc orrecta, po drían producirs e
pérdidas de líquido, sobrecalentamiento, explosión, desgaste o
daños en el p roducto, provoc ando un incendio o l esiones.
• No utilice pil as nuevas y viejas al mi smo tiempo ni mezc le
diferentes tipos de pilas.
• Utilice sólo p ilas alcalinas A A. No se pueden ut ilizar pilas
recargables.
• Utilice pilas e n la dirección ade cuada.
• Saque las pila s inmediatamen te si se gastan.
• Saque las pila s del producto si n o va a usarlo por muc ho tiempo.
• No caliente la s pilas ni las tire al fu ego ni al agua.
• Al sacar las pi las, no las pince con pi nzas metálica s ni utilice
objetos m etálicos puntiag udos o alados, com o la punta de un
portaminas o un bolígrafo.
Siga la nor mativa local par a eliminar las pila s usadas.
Al usar este producto
Por seguridad, desenchufe el producto cuando vaya a dejar de
utilizarlo.
Antes de limpiarlo, asegúrese de que desenchufa el adaptador de
CA y retire l as pilas.
J Uso de los cartuchos de cinta
• Asegúres e de utilizar cinta PX especíca .
• El cortado r no puede corta r algunos tipos de ci nta. Para más
información, consulte el manual de cintas.
• No la deje caer n i la desmonte. Si lo hac e, podría dañar la ci nta.
• Evite usar un c arrete donde no qu ede cinta. Si lo ha ce, el cabezal de
impresión podría sobrecalentarse, provocando daños o anomalías.
RECUERDE
Los cart uchos contienen c intas de tinta. Al tir ar los cartucho s, asegúrese
de cumpli r la normativa loc al de residuos.
J Otras precauciones
Sobre el uso
• Tenga cuidado d e no cortarse l os dedos al cort ar la etiqueta co n tijeras.
• No pegue eti quetas al cuerp o, a seres vivos, ins talaciones púb licas o
pertenencias de otras personas.
Sobre las etiquetas impresas
• Según el mate rial donde quier a colocar la etiqu eta o las condicion es
medioambientales, podría tener los siguientes problemas:
Etiqueta: caracteres descoloridos o apenas visibles, desprenderse
Parte adhesiva: no se puede desprender, restos de adhesivo, el color de
la etique ta no se va, daños
• Asegúres e de comprobar el mat erial de la parte a dhesiva y la nalid ad
antes del us o.
K-Sun no se resp onsabiliza p or cualquier daño o p érdida resulta ntes de
las causas anteriormente mencionadas.
Français
Pour votre sé curité, lisez at tentivement le s documents conn exes pour utilis er
ce produit c orrectemen t. Après avoir lu toute s les instruct ions, conserv ez
ce manuel à p ortée de main po ur pouvoir vous y ré férer ultérieu rement et
trouver la solution aux problèmes rencontrés.
Vous trouve rez ci-après les p récautions de s écurité à respe cter pour proté ger
les utilis ateurs, leur env ironnement et l eurs biens contre t oute blessure et
tout dommage.
Les préc autions sont class ées comme suit en fon ction des risqu es de
blessur es corporelles e t de dommages matér iels en cas de non- respect des
instructions ou de mauvaise utilisation de l'appareil.
DANGER
Ce symbole indique des informations qui, si elles sont ignorées,
peuvent entraîner des blessures corporelles graves voire mortelles.
Soyez ex trêmement vig ilant lors de l'exé cution des procé dures
précédé es de l'en-tête DAN GER.
AVERTISSEMENT
Ce symbo le indique des info rmations qui, si el les sont ignorée s,
peuvent entraîner des blessures corporelles graves voire mortelles
suite à une er reur de manipulat ion.
ATTENTION
Ce symbole indique des informations qui, si elles sont ignorées,
peuvent entraîner des blessures corporelles ou des dommages
matérie ls suite à une erreur d e manipulation .
Voici la dén ition et la signic ation de chaque sy mbole utilisé da ns les
précautions.
Indique les informations correspondant à un « rappel important ».
Indique u ne mise en garde par r apport à une ac tion interdite ou
prohibée.
Indique qu'une procédure est obligatoire.
DANGER
Manipulation des piles
En cas de fui te de liquide d'une p ile alcaline et de co ntact avec les
yeux, ne vo us frottez pas l es yeux mais rincez- les immédiatem ent
à l'eau clair e et contactez un mé decin. Le non- respect de cet te
consigne p eut entraîner un e cécité.
AVERTISSEMENT
Utilisation de l'adaptateur secteur et du câble
d'alimentation
Les cordons inclus avec ce produit contiennent des produits
chimiques, dont le plomb, reconnus dans l'état de Californie pour
causer des malformations congénitales ou d'autres problèmes de
reproduction. Lavez-vous les mains après manipulation. (Cette
mise en gar de est fournie con formément à l'ar ticle 65 du Code de
santé et de s écurité de Calif ornie du chapitr e 25249.5 et seq.)
N'utilis ez que l'adaptate ur secteur et le c âble d'alimenta tion dédiés.
N'utilis ez l'adaptateur s ecteur qu'à la ten sion spéciée . Dans le cas
contrair e, une détériora tion, une surchau e, un incendie ou un e
électrocution peut survenir.
Prenez le s précautions sui vantes lors de la ma nipulation de
l'adapta teur secteur et du c âble d'alimenta tion :
•
lez à évite r tout câblage en ca scade.
Veil
• N'insérez p as de che poussié reuse dans une pris e.
•
rez corre ctement la che da ns la prise.
Insé
• Ne tenez pas la che les mains mouil lées.
•
ez pas sur le c âble d'alimentat ion lors du débra nchement
Ne tir
de la che. Vei llez à tenir la che lo rs de son débranchement.
• Ne modie z pas l'adaptateu r secteur ou le c âble d'aliment ation.
• Protégez l'ad aptateur sect eur et le câble d'alim entation contre
tout choc v iolent et ne pose z aucun objet lour d sur l'adaptateur
secte ur ou le câble d'alime ntation.
• Évitez de tord re ou de torsader l'a daptateur sec teur ou le câble
d'alimentation.
• Ne placez pas l 'adaptateur sec teur ou le câble d'al imentation à
proximité d'un radiateur.
• N’utilisez au cun adaptateur se cteur ou câble d ’alimentation
endommagé.
• Ne touchez pa s la che d’alimenta tion en cas d’orage.
• Ne débranch ez pas l’adaptateu r secteur lors que l’appareil es t
sous tension.
• N’utilisez pa s l’adaptateur sec teur dans un espace r estreint et ne
le recouv rez pas avec un vêtem ent ou autre.
Manipulation des piles
Conser vez les piles hors d e portée des enf ants. Leur inge stion
est extrêmement dangereuse. Contactez immédiatement un
médeci n en cas d'ingesti on.
Utilisation de cet appareil
Protége z cet appareil contr e les chocs ou cont raintes (évitez
les chocs, les coups ou le piétinement). Dans le cas contraire,
vous risqu ez de casser l'app areil et d'entraîn er un incendie
ou une électrocution. Si l'appareil est endommagé, mettez-le
immédiatement hors tension, débranchez l'adaptateur secteur et
retirez l es piles, puis cont actez le center de service clientè le
d’K-Sun. Si v ous continuez à l'utiliser, un incendie ou une
électrocution peut survenir.
Veillez à ne p as renverser de bo isson (thé, café o u jus de fruit) sur
l'appareil. Veillez également à ne pas pulvériser d'insecticide en
direction de l'appareil. Il pourrait en résulter un dysfonctionnement,
un incendi e ou une électr ocution. Si du li quide a été renvers é sur
l'appareil, mettez ce dernier hors tension, débranchez l'adaptateur
secte ur, retirez les pile s immédiatemen t puis contacte z le center de
servi ce clientèle d’ K-Sun. Si vous continu ez à l'utiliser, un ince ndie ou
une électrocution peut survenir.
Ne touche z pas la tête d'impr ession. Elle dev ient très chaude e t vous
risquez de vous brûler.
N’ouvrez au cun autre cache q ue le cache désig né par le manuel.
Dans le cas co ntraire, un incen die ou une élec trocution pe ut survenir.
Utilise z toujours le pro duit comme indiqu é dans ce manuel. Da ns le
cas contraire, vous pourriez endommager l'appareil ou vous blesser.
Si vous obse rvez l'un des pr oblèmes suiva nts, mettez
immédiatement l'appareil hors tension, débranchez l'adaptateur
secte ur, retirez les pile s puis contacte z le center de ser vice clientèle
d’K-Sun .
• Si l'appareil é met de la fumée, un e odeur suspec te ou des bruits
étranges
• Si du liquide o u des corps étran gers pénètre nt dans l'apparei l
• Si l'appareil tombe ou est endommagé
Utilisation du massicot
Ne posez p as les doigts au ni veau de la fente de sor tie lors de
l'éjection des étiquettes, lors de l'impression ou de l'utilisation
du massicot . Dans le cas contrai re, vous risquez de vo us couper
les doigts.
Autres
Ne conser vez pas l'appare il, les piles, l'ada ptateur secte ur, le câble
d'aliment ation ou les car touches dans les en droits suivants :
• Un endroit o ù l'appareil se tr ouve directe ment exposé a u soleil.
• Un endroit où l'a ppareil pourr ait devenir extr êmement chaud,
comme un véhicule dont les fenêtres sont fermées.
• Un endroit où l'a ppareil pourr ait devenir extr êmement chaud,
comme à prox imité d'un radiate ur, ou un endroit dont la
tempéra ture est très inst able, comme à proxim ité du conduit
d'évacuation d'un climatiseur.
• Un endroit où l'a ppareil pourr ait être aspergé p ar une douche
(salle de b ain) ou une averse (en ex térieur).
• Un endroit p oussiéreux ou e xposé à la fumé e ou à la vapeur,
comme une c uisine ou à proximi té d'un humidic ateur.
• Une surfac e instable comme u ne table bancal e ou une surface
inclinée.
• Un endroit o ù l'appareil ser ait exposé aux v ibrations et au x chocs.
• À proximité de l ignes à haute tensio n ou de tout objet gén érant
un champ magnétique.
Conser vez les emballag es en plastique de ce t appareil ou de
ce manuel ho rs de portée de s enfants. Les enf ants pourraie nt
s'étouer e n les avalant ou en pla çant leur tête à l'inté rieur.
ATTENTION
Manipulation des piles
En cas de fui te de liquide d'une p ile, essuyez avec un ch ion et
remplace z la pile. En cas de cont act du liquide ave c les mains,
rincez immédiatement celles-ci à l'eau.
Si les pile s ne sont pas utilisé es correctem ent, elles peuv ent
présenter des fuites, surchauer, exploser, s'éroder ou
endomma ger l'appareil, c ausant ainsi un ince ndie ou des bless ures.
• N'utilisez p as des piles neuve s et usagées en mêm e temps et ne
mélange z pas diérents t ypes de piles.
• N'utilisez q ue des piles alcal ines AA. Vous ne deve z pas utiliser
de piles rechargeables.
• Placez les pil es dans le sens corre ct.
• Retirez immédiatement les piles usagées.
• Retirez les p iles si vous n'utilise z pas l'appareil pe ndant une
période prolongée.
• Ne chauez pa s les piles. De mêm e, ne les jetez pas au f eu ou
dans l'eau.
• N'utilisez p as de pinces métal liques, d'objet p ointu en métal
(comme la poi nte d'un porte- mine ou d'un sty lo à bille) pour
retirer les piles.
Lors de la mi se au rebut des pile s usagées, veill ez à respecter la
réglementation en vigueur.
Utilisation de cet appareil
À des ns de sé curité, débran chez cet appareil l orsque vous ne
l'utilisez pas.
Avant de procéder au nettoyage de l'appareil, débranchez
l'adapta teur secteur de la p rise et retirez le s piles.
J Manipulation des cassettes
• Assurez-vo us d’utiliser un rub an PX dédié.
• Certains t ypes de rubans n e peuvent être coup és par le massicot intégré.
Pour plus d' informations, ve uillez vous réfé rer au manuel d'util isation
de la casse tte.
• Veillez à ne pas f aire tomber la cass ette. De même, ne l a démontez pas.
Dans le cas contraire, vous risquez de l'endommager.
• Évitez d'util iser une casset te vide. Dans le cas co ntraire, la tête
d'impression pourrait surchauer et entraîner des dommages ou un
dysfonctionnement.
RAPPEL
Les casse ttes contienne nt un ruban. Lors de la m ise au rebut des cassettes,
veillez à re specter la rég lementation lo cale en vigueur.
J Autres mises en garde
Remarques concernant l'utilisation
• Veillez à ne pas v ous couper les do igts lors de la dé coupe des étiqu ettes.
• N'appose z pas d'étiquette s ur le corps humain, l es êtres vivant s, les
installations publiques ou tout autre bien personnel.
À propos des étiquettes imprimées
• Suivant le matériau de support ou les conditions environnementales, les
problè mes suivants peu vent survenir :
Étiquette : décoloration, caractères illisibles, décollement
Côté adhés if : décollement im possible, adhé sif résiduel, décoloration,
détérioration
• Avant toute utilisation, vériez soigneusement l'adéquation de vos
besoins av ec le type d'étiq uette, ainsi que l e support desti né à recevoir
la parti e adhésive.
K-Sun déclin e toute responsa bilité concernant l es dommages ou pe rtes
résultant des causes mentionnées ci-dessus.
Symbol List / Lista de símbolos / Liste des symboles Safety Instructions / Instrucciones de seguridad / Instructions de sécurité
Symbol/Símbolo/Symbole
1. Measurement/Medidas/Mesure
2. Metric/Métrico/Métrique/
3. Abbreviation/Abreviatura/Abréviations
4. Punctuation/Puntuación/Ponctuation/
5. Parentheses/Paréntesis/Parenthèses
6. Math/Matemáticas/Maths
7. Currency/Moneda/Devise
8. DoubleFigure/Dos cifras/Chif.doubles
9. Number/ Número/ Numéros
10. Number/ Número/ Numéros
11. Greek/Griego/Grec
12. Oce/Ocina/Bureau
13. Safety/Seguridad/Sécurité
Accent mark/Acento ortográco/Caractères accentués
14. Facility/Comercio/Commerces
15. Prohibition/Prohibición/Interdiction
16. Household/Hogar/Maison
17. Food/Alimentación/Alimentation
18. Sports/Deportes/Sports
19. Activity/Actividad/Activité
20. Occasion/Ocasión/Occasion
21. Shipping/Envío/Livraison
22. Electrical/Eléctrico/Électrique
23. Animals/Animales/Animaux
24. Zodiac/Zodíaco/Zodiaque
25.Emoticons/Emoticonos/Émoticônes
Frame/Marco/Cadre
1 2 3 4 5 6
7 8 9 10 11 12
13
14
15 16
19 20 21 22 23 24
25 26 27 28 29 30
31 32 33 34 35 36
37 38 39 40 41 42
43 44 45 46 47 48
49 50 51 52 53 54
55 56 57 58 59 60
61 62 63 64 65 66
67 68 69 70 71 72
73 74 75 76 77 78
79 80 81 82 83 84
85 86 87 88 89
17 18
 Loading...