

Page 1

IMPORTANT!
You need to reinstall EPSON® Image Authentication System™ (IAS) on
your camera if it was installed before your camera was repaired. Please see
your EPSON Image Authentication System User’s Guide for instructions.
IAS software lets you check the authenticity of photos taken with your
EPSON Photo PC® 700, 750Z, 800, or 850Z camera. IAS detects
when even a single bit of digital data in a picture has been altered. If you
don’t have IAS installed on your camera and would like to learn more about
it, call 1-800-GO EPSON, or visit our website at http//www.epson.com.
CPD 8424R1
Page 2
Page 3

EPSON is a registered trademark of SEIKO EPSON Corporation.
PhotoPC is a registered trademark, and HyPict, Image
Authentication System, and FaxAdvice are trademarks of Epson
America, Inc.
SoundAdvice is a service mark of Epson America, Inc.
Microsoft, Windows, and Windows NT are registered trademarks
of Microsoft Corporation. IBM is a registered trademark of IBM
Corporation.
Other product names used herein are for identification purposes
only and may be trademarks of their respective owners.
This software is based in part on the work of the Independent
JPEG Group.
Copyright © 1999 by EPSON America, Inc. 7/99
Torrance, California, USA CPD-8298R1
Page 4

Contents
Introduction . . . . . . . . . . . . . . . . . . . . . . . . . . . . . 1
System Requirements . . . . . . . . . . . . . . . . . . . 2
Installation and Setup . . . . . . . . . . . . . . . . . . . . . . 2
Installing IAS . . . . . . . . . . . . . . . . . . . . . . . . . 3
Uploading IAS to Your Camera . . . . . . . . . . . 4
Verifying Pictures . . . . . . . . . . . . . . . . . . . . . . . . . 11
Displaying Different Views . . . . . . . . . . . . . . . . . . 14
Where to Get Help . . . . . . . . . . . . . . . . . . . . . . . . 17
Camera Frame Rates . . . . . . . . . . . . . . . . . . . . . . . 18
i
Page 5

Introduction
The EPSON Image Authentication System™ (IAS) lets
you check the authenticity of photos taken with your
EPSON PhotoPC
IAS detects when even a single bit of digital data in a
picture has been altered. Because IAS doesn’t change the
file format, it has no effect on your ability to store and
display pictures, or to use them in other applications.
Important:
Your software license agreement permits you to
upload the IAS software to only one EPSON digital
camera per software copy or license purchased.
®
700, 750Z, 800, or 850Z camera.
1
Page 6

System Requirements
Your system must have the following:
■ IBM
■ Microsoft
■ 9-pin serial port or USB port (Windows 98 only)
■ At least 16MB RAM
■ VGA monitor with minimum resolution of
®
compatible PC with a 486 or higher processor
®
Windows®
Windows NT
®
4.0 (with Service Pack 3) or later
98, Windows 95, or
640 × 480 and at least 16-color display
Installation and Setup
This section explains how to install the IAS software on
your computer and upload it to your camera.
Note:
Once you upload IAS to your camera, you will not
be able to remove it.
2
Page 7
Installing IAS
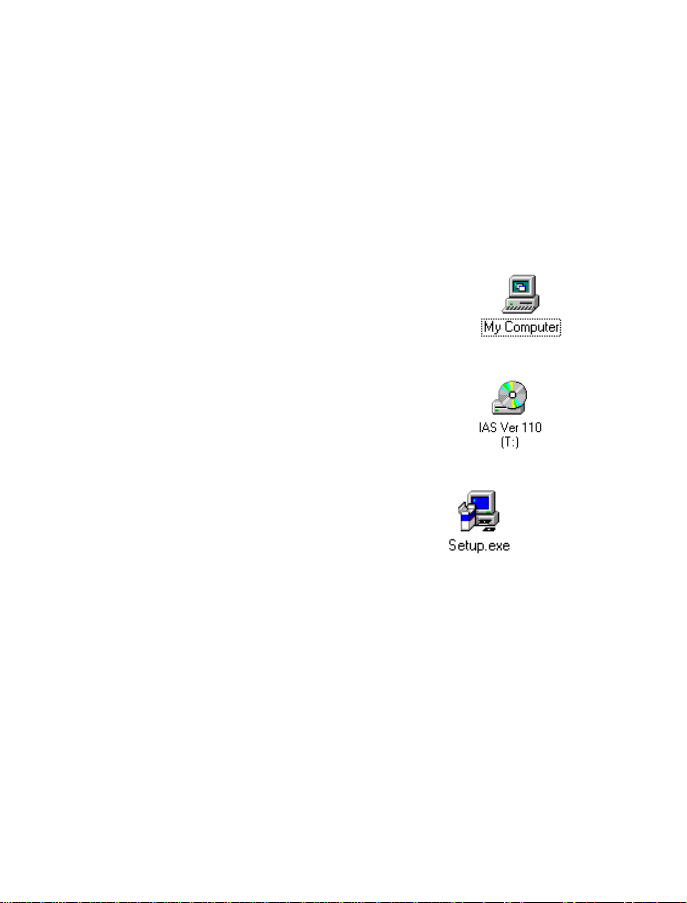
Follow these steps to install IAS:
1. Insert the EPSON Image Authentication System CD
into your CD-ROM drive.
2. Double-click the
on your Windows desktop:
3. Double-click the CD-ROM drive icon:
My Computer icon
4. Double click the
Setup.exe icon:
5. Follow the instructions on your screen to install the
software.
3
Page 8

Uploading IAS to Your Camera
EPSON Image Authentication System verifies the
authenticity of pictures taken only after the IAS program
is uploaded to your camera.
You can use this procedure both to upload IAS to your
camera and to verify that IAS is loaded on a camera.
Before you start, make sure you have the serial cable or
USB cable that came with your camera. Also, either use
an AC adapter or make sure your camera has a fully
charged set of batteries.
4
Page 9

Turn off the camera and LCD screen, then follow these
steps:
1. Locate your computer’s serial or USB port.
Note:
If you are connecting the camera to a serial
interface and your computer has two ports,
connect your camera to COM1.
2. If you are using the serial cable, align the connector
with your computer’s serial port, and plug it in. Then
tighten the screws.
5
Page 10
If you are using the USB cable, plug the connector
into the USB port on your computer or into a port
on a USB hub.
Note:
Although you can use a USB hub, it’s best to
connect the camera directly to the computer’s USB
port.
6
Page 11

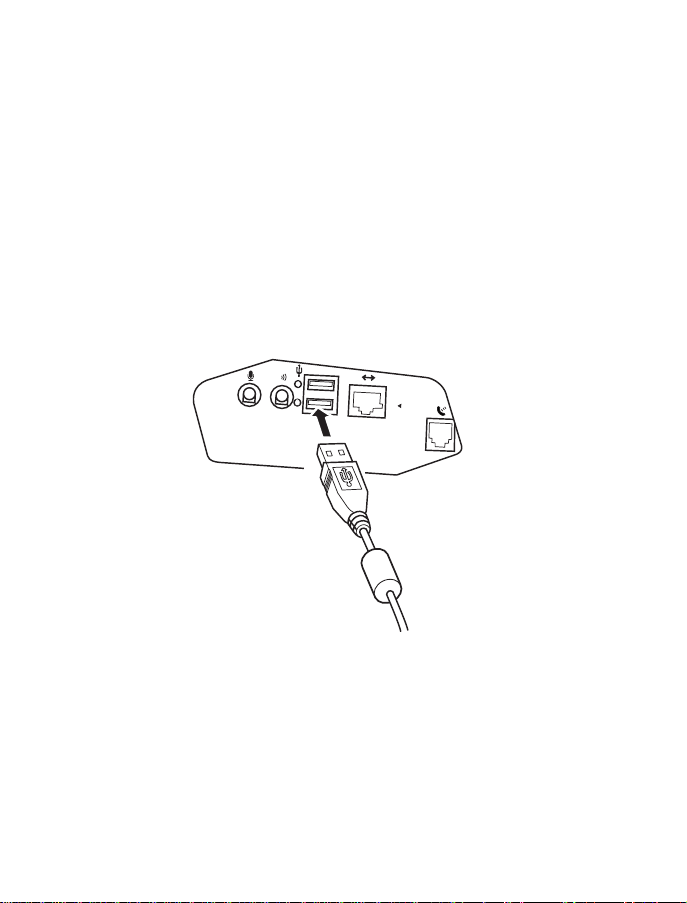
3. Open the connector cover on the side of the camera.
Align the serial or USB cable with the port and plug
it in.
serial port
USB/serial
interface
7
Page 12

4. Turn on the camera.
Note:
If you have problems connecting to the port you’ve
selected, check your computer’s port configuration
and try again. If you’re using batteries instead of an
AC adapter, make sure your batteries are fully
charged.
5. Click
Start
, point to
Authentication System
Uploader
. You see this message:
Programs, EPSON Image
, and click
Camera
Your software license permits you to upload the
software to one camera only. If you want to use the
software on another camera, you need to purchase
another copy of the software.
8
Page 13

6. Click OK. You see the IAS uploader screen:
7. Click the
UPLOAD
button. When the software has
been uploaded to your camera, you see the following
screen:
9
Page 14

Note:
If IAS can’t find your camera, follow the
instructions on the screen to establish a
connection.
If you purchased additional copies of software,
continue with step 8. Otherwise, go to step 9.
8. To upload IAS to another camera, disconnect the
first camera and connect the second. Turn the second
camera on, then click
Test Connection
to make sure
the camera is properly connected. The software
uploads automatically to the second camera.
9. Click
Close
, then turn off and disconnect your
camera when you’re finished.
Any pictures you take with your camera from this point
on can be checked by IAS for authenticity.
Note:
In the unlikely event your camera needs to be
repaired, you will need to upload IAS again.
10
Page 15
Verifying Pictures
After you’ve loaded IAS on a camera, any pictures you
take will contain an invisible, encrypted “fingerprint.”
IAS uses this fingerprint to check the integrity of a
picture. You can check a single picture or verify several
pictures at once. To verify a picture:
1. Transfer the photos to your computer as described in
your camera manual.
2. Click
Start
, point to
Authentication System
Verification
. You see the following screen:
Programs, EPSON Image
, and click
EPSON IAS
11
Page 16

3. From the File menu, select
Open Folder
Note:
The command
menu is not operational for this release.
button. You see the Open dialog box.
Select Key List File
Open
, or click the
on the File
4. Locate and select the image files you want to verify.
To select more than one file, hold down the
Ctrl
key
while you click on the files.
5. Click
Open
. You see the File List View:
12
Page 17

The File List View lists the selected files and the following
details for each picture:
Verification Results
PASS
■
■
■
indicates the picture has not been altered.
FAIL
means the picture has been altered.
Non-IAS image
indicates the picture was taken
with a camera without IAS loaded.
ERROR
■
explained under
indicates an error condition. (Errors are
Notes
.)
Filename
Shows the filename of the picture.
IAS Image
Shows whether the picture was taken with a camera
that has IAS installed.
IAS Security Level
Shows the IAS security level in use. (Your software
currently supports level 2.)
Notes
Gives more detailed explanations of errors.
Path
Shows the path of the image file.
13
Page 18

Displaying Different Views
In addition to the File List View, you can display
verification results for a single image file (Test Info View),
or you can display the File List View and Test Info View
at the same time.
File List View
button
Test Info View
button
Both Views button
14
Page 19

To display the Test Info View, click the
button in the toolbar, or choose
Test Info View
Test Info View
from the
View menu. You see the following screen:
In addition to verification results, the Test Info View
displays a thumbnail image of the selected picture.
15
Page 20

To see the File List View and Test Info View at the same
time, click the
Views
from the View menu. You see the following
Both Views
button, or choose
Both
screen:
To return to the File List View, click the
button on the toolbar, or choose
File List View
View menu.
16
File List View
from the
Page 21

Where to Get Help
EPSON provides technical assistance through electronic
support services and automated telephone systems 24
hours a day, seven days a week, as follows:
■ From the Internet, you can reach EPSON’s Home
Page at http://www.epson.com.
■ For pre-recorded answers to commonly asked
questions, call EPSON SoundAdvice
(800) 922-8911.
■ You can also access EPSON FaxAdvice
technical information library, by calling
(800) 922-8911. You must provide a return fax
number to use this service.
■ For the location of your nearest Authorized EPSON
Reseller, dial (800) 922-8911.
To speak to a technical support representative, dial
(310) 974-1983 (U.S.), or (905) 709-3839 (Canada),
6 AM to 6 PM Pacific Time, Monday through Friday.
Toll or long distance charges may apply.
You can purchase manuals and accessories from EPSON
Accessories at (800) 873-7766, or visit our website at
www.epsonsupplies.com (U.S. sales only). In Canada,
please call (800) 807-7766 for dealer referral.
SM
at
™
, EPSON’s
17
Page 22

Camera Frame Rates
When you’ve uploaded IAS to your camera, it takes
slightly longer to process pictures. The tables below give
the camera frame rates (approximate time, in seconds, you
must wait between pictures) when IAS is installed.
Color Mode, LCD Off
Image
Quality
Standard 4 4 5
Fine 10 9 9
Super Fine 15 14 14
HyPict 35 22 21
PhotoPC
750Z
PhotoPC
800
PhotoPC
Color Mode, LCD On
Image
Quality
Standard 6 5 7
Fine 13 10 11
Super Fine 18 15 16
HyPict 37 24 24
PhotoPC
750Z
PhotoPC
18
PhotoPC
800
850Z
850Z
Page 23

Page 24

CPD 8298R1
 Loading...