


ES-300C SCANNER
Scanner
7nain
unit
\
,’
I’
.,’
Document-
(dpi)
selectable
I
acanner
dpr (at
‘1 ”
converter
resolution
eke
features
cattings
(287
0
Power
ubt
The ES-300C is a low-cost, hrgh-rasolution color image scanner for usa with A4
letter-size
.
.
.
.
.
.
.
.
.
.
.
.
.
.
Subscanning
Wertical Scan)
Photoelectric
Device
Manuscript
Maximum Effective
Pkture
sheets
The
ES3OOC
offers the following features:
Uses a basic resolution of
Produces
Scans up to 256
Read8 A4 and
Offers high quality at a low price
Functions
Reduces and
Performs line-saquence (one-time) color reading
Offers tone correction levels and other
Employs color correction tables for various printer types
Functions with a high-speed interface
Uaas
Comes equipped with two standard
05era
full-color scanning by means of an E-bit A/D
monechrome
lettersiz sheets
with a variety of
enlargea imagea born
the
ESC&B3 eoftware
Bidirectional parallel interface
RS232c serial
an optional SCSI interface for use with an Apple Macintosh
300 dota
levels
printera
co
mmand level
interface
per inch
through
50% to 200% of original
proceasing
inwfacee:
Scanner Specifications
Flat
bad color image
Method
Size A4 sue: 8.5 inches (216 mm) x 11.7 inches
Elements
Movement of the reading head
CCD (charge
semor
mm)
2552 x 3508
loo40
coupled device) line
pixels at 300
Image sue)
Basic Resolution
Command
Resolutions
(dots per inch)
Reading Sequence
Scanning Speeds
Color Separation
z4mnlIng
01
Halltoning
Brightness
Image Data
DigItal
Tone Correction
Color Correction
Direct Printing
Interfaces
Light Source
Safety Regulations
Electrical Specifications
Resistance Electricity
Selectable 600.480.400.360.320.300.
Halftoning
Supply Voltage
Frequency
Power Consumption
Insulation
Resistance
Radiation Noise
Static Electricity
Horuontal scan: 300 dpi
Vertxal
scan:
300 dpr
240.200; 180; 150,14i, 120,
100, 90, 80, 75, 72. 50
You can select a resolution through a software
command.
There are two
sequence and
mode, the image is scanned three trmes
for green, then for red, and
line sequence mode, the Image is scanned once.
A monochrome scan 1s a one-time scan. You
have the optron of selecrmg a dropout color
(red. green or blue,.
In monochrome mode, the typical scannmg
speed IS 6.5 mllhseconds per line.
In color (page sequence, mode, the
scanning speed 1s 10 mtihseconds per ime.
In color (line sequence, mode, the
xannmg
By light source (three
You can reduce and enlarge an image from
KO%toZ0C%oftheoriginalsizeinl%
increments. Thin function is
software
zooming are independent.
8
bita
Seven levels
softwarecommand
l- to 8-bita
software
Bilevel (mode A, B, C. or none)
Quadlevel (mode A or none)
CRTl,
Impact-dot, thermal, ink-jet printer. color CRT
display
ESC/T%-83C
Standard interfaces: RS232C serial,
bidirectional parallel
Optional
Noble gas fluorescent lamps
UL/CSA,
120 VAC +/- 10%
49.5 to 60.5
hIAX
20 M ohms at 500 VDC between AC
power line and chaws
FTZ
10 KV (panel); 7KV. 150
modes of color
lure
sequence. In
speed is 35 milliseconds per hne.
co
mmand. Horizontal and vartical
per pixel for each color
&actable
per pixel,
CRT2;
printer A,
M-dot with color); HP Paint-Jet
interface: SCSI
TUV
Hz
40 W
FCC Class B
scannmg:
thud
for blue,. In
coiors:
green, red,
salected
by panel switch or
s&&able
(nonswitchable)
through
B, C
pF.
150 ohms (metal)
page
page sequence
(fist
typxal
typrcal
blue)
by a
Scanners
6/30/90
EWOOC1
ES-300C SCANNER
Environmental Conditions
Temperature
Humidity
Dust
Illumination
Reliability
Main Unit
Manuscripts
Use
refractwe
photographs).
1
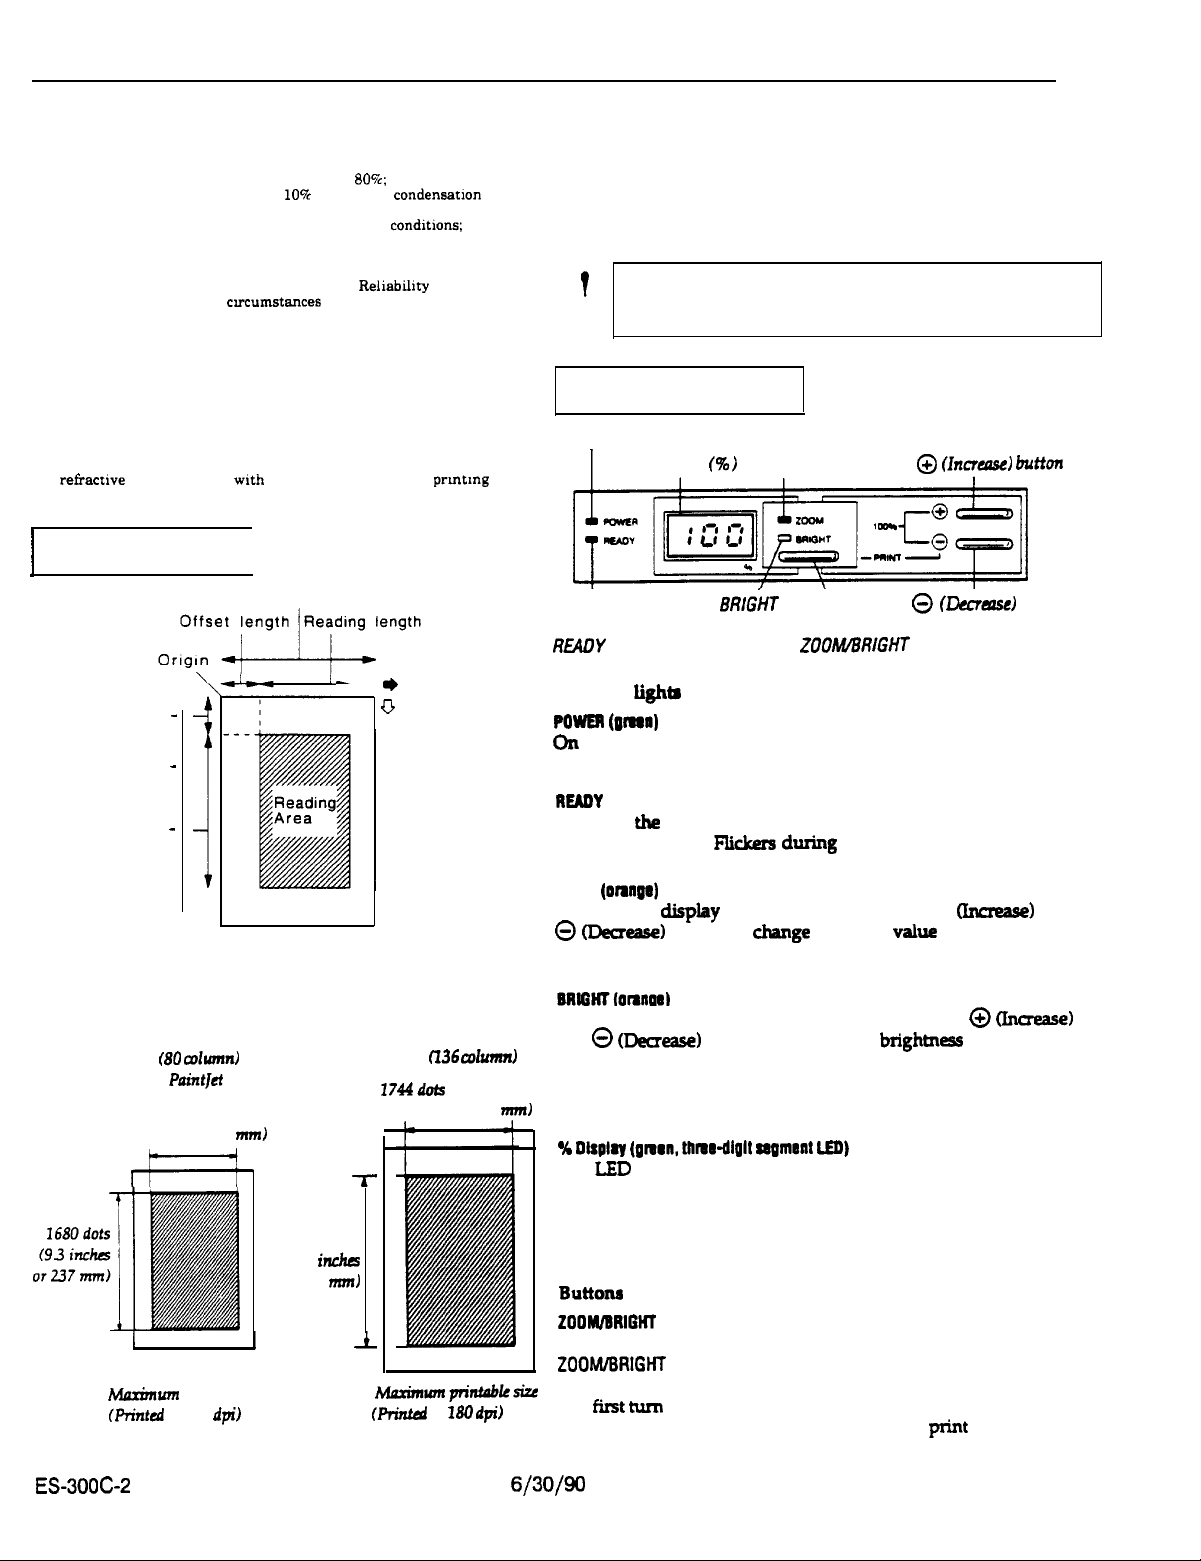
Printable Area
1
type documents
Operating: 5 to 35 degrees C
Storage: -25 to 60 degrees C
Operating: 10% to
Storage:
10%
Ordinary office or home conditions; extreme
dust should be avoided.
Do not operate under direct sunlight or near
strong light source. Reliability under such
cvcumstances cannot be guaranteed.
100,000 cycles MCBF
wth
smooth surfaces (such as
Mam scan length
80%;
to 85%; no condensation
no condensation
prmtmg
and
You can use any type of paper that is acceptable for your printer,
including single sheets or continuous paper. Always make sure,
however, that the paper you use is large enough to accommodate
the printable size.
You can adjust the printed size of the image with the zoom function
of the scanner. Details on the relation between zoom and printable
size are explained later in this appendix.
CAUTION: Never use paper smaller than the printable size
?
.
0
you choose. Printing beyond the paper can damage your
printer.
The Control Panel
POWER light
I
I
READY
light
Display f%)
Et?l&T
ZOOM light
light
\
ZOO/WBRIGHT
@ (humast?) button
@ u3?cmse)
button
button
*
Mam Scan
Offset length
Sub scan length
Reading length
-
-
-
u
Sub Scan
The maximum printable sizes available with the direct print
function are as shown below.
Epson
Cl36
Epson
(80 columns
and HP
Paintjet
1416
dots
(7.1
inch6 or
200
mm)
m
tdaximum printable size
Printat
at 180
dpi)
2136
dots
(11.9 inchrs
or 301 mnJ
1744dob
(9.7 inch6 or 246 mm)
T
Marimwnpn’ntnble*
(Printd at
mlumn)
180 dpi)
Indicator lighia
POWER
(PInIl)
On
when the POWER switch is on and power is supplied.
READY
(green)
On when the scanner is ready to receive commands from the
computer software. Flkkers
ZOOM
(onllge)
On when the display is in zoom mode. Use the@
0 CDecrm)
buttons to
during
scanning.
chnge
the zoom value shown on the
CWrease)
and
display when you are using the direst print function.
On when the display is in brightness mode. Use the @
and @ Oecrease) buttons to change the
brightnm
(Increase)
value shown on
the display when you are using the direct print function.
The display
W
Dlsolq
(gmrn, thmr-dlglt segment LED)
The
LED
display indicates the zoom value when the control panel is
in zoom mode and indicates the brightness value when the control
panel is in brightness mode. It also indicates when an error occurs in
the scanner. The scanner is in the zoom mode when you first tum on
the power.
Buttons
200M/BR1GtrT
Pressing this button selects either zoom mode or brightness mode.
ZOOhdlBRlGHT
scanner is in the ready state). The
works only when the READY light is on (when the
scanner is in zoom mode when
you first turn on the power. Use this button to select zoom or
brightness only when you are using the direct print function.
ES-300C-2
6/30/90
Scanners

@
(Incmta)
Pressing this button increases the zoom value
(in
increments of
1%)
between 50% and 200% and increases the brightness value in
increments of 1 between seven values, from -3 (lightest) to 3
(darkest). Use this button to adjust zoom and brightness only when
you are using the direct print function.
Pressing this button decreases the zoom value (in increments of 1%)
from 50% to 200% and decreases the brightness value in
inuements
of 1 between seven values, from -3 (lightest) to 3 (darkest). Use this
button to adjust zoom and brightness only when you are using the
direct print function.
Pressing ZOOM/BRIGHT and 0 simultaneously enables the direct
print function.
Self test function
By holding down
start the
scamefs
@or @while
you turn on the scanner, you
self test function. See Chapter 1 for more
CM
information.
Direct print function
The direct print function transfers a color image directly from your
scanner to your printer. To use the direct print function you must
have a special parallel interface cable. Consult your dealer to obtain
the proper cable. press down both the ZOOM/BRIGHT
and@
buttons 1
to start the direct print function. See Appendix D for more
information.
Setting the DIP Switches
Table
2.
Baud rate
Table 3. Printer type for
D,P sw
EscP24l.hmmml((10wlumn) ON
EscaP24 (1.3s camwl)
direct
2d
2.7 24
ON ON
ON OFFOFFOFFON
ES-300C SCANNER
print
2.2 24
2-2 ld l-7
OFFON OFFON wFoFFoFF
OFFOFFCN
ON ON
OFFON
cn=F
oh(
DIP awitcb 1 settings
DlPswitch1detenninetheserialinMaceprotocoisandthe
direct print function.
Tabiel.DlPswitchlsettinga
-Ilo.
l-l
l-2
14
fha@mn
8wdu4sclbn
011 OFF
soolwo2.
--v--m
ON
OFF
OFF
DIP switch 2 settings
DIP switch 2 determines the scanner operation normally required
for the direct print function. For normal
xanning
operations, your
scanner software sets these scanner functions and overrides the
current
DIP
switch settings. Therefore, except for the direct print
function, you are unlikely to change these switches from the
factory settings.
Table 4. DIP switch 2
2-l
2-2
2-3
2.4
26
I
I
2-s
2.7
I
settings
.-t-w
8otmtnmcmlamml
eaco4wmllseme
ON
se.
table 5.
SwWo6.
I
soa
I
tlbls 7.
OFF
OFF
ON
cm
I
Scanners 6/30/90
ES-300C-3

ES300C SCANNER
Tabk S.~igitd~a@ning
a-2
2-l
Set
DIgItal lMtonlng
OFF OFF
Bl-kd
OFFON Hal6onsA
CU
OFF
ON ON HdttoneC
HatlMsB
Table 6. Gamma corwction
Table 7. Color
2-7
OFF OFF lmpactdotpdnter
OFF ON
ON OFF Inkjetprlnter
ON ON
2-6
corraztion
Set
Color Correodon
Thermalprlrrtsr
Monltor(CRT)
sctttngs
Pin Assignments (Serial)
Pm
No.
SlgnalNw UD DsadpUon
1
2
3
6 10
19
I I
20
21 to 25
FG -Fnme
lxD
FIXD
NC(IWwd
DTR
NC
0 Tnnsmltdata
I
RscBhdata
0
Date
Not
gmund
temtkml ready
usml
Pin Assignments (Parallel)
Owcrlptbn
-STROBE
wklth at
micmsscontls.
These SIgnSIS Convey
level indkates ~lcal
20-27
Slgnal
-STROBE
DATA g-7
1
pubs
to read In or send out data. Pubs
recelvii
termkml must excesd 0.5
the
1st
to 8th
1; bw level
bits of
data.
lndlcatss bgbal0.
HQh
The
optional
.
Bidirectional interface board for IBM PC and compatibles
l
EpScanII
l
Apple Macintosh SCSI interface kit board
l
EpScsn
units
available for the
scanner utility program
Mac
ecanner
program
ESBOOC eca~er ere:
12-15
16
t
Pln No.
1430
31
32
33
3435
36
Return
Pin
-
-
-
-
-
-
-ACKNLG
GND
GGND
NC
Slgnal
GND
INIT
NC
GND
NC
DIR
Pubs of approximately 12
ldcates
thst data
scanner ls ready to accept more data.
When
this
dsta. The SlQnSl be~mc#i high duflng data entry.
during scsnnlng. witen
during scanner enor.
Not
Loglc gmund lsvel
Scanner
Not
II0
Descrlptlon
Twstwir
-
I
Whsn
reset 10 ItS
The pubs
greater than 50
Notused
-
Twisied-psir
Not
I
Low
slgnal Is high.
usad
chsssls
ussd
return
mb
&pal level
poweron State.
wMth
mtum signal
ussd
irxtlcates
that
mb-rids.
has been recetved
the scanner cannot
the scunwr Is not
ground
signal
ground level
becomes bw.
at
mb-rub.
Thb bvel Is
ttm mceivmg tennlnal
ground bvel
climc%bn Is
Input.
Low level
and the
ready.
the
usually
must
mcetve
and
bs
ES-300C-4
Scanners

Zoom and Dot Areas
I
ES-300C SCANNER
I
130
140
1W
160
170
190
190
200
I
barn(W)
Iw
Ia
110
120
552x760
592x819
632x877
900x936
I----
720x994
~~~~~
1-
780x1053 1096X1516
800x1111
948x1170
99 dpl
376X629 424x685
456x631
849x1158
912x
792XlP95
056x
912 I1236
I976x1347
1040x1432
I
1180
x
1224xwe4
1llOdpl
594x702
928x1287
12831 tO16x1404 ( 1224x1694
824x1140 880x1216
1179
88811229
952 x 1316 1016 x 1404
1~
[ tOwx149t ~1162x1691 I
1609
~~
1018 x
1404
11u41579 1224X10M
1208r1667
1272x1766
12oap1
504xM2
wsxa42
1120 x 1544
962 x 1310
1oBBxt497
I
12wXlrn
1380X1872
144DPl
wsxs42
720 x
1010
1344x1853
~1464x2921
I
I
I
I
Scanners
6/30/90
ES300C5

ES-300C SCANNER
Zoom
and
Dot
Amcu
fConfin.ued)
150
1w
170
180
190
200
Note: The
5996x7020 6129x6424
6440x7469 6629x9996
5776
x
7950
6m8x9647
6210x&(24
5%6x9992
6900x9369
maximum horizontal
7344 x 10108
7752x1c670 9699x13339
81Wx11232
acan
reading length ie 4096 dots.
7646x10639
6180 x
11232
9964x11934
917sx12936
10200 x 14040
ES-3OOC-6
6/30/90
Scanners

ES-300C SCANNER
Installation / Support Tips
Software
When operating the EWOCIC scanner with an IBM
1.
compatible computer, you must install the following:
o Software that supports the
Epscan II scanner program.
When operating the
2.
Macintosh computer, you must install the following:
o S&were
Epscan II scanner program.
Note: To achieve the best final image, you may need tc make
multiple scans at various scanner settings.
that supports the
ES-3WC
ES-3WC
scanner with an Apple
ES300C
scanner or Epson’s
scanner or Epson’s
set up
if you are using the scanner with an IBM-compatible computer,
connect the interface cable to the bidirectional parallel port on
the computer. Designate the interface board on the computer
as LPT2. Some systems may require that a bidirectional parallel
port be installed.
Notez
The parailel cable must be a bidirectional cable.
If
you are using the scanner with a Macintosh computer,
the SCSI interface board in the interface board slot. Then
connect the interface cable from the computer to the SCSI
connector on the scanner.
install
Scanners
6/30/90
ES-300G7

ES-300C SCANNER
Information Reference List
Engineering Change Notices
None.
Product Support Bulletins
None.
Related Documentation
TM-ESGOOC
4CXlO167
Technical Information Bulletins
None.
E!S-3COC Service
ES-3OOC
User’s Manual
Manual
EWOOC-8
6/30/90
Scanners
 Loading...