

Page 1

Page 2

®
EPSON
ES-300C
User’s Manual
Page 3

FCC COMPLIANCE STATEMENT FOR AMERICAN USERS
This equipment has been tested and found to comply with the limits for a class B digital
device, pursuant to Part 15 of the FCC Rules. These limits are designed to provide reasonable
protection against harmful interference in a residential installation. This equipment generates,
uses and can radiate radio frequency energy and, if not installed and used in accordance
with the instructions, may cause harmful interference to radio communications. However,
there is no guarantee that interference will not occur in a particular installation. If this
equipment does cause harmful interference to radio or television reception, which can be
determined by turning the equipment off and on, the user is encouraged to try to correct
the interference by one or more of the following measures:
.
Reorient or relocate the receiving antenna
.
Increase the separation between the equipment and receiver
.
Connect the equipment into an outlet on a circuit different from that to which the
receiver is connected
.
Consult the dealer or an experienced radio/TV technician for help.
The connection of a non-shielded interface cable to this equipment will invalidate the FCC
Certification of this device and may cause interference levels which exceed the limits
established by the FCC for this equipment. If this equipment has more than one interface
connector, do not leave cables connected to unused interfaces.
This digital apparatus does not exceed the Class B limits for radio noise emissions from
digital apparatus as set out in the radio interference regulations of the Canadian
Department of Communications.
Le present appareil num6rique n’emet pas de bruits radioelectriques
applicables
brouillage
All rights reserved. No part of this publication may be reproduced, stored in a retrieval
system, or transmitted, in any form or by any means, mechanical, photocopying. recording
or otherwise, without the prior written permission of Epson America, Inc. No patent liability
is assumed with respect to the use of the information contained herein. While every
precaution has been taken in the preparation of this book, Epson America, Inc. assumes no
responsibility for errors or omissions. Neither is any liability assumed for damages resulting
from the use of the information contained herein.
Epson America, Inc. shall not be liable against any damages or problems arising from the use of
any options other than those designated as Original Epson Products by Seiko Epson Corporation.
Epson is a registered trademark of Seiko Epson Corporation.
General Notice: Other product names used herein are for identification purposes only and may
be trademarks of their respective companies.
Copyright Q 1990 by Epson America, Inc.
Torrance, California
au appareils numeriques de Classe B
radio6lectriques edicte
WARNING
FOR CANADIAN USERS
prescrites
par le
Minis&e
des Communications du Canada.
dans le reglement
depassant
les limites
sur
le
ii
Page 4

IMPORTANT SAFETY INSTRUCTIONS
1.
Read all of these instructions and save them for later reference.
2.
Follow all warnings and instructions marked on the product.
3.
Unplug this product from the wall outlet before cleaning. Do not
use liquid cleaners or aerosol cleaners. Use a damp cloth for
cleaning the outside of the unit.
4.
Do not use this product near water.
5.
Do not place this product on an unstable cart, stand, or table.
The product may fall, causing serious damage to the product.
6.
Slots and openings in the cabinet and the back or bottom are
provided for ventilation; to ensure reliable operation of the
product and to protect it from overheating, these openings must
not be blocked or covered. The openings should never be
blocked by placing the product on a bed, sofa, rug, or other
similar surface. This product should never be placed near or
over a radiator or heat register. This product should not be
placed in a built-in installation unless proper ventilation is
provided.
7.
This product should be operated from the type of power source
indicated on the marking label. If you are not sure of the type of
power available, consult your dealer or local power company.
8.
This product is equipped with a 3-wire grounding-type plug, a
plug having a third (grounding) pm. This plug will only fit into
a grounding-type power outlet. This is a safety feature. If you
are unable to insert the plug into the outlet, contact your
electrician to replace your obsolete outlet. Do not defeat the
purpose of the grounding-type plug.
9.
Do not locate this product where the cord will be walked on.
iii
Page 5

10. If an extension cord is used with this product, make sure that the
total of the ampere ratings on the products plugged into the
extension cord do not exceed the extension cord ampere rating.
Also, make sure that the total of all products plugged into the
wall outlet does not exceed 15 amperes.
11.
Never push objects of any kind into this product through cabinet
slots, as they may touch dangerous voltage points or short out
parts that could result in a risk of fire or electric shock. Never
spill liquid of any kind on the product.
12. Except as specifically explained in the User’s Manual, do not
attempt to service this product yourself. Opening or removing
those covers that are marked “Do Not Remove” may expose you
to dangerous voltage points or other risks. Refer all servicing in
those compartments to service personnel.
13. Unplug this product from the wall outlet and refer servicing to
qualified service personnel under the following conditions:
A.
When the power cord or plug is damaged or frayed.
B.
If liquid has been spilled into the product.
C.
If the product has been exposed to rain or water.
iv
D.
If the product does not operate normally when the operating
instructions are followed. Adjust only those controls that
are covered by the operating instructions, since improper
adjustment of other controls may result in damage and will
often require extensive work by a qualified technician to
restore the product to normal operation.
E.
If the product has been dropped or the cabinet has been
damaged.
F.
If the product exhibits a distinct change in performance,
indicating a need for service.
Page 6

CONTENTS
Introduction
Features
Using the ES300C With Your Computer
About This Manual
Where to Get Help
Chapter 1 Setting Up the Scanner
Unpacking the Scanner
Choosing a Place for the Scanner.
Assembling the Scanner
Scanner Components.
Testing the Scanner
Connecting the Scanner to Your Computer
Setting Up Your Application Software
Chapter 2 Using the Scanner
Operating the Control Panel.
Using the Document Table
Preparing Scanner Software
Scanning an Image
Using the Scanner Functions
Tips on Using the Scanner.
..........................................
..............
................................
.................................
.............................
....................
............................
..............................
................................
............
................
........................
..........................
.........................
.................................
........................
..........................
1
1
2
2
3
1-1
1-2
1-3
1-4
1-8
1-10
1-13
1-14
2-1
2-2
2-5
2-10
2-11
2-12
2-18
Chapter 3 Maintaining and Transporting the Scanner
Cleaning the Scanner . . . . . . . . . . . . . . . . . . . . . . . . . . . . . . .
Transporting the Scanner . . . . . . . . . . . . . . . . . . . . . . . . . . .
3-1
3-2
3-4
V
Page 7

Chapter 4 Troubleshooting
4-1
Error Messages . . . . . . . . . . . . . . . . . . . . . . . . . . . . . . . . . . . .
Problems and Solutions. . . . . . . . . . . . . . . . . . . . . . . . . . . . .
4-2
4-5
Appendix A Technical Specifications A-1
Scanner Specifications . . . . . . . . . . . . . . . . . . . . . . . . . . . . . .
Initialization . . . . . . . . . . . . . . . . . . . . . . . . . . . . . . . . . . . . . .
Appendix B Connecting the Scanner to a PC
Using the Parallel Interface. . . . . . . . . . . . . . . . . . . . . . . . . .
Appendix C Connecting the Scanner to a Macintosh
Using the SCSI Interface . . . . . . . . . . . . . . . . . . . . . . . . . . . .
Installing the SCSI Interface Board ...................
Connecting the Scanner to the SCSI Interface
Removing the SCSI Board.
..........................
..........
Appendix D Direct Print Function
About Direct Print
Using the DIP Switches
.................................
.............................
Preparing for a Direct Print Operation ................
Starting a Direct Print Operation.
Tips for Direct Printing
.............................
....................
A-2
A-7
B-1
B-2
C-1
C-2
C-6
C-10
C-14
D-1
D-2
D-4
D-10
D-16
D-18
Glossary
Index
vi
Page 8

INTRODUCTION
The Epson® ES300C is a flatbed image scanner combining high
performance and reliability with a wide range of features to provide
full color or gray-scale monochrome scanning. The scanner’s color
and gray-scale capabilities make it ideal for applications such as
desktop publishing, computer graphics, computer presentations,
and software development. The scanner’s compact and streamlined
design make it easy to add to your office or home computer system.
Features
In addition to high-quality scanning and ease of operation, the
ES300C offers the following features:
Full color or gray-scale monochrome scanning
Up to 256 gradation tones per pixel per color
A maximum scanning area of 8.5 inches by 11.7 inches,
providing for U.S. letter-size paper
Nineteen scanning resolutions from 50 dots per inch to 600 dots
per inch
A zoom function that allows you to reduce or enlarge the image
size from 50 percent to 200 percent in one percent increments
Various image processing features, including gamma correction
and color correction, for better image reproduction
Software-controllable scanner functions
A direct print function that lets you use the scanner as a simple
color copier
Two interfaces to suit your computer system: with an IBM
compatible computer, you use the bidirectional parallel
interface; with a Macintosh
SCSI interface.
®
computer, you use the optional
Introduction 1
®
Page 9

Introduction
Using the ES-300C With Your Computer
To use the scanner, you need a software package to read the scanned
images. Programs are available from your Epson dealer for use with
IBM compatible computers and Macintosh computers. Other
graphics programs and scanner utilities also support the ES300C.
Be sure to choose a program that lets you use all the sophisticated
features of the scanner.
About This Manual
This user’s manual provides fully illustrated, step-by-step
instructions on setting up and maintaining your Epson scanner.
Chapter 1 contains information on setting up the scanner,
including unpacking and testing. Be sure to read and follow
these instructions first.
Chapter 2 provides important information on operating the
scanner and using the scanner functions.
Chapter 3 describes general maintenance and transportation of
the scanner.
Chapter 4 contains troubleshooting information. If the scanner
does not operate properly, see this chapter for a list of problems
and solutions.
Appendix A provides the technical specifications for the
scanner.
Appendix B describes the bidirectional parallel interface board
and includes instructions on how to connect the scanner to an
IBM compatible computer.
2
Introduction
Page 10

Introduction
l
Appendix C describes the SCSI interface board and includes
instructions on how to connect the scanner to a Macintosh.
l
Appendix D contains information on how to use the direct print
function.
At
the
end of this manual, you will find a glossary of terms and an
index.
Conventions used in this manual
WARNINGS must be followed to avoid bodily injury.
CAUTIONS must be observed to avoid damage to your
I
l
0
Notes contain important information and useful tips on the
operation of your scanner.
equipment.
Where to Get Help
Customer support and service for Epson products are provided by a
network of authorized Epson Dealers and Customer Care Centers
throughout the United States. Epson America provides product
information and support to its dealers and Customer Care Centers.
Therefore, we ask that you
purchased your Epson product to request assistance. If the people
there do not
through our dealer support program.
have
the answer to your question, they can obtain it
contact
the business where you
Introduction 3
Page 11

Introduction
Epson is confident that this policy will provide you with the
assistance you need.
Call the Epson Consumer Information Center at 1-800-922-8911 for
the following:
l
The location of the nearest Epson dealer
l
The location of the nearest Customer Care Center
l
Information on Epson User Groups.
To locate or purchase accessories or supplies, contact your nearest
Epson dealer or call 1-800-873-7766.
4
Introduction
Page 12

Chapter 1
SETTING UP THE SCANNER
Unpacking the Scanner. . . . . . . . . . . . . . . . . . . . . . . . . . . . . . . 1-2
Choosing a Place for the Scanner . . . . . . . . . . . . . . . . . . . . . . 1-3
Assembling the Scanner
Removing the Transportation Screw
Attaching the Document Cover
Scanner Components . . . . . . . . . . . . . . . . . . . . . . . . . . . . . . . . 1-8
Testing the Scanner
Plugging in the Scanner ............................
Turning on the Scanner ............................
Running the Self Tests
Connecting the Scanner to Your Computer . . . . . . . . . . . . . 1-13
Setting Up Your Application Software . . . . . . . . . . . . . . . . . 1-14
..............................
.................
.....................
..................................
.............................
1-4
1-4
1-7
1-10
1-10
1-11
1-11
Setting Up the Scanner
1-1
Page 13

Unpacking the Scanner
This chapter describes how to set up and test your scanner.
When you unpack the scanner, make sure that you have all the parts
and that
and the
these items:
none
have been damaged. In addition to this User’s Manual
Epson Color Image Scanner Image Samples
Scanner main unit
booklet, you’ll find
Power cable
After removing the parts, save the packing materials in case you
need to transport your scanner.
1-2
Setting Up the Scanner
Page 14

Choosing a Place for the Scanner
Keep the following in mind
scanner:
l
Place the scanner on a flat, hard, stable surface.
l
Place it close enough to the computer for the scanner cable to
reach.
.
Leave adequate room around the scanner to allow for easy
operation and maintenance. Make sure you can easily place and
adjust a document on the scanner.
.
Use a grounded outlet; do not use an adapter plug.
l
Avoid locations that are subject to direct sunlight, excessive
heat, moisture, or dust.
.
Avoid electrical outlets controlled by wall switches or automatic
timers.
l
Avoid using outlets that share a circuit with large motors or
electrical appliances; this could cause fluctuations in power
voltage.
Keep your entire computer system away from potential sources
of electromagnetic interference such as loudspeakers or the base
units of cordless telephones.
when
selecting a place to set up the
Do not connect more than one interface cable to the scanner at a
time.
Do not place any objects on top of the scanner.
0
CAUTION:
t
.
the transportation screw.
Do not operate the scanner without removing
Setting Up the Scanner
1-3
Page 15

Assembling the Scanner
After you’ve found the best place to set up your scanner, the next
step is to assemble the parts.
Removing the Transportation Screw
Before plugging in the scanner, you must remove the transportation
screw. This screw secures the carriage mechanism during transport
to protect it from damage due to shock or vibration.
CAUTION: Do not plug in the scanner before removing
I
l
0
1.
2.
3.
the transportation screw.
Place the scanner on a flat, stable surface with the back panel
facing you.
Locate the black rubber stopper in the center of the back panel.
This stopper protects the transportation screw.
Remove the rubber stopper by pulling it straight out toward
you.
1
1-4
Setting Up the Scanner
Page 16
Assembling the
4.
Remove the screw by turning it counterclockwise.
5.
Insert the transportation screw into the storage hole
on
Scanner
the left
side of the back panel. Push the screw all the way into the hole;
it does not screw in.
Setting Up the Scanner
1-5
Page 17

Assembling the Scanner
Place the stopper over the transportation screw with the round
6.
side of the stopper toward the top of the scanner.
Note: Do not discard the transportation screw or the stopper.
You will need to replace the transportation screw whenever you
transport the scanner.
1-6
Setting
Up the Scanner
Page 18
Assembling the Scanner
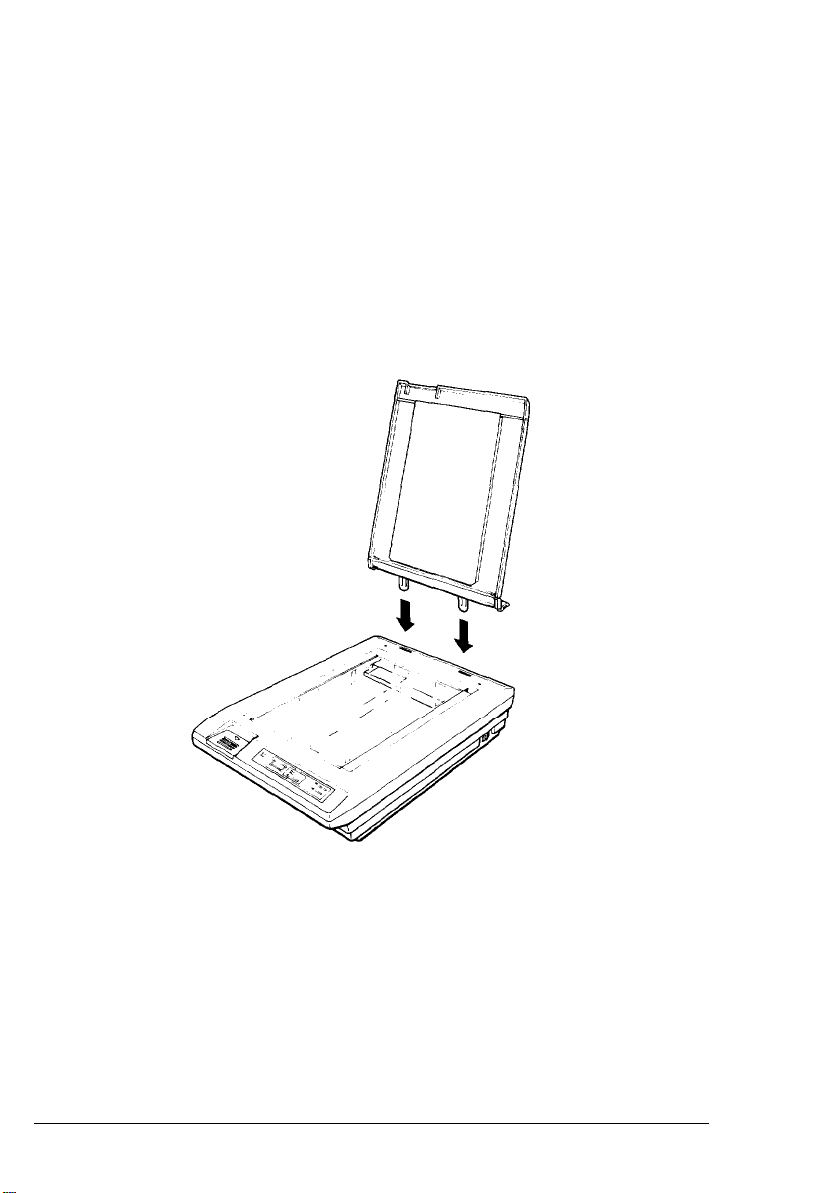
Attaching the Document Cover
The document cover keeps outside light from interfering with the
scanning process.
1.
Place the scanner on a flat, stable surface with the control panel
facing you.
2.
Hold the document cover perpendicular to its base while
holding the base parallel to the scanner.
3.
Insert the metal tongues on the base of the document cover into
the slots at the back of the scanner. The tongues slide in easily;
do not force them.
You can remove the document cover to scan thick or bound
material, such as books.
Setting
Up the Scanner
1-7
Page 19
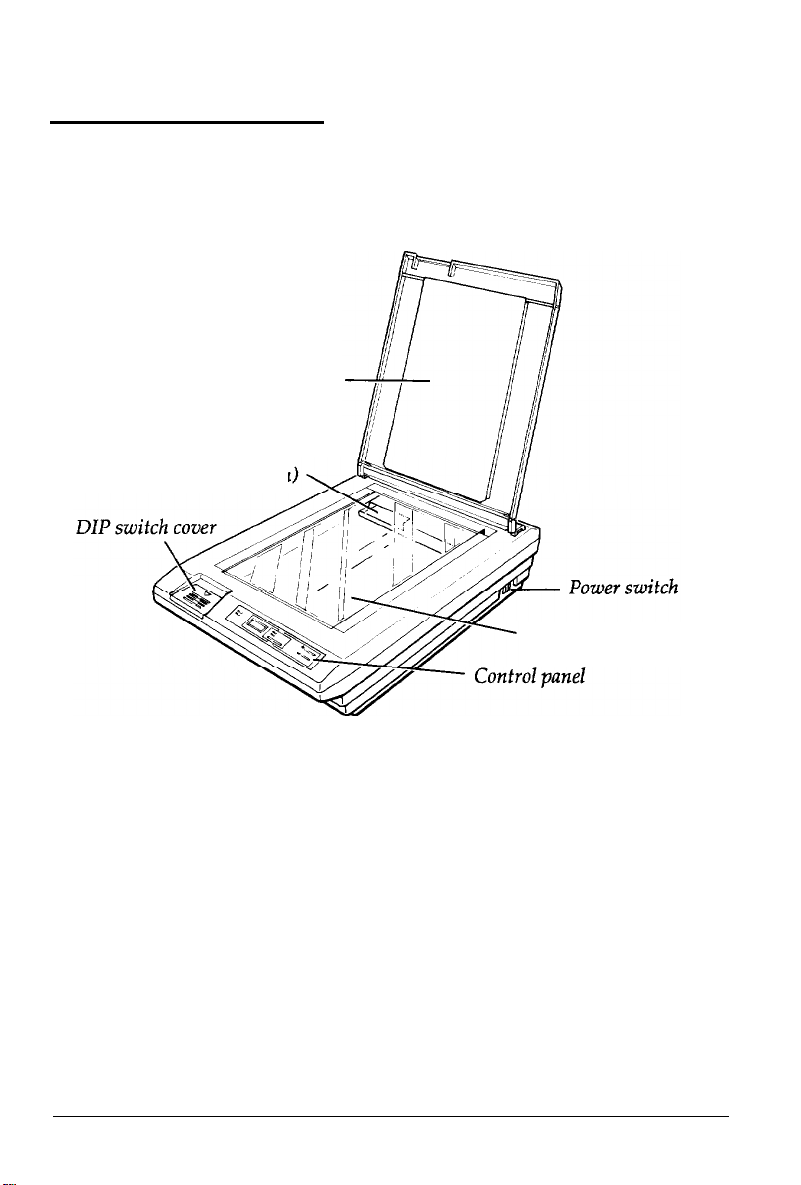
Scanner Components
Now that the scanner is assembled, you can examine the scanner
components.
Document cover
Carriage (at home position
Document table
The
document
scanning process. Close the cover when you are scanning a
document. You can remove the cover to scan bound or thick
material.
You place the document to be scanned on the
The
carriage
The carriage
You use the
the scanner in case of an error.
1-8
Setting Up the Scanner
cover prevents outside light from interfering with the
document table.
contains the optical sensor and three fluorescent lamps.
moves
power switch
when scanning a document.
to turn the scanner on and off, or to reset
Page 20
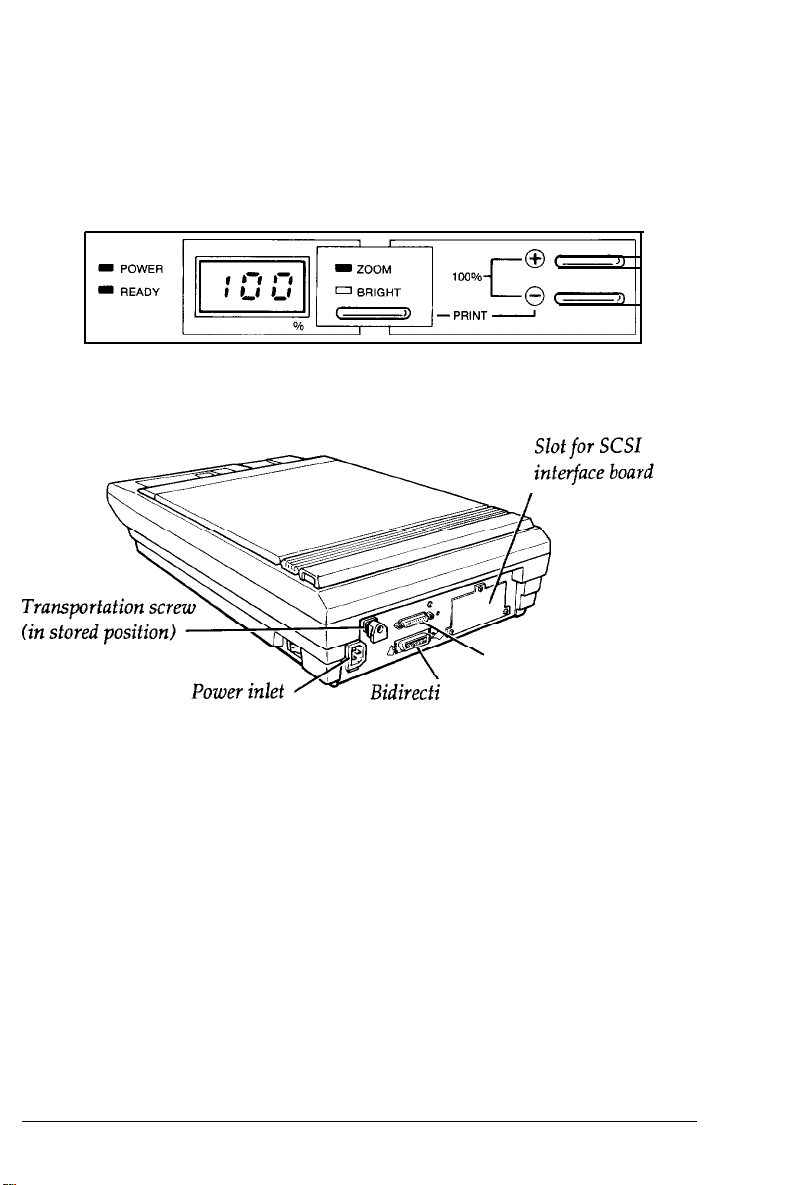
Scanner Components
The
control panel
contains indicator lights that show the status of the
scanner, and buttons for controlling the brightness, zoom, self test,
and direct print features.
DIP switches
(located under the cover) let you select settings for the
direct print function.
Serial
You connect the power cable to the
The
transportation
screw is shown in its stored position.
power inlet.
interface
onal parallel interface connector
connector
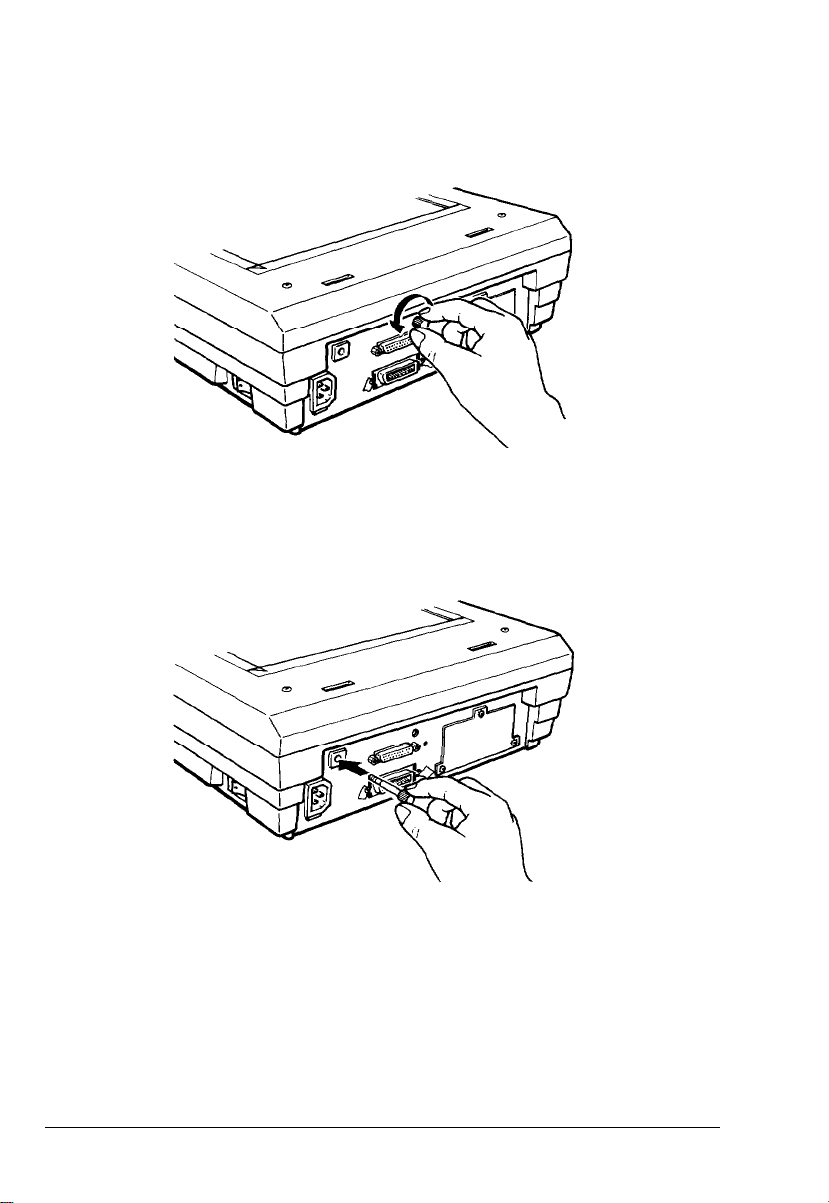
If you are using the scanner with an IBM compatible computer, you
connect the computer’s interface cable to the
connector
after installing a bidirectional parallel interface board in
bidirectional parallel
your computer.
If you are using the scanner with a Macintosh computer, you install
the SCSI interface board in the
interface board slot.
You then connect
the computer’s interface cable to the SCSI connector on the board.
The
serial interface connector
is also available where the bidirectional
parallel interface or SCSI interface is not suitable.
Setting Up the Scanner
1-9
Page 21

Testing the Scanner
Now that your scanner is fully assembled, you can use its built-in
self test function to see that it is working correctly before you
connect it to your computer. You should perform this test to make
sure the scanner was not damaged during shipping.
Before running the self test, you need to connect the scanner to an
electrical outlet.
Plugging in the Scanner
CAUTION:
1
.
0
1.
2.
transportation screw before you connect the scanner
to a power source.
Make sure the scanner is turned off.
Firmly connect the power cable to the power inlet at the back of
the scanner.
Make sure you have removed the
1-10
Setting
Up the Scanner
Page 22
Testing the Scanner
3.
Plug the power cable into a properly grounded electrical outlet.
Turning on the Scanner
When you turn on the scanner,
the POWER
and
ZOOM lights
come on.
The display shows 100, which indicates a zoom value of 100 percent.
The scanner performs a self-initialization; it returns the carriage to
the
home position and checks the fluorescent lamps. After a few
seconds,
1
.
0
the READY light comes on.
CAUTION: Whenever you turn off
the
scanner, wait at
least ten seconds before turning it back on. Rapid
switching on and off can damage the scanner.
Running the Self Tests
The scanner has two self-test modes: page sequence and line
sequence. In page sequence mode, the carriage scans the document
table three times,
red, then blue). In line sequence mode, the carriage scans
document table once using all three lamps.
During a self test,
image data to the computer. Therefore, you do
the scanner to a computer to perform
connected to a computer, you can resume normal operation after
performing a self test.
once
for each of
the
scanner does
the
fluorescent lamps (green, then
the
not scan
an image or send any
not
need to connect
the
self test. If the scanner is
To start a self test, follow these steps:
1.
Make sure
2.
Open the document cover so you can see how the scanner
operates during
the
scanner is turned off.
the
self test.
Setting Up the Scanner
1-11
Page 23

Testing the Scanner
3.
To perform the self test in page sequence mode, hold down
(Increase) while you turn on the scanner. The carriage makes
three passes from the home position to the front of
first with
the
green light on, then the red light, and then the blue
the
scanner;
light.
@
To perform the self test in
line
sequence mode, hold down
@
(Decrease) while you turn on the scanner. The carriage makes
one pass from the home position to the
front
of the scanner
using all three lamps.
When the scanner completes the self test, it moves the carriage
back to the home position and
4.
You can stop a self test at any time by turning off the scanner.
CAUTION:
Whenever you turn off the scanner, wait at
turns on the READY light.
least ten seconds before turning it back on. Rapid
switching on and off can damage the scanner.
If the self test does not seem to perform properly, check the
following items:
1.
If the scanner does
not come
on, make sure that the power cable
is properly connected to the power inlet on the back of the
scanner and to an electrical outlet.
2.
If the display on the control panel shows the fatal error
E
-F, check that the transportation screw is removed.
message
I
POWER
0
READY
0
BRIGHT
,-
%
->
( , , 1
,
,
100%
-PPRlNT-
@ C-J)
c
0 c-0
See Chapter 4, Troubleshooting, for details on scanner errors.
1-12
Setting Up the Scanner
Page 24

Connecting the Scanner to Your Computer
After testing the scanner, you are ready to connect it to your
computer.
If you plan to use the ES-300C with an IBM compatible computer,
you must install the bidirectional parallel interface board in your
computer. You then connect the scanner to the computer using the
bidirectional parallel interface. See Appendix B for details on how to
do this.
If you plan to use the ES-300C with a Macintosh computer, you
connect them using the SCSI interface. See Appendix C for complete
details on how to install the SCSI interface board in your scanner
and how to connect the scanner to the computer.
Setting Up the Scanner
1-13
Page 25

Setting Up Your Application Software
After connecting the scanner to your computer, you are ready to
begin using the scanner. See the documentation that comes with
your scanner utility program or interface kit for details on how to
use the software.
1-14
Setting Up the Scanner
Page 26

Chapter 2
USING THE SCANNER
Operating the Control Panel
The Control Panel
Using the Document Table.
The Document Table.
Placing a Document in the Scanner
Placing Bound Material in the Scanner
Preparing Scanner Software. . . . . . . . . . . . . . . . . . . . . . . . . . . 2-10
Scanning an Image . . . . . . . . . . . . . . . . . . . . . . . . . . . . . . . . . . 2-11
Using the Scanner Functions
Output Resolution.
Zoom
Brightness........................................2-13
Scanning Area
Data Format
Color Mode........................................................................ 2-14
Halftoning Mode
Gamma Correction
Color Correction
............................................
.................................
................................
....................................
......................................
..................................
................................
..................................
..........................
...........................
..............................
..................
...............
..........................
2-2
2-2
2-5
2-5
2-6
2-8
2-12
2-12
2-13
2-14
2-14
2-15
2-16
2-17
Tips on Using the Scanner
Scanning Line Art and Characters
Adjusting for Different Document Types
Minimizing the Moire Pattern.
The Scanning Speed
............................
......................
...............................
...................
.............
Using the Scanner
2-18
2-18
2-18
2-19
2-20
2-1
Page 27
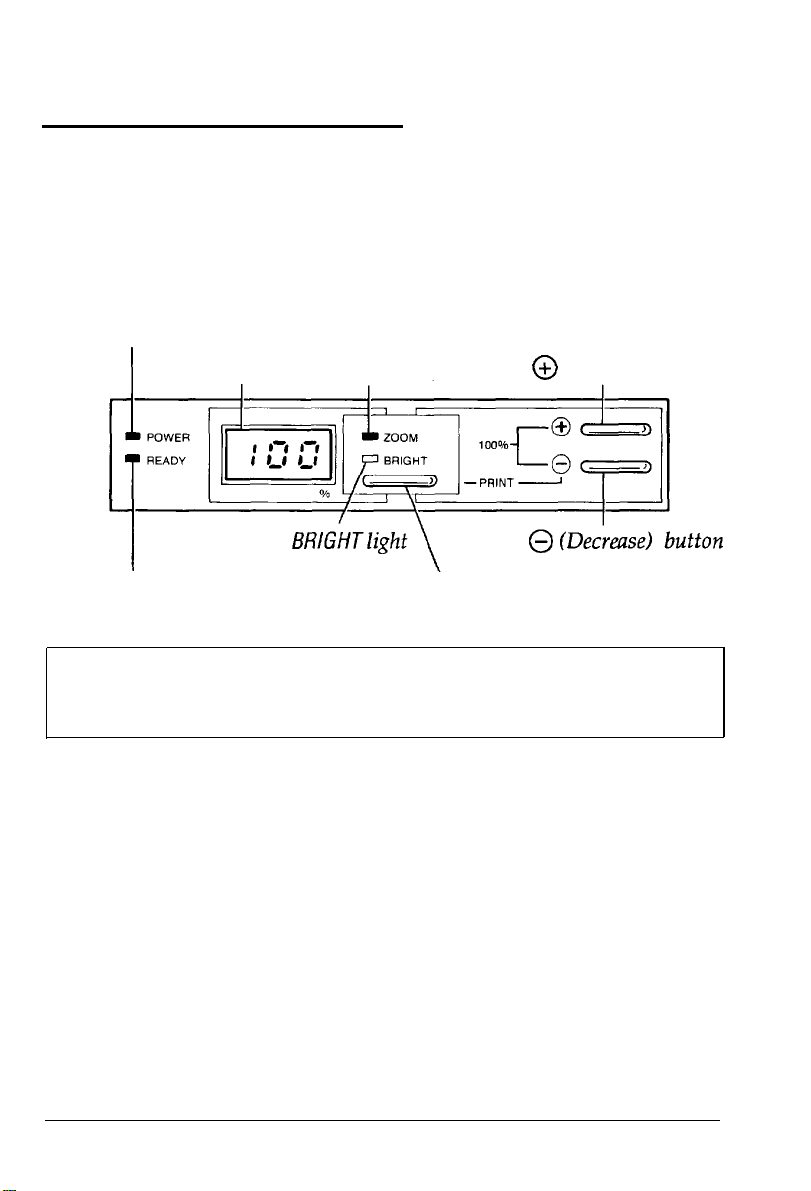
Operating the Control Panel
The ES-300C scanner’s control panel consists of four indicator lights,
an alphanumeric display, and three buttons. The control panel
shows the current status of the scanner and allows you to start the
self test and the direct print function (see Appendix D).
POWER
READY
Note: Do not use the control panel to set the zoom or brightness
level unless you are using direct print as described in Appendix
D. Your software commands override the control panel settings.
I
light
Display (%)
light
ZOOM light
ZOOM/BRIGHT
@
(increase) button
button
The Control Panel
This section describes the lights, display, and buttons on the control
panel and how you initiate a self test and direct print function.
Indicator lights
POWER (green)
On when the POWER switch is on and power is supplied.
2-2
Using the Scanner
Page 28

Operating the Control Panel
READY (green)
On when the scanner is
ready to
receive commands from
the
computer software. Flickers during scanning.
ZOOM (orange)
On when the display is in zoom mode. Use the @ (Increase) and
@
(Decrease) buttons to change
the
zoom value shown
on
the
display when you are using the direct print function.
BRIGHT (orange)
On
when the display is in brightness mode. Use the @ (Increase)
and @ (Decrease) buttons to change the brightness value shown on
the display when you are using the direct print function.
The display
% Display (green, three-digit segment)
The display indicates the zoom value when the control panel is in
zoom mode and indicates the brightness value when the control
panel is in brightness mode. It also indicates when an error occurs in
the scanner. The scanner is in the zoom mode when you first turn on
the power.
Buttons
ZOOM/BRIGHT
Pressing this button selects either zoom or brightness.
works only when the
READY
light is on (when the scanner is in the
ZOOM/BRIGHT
ready state). The display is in zoom mode when you first turn on the
power. Use this button to select zoom or brightness only when you
are using
the
direct print function.
Using the Scanner
2-3
Page 29

Operating the Control Panel
@
(Increase)
Pressing this button increases the zoom value (in increments of 1%)
between 50% and 200% and increases the brightness value in
increments of 1 between seven values, from -3 (lightest) to 3
(darkest). Use this button to adjust zoom and brightness only when
you are using the direct print function.
0
(Decrease)
Pressing this button decreases the zoom value (in increments of 1%)
from 50% to 200% and decreases the brightness value in increments
of 1 between seven values, from -3 (lightest) to 3 (darkest). Use this
button to adjust zoom and brightness only when you are using the
direct print function.
Pressing @ and 0 simultaneously resets
Self test function
the zoom
value to 100%.
By holding down @ or 0 while you turn on the scanner, you can
start the scanner's self test function. See Chapter 1 for more
information.
Direct print function
The direct print function transfers a color image directly from your
scanner to your printer. To use the direct print function you must
have a special parallel interface cable. Consult your dealer to obtain
the proper cable. Press down both the
ZOOM/BRIGHT
and 0 buttons
to start the direct print function. See Appendix D for more
information.
2-4
Using the Scanner
Page 30
Using the Document Table
This section tells you about the document table and how to place
documents and bound materials in the scanner.
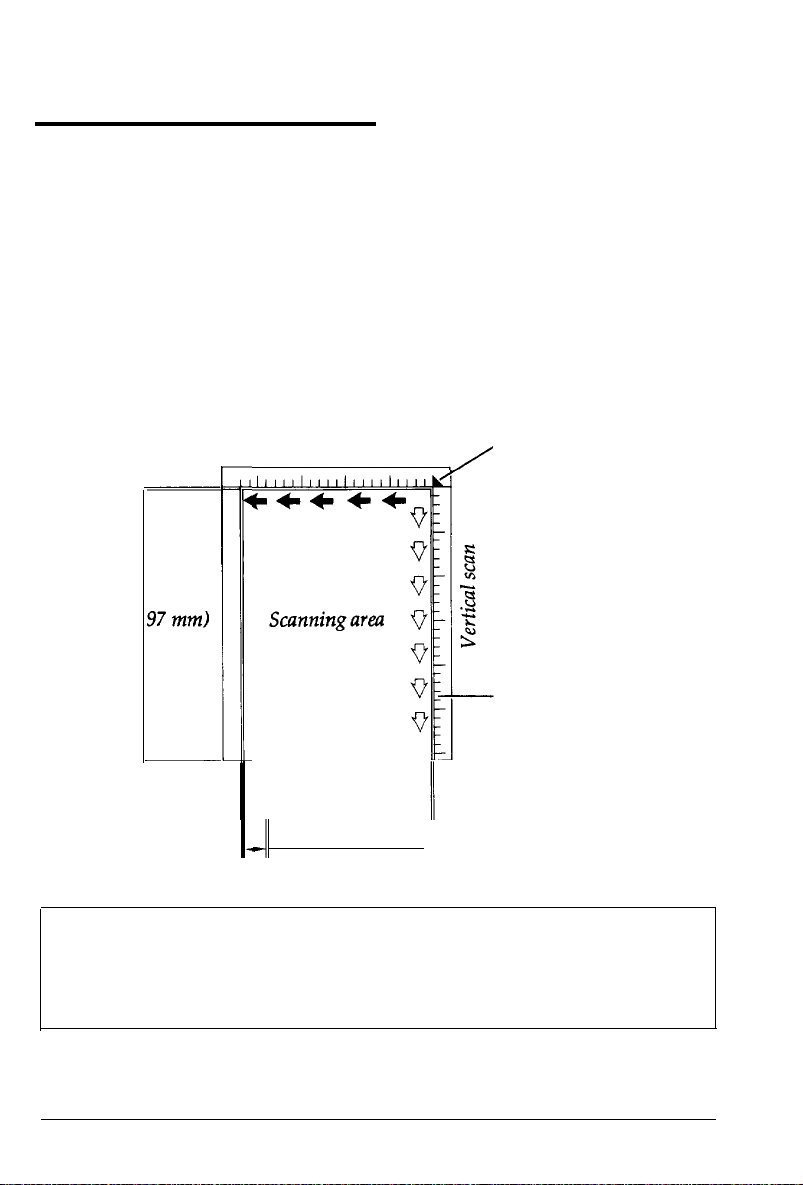
The Document Table
The document table has an origin mark and scales to help you
adjust the document position. You can scan documents of any size
up to and including U.S. letter and A4 documents.
Horizontal scan
11.7 in.
Note: There is an unscannable margin around the four edges of
the document table. It measures .12 inches (3 mm) at the top, .08
inches (2 mm) at the right,
inches (6 mm) at the bottom.
(297 mm)
1
I
,
8.5 in. (216 mm)
41
-
.16
inches (4 mm) at the left and .24
Origin mark
./
Scale
Using the Scanner
2-5
Page 31

Using the Document Table
Origin
The origin, which is the starting point of the scanning area, is
located in the upper right corner of the document table as shown in
the previous illustration. When placing your document face down
on the scanning area, you normally align the upper right comer of
your document with the origin.
Horizontal scan and vertical scan
The direction along the top (shown above by black arrows) is called
the horizontal scan. The direction along the side (shown above by
white arrows) is called the vertical scan.
Placing a Document in the Scanner
To prepare your document for scanning:
1.
Open the document cover.
2-6
Using the Scanner
Page 32

Using the Document Table
2.
Place the document face down on the document table. Adjust
the document position using the origin mark and scales.
3.
Close the document cover gently to avoid moving the document.
Using the Scanner
2-7
Page 33

Using the Document Table
Note: Make sure that the document is flat against the glass
surface so that the image is properly focused. Also be sure to
close the document cover to prevent interference from external
light.
CAUTION:
1
.
0
l
Always keep the document table clean. See Chapter 3
for information on cleaning the scanner.
l
Avoid twisting the document cover when you open or
close it.
l
Do not leave photographic paper face down on the
document table for an extended period of time because
it may stick to the glass.
l
Do not apply too much pressure on the document table;
excessive pressure could break the glass.
1
Placing Bound Material in the Scanner
To
scan thick or bound material, such as a book, remove the
document cover for easier alignment.
2-8
Using the Scanner
Page 34

Using the Document Table
1.
Lift up the document cover. Lift the base up and out of the
scanner.
2.
Place the book on the document table.
3.
Push down gently on the book spine so that its surface is flat
against the document table.
Using the Scanner
2-9
Page 35

Preparing Scanner Software
For the scanner to operate, it must interact with the computer using
various settings for scanning and image data transfer. Therefore, to
use the scanner you need a software utility program that enables
your computer to communicate with the scanner. To purchase the
proper software for your scanner, consult your Epson dealer.
Using Application Software
The main advantage of using an image scanner is that you can edit
the scanned images on a computer. Various software packages are
available for creating and editing images. Some software packages
allow you to scan images directly. Others require a utility program
to scan the image and then convert it to a usable file format.
Your software may have an installation or setup procedure that lets
you select scanner types from a list of input devices. If the ES-300C
is not listed, contact your software manufacturer to see if there is a
software update.
Note: The number and type of scanner functions you can use
depends on your software. See your software manual for details
on available functions.
Programming
If you are an experienced programmer or are familiar with
programming languages, you may be interested in the
programmer’s manual which is available from your dealer. It fully
describes software control of the scanner. This manual explains the
formats and functions of the scanner commands and handshaking
method, as well as some programming tips for getting the best
performance out of your scanner.
2-10
Using the
Scanner
Page 36

Scanning an Image
Your scanner can accommodate a maximum document size of 8.5
inches x 11.7 inches, slightly larger than
Note: There is a small unscannable margin around the four edges
of the document table. See page 2-5.
1.
Turn on the scanner and then the computer. Check that the
scanner’s
2.
Place the document face down on the document table.
READY light
is on.
U.S.
letter size or A4 size.
3.
Close the document cover.
4.
Start the scanner software on
Note:
If
any
one of the three error
the
computer and scan the image.
messages (E-C , E - I,
appears on the display, see Chapter 4.
or
E - F)
Using the Scanner
2-11
Page 37

Using the Scanner Functions
Numerous image processing functions are built into the ES-300C
and many can be combined to produce a variety of effects.
Note:
Do not use DIP switch settings or the control panel to control
l
scanner functions unless you are using the direct print
function (see Appendix D).
With some scanner software, not all of the scanner functions
l
may be available or the range of settings may be limited.
When using application software, see its documentation for
details.
Because each image, CRT, and printer combination creates a
l
unique scanning scenario, it is recommended that you use
your scanner software to experiment with a variety of
functions and settings to achieve the output you like best.
ES-300C functions and tips on how to achieve the best results using
your scanner are covered in this chapter. The
Scanner Image Samples
booklet illustrates some of the effects you can
create with these image processing functions. See your software
manual for details on using these functions.
Epson Color Image
Output Resolution
The output resolution determines how many pixels, or dots, are
used for reproducing an image. Resolution is measured in units of
dpi (dots per inch) and can be selected independently for the
horizontal scan and vertical scan. The ES-300C offers 19 settings: 50,
72, 75, 80, 90, 100, 120, 144, 150, 160, 180, 200, 240, 300, 320, 360, 400,
480, and 600 dpi.
2-12
Using the Scanner
Page 38

Using the Scanner Functions
Normally you should choose the setting that matches the resolution
of your output device, usually your CRT display or printer. To find
a matching resolution, check your software manual or follow the
guidelines below.
Dots per Inch
72,75
72, 144
180, 360
75, 150, 300, 600
100, 200, 300, 400
Output Resolution
CRT displays
9-pin dot matrix
24-pin dot matrix printers
Laser printers
Facsimile (fax) transmission
printers
Note: Use your software to control the zoom and brightness
settings unless you are using the direct print function.
(See Appendix D). Software control settings have priority over
those made from the control panel, and the current settings are
shown on the display.
Zoom
Use the zoom function to reduce or enlarge the size of the output
image. The zoom value can range from 50% to 200% in increments
of 1%. Use the software to set the horizontal scan and vertical scan
values independently; when the values are different, the display
shows only the larger of the two values.
Brightness
There are seven brightness levels for scanning images, ranging from
-3 (lightest) to 3 (darkest) with 0 (the default) as the normal setting.
Use darker settings for faint original images, line art, and text
characters. Use lighter settings for dark original images. You can
combine the brightness function with all other functions.
Using the Scanner
2-13
Page 39

Using the Scanner Functions
Scanning Area
Use this function to scan a specific portion of the original image.
You can choose a rectangular area anywhere within the maximum
scanning area of the scanner as determined by the current resolution
and zoom settings.
Data Format
The data format determines how many bits are used to represent a
pixel. A pixel (picture element) is the tiniest area a scanner “reads.”
The number of bits/pixel (from 1 to 8 bits/pixel/color) determines
how many colors or how many shades of gray the scanned image
data can represent. The larger the number of bits per pixel, the
greater the number of shades of gray can be represented. In
monochrome (black and white) scanning, for example, a data format
of 8 bits/pixel can represent up to 256 shades of gray.
Color Mode
The color mode specifies either color scanning or monochrome
(black and white) scanning. In color scanning, you can choose either
page sequence mode or line sequence mode. In monochrome
scanning you can specify a dropout color, as discussed below.
Color page sequence mode
Use this mode when you don’t require the color correction function.
The carriage scans the document table three times, once for each
color: green, then red, then blue.
Color line sequence mode
Use this mode when you require the color correction function to
achieve more accurate color. The carriage makes only one pass,
reading each of the three colors for each line.
2-14
Using the Scanner
Page 40

Using
Monochrome mode (standard)
Use
this mode when you want to scan a black and white image. If
the Scanner Functions
you scan a color image in monochrome, you may need to specify a
dropout color to recover or delete detail. See Dropout color below.
Standard monochrome scanning uses all three lamps so that the
original image is scanned with white light, thus minimizing the
dropout color.
Dropout color (monochrome scanning only)
Use this mode when you scan a color image in monochrome and
you need to recover detail, eliminate background color, or eliminate
unwanted detail. Dropout color is the color that is not recognized by
the scanner. You can choose either green, red, or blue, depending on
the colors on the original images.
Halftoning Mode
Halftoning is a digital process which simulates continuous gray
tones or continuous colors. Some printers, however, cannot print
these continuous tones. Halftoning is suitable for original images,
such as photographs, that have continuous tones. Use halftoning if
your output device can reproduce only 1 to 2 bits/pixel/color image
data.
Note:
Avoid changing the size of a halftoning processed image
with your application software. Use the scanner’s zoom function
instead to select the desired image size.
You can enable or disable the halftoning process itself, and select
from the three halftoning modes, A, B, or C.
Using the Scanner
2-15
Page 41

Using the Scanner Functions
Halftoning mode A
Use this mode for scanning most images with continuous tones.
This mode produces higher contrast images than mode B. Available
for 1 and 2 bits/pixel/color data in all color mode settings.
Halftoning mode B
Use this mode for images that contain large areas of similar tones.
The image is converted to soft tones to blend each tone into the next.
Available for 1 bit/pixel/color data. This mode is not effective
when
color line sequence is selected.
Halftoning mode C
Using mode C may produce better results if you print your image
on a dot matrix printer. The image is represented in a similar way to
the images in newspaper printing; the gradations in the original
image are represented by clusters of different numbers of dots.
Available for 1 bit/pixel/color data. Mode C is not effective when
color line sequence is selected.
Gamma Correction
Gamma correction helps you make the image you print or display
on your computer screen more closely resemble the original image
you are scanning.
Use your scanner software to choose from five settings including
three general printer types and two CRT display types. You can
combine gamma correction with all other scanner functions. When
Printer output A, B, or C is selected,
viewed
Printer output A
on
a CRT display but looks correct when printed.
the
image looks faint when
Use this setting for high density printers, such as 24-pin and laser
printers. If your results are unsatisfactory, try Printer output B.
2-16
Using the Scanner
Page 42

Using the Scanner Functions
Printer output B
Use this setting for low density printers, such as 9-pin printers and
printers that produce finer dots, such
as
laser printers and ink jet
printers. If your results are unsatisfactory, try Printer output A.
Printer output C
Use this setting for enhanced contrast and definition when scanning
images
CRT display A
that
contain both pictures and text.
Use this setting for most computer display types that cannot display
multiple tone levels, such as digital-input displays, or 8 to 16 color
displays. This setting is also suitable for line art and text characters
because the image data represents the light intensity of the original
image in
CRT display B
1:1
ratio.
Use this setting for an analog-input display system that can display
multiple levels of tones.
Color Correction
Color correction tells the scanner
screen display you are using to view
scanner processes color appropriately. Color correction must be
used with the color line sequence mode. The four settings are for:
l CRT displays
l
Impact dot matrix printers
l
Thermal transfer printers
l
Ink jet printers.
To disable this function, simply choose color page sequence mode or
monochrome mode.
what
type of printer or computer
the
scanned image so that the
Using the Scanner
2-17
Page 43

Tips on Using the Scanner
This section provides you with some tips and further information
for using the scanner.
Note: Use these guidelines and your scanner software to obtain
better results when scanning and reproducing images.
Scanning Line Art and Characters
If the line art contains many straight lines, adjust the document
position so that lines are aligned with the horizontal scan or vertical
scan directions. If it is placed askew, the straight lines will have
jagged edges.
Adjusting for Different Document Types
Focusing
For the best focus, place the document flat against the document
table. As the distance from the document table increases, the focus is
lost and the image is blurred or darkened.
Document surface
For better scanning results, make sure the document surface is
smooth. If there is a pasted-up area, colors may blur at the edge of
this area. Textured and embossed surfaces may produce blurred
images because light from the scanner lamps is not evenly reflected
on them.
2-18
Using the Scanner
Page 44

Tips on Using the Scanner
Transparent document
Transparent material may not be scanned properly because the
ES-300C scanner scans an image by reflecting light off the document
surface. In the case of overhead projector transparencies, if you can
clearly recognize the image on a transparency by placing it on an
opaque surface, it can be scanned. Film negatives or 35 mm slides
cannot be scanned because the images on them are too dark and too
small for the scanner to recognize.
Thin materials
When the document paper is too thin, the image on the reverse side
of the page or on the next sheet of paper may appear as a ghost-like
image superimposing the desired image. If this “bleed” occurs,
photocopy the image on a heavier bond paper and rescan the image.
Minimizing
the
Moiré Pattern
A moiré pattern is the repeating interference pattern that appears
overlapping a scanned image. This usually occurs with printed
material processed with screens and when the pitch of the screen
interferes with that of the scanner’s sensor. Moiré does not occur
with ordinary photographs because they do not cause interference.
Although a moiré pattern does not occur often, once it occurs it is
difficult to remove completely. To minimize the effect of the moiré
pattern, you may try the following:
l
Place a transparent plastic sheet between the document and the
document table so that the document is slightly out of focus.
l
Place the document slightly angled or move its position slightly.
l
Consult your software manual for other solutions.
Using the Scanner 2-19
Page 45

Tips on Using the Scanner
The Scanning Speed
As the amount of image data increases, the time to scan the image
and transfer the image data increases. The amount of image data
increases as you increase the resolution, data format, zoom, and
scanning area.
The speed is also affected by the interface transfer speed, computer
performance, and software performance.
2-20
Using the Scanner
Page 46

Chapter 3
MAINTAINING AND TRANSPORTING THE SCANNER
Cleaning the Scanner
Changing the Fluorescent Lamps
Transporting the Scanner. . . . . . . . . . . . . . . . . . . . . . . . . . . . . 3-4
................................
...................
3-2
3-3
Maintaining and Transporting the Scanner
3-1
Page 47

Cleaning the Scanner
To keep your scanner operating at its best, you should clean it
periodically.
Clean the outer case with mild detergent dissolved in water.
If the glass of the document table gets dirty, clean it with a soft dry
cloth. If the glass is stained with grease or another hard-to-remove
material, use a small amount of glass cleaner on a soft cloth to
remove it. Wipe off any remaining liquid with a dry cloth.
CAUTION:
I
.
0
l
Be careful not to scratch or damage the glass of the
document table, and do not use anything hard or
abrasive to clean it. A damaged glass surface can
decrease scanning quality.
l
Never use alcohol, thinner, or corrosive solvent to clean
the scanner. These chemicals can damage the scanner
components as well as the case.
l
Be careful not to spill water into the scanner mechanism
or electronic components. This could permanently
damage the mechanism and circuitry.
3-2
l
Do not spray lubricants inside the scanner.
l
Never open the case of the scanner.
Maintaining and Transporting the Scanner
Page 48

Cleaning the Scanner
Changing the Fluorescent Lamps
The luminosity of the fluorescent lamps decays over a period of
time. If the lamps break or are too dim to operate normally, the fatal
error message
dealer or service center must replace
(E-F)
appears on the display. When this happens, a
the
lamp assembly.
0
CAUTION:
I
.
think repairs or adjustments are necessary, consult your
dealer.
Never open the case of the scanner. If you
Maintaining and Transporting the Scanner
3-3
Page 49

Transporting the Scanner
When you transport the scanner or store it for an extended period,
follow the steps below to secure the
Turn on the scanner and wait until the carriage moves to the
1.
home position (the back of the scanner>. Then turn off the
scanner.
carriage.
Note: If
does not return to the home position, gently lift up the front of
the scanner. Wait until the carriage comes to rest at the back of
the scanner; then set it back down.
I
.
0
2.
the scanner is not operating properly and the carriage
CAUTION:
transport the scanner may cause additional damage
resulting in extra repair cost.
Remove the stopper and transportation screw from the storage
hole. Place the screw in the center hole and screw it in to secure
the carriage.
Failure to secure the carriage whenever you
3-4
Maintaining and Transporting the Scanner
Page 50

Transporting the Scanner
3.
Attach the stopper to the transportation screw so that the
straight edge of the stopper is aligned with the upper case as
shown below.
4.
Remove the document cover.
5.
Repack the scanner and document cover separately, using the
original packing materials and carton.
I
0
CAUTION:
.
destination, do not forget to remove the transportation
screw before operating the scanner.
When you unpack the scanner at its
Maintaining and Transporting the Scanner
3-5
Page 51

Chapter 4
TROUBLESHOOTING
Error Messages
Command Error.
Interface Error
Fatal Error . . . . . . . . . . . . . . . . . . . . . . . . . . . . . . . . . . . . . . . .
Problems and Solutions . . . . . . . . . . . . . . . . . . . . . . . . . . . . . . 4-5
. . . . . . . . . . . . . . . . . . . . . . . . . . . . . . . . . . . . . . . . . . . . . .
.................................
..................................
4-2
4-2
4-3
4-4
Troubleshooting 4-1
Page 52

Error Messages
When the scanner detects an error, the display on the control panel
shows a corresponding error message.
In case of an error, you may need to retry a scanning operation with
the software or reset the scanner. To reset the
wait 10 to 15 seconds, and then turn it on again.
There are three types of errors, as shown below.
Command Error
scanner,
turn it off,
Error indication:
Possible causes: Invalid command is received.
To recover:
The error message
light remains on. The scanner waits for a correct
command.
Invalid parameter is received.
Check that the settings on your scanner software
are correct; then retry the scanning operation to
send a correct command. Reset the scanner after
a command error only if necessary.
E-C
appears. The
READY
4-2
Troubleshooting
Page 53

Interface Error
Error Messages
Error indication:
Possible causes:
To recover:
The error message
E-I
appears. The
READY
light
goes off. The fluorescent lamps go out and the
scanner stops operating.
Wrong communication protocol.
Interface connection is broken (the connector is
unplugged or the cable wire is broken).
The host computer does not respond to the
scanner for more than 30 seconds.
Turn off the scanner. Check the interface
connection and settings on the scanner as well as
on your computer and software. Turn on the
scanner.
Troubleshooting 4-3
Page 54

Error Messages
Fatal Error
Error indication:
Possible causes:
To recover:
The error message
READY
light goes off. The fluorescent lamps go
E-F
appears and blinks. The
out and the scanner stops operating.
One or more fluorescent lamps are broken or
require replacement.
The transportation screw is not removed and the
carriage cannot move.
The scanner is broken.
Turn the scanner off. Check to see if the
transportation screw is removed; then turn on
the scanner. (See Chapter 1.) Consult your dealer
if you encounter this error again.
4-4
Troubleshooting
Page 55

Problems and Solutions
This section discusses typical problems and offers possible
solutions. For advice on getting better images, see Chapter 2.
The problems you may encounter while using the scanner often
involve the operation of your software and computer. Problems fall
in the following major categories:
l
Incorrect setup of the interface
l
Inappropriate selection of the scanner functions
l
Incorrect setup of your computer or software
l
Incorrect operation by your software or program.
Also see the documentation for your software, computer, and
printer for possible solutions.
Problem
The scanner does not
scan or stops
scanning.
The scanner does
come
on. (The
light does not come on.)
not
POWER
Solution
See that the power cable is correctly
plugged into the scanner and the power
outlet.
Try the self test function. (See Chapter 1.)
If the scanner does not operate as
described, consult your dealer.
Check the outlet you
another electrical device.
are
using with
Troubleshooting 4-5
Page 56

Problems and Solutions
Problem
The scanner does not
scan or stops
scanning
(continued).
The READY light does
not come on.
The scanner does not
start scanning, or the
scanner does not
respond to the software.
Solution
Check that the scanner is correctly
connected to
the interface settings and the cable type
are correct.
Check that the scanner’s
on. See if the scanner shows an error
message. (See the Error Messages section
earlier in this chapter.)
Check that you have selected the correct
interface port and settings with your
software. Check that the interface board
on your computer is properly installed.
See Chapter 1 and either Appendix B
(for IBM compatible computers) or
Appendix C (for Macintosh computers).
the
computer. Check that
READY
light is
The fluorescent lumps
come on but the scanner
does not scan.
4-6
Troubleshooting
If you have other expansion boards on
your computer, check that they are
not
interfering with the interrupt setting of
the interface board for your scanner.
(See your computer manual.)
If you are using a standard parallel
interface cable, the scanner may not
work properly even though the same
cable works with a parallel printer. See
Appendix B.
Page 57

Problems
and
Solutions
Problem
The scanner software
and/or your
computer are not
operating properly.
The scanner software
does not work properly.
The computer does not
start up properly, or
does not work at all.
Solution
Check that you have correctly installed
your software. Check that the system
requirements, such as the operating
system version, are correct for the
software you are using.
Check that the computer has enough
memory for your software. If you are
running other software at the same time,
using RAM resident programs, or using
many device drivers, the computer may
not have enough remaining memory.
(See your software and computer
manuals.)
Check that you have set up the computer
and software properly. Check that the
interface board and other expansion
boards are installed correctly. (See your
computer manual.)
The command error
(Error message: E-C)
occurs often and the
scanner does not
operate.
Check that your scanner software
supports an Epson scanner. If it does,
check that you properly installed and set
up the software.
Troubleshooting 4-7
Page 58

Problems and Solutions
Problem
All or part of the
image is distorted on
the CRT display or
on the printed
output document.
The entire image is
distorted or blurred.
Part
of
the image is
distorted or blurred.
Solution
Check that the document is placed flat
against the document table.
You may have accidentally moved the
document during scanning. Check the
position of the document again and do
not move it while the scanner is
operating.
The scanner may be tilted or located on
an unstable surface. Check the location of
the scanner, and locate it on a flat, stable
surface.
Part of the document may be wrinkled or
warped or not in contact with the
document table. Make this part flat.
The edges
document are not
scanned.
4-8
of
the
Troubleshooting
CAUTION:
I
.
0
If the document glass is dirty, clean it.
The document table has a non-scannable
area around the edges. Adjust the
position of your document so that the
image is inside the scannable area. (See
Chapter 2.)
objects on the document table.
Do not place heavy
Page 59

Problem Solution
All or part of the
image is distorted on
the CRT display or
on the printed
output document
(continued).
Problems and Solutions
Color is patchy or
garbled at
the
edges
of
the document.
The image is faint or
uneven.
The image is faint or
out of focus.
If the document is very thick or warped
at the edges, the edges may appear
patchy or garbled. Place opaque paper on
the back of the document covering the
edges
to
avoid interference from external
light.
If a part of
the
document rests outside
the document table, the document’s edge
may be colored. Reposition the document
so that
it rests within the document table.
Check that the document is placed flat
against
the
document table.
Check and adjust the gamma correction
setting. The image looks lighter when
gamma correction is set for a printer than
when it is set for a CRT.
Troubleshooting 4-9
Page 60

Problems and Solutions
Problem
The image is faint or
uneven (continued).
The image is too dark
on the CRT or on a
printout, and details
cannot be recognized.
The image is not
scanned at all, or only a
few dots appear.
Straight lines in the
image are jagged at
their edges.
Solution
Check that you enabled halftoning.
Without halftoning, deep-colored areas
may be scanned as black.
Check that the gamma correction is set
correctly for your output method. If it is
set for a CRT display, the printout
becomes darker than the original image.
Adjust the brightness from the software.
Also check the brightness and contrast
volumes of your CRT screen.
Make the brightness setting darker, or try
different settings and combinations of the
scanner functions, especially gamma
correction and resolution.
The document may be placed at an angle
on the document table. Align it so that
the horizontal and vertical lines are lined
up with the horizontal scan and vertical
scan directions. (See Chapter 2.)
4-10
Troubleshooting
Page 61

Problem Solution
The CRT display
image is not what
you expected.
Problems and Solutions
The scanned image does
not look the same as the
original image.
A line of dots is always
missing on the scanned
image.
Try different settings and combinations
of the scanner functions. (See Chapter 2.)
Check that your software is correctly
installed. Check the capability of your
software and computer. (See your
software and computer manuals.)
If you are importing an image file into
your application software, check that the
file format is acceptable for your
software. Also check that the settings on
your software and your image
match.
(See your software manual.)
If this happens on your printed image
only, it is probable that your printer or
its print head is malfunctioning.
(See your printer manual.)
If this happens both on your screen and
printout,
the
scanner’s sensor may be
malfunctioning. Consult your dealer.
When using halftoning
mode A, textured dots
appear on particular
areas
of
an image.
The scanner is working correctly. This
effect appears on areas of consistent color
or luminosity because the scanner tries to
simulate tones from such input. To
decrease this effect, use halftoning
mode B. (See Chapter 2.)
Troubleshooting
4-11
Page 62

Problems and Solutions
Problem
The CRT display
image is not what
you expected
(continued).
Different colored dots
appear scattered on a
background.
In monochrome
scanning, the image is
too faint or certain
colors are fainter than
other colors.
The image does not
appear on the screen.
Solution
This is normal when halftoning is
selected. Halftoning simulates subtle
differences of tones and luminosity of the
original image with a number of bi-level
dots. When the image is viewed from a
suitable distance, it appears to be a
similar color to your original.
If you selected standard monochrome
scanning (no dropout color) using the
scanner software, switch to monochrome
and specify a dropout color. Then try
different dropout colors until the image
improves.
Check the installation and settings of
your scanner software.
4-12
If you are importing an image file into
your application software, check the
software’s operation. Some software
cannot show the image as it is on the
screen, but can print properly on the
printer. (See your software manual.)
Troubleshooting
Page 63

Problems and Solutions
Problem
The CRT display
image is not what
you expected
(continued).
The
color
on the display
seems different from
that
of
the original
image.
The image is distorted
on the screen, or the
horizontal and vertical
proportions are
different.
Solution
Check the settings of the scanner
functions, especially data format, gamma
correction, and color correction. Try
different combinations of these settings.
(See Chapter 2.)
Check the capability of your computer,
display adapter, and software. Some
computers can change the color palette to
adjust colors on your screen. (See your
computer manual.)
If the resolution is correctly set for your
printer, your image will be in the correct
proportion when printed.
If the horizontal and vertical dot
resolution of your display screen differ
greatly, try different resolutions or zoom
settings.
The printed image is
not what you
expected.
The printout
of
the
image is too dark
compared to the
original image.
Check that the gamma correction is set
for a printer output setting. (If your
software cannot set the gamma
correction, use the DIP switches.
(See Appendix D.)
Troubleshooting
4-13
Page 64

Problems and Solutions
Problem
The printed image is
not what you
expected
(continued).
The printout
image is too dark
compared to the
original image.
(continued)
The printed
different from that
the originals.
The printed image is
distorted, is larger or
smaller than the
original size, or the
image is compressed or
stretched from the
original shape.
of
the
color
seems
of
Solution
Change the brightness setting with your
software.
Set the color correction for printers. Try
different combinations of other functions.
(See Chapter 2.)
Check that the resolution matches that of
the printer. Check that the zoom is set
correctly for your desired size. If your
printer and software offer different
resolutions horizontally and vertically,
adjust both the scanner’s horizontal and
vertical scan resolutions.
The image cannot be
printed on the printer,
the printout is garbled,
or the printout is not
an image.
4-14
Troubleshooting
Check that the printer is properly
connected to the computer and is
correctly set up. (See your printer
manual.)
Check that your software is properly
installed and set up for your printer.
(See your software manual.)
Page 65

Appendix A
TECHNICAL SPECIFICATIONS
Scanner Specifications. . . . . . . . . . . . . . . . . . . . . . . . . . . . . . . . A-2
Mechanical Specifications . . . . . . . . . . . . . . . . . . . . . . . . . . A-4
Electrical Specifications . . . . . . . . . . . . . . . . . . . . . . . . . . . . A-4
Environmental Conditions. . . . . . . . . . . . . . . . . . . . . . . . . . A-5
External View and Dimensions. . . . . . . . . . . . . . . . . . . . . . A-6
I
A
Initialization.
Default Settings
.......................................
...................................
A-7
A-7
Technical Specifications A-1
Page 66

Scanner Specifications
Product name:
Scanner type:
Sub-scanning method:
Photoelectric device:
Effective pixels:
Maximum
document size:
Resolution:
Output resolution:
Scanning speed:
ES-300C Color Image Scanner
Flatbed, color/monochrome
Movement of the scanning head
CCD line sensor
2552 dots by 3508 dots at 300 dpi, 100%
8.5 inches by 11.7 inches
(216 mm by 297 mm)
Horizontal scan: 300 dpi
Vertical scan: 300 dpi
50, 72, 75, 80, 90, 100, 120, 144, 150, 160,
180, 200, 240, 300, 320, 360, 400, 480, and
600 dpi selectable by software command
Monochrome mode: about 6.5 msec/line
(typ.)
Color page sequence mode: about 10
msec/line (typ.)
Color line sequence mode: about 35
msec/line (typ.) (excludes data transfer
time)
Color separation:
By switching light sources (green, red,
blue)
A-2 Technical Specifications
Page 67

Scanner Specifications
Reading sequence:
Zoom:
Image data:
Gradation:
Brightness:
Halftoning process:
Gamma correction:
Color correction:
Color page sequence mode: scans 3 times
Color line sequence mode: scans 1 time
Monochrome mode: scans 1 time (dropout
color selectable)
50%
to 200% in 1% steps
Horizontal scan and vertical scan zoom can
be independently set by software
command.
1 bit to 8 bits per pixel
8 bits per pixel per color maximum
7
levels
3
modes:
A, B, C
2 types for CRT display and 3 types for
printer output
1 type for CRT display and 3 types for
printer output, available in color line
sequence mode only
Direct printing:
Epson LQ-860, LQ-2500, and LQ-2550
(with color ribbon), through parallel
interface only
Hewlett-Packard PaintJet (or HP 3630)
color graphics printer, through parallel
interface only
Technical Specifications A-3
Page 68

Scanner Specifications
Interfaces:
Standard:
Optional:
Light source:
Noble gas fluorescent lamps (3 lamps)
Mechanical Specifications
Reliability:
Dimensions and
weight:
Main unit: MCBF 100,000 cycles
Width: 12.6 in. (320 mm)
Depth: 20.1 in. (510 mm)
Height: 4.8 in. (123 mm)
Weight: 19.8 lbs (9 kg)
Electrical Specifications
Voltage:
Frequency:
Power consumption:
120 VAC, ± 10%
49.5 to 60.5 Hz
40 VA max.
bidirectional parallel and
RS-232C serial
SCSI (for Macintosh)
Insulation resistance:
A-4
Technical Specifications
20M ohms between AC power line and
chassis at 500 VDC
Page 69

Environmental Conditions
Scanner Specifications
Temperature:
Operation:
Storage:
Humidity:
Operation:
Storage:
Operating conditions: Dust:
Illumination:
Document conditions:
Reflective documents with smooth surface
41° F to 95° F
(5°C to 35°C)
-13° F to 150° F
(-25°C to 60°C)
0% to 80%, without
condensation
10% to 85%, without
condensation
Avoid operation in very
dusty surroundings.
Avoid operation under
direct sunlight or near a
strong light source.
Technical Specifications A-S
Page 70

Scanner
Specifications
External View and Dimensions
(Unit: inches)
jjf+@
4.9 inches
Note:
Specifications and design are subject to change without
notice.
A-6 Technical Specifications
4.9 inches
Page 71

Initialization
There are three ways that the scanner can
be
initialized (returned to
a fixed set of conditions).
Hardware initialization:
l
The power is turned
l
The scanner receives an INIT signal at the parallel interface (pin
on.
31 goes LOW).
Software initialization:
l
The software sends an initialize command.
Default Settings
The table below shows the default conditions that take effect when
the scanner is initialized.
Item
Data format
Resolution
1
Zoom
Scanning area
1
Color mode
Brightness
Halftoning mode
Gamma correction
Color correction
Default
1 bit/pixel
100 dpi for horizontal scan and vertical scan
1
100% for horizontal scan and vertical scan
848 x 1169 dots, no off set
1
Monochrome
Center “0” (normal)
DIP switch setting
DIP switch setting
DIP switch setting
During initialization, the scanner terminates the scanning operation
and returns the carriage to the home position (at the back of the
scanner).
Technical Specifications A-7
Page 72

Appendix B
CONNECTING THE SCANNER TO A PC
Using the Parallel Interface
Setting Jumpers on the Bidirectional
Parallel Interface Board
The Parallel Interface Cable
Connecting the Parallel Interface
Identifying a Cable Problem
...........................
.........................
.........................
........................
....................
B-2
B-2
B-4
B-4
B-5
Connecting the Scanner to a PC
B-1
Page 73

Using the Parallel Interface
This appendix describes how you connect your ES-300C scanner to
an IBM compatible computer. You connect the scanner using the
bidirectional parallel connector on the back panel of the scanner.
The scanner’s bidirectional parallel interface requires a compatible
type of interface on your computer. If you have an IBM compatible
computer, you must install the optional bidirectional interface board
in the computer.
To install the bidirectional parallel interface board in your
computer, follow the instructions in your computer’s
documentation for installing optional interface boards (or cards).
Note: If you have an IBM PS/2™ computer, you can connect the
scanner directly to its bidirectional parallel printer interface with
a suitable shielded cable.
Setting Jumpers on the Bidirectional Parallel Interface Board
The bidirectional parallel interface board is specifically designed to
connect the Epson ES-300C scanner to an IBM compatible computer.
This board provides scanner control capability through bidirectional
input and output, allowing the high speed transmission of data.
Two sets of jumper pins are located on the board. These jumpers
allow you to configure the parallel interface port.
B-2
Connecting
the Scanner to a PC
Page 74

Using the Parallel Interface
Jumper J1 selects the I/O port addresses, and jumper J2 selects the
interrupt level. Select the address and interrupt level that are
suitable for your computeis configuration.
J1
LPT1:
LPT2:
Data address
0378h
0278h 0279h 027Ah
Status address
0379h 037Ah
Control address
Connecting the Scanner to a PC
B-3
Page 75

Using the Parallel Interface
The Parallel Interface Cable
The parallel interface cable can be the same type as the one used for
a printer connection. The computer end of the cable must be a DB-25
(D-sub 25-pin) female plug, and the scanner end must be a 36-pin
Centronics® type connector.
Connecting the Parallel Interface
Check that you have the correct parallel cable for the interface.
Make sure that both the scanner and computer are turned off.
1.
Connect the 25-pin end of the cable to the connector on the
2.
bidirectional parallel interface board in the computer. Tighten
the screws on the sides of the connector.
B-4
Connecting the Scanner to a PC
Page 76

Using the Parallel Interface
3.
Connect the 36-pin end of the cable to the bidirectional parallel
interface connector on the back panel of the scanner. Fasten the
connector with the clamps on the sides of the connector.
0
CAUTION:
I
.
the scanner. Attempting to connect more than one
interface cable may produce radio interference that
exceeds the specified limits.
Connect only one interface cable at a time to
Identifying a Cable Problem
If you are using a standard parallel interface cable, the scanner may
not work properly even though the same cable works properly with
a parallel printer. For example, if the fluorescent lamps come on but
the scanner does not start, or if your software does not recognize the
scanner, the wiring of the parallel cable may be incorrect.
Connecting the Scanner to a PC
B-5
Page 77

Using the Parallel Interface
The following illustration shows the recommended wiring for the
bidirectional parallel interface cable. The dotted lines indicate
wiring that is not required for the scanner to communicate with the
computer.
Scanner side
(36-pin)
STROBE
DATA 1
DATA 2
DATA 3
DATA 4
DATA 5
DATA 6
DATA 7
DATA 8
ACKNLG
BUSY
PE
SLCT
AUTO FEED XT
FG
INIT
ERROR
DIR
GND
Computer side
(D-sub 25-pin)
1
STROBE
2
DATA 1
3
DATA2
4
DATA3
5
DATA 4
6
DATA 5
7
DATA 6
8
DATA 7
9
DATA 8
10
ACKNLG
11
BUSY
12
PE
13 SLCT
14 AUTO FEED XT
15 ERROR
16 INIT
17 SLCT IN
- GND
If your scanner does not work properly with the parallel interface
cable, see your dealer for assistance. Your dealer can provide a
parallel cable with the correct wiring.
B-6
Connecting the Scanner to a PC
Page 78

Appendix C
CONNECTING THE SCANNER TO A MACINTOSH
Using the SCSI Interface.
Introducing the SCSI Interface
Setting the SCSI ID
Setting Up the Terminators
Installing the SCSI Interface Board. . . . . . . . . . . . . . . . . . . . C-6
Connecting the Scanner to the SCSI Interface.
Connecting the Scanner as a Single SCSI Device
Connecting the Scanner to Other SCSI Devices
The Power on Sequence
Removing the SCSI Board . . . . . . . . . . . . . . . . . . . . . . . . . . . C-14
............................
.....................
...............................
........................
..........
......
.......
...........................
C-2
C-2
C-2
C-4
C-10
C-10
C-11
C-13
Connecting the Scanner to a Macintosh
C-1
Page 79

Using the SCSI Interface
This section introduces you to
unfamiliar with the SCSI interface, be sure to read this entire
appendix thoroughly.
the
SCSI interface. If you are
Introducing the SCSI Interface
The SCSI board included in the kit allows you to connect the
ES-300C scanner to an Apple Macintosh computer using the
industry-standard set of hardware and software specifications
known as the Small Computer System Interface (SCSI).
This fast, simple interface was pioneered by Shugart and Associates
and was originally called the Shugart Associates System Interface
(SASI). The American National Standards Institute modified and
added to the SASI specifications and renamed it SCSI. This interface
has undergone several revisions and is currently defined by ANSI
specifications X3.131-1986.
The SCSI interface allows you to connect up to eight devices,
including the computer, in what is called a
All devices connected through the interface are assigned a SCSI ID
number so that they can recognize each other. When you use
multiple SCSI devices, you need to pay attention to the terminators
that affect the arrangement of the devices along the SCSI daisy
chain. SCSI IDS and terminators are explained in more detail in the
following sections.
daisy chain
arrangement.
Setting the SCSI ID
The factory set SCSI ID of the scanner’s SCSI board is 2. The
computer is always ID number 7. You must assign any other devices
a unique ID number between 0 and 6. If you are going to add the
scanner to a system in which
SCSI ID of 2, you must change the ID number of either that device
or the SCSI board.
C-2
Connecting the Scanner to a Macintosh
one
of your SCSI devices already has a
Page 80

Using the SCSI Interface
WARNING:
l
Before handling the SCSI board, first touch a grounded
metal object to release any static electricity on your
body that may cause damage to
the
components of the
board.
0
Hold the interface by its edges and
Do not touch the edge connector or the components
the
shielding plate.
on
the board.
1.
Locate the rotary switch on the SCSI board to check or change
the SCSI ID.
2.
To change the SCSI ID, rotate the small dial on the top of the
rotary switch until the number of the desired ID aligns with the
mark on the dial.
Connecting the Scanner to a Macintosh
C-3
Page 81

Using the SCSI Interface
CAUTION:
I
.
0
l
Do not set the SCSI ID (the rotary switch) to 8 or 9.
These numbers are not available for SCSI connection.
l
Do not set the ID number to an ID that is already
assigned to another device. If two or more devices have
the same ID number, the computer, the scanner, and/or
the other device will not function properly.
Setting Up the Terminators
For SCSI devices to communicate properly with each other, the SCSI
interface requires special resistor packs known as terminators. These
terminators are needed to reduce the echo, standing waves, and
interference along the SCSI interface.
You must be aware of the following important points about
terminators before you connect your scanner to the SCSI interface.
You must have only two terminators on a SCSI daisy chain: one
on the first and one on the last SCSI device.
Terminators may be internal or external. Internal terminators are
built into the SCSI device. External terminators are purchased
separately and are installed on the SCSI device.
If your Macintosh has a hard disk, the hard disk is the first SCSI
device on the daisy chain. A Macintosh with an internal hard
disk always has an internal terminator. A Macintosh with an
external hard disk may have either an internal or external
terminator.
The scanner has an internal terminator so it must be the last
SCSI device on the daisy chain.
C-4
Connecting the Scanner to a Macintosh
Page 82

Using the SCSI Interface
0
CAUTION:
I
.
terminators along the SCSI interface. Having more than
two terminators connected at one time could cause serious
damage to the SCSI devices on the daisy chain.
Do not connect more than two devices with
Connecting the Scanner to a Macintosh
C-5
Page 83

Installing the SCSI Interface Board
You install the SCSI board into the option board slot located on the
back panel of the scanner as described below.
CAUTION:
To connect the ES-300C in the middle of a
daisy chain, you must have the terminator resistors
removed from the SCSI board by your dealer before
installing the board in the scanner.
1.
Turn off the scanner and disconnect the power cable and any
other interface cables connected to the scanner.
WARNING:
Always turn off the power and disconnect the
power cable before installing or removing an optional
interface board,
C-6
Connecting the Scanner to a Macintosh
Page 84

Installing the SCSI Interface Board
2.
Remove the three screws that secure the interface slot on the
back
of the scanner.
3.
Remove the interface slot cover, Keep the cover in a safe place
for future use.
Connecting the Scanner to a Macintosh
C-7
Page 85

4.
Holding the SCSI board by the shield plate, gently insert the
board into the guides of the option slot. You will feel a slight
resistance as the board connectors plug into the connectors
inside the scanner. Press firmly to secure the connectors. If
board does
not
fit, do not force it; look to be sure you inserted
the board evenly into the connectors.
5.
Check that the board’s back panel rests flush against the
scanner’s back panel.
the
C-8
Connecting the Scanner to a Macintosh
Page 86

Installing the SCSI Interface Board
6.
When the board is properly installed, align the shield plate of
the SCSI board with the three screw holes on the back panel of
the scanner.
Connecting the Scanner to a Macintosh
C-9
Page 87

Connecting the Scanner to the SCSI Interface
This section shows you how to connect the ES-300C to the SCSI
interface. Consult your dealer to obtain the proper SCSI interface
cable.
CAUTION:
If you have a Macintosh Plus, you must first
set DIP switches SW1-1, SW1-2, and SW1-3 on your
scanner to on. (See pages D-4 to D-7 for information on
how to change DIP switch settings.)
Connecting the Scanner as a Single SCSI Device
The simplest connection hooks the computer directly to the scanner.
To connect the scanner to the Macintosh, you need a 25-pin to
50-pin SCSI system cable.
1.
Check that both the scanner and the Macintosh are turned off
and unplugged from the power source.
2.
Connect the 25-pin end of the cable to the SCSI port on the
Macintosh. The SCSI port is the larger port with the diamond-
shaped icon over it. Be sure that the cable is securely connected.
3.
Connect the 50-pin end of the cable to the upper connector on
the SCSI board.
4.
Connect the power cables on both the computer and scanner.
Plug the cables into electrical outlets.
5.
Always turn on the scanner first; then start the computer.
CAUTION:
C-10 Connecting the Scanner to a Macintosh
Do not connect more than one interface cable
Page 88

Connecting the Scanner to the SCSI Interface
Connecting the Scanner to Other SCSI Devices
If you are connecting more than two SCSI devices in the daisy chain,
you need a 50-pin to 50-pin SCSI peripheral cable.
follow those guidelines could cause damage to or interfere
with operation of the scanner and/or computer.
1.
You must place the scanner (containing the SCSI board with an
internal terminator) at the end of the daisy chain. The order of
connection does not affect the speed of scanning operations.
If you have a Macintosh with an internal hard disk, the hard
disk itself has a terminator and therefore is the first SCSI device
in the daisy chain.
2.
Attach any SCSI devices (without terminators or with terminator
resistors removed by your dealer) to the middle of the chain as
shown in the following illustration.
Internal terminator
Computer SCSI device
ES-300C scanner
CAUTION: Do not connect more than two devices with
terminators to the SCSI interface. Having more than two
terminators connected at one time could cause serious
damage to the SCSI devices on the daisy chain.
Connecting the Scanner to a Macintosh
C-11
Page 89

Connecting the Scanner to the SCSI Interface
3.
If you have a Macintosh without an internal hard disk and you
want to connect one or more SCSI devices in addition to the
scanner, you must be sure the first SCSI device in the chain has a
terminator (either external or internal) as shown in the
illustrations below.
Computer
L-
Computer
SCSI device
SCSI device
Internal terminator
-I
ES-300C scanner
Normally, in this arrangement, the first SCSI device is an
external hard disk.
Remember that you must place the scanner (with its built-in
terminator) last on the daisy chain.
CAUTION:
If you want to place the scanner in the middle
of the SCSI chain, you must take your SCSI board to the
dealer to have the terminator resistors removed. If you
have already installed the SCSI board, see the section on
removing the SCSI board later in this appendix. If you
choose to place the scanner in the middle of the SCSI
chain, you may need additional cables. Consult your
dealer.
C-12
Connecting the Scanner to a Macintosh
Page 90

Connecting the Scanner to the SCSI Inferface
The Power on Sequence
SCSI devices with terminators (the first and last devices in the daisy
chain) must be turned on before the Macintosh to allow information
to pass through the SCSI interface. The Macintosh may not start up
if these devices are not turned on. SCSI devices in the middle of the
chain may be left off if you don’t plan to use them at this time.
l
If you have an internal hard disk, turn on the scanner and any
other SCSI devices you plan to use. Wait a few seconds; then
turn on the computer.
l
If you have an external hard disk, turn on the scanner, external
hard disk (first on the daisy chain), and any other SCSI devices
you plan to use. Wait a few seconds; then turn on the computer.
Connecting the Scanner to a Macintosh
C-13
Page 91

Removing the SCSI Board
When you need to change the
your dealer, you must remove the SCSI board from the scanner.
1.
Turn off the scanner and disconnect the power cable.
2.
Remove the three retaining screws from the back panel of the
SCSI board on the back of the scanner. Keep the retaining screws
in a safe place.
3.
Pull the board straight out using the remover grips.
CAUTION: Do not pull the board by the connectors or
cables.
SCSI
ID or take the SCSI board to
Note: If you are taking the SCSI board to your dealer, replace the
slot cover on the back panel of the scanner to keep debris out of
the unit.
C-14
Connecting the Scanner to a Macintosh
Page 92

Appendix D
DIRECT PRINT FUNCTION
About Direct Print.
Choosing a Printer.
Using the DIP Switches
DIP Switch Factory Settings.
Changing the DIP Switch Settings
The DIP Switch Tables
Preparing for a Direct Print Operation.
Scanner Settings.
Printer Settings.
Connecting a Printer to the Scanner
Paper Size and Printable Size
Starting a Direct Print Operation . . . . . . . . . . . . . . . . . . . . . D-16
Tips for Direct Printing.
Terminating a Direct Print Operation
Zoom and Printable Size
Scanning Photographs and Pictures.
Scanning Line Art and Characters
Tips on Using Printers
If Direct Print Does Not Work.
.................................
............................... D-2
.............................
.......................
..................
............................
................
.................................
..................................
.................
......................
.............................
...............
..........................
................
..................
............................
.....................
D-2
D-4
D-4
D-5
D-6
D-10
D-10
D-13
D-14
D-15
D-18
D-18
D-18
D-20
D-21
D-21
D-22
Direct Print Function
D-1
Page 93

About Direct Print
The direct print function allows you to use your ES-300C scanner as
a color copier if you have an Epson LQ-2500, LQ-2550, or LQ-860
printer with a color ribbon or an HP PaintJet or HP3630 color
graphics printer with a parallel interface. With direct print, you
connect the scanner directly to your printer and print the scanned
image in color. Consult your dealer to obtain the special parallel
interface cable required for the direct print function.
Choosing a Printer
You can use the direct print function only through the parallel
interface of the scanner. You select your printer through the DIP
switches as explained in the following section.
D-2
Direct Print Function
Page 94

About Direct Print
Note:
l
This function does not work properly with monochrome (noncolor) printers or 9-pin color printers.
l
With an Epson 80 column printer or an HP PaintJet, the full
scanning area of the ES-300C cannot be printed the same size as
the original.
l
This function cannot be used with an HP PaintJet printer that
has an HP-IB interface or RS-232C interface.
l
See the printer user’s manual for details on your printer’s
operation.
Direct Print Function D-3
Page 95

Using the DIP Switches
The ES-300C has two sets of DIP switches located under the DIP
switch cover to the left of the control panel.
Change DIP switches in the following cases:
l
If you have a Macintosh Plus computer. (See Appendix C.)
l
When you use the direct print function.
l
When your software cannot specify the functions that are
selectable with DIP switches. (See your software manual.)
Note: Changes made to DIP switch settings while the scanner is
on
will not be effective until you turn the scanner off and then
back on again.
DIP Switch Factory Settings
The DIP switches are set to the following positions at the factory:
D-4
OFF
Direct Print Function
Page 96

Using the DIP Switches
The values corresponding to the above factory settings are as
follows:
Baud rate:
Stop bit:
Parity check:
Printer type:
9600 bps
2 bits
None
Epson 24-pin color printer (80 column)
(for the direct print function only)
Halftoning mode:
Gamma correction:
Color correction:
Parallel interface:
Halftoning mode A
CRT Display A
CRT Display
Bidirectional
Changing the DIP Switch Settings
1.
Turn off the scanner and remove the DIP switch cover by sliding
it toward you.
Direct Print Function
D-5
Page 97

Using the DIP Switches
2.
Use a pen, tweezers, or other pointed object to change the DIP
switch settings. A DIP switch is on when it is away from you
and off when it is toward you.
3.
Replace the DIP switch cover,
Note: The new DIP switch settings take effect when you turn the
scanner on. Changes you make to DIP switch settings while the
scanner is on will not be effective until you turn the scanner off
and then back on.
The DIP Switch Tables
The tables below show the settings for each DIP switch. The shaded
boxes show the factory (default) settings.
D-6
Direct Print Function
Page 98

Using the DIP Switches
DIP switch 1 settings
DIP switch 1 determines the serial interface protocols and the direct
print function.
Table 2. DIP switch 1 settings
See table 2.
Table 2. Baud rate
Baud rate
19200 bps
1
2400 bps
1200 bps
600 bps
1
300 bps
SCSI/Macintosh
Plus
SW1-1
OFF OFF
OFF
ON OFF
(
OFF
ON ON
1
ON
SW1-2
OFF
SW1-3
OFF
1
OFF
ON
ON
(
ON
ON
Direct Print Function D-7
I
I
Page 99

Using the DIP Switches
Table 3. Printer type for direct print
1
Epson LQ-2500 or LQ 2550 (with color ribbon)
1
ON
ON
I
DIP switch 2 settings
DIP switch 2 determines the scanner operation normally required
for the direct print function. For normal scanning operations, your
scanner software sets these scanner functions and overrides the
current DIP switch settings. Therefore, except for the direct print
function, you are unlikely to change these switches from the factory
settings.
Table 4. DIP switch 2 settings
Switch No. I Function
SW2-1
SW2-2
SW2-3
SW2-4
SW2-5
Halftoning mode
Gamma correction
I
Color correction
I
ON
See table 5.
See table 6.
See table 7.
OFF
I
I
Note: Set switch SW2-8 to off for ordinary scanner operations. Set
SW2-8 to on only when you use the direct print function.
D-8
Direct Print Function
Page 100

Table 5. Halftoning mode
Table 6. Gamma correction
Using the DIP Switches
Printer Output B
Printer Output C
Table 7. Color
correction
ON ON OFF
OFF
OFF
ON
Direct Print Function
D-9
 Loading...