

Page 1

Laser Printer
®
Network Administrator’s
Guide
Printed on recycled paper with at least 10% post-consumer content
Page 2

Copyright Notice
All rights reserved. No part of this publication may be reproduced, stored in a retrieval
system, or transmitted in any form or by any means, electronic, mechanical, photocopying,
recording, or otherwise, without the prior written permission of Seiko Epson Corporation.
The information contained herein is designed only for use with this EPSON printer. EPSON
is not responsible for any use of this information as applied to other printers.
Neither Seiko Epson Corporation nor its affiliates shall be liable to the purchaser of this
product or third parties for damages, losses, costs, or expenses incurred by purchaser or
third parties as a result of: accident, misuse, or abuse of this product or unauthorized
modifications, repairs, or alterati ons to this product, or (excluding the U.S.) failure to strictly
comply with Seiko Epson Corporation’s operating and maintenance instructions.
Seiko Epson Corporation shall not be liable for any damages or problems arising from the
use of any options or any consumable products other than those designated as Original
EPSON Products or EPSON Approved Products by Seiko Epson Corporation.
EPSON and EPSON ESC/P are registered trademarks and EPSON ESC/P 2 is a trademark
of Seiko Epson Corporation.
General Notice: Other product names used herein are for identification purposes only and
may be trademarks of their respective owners. EPSON disclaims any and all rights in those
marks.
Copyright © 1997 by Epson America, Inc. 2/97
ii
Page 3

FCC COMPLIANCE ST ATEMENT
FOR AMER ICAN U S ERS
This equipment has been tested and found to comply with the limits for a class B digital
device, pursuant to Part 15 of the FCC Rules. These limits are designed to provide
reasonable protection against harmful interference in a residential installation. This
equipment generates, uses, and can radiate radio frequency energy and, if not installed and
used in accordance with the instructions, may cause harmful interference to radio and
television reception. However, there is no g uarantee that interference will not occur in a
particular installation. If this equipment does cause interference to radio and television
reception, which can be determined by turning the equipment off and on, the user is
encouraged to try to correct the interference by one or more of the following measures:
Reorient or relocate the receiving antenna
Increase the separation between the equipment an d receiver
Connect the equipment into an outlet on a circuit different from that to which the receiver is
connected
Consult an experienced radio/TV technician for help.
WARNING
The connection of a non-shielded equipment interface cable to this equipment will
invalidate the FCC Certification of this device and may cause interference levels that exceed
the limits established by the FCC for this equipment. It is the responsibility of the user to
obtain and use a shielded equipment interface cable with this device. If this equipment has
more than one interface connector, do not leave cables connected to unused interfaces.
Changes or modifications not expressly approved by the manufacturer could void the
user’s authority to operate the equipment.
FOR CAN ADIAN USERS
This digital apparatus does not exceed the Class B limits for radio noise emissions from
digital apparatus as set out in the radio interference regulations of the Canadian
Department of Communications.
Le présent appareil numérique n’émet pas d e bruits radioélectriques dépassant les limites
applicables aux appareils numériques de Classe B prescrites dans le règlement sur le
brouillage radioélectrique édicté par le Ministère des Communications du Canada.
iii
Page 4

Contents
Introduction
Network Utility Software . . . . . . . . . . . . . . . . . . . . . . . . . . . . . . . . . 2
How This Manual Is Organized . . . . . . . . . . . . . . . . . . . . . . . . . . . . 3
Terms and Concepts . . . . . . . . . . . . . . . . . . . . . . . . . . . . . . . . . . . . . . 4
Chapter 1 G ettin g Start ed
Connecting the Ethernet Interface Card to the Network . . . . . . . 1-2
Reading the Indic ator Lights . . . . . . . . . . . . . . . . . . . . . . . . . . . . . . 1-5
Resetting the Ethernet Card . . . . . . . . . . . . . . . . . . . . . . . . . . . . . . . 1-6
Chapter 2 Configuring the EPL-N2000 for NetWare
Installing EPSON Net! for NetW are . . . . . . . . . . . . . . . . . . . . . . . . 2-3
For Windows . . . . . . . . . . . . . . . . . . . . . . . . . . . . . . . . . . . . . . . . 2-3
For DOS . . . . . . . . . . . . . . . . . . . . . . . . . . . . . . . . . . . . . . . . . . . . . 2-3
Configuring the EPL-N2000 as a Print Server . . . . . . . . . . . . . . . . 2-4
Assigning Print Queues on a Single NetWare File Server . . . 2-4
Assigning Print Queues on Multiple NetWare File Servers . 2-8
Deleting Print Queues from a Print Server . . . . . . . . . . . . . . . 2-10
Renaming the Print Serv er . . . . . . . . . . . . . . . . . . . . . . . . . . . . . 2-11
Assigning a Password . . . . . . . . . . . . . . . . . . . . . . . . . . . . . . . . . 2-11
Setting the Queue Polling T i me Interval . . . . . . . . . . . . . . . . . 2-12
Configuring the EPL-N2000 as a Remote Printer . . . . . . . . . . . . . 2-13
Defining the EPL-N2000 on a NetWare Print Server . . . . . . . 2-13
Configuring th e Operating Mode and Making Other Changes 2-14
Configuring the EPL-N2000 to Switch Modes . . . . . . . . . . . . . . . . 2-17
Chapter 3 Configuring the EPL-N2000 for AppleTalk
Installing EPSON Net! for Macint o sh . . . . . . . . . . . . . . . . . . . . . . . 3-3
Using EPSON Namer to Rename Your P rinter . . . . . . . . . . . . . . . 3-3
Using EPSON Zoner to Assign a Zone to Your Printer . . . . . . . . 3-7
v
Page 5

Chapter 4 Configuring the EPL-N2000 for Windows NT
Configuring on a W indows NT Server U sing DLC . . . . . . . . . . . . 4-2
Configuring on a Windows NT Server Using TCP/IP . . . . . . . . . 4-4
Installing EPSON Net! for Win dows NT . . . . . . . . . . . . . . . . . 4-4
Setting the IP Address . . . . . . . . . . . . . . . . . . . . . . . . . . . . . . . . . 4-4
Creating the Printer on the Windows NT Server . . . . . . . . . . 4-6
Chapter 5 Configuring the EPL-N2000 for UNIX
Setting Up the EPL-N2000 as a Netwo rk Device . . . . . . . . . . . . . . 5-2
Setting Up the EPL-N2000 as a Remo te Printer . . . . . . . . . . . . 5-4
Printing to the EPL-N 2000 . . . . . . . . . . . . . . . . . . . . . . . . . . . . . . . . . 5-6
Using ftp to Pr int . . . . . . . . . . . . . . . . . . . . . . . . . . . . . . . . . . . . . 5 -7
Using lpr to Print . . . . . . . . . . . . . . . . . . . . . . . . . . . . . . . . . . . . . 5-8
Setting Up the EPL-N2000 with Other UNIX Systems . . . . . . . . . 5-9
Setting Up for SCO UNIX Systems . . . . . . . . . . . . . . . . . . . . . . 5-9
Setting Up for IBM AIX Systems (RS/6000) . . . . . . . . . . . . . 5-12
Setting Up for HP-UX Systems . . . . . . . . . . . . . . . . . . . . . . . . . 5-13
Chapter 6 Configuring the EPL-N2000 for OS/2
Protocol Support . . . . . . . . . . . . . . . . . . . . . . . . . . . . . . . . . . . . . . . . . 6-2
Setting Up Redirection to the EPL-N2000 . . . . . . . . . . . . . . . . . . . . 6-3
Obtaining Printer Status for Redirected Ports . . . . . . . . . . . . . 6-5
Setting Up Piping to the EPL-N2000 . . . . . . . . . . . . . . . . . . . . . . . . 6-5
Copying the Piping Software . . . . . . . . . . . . . . . . . . . . . . . . . . . 6-6
Configuring Prin ters for Use with Remote Print Service . . . . 6-7
Obtaining Printer Status for Piped Ports . . . . . . . . . . . . . . . . . 6-9
Sharing an EPL-N2000 Among Several Workstatio ns . . . . . . . . . . 6-10
Chapter 7 Using the EPSON Status Moni tor
Installing the Status Monitor Utility . . . . . . . . . . . . . . . . . . . . . . . . 7-2
Accessing the Status Mo nitor Utility . . . . . . . . . . . . . . . . . . . . . . . . 7-3
From Windows 95 . . . . . . . . . . . . . . . . . . . . . . . . . . . . . . . . . . . . 7-3
From Windows NT 3.51 . . . . . . . . . . . . . . . . . . . . . . . . . . . . . . . 7-3
Using the Status Monitor Utility . . . . . . . . . . . . . . . . . . . . . . . . . . . . 7-4
Checking Printer Status . . . . . . . . . . . . . . . . . . . . . . . . . . . . . . . . 7-4
Changing Printer Settings . . . . . . . . . . . . . . . . . . . . . . . . . . . . . . 7-5
vi
Page 6

Changing Serial Settings . . . . . . . . . . . . . . . . . . . . . . . . . . . . . . . 7-7
Working with Printer Configuration Files . . . . . . . . . . . . . . . . 7-9
vii
Page 7

Introduction
The EPL-N2000 provides the network administrator with both
greater freedom and greater flexibility in allocating network
resources. Because the EPL-N2000 is equipped with an Ethernet
interface card that connects directly to the network’s physical
layer, users can configure and control print jobs directly from
their workstations rather than going through a print server. The
network administrator can monitor printer status and change
printer settings from the EPSON Status Monitor, which operates
on a Microsoft
Because the EPL-N2000 supports multiple protocols and
automatically detects the protocols on your network, you can
easily connect it to your existing network . The table below lists
the different ways in which the client wo rkstation can be
connected to the printer.
Client
Windows 3.1.x,
Windows 95,
Windows NT 3.5x,
DOS,
Windows for
Workgroups
Windows 95,
Windows NT 3.5x,
Windows for
Workgroups 3.11
Macintosh
®
Windows 95® or Windows NT® 3.5x system.
How Client Is
Connected Network Protocol
®
NetWare
and 4.x Bindery
Emulation Mode
(Remote Print S ervice
®
®
7.x AppleTalk® network AppleTalk Phase I,
or Remote Printer)
3.11
Windows NT 3.5x print
server
2.x, 3.x
IPX/SPX
NetBIOS over NetBEUI,
NetBIOS over TCP/IP,
DLC
Phase II
®
®
OS/2
UNIX Ethernet TCP/IP
OS/2 Warp
Warp Connect
®
and
®
NetBIOS over NetBEUI
NetBIOS over TCP/IP
Introduction 1
Page 8

In addition, the EPL-N2000 supports IEEE 802.2, IEEE 802.3, and
Ethernet II network protocols.
Although you configure the networking so ftware for the
EPL-N2000 in a particular environment (for example, on a
workstation running Window s NT), any workstation on the
network using the same network protocol can connect to the
printer.
Note:
Of course, any Windows workstation equipped with EPL-N2000 printer
driver software can connect directly to the printer via a parallel port
connection, whether or not the printer i s on a network. See the
EPL-N2000 User’s Guide for informatio n about installing and
configuring the Windows printer driver softw are.
Network Utility Software
The EPL-N2000 network utility software consists of the
following programs:
❏ EPSON Net! for NetWare DOS and EPSON Net! for
Windows are easy-to-use, menu-driven utility programs that
run in DOS and Windows, respectively. Use either to
configure the EPL-N2000 for NetWare .
❏ EPSON Net! fo r Macintosh is an easy-to-use, menu-driven
utility program that runs in System 7.x. Use it t o configure
the EPL-N2000 for AppleTalk.
❏ EPSON Net! for Windows NT is an easy-to-use,
menu-driven program that runs in Windows NT 3.5x. You
can use EPSON Net! for Windows NT to configure the
EPL-N2000 for TCP/IP.
2 Introduction
Page 9

Note:
You do not need special network utility software to connect the
EPL-N2000 to a Windows NT server running DLC.
❏ EPSON Net! fo r OS/2 is a character-based utility for
configuring the EPL -N2000 as a remote printer on an OS/2
LANServer
❏ The EPSON Status Monitor shows printer status and allows
the administrato r to change certain print settings, such as
print density. It runs on Wind ows 95 or Windows NT 3.5x.
®
or LANManager® workstatio n.
How This Manual Is Organized
This manual describes how to connect the EPL-N2000 to the
network and configure it in each of the suppor ted network
environments.
Chapter 1, “Getting Started,” explains how to connect the
printer to the network. It also explains how to read the indicator
lights on the Ethernet interface card and use the card to print a
status sheet.
Chapter 2, “Configuring the EPL-N2000 for NetWare,” describes
how to use EPSON Net! for NetWare DOS or EPSON Net! for
NetWare Windows to configure the EPL-N2000 for use as a print
server or remote printer run ning under Novell NetWare.
Chapter 3, “Configuring the EPL-N2000 for AppleTalk,”
describes how to use EPSON Net! for Macintosh to configure the
EPL-N2000 for use on an App leT alk network.
Chapter 4, “Configuring the EPL-N2000 for Windows NT,”
describes ho w to use EPSON Net! for Windows NT to configure
the EPL-N2000 for use on a Windows NT server running
TCP/IP. It also explains how to co nnect the printer directly to a
Windows NT server running DLC transport protocol.
Introduction 3
Page 10

Chapter 5, “Configuring the EPL-N2000 for UNIX,” describes
how to to use standard UNIX commands such as arp and ping to
set up and use the printer on a network running TCP/IP. No
special network utility is needed.
Chapter 6, “Configuring the EPL-N2000 for OS/2,” describes
how to use EPSON Net! for OS/2 to send prin t files to the
EPL-N2000 through either redirection or piping.
Chapter 7, “Using the EPSON Status Monitor,” describes how to
install the Status Monitor utility and use it to check printer
status, change printer settings, or work with printer
configuration files.
Terms and Concepts
A node address is a set of numbers that gives a unique identity to
any piece of equipment connected to a network.
The file server stores data required for the EPL-N2000 to operate
as a print server.
A print queue is an area where a print job is stored as a file before
the print server sends the jo b to the assig ned printer.
A print server moves jobs from print queues to printers.
A remote printer is a shared printer connected elsewhere on the
network, but un der the control of a NetWare print server.
Traditionally, a remote printer is connected to a network
workstation run ning NetWare’s RPRINTER, but the EP L-N2000
can also function as a remote printer .
A status sheet prints each tim e the Status Sheet button on the
Ethernet interface card is pushed. If the EPL-N2000 is configured
as a print server, the status sheet lists the co nfigurations of the
printer on each network.
4 Introduction
Page 11

A print spooler is an application that places print jobs or requests
in a queue.
TCP/IP (Transmission Control Protocol/Internet Protocol) is a
suite of protocols that performs a subset of overall networking
communication tasks.
ftp is a UNIX command for file tran sf er on a TCP/IP network.
lpr is a UNIX command for remote printing on a TCP/IP
network.
Resetting the EPL-N2000 causes it to initialize. You can res et the
printer in the follow ing ways:
❏ Switching the printer off and back on again
❏ Pressing the reset key combination (Alt–Continue) on
the printer’s control panel
A zone is a group of users, computers, and devices on an
AppleTalk network. Zones can be grouped according to physical
location, work groups, or departments.
Introduction 5
Page 12

Chapter 1
Getting Started
Connecting the Ethernet Interface Card to the Network . . . . . . . .1-2
Reading the Indic ator Lights . . . . . . . . . . . . . . . . . . . . . . . . . . . . . . .1-5
Resetting the Ethernet Card . . . . . . . . . . . . . . . . . . . . . . . . . . . . . . . .1-6
1
1
Getting Started 1-1
Page 13

This chapter explains how to connect the Ethernet interf ace card
to the network, as well as how to perform such basic tasks as
reading the card’s lights, using the card to print a status sheet,
and resetting the card.
Connecting the Ethernet Interface Card to the Network
Your EPL-N2000 comes with a preinstalled Ethernet interface
card that you can connect to your network using either a
10BASE-T or 10BASE2 networ k cable. (Your printer in cludes a
coaxial Y-connector for a 10BASE2 connection.)
Follow these steps to connect the card to your net work:
1. Make sure the Interface setting in the SelecType Setup Menu
is set to Auto, then turn off the printer.
Note:
This setting ensures that the card automatically swit ches m ode to
match the network interface used. See Chapter 3 in the User’s Guide
for information on SelecType settings.
1-2 Getting Started
Page 14
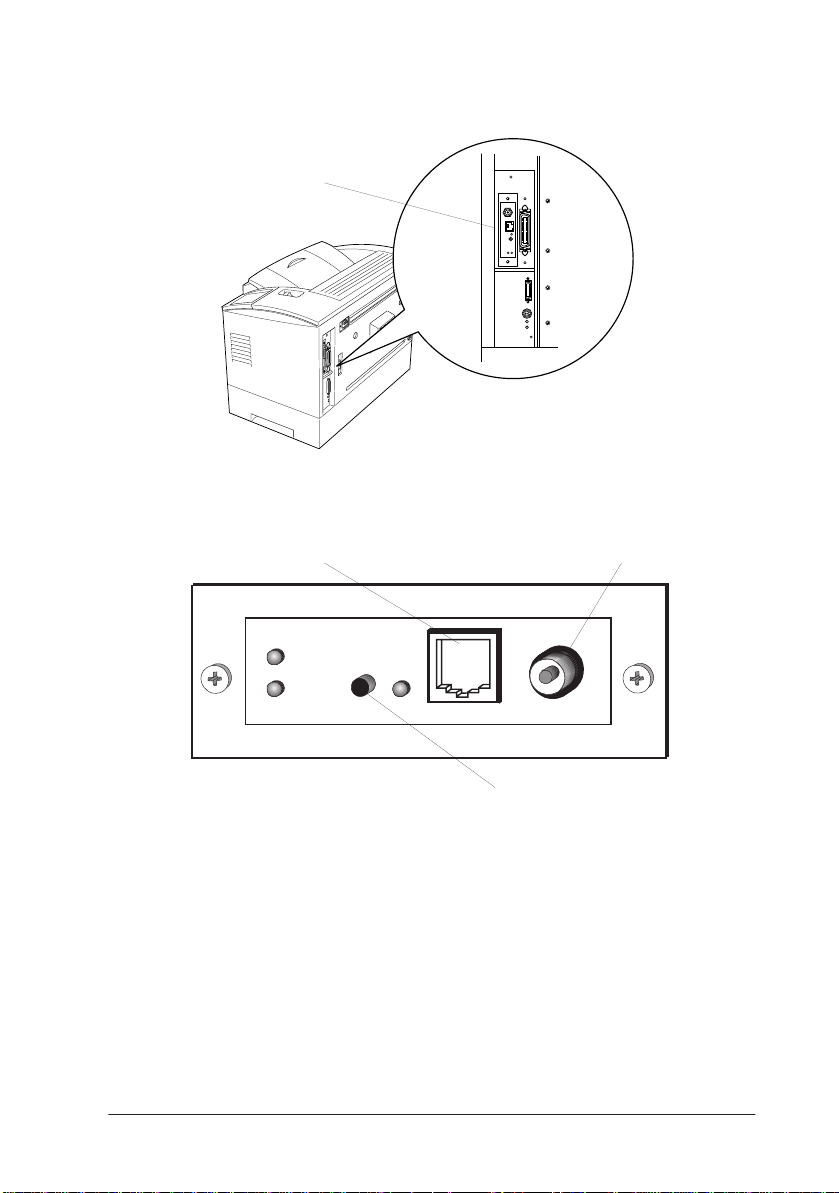
2. Locate the Ethernet card plate on th e back of the printer.
card plate
3. Attach the network cable to t he appropriate connector.
Twisted P air 10BA S E- T) Thin Coaxial 10BASE2)
status sheet button
Note:
You can attach the Ethernet interface card to only one connector at
a time.
4. Turn on the printer while pressing the status sheet button for
about three seconds. The Ethernet interface card initializes.
5. Press the status sheet but ton a second time after the card
completes initialization. A status sheet prints .
Getting Started 1-3
Page 15

The status sheet provides information you need to configure
your printer for the network, such as the IP ad dress for the
Ethernet interface card, and the printer’s serial number and
current configuration.
If the printer fails to print a status sheet, make sure that t he
printer is online and that no jobs are processing, then wait one
minute before pressing the status sheet button again. If it still
does not print a status sheet, turn the printer off. Wait at least
five seconds before turning it on, then press the status sheet
button again.
Note:
If your printer has an EPSONScript Level 2 module installed, allow
a minute for the printer to initialize before trying to configure it on
the network. The EPL-N2000 may not configure properly if
PostScript initialization has not been completed.
1-4 Getting Started
Page 16
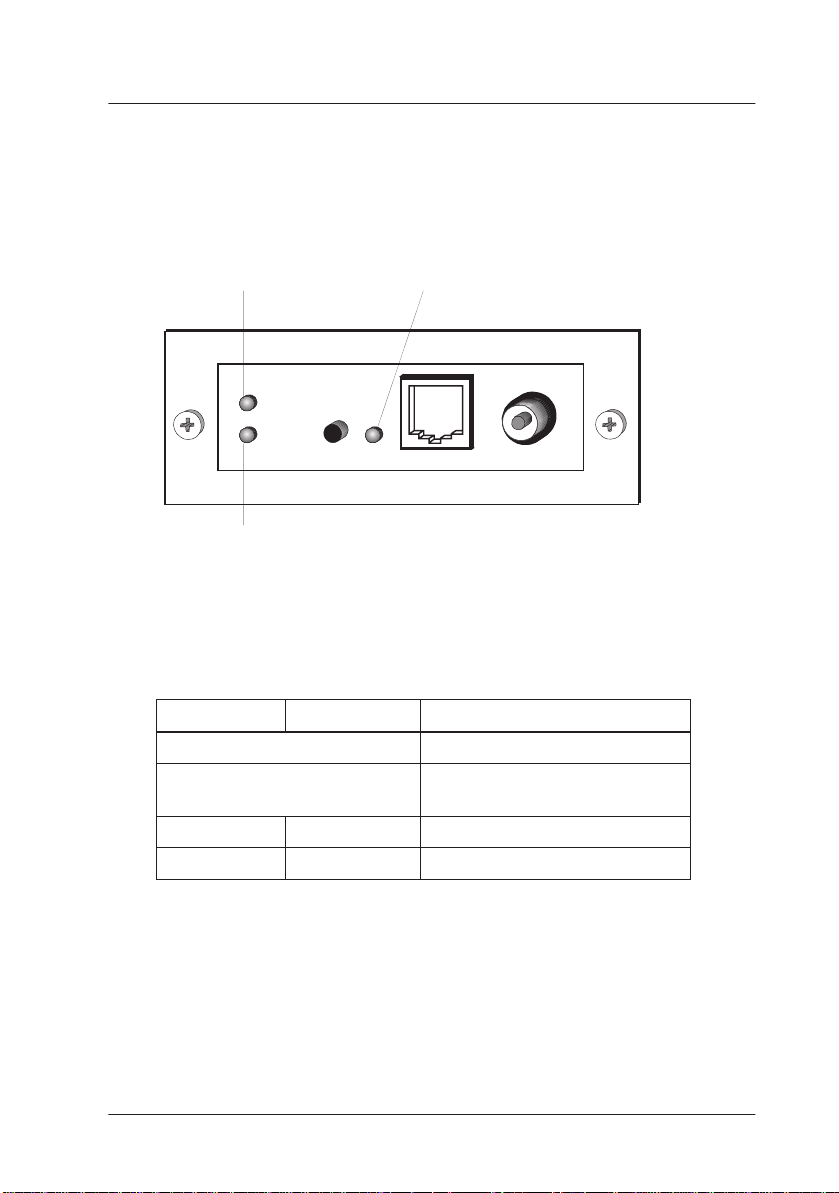
Reading the Indicator Lights
In addition to obtaining detailed information by printing a status
sheet, you can o btain basic printer status by reading the
indicator lights on the Ethernet card plate.
red status light data transmission light
green status light
The green data transmission light blinks when the Ethernet card
sends data.
The red and green status lights indicate the following conditions:
Red Green Status
Both lights blink simultaneously Ethernet card is initializing
Both lights blink alternately Ethernet card recognizes the
network connection.
Off On Normal ready status
On On Error status
Getting Started 1-5
Page 17
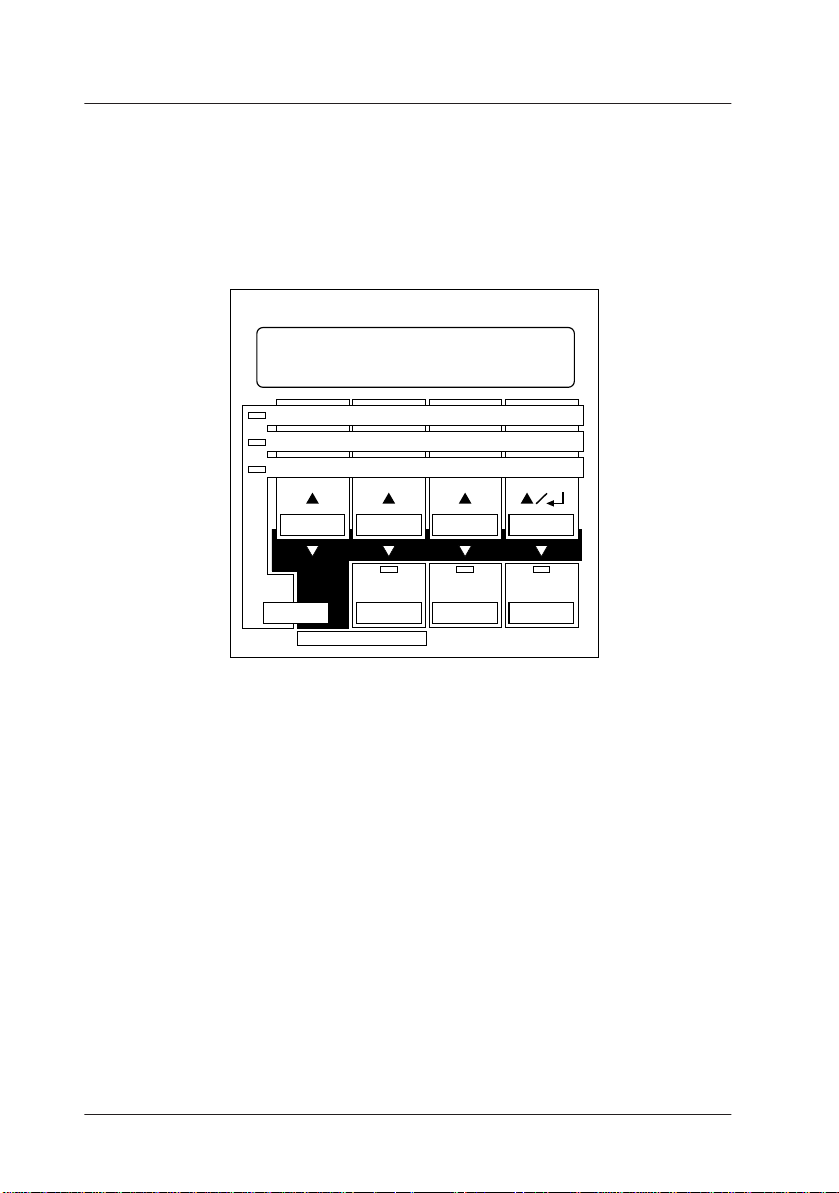
Resetting the Ethernet Card
When an error condition occurs, you may be able to correct it by
resetting the Ethernet card. Yo u can reset the card by switching
the printer off and on again, or by pressing the Reset key
sequence (Alt–Continue) on the printer control panel.
Paper Source Page Size Manual Feed Orientation
RITech Copies MP Tray Size
Menu Item Value Enter
Toner Save
Mode
Status Sheet
SelecType
Continue
Alt
Reset
Form Feed On Line
If you turn the printer on while pressing the status sheet button
on the card plate, all card configuration settings are reset to the
factory default settings.
1-6 Getting Started
Page 18

Chapter 2
Configuring the EPL-N2000 for NetWare
Installing EPSON Net! for NetW are . . . . . . . . . . . . . . . . . . . . . . . . .2-3
For Windows . . . . . . . . . . . . . . . . . . . . . . . . . . . . . . . . . . . . . . . . .2-3
For DOS . . . . . . . . . . . . . . . . . . . . . . . . . . . . . . . . . . . . . . . . . . . . . .2-3
Configuring the EPL-N2000 as a Print Server . . . . . . . . . . . . . . . . .2-4
Assigning Print Queues on a Single NetWare File Server . . . . 2-4
Assigning Print Queues on Multiple NetWare File Servers . .2-8
Deleting Print Queues from a Print Server . . . . . . . . . . . . . . . .2-10
Renaming the Print Serv er . . . . . . . . . . . . . . . . . . . . . . . . . . . . . .2-11
Assigning a Password . . . . . . . . . . . . . . . . . . . . . . . . . . . . . . . . . .2-11
Setting the Queue Polling T i me Interval . . . . . . . . . . . . . . . . . .2-12
Configuring the EPL-N2000 as a Remote Printer . . . . . . . . . . . . . .2-13
Defining the EPL-N2000 on a NetWare Print Server . . . . . . . .2-13
Configuring the O perating Mode and Making
Other Changes . . . . . . . . . . . . . . . . . . . . . . . . . . . . . . . . . . . . . . . .2-14
Configuring the EPL-N2000 to Switch Modes . . . . . . . . . . . . . . . . .2-17
2
Configuring t he EPL-N2000 for NetWare 2-1
Page 19

This chapter describes how to configure the EPL-N2000 as a
print server or remote printer running under Novell NetWare.
The EPL-N2000 comes with EPSON Net! for NetW are, EPSON’s
proprietary NetWare printer management ut ility. You can use
EPSON Net! for NetWare to add or delete queues, change port
configurations, r ename the print server, configure the interface
to service queu es on other file servers, and other tasks.
There are two versions of EPSON Net! for NetWare: EPSON
Net! for NetWare Windows, and EPSON Net! for NetWare DOS.
Before you begin, do the following:
❏ Log on the network with supervisor privileges.
❏ Decide whether you want to configure the EPL-N2000 as a
dedicated print s er ver or remote printer, or whether you
want to switch automatically between these two modes.
❏ Make sure the EPL -N2000 is connected to the network and
turned on. See Chapter 1 for information on connecting the
Ethernet interfac e card.
❏ Make sure that Novell NetWare is set up to use print
services on the network. See your Novell NetWare
documentation for details about setup.
Caution:
c
Once you make changes to the EPL-N2000, you must wait at least
five minutes before turning off or rebooting your printer.
2-2 Configuring the EPL-N2000 for NetWare
Page 20

Installing EPSON Net! for NetWare
EPSON Net! for NetWare requires a minim um of 480KB
conventional memory.
Follow these st eps to install the uti lity:
For Windows
1. Insert the EPSON Net! for NetWare Windows diskette.
2. Choose Run from the File menu.
3. Type a:\windows\install (or b:\windows\install) and click
OK.
4. Follow the ins tructions on the screen.
After installation is complete , EPSON Net! for NetWare
appears in the EPSON Net! group.
For DOS
1. Insert the EP SON Net! for NetWare DOS diskette.
Note:
Your workstation must have a high density diskette drive.
2. Use the COPY command to copy the following files to a
network directory or to your hard drive:
EPNWDE.EXE
EPNWDE.DAT
Configuring t he EPL-N2000 for NetWare 2-3
Page 21

If you are configuring the EPL-N2000 as a print server, go to
the next section in this chapter. If you are configuring the
EPL-N2000 as a remote printer, go to “Configuring the
EPL-N2000 as a Remote Printer.” If y ou want to configure
the printer to switch automatically between these two
modes, go to “Configuring the EPL-N2000 to Switch M odes”
at the end of the chapter.
Configuring the EPL-N2000 as a Print Server
In Print Server mode, the EPL-N2000 performs all print server
functions an d can service up to 32 print queues and eight file
servers. No VAP (Value- Added Process) or NLM (NetWare
Loadable Module
your application, the file server assigns the print job to a print
queue. When the corresponding printer is ready, the EPL-N2000
sends the job to the printer.
Like any NetWare print server, the EPL-N2000 services the
assigned queues in round robin fashion, and services higher
priority queues before those of lower priority. For added
security, the EPL-N2000 supports encrypted passwords.
®
) is required. When you send a print job from
Since the EPL-N2000 is set to Print Server mode by default, you
don’t need to make any special settings to use it as a print server.
However, you do need to assign it print queues on a NetWare
file server, or on multiple NetWare file servers.
Assigning Print Queues on a Single NetWare File Server
This section explains how to assign print queues on a single
NetWare file server to an EPL-N2000 configured as a print
server. If you want to set up queues on multiple NetWare file
servers, “Assigning Print Queues on Multiple NetWar e File
Servers” later in this chapter.
2-4 Configuring the EPL-N2000 for NetWare
Page 22
Follow these steps:
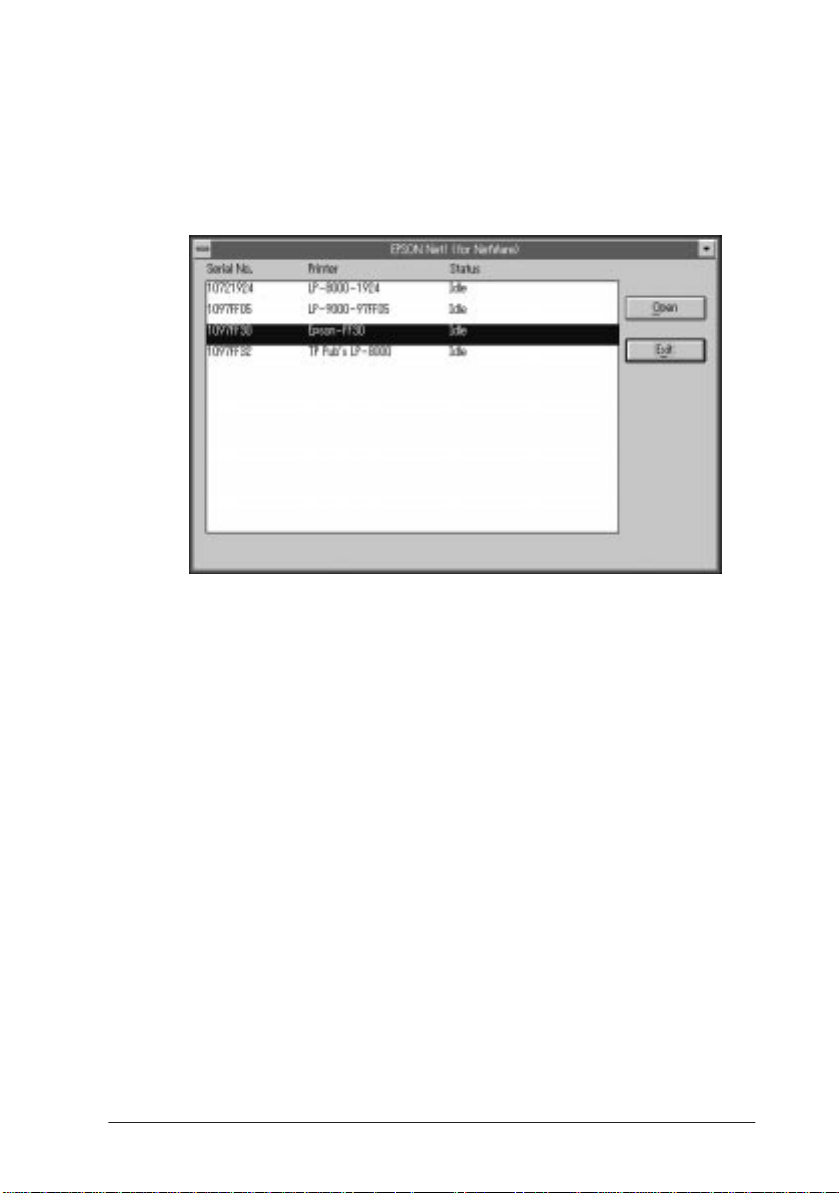
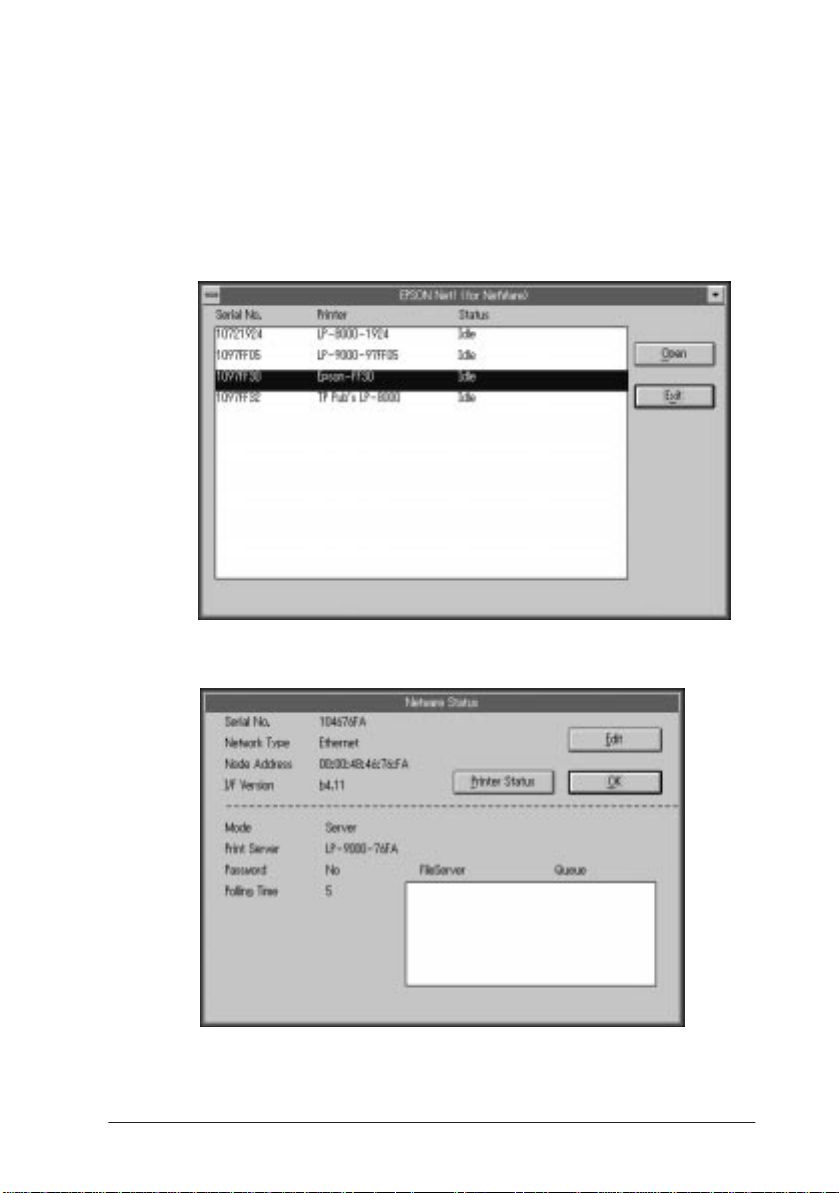
1. Run EPSON N et! for NetWare.
After a few seconds, the following dialog box appears.
This dial og displays printer status and identifies each printer
on the network by serial number and name.
2. Highlight the printer you want to configure from the list and
click Open.
Configuring t he EPL-N2000 for NetWare 2-5
Page 23
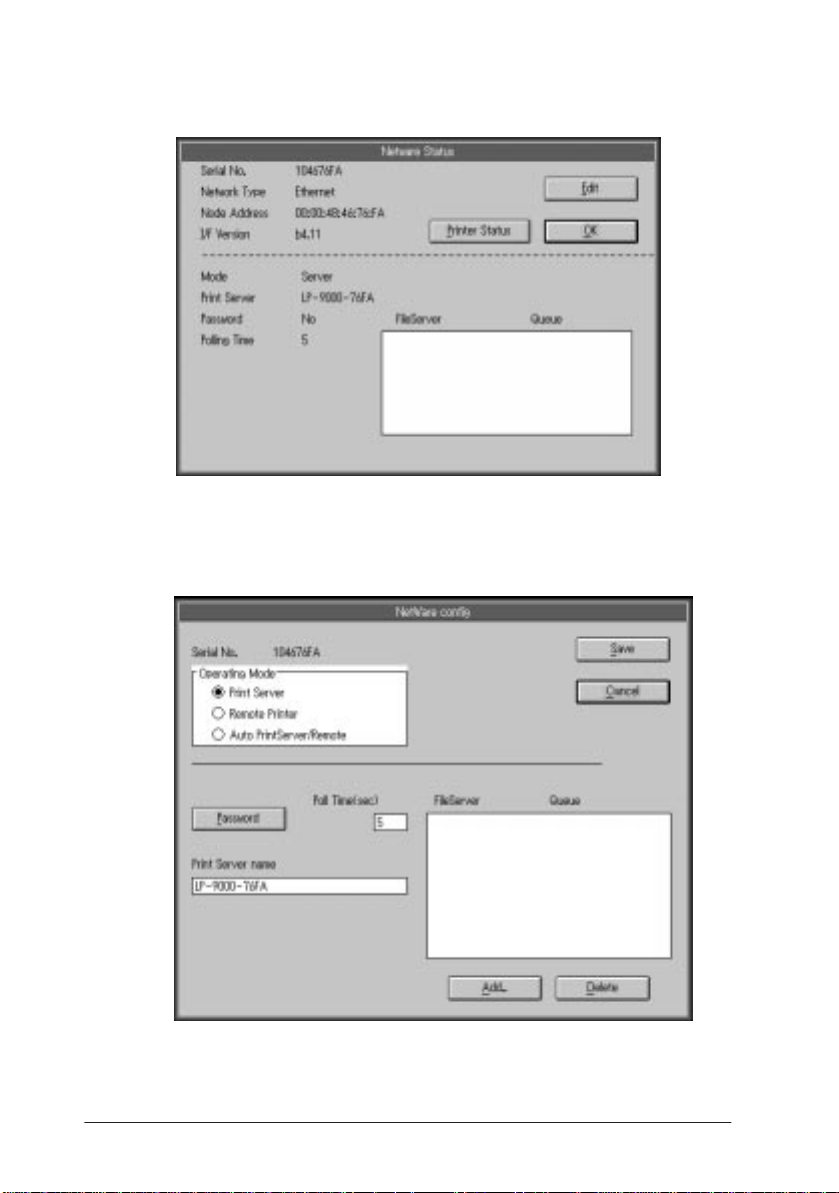
The NetWare Status dialog box appears.
3. Click Edit to configure the printer.
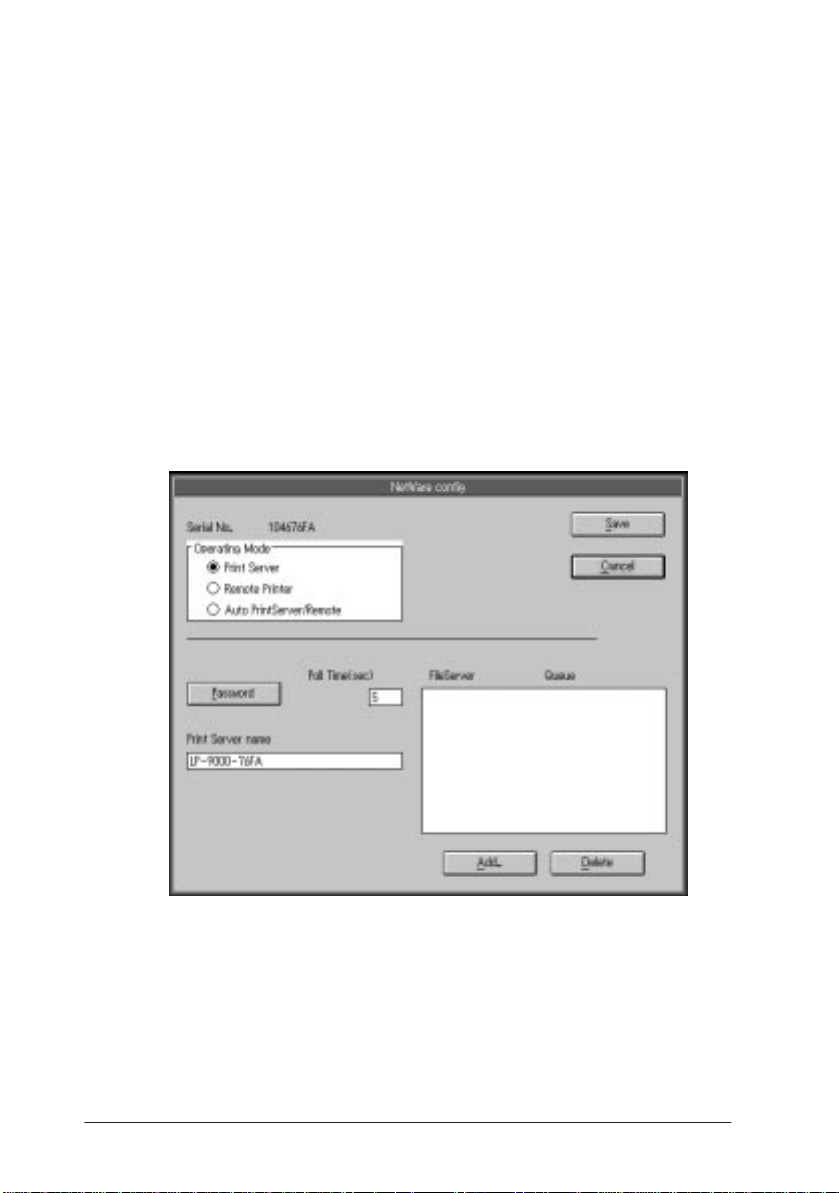
The NetWare Config dialog box appears.
2-6 Configuring the EPL-N2000 for NetWare
Page 24
4. Make sure Print Server is selected as the operating mode. In
the Print Server name b ox, enter a unique name up to 32
characters long.
Note:
It’s a good idea to choose a name that’s eas y for other users to
remember, such as a department name, or the name of the printer’s
owner. A period is allowed if it is not the first character. However,
you cannot use a space or an y of the following characters:
/ \ : ; . * | + [ ] “
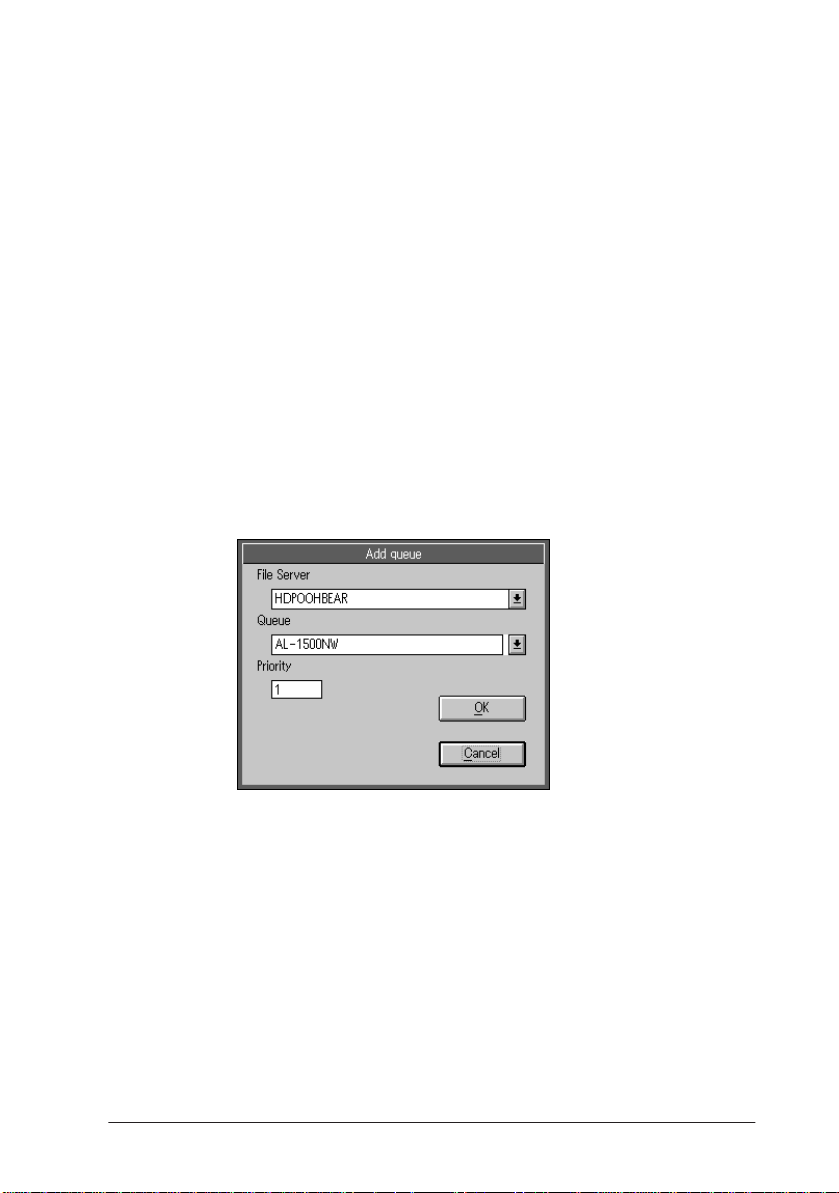
5. Click Add at the bottom of the dialog box to assign a print
queue to your print server.
The Add Q ueue dialog bo x appears. The Queue drop-down
list indicates which queues are available on this NetWare file
server.
6. Select a print queue from the Queue list, or create a new
queue by entering its name in the Queue bo x.
7. Select a priority leve l for the queue in the Priority box. You
can set a level from 1 to 10, with 1 having the highest
priority.
8. Click OK. The NetWare Config dialog box appears again.
Configuring t he EPL-N2000 for NetWare 2-7
Page 25
9. Repeat steps 6 thr ou gh 8 if you want to ad d additional print
queues to the print server.
10. Click Save
settings.
in the NetWare Config dialog box to save your
Assigning Print Queues on Multiple NetWare File Servers
You can assign queues on multiple file servers to an EPL-N2000
configured as a print server. You must have supervis or
privileges and the correct password for each file server.
Note:
If you want to assign print queues from a single NetWare file server,
see the preceding section.
Follow these steps:
1. Complete steps 1 through 4 in “Assigning Print Queues on a
Single NetWare File Server.”
2. Select the file server you want to attach to the printer from
the File Server list box.
2-8 Configuring the EPL-N2000 for NetWare
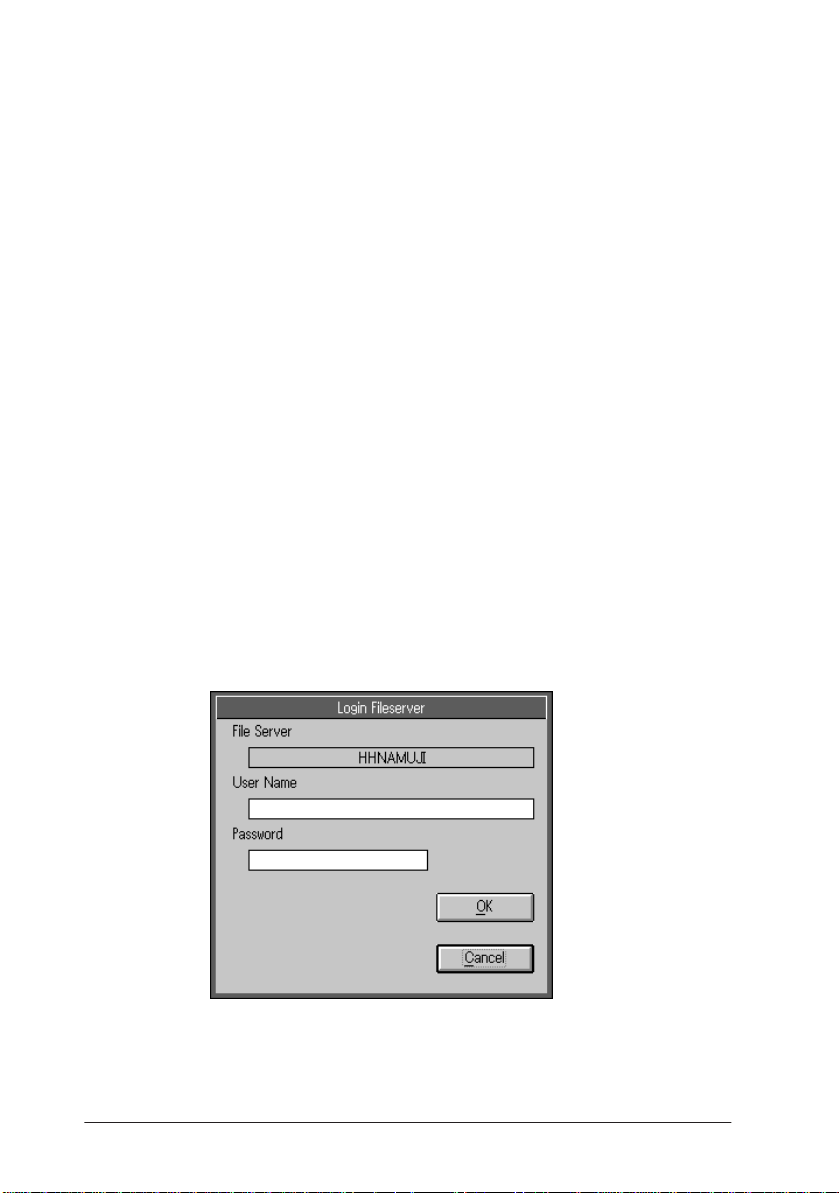
Page 26
If you have not already logged on the selected file server, the
Login Fileserver dialog box appears. Continue with the next
step. If you are already logged on the selected file server, go
to step 4.
3. Enter a username and password, then click OK. (The
username must ha ve supervisor privileges.) You return to
the NetWare Co nfig dialog box.
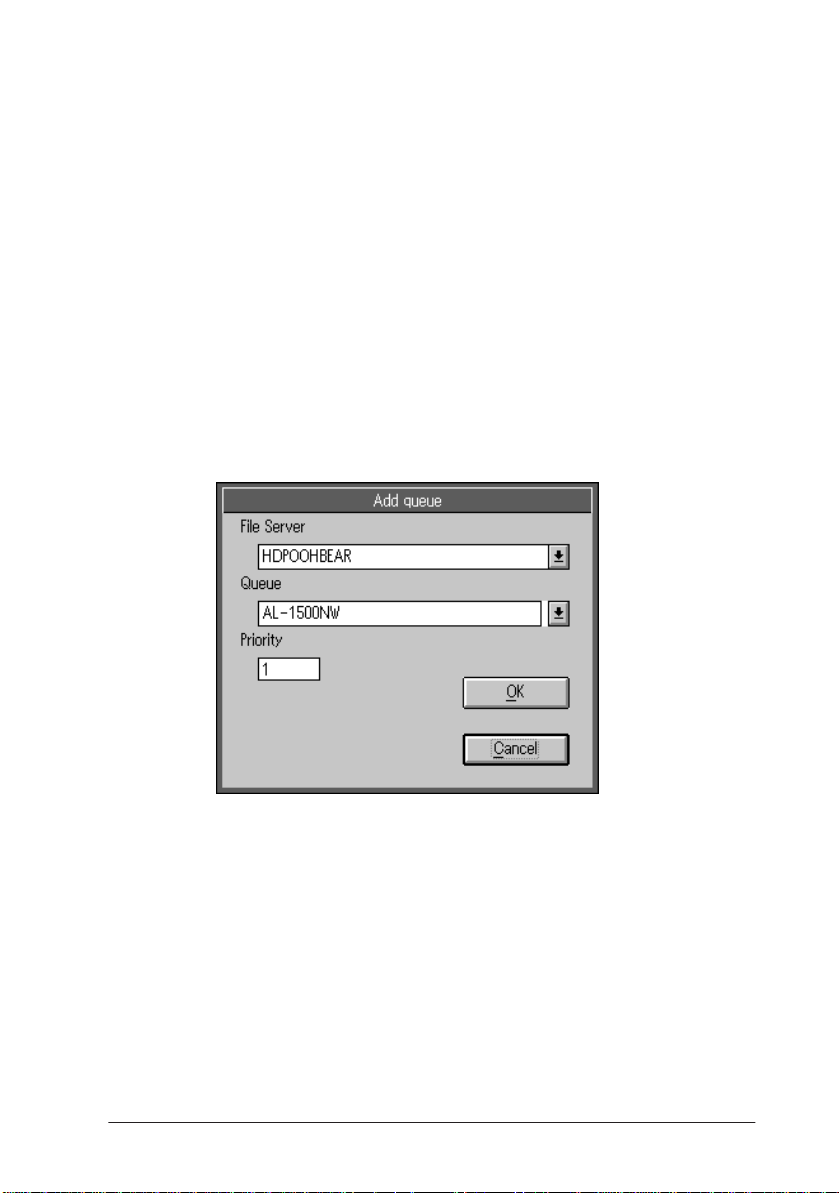
4. Click Add to assign a print queue from this file server to the
EPL-N2000.
The Add Q ueue dialog bo x appears. The Queue drop-do wn
list indicates which queues are available on this NetWare file
server.
5. Select a print queue from the Qu eue list, or create a new
queue by entering its name in the Queue bo x.
6. Select a priority leve l for the queue in the Priority box. You
can set a level from 1 to 10, with 1 having the highest
priority. Click OK.
The NetWare Config dialog box appears again.
Configuring t he EPL-N2000 for NetWare 2-9
Page 27
7. Repeat steps 2 and 3 if you want to add additional file
servers to the printer. Repeat steps 4 through 6 if you want to
add additional print queues to any f ile s erver.
8. Click Save in the NetWare Config dialog box to save your
settings and exit EPSON Net! for N etWare.
Deleting Print Queues from a Print Server
Follow these st eps to delete a print queue from a print server:
1. Access the NetWare Config dialog box.
2. Highlight the queue you want to delete and click Delete.
3. At the prompt, click OK.
4. Click Save in the NetWare Config dialog box to save your
settings.
2-10 Configuring the EPL-N2000 for N etWare
Page 28

Renaming the Print Server
You must set the operating mode to either Print Server or Auto
PrintServer/Remote to change the print server name for the
EPL-N2000.
Follow these steps:
1. Access the NetWare Config dialog box.
2. Enter the new name (up to 32 char acters) in the Print Server
text box.
Note:
It’s a good idea to choose a name that’s eas y for other users to
remember, such as a department name or the name of the printer’s
owner. A period (.) is allowed if it is not the first character. However,
you cannot use a space or an y of the following characters:
/ \ : ; , * | + [ ] “
3. Click Save.
Assigning a Password
If you’ve as signed print queues on a restricted file server to the
EPL-N2000, you need to assign a password to allow users to
connect.
Follow these steps:
1. Access the NetWare Config dialog box.
2. Click Password.
Configuring the EPL-N2000 for NetWare 2-11
Page 29
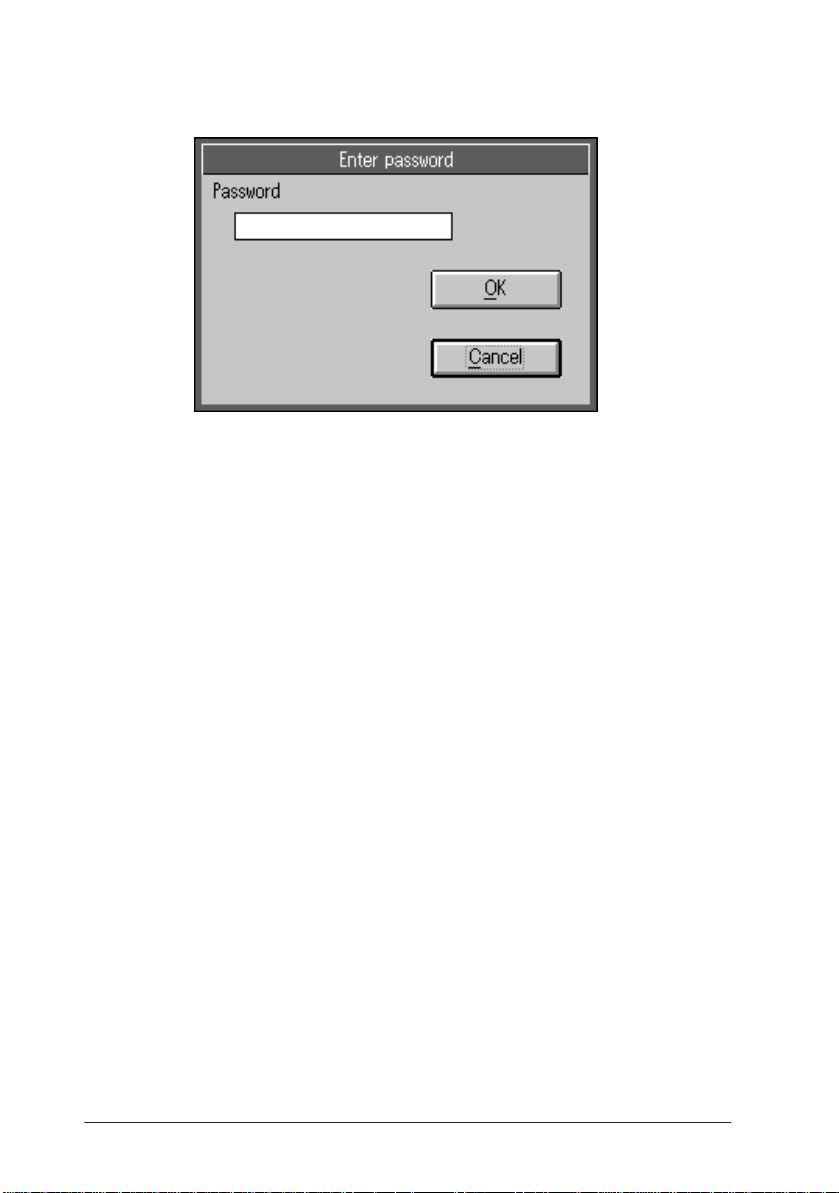
The following dialog box appears:
3. Enter the same password used for the restricted file server,
then click OK.
4. Click Save in the NetWare Config dialog box to save your
setting.
Setting the Queue Polling Time Interval
You can change the interval at which the printer checks queues
for waiting print jobs. Although the factory default setting is 5
seconds, you can set the interval at up to 90 second s to reduce
network traffic.
Follow these steps:
1. Access the NetWare Config dialog box.
2. Enter a value from 1 to 90 in the Poll Time text box.
3. Click Save.
2-12 Configuring the EPL-N2000 for N etWare
Page 30

Configuring the EPL-N2000 as a Remote Printer
As with all NetWare remote printers, the EPL-N2000’s print
speed is slower in Remote Printer mode than in Print Server
mode. The main advantage of Remote Printer mode is that
connection to a file server is not req uired, making this mo de
desirable in installations with limited available file server
connection s.
Before configu ring an EPL-N2000 as a rem o te printer, you must
use PCONSOLE to define it on a NetWare print server. The print
server can be either a dedicated workstation running PSERVER,
or a file server.
You then use EPSON Net! for NetWare to configure the
operating mode and make other configuration changes.
Defining the EPL-N2000 on a NetWare Print Server
If you use NetWare 4.x, menus will differ slightly from the menus
described in the following procedure, and you must select
Bindery Emulation. Press F4 to switch between Bindery
Emulation and Directory Services.
Follow these steps:
1. At the DOS prompt, type PCONSOLE.
2. From the Available Options menu, select Print Server
Information.
3. Select the name of a print server f ro m the Print Servers list
and press Enter.
4. From the Print Server Information list, select Prin t Serve r
Configuration and press Enter.
5. Select Printer Con figuration and press Enter.
Configuring the EPL-N2000 for NetWare 2-13
Page 31

6. Select a port number in the Conf igured Printers list and
press Enter.
7. Select the name of the EPL-N2000 on the Printer
Configuration menu. Then highlight the Printer Type and
select LPT1.
Note:
Although you can define the printer port as COM 2, it is
recommended that you define it as LPT1 to maintain compatibility.
8. Press Esc; then press Enter to save changes.
9. Select Queues Serviced by Printer from the Print Server
Configuration menu and assign a queue to the print server
port from the Available Queues list.
10. Press Esc to exit.
Configuring the Operating Mode and Making Other Changes
After you define the EPL-N2000 on a NetWare print server, you
are ready to use EP SON Net! for NetWare to configure it to
operate as a remote printer. Yo u can then make th e following
changes:
❏ Change the port number to allow the EPL-N2000 to connect
to a different port on the NetWare print server.
❏ Enable or disab le hunting, which allows the EPL-N2000 to
connect to the first available active port o n the print server.
(This feature is useful if the NetWare print server has many
ports.)
2-14 Configuring the EPL-N2000 for N etWare
Page 32
Follow these st eps to complete conf iguration of your card as a
remote printer and to make other optiona l changes:
1. Run EPSON N et! for NetWare.
2. In the EPSON N et! for NetWare summary dialog box,
highlight the EPL -N2000, then click Open.
3. Click Edit in the NetWare Status dialog box.
Configuring the EPL-N2000 for NetWare 2-15
Page 33

4. In the NetWare Config dialog box, make sure Remo te
Printer is selected as the operating mode.
5. If you don’t want to make other configuration changes, go to
step 8.
To make additional changes, select the print server that
services the EPL-N2000 in the Print Server name drop-down
list, or enter a new name.
6. To change the port number, enter the number for any
available port in the Port Number text box.
Note:
You can enter a setting from 0 to 15 for NetWare versions 3.x and
below. For NetWare 4.x and higher, available settings are from 0 to
254.
7. To enable hunting, click the On radio button in the Huntin g
box. The def ault setting is Off.
8. Click Save to save your changes.
2-16 Configuring the EPL-N2000 for N etWare
Page 34

Configuring the EPL-N2000 to Switch Modes
You can configu re the EPL-N2000 to switch automatically
between print server and remote printer modes, depending on
network conditions. If your NetWare print server is avai lable,
the EPL-N2000 detects its presence and operates as a remote
printer. However, if the NetWare print server becomes
unavailable, the EP L-N2000 provides print server backup.
Before the EPL-N2000 can operate as an alternate print server,
you must give it the same name and assign it the same print
queues as the NetWare print server.
Follow these steps:
1. Make sure the NetW are print server is on.
2. Log on with supervisor privileges to all file servers with
print queues assigned to the NetWare print server.
3. Run EPSON N et! for NetWare.
4. In the EPSON N et! for NetWare summary dialog box,
highlight the EPL -N2000, then click Open.
Configuring the EPL-N2000 for NetWare 2-17
Page 35

5. Click Edit in the NetWare Status dialog box.
6. In the NetWare Config dialog box, make sure
Auto PrintServer/Remote is selected as the o perating
mode.
2-18 Configuring the EPL-N2000 for N etWare
Page 36

7. Assign the same print qu eues to the EPL-N2000 that are
assigned to th e NetWare print server. See “Assigning Print
Queues on a Single NetWare File Server” earlier in this
chapter for more information.
8. Enter the name of the NetWare print server in the Print
Server name text box.
9. Make any additional configuration changes for either Print
Server mode or Remote Printer mode. See the appropriate
sections ear lier in t his chapter.
10. Click Save to save your settings.
Configuring the EPL-N2000 for NetWare 2-19
Page 37

Chapter 3
Configuring the EPL-N2000 for
AppleTalk
Installing EPSON Net! for Macint o sh . . . . . . . . . . . . . . . . . . . . . . . .3-3
Using EPSON Namer to Rename Your P rinter . . . . . . . . . . . . . . . .3-3
Using EPSON Zoner to Assign a Zone to Your Printer . . . . . . . . .3-7
Configuring the EPL-N2000 for AppleTalk 3-1
3
Page 38

This chapter describes how to configure the EPL-N2000 from a
Macintosh computer using EPSON Net! for Macintosh.
Before configuring the EPL-N2000 on an AppleTalk network, do
the following:
❏ Install the optional EPSONScript Level 2 ROM module
(C832261). (See the instructions that came with your
module.)
❏ Install the EPSONScript driver for Macinto sh. (Look for the
driver diskette in the box that the EPSONScript Level 2 ROM
module came in.)
❏ Make sure the EPL-N2000 is connected to the network. See
Chapter 1 for information o n connecting the Ethernet
interface card.
EPSON Net! for Macintosh consists of two utilities: EPSON
Zoner and EPSON Namer. To set up the EPL-N2000 for an
AppleTalk network, you need to copy these two utilities to your
hard disk and rename the printer using EPSON Namer. If
necessary, you then assign a zone to the printer using EPSON
Zoner.
Note:
EPSON Zoner works only on an AppleTalk Phase II network.
3-2 Configuring the EPL-N2000 for AppleTalk
Page 39

Installing EPSON Net! for Macintosh
Follow these steps:
1. Create a folder for EPSON Net! for Macintosh on your hard
disk drive.
2. Insert the EPSON Net! for Macintosh diskette.
3. Double-click on the diskette icon to open it, and copy
EPSON Namer and EPSON Zoner to the new folder.
Using EPSON Namer to Rename Your Printer
Because your EPL-N2000 has a defau lt name, you need to
rename it to avoid having multiple EPL-N2000 printers on the
same network with the same name.
The EPSON Namer utility lets you rename printers in any zone
on the network, including the local zone.
Note:
If your printer will be serviced by a print spooler, rename the print er
before configuring the spooler.
Follow these steps:
1. Make sure the EPL -N2000 is turned on. Wait at least a
minute after turning on the print er to allow for PostScript
initialization.
Note:
Your printer may not configure properly if PostScript initialization
is not complete.
Configuring the EPL-N2000 for AppleTalk 3-3
Page 40

2. Double-click on EPSON Namer to start the utility. After
EPSON Namer searches your network, the following screen
appears:
3. Select the name of the printer’s installed driver from the
Device Types list.
3-4 Configuring the EPL-N2000 for AppleTalk
Page 41
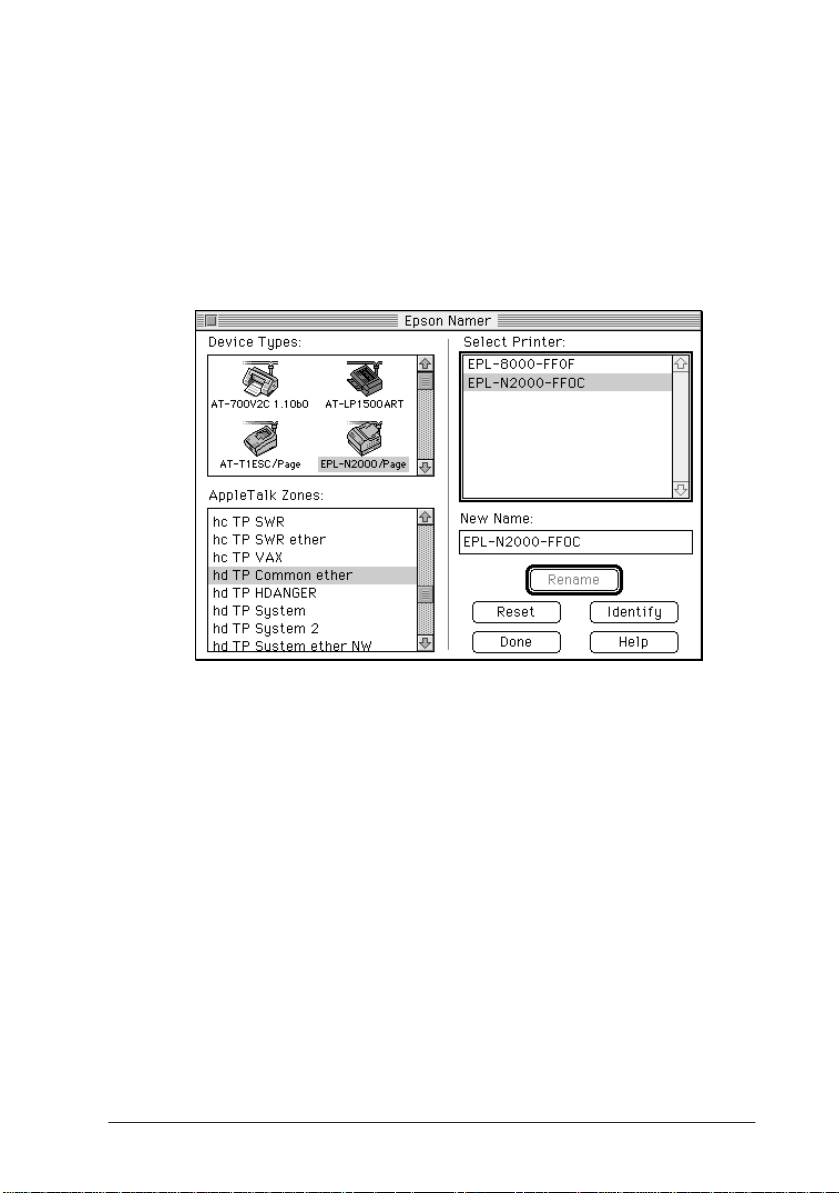
4. From the AppleTalk Zones list, select th e zone that contains
the EPL-N2000 that you want to rename. You m ay need to
scroll through the list of zones to find the one that contains
your printer.
5. Select the printer you want to rename from the Select Printer
list. If the zone has only one EPL-N2000, that printer is
selected automatically.
Note:
If you have more than one EPL-N2000 on the network, they all have
the same name in the Select Printer list. To identify a printer,
highlight the printer name and click Identify. The selected printer
prints a page providing printer name, type, and zone. Rename the
printer and repeat the process for other EPL-N2000s.
Configuring the EPL-N2000 for AppleTalk 3-5
Page 42

6. Enter a unique name in t he New Name text box. You can
choose any name up to 32 characters long.
Note:
It’s a good idea to choose a name that’s eas y for other users to
remember, such as a department name or the computer owner’s
name. A period is allowed if it is not the first character. However,
you cannot use a space or an y of the following characters:
/ \ : ; . * | + [ ] “
7. Click Rename. The new name appears in the Select Printer
list.
3-6 Configuring the EPL-N2000 for AppleTalk
Page 43
8. Click Done to exit EPSON Namer.
If you should ever want to return the EPL-N2000 to its
default name, click Reset.
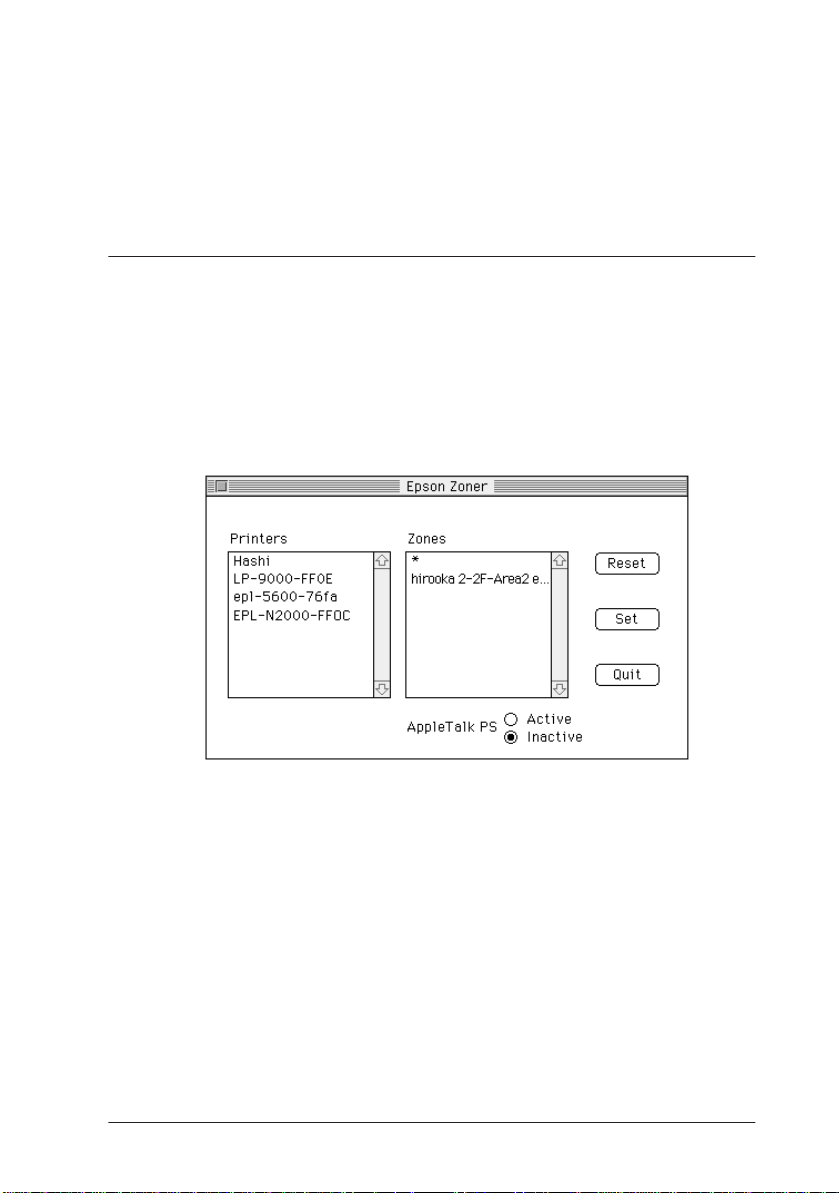
Using EPSON Zoner to Assign a Zone to Your Printer
Follow these steps to assign a zone to the EPL-N2000 on an
AppleTalk Ph ase II network:
1. Double-click on EPSON Zoner to start the utility. After
searching your network, EPSON Zoner displays the
following screen:
2. Select your printer name in the Printers list.
3. In the Zones list, select the zone that you want to assign to
your printer.
Note:
The default zone appears as an asterisk (*).
4. Set the AppleTalk PS option to Inactive.
5. Click Set.
Configuring the EPL-N2000 for AppleTalk 3-7
Page 44

6. If you are assigning a zone to more than one EPL-N2000,
repeat steps 2 through 5 for each printer.
7. Click Quit to exit.
Wait at least 30 seconds after clicking Set before rebooting your
c
printer.
Your EPL-N2000 will remain in the assigned zone as long as the
zone is available.
When you finish configuring your EPL-N2000, be sure to notify
all network users of your printer’s name and zone.
3-8 Configuring the EPL-N2000 for AppleTalk
Page 45

Chapter 4
Configuring the EPL-N2000 for
Windows NT
Configuring on a W indows NT Server U sing DLC . . . . . . . . . . . .4-2
Configuring on a W indows NT Server U sing TCP/IP . . . . . . . . . .4-4
Installing EPSON Net! for Win dows NT . . . . . . . . . . . . . . . . . .4-4
Setting the IP Address . . . . . . . . . . . . . . . . . . . . . . . . . . . . . . . . . .4-4
Creating the Printer on the Windows NT Server . . . . . . . . . . .4-6
Configuring t he EPL-N2000 for WindowsN T 4-1
4
Page 46

This chapter describes how to configure the EPL-N2000 for use
as a remote printer on a Windows NT server running either DLC
or TCP/IP.
Before configuring the EPL-N2000 for Windows NT, do the
following:
❏ Make sure the EPL -N2000 is connected to the network and
turned on. See Chapter 1 for m ore information.
❏ If you’re using DLC, make sur e that the DLC proto co l and
driver are installed. See your Windows NT documentatio n
for details. (If you’re unsure, check the list of installed
network software in the Networks d ialo g box.)
❏ If you’re using TCP/IP, make sure that standard TCP/I P
software is installed. See your Windows NT documentation
for details.
Configuring on a Windows NT Server Using DLC
You don’t need any special network setup utility when yo u
configure the EPL-N2000 on a Windows NT server using DLC.
Follow these steps:
1. Select Print Manager from the Main group.
2. Choose Create Printer from the Printer menu. The Create
Printer dialog box appears.
3. Enter a name for the printer in the Printer Name field.
4-2 Configuring the EPL-N2000 for Windows NT
Page 47

Note:
It’s a good idea to choose a name that’s eas y for other users to
remember, such as a department name, or the name of the printer’s
owner. A period is allowed if it is not the first character. However,
you cannot use a space or an y of the following characters:
/ \ : ; . * | + [ ] “
4. Select the printer driver from the Driver pull-down menu.
5. Select Other from the Print T o pull-down menu. The Print
Destination dialo g box appears.
6. Select (HP Network Port) from the Available Print
Destinations list. The Add an HP Network Peripheral Port
dialog box ap pears.
Note:
If HP Network Port does not appear as a choice, the DLC transport
protocol and driver are not installed.
7. Enter a name for the p or t in the Name box.
Note:
Make sure you don’t use the name of an existing port, such as LPT1,
or of any other existing DOS device.
8. Select LAN Hardware Address (Node Address) from the
Card Address list. (This address match es the address listed
under Node Number on the printer status sheet.)
9. Click the Timer button and select the Job Oriented option.
If you want to share the printer, click the Share the Printer
on the Network box.
Note:
The share name defaults to the printer name. You can change it if
you want.
Configuring t he EPL-N2000 for WindowsN T 4-3
Page 48

10. Click OK to exit the Add a Netwo rk Peripheral Port dialog
box, then click OK again to exit the Create Printer dialog box.
The main menu for the EPL-N2000 driver appears.
11. Set any printer options you want. See Chapter 2 in the
EPSON EPL-N2000 User’s Guide for more information.
Configuring on a Windows NT Server Using TCP/IP
To configure the EPL-N2000 on a Windows NT server running
TCP/IP protocol, you first set the printer’s IP address. Then you
use EPSON Net! f or Windows NT to create the printer on the
server.
Installing EPSON Net! for Windows NT
Follow these steps to install EPSON Net! for Windows NT:
1. Insert the EPSON Net! for Windows NT diskette.
2. Choose Run from the File menu.
3. Type a:\install.exe (or b:\in stall.exe) and click OK.
The EPSON Net! group appears in the Program Manager.
Setting the IP Address
To prevent conflict between the EPL-N2000 and another
network device, you must assign a unique IP address to the
printer before it can be used on the netwo rk.
4-4 Configuring the EPL-N2000 for Windows NT
Page 49

Follow these steps:
1. Press the status sheet but ton on the Ethernet card plate to
print a network adapter status sheet for the EPL-N2000.
(This sheet provides important information about the
printer’s node address and serial number.) See Chapter 1 for
more information.
2. Find out what the IP addresses are for several devices in u se
on the network segment to which the p rinter is connected.
Note:
The address you assign to the printer must contain the first three
octets common to IP addresses for all devices on that network
segment, and a unique fourth octet.
3. Double-click the EPSON Net! (NT) icon to start the utility.
The following dialog box appears:
4. Select the printer’s serial number from the list and c lick
Open. The IP Config dialog box appears. This dialo g box
shows the prin ter’s current IP address.
Configuring t he EPL-N2000 for WindowsN T 4-5
Page 50

5. Enter a unique IP address in the IP address box, and a subnet
mask in the Subnet mask box. You can leave the Auto IP
address off, although this option has no effect on
Windows NT.
6. Click Save to save your settings and exit the dialog box.
It takes a few seconds to register the IP address change, so there
may be a short delay bef ore it is displayed.
Creating the Printer on the Windows NT Server
Follow these st eps to create the printer on the Windows NT
server:
1. Click Print Manager in the Main program group.
2. Choose Create Printer from the Printer menu. The
Create Printer dialog box appears.
3. Enter a name for the EPL-N2000 in the Printer Name text
box.
4-6 Configuring the EPL-N2000 for Windows NT
Page 51

Note:
It’s a good idea to choose a name that’s eas y for other users to
remember, such as a department name, or the name of the printer’s
owner. A period is allowed if it is not the first character. However,
you cannot use a space or an y of the following characters:
/ \ : ; . * | + [ ] “
4. Choose the EPL-N2000 driver from the Driver pull-do wn
menu.
5. Choose Other from the Print To pull-down menu. The
Print To dialog box appears.
6. Select LPR Port from the Available Print Mon itor list, then
click OK. The Add LPR-compatible Printer dialog box
appears.
7. In the first text box, enter the IP address for the EPL-N2000.
8. Click the Printer Name of the Computer text box and enter
the name assigned in step 3. Click OK. The Create Printer
dialog box ap pears.
9. Make sure all your s ettings are correct, then click OK.
You can change the printer driver settings from th e Create
Printer dialog box at any time.
Configuring t he EPL-N2000 for WindowsN T 4-7
Page 52

Chapter 5
Configuring the EPL- N2000 for UNIX
Setting Up the EPL-N2000 as a Netwo rk Device . . . . . . . . . . . . . . .5-2
Setting Up the EPL-N2000 as a Remo te Printer . . . . . . . . . . . .5-4
Printing to the EPL-N 2000 . . . . . . . . . . . . . . . . . . . . . . . . . . . . . . . . .5-6
Using ftp to Pr int . . . . . . . . . . . . . . . . . . . . . . . . . . . . . . . . . . . . . .5-7
Using lpr to Print . . . . . . . . . . . . . . . . . . . . . . . . . . . . . . . . . . . . . .5-8
Setting Up the EPL-N2000 with Other UNIX Systems . . . . . . . . . .5-9
Setting Up for SCO UNIX Systems . . . . . . . . . . . . . . . . . . . . . . .5-9
Setting Up for IBM AIX Systems (RS/6000) . . . . . . . . . . . . . . .5-12
Setting Up for HP-UX Systems . . . . . . . . . . . . . . . . . . . . . . . . . .5-13
5
Configuring the EPL-N2000 for UNIX 5-1
Page 53

Because the EPL-N2000 supports many standard UNIX
commands, you don’t need a special setup utility to configure
it from a host computer running UNIX.
The EPL-N2000 functions as a remote printer for systems using
TCP/IP Ethernet transfe r with remote pri nting pro tocol (lpr) or
standard file transfer protocol (ftp).
After the printer has been set up on the network, any host
computer can send a print file to it, provided the host has the
device’s name and IP address in its directory.
Before you configure the EPL-N2000 for UNIX, make sure the
printer is connected to the network. See Chapter 1 for details.
Setting Up the EPL-N2000 as a Network Device
Follow these steps to set up the EPL-N2000 as a network
device:
1. Turn on the EPL-N2000 and press the status sh eet button on
the Ethernet card plate to print a netw ork adapter status
sheet. (This sheet provides information about the printer’s
node address.) See Chapter 1 for details.
2. Determine several IP addresses in use in the network
segment to which the printer is connected. (The address you
assign to the printer must contain the first three octets
common to IP addresses for all devices on that network
segment, and a unique fourth octet.)
Note:
You must assign a unique IP address to the printer before it can be
used on the network. Otherwise the network may not be able to
distinguish between the EPL-N2000 and another device. (This is
especially true if another EPL-N2000 that has not be assigned an IP
address is active on the network.)
5-2 Configuring the EPL-N2000 for UNIX
Page 54

3. From the host comp uter, use arp to assign a unique IP
address to the printer. The format is as follows:
arp-s <IP address> <node add ress>
The following example illustrates the arp command:
arp-s 133.200.3.181 00:00:48:92:DA:35
4. Use ping to verify that you have assigned a unique address.
If another device responds, repeat step 3 to assign a different
address. The format is as follows:
ping <IP address>
The EPL-N2000 is set to this IP address.
5. Edit the /etc/hosts file on the host computer to include the
new IP address and a hos t name. The format is as follows:
<IP address> <host name>
For example, you might make the following entry:
132.147.69.4 Allison
Note:
Choose a name that’s easy for other users to remember, as the host
name is used to identify the printer when sending print files. A
department name or the com puter owner’s name are good choices.
6. Use ping to make sure that the EPL-N2000 is resp ond ing.
You can use either of the following formats:
ping <host name>
or
ping <IP address>
Configuring the EPL-N2000 for UNIX 5-3
Page 55

If the card responds, you are ready to print. If not, print a
status sheet and check the IP address to make sure that it
corresponds to the IP address entered in the /etc/hosts file.
If you used the IP address to test the connection, m ake sure
that you entered it correctly with ping.
Setting Up the EPL-N2000 as a Remote Printer
After you set up the EPL-N2000 as a network device, you need
to set it up as a remote printer. If your UNIX system has an
/etc/printcap file, continue with the procedure below. If not,
see “Setting Up the EPL-N2000 with Other UNIX Systems”
later in this chapter.
In addition to the host name assigned when you set up the
printer as a network device, you must enter a remote printer
name for the EPL-N2000 and a local printer name for the
printer whose output is being redirected.
Users who want to append a form feed to the end of a print file
or insert carriage returns at the end of lines must include
output filters wh en t hey se nd a pri nt job. Before users can e nte r
filters with the lpr command, you must set up the EPL-N2000
to recognize these filters. You do this by specifying different
remote printer options when you edit the /etc/printcap file.
You must specify a different remote printer name and local
printer name for each remote printer option that you include—
in essence, treating the EPL-N2000 as if it were more than one
printer.
5-4 Configuring the EPL-N2000 for UNIX
Page 56

The remote printer options used to invoke different lpr filters
areas follo w s:
lpr filter Supports
lpb Binary file (no filters)
lpa ASCII file with carriage
returns at line ends
lpbf Binary file with form feed at
file end
lpaf ASC I I file with form feed at
line end
Follow these ste ps:
1. Edit the /etc/printcap file to include a remote printer name
for the EPL-N2000. The format is as follows:
<remote printer name>:\
Note:
You can use any name to identify the EPL-N2000. One advantage
of using simple names that follow a sequence is that it makes it easier
to assign several remote printer names to the same EPL-N2000 (for
example, printer1, printer2, and printer3). You may want to do
this if you plan to set up the EPL-N2000 to recognize different lpr
filters.
2. On a new line in the /etc/printcap file, enter a name for the
local printer being redirected to the EP L-N2000, followed by
the host name, then the path to the EPL-N2000. If you plan
to set up the printer to support different lpr filters , enter the
first printer option too. The format is as follows:
:<local printer> : rm = <host name> : rp = <remote
printer option> : sd = <path>/<remote printer name>:
Configuring the EPL-N2000 for UNIX 5-5
Page 57

Note:
You can also use any name as the local printer name (for example,
the default printer name lp can be used.)
The following example illustrates an entry with the lpb
printer option:
printer1:\
:lp = : rm = Allison : rp = lpb : sd = /var/spool/printer1:
3. If you are setting up the E PL-N2000 to support different lpr
filters, repeat steps 1 and 2 for each remot e printer option
that you want to add. Make sure to ent er a new remote
printer name and local printer name for every option.
Printing to the EPL-N2000
After setting up the printer, you can use either lpr or ftp from
any host to direct a print file to the EPL-N2000.
Note:
Because lpr may strip control characters, users may prefer to print using
ftp.
The EPL-N2000 can handle many separate communications
channels simultaneously. However, unless it is coupled with a
compatible spooling unit, the EPL-N2000 does not have any
disk-spooling capability. Print jobs received while the printer is
processing a job are stacked and printed in rotation.
The EPL-N2000 responds to a print query by sending back
status of t he cur ren t p ri nt jo b a nd any sta cke d jobs. If it re cei ve s
the query when all available connections are in use, it does not
respond.
5-6 Configuring the EPL-N2000 for UNIX
Page 58

Note:
The status report may show gaps in the stack entries; for example, only
jobs 2, 5, and 7 appear. The mis sing entries are print jobs sent by a
different protocol, such as AppleTalk.
Using ftp to Print
As a default, ftp uses binary file transfer. If you want to include
carriage returns at the end of lines, change to ASCII file transfer
by entering ascii on the command line. To change back to
binary file transfer, enter bina ry on the command line.
You can also append a form feed to the end of a print job by
giving the destination file the name FEED or feed.
Follow these steps to print using ftp:
1. Type ftp, then open t he EPL-N2000. The format is as
follows:
ftp open <host name>
2. Use the sen d command to send the print job. If you want to
specify a particular output, enter any special commands or
filters. The format for the send command is as follows:
send <filename>
The following example illustrates using ftp to send a file
named “txtfile” in ASCI I mode with a form feed appended.
ftp open Allison
ascii
send txtfile feed
Note:
You can use scripts and ftp spool queues to automate the process of
sending files to the EPL-N2000.
Configuring the EPL-N2000 for UNIX 5-7
Page 59

Using lpr to Print
Some versions of lpr strip out control characters and carriage
return characters from a file before sen din g it, so lpr ma y be
unsuitabl e for bit- imag e and fo nt down lo ad f iles. You can use
the -l filter on the lpr command line to try to avoid this
probl em.
You can also use the lpr filters listed in “Setting Up the
EPL-N2000 as a Remote Printer” to specify a particular kind of
output, such as an AS CII file wit h a carriage return at the end
of each line.
You can use either of the following formats to print with lpr:
lpr -<host name> <filename>
or
lpr -d <host name>
The following example illustrates using lpr to send a file
named “txtfile”with a form feed appended.
lpr -Plpaf txtfile
5-8 Configuring the EPL-N2000 for UNIX
Page 60

Setting Up the EPL-N2000 with Other UNIX Systems
This section contains information and scripts for setting up the
EPL-N2000 with different types of UNIX.
Setting Up for SCO UNIX Systems
Some UNIX systems, such as SCO, do not support lpr. The two
scripts on t he follo win g pag es allo w you to pr int from w ithi n
some applications using ftp, which is supported on most
systems using TCP/IP. Both scripts have been tested for SCO
UNIX, but may require modification for other systems.
In SCO UNIX, the original printer model scripts are located in
the following directory:
/usr/spool/lp/model
If you use the SCO administration program (SYSADMSH) to
create a printer, these scripts are copied to the following
directory:
/usr/spool/lp/admins/lp/interfaces
You can place a script directly into your interface directory, or
you can enter the following:
/usr/lib/lpadmin-pPRINTER-v/dev/null-i/etc/
INTERFACESCRIPT
PRINTER is the printer name used in lpd printer, and
INTERFACE SCRIP T is the file n ame c ont aining the nex t ftp
script.
Configuring the EPL-N2000 for UNIX 5-9
Page 61

Script 1
The following script is a general interface program file:
NETPRINTER=”basename $0”
copies=$4
shift;shift;shift;shift;shift;
files=”$*”
i=1
while ($i -le $co pies)
do
for files in $files
do
echo binary > / tmp /ftp.$$
echo put $file >> /tmp/ftp.$$
echo quit >> /tmp/ftp.$$
/usr/bin/ftp -n $NETPRINTER < /tmp/ftp.$$
/bin/rm /tmp/ftp .$$
done
i=’expr $i+ 1 ’
done
exit 0”
*end of script*”
5-10 Configuring the EPL-N2000 for U NIX
Page 62

Script 2
The following script should have the same name as the host
name for the EPL-N2000:
TEMPFILE=/tmp/ftpprint.$$
printer=’epsonprt’
/usr/spool /lp/model/standard “$@” >$TEMPFILE
ftp -n $printer <<EOF
send $TEMPFILE
quit
EOF
rm $TEMPFILE
exit
Script 2 intercepts the print command and runs an other printer
interface script, in this case the printer “standard,” then redirects
the output to a temporary file. The script then opens an ftp
session with the printer, sets binary m ode, and sends the
temporary file to the printer. Finally, the temporary file is
removed.
Note:
The name of the model and interface directories used by your UNIX
system may differ from those used by SCO.
Configuring the EPL-N2000 for UNIX 5-11
Page 63

Setting Up for IBM AIX System s (RS /60 00 )
AIX implemements the lpr function, which is set up using the
SMIT utility.
Follow these steps to set up the EPL-N2000 for IBM AIX
systems:
1. Complete the steps in “Setting Up the EPL-N2000 as a
Network Device” and “Setting Up the EPL-N2000 as a
Remote Printer” earlier in this chapter.
2. Invoke SMIT as the superuser and go to the Add Rem ote
Queue menu. To access the Add Remote Queue menu, select
menus and submenus in the followin g order:
Devices
Printer/Plotter
Manage Remote Printer Subsystem
Client Services
Remote Printer Queues
Add Remote Queue
3. When you see a screen requesting information similar to the
entries below, fill in the required data. For example:
Name of queue EPSON
Queuing discipline first come first
serve
Activate the queue yes
Destination host 200.200.200.99
Pathname short filter
Pathname long filter
Name of queue for remo te printer C82331_PRT
4. Check the entry for your queue under Remote Printer Queue
devices. It will list the queue name and printer capabilities.
5. Use MANAGE LOCAL PRINTER SUBSYSTEM, AND
LOCAL PRINTER QUEUES to start the queue.
5-12 Configuring the EPL-N2000 for U NIX
Page 64

The following example illustrates the /etc/qconfig file:
epson:
device=epsonprn
up=true
host=200.200.200.99
rq=C82331_PRT
epsonprn:
backend=/usr/lp/rembak
6. If you want the EPL-N2000 to support lpr filters, include a
line with the follo wing format in the /etc/qconfig file:
Remote Device=<printer option>
For example, to support the lpaf filter, enter the following:
Remote Device=lpaf
Note:
See “Setting Up the EPL-N2000 as a Remote Printer” earlier in this
chapter for a list of prin ter options.
Setting Up for HP-UX Systems
You can use either ftp or rlp (lpr) to print from an HP-UX
system. You use SAM to set up both. Before starting SAM,
enter a unique IP address and host name in the /etc/hosts file.
(See “Setting Up the EPL-N2000 as a Network Device” earlier
in this chapter for information on assigning an IP address and
host name.)
Configuring the EPL-N2000 for UNIX 5-13
Page 65

RLP Setup
On the printer definition page of SAM, use the following
settings:
Printer Name: Any name
Remote System Name: Use name in /etc/hosts
Remote Printer Name: Nothing or ’lpa’, ’lpaf’,
etc, if using filters
Remote Council Model: /bin/true
Remote Status Model: /bin/true
Make System Default: Enter as app ropriate
Printer Class: Nothing
Restrict Council: Nothing
Remote Printer on BSD system: Nothing
To print, use either rlp or the follow ing:
lpd -d <host name>
Using FTP with HP-UX
Follow these steps to use ftp with HP-UX:
1. Type the following:
lpshut
lpadmin -p<spoolername> -m <modelscript> -v/dev/
null
accept <spoolername> enable <spoolername>
lpsched
2. Create a model script:
vi/usr/spool /lp/model/lan.model
5-14 Configuring the EPL-N2000 for U NIX
Page 66

3. Enter the following:
MODEL=’basenam e $0’
REALMODEL=’echo $0 /sed -e “s%$MODEL %model.lan/
$MODEL%”’
#This variable may be initialized whe n the scrip t is
installed in the spooler.
PERIPH= if (“$PERIPH”=””)
then
PERIPH =$MODE L
fi
#Path for output of the original model
TMPPATH=/tmp/$MODEL.data
#Invoke original model and write to temp orary file
$REALMODEL “$@”TMPPATH
#Log onto peripheral, switch to binary, and send the
temporary file
( echo user xx
echo binary
echo put $TMPPATH
echo bye
) ftp -i -n $PERIPH
ERRSTAT=$?
/bin/rm $TM PPA TH
exit $ERRSTAT
*End of Script*
Configuring the EPL-N2000 for UNIX 5-15
Page 67

Chapter 6
Configuring the EPL-N2000 for OS/2
Protocol Support . . . . . . . . . . . . . . . . . . . . . . . . . . . . . . . . . . . . . . . . . .6-2
Setting Up Redirection to the EPL-N2000 . . . . . . . . . . . . . . . . . . . . .6-3
Obtaining Printer Status for Redirected Ports . . . . . . . . . . . . . .6-5
Setting Up Piping to the EPL-N2000 . . . . . . . . . . . . . . . . . . . . . . . . .6-5
Copying the Piping Software . . . . . . . . . . . . . . . . . . . . . . . . . . . .6-6
Configuring Prin ters for Use with Remote Print Service . . . .6-7
Obtaining Printer Status for P ip ed Ports . . . . . . . . . . . . . . . . . .6-9
Sharing an EPL-N2000 Among Several Workstatio ns . . . . . . . . . .6-10
6
Configuring the EPL-N2000 for OS/2 6-1
Page 68

This chapter explains how to use EPSON Net! for OS/2 to set up
your Microsoft LANManager or IBM LANServer workstation to
send print files to the EPL-N2000 through either redirection or
piping. It also explains how to use piping to set up two or more
OS/2 workstations to share an EPL-N2000 printer.
Before you begin, do the following:
❏ Make sure the EPL -N2000 is connected to the network and
turned on. See Chapter 1 for information on connecting the
Ethernet interfac e card.
❏ Make sure you have supervisor privileges for the OS/2
workstation on which you set up redirection or piping.
Protocol Support
The EPL-N2000 supports both NetBIOS over TCP/IP and
NetBEUI. EPSON Net! for OS/2 provides the following
programs for these protocols:
NETBEUI
RPRINT3, RSTAT3—LPT redirection
REMPRT3, REMBEU, REMD RV3, REMSTAT3—pipe support
TCP/IP
RPRINT, RSTAT—LPT redirection
REMPRT, REMDRV, REMSTA T—pipe supp or t
Note:
OS/2 Warp Connect must be installed with TCP/IP, and OS/2 Wa rp
and Warp Connect must be installed with NetBEUI.
6-2 Configuring the EPL-N2000 for OS/2
Page 69

Setting Up Redirection to the EPL-N2000
To redirect your workstation’s ports to one or more EPL-N2000
printers, copy the EPL-N2000 redirection software to yo ur root
directory. Then edit STARTUP.CMD to include the RPRINT
command.
Follow these steps:
1. If you’re unsure of the serial number for the EPL-N2000,
print a network adapter status sheet. See Chapter 1 for
details.
2. Insert the diskette labeled EPSON Net! for NetWare DOS
and OS/2 in your workstation’s diskette drive.
3. Open an OS/2 fu ll s creen command s ession.
4. Open the OS/2 directory on drive A (or B) and go to the
REDIRECT directory for your network protocol.
❏ If your network protocol is TCP/ IP, type CD
TCPIP\REDIRECT and press the Enter key.
❏ If your network protocol is NetBEUI, type CD
NETBEUI\REDIRECT and press the En ter key.
5. Copy the redirection files appropriate to your protocol to the
root directory of your OS/2 workstation.
❏ If your protocol is TCP/IP, copy RPRINT.EXE and
RSTAT.EXE.
❏ If your protocol is NetBEUI, co py RPRINT3.EXE and
RSTAT3.EXE.
6. Edit the STARTUP.CMD in your workstation’s root
directory to include the RPRINT command appropriate to
your network pr o tocol as the last line in the file.
Configuring the EPL-N2000 for OS/2 6-3
Page 70

❏ If your protocol is TCP/IP, enter the following
command:
RPRINT <serial number> </portname>
❏ If your protocol is NetBEUI, enter the following
command:
RPRINT3 <se rial number> </portname>
Note:
Portname designates the port that will be redirecting to the remote
printer. If no port is defined, the program assumes LPT1. For
example, the command RPRINT 10 900416 causes print files
directed to LPT1 to be received by an interface with the serial number
10900416.
7. Repeat step 6 for each port that you want to redirect.
8. Reboot the workstation.
All printed output spooled to this workstation will be redirected
to the EPL-N2000 printer(s) specified in the STARTUP.CMD
entry.
6-4 Configuring the EPL-N2000 for OS/2
Page 71

Obtaining Printer Status for Redirected Ports
You can obtain printer status for each redirected port on your
workstation by typing the RSTAT command appropriate to your
network protocol at th e OS/2 command line
❏ For TCP/IP, type RSTAT.
❏ For NetBEUI, type RSTAT3.
If several ports are redirected, RSTAT returns a message similar
to the following:
ITC Remote Print Servers act ive for LPT1—Printer Busy
ITC Remote Print Servers active for LPT2—Printer Ready
ITC Remote Print Servers active for LPT3—Printer Ready
Setting Up Piping to the EPL-N2000
To set up piping to one or more EPL-N2000 printers, first create
a remote print service directory (EPNET) on your workstation’s
root directory and copy the EPL-N2000 piping software to it.
Then configure the new printers for use with remote print
service, as follow s:
❏ Define a port in the remote print service directory for each
EPL-N2000 to which you want to pipe output.
❏ Create an initialization fil e that identifies each EPL-N2000 by
portname and serial number, then add the initialization file
to the STARTUP.CMD in your workstation’s root directory.
❏ Use NET ADMIN to add the n ewly configured printers to
the list of shared resources.
Configuring the EPL-N2000 for OS/2 6-5
Page 72

Copying the Piping Software
Follow these st eps to create a remote prin t service directory and
copy the EPL-N2000 piping software:
1. If you’re unsure of the printer’s serial number, print a
network adapter status sheet. See Chapter 1 for details.
2. Insert the diskette labeled EPSON Net! for NetWare DOS
and OS/2 in your workstation’s diskette drive.
3. Open an OS/2 fu ll s creen command s ession.
4. To create a remote print service directory, type the following
at the OS/2 command line:
MD C:\EPNET
5. Open the OS/2 directory on drive A (or B) and go to the
PIPES directory for your network protocol.
❏ If your protocol is TCP/IP, type CD TCPIP\PIPE and
press the Enter key.
❏ If your protocol is NetBEUI, type CD NETBEUI\PIPE and
press the Enter key.
6. Copy all files in the PIPES directory to the remote print
service directory:
❏ If your protocol is TCP/IP, type the following:
COPY A:\TCPIP\P IPE\*.* C:\EPNET
❏ If your protocol is NetBEUI, type the following:
COPY A:\NETBEUI\PIPE\*.* C:\EPNET
6-6 Configuring the EPL-N2000 for OS/2
Page 73

7. Type the following to change to the remote print service
directory:
CD\EPNET
Your remote print service directory should contain the files
listed in the fol lowing table:
TCP/IP NetBEUI Description
ADDPORT.CMD ADDPORT.CMD Adds ports on the
server
DELPORT.CMD DELPORT.CMD Removes ports from
the server
PORTCHG.EXE PORTCHG.EXE Program used to add
REMPRT.EXE REMPRT3.EXE Remote Print Service
REMDRV.EXE REMDRV3.EXE Remote Print Serv ice
REMSTAT.EXE REMSTAT3,EXE Printer status program
or remove ports
program
driver
Configuring Printers for Use with Remote Print Service
After you finish copying th e piping software, follo w these steps
to complete setup of remote print service:
1. From the remote print service directory, use the ADDPORT
command to define a port for the first EPL-N2000. The
format is as follows :
ADDPORT <portname>
Repeat this step for each EPL-N2000 to which you want to
pipe output.
Configuring the EPL-N2000 for OS/2 6-7
Page 74

Note:
Choose port names that help identify the printers, such as PUBSPRT
or EPLASER. You can use up to seven characters, but you can’t use
any of the following:
/ \ . [ ] : ; | > < + = ? * $ “
2. If necessary, install the prin ters and create queues attached
to your OS/2 workstation. See your OS/2 documentation for
information.
Note:
If you plan to use a shared OS/2 print queue that receives print jobs
from other workstations, install either the IBMNULL or MSNULL
printer driver. For the device to connect to, choose one of the port
names entered in step 2.
3. Create an initialization file in the remote print service
directory.
❏ If your network protocol is TCP/IP, the format of the file
is as follows:
REMPRT <serial number> <portname>
<serial number> <portname> <serial number>
<portname>
❏ If your network protocol is NetBEUI, the format is as
follows:
REMPRT3 <serial number> <portname>
<serial number> <portname> <serial number>
<portname>
Each EPL-N2000 printer to which you pipe output is
identified in this file by its serial number and the portname
defined in step 1.
6-8 Configuring the EPL-N2000 for OS/2
Page 75

Note:
The remote print service uses this file at startup to assign printer
names to the device port names. For example, the following assigns
a printer whose serial number is 10900701 to the EPLASER port:
REMPRT 100900701 EPLASER
4. To ensure that the remote print service is initialized each
time you start your workstation, edit the STARTUP.CMD in
your root directory to include the initialization file as the last
line.
❏ If your netwo rk protocol is TCP/IP, type the following:
\EPNET\REMPRT @ REMPRT.INI
❏ If your network p roto col is NetBEUI, type the f ollowing:
\EPNET\REMPRT3 @ REMPRT3.INI
Note:
If you want to start the remote print service manually, you can
execute the REMPRT command from the OS/2 command prompt.
5. Use the LA N Server Administration facility (NET ADMIN)
to add newly configured printers to the list of shared
resources . See your OS/2 do cumentation for more
information.
Obtaining Printer Status for Piped Ports
You can obtain prin ter status for each p iped port on your
workstation by typing the REMST AT command appropriate to
your network protocol at the OS/2 command pro mpt.
❏ For TCP/IP, type REMSTAT.
❏ For NetBEUI, type REMSTAT3.
Configuring the EPL-N2000 for OS/2 6-9
Page 76

If several ports are redirected, REMSTAT returns a message
similar to the following:
ITC Remote Print Servers active for PUBSPRT—Printer
Busy
ITC Remote Print Servers active for EPLASER—Printer
Ready
Sharing an EPL-N2000 Among Several Workstations
To set up two or more IBM LANServer workstations running
Warp Connect to share an EPL-N2000, you use piping to
configure a unique port name for each workstation instead of
each printer.
Follow these steps:
1. Complete the steps in “Copying the Piping Software.”
2. From your workstation’s remote print service directory, use
the ADDPORT command to co nf igure a port for the first
workstation .
Note:
Choose a name that you can use to begin a sequence.. For example,
the entry you make for the first workstation might be the following:
ADDPORT PORTA
3. Repeat step 2 for any additional workstations .
6-10 Configuring the EPL-N2000 for O S / 2
Page 77

4. Create an initialization file in the remote print service
directory.
❏ If your network protocol is TCP/IP, the format of the file
is as follows:
REMPRT <serial number> <portname>
<serial number><portname>
<serial number><portname>
❏ If your network pro tocol is NetBEUI, the form at is as
follows:
REMPRT3 <serial number>
<portname><serial number><portname>
<serial number><portname>
Note:
The remote print service uses this file at startup to assign the printer
to the workstations’ portnames. The file identifies the shared
EPL-N2000 printer by the serial number of its Ethernet card, and
each workstation by the portnames assigned in steps 2 and 3. For
example, if the printer’s Ethernet card has the seri al number
10900416, and the printer is shared by three workstations, the
initializa tion file mi ght contain the following:
REMPRT 100900416 POR TA PORTB PO RTC
5. Edit STARTUP.CMD in your workstation’s root directory to
include the REMPRT command and the initialization file as
the last line.
❏ If your network protocol is TCP/IP, type the following:
\EPNET\REMPRT @ REMPRT.INI
❏ If your network p roto col is NetBEUI, type the f ollowing:
\EPNET\REMPRT @ REMPRT3.INI
Configuring the EPL-N2000 for OS/2 6-11
Page 78

Note:
This line ensures that the remote print service is initialized each time
you start the workstation.
6. If necessary, use the LAN Server Adm inistration facility
(NET ADMIN) to add the newly configured printer to the
list of shared resources. See your OS/2 documentation for
more information.
6-12 Configuring the EPL-N2000 for O S / 2
Page 79

Chapter 7
Using the EPSON Status Monitor
Installing the Status Monitor Utility . . . . . . . . . . . . . . . . . . . . . . . . .7-2
Accessing the Status Mo nitor Utility . . . . . . . . . . . . . . . . . . . . . . . . .7-3
From Windows 95 . . . . . . . . . . . . . . . . . . . . . . . . . . . . . . . . . . . . .7-3
From Windows NT 3.51 . . . . . . . . . . . . . . . . . . . . . . . . . . . . . . . .7-3
Using the Status Monitor Utility . . . . . . . . . . . . . . . . . . . . . . . . . . . .7-4
Checking Printer Status . . . . . . . . . . . . . . . . . . . . . . . . . . . . . . . .7-4
Changing Printer Settings . . . . . . . . . . . . . . . . . . . . . . . . . . . . . .7-5
Changing Serial Settings . . . . . . . . . . . . . . . . . . . . . . . . . . . . . . . .7-7
Working with Printer Configuration Files . . . . . . . . . . . . . . . . .7-9
Using the EPSON Status Monitor 7-1
7
Page 80

The EPSON Status Monitor utility giv es the network
administrator an additiona l to ol to display printer status and
change printer settings from the network. You can use the Status
Monitor on a Win dows 95 or Window s NT 3.51 system. The
Status Monit or requires the following:
❏ If you’re using Windows NT 3.51, you mu st install
AppleTalk. (If you’re using Window s 95, the EPSON Status
Monitor utility automatically installs AppleTalk.)
❏ If you are using Windows 95, make sure that Micr osoft DLC
is not installed and that the ODI driver is not selected as the
network card driver.
Installing the Status Monitor Utility
Follow these st eps to install the Status Monitor uti lity:
1. Insert the EPSON Status Monitor diskette.
2. If you are using Win dows 95, click Start, then choose Run.
If you are using Windows NT 3.51, go to the Program
Manager, then choose Run from the File menu.
3. Type a:setup (or b:setup); then click OK. The utility begins
to install automatically. When installation is complete, you
see a message asking yo u to restart Win dows.
4. Click OK. Your system restarts.
7-2 Using the EPSON St atus Monitor
Page 81
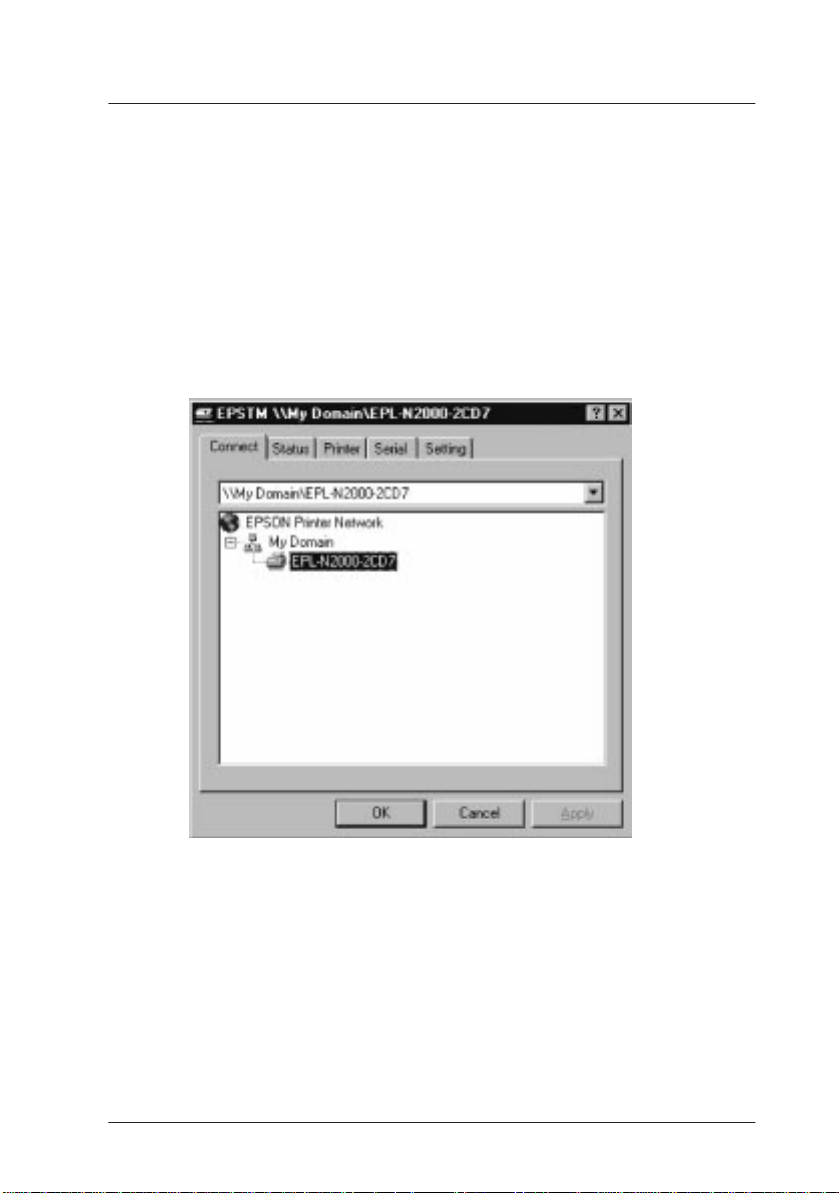
Accessing the Status Monitor Utility
Follow these steps to access the Status Monitor Utility:
From Windows 95
1. Click Start, then point to Programs.
2. Select EPSON Status Monitor. The Status Monitor Connect
menu appears.
From Windows NT 3.51
1. From the Program Manager, double-click the EPSON Status
Monitor folder.
2. Double-click the Status Monitor ico n inside the folder. The
Status Monitor Connect menu appears.
Using the EPSON Status Monitor 7-3
Page 82

Using the Status Monitor Utility
Once you select a printer in the Connect menu, yo u can use the
Status Monitor to check the printer’s status, to change basic
printer and serial settings, and to save settings in a configuration
file or load a configuration file that has already been saved to the
printer.
Checking Printer Status
Use the Status m enu to check whether the selected printer is
busy, idle, or in standby mode, as well as to check the p aper
source, paper size, the amount o f paper left in each paper tray,
the amount of toner remaining, and the amount of printer RAM.
The Status menu is read-only.
7-4 Using the EPSON St atus Monitor
Page 83

Changing Printer Settings
Use the Printer m enu to change such basic printer settings as
print density, print offset margins, and the interval of time
between jobs before the printer goes into power- saving mode.
When you finish changing settings, click the OK button at the
bottom of your screen to save them.
Print Menu Settings
Settings Options Description
Density 1 to 5 Sets the print density to make your
printout darker or lighter, as
necessary.
Job Time
Out
0 to 300 seconds Period of time between jobs before
the printer goes into power-saving
mode.
Using the EPSON Status Monitor 7-5
Page 84

Print Menu Settings (continued)
Settings Options Description
Panel
Languag
e
Page
Protect
Auto
ContinueOnOff
Power
Down
Image
Optimum
Paper
Size Error
Offset Top: -9 to 99 mm (0)
English, French,
German, Italian,
Spanish , Swedish,
Danish, Dutch,
Finnish, Portuguese
Auto
On
On
Off
Auto
On
Off
Warning
Ignore
Bottom: -9 to 150
mm (0)
Language used on printer control
panel.
Sets the printer to use Page Protect
mode for printing complex, memoryintensive docum en ts. It’s best to use
the default setting (Auto) because
Page Protect reallocates printer
memory from receiving data to
printing it, making complex jobs take
longer to print.
Sets the printer to use Auto Continue
mode to continue printing 5 seconds
after recovering from a print overrun
or insufficient memory error. It’s best
to leave Auto Continue OFF so you
are alerted to errors; if you’ll be away
from the printer and are aware of
possible errors, you can turn on Auto
Continue mode.
Sets the printer to power down automatically after the interval between
jobs specified in Job Time Out.
Sets the printer to use Image
Optimum mode so you can print
complex, memory-intensive
graphics. It is best to use the default
setting (Auto) because Image
Optimum mode reduces graphic
quality when the amount of data
reaches the memory limit.
Sets the printer to give a warning or
ignore a paper size error. If it ignores a
paper size error, the image may be
printed outside the edge of the
paper and cause smudging.
Makes fine adjustments (in 0.5 mm
increments) to the vertical and horizontal printing positions on the page.
7-6 Using the EPSON St atus Monitor
Page 85

Changing Serial Settings
Use the Serial menu to change serial setting s, such as parity and
baud rate.
Using the EPSON Status Monitor 7-7
Page 86

When you finish changing settings, click OK at the bottom of the
screen to save your settings and return to the Connect menu.
Serial Menu Settings
Settings Options Description
Baud Rate 300
600
1200
2400
4800
9600
19200
38400
Word
Length
Stop Bit 1
DTR On
Parity On
Xon/Xoff On
7
8
2
Off
Off
Off
Robust
Sets the data transfer rate (baud) for
the serial interface. The baud rate is
measured in bits per second (bps).
See your computer manual and
software documentat ion for the
correct settings.
Selects an 8-bit or 7-bit word length.
See your computer manual and
software documentat ion for the
correct setting.
Sets the number of stop bits on each
character of information sent to the
printer. Stop bits signal the end of a
character.
Turns the printer’s ready
communications protocol ON or OFF.
You can use DTR (Data Terminal
Ready) in combination with the
XON/XOFF o ption setting.
Enables or disables parity checking.
The parity bit, if used, provides a basic
form of error detection. See your
computer manual and software
documentat ion for the correct
setting.
Turns the Xon/Xoff communications
protocol on or off. You can use this
setting in combination with the DTR
option setting.
7-8 Using the EPSON St atus Monitor
Page 87

Working with Printer Configuration Files
In addition to printing a status sheet or font sample, you can use
the Setting menu to save printer settings in a configu ration file,
load a previously saved configuration file, or delete a
configuration file.
Use the Load, Save , and Delete buttons to open additional
dialog boxes for performing these tasks. (You usually save files
as EPSON Printer Setting Files, with the extension .stm.) The
Default button loads the printer’s d efault s ettings.
When you finish with the Setting menu, click OK to return to the
Connect menu.
Using the EPSON Status Monitor 7-9
Page 88

7-10 Using the EPSON Status Monitor
Page 89

Index
A
Auto Continue, 7-6
B
Baud rate, 7-8
C
Configuring
as a NetWare print server, 2-4 to
2-12
as a NetWare remote printer, 2-13
to 2-16
for HP-UX systems, 5-13
for IBM AIX systems, 5-12
for piping, 6-5 to 6-9
for redirection, 6-3 to 6-4
for SCO UNIX systems, 5-9
for Windows NT using DLC, 4-2
to 4-4
for Windows NT using TCP/IP,
4-4 to 4-7
remote printer for UNIX, 5-4 to 5-6
switch NetWare modes, 2-17
Connecting the Ethernet card to the
network, 1-2 to 1-4
D
Deleting print queues from a print
server, 2-10
DLC, configuring for Windows NT
using DLC, 4-2 to 4-4
DOS, installing EPSON Net! for
NetWare, 2-3
E
Environments supported, 1
EPSON Net! for NetWare
installing for DOS, 2- 3
installing for Windows, 2-3
EPSON Zoner, using, 3-7
Ethernet interface card
connecting to the network, 1-2 to
1-4
printing a status sheet, 1-3 to 1-4
reading the indicator lights, 1-5
resetting, 1-6
H
HP-UX systems, configuring the
printer for, 5-13
I
IBM AIX systems, configuring the
printer for, 5-12
Image Optimum, 7-6
Installing
EPSON Net! for Macintosh, 3-3
EPSON Net! for NetWare DOS,
2-3
EPSON Net! for NetWare
Windows, 2-3
EPSON Net! for Windows NT, 4-4
Status Monitor utility, 7-2
IP address
assigning for UNIX, 5-2
assigning for Windows NT, 4-4
Index IN-1
Page 90

L
Lights, reading the indicator lights,
1-5
N
NetWare
assigning a password for the print
server, 2-11
assigning prin t queues on a single
file server, 2-4
assigning print queues on
multiple file servers, 2-8
configuring the printer as a print
server, 2-4 to 2-12
configuring the printer as a
remote printer, 2-13 to 2-16
deleting print queues from a print
server, 2-10
installing EPSON Net! for
NetWare, 2-3
renaming a print server, 2-11
setting the queue polling time
interval, 2-12
switch between print server and
remote printer, 2-17
Network protocols supported, 1
Node address, definition, 4
P
Parity, 7-8
Password, assigning, 2-11
Piping
configuring printer for, 6-5 to 6-9
printer status for piped ports, 6-9
using to share printer, 6-10 to 6-12
Power-saving mode, 7-5, 7-6
Print queue
assigning on a single NetWare file
server, 2-4
assigning on multiple NetWare
file servers, 2-8
deleting from a print server, 2-10
setting the polling time interval,
2-12
Print queue, definition, 4
Print server
configuring the printer as a print
server, 2-4 to 2-12
definition, 4
deleting print queues from, 2-10
renaming, 2-11
Printing
using ftp, 5-7
using lpr, 5-8
Protocols supported, 1
R
Redirection
configuring printer for, 6-3 to 6-4
printer status for redirected ports,
6-5
Remote printer
configuring for NetWare, 2-13 to
2-16
configuring for UNIX, 5-4 to 5-6
definition, 4
Rename
EPL-N2000 for M acintosh, 3-3 to
3-7
NetWare print server, 2-11
Resetting the Ethernet card, 1-6
S
SCO UNIX system, configuring the
printer for, 5-9
Sharing printer among several OS/2
workstations, 6-10 to 6-12
IN-2 Index
Page 91

Software, network utility, 2
Stat u s
checking printer status with
Status Monitor, 7-4
printer status for piped ports, 6-9
printer status for redirected ports,
6-5
Status Monitor utility
accessing, 7-3
checking printer status, 7-4
installing, 7-2
Print Menu settings, 7-5 to 7-6
printer configuration files, 7-9
Serial Menu settings, 7-8
Status sheet, printing, 4, 1-3 to 1-4
U
Utility software, description, 2
W
Windows NT
configuring printer for DLC, 4-2 to
4-4
configuring printer for TCP/IP,
4-4 to 4-7
installing EPSON Net! for
Windows NT, 4-4
Windows, installing EPSON Net! for
NetWare, 2-3
T
TCP/IP
configuring printer for Windows
NT, 4-4 to 4-7
programs used by EPSON Net! for
OS/2, 6-2
Z
Zone
assigning to printer, 3-7
definition, 5
Index IN-3
 Loading...