

Page 1
Page 2
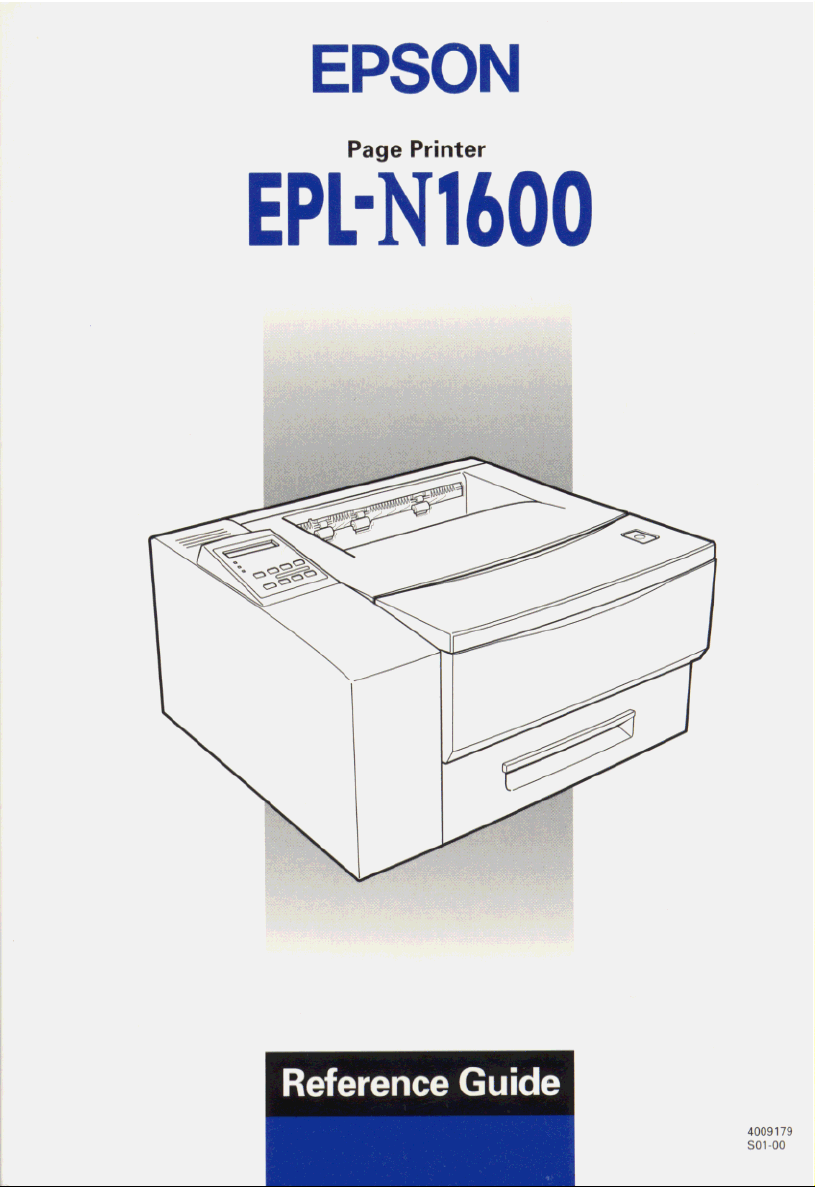
Printer Parts
)
control panel
printer cover
printer cover latch
MP Tray
lower ca ssette
tray
transparent cover
power switch
Type-B interface
connector (option
Parallel interface
connector
Serial interface
connector
AC inle t
Page 3

®
All rights reserved. No part of this publication may be reproduced, stored in a retrieval
system, or transmitted in any form or by any means, mechanical, photocopying, recording,
or otherwise, without the prior written permission of SEIKO EPSON CORPORATION. No
patent liability is assumed with respect to the use of the information contained herein.
Neither is any liability assumed fo r dam ages r e s u lting from the use of the information
cont a ined herein .
Neither SEIKO EPSON CORPORATION nor its affiliates shall be liable to the purchaser of
this product or third parties for damages, losses, costs, or expenses incurred by purchaser
or third parties as a result of: accident, misuse, or abuse of this product or unauthorized
modifications, repairs, or alterations to this product, or (excluding the U.S.) failure to strictly
comply with SEIKO EPSON CORPORATION's operating and maintenance instructions.
SEIKO EPS ON CORPO RATION sh all no t be lia ble ag ainst an y dama ges or p roble ms aris ing
from the use of any options or any consumable products other than those designated as
Original Epson Products or Epson Approved Products by SEIKO EPSON CORPORATION.
EPSON and EPSON ESC/P are registered trademarks and EPSON ESC/P 2 is a tr ademark
of SEIKO EPSON CORPORATION.
Speedo, Fontware, FaceLift, Swiss, and Dutch are trademarks of Bitstream Inc.
CG Times and CG Omega are registered tr ademarks of Miles, Inc.
Univers is a registered trademark of Linotype AG and/or its subsidiaries.
Antique Olive is a trademark of Fonderie Olive.
Albertus is a trademark of Monotype Corporation plc.
Coronet is a trademark of Ludlow Industries (UK) Ltd.
Arial and Times New Roman are registered trademarks of Monotype Corporation plc.
General Notice: Other product names used herein are for identification purposes only and may be
trademarks of their respective owners. EPSON disclaims any and all rights in those marks.
Copyright © 1998 by SEIKO EPSON CORPORATION, Nagano , J apan
Reference Guid e
Page 4

Declaration of Conformity
According to ISO/IEC Guide 22 and EN 45014
Manufacturer: SEIKO EPSON CORPO RA TION
Address: 3-5, Owa 3-chome, Suwa-shi,
Nagano-ken 392 Japan
Representative: EPSON EUROPE B.V.
Address: Prof. J. H. Bavincklaan 5 1183
AT Amstelveen
The Netherlands
Declares that the Product:
Product Name: Laser Printe r
Type Name: EPL-N1600
Model: XXB-2
Conforms to the following Dire ctive(s) a nd Norm(s):
Directive 89/336/EEC:
EN 55022 Class B
EN 61000-3-2
EN 61000-3-3
EN 50082-1
IEC 801-2
IEC 801-3
IEC 801-4
Directive 73/23/EEC:
July 1998
Y. Ishii
President of EPSON EURO PE B.V.
ii
EN 60950
Page 5

Contents
Getting Started
About This Guide . . . . . . . . . . . . . . . . . . . . . . . . . . . . . . . . . . . . . . .1
About Your Printer . . . . . . . . . . . . . . . . . . . . . . . . . . . . . . . . . . . . . .3
Features . . . . . . . . . . . . . . . . . . . . . . . . . . . . . . . . . . . . . . . . . . .3
Options. . . . . . . . . . . . . . . . . . . . . . . . . . . . . . . . . . . . . . . . . . . .4
ENERGY STAR C om pliance . . . . . . . . . . . . . . . . . . . . . . . . . . . . . .4
Safety Information. . . . . . . . . . . . . . . . . . . . . . . . . . . . . . . . . . . . . . .5
Ozone safety . . . . . . . . . . . . . . . . . . . . . . . . . . . . . . . . . . . . . . . 8
Laser Printer Precautions . . . . . . . . . . . . . . . . . . . . . . . . . . . . . . . . .9
Important Safety Instructions . . . . . . . . . . . . . . . . . . . . . . . . . . . . .11
For United Kingdom Us ers . . . . . . . . . . . . . . . . . . . . . . . . . . . . . . .13
Warnings, Cautions, and N o tes. . . . . . . . . . . . . . . . . . . . . . . . . . . .14
Chapter 1
Controlling the Printer . . . . . . . . . . . . . . . . . . . . . . . . . . . . . . . . . . .1-2
Optimizing Print Quality . . . . . . . . . . . . . . . . . . . . . . . . . . . . . . . . .1-4
Chapter 2
Using the MP Tray. . . . . . . . . . . . . . . . . . . . . . . . . . . . . . . . . . . . . . .2-2
Understanding Your Printer
Accessing the printer driver . . . . . . . . . . . . . . . . . . . . . . . . . .1-2
The Control Panel. . . . . . . . . . . . . . . . . . . . . . . . . . . . . . . . . . .1 -3
Resolution Improvemen t Te chnology. . . . . . . . . . . . . . . . . .1-4
Adjusting Print Density. . . . . . . . . . . . . . . . . . . . . . . . . . . . . .1-4
Enhanced MicroGray . . . . . . . . . . . . . . . . . . . . . . . . . . . . . . . .1-5
Paper Handling
Selecting the MP tray as the paper source . . . . . . . . . . . . . .2-2
Printing with the MP tray . . . . . . . . . . . . . . . . . . . . . . . . . . . .2-3
iii
Page 6

Printing envelopes with the MP tr a y . . . . . . . . . . . . . . . . . . 2-6
Manually Loading Paper. . . . . . . . . . . . . . . . . . . . . . . . . . . . . . . . . 2-8
Selecting the Paper Size. . . . . . . . . . . . . . . . . . . . . . . . . . . . . . . . . . 2-10
Loading an uncommon paper size . . . . . . . . . . . . . . . . . . . . 2-10
Printing on Special Paper . . . . . . . . . . . . . . . . . . . . . . . . . . . . . . . . 2-11
Envelopes . . . . . . . . . . . . . . . . . . . . . . . . . . . . . . . . . . . . . . . . . 2-11
Labels . . . . . . . . . . . . . . . . . . . . . . . . . . . . . . . . . . . . . . . . . . . . 2-11
Transparencies. . . . . . . . . . . . . . . . . . . . . . . . . . . . . . . . . . . . . 2-12
Chapter 3
500 Sheet Lower Paper Cassette Unit . . . . . . . . . . . . . . . . . . . . . . 3-3
Duplex Unit. . . . . . . . . . . . . . . . . . . . . . . . . . . . . . . . . . . . . . . . . . . . 3-20
Face Up Tray . . . . . . . . . . . . . . . . . . . . . . . . . . . . . . . . . . . . . . . . . . . 3-29
Memory Modules . . . . . . . . . . . . . . . . . . . . . . . . . . . . . . . . . . . . . . . 3-31
ROM module. . . . . . . . . . . . . . . . . . . . . . . . . . . . . . . . . . . . . . . . . . . 3-35
Optional Interfaces. . . . . . . . . . . . . . . . . . . . . . . . . . . . . . . . . . . . . . 3-36
Options
No Duplex Unit Installed . . . . . . . . . . . . . . . . . . . . . . . . . . . . 3-3
Duplex Unit Installed . . . . . . . . . . . . . . . . . . . . . . . . . . . . . . . 3-7
Loading the optional lower cassette with paper. . . . . . . . . 3-11
Removing the Lower Paper Cassette
(no duplex unit installed). . . . . . . . . . . . . . . . . . . . . . . . . . . 3-15
Removing the Lower Paper Cassette
(duplex unit installed). . . . . . . . . . . . . . . . . . . . . . . . . . . . . . 3-17
Installing the Duplex Unit . . . . . . . . . . . . . . . . . . . . . . . . . . . 3-20
Removing the Duplex Unit . . . . . . . . . . . . . . . . . . . . . . . . . . 3-25
Installing the Face Up Tray . . . . . . . . . . . . . . . . . . . . . . . . . . 3-29
Removing the Face Up Tray . . . . . . . . . . . . . . . . . . . . . . . . . 3-30
Installing a memory module . . . . . . . . . . . . . . . . . . . . . . . . . 3-32
Removing a memory m o du le . . . . . . . . . . . . . . . . . . . . . . . . 3-34
Installing a ROM Module. . . . . . . . . . . . . . . . . . . . . . . . . . . . 3-35
Removing a ROM Mo du le . . . . . . . . . . . . . . . . . . . . . . . . . . . 3-36
Installing an Interface Card . . . . . . . . . . . . . . . . . . . . . . . . . . 3-38
iv
Page 7

Chapter 4
Utility Overview . . . . . . . . . . . . . . . . . . . . . . . . . . . . . . . . . . . . . . . .4-2
Installing the Utility . . . . . . . . . . . . . . . . . . . . . . . . . . . . . . . . . . . . .4-3
Accessing the Utility . . . . . . . . . . . . . . . . . . . . . . . . . . . . . . . . . . . . .4-4
Accessing Online Help . . . . . . . . . . . . . . . . . . . . . . . . . . . . . . . . . . .4-4
EPSON Status Monitor 2 Utility
For Windows 95, 98, an d N T 4.0 . . . . . . . . . . . . . . . . . . . . . .4-4
Chapter 5
The Control Panel . . . . . . . . . . . . . . . . . . . . . . . . . . . . . . . . . . . . . . .5-2
When to use SelecType. . . . . . . . . . . . . . . . . . . . . . . . . . . . . . . . . . .5-7
SelecType . . . . . . . . . . . . . . . . . . . . . . . . . . . . . . . . . . . . . . . . . . . . . .5-8
Using the OneTouch M o des . . . . . . . . . . . . . . . . . . . . . . . . . . . . . .5 - 14
Understanding SelecType Settings . . . . . . . . . . . . . . . . . . . . . . . . .5-16
SelecType
Overview . . . . . . . . . . . . . . . . . . . . . . . . . . . . . . . . . . . . . . . . . .5-2
Display . . . . . . . . . . . . . . . . . . . . . . . . . . . . . . . . . . . . . . . . . . . .5-2
Indicator Lights . . . . . . . . . . . . . . . . . . . . . . . . . . . . . . . . . . . . .5-4
Buttons . . . . . . . . . . . . . . . . . . . . . . . . . . . . . . . . . . . . . . . . . . . .5 -5
Buttons . . . . . . . . . . . . . . . . . . . . . . . . . . . . . . . . . . . . . . . . . . . .5 -8
Using the buttons in SelecType Mo d e. . . . . . . . . . . . . . . . . .5-9
SelecType menus . . . . . . . . . . . . . . . . . . . . . . . . . . . . . . . . . . .5-10
OneTouch mode 1 . . . . . . . . . . . . . . . . . . . . . . . . . . . . . . . . . .5-14
OneTouch mode 2 . . . . . . . . . . . . . . . . . . . . . . . . . . . . . . . . . .5-15
Test menu . . . . . . . . . . . . . . . . . . . . . . . . . . . . . . . . . . . . . . . . .5-16
Emulation menu . . . . . . . . . . . . . . . . . . . . . . . . . . . . . . . . . . . .5-17
Printing menu . . . . . . . . . . . . . . . . . . . . . . . . . . . . . . . . . . . . . .5-17
Tray Size menu . . . . . . . . . . . . . . . . . . . . . . . . . . . . . . . . . . . . .5-20
Config menu . . . . . . . . . . . . . . . . . . . . . . . . . . . . . . . . . . . . . . .5-21
Setup menu . . . . . . . . . . . . . . . . . . . . . . . . . . . . . . . . . . . . . . . .5 -24
Parallel menu . . . . . . . . . . . . . . . . . . . . . . . . . . . . . . . . . . . . . .5-27
Serial Menu . . . . . . . . . . . . . . . . . . . . . . . . . . . . . . . . . . . . . . . .5-28
AUX menu. . . . . . . . . . . . . . . . . . . . . . . . . . . . . . . . . . . . . . . . .5 -30
LJ4 menu . . . . . . . . . . . . . . . . . . . . . . . . . . . . . . . . . . . . . . . . . .5-30
GL2 menu . . . . . . . . . . . . . . . . . . . . . . . . . . . . . . . . . . . . . . . . .5-32
PS menu . . . . . . . . . . . . . . . . . . . . . . . . . . . . . . . . . . . . . . . . . . .5-34
v
Page 8

ESCP2 and FX menu s . . . . . . . . . . . . . . . . . . . . . . . . . . . . . . . 5-35
I239X menu. . . . . . . . . . . . . . . . . . . . . . . . . . . . . . . . . . . . . . . . 5-38
Chapter 6
Problems and Solutions. . . . . . . . . . . . . . . . . . . . . . . . . . . . . . . . . . 6-3
Error Messages . . . . . . . . . . . . . . . . . . . . . . . . . . . . . . . . . . . . . . . . . 6-20
Replacing the Imaging Cartridge. . . . . . . . . . . . . . . . . . . . . . . . . . 6-30
Cleaning the Printer . . . . . . . . . . . . . . . . . . . . . . . . . . . . . . . . . . . . . 6-34
Transporting the Printer . . . . . . . . . . . . . . . . . . . . . . . . . . . . . . . . . 6-37
Appendix A
Paper. . . . . . . . . . . . . . . . . . . . . . . . . . . . . . . . . . . . . . . . . . . . . . . . . . A -2
Printer. . . . . . . . . . . . . . . . . . . . . . . . . . . . . . . . . . . . . . . . . . . . . . . . . A-3
Interfaces . . . . . . . . . . . . . . . . . . . . . . . . . . . . . . . . . . . . . . . . . . . . . . A-6
Troubleshooting and Maintenance
Paper jams . . . . . . . . . . . . . . . . . . . . . . . . . . . . . . . . . . . . . . . . 6-3
Operational problems. . . . . . . . . . . . . . . . . . . . . . . . . . . . . . . 6-12
Printout problems . . . . . . . . . . . . . . . . . . . . . . . . . . . . . . . . . . 6-13
Print quality problems . . . . . . . . . . . . . . . . . . . . . . . . . . . . . . 6 -15
Memory problems. . . . . . . . . . . . . . . . . . . . . . . . . . . . . . . . . . 6-18
Option problems . . . . . . . . . . . . . . . . . . . . . . . . . . . . . . . . . . . 6-19
Resetting the printer . . . . . . . . . . . . . . . . . . . . . . . . . . . . . . . . 6-29
Reset . . . . . . . . . . . . . . . . . . . . . . . . . . . . . . . . . . . . . . . . . . . . . 6-29
Reset all. . . . . . . . . . . . . . . . . . . . . . . . . . . . . . . . . . . . . . . . . . . 6-29
Removing spilled toner . . . . . . . . . . . . . . . . . . . . . . . . . . . . . 6-36
Technical Specifications
Specifications . . . . . . . . . . . . . . . . . . . . . . . . . . . . . . . . . . . . . . A-2
General . . . . . . . . . . . . . . . . . . . . . . . . . . . . . . . . . . . . . . . . . . . A-3
Environmental . . . . . . . . . . . . . . . . . . . . . . . . . . . . . . . . . . . . . A-4
Mechanical . . . . . . . . . . . . . . . . . . . . . . . . . . . . . . . . . . . . . . . . A-5
Electrical . . . . . . . . . . . . . . . . . . . . . . . . . . . . . . . . . . . . . . . . . . A-5
Parallel interface . . . . . . . . . . . . . . . . . . . . . . . . . . . . . . . . . . . A-6
Using the ECP mode in Windows 95 and Windows 98 . . A-13
Serial Interface . . . . . . . . . . . . . . . . . . . . . . . . . . . . . . . . . . . . . A-14
vi
Page 9

Error handling . . . . . . . . . . . . . . . . . . . . . . . . . . . . . . . . . . . . . .A-14
Options and Consumables. . . . . . . . . . . . . . . . . . . . . . . . . . . . . . . .A-18
500 Sheet Lower Paper Cassette Unit - Universal
(C81290✽) . . . . . . . . . . . . . . . . . . . . . . . . . . . . . . . . . . . . . . . .A-18
Face Up Tray (C81294✽) . . . . . . . . . . . . . . . . . . . . . . . . . . . . .A-18
Duplex Unit (C81293✽) . . . . . . . . . . . . . . . . . . . . . . . . . . . . . .A-19
Imaging cartridge (S051056) . . . . . . . . . . . . . . . . . . . . . . . . . .A-19
Appendix B
Introduction to Symbo l Sets. . . . . . . . . . . . . . . . . . . . . . . . . . . . . . .B-2
In LJ4 Emulation Mode. . . . . . . . . . . . . . . . . . . . . . . . . . . . . . . . . . .B -3
International Set for ISO sets . . . . . . . . . . . . . . . . . . . . . . . . . B -21
In ESC/P 2 or FX Modes . . . . . . . . . . . . . . . . . . . . . . . . . . . . . . . . .B -22
International Character Sets . . . . . . . . . . . . . . . . . . . . . . . . . .B-26
Characters available with the ESC (^ command . . . . . . . . .B -27
In I239X Emulation Mode. . . . . . . . . . . . . . . . . . . . . . . . . . . . . . . . .B-28
In EPSON GL/2 Mo de . . . . . . . . . . . . . . . . . . . . . . . . . . . . . . . . . . .B -28
Appendix C
LaserJet 4 (LJ4) Emulation Comm a nd s . . . . . . . . . . . . . . . . . . . . .C -3
GL/2 context comma nd s. . . . . . . . . . . . . . . . . . . . . . . . . . . . .C-6
ESC/P 2 and FX Comm a nd s . . . . . . . . . . . . . . . . . . . . . . . . . . . . . .C-9
ESC/P 2 mode. . . . . . . . . . . . . . . . . . . . . . . . . . . . . . . . . . . . . .C-9
FX mode. . . . . . . . . . . . . . . . . . . . . . . . . . . . . . . . . . . . . . . . . . .C-12
PJL Commands . . . . . . . . . . . . . . . . . . . . . . . . . . . . . . . . . . . . . . . . .C-15
I239X Emulation Commands. . . . . . . . . . . . . . . . . . . . . . . . . . . . . .C-16
Page format . . . . . . . . . . . . . . . . . . . . . . . . . . . . . . . . . . . . . . . .C-16
Text . . . . . . . . . . . . . . . . . . . . . . . . . . . . . . . . . . . . . . . . . . . . . . .C-17
Auxiliary Functions . . . . . . . . . . . . . . . . . . . . . . . . . . . . . . . . .C-18
AGM Mode . . . . . . . . . . . . . . . . . . . . . . . . . . . . . . . . . . . . . . . .C-19
Symbol Sets
Command Summary
vii
Page 10

Appendix D
Printer and Screen Fonts . . . . . . . . . . . . . . . . . . . . . . . . . . . . . . . . . D-2
Available Fonts . . . . . . . . . . . . . . . . . . . . . . . . . . . . . . . . . . . . . . . . . D-3
Adding More Fonts . . . . . . . . . . . . . . . . . . . . . . . . . . . . . . . . . . . . . D-6
Downloading fonts . . . . . . . . . . . . . . . . . . . . . . . . . . . . . . . . . D -6
Selecting Fonts . . . . . . . . . . . . . . . . . . . . . . . . . . . . . . . . . . . . . . . . . D-6
Working with Fonts
Appendix E
For United Kingdom and the Republic of Ireland user s . . . . . . E-2
For Australian users. . . . . . . . . . . . . . . . . . . . . . . . . . . . . . . . . . . . . E-4
For Singapore users . . . . . . . . . . . . . . . . . . . . . . . . . . . . . . . . . . . . . E-5
For Hong Kong users. . . . . . . . . . . . . . . . . . . . . . . . . . . . . . . . . . . . E-6
For Philippines users . . . . . . . . . . . . . . . . . . . . . . . . . . . . . . . . . . . . E -7
For Hong Kong Users . . . . . . . . . . . . . . . . . . . . . . . . . . . . . . . . . . . E-7
For Philippines Users. . . . . . . . . . . . . . . . . . . . . . . . . . . . . . . . . . . . E-8
Appendix F
Switching between SelecType Menus . . . . . . . . . . . . . . . . . . . . . . F-2
Contacting Customer Support
Map of SelecType Menus
Glossary
viii
Page 11

Getting Started
The EPSON EPL- N16 00 p ri nter combines hig h pe r forma nc e an d
reliability with a wide range of featur es.
To get starte d with your laser printer, ple ase:
❏ Use your
printer.
❏ Read the sa fety information, laser printer precautio ns, and
important safety instructions in this section.
See this guide for detailed information about your printer.
Getting Ready!
guid e to se t up a nd te s t y o u r n e w
About This Guide
This guide contains information about using your printer. For
information about installing and setting up the printer, se e the
separate
Chapter 1, "Understanding Your Printer", describes the basics of
how to control the p rinter.
Chapter 2, "Paper Handling", describes how to load paper into
and setting up the printer for type and size of paper that you
loaded.
Chapter 3, "Optio ns", gives step-b y-step instructions f or installing
the options availab le for the print er.
Getting Ready!
guide.
Chapter 4, "EPSON S tatus Moni tor 2 Utility", describes how to
install the EPSON Status Monitor 2 utility.
Chapter 5, "SelecType", describes the printer settings that can be
modified printer’s control panel, including the SelecType and the
OneTouch mode s.
Getting Started
1
Page 12

Chapter 6, "Troubleshooting and Maintenance", gives helpful
information for what to do if you encounter a printer error and
provides instructions on how to maintain your printer.
Appendix A, "Technical Specifications", contains the technical
specifications about the printer.
Appendix B, "Symbol Sets", lists the symbol sets available in each
emulation mode with the tables o f the characte rs for each s e t.
Appe ndix C , "Co mmand Su mmary ", l ists the com mand s tha t can
be embedded in print j obs t o control the printer. This appendix is
intended for advanced users only.
Append ix D , "Wor ki ng w ith Fo nts" , desc rib es the ste ps you nee d
to follow to a dd more fonts.
Appendix E, "Contacting Customer Support", details customer
support information.
Appendix F, "Map of SelecType Menu s", lists the SelecType
menus and the order i n which you a ccess t hem. T his app endix is
useful when you use SelecType.
2
Getting Started
Page 13

About Your Printer
Your printer is the latest in EPSON's advanced line of laser
printers. It emulates the Hewlett-Packard
printe r, allow i ng you to pr in t us i ng the wide variety of softwa r e
programs that support HP LaserJet printers.
The printer's 600-dpi (dots per inch) resolution is enhanced by
EPSON's Resolution Improvement Technology (RITech), which
smoothes the jagged edges of diagonal lines in both text and
graphics. This gives your documents a c lean, crisp look that
contributes to a professional appearance.
In addition, EPSON’s Enhance MicroGray technology provides
you with b e tte r halftoning when printing graphics.
The printer is easy to install and use. You simply set up the printer,
connect it to your computer, and install the printer driver as
described in the
The printer sup ports ECP mode in Windows 95 a nd Windows 98.
ECP mode is useful for high-speed data transfer and bidirectional
communi cation with yo ur computer.
Getting Ready!
guide.
®
LaserJet 4™ (LJ4)
Features
The printe r comes with a full set of features that contribute s to
ease of use and consiste nt, high-quality out put. The main features
are described below.
High-quality printin g
Your printer provides 600 -dpi printing at a speed of up to 16 pages
per minute. You'll appreciate the professiona l pri nt quality
produced by your printer and its quick processing speed.
Getting Started
3
Page 14

Wide variety of fonts
The printer comes with a full selection of scalable TrueType
fonts, La serJ et-c ompat ib le sc alabl e font s, and o ne b itmap f ont i n L J4
emulation mode to provide you with the fonts you need to create
professional-looking documents.
Toner Save Mode
To reduce the amou nt of toner used in printing documen ts, you
can print rough drafts using the Toner Save Mode.
Options
The printer comes with b uilt-in bidirectional paralle l interface,
serial interf ace, and 8 MB of memory, w hich can be expand ed up
to 40 MB. You can also install an additional Type-B Ethernet,
serial, coax, or twinax interface. The 500 Sheet Lower Paper
Cassette Unit-Universal (C81290✽
sheets without reloadi ng. The Duple x Unit (C81293✽) allows you to
print on bot h sides of paper fed fr om the 250 sheet cassette or the
optional 500 sheet lower cassette. The Face Up Tray (C81294✽) is
recommended for printing on media that require a straight-through
paper path, such as labels and transparencies.
), automatically feeds up to 500
®
ENERGY STAR Compliance
As an International
EPSON has determin ed that this product meets the
International
for energy efficiency.
The International
development of energy-efficient computers, printers, and other
peripheral equipment.
4
Getting Started
E
NERGY STAR Program promotes the voluntary
E
E
NERGY STAR Part ne r,
NERGY STAR Program guidelines
Page 15

Safety Information
Laser safety
This printer is certified as a Class 1 laser product under the U.S.
Department of Health and Hu ma n Services (DHHS) Radiation
Performance Standard according to the Radiation Control for
Health and Safety Act of 1968. This means that the printer does
not produce hazardous laser radiation.
Since radiation emitted by the laser is completely confined within
protectiv e housings a nd external co vers, the la se r beam cannot
escape from the machine during any phase of user operation.
For European users
United Kingdom
The EPL-N1600 is a page printer which utili zes a semiconduc tor
laser.
There is no possibility of danger from the laser, provided the
printer is operated ac cording to the instruct ions in the gu id e s
provided.
Since radiation emitted by the laser is completely confined within
protective housings, the laser beam c a nnot escape from the
machine during any phase of user operation.
Warning:
w
This is a semiconductor laser. The maximum power of the laser
diode is 5 m
Use of controls or adjustments or performance of procedures
other than those specified in this guide, may result in hazardous
radiation exposure.
W and the wavelength is 770 - 795 nm.
Getting Started
5
Page 16

CDRH regulations
The Center for Devices and Radiological Health (CDRH) of the
U.S. Food and Drug Administrati on implemented regulations for
laser products on August 2, 1976. Compliance is mandatory for
products marketed in the United States. The label shown below
indicates compliance with the CDRH regulations and must be
attached to laser products marketed in the United States.
6
Getting Started
Page 17

Laser safety labels
Warning:
w
Your printer is a Class 1 laser product as defined in IEC 825
specifications. The label shown below is attached in countries
where required.
Use of controls, adjustments, or performance of procedures other
than those specified in this g uid e may result in hazardous
radiation exposure.
Internal laser radiation
Max. Radiation Power 5
Wavelength 770
This is a Class IIIb Laser Diode Assembly that has an invisible
laser beam. The printer head unit is NOT A FIELD SERVICE
ITEM. Therefore, the printer head unit should not be opened
under any circumstances.
mW
- 795 nm
Getting Started
7
Page 18

Ozone safety
Ozone emission
Ozone gas is generated by laser printers as a by-product of the
printing process. Ozone is produced only when the printer is
printing.
Ozone exposure limit
The recommended exposure limit for ozone is 0.1 parts per
million (ppm) expressed as an average time-weighted
concen tration over an eight (8) hour period.
The EPL-N1600 laser printer generates <0.01ppm for 8 hours of
continuous printing when considering a closed room of
approximately 1000 cu ft (8' × 10' × 12').
Minimize the risk
To minimize the r isk of ex posure to ozone, you should av oid the
following conditions:
❏ Use of multiple la ser p rint ers in a co nfined ar ea (s ee above)
❏ Operation in conditions of extremely low humidity
❏ Poor room ventilation
❏ Long, continuous printing together with any of the above
Printer lo cation
The printe r should be loca ted so that the exhaust gases a nd heat
generated are:
❏ Not blown directly i nto the user's face
❏ Vented directly out of the building whenever possible
8
Getting Started
Page 19
Laser Printer Precautions
This printer uses laser technology. The following list of
precautions applies whenever you open the printer cover. Even
if you are familiar with o the r types of printers, be sure to follow
these precautions carefully to ensure safe, efficient operation.
❏ Be careful not to touch the fuser, which is marked CAUTION
HIGH TEMPERATURE. If the printer has been in use, the
fuser can be very ho t.
CAUTION HIGH TEMPERATURE
❏ Avoid to uching th e components inside the printer unless
instructe d to do so i n this guide.
❏ Never force the printer's components into place. Although the
printer is designed to be sturdy, rough handling can damage
it.
❏ Be sure not to scratch the surface o f the drum. When you
remove the cartridge from the printer, always set the unit on
a clean, smooth surface. Also, av oid touching the drum, since
oils from your skin can permanently damage its surface and
may affect print quality.
Getting Started
9
Page 20

❏ Do not turn the cartridge upside down or stand it on its sides.
❏ Protect the light-sensitive drum from exposure to light. Avoid
exposing the imaging cartridge to room light any longer than
necessa ry. Do not op en the drum’s protective co ver.
Overexposing the drum may cause abnormally dark or light
areas to appear on the printe d page and reduce the service life
of the drum.
❏ When handling the cartridge, al ways set it on a clean, sm ooth
surface.
❏ Do not attempt to modify or take apart the cartridge. It cannot
be refilled.
❏ Try not to touch the toner and avoid all contact with your eyes.
❏ Do not use a cartridge for at least one hour after moving it
from a cool to a warm environment.
Warning:
w
Do not dispose of used consum able pr oducts in fire, as they can
explode and cause injury . Dispose of them according to local
regulations.
To get the best print quality, do not store the cartridge in an area
subject to direct sunlight, dust, salty air, or corrosive gasses (such
as ammonia). Avoid locations subject to extremes or rapid
changes of heat or humidity. Also, be sure to k eep the consumable
components out of the reach of children.
Hinweis:
❏
Die Geräteanschlußleitung muß den einshlägig en N ormen
genügen.Es muß eine dreiadrig e Leitung verwendet werden.
Die Anshlußleitung darf nic h t leichter als H05VV-F order
H05VVH2-F sein.
❏
Maschinenlärminf ormatio ns-Verordnun g-3. GSGV, 18. 01. 1991:
Der arbeitsplatzbezog ene schalldruckpegel beträgt 70 dB (A) oder
weniger gemäß ISO 7779.
10
Getting Started
Page 21

Important Safety Instructions
Read all of these instructions before operating your printer.
❏ Follow all warnings and instructions marked on the printer.
❏ Unplug this printer from the wall outlet before cleaning. Use
a damp cloth for cleaning and do not use liquid or aerosol
cleaners.
❏ Do not u se this printer near water.
❏ Do not place the printer on an unstable cart, stand, or table.
❏ Slots and openings i n the cabinet and th e back or bottom are
provided for ventilation. Do not block or cover them. Do not
put the printer on a bed, sofa, rug, or other similar surface or
in a built-in installa tion unless proper ventil ation is provid ed.
❏ Use the type of power sour ce indicated on the label. I f you are
not sure of the type of p ower available, cons ult your dealer or
local power company.
❏ If you are unable to insert the plug into the outlet, contact your
electrician to replace your obsolete outlet.
❏ Do not pu t yo ur printer where the cord will be walked on.
❏ If you use an extension cord, mak e sure that the total of the
ampere ra tings on the products pl ugged into the extensio n
cord does not exceed the extension cord ampere rating. Also,
make sure that the total of all products plugged into the wall
outlet does not exceed 15 amperes.
❏ Never push objects of any kind through cabinet slots as they
may touch dangerous voltage points or short out parts that
could result in a ris k of fire or electric shoc k.
❏ Never spill liquid of any kind on the printer.
Getting Started
11
Page 22

❏ Except as s pecif ically ex plain ed in this gu ide, do not att empt
to service this product yourself. Opening or removing those
covers that are marked “Do Not Remove” may expose you to
dangerous voltage points or other risks . Refer all s ervicing i n
those compartmen ts to service pe rsonnel.
❏ Unplug th is printer from the wall outlet and refer servic ing
to qualified service personnel u nder the followi ng conditions:
1. When the power cord or plug is damaged or frayed.
2. If liquid has been spilled into it.
3. If it has been exposed to rain or water.
4. If it does not operate normally when the operating
instructions are f ollowed. Adjus t only those contr ols that
are covered by the operating instructions since improper
adjustment of other controls may result in damage and
will often require extensiv e work by a qualified technician
to restore the product to normal o p e ration.
5. If it has been dropped or the cabinet has been damaged.
6. If it exhibit s a dist inct change in perf ormance, indic at in g
a need for service.
12
Getting Started
Page 23

For United Kingdom Users
Use of options
Epson (UK) Limited shall not be liable against any damages or
problems arising from the use of any options or consumable
products other than those designated as Original EPSON
Products or EPSON Approved Prod uct s by Epso n (UK) Lim it ed.
Safety information
Warning:
and check that the appliance voltage corresponds to the supply voltage.
Important:
in accordance with the following code:
Green and yellow—Ea r th
Blue—Neutral
Brown—Live
If you need to fit a plug:
As the colours of the mains lead of this appliance may not match any coloured
markings used to identify the terminals in a plug, please proceed as follows:
❏ The green and yellow wire must be connected to the terminal
❏ The blue wire must be connected to the terminal in the plu g
❏ The brown wire must be connected to the terminal in the plug
This appliance must be earthed. Refer to rating plate for voltage
The wires in the mains lead fitted to this appliance are coloured
in the plug which is marke d with the letter E or the Ea rth
symbol (
marked wi th the letter N .
marked wi th the letter L.
G
).
If damage occurs to the plug, repla ce the cord set or consu lt a
qualified electrician.
Replac e f uses only with a fuse o f the correct size and rating.
Getting Started
13
Page 24

Warnings , Cautions, and Notes
Warnings
must be followed carefully to avoid bodily injury.
w
Cautions
must be observed to avoid damage to your equipment
c
contain important information and useful tips on the operation of
Notes
your printer.
.
14
Getting Started
Page 25

Chapter 1
Understanding Your Printer
Controlling the Printer . . . . . . . . . . . . . . . . . . . . . . . . . . . . . . . . . . . . 1-2
Accessing the printer driver . . . . . . . . . . . . . . . . . . . . . . . . . . . 1-2
The Control Panel. . . . . . . . . . . . . . . . . . . . . . . . . . . . . . . . . . . . 1-3
Optimizing Print Quality . . . . . . . . . . . . . . . . . . . . . . . . . . . . . . . . . .1-4
Resolution Improvemen t Te chno log y. . . . . . . . . . . . . . . . . . .1-4
Adjusting Print Density. . . . . . . . . . . . . . . . . . . . . . . . . . . . . . .1-4
Enhanced MicroGray . . . . . . . . . . . . . . . . . . . . . . . . . . . . . . . . .1-5
1
Understanding Your Printer
1-1
Page 26

Controlling the Printer
There are a two ways to control your printer and change its
settings:
❏ The printer driver (for Windows users only)
❏ Control Panel operation (SelecType)
Normally, you should use the printer driver to con trol your
printer. The printer dri ver allows you to easil y make the most
common printer settings, including the paper source, paper size,
and orientation. To access the driver menus, see below.
A few sof tware progr ams do not a llow you to control printe r
setting using the printer driver. In these cases, you can use the
printer’s control panel to adjust the printer settings. For
information on using the control panel, see Chapter 5.
Accessing the printer driver
You can access your printer driver directly from most Windowsbased applications, or from your Windows operating system, as
explain ed below. The printer drive r settings made from many
Windows applications override settings made when the driver is
accessed from the operating system, so in most cases you should
access the driver f rom your ap plic at ion to make su re yo u get the
results you want.
❏ To access the printer driver from your application software,
click the
You also need to click
combination of these buttons.
❏ To access the driver from Windows 3.1 or Windows 3.11 for
Workgroups, double-click the
program group, then double-click the
your EPSON printer from the Installed Prin te rs lis t and cl ick
Setup
1-2
Understanding Your Printer
Print
.
Page Setup
or
command on the File menu.
Setup, Options, Properties
Control Panel
icon in the Main
Printers
icon. Choose
, or a
Page 27

❏ To access the d river from Window s NT 3.51, d ouble-click th e
Control Pa nel
click the
Properties
select
printer is selected and click
❏ To access t he dr iver f rom Wi ndows 95, 98, an d NT 4.0, click
Start
, point to
icon of your EPSON printer and click
95 and Windows 98) or
NT 4.0).
icon in the Main program group, then double-
Printers
icon. Double-click your printer icon and
from the Printers men u. M a ke sure your
Setup
.
Settings
, and click
Document Defaults
Printers
Properties
. Next, right-click the
(in Windows
(in Wi ndows
The Control Panel
The printe r control p anel gives you e asy control over mos t
common printer operations. The panel is made up of thre e
elemen ts: a liquid crystal display (LCD), indicato r lights, and
buttons. The display and indicator lights tell you about the
current status of the printer, and you can use the buttons to select
printer settings and functions. However, se tti ngs that you make
with the buttons will be overridden by set tings made by soft ware.
Getting familiar with the way your printer’s control panel works
may help you get more from your printer. For more information
on the SelecType settings available from the control, including the
OneTouch modes, see Chapter 5, "SelecType".
1
This section also shows all SelecType menu categories and
options. It can be used as a guide whenever you use SelecType
features.
Understanding Your Printer
1-3
Page 28

Optimizing Print Quality
Your printe r pro vides you wi th a number of ways to print yo ur
documents so that they are presented with the highest possible
quality. The two features discussed here are EPSON’s Resolu tion
Improvement Technology (RITech) and Enhanced MicroGray
(Enh. MG).
Resolution Improvement Technology
Resolution Improvement Technology (RITech) is EPSON’s
original printer technology that improves the appearance of
printed line s, text and graphics.
The factory de fault se ttin g for RITec h is on. Th e RITech gi ves the
best quality text and graphics for nearly all purposes. You may
not ne ed to tur n the se tti ng of f. Howe ver, if you a re pri nti ng gray
shading or screen pa tte rns, change the setting to
To change the RITech setting, follow these steps:
Using the printer driver:
Check or uncheck the RITech check box on the Panel menu in the
printer driver to turn RITech on or off.
Off
.
Using the SelecType:
Follow the instructions in the section on using SelecType. This
setting is made in the Config menu (page 5-21).
Adjusting Print Density
Do not change the print density unless it is necessar y. Changing
the print density affects all text and graphics. Check the new
density setting by printing several pages with various kinds of
text and graphics.
If your pri ntouts a re too l ight o r too d ark, adj ust the print density
with the printer driver or the SelecType mode.
1-4
Understanding Your Printer
Page 29

Using the printer driver:
Change the Density setting on the Panel menu of the printer
driver.
Using Sele cType:
Follow the instr uctions in the sectio n on SelecT ype to change this
setting. You should use the Config menu for this ("Density", page
5-21).
Note:
Increasing the print density inc reases t oner consumption. If you select
darker printing, you may need to replace the toner cartridge more often.
Enhanced MicroGray
Enhanced MicroGray (Enh. MG) is EPSO N’s new printer
technology created especially for high quality output of photos
and other images with smooth total changes.
1
Enh. MG off
To use the Enhanced MicroGray setting folow these steps:
Using the printer driver:
Click the
driver.
Enh. MG
button on the Graphic me nu in the printer
Understanding Your Printer
Enh. MG on
1-5
Page 30

1-6
Understanding Your Printer
Page 31

Chapter 2
Paper Handling
Using the MP Tray. . . . . . . . . . . . . . . . . . . . . . . . . . . . . . . . . . . . . . . .2-2
Selecting the MP tray as the paper source . . . . . . . . . . . . . . .2-2
Printing with the MP tray . . . . . . . . . . . . . . . . . . . . . . . . . . . . .2-3
Printing envelopes with the MP tray. . . . . . . . . . . . . . . . . . . . 2 - 6
Manually Loading Paper . . . . . . . . . . . . . . . . . . . . . . . . . . . . . . . . . . 2-8
Selecting the Paper Size . . . . . . . . . . . . . . . . . . . . . . . . . . . . . . . . . . . 2-10
Loading an uncommon paper size. . . . . . . . . . . . . . . . . . . . . . 2-10
Printing on Special Paper . . . . . . . . . . . . . . . . . . . . . . . . . . . . . . . . . . 2-1 1
Envelopes. . . . . . . . . . . . . . . . . . . . . . . . . . . . . . . . . . . . . . . . . . .2-11
Labels . . . . . . . . . . . . . . . . . . . . . . . . . . . . . . . . . . . . . . . . . . . . . .2-11
Transparencies . . . . . . . . . . . . . . . . . . . . . . . . . . . . . . . . . . . . . . 2-12
2
Paper Handling
2-1
Page 32

The printer can feed paper from any of three sources: the standard
paper cassette tray, the MP Tray, or the optional 500 sheet lowe r
cassette unit. To load paper from standard paper cassette tray, see
your
Getting Ready!
cassette, see page 3-11.
guide. To load paper in an optional lower
❏ Paper should be high quality and relatively smooth with a
weight between 60 and 105 g /m
paper cassette tray and optional 500 sheet lower cassette unit, or
between 60 and 190
❏ The printer is extremely sensitive to moisture. Be sure to store
your paper in a dry environment.
❏ Use of colored paper is acceptable, but coated paper should
be avoided.
❏ You may use paper with preprinted letterheads, provided
that the p aper and ink are both of laser printer types.
g/m2 (16 to 51 lb ) for the MP Tray.
2
(16 to 28 lb) for the standard
Using the MP Tray
The MP tray is used for making short pri nt runs on pa per types
and sizes which are not loaded in the paper cassettes, or for
printing other medi a such as tran sparencies , labels, or envelopes.
Selecting the MP tray as the paper source
There are two ways to selelct the sourc e of the paper used by the
printer:
❏ Using the printer driver from Windows
❏ Using the SelecType mode
2-2
Paper Handling
Page 33

Using the printer driver:
Choose the paper source on the B asic Setting menu (excep t
Windows NT 3.51) or Document Setting menu (in Windows NT
3.51). For more information on using the printer driver, see online
help in the driver.
Using the S elecT y pe mode:
For information on changing the paper size in SelecType mode,
see Chapter 5.
Printing with the MP tray
1. Open the front cover by pulling the top of the panel towards
you.
2
Paper Handling
2-3
Page 34

2. As shown in the illustration below, pull the tab so that the MP
tray folded inside the front cov er flips out.
3. Slide the guide to the far right of the MP tray.
2-4
Paper Handling
Page 35

4. Fan the media and tap the edges on a flat surface to align them
before loading the media.
5. Place the stack of the media in the MP tray. The top of the
media (for example, th e printed letterhead at t he top of a sheet
of paper) should go in first. The surface on which you are
printing should face upwards .
6. Adjust the side guide so that i t touches the right edge of the
media stack. Make sure that the top of the stack is under the
plastic tab on the side guide.
2
Note:
Do not add any media to the MP tray while you are printing, otherwise
paper jams may occur.
Paper Handling
2-5
Page 36

Printing envelopes with the MP tray
1. Open the MP tray as explained above.
2. Slide the side guide to the far right of the MP tray.
3. Before you put the envelope s in the MP tray, make sure that
they are not stuck t ogether and that all thei r flaps are closed.
4. Put the envelopes wi th their flap s down, and the short edge
leading into the printer.
2-6
Note:
❏
If the flaps of the envelopes are on the long edge of the envelopes,
make sure that the envelopes are placed in the MP tray with the
flaps to the right.
❏
If the flaps of the envelopes are on the short edge of the envelope,
make sure that the short edge with the flap goes into the printer
first.
❏
Make sure that the envelopes are against the left edge of the MP
tray and that they are all under the plastic tab of the left guide
of the MP tray.
Paper Handling
Page 37

5. Slide the right sid e guide to the loaded envelopes. All th e
envelopes should be under the plastic tab of the right side
guide.
Note:
Do not add envelopes to the MP tray while you are printing, otherwise
paper jams may occur.
2
Paper Handling
2-7
Page 38

Manually Loading Paper
You can manually load paper. Manually loading paper can be
helpful when you want to check the print quality after each page
is printed.
❏ This loading procedure is almost the same as the procedure
for automatic paper feeding, except you load paper sheet-bysheet, send print data to print the first page, and press the
Line
button to print each page.
To load paper maually, follow the steps below.
1. Access the printer driver menus in one of the following ways:
❏ To access the printer driver from your application
software, click the
File menu. You also need to click
Properties
❏ To access the driver from Windows 3.1 or Windows 3.11
for Workgroups, double-clic k the
the Main program group, then double-click the
icon. Choose your EPSON printer from the Installed
Printers list and click
, or a combination of these buttons.
Print
Page Setup
or
Setup
.
comman d on the
Setup, Options
Control Panel
On
,
icon in
Printers
2-8
❏ To access the driver from Windo ws NT 3.51, double-click
Control Panel
the
double-click the
icon and sel ect
sure your printer is selected and click
❏ To access the driver from Windows 95, 98, and NT 4.0,
Start
click
right-click the icon of yo ur EPSON printer and click
Properties
Windows NT 4.0).
Paper Handling
, point to
(in Windows 95) or
icon in the Main program group, then
Printers
Properties
icon. Double-click your printer
from the Printers menu. Make
Setup
.
Settings
, and click
Document Defaults
Printers
. Next,
(in
Page 39

2. The Basic Setting menu (except Windows NT 3.51) or the
Printer Setup menu (Windows NT 3.51) appears. Check the
Manual Feed
3. Select the paper size from the paper size list.
4. If the correct paper size is already loaded, skip this step.
Otherwise, remove any paper remaining in the tray or cassette
that you use. Insert a sheet or stack of the correct size paper
into the tray or cassette that you use, with the printable side
up, as far as it will go. Adjust the paper guides to match the
paper size you are loading.
5. Send a print job from your application. The control panel
display shows Manual Feed and the selected page size .
check box.
2
6. Press
7. Press
On Line
printed.
Note:
If you check the continuous check box in the printer driver, the sheet
of paper is loaded and printed successively by pressing
button only once after you press t h e
will feed paper automatically. You will not have to continue to press
On Line
the
On Line
necessary. R epeat this steps f or every page to b e printe d.
to print. The sheet of paper is loaded and
On Line
On Line
button.
again to print the next page of print data, if
button, the printer
Paper Handling
2-9
Page 40

Selecting the Paper Size
By default, the printer driver is set for A4 size paper. If you load
paper of a different size, you need to change the paper size setting
using one of the following methods.
Using the printer driver:
Choose the paper siz e on the Bas ic Settings menu (except
Windows NT 3.51) or Document setting menu (in Windows NT
3.51). For more information on using the printer driver, see online
help in the driver.
Using the SelecType mode:
For more information on changing the paper size in S e lecType
mode, see Chapter 5.
Loading an uncommon paper size
To load an uncommon, or custom, paper size from 90 × 148 mm
(3.5 × 5.8 inches) to 215.9 × 355.6 mm (8.5 × 14 i nches), use the MP
Tray (as descri be d in your Getting Ready! guide) an d make the
size setting by one of the following methods:
❏ Access the printer, click inside the paper size box on the paper
menu. When you finish adjust the Width, Height, and Unit
settings to match your custom paper, click the OK button and
your custom paper s i z e wi ll be saved.
❏ Access SelecType mode (see Chapter 5 ) and set page size to
CTM
(custom ).
2-10
Paper Handling
Page 41

Printing on Special Paper
Note:
Since the quality of any pa rticular brand or type of media may be changed
by the manufacturer at any time, EPSON cannot guarantee the quality
of any type of media. Always test samp les of media stock before
purchasing large qu ant it ies or pr inting large jobs.
You can print on special paper stock such as heavy paper,
envelopes, labels, and transparencies.
Envelopes
The printing quality on envelopes may be irregular because
different parts of an envelope have dif ferent thicknesses. Print one
or two envelopes to check the print quality. If the printing is to o
light, adjust the print density as described elsewhere in this
manual.
Do not use window envelopes unl ess they are s pecially desig ned
for laser prin ters. The plastic on most window envelopes will melt
when it comes in contact with the fuser.
2
Labels
You can load a number of sheets of labels in the MP tray.
However, you may need to feed some types of label s one sheet at
a time in the paper tray, or load them manually.
You must use only labels designed for laser printers or plainpaper copiers.
To prevent the adhes iv e from comi ng into contact with printer
parts, always use labels that completely cover the backing sheet,
with no gaps between the individual labels.
Paper Handling
2-11
Page 42

You should test the l abel sheet f or leakin g adhesive by pressing a
sheet of paper on top of a sheet of labels. If the paper stic ks to the
sheet of labels, do not use the labels in your printer.
Transparencies
You may need to feed some types of transparencies one sheet at
a time in the MP tray, or load them manually.
Caution:
c
You must use only overhead projector transparencies or adhesive
drafting film made for use with laser printers or plain-paper
copiers. If you use any other kind of transparent media, you may
damage your printer.
2-12
Paper Handling
Page 43

Chapter 3
Options
500 Sheet Lower Paper Cassette Unit. . . . . . . . . . . . . . . . . . . . . . . . 3-3
No Duplex Unit Installed . . . . . . . . . . . . . . . . . . . . . . . . . . . . . 3-3
Duplex Unit Installed . . . . . . . . . . . . . . . . . . . . . . . . . . . . . . . . .3-7
Loading the optional lower cassette with paper . . . . . . . . . . 3-1 1
Removing the Lower Paper Cassette
(no duplex unit installed) . . . . . . . . . . . . . . . . . . . . . . . . . . . . 3-15
Removing the Lower Paper Cassette
(duplex unit installed) . . . . . . . . . . . . . . . . . . . . . . . . . . . . . . . 3 - 1 7
Duplex Unit . . . . . . . . . . . . . . . . . . . . . . . . . . . . . . . . . . . . . . . . . . . . .3-20
Installing the Duplex Unit. . . . . . . . . . . . . . . . . . . . . . . . . . . . . 3-20
Removing the Duplex Unit . . . . . . . . . . . . . . . . . . . . . . . . . . . . 3-25
Face Up Tray . . . . . . . . . . . . . . . . . . . . . . . . . . . . . . . . . . . . . . . . . . . . 3- 2 9
Installing the Face Up Tray. . . . . . . . . . . . . . . . . . . . . . . . . . . .3-29
Removing the Face Up Tray . . . . . . . . . . . . . . . . . . . . . . . . . . .3-30
Memory Modules . . . . . . . . . . . . . . . . . . . . . . . . . . . . . . . . . . . . . . . .3-31
Installing a memory module. . . . . . . . . . . . . . . . . . . . . . . . . . .3-32
Removing a memory m o dule. . . . . . . . . . . . . . . . . . . . . . . . . . 3- 3 4
3
ROM module . . . . . . . . . . . . . . . . . . . . . . . . . . . . . . . . . . . . . . . . . . . . 3- 3 5
Installing a ROM Module . . . . . . . . . . . . . . . . . . . . . . . . . . . . .3-35
Removing a ROM Mo dule . . . . . . . . . . . . . . . . . . . . . . . . . . . . 3-36
Optional Interfaces . . . . . . . . . . . . . . . . . . . . . . . . . . . . . . . . . . . . . . .3-36
Installing an Interface Card. . . . . . . . . . . . . . . . . . . . . . . . . . . . 3- 3 8
Opti o ns
3-1
Page 44

There are a number of options available for your printer. These
include:
❏ The 500 Sheet Lower Paper Cassette Unit - Universal
(C81290✽) increases paper feeding capacity (up to 500 sheets
of paper).
❏ The Duple x Unit (C81293✽) is useful for pr inting on both sides
of paper.
❏ The Face Up Tray(C81294✽)enables face-up output.
❏ Optional memory module expands your printer’s memory.
❏ EPSONScript Level 2 module (C83229✽) generates crisp
PostScript output. See “ROM module”.
❏ Optional interface cards and modules provides a variety of
interfaces, allowing you to use your EPL-N1600 with an
Ethernet network, an IBM mainframe and other specialized
interfaces.
Note:
✽
The asterisk (
which varies by country .
) is a substitute for the last digit of the product number,
Each of these options is discussed in its own section.
If you purchased your printer and options at the same time, first
set up the printer and run the print er test by following the
instructions in the
3-2
Options
Getting Ready!
guide. Then install the options.
Page 45

500 Sheet Lower Paper Cassette Unit
The optional lower paper cassette gi ves you a third paper source,
in additio n to the standard cassette tray and the MP Tray . This
section describes how to install the cassette and load paper.
If you have installed t he o ptional 5 00 sh eet low er paper cassett e,
you can use this in a v e ry similar way to the standard 250 she e t
paper cassette. You can use the same kinds of paper, but the
optional lower cassette will hold twice as much.
You select the lower paper cassette in the same way that you select
the MP tray: using the printer driver software, or with the control
panel.
❏ If you use the printer driv e r software, remember to add the
lower pap e r cassette to the l ist of availabl e paper sources i n
the Option me nu of the printe r driver.
❏ When yo u use the co ntrol panel to select the lower cassette,
the abbreviation shown in the display is
cassette 2).
LC2
(lower
3
No Duplex Unit Installed
If you have not installed the optional duplex unit, follow the
instructions below to install the 500 sheet lower paper cassette.
1. Unpack the 500 sheet lower paper cassette and place i t on the
surface where the printer is to be installed.
Opti o ns
3-3
Page 46

2. Make sure the printe r and cassette are facing in the same
direction.
3. Lift the printer and align the pins on the cassette with the holes
on the bottom of the printer.
Warning:
w
The printer weighs over 13 kg (about 29 lb). Take care when
lifting the printer. If necessary, get someone to help you
4. Lower the printer until it rests securely on the cassette.
3-4
Options
Page 47

5. Fasten the two feeder joints at the rear of the printer securely,
using the supplied clips.
6. Remo ve the upper 250 sheet paper cassette com p letely from
the printer, and pull out the lower 500 sheet paper cassette
until you can see the front feeder joints.
3
Opti o ns
3-5
Page 48

7. Fasten the front feeder joints securely, using the supplied
clips.
Warning:
w
Always remove the optional 500 sheet lower paper cassette before
lifting the printer. Never try to lift up the pri nter together with
the 500 sheet lower paper cassette attached to the printer.
3-6
Options
Page 49

Duplex Unit Installed
If you have already installed the duplex unit, follow the
instructions below. Otherwise, if yo u are installin g the 500 sheet
lower pap e r cassette without installing the duplex unit, turn to
"No Duplex Unit Installed", page 3-3.
If you are installing both the duplex unit and the 500 sheet lower cassette,
you must install th e du p lex unit first. Turn to "Installing the Dup lex
Unit", page 3-20 and instal l the duple x unit if you have not yet do ne so.
1. Unpack the 500 sheet lower paper cassette and place i t on the
surface where the printer is to be installed.
2. Make sure the p rinter and cassette are facing in the same
directio n.
3
3. Face the front of the printer. Pick it up using the grips on the
duplex unit, as shown below.
Note:
There are three pins on top of the 500 sheet l ower paper cassette: two
on the left and one on the right. These t h ree pins fit into three
corresponding holes on the bottom of the duplex unit for a secure fit.
Opti o ns
3-7
Page 50

c
Caution:
❏
Do not attempt to lift the printer and duplex unit
combination using the grips on the printer. Only use the
grips on the duplex un it.
❏
The printer and duplex unit toge ther weigh about 20 kg
(about 43 lb ). Ta k e care w hen lifting them together and
get another person to help you if necessary.
4. Lower the printer and duplex unit combination onto the 500
sheet lower paper cassette, taking care to line up the corners.
Make sure that the printer and duplex unit are firmly seated.
3-8
Options
Page 51

5. Use the supplied clips to fasten the two joints at the rear of the
printer (joining the duplex unit to the 500 sheet lower paper
cassette). Make sure the clips are securely fastened.
6. Completely remove the duplex feeder tray and pull out the
500 sheet lower paper cassette until you can clearly see the
two feeder joint areas on the duplex unit.
3
Opti o ns
3-9
Page 52

7. Use the supplied clips to fasten the two joints as shown below.
Make sure the clips are fastened securely.
8. Push back the 500 sheet lowe r paper cassette an d replac e the
duplex feeder tray.
3-10
Options
Page 53

Loading the optional lower cassette with paper
1. Remo ve the lower c assette by reaching into the handle a nd
pulling straight towards you.
2. Press down on the bottom plate until you feel it click into
place.
3
Options
3-11
Page 54

3. Squeeze the side guide and slide it to the far right of the
cassette.
4. You ma y need to adjust the length of the cas sette to fit the
paper you are using. Use one hand to hold the cassette steady.
Use the other hand to raise and unlock the left corner of the
end guide. While continuing to hold the cassette steady, raise
and unlock the right corner of the end guide. Slide the end
guide so that the length of the cassette matches the paper you
are using. Push the end guide down until it locks into place.
3-12
Note:
There are notches on the bottom of the cassette which you can use to
help set the guide to match the paper leng th.
Options
Page 55

5. Fan a stack of paper (up to 500 sheets) to prevent the sheets
from sticking together, and tap the edge of the stack on a firm
surface to line up the edges of the paper.
6. Insert the stack into the cassette, lining it up with the left side
of the cassette. Make sure that all the paper is under the metal
retaining cl ip and the plastic caps on the end guides. If you
load the printer with too much paper, it may cause paper jams.
7. Slide the side guide to the left, so it just touches the edge of
the stack of paper.
3
Options
3-13
Page 56

8. Replace the paper cassette in the printer.
Caution:
c
Do not remove the cassette while you are printing, otherwise you
may cause a paper jam.
3-14
Options
Page 57

Removing the Lower Paper Cassette (no duplex unit
installed)
When moving the prin te r, you should remove the lower paper
cassette first. When fitted with the lower paper cassette the printer
is very heavy.
1. Make sure that the computer and printer are turned off,
remove the power cord from the wall outlet and from the
printer. Remove any inter face cables from t he printer.
2. At the rear of the printer, you see the two feeder joint clips
joining the lower pape r cassette to the printer. Pi nch these
feeder joint clips between your thumb and fi nger and remove
them, as shown below.
3
Options
3-15
Page 58

3. Completely remove the 250 sheet standard cassette, and
partly remo ve the 500 sheet lower ca ssette until you can see
the front feeder joint clips joining the lower paper casse tte to
the printer .
4. Pinch the feeder joint clips between your thumb and finger
and remove them as shown below.
5. Push the 500 sheet lower paper cassette back into place, and
replace the 250 sheet standard paper cassette.
6. Lift the pri nter up and away from the lower paper ca ssette
unit.
3-16
Options
Page 59

Removing the Lower Paper Cassette (duplex unit
installed)
1. Make sure that the computer and printer are turned off,
remove the power cord from the wall outlet and from the
printer. Remove any inter face cables from t he printer.
2. At the re ar of the pri nte r, locate the feeder joint clips, pinch
them between your thumb and finger and remove them as
shown below.
.
3
Options
3-17
Page 60

3. Completely remove the duplex tray, and pull out the 500 sheet
lower cassette until you can see the two feeder j oints the front
of the printer as shown below.
4. Pinch the feeder joint clips between your thumb and finger
and remove them, as shown below.
5. Replace the 500 sheet lower paper cassette and the duplex
feeder tray.
3-18
Options
Page 61

6. Lift the printer and duplex unit up and away from the 500
sheet lower paper cassette.
Caution:
c
When you lift the printer and duplex unit, always use the lifting
grips in the duplex unit, as shown above. Do not use the grips in
the printer itself. If you lift the printer/duplex unit combination
using the printer grips, you may drop the duplex unit and
damage it.
3
Options
3-19
Page 62

Duplex Uni t
Installing the Duplex Unit
The optional d uplex u nit a llow s you to p r int on both si des of the
paper automatic ally. To install the duplex unit, follow the
instructions below:
1. Unpack the parts of the duplex feeder, an d place them on the
stable surface where you will be installing the printer. Lift up
the vertical unit so that it locks into the locking bar on the side
of the horizontal unit, as shown below.
3-20
Options
Page 63

2. Remo ve the transparent cover attached t o the rear of the
printer. Ins ert the duplex chute into th e body exit of the
printer, and secure it wi th the two su pplied clips.
3. Inside the vertical unit, you will find a metal bar. Use this bar
to remove the plastic cover located to the right of the body exit.
3
When you have removed the plastic cover, store it together
with the metal bar in the place in the vertical unit from where
you took the metal bar.
Options
3-21
Page 64

4. With th e front of the printer towards you, gra sp the sides of
the printer. Line up the corners of the printer with the corners
of the duplex unit and place the printer on the duplex unit.
Note:
❏
The printer weighs about 13 kg (a bout 29lb). Take care when
lifting it, and get an ot her person to help you if necessary.
❏
There are three pins on top of the duplex feeder: two on the left
and one on the right. These three pins fit into three
corresponding holes on the botto m of th e pri nt er body for a
secure fit.
3-22
Options
Page 65

5. Check that the printer is securely seated on top of the duplex
unit.
6. Use the supplied c lips t o f asten t he d uplex uni t t o the print er
and close the duplex unit’s vertical unit. Make sure the clips
are fastened securely.
.
3
Options
3-23
Page 66

7. Completely remove the paper cassette. Pull out the duplex
unit feeder tray until you can see the two feeder joints at the
front of the printer.
8. Use the supplied clips to fasten the duplex unit to the printer
at the front. Make sure the clips are fastened securely.
9. Replace the duplex unit feeder tray and the paper cassette.
To confirm that the Duplex Unit is installed correctly, print a
status sheet. if the unit is not listed on the status sheet, try
reinstalling it.
3-24
Options
Page 67

You can s e lect duplex printing either through the printer driver
software, or through the printer’s control panel.
Using the printer driver:
Check the Duplex Unit check box on the Basic Setting menu
(exce pt Wi ndows NT 3 .51) or Do cument Set ting menu (Wind ows
NT 3.51) of the printer driver.
Using Sele cType:
Follow the instruction in the section on SelecType to change this
setting. You should use the Printing menu for this ("Duplex", page
5-18).
Removing the Duplex Unit
When you wish to move or store the printer, or if you wish to
transfer the duplex unit to another printer, you should follow the
procedures described below.
1. Make sure that the computer and printer are turned off,
remove the power cord from the wall outlet and from the
printer. Remove any inter face cables from t he printer.
2. Push the release button to open the vertical unit of the duplex
unit fully.
3
Options
3-25
Page 68

3. At the rear of the printer, pinch the two feeder joint clips
between your thumb and finger and remove them, as shown
in the illustration be low.
4. Completely remove the standard paper casset te, and pull out
the duplex unit feeder tray until you can see the two front
feeder joints.
.
3-26
Options
Page 69

5. Pinch the two front f eeder joint clips between your t humb and
finger, an d remove them from the fr ont of the printer, as
shown below.
6. Save the front and r ear feeder j oint cli ps in a safe pl ace— you
will need them later. Replace the standard paper cassette and
push back the duplex feeder tray.
7. Lift the printer up and away from the duplex unit.
3
Options
3-27
Page 70

8. Inside the vertical component of the duplex unit is the plastic
cover which was originally taken from the printer. Remove it
from the duplex unit and restore it to its original location at
the right of the printer body exit.
9. Hook the transparent cover in the holes and attach it. Remove
the two clips that hold the duplex chute to the printer, and
then remove the duplex chute.
10. Store the duplex unit, the clips, and the d uplex chute in a safe
place.
3-28
Options
Page 71

Face Up Tray
The printe r normally o u tputs pap er face down on top of the
printer. If you want face-up output, you can install the optional
Face Up Tray ( C81294✽). Thi s tr ay giv es yo u i mme diat e v iew in g
of your printed output and is recommended for printing on media
such as labels and transpar encies that r equir e a s trai ght-t hrou gh
paper path .
The Face Up Tray can hold about twenty sheets of media.
Note:
Remember that when you use the face-up tray, you need to allow about
297 mm (about 11.7 inches) at the rear of the printer fo r the tray and the
ejected media.
Installing the Face Up Tray
To install the face-up tray, follow the instru ctions below.
1. Fi nd the t hree moun ting ho les on the rear of the p rinter . If yo u
have installed the optional duplex unit, there will be the
openings on the rear of th e vertical unit of the duplex un i t.
Locate and insert the three tabs on the face-up tray into these
mounting holes.
3
Options
3-29
Page 72

2. Pull the center grip of the face-up tray to open the large part
of the tray extension. If you need to use the small part of the
tray extension, flip this out as we ll.
You select f ace up or dow n print out either through the printer
driver so ftware, or through the printer’s con trol panel.
Using the printer driver:
Check the Face Up check box on the Basic Setting menu (except
Windows NT 3.51) or Document Setting menu (W indo ws NT
3.51) of the printer driver.
Using Se lecType:
Follow the instructions in the section on SelecType to change this
sett ing. You sh ould use th e Print ing menu fo r this ("O ut Bin", p age
5-18).
Removing the Face Up Tray
Follow the instructions below to remove th e fa ce-up tray.
1. If the small part of the tray extension is extended, flip it closed.
Push the l arge exten si on so that it retracts into the face-up
tray.
3-30
Options
Page 73

2. Detach the face-up tray from the rear of the printer (or from
the rear of the optional duplex unit, if you have installed it).
Store the face-up tray in a safe place.
Memory Modules
By installing a Single In-Line Memory Module (SIMM), you can
increase printer memory up to 40MB (printer default 8 MB +
optional 32 MB). You may w ant t o add additional me mory if you
are having diffic u lty pr in ting c omplex , g raphic s-i nten siv e pa ges
or if you regularly use numerous downloa ded fonts.
3
You can purchase SIMMs fo rm various vendors. B e sure the
SIMM you purchase meets the following requirements:
❏ 72-pin, EDO type
❏ Capacity of 4, 8, 16, or 32MB
❏ Access speed of 60 ns or less
❏ Dimensions within 108 mm (4.25 inches) x 26 mm (1.02
inches), with a thickness of 10 mm (0.4 inch)
Options
3-31
Page 74

Installing a memory module
1. Turn o ff the printer.
Warning:
w
2. Unplug the power cable from the electrical outlet.
3. Pull out the paper cassette, if necessary.
4. Turn the printer so its left side fa ces you .
5. Open the printer cover by pressing the latch on the right side
of the printer.
To avoid electrical shock, do not attempt to install a SIMM
unless the printer is turned off.
6. Loosen the retaining screws securing the printer’s side cover.
7. Grasp and slightly bend the side cover outside; t hen remove
the cover.
3-32
Options
Page 75

8. Insert the SIMM module into the RAM slot at an angle,
making sure the pint numbers of the slot and the SIMM match,
either 1 or 72
.
9. Press the module down until it clicks into place at right angles
to the slot. Do not apply too much force .
3
10. Replace the prin ter’s side cover.
11. Secure the retaining sc re ws.
12. Gently close the printe r cover.
13. Plug the power cord back in and t urn on the printer.
To verify that memory is correctl y installed, print a status sheet
by pressing the control panel button .
Options
3-33
Page 76

If an incorrect amount of memory is shown on the status sheet,
turn off the printer and review the steps above to make sure you
correctly installed the SIMM. If the amount of RAM is still
incorrect, contact your dealer or a qualified service person for
assistance.
Removing a memory module
1. Perform steps 1 through 7 in the previo us section to access t he
printer’s RAM slot.
2. Pull the clips on each side of the RAM slot outward to release
the memory module.
3. Grasp both sides of the SIMM and pull it out as shown above.
4. Follow steps 10 through 13 in the previous section to complete
the procedure.
3-34
Options
Page 77

ROM module
Installing a ROM Module
You can install the EPSONScript Level 2 Package (C83229 ✽) using
the same basic steps as those used to install the memory module.
1. Perform steps 1 through 7 in “Installing a memory module”
section to access the printer’s RAM slots.
2. Make sure the p rinter has th ree ROM s lots. The right ROM
slot should be already in use. You should install the
EPSONScript board in the center ROM slot.
3. Insert the EPSON Script module all the way i nto the cente r
slot.
3
Options
3-35
Page 78

Removing a ROM Module
1. Perform steps 1 through 7 in “Installing memory module”
sectio n to access the printer’s RAM slots.
2. Push the metal switch to release the ROM module.
Optional Interfaces
This section describes how to install the optional interface cards
listed below.
To add a direct connection to an Ethernet system , use an optional
Ethernet Card (C82357✽/C82362✽/C82363✽)
To add a serial or parallel i nterface t o your printer, use one of the
following:
32KB Serial Interface Card C82307✽
32KB Parallel Interface Card C82310✽
To add a di rect c onnectio n t o a n I BM mini or mainfram e sys tem,
use one of the following:
Coax Interface Card C82314✽
Twinax Interface Card C82315✽
3-36
Options
Page 79

The coax and twinax con nectors each contain a pa rallel i nterface.
since the printer’s built-in parallel interface remains active, this
gives you two parallel interfaces and a coax or twinax interface.
Print jobs can be sent to any connection, and the printer
automatically switches between the active ports.
The twinax interface is compatible with the following IBM
systems: AS-400, System 36, 5251 (model 12), System 34, System
38, and 5294. When equipped with the EPSON twinax interface,
the printer can be used in place of the following IBM system
printers: 4210, 5224 (models 1 and 2), 5256 (models 1, 2, and 3),
3218 (non IPDS), 4214 (model 2), 5225 (models 1, 2, 3, and 4), and
5219 D01, D02.
The coax i nte rface allows the printer to be connected to the
following IBM control unit s and mainfr am e systems : 3174, 3276,
4274, and 3270.
To add a direct connection to a Macintosh computer with the
optional EPSONScript Level 2 Package, use the AppleTalk
Interface Card (C82312✽) or Ethernet Card (C82357✽/C82362✽/
C82363✽).
Note:
If you reset the printer while it is receiving data through the AppleTalk
Interface Card, you need to turn the printer off and then on again before
it can communicate properly.
3
To add a direct connection to your GPIB network, use the GPIB
Interface Card (C82313✽).
Options
3-37
Page 80

Installing an Interface Card
Follow the steps below to install an optional interface card.
1. Turn o ff the printer.
2. Unplug the power cable from the electrical outlet.
3. Turn the printer so its back faces y ou.
4. Remove the two screws that secure the Type-B slot cover and
remove the cover.
5. With the component side of the optional inter face card facing
the outsid e of the printer, slide the interface card into the
grooves in the interface slot as shown below. Push it in firmly
to lock the card into place.
3-38
Options
Page 81

6. Secure the interface card with the two retaining screws.
You can verify th at the in terf ace is co rrectl y in stalled b y p rintin g
a status sheet.
3
Options
3-39
Page 82

3-40
Options
Page 83

Chapter 4
EPSON Status Monitor 2 Utility
Utility Overview . . . . . . . . . . . . . . . . . . . . . . . . . . . . . . . . . . . . . . . . . 4-2
Installing the Utility . . . . . . . . . . . . . . . . . . . . . . . . . . . . . . . . . . . . . . 4-3
Accessing the Utility . . . . . . . . . . . . . . . . . . . . . . . . . . . . . . . . . . . . . . 4-4
For Windows 95, 98, an d N T 4.0 . . . . . . . . . . . . . . . . . . . . . . . 4-4
Accessing Online Help . . . . . . . . . . . . . . . . . . . . . . . . . . . . . . . . . . . . 4 -4
4
EPSON Status Monitor 2 Utility
4-1
Page 84

Utility Overview
The EPSON Status Monitor 2 is a utility program that monitors
your print er and gives yo u information about the current s tatus
of the printer, including the amount of toner. If a print error
occurs, it also provides you with a message describing the error.
You can use the EPSON Status Monitor 2 utility t o monitor a local
printer from Microsoft Windows 95,98 or NT 4.0.
Note:
❏
This utility can only monitor a lacal printer that is connected
directly to the host computer. You cannot use it when printing over
a netw or k.
❏
The network version of t hi s uti lity is also available for Windo ws
95,98 and Windows NT 4.0. Please use the EPSON Status Monitor
2 utility that c omes with the optional Ethernet Interface Card
(C82357✽ or C82362✽) to monitor or get the current status of a
network printer.
This utility shows your printer status and allows you to change
printer se ttings, such as print density.
4-2
EPSON Status Monitor 2 Utility
Page 85

Installing the Utility
1. Make sure Windows is running.
2. Insert the CD-ROM that comes with your printer into y our
CD-ROM drive (usually this will be drive D).
3. For Windows 95, 98, and NT 4.0 users: click
Run
.
For Windows 3.1 users: make sure the Program Manager
window is open, and then choose
4. Type
5. For Windows 95,98, and Windows NT 4.0 users: in the dialog
6. In the dialog bo x that appears, select
7. When installation is complete, click OK.
The Status Monitor utility is now installed on your computer .
D:\EPSETUP.EXE
box that appears, double-clic k
can also install by sele cting
clicking the arrow on the top right.
The utility is installed automatically.
E:\EPSET UP .EXE
(or
Install Status Monit or 2
Run
Install Status Monitor 2
EPL-N1600
Start
, then choose
on the File menu.
); then click OK.
; or you
and then
and click OK.
4
EPSON Status Monitor 2 Utility
4-3
Page 86

Accessing the Utility
For Windows 95, 98, and NT 4.0
1. Click
2. Point to
To close the Status Monitor 2, click the close button at the top right
of the Stat us Monitor 2 dialog box or right-c lick the EP SON Status
Monitor 2 icon in t he tray ic on ar ea on th e t askbar , t hen c lic k
in the dialog box that appears.
Start
, then point to
Epson
Status Monitor 2 appears.
, then click
Programs
EPSON Status Monitor 2
.
Accessing Online Help
For detailed information about the utility, refer to online help. To
acces s onl ine help, clic k the ? bu tton at the top righ t of t he EP SON
Status Monitor 2 win dow, and the poin ter will b ecome a "?". Then
move the ? over the term that you want to know more about and
click.
. The
Exit
4-4
EPSON Status Monitor 2 Utility
Page 87

Chapter 5
SelecType
The Control Panel . . . . . . . . . . . . . . . . . . . . . . . . . . . . . . . . . . . . . . . .5-2
Overview . . . . . . . . . . . . . . . . . . . . . . . . . . . . . . . . . . . . . . . . . . . 5-2
Display . . . . . . . . . . . . . . . . . . . . . . . . . . . . . . . . . . . . . . . . . . . . . 5-2
Indicator Lights . . . . . . . . . . . . . . . . . . . . . . . . . . . . . . . . . . . . . .5-4
Buttons . . . . . . . . . . . . . . . . . . . . . . . . . . . . . . . . . . . . . . . . . . . . . 5-5
When to use SelecType. . . . . . . . . . . . . . . . . . . . . . . . . . . . . . . . . . . . 5-7
SelecType . . . . . . . . . . . . . . . . . . . . . . . . . . . . . . . . . . . . . . . . . . . . . . . 5-8
Buttons . . . . . . . . . . . . . . . . . . . . . . . . . . . . . . . . . . . . . . . . . . . . . 5-8
Using the buttons in SelecType Mo d e. . . . . . . . . . . . . . . . . . . 5-9
SelecType menus . . . . . . . . . . . . . . . . . . . . . . . . . . . . . . . . . . . . 5-10
Using the OneTouch M o des . . . . . . . . . . . . . . . . . . . . . . . . . . . . . . . 5 -14
OneTouch mode 1 . . . . . . . . . . . . . . . . . . . . . . . . . . . . . . . . . . .5-14
OneTouch mode 2 . . . . . . . . . . . . . . . . . . . . . . . . . . . . . . . . . . .5-15
Understanding SelecType Settings . . . . . . . . . . . . . . . . . . . . . . . . . . 5-1 6
Test menu . . . . . . . . . . . . . . . . . . . . . . . . . . . . . . . . . . . . . . . . . .5-16
Emulation menu . . . . . . . . . . . . . . . . . . . . . . . . . . . . . . . . . . . . . 5 -17
Printing menu . . . . . . . . . . . . . . . . . . . . . . . . . . . . . . . . . . . . . . . 5-17
Tray Size menu . . . . . . . . . . . . . . . . . . . . . . . . . . . . . . . . . . . . . . 5-20
Config menu . . . . . . . . . . . . . . . . . . . . . . . . . . . . . . . . . . . . . . . . 5-21
Setup menu . . . . . . . . . . . . . . . . . . . . . . . . . . . . . . . . . . . . . . . . .5-24
Parallel menu . . . . . . . . . . . . . . . . . . . . . . . . . . . . . . . . . . . . . . . 5-27
Serial Menu . . . . . . . . . . . . . . . . . . . . . . . . . . . . . . . . . . . . . . . . . 5 -28
AUX menu. . . . . . . . . . . . . . . . . . . . . . . . . . . . . . . . . . . . . . . . . .5-30
LJ4 menu . . . . . . . . . . . . . . . . . . . . . . . . . . . . . . . . . . . . . . . . . . .5-30
GL2 menu . . . . . . . . . . . . . . . . . . . . . . . . . . . . . . . . . . . . . . . . . . 5-3 2
PS menu . . . . . . . . . . . . . . . . . . . . . . . . . . . . . . . . . . . . . . . . . . . .5-34
ESCP2 and FX menu s. . . . . . . . . . . . . . . . . . . . . . . . . . . . . . . . . 5-35
I239X menu . . . . . . . . . . . . . . . . . . . . . . . . . . . . . . . . . . . . . . . . . 5-38
5
SelecType
5-1
Page 88

This section explains how to use the control panel; its display, its
indicators and its buttons to make settings. In the later part of this
section, there is an explanation of how to use the SelecType
functio ns to make more advan ced settings. There is a lso an
explanation of the OneTouch settings which help you make the
most common settings easily.
The Contro l Panel
Overview
The printe r control panel gives you e asy contro l over most
common printer operations. The panel is made up of three
elements: a liquid crystal display, indicator lights, and buttons.
The display and indicator lights tell you the current status of the
printer, and you can use the buttons to select printer settings and
functions.
Display
The display shows the following:
❏ Status messages, such as Warming Up, which indicate the
printer’s current status.
❏ Error messages, such as Paper O u t, which identify common
maintenance procedu re s you should pe rform, or erro r
conditions that you need to correct.
❏ SelecType options, such as Emulation, which allow you to
control printer functions such as the pri nter mode, fo nt
selection, paper handling, and many other functions.
5-2
SelecType
Page 89

For the w ay to respond to error mes sa g e s and maintenance
information, see "Prob lems and Solutions", page 6-3, For full
information on the SelecType op ti ons, inclu di ng the OneT ouch
commands, see the appropriate sections later in this chapte r.
Paper Source
RITech
Menu
Alt Reset
Page Size Manual Feed Orientation
Continue
Copies
MP Tray Size
Item Value Enter
Form Feed On Line
Toner Save
Mode
5
SelecType
5-3
Page 90

Indicator Lights
On Line
Form Feed
Continu e
OneTouch
mode 1
On when the printer is on line, indicating the
printer can receive and print data. When the
printer is off line, this light is off. The light
flashes as the system switches between online and off-line status.
On when data is received and stored in the
printer’s buffer but not yet printed. Flashing
indicates the printer is processing data.
When no da ta re mains in the pri nter buffer
(the section of memory reserved for
receiving data), this light is off.
Flashes when an error is detected or a
maintenance procedure must be performed.
At the same time, an e rror or maintenance
message appears on the display.
On when the printer is in OneTouch mode
1. The following se ttings can be made in this
mode: Paper Source, Page Size , Ma nual
Feed, Orientation. For details of how to use
this OneTouch mode, see "OneTouch mode
1", page 5-14.
OneTouch
mode 2
SelecType
5-4
On when the printer is in OneTouch mode
2. The following se ttings can be made in this
mode: RITech, Copies, MP Tray Size, Toner
Save.
On when the printer is in SelecType mode.
See "When to use SelecType", page 5-7, for
details of how to use th e S ele cType menus,
etc.
SelecType
Page 91

Buttons
On Line
SelecType
(ALT)
ALT + Menu,
Item, Value, or
Enter
Menu
Item
Switches the printer between on line and off
line status.
Selects a OneTouch mode or a SelecType
mode. P ress this bu tton once to enter
OneTouch mode 1. Press this button again
to enter OneTouch mode 2. Press this button
once more to enter SelecType mode.
Pressing this button while in SelecType
mode re turns the printe r to online status.
Advances the parameter or setting shown to
the next value in each group. If used in
com bination with the
SelecType mode, it returns the parameter or
setting shown to its previous va lue.
Select s the corresp onding OneTouch mode
setting listed above this button, or selects the
SelecType menu if in SelecType mode. Press
this button when the p ri nte r is on line to
enter SelecType mo de.
Select s the corresp onding OneTouch mode
option listed above this bu tton, or selects the
function available within the current menu,
after entering the SelecType mode.
ALT
button in
5
Value
Select s the corresp onding OneTouch mode
option listed above this bu tton, or selects the
parameter available within the current item,
after en tering the Item of the SelecType
mode.
SelecType
5-5
Page 92

Enter
(Status Sheet)
Selects the corresp onding OneTouch mode
option listed above this button, or accepts
the setting currently shown on the display
as a new setting when in SelecType mode.
Press this button two times when the printer
is on line to print the status sheet.
Form Feed
Continue
(Reset)
When the printer is off line, and data
remains in the printer’s buffer memory
(the Form Feed light is on), pressing this
button prints out the data and clears the
buffer.
Enables the printer to resume printing after
certain maintenance- requir ed conditions or
errors have been cleared. If the Continue
light is flashing, read the status or error
message on the display and correct the
problem as described in Chapter 6. If used
in combination with the
printer is reset.
ALT
button , the
5-6
SelecType
Page 93

When to use SelecT ype
In general, use SelecType o nl y for settings you cannot make in
your softw are, including the following:
❏ Changing the emulation modes and selecting the IES
(Intelli gent Emulatio n Switching) mode
❏ Specifying the channel and configuring the interface
❏ Choosing the size of the memory buffer used to receive data
You should keep in mind the fol l owing points when using
SelecType settings:
❏ A number of SelecType settings can also be made using the
OneTouch modes and the printer driver.
❏ Application programs may send commands to the printer that
override SelecType settings. If you are not getting the results
you expect, check your application software settings.
❏ To see the current SelecType settings, print a status sheet.
5
SelecType
5-7
Page 94

SelecType
Before entering and using SelecType, you should understand how
the button s on the pri nte r’s control panel work.
Buttons
The functions of the control panel buttons on the printer change
when in SelecType mode.
Paper Source
RITech
Menu
Alt Reset
Page Size Manual Feed Orientation
Continue
Copies
MP Tray Size
Item Value Enter
Form Feed On Line
Toner Save
Mode
5-8
SelecType
Page 95

Using the buttons in SelecType Mode
Note:
You can directly access certain menu items using the OneTouch modes.
For more information, see " U sing the OneTouch Modes", page 5-14 .
Menu
1. To enter SelecType mode, press
line.
while the printer is on
).
Menu, Item
38400
(for
Enter
OnLine
2. To ch ange the settings, pres s
❏ To select a n e w menu (menu category), pre ss
Examples of menus are the Serial menu or the Config
menu.
❏ To select an item (setting), press
Baud Rate
are
Config menu).
❏ To select a value (parameter) for an item, press
Examples of values are
Off
❏ To accept a new setting, press
❏ Press
reverse order (going back through the list). See Appendix
A for a map showing the order in which SelecType menus,
etc. are displayed.
3. To exit SelecType mode, press
(for
ALT
Toner Save
(in the Serial menu) or
to select the menus, items or parameters in
or
Item
. Examples of it ems
Toner Save
Baud Rate
.
SelecType
or
Value
.
Menu
.
(in the
Value
.
) or On or
.
5
SelecType
5-9
Page 96

SelecType menus
This section gives a brief description of the menus in SelecType
and lists the item settings available on each menu.
Test Menu
These settings select and begin the printer’s internal tes t print.
You can ob tain inform ation on the printer’s cu rrent settings,
available fonts , and a brief summary of features . You shoul d also
see "Test menu", page 5-16 for further details.
Status Sheet, ESC/Page Font Sample, LJ4 Font Sample, FX
*
Font Sample, I239X Font Sample, PS Status Sheet
Sample*, PS Fact Sheet*
* Only available when the optional EPSONScript Level 2 is installed
Emulation Menu
These settings select the default emulation for ea ch of the printer’s
interfaces. See "Emulatio n menu", page 5-17 for further details.
, PS Fon t
Parallel, Serial, Aux
* Only available when the optional Type B interface is installed.
*
Printing Menu
These settings are the settings you will probably change most
often in everyday use. Most can be set by software, and for that
reason we advise you to check your software settings, because the
software settings will over ride these Prin ting Menu se ttings. See
"Printing menu", pag e 5- 17 for further details.
Paper source, Page Size, Wide A4, Orientation, Out Bin,
Copies, Manual Feed, Resolution, Skip Blank Page, Duplex
Bind ing*, Star t P age*
* Only availa ble if the optional duplex unit has been inst alled.
5-10
SelecType
*
,
Page 97

Tray Size Menu
These settings display the paper size loaded in each paper tray.
This paper size may be different from the size set in the Page Size
menu, which specifies the size of the image that the printer
produces. See "Tray Size menu", page 5-20 for further details.
MP Tray Size, LC1 Siz e, LC2 Size
* Only available if the optional 500 sheet lower paper cassette has been
installed.
*
Config Menu
These settings affect the performance of th e printer. See "Config
menu", pa ge 5-21 for further details.
RITech, Toner Save, Density, Top Offset, Left Offset, Top offset
B, Left offset B, Size Ignore, Auto Cont, Page Protect, Image
Optimum
Setup Menu
These settings are used to provide the printer with information
necessary for printing. See "Setup m e nu", page 5-24 for further
details.
Interface, Time Out, Standby, Lang, Panel Lock, Printer Name,
Toner, Toner Counter Clear, MP Init. Paper, LC1 Init Paper, LC2
*
Init Pa pe r
* Only available if the optional 500 sheet lower paper cassette has been
installed.
, Page Count, SelecType Init
5
Parallel Menu
These settings control communication between the printer and
the host computer when using a parallel interface. See "Parallel
menu", pa ge 5-27 for further details.
Speed, Bi-D, Buffer Size
SelecType
5-11
Page 98

Serial Menu
These settings control communication between the printer and
the host computer when using a serial interface, a nd are necessary
for correct communication between the two units. See "Serial
Menu", page 5-28 for further details.
Word Length, Baud Rate, Parity, Stop Bit, DTR, Xon/Xoff, Buffer
Size
AUX Menu
If the optional Type B interface has been installed, these settings
control the communic ation between the two units using this
interface. See the manual suppl ied with the interface for further
details.
Buffe r Size
LJ4 Menu
These settings control the fonts and symbol sets when the printer
is in LJ4 emulation mode. See "LJ4 menu", page 5-30 for further
details.
*
Font Source, Font Number, Pitch
Source Symset**, Dest Symset**, CR Function, LF Function
* Depending on the font selected
**These settings depend on the font set installed.
, Height*, SymSe t**, For m ,
GL2 Menu
These settings control the behavior of the printer when in GL2
emulation mode. See "GL2 me nu", page 5-32 for further detai l s.
GL-Mode, Scale, Origin, Pen, End, Join, Pen0, Pen1*, Pen 2*,
Pen3*, Pen4 * , Pe n5* , Pe n6 *
* Available only when in GL-like mode,
5-12
SelecType
Page 99

PS Menu
These settings are available only if the optional EPSONScript
Level 2 has been installed. See "PS menu", page 5-34 for further
details.
Erro r Sheet, MicroG ray, Prot e c t Level
ESCP2 Menu
These settings control the behavior of the printer when in ESCP2
emulation mode. See "ESCP2 an d FX menus", page 5-34 for further
detail s.
Font, Pitch, Condensed, T. Margin, Text
Auto CR, Auto LF, Bit Image, ZeroChar
* These settings depend on the font setinstalled.
*
, CG Table, Country,
FX Menu
These settings cont rol the behavior of the pri nter when in FX
emulation mode. See "ESCP2 an d FX menus", page 5-34 for further
detail s.
Font, Pitch, Condensed, T. Margin, Text*, CG Table, Country,
Auto CR, Auto LF, Bit Image, ZeroChar
* These settings depend on the font setinstalled.
I239X Men u
These settings cont rol the behavior of the pri nter when in I239X
emulation mode. See "I239X menu", page 5-38 fo r further details.,
Font, Pitch, Code Page, T. Margin, Text, Auto CR, Auto LF,
Alt. Graphic, Bit Image, Zero Char, Character Set
5
SelecType
5-13
Page 100

Using the OneTouch Modes
The OneTouch modes are part of SelecType mode, but they are
more limited and easier to use. The settings you make in the
OneTouch modes and SelecType are reflected in each other.
OneTouch mode 1
To enter O ne Touch mode 1, press the
(repeatedly if necessary) until t he light next to Paper Sou rce
comes on, indicating the printer is now in OneTouch mode 1. The
current OneTouch mode 1 settings fo r Paper Sourc e , Page Size,
Manual Feed and Orientatio n are shown on t he display above th e
corresp onding setting. For exam ple,
above Orientation.
SelecType
3RUW
or
button
/DQG
is shown
Paper Source
Specifies whether paper feeds into the printer from the MP Tray,
the paper cassette, or the optional 5 00 sheet lower paper casse tte
(if installed). If you select Auto, the paper source containing the
paper that matches the setting in the Page Size menu will be used.
Page Size
Specifies the paper size.
Manual Feed
Turns Manual Feed on or off f or the MP Tr ay. For d etai ls o f h ow
to use the Manual Feed mode, see "Selecting the MP tray as the
paper source", page 2-2.
Orientation
Specifi es whethe r the page is printed in portrait or land scape
orientation. This page is printed in po rtrait orienta ti on.
5-14
SelecType
 Loading...