

Page 1

Page 2

Printer Parts
)
control panel
printer cover
printer cover latch
MP Tray
lower cassette
tray
transparent cover
power switch
Type-B interface
connector (option
Parallel interface
connector
Serial interface
connector
AC inlet
Page 3

Contents
1 Finding a Place for the Printer . . . . . . . . . . . . . . . . . . . . . . . . . . . 1
2 Unpacking . . . . . . . . . . . . . . . . . . . . . . . . . . . . . . . . . . . . . . . . . . . . 3
3 Installing the Optional Duplex Unit . . . . . . . . . . . . . . . . . . . . . . 4
4 Installing the Optional 500 Sheet Lower Paper
Cassette Unit . . . . . . . . . . . . . . . . . . . . . . . . . . . . . . . . . . . . . . . . 10
5 Installing the Imaging Cartridge . . . . . . . . . . . . . . . . . . . . . . . . . 17
6 Loading Paper. . . . . . . . . . . . . . . . . . . . . . . . . . . . . . . . . . . . . . . . . 21
7 Attaching the Power Cord. . . . . . . . . . . . . . . . . . . . . . . . . . . . . . . 26
8 Testing the printer . . . . . . . . . . . . . . . . . . . . . . . . . . . . . . . . . . . . . 27
9 Connecting the Printer to the Computer. . . . . . . . . . . . . . . . . . . 29
10 Installing the Printer Software. . . . . . . . . . . . . . . . . . . . . . . . . . . 30
11 Making Basic Driver Settings. . . . . . . . . . . . . . . . . . . . . . . . . . . . 33
12 Accessing Online Help . . . . . . . . . . . . . . . . . . . . . . . . . . . . . . . . . 37
i
Page 4

EPSON is a registered trademark of SEIKO EPSON CORPORATION.
HP and LaserJet are registered trademarks of Hewlett-Packard Company.
Microsoft, Windows, and MS-DOS are registered trademarks of Microsoft Corporation.
General Notice: Other product names used herein are for identification purposes only and
may be trademarks of their respective owners. EPSON disclaims any and all rights in those
marks.
Copyright © 1998 by SEIKO EPSON CORPORATION, Nagano, Japan.
ii
Page 5
This booklet helps you set up your printer and begin printing
quickly. If you need detailed information on printer use or if you
have problems printing, see your
Reference Guide.
1
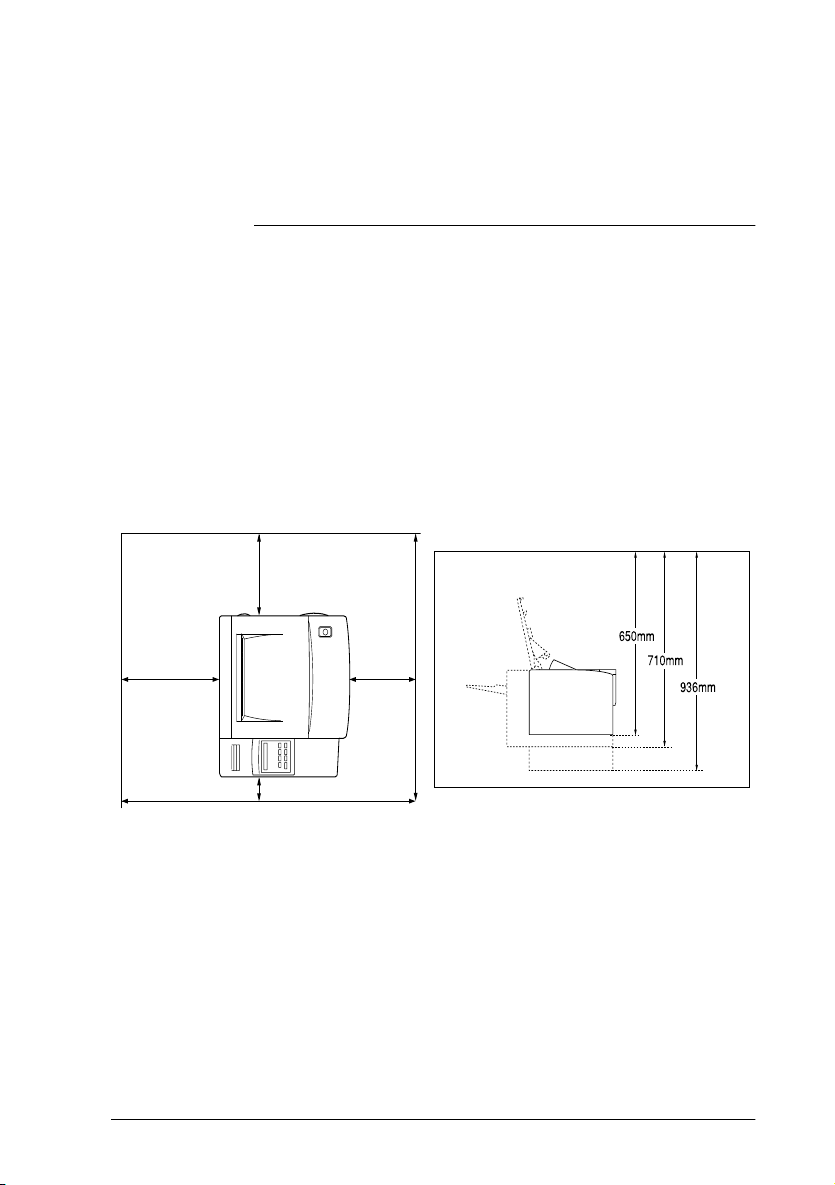
❏ Place your printer close enough to the computer or
workstation for the printer cable to connect easily.
❏ Leave adequate room around the printer to allow for easy
operation and maintenance as well as sufficient ventilation.
The diagram below shows the recommended amount of
space.
310 mm
Finding a Place for the Printer
180 mm
270 mm
25 mm
❏ If you install the optional Duplex Unit (see "Installing the
Optional Duplex Unit" on page 4), you will need to allow an
additional 235 mm (9.3 inches) at the back of the printer.
1
Page 6

c
Caution:
❏ The printer is fitted with a ventilation fan on the right-hand
side (the same side as the power switch). Make sure that this
fan is not blocked w hen you position the printer.
❏ Avoid locations that are subject to direct sunlight, excessive
heat, moisture, or dust.
❏ Place the printer where you can easily unplug the power
cord.
❏ Avoid using an electric al outlet that is controlled by wal l
switches or automatic timers. Accidental disruption of power
can wipe out valuable information in your com p uter's or
printer's memory.
❏ Avoid using outlets on the same c ircuit as large motors or
other appliances that might di sturb the power supply.
❏ Keep the entire computer and printer system a wa y from
potential sources of interference, such as loudspeakers or the
base units of cordless telephones.
2
Page 7

2
1. Remove the accessories and printer from the shipping carton.
c
2. Set the printer on a flat, stable surface.
3. Remove the packing material from the printer and its
accessories and store for future use.
4. Make sure you have the items shown below, plus one CDROM containing a printer driver, and utility programs.
Unpacking
Warni ng :
The printer weighs about 13 kg (about 29 lb) and should be
lifted with care. Get another person to help you if necessa ry
Note:
The shape of the AC power cord plug varies by country; be sure the plug
included is the right shap e for y our location.
3
Page 8

3
Installing the Optional Duplex Unit
Note:
❏ This section is only for customers installing the optional duplex
unit.
❏ If you are installing both the optional duplex unit and the optional
500 sheet lower paper cassette, you must install the duplex unit first
before pr oceedi n g wit h t he in sta lla ti o n of the 500 shee t lo wer pape r
cassette.
❏ If you are installing the optional 500 sheet l ower paper cassette and
are not installing the opt ional duplex unit, turn to "Installing the
Optional 500 Sheet Lower Paper Casset te Uni t" on p age 10 .
❏ If you are not installing either the duplex unit or the lower p aper
cassette, turn to "Loading Paper" on page 21.
❏ The optional duplex unit allows you to print on both sides of a sheet
of paper automatically . To install the duplex unit, follo w t h e
instructions below:
4
Page 9

1. Unpack the parts of the duplex feeder, and place them on the
stable surface where you will be installing the printer. Lift up
the vertical unit so that it locks into the locking bar on the side
of the horizontal unit, as shown below.
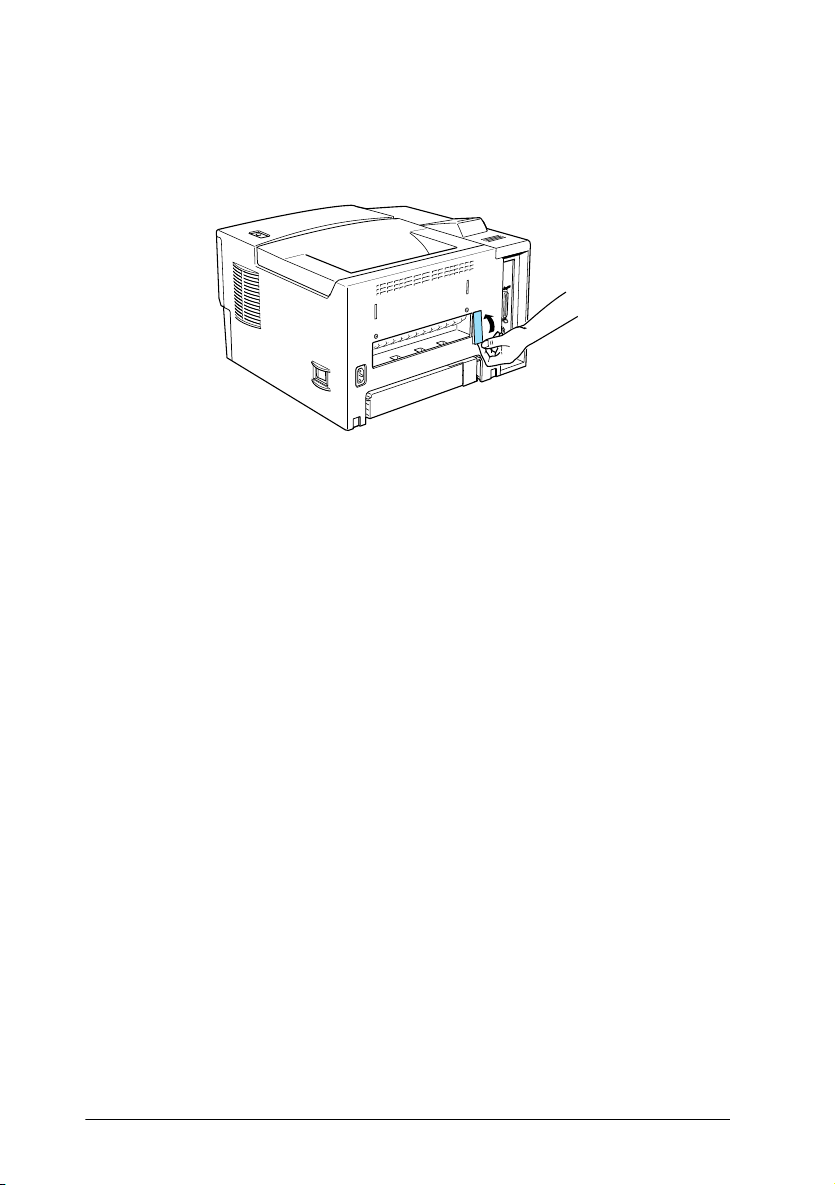
2. Remove the transparent cover attached to the rear of the
printer. Insert the duplex chute into the body exit of the
printer, and secure it with the two supplied clips.
5
Page 10
3. Inside the vertical unit, you will find a metal bar. Use this bar
to remove the plastic cover at the right of the body exit.
When you have removed the plastic cover, store it together
with the metal bar in the place in the vertical unit where you
found the metal bar.
4. With the front of the printer towards you, grasp the sides of
the printer. Line up the corners of the printer with the corners
of the duplex unit and place the printer on the duplex unit.
6
Page 11

w
Warning:
❏
The printer weighs about 13 kg (about 29 lb). Take care
when lifting it, and g e t another person to help yo u if
necessary.
❏
There are three pins on top of the duplex feeder: two on
the left and one on the right. Th ese three pins fit into
three corresponding holes on the bo ttom of the printer
body for a secure fit.
5. Check that the printer is securely seated on top of the duplex
unit.
7
Page 12
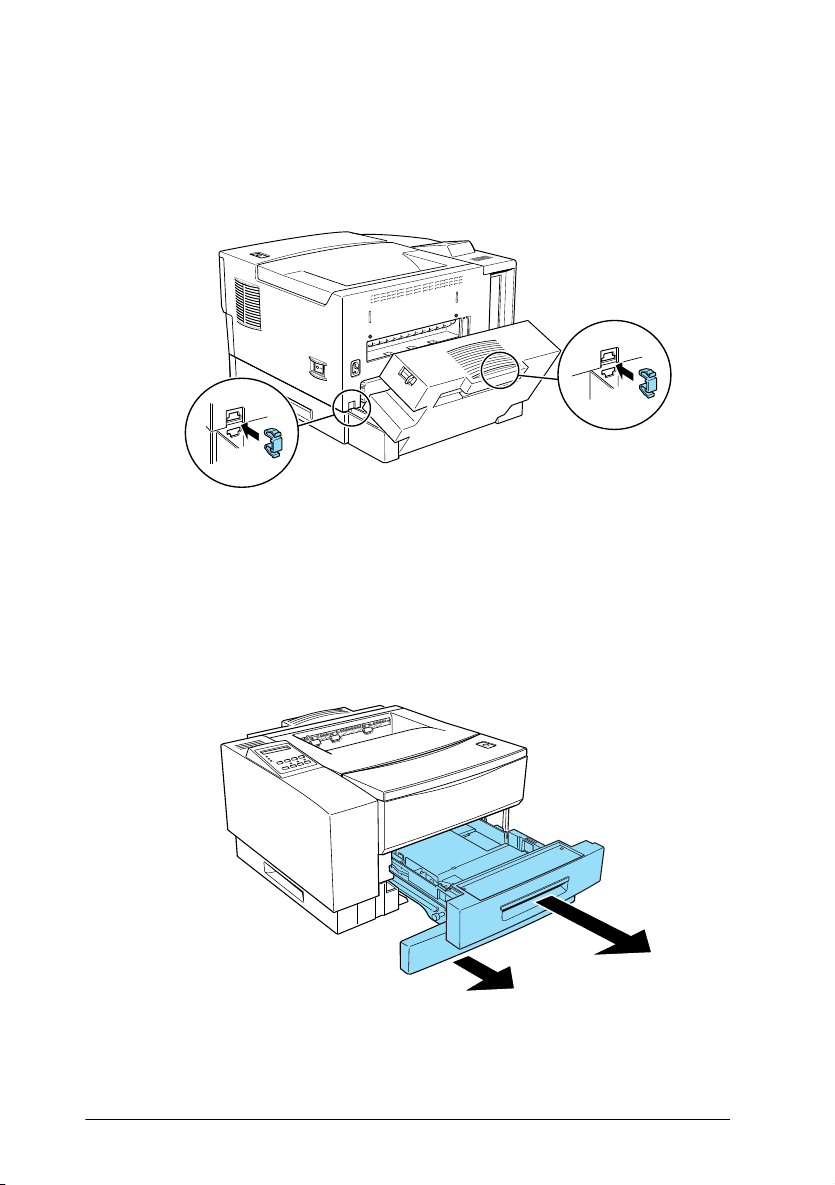
6. Use the supplied clips to fasten the duplex unit to the printer
and close the duplex unit’s vertical unit. Make sure the clips
are fastened securely.
7. Completely remove the paper cassette. Pull out the duplex
unit feeder tray until you can see the two feeder joints at the
front of the printer.
8
Page 13

8. Use the supplied clips to fasten the duplex unit to the printer
at the front. Make sure the clips are fastened securely.
9. Replace the duplex unit feeder tray and the paper cassette.
9
Page 14

4
Installing the Optional 500 Sheet Lower Paper Cassette Unit
Note:
This section is for those users installing the optional 500 sheet lower
paper cassette. If you are not installing the optional 500 sheet lower paper
cassette, go on to "Installing the Ima g ing Cartridge" on page 17.
Duplex Unit Installed
If you have already installed the duplex unit, follow the
instructions below. Otherwise, if you are installing the 500 sheet
lower paper cassette without installing the duplex unit, turn to
"No Duplex Unit Installed" on page 14.
Note:
If you are installing both the duplex unit and the 500 sheet lower cassette,
you must install the duplex unit first. Turn to "Installing the Optional
Duplex Unit" on page 4 a nd ins ta ll the du pl ex uni t if you have n o t yet
done so.
1. Unpack the 500 sheet lower paper cassette and place it on the
surface where the printer is to be installed.
10
Page 15

2. Make sure the printer and cassette are facing the same
direction.
3. Face the front of the printer. Pick it up using the grips on the
duplex unit, as shown below.
Note:
There are three pins on top of the 500 sheet l ower paper cassette: two
on the left and one on the right. These t h ree pins fit into three
corresponding holes on the bottom of the duplex unit for a secure fit.
Caution:
❏
c
Do not attempt to lift the printer and duplex unit
combination using the grips on the printer. Only use the
grips on the duplex un it.
❏
The printer and duplex unit toge ther weigh about 20 kg
(about 43 lb). Take care when lifting them together and
get another person to help you if necessary.
11
Page 16

4. Lower the printer and duplex unit combination onto the 500
sheet lower paper cassette, taking care to line up the corners.
Make sure that the printer and duplex unit are firmly seated.
5. Use the supplied clips to fasten the two joints at the rear of the
printer (joining the duplex unit to the 500 sheet lower paper
cassette). Make sure the clips are securely fastened.
.
12
Page 17

6. Completely remove the duplex feeder tray and pull out the
500 sheet lower paper cassette until you can clearly see the
two feeder joint areas on the duplex unit.
7. Use the supplied clips to fasten the two joints as shown below.
Make sure the clips are fastened securely.
13
Page 18

8. Push the 500 sheet lower paper cassette back in and replace
the duplex feeder tray.
You can now install the Imaging Cartridge. Turn to "Installing the
Imaging Cartridge" on page 17.
No Duplex Unit Installed
If you have not installed the optional duplex unit, follow the
instructions below to install the 500 sheet lower paper cassette.
1. Unpack the 500 sheet lower paper cassette and place it on the
surface where the printer is to be installed.
2. Make sure the printer and cassette are facing the same
direction.
14
Page 19

3. Lift the printer and align the pins on the cassette with the holes
on the bottom of the printer.
Warning:
w
4. Lower the printer until it rests securely on the cassette.
The printer weighs over 13 kg (about 29 lb). Take care when
lifting the printer. If necessary, get someone to help you
5. Fasten the two feeder joints at the rear of the printer securely,
using the supplied clips
.
15
Page 20

6. Remove the upper 250 sheet paper cassette completely from
the printer, and pull out the lower 500 sheet paper cassette
until you can see the front feeder joints.
7. Fasten the front feeder joints securely, using the supplied
clips.
16
c
Caution:
Always remove the optional 500 sheet lower paper cassette before
lifting the printer. See Chapt er 3 in the Reference Guide for
instructions on how to remove the cassette. Never try to lift the
printer with the 500 sheet lower paper cassette attached.
Page 21

5
c
1. Push the latch on the top right of the printer and open the
printer cover all the way.
.
Installing the Imaging Cartridge
Caution:
❏
Do not turn the Imaging Cartridge upside down. Do not
expose the Imaging Cartridge to lig h t a ny longer than
necessary.
❏
Do not open the drum’s protective cover and avoid exposing
the Imaging Cartridge to room light any longer than
necessary. Overexposing the cart rid g e may cause
abnormally da rk or ligh t areas to appear o n the pri nted page
and reduce the life of t he cartridge.
17
Page 22

2. Open the silver-colored aluminized bag which contains the
Imaging cartridge.
Note:
❏ Save the bag in case you need to store the cartridge; if you move
the printer in the future, for examp le.
❏ Never open the cartridge drum shutter. If you open the shutter,
you will damage t he photosensitive drum inside the cartridge.
❏ Do not expose the cartridge to d irect sun light or other strong
light.
❏ Install the cartridge as quic kly as possible, to avoid damaging
the cartridge by over-exposin g it to ligh t.
3. While holding the Imaging cartridge as shown below, shake
it seven or eight times to free and distribute the toner in the
cartridge.
18
Page 23

4. Set the cartridge on a clean, flat surface. Hold the cartridge
down with one hand, and grasp the end tab of the sealing tape
with the other hand. Pull the tape all the way out with firm,
even pressure as shown.
.
Note:
❏
If you pull the tab at an angle, rather than horizontally, you
may break the tab.
❏
Always pull out the tab when the top of the cartridge is
uppermost, as shown abo v e. If you p ull out the tab with the
cartridge in any other orientation, you may damage the
cartridge drum.
19
Page 24

5. Hold the cartridge as shown below. Insert it into the printer
guide channels until it clicks into place. To align the cartridge,
use the colored markers on the left guide channel of the
printer and on the cartridge itself.
6. Close the printer cover.
20
Page 25

6
This section covers how to load paper using the standard 250
Sheet Paper Cassette Tray. For details of how to use the MP Tray
or the optional 500 Sheet Lower Paper Cassette Unit, see your
Reference Guide
To load paper in the 250 Sheet Paper Cassette Tray, folow the steps
below.
1. Pull out the cassette tray by grabbing the handle and pulling
it straight towards you.
Loading Paper
.
21
Page 26

2. Press down the plate in the cassette tray until it locks into
position
.
3. Squeeze the side guide between your thumb and finger, and
slide it to the far right.
22
Page 27

4. Set the length of the cassette tray to match your paper.
❏ To lengthen the tray, slide guide A so that it matches the
length of your paper, and then adjust guide B so that it
matches the position of guide A.
❏ To shorten the tray, slide guide B so that it matches the
length of your paper, and then adjust guide A so that it
matches the position of guide B.
23
Page 28

5. Fan a stack of paper (up to 250 sheets) to separate the sheets,
and tap the edges of the stack on a flat surface to even up the
edges. Insert this stack of paper into the cassette, lining it up
with the left side of the cassette. Make sure that all sheets of
the stack are under the metal ret aining clip and th e plastic tabs
on the end guides. If you overload the cassette by putting too
many sheets of paper in at one time, this can cause paper jams.
.
6. Slide the right side guide to the left so that it just touches the
edge of the paper stack.
24
Page 29

7. Replace the cassette tray into the printer.
.
Note:
❏
Never remove the cassette tray while the printer is printing. If you
do, paper jams may occur.
❏
By default, the printer is set up to print on A4 size paper. If you are
printing on any other size of pa p er, you m ust change the printer’s
paper size setting. See "Making Basic Driver Settings" on page 33.
25
Page 30

7
Attaching the Power Cord
1. Make sure the printer is turned off. It is off when the
of the power switch on the right side of the printer is pushed in.
2. Insert the power cord into the back of the printer.
3. Plug the other end of the power cord into a properly grounded
electrical outlet.
O
side
26
Page 31

8
To test whether the printer is set up correctly, print a status sheet.
The status sheet contains information about the printer, including
the current settings. Follow the steps below.
1. Make sure that:
❏ the cartridge is correctly installed.
❏ the printer cover is properly closed.
❏ there is paper in the cassette tray, and no paper is inside
2. Turn on the printer as shown below.
Testing the printer
the printer mechanism.
27
Page 32

3. The printer warm up and several messages appear on the
display as the printer performs tests. After about 45 seconds,
and after a short while, the display will show Ready.
Paper Source
RITech
Menu
Alt Reset
4. Make sure the On Line light is on. If it is not, press the
Line
button.
5. Press the
Enter
Page Size Manual Feed Orientation
Copies
MP Tray Size
Item Value Enter
Continue
Form Feed On Line
Toner Save
Mode
Enter
On
button two times. The printer prints a status
sheet, showing the current printer settings.
If the status sheet does not print, or does not seem to be printed
properly, you should check the following:
❏ The cassette tray is properly loaded with paper and is
correctly installed in the printer (see "Loading Paper" on page
21).
❏ If the status sheet is faint or streaky (some areas are too dark
and others are too light), the cartridge may not be installed
properly, or toner may not be distributed evenly in the
cartridge. Turn off the printer and reinstall the cartridge, as
described in "Installing the Imaging Cartridge" on page 17
before printing another status sheet. If this does not solve the
problem, contact your dealer.
28
Page 33

9
Connecting the Printer to the Computer
Your printer comes with two standard interface connectors:
parallel and serial. To use the parallel interface, see the interface
connection instructions below. To use the serial interface, follow
the instru ctions below and substitute “serial” for “parallel” wh ere
appropriate.
Your printer also has a room for an optional additional interface
connector. See Chapter 3, “Options,” in the
more information on this and other options.
1. Make sure both the printer and the computer are off.
2. Connect the parallel cable to the printer’s parallel connector,
and secure the connector by squeezing the wire clips together
until they lock in place on either side of the connector.
Note:
Use only a shielded, twist e d -pair parallel cable.
3. Connect the other end of the cable to your computer, and
fasten it as required.
Reference Guide
for
4. Turn on the printer, and then turn on your computer.
29
Page 34

10
Installing the Printer Software
The CD-ROM that comes with your printer contains utility
programs and a printer driver for Microsoft
Windows 3.11 for Workgroups, Windows 95, 98, NT
4.0.
After connecting the printer to your computer, install the printer
driver. The printer driver is software that runs, or “drives”, your
printer, translating the software’s fonts, margin settings, etc. into
commands that can be understood by the printer.
With the driver software supplied with the printer, you can make
settings such as paper size, paper source, and orientation. You can
also refer to the printer driver's online help for detailed
information about printer settings.
Your computer must meet the following requirements in order to
be able to use the Windows driver included with the printer:
❏ The computer must be running either Microsoft Windows 3.1,
Windows for Workgroups (3.11), Windows 95, 98, and NT
(3.51 or 4.0).
❏ 10 MB of free hard disk space
®
Windows® 3.1,
®
3.51, and NT
30
Page 35

Installing the Printer Driver
Follow these steps to install the printer driver:
1. Make sure the printer is turned off and Windows is running
on your computer.
2. Insert the CD-ROM that comes with your printer into your
CD-ROM drive (this is usually drive D).
3. If you are using Windows 3.1, Windows 3.11 for Workgroups
or Windows NT 3.51, make sure the Program Manager
window is open; then choose
are using Windows 95, 98, and NT 4.0, click
Run
.
Run
from the File menu. If you
Start
, then choose
4. Type
D:\EPSETUP
ROM drive letter is not D, substitute the appropriate drive letter).
5. In the dialog box that appears, double-click
Driver
; or you can also install by selecting
and then clicking the arrow at the top right.
6. In the dialog box that appears, select
Advanced
automatically.
and click OK. The printer driver is installed
7. When installation is complete, click
E:\EPSETUP
(or
); then click OK (if the CD-
Install Printer
Install Printer Driver
EPSON EPL-N1600
OK
.
The printer driver is now installed on your computer.
31
Page 36

Installing Screen Fonts
Follow these steps to install the screen fonts:
1. Make sure Windows is running and the printer is turned off.
2. Insert the CD-ROM that comes with your printer into your
CD-ROM drive D (or E)
3. If you are using Windows 3.1, Windows 3.11 for Workgroups
or Windows NT 3.51, make sure the Program Manager
windows is open; then choose
are using Windows 95, 98, and NT 4.0, click
Run
.
Run
on the File menu. If you
Start
, then choose
4. Type
5. [Excluding Windows NT 3.51 users]: In the dialog box that
6. Follow the on-screen instructions.
7. When installation is complete, click OK.
The screen fonts are now installed on your computer.
D:\EPSETUP
appears, double-click
install by selecting
the arrrow at the top right.
[For Windows NT 3.51 users only]: In the dialog box that
appears, double-click
by selecting
at the top right.
Install Screen Fonts
E:\EPSETUP
(or
Install Font Manager
Install Font Manager
Install Screen Fonts
); then click OK.
and then clicking the arrow
; or you can
and then clicking
; or you can install
32
Page 37

11
Before you start printing, you should make sure that the driver
settings match your document requirements. While many
Windows applicatio ns override the printer settings made with t he
driver, some do not.
Be sure to check the following:
❏ Paper The size of the paper loaded in the
❏ Orientation The direction of printing on the
❏ Print Quality The print resolution in dots per inch
❏ Paper Source Auto Selection, MP Tray, Lower
❏ Printer Memory The amount of memory installed in
Making Basic Driver Settings
printer
page (portrait or landscape)
(dpi)
Cassette 1, or Lower Cassette 2 (if
installed)
the printer
(standard memory is 8 MB).
33
Page 38

For Windows 95, 98, and NT 4.0 Users
Follow these steps to make the required settings:
1. Click the
2. Point to
3. Right-click your printer icon and choose
Windows 95 and Windows 98) or
Windows NT 4.0). Be sure to right-click the icon.
4. Click the
Start
button.
Settings
; then click
Basic Settings
tab.
Printers
.
Properties
Document Defaults
(in
5. Select the paper size you loaded in the printer from the
list. If you don't see your paper size on the list, use the arrow
on the right to scroll through the list.
6. Select
Portrait
printing on the diagram on the screen changes according to the
orientation you select.
Landscape
or
orientation. The direction of
7. Select the resolution from Print Quality.
8. Select the paper source.
Make any other settings you wish, and click
finished.
OK
when you are
(in
Paper
34
Page 39

For Windows 3.1 and Windows 3.11 for Workgroups users
Follow these steps to access the driver and make the required
settings
1. In the Main window, double-click the
2. Double-click the
Printers
icon.
3. Make sure your printer is highlighted, and click the
button.
Control Panel
icon.
Setup
4. Select the paper size you loaded in the printer from Paper. If
you don't see your paper size on the list, use the arrow on the
right to scroll through the list.
5. Select
Portrait
direction of the screen illustration changes according to the
orientation you select.
Landscape
or
orientation. The printing
6. Select the resolution from Print Quality.
7. Select the paper source.
Make any other settings you wish, and click
finished.
OK
when you are
35
Page 40

For Windows NT 3.51 Users
Follow these steps to access the driver and make the required
settings:
1. In the Main window, double-click the
2. Double-click the
Printers
icon.
Control Panel
3. Double-click your printer icon.
4. Select Properties from Printers menu.
5. Make sure your printer is selected and click the
6. Select the paper source.
7. Select the paper size.
Make any other settings you wish, and click
finished.
OK
when you are
Setup
icon.
button.
36
Page 41

12
Your Windows printer driver has an extensive online help feature
that includes detailed information and instructions on the driver
settings. Online help will answer most of your questions about
the driver.
Note:
Online help is no t a vailable for DOS app lic ations.
Accessing Online Help
Accessing Online Help from the Windows Printer Driver
To access online help from the printer driver, follow the
instructions on page 37 to access the driver; then click the
button at the bottom of the window that appears.
Help
Accessing Online Help from Windows Applications
To access help from your application, open the File menu and
choose
Properties
depending on the software you are using. Then click the ? or
button in the window that appears.
Print
Print Setup
or
(you may need to click a combination of these buttons)
. The click
Printer, Setup, Options
, or
Help
37
Page 42

38
Page 43

EPSON OVERSEAS MARKETING LOCATIONS
EPSON AMERICA, INC.
20770 Madrona Ave.
P.O. Box 2842
Torrance, CA 90509-2842
Phone: (800) 922-8911
Fax: (310) 782-5220
EPSON DEUTSCHLAND GmbH
Zülpicher Straße 6,
40549 Düsseldorf Germany
Phone: (0211) 56030
Fax: (0211) 5047787
EPSON AUSTRALIA PTY. LTD.
70 GIBBES STREET, CHATSWOOD 2067 NSW.
Phone: 2-9903-9000
Fax: 2-9903-9177
EPSON HONG KONG LTD.
Rooms 4706-10, 47/F,
China Resources Bldg.,
26 Harbour Road, Wanchai, Hong Kong
Phone: 2585-4300
Fax: 2827-7083
EPSON ITALIA S.p.A.
V.le F.lli Casiraghi 427
20099 Sesto S.Giovanni
MI, Italy
Phone: 2-262331
Fax: 2-2440750
EPSON UK LTD.
Campus 100, Maylands Avenue,
Hemel Hempstead, Herts,
HP2 7TJ, U.K.
Phone: (+44) 01442 261144
Fax: (+44) 01442 227227
EPSON FRANCE S.A.
68 bis, rue Marjolin
92300, Levallois-Perret, France
Phone: 33.1.40.87.37.37
Telex: 610657
EPSON SINGAPORE P TE. LTD.
No. 1 Temasek Avenue #36-00
Millenia Tower, Singapore 039192
Phone: (065) 33 77 911
Fax: (065) 33 41 185
EPSON TAIWAN TECHNOLOGY &
TRADING LTD.
10F, No. 287 Nanking E. Road, Sec. 3,
Taipei, Taiwan, R.O.C.
Phone: (02) 717-7360
Fax: (02) 712-9164
EPSON IBERICA S.A.
Av. de Roma, 18-26
08290 Cerdanyola del Valles
Barcelona, Spain
Phone: 582. 15.00
Fax: 582. 15.55
SEIKO EPSON CORPO RATION
(Hirooka Office)
80 Harashinden, Hirooka
Shiojiri-shi, Nagano-ken
399-0785 Japan
EPSON PORTUGAL, S.A.
R. do Progresso, 471, 1º Perafita
4460 Matosinhos, Portugal
Phone: (02) 996 14 02
Fax: (02) 996 14 11
1998 February
Page 44

 Loading...