

Page 1

EPSON EPL-N1200
top cover latch
optional
LocalTalk/Serial
interface access
cover
optional interfa ce
card slot cover
parallel C
interface
parallel B
interface
imaging cartridge
guides
control panel
AC inlet
First print: Less than 16 seconds with A4- or letter-
size paper
Warm-up time: About 60 seconds at normal temperature
Paper feed: Automatic or manual feed
Paper feed
alignment: Center alignment for all sizes
Input paper supply
2
(20 lb [75g/m
]
paper): Up to 250 sheets in the MP Tray
Up to 500 sheets per optional lower
paper
cassette (up to two optional cassettes)
Up to 10 envelopes, dep end ing o n
thickness
Paper eject: Face down
Paper eject
2
capacity: 250 sheets of 20 lb (75g/m
) paper
Internal
emulation: PS emulation (EPSONScript Level 2)
HP LJ4 Plus (PCL5e) emulation (LJ4)
HP-GL/2 emulatio n ( GL2 mo de)
LQ 24-pin printer emulation (ESC/P 2)
ESC/P 9-pin printer em ulatio n (F X )
IBM Proprinter emula tion (I 23 9X)
fuser
front
paper stopper
power
switch
cover
Printer Speci fi cat io n s
Printing
Printing method: Laser beam scanning and dry
electrophotographic process
Resolution: 600 × 600 dpi
Printing speed: Up to 12 pages per minute depending on
the font and quantity of data
Resident fonts: 35 scalable fonts in PS mode
45 scalable, 1 bitmap font in LJ4
(PCL5e) mode
RAM: 2MB, expandable up to 64MB
Imaging Cartridge (S051016)
Storage
temperature: 32 to 95°F (0 to 35°C)
Storage humidity: 35 to 85% RH
Shelf life: 18 months after production
Life: Up to 6,000 pages und er the follow in g
conditions: letter paper, continuous
printing, and 5% print ratio
The number of pages you can print with an imaging
cartridge varies de pen ding on the type of printing . If yo u
print a few pages at a time or print dense text exceeding the
5% print ratio, your cartridge may print fewer pages.
Paper
Note:
Since the quality of any particular brand or type of paper may be changed
by the manufacturer at any time, EPSON cannot guarantee the quality of
any type of paper. Always test sam p les of paper stock before purchasing
large quantities or printing large jobs.
1/97
EPSON EPL-N1200 - 1
Page 2
EPSON EPL-N1200
Paper types: Plain paper, recycled paper, labels,
envelopes, transparencies, colo red paper,
card stock, letterhead
Note:
Use recycled paper un der normal temperat ure and humidity conditions
only. Poor quality pape r ma y re duce print quality or caus e paper jams
and other problems.
Paper weight:
2
Plain paper 60 to 90 g/m
Card stock 90 to 157 g/m
, 16 to 24 lb
2
, 24 to 42 lb
Paper size:
Paper A4 (210 mm × 297 mm)
A5 (148 mm × 210 mm)
B5 (182 mm × 257 mm)
Letter (8.5 × 11 inches)
Half-Letter (5.5 × 8.5 inches)
Legal (8.5 × 14 inches)
Government Letter (8.5 × 10.5 inches)
Government Legal (8.5 ×13 inches)
Executive (7.25 × 10.5 inches)
F4 (210 mm × 330 mm)
Custom (92 ~ 216 mm × 148.5 ~ 356
mm)
Depth: 19.0 inches (484 mm)
Weight: 33.1 lb (15 kg) including the imaging
cartridge
Durability: 5 years or 300,000 sheets, whichever
comes first
Electrical
Specification 110 V model
Voltage 90 V to 132 V
Rated frequency 50 Hz to 60 Hz
Rated current 7 A
Power consumption Less than 900 W
Power consumption in Standby mode with no
options installed
Less than 30 W
±
3 Hz
Interfaces
Parallel B Interface: IEEE 1284-I compliant
Parallel C Interface: IEEE 1284-II compliant
Using ECP Mode in Windows 95
To use the ECP mode with a Parallel C (IEEE 1284 level II
compliant) connec t or, your computer must support the ECP
mode.
Envelopes Monarch (3 7/8 ×7 1/2 inches)
Commercial 10 (4 1/8 × 9 1/2 inches)
DL (110 mm × 220 mm)
C5 (162 mm × 229 mm)
International B5 (176 mm × 250 mm)
C6 (114 mm × 162 mm)
Caution:
Only load paper sizes that are listed above.
Printable area: 95 dots from paper ed ge ba sed o n
600 dpi; varies depe nding on the
emulation mode
Environmental
Temperature: Operation: 50 to 95°F (10 to 35°C)
Storage: 32 to 95°F (0 to 35°C)
Humidity: Operation: 15 to 85% RH
Storage: 35 to 85% RH
Altitude: 8,200 feet (2,500 meters) maximum
Mechanical
Dimensions and weight:
Height: 10.4 inches (265 mm)
Note:
The ECP mode is not avai la ble with Windows 3.1 and Wind ows NT .
To use the ECP mode, follow these steps:
1. Make the ECP mode settings in the BIOS setting program
that comes with your computer. (For details of the settings
and the program, see your computer manual.)
2. Click the Start button, point to Settings, and then click
Control Panel.
3. Right-click the System icon, and click Open in the menu
that appears.
4. Select the Device Manager tab.
5. Select the ECP Printer Port under Ports (COM & LPT),
then click the Properties button.
6. Select the Resources tab.
7. Make the appropriate setting in the Resource settings
dialog box. (This setting depends on your computer
system. For details, see your computer manual.)
8. Click OK to save the settings.
Optional Serial Interface
The printer’s optional serial interface can be set for either
RS-232C or current loop operation. The data format settings
can be changed using SelecType.
Width: 16.2 inches (411 mm)
2 - EPSON EPL-N1200
1/97
Page 3
EPSON EPL-N1200
500 Sheet Lower Paper Cassette
Paper size: Letter (C81 2631 )
Paper weight: 16 to 24 lb (60 to 90 g/m
2
)
Paper feed: Automatic feed delivery system
Cassette capacity up to 500 sheets
2
(20 lb or 75 g/m
paper)
Feeding speed: For the first sheet, 22 seconds or less;
subsequent sheets, 12 pages per minute
Paper types: Plain paper, such as copier paper, and
recycled pape r
AC power supply: DC 5 V supplied by the printer
Dimensions and weight:
Height 4.2 inches (107 mm)
Width 15.9 inches (405 mm)
Depth 18.9 inches (477 mm)
Weight 8.8 lb (4.0 kg)
Options
Optional Interface Cards and Modules
EPSON
Interface name
LocalTalk/
Serial module
32KB Serial
interface card
32KB Parallel
interface card
Coax interface
card
Twinax interface
card
Multi-protocol
Ethernet print
server
* When your printer uses an EPSON Twinax interface card, it can be used
in place of these IBM system printers: 4210, 5224 (models 1 and 2), 5256
(models 1, 2, and 3), 3218 (non-IDPS), 4214 (model 2), 5225 (models 1,
2, 3, and 4), and 5219 D01 and D02.
part
number Uses
C823551 Serial port or LocalTalk port:
Serial port for connection to comput ers with
RS-232C or current loop serial connections
LocalTalk port for connection to a LocalTalk
network or for direct connection to a
Macintosh
C823071 For connection to a computer with an RS-232C
serial port
C823101 For connection to an additional co mputer with
a standard parallel port
C823141 Provides a parallel inte rfa c e a nd a coax
interface for connection to these IBM
mainframes: 3174, 3270, 3276, and 4274
C823151 Provides a parallel inte rfa c e a nd a coax
interface for co n n ect io n to these IBM systems:
AS-400, System 36, 5251 (model 12), System
34, System 38, and 5294. *
C823461 For direct connection to an Ethernet netw or k
500-sheet Lower Paper Cassettes (C812631)
By installing optional 500-sheet lower paper cassettes you
can increase the print capacity from 250 sheets (in the builtin paper tray) to 750 sheets (with one lower paper cassette)
or 1,250 sheets (with two lower paper cassettes).
Optional Memory Modules
Your printer’s controller board includes two slots in which
you can install single in-line memory modules (SIMMs) to
increase the printer’s memory up to 64MB. You can install
one or two SIMMs that meet these requirements:
❏ 72-pins
❏ 1MB, 2MB, 4MB, 8MB, 16MB, or 32MB capacity
❏ Maximum 70 ns access speed
❏ Maximum dimensions: 4.25 inches (108 mm) long,
1.53 inches (39 mm) wide, and 0.4 inch (10 mm) thick.
Installing a LocalTalk/Serial Module
1. Turn off the printer and unplug the power cable from the
electrical outlet.
Warning:
To avoid electr ic al shock, do not acce s s the printer's
controller board un l ess th e printer is turned off and
unplugged from the electrical outlet.
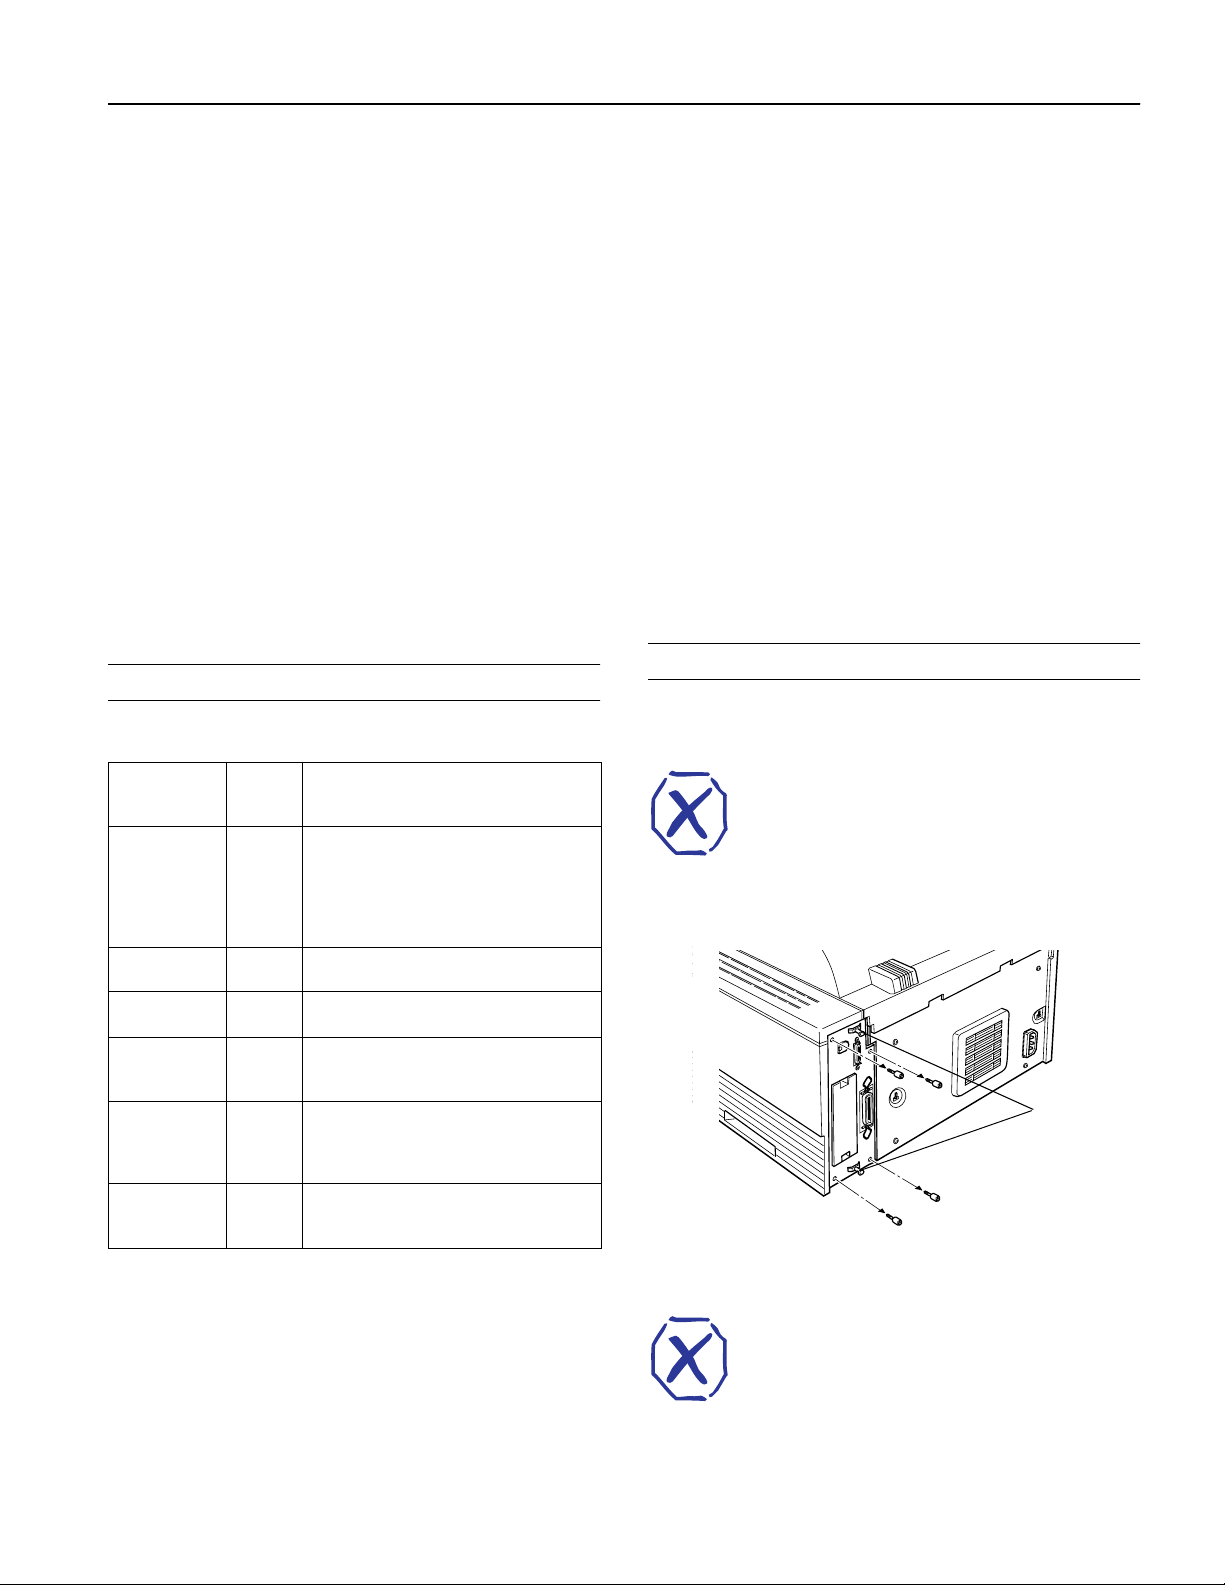
2. Remove the four screws securing the controller board
bracket on the printer’s back panel.
tabs
3. Pull on the plastic tabs to remove the controller board and
place it on a clean surface.
Warning:
Do not touch the electri ca l c om ponents on the controlle r
board; they may be hot from recent use.
1/97
EPSON EPL-N1200 - 3
Page 4

EPSON EPL-N1200
4. Remove the plastic connector cover from the controller
board bracket.
5. Now set the jumper and slide switch settings on the
LocalTalk/Serial module for the type of interface you’ll be
using: RS-232C serial, current loop serial, or LocalTalk
(default).
7. Position the controller board so its components face the
side panel of the printer and align it with th e top and
bottom guide rails in the printer. Then slide in the board.
8. Secure the controller board bracket with the four screws
you removed earlier.
Caution:
Make sure both slide switches are set to the same position or
the printer will no t operate correctly.
6. Position the mo dule as shown below; then align its
connector with connector CN4 on the controller board.
Secure the module with the two screws that came with it.
4 - EPSON EPL-N1200
9. Connect the appropriate cable to the module through the
hole you exposed in step 4.
10.Plug the power cord into an electrical outlet; then turn on
the printer.
To verify that the interface is working properly, print a
status sheet and make sure yo ur inte rfa ce is listed un der
“Hardware Configurations.”
Installing an Interface Card
1. Turn off the printer and unplug the power cable from the
electrical outlet.
Warning:
To avoid electric al shock, do not remove t he interface slot
cover unless the printer is turned off and unplugged from the
electrical outlet.
1/97
Page 5

EPSON EPL-N1200
handle
2. Remove the two screws securing the interface slot cover;
then remove the cover.
3. Position the optional interface card so its components face
the center of the back panel. Then align its top and bottom
grooves with the guide rails inside the printer and slide in
the card, pushing it firmly to lock it in place.
4. Grasp the printer by the recessed “handles.” Lift it up and
then lower it over the cassette(s), aligning the holes in the
printer with the pins on the top cassette. Make sure the
printer rests on the cassette(s) evenly and securely.
4. Secure the card with the two screws you removed earlier.
5. Connect the appropriate cable to the interface card.
6. Plug the power cord into an electrical outlet; then turn on
the printer.
To verify that the interface is working properly, print a
status sheet and make sure yo ur interf ace is listed un der
“Hardware Conf ig uratio ns .”
Installing Lower Paper Cassettes
1. Turn off the printer and unplug the power cord from the
electrical outlet.
2. Disconnect any interface cables from the printer.
3. Place each lower paper cassette next to the printer so the
ridged front edges face the same way as the ridged front
edge of the printer. If you’ll be installing two cassettes,
place one cassette on top of the other.
5. Connect the interface cable(s).
6. Make sure the printer’s power switch is in the off position;
then plug the power cable into an electrical outlet.
7. Turn on the printer.
8. Now run the Windows printer driver to add the optional
paper cassette(s) to your available paper source list.
Note:
If you use the Remote Control Panel utility or Se lecType to contro l your
printer, you need to select the optional paper cas se t te (s) onl y when you
are ready to print.
Installing Memory Modules
1. Turn off the printer and unplug the power cable from the
electrical outlet.
Warning:
To avoid electr ic al shock, do not acce s s the printer's
controller board un l ess th e printer is turned off and
unplugged from the electrical outlet.
2. Disconnect any interface cables from the printer.
3. Follow steps 2 and 3 on page 3 to remove the controller
board from the printer.
1/97
EPSON EPL-N1200 - 5
Page 6

EPSON EPL-N1200
4. Locate the two SIMM slots on the controller board. You
can use either or both RAM slots, but do not use the ROM
slot.
ROM slot
RAM slots
5. Align the SIMM pins marked either 1 or 72 with the pin
position marked on the slot .
Then insert the SIMM at an angle and rotate the top until it
is vertical and clicks into place. (Do not push too hard.)
To verify that the SIMM is working properly, print a status
sheet and make sure the correct memory amount is listed
under “Hardware Configurations.”
Using OneTouch Modes
The OneTouch mod e s give yo u a qu ick an d ea sy wa y to
change the most common settings. There are two OneTouch
modes, each with four settings shown on the top two lines of
the control panel.
Follow these steps to change a setting using OneTouch
modes:
1. Make sure the printer is turned on and the On Line light is
on.
2. To change a mode 1 setting, press the SelecType button
until the light next to the Paper Source setting comes on.
To change a mode 2 setting, press SelecType until the
light next to the RITech setting comes on.
3. The current values for all four settings appear in the
control panel display above the setting labels. Press the
button beneath the setting you want to ch ange until the
value you want appears i n the display. (To mo ve backward
through the options, hold down Alt and the button for the
setting.)
6. Follow the steps on page 4 to reinstall the controller board
in the printer.
If you ever need to remove a SIMM, pull back the metal
clips on each side of the slot; then grasp the SIMM and pull
it out.
4. To save your changes and exit the OneTouch mode, press
the On Line button.
To save your changes and move to the other OneTouch
mode, press the SelecType button; then make your
changes and press On Line to exit.
OneTouch Mode Settings
The following table lists the options available for each
OneTouch mode setting. Default settings are shown in bold
type.
6 - EPSON EPL-N1200
1/97
Page 7

EPSON EPL-N1200
OneTouch mode setting options
Setting Options Description
Paper Source Auto
Page Size A4, A5, B5, LT, HLT, LGL,
Manual Feed On
Orientation
RITech Dark
Copies 1 to 999 Selects the number of
MP Tray Size A4, A5, B5, LT, HLT, LGL,
Toner Save On
MP (built-in tray)
LC1 (lower cassette 1)
LC2 (lower cassette 2)
GLT, GLG, EXE, F4, MON,
C10, DL, C5, C6, IB5, CTM
Off
Portrait
Landscape
Medium
Light
Off
GLT, GLG, EXE, F4, MON,
C10, DL, C5, C6, IB5
Off
Selects the tray to load
paper from; Auto loads
from the tray containing
paper that matches the
Page Size setting below
Selects the page s iz e of th e
image to be produced
Turns manual feed mode
on or off for the built-in
paper tray
Selects the print direction
on the page
Sets the RITech
(Resolution Improvement
Technology) setting for
your print job
copies to print
Selects the size of paper
loaded in the built-in paper
tray
Sets the amount of toner
used in your print job; for
draft copies, set to On to
use approximately 50%
less toner for a lighter
printout
Using SelecType
The SelecType button accesses a series of menus and
options that are shown on the c ontrol panel displa y.
Although you can set some of the SelecType options
through your driver software, you need to use the printer’s
control panel to access functions like the following:
❏ Checking the amount of toner remaining
❏ Changing the memory buffer size
❏ Configuring interface channels
❏ Changing emulation modes
Changing SelecType Settings
You can look at your current SelecType settings by printing
a status sheet. To do this, wait until the printer warms up
(Ready appears on the contr ol panel display and the O n Line
light is on); then press the Enter button twice.
If you need to change SelecType settings, follow these
steps:
1. Make sure the printer is turned on and the On Line light is
on.
2. Press the Menu button on the control panel.
You have now entered SelecType mode, which changes
the functions of the control panel butto ns as described i n
the table below.
Button Function
Menu Selects a new SelecType menu
Item Selects a new menu item
Value Changes the s et ting of an item
Enter Saves the new setting of an item
Alt Used with Menu, Item, and Value to scroll
through selections in reverse ord er
Used with Continue to res e t the printer
On Line or SelecType Exits SelecType mode
3. Press the Menu button to select the SelecType menu that
includes the setting you want to change. Then press the
Item and Value buttons as necessary to change the setting.
4. Press Enter to save the new setting.
5. Press On Line or SelecType to exit SelecType mode.
See the next section for tables describing all the SelecType
menus and settings.
Note:
Some application program s may send commands to your printe r tha t
override SelecType settings. If you do not get the results you expect from
SelecType, check your application software settings to see if they affect
your output.
1/97
EPSON EPL-N1200 - 7
Page 8

EPSON EPL-N1200
SelecType Settings
Menu Items
Test Status Sheet
LJ4 Font Sample
ESCP2 Font Sample
FX Font Sample
1239X Font Sample
PS Status Sheet
PS Font Sample
PS Fact Sheet
Emulation Parallel B
Parallel C
Serial
L/T (LocalTalk)
AUX (another optional interface)
Printing Paper Source
Page Size
Orientation
Copies
Manual Feed
Resolution
Tray Size MP Tray Size
LC1
LC2
Config RITech *
Toner Save *
Density
Top Offset
Left Offset
Size Ignore
Auto Cont
Page Protect **
Image Optimum
Setup Interface
Time Out
Standby
Lang
Toner
Toner Count Clear
Page Count
SelecType Init
Parallel B and Parallel C Speed
Bi-D ***
Buffer Size
Menu Items
Serial Word Length
Baud Rate
Parity
Stop Bit
XOn/XOff
DTR
Buffer Size
* You c an also change these settings usin g One Touch modes.
** Changing the Page Protect setting reconfigures your printer memory and
may erase any downloaded fon ts.
***Available only on the Parallel B menu.
Note:
You can also change these settin gs using the Remote Control Pa nel
utility as described in the Technical Inform at ion manual. To match the
computer's baud rate or set a higher one than that supported by your
computer, see the Technical Information manual (this may not work with
some computers).
LT and AUX Menus
The LT menu appear s only whe n you ha v e insta lled the
LocalTalk/Serial module and have set the Emulation menu
to LT. The AUX menu is available only when you have
installed a Type B interface.
Both menus have one menu item, Buffer Size, that sets the
memory allocation used for the optional interface. You can
set it to Maximum (more memory allocated for receiving
data), Minimum (more memory allocated for printing data),
or Normal (for balanced usage); Normal is the default.
Menu Items
LJ4 FontSource
Font Number
Pitch
Height
SymSet *
Form
Source SymSet **
Dest SymSet **
PS Menu Err Sheet
Protect Level
8 - EPSON EPL-N1200
1/97
Page 9

EPSON EPL-N1200
Menu Items
ESCP2 and FX Font
Pitch
Condensed
T.Margin
Text ***
CG Table
Country
AutoCR
AutoLF
Bit Image
ZeroChar
1239X Font
Pitch
Code Page
T.Margin
Text ***
AutoCR
AutoLF
Alt.Graphics
Bit Image
ZeroChar
Character Set
* If the font selected in the FontSource and Font Number settings is not
available in the SymSet you choose, the FontSource and Font Number
settings return to their defa ult values.
** These menu items are available only when an optional font ROM module
is installed .
***If you change the Pag e Size, Orientation, or T.Marg in settings, the Text
setting returns to its default val ue.
Be sure to install EPSON imaging cartridge #S051016 even
if the cartridge you are removing has another part number.
Follow these steps to replace the imaging cartridge:
1. Make sure the printer is turned on.
2. Open the printer’s top cover.
3. Grasp t he old imaging cartridge and pull it straight out of
the printer.
Warning:
Do not touch the fuser inside the printer; it is marke d wi th
the label CAUTION HOT SURFACE.
4. Dispose of the used im aging cartridge with non-burnable
trash.
5. Unpack the imagin g cartridge and hold it level with the
oval handle face up. Then shake the cartridge as shown to
distribute the toner
Caution:
Do not turn the imaging cartridge upside down. Do not
expose the imaging cartridge to light a ny longer than
necessary.
.
Replacing the Imaging Cartridge
The printer’s imaging cartridge can print up to 6,000 pages,
depending on how complex your prin t jobs are. The re are
several ways to tell when you need to replace a cartridge:
You see a Toner Low message on t he contr ol pane l displ ay
❏
You see a Toner Out message on the display
❏
You notice that printing is faint and the Toner function in
❏
SelecType tells you that you have 0 t o 2 5% t oner capaci ty.
If you see a toner message on the control panel display,
replace the cartridge right away.
To check the toner capacity using SelecType, access the
Setup menu and select To ne r. If ther e is only o ne asterisk on
the display, you have 25% or less of toner left and must
replace the cartridge. If you have more left, there may be
another reason your printing is faint.
6. Grab the tab on the left side and pull the clear tape all the
way out of the cartridge.
1/97
EPSON EPL-N1200 - 9
Page 10

EPSON EPL-N1200
Correct
Incorrect
7. Now shake the cartridge again as shown to distribute the
toner.
8. Line up the cartridge pins with the green guides inside the
printer; then slide in the cartridge until it stops.
To determine whether you need to adjust the RITech
setting, print a status sheet using the printer’s control panel.
Follow the steps below:
1. Turn on the printe r and let it warm up until you see the
Ready message on the control panel display and the
On Line light comes on. (If it doesn’t come on, press the
On Line button.)
Note:
Before proceeding, m a ke sure Toner Save Mode is turne d off or the
status sheet will not print. You can also turn it off using the control panel
or the Remote Control Pane l ut il ity.
2. Press the Enter button twice to print the status sheet. At the
bottom of the sheet you see the RITech test pattern:
9. Close the top cover.
10.Select Toner Count Clear on the SelecType Setup menu to
reset the toner counter.
Adjusting the RITech Setting
EPSON’s new Resolution Improvement Technology
(RITech) automatically improves the print quality of your
lines, text, and graphics. Most of the time it works behind
the scenes to provide the best printed output. Occasionally,
however, you may need to adjust the RITech setting if you
notice a change in quality, such as after you replace the
imaging cartridge.
3. If the test pattern looks correct, do not change the RITech
setting. If it looks incorrect, go to step 4.
4. Open an application program and access the printer driver.
Note:
If you are using the Windows 3.1 EPSONScript driver, you must use the
control panel to ad jus t the RITech setting.
5. Click the Device Option s o r Printer SelecType tab.
6. If the RITech test pattern inside the square is lighter than
the background, select Dark as the RITech setting. If the
pattern is darker than the background, select Light.
7. Click th e OK button.
8. When you see the prompt asking if you want to send your
changes to the printer, select Yes.
9. Exit the printer driver.
10.Now print a page from your application to check the pr int
quality. If the quality is good, you’re finished. If the
quality needs further improvement, go to step 11.
11.Access the printer driver again and click Device Options
or Printer SelecType.
12.Change the Toner Density setting to Dark or Darkest (if
the RITech test pattern was too light) or Light or Lightest
(if the test pattern was too dark).
10 - EPSON EPL-N1200
1/97
Page 11

EPSON EPL-N1200
Note:
If you are using the Windows 3.1 EPSONScript driver, you must use the
control panel to adjust the Density setting.
13.Click the OK button.
14.When you see the prompt asking if you want to send your
changes to the printer, select Yes.
15.Exit the printer driver.
16.Print several pages from your application that contains
text and graphics to check the print quality and make sure
the Density setting is not too ex treme.
The RITech and Density setting s yo u cho se r emain in effect
even after you turn off the printer. Remember that the
darker your Density setting the more toner you use, so
change the setting back to Medium if you do not need dark
printing later on.
Using Hex Dump Mode
Hex dump mode is a special feature that makes it easy for
experienced users to find the cause of communication
problems between the printer and the computer. In hex
dump mode, the printer produces an exact printout of the
codes it receives. Follow these steps to turn on hex dump
mode and send a print job using it:
1. Make sure paper is loaded and the printer is turned off.
Never let more than 250 sheets accumulate in the output
❏
tray on top of the printer.
Try turning over the stack of paper in the tray. Most
❏
packages of paper indicate the printable surface with an
arrow on the end of the package. Make sure that side is
loaded face up.
If you use an optional lower paper cassette, check the
❏
following:
If paper will not load at all, be sure you have selected to
load from the cassette in the printer driver. (Also make
sure the cassette contains paper and is properly installed.)
Make sure you are using letter size paper in the cassette(s)
you have.
Fixing Paper Jams in the Built-in Paper Tray
If the printer stops and the Feed Jam or Paper Jam message
appears, follow these steps:
1. Open the printer’s front cover.
2. Carefully remove all the paper in th e built-in paper tray
and any sheets fed partially into the printer.
2. Hold down the Form Feed button while you turn on the
printer; hold down the button until you see Hex on the
control panel display .
3. Open an application and print a doc ument. Your printer
prints out all the codes it receives in hexadecimal format.
4. To turn off hex dump mode, turn off the printer or reset it
by pressing an d holding dow n the ALT and C ontinue
buttons at the same time. When Reset All appears on the
display, release the buttons.
Paper Feeding Problems
If you have frequent pa per fee d or pa per jam proble m s, try
the following to prevent them:
Use a higher-quality paper, one that is not too thin or
❏
rough.
Fan the stack of paper and then tap the edges to align them
❏
before you load the stack.
Be sure you do not load too much paper.
❏
Be sure to adjust the paper guides so that the paper can
❏
slide in freely.
3. Open the printer’s top cover and remove the imaging
cartridge. Then remove any paper remaining inside the
printer and replace the imaging cartridge.
Warning:
Do not touch the fuser inside the printer; it is marke d wi th
the label CAUTION HOT SURFACE.
Caution:
If toner gets on your hands as you remove paper, be careful
not to touch your clothi ng. If toner gets on your clot he s,
remove it with cold water; hot water may leave a permanent
stain.
4. Tap the edges of your stack of paper and carefully reload it
into the built-in paper tray.
5. Close the printer covers and press the Continue button.
The jammed page’s print data is automatically reprin ted.
1/97
EPSON EPL-N1200 - 11
Page 12

EPSON EPL-N1200
Fixing Paper Jams in an Optional Lower Paper Cassette
If the printer stops and the Feed Jam or Paper Jam message
appears, follow these steps:
1. Remove the paper tray from the lower paper cassette.
2. Remove all the paper from the cassette and discard any
curled or wrinkled sheets.
3. Tap the edges of your stack of paper and carefully reload it
into the cassette’s paper tray.
4. Reinstall the paper tray in the lower paper cassette.
5. Follow step 3 under “Fixing Paper Jams in the Built-in
Paper Tray,” above.
6. Press the Continue b utton. The jammed page’s print data
is automatically reprinted.
Information Reference List
Engineering Change Notices
None
Product Support Bulletins
None
Technical Information Bulletins
None
Related Documentation
TM-EPLN1200 EPSON EPL-N1200 Service Manual
PL-EPLN1200 EPSON EPL-N1200 Parts Price List
4006356 EPSON EPL-N1200 User’s Guide
4006432 EPSON EPL-N1200 Technical
Information
4006355 EPSON EPL-N1200 Quick Setup
12 - EPSON EPL-N1200
1/97
 Loading...