

Page 1
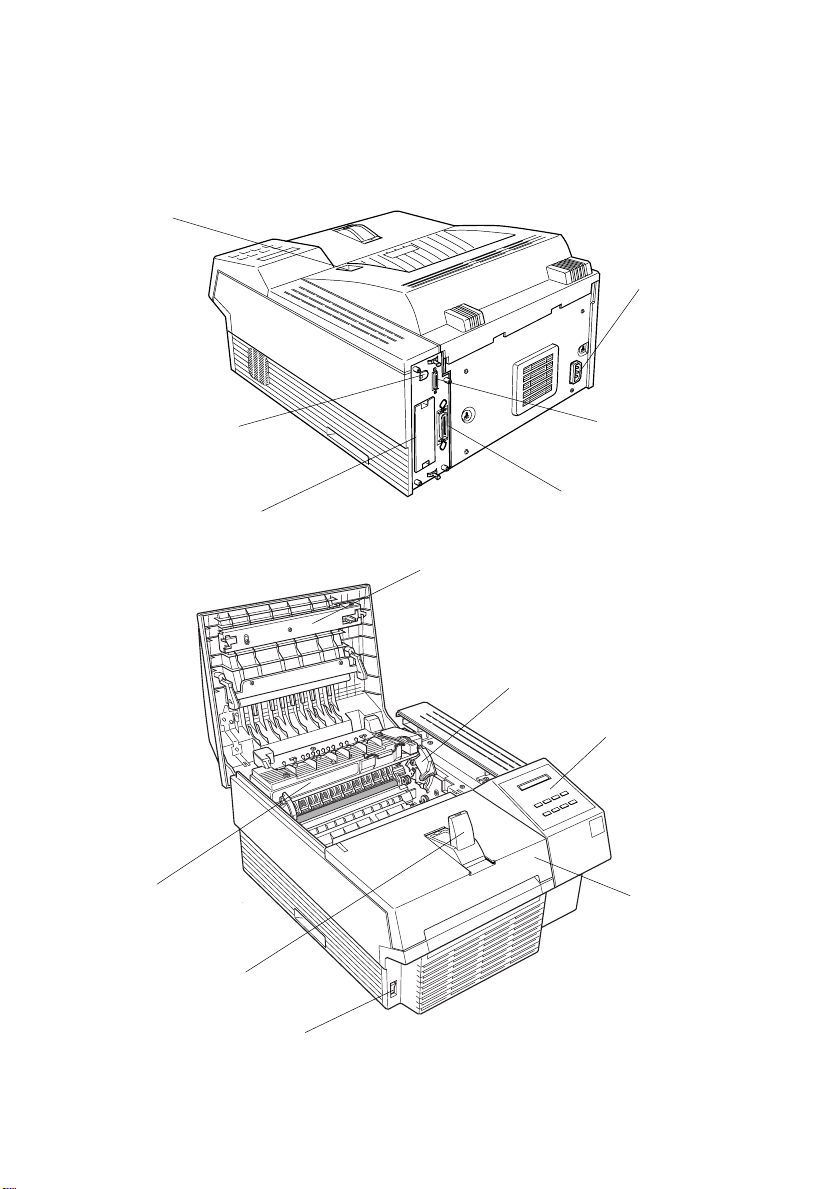
Printer Parts
printer cover latch
AC inlet
LocalTalk/Serial
interface connector
(option)
Type-B interface
connector
(option)
fuser
paper stopper
Parallel C interf ace
connector
Parallel B interface
connector
printer cover
grooves for imagi ng cartridge
control panel
front cover
power switch
Page 2

®
Laser Printer
All rights reserved. No part of this publication may be reproduced, stored in a retrieval
system, or transmitted in any form or by any means, mechanical, photocopying, recording,
or otherwise, without the prior written permission of Seiko Epson Corporation. No patent
liability is assumed with respect to the use of the information contained herein. Neither is
any liability assumed for damages resulting from the use of the information contained
herein.
Neither Seiko Epson Corporation nor its affiliates shall be liable to the purchaser of this
product or third parties for damages, losses, costs, or expenses incurred by purchaser or
third parties as a result of: accident, misuse, or abuse of this product or unauthorized
modifications, repairs, or alterations to this product, or (excluding the U.S.) failure to
strictly comply with Seiko Epson Corporation’s operating and maintenance instructions.
Seiko Epson Corporation shall not be liable against any damages or problems arising from
the use of any options or any consumable products other than those designated as Original
Epson Products or Epson Approved Products by Seiko Epson Corporation.
EPSON and EPSON ESC/P are registered trademarks and EPSON ESC/P 2 is a trademark
of Seiko Epson Corporation.
Speedo, Fontwar e, FaceLift, Swiss, and Dutch are tr ademarks of Bitstream Inc.
CG Times and CG Omega are registered trademarks of Miles, Inc.
Univers is a registered trademark of Linotype AG and/or its subsidiaries.
Antique Olive is a tra demark of Fonderie Olive.
Albertus is a trademark of Monotype Corporation plc.
Coronet is a trademark of Ludlow Industries (UK) Ltd.
Arial and Times New Roman are registered trademarks of Monotype Corporation plc.
General Notice: Oth er pr oduct names used herein are for identification purposes only and may be
trademarks of their respective owners. EPSON disclaims any and all righ ts in thos e marks.
Copyright © 1996 by Seiko Epson Corporation, Nagano, Japan
Reference Guide
Page 3

Declaration of Conformity
According to ISO/IEC Gu i d e 22 and EN 45014
Manufactu re r: SEIKO EPSON CORP ORATION
Address: 3-5, Owa 3-chome, Suwa-shi,
Nagano-ken 392 Japan
Represen ta tive: EPSON EUROP E B.V .
Address: Prof. J. H. Bavincklaan 5 1183
AT Amstelveen
The Neth erla nds
Declares that the Product:
Product Name: Laser Pr i n ter
Type Name: EPL-N1200
Model: L250A
Conforms to the following Direc tive(s) and Norm(s):
Directive 89/336 /EE C:
EN 55022 Class B
EN 50082-1
IEC 801-2
IEC 801-3
IEC 801-4
EN 61000-3-2
EN 61000-3-3
ii
Directive 73/23/E EC:
EN 60950
August 1996
M. Hamamoto
President of EP SON EUROPE B.V.
Page 4

Contents
Getting Started
About This Guide . . . . . . . . . . . . . . . . . . . . . . . . . . . . 1-1
About Your Printer . . . . . . . . . . . . . . . . . . . . . . . . . . . 1-3
Features . . . . . . . . . . . . . . . . . . . . . . . . . . . . . . . 1-3
Options . . . . . . . . . . . . . . . . . . . . . . . . . . . . . . . . 1-4
ENERGY STAR Compliance . . . . . . . . . . . . . . . . . . . . . . 1-4
About Making Printer Settings . . . . . . . . . . . . . . . . . . . . . 1-5
Printer Driver . . . . . . . . . . . . . . . . . . . . . . . . . . . . 1-5
OneTouch Modes . . . . . . . . . . . . . . . . . . . . . . . . . . 1-6
SelecType . . . . . . . . . . . . . . . . . . . . . . . . . . . . . . 1-6
Remote Control Panel utility . . . . . . . . . . . . . . . . . . . 1-6
Safety Information . . . . . . . . . . . . . . . . . . . . . . . . . . . . 1-6
Ozone safety . . . . . . . . . . . . . . . . . . . . . . . . . . . . . 1-11
Laser Printer Precautions . . . . . . . . . . . . . . . . . . . . . . . . 1-12
Important Safety Instructions . . . . . . . . . . . . . . . . . . . . . 1-15
For United Kingdom Users . . . . . . . . . . . . . . . . . . . . . . . 1-16
Warnings, Cautions, and Notes . . . . . . . . . . . . . . . . . . . . 1-18
Chapter 1 Paper Handling
Introduction . . . . . . . . . . . . . . . . . . . . . . . . . . . . . . . 1-2
Loading Paper . . . . . . . . . . . . . . . . . . . . . . . . . . . . . . 1-2
Loading paper for automatic feeding in the MP
(Multi Purpose) Tray . . . . . . . . . . . . . . . . . . . . . . . 1-2
Manually loading paper . . . . . . . . . . . . . . . . . . . . . . 1-4
Selecting the paper size . . . . . . . . . . . . . . . . . . . . . . . 1-6
Choosing Paper . . . . . . . . . . . . . . . . . . . . . . . . . . . . . 1-7
Labels . . . . . . . . . . . . . . . . . . . . . . . . . . . . . . . . . 1-8
Envelopes . . . . . . . . . . . . . . . . . . . . . . . . . . . . . . . 1-8
Colored paper . . . . . . . . . . . . . . . . . . . . . . . . . . . . 1-8
Transparencies . . . . . . . . . . . . . . . . . . . . . . . . . . . . 1-8
iii
Page 5

Chapter 2 Understanding You r Pr inter
The Control Panel . . . . . . . . . . . . . . . . . . . . . . . . . . . . 2-2
Overview . . . . . . . . . . . . . . . . . . . . . . . . . . . . . . . 2-2
Display . . . . . . . . . . . . . . . . . . . . . . . . . . . . . . . . 2-3
Indicator lights . . . . . . . . . . . . . . . . . . . . . . . . . . . 2-4
Buttons . . . . . . . . . . . . . . . . . . . . . . . . . . . . . . . . 2-5
Chapter 3 Making Printer Driver Settings
Using the Printer Driver . . . . . . . . . . . . . . . . . . . . . . . . 3-2
Understanding the required settings . . . . . . . . . . . . . . . 3-3
Accessing the driver menus . . . . . . . . . . . . . . . . . . . . 3-4
How to Make settings on the menus . . . . . . . . . . . . . . . 3-4
Saving settings . . . . . . . . . . . . . . . . . . . . . . . . . . . 3-5
Deleting settings . . . . . . . . . . . . . . . . . . . . . . . . . . 3-5
Restoring the driver default settings . . . . . . . . . . . . . . . 3-5
Getting help from the printer driver . . . . . . . . . . . . . . . 3-6
Exiting the printer driver . . . . . . . . . . . . . . . . . . . . . . 3-6
Accessing the Font Manager window . . . . . . . . . . . . . . 3-6
Accessing the Softtray Manager window . . . . . . . . . . . . 3-6
Accessing the Overlay Manager window . . . . . . . . . . . . 3-7
Driver Setting Descriptions . . . . . . . . . . . . . . . . . . . . . . 3-7
Printer Settings menu . . . . . . . . . . . . . . . . . . . . . . . . 3-7
Paper menu . . . . . . . . . . . . . . . . . . . . . . . . . . . . . 3-10
Adding a new size to the Paper Size list . . . . . . . . . . . . . 3-12
Printer SelecType menu . . . . . . . . . . . . . . . . . . . . . . 3-13
Printer Options menu . . . . . . . . . . . . . . . . . . . . . . . 3-15
Font Manager Window . . . . . . . . . . . . . . . . . . . . . . . . . 3-17
Adding fonts . . . . . . . . . . . . . . . . . . . . . . . . . . . . 3-20
Deleting fonts . . . . . . . . . . . . . . . . . . . . . . . . . . . . 3-22
Changing a font name . . . . . . . . . . . . . . . . . . . . . . . 3-23
Copying and moving fonts to another printer port . . . . . . . 3-23
iv
Page 6

Softtray Manager Window . . . . . . . . . . . . . . . . . . . . . . . 3-25
Creating a softtray . . . . . . . . . . . . . . . . . . . . . . . . . . 3-26
Overlay Manager Window . . . . . . . . . . . . . . . . . . . . . . . 3-27
Creating an overlay . . . . . . . . . . . . . . . . . . . . . . . . . 3-28
Deleting an overlay . . . . . . . . . . . . . . . . . . . . . . . . . 3-29
Chapter 4 Options
Printer Options . . . . . . . . . . . . . . . . . . . . . . . . . . . . . . 4-2
500-Sheet Lower Paper Cassette . . . . . . . . . . . . . . . . . . . . 4-3
Installing the lower paper cas sette . . . . . . . . . . . . . . . . 4-3
Loading paper into the 500-sheet lower paper cassette . . . . 4-5
Memory Modules . . . . . . . . . . . . . . . . . . . . . . . . . . . . 4-7
Installing a memory modu le . . . . . . . . . . . . . . . . . . . . 4-7
Removing a memory module . . . . . . . . . . . . . . . . . . . 4-11
ROM Module . . . . . . . . . . . . . . . . . . . . . . . . . . . . . . . 4-11
Optional Interfaces . . . . . . . . . . . . . . . . . . . . . . . . . . . 4-12
Installing the LocalTalk/Se rial module . . . . . . . . . . . . . . 4-13
Installing an optional int erfac e c ar d . . . . . . . . . . . . . . . 4-15
Using the Serial Interface . . . . . . . . . . . . . . . . . . . . . . . . 4-17
Using the serial interfac e utility . . . . . . . . . . . . . . . . . . 4-19
Chapter 5 Remote Control Panel Utility
Remote Control Panel Utility Overview . . . . . . . . . . . . . . . 5-2
When to use the Remote Contr ol Panel utility . . . . . . . . . . 5-2
Installing the Remote Control Panel utility . . . . . . . . . . . 5-3
Accessing the Remote Control Panel . . . . . . . . . . . . . . . 5-3
LaserJet 4/EpsonScript Level 2 Mode . . . . . . . . . . . . . . 5-4
ESCP2 Mode . . . . . . . . . . . . . . . . . . . . . . . . . . . . . 5-5
FX Mode . . . . . . . . . . . . . . . . . . . . . . . . . . . . . . . 5-5
I239X Mode . . . . . . . . . . . . . . . . . . . . . . . . . . . . . 5-6
Page Setup Options . . . . . . . . . . . . . . . . . . . . . . . . . . . 5-6
Type Options . . . . . . . . . . . . . . . . . . . . . . . . . . . . . . . 5-9
Printer Setup Options . . . . . . . . . . . . . . . . . . . . . . . . . . 5-11
Other Options . . . . . . . . . . . . . . . . . . . . . . . . . . . . . . 5-14
More Options . . . . . . . . . . . . . . . . . . . . . . . . . . . . . . 5-17
v
Page 7

Chapter 6 SelecType
When to Use SelecType . . . . . . . . . . . . . . . . . . . . . . . . . 6-2
SelecType . . . . . . . . . . . . . . . . . . . . . . . . . . . . . . . . . 6-3
Buttons . . . . . . . . . . . . . . . . . . . . . . . . . . . . . . . . 6-3
Using SelecType . . . . . . . . . . . . . . . . . . . . . . . . . . . 6-3
SelecType menus . . . . . . . . . . . . . . . . . . . . . . . . . . 6-4
Understanding SelecType Settings . . . . . . . . . . . . . . . . . . 6-8
Test menu . . . . . . . . . . . . . . . . . . . . . . . . . . . . . . 6-8
Emulation menu . . . . . . . . . . . . . . . . . . . . . . . . . . 6-9
Printing menu . . . . . . . . . . . . . . . . . . . . . . . . . . . 6-9
Tray Size menu . . . . . . . . . . . . . . . . . . . . . . . . . . . 6-11
Config menu . . . . . . . . . . . . . . . . . . . . . . . . . . . . 6-12
Setup menu . . . . . . . . . . . . . . . . . . . . . . . . . . . . . 6-14
Parallel B menu, Parallel C menu . . . . . . . . . . . . . . . . 6-16
Serial menu . . . . . . . . . . . . . . . . . . . . . . . . . . . . . 6-16
L/T menu, AUX menu . . . . . . . . . . . . . . . . . . . . . . 6-18
LJ4 menu . . . . . . . . . . . . . . . . . . . . . . . . . . . . . . 6-18
Using the OneTouch Modes . . . . . . . . . . . . . . . . . . . . . . 6-20
Using Other Emulations . . . . . . . . . . . . . . . . . . . . . . . . 6-22
ESC/P 2 or FX Mode . . . . . . . . . . . . . . . . . . . . . . . . . . 6-22
I239X Mode . . . . . . . . . . . . . . . . . . . . . . . . . . . . . . . 6-26
EPSON GL/2 Mode . . . . . . . . . . . . . . . . . . . . . . . . . . . 6-27
Before printing in the EPSON GL/2 mode . . . . . . . . . . . 6-28
Chapter 7 Troubleshooting and Maint en a nce
Introduction . . . . . . . . . . . . . . . . . . . . . . . . . . . . . . . 7-2
Paper Jam and Feeding Problems . . . . . . . . . . . . . . . . . . . 7-2
Preventing paper feed and paper jam problems . . . . . . . . 7-5
Print Quality Problems . . . . . . . . . . . . . . . . . . . . . . . . . 7-9
Memory Problems . . . . . . . . . . . . . . . . . . . . . . . . . . . 7-14
Option Problems . . . . . . . . . . . . . . . . . . . . . . . . . . . . 7-14
Status and Error Messages . . . . . . . . . . . . . . . . . . . . . . . 7-17
Hex Dump Mode . . . . . . . . . . . . . . . . . . . . . . . . . . . . 7-23
Replacing the Imaging Cartridge . . . . . . . . . . . . . . . . . . . 7-24
vi
Page 8

Optimizing Print Quality . . . . . . . . . . . . . . . . . . . . . . . . 7-27
Adjusting RITech . . . . . . . . . . . . . . . . . . . . . . . . . . 7-27
The RITech setting . . . . . . . . . . . . . . . . . . . . . . . . . . 7-27
Adjusting print density . . . . . . . . . . . . . . . . . . . . . . 7-28
Resetting the Printer . . . . . . . . . . . . . . . . . . . . . . . . . . . 7-29
Cleaning the Printer . . . . . . . . . . . . . . . . . . . . . . . . . . . 7-30
Removing spilled toner . . . . . . . . . . . . . . . . . . . . . . . 7-31
Cleaning the printer case . . . . . . . . . . . . . . . . . . . . . . 7-32
Transporting the Printer . . . . . . . . . . . . . . . . . . . . . . . . . 7-32
Appendix A Technical Specifications
Paper . . . . . . . . . . . . . . . . . . . . . . . . . . . . . . . . . . . A-2
Specifications . . . . . . . . . . . . . . . . . . . . . . . . . . . . . A-2
Printer . . . . . . . . . . . . . . . . . . . . . . . . . . . . . . . . . . . A-3
General . . . . . . . . . . . . . . . . . . . . . . . . . . . . . . . . A-3
Environmental . . . . . . . . . . . . . . . . . . . . . . . . . . . A-4
Mechanical . . . . . . . . . . . . . . . . . . . . . . . . . . . . . . A-4
Electrical . . . . . . . . . . . . . . . . . . . . . . . . . . . . . . . A-5
Interface . . . . . . . . . . . . . . . . . . . . . . . . . . . . . . . . . . A-5
Parallel B interface . . . . . . . . . . . . . . . . . . . . . . . . . . A-5
Parallel C interface . . . . . . . . . . . . . . . . . . . . . . . . . A-7
Using the ECP mode in Windows 95 . . . . . . . . . . . . . . . A-12
Serial Interface . . . . . . . . . . . . . . . . . . . . . . . . . . . . A-13
Options and Consumables . . . . . . . . . . . . . . . . . . . . . . . A-16
500-Sheet Lower Paper Cassette . . . . . . . . . . . . . . . . . . A-16
Imaging cartrid g e (S051016) . . . . . . . . . . . . . . . . . . . . A-16
vii
Page 9

Appendix B Symbol Sets
Introduction to Symbol Sets . . . . . . . . . . . . . . . . . . . . . . B-2
In LJ4 Emulation Mode . . . . . . . . . . . . . . . . . . . . . . . . . B-3
International Set for ISO sets . . . . . . . . . . . . . . . . . . . B-18
In ESC/P 2 or FX Modes . . . . . . . . . . . . . . . . . . . . . . . . B-19
International Character Sets . . . . . . . . . . . . . . . . . . . . B-23
Characters available with the ESC (^ command . . . . . . . . B-24
In I239X Emulation Mode . . . . . . . . . . . . . . . . . . . . . . . B-24
In EPSON GL/2 Mode . . . . . . . . . . . . . . . . . . . . . . . . . B-24
Appendix C Command Summary
LaserJet 4 (LJ4) Emulation Commands . . . . . . . . . . . . . . . . C-3
GL/2 context commands . . . . . . . . . . . . . . . . . . . . . . C-7
ESC/P 2 and FX Commands . . . . . . . . . . . . . . . . . . . . . . C-9
ESC/P 2 mode . . . . . . . . . . . . . . . . . . . . . . . . . . . . C-9
FX mode . . . . . . . . . . . . . . . . . . . . . . . . . . . . . . . C-12
PJL Commands . . . . . . . . . . . . . . . . . . . . . . . . . . . . . C-15
EJL Mode . . . . . . . . . . . . . . . . . . . . . . . . . . . . . . . . . C-16
I239X Emulation Commands . . . . . . . . . . . . . . . . . . . . . C-20
Page format . . . . . . . . . . . . . . . . . . . . . . . . . . . . . C-20
Text . . . . . . . . . . . . . . . . . . . . . . . . . . . . . . . . . . C-22
Auxiliary Functions . . . . . . . . . . . . . . . . . . . . . . . . . C-23
AGM Mode . . . . . . . . . . . . . . . . . . . . . . . . . . . . . C-23
Appendix D Working with F on ts
Printer and Screen Fonts . . . . . . . . . . . . . . . . . . . . . . . . D-2
Available Fonts . . . . . . . . . . . . . . . . . . . . . . . . . . . . . D-3
Adding More Fonts . . . . . . . . . . . . . . . . . . . . . . . . . . . D-6
Downloading fonts . . . . . . . . . . . . . . . . . . . . . . . . . D-6
Selecting Fonts . . . . . . . . . . . . . . . . . . . . . . . . . . . . . . D-6
viii
Page 10

Appendix E Map of SelecType Menus
Switching between SelecType Menus . . . . . . . . . . . . . . . . . E-2
Glossary
Index
ix
Page 11

Getting Started
The EPSON EPL-N1200 pr in ter c omb in es h i gh pe rf or man ce and
reliability with a wide range of features.
To get st a rted wi th your l aser printer, p l e ase:
❏ Read the safety inform atio n, laser print er pre ca utions , and
important safety instruction s in this section.
❏ Use your
printer.
See this guide for detailed information about your printer.
Getting Ready!
guide to set up and test your new
About This Guide
This guide contains information about using your printer. For
information about installing and set ting up the printer , see the
Getting Ready!
Chapter 1, “Paper Handling,” contain s info rm atio n on load in g
paper. Also consult this chapt e r when y ou ne ed information about
printing on special paper.
Chapter 2, “U n de rs ta n ding Your Printer,” describes how to use
the printer’s control panel.
Chapter 3, “Making Printer D river Set tings ,” desc ribes the feat ure s
of the Windows prin ter d river pac k ed with your pr in ter. If you
need information on how to install th e driv er , see the
Ready!
guide.
guide.
Getting
Chapter 4, “Options,” gives step-by-st ep inst ru ctions for insta lling
the options available for the print er.
Getting Started
1
Page 12

Chapter 5, “Remote Contr ol Panel U tility,” desc ribe s the printer
setti n gs that c a n b e m odifie d with the Remote Control Panel
utility. Read this chapter if you are not able to modif y a printer
setting from your software.
Chapter 6, “Se l ec Type, ” c on t ain s d et ailed in for mation on the
settings you can make in SelecType. Read this chapter if you are
not able to modify a print e r set ting fr om your software.
Chapter 7, “T rou blesh ooting and Mainte n an c e, ” g ives h elp ful
information for wh at to do if you enc ou nter a printer error and
provides instructions on how to maintain your printer.
Appendix A, “Technical Specif ica tio ns,” contains the technical
specifications about the prin te r.
Appendix B, “Symbol Sets,” lists the sy mbol sets available in each
emulation mode with the tabl es of the characters for each set.
Appendix C, “Command Summary,” lists the commands that can
be embedded in print jobs to control the printer. This append ix is
intended for advanced users only.
Appendix D, “Work i n g w i t h F o n ts,” describes the st e p s y ou n e ed
to follow to add more font s and lists t h e ava ilable fonts with
samples.
Appendix E, “Map of SelecType Me n us,” lists t he Selec T ype
menus and the order in whic h you access th em. This appen d ix is
useful when you use SelecType.
2
Getting Started
Page 13

About Your Printer
Your printer is the latest in EPSON’s ad vanc ed line of las er
printers. It emulates the Hewlett-Packard
printer, allowing you to print using the wide variety of software
programs tha t su pp o rt HP LaserJet printe rs.
The printer’s 600-d p i (d ot s p er in ch) resolution is enhan c ed by
EPSON’s Resolution Improveme n t Techno logy (RIT ec h ), whic h
smoothes the jagged ed g e s of diagonal lines in both te xt an d
graphics. This gives your documents a clean, crisp look that
contributes t o a pro fessional appear an c e .
The printer is easy to install and use. You simply set up the
printer, connect it to your computer, and install the printer driver
as described in the
The printer supports ECP mode in Windows 95. ECP mode is
useful for hig h -speed data transfer an d bidirectional
communication with your computer.
Getting Ready!
guide.
®
LaserJet 4 (LJ4)
Features
The printer com es with a full set of featur es that contribute s to
ease of use and consistent, high-quality output. The main features
are described below .
High-quality printing
Your printer pr ovid es 600-dpi printing at a speed of up to 12 pages
per minute. You’ll appreciate the profe ss ional pr int quality
produced by your printer and its quick processing speed.
Getting Started
3
Page 14

Wide variety of fonts
The printer comes with a selec tio n of 14 scala ble TrueT y pe® fonts,
31 LaserJet-compa tible sca lable fon t s, and one bitmap font in LJ4
emulation mode to provide you with the fonts you need to create
profession al-looking documen ts . The fon t s in c lu d ed wi th t h e
printer are listed in Appendix D.
Toner Save Mode
To reduce the amount of toner used in printing documents, you
can print rough drafts using the Toner Save Mode.
Options
The printer comes with two built-in bidirec t ional par allel
interfaces and 2 M B of memo ry, whic h c an be expa n de d up to
64 MB. You can also in s tall an additional Type- B s er i al, coa x, or
twinax interface. The 500-Sheet Lo wer P ape r Cassette (C8126 2
A4, C81263
size sheets without reloading. Using two low er paper cassettes (th e
maximum), you can preload up to 1,250 sheets of paper with the
MP Tray (250 sh eets). See Cha pter 4 for more information on
printer options .
✽
: Letter), automatic ally feeds up to 500 A4 or letter
✽
:
NERGY STAR Compliance
E
As an International ENERGY STAR Partner, EPSON
has determined that this product meets the
International
efficiency.
The International
voluntary development of energy-efficient computers, printers,
and other peripheral equipment.
4
Getting Started
E
NERGY STAR Program guidelines for energy
E
NERGY STAR Progra m pr omotes the
Page 15

About Making Printer Settings
To print, you will need to make some printer settings. This printer
offers four way to make printer settings:
❏ Printer driver
❏ Remote Control Panel utility
❏ OneTouch mode s
❏ SelecType
If you use a Windows application, use the printer driver tha t came
with the prin ter to mak e p rinter settin g s. For details on y o u r
printer driver, see “Making Prin te r Drive r Se ttin gs” in Cha pter 3.
If you use a DOS application, make the print settings in the
application. For details, see your DOS applicatio n manu al.
If you cannot make all the settings you need through the Windows
printer driver or DOS application , use Selec T ype (OneT ouc h
modes) or Remote Control Panel utility. The OneTo uch mo de s are
part of SelecType.
Printer Driver
Use the printer driver to easily and conven ient ly make n ew print er
settings. Most users may never need to use anything besides their
application software and the prin ter d river to make printer
settings. You can access the prin ter d river thr ough an applic at ion‘s
Print command or directly through the Printers folder/ pr ogram
group in your operating system. Be aware that settings you make
in your application overide other settings. See “Making Printer
Driver Settings , ” Ch apt er 3, for more informat ion .
Getting Started
5
Page 16

OneTouch Modes
Use the OneTouch modes on the printer control panel to make
printer settings when you cannot make a setting in your
application software. The On eTouch modes are the ea sies t way to
make several basic settings from the prin ter’ s control panel;
however, your software applicat ion an d printer drive r in some
cases override these settings. See “Usin g t h e On eT ouc h Modes” on
page 6-20 for mo re infor mation.
SelecType
Use the SelecType buttons and display on the printer c ontrol pane l
to make printer settings when you cannot make a setting in your
application software. Selec T ype has mo re detailed opt ions t han the
OneTouch modes but may be slower depend ing on the settings
you make. See “U sin g SelecType,” Chap te r 6, for more
information.
Remote Control Panel utility
Use the Remote Control Panel utility when the printer is not easily
accessible and you want to make SelecType se ttin gs. This utility
allows you to make SelecType settings from your computer. It
only works in DOS. See “Usi ng the Remote Control Panel Utility,”
Chapter 5, for mor e information.
Safety Information
Laser safety
This printer is certified as a Class 1 laser product under the U.S.
Department of Health and Human Services (DHHS) Radiation
Performance Standard according to the Radiation Control for
Health and Safet y Act of 1968. This mean s that the printer does
not produce hazardous laser radiation.
6
Getting Started
Page 17

Since radiation emitted by the las er is completely co nfin ed wit hin
protective housings and external covers, the laser beam cannot
escape from the machine during an y ph ase of user operation.
For European users
United Kingdom
The EPL-N1200 is a page prin ter wh ic h u tiliz es a semic on d uc tor
laser.
There is no possibility of danger from the laser, provided the
printer is operated according to the instructions in the guides
provided.
Since radiation emitted by the las er is completely co nfin ed wit hin
protective housings, the laser bea m can not esc ape from t he
machine during any phase of user operation.
Warning:
Use of controls or adjustments or performance of procedures
w
other than those specified in this guide, may result in
hazardous radiation exposure.
This is a semiconductor laser. The maximu m powe r of the las er
diode is 5.0
Denma rk
Advarsel
Usynlig laserstråling ved åbning, når sikkerhedsafbrydere er ude
af funktion. Und g å u d sættelse for strå lin g .
Klasse 1 laser produkt der opfylder IEC825 sikkerheds kravene.
×
10-4 W and the wavele ng th is 780 ± 20 nm.
Getting Started
7
Page 18

Finland and Sweden
EPL-N1200 on lasertoiminen sivukirjoitin. Las erista ei aiheudu
käyttäjälle vaaraa, kun kirjoitinta käytetään käyttöohjeiden
mukaisesti.
Laserin aiheuttama säteily jää kokonaisuudessaan
suojarakenteiden sisäpuolelle, eikä lasersäde pääse laitteen
ulkopuolelle sit käytettäessä.
VAROITUS!
Laitteen käyttäminen muulla kuin tässä käyttöohjeessa mainitulla
tavalla saattaa altistaa käyttäjän turv allisuus luokan 1 ylit tävälle
näkymättömälle lasersät eilylle.
VARNING!
Om apparaten används på annat sätt än i denna bruksanvisning
specificerats, kan an vändar en ut sätta s för osyn lig lasers trålnin g,
som överskrider gränsen för laser
klass 1.
LUOKAN 1 LASERLAI TE
KLASS 1 LASER APPARAT
Kirjoittimen taakse kuvan osoitamiin paikkoihin on kiinnitetty
tarrat, jotk a osoittavat, että kir jo itin on B .S.7192 ja IEC
825-määräyst en muk ain en luokan 1 laserla ite. Jos k irj oit time n
kuori poistetaan, näkyviin tulee kolmas, alla ole va t arra .
Norway
Advarsel
Dersom apparatet brukes på annen måte enn spesifisert i denne
bruksanvisning, kan brukeren utsettes for unsynlig laserstråling
som overskrider grensen for laser klasse 1.
Dette er en halvleder lase r. M aksimal effeckt til laserdiode er
5.0
×
10-4 W og bolgelengde er 780 ± 20 nm.
8
Getting Started
Page 19

CDRH regulations
The Center for Devices and Radiological Health (CDRH) of the
U.S. Food and Drug Administrat ion implemented regulations for
laser products on August 2, 1976. Compliance is mandatory for
products marketed in the Unite d Stat es. The label shown below
indicates compliance wit h the C D RH regulat ions an d must be
attached to laser product s ma rke ted in the U n ite d Stat es.
Laser safety labels
Warning:
Use of controls, adjustments, or performance of procedures
w
other than those specified in this guide may result in
hazardous radiation exposure.
Your printer is a Class 1 laser product as defin ed in IEC 825
specifications. The label shown below is attached in countries
where requ ired.
Getting Started
9
Page 20
Internal laser radiation
Max. Radiation Power 5.0 × 1
-4
0
W
Wave Length 780
±
20 nm
This is a Class IIIb Laser Diode As se mbly that h as an inv isible
laser beam. The printer he ad unit is NOT A FIELD SE RVICE
ITEM. Therefor e, the pr in ter head unit should not be opened
under any circumstances.
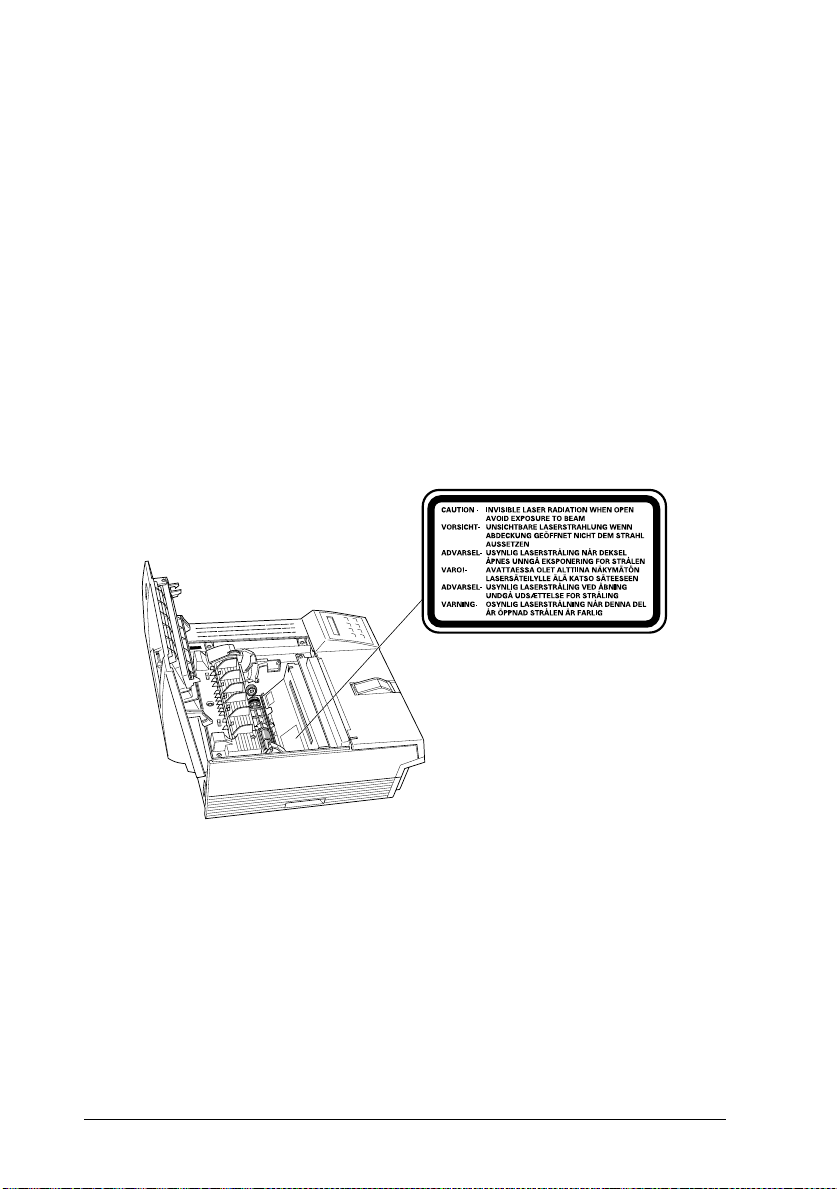
For Denmark, Finland, Sweden, and Norway users
An additional laser war nin g label is affix ed to the insid e of the
printer, as shown below.
10
Getting Started
Page 21

Ozone safety
Ozone emission
Ozone gas is generated by laser print er s as a by-product of the
printing process. Ozone is produced only when th e print er is
printing.
Ozone exposure limit
The recommended exposure limit for ozone is 0.1 parts per million
(ppm) express e d as an avera g e time -w e ig hte d conc ent ra ti o n ov er
an eight (8) hour p er i od .
The EPL-N 1200 laser printer ge n er at e s <0.01ppm for 8 hours of
continuous printing when consider in g a closed room of
approximately 1000 cu ft (8’
Minimize the risk
To minimize t h e ris k of exposure to ozone, you should avoid the
following conditions:
❏ Use of multiple laser printers in a confin ed ar ea (s ee above)
× 10’ × 12
’).
❏ Operation in conditions of extremely low h umid ity
❏ Poor room ven ti lation
❏ Long, continuo u s pri nti ng together with any of the above
Printer location
The printer should be located so that the ex haus t gases and h eat
generated are:
❏ Not blown directly into the user’s face
❏ Vented directly out of the building whenever possible
Getting Star te d
11
Page 22

Laser Printer Precautions
This printer uses laser technology. The following list of
precautions applies whenever you open the printer cover.
Even if you are familiar with other types of printers, be sure
to follow these pr ec au tio n s c ar efu lly to en sur e safe, efficient
operation .
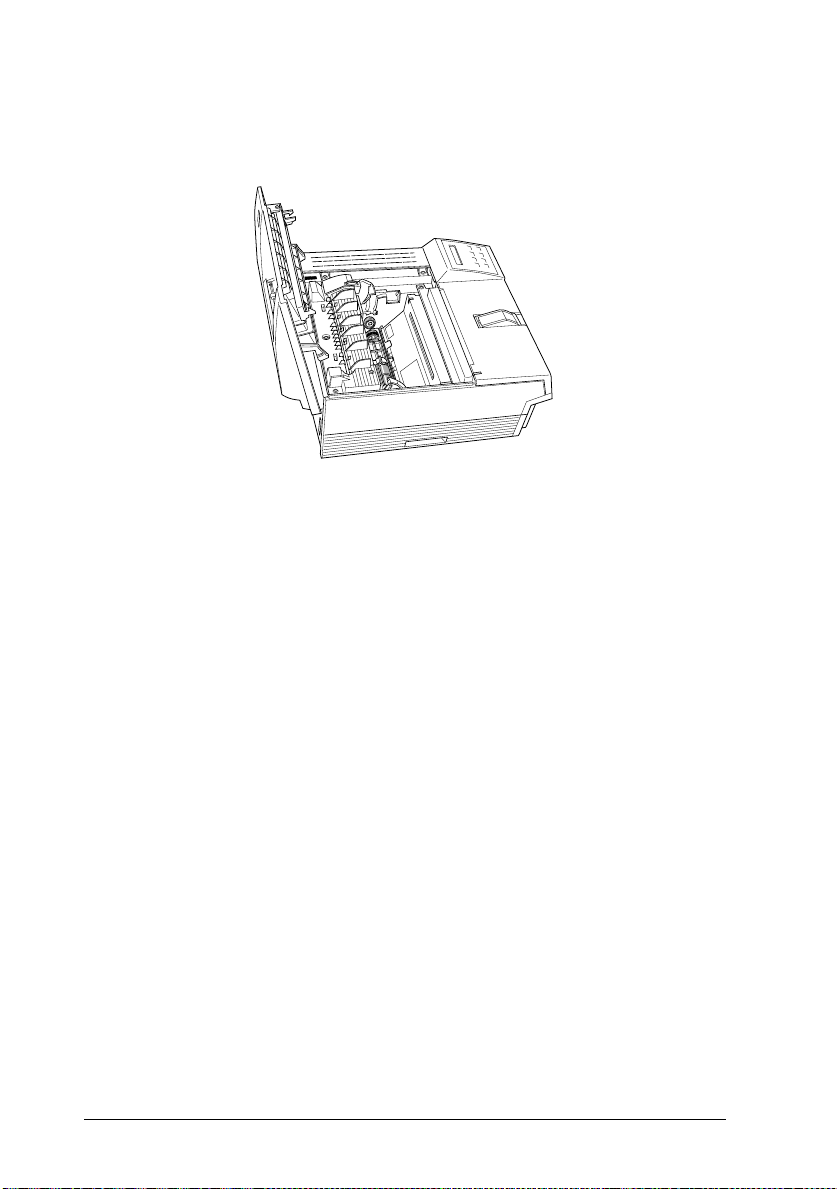
❏ Be careful not to touch the fuser, which is marked CAUTION
HOT SURFACE. If the printer has been in use, the fuser can be
very hot.
CAUTION HOT SURFACE ATENCION EXTERIOR CALIE NTE
VORSICHT HEISS ATTENTION SURFACE CHAUDE
❏ Avoid touching the components inside the printer unless
instructed to do so in this guide.
❏ Never force the printer’s components into place. Although the
printer is designed to be sturdy, rough handling can damage it.
❏ Be sure not to scratch the surface of the drum. When you
remove the imaging cartridge from the printer, always set the
unit on a cl ean, smoo th su r face. Also , av oi d touching th e
drum, since oils from your skin can permanently damage its
surface and may affect print quality.
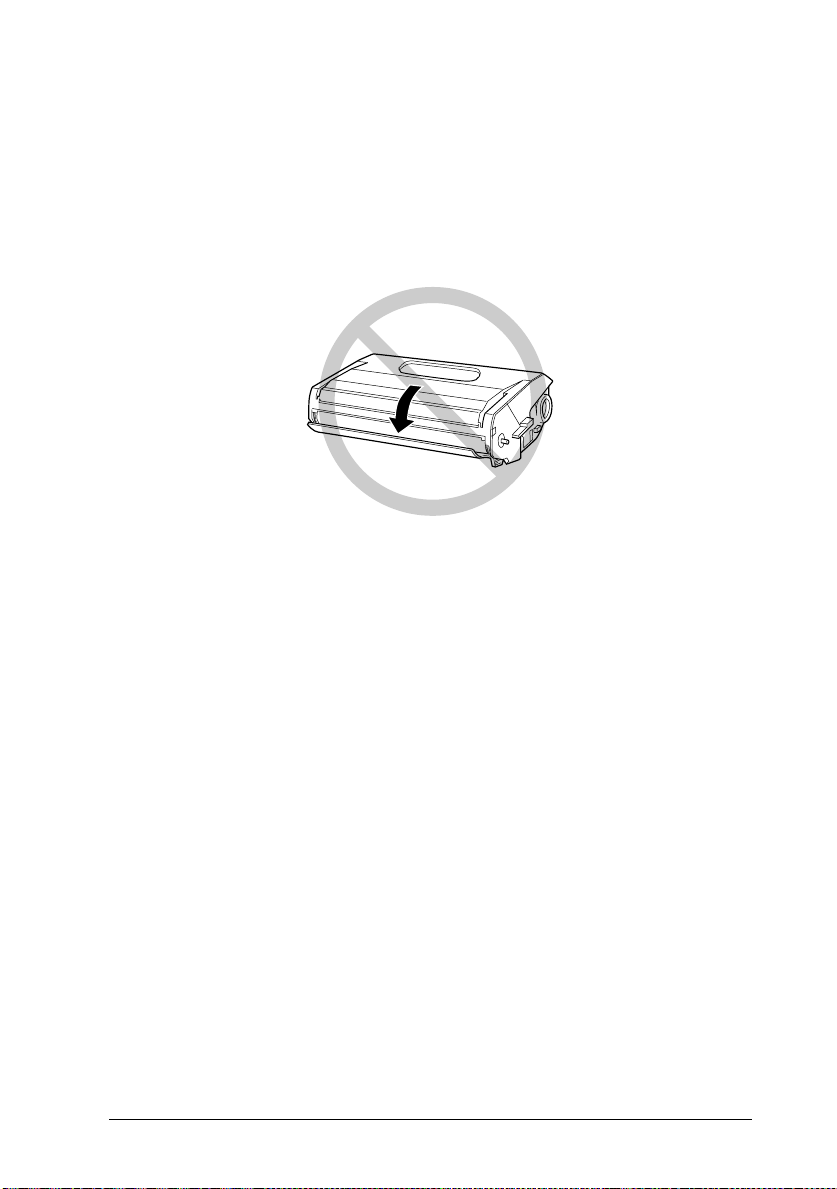
❏ Do not turn the cartridge upside down or stand it on its sides.
12
Getting Started
Page 23
❏ Protect the light-sensitive drum from exposure to light. Avoid
exposing the imaging cartridg e to room light any long er than
necessary. Do not open the drum’s protective cover.
Overexposing the drum ma y cause abn orma lly dark or ligh t
area s to appear on the pri nted pag e and re duce the servic e l i fe
of the drum.
❏ When handling the ca rt r idge, always set it on a clean, smoo th
surface.
❏ Do not attempt to modify or take apart the cartridge. It cannot
be refilled.
❏ Try not to touch the toner and avoid all contact with
your eyes.
❏ Do not use a cartridge for at least one hour after moving it
from a cool to a warm environment.
Getting Star te d
13
Page 24
❏ Avoid touching the glass in front of the laser beam; otherwise,
print quality may decline.
To get the best print quality, do not store the imaging cartridge in
an area subject to direct sunlight, dust, salty air, or corrosive gasses
(such as ammonia). Avoid locations subject to high temperatures
or humidity or abrupt changes in temperature or humidity. Also,
be sure to keep the consumable components out of the reach of
children.
Hinweis
Die Geräteanschlußleitung muß den einshlägigen Normen genügen.
Es muß eine dreiadrige Leitung verwendet werden.
Die Anshlußleitung darf nicht leichter als H05VV-F order H05VVH2-F
sein.
Maschinenlärminformations-Verordnung-3. GSGV, 18. 01. 1991: Der
arbeitsplatzbezogene schalldruckpegel beträgt 70 dB (A) oder weniger
gemäß ISO 7779.
14
Getting Started
:
Page 25

Important Safety Instructions
Read all of these instructions before operatin g your printer.
❏ Follow all warnings and instructions mark ed on the prin te r.
❏ Unplug this printer from the wall outlet before clean in g.
Use a damp cloth for cleaning and do not use liquid or aerosol
cleaners.
❏ Do not use this printer near water.
❏ Do not place the printer on an unstable cart, stand, or table.
❏ Slots and openings in the cabinet and the bac k or bottom are
provided for ventilation. Do not block or cover them. Do not
put the printer on a bed, sofa, rug, or other similar su rfac e or
in a built-in installation unless proper ventilation is provided.
❏ Use the type of power source indicated on the label. If you are
not sure of the type of power available, consult your dealer or
local power company.
❏ If you are unable to insert the plug into the outlet, contact your
electrician to replace your obsolete outlet.
❏ Do not put your printer where the cord will be walked on.
❏ If you use an extension cord, make sure that the total of the
ampere ratings on the products plugged into the extension
cord does not exceed the extension cord ampere rating. Also,
make sure that the total of all products plugged into the wall
outlet does not exceed 15 amperes.
❏ Never push objects of any k i n d th r ou g h cabinet slots as they
may touch da ngerous voltage points or sh or t ou t parts that
could result in a risk of fire or electric shock. Never spill liquid
of any kind on the printer.
Getting Star te d
15
Page 26

❏ Except as specifically explained in this guide, do not attempt
to service this product yourself. Opening or removin g those
covers that are marked “Do Not Remove” may expose you to
dangerous voltage points or other risks. Refer all servicing in
those compartments to service p e r sonnel .
❏ Unplug this printer from the wall outlet and refer serv icing to
qualified service pers onnel un d er the followin g c ond itions :
A. W hen the power cord or plug is damaged or fraye d.
B. If liquid has been spilled into it.
C. If it has been exposed to ra in or wate r.
D. If it does not operate normally when the oper ating
instructions are followed . Adjus t only th ose contr ols th at
are covered by the operatin g instruc tion s since impr ope r
adjustment of other controls may result in damage and
will often require extensive work by a qualified technician
to restore the p r oduct to no rmal oper a tion.
E. If it has been dropped or the cabinet has been d amaged.
F. If it exhibits a distinct change in performance, indicating
a need for servic e.
For United Kingdom Users
Use of options
Epson (UK) Limited shall not be liable against any damages or
problems arising from the use of any option s or consuma ble
products other th an those designat ed as Original EPSON P roduc ts
or EPSON Appro ve d P ro du cts by Epson (UK) Limi te d.
16
Getting Started
Page 27

Safety information
Warning:
for voltage and check that the appliance voltage corresponds to
the supply vol ta ge .
Important:
coloured in accordance with the following code:
Green and yellow—Earth
Blue—Neutral
Brown—Live
This appliance must be earthed. Refer to rating plate
The wires in the mains lead fitted to this appliance are
If you need to fit a plug:
As the colours of the mains lead of this appliance may not match any
coloured markings used to identify the terminals in a plug, please proceed
as follows:
❏ The green and yellow wire mus t be conn ect ed to the termin al
in the plug which is marked with the letter E or the Earth
symbol (
❏ The blue wire must be connected to the terminal in the plug
marked with the letter N.
G
).
❏ The brown wire must be connec te d to the ter minal in the plug
marked with the letter L.
If damage occurs to the plug, replace the cord set or consult a
qualified electrician.
Replace fuse s only with a fus e of the correc t si z e and rating.
Getting Star te d
17
Page 28

Warnings, Cautions, and Notes
Warnings
must be followed carefully to avoid bodily injury.
w
Cautions
must be observed to avoid damage to your equipment.
c
contain important information and useful tips on the operation of
Notes
your printer.
18
Getting Started
Page 29

Chapter 1
Paper Handling
Introduction . . . . . . . . . . . . . . . . . . . . . . . . . . . . . 1-2
Loading Paper . . . . . . . . . . . . . . . . . . . . . . . . . . . . 1-2
Loading paper for automatic feeding in the MP
(Multi Purpose) Tray . . . . . . . . . . . . . . . . . . . . . 1-2
Manually loading paper . . . . . . . . . . . . . . . . . . . . 1-4
Selecting the paper size . . . . . . . . . . . . . . . . . . . . . 1-6
Choosing Paper . . . . . . . . . . . . . . . . . . . . . . . . . . . 1-7
Labels . . . . . . . . . . . . . . . . . . . . . . . . . . . . . . . 1-8
Envelopes . . . . . . . . . . . . . . . . . . . . . . . . . . . . 1-8
Colored paper . . . . . . . . . . . . . . . . . . . . . . . . . . 1-8
Transparencies . . . . . . . . . . . . . . . . . . . . . . . . . 1-8
1
Paper Handling
1-1
Page 30
Introduction
You can feed paper into your printer from the MP
(Multi Purpose) Tray or from an optional lower paper cassette.
This chapter describes how to
load paper
switch the paper source
print on special media, such as labels or envelopes.
The following section, “Loading Paper,” describes the steps
required to load paper.
Loading P aper
This section covers how you load regular paper using the MP
Tray. To load paper in an optional lower paper cassette, see
page 4-5.
Note:
If the weight of your paper is not between 60 to 90 g/m
(16 to 24 lb), decrease the number of sheets you load.
2
Loading paper for automatic feeding in the MP (Multi
Purpose) Tray
This section describes loading a stack of regular paper. For
instructions on loading paper one sheet at a time, see
“Manually loading paper” on page 1-4.
You can load up to 250 sheets of paper in the MP Tray.
1-2
Paper Handling
Page 31

1. Open the front cover.
2. Fan a stack of paper and tap the edges of the stack on a flat
surface to even it up.
3. Adjust the paper guides to match the size of your paper.
Load the stack of paper into the MP Tray with the printable
side up.
4. Close the front cover.
5. Slide the paper stopper to match the size of your paper.
Paper Handling
1-3
Page 32

Manually loading paper
Manually loading paper is useful when you want to check the
print quality after each page is printed.
You can manually load paper ranging in size from 92 × 148.5
mm (3.6 × 6 inches) to 216 × 356 mm (8.5 × 14 inches). You can
also load up to 10 envelopes in the MP Tray.
Note:
Because thickness and surface characteristics are especially important
for envelopes, test a sample for print quality and proper feeding before
you buy a large number of envelopes.
This loading procedure is almost the same as the procedure for
automatic paper feeding, except you load paper sheet-by-sheet
in the MP Tray, send print data to print the first page, and
press the
On Line
paper manually, follow the steps below.
1. Access the printer driver menus in one of the following ways:
Note:
If you have not installed the printer driver, see your
Ready!
guide for installation instructions.
button to print each following page. To load
Getting
1-4
For access through your application software, click the
or
Print
also may need to click
combinatio n of thes e butt ons .
For direct access through Windows 3.1 and Windows NT,
double-click the
box. Next, click
Printers li st box, and then click the
Paper Handling
Printer Setup
command in the File menu. You
Setup, Options, Properties
Printers
Epson EPL-N1200
icon in the Control Panel dialog
in the Installed
Setup
button.
, or a
Page 33

For direct access through Windows 95, click
Settings
EPL-N1200
appears. Be sure to right-click the printer icon.
, and click
icon and click
Printers
. Next, right-click the
Properties
in the menu that
Start
, point to
Epson
2. The Print Settings menu appears. Click on the arrow next to
the Paper Source box to see the list of sources available.
Click
Manual feed
.
3. Click the
Paper
tab to see the Paper menu. Click the arrow
next to the Paper Size box to see the list of available paper
sizes.
Scroll through this list and click on the paper size that matches
the paper you will load in the printer.
4. Open the front cover. Remove any paper remaining in the
MP Tray.
5. Adjust the paper guides to match the paper size you are
using. Insert a sheet into the MP Tray with the printable
side up, as far as it will go. Close the front cover.
Paper Handling
1-5
Page 34

6. Send a print job from your application. The control panel
display shows Manual Feed and the selected page size.
7. Press
On Line
8. Insert another sheet and press
to print. A sheet of paper is loaded and printed.
On Line
again to print the next
page of print data, if necessary. Repeat this step for every
page to be printed.
Selecting the paper size
By default, the printer driver is set up for A4 size paper to be
loaded in the Multi Purpose Tray. If you load paper of a
different size, you may need to change the paper size setting
using one of the following methods.
Using the printer driver:
Choose the paper size in the Print Settings tab, or the Paper tab.
For more information on using the printer driver, see Chapter 3.
Using the Remote Control Panel utility:
Bring up the Remote Control Panel by typing
DOS prompt. Select the appropriate emulation from the main
Remote Control Panel window and click the
button. Then choose the paper size.
EPRCPO
Page Setup
at the
Using the SelecType mode:
For information on changing the paper size in SelecType mode,
see Chapter 6.
Note:
If you want to use a custom-size paper from 92 × 148.5 mm (3.6 × 6
inches) to 216
the size setting according to one of the following methods.
1-6
Paper Handling
×
356 mm (8.5 × 14 inches), use the MP Tray and make
Page 35

Access the printer driver (see Chapter 3), click inside the paper
size box on the paper menu, and type an original name for your
paper. When you finish adjust the Width, Height, and
Measurement Unit settings to match your custom paper, press
Enter
the
key and your custom paper size will be saved.
Access SelecType mode (see Chapter 6) and set page size to
(custom).
Access the Remote Control Panel utility (see Chapter 5) and set
page size to
Custom
.
Choosing Paper
Note:
Since the quality of any particular brand or type of paper may be
changed by the manufacturer at any time, EPSON cannot guarantee
the quality of any type of paper. Always test samples of paper stock
before purchasing large quantities or printing large jobs.
You can use many kinds of media including stock paper,
envelopes, labels, and overhead projector transparencies. The
printer feeds most types of media automatically from the MP
Tray. This section describes the paper feed and delivery
choices and how to select and load paper.
The type of paper you use in your printer can affect the quality
of your printed output. The smoother the paper you use, the
smoother and sharper your printing looks.
CTM
For best results, store your paper supply in its original
wrapper. Your printout can be marred by moisture absorbed in
the paper. Do not store paper in a humid or damp
environment.
Below are some recommendations for selecting paper and
other print media for the printer.
Paper Handling
1-7
Page 36

Labels
Use only labels designed for laser printers or plain-paper
copiers.
To prevent the adhesive from coming into contact with printer
parts, always use labels that completely cover the backing
sheet so that no gaps occur between the individual labels.
You should test the label sheet for leaking adhesive by pressing
a sheet of paper on top of a sheet of labels. If the paper sticks,
do not use the labels.
Envelopes
Load envelopes with the print surface facing up. The printing
quality on envelopes may be irregular because different parts
of an envelope have different thicknesses. If the printing is too
light, adjust the print density with the printer driver, the
Remote Control Panel utility, or SelecType.
Colored paper
You can use colored paper as long as it meets the weight limits
shown in the paper specifications. Do not, however, use coated
paper (paper to which a clear or colored coating has been
added).
Transparencies
You can use overhead projector transparencies and adhesive
drafting film if they are made for use with plain-paper copiers
or laser printers. Use the MP Tray to print on these materials.
1-8
Paper Handling
Page 37

Chapter 2
Understanding Your Printer
The Control Panel . . . . . . . . . . . . . . . . . . . . . . . . . 2-2
Overview . . . . . . . . . . . . . . . . . . . . . . . . . . . . 2-2
Display . . . . . . . . . . . . . . . . . . . . . . . . . . . . . . 2-3
Indicator lights . . . . . . . . . . . . . . . . . . . . . . . . . 2-4
Buttons . . . . . . . . . . . . . . . . . . . . . . . . . . . . . 2-5
2
Understanding Your Printer
2-1
Page 38

This chapter tells you how to:
Control the printer from your computer
Use the control panel
Getting acquainted with your printer’s control panel may help
you get more from your printer. For more information on the
SelecType settings availabe from the control panel, including
the OneTouch modes, see Chapter 6.
Appendix E shows all SelecType menu categories and options.
It can be used as a guide whenever you use SelecType.
The Control Panel
Overview
The printer control panel gives you easy control over most
common printer operations. The panel is made up of three
elements: a liquid crystal display, indicator lights, and buttons.
The display and indicator lights tell you the current status of
the printer, and you can use the buttons to select printer
settings and functions. However, software settings override
these settings.
2-2
Understanding Your Printer
Page 39

Display
The display shows the following:
Status messages, such as Warming Up, indicate the printer’s
current status.
Error messages, such as Paper Out, identify maintenance
procedures you must perform or error conditions you need
to correct.
SelecType options, such as Emulation, allow you to control
printer mode, font selection, paper handling, and several
other printer functions.
For solutions to error messages and maintenance information,
see Chapter 7. For full information on SelecType, see Chapter 6.
lights
display
buttons
lights
Understanding Your Printer
2-3
Page 40

Indicator lights
On Line
Form Feed
Continue
OneTouch
mode 1
On when the printer is on line, indicating
the printer can receive and print data.
When the printer is off line, this light is off.
The light flashes as the system switches
between on-line and off-line status.
On when data is received and stored in the
printer’s buffer but not yet printed.
Flashing indicates the printer is processing
data. When no data remains in the printer
buffer (the section of memory reserved for
receiving data), this light is off.
Flashes when an error is detected or a
maintenance procedure must be
performed. At the same time, an error or
maintenance message appears on the
display.
On when the printer is in OneTouch
mode 1. For details on the OneTouch
modes, see page 6-20.
2-4
OneTouch
mode 2
On when the printer is in OneTouch
mode 2. For details on the OneTouch
modes, see page 6-20.
SelecType
On when the printer is in SelecType mode.
See Chapter 6 for more information.
Understanding Your Printer
2-1c
Page 41

Buttons
Item
Menu
SelecType
Continue
(Reset)
On Line
SelecType
(ALT)
Value
Enter
On Line
Form Feed
Switches the printer between on line and
off line status.
Selects a OneTouch mode or SelecType
mode. Press this button once to enter
OneTouch mode 1. Press this button
again to enter OneTouch mode 2. Press
this button once more to enter SelecType
mode. Pressing this button while in
SelecType mode returns the printer to on
line status. See Chapter 6 for more
information.
ALT + Menu,
Item, Value,
or Enter
Advances the parameter or setting shown
to the next value in each group. If used in
combination with the
button in
ALT
SelecType mode, it returns the parameter
or setting shown to its previous value.
Understanding Your Printer
2-5
Page 42

Menu
Selects the corresponding OneTouch
mode setting listed above this button, or
selects the SelecType menu if in
SelecType mode. Press this button when
the printer is on line to enter SelecType
mode.
Item
Value
Enter
Form Feed
Continue
(
Reset
)
Selects the corresponding OneTouch mode
setting listed above this button or selects
the function available within the current
menu after entering the SelecType mode.
Selects the corresponding OneTouch
mode option listed above this button, or
selects the parameter available within the
current item, after entering the Item of the
SelecType mode.
Selects the corresponding OneTouch
mode option listed above this button, or
accepts the setting currently shown on the
display as a new setting when in
SelecType mode. Press this button two
times when the printer is on line to print
the status sheet.
When the printer is off line and data
remains in the printer’s memory, prints
out the data and clears the buffer.
Enables the printer to resume printing
after certain maintenance-required
conditions or errors have been cleared. If
the
Continue
status or error message on the display
and correct the problem as described in
Chapter 7. If used in combination with
the
button, the printer is reset.
ALT
light is flashing, read the
2-6
Understanding Your Printer
Page 43

Understanding Your Printer
2-7
Page 44

Chapter 3
Making Printer Driver Setting s
Using the Printer Driver . . . . . . . . . . . . . . . . . . . . . . 3-2
Understanding the required settings . . . . . . . . . . . . . 3-3
Accessing the driver menus . . . . . . . . . . . . . . . . . . 3-4
How to Make settings on the menus . . . . . . . . . . . . . 3-4
Saving settings . . . . . . . . . . . . . . . . . . . . . . . . . 3-5
Deleting settings . . . . . . . . . . . . . . . . . . . . . . . . 3-5
Restoring the driver default settings . . . . . . . . . . . . . 3-5
Getting help from the printer driver . . . . . . . . . . . . . 3-6
Exiting the printer driver . . . . . . . . . . . . . . . . . . . 3-6
Accessing the Font Manager window . . . . . . . . . . . . 3-6
Accessing the Softtray Manager window . . . . . . . . . . 3-6
Accessing the Overlay Manager window . . . . . . . . . . 3-7
Driver Setting Descriptions . . . . . . . . . . . . . . . . . . . . 3-7
Printer Settings menu . . . . . . . . . . . . . . . . . . . . . 3-7
Paper menu . . . . . . . . . . . . . . . . . . . . . . . . . . . 3-10
Adding a new size to the Paper Size list . . . . . . . . . . . 3-12
Printer SelecType menu . . . . . . . . . . . . . . . . . . . . 3-13
Printer Options menu . . . . . . . . . . . . . . . . . . . . . 3-15
3
Font Manager Window . . . . . . . . . . . . . . . . . . . . . . 3-17
Adding fonts . . . . . . . . . . . . . . . . . . . . . . . . . . 3-20
Deleting fonts . . . . . . . . . . . . . . . . . . . . . . . . . . 3-22
Changing a font name . . . . . . . . . . . . . . . . . . . . . 3-23
Copying and moving fonts to another printer port . . . . . 3-23
Softtray Manager Window . . . . . . . . . . . . . . . . . . . . 3-25
Creating a softtray . . . . . . . . . . . . . . . . . . . . . . . 3-26
Overlay Manager Window . . . . . . . . . . . . . . . . . . . . 3-27
Creating an overlay . . . . . . . . . . . . . . . . . . . . . . . 3-28
Deleting an overlay . . . . . . . . . . . . . . . . . . . . . . . 3-29
Making Printer Driver Settings
3-1
Page 45

This chapter describes the available settings for your
®
Microsoft
Windows® printer driver. For information on
installing the printer driver and making basic settings, see the
Getting Ready! guide that came with your printer.
A printer driver is a custom-designed program that works with
the software on your computer to send codes that run (or
“drive”) your printer. These software codes select the graphic
resolution, orientation, copies, and other features of the
document you are printing.
Using the Printer Driver
Printer driver settings are divided among four menus that are
identified by the tabs on the tops of the menus: Print Settings,
Paper, Printer SelecType, and Printer Options. Each menu has
a variety of settings that affect printing as described in “Driver
Setting Descriptions” on page 3-7.
The Driver Settings window, shown below, contains all the
settings you can make through the driver.
3-2
Making Printer Driver Settings
Page 46

Understanding the required settings
Before printing, you must make a few required settings. These
are listed below. Choose the settings to match your document
requirements. For more detailed information, see “Driver
Setting Descriptions” on page 3-7.
Print Settings Menu
Graphic
Resolution
Halftone
Paper Format
Paper Source
Orientation
Copies
Sets the degree of detail in your printout.
The numbers stand for the horizontal and
vertical dots per inch (dpi). The higher the
numbers, the more detailed the printout.
Sets the pattern, or method, your printer
uses to print graphics. This is also called
grayscale.
Indicates the size of the paper to be printed.
Tells the printer which tray to take paper
from.
Sets the direction of printing on the page,
portrait or landscape. This page is portrait.
Sets the number of copies to be printed.
Making Printer Driver Settings
3-3
Page 47

Accessing the driver menus
Printer driver menus contain organized groups of print
options. There are three ways to access the driver menus,
choose the one that best suits your needs.
For access through your application software, click the
or
Printer Setup
need to click
of these buttons.
For direct access through Windows 3.1 and Windows NT,
double-click the
box. Next, click
list box, and then click the
For direct access through Windows 95, click
Settings
EPL-N1200
appears. Be sure to right-click the printer icon. Select the
Details
Setup
When you access the Driver Settings window, the Print
Settings menu appears. To bring another menu to the front of
the window, click the tab for that menu near the top of the
screen.
, and click
tab at the top of the window, and then click the
button.
command in the File menu. You also may
Setup, Options, Properties
Printers
Epson EPL-N1200
icon and click
icon in the Control Panel dialog
in the Installed Printers
button.
Setup
Printers
. Next, right-click the
Properties
, or a combination
Start
in the menu that
Print
, point to
Epson
How to Make settings on the menus
You can make settings in any of the following ways:
Click the option button or name.
Click the check box.
Click the scroll box on the scroll bar and drag it.
3-4
Making Printer Driver Settings
Page 48

Click on the pointer to open a drop-down list, and then
highlight an item on the list to select it.
Click the text box, then enter a number or text.
Hold down the
representing the setting.
key and type the underlined character
Alt
If you need more information, see your Windows
User’s Guide
Saving settings
When you have selected the settings you want and you’re
ready to print, click the OK button. This exits you from the
driver setup and saves your selections. Your settings stay in
effect until you make additional changes and choose the
button again.
If you want to save your new settings, after making the choices
you want, type a unique name for the new settings in the
Default box on the Print Settings menu and click OK. Then
when you are ready to print, open the Default drop-down list
by clicking the arrow next to the Default box and select the
name of the settings you want to make.
Deleting settings
If you decide you want to delete your settings, select the name
of the settings that you want to delete in the Default box on the
Print Settings menu and click the
Delete
button.
.
OK
Restoring the driver default settings
If you decide you want to use the original factory settings,
select
Driver default
in the Default drop-down list.
Making Printer Driver Settings
3-5
Page 49

Getting help from the printer driver
If you are ever unsure about the meaning or purpose of an item
in a window, do one of the following:
Hold the mouse pointer over an item in the window for a
couple of seconds. A short description of that item appears.
Click the
the current window.
button. This displays help information for
Help
Exiting the printer driver
There are two ways to exit the Driver Settings window:
Click the OK button at the bottom of the window to save all
the settings you made and exit the printer driver.
Click the
you made and exit the printer driver.
Cancel
button to ignore all the current changes
Accessing the Font Manager window
Click the
window to access the Font Manager window. See page 3-17 for
more detailed information about the Font Manager.
button at the bottom of the Driver Settings
Fonts
Accessing the Softtray Manager window
Click the
window to access the Softtray Manager window. See page 3-25
for more information about the Softtray Manager.
3-6
Making Printer Driver Settings
Overlays
button at the bottom of the Driver Settings
Page 50

Accessing the Overlay Manager window
Click the
window to access the Softtray Manager window. Then click the
Manage Overl ays
Overlay Manager. See page 3-27 for more information about
the Overlay Manager.
Overlays
button at the bottom of the Driver Settings
button on the Overlay menu to display the
Driver Setting Description s
This section describes the settings you can make with the
printer driver and provides a general overview of each menu.
Printer Settings menu
Use this menu to select general print settings. When you access
the Driver Settings window, the Print Settings menu appears
by default.
Making Printer Driver Settings
3-7
Page 51

Graphics Resolution
Use this drop-down list to select the resolution you want to
use for printing graphics. However, your choices for
graphics resolution depend on your selection from the
Device Resolution drop-down list in the Printer SelecType
menu. If you set Device Resolution to
can choose
in the Graphics Resolution list. If you set the Device
Resolution to
dpi, 150 × 150 dpi
Resolution list.
600 × 600 dpi, 300 × 300 dpi
Low (300 dpi)
or
, you can choose
75 × 75 dpi
High (600 dpi)
, or
150 × 150 dpi
300 × 300
from the Graphics
Halftone
Use this drop-down list to select a halftoning method when
printing graphics. The following settings are available in
this list.
Dithering
This method uses the standard Windows dithering
patterns, and is the one you should normally select.
Screening (default)
This method controls color intensity by using variable dot
sizes. It is similar to the rastering method used to produce
newspaper images. You should use this method for
scanned images, for bitmap printing, or when your output
will be photocopied.
, you
3-8
Error Diffusion
You should use this method for photographic images or
equivalent drawings. This setting is not available if you
select
EPSON GL/2
in the Printer SelecType menu.
Making Printer Driver Settings
in the Graphics Mode drop-down list
Page 52

Paper Format
Use this drop-down list to select the paper size you have
loaded in the current paper source. See the section below
for more information. The illustration next to the list
changes according to the paper size you select. Your
choices are:
A4 210 × 297 mm
Envelope C6 114 × 162 mm
A5 148 × 210 mm
Letter 8.5 × 11 inches
Executive 7.25 × 10.5 inches
Legal 8.5 × 14 inches
International B5 176 × 250 mm
JIS B5 Paper
Envelope DL
Commercial-10
Monarch
C5 6.36 × 9.02 inches
US half
Government Legal
Government Letter
F4
Paper Source
Use this drop-down list to select the paper source. The usual
selections available in this list are:
(default),
the optional lower paper cassette and select
cassette
drop-down list of the Printer Options tab, your choice of
paper sources will be:
MP/Lower Cassette [2 or 1]
Manual feed
or
2 Lower paper cas s ettes
, and
Lower Cassette [2 or 1]
Making Printer Driver Settings
Multi Purpose Tray
. However, if you install
Auto
Lower paper
in the Feeder
.
or
3-9
Page 53

Orientation
Use this drop-down list to select the orientation: either
(default) or
Landscape.
Copies
Use the scroll arrows or click the text box and enter a number
using your keyboard to specify the number of copies you
want. You can enter from 1 to 999.
Paper menu
Use this menu to select duplex (double-sided) printing, paper
size, and printable area.
Portrait
3-10
Making Printer Driver Settings
Page 54

Duplexing
Use this drop-down list to select the duplex mode for
double-sided printing. The selections available in this list
are:
Duplex OFF
(default),
Top Binding
, and
Left Binding
.
Top Binding
Left Binding
Duplexing tells the printer to print every other page; then,
after you flip over and reinsert the pages, the printer prints
the alternate pages on the back of the previously printed
pages.
is useful to bind the printout at the top, while
is useful for binding on the left side.
Paper Size
Use this drop-down list to select a paper size for printing.
You can use any of the standard paper sizes that are
automatically listed by the printer driver, or you can edit
the list to create your own selection of paper sizes.
For more information on how to create your own selection,
see “Adding a new size to the Paper Size list” on page 3-12.
Remove
Click this button to delete the paper size that is selected in the
Paper Size list. You can use this button to shorten the list to
contain only the paper sizes you need.
Restore
Click this button to restore the Paper Size list so it includes all
of the preset paper sizes.
Size
The two boxes in this block show the vertical and horizontal
dimensions of the paper selected in the Paper Size list. You
can also input values into these boxes to change the
dimensions.
Making Printer Driver Settings
3-11
Page 55

Measurement Unit
Use this drop-down list to select the unit of measurement
you want to use. The settings available in this list are:
(default),
cm
As soon as you change the measurement unit, the values
in the Size block change automatically to match.
inch, Pixel, Pica, Point
.
Adding a new size to the Paper Size list
Use the following procedure to specify a custom paper size of
your own and add it to the Paper Size list.
1. In the Driver Settings window, click the
2. Move the cursor over the Paper Size box, click once, and
input the name of the paper size.
3. Use the Measurement Unit drop-down list to specify the unit
of measurement you want to use.
4. Click on the dimension boxes in the Size block and input
values for the horizontal and vertical dimensions of the
paper you are adding.
5. Click the OK button at the bottom of the window to save the
new paper size.
Paper
tab.
3-12
Making Printer Driver Settings
Page 56

Printer SelecType menu
Use this menu to set resolution, toner usage, power
consumption, and other options.
Graphics Mode
Use this drop-down list to select a graphics mode. The
selections available in this list are:
EPSON GL/2
, and
Pure Raster
Raster - internal Fonts
.
Device Resolution
Use this drop-down list to select device resolution. The
available settings are:
(
300 dpi
your printout, see “Graphics Resolution” on page 3-8.
). For information on how these settings affect
High (600 dpi
Making Printer Driver Settings
) (default) and
,
Low
3-13
Page 57

RITech
Use this drop-down list to select the RITech (Resolution
Improvement Technology) setting you want to use. The
settings available in this list are:
Light, Off
. For normal printing, the default is sufficient.
Dark, Medium
(default),
Density
Adjust the print density to make the printout darker or
lighter. The settings available in this list are:
Medium
(default),
Light
, and
Lightest
.
Darkest, Dark
Show all font names
When this checkbox is selected, EPSON fonts are added to
your application’s font lists. If you deselect this option, the
printer’s internal fonts will not be displayed in the font list.
BiDi Mode
Use this drop-down list to enable the bidirectional interface
to send printer status back to the PC. Leave the default
value set to “
to print.
Bidi OFF
” if your system hangs when you try
,
Time-out
Use this drop-down list to specify how long the printer should
wait for data before terminating the current print job. You
can specify a time as short as 5 seconds or as long as 300
seconds.
Toner Save Mode
Use this drop-down list to switch the Toner Save Mode on and
off. When the Toner Save Mode is switched on, the printer
consumes less toner but print quality is reduced.
3-14
Making Printer Driver Settings
Page 58

Low Power Consumption
When Low Power Consumption is turned on, the printer goes
into a standby mode after being idle for 30 minutes. It takes
about 60 seconds for the printer to warm up again.
Auto Continue
Use this drop-down list to switch Auto Continue on and
off. This permits the printer to automatically recover from
a print overrun or insufficient memory error. The printer
then continues printing after a wait of five seconds.
When Auto Continue is off, you must press the button on
the printer control panel to resume printing. In most cases,
leave Auto Continue off so you are aware of the error
messages and can make the necessary corrections. You
might want to set Auto Continue on when printing long jobs
or when you are away from the printer for long periods.
Printer Options menu
Use this menu to set printer options such as available memory
and paper source.
Making Printer Driver Settings
3-15
Page 59

Memory
Use this drop-down list to check the amount of memory
installed in your printer.
Page Protect
Use this list to make use of the Page Protect function. This
allows you to allocate additional printer memory for
printing data, as opposed to receiving it. You may need to
use Page Protect if you are printing a highly complex page
and do not have sufficient memory. If a memory error
occurs, change the setting to ON and reprint your data.
This reduces the amount of memory reserved for receiving
data so your computer may take longer to send the print
job, but it will allow you to print complex jobs. Page Protect
usually works best if set to
your printer’s memory if memory errors continue to occur.
Note:
Changing the Page Protect setting reconfigures the printer’s
memory which causes any downloaded fonts to be erased.
. You will need to increase
Auto
Image Optimum
Use this drop-down list to reduce the amount of graphics data
when the data reaches the memory limit, allowing complex
documents to be printed. When this mode is on, the
graphics quality is reduced. The options are:
Auto
Feeder
Use this drop-down list to select the feeder. The selections
available in this list are:
Cassette
3-16
Making Printer Driver Settings
OFF, ON
.
Standard
, and
2 Lower Paper Cassette
(default),
.
Lower Paper
, and
Page 60

Installed Cartridge
Not available with this printer.
Advanced...
Click here to print a status sheet or a font sample.
Font Manager Window
The Font Manager window handles the installation and all
administration of printer fonts. Fonts of various formats can be
added, deleted, and copied using this window. You can also
specify whether the font being installed is temporary or
permanent.
Making Printer Driver Settings
3-17
Page 61

Installed Fonts
This list shows all the fonts that are already installed. Fonts
whose names are marked with a check are permanent.
Whenever you highlight a font name in this list, the font’s
format, character set, name, and other information appear
in the status line.
Use the procedure described under “Adding fonts” on page
3-20 to install fonts and add their names to the Installed
Fonts list.
Available Fonts
This list is next to the Installed Fonts list and shows all fonts
that are currently available for installation. Each font name
includes an icon or abbreviation that indicates the format of
that font. Whenever you select a font by highlighting its
name in this list, the font’s format, character set, name, and
other information appear in the status line.
Delete
Click this button to delete (de-install) the font whose name is
highlighted in the Installed Fonts list.
Edit Font
3-18
Click this button to display the Edit Font window to edit the
highlighted font in the Installed Fonts list. You can use the
Edit Font window to change the name of the font, the font
description, and ID.
Making Printer Driver Settings
Page 62

Temporary/Permanent
Click on these radio buttons to specify whether the font
selected in the Installed Fonts list is temporary or
permanent. Permanent fonts remain in printer memory
until power is switched off. Temporary fonts must be
downloaded to the printer for each print job.
Add Fonts
Click this button to open the Add Fonts window. Use this
window to select the drive and directory that contains the
fonts you want to add. For details on using this window,
see “Adding fonts” on page 3-20.
After selecting the directory that contains the fonts you want
to add, click OK to return to the Font Manager window.
The names of the fonts contained in the directory you
selected will appear in the Available Fonts list.
You can also exit the Add Fonts window by clicking
This returns you to the Font Manager window.
Copy Port
Click this button to open the Copy Port window. Use this
window to copy or move installed fonts to another printer
port. For details on using this window, see “Copying and
moving fonts to another printer port” on page 3-23.
Exit
Click this button to exit the Font Manager window and return
to the Driver Settings window.
Making Printer Driver Settings
Cancel
3-19
.
Page 63

Adding fonts
Use the following procedure to install soft (downloadable)
fonts. You can also specify certain fonts as being permanent,
which means they are kept in printer memory until power is
switched off.
1. Open the Font Manager window.
2. Click
3. Select the drive that contains the fonts you want to add by
4. Choose the name of the directory that contains the fonts you
5. After you highlight the name of the directory that contains
Add Fonts
Initially, the list in the Add Fonts window contains drive
names.
double-clicking on its drive name, or by highlighting the
drive name and then clicking OK.
The list changes to show all of the directories contained on the
drive you selected, in addition to the drive names.
want to add and highlight its name in the list.
To open a directory, double-click on the directory name, or
highlight the directory name and then click OK.
The directory name followed by
previous directory. By selecting
through the directories.
the fonts you want to add, click OK to return to the Font
Manager window.
.
on the list indicates the
[..]
, you can backstep
[..]
3-20
The names of the fonts contained in the directory you selected
using the Add Fonts window are shown in the Available
Fonts list.
Making Printer Driver Settings
Page 64

6. Select the fonts you want to install by highlighting their
names in the Available Fonts list.
As soon as you highlight a font name, the arrow button
between the two lists points to the left, indicating the fonts
will be transferred to the Installed Fonts list.
7. After selecting all of the fonts you want to install, click on the
left-pointing arrow button to begin the installation.
The fonts are copied into a directory named PCLFNT, which
is created by the Font Manager. If you want to use a
different directory name, specify the name you want to use
before clicking OK.
8. Now you can specify permanent fonts (fonts that stay in
printer memory until you switch power off). Select a font
name in the Installed Fonts list by highlighting its name,
and click on the
Permanent
radio button.
Note:
You must specify permanent fonts one-by-one. If you select more
than one font name in the Installed Fonts list, the
Permanent
and
radio buttons will become dimmed on the
Temporary
display (which indicates they cannot be used). If you want to
make more than one font permanent, you must repeat the above
step as many times as necessary. Permanently installed fonts
may make printing quicker, but they also reduce the amount of
memory available for printing graphics and complex pages.
9. After you finish installing the fonts, click
the Driver Settings window.
Making Printer Driver Settings
to return to
Exit
3-21
Page 65

Deleting fonts
The following procedure deletes fonts from printer memory. It
also gives you the option of deleting the font file from the
temporary file on your computer’s hard disk. Unless you plan
to use a font later, it is a good idea to remove it from the hard
disk to free up storage space.
1. Open the Font Manager window.
2. Select the font you want to delete by highlighting its name in
the Installed Fonts list.
3. After selecting the font, click
A message appears asking if you want to delete the selected
font from your computer’s hard disk.
4. Click
memory and your computer’s hard disk.
Selecting No deletes the selected font from printer memory but
leaves it on the hard disk. The font name will not appear in
any menus, but the font will continue to take up hard disk
space.
5. After you finish deleting the font, click
Driver Settings window.
Note:
The above delete operation does not remove factory default fonts from
printer memory.
to delete the selected font from both printer
Yes
Delete
.
to return to the
Exit
3-22
Making Printer Driver Settings
Page 66

Changing a font name
This feature comes in handy when you want to add a font that
has the same name as an already installed font. You should
change the name of the installed font before adding the new
one.
1. Click the
window to open the Font Manager window.
2. Select the font whose name you want to change by
highlighting its name in the Installed Fonts list.
3. After selecting the font, click
4. Type in the new name for the selected font in the window
that appears.
5. After typing in the new name, click OK.
The new name appears in the Font Manager’s Installed Fonts
list and in all Windows applications.
6. After you finish renaming the font, click
Driver Settings window.
button at the bottom of the Driver Settings
Fonts
Edit Font
.
to return to the
Exit
Copying and moving fonts to another printer port
Use the following procedure to copy or move installed fonts to
another printer port when you are using more than one
EPSON printer or if you change the port to which your printer
is connected.
1. Click the
window to open the Font Manager window.
2. Click
Copy Port
A window appears with a list of ports.
button at the bottom of the Driver Settings
Fonts
.
Making Printer Driver Settings
3-23
Page 67

3. Select the port to which you want to copy or move the fonts
by highlighting the port name in the list.
4. After selecting a port name, click OK to return to the Font
Manager window.
and
Move
button is now a
Port
You can use the
buttons have been added. Also, the
Copy
Close Port
Close Port
button.
button to abort the font copy/move
Copy
operation at any time.
5. Select the fonts you want to copy or move by highlighting
their names in the Installed Fonts list.
6. After selecting the fonts, click
Clicking
causes the fonts to be moved to the list on the
Move
Move
or
Copy
.
right for the port you selected. The move operation deletes
the fonts from the Installed Fonts list.
Clicking
causes the fonts to be copied to the list on the
Copy
right for the port you selected. The copy operation leaves
the fonts in the Installed Fonts list.
7. After you finish copying or moving the fonts, click
Exit
to
return to the Driver Settings window.
3-24
Making Printer Driver Settings
Page 68

Softtray Manager Window
If your application program does not include a softtray
management function, use the Softtray Manager window to
merge your document files with a previously defined overlay
and assign the overlay to specified pages of the document.
The button functions for this window are described below.
Note:
If your application software has a Header/Footer function, use that
instead of Softtray Manager and Overlay Manager.
Manage Overlays
Click this button to switch to the Overlay Manager window.
Zoom
Click this button to show a full-page preview of the selected
page.
Making Printer Driver Settings
3-25
Page 69

Delete
Click this button to delete an overlay.
Exit
Click this button to close the Softtray Manager window and
return to the previous window.
Creating a softtray
After creating an overlay, follow these steps to create and
assign a softtray. See the next section for details about overlays.
1. In the Driver Settings window, click the
you see the Overlay menu of Softtray Manager.
2. Click on the page or pages (represented by page icons) that
you want the overlay to print on. If you want to assign the
overlay to print on a range of pages, click on the
tab and then enter the desired values in the Start with page
or Page range from 1 to option boxes.
3. Click the
above the page icons, select the overlay you want.
4. Open the Active Softtray list by clicking the arrow next to it.
5. Choose a softtray from this list or assign a unique name to the
softtray by entering text in the box.
6. Click
All subsequent documents will be printed with this softtray.
To stop overlay printing, open the printer driver and
deselect the overlay. You can always delete previously
defined softtrays and overlays.
Exit
Overlay
.
tab. From the list of available overlays
Overlays
button;
Options
3-26
Making Printer Driver Settings
Page 70

Overlay Manager Windo w
The Overlay Manager window lets you define, create, and
manage overlays. Overlays are stored on the hard disk of your
computer, and make it possible to include company logos,
forms, and other types of overlays in a printed document. You
can assign previously defined overlays to specific pages with
the Softtray Manager. The Overlay Manager also lets you
assign one overlay to different softtrays.
Making Printer Driver Settings
3-27
Page 71

Creating an overlay
To create an overlay, follow these steps:
1. From the Driver Settings window, click the
2. Click the
Manager window appears.
3. Make sure the Create menu is selected, then input a name for
the overlay you want to define in the Description box.
4. Click
5. If you are using the Overlay Manager or Softtray Manager
for the first time, a dialog box appears showing you the
name of the default overlay directory. Click OK to save
your overlay in the default directory.
If you want to store your overlay in a different directory, click
Cancel
the Description box. Make sure the
button is checked. Next, click
6. In the dialog box that appears, click OK. The next file you
send to the printer from an application program, such as
Windows Write or Notepad, will be saved as the overlay
using the name you entered earlier. If you want to stop the
procedure, click
Manage Overlays
Create
.
and then input the entire path to the directory in
Cancel
button. Then the Overlay
Capture Printout
Create
.
Overlays
.
button.
radio
7. Exit the printer driver and open the application that you will
use to create the overlay.
8. Print the file that you want to save as the overlay. It is
possible to save any kind of file as an overlay. When
printing starts, a message appears telling you the overlay
was programmed successfully.
3-28
Making Printer Driver Settings
Page 72

Deleting an overlay
To delete an overlay, follow these steps:
1. Click the
2. Use the Available Overlays list to select the overlay that you
want to delete.
3. Click
4. Click
highlighted overlay.
Note:
If you check the Delete Overlays from disk radio box and you click the
Delete
hard disk.
Edit/Delete
Delete
Yes
button, the highlighted overlay will be deleted from your
.
in the dialog box that appears to delete the
tab in the Overlay Manager window.
Making Printer Driver Settings
3-29
Page 73

3-30
Making Printer Driver Settings
Page 74

Chapter 4
Options
Printer Options . . . . . . . . . . . . . . . . . . . . . . . . . . . 4-2
500-Sheet Lower Paper Cassette . . . . . . . . . . . . . . . . . . 4-3
Installing the lower paper cassette . . . . . . . . . . . . . . 4-3
Loading paper into the 500-sheet lower paper cassette . . . 4-5
Memory Modules . . . . . . . . . . . . . . . . . . . . . . . . . . 4-7
Installing a memory module . . . . . . . . . . . . . . . . . . 4-7
Removing a memory module . . . . . . . . . . . . . . . . . 4-11
ROM Module . . . . . . . . . . . . . . . . . . . . . . . . . . . . 4-11
Optional Interfaces . . . . . . . . . . . . . . . . . . . . . . . . . 4-12
Installing the LocalTalk/Serial module . . . . . . . . . . . . 4-13
Installing an optional interface card . . . . . . . . . . . . . 4-15
Using the Serial Interface . . . . . . . . . . . . . . . . . . . . . . 4-17
Using the serial interface utility . . . . . . . . . . . . . . . . 4-19
Options
4
4-1
Page 75

Printer Options
You can add to your printer’s capabilities by installing any of
the following options:
500-Sheet Lower Paper Cassette (C81262✽: A4, C81263✽:
Letter) increases paper feeding capacity. Each cassette can
hold up to 500 sheets of one kind of paper: A4 or Letter.
You can’t switch back and forth between paper sizes in one
cassette. However, you can use up to two optional cassettes
at the same time. See page 4-3.
Note:
The asterisk (✽) is a substitute for the last digit of the product
number, which varies by country.
EpsonScript Level 2 ROM module (C83219✽) generates
crisp PostScript output. See page 4-11.
Optional memory modules expand your printer’s memory.
See page 4-7.
Optional interface cards and modules provide a link that
enables you to use the EPL-N1200 with a Macintosh,
LocalTalk network, IBM mainframe, and so on. See page
4-12.
If you purchased your printer and options at the same time,
first set up the printer and run the print test by following the
instructions in the Getting Ready! guide. Then install the
options.
Caution:
c
4-2
Before installing an option, carefully read the manual that
comes with the option.
Options
Page 76

500-Sheet Lower Paper Cassette
The optional lower paper cassette gives you a second paper
source, in addition to the MP Tray. You can install up to 2
optional cassettes (for a maximum of 1,250 sheets loaded in the
printer, including the MP Tray). This section describes how to
install the cassette and load paper.
Installing the lower paper cassette
1. Turn off the printer.
2. Unplug the printer’s power cord from the electrical outlet
and from the printer.
3. Remove all interface cables from the interface connectors.
4. Lift the printer. Make sure the printer and cassette are facing
the same way. Align the pins on the cassette with the holes
on the bottom of the printer, and then lower the printer
until it rests securely on the cassette.
Options
4-3
Page 77

Note:
❏
The printer is heavy, so you may need to have someone help
you lift it.
❏
If you are installing the second optional cassette, lift the
printer off the first cassette, fit one cassette on top of the
other, and replace the printer as described above.
5. Reconnect any interface cables you removed.
6. Make sure the power is turned off and then plug the power
cord into the printer and into an electrical outlet.
7. Turn on the printer.
To confirm that the lower paper cassette is installed correctly,
print a status sheet. If the cassette is not listed on the status
sheet, try reinstalling it.
Be sure to select the paper source in your application program.
Since the selection method varies from application to
application, see your software documentation for more
information.
4-4
Options
Page 78

Loading paper into the 500-sheet lower paper
cassette
1. Pull out the paper tray from the paper cassette.
2. Press down the plate in the paper tray until it locks into
position.
Options
4-5
Page 79

3. Fan a stack of paper and tap it on a flat surface to even the
edges. Insert the paper face-up into the tray.
4. Replace the paper tray in the paper cassette.
4-6
You are now ready to print using the lower paper cassette.
Options
Page 80

Memory Modules
By installing a Single In-line Memory Module (SIMM) in both
open slots, you can increase printer memory up to 64 MB. You
may want to add additional memory if you are having
difficulty printing complex, graphics-intensive pages or if you
regularly use numerous downloaded fonts.
You can purchase SIMMs from various vendors. Be sure the
SIMM you purchase meets the following requirements:
72-pin type
Capacity of 1, 2, 4, 8, 16, or 32 MB
Access speed of 70ns or less
Dimensions within 108 mm (4.25 inches) × 39 mm
(1.53 inches), with a thickness of 10 mm (0.4 inch)
Installing a memory module
1. Turn off the printer.
Warning:
w
2. Unplug the power cable from the electrical outlet.
To avoid electr ica l sh ock, do not attempt to insta ll a SIM M
unless the printer is turned off.
Options
4-7
Page 81

3. Facing the back of the printer, remove the four screws that
secure the interface bracket.
4. Pull the tab on the bracket to release the controller board, as
shown below.
Warning:
w
5. Place the controller board on a clean, stable surface.
4-8
Options
Avoid touching the electrical components that are exposed.
They may be very hot if the printer has been used recently.
Page 82

6. Locate the two memory module slots as shown below.
ROM SLOT
RAM SLOT
7. Insert the SIMM module into either RAM SLOT (CN1,CN6),
making sure the pin numbers of the slot and the SIMM
match, either 1 or 72.
Note:
You can insert the SIMM module in either RAM slot.
8. Press the module in firmly until it clicks into place. Do not
apply too much force.
Options
4-9
Page 83

9. With the component side of the controller board facing the
outside of the printer, fit it on the top and bottom guide
rails.
10. Slide the controller board into the printer. Press it firmly on
both sides of the bracket to lock the board into place. If the
controller board does not fit smoothly into the printer, do
not force it. Remove it and make sure the edges fit properly
into the grooves inside the slot.
11. Secure the interface bracket with the four retaining screws
that you removed earlier.
4-10
Options
Page 84

Removing a memory module
1. Perform steps 1 through 6 in the previous section to access
the printer’s SIMM socket.
2. Pull the metal clips on each side of the SIMM socket outward
to release the memory module.
3. Grasp both sides of the SIMM and pull it out as shown above.
4. Follow steps 9 through 12 in the previous section to complete
the procedure.
ROM Module
You can install the EpsonScript Level 2 module (C83219✽)
using the same basic steps as those used to install the memory
module. See “Installing a memory module” for installation
instructions. However, this must be installed in the ROM SLOT
rather than in the RAM SLOT.
Options
4-11
Page 85

Optional Interfaces
This section describes how to install the LocalTalk/Serial
modules and optional interface cards listed below.
To add a serial or parallel interface to your printer, use one
of the following:
LocalTalk/Serial module C82334
32 KB Serial Interface Card C82307
32 KB Parallel Interface Card C82310
The LocalTalk/Serial module provides your printer with either
an RS-232C or current loop serial connection.
To add a direct connection to an IBM mini or mainframe
system, use one of the following:
Coax Interface Card C82314
Twinax Interface Card C82315
The coax and twinax connectors each contain a parallel
interface. Since the printer’s built-in parallel interface remains
active, this gives you three parallel interfaces and a coax or
twinax interface. Print jobs can be sent to any connection, and
the printer automatically switches between the active ports.
The twinax interface is compatible with the following IBM
systems: AS-400, System 36, 5251 (model 12), System 34,
System 38, and 5294. When equipped with an EPSON twinax
interface, the printer can be used in place of the following IBM
system printers: 4210, 5224 (models 1 and 2), 5256 (models 1, 2,
and 3), 3218 (non IPDS), 4214 (model 2), 5225 (models 1, 2, 3,
and 4), and 5219 D01, D02.
✽
✽
✽
✽
✽
The coax interface allows the printer to be connected to the
following IBM control units and mainframe systems: 3174,
3276, 4274, and 3270.
4-12
Options
Page 86

To add a direct connection to an Ethernet system, use the
Ethernet Card (C82331✽).
To add a direct connection to a Macintosh computer with
the optional EpsonScript Level 2 module, use either the
LocalTalk/Serial module or the AppleTalk Interface Card
(C82312✽).
Note:
If you reset the printer while it is receiving data through the
AppleTalk Interface Card, you need to turn the printer off and
then on again before it can communicate properly.
To add a direct connection to your GPIB network, use the
GPIB Interface Card (C82323✽).
Installing the LocalTalk/Serial module
1. Perform steps 1 to 5 in “Installing a memory module,” page
4-7, to access the printer’s SIMM SLOT.
2. Remove the connector cover as shown.
Options
4-13
Page 87

3. Select one of the following interface settings: RS-232C type
serial interface, current loop type serial interface, or
LocalTalk interface, using a jumper switch and the two
slide switches on the module. The default selection is
LocalTalk. If you want to select the serial interface settings,
change the jumper and the two slide switches to the serial
interface positions as shown below.
Note:
Make sure both slide switches are set to the same position;
otherwise, the printer will not operate correctly.
4. Position the module as shown below; then carefully insert its
connector into printer connector CN4. Secure the module
with the two screws that come with it.
4-14
Options
Page 88

5. Perform steps 9 to 11 on page 4-10 to complete procedure.
You can verify whether the interface is correctly installed by
printing a status sheet.
Installing an optional interface card
1. Turn off the printer.
Warning:
w
2. Unplug the power cable from the electrical outlet.
3. Turn the printer so its back faces you.
4. Remove the two screws that secure the Type-B slot cover and
remove the cover.
High voltages are present inside the printer when the power
is on. Do not attempt to install the card unless the printer is
turned off.
Options
4-15
Page 89

5. With the component side of the optional interface card facing
the inside of the printer, slide the interface card into the
grooves in the interface slot as shown below. Push it in
firmly to lock the card into place.
6. Secure the interface card with the two retaining screws.
You can verify the interface is correctly installed by printing a
status sheet.
4-16
Options
Page 90

Using the Serial Interface
To use a serial interface, you must purchase an appropriate
interface cable. EPSON supplies several types of interface
cables. You can use any interface cable that meets the printer
specifications listed below. See your computer manual for any
special computer requirements.
RS-232C Cable (9 pin) C836152 (2.0 m) from mini DIN
(printer) to D-SUB 9-pin (computer) for RS-232C; for direct
printer to computer connection
RS-232C Cable (25 pin) C836151 (2.0 m) form mini DIN
(printer) to D-SUB 25-pin (computer) for RS-232C; for
direct printer to computer connection
Current Loop Cable C836141 (0.4 m) from mini DIN
(printer) to D-SUB 25-pin (interface cable) for both RS-232C
and Current loop; a cable extension for printer to interface
cable connection
If you installed a serial interface, you need to ensure that the
printer and the computer are using the same serial settings. If
the serial settings do not match, you must make the
appropriate settings. The settings can be changed either in the
printer or computer. See the next section for information about
the serial interface utility that comes with your printer.
Options
4-17
Page 91

The default serial settings for the optional serial interface are
listed below. To change the serial settings, see the interface
card’s manual if you are using a Type-B serial interface or if
you installed a LocalTalk/Serial module. For information
about your computer’s serial settings, see your computer
manual.
Serial type: RS-232C
Word length: 8
Baud rate: 9600
Parity: NONE
Stop bit: 1
DTR: OFF
XON/XOFF: ON
You also need to change the port setting of your computer if it
is not already set to the serial port. The following procedures
describe how to change the port setting in Windows 3.1 and 95.
To change the setting using non-Windows software, see your
software manual.
For Windows 3.1
1. In the Main window, double-click the
2. Double-click the
Printers
icon.
3. In the Printers dialog box that appears, click the
button.
4. Select a COM (serial) port.
5. Click the OK button.
6. Close the Printers dialog box.
4-18
Options
Control Panel
Connect
icon.
Page 92

For Windows 95
1. Click the
Printers
2. Right-click the
in the menu that appears. Be sure to right-click your printer.
3. Select the
4. Click the arrow next to the Printer Port drop-down list. Then
select a COM (serial) port.
5. Click OK to save this setting.
.
button, point to
Start
Epson EPL-N1200
Details
tab.
Settings
, and then click
icon, and click
Properties
Using the serial interface utility
You can use the serial interface utility that comes with your
printer to specify the port and the baud rate of your computer
for the serial interface connection.
This utility is included in the Remote Control Panel utility. For
details on installation of the Remote Control Panel utility, see
Chapter 5.
Your printer supports the following serial interface baud rates:
300, 600, 1200, 2400, 4800, 9600, 19200, 38400, and 57600. If you
want to use your printer with a higher baud rate that is
supported by your computer system, you can use the utility to
match the baud rate between the computer and printer.
Note:
This utility may not work with all computer systems.
Options
4-19
Page 93

1. Type
HSERIAL
at the DOS prompt and press
Enter
to bring up
the list of parameters for the port and the baud rate
selection.
C:\HSERIAL
2. Select the appropriate parameters from the list and type the
following:
C:\HSERIAL /P=n /B=
n = parameter for the port selection
m = parameter for the baud rate selection
m
For example, if you would like to use the COM1 port with the
57600 baud rate, type the following:
C:\HSERIAL /P=1 /B=576
If you need help, type the following:
C:\HSERIAL\?
4-20
Options
Page 94

Chapter 5
Remote Control Panel Utility
Remote Control Panel Utility Overview . . . . . . . . . . . . . 5-2
When to use the Remote Control Panel utility . . . . . . . . 5-2
Installing the Remote Control Panel utility . . . . . . . . . 5-3
Accessing the Remote Control Panel . . . . . . . . . . . . . 5-3
LaserJet 4/EpsonScript Level 2 Mode . . . . . . . . . . . . 5-4
ESCP2 Mode . . . . . . . . . . . . . . . . . . . . . . . . . . 5-5
FX Mode . . . . . . . . . . . . . . . . . . . . . . . . . . . . . 5-5
I239X Mode . . . . . . . . . . . . . . . . . . . . . . . . . . . 5-6
Page Setup Options . . . . . . . . . . . . . . . . . . . . . . . . . 5-6
Type Options . . . . . . . . . . . . . . . . . . . . . . . . . . . . 5-9
Printer Setup Options . . . . . . . . . . . . . . . . . . . . . . . 5-11
Other Options . . . . . . . . . . . . . . . . . . . . . . . . . . . . 5-14
More Options . . . . . . . . . . . . . . . . . . . . . . . . . . . . 5-17
5
Remo t e C o ntrol Pa n el Utility
5-1
Page 95

Remote Control Panel Utility Overview
The Remote Control Panel utility is software that allows you to
change printer settings, such as the print quantity, paper size,
and RITech setting.
When to use the Remote Control Panel utility
You do not normally need to use the Remote Control Panel to
change printer settings. Most software programs let you
change settings that affect the final printed output, and any
settings you make from your software override those made
from the Remote Control Panel.
However, if you are not able to change printer settings from
your software program or if you are running DOS, the Remote
Control Panel will allow you to:
specify the size of paper loaded in the paper tray
turn the Toner Save Mode on and off
change the density setting or RITech setting
change the emulation mode
turn the Standby mode on and off
specify the Top Offset and Left Offset
Note:
When the printer is shared by more than one user, the settings may be
changed by other users. Even if the Remote Control Panel window
shows your desired setting, always click the Send button.
5-2
Remote Contro l Pane l Uti li ty
Page 96

Installing the Remote Control Panel utility
To install the utility, follow these steps:
1. Insert the floppy disk containing the utility into your
computer’s disk drive.
2. Type SETUP at the DOS prompt and press Enter.
A:\SETUP
3. Follow the instructions on the screen to install the utility.
Accessing the Remote Control Panel
To start the Remote Control Panel, type the following at the
DOS prompt and press Enter. (If you changed the default
directory during installation, type that directory instead.)
C:\EPSONRCP\EPRCPO
The main Remote Control Panel menu appears.
Remo t e C o ntrol Pa n el Utility
5-3
Page 97

Click the button for the emulation mode you want to configure.
Note:
EpsonScript Level 2 is available only when the EpsonScript Level 2
option is installed.
LaserJet 4/EpsonScript Level 2 Mode
The main menu displays the current printer settings for the
selected printer mode. The buttons on the left open dialog
boxes so you can change the settings listed under Printer Status.
Print ERR SHEET for EpsonScript*
Turn this setting on if you want a printed record of EpsonScript
Level 2 errors. When an error is detected, the printer prints a
sheet listing the type of error.
*Available only when the EpsonScript Level 2 option is installed
5-4
Remote Contro l Pane l Uti li ty
Page 98

ESCP2 Mode
FX Mode
Remo t e C o ntrol Pa n el Utility
5-5
Page 99

I239X Mode
Page Setup Options
Clicking the
menu opens the following menu:
5-6
Remote Contro l Pane l Uti li ty
Page Setup
button on the Remote Control Panel
Page 100

If you are unable to make the settings that are availabe on the
Page Setup menu from your software program, make the
settings on this menu as follows:
Page Size
Selects the default paper size. You should change this item
only if you cannot change the paper size from your software
program.
If your paper size is not listed below, you can define a new size
using the Custom setting. Use the following settings when
defining a custom page size: 92 to 216 mm × 148.5 to 356 mm.
The Page Size options are as follows:
LT (Letter)
A4
A5
B5
HLT (Half letter)
LGL (Legal)
GLT (Government letter)
GLG (Government legal)
EXE (Executive)
F4
MON (Monarch)
C10 (Commercial 10)
DL
C5
IB5 (International B5)
C6
Custom
Remo t e C o ntrol Pa n el Utility
5-7
 Loading...