

Page 1
EPL-8000
Shield
dates- 1
JrY
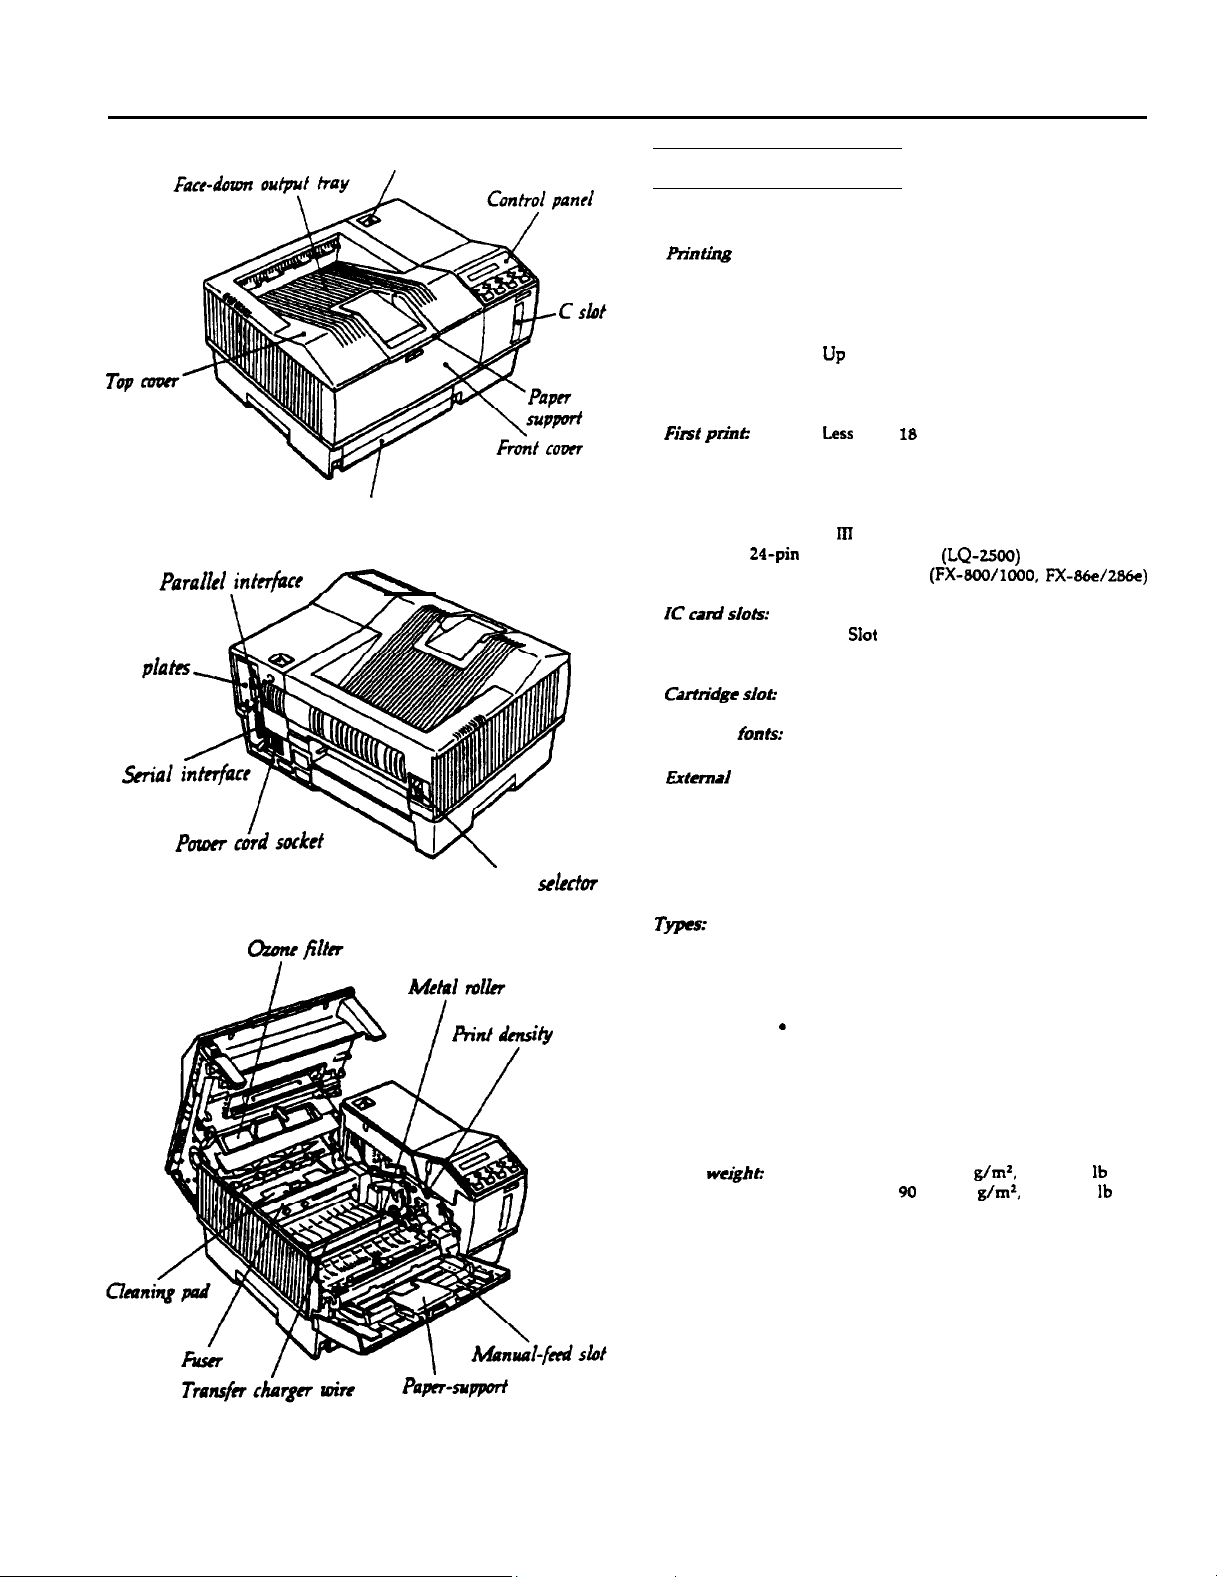
Power switch
Paper cassette
Printer Specifications
Printing
Printiitg
Resolution:
Printing speed:
F&f
Warm-up time:
Printer
l HP LaserJet series
. ESC/P 24-pin printer emulation
. ESC/P 9-pin printer emulation
IC cani sIots:
Catin’dge slob
Resident
method
prinll
modes..
fonts:
Laser beam scanning and dry
electrophotographic process
300 X 300 dpi
up
to 10 pages per minute (letter or A4)
(depending on the font and quantity of
data)
Less
than I8 seconds with A4 or letter
70 seconds or less at normal temperature
Bf
emulation
2 slots for identity or font cards
l Slot A holds identity or font cards
l Slot B holds font cards only
1 slot for font cartridges
Depends on the printer mode
(LQ-~%Jo)
(FX-~OO/MOO, FX-~+e/286~)
Paper-path
ity
sektor
knob
Extend
Paper and paper delivery
Paper Specifications
Tms:
Epson does not recommend or guarantee any particular brand of
paper. Because paper characteristics are subject to change by
individual manufacturers, it is your responsibility to ensure the
quality of paper used with the printer.
Paper
fonts:
we&he
Optional fonts provided with font cards or
cartridges
Download fonts
. Plain paper
. Special papers:
. Libels
. Envelopes
. Transparencies
s
Colored paper
. Cardstock
Plain paper: 60 to 90
Card stock: 90 to 157
g/mZ,
g/m’,
16 to 24 lb
24 to 42 lb
Laser Printers
3/3/92
EPL-8000-1
Page 2
EPL-8000
Paper sizes:
Paper:
Type
A4
AS
B5
Letter
Half-Letter
Legal
Government Letter
Government Legal
Executive
F4
Envelope:
Monarch
commerciPl
10
DL
c5
Rzh~ble a-a:
Depends on the printer mode.
Range of paper width and length:
WiUth
Paper cassette
Manual feed
Size of your
standard cassette
86lo
216
mm
(3.4 to 8.5 inches)
Prpu feed Sh&mnent
and
dziwtton:
Center alignment for all sizes
Paper f&d:
Input
ppcr
Automatic or manual feed
supply
c75 g/m’
or 20 Ib
250 sheets
250
additional sheets with optional lower paper
cassette unit installed
swud
envelopes
Paper
l
jece
Paper ejuf capity
Face-up or face-down
OS g/m~ or 20
Face-down
150
sheets
Face-up 50 sheets with optional face-up output
tray
Size
210 X 297 mm
148 X 210 mm
182 X
257 mm
8.5 X 11 inches
5.5 X 8.5 inches
8.5 X 14 inches
8.0 X 10.5 inches
8.5 X 13 inches
7.25 X 10.5 inches
210 X 330 mm
7/a x
7
4 l/8
X 9
110 x220
162 X229 mm
Size of your
standard cassette
140
(5.5 to 14
paperk
lb. paperk
l/2
to
inches
l/t
inches
mm
Length
356
mm
inches)
The number of pages you can print with an imaging cartridge
varies depending on the type of printing. If you print a few page
at a time or print dense text exceeding the 5% print ratio, your
cartridge may print fewer pages.
Ozone filter H9laa7):
Needs to be replaced every six months.
Mechanical
I
Dimensions and weight:
266
Height:
Width:
Depth:
Weight:
Durability:
5
years or
~O&OOO
sheets, whichever comes first
mm
477 mm (18.8 inches)
383 mm (15.1 inches)
18 kg
Electrkill
12OVmodd 220/240
Voltage
rw?d lrew?ncy
Power
comsummm
!nsulalM
realslance
D~e!ectnc strength
(W
AC
chasslsl
line
and
9ovm 132v
50 Hz to 60 HZ -c 3 Hz 50 HZ 10 60 Hz 2 3 HZ
Less than 850 W
2 M tl
mmnum
1000 VAC me br one
mwwle or 1200 VAC rms mmule or 1650 VAC
for
one second
198vto264v
Less Ihan E50 W
2 M tl muwnum
1500
VAC rms
for one second
(10.5
inches)
V model
for one
rrns
Consumable products
Long lifk ihag@ carttidp tSOSl~9~:
Storage temperature:
Storage humidity:
Shelf life:
Life:
EPL-8000-2
0 to
30C(32to86
F)
30 to a5 96 RH
18
months after production
Up to 8000 pages under the following conditions:
Letter- or
A4-site
paper, continuous printing, and
5% print ratio.
Note: Check the label on the back of the printer for the voltage
of vour orinter.
controller hardware
CPU:
RAM:
68000.16.67 h&z
1.0 MB (expandable up to 7.5 MB)
Envimnmental
Tempera-
Operation: 10 to 35 ‘C
(50
to 95
Storage: 0 to 35 l C (32 to 95 ‘F)
Humidity:
Altitude:
Operatiom15to85WRH
Storage: 30 to 85
%
RH
2500 meters (8200 feet) maximum
3/3/92
‘F)
Laser Printers
Page 3
Options
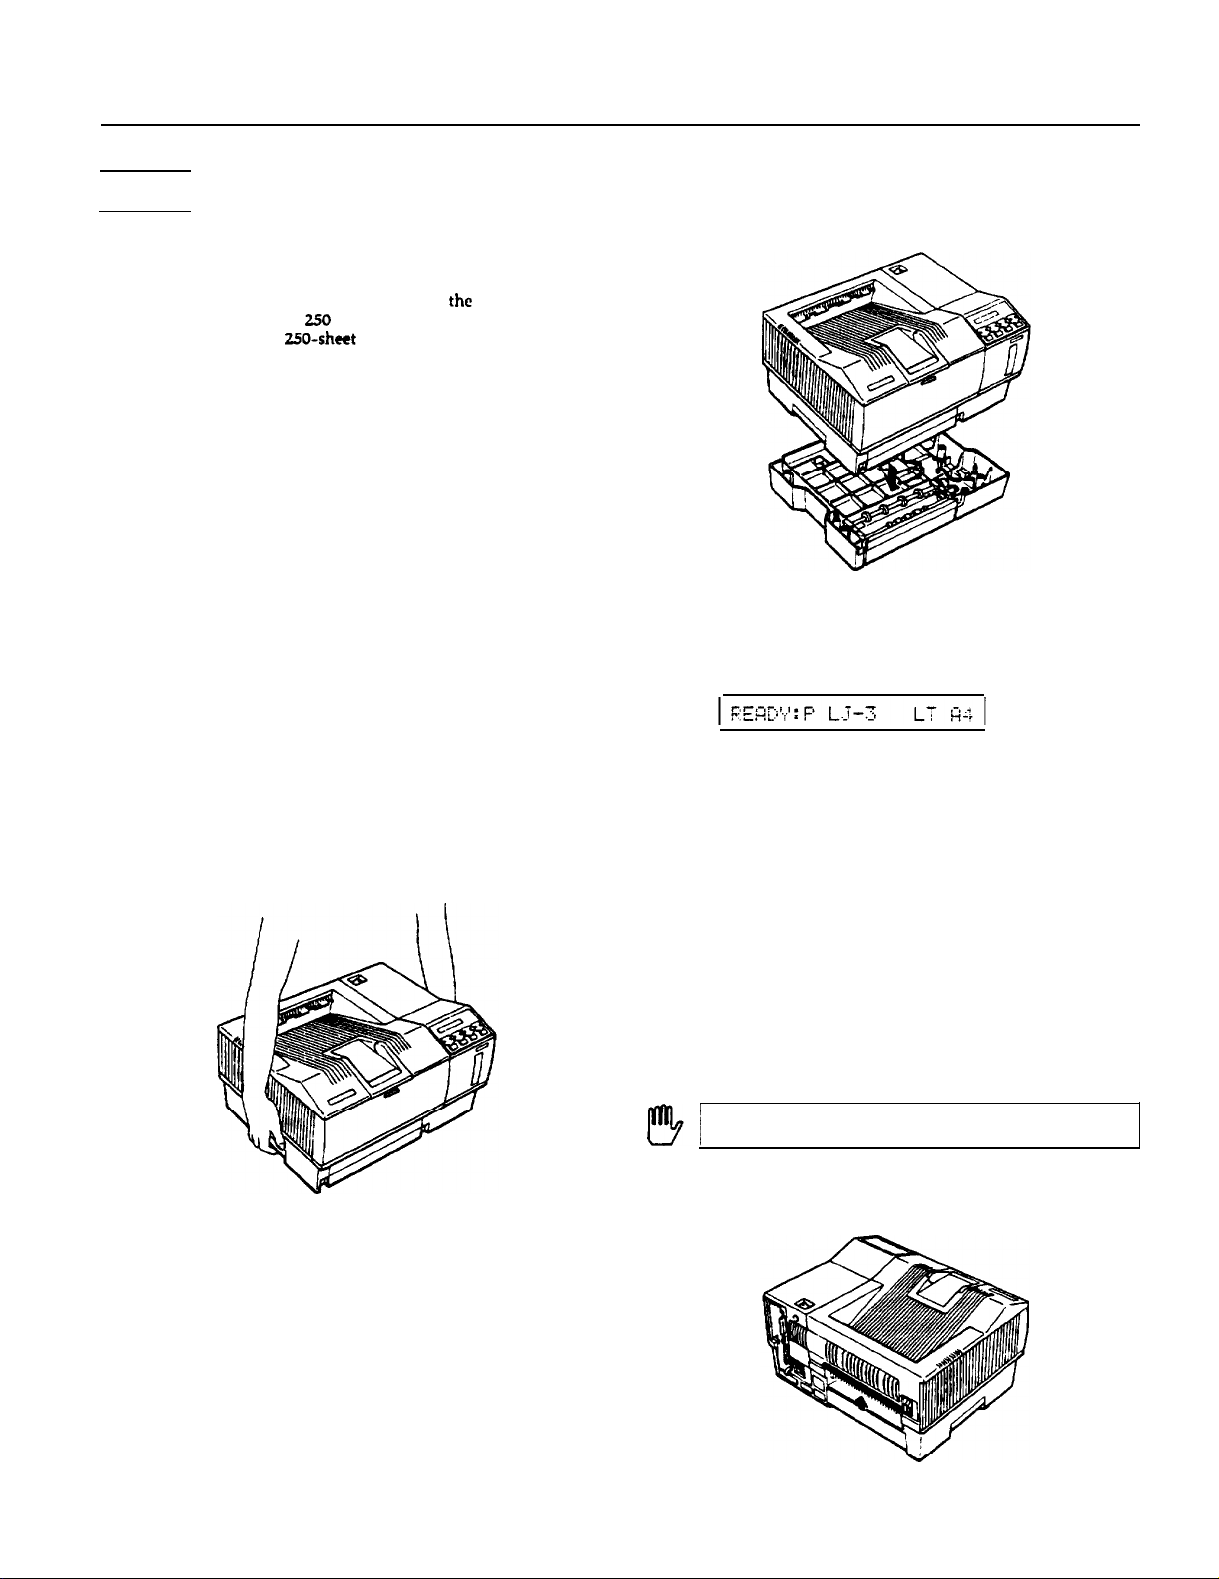
The Lower Paper Cassette Unit
The optional lower paper cassette unit is an automatic sheet feeder
that fits directly beneath the printer. It houses the adjustable paper
cassette, which holds up to
standard paper cassette’s
With the optional cassette installed, you can load two different
sizes of paper in your printer at once: one in the lower cassette and
the other in the standard cassette. You can also use the SelecType
INPUT AUTO setting to use both cassettes and print up to 500
sheets of the same size paper.
Installing the lower paper cassette unit
If you purchased your printer and lower paper cassette unit at the
same time, first set up your printer and then run a print test. Then,
when you are sure the printer is working properly, install the
optional cassette unit.
1.
Turn off the printer.
2.
Unplug the printer’s power cord from the electrical outlet and
from the printer. Also unplug the interface cable.
3.
Remove the face-up tray, if it is installed, by lifting it up
slightly and pulling it out.
4.
Move the printer and place the lower paper cassette in the
location where you will operate your printer.
5.
Lift the printer using the recessed handles on each side and
hold it over the lower paper cassette. The printer is heavy, so
you may need to have someone help you lift it.
2.50
sheets of paper to supplement the
f50-sheet
capacity.
EPL-8000
6.
Make sure the front of the printer faces the same way as the
front of the cassette. Then align the printer with the cassette
using the two alignment pins, shown below. These pins fit into
the two holes on the bottom of the printer. Lower the printer
until it rests on the cassette unit.
7.
Plug the power cord back into the printer and into an electrical
outlet. Also re-attach the interface cable.
8. Turn the printer on. On the right of the display, you see both
the size of paper in the standard cassette and the size of paper
in the lower paper cassette unit.
If you use letter size in the standard cassette and A4 size in the
lower paper cassette, you see the display above. Two hyphens (--)
in the display indicate that are tray is empty.
The Face-up Output Tray
The printer normally delivers paper face down on top of the
printer. If you want face-up delivery, you can install the optional
face-up output tray. This tray gives you immediate viewing of
your printed output and is recommended for printing on media
such as labels and overhead transparencies that require a straight-
through paper path.
Installing the face-up output tray
Also, you may need to have someone help you align the holes on
the printer with the pins on the cassette unit.
Laser Printers
1. Unpack both the tray and the static brush from the carton.
2. Turn off the printer.
‘WARNING:
I!!!!!!1
3.
3/3/92 EPL-8000-3
cool before you proceed.
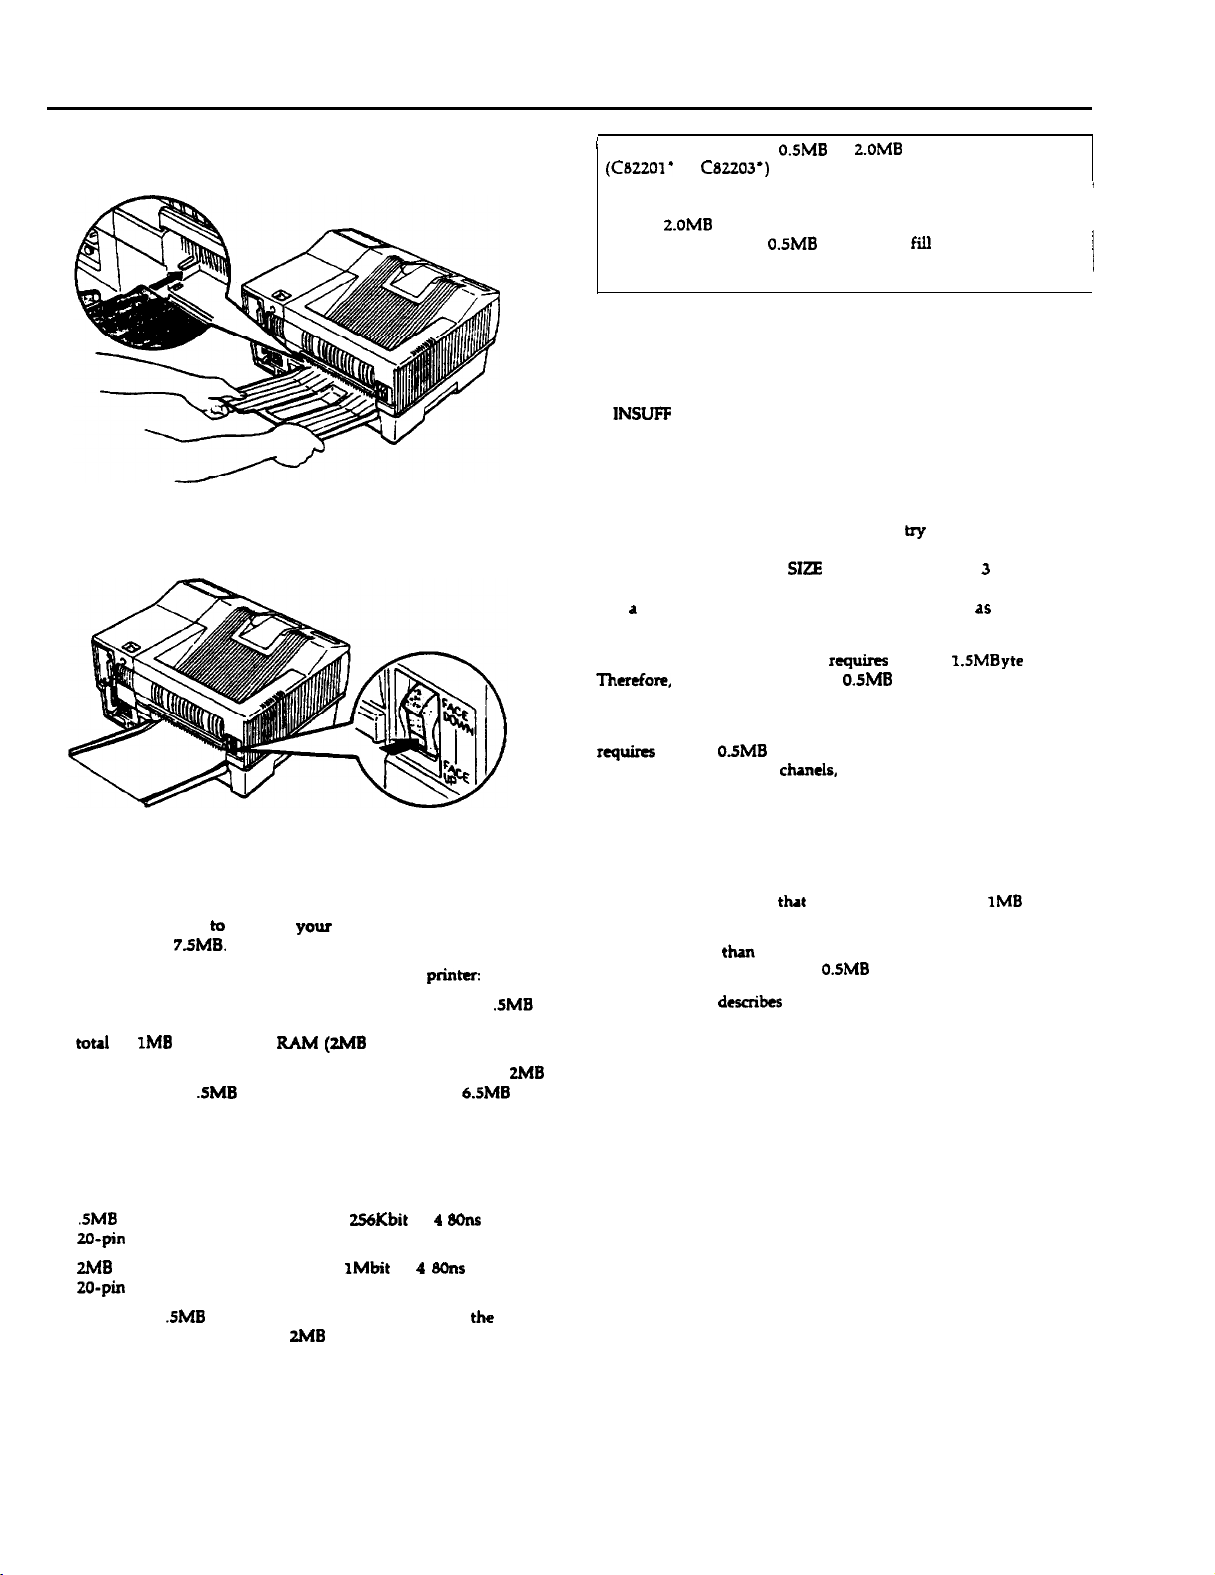
Snap the static brush onto the upper edge of the face-up
output slot shown below.
If you have used the printer recently, let it
Page 4
EPL-8000
4.
Slide the tray into the bottom of the face-up output slot so the
notches on each side fit under the tabs on the side of the slot
The printer is factory set for facedown output. To select face-up
delivery, set the paper path selector to the FACE UP position, as
shown below.
’
Note: You can use the
(C82201’
or
C82203’)
O.SMB
or
2.OMB
expansion board
in your printer with the following
conditions:
. You must first increase the controller board’s memory to its
full
2.OMB
. You can use only
capacity.
0.5MB
chip sets to fill the expansion
board.
l You do not need to change any DIP switches.
When to increase the printer memory
The printer displays one of these status messages when you have
insufficient memory.
.
INSLWF
MEMORY
. PAGE BUFFER FULL
. ADD MEMORY FOR CH X
These messages are described in more detail in Chapter 6.
If one of these messages appears, you can hy to reclaim any
unused RAM by changing the settings for the SelecType FULL
PRINT and RX-BUFFER
SIZE
options. See Chapter 3 for
information on changing these options. If insufficient memory is
still d problem, you can install additional memory,
dS
described
in this section.
Using an optional identity card
Therefore, you must add at least
rquires
at least I.SMByte of RAM.
0.5MB
of additional RAM to
your printer to use an identity card.
If you use the INDIVIDUAL setting in SelecType. each channel
requires at least
0.5MB
of RAM. Therefore, if you plan to use
more than two interface chanels, you must add RAM to your
printer.
f
I
Memory Options
The printer comes with 1MB of Random Access Memory (RAM).
If you regularly print complex pages using graphics or downloaded
fonts, you may need
increase it up to
You have two options for adding memory to your printer:
. Increase the memory on the main controller board with
memory chip sets. You can install up to two chip sets for d
total of
1MB
. Add a OK memory expansion board and install up to four
chip sets and/or
additional RAM (7.5 MB RAM total).
You can install memory on either the controller board or the OK
expansion board or both.
There are two types of chip sets you can buy:
.
.SMB
chip sets each containing four
20-pin DIP chips
l
2MB
chip sets each containing four 1Mbit X 4
20-pin DIP chips
You can install
expansion board; you can install
expansion board.
t0
increase
your
printer’s memory. You can
7.5MB.
of additional RAM
.5MB
chip sets for a total of up to
@MB
256Kbit
RAM total).
X 4 Wns DRAM
8Ons
.SMB
chip sets on the controller board or the OK
2MB
chip sets only on the OK
.SMB
6.5MB
DRAM
ZMB
of
Selecting a memory option
Before adding memory, you should determine the combination of
components you need to use to obtain the total amount of memory
you want. Keep in mind
tkt
your printer comes with IMB of
internal memory.
If you need more than 2MB of RAM, you can install the OKB
expansion board and use either
The table below
desaibes
0.5MB
or 2MB chip sets.
the chip sets you can install on the
controller board and/or the 0KB expansion board.
EPL-8000-4
3/3/92
Laser Printers
Page 5

EPL-8000
3.
Remove the four screws that secure the metal bracket on the
back of the printer. Keep the screws so you can use them to
reinstall the controller board.
4.
Press down on the lever at the bottom of the bracket to release
the controller board, as shown below. Press firmly until the
board pops out slightly.
’ If
you mall
ms!all
maximum
installing
6.5ME
any
adcilllonal
of
7SM0.
additional memory
01
memory on Ihe
ctsp
sets on
lhe
conlrMter
OKB expansm
board:
board. you do
your onnler
can access a
t-101
need
To install a memory chip set or a memory expansion board you
need a cross-head
suewdriver
and a chip puller or a flat-head
screwdriver. If you have questions about installing the chip
set or the board, contact your dealer for assistance.
WARNING: High voltages are present inside the printer
when the power is on. Do not attempt to remove the
controller board
tutlees
the printer is turned off and the
contacts on the printer’s circuit board because many of
the components can be destroyed by the static electricity
The rest of this chapter describes the procedures for installing
memory chip set and/or the OK expansion board.
Removing the controller board
1.
Unplug the power cable from the electrical outlet and from the
back of the printer.
2.
Disconnect all interface cables from the back of the printer.
IO
5.
Grasp the board with both hands and pull it straight out of its
slot.
a
6.
Set the controller board on a clean, stable surface with the
bracket (connector) facing to your right and the components
facing up.
7.
If you have installed an optional interface card, you must
remove it before you can install a memory chip set on the
controller board. Grasp the interface card and pull it straight
out of the interface slot.
Laser Printers 3/3/92
Note: If you are installing chip sets on the controller board, you
may want to remove the plastic guide rail above the RAM chip
sockets. To do so, release the two tabs that secure the guide rail
and lift it off the board. Replace the rail after you install the
chips
EPL-8000-5
Page 6

EPL-8000
Installing chip sets on the controller board
The RAM chip sockets are located on the upper right side of the
controller board.
There are two sectors on the board, each containing four chip
sockets (identified by their IC numbers), as shown below.
3.
Gently press the chip halfway into the socket. If it goes in at
an angle, remove it with a chip puller or a small flat-head
screwdriver; then reinsert the chip.
CAUTION: Be careful not to scratch the chip or the
board when removing the chip.
4. Once the chip is properly inserted, push down firmly on
both ends to make sure it is fully seated.
17
16
I5
14
If both two sectors are empty,
install
the
fist
IO
I I
12
13
chip set in sector 1.
If sector 1 is already filled, install the second chip set in sector 2.
sector
I
2
1
Q!
Total RAM when
1
SMB
2M0
zMB
chip set on the
CAVIION:
IC
number
IO. 11.
12.
13
14.
15. 16.
17
You cannot install a
controller board: you can only use the SMB chio sets.
hllea
Follow these steps to install a memory chip set:
Make sure all the pins on the chip are aligned. They should
point inward at slightly less than a
K
If any of the pins are bent incorrectly,
90’
-------
-,--0
---====a
angle, as shown below.
gentiy
push them back
into alignment.
Line up the pins on the RAM chip with the holes in the
socket. Be sure that the small notch on the end of the chip is
toward your right.
5.
Repeat steps 1 through 4 for each of the remaining chips.
6. Reinstall the interface card, if necessary.
Installing chip sets on the memory expansion board
There are four sectors on the memory exp,ansion board, each
containing four chip sockets (identified by their IC numbers).
The four sectors must be filled in alphabetical order. For example,
if you are installing your first chip set, install it in sector A. Then
install your next chip set in sector B and so on. See the table under
“Selecting a memory option,” earlier in this section. for a list of
the RAM configurations possible the memory expansion board.
Before you install the chips, check their pin alignment as described
in step 1 of the previous seclion. Then follow these steps:
Place the expansion board on your work surface with the
1.
components facing up.
Align the chip’s pins with the holes in the socket. Be sure the
2.
small
notch on the end of the chip is facing in the direction
shown below.
Laser Printers
Page 7

3.
Press the chip into the socket as described in steps 3 and 4 of
the previous section.
4.
Set the board’s DIP switches to indicate the amount of memory
you have installed. Use a pointed object, such as a ball-point
pen, to set the DIP switches as shown below.
EPL-8000
Reinstalling the controller board
1.
Hold the controller board so the component side faces your
left, and fit its top and bottom edges into the grooves inside
the slot. Gently slide the board about halfway into the printer.
Set the switches according to the tables below.
RAM
(~ntemal
and amount added lo controller
board1
pqqigjq
31
Installing the expansion board on the controller board
1. Locate connector chJ3 on the controller board. position the
memory expansion board as shown below, and carefully insert
its connector into connector
CN3.
Make sure the lever on the bottom of the controller board is
2.
the way down. As you slide the board further into the printer,
make sure the lever’s tab is positioned inside the opening in
the bracket. as shown below.
Now slide the controller board into the printer. The
lever pivots outward. Firmly press up on the lever to lock the
board into
pIace.
If the controller board does not fit smoothly into the printer,
do not force it. Remove it and make sure the edges fit properly
into the grooves in the slot.
Gently press in on the
baud
to make sure it is fully seated.
Then secure the board with the four screws you removed
previously.
a11
2.
Secure the expansion board with the three screws that came
with it.
Laser Printers
ml92
Replace the optional interface card, if you removed one
5.
Connect any interface cables you removed.
6
7.
Be sure the power is turned off and then plug the power cord
into the printer and into an electrical outlet.
EPL-8000-7
Page 8

Option Specifications
Lower paper cassette unit
Electrical
AC power supply: DC 24 V supplied by the printer
Insulation resistance:
Dielectric strength (between AC line and chassis):
Power consumption:
Paper and paper delivery
Weight:
Paper feed: Automatic feed delivery system; tray capacity up
1oMohmminimum
Can withstand 1000 VAC rms
1500 VAC
12 W or less
60
to 90 g/m2 (16 to 24 lb)
to 250 sheets (75
rms
(220/24OV model) for one minute
g/ma
or 20 lb paper)
(12OV
model)
or
If none of the above printers is listed among your program’s
options, select
Command Language (PCL).
Epson LQ and FX emulation modes
When your printer is in the Epson LQ or FX printer mode, select
one of the following drivers from your program’s printer selection
menu:
LQ-2500
LQ.loso/s5O
LQ-1000/800
LQ-so0
LQ-1500
LQ printer
any printer model
(expdnded ESC/P)
(with version 2 ROM)
that
uses
the
HP Printer
FX-1000/800 (286e/86e)
FX-85
FX-SO
If none of the printers listed are available from your program,
choose the first
dvaihrble
of the following:
RX, Epson
printer,
Standard printer, or Draft printer.
Sharing the Printer
F&g S@
For first sheet, 18 seconds or less (A4 or letter-size
paper)
For subsequent sheets, up to 10 pages per minute
(M-sire paper)
T-:
Plain paper, such as copier paper, memo sheets,
and letterheads
Mechanical
Dimensions and we&M (without the
Height:
Width: 480
Depth:
Weight:
70 mm (2.8 inches)
mm
(lg.9 inches)
370
mm
(15
3.8 kg
inches) including the standard cassette
(8.41b)
including the standard cassette
print@
Face-up output tray
Dimensibns and
Height: 40 mm (1.6 inches)
Width: 255 mm (9.2 inches)
Depth:
Weight:
Paper
ejet opacityf
wright (without
the pknter.:
255 mm (11.2 inches)
0.3 kg (K’lb)
50 sheets
@Og/m*)
Application Software
You can connect your printer
computers at the same time using
seriai,
and
optiorul
the computers
If you
use
that’s
the default printer mode LJ-3
all
you need to do unless you need to change serial interface
interfaces. Simply connect interface cables from
to the interfaces.
to as many as three different
any
combination of the parallel,
for
all
the interfaces,
settings. If you wish, however, you can choose different
printer modes for each interface,
pdrt
of the printer’s memory for each interface.
Your printer receives data from the computers through the
following channels:
Channel P
is the pdrallel interface.
dnd
you can allocate =
separdte
Channel S is the serial interface.
Chdnnel
0 is the optional interface.
Status and Error Messages
This section contains an alphabetical list of status and error
messages that you
problems.
If an error occurs, the control panel displays an error messages that
tells you what is wrong and, in some cases, offers d solution.
Status messages
operation; they indicate the printer’s current
may
encounter and includes likely solutions to
aiso
dppedr
on the display during
normal
status.
HP
herJet III
When your printer is in HP LaserJet
emulation mode
II1
(LJ-3) mode, the factory
setting, select one of the following drivers from your program’s
printer selection menu:
HP LaserJet
IllSi”
HP LaserJet UP””
HP LaserJet series
HP LaserJet
HP LaserJet series
III””
IIPr’”
II”
HP LaserJet Plus”’
HP LaserJet
HP
LaserJet”’
500”
EPL-8000-8
Note
In some cases, the red CONTINUE light flashes when an ~
error is detected. This requires you to correct the problem and
then press the CONTlNUE button to clear the error. However. if
!
the AUTO CONT option in 9elecType is set to ON, some errors
may clear automatically even though the problem remains.
313192
1
/
/
Laser Printers
Page 9

In this section, status messages are preceded by
messages are preceded by
p].
In some cases the message you see on your display
[W),
and error messages are preceded by
[S], warning
the printer mode.
s[:,:; nz;:;;R’,
F,-!?
_I. i,
I;,, ’
The printer has insufficient memory available in the channel
displayed. You may have changed the printer mode, increased
the RX-BUFFER
SIZE
setting, or changed the CH
INDIVIDUAL setting. To correct the error, decrease the
BLWER
SIZE setting or change the CH INDIVIDUAL setting
in SelecType. Changing the CH setting from INDIVIDUAL to
AUTOSENSE may solve this problem. If necessary, add
memory to your printer.
CGwCEL i’11WJliL
IW
There is no
FEED
paper
in the manual-feed tray when you have
selected manual feed. To cancel manual feed, press the
h4ANUAL
button to feed
paper
from the cassette. This message
alternates with the SET MANUAL message.
il&,Rfl p~E/-~~tR’$J
[El
!:@FFiC&t
This message indicates that the combined memory of the
cards in slots A or B exceeds
the
ords
and press the CONTINUE button.
CHflF CREX I Nij
Fl
MB.
Remove one or both of
The printer is creating characters.
::~lp’i’ Et.10 :.;ij;
PI
Multiple-copy printing is canceled (you pressed the COPY
END button with the printer off line).
Oi’llt!ER IJFEN
The
primfs
cover
is
open.
Close the printer
COV~C
continue printing
YGTG
M
The printer has
dvcd
data but is not yet printing, or is off
line. To resume printing, press ON LINE if the printer is off
line,orpressFEED.
FEED
[El
JFlM
Paper is not feeding into the printer from the specified
cassette or has jammed on its way into the printer. If the
paper ls jammed at the paper cassette, open the printer case,
remove the jammed paper from the standard paper cassette or
optional
FONT
The printer is
‘GRIT+!
pays cass&e
CREFlTI t4G
crating
I
!I: DR,9!.1!
I NG
and then close the printer’s covers.
a font.
The printer is composing a graphic.
[El
The printer cannot read the card inserted in the slot indicated
on the dispiay. To correct the error, press CONTINUE. If the
error message remains, make sure the printer is off line and
remove the card. If the red
CONllNUB
light still flashes,
press CONTINUE
IS1
The printer is being initialized to the factory settings.
[El
1 fJ:fF 7
I
b$Tj~i 1 f.!li CEyTi;
The imaging cartridge is not installed.
I t,ScF’ y;-,’ *
L.1
(El
!
The standard paper cassette is not installed.
aI00 shows
RX-
to
EPL-8000
-,
,._’ ,:
.-
“:
.
:.y : I;; p I I
I,_._.
[El
The printer has insufficient memory available for the current
task. To correct the error, press CONTINUE. If the message
remains, press
RESET
or initialize the printer.
You can also clear this error by turning the printer off and
back on again. However, it may be necessary to simplify the
page you are trying to print or add more memory to the
printer.
19
If you assign PostScript to more than one channel, this
message appears when you attempt to exit from SelecType.
Press
/7J
assignments.
r, -.,-., -
t _,_:I_ c,iJiTl-EF FiJ-1
@1
Text or graphics data has filled the printer’s buffer and the
printer has ejected an incomplete page. Press CONTINUE to
clear the error. You may need to add more memory to your
printer.
IS1
The printer is feeding paper.
r-.,-.‘,i-?
8
Pi
[El
Paper is not being fed into the printer or paper is jammed in
the paper path.
as described later in this chapter.
TGCCC f-01 iT
(El
There is no paper in the standard paper cassette or the
optional lower paper cassette (if installed). Load more paper
into the selected paper cassette.
F;pEF,
[El
There is no paper in the standard cassette or the optional
lower paper cassette (if installed). The display prompts you to
load paper
7’GPEE
Cl
There is no paper in the optional lower paper cassette.
The display prompts you to load the correct paper size into
the lower paper cassette.
r
---_- -
r’HrCp’ I-BUT ~T[J ;..z”..;x
[El
There is no paper in the standard paper cassette.
prompts you to ioad the
to return to MODE ASSIGN and change the
JKK
i,-
Opm
the printer and clear the jammed paper
_a. __.
CtiJT
QiJTI:t :A::A:~:
into
the specified cassette.
i:li-lT
IIIFT
X>::):
correct
paper size into the cassette.
The
IS1
The printer has received data and is printing.
= F i 1;; 5 TI]~ >.: i-:s.Y
PI
The printer stops printing during the multi-copy print
operation.
p
=.; ,,.l.\.
. iti.,‘, ,I
ISI
The printer is using the intelligent emulation switch and is
not in a timeout status. It can use either one of the modes
shown on the display.
lTJ#l 1: het1.p j/z:. ;I..; ME
[sl
The printer is checking the available RAM (X.X = capacity).
C’EGD’?
5. I
VI
The printer is ready to print.
display
Laser Printers
3m92
EPL-8000-9
Page 10

EPL-8000
=.r,,.lcrpT
.--*1_..-
[El
You may have removed an option card while the RED light
:,lJE.,;
was still lit or while the printer was on tine. To correct the
error,
make sure the printer is off line. Next, reinsert
the correct slot and press CONTlNUE.
You may have inserted an option card while the printer was
on line or while the FEED light was on. Data still remains in
the printer’s Buffer. To correct this error, take the printer off
line. Then remove the card and press
CONTlNLJB.
reinsert the card, make sure that alI data in the buffer has
been printed and that the
is on, press
PBBD
printer
is off line. If the
to print any remaining data.
EEX;ECT TERY
The optional lower paper camette
unit is not installed and the
lNPUT option is set to OPT or AUTO. Turn off the printer
and install the optional lower paper cassette unit. If you
decide not to use the optional paper cassette unit, pms
CONTINUE to
&v
casettt?.
DE’;=?
--.
The printer has been reset to the macro specified with the
SdecType
sdect
paper automaticaBy frum the standard
After printing, change the INPUT option to
LOAD MACRO option.
The printer is checking ROM.
SRJJE
MEMORY OUERFiOW
Thismessagemayappearwhenyouaretryingtosavea
macro with the SAVE MACRO
have enough memory to save the
delete unused
SERJJ
I
A
controlk
macros using the
I=E REQ. CXXZ’X
error has been detected. Write down the
option
The painter does not
mauo.
To correct this error,
DELBTE
MACRO option.
numkrlistedonthedispLyudhunoffthcprinta.Wlitat
I~tfive~drurdthmtrunitbulron.Ifthcerot
message still
cord, and contact a qualified
A print engine error has been
number listed on the
appur, turn
display
off the printer, unpiug the power
savice pemoa
dehxted. Write
down the error
and turn off the printer. Wait at
Ieastfivesecundsandthentumitbackon.Iftheerror
message
stlB
appears, turn off the printer, unplug the power
cord, and contact a quaBfies service person.
ZET
FIJLL PRIHT
This message may appear when you are trying to
graphics or a mix of text and graphics. Press CONTINUE and
then change the SelecType
Iw]
SET
t4UNiJFIL
PULL
PRINT setting.
There is no paper in the manual feed tray and you have
Eclccted~~fced.~dashntof~pclinthe~uJ
feed tray. To cancel manual feed, press the MANUAL button
to feed paper from the paper
with
CANCBL
[Sj ,;TR:jcB’,’ MOcaE
- *
MANUAL
ussette.
FEED.
This message alternates
If all of the channels received no data for about thirty
minutes and you enabled the STANDBY mode in SelecType,
the printer enters standby mode. Press any panel button or
send data to warm up the printer.
card
into
Before you
FEED
light
CrroI
print
STPFT ;JF TE:QR
[El
If this message appears when you turn on the printer, the
power may have been turned off while the printer was
performing a save operation. To clear this error, press m or
m
to return the printer’s default settings to LT or A4
paper, respectively.
[WI
The printer is almost out of toner. When you see this
message,
you
can still
print
up to 25 more pages. You must
replace the imaging cartridge soon.
T!-itjC=; !7I IT
-
b..d”I
Fl
You must replace the imaging cartridge.
PI
The paper
specified paper cassette. The display indicates the expected
paper
size
setting does not match the paper loaded in the
size
and the currently selected cassette. You can either
change the paper size setting or load the correct paper size.
Afta
you
comet
IEI
The
&cified
the paper mismatch,
paper size does not match the paper loaded in
pters
CONTINUE.
the optional lower paper cassette. The display indicates the
expected paper size. After you correct the paper mismatch,
pmscoNTINuE.
m
The specified paper size does not match the paper loaded in
the standard paper cassette. The display indicates the expected
paper size. After you currect the paper mismatch, press
CON-IlNUE.
l$S:bjI
t4G
PI
Printer is warming up.
i-F
SelecType
The SelecType function on the printer control panel allows you to
control most of the printer’s functions, such as printing test pages,
selecting paper size, and changing the printer’s configuration.
SekcType
contains everyday printing and font selection functions, and Level
2 contains functions that you are less likely to change frequently,
such as printer mode and printer configuration.
Your application program may send printer commands that
override the SelecType settings. If you are not getting the results
you expect, check your application software settings.
Noter
off the
CONFIG option or the Level 2 P-CONPIG SAVE option.
is divided into two levels: Level 1 and Level 2. Level
New SelecType
printer
unless
settbgs
you
are in effect only until you turn
save them with the Level 1
SY!XEM
1
EPL-8000-10
3/3/92
Laser Printers
Page 11

EPL-8000
Level 1 functions
S’?STEtl
CONFI6
Level 2 functions
1=
1:‘15blF I I:.
f?~:-fl_!F~ EF 5 IX
1-l-l
T I
llE’3~sIT
Selects the serial, parallel, or optional channel
when you have set up more than two interfaces
and used the INDIVIDUAL mode.
Selects the standard or optional paper cassette.
Specifies the size of paper.
Selects the number of copies to be printed.
Selects the printing orientation: portrait
(vertical)
!kkcts
or landscape (horizontal).
one of the fonts available in the current
printer mode.
Prints a report listing the current printer
settings.
Prints a sample of the fonts available in the
current printer mode.
Defines the printer’s subconfiguration;
depending on the printer mode, controls such
features as symbol set and number of text lines.
Dcfii the print&s
saves
Iawl
1 settings, displays the amount of
system crx&guratkm;
memory remaining, changes top and left offsets,
ad
enables printing of complex pages.
Prints two test patterns to check the printer’s
operrtion.
Chooses une of the emulation modes:
LaserJet III, Epson LQ, Epson FX, or
IiP
IFS
modes.
In the IFS modes, the printer switches
automatically between PostSrript and another
mode (if PostScript is available). With an
optional identity card, you can also
sekct
Epson
GL or PostScript emulation.
Configures the
paralkl
and serial interfaces.
Chooses the size of the receive buffer.
Selects the AUTOSENSE or INDIVIDUAL
mode and assigns memory for INDIVIDUAL
Defines the auto emulation switch timeout; if
no more data is sent during the specified time
period, the printer switches from one emulation
mode to the other.
Defines the channel timeout; if no data is sent
during the spscified time period, the printer
switches from one channel to the other.
Selects automatic continue, which permits the
printer to continue printing instead of stopping
after certain error conditions occur.
Turns the beeper on or off.
F-IXHFI
~ SIWE
Saves the printer’s configuration; saves all
2
settings as defaults so they take effect each
Level
time you turn on the printer.
FliCTOF?,I
RESET Returns all Level 1 and Level 2 settings to their
factory settings.
!.jE& i
i)tI
Displays the
vemion
numbers of the printer’s
firmware components such as controller and
font.
FQGE
!I:OUtJTER
F: 1 Te,: p,
Displays the total number of sheets printed by
tk
printer.
Selects one of the settings for Epson’s
Resolution Improvement Technology, which
produces smooth text and graphics.
$,T;li.{[:@,’
Conserves energy by reducing power to the
fm
heater when the printer is not in use for
30
minutes.
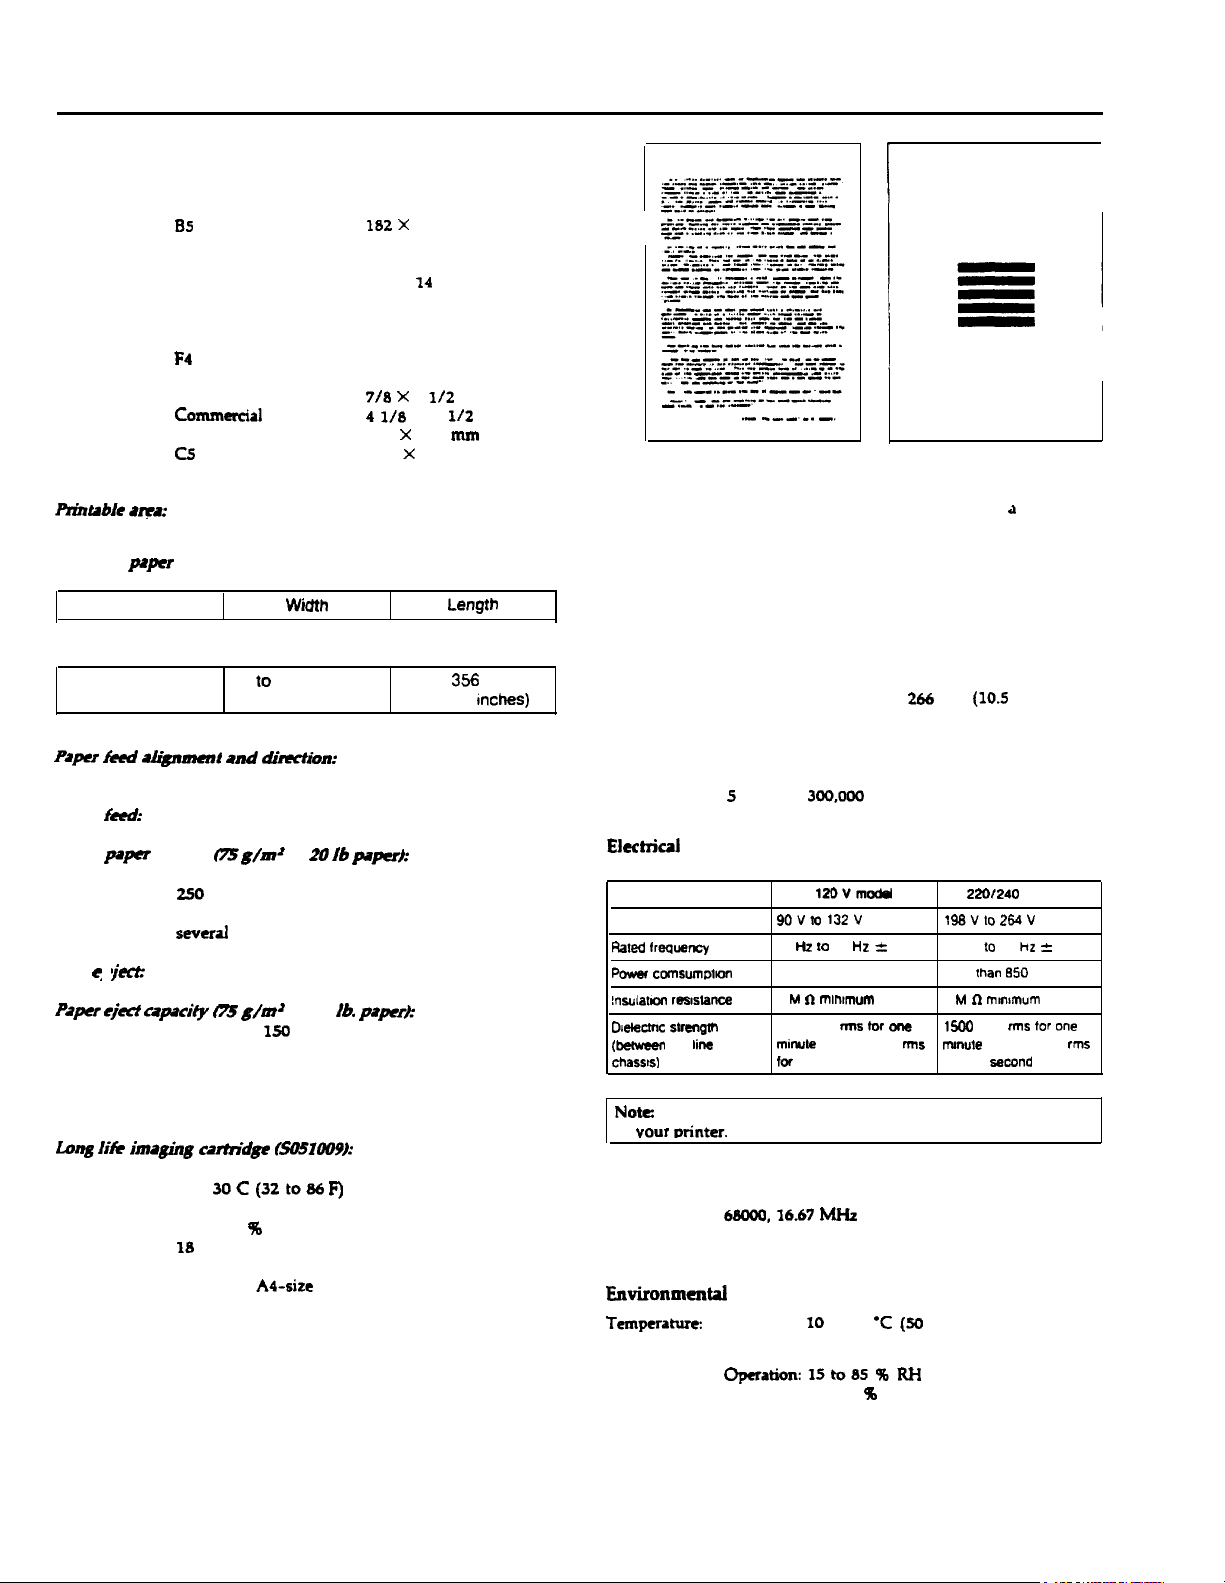
Printing a Status Sheet
In addition to the test print patterns, you can print a status sheet
that lists the current printer
N&C The status sheet lists the printer’s current settings. If you
cm
the macro number setting for the LOAD MACRO option
in the SYSTEM CONFIG submenu, the status sheet prints out
the new
maw
settings. MACRO 0 is the factory default setting.
Follow these steps to print the status sheet:
1.
Press SelecType once to enter SelecType Level
Note: If
YOU
have already chosen the INDIVIDUAL mode in
SelecType and have set up more than one channel, the following
option appears on the display (The display shows avaikbie
channds only):
l::irrN!:EL : f5 :
Press any arrow button to choose your channel; then go on to
step 2.
2. Press
u-]
until
-ATUS
3. Press m twice to print the status sheet.
4.
Press the SelecType button twice to exit SelecType.
A portion of tk status sheet printout is shown below.
set&gs.
I.
F: -’
I_! :I;
SHEET appears on the display.
Laser Printers 3l3l92
EPL-8000-11
Page 12

Data Dump Mode
Information Reference List
Data dump mode is a special feature that makes it easy for
experienced users to find the cause of communication problems
between the printer and computer. In data dump mode, the printer
produces as exact printout of the codes it receives.
Make sure that paper is loaded and the printer is off.
Hold down the SelecType button while you turn on the
printer. Make sure you hold the button down until you see
message HEX DUMP on the display.
Next, run any program that causes the printer to print (either
an apphcation program or a program written in any
programming language). Your printer prints out all the codes it
receives in hexadecimal format, as
.**...*.
WEI mmP
4.
To
turn
off
the data dump mode and stop printing, press ON
LIST.* . . . . . .
showm
below.
PASE
1
LINEtosettheprinteroffline.(IfyoupmsONLINEwNea
page is being printed, the green ON LINE
Ii&t
flashes until the
page is ejected and the printer goes off line.) To exit the data
dump mode, turn off the printer.
Engineering Change Notices
NOrb2.
Product Support Bulletins
NOXU?.
Technical Information Bulletins
NOlW.
Related Documentation
TM-EPL8ooo
PL-EPL8ooo
SPKEPL8ooo
4oooa34
4uoos35 Gal-al
GtI1-00
EPL8ooo
EPL-8000
EPL-8ooo
EPL-8000
EPL-8000 Quick
Service
Manual
Parts Price List
self
Paced Kit
User’s Guide
Setup&
Maintenance Guide
Look at the
sample
data
dump printout. By reading the characters
printedinthetextfieldmtherightsidedthedatadump
printout or the printout of hexadecimal codes, you can check what
codes are being set to the printer. In the text
field,
printable
characters appear as their true ASCII characters. Non-printable
codes, such as control codes, are
To interpret a data dump
hexadedd
codes on line
Code 73 represents the letter s; code 20
rqmsented by dots.
printout,
look at the
0004
of the printout
fht two
sample
(73 to).
repmsents a space.
ChcckthefihhlineofthernctCiddantheri%tEideofthe
printout and you will find the letter s followed by a space.
EPL-8000-12
3/3/92
Laser Printers
 Loading...