

Page 1
Page 2

FCC COMPLIANCE STATEMENT FOR AMERICAN USERS
This equipment has been tested and found to comply with the limits for a class B digital
device, pursuant to Part 15 of the FCC Rules. These limits are designed to provide
reasonable protection against harmful interference in a residential installation. This
equipment generates, uses and can radiate radio frequency energy and, if not installed and
used in accordance with the instructions, may cause harmful interference to radio
communications. However, there is no guarantee that interference will not occur in a
particular installation. If this equipment does cause harmful interference to radio or
television reception, which can be determined by turning the equipment off and on, the user
is encouraged to try to correct the interference by one or more of the following measures:
Reorient or relocate the receiving antenna.
Increase the separation between the equipment and receiver.
Connect the equipment into an outlet on a circuit difference from that to which the
receiver is connected.
Consult the dealer or an experienced radio/TV technician for help
WARNING
The connection of a non-shielded printer interface cable to this printer will invalidate the
FCC Certification of this device and may cause interference levels which exceed the limits
established by the FCC for this equipment. It is the responsibility of the user to obtain and
use a shielded equipment interface cable with this device. If this equipment has more than
one interface connector, do not leave cables connected to unused interfaces.
Seiko Epson Corporation shall not be liable against any damages or problems arising from
the use of any options or any consumable products other than those designated as Original
Epson Products or Epson Approved Products by Seiko Epson Corporation.
All rights reserved. No part of this publication may be reproduced, stored in a retrieval
system, or transmitted, in any form or by any means, mechanical, photocopying, recording,
or otherwise, without the prior written permission of Epson America, Inc. No patent liability
is assumed with respect to the use of the information contained herein. While every
precaution has been taken in the preparation of this book, Epson America, Inc. assumes no
responsibility for errors or omissions. Neither is any liability assumed for damages resulting
from the use of the information contained herein.
FOR CANADIAN USERS
This digital apparatus does not exceed the Class B limits for radio noise emissions from
digital apparatus as set out in the radio interference regulations of the Canadian Department
of Communications.
Le présent appareil numérique n’émet pas de bruits radioélectriques dépassant les limites
applicables aux appareils numériques de Class B prescrites dans le règlement sur le
brouillage radioélectrique édicté par le Ministère des Communications du Canada.
Page 3

Page 4

The manual and software and coded font programs described in this manual are registered
and copyrighted. The copyright of this manual is owned by Seiko Epson Corporation and
the copyrights of the software and coded font programs described in this manual are owned
by Adobe Systems Incorporated and are registered in the U.S. Patent and Trademark Office.
Epson is a registered trademark of Seiko Epson Corporation.
Helvetica, Palatino, and Times are trademarks of Linotype AG and/or its subsidiaries.
ITC Avant Garde, ITC Bookman, ITC Zapf Chancery, ITC Zapf Dingbats and Stone are
registered trademarks of International Typeface Corporation.
IBM and IBM PC are trademarks of International Business Machines Corporation.
LaserJet, LaserJet+, LaserJet 500, LaserJet series II, and LaserJet series IIP are trademarks of
Hewlett-Packard Company.
Apple, AppleTalk, and LaserWriter are registered trademarks of Apple Computer, Inc.
Macintosh is a trademark of Apple Computer, Inc.
Centronics is a trademark of Centronics Data Computer Corporation.
PostScript is a registered trademark of Adobe Systems Incorporated.
Copyright © 1990 by Seiko Epson Corporation
Nagano, Japan
Copyright © 1990 by Epson America Inc.
Torrance, California
ii
Page 5

IMPORTANT SAFETY INSTRUCTIONS
1.
Read all of these instructions and save them for later reference.
2. Follow all warnings and instructions marked on the product.
3.
Unplug this product from the wall outlet before cleaning. Do
not use liquid cleaners or aerosol cleaners. Use a damp cloth for
cleaning.
4. Do not use this product near water.
5.
Do not place this product on an unstable cart, stand, or table.
The product may fall, causing serious damage to the product.
6.
Slots and openings in the cabinet and the back or bottom are
provided for ventilation; to ensure reliable operation of the
product and to protect it from overheating, these openings
must not be blocked or covered. The openings should never be
blocked by placing the product on a bed, sofa, rug, or other
similar surface. This product should never be placed near or
over a radiator or heat register. This product should not be
placed in a built-in installation unless proper ventilation is
provided.
7.
This product should be operated from the type of power source
indicated on the marking label. If you are not sure of the type
of power available, consult your dealer or local power
company.
8. This product is equipped with a 3-wire grounding-type plug, a
plug having a third (grounding) pin. This plug will only fit into
a grounding-type power outlet. This is a safety feature. If you
are unable to insert the plug into the outlet, contact your
electrician to replace your obsolete outlet. Do not defeat the
purpose of the grounding-type plug.
9.
Do not locate this product where the cord will be walked on.
iii
Page 6

10. If an extension cord is used with this product, make sure that
the total of the ampere ratings on the products plugged into
the extension cord does not exceed the extension cord ampere
rating. Also, make sure that the total of all products plugged
into the wall outlet does not exceed 15 amperes.
11. Never push objects of any kind into this product through
cabinet slots as they may touch dangerous voltage points or
short out parts that could result in a risk of fire or electric
shock. Never spill liquid of any kind on the product.
12. Except as specifically explained in the User’s Manual, do not
attempt to service this product yourself. Opening or removing
those covers that are marked “Do Not Remove” may expose
you to dangerous voltage points or other risks. Refer all
servicing in those compartments to service personnel.
13.Unplug
qualified service personnel under the following conditions:
A. When the power cord or plug is damaged or frayed.
B. If liquid has been spilled into the product.
C. If the product has been exposed to rain or water.
D. If the product does not operate normally when the
operating instructions are followed. Adjust only those
controls that are covered by the operating instructions since
improper adjustment of other controls may result in damage
and will often require extensive work by a qualified
technician to restore the product to normal operation.
E. If the product has been dropped or the cabinet has been
damaged.
F.
If the product exhibits a distinct change in performance,
indicating a need for service.
this product from the wall outlet and refer servicing to
iv
Page 7
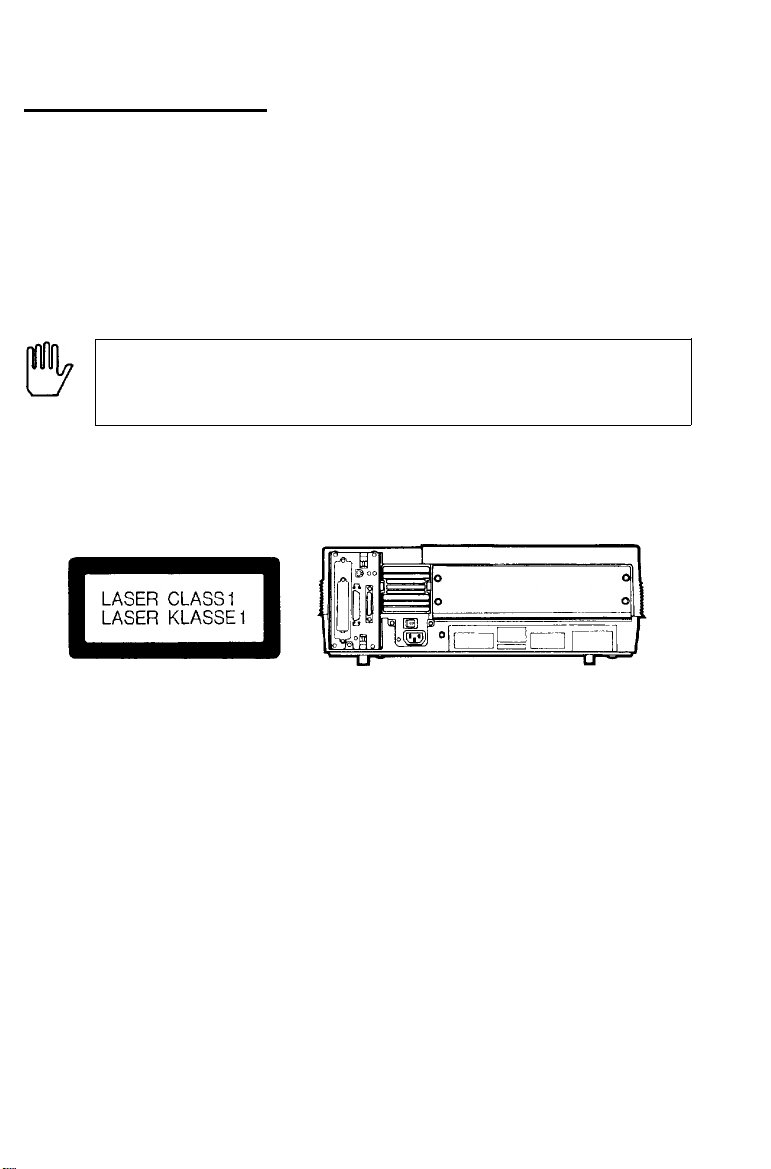
Safety Information
The EPL-7500 printer is certified as a Class 1 laser product, which
means that the printer does not produce hazardous laser radiation.
Since radiation emitted by the laser is completely confined within
protective housings and external covers, the laser beam cannot
escape from the machine during any phase of user operation.
WARNING: Use of controls, adjustments or performance
of procedures other than those specified in this guide
may result in hazardous radiation exposure.
The label shown below indicates that the printer is a Class 1 laser
product as defined in BS4803 and IEC 825 specifications.
Internal Laser Radiation
(nm)
-4
(W)
Maximum Radiation Power
Wavelength
. . . . . . . . . . . . . . . . . . . . . . . . . . . . . . . . . . . . . .
. . . . . . . . . . .
2.42 X l0
780
This is a Class IIIb Laser Diode Assembly that has an invisible
laser beam.
The print head unit is NOT A FIELD SERVICE ITEM. Therefore,
the print head unit should not be opened under any circumstance.
v
Page 8

Ozone Emission
During printer operation, a small amount of ozone is released. This
amount is not large enough to affect human beings adversely.
However, it is best to make sure the room where you a using the
printer has adequate circulation, especially if you are printing a
high volume of materials or using the printer continuously over a
long period of time.
vi
Page 9

Contents
Introduction
Laser Printer Precautions
Finding Your Way Around
Chapter 1 Setting Up the Printer
Finding a Place for the Printer
Unpacking the
Assembling
the Printer..
Printer..
.......................................................... 1-6
.........................................................
..............................................
Chapter 2 Testing and Connecting Your Printer
The Control
Testing the Printer..
Connecting to Your Computer
Panel...................................................................
................................................................
..............................................
Chapter 3 SelecType
SelecType Overview
Using SelecType......................................................................
SelecType
Options..
...............................................................
................................................................ 3-9
1
5
7
l-l
1-2
1-11
2-1
2-2
2-6
2-16
3-1
3-2
3-4
Chapter 4 Paper Handling
Choosing Paper
Choosing a Paper Size
Choosing Printing
Loading Paper in
Loading Paper Manually
.......................................................................
............................................................
Methods..
the Cassette.. .............................................
.................................................
........................................................
Chapter 5 Application Software
Using Your Printer with
Controlling the
Using PostScript Fonts
Printer.. .........................................................
Application
...........................................................
Software..
.................
Contents
4-1
4-2
4-5
4-6
4-9
4-13
5-1
5-2
5-5
5-7
vii
Page 10

Chapter 6 Maintenance and Transportation
TONER
Routine Cleaning
Transporting
LOW
Message..
Your Printer
...
........................................................
.................................................................
.....................................................
6-1
6-2
6-14
6-22
Chapter 7 Troubleshooting
Status
Troubleshooting
Paper
Power
Test
Printing
Problems
SelecType
Paper
Decline
Options
and Error
Jam Problems..
Supply
Print .................................................................................
Problems
with
Problems..
Handling
in Print
....................................................................................
Messages..
Directory..
..............................................................
..........................................................................
...................................................................
Graphics..
..............................................................
.......................................................................
Quality
...................................................
...................................................
.......................................................
........................................................
Chapter 8 Technical Specifications
Printer
Interface
Initialization..
Option
Specifications..
Specifications..
Specifications
...........................................................................
............................................................
.........................................................
.............................................................
Appendix A Options
Lower Paper
The
Face-up
The
Memory
The
Cassette
Output Tray
Expansion
....................................................
....................................................
Board ............................................
7-1
7-2
7-6
7-8
7-17
7-18
7-19
7-22
7-23
7-24
7-28
7-34
8-1
8-2
8-10
8-17
8-24
A-1
A-2
A-14
A-20
Appendix B Character Samples
PostScript
Emulation
HP
Mode . . . . . . . . . . . . . . . . . . . . . . . . . . . . . . . . . . . . . . . . . . . . . . . . . . . . . . . . . . . . . . . . . .._.
Mode . . . . . . . . . . . . . . . . . . . . . . . . . . . . . . . . . . . . . . . . . . . . . . . . . . . . . . . . . . . . . .
Glossary
Index
viii
Contents
B-l
B-2
B-5
GL-1
IN-1
Page 11

Introduction
The EPL-7500 is the first PostScript® printer in Epson’s advanced
line of laser printers. Real Adobe PostScript combines with Epson
quality for a high performance, reliable printer with a wide range
of graphic capabilities.
The PostScript imaging system used by the
a powerful processor that allows the printer to compose an entire
page in internal memory before printing. The
you with many features not found on other types of printers,
including the ability to mix text and graphics, create pre-defined
forms, and print with a range of fonts normally associated with
typeset material.
The EPL-7500 combines a semiconductor laser with the
electrophotographic technology used in office copiers to give you
high-quality printing that is both fast and quiet.
EPL-7500
EPL-7500
is driven by
provides
Features
In addition to the superior printing and easy operation you’d
expect from an Epson printer, these features make the EPL-7500
your best choice for today’s desktop publishing.
The Adobe PostScript Language. This powerful printer
language easily rotates, scales, clips, and orients any graphic
object on your page. Choose from the wide range of application
programs written for PostScript printers for professional results.
35 fonts in 11 font families. You’ll find these font families built
into the EPL-7500: Times™, Helvetica™, Courier, Symbol,
Avant Garde®, Bookman®, Helvetica Narrow, New Century
Schoolbook, Palatino™, Zapf Chancery®, and Zapf Dingbats®.
2 Megabytes of standard Random Access Memory (RAM). You
can expand the printer’s RAM to 6 Megabytes with the easyto-install optional 4 Megabyte memory board.
Introduction 1
Page 12

A standard paper cassette that holds up to 250 sheets of paper.
Add the optional lower paper cassette, which holds an
additional
High-quality, 300 dots-per-inch (DPI) printing at a speed of up
to six pages per minute. Whether you’re a serious desktop
publisher or just beginning, you’ll appreciate the crisp,
professional print quality produced by the EPL-7500 and its
leading edge processing speed.
Four built-in interfaces. Choose Centronics® parallel,
AppleTalk”, RS-232 serial, or RS-422 serial.
An all-in-one imaging cartridge that combines the
photoconductive, developing, and toner elements in a single,
disposable cartridge. Replace it in minutes for simple printer
maintenance.
Two paper delivery methods. Choose standard face-down
delivery for your everyday printing needs, or add the optional
face-up tray for printing on special media like labels or very
heavy paper.
A SelecType control panel for easy configuration control.
Customize your printer’s interface and communication settings
with the touch of a button from the printer’s front panel to
create the system that’s right for you.
250
sheets, and you can print up to
500
pages.
The HP™ emulation for application programs written for
Hewlett-Packard” LaserJet printers.
Options
Several printer options are available for your printer. For detailed
information on installing and using these options, see Appendix A.
2
Introduction
Page 13
The Lower paper cassette (C812051 or C812061)
The optional lower paper cassette fits directly beneath the printer
and feeds up to 250 sheets of paper into the printer. The optional
cassette expands your standard paper cassette’s 250-sheet capacity
to
500
sheets.
The face-up output tray (C812071 or C812072)
The face-up output tray delivers paper face-up for immediate
viewing of your printed output. Also use the face-up output tray
for printing that requires a straight-through paper path, such as
labels, overhead transparencies and heavy paper.
Introduction 3
Page 14
Introduction
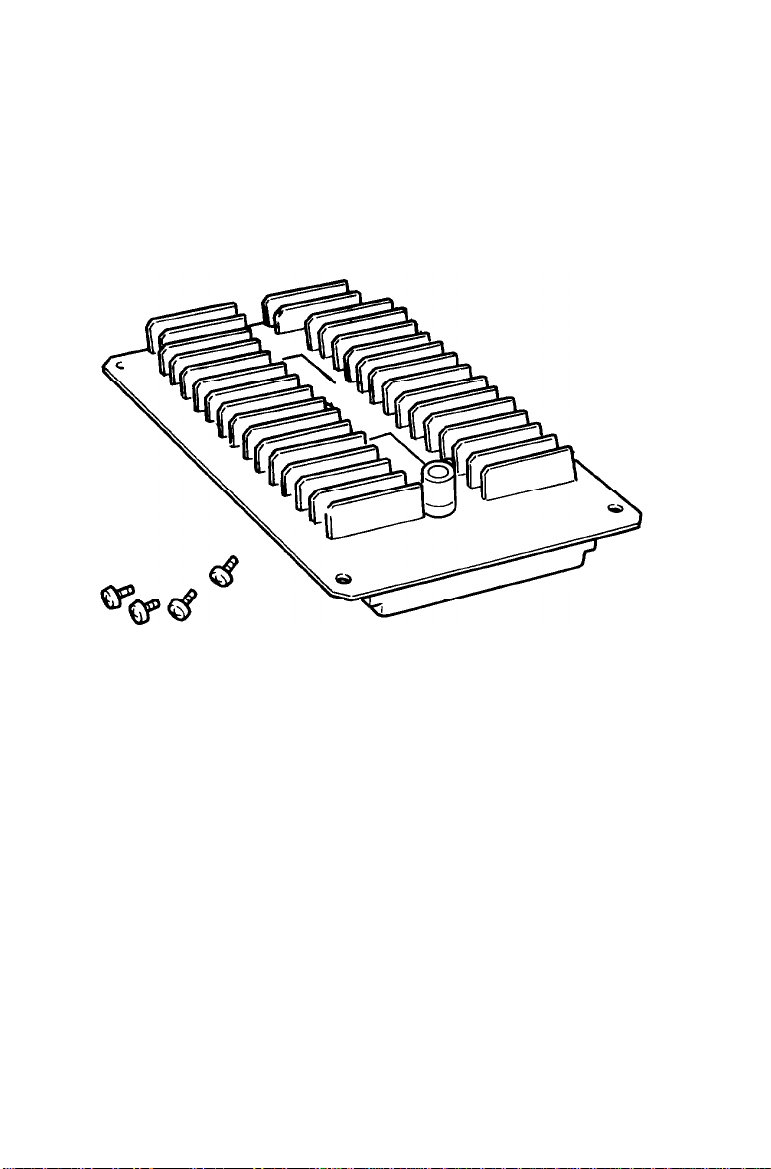
Memory expansion board (C822021 or C822022)
The memory expansion board adds an extra 4 MB of RAM to your
printer. With this board, you can increase your printer’s memory
to a powerful 6 MB of RAM for rapid processing of the most
complex graphics.
Accessories and supplies
To locate or purchase accessories or supplies, contact your nearest
Epson dealer or call
4
Introduction
1-800-873-7766.
Page 15
Laser Printer Precautions
This printer uses laser technology. The following list of precautions
applies whenever you open the printer cover. Even if you are
familiar with other types of printers, be sure to follow these
precautions carefully to ensure safe, efficient operation.
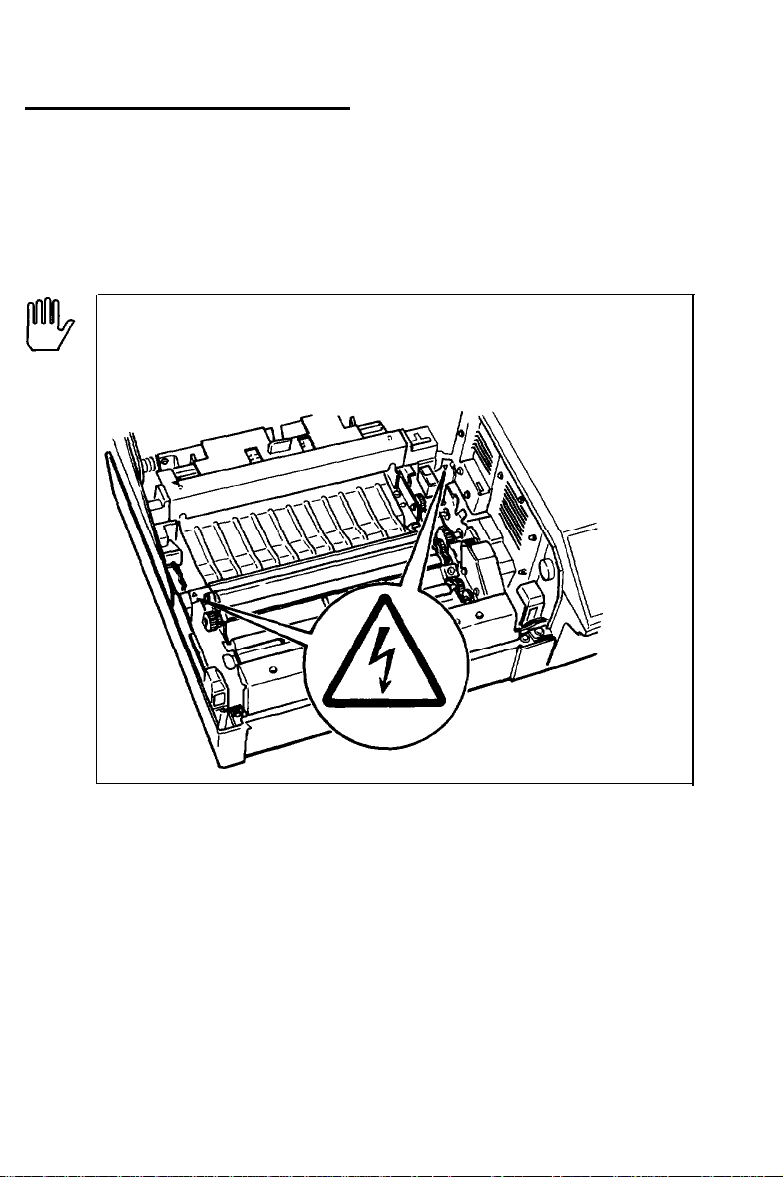
WARNING: High voltages are present inside the printer
when the power is on. Do not touch the areas marked by
a high voltage label.
l
Be careful not to touch the fuser, which is marked by a
CAUTION: HOT SURFACE label. If the printer has been in
operation, the fuser can be very hot.
l Protect the light-sensitive drum from exposure to light. You
should avoid exposing the imaging cartridge to room light for
any longer than necessary. Do not open the drum’s protective
cover. Overexposing the drum may cause abnormally dark or
light areas to appear on the printed page.
Laser Printer Precautions
5
Page 16

If you must expose the drum either by taking the imaging
cartridge out of the printer or by leaving the printer cover
open, cover the drum with a soft cloth or sheet of paper.
l When you remove the imaging cartridge from the printer,
always set the cartridge on a clean, smooth surface.
l
Be sure not to scratch the surface of the drum. Also, avoid
touching the drum, since oils from your skin can permanently
damage its surface and may affect print quality.
l
Avoid pressing on the top of the toner cartridge. Pressing
directly on the cartridge may cause toner to spill into the
printer. If there is a spill, see Chapter 6 for cleaning
instructions.
l Never try to force the printer’s components into place.
Although the printer is designed to be sturdy, rough handling
can damage it.
6
Laser Printer Precautions
Page 17

Finding Your Way Around
This user’s manual provides fully illustrated, step-by-step
instructions on setting up and operating your printer.
Chapter 1 contains information on unpacking and setting up the
EPL-7500. Be sure to read and follow these instructions first.
Chapters 2 and 3 contain information on using the control panel,
testing and connecting the printer, and general operation. Chapter
3 contains full information on SelecType.
For a detailed discussion of paper handling, see Chapter 4. Make
sure you read this chapter before purchasing your paper supply.
Chapter 5 contains information on using the printer with software,
while Chapter 6 gives you information on maintaining your
printer.
If the EPL-7500 does not operate properly or the printed results are
not what you expect, see Chapter 7 for troubleshooting tips.
Other chapters and appendixes contain information on technical
specifications, printer options, and printer modes. The appendixes
contain available character samples. The manual ends with a
glossary of printer terms and an index.
At the back of this manual is a Quick Reference card showing all
SelecType options. The SelecType menu maps found on this card
can be used as guides whenever you use SelecType.
On the back cover foldout are illustrations identifying the different
parts of your printer. You can refer to these as you set it up.
Finding Your Way Around
7
Page 18

Finding Your Way Around
Warnings, Cautions, and Notes
WARNING: must be followed carefully to avoid bodily
injury.
CAUTION: must be observed to avoid damage to your
equipment.
Note: contain important information and useful tips on the
operation of your printer.
Where to Get Help
A network of authorized Epson dealers and Customer Care Centers
throughout the United States offers customer support and service
for Epson products. Epson America provides product information
and support to its dealers and Customer Care Centers.
Therefore, we ask you contact the business where you purchased
your Epson product to request assistance. If the people there do
not have the answer to your question, they can obtain it through
our dealer support program.
Epson is confident that this policy will provide you with the
assistance you need. Call the Epson Consumer Information Center
at l-213-782-2600 for the following:
l The location of the nearest Epson dealer.
l The location of the nearest Customer Care Center.
To locate or purchase accessories or supplies, contact your Epson
dealer.
8
Finding Your Way Around
Page 19

Chapter 1
Setting Up the Printer
the Printer..
a
Finding
Opening the printer cover
Unpacking the Printer
Carrying the printer
Assembling the Printer
Installing the cleaning pad
Installing the imaging cartridge
Installing the paper cassette
Attaching the power cord..
Place
for
............................................................
............................................................
...........................................................
............................................
.................................................
.................................................
.........................................
...............................................
................................................
l-2
1-4
l-6
l-10
l-11
l-11
l-13
l-19
l-21
Setting Up the Printer
l-l
Page 20
Finding a Place for the Printer
Before unpacking the printer, you need to find a suitable place to
use it. Keep the following points in mind when selecting a place
for your printer:
Place the printer on a flat, stable surface.
Place the printer close enough to the computer or workstation
for its cable to reach.
Use a grounded outlet; one that has three holes to match the
power plug on the printer. Do not use an adapter plug.
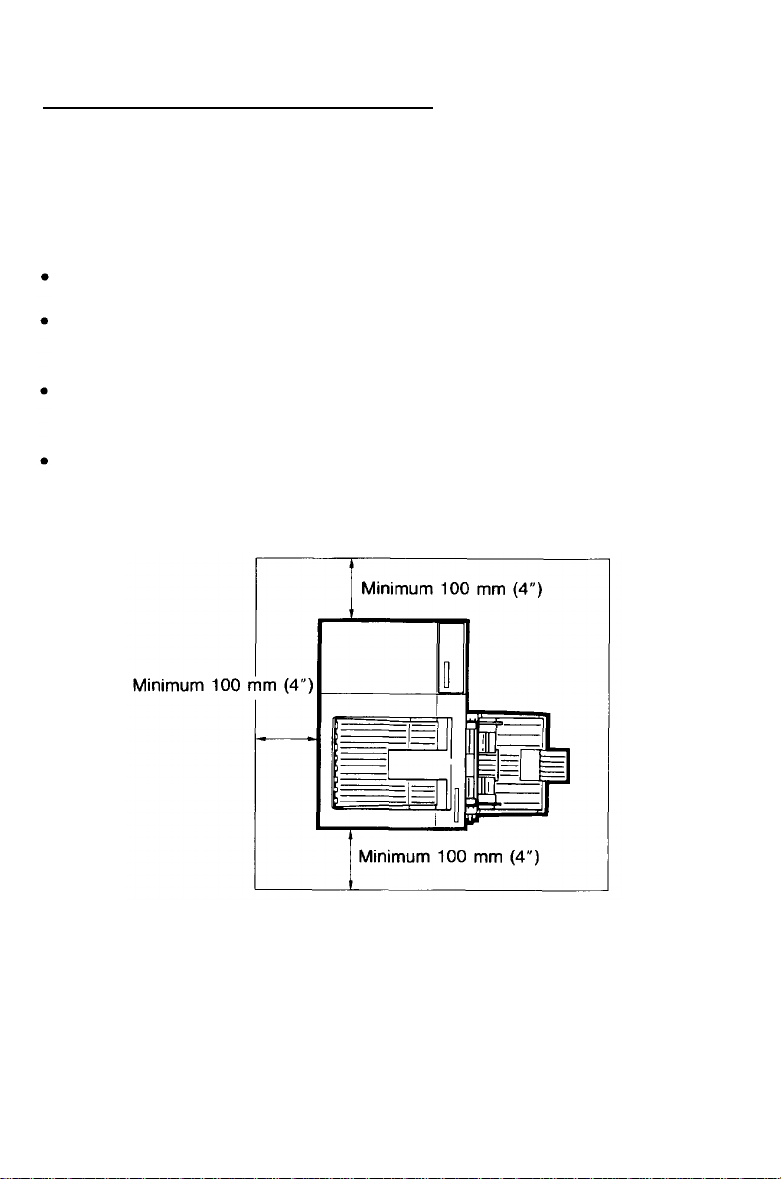
Leave adequate room around the printer to allow easy printer
operation and maintenance. The diagram below shows the
amount of space recommended for your printer.
l-2 Setting Up the Printer
Page 21
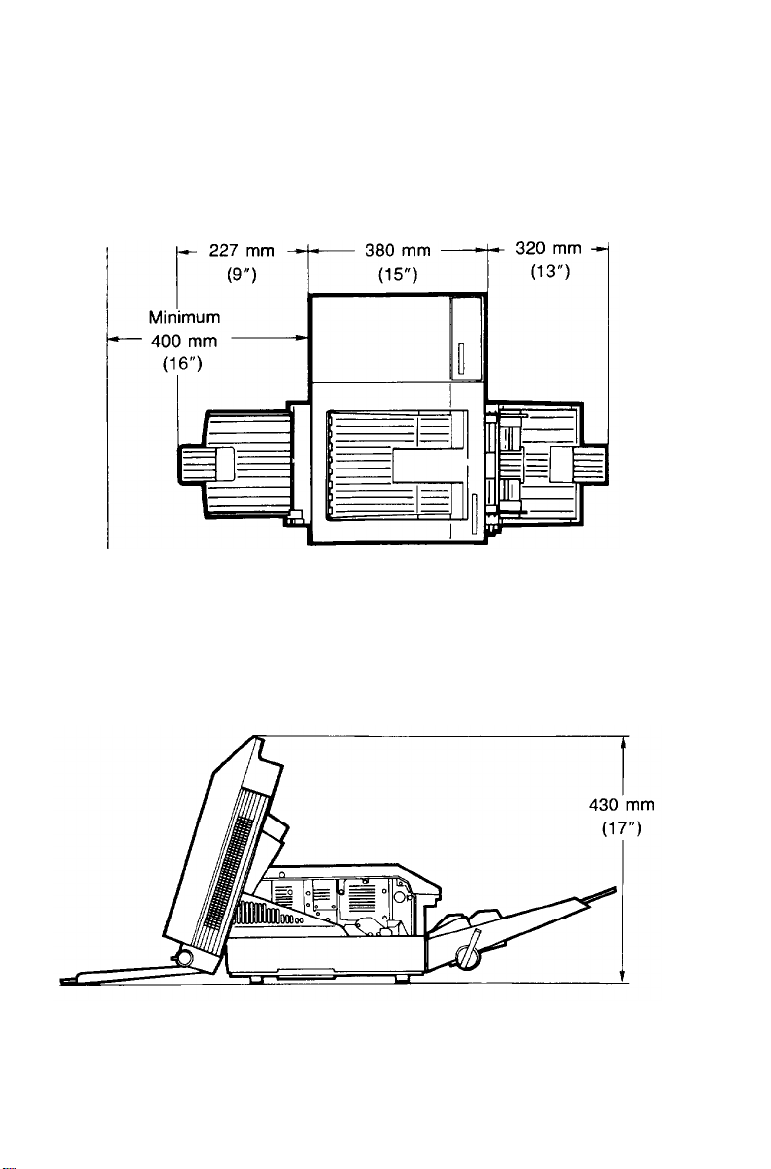
• If you install the optional face-up tray, you need 400 mm (16
inches) of space behind the printer. Make sure there is 330 mm
(13 inches) of flat, unobstructed space to the left of the printer
to accommodate the tray.
•
To give you enough room to open the printer cover, allow
430 mm (17 inches) from the bottom of the printer to any shelf
or surface directly above the printer, as shown below.
Setting Up the Printer
l-3
Page 22

Finding a Place for the Printer
If you install the optional lower paper cassette, you need an
additional 100 mm (4 inches) directly above the printer.
CAUTIONS:
Avoid locations that are subject to direct sunlight,
excessive heat, moisture, or dust.
Avoid using electrical outlets that are controlled by
wall switches or automatic timers. Accidental
disruption of power can wipe out valuable
information in your computer’s memory and printer’s
memory.
Avoid using outlets on the same circuit with large
motors or other appliances that might disturb the
power supply.
Keep the entire computer and printer system away
from potential sources of interference, such as
loudspeakers or the base units of cordless telephones.
Opening the printer cover
The printer cover opens to two positions, as shown on the
following page. When you lift the latch to open the printer cover,
it stops automatically in the lower position (at an angle of about
45 degrees). This position protects the imaging cartridge from
overexposure to light. When you lift the cover as far as it will go,
it stops at the upper position (about 70 degrees). The instructions
in this manual tell you which position to use for each task.
1-4
Setting Up the Printer
Page 23
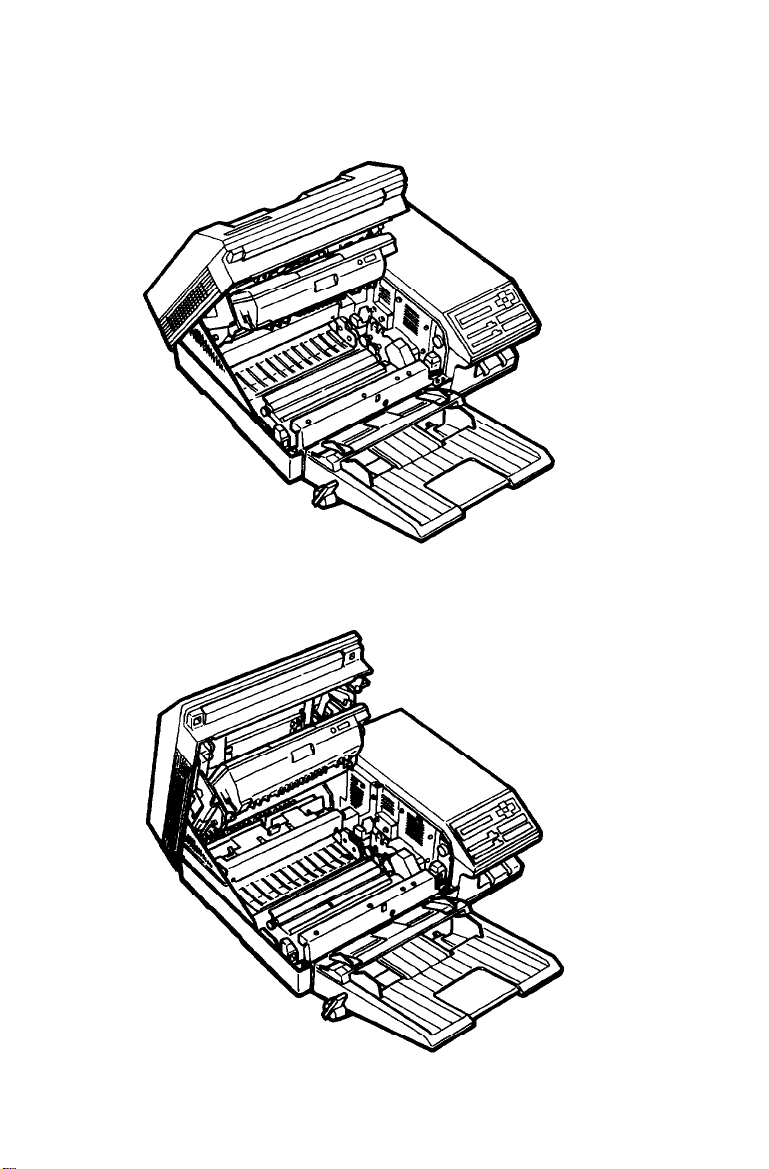
Lower position (45°)
Upper position (70°)
Finding a Place for the Printer
Setting Up the Printer 1-5
Page 24
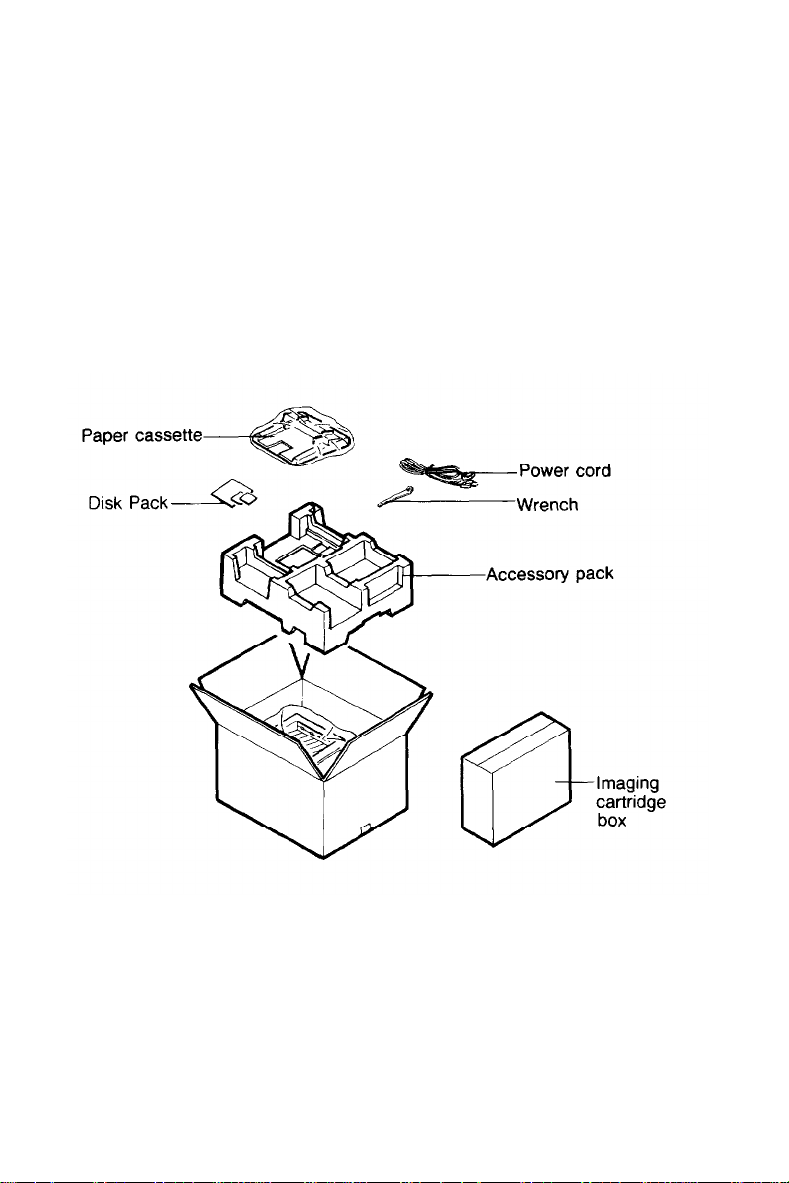
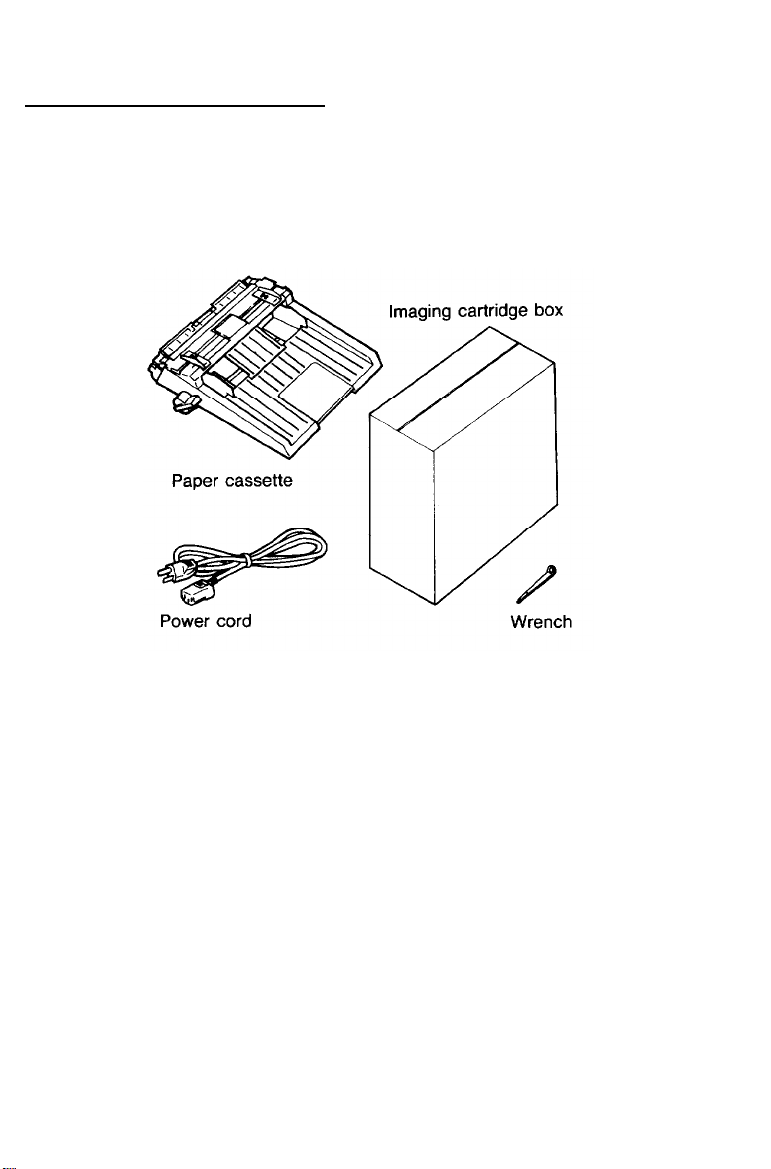
Unpacking the Printer
The printer and the imaging cartridge are packed separately. First,
carefully unpack the large main carton. At the top of this carton is
the accessory pack containing several printer components. Under
this is the printer itself, which is protected by white packing
material.
1.
Remove the accessory pack and make sure you have the
accessories shown below.
1-6
Setting Up the Printer
Page 25
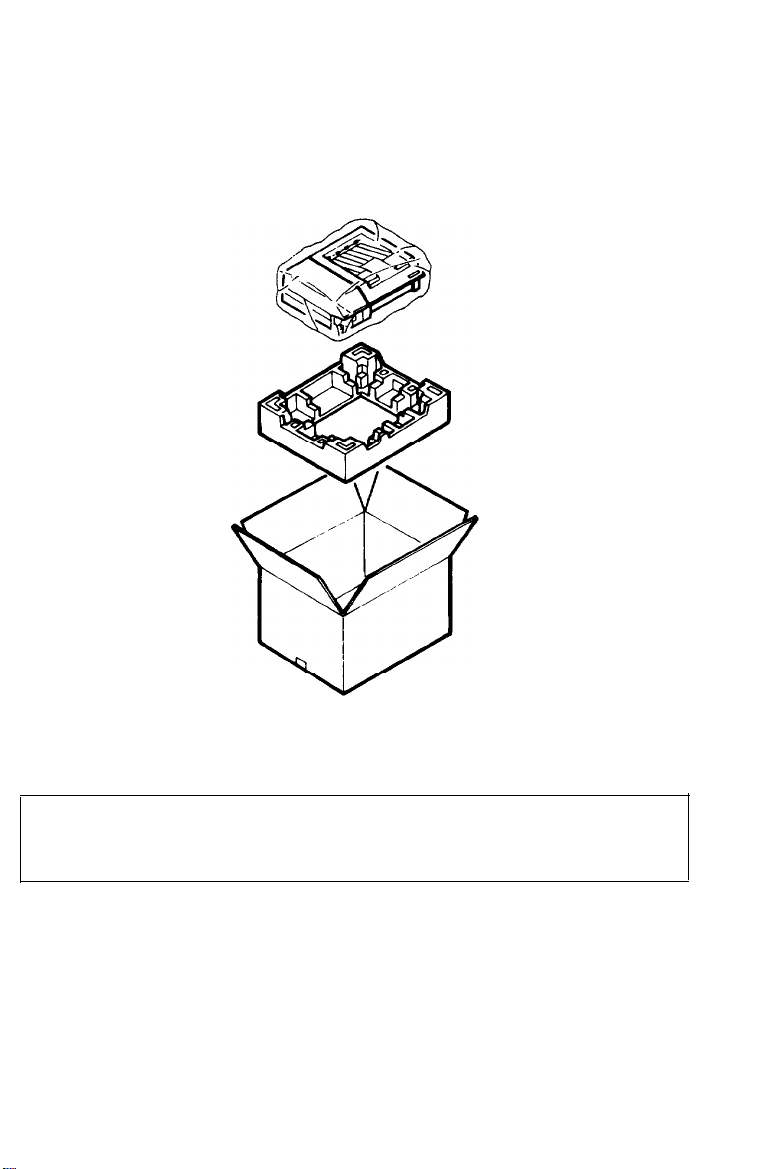
Unpacking the Printer
Carefully remove the printer from the large carton and set it on
2.
a flat, stable surface. Since the printer is heavy, you may need
someone to help you lift it.
Remove the plastic bag protecting the printer. Then remove the
3.
plastic bag from the paper cassette.
Note: Make sure that you save all packing materials. You must
repack the printer in these materials whenever you transport it.
See Chapter 6 for details on transporting your printer.
Setting Up the Printer
1-7
Page 26
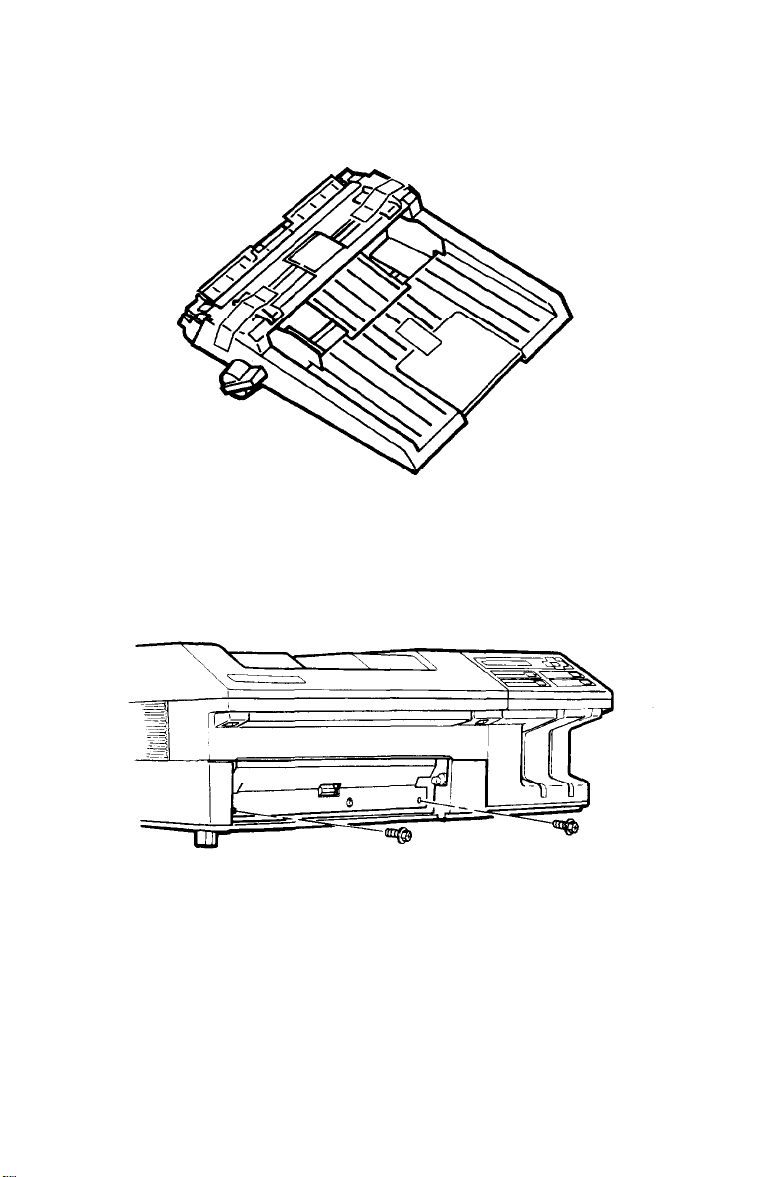
Unpacking the Printer
4. Remove the tape from the printer and the paper cassette.
5.
Use the wrench to unscrew the two screws on the front of the
printer, as shown below.
1-8 Setting Up the Printer
Page 27
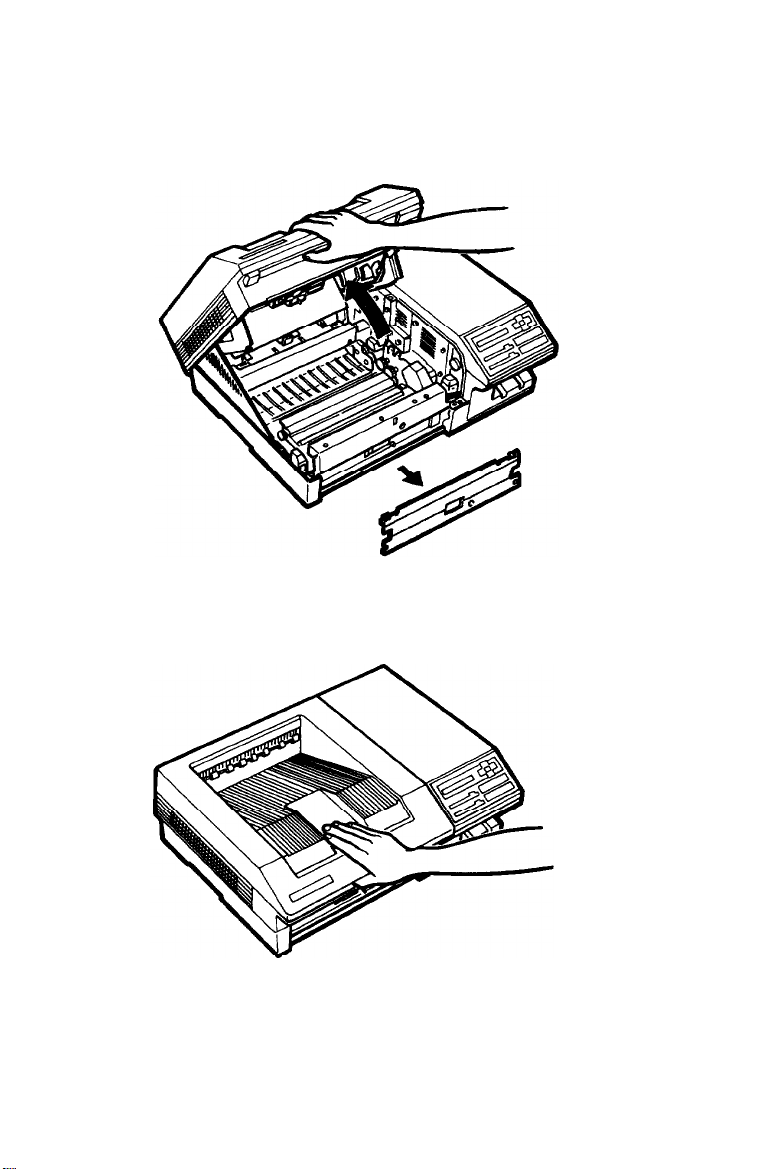
Unpacking the Printer
6
Lift up the front latch and open the printer cover as far as it
will go, as shown below. Remove the protective plate.
7. To close the printer, gently press down on the top of the case
until the latch clicks shut.
8.
Finally, check to see that neither the printer nor any of the
accessories has been damaged during transportation.
Setting Up the Printer
1-9
Page 28
Unpacking the printer
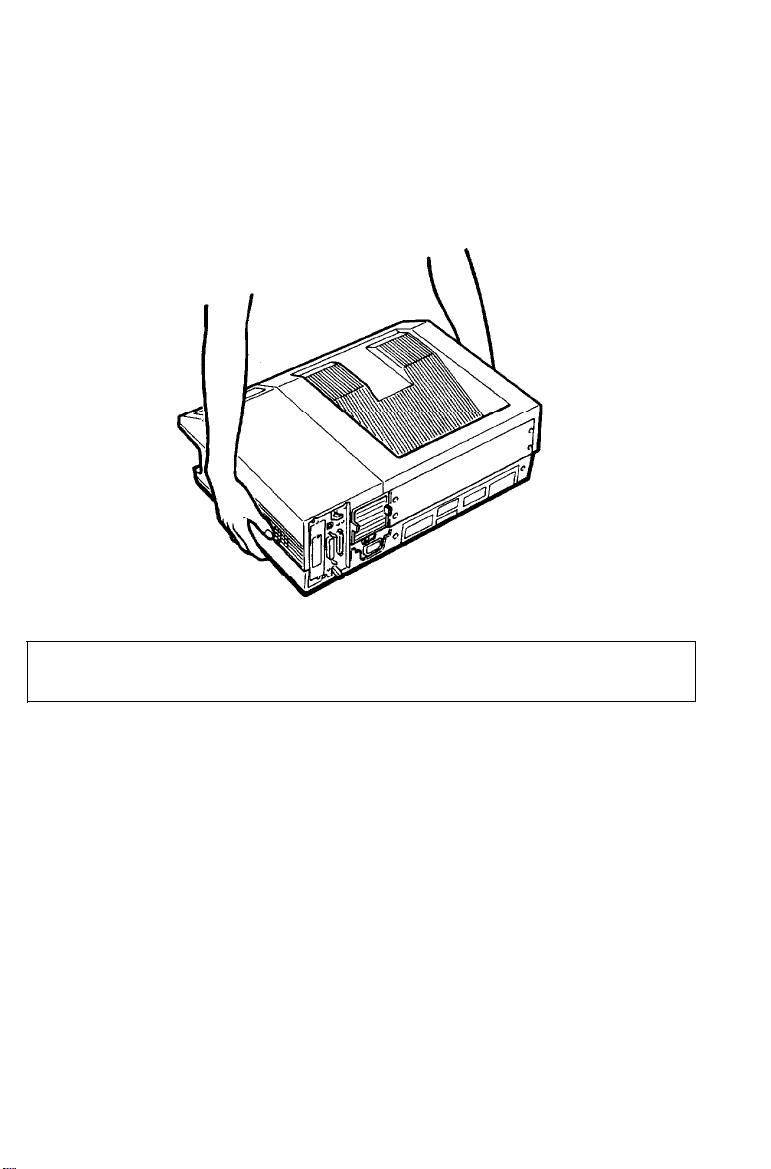
Carrying the printer
When you move your printer to the location you selected for it,
carry it by grasping the recesses on each side of the printer, as
shown below.
Note: The printer weighs about 18 kg (40 lb.) and should be
carried with care. You may need someone to help you lift it.
1-10
Setting Up
the
Printer
Page 29
Assembling the Printer
Before you can use the printer, you need to install a few important
parts. Make sure your printer is at its operating location before
you install the parts.
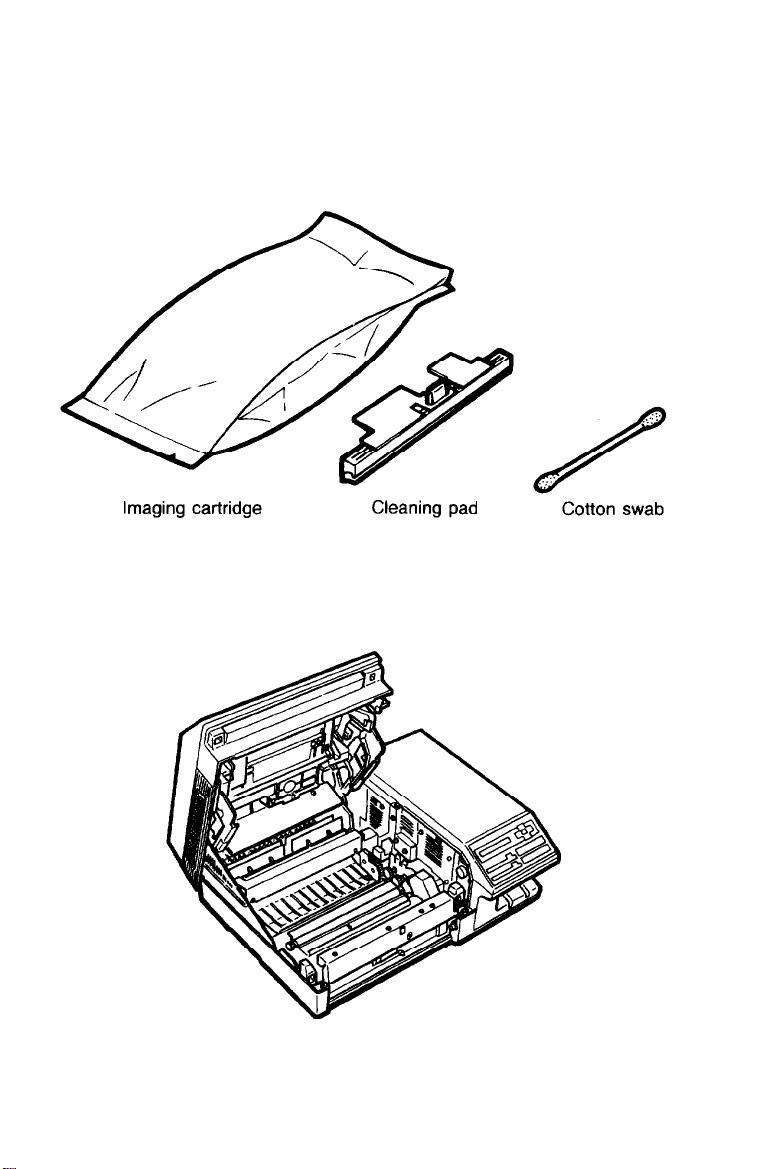
Installing the cleaning pad
The first component that you need to install is the cleaning pad.
It is packaged inside the imaging cartridge box. The felt cleaning
pad constantly cleans the surface of the fusing roller, which fixes
toner onto the paper.
Setting Up the Printer
1-11
Page 30
Assembling the Printer
1.
Open the imaging cartridge box and take out the cleaning pad.
Leave the imaging cartridge, cotton swab, and packing materials
inside the box for now; you will use them later.
2.
Lift up the front latch and open the printer cover to the upper
position, as shown below.
1-12
Setting Up the Printer
Page 31

Assembling the Printer
WARNING: Never touch the fuser. When the printer is
in operation, the fuser becomes very hot.
3.
Hold the cleaning pad by the yellow handle and place it into
the indentation on top of the fuser. To make sure you install
the pad in the correct position, match the triangle on the
cleaning pad with the triangle on the fuser, as shown below.
Installing the imaging cartridge
The imaging cartridge forms the image and transfers it onto the
paper. See Chapter 6 for information on imaging cartridge life.
CAUTION: The drum is light-sensitive. Do not expose it
to light any longer than necessary and do not expose it
to light brighter than normal room light.
Setting Up the Printer
1-13
Page 32

Assembling the Printer
Handling the imaging cartridge
Keep the following cautions in mind whenever you handle the
imaging cartridge:
•
Do not turn the cartridge upside down.
l Do not open the drum’s protective cover. Do not scratch or
mar the surface of the drum. Also, do not touch the drum,
since oils from your skin can permanently mar its surface and
may affect print quality.
1-14
Setting Up the Printer
Page 33

Assembling the Printer
•
Do not expose the cartridge to direct sunlight. If you must
expose the drum, first cover it with the aluminum packing bag
provided or with a soft cloth.
l
When handling the imaging cartridge, always set it on a clean,
smooth surface.
• Do not attempt to modify or take apart the cartridge. It cannot
be refilled.
l Do not use a cartridge for at least one hour after moving it
from a cool to a warm environment.
Storing the imaging cartridge
Follow these storage precautions to get the best print quality from
your imaging cartridge:
l Do not store in direct sunlight.
l Do not store in dusty places.
l
Do not store where salty air or corrosive gasses (such as
ammonia) are present.
l Do not store where the temperature or humidity are high or
subject to abrupt changes.
Setting Up the Printer 1-15
Page 34

Assembling the Printer
Follow these steps to install the imaging cartridge:
1.
Remove the imaging cartridge from its aluminum packing bag.
CAUTION: Do not open the drum’s protective cover. It
protects the drum from light and contact.
2.
Hold the imaging cartridge as shown below and shake the
cartridge from side to side a few times to distribute the toner.
1-16
Setting Up the Printer
Page 35

Assembling the Printer
3. Pull the yellow tab firmly, as shown below, to remove the clear
seal completely.
After you remove the seal, gently shake the imaging cartridge
4.
again four or five times.
Setting Up the Printer
1-17
Page 36

Assembling the Printer
Make sure the printer cover is in the lower position
5.
6.
Hold the imaging cartridge as shown below. Carefully place the
plastic runners on either side of the cartridge into the green
grooves inside the printer and slide the cartridge forward as far
as it will go.
1-18 Setting Up the Printer
Page 37

Assembling the Printer
7.
Now that you have installed the internal components, close the
printer and gently press down on the top of the case until the
latch clicks shut.
CAUTION: Never transport the printer with the imaging
cartridge installed. See Chapter 6 for details on moving or
transporting the printer.
Installing the paper cassette
Before you install the paper cassette, make sure you have removed
the tape from the cassette.
Setting Up the Printer
1-19
Page 38

Assembling the Printer
Locate the paper cassette opening at the front of the printer. Align
the small notches on either side of the paper cassette with the
metal pins inside the printer; then lower the paper cassette into
place, as shown below.
Note: Make sure the notches fit securely onto the pins on the
printer. If the paper cassette is not installed properly, an OUT
OF PAPER error may appear on the display.
1-20
Setting Up the Printer
Page 39

Assembling the Printer
Attaching the power cord
1.
Before you attach the power cord, make sure the power switch
at the rear of the printer is turned off. It is off when the O on
the switch is pressed toward the printer, as shown below.
WARNING: If the rated voltage of the printer and your
outlet voltage do not match, contact your dealer for
assistance. Do not plug in the power cable.
Setting Up the Printer
1-21
Page 40

Assembling the Printer
2.
Insert the power cord into the socket at the back of the printer,
as shown below. Then plug the other end of the power cord
into a properly grounded outlet.
1-22
Setting Up the Printer
Page 41

Chapter 2
Testing and Connecting Your Printer
The Control Panel
Display
Indicator lights
Buttons
Testing the Printer..
Loading paper forastart page
Turning on the printer
Adjusting the print density
Connecting the Printer to Your
IBM ® and compatible computer
Macintosh®users
Connecting the parallel
Other interface selections
Connecting the serial interface
.................................................................................
.................................................................................
...................................................................
....................................................................
................................................................
.......................................................
................................................................
interface cable.. ..........................
..................................................
..........................................
...............................................
Computer..
users.. ............................ 2-16
cable.. .............................. 2-22
........................
2-2
2-2
2-3
2-4
2-6
2-6
2-10
2-13
2-16
2-16
2-18
2-20
Testing and Connecting Your Printer 2-1
Page 42

The Control Panel
The printer control panel is made up of three elements: buttons,
indicator lights, and a liquid crystal display. You use the buttons
to select printer settings and functions, and the indicator lights and
display let you monitor the current status of the printer.
Display
The display shows the printer’s status and available options. The
types of information displayed and an example of each are given
below.
Status messages, such as WARMING UP, indicate the printer’s
current status.
Maintenance and error messages, such as COVER OPEN,
inform you of maintenance procedures that must be performed
or of error conditions.
SelecType options, such as MODE, allow you to control printer
mode, font selection, paper handling, and many other printer
functions.
For information on using SelecType, see Chapter 3. For a complete
list of maintenance and error messages, see Chapter 7.
2-2
Testing and Connecting Your Printer
Page 43

The Control Panel
Indicator lights
LEVEL 1, LEVEL 2 One of these lights is on when the printer is in
the SelecType mode, depending on which level
you enter. These lights are off if the printer is not
in SelecType mode.
ON LINE
CONTINUE
CH S, CH P
The light is on when the printer is on line,
indicating that the printer can receive and print
data. When the printer is off line, this light is off.
This light is on when the printer is in HP
emulation mode and there is information on the
page. It has no meaning in Post script mode.
One of these lights goes on when data is received
by the indicated channel and is stored in the
printer without being printed out. The CH S light
is for AppleTalk or a serial interface. The CH P
light is for the parallel interface.
Testing and Connecting Your Printer
2-3
Page 44

The Control Panel
Buttons
You use these four arrows to select and set
printer options in SelecType mode. Their
functions are described in detail in Chapter 3.
FEED
ON LINE
2-4 Testing and Connecting Your Printer
In HP emulation mode, this button is used like
the form feed key on an HP LaserJet. If there is
anything on the current page, pressing this
button causes the printer to print the page. If
there is nothing on the current page, this
button is ignored. This button operates only if
the ON LINE light is on and WAITING appears
on the display. This button is inactive in other
modes.
Switches the printer between on line (READY)
and off line status. This switch is disabled
when you are in SelecType mode.
Page 45

The Control Panel
CONTINUE
COPY END/RESET THE JOB is on the display, the display changes to
Select Type
RESET-If you press this button while QUIT
QUITTING THE JOB
the printer’s memory. If you press any other
buttons, the printer returns to its previous status
without printing data.
Enters or exits SelecType mode. Press once to
enter Level 1; press twice to enter Level 2. For a
complete description of the two SelecType levels
and their functions, see Chapter 3.
and the job is flushed from
Testing and Connecting Your Printer
2-5
Page 46

Testing the Printer
When you turn on the printer, it automatically prints a start page,
containing simple text and graphics. Normally, processing of the
start page begins about 70 seconds after you turn the printer on.
The start page does not print if the STARTPAGE option in
SelecType Level 2 is set to OFF or if the printer takes more than
three minutes to warm up.
Note: In most cases, leave the STARTPAGE option set to on.
The start page lists useful information about your printer’s
current settings and lets you know the printer is working
properly and ready to print.
You can also print test prints with the TEST PRINT option in
SelecType Level 2. See Chapter 3.
Before you turn on the printer, make sure you have removed all
packing material from the printer, as described in Chapter 1,
installed all the components, and loaded paper as described in the
following section. You do not need to connect the printer to your
computer to print a start page.
Loading paper for a start page
The standard paper cassette can automatically feed up to 250
sheets of paper. To load paper, follow the steps below. See
Chapter 4 if you need more information on paper handling.
2-6
Testing and Connecting Your Printer
Page 47

Testing the Printer
1. Push the paper set lever forward to the manual position.
2. Slide the paper guides all the way open, as shown below.
Testing and Connecting Your Printer
2-7
Page 48

Testing the Printer
3.
Take a stack of A4 or letter-size paper (high-quality copier
paper is recommended) and tap the edges of the paper on a flat
surface to even up the stack.
4.
Insert the stack of paper into the paper cassette, making sure
that the top of the stack does not exceed the maximum height
mark inside the cassette, as shown below. Gently push the
paper in as far as it will go.
2-8
Testing and Connecting Your Printer
Page 49

Testing the Printer
5.
Slide the paper guides together until they both rest lightly
against the paper.
6. Pull the paper set lever back to the automatic position.
Testing and Connecting Your Printer
2-9
Page 50

Testing the Printer
Note: The paper set lever must be in the automatic position
before paper can be fed automatically from the paper cassette. If
you set the lever to the manual position when the printer is on,
automatic paper feeding is disabled and the OUT OF PAPER
message appears on the display, even if there is paper in the
paper cassette.
Now you’re ready to turn on the printer and print a start page.
Turning on the printer
Make sure the printer is plugged in and the imaging cartridge is
installed; then turn on the power by pressing the vertical bar (1)
on the power switch located at the back of the printer.
All of the lights on the control panel light briefly at power on. The
following messages appear on the display as the printer performs a
series of internal tests and warms up.
2-10
Testing and Connecting Your Printer
Page 51

Testing the Printer
CAUTIONS:
Do not open the printer cover while the printer is
warming up or printing.
After you turn off the printer, always wait at least
five seconds before turning it back on.
It takes approximately 70 seconds for the printer to complete its
power-on routine. Then the printer automatically prints the start
page. After the page has printed, the printer is on line and the
display shows READY. If the display remains blank, see Chapter 7
for troubleshooting information.
The start page contains information about several current
parameters of your printer. A typical start page printout is shown
on the next page.
Testing and Connecting Your Printer
2-11
Page 52

Testing the Printer
2-12 Testing and Connecting Your Printer
Page 53

Testing the Printer
If the start page prints correctly, you can skip to the section on
connecting the printer to your computer later in this chapter. If the
start page does not operate properly, see Chapter 7 for
troubleshooting information.
Adjusting print density
You can control the overall density of the printed image with the
print density control knob. If your test print is too light or too
dark, adjust the print density as follows:
Lift the latch to open the printer cover to the lower position.
1.
Locate the yellow density control knob inside the front right
2.
corner of the printer, as shown below.
Testing and Connecting Your Printer
2-13
Page 54

Testing the Printer
3.
For darker print, turn the knob clockwise as shown.
Note: Increasing the print density increases toner consumption.
If you select darker print, you may need to replace the imaging
cartridge more often.
4.
For lighter print, turn the knob counterclockwise as shown.
Note: If you want to return the print density setting to the
factory setting (center position), align the vertical line on the
knob with the dot on the scale.
2-14 Testing and Connecting Your Printer
Page 55

Testing the Printer
5. Close the printer cover.
6.
Print a start page again to check the new print density setting.
To do this, turn the printer off, wait five seconds, and turn it
on again.
Testing and Connecting Your Printer
2-15
Page 56

Connecting the Printer to Your Computer
The EPL-7500 has four built-in interfaces, but choosing which one
to use is easy. The two most common are listed below. The others
are described later in this chapter.
IBM and compatible computer users
Connect your computer’s parallel interface to the EPL-7500’s
parallel interface connector with a suitable shielded cable and begin
using the printer. See Connecting the parallel interface cable later
in this chapter.
Macintosh users
Follow the simple 10-step procedure below to select the EPL-7500’s
AppleTalk interface and then connect your Mac” to the printer
with a properly shielded AppleTalk cable.
CAUTION: Do not connect the cable before you have
selected the AppleTalk interface on the EPL-7500.
To select the AppleTalk interface, follow these steps:
1.
Turn on the printer and wait until it prints the start page.
2. Press ON LINE to take the printer off line.
3.
Press SelecType twice. The Level 2 light comes on.
4. If INTERFACE does not appear on the display, press
once. INTERFACE appears on the display.
2-16 Testing and Connecting Your Printer
Page 57

Connecting the Printer to Your Computer
5. Press once and then press until APPLETALK
appears on the display.
6. Press once. SELECTED appears briefly on the display;
then APPLETALK* appears. The asterisk (*) shows that
AppleTalk is selected.
7. Press once, then once, then once.
8. Press until SAVE LEVEL 2 appears on the display.
9. Press once.
10. Turn the printer off.
CAUTION: If you connect an AppleTalk cable, never
operate the printer with the SelecType INTERFACE
option set to any other interface. Failure to use the
APPLETALK setting may leave your printer inoperable or
bring down your entire system.
Now connect the AppleTalk interface cable.
1.
Turn off both the printer and the Macintosh and unplug the
printer.
Testing and Connecting Your Printer
2-17
Page 58

Connecting the Printer to Your Computer
Plug the AppleTalk cable connector securely in the CH S1
2.
connector, as shown below.
Plug the other end of the cable into your Mac.
3.
Connecting the parallel interface cable
The EPL-7500 is set up at the factory for parallel communication.
If your computer has a parallel interface and you have a suitable
shielded cable, you can connect to most computers immediately.
Follow these steps to connect the parallel interface cable:
Turn off both your printer and computer. Then unplug the
1.
power cord from the electrical outlet.
2-18
Testing and Connecting Your Printer
Page 59

Connecting the Printer to Your Computer
2.
Plug the cable securely into the CH P parallel interface
connector of the printer, as shown below.
3.
Squeeze the wire clips together until they lock in place on
either side of the connector.
Testing and Connecting Your Printer 2-19
Page 60

Connecting the Printer to Your Computer
4.
If your cable has a grounding wire, connect it to the printer’s
ground connector as shown.
5.
Plug the other end of the connector into your computer. Some
parallel cables have grounding wires at the computer end as
well. If so, connect this wire to the ground screw on the
computer.
Other interface selections
The EPL-7500 has four built-in interfaces, two of which are
discussed earlier in this chapter.
l Centronics compatible parallel
l
RS-232
l
RS-422
l AppleTalk
2-20
serial
serial
Testing and Connecting Your Printer
Page 61

Connecting the Printer to Your Computer
CAUTION: The EPL-7500 is factory-set for the parallel
interface. To use another interface, you must change the
INTERFACE setting in SelecType Level 2 before you
connect the interface cable. See Chapter 3 for instructions
on changing SelecType settings.
Choosing an interface
The type of interface you choose depends upon your computer.
PC users can choose the parallel or serial interfaces.
Apple Macintosh users must use the AppleTalk interface
The EPL-7500 is set up for parallel communication. Parallel
communication is best for PC users because it is faster than serial
communication. If you are an experienced PostScript user and want
to use the interactive mode, or if your computer does not have a
parallel port, choose one of the serial interfaces. If you are unsure
which interface your computer requires, check your computer
manual.
Testing and Connecting Your Printer
2-21
Page 62

Connecting the Printer to Your Computer
Connecting a serial interface cable
The EPL-7500 has two serial channels, one wired to a 25-pin
(RS-232)
either of which can be used for conventional asynchronous serial
communication.
If you want to use one of the printer’s serial interfaces, make sure
that you have a properly shielded cable and that it is the correct
one for your computer and the EPL-7500. Be sure to change the
SelecType Level 2 INTERFACE setting to the serial mode you want
to use before you connect the interface. Save the new setting with
the SAVE LEVEL 2 option. See Chapter 3 for instructions on
changing SelecType settings.
Connecting the RS-232 serial interface cable
Follow these steps to connect the RS-232 serial interface cable:
1.
Turn off both the printer and computer. Then unplug the
power cord from the electrical outlet.
connector, and the other to an S-pin
(RS-422)
connector,
2.
Plug the cable connector securely into the CH S2 serial interface
as shown below.
2-22 Testing and Connecting Your Printer
Page 63

Connecting the Printer to Your Computer
3. Use a screwdriver to fasten the screws of the connector, if
required.
4.
If your cable has a grounding wire, connect it to the printer’s
ground connector.
5.
Plug the other end of the cable into your computer. (Fasten the
connector screws to the interface, if required.)
Testing and Connecting Your Printer 2-23
Page 64

Connecting the Printer to Your Computer
Connecting to the RS-422 serial interface cable
Follow these steps to connect the
1.
Turn off both the printer and computer. Then unplug the
power cord from the electrical outlet.
2. Plug the cable connector securely into the CH S1 serial
interface as shown below.
RS-422
serial interface cable:
3. Plug the other ends of the cable into your computer. (Fasten
the connector screws to the interface, if required.)
This completes the connection of the RS-422 serial interface cable.
Before you can use the printer, make sure you have set the printer
for
RS-422
interface settings with the SelecType INTERFACE option in Level
serial communication. You may need to change some
2. Be sure to save the new setting with the SAVE LEVEL 2 option.
See Chapter 3 for instructions on changing the serial interface
settings to work with your computer.
2-24
Testing and Connecting Your Printer
Page 65

Chapter 3
SelecType
SelecType
SelecType
SelecType
Using SelecType..
Buttons, lights, and
Steps
SelecType Options..
Level1options..
Level
Overview..
Level1functions..
Level 2 functions
.....................................................................
using SelecType
to
2
options
...................................................................
.............................................................
............................................. 3-3
..............................................
the display..
....................................................
.................................................................
..................................................................
......................................
3-2
3-3
3-4
3-4
3-5
3-9
3-9
3-16
SelecType 3-1
Page 66

SelecType Overview
The SelecType function on the printer’s control panel allows you
to print a test page, display memory size, select paper sizes, and
change your printer’s configuration without using DIP switches or
software commands.
SelecType is divided into two levels, as shown below. A brief
description of each main menu option follows. See SelecType
Options later in this chapter for detailed descriptions of main
menu and submenu options. For complete instructions on using
SelecType, see Steps to using SelecType, later in this chapter.
Level 1
SOFTWARE
INPUT
OUTPUT
MISCELLANEOUS
Level 2
INTERFACE
MISCELLANEOUS
Note: See the Quick Reference Card at the back of this manual
for a complete map of SelecType menus and options.
3-2
SelecType
Page 67

SelecType Level 1 functions
SelecType Overview
SOFTWARE
INPUT
Sets up the printer’s operating mode.
Specifies the paper feeding method and the
paper size.
OUTPUT
Selects the face-down or optional face-up
output tray.
MISCELLANEOUS
Returns all Level 1 settings to their factory
settings, saves Level 1 settings, sets paper jam
recovery, and displays the amount of memory
available in each software mode.
SelecType Level 2 functions
INTERFACE
MISCELLANEOUS
Sets up the interface configuration
Returns all Level 2 settings to their factory
settings, turns the beeper on or off, prints a test
page, saves Level 2 settings, turns the standby
mode on or off, displays the number of pages
the printer has printed since it was installed,
and turns automatic error recovery on or off.
SelecType 3-3
Page 68

Using SelecType
This section explains how to use SelecType.
Buttons, lights, and the display
The SelecType portion of the control panel contains the SelecType
button, Level 1 and Level 2 indicator lights, four arrow buttons,
and the display.
When you enter SelecType, options appear on the display. There
are three types of options: some options, like the SOFTWARE
option, lead you to a list of further choices; some options, like the
PAGES option, display information, and some options, like the
TEST PRINT option, cause the printer to perform an action.
If an option leads to a list of choices or to another option, you can
press to see further choices. Some options require no action
at all; they simply display information.
Enters and exits SelecType. Press once
to enter Level 1 or twice to enter
Level 2. The Level 1 and Level 2
lights tell you which level is active.
3-4
SelecType
Page 69

Using Selec Type
Use the arrow buttons to move through menus and to
display and select SelecType options. They are active only when
you are in SelecType mode. Pressing them at any other time
sounds three beeps.
Enters a submenu or selects an option or an
action.
Backs up through the options to the main
menu.
Displays options in the same menu. You can
view the options one at a time by pressing the
buttons.
Note: If you press an arrow that is invalid, the printer beeps
three times and does not change the display.
Steps to using SelecType
There are five steps to useing SelecType:
1. Enter SelecType mode.
2. Move to the option you want to select.
3. Select the option.
4. Save the new setting, if necessary.
5. Exit SelecType mode.
You’ll see how to complete each step on the following pages. This
section uses the SelecType Level 1 OUTPUT option to explain the
steps to using SelecType. You may want to try each step as you
read it for hands-on practice.
SelecType 3-5
Page 70

Using SelecType
Enter SelecType mode
To enter SelecType mode:
1.
Press ON LINE to take the printer off line. The display reads
OFF LINE.
SelecType has two levels, Level 1 and Level 2. Press the SelecType
button once to enter Level 1, or twice to enter Level 2. The LEVEL
1 or LEVEL 2 indicator light goes on to indicate which level is
active.
2. Press SelecType once to enter SelecType Level 1.
Move to the desired option
When you enter SelecType Level 1 or Level 2, one of the main
menu options appears on the display. To look at the other options
at this level, you can use the and buttons.
1. Press until the OUTPUT option appears on the display,
as shown below.
2. Press to enter the next level of the OUTPUT option. This
option has two choices. The currently selected OUTPUT option
appears on the display, as shown below.
The asterisk (*) shows that FACE DOWN is currently selected.
You can use or to look at the other choices at this
level. You can back out to the main menu at any time by pressing
3-6 SelecType
Page 71

Using SelecType
Select the option
To select an option, you simply press
To continue the practice, use or to move to FACE UP.
Your display should look like this:
Press to select face-up delivery. SELECTED appears briefly
on the display; then the following display appears:
The asterisk shows that FACE-UP is selected. It remains selected
only until you change it or turn off the printer, unless you save
the Level 1 settings as described in the next section.
Note: If you press to select an option that is already
selected, IS SELECTED appears briefly on the display.
Now FACE UP is selected, but it does not affect the operation of
your printer unless you have installed the face-up output tray and
have also moved the paper path lever to the FACE UP position.
SelecType 3-7
Page 72

Save the setting
If you want to save a new setting so it will take effect each time
you turn on the printer, you can use the SAVE LEVEL 1 option for
settings made in Level 1, or SAVE LEVEL 2 option for settings
made in Level 2.
Here’s how to save your setting:
Press to move back to the main menu.
1.
Press or until MISCELLANEOUS appears on the
2.
display:
Press to enter the MISCELLANEOUS submenu.
3.
One of the five options in the MISCELLANEOUS submenu
appears on the display.
Press.
4.
shown below.
Press m to execute the save. The printer beeps when the
5.
or
to move to the SAVE LEVEL 1 option, as
save is complete.
Exit SelecType
Press ON LINE to exit SelecType mode.
Next, go through the entire exercise again, but select FACE
DOWN. Then your printer will be back to its original settings, and
you will understand the basic steps to using SelecType.
3-8
SelecType
Page 73

SelecType Options
This section lists all options available in SelecType. See the Quick
Reference Card for a complete map of the SelecType menus and
options.
Level 1 options
When the printer is off line, press the SelecType button once to
enter SelecType Level 1. One of the Level 1 main menu options
listed below appears on the display.
SOFTWARE
INPUT
OUTPUT
MISCELLANEOUS
Each of these options is described below. An asterisk (*) indicates
the factory default setting for each option.
POSTSCRIPT*
HP LASERJET II
PS BINARY
This option selects one of three operating modes that the printer
can use. The PostScript mode offers the widest range of features.
PS Binary mode is a binary protocol and host switching
communications mode. HP LaserJet II mode emulates the HP
LaserJet series II printer.
SelecType 3-9
Page 74

SelecType Options
This option includes the three submenus shown below.
TRAY
PAPERSIZE STD TRAY
PAPERSIZE OPT TRAY
STANDARD*
OPTION
MANUAL FEED
This option selects whether paper feeds into the printer from the
standard paper cassette, the optional lower paper cassette, or the
manual feed slot.
If you choose STANDARD, the printer loads paper from the
standard paper cassette. If you choose OPTION, the printer loads
paper from the optional lower paper cassette. If you want to feed
paper manually, choose MANUAL FEED. If the optional lower
paper cassette is not installed or if the paper tray is not correctly
installed in the lower paper cassette, NO PAPER appears on the
display.
3-10 SelecType
Page 75

SelectType Options
LETTER*
A4*
A 5
B5
HALFLETTER
LEGAL
GLT
GLG
EXECUTIVEPAGE
F4
You can use the PAPER SIZE option to choose the printable area
for any of the paper sizes listed above for the standard paper
cassette. See Chapter 8 for the printable area of each paper size.
The factory default setting is different for different countries.
This option sets the printable area for the chosen paper size, not
the actual paper size. Even if the selected paper size doesn’t match
the paper you load into the standard paper cassette, the printer
loads a page from the location specified with the TRAY option and
prints within the printable area specified by the PAPERSIZE STD
TRAY setting.
CAUTION: Be absolutely sure that you do not choose a
peper size larger than the paper you have loaded in your
standard paper cassette.
SelecType
3-11
Page 76

SelecType Options
LETTER*
A4*
A 5
B5
HALFLETTER
LEGAL
GLT
GLG
EXECUTIVEPAGE
F4
You can choose any of the paper sizes listed above for the optional
lower paper cassette with the PAPER SIZE option. This option is
always available, but has no effect unless the optional lower paper
cassette is installed. See Chapter 8 for the printable area of each
paper size. The factory default setting is different for different
countries.
This option sets the printable area for the chosen paper size, not
the actual paper size. Even if the selected paper size doesn’t match
the paper you load into paper cassette, the printer loads a page
from the location specified with the TRAY option and prints
within the printable area specified by the PAPERSIZE OPT TRAY
setting.
CAUTION: Be absolutely sure that you do not choose a
paper size larger than the paper you have loaded in the
paper tray of your lower paper cassette.
3-12
SelecType
Page 77

SelecType Options
FACE DOWN*
FACE UP
The printer is factory set for face-down output on top of the
printer. If you want to choose face-up delivery, you must first
install the optional face-up output tray and move the paper path
lever to the FACE UP position. See Appendix A for more
information on installing the optional face-up tray. If you select
FACE UP without installing the face-up tray and moving the paper
path lever, the setting has no effect.
Note: Some application software programs distinguish between
face-down and face-up paper delivery. For those programs, see
your software documentation to set the correct paper delivery.
This option includes the 5 submenus shown below.
RESET LEVEL 1
SAVE LEVEL 1
RECOVERY
VM RAM:XXXXXX
LJ RAM
SelecType
3-13
Page 78

SelecType Options
Each of MISCELLANEOUS options is described below.
This option returns all Level 1 settings to their factory default
settings. Press to execute the reset, or press to return to
the main menu without resetting the printer.
This option lets you save the current Level 1 settings. Press
to save the Level 1 settings so that they are in effect each time you
turn the printer on. Press to exit this submenu without
saving settings.
PARTIAL*
COMPLETE
When this option (for paper jam recovery) is set to PARTIAL, a
jammed page is not automatically reprinted when you clear the
jam. In most cases leave the RECOVERY option set to PARTIAL,
because complex pages may print faster. When this option is set to
COMPLETE and a paper jam is detected in the printer, the page is
automatically reprinted after you clear the jam.
3-14
SelecType
Page 79

SelecType Options
This option displays the amount of memory available. If you
expand the printer’s memory with the optional memory board, you
can display this information to see whether a newly-installed
board is working correctly. You can also use it any time to see
how much memory you have available for fonts or complex
graphics.
LJ AVAIL:XXXXXXXX
LJ ALLOCATION NONE*
10%
100%
LJ AVAIL displays the amount of memory available for the HP
emulation mode. LJ ALLOCATION specifies the proportion of
memory for HP emulation mode. The proportion of memory can
be set from NONE (0%) to 100% by 10% increments. Press
or to change the setting. The setting becomes effective after
you save the setting with SAVE LEVEL 1 option and turn the
printer off then back on. Leave the setting at 0% unless you need
to use a downloaded bitmap font in HP mode. Settings above 0%
increase the chance for a lack of memory error in PostScript mode.
A setting of 100% disables the PostScript mode completely.
SelecType
3-15
Page 80

SelecType Options
Level 2 options
When the printer is off line, press SelecType twice to enter Level 2.
One of the Level 2 main menu options listed below appears on the
display.
INTERFACE
MISCELLANEOUS
Each of these options is described below. An asterisk (*) indicates
the factory default setting.
PARALLEL*
SERIAL RS232
SERIAL RS422
APPLETALK
This option selects the printer interface. The printer has four
interfaces. PARALLEL, SERIAL RS232, and SERIAL RS422 have
submenus to set other configuration settings. The APPLETALK
option has no submenus.
CAUTION: Whenever you change the INTERFACE
setting, make sure you save the new setting with the
SelecType SAVE LEVEL 2 option and turn the printer off
before you attach the interface cable, or you could
damage your printer.
3-16
SelecType
Page 81

SelecType Options
The PARALLEL option has one submenu, as shown below:
BUSY DELAY: 0*
BUSY DELAY: + 5
BUSY DELAY: -- 5
This option sets the delay period from the ACKNLG to the BUSY
signal. Available settings are -5, 0, and +5 microseconds. For
most applications, leave this option set to 0 microseconds.
The SERIAL RS232 and SERIAL RS422 options have these
submenus:
BAUD RATE
PARITY
FLOW CONTROL (RS232 only)
STOP BITS
A brief description of each serial interface option follows
300 BAUD
600 BAUD
1200 BAUD
2400 BAUD
4800 BAUD
9600
BAUD*
19200 BAUD
38400 BAUD
57600 BAUD (RS422 only)
SelecType 3-17
Page 82

SelecType Options
Use this option to set the data transfer rate (baud) for the serial
interface. The baud rate is measured in bits per second (bps). See
your computer manual and software documentation for the proper
setting.
MARK OR NONE*
SPACE OR NONE
PARITY ODD
PARITY EVEN
When this option is set to space or none, or mark or none, parity
checking is disabled. The parity bit, if used, provides a basic form
of error detection. See your computer manual and software
documentation for the proper setting.
XON/XOFF*
DTR
XON/XOFF + DTR
This option is available only with SERIAL RS232. You can select
serial communication from two options, the XON/XOFF
communication protocols or the DTR (Data Terminal Ready) signal
levels. When the vacant area for data in the input buffer drops to
128 bytes, the printer outputs an XOFF code indicating that it
cannot receive more data. Once the vacant area for data in the
buffer recovers to 256 bytes, the printer outputs an XON code or
sets the DTR flag to high (SPACE) indicating that it is again ready
to receive data.
3-18
SelecType
Page 83

1 ST OP BIT
2 STOP BITS*
SelecType Options
This option sets the number of stop bits on each character
information sent to the printer. Stop bits signal the end of
of
a
character.
7 DATA BITS
8 DATA BITS*
You can select a word length for serial communications from two
options: B-bit word length or 7-bit word length. See your computer
manual and software documentation for the proper setting.
This option includes the eight submenus shown below.
BEEPER
STARTPAGE
TEST PRINT
SAVE LEVEL 2
PAGES:XXX
FACTORY RESET
ERROR HANDLER
STANDBY
SelecType
3-19
Page 84

SelecType Options
Each of these options is described below.
BEEPER:ON*
BEEPER:OFF
When this option is on, a beeper sounds when a printer error
occurs. When the option is off, the beeper does not sound.
STARTPAGE:ON*
STARTPAGE:OFF
When this option is on, the printer prints a test print (called a
start page) whenever you turn the printer on. The start page
contains simple text and graphics and lets you know the EPL-7500
is ready. When this option is off, the printer does not print a test
print when you turn on the printer. Even if the STARTPAGE
option is set to off, you can print a test print using the TEST
PRINT option described below.
Use this option to print a test print to check whether your printer
is working correctly. Move to the TEST PRINT option; then press
once. You see the following display while the EPL-7500
prints the test print:
3-20
SelecType
Page 85

SelecType Options
Use this option to save settings you make in Level 2 so they take
effect each time you turn the printer on.
Counts the number of pages printed by the
EPL-7500
since
installation.
LETER
A4
FACTORY RESET returns all Level 1 and 2 settings to their
factory default settings. When you select this option, the display
shows LETTER or A4. Choose the one that you wish to be the
default setting for PAPERSIZE STD TRAY and PAPERSIZE OPT
TRAY in SelecType Level 1. Then press to execute the reset,
or press twice to return to the main menu without resetting
the printer.
SelecType
3-21
Page 86

SelecType Options
ERROR HANDLER:ON
ERROR HANDLER:OFF*
When this option is on, PostScript errors are printed on the paper
when they occur. When this option is off, they are not. This
feature can be a convenience for programmers using the parallel
interface.
STANDBY:DISALLOWED*
STANDBY:ALLOWED
The standby mode is designed to save power by reducing the
power to the fixing heater whenever no panel buttons are pushed
or data sent to the printer for 30 minutes. In this mode the printer
begins warming up as soon as you press any button or send any
data, becoming ready to print within 70 seconds. The default is
DISALLOWED, which keeps the printer warmed up and ready to
print at all times.
3-22
SelecType
Page 87

Chapter 4
Paper Handling
Choosing Paper
a
Choosing
Choosing
Paper
Paper
Loading
Loading
Paper
Printing Methods..
delivery method
feed method.. ............................................................
Paper in the
Paper
. . . . . . . . . . . . . . . . . . . . . . . . . . . . . . . . . . . . . . . . . . . . . . . . . . . . . . . . . . . . . . . . . . . . . . .
Size . . . . . . . . . . . . . . . . . . . . . . . . . . . . . . . . . . . . . . . . . . . . . . . . . . . . . . . . . . . .
.................................................
.......................................................
Cassette . . . . . . . . . . . . . . . . . . . . . . . . . . . . . . . . . . . . . . . . . . . . . . .
Manually . . . . . . . . . . . . . . . . . . . . . . . . . . . . . . . . . . . . . . . . . . . . . . . . . . . . . . . .
4-2
4-5
4-6
4-6
4-7
4-9
4-13
Paper Handling 4-1
Page 88

Choosing Paper
With this printer you can print on many sizes and types of paper.
You can also use other types of media, such as envelopes, labels,
and overhead projector transparencies. The printer feeds most
types of media automatically from the paper cassette, while some
media require hand-feeding for greater control. This chapter
describes the paper delivery choices and how to select and load
paper.
The type of paper you use in your printer directly affects the
quality of your printed output. The printed image is made up of
many tiny dots of toner that are transferred to the paper. If the
paper is rough, the edges of the letters become ragged because
some of the dots fall into indentations on the paper. The smoother
the paper you use, the better your printing looks.
You should use especially smooth paper for printing originals that
will be used to make reproductions. Because reproduction
introduces its own raggedness to the edges of the letters, you want
to start with the best original possible.
For best results, store your paper supply in its original wrapper.
Printing is sensitive to moisture absorbed by the paper. Do not
store your paper in a humid or damp environment.
Following are some recommendations for selecting paper and other
print media.
Note: Since the quality of any brand or type of paper may be
changed by the manufacturer at any time, Epson cannot
guarantee the use of any particular brand or type of paper.
Always test samples of paper stock before purchasing large
quantities or printing large jobs.
4 - 2
Paper Handling
Page 89

Choosing Paper
Standard office paper -- You can use the printer’s paper cassette
to automatically feed most types of
g/m2) paper. This typically includes such paper as copier paper,
memo sheets, cotton bond, and letterhead. If you feed paper
manually or load it one sheet at a time through the paper cassette,
you can use
For best results, use paper made especially for laser printers. Paper
made for plain-paper copiers is also a good choice.
If you want to use less expensive paper, test it before regular use.
Paper should be of good quality and relatively smooth. Also keep
in mind that if the paper is textured or too rough, the printed
output may not be as clear.
Some letterheads use inks or dyes that may smear or come off
when subjected to the high temperatures of the fuser. Try a few
sheets before you print on letterhead or other special paper.
Special paper -- You can use colored paper as long as it meets the
weight limits given above for standard office paper. Do not,
however, use coated paper (paper to which a colored coating has
been added).
16
to
42
lb.
(60
16
g/m2 to
to
24
157
lb.
(60
g/m2 to
g/m2) paper.
90
Labels -- Use only labels designed for laser printers or plain-paper
copiers in your printer. When printing labels, for best results, use
the optional face-up output tray; this keeps the labels from curling
or coming off the backing sheet.
To prevent the adhesive from coming into contact with the printer
parts, always use labels that completely cover the backing sheet so
that there are no gaps between the individual labels.
Test the label sheet for leaking adhesive by pressing a sheet of
paper on top of a sheet of labels. If the paper sticks at all, do not
use the labels.
Paper Handling 4-3
Page 90

Choosing Paper
Envelopes-You can load envelopes as shown below. Load
envelopes along the length of an envelope. The printing quality on
envelopes may be irregular because different parts of an envelope
have different thicknesses. If the printing is too light, turn the
print density knob counterclockwise. Always return the print
density knob to the center position when you go back to printing
on ordinary paper. Also, for better printing of envelopes, use the
optional face-up output tray.
Other materials
and adhesive drafting film if they are made for use with plainpaper copiers or laser printers. When printing these materials, use
the optional face-up output tray for best results.
4-4
Paper Handling
-- You can use overhead projector transparencies
Page 91

Choosing a Paper Size
The printer can feed several sizes of paper automatically. To select
a paper size, simply change the paper size setting with SelecType.
You may also need to adjust the paper guides on the paper cassette
to match the size of the paper you want to use.
Note: If you are using the optional lower paper cassette, see
Appendix A for instructions on selecting a paper size.
The table below lists all of the paper sizes on the SelecType menu.
Not all the sizes in this table are marked on the paper cassette, just
the more commonly used paper sizes.
Paper:
letter
A4
A5
B5
halfletter
legal
glt (Government
glg (Government
executive
F4
letter)
legal)
8.5 X 11 inches
210 X 297 mm
148 X 210 mm
182 X 257 mm
5.5 X 8.5 inches
8.5 X 14 inches
8 X 10.5 inches
8.5 X 13 inches
7.25 X 10.5 inches
210 X 330 mm
You will probably use one paper size most of the time. For your
convenience, you can use the SelecType Level 1 SAVE LEVEL 1
option so that the paper size you use most often is automatically
selected whenever you turn on, reset, or initialize your printer. See
Chapter 3 for details.
Paper Handling 4-5
Page 92

Choosing Printing Methods
The EPL-7500 offers you several printing methods. Your choices
depend mainly on the type of paper or other print media you want
to use.
l
Paper delivery method -- Choose face-down output or face-up
output (with the optional face-up tray).
l Paper feed method -- Select either automatic or manual paper
feed.
Paper delivery method
The printer can deliver paper face-down on top of the printer or
face-up into the optional face-up tray. The advantage of printing
face-down is that when the printed stack is turned over, the first
page of the document is on top and the last page on bottom. The
printer is factory-set for face-down delivery.
The optional face-up tray gives you immediate viewing of your
printed output. Also, this method of delivery is recommended for
printing on media such as labels, envelopes, and overhead
transparencies that require a straight-through paper path.
To choose face-up delivery, install the optional face-up output tray
as described in Appendix A. Move the paper path lever to the
FACE UP position, as shown below.
4-6 Paper Handling
Page 93

Choosing Printing Methods
Then set the OUTPUT option in SelecType Level 1 to face-up
delivery. See Chapter 3 for SelecType instructions.
Even with the optional face-up tray installed, you can still choose
either face-up or face-down delivery. To choose face-down
delivery when the face-up output tray is installed, move the paper
path lever to FACE DOWN, and set the OUTPUT option to facedown.
Paper feed method
The printer feeds most types of media automatically from the
paper cassette; however, some media require hand-feeding for
greater control.
The following table lists recommended settings for different print
media. (If you want to try other settings, be sure to test print a
few sheets before regular use.)
Paper Handling 4-7
Page 94

Choosing Printing Methods
Material
Regular Paper
(60 - 90 g/m2)
(16-24 lb.)
Heavy Paper
(90 - 157 g/mZ)
(24 - 42 lb.)
Envelopes
Transparencies
Labels
Feed
Auto or manual
Manual or auto
Manual or auto
Manual
Manual Face-up
Delivery
Face-up or face-down
Face-up
Face-up or face-down
Face-up or face-down
Note: To print on letterhead paper, load the paper face-up with
the top of the paper entering the printer first.
4-8 Paper Handling
Page 95

Loading Paper in the Cassette
The standard paper cassette holds up to 250 sheets of paper. To
load paper in the cassette, follow these steps:
1. Push the paper set lever forward to the manual position, as
shown below.
2. Slide the paper guides all the way apart, as shown below.
Paper Handling 4-9
Page 96

Loading Paper in the Cassette
3.
Take a stack of paper and tap the edges of the paper on a flat
surface to even up the stack as shown.
4.
Insert the stack of paper into the paper cassette, making sure
that the top of the stack is below the maximum height mark
inside the paper cassette. Push the paper in gently as far as it
will go.
4-10 Paper Handling
Page 97

Loading Paper in the Cassette
Note: To print on long paper such as legal-size paper (8 l/2 X
14
inches), open the paper support as shown below.
Slide the paper guides together until they both rest lightly
5.
against the stack of paper.
Paper Handling
4-11
Page 98

Loading Paper in the Cassette
6.
Pull the paper set lever to the automatic position until it clicks
into
place.
Note: The paper set lever must be set back to the automatic
position before paper can be fed automatically from the paper
cassette. If the paper set lever is forward while the printer is on,
the control panel displays the OUT OF PAPER message, even if
there is paper in the cassette.
7.
If you have changed the paper size, use SelecType to choose
the new paper size, as described in Chapter 3.
8. Press ON LINE to set the printer on line.
Note: When you reload paper, make sure the output roller stops
rotating before you insert a new stack of paper into the paper
cassette.
4-12 Paper Handling
Page 99

Loading Paper Manually
If you want to print labels, envelopes, transparencies, heavy paper
(over 24 lb. or 90 g/m2), or other special papers, you can load the
paper one sheet at a time in the paper cassette or you can handfeed it. Hand-feeding is more convenient, especially when you
want to print a small job on a different type of paper than is
already loaded in the cassette.
You can hand-feed paper ranging in size from
(3.62 X 6.3
It is easy to hand-feed paper with this printer; just follow the
steps below:
inches) to
216 X 356
mm
92 X 160
(8.5 X 14
mm
inches).
1. Set the SelecType Level 1 TRAY option to MANUAL FEED.
See Chapter 3 to use SelecType.
2. If necessary, use SelecType to choose the new paper size as
described in Chapter 3.
If the printer is on line, press ON LINE to set the printer off line.
3.
Push the paper set lever forward to the manual position.
4.
Paper Handling
4-13
Page 100

Loading Paper Manually
Adjust the manual feed paper guides to match the size of paper
5
you are using, as shown below.
Insert a sheet of paper into the manual feed slot as far as it
6.
will go. (The control panel displays the READY message when
you insert the paper correctly.)
4-14 Paper Handling
 Loading...