

Page 1
Page 2

User's Guide
Page 3

Page 4
User's Guide
Safety Instructions
For your safety, read all the instructions in this guide before using this product. Incorrect handling that ignores
instructions in this guide could damage this product or could result in personal injury or property damage.
Keep this installation guide at hand for future reference.
Read the User's Guide and Safety Instructions for your projector and follow the instructions in these documents.
Safety indications
The documentation and this product use graphical symbols to show how to use this product safely.
The indications and their meaning are as follows. Make sure you understand them properly before reading
the guide.
Indication Explanation
Warning
Caution
This symbol indicates information that, if ignored, could result i n pe r s on a l in j u r y o r e ve n d ea t h
due to incorrect handling.
This symbol indicates information that, if ignored, could result in personal injury or physical
damage due to incorrect handling.
Explanation of Symbols
Symbols Explanation
Indicates actions that must not be performed.
Indicates actions that should be performed.
Indicates contents that could cause damage or malfunction to this product or the projector.
Attention
Indicates related or useful information.
c
3
Page 5
User's Guide
Safety Precautions for Installation
Warning
Follow the instructions in this guide when installing this product.
If the instructions are not followed, this product may fall, resulting in personal injury or an accident.
Do not install this product in an unstable location.
Make sure the installation location is strong enough to support the weight of the projector and this
product.
Do not use adhesives, lubricant, oil, and so on when securing the screws.
If you use adhesives on the mount fixing points to prevent the screws from loosening, or if you use
things such as lubricants or oils on the projector, the projector case may crack and cause the projector to fall, resulting in personal injury or property damage.
This product is for portrait projection or stacked projection only. Do not attach
any devices other than the projector.
Otherwise this product may be damaged; if the projector falls, it could cause death or personal injury.
This product should be installed by at least two qualified service personnel.
When loosening screws during installation, be careful not to drop this product.
If this product or the projector falls, it could cause death or personal injury.
After making adjustments, make sure you tighten all of the screws.
Otherwise, the product may fall and cause personal injury or property damage.
Wear non-slip gloves when moving and installing.
If this product falls, it could cause personal injury or property damage.
Do not cover the projector's air intake vent or air exhaust vent.
If either of the vents is covered, the internal temperature could rise and cause a fire.
Caution
Do not install this product in a location subject to temperatures outside the projector's operating range.
This may cause malfunctions to occur.
Do not install the projector in a location where it may be subject to vibrations or
shocks.
When securing the frame with bolts, make sure you do not catch your hand or
finger between the bolts and the frame.
Do not stack more than three projectors in a stacked configuration.
The frame could fall and cause an injury.
4
Page 6
Notes on Usage
Warning
Modifying and disassembling should only be performed by qualified service personnel except when explicitly stated in the User's Guide.
Otherwise, malfunctions or accidents may occur.
Do not hang from this product.
Also, do not hang any objects on this product except for the projector.
If this product breaks and falls, it could cause death or personal injury.
Do not stand or sit on this product.
Otherwise, the product could be damaged.
Periodically check that there are no damaged sections or loose screws.
If any parts are damaged, stop using the product immediately.
User's Guide
If this product or the projector falls, it could cause death or personal injury.
Caution
Do not apply too much force when adjusting this product.
Otherwise, the product may break and cause an injury.
Do not place screws or feet within reach of small children.
Children may swallow them by accident.
If this happens, contact a doctor immediately.
5
Page 7
User's Guide
Product Features
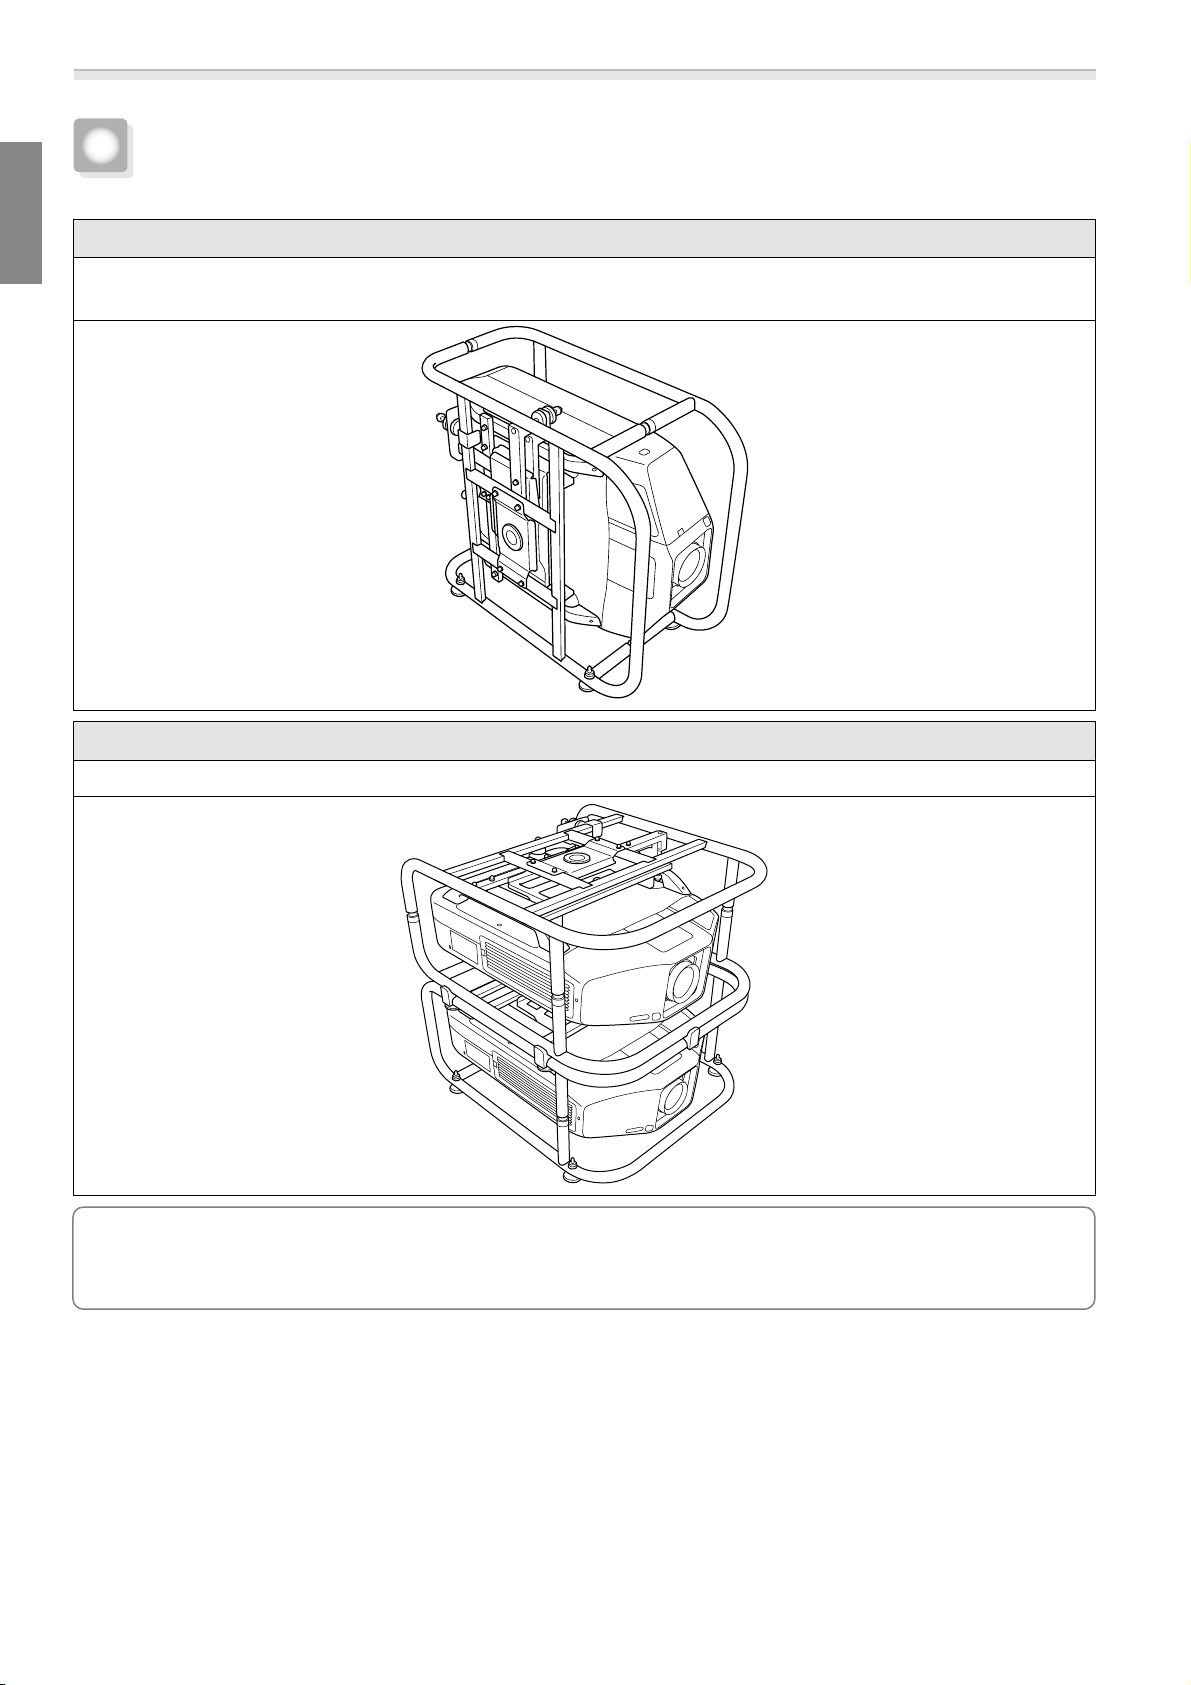
Portrait Projection
For projectors that support portrait projection, you can perform portrait projection by placing a projector in the
frame, and then installing the frame vertically.
Stacked Projection
You can secure a projector to this product, and stack up to two projectors.
•
You can also install projector installation plates on the frame, and place the projector.
•
c
You can stack two frames and place a backup projector on top.
•
This product can support a backup projector that weighs up to 15 kg.
6
Page 8
User's Guide
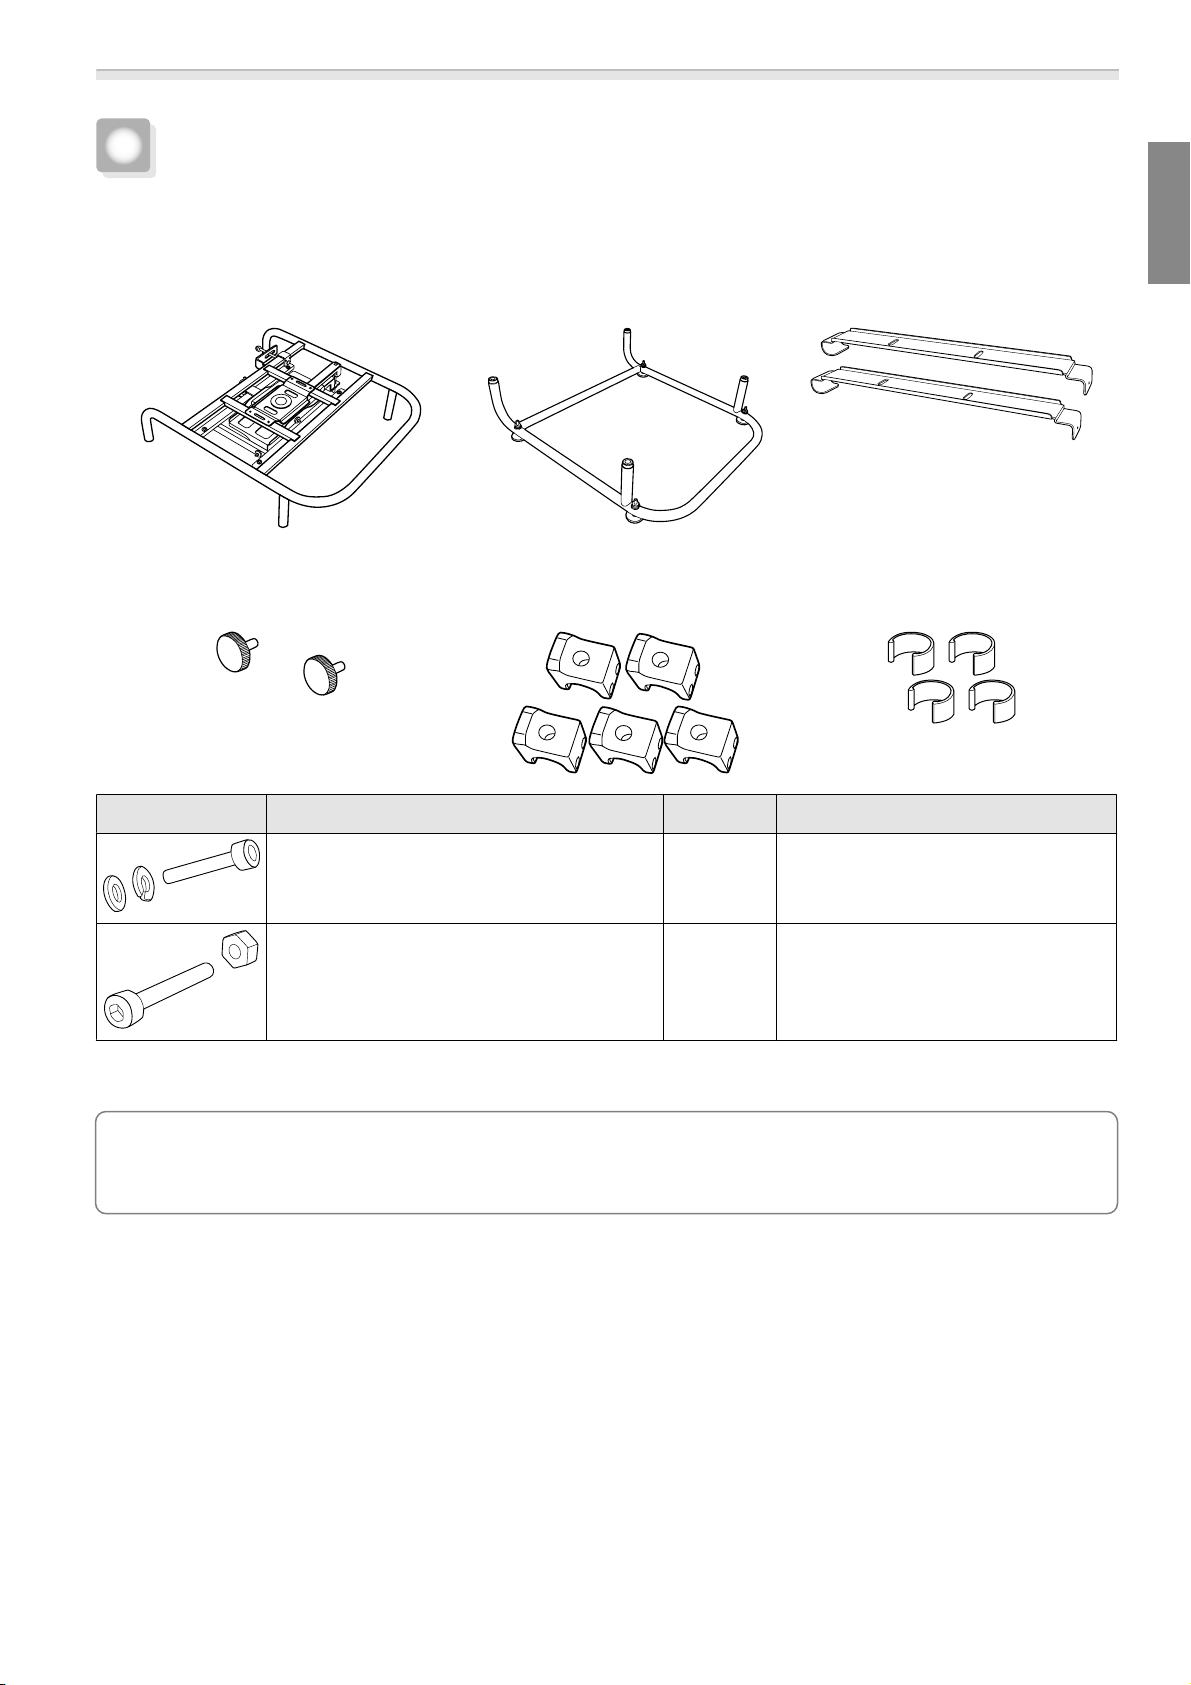
Package Contents
The following parts are supplied with this product. Make sure that all of the parts are supplied.
If there is anything missing or if there are damaged parts, contact the store where you purchased the product.
Top Frame (x1) Bottom Frame (x1) Projector Installation Plates (x2)
Screws for securing the Projector In-
stallation Plates
(x2)
Shape Name
M6 x 30 mm hexagon socket head cap bolt
with washer/spring washer
M6 x 40 mm hexagon socket head cap bolt
M6 hexagon nut
Use the bolts or screws supplied with this product to install it as directed in this guide. Do not substitute these
bolts with any other types.
Stacking Guides (x5) Stoppers (x4)
Number
4 For attaching the projector
10 For attaching the Stacking Guides
Usage
c
•
Gather the tools and parts you need before you begin installation.
•
Dispose of this product in accordance with your local laws and regulations. Follow the disposal
regulations of your workplace if they apply.
7
Page 9
User's Guide
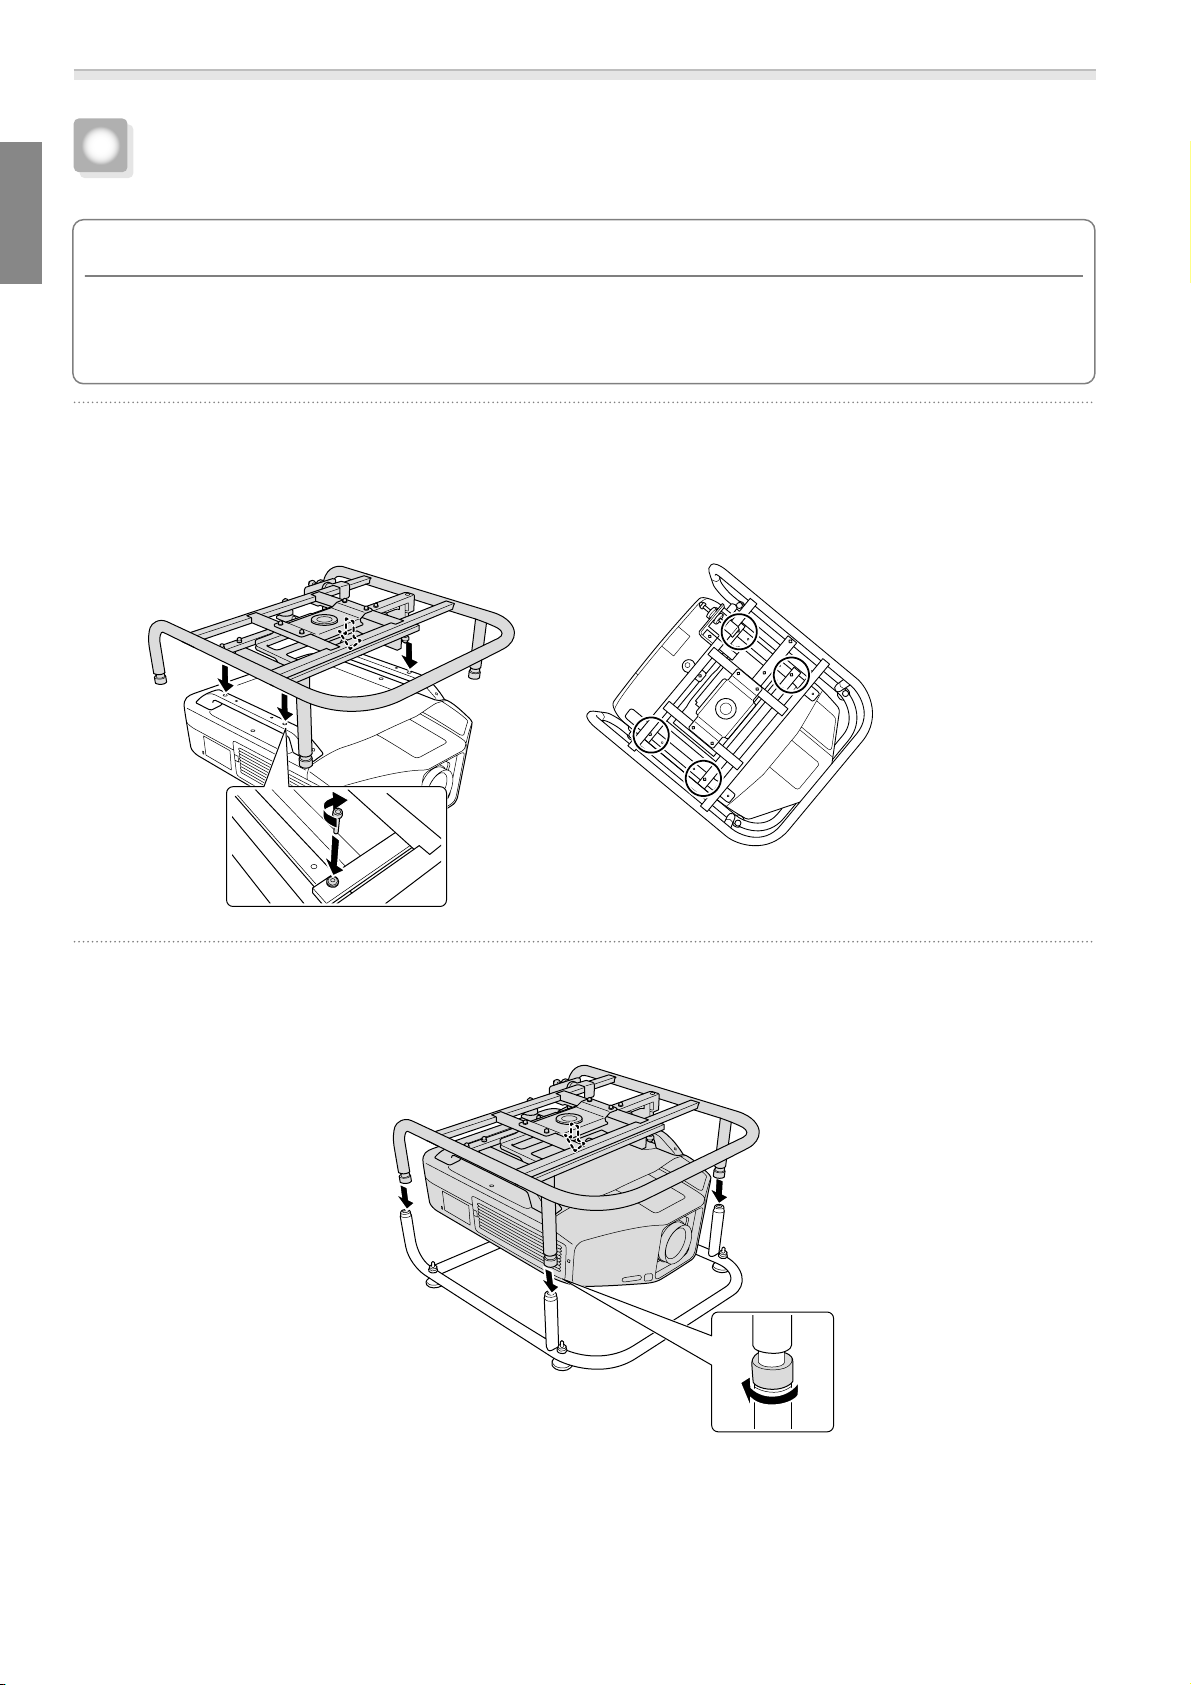
Attaching to the Projector
Attention
•
Do not remove screws for parts that are not specified in this guide.
•
Make sure the screws to secure the projector to this product, as well as the metal fittings to connect the top
and bottom frames are secured.
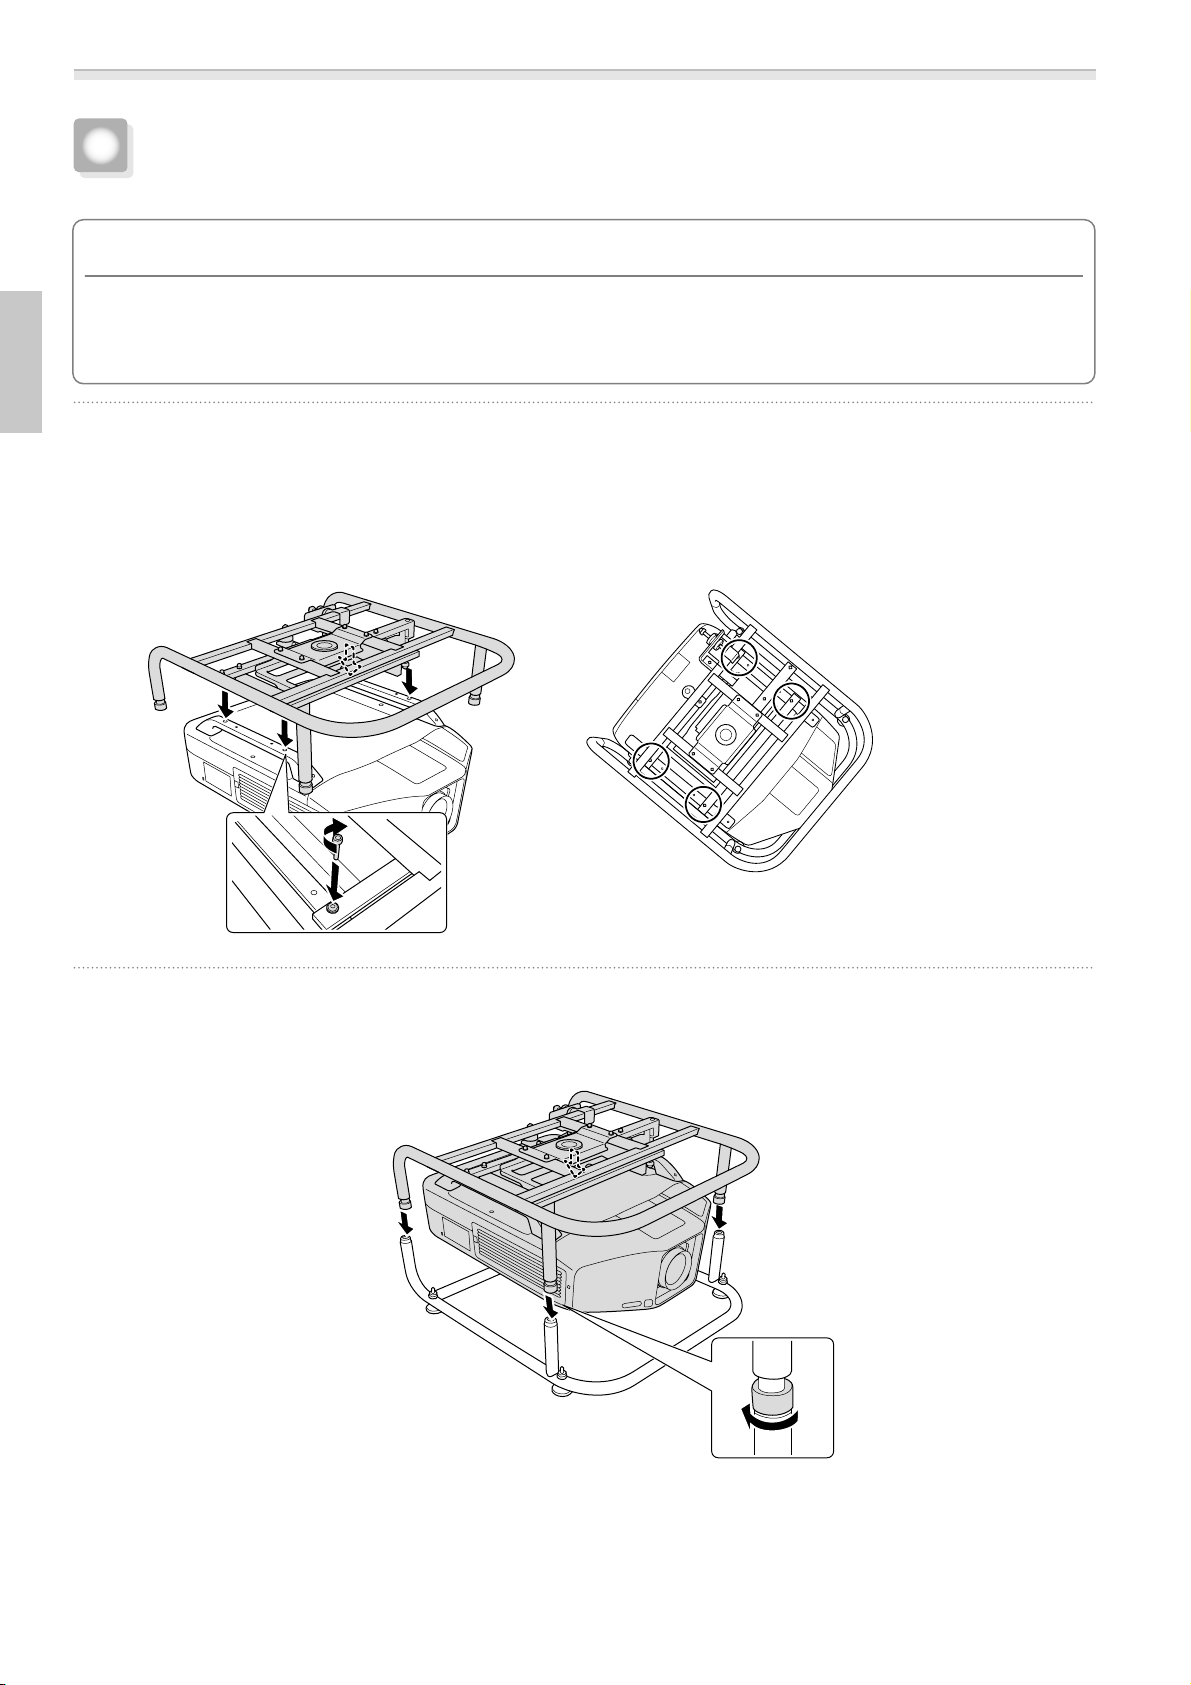
Attach the top frame to the projector.
a
b
Align the bolt holes on the top frame with the ceiling mount fixing points (four points).
Use a commercially available hexagon wrench to tighten the M6 x 30 mm bolts (with washers/spring
washers) supplied, and then secure the frame.
Attach the top frame to the bottom frame.
Align the Top Frame with the Bottom Frame, and rotate the metal fittings (four points) to secure them
in place.
8
Page 10
c
d
User's Guide
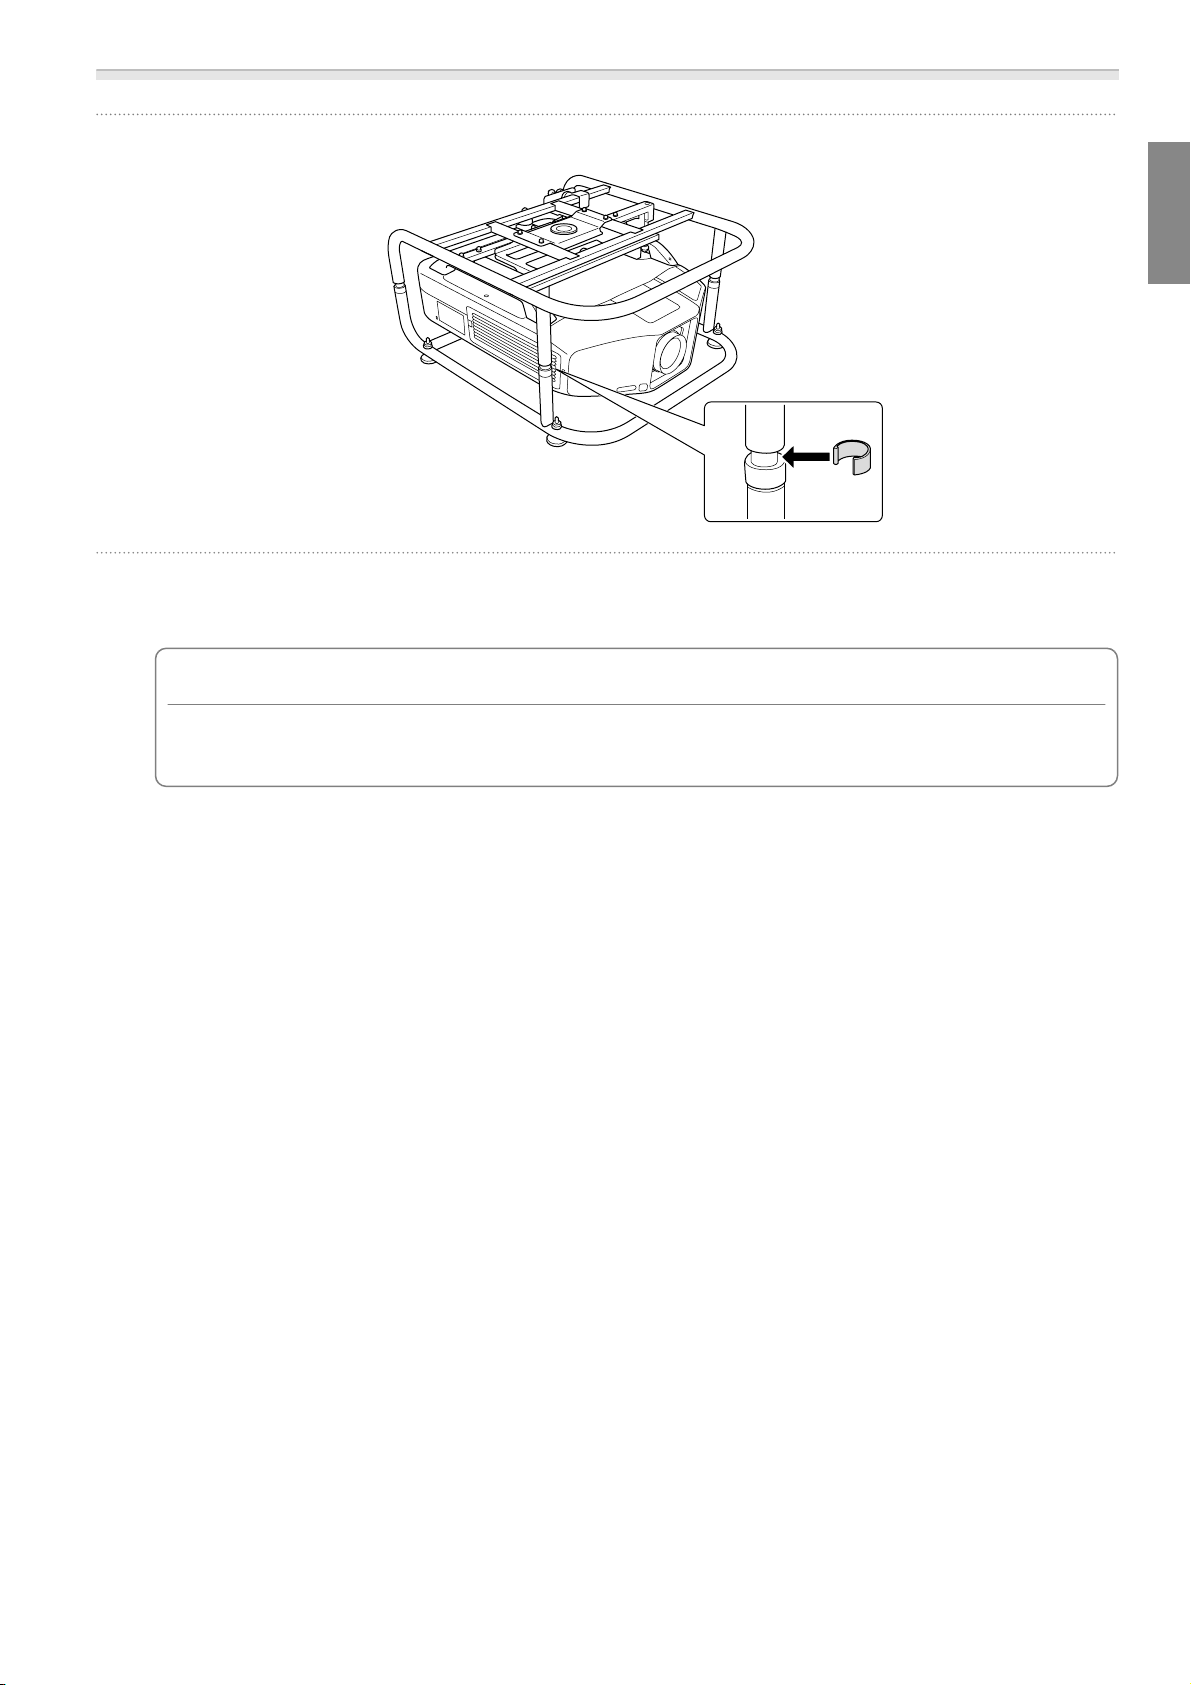
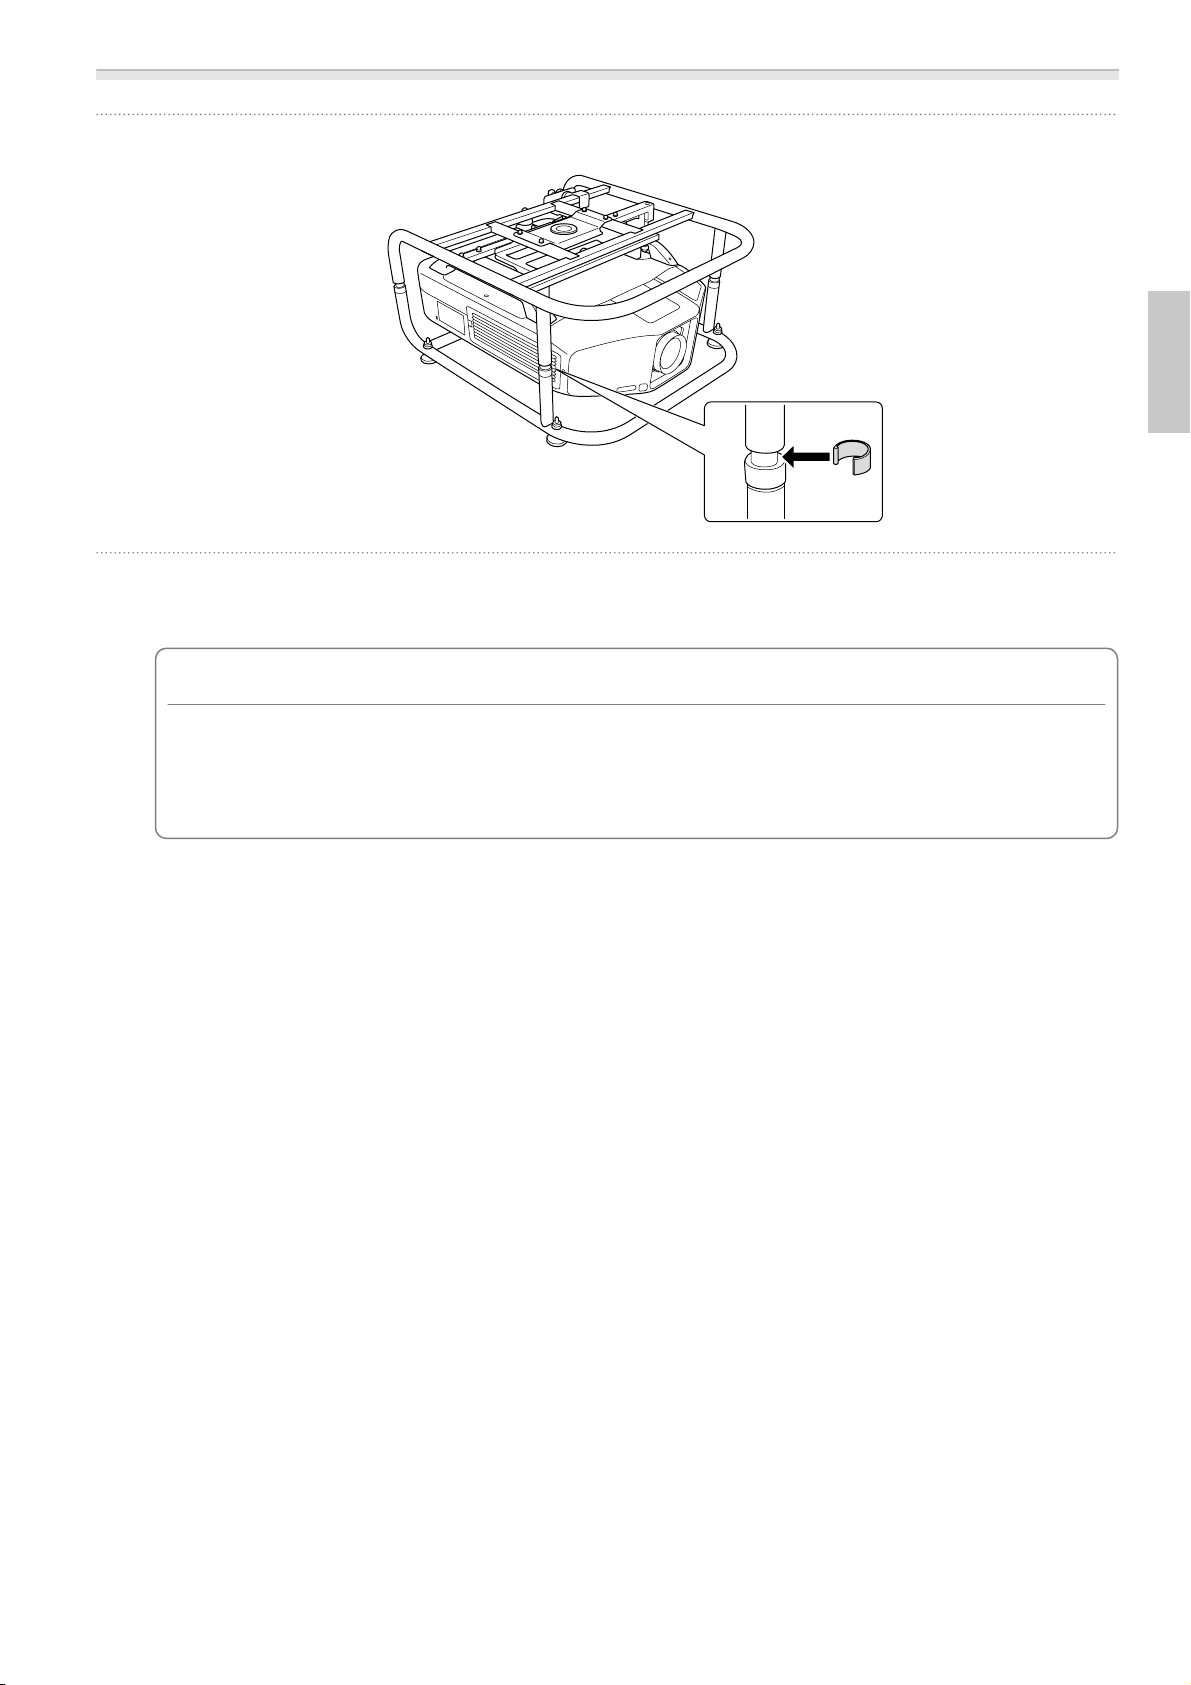
Attach the stoppers (four points).
Remove the projector's feet.
See the User's Guide supplied with the projector for information on how to remove the feet.
Attention
•
If the projector's feet are left attached, they could interfere with the frame during angle adjustment.
•
Do not place the projector directly on the floor and so on while the projector's feet are removed.
9
Page 11
User's Guide
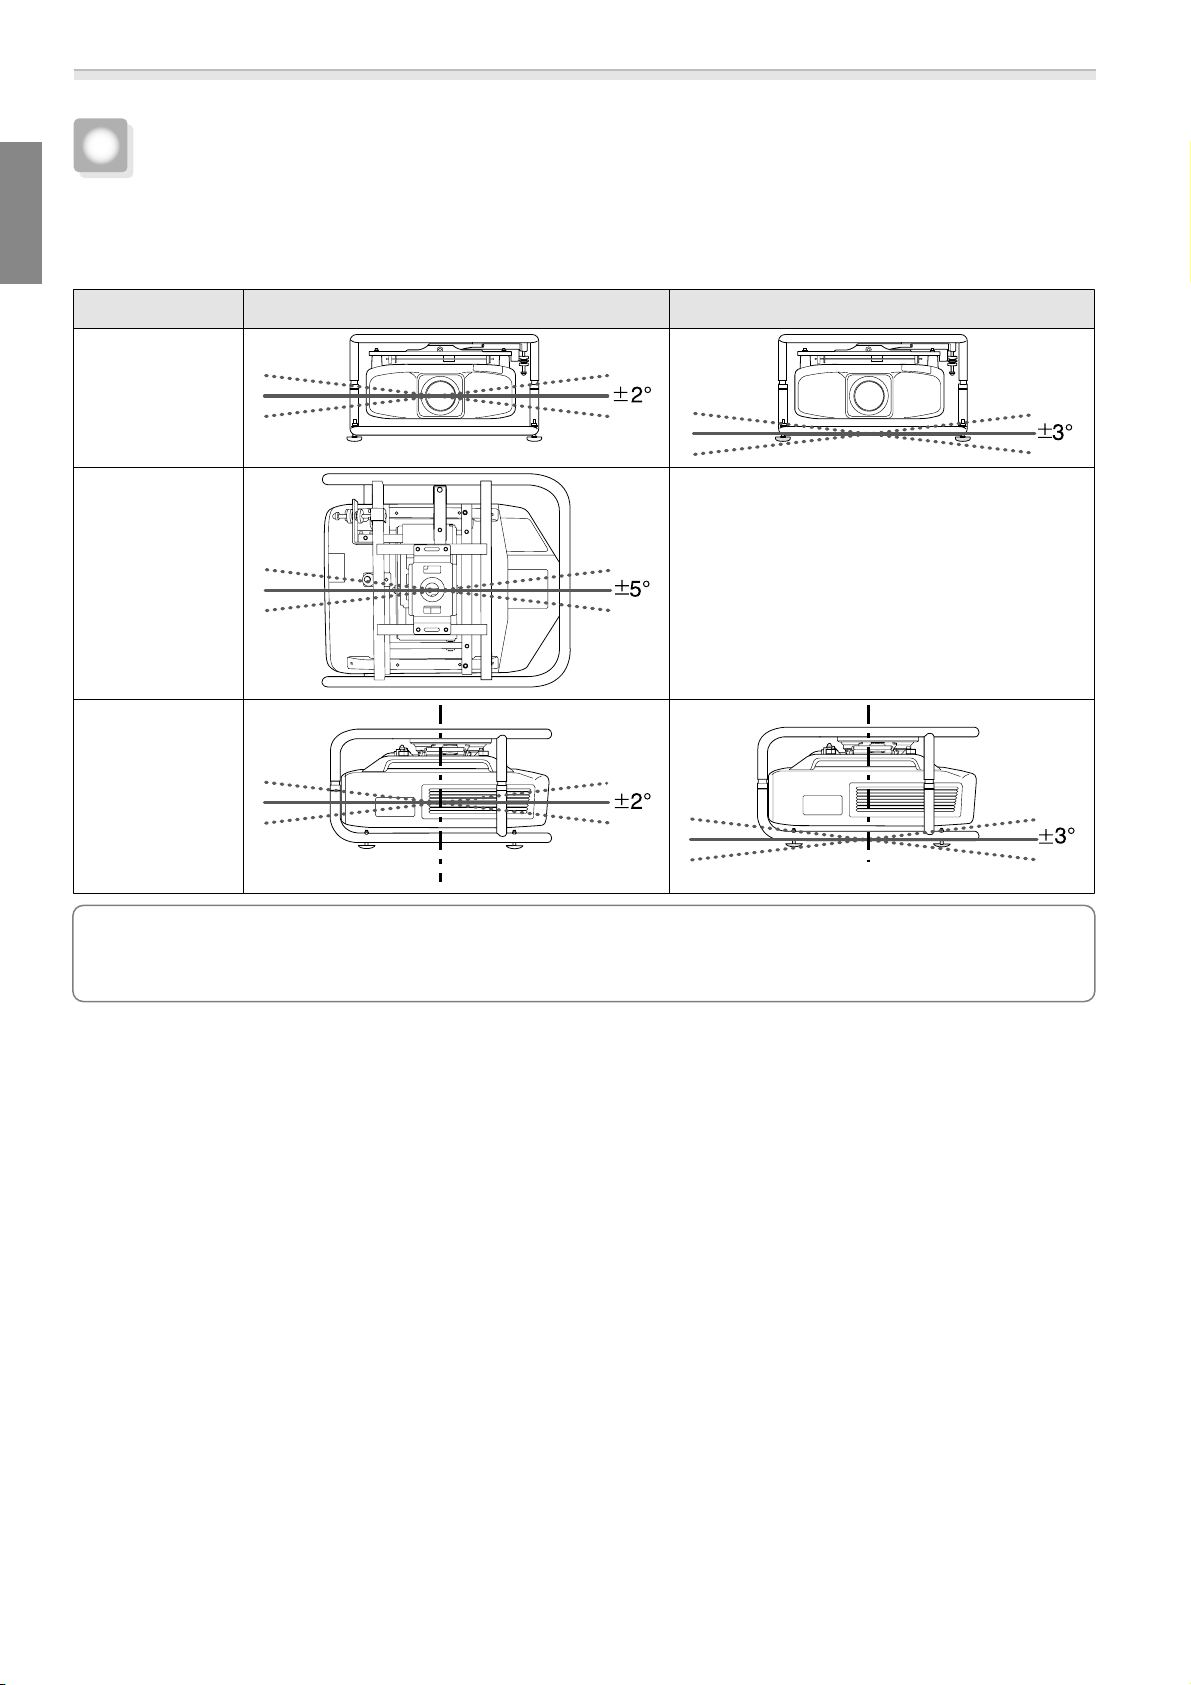
Adjusting the Installation Angle
You can adjust the projector's angle using the three adjustment dials and the feet.
Tilt the projector, or rotate horizontally to adjust the position of the projected image.
Adjustable Range for the Adjustment Dial Adjustable Range for the Feet
Tilt adjustment
Horizontal adjustment
Vertical adjustment
Make sure that the installation angle is within the specified range. See the User's Guide supplied with
the projector for information on the angle of tilt.
c
10
Page 12
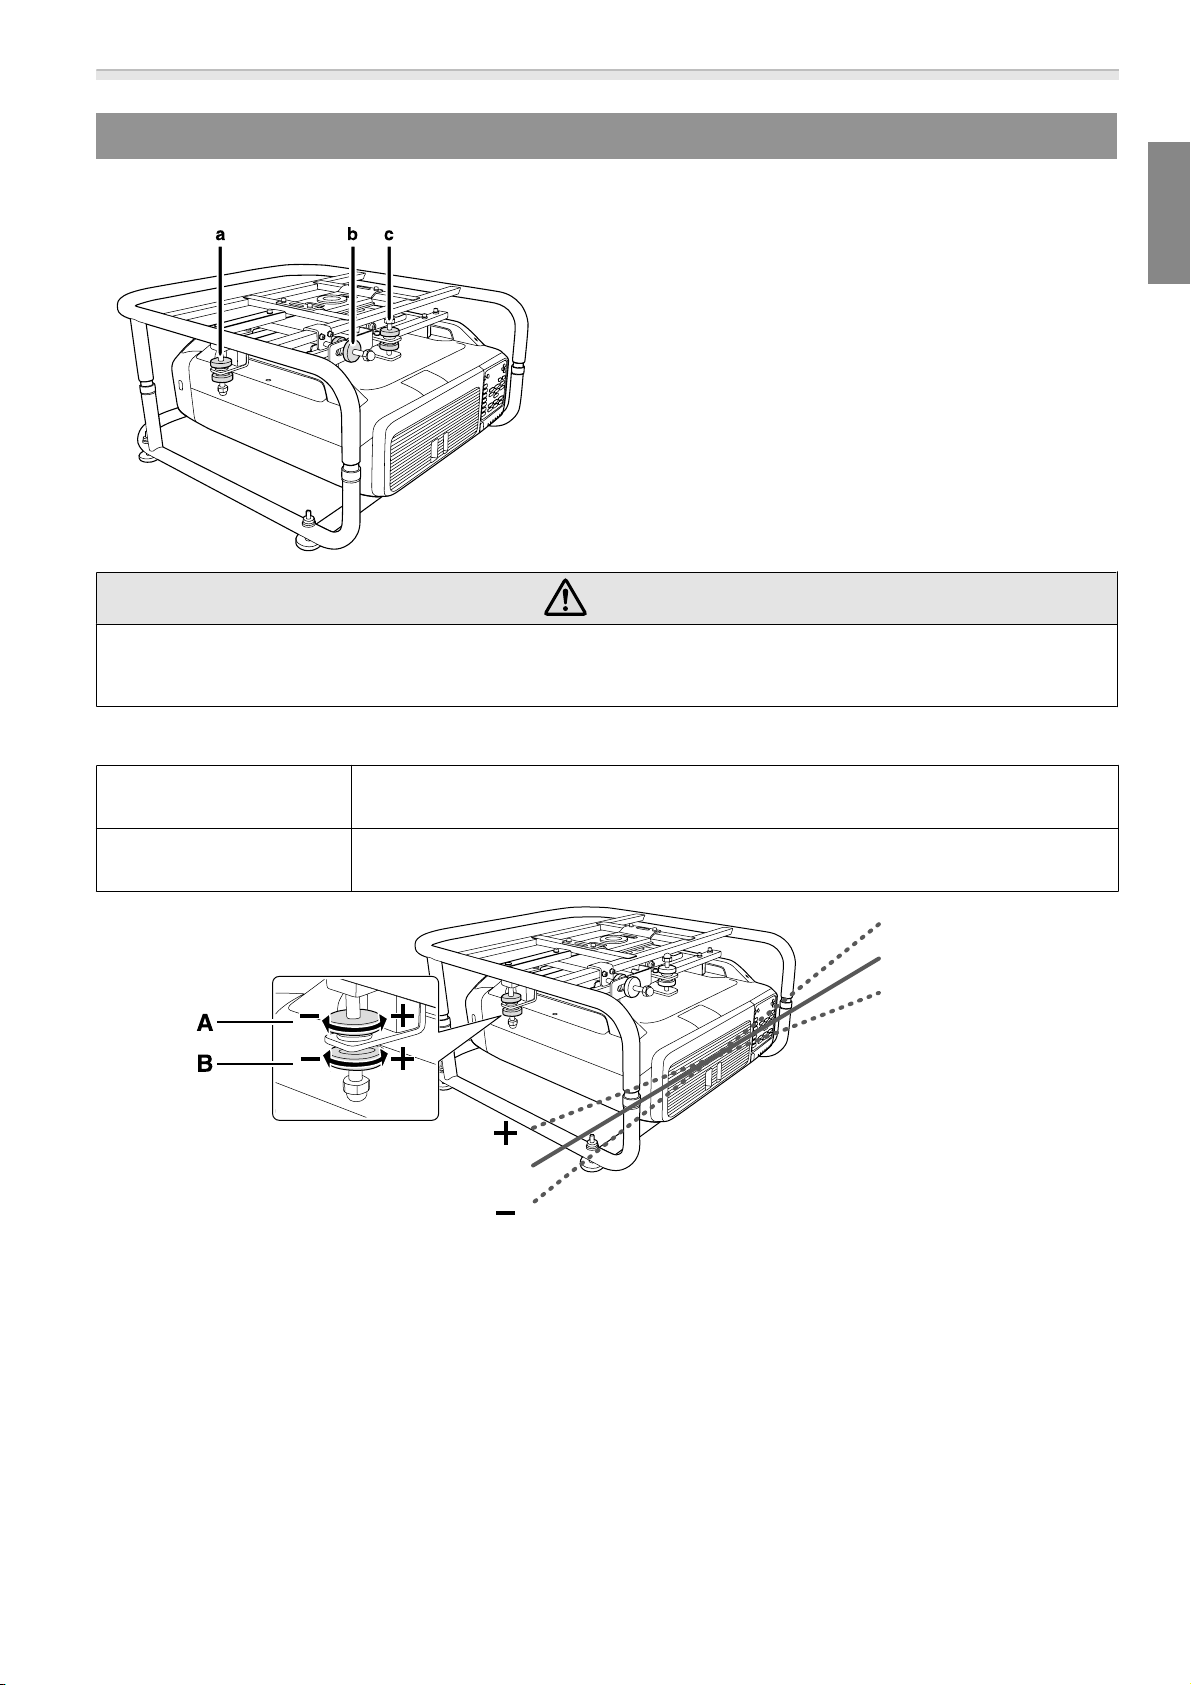
Adjusting the Angle Using the Adjustment Dial
You can adjust the tilt (±2°) and direction (horizontally ±5°, vertically ±2°) of the set projector.
a: For adjusting the tilt
b: For adjusting the horizontal angle
c: For adjusting the vertical angle
Caution
User's Guide
When rotating the adjustment dials, make sure you do not catch your hand or finger between the dials.
a: For adjusting the tilt
Adjust to the + side
Adjust to the - side
Rotate adjustment dial A in the + direction first, and then rotate adjustment dial B
in the + direction to secure them in place.
Rotate adjustment dial B in the - direction first, and then rotate adjustment dial A
in the - direction to secure them in place.
After making adjustments, make sure that adjustment dials A and B are not loose.
11
Page 13
User's Guide
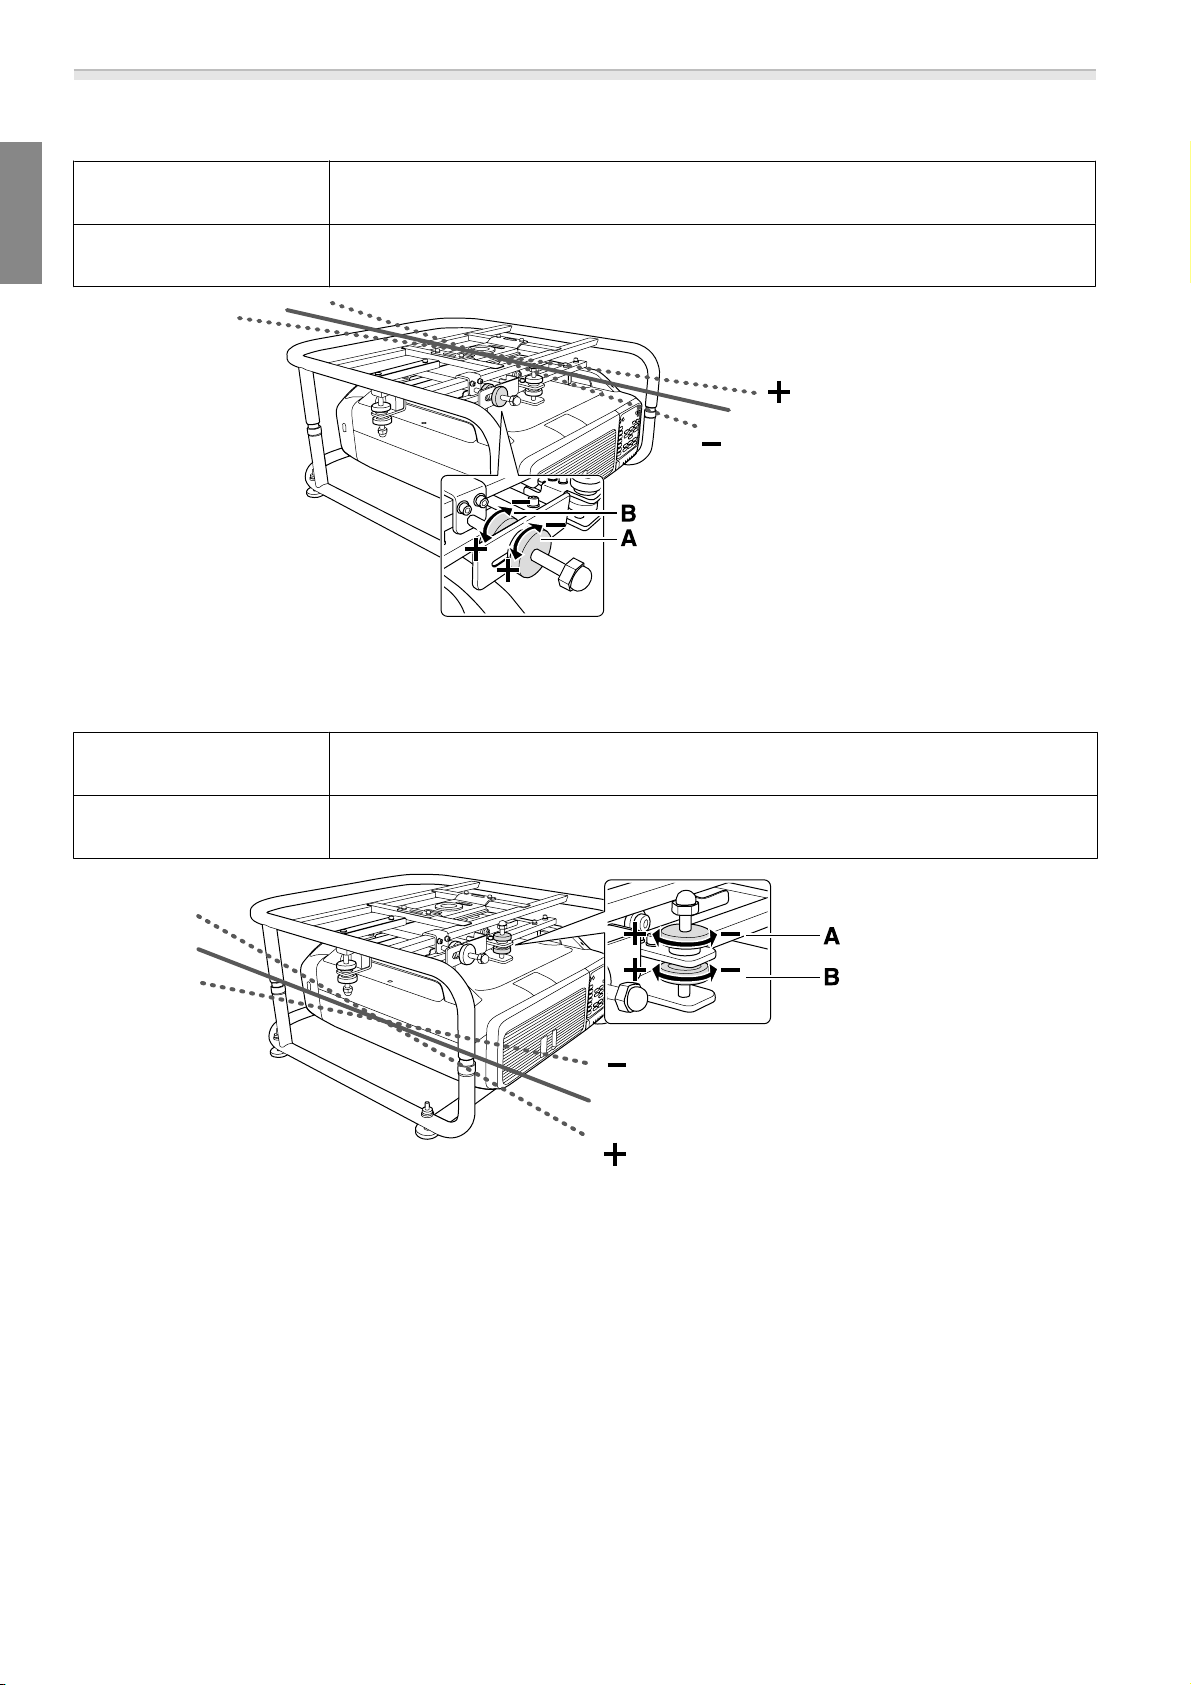
b: For adjusting the horizontal angle
Adjust to the + side
Adjust to the - side
Rotate adjustment dial A in the + direction first, and then rotate adjustment dial B
in the + direction to secure them in place.
Rotate adjustment dial B in the - direction first, and then rotate adjustment dial A
in the - direction to secure them in place.
After making adjustments, make sure that adjustment dials A and B are not loose.
c: For adjusting the vertical angle
Adjust to the + side
Rotate adjustment dial B in the + direction first, and then rotate adjustment dial A
in the + direction to secure them in place.
Adjust to the - side
Rotate adjustment dial A in the - direction first, and then rotate adjustment dial B
in the - direction to secure them in place.
After making adjustments, make sure that adjustment dials A and B are not loose.
12
Page 14
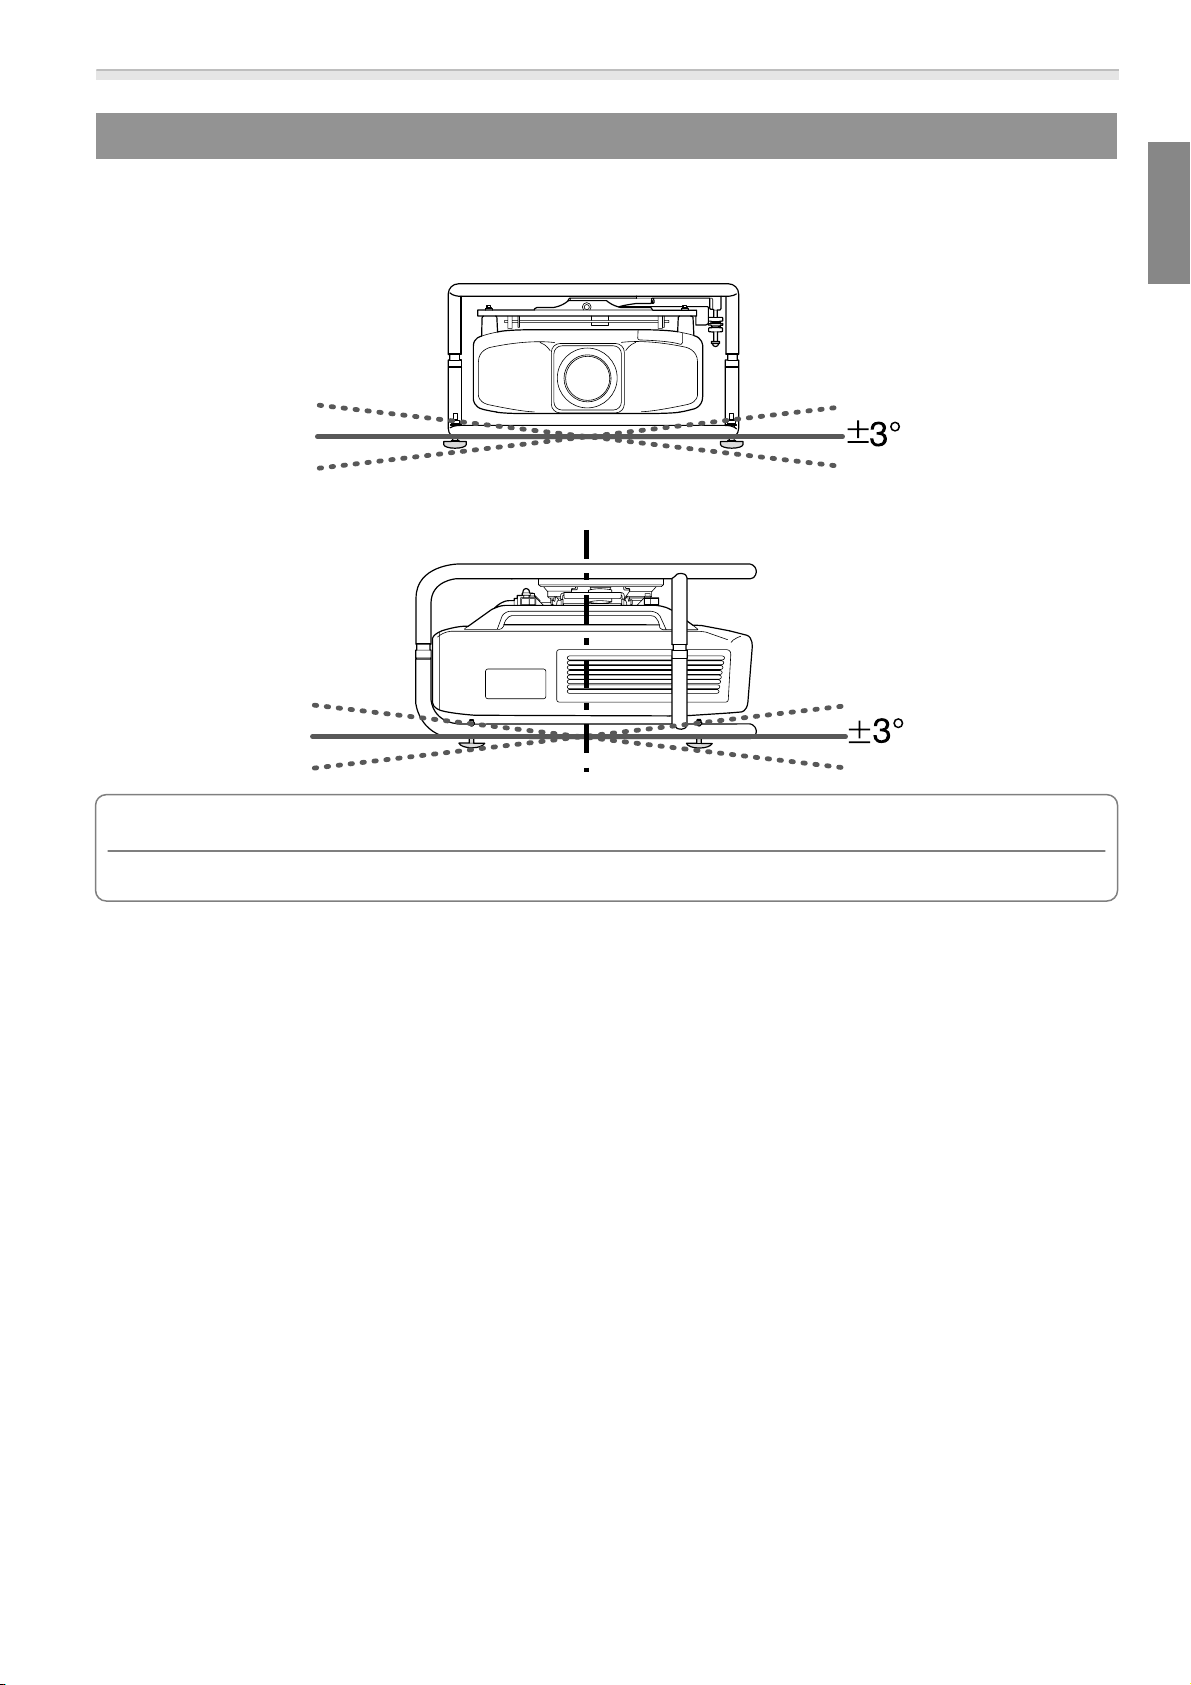
Adjusting the Angle Using the Feet
When the frame is placed on the floor, you can adjust the installation angle with the feet.
You can adjust the tilt (horizontal ±3°) and direction (vertically ±3°) of the projector.
Adjusting the tilt: Use the left and right feet.
Adjusting the horizontal angle: Use the front and back feet.
User's Guide
Attention
The feet can be attached and removed. Note that the feet will detach if they are extended too far.
13
Page 15
User's Guide
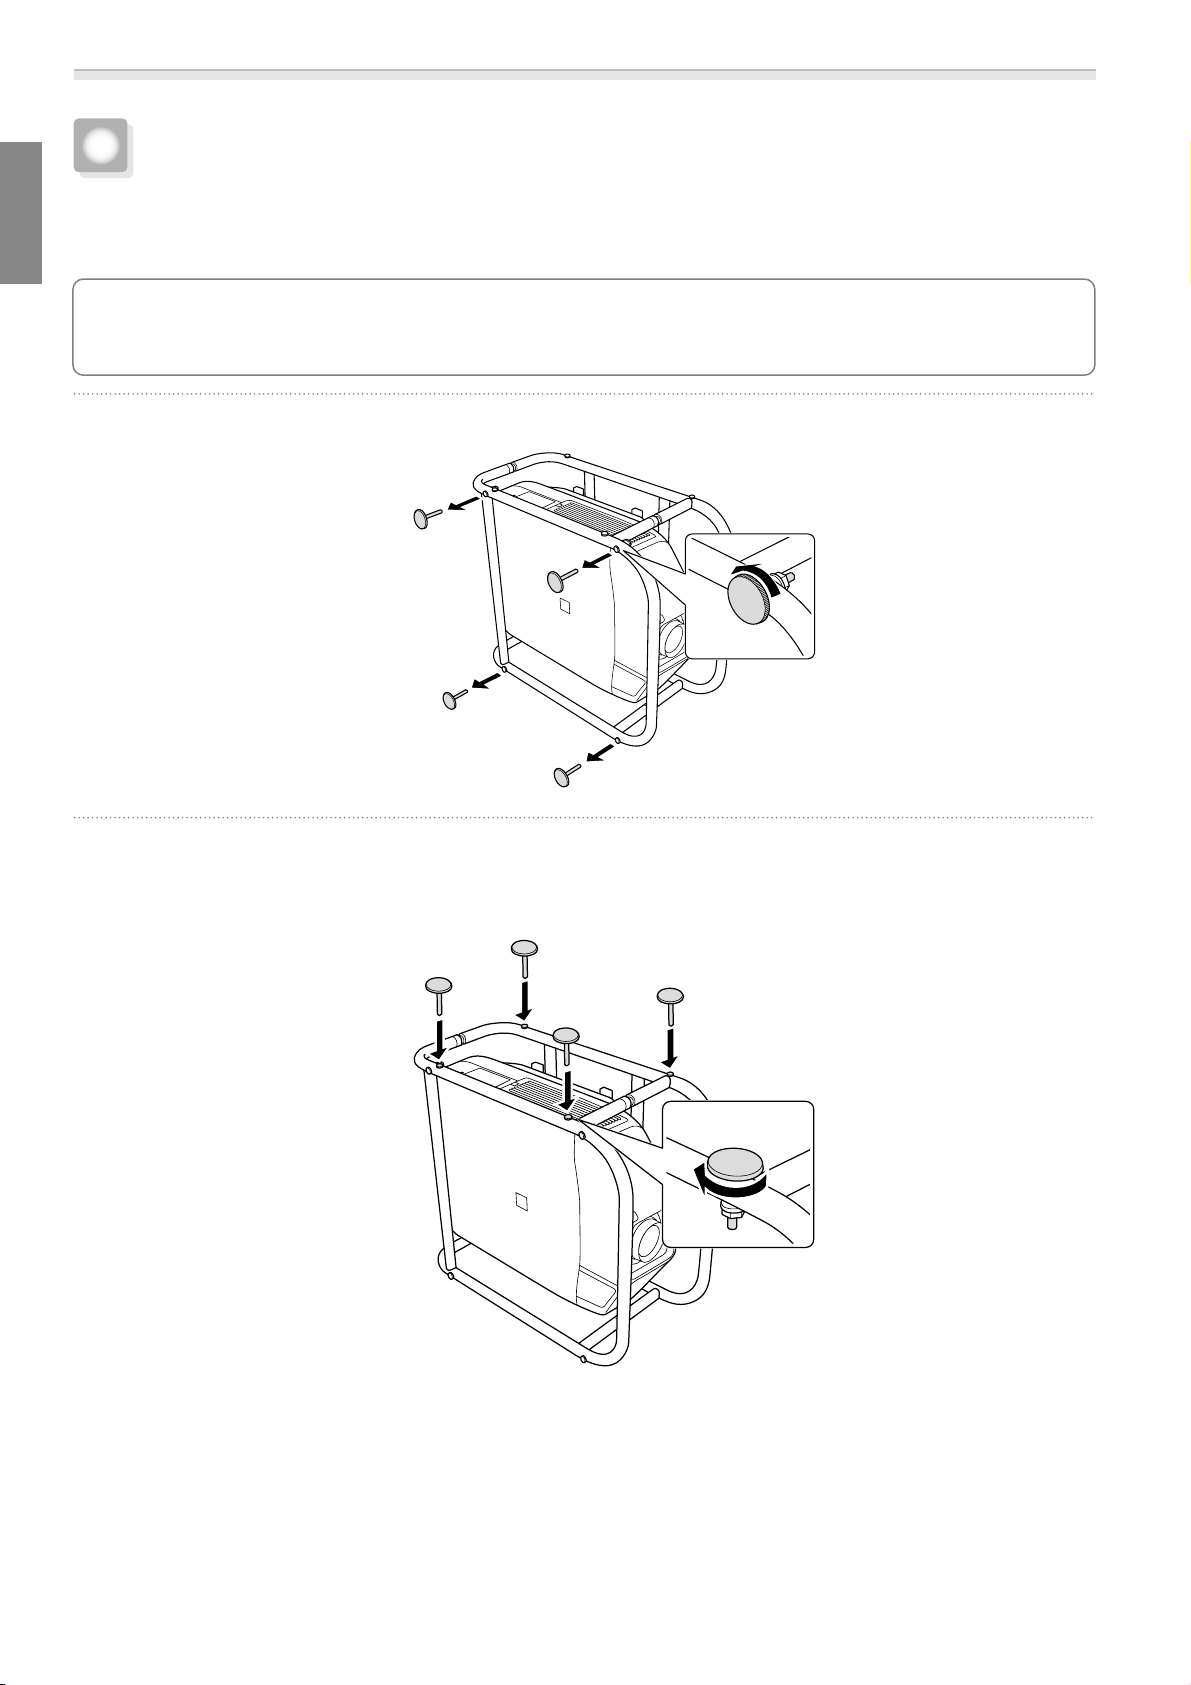
Portrait Projection
You can perform portrait projection by placing the projector in the frame, and then installing the frame
vertically.
See the User's Guide supplied with the projector to check if your projector supports portrait
projection.
c
Remove the feet (four points) from the bottom frame.
a
b
Attach the removed feet (four points) to the side of the frame.
There are screw holes on the side to which you can attach the feet. Make sure you do not attach them
to the wrong side.
14
Page 16
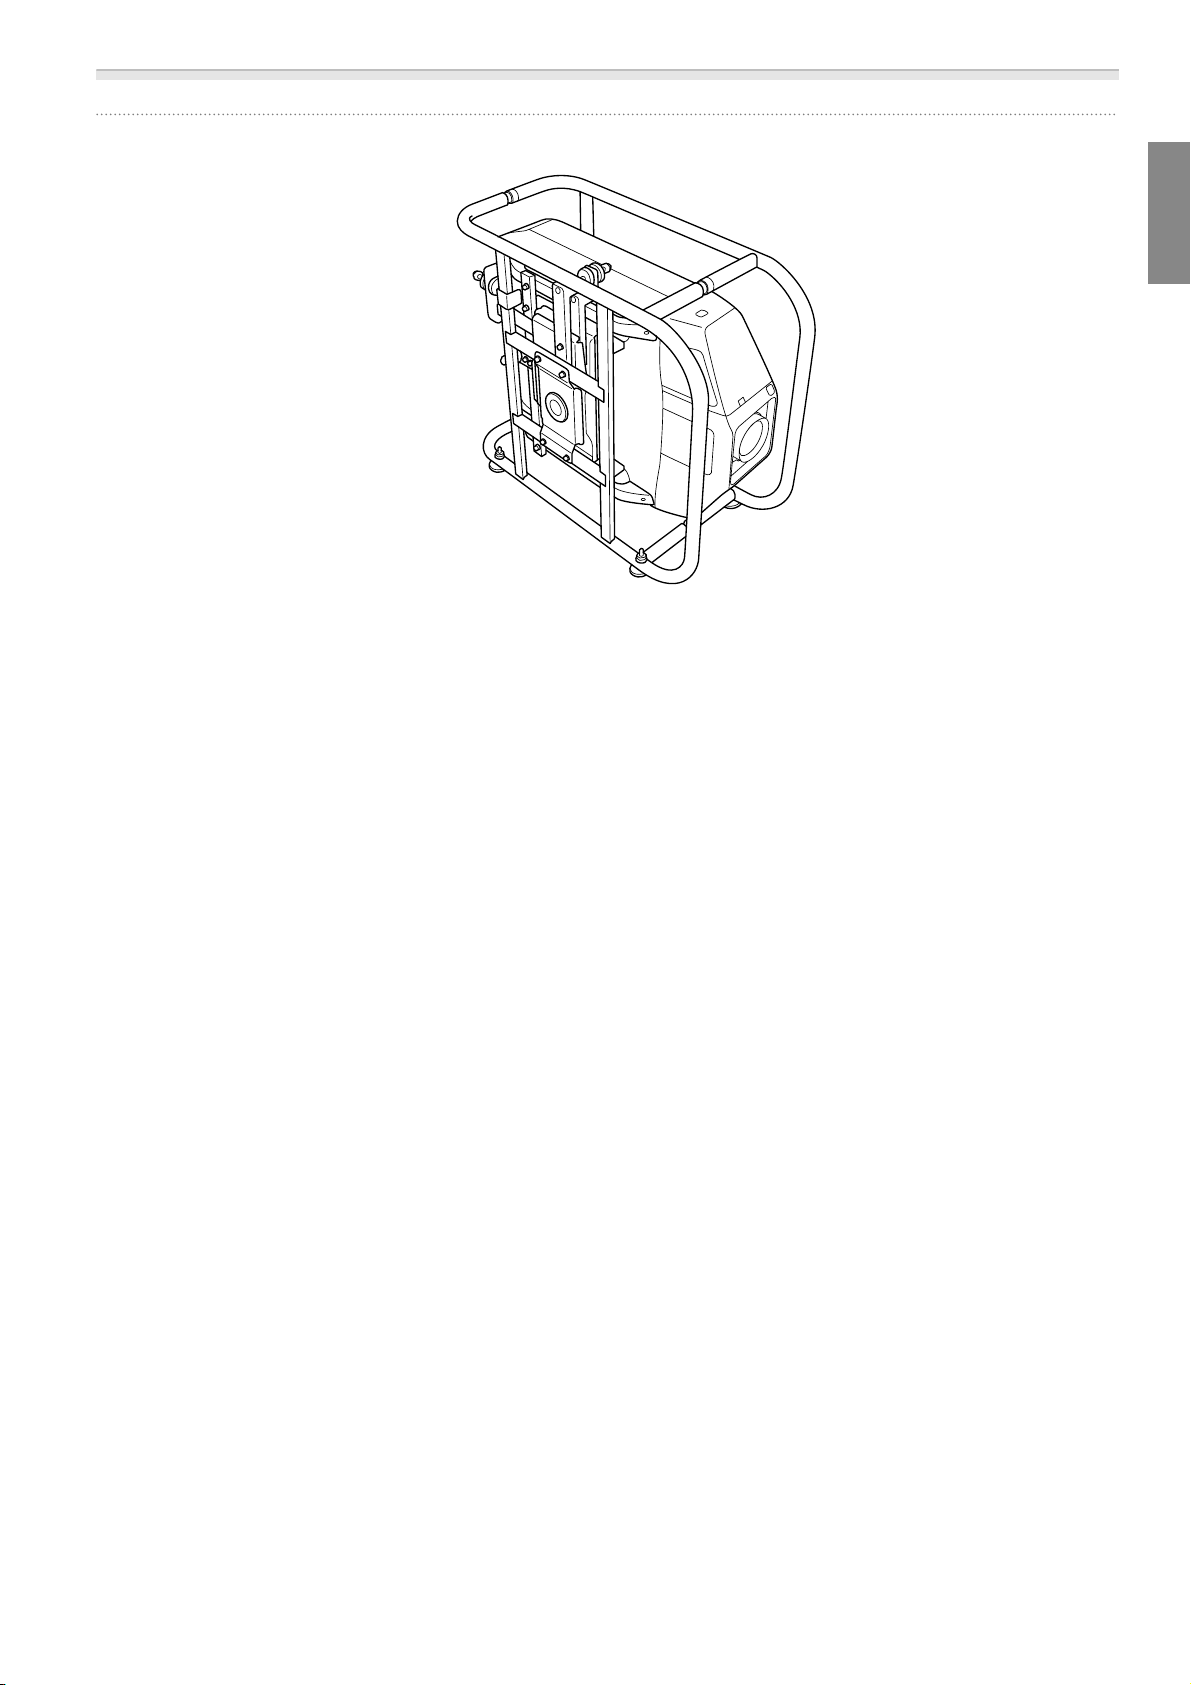
c
User's Guide
With the feet facing down, stand the frame vertically.
15
Page 17
User's Guide
Stacking Two Projectors
You can stack up to two frames.
Warning
When stacking two frames, do not suspend them from a ceiling and so on.
If this product or the projector falls, it could cause death or personal injury.
Caution
Do not stack more than three frames for stacked projection.
The frame could fall and cause an injury.
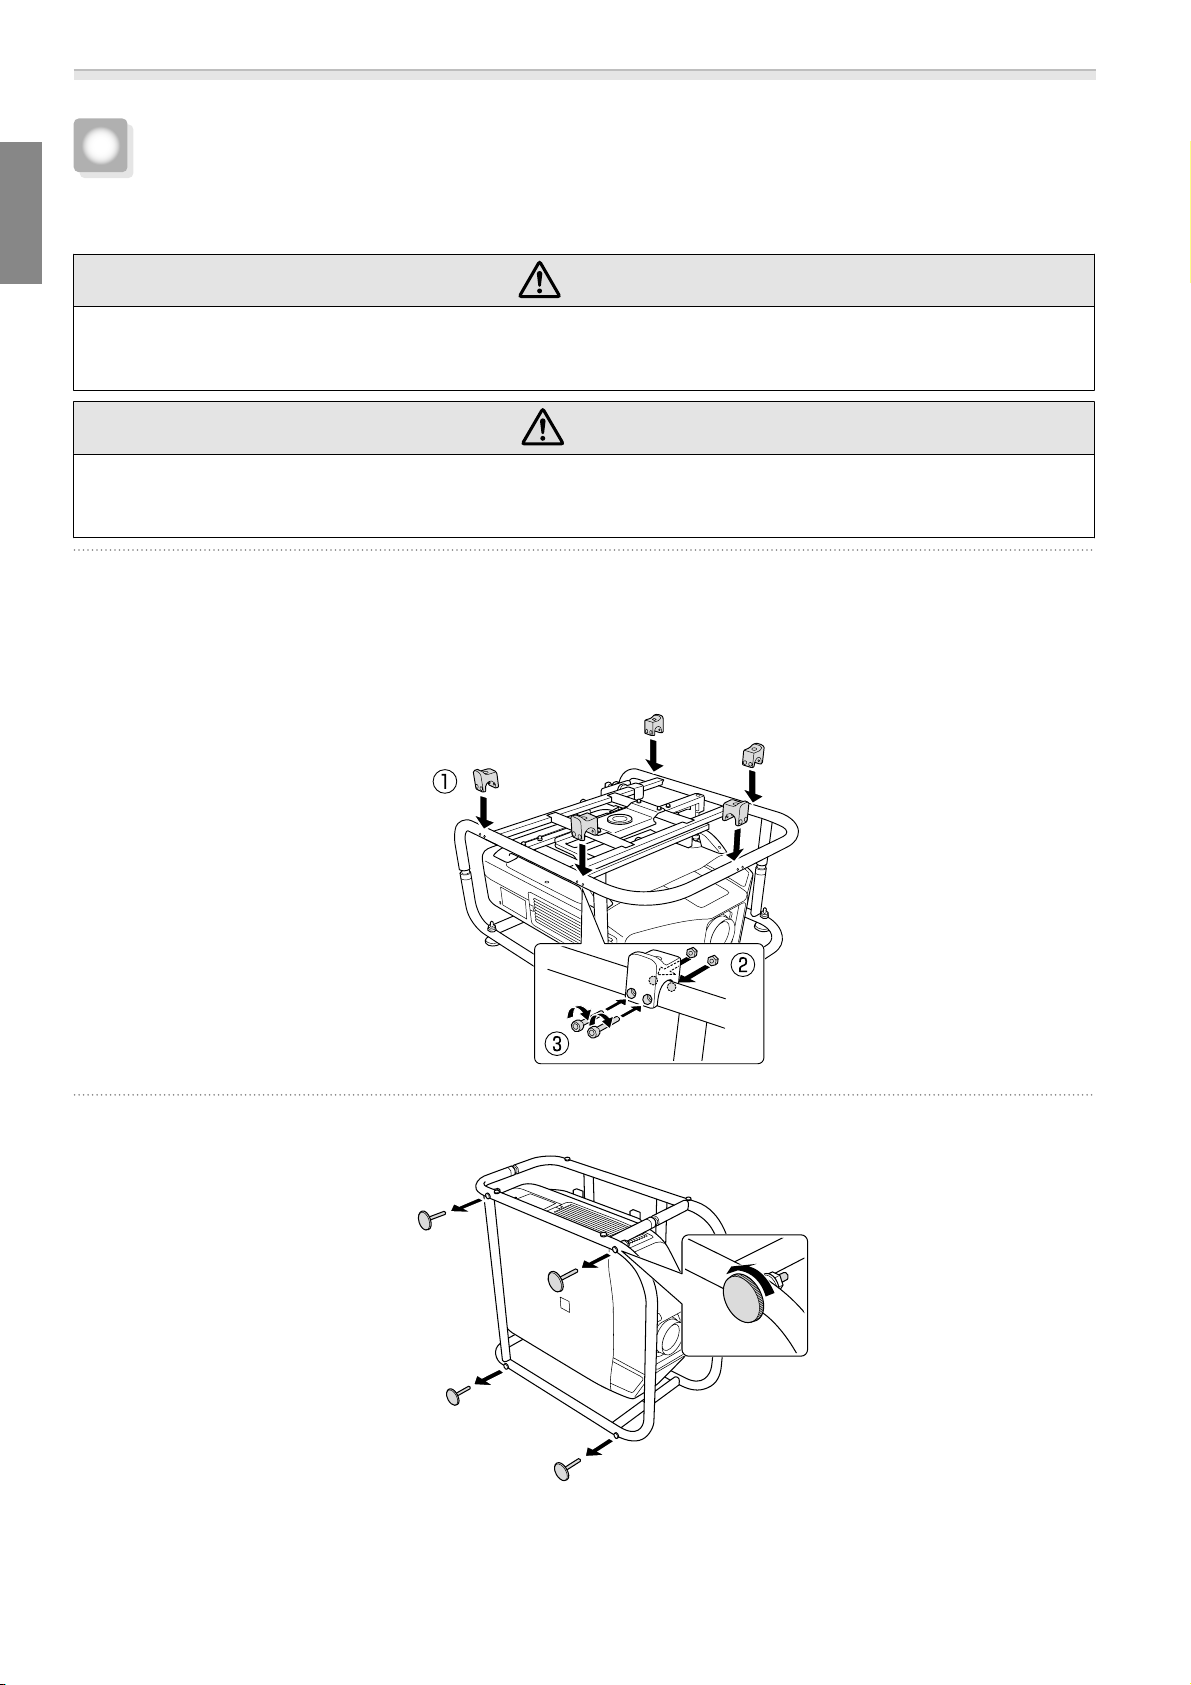
Attach the stacking guides (five points) to the frame that will be at the bottom of the stack.
a
b
Use a commercially available hexagon wrench to tighten the M6 x 40 mm bolts (with
hexagon nuts) supplied to secure the guides.
Use two bolts to secure each stacking guide.
Remove the four feet from the bottom frame that will be at the top of the stack.
16
Page 18
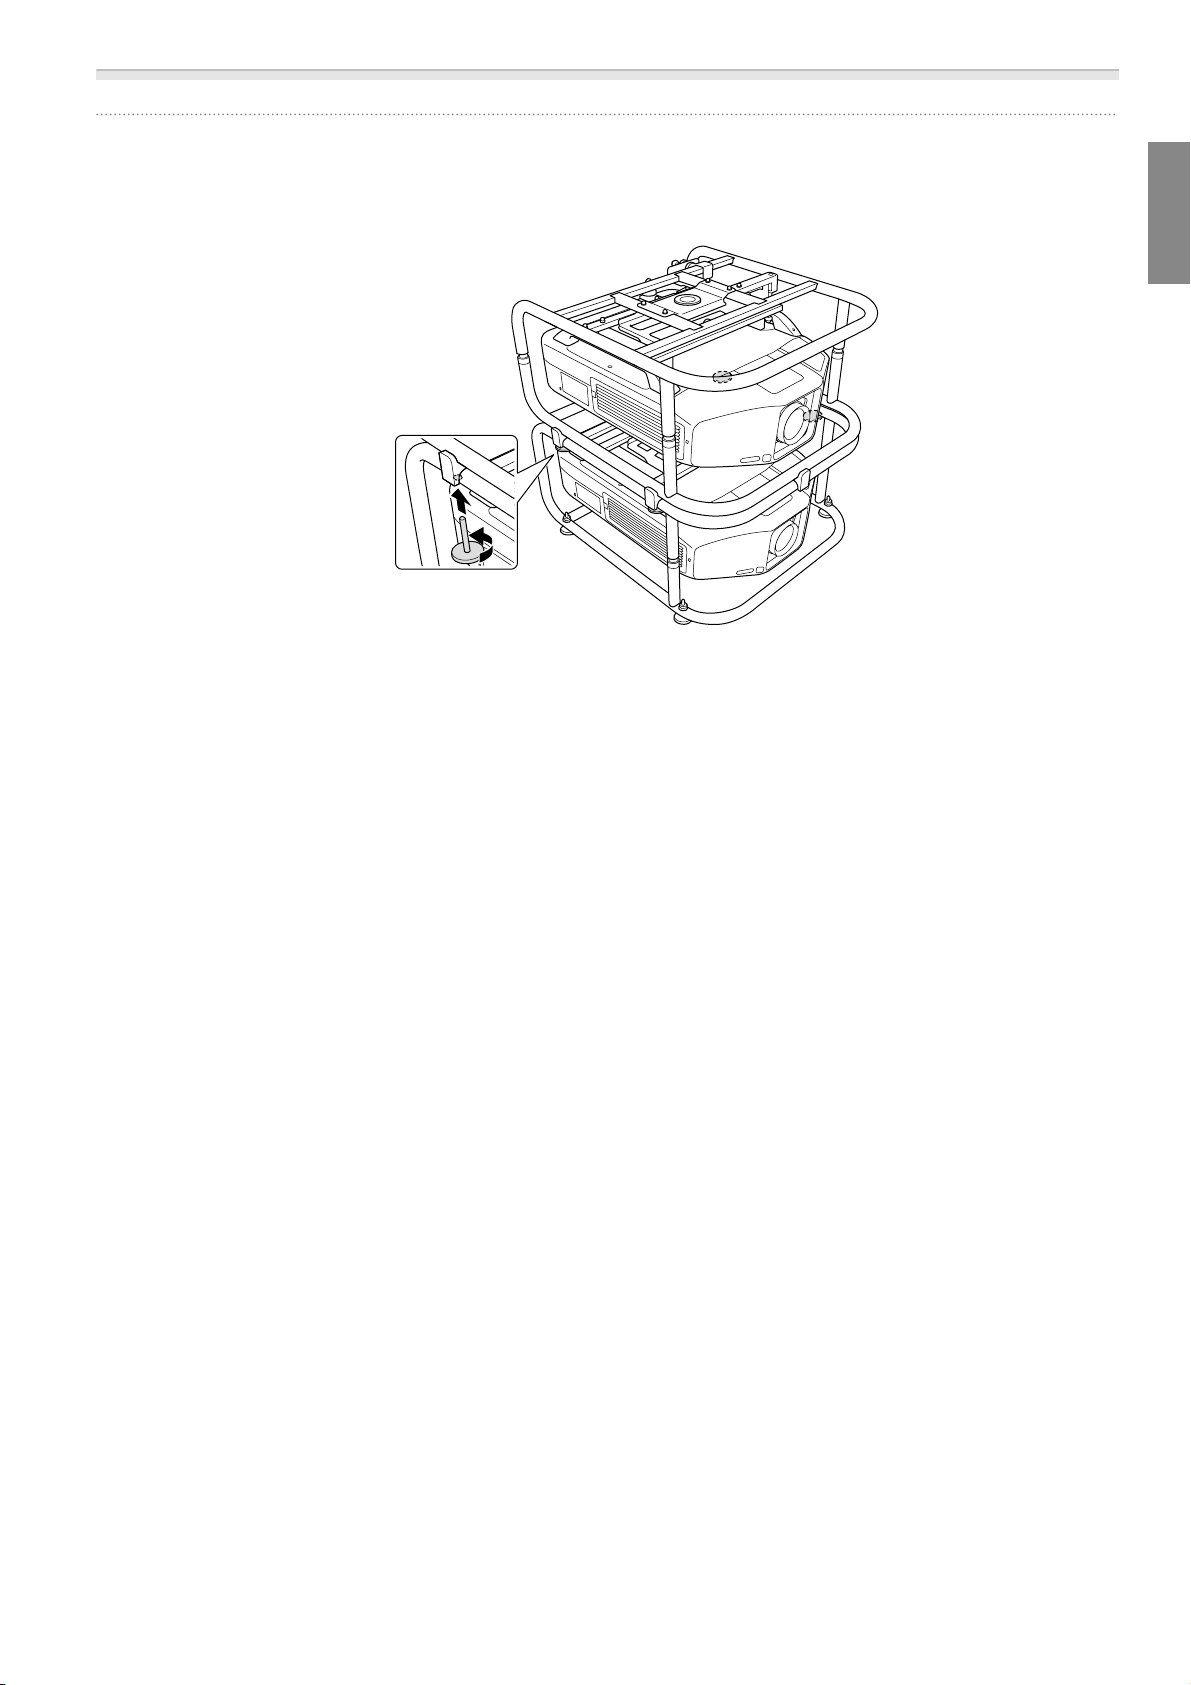
c
User's Guide
Place the frame that will be at the top of the stack on the stacking guides, and secure it
with the feet removed in step 2.
Use the feet to secure the four points on the left and right of the frame.
17
Page 19

User's Guide
Installing the Backup Projector
By installing the projector installation plate, you can place a backup projector on the frame.
•
This product can support a backup projector that weighs up to 15 kg.
•
c
a
You can stack two frames and place a backup projector on top.
Align the holes on the projector installation plate with the screw holes of the top frame.
Secure the projector installation plate with the screws supplied (two points).
Adjust the position of the projector installation plate, and then place the backup projector.
b
Align the position of the projector installation plate with the position of the backup projector's feet,
and then place the backup projector.
Attention
Do not secure the projector installation plate with a fastening belt and so on. Otherwise the projector
installation plate could be deformed.
18
Page 20
Specifications
Projector Specifications
Installation Direction Horizontally/Vertically
* Projectors can only be stacked horizontally.
User's Guide
Adjustment Angle
Maximum load capacity Approx. 32 kg
Maximum Weight for Backup Projector 15 kg
Frame Diameter 30 mm
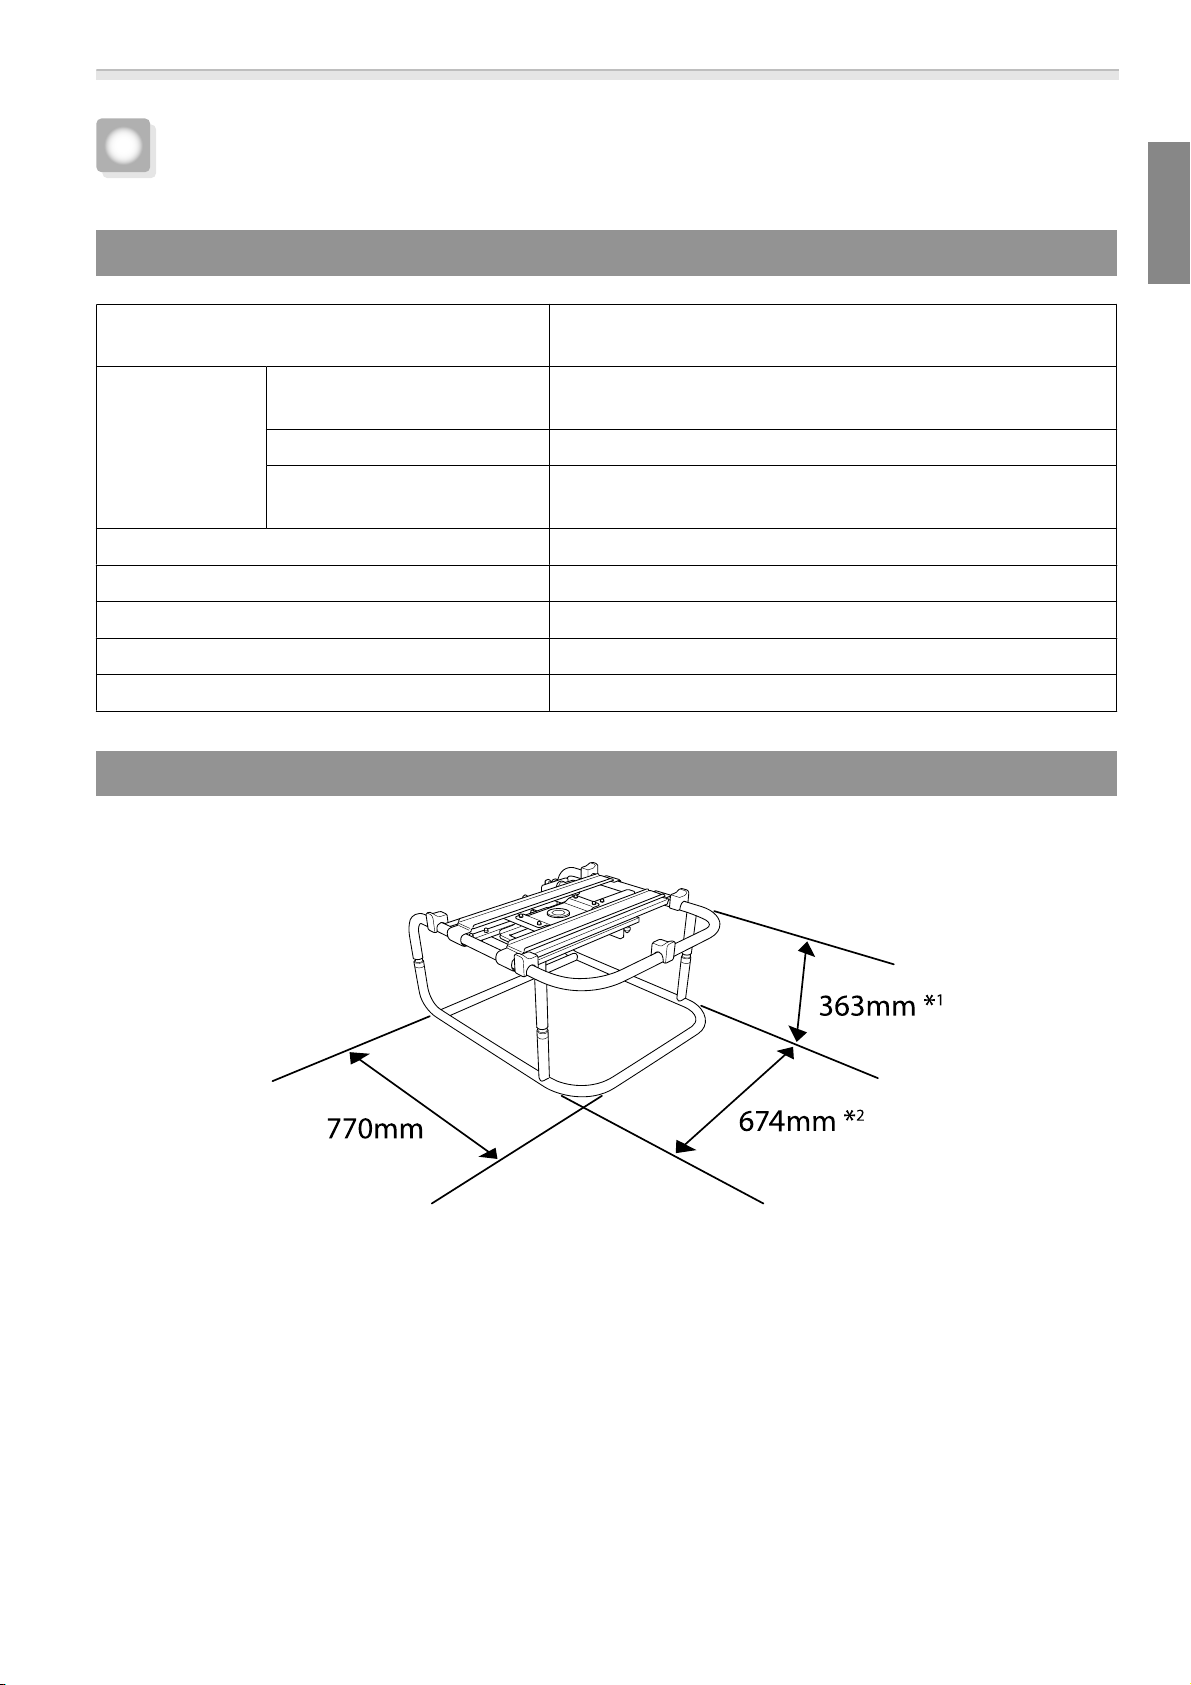
External Dimensions 674 (W) x 363 (H) x 770 (D) mm (not including raised section)
Frame weight Approx. 17.5 kg
Horizontal Tilt Adjustment dial: ± 2°, feet ±3°
* You can adjust up to ±5°.
Horizontal Rotation Adjustment dial: ±5°
Vertical Tilt Adjustment dial: ± 2°, feet ±3°
* You can adjust up to ±5°.
External Dimensions
Values are just reference.
*1: Value when the feet are removed. 381 mm when the feet are attached.
*2: Value when the feet are removed. 695 mm when the feet are attached.
19
Page 21

User's Guide
Trademarks and Copyrights
Other product names used herein are for identification purposes only and may be trademarks of their
respective owners. Epson disclaims any and all rights in those marks.
© SEIKO EPSON CORPORATION 2014. All rights reserved.
20
Page 22
Bedienungsanleitung
Page 23

Page 24
Bedienungsanleitung
Sicherheitsanweisungen
Machen Sie sich zu Ihrer eigenen Sicherheit mit der gesamten Bedienungsanleitung vertraut, bevor Sie das
Gerät benutzen. Falsche, von den Hinweisen in dieser Bedienungsanleitung abweichende Handhabung kann
zu Beschädigungen des Gerätes, Verletzungen und Sachschäden führen. Bewahren Sie diese Anleitung auf,
damit Sie später darin nachlesen können.
Machen Sie sich mit der Bedienungsanleitung und den Sicherheitsanweisungen zu Ihrem Projektor vertraut,
halten Sie sich an die Anweisungen in diesen Dokumenten.
Sicherheitssymbole
In der Dokumentation und am Gerät selbst finden Sie grafische Symbole, die Ihnen dabei helfen, das Gerät
auf sichere Weise zu bedienen.
Nachstehend finden Sie die Symbole und ihre Bedeutung. Machen Sie sich gründlich damit vertraut, bevor
Sie die Anleitung lesen.
Symbol Erläuterung
Warnung
Vorsicht
Dieses Symbol weist auf Informationen hin, die bei Nichtbeachtung zu Verletzungen, im
schlimmsten Fall mit Todesfolge, führen können.
Dieses Symbol weist auf Informationen hin, die bei Nichtbeachtung zu Verletzungen oder
Sachschäden führen können.
Die Symbole
Symbole Erläuterung
Kennzeichnet unzulässige Handlungen und Aktionen.
Kennzeichnet Handlungen und Aktionen, die ausgeführt werden sollten.
Achtung
Kennzeichnet Inhalte, die zu Beschädigungen oder Fehlfunktionen dieses Produktes oder
des Projektors führen können.
Weist auf verwandte oder anderweitig nützliche Informationen hin.
c
23
Page 25
Bedienungsanleitung
Sicherheitshinweise zur Installation
Warnung
Halten Sie sich bei der Installation dieses Produktes eng an diese Anleitung.
Bei Nichtbeachtung der Anleitung kann das Produkt stürzen, Verletzungen verursachen oder Unfälle provozieren.
Installieren Sie das Produkt nicht an instabilen Stellen.
Achten Sie darauf, dass der Installationsort das Gewicht des Projektors mitsamt diesem Produkt
mühelos tragen kann.
Setzen Sie keine Klebstoffe, Schmiermitteln, Fette und dergleichen beim Fixieren
der Schrauben ein.
Falls Sie Klebstoffe zur Schraubensicherung an den Montagepunkten verwenden oder den Projektor mit Schmiermitteln oder Fetten behandeln, kann das Projektorgehäuse brechen, der Projektor
stürzen - und dadurch Verletzungen oder Sachschäden verursachen.
Dieses Produkt eignet sich ausschließlich zur Hochformat- oder gestapelten Projektion. Ausschließlich am Projektor, an keinen anderen Gegenständen anbringen.
Andernfalls kann das Produkt beschädigt werden; bei einem Sturz des Projektors kann es überdies
zu schweren Verletzungen, im schlimmsten Fall mit Todesfolge, kommen.
Das Produkt sollte von mindestens zwei qualifizierten Fachleuten installiert werden.
Achten Sie beim Lösen der Schrauben während der Installation gut darauf, dass
das Produkt nicht stürzt.
Falls Produkt oder Projektor stürzen sollten, kann es zu schweren bis tödlichen Verletzungen kommen.
Vergessen Sie nicht, nach Anpassungen sämtliche Schrauben wieder fest anzuziehen.
Andernfalls kann das Produkt stürzen, Verletzungen und Sachschäden verursachen.
Tragen Sie rutschfeste Handschuhe, wenn Sie das Produkt bewegen und installieren.
Falls das Produkt stürzt, kann es Verletzungen oder Sachschäden verursachen.
Achten Sie darauf, dass Ansaugöffnung und Luftaustritt des Projektors nicht blockiert werden.
Falls die Belüftungsöffnungen blockiert werden, kann das Gerät überhitzen, im schlimmsten Fall
einen Brand verursachen.
24
Page 26

Bedienungsanleitung
Vorsicht
Installieren Sie das Produkt nicht an Stellen, an denen Temperaturen außerhalb
der für den Projektor zugelassenen Temperaturen herrschen.
Dies kann Fehlfunktionen verursachen.
Installieren Sie den Projektor nicht an Stellen, an denen er Vibrationen oder Stößen ausgesetzt wird.
Achten Sie beim Fixieren des Rahmens mit Schrauben darauf, sich nicht Hände
oder Finger zwischen Schrauben und Rahmen einzuklemmen.
Setzen Sie bei einer gestapelten Aufstellung nicht mehr als drei Projektoren
übereinander.
Ansonsten kann der Rahmen stürzen und Verletzungen verursachen.
Hinweise zum Einsatz
Warnung
Veränderungen und Demontage sollten ausschließlich von qualifizierten Fachleuten ausgeführt werden, sofern nicht anders in der Bedienungsanleitung angegeben.
Andernfalls können Fehlfunktionen oder Unfälle eintreten.
Hängen Sie sich nicht an das Produkt.
Bringen Sie auch keinerlei sonstigen Gegenstände mit Ausnahme des Projektors
an.
Falls das Produkt stürzen sollte, kann es zu schweren bis tödlichen Verletzungen kommen.
Stellen und setzen Sie sich nicht auf das Produkt.
Andernfalls kann das Produkt beschädigt werden.
Prüfen Sie von Zeit zu Zeit auf beschädigte Komponenten und lose Schrauben.
Falls etwas beschädigt sein sollte, stellen Sie die Nutzung des Produktes unverzüglich ein.
Falls Produkt oder Projektor stürzen sollten, kann es zu schweren bis tödlichen Verletzungen kommen.
Vorsicht
Wenden Sie bei der Justage des Produktes nicht zu viel Kraft auf.
Andernfalls kann das Produkt beschädigt werden und Verletzungen verursachen.
Legen Sie Schrauben und Gerätefüße nicht in Reichweite von Kleinkindern ab.
Kleinteile können versehentlich verschluckt werden.
Falls dies geschieht, suchen Sie unverzüglich einen Arzt auf.
25
Page 27

Bedienungsanleitung
Produktmerkmale
Hochformatprojektion
Bei zur Hochformatprojektion geeigneten Projektoren können Sie die Hochformatprojektion realisieren, indem
Sie einen Projektor in den Rahmen setzen und den Rahmen vertikal installieren.
Gestapelte Projektion
Sie können einen Projektor an diesem Produkt fixieren und bis zu zwei Projektoren stapeln.
•
Sie können auch Projektorinstallationsplatten am Rahmen installieren und den Projektor einsetzen.
•
c
Sie können zwei Rahmen stapeln und einen Projektor oben aufsetzen.
•
Das Produkt eignet sich für Projektoren mit einem Gewicht bis 15 kg.
26
Page 28

Bedienungsanleitung
Lieferumfang
Folgende Komponenten werden mit dem Produkt geliefert. Vergewissern Sie sich, dass nichts fehlt.
Falls etwas fehlen oder beschädigt sein sollte, wenden Sie sich bitte an den Händler, bei dem Sie das Produkt
erworben haben.
Oberer Rahmen (1 x) Unterer Rahmen (1 x) Projektorinstallationsplatten (2
x)
Schrauben zum Fixieren der Projek-
torinstallationsplatten
(2 x)
Form Name
M6 x 30 mm-Innensechskantschraube
mit Unterlegscheibe/Federscheibe
M6 x 40 mm-Innensechskantschraube
M6-Sechskantmutter
Verwenden Sie die mit dem Produkt gelieferten Bolzen oder Schrauben wie in dieser Anleitung angegeben.
Ersetzen Sie die Schrauben nicht durch Schrauben oder Bolzen anderer Typen.
Stapelführungen (5 x) Stopper (4 x)
Anzahl
4 Zur Projektoranbringung
10 Zum Anbringen der Stapelführun-
gen
Verwendung
c
•
Legen Sie vor Beginn der Installation sämtliche Werkzeuge und Teile zurecht.
•
Entsorgen Sie das Produkt zum Ende seiner Einsatzzeit vorschriftsgemäß. Halten Sie sich an die
Entsorgungsbestimmungen an Ihrem Arbeitsplatz, sofern gegeben.
27
Page 29
Bedienungsanleitung
Am Projektor anbringen
Achtung
•
Lösen Sie keine Schrauben von Komponenten, die nicht in dieser Anleitung behandelt werden.
•
Achten Sie darauf, dass die Schrauben, die den Projektor am Produkt fixieren, und die Verschraubungen zur
Verbindung von oberem und unterem Rahmen fest sitzen.
Bringen Sie den oberen Rahmen am Projektor an.
a
b
Bringen Sie die Schraubenbohrungen am oberen Rahmen mit den Montagepunkten (vier Punkte) an
der Deckenhalterung in Flucht.
Ziehen Sie die mitgelieferten M6 x 30 mm-Schrauben (mitsamt Unterlegscheiben/Federscheiben) mit
einem handelsüblichen Innensechskantschlüssel fest, fixieren Sie dann den Rahmen.
Bringen Sie den oberen Rahmen am unteren Rahmen an.
Bringen Sie den oberen Rahmen mit dem unteren Rahmen in Flucht, drehen Sie die Metallfittings (vier
Stellen) zum Fixieren.
28
Page 30
c
d
Bedienungsanleitung
Bringen Sie die Stopper an (vier Stellen).
Nehmen Sie die Füße vom Projektor ab.
Hinweise zum Abnehmen der Füße finden Sie in der mit dem Projektor gelieferten Bedienungsanleitung.
Achtung
•
Falls die Projektorfüße nicht abgenommen werden, können diese bei der Winkeleinstellung an den
Rahmen stoßen.
•
Stellen Sie den Projektor nicht direkt auf den Boden oder andere Unterlagen, solange die Füße
abgenommen sind.
29
Page 31

Bedienungsanleitung
Installationswinkel einstellen
Sie können den Projektorwinkel mit den drei Einstellrädern und den Füßen anpassen.
Zum Einstellen der Position des projizierten Bildes neigen Sie den Projektor oder drehen ihn horizontal.
Einstellbereich Einstellrad Einstellbereich Füße
Neigungsverstellung
Horizontalverstellung
Vertikalverstellung
Achten Sie darauf, dass der Installationswinkel innerhalb des angegebenen Bereiches liegt. Hinweise
zum Neigungswinkel finden Sie in der mit dem Projektor gelieferten Bedienungsanleitung.
c
30
Page 32

Bedienungsanleitung
Winkel mit den Einstellrädern verstellen
Sie können Neigung (± 2 °) und Richtung (horizontal ± 5 °, vertikal ± 2 °) des Projektors anpassen.
a: Neigung einstellen
b: Horizontalwinkel einstellen
c: Vertikalwinkel einstellen
Vorsicht
Klemmen Sie sich beim Drehen der Einstellräder nicht Hände oder Finger ein.
a: Neigung einstellen
Zur ”+“-Seite einstellen
Zur ”-“-Seite einstellen
Vergewissern Sie sich nach dem Einstellen, dass die Einstellräder A und B nicht lose sind.
Drehen Sie das Einstellrad A zunächst in Richtung +, drehen Sie das Einstellrad B
anschließend zum Fixieren in Richtung +.
Drehen Sie das Einstellrad B zunächst in Richtung -, drehen Sie das Einstellrad A
anschließend zum Fixieren in Richtung -.
31
Page 33

Bedienungsanleitung
b: Horizontalwinkel einstellen
Zur ”+“-Seite einstellen
Zur ”-“-Seite einstellen
Drehen Sie das Einstellrad A zunächst in Richtung +, drehen Sie das Einstellrad B
anschließend zum Fixieren in Richtung +.
Drehen Sie das Einstellrad B zunächst in Richtung -, drehen Sie das Einstellrad A
anschließend zum Fixieren in Richtung -.
Vergewissern Sie sich nach dem Einstellen, dass die Einstellräder A und B nicht lose sind.
c: Vertikalwinkel einstellen
Zur ”+“-Seite einstellen
Drehen Sie das Einstellrad B zunächst in Richtung +, drehen Sie das Einstellrad A
anschließend zum Fixieren in Richtung +.
Zur ”-“-Seite einstellen
Drehen Sie das Einstellrad A zunächst in Richtung -, drehen Sie das Einstellrad B
anschließend zum Fixieren in Richtung -.
Vergewissern Sie sich nach dem Einstellen, dass die Einstellräder A und B nicht lose sind.
32
Page 34

Bedienungsanleitung
Winkel mit den Füßen verstellen
Wenn der Rahmen auf dem Boden steht, können Sie den Installationswinkel mit Hilfe der Füße einstellen.
Sie können Neigung (horizontal ± 3 °) und Richtung (vertikal ± 3 °) des Projektors einstellen.
Neigung einstellen: Benutzen Sie die Füße links und rechts.
Horizontalwinkel einstellen: Benutzen Sie die Füße vorne und hinten.
Achtung
Die Gerätefüße können angebracht und abgenommen werden. Beachten Sie, dass sich die Gerätefüße
lösen, wenn sie zu weit herausgedreht werden.
33
Page 35

Bedienungsanleitung
Hochformatprojektion
Sie können Hochformatprojektion realisieren, indem Sie einen Projektor in den Rahmen setzen und den
Rahmen anschließend vertikal installieren.
Lesen Sie in der mit dem Projektor gelieferten Bedienungsanleitung nach, ob Ihr Projektor
Hochformatprojektion unterstützt.
c
Lösen Sie die Füße (vier Stellen) vom unteren Rahmen.
a
b
Bringen Sie die gelösten Füße (vier Stellen) an der Seite des Rahmens an.
An der Seite befinden sich Gewinde zur Aufnahme der Füße. Achten Sie beim Anbringen auf die richtige
Seite.
34
Page 36

c
Bedienungsanleitung
Stellen Sie den Rahmen vertikal mit den Füßen nach unten auf.
35
Page 37

Bedienungsanleitung
Zwei Projektoren stapeln
Sie können zwei Rahmen aufeinandersetzen.
Warnung
Gestapelte Rahmen dürfen nicht an der Decke oder anderen Gegenständen angebracht
werden.
Falls Produkt oder Projektor stürzen sollten, kann es zu schweren bis tödlichen Verletzungen kommen.
Vorsicht
Setzen Sie zur gestapelten Projektion nicht mehr als drei Rahmen ein.
Ansonsten kann der Rahmen stürzen und Verletzungen verursachen.
Bringen Sie die Stapelführungen (fünf Stellen) an dem Rahmen an, der ganz unten
a
eingesetzt wird. Ziehen Sie die mitgelieferten M6 x 40 mm-Schrauben (mitsamt
Sechskantmuttern) zum Fixieren der Führungen mit einem handelsüblichen
Innensechskantschlüssel fest.
Fixieren Sie jede Stapelführung mit zwei Schrauben.
Lösen Sie die vier Füße am unteren Rahmen, der im Stapel oben eingesetzt wird.
b
36
Page 38

c
Bedienungsanleitung
Setzen Sie den Rahmen, der im Stapel oben eingesetzt wird, auf die Stapelführungen,
fixieren Sie diesen mit den in Schritt 2 gelösten Füßen.
Fixieren Sie die vier Punkte links und rechts am Rahmen mit den Füßen.
37
Page 39

Bedienungsanleitung
Zweitprojektor installieren
Durch Installation der Projektorinstallationsplatte können Sie einen Zweitprojektor im Rahmen platzieren.
•
Das Produkt eignet sich für Projektoren mit einem Gewicht bis 15 kg.
•
c
a
Sie können zwei Rahmen stapeln und einen Projektor oben aufsetzen.
Bringen Sie die Öffnungen in der Projektorinstallationsplatte mit den Schraubbohrungen
im oberen Rahmen in Flucht. Fixieren Sie die Projektorinstallationsplatte mit den
mitgelieferten Schrauben (zwei Stellen).
Bringen Sie die Projektorinstallationsplatte in die richtige Position, setzen Sie dann den
b
Zweitprojektor ein.
Bringen Sie die Projektorinstallationsplatte mit den Füßen des Zweitprojektors in Flucht, setzen Sie
dann den Zweitprojektor ein.
Achtung
Fixieren Sie die Projektorinstallationsplatte nicht mit Haltegurten oder ähnlichen Hilfsmitteln. Andernfalls
kann sich die Projektorinstallationsplatte verformen.
38
Page 40

Technische Daten
Projektor-Spezifikationen
Installationsrichtung Horizontal/Vertikal
* Projektoren können nur horizontal gestapelt werden.
Einstellwinkel Horizontale Neigung Einstellrad: ± 2 °, Füße ± 3 °
* Eine Einstellung bis ± 5 ° ist möglich.
Horizontale Drehung Einstellrad: ± 5 °
Vertikale Neigung Einstellrad: ± 2 °, Füße ± 3 °
* Eine Einstellung bis ± 5 ° ist möglich.
Maximale Tragfähigkeit Etwa 32 kg
Zweitprojektor-Maximalgewicht 15 kg
Rahmendurchmesser 30 mm
Bedienungsanleitung
Außenabmessungen 674 × 363 × 770 mm (B × H × T, ohne erhabenen Teil)
Rahmengewicht Etwa 17.5 kg
Außenabmessungen
Die Angaben sind lediglich Orientierungswerte.
*1: Wert bei abgenommenen Füßen. 381 mm bei angebrachten Füßen.
*2: Wert bei abgenommenen Füßen. 695 mm bei angebrachten Füßen.
39
Page 41

Bedienungsanleitung
Marken und urheberrechtliche Hinweise
Weitere in dieser Anleitung erwähnte Produktnamen dienen lediglich zur Orientierung und können Marken
ihrer jeweiligen Eigentümer sein. Epson verzichtet auf jedwede Rechte an diesen Marken.
© SEIKO EPSON CORPORATION 2014. All rights reserved.
40
Page 42

Guide de l'utilisateur
Page 43

Page 44

Guide de l'utilisateur
Consignes de sécurité
Pour votre sécurité, lisez toutes les consignes du présent guide avant d'utiliser ce produit. Une manipulation
incorrecte ne respectant pas les consignes du présent guide peut endommager ce produit ou causer des
blessures corporelles ou des dégâts matériels. Conservez le présent guide d'installation à portée de main
pour consultation ultérieure.
Lisez le guide de l'utilisateur et les consignes de sécurité de votre projecteur et suivez les instructions de ces
documents.
Indications de sécurité
La documentation et ce produit utilisent des symboles graphiques qui indiquent comment utiliser cet
appareil en toute sécurité.
Les indications et leur signification sont les suivantes. Veillez à bien les comprendre avant de lire le guide.
Indication Explication
Avertisse-
ment
Attention
Ce symbole signale des informations qui, si elles sont ignorées, peuvent provoquer des blessures corporelles, voire la mort, en raison d’une manipulation incorrecte.
Ce symbole indique des informations qui, si elles sont ignorées, peuvent provoquer des blessures corporelles ou des dégâts matériels, en raison d’une manipulation incorrecte.
Explication des symboles
Symboles Explication
Indique des actions qui ne doivent pas être effectuées.
Indique des actions qui doivent être effectuées.
Attention
Indique un contenu qui peut endommager ou provoquer un dysfonctionnement de ce produit ou du projecteur.
Indique des informations en rapport ou utiles.
c
43
Page 45

Guide de l'utilisateur
Précautions de sécurité pour l'installation
Avertissement
Suivez les consignes du présent guide lors de l'installation de ce produit.
Si les consignes ne sont pas suivies, ce produit peut tomber et entraîner des blessures corporelles
ou un accident.
N'installez pas ce produit dans un endroit instable.
Assurez-vous que l'emplacement de l'installation est assez résistant pour supporter le poids du
projecteur et de ce produit.
N'utilisez pas d'adhésif, de lubrifiant, d'huile, etc. lors du serrage des vis.
En cas d’utilisation d’adhésifs sur les points d’installation des fixations pour éviter que les vis ne se
desserrent, ou en cas d’utilisation de lubrifiants ou d’huiles sur le projecteur, le projecteur risque de
se craqueler et de tomber, entraînant des blessures physiques ou des dégâts matériels.
Ce produit est uniquement destiné à la projection au format portrait ou à la projection empilée. Ne fixez pas d'autres appareils que le projecteur.
Dans le cas contraire, ce produit peut être endommagé. Si le projecteur tombe, il peut entraîner la
mort ou des blessures corporelles.
Ce produit doit être installé par au moins deux agents de service qualifiés.
Lors du desserrage des vis pendant l'installation, faites attention à ne pas faire
tomber ce produit.
Si le produit ou le projecteur tombent, ils peuvent entraîner la mort ou des blessures.
Après avoir effectué des réglages, assurez-vous de serrer toutes les vis.
Dans le cas contraire, le produit peut tomber et causer des blessures corporelles ou des dégâts
matériels.
Portez des gants antidérapants lors des déplacements et de l'installation.
Si ce produit tombe, il peut causer des blessures corporelles ou des dégâts matériels.
Ne couvrez pas la grille d'entrée d'air ni la grille de sortie d'air du projecteur.
L'obstruction de l'une des grilles peut provoquer une élévation de la température interne et un
incendie.
Attention
N'installez pas ce produit dans un emplacement soumis à des températures en
dehors de la plage de fonctionnement du projecteur.
Ceci peut entraîner des dysfonctionnements.
N 'i ns ta l l ez pas le pr oj ec t e ur d an s u n e n d ro it o ù i l pe ut êt re so u m is à d es vi br a t io ns
ou à des chocs.
Lors de la fixation du cadre avec des boulons, assurez-vous de ne pas prendre
votre main ou vos doigts entre les boulons et le châssis.
44
Page 46

Guide de l'utilisateur
Attention
N'empilez pas plus de trois projecteurs dans une configuration empilée.
Le châssis pourrait tomber et causer des blessures.
Remarques sur l'utilisation
Avertissement
Les modifications et le démontage doivent uniquement être effectués par du
personnel de service qualifié sauf si explicitement indiqués dans le guide de l'uti-
lisateur.
Dans le cas contraire, des dysfonctionnements ou des accidents peuvent se produire.
Ne vous suspendez pas à ce produit.
Ne suspendez pas non plus d'objets à ce produit hormis le projecteur.
Si le produit se casse et tombe, il peut entraîner la mort ou des blessures corporelles.
Ne montez pas et ne vous asseyez pas sur ce produit.
Dans le cas contraire, le produit pourrait être endommagé.
Vérifiez régulièrement la présence de sections endommagées ou de vis desserrées.
Si des pièces sont endommagées, arrêtez immédiatement d'utiliser le produit.
Si le produit ou le projecteur tombent, ils peuvent entraîner la mort ou des blessures.
Attention
N'appliquez pas trop de force lors du réglage de ce produit.
Dans le cas contraire, le produit peut se casser et causer des blessures.
Ne placez pas les vis ni les pieds à portée des enfants en bas âge.
Les enfants peuvent les avaler accidentellement.
Si cela se produit, contactez immédiatement un médecin.
45
Page 47

Guide de l'utilisateur
Caractéristiques du produit
Projection au format portrait
Pour les projecteurs prenant en charge la projection au format portrait, vous pouvez effectuer la projection en
portrait en plaçant un projecteur dans le châssis puis en installant le châssis verticalement.
Projection empilée
Vous pouvez fixer un projecteur à ce produit et empiler jusqu'à deux projecteurs.
•
Vous pouvez également installer des plaques d'installation de projecteur sur le châssis et placer le
c
projecteur.
•
Vous pouvez empiler deux châssis et placer un projecteur de secours sur le dessus.
•
Ce produit peut supporter un projecteur de secours pesant jusqu'à 15 kg.
46
Page 48

Guide de l'utilisateur
Contenu de l'emballage
Les pièces suivantes sont fournies avec ce produit. Assurez-vous que toutes les pièces sont fournies.
Si quelque chose manque ou si des pièces sont endommagées, contactez le magasin où vous avez acheté le
produit.
châssis supérieur (1) châssis inférieur (1) Plaques d'installation du projec-
teur (2)
Vis pour fixer les plaques d'installa-
tion du projecteur
(2)
Forme Nom
Boulon à six pans creux M6 x 30 mm
avec rondelle / rondelle élastique
Boulon à six pans creux M6 x 40 mm
Écrou hexagonal M6
Utilisez les boulons ou les vis fournis avec ce produit pour l'installer comme indiqué dans le présent guide.
Ne remplacez pas ces boulons par un autre type.
Guides d'empilage (5) Butées (4)
Nombre
4 Pour fixer le projecteur
10 Pour fixer les guides d'empilage
Utilisation
c
•
Rassemblez les outils et les pièces dont vous avez besoin avant de commencer l'installation.
•
Jetez ce produit conformément à vos lois et réglementations locales. Suivez les réglementations de
mise au rebut de votre lieu de travail si elles sont applicables.
47
Page 49

Guide de l'utilisateur
Fixation au projecteur
Attention
•
Ne retirez pas les vis des pièces qui ne sont pas spécifiées dans le présent guide.
•
Assurez-vous que les vis pour fixer le projecteur à ce produit, ainsi que les éléments en métal pour raccorder
les châssis supérieur et inférieur sont serrés.
Fixez le châssis supérieur au projecteur.
a
b
Alignez les trous des boulons du châssis supérieur avec les points d'installation de la fixation de plafond
(quatre points).
Utilisez une clé hexagonale du commerce pour serrer les boulons M6 x 30 mm (avec rondelles /
rondelles élastiques) fournis, puis fixez le châssis.
Fixez le châssis supérieur au châssis inférieur.
Alignez le châssis supérieur avec le châssis inférieur et tournez les raccords en métal (quatre points)
pour les fixer en place.
48
Page 50

c
d
Guide de l'utilisateur
Fixez les butées (quatre points).
Retirez les pieds du projecteur.
Consultez le guide de l'utilisateur fourni avec le projecteur pour de plus amples informations sur la façon
de retirer les pieds.
Attention
•
Si les pieds du projecteur restent fixés, ils peuvent gêner le châssis lors du réglage de l'angle.
•
Ne placez pas le projecteur directement sur le sol ou autre quand les pieds du projecteur sont retirés.
49
Page 51

Guide de l'utilisateur
Régler l'angle d'installation
Vous pouvez régler l'angle du projecteur à l'aide des trois molettes de réglage et des pieds.
Inclinez le projecteur ou faites-le tourner horizontalement pour régler la position de l'image projetée.
Plage réglable de la molette de réglage Plage réglable des pieds
Réglage de l'inclinaison
Réglage horizontal
Réglage vertical
Assurez-vous que l'angle d'installation est dans la plage spécifiée. Consultez le guide de l'utilisateur
fourni avec le projecteur pour de plus amples informations sur l'angle d'inclinaison.
c
50
Page 52

Guide de l'utilisateur
Régler l'angle à l'aide de la molette de réglage
Vous pouvez régler l'inclinaison (±2°) et la direction (horizontalement ±5°, verticalement ±2°) du projecteur.
a : Pour régler l'inclinaison
b : Pour régler l'angle horizontal
c : Pour régler l'angle vertical
Attention
En tournant les molettes de réglage, assurez-vous de ne pas prendre votre main ou vos
doigts entre les boutons.
a : Pour régler l'inclinaison
Régler dans le sens +
Régler dans le sens -
Tournez d'abord la molette de réglage A dans la direction + puis tournez la molette
de réglage B dans la direction + pour les fixer en place.
Tournez d'abord la molette de réglage B dans la direction - puis tournez la molette
de réglage A dans la direction - pour les fixer en place.
Après avoir fait les réglages, assurez-vous que les molettes de réglage A et B ne sont pas desserrées.
51
Page 53

Guide de l'utilisateur
b : Pour régler l'angle horizontal
Régler dans le sens +
Régler dans le sens -
Tournez d'abord la molette de réglage A dans la direction + puis tournez la molette
de réglage B dans la direction + pour les fixer en place.
Tournez d'abord la molette de réglage B dans la direction - puis tournez la molette
de réglage A dans la direction - pour les fixer en place.
Après avoir fait les réglages, assurez-vous que les molettes de réglage A et B ne sont pas desserrées.
c : Pour régler l'angle vertical
Régler dans le sens +
Tournez d'abord la molette de réglage B dans la direction + puis tournez la molette
de réglage A dans la direction + pour les fixer en place.
Régler dans le sens -
Tournez d'abord la molette de réglage A dans la direction - puis tournez la molette
de réglage B dans la direction - pour les fixer en place.
Après avoir fait les réglages, assurez-vous que les molettes de réglage A et B ne sont pas desserrées.
52
Page 54

Guide de l'utilisateur
Régler l'angle à l'aide des pieds
Si le châssis est placé sur le sol, vous pouvez régler l'angle d'installation avec les pieds.
Vous pouvez régler l'inclinaison (horizontale ±3°) et la direction (verticalement ±3°) du projecteur.
Régler l'inclinaison : Utilisez les pieds gauche et droit.
Régler l'angle horizontal : Utilisez les pieds avant et arrière.
Attention
Les pieds peuvent être fixés et retirés. Veuillez noter que les pieds se détachent s'ils sont dépliés trop loin.
53
Page 55

Guide de l'utilisateur
Projection au format portrait
Vous pouvez effectuer la projection au format portrait en plaçant le projecteur dans le châssis puis en installant
le châssis verticalement.
Consultez le guide de l'utilisateur fourni avec le projecteur pour vérifier si votre projecteur prend en
charge la projection au format portrait.
c
Retirez les pieds (quatre points) du châssis inférieur.
a
b
Fixez les pieds retirés (quatre points) sur le côté du châssis.
Des trous destinés aux vis se situent sur le côté où vous pouvez fixer les pieds. Assurez-vous de ne pas
les fixer du mauvais côté.
54
Page 56

c
Guide de l'utilisateur
Avec les pieds orientés vers le bas, tenez le châssis verticalement.
55
Page 57

Guide de l'utilisateur
Empiler deux projecteurs
Vous pouvez empiler jusqu'à deux châssis.
Avertissement
Si vous empilez deux châssis, ne les suspendez pas depuis un plafond ou autre.
Si le produit ou le projecteur tombent, ils peuvent entraîner la mort ou des blessures.
Attention
N'empilez pas plus de trois châssis pour une projection empilée.
Le châssis pourrait tomber et causer des blessures.
Fixez les guides d'empilage (cinq points) sur le châssis qui sera en bas de la pile. Utilisez
a
b
une clé hexagonale du commerce pour serrer les boulons M6 x 40 mm (avec écrous
hexagonaux) fournis afin de fixer les guides.
Utilisez deux boulons pour fixer chaque guide d'empilage.
Retirez les quatre pieds du châssis inférieur qui sera sur le dessus de la pile.
56
Page 58

c
Guide de l'utilisateur
Placez le châssis qui sera sur le dessus de la pile sur les guides d'empilage et fixez-le avec
les pieds retirés à l'étape 2.
Utilisez les pieds pour fixer les quatre points à gauche et à droite du châssis.
57
Page 59

Guide de l'utilisateur
Installation du projecteur de secours
En installant la plaque d'installation du projecteur, vous pouvez placer un projecteur de secours sur le châssis.
•
Ce produit peut supporter un projecteur de secours pesant jusqu'à 15 kg.
•
c
a
Vous pouvez empiler deux châssis et placer un projecteur de secours sur le dessus.
Alignez les trous de la plaque d'installation du projecteur avec les trous destinés aux vis du
châssis supérieur. Fixez la plaque d'installation du projecteur avec les vis fournies (deux
points).
Réglez la position de la plaque d'installation du projecteur puis placez le projecteur de
b
secours.
Alignez la position de la plaque d'installation du projecteur avec la position des pieds du projecteur
de secours puis placez le projecteur de secours.
Attention
Ne fixez pas la plaque d'installation du projecteur avec une courroie de fermeture ou autre. Dans le cas
contraire, la plaque d'installation du projecteur pourrait être déformée.
58
Page 60

Spécifications
Spécifications du projecteur
Direction d'installation Horizontalement / Verticalement
* Les projecteurs peuvent uniquement être empilés horizontalement.
Angle de réglage Inclinaison horizontale Molette de réglage : ± 2°, pieds ±3°
* Vous pouvez régler jusqu'à ±5°.
Rotation horizontale Molette de réglage : ±5°
Inclinaison verticale Molette de réglage : ± 2°, pieds ±3°
* Vous pouvez régler jusqu'à ±5°.
Capacité de charge maximale Environ 32 kg
Poids maximum pour le projecteur de secours 15 kg
Guide de l'utilisateur
Diamètre du châssis 30 mm
Dimensions extérieures 674 (L) x 363 (H) x 770 (P) mm (sans la section surélevée)
Poids du cadre Environ 17.5 kg
Dimensions extérieures
Les valeurs sont à titre indicatif uniquement.
*1: Valeur si les pieds sont retirés. 381 mm si les pieds sont fixés.
*2: Valeur si les pieds sont retirés. 695 mm si les pieds sont fixés.
59
Page 61

Guide de l'utilisateur
Marques commerciales et droits d'auteur
L e s au t r e s no m s d e p ro d u i t s u t i l i s és d a n s le p r é s e nt document sont donnés à titre d’identification uniquement
et peuvent être des marques commerciales de leurs propriétaires respectifs. Epson décline tout droit quant
à ces marques.
© SEIKO EPSON CORPORATION 2014. All rights reserved.
60
Page 62

Manuale dell'utente
Page 63

Page 64

Manuale dell'utente
Istruzioni sulla sicurezza
Per la sicurezza, leggere tutte le istruzioni contenute nella presente guida prima di utilizzare questo prodotto.
Un'errata manipolazione che ignori le istruzioni contenute nella presente guida potrebbe danneggiare il
prodotto o causare lesioni personali o danni materiali. Tenere la presente guida di installazione a portata di
mano per consultazioni future.
Leggere il Manuale dell'utente e le Istruzioni sulla sicurezza del proiettore e seguire le istruzioni riportate nei
documenti.
Indicazioni sulla sicurezza
Nella documentazione e in questo prodotto viene fatto uso di simboli grafici per segnalare le procedure di
utilizzo corretto del prodotto.
Le indicazioni e i relativi significati vengono illustrati di seguito. Assicurarsi di avere acquisito familiarità con
queste indicazioni prima di leggere la guida.
Indicazioni Descrizione
Avverten-
za
Attenzione
Questo simbolo indica informazioni per un uso corretto del prodotto, che, se ignorate, potrebbero provocare lesioni personali o il decesso dell'utente.
Questo simbolo indica informazioni per un uso corretto del prodotto, che, se ignorate, potrebbero provocare lesioni personali o danni fisici.
Descrizione dei simboli
Simboli Descrizione
Indica azioni che non devono essere eseguite.
Indica azioni che non dovrebbero essere eseguite.
Indica contenuti che potrebbero danneggiare o causare anomalie al prodotto o al proiettore.
Attenzione
Indica informazioni correlate o utili.
c
63
Page 65

Manuale dell'utente
Precauzioni di sicurezza per l'installazione
Avvertenza
Seguire le istruzioni nella presente guida durante l'installazione del prodotto.
Qualora non si seguissero le istruzioni, il prodotto potrebbe cadere provocando lesioni personali o
incidenti.
Non installare il prodotto in un luogo instabile.
Assicurarsi che il luogo di installazione sia sufficientemente resistente per sostenere il peso del
proiettore e del prodotto.
Non utilizzare sostanze adesive, lubrificanti, grassi e simili durante il fissaggio
delle viti.
Se si utilizzano nastri adesivi per prevenire l'allentamento delle viti dei Punti di fissaggio del montaggio oppure se sul proiettore si applicano sostanze quali lubrificanti o grassi, è possibile che il
telaio si crepi e che il proiettore cada, provocando lesioni personali o danni materiali.
Questo prodotto è destinato solamente per proiezione verticale o proiezione a
stack. Non collegare dispositivi diversi dal proiettore.
In caso contrario il prodotto potrebbe danneggiarsi; se il proiettore cade, potrebbe causare il decesso o lesioni personali.
Questo prodotto deve essere installato da almeno due tecnici qualificati.
Quando si allentano le viti durante l'installazione, prestare attenzione a non far
cadere il prodotto.
La caduta del prodotto o del proiettore potrebbe provocare il decesso o lesioni personali.
Dopo aver effettuato le regolazioni, assicurarsi di stringere tutte le viti.
In caso contrario, il prodotto potrebbe cadere provocando lesioni personali o danni meteriali.
Indossare guanti antiscivolo durante lo spostamento e l'installazione.
Qualora il prodotto dovesse cadere, potrebbe provocare lesioni personali o danni materiali.
Non coprire la Presa dell'aria o lo Sfiatatoio dell'aria del proiettore.
Se la presa o lo sfiatatoio vengono coperti, la temperatura interna potrebbe aumentare e causare
un incendio.
Attenzione
Non installare il prodotto in un luogo soggetto a temperature al di fuori dell'intervallo operativo del proiettore.
Ciò potrebbe comprometterne il corretto funzionamento.
Non installare il proiettore in luoghi soggetti a vibrazioni o urti.
Durante il fissaggio del telaio con i bulloni, fare attenzione che la mano o le dita
non rimangano incastrate tra i bulloni ed il telaio.
64
Page 66

Manuale dell'utente
Attenzione
Non impilare più di tre proiettori in una configurazione a stack.
Il telaio potrebbe cadere e provocare lesioni.
Note sull'utilizzo
Avvertenza
La modifica e lo smontaggio devono essere effettuati solo da personale qualificato, salvo quando espressamente indicato nel Manuale dell'utente.
In caso contrario, potrebbero verificarsi malfunzionamenti o incidenti.
Non appendersi al prodotto.
Inoltre, non appendere alcun oggetto al prodotto fatta eccezione per il proiettore.
Se il prodotto si rompe e cade, potrebbe provocare il decesso o lesioni personali.
Non salire o sedersi sul prodotto.
In caso contrario, potrebbe danneggiarsi.
Controllare periodicamente che non vi siano parti danneggiate o viti allentate.
Qualora vi siano parti danneggiate, interrompere immediatamente l'uso del prodotto.
La caduta del prodotto o del proiettore potrebbe provocare il decesso o lesioni personali.
Attenzione
Non applicare una forza eccessiva durante la regolazione del prodotto.
In caso contrario, il prodotto potrebbe rompersi e provocare lesioni.
Tenere le viti o i piedini lontani dalla portata dei bambini.
I bambini potrebbero accidentalmente ingoiarli.
Qualora ciò si verificasse, contattare immediatamente un medico.
65
Page 67

Manuale dell'utente
Caratteristiche del prodotto
Proiezione verticale
Se si desidera eseguire la proiezione verticale per i proiettori che la supportano, occorre collocarli nel telaio e
quindi installare il telaio verticalmente.
Proiezione a stack
È possibile fissare un proiettore al prodotto e sovrapporre fino a due proiettori.
•
È inoltre possibile installare delle piastre di installazione del proiettore sul telaio e collocare il proiettore.
•
c
È possibile impilare due telai e collocare un proiettore di backup nella parte superiore.
•
Questo prodotto può supportare un proiettore di backup che pesi fino a 15 kg.
66
Page 68

Manuale dell'utente
Contenuto della confezione
Le seguenti parti sono fornite in dotazione con il prodotto. Assicurarsi che tutte le parti siano contenute nella
confezione.
Qualora vi siano parti mancanti o danneggiate, contattare il proprio rivenditore.
Telaio superiore (x1) Telaio inferiore (x1) Piastre di installazione del
proiettore (x2)
Viti per fissare le piastre di installa-
zione del proiettore
(x2)
Forma Nome
Bulloni M6 x 30 mm con testa cilindrica ad
esagono incassato
con rondella/rondella elastica
Bulloni M6 x 40 mm con testa cilindrica ad
esagono incassato
Dado esagonale M6
Utilizzare i bulloni o le viti forniti con questo prodotto per installarlo come indicato nella presente guida. Non
utilizzare bulloni diversi da quelli forniti in dotazione.
Guide di impilamento (x5) Dispositivi di arresto (x4)
Numero
4 Per il montaggio del proiettore
10 Per montare le Guide di impilamen-
to
Uso
c
•
Preparare gli strumenti e le parti necessarie prima di iniziare l'installazione.
•
Sma lt ir e i l p ro do tt o i n c on fo rm it à c on le le gg i e le normative locali. Attenersi alle norme di smaltimento
del proprio posto di lavoro, se applicabili.
67
Page 69

Manuale dell'utente
Montaggio al proiettore
Attenzione
•
Non rimuovere le viti di parti che non sono state specificate nella presente guida.
•
Assicurarsi che le viti fissino il proiettore a questo prodotto e che i raccordi metallici che collegano i telai
superiori ed inferiori siano fissati.
Fissare il telaio superiore al proiettore.
a
b
Allineare i fori sul telaio superiore con i punti di fissaggio del montaggio a soffitto (quattro punti).
Utilizzare una chiave esagonale disponibile in commercio per stringere i bulloni M6 x 30 mm (con
rondelle/rondelle elastiche) forniti e quindi fissare al telaio.
Fissare il telaio superiore al telaio inferiore.
Allineare il telaio superiore con il telaio inferiore e ruotare i raccordi metallici (quattro punti) per fissarli
in posizione.
68
Page 70

c
d
Manuale dell'utente
Fissare i dispositivi di arresto (quattro punti).
Rimuovere i piedini del proiettore.
Fare riferimento al Manuale dell'utente fornito con il proiettore per le informazioni sulla rimozione dei
piedini.
Attenzione
•
Se i piedini del proiettore rimangono fissati, potrebbero interferire con il telaio durante la regolazione
dell'angolo.
•
Non collocare direttamente il proiettore sul pavimento o simili se i piedini sono stati rimossi.
69
Page 71

Manuale dell'utente
Regolazione dell'angolo di installazione
È possibile regolare l'angolazione del proiettore utilizzando le tre ghiere di regolazione ed i piedini.
Inclinare o ruotare orizzontalmente il proiettore per regolare la posizione dell'immagine proiettata.
Regolazione dell'inclinazione
Regolazione
orizzontale
Regolazione verticale
Intervallo di regolazione per la ghiera di
regolazione
Intervallo di regolazione per i piedini
Assicurarsi che l'angolo di installazione rientri nell'intervallo specificato. Fare riferimento al Manuale
dell'utente fornito con il proiettore per le informazioni sull'angolo di inclinazione.
c
70
Page 72

Manuale dell'utente
Regolazione dell'angolo tramite la ghiera di regolazione
È possibile regolare l'inclinazione (±2°) e la direzione (orizzontale ±5°, verticale ±2°) del proiettore una volta
impostato.
a: Per regolare l'inclinazione
b: Per regolare l'angolo in orizzontale
c: Per regolare l'angolo in verticale
Attenzione
Quando si ruotano le ghiere di regolazione, fare in modo che la mano o le dita non rimangano incastrate tra le ghiere.
a: Per regolare l'inclinazione
Regolare verso il lato +
Regolare verso il lato -
Ruotare in primo luogo la ghiera di regolazione A verso il + e in seguito ruotare la
ghiera di regolazione B verso il + per fissare entrambe in posizione.
Ruotare in primo luogo la ghiera di regolazione B verso il - e in seguito ruotare la
ghiera di regolazione A verso il - per fissare entrambe in posizione.
Dopo aver effettuato le regolazioni, assicurarsi che le ghiere di regolazione A e B non siano allentate.
71
Page 73

Manuale dell'utente
b: Per regolare l'angolo in orizzontale
Regolare verso il lato +
Regolare verso il lato -
Ruotare in primo luogo la ghiera di regolazione A verso il + e in seguito ruotare la
ghiera di regolazione B verso il + per fissare entrambe in posizione.
Ruotare in primo luogo la ghiera di regolazione B verso il - e in seguito ruotare la
ghiera di regolazione A verso il - per fissare entrambe in posizione.
Dopo aver effettuato le regolazioni, assicurarsi che le ghiere di regolazione A e B non siano allentate.
c: Per regolare l'angolo in verticale
Regolare verso il lato +
Ruotare in primo luogo la ghiera di regolazione B verso il + e in seguito ruotare la
ghiera di regolazione A verso il + per fissare entrambe in posizione.
Regolare verso il lato -
Ruotare in primo luogo la ghiera di regolazione A verso il - e in seguito ruotare la
ghiera di regolazione B verso il - per fissare entrambe in posizione.
Dopo aver effettuato le regolazioni, assicurarsi che le ghiere di regolazione A e B non siano allentate.
72
Page 74

Manuale dell'utente
Regolazione dell'angolo tramite i piedini
Quando il telaio è collocato sul pavimento, è possibile regolare l'angolo di installazione tramite i piedini.
È possibile regolare l'inclinazione (in orizzontale ±3°) e la direzione (in verticale ±3°) del proiettore.
Regolazione dell'inclinazione: utilizzare i piedini a destra e a sinistra.
Regolazione dell'angolo orizzontale: utilizzare i piedini anteriori e posteriori.
Attenzione
I piedini possono essere montati e rimossi. Tenere presente che i piedini si distaccheranno se vengono
estesi eccessivamente.
73
Page 75

Manuale dell'utente
Proiezione verticale
È possibile eseguire la proiezione verticale collocando il proiettore nel telaio e quindi installando il telaio in
verticale.
Fare riferimento al Manuale dell'utente in dotazione del proiettore per controllare se il proiettore
supporta la proiezione verticale.
c
Rimuovere i piedini (quattro punti) dalla parte inferiore del telaio.
a
b
Fissare i piedini rimossi (quattro punti) al lato del telaio.
Sono presenti sul lato dei fori per le viti ai quali è possibile fissare i piedini. Assicurarsi di non fissarli sul
lato sbagliato.
74
Page 76

c
Manuale dell'utente
Posizionare il telaio in verticale con i piedini rivolti verso il basso.
75
Page 77

Manuale dell'utente
Sovrapposizione di due proiettori
È possibile sovrapporre fino a due telai.
Avvertenza
Quando si sovrappongono due telai, non appenderli al soffitto ecc.
La caduta del prodotto o del proiettore potrebbe provocare il decesso o lesioni personali.
Attenzione
Non sovrapporre più di tre telai per la proiezione a stack.
Il telaio potrebbe cadere e provocare lesioni.
Fissare le guide di impilamento (cinque punti) al telaio che sarà collocato nella parte
a
b
inferiore nella configurazione a stack. Utilizzare una chiave esagonale disponibile in
commercio per stringere i bulloni M6 x 40 mm (con dadi esagonali) forniti per fissare le
guide.
Utilizzare due bulloni per fissare ciascuna guida di impilamento.
Rimuovere i quattro piedini dalla parte inferiore del telaio che verrà collocato nella parte
superiore della configurazione a stack.
76
Page 78

c
Manuale dell'utente
Collocare il telaio che sarà posizionato nella parte superiore dello stack sulle guide di
impilamento e fissarlo con i piedini rimossi nel passaggio 2.
Utilizzare i piedini per fissare i quattro punti sul lato sinistro e destro del telaio.
77
Page 79

Manuale dell'utente
Installazione del proiettore di backup
Installando la piastra di installazione del proiettore, è possibile collocare un proiettore di backup sul telaio.
•
Questo prodotto può supportare un proiettore di backup che pesi fino a 15 kg.
•
c
a
È possibile impilare due telai e collocare un proiettore di backup nella parte superiore.
Allineare i fori sulla piastra di installazione del proiettore con i fori delle viti del telaio
superiore. Fissare la piastra di installazione del proiettore con le viti in dotazione (due punti).
Regolare la posizione della piastra di installazione del proiettore e quindi collocare il
b
proiettore di backup.
Allineare la posizione della piastra di installazione del proiettore con la posizione dei piedini del
proiettore di backup e quindi collocare il proiettore di backup.
Attenzione
Non fissare la piastra di installazione del proiettore con una cinghia di fissaggio o simili. In caso contrario
la piastra di installazione del proiettore potrebbe deformarsi.
78
Page 80

Specifiche
Specifiche del proiettore
Direzione di installazione Orizzontale/verticale
* I proiettori possono essere sovrapposti solo in orizzontale.
Manuale dell'utente
Angolo di regolazione
Capacità massima di carico Circa 32 kg
Peso massimo per il proiettore di backup 15 kg
Diametro del telaio 30 mm
Dimensioni esterne 674 (L) x 363 (A) x 770 (P) mm (parti rialzate escluse)
Peso telaio Circa 17.5 kg
Inclinazione orizzontale Ghiera di regolazione: ± 2°, piedini ±3°
* È possibile regolare fino a ±5°.
Rotazione orizzontale Ghiera di regolazione: ± 5°
Inclinazione verticale Ghiera di regolazione: ± 2°, piedini ±3°
* È possibile regolare fino a ±5°.
Dimensioni esterne
I valori sono solo di riferimento.
*1: Il valore si riferisce a quando i piedini sono rimossi. 381 mm quando i piedini sono fissati.
*2: Il valore si riferisce a quando i piedini sono rimossi. 695 mm quando i piedini sono fissati.
79
Page 81

Manuale dell'utente
Marchi e copyright
Altri nomi di prodotto utilizzati nel presente documento hanno solo scopo identificativo e possono essere
marchi di fabbrica dei rispettivi proprietari. Epson rinuncia espressamente a tutti i diritti su questi marchi.
© SEIKO EPSON CORPORATION 2014. All rights reserved.
80
Page 82

Manual de usuario
Page 83

Page 84

Manual de usuario
Instrucciones de seguridad
Para su seguridad, lea todas las instrucciones de esta guía antes de usar este producto. Un manejo incorrecto
sin seguir las instrucciones de esta guía podría dañar este producto o causar daños personales o materiales.
Guarde a mano esta guía de instalación para futuras consultas.
Lea el Manual de usuario y las Instrucciones de seguridad del proyector y siga las instrucciones de estos
documentos.
Indicaciones de seguridad
La documentación y este producto utilizan símbolos gráficos para mostrar cómo utilizar este producto de
forma segura.
A continuación se muestran las indicaciones y su significado. Asegúrese de comprenderlas correctamente
antes de leer el manual.
Indicación Explicación
Adverten-
cia
Precaución
Indica una información que debe seguirse pues, si se ignora, podrían producirse lesiones
personales o incluso la muerte por una manipulación incorrecta.
Indica una información que debe seguirse pues, si se ignora, podrían producirse lesiones
personales o daños materiales por una manipulación incorrecta.
Explicación de los símbolos
Símbolos Explicación
Indica acciones que no se deben realizar.
Indica acciones que se deben realizar.
Indica contenido que podría dañar o hacer funcionar mal este producto o el proyector.
Atención
Indica información relacionada o útil
c
83
Page 85

Manual de usuario
Precauciones de seguridad para la instalación
Advertencia
Siga las instrucciones de esta guía para instalar este producto.
Si no sigue las instrucciones, este producto puede caerse y provocar daños personales o accidentes.
No instale este producto en una ubicación inestable.
Asegúrese de que la ubicación de instalación es lo suficientemente resistente como para soportar
el peso del proyector y de este producto.
No utilice adhesivos, lubricantes, aceite y productos similares cuando fije los tornillos.
Si usa adhesivos en los puntos de fijación del soporte para evitar que los tornillos se aflojen, o
productos como lubricantes o aceites en el proyector, la carcasa de este se podría romper y provocar
la caída del proyector, lo que puede originar lesiones personales o daños materiales.
Este producto está pensado solamente para proyección vertical o proyección
apilada. No acople ningún dispositivo que no sea el proyector.
De lo contrario, este producto puede resultar dañado; si el proyector se cae, podría causar lesiones
personales o, incluso, la muerte.
Este producto debe ser instalado por, al menos, dos personas cualificadas de
servicio técnico.
Cuando afloje los tornillos durante la instalación, tenga cuidado para que este
producto no se caiga.
Si este producto o el proyector se cae, podría causar la muerte o lesiones personales.
Después de realizar los ajustes, asegúrese de apretar todos los tornillos.
De lo contrario, el producto podrían caerse, provocando daños personales o materiales.
Utilice guantes antideslizantes cuando mueva e instale el producto.
Si este producto se cae, podría causar lesiones personales o daños materiales.
No tape la ventilación de entrada de aire o la ventilación de salida de aire.
Si cualquiera de las ventilaciones se tapa, la temperatura interna podría aumentar y provocar un
incendio.
Precaución
No instale este producto en una ubicación sujeta a temperaturas que se encuentren fuera del intervalo de funcionamiento del proyector.
Si no sigue esta recomendación, se podría producir un mal funcionamiento.
No instale el proyector en una ubicación que pueda estar sujeta a vibraciones o
impactos.
Cuando fije el armazón con tornillos, asegúrese de que sus manos y dedos no
quedan atrapados entre dicho armazón y tornillos.
84
Page 86

Manual de usuario
Precaución
No apile más de tres proyectores en una configuración apilada.
El armazón podría caerse y provocar lesiones.
Notas sobre el uso
Advertencia
La modificación y desensamblaje solamente deben ser realizados por personal
cualificado de servicio técnico, excepto cuando se indique explícitamente en el
Manual de usuario.
De lo contrario, se pueden producir averías o accidentes.
No se cuelgue de este producto.
Asimismo, no cuelgue ningún objeto en este producto excepto el proyector.
Si este producto se rompe y se cae, podría causar la muerte o lesiones personales.
No se apoye o siente en este producto.
De lo contrario, el producto podría resultar dañado.
Compruebe periódicamente que no hay secciones dañadas o tornillos aflojados.
Si hay piezas dañadas, deje de utilizar el producto de manera inmediata.
Si este producto o el proyector se cae, podría causar la muerte o lesiones personales.
Precaución
No aplique demasiada fuerza al ajustar este producto.
De lo contrario, el producto podría romperse y causar lesiones personales.
No coloque tornillos o pies al alcance de los niños.
Los niños podrían tragárselos por accidente.
Si se da tal situación, póngase en contacto con un médico inmediatamente.
85
Page 87

Manual de usuario
Características del producto
Proyección vertical
En el caso de proyectores que admiten la proyección vertical, puede llevar a cabo dicha proyección colocando
un proyector en el armazón y, a continuación, instalando dicho armazón verticalmente.
Proyección apilada
Puede fijar un proyector a este producto y apilar hasta dos proyectores.
•
También puede instalar placas de instalación del proyector en el armazón y colocar el proyector.
•
c
Puede apilar dos armazones y colocar un proyector de reserva encima.
•
Este producto admite un proyector de reserva con un peso de hasta 15 kg.
86
Page 88

Manual de usuario
Contenido del paquete
Con este producto se incluyen las piezas siguientes. Asegúrese de que se incluyen todas las piezas.
Si alguna de ellas falta o hay piezas dañadas, póngase en contacto con la tienda donde adquirió el producto.
Armazón superior (x1) Armazón inferior (x1) Placas de instalación del proyec-
tor (x2)
Tornillos para fijar las placas de ins-
talación del proyector
(x2)
Forma Nombre
Tornillo de cabeza Allen M6 x 30 mm
con arandela/arandela de presión
Tornillo de cabeza Allen M6 x 40 mm
Tuerca hexagonal M6
Utilice los tornillos que se entregan con este producto para instalarlo, tal y como se indica en este manual.
No sustituya estos tornillos por otros.
Guías de apilamiento (x5) Topes (x4)
Número
4 Para acoplar el proyector
10 Para acoplar las guías de apilamien-
to
Uso
c
•
Antes de comenzar la instalación, asegúrese de tener todas las piezas y herramientas.
•
Deseche este producto de acuerdo con las leyes y reglamentos locales. Si se aplican, siga las normativas
de desecho de su zona.
87
Page 89

Manual de usuario
Acoplar el proyector
Atención
•
No quite los tornillos de las piezas que no se especifican en este manual.
•
Asegúrese de que los tornillos fijan el proyector a este producto y que los accesorios metálicos para unir los
armazones superior e inferior son seguros.
Acople el armazón superior al proyector.
a
b
Alinee los orificios de los tornillos del marco superior con los puntos de fijación del soporte para techo
(cuatro puntos).
Utilice una llave Allen que puede adquirir en cualquier tienda especializada para apretar los tornillos
M6 x 30 mm (con arandelas/arandelas de presión) suministrados y, a continuación, fije el armazón.
Acople el armazón superior al armazón inferior.
Alinee el armazón superior con el armazón inferior y gire los accesorios metálicos (cuatro puntos) para
fijarlos en su lugar.
88
Page 90

c
d
Manual de usuario
Acople los topes (cuatro puntos).
Quite los pies del proyector.
Consulte el Manual de usuario suministrado con el proyector para obtener información sobre cómo
quitarlos.
Atención
•
Si los pies del proyector están acoplados a la izquierda, podrían interferir con el soporte a la hora de
ajustar el ángulo.
•
No coloque el proyector directamente en el suelo mientras quita los pies de aquel.
89
Page 91

Manual de usuario
Ajustar el ángulo de instalación
Puede ajustar el ángulo del proyector utilizando tres diales de ajuste y los pies.
Incline el proyector o gire horizontalmente para ajustar la posición de la imagen proyectada.
Intervalo ajustable para el dial de ajuste Intervalo ajustable para los pies
Ajuste de la inclinación
Ajuste horizontal
Ajuste vertical
Asegúrese de que el ángulo de instalación se encuentra dentro del intervalo especificado. Consulte
el Manual de usuario suministrado con el proyector para obtener información sobre el ángulo de
c
inclinación.
90
Page 92

Manual de usuario
Ajustar el ángulo utilizando el dial de ajuste
Puede ajustar la inclinación (±2°) y la dirección (horizontalmente ±5°, verticalmente ±2°) del proyector
establecido.
a: Para ajustar la inclinación
b: Para ajustar el ángulo horizontal
c: Para ajustar el ángulo vertical
Precaución
Cuando gire los diales de ajuste, asegúrese de que su mano o dedos no se queden atrapados
entre dichos diales.
a: Para ajustar la inclinación
Ajustar hacia el lado +
Ajustar hacia el lado -
Gire el dial de ajuste A en la dirección + primero y, a continuación, gire el dial de
ajuste B en la dirección + para fijarlos en su lugar.
Gire el dial de ajuste B e n l a di r ec ci ó n - prim e ro y , a co n ti nu a ci ó n, gi r e e l di a l d e aj us t e
A en la dirección - para fijarlos en su lugar.
Después de realizar los ajustes, asegúrese de que los diales de ajuste A y B no están sueltos.
91
Page 93

Manual de usuario
b: Para ajustar el ángulo horizontal
Ajustar hacia el lado +
Ajustar hacia el lado -
Gire el dial de ajuste A en la dirección + primero y, a continuación, gire el dial de
ajuste B en la dirección + para fijarlos en su lugar.
Gire el dial de ajuste B en la dirección - primero y, a continuación, gire el dial de ajuste
A en la dirección - para fijarlos en su lugar.
Después de realizar los ajustes, asegúrese de que los diales de ajuste A y B no están sueltos.
c: Para ajustar el ángulo vertical
Ajustar hacia el lado +
Gire el dial de ajuste B en la dirección + primero y, a continuación, gire el dial de ajuste
A en la dirección + para fijarlos en su lugar.
Ajustar hacia el lado -
G ir e el d ia l de aj u st e A en l a d i re cc i ón - pr im e ro y, a c on tinu a ci ón, g i re e l d ia l de ajus t e
B en la dirección - para fijarlos en su lugar.
Después de realizar los ajustes, asegúrese de que los diales de ajuste A y B no están sueltos.
92
Page 94

Manual de usuario
Ajustar el ángulo utilizando los pies
Cuando el armazón esté colocado en el suelo, podrá ajustar el ángulo de instalación con los pies.
Puede ajustar la inclinación (horizontal ±3°) y la dirección (verticalmente ±3°) del proyector.
Ajustar la inclinación: use los pies izquierdo y derecho.
Ajustar el ángulo horizontal: use los pies delantero y trasero.
Atención
Los pies se pueden acoplar y quitar. Tenga en cuenta que los pies se desmontarán si se extienden
demasiado.
93
Page 95

Manual de usuario
Proyección vertical
Puede realizar la proyección vertical colocando el proyector en el armazón y, a continuación, instalando este
en posición vertical.
Consulte el Manual de usuario proporcionado con el proyector para comprobar si este admite la
proyección vertical.
c
Quite los pies (cuatro puntos) del armazón inferior.
a
b
Acople los pies quitados (cuatro puntos) en el lateral del armazón.
Hay tres orificios para tornillos en el lateral en los que puede acoplar los pies. Asegúrese de no acoplarlos
en el lateral erróneo.
94
Page 96

c
Manual de usuario
Con los pies hacia abajo, mantenga el armazón verticalmente.
95
Page 97

Manual de usuario
Apilar dos proyectores
Puede apilar hasta dos armazones.
Advertencia
Cuando acople dos armazones, no los suspenda del techo.
Si este producto o el proyector se cae, podría causar la muerte o lesiones personales.
Precaución
No apile más de tres armazones para proyección apilada.
El armazón podría caerse y provocar lesiones.
Acople las guías de apilamiento (cinco puntos) al armazón que se situará en la parte inferior
a
del apilamiento. Utilice una llave Allen que puede adquirir en cualquier tienda especializada
para apretar los tornillos M6 x 40 mm (con tuercas hexagonales) suministrados y, a
continuación, fije las guías.
Utilice dos tornillos para fijar cada guía de apilamiento.
Quite los cuatro pies del armazón inferior que estará en la parte superior del apilamiento.
b
96
Page 98

c
Manual de usuario
Coloque el armazón que estará en la parte superior del apilamiento en las guías de
apilamiento y fíjelo con los pies quitados en el paso 2.
Utilice los pies para fijar los cuatro puntos en el lado izquierdo y derecho del armazón.
97
Page 99

Manual de usuario
Instalar el proyector de reserva
Si coloca la placa de instalación del proyector, puede ubicar un proyector de reserva en el armazón.
•
Este producto admite un proyector de reserva con un peso de hasta 15 kg.
•
c
a
Puede apilar dos armazones y colocar un proyector de reserva encima.
Alinee los orificios de la placa de instalación del proyector con los orificios para tornillos
del marco superior. Fije la placa de instalación del proyector con los tornillos suministrados
(dos puntos).
Ajuste la posición de la placa de instalación del proyector y, a continuación, coloque el
b
proyector de reserva.
Alinee la posición de la placa de instalación del proyector con la posición de los pies del proyector de
reserva y, a continuación, coloque este.
Atención
No fije la placa de instalación del proyector con un cinturón de sujeción o similar. Si nos sigue esta
recomendación la placa de instalación del proyector se deformará.
98
Page 100

Especificaciones
Especificaciones del proyector
Dirección de instalación Horizontalmente/Verticalmente
* Los proyectores solamente se pueden apilar horizontalmente.
Ajuste del ángu-loInclinación horizontal Dial de ajuste: ± 2°, pies ±3°
* Puede ajustar hasta ±5°.
Giro horizontal Dial de ajuste: ±5°
Inclinación vertical Dial de ajuste: ± 2°, pies ±3°
* Puede ajustar hasta ±5°.
Capacidad máxima de carga Aprox. 32 kg
Peso máximo para el proyector de reserva 15 kg
Manual de usuario
Diámetro del armazón 30 mm
Dimensiones externas 674 (AN) x 363 (AL) x 770 (FO) mm (sin la sección en relieve)
Peso del cuadro Aprox. 17.5 kg
Dimensiones externas
Los valores son solamente para referencia.
*1: Valor cuando los pies están quitados. 381 mm cuando los pies están acoplados.
*2: Valor cuando los pies están quitados. 695 mm cuando los pies están acoplados.
99
 Loading...