

Page 1

EPSON® ELPDC02
High Resolution Document Imager
User’s Guide
Page 2

Important Safety Information
WARNING: Never open any cover on the document camera. Dangerous electrical voltages inside the document
camera can severely injure you. Do not attempt to service this product yourself. Refer all servicing to qualified
service personnel.
WARNING: The document camera and its accessories come packaged in plastic bags. Keep plastic bags away from
small children to avoid any risk of suffocation.
Caution
: Never attempt to replace the lamps. Refer all lamp servicing to qualified service personnel.
Copyright Notice
All rights reserved. No part of this publication may be reproduced, stored in a retrieval system, or transmitted in
any form or by any means, electronic, mechanical, photocopying, recording, or otherwise, without the prior
written permission of SEIKO EPSON CORPORATION. The information contained herein is designed only for
use with this EPSON product. EPSON is not responsible for any use of this information as applied to other
products.
Neither SEIKO EPSON CORPORATION nor its affiliates shall be liable to the purchaser of this product or third
parties for damages, losses, costs, or expenses incurred by purchaser or third parties as a result of: accident, misuse,
or abuse of this product or unauthorized modifications, repairs, or alterations to this product, or (excluding the
U.S.) failure to strictly comply with SEIKO EPSON CORPORATION’s operating and maintenance instructions.
SEIKO EPSON CORPORATION shall not be liable for any damages or problems arising from the use of any
options or any consumable products other than those designated as Original EPSON Products or EPSON
Approved Products by SEIKO EPSON CORPORATION.
EPSON is a registered trademark of SEIKO EPSON CORPORATION.
PrivateLine and Presenters Club are registered trademarks of Epson America, Inc.
General Notice: Other product names used herein are for identification purposes only and may be trademarks of
their respective owners. EPSON disclaims any and all rights in those marks.
Copyright © 2001 by Epson America, Inc. 5/01
CPD-12274
Printed on recycled paper.
ii
Page 3

Contents
C
1
Welcome
Getting the Most from Your Document Camera . . . . . . . . . . 2
Using Your Documentation . . . . . . . . . . . . . . . . . . . . . . . . . . 2
Getting More Information . . . . . . . . . . . . . . . . . . . . . . . . 3
Registration . . . . . . . . . . . . . . . . . . . . . . . . . . . . . . . . . . . . . . 3
Setting Up the Document Camera
Unpacking the Document Camera . . . . . . . . . . . . . . . . . . . . . 6
Installing Batteries in the Remote Control . . . . . . . . . . . . . . . 7
Unfolding the Document Camera . . . . . . . . . . . . . . . . . . . . . 8
Positioning the Document Camera. . . . . . . . . . . . . . . . . . . . 10
Connecting to a Projector or Monitor . . . . . . . . . . . . . . . . . 11
Connecting the RGB Video Cable. . . . . . . . . . . . . . . . . 11
Connecting the S-Video Cable. . . . . . . . . . . . . . . . . . . . 12
Connecting the RCA Cable . . . . . . . . . . . . . . . . . . . . . . 12
Adjusting the Camera Head Switches . . . . . . . . . . . . . . . . . . 13
Connecting to a Computer. . . . . . . . . . . . . . . . . . . . . . . . . . 14
Connecting the RGB Video Cable. . . . . . . . . . . . . . . . . 14
. . . . . . . . . . . . . . . . . . . . . . . . . . . . . . . . . . . . . . 1
. . . . . . . . . . . 5
2
Using the Document Camera
Turning On Your Equipment. . . . . . . . . . . . . . . . . . . . . . . . 16
Turning On the Document Camera . . . . . . . . . . . . . . . 16
What To Do If You See a Blank Screen . . . . . . . . . . . . . 18
Switching Between Picture Sources. . . . . . . . . . . . . . . . . . . . 18
Adjusting the Lighting . . . . . . . . . . . . . . . . . . . . . . . . . . . . . 19
. . . . . . . . . . . . . . . 15
iii
Page 4

Adjusting the Image . . . . . . . . . . . . . . . . . . . . . . . . . . . . . . . 20
Zooming and Focusing Your Image. . . . . . . . . . . . . . . . 20
Adjusting the Image Position and Size . . . . . . . . . . . . . . 21
Adjusting the Brightness . . . . . . . . . . . . . . . . . . . . . . . . 22
Using the Camera Head as a Conventional
Video Camera . . . . . . . . . . . . . . . . . . . . . . . . . . . . . 22
Turning Off and Storing the Document Camera . . . . . . . . . 23
3
4
5
Maintaining and Transporting the
Document Camera
Cleaning the Lenses . . . . . . . . . . . . . . . . . . . . . . . . . . . . . . . 26
Cleaning the Document Camera Case . . . . . . . . . . . . . . . . . 27
Transporting the Document Camera . . . . . . . . . . . . . . . . . . 28
Solving Problems
Solving Problems with the Image . . . . . . . . . . . . . . . . . . . . . 30
Switching Between NTSC and PAL. . . . . . . . . . . . . . . . 31
Solving Problems with the Remote Control . . . . . . . . . . . . . 32
Where to Get Help. . . . . . . . . . . . . . . . . . . . . . . . . . . . . . . . 32
Telephone Support Services . . . . . . . . . . . . . . . . . . . . . . 33
Technical Specifications
General. . . . . . . . . . . . . . . . . . . . . . . . . . . . . . . . . . . . . . . . . 35
Lighting . . . . . . . . . . . . . . . . . . . . . . . . . . . . . . . . . . . . . . . . 35
Remote Control . . . . . . . . . . . . . . . . . . . . . . . . . . . . . . . . . . 36
Dimensions . . . . . . . . . . . . . . . . . . . . . . . . . . . . . . . . . . . . . 36
Electrical . . . . . . . . . . . . . . . . . . . . . . . . . . . . . . . . . . . . . . . 36
Environmental . . . . . . . . . . . . . . . . . . . . . . . . . . . . . . . . . . . 36
Safety . . . . . . . . . . . . . . . . . . . . . . . . . . . . . . . . . . . . . . . . . . 37
Compatible Video Formats . . . . . . . . . . . . . . . . . . . . . . . . . 37
. . . . . . . . . . . . . . . . . . . . . . . . . . 25
. . . . . . . . . . . . . . . . . . . . . . . . . . . . 29
. . . . . . . . . . . . . . . . . . . . . 35
iv
Page 5

6
Notices
Important Safety Instructions . . . . . . . . . . . . . . . . . . . . . . . . 39
Remote Control Information . . . . . . . . . . . . . . . . . . . . . . . . 42
Declaration of Conformity . . . . . . . . . . . . . . . . . . . . . . . . . . 43
FCC Compliance Statement. . . . . . . . . . . . . . . . . . . . . . . . . 44
Warranty . . . . . . . . . . . . . . . . . . . . . . . . . . . . . . . . . . . . . . . 45
. . . . . . . . . . . . . . . . . . . . . . . . . . . . . . . . . . . . . . . 39
Index
. . . . . . . . . . . . . . . . . . . . . . . . . . . . . . . . . . . . . . . . . 47
v
Page 6

vi
Page 7

Welcome
W
The EPSON
high resolution document camera that can be connected to all types of
projectors and display devices. From boardrooms to auditoriums, you
can show fine detail in a large variety of presentation materials.
The document camera’s upper lamps provide ample lighting for
printed material and 3-D objects, while its base lamps offer
illumination for overhead transparencies and film negatives.
Your document camera captures images at a resolution of
1024 × 768 pixels with a maximum shooting area of 13.8 × 10.2 in.
(350 × 260 mm). With its 10× zoom capability and true XGA
resolution, even 10 point type can be read clearly. And the document
camera’s support for S-Video and composite video provides additional
versatility.
You can connect the document camera to a wide range of computers,
including IBM
Power Macintosh
PowerBook
high-end workstations such as the Sun
computers can be connected simultaneously.
®
computers, many iMac™ and iBook™ series systems, and
®
ELPDC02 High Resolution Document Imager is a
®
compatible PCs and laptops, Apple® Macintosh,®
™
series (including G3 and G4 systems),
®
SPARCstation.™ Up to two
Welcome 1
Page 8

Getting the Most from Your Document Camera
Depending on your presentation, you can take advantage of any or all
of these options:
■
Connecting to a projector or monitor
The document camera requires an output device, such as a
projector or monitor, to display its image. To connect the
document camera to these devices, see page 11.
■
Connecting to a laptop or other computer
You can connect up to two other video output sources, such as a
laptop and desktop computer. This is especially useful if your
projector has only one video input port. See page 14 for more
information.
■
Using the remote control
The remote control lets you control the lamps, zoom and focus
your image, and switch the display from the camera to a
computer. See Chapter 2 for details.
2 Welcome
Using Your Documentation
This book contains all the information you need to set up and use
your document camera. Please follow these guidelines as you read
through it:
■
Warnings must be followed carefully to avoid bodily injury.
■
Cautions must be observed to avoid damage to your equipment.
■
Notes contain important information about your document
camera.
Page 9

Getting More Information
Need tips on giving presentations? More information about your
document camera? Here’s where you can look for help:
■
http://www.presentersonline.com
Includes a library of articles covering presentation tips, tricks, and
technology. The site provides templates, clip art, and sound clips,
as well as Presenters Services to use on the road. Even more
resources and services are available if you register to join the
Presenters Club
■
http://support.epson.com
Download FAQs and e-mail your questions to EPSON support.
If you still need help after checking this User’s Guide and the sources
listed above, you can use the EPSON PrivateLine
get help fast. Call (800) 637-7661 and enter the PIN on the card
included with your document camera. Or take advantage of EPSON’s
electronic support services 24 hours a day. See page 32 for more
information.
®
—and it’s free.
®
Support service to
Registration
To register, simply fill out and return the enclosed registration card.
Welcome 3
Page 10

4 Welcome
Page 11

Setting Up the
1
Document Camera
This chapter tells you how to set up the document camera for a video
presentation.
You’ll find instructions for the following in this chapter:
Unpacking the document camera
■
Installing batteries in the remote control
■
Unfolding the document camera
■
Positioning the document camera
■
Connecting to a projector or monitor
■
Adjusting the camera head switches
■
Connecting to a computer
■
Setting Up the Document Camera 5
Page 12
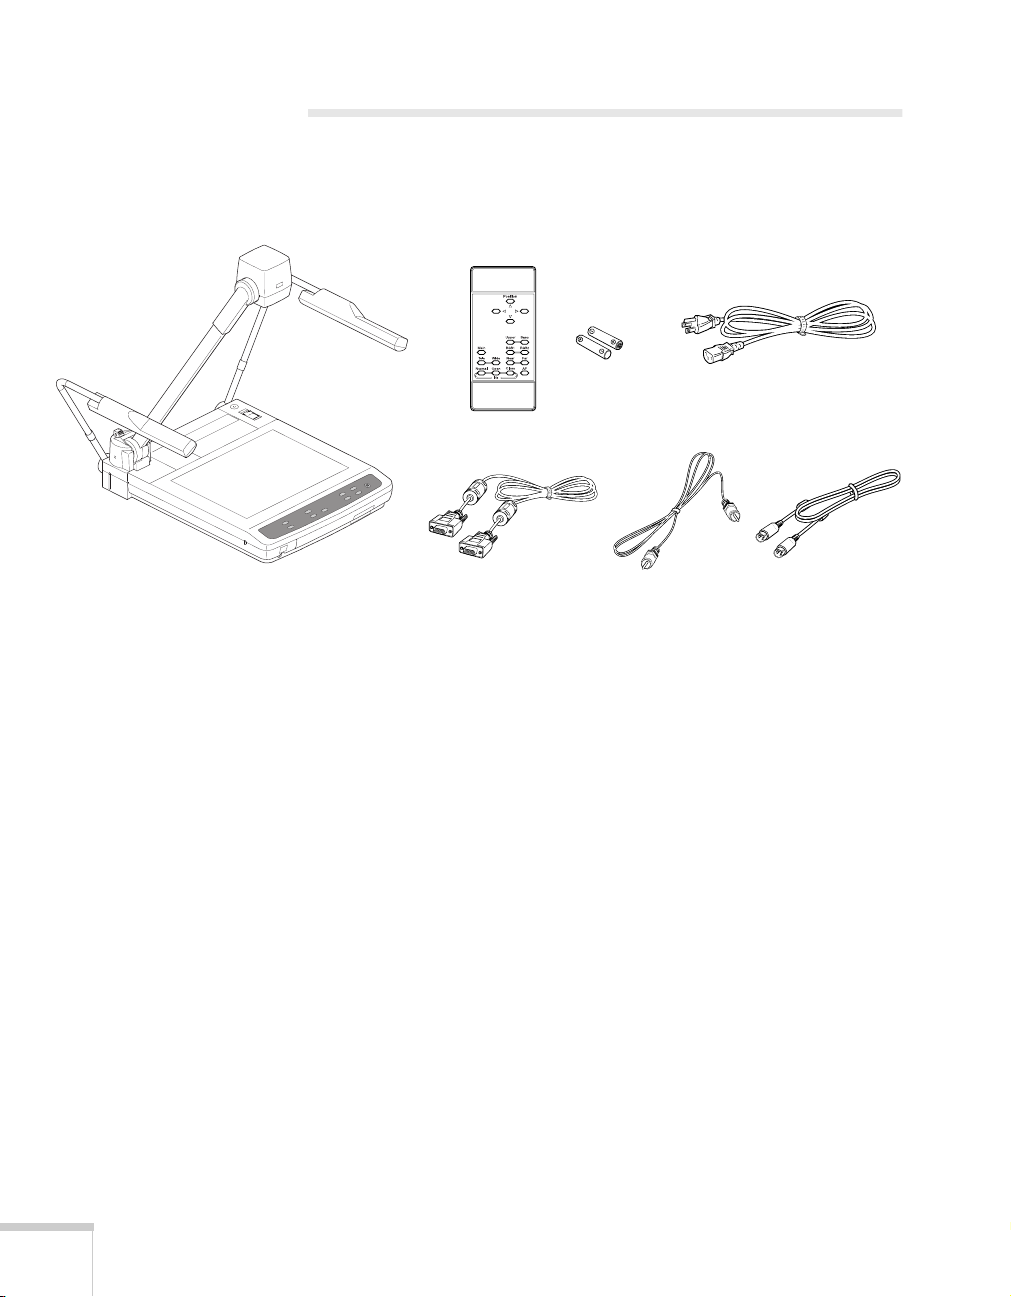
Unpacking the Document Camera
After unpacking the document camera, make sure you have all the
items shown below:
document camera
batteries
remote control
RCA cableRGB video cable S-Video cable
power cord
Save all packaging in case you need to ship the document camera.
Always use the original packaging (or the equivalent) when you need
to send the document camera to another location. For transportation
instructions, see page 28.
6 Setting Up the Document Camera
Page 13
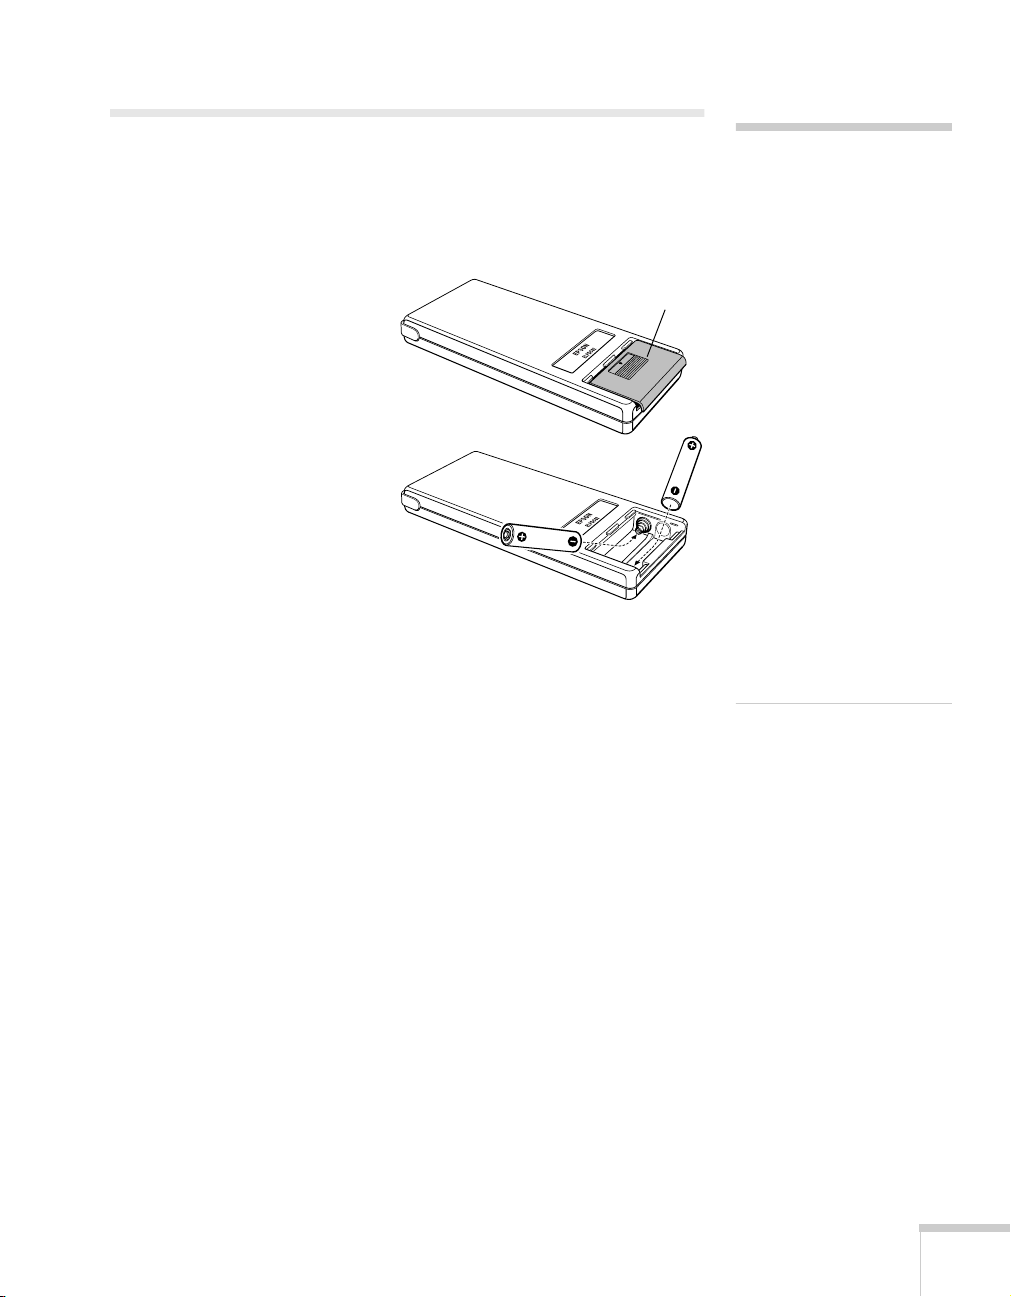
Installing Batteries in the Remote Control
Before using the remote control, you need to install its batteries as
described below.
1. Press down on the ridged
area and remove the battery
compartment cover.
2. Insert two AAA batteries as
shown.
3. Replace the battery
compartment cover.
ridged
area
caution
When replacing batteries,
take the following
precautions:
■
Don’t mix old and new
batteries.
■
Replace batteries as soon as
they run out. If the
batteries leak, wipe away
battery fluid with a soft
cloth. If fluid gets on your
hands, wash them
immediately.
■
Don’t expose batteries to
heat or flame.
■
Dispose of used batteries
according to local
regulations.
■
Remove batteries if you
won’t be using the
document camera for a
long period of time.
Setting Up the Document Camera 7
Page 14

Unfolding the Document Camera
Follow the steps below to unfold the document camera.
1. Unfold the first lighting unit arm (1) and then the second (2) as
shown until they stop.
2
1
8 Setting Up the Document Camera
Page 15
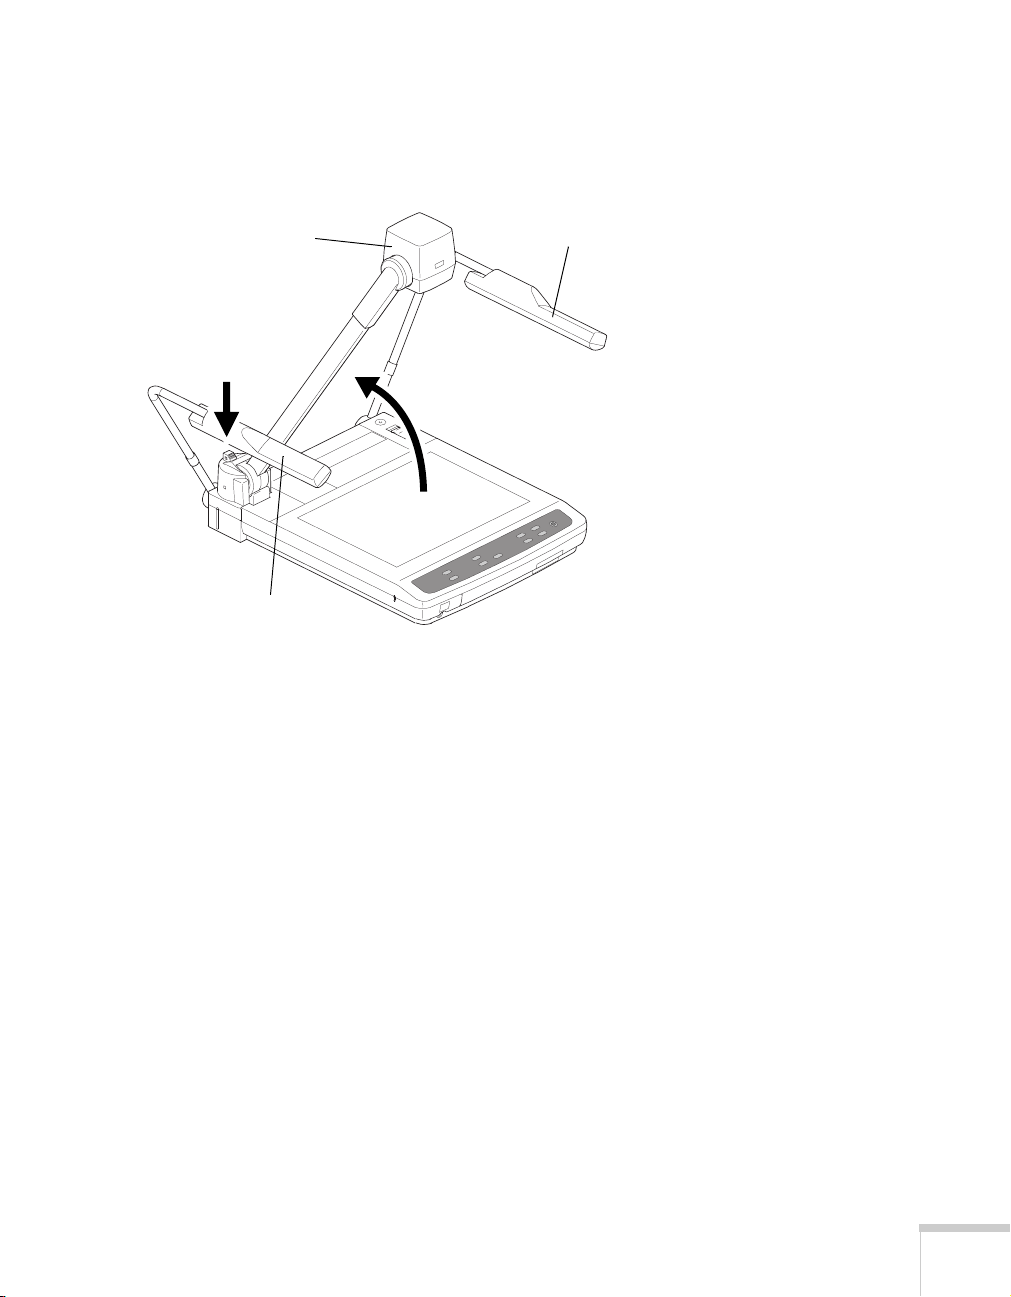
2. Press the camera arm lock release button (3) and raise the camera
arm (4) until the button returns to its original position and you
hear a click. Make sure the camera arm is securely locked.
camera head
lighting unit
3
4
lighting unit
3. Rotate the camera head so that the lens faces the stage
(downward).
4. Rotate the lighting units so that the lamps face the stage.
Setting Up the Document Camera 9
Page 16

caution
Don’t hold or lift the
document camera by the
camera head or lighting unit
arms, or you may damage
them.
Positioning the Document Camera
Before connecting the document camera, you need to decide where to
place it. Wherever you place it, be sure to follow these guidelines:
■
Place the document camera on a sturdy, level surface.
■
Make sure there is plenty of space for ventilation around and
under the document camera.
■
Make sure the document camera is within 10 feet (3 m) of a
grounded electrical outlet or extension cord, and within 5 feet
(1.5 m) of your output source.
■
Make sure you are within 23 feet (7 m) of the front or back of the
document camera to use the remote control.
■
With the control panel facing you, place the document camera
directly in front of you. Otherwise, items you place on the stage
may appear upside-down.
Most presenters find it convenient to place the document camera in
front of the audience. This lets the presenter stand in the front of the
room, face the audience, and remain close enough to the equipment to
be able to control it.
10 Setting Up the Document Camera
stage
control panel
Page 17
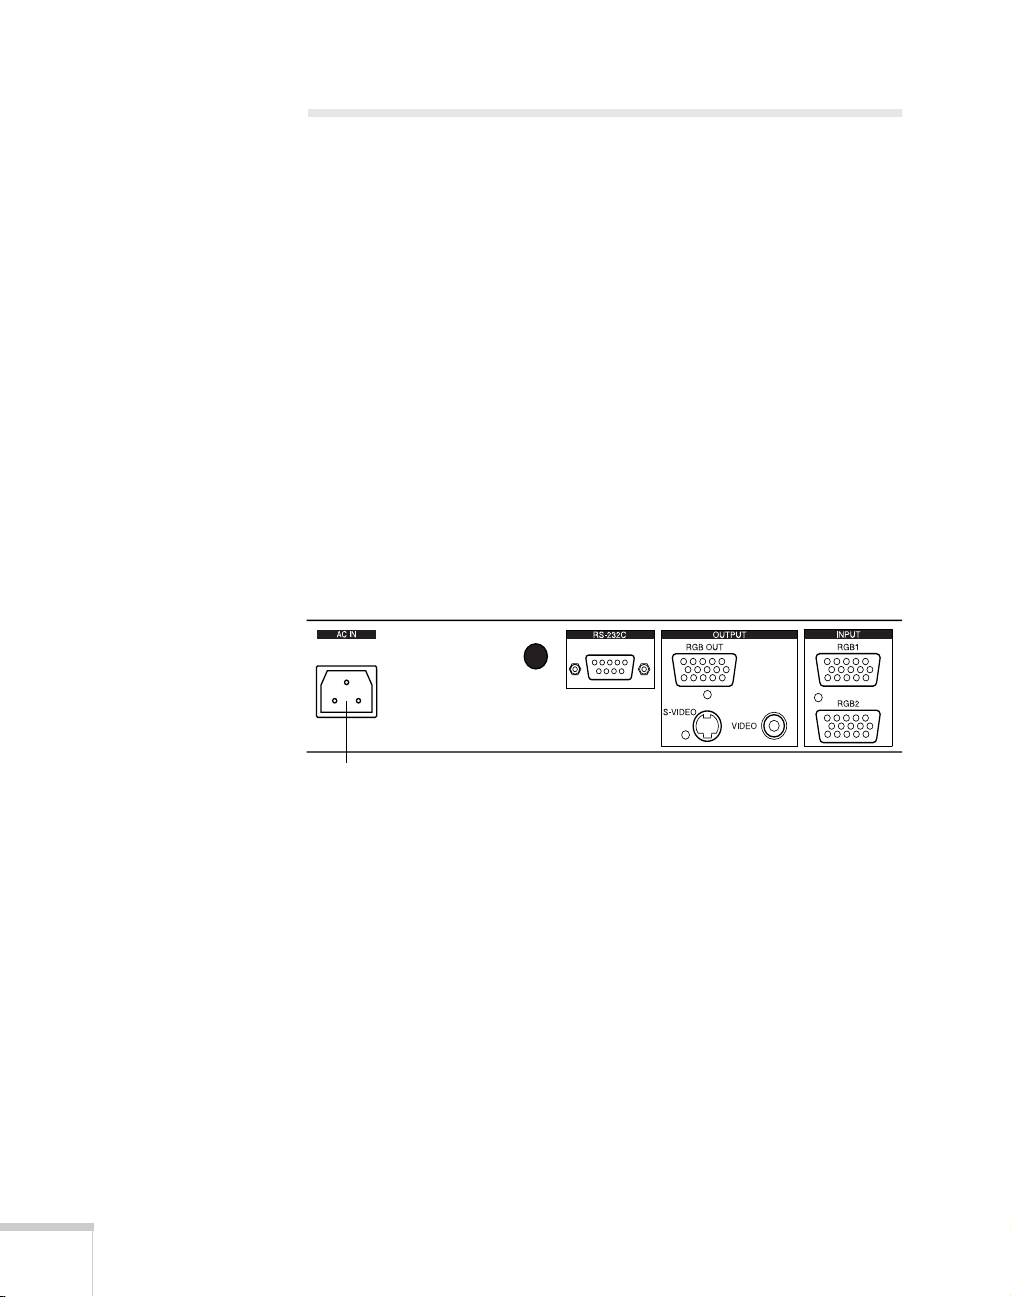
Connecting to a Projector or Monitor
You can connect the document camera to any projector or monitor
that has a standard RGB video, composite video, or S-Video input
port. EPSON projectors support all three connections. Most
computer monitors support only RGB video, while many television
monitors support S-Video and composite video.
RGB video provides the highest quality, with true XGA resolution.
S-Video offers the next best quality, followed by composite video.
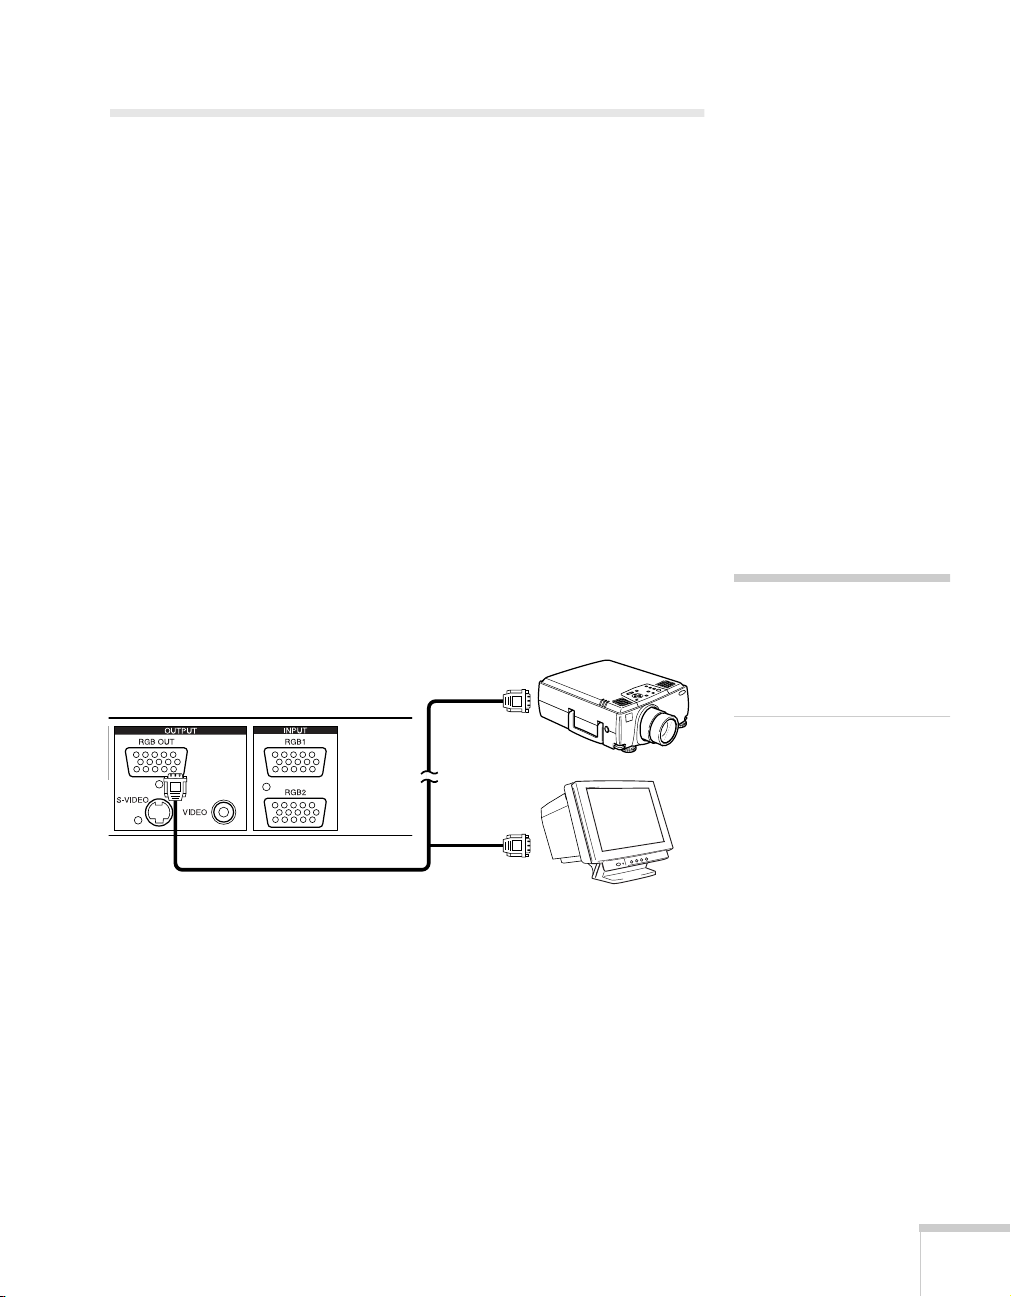
Connecting the RGB Video Cable
Before you start, make sure your document camera and projector or
monitor are turned off.
1. Connect one end of the RGB video cable to the document
camera’s
RGB OUT
port.
2. Connect the other end of the RGB video cable to RGB video
input port on the projector or monitor.
or
3. Tighten the screws on the connectors.
note
The RGB video input port on
the projector or monitor may
be labeled computer,
component video, or video in.
Setting Up the Document Camera 11
Page 18

Connecting the S-Video Cable
Before you start, make sure your document camera and projector or
monitor are turned off.
1. Connect one end of the S-Video cable to the document camera’s
S-VIDEO
port.
2. Connect the other end of the S-Video cable to the S-Video input
port on the projector or monitor.
or
Connecting the RCA Cable
Before you start, make sure your document camera and projector or
monitor are turned off.
1. Connect one end of the RCA cable to the document camera’s
VIDEO
2. Connect the other end of the RCA cable to the RCA input port
on the projector or monitor.
12 Setting Up the Document Camera
port.
or
Page 19

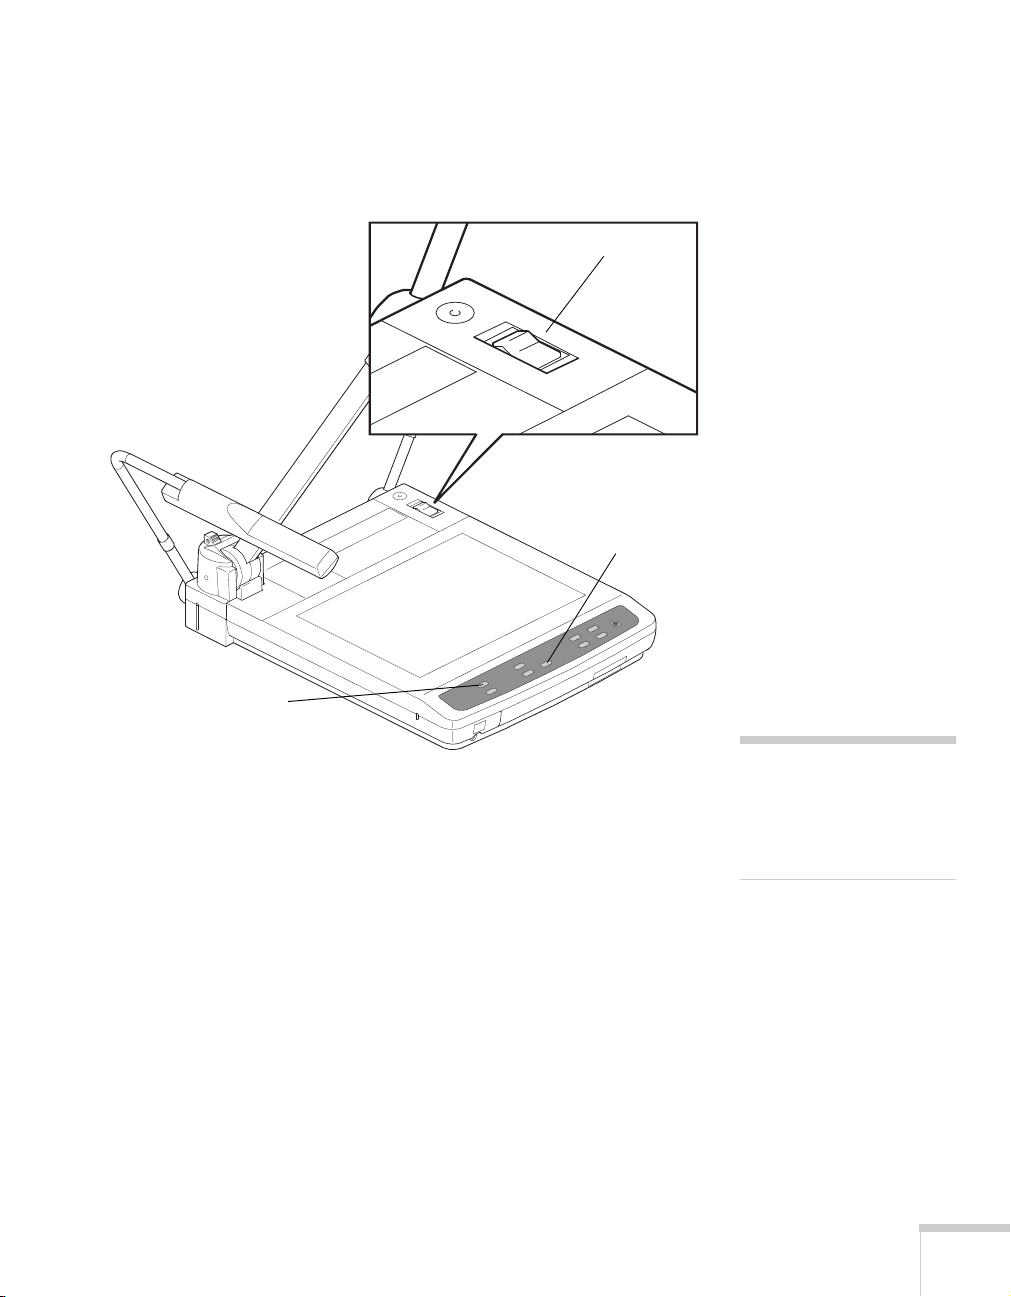
Adjusting the Camera Head Switches
The gamma selection switch adjusts the output color to match the
device connected to the
connected to a projector or
The frequency selection switch is factory set to 60 Hz. In an area
where power frequency is 50 Hz, set the switch to
flickering.
RGB OUT
ON
when connected to a monitor.
port. Set the switch to
50
to reduce
OFF
when
gamma
selection
switch
frequency
selection
switch
Setting Up the Document Camera 13
Page 20

Connecting to a Computer
In addition to using the stage for your presentation material, you can
connect up to two devices that have RGB video output ports, such as a
laptop and desktop computer.
This is especially useful if your projector has only one input port. You
can connect the computers to the document camera’s RGB input
ports as described below, and connect the document camera to the
projector’s input port as shown on page 11. This way, you can use the
camera’s control panel or remote control to switch easily between
picture sources. Follow the instructions on page 18 to switch between
the sources.
Connecting the RGB Video Cable
Before you start, make sure your document camera and computers are
turned off.
1. Connect one end of the RGB video cable to the document
camera’s
2. Connect the other end of the RGB video cable to your computer’s
RGB video output (monitor) port.
RGB1
or
RGB2
port.
3. Tighten the screws on the connectors.
Repeat the steps to connect a second computer.
14 Setting Up the Document Camera
Page 21

Using the
2
Document Camera
Once you have set up the document camera, you’re ready to turn it
on, adjust the image, and give your presentation. This chapter covers
the following:
Turning on the document camera and other equipment
■
Switching between picture sources
■
Adjusting the lighting
■
Adjusting the image position and size
■
Using the camera head as a conventional video camera
■
Turning off and storing the document camera
■
Using the Document Camera 15
Page 22
Turning On Your Equipment
Make sure your document camera and other equipment are set up and
connected correctly, as described in Chapter 1. Always turn on your
projector or monitor first. Then turn on your document camera, as
described below, followed by any other equipment you’ve connected
to it.
You can turn on your computer and video equipment in any order. If
you have both a computer and video source connected, you may have
to switch to the desired source to see its image as described on
page 18.
Turning On the Document Camera
Follow these steps to plug in and turn on the document camera:
1. Connect one end of the power cord to the document camera’s
power inlet.
f
power
inlet
2. Connect the other end to a grounded electrical outlet.
3. Turn on the projector or monitor.
16 Using the Document Camera
Page 23
4. Turn on the document camera.
After a few moments, the
Main
and
Upper
control panel and the upper lamps turn on.
Upper
indicator light
indicator lights on the
power switch
Main
indicator light
5. Place your presentation material on the stage. You should see an
image on screen.
Once you see your image, turn to page 19 for instructions on making
adjustments.
If your image doesn’t appear, see the next section for help.
When you’re done with your presentation, turn off the document
camera as described on page 23.
Using the Document Camera 17
note
If you turn off the document
camera, always wait a few
seconds before turning it
back on.
Page 24
What To Do If You See a Blank Screen
If an image doesn’t appear, try the following:
■
Make sure the cables are connected correctly, as described on
page 11 for a projector or monitor or page 14 for a computer.
■
Make sure everything is turned on.
Remote control
■
Make sure the
Main
and
Upper
lights on the control panel and
the upper lamps are on.
■
If you are using a video source, such as a laptop or desktop
computer, you may need to switch video sources. See the next
section for instructions.
■
If an image still doesn’t appear, refer to Chapter 4 for more help.
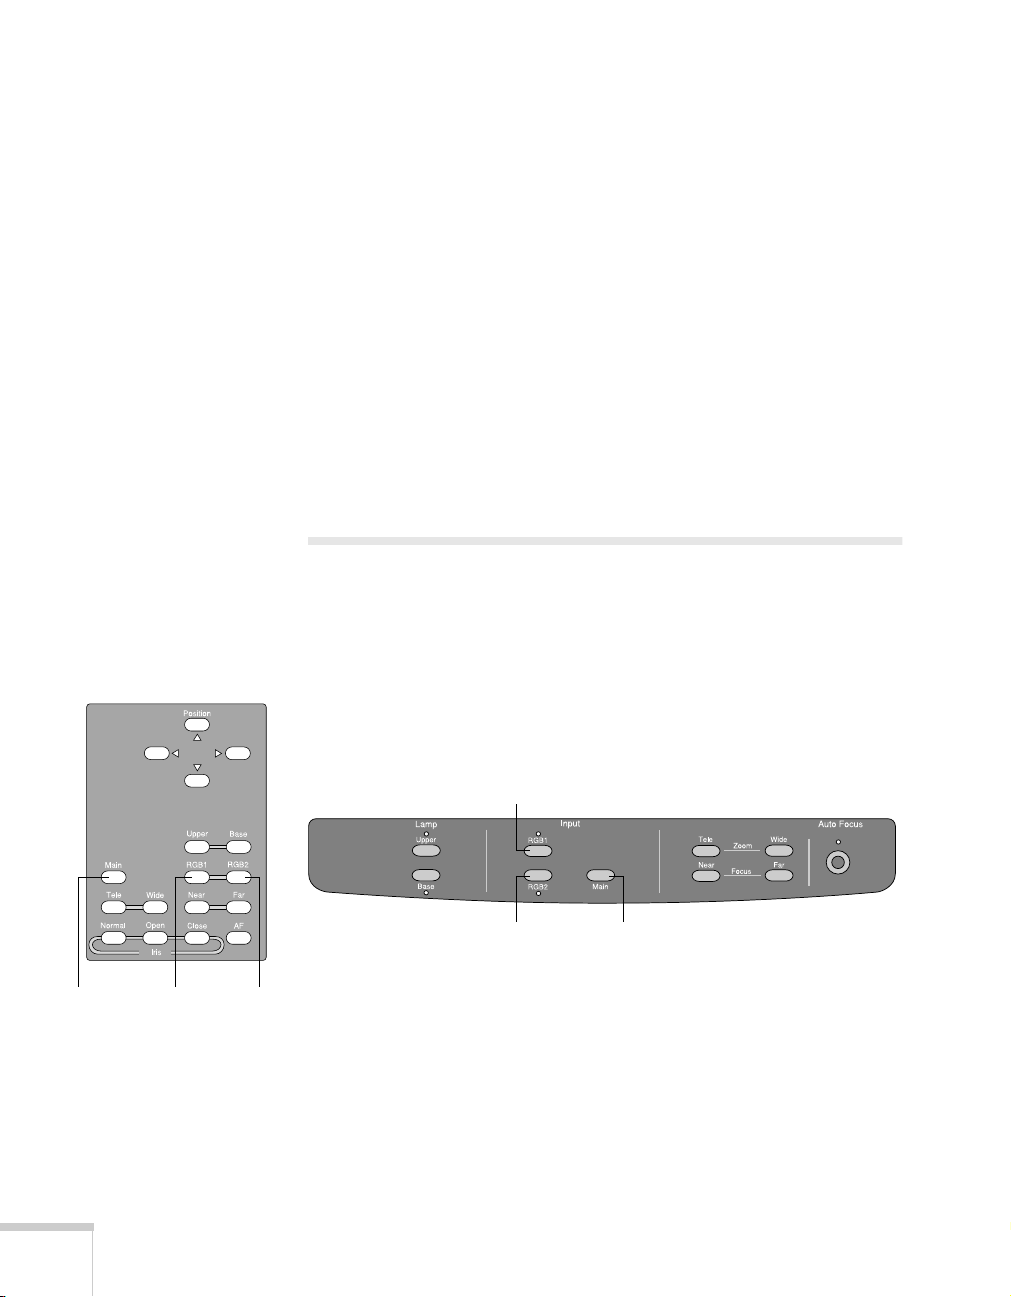
Switching Between Picture Sources
If you have external video sources connected to the document camera,
such as a laptop or desktop computer, you can switch between them
and the camera. Press the
or remote control to switch to the desired video source. Press the
Main
button to switch back to the camera.
RGB1
RGB1
Control panel
or
RGB2
button on the control panel
Main RGB1 RGB2
18 Using the Document Camera
RGB2
Main
Page 25
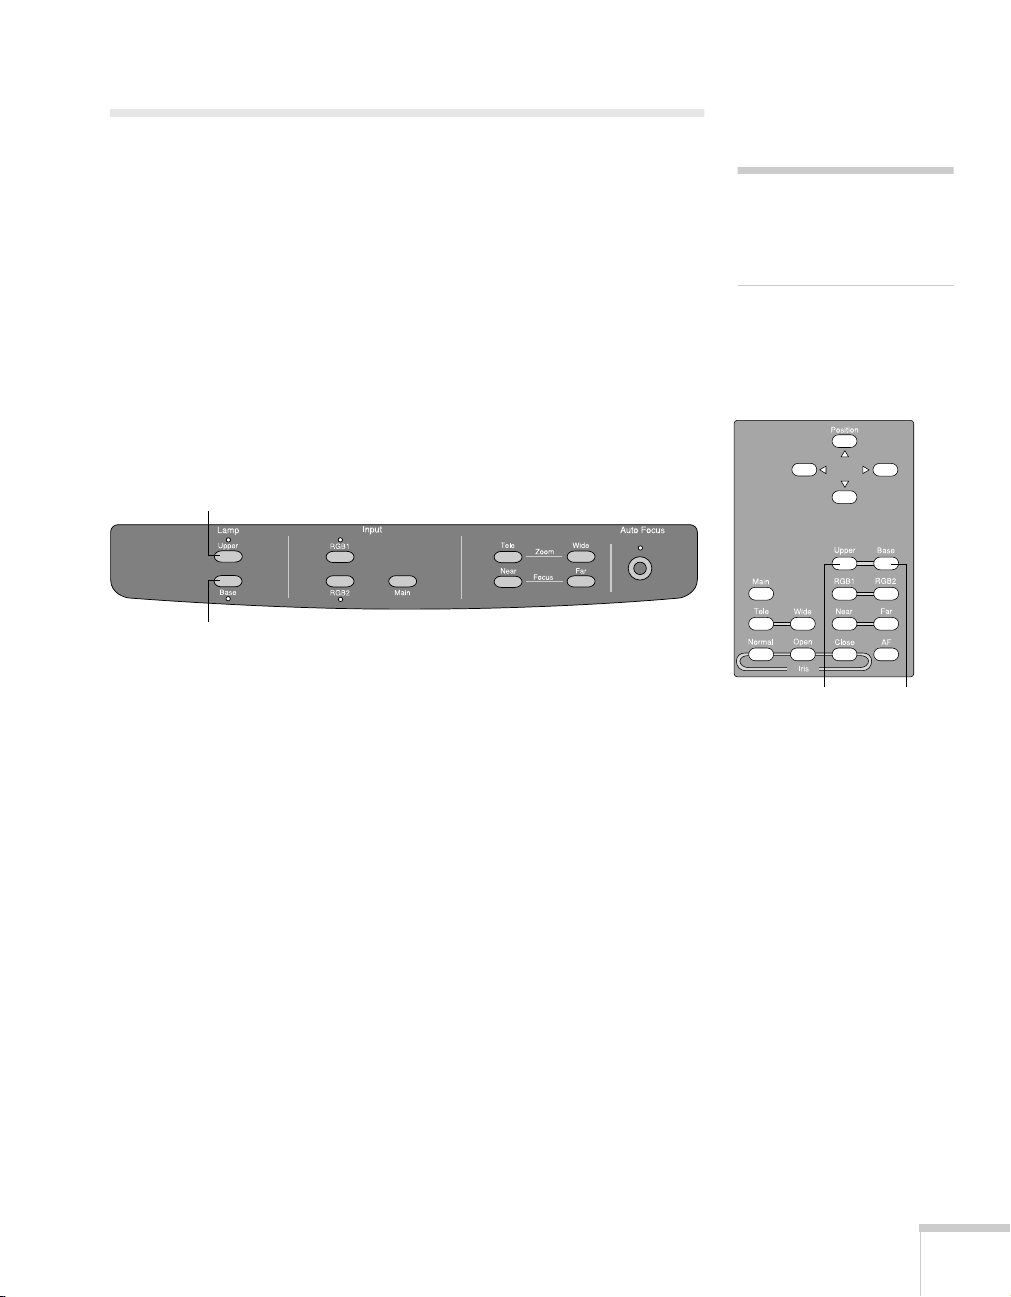
Adjusting the Lighting
If you are presenting printed material or 3-D objects, the two upper
lamps will provide ample light. If the ambient lighting in the room is
sufficient, however, you may obtain a better image with the upper
lamps off. Press the
Upper
button on the control panel or remote
control to turn off the lamps. Press it again to turn the lamps back on.
If you are presenting transparent material, such as an overhead
transparency, x-ray, slide, blueprint, or negative, you need to use the
base lamp. Press the
Base
button on the control panel or remote
control to turn on the base lamp. The upper lamps will turn off
automatically.
Upper
Base
Control panel
note
You can’t have the upper and
base lamps turned on
simultaneously.
Remote control
Upper Base
Using the Document Camera 19
Page 26

Adjusting the Image
Once you see your image, you may need to make certain adjustments:
■
To zoom or focus your image, see the next section.
■
If the image is too high or too low, you can reposition it. If the
image is too large or too small, you can resize it. See page 21.
■
If the image is too light or dark, see page 22.
Zooming and Focusing Your Image
note
The auto focus function
works up to a height of
approximately 3.9 in.
(10 cm) above the stage
.
surface
Remote control
Use the
the image, and use the
Tele
button on the control panel or remote control to enlarge
Wide
button to reduce it. The document
camera will automatically focus the image.
If you change items on the stage, press the
Auto Focus
button to
focus the image. The indicator light flashes until the image is focused.
The following objects may not focus well using the auto focus feature:
■
Objects with little contrast
■
Objects with a bright background or excessive contrast
■
Objects with fine repeated patterns or stripes
■
Objects that glitter or reflect bright light
■
Objects with varying depths of field
To manually focus these objects, use the
Control panel WideTele
Far
Near
or
Far
button.
Auto FocusFarNear
Tele Wide Near
20 Using the Document Camera
Auto
Focus
Page 27

Adjusting the Image Position and Size
w
If you are displaying a
Remote control
computer image using the
Video
S-Video
or
output
port, you can adjust its
position and size.
To adjust the image
position, use the
Position
arrow buttons on the remote
control.
To adjust the image size,
press and hold the
Main
button on the control panel.
Then use the right and/or down
Position
arrow buttons on the
remote control to enlarge the image. Use the up and/or left
arrow buttons to reduce the image.
Control panel
Position arro
buttons
Position
note
You can’t adjust the position
or size of an image captured
with the overhead camera or
an image output through the
RGB video output port.
Main
The document camera will remember the position and size. If the
signal frequency of the
RGB1
or
RGB2
port changes, however, you
may need to readjust the position.
Using the Document Camera 21
Page 28

Adjusting the Brightness
note
The camera shoots at
15 frames per second.
The document camera is initially set to
Remote control
auto iris. When using the camera, you can
manually adjust the iris to control the
amount of light that reaches the lens.
If the screen looks dark, press the
Open
button to open the iris so that more light
reaches the lens. If the screen looks too
light, press the
Close
button. To return to
the default setting of auto iris, press the
Normal
button.
Normal Open Close
Using the Camera Head as a Conventional Video Camera
By adjusting the camera head to a horizontal position, you can use the
document camera like a conventional video camera. To view walls or
distant objects, flip down the close-up lens. The document camera can
resolve images from 3.6 feet (1.1 m) to
∞
(infinity).
camera head in
horizontal position
22 Using the Document Camera
close-up
lens
Page 29

Turning Off and Storing the Document Camera
When you’ve finished using the document camera, follow these steps
to turn off and store it. If you’re using a monitor or projector, shut it
down last.
1. Turn off the document camera.
2. Unplug the power cord and disconnect any attached video cables.
3. If the close-up lens is flipped down, close it.
4. Place the remote control inside the remote control storage
compartment and close the tray.
remote control
storage
compartment
Using the Document Camera 23
Page 30

caution
Be careful not to let the
camera arm drop, or you may
damage it.
5. Hold the camera arm and press the camera arm release button (1).
Then fold down the camera arm (2).
1
2
6. Fold down the first lighting unit arm (3) and then the second (4).
Store the camera as shown.
24 Using the Document Camera
4
3
Page 31

3
y
warning
Before you clean any part of
the document camera, turn it
off and unplug the power
cord. Never open any cover
on the document camera.
Dangerous electrical voltages
in the document camera can
injure you severely. Don’t try
to service this product
ourself. Refer all servicing to
qualified service personnel.
Maintaining and
Transporting the
Document Camera
Your document camera needs little maintenance. All you need to do
on a regular basis is keep the lenses and stage clean. Any dirt or smears
on the lenses or stage may show up on your presented image.
You should not replace the lamps or any other parts. If any part needs
replacing, contact your dealer or a qualified servicer.
This chapter covers the following:
Cleaning the lenses
■
Cleaning the document camera case
■
Transporting the document camera
■
Maintaining and Transporting the Document Camera 25
Page 32

Cleaning the Lenses
Clean the lenses whenever you notice dirt or dust on the surface.
■
Use a canister of compressed air to remove dust.
■
To remove dirt or smears on the lenses, use lens-cleaning paper. If
necessary, moisten a soft cloth with lens cleaner and gently wipe
the lens surface.
■
Clean both sides of the close-up lens.
main lens
close-up lens
26 Maintaining and Transporting the Document Camera
Page 33
Cleaning the Document Camera Case
Before you clean the case, first turn off the document camera and
unplug the power cord.
■
To remove dirt or dust, wipe the case with a soft, dry, lint-free
cloth.
■
To remove stubborn dirt or stains, moisten a soft cloth with water
and a neutral detergent. Then wipe the case.
■
Do not use wax, alcohol, benzene, thinner, or other chemical
detergents. These can damage the case.
■
Take special care when cleaning the stage, or you may scratch it.
Scratches on the stage may appear on your image.
stage
Maintaining and Transporting the Document Camera 27
Page 34

Transporting the Document Camera
f
note
EPSON shall not be liable
or any damages incurred
during transportation.
The document camera contains many glass and precision parts. If you
need to transport it, follow these packing guidelines to prevent
damage to the document camera:
■
Make sure to turn off and fold the document camera as described
on page 23.
■
When shipping the document camera for repairs, use the original
packaging material if possible. If you do not have the original
packaging, use equivalent materials, placing plenty of cushioning
around the document camera.
■
When transporting the document camera a long distance, pack it
in a firm box, using cushioning around the document camera.
■
When you are hand-carrying the document camera, be sure to use
the carrying handle.
■
When transporting the document camera, you may leave the
remote control inside the remote control storage compartment.
carrying handle
28 Maintaining and Transporting the Document Camera
remote control
storage
compartment
Page 35

Solving Problems
4
This chapter helps you solve problems with your document camera,
and tells you how to contact technical support for problems you can’t
solve yourself. This chapter explains the following:
Solving problems with the image
■
Solving problems with the remote control
■
Contacting technical support
■
Solving Problems 29
Page 36

Solving Problems with the Image
No image appears on the screen.
■
Check that all cables are properly connected (see Chapter 1) and
everything is turned on.
■
Make sure the projector or computer is not in sleep mode. Check
the projector documentation, or try pressing a key on the
computer keyboard.
■
The document camera may have been turned on too quickly after
it was turned off. Turn the document camera off, wait a few
seconds, and then turn it on again.
■
The wrong source may be selected. Try pressing the
or
RGB2
button.
■
The document camera may need to have its NTSC or PAL setting
Main, RGB1
changed. See page 31 for instructions.
The image contains static or noise.
■
If you’re using cables that are longer than 6 feet (2 m), or an
extension cable, the image quality may be reduced.
■
Keep your projector, computer, and video cables away from the
power cord as much as possible to prevent interference.
■
The camera head switches may be set incorrectly. Try adjusting
the switches as described on page 13.
The image is blurry.
■
There may be dirt on the lenses. Clean the lenses as described on
page 26.
■
Try pressing the
■
Some objects do not auto focus well (see page 20). Manually focus
these objects using the
Auto Focus
Near
button.
Far
and
buttons.
,
30 Solving Problems
■
The presentation material may be too close to the lens. Make sure
the close-up lens is closed.
Page 37

■
The presentation material may be too far from the lens. Flip down
the close-up lens.
■
Make sure there is no condensation on the lenses. You may need
to wait before using the document camera after moving it from a
cold environment to a warm environment.
Switching Between NTSC and PAL
For video output, the document camera is set at the factory to NTSC
mode. Follow the steps below to switch to PAL mode.
Before you start, make sure your document camera is plugged in.
1. Make sure the document camera is turned off.
Main
2. Press and hold the
control panel.
button on the document camera’s
Control panel
Main
3. Turn on the document camera.
4. Release the
Main
button.
The document camera will remain in PAL mode, even after turning it
off. To switch back to NTSC mode, repeat the same steps.
Solving Problems 31
Page 38

Solving Problems with the Remote Control
■
Make sure you are within 23 feet (7 m) of the document camera,
and within range of the document camera’s front or back sensor
(approximately 30° to the left or right and 15° above or below).
■
The remote control batteries may not be installed correctly or may
be low on power. Try changing the batteries as described on
page 7.
■
Dim the room lights and turn off any fluorescents. Make sure the
document camera is not in direct sunlight. Strong lighting,
especially fluorescent lights, may affect the document camera’s
infrared receivers.
■
Turn off any nearby equipment that emits infrared energy, such
as a radiant room heater.
Where to Get Help
EPSON provides technical assistance through electronic support
services 24 hours a day, as listed in the following table.
Electronic support services
Service Access
World Wide Web From the internet, you can reach EPSON’s product support at
http://support.epson.com. After selecting your product, you can access
troubleshooting information, download product documentation, and receive
technical advice through e-mail.
Presenters Online Access tips, templates, and training for developing successful presentations at
http://www.presentersonline.com.
32 Solving Problems
Page 39

Telephone Support Services
To use the EPSON PrivateLine Support service, call (800) 637-7661
and enter the PIN on the EPSON PrivateLine Support card included
with your document camera. This is the fastest way of speaking to a
live representative, and it’s free. This service is available 6
Pacific Time, Monday through Friday, for the duration of your
warranty period.
You may also speak with an EPSON document camera support
specialist by dialing one of these numbers:
■
U.S.: (562) 276-4394, 6AM to 6PM, Pacific Time, Monday
through Friday
■
Canada: (905) 709-3839, 6AM to 6PM, Pacific Time, Monday
through Friday
Toll or long distance charges may apply.
Before you call, please have the following information ready:
■
Product name (EPSON ELPDC02 High Resolution Document
Imager)
■
Product serial number (located on the rear panel of the document
camera)
to 6PM,
AM
■
Computer configuration, if applicable
■
Description of the problem
Solving Problems 33
Page 40

34 Solving Problems
Page 41

Technical Specifications
5
General
CCD 1/3 inch (848,676 progressive square pixels)
Resolution 1024 × 768 pixels
Lens F=2.8, f=5.8 to 58 mm
Frame speed 15 frames per second
Shooting area 13.8 × 10.2 in. (350 × 260 mm) max.
Limit of focus
adjustment 3.9 in. (100 mm) from the stage surface
Zoom 10× optical with double speed function
Focus Automatic/manual
Iris Automatic/manual
1.5 × 1.1 in. (38 × 28 mm) min.
using the close-up lens
∞
3.6 feet (1.1 m) to
positioned horizontally and without using
the close-up lens
with the camera
White balance Automatic
γ
Gamma selection ON (
Frequency selection 50 or 60 Hz
Video output NTSC or PAL
Lighting
Upper lamps 3 wavelength fluorescent, 6 W × 2
Base lamps 3 wavelength fluorescent, 6 W × 2
=0.6), OFF (γ=1.0)
Technical Specifications 35
Page 42

Remote Control
Range 23 feet (7 m)
Batteries Alkaline AAA (2)
Dimensions
Weight 22.1 lb (10 kg)
Folded (h × w × d) 6.6 × 15.7 × 26.0 in.
(168 × 400 × 660 mm)
Unfolded (h × w × d) 24.6 × 27.6 × 21.3 in.
(625 × 700 × 542 mm)
Electrical
Rated frequency 50/60 Hz
Power supply 100 to 120 VAC
200 to 240 VAC
Power consumption 100 to 120 VAC: 43 W
200 to 240 VAC: 0.3 A
36 Technical Specifications
Environmental
Temperature Operating: 41 to 104 °F (5 to 40 °C)
Storage: 14 to 140 °F (–10 to 60 °C)
Humidity Operating: 30 to 85% RH,
non-condensing
Storage: 20 to 90% RH,
non-condensing
Page 43

Safety
United States FCC 47CFR Part 15B
UL1492
Canada ICES-003
CSA C22.2 No.1-94 (cUL)
CE Marking Directive 89/336/EEC
EN 55022, EN 55024
Directive 73/23/EEC
EN 60950
Compatible Video Formats
The document camera supports NTSC and PAL video standards, as
well as the monitor display formats listed below.
Mode Refresh Rate (Hz) Resolution
VGA1 85.08 640 × 350
400
VGA2 85.08 640
VGA3 85.039 720
×
400
×
VGA—60 59.94 640 × 480
480
VGA—72 72.809 640
VGA—75 75 640
VGA—85 85.008 640 × 480
SVGA—56 56.25 800
SVGA—60 60.317 800
SVGA—72 72.188 800 × 600
SVGA—75 75 800
SVGA—85 85.061 800
XGA—60 60.004 1024 × 768
XGA—70 70.069 1024
XGA—75 75.029 1024
XGA—85 84.997 1024 × 768
×
480
×
600
×
600
×
600
×
600
×
×
×
768
768
Technical Specifications 37
Page 44

Mode Refresh Rate (Hz) Resolution
SXGA1 75 1152 × 864
SXGA2 60 1280 × 960
960
SXGA3 85.002 1280
SXGA—60 60.02 1280
×
1024
×
SXGA—75 75.025 1280 × 1024
1024
SXGA—85 85.024 1280
UXGA—60 60 1600
×
1200
×
UXGA—65 65 1600 × 1200
1200
UXGA—70 70 1600
UXGA—75 75 1600
×
1200
×
UXGA—85 85 1600 × 1200
480
MAC 13 66.667 640
MAC 16 74.55 832
×
×
624
MAC 19 74.927 1024 × 768
870
MAC 21 75.062 1152
×
38 Technical Specifications
PC98 56.42 640
×
400
Page 45

Notices
6
T
his chapter includes safety instructions and other important information
about your EPSON document camera.
Important Safety Instructions
Follow these safety instructions when setting up and using the document
camera:
Read Instructions – All the safety and operating instructions should be
■
read before the appliance is operated.
Retain Instructions – The safety and operating instructions should be
■
retained for future reference.
Heed Warnings – All warnings on the product appliance and in the
■
operating instructions should be adhered to.
Follow Instructions – All operating and use instructions should be
■
followed.
Cleaning – Unplug this product from the wall outlet before cleaning.
■
Do not use liquid cleaners or aerosol cleaners. Use a damp cloth for
cleaning.
Attachments – Do not use attachments not recommended by the
■
product manufacturer as they may cause hazards.
Water and Moisture – Do not use this product near water—for example,
■
near a bath tub, wash bowl, kitchen sink, or laundry tub, in a wet
basement, or near a swimming pool, and the like.
Accessories – Do not place this product on an unstable cart, stand,
■
tripod, bracket, or table. The product may fall, causing serious injury to
a child or adult, and serious damage to the product. Use only with a cart,
stand, tripod, bracket, or table recommended by the manufacturer, or
sold with the product. Any mounting of the product should follow the
manufacturer’s instructions, and should use a mounting accessory
recommended by the manufacturer.
Notices 39
Page 46

Ventilation – Slots and openings in the cabinet are provided for
■
ventilation and to ensure reliable operation of the product and to protect
it from overheating, and these openings must not be blocked or covered.
The openings should never be blocked by placing the product on a bed,
sofa, rug, or other similar surface. This product should not be placed in a
built-in installation such as a bookcase or rack unless proper ventilation
is provided or the manufacturer’s instructions have been adhered to.
Place the document camera near a wall outlet where the plug can be
■
easily unplugged.
■
Placez l’appareil près d’une prise de courant où la fiche peut être débranchée
facilement.
Power Sources – This product should be operated only from the type of
■
power source indicated on the marking label. If you are not sure of the
type of power supply to your home consult your appliance dealer or local
power company. For products intended to operate from battery power,
or other sources, refer to the operating instructions.
Grounding or Polarization – This product may be equipped with either
■
a polarized 2-wire AC line plug (a plug having one blade wider than the
other) or a 3-wire grounding type plug (a plug having a third grounding
pin). The 2-wire polarized plug will fit into the power outlet only one
way. This is a safety feature. If you are unable to insert the plug fully into
the outlet, try reversing the plug. If the plug still fails to fit, contact your
electrician to replace your obsolete outlet. Do not defeat the safety
purpose of the polarized plug. The 3-wire grounding type plug will fit
into a grounding type power outlet. This is a safety feature. If you are
unable to insert the plug into the outlet, contact your electrician to
replace your obsolete outlet. Do not defeat the safety purpose of the
grounding type plug.
Power-Cord Protection – Power-supply cords should be routed so that
■
they are not likely to be walked on or pinched by items placed upon or
against them, paying particular attention to cords at plugs, convenience
receptacles, and the point where they exit from the product.
Lightning – For added protection for this product during a lightning
■
storm, or when it is left unattended and unused for long periods of time,
unplug it from the wall outlet and disconnect the antenna or cable
system. This will prevent damage to the product due to lightning and
power-line surges.
Overloading – Do not overload wall outlets, extension cords, or integral
■
convenience receptacles as this can result in a risk of fire or electric
shock.
40 Notices
Page 47

A product and cart combination should be moved with care. Quick
■
stops, excessive force, and uneven surfaces may cause the product and
cart combination to overturn.
Object and Liquid Entry – Never push objects of any kind into this
■
product through openings as they may touch dangerous voltage points
or short-out parts that could result in a fire or electric shock. Never spill
liquid of any kind on the product.
Servicing – Do not attempt to service this product yourself as opening or
■
removing covers may expose you to dangerous voltage or other hazards.
Refer all servicing to qualified service personnel.
Damage Requiring Service – Unplug this product from the wall outlet
■
and refer servicing to qualified service personnel under the following
conditions:
When the power-supply cord or plug is damaged.
■
If liquid has been spilled, or objects have fallen into the product.
■
If the product has been exposed to rain or water.
■
If the product does not operate normally by following the operating
■
instructions. Adjust only those controls that are covered by the operating
instructions as an improper adjustment of other controls may result in
damage and will often require extensive work by a qualified technician to
restore the product to its normal operation.
If the product has been dropped or damaged in any way.
■
When the product exhibits a distinct change in performance—this
■
indicates a need for service.
Replacement Parts – When replacement parts are required, be sure the
■
service technician has used replacement parts specified by the
manufacturer or have the same characteristics as the original part.
Unauthorized substitutions may result in fire, electric shock or other
hazards.
Safety Check – Upon completion of any service or repairs to this
■
product, ask the service technician to perform safety checks to determine
that the product is in proper operating condition.
Heat – The product should be situated away from heat sources such as
■
radiators, heat registers, stoves, or other products (including amplifiers)
that produce heat.
Notices 41
Page 48

WARNING:
TO REDUCE THE RISK OF FIRE OR ELECTRIC
SHOCK, DO NOT EXPOSE THIS PRODUCT TO
RAIN OR MOISTURE.
THIS IS A CLASS B PRODUCT. IN A DOMESTIC
ENVIRONMENT THIS PRODUCT MAY CAUSE
RADIO INTERFERENCE IN WHICH CASE THE USER
MAY BE REQUIRED TO TAKE ADEQUATE
MEASURES.
Remote Control Information
You can operate the document camera by remote control via a line-of-sight
infrared (IR) receiver at the front and rear of the document camera. The
document camera may not respond to remote control commands under the
following conditions:
There is an object between the remote control IR emitter and the IR
■
receiver on the document camera.
Ambient light is too bright.
■
Certain types of fluorescent lighting are used.
■
A strong light source shines into the IR receiver.
■
Other equipment that emits infrared energy, such as a radiant room
■
heater, is in the room.
42 Notices
These conditions commonly cause problems for most infrared-controlled
equipment. Try the following:
The remote control batteries may be low on power; replace them.
■
Dim the ambient lighting and/or turn off any fluorescent lights.
■
Close any window coverings and/or move the document camera out of
■
direct sunlight.
Turn off other equipment that emits infrared energy.
■
If the remote control still does not work properly, you can always use the
buttons located on the document camera control panel, even in an
environment containing one of the conditions listed above.
Page 49

Declaration of Conformity
According to 47CFR, Part 2 and 15
Class B Personal Computers and Peripherals; and/or CPU Boards and Power
Supplies used with Class B Personal Computers
We: EPSON AMERICA, INC.
Located at: 3840 Kilroy Airport Way
MS: 6-43
Long Beach, CA 90806-2469
Telephone: (562) 290-5254
Declare under sole responsibility that the product identified herein, complies
with 47CFR Part 2 and 15 of the FCC rules as a Class B digital device. Each
product marketed, is identical to the representative unit tested and found to
be compliant with the standards. Records maintained continue to reflect the
equipment being produced can be expected to be within the variation
accepted, due to quantity production and testing on a statistical basis as
required by 47CFR §2.909. Operation is subject to the following two
conditions: (1) this device may not cause harmful interference, and (2) this
device must accept any interference received, including interference that may
cause undesired operation.
Trade Name: EPSON
Type of Product: Document Camera
Model: ELPDC02
Notices 43
Page 50

FCC Compliance Statement
For United States Users
This equipment has been tested and found to comply with the limits for a
Class B digital device, pursuant to Part 15 of the FCC Rules. These limits are
designed to provide reasonable protection against harmful interference in a
residential installation. This equipment generates, uses, and can radiate radio
frequency energy and, if not installed and used in accordance with the
instructions, may cause harmful interference to radio or television reception.
However, there is no guarantee that interference will not occur in a particular
installation. If this equipment does cause interference to radio and television
reception, which can be determined by turning the equipment off and on,
the user is encouraged to try to correct the interference by one or more of the
following measures:
Reorient or relocate the receiving antenna.
■
Increase the separation between the equipment and receiver.
■
Connect the equipment into an outlet on a circuit different from that to
■
which the receiver is connected.
Consult the dealer or an experienced radio/TV technician for help.
■
WARNING
44 Notices
The connection of a non-shielded equipment interface cable to this
equipment will invalidate the FCC Certification of this device and may cause
interference levels which exceed the limits established by the FCC for this
equipment. It is the responsibility of the user to obtain and use a shielded
equipment interface cable with this device. If this equipment has more than
one interface connector, do not leave cables connected to unused interfaces.
Changes or modifications not expressly approved by the manufacturer could
void the user’s authority to operate the equipment.
For Canadian Users
This Class B digital apparatus meets all requirements of the Canadian
Interference-Causing Equipment Regulations.
Cet appareil numérique de la classe B respecte toutes les exigences du Règlement
sur le materiel brouilleur du Canada.
Page 51

Warranty
Epson America, Inc. Limited Warranty
What is Covered
customer of the EPSON product enclosed with this limited warranty
statement that the product, if purchased and used in the United States or
Canada, conforms to the manufacturer's specifications and will be free from
defects in workmanship and materials for a period of one (1) year from the
date of original purchase (except that the warranty period is 90 days for
lamps). For warranty service, you must provide proof of the date of original
purchase.
What Epson Will Do To Correct Problems
prove defective during the warranty period, please bring the product securely
packaged in its original container or an equivalent, along with proof of the
date of original purchase, to your EPSON Dealer or EPSON Customer Care
Center. Epson will, at its option, repair or replace on an exchange basis the
defective unit, without charge for parts or labor. When warranty service
involves the exchange of the product or of a part, the item replaced becomes
EPSON property. The exchanged product or part may be new or previously
repaired to the EPSON standard of quality. Exchange or replacement
products or parts assume the remaining warranty period of the product
covered by this limited warranty. However, each replacement lamp carries
the limited 90-day warranty stated above.
What This Warranty Does Not Cover
the United States and Canada. For lamps, 24-hour-per-day use causes
unusual strain and is not considered normal use. This warranty is not
transferable and will not apply to products purchased from an end user. This
warranty does not cover consumables (e.g., fuses), other than lamps. EPSON
is not responsible for warranty service should the EPSON label or logo or the
rating label or serial number be removed or should the product fail to be
properly maintained or fail to function properly as a result of misuse, abuse,
improper installation, neglect, improper shipping, damage caused by disasters
such as fire, flood, and lightning, improper electrical current, software
problems, interaction with non-EPSON products, or service other than by an
EPSON Authorized Servicer. Postage, insurance, or shipping costs incurred
in presenting your EPSON product for carry-in warranty service are your
responsibility. If a claimed defect cannot be identified or reproduced in
service, you will be held responsible for costs incurred.
: Epson America, Inc. (“Epson”) warrants to the first end user
: Should your EPSON product
: This warranty covers only normal use in
THE WARRANTY AND REMEDY PROVIDED ABOVE ARE
EXCLUSIVE AND IN LIEU OF ALL OTHER EXPRESS OR IMPLIED
WARRANTIES INCLUDING, BUT NOT LIMITED TO, THE
IMPLIED WARRANTIES OF MERCHANTABILITY OR FITNESS
Notices 45
Page 52

FOR A PARTICULAR PURPOSE. SOME LAWS DO NOT ALLOW
THE EXCLUSION OF IMPLIED WARRANTIES. IF THESE LAWS
APPLY, THEN ALL EXPRESS AND IMPLIED WARRANTIES ARE
LIMITED TO THE WARRANTY PERIOD IDENTIFIED ABOVE.
UNLESS STATED HEREIN, ANY STATEMENTS OR
REPRESENTATIONS MADE BY ANY OTHER PERSON OR FIRM
ARE VOID. EXCEPT AS PROVIDED IN THIS WRITTEN
WARRANTY, NEITHER EPSON AMERICA, INC. NOR ITS
AFFILIATES SHALL BE LIABLE FOR ANY LOSS, INCONVENIENCE,
OR DAMAGE, INCLUDING DIRECT, SPECIAL, INCIDENTAL OR
CONSEQUENTIAL DAMAGES, RESULTING FROM THE USE OR
INABILITY TO USE THE EPSON PRODUCT, WHETHER
RESULTING FROM BREACH OF WARRANTY OR ANY OTHER
LEGAL THEORY. IF THE REMEDY ABOVE FAILS, EPSON’S
ENTIRE LIABILITY SHALL BE LIMITED TO A REFUND OF THE
PRICE PAID FOR THE EPSON PRODUCT COVERED BY THIS
LIMITED WARRANTY.
In Canada, warranties include both warranties and conditions.
Some jurisdictions do not allow limitations on how long an implied warranty
lasts and some jurisdictions do not allow the exclusion or limitation of
incidental or consequential damages, so the above limitations and exclusions
may not apply to you.
This warranty gives you specific legal rights, and you may also have other
rights which vary from jurisdiction to jurisdiction.
46 Notices
To locate an Authorized EPSON Servicer nearest you, call the EPSON
Connection at (562) 276-4394 in the U.S. and (905) 709-3839 in Canada or
write to: Epson America, Inc., P. O. Box 93012, MS: 6-33, Long Beach, CA
90809-3012.
Page 53

Index
Numerics
3-D objects, presenting, 19
A
Auto Focus button, 20
B
Base button, 19
Batteries, installing, 7
Blank screen, 18
Blueprints, presenting, 19
Blurry image, 30
Buttons
focus, 20
input, 18
iris, 22
lamp, 19
position arrow, 21
zoom, 20
C
Cables, 6, 30
Camera head switches, adjusting, 13
Cleaning, 26 to 27
Close button, 22
Close-up lens, 22, 26
Computer, connecting, 14
Connecting document camera
to a computer, 14
to a monitor, 11 to 12
to a projector, 11 to 12
to RGB video sources, 14
D
Declaration of Conformity, 43
Document camera
cleaning, 26 to 27
connecting, 11 to 14
folding, 23 to 24
positioning, 10
specifications, 35 to 38
storing, 23 to 24
transporting, 28
turning off, 23
turning on, 16 to 17
unfolding, 8 to 9
E
Electrical specifications, 36
Environmental specifications, 36
EPSON technical support, 3, 32 to 33
F
Far button, 20
FCC compliance statement, 44
Focusing image, 20
Folding document camera, 23 to 24
Frame speed, 22, 35
Frequency
selection switch, 13
specification, 35
G
Gamma
selection switch, 13
specification, 35
H
Help, 3, 32 to 33
Index 47
Page 54

I
Image
focusing, 20
position, adjusting, 21
resolution, 35
shooting area, 35
shooting speed, 22, 35
size, adjusting, 21
sources, selecting, 18
troubleshooting, 18, 30 to 31
zooming, 20
Iris, adjusting, 22
L
Lamp
specifications, 35
Lamp, selecting, 19
Lens
cleaning, 26
specifications, 35
Lighting, adjusting, 19
M
Main button, 18
Monitor, connecting, 11 to 12
N
Near button, 20
Negatives, presenting, 19
Normal button, 22
NTSC mode, 31
O
Open button, 22
P
PAL mode, 31
Picture, see Image
Position arrow buttons, 21
Positioning
document camera, 10
image, 21
Power
specifications, 36
switch, 17
Printouts, presenting, 19
PrivateLine Support, 3, 33
Problems
blank screen, 18
image, 30 to 31
remote control, 32, 42
Projector, connecting, 11 to 12
R
Registration, 3
Remote control
batteries, 7
specifications, 36
storing, 28
transporting, 28
troubleshooting, 32, 42
Resolution, 35
RGB buttons, 18
RGB video sources, connecting, 14
S
Safety
instructions, 39 to 41
specifications, 37
Screen image, see Image
Service,
Shooting speed, 22, 35
Size, adjusting image, 21
Slides, presenting, 19
Technical support
see
48 Index
Page 55

Specifications
dimensions, 36
electrical, 36
environmental, 36
general, 35
lamp, 35
lens, 35
remote control, 36
safety, 37
video formats, 37 to 38
Support, see Technical support
T
Technical support, 3, 32 to 33
Tele button, 20
Temperature requirements, 36
Transparencies, presenting, 19
Transporting, 28
Troubleshooting
image problems, 18, 30 to 31
remote control problems, 32, 42
Turning off document camera, 23
Turning on document camera, 16 to 17
U
Unfolding document camera, 8 to 9
Upper button, 19
V
Video camera, using camera as, 22
Video formats, supported, 37 to 38
W
Warranty, 45 to 46
Wide button, 20
X
X-rays, presenting, 19
Z
Zooming image, 20
Index 49
 Loading...