

Page 1
Connection & Control Box Operation Guide
How To Switch Input Sources
■
Connect devices Change sources Projection starts
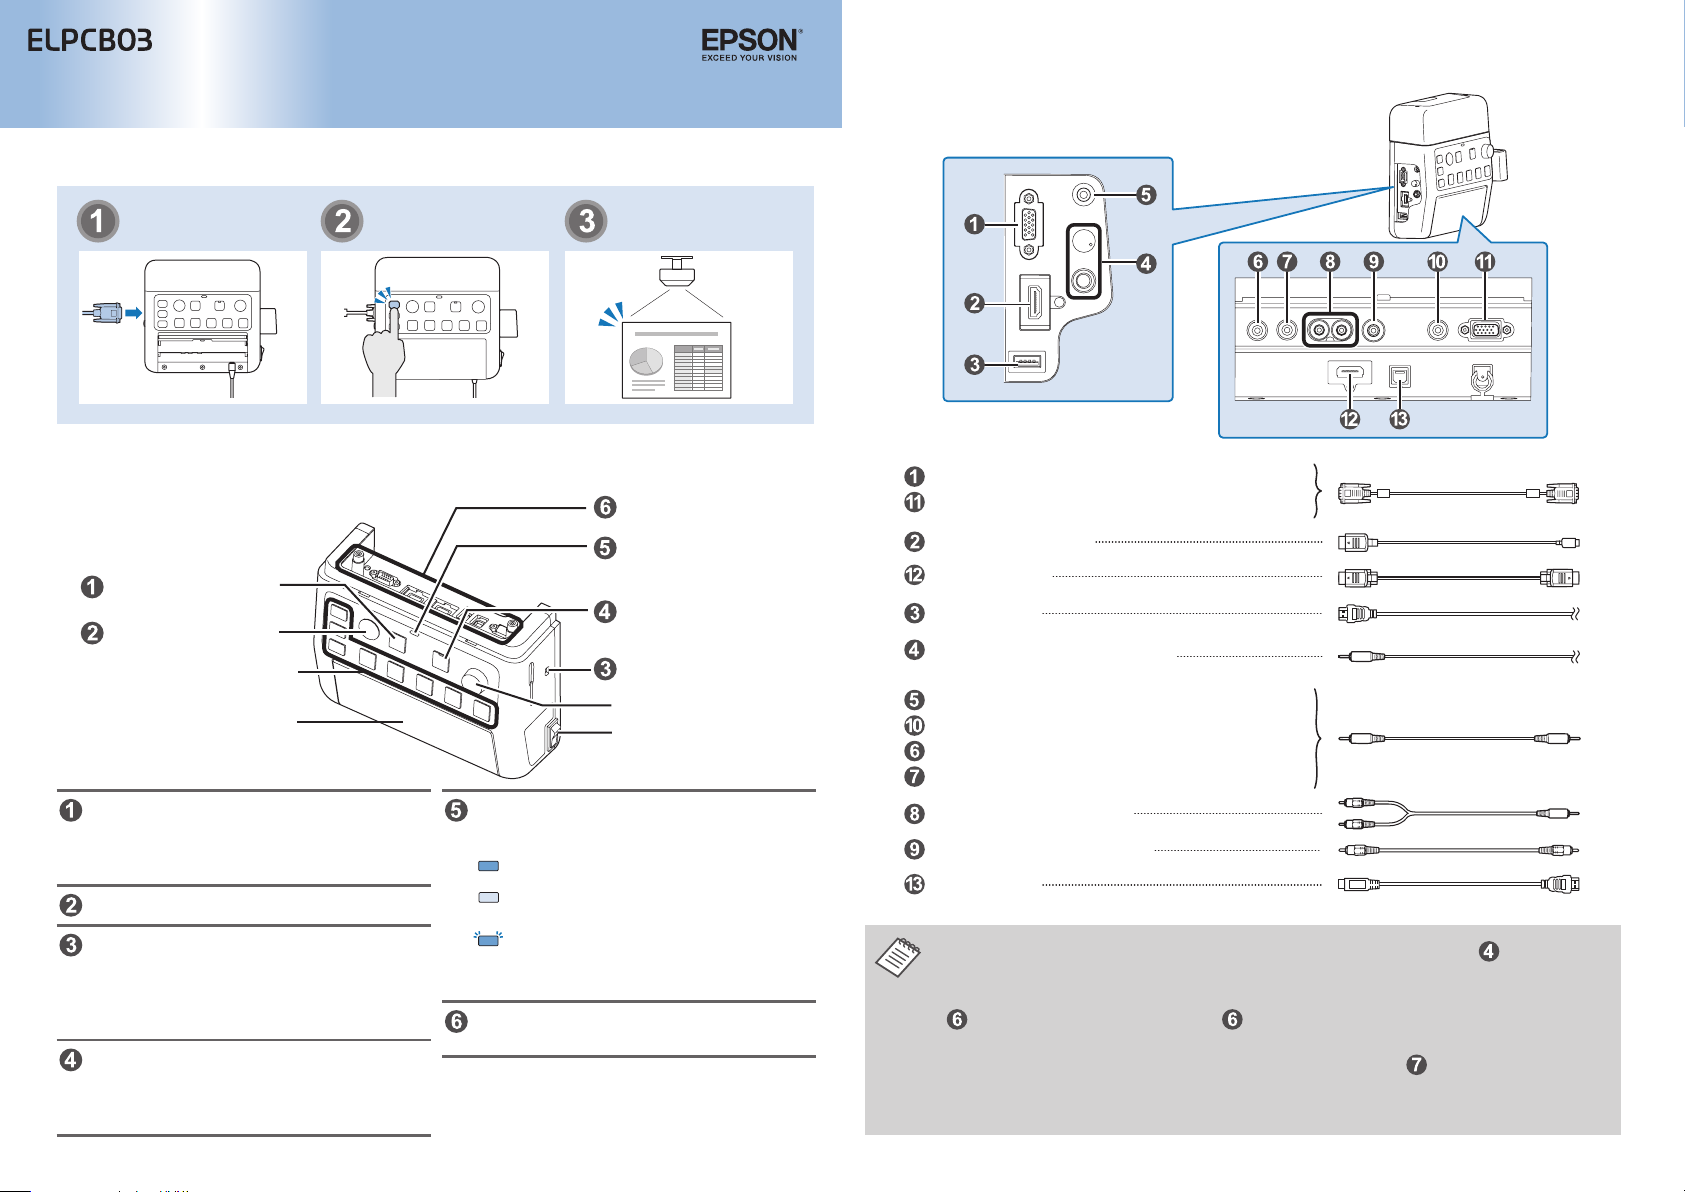
Part Names and Functions
■
Output ports
Input Ports
■
Connect cables according to your devices to use.
[Computer1] input port
[Computer2] input port
(Mini D-Sub 15-pin (female))
[A/V Mute] button
[Projector] button
Input source buttons
Input interface cover
Temporarily interrupts video and audio
output from the projector or speakers,
except for the [Mic] port and the [AUX In]
port.
Turns the projector power on or o.
Congures the audio output from the
speakers when they are connected to this
product.
Do not change this switch because the
setting was done optimally at installation.
Temporarily mutes audio signals from the
[Mic] port and the [AUX In] port. While audio
is muted, the indicator of the mute button
turns blue.
Operation indicator
[Audio Mute] button
Dip switch
[Volume] dial
Power switch
Indicates the status of the Connection &
Control Box. (This does not indicate the
status of the projector. )
:
Operating normally.
Blue
:
In standby. Press any button to
Orange
resume.
:
An error has occurred. Unplug the
Blue
Connection & Control Box, and contact
your dealer.
Connects the projector to this device. See
the Installation Manual for more details.
[HDMI1/MHL] port
[HDMI2] port
[USB-A] port
Mic] port
[
[Volume] dial
[Audio1] port
[Audio2] port
[AUX In] port
[REC Out] port
[Audio-L/R]
[Video] input port
[USB-B] port
• When using a commercially available dynamic microphone, connect to the [Mic] port.
Plug-in power is not supported.
• When inputting audio from a portable audio player and such, connect the audio cable to
selected source.
• When connecting a recording device, connect the audio cable to
input from the audio input ports, the Aux In, and the Mic port is output. Audio is output in a
constant level and cannot be adjusted.
(φ6.3 mm stereo jack)
(mic input)
We recommend using a shielded cable.
(RCA jack)
port
(RCA jack)
[AUX In] port. The audio input from [AUX In] port is always played regardless of the
/
(φ3.5 mm stereo mini jack)
[REC Out] port. The audio
1
Page 2
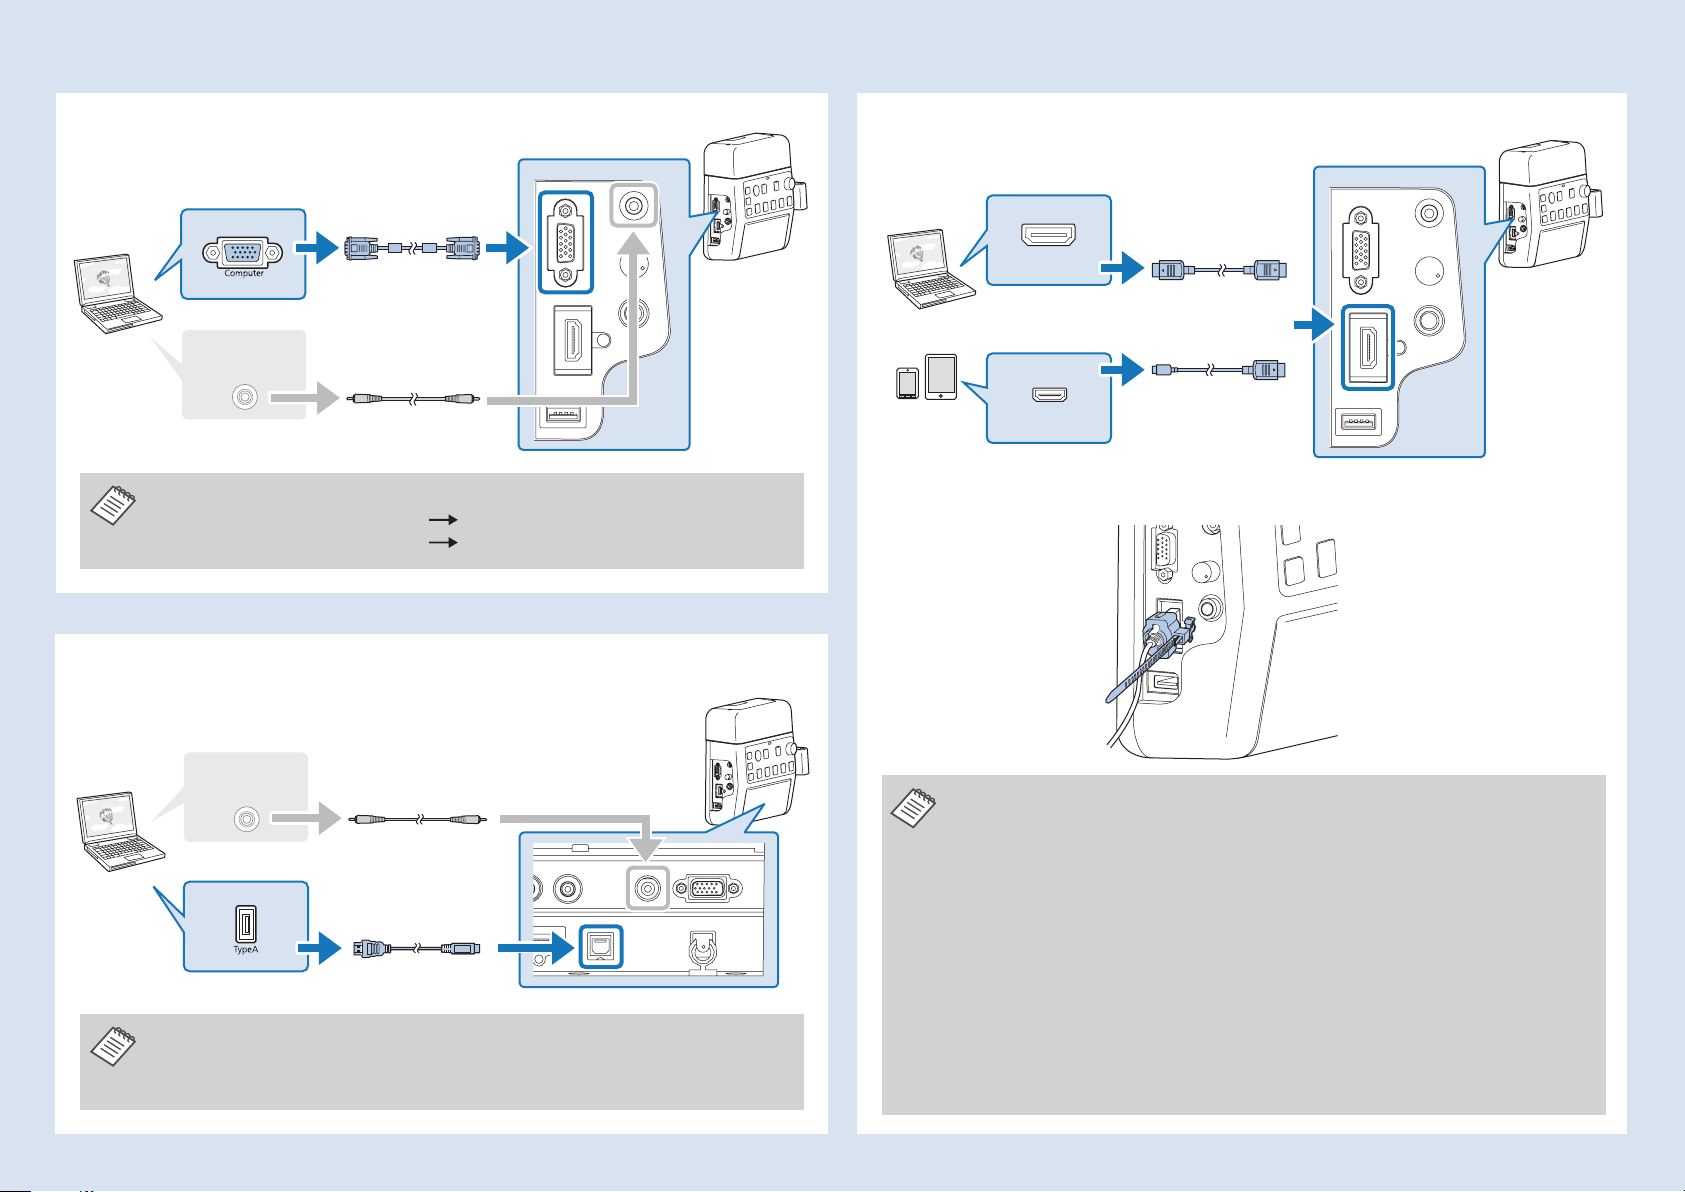
Connection Examples
■
Connecting Using a Computer Cable
If you output
audio
Connect the ports in either of the following combinations.
When using [Computer1] input port [Audio1] port
When using [Computer2] input port
[Audio2] port
Connecting Using a USB Cable
Connecting with HDMI Cables
HDMI
MHL
If you use a thick HDMI cable, it may disconnect under its own weight. Use the HDMI
cable clamp to secure the cable.
If you output
audio
• For projectors which audio can be input with the USB cable in the USB Display
function, there is no need to connect the audio cable.
• Be sure to connect the projector and the computer directly, not via a USB hub.
• When the projector only has one HDMI port, make sure you connect the HDMI
cable to the [HDMI1/MHL] port.
• You may not be able to connect an MHL cable to all devices. Also, depending on
the model or settings of the device, images may not be projected correctly.
• When connecting an MHL cable, make sure the cable meets the MHL standards.
If the cable does not meet the MHL standard, the connected device may
malfunction.
• If you connect using a commercially available MHL-HDMI conversion adapter,
you may not be able to charge the connected device or you may not be able to
perform operations from the projector's remote control.
• If images are not projected correctly using an MHL cable, disconnect and then
reconnect the MHL cable.
• If you switch the HDMI1/MHL source and the HDMI2 source while playing a movie,
the movie may freeze. Stop the movie before switching sources.
2
Page 3

Switching Images
■
Names and Functions of the Input Source Buttons
Troubleshooting
■
No images appear
Did you turn on the connected device? Turn on the power of the connected device.
Did you turn on the projector? Press the [Projector] button.
Did you press the correct Input Source
button for the connected device you
want to play?
Did you press the [A/V Mute] button? Press the [A/V Mute] button again.
Is the operation indicator light on
?
When no specic input source is selected, [Computer1]
button is automatically selected and images from the
[Computer1] input port are displayed. Press the correct
Input Source button corresponding to the connected
device.
If no operations are made on the Connection & Control
Orange
Box for eight hours, it enters standby status. Press any
button and the indicator turns to
Source button.
, press the Input
Blue
The source can not be switched
Press the Input Source buttons to input images and audio from the device connected to
the port as shown in the following table.
Switching sources may take a while.
Input Source Button Image Input Audio Input
Computer1 Computer1 Audio1
HDMI1/MHL HDMI1/MHL HDMI1/MHL
USB USB Display W USB-A USB Display/Audio2
Computer2 Computer2 Audio2
HDMI2 HDMI2 HDMI2
HDMI3 HDMI3
Video Video Audio-L/R
LAN LAN LAN/Audio2
*
If the projector supports audio transfer using USB display or over a network, audio is
**
HDMI3
**
*
*
input through USB Display or LAN. When you use a projector that does not support
audio transfer, [Audio2] is input.
**
Inputs images and audio from the device connected to the projector's HDMI3 port.
Did you press the correct Input
Source button corresponding to the
connected device?
Is the Message Broadcasting dialog
displayed?
Press the correct Input Source button.
Press the [Projector] button and restart the projector.
The Connection & Control Box is not operating
Is the power of this product on? Turn on the power switch.
Is the power cable plugged? Plug in the power cable of the Connection & Control Box.
Is the operation indicator ashing
?
Unplug the power cable of the Connection & Control Box,
Blue
and contact your dealer.
No sound comes out or the sound is faint
Is the projector's audio input setting
correct?
Did you turn down the audio volume
of the projector or speakers too much?
Is the projector's "MIC Input Level"
appropriate?
Is the audio cable of the connected
device correctly connected?
Is there a cable connected to the
projector's audio output port?
Is the Dip switch setting correct? Check the Dip switch setting.
Check that the projector's "A/V Settings" or "Audio Input"
are correct.
Turn up the volume with the [Volume] dial.
Projector's or Speakers' user's guide.
Adjust the input level of the microphone.
Check the connection of the audio cable. This manual
"Input Ports", Connection & Control Box Installation Manual
"Connecting to the Speaker"
If a cable is connected to the projector's audio output
port, sound does not come out from the built-in speaker.
Installation Manual "Connecting to the Speaker"
Projector's user's guide
Connection & Control Box
3
 Loading...