

Page 1

Printed on recycled paper.
Fiery Spark™ Professional
EPSON Stylus® Pro 5500
EPSON Stylus
®
Pro 10000
Installation Guide
Page 2

ii |
Copyright © 2001 by Epson America, Inc.
All rights reserved. No part of this publication may be reproduced, stored in a retrieval system, or
transmitted in any form or by any means, electronic, mechanical, photocopying, recording, or
otherwise, without the prior written permission of SEIKO EPSON CORPORATION. The
information contained herein is designed only for use with these EPSON printers. EPSON is not
responsible for any use of this information as applied to other printers.
Trademarks
EPSON and EPSON Stylus are registered trademarks of SEIKO EPSON CORPORATION.
EPSON Preferred is a service mark of Epson America, Inc.
General Notice: Other product names used herein are for identification purposes only and may
be trademarks of their respective owners. EPSON disclaims any and all rights in those marks.
Legal Notices
Neither SEIKO EPSON CORPORATION nor its affiliates shall be liable to the purchaser of
this product or third parties for damages, losses, costs, or expenses incurred by purchaser or third
parties as a result of: accident, misuse, or abuse of this product or unauthorized modifications,
repairs, or alterations to this product, or (excluding the U.S.) failure to strictly comply with
SEIKO EPSON CORPORATION’s operating and maintenance instructions.
SEIKO EPSON CORPORATION shall not be liable for any damages or problems arising from
the use of any options or any consumable products other than those designated as Original
EPSON Products or EPSON Approved Products by SEIKO EPSON CORPORATION.
Part Number: CPD-12826
Printed in USA 8/01
Page 3

| iii
Contents
Introduction . . . . . . . . . . . . . . . . . . . . . . . . . . . . . . . . . . . . . . . . . . . . . . . . 1
Where To Get Help . . . . . . . . . . . . . . . . . . . . . . . . . . . . . . . . . . . . . . . 1
System Requirements . . . . . . . . . . . . . . . . . . . . . . . . . . . . . . . . . . . . . . . . . . 2
Server . . . . . . . . . . . . . . . . . . . . . . . . . . . . . . . . . . . . . . . . . . . . . . . . . . 2
Windows Client Computer . . . . . . . . . . . . . . . . . . . . . . . . . . . . . . . . . . 3
Macintosh Client Computer . . . . . . . . . . . . . . . . . . . . . . . . . . . . . . . . . 3
Server Software Installation . . . . . . . . . . . . . . . . . . . . . . . . . . . . . . . . . . . . . 4
Installing the Fiery Spark Server Software . . . . . . . . . . . . . . . . . . . . . . . 4
Installing Command WorkStation . . . . . . . . . . . . . . . . . . . . . . . . . . . . 5
Enabling File and Printer Sharing . . . . . . . . . . . . . . . . . . . . . . . . . . . . . 7
Enabling AppleTalk Protocol . . . . . . . . . . . . . . . . . . . . . . . . . . . . . . . . 7
Hardware Key Installation . . . . . . . . . . . . . . . . . . . . . . . . . . . . . . . . . . . . . . 8
Windows Client Software Installation . . . . . . . . . . . . . . . . . . . . . . . . . . . . . 8
Installing the PostScript Printer Driver for Windows Me . . . . . . . . . . . 8
Installing the PostScript Printer Driver for Windows 2000 . . . . . . . . . . 9
Creating Shortcuts to the Fiery Spark Drop Folders . . . . . . . . . . . . . . 11
Installing Command WorkStation . . . . . . . . . . . . . . . . . . . . . . . . . . . 12
Macintosh Client Software Installation . . . . . . . . . . . . . . . . . . . . . . . . . . . 14
Installing Printer Files . . . . . . . . . . . . . . . . . . . . . . . . . . . . . . . . . . . . . 14
Installing Fonts . . . . . . . . . . . . . . . . . . . . . . . . . . . . . . . . . . . . . . . . . . 15
Creating Shortcuts to the Fiery Spark Drop Folders . . . . . . . . . . . . . . 15
Installing Fiery Spooler . . . . . . . . . . . . . . . . . . . . . . . . . . . . . . . . . . . . 16
Installing Fiery Downloader . . . . . . . . . . . . . . . . . . . . . . . . . . . . . . . . 17
Installing ColorWise Pro Tools . . . . . . . . . . . . . . . . . . . . . . . . . . . . . . 18
Selecting TCP/IP . . . . . . . . . . . . . . . . . . . . . . . . . . . . . . . . . . . . . . . . 19
Printing to the Fiery Spark . . . . . . . . . . . . . . . . . . . . . . . . . . . . . . . . . . . . 19
Notices . . . . . . . . . . . . . . . . . . . . . . . . . . . . . . . . . . . . . . . . . . . . . . . . . . . 20
FCC Compliance Statement . . . . . . . . . . . . . . . . . . . . . . . . . . . . . . . . 20
Warranty . . . . . . . . . . . . . . . . . . . . . . . . . . . . . . . . . . . . . . . . . . . . . . . 20
Page 4

Introduction
This guide provides basic installation instructions for the Fiery Spark™
Professional software in a client-server configuration. Fiery Spark Professional
includes a System Software CD-ROM, a User Software CD-ROM, and a USB
hardware key.
Note
Do not misplace your hardware key. Lost keys are not covered under
your warranty.
For instructions on using the Fiery Spark software, see the manuals in the
Documentation
English
>
folder on the User Software CD-ROM. You have a
Getting Started Guide, Configuration Guide, Printing Guide, Job Management
Guide, and Color Guide.
®
These manuals are in PDF format. If you don’t have Adobe
Acrobat® Reader™
for viewing the manual, you can install it by double-clicking the ar405eng
icon in the
Note
Documentation
If you are using the EPSON® Color Calibrator, make sure you are
using software version 2.1 or later. This version can be downloaded
from http://support.epson.com.
folder on the User Software CD-ROM.
Where To Get Help
EPSON provides technical support and information on the installation,
configuration, and operation of professional graphics arts products through the
EPSON Preferred Protection Plan. Call (888) 377-6611, 6
Time, Monday through Friday, and 7
SM
to 4PM, Pacific Time, Saturday.
AM
to 8PM, Pacific
AM
Before you call, make sure you have your Unit ID number, which is included
with the EPSON Preferred Protection Plan information that came with your
printer. You’ll also need your printer serial number and proof of purchase. If
you experience difficulty using your Unit ID number when accessing the
toll-free EPSON Preferred phone number, please call (562) 276-1305 in the
U.S. or (905) 709-2567 in Canada during normal business hours.
Page 5

2 | Installation Guide
EPSON also provides technical assistance 24 hours a day through the World
Wide Web. You can reach EPSON Support at http://support.epson.com. At
this site, you can download drivers and other files, look at product
documentation, access troubleshooting information, and receive technical
advice through e-mail.
System Requirements
Before you install the software, make sure your computer meets the minimum
system requirements listed below.
Server
•
Pentium® 4 1.2GHz (1.7GHz recommended)
•
Windows® 2000 Professional
Note
Windows 2000 Server is recommended if you have more than
10 users printing concurrently, require support for SMP with more
than 2 CPUs, or require greater fault tolerance
•
256MB RAM (512MB RAM recommended)
•
At least 200MB free hard disk space to install the software and at least 1GB
free disk space for processing files (4GB or more available hard disk space
recommended)
•
USB connection for EPSON Stylus® Pro 5500 or IEEE-1394 PCI card
(OHCI compliant) connection for EPSON Stylus Pro 10000
•
Netscape® Communicator® version 4.5 or 4.7 with Java enabled, or
Microsoft
®
Internet Explorer version 5.0 or 5.5 with Java enabled, for
Fiery WebTools
•
A TCP/IP-enabled network and the IP address or computer name for the
Fiery Spark server
•
File and Printer Sharing for Microsoft Network enabled for PC clients
•
AppleTalk® Protocol enabled for Macintosh clients
Page 6

Macintosh Client Computer | 3
Windows Client Computer
•
Pentium II processor (Pentium III or higher recommended)
•
Windows 98, Me, 2000, or Windows NT® 4.0 with Service Pack 5 or later
•
128MB RAM (256MB or more recommended)
•
PostScript® printer driver for Windows
•
Windows 98 and Me: Adobe PostScript Printer Driver version 4.3.1
•
Windows 2000: Microsoft PostScript Printer Driver for Windows
2000 (included with the Windows 2000 operating system)
•
Windows NT: Adobe PostScript Printer Driver version 5.1.2
•
For Windows 98 and Me, you also need TCP/IP networking protocol
enabled
•
For Windows NT 4.0 and Windows 2000, you also need TCP/IP or
AppleTalk networking protocol enabled
Macintosh Client Computer
•
Macintosh® G3, G4, or iMac™ (G4 recommended)
•
System 8.6 through 9.1
•
450MHz or faster processor
•
256MB RAM (512MB recommended)
•
AppleTalk networking protocol enabled
Page 7

4 | Installation Guide
Server Software Installation
Before you begin, make sure you’ve:
•
Connected the printer to the server
•
Installed the EPSON printer driver (see your EPSON printer
documentation for instructions)
•
Installed the IEEE-1394 driver if you’re using the EPSON Stylus
Pro 10000 (the driver is on the CD-ROM that came with your printer; for
installation instructions, see the Product Support Bulletin at
http://support.epson.com)
•
Closed all open programs and turned off any virus protection programs.
Note
Use a short server name (8 characters or less). Otherwise, you won’t
be able to see the server name and print queue in the Chooser on
Macintosh clients.
Do not install the hardware key until after all the software is installed.
Install the following software on the server:
•
Fiery Spark Server software (see below)
•
Command WorkStation (page 5)
Installing the Fiery Spark Server Software
Follow these steps:
1. Insert the Fiery Spark System Software CD-ROM in your CD-ROM or
DVD drive.
2. Double-click
My Computer
, then double-click the
CD-ROM
icon.
3. Double-click the
Setup
icon in Fiery folder, then click
Next
.
4. Follow the on-screen instructions.
Page 8
Installing Command WorkStation | 5
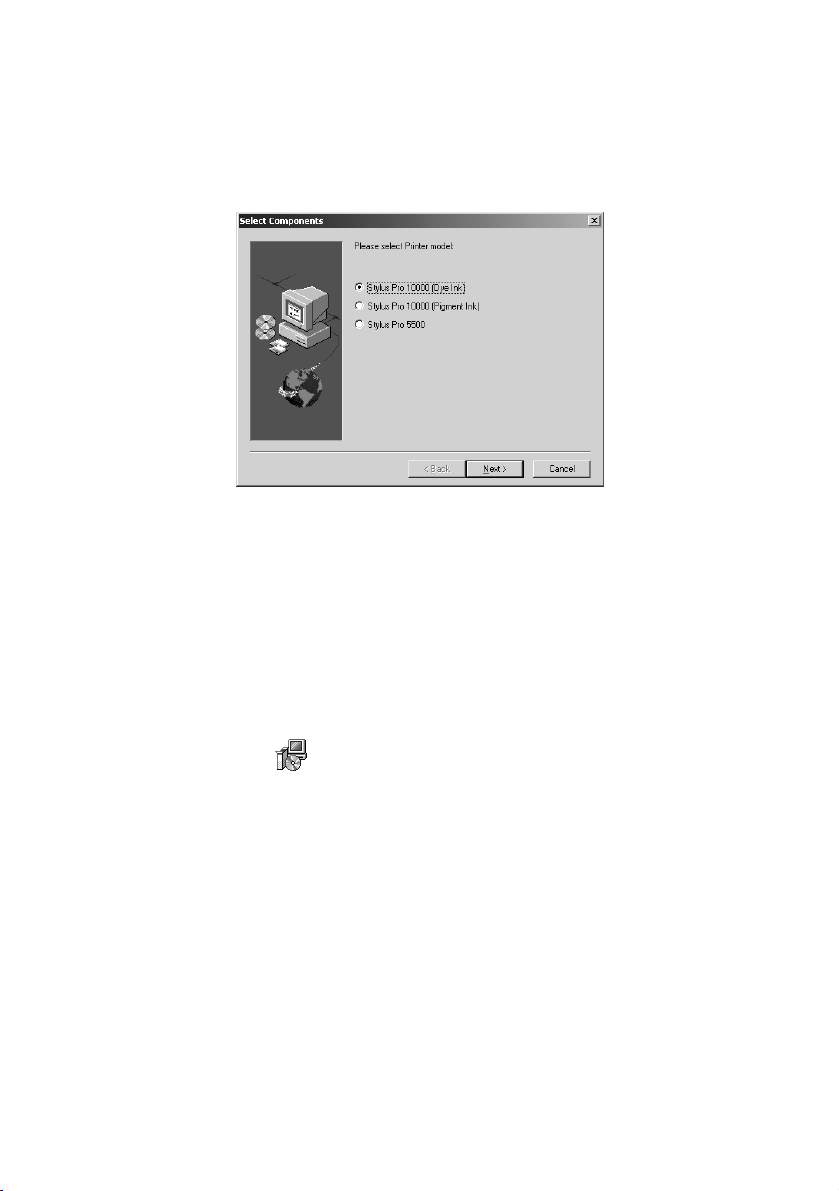
5. When you see this screen, select your printer model; then click
Next
to
continue the installation.
6. Click
OK
at the end of the installation. Your computer restarts.
Installing Command WorkStation
This installation also installs ColorWise Pro Tools and Fiery Downloader.
Follow these steps:
1. On the Fiery Spark User Software CD-ROM, open the
CStation
folder.
Setup
2. Double-click the
icon.
3. Follow the instructions on screen.
Finish
4. Click
at the end of the installation. Your computer restarts.
5. Configure Command WorkStation as described in the next section.
Page 9

6 | Installation Guide
Configuring Command WorkStation
1. If Command WorkStation is open, click
Otherwise, go to
Command WorkStation
click
Start
Programs
>
.
OK
.
Command WorkStation
>
2. Enter the appropriate information for the Fiery Spark, then click
the Nickname can be
different from the Fiery
Spark server name, but
cannot contain
[ ] _ " ' <space> <tab>
This example uses
EPSON as the
nickname.
enter localhost
enter PRO10K for the
Stylus Pro 10000 (dye
ink), PRO10KCF for
the Stylus Pro 10000
(pigment ink), or
PRO5500 for the
Stylus Pro 5500
click Add
, then
Add
:
3. Make sure the printer name is selected in the Devices list, then click
4. Select the printer name in the list
OK
of Available Servers, then click
.
OK
.
Page 10

Enabling AppleTalk Protocol | 7
Enabling File and Printer Sharing
If you have Windows clients, you must enable File and Printer Sharing on the
server. Follow these steps:
1. From the
Connections
2. Click the
3. Click
4. Click
5. Select
Control Panel
, double-click
, then double-click
Properties
Install
.
Service
File and Printer Sharing for Microsoft Networks
button.
, then click
Add
.
Networks and Dial-up
Local Area Connection
.
, then click OK.
6. Close any open windows, then restart your computer.
Enabling AppleTalk Protocol
If you have Macintosh clients, you must enable AppleTalk Protocol on the
server. Follow these steps:
1. From the
Connections
2. Click the
3. Click
Install
Control Panel
, then double-click
Properties
button.
.
, double-click
Networks and Dial-up
Local Area Connection
.
4. Click
5. Select
Protocol
AppleTalk Protocol
, then click
Add
.
, then click OK.
6. Close any open windows, then restart your computer.
Page 11

8 | Installation Guide
Hardware Key Installation
After all the software is installed, connect the hardware key to an available USB
port on the server. After a few moments, Fiery Spark is ready to accept print
jobs.
Windows Client Software Installation
Instructions are given for installation on Windows Me and Windows 2000.
Installation on other Windows operating systems are similar. For detailed
instructions, see the Getting Started Guide on the User Software CD-ROM.
On a PC client, you need to install and configure the following software:
•
PostScript printer driver (see below for Windows Me; see page 9 for
Windows 2000)
•
Shortcuts to the Fiery Spark drop folder (see page 11)
•
Command WorkStation (see page 12)
Depending on your workflow, you can install the PostScript printer driver, the
shortcuts to the Fiery Spark drop folders, or both.
Installing the PostScript Printer Driver for Windows Me
1. Insert the User Software CD-ROM into the CD-ROM drive.
2. Click
Start, Settings
3. Double-click the
Next
4. Click
.
, and then choose
Add Printer
icon.
Printers
.
Page 12

Installing the PostScript Printer Driver for Windows 2000 | 9
5. The following screen appears. Make
sure
Network printer
then click
Next
is checked,
.
6. Enter (or browse to) the network path
Next
to the printer, then click
.
7. Leave the default printer name as is.
Click
Next
.
8. Select
No
to print a test page option; then click
Finish
.
Installing the PostScript Printer Driver for Windows 2000
This section includes instructions for installing the PostScript printer driver
and setting up the TCP/IP printer port for Windows 2000. Before you begin,
make sure you know the name or IP address of the Fiery Spark server and that
the TCP/IP Protocol and Microsoft TCP/IP Printing software is installed on
the Windows 2000 workstation.
1. Insert the User Software CD-ROM into the CD-ROM drive.
2. Click
Start, Settings
3. Double-click the
, and then choose
Add Printer
icon.
Printers
.
4. The following screen appears. Make
Local printer
sure
Automatically detect and install
my Plug and Play printer
unchecked, then click
5. Click
Create a New Port
Standard TCP/IP Port
Next
.
is checked and
is
Next
.
, select
, and click
6. Click
Next
again.
Page 13

10 | Installation Guide
7. Enter the Server Name or IP address of the Fiery Spark, then click
8. Select
Custom
and click
Settings
.
9. Select the following settings:
•
Protocol:
•
LPR Settings:
• SNMP Status Enabled
Queue name (this name is case-sensitive; use lowercase letters):
•
hold
Then click
10. Click
OK
LPR
LPR Byte Counting Enabled
direct
, or
Next
.
.
to close the Configure Standard TCP/IP Port Monitor dialog
box.
Next
11. Click
12. Click
.
Finish
to close the Add Standard TCP/IP Printer Port Wizard dialog
box.
13. At the next screen, click
Have Disk
.
Next
print
.
,
14. Click
English
15. Click
16. Click
Browse
Open
OK
. Then browse to the following folder on the CD-ROM:
Prntdrvr
>
Ps_drvr
>
Win_2000
>
to return to the Install from Disk window.
.
17. Select the appropriate Fiery Spark file for your printer, then click
If you are using this printer Select this file
EPSON Stylus Pro 10000 (pigment ink) Fiery Spark PRO10KCF v1.0
EPSON Stylus Pro 10000 (dye ink) Fiery Spark PRO10K v1.0
EPSON Stylus Pro 5500 printer Fiery Spark PRO5500 v1.0
Next
:
Page 14

Creating Shortcuts to the Fiery Spark Drop Folders | 11
18. Leave the default name or enter a name for the Fiery Spark (31 characters
maximum) in the Printer Name box. This name will be used in the
Printers and Queue windows.
Then click
19. Click
Note
Next
.
Finish
to complete installation.
If you see the Digital Signature Not Found window, click Yes to
continue the installation.
If this is the first printer driver you are installing on the computer, you
are prompted to install files from the Windows 2000 CD. Insert the
CD-ROM, browse to the win2000\english\i386 folder, and then click
OK.
Creating Shortcuts to the Fiery Spark Drop Folders
The Fiery Spark features a unique drop folder system to print jobs over the
network. Creating shortcuts on the client to the Fiery Spark server drop folders
enables you to print your files to the Fiery Spark. To print, simply drag and
drop your files into the drop folder shortcuts. However, using drop folders does
not allow you to change print or color options. If you need to change these
options, print to the Fiery Spark from an application. For details, see the
Printing Guide on the User Software CD-ROM.
Follow these steps to create shortcuts to the Fiery Spark drop folders:
1. Double-click
My Network Places
, then browse to the Fiery Spark Pro
Server.
2. Select the
Spark Hold, Spark Print
3. Right-click the drop folders and select
Spark Direct
, and
Create Shortcut
drop folders.
.
4. You are asked if you want the shortcut to be placed on the desktop.
Yes
Click
.
Page 15

12 | Installation Guide
Installing Command WorkStation
This installation also installs Fiery Downloader and ColorWise Pro Tools.
Follow these steps:
1. On the User Software CD-ROM, open the
Setup
2. Double-click the
icon.
CStation
folder.
3. Follow the instructions on screen.
Finish
4. Click
at the end of the installation. Your computer restarts.
5. Configure Command WorkStation as described in the next section.
Page 16

Installing Command WorkStation | 13
Configuring Command Workstation
1. If Command WorkStation is open, click
Otherwise, go to
Command WorkStation
click
Start
Programs
>
.
OK
.
Command WorkStation
>
2. Enter the appropriate information for the Fiery Spark, then click
the Nickname can be
different from the Fiery
Spark server name, but
cannot contain
[ ] _ " ' <space> <tab>
This example uses
EPSON as the
nickname.
enter the IP address or
server name of the
Fiery Spark
enter PRO10K for the
Stylus Pro 10000 (dye
ink), PRO10KCF for
the Stylus Pro 10000
(pigment ink), or
PRO5500 for the
Stylus Pro 5500
click Add
, then
Add
:
3. Make sure the printer name is selected in the Devices list, then click
4. Select the printer name in the list
OK
of Available Servers, then click
.
OK
.
Page 17

14 | Installation Guide
Macintosh Client Software Installation
For a Macintosh client computer, install the following software:
•
printer files (see below)
•
fonts (see page 15)
•
Shortcuts to the Fiery Spark drop folders (see page 15)
•
Fiery Spooler (see page 16)
•
Fiery Downloader (see page 17)
•
ColorWise Pro Tools (see page 18)
After installing the software, you must enable TCP/IP (see page 19).
Installing Printer Files
To set up the Fiery Spark as a PostScript printer, install the Adobe PostScript
printer driver, and the PPD file that corresponds to your printer. Follow these
steps:
1. On the User Software CD-ROM, open the
English
Printer Driver
>
folder.
2. Double-click the
Yes
3. Click
to continue with the installation and to confirm that your
AdobePS 8.7 Installer
icon.
computer must be restarted after installation. The AdobePS Installer
installs the Adobe PostScript printer driver and the PPD file that
corresponds to your printer.
4. Click
Restart
when installation is complete.
Page 18

Creating Shortcuts to the Fiery Spark Drop Folders | 15
Installing Fonts
The Fonts installer on the User Software CD-ROM includes screen and printer
fonts that correspond to the 136 built-in PostScript printer fonts on the Fiery
Spark. The Font installer copies both kinds of fonts to the System Folder >
Fonts folder on your hard drive. To be available to applications, the screen
fonts must remain in this folder. The printer fonts can be copied to a folder of
your choice. If you have any applications open, you must quit and relaunch
them before the newly installed screen fonts are available.
Follow these steps:
1. On the User Software CD-ROM, double-click the
Install
2. At the next screen, click
3. Click
Restart
when installation is complete.
.
Fonts
icon.
Creating Shortcuts to the Fiery Spark Drop Folders
The Fiery Spark features a unique drop folder system to print jobs over the
network. Creating shortcuts on the client to the Fiery Spark server drop folders
enables you to print your files to the Fiery Spark. To print, simply drag and
drop your files into the drop folder shortcuts. However, using drop folders does
not allow you to change print or color options. If you need to change these
options, print to the Fiery Spark from an application. For details, see the
Printing Guide on the User Software CD-ROM.
Follow these steps to create shortcuts to the Fiery Spark drop folders:
1. On the User Software CD-ROM, double-click the
DropFolders
icon.
2. Read the license agreement, then click
Install
3. Click
. The drop folders application for Mac OS is installed and
Accept
.
three drop folders are created on the desktop.
Page 19

16 | Installation Guide
After creating the shortcuts, connect to the server as follows:
1. Double-click the
DropFolders
application on the desktop, if it is not
already open.
2. Enter the IP address of the Fiery Spark server, then click
OK
.
The drop folders are activated and ready to accept print jobs.
Installing Fiery Spooler
This installation also installs Mac OS Runtime of Java (MRJ), if it isn’t already
installed on your system.
1. On the User Software CD-ROM, double-click the
Fiery Spooler
icon.
2. Read the license agreement, then click
Install
3. At the next screen, click
Quit
4. Click
when the installation is complete.
.
Accept
.
After installing Fiery Spooler, connect to the server as follows:
1. Double-click the
Fiery_Spooler
icon in the Fiery f folder on your
hard drive.
2. Click
3. Click
Option
Add
.
.
Page 20

Installing Fiery Downloader | 17
4. Enter the Name (IP address) and New Device (printer name). Click
then click
enter PRO10K for the
Stylus Pro 10000 (dye
ink), PRO10KCF for
the Stylus Pro 10000
(pigment ink), or
PRO5500 for the
Stylus Pro 5500
5. Click
OK
.
then click OK
OK
twice. Fiery Spooler launches.
enter the IP address
click Add
Installing Fiery Downloader
1. On the User Software CD-ROM, double-click the
Downloader
icon.
Fiery
Add
,
2. Read the license agreement, then click
Install
3. At the next screen, click
Quit
4. Click
when the installation is complete.
.
Accept
.
Page 21

18 | Installation Guide
Installing ColorWise Pro Tools
This installation also installs Mac OS Runtime of Java (MRJ), if it isn’t already
installed on your system.
1. On the User Software CD-ROM, double-click the
Tools
icon.
2. Read the license agreement, then click
3. At the next screen, click
Install
.
Accept
.
ColorWise Pro
After installing ColorWise Pro Tools, connect to the server as follows:
1. Double-click the
ColorWise Pro Tools
icon in the Fiery f folder on your
hard drive.
Add
2. Click
.
3. Enter the appropriate information for the Fiery Spark, then click
the nickname can be different
from the Fiery Spark server
name, but cannot contain
[ ] _ " ' <space> <tab>
IP address of the Fiery
enter PRO10K for the
Stylus Pro 10000 (dye
ink), PRO10KCF for the
Stylus Pro 10000
(pigment ink), or
PRO5500 for the
Stylus Pro 5500
Spark
click Add
Add
.
OK
4. Make sure the printer name is selected in the Devices list, then click
.
5. At the next window, select the printer name in the list of Available Servers,
Select
then click
.
Page 22

Selecting TCP/IP
Printing to the Fiery Spark | 19
You must select
TCP/IP window, select
TCI/IP
from the Control Panel in the Apple menu. In the
Connect via Ethernet
. Then restart your Macintosh.
Printing to the Fiery Spark
If you’re printing from a Macintosh, select
AdobePS
the Chooser, then close the Chooser.
For instructions on using the Fiery Spark software, see the User Guide on the
Fiery Spark CD-ROM.
Fiery Spark
and
from
Page 23

20 | Installation Guide
Notices
FCC Compliance Statement
For United States Users
This equipment has been tested and found to comply with the limits for a Class A digital device,
pursuant to Part 15 of the FCC Rules. These limits are designed to provide reasonable protection
against harmful interference when the equipment is operated in a commercial environment. This
equipment generates, uses, and can radiate radio frequency energy and, if not installed and used
in accordance with the instruction manual, may cause harmful interference to radio
communications. Operation of this equipment in a residential area is likely to cause harmful
interference, in which case the user will be required to correct the interference at his own
expense.
This device complies with Part 15 of the FCC Rules. Operation is subject to the following two
conditions:
(1) this device may not cause harmful interference, and
(2) this device must accept any interference received, including interference that may cause
undesired operation.
WARNING
The connection of a non-shielded equipment interface cable to this equipment will invalidate the
FCC Certification of this device and may cause interference levels which exceed the limits
established by the FCC for this equipment. It is the responsibility of the user to obtain and use a
shielded equipment interface cable with this device. If this equipment has more than one
interface connector, do not leave cables connected to unused interfaces. Changes or
modifications not expressly approved by the manufacturer could void the user’s authority to
operate the equipment.
For Canadian Users
This Class A digital apparatus complies with Canadian ICES-003.
Cet appareil numérique de la classe A est conforme à la norme NMB-003 du Canada.
Warranty
Epson America, Inc. Limited Warranty for Commercial Products
What Is Covered: Epson America, Inc. (“Epson”) warrants to the first end-user customer that the
EPSON Fiery Spark Software RIP License Protection Key (the “key” or the “product”)
accompanied by this limited warranty statement, if purchased and used in the United States or
Canada, will conform to the manufacturer’s specifications and will be free from defects in
workmanship and materials for a period of 1 year from the date of original purchase (proof of
purchase required).
Page 24

Warranty | 21
The key is needed by the end-user to use the Fiery Spark Software RIP (the “Software”). THIS
LIMITED WARRANTY COVERS ONLY THE KEY, NOT THE SOFTWARE. For the
Software license and Software warranty terms, please refer to the ELECTRONIC FOR
IMAGING SOFTWARE LICENSE AGREEMENT, which will appear on-screen during the
Software installation process.
What Epson Will Do to Correct Problems: Should the key prove defective during the warranty
period, please call the toll-free EPSON Preferred support line identified in the EPSON Preferred
limited warranty booklet that was included with your printer. In order to access this toll-free
number for warranty support for the key, you must have the printer’s Unit ID number, which
was provided in the booklet. Please see the printer’s limited warranty booklet for more
information about toll-free technical support. If you have any difficulty with the toll-free support
number, please call (562) 276-1305 in the U.S. or (905) 709-2567 in Canada during normal
business hours.
When you call, an Epson service technician will provide telephone diagnostics to determine the
cause of the problem with the key. If it is determined that the key is defective, then Epson will
exchange the defective key. The replacement key may be new or refurbished to the Epson
standard of quality. Exchange products assume the remaining warranty period of the original
product.
Epson usually will ship the replacement key to your location the next business day, if notified
before 2:00 p.m. Pacific Time. If notified after that time, the replacement key usually will arrive
on the second business day. To secure the replacement of the key, you must provide Epson with
a valid credit card number with sufficient credit to cover the price of the defective key. You will
be billed at the Manufacturer’s Suggested Retail Price if the defective key is not returned to
Epson within ten (10) business days of your call.
TO RECEIVE A FREE REPLACEMENT KEY, YOU MUST BE ABLE TO PROVIDE
EPSON WITH YOUR DEFECTIVE KEY.
What this Warranty Does Not Cover: This warranty covers only normal use in the United States
and Canada. Epson is not responsible and will not provide a replacement key free of charge if the
key is lost. This warranty does not cover damage attributable to third party parts, components or
peripheral devices added to the Epson product after its shipment from Epson (for example,
dealer- or user-added non-Epson boards). Epson is not responsible for recovery or restoration of
data from failed components, or establishment of other than factory default settings. Epson is not
responsible for warranty service should the Epson label or logo, or the rating label or serial
number be removed or should the product fail to be properly maintained or fail to function
properly as a result of misuse, abuse, improper installation, neglect, improper shipping, damage
caused by disasters such as fire, flood, lightning, improper electrical currents, software problems,
or interaction with non-Epson products.
Disclaimer of Warranties: THE WARRANTY AND REMEDY PROVIDED ABOVE ARE
EXCLUSIVE AND IN LIEU OF ALL OTHER EXPRESSED OR IMPLIED WARRANTIES
INCLUDING, BUT NOT LIMITED TO, THE IMPLIED WARRANTIES OF
MERCHANTABILITY OR FITNESS FOR A PARTICULAR PURPOSE. UNLESS
STATED HEREIN, ANY STATEMENTS OR REPRESENTATIONS MADE BY ANY
OTHER PERSON OR FIRM ARE VOID.
Page 25

22 | Installation Guide
Remedies: Your exclusive remedy and Epson’s entire liability for a material breach of this
Agreement will be limited to a refund of the price paid for the Epson products covered by this
Agreement. Any action for breach of warranty must be brought within 15 months of the date of
original purchase. Epson is not liable for performance delays or for nonperformance due to
causes beyond its reasonable control. Except as provided in this written warranty, neither Epson
nor its affiliates shall be liable for any loss, inconvenience, or damage, including direct, special,
incidental or consequential damages, including lost profits, cost of substitute equipment,
downtime, claims of third parties, including customers, or injury to property, resulting from the
use or inability to use the Epson products, whether resulting from a breach of warranty or any
other legal theory. Some jurisdictions do not allow limits on warranties or remedies for breach in
certain transactions. In such jurisdictions, the limits in this paragraph and the preceding
paragraph may not apply.
In Canada, warranties include both warranties and conditions.
Governing Laws: Any disputes arising out of this Agreement will be settled by arbitration to be
conducted in Los Angeles, California, in accordance with the commercial Arbitration Rules of
the American Arbitration Association, and judgment upon the award rendered by the
arbitrator(s) may be entered in any court having jurisdiction thereof. This Agreement shall be
construed in accordance with the laws of the State of California, except the arbitration clause that
shall be enforced pursuant to the Federal Arbitration Act.
Epson America, Inc. – P.O. Box 93012 – Long Beach CA 90809-9941 – MS: 6-40
Page 26

Printed in USA
CPD-12826
 Loading...