

Page 1
User's Guide
Page 2

Contents
2
Notations Used in This Guide 5
Using the Manual to Search for Information.....................................7
Searching b
Jumping Directly from Bookmarks.....................................................................7
Printing Only the Pages You Need......................................................................7
y Keyword......................................................................................7
Getting the Latest Version of the Documents................................... 8
Introduction to Your Projector 9
Projector Parts and Functions.......................................................... 10
tor Parts - Front/Side..............................................................................10
Projec
Projector Parts - Rear/Side...............................................................................11
Projector Parts - Base...................................................................................... 12
Projector Parts - Remote Control......................................................................14
Setting Up the Projector 16
Projector Placement..........................................................................17
tor Setup and Installation Options.......................................................... 19
Projec
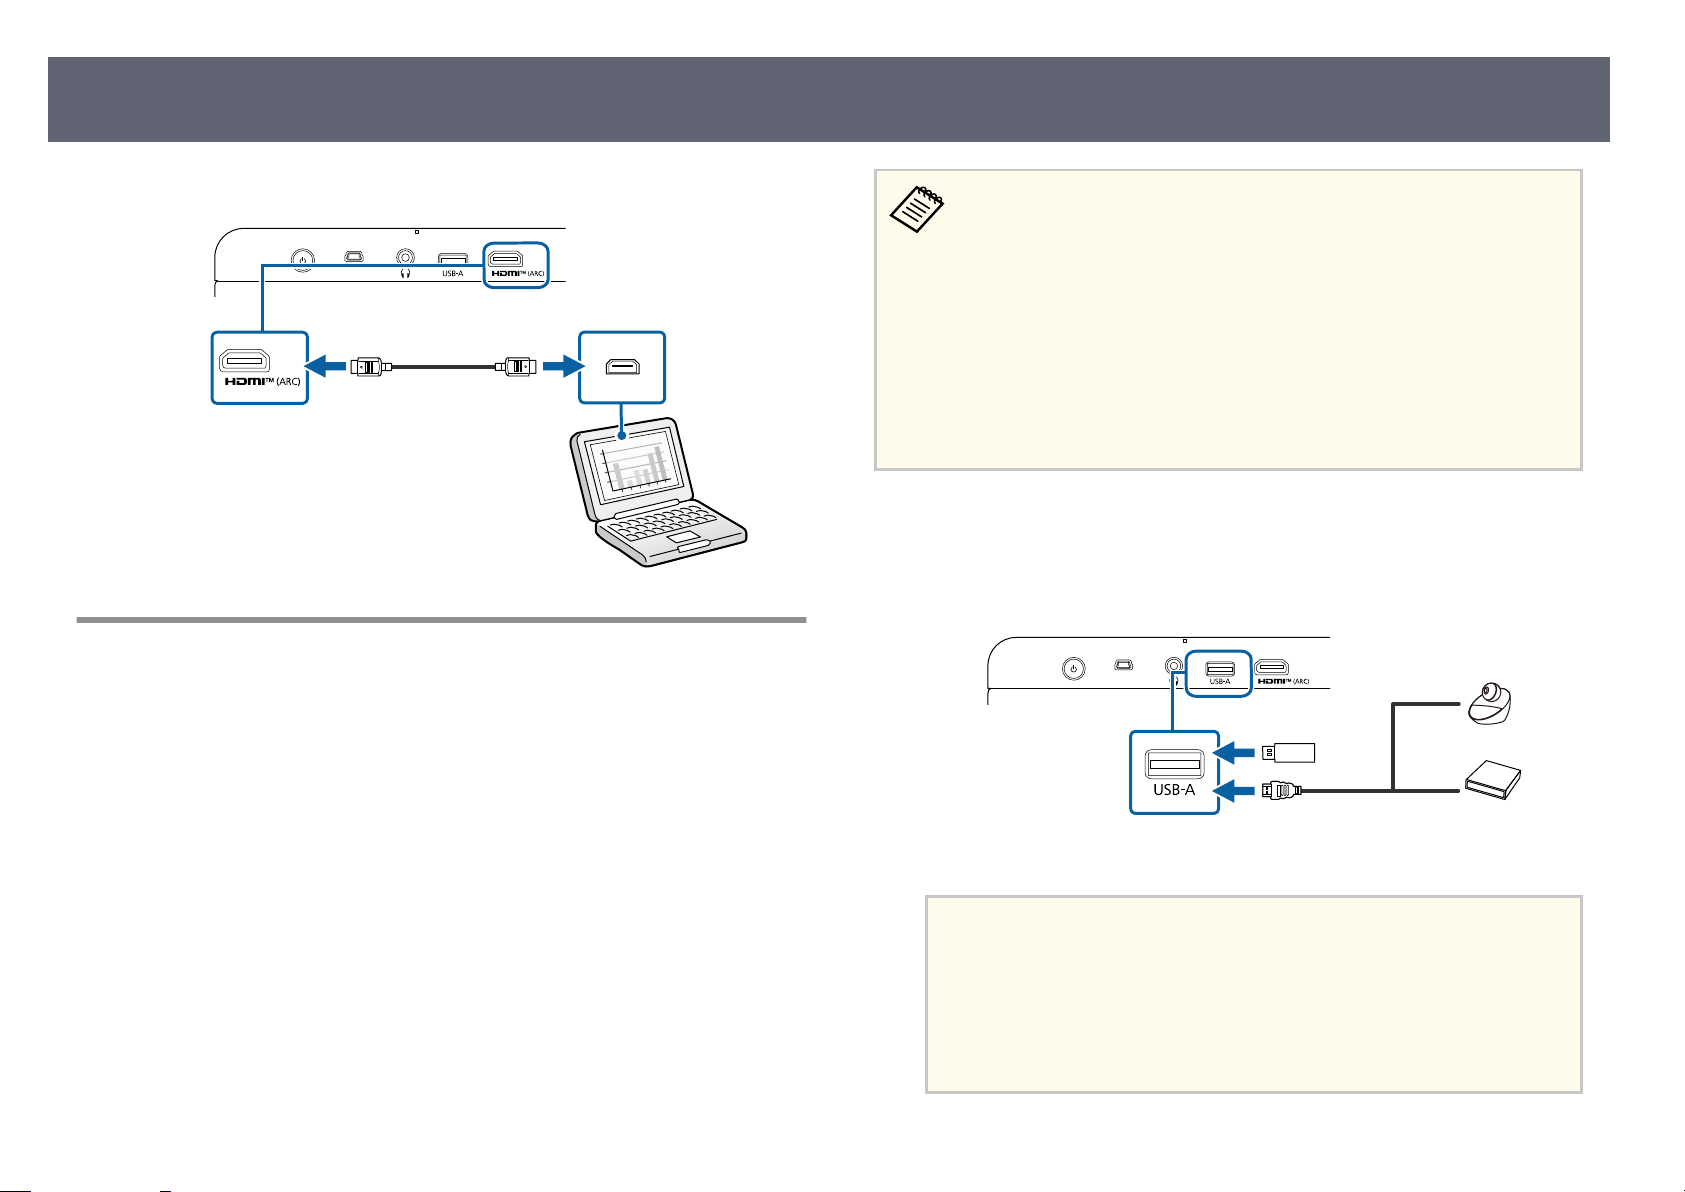
Precautions on Installation...........................................................................19
Projection Distance.........................................................................................20
Mounting the Projector on a Tripod or Projector Stand...................................... 21
Projector Connections.......................................................................23
Connecting to an HDMI Video Source...............................................................23
Connecting to a Computer for HDMI Video and Audio.......................................23
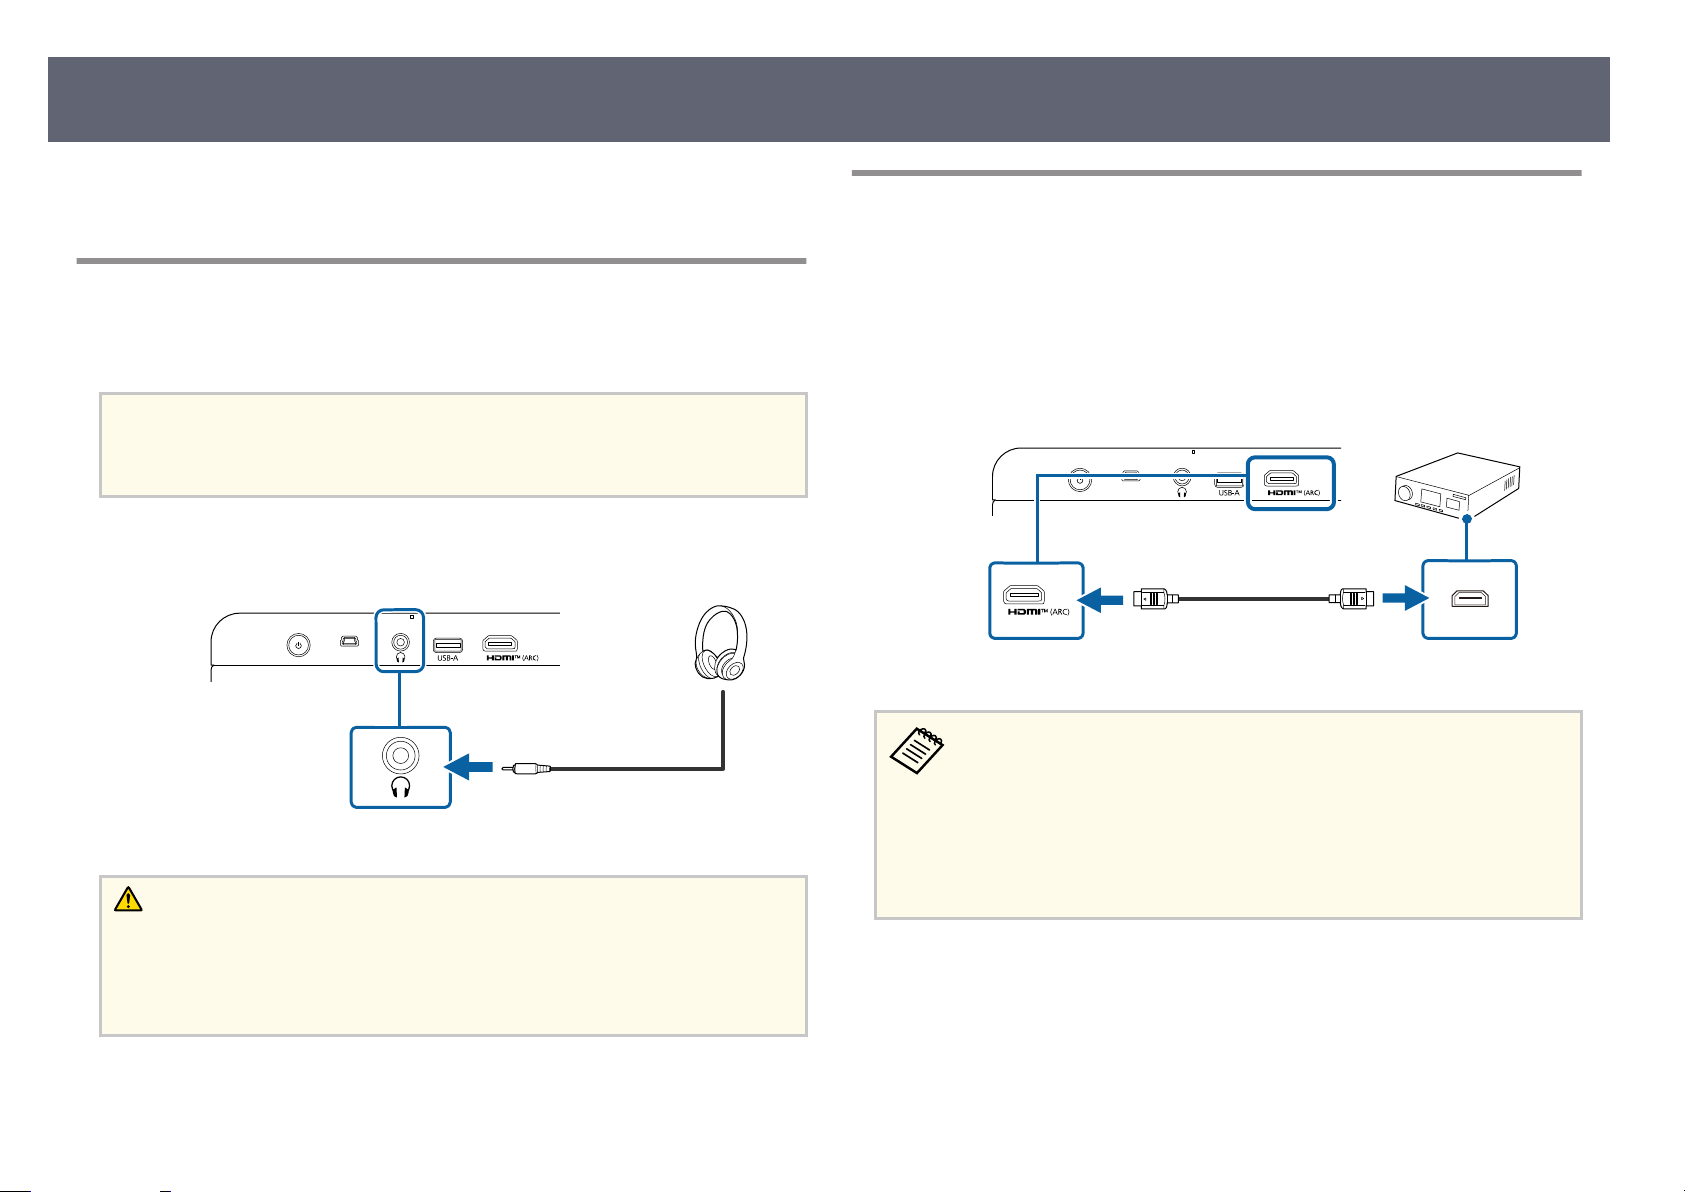
Connecting to External USB Devices.................................................................24
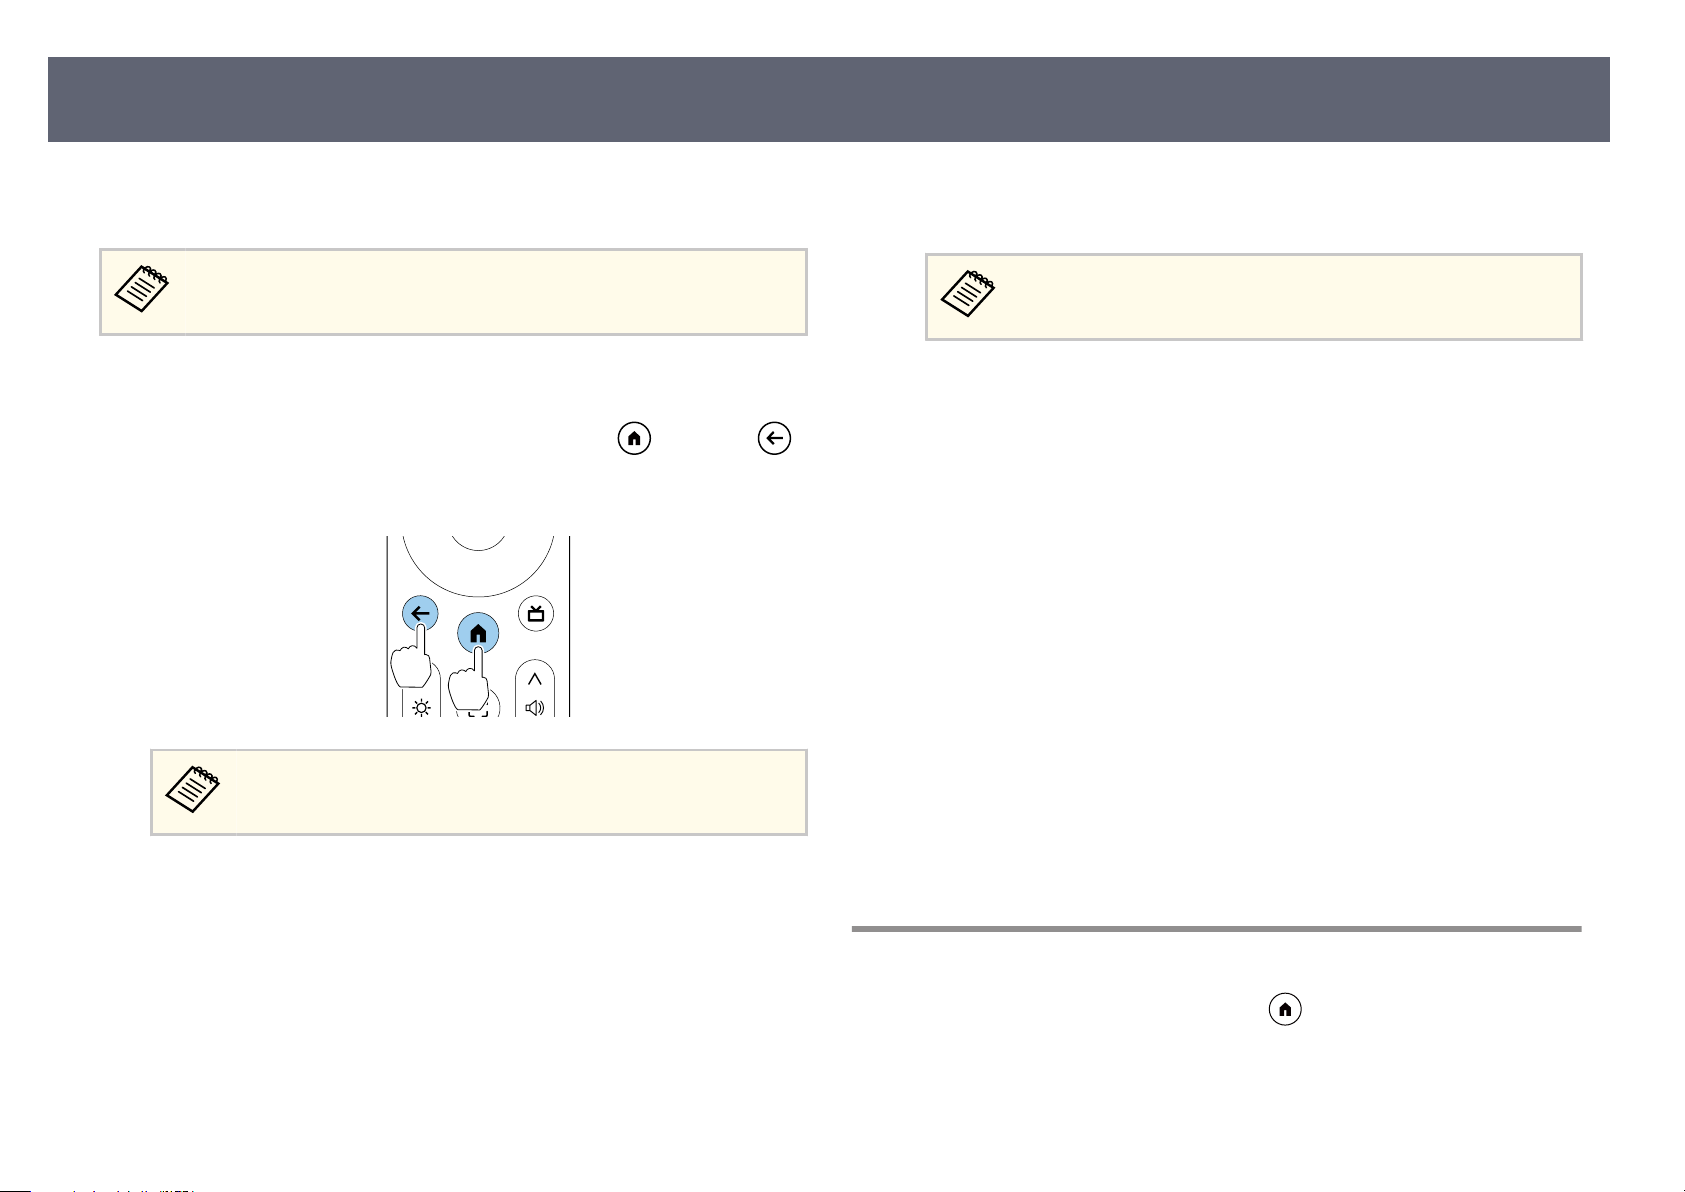
Connecting Headphones................................................................................ 25
Connecting to an ARC Compatible AV System...................................................25
Installing Batteries in the Remote Control...................................... 26
Remote Control Operation.............................................................................. 26
Setting Up the Google TV................................................................. 28
Google TV Home Screen................................................................................. 28
About Epson Projector Update.........................................................30
Installing Epson Projector Update....................................................................30
Using Basic Projector Features 31
Turning On the Projector (EF-21)......................................................32
Turning On the P
AC Adapter Safety Instructions........................................................................ 33
Turning O the Projector.................................................................. 35
Projection Modes...............................................................................36
Changing the Projection Mode Using the Menus...............................................36
Adjusting the Image Height (EF-21).................................................37
Adjusting the Position of the Image (EF-22)....................................38
Image Shape.......................................................................................39
Correcting the Image Shape and Focus Automatically.......................................39
Adjusting the Size of the Image....................................................................... 40
Adjusting the Position of the Image................................................................. 41
Automatically Correcting the Image Shape with Fit to Screen.............................41
Correcting the Image Shape Manually..............................................................42
Focusing the Image Using the Projector Menus............................. 44
Selecting an Image Source................................................................45
Image Aspect Ratio............................................................................46
Changing the Image Aspect Ratio....................................................................46
Available Image Aspect Ratios.........................................................................46
Adjusting Image Quality (Color Mode)............................................ 47
Changing the Color Mode............................................................................... 47
Available Color Modes.................................................................................... 47
Adjusting Image Quality in Detail....................................................48
rojector (EF-22)......................................................33
Page 3

Contents
3
Turning On Automatic Luminance Adjustment.............................. 49
Adjusting the Light S
ource Brightness............................................ 50
Controlling the Volume with the Volume Buttons..........................51
Changing the Sound Mode............................................................... 52
Available Sound Modes...................................................................................52
Adjusting Projector Features 53
Using the Projector as a Bluetooth Speaker....................................54
Bluetooth Specications
Shutting O the Image Temporarily................................................ 56
Using Google Cast™............................................................................57
HDMI CEC Features............................................................................58
Operating Connected Devices Using the HDMI CEC Features............................. 58
Installing a Security Cable................................................................ 59
Updating Projector Firmware Using Epson Projector Update....... 60
Initializing the Projector................................................................... 61
................................................................................. 54
Apps Menu.................................................................................................... 68
System Menu................................................................................................. 68
Remotes & Accessories Menu.......................................................................... 69
Help & Feedback Menu...................................................................................69
Maintaining the Projector 70
Projector Maintenance......................................................................71
Cleaning the Lens..............................................................................
72
Cleaning the Projector Case..............................................................73
Air Filter and Vent Maintenance.......................................................74
Cleaning the Air Filters and Intake Vents ..........................................................74
Solving Problems 76
Projection Problems..........................................................................77
Projec
Solving Projector Power-On or Power-O Problems......................80
tor Indicator Status.................................................................78
Solving Projector Power Problems....................................................................80
Solving Projector Shutdown Problems............................................................. 80
Adjusting the Menu Settings 62
Using the Projector's Menus............................................................. 63
Projec
Projector Feature Settings - Projector Menu...................................65
Image Quality Settings - Display & Sound Menu............................ 67
Other Menus...................................................................................... 68
tor Feature Settings - Inputs Menu........................................64
Network & Internet Menu................................................................................68
Accounts & sign-in Menu.................................................................................68
Privacy Menu................................................................................................. 68
Solving Image Problems................................................................... 81
Solving Missing Image Problems......................................................................81
Adjusting an Image that is not Rectangular.......................................................81
Adjusting a Fuzzy or Blurry Image....................................................................82
Fixing Partial Image Problems..........................................................................82
Adjusting an Image that Contains Noise or Static.............................................. 83
Adjusting an Image with Incorrect Brightness or Colors.....................................83
Adjusting an Upside-down Image....................................................................84
Solving Auto Correction Problems................................................................... 84
Solving Sound Problems...................................................................85
Solving Missing or Low Audio Problems...........................................................85
Solving Bluetooth Speaker Mode Problems...................................................... 85
Page 4

Contents
Solving Remote Control Operation Problems.................................87
4
Solving HDMI CEC Pr
oblems.............................................................88
Solving Wi-Fi Network Problems......................................................89
Solving Google TV Problems............................................................ 90
Appendix 91
Optional Accessories and Replacement Parts................................. 92
Mounts
Screen Size and Projection Distance................................................93
Supported Monitor Display Resolutions......................................... 95
Projector Specications.................................................................... 96
AC Adapter Specications (EF-22).................................................................... 97
Connector Specications.................................................................................97
External Dimensions......................................................................... 98
List of Safety Symbols and Instructions........................................ 100
Laser Safety Information................................................................ 102
Laser Warning Labels.................................................................................... 102
..........................................................................................................92
Glossary............................................................................................106
Notices..............................................................................................107
FCC Compliance Statement...........................................................................107
Indication of the manufacturer and the importer in accordance with requirements
of EU directive..............................................................................................108
Indication of the manufacturer and the importer in accordance with requirements
of United Kingdom directive..........................................................................108
Restriction of Use..........................................................................................108
Trademarks..................................................................................................109
Copyright Notice.......................................................................................... 109
Copyright Attribution....................................................................................109
Page 5
Notations Used in This Guide
ty Symbols
Safe
e projector and its manuals use graphical symbols and labels to indicate content that tells you how to use the projector safely.
Read and carefully follow the instructions that are marked with these symbols and labels to avoid injury to persons or damage to property.
is symbol indicates information that, if ignored, could possibly result in personal injury or even death.
Warning
Caution
General Information Notations
Attention
button
Menu/Setting name Indicates projector menu and setting names.
s
is symbol indicates information that, if ignored, could possibly result in personal injury or physical damage due to incorrect handling.
is label indicates procedures that may result in damage or injury if sucient care is not taken.
is label indicates additional information that may be useful to know.
Indicates the buttons on the remote control or the control panel.
xamp
le:
E
Examp
Select the Projector menu.
s Projector > Image Correction > Auto Keystone Correction
is label indicates links to the related pages.
label indicates the projector's current menu level.
is
button
le:
Related Links
g
•
"Using the Manual to Search for Information" p.7
Page 6

•
ing the Latest Version of the Documents" p.8
"Gett
Page 7

Using the Manual to Search for Information
e PDF manual allows you to search for information you are looking for by
yword, or jump directly to specic sections using the bookmarks. You can
ke
also print only the pages you need. is section explains how to use a PDF
manual that has been opened in Adobe Reader X on your computer.
Related Links
g
•
"Searching by Keyword" p.7
•
"Jumping Directly from Bookmarks" p.7
•
"Printing Only the Pages You Need" p.7
7
Searching by Keyword
Click Edit > Advanced Search. Enter the keyword (text) for information you
want to nd in the search window, and then click Search. Hits are displayed as a
list. Click one of the displayed hits to jump to that page.
Jumping Directly from Bookmarks
Click a title to jump to that page. Click + or > to view the lower level titles in
that s
ection. To return to the previous page, perform the following operation on
your keyboard.
•
Windows: Hold down Alt, and then press ←.
•
Mac OS: Hold down the command key, and then press ←.
Printing Only the Pages You Need
You can extract and print only the pages you need. Click Print
and then specify the pages you want to print in Pages in Pages to Print.
•
To specify a series of pages, enter a hyphen between the start page and the
end page.
Example: 20-25
•
To specify pages that are not in series, divide the pages with commas.
Example: 5, 10, 15
in the File menu,
Page 8

Getting the Latest Version of the Documents
8
You can get the latest version of the manuals and spe
Web site.
Visit epson.sn, and enter your model name.
cications on the Epson
Page 9

Introduction to Your Projector
hese sections to learn more about your projector.
See t
Related Links
g
•
"Projector Parts and Functions" p.10
Page 10

Projector Parts and Functions
e following sections explain the projector parts and their functions.
l of the features in this guide are explained using illustrations of EF-21 unless
Al
otherwise mentioned.
Related Links
g
•
"Projector Parts - Front/Side" p.10
•
"Projector Parts - Rear/Side" p.11
•
"Projector Parts - Base" p.12
•
"Projector Parts - Remote Control" p.14
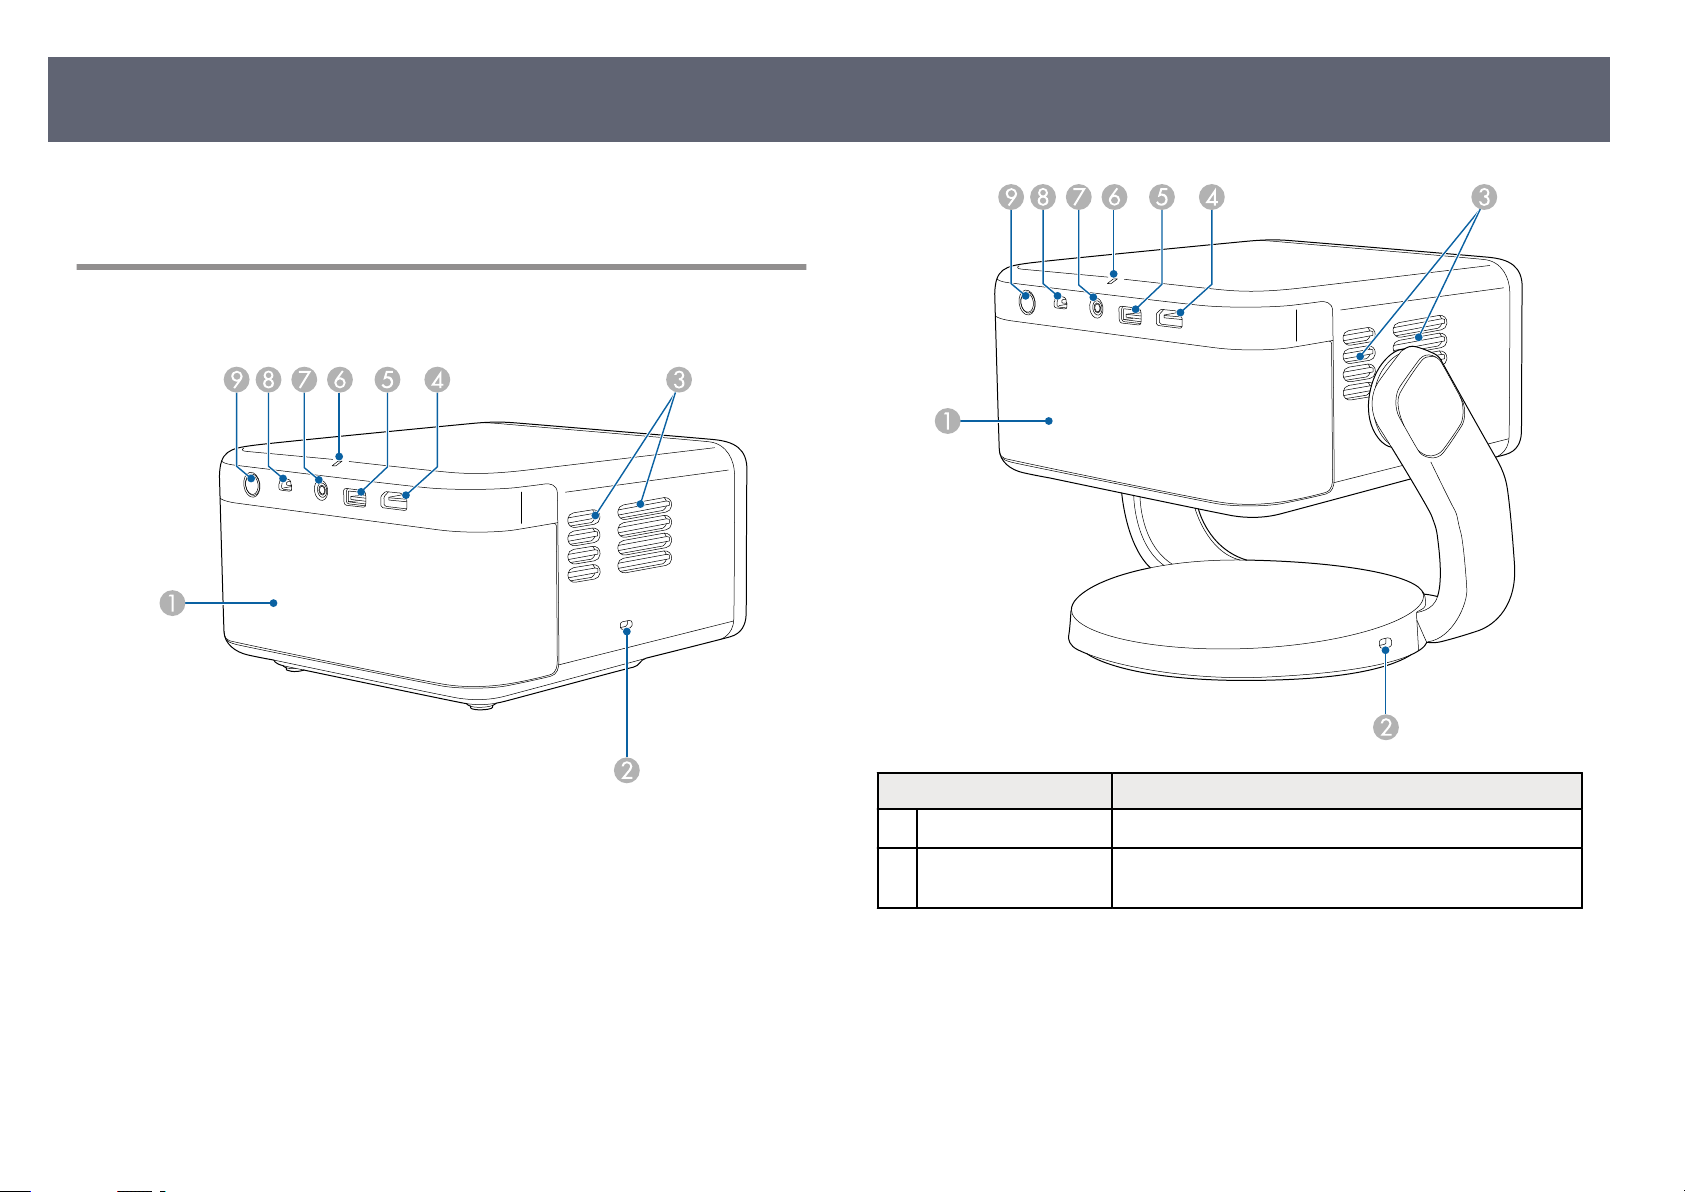
Projector Parts - Front/Side
EF-21
10
EF-22 (model with stand)
Name Function
Power inlet Connects the power cord to the projector (EF-21).
A
AC adapter port Connects the AC adapter (EF-22).
A
Sensor Detects obstacles that are interfering with the projection
B
Lens Images are projected from here.
C
Remote receiver Receives signals from the remote control.
D
Camera Automatically adjusts the shape and focus of the
E
area an
d automatically adjusts the shape and focus of
the projected image. It also reduces the brightness of the
light source to minimize glare (Smart eye protection).
pro
jected image.
Page 11
Projector Parts and Functions
Related Links
g
•
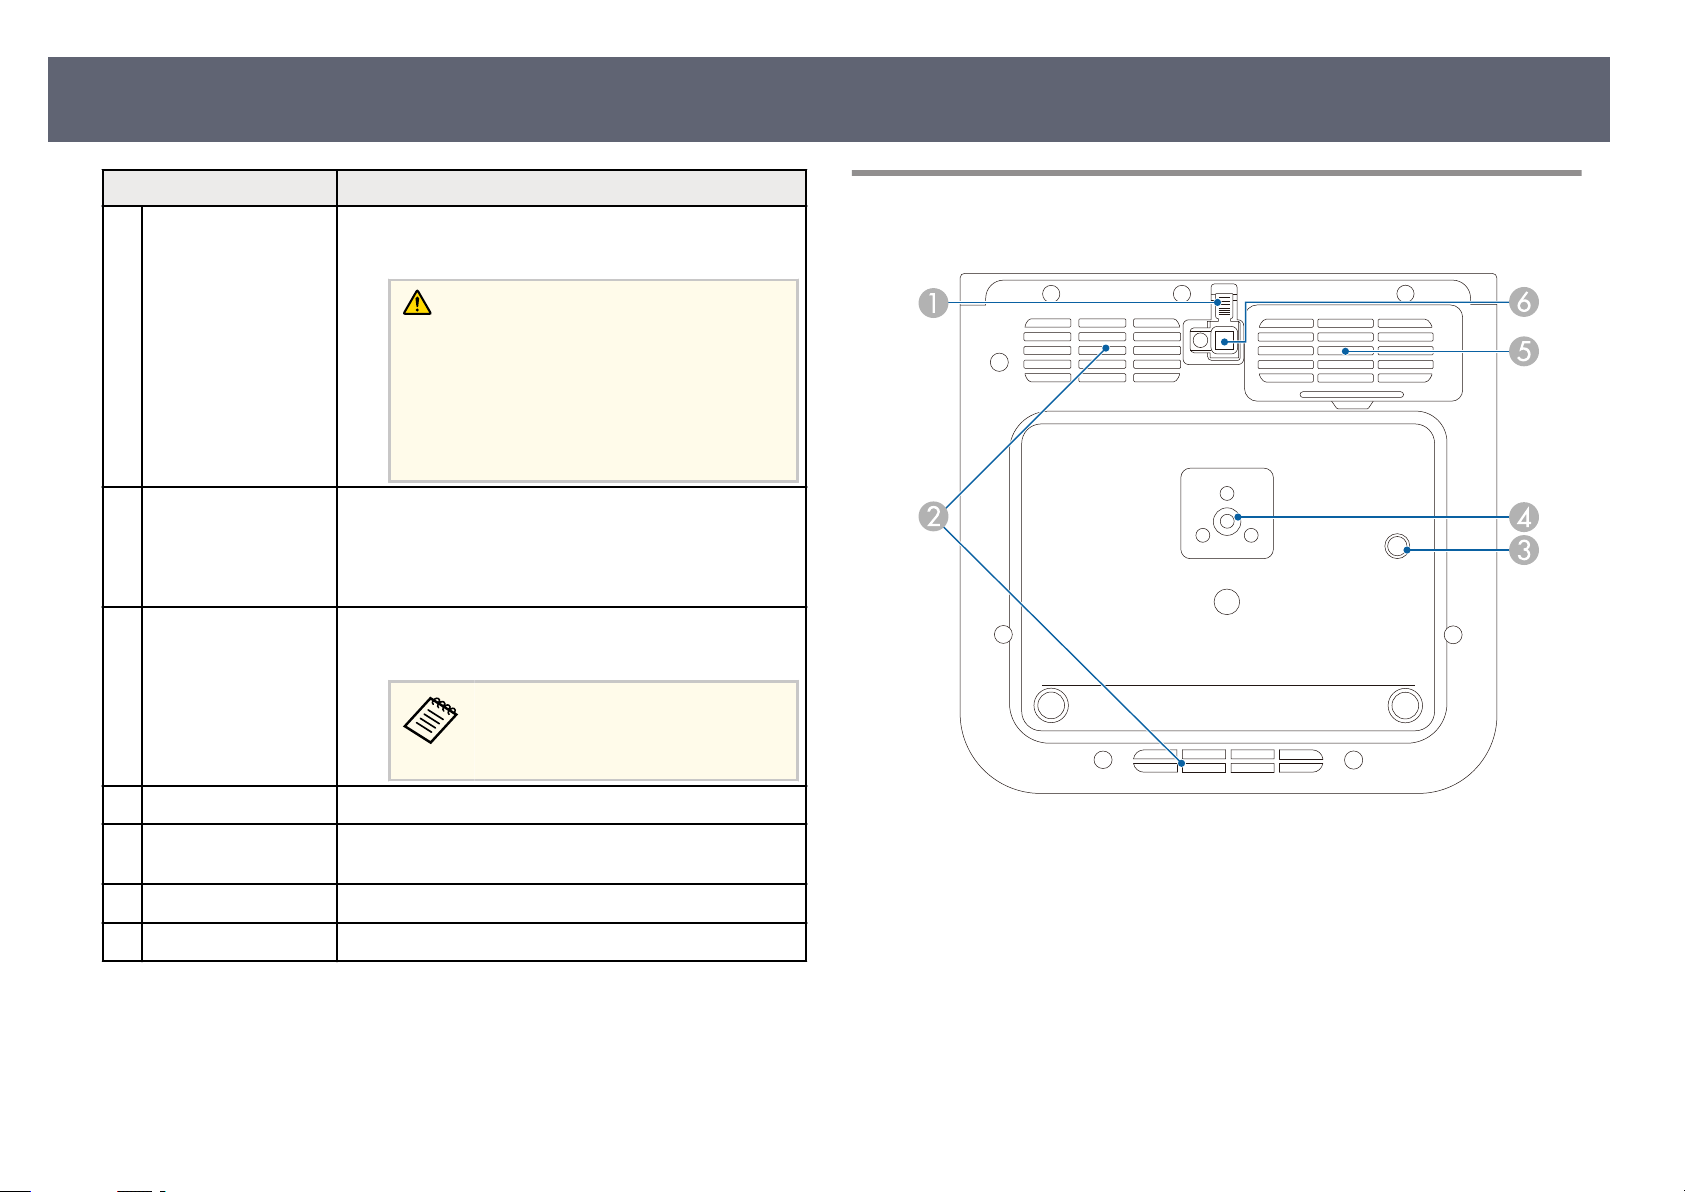
Projector Parts - Rear/Side
EF-21
ote Control Operation" p.26
"Rem
11
EF-22 (model with stand)
Name Function
Speaker Outputs audio.
A
Security slot You can install the security cable (security lock) on the
B
pro
jector to deter the.
Page 12
Projector Parts and Functions
12
Name Function
Air exhaust vents Exhaust vents for air used to cool the projector
C
inter
nally.
Caution
While p
near the air exhaust vent, and do not place
objects that may become warped or damaged
by heat near the vent. Hot air from the air
exhaust vent could cause burns, warping, or
accidents to occur.
HDMI (ARC) port Inputs video signals from HDMI compatible video
D
USB-A port Connects a commercially available USB device such as a
E
equi
pment and computers.
is projector is compatible with HDCP 2.3.
is port is compatible with HDMI ARC.
web
cam, external HDD, or keyboard.
rojecting, do not put your face or hands
is port is not guaranteed to
erate for all devices that support
op
USB.
Projector Parts - Base
EF-21
Status indicator Indicates the projector's status.
F
Audio Out port Outputs audio from the current input source to
G
Service port is port is not normally used.
H
Po
wer button Turns the projector on or o.
I
Related Links
g
•
"Pr
ojector Connections" p.23
•
"Installing a Security Cable" p.59
•
"Projector Indicator Status" p.78
head
phones.
EF-22 (model with stand)
Page 13

Projector Parts and Functions
Name Function
Front adjustable foot When setup on a surface such as a desk, extend the foot
F
Related Links
g
•
"Mounting the Projector on a Tripod or Projector Stand" p.21
•
"Adjusting the Image Height (EF-21)" p.37
•
"Air Filter and Vent Maintenance" p.74
ust the position of the image (EF-21).
to adj
13
Name Function
Foot release lever Press the foot release lever to extend and retract the
A
Air intake vent Takes in air to cool the projector internally.
B
Security cable
C
attac
hment point
Mounting hole for
D
tri
pod
Air intake vent (air
E
lter)
nt adjustable foot (EF-21).
fro
Attach the optional safety wire here to prevent the
projector from falling from the ceiling or wall (EF-21).
Use when mounting the projector on a commercially
available tripod.
For the EF-22, this hole is located at the center of the
bottom of the stand.
T
akes in air to cool the projector internally.
Page 14
Projector Parts and Functions
14
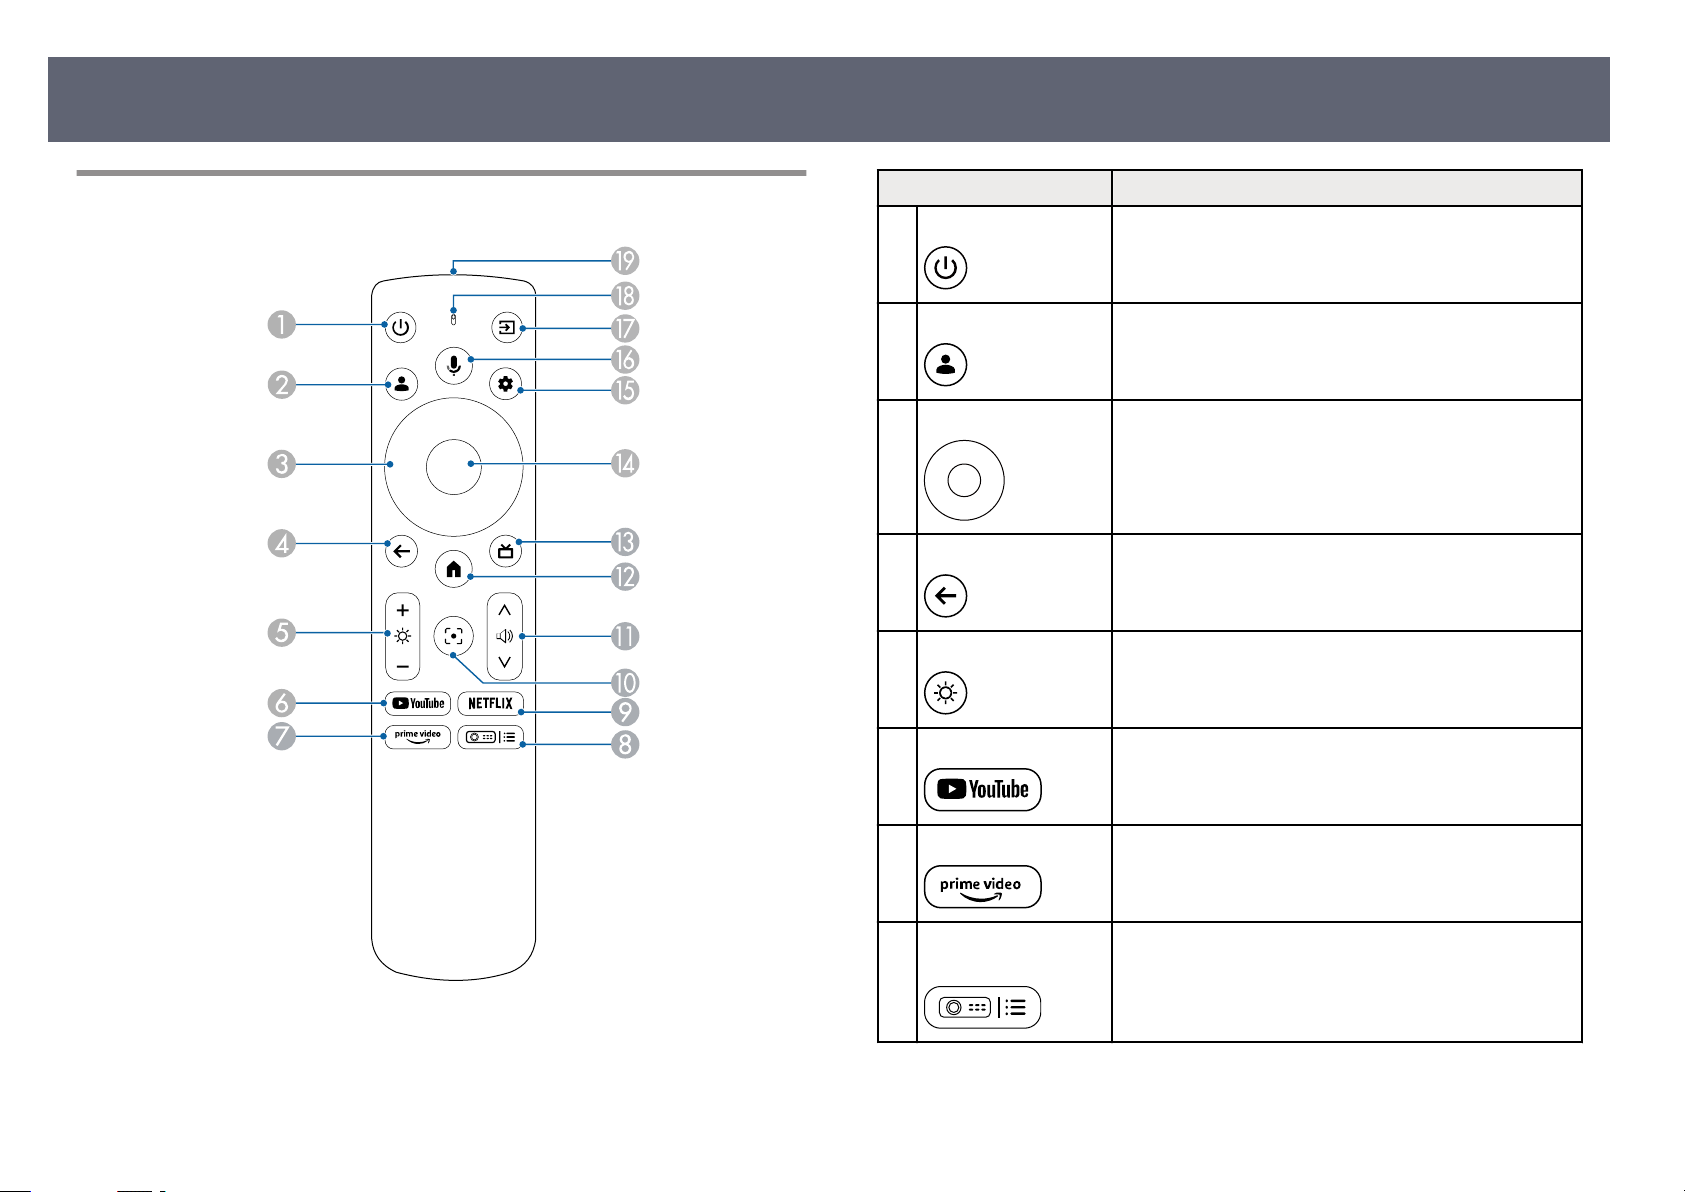
Projector Parts - Remote Control
Name Function
Power button Turns the projector on or o.
A
er Prole button
Us
B
Arrow buttons
C
Esc button
D
Brightness button Lightens or darkens the projected image.
E
YouTube button
F
Displays the user pro
Selects items on the home screen to play online content.
Sele
cts menu items while displaying the projector's
menu.
Stops the current function.
Moves back to the previous menu level while displaying
the projector's menu.
Starts the YouTube application.
le.
Prime Video button Starts the Amazon Prime Video application.
G
Projector menu
H
but
ton
Displays the Projector menu screen.
Page 15

Projector Parts and Functions
15
Name Function
Netix button Starts the Netix application.
I
cus button
Fo
J
Volume up/down
K
but
tons
Home button
L
HDMI button
M
[Enter] button Enters the current selection and moves to the next level
N
Displays the focus adjustment screen. Press the up and
down ar
Hold down this button to automatically correct the
focus of the projected image.
Adjusts the volume for the speaker and headphones.
Displays the Google TV™ hom
Switches to the HDMI source.
while di
row buttons to adjust the focus setting.
e screen.
splaying the projector's menu.
Name Function
Source Search button Displays a list of available input sources.
Q
Indicator/Microphone Turns on when outputting signals from the remote
R
Remote control light
S
emitt
ing area
Related Links
g
•
•
•
•
•
•
•
ning On the Projector (EF-21)" p.32
"Tur
"Turning On the Projector (EF-22)" p.33
"Adjusting the Light Source Brightness" p.50
"Controlling the Volume with the Volume Buttons" p.51
"Focusing the Image Using the Projector Menus" p.44
"Using the Projector's Menus" p.63
"Selecting an Image Source" p.45
rol.
cont
Detects audio when you press the Google Assistant
button.
Outputs remote control signals.
Settings button
O
Google Assistant
P
but
ton
Opens the Google TV dashboard.
Press the Google Assistant button on the remote, or say,
oogle" to get started.
"Hey G
Google Assistant is not available
in certain l
Availability of services varies by
country and language.
anguages and countries.
Page 16

Setting Up the Projector
low the instructions in these sections to set up your projector.
Fol
Related Links
g
•
"Projector Placement" p.17
•
"Projector Connections" p.23
•
"Installing Batteries in the Remote Control" p.26
•
"Setting Up the Google TV" p.28
•
"About Epson Projector Update" p.30
Page 17
Projector Placement
17
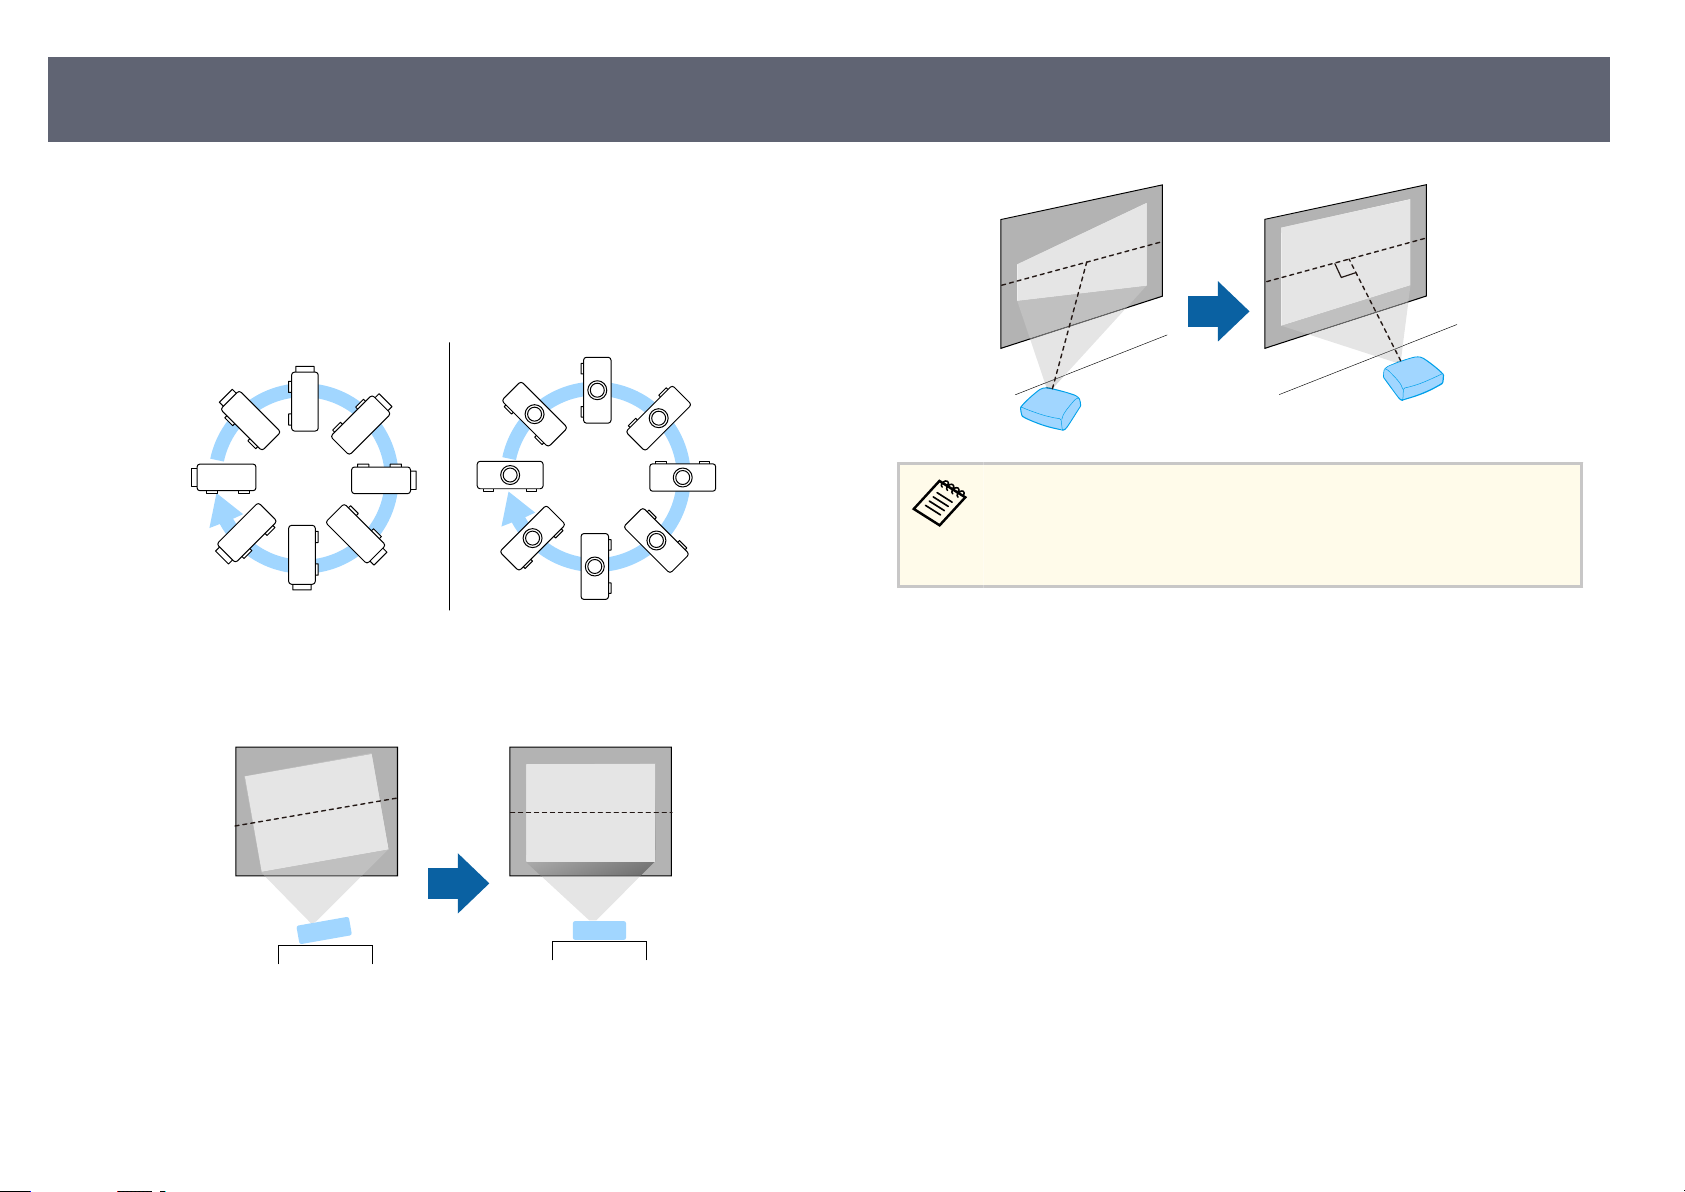
You can place the projector on almost any at surface t
You can also mount the projector on a commercially available tripod or on a
commercially available projector stand.
e projector can be installed at various angles. ere is no vertical or
horizontal limit to how the projector can be installed.
Note the following points when selecting a projector location:
•
Place t
he projector on a sturdy, level surface or install it using a compatible
mount.
o project an image.
If you cannot install the projector squarely facing the screen, correct
any res
ulting keystone distortion using the projector controls. For the
best quality images, we recommend adjusting the installation position
of the projector to achieve the correct image size and shape.
•
Leav
e plenty of space around and under the projector for ventilation, and do
not place it on top of or next to anything that could block the vents.
•
Place the projector so it squarely faces the screen, not at an angle.
Page 18

Projector Placement
18
Warning
•
You m
ust install a ceiling mount when suspending the projector from a ceiling. If
you do not install the projector correctly, it could fall and cause damage or injury.
•
Do not use adhesives on the mounting hole to prevent the screws from loosening,
or use lubricants, oils, or similar substances on the projector; the projector case
may crack causing it to fall. is could cause serious injury to anyone under the
ceiling mount and could damage the projector.
•
Do not install the projector in a location subject to high levels of dust or humidity,
or in a location subject to smoke or steam. Otherwise, it could cause a re
or electric shock to occur. e projector's case could also deteriorate and be
damaged causing the projector to fall from the mount.
Examples of environments that could cause the projector to fall due to case
deterioration
•
Locations subject to excessive smoke or airborne oil particles, such as factories
or kitchens
•
Locations containing volatile solvents or chemicals, such as factories or
laboratories
•
Locations where the projector could be subjected to detergents or chemicals,
such as factories or kitchens
•
Locations in which aroma oils are oen used, such as relaxation rooms
•
Near devices that produce excessive smoke, airborne oil particles, or foam at
events
•
Locations near humidiers
Warning
•
Do no
t cover the projector's air intake or air exhaust vents. If the vents are
covered, the internal temperature could rise and cause a re.
•
Do not use or store the projector in locations where it will be subject to dust or
dirt. Otherwise, the quality of the projected image may decline, or the air lter
may become clogged, resulting in a malfunction or re.
•
Do not install the projector on an unstable surface or in a location beyond the
weight specications of the projector. Otherwise, it could fall or topple causing an
accident and injury.
•
When installing the projector in a high position, take measures to prevent falling
by using wires to ensure safety in an emergency, such as an earthquake, and to
prevent accidents. If it is not installed correctly, it could fall causing an accident
and injury.
•
Do not install in locations where salt damage could occur, or in locations subject
to corrosive gas such as sulphuric gas from hot springs. Otherwise, corrosion
could cause the projector to fall. It could also cause the projector to malfunction.
Caution
When c
projector could fall causing damage or injury (EF-22).
g
•
•
•
•
•
•
•
•
arrying the projector, be sure to hold the stand in both hands. Otherwise, the
Related Links
ojector Setup and Installation Options" p.19
"Pr
"Projection Distance" p.20
"Mounting the Projector on a Tripod or Projector Stand" p.21
"Adjusting the Image Height (EF-21)" p.37
"Adjusting the Position of the Image (EF-22)" p.38
"Focusing the Image Using the Projector Menus" p.44
"Image Shape" p.39
"Focusing the Image Using the Projector Menus" p.44
Page 19

Projector Placement
19
Projector Setup and Installation Options
You can set up or install your projector in the following ways:
Make s
menu according to the installation method being used.
Front/Rear
Front Ceiling/Rear Ceiling
ure you select the correct Projection Mode option in the projector's
Caution
Do no
t cover the projector's lens. If the lens is covered, the internal temperature
could rise and it could result in a malfunction.
Attention
•
We re
commend installing the projector on a protective mat to prevent the
projector or the cloth covering the speaker from being damaged, or the color
from staining unprotected surfaces (EF-21).
•
e sound from the projector's speaker may be mued (EF-21).
•
If you tilt the projector toward the ceiling while connection cables are connected
to the projector's ports, the cables and ports can be damaged. Disconnect the
cables before tilting the projector (EF-22).
Related Links
g
•
"Pr
ecautions on Installation" p.19
•
"Projection Modes" p.36
Precautions on Installation
e the following precautions when installing the projector.
Not
Projecting Images onto a Ceiling
Page 20
Projector Placement
20
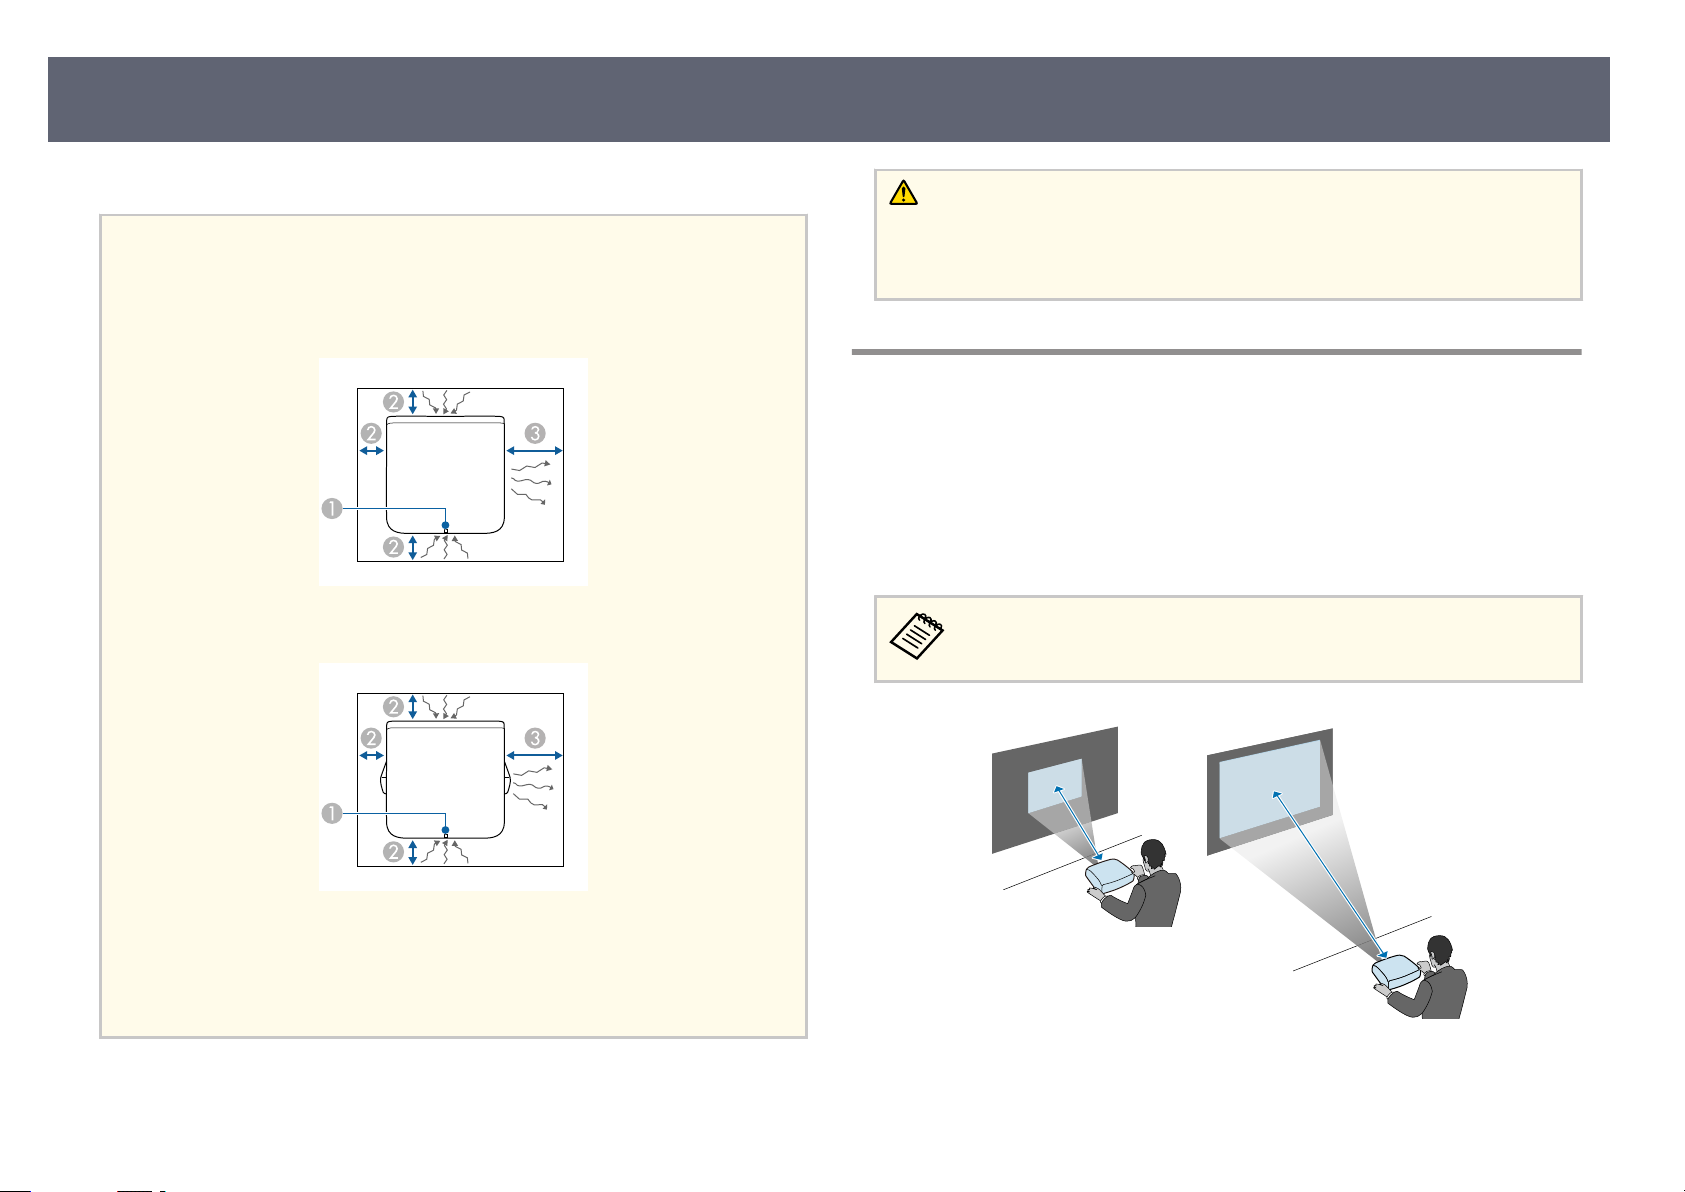
Installation space
Attention
Be sur
e to leave the following amount of space around the projector so as not to
block the air exhaust and intake vents.
EF-21
EF-22
Caution
Ins
tall the supplied AC adapter more than 30 cm away from the projector. If the
temperature of the AC adapter rises due to heat from the projector, the projector
may not operate properly (EF-22).
Projection Distance
e distance at which you place the projector from the screen determines the
app
roximate size of the image. e image size increases the farther the projector
is from the screen, but can vary depending on the aspect ratio and other
settings.
See the Appendix for details about how far to place the projector from the
screen based on the size of the projected image.
When correcting keystone distortion, your image is slightly smaller.
Status indicator
A
10 cm
B
30 cm
C
Relat
g
•
ed Links
cr
een Size and Projection Distance" p.93
"S
Page 21

Projector Placement
Mounting the Projector on a Tripod or Projector Stand
You can mount the projector on a commercially available tripod or projector
stan
d.
21
•
•
Turn the projector upside down.
a
When installing the projector in a high place, attach the optional security
b
wire s
et (ELPWR01) to the security cable attachment point.
EF-21
EF-22
an mount the projector on a tripod that uses 1/4-20UNC size
You c
xing screws.
When installing the projector in a high place, be sure to attach the
optional security wire set (ELPWR01) for safety purposes.
Mount the projector on a tripod or a projector stand. For details, see the
c
do
entation supplied with the tripod or projector stand.
cum
Warning
When m
•
•
•
•
•
ounting the projector on the tripod, note the following points:
Use a tripod that is strong enough to support the weight of the projector.
Securely tighten the tripod's screw into the projector's mounting hole. If the
screw loosens, the projector could fall or topple causing an accident and
injury.
Do not carry the projector while it is mounted on a tripod. Doing so will
put too much pressure on the tripod xing point and the projector could
fall or topple causing an accident and injury.
Place the tripod on a at and stable surface. Otherwise, the tripod could
topple causing an accident and injury.
For details on how to use the tripod, see the documentation supplied with
the tripod.
Page 22
Projector Placement
When installing the projector in a high place such as a ceiling,
make s
ure you hook the carabiner of the optional security wire set
(ELPWR01) to a point that is strong enough to hold the weight of
the projector and the mounting hardware.
22
Page 23

Projector Connections
23
See these sections to connect the projector to a variety of projection sources.
Attention
•
Che
ck the shape and orientation of the connectors on any cable you plan to
connect. Do not force a connector into a port if it does not t. e device or your
projector could be damaged or could malfunction.
•
Make sure you connect the projector and video devices rst, and then connect the
power cord to the projector's power inlet and plug it into an electrical outlet.
•
If you tilt the projector toward the ceiling while connection cables are connected
to the projector's ports, the cables and ports can be damaged. Disconnect the
cables before tilting the projector (EF-22).
Related Links
g
•
"Co
nnecting to an HDMI Video Source" p.23
•
"Connecting to a Computer for HDMI Video and Audio" p.23
•
"Connecting to External USB Devices" p.24
•
"Connecting Headphones" p.25
•
"Connecting to an ARC Compatible AV System" p.25
Connecting to an HDMI Video Source
•
If th
e port on the device you connect has an unusual shape, use the
cable supplied with the device or an optional cable to connect to the
projector.
•
Some video devices are capable of outputting dierent types of signals.
See your video device manual to conrm what type of signals can be
output.
Connect the HDMI cable to your video source's HDMI output port.
a
Connect the other end to the projector's HDMI (ARC) port.
b
If your video source has an HDMI port, you can connect it to the projector
using an HD
MI cable.
Attention
Do not turn on the video source before connecting it to the projector. Doing so could
damage the projector.
Connecting to a Computer for HDMI Video and Audio
If your computer has an HDMI port, you can connect it to the projector using
an HDMI cab
Connect the HDMI cable to your computer's HDMI output port.
a
le.
Page 24
Projector Connections
24
Connect the other end to the projector's HDMI (ARC) port.
b
Connecting to External USB Devices
By connecting any of these devices to your projector, you can project images
her content or play audio without using a video device.
and ot
•
Microphone
•
USB ash drive
•
Digital camera
•
USB hard drive
•
USB-A po
•
You may need an app to project content from your USB device.
•
USB hard drives must meet these requirements:
•
•
•
•
If your USB device came with a power adapter, plug the device into an
a
elec
trical outlet.
Connect the USB device to the projector's USB-A port as shown.
b
rt is not guaranteed to operate all devices that support USB.
USB Mass Storage Class-compliant (not all USB Mass Storage Class
devices are supported)
Formatted in FAT16/32
Self-powered by their own AC power supplies (bus-powered hard
drives are not recommended)
Avoid using hard drives with multiple partitions
Attention
•
Use t
he USB cable supplied with or specie d for use with the device.
•
If the USB cable is too long, the device may not operate correctly. We
recommend using a USB cable that is three meters or less.
•
If you use a USB hub, the device may not operate correctly. We recommend
checking the operation in advance.
Page 25
Projector Connections
25
Connect the other end to your device, if necessary.
c
Connecting H
You can connect headphones to the projector's Audio Out port. You can control
olume using the projector's remote control.
the v
Attention
e pro
headphones, audio may not be output normally.
a
jector's Audio Out port only supports 3-pin headphones. If you use any other
Connect the stereo headphone's mini-jack cable to the projector's Audio
Out p
eadphones
ort.
Caution
t start a playback at a high volume setting. Sudden loud noises may cause
Do no
hearing loss.
Always lower the volume before powering o, so that you can power on and then
gradually increase the volume.
Connecting to an ARC Compatible AV System
If your AV system has an HDMI port, you can connect it to the projector using
an HDMI cab
Connect the HDMI cable to your AV system's HDMI output port (ARC
a
comp
Connect the other end to the projector's HDMI (ARC) port.
b
le (ARC compatible) to output audio to the AV system.
atible).
•
•
•
tput audio, set HDMI control to On in the projector's menu.
To ou
s Inputs > Inputs > HDMI control
If audio is not output properly, try changing Auto to PCM as the
Digital Output setting in the projector's menu.
s Display & Sound > Audio Output > Digital Output
When playing Google TV contents, audio is output in 2 ch (L-PCM).
Page 26

Installing Batteries in the Remote Control
26
e remote control uses the two AAA batteries that came with the projector.
Attention
Make s
ure you read the Safety Instructions before handling the batteries.
Remove the battery cover as shown.
a
Remove the old batteries, if necessary.
b
Dispose of used batteries according to local regulations.
Warning
Che
ck the positions of the (+) and (–) marks inside the battery holder to
ensure the batteries are inserted the correct way. If the batteries are not used
correctly, they could explode or leak causing a re, injury, or damage to the
product.
Replace the battery cover and press it down until it clicks into place.
d
Related Links
g
•
"Rem
ote Control Operation" p.26
Remote Control Operation
Insert the batteries with the + and –
c
ends facing as shown.
e remote control lets you control the projector from almost anywhere in the
om.
ro
It is recommended that you aim the remote control at the projector's receivers
within the distance and angles listed here.
Page 27

Installing Batteries in the Remote Control
27
Avoid using the remote control in conditions with bright uores
or in direct sunlight, or the projector may not respond to commands. If
you are not going to use the remote control for a long time, remove the
batteries.
cent lights
Page 28
Setting Up the Google TV
28
When you turn on the projector for the rst
using the initial setup wizard.
You can change each of the settings even aer comp
Turn on the projector.
a
When the pairing screen is displayed, hold down the button and
b
button on the remote control at the same time to pair the remote control
and the projector.
time, you need to setup Google TV
leting the initial setup.
When the Google TV setting screen is displayed, follow the on-screen
d
in
ructions to make the initial settings for Google TV.
st
We recommend logging in with your Google Account to make more
d settings.
detaile
When the Wi-Fi setting screen is displayed, select the wireless network
e
you wan
necessary settings.
•
•
Follow the on-screen instructions to make other necessary settings.
f
When you agree to the EPSON license terms, the initial setup wizard
g
c
loses.
t to use, and then follow the on-screen instructions to make
An internet connection is required to view online content. Make sure
you can use the Wi-Fi service.
e customer is responsible are responsible for any communication
charges incurred when downloading the app or watching online
content.
When pairing starts, the indicator on the remote control ashes.
hen pairing is complete, the indicator turns o.
W
When the language selection screen is displayed, select the language you
c
wan
o u
se, and then follow the on-screen instructions to select your
t t
country or region.
hen you have nished the initial setup, the home screen is displayed.
W
Related Links
g
•
"Google TV Home Screen" p.28
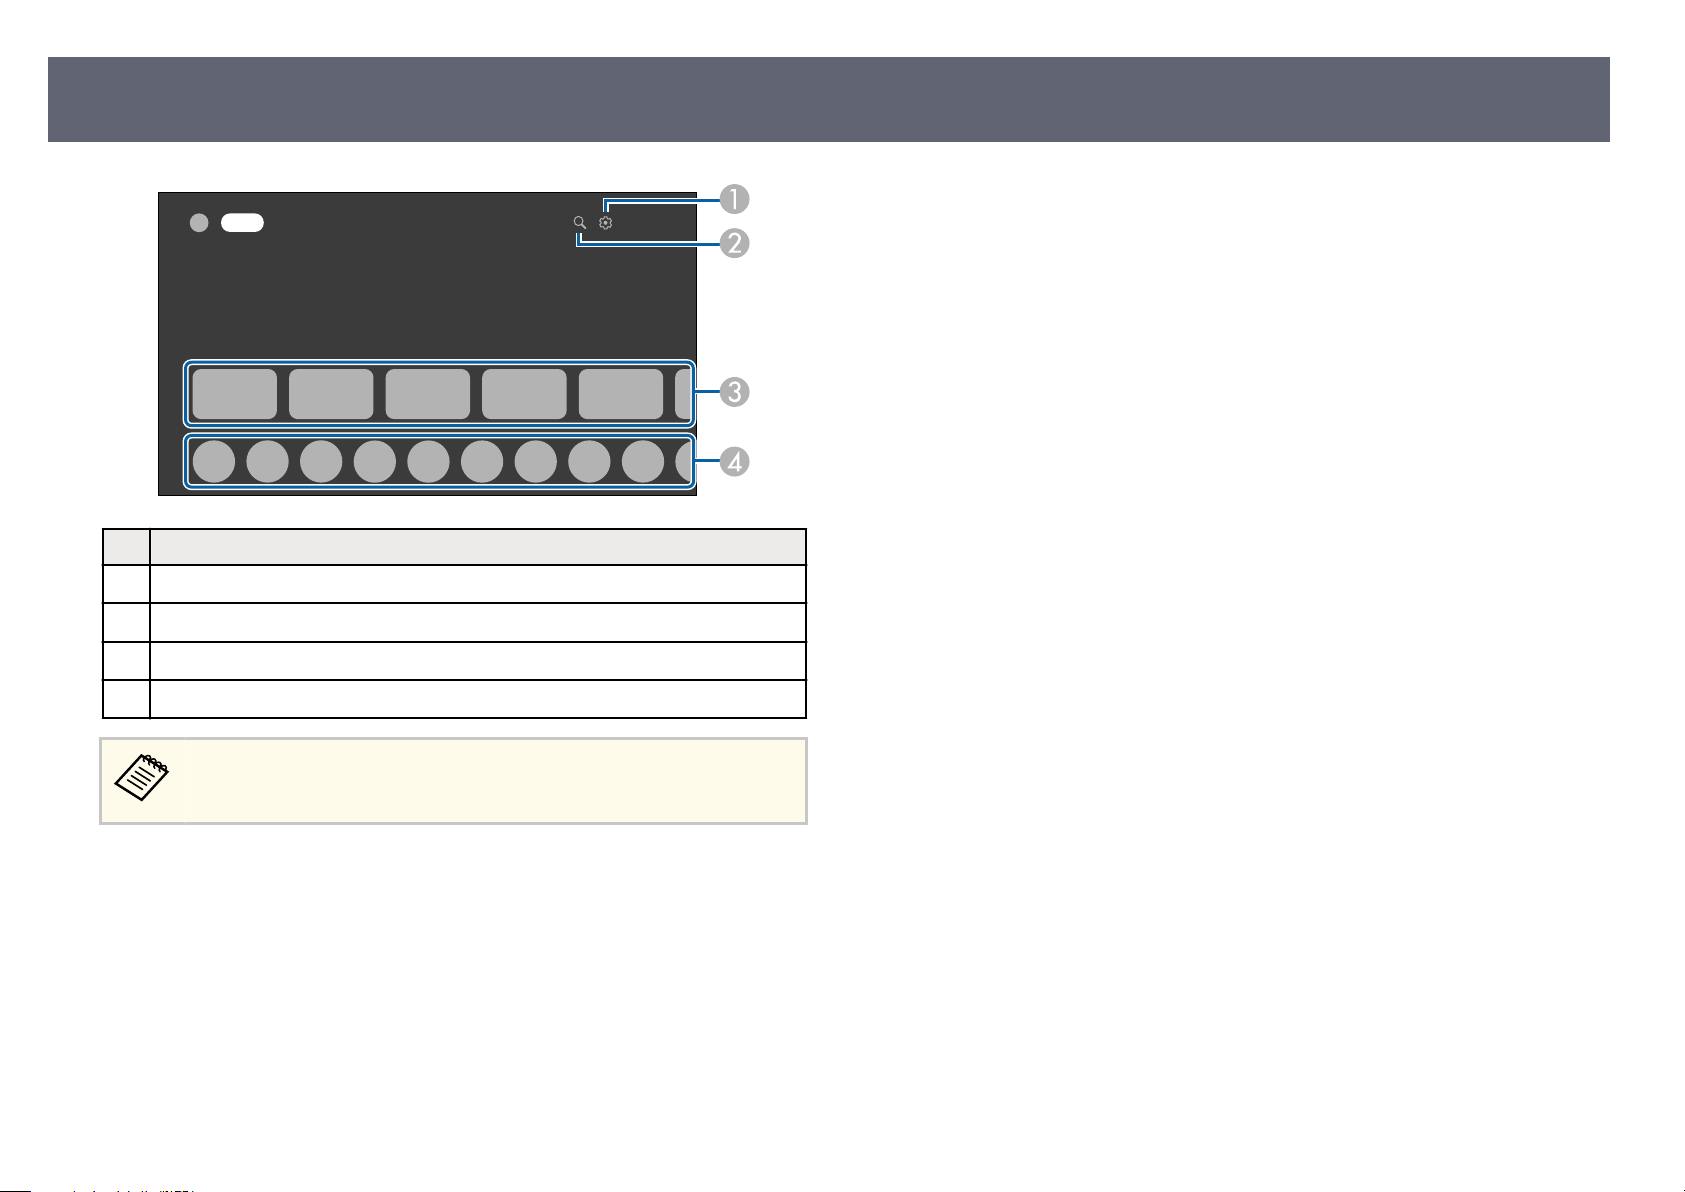
Google TV Home Screen
When you turn on the projector or press the button on the remote control,
the G
oogle TV home screen is displayed.
You can easily access recommended online content and applications from the
home screen.
Page 29
XXXX XXXX XXXX XXXX XXXX
Google TV
Setting Up the Google TV
Description
Displays the dashboard menu.
A
Searches for applications and online content.
B
Displays the online content recommended by the applications.
C
29
Displays the applications downloaded on the projector.
D
ntent of the home screen may change depending on the version of
e co
t
e Google TV.
h
Page 30

XXXX XXXX XXXX XXXX XXXX
Google TV
Epson Projector Update
About Epson Projector Update
30
e Epson Projector Update app allows you to check the projector rmware
pdate it to the latest version. is is necessary to keep the projector up to
and u
date. Install the app from Google Play, launch the app, and check for the latest
rmware.
e Epson Projector Update app is automatically installed by the Google
TV ini
tial setting wizard. To install it automatically, make sure you log
in with your Google Account, make the necessary Wi-Fi settings, and
connect the projector to the internet.
Related Links
g
•
"In
stalling Epson Projector Update" p.30
Installing Epson Projector Update
Follow the steps below to manually install the Epson Projector Update app.
Select the search icon at the top right of the Google TV home screen.
a
Search for "Epson Projector Update" to install it on the projector.
b
Start the Epson Projector Update app and co
c
rmware is installed on the projector.
Related Links
g
•
"Updating Projector Firmware Using Epson Projector Update" p.60
the latest projector
nrm
Page 31

Using Basic Projector Features
low the instructions in these sections to use your projector's basic features.
Fol
Related Links
g
•
"Turning On the Projector (EF-21)" p.32
•
"Turning On the Projector (EF-22)" p.33
•
"Turning O the Projector" p.35
•
"Projection Modes" p.36
•
"Adjusting the Image Height (EF-21)" p.37
•
"Adjusting the Position of the Image (EF-22)" p.38
•
"Image Shape" p.39
•
"Focusing the Image Using the Projector Menus" p.44
•
"Selecting an Image Source" p.45
•
"Image Aspect Ratio" p.46
•
"Adjusting Image Quality (Color Mode)" p.47
•
"Adjusting Image Quality in Detail" p.48
•
"Turning On Automatic Luminance Adjustment" p.49
•
"Adjusting the Light Source Brightness" p.50
•
"Controlling the Volume with the Volume Buttons" p.51
•
"Changing the Sound Mode" p.52
Page 32
Turning On the Projector (EF-21)
32
When you connect the video equipment to the projector, turn on the video
pment you want to use aer you turn on the projector.
equi
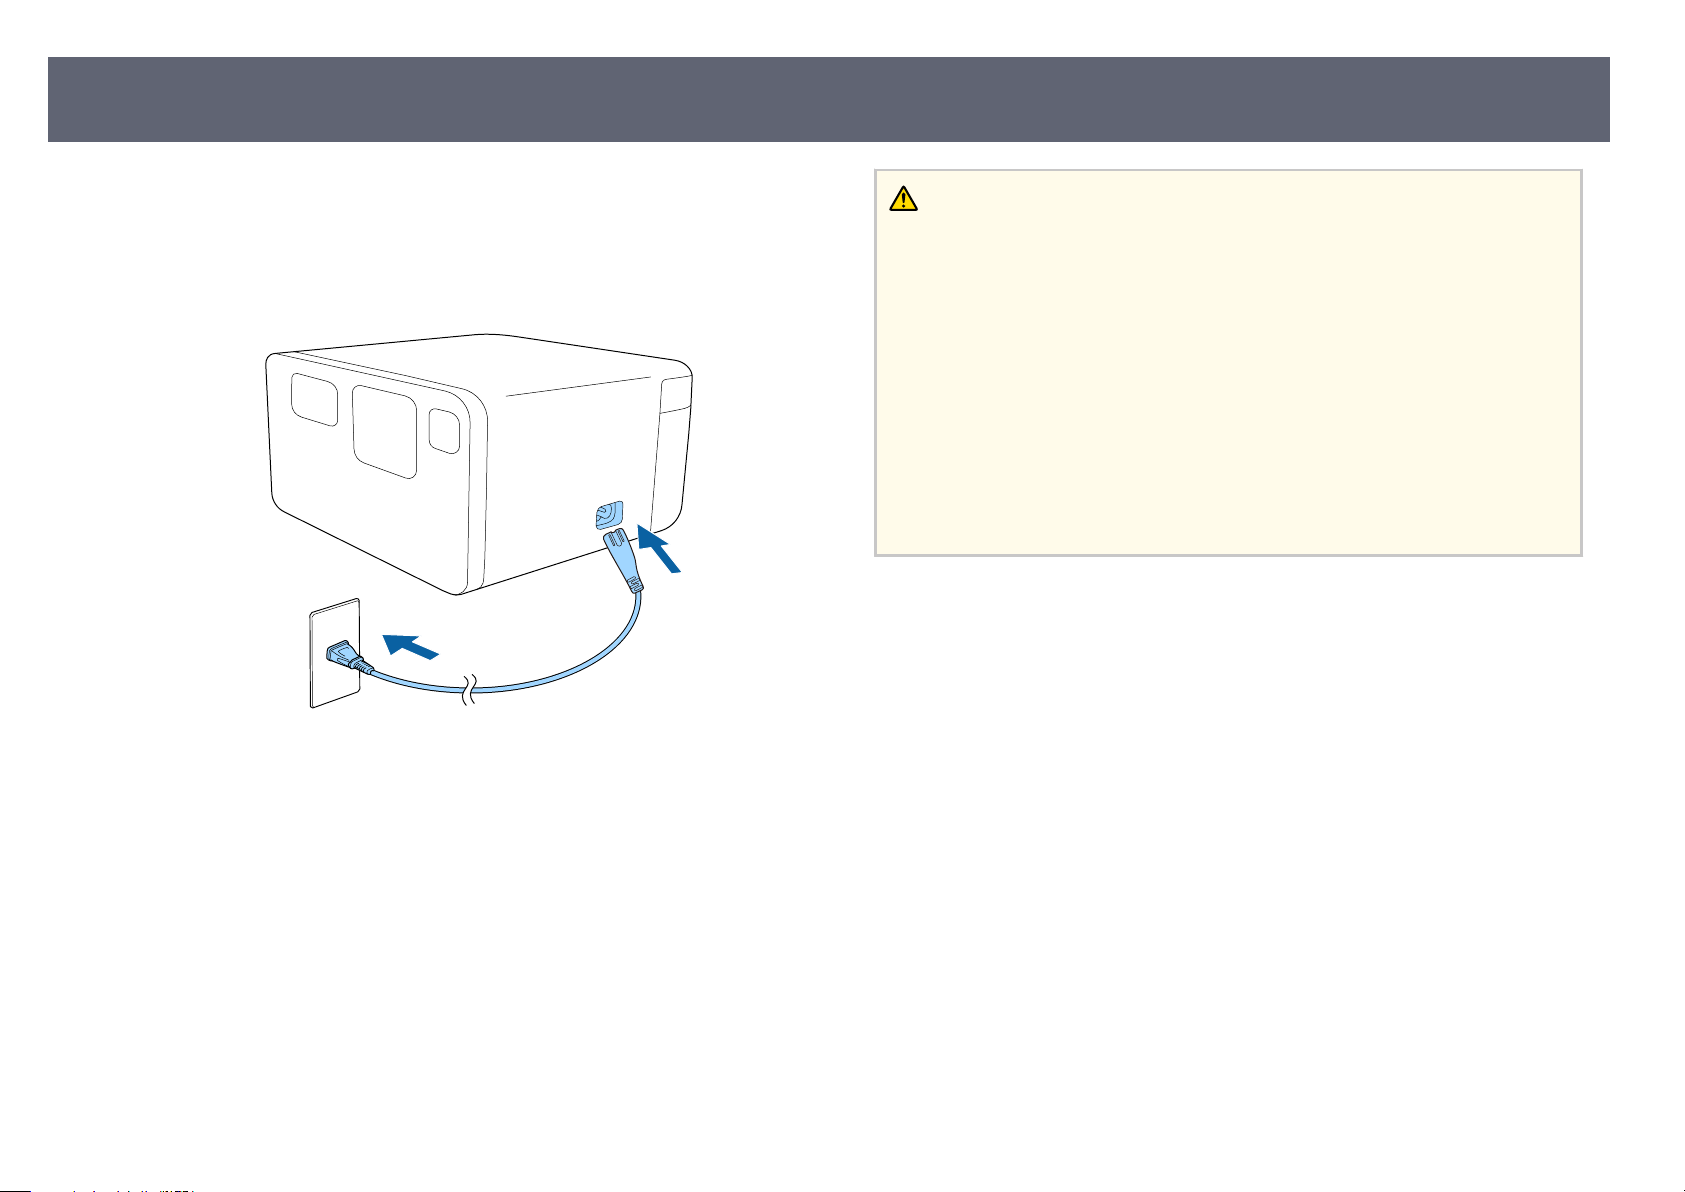
Connect the power cord to the projector's power inlet and plug it into an
a
elec
trical outlet.
e status indicator ashes blue as the projector warms up.
Wh
en the indicator turns o, the projector enters standby mode. is
indicates that the projector is receiving power, but is not yet turned on.
Warning
•
Nev
er look into the projector lens when the light source is on. is can damage
your eyes and is especially dangerous for children.
•
When turning on the projector at a distance using the remote control, make sure
no one is looking into the lens.
•
During projection, do not block the light from the projector with a book or other
objects. If the light from the projector is blocked, the area on which the light
shines becomes hot which could cause it to melt, burn, or start a re. Also, the
lens may get hot due to the reected light which could cause the projector to
malfunction. To stop projection, turn o the projector.
•
Even when the projector is turned o, do not place any ammable objects such as
a book or cloth in front of the lens. If the projector is unexpectedly turned on for
some reason, it could result in a re.
Press the power button on the projector or remote control to turn on the
b
pro
jector.
e status indicator turns blue and the light source turns on.
Auto focus and Auto Keystone Correction automatically correct the
focus and any distortion of the projected image.
Page 33

Turning On the Projector (EF-22)
33
When you connect the video equipment to the projector, turn on the video
pment you want to use aer you turn on the projector.
equi
Connect the AC adapter to the projector's AC adapter port.
a
Connect the power cord to the AC adapter.
b
Plug the power cord into an electrical outlet.
c
Auto focus and A
focus and any distortion of the projected image.
uto Keystone Correction automatically correct the
Warning
•
Nev
er look into the projector lens when the light source is on. is can damage
your eyes and is especially dangerous for children.
•
When turning on the projector at a distance using the remote control, make sure
there is no one looking into the lens.
•
During projection, do not block the light from the projector with a book or other
objects. If the light from the projector is blocked, the area on which the light
shines becomes hot which could cause it to melt, burn, or start a re. Also, the
lens may get hot due to the reected light which could cause the projector to
malfunction. To stop projection, turn o the projector.
•
Even when the projector is turned o, do not place any ammable objects such as
a book or cloth in front of the lens. If the projector is unexpectedly turned on for
some reason, it could result in a re.
Related Links
g
•
dapter Safety Instructions" p.33
"AC A
e status indicator ashes blue as the projector warms up.
Wh
en the indicator turns o, the projector enters standby mode. is
indicates that the projector is receiving power, but is not yet turned on.
Press the power button on the projector or remote control to turn on the
d
pro
jector.
e status indicator turns blue and the light source turns on.
AC Adapter Safety Instructions
Follow these safety instructions when using the supplied AC adapter.
Page 34

Turning On the Projector (EF-22)
Warning
•
Under t
repairs to qualied service personnel. Continuing to use under these conditions
may result in re or electric shock.
•
•
•
•
•
Inco
Take the following precautions when using the AC adapter.
•
•
•
•
•
•
•
•
•
•
he following conditions, unplug the projector from the outlet and refer all
If smoke comes from the AC adapter.
If strange odors or strange noises come from the AC adapter.
If the AC adapter has been damaged.
If liquid or foreign objects get inside the AC adapter.
Warning
rrect use of the AC adapter may cause malfunction, re, or electric shock.
Do not use any AC adapter other than the one supplied with the projector.
e supplied AC adapter is designed specically for this projector model. Do
not use it with any other models.
Do not apply strong pressure or shocks to the AC adapter.
Do not hold the AC adapter with wet hands.
Do not install the AC adapter in a narrow space and do not cover it with cloth.
Do not touch the AC adapter for a long time while it is energized. It may cause
a low-temperature burn.
Do not spray ammable gas such as insecticide on the AC adapter.
Do not put the AC adapter in a high-pressure container or a cooking appliance
such as a microwave oven.
Do not place the AC adapter near the projector's air exhaust vent.
Do not wind the power cord around the AC adapter.
34
Page 35
Turning O the Projector
Turn o the projector aer use.
Turn o this product when it is not in use to prolong the life of
th
e projector. Light source life varies depending on the environmental
conditions and usage. Brightness decreases over time.
Press the power button on the control panel or remote control.
a
e light s
To transport or store the projector, make sure the status indicator on the
b
pro
jector is o, and then unplug the power cord.
ource turns o, and the status indicator turns o.
35
Page 36

Projection Modes
Depending on how you positioned the projector, you may need to change the
jection mode so your images project correctly.
pro
•
Front lets you project from in front of the screen.
•
Front Ceiling ips the image over top-to-bottom to project upside-down
from a ceiling.
•
Rear ips the image horizontally to project from behind a translucent screen.
•
Rear Ceiling ips the image over top-to-bottom and horizontally to project
from a ceiling and behind a translucent screen.
Related Links
g
•
"Changing the Projection Mode Using the Menus" p.36
•
"Projector Setup and Installation Options" p.19
Changing the Projection Mode Using the Menus
You can change the projection mode to ip the image over top-to-bottom using
the projector menus.
36
Turn on the projector and display an image.
a
Press the
b
Select the menus in the following order:
c
s A
Select a projection mode and press [Enter].
d
Press
e
e
dvanc
d Settings > Projection Mode
to exit the menus.
button on the remote control.
Page 37
Adjusting the Image Height (EF-21)
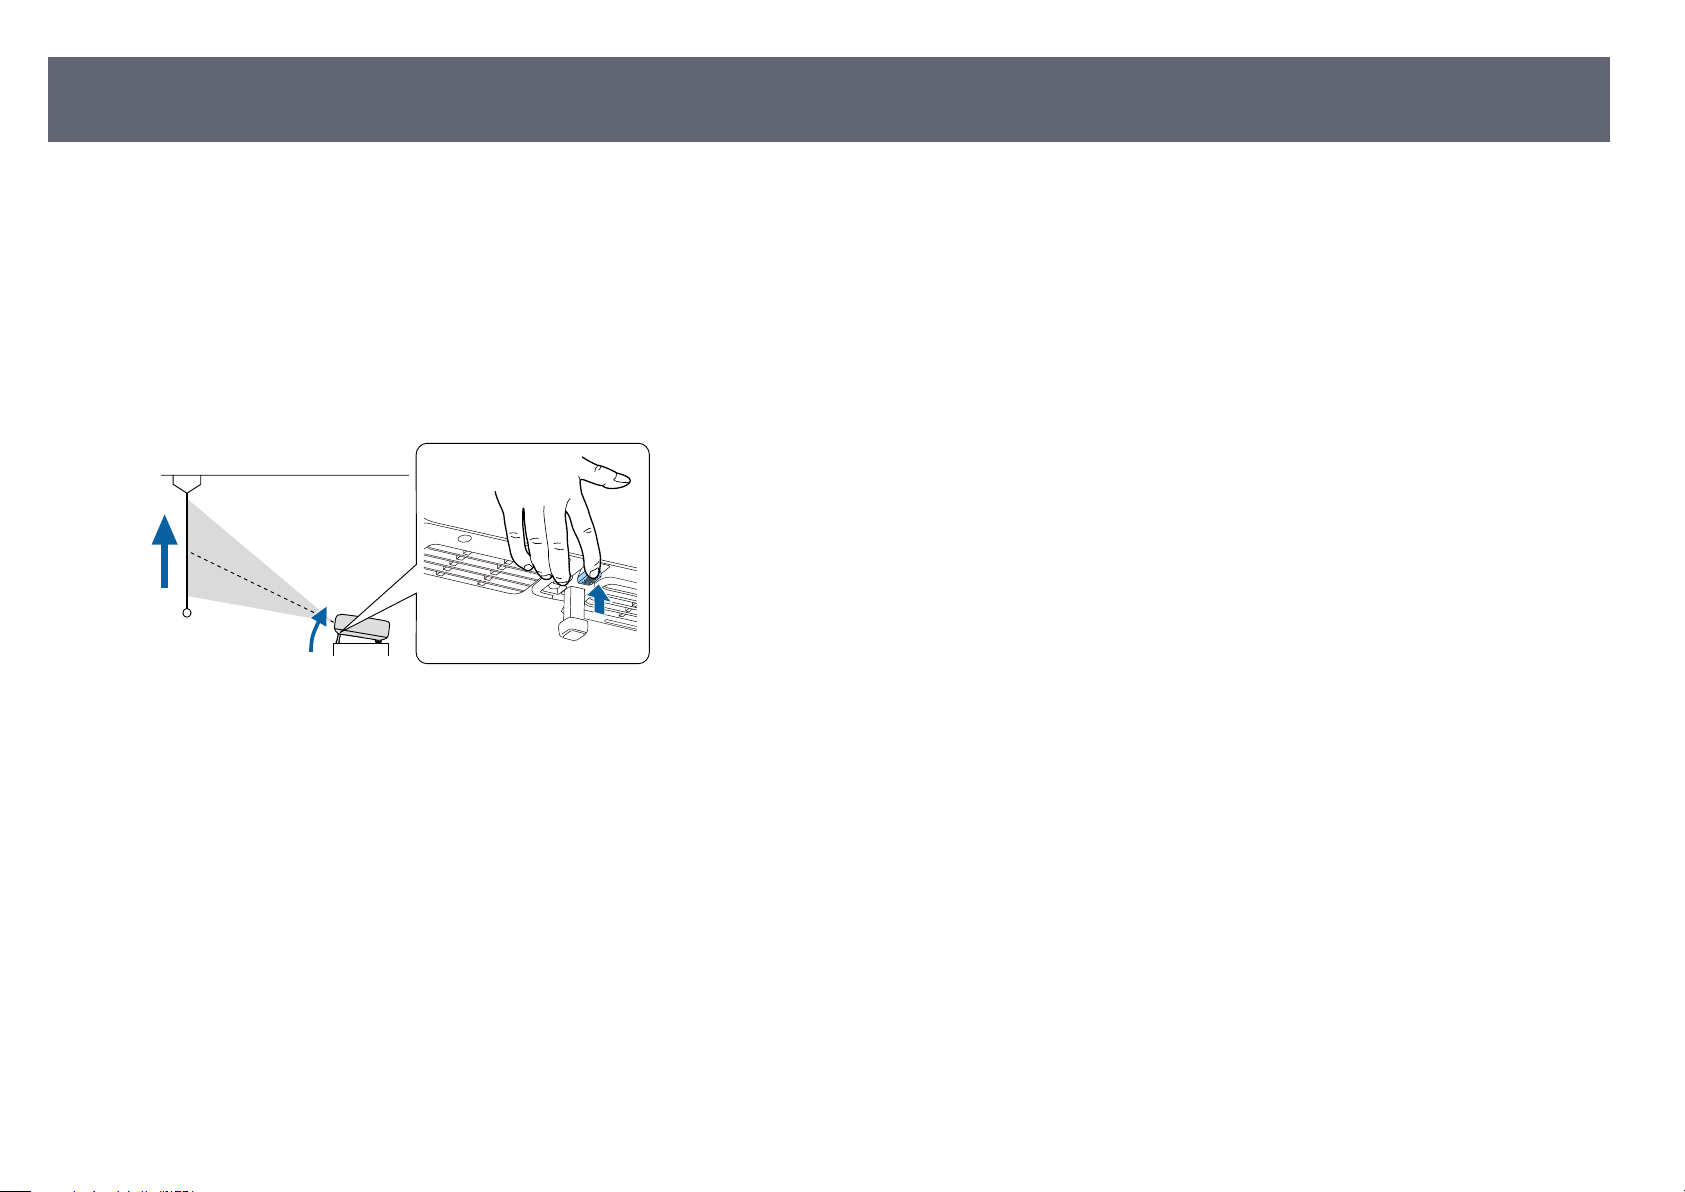
If you are projecting from a table or other at surface and the image is too high
or low, you can adjust the image height using the projector's adjustable foot.
e larger the angle of tilt, the harder it becomes to focus. Locate the projector
so that it only needs to be tilted at a small angle.
Turn on the projector and display an image.
a
Press the foot release lever to extend and retract the front adjustable foot.
b
37
e foot extends from the projector.
You can adjust the position up to 9 degrees.
Release the lever to lock the foot.
c
If the projected image is unevenly rectangular, you need to adjust the image
shape.
Related Links
g
•
"Image Shape" p.39
Page 38

Adjusting the Position of the Image (EF-22)
38
If you are projecting from a table or other at surface, you can adjust the image
position by tilting or moving the projector on the stand.
e larger the angle of tilt, the harder it becomes to focus. Locate the projector
so that it only needs to be tilted at a small angle.
Turn on the projector and display an image.
a
Adjust the image height by tilting the projector up or down.
b
Attention
•
You can adjust the position from -30 to +120 degrees vertically.
•
Do not tilt the projector up or down beyond its range of movement. Doing
so may cause a malfunction.
Attention
•
Turn the projector stand slowly. Turning it with too much force may cause a
malfunction.
•
Do not turn the projector stand le or right beyond its range of movement.
Doing so may cause a malfunction.
•
Do not turn the projector stand by holding the cables connected to the
projector's ports. Doing so may damage the cables or ports.
If the projected image is unevenly rectangular, you need to adjust the image
shape.
Related Links
g
•
"Image Shape" p.39
To adjust the horizontal position of the projected image, turn the projector
c
stand le or right as shown below.
Page 39

Image Shape
39
You can project an even, rectangular image by placing the projector directly in
nt of the center of the screen and keeping it level. If you place the projector at
fro
an angle to the screen, or tilt it up or down, or o to the side, you may need to
correct the image shape.
Aer correction, your image is slightly smaller.
For the best quality images, we recommend adjusting the installation position of
the projector to achieve the correct image size and shape.
Related Links
g
•
"Correcting the Image Shape and Focus Automatically" p.39
•
"Adjusting the Size of the Image" p.40
•
"Adjusting the Position of the Image" p.41
•
"Automatically Correcting the Image Shape with Fit to Screen" p.41
•
"Correcting the Image Shape Manually" p.42
Correcting the Image Shape and Focus Automatically
e projector automatically corrects the focus and any keystone distortion of
the projected image in the following situations:
•
When you turn on the projector.
•
When the projector is moved or tilted.
Focus and keystone distortion can be automatically corrected under the
following conditions:
•
When the size of the projected image (diagonal length) before correcting the
focus and keystone distortion is from 30 to 100 inches.
•
When the projection distance is about 0.7 to 2.2 m.
•
When the installation angle of the projector toward the projection surface is
within 20º right, le, up, or down.
•
Foc
us and keystone distortion are corrected even if the size of the
projected image exceeds 100 inches. However, the adjustment may fail
depending on the installation angle of the projector, the brightness of
the room, and the material of the projection surface. If necessary, adjust
the keystone distortion and focus settings manually using the projector
menu.
•
When an image is being projected at an angle and has been reduced
using the Zoom function, keystone distortion may not be corrected. If
the correction fails, adjust the reduction ratio of the image so that it is
closer to 100%.
s Projector > Image Correction > Zoom & Shi > Zoom
Page 40
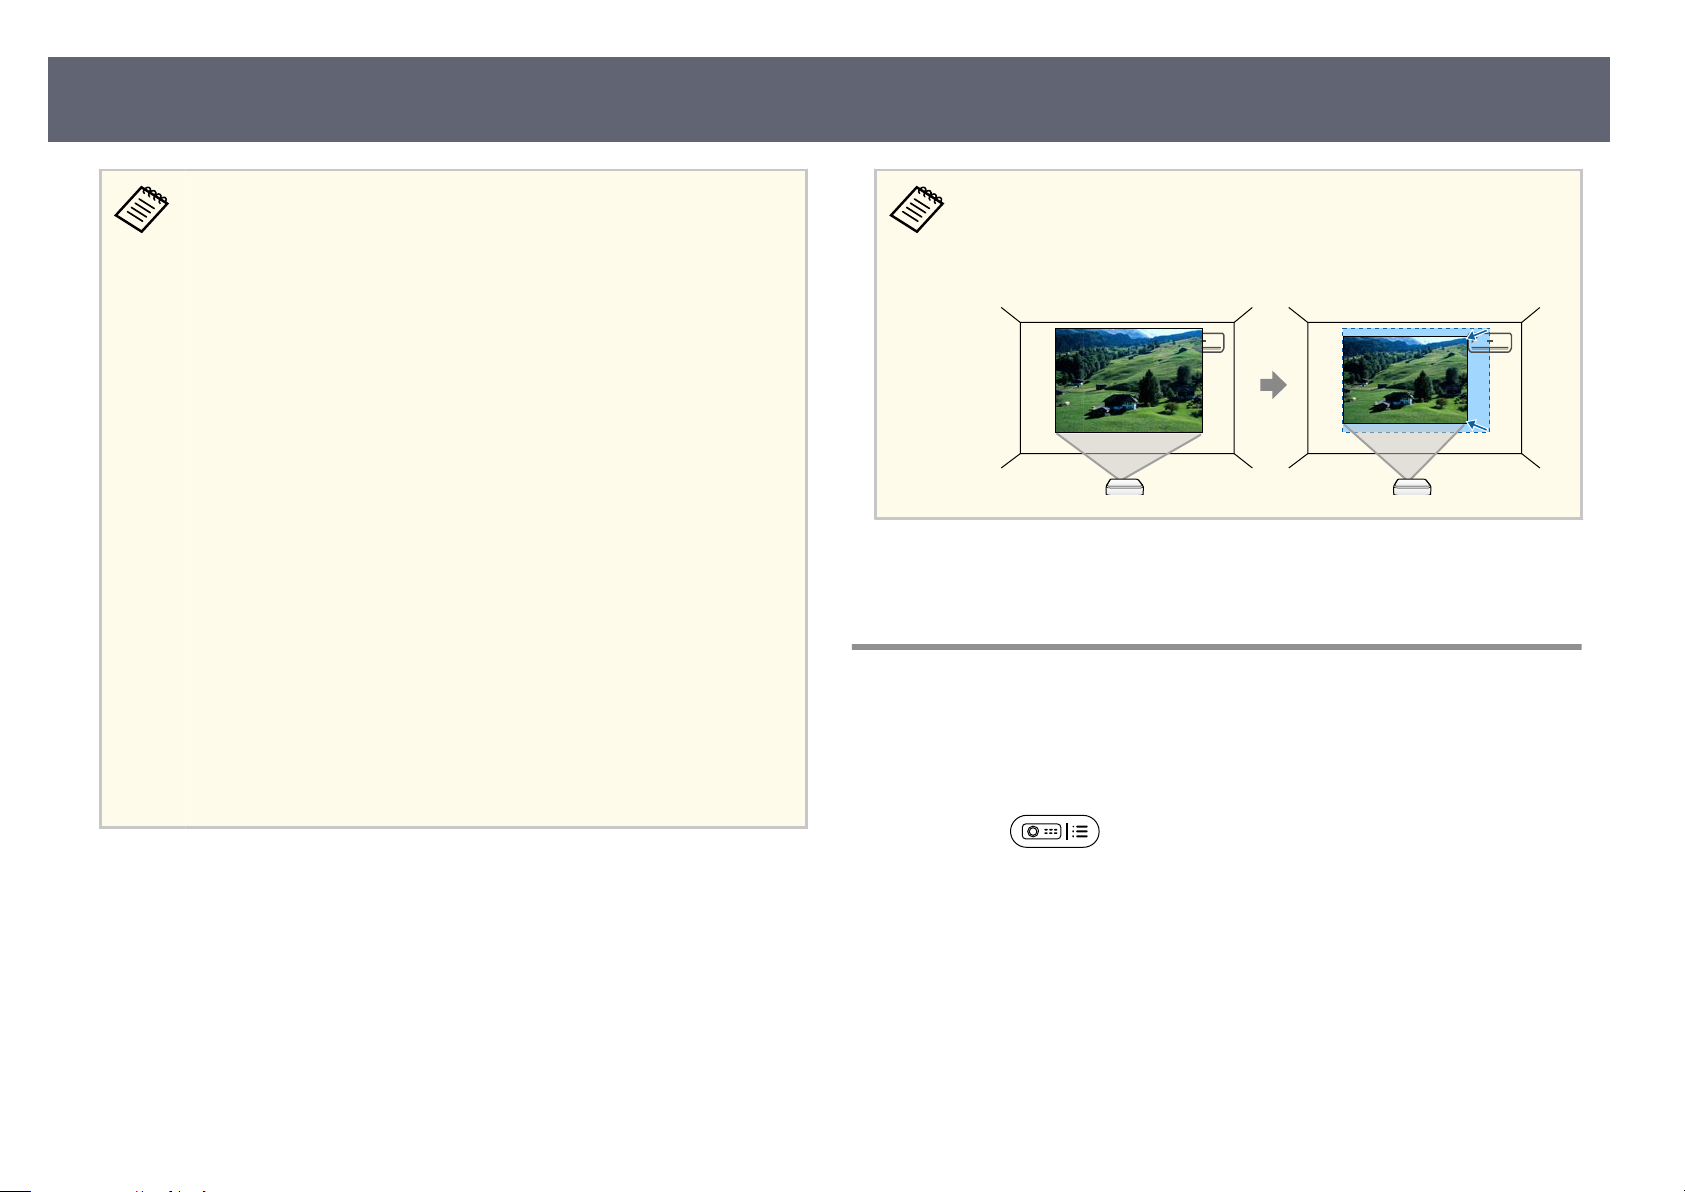
Image Shape
40
•
Make s
ure that Auto Focus at Startup and Auto Focus When Moving
are set to On in the projector's menu.
s Projector > Focus > Advanced > Auto Focus at Startup
s Projector > Focus > Advanced > Auto Focus When Moving
•
If you set Auto Focus at Startup to O, the focus of the projected
image is not automatically corrected when you turn on the projector.
•
If you set Auto Focus When Moving to O, the focus of the
projected image is not automatically corrected when the projector
is moved or tilted.
•
Make sure that Auto Keystone Correction At Startup and Auto
Keystone Correction on Movement are set to On in the projector's
menu.
s Projector > Image Correction > Advanced > Auto Keystone
Correction At Startup
s Projector > Image Correction > Advanced > Auto Keystone
Correction on Movement
•
If you set Auto Keystone Correction At Startup to O, Auto
Keystone Correction does not automatically correct keystone
distortion of the projected image when you turn on the projector.
•
If you set Auto Keystone Correction on Movement to O,
Auto Keystone Correction does not automatically correct keystone
distortion of the projected image when the projector is moved or
tilted.
If you set Avoid Obstacles to On, the image is projected so that it avoids
any o
bstacles in front of the projection surface. Your image is slightly
smaller.
s Projector > Image Correction > Advanced > Avoid Obstacles
Related Links
g
•
"Projector Feature Settings - Projector Menu" p.65
Adjusting the Size of the Image
You can use the Zoo
Turn on the projector and display an image.
a
m feature to adjust the size of the projected image.
Press the
b
Select the menus in the following order:
c
s I
mage Co
e zoom adjustment screen is displayed.
button on the remote control.
rrection > Zoom & Shi > Zoom
Page 41

Image Shape
41
Use the le and rig
d
Press
e
Related Links
g
•
"Pr
ojector Feature Settings - Projector Menu" p.65
to exit the menus.
ht arrow buttons to adjust the image size.
Adjusting the Position of the Image
You can use the Image Re
image.
Turn on the projector and display an image.
a
Press the
b
Select the menus in the following order:
c
s Image Correction > Zoom & Shi > Image Reposition
e image position adjustment screen is displayed.
position feature to adjust the position of the projected
button on the remote control.
Use the arrow buttons to adjust the image position.
d
Press to exit the menus.
e
Related Links
g
•
"Pr
ojector Feature Settings - Projector Menu" p.65
Automatically Correcting the Image Shape with Fit to Screen
You can use the projector's Fit t
shape and position of images to t on your screen.
o Screen feature to automatically correct the
Page 42

Image Shape
42
Fit to Screen operat
•
Screen size is from 30 to 100 inches.
•
Projection distance is about 0.7 to 2.2 m.
•
Projection angle is within about 15º right, le, up, or down.
•
e room is not too dark.
•
e projection surface is not patterned and does not deect the projector's
camera in some way.
Turn on the projector and display an image.
a
Press the
b
Select the menus in the following order:
c
s Image Co
You see a message on the screen.
Expand the projection area so that it extends beyond the edges of the
d
scre
en.
es under the following conditions:
button on the remote control.
rrection > Fit to Screen
•
Mov
e the projector farther away from the screen as necessary.
•
For example, when you project onto a wide screen in a small
room and you cannot extend the projection area beyond the
screen frame, the projection area must include at least the top
and bottom two sides of the screen so that Fit to Screen detects
the screen height and adjusts the image to t the screen.
Press
f
Related Links
g
•
ojector Feature Settings - Projector Menu" p.65
"Pr
to exit the menus.
Correcting the Image Shape Manually
You can use the projector's Manual Keystone Correction setting to correct the
shape and size of an image that is unevenly rectangular.
Turn on the projector and display an image.
a
Press the
b
Select the menus in the following order:
c
s Image Co
You see the Manual Keystone Correction screen.
button on the remote control.
rrection > Manual Keystone Correction
Select START.
e
Wh
block the image.
en the adjustment screen is displayed, do not move the projector or
Page 43
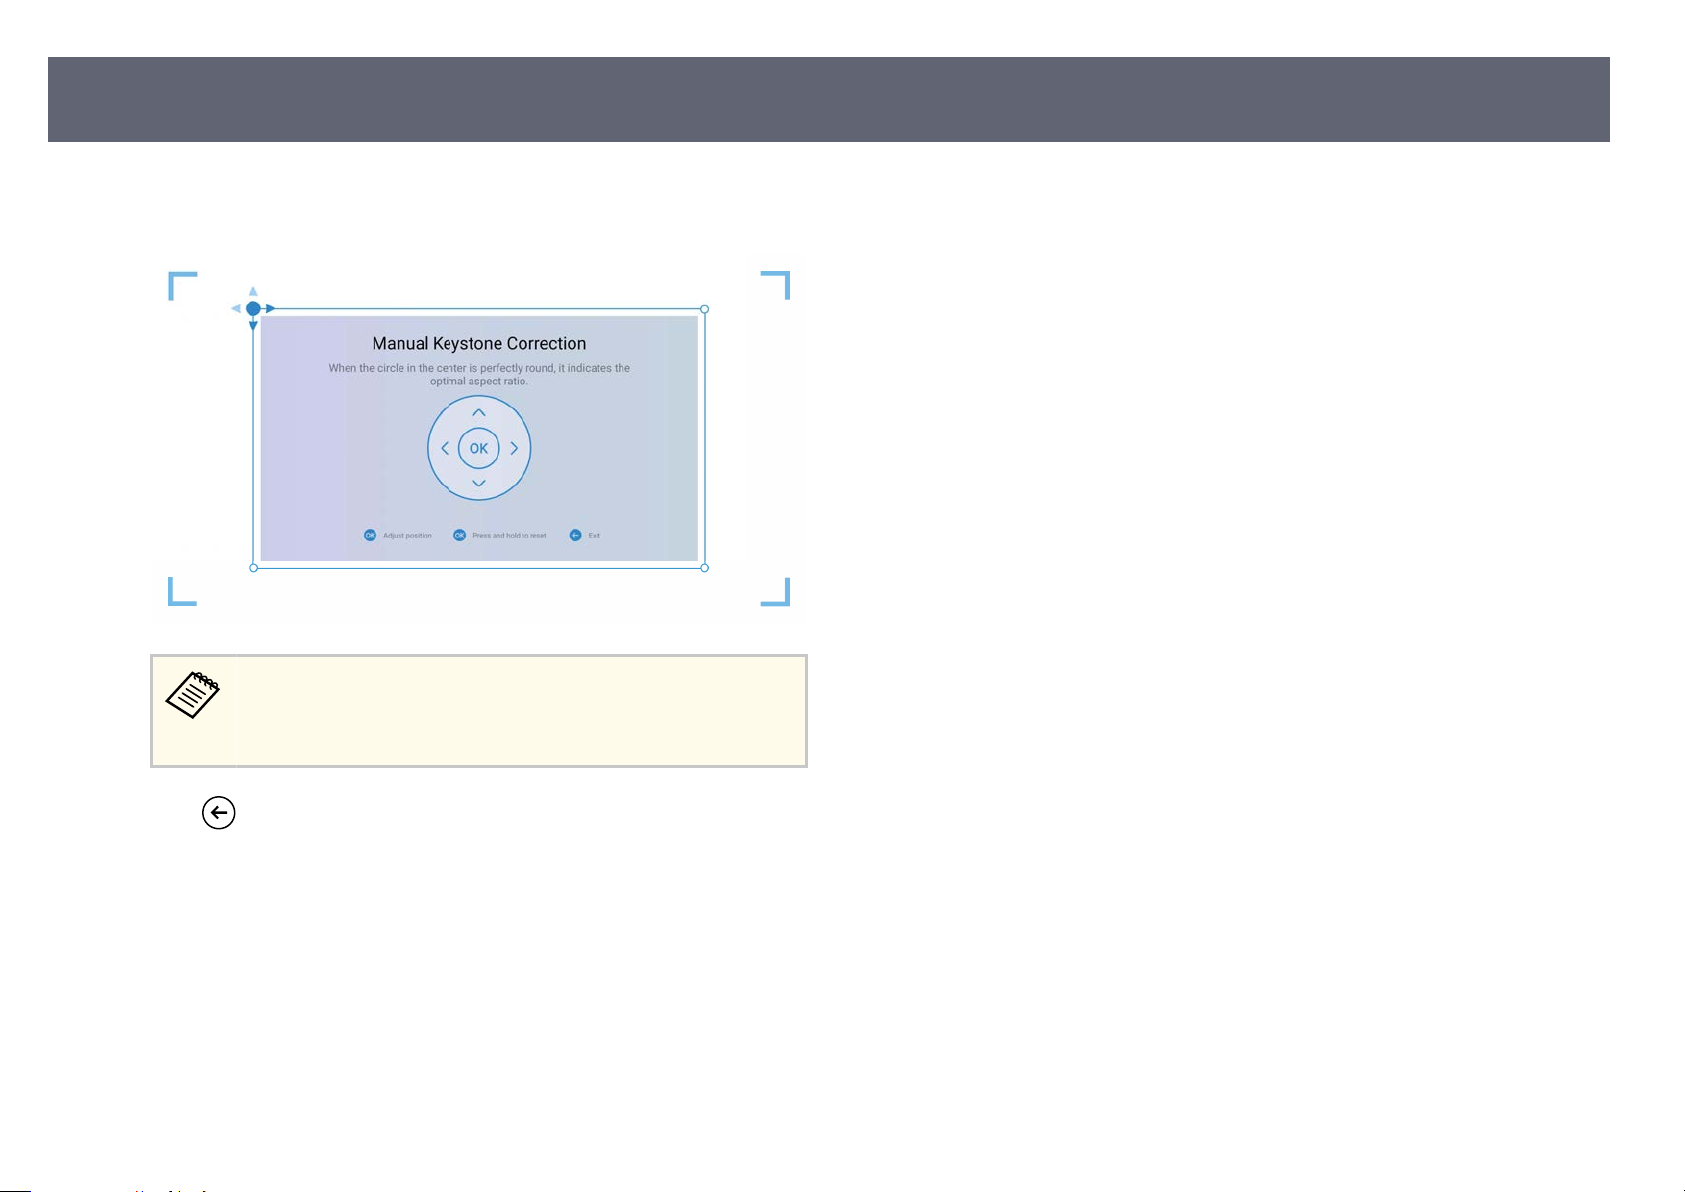
Image Shape
Use the [Enter] button to select the point on the image you want to adjust,
d
and adj
ust the image shape using the arrow buttons.
43
•
e direction key on the screen turns gray, you cannot make
If th
further adjustments in that direction.
•
To reset the corrections, press and hold the [Enter] button.
Press to exit the menus.
e
Related Links
g
•
"Pr
ojector Feature Settings - Projector Menu" p.65
Page 44

Focusing the Image Using the Projector Menus
You can correct the focus using the projector menus.
When you hold down the button on the remote control, the focus
e projected image is automatically corrected. If you want to manually
of th
adjust the focus, follow the steps below.
Turn on the projector and display an image.
a
Press the button on the remote control.
b
e foc
us adjustment screen is displayed.
44
Press the up and down arrow buttons on the remote control to adjust the
c
f
us setting.
oc
d
Press
to exit the menus.
Page 45
Selecting an Image Source
When multiple image sources are connected to the projector, such as a
uter and DVD player, you can switch from one image source to the other.
comp
Make sure the connected image source you want to use is turned on.
a
For video image sources, insert a DVD or other video media and press
b
p
.
lay
45
Press the
c
Press the up or down arrow button to select the image source you want.
d
button on the remote control.
When no image signal is detected, check the cable connections
een the projector and the image source.
betw
Page 46

Image Aspect Ratio
46
e projector can display images in dierent width-to-height ratios called
ect ratios. Normally, the input signal from your video source determines
asp
the image's aspect ratio. However, you can change the aspect ratio for certain
images to t your screen.
If you always want to use a particular aspect ratio for a certain video input
source, you can select it using the projector's Screen menu.
You can select this setting only when the current input source is HDMI.
Related Links
g
•
anging the Image Aspect Ratio" p.46
"Ch
•
"Available Image Aspect Ratios" p.46
Changing the Image Aspect Ratio
You can change the aspect ratio of the displayed image.
Turn on the projector and display an image.
a
Available Image Aspect Ratios
You can select the following image aspect ratios.
Note that using the aspect ratio function of the projector to reduce,
ge, or split the projected image for commercial purposes or for public
enlar
viewing may infringe upon the rights of the copyright holder of that image
based on copyright law.
Aspect mode Description
Full Displays images using the full size of the projection
area.
uper Zoom Zooms into images. e righ
S
edges are missing.
Unscaled Displays images as they are.
4:3 Scales images to 4:3.
Movie expand 14:9 Scales images to 14:9.
Movie expand 16:9 Scales images to 16:9.
t, le, top, and bottom
Press the button on the remote control to open the dashboard.
b
Select
c
Select the menus in the following order:
d
s Displ
Select one of the available aspect ratios for your input signal and press
e
[Enter].
P
f
ress
on the dashboard.
ay & Sound > Screen
to exit the menus.
Page 47

Adjusting Image Quality (Color Mode)
47
e projector oers dierent color modes to provide optimum brightness,
trast, and color for a variety of viewing environments and image types.
con
You can select the mode designed to match your image and environment, or
experiment with the available modes.
Related Links
g
•
"Changing the Color Mode" p.47
•
"Available Color Modes" p.47
Changing the Color Mode
You can change the projector's color mode to optimize the image for your
viewing environment.
Turn on the projector and display an image.
a
Press the button on the remote control to open the dashboard.
b
c
Select
on the dashboard.
Color mode Description
Dynamic is is the brightest mode. Best for prioritizing
ightness.
br
Vivid Best for enjoying content with bright colors.
Natural Reproduces natural colors. is i
you want to adjust the image color.
Cinema Best for enjoying content such as movies.
s the best option when
Select the menus in the following order:
d
s Displ
Select the color mode you want to use from the list and press [Enter].
e
Press
f
Available C
You can set the projector to use these color modes, depending on your
envir
onment and image types.
ay & Sound > Picture
to exit the menus.
olor Modes
Page 48

Adjusting Image Quality in Detail
You can ne-tune various aspects of how quality and colors are displayed in
ur projected images.
yo
Turn on the projector and display an image.
a
48
Press the
b
Select on the dashboard.
c
Select the menus in the following order:
d
s Dis
Select one of the following options:
e
•
To adj
adjust the Contrast setting.
•
To adjust the overall vividness of the color, adjust the Saturation
setting.
•
To adjust the outline of the image, adjust the Sharpness setting.
•
To adjust the individual R (red), G (green), and B (blue) components of
the gain, adjust the Color Gain setting.
•
To adjust the coloring, adjust the Gamma setting.
Press
f
button on the remote control to open the dashboard.
ay & Sound > Picture > Custom
pl
ust the dierence between light and dark areas of the image,
to exit the menus.
Related Links
g
•
"Im
age Quality Settings - Display & Sound Menu" p.67
Page 49

Turning On Automatic Luminance Adjustment
49
You can turn on Dynami
luminance. is improves the image contrast based on the brightness of the
content you project.
Turn on the projector and display an image.
a
Press the
b
Select the menus in the following order:
c
s Advance
Select On to enable Dynamic Contrast.
d
Pr
e
g
•
ess
Related Links
ojector Feature Settings - Projector Menu" p.65
"Pr
d Settings > Dynamic Contrast
to exit the menus.
c Contrast to automatically optimize the image
button on the remote control.
Page 50

Adjusting the Light Source Brightness
You can adjust the brightness of your projector's light source.
Turn on the projector and display an image.
a
Press the up/down buttons on the remote control to adjust the
b
brig
htness.
50
c
Press
to exit the menus.
Page 51
Controlling the Volume with the Volume Buttons
e volume buttons control the projector's internal speaker system.
n on the projector and start a video.
Tur
a
51
To lower or raise the volume, press the
b
remo
te control.
A volume gauge appears on the screen.
up/down buttons on the
Caution
D
o
t start a playback at a high volume setting. Sudden loud noises may cause
o n
hearing loss.
Always lower the volume before powering o, so that you can power on and then
gradually increase the volume.
Page 52
Changing the Sound Mode
52
e projector oers dierent sound modes to provide optimum sound for a
y of image types.
variet
You can select the mode designed to match your image, or experiment with the
available modes.
Turn on the projector and start a video.
a
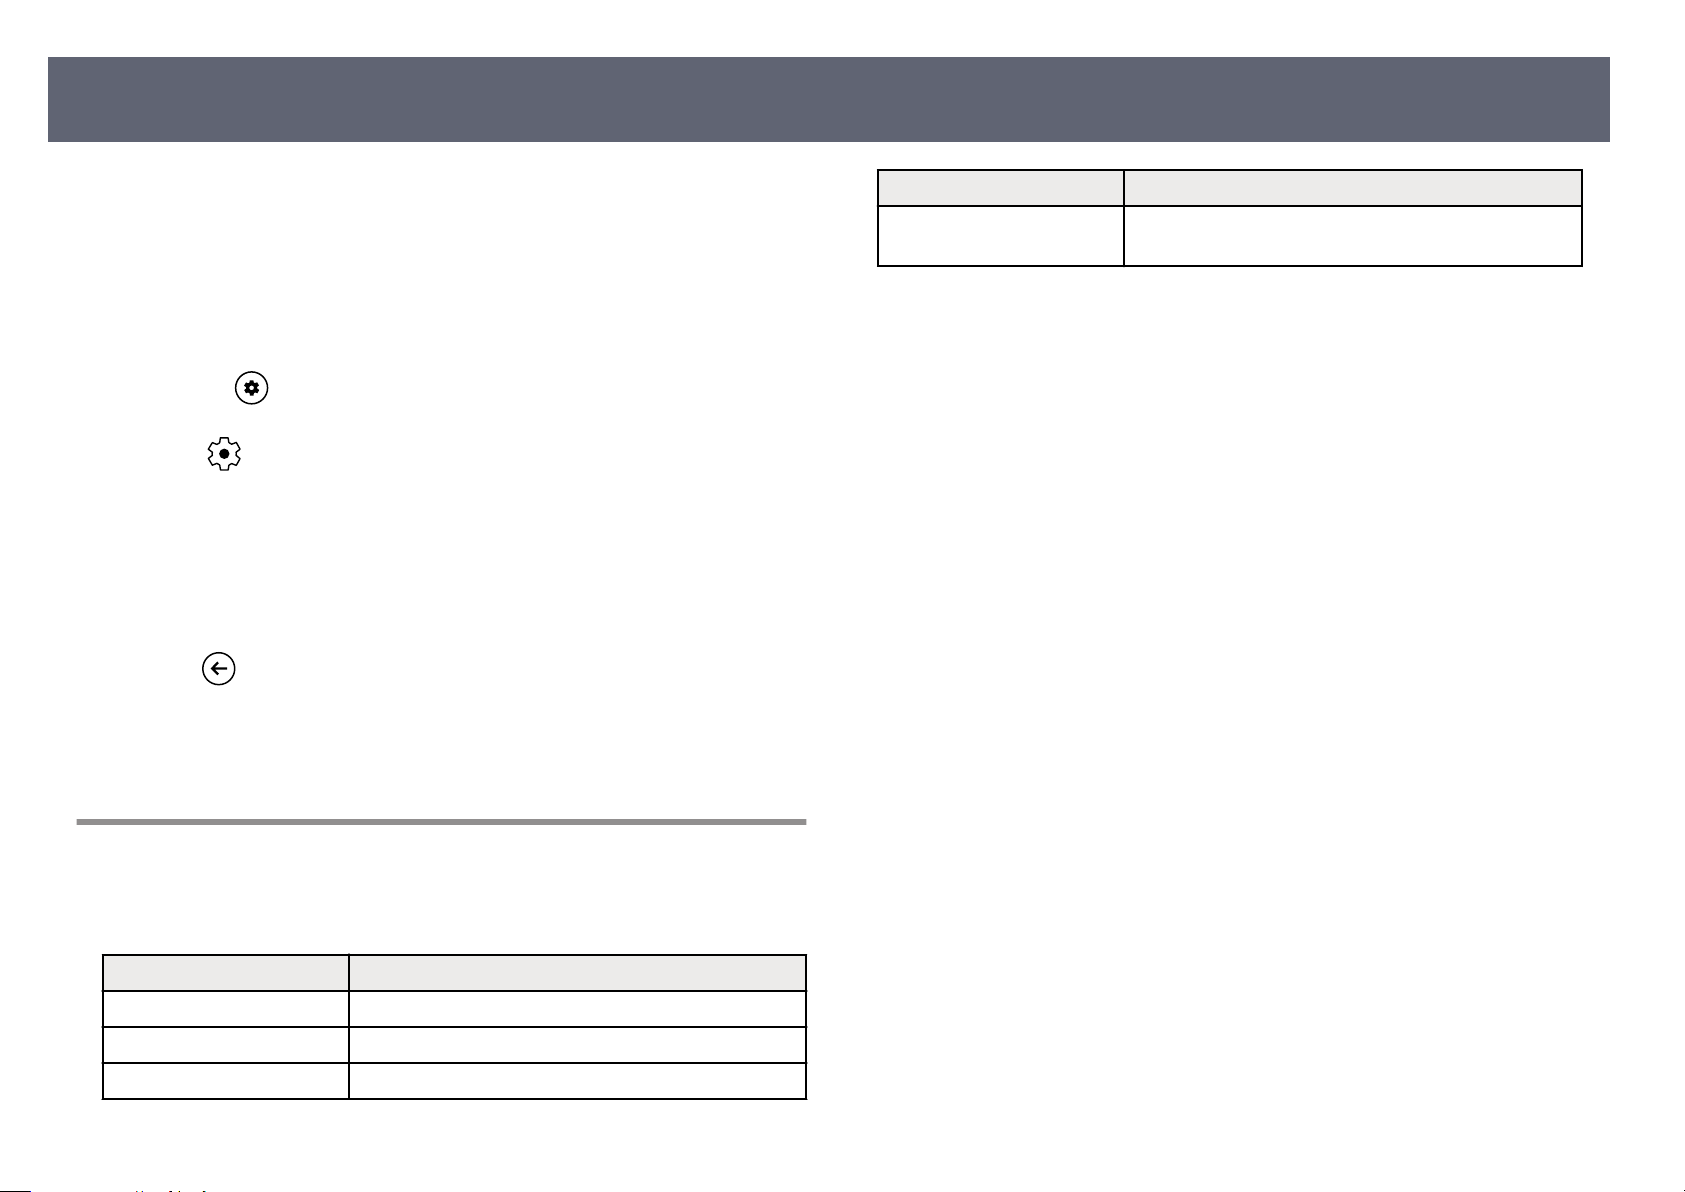
Press the
b
Select on the dashboard.
c
Select the menus in the following order:
d
s Dis
Select your sound mode and press [Enter].
e
Press
f
Related Links
g
•
"Avai
lable Sound Modes" p.52
button on the remote control to open the dashboard.
ay & Sound > Sound
pl
to exit the menus.
Sound mode Description
Movie Best for audio from videos or movies. Low and high
ch sounds are emphasized.
pit
Available Sound Modes
You can set the projector to use these sound modes, depending on the input
sour
ce you are using:
Sound mode Description
Standard Outputs the audio using normal sound quality.
Vocal Best for hearing voices and spoken lines.
Music Best for music. Low and high pitch sounds are clearer.
Page 53

Adjusting Projector Features
low the instructions in these sections to use your projector's adjustment features.
Fol
Related Links
g
•
"Using the Projector as a Bluetooth Speaker" p.54
•
"Shutting O the Image Temporarily" p.56
•
"Using Google Cast™" p.57
•
"HDMI CEC Features" p.58
•
"Installing a Security Cable" p.59
•
"Updating Projector Firmware Using Epson Projector Update" p.60
•
"Initializing the Projector" p.61
Page 54
Using the Projector as a Bluetooth Speaker
54
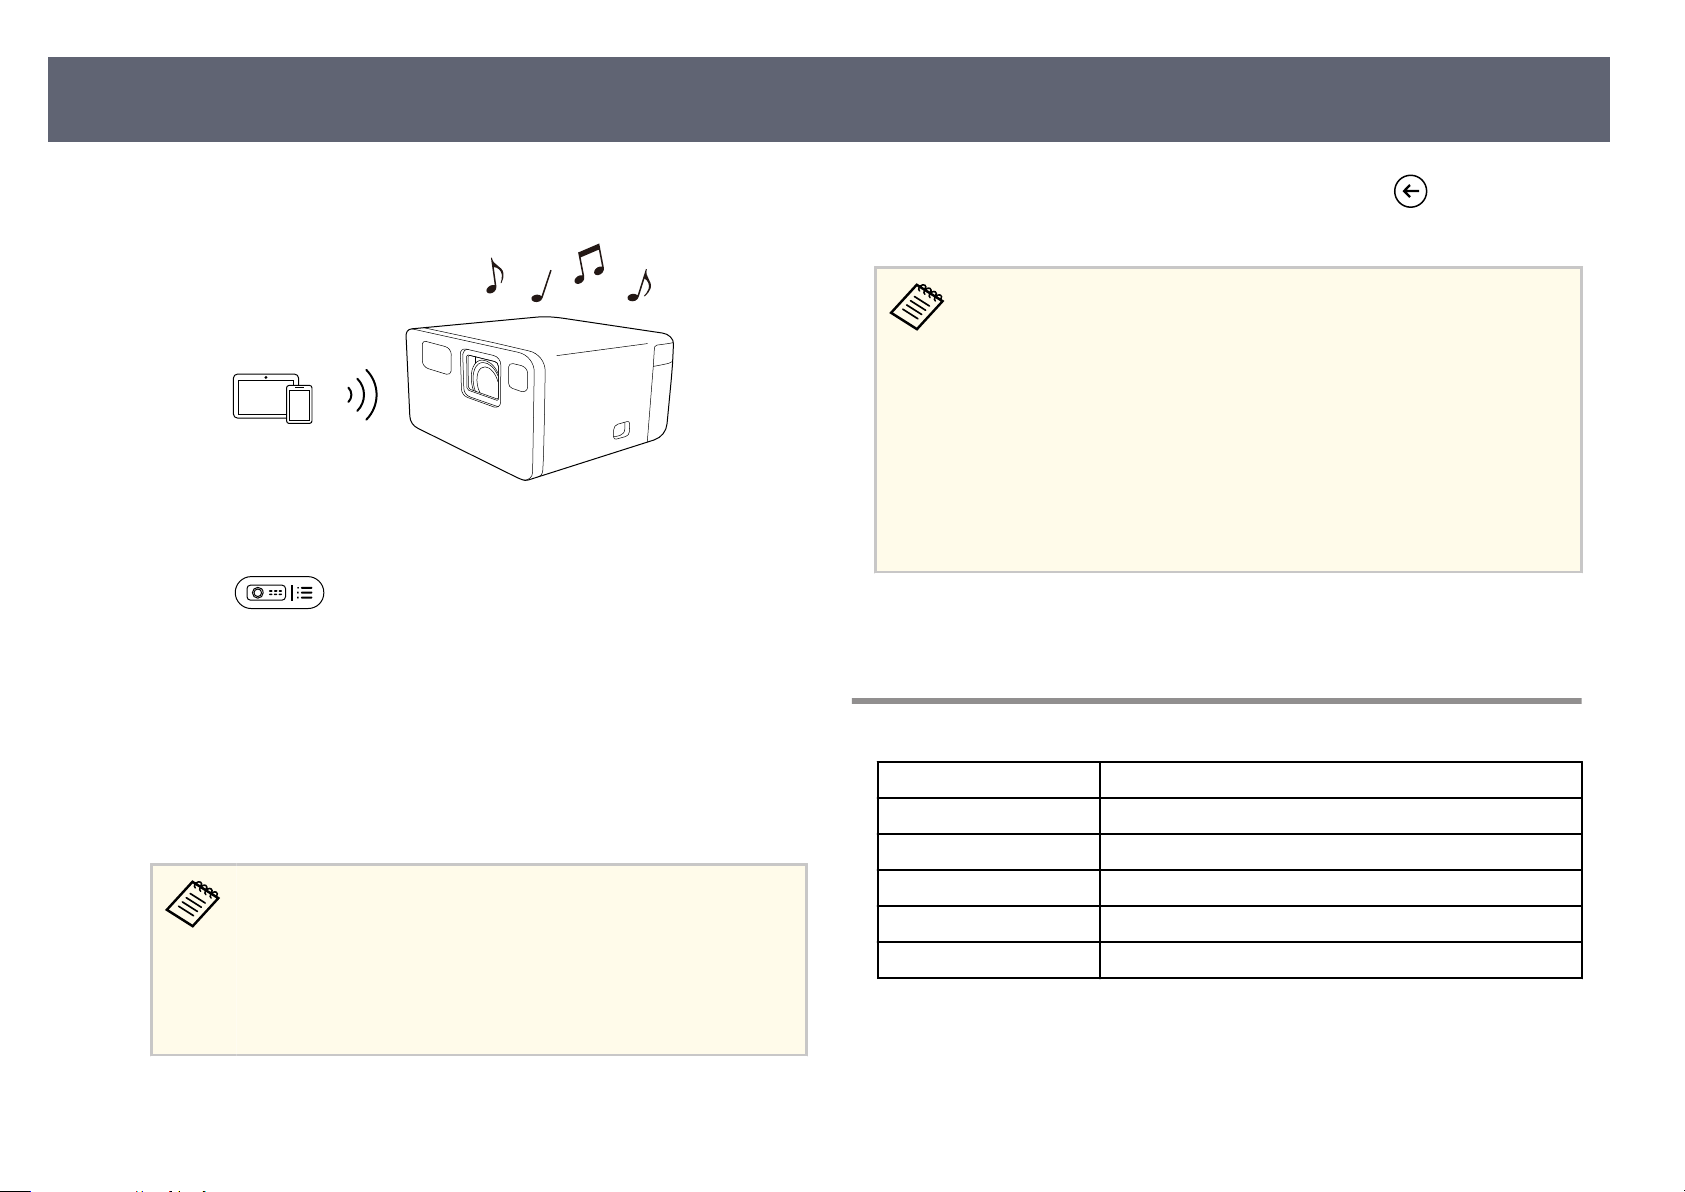
You can use the projector's speaker to output audio from a video/audio device
cted by Bluetooth.
conne
Turn on the projector and display an image.
a
Press the
b
Select B
c
e
turns o aer 10 seconds.
luetooth Speaker Mode and press [Enter].
Bluetooth Speaker Mode screen is displayed and the projected image
button on the remote control.
To exit B
e
two s
Related Links
g
•
"Bl
uetooth Specications" p.54
luetooth Speaker Mode, press and hold the button for about
econds.
•
ere i
s a delay in the audio output from any Bluetooth audio device.
•
You cannot connect multiple video/audio devices by Bluetooth at the
same time.
•
You can also connect the projector to Bluetooth audio devices, such
as speakers or headphones, to output the projector's audio from these
devices. Select the menus in the following order to perform pairing
from the menu displayed.
s Remotes & Accessories > Pair accessory
•
Bluetooth audio devices are not supported in some countries and
regions.
Bluetooth Specications
Enable the Bluetooth function on the device you want to connect
d
and se
lect EPSON Projector from the available device list. See the
documentation supplied with the device for more information.
•
•
an change the name EPSON Projector. Select another
You c
name or use a custom name from the projector's Device name
menu.
s System > About > Device name
To cancel a Bluetooth connection, disconnect from the
connected device.
Version Bluetooth Ver. 5.1
Output Class 1
Communication distance Approx. 10 m
Supported p
Frequency used 2.4 GHz band (2.402 to 2.480 GHz)
Supported codecs SBC
roles A2DP
, AVRCP
Page 55
Using the Projector as a Bluetooth Speaker
Warning
Do no
t use the device near any medical equipment or equipment that is
automatically controlled, such as automatic doors or re alarms. Electromagnetic
interference from the device may cause such equipment to malfunction and cause an
accident.
•
You m
ay not be able to connect depending on the standard and type of
device.
•
Even when connecting within the specied communication distance,
connections can be lost due to the status of the signal.
•
e communication method for Bluetooth uses the same frequency
(2.4 GHz) as wireless LAN (IEEE802.11b/g) or microwave ovens.
erefore, if these devices are used at the same time, radio
wave interference may occur, the audio may be interrupted, or
communication may not be possible. If you do need to use these
devices at the same time, make sure there is enough distance between
them and the Bluetooth device.
55
Page 56
Shutting O the Image Temporarily
56
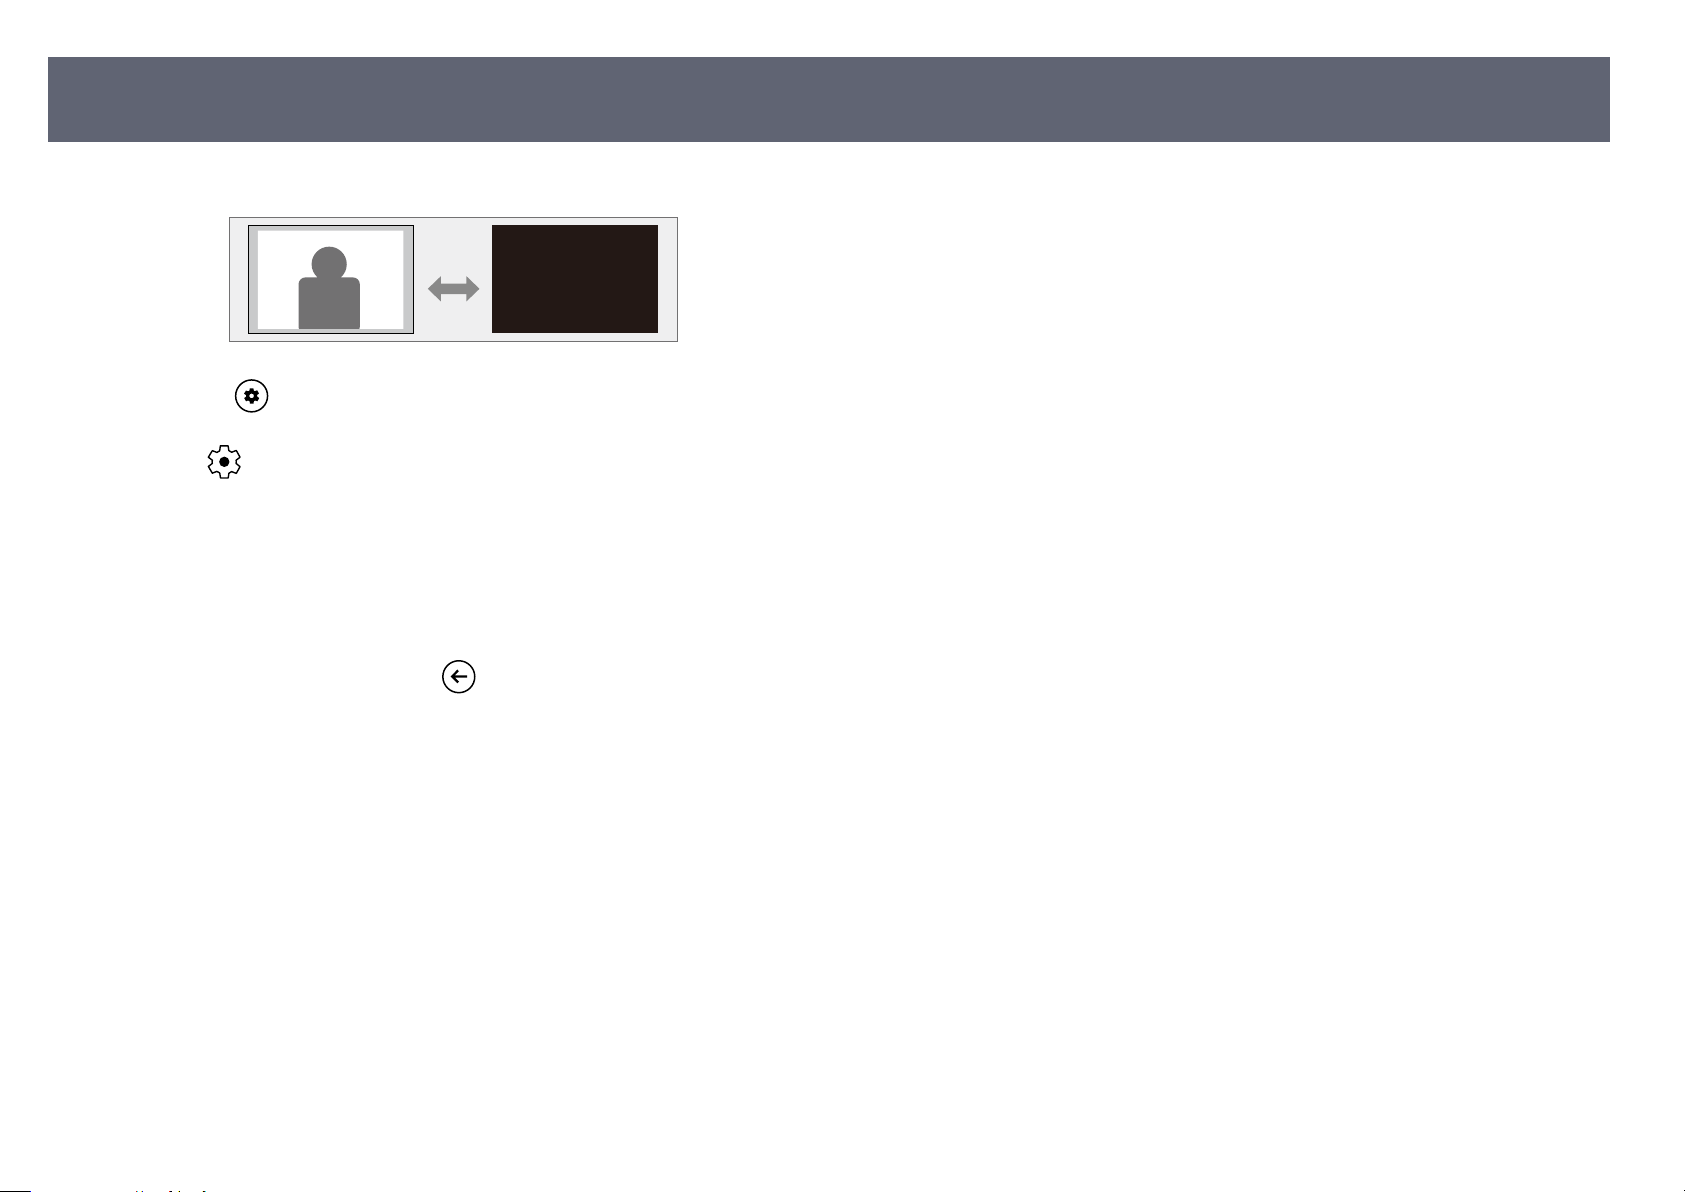
You can temporarily turn o t
Press the
a
Select on the dashboard.
b
Select the menus in the following order:
c
s Sys
Select Picture o to turn o the projected image.
d
To t
e
Related Links
g
•
"Sys
urn the image back on, press
tem Menu" p.68
button on the remote control to open the dashboard.
tem > Power & Energy > Power
he projected image.
.
Page 57
Using Google Cast
e projector comes with Google Cast, allowing you to cast content from
omecast-enabled apps.
Chr
Connect your device or computer to the same wireless network as the
a
pro
jector.
™
57
Open the Chromecast-enabled app and press
b
Select your projector from the list of devices.
c
By default, the name of the projector is EPSON Pr
change the name by selecting another name or using a custom name
from the projector's Device name menu.
s System > About > Device name
e app connects and starts casting to the projector.
top casting, press
d
To s
in the app and choose the disconnect option.
.
ojector. You can
Page 58
HDMI CEC Features
When an audio/video source that meets the HDMI CEC standard is connected
e projector's HDMI port, you can use the projector's remote control to
to th
control certain features of the linked device.
•
To automatically turn on the projector when you turn on the connected
device, set TV auto power on to On.
58
Related Links
g
•
"Operating Connected Devices Using the HDMI CEC Features" p.58
Operating Connected Devices Using the HDMI CEC Features
You can control connected audio/video devices using the HDMI CEC features.
•
•
•
Press the button on the remote control to open the dashboard.
a
Select
b
ust also congure the connected device. See the documentation
You m
supplied with the device for more information.
Some connected devices or functions of those devices may not
operate properly even if they meet the HDMI CEC standard. See the
documentation supplied with the device for more information.
Use a cable that supports the HDMI standard.
on the dashboard.
Press
f
an use the projector's remote control to control the linked device such as
You c
playback, stop, or adjust the volume.
Related Links
g
•
"Projector Feature Settings - Inputs Menu" p.64
to exit the menus.
Select the menus in the following order:
c
s Inputs > Inputs > HDMI control
Set HDMI control to On.
d
Ad
e
just the following HDMI CEC settings as necessary.
•
To aut
omatically turn o the connected device when you turn o the
projector, set Device auto power o to On.
Page 59

Installing a Security Cable
You can use the security slot on the projector to install security cable (security
o deter the.
lock) t
Related Links
g
•
"Projector Parts - Rear/Side" p.11
59
Page 60

XXXX XXXX Apps XXXX Google TV
Your apps
Updating Projector Firmware Using Epson Projector Update
60
You can get the latest version of the projector rmwar
Update.
•
You c
an search for and install the Epson Projector Update app from the
search window on the home screen. Be sure to install the app to keep
the projector up to date.
•
When the latest projector rmware is available, a notication
is automatically displayed on the screen. Follow the on-screen
instructions to update the rmware.
Press the button on the remote control.
a
b
Select A
ap
pps and start Epson Projector Update by selecting it from the
ps li
st.
e by using Epson Projector
Follow the on-screen instructions to update the rmwar
c
Caution
While u
pdating the rmware, do not operate or turn o the projector.
e.
Page 61

Initializing the Projector
You can reset all of the projector settings to their default values.
If you initialize the projector, all the information such as installed apps,
Goog
le Account login information, and the projector's menu settings
are deleted. Write down the settings you do not want to lose before
performing initialization.
Turn on the projector and display an image.
a
Press the button on the remote control to open the dashboard.
b
61
Select
c
Select the menus in the following order:
d
s Sys
Follow the on-screen instructions to start initializing the projector.
e
Related Links
g
•
"Sys
tem Menu" p.68
on the dashboard.
tem > About > Reset > Factory reset
Page 62

Adjusting the Menu Settings
low the instructions in these sections to access the projector menu system and change projector settings.
Fol
Related Links
g
•
"Using the Projector's Menus" p.63
•
"Projector Feature Settings - Inputs Menu" p.64
•
"Projector Feature Settings - Projector Menu" p.65
•
"Image Quality Settings - Display & Sound Menu" p.67
•
"Other Menus" p.68
Page 63

Using the Projector's Menus
You can use the projector's menus to adjust the settings that control how your
jector works. e projector displays the menus on the screen.
pro
63
Press the
a
Select on the dashboard.
b
Press the up or down arrow buttons to move through the menus listed on
c
the s
creen.
To change settings in the displayed menu, press the [Enter] button.
d
Press the arrow buttons to move through the settings.
e
Change the settings using the buttons as necessary.
f
When you ni
g
Press to exit the menus.
h
button on the remote control to open the dashboard.
sh
changing settings on a menu, press
.
Page 64
Projector Feature Settings - Inputs Menu
64
Settings on the Inp
uts menu let you control the audio/video device you are
currently using.
Setting Options Description
Inputs HDMI1 Selects a name you want to display as the
f the audio/video device that is
name o
connected to the projector's HDMI
(ARC) port. To give it a name that is not
in the list, select Custom.
HDMI control Select On to control the connected audio/
vide
o device using the projector's remote
control.
Device auto poweroSe
TV auto power on Select On to automatically turn on
HDMI EDID
Versio
n
lect On to automatically turn o the
connected audio/video device when you
turn o the projector.
th
e projector when you turn on the
connected device, or when you start
playback on the connected device.
Displays the EDID version.
CEC Device List Lists the devices connected to the
pro
jector's HDMI (ARC) port.
Related Links
g
•
erating Connected Devices Using the HDMI CEC Features" p.58
"Op
Page 65

Projector Feature Settings - Projector Menu
65
Settings on the Pro
jector menu provide correction methods to properly project
your image.
Setting Options Description
Focus Auto focus Automatically adjusts the focus of the
jected image.
pro
Manual Focus Manually adjusts the focus of the
pro
jected image.
Advanced Auto Focus at Startup: Sele
Image Correction Auto Keystone
Cor
rection
Manual Keystone
Cor
rection
Fit to Screen Automatically corrects the shape and
Zoom & Shi Zo
Reset to Default
Imag
e
automatically correct the focus of the
projected image when you turn on the
projector.
Auto Focus When Moving: Select On
to automatically correct the focus of the
projected image when the projector is
moved or tilted.
Automatically adjusts any horizontal/
vertical distortion of the projected image.
Manually adjusts any horizontal/vertical
distortion of the projected image.
posit
ion of the projected image to t on
your screen.
om: Resizes the projected image.
Image Reposition: Adjusts the image
position.
Resets all adjustment values on the Image
Correction menu to their default settings.
ct On to
Setting Options Description
Advanced Auto Keystone Correction At Startup:
ct On to automatically adjust any
Sele
horizontal/vertical distortion of the
projected image when you turn on the
projector.
Auto Keystone Correction on
Movement: Select On to automatically
adjust any horizontal/vertical distortion
of the projected image when the projector
is moved or tilted.
Avoid Obstacles: Set to On to enable the
Avoid Obstacles function.
Bluetooth Speaker
Mode
Advanced Settings Smart Eye
— O
Pro
tection
Projection Mode Selects the way the projector faces the
Remote Control Remote Control Battery Level: Disp
pens the Bluetooth device connection
screen to switch to Bluetooth Speaker
Mode.
Select On to enable the Smart Eye
Protection function.
When the projector's sensor detects
obstacles that are interfering with the
projection area, the brightness of the
light source is automatically reduced to
minimize glare.
scre
en so the image is oriented correctly.
the remaining battery level of the remote
control.
Remote Control Version: Displays the
remote control version.
lays
Product Name Displays the product name.
Sub System version Displays the Sub system version.
Dynamic Contrast Select On to enable the Dynamic
Co
ntrast function.
Page 66

Projector Feature Settings - Projector Menu
Related Links
g
•
rrecting the Image Shape and Focus Automatically" p.39
"Co
•
"Adjusting the Size of the Image" p.40
•
"Adjusting the Position of the Image" p.41
•
"Automatically Correcting the Image Shape with Fit to Screen" p.41
•
"Correcting the Image Shape Manually" p.42
66
Page 67

Image Quality Settings - Display & Sound Menu
67
Settings on the Displ
ay & Sound menu let you adjust the quality of your image
and optimize the sound for the input source you are currently using.
Setting Options Description
Picture Brightness Selects the brightness of the light source.
Dynamic
Vivid
Natural
Cinema
Custom Contrast: Adjusts the dierence between
Color Temperature Sets the color temperature according to
Select your favorite color mode from the
list.
ligh
t and dark areas of the image.
Saturation: Adjusts the overall vividness
of the color.
Sharpness: Adjusts the sharpness or
soness of the image.
Color Gain: Adjusts the individual
R (red), G (green), and B (blue)
components of the gain.
Gamma: Selects the gamma to adjust the
coloring.
the co
lor mode you selected.
Setting Options Description
Sound Standard
al
Voc
Music
Movie
System Sound Turns on/o the system sound.
Audio O
g
•
•
•
utput Digital Output Selects the sound output format when
Digital Output
Del
ay
Related Links
"Ch
anging the Color Mode" p.47
"Adjusting Image Quality in Detail" p.48
"Changing the Sound Mode" p.52
Select your favorite mode for sound
output from the projector's speaker
system according to the playback
contents.
you o
utput audio to an external audio
device.
Adjusts the audio latency. If the audio is
fast, select a higher value.
Reset to Default Resets all adjustment values on the
Screen Full
Sup
Unscaled
4:3
Movie expand 14:9
Movie expand 16:9
er Zoom
Pic
ture menu to their default settings.
Sets the aspect ratio (width-to-height
ratio) for the input source. (is setting
is available only when the current input
source is HDMI.)
Page 68

Other Menus
68
Options on other menus let you customize various Google TV features.
Related Links
g
•
•
•
•
•
•
•
work & Internet Menu" p.68
"Net
"Accounts & sign-in Menu" p.68
"Privacy Menu" p.68
"Apps Menu" p.68
"System Menu" p.68
"Remotes & Accessories Menu" p.69
"Help & Feedback Menu" p.69
Network & Internet Menu
Settings on the Network & Internet menu let you view network information
and set up the projector for controlling over a network.
Accounts & sign-in Menu
Settings on the Acc
used to log in to the Google TV, and make detailed settings for these accounts.
ounts & sign-in menu let you add new Google Accounts
System Menu
Settings on the Sys
Setting Description
Accessibility Allows you to make settings for accessibility, such as
About Displays the projector's preferences and status.
Date & Time Adjusts the projector's system time and date settings.
Language Select the language used for the projector menus and
Keyboard Allows you to make detailed settings for the virtual
Storage Allows you to display the usage status of the internal
Ambient mode Allows you to make settings for the screen saver.
Power & Energy Allows you to make settings for power and energy
Cast Allows you to make settings for the cast function using
tem menu let you customize various projector features.
sub
titles and text reading.
You c
an return all the projector settings to their factory
default values from this menu.
mess
ages.
key
board installed in the projector's menu.
sto
rage and clean the cache.
savin
g such as the Sleep Timer or Picture o features.
Goog
le Cast.
Privacy Menu
Settings on the Privacy
Apps Menu
pps menu displays your most recently used apps or all the apps that are
e A
in
talled on the projector.
s
menu let you change your privacy and security settings.
System Sound Turns on/o the system sound.
Res
tart Restarts the projector.
Related Links
g
•
tializing the Projector" p.61
"Ini
•
"Shutting O the Image Temporarily" p.56
Page 69

Other Menus
Remotes & Accessories Menu
69
Settings on the Remo
and the projector, or let you connect/disconnect your Bluetooth devices to the
projector.
tes & Accessories menu let you pair the remote control
Help & Feedback Menu
e Help & Feedback menu provides a link to the Google TV help page, or lets
u send feedback or comments about the product.
yo
Page 70

Maintaining the Projector
low the instructions in these sections to maintain your projector.
Fol
Related Links
g
•
"Projector Maintenance" p.71
•
"Cleaning the Lens" p.72
•
"Cleaning the Projector Case" p.73
•
"Air Filter and Vent Maintenance" p.74
Page 71
Projector Maintenance
You may need to clean the projector's lens periodically, and clean the air
and air vents to prevent the projector from overheating due to blocked
lter
ventilation.
e only part you should replace is the remote control batteries. If any other
part needs replacing, contact Epson or an authorized Epson distributor.
Warning
Befo
re cleaning any part of the projector, turn it o and unplug the power cord.
Never open any cover on the projector, except as specically explained in this
manual. Dangerous electrical voltages in the projector can injure you severely.
71
Page 72
Cleaning the Lens
Clean the projector's lens periodically, or whenever you notice dust or smudges
e surface.
on th
•
To remove dust or smudges, gently wipe the lens with clean and dry lenscleaning paper.
•
If the lens is dusty, blow o dust using a blower, and then wipe the lens.
Warning
•
Befo
re cleaning the lens, turn o the projector and unplug the power cord.
•
Do not use any ammable gas sprays such as air dusters to blow o dust. e
high heat generated by the projector may cause a re.
Attention
•
Do no
t wipe the lens right aer you turn o the projector. Doing so could
damage the lens.
•
Do not use any harsh materials to clean the lens and do not subject the lens to
any impacts; otherwise, it could be damaged.
72
Page 73

Cleaning the Projector Case
73
Before cleaning the projector case, turn o t
cord.
•
To remove dust or dirt, use a so, dry, lint-free cloth.
•
To remove stubborn dirt, use a so cloth moistened with water and mild
soap. Do not spray liquid directly on the projector.
he projector and unplug the power
Attention
Do no
t use wax, alcohol, benzene, paint thinner, or other chemicals to clean the
projector case. ese can damage the case. Do not use canned air, or the gases
may leave a ammable residue.
Page 74
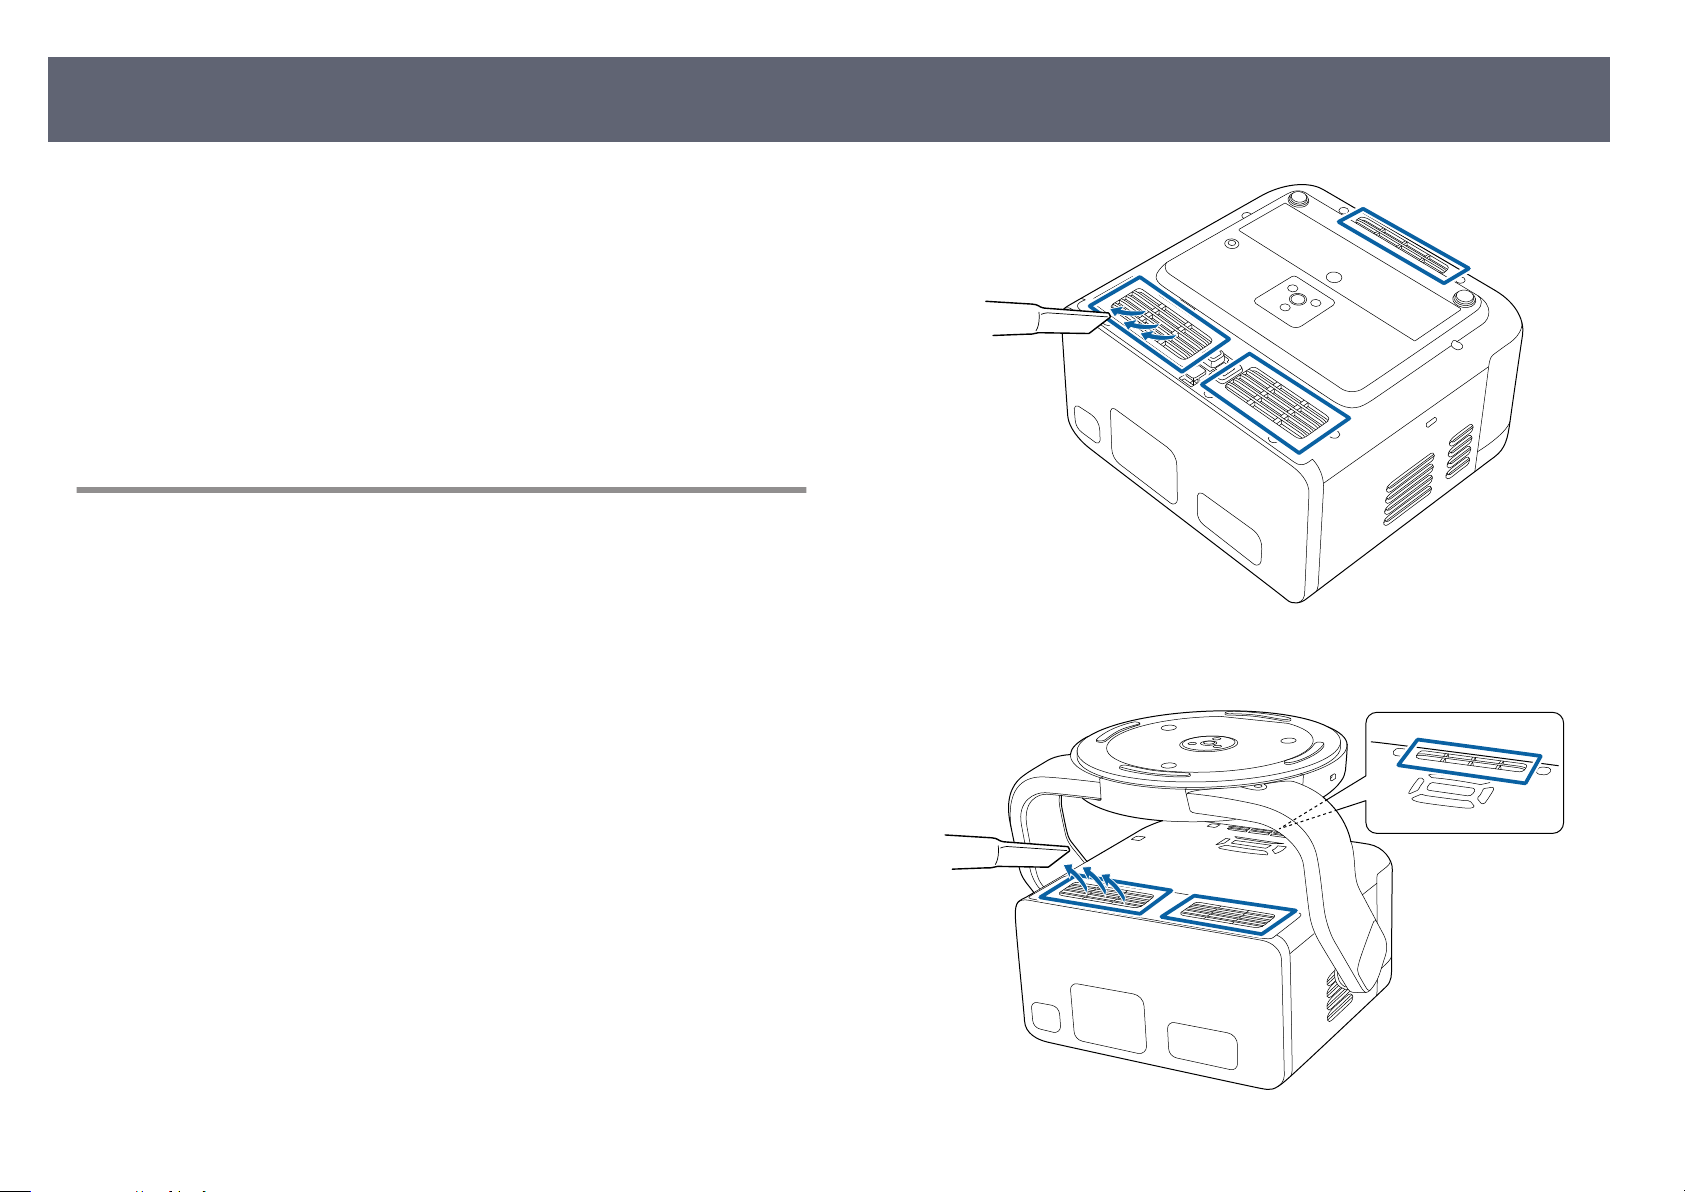
Air Filter and Vent Maintenance
Regular lter maintenance is important to maintain your projector. Clean
e air lter when a message appears telling you the temperature inside the
th
projector has reached a high level. It is recommended that you clean these parts
about once every year. Clean them more oen than this if you use the projector
in an environment that is dustier than expected. (Assuming the projector is used
in an atmosphere in which airborne particulate matter is less than 0.04 to 0.2
mg/m3.)
Related Links
g
•
"Cleaning the Air Filters and Intake Vents " p.74
Cleaning the Air Filters and Intake Vents
You need to clean the projector's air lter or air intake vents in the following
situations:
•
e lter or vents get dusty.
•
e projector's Status indicator turns orange.
74
EF-22
Turn o the projector and unplug the power cord.
a
Gen
b
tly remove the dust using a small vacuum designed for computers or a
very
so brush (such as a paintbrush).
EF-21
Page 75

Air Filter and Vent Maintenance
Attention
•
Do no
t rinse the air lter in water, or use any detergent or solvent to clean
it.
•
Do not directly vacuum the air lter. Doing so could damage the lter.
•
Do not use canned air. e gases may leave a ammable residue or push
dust and debris into the projector's optics or other sensitive areas.
•
If dust is dicult to remove or the air lter is damaged, contact Epson to
request help with replacing the air lter.
75
Page 76

Solving Problems
ck the solutions in these sections if you have any problems using the projector.
Che
Related Links
g
•
"Projection Problems" p.77
•
"Projector Indicator Status" p.78
•
"Solving Projector Power-On or Power-O Problems" p.80
•
"Solving Image Problems" p.81
•
"Solving Sound Problems" p.85
•
"Solving Remote Control Operation Problems" p.87
•
"Solving HDMI CEC Problems" p.88
•
"Solving Wi-Fi Network Problems" p.89
•
"Solving Google TV Problems" p.90
Page 77

Projection Problems
77
If the projector is not working properly, turn it o, un
back in and turn it on.
If this does not solve the problem, check the following:
•
e indicators on the projector may indicate the problem.
•
e solutions in this manual can help you solve many problems.
If none of these solutions help, contact Epson for technical support.
plug it, and then plug it
Page 78

Projector Indicator Status
e indicators on the projector indicate the projector status and let you know
en a problem occurs. Check the status and color of the indicators and then
wh
refer to this table for a solution.
If the indicators display a pattern not listed in the table below, turn the
pro
jector o, unplug it, and contact Epson for help.
EF-21
78
EF-22
Status indicator
A
Projector status
Indicator status Problem and solutions
Lit blue Normal operation.
Flashing blue Warming up or updating the projector r
Remote control operations may be disabled when the
indicator is ashing blue.
O Standby.
When y
ou press the power button, projection starts.
mwar
e.
Page 79

Projector Indicator Status
Indicator status Problem and solutions
79
Lit orange Projector has overheated and turned o. L
o to cool down for 5 minutes.
•
Make sure that the vents and air lter are not clogged
with dust or obstructed by nearby objects.
•
Make sure the environmental temperature is not too
hot.
•
Clean or replace the air lter.
•
If the problem persists, unplug the projector and
contact Epson for help.
Flashing orange Internal projector error.
Turn t
he projector o, unplug it, and contact Epson for
help.
Related Links
g
•
"Cle
aning the Air Filters and Intake Vents " p.74
eave it turned
Page 80

Solving Projector Power-On or Pow
er-O Problems
80
Check the solutions in these sections if the projector does not turn on when you
s the power button or it turns o unexpectedly.
pres
Related Links
g
•
"Solving Projector Power Problems" p.80
•
"Solving Projector Shutdown Problems" p.80
Solving Projector Power Problems
If the projector does not turn on when you press the power button, try the
following steps until the problem is solved.
Make sure the power cord is securely connected to the projector and to a
a
wor
king electrical outlet.
If you are using the remote control, check the batteries of the remote
b
cont
rol.
e power cord may be defective. Disconnect the cord and contact Epson
c
fo
r help.
Aer waking the projector, Sleep Timer is automatically set to O.
e projector may have turned o aer the interval of time specied in
b
Switch O Timer in the projector's Power & Energy menu has passed.
Press the power button on the projector or remote control to turn back on
the projector.
s System > Power & Energy > Power > Switch O Timer
When the status indicator is lit orange, the projector has overheated and
c
turn
ed o.
e cooling fans may run in standby status depending on the
pr
ojector settings. Also, when the projector wakes from standby
status, the fans may cause an unexpected noise. is is not a
malfunction.
Related Links
g
•
tem Menu" p.68
"Sys
Solving Projector Shutdown Problems
If the projector's light source turns o un
the problem is solved.
e projector may have entered sleep mode aer the interval of time
a
sp
ecied in Sleep Timer in the projector's Power & Energy menu has
passed. Press the power button on the projector or remote control to wake
the projector.
s System > Power & Energy > Power > Sleep Timer
expectedly, try the following steps until
Page 81

Solving Image Problems
81
Check the solutions in these sections if you have any problems with projected
images.
ed Links
Relat
g
•
"Solving Missing Image Problems" p.81
•
"Adjusting an Image that is not Rectangular" p.81
•
"Adjusting a Fuzzy or Blurry Image" p.82
•
"Fixing Partial Image Problems" p.82
•
"Adjusting an Image that Contains Noise or Static" p.83
•
"Adjusting an Image with Incorrect Brightness or Colors" p.83
•
"Adjusting an Upside-down Image" p.84
•
"Solving Auto Correction Problems" p.84
Solving Missing Image Problems
If no image is displayed, try the following steps until the problem is solved.
Check the projector's status:
a
•
Che
ck the status indicator to conrm that the projector is in normal
operating status.
•
Press the projector's power button to wake it from standby or sleep
mode.
s System > Power & Energy > Power > Sleep Timer
Check the cable connection:
b
•
Make s
on for the projector.
•
Connect the video source directly to the projector.
•
Replace the HDMI cable with the shorter one.
ure all necessary cables are securely connected and the power is
Check the status of your video source:
c
•
Make s
the documentation supplied with the device for more information.
•
If you are projecting from a laptop computer, make sure it is set up to
display on an external monitor.
Check the following items:
d
•
You n
your Wi-Fi is on.
•
Set the CEC function for the connected device again and restart the
device.
•
Make sure the computer's display resolution does not exceed the
projector's resolution and frequency limits. If necessary, select a
dierent display resolution for your computer. (See your computer
manual for details.)
•
Resets all of the projector settings to their default values.
Related Links
g
•
"System Menu" p.68
ure the connected device meets the HDMI CEC standard. See
eed an Internet connection to view online content. Make sure
Adjusting an Image that is not Rectangular
If the projected image is not evenly rectangular, try the following steps until the
blem is solved.
pro
Place the projector directly in front of the center of the screen, facing it
a
squ
arely, if possible.
Page 82
Solving Image Problems
82
Make sure that Aut
b
Correction on Movement are set to On in the Projector menu.
s Projector > Image Correction > Advanced > Auto Keystone
Correction At Startup
s Projector > Image Correction > Advanced > Auto Keystone
Correction on Movement
Select Auto Keystone Correction in the Projector menu to automatically
c
adj
ust the image shape.
s Projector > Image Correction > Auto Keystone Correction
When projecting on a screen, use Fit t
d
the shape and position of the image so that it ts on your screen.
s Projector > Image Correction > Fit to Screen
Adjust the image shape manually using Manu
e
the Projector menu.
s Projector > Image Correction > Manual Keystone Correction
Related Links
g
•
"Projector Feature Settings - Projector Menu" p.65
o Keystone Correction At Startup and Auto Keystone
o Screen to automatically correct
al Keystone Correction in
Check the following items:
c
•
P
t
ion the projector close enough to the screen.
osi
•
Position the projector so the keystone adjustment angle is not so wide
that it distorts the image.
Clean the projector's lens.
d
To avoid condensation on the lens aer brin
in from a cold environment, let the projector warm up to room
temperature before using it.
Adjust the Sharpness setting in the projector's Display & Sound menu to
e
imp
rove image quality.
s Display & Sound > Picture > Custom > Sharpness
If you are projecting from a computer, use a lower resolution or select a
f
reso
lution that matches the projector's native resolution.
Related Links
g
•
"Image Quality Settings - Display & Sound Menu" p.67
ging the projector
Adjusting a Fuzzy or Blurry Image
If the projected image is fuzzy or blurry, try the following steps until the
blem is solved.
pro
Hold down the
a
Press the
b
adju
stment screen and adjust focus manually.
button on the remote control to perform Aut
button on the remote control to display the focus
o focus.
Fixing Partial Image Problems
If only a partial image is displayed, try the following steps until the problem is
ved.
sol
Adjust the position of the projected image using the Image Re
a
setting in the Projector menu.
s Projector > Image Correction > Zoom & Shi > Image Reposition
position
Page 83

Solving Image Problems
83
Select an appropriate aspect ratio from the Scre
b
current input source. (Available only when the current input source is
HDMI.)
s Display & Sound > Screen
Make sure you select the correct projection mode. You can select this from
c
the
Projection Mode menu.
s Projector > Advanced Settings > Projection Mode
Check your computer display settings to disable dual display and set the
d
reso
lution within the projector's limits. (See your computer manual for
details.)
Related Links
g
•
"Projector Feature Settings - Projector Menu" p.65
•
"Image Quality Settings - Display & Sound Menu" p.67
en menu according to the
Adjusting an Image that Contains Noise or Static
If the projected image contains electronic interference (noise) or static, try the
fol
lowing steps until the problem is solved.
Check the cables connecting your video source to the projector. ey
a
sh
ould be:
•
Separated from the power cord to prevent interference
•
Securely connected at both ends
•
Not connected to an extension cable
If you connected an extension power cable, try projecting without it to see
c
if it cau
Select a computer video resolution and refresh rate that are compatible
d
wit
Related Links
g
•
"Image Quality Settings - Display & Sound Menu" p.67
sed interference in the signal.
h the projector.
Adjusting an Image with Incorrect Brightness or Colors
If the projected image is too dark or bright, or the colors are incorrect, try the
lowing steps until the problem is solved.
fol
Try dierent color modes for your image and environment by selecting
a
th
e color mode setting in the projector's Picture menu.
s Display & Sound > Picture
Check your video source settings.
b
Adjust the settings for C
c
menu for the current input source.
s Display & Sound > Picture
Make sure all the cables are securely connected to the projector and your
d
video e
cables.
quipment. If you connected long cables, try connecting shorter
om and Color Temperature in the Picture
ust
If you adjusted the image shape using the projector controls, try
b
decre
asing the Sharpness setting in the projector's Display & Sound
menu to improve image quality.
s Display & Sound > Picture > Custom > Sharpness
Position the projector close enough to the screen.
e
Related Links
g
•
"Im
age Quality Settings - Display & Sound Menu" p.67
Page 84

Solving Image Problems
Adjusting an Upside-down Image
If the projected image is upside-down, select the correct projection mode.
s Pro
g
•
Solving Auto Correction Problems
jector > Advanced Settings > Projection Mode
Related Links
"Projector Feature Settings - Projector Menu" p.65
•
When t
surface is within 20º right, le, up, or down.
•
Remove any obstacles between the projector and the projection surface
as these can interrupt the projection.
•
If you are using the projector in a bright room, darken the room. Do
not change the room brightness while automatically correcting focus
and keystone distortion.
•
Project the image on to a plain and at surface. Do not project the
image on to a patterned surface or a unlevel surface.
he installation angle of the projector toward the projection
84
Try the following steps if you cannot automatically correct focus and vertical/
hor
izontal distortion of the projected image in the following situations:
•
When you turn on the projector.
•
When the projector is moved or tilted.
•
When you perform Auto focus.
•
When you perform Auto Keystone Correction.
Check the projector's status:
a
•
Remo
ve any obstacles that are blocking the projector's camera and
sensor.
•
Clean the projector's camera and sensor if they are dusty or dirty.
•
Do not move the projector while correcting the focus and keystone
distortion.
Check the installation environment of the projector.
b
•
Foc
us and keystone distortion of the projected image are automatically
corrected under the following conditions:
•
When the size of the projected image (diagonal length) before
correcting focus and keystone distortion is from 30 to 100 inches.
•
When the projection distance is about 0.7 to 2.2 m.
If you cannot correct focus and any distortion of the projected image,
the p
rojector's camera or sensor may be malfunctioning. Turn o the
projector and disconnect the power cord, then reconnect the power cord
and turn the projector back on. If a warning screen is displayed when you
turn on the projector, contact Epson for help.
Related Links
g
•
"Co
rrecting the Image Shape and Focus Automatically" p.39
Page 85
Solving Sound Problems
85
Check the solutions in these sections if you have any problems with projected
d.
soun
Related Links
g
•
"Solving Missing or Low Audio Problems" p.85
•
"Solving Bluetooth Speaker Mode Problems" p.85
Solving Missing or Low Audio Problems
If there is no sound or the volume is too low, try the following steps until the
problem is solved.
Adjust the projector's volume settings using the up/down buttons on
a
the remote control.
Check the cable connection between the projector and your video source.
b
Check your video source to make sure the volume is turned up and the
c
audio o
If you want to output audio to an external audio device that supports
d
HDMI ARC u
•
Set HDMI control to On in the Inputs menu.
s Inputs > Inputs > HDMI control
•
Make sure the HDMI cable is compliant with HDMI ARC.
put is set for the correct source.
ut
sing an HDMI cable, try the following solutions:
If audio is not output to an external audio device that supports HDMI
e
ARC, tr
s Display & Sound > Audio Output > Digital Output
Related Links
g
•
"Projector Feature Settings - Inputs Menu" p.64
•
"Image Quality Settings - Display & Sound Menu" p.67
y changing Auto to PCM as the Digital Output setting.
Solving Bluetooth Speaker Mode Problems
If you cannot connect a Bluetooth audio device to the projector, try the
fol
lowing solutions.
Select Bluetooth Speaker Mode in the Projector menu and press the
a
[Ent
er] button on the remote control.
Select EPSON Projector from the available Bluetooth device list displayed
b
on y
our device.
By default, the name of the projector is EPSON Pr
change the name by selecting another name or using a custom name
from the projector's Device name menu.
s System > About > Device name
Check your Bluetooth audio device to make sure the volume is turned up
c
and the audio output settings are correct.
ojector. You can
When outputting audio to an external audio device that does not
port HDMI ARC using an HDMI cable, set HDMI control to
sup
O in the Inputs menu.
s Inputs > Inputs > HDMI control
Make sure only one Bluetooth device is connected to the projector.
d
You c
annot connect multiple Bluetooth audio devices to the projector at
the same time.
Make sure the device meets the projector's Bluetooth spe
e
cications.
Page 86

Solving Sound Problems
Check the following items:
f
•
Che
ck for obstacles between the Bluetooth audio device and the
projector, and change their positions to improve communication.
•
Make sure the connected Bluetooth audio device is within the specie d
communication distance.
•
Avoid using the projector near wireless networks, microwave ovens, 2.4
GHz cordless phones, or other devices that use the 2.4 GHz frequency
band. ese devices can interfere with the signal between the projector
and the Bluetooth audio device.
Related Links
g
•
"Using the Projector as a Bluetooth Speaker" p.54
•
"Bluetooth Specications" p.54
86
Page 87

Solving Remote Control Operation Problems
If the projector does not respond to remote control commands, try the following
steps un
a
b
c
til the problem is solved.
If you lose the remote control, you can order another one. Contact Epson
for h
elp.
Check that the remote control batteries are installed correctly and have
power. If necessary, replace the batteries.
Check to see if a button on the remote control is stuck down, causing it to
enter s
leep mode. Release the button to wake the remote control up.
If the pairing screen is displayed, perform pairing again by holding down
the
abou
button and button on the remote control at the same time for
t three seconds.
87
Perform pairing again by displaying the pairing screen manually from the
d
Remo
tes & Accessories menu.
If the image is projected from the projector, make sure you are operating
e
the r
emote control within the reception angle and range of the projector.
Strong uorescent lighting, direct sunlight, or infrared device signals may
f
be in
terfering with the projector's remote receivers. Dim the lights or
move the projector away from the sun or interfering equipment.
Related Links
g
•
"Remote Control Operation" p.26
•
"Installing Batteries in the Remote Control" p.26
•
"Projector Indicator Status" p.78
Page 88

Solving HDMI CEC Problems
If you cannot operate the connected devices from the projector, try the
lowing steps until the problem is solved.
fol
Make sure the cable meets the HDMI CEC standard.
a
Make sure the connected device meets the HDMI CEC standard. See the
b
do
Set HDMI control to On in the Inputs menu.
c
s In
Make sure all the cables are securely connected to the projector and your
d
video e
Make sure the connected devices are turned on and in standby status. See
e
the do
If you connect a new device or change the connection, set the CEC
f
func
entation supplied with the device for more information.
cum
puts > Inputs > HDMI control
quipment.
cumentation supplied with the device for more information.
tion for the connected device again and restart the device.
88
Related Links
g
•
"Projector Feature Settings - Inputs Menu" p.64
•
"Projector Indicator Status" p.78
Page 89

Solving Wi-Fi Network Problems
If you cannot connect to a Wi-Fi network, try the following solutions.
Make sure your Wi-Fi router and modem are working properly. Rebooting
a
thes
e devices may solve the network connection problem.
Check for obstacles between the Wi-Fi router and the projector, and
b
chan
ge their positions to improve communication.
89
You can check the network settings from Wi-Fi
c
Internet menu.
If you initialize the projector, you need to select the network settings again
d
on th
e initial setup screen.
Related Links
g
•
"Initializing the Projector" p.61
in the Network &
Page 90
Solving Google TV Problems
See the following page if you have any problems when watching the Google TV.
ps://support.google.com/googletv/
htt
If there is not enough space in the internal storage, system updates may
fail. F
ree up space by deleting unnecessary apps and caches, then try
updating again.
90
Page 91

Appendix
ck these sections for the technical specications and important notices about your product.
Che
Related Links
g
•
"Optional Accessories and Replacement Parts" p.92
•
"Screen Size and Projection Distance" p.93
•
"Supported Monitor Display Resolutions" p.95
•
"Projector Specications" p.96
•
"External Dimensions" p.98
•
"List of Safety Symbols and Instructions" p.100
•
"Laser Safety Information" p.102
•
"Glossary" p.106
•
"Notices" p.107
Page 92
Optional Accessories and Replacement Parts
e following optional accessories and replacement parts are available. Please
chase these products as and when needed.
pur
e following list of optional accessories and replacement parts is current as of:
July 2024.
Details of accessories are subject to change without notice and availability may
vary depending on the country of purchase.
Related Links
g
•
"Mounts" p.92
Mounts
Safety Wire Set ELPWR01
Use when connecting the projector to the location where the projector is
installed to prevent it from falling.
Special expertise is required to suspend the projector from a ceiling.
92
Related Links
g
•
unting the Projector on a Tripod or Projector Stand" p.21
"Mo
Page 93

Screen Size and Projection Distance
93
Check the table here to determine how far to place the projector from the screen
d on the size of the projected image.
base
16:9 screen size
30" 66× 37 64 0 37
40" 89× 50 87 0 50
50" 111× 62 110 0 62
60" 133× 75 132 0 75
70" 155× 87 155 0 87
80" 177× 100 178 0 100
90" 199 × 112 201 0 112
100" 221× 125 224 0 125
120" 266× 149 269 0 149
150" 332 × 187 337 0 187
16:10 screen size
30" 65× 40 70 0 40
A B C
Minimum
(Wide)
A B C
Minimum
(Wide)
Minim
(Wide)
Minim
(Wide)
um
um
Minimum
(Wide)
Minimum
(Wide)
Projection distance (cm)
A
Distance from the projector to the bottom of the screen (cm)
B
Distance from the projector to the top of the screen (cm)
C
Center of lens
D
40" 86× 54 94 0 54
50" 108× 67 119 0 67
60" 129× 81 144 0 81
70" 151× 94 168 0 94
80" 172× 108 193 0 108
90" 194× 121 217 0 121
100" 215× 135 242 0 135
120" 258× 162 291 0 162
130" 280× 175 316 0 175
Page 94
Screen Size and Projection Distance
94
16:10 screen size
140" 302 × 188 341 0 188
4:3 screen size
30" 61× 46 79 0 46
40" 81× 61 107 0 61
50" 102× 76 135 0 76
60" 122× 91 163 0 91
70" 142 × 107 191 0 107
80" 163× 122 219 0 122
90" 183× 137 247 0 137
100" 203×152 275 0 152
120" 244× 183 330 0 183
A B C
Minimum
(Wide)
A B C
Minimum
(Wide)
Minim
(Wide)
Minim
(Wide)
um
um
Minimum
(Wide)
Minimum
(Wide)
Page 95

Supported Monitor Display Resolutions
See the Supplemental A/V Support Specication for detailed information on
patible refresh rates and resolutions for each compatible video display
com
format.
95
Page 96

Projector Specications
EF-21
Product name EF-21W/EF-21R/EF-21G
Dimensions 197 (W) × 110.5 (H) × 191 (D) mm (not including raised
tion)
sec
LCD panel size 0.62"
Display method 3LCD
Number of pixels Full HD (1,920 (W) × 1,080 (H) dots) × 3
Screen resolution 2,073,600 pixels (1,920 × 1,080)
Focus adjustment Auto
Zoom adjustment 1.0 to 1.82 (Digital)
Light source Laser diode
Light source output
p
ower
Wavelength 449 to 461 nm
Up to 24.5 W
Operating altitude Altitude 0 to 3,000 m
Operating temperature ** Altitude of 0 to 2,286 m: 5 to +35°C (Humidity of 20 to
80%, No con
Altitude of 2,287 to 3,000 m: 5 to +30°C (Humidity of 20
to 80%, No condensation)
Storage temperature -10 to +60°C (Humidity of 10 to 90%, No condensation)
Mass Approx. 2.3 kg
densation)
* Approximate time until the light source brightness decreases to half of its
orig
inal value. (Assuming the projector is used in an atmosphere in which
airborne particulate matter is less than 0.04 to 0.2mg/m3. e estimated time
varies depending on the projector usage and operating conditions.)
** Light source brightness automatically dims if the surrounding temperature
gets too high.
e rating label is attached on the bottom of the projector.
is product is also designed for IT power distribution system with phase-to-
phase voltage 230V.
96
Laser class (internal laser
light s
ource)
Light source life * Up to about 20,000 hours
Max. audio output 5 W × 2
Speaker 2 (Stereo)
Power supply 100 - 240 V AC±10%, 50/60 Hz 1.1 - 0.5 A
Operating power
co
umption (100 to 120
ns
V area)
Operating power
cons
umption (220 to 240
V area)
Standby power
cons
umption
Class 4
When the light source brightness is 100%: 109 W
When the light source brightness is 50%: 80 W
When the light source brightness is 100%: 106 W
When the light source brightness is 50%: 78 W
Communication On: 2.0 W
Communication O: 0.5 W
EF-22
Product name EF-22B/EF-22N
Dimensions 236 (W) × 191 (H) × 191 (D) mm (not including raised
sec
tion)
LCD panel size 0.62"
Display method 3LCD
Number of pixels Full HD (1,920 (W) × 1,080 (H) dots) × 3
Screen resolution 2,073,600 pixels (1,920 × 1,080)
Focus adjustment Auto
Zoom adjustment 1.0 to 1.82 (Digital)
Light source Laser diode
Page 97
Projector Specications
97
Light source output
er
pow
Wavelength 449 to 461 nm
Laser class (internal laser
light s
ource)
Light source life * Up to about 20,000 hours
Max. audio output 5 W × 2
Speaker 2 (Stereo with passive radiators)
Power supply 24V DC 4.2A
Operating power
co
umption (100 to 120
ns
V area)
Operating power
cons
umption (220 to 240
V area)
Standby power
cons
umption
Operating altitude Altitude 0 to 3,000 m
Operating temperature ** Altitude of 0 to 2,286 m: 5 to +35°C (Humidity of 20 to
Storage temperature -10 to +60°C (Humidity of 10 to 90%, No condensation)
Up to 24.5 W
Class 4
When the light source brightness is 100%: 105 W
When the light source brightness is 50%: 75 W
When the light source brightness is 100%: 103 W
When the light source brightness is 50%: 73 W
Communication On: 2.0 W
Communication O: 0.5 W
80%, No con
Altitude of 2,287 to 3,000 m: 5 to +30°C (Humidity of 20
to 80%, No condensation)
densation)
e rating label is attached on the bottom of the projector.
is
product is also designed for IT power distribution system with phase-to-
phase voltage 230V.
Related Links
g
•
"AC Adapter Specications (EF-22)" p.97
•
"Connector Specications" p.97
AC Adapter Specications (EF-22)
Manufacturer EPSON
Model AD10370LF
Input power 100-240V AC ±10% 50/60Hz 1.75A
Output power 24.0V DC 5.0A 120.0W
Connector Specications
Audio Out port 1 Stereo mini pin jack
HDMI (ARC) port 1 HDMI
USB-A port 1 USB connector (Type A)
Service port 1 USB connector (Mini-B)
Mass Approx. 3.0 kg
* Approximate time until the light source brightness decreases to half of its
inal value. (Assuming the projector is used in an atmosphere in which
orig
airborne particulate matter is less than 0.04 to 0.2mg/m3. e estimated time
varies depending on the projector usage and operating conditions.)
** Light source brightness automatically dims if the surrounding temperature
gets too high.
USB ports are not guaranteed to operate all devices that support USB.
Page 98
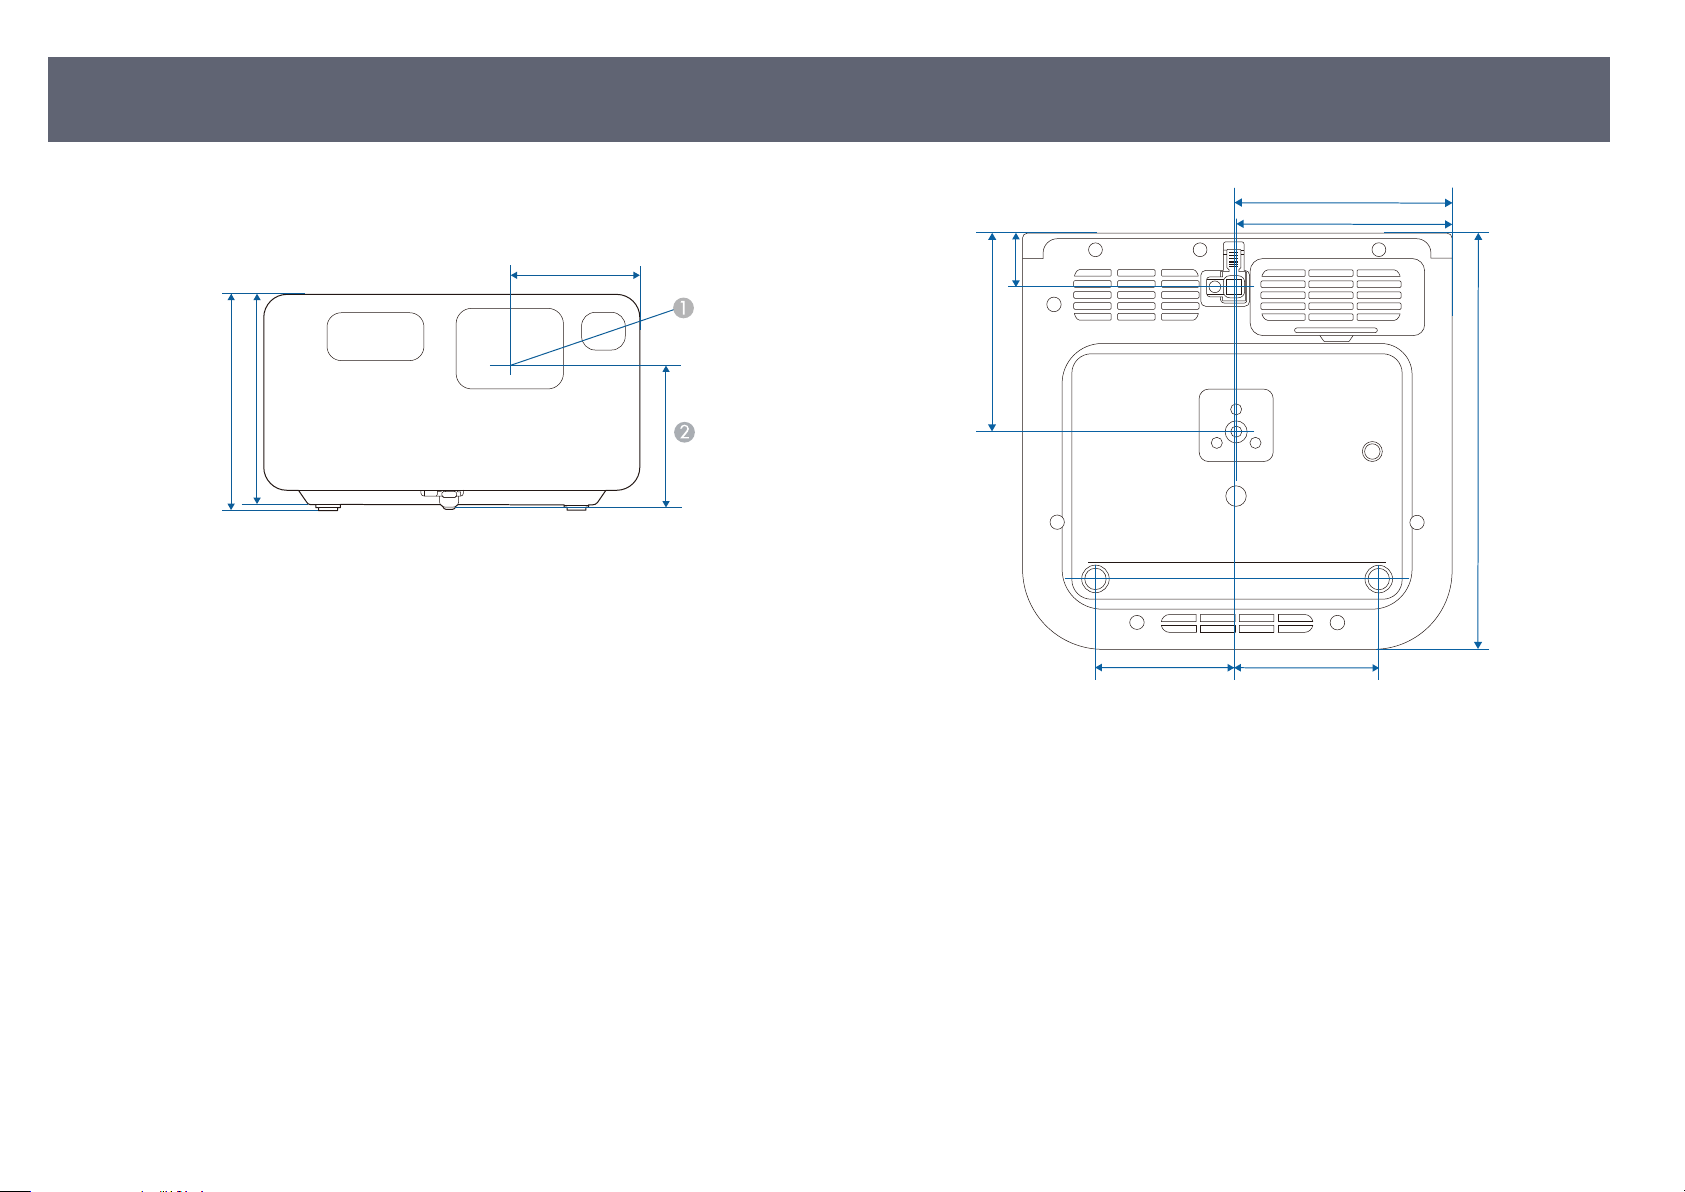
68.5
113
110.5
72.8
191
24.5
91
100
99
63.5 66.5
External Dimensions
EF-21
Center of lens
A
Distance from center of lens to tripod xing point
B
98
e unit in these illustrations is mm.
Page 99

87.9
153.6
191
193
95
118
230
External Dimensions
99
EF-22
Center of lens
A
Distance from center of lens to tripod xing point
B
When projecting images onto a ceiling by tilting the projector 90 degrees
ds
upwar
e uni
t in these illustrations is mm.
Page 100
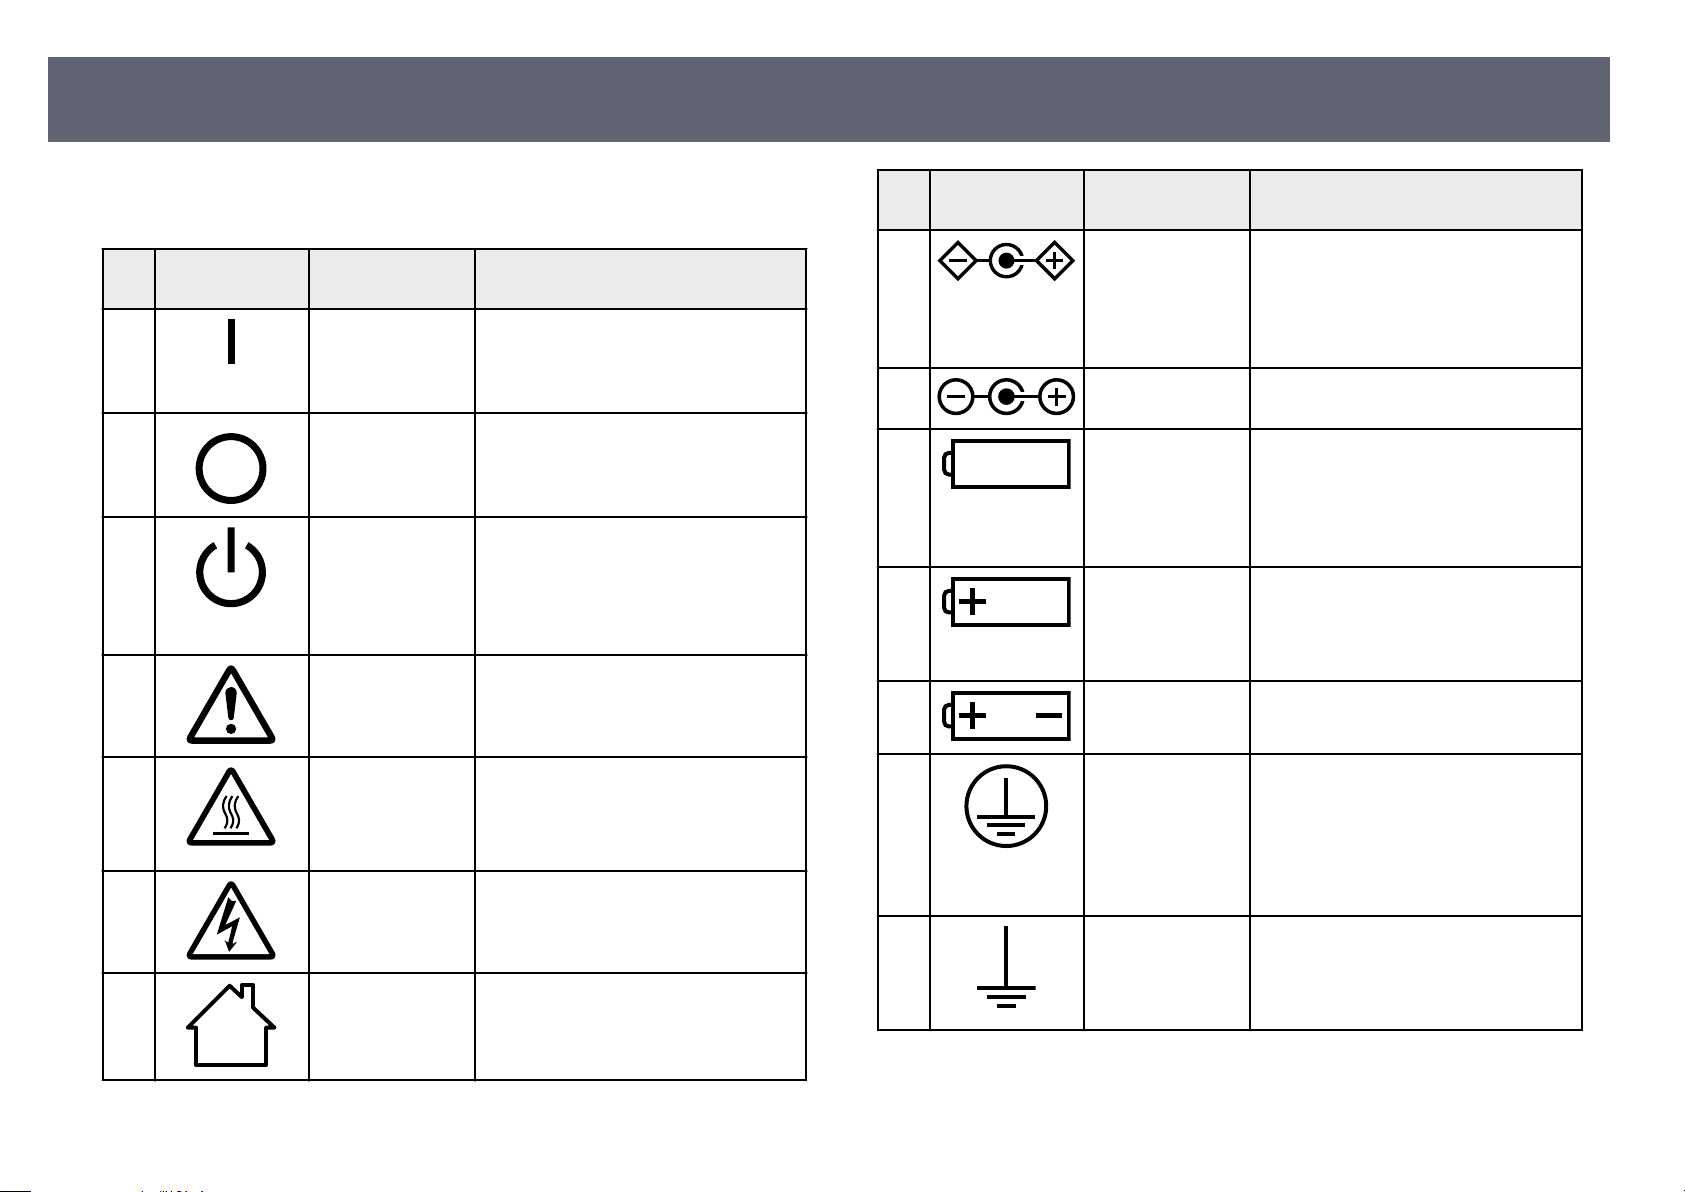
List of Safety Symbols and Instructions
100
e following table lists the meaning of the safety symbols labeled on the
uipment.
eq
No. Symbol mark Approved
dards
stan
A
B
C
D
IEC60417
No. 5007
IEC60417
No. 5008
IEC60417
No. 5009
ISO7000
No. 0434B
IEC3864-B3.1
,
Description
N" (power)
"O
To indicate connection to the mains.
"O
FF" (power)
To indicate disconnection from the
mains.
S
tand-by
To identify the switch or switch
position by means of which part of the
equipment is switched on in order to
bring it into the stand-by condition.
Caution
To identify general caution when using
the product.
No. Symbol mark Approved
dards
stan
H
I
J
K
L
IEC60417
No. 5926
— e same as No. 8.
IEC60417
No. 5001B
IEC60417
No. 5002
— e same as No. 11.
Description
olarity of d.c. power connector
P
To identify the positive and negative
connections (the polarity) on a piece
of equipment to which a d.c. power
supply may be connected.
attery, general
B
On battery powered equipment. To
identify a device for instance a cover
for the battery compartment, or the
connector terminals.
ositioning of cell
P
To identify the battery holder itself and
to identify the positioning of the cell(s)
inside the battery holder.
E
F
G
IEC60417
No. 5041
IEC60417
No. 6042
ISO3864-B3.6
IEC60417
No. 5957
C
aution, hot surface
To indicate that the marked item can
be hot and should not be touched
without taking care.
C
aution, risk of electric shock
To identify equipment that has risk of
electric shock.
F
or indoor use only
To identify electrical equipment
designed primarily for indoor use.
M
N
IEC60417
No. 5019
IEC60417
No. 5017
P
rotective earth
To identify any terminal which is
intended for connection to an external
conductor for protection against
electric shock in case of a fault, or the
terminal of a protective earth electrode.
E
arth
To identify an earth (ground) terminal
in cases where neither the symbol No.
13 is explicitly required.
 Loading...