

Page 1

User’s Guide
– for use without a computer –
Introduction
Important Safety Instructions .............................................................. 1
Copyright Notice ................................................................................. 2
Control Panel Information................................................................... 2
Guide to Parts and Control Panel Functions
Parts ....................................................................................................... 3
Control Panel Functions ...................................................................... 4
Handling Paper
Selecting Paper.................................................................................... 6
Loading Paper...................................................................................... 6
Copying
Placing Originals on the Document Table ........................................ 8
Copying Documents ........................................................................... 8
Copying Photos.................................................................................. 10
English
Printing from a Memory Card
Handling a Memory Card ................................................................. 12
Printing Photos .................................................................................... 14
Selecting and Printing Photos Using an Index Sheet...................... 16
Printing from a Digital Camera
Digital Camera Requirements .......................................................... 18
Connecting and Printing................................................................... 18
Maintenance
Replacing Ink Cartridges................................................................... 19
Checking and Cleaning the Print Head ......................................... 22
Aligning the Print Head ..................................................................... 23
Cleaning This Product........................................................................ 24
Transporting This Product................................................................... 24
Solving Problems
Error Messages.................................................................................... 25
Problems and Solutions ..................................................................... 27
Contacting Customer Support......................................................... 29
Panel Icon List .................................................................................................. 30
Page 2

Where to Find Information
Paper manuals
Start Here
Be sure to read this sheet first.
This sheet tells you how to set up the product and install the software. It
also includes instructions on loading paper and placing originals.
(this book)
Online manuals
User's Guide -for use without a computer-
This book contains information on how to use the product without
connecting your computer, such as instructions on copying and printing
from a memory card.
If you have problems using the product, see the Solving Problems chapter
in this book.
User's Guide
This guide provides instructions for printing and scanning from your
computer and information on the software.
This guide is included on the software CD-ROM and installed
automatically when you installed the software. To read this guide,
double-click the icon on your desktop.
Online help
Online help is built in each application included on the software
CD-ROM. It provides detailed information on the application.
Page 3

Introduction
Important Safety Instructions
Before using this product, read and follow these
safety instructions:
■ Use only the power cord that comes with the
product. Use of another cord may cause fire or
shock. Do not use the cord with any other
equipment.
■ Make sure the power cord meets all relevant
local safety standards.
■ Use only the type of power source indicated on
the label.
■ Place the product near a wall outlet where the
power cord can be easily unplugged.
■ Do not let the power cord become damaged or
frayed.
■ If you use an extension cord with the product,
make sure the total ampere rating of the devices
plugged into the extension cord does not exceed
the cord’s ampere rating. Also, make sure the
total ampere rating of all devices plugged into
the wall outlet does not exceed the wall outlet’s
ampere rating.
■ Avoid locations that are subject to rapid changes
in heat or humidity, shocks or vibrations, or
dust.
■ Leave enough room around the product for
sufficient ventilation. Do not block or cover
openings in the case or insert objects through the
slots.
■ Do not place the product near a radiator or
heating vent or in direct sunlight.
■ Place the product on a flat, stable surface that
extends beyond its base in all directions. It will
not operate properly if it is tilted or at an angle.
■ Make sure the back of the product is at least
10 cm away from the wall.
■ Do not open the scanner unit while copying,
printing, or scanning.
■ Do not spill liquid on the product.
■ Except as specifically explained in your
documentation, do not attempt to service the
product yourself.
■ Unplug the product and refer servicing to
qualified service personnel under the following
conditions: if the power cord or plug is damaged;
if liquid has entered the product; if the product
has been dropped or the case damaged; if the
product does not operate normally or exhibits a
distinct change in performance. Adjust only
those controls that are covered by the operating
instructions.
■ When storing or transporting the product, do not
tilt it, stand it on its side, or turn it upside down;
otherwise ink may leak from the cartridges.
■ Be careful not to trap your fingers when closing
the scanner unit.
Ink cartridge safety instructions
■ Keep ink cartridges out of the reach of children
and do not drink the ink.
■ Be careful when you handle used ink cartridges;
there may be ink remaining around the ink
supply port. If ink gets on your skin, wash it off
with soap and water. If it gets in your eyes, flush
them immediately with water. If you still have
discomfort or vision problems, see a doctor
immediately.
■ Do not put your hand inside the product or
touch any cartridges during printing.
■ Install a new ink cartridge immediately after you
remove an expended cartridge. Leaving
cartridges uninstalled can dehydrate the print
head and may prevent the product from
printing.
■ If you remove an ink cartridge for later use,
protect the ink supply area from dirt and dust
and store it in the same environment as the
product. Note that there is a valve in the ink
supply port, making covers or plugs
unnecessary, but care is needed to prevent the
ink from staining items that the cartridge
touches. Do not touch the ink cartridge, ink
supply port, or surrounding area.
English
■ Do not use aerosol products that contain
flammable gases inside or around the product.
Doing so may cause fire.
Introduction 1
Page 4

Warnings, Cautions, and Notes
SDHC™ is a trademark.
Follow these guidelines as you read your
instructions:
w Warning:
Warnings must be followed carefully to avoid bodily injury.
c Caution:
Cautions must be observed to avoid damage to your equipment.
Note:
Notes contain important information about the product.
Tip:
Tips contain hints for using the product.
Copyright Notice
No part of this publication may be reproduced,
stored in a retrieval system, or transmitted in any
form or by any means, electronic, mechanical,
photocopying, recording, or otherwise, without the
prior written permission of Seiko Epson
Corporation. The information contained herein is
designed only for use with this product. Epson is not
responsible for any use of this information as applied
to other printers.
Memory Stick, Memory Stick Duo, Memory Stick
PRO, and Memory Stick PRO Duo are trademarks of
Sony Corporation.
xD-Picture Card™ is a trademark of Fuji Photo Film
Co., Ltd.
General Notice: Other product names used herein
are for identification purposes only and may be
trademarks of their respective owners. Epson
disclaims any and all rights in those marks.
Copyright © 2006 Seiko Epson Corporation. All
rights reserved.
Control Panel Information
Some displays on the control panel and LCD screen
vary depending on the area you purchased the
product.
Control panel
Icon panel Text panel
Neither Seiko Epson Corporation nor its affiliates
shall be liable to the purchaser of this product or
third parties for damages, losses, costs, or expenses
incurred by the purchaser or third parties as a result
of accident, misuse, or abuse of this product or
unauthorized modifications, repairs, or alterations to
this product, or (excluding the U.S.) failure to strictly
comply with Seiko Epson Corporation's operating
and maintenance instructions.
Seiko Epson Corporation shall not be liable for any
damages or problems arising from the use of any
options or any consumable products other than those
designated as Original Epson Products or Epson
Approved Products by Seiko Epson Corporation.
Seiko Epson Corporation shall not be held liable for
any damage resulting from electromagnetic
interference that occurs from the use of any interface
cables other than those designated as Epson
Approved Products by Seiko Epson Corporation.
EPSON
STYLUS™ and Exceed Your Vision are trademarks
of Seiko Epson Corporation.
®
is a registered trademark and EPSON
LCD display
Icon display Text display
Icons only are displayed. A text message or text with icons
is displayed.
USB DIRECT-PRINT™ and the USB DIRECT-PRINT
logo are trademarks of Seiko Epson Corporation.
Copyright © 2002 Seiko Epson Corporation. All
rights reserved.
DPOF™ is a trademark of CANON INC., Eastman
Kodak Company, Fuji Photo Film Co., Ltd. and
Matsushita Electric Industrial Co., Ltd.
2 Introduction
Page 5

Guide to Parts and Control Panel Functions
Parts
document cover
paper support e xtension
English
LCD
screen
control
panel
memory card
slot cover
external interface
USB port
edge guide
document table
sheet feeder
output tray
paper support
feeder guard
output tra y
extension
scanner unit
cartridge cover
memory card slot
memory card light
paper thickness lever
USB port
AC inlet
Guide to Parts and Control Panel Functions 3
Page 6

Control Panel Functions
Buttons
Icon panel
Text panel
Button Function
r Copy Press to select the copy mode.
100% Select this option to print your
photo at the actual size.
o [Fit to Page] Select this option to reduce or
enlarge the copied photo to fit the
selected paper size.
4-way scroll l r Press to select the photo you want
to print, to select color or
black-and-white copy, or to select
the setup and utility functions.
u d Press to select the number of
copies or to select the numbers
when using the Head Alignment
Utility.
F [Setup/Utilities] Press to run maintenance programs or adjust miscellaneous settings.
Paper Type Press to select the paper type you loaded in the sheet feeder.
g [Photo Paper] Premium Glossy Photo Paper,
Premium Semigloss Photo Paper,
Glossy Photo Paper, Ultra Glossy
Photo Paper
h [Matte Paper] Matte Paper - Heavyweight
l [Plain Paper] Plain paper, Bright White Ink Jet
Paper, Premium Ink Jet Plain
Paper
P On Press to turn the product on and off.
C Memory Card Press to select a memory card print option.
j [Select Photo] Select this option to choose the
e / f [Print All / PictBridge] Select this option to print all the
m [Print Index Sheet] Select this option to print an index
i [Print from Index Sheet] Select this option to print the
Photo Press to copy from photos. You can copy them as they are or with color
restoration.
Paper Size Press to select the size of the paper loaded in the sheet feeder. You can
select 10 × 15/4” × 6”, 13 × 18/5” × 7” or A4.
photos you want to print.
photos on a memory card, to print
photos using the DPOF information
stored on the memory card, or to
print photos directly from a digital
camera.
sheet of the photos on your
memory card.
photos you selected on the index
sheet.
y Stop/Clear Press to stop printing, copying, or reset the settings you have made. The
x Start Press to start printing, copying, or confirm the settings you have selected.
4 Guide to Parts and Control Panel Functions
sheet being printed is ejected and the number of copies is reset.
Page 7

LCD Screen
The screen displays a preview of the selected photos,
or displays settings that you can change with the
buttons.
Changing LCD display for text display
users only
There are two types of LCD display settings. Follow
these steps to change your display setting.
Icon display Text display
Low power mode
If the product is inactive for 13 minutes, the LCD
screen turns black and all lights, except the On light,
go out to save energy.
Press any button (except P On) to return the screen
to its previous state.
Changing LCD contrast
If you want to change LCD contrast, follow these
steps.
1. Press the F [Setup/Utilities] button to enter the
setup mode. Use the l or r button to select
Photo Viewer Adjustment.
1. Press the Setup/Utilities button to enter the
setup mode. Use the l or r button to select
Display.
2. Press the x Start button.
3. Use the u or d button to select the options.
Settings Description
Pictographic:
(Icon display)
Icons only are displayed
on the LCD screen.
English: (Text display)
Icons and text are
displayed on the LCD
screen.
English
2. Press the x Start button.
3. Use the u or d button to select the LCD contrast.
You can choose from - 2 to + 2.
darker brighter
4. Press the x Start button again to confirm your
selection.
5. Press the F [Setup/Utilities] button to return to
the previous mode.
4. Press the x Start button to confirm your
selection.
5. Press the Setup/Utilities button to return to the
previous mode.
Guide to Parts and Control Panel Functions 5
Page 8

Handling Paper
Epson offers an extensive line of special papers that
provide outstanding results when used with Epson
printers and ink. The type of paper you choose
affects the way your printout looks, so be sure to
select the correct paper for your job.
Selecting Paper
If you are just making a copy or printing a rough
draft of an image, plain paper is fine. However, for
the best results, you will want to use one of Epson’s
special ink jet papers designed for the product.
Before printing, you need to select the correct Paper
Type setting on the control panel. This important
setting determines how the ink is applied to the
paper.
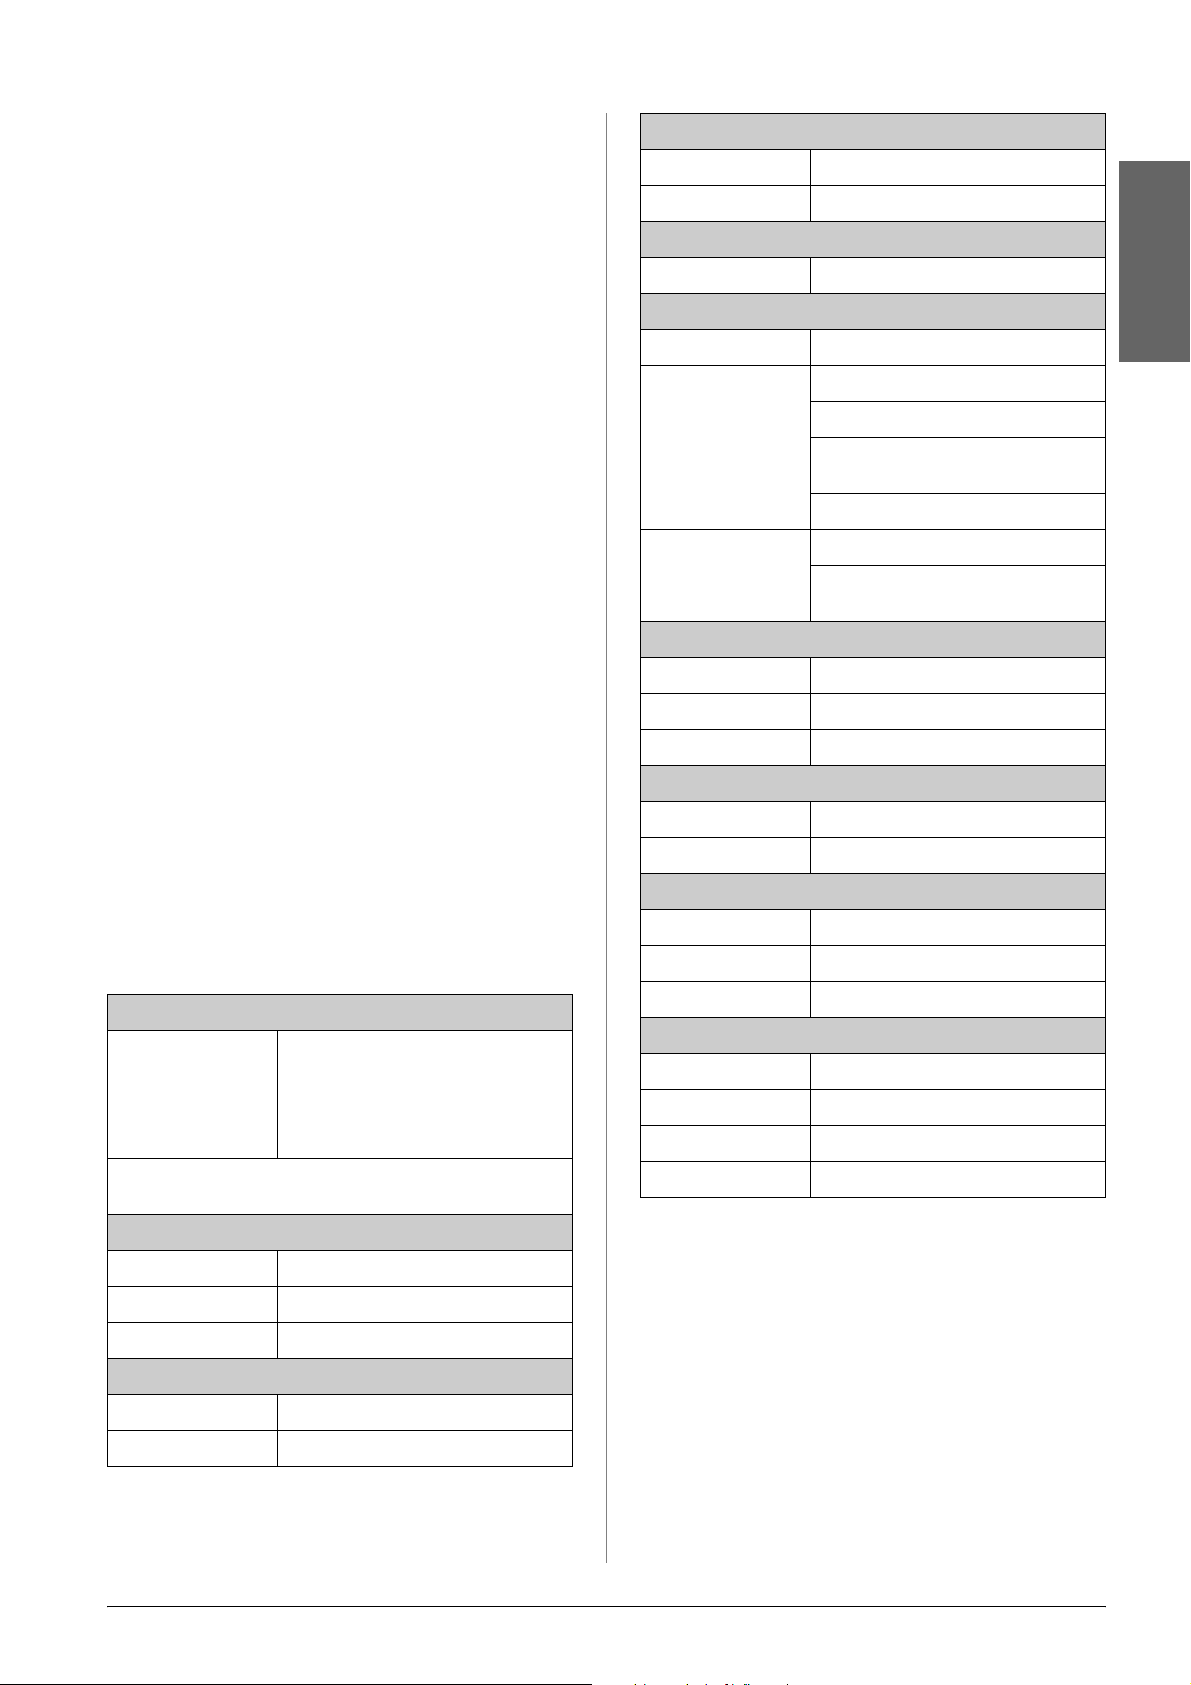
Choose from these paper types and settings:
Paper Type Size Paper
Type
Setting
Plain paper* A4 Plain paper 12 mm
Loading
Capacity
Loading Paper
1. Open and extend the paper support.
2. Open the output tray and slide out the
extensions.
Bright White
Ink Jet Paper
Premium Ink
Jet Plain
Paper
Premium
Glossy Photo
Paper
Premium
Semigloss
Photo Paper
Glossy Photo
Paper
Ultra Glossy
Photo Paper
Matte Paper
-Heavyweight
A4 Plain paper 80 sheets
A4 Plain paper 100 sheets
10 × 15 cm
(4 × 6 in.),
13 × 18 cm
(5 × 7 in.),
A4
10 × 15 cm
(4 × 6 in.),
A4
10 × 15 cm
(4 × 6 in.),
13 × 18 cm
(5 × 7 in.),
A4
10 × 15 cm
(4 × 6 in.),
13 × 18 cm
(5 × 7 in.),
A4
A4 Matte Paper 20 sheets
Photo paper 20 sheets
Photo paper 20 sheets
Photo paper 20 sheets
Photo paper 20 sheets
3. Flip the feeder guard forward.
* You can use paper with a weight of 64 to 90 g/m2.
Note:
The availability of special media varies by location.
6 Handling Paper
Page 9

4. Set the paper as shown in the following
illustrations.
The printable
side is often
whiter or
brighter than
the other side.
place behind
the tabs
English
10 × 15 cm (4 × 6 in.) and 13 × 18 cm (5 × 7 in.)
A4
5. Flip the feeder guard back.
Also make sure the paper thickness lever is set
down to the m position.
make sure it
fits under the
arrow inside
the left edge
guide
The LCD screen indicates that the lever
has been moved and the m or ^ position
has been changed.
Note:
Make sure you do not load more than the recommended
number of sheets. Check the Paper Type setting before
printing to make sure it matches the type of paper you have
loaded (& “Selecting Paper” on page 6).
Handling Paper 7
Page 10

Copying
You can copy documents and photos without a
computer.
Note the following when copying:
■ The copied image may not be exactly the same
size as the original.
■ Depending on the type of paper used, print
quality may decline in the top and bottom areas
of the printout, or these areas may be smeared.
■ If you see a low ink icon while you are
copying, you can either continue copying until
the ink is expended, or stop and replace the
cartridge.
■ Keep the document table clean.
■ Make sure the document or photo is flat against
the document table; otherwise, the copy will be
out of focus.
■ Do not pull out paper that is being printed; it will
be ejected automatically.
2. Close the cover gently so you do not move the
original.
c Caution:
Never open the document cover beyond where it stops and
do not place heavy objects on top of the product.
If you need to copy a thick or large document, you
can remove the document cover. Just open it and pull
it straight up.
Placing Originals on the Document Table
1. Open the document cover and place your
original face-down on the document table, in the
upper left corner.
If you need to press the document flat while you
copy it, do not press too hard and be careful not to
move it.
When you are done, replace the document cover by
inserting the tabs back into the slots.
Copying Documents
8 Copying
Tip:
Plain photocopier paper works well for making everyday copies.
For crisper text and more vivid colors, try one of the special Epson
papers (& “Selecting Paper” on page 6).
Page 11

1. Load A4 plain paper (& page 6).
2. Place your original on the document table
(& “Placing Originals on the Document Table”
on page 8).
3. Make the following settings on the control panel.
Icon panel Text panel
Press the r Copy button.
Use the u or d button to select the number of copies (1 to 99).
Press the x Start button. Your document is copied.
If you need to stop copying, press the y Stop/Clear
button.
Note:
If the edges of the copy are cropped off, move the original away
from the corner slightly.
English
Selecting copy quality
If you want to make a copy quickly and do not need
high quality, you can print a “Draft” copy.
Alternatively, if you want to print high quality
photos, you can print a “Photo” copy.
1. Press the F [Setup/Utilities] button to enter the
setup mode. Use the l or r button to select Copy
Quality.
Icon display Text display
Use the l or r button to select color copy or black-and-white
copy.
Display Color Copy Black-and-
White Copy
Icon
Text
Select l [Plain Paper].
Select A4.
Tip:
If you want to automatically resize the copy to the size of
paper that you loaded, press the r Copy button until the icon
shown below is displayed on the LCD screen.
Icon display Text display
2. Press the x Start button.
3. Use the u or d button to select Normal, Draft, or
Photo.
Setting Description
Icon display Text display
Normal:
This is automatically
selected when you
turn the product on.
This mode is the
best for text copy.
Draft:
Select this if you
want to make a
quick copy and
quality is not
important.
Photo:
Select this if you
want to print high
quality photos.
4. Press the x Start button again to confirm your
selection.
Press the F [Setup/Utilities] button to return to the
previous mode.
Copying 9
Page 12

Copying Photos
1. Load photo paper (& page 6).
2. Place your original on the document table
(& “Placing Originals on the Document Table”
on page 8).
You can place more than two photos on the
document table at one time (& “Copying
multiple photos” on page 11).
3. Make the following settings on the control panel.
Icon panel Text panel
Icon panel Text panel
Use the l or r button to view the photos. Use the u or d
button to set the number of copies.
Select the paper type you loaded.
If you select Photo or Matte paper, your photo is copied
without a border.
Select the paper size you loaded.
Press the x Start button again. Your photo is copied.
If you need to stop copying, press the y Stop/Clear
button.
Press the Photo button.
Use the l or r button to set the color restoration mode to on
or off (& “Restoring color in photos” on page 11).
Press the x Start button. The photo is scanned and a preview
is displayed on the LCD screen.
During scanning, one of the following screens is displayed.
Icon display Text display
Note:
If the edges of the copy are cropped off, move the original away
from the corner slightly.
10 Copying
Page 13

Restoring color in photos
Copying multiple photos
If you have photos that have faded over time, you
can bring them back to life with color restoration
when you reprint them.
1. Load photo paper (& page 6).
2. Place your original on the document table
making sure that it is aligned correctly
(& “Placing Originals on the Document Table”
on page 8).
You can place more than two photos on the
document table at one time (& “Copying
multiple photos” on page 11).
3. Press the Photo button.
4. Use the l or r button to set the color restoration
mode to on or off.
Display Color Restoration
On Off
Icon
Place each photo vertically as shown in the
illustration below.
English
■ You can copy two 10 × 15 cm (4 × 6 in.) size
photos at a time. If the edge of the photo is
missing after you print, try copying them one at
a time.
■ Place your photo 5 mm away from the edge of
the document table. Also when you place two
photos, position each photo at least 5 mm away
from the adjacent photo.
■ You can copy several different sized photos at
the same time, as long as they are larger than 30
× 40 mm and all fit inside the 216 × 297 mm area.
Text
5. Press the x Start button. The photo is scanned,
and a preview is displayed on the LCD screen.
Note:
When color restoration is on, the icon shown below is displayed at
the top of the LCD screen.
6. Use the l or r button to view the photos. Use the
u or d button to set the number of copies (1 to
99).
7. Select the paper type you loaded.
8. Select the paper size you loaded.
9. Press the x Start button again. Your photo is
copied.
If you need to stop copying, press the y
Stop/Clear button.
Copying 11
Page 14
Printing from a Memory Card
You can print photos directly from your digital
camera's memory card. Just insert it into the memory
card slot and you are ready to print.
Handling a Memory Card
Compatible cards
Make sure your memory card meets the following
requirements.
Card type CompactFlash, Microdrive,
SD Memory Card, SDHC Memory Card,
MultiMediaCard, miniSD card,
miniSDHC card, microSD card,
microSDHC card, Memory Stick,
Memory Stick PRO,
Magic Gate Memory Stick,
Magic Gate Memory Stick Duo,
Memory Stick Duo,
Memory Stick PRO Duo,
xD-Picture Card, xD-Picture Card Type M
xD-Picture Card Type H
Media format DCF (Design rule for Camera File system)
version 1.0 or 2.0 compliant
All card types standard version compliant.
4. Make sure the memory card light is off and no
memory cards are in the slots. Then insert your
memory card.
memory card light
File format JPEG with the Exif Version 2.21 standard
Image size 80 × 80 pixels to 9200 × 9200 pixels
Number of files Up to 999
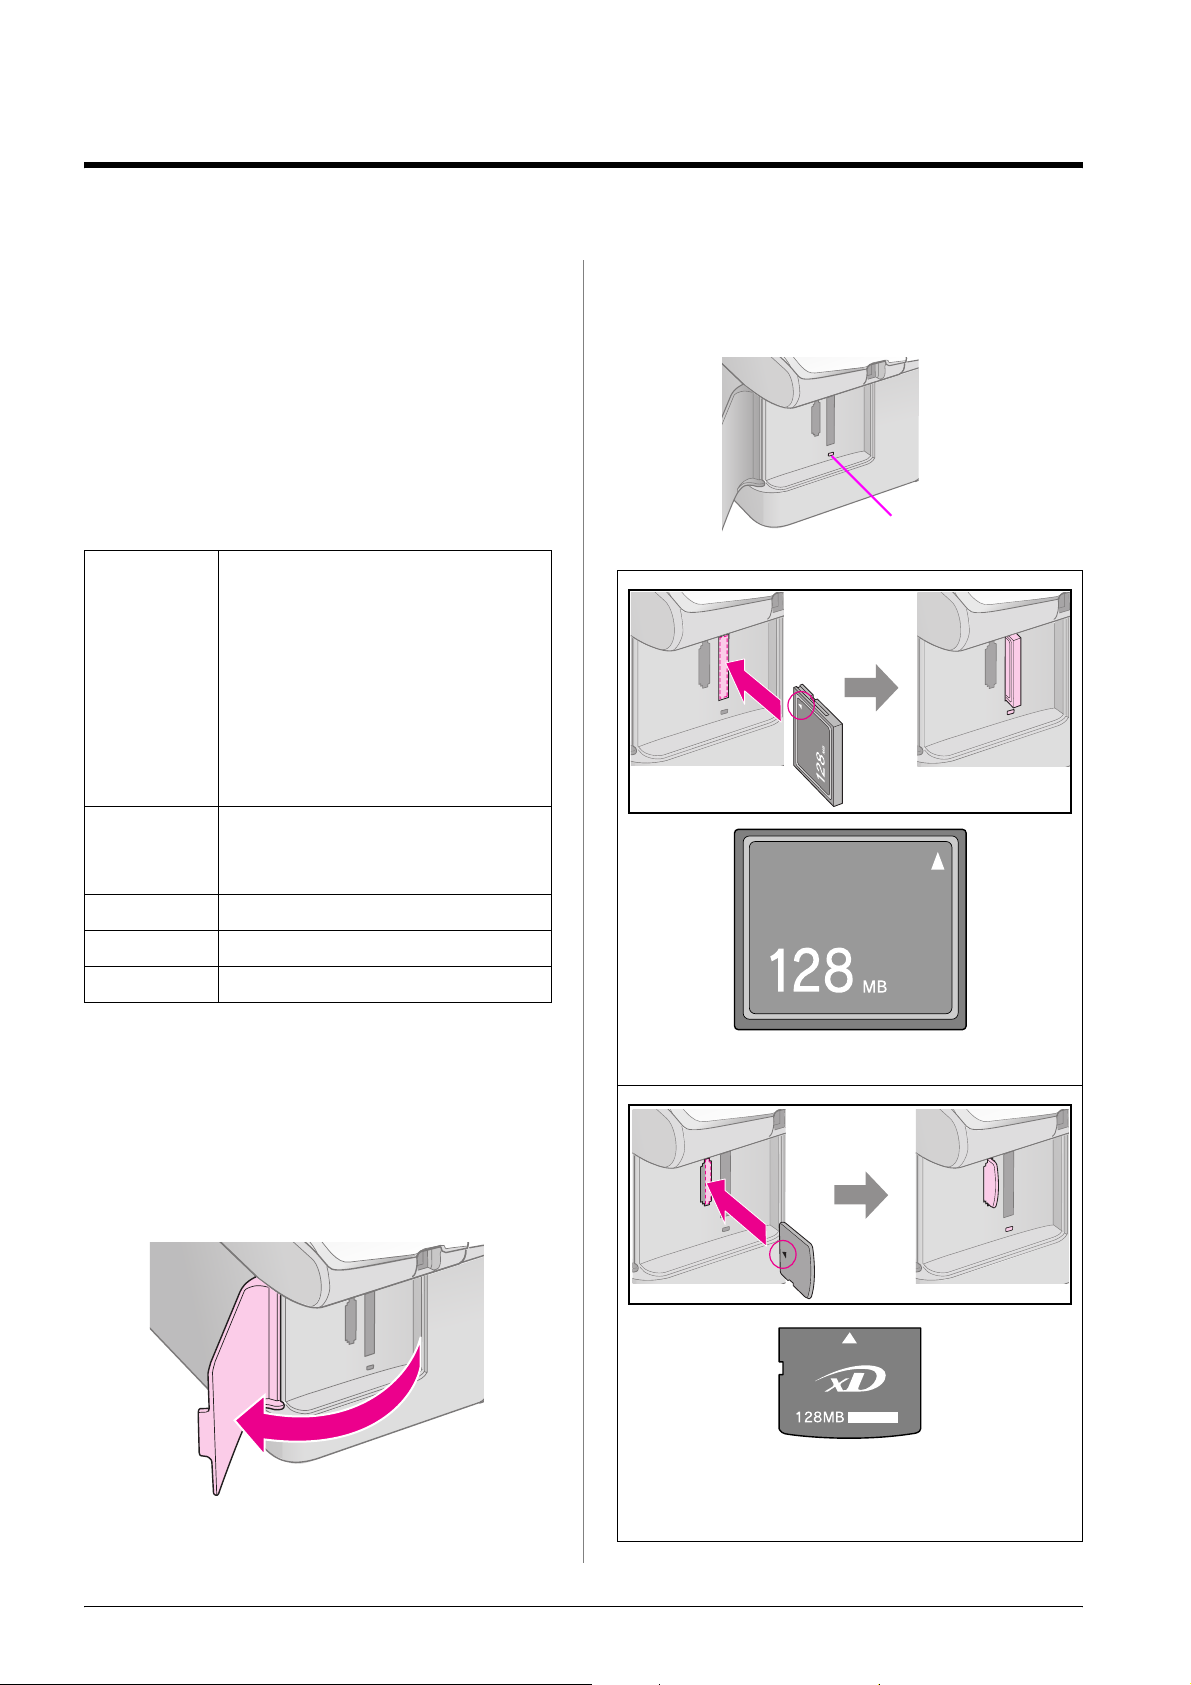
Inserting a memory card
1. Turn off your computer or disconnect it from the
product.
2. Make sure the product is turned on.
3. Open the memory card slot cover.
CompactFlash
Microdrive
xD-Picture Card
xD-Picture Card Type M
xD-Picture Card Type H
12 Printing from a Memory Card
Page 15

c Caution:
Make sure you check which direction the card should be
inserted, and if the card needs an adapter make sure you
attach the adapter before inserting the card. Otherwise, you
may not be able to remove the card from the product.
5. Make sure the memory card light flashes and
then stays on.
SD Memory Card
SDHC Memory Card
MultiMediaCard
miniSD card*
miniSDHC card*
(* Adapter required)
microSD card*
microSDHC card*
6. Close the memory card slot cover.
c Caution:
❏ Do not insert more than one memory card at a time.
❏ Do not try to force the memory card into the slot. Memory cards
will not go all the way in. Forcing a memory card into the slot
may damage the product, the memory card, or both.
❏ Keep the memory card slot cover closed while a memory card
is inserted. This protects the memory card and the slot from
dust and static; otherwise data on the memory card may be
lost, or the product may be damaged.
❏ The static charge on memory cards may cause malfunction.
Note:
❏ You can print only in color from a memory card; you cannot
print in black and white.
❏ If a digital camera is connected to the product, disconnect it
before you insert your memory card.
English
Memory Stick
Memory Stick PRO
MagicGate Memory Stick
Memory Stick Duo*
Memory Stick PRO Duo*
MagicGate Memory Stick Duo*
(* Adapter required)
Removing the memory card
1. Make sure all print jobs are finished.
2. Open the memory card slot cover.
3. Make sure the memory card light is not flashing.
4. Remove the memory card by pulling it straight
out of its slot.
5. Close the memory card slot cover.
c Caution:
❏ Do not remove the memory card or turn off the product while
the memory card light is flashing, or you may lose data on the
memory card.
❏ If your computer uses Windows 2000 or XP, never turn off the
product or disconnect the USB cable when a memory card is
inserted; you may lose data on the memory card. See your
online User’s Guide for details.
Printing from a Memory Card 13
Page 16

Printing Photos
After inserting a memory card you can:
Note:
If your camera supports DPOF, you can use it to select the
photos you want to print and the number of copies
(& “Printing all photos or DPOF photos” on page 14).
Depending on the data on your card, you see a screen
like this:
4. Use the l or r button to select a photo. Use the u
or d button to set the number of copies.
5. Select the paper type you loaded.
Setting Description
Icon panel Text panel
j
f/e
m
i
Select Photo Prints only the
Print All/
PictBridge
Print
Index Sheet
Print from
Index Sheet
photos that you
choose.
Prints all the
photos on your
card, or prints the
photos with DPOF
information.
Prints an index
sheet of the photos
on your card.
Prints the photos
you selected on
the index sheet.
Printing selected photos
Follow the steps below to select the photos you want
to print from your memory card.
1. Load the type of paper you want to use
(& page 6). Load enough sheets for the number
of photos you want to print.
2. Insert a memory card (& page 12).
3. Press the C Memory Card button until the j
[Select Photo] light turns on.
If you select l [Plain Paper], the photos are
printed with a white border. If you select g
[Photo Paper] or h [Matte Paper], the photos
are printed without borders to the edge of the
paper.
6. Select the paper size you loaded.
7. Press the x Start button. Your photos are
printed.
If you need to cancel printing, press the y
Stop/Clear button.
Printing all photos or DPOF photos
Follow the steps below to print one copy of each
photo on the card or to print only those photos that
were pre-selected with your camera’s DPOF feature.
1. Load the type of paper you want to use
(& page 6). Load enough sheets for the number
of photos you want to print.
2. Insert a memory card (& page 12).
3. Press the C Memory Card button until the f/e
[Print All/PictBridge] light turns on.
Icon panel Text panel
Icon panel Text panel
14 Printing from a Memory Card
Page 17

If your memory card contains DPOF
information, one of the following screens is
displayed. You cannot print all of the photos on
the card, even when f/e [Print All/PictBridge]
is selected. To print all the photos on the memory
card, cancel the DPOF information from your
digital camera.
Icon display Text display
4. Select the paper type you loaded.
If you select l [Plain Paper], the photos are
printed with a white border. If you select g
[Photo Paper] or h [Matte Paper], the photos
are printed without borders to the edge of the
paper.
5. Select the paper size you loaded.
6. Press the x Start button. Your photos are
printed.
If you need to cancel printing, press the y
Stop/Clear button.
Printing the date on photos
English
Follow the steps below to print the date they were
taken.
1. Press the F [Setup/Utilities] button.
2. Use the l or r button to select Date Stamp.
3. Press the x Start button.
4. Use the u or d button to select the format you
want to use. The date format options are No
Date (no date), yyyy.mm.dd (2006.06.16),
mmm.dd.yyyy (Jun.16.2006), or
dd.mmm.yyyy (16.Jun.2006).
5. Press the x Start button to confirm your
selection.
6. Press the F [Setup/Utilities] button to return to
the previous mode.
Printing from a Memory Card 15
Page 18

Selecting and Printing
1. Printing an index sheet
Photos Using an Index Sheet
To select photos for printing, you can use an index
sheet. First, print an index sheet which has small
images of all the photos on your memory card. Then,
mark the photos on the index sheet that you want to
print, scan the sheet, and the selected photos will be
printed automatically.
Printing an index sheet
Selecting photos from the index sheet
1. Load several sheets of A4-size plain paper
(& page 6).
Up to 30 images are printed on each page, so if
there are more than 30 photos on your memory
card, you will need enough sheets for all the
index pages to be printed.
2. Insert a memory card (& page 12).
3. Press the C Memory Card button until the m
[Print Index Sheet] light turns on.
Icon panel Text panel
One of the following screens is displayed.
Icon display Text display
Scanning the index sheet
Printing the selected photos
4. Make sure l [Plain Paper] and A4 are selected.
5. Press the x Start button. The index sheet is
printed.
If you need to cancel printing, press the y
Stop/Clear button.
Note:
❏ Make sure the triangle mark on the upper left corner of the
index sheet is printed properly. If the index sheet is not
printed correctly, the product cannot scan it.
❏ If there are a lot of photos on your memory card, this may
take a few minutes.
❏ For multiple index sheets, the pages are printed from the
last sheet to the first, so the most recent images are
printed first.
16 Printing from a Memory Card
Page 19

2. Selecting photos from the index sheet
On the index sheet, use a dark pen or pencil to fill in
the circles and make your selections.
Good:
One of the following screens is displayed.
Icon display Text display
English
NOT good:
Select All to print one copy of each photo, or fill in the
number beneath each photo to select 1, 2, or 3 copies.
3. Scanning the index sheet and printing the selected photos
1. Place the index sheet face-down on the
document table, in the upper left corner, so that
the top of the sheet is aligned against the left
edge of the document table.
Bottom
Top
5. Select the paper type you loaded.
If you select l [Plain Paper], the photos are
printed with a white border. If you select g
[Photo Paper] or h [Matte Paper], the photos
are printed without borders to the edge of the
paper.
6. Select the paper size you loaded.
7. Press the x Start button. Your photos are
printed.
If you want to stop printing, press the y
Stop/Clear button.
Note:
If you have more than one index sheet, wait each time until
printing is complete. Then repeat the steps above to scan and
print from each additional sheet.
2. Close the document cover.
3. Load the type of paper you want to use
(& page 6). Load enough sheets for the number
of photos you want to print.
4. Make sure the i [Print from Index Sheet] light
is on.
Icon panel Text panel
Printing from a Memory Card 17
Page 20

Printing from a Digital Camera
You can print your photos by connecting your digital
camera directly to this product.
Digital Camera Requirements
Make sure your camera and photos meet the
following requirements.
Direct printing
compatibility
File format JPEG
Image size 80 × 80 pixels to 9200 × 9200 pixels
PictBridge or USB DIRECT-PRINT
Connecting and Printing
1. Make sure the product is not printing from a
computer.
2. Load the type of paper you want to use
(& page 6). Load enough sheets for the number
of photos you want to print.
3. Select the paper type you loaded.
If you select l [Plain Paper], the photos are
printed with a white border. If you select g
[Photo Paper] or h [Matte Paper], the photos
are printed without borders to the edge of the
paper.
6. Make sure your camera is turned on. The f/e
[Print All/PictBridge] light turns on, and one of
the following screens is displayed.
Display PictBridge USB
DIRECT-PRINT
Icon
Text
7. Use your camera to select the photos you want to
print, adjust any necessary settings, and print
your photos. See your camera’s manual for
details.
Note:
❏ If your camera is not compatible with PictBridge or USB
DIRECT-PRINT, one of the following screens is displayed.
Epson cannot guarantee the compatibility of any cameras.
Icon display Text display
4. Select the paper size you loaded.
5. Connect the USB cable that came with your
camera to the external interface USB port of the
product.
18 Printing from a Digital Camera
❏ Depending on the settings on the product and the digital
camera, some combinations of paper type, size, and
layout may not be supported.
❏ Some of the settings on your digital camera may not be
reflected in the output.
Page 21

Maintenance
You can keep the operation of the product at its best
by performing the procedures described in this
chapter. Also, this section includes instructions on
how to replace ink cartridges and transport the
product.
Replacing Ink Cartridges
When an ink cartridge is low, the icon shown below
is displayed in the upper-left corner of the LCD
screen.
Icon display Text display
When printing or copying, a bar showing which ink
cartridge is low is displayed next to the Ink Low icon.
Icon display Text display
2. Use the l or r button to select Check Ink
Levels.
3. Press the x Start button.
You see a graphic showing the ink cartridge
status.
4. When you are done checking the ink cartridge
status, press the x Start button.
5. Press the F [Setup/Utilities] button to return to
the previous mode.
When your ink starts getting low, make sure you
have replacement cartridges available. You cannot
print if a cartridge is expended.
English
When an ink cartridge is expended, the following
LCD screen is displayed.
Tip:
If a cartridge is more than six months old, print quality may decline.
If necessary, try cleaning the print head (& “Checking the print
head” on page 22). If printouts still do not look their best, you may
need to replace the cartridge.
Checking the ink cartridge status
Follow these steps to check your ink cartridge status.
1. Press the F [Setup/Utilities] button.
Note:
Epson cannot guarantee the quality or reliability of non-genuine
ink. If non-genuine ink cartridges are installed, the ink status will
not be displayed.
Purchasing ink cartridges
Use the Epson ink cartridges within six months of
installing them and before the expiration date.
Color Part Number
DX6000 series CX5900 series
Black T0711 T0731
Cyan T0712 T0732
Magenta T0713 T0733
Yellow T0714 T0734
c Caution:
Epson recommends the use of genuine Epson ink cartridges. The
use of non-genuine ink may cause damage that is not covered by
Epson’s warranties, and under certain circumstances, may cause
erratic printer behavior. Epson cannot guarantee the quality or
reliability of non-genuine ink. Information about the ink cartridge
status is not displayed when non-genuine ink is used.
Maintenance 19
Page 22

Ink cartridge precautions
w Warning:
If ink gets on your hands, wash them thoroughly with soap and
water. If ink gets in your eyes, flush them immediately with water.
If you still have discomfort or vision problems, see a doctor
immediately.
■ To avoid damaging the product, never move the
print head by hand.
■ When an ink cartridge is expended, you cannot
continue copying or printing even if the other
cartridges still contain ink.
■ Leave the expended cartridge installed until you
have obtained a replacement. Otherwise the ink
remaining in the print head nozzles may dry out.
■ An IC chip on each ink cartridge monitors the
amount of ink used from the cartridge.
Cartridges are usable even if they are removed
and reinserted. However, some ink is consumed
each time cartridges are inserted because the
printer automatically checks their reliability.
■ Ink cartridges with low ink status cannot be used
when reinserted.
2. Press the x Start button again, and then lift up
the scanner unit.
c Caution:
Do not lift up the scanner unit when the document cover is
open.
One of the following screens is displayed.
Icon display Text display
Removing and installing ink cartridges
Make sure you have a new ink cartridge before you
begin. Once you start replacing a cartridge, you must
complete all the steps in one session.
1. Do one of the following:
■ If an ink cartridge is expended:
Look at the LCD screen to find out which
cartridge should be replaced, then press the x
Start button.
■ If an ink cartridge is not expended:
Check the ink cartridge status (& “Checking the
ink cartridge status” on page 19). Press the F
[Setup/Utilities] button. Use the l or r button to
select Change Cartridges. Then press the x
Start button.
3. Open the cartridge cover.
c Caution:
❏ Never attempt to open the cartridge cover when the print
head is moving. Wait until the cartridges have moved to
the replacement position.
❏ Be careful not to touch the parts highlighted below.
20 Maintenance
Page 23

4. Remove the cartridge you need to replace.
Squeeze the tab at the back of the cartridge and
lift it straight out. Dispose of it carefully.
c Caution:
Do not refill the ink cartridge. Other products not
manufactured by Epson may cause damage that is not
covered by Epson’s warranties, and under certain
circumstances, may cause erratic printer behavior.
5. Before you open the new ink cartridge package,
shake it four or five times. Then remove it from
the package.
c Caution:
❏ You must remove the yellow tape from the cartridge
before installing it; otherwise, print quality may decline or
you may not be able to print.
❏ If you have installed an ink cartridge without removing the
yellow tape, take the cartridge out of the product remove
the yellow tape, and then reinstall it.
❏ Do not remove the transparent seal from the bottom of the
cartridge; otherwise, the cartridge may become unusable.
❏ Do not remove or tear the label on the cartridge;
otherwise, ink will leak.
English
c Caution:
Do not touch the green chip on the side of the cartridge. This
can damage the ink cartridge.
6. Remove the yellow tape from the bottom of the
ink cartridge.
7. Place the ink cartridge into the cartridge holder
with the bottom down. Then push down the ink
cartridge until it clicks into place.
8. Replace any other ink cartridges that need to be
replaced.
9. Close the ink cartridge cover and press it until it
clicks into place.
c Caution:
If you find it difficult to close the cover, make sure all the
cartridges are firmly seated. Press down on each cartridge
until you hear it click into place. Do not attempt to force the
cover closed.
Maintenance 21
Page 24
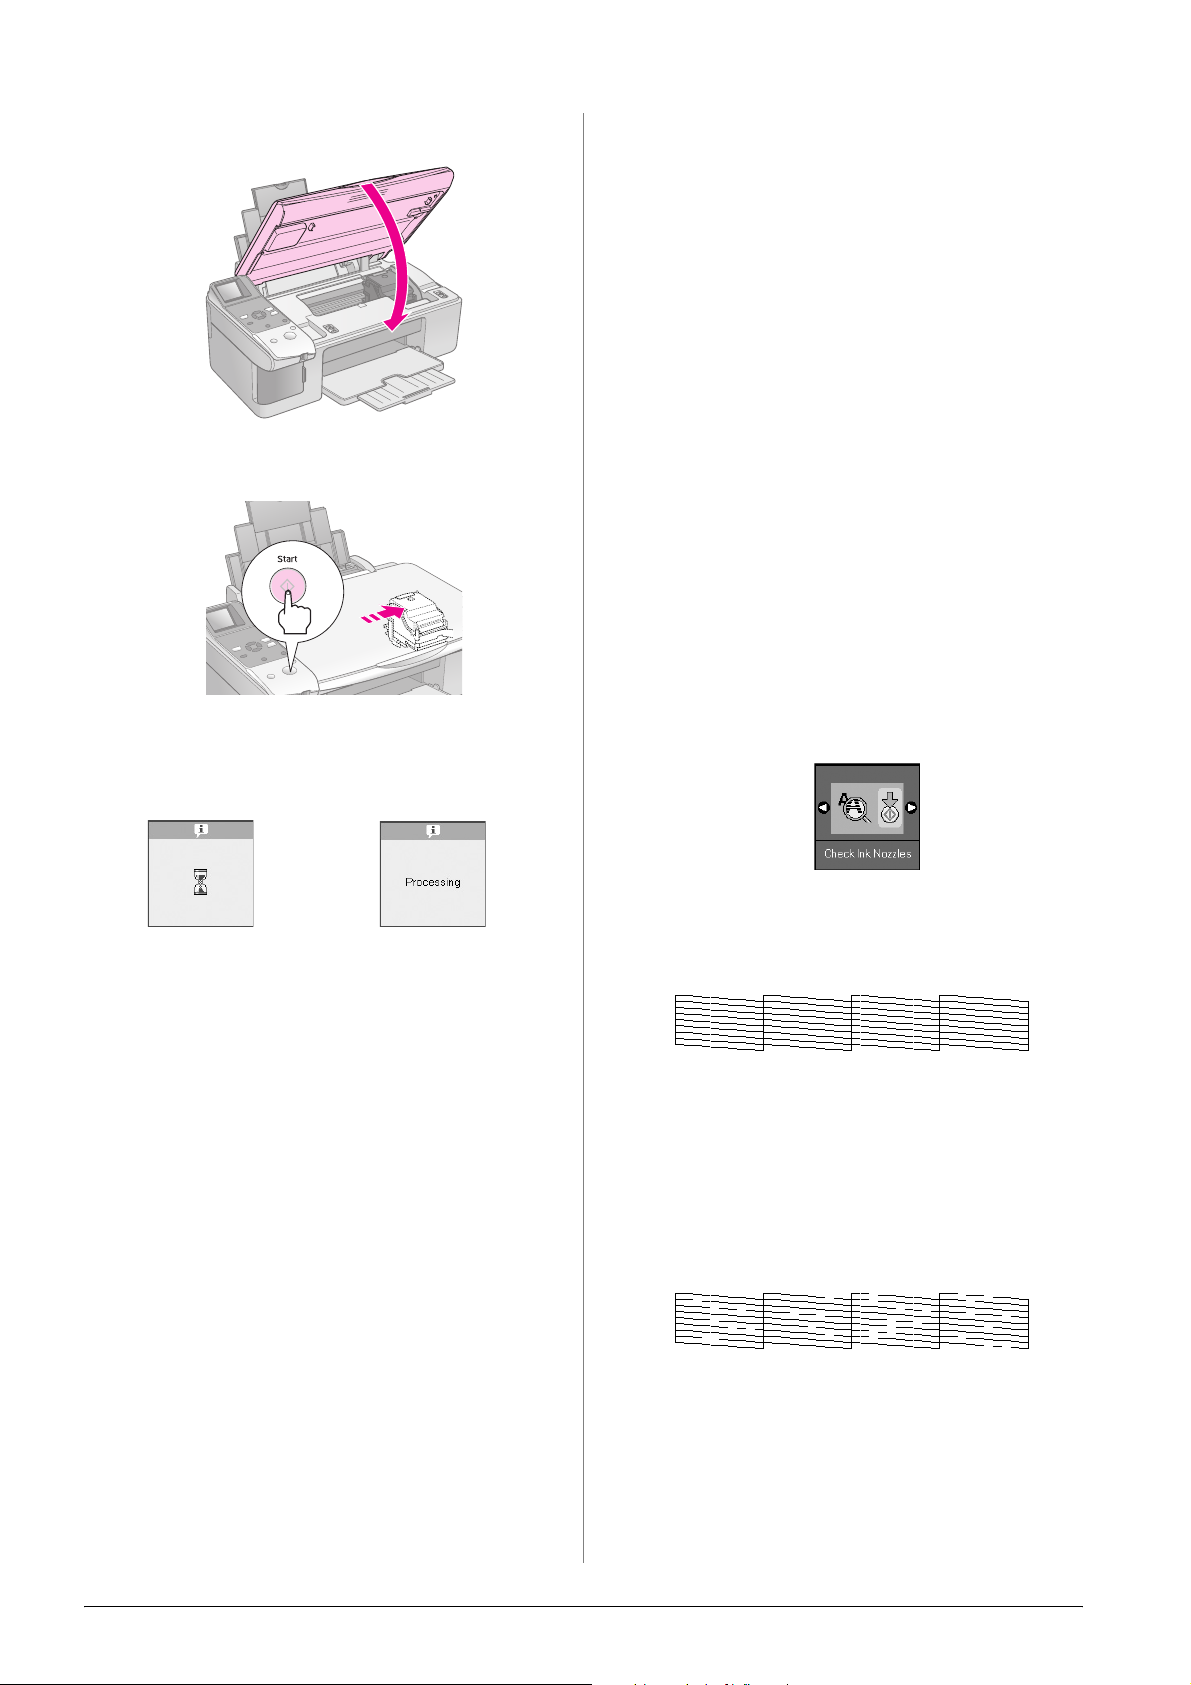
10. Close the scanner unit.
Checking and Cleaning the Print Head
If your printouts are unexpectedly light, colors are
missing, or you see light or dark lines across the
page, you may need to clean the print head. This
clears the print head nozzles, which can become
clogged if you do not use the product for a long time.
Tip:
We recommend that you turn on the product at least once a month
to maintain good print quality.
11. Press the x Start button.
When the product begins charging, one of the
following LCD screens is displayed.
Icon display Text display
This takes about one minute. When the ink
charging finishes, it automatically returns to the
Copy mode.
Checking the print head
You can print a nozzle check pattern to see if any
print head nozzles are clogged, or to check the results
after cleaning the print head.
1. Load A4-size plain paper in the sheet feeder
(& page 6).
2. Press the F [Setup/Utilities] button.
3. Use the l or r button to select Check Ink
Nozzles, and then press the x Start button to
print the nozzle check pattern.
4. Examine the nozzle check pattern you printed.
Each staggered line should be solid, with no
gaps, as shown.
c Caution:
Do not turn off the product during ink charging as this will
waste ink.
22 Maintenance
■ If your printout looks okay, the print head
does not need to be cleaned yet. Press the F
[Setup/Utilities] button to return to the
previous mode.
■ If you see any gaps, as shown below, clean
the print head as described in the next
section.
Page 25
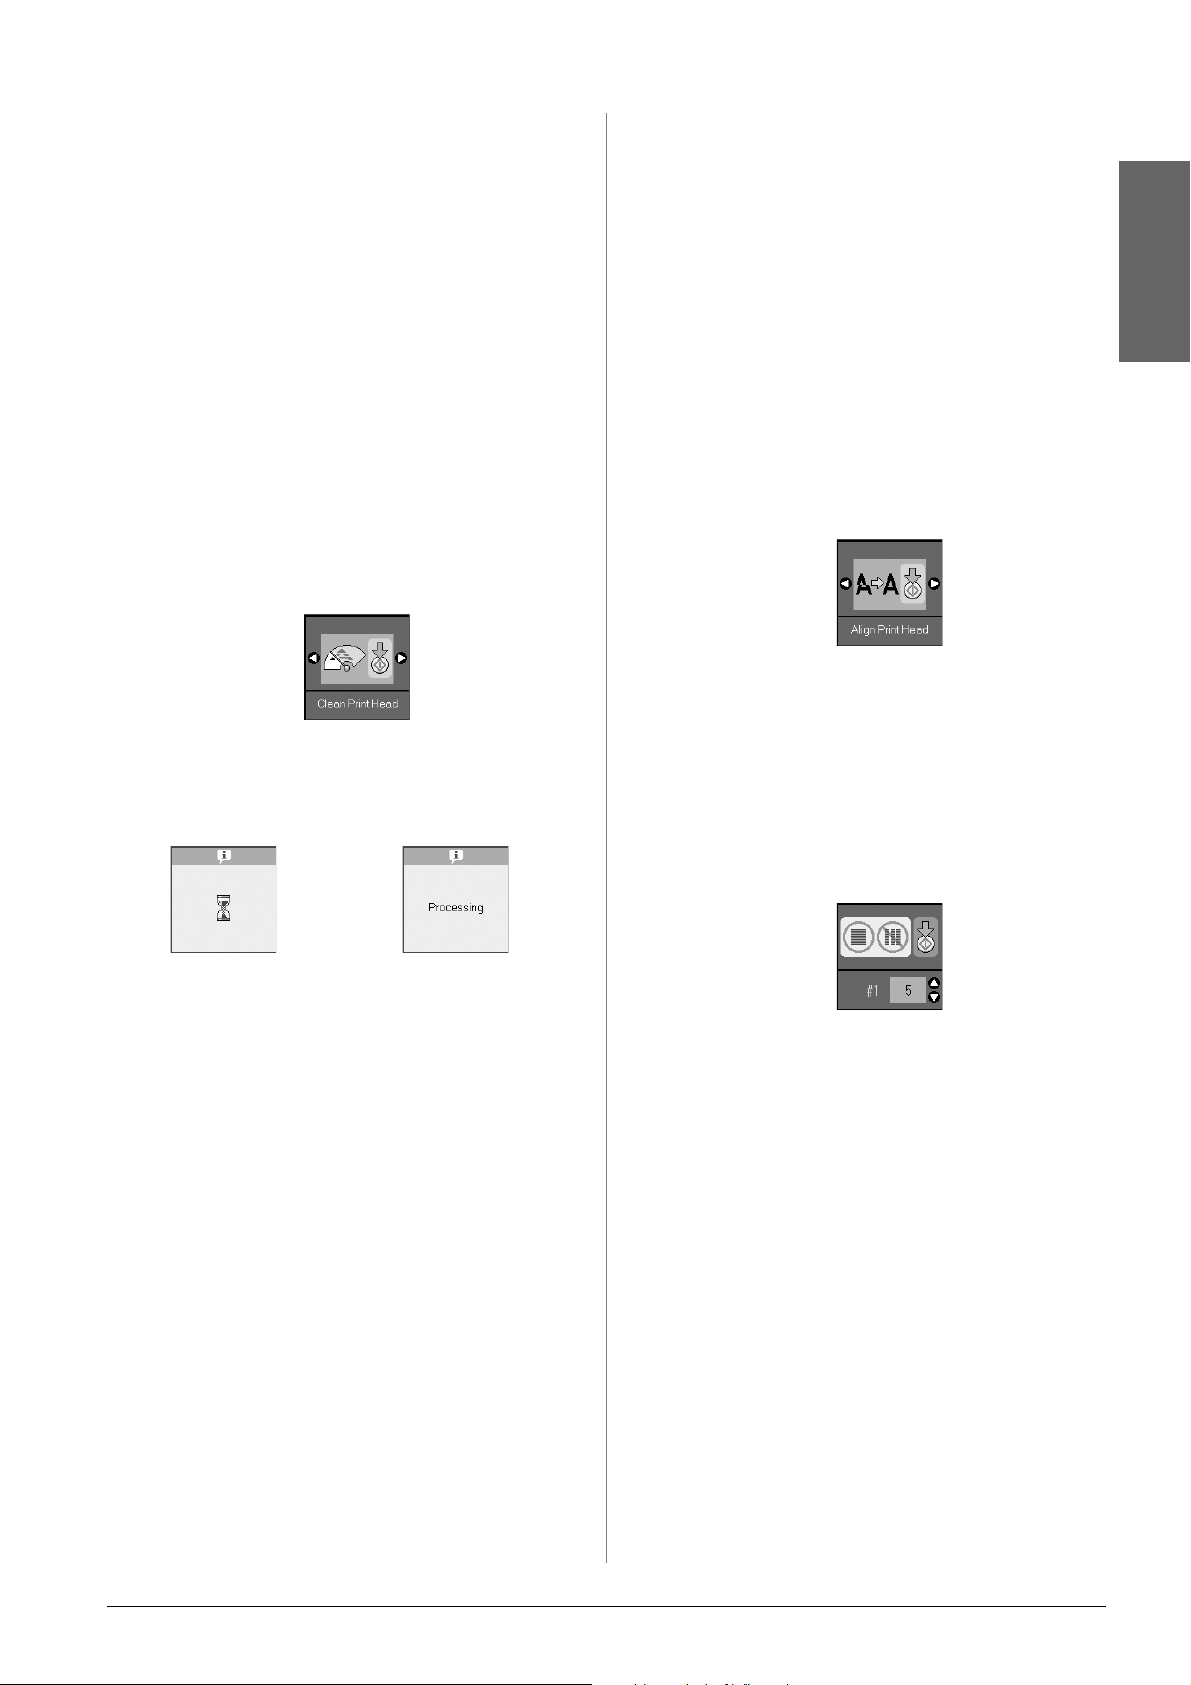
Cleaning the print head
Aligning the Print Head
Follow these steps to clean the print head so it can
deliver ink properly. Before cleaning the print head,
run a nozzle check to see if the print head needs
cleaning (& “Checking the print head” on page 22).
Note:
❏ Print head cleaning uses ink, so clean it only if quality declines.
❏ If a message on the LCD screen tells you that a cartridge is
expended or low on ink, you cannot clean the print head. You
must first replace the ink cartridge indicated (& “Replacing Ink
Cartridges” on page 19).
1. Make sure the product is turned on but not
printing.
2. Press the F [Setup/Utilities] button.
3. Use the l or r button to select Clean Print
Head, and then press the x Start button to start
cleaning.
If you notice that vertical lines are not aligned
properly on the nozzle check printout, you may be
able to solve this problem by aligning the print head.
You can align the print head by pressing the buttons,
or you can run the Print Head Alignment utility from
your computer. For the most accurate alignment, the
utility is recommended.
1. Load A4-size plain paper (& page 6).
2. Press the F [Setup/Utilities] button.
3. Use the l or r button to select Align Print Head,
and then press the x Start button to print the
alignment sheet.
Note:
Do not press the y Stop/Clear button while printing an
alignment pattern.
English
During cleaning, one of the following screens is
displayed.
Icon display Text display
c Caution:
Never turn off the product while head cleaning is in progress.
You may damage it.
4. When cleaning finishes, print a nozzle check
pattern to check the results (& “Checking the
print head” on page 22).
If there are still gaps or the test patterns are faint,
run another cleaning cycle and check the nozzles
again.
Note:
If you do not see any improvement after cleaning about four
times, turn off the product and wait overnight. This lets any
dried ink soften. Then try cleaning the print head again. If
quality still does not improve, one of the ink cartridges may be
old or damaged and needs to be replaced (& “Replacing Ink
Cartridges” on page 19).
4. Look at pattern #1 and find the patch that is most
evenly printed, with no noticeable streaks or
lines.
5. Press the u or d button until the number for that
patch is displayed on the LCD screen.
6. Press the x Start button.
7. Repeat steps 4 to 6 for each of the other
alignment patterns.
8. Press the F [Setup/Utilities] button to return to
the previous mode.
Maintenance 23
Page 26
Cleaning This Product
Transporting This Product
To keep the operation of the product at its best, clean
it periodically using the following procedure.
1. Unplug the power cord.
2. Remove all paper from the sheet feeder.
3. Use a soft brush to carefully clean away all dust
and dirt from the sheet feeder.
4. If the glass surface of the document table gets
dirty, clean it with a soft, dry, clean cloth. If the
glass surface is stained with grease or some other
hard-to-remove material, use a small amount of
glass cleaner and a soft cloth to remove it. Wipe
off all remaining liquid.
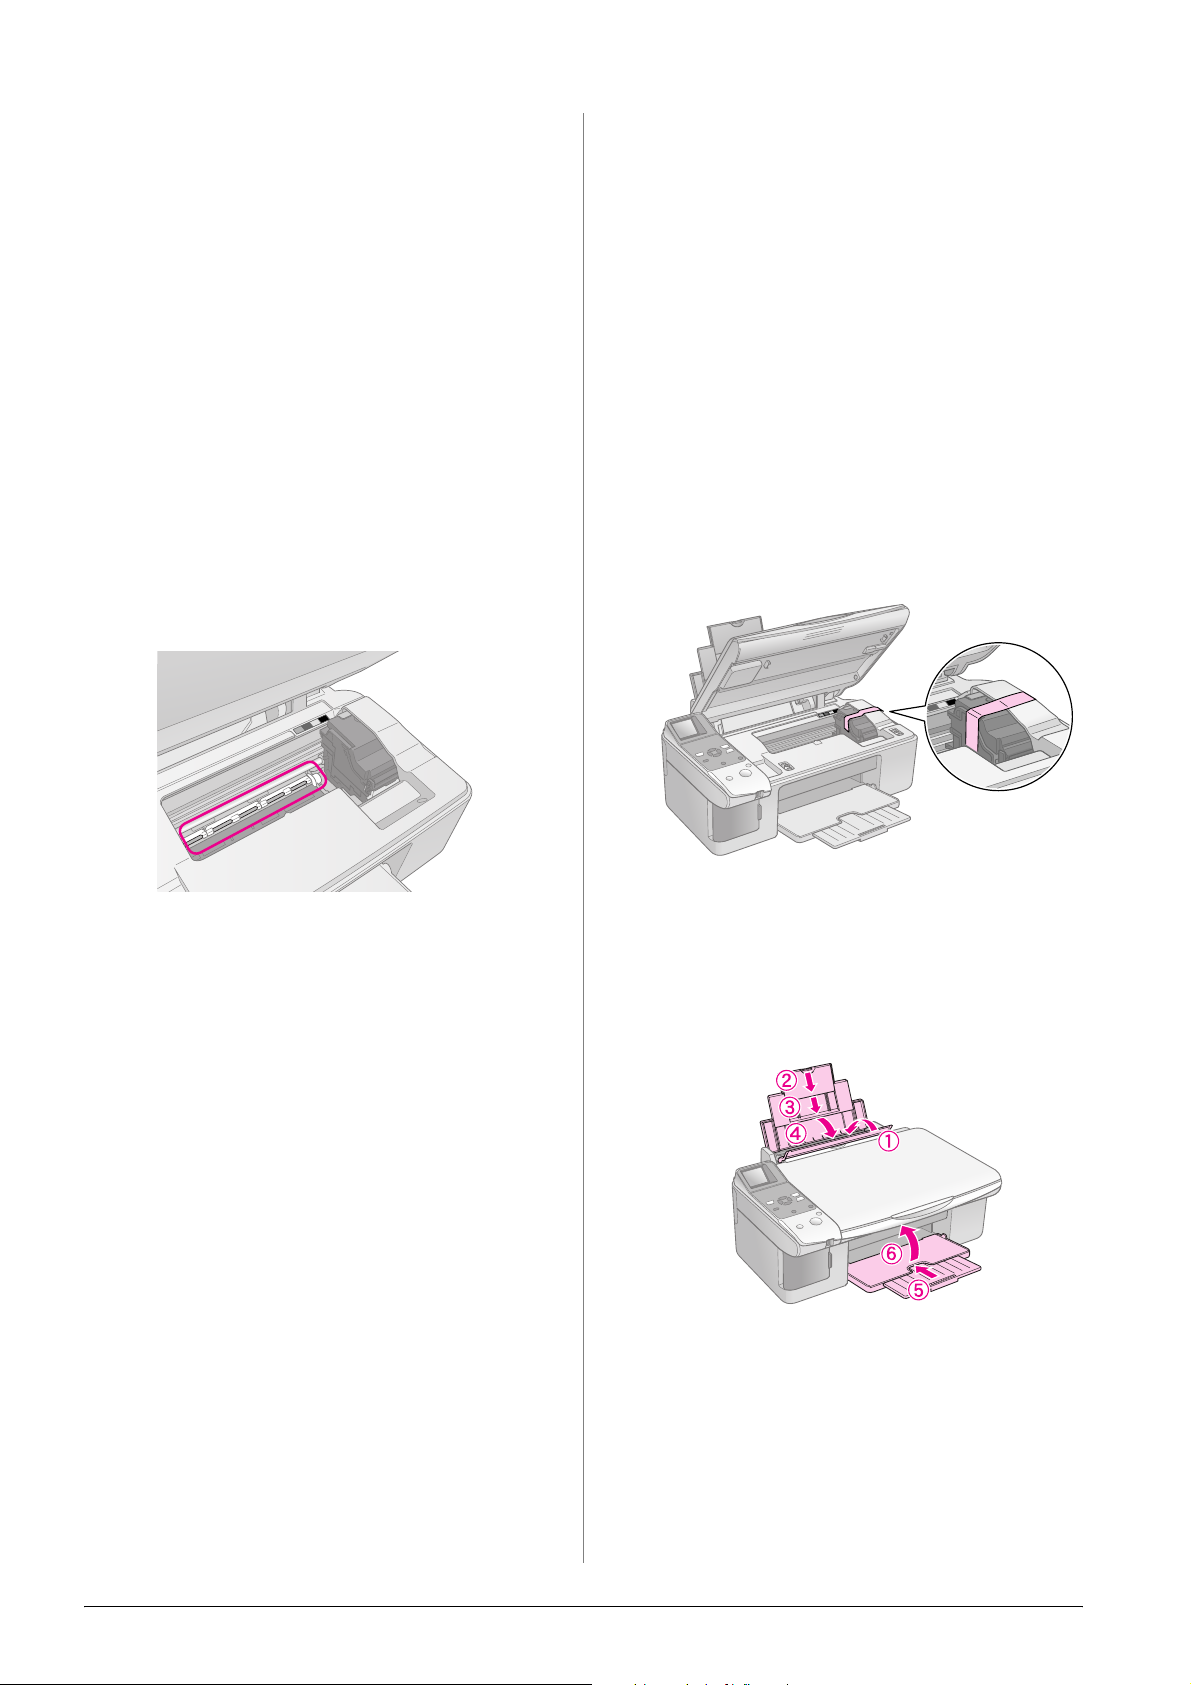
5. If the inside of the product accidentally gets
soiled with ink, use a soft, dry, clean cloth to
wipe the ink off the area indicated in the
illustration.
If you need to move the product some distance, you
need to prepare it for transportation in its original
box or one of a similar size.
c Caution:
❏ When storing or transporting the product, avoid tilting it, placing
it vertically, or turning it upside down; otherwise ink may leak
from the cartridges.
❏ Leave the ink cartridges installed; removing the cartridges for
transportation may damage the product.
1. Remove all paper from the sheet feeder and
make sure the product is off.
2. Open the scanner unit and make sure the print
head is in the home position on the right.
3. Secure the ink cartridge holder to the case with
tape as shown.
w Warning:
Be careful not to touch the gears or rollers inside the product.
c Caution:
❏ Do not press the glass surface of the document table with any
force.
❏ Be careful not to scratch or damage the glass surface of the
document table, and do not use a hard or abrasive brush to
clean it. A damaged glass surface can decrease the copy
quality.
❏ Do not apply grease to the metal parts under the print head
carriage.
❏ Never use alcohol or thinner to clean the product. These
chemicals can damage the components as well as the case.
❏ Be careful to keep water away from the printing and copying
mechanisms and electronic components.
❏ Do not spray the inside of the product with lubricants.
Unsuitable oils can damage the mechanism. Contact your
dealer or a qualified service person if lubrication is needed.
4. Close the scanner unit.
5. Unplug the power cord from the outlet, then
disconnect the USB cable from your computer.
6. Close the paper support, the feeder guard, and
the output tray.
7. Repack the product in the box, using the
protective materials that came with it.
Keep the product level as you transport it. After you
move it, remove the tape securing the print head. If
you notice a decline in print quality, run a cleaning
cycle (& “Checking and Cleaning the Print Head” on
page 22) or align the print head (& “Aligning the
Print Head” on page 23).
24 Maintenance
Page 27

Solving Problems
If you have a problem with the product, check the messages on the LCD screen to diagnose what may be causing
the problem.
You can also check “Problems and Solutions” on page 27 for troubleshooting suggestions on using the product
without a computer. See the User’s Guide included in the software CD-ROM for help on using the product with a
computer.
Error Messages
You can diagnose and solve most problems by checking the messages on the LCD screen. If you cannot solve the
problems by checking the messages, use the following table and try the recommended solution.
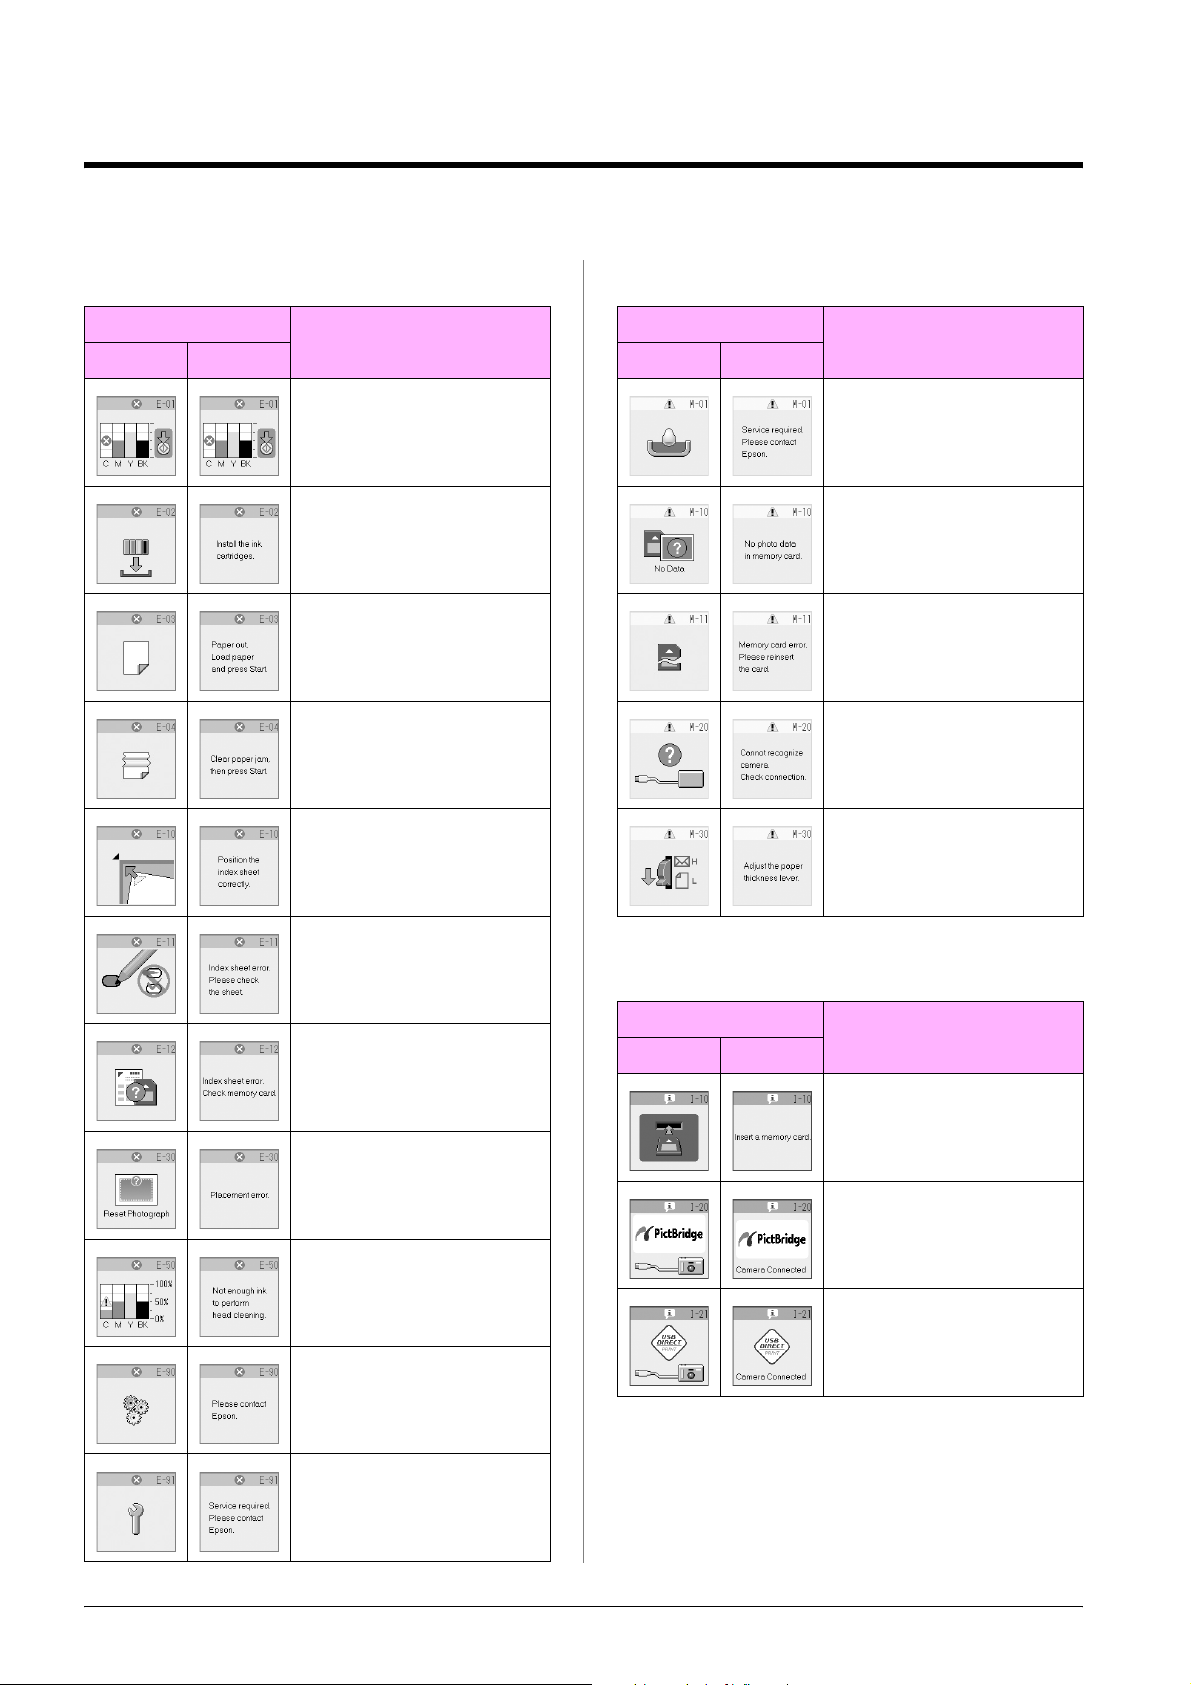
LCD Screen Cause Solution
Icon Text
The ink cartridge is
expended.
The ink cartridge is not
installed or not installed
correctly.
Change the expended ink cartridges (& “Replacing Ink Cartridges”
on page 19).
Install the ink cartridges correctly (& “Replacing Ink Cartridges” on
page 19).
English
No paper is loaded in the
sheet feeder.
Paper is jammed. Clean the jam, then press x Start (& “Paper feed problems” on
The index sheet was not
recognized because it is
not positioned correctly.
The index sheet is marked
incorrectly.
The index sheet does not
match the photos on the
memory card.
Load paper in the sheet feeder. Then press x Start to continue or
y Stop/Clear to cancel (& “Loading Paper” on page 6).
page 27).
Position the index sheet correctly on the document table, aligning
the top of it with the left edge of the glass. Then press x Start to
continue or y Stop/Clear to cancel.
The index sheet was not printed correctly. Print the index sheet,
mark it, and try again (& “Selecting and Printing Photos Using an
Index Sheet” on page 16).
Remove the index sheet, mark it correctly, and try again
(& “2. Selecting photos from the index sheet” on page 17).
Remove the memory card and insert the card used to print the
index sheet -or place the correct index sheet on the document
table. Then press x Start to continue or y Stop/Clear to cancel.
Solving Problems 25
Page 28

LCD Screen Cause Solution
Icon Text
An error occurred during
photo pre-scanning.
Not enough ink to perform
head cleaning.
There is a problem with the
product.
Waste ink pad in the
product is saturated.
Check that the photo is placed correctly and try again (& “Placing
Originals on the Document Table” on page 8).
Replace with new ink cartridges (& “Replacing Ink Cartridges” on
page 19).
Turn the product off and then back on. If the error does not clear,
contact your dealer (& “Contacting Customer Support” on page
29).
Contact your dealer to replace it (& “Contacting Customer Support”
on page 29).
The memory card does not
contain any valid photos.
Memory card error. Remove the memory card (& “Handling a Memory Card” on page
The connected camera is
not recognized.
The paper thickness lever
is set to the wrong position.
No memory card is
inserted.
Remove the memory card (& “Handling a Memory Card” on page
12).
12).
Check the connection and try again (& “Printing from a Digital
Camera” on page 18).
Set the paper thickness lever to the correct position and try again.
If you are printing on paper, move the lever to the m position. If you
are printing on envelopes, move the lever to the ^ position.
Insert a valid memory card and try again (& “Handling a Memory
Card” on page 12).
26 Solving Problems
Page 29

Problems and Solutions
Check the solutions below if you are having
problems using the product.
■ Do not load paper above the c arrow mark
inside the left edge guide (& “Loading Paper” on
page 6).
Blank pages are printed.
Setup problems
The product makes noise after you turn it on.
■ Make sure the protective tape is not blocking the
print head. After releasing the print head, turn
off the power, wait a moment, then turn it back
on.
The product makes noise after ink cartridge
installation.
■ When you install ink cartridges, the ink delivery
system must be charged. Wait until charging is
finished, then turn off the product. If you turn it
off too soon, it may use extra ink the next time
you turn it on.
■ Make sure the ink cartridges are seated securely
and no protective material remains in the
product. Open the cartridge cover and push the
cartridges down until they click into place. Turn
off the power, wait a moment, then turn it back
on.
A screen that prompts you to restart the computer
did not display after finishing the software
installation.
■ The software has not been installed correctly.
Eject and insert the CD-ROM, and then install
the software again.
Printing and copying problems
The product makes printing sounds, but nothing
prints.
■ The print head nozzles may need cleaning
(& “Checking the print head” on page 22).
■ Make sure the product is on a flat, stable surface.
■ Make sure the paper size settings are correct for
the paper you have loaded.
■ The print head nozzles may need cleaning
(& “Cleaning the print head” on page 23).
Paper feed problems
Paper does not feed correctly or is jammed.
■ If paper does not feed, remove it from the sheet
feeder. Fan the paper, load it against the right
side, and slide the left edge guide against the
paper (but not too tightly). Make sure the paper
is not in front of the feeder guard.
■ Do not load paper above the c arrow mark
inside the left edge guide (& “Loading Paper” on
page 6).
■ If paper is jammed, the icon or the message is
displayed on the LCD screen. Follow these steps
to clear the jam:
1. Press the x Start button to eject the jammed
paper. If the jammed paper is not ejected, go on
to the next step.
2. If the paper is stuck near the sheet feeder or
output tray, gently pull it out then press the
x Start button.
If the paper is stuck inside the product, press the
P On button to turn it off. Open the scanner unit
and remove any paper inside, including any torn
pieces. Do not pull it backward; this can damage
the sheet feeder. Close the scanner unit, then
turn the product back on.
■ If paper jams frequently, make sure the left edge
guide is not pushed too tightly against the paper.
Try loading fewer sheets of paper.
English
The margins are incorrect.
■ Make sure your original is positioned in the top
left corner of the document table.
■ If the edges of the copy are cropped off, move the
original away from the corner slightly.
■ Make sure the paper size settings are correct for
the paper you have loaded.
■ Make sure your paper is loaded short edge first,
all the way to the right, with the left edge guide
lightly against the paper (& “Loading Paper” on
page 6).
Print quality problems
You see banding (light lines) in your printouts or
copies.
Solving Problems 27
Page 30

■ Clean the print head (& “Checking the print
head” on page 22).
■ Clean the document table (& “Cleaning This
Product” on page 24).
■ Make sure you select the correct paper type
(& “Selecting Paper” on page 6).
■ Make sure the printable (whiter or glossier) side
of the paper is face-up.
■ The ink cartridges may need replacing
(& “Removing and installing ink cartridges” on
page 20).
■ Align the print head (& “Aligning the Print
Head” on page 23).
■ Clean the document table (& “Cleaning This
Product” on page 24).
Your printout is blurry or smeared.
Your printout is faint or has gaps.
■ Clean the print head (& “Cleaning the print
head” on page 23).
■ If you notice jagged vertical lines, you may need
to align the print head (& “Aligning the Print
Head” on page 23).
■ The ink cartridges may be old or low on ink.
Replace the ink cartridges (& “Replacing Ink
Cartridges” on page 19).
■ Make sure you select the correct paper type
(& “Selecting Paper” on page 6).
■ Make sure your paper is not damaged, old, dirty,
or loaded face-down. If it is, load new paper with
the whiter or glossier side face-up.
Your printout is grainy.
■ If you are printing or copying a photo, make sure
you are not enlarging it too much. Try printing it
smaller.
■ Align the print head (& “Aligning the Print
Head” on page 23).
■ Make sure the document is placed flat against
the document table. If only part of the image is
blurred, your original may be wrinkled or
warped.
■ Make sure the product is not tilted or placed on
an uneven surface.
■ Make sure your paper is not damp, curled, or
loaded face-down (the whiter or glossier
printable side should be face-up). Load new
paper face-up.
■ Use a support sheet with special paper or try
loading your paper one sheet at a time.
■ Load your paper one sheet at a time. Remove
sheets from the output tray so not too many
collect at a time.
■ Align the print head (& “Aligning the Print
Head” on page 23).
■ Make several copies without placing a document
on the document table.
■ Use only paper recommended by Epson and
genuine Epson cartridges.
■ Set the paper thickness lever to the m position for
most paper types. If you are printing on
envelopes, set the lever to the ^ position.
You see incorrect or missing colors.
■ Clean the print head (& “Cleaning the print
head” on page 23).
■ The ink cartridges may be old or low on ink.
Replace the ink cartridges (& “Replacing Ink
Cartridges” on page 19).
■ Make sure you loaded the right paper and
selected the correct setting for it on the control
panel.
The image size or position is incorrect.
■ Make sure you loaded the right paper and
selected the correct setting for it on the control
panel.
■ Make sure the original is placed correctly on the
document table (& “Placing Originals on the
Document Table” on page 8).
■ Clean the document table (& “Cleaning This
Product” on page 24).
Other problems
When you turn off the product, a red lamp inside
the product may remain on.
■ The lamp will stay on for a maximum of 15
minutes, then go out automatically. This does
not indicate malfunction.
28 Solving Problems
Page 31
Contacting Customer
Thailand
Support
Regional customer services
If your Epson product is not operating properly and
you cannot solve the problem using the
troubleshooting information in your product
documentation, contact customer support services
for assistance. If customer support for your area is
not listed below, contact the dealer where you
purchased your product.
Customer support will be able to help you much
more quickly if you give them the following
information:
■ Product serial number
(The serial number label is usually on the back of
the product.)
■ Product model
■ Product software version
(Click About, Version Info, or a similar button in
the product software.)
■ Brand and model of your computer
■ Your computer operating system name and
version
■ Names and versions of the software applications
you normally use with your product
URL http://www.epson.co.th
Telephone (66)2-670-0333
Vietnam
Telephone 84-8-823-9239
Indonesia
URL http://www.epson.co.id
Telephone/
Fax
Telephone Yogyakarta: (62) 274-565478
Hong Kong
URL http://www.epson.com.hk
Phone (852) 2827-8911
Fax (852) 2827-4383
Malaysia
URL http://www.epson.com.my
Phone 603-56288333
India
Jakarta: (62) 21-62301104
Bandung: (62) 22-7303766
Surabaya:
(62) 31-5355035/31-5477837
Medan: (62)61-4516173
Makassar:
(62)411-350147/411-350148
English
Note:
For more information on contacting customer support, see the
online User's Guide.
Europe
URL http://www.epson.com
Select the Support section of your
local EPSON web site for the latest
drivers, FAQs, manuals and other
downloadables.
Check your Pan-European Warranty Document for information
on how to contact EPSON Customer support.
Australia
URL http://www.epson.com.au
Telephone 1300 361 054
Fax (02) 8899 3789
Singapore
URL http://www.epson.com.sg
Telephone (65) 6586 3111
URL http://www.epson.co.in
Phone 30515000
FAX 30515005/30515078
Philippines
URL http://www.epson.com.ph
Phone (63) 2-813-6567
Fax (63) 2-813-6545
E-mail epchelpdesk@epc.epson.com.ph
Solving Problems 29
Page 32
Panel Icon List
Error Message Warning Message
Display Meaning
Icon Text
The ink cartridge is expended.
Change the expended ink
cartridges.
The ink cartridge is not
installed.
Install the ink cartridge correctly.
Paper out.
No paper is loaded in the sheet
feeder.
Paper is jammed.
Clear paper jam, then press the
x Start button.
Index sheet error.
Position the index sheet
correctly.
Display Meaning
Icon Text
Waste ink pad in the product is
saturated.
Contact your dealer.
No photo data on the memory
card.
Check data on the memory card.
Memory card error.
Check the memory card.
Cannot recognize camera.
Check connection.
Paper thickness lever position
error.
Set the paper thickness lever
correctly.
Index sheet error.
Fill in the circles correctly.
Index sheet error.
The index sheet does not match
the photos on the memory card.
Check the memory card.
Pre-scanning error.
Check photo placement.
Not enough ink to perform
head cleaning.
Replace with new ink cartridges.
Mechanical error.
Contact your dealer.
Waste ink pad in the product is
saturated.
Contact your dealer.
Information
Display Meaning
Icon Text
Insert a memory card.
PictBridge camera connected.
USB DIRECT-PRINT camera
connected.
30 Panel Icon List
Page 33

Display Meaning
Display Meaning
Icon Text
Paper thickness lever position
was changed.
Ink cartridge status
PC connected.
Common
Display Meaning
Icon Text
Copying/printing a B&W copy.
Fit to page.
Memory Card Mode
Display Meaning
Icon Text
Print All.
Print index sheet.
English
Icon Text
Ink low indicator.
Ink low indicator
(when printing).
Copying/printing a color copy.
Copy Mode
Display Meaning
Icon Text
Copies.
Print from index sheet.
Place the index sheet and then
press the x Start button.
DPOF data found.
Photo Mode
Display Meaning
Icon Text
Restoration on.
Restoration off.
Color copying.
B&W copying.
Panel Icon List 31
Page 34

Setup/Utilities Mode
Display Meaning
Display Meaning
Check ink cartridge status.
You can check the ink cartridge status.
Press the x Start button to enter this mode.
Check ink nozzles.
You can print a nozzle check pattern.
Press the x Start button to enter this mode.
Icon Text Printing
Clean print head.
You can clean the print head.
Press the x Start button to enter this mode.
Copy Quality
You can select the copy quality.
Press the x Start button to enter this mode.
Icon Text Quality
nozzle
check
pattern.
Normal
Change Cartridges.
You can change the ink cartridges.
Press the x Start button to enter this mode.
Press the x Start button,
and then open the scanner
unit.
Change ink cartridges.
Close the scanner unit, and
then press the x Start
button.
Align print head.
You can align the print head.
Press the x Start button to enter this mode.
Icon Text Printing
head
alignment
set pattern.
Set head alignment.
Draft
Photo
Date
You can print the date on your photo.
Press the x Start button to enter this mode.
No date
2006.06.16
Jun.16.2006
16.Jun.2006
Text
display
users only
Change LCD contrast.
You can change the LCD contrast.
Press the x Start button to enter this mode.
Display
You can select the display settings.
Press the x Start button to enter this mode.
Icons only are displayed on
the LCD screen.
Icons and text are displayed
on the LCD screen.
32 Panel Icon List
Page 35

English
Page 36

Purchasing ink cartridges
Product name Black Cyan Magenta Yellow
DX6000 series T0711 T0712 T0713 T0714
CX5900 series T0731 T0732 T0733 T0734
 Loading...