

Page 1
Page 2
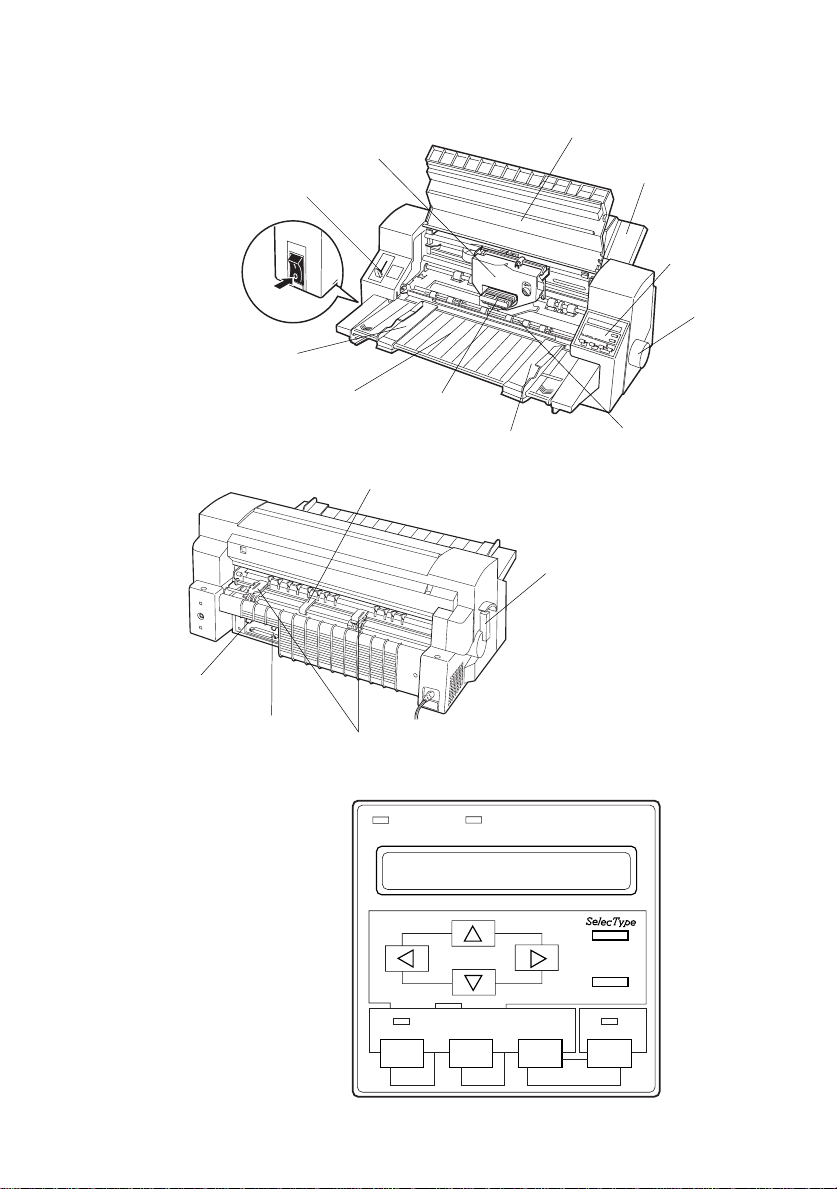
Printer Parts
paper thickness lever
ribbon cartridge
printer cover
rear paper guide
power switch
left edge guide
front paper guide
parallel interface
serial interface
Control Panel
OFF
print head
right edge guide
center paper support*
sprocket units*
Power Paper Out
control panel
knob
paper bail
paper release lever
* tractor unit parts
Load/Eject
Tear Off
Font Pitch Reset
LF/FF
Paper Select
Pause
Page 3

®
1
24-Pin Dot Matrix Printer
All rights reserved. No part of this publication may be reproduced, stored in a retrieval
system, or transmitted in any form or by any means, electronic, mechanical, photocopying,
recording, or otherwise, without the prior written permission of SEIKO EPSON
CORPORATION. The information contained herein is designed only for use with this
EPSON printer. EPSON is not responsible for any use of this information as applied to
other printers.
Neither SEIKO EPSON CORPORATION nor its affiliates shall be liable to the purchaser of
this product or third parties for damages, losses, costs, or expenses incurred by the
purchaser or third parties as a result of: accident, misuse, or abuse of this product or
unauthorized modifications, repairs, or alterations to this product, or (excluding the U.S.)
failure to strictly comply with SEIKO EPSON CORPORATION’ s operating and
maintenance instructions.
SEIKO EPSON CORPORATION shall not be liable for any damages or problems arising
from the use of any options or any consumable products other than those designated as
Original EPSON Products or EPSON Approved Products by SEIKO EPSON
CORPORATION.
EPSON and EPSON ESC/P are registered trademarks and EPSON ESC/P 2 is a trademark
of SEIKO EPSON CORPORATION.
Microsoft and Windows are registered trademarks of Microsoft Corporation.
IBM is a registered trademark of International Business Machines Corporation.
General Notice: Other product names used herein are for identification purposes on ly and may be
trademarks of their respectiv e owners. EPSON disclaims any and all rights in those marks.
Copyright © 1997 by SEIKO EPSON CORPORATION, Nagano, Japan.
DLQ-3000+
User’s Guide
Page 4

Declaration of Conformity
Accordi ng to ISO/IE C Gui d e 22 an d E N 45014
Manufacturer: SEIKO EPSON CORPORATION
Address: 3-5, Owa 3-chome, Suwa-shi,
Nagano-ken 39 2 Japan
Representative: EPSON EUROPE B.V.
Address: Prof. J. H. Bavinc klaan 5 1183 AT Amstelveen
The Netherlands
Declares that the Product:
Product Name: Dot Matrix Printer
Model: P821A
Conforms to the foll owing Directive(s) and Norm( s):
Directive 73/ 23/EEC:
EN 60950
Directive 89/ 336/EEC:
EN 55022 Class B
EN 61000-3-2
EN 61000-3-3
EN 50082-1
IEC 801-2
IEC 801-3
IEC 801-4
ii
August 1997
Y. Ishii
President of EPSON EURO PE B.V.
Page 5

Safety Information
Important Safety Instructio ns
Read all of these in st ruc t ion s and save them for later reference. Follow all
warnings and instructions marked on the printer.
Do not place the pr int er on an unstable surface or ne ar a radiator or
❑
heat source.
Place the prin te r on a f lat surface. The printer will not op erat e
❑
properly if it is tilted or at an angle.
Do not block or cover the op enings in the printer’s cabinet. Do not
❑
insert objects thr ou gh the slots.
Use only the type of power source indicated on the printer’s label.
❑
Connect all equip m ent to properly grounded power outlets. Avoid
❑
using outle ts on t he sam e circuit as photocopiers or air control
systems that regu larly switch on and off.
Do not use a damaged or frayed power cord.
❑
If you use an extension cord with the printer, make sure the total
❑
ampere rating o f all dev ices plugged into the extensio n cord does not
exceed the cord’s am per e rating. Also, make sure the total ampere
rating of all devices plugged into the wall outlet does no t exc eed the
wall outlet’s ampere rating.
Unplug the printer before cleaning. Clean with a damp cloth only.
❑
Do not spill liquid o n the pri nt er.
Except as specifically explained in this guide, do not attempt to
❑
service the printer yourself.
iii
Page 6

Unplug the printer and refer servicing to qualified service
❑
personnel under the following condition s:
If the power cord or plug is dam aged; if liquid has entered the
printer; if the prin te r has been dropped or the cabinet damaged;
if the printer does not operate normally or exhibits a distinct change
in performance. Adjust only those cont rol s th at are co v ered by the
operating instruc ti ons .
If you plan to use the prin te r in Germany, observe the follo wi ng:
❑
To provi de adequat e s hort-circuit protecti on and over-c urrent
protection for this printer, the building installation must be
protected by a 16 A m p circuit breaker.
Bei Anschluß de s D ruc kers an die Stromversorgung m uß
sichergestellt wer den, daß die Gebäu deinstallation mit einem
16 A-Überstr oms c halter abgesichert ist.
Print Head Caution Symbol
The symbol on the print head indicates that this part may
be hot. Neve r touc h t he print head just after the print er
has been used. Let the print head cool for a few minutes
before touching it.
K
NERGY STAR Compliance
E
As an ENERGY STAR Partner, EPSON has determined
E
that this product meets the
for energy efficie ncy.
E
The International
voluntary partnersh ip with the co m pu ter and office equipment industry
to promote the introduction of ene rgy- ef ficient personal computers,
monitors, print ers, fax machines, and co piers in an effort to reduce air
poll ution caused by power gen erati on.
NERGY STAR Offi ce Eq uipment progra m is a
NERGY STAR guidelines
iv
Page 7

For United Kingdom Users
Use of options
Epson (UK) Limite d shall not be liable against any damages o r
problems arising from the use of any options or consumable products
other than those designated as Original EPSON Products or EPSON
Approved Products by Epson (UK) Limited.
Safety information
Warning:
w
for voltage and check that the appliance voltage corresponds to the
supply voltag e .
Important:
are coloured in accordance with the following code:
Green and yellow — Earth
Blue — Neutral
Brown — Live
If you have to fit a plug:
As the colours of the mains lead of this appliance may not match coloured
markings used to identify the terminals in a plug, please proceed as
follows:
The green and yellow wi re must be connected to the terminal in the plug
which is mark ed w it h th e lett er E or the Eart h sym bol (
The blue wire mu st be connected to the terminal in the plu g m arked with
the letter N.
The brown wire must be connected to the terminal in t he plug marked
with the letter L.
This appliance must be earthed. Refer to rating plate
The wires in the mains lead fitted to this appliance
G
).
If damage oc curs to the plug, replace the co rd set or consult a qualified
electrician .
Replace fuses only with a fuse of the correct size and rating.
v
Page 8

Contents
Int roduction
Features . . . . . . . . . . . . . . . . . . . . . . . . . . . . . . . . . 0-1
Options . . . . . . . . . . . . . . . . . . . . . . . . . . . . . . . . . . 0-2
How to Use This Manual . . . . . . . . . . . . . . . . . . . . . . . . 0-3
Warnings, Cautions, and Notes . . . . . . . . . . . . . . . . . . . . 0-4
Chapter 1
Unpacking the Printer . . . . . . . . . . . . . . . . . . . . . . . . . 1-2
Choosing a Place for the Printer . . . . . . . . . . . . . . . . . . . . 1-3
Assembling the Printer . . . . . . . . . . . . . . . . . . . . . . . . . 1-5
Installing the ribbon cartridge . . . . . . . . . . . . . . . . . . 1-5
Attaching the paper guides . . . . . . . . . . . . . . . . . . . 1-8
Plugging In the Printer . . . . . . . . . . . . . . . . . . . . . . . . . 1-9
Connecting the Printer to Your Computer . . . . . . . . . . . . . . 1-10
Chapter 2
For Windows 95 Users . . . . . . . . . . . . . . . . . . . . . . . . . 2-2
Installing the printer driver using My Computer . . . . . . . 2-2
Installing the printer driver using plug-and-play . . . . . . . 2-3
Using the printer driver . . . . . . . . . . . . . . . . . . . . . 2-5
Installing EPSON Status Mon it or 2 . . . . . . . . . . . . . . . 2-8
For Windows 3.1 Users . . . . . . . . . . . . . . . . . . . . . . . . . 2-9
Installing the printer driver using Program Manager . . . . 2-9
Using the printer driver . . . . . . . . . . . . . . . . . . . . . 2-10
For Windows NT 4.0 Users . . . . . . . . . . . . . . . . . . . . . . 2-13
Installing the printer driver . . . . . . . . . . . . . . . . . . . 2-13
Using the printer driver . . . . . . . . . . . . . . . . . . . . . 2-14
Se tting Up the Printer
Setting Up Your Software
vi
Page 9

For Windows NT 3.5x Users . . . . . . . . . . . . . . . . . . . . . . 2-17
Installing the printer driver . . . . . . . . . . . . . . . . . . . . 2-17
Using the printer driver . . . . . . . . . . . . . . . . . . . . . . 2-18
For DOS Program Users . . . . . . . . . . . . . . . . . . . . . . . . 2-21
Installing the printer driver . . . . . . . . . . . . . . . . . . . . 2-21
Using the printer utilities . . . . . . . . . . . . . . . . . . . . . 2-22
Chapter 3
Selecting a Paper-Feeding Method . . . . . . . . . . . . . . . . . . 3-2
Paper-feeding methods and paper types . . . . . . . . . . . . 3-3
Setting the paper release lever . . . . . . . . . . . . . . . . . . 3-4
Adjusting the Paper Thickness Lever . . . . . . . . . . . . . . . . . 3-5
Using Single Sheets . . . . . . . . . . . . . . . . . . . . . . . . . . . 3-7
Loading single sheets from the front . . . . . . . . . . . . . . 3-7
Loading single sheets from the rear . . . . . . . . . . . . . . . 3-10
Using Continuous Paper . . . . . . . . . . . . . . . . . . . . . . . . 3-13
Positioning your continuous paper supply . . . . . . . . . . . 3-13
Loading continuous paper with the tractor . . . . . . . . . . . 3-14
Using the tear-off function . . . . . . . . . . . . . . . . . . . . 3-20
Removing continuous paper . . . . . . . . . . . . . . . . . . . 3-23
Using Special Paper . . . . . . . . . . . . . . . . . . . . . . . . . . . 3-24
Multi-part forms . . . . . . . . . . . . . . . . . . . . . . . . . . 3-24
Labels . . . . . . . . . . . . . . . . . . . . . . . . . . . . . . . . 3-25
Envelopes . . . . . . . . . . . . . . . . . . . . . . . . . . . . . . 3-26
Postcards . . . . . . . . . . . . . . . . . . . . . . . . . . . . . . 3-28
Overlapping multi-part forms . . . . . . . . . . . . . . . . . . 3-29
Continuous forms with labels . . . . . . . . . . . . . . . . . . 3-31
Overlapping multi-part forms with labels . . . . . . . . . . . 3-33
Switching Between Continuous Paper and Single Sheets . . . . . . 3-36
Switching to single sheets . . . . . . . . . . . . . . . . . . . . . 3-36
Switching to continuous paper . . . . . . . . . . . . . . . . . . 3-37
Using the Micro-Feed Feature . . . . . . . . . . . . . . . . . . . . . 3-38
Adjusting the printing position . . . . . . . . . . . . . . . . . 3-38
Adjusting the tear-off position . . . . . . . . . . . . . . . . . . 3-39
Pa per Handling
vii
Page 10

Chapter 4
Control Panel . . . . . . . . . . . . . . . . . . . . . . . . . . . . . . 4-2
Display . . . . . . . . . . . . . . . . . . . . . . . . . . . . . . . 4-3
Lights . . . . . . . . . . . . . . . . . . . . . . . . . . . . . . . . 4-4
Buttons . . . . . . . . . . . . . . . . . . . . . . . . . . . . . . . 4-4
Other control panel features . . . . . . . . . . . . . . . . . . . 4-7
SelecType . . . . . . . . . . . . . . . . . . . . . . . . . . . . . . . . . 4-8
SelecType overview . . . . . . . . . . . . . . . . . . . . . . . . 4-8
Using SelecType . . . . . . . . . . . . . . . . . . . . . . . . . . 4-9
Level 1 options . . . . . . . . . . . . . . . . . . . . . . . . . . . 4-12
Level 2 options . . . . . . . . . . . . . . . . . . . . . . . . . . . 4-15
Type Styles . . . . . . . . . . . . . . . . . . . . . . . . . . . . . . . . 4-20
Character fonts . . . . . . . . . . . . . . . . . . . . . . . . . . 4-20
Character spacing . . . . . . . . . . . . . . . . . . . . . . . . . 4-22
Printing in Color . . . . . . . . . . . . . . . . . . . . . . . . . . . . 4-23
Barcode Printing . . . . . . . . . . . . . . . . . . . . . . . . . . . . 4-23
Controlling the Printer
Chapter 5
Opening and Using EPSON Status Monitor 2 . . . . . . . . . . . . 5-2
Understanding the EPSON Status Monitor 2 window . . . . 5-2
Getting detailed printer status information . . . . . . . . . . 5-6
Using the Background Monitoring Feature . . . . . . . . . . . . . 5-8
Setting monitoring preferences . . . . . . . . . . . . . . . . . 5-8
Using the background monitoring icon . . . . . . . . . . . . 5-10
Chapter 6
Cut-Sheet Feeder . . . . . . . . . . . . . . . . . . . . . . . . . . . . 6-2
Installing the cut-she et fe ed er . . . . . . . . . . . . . . . . . . 6-2
Loading paper with the cut-sheet feeder . . . . . . . . . . . . 6-5
Loading paper manually from the front paper guide . . . . . 6-9
Switc hing betwee n the tractor and the cu t-sheet fe eder . . . 6-10
Interface Cards . . . . . . . . . . . . . . . . . . . . . . . . . . . . . 6-11
Installing an interfac e ca rd . . . . . . . . . . . . . . . . . . . . 6-12
Using EPSON Stat us Monitor 2
Us ing Printer Options
viii
Page 11

Chapter 7
Replacing the Ribbon Cartridge . . . . . . . . . . . . . . . . . . . . 7-2
Cleaning the Printer . . . . . . . . . . . . . . . . . . . . . . . . . . . 7-5
Transporting the Printer . . . . . . . . . . . . . . . . . . . . . . . . 7-6
Maintenance and Transportation
Chapter 8
Using the Error Indicators . . . . . . . . . . . . . . . . . . . . . . . 8-3
Printing a Self Test . . . . . . . . . . . . . . . . . . . . . . . . . . . . 8-5
Using the Hex Dump Mode . . . . . . . . . . . . . . . . . . . . . . 8-6
Problems and Solutions . . . . . . . . . . . . . . . . . . . . . . . . . 8-7
Power supply . . . . . . . . . . . . . . . . . . . . . . . . . . . . . . 8-8
Paper handling . . . . . . . . . . . . . . . . . . . . . . . . . . . 8-9
Operation . . . . . . . . . . . . . . . . . . . . . . . . . . . . . 8-17
Printout . . . . . . . . . . . . . . . . . . . . . . . . . . . . . . . 8-19
Clearing a Paper Jam . . . . . . . . . . . . . . . . . . . . . . . . . . 8-24
Using Bidirectional Adjustment Mode . . . . . . . . . . . . . . . . 8-25
Appendix A
Technical Specifications . . . . . . . . . . . . . . . . . . . . . . . . . A-2
Printing . . . . . . . . . . . . . . . . . . . . . . . . . . . . . . . A-2
Paper . . . . . . . . . . . . . . . . . . . . . . . . . . . . . . . . A-4
Mechanical . . . . . . . . . . . . . . . . . . . . . . . . . . . . . A-15
Electrical . . . . . . . . . . . . . . . . . . . . . . . . . . . . . . A-16
Environmental . . . . . . . . . . . . . . . . . . . . . . . . . . . A-16
Safety approvals . . . . . . . . . . . . . . . . . . . . . . . . . . A-17
CE marking . . . . . . . . . . . . . . . . . . . . . . . . . . . . . A-17
Parallel Interface Specifications . . . . . . . . . . . . . . . . . . . . A-18
Forward channel . . . . . . . . . . . . . . . . . . . . . . . . . . A-18
Reverse channel . . . . . . . . . . . . . . . . . . . . . . . . . . A-18
Serial Interface Specifications . . . . . . . . . . . . . . . . . . . . . A-19
Optional Cut-Sheet Feeder Specifications . . . . . . . . . . . A-19
Troubleshooting
Specificat ions
ix
Page 12

Appendix B
EPSON ESC/P 2 Control Codes . . . . . . . . . . . . . . . . . . . . B-2
Barcode command . . . . . . . . . . . . . . . . . . . . . . . . B-3
IBM 2391 Plus Emulation Control Codes . . . . . . . . . . . . . . B-6
Character Tables in EPSON ESC/P 2 Mode . . . . . . . . . . . . . B-7
Command Lists and Character Tables
Appendix C
For United Kingdom and the Republic of Ireland User s . . . . . . C-2
Enquiry Desk . . . . . . . . . . . . . . . . . . . . . . . . . . . C-3
Customer Support . . . . . . . . . . . . . . . . . . . . . . . . . C-3
Faxon EPSON . . . . . . . . . . . . . . . . . . . . . . . . . . . C-3
EPtec - Bulletin Board Service for latest drivers and
utilities . . . . . . . . . . . . . . . . . . . . . . . . . . . . . . C-4
World Wide Web . . . . . . . . . . . . . . . . . . . . . . . . . C-4
For Australian Users . . . . . . . . . . . . . . . . . . . . . . . . . . C-5
EPSON FAXBACK . . . . . . . . . . . . . . . . . . . . . . . . C-5
EPSON Bulletin Board System . . . . . . . . . . . . . . . . . . C-5
Internet URL http://www.epson.com.au . . . . . . . . . . . C-5
Your dealer . . . . . . . . . . . . . . . . . . . . . . . . . . . . . C-5
EPSON Helpdesk . . . . . . . . . . . . . . . . . . . . . . . . . C-6
For Singapore Users . . . . . . . . . . . . . . . . . . . . . . . . . . C-6
For Hong Kong Users . . . . . . . . . . . . . . . . . . . . . . . . . C-7
Internet home page . . . . . . . . . . . . . . . . . . . . . . . . C-7
Electronic bulletin board system . . . . . . . . . . . . . . . . C-7
Technical Support Hotline . . . . . . . . . . . . . . . . . . . . C-7
For Philippines Users . . . . . . . . . . . . . . . . . . . . . . . . . . C-8
Contacting Customer Support
Glossary
Index
x
Page 13

Introduction
Your new EPSON® DLQ-3000+ 24-pin dot matrix printer offers
high performance wi th a wide range of features in a compact
design. You will find the same high-quality printing and ease
of operation you have come to expect from EPSON printers.
Features
Here are some of the features that make your printer a great
value:
High-spee d draft mode prin ting of up to 444 charact ers pe r
❑
second (cps) at 10 characters per inch (cpi)
The ability to handle a wide range of paper types, including
❑
single sheets, continuous paper, multi-part forms (one
original plus up to six copies), labels, envelopes, postcards,
overlapping forms, and continuous forms with labels
High-precision printouts even on multi-part forms, made
❑
possible by keeping the paper flat, not rolled, during
printing
Easy paper handling for both single sheets and continuous
❑
paper
An AUTO function on the paper thickness lever that
❑
automatically compensates for the thickness of paper in the
printer
Eight barcode fonts and four scalable fonts, as well as one
❑
draft and nine letter-quality bitmap fonts
A large printable area: 70 lines on A4 size paper and 66
❑
lines on letter size paper
Introductio n
1
Page 14

Color printing with a color-ribbon cartridge (S015067).
❑
Bidirectional communication with IEEE 1284 Nibble Mode
❑
support.
Support of advanced EPSON ESC/P 2 commands and
❑
❑
®
2391 Plus emulation
IBM
An advanced control panel, including a display screen
that provides you with current printer current status
information. Also, using the control panel, you can enter
SelecType mode, which enables you to make more printer
settings than are available through many application
programs.
An automatic interface selection feature. You can connect
❑
more than one computer at a time, and the printer switches
from one to the other as it receives data.
Software, including a printer driver and a remote control
❑
panel utility that let s you chan g e prin t er se ttin gs qu ick ly
and easily
For Windows 95 users, the EPSON Status Monitor utility.
❑
This program monitors printer status, alerts you when
printer errors occur, and provides simple troubleshooting
tips.
Options
The following options are available for your printer:
The cut-sheet feeder which automatically feeds up to 200
❑
sheets of plain paper without reloading.
Interface cards, which are available to supplement the
❑
printer’s built-in parallel and serial interface.
2
Introduction
Page 15

Chapter 6, “Using Printer Options,” contains detailed
information about installing and using these options.
How to Us e This Manua l
This manual provides illustrated, step-by-step instructions for
setting up and operating your printer.
Chapter 1 “Setting Up the Printer” contains information on
unpacking, setting up, and connecting the printer. Be sure to
read this chapter first.
Chapter 2 “Setting Up Your Software” describes how to set up
your softwa re , whic h in clud es a prin ter driver for Microsoft
®
Windows® operating systems, the EPSON Status Monitor
utility for Windows 95, and two DOS-based printer utilities.
Chapter 3 “Paper Handling” explains how to load and use
single sheets, continuous paper, and other types of paper.
Chapter 4 “ Controlling the Printer” contains information on
controlling the printer using the control panel. To change many
of the printer’s default settings, see “SelecType” in this chapter.
Chapter 5 “Using EPSON Status Monitor 2” explains how to
use the EPSON Status Monitor 2 utility for Window s 95.
Chapter 6 “Using Printer Options” explains how to use
optional accessories with your printer.
Chapter 7 “Maintenance and Transportation” provides
maintenance information, including transportation guidelines.
Chapter 8 “ Troubleshooting” contains troubleshooting
information. If the printer does not operate properly or the
printed results are not what you expect, see this chapter for
solutions.
Introductio n
3
Page 16

Appendix A “Specifications” provides specific at ions for the
printer and the optional cut-sheet feeder.
Appendix B “Command Lists and Character Tables” lists the
printer’s commands and character tables.
Appendix C “Contacting Customer Support” lists the best
ways for getting help and more information about EPSON
products and services.
A Glossary and an Index are provided at the end of this
manual.
Warnings, Cautions, and Notes
Warnings must be followed to avoid bodily injury.
w
Cautions must be observed to avoid damage to your equipment.
c
Notes contain import ant information and useful tips on the operation
of your prin ter.
4
Introduction
Page 17

Chapter 1
Setting Up the Printer
Unpacking the Printer . . . . . . . . . . . . . . . . . . . . . . . . 1-2
Choosing a Place for the Printer . . . . . . . . . . . . . . . . . . 1-3
Assembling the Printer . . . . . . . . . . . . . . . . . . . . . . . 1-5
Installing the ribbon cartridge . . . . . . . . . . . . . . . . . 1-5
Attaching the paper guides . . . . . . . . . . . . . . . . . . . 1-8
Plugging In the Printer . . . . . . . . . . . . . . . . . . . . . . . 1-9
Connecting the Printer to Your Computer . . . . . . . . . . . . 1-10
1
Setting Up the Printer
1-1
Page 18
This chapter describes how to set up your printer and connect
it to your computer.
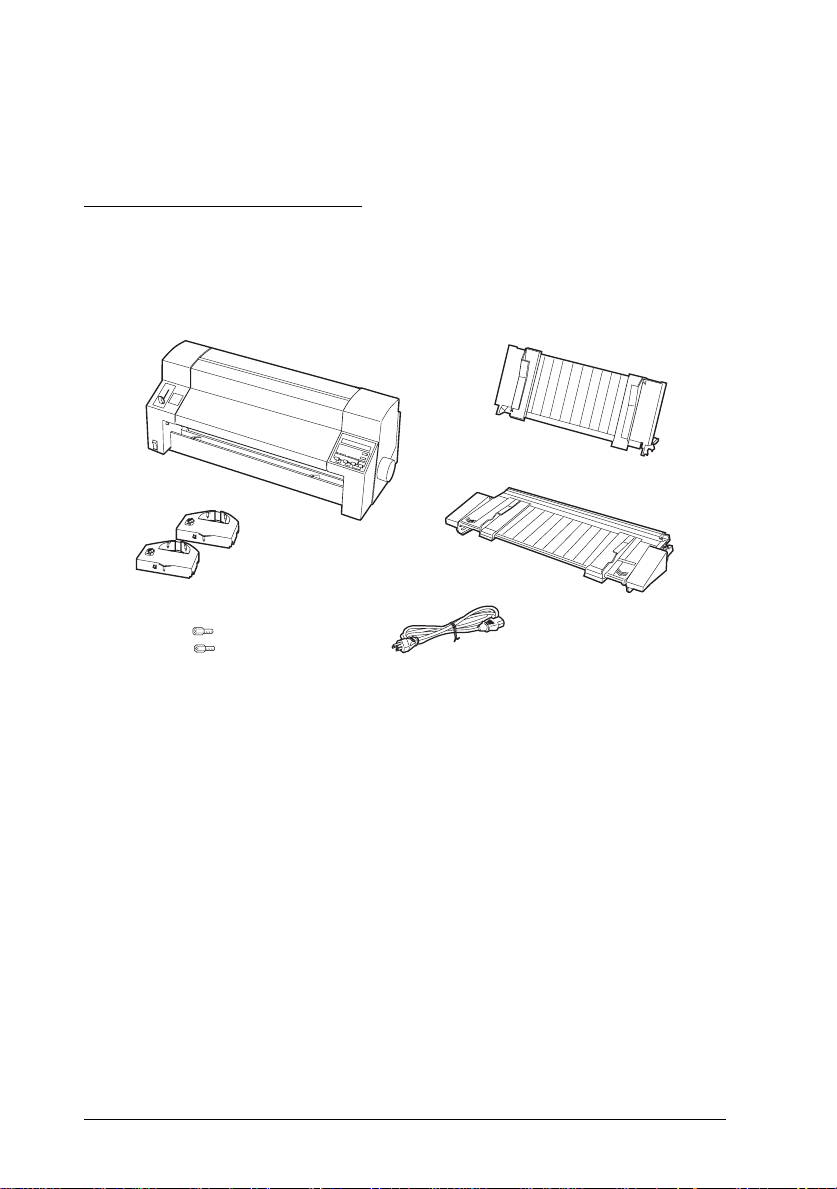
Unpacking the Pri nter
Besides this guide, your printer box should include EPSON
printer software disks, a Notice Sheet, and the following items:
rear paper guide
printer
black ri bbon
color ribbon
front paper guide
optional connector
lock nuts
power cord
Note:
Depending on your printer model, the power cord may be
permanently attached to the printer. Also, the shape of the power cord
plug varies depending on the country in which you bought your
printer; be sure the plug you have is the right one for your location.
You must remove all protective materials packed around and
inside your printer before you set it up and turn on the power.
Follow the directions on the Notice Sheet (packed with the
printer) to remove these materials.
Save all packing and protective materials in case you need to
ship the printer in the future. It should always be transported
in its original packaging or equivalent materials.
1-2
Setting Up the Printer
Page 19
Caution:
❑
c
Be sure to remove all protective materials before you turn
on the printer.
❑
There are several models of the printer designed for
different voltages, and it is not possible to adjust the
printer for use at another voltage. If the label on the back
of the printer does not show the correct voltage for your
country, contact your dealer.
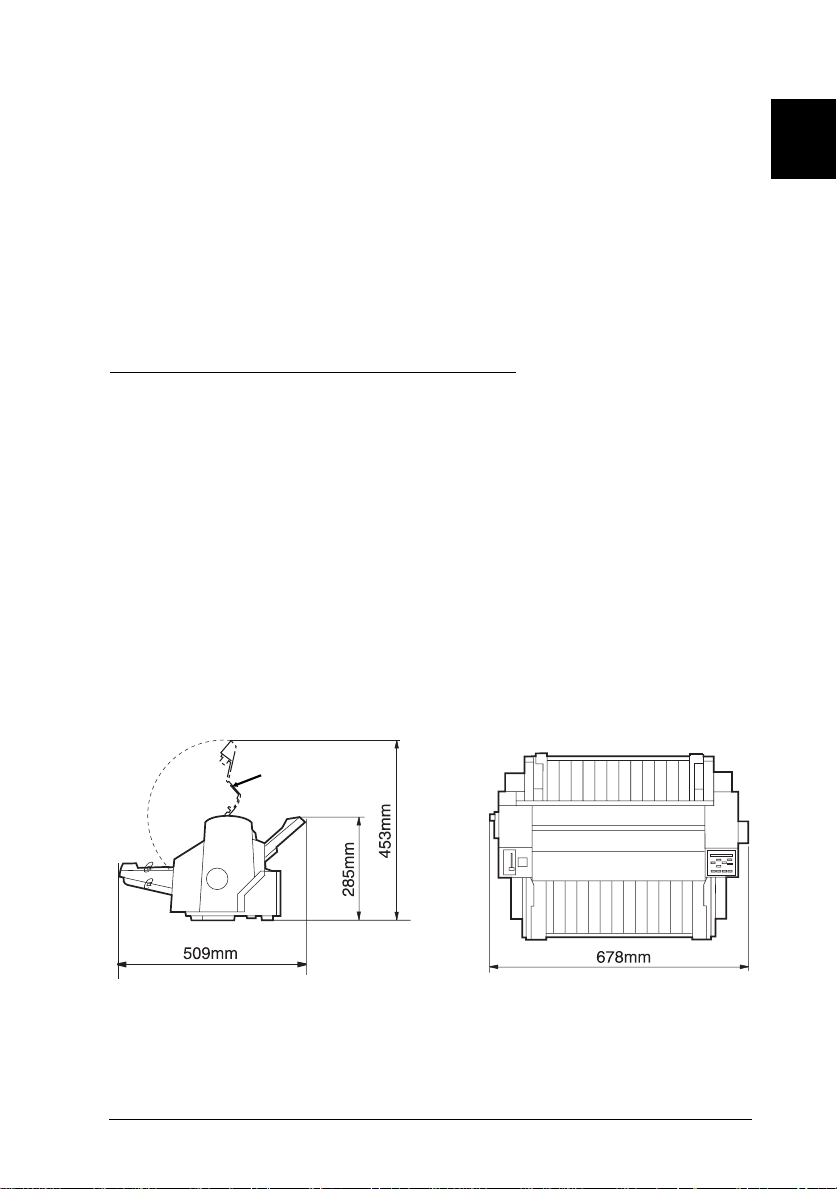
Choosing a Place for the Printer
Follow the gu id elin es bel ow whe n sel ec ting a locatio n for your
printer.
Place the printer on a flat, stable surface. The printer will
❑
not operate properly if it is tilted or at an angle.
Place the printer where you can easily connect it to a
❑
network interface cable, if necessary.
Leave adequate room around the printer for easy operation
❑
and maintenance, as shown below.
1
printer cover
Place the printer near a wall outlet where you easily
❑
unplug the power cord.
Setting Up the Printer
1-3
Page 20

Avoid using or storing the printer in places subject to rapid
❑
changes in temperature and humidity. Also keep it away
from direct sunlight, strong light, heat sources, or excessive
moisture or dust.
Avoid places subject to shocks and vibrations.
❑
Note for French-speaking users:
Placez l’imprimante près d’une prise de contact où la fiche
peut être débranchée facilement.
Avoid electrical outlets controlled by wall switches or
❑
automatic timers. An interruption in power can erase
information in the memory of your printer or computer.
Also avoid outlets on the same circuit as large motors or
other appliances that can cause voltage fluctuations.
Keep the entire computer system away from potential
❑
sources of electromagnetic interference, such as
loudspeakers or the base units of cordless telephones.
Use a grounded power outlet; do not use an adapter plug.
❑
Make sure the paper path is clear and unobstructed before
❑
you print on continuous paper. See 3-13 for details.
Using a printer stand
If you plan to use a printer stand, follow these guidelines:
Use a stand that supports at least 33 kg (72.8 lb).
❑
Never use a stand that tilts the printer. The printer should
❑
always be kept level.
Position your printer’s power cord and interface cable so
❑
they do not interfere with paper feeding. If possible, secure
the cables to a leg of the printer stand.
1-4
Setting Up the Printer
Page 21

Assembling the Printer
Installing the ribbon cartridge
Before installing the ribbon cartridge, make sure that the power
cord is not plugged into an electrical outlet.
To install the ribbon cartridge, remove it from its packaging
and then follow these steps:
1. Hold the center of the front edge of the printer cover (not the
right side), and lift gently up and away from you.
1
2. Open the paper bail.
Setting Up the Printer
1-5
Page 22
Warning:
w
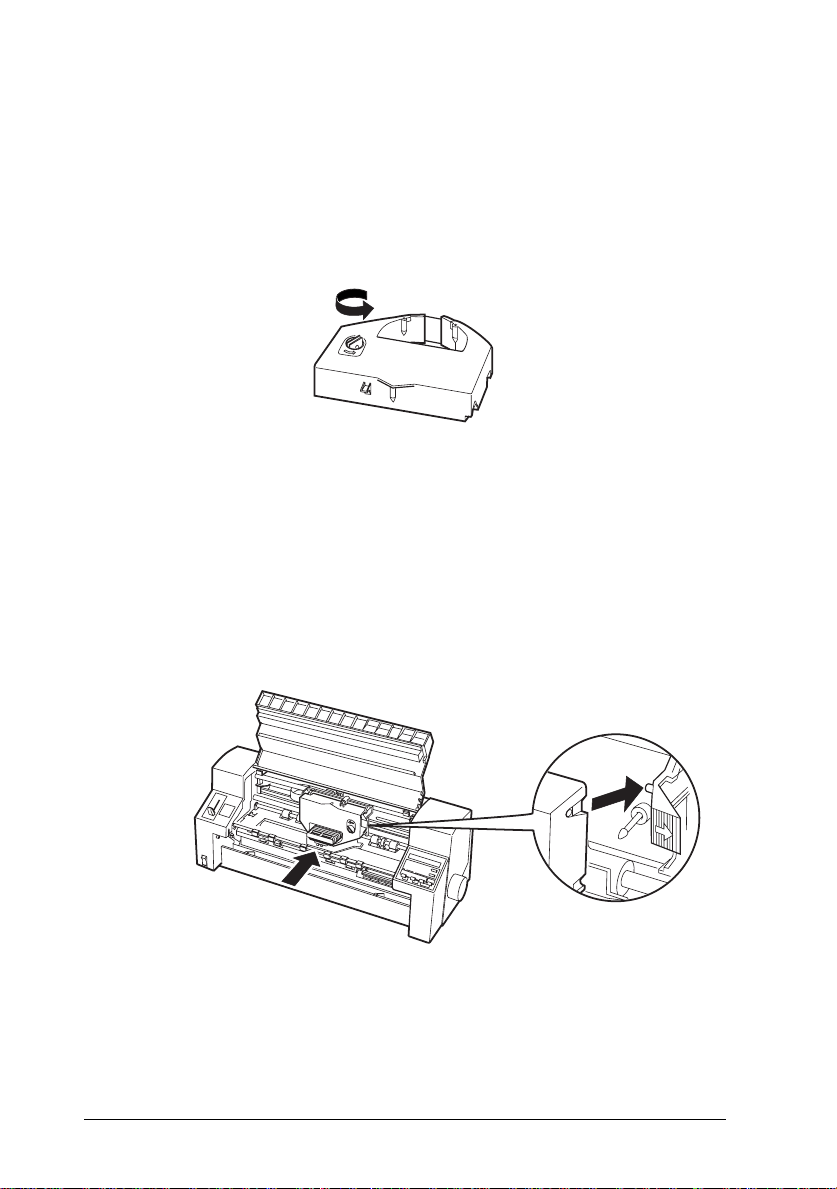
3. Turn the ribbon-tightening knob in the direction of the arrow
to take up any slack in the ribbon.
4. Hold the ribbon cartridge with the exposed ribbon down and
the ribbon-tightening knob facing you.
As shown below, guide the ribbon under the print head, and
snap the cartridge into place from left to right so that the
tabs on both sides of the cartridge fit into the notches in the
cartridge holder. Then pivot the bottom of the cartridge
into place.
Never move the print head while the printer is turned on;
this can damage the printer.
1-6
Setting Up the Printer
Page 23
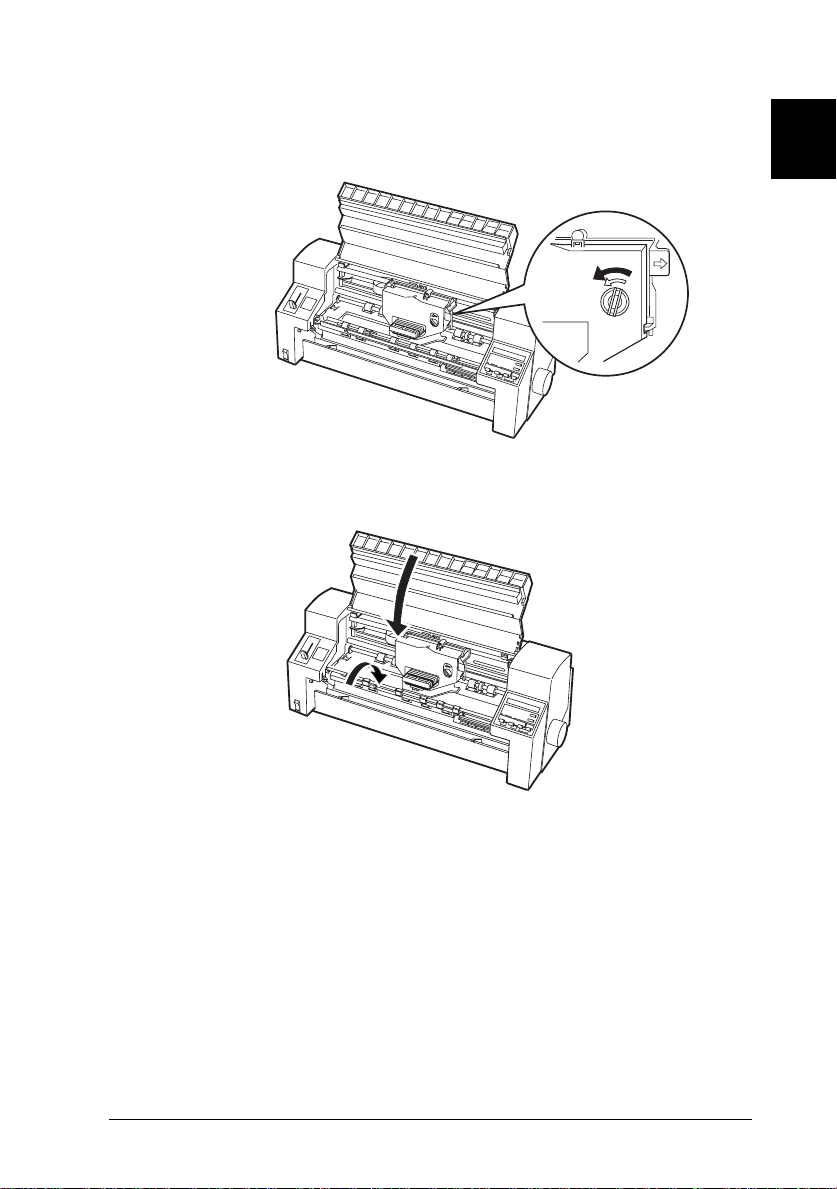
5. Turn the ribbon-tightening knob again to remove any slack
in the ribbon and to make sure the ribbon moves freely.
6. Close the paper bail and the printer cover.
1
Setting Up the Printer
1-7
Page 24
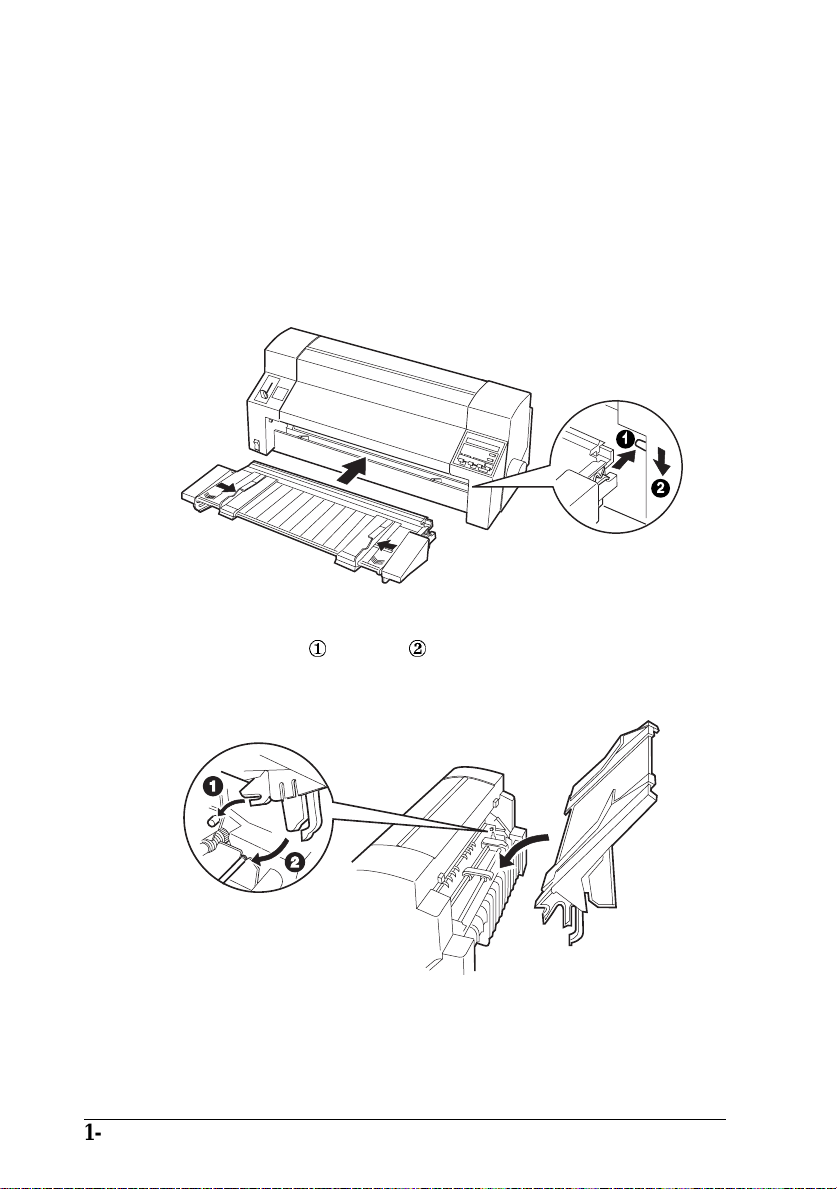
Attaching the paper guides
To attach the front and rear paper guides, follow these steps.
1. Slide the edge guides slightly to the center. Hold the front
paper guide horizontally with both hands. Slide the slots on
both sides of it onto the mounting pegs in the printer as
shown below. Then lower it until it locks into place.
2. In the same way, place the rear paper guide clips over the
mounting pins ¬ and bar ; then lower it until it locks into
place.
1-8
Setting Up the Printer
Page 25

Plugging In the Printer
1. Make sure the printer is turned off. The printer is off when
N
side of the power switch is pressed.
the
2. Check the label on the back of the printer to make sure its
voltage matches that of your electrical outlet. Also make
sure the plug on your printer’s power cord matches your
electrical outlet.
Caution:
c
3. If the power cord is not attached to the printer, plug the
appropriate end into the AC inlet on the back of the printer.
4. Plug the power cord into a properly grounded electrical
outlet.
It is not possible to change the printer’s voltage. If the
rated voltage and your outlet voltage do not match,
contact your dealer for assistance. Do not plug in the
power cord.
1
Setting Up the Printer
1-9
Page 26
Connecting the Printer to Your Co mputer
Your printer has two separate interface connections: an
IEEE-1284 compatible parallel interface and an EIA-232D serial
interface. See page A-18 for more information.
If your computer requires a different type of printer interface,
see page 6-11 for a list of compatible, optional interfaces.
To connect the printer to your computer using the built-in
paralle l or ser ia l inte rfa ce , fo llo w the st ep s b elow .
1. Make sure both the printer and computer are turned off.
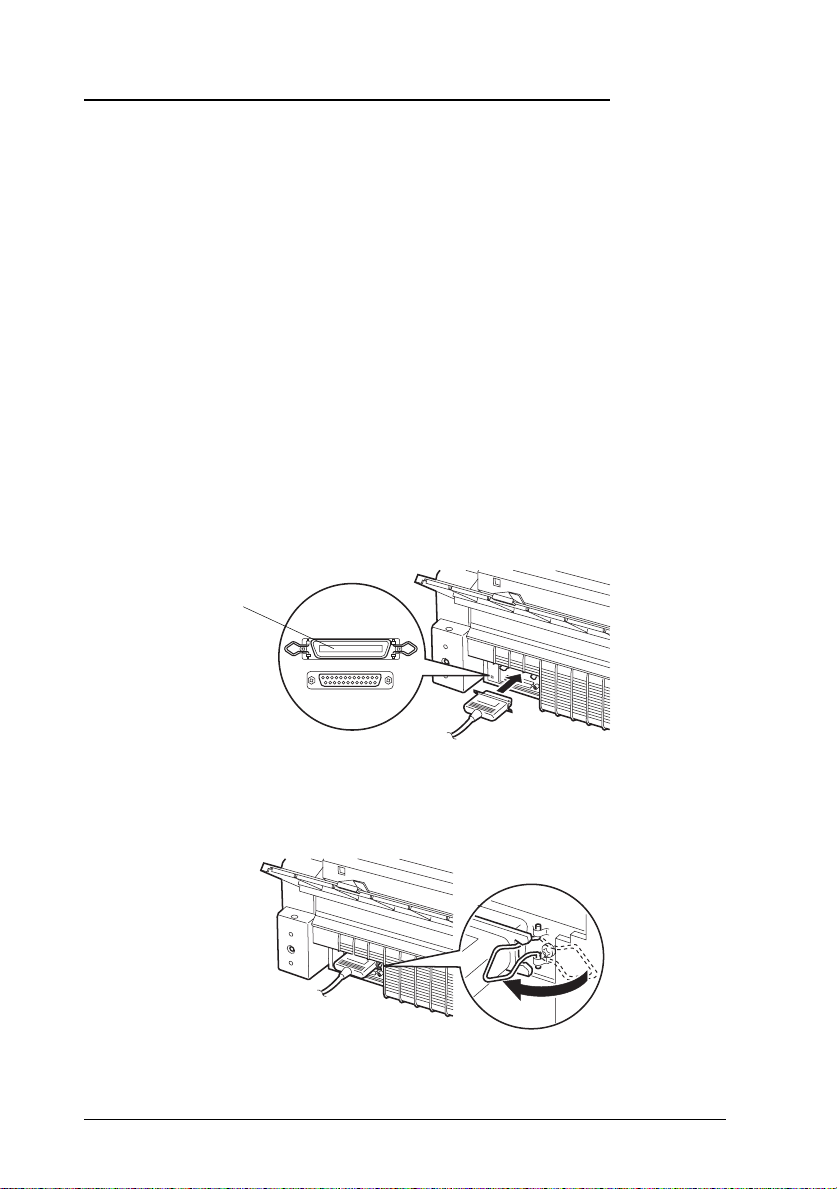
2. Plug the cable connector securely into the appropriate
interface connector as shown below.
parallel interface
parallel interface
connector
1-10
Squeeze the wire clips together until they lock in place on both
sides of the connector.
Setting Up the Printer
Page 27

serial interf ac e
serial interface
connector
Tighte n th e scr e w s on b ot h sid e s of th e co nn ec t o r.
Note:
If the screws that come with the cable do not fit into the connector
lock nuts on the interface, replace the lock nuts with the optional
lock nuts provided with the printer.
1
3. If your cable has a ground wire, connect it to the printer’s
ground connector as shown below.
4. Plug the other end of the cable into the computer.
Setting Up the Printer
1-11
Page 28

Before using the printer’s serial interface with SelecType, make
sure that the printer’s serial communication settings match
those on your computer. See “SelecType” on page 4-8 for more
information.
Now that the printer hardware is set up, see Chapter 2 for
instructions on installing and using the printer software.
1-12
Setting Up the Printer
Page 29

Chapter 2
Setting Up Your Software
For Windows 95 Users . . . . . . . . . . . . . . . . . . . . . . . 2-2
Installing the printer driver using My Computer . . . . . . 2-2
Installing the printer driver using plug-and-play . . . . . . 2-3
Using the printer driver . . . . . . . . . . . . . . . . . . . . 2-5
Installing EPSON Status Monitor 2 . . . . . . . . . . . . . . 2-8
For Windows 3.1 Users . . . . . . . . . . . . . . . . . . . . . . . 2-9
Installing the printer driver using Program Manager . . . 2-9
Using the printer driver . . . . . . . . . . . . . . . . . . . . 2-10
For Windows NT 4.0 Users . . . . . . . . . . . . . . . . . . . . 2-13
Installing the printer driver . . . . . . . . . . . . . . . . . . 2-13
Using the printer driver . . . . . . . . . . . . . . . . . . . . 2-14
For Windows NT 3.5x Users . . . . . . . . . . . . . . . . . . . . 2-17
Installing the printer driver . . . . . . . . . . . . . . . . . . 2-17
Using the printer driver . . . . . . . . . . . . . . . . . . . . 2-18
For DOS Program Users . . . . . . . . . . . . . . . . . . . . . . 2-21
Installing the printer driver . . . . . . . . . . . . . . . . . . 2-21
Using the printer utilities . . . . . . . . . . . . . . . . . . . 2-22
2
Setting Up Your Software
2-1
Page 30

The EPSON printer software that comes with your printer
includes the printer driver software, a status monitor utility for
use with Windows 95, and two DOS-based utilities.
A printer driver is software that allows your computer to
control the printer. You need to install the printer driver so
your software applications can take full advantage of the
printer’s capabilities.
For instructions on installing the printer software, see the next
section if you are using Windows 95, or see page 2-9 for
Windows 3.1, page 2-13 for Windows NT 4.0, page 2-17 for
Windows NT 3.5x, or page 2-21 for DOS programs.
Note:
Before you install the printer software, it is best to make backup copies
of the EPSON printer software disks.
For Windows 95 Users
Follow the steps below to install the printer driver for
Windows 95. For instructions on installing the EPSON Status
Monitor 2 utility, see page 2-8.
Installing the printer driver using My Computer
1. Make sure Windows 95 is running and the printer is off.
2. Insert Disk 1 of your printer driver software in a disk drive.
Double-click the My Computer icon, and then double-click
the drive in which you inserted the disk.
2-2
Setting Up Your Software
Page 31

3. Double-click the Setup.exe icon, then select your printer
icon in the EPSON Printer Driver Setup dialog box shown
below. Click OK and follow the on-screen instructions.
Note:
When you install your printer driver, the EPSON Label Form utility
program is also installed. For information on accessing this
DOS-based utility, see page 2-23.
Once you install your printer driver for Windows 95, you can
install the EPSON Status Monitor 2 utility program. This utility
monitors the status of your printer, alerts you when errors
occur, and provides you with troubleshooting tips. See page
2-8 for instructions on installing the Status Monitor.
2
Installing the printer driver using plug-and-play
Note:
You can install the printer driver using plug-and-play only
❑
if your computer has an IEEE-1284 compatible, bidirectional
parallel port. See your computer documentation for more
information.
You cannot install the EPSON Label Form utility program using
❑
plug-and-play. To install the utility, see “Installing the printer
driver using My Computer” on page 2-2.
Setting Up Your Software
2-3
Page 32

1. Make sure the printer is connected to your computer as
described on page 1-10.
2. Turn off your printer and computer, if necessary.
3. First turn on your printer and then turn on the computer.
Your computer starts loading Windows 95.
4. If you use a password, enter it at the prompt. You see the
New Hardware Found screen.
Note:
If you do not see the New Hardware Found screen, or if you run
into any kind of problem, click
Cancel
and follow the
instructions under “Installing the printer driver using My
Computer” on page 2-2.
5. Make sure the screen displays your printer model name.
Then click the
manufacturer
Note:
Driver from disk provided by hardware
radio button.
The next time you turn on your computer after you install the
driver, Windows 95 may display the New Hardware Found
screen again. If this happens, select the
Do not install a driver
radio button and then click OK. This screen will not appear again.
6. Click OK. You see the Install From Disk screen.
7. Insert Disk 1 of your printer driver software in a disk drive.
8. If you inserted the disk in drive A, type “
. Otherwise, change the drive letter in the Copy
OK
Win95”
manufacturer’s files from box and click OK.
9. You can type a unique name for the printer in the printer
name box in the Add Printer Wizard dialog box. We
recommend that you keep the model name as shown.
2-4
Setting Up Your Software
and click
Page 33

To use the printer as the default printer for Windows 95
applications, select
. (No is the default setting.)
Yes
10. Click the
hard disk and adds an icon to the Printers folder using the
printer model name or the name you selected.
Once you install your printer driver for Windows 95, you can
install the EPSON Status Monitor 2 utility program. This utility
monitors the status of your printer, alerts you when errors
occur, and provides you with troubleshooting tips. See page
2-8 for instructions on installing the Status Monitor.
button. The program copies the files to your
Finish
Using the printer driver
Before you start printing, you should make sure that the
printer driver settings match your document requirements.
While many Windows applications override the printer
settings made with the driver, some do not.
See this section for instructions on how to access the printer
driver, check the printer driver settings, and change settings if
necessary.
Accessing the printer driver from Windows applications
2
When you access the printer driver from a Windows
application, any settings you make apply only to the
application you are using. The access method explained below
is typical for many Windows applications, but the way you
access your printer driver may differ depending on your
application. See your application manual for details.
To access the printer driver setting, select
from the File menu of your application software. The Printer or
Print Setup dialog box appears.
Setting Up Your Software
Print Setu p
or
Print
2-5
Page 34

To access the printer driver from the Print dialog box, choose
Printer, Setup, Properties
options available in your application. (You may need to choose
a combination of these options.) The Properties window
appears. The Paper and Graphics menus contain the printer
driv e r se t ti ng s. Click th e ta b s at th e top of the wi ndow to open
these menus.
, or
Options
, depending on the
Accessing the printer driver from the Start menu
When you access the printer driver from the Windows 95 Start
menu, the settings you make apply to any Windows
applications you open afterward. To access the printer driver
from the Start menu, follow these steps:
1. Click the
2. Click
3. Right-click your printer icon, and click
4. The Paper and Graphics menus contain the printer driver
Printers
Properties window appears.
set ti ng s. Click th e ta b s a t th e top of the wi ndow to open
these menus.
button, and then point to
Start
.
Settings
Properties
Checking and changing printer driver settings
Before printing, check that the printer driver settings on the
Paper and Graphics menus are appropriate for the kind of
document you want to print, and change settings as needed.
When you are finished making changes, click OK to apply the
settings, or click
their factory defaults.
Restore Defaults
to return the settings to
.
. The
2-6
Setting Up Your Software
Page 35

Paper menu
Paper size Select the size of the paper loaded in
❑
the printer. If you don’t see your paper
size, use the scroll bar to scroll through
the list. If your paper size is not included
in the list, click
paper size in the dialog box that appears.
Custom
and enter the
2
Orientation Select
❑
Paper source Click the paper source you want to use.
❑
Portrait
or
Landscape
Graphics menu
Resolution Click the printing resolution you want.
❑
Dithering You can leave this option set to
❑
which is the default setting, or select
another dithering pattern, depending
on the kind of printout you want. The
display to the left of the dithering
options shows the effect of your setting.
Intensity Move the slider to make your printout
❑
lighter or darker.
Color Press the
❑
Color dialog box, where you can select
Color control
options.
intent
Once you’ve checked your printer driver settings, you are
ready to print. If you have any trouble while printing, see
Chapter 8, “Troubleshooting.”
button to open the
Color
and
Color rendering
.
Fine
,
Setting Up Your Software
2-7
Page 36

Installing EPSON Status Monitor 2
After you have installed the printer driver for Windows 95,
follow the steps below to install the EPSON Status Monitor 2
utility program.
Note:
Install the printer driver before installing the Status Monitor utility.
If you already installed the Status Monitor before the driver, install
the Status Monitor again after completing the driver installation.
1. Insert the Disk 1 of the EPSON Status Monitor 2 software in a
floppy disk drive.
2. Click
3. Type
other than drive A, substitute the appropriate letter) and
click OK.
4. Follow the on-screen instructions, then click
complete the installation procedure.
See Chapter 5, “Using EPSON Status Monitor 2,” for
instructions on how to use the Status Monitor.
and
START
A:\SETUP
.
Run
(if you inserted the driver disk in a drive
FINISH
to
2-8
Setting Up Your Software
Page 37

For Windows 3.1 Users
Installing the printer driver using Program Manager
Follow the steps below to install the printer driver for
Windows 3.1.
1. Make sure Windows 3.1 is running and the Program
Manager window is open.
2. Insert the Disk 1 of your printer driver software in a disk
drive.
2
3. Choose
appears:
4. Type
A:\SETUP
other than “A”, substitute the appropriate letter.) Click OK.
The EPSON Printer Driver Setup dialog box appears.
from the File menu. The following dialog box
Run
. (If you inserted the driver disk in a drive
Setting Up Your Software
2-9
Page 38

5. Select your printer and click OK. The installation program
begins copying the printer driver files.After a few
moments, the installation program creates the EPSON
program group in Windows.
6. When th e insta llatio n is co mp lete, click OK to exit the
installatio n progr am .
Windows will now use the EPSON DLQ-3000+ printer as its
default printer on port LPT1. If you need to change the default
printer or the port assignment, use the Printers utility in the
Contr ol Panel.
Note:
When you install your printer driver, the EPSON Label Form utility
program is also installed. For information on accessing this
DOS-based utility, see page 2-23.
Using the printer driver
Before you start printing, you should make sure that the printer
driver settings match your document requirements. While
many Windows applications override the printer settings made
with the driver, some do not.
See this section for instructions on how to access the printer
driver, check the printer driver settings, and change settings if
necessary.
Accessing the printer driver from Windows applications
When you access the printer driver settings from a Windows
application, any settings you make apply only to the
application you are using. The access method explained below
is typical for many Windows applications, but the way you
access your printer driver may differ depending on your
application. See your application manual for details.
2-10
Setting Up Your Software
Page 39

To access the printer driver settings, select
from the File menu of your application software. If you choose
Print Setu p
where you can make settings for paper size, paper source, and
orientation. Some applications also feature an Options button,
which allows you to access the printer driver’s Options dialog
box.
, you see your application’s Print Setup dialog box,
Print Setup
or
Print
2
If you choose
To access the printer driver settings, choose
Options
application software. (You may need to choose a combination
of these options.)
Note:
Your application software may let you access only a portion of the
printer driver.
, depending on the options available in your
, you see your application’s Print dialog box.
Print
Printer, Setup
Accessing the printer driver from the Control Panel
When you access the printer driver from the Windows 3.1
Control Panel, the settings you make apply to any Windows
applications you open afterward. To access the printer driver
from the Control Panel, follow these steps:
1. In the Main window, double-click the
2. Double-click the
appears.
3. Make sure your printer is highlighted, then click
printer driver settings window appears.
Printers
icon. The Printers dialog box
Control Panel
icon.
Setup
, or
. The
Setting Up Your Software
2-11
Page 40

Checking and changing printer driver settings
Before printing, check that the printer driver settings are
appropriate for the kind of document you want to print, and
change settings as needed. When you are finished making
chan ges, click OK to apply the settings, or click
Cance l
cancel your changes.
If you accessed the printer driver from your application, some
of the settings below may appear in your application’s Page
Setup dialog box. If you accessed the driver from the Control
Panel, these settings appear in the printer driver settings
window.
Resolution Click the printing resolution you want.
❑
Paper Size Select the size of the paper loaded in
❑
the printer. If you don’t see your
paper size, use the scroll bar to scroll
through the list. If your paper size is
not included in the list, click
Define d Size
and enter the paper size
in the dialog box that appears.
Paper Source Click the paper source you want to
❑
use.
to
User
Orientation Select
❑
Portrait
or
Landscape
diagram on the screen changes
according to the orientation you select.
To access the following settings from your application, you
may need to click
Printer, Setup, Options
, or some
combination of these buttons. If you accessed the driver from
the Control Panel, click
Dithering You can leave this option set to
❑
Options
to access these settings.
which is the default setting, or select
another dithering pattern depending
on the kind of printout you want.
2-12
Setting Up Your Software
. The
Fine
,
Page 41

Intensity Control Move the slider to make your printout
❑
lighter or darker.
Once you’ve checked your printer driver settings, you are
ready to print. If you have any trouble while printing, see
Chapter 8, “Troubleshooting.”
For Windows NT 4.0 Users
Installing the printer driver
Note:
Printer driver installation may require network administration
privileges. Ask your network administrator for more details.
1. Make sure Windows NT 4.0 is running and the printer is off.
2. Insert the Disk 1 of your printer driver software in a disk
drive. Double-click the
double-click the drive in which you inserted the driver disk.
My Computer
icon, and then
2
3. Double-click the
in the EPSON Printer Driver Setup dialog box shown
below. Click OK and follow the on-screen instructions.
Setup.exe
icon, then select your printer icon
Setting Up Your Software
2-13
Page 42

Note:
When you install your printer driver, the EPSON Label Form utility
program is also installed. For information on accessing this
DOS-based utility, see page 2-23.
Using the printer driver
Before you start printing, you should make sure that the printer
driver settings match your document requirements. While
many Windows applications override the printer settings made
with the driver, some do not.
See this section for instructions on how to access the printer
driver, check the printer driver settings, and change settings if
necessary.
Accessing the printer driver from Windows applications
When you access the printer driver from a Windows
application, any settings you make apply only to the
application you are using. The access method explained below
is typical for many Windows applications, but the way you
access your printer driver may differ depending on your
application. See your application manual for details.
To access the printer driver, select
File menu of your application software. If you choose
, you see your application’s Print Setup dialog box. If you
Setup
choose
To access the printer driver from the Print dialog box, choose
Printer, Setup, Properties
options available in your application. (You may need to choose
a combination of these options.) The Properties window
appears. The Page Setup and Advanced menus contain the
printer driver settings. Click the tabs at the top of the window
to open these menus.
2-14
Setting Up Your Software
, you see your application’s Print dialog box.
Print
, or
Print Setu p
Options
, depending on the
or
Print
from the
Print
Page 43

Accessing the printer driver from the Start menu
When you access the printer driver from the Windows NT Start
menu, the settings you make apply to any Windows
applications you open afterward.
To access the printer driver from the Start menu, follow these
steps:
2
1. Click the
2. Click
3. Right-click your printer icon, and click
Printers
The screen diaplays the Default Document Properties
window, which contains the Page Setup and Advanced
menus. Click the tabs at the top of the windows to open
these menus.
button, and then point to
Start
.
Settings
Document Defaults
Checking and changing pri n ter driver settings
Before printing, check that the printer driver settings on the
Page Setup and Advanced menus are appropriate for the kind
of document you want to print, and change settings as needed.
When you are finished making changes, click OK to apply the
settings, or click
values.
Cancel
to return the settings to their previous
Page Setup menu
Paper Size Select the size of the paper you want to
❑
use. If you don’t see your paper size,
select it from the Paper Size list.
.
.
Paper Source Click the paper source you want to use.
❑
If you don’t see your paper source,
select it from the Paper Source list.
Orientation Select
❑
Portrait
or
Landscape
Setting Up Your Software
.
2-15
Page 44

Color Appearance Select
❑
Advanced menu
Gray Scale
or
Color
.
Paper/Output Check the
❑
Paper Source
Paper Size, Orientation
settings you made on the
, and
Page Setup menu and change them
if necessary. Select the paper source and
then choose paper size from the Change
Setting list box.
Graphic Select
❑
Resolution
and then choose the
printing resolution from the Change
Setting list box. Click
and select
Gray Scale
Color appearance
or
Color
in the
bottom of the window.
Document Double-click
❑
Options to open this dialog box. Click
as Graphics
select On or
Halftone Color Adjustment
Print Text
or
Metafile Spooling
in each list box.
Off
and
Once you’ve verified your printer driver settings, you are ready
to print. If you have any trouble while printing, see Chapter 8,
“Troubleshooting.”
2-16
Setting Up Your Software
Page 45

For Windows NT 3.5x Users
Installing the printer driver
Note:
Printer driver installation may require network administration
privileges. Ask your network administrator for more details.
1. Make sure Windows NT 3.5x is running and the Program
Manager window is open.
2. Insert the Disk 1 of your printer driver software in a disk
drive.
2
3. From the
In the command line box, type
you inserted the driver disk in a drive other than “A”,
substitute the appropriate letter.
menu, select
File
. You see the Run dialog box.
Run
A:\SETUP
, and click OK. If
Setting Up Your Software
2-17
Page 46

4. Select your printer icon in the EPSON Printer Driver Setup
dialog box. Click OK and follow the on-screen instructions.
Note:
When you install your printer driver, the EPSON Label Form utility
program is also installed. For information on accessing this
DOS-based utility, see page 2-23.
Using the printer driver
Before you start printing, you should make sure that the printer
driver settings match your document requirements. While
many Windows applications override the printer settings made
with the driver, some do not.
See the following for instructions on how to access the printer
driver, check the printer driver settings, and make settings if
necessary.
Accessing the printer driver from Windows applications
When you access the printer driver settings from a Windows
application, any settings you make apply only to the
application you are using. The access method explained below
is typical for many Windows applications, but the way you
access your printer driver may differ depending on your
application. See your application manual for details.
2-18
Setting Up Your Software
Page 47

To access the printer driver, select
File menu of your application software. The Print or Print
Setup dialog box appears. Make sure that your printer is
select ed and the n clic k
You may need to click a combination of these buttons. You see
the Document Properties dialog box, which contains the Form
and Orientation settings. To open the Advanced Document
Properties dialog box, you may need to click
Advanced Document Properties dialog box includes the
Graphics Resolution, Color, and Optimization settings. (See
page 2-20 for details on these settings.)
Note:
Your application software may only let you access a portion of the
printer driver.
Printer, Setup, Properties
Print Setu p
or
Print
, or
Options
Accessing the printer driver from the Control Panel
When you access the printer driver from the Windows NT 3.5x
Control Panel, the settings you make apply to any applications
you open afterward. To access the printer driver from the
Control Panel, follow these steps:
from the
Options
. The
.
2
1. In the Main window, double-click the
The Print Manager window appears.
2. Make sure your printer is highlighted, then click
select
Properties
3. Click the
Document Properties dialog box, which includes the Form
and Orientation settings described below.
4. Click
dialog box, which contains the Graphics Resolution, Color,
and Optimization settings.
Details
Options
. The Printer Properties dialog box appears.
button, then click
to open the Advanced Document Properties
Setting Up Your Software
Print Manager
Job Default
Printer
. You see the
icon.
, and
2-19
Page 48

Checking and changing printer driver settings
Before printing, check that the printer driver settings are
appropriate for the kind of document you want to print, and
change settings as needed. When you are finished making
chan ges, click OK to apply the settings, or click
Cance l
cancel your settings.
Document Properties dialog box
Form Select the kind of form loaded in the
❑
printer. If you don’t see your form, select
it from the Form list.
to
Orientation Select
❑
Portrait
or
Landscape
diagram on the screen changes
according to the orientation you select.
Advan ced Documen t Properties dial og box
Graphics Click the printing resolution you want.
❑
Resolution If you don’t see your resolution, select it
from the Graphics Resolution list.
Color Click the
❑
Color
radio button when you
print in color.
Optimization Turn the Print Text as Graphics setting
❑
on or off.
If you need to make settings for contrast, brightness, input RGB
Gamma, and so forth, click
Halftone.
Adjustment dialog box appears. For details, click
The Halft on e Co lo r
Help
dialog box.
Once you’ve verified your printer driver settings, you are ready
to print. If you have any trouble while printing, see Chapter 8,
“Troubleshooting.”
. The
in this
2-20
Setting Up Your Software
Page 49

For DOS Program Users
Installing the printer driver
To install a printer driver in most DOS applications, you must
select the printer you are using during the installation or setup
procedure.
Choose the EPSON DLQ-3000+ printer at the appropriate step
in the procedure. If the list in your application does not include
the DLQ-3000+ printer, choose the first available printer from
this list:
DLQ-3000
LQ-2070
LQ-2170
LQ-1170
LQ-1070/1070+
DLQ-2000
LQ-1060
LQ-1050
LQ-2550
LQ-2500
2
If none of these printers is listed, choose the first one available
from the following:
LQ
EX
FX
LX
RX
MX
EPSON printer
Standard printer
Draft printer
Setting Up Your Software
2-21
Page 50

Note:
If your application does not list a suitable alternative, contact the
software manufacturer to see if an update is available.
Using the printer utilities
The following DOS utilities are included with the printer:
EPSON Remote! allows you to change the printer’s default
❑
settings from your computer.
EPSON Label Form enables you to register the label
❑
position and thickness before you use continuous forms
with labels or overlapping multi-part forms with labels.
Installing the printer utilities
Follow the steps below when installing the EPSON Remote!
and EPSON Label Form utilities.
1. Insert the Disk 1 of your printer driver software into your
computer’s disk drive.
2. From the DOS prompt, type
driver disk in a drive other than “A”, substitute the
appropriate letter.) Then press
3. Select your printer’s name in the Printer Model window and
4. Press
2-22
press
directory.
Setting Up Your Software
. Then
Enter
. All the necessary files are copied to C:\EPUTIL.
Enter
C:\EPUTIL
A:\SETUP. (
Enter
appears as the default
If you inserted the
.
Page 51

Acce ssing the printer utilities
To access the EPSON utilities, follow these steps:
1. From the DOS prompt, make sure the current directory is
drive C.
2
2. To access the EPSON Remote! utility, type
press
To access the EPSON Label Form utility, type
and press
3. Follow the on-screen instructions to use the utilities.
Enter
.
Enter
.
PRNSET
EPUTIL\EPLABEL
, and
,
Setting Up Your Software
2-23
Page 52

2-24
Setting Up Your Software
Page 53

Chapter 3
Paper Ha n d lin g
Selecting a Paper-Feeding Method . . . . . . . . . . . . . . . . 3-2
Paper-feeding methods and paper types . . . . . . . . . . . 3-3
Setting the paper release lever . . . . . . . . . . . . . . . . . 3-4
Adjusting the Paper Thickness Lever . . . . . . . . . . . . . . . 3-5
Using Single Sheets . . . . . . . . . . . . . . . . . . . . . . . . . 3-7
Loading single sheets from the front . . . . . . . . . . . . . 3-7
Loading single sheets from the rear . . . . . . . . . . . . . . 3-10
Using Continuous Paper . . . . . . . . . . . . . . . . . . . . . . 3-13
Positioning your continuous paper supply . . . . . . . . . 3-13
Loading continuous paper with the tractor . . . . . . . . . 3-14
Using the tear-off function . . . . . . . . . . . . . . . . . . . 3-20
Removing continuous paper . . . . . . . . . . . . . . . . . . 3-23
Using Special Paper . . . . . . . . . . . . . . . . . . . . . . . . . 3-24
Multi-part forms . . . . . . . . . . . . . . . . . . . . . . . . 3-24
Labels . . . . . . . . . . . . . . . . . . . . . . . . . . . . . . 3-25
Envelopes . . . . . . . . . . . . . . . . . . . . . . . . . . . . 3-26
Postcards . . . . . . . . . . . . . . . . . . . . . . . . . . . . . 3-28
Overlapping multi-part forms . . . . . . . . . . . . . . . . . 3-29
Continuous forms with labels . . . . . . . . . . . . . . . . . 3-31
Overlapping multi-part forms with labels . . . . . . . . . . 3-33
3
Switching Between Continuous Paper and Single Sheets . . . . 3-36
Switching to single sheets . . . . . . . . . . . . . . . . . . . 3-36
Switching to continuous paper . . . . . . . . . . . . . . . . 3-37
Using the Micro-Feed Feature . . . . . . . . . . . . . . . . . . . 3-38
Adjusting the printing position . . . . . . . . . . . . . . . . 3-38
Adjusting the tear-off position . . . . . . . . . . . . . . . . 3-39
Paper Handling
3-1
Page 54

Your printer can print on a wide variety of paper types,
including single sheets, continuous paper, multi-part forms,
labels, envelopes, postcards, overlapping forms, and
continuous forms with labels. This chapter explains how to use
these paper types with your printer.
Caution:
c
Do not use paper that is folded (except envelope flaps), creased,
curled, torn, stained, or stamped. Always use new, clean paper
that meets the paper specifications described on page A-4.
Selecting a Paper-Feeding Method
Your printer can accommodate a variety of paper types
through four paper-feeding methods: front and rear paper
guides, tractor, or optional cut-sheet feeder. The paper-feeding
method you select depends on the type of paper you want to
use.
For all four paper-feeding methods, the printer prints on the
paper and then ejects it as shown below.
Note:
Be sure to load paper printable side up.
3-2
Paper Handling
1234567
ABCDEFGHIJ
Page 55

Paper-feeding methods and paper types
Basically, there are two types of paper and four methods for
loading, or feeding paper. The table below shows the
relationship between paper types and paper-feeding methods,
as well as paper loading and ejecting orientation.
Paper path Release
Continuous
paper
Single sheets front paper guide
tractor
print out
print ou t
load
rear paper guide
print out
optional cut-sheet feeder
print ou t
load
load
load
lever
position
3
Continuous paper includes labels, multi-part forms, continuous forms with
labels, overlapping multi-part fo rms, and overlapp ing multi-part forms with
labels.
Single sheets includes envelo pes, postcards , and single-s heet multi-part
forms. You can use only single-sheet multi-part forms that are glued at the
top of the forms in the optional cut sheet feeder.
Paper Handling
3-3
Page 56

Setting the paper release lever
You can set the paper path you want to use by adjusting the
paper release lever. The paper release lever has three positions:
for tractor feeding, for single-sheet feeding and for
paper release, as described below.
Single-sheet feeding position − for loading single
sheets (inc lu d in g en velopes and postcards) fr om a
paper guide or the optional cu t-sheet feeder.
Tractor feeding position
paper (including labels an d overlappin g forms )
from the tractor.
Paper release position
the printer manually when a paper jam error
ocurrs. For more information, see “Clearing a
Paper Jam” on page 8-24.
3-4
Paper Handling
−
for loading continuous
−
for removing paper from
Page 57

Adjusting the Paper Thickness Lever
You can get the best printing quality by adjusting the paper
thickness lever according to the type of paper you use.
Usually, set the paper thickness lever to the
AUTO
position as
shown below; your printer automatically adjusts itself to the
thickness of the paper loaded in the printer.
-1
0
1
2
3
4
5
6
7
8
9
AUTO
If you are not content with the printing quality, especially
when using special paper such as multi-part forms, manually
set th e pa per thick n es s le v er to th e ap pr o p r i at e po s it ion
referring to the table on the next page.
3
The higher the number you set the paper thickness lever to, the
wider the space between the platen and print head. If your
printout appears faint or characters seem skipped or missing,
this setting may be too high. On the other hand, if the setting is
too low, your printout may appear smudged, the paper may
not feed correctly, or the ribbon may become damaged.
Use the table on the next page as a guide, but adjust the paper
thickness lever as necessary.
Paper Handling
3-5
Page 58

The following table provides guidelines for selecting the
appropriate lever position for the type of paper you use.
Paper type Paperthickness
lever position
Ordinary paper (single sheets or
con t inuous paper)
Multi-part forms (carbonless)
2 parts (original plus + 1 copy)
3 parts (original plus + 2 copies)
4 parts (original plus + 3 copies)
5 parts (original plus + 4 copies)
6 parts (original plus + 5 copies)
7 parts (original plus + 6 copies)
Labels
Envelopes
Postcards
*Continuous forms with labels
Overlapping multi-part forms
*Overlapping multi-part forms with labels
* For this paper, make the thickness settings using the EPSON Label
Form Utility. See page 2-23, for instructions on accessing the utility.
0 or 1
2
3
5
6
7
9
2 or 3
5 to 9
3
Auto
Auto
Auto
Caution:
c
Do not set the paper thickness lever to
AUTO
when using
labels whose backing sheet is exposed. Set it to the appropriate
position according to the table above.
Note:
Overlapping Form
In
operates on
AUTO
may be set to another position.
3-6
Paper Handling
NO.a
and
modes, the printer automatically
function even though the paper thickness lever
Page 59

Using Single Sheets
Your printer can print on single sheets of paper from 92 to
420 mm (3.6 to 16.5 inches) wide. See page A-4 for detailed
single-sheet paper specifications.
You can load one sheet of paper at a time in the front or rear
paper guide, or you can load a stack of paper in the optional
cut-sheet feeder. (See page 6-2 for more information on the
optional cut-sheet feede r.)
Note:
If you load long paper (for example, legal size paper), leave enough
space at the back of the printer so that the paper is not obstructed.
Loading single sheets from the front
1. Make sure the front paper guide is attached as described on
page 1-8. Then close the tractor unit sprocket covers located
on the back of your printer and push down the sprocket
lock levers to lock the sprocket units in place.
2. Set the paper release lever to the single-sheet position as
shown below.
3
3. Turn on the printer. The
Power
light comes on.
Paper Handling
3-7
Page 60

4. Push down on the right edge guide lock to unlock the right
edge guide, slide the right edge guide until it rests against
the guide mark, then push up on the right edge guide lock
to secure the right edge guide.
guide mark
edge guide lock
Note:
If you load A3-size paper in landscape orientation (long edge
first), slide both right and left edge guides as far to the sides as
they will go. You may need to slightly lift the right edge guide
to move it over the edge guide mark.
5. Push down on the left edge guide lock to unlock the left edge
guide, and while adjusting the left edge guide to match the
width of your paper, insert a sheet of paper between the
edge guides until it meets resistance. Be sure to load your
paper printable side up. Then push up on the left edge
guide lock to secure the lef t edge guide .
3-8
Paper Handling
Page 61

After a few seconds, the printer automatically advances the
paper to the loading position. The printer is ready to start
printing.
Caution:
❑
c
Note:
❑
If the platen rotates but the printer does not load the paper,
completely remove the paper and then insert it all the way into
the printer again.
❑
If you need to adjust the position of the paper after it is loaded,
see “Adjusting the printing position” on page 3-38. To move and
save the loading position of the paper, use the SelecType
“T-Margn Manual F” setting. For more information on
SelecType settings, see page 4-8.
Use the knob on the right side of the printer only to clear
paper jams when the printer is off. Otherwise, you may
damage the printer or cause it to lose the top-of-form
position.
❑
Do not open the printer cover while paper is being fed;
otherwise the printer cannot load the paper correctly.
3
After printing a sheet, the printer ejects it onto the front paper
guide and the
printing a multiple-page document, remove the printed sheet
and insert a new sheet into the paper guide. The printer
automatically advances the paper and resumes printing.
Note:
If the printer does not eject the printed sheet, press the
button.
Paper Out
and
lights come on. If you are
Pause
Paper Handling
Load/Eject
3-9
Page 62

Loading single sheets from the rear
1. Make sure the front and rear paper guides are attached.
2. Push the paper thickness lever to the single-sheet position.
3. Pull out the front paper guide extension until it is fully
extended if you plan to stack the printed sheets.
4. Turn on the printer. The
3-10
Paper Handling
Power
light comes on.
Page 63

5. Slide both right and left edge guides of the front paper guide
all the way to each side. Next, slide the right edge guide of
the rear paper guide until it rests against the guide mark.
guide mark
Note:
If you load A3-size paper in landscape orientation (long edge first),
slide bot h ri ght an d le ft e dg e guides as far to the s id es as t he y w ill go.
You may nee d t o s lig htly li ft the r ig ht e dg e gui de t o m ove it ove r the
edge gu id e mark .
6. While adjusting the left edge guide to match the width of
your paper, insert the paper between the edge guides
printable side up until it meets resistance. The printer
automatically advances the paper to the loading position.
The printer is ready to start printing.
3
Paper Handling
3-11
Page 64

Caution:
❑
c
Note:
❑
❑
Use the knob on the right side of the printer only to clear
paper jams when the printer is off. Otherwise, you may
damage the printer or cause it to lose the top-of-form
position.
❑
Do not open the printer cover while paper is being fed;
otherwise you cannot load the paper correctly.
If the platen turns without loading the paper, completely remove
the paper and then insert it all the way into the printer again.
If you need to adjust the position of the paper after it is loaded,
see “Adjusting the printing position” on page 3-38. To move and
save the loading position of the paper, use the SelecType
“T-Margn Manual R” setting. For more information on
SelecType settings, see page 4-8.
3-12
Paper Handling
Page 65

Using Continuous Paper
Your printer can print on continuous paper from 101.6 to
406.4 mm (4.0 to 16.0 inches) wide. You can load continuous
paper from the built-in tractor unit.
Note:
See page A-5 for detailed specifications on continuous paper.
Positioning your continuous paper supply
When you load continuous paper, make sure you line up your
paper supply with the tractor so the paper feeds smoothly into
the printer, as shown below.
3
Paper Handling
3-13
Page 66

Loading continuous paper with the tractor
1. Set the paper release lever to the tractor position, as shown
below.
2. Slide the front edge guides as far apart as they can go.
3-14
Paper Handling
Page 67

3. Remove the rear paper guide by pulling it toward the printer
as shown below, and lifting it away from the printer.
4. Relea se the sp roc ke t lock lever s by pushi ng th em up.
3
sprocket lock lever
Paper Handling
3-15
Page 68

5. Facing the back of the printer, position the left sprocket unit
so that the sprocket pins are to the left of the arrow mark on
the back of printer. Then push down the lock lever to lock
the sprocket in place.
arrow mark
Note:
Printing starts at the arrow mark on the back of the printer.
The unprintable area is to the left of the arrow mark.
6. Slide the right sprocket unit to roughly match the width of
your paper, but do not lock it.
3-16
Paper Handling
Page 69

7. Slide the center paper support to the middle between the two
sprocket units.
8. Open the sprocket covers.
sprocket cover
3
Paper Handling
3-17
Page 70

9. Fit the first three holes of the continuous paper over the
sprocket pins on both sides. Be sure to position your paper
supply so that the printable side faces up.
Caution:
Make sure the first sheet of your continuous paper has a
c
clean, straight edge so that it can feed smoothly into the
printer.
10. Close the sproc ke t co ver s and pu sh d ow n the spr oc ke t loc k
lever to lock the sprocket in place.
3-18
Paper Handling
Page 71

11. Slide the right sprocket unit to remove any slack in the
paper. Then push down the sprocket lock lever to lock the
sprocket in place.
12. Turn on the printer if it is turned off. The printer is ready to
start printing.
When using continuous paper, you can use the tear-off
function to tear off printed pages and save the blank pages that
are usually wasted between print jobs. For more information,
see the next section.
Note:
Always make sur e there is at least one more s heet than required;
continuous paper may not feed properly if it is not fed through the
sprocket.
3
c
Caution:
❑
Use the knob on the right side of the printer only to clear
paper jams when the printer is off. Otherwise, you may
damage the printer or cause it to lose the top-of-form
position.
❑
Do not open the printer cover while paper is being fed;
otherwise you cannot load the paper correctly.
Paper Handling
3-19
Page 72

Note:
If you need to adjust the position of the paper after it is loaded, see
“Adjusting the printing position” on page 3-38. To move and save the
loading position of the paper, use the SelecType “T-Margin Tractor”
setting. For information on SelecType settings, see page 4-8.
Using the tear-off function
After you have finished printing, you can use the tear-off
function to advance continuous paper on the tractor to the
tear-off edge of the printer. You can then easily tear off printed
sheets. When you resume printing, the printer automatically
feeds paper back to the loading position so you can save paper
that would normally be lost between documents.
You can use the tear-off function in two ways: manually by
pressing the
automatically by making the appropriate SelecType setting or
using EPSON Remote!. (See page 4-8 for information on
making SelecType settings.)
If the perforation between pages is not aligned with the
tear-off edge, you can adjust the tear-off position using the
micro-feed feature as described on page 3-39.
Tear Off
button on the control panel, or
c
3-20
Caution
Never use the tear-off function when you use labels; otherwise
they may come off their backing sheet and jam the printer.
Paper Handling
:
Page 73

Using the Tear Off button
When using the tractor, you can use the
advance continuous paper to the tear-off position; follow the
steps below.
1. Make sure printing has finished. Then press the
button. The printer advances the paper to the tear-off edge.
2. Tear off all printed pages. If the perforation is not aligned
with the tear-off edge, adjust the tear-off position using the
micro-feed feature. See “Adjusting the tear-off position” on
page 3-39.
Tear Off
button to
Tear Off
tear-off edge
3
3. When you resume printing, the printer feeds the paper
back to the top-of-form position and begins printing. (You
can also manually feed the paper back to the top-of-form
position by pressing the
Tear Off
button.)
Paper Handling
3-21
Page 74

Using auto tear-off mode
When you turn on the auto tear-off function with SelecType
setting or EPSON Remote!, the printer advances continuous
paper to the tear-off position when you finish printing.
Caution
c
1. When you finish printing on continuous paper, the printer
2. Tear off all printed pages. (If the perforation is not aligned
Always turn off the auto tear-off function in SelecType 2 when
you use labels; otherwise they may come off their backing sheet
and jam the printer.
The printer advances paper to the tear-off position only when it
receives a full page of data or a form-feed command and then
receives no more data for three seconds.
For instructions on how to activate the auto tear-off function,
see “SelecType” on page 4-8 or open the EPSON Remote! utility
as described on page 2-23 and follow the on-screen instructions.
While using SelecType mode or the utility, also make sure the
page length is set correctly for your continuous paper.
The steps below describe how to use auto tear-off.
advances the perforation of the final printed page to the
tear-off position.
with the tear-off edge, you can adjust the tear-off position
using the micro-feed feature. See “Adjusting the tear-off
position” on page 3-39.)
:
3. When you resume printing, the printer automatically feeds
the paper back to the top-of-form position and begins
printing. (You can also manually feed the paper back to the
3-22
top-of-form position by pressing the
Paper Handling
Tear Off
button.)
Page 75

You can leave auto tear-off mode on even when you are using
single sheets because the mode is disabled when you move the
paper release lever to the single-sheet position.
Removing continuous paper
1. After you finish printing, press the
printer advances the paper to the tear-off position.
Note:
When the auto tear-off function is on, the printer advances the
paper perforation to the tear-off position automatically. You can
turn on the auto tear-off function by using SelecType or the
EPSON Remote! utility. For instructions, see “SelecType” on
page 4-8, or open EPSON Remote! as described on page 2-23 and
follow the on-screen instructions.
2. Tear off the printed pages.
3. Press the
backward out of the printer and into the standby position.
4. To completely remove continuous paper from the printer,
open the sprocket covers. Remove the paper from the
tractor unit, and then close the sprocket covers.
Load/Eject
button to feed the continuous paper
Tear Off
button. The
3
Paper Handling
3-23
Page 76

Using Spec ial Paper
Multi-part forms
Your printer can print on both single-sheet and continuous
multi-part forms. It can use multi-part forms with up to seven
parts including the original.
Caution:
c
Use only carbonless multi-part forms.
Before printing, set the paper thickness lever to the appropriate
position for your multi-part forms referring to the table on
page 3-6.
You can load single-sheet multi-part forms from the front and
rear paper guides or with the optional cut-sheet feeder. For
instructions, see “Using Single Sheets” on page 3-7 or “Loading
paper from the cut-sheet feeder” on page 6-5. You can load
continuous multi-part forms in the same way as you load
ordinary continuous paper. For instructions, see “Using
Continuous Paper” on page 3-13.
c
3-24
Caution:
❑
When printing on multi-part forms, make sure that
your software settings keep the printing entirely
within the printable area of the forms. Printing on the edge
of a multi-part form can damage the print head.
For information about the printable area, see the paper
specifications on page A-5 or A-7.
❑
Single-sheet multi-part forms that are glued at the side of
the form should be loaded only from the front or rear paper
guide, not from the optional cut-sheet feeder.
Paper Handling
Page 77

Labels
When selecting labels for printing, always choose labels
mounted on continuous backing sheets with sprocket holes for
use with a tractor. Do not use labels on shiny single-sheet
backing, because the backing sheet tends to slip and may not
feed properly.
Caution:
c
L oading labels
1. Make sure of the following:
2. Load labels as described in “Loading continuous paper with
Use labels only under normal operating conditions because
labels are especially sensitive to temperature and humidity.
Your software settings keep the printing entirely within
❑
the printable area. For information about the printable
area, see the paper specifications on page A-8.
Caution:
c
❑
❑
the tractor” on page 3-13.
Printing on the edge of a label can damage the print head.
The auto tear-off function is turned off in SelecType 2.
If you use labels whose backing sheet is exposed, make
sure th e pa per thick n e ss le v er i s
to the appropriate position according to the table on
page 3-6.
not
set to
AUTO
3
. Set it
Paper Handling
3-25
Page 78

To tear off and eject labels
Always tear off and eject labels as described below.
Caution:
c
1. At the back of your printer, tear off the last label form that
Never feed labels backward using the
Tear Off
Labels can easily peel off their backing and jam the printer.
has entered the printer, but
See the illustration below.
button, or knob on the right side of the printer.
do not
Load/Eject
press the
Tear Off
butto n,
button.
2. Press the
Caution:
c
Envelopes
3-26
Do not leave labels loaded in the printer between print jobs;
they tend to curl and may come off their backing sheet
and jam the printer when you resume printing.
You can print on a variety of envelopes by loading them the
same way you load single sheets—from a paper guide or with
the optional cut-sheet feeder.
Paper Handling
button to eject the last label form forward.
LF/FF
Page 79

Caution:
c
L oading envelopes
1. Make sure that your software settings keep the printing entirely
Use envelopes only under normal operating conditions.
within the printable area. For information about the printable
area, see the paper specifications on page A-10.
Caution:
c
Printing on the edge of an envelope can damage the print
head.
3
2. Select
3. Follow the instructions in “Using Single Sheets” on page 3-7
4. Make sure that the right edge guide is aligned with the arrow
from the front paper guide from the rear paper guide
*Insert envelopes with this orientation
Envelopes
or “Loading paper from the cut-sheet feeder” on page 6-5
and load envelopes as shown below. Be sure to fold the flap
and be careful of the flap’s orientation.
on the paper guide, and position the left edge guide to
match the width of your envelopes.
mode using SelecType 2.
when loading from the cut-sheet feeder.
bott om edge f irst and
flap side down
top edge first and
flap side down
Paper Handling
3-27
Page 80

Postcards
You can print on a variety of postcards by loading them the
same way you load single sheets—from a rear paper guide or
with the optional cut-sheet feeder. Follow the procedure below.
Caution:
c
Loading postcards
1. Make sure that your software settings keep the printing entirely
Use postcards only under normal operating conditions.
within the printable area. For information about the printable
area, see the paper specifications on page A-10.
Caution:
Printing on the edge of a postcard can damage the print
c
head.
2. Select
3. Follow the instructions in “Loading single sheets from the
4. Make sure that the right edge guide is aligned with the arrow
3-28
Paper Handling
Cards
front” on page 3-7, “Loading single sheets from the rear” or
“Loading paper from the cut-sheet feeder” on page 6-5.
on the paper guide, and position the left edge guide to
match the width of your postcard.
mode using SelecType 2.
Page 81

Overlapping multi-part forms
This kind of continuous paper provides you with multi-part
forms. The page length of the multi-part forms is longer than
that of the backing continuous paper. So when exten ded, one
page’s multi-part forms overlap the next page’s multi-part
forms as shown below. The thickness of this overlapping area
is thicker than the printable area.
Caution:
c
L oading overlappin g multi-pa rt forms
Use overlapping multi-part forms only under normal
operating conditions.
3
1. Make sure of the following:
Your software settings keep the printing entirely within
❑
the printable area. For information about the printable
area, see the paper specifications on page A-12 and
A-13.
The paper release lever is set to the tractor position.
❑
The setting in
❑
page length of the form you use.
Note:
Overlapping Form
In
automatically activates the
though the paper thickness lever may be set to another position.
Page Tractor
and
AUTO
in SelecType 1 matches the
NO.a
modes, the printer
paper thickness function even
Paper Handling
3-29
Page 82

2. Select
c
Overlapping Form
Caution:
❑
Printing on the edge of overlapping multi-part forms
can damage the print head.
mode using SelecType 2.
❑
Be sure to select
using this type of paper; otherwise your printer may
be damaged.
3. Follo w the in st ruc tion s in “ Load ing co nt inu ou s pa per wi th
the tractor” on page 3-14.
To tear off and eject overlapping multi-part forms
Always tear off and eject overlapping multi-part forms
according to the procedure below.
Note:
Overlapping Form
In
Load/Eject
the
1. At the back of your printer, tear off the last overlapping
multi-part form that has entered the printer.
2. Press the
forms forward.
button only feeds forms forward.
LF/FF
mode, the
button to eject the last overlapping multi-part
Overlapping Form
Tear Off
button is disabled and
mode when
3-30
Paper Handling
Page 83

Continuous forms with labels
This kind of continuous paper has one label on each page. This
is different from label paper, which consists entirely of labels.
When priting on continuous forms with labels, the printer must
adjust the height of the print head for the extra thickness of the
labels. Before printing on this kind of paper, measure the label
thickness using the EPSON Label Form Utility. Read the
on-screen instructions on this utility. See page 2-23 for
instructions on accessing the utility.
Caution:
c
Use continuous forms with labels only under normal operating
conditions.
3
Loading continuous forms with labels
1. Make sure of the following:
Your software settings keep the printing entirely within
❑
the printable area. For information about the printable
area, see the paper specifications on page A-10 and
A-11.
The paper release lever is set to the tractor position.
❑
Note:
Overlapping Form
In
automatically activates the
though the paper thickness lever may be set to another position.
and
AUTO
NO.a
paper thickness function even
modes, the printer
Paper Handling
3-31
Page 84

2. Press the
the
3. Follo w the in st ruc tion s in “ Load ing co nt inu ou s pa per wi th
the tractor” on page 3-14.
Caution:
c
To tear off and eject continuous forms with labels
1. At the back of your printer, tear off the last label form that
❑
❑
Always tear off and eject continuous forms with labels by
following the procedure below.
Note:
NO.a
In
button only feeds forms forward.
has entered the printer.
Paper Select
Ready:#a
Printing on the edge of continuous forms with labels can
damage the print head.
When loading continuous forms with labels, make sure the
left edge of the form is no further than 3 cm to the left of
the arrow mark (when facing the back of the printer).
mode, the
message appears on the control panel display.
Tear Off
button to select
button is disabled and the
and make sure
NO.a
Load /Eject
2. Press the
3-32
LF/FF
Paper Handling
button to eject the last label form forward.
Page 85

3. To print on another type of paper, press the
button to select
appears on the control panel display.
Caution:
c
Overlapping multi-part forms with labels
This kind of continuous paper is a combination of the two
types of forms described above. Be sure to follow any special
instructions intended for either type. For this paper, make the
thickness settings using the EPSON Label Form Utility. Read
the on-screen instructions on this utility. See page 2-23 for
instructions on accessing the utility.
Do not leave continuous forms with labels loaded in the
printer between print jobs; they tend to curl and may come off
their backing sheet and jam the printer when you resume
printing.
and make sure the
NO.0
Paper Select
Ready:#0
message
3
c
Caution:
Use overlapping multi-part forms with labels only under
normal operating conditions because labels are especially
sensitive to temperature and humidity.
Paper Handling
3-33
Page 86

L oading ov erlapping multi-part forms with labels
1. Make sure of the following:
Your software settings keep the printing entirely within
❑
the printable area. For information about the printable
area, see the paper specifications on page A-13 and
A-14.
The paper release lever is set to tractor position.
❑
The setting in
❑
page length of the form you use.
Note:
Overlapping Form
In
automatically activates the
though the paper thickness lever may be set to another position.
2. Press the
the
3. Follo w the in st ruc tion s in “ Load ing co nt inu ou s pa per wi th
the tractor” on page 3-14.
Caution:
c
❑
❑
Paper Select
Ready:#a
Printing on the edge of overlapping multi-part forms with
labels can damage the print head.
When loading overlapping multi-part forms with labels,
make sure the left edge of the form is no further than 3 cm
to the left of the arrow mark (when facing the back of the
printer).
Page Tractor
and
AUTO
button to select
message appears on the control panel display.
in SelecType 1 matches the
NO.a
modes, the printer
paper thickness function even
and make sure
NO.a
3-34
Paper Handling
Page 87

To tear off and eject over lapping mul ti- par t forms with
labels
Always tear off and eject overlapping multi-part forms with
labels by following the procedure below.
Note:
NO.a
In
button only feeds forms forward.
1. At the back of your printer, tear off the last overlapping
mode, the
multi-part form that has entered the printer.
Tear Off
button is disabled and the
Load/Eject
3
2. Press the
forms with labels forward.
3. To print on another type of paper, press the
button to select
appears on the control panel display.
Caution:
c
Do not leave overlapping multi-part forms with labels loaded
in the printer between print jobs; they tend to curl and may
come off their backing sheet and jam the printer when you
resume printing.
button to eject the last overlapping multi-part
LF/FF
and make sure the
NO.0
Ready:#0
Paper Select
message
Paper Handling
3-35
Page 88

Swi tching Between Continuous Paper and Single
Sheets
When using the tractor, you can easily switch between
continuous paper and single sheets (including envelopes or
postcards) without removing the continuous paper from the
tractor.
Switching to single sheets
To switch from continuous paper to single sheets, follow the
steps below.
1. When you have finished printing on continuous paper, press
the
Tear Off
position. (If you selected auto tear-off in the SelecType
mode or the EPSON Remote! utility, the printer advances
the paper perforation to the tear-off position automatically.)
2. Tear off the printed pages.
c
button to advance the paper to the tear-off
Caution:
❑
Always tear off paper before feeding it backwards;
feeding too many sheets backwards can cause a paper
jam.
3. Press the
3-36
❑
Never feed labels backward using the
button,
the printer. Labels can easily peel off their backing and
jam the printer. For information on removing labels
from the paper path, see page 3-26.
Load/Eject
back to the standby position. The paper is still attached to
the tractor, but is no longer in the paper path.
Paper Handling
Tear Off
button, or knob on the right side of
button to feed the continuous paper
Load/Eject
Page 89

4. Move the paper release lever to the single-sheet position.
Now you can load single sheets from the front or rear paper
guide. For details, see “Using Single Sh eets” on page 3-7.
Switching to continuous paper
To switch from single sheets to continuous paper, follow the
steps below.
3
1. If necessary, press the
printed single sheet.
2. Make sure continuous paper is loaded in the printer as
described under “Loading continuous paper with the
tractor” on page 3-14.
3. Move the paper release lever to the tractor position.
Load/Eject
button to eject the last
Paper Handling
3-37
Page 90

The printer automatically advances the continuous paper from
the standby position to the loading position when it receives
data.
Using the Micr o-Feed Feature
The micro-feed feature allows you to move paper forward or
backward in 1/180-inch increments, so you can finely adjust
the printing and tear-off positions.
Adjusting the printing position
The printing position is the position on the page where the
print head actually prints during a print job. You can change
the current vertical printing position temporarily by using the
micro-feed feature as described in the steps below.
Note:
Your printing position setting is in effect only until the next time you
load paper or turn off the printer.
1. Make sure the printer is turned on.
2. Press the
comes on.
3. Press the
feed pa per backw ar d .
4. When your paper is positioned correctly, press the
button to resume printing.
3-38
Paper Handling
Pause
d
button to stop printing. The
button to feed paper forward or the
Pause
u
light
button to
Pause
Page 91

Adjusting the tear-off position
If your paper perforation is not aligned with the tear-off edge,
you can use the micro-adjust feature to move the perforation to
the tear-off position as follows:
1. Press the
Tear Off
2. Press the
the
perforation is aligned with the tear-off edge.
Note:
The printer has a minimum and a maximum tear-off position. If
you try to adjust the tear-off position beyond these limits, the
printer beeps and stops moving the paper.
3. Tear off the printed pages.
Pause
button. The Tear Off light comes on.
d
button to feed paper backward, until the paper
u
button if the printer is printing. Press the
button to feed paper forward, or press
3
4. When you resume printing, the printer automatically feeds
the paper back to the top-of-form position and begins
printing.
Note:
Your tear-off position setting remains in effect until you change it,
even if you turn off the printer.
Paper Handling
3-39
Page 92

3-40
Paper Handling
Page 93

Chapter 4
Controlling the Printer
Control Panel . . . . . . . . . . . . . . . . . . . . . . . . . . . . 4-2
Display . . . . . . . . . . . . . . . . . . . . . . . . . . . . . . 4-3
Lights . . . . . . . . . . . . . . . . . . . . . . . . . . . . . . . 4-4
Buttons . . . . . . . . . . . . . . . . . . . . . . . . . . . . . . 4-4
Other control panel features . . . . . . . . . . . . . . . . . . 4-7
SelecType . . . . . . . . . . . . . . . . . . . . . . . . . . . . . . . 4-8
SelecType overview . . . . . . . . . . . . . . . . . . . . . . . 4-8
Using SelecType . . . . . . . . . . . . . . . . . . . . . . . . . 4-9
Level 1 options . . . . . . . . . . . . . . . . . . . . . . . . . . 4-12
Level 2 options . . . . . . . . . . . . . . . . . . . . . . . . . . 4-15
Type Styles . . . . . . . . . . . . . . . . . . . . . . . . . . . . . . 4-20
Character fonts . . . . . . . . . . . . . . . . . . . . . . . . . . 4-20
Character spacing . . . . . . . . . . . . . . . . . . . . . . . . 4-22
Printing in Color . . . . . . . . . . . . . . . . . . . . . . . . . . . 4-23
Barcode Printing . . . . . . . . . . . . . . . . . . . . . . . . . . . 4-23
4
Controlling the Printer
4-1
Page 94

This chapter explains how you can use the control panel to
control the basic operation of the printer and to perform more
advanced operations, such as making changes to default
settings.
Control Panel
The indicator lights on the control panel let you monitor the
current status of the printer. The buttons let you control many
printer ope rat ions. Th e con tro l pane l displ ay provid es yo u with
current status messages, the SelecType features, and error
messages.
Power Paper Out
display
Paper Select
4-2
Tear Off
Font Pitch Reset
Controlling th e Pri n te r
LF/FF
Load/Eject
Pause
Page 95

Display
The display shows the fol lo w in g:
Status messages that indicate the printer’s current status,
❑
as shown in the following table:
Display message Status
Ready:# 0 The printer is ready to receive
Printing:# 0 The printer is printing normally.
Paused:# 0 Printing is paused.
Data in Buffer Data is in the buffer but printing
Cut the Paper The printer is in tear-off mode
Test Printing The printer is printing the self test.
Setting Printing The printer is printing the current
Hex Dump The printer is in hex dump mode.
SelecT ype 1 The printer is in SelecType Level 1.
SelecT ype 2 The printer is in SelecType Level 2.
Bi-d adjustment The printer is in Bi-d adjustment
Error messages, such as Paper Out, which identify
❑
data from the computer.
is paused.
and has advanced paper to the
tear-off position.
default settings.
mode.
maintenance procedures you must perform or error
conditions you need to correct. See pages 8-3 and 8-4 for
more information.
4
SelecType features and options such as Character Table,
❑
which give you a greater degree of control over printer
functions. See page 4-8 for more information.
Controlling the Printer
4-3
Page 96

Lights
Power
On when the power switch is on and power is supplied to the
printer.
Paper Out
On when the printer runs out of paper.
Pause
On when the printer is not ready to print data, paper is out or
jammed, or you press the
Note:
Even if the printer is paused, the printer interface does not stop
recieving data until the input buffer becomes full and the head
carriage moves to its home position.
Tear Off
On when the printer is in the tear-off mode. The printer stores
any change you make to the tear-off position when this light is
on.
(green)
(red)
(orange)
(orange)
Pause
button to pause printing.
Buttons
Pause
Press this button to temporarily stop printing, and press it
again to resume printing.
SelecType
Press this button to enter, scroll through, or exit SelecType
mode where yo u make the def au lt settin gs. For more
information, see page 4-8.
4-4
Controlling th e Pri n te r
Page 97

Paper Select
Press this button to select
before you use and load continuous forms with labels or
overlapping multi-part forms with labels. After using this
paper, be sure to press this button to select
before you use and load another type of paper. Only press this
button when no paper is loaded in the printer.
Load/Eject
Press this button to advance single-sheet or continuous paper
to the loading position. (The printer normally loads paper
automatically.) If a single sheet is already in the loading
position, press this button to eject it. If continuous paper is in
the loading or tear-off position, press this button to feed it
backward to the standby position.
(line feed/form feed)
LF/FF
Press this button briefly to feed the paper forward one line.
Hold it down for a few seconds to eject a single sheet or
advance continuous paper to the top of the next page. You can
also use this button to load a single sheet of paper from the
optional cut-sheet feeder or to feed continuous paper from the
standby position to the loading position.
on the contr ol pa ne l disp lay
No.a
on the display
No.0
4
Font
Press this button to select from among the built-in fonts after
you enter SelecType 1 or SelecType 2. For more information,
see “ SelecType” on page 4-8. Be aware that the font setting in
your software overrides this setting.
Printing with the Draft font requires fewer dots per character,
which significantly increases the printing speed. However,
printing with this font also reduces print quality. When you
need letter-quality printing, select a font other than Draft.
Controlling the Printer
4-5
Page 98

Tear Off
Press this button to feed continuous paper to the tear-off
position. Press it again to feed the paper backward to the
loading position.
Note:
You can turn on the auto tear-off feature using SelecType. For more
information, see “SelecType” on page 4-8.
u
and
d
Press these buttons briefly to advance and reverse the loaded
paper in 1/180-inch increments, and continuously to move the
paper further. You can also use these micro-feed buttons to
adjust the tear-off and printing positions. When you are in the
SelecType mode, use these buttons to select the next or
previous feature or option in the mode. For more information,
see “SelecType” on page 4-8.
l
Press these buttons in SelecType mode to enter and exit the
feature and option menus. For more information, see page 4-8.
and
r
Pitch
Press this button in SelecType mode to select character pitch.
For more information, see “SelecType” on page 4-8. Be aware
that the pitch in your software overrides this setting.
Reset
Press the
reset or initialize the printer.
4-6
Controlling th e Pri n te r
Pause
and
Load/Eject
buttons simultaneously to
Page 99

Other control panel features
To use a few of the more advanced functions of this prin ter,
you must hold dow n the approp riat e butt on while tur nin g on
the printer as described below.
Letter-qua lity self te st =
Performs a letter-quality self test, which helps you determine
the source of some printing problems. See “Printing a Self Test”
on page 8-5 for details.
Draft self test =
Performs a draft self test, which helps you determine the
source of some printing problems. See “Printing a Self Test” on
page 8-5 for details.
Bidirectional adjustment =
Turns on the bidirectional adjustment mode, which allows you
to correct printing alignment problems. See “Using
Bidirectional Adjustment” on 8-25 for details.
Hex dump =
Prints the data sent to the printer in hexadecimal code, which
helps experienced users determine the source of some printing
problems. See “Using Hex Dump Mode” on 8-6 for details.
Load/Eject
Load/Eject + LF/FF
LF/FF
Pause
4
Setting Printing =
Hold down the SelecType button while you turn on the printer
to print the current default settings or current label settings,
depending on the Paper Select mode. When the Paper Select is
set to #0, the printer prints the current SelecType (default)
settings. When the Paper Select is set to
the label size and position settings that are currently registered
in the EPSON Label Form Utility.
SelecType
, the printer prints
a
#
Controlling the Printer
4-7
Page 100

SelecType
This section describes how to use the SelecType mode to make
the printer’s default settings.
SelecType overview
When you press the
SelecType mode, where you can make the default settings for
most of the printer’s functions, such as character tables,
margins, printer mode, serial communication, and other
settings.
In many cases, you do not need to change the SelecType
settings because they are set to the factory (default) settings,
which meet the needs of most users.
Note:
You can print out a list of the current default settings by holding
down the
is printed in the language selected in SelecType.
Your software program sends printer commands that usually
ove r r ide th e S el ecType se t t in gs. If you do not get the results
you expect, check your software settings first.
SelecType has two levels: Level 1 contains printing functions,
such as character table, page length, and margins; Level 2
contains printer configuration functions that you change less
frequently, such as auto tear-off, interface selection, and serial
communication settings.
SelecTy pe
SelecType
button while you turn on the printer. The list
button, you enter the
4-8
Controlling th e Pri n te r
 Loading...