

Page 1

Unpacking and Setup Guide
EPSON® ColorPage 8000
Page 2

Copyright © 1999 by Epson America, Inc.
All rights reserved. No part of this publication may be reproduced, stored in a retrieval system, or transmitted in
any form or by any means, electronic, mechanical, photocopying, recording, or otherwise, without the prior
written permission of
with this
EPSON
Trademarks
EPSON
is a registered trademark of
General Notice
their respective owners.
NERGY STAR
The E
Legal Notices
SEIKO EPSON CORPORATION
Neither
parties for damages, losses, costs, or expenses incurred by purchaser or third parties as a result of: accident, misuse,
or abuse of this product or unauthorized modifications, repairs, or alterations to this product, or (excluding the
U.S.) failure to strictly comply with
SEIKO EPSON CORPORATION
or any consumable products other than those designated as Original
Products by
SEIKO EPSON CORPORATION
Part Number: CPD-7701 1/99
SEIKO EPSON CORPORATION
printer.
EPSON
is not responsible for any use of this information as applied to other printers.
SEIKO EPSON CORPORATION
. The information contained herein is designed only for use
.
: Other product names used herein are for identification purposes only and may be trademarks of
EPSON
disclaims any and all rights in those marks.
emblem does not represent EPA endorsement of any product or service.
nor its affiliates shall be liable to the purchaser of this product or third
SEIKO EPSON CORPORATION
’s operating and maintenance instructions.
shall not be liable for any damages or problems arising from the use of any options
EPSON
Products or
EPSON
Approved
.
Printed on recycled paper with at least 10% post-consumer content.
Page 3

Unpacking and Setup Guide | 1
H
■
■
■
■
■
■
■
■
■
■
R
ere’s what you need to do to unpack and set up your EPSON® ColorPage 8000:
Remove the printer from the carton.
Remove the packing materials.
Install the extension tray.
Install the face-up tray.
Install the toner cartridges.
Install the photoconductor unit.
Install the fuser oil roll.
Install the A3W paper cassette
Install the large capacity paper unit.
Test the printer.
EMOVING THE PRINTER FROM THE CARTON
Because of its size and weight, the printer is shipped on a pallet. Rather than lifting
the printer out of the carton, you should remove the carton from around the printer
and then simply lift the printer off the pallet.
The printer weighs approximately 154 lb. Do not try to lift it
without assistance.
Page 4

2 | Unpacking and Setup Guide
Follow these steps to remove the printer from the carton:
Remove the accessory boxes,
1
documentation box, and
cardboard tray.
Lift the carton off of the printer.
2
Page 5
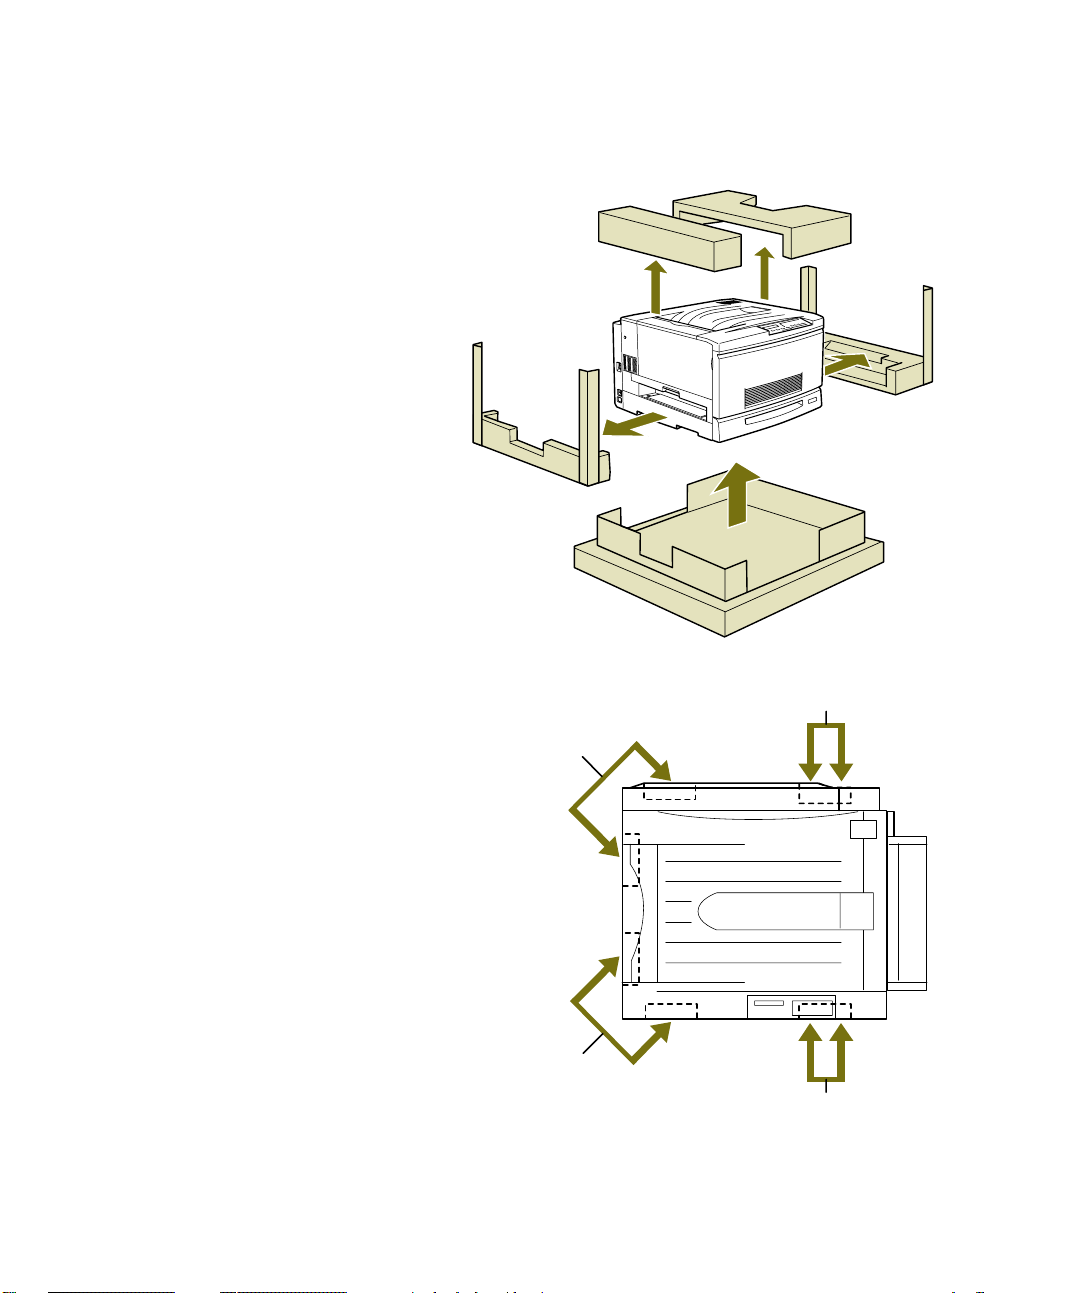
Remove the protective
3
materials.
Unpacking and Setup Guide | 3
Lift the printer off the pallet.
4
Make sure you have at least four
■
people lift it.
Hold the printer at the four
■
“handle” areas shown on the
right.
Try to balance the printer’s
■
weight. (The back of the printer
is heavier than the front.)
Do not tilt the printer more than
■
10 degrees.
4
3
back
front
2
1
Page 6

4 | Unpacking and Setup Guide
5
Make sure you have all the parts
shown here:
extension tray
face-up tray
printer
toner
cartridges
fuser oil roll
power cord
photoconductor
unit
Page 7

Unpacking and Setup Guide | 5
Locating the Printer
If you do not have the large capacity paper unit, place the printer on a flat, stable
surface. (If you have the large capacity paper unit, follow the instructions on page 21
to install the printer on the unit.)
Make sure you locate the
printer near a grounded power
outlet. Allow adequate space
around it for operation,
maintenance, and ventilation,
as shown on the right.
Do not place the printer:
■
On a narrow or unstable
surface
■
In an area of direct
sunlight, high
temperatures, moisture,
dust, shock, or vibration
■
Near sources of heat or
electromagnetic
interference, such as
loudspeakers or cordless
telephone base units
■
Near a TV, radio, air
conditioner, or humidifier
fuser unit pulled out paper tray pulled out
6"
20"
paper cassette pulled out
22"
33"
■
Near combustible objects
Make sure you follow all the safety instructions in your Printer Guide.
Page 8
6 | Unpacking and Setup Guide
EMOVING THE PACKING MATERIALS
R
To protect your printer during shipping, tape has been placed on the outside and
various types of packing materials have been placed inside the printer. Remove the
tape from the outside of the printer and follow the instructions in this section to
remove the protective materials from these locations:
■
Fuser unit
■
Paper cassette
■
Paper path unit
■
Toner cartridge slots
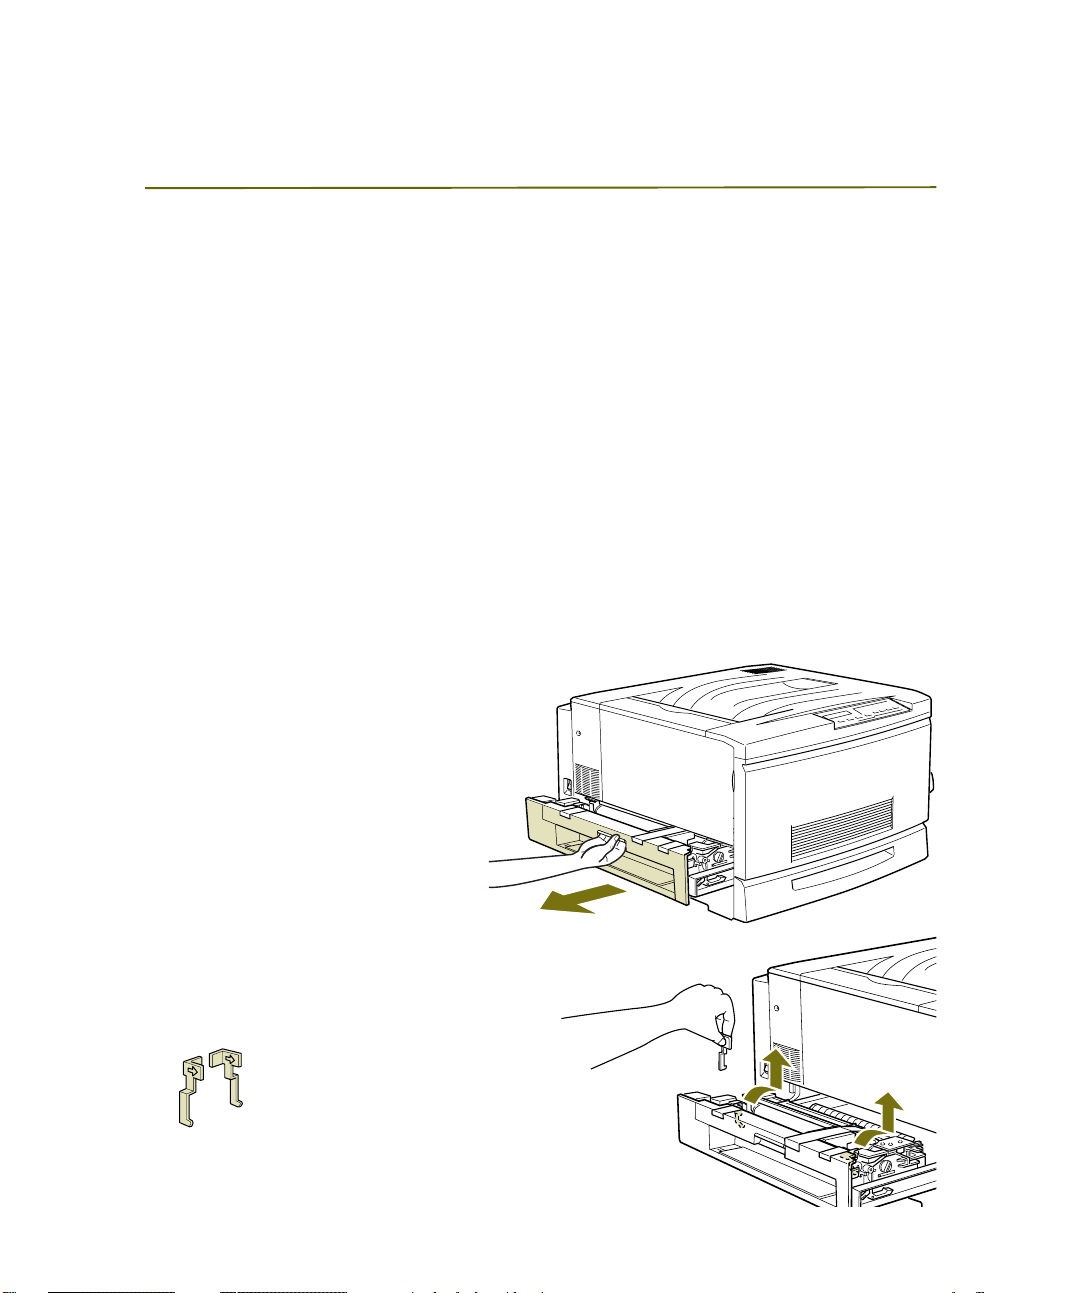
Unpacking the Fuser Unit
Follow these steps:
1
Pull out the fuser unit using the
handle, as shown:
2
Remove the two metal pieces by
pushing them back toward the printer
and pulling them out.
Page 9
3
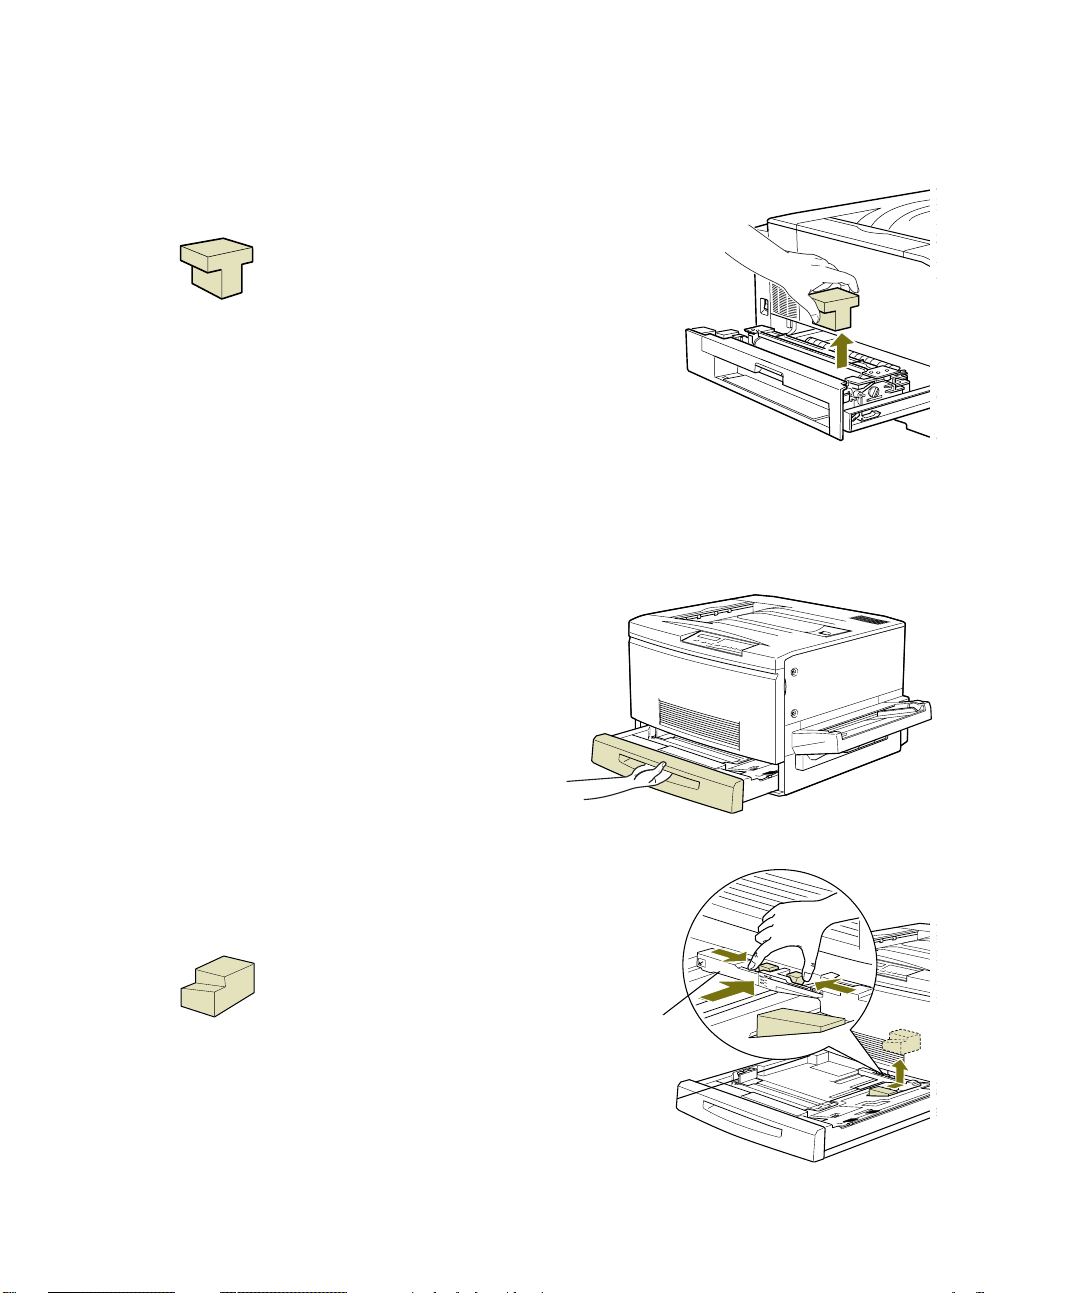
Peel off the tape to remove styrofoam block A.
4
Push in the fuser unit.
Unpacking the Paper Cassette
Follow these steps:
1
Grab the handle and pull out the paper
cassette at the bottom of the printer.
Unpacking and Setup Guide | 7
2
Squeeze the clips and slide the edge guide
toward the back of the printer. Then remove
styrofoam block C.
edge
guide
Page 10

8 | Unpacking and Setup Guide
3
Peel off the tape and remove the square
piece from the cassette as shown:
4
Push in the paper cassette.
Unpacking the Paper Path
Follow these steps:
1
Grab the handle and pull out
the paper tray.
Page 11
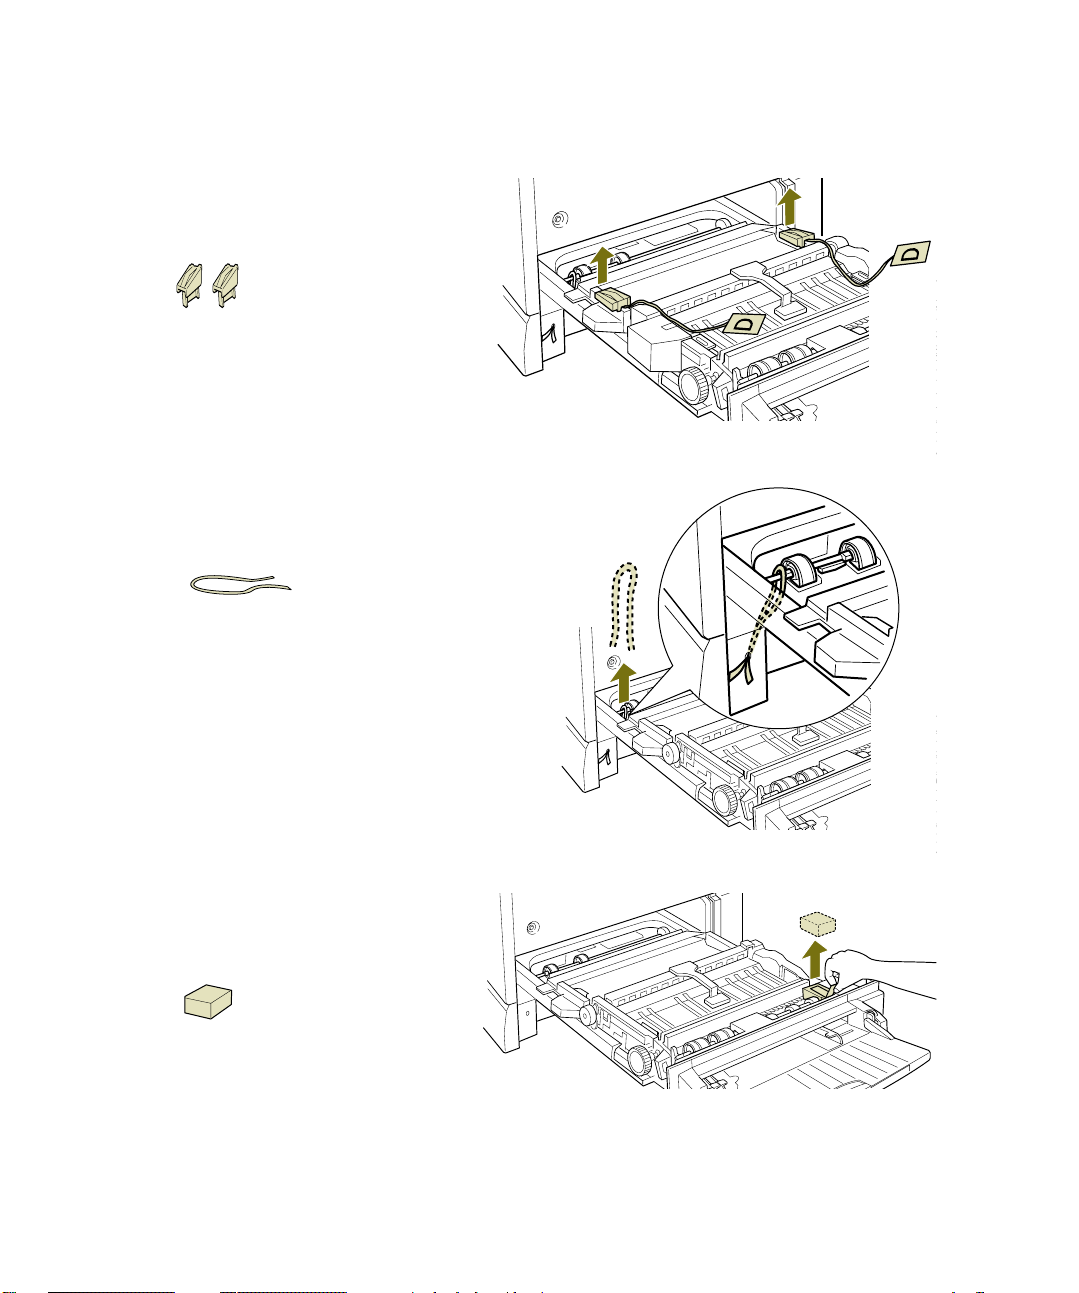
2
Remove the two orange plastic
pieces (tagged with the letter D).
3
Remove the red wire fastened to the
left side of the paper roller (E).
Unpacking and Setup Guide | 9
4
Peel off the tape and remove
the styrofoam block.
5
Push in the paper tray.
Page 12

10 | Unpacking and Setup Guide
Unpacking the Toner Cartridge Slots
Follow these steps:
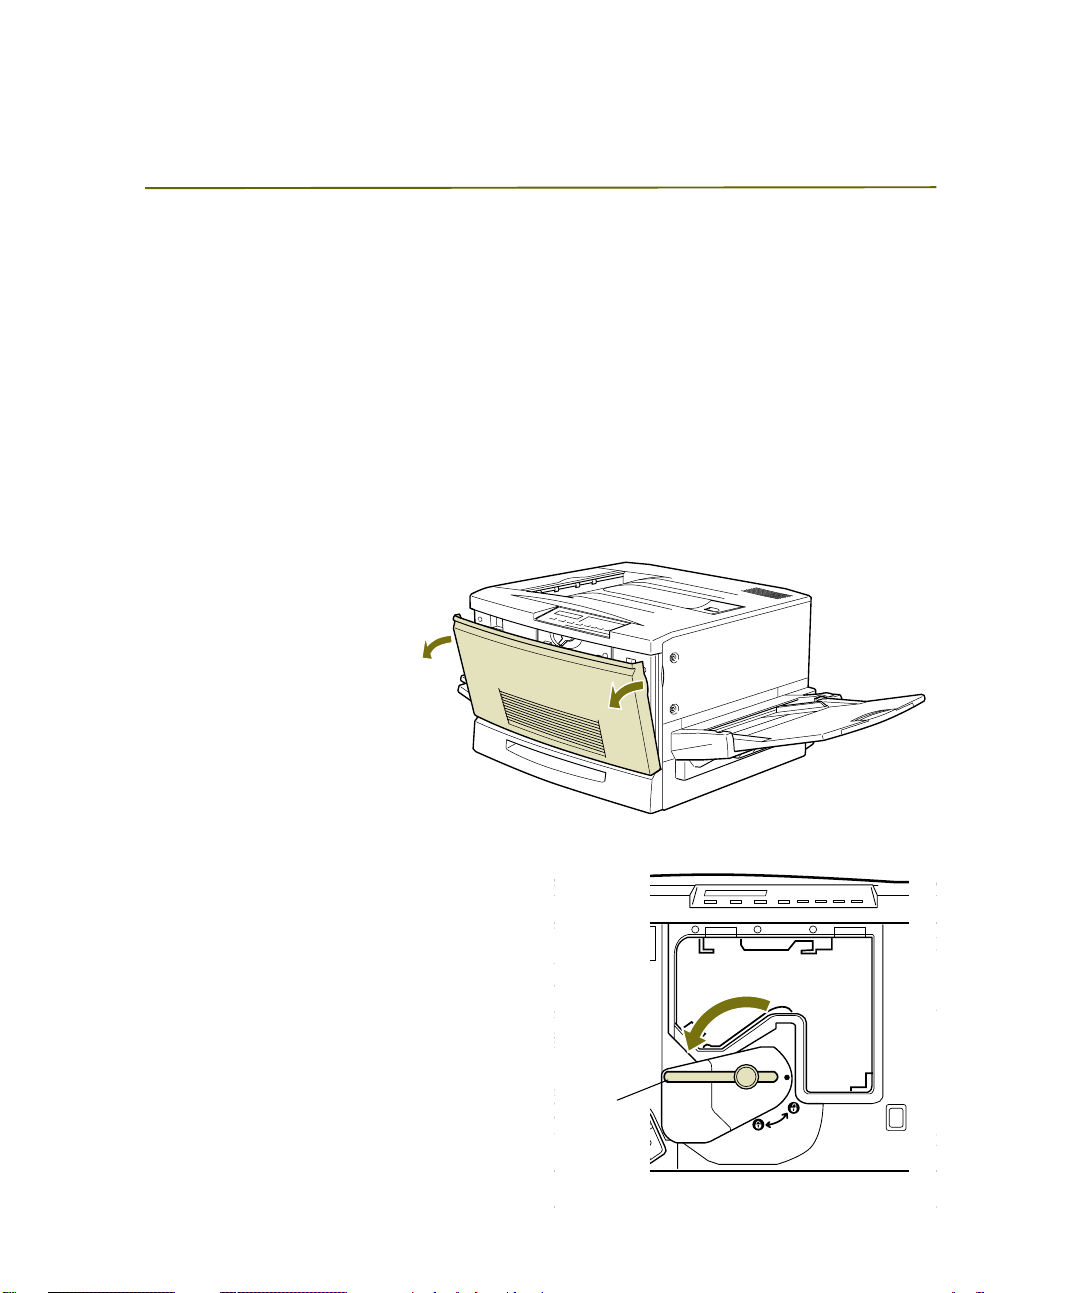
1
Open the front cover of the
printer.
2
Pull out styrofoam insert B.
3
Grab the tab of the cartridge
slot insert and carefully pull it
straight out.
Page 13

Unpacking and Setup Guide | 11
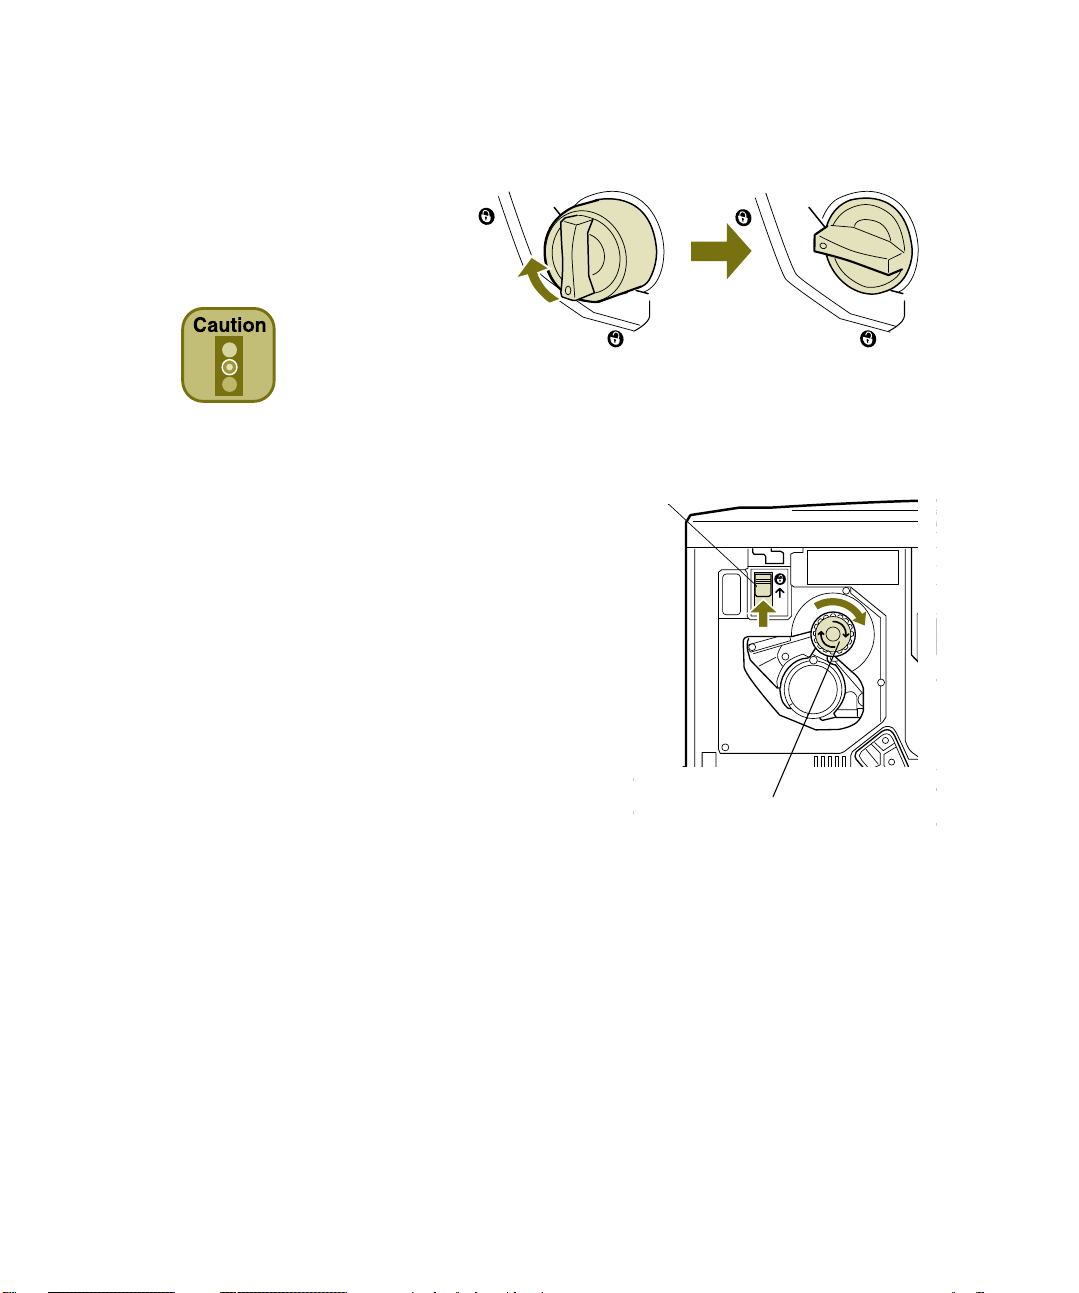
4
Push up the switch; then let it go. Turn the
knob in the direction of the arrow until it stops.
You will hear a click and the switch will return
to its original position.
If the knob won’t turn, don’t force it. Push up
the switch and try turning it again.
5
Grab the tab of the cartridge slot insert and pull
it straight out, as shown on page 10.
6
Follow steps 4 and 5 for the other two toner
cartridge slots.
7
After you have removed all four inserts, close the front cover.
switch
knob
NSTALLING THE EXTENSION TRAY
I
The extension tray is used for wide paper. Follow these steps to install the extension
tray on the built-in multipurpose tray:
.
1
Hold the tray vertically and
extension tray
insert the pin on the right side
into the hole in the multipurpose
tray.
multipurpose tray
Page 14

12 | Unpacking and Setup Guide
2
Snap the pin on the left side into the
corresponding hole.
NSTALLING THE FACE-UP TRAY
I
The face-up output tray allows you to print on envelopes, transparencies, labels, and
other materials that don’t work with the face-down tray. Follow these steps to install
the face-up tray in the output slot on the left side of the printer.
1
Fold down the metal spring against the tray.
2
Insert the pin on the
right side of the tray
into the hole in the
output slot. Then
release the spring so it
rests against the printer.
Make sure the metal
spring is not jammed
inside the output slot.
spring
Page 15

Unpacking and Setup Guide | 13
3
Snap the pin on the left side of the
tray into the corresponding hole in
the output slot.
NSTALLING THE TONER CARTRIDGES
I
The printer uses four toner cartridges. Before you install the cartridges, make sure
they are at room temperature. Wait at least an hour after moving cartridges from a
cool to a warm environment.
Try not to touch the toner, and do not get it in your eyes. If
toner gets on your skin or clothes, wash it off with soap and
cold water immediately. Keep toner cartridges out of the reach
of children.
Follow these steps to install the cartridges:
1
Open the front cover of
the printer.
Page 16
14 | Unpacking and Setup Guide
2
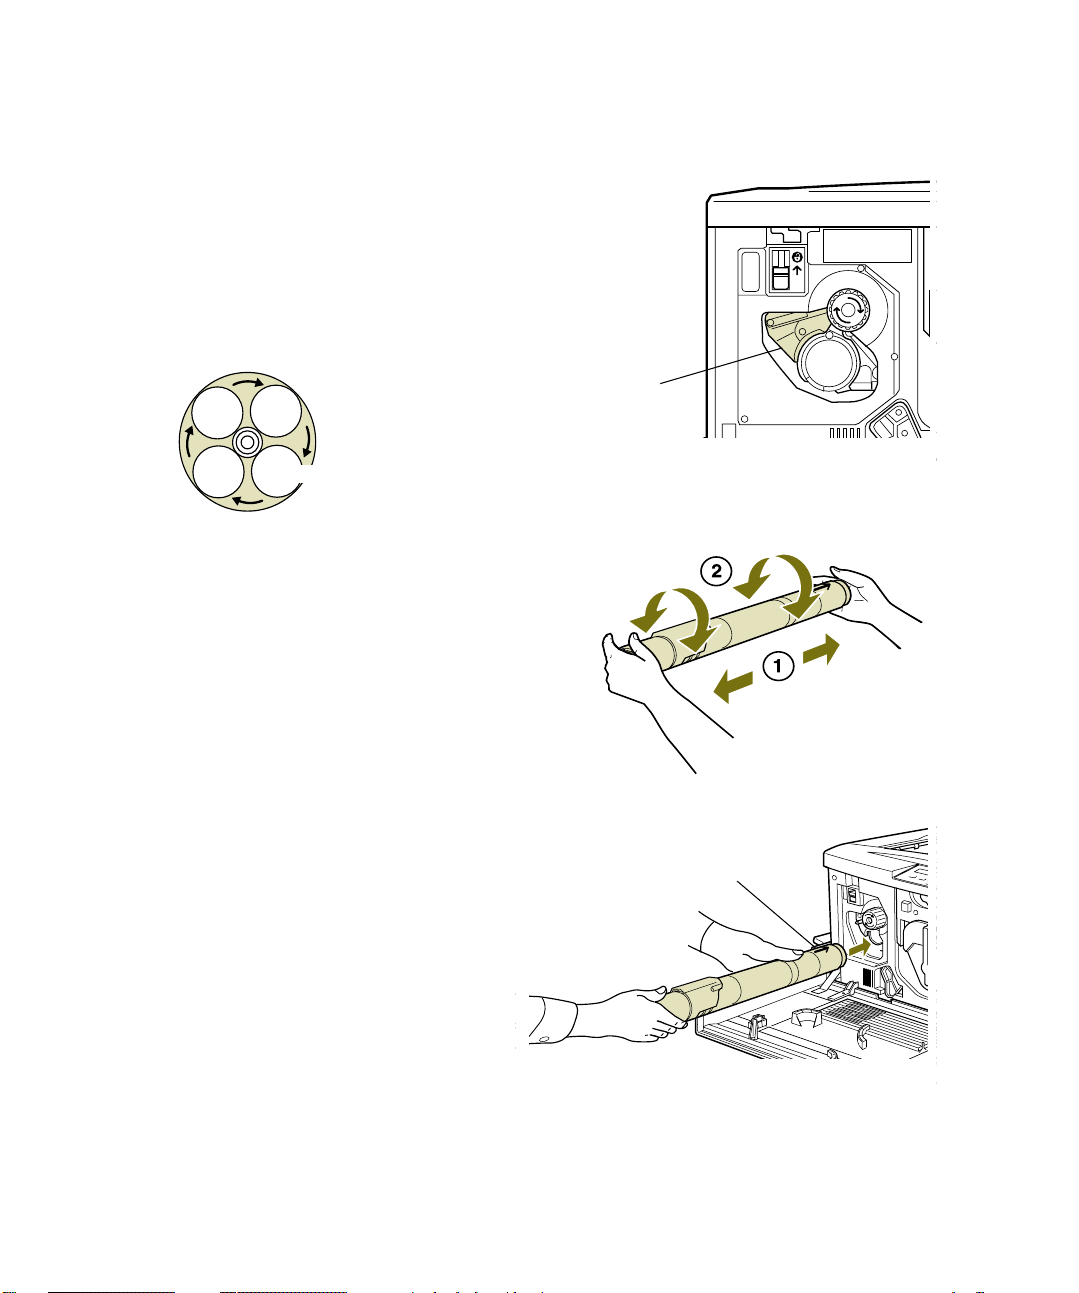
Check which of the four colors appears in
the cartridge installation window. This is
the one you will start with.
The cartridge installation window rotates
in the direction shown:
black cyan
yellow
3
Take the cartridge out of the package.
magenta
Gently shake it back and forth and from
front to back to distribute the toner
evenly.
4
Hold the cartridge with the arrow
facing up and insert it as far as
possible into the cartridge slot.
Match this
color with
the cartridge
color.
arrow
Page 17
5
Turn the cartridge clockwise
90 degrees, pushing it the
rest of the way into the slot.
Make sure
you turn the
cartridge all the
way, as shown in the
illustration. Otherwise, toner may leak.
Unpacking and Setup Guide | 15
6
Push up the switch, then release it.
7
Turn the knob in the direction of the arrow
until it stops. The switch drops down
automatically and the next cartridge slot is in
position.
If the knob won’t turn, don’t force it. Push up
the switch and try turning it again.
8
Follow steps 2 through 7 above to install the
other three cartridges.
switch
knob
Page 18
16 | Unpacking and Setup Guide
NSTALLING THE PHOTOCONDUCTOR UNIT
I
The photoconductor unit is highly sensitive and requires careful handling to provide
the best print quality. Follow these guidelines when you install the photoconductor
unit:
■
Avoid exposing the unit to room light any longer than necessary.
■
Be careful not to scratch the surface of the drum.
■
Avoid touching the drum, since oils from your skin can permanently damage its
surface and will affect print quality.
Follow these steps to install the photoconductor unit:
1
Open the front cover of
the printer.
2
Turn the large lever counterclockwise
90 degrees.
lever
Page 19

3
Take the photoconductor unit out of the
box and remove the protective bag. Hold the
handle and remove the protective sheet as
shown.
Don’t touch or scratch the
surface of the drum. Any
toner you see on it will be
automatically cleaned. Avoid exposing the drum to room
light any longer than necessary.
4
Position the unit over the
guide rails inside the printer.
Then carefully slide it all the
way in.
Unpacking and Setup Guide | 17
5
Turn the small lever on the
photoconductor unit to the left.
6
Turn the large lever clockwise 90
degrees.
7
Close the front cover of the printer.
small
ADD
lever
ARROW
large
lever
Page 20
18 | Unpacking and Setup Guide
NSTALLING THE FUSER OIL ROLL
I
Make sure you handle the fuser oil roll carefully before you install it. To avoid oil
leakage and reduced print quality, follow these guidelines:
■
Don’t touch or scratch the white roll surface.
■
If the oil gets on your skin or clothes, wash it off immediately.
■
Don’t tilt the roll or place it on an uneven surface.
Follow these steps to install the fuser oil roll:
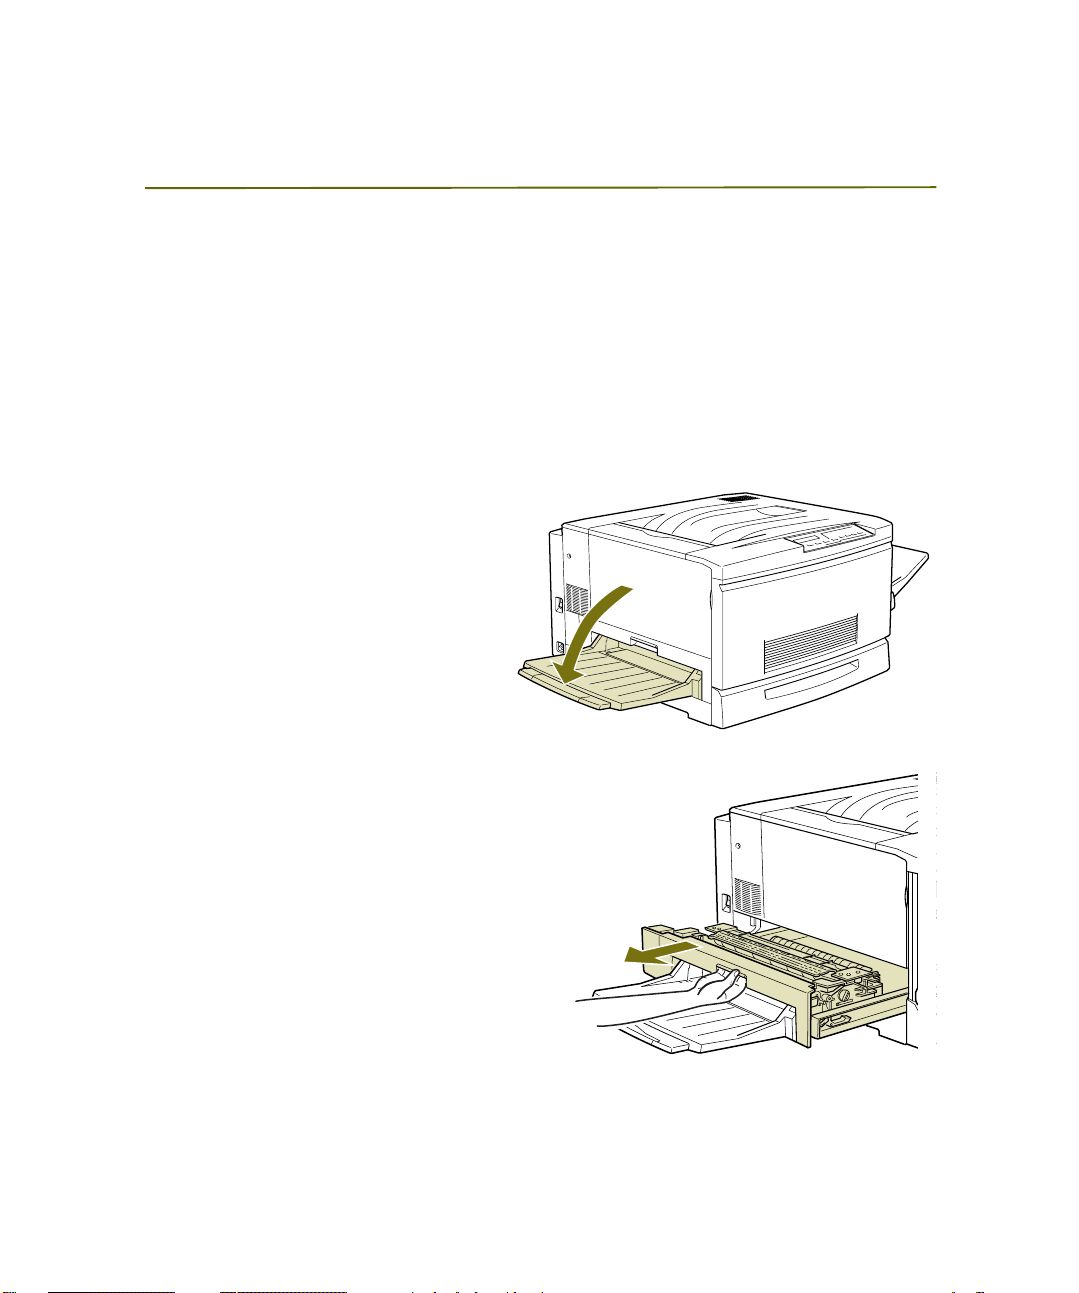
1
Make sure the face-up tray is in
the down position.
2
Grab the handle of the fuser unit and
pull it all the way out.
Page 21
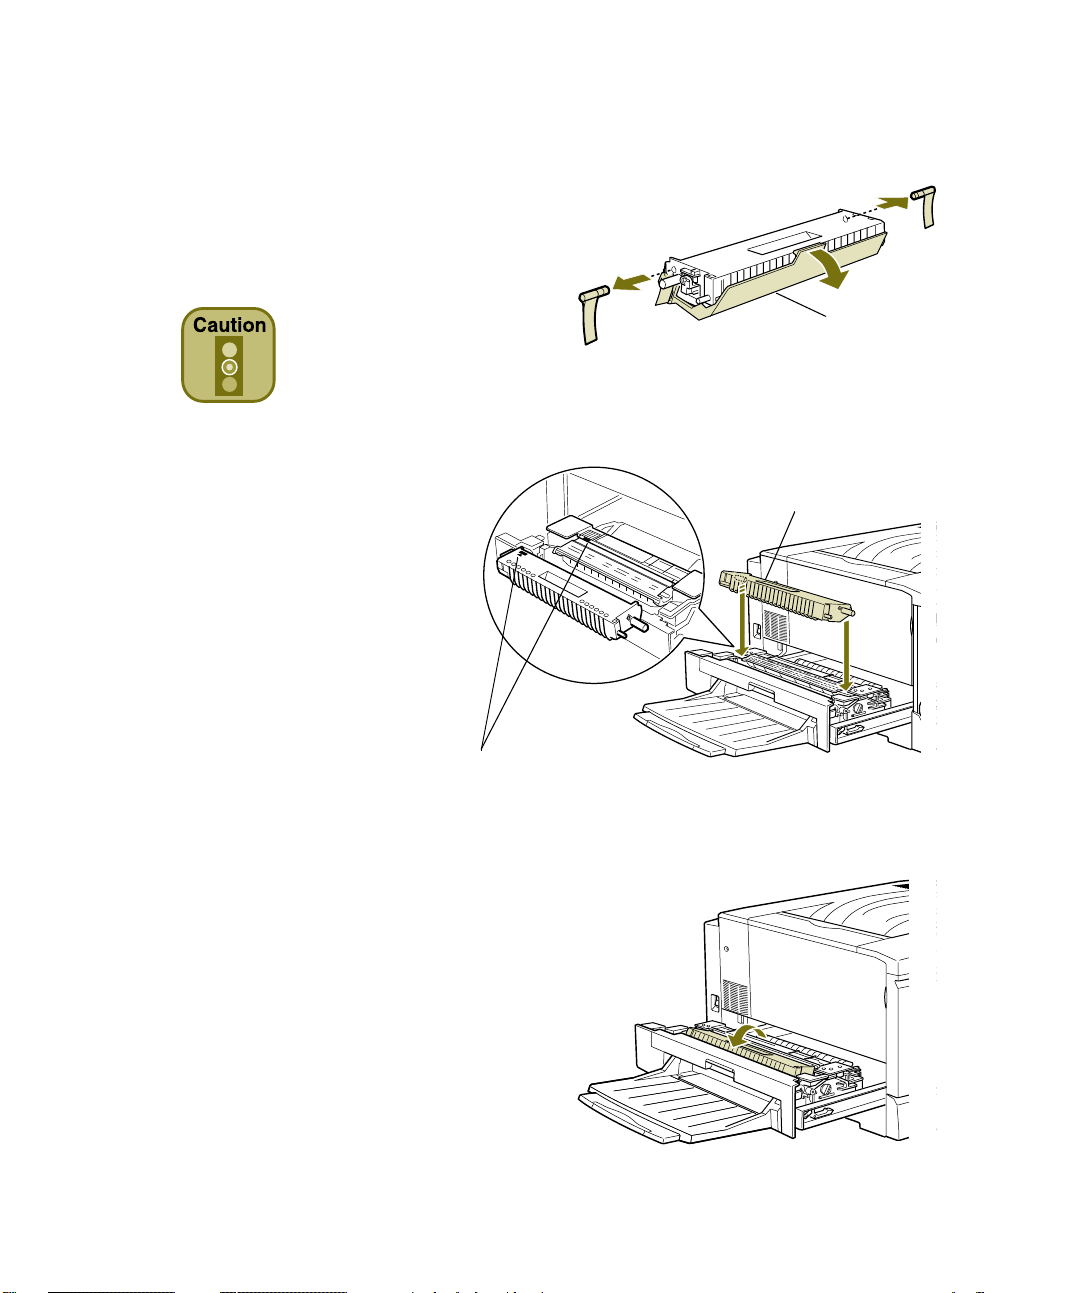
3
Take the fuser oil roll out of the box.
Remove the tape, plastic tray, and
shipping pins, as shown:
Unpacking and Setup Guide | 19
To avoid reduced print
quality, do not touch the
white roll surface.
4
Hold the roll handle and
insert it into the fuser unit,
matching the green marks
on the roll and unit.
5
Push the roll down firmly until it clicks
into place.
plastic tray
handle
positioning marks
6
Slide the fuser unit back into the
printer.
Page 22
20 | Unpacking and Setup Guide
NSTALLING THE
I
This cassette lets you print on A3W-size paper (12.9 × 17.8 inches). If you don’t have
the optional lower paper cassette, skip to the next section.
Follow these steps to install the cassette:
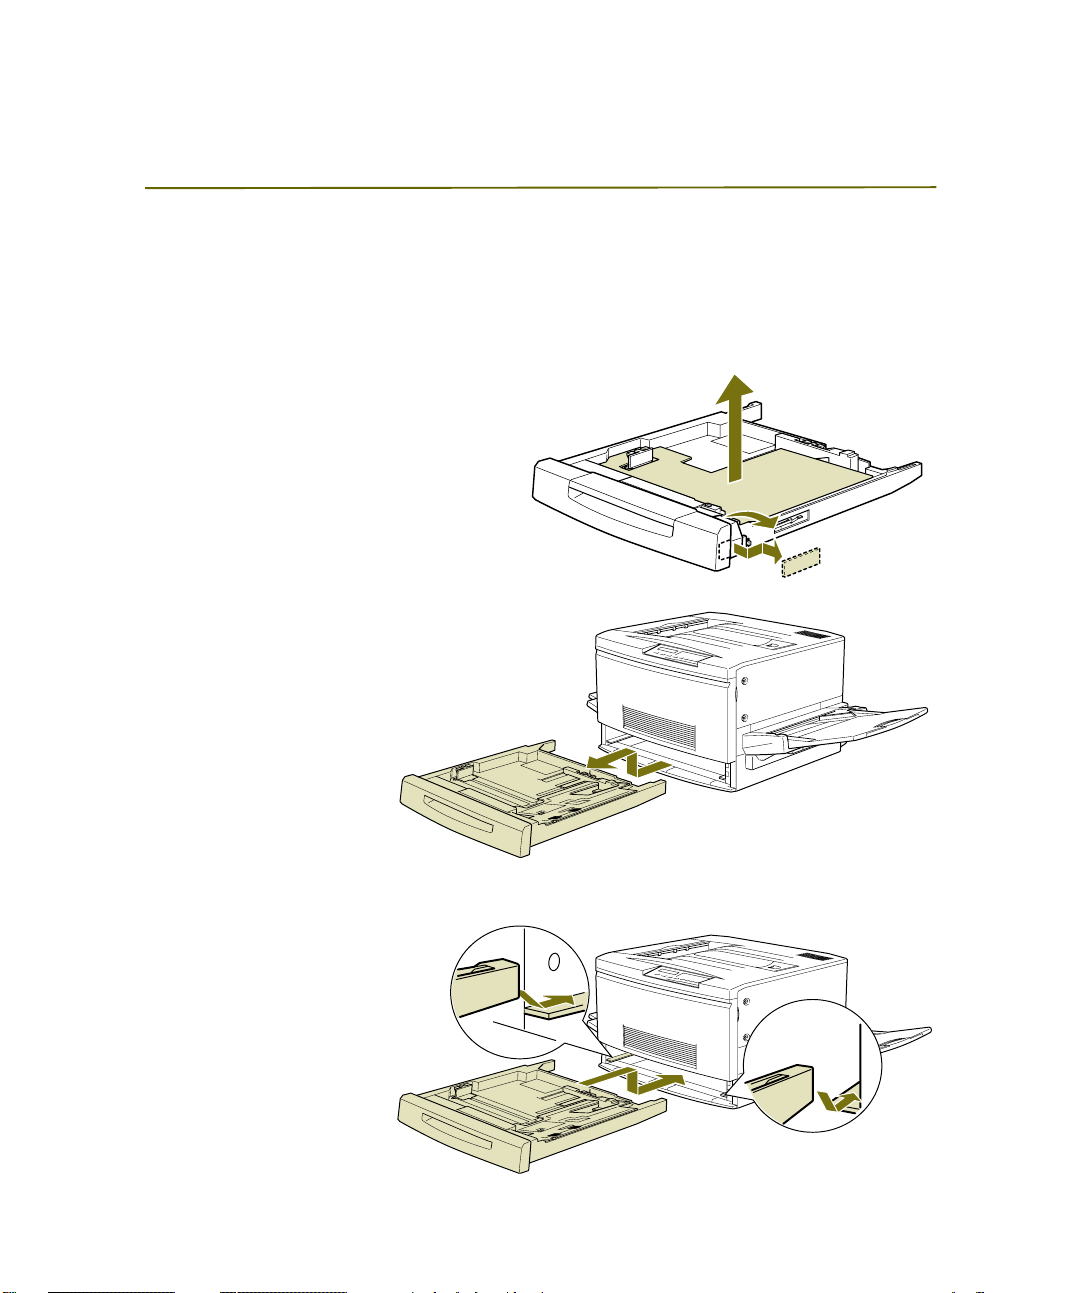
1
Unpack the cassette and remove
the protective materials.
2
Pull the standard
paper cassette all the
way out and lift it up
to remove it.
A3W P
APER CASSETTE
3
Align the legs of the
A3W cassette on the
metal rails. Then
push the cassette all
the way into the slot.
Page 23

Unpacking and Setup Guide | 21
NSTALLING THE LARGE CAPACITY PAPER UNIT
I
The large capacity paper unit has three paper cassettes. This allows you to have three
additional types or sizes of paper available for your printer at all times. You place the
printer on top of the large capacity paper unit, which includes casters so you can easily
move the printer.
If you don’t have the large capacity paper unit, skip to the next section.
Before you install the unit, note the following precautions:
■
The large capacity paper unit weighs approximately 53 lb. Do not try to lift or
carry it alone.
■
To avoid accidents, make sure you lock all casters on the unit before you install
the printer on it, or when you don’t need to move it. (See page 23.)
■
The printer weighs approximately 154 lb. Four people are required to lift it.
Unpacking the Paper Unit
Follow these steps to unpack the unit and remove the protective materials:
1
Open the box and have at least two people
remove the paper unit by lifting it with the
bars.
The large capacity paper unit
weighs approximately 53 lb.
Do not try to lift or carry it
alone.
Lift with these bars.
Page 24

22 | Unpacking and Setup Guide
2
Pull out the top
cassette and remove
the following packing
materials in this order:
■
cardboard
■
styrofoam
■
tape and plastic
piece
3
Remove the cassette from the unit by gently lifting it up.
4
Follow steps 2 and 3 for the other two cassettes.
5
Remove the two pieces of cardboard from
➀
➁
➂
inside the unit.
6
Return the cassettes to the unit. Slide each
cassette onto the guide rails, and then
push it all the way in.
Page 25

Unpacking and Setup Guide | 23
Installing the Printer on the Large Capacity Paper Unit
To install the printer, you need to place it on top of the large capacity paper unit.
Make sure four people are available to lift the printer.
To keep the paper unit from moving, lock the
casters before you start the installation.
Then follow these steps to install the printer on the paper unit:
1
Remove the
printer’s face-up
tray and fold up
the extension tray.
2
Lift the printer,
keeping it
horizontal as you
place it on the
paper unit.
The printer weighs
approximately 154 lb. Four
people are required to lift it,
holding the printer at the four
points shown:
4
3
2
1
Page 26

24 | Unpacking and Setup Guide
3
Position the printer on the paper unit so the
three pins on the top of the unit fit into the
holes in the bottom of the printer. Make sure
the front of the printer is aligned with the
front of the paper unit, as shown:
4
Remove the top cassette
from the paper unit (not
the standard paper tray
in the printer).
Page 27
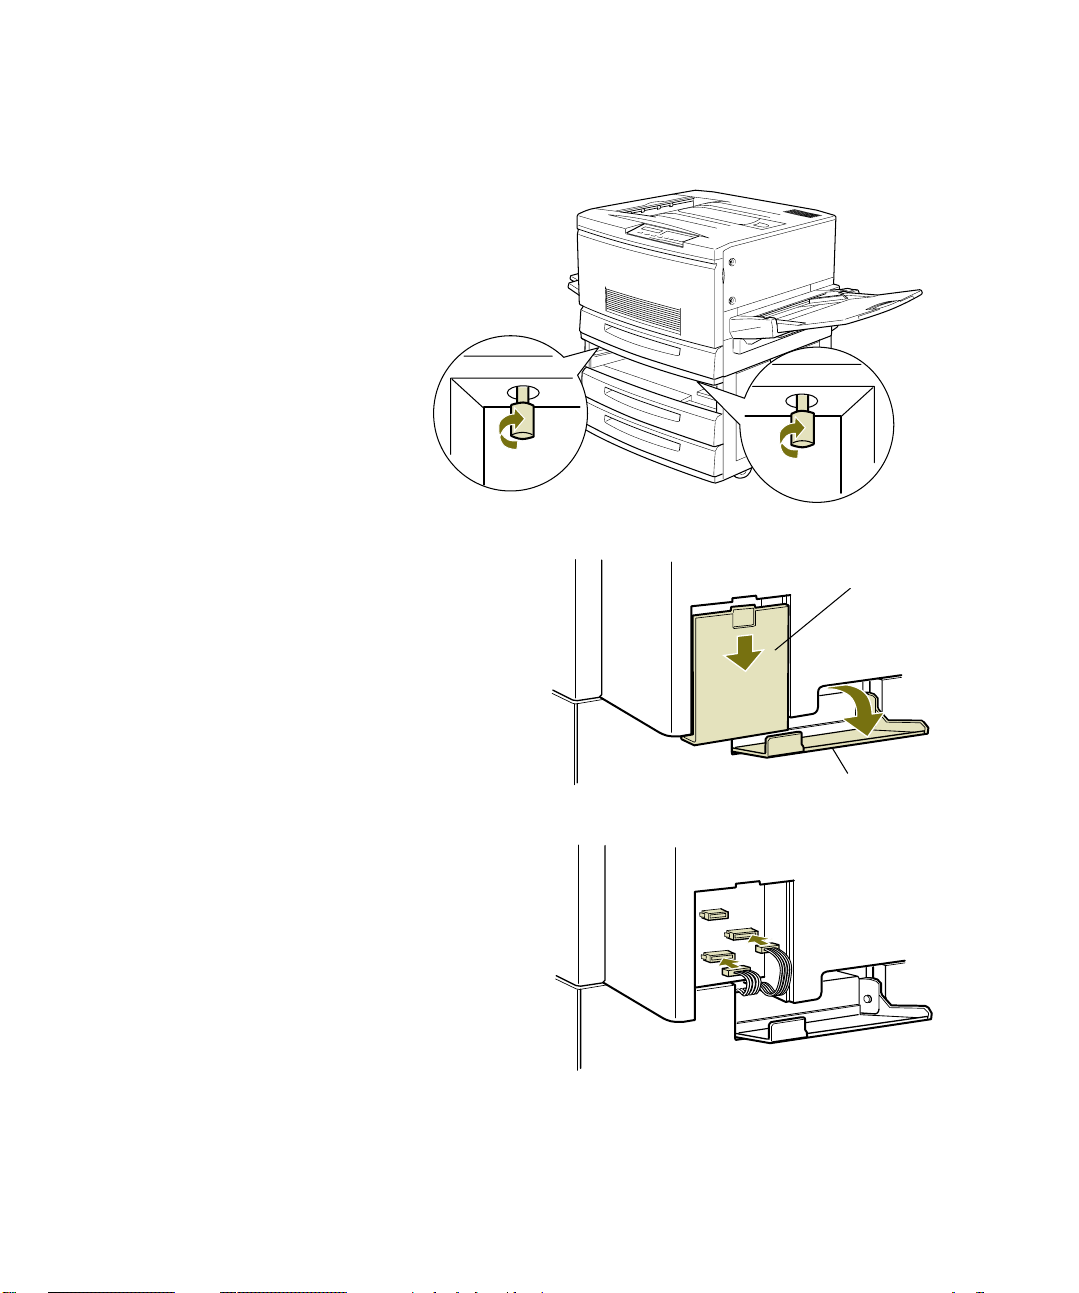
5
Tighten the two
thumbscrews on the
upper side of the paper
unit to secure it to the
printer.
6
Return the top cassette
to the paper unit.
Unpacking and Setup Guide | 25
7
Pull open the cable cover at the back
of the paper unit. Then remove the
connector cover at the back of the
printer by sliding it down.
8
Gently pull the two cables out of the
paper unit. Plug each cable into the
corresponding connector on the
printer.
9
Close the cable cover on the paper unit
and hold it closed. Slide up the
connector cover on the printer, and
then push it into position. This holds
the cable cover on the paper unit
closed.
connector
cover
cable cover
Page 28

26 | Unpacking and Setup Guide
ESTING THE PRINTER
T
Once your printer is set up, you should test it to make sure it works correctly. This
involves three steps:
■
Plugging in the printer
■
Loading paper
■
Printing a status sheet
Plugging in the Printer
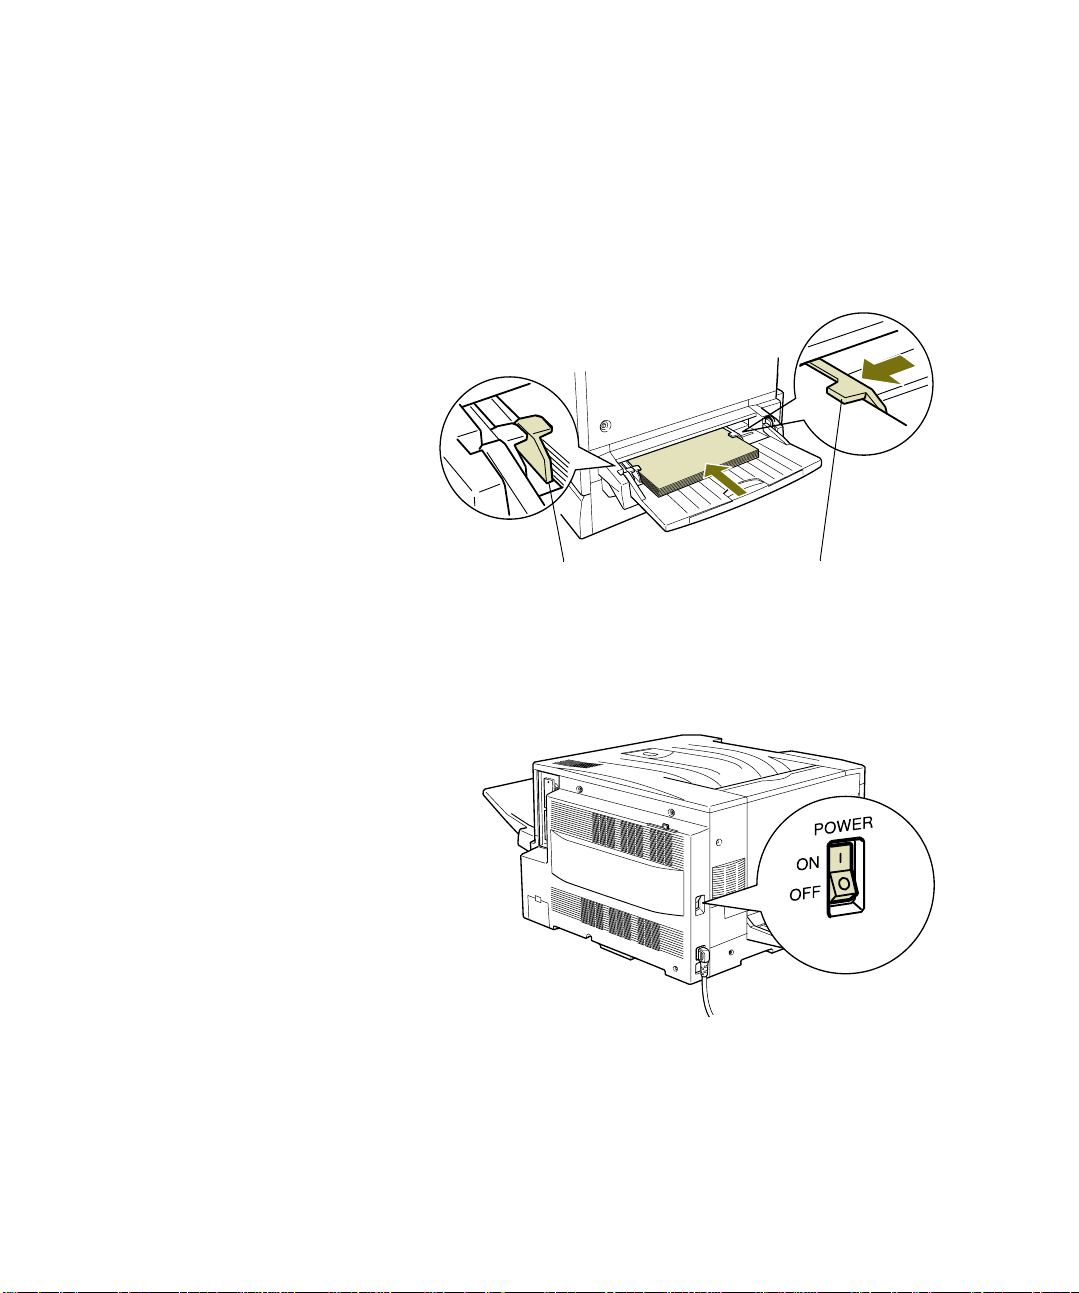
Follow these steps to plug in the printer:
1
Make sure the printer is turned
off. The power switch, which
is located on the left side of
the printer, should be in the
position shown:
2
Connect the power cord to the
AC inlet below the power
switch.
3
Plug the other end of the
power cord into a properly
grounded outlet. Avoid using
outlets where other appliances
are plugged in.
AC inlet
Page 29
Unpacking and Setup Guide | 27
.
Loading Paper
You can load up to 150 sheets in the multipurpose tray. Follow these steps:
1
Fan a stack of plain paper and then even the edges.
2
Load the paper into the
multipurpose tray long
edge first. Push the
paper against the left
edge guide. Then slide
the right edge guide
against the paper.
left edge guide
Printing a Status Sheet
Follow these steps to turn on the printer and print a status sheet:
1
Turn the power switch on.
The control panel lights come
on and then turn off. The
display shows
Then the display shows
check
and the memory
installed in your printer.
Next, the display shows
, and then
Test
The
On Line
After about five minutes, the display shows
ROM check
RAM
Self
Warming Up.
light comes on.
Ready
.
right edge guide
Page 30

28 | Unpacking and Setup Guide
2
Press the
button. The display
3
shows
Press the
Status Sheet.
button again. The
Enter
Enter
ContinueForm FeedOn Line
Paper Source
Page Size
Manual Feed
MP Tray Size
Value
Enter buttondisplay
Orientation
Out Bin
Enter
Copies
RITech
Item
Menu
AltReset
display message and
Form Feed
light
flash while the Status
Sheet is printed.
4
Check the Status Sheet to make sure the printing is clear and the oil coating is
evenly distributed. You may have to print several sheets before the oil coating is
even.
If you can’t print the Status Sheet, or it doesn’t print correctly, contact IKON as
described in the Printer Guide.
^
If the Status Sheet prints correctly, you’re ready to connect the printer to the
RIP Station 5000 (if you purchased it along with your printer). See the RIP Station
5000 Getting Started Guide for more information.
 Loading...