

Page 1
Daily Use
4012511-00
XXX
Page 2

Where to Find Information
The following guides are included with your printer.
Setup Guide
This guide will help you to install the printer software and set up
your printer so that you can start printing.
Daily Use guide
This guide provides information about normal printer operations.
It also contains troubleshooting tips and customer support
information.
Online guides included on CD-ROM
The guides contained on the CD-ROM included with your printer
help you to learn more about your printer and color printing. To
view these guides, you must have a Web browser installed on
your computer. The included guides are as follows:
❏ Reference Guide
❏ Color Guide
Opening the Reference Guide or Color Guide:
Insert the printer software CD in the CD-ROM drive.
For Windows, select
click . Then, click
Guide
For Macintosh, double-click the
window and then the
click
guide.
Note:
It is possible to install the Reference Guide on your hard disk. See
“Installing in Windows” or “Installing in Macintosh” in your Setup
Guide for instructions.
to open the guide.
View Reference Guide
Provides detailed information about
printer software settings, printing on
special paper, maintenance, and problem
solving.
Includes sample images, explanations and
troubleshooting information that will
answer your questions about color imaging
and printing.
Online Guide
View Reference Guide
EPSON STYLUS COLOR 980
in the Installer dialog box and
or
View Color
Online Guide
or
View Color Guide
icon in the EPSON
icon. Then,
to open the
Page 3

All rights reserved. No part of this publication may be reproduced, stored in a retrieval
system, or transmitted in any form or by any means, electronic, mechanical, photocopying,
recording, or otherwise, without the prior written permission of SEIKO EPSON
CORPORATION. The information contained herein is designed only for use with this EPSON
printer. EPSON is not responsible for any use of this information as applied to other printers.
Neither SEIKO EPSON CORPORATION nor its affiliates shall be liable to the purchaser of
this product or third parties for damages, losses, costs, or expenses incurred by the purchaser
or third parties as a result of: accident, misuse, or abuse of this product or unauthorized
modifications, repairs, or alterations to this product, or (excluding the U.S.) failure to strictly
comply with SEIKO EPSON CORPORATION's operating and maintenance instructions.
SEIKO EPSON CO RPORATION shall not be liable for any damages or problems arisin g from
the use of any options or any consumable products other than those designated as Original
EPSON Products or EPSON Approved Products by SEIKO EPSON CORPORATION.
SEIKO EPSON CORPORATION shall not be held liable for any damage resulting from
electromagnetic interference that occurs from the use of any interface cables other than those
designated as EPSON Approved Products by SEIKO EPSON CORPORATION.
EPSON is a registered trademark and EPSON Stylus is a trademark of SEIKO EPSON
CORPORATION.
Microsoft and Windows are registered trademarks of Microsoft Corporation.
General Notice: Other product names used herein are for identification purposes only and may be
trademarks of their respective owners. EPSON disclaims any and all rights in those marks.
Copyright © 2000 by SEIKO EPSON CORPORATION, Nagano, Japan.
Page 4

Contents
Safety Instructions . . . . . . . . . . . . . . . . . . . . . . . . . . .1
Important Safety Instructions . . . . . . . . . . . . . . . . . . . . . . . . . . . . .1
A Few Precautions . . . . . . . . . . . . . . . . . . . . . . . . . . . . . . . . . . . . . . 2
ENERGY STAR Compliance . . . . . . . . . . . . . . . . . . . . . . . . . . . . . .4
For United Kingdom Users . . . . . . . . . . . . . . . . . . . . . . . . . . . . . . .5
Warnings, Cautions, and Notes . . . . . . . . . . . . . . . . . . . . . . . . . . . 6
Printer Parts and Functions . . . . . . . . . . . . . . . . . . . . 7
Printer Parts and Control Panel Functions . . . . . . . . . . . . . . . . . . 7
Loading Special Paper, Envelopes,
and Other Media . . . . . . . . . . . . . . . . . . . . . . . . . . . .9
Loading Special Paper and Other Media . . . . . . . . . . . . . . . . . . . 9
Loading Envelopes . . . . . . . . . . . . . . . . . . . . . . . . . . . . . . . . . . . . . .11
Printing with Windows . . . . . . . . . . . . . . . . . . . . . . . . 13
Printer Software Introduction . . . . . . . . . . . . . . . . . . . . . . . . . . . . . 13
Making Changes to Printer Settings . . . . . . . . . . . . . . . . . . . . . . . 15
Previewing your printout . . . . . . . . . . . . . . . . . . . . . . . . . . . . . . . . 17
Getting Information Through Online Help . . . . . . . . . . . . . . . . . 20
Printing with Macintosh . . . . . . . . . . . . . . . . . . . . . . . 21
Printer Software Introduction . . . . . . . . . . . . . . . . . . . . . . . . . . . . . 21
Making Changes to Printer Settings . . . . . . . . . . . . . . . . . . . . . . . 21
Previewing your printout . . . . . . . . . . . . . . . . . . . . . . . . . . . . . . . . 24
Double-Sided Printing . . . . . . . . . . . . . . . . . . . . . . . . 26
Using Double-Sided Printing . . . . . . . . . . . . . . . . . . . . . . . . . . . . . 26
Replacing Ink Cartridges . . . . . . . . . . . . . . . . . . . . . 30
Replacing an Empty Ink Cartridge . . . . . . . . . . . . . . . . . . . . . . . . 30
iii
Page 5

Maintenance . . . . . . . . . . . . . . . . . . . . . . . . . . . . . . . 32
Checking the Print Head Nozzles . . . . . . . . . . . . . . . . . . . . . . . . . 32
Cleaning the Print Head . . . . . . . . . . . . . . . . . . . . . . . . . . . . . . . . . 34
Aligning the Print Head . . . . . . . . . . . . . . . . . . . . . . . . . . . . . . . . . 36
Troubleshooting . . . . . . . . . . . . . . . . . . . . . . . . . . . . . 38
Correcting USB Problems . . . . . . . . . . . . . . . . . . . . . . . . . . . . . . . . 38
Using the Error Indicators . . . . . . . . . . . . . . . . . . . . . . . . . . . . . . . 42
Typical Problems and Solutions . . . . . . . . . . . . . . . . . . . . . . . . . . 43
Cancelling Printing . . . . . . . . . . . . . . . . . . . . . . . . . . . . . . . . . . . . . 46
Where to Get Help . . . . . . . . . . . . . . . . . . . . . . . . . . . . . . . . . . . . . . 48
Options and Consumable Products . . . . . . . . . . . . . 54
Options and Consumable Products . . . . . . . . . . . . . . . . . . . . . . . 54
Printer Specifications . . . . . . . . . . . . . . . . . . . . . . . . . 59
System Requirements . . . . . . . . . . . . . . . . . . . . . . . . . . . . . . . . . . . 59
Printing with DOS . . . . . . . . . . . . . . . . . . . . . . . . . . . . 62
Installing the Printer Driver for DOS Programs . . . . . . . . . . . . . 62
Changing the Print Settings . . . . . . . . . . . . . . . . . . . . . . . . . . . . . . 63
Changing the default settings . . . . . . . . . . . . . . . . . . . . . . . . . . . . 64
iv
Page 6

Safety Instructions
Important Safety Instructions
Read all of the instructions in this section before using your
printer. Also, be sure to follow all warnings and instructions that
are marked on the printer.
Do not block or cover the openings in the printer’s cabinet.
❏
Do not insert objects through the slots.
Do not to spill liquid on the printer.
❏
Use only the type of power source that is indicated on the
❏
printer’s label.
Connect all equipment to properly grounded power outlets.
❏
Avoid using outlets that are on the same circuit as
photocopiers or air control systems that regularly switch on
and off.
Avoid electrical outlets that are controlled by wall switches
❏
or automatic timers.
Keep the entire computer system away from potential sources
❏
of electromagnetic interference, such as loudspeakers or the
base units of cordless telephones.
Do not use a damaged or frayed power cord.
❏
If you use an extension cord with the printer, make sure that
❏
the total ampere rating of the devices that are plugged into
the extension cord does not exceed the cord’s ampere rating.
Also, make sure that the total ampere rating of all devices that
are plugged into the wall outlet does not exceed the wall
outlet’s ampere rating.
Do not attempt to service the printer yourself.
❏
1
Page 7

Unplug the printer and refer servicing to qualified service
❏
personnel under the following conditions:
The power cord or plug is damaged; liquid has entered the
printer; the printer has been dropped or the cabinet damaged;
the printer does not operate normally or exhibits a distinct
change in performance.
If you plan to use the printer in Germany, the building
❏
installation must be protected by a 10 or 16 amp circuit
breaker to provide adequate short-circuit protection and
over-current protection for this printer.
Note for German-speaking users:
Bei Anschluss des Druckers an die Stromversorgung muss
sichergestellt werden, dass die Gebäudeinstallation mit einer
10 A- oder 16 A-Sicherung abgesichert ist.
A Few Precautions
Read the information in this section before using the printer,
handling the ink cartridges, or choosing a location for the printer.
Using the printer
Observe the following when using the printer.
Do not put your hand inside the printer or touch the ink
❏
cartridges during printing.
Do not move the print head by hand; otherwise, you may
❏
damage the printer.
Always turn the printer off using the
❏
this button is pressed, the
then goes off. Do not unplug the printer or turn off the power
to the outlet until the
Before transporting the printer, make sure that the print head
❏
is in the home (far right) position and that the ink cartridges
are in place.
P
power light flashes briefly and
P
power light stops flashing.
2
power button. When
P
Page 8

Handling the ink cartridges
Observe the following when handling the ink cartridges.
Keep ink cartridges out of the reach of children. Do not allow
❏
children to drink from or otherwise handle the cartridges.
Be careful when you handle the used ink cartridges, as there
❏
may be some ink around the ink supply port. If ink gets on
your skin, wash the area thoroughly with soap and water. If
ink gets in your eyes, flush them immediately with water. If
discomfort or vision problems remain after a thorough
flushing, see a doctor immediately.
Do not shake an ink cartridge; this can cause leakage.
❏
Install an ink cartridge immediately after you remove it from
❏
its package. Leaving the cartridge unpacked for a long time
before use may result in reduced print quality.
Once you install an ink cartridge, do not open the clamp or
❏
remove the cartridge except to replace it with a new one.
Otherwise, the cartridge may become unusable.
Do not use an ink cartridge beyond the date printed on the
❏
cartridge carton: otherwise, it may result in reduced print
quality. For best results, use up the ink cartridges within six
months of first installing them.
After bringing an ink cartridge inside from a cold storage site,
❏
allow it to warm up at room temperature for at least three
hours before using it.
Store ink cartridges in a cool, dark place.
❏
Do not dismantle the ink cartridges or try to refill them. This
❏
could damage the print head.
3
Page 9

Choosing a place for the printer
Observe the following when choosing a place for the printer.
Place the printer on a flat, stable surface that extends beyond
❏
the printer base in all directions. The printer will not operate
properly if it is tilted or at an angle.
Avoid places that are subject to rapid changes in temperature
❏
and humidity. Also, keep the printer away from direct
sunlight, strong light, and heat sources.
Avoid places that are subject to shocks and vibrations.
❏
Leave enough room around the printer to allow for sufficient
❏
ventilation.
Avoid places subject to dust.
❏
Place the printer near a wall outlet where the plug can be
❏
easily unplugged.
Note for French-speaking users:
Placez l’imprimante près d’une prise de contacte où la fiche
peut être débranchée facilement.
ENERGY STAR Compliance
As an ENERGY STAR Partner, EPSON has determined
that this product meets the ENERGY STAR guidelines
for energy efficiency.
The International ENERGY STAR Office Equipment Program is
a voluntary partnership with the computer and office equipment
industry to promote the introduction of energy-efficient personal
computers, monitors, printers, fax machines, copiers, and
scanners, in an effort to reduce air pollution caused by power
generation.
4
Page 10

For United Kingdom Users
Use of options
EPSON (UK) Limited shall not be liable against any damages or
problems arising from the use of any options or consumable
products other than those designated as Original EPSON
Products or EPSON Approved Products by EPSON (UK) Limited.
Safety information
Warning:
w
Important:
The wires in the mains lead fitted to this appliance are coloured
in accordance with the following code:
Green and yellow — Earth
Blue — Neutral
Brown — Live
This appliance must be earthed. Refer to the rating plate for
voltage and check that the appliance voltage corresponds to the
supply voltage.
If you have to fit a plug:
As the colours of the mains lead for this appliance may not match
the coloured markings used to identify the terminals in a plug,
please proceed as follows:
The green and yellow wire must be connected to the terminal in
the plug that is marked with the letter E or the earth symbol (
The blue wire must be connected to the terminal in the plug that
is marked with the letter N.
The brown wire must be connected to the terminal in the plug that
is marked with the letter L.
G
5
).
Page 11

If damage occurs to the plug, replace the cord set or consult a
qualified electrician.
Replace fuses only with a fuse of the correct size and rating.
Warnings, Cautions, and Notes
Warnings
w
c
Notes
contain important information and useful tips on the operation of your
printer.
must be followed carefully to avoid bodily injury.
Cautions
must be observed to avoid damage to your equipment.
6
Page 12
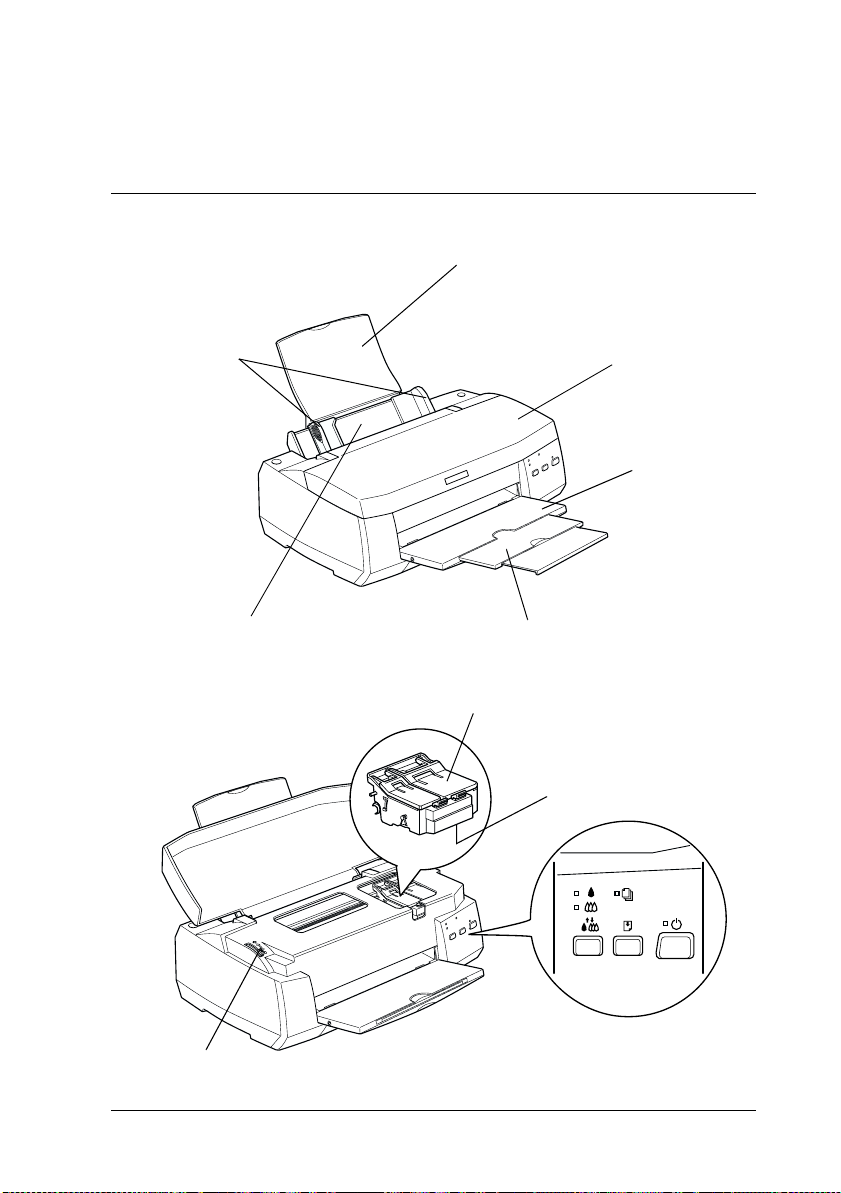
Printer Parts and Functions
t
Printer Parts and Control Panel Functions
paper suppor
edge guides
sheet feeder
output tray extension
ink cartridge clamps
printer cover
output tray
Print head
adjust lever
control panel
7
Page 13
Buttons
Button Function
Lights
P
power
E
load/eject
R
cleaning
Light Description
P
power
S
paper out
Turns the printer on and off.
Clears the printer's memory if pressed twice while the
power is on.
Loads or ejects paper if pressed and released within
2seconds.
Resumes printing if pressed and released after a paper
out error.
Moves the print head to the ink cartridge replacement
position if pressed for 3 seconds while the
color ink out light is flashing or on.
Returns the print head to its home position after ink
cartridge replacement.
Performs print head cleaning if pressed for 3 seconds
when the
On when the printer is on.
Flashing when printer is receiving data, printing,
replacing an ink cartridge, charging ink, or cleaning
the print head.
On whe n th e pr int er is out of p ape r. L oad pap er in th e
sheet feeder, then press the
resume printing.
Flashing when the paper is jammed. Take all of the
paper out of the feeder, then reload the paper. If the
light continues to flash, turn off the printer and gently
pull all of the paper out of the printer.
B
B
black or A color ink out light is off.
E
load/eject button to
black or
A
8
B
black ink
out
A
color ink
out
On when the black ink cartridge is empty. Replace the
black ink cartridge (T003).
Flashing when the black ink cartridge is nearly empty.
On when the color ink cartridge is empty. Replace the
color ink cartridge (T005).
Flashing when the color ink cartridge is nearly empty.
Page 14
Loading Special Paper, Envelopes, and Other Media
Loading Special Paper and Other Media
You can print on a wide variety of special media, including ink
jet paper, photo quality glossy film, photo paper, transparencies,
index cards, and adhesive sheets.
When loading special media that is distributed by EPSON, read
the instruction sheets packed with the media first and keep the
points listed below in mind. For more details on using special
media, see “Paper Handling” in the online
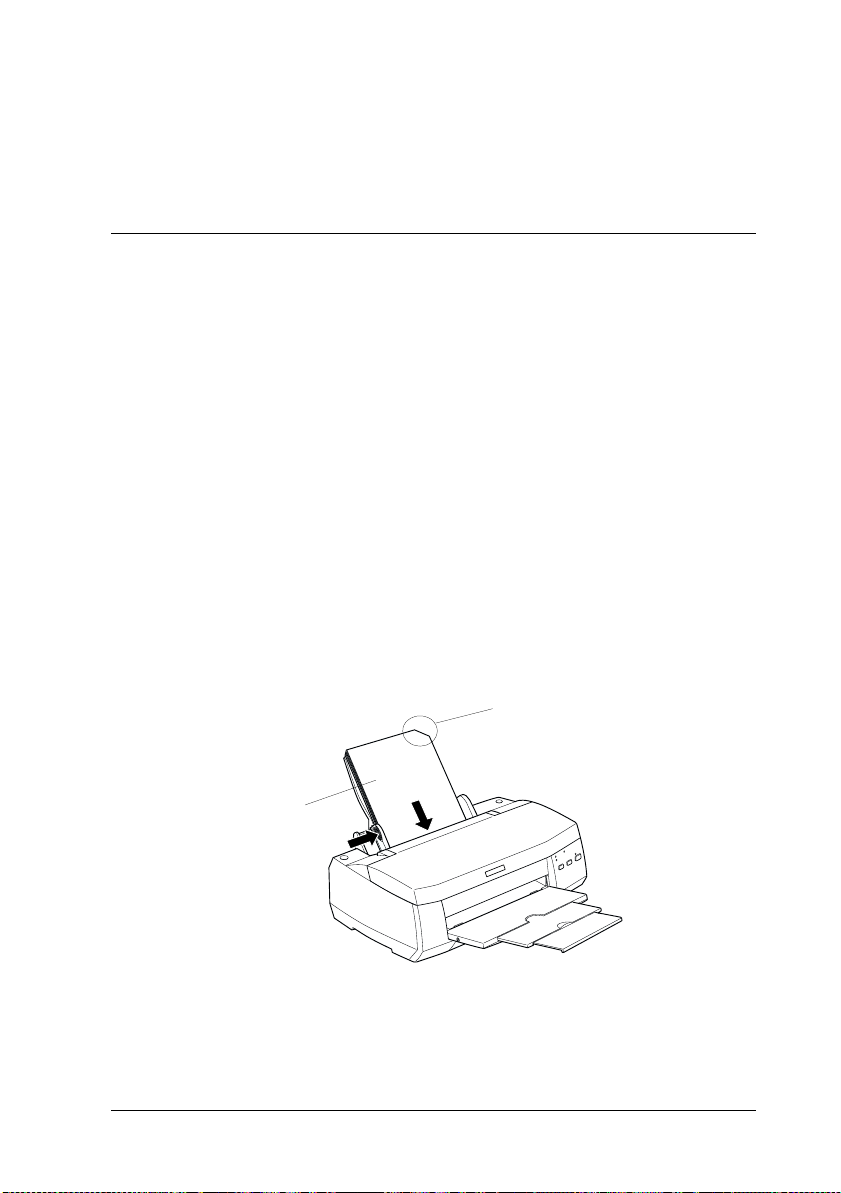
Make sure that the printable side of the paper is facing up
❏
when loading media into the sheet feeder. See the instruction
sheets packed with the media to determine which side is the
printable surface. Some types of media have cut corners to
help identify the correct loading direction, as shown in the
illustration.
Reference Guide
.
cut corner
printable
side up
Make sure that the paper stack fits under the arrow mark that
❏
is located on the inside surface of the left edge guide.
9
Page 15
Loading capacities for EPSON special media
See below to find the loading capacities for EPSON special media.
Media Type Loading Capacity
360 dpi Ink Jet Paper and
Photo Quality Ink Jet
Paper
Photo Quality Ink Jet
Cards, Ink Jet Note
Cards, and Ink Jet
Greeting Cards
Photo Quality Glossy Film One sheet at a time or a maximum of 20
Ink Jet Transparencies Up to 30 transparencies.
Photo Quality Self
Adhesive Sheets
Photo Paper Up to 20 sheets.
Premium Glossy Photo
Paper
Up to the arrow mark on the left edge
guide.
Up to 30 cards.
Always place the included support sheet*
under the cards.
sheets. When loading multiple sheets, set
the minimum top margin of the page to
30 mm.
Always put a support sheet* or a sheet of
plain paper under the glossy film.
Always put a sheet of plain paper under
the stack of transparencies.
One sheet at a time.
For 200×300 mm Photo Paper, you can
only load one sheet at a time. Always put
a support sheet* under the stack of Photo
Paper.
One sheet at a time.
Photo Stickers 16 and
Photo Stickers 4
Panoramic Photo Paper
and Iron-On Cool Peel
Transfer Paper
Matte PaperHeavyweight
* Do not print on support sheets that are loaded under special media.
One sheet at a time.
One sheet at a time.
Up to 20 sheets.
Always put a support sheet* under the
stack of Matte Paper-Heavyweight.
10
Page 16

About special media cleaning sheets
Cleaning sheets that are packaged with EPSON special media
should not be used with this printer. The cleaning function
performed by these sheets is not necessary with this type of
printer and the sheets may jam in the printer.
Loading Envelopes
When printing on envelopes, please note the following:
You can load up to 10 envelopes in the sheet feeder.
❏
Note:
The folding quality and thickness of envelopes varies widely. If the
total thickness of the stack of envelopes exceeds 10 mm, press each
envelope in the stack flat before loading.
Set the adjust lever to the “+” position. To do this, open the
❏
printer cover and reposition the lever.
Note:
❏ Return the adjust lever to the “0” position, which is the normal
position, after you finish printing on envelopes. Leaving the
lever in the “+” position may cause gaps to appear in images
that are printed on other media.
❏ When the adjust lever is in the “+” position, make sure that the
High Speed
box is cleared. To clear this check box, you may also need to
change the Print Quality setting.
check box in the printer driver’s Advanced dialog
11
Page 17
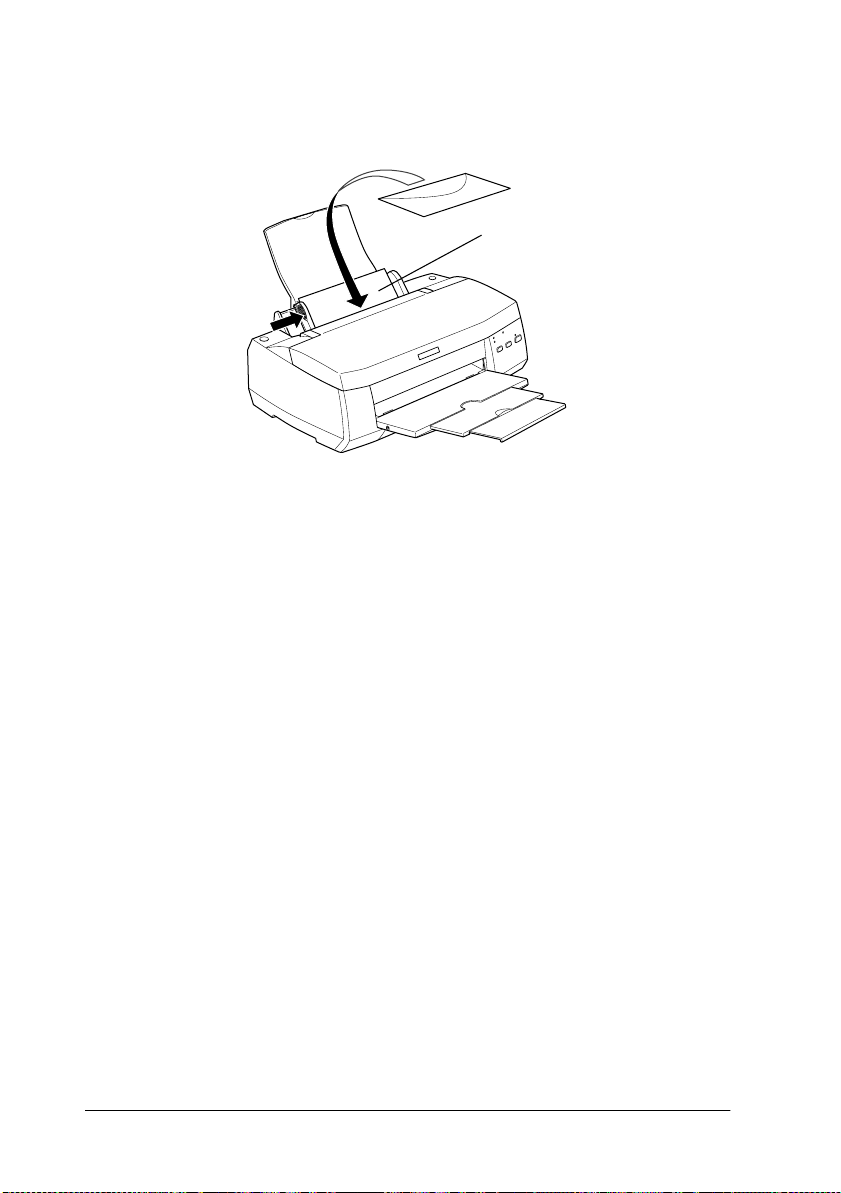
Load envelopes flap edge first with the flap side down, as
❏
shown in the illustration.
Available envelopes sizes are:
No.10, DL, C6, 132 mm
Do not use envelopes that are curled or folded. Flatten the
❏
envelope flaps before loading. Avoid using envelopes that are
too thin as they may curl during printing.
❏
Select
Plain Paper
as the Media Type setting in the printer
driver.
×
220 mm
12
Page 18

Printing with Windows
Printer Software Introduction
The printer software CD-ROM which comes with your printer
includes a printer driver and printer utilities. The printer driver
lets you choose from a wide variety of settings to achieve the best
results with your printer. The printer utilities help you to check
the printer and keep it in top condition.
Getting more information
For information on using the printer driver, see “Making Changes
to Printer Settings” on page 15.
For information on using the printer utilities, see “Using the
Printer Utilities” in the online
Note:
The specific features available in the printer software vary, depending
on the version of Windows that you are using.
Reference Guide
.
Online help provides more information about the printer
software. See “Getting Information Through Online Help” on
page 20 for instructions on accessing help.
Accessing the printer software
You can access the printer software from most Windows
applications, from the Windows Start menu (Windows 98, 95,
2000, and NT 4.0), or from the Control Panel (Windows 3.1).
When you access the printer software from a Windows
application, the settings that you make apply only to the
application that you are using.
13
Page 19

When you access the printer software from the Start menu, the
settings that you make apply to all of your Windows applications.
Refer to the appropriate section below.
From Windows applications
Follow the steps below to access the printer software from
Windows applications.
1. From the File menu, click
2. In the dialog box that appears, click
or
Properties
to click a combination of these buttons.) The printer driver
opens.
. (Depending on your application, you may need
Print
or
Print Setup
Printer, Setup, Options
.
From the Windows Start menu (Windows 98, 95, 2000, and
NT 4.0)
Follow the steps below to access the printer software from the
Start menu.
1. Click
2. For Windows 98 and 95, select your printer, then click
Properties
printer, then click
Windows NT 4.0, select your printer, then click
Defaults
, point to
Start
on the File menu. For Windows 2000, select your
on the File menu. The printer driver opens.
Settings
Printing Preferences
, then click
Printers
on the File menu. For
.
Document
From the Control Panel (Windows 3.1)
Follow the steps below to access the printer software from the
Control Panel in Windows 3.1.
,
1. Double-click the
group.
2. Double-click the
14
Control Panel
Printers
icon.
icon in the Main program
Page 20
3. Select your printer in the
Installed Printers
list.
4. Click
. The printer driver opens.
Setup
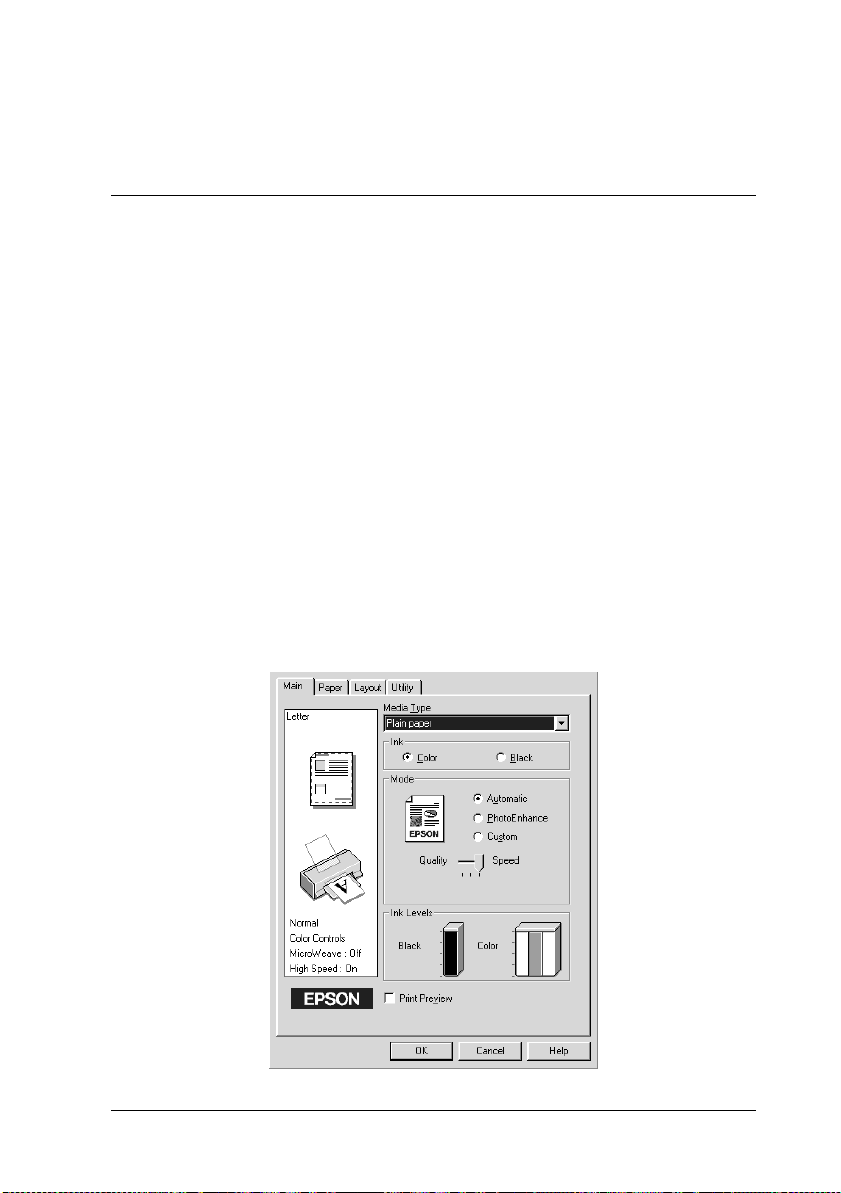
Making Changes to Printer Settings
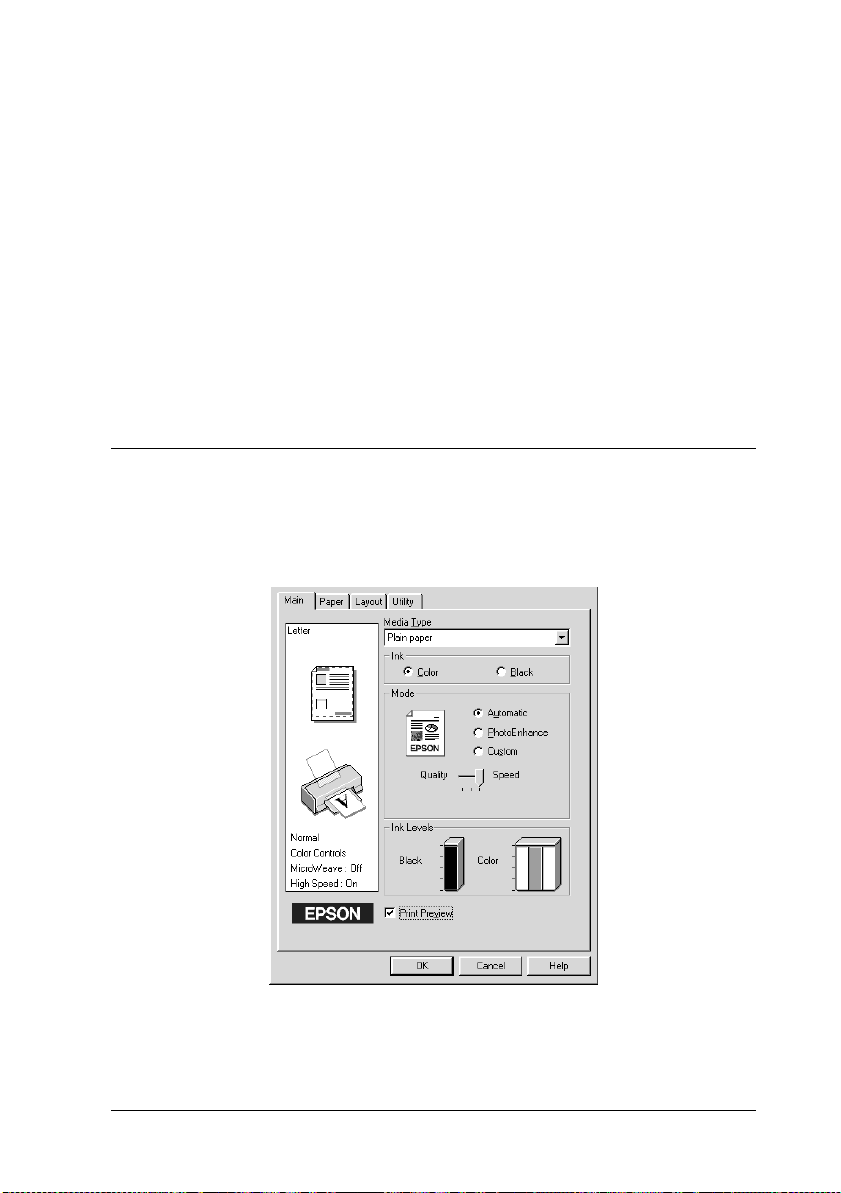
The printer driver features the following menus and settings.
Main: Media Type, Ink, Mode, Print Preview
Paper: Paper Size, Copies, Orientation, Printable Area
Layout: Reduce/Enlarge, Double-Sided Printing, Multi-Page,
Watermark
Note:
The Layout menu is available only for Windows 98, 95, 2000, and
NT 4.0 users.
The Mode settings on the Main menu are arranged to give you
three levels of control over the printer driver, as explained below.
15
Page 21
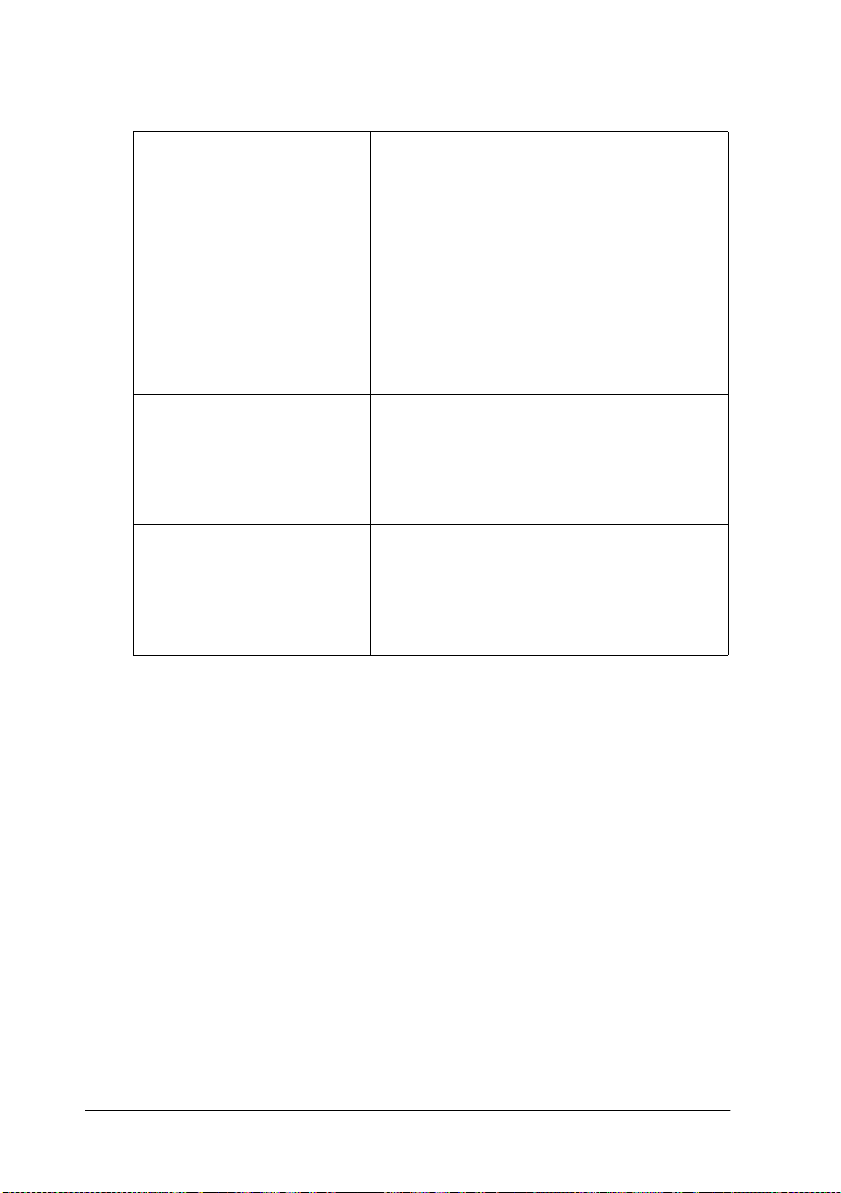
Automatic
When this mode is selected, the printer
driver takes care of all detailed settings
based on the current Media Type and Ink
settings. To make the Ink setting, click
Color to print in color, or Black to print in
black-and-white or grayscale.
Depending on the media selected in the
Media Type list (while Automatic is
selected), a slider appears under the
Custom radio button that lets you choose
either Quality or Speed. Select Quality
when print quality is more important than
speed.
PhotoEnhance
Custom
This mode provides a variety of imagecorrection settings that you can apply to
your photos before printing.
PhotoEnhance does not affect your
original data. This mode is only available
when printing 16-, 24-, or 32-bit color data.
This mode offers ready-made settings
designed for printing text and graphs and
for applying a color-matching method.
You can also create and save your own
custom settings using the settings in the
Advanced dialog box.
In addition to making comprehensive Mode settings that affect
overall print quality, you can also modify individual aspects of
your printout using the Paper and Layout menus. For more
information about the Paper and Layout menus, see your online
Reference Guide
.
Making the Media Type setting
The Media Type setting determines what other settings are
available, so you should always make this setting first.
16
Page 22
On the Main menu, select the Media Type setting that matches
the media that is loaded in the printer. To determine what Media
Type you are using, locate your media in the list found under
“Media types” on page 56, and refer to the corresponding Media
Type under which it is grouped (shown in larger type). For some
types of media, there are several Media Type settings to choose
from.
Note:
For Windows 3.1 users, if the Media Type that you wish to select does
not appear in the list, make the
Settings dialog box first. To access this dialog box, click the
button on the Main menu, then click
Print Quality
More Settings
setting in the More
Advanced
.
Previewing your printout
Select the
preview of your document before printing.
Note:
This feature is not available for Windows 3.1.
Print Preview
check box on the Main menu to see a
17
Page 23

When you send a print job to the printer, the Print Preview
window opens, allowing you to make changes before printing.
The Preview dialog box contains several icon buttons that allow
you to perform various functions. See online help for each
function.
You can also manipulate the previewed document in the
following ways:
Select and preview individual pages.
❏
Reduce or enlarge the size of the preview.
❏
Select and print any or all pages.
❏
Magnify the previewed document. To do this, click View and
❏
then Magnify to open the Magnify window, which magnifies
the area of the previewed document which is outlined by a
red box. By dragging the red box, you can change which part
of the document is magnified.
18
Page 24

View the individual pages that comprise a poster. The Poster
❏
window opens automatically when you send a print job while
Poster
menu. From this window, you can view the individual pages
which make up a poster. You ca n also open this d ialog box by
clicking
Apply watermarks. The watermark that you select will
❏
appear in the previewed image. For detailed information on
customizing watermarks, see “Printing a watermark on your
document” in the online
Specify which pages in the document you would like printed
❏
using the Add and Remove features. To add or remove a page,
you must first click the page icon in the list appearing at the
left side of the preview window. Then add or remove it using
the commands on the Print Options menu.
Note:
❏ When using the double-sided printing feature, the Preview window
allows you to toggle between pages in the print job by clicking the
appropriate page in the list at the left side of the screen. The pages
are listed in two columns, Front and Back. The pages in the Front
column will print first. The page numbers listed refer to pages of the
print job, and may contain more than one document page.
is selected as the Multi-Page option on the Layout
View
and then
Poster
.
Reference Guide
.
❏ If it is necessary to reprint part of a double-sided print job, select
each page of the print job that does not need to be reprinted in the
list at the left side of the screen, then click
Print Options menu. Make sure that the paper is loaded properly so
that the print job will start on the correct side of the correct page.
After you have previewed the document, click
document, or click
Cancel
to cancel printing.
Remove Page
Print
on the
to print the
19
Page 25

Getting Information Through Online Help
Your printer software has an extensive online help feature, which
provides you with instructions on printing, making printer driver
settings, and using the printer utilities. In Windows 98, 95, 2000,
and NT 4.0, you can access online help from an application or from
the Windows Start menu. In Windows 3.1, you can access online
help through the EPSON program group. Refer to the appropriate
section below.
Accessing help from an application
To access help from an application, open the application’s File
menu and choose
Options
need to click a combination of these buttons.)
bottom of the Main, Paper, Layout, and Utility menu for help
related to that menu.
For Windows 98, 95, 2000, and NT 4.0, you can get specific help
related to any item on a menu by right-clicking the item, then
clicking the
appears
, or
Properties
What's This?
The help contents window opens.
.
or
Print
Print Setup
. (Depending on the application, you may
command in the shortcut menu that
. Then click
Click
Printer, Setup
Help
,
at the
Accessing help from the Windows Start menu
To access help from the Start menu, click the
to
Programs
EPSON Printers
EPSON Stylus COLOR 980 Help
opens.
and then to
(for Windows 2000 and NT 4.0), then click
Epson
(for Windows 98 and 95) or
. The help contents window
button, point
Start
Accessing help from Windows 3.1
To access help in Windows 3.1, open the EPSON program group
and click the
contents window opens.
20
EPSON Stylus COLOR 980 Help
icon. The help
Page 26

Printing with Macintosh
Printer Software Introduction
The printer software that comes with your printer includes a
printer driver and printer utilities. The printer driver lets you
choose from a wide variety of settings to get the best results from
your printer. The printer utilities help you check the printer and
keep it in top operating condition.
For information on using the printer driver, see “Making Changes
to Printer Settings” on page 21.
For information on using the printer utilities, see “Using the
Printer Utilities” in the online
You can also get more information about the printer software by
clicking the help icon in any of the dialog boxes in the printer
driver.
Reference Guide
Making Changes to Printer Settings
.
You will find the printer driver settings in the following dialog
boxes.
Print dialog box (click
❏
application or click
Background Printing dialog box (click the Background
❏
Printing icon button located in the Print dialog box)
Page Setup dialog box (click
❏
your application)
Layout dialog box (click the Layout icon button in the Print
❏
dialog box)
Preview dialog box (click the Preview icon button in the
❏
Print dialog box and then click
Options
on the File menu of your
Print
in the Page Setup dialog box)
Page Setup
Preview
on the File menu of
)
21
Page 27

The Mode settings in the Print dialog box are arranged to give you
three levels of control over the printer driver.
The Mode settings are explained below.
Automatic
PhotoEnhance
Custom
When this mode is selected as the Mode
setting in the Print dialog box, the printer
driver takes care of all detailed settings
based on the current Media Type and Ink
settings. To make the Ink setting, click
Color to print in color, or Black to print in
black-and-white or grayscale.
Depending on the media that you
choose in the Media Type list (while
Automatic is selected), a slider appears
to the right of the Mode options that lets
you choose Quality or Speed. Select
Quality when print quality is more
important than speed.
This mode provides a variety of imagecorrection settings that you can apply to
your photos before printing.
PhotoEnhance does not affect your
original data. This mode is only available
when printing 32-bit color data.
The Custom mode offers ready-made
settings designed for printing text and
graphs and for applying a colormatching method. You can also create
and save your own custom settings using
the settings in the Advanced dialog box.
22
Page 28

In addition to making comprehensive Mode settings that affect
overall print quality, you can also modify individual aspects of
your printout using the settings contained in the Page Setup and
the Layout dialog boxes.
Making the Media Type setting
The Media Type setting determines what other settings are
available, so you should always make this setting first.
In the Print dialog box, select the Media Type setting that matches
the paper that is loaded in the printer. To find out what Media
Type you are using, find your media in the list found under
“Media types” on page 56, and refer to the corresponding media
type under which it is grouped (shown in larger type). For some
types of media, there are several Media Type settings to choose
from.
Saving spool data as a file
You can save the spool data as a file by using the Save File feature
in the Print dialog box. This feature lets you print the file at a later
time using the saved spool data, simply by double-clicking the
saved file. Follow the steps below to save spool data for files and
to print files using saved spool data.
1. Make your printer driver settings.
2. Click the
repeatedly until the
button.
3. Click the
4. Browse for the location where you want to save the file, then
type a file name in the Save As text box and click
print settings are now saved for this file.
5. When you want to print the document, double-click the file
to open EPSON Monitor 3, make sure that the correct
document is selected, then click the Resume button to send
the data to the printer.
Preview icon button in the Print dialog box
button changes into the
Print
Save File
button.
Save File
. The
Save
23
Page 29

Previewing your printout
The Preview feature allows you to see how your document will
look before actually printing it. Follow the steps below to preview
your document.
1. Make your printer driver settings.
2. Click the
button changes into a
Print
Note:
Click the Preview icon button to toggle between the Print
Preview, and Save File modes. For information on the Save
File mode, see “Saving spool data as a file” on page 23.
3. Click the
and displays a preview of your document.
Preview icon button in the Print dialog box. The
button.
Preview
Preview
button. The Preview dialog box appears
,
24
The Preview dialog box contains six icon buttons that you can
use to perform various functions. See online help for more
details.
Page 30

Note:
❏ When using the double-sided printing feature, the Preview
window allows you to toggle between pages in the print job by
clicking the appropriate page in the list at the left side of the
screen. The pages are listed in two columns, Front and Back.
The pages in the Front column will print first. The page
numbers listed refer to pages of the print job, and may contain
more than one document page.
❏ If it is necessary to reprint part of a double-sided print job, select
each page of the print job that does not need to be reprinted in
the list at the left side of the screen, then click the remove
page button. Make sure that the paper is loaded properly so that
the print job will start on the correct side of the correct page.
4. If you are satisfied with the previewed image, click
If you are not satisfied with the appearance of the image, click
Cancel
current print settings preserved. Open the Print dialog box
again to make additional changes to the print settings.
. The Preview and Print dialog boxes close with the
Print
.
25
Page 31

Double-Sided Printing
Using Double-Sided Printing
The EPSON Stylus COLOR 980 allows double-sided printing.
There are two types of double-sided printing available. Standard
double-sided printing allows you to print the odd-numbered
pages first. Once these are printed, you can reload the printouts
in the sheet feeder and print the even-numbered pages on the
other side of the paper. Folded Booklet double-sided printing
allows you to make single-fold booklets. For more details about
making single-fold booklets and double-sided printing, refer to
your online
Note:
❏ Double-sided printing via a network is possible when the High-
Speed Printing is set to ON in EpsonNet Direct Print Version 2 or
higher, running on the server. For details, please refer to the Readme
file on the Printer software CD-ROM.
❏ You can load up to 30 sheets of paper at one time when double-sided
printing; however, the loading capacity of the sheet feeder varies,
depending on the media type.
Reference Guide
.
❏ Only use media types which are suitable for double-sided printing.
Otherwise, the printout quality may deteriorate.
❏ This feature is not available for Windows 3.1 users.
❏ Depending on the type of paper and the amount of ink used to print
text and images, ink may bleed through to the other side of the paper.
26
Page 32

For Windows users, select the
on the Layout menu of your printer driver to use the double-sided
printing feature. To access your printer driver, see “Accessing the
printer software” on page 13.
Double-Sided Printing
check box
For Macintosh users, select the
in the Page Setup dialog box. For information on making settings
in this dialog box, see “Making Changes to Printer Settings” on
page 21.
Double-Sided Printing
check box
27
Page 33

Once the
possible to make the following double-sided printing settings.
Margins
Click this button to open the Margins dialog box, where you can
specify which edge the binding will be on. You can choose
between
the binding margin by entering a value in the Binding Margin text
box.
Double-Sided Printing
Left, Top
, and
Right
check box is selected, it is
. You can also specify the width of
28
Page 34

Folded Booklet
Select this check box to make single-fold booklets. For more
details on this feature, refer to your online
Once you have made your settings, click OK to save them. Load
paper in the sheet feeder, then send the print job from your
application. The odd-numbered pages will print first, unless
Folded Booklet
numbered pages, instructions are displayed which explain how
to reload the paper correctly. Follow the instructions to reload the
paper, then click
is selected. While the printer is printing the odd-
Resume
to print the even-numbered pages.
Reference Guide
.
29
Page 35

Replacing Ink Cartridges
Replacing an Empty Ink Cartridge
Follow the instructions in this section to replace an ink cartridge
using the printer’s control panel or the Status Monitor utility.
Using the printer's control panel
The printer’s indicator lights will inform you when it is time to
obtain a replacement ink cartridge and when it is time to replace
an empty cartridge. You can also check ink levels and start the ink
cartridge replacement procedure from your computer using the
Status Monitor utility. See the online
information.
Note:
If you need to replace an ink cartridge while the
out lights are off, see “Replacing an Old or Damaged Ink Cartridge” in
the online Reference Guide.
The following table describes the status of the lights on your
printer and the actions that you need to take.
Reference Guide
black and A color ink
B
for more
o
= on, f = flashing
30
Light Action
f B
o B
f A
o A
Obtain a replacement black ink cartridge (T003).
Replace the empty black ink cartridge.
Obtain a replacement color ink cartridge (T005).
Replace the empty color ink cartridge.
Page 36

Warning:
w
c
Note:
❏ You cannot continue printing with one ink cartridge empty, even if
❏ In addition to the ink used during printing, ink is consumed during
❏ Keep ink cartridges out of the reach of children. Do not allow
children to drink from or otherwise handle the cartridges.
❏ If ink gets on your skin, wash it thoroughly with soap and
water. If ink gets in your eyes, flush them immediately with
water. If discomfort or vision problems remain after a
thorough flushing, see a doctor immediately.
Caution:
❏ EPSON recommends the use of genuine EPSON ink
cartridges. Other products not manufactured by EPSON
may cause damage to your printer not covered by EPSON's
warranties.
❏ Leave the old cartridge installed in the printer until you have
obtained a replacement; otherwise, ink remaining in the print
head nozzles may dry out.
the other cartridge still contains ink. Before printing, replace the
empty cartridge.
the print head cleaning operation and during the self-cleaning cycle
which is performed when the printer is turned on.
To replace an ink cartridge using the printer’s control panel, refer
to the online
Note:
You can also replace an ink cartridge from your computer using the
Status Monitor. Click the
Status Monitor’s Printer Status window, then follow the on-screen
instructions.
Reference Guide
.
Replace Ink Cartridge
button in the
31
Page 37

Maintenance
Checking the Print Head Nozzles
If you find that the printed image is unexpectedly faint or that
dots in the printed image are missing, you may be able to identify
the problem by checking the print head nozzles.
You can check the print head nozzles from your computer using
the Nozzle Check utility in the printer software, or from the
printer using the printer’s control panel buttons.
For more information about the control panel buttons, see your
online
Reference Guide
Using the Nozzle Check utility
To use the Nozzle Check utility, refer to the appropriate section
below.
Note:
Do not use the Nozzle Check utility while printing is in progress;
otherwise, your printout may be marred.
.
For Windows users
Follow the steps below to use the Nozzle Check utility.
1. Make sure that A4 or Letter size paper is loaded in the sheet
feeder.
2. Click the
Nozzle Check
3. Follow the on-screen instructions.
tab in the printer software, then click the
Utility
button.
For Macintosh users
Follow the steps below to use the Nozzle Check utility.
32
Page 38

1. Make sure that A4 or Letter size paper is loaded in the sheet
feeder.
2. Access the Print or Page Setup dialog box.
3. Click the Utility icon button, then click the
Nozzle Check
button.
4. Follow the on-screen instructions.
The printer prints an operation check page that includes your
printer’s ROM version information, the ink counter code, and a
nozzle check pattern. Below are sample printouts.
Good sample
Print head needs to be cleaned
Segments are missing
The above sample is in black and white, but the actual test prints in color
(CMYK).
If the nozzle check page does not print satisfactorily (for example,
if any segment of the printed lines is missing), there is a problem
with the printer. This could be a clogged ink nozzle or a
misaligned print head. See the next section for details on cleaning
the print head. For information on aligning the print head, see
“Aligning the Print Head” on page 36.
33
Page 39

Cleaning the Print Head
If you find that the printed image is unexpectedly faint or that
dots in the printed image are missing, you may be able to solve
these problems by cleaning the print head, which ensures that the
nozzles are delivering ink properly.
You can clean the print head from your computer using the Head
Cleaning utility in the printer software, or from the printer itself
by using the printer’s control panel buttons. For more information
about the control panel buttons, see your online
Note:
❏ Print head cleaning uses both color and black ink. To avoid wasting
ink, clean the print head only if print quality declines. For example,
if the printout is blurry or the color is incorrect or missing.
❏ Use the Nozzle Check utility first to confirm that the print head
needs to be cleaned. This saves ink.
Reference Guide
.
❏ You cannot clean the print head while the
out light is flashing or on. Replace the appropriate ink cartridge first.
❏ Do not start the Head Cleaning or Nozzle Check utility while
printing is in progress; otherwise, your printout may be marred.
black or A color ink
B
Using the Head Cleaning utility
Refer to the appropriate section below to clean the print head
using the Head Cleaning utility.
For Windows users
Follow the steps below to clean the print head.
1. Make sure that the printer is on and both the
color ink out lights are off.
Note:
black or A color ink out light is flashing, you cannot clean
B
If the
the print head. Replace the appropriate ink cartridge first.
34
B
black and A
Page 40

2. Click the
Cleaning
3. Follow the on-screen instructions.
tab in the printer driver, then click the
Utility
button.
For Macintosh users
Follow the steps below to clean the print head.
Head
1. Make sure that the printer is on, and the
ink out lights are off.
2. Click the Utility icon button in the Print or Page Setup
dialog box, then click the
3. Follow the on-screen instructions.
If print quality hasn’t improved after repeating this procedure
four or five times, turn the printer off and leave it alone overnight.
Then, perform the head cleaning again.
If the print quality still has not improved, one or both of your ink
cartridges may be old or damaged and may need to be replaced.
To replace an ink cartridge before it is empty, see “Replacing Ink
Cartridges” in the online
If print quality remains a problem after replacing the ink
cartridges, contact your dealer.
Note:
To maintain print quality, EPSON recommends turning on the printer
for at least one minute every month.
Head Cleaning
Reference Guide
black and A color
B
button.
.
35
Page 41

Aligning the Print Head
If you notice a misalignment of vertical lines, you may be able to
solve this problem using the Print Head Alignment utility in your
printer software. Follow the directions in the appropriate section
below.
Note:
Do not start the Print Head Alignment utility while printing is in
progress; otherwise, your printout may be marred.
For Windows users
Follow the steps below to align the print head.
1. Make sure that A4 or Letter size plain paper is loaded in the
sheet feeder.
2. Click the
Head Alignment
3. Follow the on-screen instructions to align the print head.
tab in the printer driver, then click the
Utility
button.
For DOS users
Follow the steps below to align the print head.
1. Insert the printer software CD in your CD-ROM drive.
2. Type
3. Press the
4. After running the setup program, type
D:\SETUP
is assigned a drive letter other than "D", or if you are using the
floppy disk version, substitute the appropriate letter.)
hard drive is assigned a drive letter other than “C”, substitute
the appropriate letter.)
at the DOS prompt. (If your CD-ROM drive
key, then follow the on-screen instructions.
Enter
C:\EPCALIB2
Print
. (If your
36
Page 42

5. Press the
key. The following window appears.
Enter
6. Make sure that your printer is selected. Click
follow the on-screen instructions.
Next
For Macintosh users
Follow the steps below to align the print head.
1. Make sure that A4 or Letter size plain paper is loaded in the
sheet feeder.
2. Click the Utility icon button in the Print or Page Setup
dialog box, then click the
3. Follow the on-screen instructions to align the print head.
Print Head Alignment
, then
button.
37
Page 43

Troubleshooting
Correcting USB Problems
Make sure that your computer is a Windows 98
or Windows 2000 pre-installed model
Your computer must be a Windows 98 or Windows 2000 preinstalled model. You may not be able to install or run the USB
Printer Driver on a computer which is not equipped with a USB
port or which has been upgraded from Windows 95 to Windows
98 or 2000.
For details about your computer, contact your dealer.
Make sure that EPSON USB Printer Devices
appears in the list on the Device Manager menu
(for Windows 98 only)
38
If you canceled the plug-and-play driver installation before the
procedure was completed, either the USB printer device driver or
the printer driver may be installed incorrectly.
Follow the steps below to check the installation and reinstall the
drivers.
1. Turn the printer on. Plug the USB cable into the printer and
the computer.
2. Right-click the
click
Properties
3. Click the
Device Manager
My Computer
in the shortcut menu that appears.
icon on your desktop, then
tab.
Page 44

If your drivers are correctly installed,
Devices
menu.
should appear in the list on the Device Manager
EPSON USB Printer
If
EPSON USB Printer Devices
the plus (+) sign beside
devices.
If
USB Printer
device driver is not installed correctly. If
COLOR 980
correctly.
If neither
under
from the printer, then plug it into the printer again.
Other Devices
appears under
appears, the printer driver is not installed
USB Printer
nor
, click
does not appear in the list, click
Other Devices
Other Devices
EPSON Stylus COLOR 980
Refresh
to view the installed
, the USB printer
EPSON Stylus
or unplug the USB cable
appears
39
Page 45

4. Under
COLOR 980
5. When the following dialog box appears, click OK. Then click
OK
Other Devices
, then click
again to close the Properties window.
, select
Remove
USB Printer
. Then click OK.
or
EPSON Stylus
6. Turn off both the printer and the PC. Then, install the drivers
again, following the instructions in the
Setup Guide
40
.
Page 46

Printer does not work correctly with a USB cable
If your printer does not work correctly with a USB cable, try one
or more of these solutions:
Use the recommended USB cable as described in “System
❏
Requirements” in the online
If you use a USB hub, connect the printer to the first tier of the
❏
hub, or connect the printer to the computer’s USB port
directly.
For Windows 98 users, try reinstalling the USB printer device
❏
driver and the printer software. First, uninstall
Software
Control Panel, then uninstall
Next, reinstall the software as described in
EPSON USB Printer Devices
Add/Remove Programs list, browse the CD-ROM and
double-click
the on-screen instructions.
using the Add/Remove Programs utility in the
epusbun.exe
Reference Guide
EPSON USB Printer Devices
is not registered in the
in the Win 9x folder. Then, follow
.
EPSON Printer
Setup Guide
.
. If
41
Page 47

Using the Error Indicators
You can identify many common printer problems using the lights
on your printer’s control panel. If your printer stops working and
the lights are on or flashing, use the following table of panel light
patterns to diagnose the problem, then follow the recommended
corrective measures.
Lights Problem and solutions
Paper out
o S
f S
n B
n A
No paper is loaded in
the sheet feeder.
Paper jam
Paper has jammed in
the printer.
Load paper in the sheet
feeder, then press the
load/eject button. The printer
resumes printing and the light
goes out.
Press the
to eject the jammed paper. If
the error does not clear, open
the printer cover and remove
all of the paper inside,
including any tone pieces.
Then, reload the paper in the
sheet feeder and press
load/eject button to resume
printing.
E
load/eject button
E
E
42
f B
o B
f A
Ink low (black ink cartridge)
The black ink cartridge
is nearly empty.
Ink out (black ink cartridge)
The black ink cartridge
is empty.
Ink low (color ink cartridge)
The color ink cartridge
is nearly empty.
Obtain a replacement black
ink cartridge (T003).
Replace the black ink
cartridge with a new one
(T003). See “Replacing Ink
Cartridges” on page 30 for
details.
Obtain a replacement color
ink cartridge (T005).
Page 48

Ink out (color ink cartridge)
o A
f P
f S
o B
o A
f P
f S
The color ink cartridge
is empty.
Carriage error
The print head is
obstructed by jammed
paper or other foreign
material and cannot
return to the home
position.
Unknown printer error
An unknown printer
error has occurred.
f B
f A
o
= on, n = off, f = flashing
Replace the color ink
cartridge with a new one
(T005). See “Replacing Ink
Cartridges” on page 30 for
details.
Turn off the printer. Open the
printer cover and remove any
paper from the paper path by
hand. Then, does turn the
printer back on.
If the error does not clear,
contact your dealer.
Turn off the printer and
contact your dealer.
Typical Problems and Solutions
Most printer problems have simple solutions. Locate the problem
in the list below, then apply the recommended solution. For more
information, see “Troubleshooting” in the online
Print quality problems
If you are having print quality problems, try the solutions offered
for the problems listed in this section.
Reference Guide
.
43
Page 49

Horizontal banding
Try one or more of these solutions:
Make sure that the printable side of the paper is face up in the
❏
sheet feeder.
Run the Head Cleaning utility to clear any clogged ink
❏
nozzles.
Vertical misalignment
Try one or more of these solutions:
Make sure that the printable side of the paper is face up in the
❏
sheet feeder.
Run the Print Head Alignment utility.
❏
Clear the
❏
Advanced dialog box. For Windows users, see the printer
driver’s online help for more information. For Macintosh
users, see “Making the Media Type setting” in the online
Reference Guide
High Speed
“.
Color gaps
Try one or more of these solutions:
Make sure that your paper is not damaged, dirty, or too old.
❏
Run the Head Cleaning utility to clear any clogged ink
❏
nozzles.
Check the
❏
flashing, replace the ink cartridge. See “Replacing Ink
Cartridges” on page 30.
black and
B
check box in your printer driver’s
A
color ink out lights. If a light is
44
Page 50

Blurry or smeared printout
Try one or more of these solutions:
Make sure that the printable side of the paper is face up in the
❏
sheet feeder.
Make sure that your paper is not damaged, dirty, or too old.
❏
Set the adjust lever to the “+” position, and make sure that the
❏
Media Type setting in your printer driver is correct.
Paper feed or paper jam problems
If the paper does not feed, feeds multiple pages, or the paper is
jammed, remove and reload the stack of paper, then press the
load/eject button. Also, make sure the following:
E
The paper is not creased or too old.
❏
The paper is not loaded above the arrow on the left edge
❏
guide.
The edge guides are set correctly.
❏
The paper is not too thin or too rough. Use paper that meets
❏
the paper specifications for this printer. See the online
Reference Guide
To ensure that no pages are skipped and the document is printed
correctly when using the double-sided printing feature, make
sure that page settings in your application are correct and that the
paper is loaded properly.
for paper specifications.
45
Page 51

Cancelling Printing
If the printouts are not what you expect and display incorrect or
garbled characters or images, you may need to cancel the print
job. To cancel the print job, follow the instructions in the
appropriate section below.
For Windows 98, 95, 2000, and NT 4.0 users
When you send a print job to the printer, the Progress Meter
opens.
Click the
button to cancel the print job.
Stop
For Windows 3.1 users
When you send a print job to the printer, the Despooler opens.
Click the
46
Stop button to cancel the print job.
Page 52

For Macintosh users
The procedure for canceling a print job from a Macintosh varies,
depending on whether background printing is on or off. Refer to
the appropriate section below.
When background printing is on
Follow the steps below to cancel the print job.
1. Press the
2. Select
Monitor3 opens.
3. Select the print job that you wish to cancel in the Document
Name list, then click the Stop icon button to cancel the print
job.
power button to turn off the printer.
P
EPSON Monitor3
from the application menu. EPSON
47
Page 53

When background printing is off
Follow the steps below to cancel the print job.
1. Press the
2. Hold down the
the period (.) key to cancel the print job.
power button to turn off the printer.
P
command key on your keyboard and press
J
Where to Get Help
If your printer is not operating properly and you cannot solve the
problem using the troubleshooting information in your printer
documentation, contact customer support services for assistance.
Customer support will be able to help you much more quickly if
you provide them with the following information:
Serial number of your printer
❏
(the serial number label is on the back of the printer)
Printer model
❏
Brand and model of your computer
❏
Printer software version
❏
(click
About
in your printer driver)
Windows version that you are using
❏
Software application(s) you normally use with your printer
❏
and their version number(s)
For United Kingdom and the Republic of Ireland users
If you purchased your product in the UK or the Republic of
Ireland, EPSON (UK) LTD provides a range of customer services
and technical support.
48
Page 54

Support via the World Wide Web
For information on the latest EPSON products, software
❏
drivers, on-line user guides and answers to frequently asked
questions:
http://www.epson.co.uk
To email EPSON Technical Support:
❏
http://www.epson.co.uk/support/email/
For a full list of EPSON Customer and Warranty Support
❏
services:
http://www.epson.co.uk/support/
Support via telephone
Our Customer and Warranty Support teams can be contacted by
calling 0870 163 7766 in the UK or 0044 0870 163 7766 from the
Republic of Ireland. They can provide the following services:
Technical information on installing, configuring and
❏
operating your EPSON products
Arranging for faulty EPSON products to be repaired within
❏
the warranty period
Pre Sales Enquiry Desk
Our Enquiry Desk team can be contacted by calling 0800 220546
in the UK or 1 800 409132 from the Republic of Ireland, by faxing
01442 227271 in the UK or 0044 1442 227271 from the Republic of
Ireland, and via Email at info@epson.co.uk. They can provide the
following information:
Pre sales information and literature on new EPSON products
❏
(also available via our world wide web site at
http://www.epson.co.uk)
Where to purchase genuine EPSON consumables,
❏
accessories, and options
49
Page 55

For Australia users
EPSON Australia wishes to provide you with a high level of
customer service. In addition to this user’s guide, we provide the
following sources for obtaining information:
EPSON FAXBACK
EPSON FAXBACK will fax you the latest specifications and
pricing for most EPSON products offered in Australia. There is
also technical information including details of the latest software
and drivers available. Phone (02) 9903 9075 and the system will
guide you through a number of choices before faxing the
information to your fax machine.
Internet URL http://www.epson.com.au
Access the EPSON Australia World Wide Web pages. Worth
taking your modem here for the occasional surf! You can get the
same information as offered on the EPSON FAXBACK and the
EPSON Bulletin Board, plus more.
Your dealer
Don’t forget that your dealer can often help identify and resolve
problems. The dealer should always be the first call for advice on
problems. They can often solve problems quickly and easily as
well as give you advice on the next step to take.
EPSON Helpdesk
EPSON Helpdesk is provided as a final backup to make sure that
our clients have access to advice. Operators at the Helpdesk can
aid you in diagnosing hardware and software problems. They can
also advise you on the latest EPSON products and where the
nearest dealer or service agent is located. Many types of queries
are answered here.
50
Page 56

The Helpdesk numbers are:
Phone: 1300 361 054
Fax: (02) 9903 9189
We encourage you to have all the relevant information on hand
when you ring. The more information you prepare, the faster we
can help solve the problem. This information includes the
for your EPSON product, type of computer, operating
Guide
system, application programs, and any other information you feel
is required.
For India users
Contacts for information, support and services are:
World Wide Web (www.epson.co.in)
Information on product specifications, drivers for download,
Frequently Asked Questions (FAQ) Product Enquiry and
Technical Query are available.
Epson India Bangalore Head Office:
User’s
Phone: 080 5095465
Fax: 080 5095474
For Malaysia users
Contacts for information, support and services are:
World Wide Web (www.epson.com.my)
Information on product specifications, drivers for download,
Frequently Asked Questions (FAQ) and Email Enquiry are
available.
51
Page 57

Epson Trading Shah Alam Head Office
Phone: 03 5191366
Fax: 03 5191281
For Singapore users
Sources of information, support and services available from
Epson Singapore are:
World Wide Web (www.epson.com.sg)
Information on product specifications, drivers for download,
Frequently Asked Questions (FAQ), Sales Enquiry, and Technical
Email Support are available.
Epson HelpDesk <Phone: (065) 5863111>
Our HelpDesk team can help you with the following over the
phone:
Sales enquiry and product information
Product usage questions or problem
Enquiries on repair service and warranty
For Hong Kong users
To obtain technical support as well as other after-sales services,
users are welcome to contact EPSON Hong Kong Limited.
Internet home page
EPSON Hong Kong has established a local home page in both
Chinese and English on the Internet to provide users with the
following information:
Product information
❏
Answers to Frequently Asked Questions (FAQs)
❏
52
Page 58

Latest versions of EPSON printer drivers
❏
Users can access our World Wide Web home page at:
http://www.epson.com.hk
Electronic bulletin board system
An electronic bulletin board system (BBS) is also available to
obtain printer information and the latest versions of printer
drivers. You can log on to the following number for the BBS
service:
BBS: (852) 2827-4244
Technical Support Hotline
You can also contact our technical staff at the following telephone
and fax numbers:
Phone: (852) 2585-4399
Fax: (852) 2827-4383
For Philippines users
To obtain technical support as well as other after sales services,
users are welcome to contact the EPSON Philippines
Representative Office at the telephone and fax numbers below:
Phone: (632) 813-6552
Fax: (632) 813-6545
BBS: (632) 814-0595
53
Page 59

Options and Consumable Products
Options and Consumable Products
The following options and consumable products are available for
your printer.
Options
EPSON supplies the following interface cables. However, you can
use any interface cable that meets these specifications. See your
computer manual for any additional requirements.
Parallel Interface Cable (shielded) C83602✽ from D-SUB 25-
❏
pin (computer) to 36-pin Amphenol 57 Series (printer)
USB Interface Cable (shielded) C83623✽ from Series A 4-pin
❏
(computer) to Series B 4-pin (printer)
Note:
❏ The asterisk (✽) is a substitute for the last digit of the product
number, which varies by location.
❏ Depending on your geographic location, one or both of these cables
may not be supplied.
Caution:
c
54
Use only interface cables which meet the specifications listed
above. Using other cables not covered by EPSON warranties may
cause the printer to malfunction.
Page 60

Interface cards
A number of optional interfaces are available to supplement the
printer’s built-in interfaces. See “Using optional interface cards”
in the online
If you are not sure whether you need an optional interface or if
you want to know more about interfaces, contact your dealer.
Reference Guide
for more information.
Ethernet Interface Card C82362
C82363
C82364
C82384
IEEE 1394 Interface Card C82372
Note:
The asterisk (✽) is a substitute for the last digit of the product number,
which varies by location.
✽
✽
✽
✽
✽
55
Page 61

Consumable products
The following ink cartridges and EPSON special media are
available for your printer.
Ink cartridges
You can use the following cartridges with your printer.
Black ink cartridge T003
Color ink cartridge T005
Note:
The product numbers of ink cartridges may vary by location.
Media types
EPSON offers specially designed media for ink jet printers to meet
most high-quality printing needs.
To make the Media Type setting in your printer driver, select the
Media Type setting that matches the media that is loaded in the
printer. To find out what Media Type you are using, find your
media in the list below, and refer to the corresponding Media
Type under which it is grouped (shown in larger type). For some
media, there are several Media Type settings to choose from.
The available media types are listed below.
Plain Paper
Plain paper
Envelopes
EPSON Premium Ink Jet Plain Paper (A4) S041214
56
Page 62

360 dpi Ink Jet Paper
EPSON 360 dpi Ink Jet Paper (A4) S041059
S041025
EPSON 360 dpi Ink Jet Paper (Letter) S041060
S041028
EPSON Iron-On Cool Peel Transfer Paper (A4) S041154
EPSON Iron-On Cool Peel Transfer Paper (Letter) S041153
S041155
Photo Quality Ink Jet Paper
EPSON Photo Quality Ink Jet Paper (A4) S041061
S041026
EPSON Photo Quality Ink Jet Paper (Letter) S041062
S041029
EPSON Photo Quality Ink Jet Paper (Legal) S041067
S041048
EPSON Photo Quality Ink Jet Cards (A6) S041054
EPSON Photo Quality Ink Jet Cards (5×8”) S041121
EPSON Photo Quality Ink Jet Cards (8×10”) S041122
EPSON Photo Quality Self Adhesive Sheets (A4) S041106
EPSON Ink Jet Note Cards A6 (with envelopes) S041147
EPSON Ink Jet Greeting Cards 5×8”
(with envelopes)
EPSON Ink Jet Greeting Cards 8×10”
(with envelopes)
Matte Paper-Heavyweight
EPSON Matte Paper-Heavyweight (A4) S041256
EPSON Matte Paper-Heavyweight (Letter) S041257
S041148
S041149
S041258
S041259
57
Page 63

Photo Paper
EPSON Photo Paper (A4) S041140
EPSON Photo Paper (Letter) S041141
EPSON Photo Paper (4×6”) S041134
EPSON Photo Paper (100×150 mm) S041255
EPSON Photo Paper (200×300 mm) S041254
EPSON Panoramic Photo Paper (210×594 mm) S041145
EPSON Photo Paper Cards (A4) S041177
Photo Quality Glossy Film
EPSON Photo Quality Glossy Film (A4) S041071
EPSON Photo Quality Glossy Film (Letter) S041072
EPSON Photo Quality Glossy Film (A6) S041107
EPSON Photo Stickers 16 (A6) S041144
EPSON Photo Stickers 4 (A6) S041176
Ink Jet Transparencies
EPSON Ink Jet Transparencies (A4) S041063
EPSON Ink Jet Transparencies (Letter) S041064
Premium Glossy Photo Paper
EPSON Premium Glossy Photo Paper (A4) S041287
EPSON Premium Glossy Photo Paper (Letter) S041286
Note:
The availability of special media varies by location.
58
S041297
Page 64

Printer Specifications
System Requirements
Using the printer
Refer to the appropriate section below for the minimum and
recommended computer system requirements necessary to use
this printer.
For Windows computers
To use this printer, you need Microsoft® Windows®98,
Windows
NT
®
®
95, Windows®3.1, Windows®2000 or Windows
4.0 installed and a shielded, twisted-pair parallel cable
connected. If you wish to connect your printer to a USB port, you
need a Windows 98 or 2000 pre-installed PC that is equipped with
a USB port and is connected to the printer via a shielded USB
cable.
Your computer should also meet the following system
requirements.
Minimum System Requirements Recommended System
i386/25 MHz for Windows 3.1
i486/25 MHz for Windows 95 and NT 4.0
i486/66 MHz for Windows 98 and 2000
16 MB RAM 32 MB RAM or more for
20 MB hard disk space for Windows 98,
95, and 3.1
40 MB for Windows 2000 and NT 4.0
VGA monitor VGA monitor or better
Pentium or better processor
Windows 98, 95, and 3.1
64 MB RAM or more for
Windows 2000 and NT 4.0
50 MB or more hard disk space
for Windows 98, 95, and 3.1
100 MB or more for
Windows 2000 and NT 4.0
59
Page 65

Your computer dealer can help you update your system if it does
not meet these requirements.
For Macintosh computers
To connect this printer to an Apple® Macintosh® computer, you
must use a USB cable.
Your Macintosh must also meet the following system
requirements.
Minimum System Requirements Recommended System
Mac OS 8.1
(If using the optional IEEE1394
Interface Card, MacOS 8.6.)
9MB RAM
9MB RAM when background
printing is turned on.
Mac OS 8.5.1 or later
(If using the optional IEEE1394
Interface Card, MacOS 8.6 or
later.)
21 MB RAM or more.
36 MB RAM or more when
background printing is turned on.
Note:
❏ The amount of available memory varies according to the number and
kind of applications that are open. To see how much memory is
available, click
About This Computer
on the Apple menu and refer
to the memory size (listed in kilobytes) under “Largest Unused Block”
(1,024K=1 MB).
❏ The memory requirements above are for printing on Letter size
paper. These requirements may vary depending on the size of the
paper, the type of application that you are using, and the complexity
of the document that you want to print.
In addition to these system and memory requirements, you need
10 MB of free hard disk space to install the printer software. To
print, you also need extra hard disk space amounting to about
twice the size of the file that you want to print.
60
Page 66

Using the online Reference Guide
Refer to the appropriate section below for the minimum system
requirements necessary to use the online
For Windows computers
System Microsoft Windows®98, 95, 2000 or NT 4.0
Reference Guide
.
CPU i486/66 MHz for Windows 98
Memory 16 MB for Windows 98, 95, 3.1, and NT 4.0
Hard disk space 2 MB to install the Reference Guide
CD-ROM drive Double-speed
Display 640×480 pixel or 800×600 pixel resolution, with
Browser Web browser
(Pentium or better processor recommended)
i486/25 MHz for Windows 95 and NT 4.0
Pentium 133 MHz for Windows 2000
i386/25 MHz for Windows 3.1
(32 MB or more recommended)
32 MB for Windows 2000
(Quad-speed or faster recommended)
High Color (16 bit) or True Color (32 bit) settings
(Microsoft Internet Explorer 4.0 or later
recommended)
For Macintosh computers
System System 7.5.1 (System 7.6 or later recommended)
Memory 16 MB (32 MB or more recommended)
Hard disk space 4 MB to install the Reference Guide
15 MB to install Microsoft Internet Explorer
CD-ROM drive Double-speed
Display 640×480 pixel or 800×600 pixel resolution, with
Browser Web browser
(Quad-speed or faster recommended)
High Color (16 bit) or True Color (32 bit) setting
(Microsoft Internet Explorer 4.0 or later
recommended)
61
Page 67

Printing with DOS
Installing the Printer Driver for DOS Programs
Most DOS software programs include a driver for EPSON
ESC/P 2™ printers and require that you select the printer from a
list to install the printer driver. To take advantage of your printer's
advanced, built-in, scalable fonts and graphics handling, you
must select an appropriate driver.
If your printer is not included in the list, contact your software
manufacturer to obtain updated software.
If the manufacturer does not have an updated printer driver for
your printer, select an alternative printer from those listed below,
choosing the printers listed at the top first.
When printing in black only:
LQ-870/1170
LQ-570 (+)/1070(+)
SQ-870/1070
LQ-850
LQ-500
When printing in black and color:
EPSON Stylus PRO
EPSON Stylus COLOR 500
EPSON Stylus COLOR II
LQ-860
LQ-2550
Note:
The drivers for the printers listed above do not allow access to all of the
features offered by the EPSON STYLUS COLOR 980, such as 720-dpi
printing, 1440-dpi printing, and MicroWeave.
62
Page 68

DOS software varies greatly. See the printing section of your
software manual for information on accessing the printer driver
settings.
Changing the Print Settings
You can change many print settings such as print direction and
loading position. Because these settings take effect each time you
turn on the printer, they are also called default settings.
The factory default settings are designed to meet the needs of
most users, so you may not need to change them. The table below
lists the features you can select in the default-setting mode.
Settings Options
Font Courier, Roman, Sans Serif, Prestige, Script,
Pitch 10 cpi, 12 cpi, 15 cpi, 17.1 cpi, 20 cpi,
Print direction Auto, Bi-D, Uni-D
Loading position 8.5mm, 3mm, Others
I/F mode Auto, Parallel, USB
Auto I/F wait time 10 seconds, 30 seconds
Network I/F mode Off, On
Parallel I/F transfer rate Fast, Normal
Software ESC/P 2, IBM X24E
Auto CR (IBM mode
only)
AGM (IBM mode only) Off, On
Auto line feed Off, On
0 slash 0, 0 with slash
Roman T, Sans Serif H, Draft
Proportional
Off, On
63
Page 69

Character table
Standard model
PC860, PC861, PC863, PC865, BRASCII,
Abicomp, Roman 8, ISO Latin 1, PC858, ISO
8859-15
All other models
PC437 Greek, PC850, PC852, PC853,
PC855, PC857, PC866, PC869, MAZOWIA,
Code MJK, ISO 8859-7, ISO Latin 1T,
Bulgaria, PC774, Estonia, ISO 8859-2,
PC866 LAT, PC866 UKR, PCAPTEC, PC708,
PC720, PCAR864, PC860, PC861, PC863,
PC865, BRASCII, Abicomp, Roman 8, ISO
Latin 1, PC858, ISO 8859-15
: Italic, PC437, PC850,
: Italic, PC437,
Note:
Most software controls the character table and auto line feed. If your
software controls these features, you may never need to set them with
the control panel.
Changing the default settings
To change the printer’s default settings, use the control panel
buttons. Your selections are indicated by the control panel lights.
Follow the steps below.
64
1. Make sure that the printer is turned off and that A4 or Letter
size paper is loaded in the sheet feeder.
R
2. Hold down the
cleaning button and turn on the printer
to enter the default-setting mode.
The printer loads a sheet of paper and prints a brief summary
and instructions. It instructs you to select the language that
you want messages printed in (English, French, German,
Italian, Spanish, or Portuguese).
Page 70

3. Press the Rcleaning button until the control panel lights
indicate the language of your choice, as shown below.
Language
English
French
German
Italian
Spanish
Portuguese
o
= On, n = Off
SBA
nno
non
noo
onn
ono
oon
4. Press the Eload/eject button to print the current default
settings and the next set of instructions in the language that
you selected. The printed instructions include submenu
tables that list all of the settings that you can change and
describe the appearance of the control panel lights for each
selection. Use these instructions to change the settings using
the control panel.
5. After making your changes, exit the default-settings mode by
turning off the printer.
Note:
You may exit the default-settings mode at any time by turning off the
printer. Any settings that you have made remain in effect until you
change them.
If you want to check the current default settings, enter the defaultsettings mode again and print the current default settings. The
current settings are indicated with arrows.
65
Page 71

EPSON OVERSEAS MARKETING LOCATIONS
EPSON AMERICA, INC.
20770 Madrona Ave.
P.O. Box 2842
Torrance, CA 90509-2842
Phone: (800) 922-8911
Fax: (310) 782-5220
EPSON DEUTSCHLAND GmbH
Zülpicher Straße 6,
40549 Düsseldorf Germany
Phone: (0211) 56030
Fax: (0211) 5047787
EPSON AUSTRALIA PTY. LTD.
70 GIBBES STREET, CHATSWOOD 2067 NSW.
Phone: 2-9903-9000
Fax: 2-9903-9177
EPSON HONG KONG LTD.
Rooms 4706-10, 47/F,
China Resources Bldg.,
26 Harbour Road, Wanchai, Hong Kong
Phone: 2585-4300
Fax: 2827-7083
EPSON ITALIA S.p.A.
V.le F.lli Casiraghi 427
20099 Sesto S.Giovanni
MI, Italy
Phone: 2-262331
Fax: 2-2440750
EPSON UK LTD.
Campus 100, Maylands Avenue,
Hemel Hempstead, Herts,
HP2 7TJ, U.K.
Phone: (+44) 01442 261144
Fax: (+44) 01442 227227
EPSON FRANCE S.A.
68 bis, rue Marjolin
92300, Levallois-Perret, France
Phone: 33.1.40.87.37.37
Telex: 610657
EPSON SINGAPORE PTE. LTD.
No. 1 Temasek Avenue #36-00
Millenia Tower, Singapore 039192
Phone: (065) 33 77 911
Fax: (065) 33 41 185
EPSON TAIWAN TECHNOLOGY &
TRADING LTD.
10F, No. 287 Nanking E. Road, Sec. 3,
Taipei, Taiwan, R.O.C.
Phone: (02) 717-7360
Fax: (02) 712-9164
EPSON IBERICA S.A.
Av. de Roma, 18-26
08290 Cerdanyola del Valles
Barcelona, Spain
Phone: 582. 15.00
Fax: 582. 15.55
SEIKO EPSON CORPORATION
(Hirooka Office)
80 Harashinden, Hirooka
Shiojiri-shi, Nagano-ken
399-0785 Japan
EPSON PORTUGAL, S.A.
R. do Progresso, 471, 1° Perafita
4460 Matosinhos, Portugal
Phone: (02) 996 14 02
Fax: (02) 996 14 11
1999 September
Page 72

Daily Use
Printed in Japan
00.XX-XX
 Loading...