

Page 1

®
EPSON Stylus COLOR 760
®
EPSON Stylus COLOR 860
Printer Basics
Printed on recycled paper with at least 10% post-consumer content.
Page 2

Copyright Notice
All rights reserved. No part of this publication may be reproduced, stored in a retrieval system, or transmitted in
any form or by any means, electronic, mechanical, photocopying, recording, or otherwise, without the prior
written permission of SEIKO EPSON CORPORATION. The information contained herein is designed only for
use with this EPSON printer. EPSON is not responsible for any use of this information as applied to other
printers.
Neither SEIKO EPSON CORPORATION nor its affiliates shall be liable to the purchaser of this product or third
parties for damages, losses, costs, or expenses incurred by purchaser or third parties as a result of: accident, misuse,
or abuse of this product or unauthorized modifications, repairs, or alterations to this product, or (excluding the
U.S.) failure to strictly comply with SEIKO EPSON CORPORATION’s operating and maintenance instructions.
SEIKO EPSON CORPORATION shall not be liable for any damages or problems arising from the use of any
options or any consumable products other than those designated as Original EPSON Products or EPSON
Approved Products by SEIKO EPSON CORPORATION.
Trademarks
EPSON and EPSON Stylus are registered trademarks of SEIKO EPSON CORPORATION.
SoundAdvice is a service mark and EPSON FaxAdvice, Micro Piezo, EPSON Software, Film Factory, and
PhotoEnhance are trademarks of Epson America, Inc.
General Notice: Other product names used herein are for identification purposes only and may be trademarks of
their respective owners. EPSON disclaims any and all rights in those marks.
ii
The E
NERGY STAR
Copyright © 1999 by Epson America, Inc. 12/99
emblem does not represent EPA endorsement of any product or service.
CPD-8991R1
Page 3

Contents
WELCOME! 1
About Your Software
About Your Documentation
Warnings, Cautions, Notes, and Tips
Windows System Requirements
Macintosh System Requirements
ENERGY STAR Compliance
Year 2000 Ready
Important Safety Instructions
Ink Cartridge Safety Instructions
VIEWING YOUR ELECTRONIC PRINTER MANUAL 9
Accessing Your Electronic Printer Manual
Navigating Your Electronic Printer Manual
10
PRINTING FROM START TO FINISH 13
Using the EPSON Guided Printing Exercise
Printing with Windows
13
14
2
3
3
4
5
6
6
6
7
9
Loading Paper
Opening the Printer Software
Selecting Printer Software Settings
Controlling Printing
Printing on a Macintosh
Loading Paper
Opening the Printer Software
Selecting Printer Software Settings
Controlling Printing
14
15
16
18
19
19
20
21
22
iii
Page 4

Printing with PhotoEnhance 23
Using Custom Project Types 26
Using Advanced Settings 28
Using Special Papers 31
EPSON Photo Quality Ink Jet Paper 31
Matte Paper - Heavyweight 31
EPSON Photo Paper 31
Envelopes 34
Selecting the Correct Media Type 35
MAINTAINING YOUR PRINTER 37
Cleaning the Print Head 37
Using the Head Cleaning Utility 38
Using the Control Panel to Clean the Print Head 39
Examining the Nozzle Check Pattern 40
Replacing an Ink Cartridge 41
Removing and Installing Ink Cartridges 42
iv
Replacing an Outdated Ink Cartridge 44
Aligning the Print Head 46
Cleaning the Printer 47
Transporting the Printer 48
Page 5

PROBLEM SOLVING 49
Diagnosing Printer Problems 49
Checking the Control Panel Lights 49
Running a Printer Check 51
Identifying Printer Parts 52
Problems and Solutions 53
Problems Setting Up the Printer or Installing Software 53
Problems with Printing 54
Problems Getting Good Print Quality 55
Problems with Paper Feeding 58
Solving Miscellaneous Printout Problems 59
Uninstalling Printer Software 60
Reinstalling Printer Software 60
Where To Get Help 61
EPSON Technical Support 61
Creative Software Technical Support 62
INDEX 63
v
Page 6

vi
Page 7

Welcome!
Your EPSON Stylus® COLOR printer is the ideal output device for small office or
business printing. You can print anything from reports and resumes to photos and
overhead transparencies with great results.
The printer comes with these features:
■ Resolutions up to 1440 by 720 dpi (dots per inch), even on plain paper
■ Fast print speeds: EPSON Stylus COLOR 760 prints approximately 7 ppm
(pages per minute) for black text and 6 ppm for color; EPSON Stylus
COLOR 860 prints approximately 9.5 ppm for black text and 7 ppm for color
■ EPSON’s exclusive Micro Piezo
™
ink jet technology for cleaner dots as small as
4 picoliters
■ Specially-designed print engine for whisper-quiet operation
■ Four-color printing for photo-quality color and sharp black text on plain paper or
a variety of special media
■ Great results on any paper size, including letter, legal, envelope, card, and
panoramic paper
■ Creative software for implementing all your print projects
1
Page 8

About Your Software
The printer software CD-ROM includes all the software you need for printing:
■ Your printer driver runs your printer and lets you control how your documents
look. You can’t use your printer without it.
■ The EPSON
®
Guided Printing Exercise, a quick step-by-step guide to changing
your printer software settings
■ Your creative software, including:
■ Polaroid
■ ArcSoft
■ eFax,
®
PhotoMAX™ Pro, a full-featured image editing program
™
PhotoPrinter™ SE, a photo layout program
™
a program that allows you to send and receive faxes directly from your
PC (trial version; Windows only)
■ EPSON Software
™
Film Factory,™ a photo printing and organizing program
(trial version; Windows only)
■ Your electronic Reference Guide gives you complete information about your
printer. (You need an HTML browser—such as Microsoft® Internet Explorer 3.0
or later, or Netscape® Navigator® 3.0 or later—to view the guide.)
If you haven’t yet installed your printer software or creative software from your
CD-ROM, see the Start Here poster for instructions.
2
Page 9

About Your Documentation
To set up your printer and install its software, see the Start Here poster. This book
contains system requirements, important safety information, and instructions on:
■ viewing your electronic printer manual
■ printing with Windows
■ using special papers
■ maintaining the printer
■ solving basic problems
®
or on a Macintosh
®
For more details about printing with, maintaining, or troubleshooting your printer,
see your electronic Reference Guide. For instructions on viewing it, see page 9.
(The illustrations in this book show the EPSON Stylus COLOR 860; the EPSON
Stylus COLOR 760 has a solid color cover.)
Warnings, Cautions, Notes, and Tips
Please follow these guidelines:
Warnings must be followed carefully to avoid bodily injury.
Cautions must be observed to avoid damage to your
equipment.
Notes contain important information about your printer.
Tips contain additional hints for better printing.
3
Page 10

Windows System Requirements
To use your printer and its software, your system should have:
■ An IBM
®
compatible PC with at least a 486/66 MHz (for Windows 98) or
486/25 MHz (for Windows 95 or Windows NT® 4.0) processor (Pentium®
processor recommended)
■ Microsoft Windows 95, Windows 98, or Windows NT 4.0
■ At least 16MB of RAM (32MB for Windows 95 or 98, or 64MB for
Windows NT 4.0 recommended)
■ At least 50MB of free hard disk space (100MB recommended)
■ VGA, Super VGA, or better display adapter and monitor
■ Double-speed (2x) CD-ROM drive (quad-speed [4x] or faster recommended) for
installing the printer software
■ For parallel connection: a high-speed, bidirectional, IEEE-1284 compliant
parallel cable (6 to 10 feet long); the cable must have a D-SUB, 25-pin, male
connector for your computer and a 36-pin, Centronics® compatible connector for
the printer
For USB connection: a computer running Windows 98 with a Windows 98
compliant USB port and a shielded USB “AB” cable from Series A (computer) to
Series B (printer), up to 6.5 ft. (2 meters) long.
4
Using an improperly shielded USB cable—especially a cable
more than 6.5 ft. (2 meters) long—may cause the printer to
malfunction.
Page 11

Macintosh System Requirements
To use your printer and its software, your system should have:
■ An Apple
■ For iMac: Mac
®
iMac™ series or Power Macintosh® G3 with USB port
®
OS 8.1 or later
For Power Macintosh G3: Mac OS 8.5.1 or later
If your iMac is running OS 8.1, you’ll need to update your
operating system before installing your printer software.
Download and install iMac Update 1.0 or later from Apple at
http://swupdates.info.apple.com. Contact Apple if you have
problems installing the update.
If your iMac is running OS 8.5 or 8.5.1, do not install iMac
Update 1.0. Instead, Apple recommends that you download
and install iMac Update 1.1.
To find out which operating system your iMac is running,
select About This Computer from the Apple menu.
■ At least 16MB of available RAM (32MB recommended)
■ At least 50MB of free hard disk space (100MB recommended)
■ VGA, Super VGA, or better display adapter and monitor
■ Double-speed (2x) CD-ROM drive (quad-speed [4x] or faster recommended) for
installing the printer software
■ A shielded USB “AB” cable from Series A (computer) to Series B (printer), up to
6.5 ft. (2 meters) long.
Using an improperly shielded USB cable—especially a cable
more than 6.5 ft. (2 meters) long—may cause the printer to
malfunction.
5
Page 12

NERGY STAR
E
Compliance
As an E
this product meets the E
efficiency. The EPA E
program is a voluntary partnership with the computer and
office equipment industry to promote the introduction of
energy-efficient personal computers, monitors, printers, fax machines, and copiers in
an effort to reduce air pollution caused by power generation.
NERGY STAR
Partner, EPSON has determined that
NERGY STAR
NERGY STAR
guidelines for energy
office equipment
Year 2000 Ready
Your EPSON printer is Year 2000 Ready. However, be sure the other parts of your
computer system are also ready for the year 2000.
Important Safety Instructions
Before using your printer, read the following safety instructions to make sure you use
the printer safely and effectively:
6
■ Be sure to follow all warnings and instructions marked on the printer.
■ Turn off and unplug the printer before cleaning. Clean with a damp cloth only.
Do not spill liquid on the printer.
Always turn the printer off using the
switch off the power strip, or unplug the printer until the
Ppower light is off.
■ Do not place the printer on an unstable surface or near a radiator or heating vent
or in direct sunlight.
■ Do not block or cover the openings in the printer’s case or insert objects through
the slots.
■ Use only the type of power source indicated on the printer’s label.
Ppower button. Don’t
Page 13

■ Connect all equipment to properly grounded power outlets. Avoid using outlets
on the same circuit as photocopiers or air control systems that regularly switch on
and off.
■ Place the printer near a wall outlet where the plug can be easily unplugged.
Placez l’imprimante près d’une prise de contacte où la fiche peut être débranchée
facilement.
■ Do not let the power cord become damaged or frayed.
■ If you use an extension cord with the printer, make sure the total ampere rating of
the devices plugged into the extension cord does not exceed the cord’s ampere
rating. Also, make sure the total ampere rating of all devices plugged into the wall
outlet does not exceed the wall outlet’s ampere rating.
■ Except as specifically explained in this manual, do not attempt to service the
printer yourself.
■ Unplug the printer and refer servicing to qualified service personnel under the
following conditions:
If the power cord or plug is damaged; if liquid has entered the printer; if the
printer has been dropped or the case damaged; if the printer does not operate
normally or exhibits a distinct change in performance. Adjust only those controls
that are covered by the operating instructions.
Ink Cartridge Safety Instructions
■ Install the ink cartridge immediately after you remove it from its foil package.
Leaving the cartridge unpacked for a long time before use may result in reduced
print quality.
■ Do not put your hand inside the printer or touch the cartridge during printing.
■ Under normal circumstances, ink will not come out of the cartridge. If it does get
on your skin, wash it off with soap and water. If it gets in your eyes, flush them
immediately with water.
■ Keep ink cartridges out of the reach of children.
■ Do not dismantle the ink cartridges or try to refill them. This could result in
damage to the print head.
7
Page 14

■ Once you install an ink cartridge, do not open the clamp or remove the cartridge
except to replace it with a new one. The cartridge may become unusable
otherwise.
■ Do not use an ink cartridge beyond the date printed on the cartridge package. For
best results, use up the ink cartridges within six months of installing them.
■ Do not shake an ink cartridge; this can cause leakage.
■ Do not move the print head by hand; otherwise you may damage the printer.
■ Before transporting the printer, make sure the print head is capped in the far right
position and the ink cartridges are in place.
8
Page 15
Viewing Your Electronic Printer Manual
Your printer software CD-ROM includes an electronic Reference Guide for your
printer. The manual is in HTML format, so you need a browser—such as Internet
Explorer 3.0 or later or Netscape Navigator 3.0 or later—to view it. If you are using a
different browser, the pages may not display correctly.
A browser is not included on the printer software CD-ROM.
Accessing Your Electronic Printer Manual
You can view your electronic Reference Guide from the CD-ROM or copy it to your
hard drive and view it from there. Follow these steps:
1. Insert your printer software CD-ROM.
2. Windows: Double-click My Computer, double-click your CD-ROM
drive icon, then double-click the EPSON icon.
Macintosh: Double-click the EPSON CD-ROM icon, then double-click the
EPSON
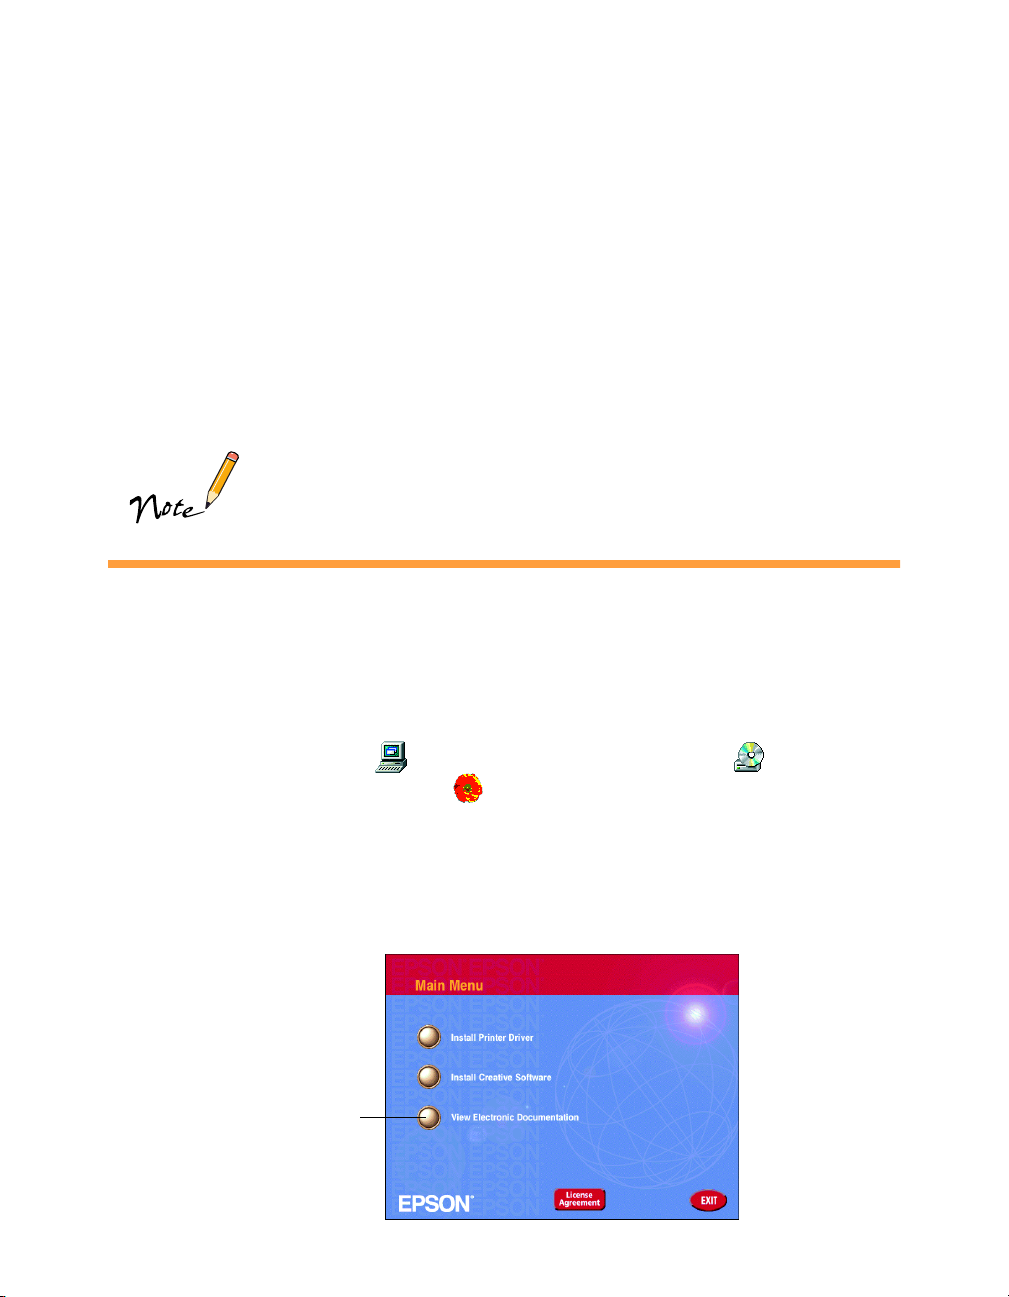
The Main Menu appears:
icon.
Click here
9
Page 16
3. Click View Electronic Documentation.
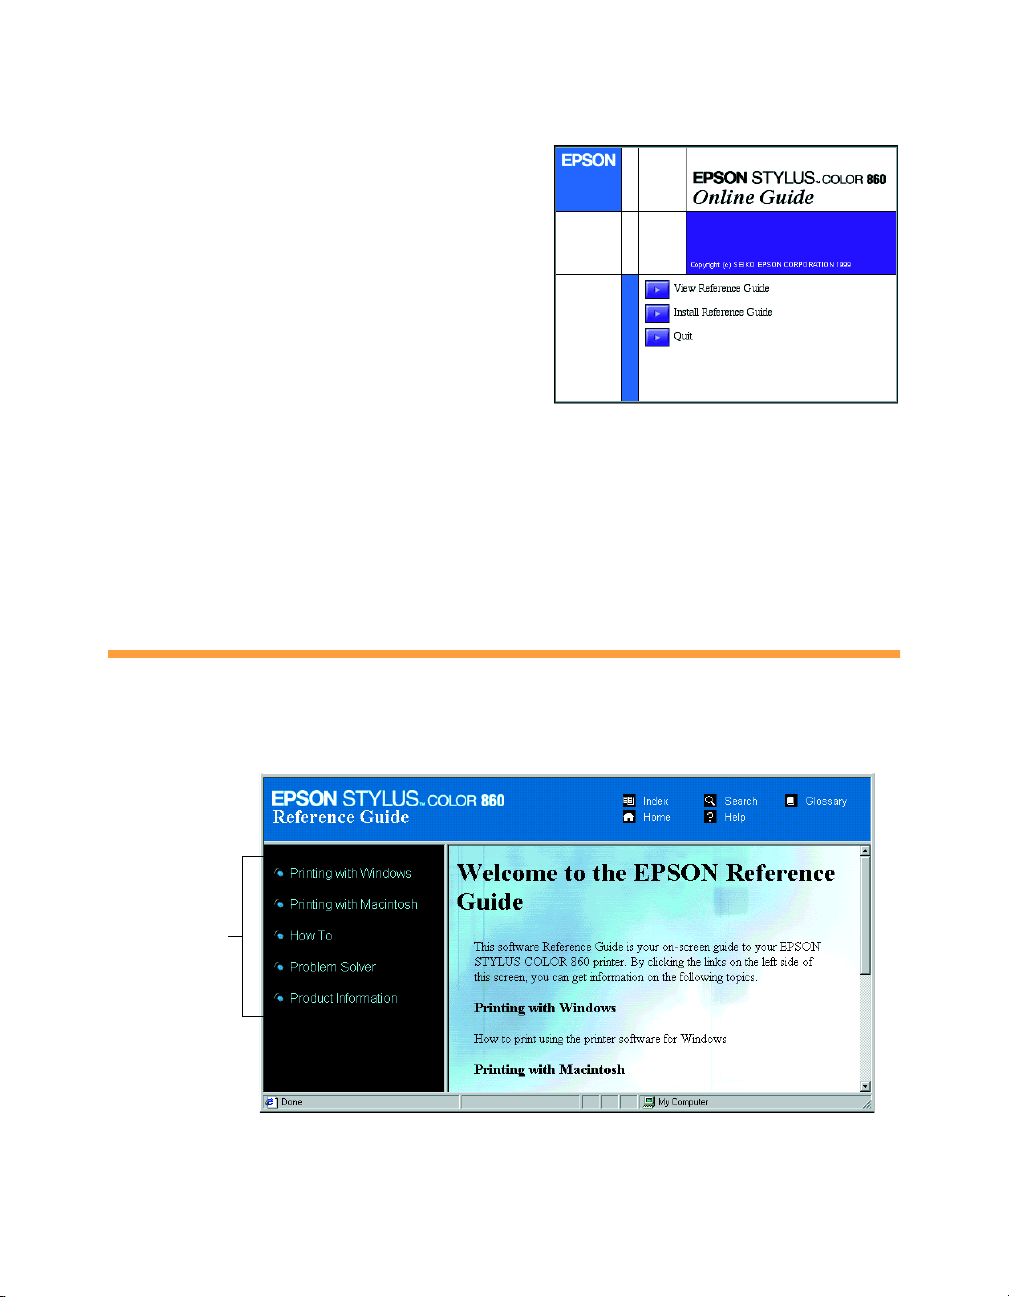
The main screen for your printer appears:
4. You can either view the manual from the
CD-ROM (View Reference Guide) or
copy the manual to your hard drive (Install
Reference Guide
) and view it from there.
For details on viewing the manual, see
the next section.
If you copied the manual to your hard drive, you can access it at any time, as follows:
Windows: Select Start, Programs, EPSON, and double-click ESC760 Guide or
ESC860 Guide.
Macintosh: Open the EPSON Stylus COLOR 760 or EPSON Stylus COLOR 860
folder and double-click View Reference Guide.
Navigating Your Electronic Printer Manual
10
When you first open the Reference Guide, you see this screen:
Click here to
expand the
table of
contents
Click a topic on the left to expand the table of contents.
Page 17
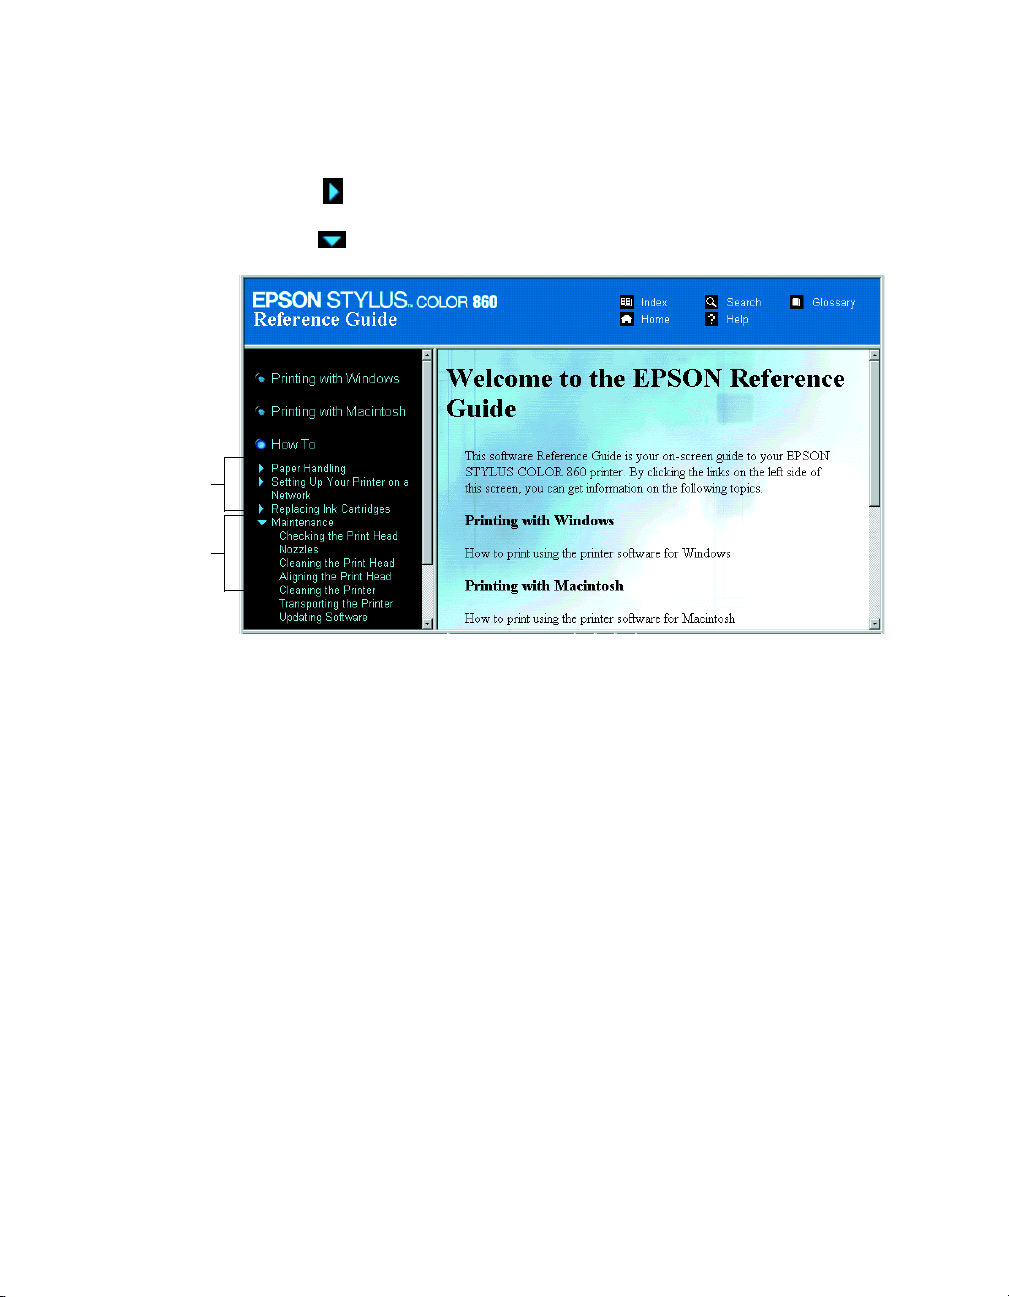
After expanding the table of contents, you can click on the topic you want to view.
If there’s a right arrow , click it to view subtopics, then click on a topic to go to it.
Click the down arrow to close a subtopic list.
Closed list,
click to
expand
Click to go
to topic
11
Page 18

12
Page 19

Printing from Start to Finish
Here’s what to do to print a basic document—such as a memo, newsletter, or
photograph—from loading the paper to selecting print settings to controlling the
print job. Follow the instructions in these sections:
■ “Printing with Windows” on page 14
■ “Printing on a Macintosh” on page 19
You can even practice selecting settings using the EPSON Guided Printing Exercise,
as described below.
If you’re already familiar with ink jet printing, you can skip ahead to these sections:
■ Improving the quality of low-resolution photos and adding special effects with
PhotoEnhance,™ on page 23
■ Selecting a preset project type or a color-matching method, on page 26
■ Fine-tuning your settings for maximum control of your printouts, on page 28
■ Using special papers such as EPSON Photo Paper or envelopes, on page 31
Using the EPSON Guided Printing Exercise
Your printer software CD-ROM includes a Guided Printing Exercise with
step-by-step printing instructions showing you how to access your printer software
and make changes to the settings.
To run the exercise, do the following:
Windows: Double-click the
desktop.
Macintosh: Double-click the
EPSON Guided Printing Exercise
Follow the on-screen instructions to use your printer software and print a full-color
image.
EPSON Guided Printing Exercise
EPSON Guided Printing Exercise
folder.
icon on your
icon in the
13
Page 20
If you didn’t install the Guided Printing Exercise when you set up your printer, follow
these steps to install it:
1. Insert the printer software CD-ROM.
2. Windows: Double-click My Computer, double-click your CD-ROM
drive icon, then double-click the EPSON icon. The Main Menu appears.
Macintosh: Double-click the EPSON CD-ROM drive icon, then double-click the
EPSON icon. The Main Menu appears.
3. Click Install Creative Software, then click EPSON Guided Printing Exercise.
The exercise is installed on your system.
Printing with Windows
This section describes these basic steps for printing with Windows:
■ loading paper
■ opening the printer software
■ selecting printer software settings
14
■ controlling printing
(To print on a Macintosh, see page 19.)
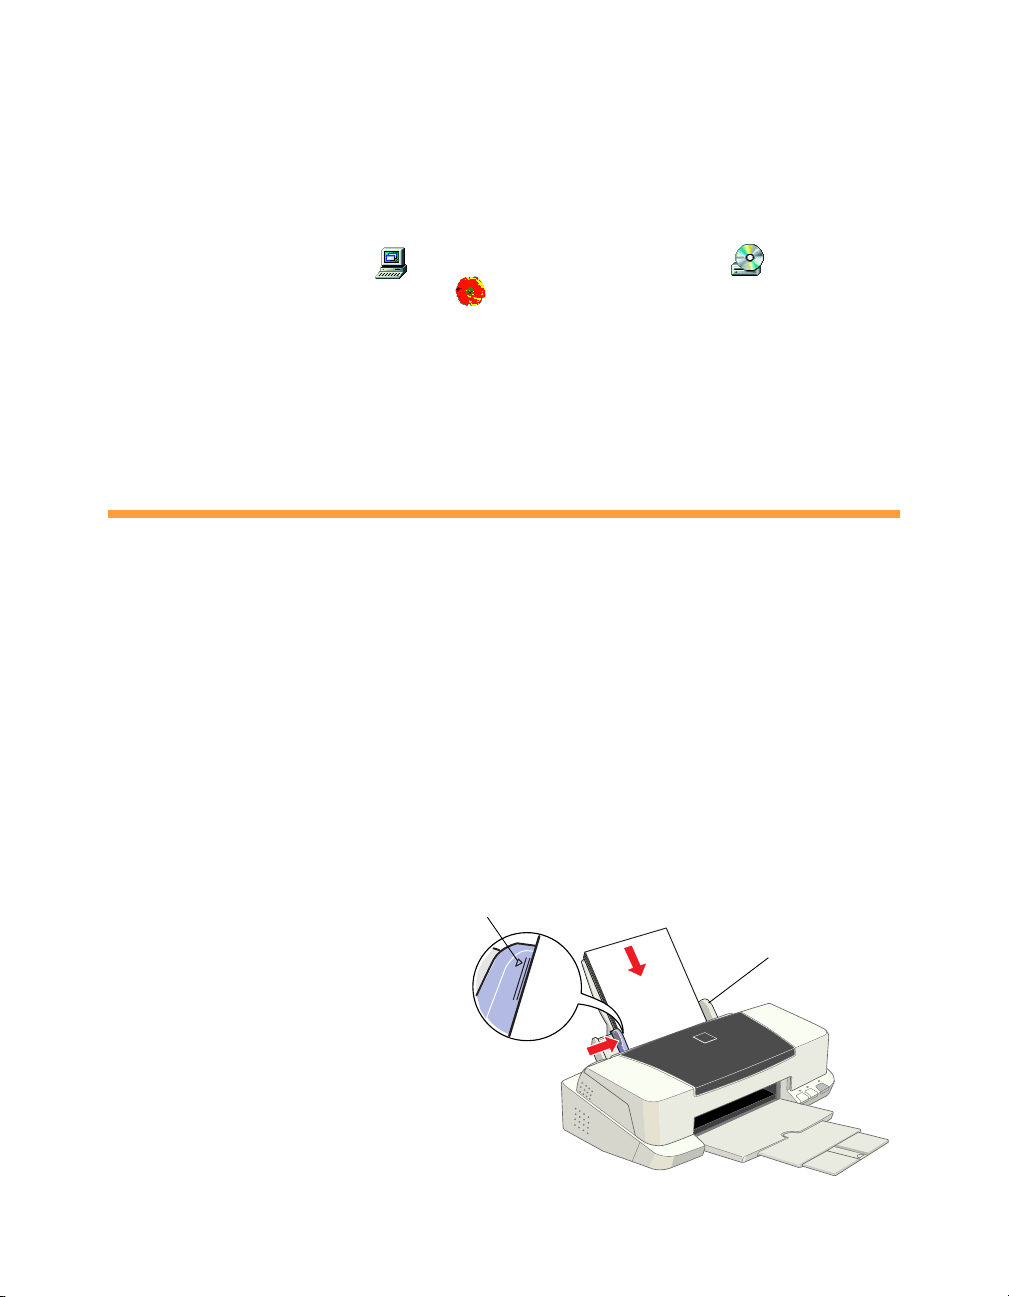
Loading Paper
Load paper only up
to this arrow
Make sure your printer and
computer are turned on.
Place your paper against the right
edge guide and slide the left edge
guide against the paper.
Slide paper against the
right edge guide
Page 21
Keep the following in mind when loading paper:
■ Load the printable side face up. It’s usually whiter or brighter than the other side.
■ Load letterhead or preprinted paper into the printer top edge first.
■ Don’t load paper above the arrow on the left edge guide.
If you’re printing on envelopes or other special paper sizes or
types, see page 31 for loading instructions.
Opening the Printer Software
After you open your application program and create your document, you’re ready to
select your printer software settings.
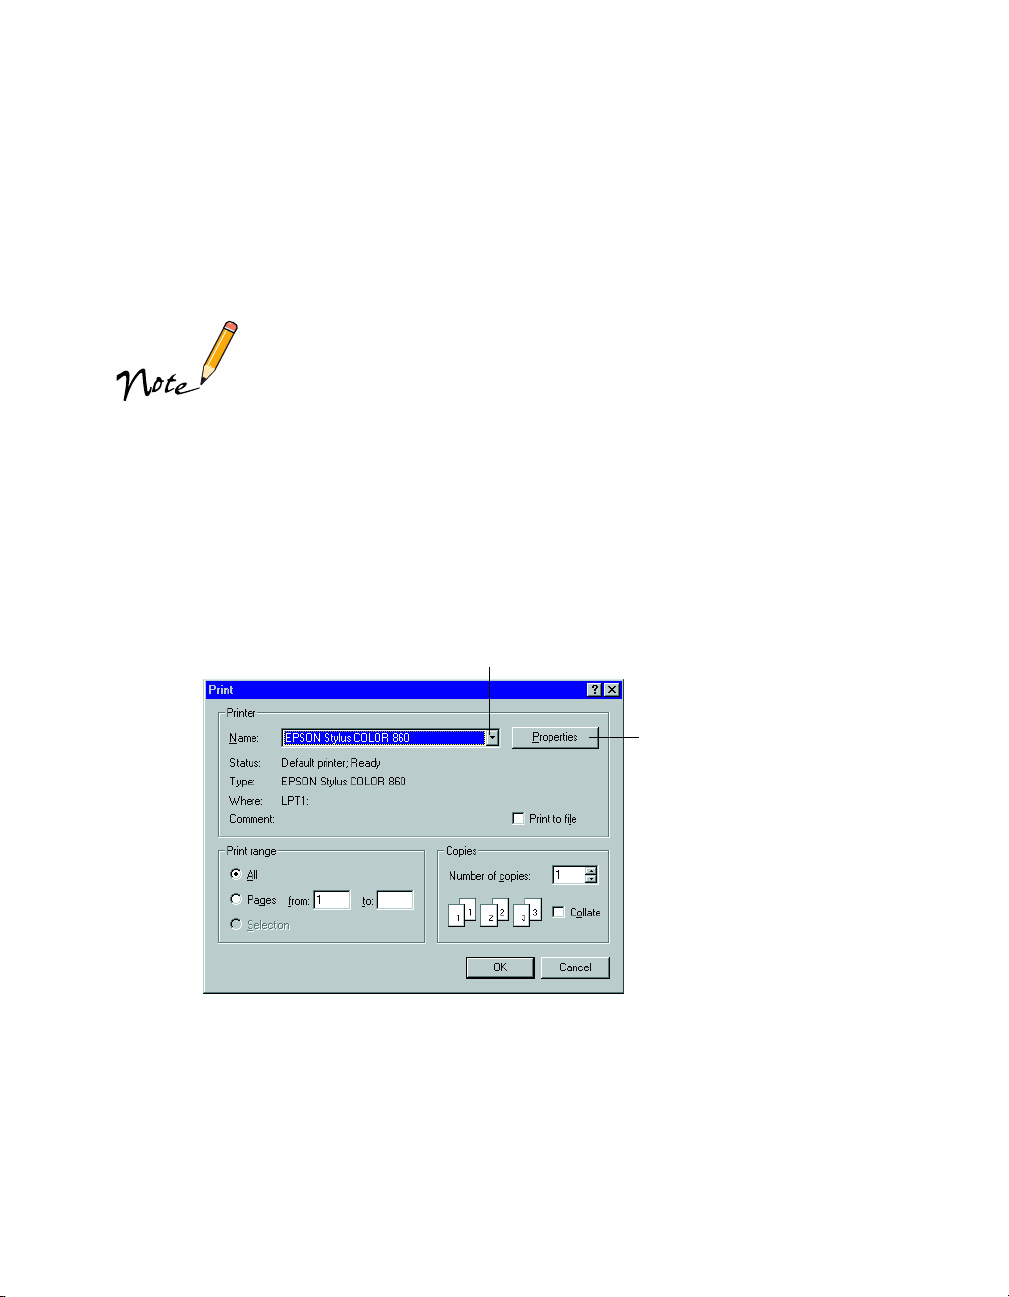
From the File menu, click Print. You see your application’s Print dialog box (your
dialog box may look slightly different):
Select your printer here
Make the following selections on the Print dialog box:
■ Make sure your
■ If the Print dialog box contains a
Printer, or Options button, click it. Then click
EPSON Stylus COLOR
Properties
printer model is selected.
button, click it. (If you see a Setup,
Properties
Click here to open
your printer software
on the next screen.)
15
Page 22
If you click the print icon on your application’s tool bar instead
of selecting Print from the File menu, you may not get the
option to change the printer software settings before printing.
Selecting Printer Software Settings
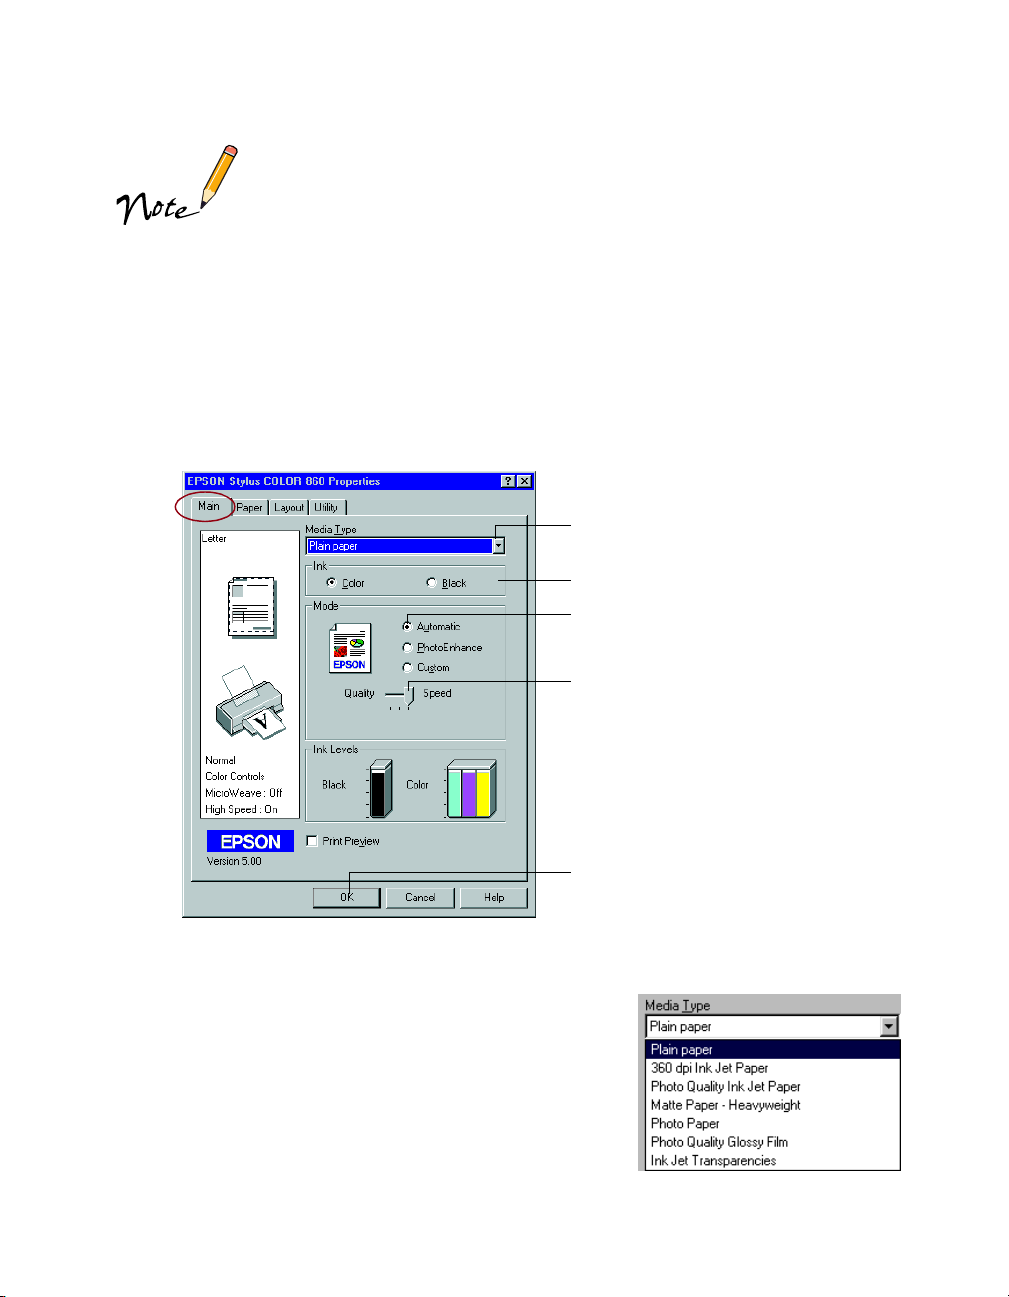
Once you click Properties, you see your printer software Properties dialog box.
The most important thing to remember is to set the correct Media Type for the paper
you’re using. The Media Type setting affects the other options you can choose. If
necessary, click the Main tab to display the settings shown below:
Select the type of paper you loaded
Select the Ink color
Select Automatic mode
Select faster or higher-quality
printing, or in-between
16
Click OK
Make the following settings on the Properties dialog box:
■ Choose the
Media Type
you’re printing on (click
the arrow button to scroll through the list). If you’re
not sure which setting to select, see page 35.
■ Set the Ink option to
Color
to print a color
document. To print a black text document, click
Black
.
Page 23

■ Set the Mode option to Automatic. This lets the printer software determine the
best settings for your print job. It’s the easiest way to get good printing results on
all types of paper.
■ Set the slider in the Mode box to Quality or Speed. This lets you choose between
a higher resolution or faster printing (or an in-between setting) for the paper
you’re using. (The slider is not available when certain media types are selected.)
■ When you’ve selected your settings, click OK to return to your application’s Print
dialog box.
For more information about printer settings, click the Help
button. Or you can right-click any item on the screen and then
click What’s This?.
Selecting Windows Default Settings
The printer settings you make apply only to the application you’re currently using. If
you usually print one type of document in different applications—for example, black
ink on legal size paper—you can change the default printer settings for all your
programs. You do this using the Windows Printer utility:
1. Click Start, point to Settings, and then select Printers.
2. Right-click the EPSON Stylus COLOR 760 or 860 icon.
3. Select Properties (Document Defaults in Windows NT). Then click the Main
tab.
4. Select the default settings you want to use for all your applications. Click OK
when you’re finished.
Remember, you can always change the default settings in your application when you
want to print different types of documents. Another way to select a group of settings
quickly is to save them as a group; see page 28 for details.
17
Page 24

Controlling Printing
Once you’ve clicked OK, you return to the Print dialog box.
Click OK to start
printing
Click OK (or Print, depending on your application) to start printing.
After a moment, the Progress Meter appears and shows the progress of your print job.
You can use the buttons to cancel, pause, or restart printing. You can also see how
much ink you have left and view printing tips.
18
Click to cancel printing
Click to pause or resume
Does not appear if
you are printing
over a network
Click to display or
close Epson
Printing Tips
below
printing
Click to view more details
about the displayed Tip
For more advanced printer settings, see pages 23 through 30. For more information
on printing—for example, previewing your printout, changing the paper size, or
adding a watermark—see your electronic Reference Guide (described on page 9).
Page 25

Printing on a Macintosh
This section describes these basic steps for printing on a Macintosh:
■ loading paper
■ opening the printer software
■ selecting printer software settings
■ controlling printing
(To print with Windows, see page 14.)
Loading Paper
Make sure your printer and
Load paper only up
to this arrow
Slide paper against the
right edge guide
computer are turned on.
Place your paper against the right
edge guide and slide the left edge
guide against the paper.
Keep the following in mind when loading paper:
■ Load the printable side face up. It’s usually whiter or brighter than the other side.
■ Load letterhead or preprinted paper into the printer top edge first.
■ Don’t load paper above the arrow on the left edge guide.
If you’re printing on envelopes or other special paper sizes or
types, see page 31 for loading instructions.
19
Page 26

Opening the Printer Software
After you open your application program and create your document, you’re ready to
select your page setup and other printer software settings.
From the File menu, click Page Setup. You see your application’s page setup dialog
box (your dialog box may look slightly different):
Verify your printer model here
Select your Paper Size, Orientation,
and Printable Area settings
Click OK
Make the following selections on the page setup dialog box:
■ Make sure your EPSON Stylus COLOR printer model (SC 760 or SC 860) is
selected. (If the model is incorrect, you need to select your printer in the Chooser;
see the Start Here poster for instructions.)
■ Select the correct Paper Size, Orientation, and Printable Area settings for your
document. See your electronic Reference Guide for details.
■ Click
OK
to close the page setup dialog box and return to your application
window.
20
Page 27

Selecting Printer Software Settings
Now open the File menu and click Print. You see the main printer settings dialog box
for your application (your dialog box may look slightly different):
Select the type
of paper you
loaded
Select the
Ink color
Select Automatic mode
Select faster or higher-quality printing, or in-between
The most important thing to remember is to set the correct Media Type for the paper
you’re using. The Media Type setting affects the other options you can choose.
Make the following settings on the dialog box:
■ Choose the Media Type you’re printing on (click the
arrow button to scroll through the list). If you’re not
sure which setting to select, see page 35.
■ Set the Ink option to Color to print a color document.
To print a black text document, click
■ Set the Mode option to
Automatic
Black
.
. This lets the printer software determine the
best settings for your print job. It’s the easiest way to get good printing results on
all types of paper.
■ Set the slider in the Mode box to
Quality
or
Speed
. This lets you choose between
a higher resolution or faster printing (or an in-between setting) for the paper
you’re using. (The slider is not available when certain media types are selected.)
■ When you’ve selected your settings, click
Print
to print your document.
21
Page 28

Controlling Printing
Once you’ve clicked Print, your printer begins printing.
If you turned on background printing, you can select EPSON Monitor3 from the
Application menu at the right side of the menu bar to check the progress of your print
job. You see the EPSON Monitor3 dialog box:
Click to restart your print job
Click to cancel printingClick to pause printing
Click on your
print job. . .
Then click here to
view the details
below and control
print job priorities
22
If you’re not using background printing, but you need to
cancel the current print job, hold down the
J key and press
the . (period) key.
For more advanced printer settings, see pages 23 through 30. For more information
on printing—for example, previewing your printout, changing the paper size, or
adding a watermark—see your electronic Reference Guide (described on page 9).
Page 29

Printing with PhotoEnhance
The printer driver includes PhotoEnhance options that increase image brightness and
contrast to improve the appearance of low-resolution photos. You can also add special
effects, such as Soft Focus.
If you’re printing high-resolution images, you may want to use
the Automatic setting instead; see page 16 (Windows) or
page 20 (Macintosh).
PhotoEnhance does not affect your original image; it only
affects your printout. Printing with PhotoEnhance may take
longer on some systems and images.
Follow these steps:
1. Create your image or document in your application software.
2. On a Macintosh, first choose your paper size, orientation, and printable area
settings by selecting Page Setup from the File menu. See your electronic Reference
Guide for details. (You can often make these settings in your application software.
If so, you should make the changes there.)
3. Access the printer settings dialog box as described on page 15 (Windows) or
page 20 (Macintosh).
23
Page 30

You see one of these dialog boxes:
Windows
Click PhotoEnhance
24
Macintosh
4. Choose the
Media Type
you want to print on. (If you’re not sure which setting to
select, see page 35.)
5. Choose
6. Click
PhotoEnhance
Color
ink. (You cannot select PhotoEnhance if
.
Black
ink is selected.)
7. If your photograph was taken with a digital camera, you can click the
Camera Correction
box. This gives your printed images the appearance of
photographs taken with a film camera.
Digital
Page 31

8. For more fine tuning, click Standard. You see a list of
specialized settings for photographs.
Select the setting that most closely matches your
photograph (People or Nature) or select one of the
special filters (Soft Focus or Sepia). You may need to
experiment with these settings to get the exact look you
want, especially if you have multiple images on a page.
You can also make detailed settings on the Advanced dialog
box to fit your individual needs, as described on page 28.
9. Windows: If you need to change your paper size, number of copies, orientation,
and printable area, click the Paper tab. (You can often make these settings in your
application software. If so, you should make the changes there.)
Macintosh: Go to step 10; you already made paper changes in step 2.
10. If you need to reduce or enlarge the image (proportional printing), print multiple
pages on a single sheet, “tile” an image to make a large poster, or add a watermark,
do the following:
Windows: Click the Layout tab.
Macintosh: Click the Layout button.
(You can often make these settings in your application software. If so, you should
make the changes there.)
11. Windows: Click OK to return to your application’s Print dialog box. Then click
OK
Macintosh: Click
(or
Print
, depending on your application) to start printing.
Print
to start printing.
For more details on the printer settings, see your electronic Reference Guide, as
described on page 9.
25
Page 32

Using Custom Project Types
Your EPSON Stylus COLOR printer software includes custom project types with
preset options for printing specific types of documents—such as reports, graphs, or
drafts. These options let you quickly select the best settings for your particular type of
document and paper, or select a color-matching method for your project.
Follow these steps to print with custom project types:
1. Create your image or document in your application software.
2. On a Macintosh, first choose your paper size, orientation, and printable area
settings by selecting Page Setup from the File menu. See your electronic Reference
Guide for details. (You can often make these settings in your application software.
If so, you should make the changes there.)
3. Access the printer settings dialog box as described on page 15 (Windows) or
page 20 (Macintosh).
4. Choose the Media Type you want to print on. (If you’re not sure which setting to
choose, see page 35.)
5. Choose Color or Black ink.
6. Click Custom, and then click Custom Settings. You see the list of project types.
26
Always choose your Media Type
and Ink settings before you select
a custom project type
Click Custom, then click here
to select a project type
Windows
Page 33

Always choose your Media Type and Ink settings
Macintosh
Click Custom, then click here to select a project type
before you select a custom project type
7. Choose a project type following these guidelines (these settings are restricted by
your Media Type and Ink settings):
■ Text/Graph: For printing graphics-intensive documents like presentations
with charts and graphs.
■ Economy: For printing rough drafts of text on plain paper. Saves ink.
■ ICM (Image Color Matching; Windows 95 and Windows 98 only):
For printing documents created in an ICM compatible application.
■ sRGB (standard Red Green Blue; recommended only with Windows 98): For
printing documents created in an sRGB compatible application using sRGB
colors, such as those designed for the World Wide Web. See your
Windows 98 online help for details.
ColorSync
■
(Macintosh only): For printing documents in conjunction with
ColorSync compatible devices and applications.
You can also fine-tune these settings on the Advanced dialog
box to fit your individual needs, as described on page 28.
8. Windows: If you need to change your paper size, number of copies, orientation,
and printable area, click the
Paper
tab. (You can often make these settings in your
application software. If so, you should make the changes there.)
Macintosh: Go to step 9; you already made paper changes in step 2.
27
Page 34

9. If you need to reduce or enlarge the image (proportional printing), print multiple
pages on a single sheet, “tile” an image to make a large poster, or add a watermark,
do the following:
Windows: Click the Layout tab.
Macintosh: Click the Layout button.
(You can often make these settings in your application software. If so, you should
make the changes there.)
10. Windows: Click OK to return to your application’s Print dialog box. Then click
OK (or Print, depending on your application) to start printing.
Macintosh: Click Print to start printing.
For more details on the printer settings, see your electronic Reference Guide, as
described on page 9.
Using Advanced Settings
For maximum control over your project, you can customize your print settings and
use special effects. You can even save your custom settings as a group so you can
quickly select them whenever you print a similar project.
28
To access advanced settings, follow these steps:
1. Create your image or document in your application software.
2. On a Macintosh, first choose your paper size, orientation, and printable area
settings by selecting
Guide for details. (You can often make these settings in your application software.
If so, you should make the changes there.)
3. Access the printer settings dialog box as described on page 15 (Windows) or
page 20 (Macintosh).
4. Select your Media Type and Ink settings.
Page Setup
from the File menu. See your electronic Reference
Page 35

5. Click Custom, and then click the Advanced button. You see the Advanced dialog
box:
Click here to
change your Print
Quality (resolution)
This section
changes depending
on the Color
Management
setting selected
above
Windows
Click here to
change your Print
Quality (resolution)
Macintosh
This section
changes depending
on the Color
Management
setting selected
above
6. Check the displayed Media Type and Ink settings you selected on the main dialog
box. You can change them here as you customize your settings, if needed.
7. Choose a
Print Quality
setting (the availability depends on your Media Type
setting).
29
Page 36

8. Select a color management method (the availability depends on your operating
system).
9. Select any other settings you need to change. Many of the settings are
automatically selected by other settings you choose.
For details on all the printer software settings, see your electronic Reference Guide.
After you customize your print settings, you can save them as
a group. Then you can reuse them whenever you print a
similar project. Click Save Settings in the Advanced dialog
box. Type a name for your setting group and click OK.
10. Click OK to return to the main printer settings dialog box.
11. Windows: If you need to change your paper size, number of copies, orientation,
and printable area, click the Paper tab. (You can often make these settings in your
application software. If so, you should make the changes there.)
Macintosh: Go to step 12; you already made paper changes in step 2.
12. If you need to reduce or enlarge the image (proportional printing), print multiple
pages on a single sheet, “tile” an image to make a large poster, or add a watermark,
do the following:
30
Windows: Click the Layout tab.
Macintosh: Click the Layout button.
(You can often make these settings in your application software. If so, you should
make the changes there.)
13. Windows: Click OK to return to your application’s Print dialog box. Then click
OK
Macintosh: Click
(or
Print
, depending on your application) to start printing.
Print
to start printing.
Page 37

Using Special Papers
How can you get the best-looking photos, most vivid colors, and sharpest text? Always
use EPSON’s special ink jet papers. To show you how much difference EPSON paper
can make, we’ve included some free samples.
Check out the EPSON Photo Quality Media Pack that came with your printer.
Instructions for printing on the samples, along with other papers, are given in the
following sections.
For a list of EPSON special ink jet papers and ordering information, see the inside
back cover.
EPSON Photo Quality Ink Jet Paper
EPSON Photo Quality Ink Jet Paper is great for presentation materials and
newsletters. Load it as described on page 14. Before you print, select Photo Quality
Ink Jet Paper
Matte Paper - Heavyweight
as the Media Type.
Matte Paper - Heavyweight has a professional-looking, flat matte finish for printing
photos and graphics on a non-glossy surface. Load up to 20 sheets as described on
page 14, including a support sheet beneath the stack. Before printing, select Matte
Paper - Heavyweight
as the Media Type.
EPSON Photo Paper
You can use EPSON Photo Paper to print photographs that look almost as good as
the ones you get from film processing. Photo Paper is available in a variety of sizes.
Keep the following in mind when using EPSON Photo Paper:
■ Always load the paper with the whiter (glossier) side facing up.
■ Load up to 20 sheets of 4 × 6-inch, letter-size, or A4-size Photo Paper, or 1 sheet
of Panoramic paper. Use a support sheet if it is included in the paper package.
31
Page 38

■ Select Photo Paper as the Media Type setting.
■ To keep your printouts looking their best, store them in a resealable plastic bag or
other airtight covering and protect them from heat, humidity, and direct sunlight.
Return unused paper to the original package as soon as you finish printing.
If you’re using letter-size or A4-size Photo Paper, follow the instructions on page 14
to load and print on the paper. If you’re using 4 × 6-inch or Panoramic Photo Paper,
see the next sections.
4
6-inch Photo Paper
××××
EPSON 4 ×6-inch Photo Paper is micro-perforated around the edges so you can trim
your printouts and “bleed” the photo—extend it to the edge of the paper—on all
sides.
1. Load the paper against the right edge guide
with the glossy side facing up and the
perforated margins positioned as shown. Then
slide the left edge guide against the paper.
You can load up to 20 sheets at a time, with
the included support sheets A and B beneath
the stack. (If you don’t have the support
sheets, use plain paper cut to size.)
32
2. When you create the image in your application
software, size it to 4.25 × 6.25 inches. Or use
your printer software’s Reduce/Enlarge
(Windows) or Fit to Page (Macintosh) settings,
as described in your electronic Reference Guide.
3. Choose
Photo Paper
as the Media Type
setting.
4. Choose
setting and
Photo Paper 4 × 6 in
Maximum
as the Printable Area
as the Paper Size
setting.
5. After you print your picture, fold the paper
back and forth along the perforations and
carefully tear off the margins.
trim size
printed
image size
Remove the
margins
Page 39

Panoramic Photo Paper
1. Pull up the paper support extension. Load one sheet of Panoramic paper
glossy side up. Hold up the paper’s top edge and press the
feed it into the printer.
Support the
paper as it
feeds into the
printer
2. Choose Photo Paper as the Media Type setting and Panoramic 210 × 594 mm as
the Paper size setting.
S load/eject button to
Support the paper as it
ejects from the printer so it
doesn’t fall onto the floor
Preserving Photos on EPSON Photo Paper
EPSON Photo Paper has been specially formulated to work with EPSON’s ink to
create prints that last as long as traditional photographs when protected from light in
photo albums or similar archival conditions.
When you display your EPSON Photo Paper prints in picture frames or mounted on
the wall, the paper provides extra UV (ultraviolet) light protection so your prints will
last longer than prints on other ink jet photo papers. Depending on the type and
intensity of the light your print is exposed to, a print on EPSON Photo Paper may
last two or more years before noticeable fading occurs. Fade resistance could decrease
in intense light conditions or increase if your print is protected by glass or special
laminates.
For optimum results and longer print life, print your digital photos on EPSON Photo
Paper. See the inside back cover of this manual for a list of available paper sizes.
33
Page 40

Envelopes
You can load up to 10 envelopes at a time, flap
edge first and printable side up. Place them against
the right edge guide and slide the left edge guide
against them.
(You’ll get better results if you press each envelope
flat before loading it, or load one envelope at a
time.)
Set the thickness lever to the
+ position when you print on
envelopes or other thick media.
(Return the lever to the
0 position before you print on
regular paper.)
Lever position for
envelopes and thick paper
Select Plain paper as the Media Type setting and choose the correct envelope size as
the Paper Size setting.
34
If the printing smears or you have banding (light lines), try turning off High Speed
printing in the Advanced dialog box. (See page 28 for instructions on accessing the
dialog box.)
Page 41

Selecting the Correct Media Type
Your printer automatically adjusts itself for the type of
paper you select in your printer software. That’s why
the Media Type setting is so important. It tells your
printer what kind of paper you’re using and adjusts the
ink coverage accordingly.
Before you print, always check your Media Type
setting. Here are the settings you should choose for
your paper:
For this paper . . . Select this Media Type setting . . .
Plain paper sheets or envelopes
EPSON 360 dpi Ink Jet Paper
EPSON Iron-On Cool Peel Transfer Paper
EPSON High Quality Ink Jet Paper
EPSON Photo Quality Ink Jet Paper
EPSON Photo Quality Ink Jet Cards
EPSON Photo Quality Self Adhesive Sheets
EPSON Photo Paper
EPSON Photo Quality Glossy Paper
EPSON Photo Quality Glossy Film
EPSON Photo Stickers
EPSON Ink Jet Transparencies
Matte Paper - Heavyweight
If any paper you buy comes with a cleaning sheet, don’t use
the cleaning sheet with this printer; it may jam inside the
printer.
Plain paper
360 dpi Ink Jet Paper
Photo Quality Ink Jet Paper
Photo Paper
Photo Quality Glossy Film
Ink Jet Transparencies
Matte Paper - Heavyweight
35
Page 42

36
Page 43

Maintaining Your Printer
This section describes maintenance procedures to keep your printer working at its best
and preparation steps for moving your printer. Follow the instructions here for:
■ cleaning the print head (below)
■ replacing an ink cartridge (on page 41)
■ aligning the print head (on page 46)
■ cleaning the printer (on page 47)
■ transporting the printer (on page 48)
For more details, see your electronic Reference Guide, as described on page 9.
Cleaning the Print Head
If your printed image is unexpectedly light or faint, or dots are missing from the
image, you may need to clean the print head. This unclogs the nozzles so they can
deliver ink properly.
Cleaning the print head uses ink, so clean it only if print quality declines. You can
clean the print head in either of the following ways:
■ using the Head Cleaning utility (when the printer is connected to a local port, not
over a network), as described on page 38
■ using the printer’s control panel buttons, as described on page 39
When you don’t turn on your printer for a long time, the print
quality can decline. It’s a good idea to turn on your printer at
least once a month to maintain good print quality.
If any paper you buy comes with a cleaning sheet, don’t use
the cleaning sheet with your printer; it may jam inside the
printer.
37
Page 44

Using the Head Cleaning Utility
Follow these steps to run the Head Cleaning utility:
1. Make sure the printer is turned on but not printing, and both the
B black and
A color ink out lights are off. (If an ink out light is flashing, replace the ink
cartridge instead.)
2. If you have an application running, access the printer settings dialog box as
described on page 15 (Windows) or page 20 (Macintosh).
Or, with Windows, click Start, point to Settings, then select Printers. Right-click
your EPSON Stylus COLOR printer icon in the Printers window. Then select
Properties (Document Defaults in Windows NT).
3. Windows: Click the Utility tab.
Macintosh: Click the Utility
button.
4. On the Utility menu, click the
Head Cleaning button.
5. Follow the instructions on the
screen to clean the print head.
Cleaning takes about 30 seconds,
during which the printer makes
some noise and the
light flashes.
Ppower
Head Cleaning
button
38
Never turn off the printer while the
unless the printer hasn’t moved or made noise for more than
5 minutes.
6. When the
Ppower light stops flashing, run a nozzle check to confirm the print
head nozzles are clean and reset the cleaning cycle.
Make sure paper is loaded in the printer and click
Then click
Next
. The nozzle check pattern prints (see page 40 for details).
P
power light is flashing,
Print nozzle check pattern
.
Page 45

7. If the nozzle check pattern has no gaps in its dots, click Finish.
If the pattern is missing dots, click Clean to clean the print head again. If you
don’t see any improvement after cleaning three or four times, check the solutions
in “Problems Getting Good Print Quality” on page 55. You can also turn the
printer off and wait overnight—this allows any dried ink to soften—and then try
cleaning the print head again.
Using the Control Panel to Clean the Print Head
Follow the steps below to clean the print head. (See page 49 for more control panel
information.)
1. Make sure the printer is turned on but not printing, and both the
B black and
A color ink out lights are off. (If an ink out light is flashing, replace the ink
cartridge before continuing.)
2. Press the
B A cleaning button and hold it down
for three seconds. Cleaning takes about
30 seconds, during which the printer makes
some noise and the
3. After the
Ppower light stops flashing, print a page to test the print quality and
Never turn off the printer while the
unless the printer hasn’t moved or made noise for more than
5 minutes.
Ppower light flashes.
cleaning button
P
power light is flashing,
reset the cleaning cycle.
If your printer is connected directly to the computer, go to step 4 to run a nozzle
check.
If you’re printing over a network, open an application and print a short document
containing black and color data. Then go to step 8.
4. If you have an application running, access the printer settings dialog box as
described on page 15 (Windows) or page 20 (Macintosh).
39
Page 46

Or, with Windows, click Start, point to Settings, then select Printers. Right-click
your EPSON Stylus COLOR printer icon in the Printers window. Then select
Properties (Document Defaults in Windows NT).
5. Windows: Click the Utility tab.
Macintosh: Click the Utility button.
6. Make sure paper is loaded in the printer, click the Nozzle Check button, and click
Next. The nozzle check pattern prints (see the next section for details).
7. If the nozzle check pattern has no gaps in its dots, click Finish.
If the pattern is missing dots, click Clean to clean the print head again.
8. If you don’t see any improvement after cleaning three or four times, check the
solutions beginning on page 55. You can also turn the printer off and wait
overnight—this allows any dried ink to soften—and then try cleaning the print
head again.
Examining the Nozzle Check Pattern
Examine the nozzle check pattern you print. It should look something like this:
40
Each staggered horizontal and straight vertical line should be complete, with no gaps
in the dot pattern. If your printout looks okay, you’re done. If any dots are missing, as
shown below, clean the print head again; see page 37 for instructions.
missing dots
missing dots
missing dots
Page 47

Replacing an Ink Cartridge
When the
B black or
A color ink out light flashes, the indicated cartridge is low on
ink. This is a good time to make sure you have a new cartridge. When the light stays
on, the cartridge is empty and you need to replace it.
You cannot print if either ink cartridge is empty. Leave the
empty cartridge installed in the printer until you have obtained
a replacement. Otherwise the ink remaining in the print head
nozzles may dry out.
Use these EPSON ink cartridges within six months of installing them and before the
expiration date on the package:
■ Black ink cartridge: S020189
■ Color ink cartridge: S020191
To ensure good results, use genuine EPSON ink cartridges
and do not refill them. Other products may cause damage to
your printer not covered by EPSON’s warranty.
When you need new ink cartridges, contact your dealer or call EPSON Accessories at
(800) 873-7766 or visit our web site at www.epsonsupplies.com (U.S. sales only). In
Canada, please call (800) 873-7766 for dealer referral.
If you need to replace an ink cartridge before the lights flash (because the ink is too
old, for example) follow the instructions in “Replacing an Outdated Ink Cartridge”
on page 44.
41
Page 48

Removing and Installing Ink Cartridges
You can replace a cartridge when the
B black or
A color ink out light is either
flashing or on. (If you perform these steps when both ink out lights are off, the printer
cleans the print heads as described on page 37.)
Be sure you have a new ink cartridge before you begin. Once you start the ink
cartridge replacement procedure, you must complete all the steps in one session.
Follow these steps to replace ink cartridges:
1. Make sure the printer is turned on and not printing (the
Ppower light should be
on, but not flashing), then open the printer cover.
2. Press the
head moves left and the
B A
cleaning button and hold it for about three seconds until the print
Ppower light begins flashing.
To avoid damaging the printer, never move the print head by
hand. Don’t open the clamp or remove a cartridge except to
replace it with a new one. Once you remove a cartridge, you
can’t reuse it, even if it contains ink.
3. Pull up the ink cartridge clamp. The
cartridge rises up from its holder. (The
illustration shows color ink cartridge
replacement. To replace the black ink
cartridge, lift up only the smaller clamp
on the left.)
42
4. Lift the cartridge out of the printer and
dispose of it carefully.
Keep ink cartridges out of
the reach of children.
If ink gets on your hands,
wash them thoroughly with
soap and water. If ink gets
into your eyes, flush them
immediately with water.
Page 49

5. Unwrap the new ink cartridge. Then remove only the
yellow part of the tape seal on top. Don’t remove the
blue part of the tape seal.
You must remove the yellow tape
from the top of the cartridge or you
will permanently damage it. Don’t
pull off the blue portion or try to
remove the clear seal underneath
the cartridge.
6. Lower the new ink cartridge into its holder
with the label facing up and toward the back
of the printer.
7. Press down the ink cartridge clamp until it
locks in place, but don’t press down on the
cartridge itself.
black cartridge
(S020189)
color cartridge
(S020191)
8. If you need to replace the other ink cartridge,
repeat steps 3 through 7 before continuing
with step 9.
9. Press the
B A cleaning button and close the
printer cover. The printer moves the print
head and begins charging the ink delivery system.
The
Ppower light flashes, and the printer makes noise. Charging takes about
30 seconds. When it’s finished, the
Never turn off the printer while the
unless the printer hasn’t moved or made noise for more than
5 minutes.
Ppower light stops flashing and stays on.
P
power light is flashing,
43
Page 50

Replacing an Outdated Ink Cartridge
When an ink cartridge is more than six months old, you may need to replace it if you
notice that your printouts don’t look as good as they used to. If print quality doesn’t
improve after cleaning and aligning the print head, you can replace one or both
cartridges.
Follow these steps to replace an ink cartridge before the
B black or
light is flashing or on:
1. Make sure the printer is turned on and not printing (the
on, but not flashing), then open the printer cover.
2. Press the
head moves left and the
S load/eject button and hold it for about three seconds until the print
Ppower light begins flashing.
To avoid damaging the printer, never move the print head by
hand. Don’t open the clamp or remove a cartridge except to
replace it with a new one. Once you remove a cartridge, you
can’t reuse it, even if it contains ink.
3. Pull up the ink cartridge clamp. The
cartridge rises up from its holder. (The
illustration shows color ink cartridge
replacement. To replace the black ink
cartridge, lift up only the smaller clamp
on the left.)
A color ink out
Ppower light should be
44
4. Lift the cartridge out of the printer and
dispose of it carefully.
Keep ink cartridges out of
the reach of children.
If ink gets on your hands,
wash them thoroughly with
soap and water. If ink gets
into your eyes, flush them
immediately with water.
Page 51

5. Unwrap the new ink cartridge. Then remove only the
yellow part of the tape seal on top. Don’t remove the
blue part of the tape seal.
You must remove the yellow tape
from the top of the cartridge or you
will permanently damage it. Don’t
pull off the blue portion or try to
remove the clear seal underneath
the cartridge.
6. Lower the new ink cartridge into its holder
with the label facing up and toward the back
of the printer.
7. Press down the ink cartridge clamp until it
locks in place, but don’t press down on the
cartridge itself.
black cartridge
(S020189)
color cartridge
(S020191)
8. If you need to replace the other ink cartridge,
repeat steps 3 through 7 before continuing
with step 9.
9. Press the
S load/eject button again and close
the printer cover. The printer moves the
print head and begins charging the ink
delivery system.
The
Ppower light flashes and the printer makes noise. Charging takes about
30 seconds. When it’s finished, the
Never turn off the printer while the
unless the printer hasn’t moved or made noise for more than
5 minutes.
Ppower light stops flashing and stays on.
P
power light is flashing,
45
Page 52

Aligning the Print Head
If your printouts contain misaligned vertical lines, you may need to align the print
head. Your printer must be connected to a local port, not on a network, to use the
Print Head Alignment utility.
Follow these steps:
1. Make sure the printer is turned on, but not printing, and letter-size paper is
loaded.
Load paper that’s at least 8.27 inches (210 mm) wide to
prevent ink from spraying inside the printer and smudging
your printouts.
For the best results, load EPSON ink jet paper in the printer
whenever you check the print head alignment.
2. If you have an application running, access the printer settings dialog box as
described on page 15 (Windows) or page 20 (Macintosh).
Or, with Windows, click Start, point to Settings, then select Printers. Right-click
the EPSON Stylus COLOR icon in the Printers window. Select Properties
(Document Defaults in Windows NT).
46
3. Windows: Click the Utility tab.
Macintosh: Click the Utility
button.
4. You see the Utility menu. Click the
Print Head Alignment
button.
5. Follow the instructions on the
screen to print a test page.
6. Select the most precise alignment
pattern from the choices on the test
page. Enter the number of the best
aligned pattern following the
instructions on the screen.
Print Head
Alignment button
Page 53

Cleaning the Printer
To keep your printer working at its best, you should clean it several times a year.
Follow these steps:
1. Turn off the printer, unplug the power cord, and disconnect the printer cable.
2. Remove all the paper from the sheet feeder.
3. Clean the exterior of the printer with a soft, damp cloth.
4. Clean ink out of the printer’s interior with a soft, damp cloth.
Don’t touch the gears inside the printer.
Never use alcohol or thinner for cleaning; they can damage
the printer components and case.
Don’t use a hard or abrasive brush.
Don’t get water on the printer components and don’t spray
lubricants or oils inside the printer.
Don’t use any cleaning sheets included with special media;
they may jam inside the printer.
47
Page 54

Transporting the Printer
If you move your printer some distance, you need to prepare it for transportation in
its original box. Follow these steps:
To avoid damage, always leave the ink cartridges installed
when transporting the printer.
Be sure to remove the tape used in step 4 after installing the
printer in its new location.
1. Turn on the printer, wait until the print head locks in the far right position, then
turn off the printer.
2. Unplug the power cord from the electrical outlet. Then disconnect the printer
cable from the printer.
3. Remove any paper from the printer and remove the paper support.
4. Open the printer cover. Secure the ink
cartridge holder to the printer with tape as
Tape the ink cartridge holder
to the printer case
shown, then close the printer cover.
5. Push in the output tray extensions and close
the tray.
6. Repack the printer and attachments in the
original box using the protective materials
that came with it. See the unpacking sheet
that was packed with your printer.
Be sure to keep the printer level as you transport it.
After transporting the printer, remove the tape securing the print head and test your
printer. If you notice a decline in print quality, clean the print head (see page 37); if
output is misaligned, align the print head (see page 46).
48
Page 55

Problem Solving
This section gives you the basics for diagnosing and solving printer problems.
■ First see “Diagnosing Printer Problems” to help determine what the cause of the
problem may be.
■ Then see “Problems and Solutions” on page 53 for solutions to common setup
and software problems.
It’s a good idea to check EPSON’s web site periodically for
possible updates to your printer driver. Visit www.epson.com
and check the section for your product to see if there is a new
driver available for downloading to your computer.
Diagnosing Printer Problems
You can diagnose some problems by checking the printer’s control panel lights, as
described below, or running a printer check, as described on page 51.
Checking the Control Panel Lights
paper out light
color ink out light
black ink out light
cleaning button
load/eject
button
power button
Follow the guidelines on the next page when you check the control panel lights.
power
light
49
Page 56

P is on The
flashes when the printer is receiving a print job, charging ink, or
cleaning the print head.
Ppower light is on when the printer is on and ready to print. It
flashes and
S
B
and A are on
is on When the
S
B
or A flash When an ink out light flashes, your ink supply is low. Make sure you
B
or A are on When an ink out light comes on, you need to replace the ink cartridge.
P and S flash
and
B
and A are on
When the
you have a paper jam. Press the
jam. If that doesn’t work, turn off the printer and gently pull out all the
paper. Make sure none of the sheets are curled, creased, old, stuck
together, or too thin. Then reload the paper against the right edge
guide and slide the left edge guide against it. Turn on the printer and
press the
loaded. Make sure none of the sheets are curled, creased, old, stuck
together, or too thin. Then reload the paper against the right edge
guide and slide the left edge guide against it. Press the
button to resume printing.
have a replacement cartridge (black S020189, color S020191).
Make sure you have a replacement cartridge (black S020189, color
S020191). See page 41 for replacement instructions.
When the
ink out lights come on, jammed paper may be blocking movement of
the print head or you may not have removed the yellow tape seal from
the installed ink cartridge(s). Turn off the printer, open the cover, and
check inside for any jammed paper. Then turn the printer back on. If an
ink out light remains on and the print head moves into replacement
position, replace the ink cartridge(s) as described on page 44. If the
lights still flash and/or come on, contact your dealer or EPSON; see
page 61 for contact information.
S paper out light flashes and both ink out lights come on,
S load/eject button to try to clear the
S load/eject button to resume printing.
S paper out light comes on, your paper is out or incorrectly
S load/eject
Ppower and
S paper out lights flash, and one or both of the
50
P S B A flash When all the lights flash, your printer may have an internal error. Make
sure you removed all the packing material as described on the
unpacking sheet in your printer box. Then turn off the printer, wait a
few seconds, and turn it on again. If the lights still flash, contact your
dealer or EPSON; see page 61 for contact information.
P S B A are off When all the lights are off, the printer is not receiving power. Try these
solutions:
■ Make sure the printer is turned on.
■ Turn off the printer, plug in the power cord securely, and turn on
the printer again.
■ Make sure the outlet is operable and is not controlled by a switch
or timer. If in doubt, try using another outlet.
Page 57

Running a Printer Check
You can run a printer check to determine whether a problem comes from the printer
itself or some other source. Follow these steps to run the printer check:
1. Make sure both the printer and computer are turned off.
2. Disconnect the interface cable from the printer.
3. Make sure paper is loaded in the printer.
4. Hold down the
Continue holding down the
flash, then release it.
The printer prints one page showing its ROM version number, ink counter, and a
nozzle check pattern. Only the nozzle check pattern is shown below. (If the
pattern has gaps in its dots, you need to clean the print head; see page 37.)
5. To end the check, turn off the printer after it prints the check page. Then
reconnect the interface cable and turn on your printer and computer.
If the check page prints, the problem probably lies in your software settings, the
interface cable, or your computer.
If the check page doesn’t print, you may have a problem with your printer.
Try the suggestions in “Problems and Solutions” beginning on page 53. If nothing
seems to work, contact your dealer or EPSON as described on page 61.
S load/eject button, then press and release the
S load/eject button until the
Ppower light starts to
Ppower button.
51
Page 58

Identifying Printer Parts
If you need help identifying the parts of the printer, refer to these illustrations:
paper support
sheet
feeder
left edge
guide
right edge guide
thickness
lever
ink cartridge
holders
printer cover
output tray
output tray extensions
control panel
52
Page 59

Problems and Solutions
Here are some basic troubleshooting tips if you have any problems setting up your
printer, installing software, getting good print quality, feeding paper, or other
miscellaneous problems.
Problems Setting Up the Printer or Installing Software
The printer started making noise
after ink cartridge installation . . .
■ The first time you install ink
cartridges, the printer must charge
its ink delivery system for a couple
minutes. Wait until charging
finishes (the
Ppower light stops
flashing) before you turn off the
printer. If you turn off the printer
while it’s charging, it begins
charging again the next time you
turn it on and uses more ink than
necessary.
■ Make sure the ink cartridge
clamps are locked down
completely and that no packing
material remains in the printer.
Turn off the printer, disconnect it
from your computer, and turn it
on again to clear the error. Then
turn it off, reconnect it, and turn
it on again.
■ If the printer stops moving or
making noise, but the
Ppower
light is still flashing after
5 minutes, turn off the printer.
If the light is still flashing when
you turn it back on, contact your
EPSON dealer or see “Where To
Get Help” on page 61.
You’re having problems installing
the printer software . . .
■ Carefully follow the instructions
on the Start Here poster.
■ Make sure your printer is turned
on and the printer cable is securely
connected to the printer and
computer.
■ Make sure you’ve closed all other
applications, including any screen
savers. Then try installing the
software again.
You’re printing over a network . . .
See your electronic Reference Guide
for instructions on configuring your
printer for use on a network.
53
Page 60

Problems with Printing
Only the
Ppower light is on, but
nothing prints . . .
■ Make sure the interface cable is
connected securely and that the
cable meets the system
requirements on page 4 or page 5.
■ Run a printer check as described
on page 51. If the check page
prints, make sure your printer and
application software are installed
correctly.
■ If you’re printing on a network,
you need to set up your printer for
network printing, as described in
your electronic Reference Guide.
The printer sounds as though it is
printing, but nothing prints . . .
Make sure the print head nozzles are
not clogged. To clean the print head,
see page 37.
Printing is too slow . . .
Make sure your system meets the
requirements listed on page 4 or
page 5. If you’re printing a
high-resolution image, you need
more than the minimum
requirements listed.
You may also need to:
■ Clear space on your hard disk or
run a defragmentation utility.
■ Close open applications that
you’re not using.
■ Increase your system’s memory
(RAM).
For the fastest printing, try the
following:
■ Choose Black ink if your
document doesn’t include color.
■ Set the Quality/Speed slider to
Speed.
■ In the printer software’s Advanced
dialog box, turn MicroWeave off
and turn High Speed on.
■ If you’re using the parallel port,
enable ECP/DMA mode on your
computer’s parallel port for
maximum print speeds. See your
computer documentation or the
manufacturer for instructions.
Your printer makes noise when
you turn it on or after it has been
sitting for a while . . .
Your printer is performing routine
maintenance.
54
Page 61

Problems Getting Good Print Quality
You see horizontal banding . . .
■ Make sure the print head nozzles are
not clogged. To clean the print head,
see page 37.
■ Make sure the Media Type setting
matches the paper you loaded. See
page 35 for guidelines.
■ Make sure the printable side of the
paper is face up. It is usually whiter
or shinier.
■ Make sure the ink cartridges aren’t
low on ink. If either ink out light is
flashing, replace the ink cartridge; see
page 41. If your ink cartridge is more
than six months old, see page 44 for
replacement steps.
■ Try using Automatic mode. See
page 16 (Windows) or page 21
(Macintosh) for instructions.
■ Make sure the paper thickness lever is
in the 0 position, as shown to the
right. Set the lever to the + position
when you print on thicker paper or
envelopes. You may also need to turn
off High Speed printing in the
printer software.
You see vertical banding . . .
■ Make sure the print head nozzles are
not clogged. To clean the print head,
see page 37.
■ Run the Print Head Alignment
utility. See page 46 for instructions.
■ Check the paper thickness lever
position. If it’s in the + position,
your printer is set for thicker paper
or envelopes and your image may
have banding. For most papers,
set the paper thickness lever to the
0 position.
55
Page 62

Your printout is blurry or
smeared . . .
Your printout is faint or has gaps in
the image . . .
■ Make sure your paper isn’t damp or
loaded face down (the printable side
should be loaded face up). If it’s
damp, reload a new stack of paper.
■ Use a support sheet with special
media or try loading your media
one sheet at a time.
■ Make sure your paper or media meets
the specifications listed in
your electronic Reference Guide.
■ Run the Print Head Alignment
utility. See page 46 for instructions.
■ Check the paper thickness lever
position. If it’s in the + position,
your printer is set for thicker paper
or envelopes and your image may
smear. For most papers, set the paper
thickness lever to the 0 position, as
shown on page 55.
■ Make sure the print head nozzles are
not clogged. To clean the print head,
see page 37.
■ Make sure the ink cartridges aren’t
low on ink. To replace an ink
cartridge, see page 41.
■ Make sure the Media Type setting
matches the paper you loaded. See
page 35 for guidelines.
■ Make sure your paper isn’t damaged,
old, dirty, or loaded face down. If it
is, reload a new stack of paper with
the printable side up; it is usually
whiter or shinier than the other side.
56
Page 63

You see wrong or missing colors . . .
■ Make sure the Ink setting is set to
Color for color images and your
application is set for color printing.
■ Make sure the print head nozzles are
not clogged. To clean the print head,
see page 37.
■ Make sure the ink cartridges aren’t
low on ink. If either ink out light is
flashing, replace the ink cartridge; see
page 41. If your ink cartridge is more
than six months old, see page 44 for
replacement steps.
■ If you’re printing a high-resolution
image, turn off PhotoEnhance.
■ Try using Automatic mode. See
page 16 (Windows) or page 21
(Macintosh) for instructions.
■ Make sure your printer and port are
selected in your software.
■ Your printed colors can never
exactly match your on-screen colors.
However, you can use a color
management system to get as close as
possible. For information, see your
electronic Reference Guide.
You see incorrect characters . . .
■ Make sure the interface cable is
securely connected and that the cable
meets the system requirements on
page 4 or page 5. Then try printing
again.
■ Make sure your printer is selected in
your application, or as the Windows
default printer or the current printer
in the Macintosh Chooser.
■ Make sure there aren’t any stalled
print jobs. If there are, delete them
and then try printing again. See your
electronic Reference Guide for
instructions.
■ If you’re using a switch box with
your printer; connect the printer
directly to your computer and try
printing again.
Your printout is grainy . . .
■ Try using a higher quality paper.
■ Set the Quality/Speed slider to the
Quality setting in your printer
software; see page 16 (Windows) or
page 21 (Macintosh).
■ Run the Print Head Alignment
utility. See page 46 for instructions.
■ You may need to increase the image
resolution or print it in a smaller size;
see your software documentation.
57
Page 64

Problems with Paper Feeding
Too many copies are printing . . .
Make sure the Copies settings
in the printer software and your
application aren’t both set for
multiple copies.
Paper doesn’t eject fully or is
wrinkled . . .
■ If the paper doesn’t eject fully, you
may have set the wrong paper size.
Press the
S load/eject button to
eject the paper. Then select the
correct paper size in your
application or printer software.
■ If it’s wrinkled when it ejects, the
paper may be damp or too thin.
Paper doesn’t feed . . .
Remove the stack of paper from the
sheet feeder. Check that the paper:
Paper jams inside the printer . . .
Turn off your printer, open the
cover, and remove all the paper
that’s inside, including any small
pieces that may have torn off.
If your paper jams frequently:
■ Use smooth, high-quality paper,
loaded printable side up.
■ Fan the stack and then even the
edges before loading it.
■ Don’t load paper above the arrow
mark on the left edge guide.
■ Place the paper against the right
edge guide and slide the left edge
guide against your paper.
Multiple pages feed at once . . .
Remove the stack of paper from the
printer. Then:
58
■ Isn’t curled or creased
■ Isn’t too old
■ Isn’t loaded above the arrow on
the left edge guide
■ Isn’t jammed inside the printer.
(If the
S paper out light is
flashing, paper is jammed.)
When you reload the paper, make
sure the left edge guide fits the paper.
■ Make sure the paper isn’t too thin.
■ Fan the edges of the stack of paper
to separate the sheets.
■ Reload the paper as described on
page 14.
■ Make sure the edge guides are
snug against the paper.
Page 65

Solving Miscellaneous Printout Problems
The margins are incorrect . . .
■ Make sure the paper settings in
your printer software are correct
for your paper size. See the
electronic Reference Guide for
instructions.
■ Check your software
documentation for instructions on
selecting the correct margins for
your paper size. The margins must
be within the printable area of the
page. See “Specifications” in your
electronic Reference Guide for
more information.
The image size or position is
incorrect . . .
Make sure the paper and/or layout
options are set correctly.
The image is inverted, as if viewed
in a mirror . . .
Turn off Flip Horizontal in the
printer software or the mirror setting
in your application software. (If
you’re printing on EPSON Iron-On
Cool Peel Transfer Paper, the image
should be inverted so it looks correct
when it’s ironed on.)
The printer prints blank pages . . .
■ Make sure your printer is selected
in your application, or as the
Windows default printer or the
current printer in the Macintosh
Chooser.
■ Make sure the paper settings in the
printer software are correct for
your paper size. See your
electronic Reference Guide for
instructions.
■ Make sure the print head nozzles
are not clogged. To clean the print
head, see page 37.
59
Page 66

Uninstalling Printer Software
Windows
1. Double-click My Computer, then double-click the Control Panel icon.
2. Double-click Add/Remove Programs. Click EPSON Printer Software in the
program list, then select your EPSON Stylus COLOR printer icon.
3. Click the Add/Remove button and follow the instructions.
4. If you’re using the USB port, click EPSON USB Printer Devices in the program
list; then click the Add/Remove button. Restart your computer.
Macintosh
1. Insert your printer software CD-ROM. Then double-click the EPSON
CD-ROM icon and double-click the EPSON icon. You see the Main Menu.
2. Click Install Printer Driver. On the installer screen, click the arrow in the Easy
Install list at the top and select Uninstall. Then click the Uninstall button at the
bottom and follow the instructions. Restart your Macintosh.
Reinstalling Printer Software
60
Before reinstalling your printer software, first uninstall it as described above.
Windows
1. USB connection: Follow the plug-and-play software installation instructions on
your Start Here poster.
Parallel connection: Insert your printer software CD-ROM. Double-click
My Computer
double-click the
2. Click
Macintosh
1. Insert your printer software CD-ROM. Then double-click the
2. Click Install Printer Driver and follow the instructions on screen. Restart your
Install Printer Driver
CD-ROM icon and double-click the
Macintosh.
, double-click your CD-ROM drive icon, then
EPSON
icon The Main Menu appears.
and follow the instructions. Restart your computer.
EPSON
EPSON
icon. You see the Main Menu.
Page 67

Where To Get Help
If you need help with your printer or its software, see the contact information below.
For help with the creative applications on the printer software CD-ROM, see page 62
for contact information. If you need help using other software with an EPSON
product, see the documentation for that software for technical support information.
EPSON Technical Support
EPSON provides technical assistance through electronic support services and
automated telephone services 24 hours a day, as listed in the following tables:
Electronic support services
Service Access
World Wide Web
EPSON Internet
FTP Site
From the Internet, you can reach EPSON’s Home Page at
http://www.epson.com
If you have Internet FTP capability, use your Web browser (or
other software for FTP downloading) to log onto
with the user name
password.
Automated telephone services
Service Access
EPSON
SoundAdvice
EPSON
FaxAdvice
EPSON Referral
Service
SM
TM
For pre-recorded answers to commonly asked questions about
EPSON products 24 hours a day, seven days a week, call
(800) 922-8911.
Access EPSON’s technical information library by calling
(800) 922-8911
this service.
For the location of your nearest Authorized EPSON Reseller or
Customer Care Center, call
.
ftp.epson.com
anonymous
. You must provide a return fax number to use
and your e-mail address as the
(800) 922-8911
.
61
Page 68

To speak to a technical support representative, dial:
■ U.S.: EPSON Stylus COLOR 760; (562) 276-7542
EPSON Stylus COLOR 860; (562) 276-7586
6 AM to 8 PM, Pacific Time, Monday through Friday and 7 AM to 4 PM, Saturday
■ Canada: (905) 709-2567, 6 AM to 8 PM, Pacific Time, Monday through Friday
and 7 AM to 4 PM, Saturday
Toll or long distance charges may apply.
Before you call, please have the following information ready:
■ Product name (EPSON Stylus COLOR 760 or 860)
■ Product serial number (located on the back of the printer)
■ Computer configuration
■ Description of the problem
You can purchase ink cartridges, paper, manuals, and accessories from EPSON
Accessories at (800) 873-7766 or visit our web site at www.epsonsupplies.com (U.S.
sales only). In Canada, please call (800) 873-7766 for dealer referral
.
62
Creative Software Technical Support
If you need help with the creative software on the printer software CD-ROM, please
contact the manufacturer, as listed below:
Contact method Polaroid PhotoMAX Pro and ArcSoft PhotoPrinter
Phone
Fax
Online
Mail
(510) 440-9901, 8:30 AM to 5:30 PM Pacific Standard Time
(510) 440-1270
e-mail: support@arcsoft.com; web site: http://www.arcsoft.com
ArcSoft Technical Support
46601 Fremont Blvd.
Fremont, CA 94538
Page 69

Index
Numerics
360 dpi Ink Jet Paper, 35
4 x 6-inch Photo Paper, 31 to 32
A
Accessories, 41, 62
Advanced settings, 28 to 30
Aligning print head, 46
Automatic mode, 16 to 17, 21
B
Background printing, 22
Banding, 34, 55
Blurry images, 56
Browser, 9
C
Cable, printer, 4, 5
Checking printer, 51
Cleaning
print head, 37 to 40
printer, 47
sheets, 35, 37, 47
Color management settings, 29 to 30
Colors, incorrect, 57
Control panel, 39, 49 to 50
Controlling printing, 18, 22
Copies setting, 58
Creative software, 2, 62
Custom project types, 26 to 28
D
Default settings, Windows, 17
Digital Camera Correction setting, 24
Documentation, 3
E
Economy setting, 27
Electronic manual, 2, 9 to 11
ENERGY STAR, 6
Envelopes, 34
EPSON
Accessories, 41, 62
help, 61 to 62
Monitor3, 22
papers, 31 to 35
F
Faint images, 56
Flip Horizontal setting, 59
G
Glossy media, 35
Graph setting, 27
Guided Printing Exercise, 13 to 14
H
Head Cleaning utility, 37 to 39
Help
creative software, 62
EPSON, 61 to 62
High Quality Ink Jet Paper, 35
High Speed setting, 54
High-resolution images, 23, 57
63
Page 70

I
N
ICM (Image Color Matching) setting, 27
Incorrect characters, 57
Incorrect colors, 57
Ink cartridge
replacing, 41 to 43
replacing outdated, 41, 44 to 45
safety instructions, 7 to 8
Ink Jet Transparencies, 35
Ink level, 18, 41
Ink setting, 16, 21, 24, 26, 29
Iron-On Cool Peel Transfer Paper, 35, 59
L
Layout
problems, 59
settings, 25, 28, 30
Lever, thickness, 34, 55, 56
Lights, 49 to 50
Low-resolution images, 23
M
Macintosh
printer status, 22
printing with, 19 to 22
system requirements, 5
USB, 5
Maintaining printer, 37 to 47
Matte Paper - Heavyweight, 31, 35
Media Pack, EPSON, 31
Media Type setting, 16, 21, 24, 26, 29, 35
MicroWeave setting, 54
Mirror images, 59
Monitor3, EPSON, 22
Monitoring ink level, 18, 41
Moving printer, 48
Network printing, 53
Nozzle check pattern, 38 to 40, 51
O
Orientation, 20, 23, 26, 28
Outdated ink cartridges, 41, 44 to 45
P
Page Setup dialog box, 20, 23, 26, 28
Panoramic Photo Paper, 33
Paper
EPSON, 31 to 35
feeding problems, 58
loading, 14 to 15, 19, 31 to 34
size, 18, 20, 22 to 23, 25 to 28, 30
thickness lever, 34, 55, 56
type, setting, see Media Type setting
Photo Paper, 31 to 33, 35
Photo Quality Glossy media, 35
Photo Quality Ink Jet Paper, 31, 35
Photo Quality Media Pack, 31
Photo Stickers, 35
PhotoEnhance, 23 to 25
Preserving photos, 33
Previewing, 18, 22
Print dialog box, 15 to 16, 18
Print head
aligning, 46
cleaning, 37 to 40
Print Head Alignment utility, 46
Print quality
problems, 55 to 57
setting, 29
Printable Area setting, 20, 23, 26, 28, 32
64
Page 71

Printer
cable, 4, 5
check, 51
cleaning, 47
control panel, 39, 49 to 50
features, 1
maintaining, 37 to 47
noise, 54
parts, 52
problems, 49 to 51, 54
status, 18, 22
transporting, 48
Printing
advanced, 28 to 30
controlling, 18, 22
Macintosh, 19 to 22
Windows, 14 to 18
with custom project types, 26 to 28
with PhotoEnhance, 23 to 25
Problems
installing software, 53
miscellaneous, 59
paper feeding, 58
print quality, 55 to 57
printing, 54
setting up printer, 53
Progress Meter, 18
Project types, custom, 26 to 28
Software
creative, 2, 62
problems, solving, 53
reinstalling, 60
uninstalling, 60
Special effects, 28
Special papers, 31 to 35
sRGB (Standard Red Green Blue) setting, 27
Support, 61 to 62
System requirements, 4, 5
T
Text/Graph setting, 27
Thickness lever, 34, 55, 56
Transfer Paper, Iron-On Cool Peel, 35, 59
Transparencies, 35
Transporting printer, 48
Troubleshooting, 49 to 62
U
Uninstalling software, 60
USB, 4, 5, 60
Utilities
Head Cleaning, 37 to 39
Print Head Alignment, 46
Q
Quality/Speed setting, 17, 21
R
Reference Guide, 2, 9 to 11
Reinstalling software, 60
S
Safety instructions, 6 to 8
Saving settings, 28, 30
Service, 61 to 62
Smears, 34, 56
W
Watermark, 18, 22, 25, 28, 30
Windows
default settings, 17
printer status, 18
printing with, 14 to 18
system requirements, 4
USB, 4, 60
World Wide Web, 61, 62
Y
Year 2000, 6
65
Page 72

FCC Compliance Statement
For United States Users
This equipment has been tested and found to comply with the limits for a Class B digital device, pursuant to Part 15 of the FCC
Rules. These limits are designed to provide reasonable protection against harmful interference in a residential installation. This
equipment generates, uses, and can radiate radio frequency energy and, if not installed and used in accordance with the
instructions, may cause harmful interference to radio or television reception. However, there is no guarantee that interference will
not occur in a particular installation. If this equipment does cause interference to radio and television reception, which can be
determined by turning the equipment off and on, the user is encouraged to try to correct the interference by one or more of the
following measures:
■ Reorient or relocate the receiving antenna.
■ Increase the separation between the equipment and receiver.
■ Connect the equipment into an outlet on a circuit different from that to which the receiver is connected.
■ Consult the dealer or an experienced radio/TV technician for help.
WARNING
The connection of a non-shielded equipment interface cable to this equipment will invalidate the FCC Certification of this
device and may cause interference levels which exceed the limits established by the FCC for this equipment. It is the
responsibility of the user to obtain and use a shielded equipment interface cable with this device. If this equipment has more than
one interface connector, do not leave cables connected to unused interfaces. Changes or modifications not expressly approved by
the manufacturer could void the user’s authority to operate the equipment.
For Canadian Users
This Class B digital apparatus meets all requirements of the Canadian Interference-Causing Equipment Regulations.
Cet appareil numérique de la classe B respecte toutes les exigences du Règlement sur le materiel brouilleur du Canada.
66
DECLARATION of CONFORMITY
According to 47CFR, Part 2 and 15 for Class B Personal Computers and Peripherals; and/or CPU
Boards and Power Supplies used with Class B Personal Computers:
We: EPSON AMERICA, INC.
Located at: 20770 Madrona Avenue
MS: B2-11
Torrance, CA 90503
Telephone: (310) 782-5254
Declare under sole responsibility that the product identified herein, complies with 47CFR Part 2 and 15 of the FCC rules as a
Class B digital device. Each product marketed, is identical to the representative unit tested and found to be compliant with the
standards. Records maintained continue to reflect the equipment being produced can be expected to be within the variation
accepted, due to quantity production and testing on a statistical basis as required by 47CFR §2.909 Operation is subject to the
following two conditions: (1) this device may not cause harmful interference, and (2) this device must accept any interference
received, including interference that may cause undesired operation.
Trade Name: EPSON
Type of Product: Ink Jet Printer
Model: P150B (EPSON Stylus COLOR 760)
P150A (EPSON Stylus COLOR 860)
Page 73

EPSON Ink Jet Papers
Use EPSON’s paper and inks to get the same photo quality results that have earned your printer all of
its awards! EPSON’s papers are specially coated to work with EPSON’s quick drying inks. You’ll notice
that when prints come out of your printer, you can immediately handle them. There is no drying time,
no smearing or smudging, and your image is clean and smooth. Here are just a few of EPSON’s papers:
Photo Quality Ink Jet Paper
Bright white, with a smooth matte finish to create your best impression. Perfect
for presentations, newsletters, color reproductions, and all your photo and craft
projects.
Photo Quality Glossy Film
Durable, bright white film sheets with the highest-gloss finish. Perfect for
printing professional quality, high-resolution photographs of all your digital
images.
Photo Paper and Panoramic Photo Paper
Photo lab quality, heavier weight glossy paper available in a variety
of sizes. Perfect for color photo keepsakes of snapshots, framed art,
banners, and panoramics.
Iron-On Cool Peel Transfer Paper
Transfer your designs and photographs onto T-shirts or other cloth items. Perfect
for ironing onto team T-shirts, canvas bags, crafts, and gifts.
See the inside back cover for a list of EPSON papers and ordering information.
Only the EPSON Stylus COLOR 860 printer is shown on the cover.
68
Page 74

How to Order EPSON Ink and Paper
To order EPSON ink cartridges, paper, and other printing media, contact your dealer or call EPSON
Accessories at (800) 873-7766 or visit our web site at www.epsonsupplies.com (U.S. sales only). In
Canada, please call (800) 873-7766 for dealer referral.
Ink Cartridges
Black S020189
Color S020191
EPSON Papers
Paper name Size Part number
EPSON 360 dpi Ink Jet Paper Letter S041060
A4 (8.3 x 11.7 inches) S041059
EPSON High Quality Ink Jet Paper Letter S041111
A4 (8.3 x 11.7 inches) S041117
EPSON Photo Quality Ink Jet Paper Letter S041062
A4 (8.3 x 11.7 inches) S041061
Legal S041067
EPSON Photo Quality Ink Jet Cards A6 (4.1 x 5.8 inches) S041054
8 x 10 inches S041122
EPSON Photo Paper 4 x 6 inches S041134
Letter S041141
A4 (8.3 x 11.7 inches) S041140
Panoramic (8.3 x 23 inches) S041145
EPSON Photo Stickers Kit (CD-ROM/paper) A6 (4.1 x 5.8 inches) S041144-KIT
EPSON Photo Stickers (refill) A6 (4.1 x 5.8 inches) S041144
EPSON Photo Quality Glossy Film Letter S041072
A4 (8.3 x 11.7 inches) S041071
A6 (4.1 x 5.8 inches) S041107
EPSON Ink Jet Transparencies Letter S041064
EPSON Photo Quality Self Adhesive Sheets A4 (8.3 x 11.7 inches) S041106
EPSON Iron-On Cool Peel Transfer Paper Letter S041153/S041155
EPSON Photo Quality Glossy Paper Letter S041124
A4 (8.3 x 11.7 inches) S041126
Matte Paper - Heavyweight Letter S041257
69
 Loading...