

Page 1
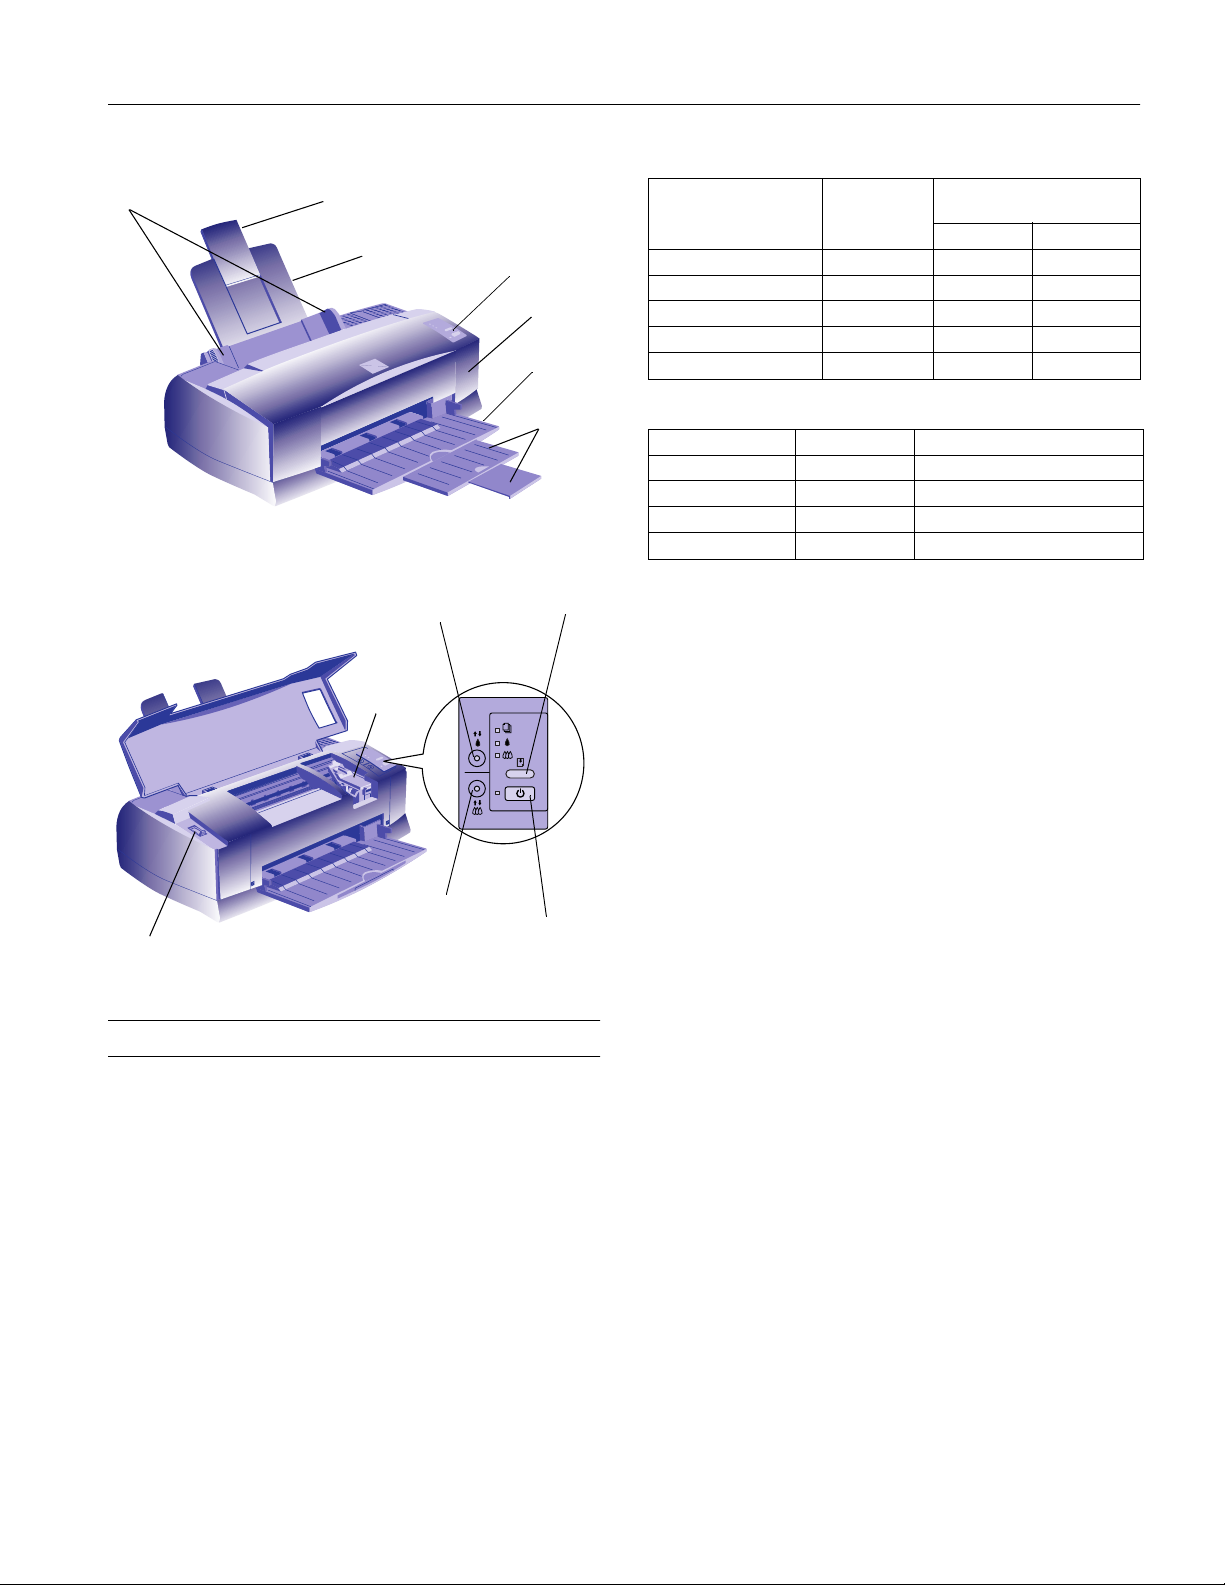
edge guide s
paper support extension
paper support
control
panel
printer
cover
output
tray
output tray
extensions
EPSON Stylus COLOR 800
Character mode
Printing speed
Character pitch
(characters per inch)
10 80 533 400
12 96 640 480
15 120 800 600
17 (10 condensed) 137 912 684
20 (12 condensed) 160 1067 800
Printable
columns
Raster graphics mode (Print able area is 8.27 inches)
Print quality Available dots CR speed (inches per second)
180 dpi
360 dpi
720 dpi
1440 dpi
180 dpi 1488 26.7
×
360 dpi 2976 20
×
720 dpi 5952 20
×
720 dpi 5952 10
×
(characters per second)
Draft Normal (LQ)
black print head
clean i n g bu t t on
ink cartridge
clamp
color print head
cleaning button
thickness lever
load/eject
button
Printer Specifications
Printing
Printing method On-demand ink jet
Nozzle
configuration 128 black nozzles ( 32
64 color nozzles
yellow)
Printable columns
and printing speed Up to 8 pages per min ute in black,
7 pages per minute in color
4, staggered)
×
3 (cyan, magenta,
×
power
button
Resolution Maximum 1440 × 720 dpi (using driver
MicroWeave)
Input buffer 32KB
Print direction Bidirectional with logic seeking for text
and graphics
™
Control code ESC/P 2
and expanded raster graphics
code; IBM X24E emulatio n c ode;
EPSON remote command
Character tables 1 italic and 10 graphics character tables
Character sets 14 international character sets and 1
legal character set
Bitmap fonts • EPSON Roman (pr opor tiona l)
• EPSON Sans Ser if (proportional)
• EPSON Courier
• EPSON Prestige
• EPSON Script
All bitmap fonts are available in 10, 12,
and 15 cpi. You can s elect oth e r font/
pitch
combinations using ESC/P command s.
Scalable fonts • EPSON Roman
• EPSON Sans Ser i f
• EPSON Roman T
• EPSON Sa ns Se rif H
All scalable fonts are available in sizes from 8 to 32 points,
in 2 point increments, and four styles: normal, bold, italic,
and bold italic.
1/97
EPSON Stylus COLOR 800 - 1
Page 2
EPSON Stylus COLOR 800
The printer always u ses the fonts you se lec t with you r
software application. You need to use the printer’s internal
fonts only if your applica tion does n’t allow you to s ele ct
fonts.
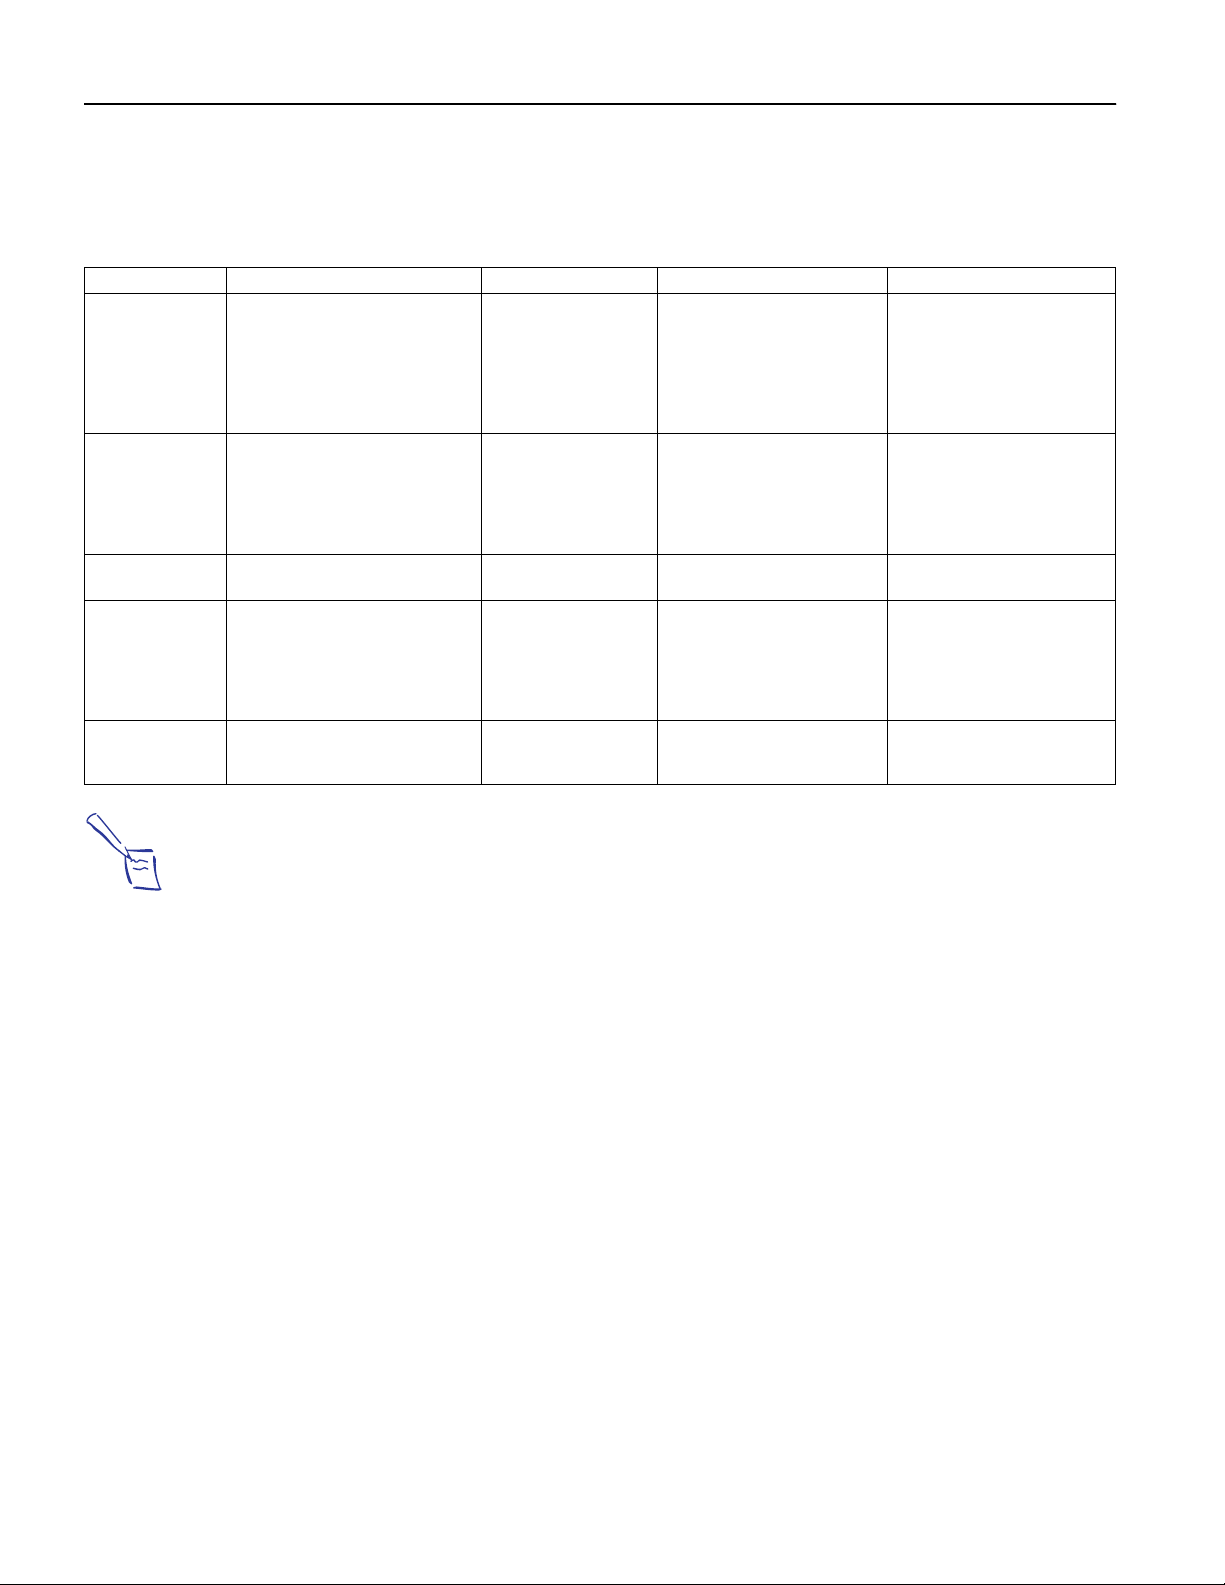
Paper Type Size Paper Types Thickness Weight
Single Sheets Letter (8.5 × 11 inches)
Transparencies and
glossy media
Self adhesive sheets A4 (210 × 297 mm) Self adhesive sheets
Envelopes No. 10 (9.5 × 4.1 inches,
Cards A6 (105 × 148 mm)
A4 (210 × 297 mm)
A5 (148 × 210 mm)
B5 (182 × 257 mm)
Legal (8.5 × 14 inches)
Half letter (5.5 × 8.5 inches)
Executive (7.5 × 10 inches)
Letter (8.5 × 11 inches)
A4 (210 × 297 mm)
A6 (105 × 148 mm, glossy film only)
240 × 104 mm)
DL (8.7 × 4.3 inches,
220 × 110 mm)
C6 (4.4 × 6.4 inches,
114 × 162 mm)
5 × 8 inches (127 × 203 mm)
8 × 10 inches (203 × 254 mm)
Plain paper and special ink
jet papers distributed by
EPSON
Transparencies, glossy
paper, and glossy film
distributed by EPSON
distributed by EPSON
Plain, bond, or air mail
paper
Ink jet cards dist ribut ed by
EPSON
Paper
0.003 to 0.004 inch
(0.0 8 to 0.11 mm)
Glossy film and transparencies:
0.0051 to 0.0059 inch
(0.1 3 to 0.15 mm)
glossy paper:
0.0067 to 0.0071 inch
(0.1 7 to 0.18 mm)
——
0.006 to 0.017 inch
(0.1 6 to 0.43 mm)
0.0091 inch (0.23 mm) 50.7 lb (188 g/m
17 to 24 lb (64 to 90g/m
use 24 lb (90 g/m
normal temperature and humidity
conditions
—
12 to 20 lb (45 to 75g/m
2
);
2
) paper under
2
)
2
)
Notes:
Since the qu ality of any particular brand or type of paper may
be changed by th e manufacturer at any time, EPSON canno t
guarantee the use of any particular brand or type of paper.
Always test samples of paper stock be fo re purchasing large
quantities or printing large jobs.
Poor qua li ty paper ma y re duce print quality and caus e pa p e r
jams and othe r p roble ms. I f you enc oun ter probl ems, s witch to
a higher grade of paper.
Do not load curled or folded paper, envelopes, or
transparencies.
Print on in k jet papers and envelopes only under these
conditions:
Temperatur e: 59 to 77°F (15 to 25°C)
Humi di t y: 40 to 60% RH
Store gloss y media and self adhesive shee ts under these
conditions:
Temperatur e: 59 to 86°F (15 to 30°C)
Humi di t y: 20 to 60% RH
2 - EPSON Stylus COLOR 800
1/97
Page 3
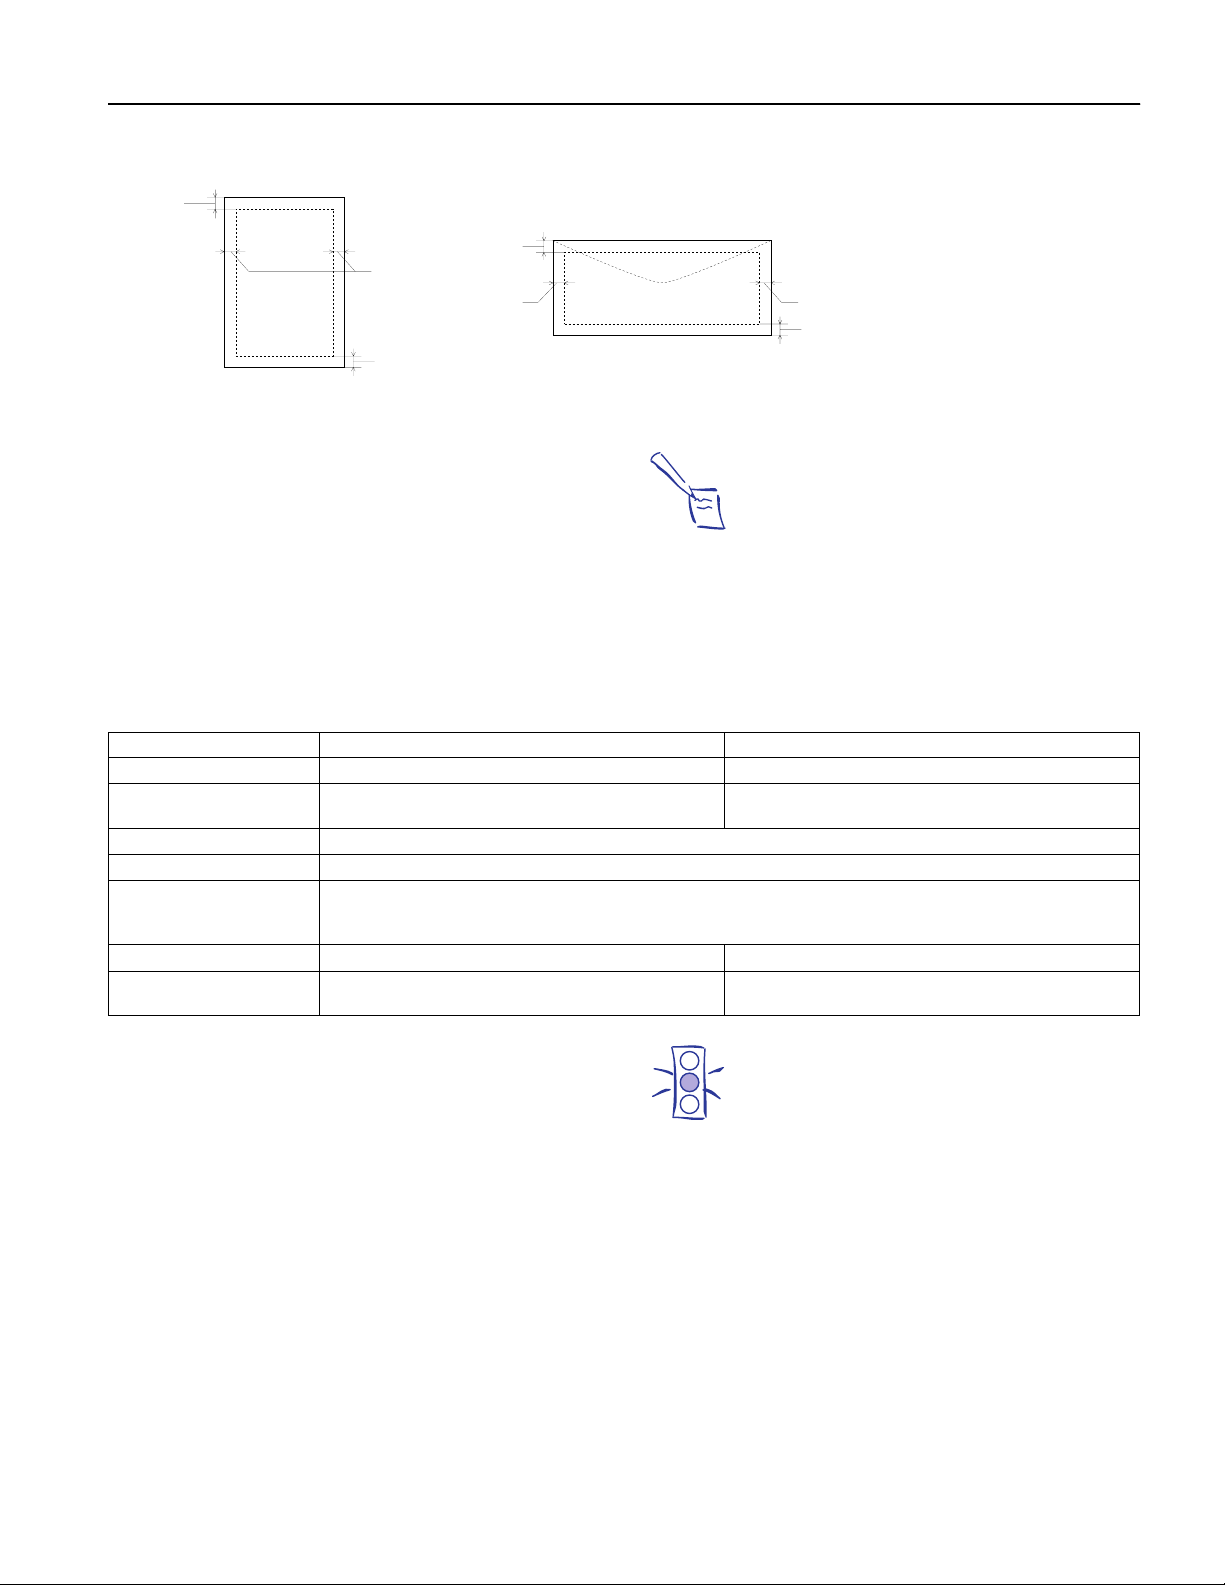
Printable area
A
EPSON Stylus COLOR 800
B-L
A
B-R
B-L
B-R
C
C
Envelope
Single sheet
A The minimum top margin is 0.12 inch (3.0 mm).
When printing multiple sheets of glossy medi a, the minimum
top margin is 1.2 inches (30 mm).
Note:
Always load paper int o the sheet feeder short edge first except
envelo pes . Load envelopes long edge first.
BL The minimum left margin is 0.12 inch (3.0 mm).
BR The minimum right margin is:
0.35 inch (9.0 mm) for Letter and Legal
0.12 inch (3.0 mm) for all other paper sizes
1.10 inches (28 mm) for #10 envelopes
0.28 inch (7 mm) for DL envelopes
0.12 inch (3 mm) for C6 envelopes
C The minimum bottom margin is 0.54 inch (14.0 mm).
Ink Cart ri dg es
Specification Black ink cartridge (S020108) Color ink cartridge (S020089)
Color(s)
Print Capacity*
Cartridge life
Storage Tempe rat ur e
Transit Temperature
Freezing Temperature**
Dimensions
Black Cyan, magenta, and yellow
900 pages (A4 paper; text at Normal - 360 dpi; 5%)
(ISO/IEC 10561 Letter Pattern)
2 years from production date and up to within 6 months after opening package at 25 °F (77 °C)
–4 to 104 °F (–20 to 40 °C)1 month at 104 °F (40 °C)
–30 to 60 °F (–22 to 140 °C)
1 month at 104 °F (40 °C)
120 hours at 140 °F (60 °C)
–3.2 °F (16 °C) –0.4 °F (–18 °C)
1.09 (W) × 2.1 (D) × 1.5 (H) i nches
27.8 (W ) × 52.7 (D) × 38.5 (H) mm
300 pages (A4 paper; Normal - 360 dpi, 5% each color)
1.7 (W) × 2.1(D) × 1.5 (H) inches
42.9 (W) × 52.7 (D) × 38.5 (H) mm
* The print capacity may vary depending on how of ten you use the
print head cleaning function. Also, if you print large graphics and
dense text wit h little white space, you use ink faster.
** The i nk thaws and is usable after approximately 3 hou rs at 77 °F (25
°C).
1/97
Caution:
To ensure good results, us e genuine EPSON cart ridges and
do not re fill t he m. Oth er pr oduct s ma y ca use d amage to yo ur
print er not covered by EPSON’s warr a nty.
Do not use an ink cartridge after the expiration date on the
package.
EPSON Stylus COLOR 800 - 3
Page 4
EPSON Stylus COLOR 800
Mechanical
Paper feed
method Friction with auto sheet feeder, rear
entry
Sheet feeder
capacity Max imu m 10 0 she ets of 17 lb
(64 g/m
2
) paper
Dimensions St orage
Width: 18.7 in ches (4 75 m m )
Depth: 10.7 inches (274 m m )
Height: 7.4 inches (177 mm)
Printing
Width: 18.7 inch es (4 75 m m )
Depth: 24.0 inches (610 m m )
27.2 inches (692 m m ,
when loading transparencies)
Height: 12.4 inches (315 mm)
7.95 inches (202 m m ,
when loading transparencies)
Weight 14.3 lb (6.5 kg) without the ink
cartridges
Electrical
Safety Approvals
Safety standards UL 1950 with D3, CSA 22.2 950
with D3
EMC FCC part 15 subpart B class B
CSA C108.8 class B
DOS Support
If driver support for the EPSON Stylus COLOR 800 is not
available from your software manufacturer, you can use one
of the other EPSON ESC/P 2 print er drivers. Choos e the first
printer available from the following two lists:
Black printing only
• LQ-870/1170
• LQ-570(+)/1070(+)
• SQ-870/1070
• LQ-850
• LQ-500
Color and black printing
• EPSON Stylus PRO
• EPSON Stylus COLOR 500
• EPSON Stylus COLOR II
• LQ-860
• LQ-2550
Specification 120 V model 240 V model
Input voltage range 103.5 to 132 V 198 to 264 V
Rated frequency range 50 to 6 0 Hz
Input frequency range 49.5 to 60.5 Hz
Rated current 0.4A 0.2A
Power consumption Approx. 18 W (ISO/IEC 10561 Letter Pattern)
Environmental
Temperature Operation 50 to 95 °F (10 to 35 °C)
Storage* –4 to 140 °F (– 20 to 60 °C)
1 month at 104 °F (4 0 °C)
120 hours at 140 °F (60 °C)
Humidity Operation 20 to 80% RH
Storage* 5 to 85% RH
(without condensa tion)
* Stored in sh ipping container
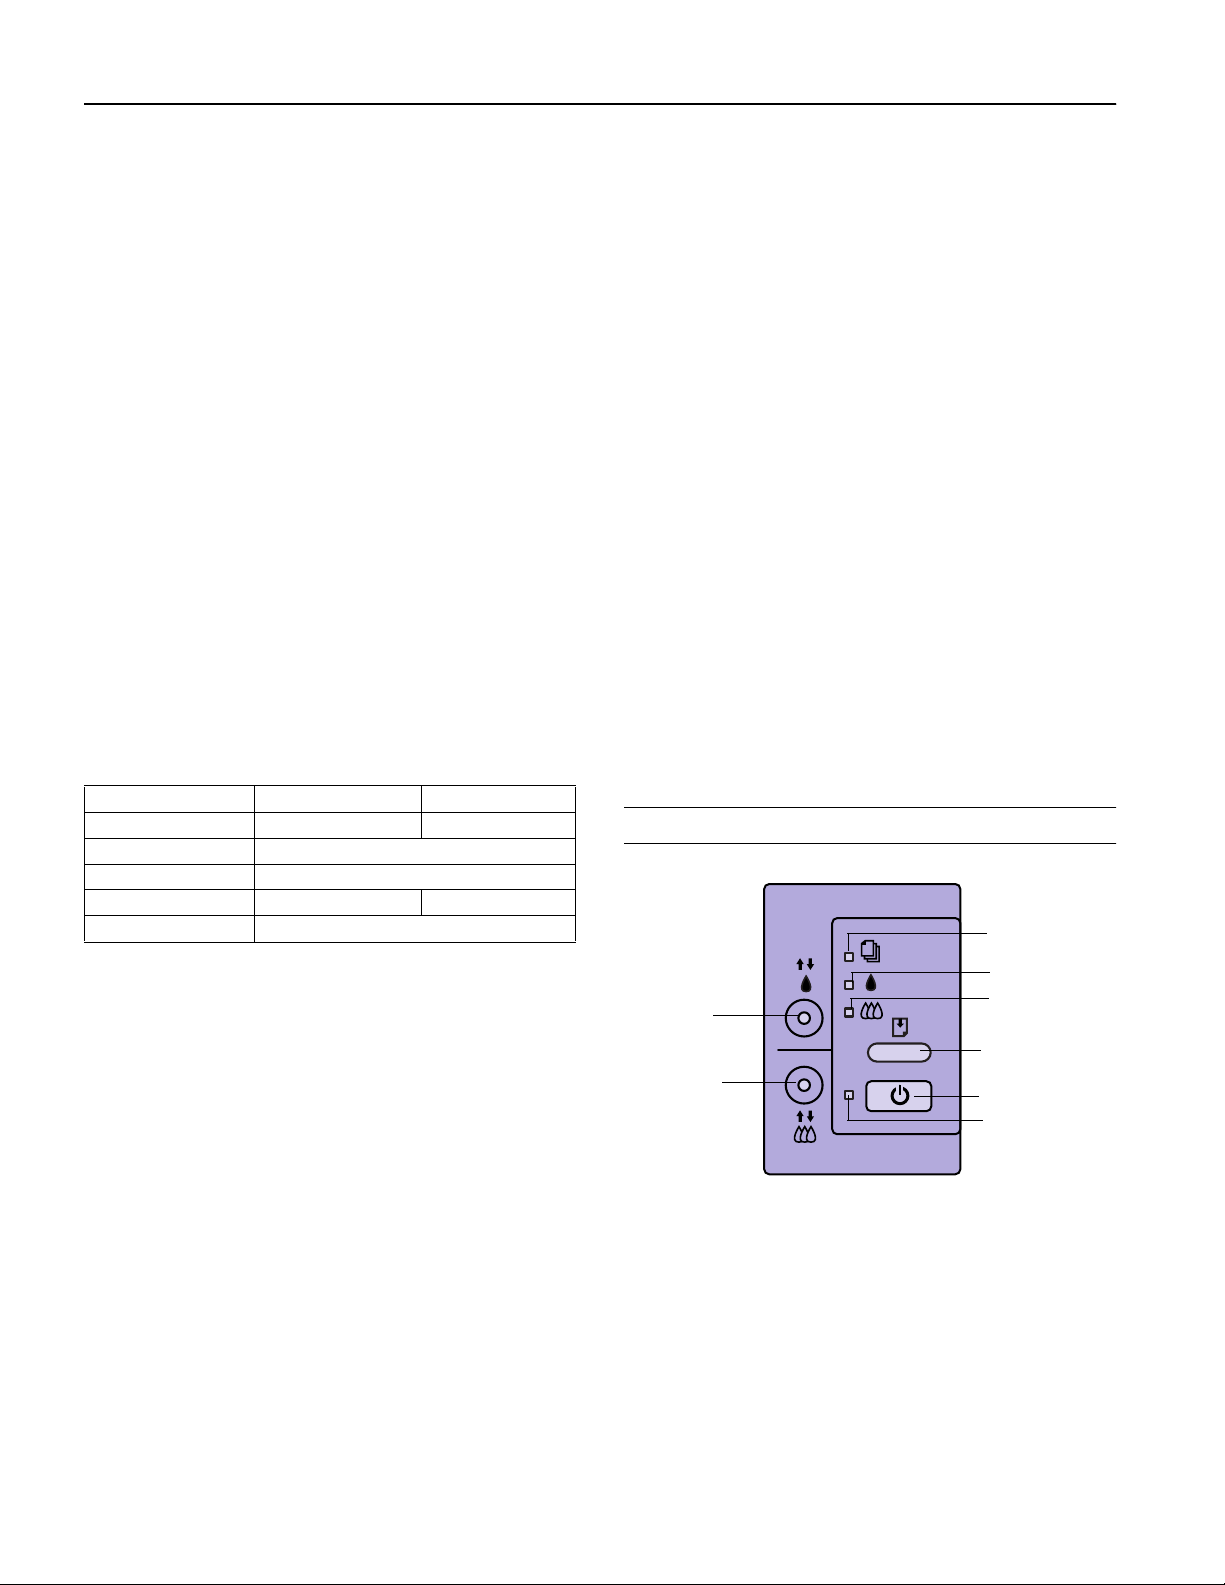
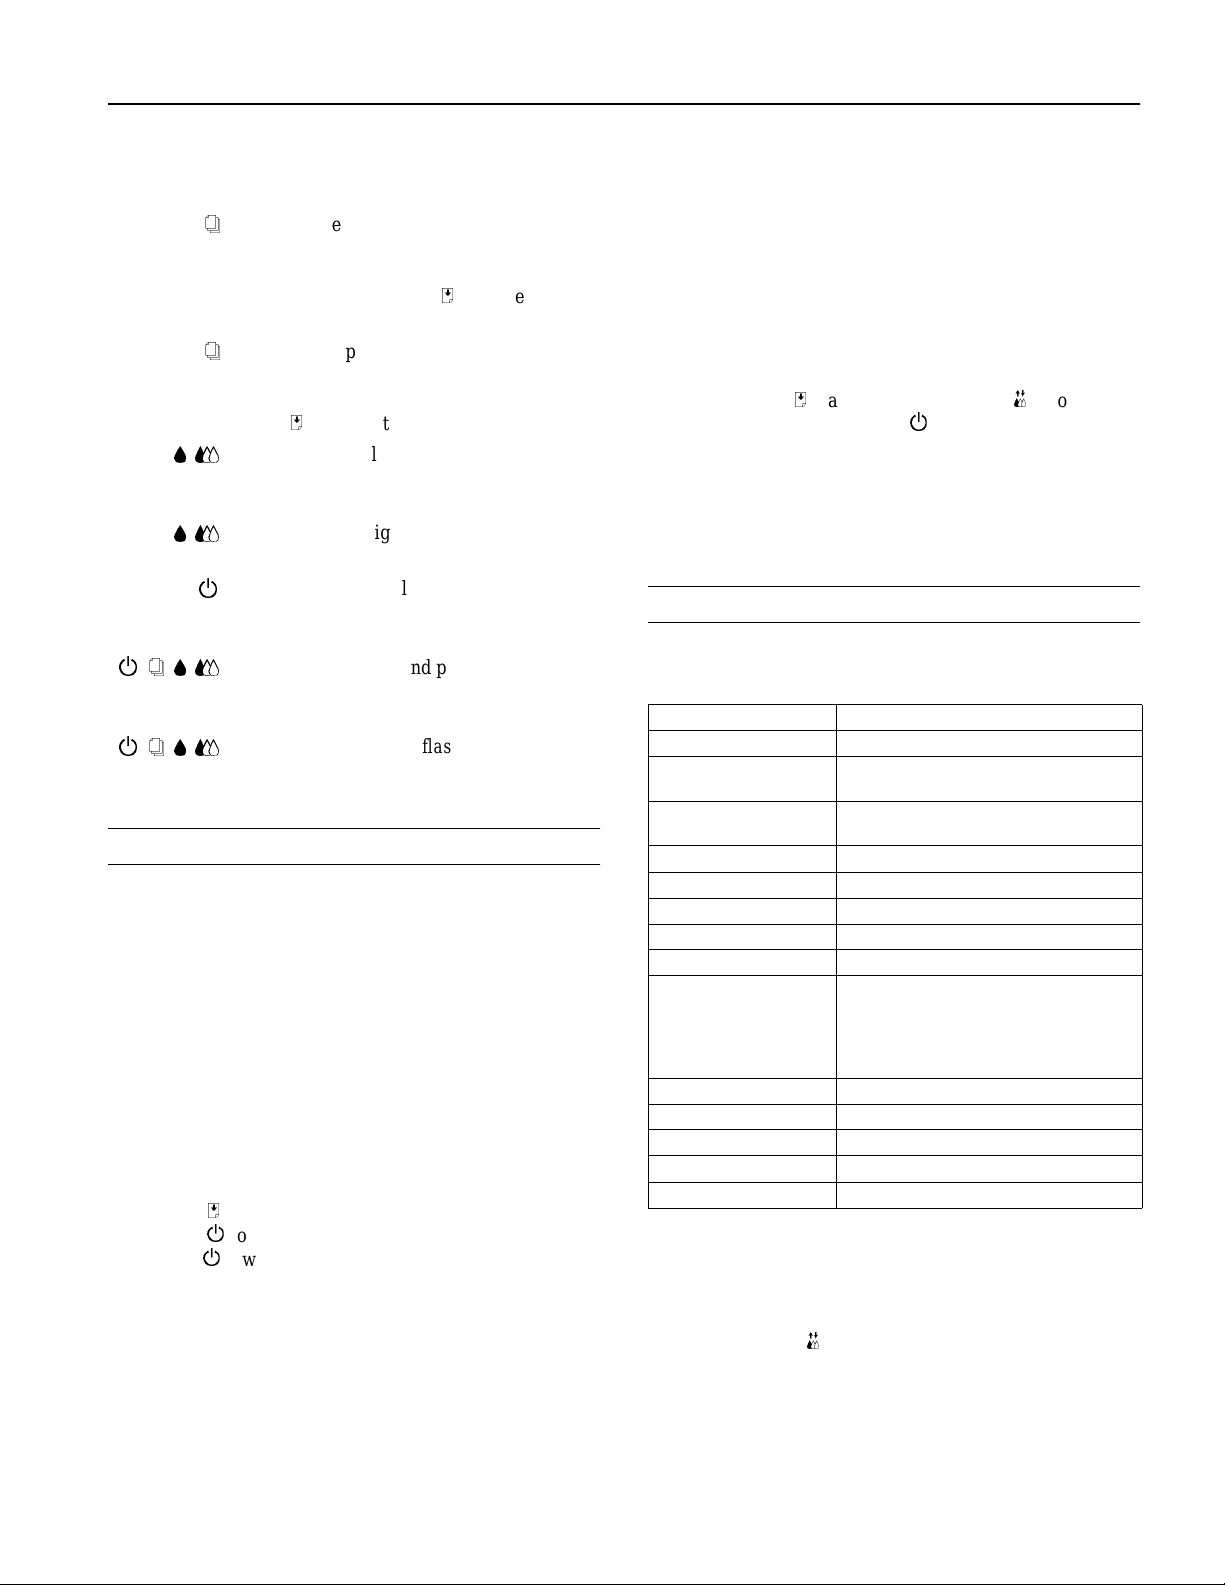
Control Panel
black clean ing
button
color cleani ng
button
paper ou t li g ht
black ink out li ght
color in k out light
load/eject button
power button
power light
4 - EPSON Stylus COLOR 800
1/97
Page 5
EPSON Stylus COLOR 800
The four lights on your printer’s control panel show the
printer’s status and alert you to p roble ms like pa per jam s.
When the paper light flashes, paper is
S
jammed in the printer. Turn off the
printer and gently pull out all jammed
load/eject
paper. Then press the
E
button.
When the paper light comes on, your
S
paper ran out or is incorrectly loaded.
Load paper in the feeder and then press
load/eject button.
E
the
BA
When an ink light flashes, your ink
supply is low. Make sure you h av e a
replacement cartridge.
BA
When an ink light comes on, you need to
replace the ink cartridge.
P
When the power light flashes, the
printer is receiving a print job or
performing a maintenance operation.
PSBA
When the power and paper lights flash
and the other lights are on, you r printer
has a carriage error.
PSBA
When all the lights flash, your printer
may have an internal error.
Testing the Printer
You can run a self test to determine whether the problem
comes from the printer itself or the computer.
❏ If the results are satisfac tory, the problem lies in software
settings, the interface cable, or your computer.
❏ If the self test does not pr int correctly, you have a problem
with your printer.
Follow these steps to run the test:
1. Make sure both the printer a nd computer are turned off.
2. Disconnect th e in terface cable from th e p r in te r .
3. Make sure paper is loaded in th e feeder.
load/eject button and hold it down while you
4. Press the
press the
until the
The printer prin ts a nozzle check pattern and sa mpl es of
fonts and colors.
5. To end the test, turn off the printer.
E
power button. Continue to hold the buttons
P
power light star ts to flash.
P
Using Hex Dump Mode
You can use the printer’s hex dump mod e to id entify
problems if you know how to interpret hex code. Or, you
can fax the hex printout to a technic al su ppor t
representative. Fo llow thes e steps to us e he x dump m ode :
1. Make sure the printer is turned off and has paper in the
feeder.
2. Open the cover.
load/eject button and the X color
3. Hold down the
cleaning but ton and press the
E
power button. The printer
P
prints Hex Dump Mode at t he top of a page and then s tops.
4. Print one or more pages from an application as usual. The
printer pr ints the exact code it re ceives in hexadecima l
format.
Default Con tro l Pane l Se ttings
You can change the following “default” settings from the
printer’s control pane l:
Setting Options
Print direction Auto, Bi-D, Uni-D
Font Courier, Roman, Sans Serif, Prestige, Script,
Pitch 10 cpi, 12 cpi, 15 cpi, 17.1 cpi, 20 cpi,
I/F mode Auto, Parallel, Serial, Option
Auto I/F wait time 10 seconds, 30 seconds
Softwa r e ESC/ P 2, IBM X24E
Auto CR (IBM mode only) Off, On
AGM (IBM mode only) Off, On
Character table PC437, PC850, PC860, PC861, PC863, PC865,
Auto line feed Off, On
Network I/F mode Off, On
Loading position 8.5 mm, 3 mm, Others
Economy Off, On
Parallel I/F transfer rate Fast, Normal
Changing control panel settings
Follow these steps to change the settings liste d above:
1. Make sure the printer is turned off and has paper loaded.
2. Hold down the
power button. The printer prints a summary of
instructions for changing settings and choosing the
language to use for add itional instructions.
Roman T, Sans Serif H, Draft
Proportional
Abicomp, BRA S CII, Rom an 8, IS O Latin 1,
Italic U.S.A., Italic France, Italic Germany,
Italic U.K., Italic Denmark 1, Italic Sweden,
Italic Italy, Italic Spain 1
color cleaning button and press the
X
1/97
EPSON Stylus COLOR 800 - 5
Page 6
EPSON Stylus COLOR 800
3. Press the
color cleaning button t o print a list o f current
X
settings and additional in st ructions.
4. After you make the changes you want, turn the printer
off to s ave t he set tin gs. T he s et tings re main in ef f ect un til
you change them again.
Printing from Windows
When you want to print f rom your Win dows a pplication,
you click the print icon or cho ose Print from the File men u.
You can then choose which pages to print, the number of
copies, and other options. The settings that describe your
print job—wheth er you w a nt to us e color or bla ck ink, for
example—are pa rt of y our pr inte r driv e r softwa re.
Note:
If you’re using Windows NT, you’ll need special software for
your print e r . Contact EPSO N if you need pri nter driver
software for Windows NT.
Setting Printer Options from Windows Applications
Follow these steps to check printer settings from your word
processor or oth e r Win dow s s oftw a re:
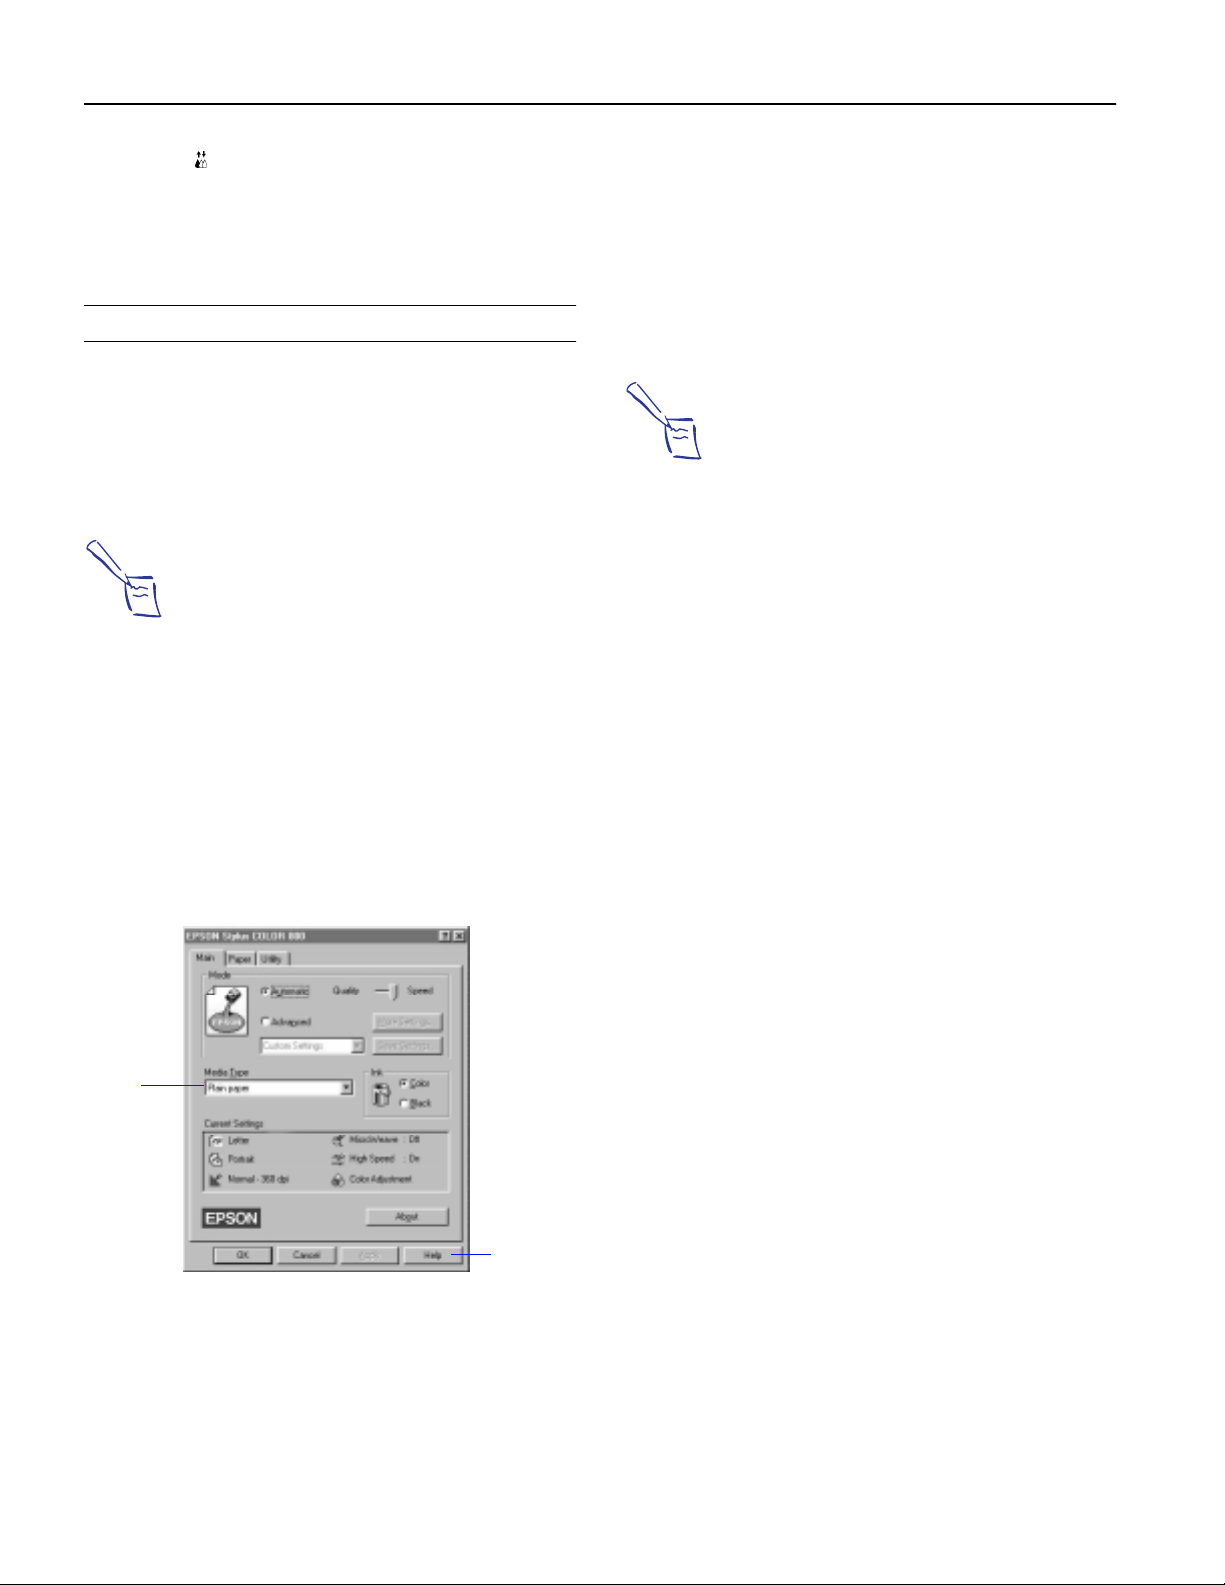
1. Click the Pri nt i con or ch oose Pri nt o r Print Set up from t he
File menu. You see a printing dialog box.
2. Make sure your EPSON Stylus COLOR 800 printer is
selected, and then cl ick the Printer, Setup, Properties, or
Options button. (You may have to click a combinati on of
these buttons.) You see a dialog box li ke the following:
3. Click the Main ta b if necessary and make sure the Mode
option is se t to Automatic. This is the easies t way to get
good printing results for all kinds of documents, on all
types of paper.
4. Choose the Media Ty pe you want to print on.
The type of paper or other media you cho os e det ermines
the print quali ty or resol ution you ca n use. See page 14 for
guidelines on choosing paper.
Note:
For print ing at the highest resoluti on (SuperFi ne quality
at 1440 dpi), you need to use one of the photo quality
media. For the b est prin tin g at any re so lut ion, alwa ys use
EPSON media.
5. Choose Color or Bla ck ink.
6. Set the slider to Quality or Speed. This lets you choose
between the fast es t printing or the highest resolution for
the media you’re using. (The slider is not available for
certain media type s. )
7. If necessary, click the Paper tab and choose your paper
size, number of copies, and orientation. If your software
application lets you control these settings, you don’t need
to use the P ap er tab.
8. Click OK when you’re finished checking your settings.
The dialog box clos es.
If you’re using Windows 95, you ca n click Apply and
keep the dialog box open.
9. In the printing dia log box, click Close, OK, or Print. You
may need to click a combination of these buttons.
Click to see
list of media
types.
6 - EPSON Stylus COLOR 800
Click for
more
information.
Setting Windows Default Options
When you change printer s ettings through your software
application, the settings apply only to the application you’re
using. If you want to adju st the de fault settings for all your
Windows applications, you can access the dialog box
through the Window s 95 Settings option or the Windows
3.1 Control Panel.
Make sure all your sof tware applic ations are closed before
you start. If not, you’ll have to clos e and then re o pe n them
to have the new default settings take effect.
Setting Default Options in Windows 95
Follow these steps:
1. Click Start , point to Settings , and then point to Printers.
2. Right-click the EPSON Stylus COLOR 800 icon.
3. Select Properties. Then click the Main tab.
You see the Main p rint er sett ings di al og box. Any c hanges
you make will become the defa ult settings for al l your
applicati ons and documents.
1/97
Page 7

EPSON Stylus COLOR 800
Setting Default Options in Windows 3.1
Follow these steps:
1. Double-click the Control Panel icon in the Main group.
2. Do uble-c li ck the Print er s ic o n.
3. Select EPSON Styl us COLOR 800 f rom the list of pr inters
and click Setup.
You see the Main print er sett ings di al og box. Any c hanges
you make will become the defa ult settings for al l your
applicati ons and documents.
Printing from a Macintosh
When you set up a new printer for your Mac intos h, you
need to check the page setup for documents in each
application you use. You c an then clic k the prin t ico n or
choose Print from the File menu. You see a dia log box tha t
lets you choose which pag es to pr int, the numbe r of cop ies,
and other options. The settings that de sc ribe your print
job—whether yo u want to us e color or black ink, for
example—are pa rt of y our pr inte r driv e r softwa re.
Follow these steps to check printer settings from your word
processor or oth er Ma cintos h s oftw a re:
6. Choose the Media Type you want to p r int on. See page 14
for guidelines on choo si ng paper.
Note:
For print ing at the highest resoluti on (SuperFi ne quality
at 1440 dpi), you need to use one of the photo quality
media.
7. Choose Color or Bla ck ink.
8. Set the slider to Quality or Speed. This lets you choose
between the fast es t printing or the highest resolution for
the media you’re using.
9. Click Print when you’re f inished checking your se ttings.
If you chose background printing when you set up your
printer, you can continue working while your docum ent is
printing.
Note:
On the Macint os h, printer s e ttings are saved with your
document, but you can’t sav e them from one application to
anothe r. You’ll have to check your setti ngs each time you
open a new appl ication. I f yo u want to reuse settings, you can
create document templates for your favorite applications.
Managing Print Jobs in Windows
1. Choose Page Setup from the File menu. You see the Page
Setup dialog box.
2. Choose your paper size and other page setup options and
click OK.
3. Choose Print from the File menu or click the Print icon in
your application. You see a dialog box like the following:
Click for more information
about printer settings.
Click to see list of
media types.
4. Choose the number of copies and indicate which pages
you want to print.
5. Make sure the Mode opt ion is set to Aut omati c. This is the
easiest way to get good printing results for all kinds of
documents, on all types of paper.
Your Windows pr inter s oftw ar e incl udes two ma nage me nt
utilities: the Spool Manager and Status Monitor.
❏ The Spool Manager starts automatically when you send a
job to the printer. It allows you to print in the background
while you continue to work on your computer and to
queue jobs to print at a later time. If you’re using your
printer on a network, it also handles mu ltiple print jobs
that com e in a t th e same time .
❏ The Status Monitor, whic h is available only if you’re
using Windows 95, also starts automa tically when you
send a job to the printer. It displays in the lower right
corner of your screen to a lert you about printe r and ink
stat us, as de s c ribed on page 9.
Note:
The Status Monitor doesn’t work if you’ re printing over a
network.
Using the Spool Manager
The Spool Manager works like the Windows Print Manager.
❏ To open it while you’re printing, clic k the Spool Manager
icon that appears on the Taskbar (Windows 95) or at the
bottom of your desktop (Windows 3.1).
1/97
EPSON Stylus COLOR 800 - 7
Page 8

EPSON Stylus COLOR 800
❏ To open the Spool Manager at any ti me , double-click the
Spool Manager4 icon in the EPSON program group or
folder.
You see the Spool Mana g er window:
menus
queue
journal file
When you send a job to yo ur printer, your printer softw a re
creates a temporary journal file, stores it in the C:\TEMP or
C:\WINDOWS\TEMP fo lder or directory, and assigns it to
a print queue. The software then sends the file to your
printer at the right time.
The Spool Manager window displays the status of your print
queues and journal files and lets you control them. Here are
some of the things you can do:
❏ Hold or release a que ue
❏ Send journal files to your printer over a network
❏ Hold, re-queue, or del ete a journal file
❏ Select the inf ormation you want to see in the Spool
Manager window
Deleting a Stalled Print Jo b
If you’re having trouble printing, it may be because of a
stalled print job. Follow these steps to delete it so you can
continue printing:
1. Open the Spool Manager as described above.
2. Click on any print jobs marked Held, then ope n the
Document menu and click Delete.
3. Exit Spool Manager and try printing again.
Changing the Default Spo ol Direct or y
If you get an error mes sag e w hen you try to print, or
printing is very slow, you can try changing your defau lt
spool directory. Follow the se steps:
1. Make a directory on your hard drive where you want
Spool Manager to store journal files, for example,
C:\SPLTEMP.
2. Open the Spool Manager as described above.
3. Make sure EPSON Stylus COLOR 800 is sele cted, and
then choose Setup from the Queue menu. The Queue
Setup dialog box appears.
4. Change the spoo l directory to the one you created in
step 1. Also make sure Use Print Manage r for this port is
checked. (If you don’t see the Status Monit or when you
print, make sure it’s unchecked.) Then click OK.
5. Choose Default Spool Directory from the Option s menu.
6. In the dialog box, change the spool directory to the one
you created in step 1. Then click OK.
7. Close Spool Manager.
Using the Status Monitor
❏ Prevent the Despooler popup window from appeari ng on
your screen whenever you print
❏ Change your default spool directory
8 - EPSON Stylus COLOR 800
The Status Monitor, available only if you’re using Windows
95, displays automatically when you sen d a job to the
printer. However, you c an us e it at any time to see ho w
much ink you have left. Follo w the se steps:
1. Access the Main printer settings dialog box as described
on page 6.
2. Click the Utility tab.
3. Click the Status Monitor icon. You see the Despooler
window with the Status Monitor at the bottom.
4. Check the amount of ink you have left. For more
information about the Despooler window, see the next
section.
If the Status Monitor does n’t appe ar on the Desp ooler
window, you may need to c heck your bidire ctional s poo l
settings. Follow these steps:
1. Click Start , point to Settings , and then point to Printers.
1/97
Page 9

EPSON Stylus COLOR 800
2. Right-click the EPSON Stylus COLOR 800 icon.
3. Sel ect Prop er t ies. Then cl ick the De ta il s ta b .
4. Click Spool Set tings.
5. Make sure Enable bi-directional support for this printer is
turned on. Then click OK.
Using the Despooler
While your docum e nt is printing, the EPSON Des pooler
dialog box appears in the lower right c orn e r of yo ur scr een :
The name of the
file you’re
Click to pause
printing.
Click to
cancel
printing.
printing appears
here.
Click to restart
printing.
This dialog box shows the progress of your print job and the
status of your printer. If you run out of paper while printing,
for example, the Des poo ler wa rn s yo u. You c an us e the
buttons to cancel, pause, or restart your print job.
The Status Monitor a t the bottom of the dialog box shows
how much ink is left in your printer, along with these statu s
icons:
The Status Monitor is checking printer status.
An error ha s o ccu red. Che ck your printer.
Your printer is ready to print.
Your printer is printing.
The ink level is low or empty. Check the
light on the control panel and replace the
A
or
B
cartridge if necessary.
Managing Print Jobs on a Macintosh
Your Macintosh prin te r softwa re inc lud es two m ana gem ent
utilities: Monitor2 and Status Monitor .
❏ If you’re using background printing, Monitor2 starts
automatically when you send a job to the printer. It
handles background printing while you continue to work
on your Macintosh and lets you track documents that are
waiting to be printed.
Note:
The Status Monitor appears only if you’re us ing Windows 95
and you’re not print ing over a netw ork.
❏ The Status Monitor al erts you to any problems that occ ur
during printin g. You can also use it at any time to see how
much ink you have left.
Using Monitor2
The Monitor2 utility lets you continue to work on your
Macintosh while your docum ent is p rinting . However,
background printing is slower and may also slow down your
system.
If you want to use this utility, you ne ed to turn on
background printing in the Chooser and increase the
memory allocation for Monitor2. Follow these steps to turn
on background printing and us e the Monito r2 utility:
1. Open the Chooser from the Apple menu and make sure
your EPSON Stylus COLOR 800 print er is selected.
2. Under Background Printing, click On and close the
Chooser.
3. Select EPSON Monitor2 in your Extensions folder within
the System folder.
4. Choose Get Info from the File menu.
1/97
EPSON Stylus COLOR 800 - 9
Page 10

EPSON Stylus COLOR 800
5. Set the Mem ory Require ments t o 2 000 o r 3000 , depe ndi ng
on your system’s available RAM.
6. While you’re printing, click the EPSON Mon itor2 icon on
the Application menu at the right end of the menu bar.
You see a dialog box like the following:
Job currently
printing
Jobs queued
for printing
7. You can select a job and cance l it or just use this window
to track the printer’s progress.
Using the Macintosh Status Monitor
You can use the Status Monitor to check the level of ink in
your printer and to control the way your software warns you
about printer problem s. Fo llow thes e step s:
1. Choose Print from the File menu or click the Print button
in your applicat ion. You see the printer settings dialog
box.
4. If you want to change prin ter messages and warning s,
click the Configuration button. You see the following
dialog box:
Printing stops
when these
messages appear.
Printing continues
when these
messages appear.
5. Choose the options you want and click OK.
Network Printing on a PC
You can use your printer on a network under Win dow s 95
or other network operating systems. First you need to set up
your printer, using either your p rinter s oftw are ’s built-in
network support or the network’s LPT port redirec tio n
functions.
Note:
If you need to install a network interface board in your printer,
see page 17 for instructions.
2. Click the Utility button.
3. Click the Stat usMonitor icon. The softwa re c hecks the
amount of ink remain ing in the printer and displ ays the
StatusMonitor window:
Click to control messages
and warnings.
Clic k to r e check in k l e ve l.
When you use your printe r ’s built-in s uppo rt, the Spool
Manager sends journal files from your computer to a shared
directory on a network server. These files can then be
printed from another computer attached to the printer.
First you need to run Spool Manager and identify the shared
directory to use for journal files. After you set this up on the
computer connec ted to the printer (the host sys tem ), you
need to perform a similar procedure on each remote system
on the network.
Under Window s 95 , you a lso need to specify the port and
network path to the printer.
Setting Up the Host System
Follow these steps to set up the computer connected to the
printer:
1. Create an icon for the EPSON Spool Manager
(EPSPLMGR.EXE in the \WINDOWS\SYSTEM folder
or directory).
2. Place this icon in the Startup folder.
3. Open the Spool Manager window as des cribed on page 7.
10 - EPSON Stylus COLOR 800
1/97
Page 11

EPSON Stylus COLOR 800
4. In the Spoo l Manag er window, do uble-cl ick t he queue y ou
want to use for network printing. The Queue Setup dialog
box appears.
5. Click the Remote Despool tab and then click the Printing
from remote queues option.
6. Click the Browse button and select the remote server
directory that will receive jour nal files.
7. Click OK and minimize the Sp ool Manager.
Setting Up Remote Systems
Follow these steps to set up computers on the network:
1. Create an icon for the EPSON Spool Manager
(EPSPLMGR.EXE in the \WINDOWS\SYSTEM folder
or directory).
2. Open the Spool Manager window as des cribed on page 7.
3. In the Spoo l Manag er window, do uble-cl ick t he queue y ou
want to use for network printing. The Queue Setup dialog
box appears.
4. Click the Spo o l to r emote printe r button.
5. Click the Browse button and select the directory you’re
using for journal files on the host system.
Network Printing on a Macintosh
If you want to use you r printe r on a n App le Talk™ network,
you need to install one of the optional interface boards:
either the LocalTalk
page 17 for more information about optional inte rf ac es.
Then you can use the EPSON Namer utility and set up your
printer in the Chooser. The EPSON Namer was installed on
your hard drive along with the other printer softwa r e.
Assigning a Name to the Printer
Follow these steps to use the EPSON Namer utility:
1. Double-click the EPSON Namer icon on your hard drive.
2. Click the EPSON Stylus (AT) icon in the Device Types
window.
3. Select the zone where your printer is located.
4. Under New Name, type a name for your printer to
distinguish it from other printers on the network.
5. Click Rename and then click Done.
Using the AppleTalk Connection
™
board or the Ethernet™ board. See
6. Click OK and minimize the Sp ool Manager.
Setting Up Your Network Path in Windows 95
If you want to use your printer on a networ k running
Windows 95, yo u need to s et u p the port and network path
on the computer connected to the printer. Follow these
steps :
1. D o ub le-cli c k M y Computer.
2. Do ub le-cli ck th e P rinters folder.
3. Right-click the EPSON Stylus COLOR 800 icon and
choose Properties.
4. Click the Details tab.
5. Click the Add Port button, then specify the network path
to the pr in ter and cl ic k OK .
6. Open the Spool Manager window as des cribed on page 7.
7. In the Spool Manage r window, doubl e-cli ck yo ur printer ’s
queue. The Queue Setup dialog box appears.
8. Make sure the Use Print Mana ger for this port option is
checked. Then click OK.
Make sure your printer is turned on and then follow these
steps to set up your printer o n an App leTa lk netw ork:
1. Open the Chooser from the Apple menu.
2. Click the EPSON Stylus(AT) icon.
3. Select the Apple Talk zone you want to use. A list of all
printers connected to the selec ted zone appears on th e
right.
4. Click the name you assigned to your EPSON Stylus
COLOR 800. You see a prompt asking you to confirm
your choice.
5. Click OK.
If your printer name doesn’t appear, make sure the printer
is turned on and correctly connected, then click RETRY.
6. To ensure compatibility, leave Background Printing
turned off.
7. Close the Choose r when you’re finished.
1/97
EPSON Stylus COLOR 800 - 11
Page 12

EPSON Stylus COLOR 800
Replacing an Ink Cartridge
When a B black or A color ink out light flashes, the
indicated cartridge is low on ink. This is a good time to
make sure you have a new c artr idge. When the light stays
on, the cartridge is empty and you need to replace it.
Caution:
To ensure good results, us e genuine EPSON cart ridges and
do not re fill t he m. O ther pr oduct s ma y ca use d amag e to yo ur
print er not covered by EPSON’s warranty.
Use these EPSON ink cartridges within six
months of installing them and be fo re the expira tio n date on
the package:
❏ Black ink cartridge S020108
❏ Color ink cartri dge S020089
color ink out light comes on, you can continue
When the
to print with black ink. Simply turn the printer off and then
back on again. When you print, make sure you choose Black
as the Ink setting in your printer software.
A
black or X color cleaning button and hold it for
3. Press the
Y
three seconds.
Caution:
If you press the cleaning button when no i nk out light is
flashing or on, the print er cleans the pri nt heads, as
described on pag e 16. If yo u need to repla ce an ink car tri dge
before the lights flash (because the ink is too old , for
example) follow the instructions on page 13.
The print heads mo ve s lightly left and the Ppower light
begins flashing. (The print heads return to their home
position if you don’t proceed to step 4 within 60 s ec onds.)
4. Pull up the ink cartri dge clamp. (Although the illustration
shows the black ink cart ridge, the procedure is th e sam e
for replacing the color ink cart ridge.)
Caution:
Don’t open the clamp or remove a cartridge except to
replace it with a new one. O nce you r emove a cart r idge, you
can’t reus e it, even if it contains ink.
Removing an Empty Ink Cartridge
black or A color
You can replace a cartridge when the
B
ink out light is either flashing or on. Make sure the printer is
turned on and not printing before you start. Then fo llow
these steps:
Caution:
To avoid damaging the print er, never move t he pr int heads
by hand.
1. Determine which cartridge needs to be replaced.
2. Lower the output tr ay and raise the printer cover. Then
black and X color cleaning buttons next to the
locate the
Y
control panel under the printer’s cover.
black cleaning
button
color cleaning
button
The cartridge rises up from its holder.
5. Lift the cartridge out of the printer and dispose of it
carefully.
Warning:
If ink gets on your hands, wash them thoroughly with s oap
and water. If ink gets into your eyes, flush them
immediately with water.
6. Follow the steps in the next section to install the new ink
cartridge.
12 - EPSON Stylus COLOR 800
1/97
Page 13

EPSON Stylus COLOR 800
Installing the New Cartridge
Once you have rem oved the em pty ca rtr idge, you’re ready
to install the new one. Follow these steps:
1. Remove the new ink cartridge from its packaging .
2. Remove the yellow tape seal as shown:
black cartridge color cartridge
Caution:
You mus t re m o ve t h e ye l low tape se a l fr om t h e t o p of the
cartridge; leaving the tape on will permanently damage it.
Do not remove the clear seal from the bottom of the
cartridge; ink will le ak ou t.
3. Lower the ink cartridge into its holder with the label
facing up and the arrow pointing to the back of the printer.
Caution:
Don’t turn off the printer while the
flashing, unless the printer has not moved or made noise for
more than 5 minutes.
power light is
P
Replacing an Outdated Ink Cartri d ge
If an ink cartridge is mo re than six mon ths old, you ma y
need to replace it. How can you tell? You may notice that
your printouts don’t loo k as goo d as they u sed to. If print
quality doesn’t improve after cleaning and aligning the print
heads, you can replace one or both cartridges.
Follow these steps to replace an ink cartridge before the
black or
color ink out light is flashing or on:
A
B
1. Make sure the printer is turned on and not printing.
2. Lower the output tr ay and raise the printer cover. Then
black and X color cleaning buttons next to the
locate the
Y
control panel under the printer’s cover.
black and X color cleaning buttons and
3. Press both the
Y
hold them down for a few seconds until the print heads
move to th e left.
Caution:
To avoid damaging the print er, never move t he pr int heads
by hand.
4. Press down the ink cartridge clamp until it locks in plac e.
5. If you need to replace the other ink cartridge, follow the
steps under “ Removing a n Empt y Ink Cart ridge, ” and th en
steps 1 through 4 under “Installing the New Cartridge.”
load/eject button and close the printer cover.
6. Press the
E
The printer moves the print he ads and begins chargi ng the
ink delivery sys tem. (Even if you don’t press the button,
ink charging begins 60 seconds after you close the clamp.)
❏ To replace the black ink cartridge, follow the
instructions beginning with step 4 on page 12.
❏ To replace the color ink cartridge, press the
color
X
cleaning button and hold it down for a few seconds.
After the color ink cartridge moves to the left, follow
the instruc tions beginning with step 4 on page 12.
Loading Paper
1. Slide the left edge guide all the way lef t and pull out the
output tray extensions.
power light flas hes, and the printer makes various
P
The
sounds. Charging takes about two minute s. When it’s
finished, you can print again.
1/97
EPSON Stylus COLOR 800 - 13
Page 14

EPSON Stylus COLOR 800
2. Fan a stack of plain paper and then even the edges.
3. Load the stack with the printable s urface face up . Push the
paper against the right edge guid e.
arrow mark
Note:
Don’t load paper above the arrow mark inside the left edge
guide.
4. Slide the left e dge guide back against the st ack of paper.
EPSON ink jet media and their settings
Media name Size Part number
EPSON Photo Quality
Glossy Film
EPSON High Quality
Glossy Paper
EPSON Iron-On
Transfer Paper
EPSON Ink Jet
Transparencies
EPSON Photo Quality
Ink Jet Cards
EPSON 720 dpi Index
Card
EPSON Photo Quality
Self Adhesive Sheets
A4
Letter
Letter S041072
Letter S041001,
A4
Letter
4.1
(A6)
5
×
8
×
4.1
(A6)
A4 S041106
S041071
S041072
S041002
S041063
S041064
5.8
×
S041054
8
S041121
10
S041122
5.8
S041054
×
The type of paper or other medi a you use is one of the mo st
important factors in determining the qu ality of you r printed
output. For example, you can achieve the highest resolution
(SuperFine quality at 1440 dpi) only when you us e EPSON
Photo Quality media. The follo wing tips w ill help you get
the best results on any ty pe of pape r o r other m e dia.
Letterhead, Preprinted Forms, and Legal-size Paper
Media Type
setting
Photo Quality
Glossy Film
Ink Jet
Transparencies
Photo Quality Ink
Jet Paper
Using Special Media
When you print on spe cia l media, you nee d to be c areful
about choosing the c orrect Med i a Typ e and Pape r Size
settings in your printer software. The following table lists
the available EPSON media and the Media Type setting to
choose for each one.
EPSON ink jet media and their settings
Media name Size Part number
EPSON 360 dpi Ink Jet
Paper
EPSON Special Coated
Paper for 360 dpi
Printing
EPSON High Quality
Ink Jet Paper
EPSON Photo Quality
Ink Jet Paper
EPSON Photo Quality
Glossy Paper
A4
Letter
Letter S041060
Letter S041111 Photo Quality
A4
Letter
Legal
A4
Letter
S041059
S041060
S041061
S041062
S041067
S041126
S041124
Media Type
setting
360 dpi Ink Jet
Paper
Ink Jet Paper
Photo Quality
Glossy Paper
Note:
When you loa d paper, make sure the printable side is facing
up. Some special media have a cut corner that you need to
position correctly; follow any instructions in the package.
Always handle sheets by the edges, and don’t touch the
printabl e s ur f ace.
Load the top edge first. W hen you load legal-size pape r,
pull up the paper suppor t extensio n as shown below:
14 - EPSON Stylus COLOR 800
1/97
Page 15

EPSON Stylus COLOR 800
EPSON 360 dpi High Quality and Photo Quality Ink Jet Paper
Caution:
Don’t use the cleaning sheets th at may be included with
your special media; they may damage the printer.
You can load paper up to the arrow mark on the left edge
guide. If you use legal-size ink jet pa per, don’t load it more
than half way to the arrow mark.
EPSON Photo Quality Gloss y Paper, Film, and Transparenci es
Before you load glossy media or transparencies, put a
support sheet (packed with the media) or a plain paper sheet
beneath the stack. You can loa d up to 20 sh eets of g lossy
paper, and up to 30 she ets of g loss y film or transparencies.
Note:
Use ink jet papers within one year of purchase.
Use glossy media and transparencies within six months.
Return unused sheets and envelopes to their original package
as soon as po s s ible.
However, you may get better results by loading one sheet at
a time. With multiple sheets loaded, the minimum top
margin you can use is 1.2 inc hes (30 mm ). If you want to
use a smaller top margin, load and print one sheet at a time.
Remove each sheet from the output tray immediately after
it’s printed. Make sure each sheet is dry before stacking.
To print on transparenc ies , remove the paper support an d
reposition it in the slots at the back of the printer as shown:
Envelopes
You can load up to 10 env e lopes as shown below:
If ink smears when yo u print on envelopes or other thick
media, set the paper thickness lever to the + position. Open
the printer cover and position the lever as shown below.
Then close the cover and print. (Make sure you return the
lever to the 0 position before you print on other m edia.)
Set the thickness lever to
+ if ink s me ars w hen y ou
print on envelopes or
cards.
EPSON Photo Quality Ink Jet Cards
You can use these cards to print photographs that look
almost as good as the one s you get fr om film p roces sing .
Make sure you set the paper thickness lever to the + position
as shown above.
You can load up to 30 cards at a time. Always place the
included support s heet under the c ard s. W he n you’ re re ady
to print, use your software to set the Paper Size option for
the size card you’re us ing.
EPSON Photo Quality Self Adhesive Sheets
Use these sheets to print labels or stickers. You can load one
sheet at a time.
1/97
EPSON Stylus COLOR 800 - 15
Page 16

EPSON Stylus COLOR 800
EPSON Iron-On Transfer Paper
Note:
For iron-on transfers , make sure you rever s e your image
before you print it, especially if it includes text. Then the
text will read correctly whe n it’s trans fer red. You can
use the Flip Horizontal option in your printer software.
You can print photos, compa ny logos , or
anything else you want on this paper, and then transfer your
images to T-shirts or oth er cloth ite ms. L oad one s heet of
transfer paper at a time. After you print, follow the
instructions that came with the paper to iron the image onto
the shirt or other item.
Printer Care
Cleaning the Print Heads
If your printed imag e is unexp e ctedly light or f ain t, or dots
are missing from the image, you may need to clean the print
heads. This unclogs the nozzles so they can deliver ink
properly.
Cleaning the print heads uses ink, so clean them only if print
quality declines. You can clean the print heads in either of
the following two ways:
❏
With the Head Cleaning utility in your printer software
(when the printer is on a local por t r ather than a network)
❏
Using the printer’s control panel butt ons
Using the Head Cleaning Utility
Follow these steps to run the utility from a W indows
computer or a Macin tos h:
1. Make sure the printer is turned on but not printing, and the
B
black and A color ink out lights are off.
2. Access the main printer settings dialog box.
3. Click the Utility tab (Windo ws) or the Utility b utton
(Macintosh). You see the Utility menu.
6. Make sure paper is loaded in the printer and click Print
nozzle check pat tern (Windows) or Confirmation
(Macintosh.
If your print quality has not improved, repeat the steps
above.
Using the Control Panel To Clean the Print Heads
Follow these steps to clean the print heads using the control
panel buttons:
1. Make sure the printer is turned on and not printing, and
B
that th e
black and A color ink out lights are of f .
2. Open the printer cover.
Y
3. Press the
black or X color cleaning button and hold it for
three seconds. Cleaning takes about two minutes, during
P
which the printer makes s om e noise and t he
power light
flashes.
P
4. When the
power light stops fla s hing, repeat step 2 for
the other print he ad if ne cessary.
P
After you’re finished cleaning and th e
power light s tops
flashing, you need to run a nozzle check.
5. Access the main printer settings dialog box.
6. Click the Utility tab (Windo ws) or the Utilit y button
(Macintosh). You s ee the Utility menu.
7. Click the Nozzle Che ck icon. See the next section for
instructions on examining the nozzle check pattern.
If your print quality has not improved, repeat the steps
above.
Examining the Nozzle Check Pattern
Examine the nozzle check pattern you print after cleaning
the print heads. It should look som eth ing like this , with the
lower pattern colored cyan, magenta, and yellow:
4. Click the Head Cleaning icon.
Caution:
Don’t turn off the printer while the Ppower light is
flashing, unless the printer has not moved or made noise for
more than 5 minutes.
5. Follow the instructions on the screen to clean one or
both print heads. Cleaning each head takes about two
minutes, during which the printer makes some noise and
P
power light flashes.
the
When the power light stops flashing, you need to run a
nozzle check.
16 - EPSON Stylus COLOR 800
Each staggered horizo nta l and stra ight vertica l line sh ould
be complete, with no gaps in the dot pattern. If your printout
looks okay, you’re do ne . If any dots are missing, clean the
print heads again, as explained in the previous sections.
1/97
Page 17

EPSON Stylus COLOR 800
Aligning the Print Heads
If your printouts c ontain m isalig ne d vertic al line s, yo u m ay
need to align the print heads. You can align the print heads
in either of the following two ways:
❏ With the Print Head Alignment utility in your printer
software (when the printer is on a local port rathe r than a
network)
❏ Using the printer’s control panel buttons
Using the Print Head Alignment Utility
Follow these steps to run the utility from a W indows
computer or a Mac intos h:
1. Make sure the printer is turned on and paper is loaded.
Caution:
Load paper that’s at least 8.27 inches (210 mm) wide. This
prevents ink from spraying inside the printer and smudging
your printouts.
2. Access the Main printer settings dialog box.
3. Click the Utility tab (Windo ws) or the Utility b utton
(Macintosh). You see the Utility menu.
4. Click the Print Head Alignment icon.
5. Follow the instructions on the screen to print a test page
and select the correct alignment.
Using the Cont rol Pa ne l To Alig n the Print Heads
Follow these steps to align the print heads using the control
panel buttons:
1. Make sure the printer is turned off and paper is loaded.
2. Open the printer cover.
load/eject button and the Y black
3. Hold down the
E
cleaning but ton and turn on the printer. Then release the
buttons.
The printer pri nts an in struc tio n sheet tha t tells you how to
align the print heads.
Caution:
Don’t touch the gears in side the pri nt er.
Never use alcohol or thinner for cleaning; t hey can damage
the printer components and case.
Don’t use a har d or abrasive br ush.
Don’t get water on the printer com po nen ts .
Don’t spray lubricants or oils inside the printer.
1. Turn off the printer , unplug the power cord, and
disconnect the printer cable.
2. Remove all the pap er from the sheet feeder.
3. Carefully clean away dust and dirt with a soft brush.
4. Clean the exterior of the printer with a soft, damp cloth.
Keep the printer cover closed so water doesn’t get inside.
5. Clean ink out of the printer’s interior with a soft, damp
cloth.
Using Optional Interfaces
Your EPSON Stylus COLOR 800 includes both parallel and
serial interfaces. You can connect it to a PC or Macintosh,
or both at the same time. If you want to connect to an other
system or to a network, you can install an optional interface
board.
You can install the following interface boards in your
printer:
Type of interface board Model number Compatibility
Serial C823051 PC
32KB serial C832071 PC
32KB parallel C823101 PC
LocalTalk C823121 Macintosh
Twinax C823151 PC
Coax C823141 PC
Ethernet C823461 Macintosh/PC
Using Macintosh Interf ace Boards
4. Follow the instructions on the printed sheet.
5. When you’re finished, turn off the printer to exit the
alignment mode.
Cleaning the Printer
To keep your printer working at its best, you should clean it
several times a year, following these steps:
If you are planning to install the LocalTalk board, you will
also need two LocalTalk Locking Connector Kits (DIN-8
version). Attach one connec tor box to the AppleTalk
interface on the printer and the other to the printer port on
the Macintosh. Then attach the LocalTalk cable between the
two connector bo xe s. F or m ore info rm a tion, see the
instructions that came with the connector kits.
If you install the Ethernet board connected to a thin coaxial
(10BASE2) cable, and the printer is the last device on the
network, you need to obtai n a 50-o hm term ina tor. T he
Ethernet transcei ver is include d on the EPSON Ethern et
board, so you do not need a n ada p ter box for the printer.
1/97
EPSON Stylus COLOR 800 - 17
Page 18

EPSON Stylus COLOR 800
Using the PC Serial Interface Board
Before you install the serial interface board in your printer,
follow the instructions that come with the board for setting
baud rate and parity. Refer to your computer documentation
for information about matching the board’s setting s to your
computer system. You may also need to set the board’s
handshake timing, error handling, and other d ata tran sfer
conventions.
Installing O ptional Interfaces
Before you install an optional interface board in your
printer, make sure the printer is turned off and all the
printer’s lights are off. Then follow these steps:
1. Unplug the powe r c ord from the e lect rical out let (and from
the back of the printer, if your printer’s power cord is
removable).
Caution:
To avoid damaging your pr inter or compu ter, do not install
the interface board when t he pr inter is connected to an
electrical outlet.
2. Turn the printer around so that its back faces you , and
disconnect any interface cables.
3. Use a cross-head screwdriver to remove the two screws
securing the shield plate to the interface slot; then lift off
the plate. Be sure to keep both screws; you may need to
use them again when you reinstall the shield plate.
5. Slide the interface board along the slots on both sides of
the compartment. Push it in firmly to fully insert the
board’s connector into the printer’s internal socket.
6. Secure the interface board in the slot with the two screws
included with the interface board.
7. Connect the proper interface cable to the interface board
and to your computer . If the cable has a grounding wire,
connect it to one of the screws securing the parallel
interface.
Also, if you are using more than one computer, reconnect
the ot h er interface cable .
8. Make sure the printer is tu rned off. Then plug in t he power
cord.
In most cases, the printer automatically detects the inter face
you’re using. However, if you have trouble printing through
an installed interface board, you may need to change the
printer’s I/F (interface) mode setting. See page 5 for
instructions.
4. Be sure to set any switches and jumpers on the board. See
the interface board’s manual for details. If your board has
a jumper labeled J G, make sure that you set it to on, or the
board will not work properly.
18 - EPSON Stylus COLOR 800
To remove the interf ace bo a rd, follow the a bove s teps in
reverse order .
Information R e fe rence List
Engineering Change Notices
None
Product Support Bulletins
None
Techn ical Info rmation Bulletin s
None
1/97
Page 19

Related Documentation
TM-STYCLR800 EPSON Stylus COLOR 800
Service Manual
PL-STYCLR800 EPSON Stylus CO LOR 8 00
Parts Price List
4006678 EPS ON Sty lus CO LOR 800 User’s
Guide
4006677 EPSON Stylus COLOR 800 Quick Setup
CPD4457 Installing Your Software
EPSON Stylus COLOR 800
1/97
EPSON Stylus COLOR 800 - 19
Page 20

EPSON Stylus COLOR 800
20 - EPSON Stylus COLOR 800
1/97
 Loading...