

Page 1

The transparency
unit comes with the
Professional model
of the EPS ON
Expression 800
scanner . It’ s an
option for the
Executiv e and Artist
models of the
scanner.
Using the Transparency Unit
The optio nal transpare nc y unit (part number B81315 2) lets you scan f ull
color transparencies , str ips of negatives or posi tives, and slides . Yo u c an
also scan normal opaque docume nt s w it h th e T PU installed.
Follow the s t eps in these se c tio ns t o ins t all and use the T PU :
Unpacking the Transparency Unit
◗
Removing the Shipping Screw
◗
Installing t he Transpar ency Unit
◗
Scanning Oversized T ransparenc ies and Film
◗
Using the F ilm Guides
◗
Scanning Normal Documents with the Transparency Unit Installed
◗
Page 2

You can store the
film guide s in th e
storage area built
into the TPU.
However, it is
recommended that
you do not store the
small 120/22 0-size
film guide in t he
storage area.
Unpacking the Transparency Unit
Make sure all these items are included in the box with the TPU. Contact
your EPSON dealer if a ny t hing is missing or damaged.
reflective document mat
transparency unit
4 x 5-i nch film
installation
screws
guide
35 mm slide transparency guide
35 mm filmstrip guide
120/220-size (medium
format) film
guide
Page 3
You may damage the
TPU if you try to use it
without removing the
screw from t he hole
labeled CLAMP.
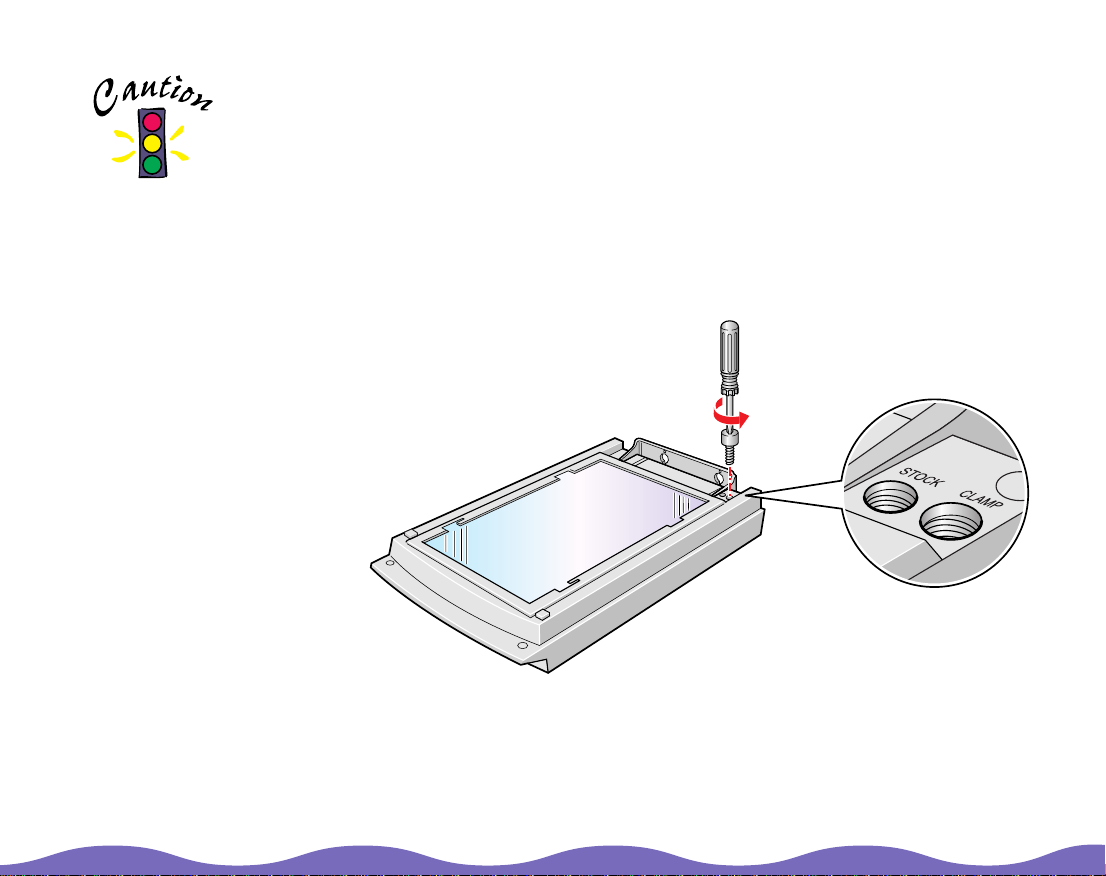
Removing the Shipping Screw
To preven t dam age during sh ipping, a shipp ing screw is att ac hed to the
TPU to secure its lamp assembly. You must remove this screw before
using the TP U .
Turn the TPU so the glass side faces up.
1
Use a Phill ips head (cross head) screwdriver to remov e the shippin g
2
screw from the hole labeled CLAMP , as sh ow n below.
Install the screw in the stor age hole labe led STOCK.
3
Page 4
If you can’t insert the
shipping screw in the
hole labeled CLAMP
when you prepare
the scanner for
transportation, the
TPU’s lamp
assembly may not be
in its home position.
If this is the case,
slowly rais e t he front
of the TPU to allow
the lamp assembly to
slide to the home
position .
Before transporting the scanner, tu rn it off, r emove the TPU, and reinstall
the shipp ing screw in the out er shipping hole labeled CLAMP. The
transpor ta t ion lock at the ba c k o f the scanner must also be in th e LOCK
position before you move the scanner (see
Scanner).
Setting Up and Using Yo ur
Installing the Transparency Unit
Follow the s t eps below to ins t all t he TPU:
Make sure the scanner is turned off. Then unplug the power cable from
1
the scanner.
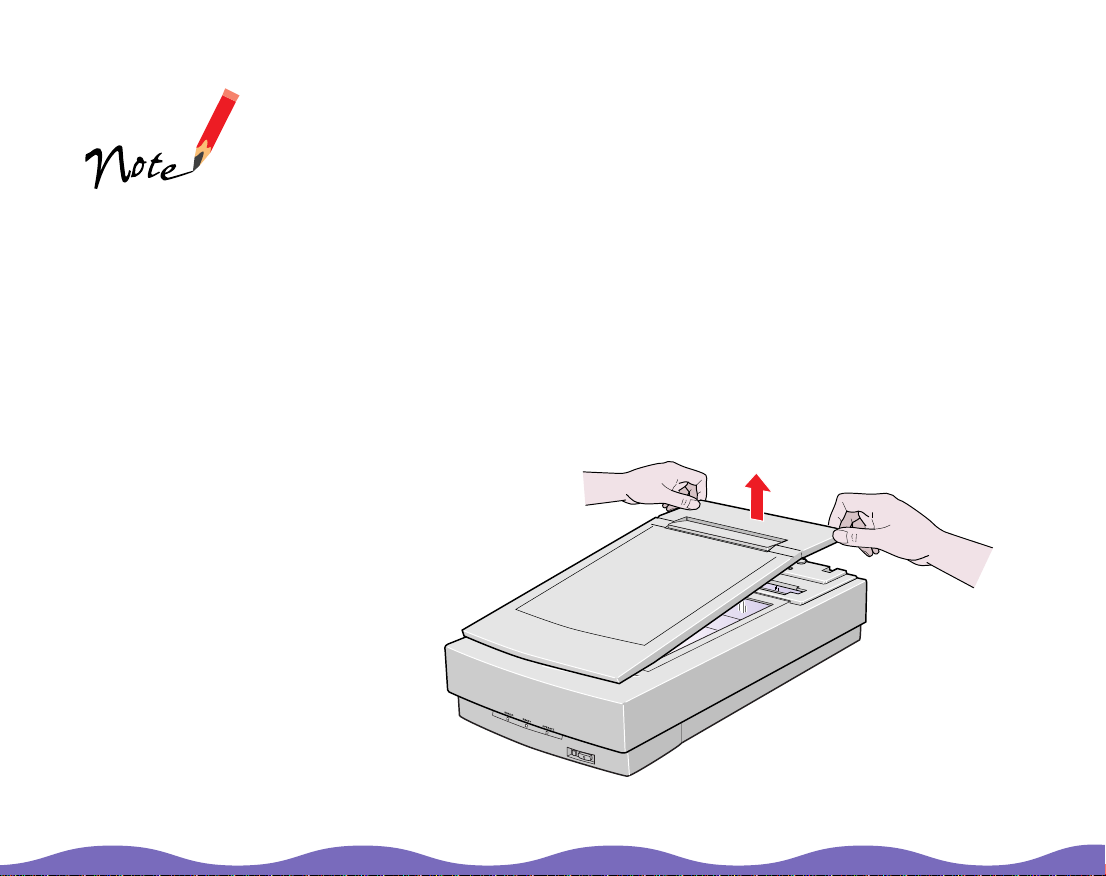
Remove the document cover by grasping the back of the document
2
cover as sh ow n and easing t he cover up.
Page 5
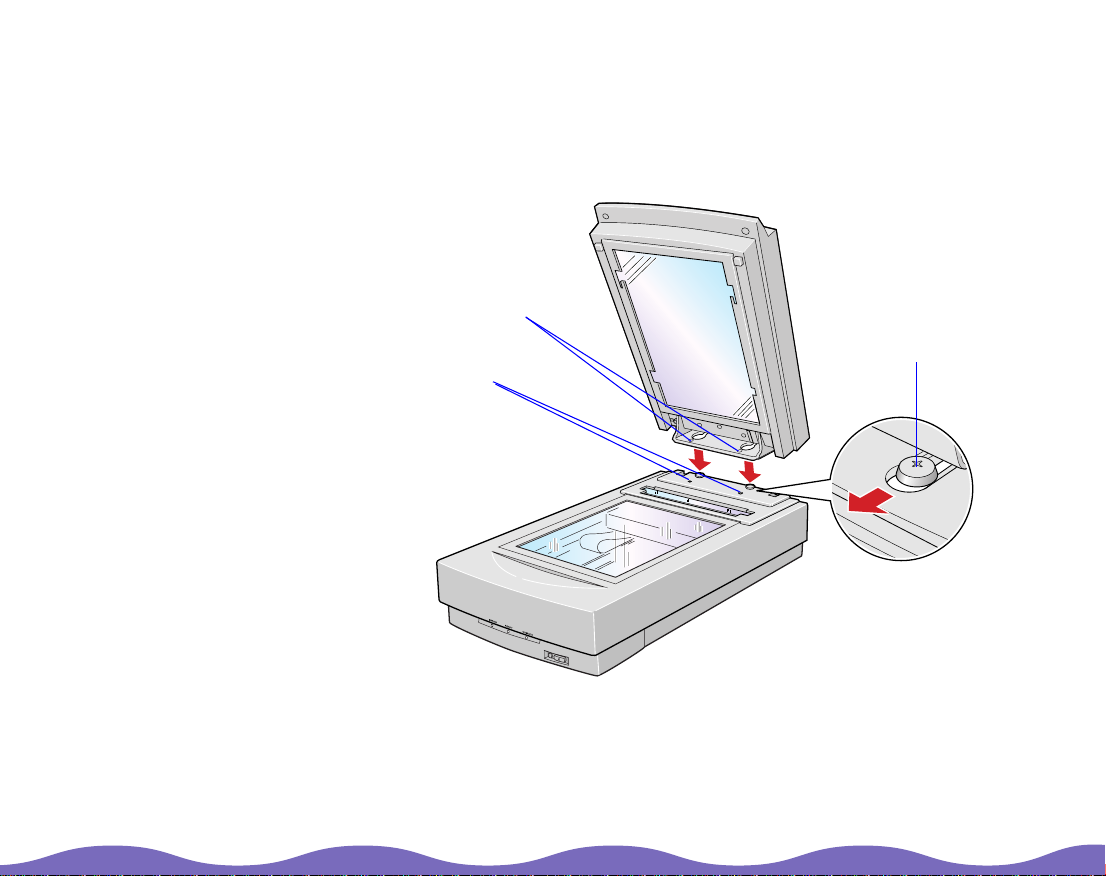
Position the sl o ts on the TPU’s mo unti ng bracket over th e heads of the
3
two mounting screws located at the back of the scanner. Slide the TPU
forward slightly until th e t w o holes in front of th es e s lots are align ed
with the screw holes at the back of the scanner.
align these holes
with the screw holes
on the scanner
screw holes on
scanner
position the slots on the
TPU’s mounting
bracket over the two
large screws at the
back of the scanner
Page 6

Insert the two installation screws that came with the TPU into the
4
screw holes, then tigh te n t he s c rews with a coin.
install the screws in
the screw holes
Gently clos e the TPU.
5
Page 7

Do not put heavy
objects on the TPU—
doing so may
damage the TPU.
Attach the TPU connector to the option connector at the back of the
6
scanner. To secure the TPU connector, tighten the attached screws.
OPTION
UNLOCK
LOCK
OPTION
TERMINATOR
SW
ON
SCSI
OFF
ID
0
1
2
7
6
3
4
5
Plug the scanner back in and turn it on.
7
Page 8

If you have th e Artist
or Professional
model and are using
LaserSoft SilverFast
4.0, you’ll f ind the
electronic manual for
that scan ner
software on the
LaserSoft SilverFast
CD-ROM.
Scanning Oversized Transparencies and Film
To scan a tra ns parency or film t hat is larger than any of the film guides,
place the transparency or film face down on the document table. Position
the corne r of yo ur original aga inst the arrow in th e upper right c orner of
the document table, as shown below. The maximum size of your
transparency or film is 8.5 × 11.7 inches (216 × 297 mm).
Close the T PU and scan acc ording to the in s tr uc t ions in your elect ronic
EPSON TWAIN Pro User’s Guide
. (You’ll fin d both guides in th e M anuals folde r on your EPSON
Guide
Expression 800 Scanning Tools CD-ROM.)
position the original
against the upper
right corner of the
document table
or
LaserSof t Silv erFast Lite Us er’s
Page 9

Using the Film Guides
You can use the four film guides that came with the TPU to scan 35 mm
slides, strips of 35 mm ne gative or posit iv e f ilm , 120-size or 22 0-s iz e
format film, and 4 × 5-inch (102×127 mm) film. Follow the steps in these
sections:
Loading 35 m m s lides
◗
Loading strips of 35 mm negative or positive film
◗
Loading m edium format size (120 or 220 -s iz e f ormat) film
◗
Loading 4
◗
x 5-inc h film
Page 10

If you have the Artist
or Professional
model and are using
LaserSoft SilverFast
4.0, you’ll f ind the
electronic manual for
that scan ner
software on the
LaserSoft SilverFast
CD-ROM.
Loading 35 mm slides
Position the slide transparency guide on the document table, as shown
1
below. The upper and righ t edges of the guide s hould be flush ag ainst
the ruled edges of the doc ument table.
you can line up two
columns of 35 mm
slides in the larger
section of the guide
Carefully position each slide insid e th e guide, making sure that th e
2
glossy (smooth) sid e of the fi lm is facin g down and the emulsi on side is
facing up .
Close the T PU and scan the s lides according to your ele c tr onic
3
EPSON TWAIN Pro User’s Guide
. (You’ll fin d both these guides in the Manuals direc to ry on y our
Guide
EPSON Ex pression 80 0 Scanning T ools CD-ROM. )
or
LaserSof t Silv erFast Lite Us er’s
Page 11

If your film s t rip is
longer than the film
guide, it may affect
the quality of t he
scan.
Loading strips of 35 mm negative or positive film
Insert the film strips face down in the film s tri p guide.
1
Place the filmstrip guide on the document table. Make sure the glossy
2
(smooth) side of the film is facing down and the emulsion side is facing
up. Align the upper and right edges of the guide with the ruled edges of
the document table.
Page 12

Close the T PU and scan the f ilm ac c ording to the ins t ruc t ions in your
3
electronic
EPSO N TWAIN Pro Us er’s Guide
Lite User’s Guide
.
or
LaserSoft SilverFa s t
If you have the Artist
or Professional model
and are using
LaserSoft SilverFast
4.0, you’ll f ind the
electron ic m anual for
that scanner software
on the Las erSoft
SilverFast CD-ROM.
Loading medium form at si ze (120 or 220-size format) film
Place the 120/220-size f ilm guide on the s c anner’s docu m ent table,
1
fitting one c orner of the gu ide against the upper right c orner of the
docume nt ta ble.
Page 13

If you have the Artist
or Professional
model and are using
LaserSoft SilverFast
4.0, you’ll f ind the
electronic manual for
that scann er
software on the
LaserSoft SilverFast
CD-ROM.
Place the film inside the gu ide, making s ure that the area y ou want
2
to scan is ali gned with the open scan are a in the guide. The glossy
(smooth) s ide of the film should be facing down and the emu ls ion side
should be facing up.
Close the T PU and scan the f ilm ac c ording to the ins t ruc t ions in your
3
electronic
Lite User’s Guide
EPSON Ex pression 80 0 Scanning T ools CD-ROM. )
EPSO N TWAIN Pro Us er’s Guide
. (You’ll find both guides in the Manuals folder of your
or
LaserSoft SilverFa s t
Page 14

If you have the Artist
or Profes s ional
model and are using
LaserSoft SilverFast
4.0, you’ll f ind the
electronic manual for
that scanner
software on the
LaserSoft SilverFast
CD-ROM.
Loading 4 x 5-inch film
Place the 4 × 5-inch film guide on the document table.
1
Place the film inside the guide, aligning the area you want to scan with
2
the scan areas on the guide. Make sure the smooth (glossy) side of
your film is facing down and the emulsion side is facing up.
Close the TPU. Scan according to the instructions in your online
3
TWAIN Pro User’s Guide
or
LaserSoft SilverFast Lite User’s Guide
EPSON
.
Page 15

Scanning Normal Documents with the Transparency Unit Installed
To scan normal documents with the T PU installed, ins ert the reflec ti ve
docume nt m at inc luded with the TPU as described below.
Open the TPU. If there’s a film guide on the document table, remove it.
1
Insert the tabs on t he ref lective docum ent mat into the slot s on the TPU
2
and slide the ma t do w n unt il th e tabs are secur e.
reflective document mat
tab
Place your document on the document table and close the TPU.
3
Page 16

If you have the Artist
or Professional
model and are using
LaserSoft SilverFast
4.0, you’ll f ind the
electronic manual for
that scan ner
software on the
LaserSoft SilverFast
CD-ROM.
Scan according to the ins t ruc t ions in your ele c tr onic
4
Pro User’ s G uide
both guides in the Manuals folder on yo ur EPSON Ex pression 800
Scanning Tools CD-ROM). Set your Document Source to
(TWAIN Pro) or your Document Type to
To remove the reflective documen t ma t , slide it up until you can
disengage the tabs from the slots, then gently pull it out of the TPU.
or
LaserSoft SilverFast Lite User’s Guide
Reflective
EPSON TWAIN
(you’ll fin d
Flatbed
(SilverFast Lite).
Using the Auto Document Feeder
The auto document feeder (part number B813162) automatically loads
multiple- page docum ents into your sc anner. It is par ticularly useful for
OCR (optic al character recognition ) s c anning or for cr eat ing an image
databas e. F ollow the steps in these sections to install and use the ADF :
Unpacking the Auto Document Feeder
◗
Installing t he Auto Docum ent Feede r
◗
Loading Paper in the Aut o D oc ument Feeder
◗
Fixing Paper Jams in the Auto Document Feeder
◗
 Loading...