

Page 1

®
Network Scan Server
EPSON Network Image Express Card
User’s Guide
All rights reserved. No part of this publication may be reproduced, stored in a retrieval
system, or transmitted in any form or by any means, electronic, mechanical, photocopying,
recording, or otherwise, without the prior written permission of SEIKO EPSON
CORPORATION. No patent liability is assumed with respect to the use of the information
contained herein. Neither is any liability assumed for damages resulting from the use of the
M
information contained herein.
Neither SEIKO EPSON CORPORATION nor its affiliates shall be liable to the purchaser of
this product or third parties for damages, losses, costs, or expenses incurred by purchaser or
third parties as a result of: accident, misuse, or abuse of this product or unauthorized
modifications, repairs, or alterations to this product.
SEIKO EPSON CORPORATION and its affiliates shall not be liable against any damages or
problems arising from the use of any options or any consumable products other than those
designated as Original EPSON Products or EPSON Approved Products by SEIKO EPSON
CORPORATION.
EPSON is a registered trademark of SEIKO EPSON CORPORATION.
IBM and PS/2 are registered trademarks of International Business Machines Corporation.
Apple, Macintosh, Mac, iMac, and Power Macintosh are registered trademarks of Apple
Computer, Inc.
Microsoft and Windows are registered trademarks of Microsoft Corporation in the United
States of America and other countries.
This product includes software developed by the University of California, Berkeley, and its
contributors.
General Notice: Other product names used herein are for identification purposes only and
may be trademarks of their respective companies.
Copyright © 2003 by SEIKO EPSON CORPORATION, Nagano, Japan.
English
1
Page 2

FCC Compliance Statement
For United States Users
This device complies with Part 15 of FCC Rules. Operation is subject to the following two
conditions: (1) this device may not cause harmful interferen ce, and (2) this device must accep t
any interference received, including interference that may cause undesired operation.
This equipment has been tested and found to comply with the limits for a Class B digital
device, pursuant to Part 15 of the FCC Rules. These limits are designed to provide reasonable
protection against harmful interference in a residential installation. This equipment
generates, uses and can radiate radio frequency energy and, if not installed and used in
accordance with the instructions, may cause harmful interference to radio or television
reception. However, there is no guarantee that interference will not occur in a particular
installation. If this equipment does cause interference to radio and television reception, which
can be determined by turning the equipment off and on, the user is encouraged to try to
correct the interference by one or more of the following measures.
❏ Reorient or relocate the receiving antenna
❏ Increase the separation between the equipment and receiver
❏ Connect the equipment into an outlet on a circuit different from that to which the
receiver is connected
❏ Consult the dealer or an experienced radio/TV technician for help.
WARNING
The connection of a non-shielded equipment interface cable to this equipment will invalidate
the FCC Certification of this device and ma y cause interference levels which exceed the limits
established by the FCC for this equipment. It is the responsibility of the user to obtain and
use a shielded equipment interface cable with this device. If this equipment has more than
one interface connector, do not leave cables connected to unused interfaces.
Changes or modifications not expressly approved by the manufacturer could void the user’s
authority to operate the equipment.
For Canadian Users
This Class B digital apparatus complies with Canadian ICES-003.
Cet appareil numérique de la classe B est conforme à la norme NMB-003 du Canada.
For European Users
This product conforms to CE marking requirements in accordance with EC Directive
89/336/EEC.
2
Page 3

DECLARATION of CONFORMITY
According to 47CFR, Part 2 and 15 for Class B Personal Computers and
Peripherals; and/or CPU Boards and Power Supplies used with Class B
Personal Computers:
We: EPSON AMERICA, INC.
English
Located at: MS 6-43
3840 Kilroy Airport Way
Long Beach, CA 90806-2469
Telephone: (562)290-5254
Declare under sole responsibility that the product identified herein, complies
with 47CFR Part 2 and 15 of the FCC rules as a Class B digital device. Each
product marketed, is identical to the representative unit tested and found to
be compliant with the standards. Records maintained continue to reflect the
equipment being produced can be expected to be within the variation
accepted, due to quantity production and testing on a statistical basis as
required by 47CFR §2.909 Operation is subject to the following two
conditions: (1) this device may not cause harmful interference, and (2) this
device must accept any interference received, including interference that
may cause undesired operation.
Trade Name: EPSON
Type of Product: Network Scan Server
Model: EU-81
3
Page 4

Contents
Safety Instructions
Important Safety Instructions. . . . . . . . . . . . . . . . . . . . . . . . . . . . . . . . 6
Warnings, Cautions, and Notes . . . . . . . . . . . . . . . . . . . . . . . . . . . . . . 6
Chapter 1 Getting to Know Your Network Image Express Card
Package Contents . . . . . . . . . . . . . . . . . . . . . . . . . . . . . . . . . . . . . . . . . . 8
Operating Environment . . . . . . . . . . . . . . . . . . . . . . . . . . . . . . . . . . . . 9
Features . . . . . . . . . . . . . . . . . . . . . . . . . . . . . . . . . . . . . . . . . . . . . . . . . 10
Physical Description. . . . . . . . . . . . . . . . . . . . . . . . . . . . . . . . . . . . . . . 11
About the Software . . . . . . . . . . . . . . . . . . . . . . . . . . . . . . . . . . . . . . . 12
Chapter 2 Setting Up the Network Image Express Card
Connecting the Network Image Express Card on a Network. . . . 14
Installing EpsonNet WinAssist/MacAssist . . . . . . . . . . . . . . . . . . . 16
For Windows . . . . . . . . . . . . . . . . . . . . . . . . . . . . . . . . . . . . . . . . 16
For Macintosh . . . . . . . . . . . . . . . . . . . . . . . . . . . . . . . . . . . . . . . 17
Setting an IP Address Using EpsonNet WinAssist . . . . . . . . . . . . . 18
About password . . . . . . . . . . . . . . . . . . . . . . . . . . . . . . . . . . . . . 23
Using EpsonNet WinAssist EasySetup . . . . . . . . . . . . . . . . . . 24
Setting an IP Address Using EpsonNet MacAssist . . . . . . . . . . . . . 27
About Password . . . . . . . . . . . . . . . . . . . . . . . . . . . . . . . . . . . . . 32
Using EpsonNet MacAssist EasySetup . . . . . . . . . . . . . . . . . . 33
Setting an IP Address Using EpsonNet WebAssist. . . . . . . . . . . . . 36
Supported Web browser . . . . . . . . . . . . . . . . . . . . . . . . . . . . . . 36
About Web browser setting. . . . . . . . . . . . . . . . . . . . . . . . . . . . 37
Using EpsonNet WebAssist. . . . . . . . . . . . . . . . . . . . . . . . . . . . 37
Setting an IP Address Using the arp Command . . . . . . . . . . . . . . . 41
4
Page 5

Chapter 3 Scanning an Image
Preparing for Scanning at the Client PC . . . . . . . . . . . . . . . . . . . . . .44
Scanning an Image . . . . . . . . . . . . . . . . . . . . . . . . . . . . . . . . . . . . . . . .44
Chapter 4 Troubleshooting
Problems and Solutions . . . . . . . . . . . . . . . . . . . . . . . . . . . . . . . . . . . .46
Restoring Factory Default Settings . . . . . . . . . . . . . . . . . . . . . . . . . . .48
Setting the Interface Mode . . . . . . . . . . . . . . . . . . . . . . . . . . . . . . . . . .49
Uninstalling Software . . . . . . . . . . . . . . . . . . . . . . . . . . . . . . . . . . . . . .51
Uninstalling EpsonNet WinAssist . . . . . . . . . . . . . . . . . . . . . . .51
Uninstalling EpsonNet MacAssist . . . . . . . . . . . . . . . . . . . . . . .52
Appendix A Technical Specifications
Network Image Express Card . . . . . . . . . . . . . . . . . . . . . . . . . . . . . . .54
Environmental . . . . . . . . . . . . . . . . . . . . . . . . . . . . . . . . . . . . . . . . . . . .55
Safety Approvals . . . . . . . . . . . . . . . . . . . . . . . . . . . . . . . . . . . . . . . . .55
Index
English
5
Page 6

Safety Instructions
Important Safety Instructions
Read all these instructions and save them for later reference.
Follow all warnings and instructions marked on the EPSON
Network Image Express Card.
❏ Do not spill liquid onto the Network Image Express Card.
❏ Do not place the Network Image Express Card on an unstable
surface, or near a radiator or heat source.
❏ Avoid using outlets on the same circuit as photocopiers or air
control systems that regularly switch on and off.
❏ Except as specifically explained in this User's Guide, do not
attempt to service the Network Image Express Card yourself.
Warnings, Cautions, and Notes
Warnings must be followed carefully to avoid bodily injury.
w
Cautions must be observed to avoid damage to your equipment.
c
Notes contain important information and useful tips on the operation
of your product.
6 Safety Instructions
Page 7

Chapter 1
Getting to Know Your Network Image
Express Card
Package Contents. . . . . . . . . . . . . . . . . . . . . . . . . . . . . . . . . . . . . . . . . . .8
Operating Environment . . . . . . . . . . . . . . . . . . . . . . . . . . . . . . . . . . . . .9
Features. . . . . . . . . . . . . . . . . . . . . . . . . . . . . . . . . . . . . . . . . . . . . . . . . .10
Physical Description . . . . . . . . . . . . . . . . . . . . . . . . . . . . . . . . . . . . . . .11
About the Software . . . . . . . . . . . . . . . . . . . . . . . . . . . . . . . . . . . . . . . .12
English
1
1
1
1
1
1
1
Getting to Know Your Network Image Express Card 7
1
1
1
1
Page 8

Package Contents
Your Network Image Express Card package includes:
❏ Network Image Express Card (the utility EpsonNet
WebAssist is pre-installed)
❏ The Software CD-ROM including:
-- EpsonNet WinAssist
-- EpsonNet MacAssist
❏ User’s Guide
Note:
You need to supply items such as an EPSON scanner with an interface
slot and an Ethernet cable (Category 5 shielded twisted-pair cable).
Network Image Express Card
Software CD-ROM User’s Guide
8 Getting to Know Your Network Image Express Card
Page 9

Operating Environment
The Network Image Express Card supports the following
environments.
Windows
English
1
Operating system Windows® XP, Me, 98, 2000, and Windows NT 4.0
Protocol TCP/IP
Macintosh
®
Operating system Mac
Protocol TCP/IP
Supported EPSON Scan
Use EPSON Scan 1.1 or later shipped with your scanner. If you
have EPSON TWAIN Pro Network, EPSON TWAIN HS
Network, or EPSON Scan 1.0, contact the dealer in your country
to get the latest version of the software.
Supported EPSON scanner
The Network Image Express Card supports the following EPSON
scanners (as of March, 2003).
❏ Expression 1680/1640XL
OS 8.6 to 9.x, Mac OS X 10.2 or later
1
1
1
1
1
1
1
1
❏ GT-30000/15000
Note:
Future scanners with an interface slot are planned to be supported.
Getting to Know Your Network Image Express Card 9
1
1
Page 10
Features
The EPSON Network Image Express Card enables an EPSON
scanner supporting EPSON Scan to become shareable on a
network. With the Network Image Express Card, support for
10Base full/half duplex and 100Base full/half duplex, any clients
(Windows or Macintosh) with EPSON Scan software installed can
access the scanner at high speed.
The Network Image Express Card and EPSON Scan software
work together to directly control all of the features of the scanner.
As a result, the scanner can be shared and scanned images can be
imported into any TWAIN-compliant application.
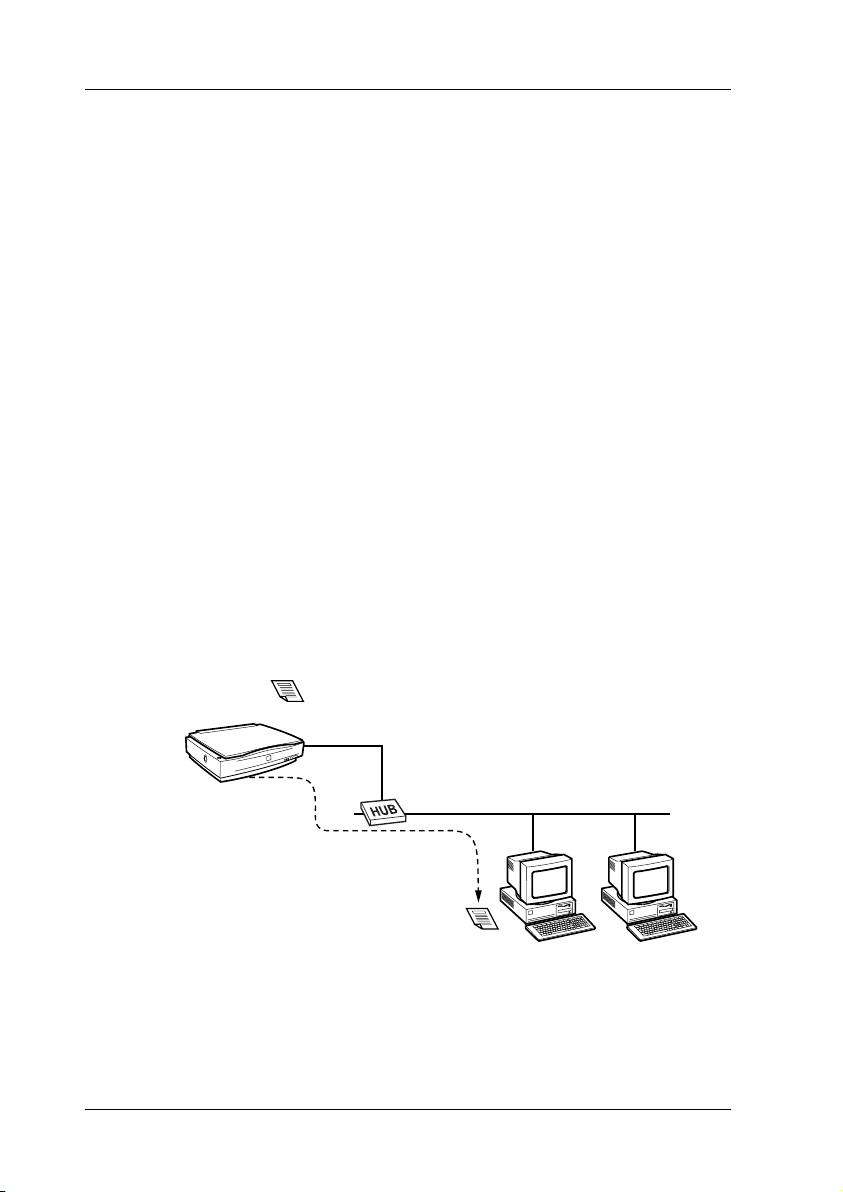
The illustration below shows how the EPSON scanner with the
Network Image Express Card becomes shareable on a network.
Your client PC can connect to the Network Image Express Card
and import a scanned image from the scanner. When your PC
disconnects, another client PC can access the Network Image
Express Card for network scanning as well.
document to be scanned
EPSON scanner with Network Image Express Card
network
scanned image
client PC
10 Getting to Know Your Network Image Express Card
client PC
Page 11
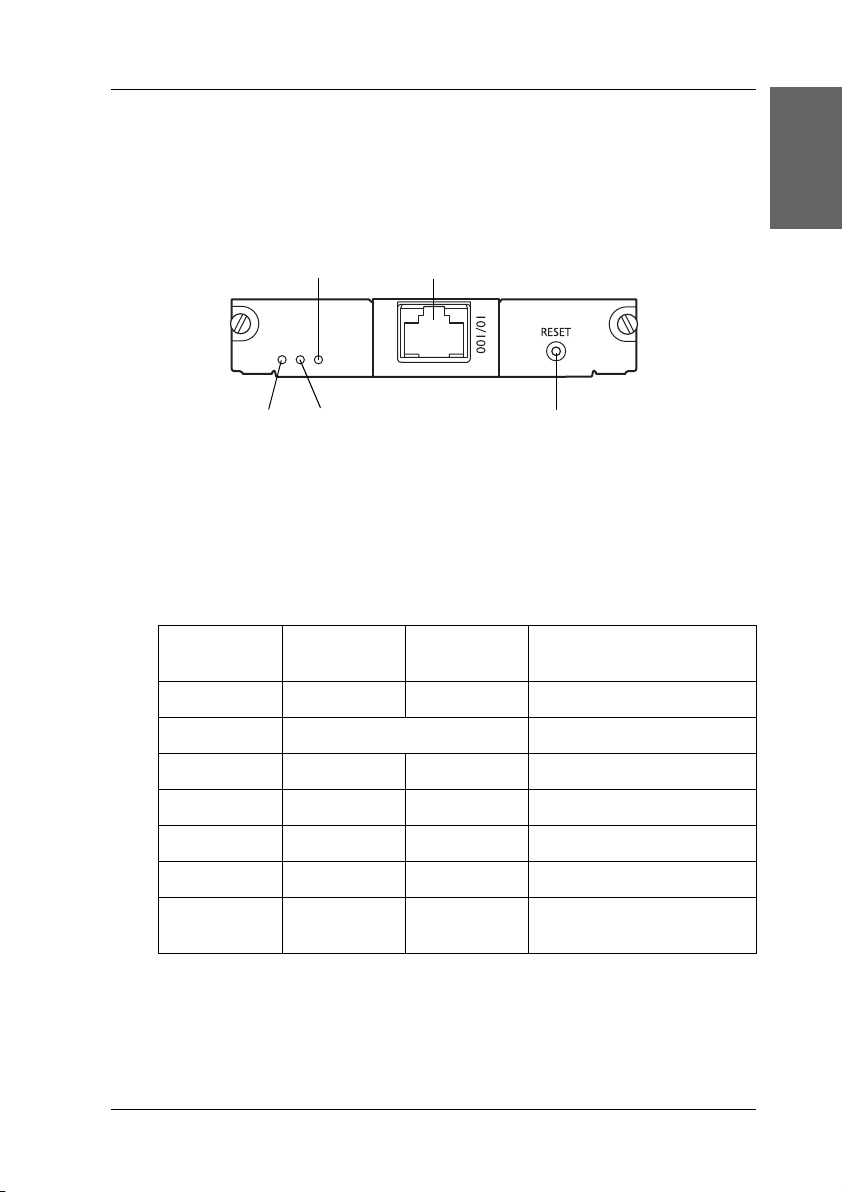
Physical Description
The status lights provide you with important information about
the operation of the Network Image Express Card.
Data light network connector
English
1
1
1
Yellow status light Red status light
Status and Data lights
The Network Image Express Card has three lights (two Status and
one Data), which indicates the current operating status of the
Network Image Express Card.
Status Light
(Yellow)
Off On On Initializing
Off Flashing alternately Firmware update mode
Off Flashing On Error status
On Off On Ready (10M link)
On Off Flashing Receiving data (10M link)
On On On Ready (100M link)
On On Flashing Receiving data
Status Light
(Red)
Data Light
(Green)
Reset button
Status
(100M link)
1
1
1
1
1
1
1
Getting to Know Your Network Image Express Card 11
1
Page 12

Network connector
The network connector accepts a 10Base-T or 100Base-TX network
cable for connection to an Ethernet network. Be sure to use a
Category 5 shielded twisted-pair cable to prevent malfunctions.
The Network Image Express Card automatically selects either
10Base-T or 100Base-TX for the connection.
Reset button
You can return the EPSON Network Image Express Card to its
factory default settings. To do this, turn on the scanner while
holding down the Reset button. Keep holding down the button
for ten seconds or more; EPSON Network Image Express Card is
returned to its factory default settings.
About the Software
❏ EpsonNet WinAssist is a Windows-based configuration
utility for administrators that allows you to configure the
Network Image Express Card for TCP/IP. See “Setting an IP
Address Using EpsonNet WinAssist” on page 18.
❏ EpsonNet MacAssist is a Macintosh-based configuration
utility for administrators that allows you to configure the
Network Image Express Card for TCP/IP. See “Setting an IP
Address Using EpsonNet MacAssist” on page 27.
❏ EpsonNet WebAssist is a web-based configuration utility
that allows you to configure the Network Image Express Card
for TCP/IP. You can start EpsonNet WebAssist from
EpsonNet WinAssist or MacAssist, or by typing the IP
address of the Network Image Express Card as the URL in
your browser. See “Setting an IP Address Using EpsonNet
WebAssist” on page 36.
12 Getting to Know Your Network Image Express Card
Page 13

Chapter 2
Setting Up the Network Image Express
Card
Connecting the Network Image Express Card on a Network . . . .14
Installing EpsonNet WinAssist/MacAssist. . . . . . . . . . . . . . . . . . . .16
For Windows. . . . . . . . . . . . . . . . . . . . . . . . . . . . . . . . . . . . . . . . .16
For Macintosh . . . . . . . . . . . . . . . . . . . . . . . . . . . . . . . . . . . . . . . .17
Setting an IP Address Using EpsonNet WinAssist . . . . . . . . . . . . .18
About password . . . . . . . . . . . . . . . . . . . . . . . . . . . . . . . . . . . . . .23
Using EpsonNet WinAssist EasySetup . . . . . . . . . . . . . . . . . . .24
Setting an IP Address Using EpsonNet MacAssist . . . . . . . . . . . . .27
About Password . . . . . . . . . . . . . . . . . . . . . . . . . . . . . . . . . . . . . .32
Using EpsonNet MacAssist EasySetup . . . . . . . . . . . . . . . . . . .33
Setting an IP Address Using EpsonNet WebAssist . . . . . . . . . . . . .36
Supported Web browser . . . . . . . . . . . . . . . . . . . . . . . . . . . . . . .36
About Web browser setting . . . . . . . . . . . . . . . . . . . . . . . . . . . .37
Using EpsonNet WebAssist . . . . . . . . . . . . . . . . . . . . . . . . . . . .37
Setting an IP Address Using the arp Command. . . . . . . . . . . . . . . .41
2
English
2
2
2
2
2
2
Setting Up the Network Image Express Card 13
2
2
2
2
Page 14
Connecting the Network Image Express Card
on a Network
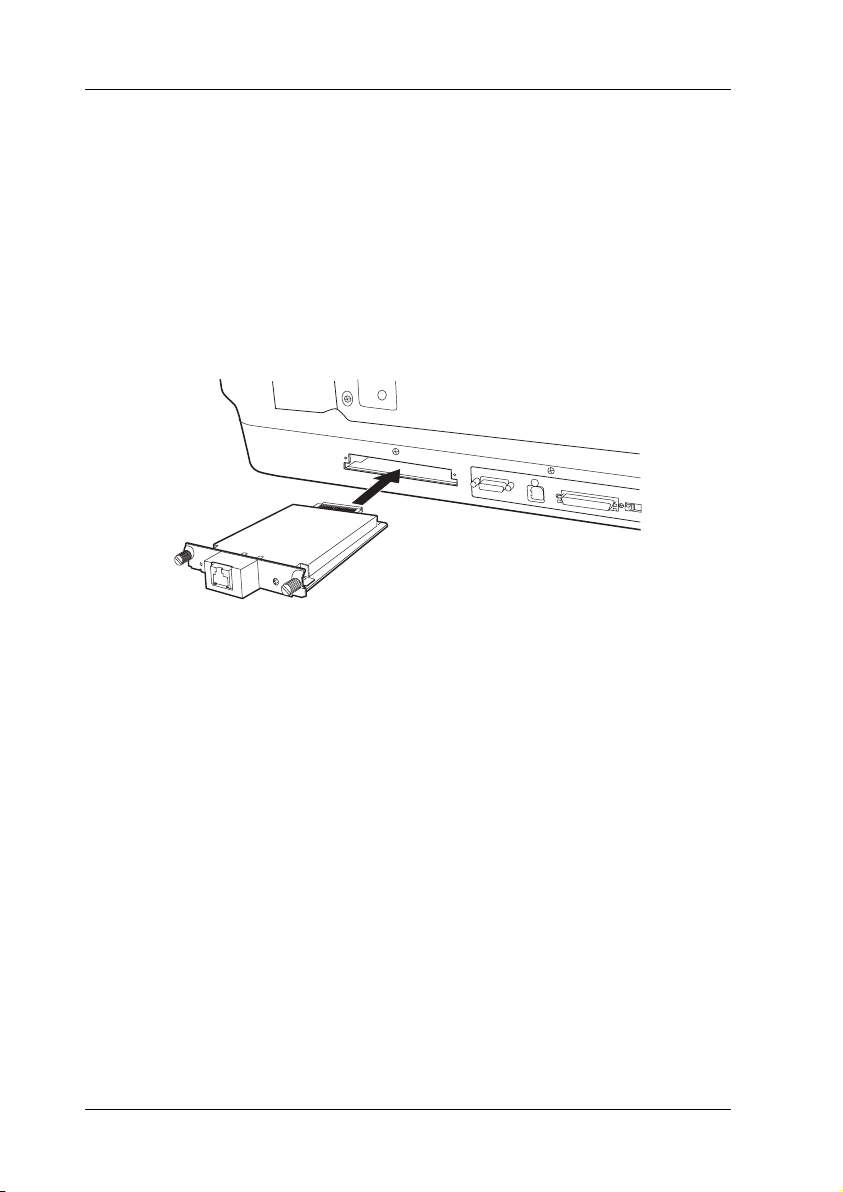
You need to install the Network Image Express Card in your
scanner and connect it to your network. Follow the steps below
for instructions.
1. Insert the Network Image Express Card in your scanner’s
optional interface slot and then tighten the screws.
For detailed information on installing the Network Image
Express Card, refer to the user’s guide of the scanner.
Caution:
Do not install or uninstall the Network Image Express Card
c
from the scanner while the scanner is turned on; otherwise
damage may occur.
2. Initialize the Network Image Express Card. To do this, turn
on the scanner while holding down the Reset button for 10
seconds until the red status light and green data light turn on.
Note:
Be sure to initialize the Network Image Express Card when you
insert or re-insert it in the scanner.
3. Turn off the scanner.
14 Setting Up the Network Image Express Card
Page 15

4. Connect an Ethernet cable (Category 5 shielded twisted-pair
cable) to the RJ-45 connector on the Network Image Express
Card, and then connect its other end to the network.
Caution:
❏ You must use a Category 5 shielded twisted-pair cable to
c
connect the Network Image Express Card to prevent
malfunction.
2
English
2
2
2
❏ Do not connect or disconnect the network cable when the
scanner is on.
❏ Do not connect the Network Image Express Card and the
computer directly. Be sure to use a HUB to connect the
Network Image Express Card to the network.
5. Turn on the scanner.
6. Check the lights on the Network Image Express Card.
Initialization is in progress while the red status light and the
green data light are on. When the yellow status light goes on,
initialization is complete.
Now, you can configure the Network Image Express Card using
EpsonNet WinAssist/MacAssist. Go to the next section
“Installing EpsonNet WinAssist/MacAssist” on page 16.
2
2
2
2
2
2
2
Setting Up the Network Image Express Card 15
Page 16

Installing EpsonNet WinAssist/MacAssist
You need to install EpsonNet WinAssist or MacAssist to configure
the Network Image Express Card.
Note:
❏ Be sure to use EpsonNet WinAssist/MacAssist included on the
Software CD-ROM shipped with this product.
❏ Make sure the necessary components such as TCP/IP are installed
on the computer, and network settings (such as the IP address,
subnet mask, etc.) of the computer are set. See the online help on
your operating system for instructions.
For Windows
System requirements
The following table lists the system requirements of EpsonNet
WinAssist. You can configure the Network Image Express Card
using EpsonNet WinAssist on the following operating systems.
Operating systems Windows XP, Me, 98, 2000, and Windows NT 4.0
(with Service Pack 5.0 or higher)
Hard disk drive space 10 MB
Installing EpsonNet WinAssist
Follow the steps below to install EpsonNet WinAssist.
Note:
If you add or delete protocols or services from your operating system after
installing EpsonNet WinAssist, EpsonNet WinAssist may not work
correctly. If this happens, uninstall EpsonNet WinAssist and then
install it again.
16 Setting Up the Network Image Express Card
Page 17

1. Insert the Software CD-ROM in the CD-ROM drive.
2. The EPSON Installation Program starts automatically.
If the Installer dialog box does not appear, double-click
SETUP.EXE on the CD-ROM.
3. Select Install EpsonNet WinAssist, and then click .
4. Follow the on-screen instructions to complete the installation.
For Macintosh
System requirements
The following table lists the system requirements of EpsonNet
MacAssist. You can configure the Network Image Express Card
using EpsonNet MacAssist on the following operating systems.
Operating systems Mac OS 8.6 to 9.x, Mac OS X 10.2 or later
Models PowerPC Macintosh
Hard disk drive space 10 MB
2
English
2
2
2
2
2
2
Installing EpsonNet MacAssist
Follow the steps below to install EpsonNet MacAssist.
1. Insert the Software CD-ROM in the CD-ROM drive.
2. Mac OS 8.6 to 9.x:
Double-click the EPSON icon in the EPSON folder.
Mac OS X:
Double-click the Mac OS X folder in the EPSON folder, then
double-click the EPSON icon.
Setting Up the Network Image Express Card 17
2
2
2
2
Page 18

Note:
When the authentication dialog box to assign administrator
privileges appears, enter the user name and password, and then click
OK.
3. The EPSON Installation Program starts automatically. Select
Install EpsonNet MacAssist, and then click .
4. Follow the on-screen instructions to install the software.
5. Restart your computer.
Mac OS 8.6 to 9.x:
The MacAssistxxx folder, which contains the EpsonNet
MacAssist icon and the EpsonNet MacAssist EasySetup
icon, is created in the Applications folder.
Mac OS X:
The EpsonNet MacAssist OSX x.xx folder, which contains the
EpsonNet MacAssist for OS X icon and the
EpsonNetMacAssistOSXEasySet icon, is created in the
Applications folder.
Setting an IP Address Using EpsonNet
WinAssist
This section explains how to use EpsonNet WinAssist to configure
the Network Image Express Card.
Note:
❏ Check that the necessary protocols are installed on the computer.
❏ Make sure the Network Image Express Card and the computer are
connected to the same network.
❏ Refer to the online help to learn about other functions of EpsonNet
WinAssist. To access the online help, click the Help button.
18 Setting Up the Network Image Express Card
Page 19

❏ The sample screens are taken from Windows 98 using EpsonNet
WinAssist. Other systems may differ in appearance, but the
instructions are the same, except as noted.
2
1. Turn on the scanner with the Network Image Express Card.
2. Click Start, point to Programs or All Programs
(Windows XP), and then select EpsonNet WinAssist V4. Click
EpsonNet WinAssist to start it.
3. Select the scanner you want to configure, and then click
Configuration or double-click the scanner icon.
Note:
❏ If the same scanner model name appears in the list, you can
identify the scanners by checking their MAC address, which are
found on the Network Image Express Card.
English
2
2
2
2
2
2
2
❏ You can search scanners in other segments by using Search
Options from the Tool menu. See the online help for more
information.
❏ The Launch Browser button can be used only if a valid IP
address is assigned to the scanner.
❏ The default IP address “192.168.192.168” cannot be used on
the network. Be sure to assign a valid IP address manually or
by using the DHCP server.
Setting Up the Network Image Express Card 19
2
2
2
Page 20

4. Click the TCP/IP tab.
Note:
Refer to the online help to learn about other functions of EpsonNet
WinAssist. To access the online help, click the Help button.
5. Select a method to specify the IP address. When you select
Automatic, DHCP becomes available and assigns an IP
address automatically. If you want to set the IP address
manually, select Manual.
Note:
❏ The network administrator must confirm any changes made to
the IP address settings.
20 Setting Up the Network Image Express Card
Page 21

❏ When Automatic is selected, DHCP becomes available. To use
the DHCP server, make sure it is installed on your computer
and correctly configured. See your operating system’s online
help for detailed instructions.
❏ We recommend that you select Manual and enter an IP
address. This is because if you select Automatic, the IP
address of the Network Image Express Card changes every time
you turn on the scanner so that you need to change the EPSON
Scan setting accordingly.
2
English
2
6. If you want to automatically get a private address between
169.254.1.1 and 169.254.254.254 when an IP address cannot be
obtained by the DHCP server, select the Set using Automatic
Private IP Addressing (APIPA) check box.
7. When setting the IP address using the ping command, select
the Set using PING check box. Do not select it when setting
the IP address with EpsonNet
WinAssist/MacAssist/WebAssist; this prevents any
unexpected changes of the IP address.
Note:
Be sure not to select the check box when not using ping; this prevents
an unexpected change of the IP address.
8. To assign the IP address manually, enter the IP address, the
subnet mask, and the default gateway. Be sure the IP address
does not conflict with any other device on the network.
Note:
If there is a server or a router functioning as a gateway, enter the IP
address of the server or the router for the gateway address. If there
is no gateway, leave the default values there.
2
2
2
2
2
2
2
2
9. Click the Extended Settings button if you want to change
any extended settings, such as Host Name and Domain Name
Setting; otherwise, go to step 13.
Setting Up the Network Image Express Card 21
2
Page 22

Note:
The DNS Server Address Settings and the Universal Plug and Play
Settings are not supported.
10. Select the Acquire host name and domain name
automatically check box if you want to get the host name
and the domain name using the DHCP server.
If you want to enter manually, enter the host name and the
domain name in the text boxes.
11. Select the Register the network interface’s address to DNS
server check box if you want to register the host name and
domain name on the DNS server through the DHCP server
that supports Dynamic DNS.
12. After changing the settings, click OK.
22 Setting Up the Network Image Express Card
Page 23

13. In the TCP/IP dialog box, click OK. The Password dialog box
appears.
14. Enter your password (up to 20 characters) and then click OK
to save the settings. If you are entering a password for the first
time, click Change and then set the password. See “About
password” on page 23 for more information.
2
English
Follow the on-screen instructions. After the update is
complete, refresh the configuration by selecting Refresh from
the View menu.
Caution:
Since it takes 2 or 3 minutes to send new settings to the
c
Network Image Express Card, wait until an on-screen
message appears to indicate that you can turn off your
scanner. Do not turn off the scanner while the red status light
and green data light are on.
About password
A password is required to configure the Network Image Express
Card. When you click OK in the setting dialog box or click the
Return to Default button, the Password dialog box appears.
1. To set a password or to change the current password, click
Change. The Administrator password dialog box appears.
2. When you set a password for the first time, leave the Old
Password box blank, and enter a password in the New
Password box and the New Password (again) box (up to 20
characters). Then click OK. Passwords are case sensitive.
Note:
❏ The same password is used for EpsonNet WinAssist,
MacAssist, and WebAssist.
2
2
2
2
2
2
2
2
2
2
Setting Up the Network Image Express Card 23
Page 24

❏ Since the new password becomes effective after the data is sent
to the Network Image Express Card, enter the old password
immediately after changing the password.
❏ If you forget your password, you need to initialize the Network
Image Express Card. See “Restoring Factory Default Settings”
on page 48 for instructions.
Using EpsonNet WinAssist EasySetup
You can also use EpsonNet WinAssist EasySetup to easily
configure the Network Image Express Card ready for TCP/IP
within a short time.
Note:
❏ The computer to use for the following steps must be in the same
segment as the Network Image Express Card.
❏ When you assign an IP address manually, we recommend you use
EpsonNet WinAssist to set the subnet mask and the default gateway.
❏ If EpsonNet WinAssist is installed on your computer, you can also
run EpsonNet WinAssist EasySetup from the Start menu. Click
Start, point to Programs or All Programs (Windows XP), and
then select EpsonNet WinAssist V4. Click EpsonNet
EasySetup to start it. Then go to step 5 below.
Follow the steps below to configure the Network Image Express
Card using EpsonNet WinAssist EasySetup.
1. Turn on the scanner with the Network Image Express Card.
2. Insert the Software CD-ROM in the CD-ROM drive.
3. The EPSON Installation Program starts automatically.
If the Installer dialog box does not appear, double-click
SETUP.EXE on the CD-ROM.
24 Setting Up the Network Image Express Card
Page 25

4. Select EpsonNet WinAssist Easy Setup, and then click .
5. In the EpsonNet WinAssist EasySetup dialog box, click Next.
6. Read the License Agreement and then click Next.
7. Select the target scanner and then click Next.
Note:
If the same scanner model name appears on the list, you can identify
the scanners by checking their MAC addresses, which are found on
the Network Image Express Card.
2
English
2
2
2
2
2
2
Setting Up the Network Image Express Card 25
2
2
2
2
Page 26

8. Select Automatic or Manual. If you select Automatic,
DHCP becomes available and assigns an IP address
automatically. If you select Manual, enter the IP address.
Click Next.
Note:
❏ The default IP address “192.168.192.168” cannot be used on
the network. Be sure to assign a valid IP address manually or
by using the DHCP server.
❏ We recommend that you select Manual and enter an IP
address. This is because if you select Automatic, the IP
address of the Network Image Express Card changes every time
you turn on the scanner so that you need to change the EPSON
Scan setting accordingly.
❏ To use the DHCP server, make sure it is installed on your
computer and configured correctly. See your operating system’s
online help for detailed instructions.
26 Setting Up the Network Image Express Card
Page 27

9. Check the settings and then click Send.
If you have set a password, the Password dialog box appears.
Enter your password (up to 20 characters) and then click OK.
Follow the on-screen instructions.
Caution:
It takes two or three minutes to send new settings to the
c
Network Image Express Card. Do not turn off your scanner
until an on-screen message prompts you to do so.
Setting an IP Address Using EpsonNet
2
English
2
2
MacAssist
This section explains how to use EpsonNet MacAssist to configure
the Network Image Express Card.
Note:
❏ Make sure the scanner and the computer is connected to the same
network.
❏ Make sure that Ethernet is selected for Connect via in the
TCP/IP control panel.
1. Turn on the scanner with the Network Image Express Card.
2. Mac OS 8.6 to 9.x:
Double-click the EpsonNet MacAssist icon in the
MacAssistxxx folder.
Mac OS X:
Double-click the EpsonNet MacAssist for OSX icon in the
EpsonNet MacAssistOS X x.xx folder.
2
2
2
2
2
2
2
2
Setting Up the Network Image Express Card 27
Page 28

3. Select the scanner you want to configure from the list and click
Configure.
Note:
❏ If the same scanner model name appears in the list, you can
identify the scanners by checking their MAC addresses on the
Network Image Express Card.
❏ You can search scanners in other zones just like computers by
changing the zone setting. See the online help for more
information.
❏ The Launch Browser button can be used only if a valid IP
address is assigned to the scanner.
❏ The default IP address “192.168.192.168” cannot be used on
the network. Be sure to assign a valid IP address manually or
by using the DHCP server.
4. Click the TCP/IP tab.
28 Setting Up the Network Image Express Card
Page 29

Note:
Refer to the online help to learn about other functions of EpsonNet
WinAssist. To access the online help, click the help button.
2
English
2
2
2
2
5. Select a method to specify the IP address. When you select
Automatic, DHCP becomes available and assigns an IP
address automatically. If you want to set the IP address
manually, select Manual.
Note:
❏ The network administrator must confirm any changes made to
the IP address settings.
❏ When Automatic is selected, DHCP becomes available. To use
the DHCP server, make sure it is installed on your computer
and correctly configured. See your operating system’s online
help for detailed instructions.
❏ We recommend that you select Manual and enter an IP
address. This is because if you select Automatic, the IP
address of the Network Image Express Card changes every time
you turn on the scanner so that you need to change the EPSON
Scan setting accordingly.
Setting Up the Network Image Express Card 29
2
2
2
2
2
2
Page 30

6. When setting the IP address using the ping command, select
the Set using PING check box. Do not select it when setting
the IP address with EpsonNet
WinAssist/MacAssist/WebAssist; this prevents any
unexpected changes of the IP address.
Note:
Be sure not to select the check box when not using ping; this prevents
an unexpected change of the IP address.
7. If you want to automatically get a private address between
169.254.1.1 and 169.254.254.254 when an IP address cannot be
obtained by the DHCP server, select the Set using Automatic
Private IP Addressing (APIPA) check box.
8. To assign the IP address manually, enter the IP address, the
subnet mask, and the default gateway. Be sure the IP address
does not conflict with any other device on the network.
Note:
If there is a server or a router functioning as a gateway, enter the IP
address of the server or the router for the gateway address. If there
is no gateway, leave the default values there.
9. Click the Extended Settings button if you want to change
any extended settings, such as Host Name and Domain Name
Setting; otherwise, go to step 13.
30 Setting Up the Network Image Express Card
Page 31

Note:
The DNS Server Address Settings and the Universal Plug and Play
Settings are not supported.
2
English
2
2
2
2
2
10. Select the Acquire host name and domain name
automatically check box if you want to get the host name
and the domain name using the DHCP server.
If you want to enter manually, enter the host name and the
domain name in the text boxes.
11. Select the Register the network interface’s address to DNS
server check box if you want to register the host name and
domain name on the DNS server through the DHCP server
that supports Dynamic DNS.
12. After changing the settings, click OK.
13. In the TCP/IP dialog box, click OK. The Password dialog box
appears.
Setting Up the Network Image Express Card 31
2
2
2
2
2
Page 32

14. Enter your password (up to 20 characters) and then click OK
to save the settings. If you are entering a password for the first
time, click Change Password and then set the password. For
more information on passwords, see “About Password” on
page 32.
Follow the on-screen instructions. After the update is
complete, refresh the configuration by selecting Refresh from
the Device menu.
Caution:
Since it takes 2 or 3 minutes to send new settings to the
c
Network Image Express Card, wait until an on-screen
message appears to indicate that you can turn off your
scanner. Do not turn off the scanner while the red status light
and green data light are on.
About Password
A password is required to configure the Network Image Express
Card. When you click OK in the setting dialog box or click Return
to Default, the Password dialog box appears.
1. To set the password or to change the current password, click
Change Password. The Change Password dialog box
appears.
2. When you set a password for the first time, leave the Current
Password box blank, and enter a password in the New
Password box and the New Password (again) box (up to 20
characters). Then click OK. Passwords are case sensitive.
Note:
❏ The same password is used for EpsonNet WinAssist,
MacAssist, and WebAssist.
32 Setting Up the Network Image Express Card
Page 33

❏ Since the new password takes effect after the data is sent to the
Network Image Express Card, enter the old password
immediately after changing the password.
2
❏ If you forget your password, you need to initialize the Network
Image Express Card. See “Restoring Factory Default Settings”
on page 48 for instructions.
Using EpsonNet MacAssist EasySetup
You can also use EpsonNet MacAssist EasySetup to easily
configure the Network Image Express Card ready for TCP/IP
within a short time.
Note:
❏ The computer to use for the following steps must be in the same
segment as the Network Image Express Card.
❏ When you assign an IP address manually, we recommend you use
EpsonNet MacAssist to set the subnet mask and the default
gateway.
❏ If EpsonNet MacAssist is installed on your computer, you can also
run EpsonNet MacAssist EasySetup from the EpsonNet MacAssist
folder. Just double-click the EpsonNet MacAssist EasySetup
icon (Mac OS 8.6 to 9.x) or the
EpsonNetMacAssistOSXEasySet icon (Mac OS X) and go to
step 5 below.
English
2
2
2
2
2
2
2
Follow the steps below to configure the Network Image Express
Card using EpsonNet MacAssist EasySetup.
1. Turn on the scanner with the Network Image Express Card.
2. Insert the Software CD-ROM in the CD-ROM drive.
3. Mac OS 8.6 to 9.x:
Double-click the EPSON icon in the EPSON folder.
Setting Up the Network Image Express Card 33
2
2
2
Page 34

Mac OS X:
Double-click the Mac OS X folder in the EPSON folder, then
double-click the EPSON icon.
Note:
When the authentication dialog box to assign administrator
privileges appears, enter the user name and password, and then click
OK.
4. The EPSON Installation Program starts automatically. Select
EpsonNet MacAssist Easy Setup, and then click .
5. Click Next.
6. Read the License Agreement and then click Next.
7. Select the target scanner and then click Next.
Note:
If the same scanner model name appears on the list, you can identify
the scanners by checking their MAC addresses, which are found on
the Network Image Express Card.
34 Setting Up the Network Image Express Card
Page 35

8. Select a method for specifying the IP address. If you select
Automatic, DHCP becomes available and assigns an IP
address automatically. If you select Manual, enter the IP
address. Click Next.
2
English
2
2
2
2
Note:
❏ The default IP address “192.168.192.168” cannot be used on
the network. Be sure to assign a valid IP address manually or
by using the DHCP server.
❏ We recommend that you select Manual and enter an IP
address. This is because if you select Automatic, the IP
address of the Network Image Express Card changes every time
you turn on the scanner so that you need to change the EPSON
Scan setting accordingly.
❏ To use the DHCP server, make sure it is installed on your
computer and configured correctly. See your operating system’s
online help for detailed instructions.
Setting Up the Network Image Express Card 35
2
2
2
2
2
2
Page 36

9. Check the settings and then click Send.
If you have set a password, the Password dialog box appears.
Enter your password (up to 20 characters) and then click OK.
Follow the on-screen instructions.
Caution:
It takes two or three minutes to send new settings to the
c
Network Image Express Card. Do not turn off your printer
until an on-screen message prompts you to do so.
Setting an IP Address Using EpsonNet
WebAssist
EpsonNet WebAssist is a web-based configuration application
which allows you to configure the Network Image Express Card
for TCP/IP. You can use EpsonNet WebAssist to change the
settings and get information about the Network Image Express
Card.
Supported Web browser
❏ Microsoft Internet Explorer version 4.0 or later
❏ Netscape Communicator version 4.0 or later
❏ Netscape Navigator version 3.02 or later
Note for Windows NT 4.0 users:
If you have not yet upgraded with Windows NT Service Pack 3, install
the Windows NT Service Pack before installing Microsoft Internet
Explorer.
36 Setting Up the Network Image Express Card
Page 37

About Web browser setting
When running EpsonNet WebAssist, be sure not to use a proxy
server to access the Internet. If the Access the Internet using a
proxy server check box is selected, you cannot use EpsonNet
WebAssist. Use the following steps to clear the Access the
Internet using a proxy server check box.
1. Right-click the Internet Explorer icon on the desktop, and
then select Properties.
2. Click the Connection tab.
3. Clear the Access the Internet using a proxy server check
box.
Using EpsonNet WebAssist
Note:
❏ A web browser must be installed on your computer.
❏ There are some restrictions on the characters you can use depending
on your browser. For details, see your browser or OS
documentation.
2
English
2
2
2
2
2
2
❏ TCP/IP must be correctly set up for the client PC and the Network
Image Express Card.
❏ The valid IP address needs to be set in advance. (The valid IP address
means that communication with the client PC can be performed at
that address.)
Setting Up the Network Image Express Card 37
2
2
2
2
Page 38

1. Turn on the scanner with the Network Image Express Card.
2. Run EpsonNet WebAssist using one of the following ways:
❏ Run EpsonNet WinAssist or EpsonNet MacAssist. Select
the scanner you want to configure from the list and then
click the Launch Browser button.
❏ Open your browser, and then type in the IP address of the
Network Image Express Card directly.
http://IP address of Network Image Express Card/
Example: http://192.168.100.201/
3. The following screen appears.
38 Setting Up the Network Image Express Card
Page 39

4. Click TCP/IP under Network on the Configuration menu. The
TCP/IP setting screen appears.
2
English
2
2
2
2
2
5. Select the “Get IP Address” method. When you select Auto,
DHCP becomes available and assigns an IP address
automatically. If you want to set the IP address manually,
select Manual.
Note:
❏ The network administrator must confirm any changes made to
the IP address settings.
❏ When Auto is selected, DHCP becomes available. To use the
DHCP server, make sure it is installed on your computer and
correctly configured. See your operating system’s online help
for detailed instructions.
Setting Up the Network Image Express Card 39
2
2
2
2
2
Page 40

❏ If Set using Automatic Private IP Addressing (APIPA)
is enabled, a private IP address is automatically assigned to the
Network Image Express Card even when there are no DHCP
servers on your system or your network.
❏ We recommend that you select Manual and enter an IP
address. This is because if you select Auto, the IP address of the
Network Image Express Card changes every time you turn on
the scanner so that you need to change the EPSON Scan setting
accordingly.
6. To assign the IP address manually, enter the IP address, the
subnet mask, and the default gateway. Be sure the IP address
does not conflict with any other device on the network.
Note:
If there is a server or a router functioning as a gateway, enter the IP
address of the server or the router for the gateway address. If there
is no gateway, leave the default values there.
7. If you want to get a private address between 169.254.1.1 and
169.254.254.254 automatically when an IP address cannot be
obtained by the DHCP server, select Enable for Set using
Automatic Private IP Addressing (APIPA).
8. When setting the IP address using the ping command, select
Enable for Set using PING. Select Disable when setting the
IP address with EpsonNet WinAssist/MacAssist/WebAssist;
this prevents any unexpected change of the IP address.
Note:
Be sure to select Disable when not using ping; this prevents an
unexpected change of the IP address.
9. Select Manual or DHCP for Setting Method. You can select
DHCP only if you have selected Auto for the Get IP Address
method in step 5.
10. Enter the host name and the domain name.
40 Setting Up the Network Image Express Card
Page 41

11. Select Enable or Disable for Request DNS dynamic
updates via DHCP server.
12. Click SUBMIT and enter the password to update the settings.
The same password is required for EpsonNet WinAssist,
MacAssist, and WebAssist.
Note:
If you have set the Administrator Name in the Administrator screen,
enter the administrator name for the user name.
2
English
2
13. If the message “Configuration change is complete!” appears
on your screen, the update is complete. Do not exit the Web
browser and do not send a job to the Network Image Express
Card until this message appears. Follow the on-screen
instructions to reset the Network Image Express Card.
Note:
❏ Since the new IP address becomes available after the Network Image
Express Card is reset, you need to restart EpsonNet WebAssist by
entering the new IP address.
❏ Only changes on the page where you press the SUBMIT button take
effect.
❏ Refer to the online help to learn about other functions of EpsonNet
WebAssist. To access the online help, click Help on the Index.
Setting an IP Address Using the arp Command
For Windows XP, Me, 98, 2000, and NT 4.0, you can use the arp
and ping commands to set the IP address of the Network Image
Express Card. Make sure the TCP/IP protocol is correctly
installed on the Windows system. The Network Image Express
Card and the host must be in the same segment.
2
2
2
2
2
2
2
2
2
Setting Up the Network Image Express Card 41
Page 42

Before you start, obtain the following information:
❏ A valid IP address for the Network Image Express Card. Ask
your network administrator for an IP address which will not
cause conflict with any other device on the network. If you
are the network administrator, choose an address within the
subnet which will not cause conflict with any other device.
The MAC (Ethernet hardware) address of the Network Image
❏
Express Card. This is a unique number for your Network Image
Express Card which is different from the hardware serial
number of the Network Image Express Card. You can find out
the MAC address on the Network Image Express Card.
To set the new IP address, use the arp command with the -s flag
(create ARP entry).
Note:
The following example assumes the MAC address is 00:00:48:93:00:00
(hexadecimal) and IP address is 192.135.223.6 (decimal). In real cases,
substitute your values for these addresses when entering the commands.
Follow the steps below to assign an IP address using the arp
command:
1. From the command line, type:
Example: arp -s 192.135.223.6 00-00-48-93-00-00
2. Check the new IP address by “pinging” it:
Example: ping 192.135.223.6
3. The Network Image Express Card should now respond to the
ping. If it does not, you may have incorrectly typed the MAC
address or the IP address in the arp -s command. Check and
try again. If the problem still continues, re-connect the
Network Image Express Card and start over again.
Caution:
Do not turn off the scanner while the red status light and green
c
data light are on; otherwise damage may occur.
42 Setting Up the Network Image Express Card
Page 43

Chapter 3
Scanning an Image
Preparing for Scanning at the Client PC . . . . . . . . . . . . . . . . . . . . . .44
Scanning an Image . . . . . . . . . . . . . . . . . . . . . . . . . . . . . . . . . . . . . . . .44
3
English
3
3
3
3
3
3
Scanning an Image 43
3
3
3
3
Page 44

Preparing for Scanning at the Client PC
After setting up the Network Image Express Card, install EPSON
Scan on your client PC. Specify the IP address of the Network
Image Express Card using EPSON Scan, before the clients use the
scanner with the card to scan documents in the networked
environment. Refer to the user’s guide of the scanner to learn how
to install the software and specify the IP address.
Use EPSON Scan 1.1 or later shipped with your scanner. If you
have EPSON TWAIN Pro Network, EPSON TWAIN HS
Network, or EPSON Scan 1.0, contact the dealer in your country
to get the latest version of the software.
Note:
If you are using an older version of EPSON Scan, you need to uninstall
it before installing the latest version. Refer to the user’s guide of the
scanner to learn how to uninstall the software.
Scanning an Image
Network scanning requires that all of the devices (the scanner
with the Network Image Express Card and the client PC) be
turned on, and the EPSON Scan be running.
To scan a document, click the Scan button in the EPSON Scan
dialog box. Refer to the user’s guide of the scanner to learn how
to use EPSON Scan.
44 Scanning an Image
Page 45

Chapter 4
Troubleshooting
Problems and Solutions . . . . . . . . . . . . . . . . . . . . . . . . . . . . . . . . . . . .46
Restoring Factory Default Settings . . . . . . . . . . . . . . . . . . . . . . . . . . .48
Setting the Interface Mode . . . . . . . . . . . . . . . . . . . . . . . . . . . . . . . . . .49
Uninstalling Software . . . . . . . . . . . . . . . . . . . . . . . . . . . . . . . . . . . . . .51
Uninstalling EpsonNet WinAssist . . . . . . . . . . . . . . . . . . . . . . .51
Uninstalling EpsonNet MacAssist . . . . . . . . . . . . . . . . . . . . . . .52
4
English
4
4
4
4
4
4
Troubleshooting 45
4
4
4
4
Page 46

Problems and Solutions
This section provides solutions to problems you may have.
Refer to the “Troubleshooting” section in the user’s guide of the
scanner if you have problems with the software.
The online help also provides versatile tips and other information
helpful for problem-solving.
If you cannot solve a problem after reading and following the
information in this chapter, contact your dealer or a qualified
customer support person for assistance.
Unable to start EpsonNet WinAssist.
Cause What to do
You have added or deleted
protocols after installing
EpsonNet WinAssist.
Uninstall EpsonNe t WinAssist and then
reinstall it. See “Uninstalling Software”
on page 51 and “Installing EpsonNet
WinAssist/MacAssist” on page 16.
The message “EpsonNet WinAssist cannot be used because no
network is installed.” appears when you start EpsonNet
WinAssist.
Cause What to do
The TCP/IP protocol is not
installed on the computer.
TCP/IP is installed on the
computer, but its IP address is
not set correctly.
Install the TCP/IP protocol on your
computer.
Set the IP address for the computer
correctly.
46 Troubleshooting
Page 47

The red status light is on while the data light is off.
Cause What to do
4
A fatal error occurs, or the
Network Image Express Card
is malfunctioning.
The scanner does not scan.
Cause What to do
The scanner is off. Make sure the scanner is turned on.
The Network Image Express
Card is not connected
properly.
The scanner is not supported
by the Network Image Express
Card.
When an error occurs, turn off the
scanner and then turn it back on again.
If this does not correct the problem,
consult your dealer.
Refer to the user’s guide of the scanner
to learn how to turn on the scanner.
Turn off the scanner and make sure the
Network Image Express Card is
properly installed in your scanner and
connected to the network. See
“Connecting the Network Image
Express Card on a Network” on page 14
for details.
Make sure the supported scanner is
connected to the Network Image
Express Card. See “Network Image
Express Card” on page 54 for more
details.
English
4
4
4
4
4
4
4
The interface mode of the
Network Image Express Card
is not appropriate for your
network environment.
The software version is not
proper.
Check the interface mode of the HUB,
and change the jumper setting of the
Network Image Express Card. See
“Setting the Interface Mode” on page
49.
Make sure you install EPSON Scan 1.1
or later on the client PC.
Troubleshooting 47
4
4
4
Page 48

The scanner does not appear in the list of EpsonNet WinAssist
or MacAssist.
Cause What to do
You may be using the older
version of EpsonNet
WinAssist or MacAssist.
Use EpsonNet WinAssist or MacAssist
Version 4.1 or higher that is included on
the Soft ware CD-ROM shippe d with the
Network Image Express Card.
Restoring Factory Default Settings
If required, you can return the EPSON Network Image Express
Card to its factory default settings. When you restore the default
settings, all your current settings will be lost. You will need to reassign the IP address as described in Chapter 2, “Setting Up the
Network Image Express Card.”
Note:
You cannot use the default IP address “192.168.192.168” on the
network. You must assign a valid IP address to use it on your network.
The defaults of the Network Image Express Card are as follows:
TCP/IP:
Get IP address: Manual
IP Address: 192.168.192.168
Subnet Mask: 255.255.255.0
Default Gateway: 255.255.255.255
Automatic Private IP Addressing: OFF
Set by PING: ON
Dynamic DNS request: OFF
Use Host name acquired from DHCP: OFF
48 Troubleshooting
Page 49

1. Make sure that the scanner with the Network Image Express
Card is turned off.
2. While holding down the Reset button, turn on the scanner.
3. Keep holding down the Reset button for 10 seconds or more
until the red status light and green data light turn on. The
factory default settings are restored.
Caution:
Do not turn off the scanner while the red status light and green
c
data light are on; otherwise the scanner may become damaged.
4
English
4
4
Setting the Interface Mode
Jumpers are located on the board of Network Image Express Card.
By default, the Network Image Express Card automatically
selects the interface mode.
If you want to manually set the interface mode, follow the steps
below.
1. Turn off your scanner.
2. Pull out the Network Image Express Card from the scanner’s
interface slot, and place it on an insulator such as a sheet.
3. Use the following table to change the jumper settings.
4
4
4
4
4
4
4
4
Troubleshooting 49
Page 50

Note:
Do not change the jumper other than the following table.
JP3
JP2
JP2 JP3 JP4 JP5 Mode
Open Open Open Open Auto-negotiation (10Half,
Close Open Open Open 100Base-TX Full Duplex
Close Open Open Close 100Base-TX Half Duplex
Close Open Close Open 10Base-T Full Duplex
Close Open Close Close 10Base-T Half Duplex
JP5
JP4
10Full, 100Half, 100Full)
Factory default setting
For example, if you want to set to 10Base-T Full Duplex, pull
out the jumper of JP2 and JP4, and put it over the two pins.
JP2
50 Troubleshooting
JP4
Page 51

4. After changing the settings, make sure the scanner is turned
off, and then insert the Network Image Express Card into the
scanner’s interface slot.
4
5. Turn on your scanner.
Uninstalling Software
Uninstalling EpsonNet WinAssist
Windows Me/98/2000/NT 4.0
1. Click Start, point to Settings, and then select Control Panel.
2. Double-click the Add/Remove Programs icon.
3. Select the utility you want to uninstall, and then click the
Add/Remove button (Windows Me/98/NT 4.0) or the
Change/Remove button (Windows 2000).
4. Follow the on-screen instructions to complete uninstallation.
Windows XP
1. Click Start, click Control Panel, and then click Add or
Remove Programs.
English
4
4
4
4
4
4
4
2. Click the Change or Remove Programs icon.
3. Select the utility you want to uninstall, and then click the
Change/Remove button.
4. Follow the on-screen instructions to complete uninstallation.
Troubleshooting 51
4
4
4
Page 52

Uninstalling EpsonNet MacAssist
1. Insert the Software CD-ROM in the CD-ROM drive.
2. Mac OS 8.6 to 9.x:
Double-click the EpsonNet MacAssist folder.
Mac OS X:
Double-click the Mac OS X folder, and then double-click the
EpsonNet MacAssist folder.
3. Double-click the EpsonNet MacAssist Installer icon.
4. Click the Continue button.
5. In the License dialog box, read the License Agreement, and
then click the Accept button.
6. Select Uninstall from the pull down menu.
7. Click the Uninstall button.
8. Follow the on-screen instructions to complete uninstallation.
Note:
You can also uninstall EpsonNet MacAssist by dragging the
MacAssistxxx folder (Mac OS 8.6 to 9.x) or the EpsonNet MacAssist
OSX x.xx folder (Mac OS X) to the Trash.
52 Troubleshooting
Page 53

Appendix A
Technical Specifications
Network Image Express Card . . . . . . . . . . . . . . . . . . . . . . . . . . . . . . .54
Environmental . . . . . . . . . . . . . . . . . . . . . . . . . . . . . . . . . . . . . . . . . . . .55
Safety Approvals . . . . . . . . . . . . . . . . . . . . . . . . . . . . . . . . . . . . . . . . .55
A
English
A
A
A
A
A
A
Technical Specifications 53
A
A
A
A
Page 54

Network Image Express Card
Supported scanner: Expression 1680
Expression 1640XL
GT-30000
GT-15000
Supported EPSON Scan:EPSON Scan (Win) Version 1.1 or later
EPSON Scan (Mac) Version 1.1 or later
Network
Cable interface: 10Base-T/100Base-TX
Connector: RJ-45 connector
Supported protocol: TCP/IP
Rated Voltage: 5 V±5%, 24 V±10%
Current: 5 V 190 mA, 24 V 50 mA
Power: Approx. 2.2 W
Light source: Status light (Yellow)
Status light (Red)
Data light (Green)
Size: Width: 95 mm (3.8 inches)
Depth:160 mm (6.4 inches)
Height: 20.6 mm (0.824 inches)
Weight: Approx. 200 g
54 Technical Specifications
Page 55

Environmental
Temperature:
Operation 5 to 35° C (41 to 95° F)
Storage -25 to 60° C (-13 to 140° F)
Humidity:
Operation 10 to 80%, without condensation
Storage 10 to 85%, without condensation
Operating
conditions:
Ordinary office or home conditions.
Extreme dust should be avoided.
Operation under direct sunlight or near a
strong light source should be avoided.
A
English
A
A
A
Note:
Specifications are subject to change without notice.
Safety Approvals
U.S. model:
EMC
European model:
EMC Directive 89/336/EEC
Australian model:
EMC
FCC Part 15 Subpart B Class B
CSA C108.8 Class B
EN 55022 Class B
EN 55024
EN 61000-3-2
EN 61000-3-3
AS/NZS 3548 Class B
A
A
A
A
A
A
A
Technical Specifications 55
Page 56

Index
Numerics
100Base-TX, 12
10Base-T, 12
A
arp, 41
Automatic Private IP Addressing
(APIPA), 21, 30, 40
D
Default gateway, 21, 30, 40
E
Environmental specifications, 55
EpsonNet
MacAssist, 27
MacAssist EasySetup, 33
WebAssist, 36
WinAssist, 18
WinAssist EasySetup, 24
EPSON Scan, 9, 44
F
Factory default settings, 48
I
Important safety instructions, 6
Installation
EpsonNet MacAssist, 17
EpsonNet WinAssist, 16
IP address setting, 18, 27, 36, 41
N
Network, 54
Network connector, 12
P
Password for
EpsonNet MacAssist, 32
EpsonNet WinAssist, 23
R
Router, 21, 30, 40
S
Specifications
environmental, 55
Interface card, 54
Safety approvals, 55
Subnet mask, 21, 30, 40
T
TCP/IP, 20, 28, 39, 41
U
Uninstallation
EpsonNet MacAssist, 52
EpsonNet WinAssist, 51
Unpacking, 8
J
Jumper, 49
56 Index
 Loading...