

Page 1
Using the Epson B-500 Series With
Roll Media
Before You Begin
Before printing on roll media with the Epson B-500 Series printer, make sure to do the following:
• Check the environmental specifications that came with your printer, roll media feeding equipment, and roll media, and
set up the system in an area that complies with these conditions. Operate and store the printer and roll media in a
dust-free area.
• If the power source in your area is 220V, install an appropriate step-down converter and connect the B-500 Series
printer to it to protect the printer’s 120VAC power supply.
• Set up the printer and install its software as described on the Start Here sheet that came with the printer. Print a test
page on sheet paper to ensure that the printer is set up correctly before you proceed.
• Remove the duplex unit from the back of the printer using the buttons on the side of the duplex unit. See your printer
documentation for details.
• Set up your roll media feeding equipment as described in the documentation that came with it.
• Install your RIP (Raster Image Processing) software as described in the documentation that came with it.
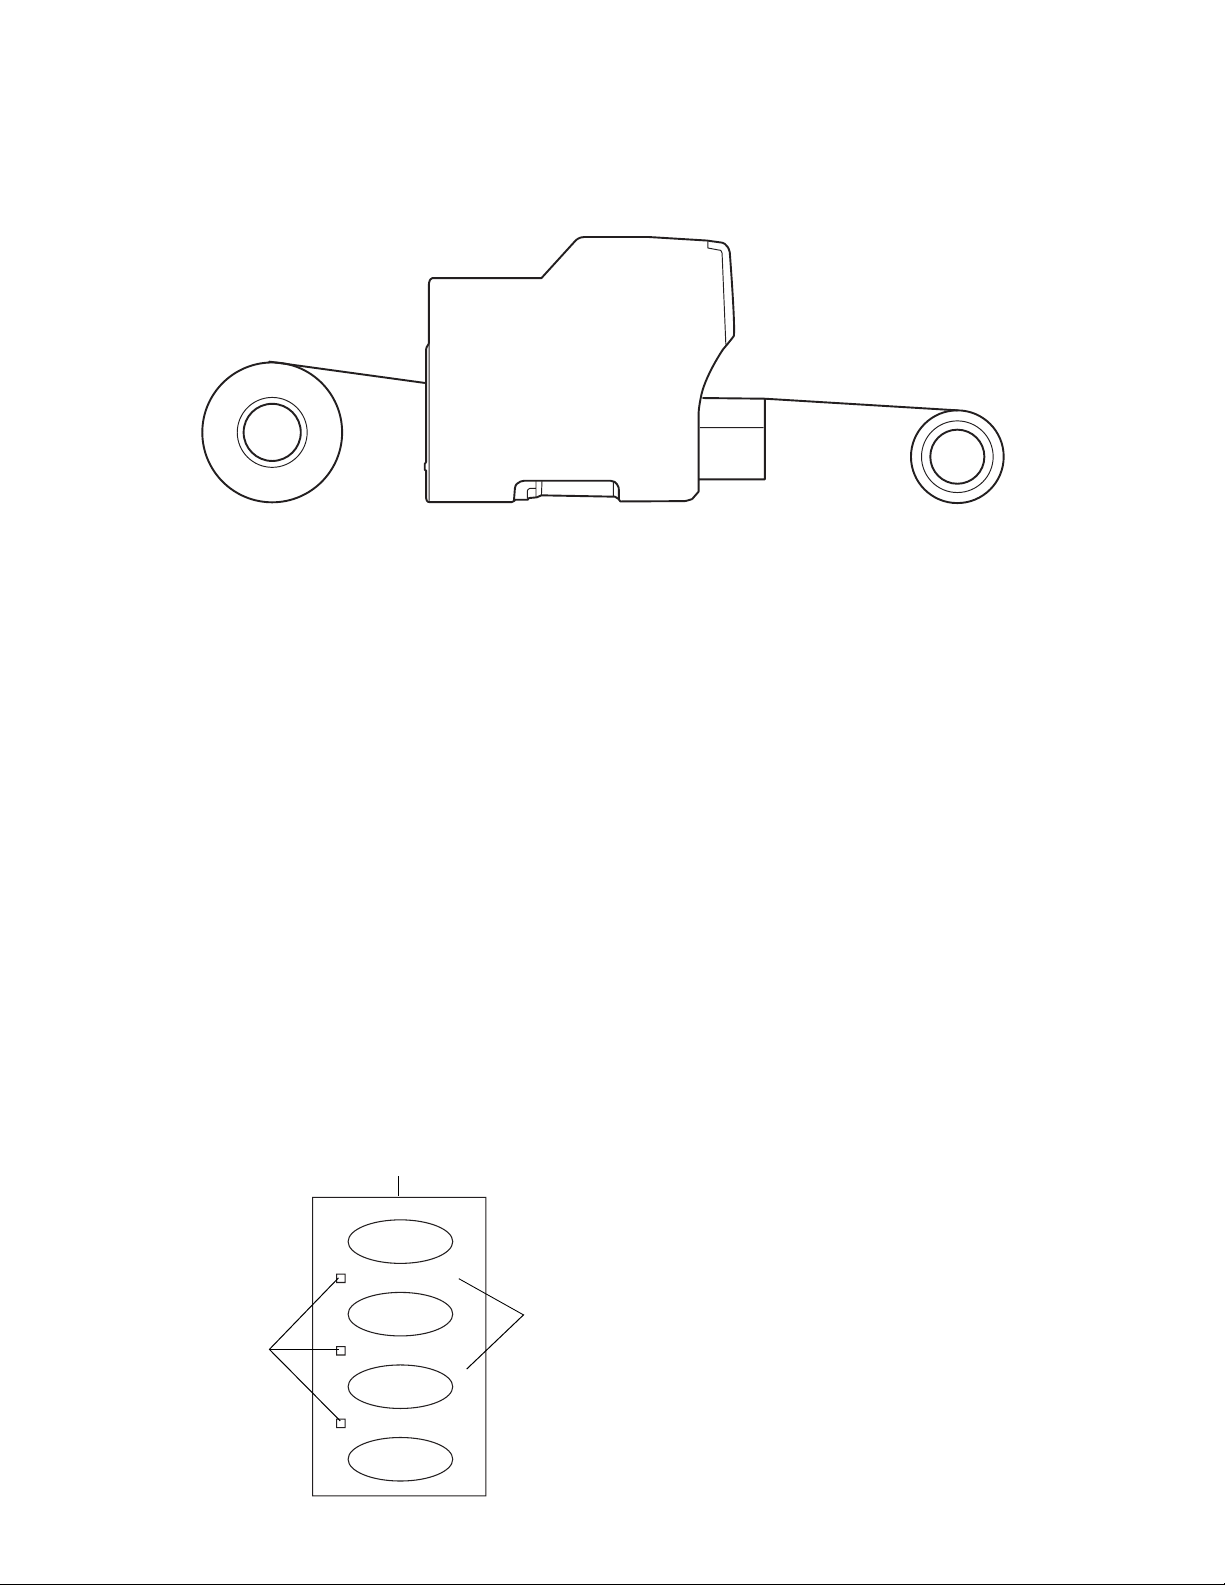
Precautions for Using Pre Die-Cut Media Rolls
Load ONLY pre die-cut media rolls with no exposed backing or liner surface, and do not remove the liner surface from the
media before loading. Also make sure the die-cut holes are on the left side of the media roll (as it loads into the printer).
Feed this end into printer
No liner surface
exposed
Die-cut holes
on left
Caution:
Do not load pre die-cut media rolls
with exposed backing or liner surface
or the labels may peel off during
printing and damage the inside of your
printer.
Page 2
Loading Roll Media
Carefully follow the instructions included with your roll media feeding equipment and your roll media to load the media
onto the equipment correctly. Then follow these steps to feed the media into the printer:
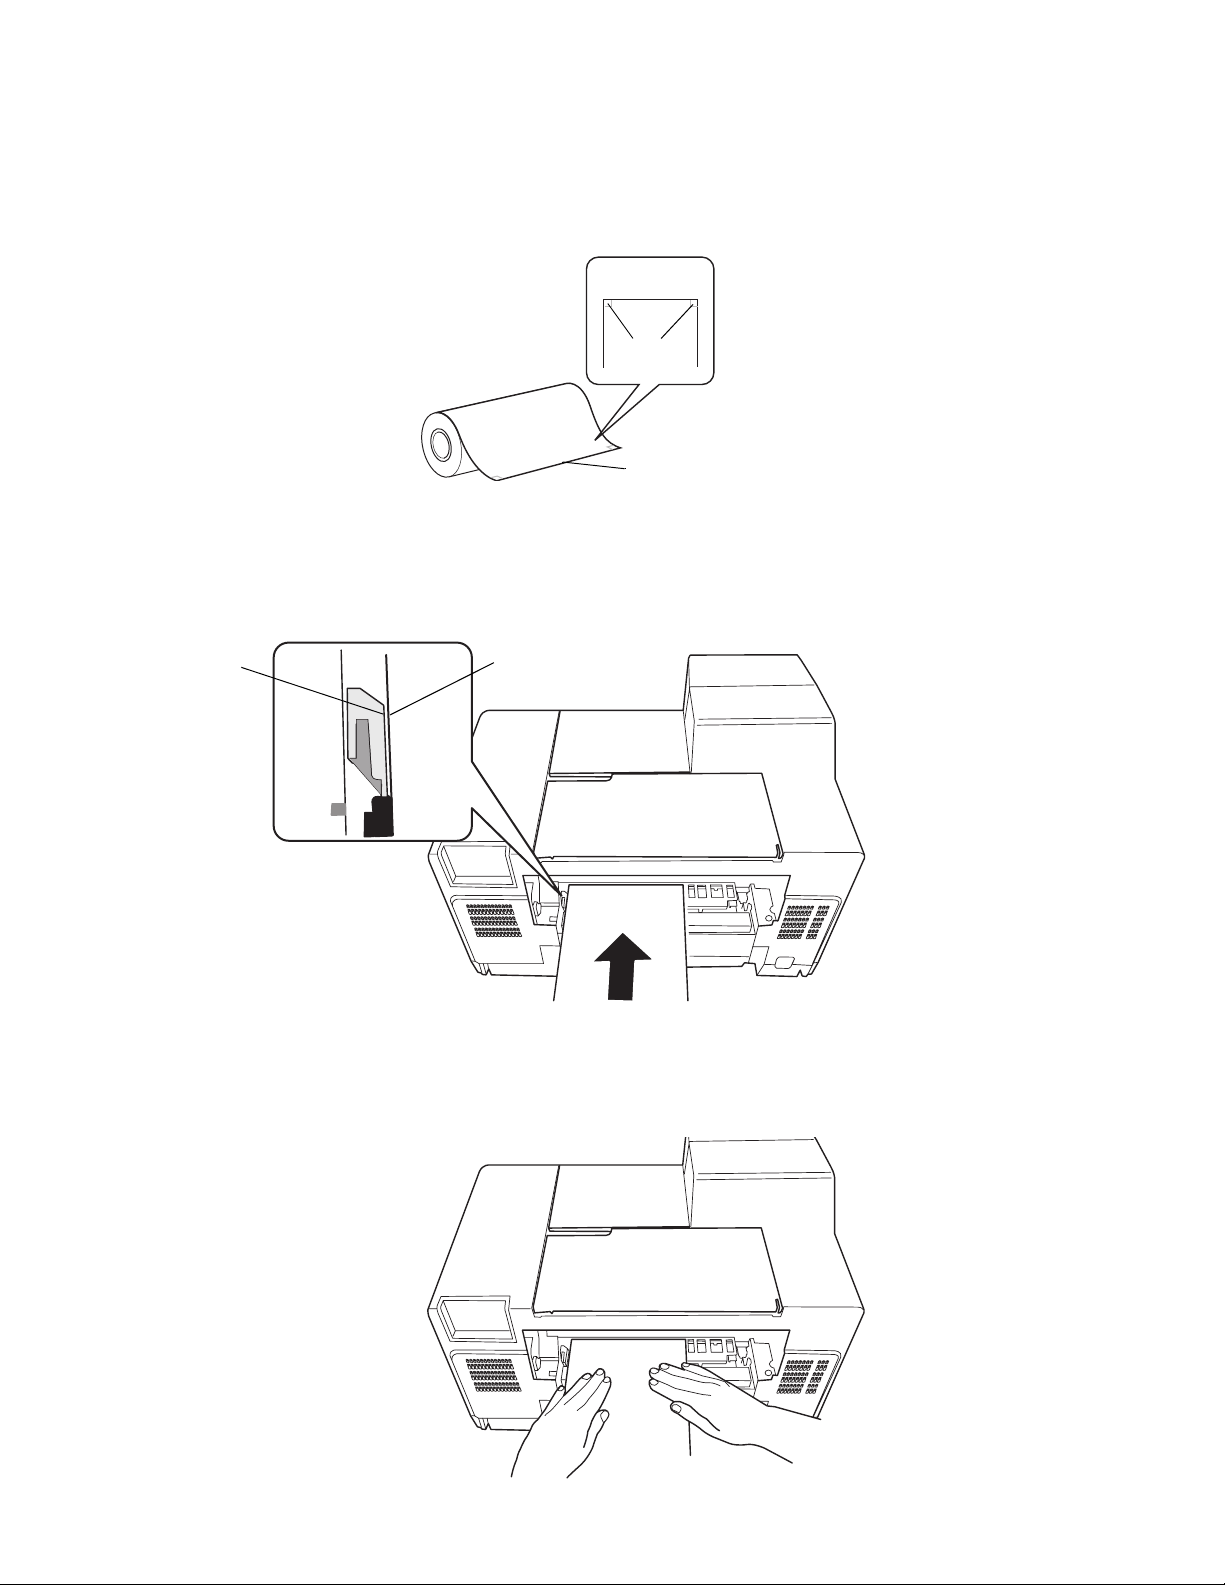
1. Cut the leading edge of the roll media squarely and evenly, so the corners are at 90° angles.
90°
Straight edge
2. Feed the end of roll media into the manual feed slot at the back of the printer. Looking down from above, align the left
edge of the media with the edge of the white plastic tab as shown below. Align the paper as close to the inside edge of
the plastic tab as possible without covering the edge (the edge of the tab should still be visible). Make sure the media
feeds straight into the slot.
Edge of white
plastic tab
Edge of paper
3. Guide the media straight into the slot until you hear the printer feed motor. Hold the media in place for 3 seconds or
until the printer feeds it in. If it does not feed, remove the media and press the u button on the printer control panel
once to clear any errors, then repeat steps 2 and 3 to align and reload the media.
Caution:
Do not move the printer
once roll media is loaded.
Hold for 3 seconds
or until media feeds
automatically
2
Page 3
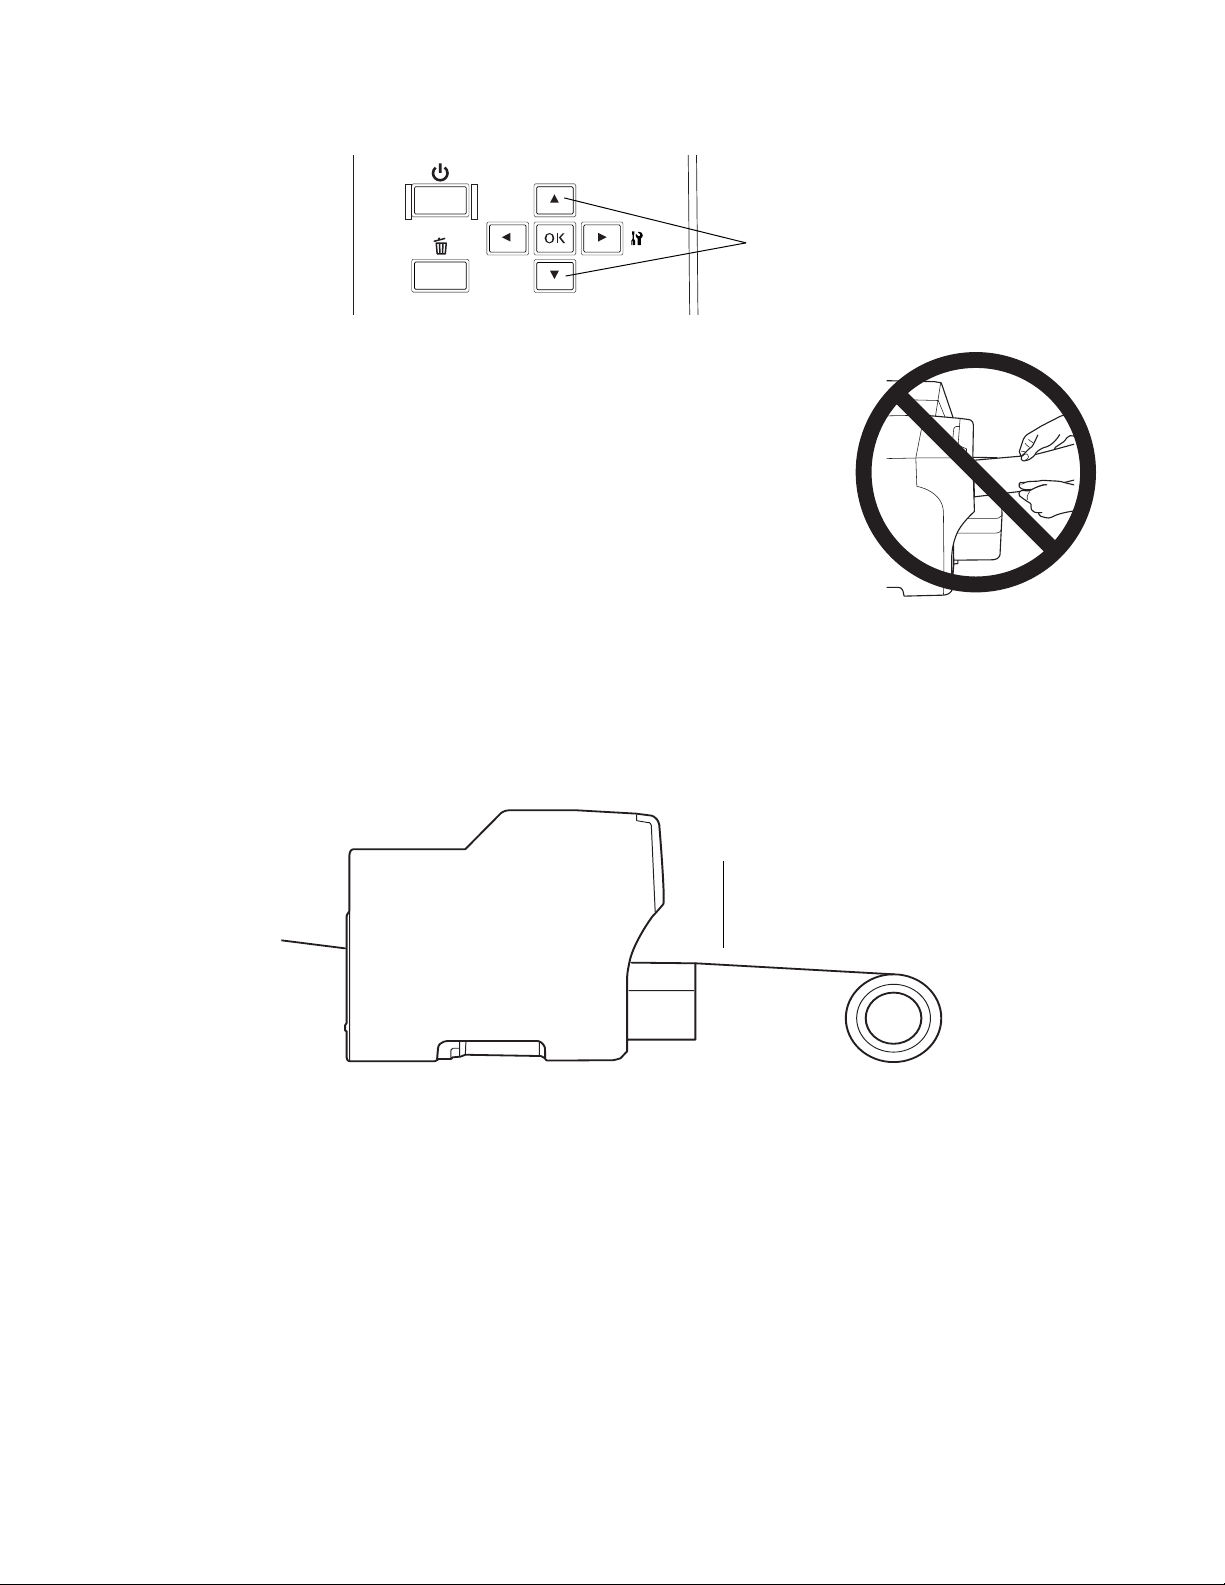
4. To feed the media all the way through the printer, hold down the d button on the printer control panel. Continue
feeding media until enough emerges for you to attach it to your take-up roller, if you are using one.
ALWAYS use
the media feed
buttons
Caution:
NEVER pull roll media through the printer with your hands or you may damage the
printer. ALWAYS use the d or u button to feed media. Check to make sure the media
is straight all the way through the “web” (paper path of the roll media feeding
system). Adjust the media position, if necessary.
5. Send your roll media print job as described in your RIP software documentation
or your printer documentation.
Note:
If you need to cancel a print job, first cancel any queued print jobs using the Windows
Print Monitor utility in your computer’s system tray. Then press the + Cancel button
on the printer’s control panel to cancel the current print job.
6. When your print job is completed, do one of the following:
• To print additional jobs on the same media, simply send the other print jobs.
• To remove the printed media, but leave the same media loaded, cut the media where it is output from the front of
the printer and remove the printed media.
Cut media where it is
output at front of printer
Hold down the d button on the printer control panel to feed more media through the printer until enough
emerges for you to attach it to your take-up roller, if you are using one.
• To remove the roll media from the input reel, cut off the printed media as shown above. Then hold down the
u button on the printer control panel until the media feeds all the way back through the printer and remove the
roll media.
Note:
The printer will not enter power-saving mode while roll media is loaded.
Roll Media Tips
• For best results, always ensure the roll media loads straight into and out of the printer. To avoid reloading roll media,
always cut off printed media where it is output from the front of the printer. You also use less media this way.
• Store unused media in a sealable plastic bag to protect it from dust and humidity.
3
Page 4

Troubleshooting
You see a LOAD CORRECT PAPER error message on the printer’s LCD screen
Your RIP software settings may be incorrect for your print job. Do the following to cancel any print jobs, fix the error,
and continue printing:
• First cancel any queued print jobs using the Windows Print Monitor utility in your computer’s system tray. Then
press the +
• In your RIP software, make sure you selected the correct media type (sheet vs. roll, continuous roll media vs.
DCH/pre die-cut) for the media you are printing on. Also check the RIP software documentation for instructions
on cancelling the print job so you can reload media and start again.
• To remove loaded roll media, cut it off on either side of the printer, if necessary. Then use the u or d button to
feed the remaining media out of the printer. Trim the leading edge of the media as shown on page 2 and carefully
reload it, making sure it loads straight into the printer. Press
• Media may not be loaded straight or is aligned incorrectly. Follow the steps above to remove and reload it.
Your printed images contain banding (horizontal or vertical lines)
• Check your roll media feeding equipment instructions to make sure the roller tension and other adjustments are set
correctly for your media.
• Clean the print head. Press r to enter the menu system, press u or d to select Maintenance, and press OK. Press
u or d to select
screen. If continuous roll media or sheet media is loaded, press
print on your roll media. (For pre die-cut media, press +
clogged, repeat these steps. If nozzles are still clogged after running two cleaning cycles, remove the roll media as
described on page 3, load letter-size paper in the printer’s rear sheet feeder, and clean again. If nozzles are still
clogged after running four cleaning cycles, contact your dealer or the equipment manufacturer as directed in their
documentation.
Cancel button on the printer’s control panel to cancel the current print job.
OK to cancel the error message.
Cleaning and press OK to begin the cleaning cycle. You see Nozzle Check on the printer’s LCD
OK, then wait 2 to 3 minutes for the nozzle check to
Cancel.) If the printout shows that nozzles are still
• When printing on continuous roll media, you can set up automatic cleaning cycles. Follow the instructions above
to enter the
Cleaning
to
2 to check and clean after two print jobs, etc. (Auto Cleaning is not recommended for printing on pre die-cut
Maintenance menu, select Auto Cleaning, then select how often you want to clean. If you set Auto
to 1, the printer will automatically check and clean the print head, if necessary, after each print job. Set it
label media because cleaning occurs automatically after printing each label, every 2 labels, etc.) To turn off
automatic cleaning cycles, set
Auto Cleaning to 0.
Images printed on pre die-cut label media are not aligned on the labels accurately
Position Detect from the printer control panel Printer Setting menu and select the most frequent setting (1).
Select
You see another error message on the printer’s LCD screen
Check the printer documentation for solutions. Keep in mind that some of your printer’s control panel settings differ
from those described in your documentation due to its adaptation for roll media printing. For best results, do not adjust
any of the new settings from their default settings, except as described here.
You need additional help with your roll media feeding system
Contact your dealer or the equipment manufacturer as directed in their documentation.
Epson is a registered trademark and Epson Exceed Your Vision is a registered logomark of Seiko Epson Corporation.
© Epson America, Inc. 2009 CPD-27957
 Loading...