

Page 1
Epson B-500DN
Technical Support Bulletin
Steps to Address
Banding
Last update 9/14/11
Abstract: Epson B-500DN / Steps to Prevent, Reduce or Eliminate Banding
Some potential causes:
1) Wrong resolution or color profile selected. Select appropriate profile for your paper type and
manufacturer, as results may vary. Recommended minimum resolution is 720 x 720.
2) ADSI recommends the use of ADSI approved media with the color profiles from ADSI for these
medias, which are available at http://www.allendatagraph.com/techsupport/axxisfirmware.html.
If using label substrates other than ADSI media, then an ICC color profile should be created for
that specific media to achieve maximum quality. In most cases using the proper ICC Color
Profile will eliminate or reduce banding. ADSI has a referral to a qualified ICC Color Profiling
service.
3) Inkjet heads need cleaning and / or alignment. Most commonly a few head cleanings will solve
quality issues.
First step: Checking Print Head Nozzles
Note you can skip the Nozzle Check and run some head cleanings first, then do Nozzle Check.
Refer to: Chapter 8 - Page 137 to 142 from Epson B-500DN manual – Maintaining Your Printer
If you find that your printouts are unexpectedly faint or have gaps in them, you may be able to identify
the problem by checking the print head nozzles. You can check the print head nozzles from your
computer by using the Nozzle Check Utility or from the printer by using the control panel or buttons.
Page 2
Using the Nozzle Check Utility for Windows
Follow the steps below to use the Nozzle Check utility.
1. Make sure that no lights are indicating errors.
2. Make sure that letter/A4 size paper is loaded in the front paper cassette.
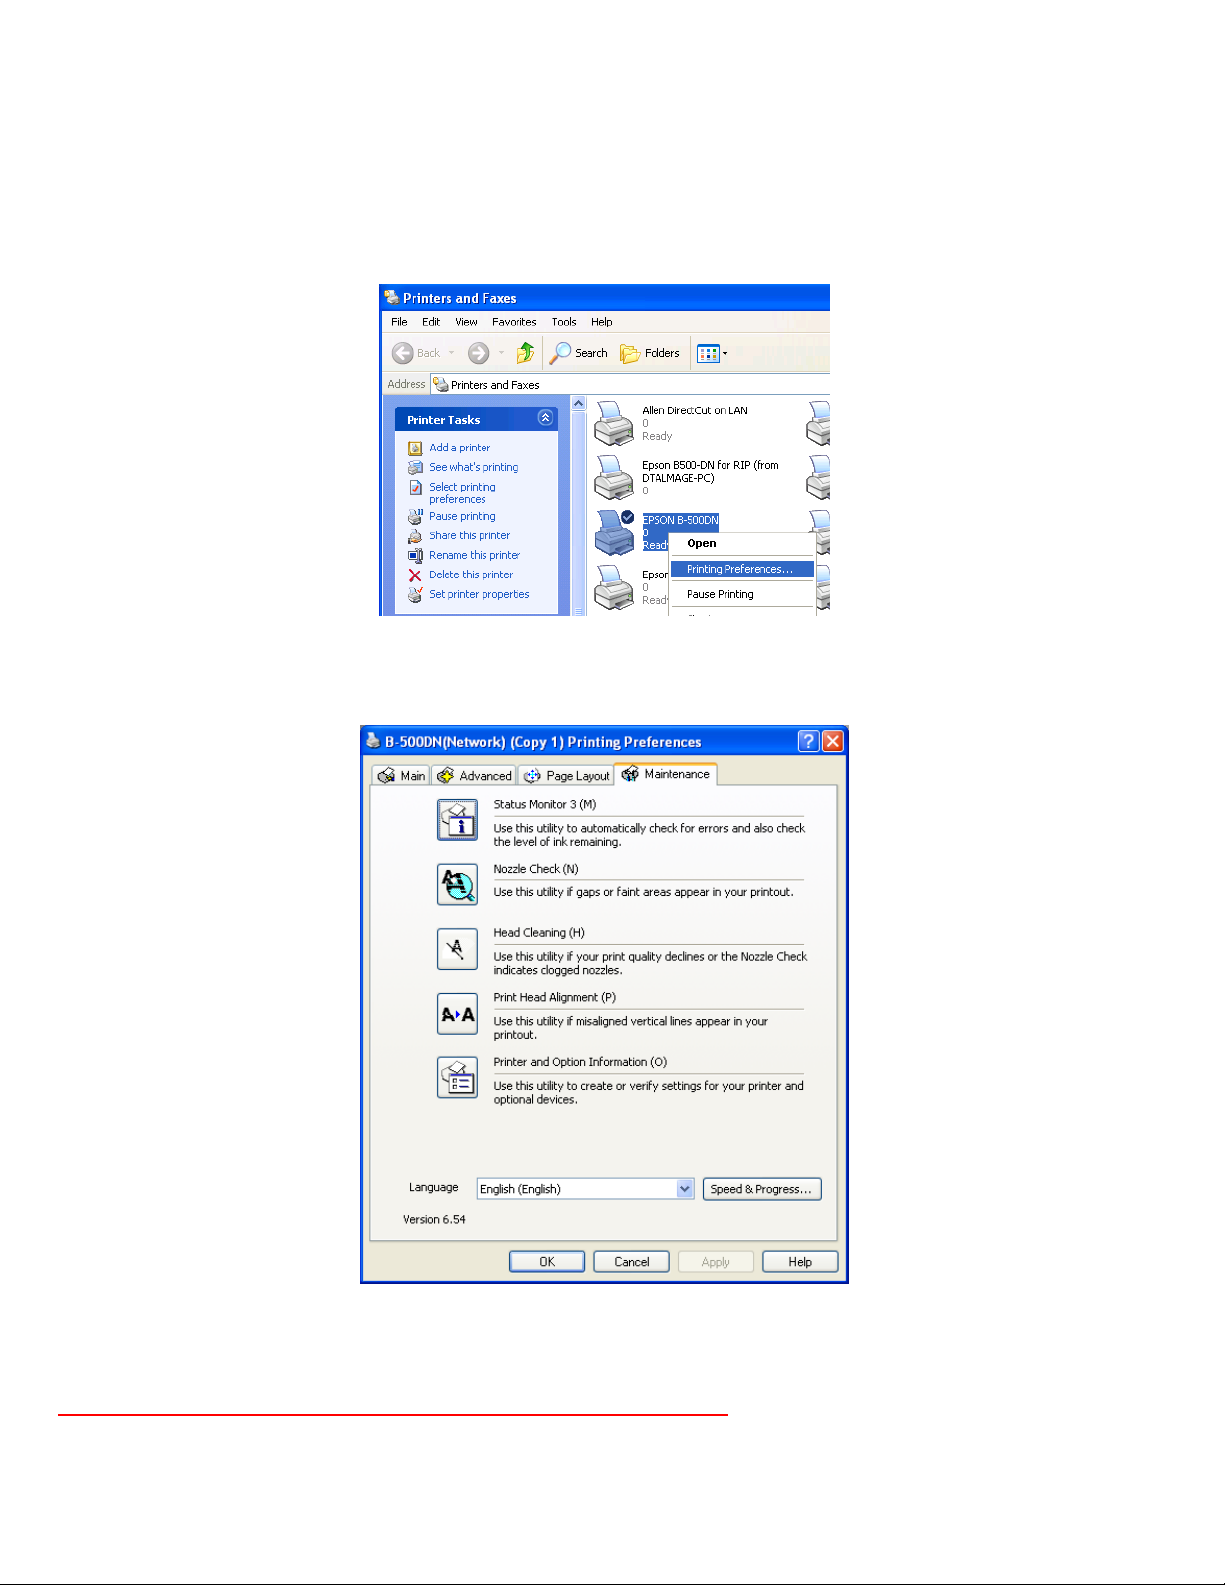
3. Click on Start > control panel > printer and faxes or printers > Right click on the b500dn printer
and select printing preferences (fig. 1).
fig.1
Then go to Maintenance tab and select Nozzle Check (fig. 2).
fig. 2
4. Follow the on-screen instructions.
Note: You may need to run multiple head cleanings on occasion
used the Epson printer to achieve maximum quality results. Always have a spare maintenance kit.
, especially if you have not recently
Page 3

Next step: Cleaning the Print Head
If you find that your printouts are unexpectedly faint or have gaps in them, you may be able to solve
these problems by cleaning the print head, which ensures that the nozzles are delivering ink properly.
You can clean the print head from your computer using the Head Cleaning utility in the printer driver or
by going to printing preferences (fig.1) and then going to Maintenance tab (fig. 2) and selecting Head
Cleaning.
Note: You may need to run multiple head cleanings in a row before you see results.
Try 2-4 Head Cleanings then print 2-4ft of material, and repeat.
Clean the print head if print quality declines; for example, if printout is blurry or the color is incorrect or
❏
missing.
You can use the Nozzle Check utility first to confirm that the print head needs to be cleaned.
❏
When ink is low you may not be able to clean the print head. When ink is expended you cannot clean the
❏
print head. Replace the appropriate ink cartridge first.& See “Replacing an Ink Cartridge” on page 128 of
the Epson B-500DN manual.
Next step: Turn off High Speed Printing
Click on Start > control panel > printer and faxes or printers > right click on the b500dn
printer and select printing preferences (fig. 1). Then go to Advanced tab (fig. 3).
Set preferences as shown in fig. 3.
Make sure to uncheck “High Speed” under Print Options.
fig. 3
Page 4

Next step: Selecting the Correct Profile
To know what profile to use is a tricky topic. Always start with the profile designed for that media.
Ex: “ADSI_EpsonB500_720x720_BOPP_Bidirectional” is made for and should be used on
biaxially oriented polypropylene or BOPP.
But when banding is occurring we are open to more options. I would print the banded label on at least
these profiles; if you have additional profiles do try them as well. Label each print with the profile used.
ADSI_EpsonB500_720x720_BOPP_Bidirectional
ADSI_EpsonB500_720x720_MATTE_Bidirectional
ADSI_EpsonB500_720x720_GLOSS_Bidirectional
Then select the print with the least amount of banding and use that as your profile and go to the next
step.
Next step: Ink Reduction within Wasatch
Go to Print > Setup > Edit > Select Color Transformations > Calibration.
Slide all C,M & Y scales to 90-95%
Keep the same % on all 3 colors if you want to maintain the color balance.
Rename the Profile, with the new dpi resolution for future reference and use. Then print test.
Page 5

Next step: Printing with a higher dpi resolution via the Wasatch SoftRIP
Go to Print. SETUP (or click print setup icon to right of device window)
Imaging configuration. Click Properties
To change dpi, select the dpi you want from Print Mode drop down.
You can also increase to 1440 x 720 by changing Media Type to Photo Quality
Ink Jet Paper and then select DPI with Print Mode.
You must rename the Profile. It is a good idea to rename it with the new dpi resolution for future
reference and use.
Note: you may see some color balance shifts when changing to higher dpi settings.
To minimize color shifts when using 720 x 1440 or 1440 x 1440 to achieve the best results you should
have a custom ICC color profile that was based on these resolutions for your substrate.
Next step: If the previous steps have not worked check your Head
Alignment
If you still have banding follow these Head Alignment steps in the Epson B-500DN manual pages. 143144
Since the Head Alignment test requires a cut sheet for print testing, you will need to adhere a
10” long by up to 8” wide piece of your pressure sensitive roll substrate to a 8.5” x 11” cut
sheet to feed via the Epson sheet feeder for the Head Alignment test and adjustments.
Aligning the Print Head on Epson B-500DN (from pg. 143-144 Epson manual)
If you notice a misalignment of vertical lines or horizontal banding, you may be able to solve this
problem by using the Print Head Alignment utility in your printer driver or from the printer by using the
buttons.
Note: Prior to a Print Head Alignment, 1st Check Print Head Nozzles & Clean Heads
Refer to the appropriate section below.
Note: Do not press the + Cancel button (B-500DN) to cancel
printing while printing a test pattern with the Print Head Alignment utility.
Page 6

Using the Print Head Alignment Utility for Windows
Follow the steps below to align the print head using the Print Head Alignment utility.
1. Make sure that no lights are indicating errors.
2. Make sure letter/A4 size plain paper is loaded in the front paper cassette.
Attach a 10” long x up to 8” wide of your label substrate to a 8.5 x 11 cut sheet for this test.
3. Right-click the printer icon on the taskbar, then select Print Head Alignment.
If the printer icon does not appear, refer to the following section to add the icon
& See “From the Shortcut Icon on the Taskbar” on page 15.
4. Follow the on-screen instructions to align the print head.
Then try printing a few test prints again and see if print quality improved.
 Loading...