

Page 1

User's Manual
Scanner
Epson Perfection
Document ID: PUB-119
Revision B
Page 2

User's Manual Scanner Epson Perfection
The names of any providers and patients used in illustrations or
examples in this document are fictitious.
Every effort has been made to ensure this manual is accurate,
complete, and useful. Please let us know if you have any
suggestions for improvement using one of the following means
of contact:
AFHCAN
Training Department
4000 Ambassador Drive
Anchorage, AK 99508
Phone: 877 885-5672
Fax: 907 729-2269
Email: customersupport@afhcan.org
Copyright © 2006 Alaska Native Tribal Health Consortium (ANTHC). All rights reserved. No part of this
publication may be reproduced, stored in a retrieval system, or transmitted, in any form, or by any means,
including photocopying, electronic, mechanical, recording or otherwise, without the prior written permission
of Alaska Native Tribal Health Consortium.
PUB-119 Rev B.doc ii
Page 3

User's Manual Scanner Epson Perfection
Table of Contents
Section Title Page
Preface ............................................................................................................................................ 5
About this Document .................................................................................................................. 5
Related Documents ..................................................................................................................... 5
For More Information ................................................................................................................. 5
Section 1 – Introduction ................................................................................................................ 1
1.1 Introduction to the Scanner .................................................................................................. 1
1.1.1 Functional Description .................................................................................................. 2
1.1.2 General Descriptions of Scanner Hardware .................................................................. 4
1.1.2.1 Model 1640 Hardware Features ............................................................................ 4
1.1.2.2 Model 1650 Hardware Features ............................................................................ 6
1.1.2.3 Model 4490 Hardware Features ............................................................................ 8
1.1.2.4 Model 4990 Hardware Features .......................................................................... 10
1.1.3 Scanner Features in the AFHCAN Software .............................................................. 12
1.1.3.1 Primary Features .................................................................................................. 12
1.1.3.2 Recovering from Manual Mode .......................................................................... 15
1.1.3.3 Scan Failure ......................................................................................................... 16
1.2 Particulars of the AFHCAN Installation ............................................................................ 17
1.3 Warnings and Cautions ...................................................................................................... 18
Section 2 – Operation .................................................................................................................. 19
2.1 Scanning ............................................................................................................................. 19
2.2 Restoring Automatic Mode ................................................................................................ 19
Section 3 – Routine Maintenance ............................................................................................... 21
Index ............................................................................................................................................. 23
List of Illustrations
Figure Title Page
1 Four scanner models ............................................................................................................ 1
2 General view of the 1640 .................................................................................................... 4
3 Model 1640 document table and scanner cover .................................................................. 5
4 Rear view of 1640 ............................................................................................................... 5
5 General view of the 1650 .................................................................................................... 6
6 General view of the 4490 .................................................................................................... 7
7 Rear view of 4490 ............................................................................................................... 8
8 Cover and mat of 4490 ........................................................................................................ 8
9 General view of the 4990 .................................................................................................... 9
PUB-119 Rev B.doc iii
Page 4

User's Manual Scanner Epson Perfection
10 Rear view of 4990 ............................................................................................................. 10
11 Cover and mat of 4990 ...................................................................................................... 10
12 Initial appearance of the Scanner screen .......................................................................... 11
13 TWAIN driver pop-up screen – preview ........................................................................... 12
14 TWAIN driver pop-up screen – scanning ......................................................................... 13
15 Completed scan ................................................................................................................. 13
16 TWAIN screen leading to manual mode ........................................................................... 14
17 TWAIN manual mode screen ............................................................................................ 15
18 Scan failed message ........................................................................................................... 15
19 Scanner as mounted on V1 Cart and V3 Cart .................................................................... 16
List of Tables
Table Title Page
1 Image types, characteristics, and resolution ........................................................................ 3
2 Scanner models and their TWAIN drivers .......................................................................... 4
3 Model 1640 indicator light .................................................................................................. 5
4 Model 1650 indicator light .................................................................................................. 6
5 Model 4490 indicator light .................................................................................................. 7
6 Model 4990 indicator lights ................................................................................................ 9
7 Functions of Scanner screen buttons ................................................................................ 11
PUB-119 Rev B.doc iv
Page 5

User's Manual Scanner Epson Perfection
Preface
About this Document
This document is part of the set of user manuals provided with the AFHCAN Cart. These user
manuals, covering various topics, are normally assembled into a binder delivered with each Cart.
This modular design has the following advantages:
• the set of manuals provided with your cart includes documents for the specific peripheral
devices installed
• each document is a stand-alone publication; as new devices or features are added to the
Cart, new manuals can be added to the existing binder
• user information that is common to all items of equipment does not need to be repeated in
each module, but can be covered in separate modules and referenced as needed
Related Documents
This document assumes you have read the introductory hardware and software manuals included
in this binder.
The original manuals provided with the equipment were included in a set of materials delivered
with the AFHCAN Cart. Those manuals can be used to supplement the information provided in
this document. Be aware, however, that items installed on an AFHCAN Cart may have been
modified slightly, so the features as described in the original product manuals may not apply.
For More Information
This document describes the equipment to a level of detail that will meet most user's needs in the
context of clinical use of the AFHCAN Cart. For more information, contact AFHCAN Customer
Support:
AFHCAN Customer Support
Phone: 888 449-4435
Fax: 907 729-2269
email: customersupport@afhcan.org
Additional information about the scanner can be found on the manufacturer's website:
www.epson.com
PUB-119 Rev B.doc v
Page 6

User's Manual Scanner Epson Perfection
PUB-119 Rev B.doc vi
Page 7
Section 1 – Introduction
1.1 Introduction to the Scanner
This manual describes the features and operation of the scanner as installed on an AFHCAN Cart.
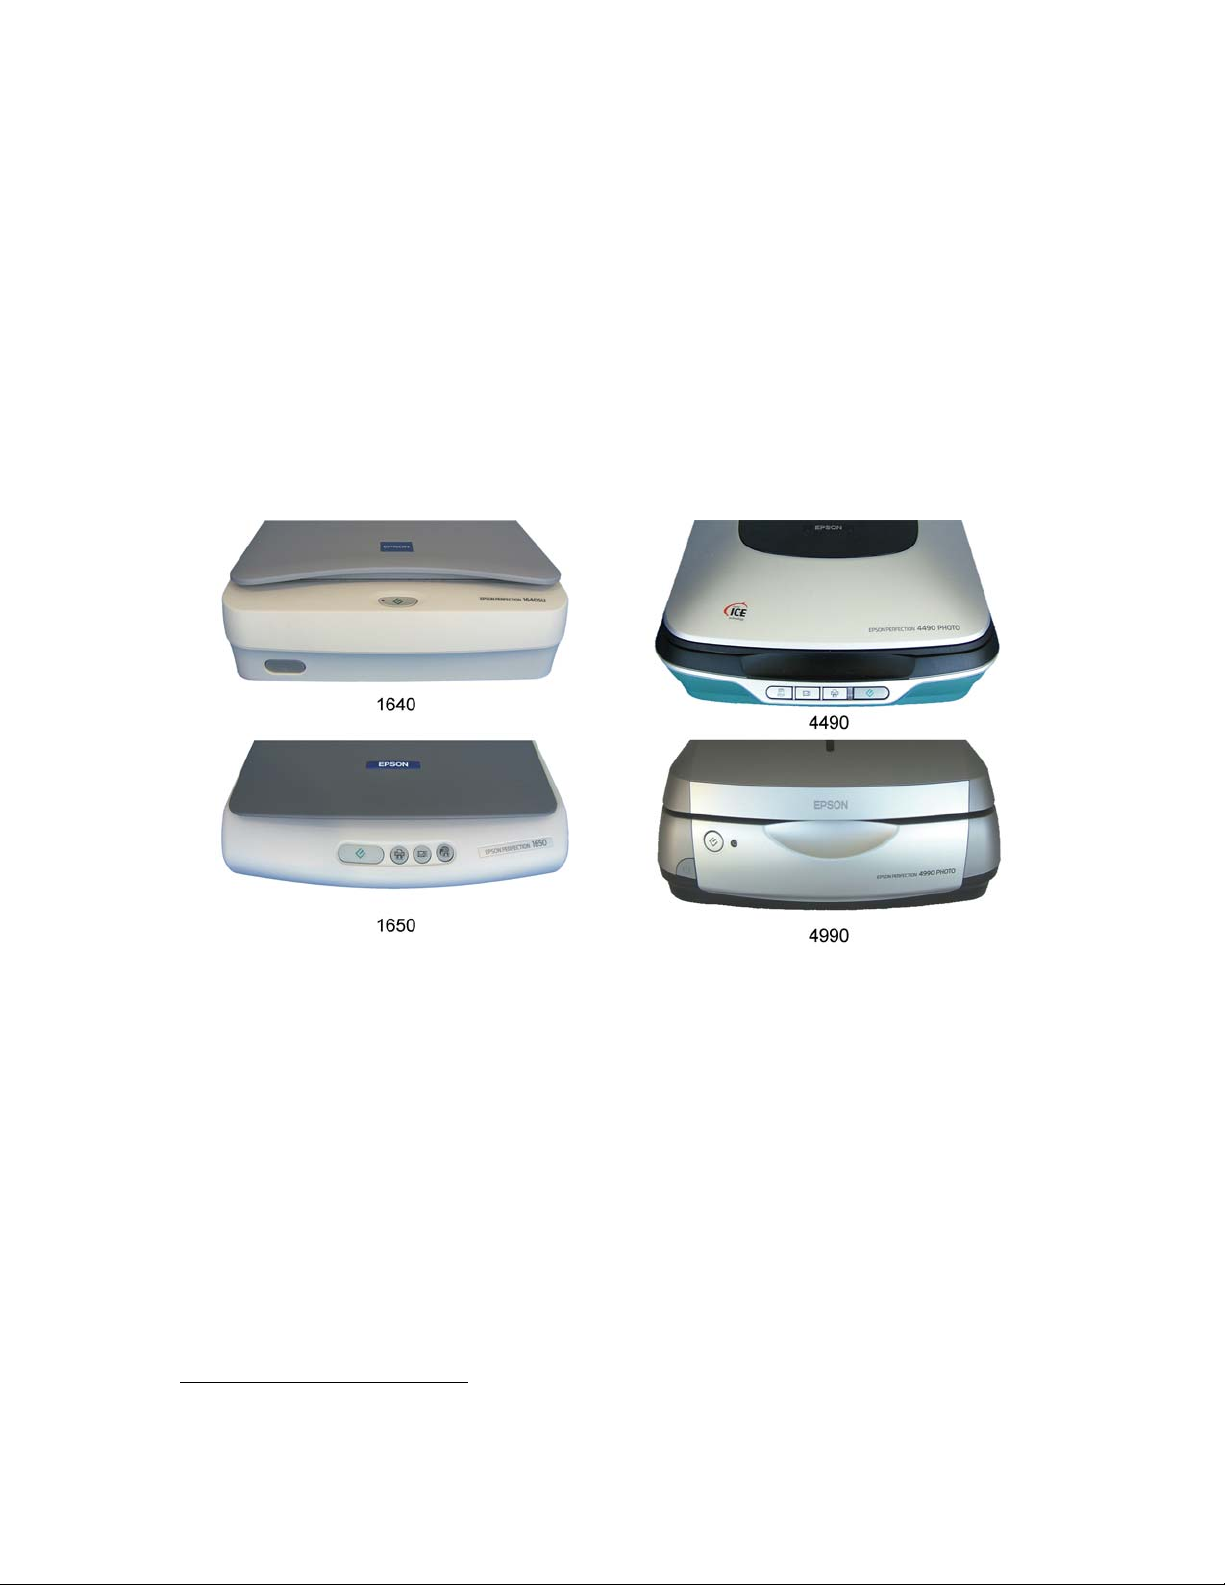
Four scanner models are covered (see Figure 1):
• Epson Perfection Model 1640
• Epson Perfection Model 1650
• Epson Perfection Model 4490
• Epson Perfection Model 4990
Figure 1
Four scanner models
Models 1640 and 1650 were part of the original deployment of AFHCAN Carts. These models
work well in the AFHCAN installation, but are no longer being manufactured. Model 4490 is
standard for new installations, or may be selected as a replacement for the previous models.
Model 4990 is an option that can be ordered in place of the 4490, and allows for 8-inch by
1
10-inch transparencies such as x-rays to be scanned.
In general, the AFHCAN software functions the same for all the scanners that have been
deployed with the AFHCAN Cart. There is no significant difference in the basic operating
sequences. However, with the newer scanners, the appearance of certain screens may vary
slightly from the illustrations shown in this manual.
1
Scanning of transparencies requires the use of manual mode, which is an advanced scanning feature.
Information on manual mode will be provided separately. Consult the Epson documentation for details.
PUB-119 Rev B.doc 1
Page 8

User's Manual Scanner Epson Perfection
The scanners have a variety of buttons on their front panels. None of these buttons interact with
the AFHCAN software, so they are not described here. Model 1650 does not have a power
switch, but the other three models do. As installed on the AFHCAN Cart, the scanner power
switch is not readily accessible. It is the standard practice on the AFHCAN installation to leave
the scanner power button on at all times and to control power to the scanner via the Cart’s main
power switch. This power distribution strategy applies to most other devices on the Cart. For
exceptions, refer to device-specific modules in this binder for details.
1.1.1 Functional Description
The scanner is used to scan paper documents, photographs, or other items into a case. The
AFHCAN software activates a TWAIN driver, which is software that comes with the scanner.
The TWAIN driver controls the operation of the scanner.
The AFHCAN software and the TWAIN driver interact differently depending on which scan
mode is selected. The AFHCAN software offers two scan modes:
• black and white (
• color (
Scan Color button)
In black and white mode (
Scan button)
Scan mode), the AFHCAN software directs the TWAIN driver to scan
in black and white. Each pixel is forced to be either white or black (in other words, shades of
gray are lost). This is useful when scanning black and white forms or other documents where
high contrast is a plus. The downside is that if there are items which are lightly shaded, those
items may be dropped, and the overall image resolution may appear to be diminished. In
mode, a small window appears indicating that a scan is underway.
Scan mode saves files in a
Scan
PNG image format.
Scan Color mode, the TWAIN software performs the following steps:
In the
• previews the image to determine the type of image, image area, and image characteristics
• automatically adjusts the image resolution, size, and other attributes
2
• scans the image and saves it in a JPG image file format
• sends the image file to the AFHCAN software for inclusion in a case
When running on a Cart, the software resets the TWAIN driver to factory defaults each time the
AFHCAN software is started. This places the TWAIN driver in automatic mode.
Note: When the software is running on a PC workstation, the reset
does not take place, which means the TWAIN driver will open in the
same mode and with the same settings that were in effect when the
software was last used.
In automatic mode, the preview is analyzed to determine the type of image, the image area, and
any optimal settings. The TWAIN software distinguishes the types of images listed in Table 1.
2
The term TWAIN refers to software that fits between the user application and a device (scanner, camera,
etc.) TWAIN drivers make it easier to standardize the integration and control of various devices on a
computer system. For more information on TWAIN, go to www.twain.org.
PUB-119 Rev B.doc 2
Page 9

User's Manual Scanner Epson Perfection
Table 1
Image types, characteristics, and resolution
Default
Image Type Description1
color photo high resolution, color image 300 dpi
black & white photo high resolution, black and white image 300 dpi
illustration drawing with halftone components 150 dpi
text/line art mostly text with simple line art 300 dpi
color document color words and images (printed, not photo) 150 dpi
black & white document black & white words and images (printed, not photo) 150 dpi
Note 1: The exact criteria by which automatic mode categorizes items is difficult to determine. The descriptions shown
here are based on tests with the Model 1650 scanner. In some cases, the image preview assigned an image type other
than what was expected. However, we found that automatic mode always produced reasonably good scans.
Resolution
During the preview, it is possible to interrupt the automatic scan and activate the TWAIN driver's
manual mode. Manual mode allows the user to manually control a number of image attributes
such as resolution, color balance, and image area. The use of manual mode is not recommended
for most AFHCAN installations.
Note: The settings in manual mode are complex and are beyond the
scope of this manual (refer to the Epson documentation for details).
For those not familiar with advanced scanning features, manual mode
can cause a lot of confusion, and can lead to technical difficulties or
poor quality scans. Furthermore, some combinations of manual
settings can generate huge files and may lead to system freeze-up.
Please be aware that the last scanner mode used becomes the default
mode for the next session. If someone goes into manual mode and
does not set it back to automatic mode, the next person to use the
scanner will encounter the screen for manual mode. Software running
on an AFHCAN Cart will reset the TWAIN driver to automatic mode
each time the software is restarted.
On completion of the scan, the TWAIN driver saves the file and notifies the AFHCAN software
that a scanned file has been saved. If for some reason the TWAIN driver cannot complete the
scan, the AFHCAN software will display a Scan Failed message.
There are several situations that can cause a Scan Failed message to appear in the AFHCAN
software. Some of the more obvious ones are the following:
• the scan was canceled in the TWAIN driver window
• scanner power switch is turned off or the scanner power cable is disconnected
• scanner data cable is disconnected
PUB-119 Rev B.doc 3
Page 10

User's Manual Scanner Epson Perfection
• the incorrect TWAIN driver has been selected
Each scanner model requires a specific TWAIN driver. If the TWAIN driver does not match the
scanner model, the AFHCAN software will bring up the Scan Failed message when you attempt
to scan.
The correct TWAIN driver is normally installed and tested when the scanner is installed.
Normally it should not need to be changed. However, if the Scan Failed message appears, you
will be invited to open a pop up window allowing you to select a different TWAIN driver.
Note: Selecting a new TWAIN driver typically would apply only
when a different model scanner is being installed.
Table 2 lists the scanner models and associated TWAIN drivers. (Other TWAIN driver options
may appear in the window that may not apply to scanners. Disregard any drivers not listed in
Table 2.)
Table 2
Scanner models and their TWAIN drivers
Scanner TWAIN Driver1 Pop-Up Text
1640 5.71A (Rev F) EPSON TWAIN 5 5.71 (32-22)
1650 5.71A (Rev F) EPSON TWAIN 5 5.71 (32-22)
4490 2.76A EPSON Perfection 4490 2.71 (32-22)
4990 2.68A EPSON Perfection 4990 2.68 (32-32)
Note 1: These specific drivers were listed on the EPSON website, and were available for download, during the time when
this document was in development. Other versions may be included with your software.
1.1.2 General Descriptions of Scanner Hardware
1.1.2.1 Model 1640 Hardware Features
Figures 2 through 4 show the main hardware features of the Model 1640.
PUB-119 Rev B.doc 4
Page 11

User's Manual Scanner Epson Perfection
Figure 2
General view of the 1640
The indicator light on the scanner's start button is active in the AFHCAN installation. Table 3
lists the significance of the indicator light.
Table 3
Model 1640 indicator light
Condition Color Status
flashing green Scanner is initializing (warming up) or busy scanning.
on steady green Scanner is on and ready to scan images.
flashing red Indicates error or malfunction. Refer to the section on troubleshooting.
off n/a The scanner is turned off or the Cart is powered down.
PUB-119 Rev B.doc 5
Page 12

User's Manual Scanner Epson Perfection
Figure 3
Model 1640 document table and scanner cover
Figure 4
Rear view of 1640
1.1.2.2 Model 1650 Hardware Features
Figure 5 shows the main hardware features of the Model 1650. The indicator light on the
scanner's start button is active in the AFHCAN installation. Table 4 lists the significance of the
indicator light.
PUB-119 Rev B.doc 6
Page 13

User's Manual Scanner Epson Perfection
Figure 5
General view of the 1650
Table 4
Model 1650 indicator light
Condition Color Status
flashing green Scanner is initializing (warming up) or busy scanning.
on steady green Scanner is on and ready to scan images.
flashing red Indicates error or malfunction. Refer to the section on troubleshooting.
off n/a The scanner is turned off or the Cart is powered down.
PUB-119 Rev B.doc 7
Page 14

User's Manual Scanner Epson Perfection
1.1.2.3 Model 4490 Hardware Features
Figures 6 through 8 show the main hardware features of the Model 4490.
Figure 6
General view of the 4490
The indicator light is active in the AFHCAN installation. Table 5 lists the significance of the
indicator light.
Table 5
Model 4490 indicator light
Condition Color Status
flashing green Scanner is initializing (warming up) or busy scanning.
on steady green Scanner is on and ready to scan images.
flashing red Indicates error or malfunction. Refer to the section on troubleshooting.
off n/a The scanner is turned off or the Cart is powered down.
PUB-119 Rev B.doc 8
Page 15

User's Manual Scanner Epson Perfection
Figure 7
Rear view of 4490
Figure 8
Cover and mat of 4490
PUB-119 Rev B.doc 9
Page 16

User's Manual Scanner Epson Perfection
1.1.2.4 Model 4990 Hardware Features
Figures 9 through 11 show the main hardware features of the Model 4990.
Figure 9
General view of the 4990
The indicator light is active in the AFHCAN installation. Table 6 lists the significance of the
indicator light.
Table 6
Model 4990 indicator lights
Condition Color Status
flashing green Scanner is initializing (warming up) or busy scanning.
on steady green Scanner is on and ready to scan images.
flashing red Indicates error or malfunction. Refer to the section on troubleshooting.
off n/a The scanner is turned off or the Cart is powered down.
Blue document cover light
on steady blue Scanning transparent originals such as x-rays (manual mode only).
off n/a Scanning reflective originals such as photographs or paper documents.
PUB-119 Rev B.doc 10
Page 17

User's Manual Scanner Epson Perfection
Figure 10
Rear view of 4990
Figure 11
Cover and mat of 4990
PUB-119 Rev B.doc 11
Page 18

User's Manual Scanner Epson Perfection
1.1.3 Scanner Features in the AFHCAN Software
1.1.3.1 Primary Features
The AFHCAN software provides a means for activating the TWAIN driver and for handling the
image that the TWAIN driver returns. To scan an image, press the
To Case screen. Figure 12 shows the initial Scanner screen. Table 7 shows the buttons on the
Scanner screen and describes their functions.
Scanner button on the Add
Figure 12
Initial appearance of the Scanner screen
Table 7
Functions of Scanner screen buttons
Button Function
Pressing the Scan button activates the TWAIN driver and initiates a scan.
The Scan button is used for scanning documents where a high-contrast,
black-and-white image is desired. When the Scan button is used to initiate a
scan, the software forces each pixel in the image to either 100% black or
100% white. This enhances the contrast for documents like forms, but
removes shading information needed for photographic images. The resulting
image file will be somewhat compressed, meaning it requires less memory and
takes less time to send and receive. The Scan button can be pressed
repeatedly to scan additional items. Each scan will be stored as a thumbnail
on the Scanner page.
PUB-119 Rev B.doc 12
Page 19

User's Manual Scanner Epson Perfection
Button Function
The Scan Color button is similar to the Scan button in that it activates the
TWAIN driver and initiates a scan. Scan Color tells the AFHCAN software to
receive and store the image exactly as provided by the scanner. In automatic
mode, the scanner will determine the type of image and the appropriate image
settings. Color and shading information will be retained making Scan Color
more suitable for photographs. Scan Color may provide better results on
some forms having higher levels of detail. The Scan Color button can be
pressed repeatedly to scan additional images. Each scan will be stored as a
thumbnail on the Scanner page.
The Rotate button rotates the scanned image 90%. Rotate can be pressed
any number of times to bring the image into the desired orientation. This is
useful for getting text right-side-up when originals are in landscape mode.
Image rotation must be done before the image is saved to the case.
The Save button saves one or more scanned images (thumbnails) into the
case and returns to the Case screen. It is always possible to add more scans
by going to the Add To Case screen and pressing the Scanner button.
The Back button exits from the Scanner screen and returns to the Add To
Case screen. If any scans have been obtained, a warning message will
appear. If the action is confirmed, the images will be erased.
Once a scan has been initiated, the TWAIN driver displays a pop-up window over the Scanner
page, as shown in Figure 13. Windows for Models 4490 and 4990 have a different appearance,
but offer the same functionality.
Figure 13
TWAIN driver pop-up screen – preview
PUB-119 Rev B.doc 13
Page 20

User's Manual Scanner Epson Perfection
The preview function does a quick scan of the original to determine its type and area (image types
are listed in Table 1). When actual scanning begins, the TWAIN pop-up has the appearance
shown in Figure 14. Figure 15 shows the Scanner screen after scans have been obtained.
Figure 14
TWAIN driver pop-up screen – scanning
Figure 15
Completed scan
PUB-119 Rev B.doc 14
Page 21

User's Manual Scanner Epson Perfection
When the scan is completed, a thumbnail of the scan will be added in the left column, and the
scanned image will be displayed in the middle area of the screen (Figure 14). All images must be
given a name. The AFHCAN software will automatically enter the word SCAN with a sequence
number. You can type in a different name manually. At this point, the selected scans can be
saved to the case by pressing the
Back.
1.1.3.2 Recovering from Manual Mode
Save button. To discard all the currently displayed scans, press
As mentioned previously, manual mode is complex and is not recommended for routine scanning.
Details on manual mode are beyond the scope of this manual. However, if another user scans
with manual mode, you may encounter the TWAIN screens for manual mode when you do a new
scan. This is because the software remembers what mode was used last and opens the next
scanning session in the same mode. Clicking
in Figure 16. Clicking
Manual Mode in Figure 16 brings up the screen in Figure 17.
Cancel during preview brings up the screen show
Figure 16
TWAIN screen leading to manual mode
PUB-119 Rev B.doc 15
Page 22

User's Manual Scanner Epson Perfection
Figure 17
TWAIN manual mode screen
Pressing the Full Auto mode button returns to the screen in Figure 16. Pressing Scan in Figure
16 returns to the screen in Figure 13.
1.1.3.3 Scan Failure
If for any reason the TWAIN driver cannot complete the scan, it will notify the AFHCAN
software. The AFHCAN software will display the message shown in Figure 18.
Figure 18
Scan failed message
PUB-119 Rev B.doc 16
Page 23

User's Manual Scanner Epson Perfection
The TWAIN drivers for various scanners were listed in Table 2. Possible causes of Scan Failed
error message include but are not limited to the following:
• not placing an original on the document table
• manually cancelling a scan (while not the preferred method, it is possible to cancel a scan
during the preview: on the screen shown in Figure 12, push
shown in Figure 15, push
Close)
Cancel, then on the screen
• scanner power turned off (difficult to do on the V3 Cart)
• a scanner cable has been disconnected (cables are well protected on the V3 Cart)
• an actual malfunction of the scanner (the indicator light will flash red)
• the TWAIN driver does not match the scanner model (the TWAIN driver is selected and
tested by qualified personnel when the scanner is installed)
Users may be able to clear this message as follows:
1. click the
2. click
Yes button to view the list of drivers
OK to accept the highlighted driver (the correct driver should be established when the
system is installed and should not need to be changed)
3. click the
Scan or Scan Color button
If the problem persists, contact AFHCAN Customer Support at 888-449-4435.
1.2 Particulars of the AFHCAN Installation
On the V3 Cart the scanner is in the second drawer (Figure 19). This limits access to the power
switch, the cables, and the scanner transport locks. The scanner power switch is normally left on
with power to the scanner being controlled via the Cart's main power switch.
The use of equipment options such as a sheet feeder or separate transparency unit are not
supported in the AFHCAN installation.
The front panel buttons on the scanners do not interact with the AFHCAN software.
The position of the scanner in the drawer does not permit the scanner cover to be opened to the
full 90 degree position. As installed in the second drawer on the V3 Cart, the Model 4490 cover
opens to the first detent (about 45 degrees). Scanner covers should not be removed.
PUB-119 Rev B.doc 17
Page 24

User's Manual Scanner Epson Perfection
Figure 19
Scanner as mounted on V1 Cart and V3 Cart
1.3 Warnings and Cautions
Please observe the following points:
• Follow all warnings and cautions in the manufacturer's literature provided with the device,
as applicable.
• Avoid placing heavy objects on the document table.
• Do not expose the scanner to fluids, except as described in Section 3.
• Avoid scratching glass on document table, and do not use abrasive cleansers or materials to
clean it.
• Before opening the scanner cover on the V3 Cart:
- ensure the upper drawer is fully closed
- ensure the lower drawer is fully extended
• Open the cover carefully to ensure it does not contact the drawer above it.
PUB-119 Rev B.doc 18
Page 25

Section 2 – Operation
2.1 Scanning
1. From the Add To Case screen, press the Scanner button.
2. On the V3 Cart, make sure the upper drawer is fully closed and the lower drawer is fully
extended.
3. Lift the scanner cover and place the original face down on the document table:
- the top of the image should be towards the back of the scanner (or the image can be
rotated later)
- the original should be aligned into the right rear corner of the document table
4. On the Scanner screen, select the type of scan:
- for a high-contrast, black and white image, push
- to retain color, shading, and details, push
5. Observe the TWAIN driver window as it goes through the following steps:
a. scanner warming up
b. preview
c. scan
6. When the scan is complete, the image will appear in the Scanner screen. If desired, push
the
Rotate button to rotate the image 90 degrees.
7. Scan additional images, if desired.
8. Click on the checkbox next to each thumbnail image to select or deselect it, and press
to save the selected images into the case.
Scan Color
Scan
Save
2.2 Restoring Automatic Mode
The following procedure specifically applies to the TWAIN 5 driver supplied with the Model
1640 and 1650 scanners.
In the event that a scan brings up the manual mode screen (see Figure 16), return to automatic
mode as follows:
1. Press the
2. On the screen shown in Figure 15, ensure that the manual setting for resolution is
deactivated as follows:
a. Press the right arrow button
b. If the box by Specify Resolution for Full Auto Mode is checked, click on it to remove
PUB-119 Rev B.doc 19
Full Auto mode button. This returns to the screen in Figure 15.
to expand the lower area of the screen, if necessary.
the checkmark.
Page 26

User's Manual Scanner Epson Perfection
c. Press the left arrow button to collapse the screen.
3. On the screen in Figure 15 (upper window), press
mode as the default for the next scan session.
Scan to initiate a scan and set automatic
PUB-119 Rev B.doc 20
Page 27

Section 3 – Routine Maintenance
Maintenance is limited to light cleaning.
Clean the exterior of the scanner using a soft, clean cloth dampened with a mild detergent
solution.
Clean any paper dust or debris off the glass document table by wiping it gently with a soft, clean
dry cloth.
Clean any smudges from the glass document table with a soft, clean cloth lightly dampened with
glass cleaner.
PUB-119 Rev B.doc 21
Page 28

User's Manual Scanner Epson Perfection
PUB-119 Rev B.doc 22
Page 29

Index
AFHCAN Cart
power distribution strategy, 2
scanners installed on (image), 18
AFHCAN Software
activating TWAIN driver, 2
Add To Case screen, 12
image conversion, 2
Scan Failed message. See Scan Failed message
Scanner button, 12
Scanner screen. See Scanner screen
automatic mode
available settings, 15
general reference, 13
image types, 3
procedure for recovering from manual m ode, 19
variations in type recognition, 3
Back button
function, 13
on Scanner screen (image), 12
cleaning, 21
image rotation. See rotating the image
image transformation, 2
image types, 3
indicator light
Model 1640 (image), 5
Model 1640, meanings, 5
Model 1650 (image), 7
Model 1650, meanings, 7
Model 4490 (image), 8
Model 4490, meanings, 8
Model 4990 (image), 10
Model 4990, meanings, 10
maintenance, 21
manual mode
becomes default mode for next user, 3, 15
complexities of, 3
function, 3
general reference, 1
restoring automatic mode, 15, 19
scanning transparencies, 10
second pop-up screen (image), 16
manual settings in automatic mode (image), 15
Model 1640
document table (image), 6
front panel (image), 1
general view (image), 5
hardware, 4
indicator light (image), 5
indicator light status, 5
original deployment, 1
power switch (image), 5
rear view (image), 6
start button (image), 5
transportation lock (image), 5
TWAIN driver, 4, 19
Model 1650
document table (image), 7
front panel (image), 1
front panel buttons (image), 7
general view (image), 7
indicator (image), 7
indicator light status, 7
rear view (image), 7
Model 4490
document table (image), 9
front panel (image), 1
front panel buttons (image), 8
general view (image), 8
indicator light status, 8
power switch (image), 8
rear view (image), 9
transportation lock in base (image), 9
transportation lock in cover (image), 9
Model 4990
document mat (image), 11
document table (image), 11
front panel (image), 1
general view (image), 10
indicator (image), 10
indicator light status, 10
power switch (image), 10
rear view (image), 11
start button (image), 10
transparency unit (image), 11
transportation lock on base (image), 10
transportation lock on cover (image), 11
power switch
general comparison, 2
Model 1640 (image), 5
Model 4490 (image), 8
Model 4990 (image), 10
normal position, 2
restoring automatic mode, 15
Rotate button
function, 13
on Scanner screen (image), 12
rotating the image, 13, 19
Save button
function, 13
on Scanner screen (image), 12
Scan button
function, 12
general reference, 2
on Scanner screen (image), 12
PUB-119 Rev B.doc 23
Page 30

User's Manual Scanner Epson Perfection
Scan Color button
function, 13
general reference, 2
on Scanner screen (image), 12
Scan Failed message
causes of, 3, 17
general reference, 3, 4, 16
screen display (image), 16
Scanner
comparing models (image), 1
deployment history, 1
function, 2
functional comparison, 1
Scanner screen
button functions, 12
initial appearance (image), 12
scan failed message, 16
with scanned photo (image), 14
scanning mode
black and white, 2, 19
color, 2
TWAIN
activation, 12, 13
automatic image type recognition, 2
defined, 2
driver, 4, 17, 19
drivers, list of, 4
general reference, 17
installation, 4
leaving automatic mode (image), 15
manual mode, 3, 15
manual mode (image), 16
pop-up window (image), 13, 14
previous mode retained, 15
Scan Failed message, 3
sequence of steps, 19
PUB-119 Rev B.doc 24
 Loading...