

Page 1

®
Color Laser Printer
All rights reserved. No part of this publication may be reproduced, stored in a retrieval
system, or transmitted in any form or by any means, mechanical, photocopying, recording,
or otherwise, without the prior written permission of SEIKO EPSON CORPORATION. No
patentliabilityisassumedwithrespecttotheuseoftheinformationcontainedherein.Neither
is any liability assumed for damages resulting from the use of the information contained
herein.
Neither SEIKO EPSON CORPORATION nor its affiliates shall be liable to the purchaser of
this product or third partiesfor damages,losses, costs,or expenses incurred by purchaseror
third parties as a result of: accident, misuse, or abuse of this product or unauthorized
modifications, repairs,or alterationsto thisproduct, or(excluding theU.S.) failureto strictly
comply with SEIKO EPSON CORPORATION’s operating and maintenance instructions.
SEIKO EPSONCORPORATION shallnot be liable against anydamages orproblems arising
from the use of any options or any consumable products other than those designated as
Original Epson Products or Epson Approved Products by SEIKO EPSON CORPORATION.
EPSON and EPSON ESC/P are registered trademarks and EPSON ESC/P 2 is a trademark
of SEIKO EPSON CORPORATION.
Speedo, Fontware, FaceLift, Swiss, and Dutch are trademarks of Bitstream Inc.
CG Times and CG Omega are registered trademarks of Miles, Inc.
Univers is a registered trademark of Linotype AG and/or its subsidiaries.
AntiqueOliveisatrademarkofFonderieOlive.
Albertus is a trademark of Monotype Corporation plc.
Coronet is a trademark of Ludlow Industries (UK) Ltd.
Arial and Times New Roman are registered trademarks of Monotype Corporation plc.
HP and HP LaserJet are registered trademarks of Hewlett-Packard Company.
Macintosh, AppleTalk, EtherTalk, are registered trademarks of Apple Computer, inc.
Adobe and PostScript are trademarks of Adobe Systems Incorporated, which may be
registered in certain jurisdictions.
General Notice: Other product names used herein are for identification purposes only and
may be trademarks of their respective owners. EPSON disclaims any and all rights in those
marks.
Copyright © 2001 by SEIKO EPSON CORPORATION, Nagano, Japan.
Administrator®s Guide
Page 2

ii
Page 3

Contents
Introduction
AboutYourPrinter.....................................1
AboutThisGuide......................................2
Warnings,Cautions,andNotes.......................2
FunctionsoftheInternalPrintServer.......................3
OperatingEnvironment..................................3
About the Software. . . . . . ...............................5
Chapter 1 Getting Started
Overview.............................................7
SelectingaPrintingMethod..............................8
PrintingfromWindows..............................8
Printing from Macintosh . . . . . . . . . . . . . . ...............9
FeaturesofthePrintingMethods..........................9
LPR(TCP/IP)printing...............................9
Internetprinting ..................................10
MicrosoftNetworkSharedprinting....................10
EthernetOperation....................................11
Statuslights.....................................11
Network connector . . ..............................11
PrintingaNetworkStatusSheet..........................12
InitializingYourPrinter.................................13
Chapter 2 Easy Setup for Windows Me/98/95
EasySetupProcedures................................15
Making TCP/IP Settings for the Computer ..................16
ConnectingYourPrintertotheNetwork....................18
Setting an IP address to the Printer Using
EpsonNetEasySetup ...............................19
iii
Page 4

PreparingtheComputerforNetworkPrinting................23
Installing EpsonNet Direct Print . . . . . . . . . . ............23
Installing the printer driver . . . . . . . . . . . . . . ............24
Chapter 3 Installing Components on Your Computer
About Installing Components on Your Computer .............27
WindowsMe/98/95....................................27
WindowsXP.........................................30
Windows2000 .......................................32
WindowsNT4.0......................................35
Macintosh...........................................40
Macintosh(withOpenTransport).....................40
Macintosh(withoutOpenTransport) ..................40
Chapter 4 EpsonNet WinAssist Configuration Utility
AboutEpsonNetWinAssist..............................41
SystemRequirements..................................41
Installing EpsonNet WinAssist . . . . . . . . . . . . . . . ............42
Configuring Your Printer Using EpsonNet WinAssist . . . . . . . . . .43
Aboutpasswords .................................47
DetailsoftheConfigurationDialogBox....................49
Information......................................49
TCP/IP .........................................50
NetWare........................................51
NetBEUI........................................57
AppleTalk.......................................58
IPP............................................60
SNMP..........................................62
MenuBar ...........................................63
Time-outoption...................................64
Searchoptions...................................65
iv
Page 5

Chapter 5 EpsonNet MacAssist Configuration Utility
AboutEpsonNetMacAssist.............................69
SystemRequirements.................................69
Installing EpsonNet MacAssist. . . . . . . . . . . . . ..............69
Configuring Your Printer Using EpsonNet MacAssist. . . . . . . . . . 70
Aboutpasswords.................................73
Options.............................................74
Timeout ........................................74
Zone...........................................75
Chapter 6 Installing the Printer Driver
About Installing the Printer Driver. . . . . . . . . . . ..............77
WindowsMe/98/95....................................77
LPRprinting.....................................77
Internetprinting(Windows98/95) ....................77
Internetprinting(WindowsMe) ......................78
MicrosoftNetworkSharedprinting....................78
Installing a printer driver. . . . . . . . . . . . . . ..............79
UsingtheNETUSEcommand.......................80
WindowsXP.........................................81
LPRprinting.....................................81
Internetprinting ..................................84
MicrosoftNetworkSharedprinting....................85
Installing a printer driver. . . . . . . . . . . . . . ..............86
UsingtheNETUSEcommand.......................87
Windows2000.......................................88
LPRprinting.....................................88
Internetprinting ..................................91
MicrosoftNetworkSharedprinting....................92
Installing a printer driver. . . . . . . . . . . . . . ..............92
UsingtheNETUSEcommand.......................93
WindowsNT4.0......................................94
LPRprinting.....................................94
Internetprinting ..................................95
MicrosoftNetworkSharedprinting....................95
Installing a printer driver. . . . . . . . . . . . . . ..............96
v
Page 6

UsingtheNETUSEcommand.......................97
Macintosh...........................................98
AppleTalkprinting.................................98
OS/2...............................................98
LPRprinting.....................................99
NetBEUIprinting.................................102
Chapter 7 Settings for NetWare Server
IntroductiontoNetWareSettings........................105
Supportedsystems...............................105
Aboutmodes....................................105
InstructionsforUsingNetWare..........................107
Using Bindery Print Server (NetWare 3.x/4.x) . . . ...........108
UsingNDSPrintServer(NetWare4.x/5.x/6.0)..............109
UsingRemotePrinterMode(NetWare3.x)................110
UsingBinderyRemotePrinterMode(NetWare4.x)..........114
Using NDS Remote Printer Mode (NetWare 4.x/5.x/6.0) . . . . . .116
UsingtheEpsonNetNDPSGateway.....................122
Outlineofsettings................................122
Installing EpsonNet NDPS Gateway on your
NetWareserver................................123
Uploading printer driver files to the RMS . . . ...........124
CreatinganNDPSManager........................125
CreatingaPrinterAgent...........................125
Configuring for NetWare using EpsonNet WinAssist . . . . .131
Setting the printer on client workstations . . . ...........131
InstructionsforUsingaDial-UpNetwork..................132
Usingadial-upnetworkineachmode................133
When there is a primary server at the dial-up destination .133
Whenthereisaprimaryserverinthelocalnetwork......135
vi
Page 7

Chapter 8 Settings for UNIX
IntroductiontoUNIXSettings...........................137
lprfilters...........................................137
Setting Up Different UNIX Systems Using the lpr Command. . . 138
Setting up for SunSoft Solaris 2.4 or later .............139
Setting up for SunOS 4.1.4 or later . . . . . .............140
Setting up for IBM AIX 3.2.5 or later and 4.1.3 or later . . . 141
Setting up for HP-UX 9.05 or later . . . . . . .............142
Setting up for SCO UNIX 4.2 or later (Open Server) . . . . . 143
UsingtheftpCommand...............................144
Chapter 9 EpsonNet Direct Print
AboutEpsonNetDirectPrint............................147
SystemRequirements................................147
Installing EpsonNet Direct Print . . . . . . . . . . . . .............148
Setting Up Your Printer Using EpsonNet Direct Print. . . . . . . . . 149
Adding a printer located in the same segment. . . . . . . . . . 149
Adding a printer beyond a router . . . . . . . .............151
AddingaprinterfromthePrintersfolder..............153
Installing the printer driver . . . . . . . . . . . . .............155
ConfiguringthePrinterPort............................156
WindowsMe/98/95/NT4.0.........................156
WindowsXP/2000...............................158
Chapter 10 EpsonNet Internet Print
About EpsonNet Internet Print . . . . . . . . . . . . . .............161
SystemRequirements................................162
Installing EpsonNet Internet Print. . . . . . . . . . . .............162
Setting Up Your Printer Using EpsonNet Internet Print . . . . . . . 163
Windows98/95..................................163
WindowsNT4.0.................................167
StatusAlertWindow..................................171
vii
Page 8

Chapter 11 EpsonNet WebAssist
AboutEpsonNetWebAssist............................173
SupportedWebbrowser...........................173
AboutWebbrowsersetting.........................173
Configuring Your Printer Using EpsonNet WebAssist . . . . . . . .174
OpeningScreen.....................................179
Index..........................................179
Menu..........................................180
Information-PrinterScreens...........................181
Deviceinformation...............................181
Consumableinformation...........................182
Configuration-Printerscreens..........................183
Inputinformation.................................183
Printinformation.................................184
EmulationInformation.............................188
InterfaceInformation..............................193
Information-NetworkScreen...........................194
Generalinformation ..............................194
Configuration-NetworkScreens........................195
NetWare.......................................195
TCP/IP ........................................197
AppleTalk......................................198
NetBEUI.......................................198
IPP...........................................199
SNMP.........................................199
OptionalScreens ....................................201
Administrator....................................201
Reset .........................................201
Password......................................202
viii
Page 9

Chapter 12 EpsonNet WebManager
AboutEpsonNetWebManager..........................203
SystemRequirements................................204
EpsonNetWebManagerFunctions.......................206
EpsonNetWebManagerOperatingStructure...............207
Installing EpsonNet WebManager . . . . . . . . . . .............209
StartingEpsonNetWebManager........................210
OpeningtheOnlineGuide.............................211
Chapter 13 Troubleshooting
GeneralProblems....................................213
ProblemsSpecifictoYourNetworkEnvironment............217
WindowsMe/98/95environment....................217
WindowsNTenvironment .........................218
Macintoshenvironment ...........................219
NetWareenvironment ............................220
ReformattingtheHardDiskDrive........................221
DisablingtheStandbyMode............................222
Appendix A Tips for Administrators
InstructionsonUsingaDial-UpRouter ...................223
UsingthePrinterSoftwarewithWindows..................224
Registering form overlay data on an
OptionalHardDiskDrive........................224
DeletingtheformoverlaydataintheHardDiskDrive....225
DistributingthePrinterDriverAutomatically................225
EpsonNet WebManager. . . . . . . . . . . . . . .............226
EpsonNetNDPSGateway.........................226
FunctionofUniversalPlugandPlay......................226
Uninstalling Software .................................227
WindowsMe/98/95/2000/NT4.0....................227
WindowsXP....................................228
WindowsNT3.51................................228
Macintosh......................................228
ix
Page 10

Appendix B SettinganIPAddressforthePrinter
Setting an IP Address on the Printer’s Control Panel . . . . . . . . .229
NetworkMenu...................................231
AUXMenu .....................................233
Setting an IP Address Using the arp/ping Command . . . . . . . . .234
CheckingtheLAN................................235
Setting and checking the new IP address. . . ...........236
Appendix C Specifications
NetworkSoftware....................................239
Network Connectors . . . . . . . ...........................239
Index
x
Page 11

Introduction
About Your Printer
Your printer has a built-in Ethernet interface and can connect
anywhere on your network using 10Base-T or 100Base-TX. The
interface, which is called the Internal Print Server in this manual,
automatically selects the correct standard when it connects to a
network. In addition, it supports and automatically selects the
IEEE 802.2, IEEE 802.3, Ethernet II, and Ethernet SNAP network
protocols.
Because the InternalPrint Server supports multiple protocolsand
automatically detects protocols on your network, you can print
from Microsoft
®
OS/2 applications.
IBM
Use EpsonNet WinAssistor MacAssist,the configuration utilities
provided with your printer, to quickly and easily configure the
Internal Print Server to use protocols such as TCP/IP, NetWare,
NetBEUI, AppleTalk
®
Windows®,Apple®Macintosh®,UNIX®,and
®
, IPP, and SNMP.
Note:
The EpsonNet WinAssist/MacAssist utility configures the Internal
Print Server to work only with protocols that exist on your network.
This does notimply that youcan use allof the above-mentionedprotocols
in your network or operating system. The protocols that the Internal
Print Server can use may vary depending on the operating systems used
and the network configuration.
Introduction
1
Page 12

About This Guide
This Administrator’sGuide contains information about using your
printer on a network. It includes how to install the configuration
software and change network settings of your printer and
computers.
For information about your printer, see your Reference Guide.
Note:
❏ To read the online guide, you must have Adobe® Acrobat® Reader
4.0 (or later) installed on your computer.
❏ This manual is written fornetwork administrators,and manyof the
steps included here require detailed network knowledge and
administrator rights.
❏ The term network administrator refers to the person responsible for
maintaining the network. “Administrator” is synonymous with
“Supervisor” in this manual.
❏ Some screen shotsin this manuallist a printer nameother than your
printer. This difference does not alter the instructions.
Warnings, Cautions, and Notes
Warnings must be followed carefully to avoid bodily injury.
w
Cautions must be observed to avoid damage to your equipment.
c
Notes contain important information and useful tips on the operation
of your printer.
2
Introduction
Page 13

Functions of the Internal Print Server
❏ Your printer has a built-in Ethernet interface, which is called
Internal Print Server in this manual.
❏ TheInternal Print Serverautomatically selects either10Base-T
or 100Base-TX when it is connected to a network.
❏ An IP address is automatically assigned to the Internal Print
Server even if there is no DHCP server on your network.
❏ The Internal Print Server is equipped with SSDP (Simple
Service Discovery Protocol) to support Universal Plug and
Play.
❏ The Internal PrintServer supportsmultiple protocols, suchas
TCP/IP, NetWare, NetBEUI, AppleTalk, IPP, and SNMP.
❏ Becausethe Internal PrintServer supports PrinterMIB,SNMP
settings such as SNMP community, IP trap, and IPX trap
settings become available with EpsonNet WinAssist and
WebAssist.
Operating Environment
Your printer supports the following environments.
OS Version Protocol
Windows 98/95 - TCP/IP (using EpsonNet Direct
Print)
IPP (using EpsonNet Internet
Print)
NetBEUI
Introduction
3
Page 14

OS Version Protocol
Windows Me - TCP/IP (using EpsonNet Direct
Print)
IPP
NetBEUI
Windows XP - TCP/IP (using LPR, Standard
TCP/IP Port, or EpsonNet Direct
Print)
IPP
Windows 2000 - TCP/IP (using LPR, Standard
TCP/IP Port, or EpsonNet Direct
Print)
IPP
Windows NT 4.0 - TCP/IP (using LRP or EpsonNet
Macintosh Mac OS 9.x, 8.x,
7.6.x
System 7.5.x
NetWare 3.x Bindery mode
4.x/IntranetWare NDS mode
5.x/6.0 NDS Queue-based print system
OS/2 (OS/2 Warp
Connect, OS/2 Warp
Server)
V3
V4
Direct Print)
IPP (using EpsonNet Internet
Print)
NetBEUI
AppleTalk
Bindery emulation mode
NDPS
TCP/IP (lprportd)
NetBEUI
4
Introduction
Page 15

OS Version Protocol
UNIX Sun OS 4.1.4 or
later: SPARC
SunSoft Solaris
2.4 or later:
SPARC and x86
SCO UNIX 4.2 or
later
SCO UnixWare
2.01 or later
HP/UX 9.05 or
later
IBM AIX 3.2.5 or
later and 4.1.3 or
later
lpr, ftp
Note:
❏
Only the Intel version of Windows NT is supported.
❏
The multi-user environment of Mac OS 9 is not supported.
❏
If youuse theprinter in a dial-up routerenvironment, youmust set
an IP address for the printer. Make sure the IP address is suitable
for the segment; incorrect IP address may generate unexpected
dial-up.
About the Software
❏ EpsonNet WinAssist is a Windows-based configuration
utility for administrators that allows you to configure the
Internal Print Server for TCP/IP, NetWare, NetBEUI,
AppleTalk, IPP, and SNMP. In particular, you can use
EpsonNet WinAssist Easy Setup to easily configure the
Internal Print Server for TCP/IP and NetBEUI. See “About
EpsonNet WinAssist” on page 41 for detailed information.
Introduction
5
Page 16

❏ EpsonNet MacAssist is a Macintosh-based configuration
utility for administrators that allows you to configure the
Internal Print Server for TCP/IP and AppleTalk. See “About
EpsonNet MacAssist” on page 69 for detailed information.
❏ EpsonNet WebAssist is a web-based configuration utility
that allows you to configure the Internal Print Server for
TCP/IP,NetWare, NetBEUI, AppleTalk,IPP,andSNMP. You
can start EpsonNet WebAssist from EpsonNet WinAssist or
MacAssist, or by typing the IP address of the Internal Print
Server as the URL in your browser. See “About EpsonNet
WebAssist” on page 173 for detailed information.
❏ EpsonNet Direct Print is a utility that enables TCP/IP
printing for Windows Me/98/95/XP/2000/NT 4.0.
(Windows XP/2000/NT 4.0 also support OS standard LPR
printing.) See“About EpsonNetDirect Print” on page 147 for
detailed information.
❏ EpsonNet Internet Print is a utility that supports printing
across the Internet using Internet Printing Protocol for
Windows 98/95/NT 4.0. See “About EpsonNet Internet
Print” on page 161 for detailed information.
❏ EpsonNet WebManager is a web-based utility that helps
network administrators to easily manage network devices.
See “About EpsonNetWebManager” on page203 for detailed
information.
❏ EPSON Status Monitor 3 is a utility that comes with your
printer driver andgives youinformation about your printer’s
current status. See the Reference Guide for detailed
information.
6
Introduction
Page 17

Chapter 1
Getting Started
Overview
This section describes the general procedure on how to use a
printer on a network.
1. Set up your printer
Set paper and toner in the printer, as necessary. See the
Guide
.
2. Select a printing method
Select a printing method appropriate for your network
environment and operating system. See “Selecting a Printing
Method” on page 8 for more details.
3. Connect your printer to the network
Connect your printer to the hub with an Ethernet cable. See
“Connecting Your Printer to the Network” on page 18 for more
details.
1
1
1
1
Reference
1
1
1
1
1
4. Check the network settings of your computer
Check the network settings such as IP address and subnet mask
of your computer. Install network protocols if necessary. See
“About Installing Components on Your Computer” on page 27
for more details.
Getting Started
1
1
1
7
Page 18

5. Configure the Internal Print Server
Use EpsonNet WinAssist or MacAssist to configure the Internal
Print Server. Set its IP address, subnet mask, default gateway,
printer name, etc. If you print via a NetWare server, set up the
printing environment on the server first. See “About EpsonNet
WinAssist” on page 41 or “About EpsonNet MacAssist” on page
69 for more details.
6. Install the printer driver
Install the printer driver from the CD-ROM that comes with the
printer. See “About Installing the Printer Driver” on page 77 for
more details.
Selecting a Printing Method
If necessary, use this section to help you select a printing method.
Printing from Windows
Check if there is a Windows XP/2000/NT print server on your
network, and then use the suggestions below.
Note:
Only the recommended printing methods are introduced here. See
“Features of the Printing Methods” on page 9 for more methods.
If no Windows XP/2000/NT print server exist
Use a printing method appropriate to your operating system, as
follows:
❏ For Windows Me/98/95
We recommend TCP/IP printing via EpsonNet Direct Print.
See “Easy Setup Procedures” on page 15.
8
Getting Started
Page 19

❏
For Windows XP/2000/NT
Werecommend TCP/IP printing viaLPR.See “Windows XP”
on page 81, “Windows 2000” on page 88, or “Windows NT
4.0” on page 94.
1
If a Windows XP/2000/NT print server exists
On the server, set the printer to connect with LPR and turn it into
a sharedprinter. Yourclients can then print to thisshared printer.
Printing from Macintosh
Use AppleTalk toprintfrom Macintosh. See “Macintosh”on page
40.
Features of the Printing Methods
This section describes features of the printing methods available
for you to choose.
LPR (TCP/IP) printing
Advantages
1
1
1
1
1
1
1
1
❏
No print server (computer) is required.
❏
No special utility for Windows XP/2000/NT is required.
❏
You can see the printer status using EPSON Status Monitor 3.
❏
For Windows XP/2000/NT, you can create a print log using
the event viewer.
❏
You can print via a router.
Getting Started
1
1
1
9
Page 20

Disadvantages
❏ You need to set up TCP/IP.
❏ For Windows Me/98/95, EpsonNet Direct Print must be
installed on all computers to use for printing.
Internet printing
Advantages
❏ No proxy server (computer) is required.
❏ You can print to the printer over the Internet.
Disadvantages
❏ EPSON Status Monitor 3 cannot be used.
❏ TCP/IP and DNS settings are required.
❏ For Windows Me/98/95, EpsonNet Internet Print must be
installed on all computers used for printing.
❏ For WindowsXP/2000, you cannot share the Internet printer.
Microsoft Network Shared printing
Advantages
❏ Easy toset up (IP address isnot required if NetBEUI protocol
is installed).
❏ No print server (computer) is required.
❏ No special print utility is required.
10
Getting Started
Page 21

Disadvantages
❏
EPSON Status Monitor 3 cannot be used.
❏
You cannot print via a router.
❏
It takes a longer time to start printing because more time is
required to search for a network printer.
1
1
1
Ethernet Operation
Status lights
The indicator lights (one green and one orange) provide you with
important information on the operations of the Internal Print
Server.
The green light is a data transmission light which flashes when
the host interface receives data.
The orange light indicates whether the Internal Print Server is
connected to 10Base-T or 100Base-TX. The light is on when the
connection is100Base-TX, or off when theconnection is 10Base-T.
Note:
See the Reference Guide for the locations of the lights.
Network connector
RJ-45 connector:
Connect a Category-5 shielded twisted pair cable to the RJ-45
connector on the Internal Print Server. You can use this cable for
both 10Base-T and 100Base-TX.
1
1
1
1
1
1
1
1
1
Getting Started
11
Page 22

Caution:
You mustuse aCategory-5 shielded twisted-pair cable to connect
c
the Internal Print Server to a network to prevent malfunctions.
Printing a Network Status Sheet
Before you start configuring the Internal Print Server, be sure to
print a network status sheet which contains important
information such as the current configuration and the MAC
address of the Internal Print Server.
To print a network status sheet, follow the steps below.
1. Press the Enter, Up, Down,orBack button on the printer's
control panel once to enter the SelecType mode. The LCD
panel displays
2. Press the Enter button.
Information Menu
.
3. Press the Downbutton until
on the LCD panel.
4. Finally, pressthe Enterbutton to printa network status sheet.
Note:
❏ You cannot print a status sheet in the following cases: the printer
has started printing, it is offline, or it is not ready to print.
❏ SeetheReferenceGuideformoreinformationontheprinter’s
control panel.
12
Getting Started
Network Status Sheet
appears
Page 23

Initializing Your Printer
To initialize your printer, turn on the printer while pressing the
Job Cancel
c
button on the printer’s control panel.
Caution:
Note that all changes made to the printer and network settings
are cleared when you initialize the printer using this method.
Therefore, do not initialize your printer except in the case you
forgetthe EpsonNet WinAssist/MacAssist/WebAssistpassword.
1
1
1
1
1
1
1
Getting Started
1
1
1
1
1
13
Page 24

14
Getting Started
Page 25

Chapter 2
Easy Setup for Windows Me/98/95
Easy Setup Procedures
This chapterdescribes how WindowsMe/98/95 users can easily
set up the printer on the network. TCP/IP printing is
recommended here.
To set up the printer on the network, install the necessary
protocols and the printer driver, using the following general
procedure.
1. Set up your printer. See the
2. Install the TCP/IP protocol on the computer used for
configuring the Internal Print Server. Also, set the IP address
and the subnet mask. If there is a router on the network, set
the gateway address as well.
3. Use an Ethernet cable to connect your printer to the network.
Reference Guide
for details.
2
2
2
2
2
2
2
2
4. Use EpsonNet WinAssist EasySetup to set the IP address of
the Internal Print Server.
5. For client:
Install the TCP/IP protocol onthe clientcomputer andset the
IP address and the subnet mask. If there is a router on the
network, set the gateway address as well. Also, install the
printer driver and the EpsonNet Direct Print utility that
enables TCP/IP printing.
Easy Setup for Windows Me/98/95
2
2
2
2
15
Page 26
Making TCP/IP Settings for the Computer
Install the TCP/IP protocol and set the IP address for the
computer, using the following procedure. Be sure to use an
address that does not conflict with any other device on the
network.
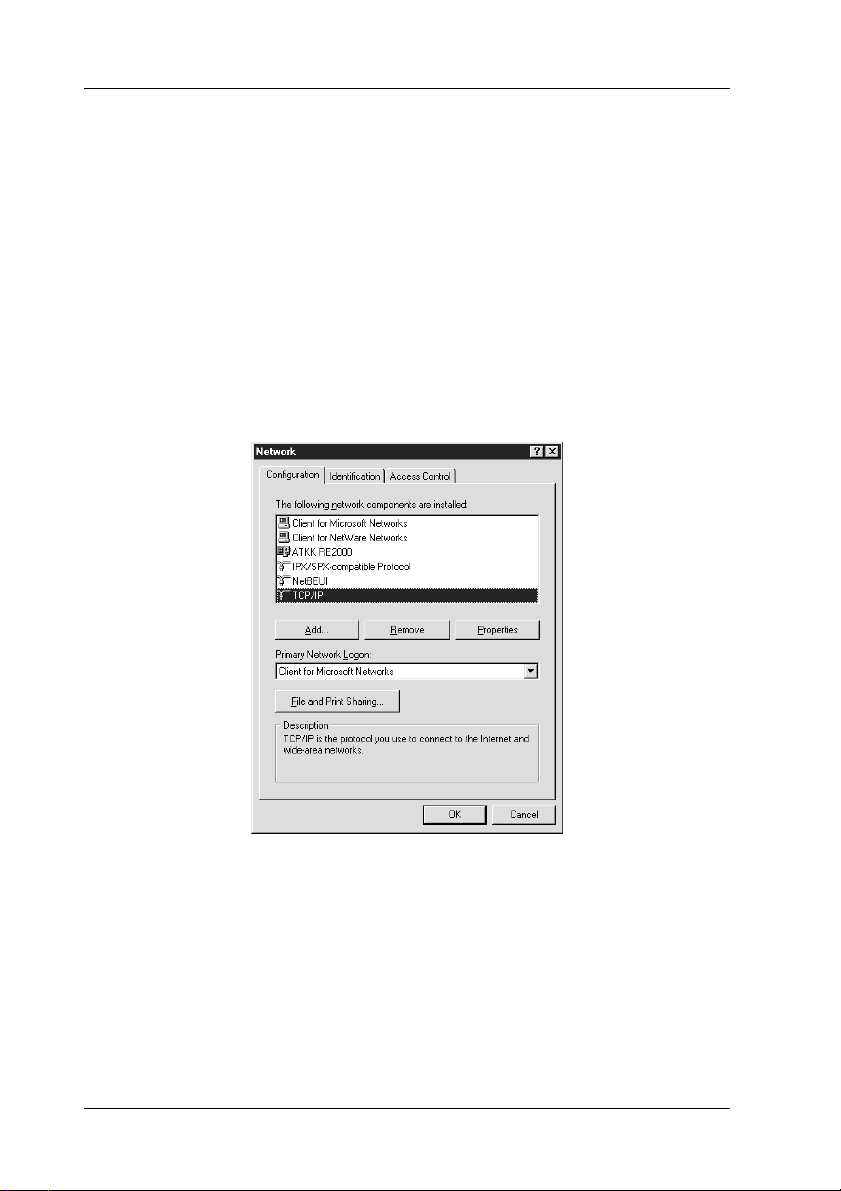
1. Click Start, point to Settings, and then select Control Panel.
2. Double-click the Network icon, and check if TCP/IP is in the
list of installed network components on the Configuration
menu.
3. If TCP/IP is not in the list, click Add.
16
Easy Setup for Windows Me/98/95
Page 27
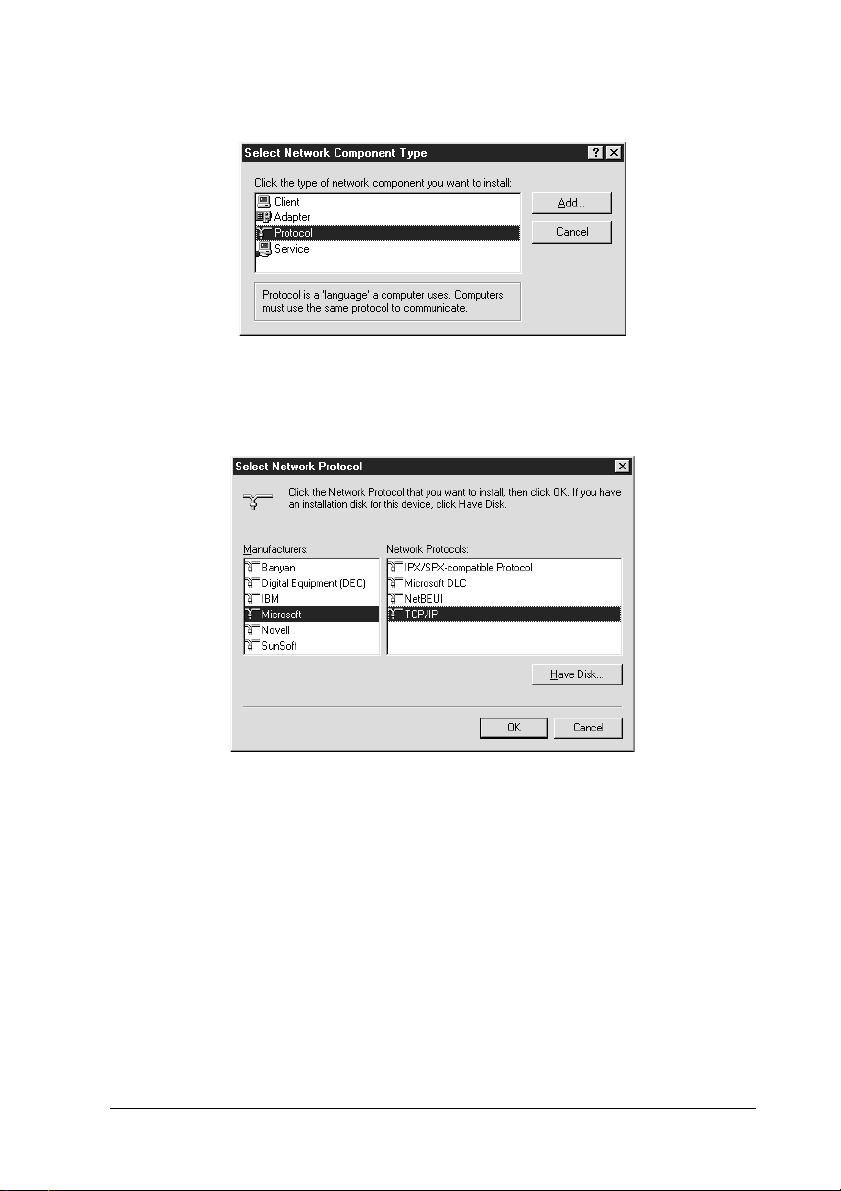
4. Select
Protocol
and click
Add
.
2
2
2
5. Select
6. Double-click
7. Set the IP address and the subnet mask. Then restart the
Microsoft
the Network protocols list. Then clickOK.
TCP/IP Properties dialog box.
computer.
from the Manufacturerslist and
TCP/IP
on the Configuration menu to open the
TCP/IP
from
2
2
2
2
2
2
2
2
Easy Setup for Windows Me/98/95
2
17
Page 28

Connecting Your Printer to the Network
Follow theinstructions belowto connectthe InternalPrint Server
to the network.
1. Make sure that your printer is turned off.
2. Connect one end of the network cable to the RJ-45 connector
on theInternal Print Server, and the otherend to the network.
Caution:
You must use a Category-5 shielded twisted-pair cable to
c
connect the Internal Print Server to prevent malfunctions.
Note:
❏ The Internal Print Server is set to the default IP address
“192.168.192.168”. This private IP address may conflict with
any otherdevice on your network. Therefore, before connecting
the Internal Print Server to the network, make sure this IP
address does not already exist on the network. If it does, turn
off the device that is using this IP address.
❏ Donot connector disconnect thenetworkcable when theprinter
is on.
❏ Be sure to use a hub to connect the Internal Print Server to the
network.
3. Turn on your printer. After the status lights go off, print a
network status sheet.
Caution:
After turning off the printer, wait until the status lights go out
c
before turning itback on; otherwisethe Internal PrintServer may
not work correctly.
18
Easy Setup for Windows Me/98/95
Page 29

Setting an IP address to the Printer Using EpsonNet Easy Setup
2
You can set an IP address to the Internal Print Server, using
EpsonNet WinAssist Easy Setup.
Note:
Thecomputertouseforthefollowingstepsmustbeinthesamesegment
as the printer.
1. Insert the software CD-ROM shipped with the printer in the
CD-ROM drive.
2. The EPSON Installation Program starts automatically.
If the EPSON Installation Program does not start
Next
Start
.
and then
automatically, click
and then clickOK. (Substitute the appropriate letter for your
CD-ROM drive if necessary.)
3. Double-click
When the EpsonNet WinAssist Easy Setup dialog box
appears, click
4. Read the Usage Agreement and click
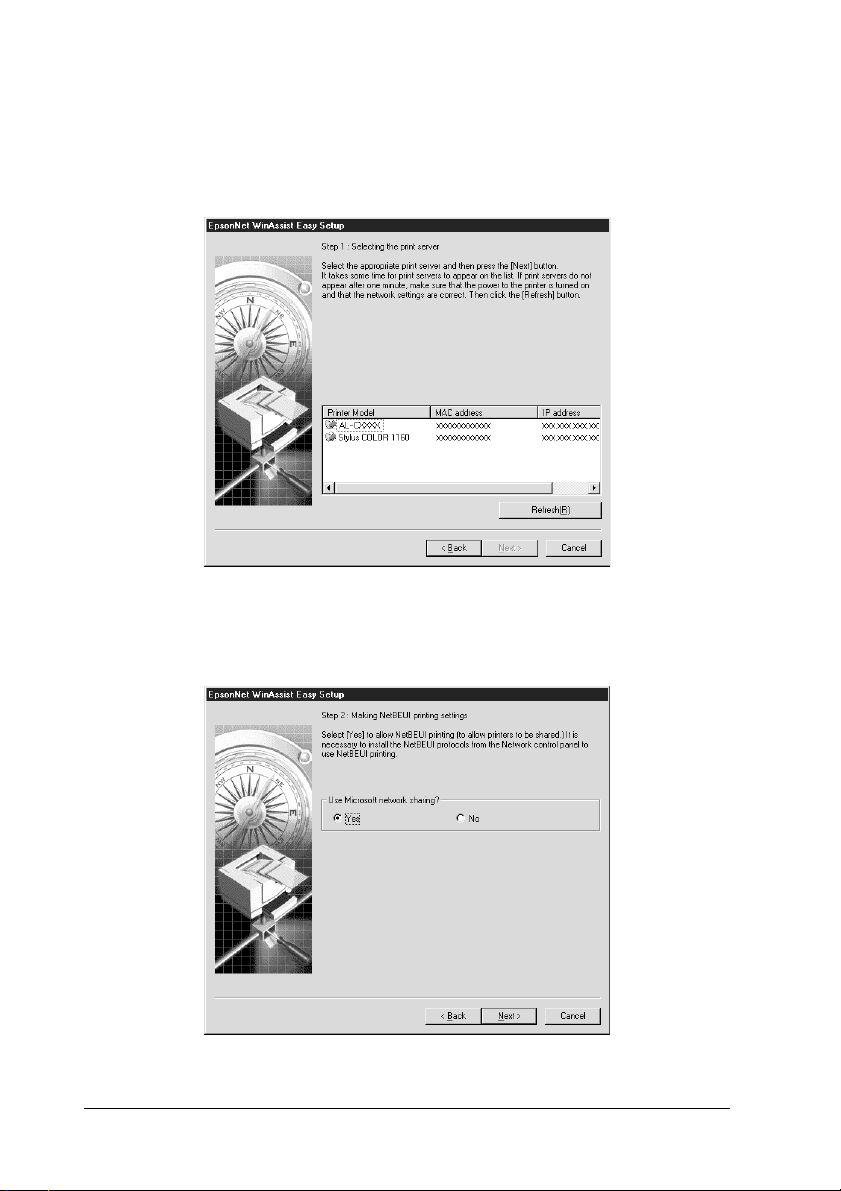
5. Select the target printer and click
Run EpsonNet WinAssist Easy Setup
Run
Next
.Type
Next
.
D:\EPSETUP
.
.
2
2
2
2
2
2
2
2
Easy Setup for Windows Me/98/95
2
2
2
19
Page 30
Note:
If the same printer model name appears multiple times in the list,
you can distinguish theprinters by theirMAC addresses,which are
found on the network status sheet.
6. Specify whether touse the Microsoftnetwork sharing service,
and then click Next. (If you select No, proceed to step 9.)
20
Easy Setup for Windows Me/98/95
Page 31

7. Check the host name (NetBIOS name) and change it if
necessary. Click
8. Select
Yes
step 10.)
Next
to proceed.
and then click
Next
. (If you selectNo,proceedto
2
2
2
2
2
2
2
Easy Setup for Windows Me/98/95
2
2
2
2
2
21
Page 32

9. Select Auto or Manual.IfyouselectAuto, DHCP becomes
available and assigns an IP address automatically. If you
select Manual, you can enter the IP address manually. Click
Next.
Note:
❏ We recommend that you select Manual and enter the IP
address. If you select Auto, every time you turn on the printer
the IP address of the Internal Print Server changes so that you
need to change the printer port setting accordingly.
❏ To use the DHCP server, make sure it is installed on your
computerand configured correctly.Seeyouroperating system’s
online help for detailed instructions.
10. Check your settings and click Send.
If you have set a password for the Internal Print Server, the
Password dialogbox appears. Enter yourpassword (up to 20
characters) and click OK to save your settings. Follow the
on-screen instructions.
22
Easy Setup for Windows Me/98/95
Page 33

Caution:
It takes two or three minutes to send new settings to the
c
Internal Print Server. Do not turn off your printer until an
on-screen message appears instructing you to do so.
2
Starting Easy Setup from the Start menu
If you have already installed EpsonNet WinAssist on your
computer, you canstart EpsonNet WinAssistEasy Setup from the
Start menu.
Start
Click
WinAssist
WinAssist Easy Setup dialog box appears, click
to step 4 in “Setting an IP address to the Printer Using EpsonNet
Easy Setup” on page 19 for detailed instructions on using
EpsonNet WinAssist Easy Setup.
,pointto
. Click
Programs
EpsonNet EasySetup
and then select
EpsonNet
. When the EpsonNet
Next
and then go
Preparing the Computer for Network Printing
If you are the network administrator, instruct your clients to
install the printer driver and the network utilities (such as
EpsonNet Direct Print) on their computers so they are ready for
network printing. EpsonNet Direct Print must be installed on all
the computers to use TCP/IP printing.
2
2
2
2
2
2
2
2
Installing EpsonNet Direct Print
To print using TCP/IP from Windows Me/98/95, the computer
must have EpsonNet Direct Print installed. Use the following
procedure to install EpsonNet Direct Print.
Easy Setup for Windows Me/98/95
2
2
2
23
Page 34

Note:
Installing EpsonNet Direct Print creates the Epson_lpr icon in the
Network Neighborhood. Double-click the Epson_lpr icon to see the
printer available for TCP/IP printing.
1. Insert the software CD-ROM shipped with the printer in the
CD-ROM drive.
2. The EPSON Installation Program starts automatically.
If the EPSON Installation Program does not appear
automatically, click Start and then Run.Type
D:\EPSETUP.EXE and then click OK. (Substitute the
appropriate letter for your CD-ROM drive if necessary.)
3. Double-click Install EpsonNet Direct Print;oryoucanalso
select Install EpsonNet Direct Print and then click the arrow
at the top right.
4. Follow the on-screen instructions and continue.
5. When the installation is complete, restart the computer.
Note:
For more detailsonEpsonNet Direct Print, see“About EpsonNet Direct
Print” on page 147.
Installing the printer driver
Use the following procedure to install the printer driver which
comes with the printer.
1. Click Start, point to Settings, and then select Printers.
2. In the Printer window, double-click Add Printer.
3. Select the Network Printer radio button and then click Next.
24
Easy Setup for Windows Me/98/95
Page 35

4. Click
Browse
printer which has the IP address you have set and then click
OK
.
, and then double-click
Epson_lpr
. Select the
2
5. Click
6. Click the
7. Insert the software CD-ROM shipped with the printer in the
8. Click
9. ClickOK.
10. Select the target printer name and then click
11. Follow the on-screen instructions to install the printer driver.
Your computer is now set up to print with LPR via EpsonNet
Direct Print.
Next
.
Have Disk
the CD-ROM shipped with the printer.
CD-ROM drive.
Browse
, and then select the target folder. ClickOK.
button to install the printer driver from
Next
.
2
2
2
2
2
2
2
2
Easy Setup for Windows Me/98/95
2
2
2
25
Page 36

26
Easy Setup for Windows Me/98/95
Page 37

Chapter 3
Installing Components on Your Computer
About Installing Components on Your Computer
Before configuring theInternal Print Server andprinting from the
computer, you need to install the necessary components (such as
TCP/IP, NetBEUI, etc.), depending on the printing method you
want to use. See the section in this chapter appropriate for your
operating system.
Windows Me/98/95
For Windows Me/98/95, use the following procedure to install
the necessary components.
Note:
❏
The Windows Me/98/95 CD-ROM may be required during the
installation.
3
3
3
3
3
3
3
3
❏
When using TCP/IP or IPP for printing, you need to set the IP
address, the subnet mask, and the default gateway of the computer.
1. Click
Start
, point to
Settings
Installing Components on Your Computer
, and then select
Control Panel
.
27
3
3
3
3
Page 38

2. Double-click the Network icon. Check if the following
necessary components are in the list of installed network
components on the Configuration menu. If the components
are already installed, go to “About EpsonNet WinAssist” on
page 41.
28
The following table lists the components required for
configuring the Internal Print Server with EpsonNet
WinAssist.
EpsonNet WinAssist’s setting
screens
TCP/IP, AppleTalk, IPP, SNMP (IP trap) TCP/IP
NetBEUI NetBEUI
NetWare, SNMP (IPX trap) NetWare Client such as
Necessary components
Client32 or IntranetWare Client
Installing Components on Your Computer
Page 39

Note:
Do not use Novell Client for Windows 95/98 version 3.00 and
Novell Client for Windows NT version 4.50 when using the
following modes: NetWare 3.x/4.x Bindery Print Server mode,
NetWare 3.x Remote Printer mode, NetWare 4.x Bindery Remote
Printer mode, and NetWare 4.x/5.x NDS Remote Printer mode.
Thefollowing table liststhecomponentsrequired fornetwork
printing.
Printing method Necessary components
LPR or Internet printing TCP/IP
3
3
3
3
Microsoft Network Shared
printing
Printing via NetWare server Some examples of Microsoft
3. If the necessary components are not in the list, click
install them, as described below.
For LPR or Internet printing:
Protocol
Select
Manufacturers list and
list. Then clickOK.
For Microsoft Network Shared printing:
To useTCP/IP, seethe description described earlier to install
TCP/IP.
To use NetBEUI, select
Microsoft
Network Protocols list. Then clickOK.
Client
Select
Manufacturers list and
Network Clients list. Then clickOK.
and then click
from the Manufacturers list and
and then click
TCP/IP or NetBEUI
Client for Microsoft Networks
components are:
- IPXl/SPX-compatible Protocol
- Client for NetWare Networks
Add
.Select
TCP/IP
Protocol
Clientfor Microsoft Networks
from the Network Protocols
and then click
Add
. Select
Microsoft
NetBEUI
Microsoft
Add
from the
Add
to
from the
. Select
from the
from the
3
3
3
3
3
3
3
3
Installing Components on Your Computer
29
Page 40

For printing via NetWare server:
Select Protocol and then click Add.SelectMicrosoft from the
Manufacturers list and IPX/SPX-compatible Protocols from
the Network Protocols list. Then click OK.
Select Client and then click Add. Select Microsoft from the
Manufacturers listand ClientforNetWare Networksfrom the
Network Clients list. Then click OK.
4. For LPR, Internet, Microsoft Network Shared printing:
Double-click TCP/IP on the Configuration menu to open the
TCP/IP Properties dialog box. Set the IP address, the subnet
mask,etc.andthenclickOK.
5. Restart the computer.
The necessary components are now installed. Go to “About
EpsonNet WinAssist” on page 41.
Windows XP
For Windows XP, use the following procedure to install the
necessary components.
Note:
❏ The Windows XP CD-ROM may be required during the
installation.
❏ When using TCP/IP or IPP for printing, you need to set the IP
address, the subnet mask, and the default gateway of the computer.
1. Click Startand then Control Panel.ClickNetworkandInternet
Connections,andthenselectNetwork Connections.
2. Under LAN or High-Speed Internet,clicktheLocal Area
Connection icon.
30
Installing Components on Your Computer
Page 41

3. Under
connection
4. Check ifthe following necessary components are inthe list. If
theyare alreadyinstalled, goto “AboutEpsonNet WinAssist”
on page 41.
Network Tasks
.
Change settings of this
,click
3
3
3
3
3
3
3
Thefollowing table liststhecomponentsrequired fornetwork
printing.
Printing method Necessary components
LPR or Internet printing Internet Protocol (TCP/IP)
Microsoft Network Shared
printing
Printing via NetWare server Some examples of Microsoft
Installing Components on Your Computer
Internet Protocol (TCP/IP)
Client for Microsoft Networks
components are:
-NWLinkIPX/SPX/NetBIOSCompatible
Transport Protocol
- Client Service for NetWare
31
3
3
3
3
3
Page 42

5. If the necessary components are not in the list, click Install to
install them, as described below.
For LPR or Internet printing:
Internet Protocol (TCP/IP) is installed by default. You cannot
add or delete it.
For Microsoft Network Shared printing:
Select Client and then click Add. Select Client for Microsoft
Networks and then click OK.
For printing via NetWare server:
Select Service and then click Add. Select Service Advertising
Protocol and then click OK. NWLink IPX/SPX/NetBIOS
Compatible Transport Protocol is installed.
Select Client and then click Add. Select Client Service for
NetWare and then click OK.
6. For LPR, Internet, Microsoft Network Shared printing:
Double-click Internet Protocol (TCP/IP) on the Local Area
Connection Properties dialog box to open the Internet
Protocols (TCP/IP) Properties dialog box. Set the IP address,
the subnet mask, etc. and then click OK.
7. Restart the computer.
The necessary components are now installed. Go to “About
EpsonNet WinAssist” on page 41.
Windows 2000
For Windows 2000, use the following procedure to install the
necessary components.
Note:
❏ The Windows 2000 CD-ROM may be required during the
installation.
32
Installing Components on Your Computer
Page 43

❏
When using TCP/IP or IPP for printing, you need to set the IP
address, the subnet mask, and the default gateway of the computer.
1. Click
2. Right-click the desired network connection and then select
3. Check ifthe following necessary components are inthe list. If
Start
, point to
Dial-up Connections
screen appears.
Properties
theyare alreadyinstalled, goto “AboutEpsonNet WinAssist”
on page 41.
.
Settings
. The Network and Dial-up Connections
, and then select
Network and
3
3
3
3
3
3
3
Installing Components on Your Computer
3
3
3
3
3
33
Page 44

The following table lists the components required for
configuring the Internal Print Server with EpsonNet
WinAssist.
EpsonNet WinAssist’s setting
screens
TCP/IP, AppleTalk, IPP, SNMP (IP trap) Internet Protocol (TCP/IP)
NetBEUI NetBEUI
NetWare, SNMP (IPX trap) NetWare Client such as
Necessary components
Client32 or IntranetWare Client
Note:
Do not use Novell Client for Windows 95/98 version 3.00 and
Novell Client for Windows NT version 4.50 when using the
following modes: NetWare 3.x/4.x Bindery Print Server mode,
NetWare 3.x Remote Printer mode, NetWare 4.x Bindery Remote
Printer mode, and NetWare 4.x/5.x NDS Remote Printer mode.
Thefollowing table liststhecomponentsrequired fornetwork
printing.
Printing method Necessary components
LPR or Internet printing Internet Protocol (TCP/IP)
Microsoft Network Shared
printing
Internet Protocol (TCP/IP) or NetBEUI
Client for Microsoft Networks
Printing via NetWare server Some examples of Microsoft
components are:
-NWLinkIPX/SPX/NetBIOS Compatible
Transport Protocol
-ClientServiceforNetWare
4. If the necessary components are not in the list, click Install to
install them, as described below.
34
Installing Components on Your Computer
Page 45

For LPR or Internet printing:
Protocol
Select
Protocoldialog box,select
clickOK.
and then click
InternetProtocol(TCP/IP)
Add
. In the Select Network
andthen
3
For Microsoft Network Shared printing:
To useInternet Protocol, see the description describedearlier
to install Internet Protocol (TCP/IP).
To use NetBEUI, select
NetBEUI Protocol
Client
Select
Networks
For printing via NetWare server:
Select
IPX/SPX/NetBIOS Compatible Transport Protocol
clickOK.
Select
NetWare
For LPR, Internet, Microsoft Network Shared printing:
5.
Double-click
menu to open the TCP/IP Properties dialog box. Set the IP
address, the subnet mask, etc. and then clickOK.
6. Restart the computer.
The necessary components are now installed. Go to “About
EpsonNet WinAssist” on page 41.
and then click
and then clickOK.
Protocol
Client
and then click
and then click
and then clickOK.
Internet Protocol (TCP/IP)
Protocol
and then clickOK.
and then click
Add
. Select
Add
.Select
Add
. Select
Client for Microsoft
Client Service for
on theConfiguration
Add
NWLink
. Select
and then
3
3
3
3
3
3
3
3
Windows NT 4.0
For Windows NT 4.0, use the following procedure to install the
necessary components.
Installing Components on Your Computer
3
3
3
35
Page 46

Note:
❏ The Windows NT 4.0 CD-ROM may be required during the
installation.
❏ When using TCP/IP or IPP for printing, you need to set the IP
address, the subnet mask, and the default gateway of the computer.
1. Click Start, point to Settings, and then select Control Panel.
2. Double-click the Network icon in the Control Panel.
3. Check ifthe following necessary components are inthe list. If
theyare alreadyinstalled, goto “AboutEpsonNet WinAssist”
on page 41.
36
Installing Components on Your Computer
Page 47

The following table lists the components required for
configuring the Internal Print Server with EpsonNet
WinAssist.
3
EpsonNet WinAssist’s setting
screens
TCP/IP, AppleTalk, IPP, SNMP (IP trap) TCP/IP
NetBEUI NetBEUI
NetWare, SNMP (IPX trap) NetWare Client such as
Note:
Do not use Novell Client for Windows 95/98 version 3.00 and
Novell Client for Windows NT version 4.50 when using the
following modes: NetWare 3.x/4.x Bindery Print Server mode,
NetWare 3.x Remote Printer mode, NetWare 4.x Bindery Remote
Printer mode, and NetWare 4.x/5.x NDS Remote Printer mode.
Thefollowing table liststhecomponentsrequired fornetwork
printing.
Printing method Necessary components
LPR or Internet printing Protocols menu: TCP/IP
Services menu: Microsoft TCP/IP Printing
Microsoft Network
Shared printing
Printing via NetWare
server
Protocols menu: TCP/IP or NetBEUI
Services menu: Workstation
Some examples of Microsoft components are:
Protocols menu: NWLink IPX/SPX Compatible
Transport
Services menu: Client Service for NetWare
Necessary components
Client32 or IntranetWare Client
3
3
3
3
3
3
3
3
3
4. If the necessary components are not in the list, click
install them, as described below.
Installing Components on Your Computer
Add
to
3
3
37
Page 48

For LPR or Internet printing:
Selectthe Protocolstab and then clickAdd.Select TCP/IPfrom
the list and then click OK. Set theIP address,the subnetmask,
etc. and then click OK.
Select the Services tab and then click Add.SelectMicrosoft
TCP/IP Printing from the list and then click OK.
For Microsoft Network Shared printing:
To useTCP/IP, seethe description described earlier to install
TCP/IP.
To use NetBEUI, select the Protocols tab and then click Add.
Select NetBEUI from the list and then click OK.
Select the Services tab and then click Add. Select Workstation
from the list and then click OK.
38
Installing Components on Your Computer
Page 49

For printing via NetWare server:
Select the
IPX/SPX Compatible Transport
OK
.
Select the
Service for NetWare
Protocols
Services
tab and then click
tab and then click
from the list and then clickOK.
Add
.Select
from the list and then click
Add
.Select
NWLink
Client
3
3
3
3
3
3
3
5. Restart the computer.
The necessary components are now installed. Go to “About
EpsonNet WinAssist” on page 41.
Installing Components on Your Computer
3
3
3
3
3
39
Page 50

Macintosh
To print using the AppleTalk protocol and configure the Internal
Print Server with EpsonNet MacAssist, you just need to select
Ethernet in the AppleTalk Control Panel. Then configure the
Internal Print Server with EpsonNet MacAssist. See “About
EpsonNet MacAssist” on page 69.
If you use EpsonNet WebAssist or EpsonNet WebManager, set
an IP address to your Macintosh as described below.
Macintosh (with Open Transport)
Follow the steps below to set or check the IP address.
1. Double-click the TCP/IP Control Panel.
2. Set an IP address, and change other settings if necessary.
Macintosh (without Open Transport)
Follow the steps below to set or check the IP address.
1. Double-click the MacTCP Control Panel, and then check
whether an IP address has been set.
2. If no IP address is set, click the Detailsbutton and change the
necessary settings. Then, set an IP address in the MacTCP
dialog box.
40
Installing Components on Your Computer
Page 51

Chapter 4
EpsonNet WinAssist Configuration Utility
About EpsonNet WinAssist
After changing the network settings of your computer, you need
toconfigure theInternal Print Serverforuse on thenetwork,using
EpsonNet WinAssist/MacAssist.
EpsonNet WinAssist is a Windows-based configurationsoftware
for administrators to configure the Internal Print Server for
TCP/IP, NetWare, NetBEUI, AppleTalk, IPP, and SNMP.
Note:
❏
EpsonNet MacAssist is a Macintosh-based configuration software.
See “About EpsonNet MacAssist” on page 69 for details.
❏
Be sure to use EpsonNet WinAssist included on the software
CD-ROM shipped with this printer.
4
4
4
4
4
4
4
4
System Requirements
The following table lists the system requirements of EpsonNet
WinAssist.
Operating systems Windows Me/98/95
Windows 2000 Server/Professional
WindowsNT 4.0 Server/Workstationwith Service Pack
3.0 or higher
Windows NT 3.51 Server/Workstation with Service
Pack 5.0 or higher
Hard disk drive space 4 MB
EpsonNet WinAssist Configuration Utility
4
4
4
4
41
Page 52

Installing EpsonNet WinAssist
Follow the steps below to install EpsonNet WinAssist.
Note:
If you add or delete protocols or services in your operating system after
installing EpsonNet WinAssist, EpsonNet WinAssist may not work
correctly. If this happens, uninstall EpsonNet WinAssist and then
reinstall it.
1. Insert the software CD-ROM shipped with the printer in the
CD-ROM drive.
2. The EPSON Installation Program starts automatically.
If the EPSON Installation Program does not start
automatically, click Start and then Run (Windows
Me/98/95/2000/NT 4.0); or choose Run fromtheFilemenu
in the Program Manager (NT 3.51). Type D:\EPSETUP.EXE
and then click OK. (Substitute the appropriate letter for your
CD-ROM drive if necessary.)
3. Double-click
4. Follow theon-screen instructionsto completethe installation.
To start EpsonNet WinAssist, click Start,pointtoProgramsand
EpsonNet WinAssist, and then select EpsonNet WinAssist
(Windows Me/98/95/2000/NT 4.0); or double-click the
EpsonNet WinAssist icon in the EpsonNet WinAssist window
(NT 3.51).
42
EpsonNet WinAssist Configuration Utility
EpsonNet WinAssist.
Install
Page 53

Configuring Your Printer Using EpsonNet WinAssist
4
This sectionexplains how to use EpsonNetWinAssist to set an IP
address for the Internal Print Server.
Note:
❏
If you are using the printer in a dial-up environment not running
NetWare, clear the use NetWare check box on theNetWare screen.
If this check box is selected, the extra account may be charged when
you use the dial-up router.
❏
When configuring the Internal Print Server for NetWare, use the
IPX protocol and log in to the NetWare server or the NDS context
with supervisor privileges.
❏
When you configure the Internal Print Server forNetWare 5.x, you
must log in to the NetWare server using an IPX connection. If you
log in to the NetWare server using an IP connection, the NetWare
screen and the IPX trap setting of SNMP are not available.
❏
To set the IP address for OS/2 and UNIX, use the arp and ping
commands.For moreinformation, see“Setting anIP Address Using
the arp/ping Command” on page 234.
FollowthestepsbelowtosettheIPaddress.Thesamplescreens
are taken from Windows 95 using EpsonNet WinAssist. Other
systems differ in appearance, but the instructions are the same,
except as noted.
4
4
4
4
4
4
4
4
1. Check that the necessary protocols are installed on the
computer.
2. Turn on your printer.
3. Start EpsonNet WinAssist.
EpsonNet WinAssist Configuration Utility
4
4
4
43
Page 54

For Windows Me/98/95/2000/NT 4.0:
Click Start, point to Programs, and then select EpsonNet
WinAssist.ClickEpsonNet WinAssist.
For Windows NT 3.51:
Double-click the EpsonNet WinAssist icon in the EpsonNet
WinAssist group.
4. Select All or your preferred protocol on the left side of screen.
5. Select the printer you want to configure, and then click
Configuration or double-click the printer icon.
Note:
❏ If the same printer model name appears multiple times in the
list, you can distinguish the printers by their MAC address,
which are found on a network status sheet.
❏ You can search printers in other segments by setting the
Search Options from theTool menu. See“Search options” on
page 65 for more information.
❏ The Launch Browser button can be used only if a valid IP
address is assigned to the printer.
6. Click the TCP/IP tab to display the TCP/IP menu.
44
EpsonNet WinAssist Configuration Utility
Page 55

Note:
If you want to configure a protocol other thanTCP/IP, see “Details
of the Configuration Dialog Box” on page 49.
4
4
4
4
4
4
4
7. Select the“Get IP address” method. Ifyou select
becomes available and assigns an IP addressautomatically. If
you select
Note:
❏
The default is Auto.WhenAuto is selected, DHCP becomes
available. To use the DHCP server, make sure it is installed on
your computer and configured correctly. See your operating
system’s online help for detailed instructions.
Manual
, you can enter the IP address manually.
EpsonNet WinAssist Configuration Utility
Auto
4
,DHCP
4
4
4
4
45
Page 56

❏ If Auto is selected but no DHCP server is installed in your
system or on your network and the Usea private IP address
when an IP address cannot be assigned by the DHCP
server check box is cleared, the Internal Print Server uses
“192.168.192.168” as the default IP address.
❏ If Autois selected for GetIP address, every time you turn on
the printer you need to change the printer port setting
accordingly. Therefore, for TCP/IP printing we recommend
selecting Manual and setting the IP address manually.
8. When setting the IP address using the ping command, select
Manual and then select the Set by PING check box.
Note:
Be sure to clear the check box when not using ping; this prevents
anyunexpectedchangeoftheIPaddressbyEpsonNet
WebManager.
9. When you select Manual, assign the IP address, the subnet
mask, and the default gateway. Be sure to give an IP address
that does not conflict with any other device on the network.
Note:
❏ The default value for the IP address, subnet mask, and default
gateway are 192.168.192.168, 255.255.255.0, and
255.255.255.255 respectively.
❏ If there is a server or a router which functions as a gateway,
enter the IP address of the server or the router for the gateway
address. If there is no gateway, leave the default values there.
10. Select theUseaprivateIPaddress when anIPaddresscannot
be assigned by the DHCP server check box to get a private
address between 169.254.1.1 and 169.254.254.254
automatically when an IP address cannot be obtained by the
DHCP server.
46
EpsonNet WinAssist Configuration Utility
Page 57

11. Select the
want to use the Universal Plug and Play function in
Windows Meor future operatingsystems.Changethedefault
Universal Plug and Play device name, if desired. This device
name is used for Windows that supports the Universal Plug
and Play function.
12. After changing the settings, clickOK. The Password dialog
box appears.
Universal Plug and Play function
check box if you
4
4
4
13. Enter your password (up to 20 characters) and then click
to save thesettings. If you areentering apassword for thefirst
time, click
information on passwords, see “About passwords” on page
47.
Follow the on-screen instructions. After the update is
complete, refresh theconfiguration byselecting
the View menu.
c
Print a network status sheet to confirm the new IP address.
Change
Caution:
Since it takes 2 or 3 minutes to send new settings to the
Internal Print Server, wait until an on-screen message
appears to indicates that you can turn off your printer.
and set the password. For more
About passwords
A password is required to configure the Internal Print Server.
When youclickOKin thesetting dialog box or clickthe
default
button, the Password dialog box appears.
Refresh
Return to
OK
from
4
4
4
4
4
4
4
4
EpsonNet WinAssist Configuration Utility
4
47
Page 58

1. To set a password or to change the current password, click
Change.
2. In the Administrator password dialog box, enter a password
(up to 20 characters) and click OK. Passwords are case
sensitive.
Note:
❏ ThesamepasswordisusedforEpsonNetWinAssist,
MacAssist, and WebAssist.
❏ Since the new password becomeseffective aftersending the data
tothe Internal Print Server,enterthe old passwordimmediately
after changing the password.
48
❏ If you forget your password, you need to initialize the Internal
Print Server. See “Initializing Your Printer” on page 13 for
instructions.
EpsonNet WinAssist Configuration Utility
Page 59

Details of the Configuration Dialog Box
4
Information
The Information menu shows the various Internal Print Server
parameters.
4
4
4
4
4
4
4
4
Items Explanations
MAC address Displays the name of the Internal Print Server.
Youcan checkthe MACaddress on a network status sheet.
Hardware version Displays the hardware version of the Internal Print Server.
Software version Displays the software version of the Internal Print Server.
EpsonNet WinAssist Configuration Utility
4
4
4
49
Page 60
Printer model Displays the product name of the printer.
Location Enter the location of the Internal Print Server.
Return to default Resets all configuration settings of the Internal Print Server
to the default settings.
OK Updates the settings.
Cancel Cancels any changes.
Help Accesses help.
TCP/IP
To use the printer in the TCP/IP environment, configure the
InternalPrint Server onthisscreen.See “Configuring YourPrinter
Using EpsonNet WinAssist” on page 43 for more details.
50
EpsonNet WinAssist Configuration Utility
Page 61

Items Explanations
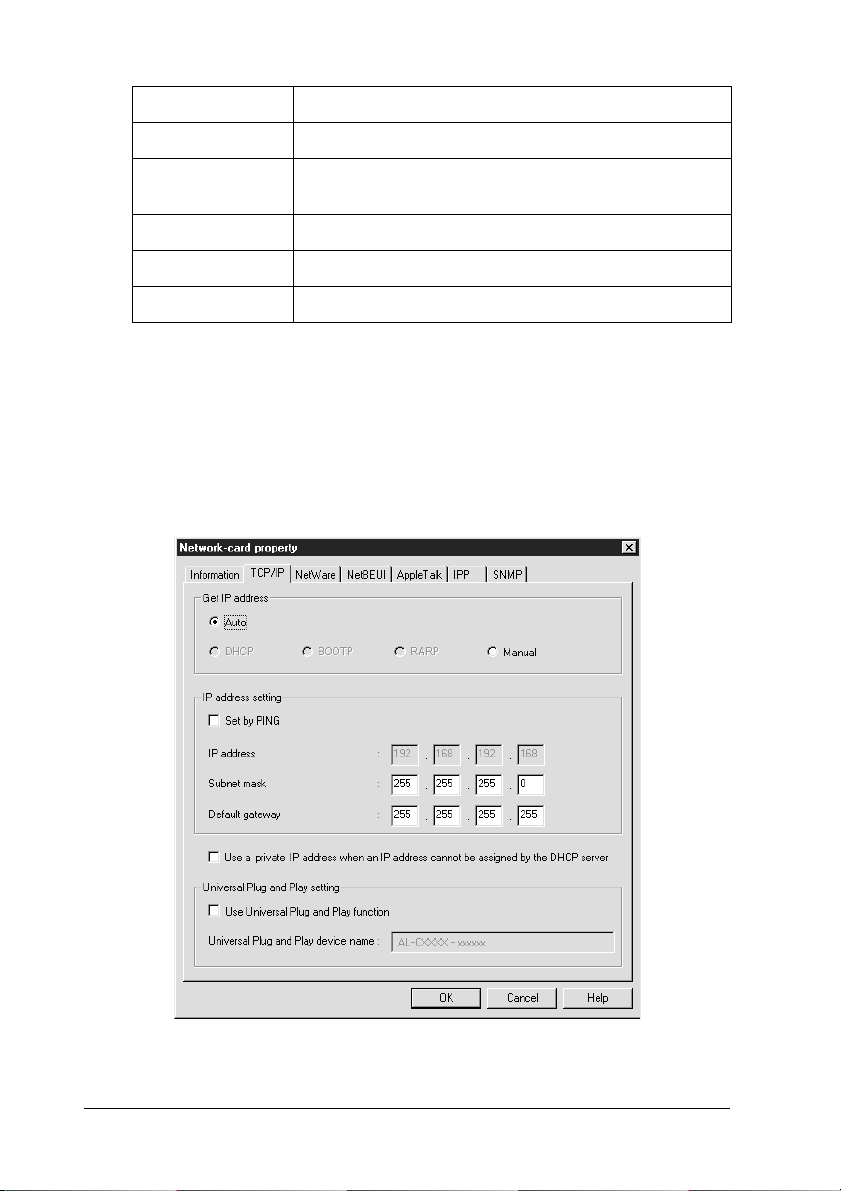
Get IP address Select a method for acquiring IP addresses.
Set by PING Enablesordisables IPaddresssetting usingtheping
command.
4
4
IP address Enter an IP address for the Internal Print Server. Be
Subnet mask Enter the subnet mask of the IP address.
Default gateway Enter the gateway address.
Use a private IP address
when an IP address
cannot be assigned by
the DHCP server
Universal Plug and Play Enables o r disables the Universal Plug and Play.
Universal Plug and Play
device name
sure that the IP address is unique and does not
conflict with any other device on the network.
Selectthis checkbox to assign an privateIP address
automaticallywithoutusing theDHCPserver onyour
network.
Enter the device name for the Universal Plug and
Play.
NetWare
To use the printer in the NetWare environment, configure the
InternalPrint Serveronthis screen. Youcanconfigure the Internal
Print Server either in Print Server mode or Remote Printer mode.
Note:
❏
Log in to the NetWare server or the NDS context with supervisor
privileges.
4
4
4
4
4
4
4
4
❏
If the current login environment is different from the current
configuration of the Internal Print Server, a message appears when
you run EpsonNet WinAssist. If you do not want to change the
current Internal Print Server configuration, click Cancel and log
in to the NetWare server or the NDS context with the same mode
set to the Internal Print Server again.
EpsonNet WinAssist Configuration Utility
4
4
51
Page 62
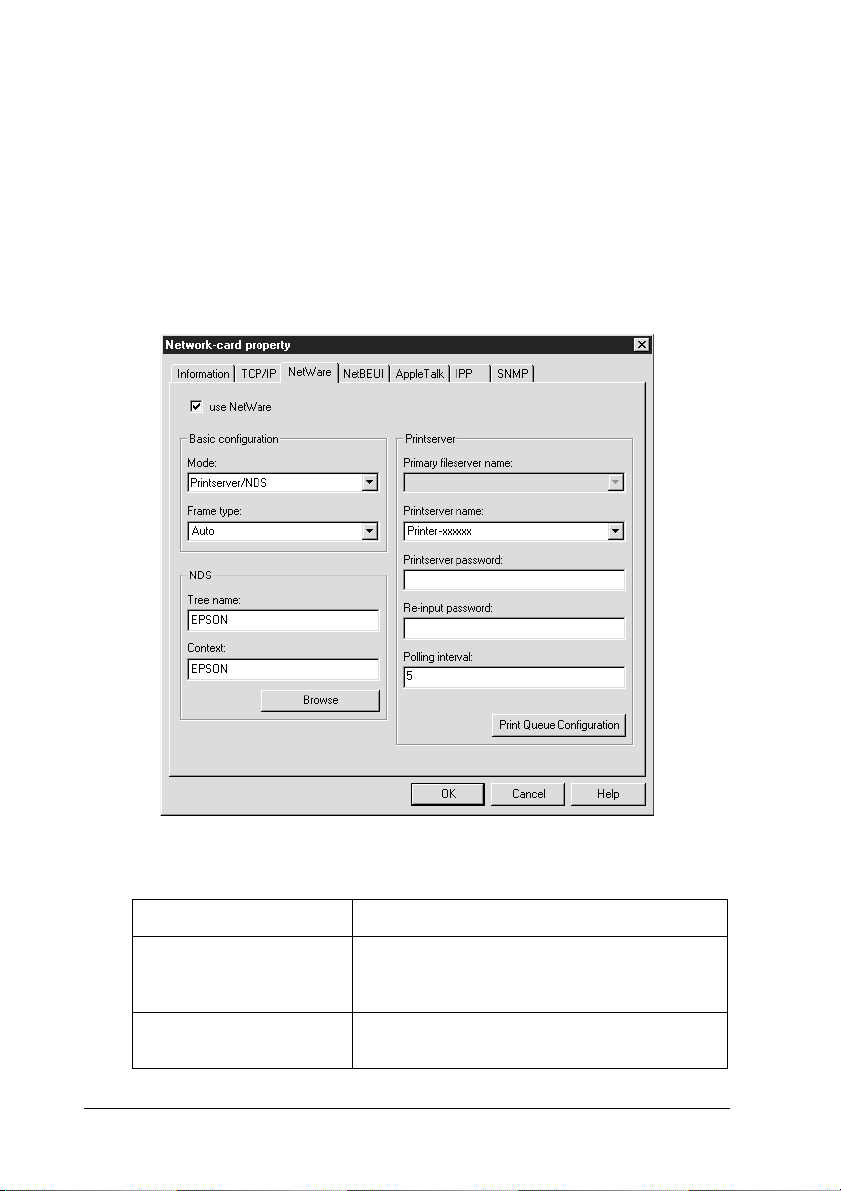
Print Server mode
To use the printer with Print Server mode, configure the Internal
Print Server on this screen.
Note:
When you savethesettings, the PrinterObjects,named PR0for Bindery
mode or print server name_P0 for NDS mode, are automatically
created. To change the printer name, use PCONSOLE or NWADMIN.
52
Items Explanations
use NetWare Select this box when using NetWare. This check
box is dimmed when using the printer only in the
NetWare environment.
Mode Select the mode, either Print Server/Bindery or
Print Server/NDS.
EpsonNet WinAssist Configuration Utility
Page 63

Frame type Leave the default frame type (Auto) as it is.
Tree name Only for the NDS mode:
Click the Browse button and select the NDS
context so the Tree name is also selected.
Context Only for the NDS mode:
Click the Browse button and select the NDS
context.
Browse Browse the NDS context.
Primary file server name Only for the Bindery mode:
Select the server where the print server logs in.
Print server name Select or enter the print server name.
Print server password Enter the password to log in to the print server(up
to 20 characters). See the NetWare
documentation for more details. Usually you do
notneedtoset.
Re-Input password Enter the password again.
Polling interval Set the polling interval between 5 to 90 seconds.
Seethe NetWaredocumentation for more details.
Usually you do not need to set.
Print Queue Configuration Make print queue settings. If you have assigned
the queue with PCONSOLE, NWAdmin, or
EpsonNet!2 for Windows (an older version of the
configuration utility), reassign the print queue
here.
4
4
4
4
4
4
4
4
Print Queue Configuration dialog box
When you click the
server menu, the following dialog box appears.
Print Queue Configuration
EpsonNet WinAssist Configuration Utility
4
buttoninthePrint
4
4
4
53
Page 64

Note:
You can make queue settings for a higher context than the context you
specified in the NDS context box. In this case, you must have a
supervisor privileges for the context in which you set the queue.
Items Explanations
Queue name Displays the queue name that is assigned to the
print server by browsing the queue.
Browse Click the Browse button to select a queue. You
Queue list box Liststhe print queues.
Add Adds a print queue.
Remove Removes a print queue.
OK Updates the settings.
Cancel Cancels any changes.
❏ Selecting a queue
Click the queue and click OK to select the queue.
54
EpsonNet WinAssist Configuration Utility
can also create or delete a queue.
Page 65

❏
Creating a queue
For Bindery mode:
create a queue, and right-click it, and then select
Queue
. Enter the queue name (up to 47 characters).
Click the file server where you want to
Create
4
For NDS mode:
a queue, right-click it, and then select
queuename(upto47characters).Browseforthecontext,and
select the volume name from the drop down list. The queue
will becreated under the SYSvolume of the file server. If you
want to create a queue in another volume, use PCONSOLE or
NWAdmin to create a queue.
❏
Deleting a queue
Select the print queue you want to delete, right-click it, and
then select
Select the context where you want to create
Create Queue
Delete Queue
.
4
.Typea
4
4
4
4
4
4
4
4
EpsonNet WinAssist Configuration Utility
4
4
55
Page 66

Remote Printer mode
To use the printer with Remote Printer mode, configure the
Internal Print Server on this screen.
56
Items Explanations
use NetWare Select this box when using NetWare. This check
box is dimmed when using the printer only in the
NetWare environment.
Mode Select Remote Printer.
Frame type Leave the default frame type (Auto) as it is.
Tree name Leave as is.
Context Leave as is.
Browse Not available.
EpsonNet WinAssist Configuration Utility
Page 67
Primary print server name Enter the primary print server name which is
created by PCONSOLE or NWAdmin (up to 47
characters).
For NDPS Gateway, enter the SAP name you
have set for NetWare (up to 47 characters).
Printer port number Enter the printer port number.
For NDPS Gateway, enter the same printer
numberyou haveset for NetWare (between 0 and
254).
4
4
4
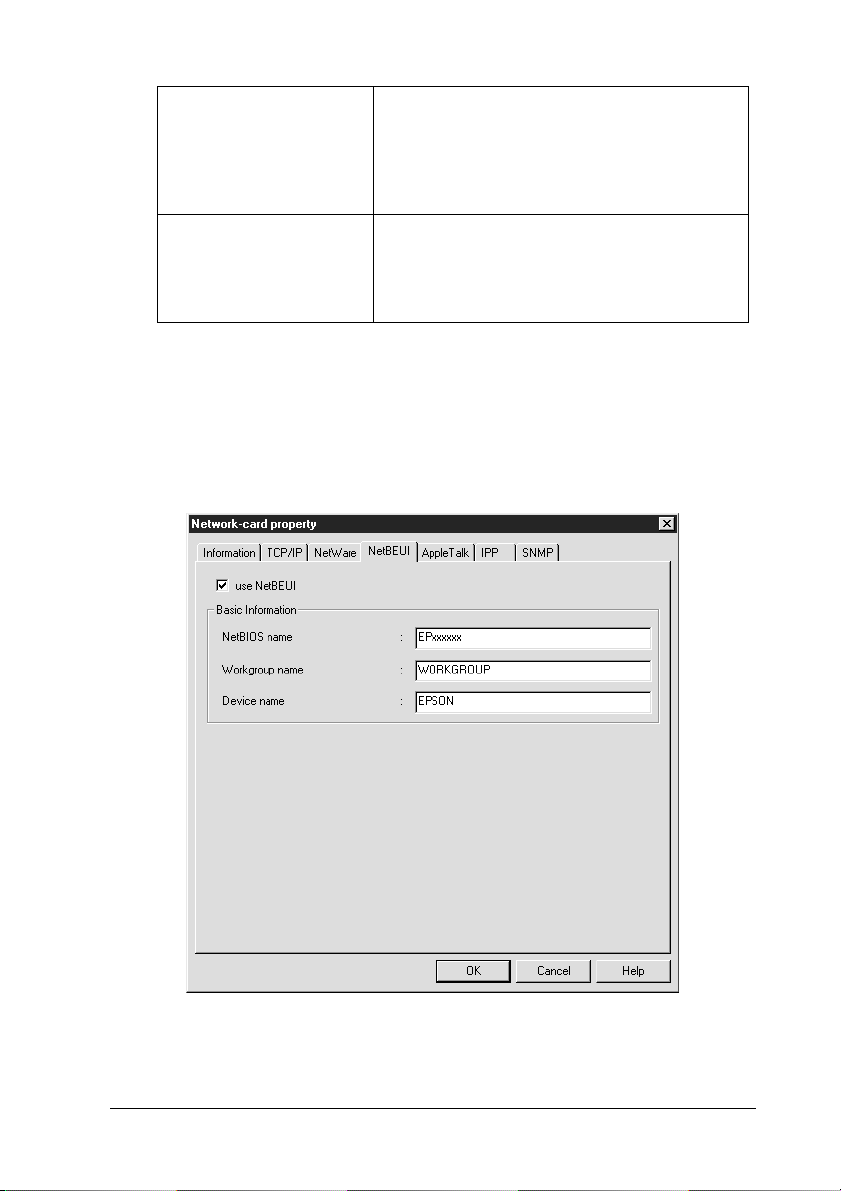
NetBEUI
To use the printer in the NetBEUI environment, configure the
Internal Print Server on this screen.
4
4
4
4
4
4
4
4
EpsonNet WinAssist Configuration Utility
4
57
Page 68

Items Explanations
use NetBEUI Select this box when using NetBEUI. This check box is
dimmed when using the printer only in the NetBEUI
environment.
NetBIOS name Enter the printer's NetBIOS name (up to 15 characters). Be
sure to give a unique name that will not causeconflicts with
any other device on the network.
Workgroup
name
Device name Enterthe printer’sdevice name (up to 12 characters). Do not
Enter the workgroup name or domain name used for the
Windows network environment (up to 15 characters).
use LPT1, LPT2, LPT3, or COM.
AppleTalk
To use the printer in the AppleTalk environment, configure the
Internal Print Server on this screen.
Note:
To make AppleTalk settings with EpsonNet WinAssist, the following
conditions must be maintained;
❏ The Internal Print Server has a valid IP address other than the
default IP address (192.168.192.168).
❏ You have logged in to the NetWare server orthe NDS context with
supervisor privileges.
58
EpsonNet WinAssist Configuration Utility
Page 69

❏
The shared service is installed in the computer.
4
4
4
4
4
4
4
Items Explanations
use AppleTalk Select this box when using AppleTalk.
Printer name Enter the name of the printer (up to 32 characters).
Zone name Enter the network zone name (up to 32 characters). T o
have the zone selected automatically, select Auto as the
Network number set option and enter an asterisk (*) in
this box.
Entity type Displays the entity type of the printer. Do not c hange the
entity type unless “epson” is displayed. If “epson” is
displayed, click the Entity configuration button and enter
the entity type to match the driver for the printer.
Entity configuration If “epson” is displayed in the Entity type box, press this
button and enter the entity type (up to 32 characters).
EpsonNet WinAssist Configuration Utility
4
4
4
4
4
59
Page 70

Items Explanations
Network number set Selects the method for acquiring the network number.
Auto is usually preferred.
Network number for
manual mode
Enter a value between 0 and 65534 when Manual is
selected for the Network number setting.
IPP
To use the printer in the IPP environment, configure the Internal
Print Server on this screen.
60
EpsonNet WinAssist Configuration Utility
Page 71

Items Explanations
IPP URL Displays the printer’s URL for Internet Printing.
Format:
http://IP address of Internal Print Server:631/
printer name set below
Example:
http://192.168.100.201:631/EPSON_IPP_Printer
Printer name Enter the printer name to use for Internet Printing
(up to 127 characters).
Example:
EPSON_IPP_Printer
4
4
4
4
Location Enterthe nameof the printer’sphysical location (up
to 64 characters).
4
4
4
4
4
4
4
4
EpsonNet WinAssist Configuration Utility
61
Page 72

SNMP
In the SNMP menu, you can set SNMP information.
62
Items Explanations
Read Only The word “public” is always displayed.
Read/Write Enterthe Read/Write community name (up to 32
characters).
enable IP Trap 1 or/and 2 Enable or Disable the IP trap 1 or/and 2.
Address Enter the IP address of the server to which the
trap is transmitted.
Community Enterthecommunity name (up to 32characters).
enable IPX Trap 1 or/and 2 Enable or Disable the IPX trap 1 or/and 2.
EpsonNet WinAssist Configuration Utility
Page 73

Address Enter the Network Address and Node Number
(MAC Address) of the server to which the trap is
transmitted.
Format:
Network Address: Node Number
Assume that the Network Address is A7E00BB0
(hexadecimal) and Node Number is
000048930000 (hexadecimal). In this case, the
address is A7E00BB0:000048930000.
Community Enterthecommunity name (up to 32characters).
Menu Bar
EpsonNet WinAssist has the following menus and sub-menus.
4
4
4
4
4
Device menu:
❏
Configuration
Configures the Internal Print Server you have selected.
❏
Launch Browser
StartsEpsonNet WebAssistwhich allowsyou to configure the
Internal Print Serveryou haveselected. EpsonNetWebAssist
is a utility that runs on a browser.
❏
Close
Closes EpsonNet WinAssist.
View menu:
❏
Refresh
Updates to the latest information by searching for available
printers again.
4
4
4
4
4
4
4
EpsonNet WinAssist Configuration Utility
63
Page 74

Tool menu:
❏ Timeout
Sets the time-out value between 2 and 120 seconds. See
“Time-out option” on page 64 for more information.
❏ Search Options
Configuresthe optionsfora searchwith IPorIPX. See “Search
options” on page 65 or for more information.
Help menu:
❏ Help Topic
Opens EpsonNet WinAssist help.
❏ About EpsonNet WinAssist
Displays the copyrightand version informationfor EpsonNet
WinAssist.
Time-out option
Sets the length of time before a time-out occurs (between 2 and
120 seconds). A communication error occurs if this time is
exceeded. Thedefault valueis 6 seconds. If you seta largervalue,
it takes more time to search the network printers. Therefore,
change this value only if you prefer.
64
EpsonNet WinAssist Configuration Utility
Page 75

Search options
Search Options-IP
4
To search for the Internal Print Servers in other segments, set the
segment (a network address) using this option. However, what
you set here is invalid in EpsonNet WinAssist Easy Setup.
When you want to configure the Internal Print Server outside of
the local network, set the specific network address to search for
the Internal Print Server in the segment you specified. Restart
EpsonNet WinAssist or select
the settings to take effect.
Refresh
from the View menu for
4
4
4
4
4
4
4
4
Item Explanation
Searcheffectivenessof
the specific address
Select this check box to search for an Internal Print
Server that is beyond the router.
EpsonNet WinAssist Configuration Utility
4
4
4
65
Page 76

Text box Enterthe network address (valid range0 to 255) of the
Internal Print Server you want to find as described
below:
Class A: value.255.255.255
Class B: value. value.255.255
Class C: value. value. value.255
List box Displays network addresses that have been
registered.
Add button Registersnetworkaddresses (up to20addresses). Do
not add the network address if it is in the same
segment.
Delete button Deletes a network address from the List box.
OK Saves the settings.
Cancel Cancels any changes.
Search Options-IPX
When you manage the Internal PrintServer with IPX (NetWare),
and when youwant toconfigure theInternal PrintServer outside
of thelocal network, setthe network addressof the InternalPrint
Server. Restart EpsonNet WinAssist or select Refresh from the
View menu for the settings to take effect.
Note:
❏ To use this option, you need to log in to the NetWare server as a
supervisor.
66
EpsonNet WinAssist Configuration Utility
Page 77

❏
When using a dial-up network, delete any unnecessary addresses
from the Select Search Address list to prevent charges for extra
accounts.
4
4
4
4
4
4
4
Item Explanation
Search effectiveness
of the specific address
All Network Address Displays all current network addresses.
Select Search
Address
Add button Selectanaddressin All NetworkAddress,andthen click
Remove button Removes an address from the Select Search Address
OK Saves the settings.
Displaytime can be reduced by selecting thischeck box
and choosing the target networks, so that unnecessary
or unwanted information is not obtained.
Displays the network address to be searched.
Add to add an address to Select Search Address (up to
256 address).
list.
EpsonNet WinAssist Configuration Utility
4
4
4
4
4
67
Page 78

Cancel Cancels any changes.
68
EpsonNet WinAssist Configuration Utility
Page 79

Chapter 5
EpsonNetMacAssistConfigurationUtility
About EpsonNet MacAssist
After changing the network settings of your computer, you need
to use EpsonNet MacAssist to configure the Internal Print Server
for use on the network.
EpsonNet MacAssist is a Macintosh-based configuration
software for administrators that allows you to configure the
Internal Print Server for TCP/IP and AppleTalk.
Note:
Be sureto useEpsonNet MacAssist included on the software CD-ROM
shipped with this printer.
System Requirements
5
5
5
5
5
5
5
5
The following table lists the system requirements of EpsonNet
MacAssist.
Operating systems Mac OS 9.x, 8.x, 7.6.x
System 7.5.x
Hard disk drive space 4 MB
Installing EpsonNet MacAssist
Follow the steps below to install EpsonNet MacAssist.
EpsonNet MacAssist Configuration Utility
5
5
5
5
69
Page 80

1. Insert the software CD-ROM in the CD-ROM drive.
2. The disk icon opens automatically. If the disk icon does not
open automatically, double-click the disk icon. Then,
double-click the EpsonNet MacAssist folder.
3. Drag the EpsonNet MacAssist icon to your hard disk.
To start EpsonNet MacAssist, double-click the EpsonNet
MacAssist icon on your hard disk.
Configuring Your Printer Using EpsonNet MacAssist
Use EpsonNet MacAssistto configurethe Internal Print Server as
described below.
1. Turn on your printer.
2. Double-click the EpsonNet MacAssist icon.
3. Select the printer you wantto configurefrom the list and click
Configuration.
70
EpsonNet MacAssist Configuration Utility
Page 81

Note:
❏
If the same printer model name appears multiple times in the
list, you can distinguish the printers by their MAC addresses,
which are found on the network status sheet.
5
❏
You can search printers in other zones just like a computer by
changing the Zone setting in the Option dialog box. See
“Options” on page 74 for more information.
4. The IP Address Configuration and the AppleTalk
Configuration dialog box appears.
5
5
5
5
5
5
5
5
5. Set the followingoptionsin the IP AddressConfigurationbox.
IP Address Setting:
When you select
an IP address automatically. If you want to set the IP address
manually, select
Auto
, DHCP becomes available and assigns
Manual
EpsonNet MacAssist Configuration Utility
.
71
5
5
5
Page 82

Note:
Whenever the printer is turned on, you need to change the printer
port setting if Auto is selected for Get IP address.ForTCP/IP
printing, we recommend selecting Manual and setting the IP
address manually.
IP Address:
Enter anIP address. Besure to give anIP address whichdoes
not conflict withany otherdevice on thenetwork. Thedefault
value is 192.168.192.168.
Subnet Mask:
Enter the Subnet Mask. The default value is 255.255.255.0.
Default Gateway:
Enter the default gateway address. If there is a server or a
router which functions as a gateway, enter the IP address of
the server or the router. If there is no gateway, leave the
default values. The default value is 255.255.255.255.
6. Set the following optionsin theAppleTalk Configuration box.
Printer Name:
Enter the printername(up to32characters). The default name
is shown below.
Printer product name-xxxxxx
(xxxxxx is asubstitute forthe last6 digits of the MACaddress)
72
Entity Type:
Displays the printer’s entity type. Do not change the entity
type unless “epson”is displayed.If “epson” isdisplayed, you
need to entertheentity typeto matchthedriver for theprinter.
Zone Name:
Select the network zone in which you want the printer to
appear. To have the zone selected automatically, select Auto
as the Network number set option and enter an asterisk (*) in
this box.
EpsonNet MacAssist Configuration Utility
Page 83

Network Number Set:
Select either
Network Number for Manual Mode:
Type a value between 0 and 65534 when
for Network Number Set.
AutoorManual.Auto
is usually preferred.
Manual
5
is selected
5
7. After making settings, click
appears.
8. Enteryour password(up to 20characters)andclickOKtosave
settings. If you are entering a passwordfor thefirst time,click
Change
passwords, see “About passwords” on page 73.
After updating is complete, refresh the configuration. To do
this, quit and restart EpsonNet MacAssist.
c
and set the password. For more information about
Caution:
Since it takes 2 or 3 minutes to send new settings to the
Internal Print Server, wait until an on-screen message
appears to indicates that you can turn off your printer.
Send
. The Password dialog box
About passwords
The password is required to configure the Internal Print Server.
When you click
default
, the Password dialog box appears.
OK
in the setting dialog box or click
Return to
5
5
5
5
5
5
5
1. To set the password or to change the current password, click
Change
2. In the Administrator password dialog box, enter a password
(up to 20 characters) and clickOK. Passwords are case
sensitive.
.
EpsonNet MacAssist Configuration Utility
73
5
5
5
Page 84

Note:
❏ The password is used forEpsonNet WinAssist,MacAssist, and
WebAssist.
❏ Since the new password takes effect after the data is sent to the
Internal Print Server,enter theold passwordimmediately after
changing the password.
❏ If you forget your password, you need to initialize the Internal
Print Server. See “Initializing Your Printer” on page 13 for
instructions.
Options
Timeout
In the EpsonNet MacAssist dialog box, click the Options button
to display the Timeout setting dialog box. Set the length of time
before a time-out occurs (between 3 and 99 seconds). A
communication error occurs if this time is exceeded. The default
value is 5 seconds. If you set a larger value, it takes more time to
search the network printers. Therefore, change this value only if
you prefer. Restart EpsonNet MacAssist for the settings to take
effect.
74
EpsonNet MacAssist Configuration Utility
Page 85

Zone
By clicking the
can add a zone to search for Internal Print Servers in a particular
zone. The Internal Print Servers that belong to the selected zone
are displayed in the List box and you can change their settings.
The zones obtained fromthe networkenvironment aredisplayed
in the Zone list. The zones to be searched are displayed in the
Search list.The maximum number of zonesthat can be displayed
in the Zone list and Search zone is 2000. You need to restart
EpsonNet MacAssist for the settings to take effect.
Select Zone
button in the Option dialog box, you
5
5
5
5
5
5
5
5
EpsonNet MacAssist Configuration Utility
5
5
5
5
75
Page 86

76
EpsonNet MacAssist Configuration Utility
Page 87

Chapter 6
Installing the Printer Driver
About Installing the Printer Driver
To print to the network printer, you need to install the printer
driveron the computer. Seethesection in thischapterappropriate
for your operating system.
Windows Me/98/95
ForWindows Me/98/95, theprinter driver installationprocedure
differs depending on the printing method you prefer.
LPR printing
Since Windows Me/98/95 does not support LPR, standard
TCP/IP printing cannot be used. However, you can print via
TCP/IP using the EpsonNet Direct Print utility included on the
software CD-ROM. First, install EpsonNet Direct Print. Then,
install the printer driver. See “About EpsonNet Direct Print” on
page 147 for more details.
6
6
6
6
6
6
6
6
6
Internet printing (Windows 98/95)
Internet printingis possible by using the EpsonNetInternet Print
utility included onthe softwareCD-ROM. First, install EpsonNet
Internet Print. Then, install the printer driver and set the printer
port. See “AboutEpsonNetInternetPrint” on page 161 for more
details.
Installing the Printer Driver
6
6
6
77
Page 88

Internet printing (Windows Me)
Installing the IPP client
The IPP client must be installed on your computer. Follow the
steps below to install it.
1. Insert the Windows Me CD-ROM.
2. Select the add-ons folder, and then select the IPP folder.
3. Double-click wpnpins.exe. Then follow the on-screen
instructions.
4. Click OK to restart your computer.
Setting up the printer
Connect your computer to a printer through IPP.
1. Click Start, point to Settings, and then select Printers.
2. Click Add Printer, and then click Next.
3. Click Network Printer,andthenclickNext.
4. Type the URL of the printer, and then click Next.
Format:
http://IP address of Internal Print Server:631/printer name
5. See “Installing a printer driver” on page 79 to install the
printer driver.
Microsoft Network Shared printing
1. Click Start, point to Settings, and then select Printers.
78
Installing the Printer Driver
Page 89

2. Double-click
Add Printer
in the Printer window.
3. Select the
4. Click
If you cannotbrowse, enter thefollowing in theNetwork path
or queue name box.
\\NetBIOS name of Internal Print Server\
Device name of Internal Print Server
Network Printer
Browse
, and then select the network path from the list.
radio button and then click
Next
6
.
6
6
6
6
6
6
6
5. The Add Printer wizard appears. Click
6. See “Installing a printer driver” on page 79 to install the
printer driver.
Installing a printer driver
1. Insert the software CD-ROM shipped with the printer.
2. Click
Finish
appears.
if the EPSON Installation Program screen
Installing the Printer Driver
Next
.
6
6
6
6
79
Page 90

3. Click the Have Disk button. The InstallFrom Disk dialog box
appears.
4. Click Browse.
5. Select the CD-ROM drive for Drives, and then double-click
the folder named after your operating system. Click OK.
6. Click OK in the Install From Disk dialog box.
7. Select the model name of the printer, and then click Next.
Note:
If the Add Printer wizard prompts you to select either Keep
existing driver or Replace existing driver, be sure to select the
Replace existing driver radio button.
8. Click Finish and followtheon-screen instructionsto complete
the setup.
When you print using Microsoft Network Shared printing in
theWindows 2000/NT/XPenvironment,see “Using theNET
USE command” on page 80 for more details.
Using the NET USE command
If youare running Windows 2000/NT/XP andusing NetBIOS to
connect to the printer, we recommend that you use the NET USE
command, as follows:
1. Right-click the Network Neighborhood icon or My Network
Places icon and then select Properties.
2. Check that ClientforMicrosoftNetworksis inthe Components
list. If it is not installed, click Add to install it.
3. Run the command prompt and enter the followingcommand.
80
Installing the Printer Driver
Page 91

NET USE
Server\Device name of Internal Print Server
Selecting the port
printer port
NetBIOS name of Internal Print
:\\
6
1. Click
2. Right-click the printer icon and select
3. Click the
Start
, point to
Details
NET USE command.
Settings
tab and select the port you have set with the
, and then select
Properties
Printers
.
Windows XP
ForWindowsXP,theprinterdriverinstallationprocedurediffers
depending on the printing method you prefer.
LPR printing
Note:
If you are usingEpsonNet DirectPrint, thesetup procedureis different.
See “About EpsonNet Direct Print” on page 147 for details.
1. Click
Hardware
Start
, and then click
,click
Control Panel
Printers and Faxes
Printers and Other
,click
.
.
6
6
6
6
6
6
6
6
2. Under
Printer wizard, and then click
3. Click
AutomaticallydetectandinstallmyPlugandPlay printer
box, and then click
Printer Tasks
Local printer attached to this computer
Next
,click
.
Add a printer
Next
Installing the Printer Driver
to start the Add
.
,clearthe
check
81
6
6
6
Page 92

Note:
You must clearthe Automaticallydetectand install my Plug and
Playprintercheckboxbecausetheprinterisattacheddirectlytothe
network, not to a Windows XP computer.
82
Installing the Printer Driver
Page 93

4. Select the
Standard TCP/IP Port
5. Enter the IP address of the InternalPrint Serverand thenclick
Next
Create a new port
.
radio button, and then select
from the list. Then click
Next
.
6
6
6
6
6
6
6
Installing the Printer Driver
6
6
6
6
6
83
Page 94

6. If an error occurs, the following dialog boxappears. Selectthe
Standard radio button and then select EPSON Network
Printer.ClickNext.
7. Click Finish.
8. See “Installing a printer driver” on page 86 to install the
printer driver.
Internet printing
1. Click Start,clickControl Panel,clickPrinters and Other
Hardware, and then click Printers and Faxes.
2. Under Printer Tasks,clickAdd a printer to start the Add
Printer wizard, and then click Next.
3. Click A network printer, or a printer attached to another
computer, and then click Next.
84
Installing the Printer Driver
Page 95
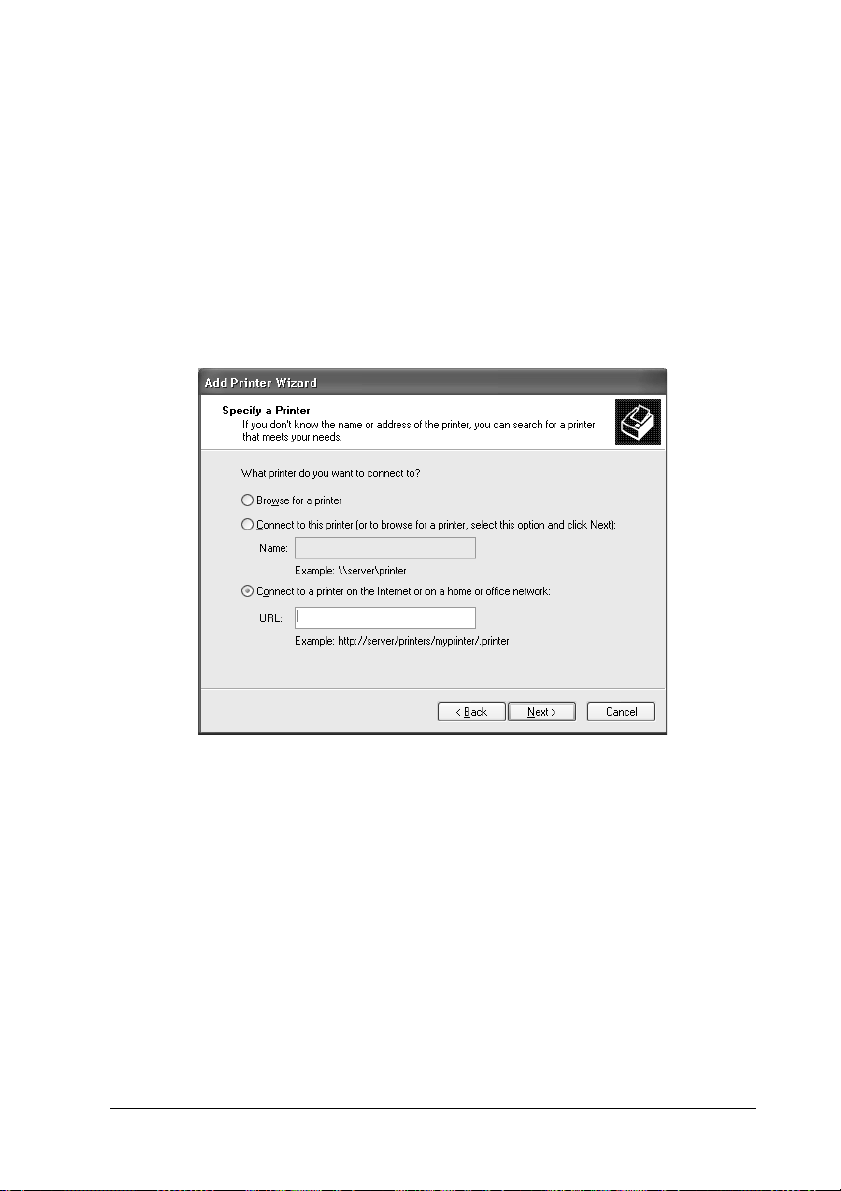
4. Select the
office network
5. Enter the URL of the target printer using the format below.
TheURLshouldbesameastheURLyousetonEpsonNet
WinAssist/WebAssist’s IPP configuration page.
Connect to a printer on the Internet or on a home or
radio button.
6
6
http:
Example:
6. Follow the on-screen instructions to set up the printer. See
“Installing a printer driver” on page 86 if necessary.
IP address of printer
//
http://192.168.100.201:631/EPSON_IPP_Printer
631
:
/
Printer name
6
6
6
6
6
6
6
Microsoft Network Shared printing
1. Click
2. Under
Start
Hardware
Printer wizard, and then click
, and then click
Printer Tasks
,click
Control Panel
Printers and Faxes
Add a printer
,click
Installing the Printer Driver
,click
Next
Printers and Other
.
.
to start the Add
6
6
6
85
Page 96

3. Click A network printer, or a printer attached to another
computer, and then click Next.
4. Select the Browse for a printer radio button, and then click
Next.
5. Enter thefollowing inthe Printerbox orselect theprinter you
want to use from the Shared printers list box, and then click
Next.
\\NetBIOSname ofInternal Print Server\DevicenameofInternal
Print Server
6. Follow the on-screen instructions to set up the printer. See
“Installing a printer driver” on page 86 if necessary.
Installing a printer driver
1. Insert the software CD-ROM shipped with the printer.
2. Click Finish if the EPSON Installation Program screen
appears.
3. Click the Have Disk button. The InstallFrom Disk dialog box
appears.
4. Click Browse.
5. Select the CD-ROM drive for Drives, and double-click the
WIN2000 folder. Click Open.
6. Click OK in the Install From Disk dialog box.
7. Select the model name of the printer, and then click Next.
86
Installing the Printer Driver
Page 97

Note:
If the Add Printer wizard prompts you to select either Keep
existing driver or Replace existing driver, be sure to select the
Replace existing driver radio button.
6
8. Click
Finish
and follow theon-screen instructions tocomplete
the setup.
When you print using Microsoft Network Shared printing in
theWindows 2000/NT/XPenvironment,see “Using theNET
USE command” on page 87 for more details.
Using the NET USE command
If youare running Windows 2000/NT/XP andusing NetBIOS to
connect to the printer, we recommend that you use the NET USE
command, as follows:
1. Click
2. Under
3. Under
4. Check that
5. Run the command prompt and enter thefollowing command.
Start
Connections
LAN or High-Speed Internet
Connection
Network Tasks
connection
installed, click
Control Panel
,click
,andthenselect
icon.
,click
.
ClientforMicrosoftNetworks
Install
to install it.
,click
Network Connections
,clickthe
Change settings of this
Network and Internet
Local Area
is installed. Ifit isnot
6
6
6
6
6
.
6
6
6
6
NET USE
Server\Device name of Internal Print Server
printer port
NetBIOS name of Internal Print
:\\
Installing the Printer Driver
6
6
87
Page 98

Selecting the port
1. Click Start,clickControl Panel,clickPrinters and Other
Hardware, and then click Printers and Faxes.
2. Right-click the printer icon and then select Properties.
3. Click the Portstab and then select the port you have set with
the NET USE command.
Windows 2000
For Windows 2000, the printer driver installation procedure
differs depending on the printing method you prefer.
LPR printing
Note:
If you areusing EpsonNetDirect Print,the setupprocedure isdifferent.
See “About EpsonNet Direct Print” on page 147 for details.
1. Click Start, point to Settings, and then select Printers.
2. Double-click AddPrinterto start the Add Printer wizard, and
then click Next.
3. Click Local printer,cleartheAutomatically detect and install
my Plug and Play printer check box, and then click Next.
88
Installing the Printer Driver
Page 99

Note:
You must clearthe Automaticallydetect and install my Plug and
Playprinter check box because the printer is attached directly to the
network, not to a Windows 2000 computer.
6
6
6
6
6
6
6
Installing the Printer Driver
6
6
6
6
6
89
Page 100

4. Select the Create a new port radio button, and then select
Standard TCP/IP Port from the list. Then click Next.
5. Enter the IP address of the InternalPrint Serverand thenclick
Next.
90
Installing the Printer Driver
 Loading...