

Page 1
Color Laser Printer
You can hang this guide on the printer
using the hook provided.
Quick Reference
4012465-00
F04
Page 2
Replacing Consumable Products
You need to replace the following consumable products
when a notice message is displayed on the LCD panel
or the window of the EPSON Status Monitor 3 utility
Replacing a toner cartridge
Follow these steps to replace a toner cartridge:
1. Confirm the color of the toner cartridge that needs
to be replaced by checking the LCD panel.
Toner Cartridge (Black) S050038
Toner Cartridge (Yellow) S050039
Toner Cartridge (Magenta) S050040
Toner Cartridge (Cyan) S050041
Photoconductor Unit
(includes the waste toner
collector)
Waste Toner Collector S050020
S051073
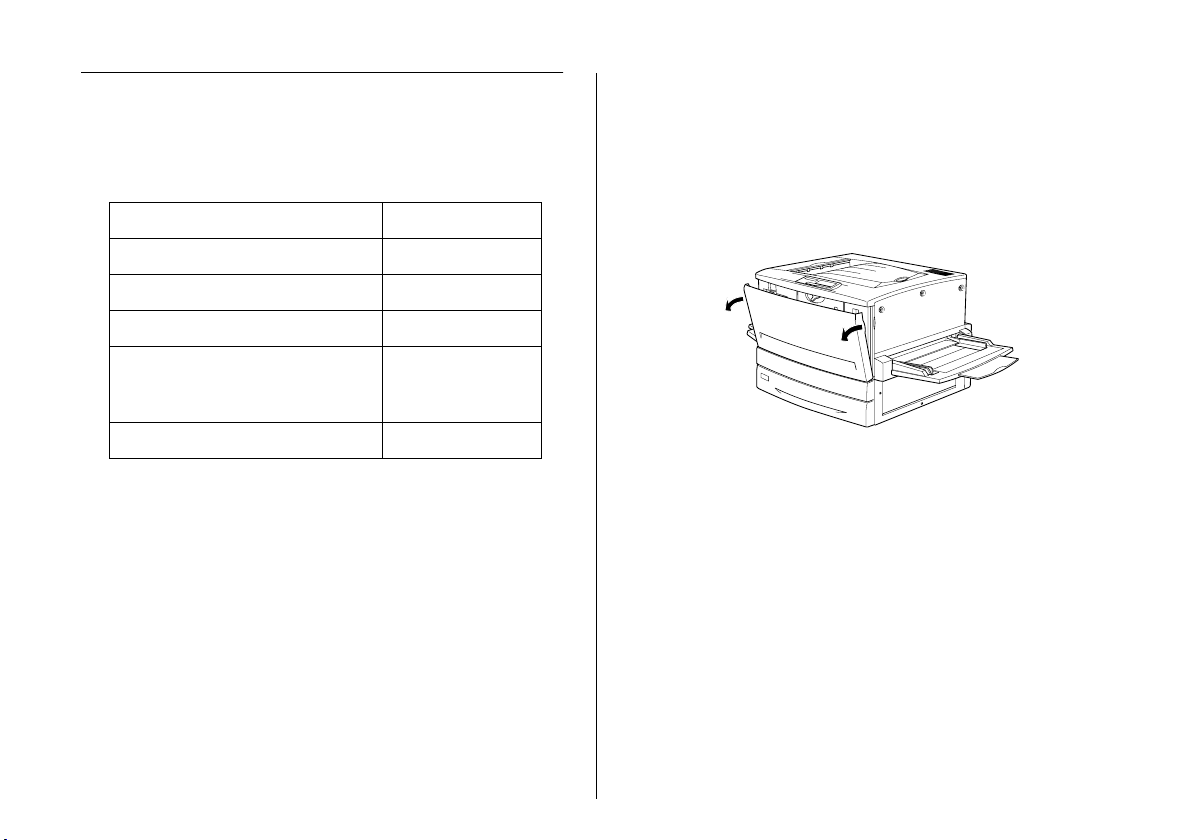
2. Open the front cover.
3. Check the color of the toner cartridge that appears
in the cartridge installment window.
If you see the color that you need to replace, go to
step 5.
If you see a different color, go to the next step.
2222
Page 3
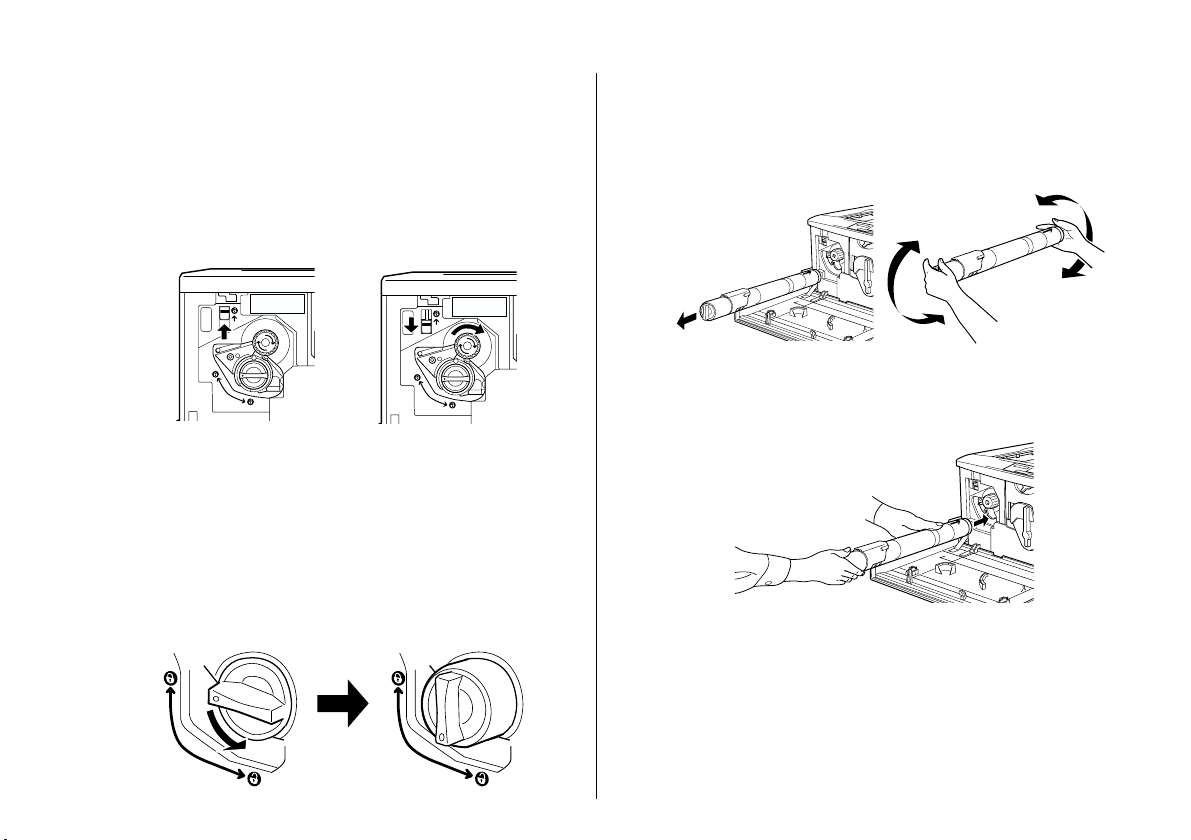
4. Push up the switch located on the top left, then
release it. Turn the upper knob located just above
the cartridge installation window clockwise until it
stops. The switch automatically drops down to the
lower position and the next toner cartridge appears
in the installation window. Repeat this step until
you see the color that you need to replace.
Note:
If the knob cannot be moved, first check that the switch
is in the upper position. Do not turn the knob by force.
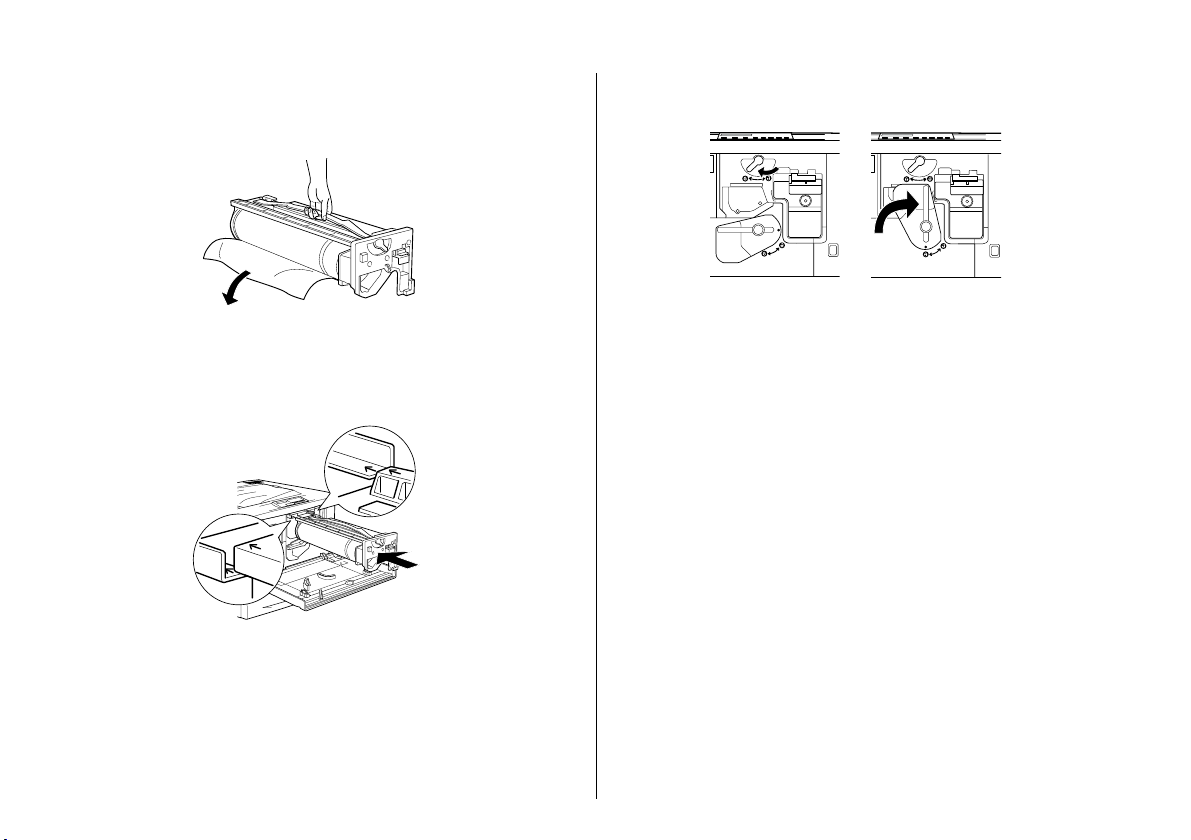
5. Turn the toner cartridge knob 90 degrees
counterclockwise so that the
is in the release position shown below. By turning
the knob, the toner cartridge protrudes slightly.
N symbol on the knob
6. Pull the toner cartridge out of the slot.
7. Take the new toner cartridge out of its package, and
gently shake it from side to side and front to back
to distribute the toner evenly.
8. Hold the toner cartridge as shown below, and
insert it all the way into the slot until it stops.
3333
Page 4
9. Turn the toner cartridge knob 90 degrees clockwise
so that the
shown below. By turning the knob, the cartridge is
pressed into the slot and installed completely.
c
10. If you need to replace another toner cartridge,
repeat steps 3 to 9.
11. Close the front cover.
N symbol on the knob is in the position
Caution:
Be sure to turn the knob all the way to the locked
position. Otherwise, you may have toner
problems or leakage.
Replacing the photoconductor unit
When you purchase a photoconductor unit, it always
comes with a waste toner collector because it usually
needs replacement at the same time as the
photoconductor unit. However, the waste toner
collector is also sold individually as you may need to
replace it separately depending on use.
1. Turn off the printer.
2. Open the front cover.
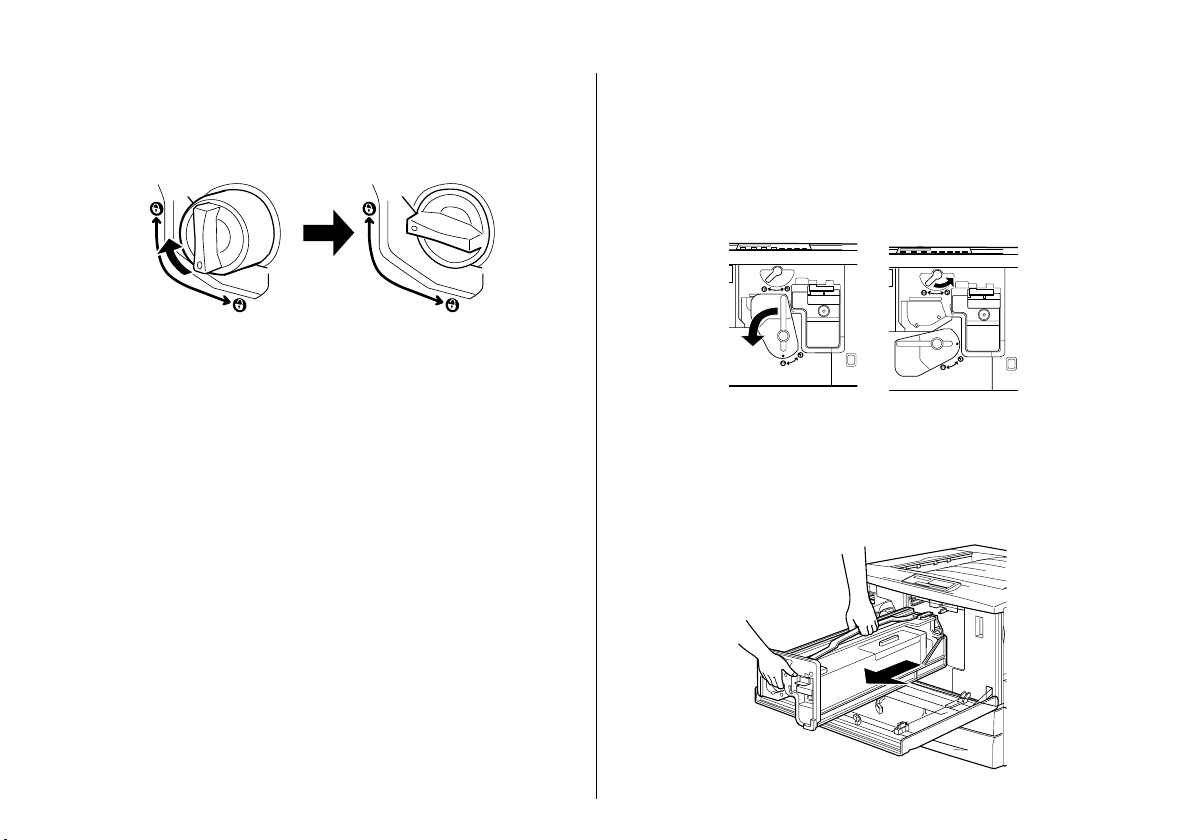
3. Turn the large lever 90 degrees counterclockwise.
4. Turn the small lever to the right.
5. Pull the photoconductor unit about 20 cm out of the
printer.
6. Hold the handle at the top of the photoconductor
unit and gently pull it all the way out.
Follow these steps to replace the photoconductor unit:
4444
Page 5
7. Take the new photoconductor unit out of its
package and unwrap the protective sheet while
holding the handle as shown below.
8. Holding the photoconductor unit by its handle,
place the unit on the guide rails and push it all the
way into the printer.
9. Turn the small lever to the left.
10. Turn the large lever 90 degrees clockwise.
11. Close the front cover.
Replacing the waste toner collector
The waste toner collector is sold as part of the
photoconductor unit because it usually needs
replacement at the same time as the photoconductor
unit. However, the waste toner collector is also sold
individually as sometimes you may need to replace the
waste toner collector separately depending on use.
Follow these steps to replace the waste toner collector:
1. Open the front cover.
2. Hold the handle of the waste toner collector and
push the tab down to release the lock.
5555
Page 6
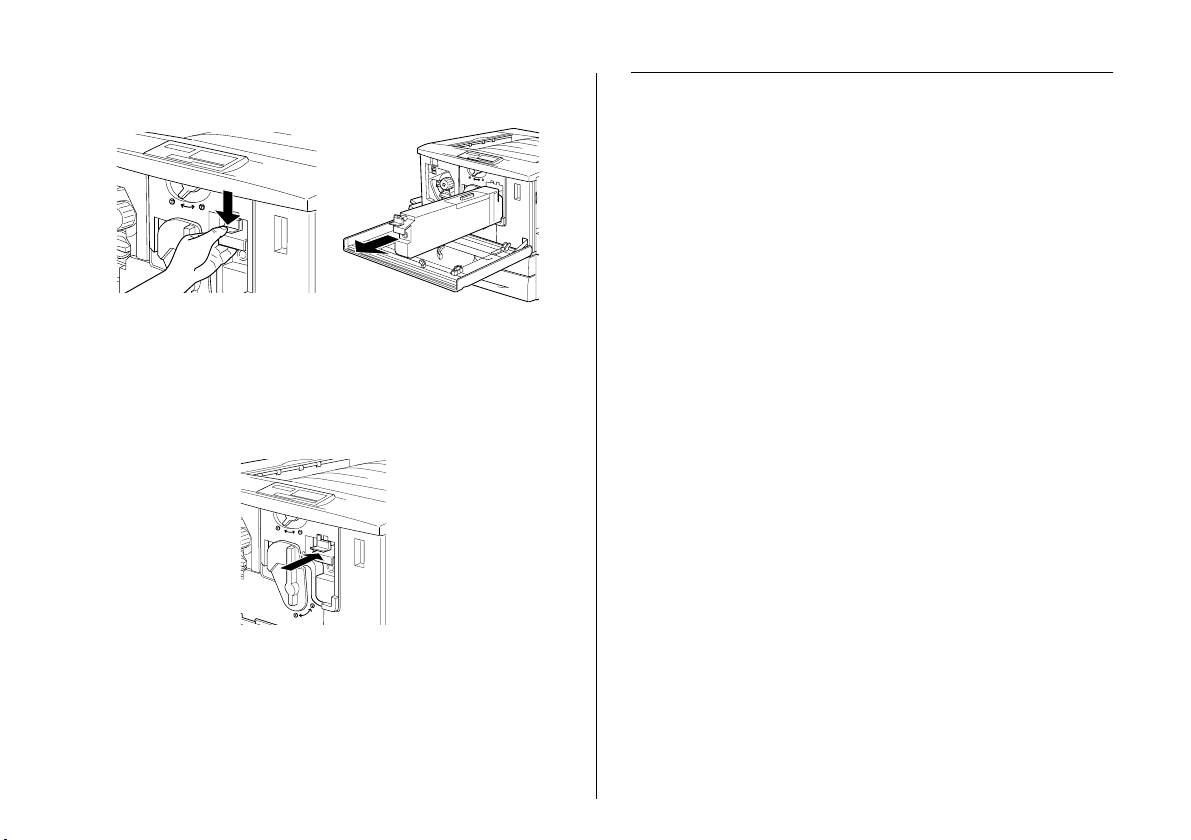
3. Pull out the waste toner collector.
4. Take the new waste toner collector out of its
package.
5. Insert the new waste toner collector firmly into the
slot until the tab clicks into place.
Clearing Jammed Paper
When paper is jammed in the printer, the printer’s LCD
panel and the EPSON Status Monitor 3 utility provide
alert messages.
Error messages for paper jams
If the following messages appears on the LCD panel,
you must clear all jammed paper.
6. Close the front cover.
6666
Page 7

Jam xxxx
P
The location where the paper jam occurred is displayed
at xxxx. xxxx represents an alphabet that indicates the
location of the paper jam. Use the illustrations below as
a guide for the printer parts represented by alphabets.
aper path
unit (unit c)
Duplex
Unit’s main
unit (unit G)
Standard
and
optional
lower
cassettes
output path cover
(cover A)
Large Capacity Paper
Unit cover (cover E)
MP tray
paper cassette
cover (cover D)
If a paper jam occurs at two or more locations
simultaneously, the corresponding multiple locations
are displayed.
Jam A
Paper is jammed inside the output path cover
(cover A).
Jam B
Jam C
Paper is jammed inside the fuser unit (unit B).
Paper is jammed inside the paper path unit
(unit C).
Jam D
Paper is jammed inside the paper cassette
cover on the right side of the printer (cover D).
If you cannot find any jammed paper in this
cover, check the optional Duplex Unit’s
inverter cover (cover F), then its main unit
(unit G).
Jam E
Paper is jammed at the side cover of the
optional Large Capacity Paper Unit (cover E).
Jam F
Paper is jammed at the optional Duplex Unit’s
inverter cover (cover F).
If you cannot find any jammed paper in this
cover, check the paper cassette cover (cover D),
then optional Duplex Unit’s main unit (unit G).
Jam G
Paper is jammed inside the optional Duplex
Unit’s main unit (unit G).
Be sure to check if the jammed paper is not in
the paper cassette cover (cover D) or the
Duplex Unit’s inverter cover (cover F) before
checking the main unit of the Duplex Unit.
fuser unit
(unit B)
Duplex Unit’s
inverter cover (unit F)
7777
Page 8

Clearing the lower cassette
3. Remove the stack of paper from the cassette.
Follow these steps to clear paper jams in the lower
cassettes. The illustrations show the standard lower
cassette.
1. Pull the lower cassette out slowly until it stops. Be
careful not to tear the jammed paper.
2. Remove any jammed or crumpled paper.
Note:
If paper is torn, be sure to remove all torn pieces.
4. Tap the stack of paper on a flat surface to even out
the edges, then reinsert it into the lower cassette. Be
sure the paper is evenly aligned and the top of the
stack is below the metal retaining clip and the
maximum paper mark.
5. Push the lower cassette back into the printer.
When the paper jam is cleared completely and the lower
cassette is pushed back into the printer, the jammed
page’s print data is automatically reprinted.
Clearing the MP tray
Follow these steps to clear paper jams at the MP tray:
1. Pull the jammed paper out gently.
Caution:
c
If the jammed paper is visible deep inside the MP
tray, do not pull the paper by force. Pull out the
paper path unit to remove the jammed paper.
8888
Page 9

2. Remove and tap the remaining paper stack on a flat
surface to even out the edges before reloading it
into the MP tray.
When the paper jam is cleared completely and the
output path cover (cover A) is closed, the jammed
page’s print data is automatically reprinted.
Clearing the output path cover (Jam A)
When there is paper jammed at the output path cover,
the LCD panel displays the Jam A error message.
Follow these steps to clear paper jams in the output path
cover:
1. Open the output path cover on the left side of the
printer.
2. Remove any jammed paper gently with both
hands. Be careful not to tear the jammed paper.
z
Note:
Always try to remove jammed paper with both
❏
hands to avoid tearing it.
If paper is torn, be sure to remove all torn pieces.
❏
3. Close the output path cover.
Clearing the fuser unit (Jam B)
When there is paper jammed at the fuser unit, the LCD
panel displays the Jam B error message.
Follow these steps to clear paper jams in the fuser unit:
1. Pull the fuser unit out gently until it stops. Be
careful not to tear the jammed paper.
Warning:
w
Do not insert your hand deep into the fuser unit
(unit B) as some components are sharp and may
cause injury.
9999
Page 10

2. Pull the lever up to release the paper path.
Note:
Be sure to remove the jammed paper by pulling it
❏
upward.
If paper is torn, be sure to remove all torn pieces.
❏
5. Push the fuser unit back into the printer firmly.
When the paper jam is cleared completely and the fuser
unit (unit B) is pushed back into the printer, the jammed
page’s print data is automatically reprinted.
Warning:
w
3. Turn the knob in the fuser unit to eject the jammed
paper.
4. Gently remove the jammed paper with both hands.
Be careful not to tear the jammed paper.
Do not touch the fuser, which is marked
CAUTION! HIGH TEMPERATURE, or the
surrounding areas. If the printer has been in
use, the fuser and the surrounding areas may be
very hot.
Clearing the paper path unit (Jam C)
When there is paper jammed at the paper path unit, the
LCD panel displays the Jam C error message.
Follow these steps to clear paper jams in the paper path
unit:
1. Pull the paper path unit out until it stops.
2. Lift the cover inside the paper path unit by its
handle.
10
10
1010
Page 11

3. Gently remove the jammed paper with both hands.
Note:
If paper is torn, be sure to remove all torn pieces.
When the paper jam is cleared completely and the paper
path unit (unit C) is pushed back into the printer, the
jammed page’s print data is automatically reprinted.
4. Check if jammed paper is left at the bottom of the
paper path unit. If you find any jammed paper,
gently remove it with both hands.
5. Lower the cover inside the paper path unit.
6. Push the paper path unit back into the printer
firmly.
Clearing the paper cassette cover (Jam D)
When there is paper jammed at the paper cassette cover,
the LCD panel displays the Jam D error message.
Follow these steps to clear paper jams in the paper
cassette cover:
1. Open the paper cassette cover (cover D).
2. Gently remove the jam med paper with both hands.
Be careful not to tear the jammed paper.
3. Close the paper cassette cover.
When the paper jam is cleared completely and the paper
cassette cover (cover D) is closed, the jammed page’s
print data is automatically reprinted.
11
11
1111
Page 12

Note:
If you cannot find any jammed paper in this cover, check the
optional Duplex Unit’s inverter co ver (cover F), then its main
unit (unit G).
Clearing the optional Large Capacity Paper Unit cover (Jam E)
When there is paper jammed at the side cover of the
optional Large Capacity Paper Unit, the LCD panel
displays the Jam E error message.
Follow these steps to clear paper jams in the optional
Large Capacity Paper Unit:
1. Open the cover (cover E) on the right side of the
optional Large Capacity Paper Unit.
2. Gently remove the jam med paper with both hands.
Be careful not to tear the jammed paper.
3. Close the cover.
When the paper jam is cleared completely and the cover
on the right side of the Large Capacity Paper Unit (cover
E) is pushed back into the printer, the jammed page’s
print data is automatically reprinted.
Clearing the optional Duplex Unit’s inverter cover (Jam F)
When there is paper jammed at the optional Duplex
Unit’s inverter cover, the LCD panel displays the Jam F
error message.
Follow these steps to clear paper jams in the Duplex
Unit’s inverter cover:
12
12
1212
Page 13

1. Open the Duplex Unit’s inverter cover (cover F) on
the left side of the printer.
2. Gently remove the jammed paper inside the
inverter cover.
Note:
If paper is torn, be sure to remove all torn pieces.
3. Close the inverter cover.
When the paper jam is cleared completely and the
Duplex Unit’s inverter cover (cover F) is closed, the
jammed page’s print data is automatically reprinted.
Note:
If you cannot find any jammed paper in this cover, check the
paper cassette cover (cover D) or the optional Duplex Unit’s
main unit (unit G).
Clearing the optional Duplex Unit’s main unit (Jam G)
When there is paper jammed at the optional Duplex
Unit’s main unit, the LCD panel displays the Jam G error
message.
Follow these steps to clear paper jams in the optional
Duplex Unit’s main unit:
Caution:
c
1. Pull the main unit of the optional Duplex Unit out
Be sure to pull out the Duplex Unit’s main unit after
checking if the jammed paper is in the paper cassette
cover (cover D) or the Duplex Unit’s inverter cover
(cover F). If you pull out the main unit first, the paper
jam may occur.
until it stops.
13
13
1313
Page 14

2. Gently remove the jammed paper with both hands.
Be careful not to tear the jammed paper.
Note:
If paper is torn, be sure to remove all torn pieces.
3. Push the main unit of the Duplex Unit’s main unit
back into the printer.
When the paper jam is cleared completely and the
Duplex Unit’s main unit (unit G) is pushed back into the
printer, the jammed page’s print data is automatically
reprinted
Note:
If you cannot find any jammed paper in this unit, check the
Duplex Unit’s inverter cover (cover F) or the paper cassette
cover (cover D).
Removing the main unit
Be sure to r emov e th e Du ple x Un it’ s ma in u nit fro m th e
printer only when you cannot clear the jammed paper.
Follow these steps to remove the Duplex Unit’s main
unit.
1. Identify the jammed paper in the side of the main
unit.
2. Push the main unit slightly backward, then remove
the main unit by pulling it toward you while
pushing down both levers.
14
14
1414
Page 15

Error Messages
Messages Description
Can't Print
Duplex
Check Paper Size The paper size setting is different
Check Paper Type This message appears when Paper
Check
Transparency
The printer has encountered
problems during duplex printing.
Make sure you are using an
appropriate type and size of paper
for the Duplex Unit. The problem
could also be a result of incorrect
settings for the paper source you
are using. Pressing the Continue
button will resume single-side
printing.
f ro m t he si ze of pa pe r lo ad ed in t he
printer. Check to see if the correct
size of paper is loaded in the
specified paper source, then press
the Continue button.
Type is specified with Paper Source
set to Auto and there is no paper
feed unit with paper that matches
the Paper Size and Paper Type
settings.
You have loaded me dia other than
transparencies when the Paper
Type setting in the printer driver is
Transparency. The printer stops
loading to prevent printer damage.
Load transparencies in the
specified paper source, then press
the Continue button.
Messages Description
Collate was
disabled
Cover A Open Cover A, the output path cover on
Cover D Open Cover D, the paper cassette cover
Cover E Open Cover E, the cover on the right side
Cover F Open Cover F, the optional Duplex Unit’s
Depleted Battery The printer’s battery needs to be
Printing by specifying the num ber of
copies is no longer possible due to
a la ck of m em or y ( RA M ) o r f re e di sk
space on the optional Hard Disk
Drive. If this error occurs, print only
one copy and end printing.
the left side of the printer, is open.
Close the cover and the error is
automatically cleared.
on the right side of the printer, is
open. Close the cover and the error
is automatically cleared.
of the optional Large Capacity
Paper Unit, is open. C lose the cover
and the error is automatically
cleared.
inverter cover on the left side of the
printer, is open. Close the cover
and the error is automatically
cleared.
replaced. Contact a qualified
service representative in your area.
You can continue printing despite
this message.
15
15
1515
Page 16

Messages Description
Duplex Mem
Overflow
Format Error ROM
A/Format Error
ROM B
Front Cover Open The front cover is open. Close the
There is not enough memory for
duplex printing. The printer prints
only on the top side and ejects the
paper. To correct this error, follow
the instructions below.
If Auto Cont is set to Off in the
SelecType Config Menu, either
press Continue or reset the printer
by pressing the ALT and Reset
buttons at the same time.
If Auto Cont is set to On in the
SelecType Config Menu, the error is
automatically corrected after a
certain period of time.
An unformatted ROM module has
been inserted. If the ROM module
has been formatted, but is
unreadable, format it again. If the
ROM is still unreadable after
reformatting, take it to your dealer
for repair or replacement.To clear
this error, either press the Continue
button or turn off the printer and
remove the ROM module.
cover and the error is automatically
cleared.
Messages Description
Image Optimum There is insufficient memory to print
Install
Photocondctr
the page at the specified print
quality. The printer automatically
lowers the print quality so that it can
continue printing. If the quality of
the printout is not acceptable, try
simplifying the page by limiting the
number of graphics or reducing the
number and size of fonts.
Press the Continue button or reset
the printer to clear the message.
Turn the Image Optimum setting off in
the SelecType Config Menu if you
do not want the printer to
automatically lower the print
quality to continue printing.
You may need to increase the
amount of printer memory to be
able to print at the desired print
quality for your document.
The photoconductor unit is not
installed, or is installed incorrectly.
Install a photoconductor unit if it is
not installed.
If the photoconductor unit is
already installed, try removing it
and then reinstalling it into the
printer.
16
16
1616
Page 17

Messages Description
Install Waste T
Box
Invalid AUX I/F
Card
Invalid HDD Either the optional Hard Disk Drive is
Invalid PS3 An optional PostScript 3 ROM
Invalid ROM
A/Invalid ROM B
Irregular
Density
The waste toner collector is not
installed, or is installed incorrectly. If
there is no waste toner collector
installed, install one into the printer.
If there is a waste toner collector
already installed, try removing it
and reinstalling it.
This message means that the printer
cannot communicate with the
installed optional interface card.
Turn off the printer, remove the
card, then reinstall it.
damaged or it cannot be used with
this printer. Turn off the printer and
remove the Hard Disk Drive.
m od u l e t h at c an n ot b e u s e d o n th i s
printer is installed. Turn off the printer
and remove the module.
The printer cannot read the
installed optional ROM module.
Turn off the printer and remove the
ROM module.
If you try to print on media of overly
high density, the printer stops
loading the media to prevent
printer damage. In this case, you
need to clear any jammed media
from the MP tray or the paper path
unit.
Messages Description
Jam xxxx The location where the paper jam
Manual Feed XXX
YYY
Mem Overflow The printer has insufficient memory
Menus Locked This message appears if you try to
occurred is displayed at xxxx.
xxx represents an alphabet that
indicates the location of the error.
If a paper jam occurs at two or
more locations simultaneously, the
corresponding multiple locations
are displayed.
For more information, See
“Clearing Jammed Paper” on
page 6.
XXX: The selected paper source is
indicated.
YYY: The selected paper size is
indicated.
The printer is waiting for media to be
inserted manually.
to execute the current task. To
correct the error, press the
Continue button on the control
panel.
change the printer’s settings
through the control panel when the
buttons are locked. You can unlock
them by using the EPSON WinAssist
utility or WebAssist. Refer to the
Administrator’s Guide
Administrator’s Guide for
Administrator’s GuideAdministrator’s Guide
information.
17
17
1717
Page 18

Messages Description
Need Memory The printer has insufficient memory
Outbin Select
Error
Paper Out XXX
YYY
Paper Set XXX
YYY
to execute the current task.
Printouts are not output to the
specified out put tray but to another
tray due to a printing restriction.
XXX: The selected paper source is
indicated.
YYY: The selected paper size is
indicated.
There is no paper in the specified
paper source (XXX). Load paper of
the indicated size (YYY) into the
paper source.
XXX: The selected paper source is
indicated.
YYY: The selected paper size is
indicated.
The paper loaded in the specified
paper source (X XX) does not match
the required paper size (YYY).
Replace the loaded paper with the
correct size paper and press
Continue.
If you press Continue without
replacing the paper, the printer will
print on the loaded paper even
though it does not match the
required size.
Messages Description
Photocondctr
Trouble
Print Overrun The required time to process the
PS3 Hard Disk
full
The installed photoconductor unit
has a problem. Turn off the printer,
remove the photoconductor unit
and install a new photoconductor
unit.
print data exceeds the print engine
speed because the current page is
too complex. Press the Continue
button to resume printing. If this
message appears again, turn on
Page Protect in the SelecType
Config Menu.
If you continue to receive this
message when printing a particular
page, try simplifying the page by
limiting the number of graphics or
reducing the number and size of
fonts.
The writing of PostScript 3
commands on the optional Hard
Disk Drive is no longer possible as
the amount of space allocated to
PostScript 3 on the Hard Disk Drive is
used up.
18
18
1818
Page 19

Messages Description
Replace
Photocondctr
Replace Waste T
Box
Time Exceeded Paper was forcibly output (blank
Turn Paper LC1 Paper is loaded in the wrong
Turn Paper
LC2/Turn Paper
LC3
The photoconductor unit has
reached the end of its service life.
Turn off the printer, then remove the
photoconductor unit and install the
new photoconductor unit.
The error clears itself once you have
replaced all the items and close all
printer covers. The photoconductor
level counter is automatically reset.
The waste toner collector is full of
toner. Replace it with a new waste
toner collector.
The error clears itself after you have
replaced the waste toner collector
and close the front cover.
sheet printing) as the print data did
not arrive in time even though
paper was pre-fed.
orientation in the standard lower
cassette. Remove the paper stack
from the standard lower cassette,
turn it by 90 degrees, and reload it
with the long edge first.
Paper is loaded in the wrong
orientation in the optional 500Sheet Paper Cassette Unit or the
Large Capacity Paper Unit.
Remove the paper stack from the
cassette, turn it by 90 degrees, and
reload it with the long edge first.
Messages Description
Unit B Open The fuser unit is open. The error
Unit C Open The paper path unit is open. The
Unit G Open The optional Duplex Unit’s main unit
Waste T Box
Nearfull
Worn
Photoconductor
automatically clears itself when the
fuser unit is closed properly.
error automatically clears itself
when the paper path unit is closed
properly.
is open. The error automatically
clears itself when the Duplex Unit’s
main unit is closed properly.
The waste toner collector is nearly
full of toner. You can continue to
print until the Replace Waste T Box
error message appears, but early
replacement is recommended to
maintain high print quality.
This message warns you that the
photoconductor unit is near the
end of its service life. You can
continue to print until the Replace
Photocondctr error message
appears, but early replacement is
recommended to maintain high
print quality.
You can clear this warning by
performing one of the following:
• Pressing the Continue button.
• Resetting the printer.
• Replacing the photoconductor
unit.
19
19
1919
Page 20

Messages Description
Write Error ROM
A/Write Error
ROM P
Wrong
Photoconductor
XXXX Toner Crtg
Out
XXXX Toner Low XXXX: The letters C , M, Y, or K appear
This message indicates an internal
error in the printer. Reset the printer.
If this error persists, consult your
dealer.
You have installed a
photoconductor unit that has not
been designed for this printer. Turn
off the printer, remove the in correct
photoconductor unit and install
one designed for this printer
(S051073).
XXXX: The letters C , M, Y, or K appear
in place of XXXX. C, M, Y, and K
stand for Cyan, Magenta, Yellow,
and Black respectively.
The indicated toner cartridge(s) is
not installed in the printer. Install the
appropriate toner cartridge.
in place of XXXX. C, M, Y, and K
stand for Cyan, Magenta, Yellow,
and Black respectively.
The amount of remaining toner in
the indicated toner cartridge(s) is
very small. You can continue to
print until the XXXX Toner Out error
message appears, but early
replacement is recommended to
maintain high print quality.
Messages Description
XXXX Toner Out XXXX: The letters C, M, Y, o r K appear
in place of XXXX. C, M, Y, and K
stand for Cyan, Magenta, Yellow,
and Black respectively.
No toner is left in the indicated
toner cartridge(s). Replace it with a
new toner cartridge.
Printed in Japan 00. XX-XXCopyright © 2000 by SEIKO EPSON CORPORATION, Nagano, Japan
20
20
2020
 Loading...