

Page 1
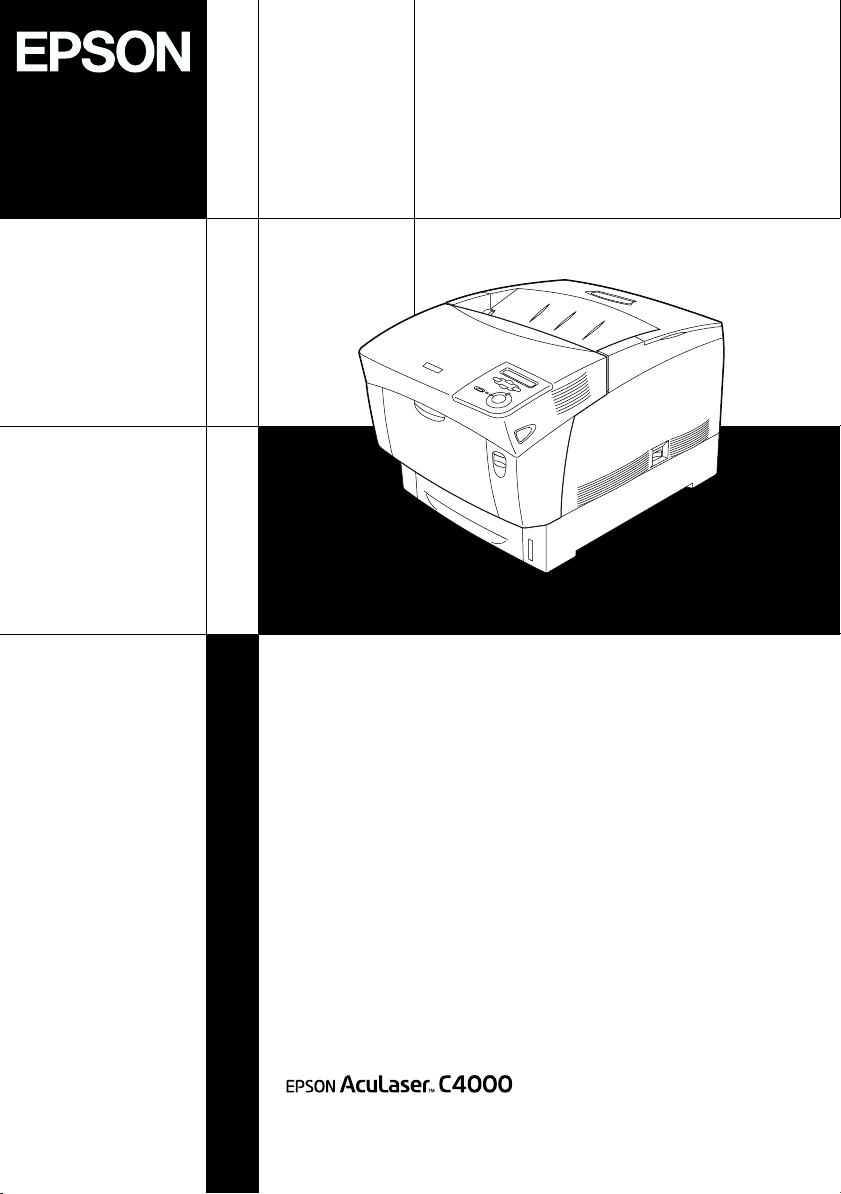
Color Laser Printer
Setup Guide
4020199-00
EUL
Page 2

Where to Find Information
Setup Guide (this manual)
Contains information on how to place the printer, how to
assemble the printer, and how to install the printer driver.
User Guides
The CD-ROM shipped with your printer includes
the following guides as well as the printer driver.
Note:
Microsoft
later, must be installed in your computer to view the Reference Guide
and the Administrator’s Guide. Adobe
must be installed in your computer to view the Quick Reference.
®
Internet Explorer 4.0 or later, or Netscape Navigator 4.0 or
®
Acrobat Reader 4.0 or later
Reference Guide (HTML)
❏ How to use the printer
❏ How to solve problems
❏ How to keep your printer in good condition
❏ Safety information and technical specifications
Administrator’s Guide (HTML)
Provides network administrators with information on both the
printer driver and network settings.
Quick Reference (PDF)
Provides you with a list of LCD panel messages, solutions for
paper jam problems, and other information about your printer
that you may need to refer to on a regular basis. We recommend
printing this guide and keeping it near the printer.
Page 3

Color Laser Printer
Setup Guide
Safety Instructions . . . . . . . . . . . . . . . . . . . . . 1
1 Removing the Protective Materials. . . . . . 8
2 Finding a Place for the Printer . . . . . . . . . . 9
3 Assembling the Printer . . . . . . . . . . . . . . . 11
4 Installing Options . . . . . . . . . . . . . . . . . . . . 19
5 Testing and Connecting the Printer . . . . 30
6 Installing the Printer Software. . . . . . . . . . 36
7 Printing Quick Reference . . . . . . . . . . . . . 41
Page 4

All rights reserved. No part of this publication may be reproduced, stored in a retrieval system, or
transmitted in any form or by any means, mechanical, photocopying, recording, or otherwise,
without the prior written permission of SEIKO EPSON CORPORATION. No patent liability is
assumed with respect to the use of the information contained herein. Neither is any liability
assumed for damages resulting from the use of the information contained herein.
Neither SEIKO EPSON CORPORATION nor its affiliates shall be liable to the purchaser of this
product or third parties for damages, losses, costs, or expenses incurred by purchaser or third
parties as a result of: accident, misuse, or abuse of this product or unauthorized modifications,
repairs, or alterations to this product, or (excluding the U.S.) failure to strictly comply with SEIKO
EPSON CORPORATION’s operating and maintenance instructions.
SEIKO EPSON CORPORATION and its affiliates shall not be liable against any damages or
problems arising from the use of any options or any consumable products other than those
designated as Original EPSON Products or EPSON Approved Products by SEIKO EPSON
CORPORATION.
EPSON and EPSON ESC/P are registered trademarks and EPSON AcuLaser and EPSON ESC/P
2 are trademarks of SEIKO EPSON CORPORATION.
Microsoft and Windows are registered trademarks of Microsoft Corporation in the United States
and/or other countries.
Adobe and PostScript are trademarks of Adobe Systems Incorporated, which may be registered in
certain jurisdictions.
Apple and Macintosh are registered trademarks of Apple Computer, Inc.
General Notice: Other product names used herein are for identification purposes only and may be
trademarks of their respective owners. EPSON disclaims any and all rights in those marks.
Copyright © 2002 by SEIKO EPSON CORPORATION, Nagano, Japan.
Warnings, Cautions, and Notes
Warnings
w
Cautions must be observed to avoid damage to your
equipment.
c
contain important information and useful tips on the
Notes
operation of your printer.
ii
must be followed carefully to avoid bodily injury.
Page 5

Safety Instructions
Laser Printer Precautions
This printer uses laser technology. Follow the precautions below
carefully to ensure safe, efficient operation.
❏ Be careful not to touch the
fuser, which is marked
CAUTION HIGH
TEMPERATURE, or the
surrounding areas. If the
printer has been in use,
these areas may be very
hot.
❏ Do not attempt to modify
or take the toner cartridge
apart. It cannot be refilled.
❏ Do not touch the toner and
avoid getting toner in your
eyes.
CAUTION HIGH
TEMPERATURE
Do not insert your hand
deep into the fuser unit
❏ Do not dispose of used toner cartridges, photoconductor unit,
fuser unit, or transfer unit in fire, as they can explode and
cause injury. Dispose of them according to local regulations.
Safety Instructions
1
Page 6
Important Safety Instructions
Read all of the following instructions before operating your
printer:
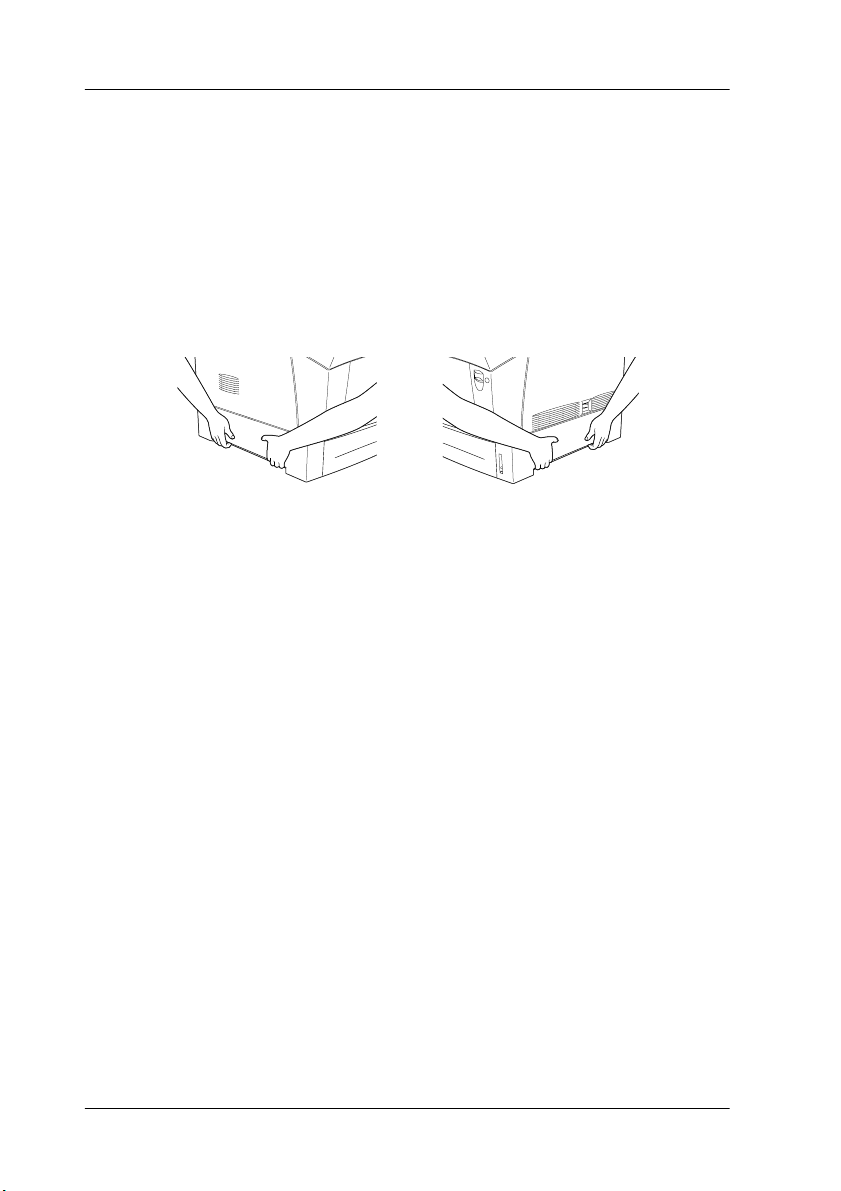
❏ The printer weighs about 29.2 kg (64.3 lb) without consumable
products installed. One person should not attempt to lift or
carry the printer. Two people should carry it, lifting it by the
correct positions as shown below.
left
right
❏ Follow all warnings and instructions marked on the printer.
❏ Unplug the printer from the electrical outlet before cleaning.
Use a damp cloth for cleaning and do not use liquid or aerosol
cleaners.
❏ Avoid touching the components inside the printer unless
instructed to do so in this guide.
❏ Never force printer components into place. Although the
printer is designed to be sturdy, rough handling can damage
it.
❏ Be sure to keep consumables out of the reach of children.
❏ Do not leave jammed paper inside of the printer. This can
cause the printer to overheat.
❏ Do not use the printer near water.
❏ Do not place the printer on an unstable surface.
2
Safety Instructions
Page 7

❏ Do not put your printer where the cord will be stepped on.
❏ Avoid using outlets that other appliances are plugged into.
❏ Slots and openings, located on the sides of the printer, are
provided for ventilation. Keep these slots and openings clear
to allow proper ventilation. Avoid placing the printer on a soft
surface like a bed or a sofa, or in a small enclosed area, as this
restricts ventilation.
❏ The interface connector for this printer is Non-LPS
(non-limited power source).
❏ When using an extension cord, be careful not to exceed its
recommended amperage limit. Also, be sure that all items
plugged into the electrical outlet do not exceed a total of 15
amperes.
❏ Never push objects of any kind through cabinet slots as they
may touch dangerous voltage points or short out parts that
could result in fire or electric shock.
❏ Never spill liquid on the printer.
❏ Unless specifically instructed in this guide, do not attempt to
service this product yourself. Opening or removing covers
that are marked Do Not Remove exposes you to dangerous
voltage points and other risks. Refer all servicing in those
compartments to a qualified service representative.
❏ Adjust only those controls that are covered by the operating
instructions. Improper adjustment of other controls may
result in damage and may require repairs by a qualified
service representative.
❏ Unplug the printer and refer servicing to a qualified service
representative under the following conditions:
A. If liquid has entered the printer.
B. If the printer has been exposed to rain or water.
Safety Instructions
3
Page 8

C. If the printer does not operate normally or exhibits a
distinct change in performance.
D. If the printer has been dropped or the cabinet damaged.
E. When the power cord or plug is damaged or frayed.
❏ If you plan to use the printer in Germany, observe the
following:
To provide adequate short-circuit protection and
over-current protection for this printer, the building
installation must be protected by 10 or 16 ampere circuit
breaker.
Safety Information
Power cord
Caution:
Be sure the AC power cord meets the relevant local safety
c
standards.
Laser safety labels
Warning:
The use of controls, or the performance of procedures and
w
adjustments other than those specified in this guide may result in
hazardous radiation exposure.
4
Safety Instructions
Your printer is a Class 1 laser product
as defined in the IEC60825
specifications. The label shown below
is attached in countries where
required.
Page 9

Internal laser radiation
Max. Radiation Power 10 mW (for 1 Beam)
Wave Length 775 to 799 nm
This is a Class IIIb Laser Diode Assembly that has an invisible
laser beam. The printer head unit is NOT A SERVICE ITEM.
Therefore, the printer head unit should not be opened under any
circumstances. An additional laser warning label is affixed to the
inside of the printer.
CDRH regulations
For information about the Center for Devices and Radiological
Health of the U.S. Food and Drug Administration, see the
Reference Guide on the CD-ROM.
Ozone safety
Ozone emission
Ozone gas is generated by laser printers as a by-product of the
printing process. Ozone is produced only when the printer is
printing.
Ozone exposure limit
The recommended exposure limit for ozone is 0.1 parts per
million (ppm) expressed as an average time-weighted
concentration over an eight (8) hour period.
The EPSON AcuLaser C4000 laser printer generates less than 0.1
ppm for eight (8) hours of continuous printing.
Minimize the risk
To minimize the risk of exposure to ozone, you should avoid the
following conditions:
Safety Instructions
5
Page 10

❏ Use of multiple laser printers in a confined area
❏ Operation in conditions of extremely low humidity
❏ Poor room ventilation
❏ Long, continuous printing together with any of the above
Printer location
The printer should be located so that the exhaust gases and heat
generated are:
❏ Not blown directly into the user’s face
❏ Vented directly out of the building whenever possible
For United Kingdom Users
The EPSON AcuLaser C4000 is a page printer which utilizes a
semiconductor laser.
There is no possibility of danger from the laser, provided that the
printer is operated according to the instructions in the guides
provided.
Since radiation emitted by the laser is completely confined within
protective housings and external covers, the laser beam cannot
escape from the machine during any phase of user operation.
Warning:
The use of controls, or the performance of procedures and
w
adjustments other than those specified in this guide may result in
hazardous radiation exposure.
This is a semiconductor laser. The maximum power of the laser
diode is 10 mW and the wavelength is 775 to 799 nm.
6
Safety Instructions
Page 11

Use of options
Epson (UK) Limited shall not be liable against any damages or
problems arising from the use of any options or consumable
products other than those designated as Original EPSON
Products or EPSON Approved Products by Epson (UK) Limited.
Safety information
Warning: This appliance must be earthed. Refer to the rating plate
for voltage and check that the appliance voltage corresponds to
the supply voltage.
Important: The wires in the mains lead fitted to this appliance are
coloured in accordance with the following code:
Green and yellow—Earth
Blue—Neutral
Brown—Live
If you need to fit a plug:
As the colours of the mains lead of this appliance may not match any
coloured markings used to identify the terminals in a plug, please proceed
as follows:
❏ The green and yellow wire must be connected to the terminal
in the plug which is marked with the letter E or the Earth
symbol (
❏ The blue wire must be connected to the terminal in the plug
marked with the letter N.
❏ The brown wire must be connected to the terminal in the plug
marked with the letter L.
If damage occurs to the plug, replace the cord set or consult a
qualified electrician.
Replace fuses only with a fuse of the correct size and rating.
G).
Safety Instructions
7
Page 12
Removing the Protective
1
Materials
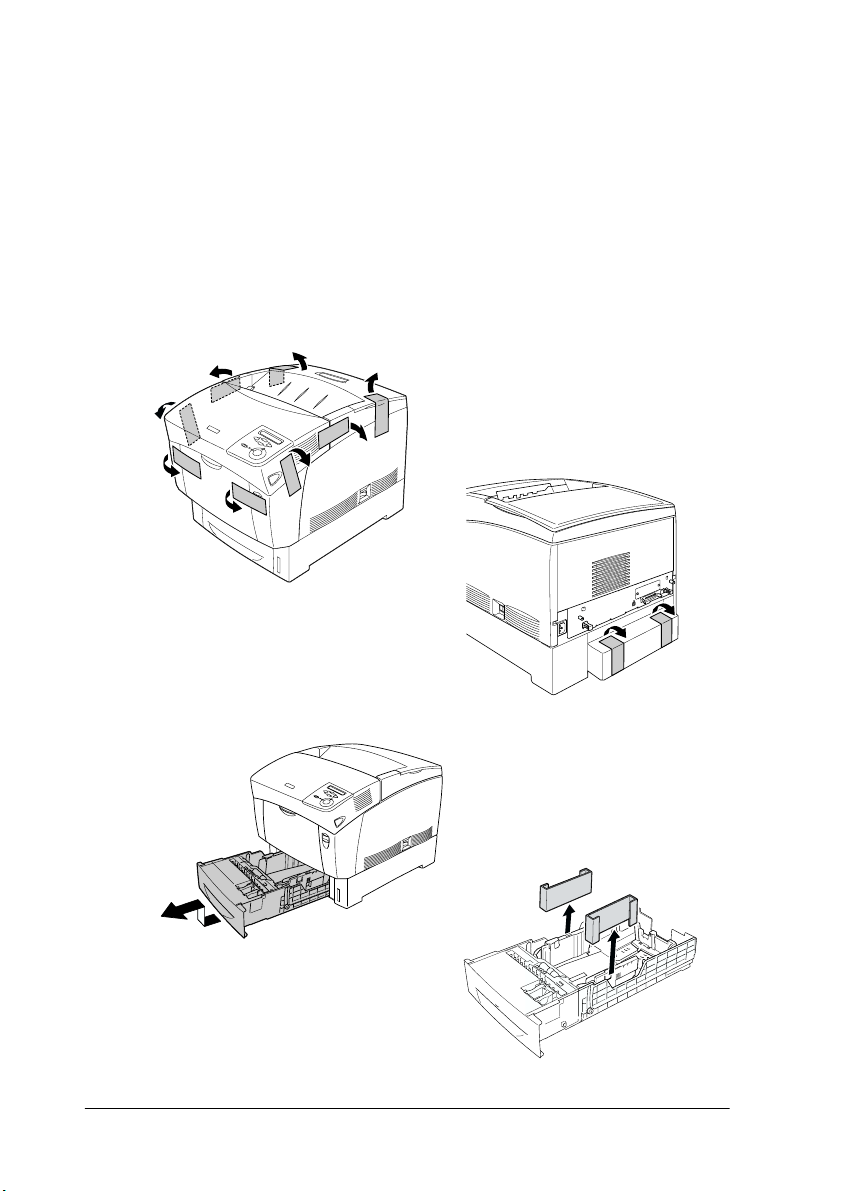
Remove all protective materials as shown in the illustrations
below.
1
2
8
Removing the Protective Materials
Page 13
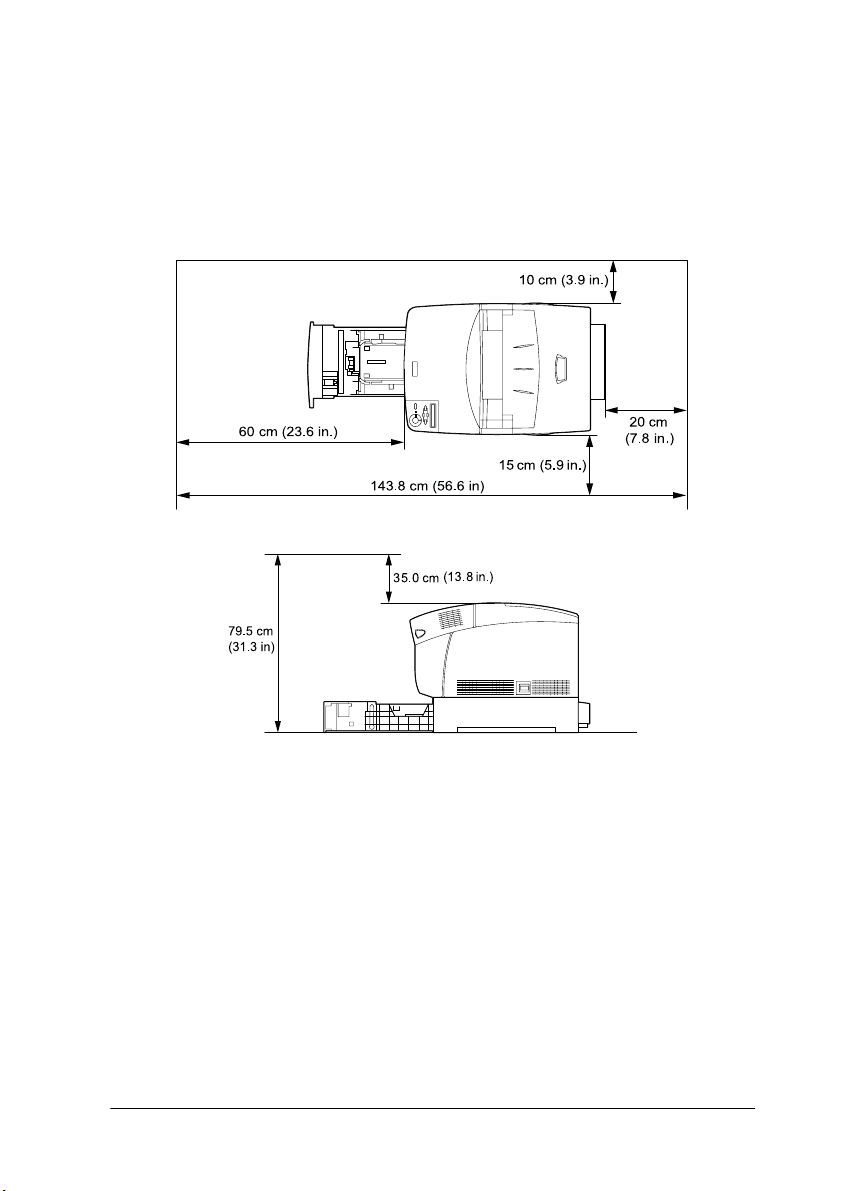
Finding a Place for the Printer
2
Place the printer with adequate space for easy operation and
maintenance. The adequate space is as shown below.
To install and use the optional Large Capacity Paper Unit, you
will need an additional 35.2 cm (14.3 in.) to install the unit beneath
the printer.
Always follow the precautions below when finding a place to
locate the printer:
❏ Place the printer where you can easily unplug the power cord.
Finding a Place for the Printer
9
Page 14

❏ Keep the entire computer and printer system away from
potential sources of interference, such as loudspeakers or the
base units of cordless telephones.
Caution:
❏ Leave adequate room around the printer to allow for sufficient
c
ventilation.
❏ Avoid locations that are subject to direct sunlight, excessive
heat, moisture, or dust.
10
Finding a Place for the Printer
Page 15
Assembling the Printer
3
Installing the Toner Cartridges
Handling precautions:
❏ When handling the toner cartridges, always place them on a
clean, smooth surface.
❏ If toner gets onto your skin or clothes, wash it off with soap
and water immediately.
❏ Wait for at least one hour before installing a toner cartridge
after moving it from a cool to a warm environment to prevent
damage from condensation.
To install the toner cartridges, follow the instructions below.
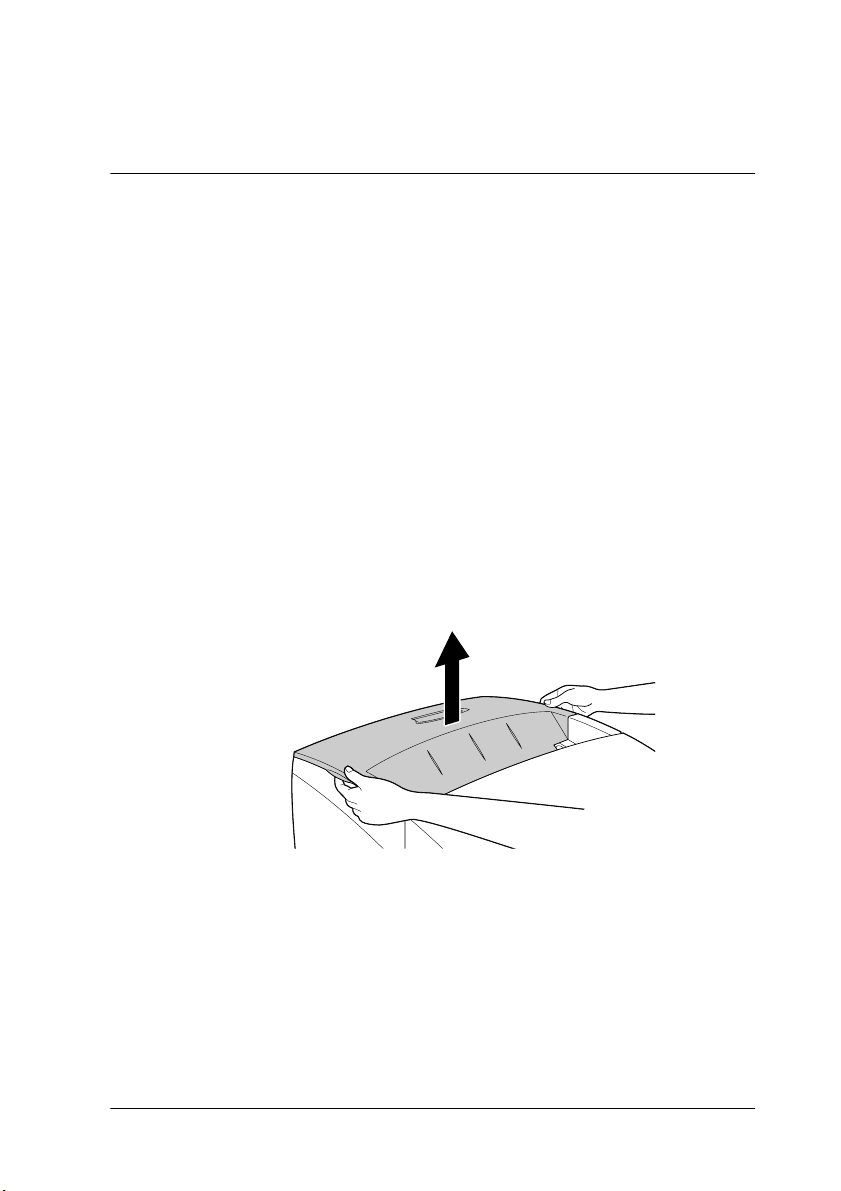
1. Remove the top cover.
Assembling the Printer
11
Page 16

2. Identify the slot that corresponds to the color of the cartridge.
Black
Cyan
Magenta
Yellow
3. Shake the toner cartridge well.
Note:
Do not remove the protective tape yet.
4. Hold the toner cartridge as shown below, and lower it into
the appropriate slot.
12
Assembling the Printer
Page 17

5. Turn the toner cartridge knobs to the locked position.
Note:
Hold the knobs with both hands and turn them until they click.
Caution:
Be sure to turn the knob all the way to the locked position.
c
Otherwise, you may have toner problems or leakage.
6. Remove the protective tape.
Assembling the Printer
13
Page 18

7. Install the remaining toner cartridges in the same way.
8. Replace the top cover.
Installing the Photoconductor Unit
Handling precautions:
❏ The photoconductor unit weighs 4.5 kg (9.9 lb). Be sure to hold
it firmly by the handle when carrying it.
14
Assembling the Printer
Page 19

❏ When installing the photoconductor unit, avoid exposing it
to room light more than five minutes. The unit contains a
light-sensitive drum. Exposure to light can damage the drum,
causing dark or light areas to appear on printouts and
reducing the service life of the drum. If you need to keep the
unit out of the printer for long periods, cover it with an opaque
cloth.
❏ To get the best print quality, do not store the photoconductor
unit in an area subject to direct sunlight, dust, salty air, or
corrosive gases (such as ammonia). Avoid locations subject to
extreme or rapid changes in temperature or humidity.
❏ Keep the photoconductor unit out of the reach of children.
❏ Do not tilt the photoconductor unit. Otherwise, the toner will
spill out and may reduce the print quality.
To install the photoconductor unit, follow the instructions below.
1. Press the latch on cover A and open the cover.
Assembling the Printer
15
Page 20

2. Raise cover D.
3. Take the new photoconductor unit and tear away the top
portion of the bag along the dotted line to expose the handle.
Then, grab the handle and remove the styrofoam insert and
tear open the bag along the dotted line.
Note:
Always keep the cartridge positioned as shown in the illustration.
16
Assembling the Printer
Page 21

4. Unwrap the protective sheet and material while holding the
handle as shown below.
Caution:
❏ Be careful not to touch or scratch the surface of the drum.
c
❏ Avoid touching the drum, since oil from your skin may
permanently damage its surface and affect print quality.
5. Remove the protective tapes.
Assembling the Printer
17
Page 22

6. Holding the handle firmly, lower the photoconductor unit
into the printer, making sure the posts on the sides of the unit
slide into the slots.
7. Close covers D and A.
18
Assembling the Printer
Page 23

Installing Options
4
If you purchased any options with the printer, install them before
plugging in the printer. To install the Large Capacity Paper Unit,
see the Reference Guide on the printer software CD-ROM.
This chapter explains how to install the Hard Disk Drive, memory
modules, ROM module, and optional interface card.
Installing the Hard Disk Drive, Memory Modules, or ROM Module
1. Make sure the printer is turned off and the power cord is
unplugged.
OFF
Installing Options
19
Page 24

2. Loosen the two screws on the back of the printer.
Warning:
Removing other screws and covers will expose high voltage
w
areas.
3. Pull out the circuit board tray by holding the knobs on the
right and left sides.
20
Installing Options
Page 25

4. Identify the installation slots for the Hard Disk Drive,
memory modules, and ROM module.
Hard Disk
Drive Socket
Memory
slot S0
Memory
slot S1
ROM slot A
To install the Hard Disk Drive, proceed to the next section.
To install memory modules, skip to “Installing a memory
module” on page 23.
To install a ROM module, skip to “Installing a ROM Module”
on page 25.
Installing the Hard Disk Drive
The optional Hard Disk Drive allows you to expand the printer’s
network buffer, giving you additional memory for graphics
processing, and allowing faster multi-page, multi-output sorting.
This option also allows you to use the following functions:
❏ Storing print jobs using the Reserve Job function.
❏ Storing form overlay data using the form Overlay function.
Caution:
Before you install the Hard Disk Drive, be sure to discharge any
c
static electricity by touching a grounded piece of metal.
Otherwise, you may damage static-sensitive components.
Installing Options
21
Page 26

Warning:
Be careful when working inside the printer as some components
w
are sharp and may cause injury.
1. Connect the Hard Disk Drive cable to the circuit board.
2. Align the three screw holes on the Hard Disk Drive with the
screw holes on the circuit board.
22
Installing Options
Page 27

3. Secure the drive with the screws provided.
Note:
Be careful not to damage the cable when tightening the screws.
Caution:
Do not remove any modules from the circuit board. Otherwise,
c
the printer will not work.
If you do not install other options, skip to “Replacing the circuit
board tray” on page 27.
Installing a memory module
Increasing the printer’s memory allows you to print complex and
graphics-intensive documents. You can increase printer memory
up to 1024 MB.
This printer has two Memory slots, but one slot has a 64 MB
DIMM already installed in it at the time of manufacture. To
increase printer memory to more than 576 MB, you have to
remove the original 64 MB DIMM first and then install two
optional DIMMs.
Installing Options
23
Page 28

You can purchase DIMMs from various vendors. Be sure they
meet the following requirements:
DRAM type Synchronous Dynamic RAM Dual In-line
Memory size 32 MB, 64 MB, 128 MB, 256 MB, or 512 MB
CAS Latency CL = 2
Type 168-pin type, 64 bit, 3.3 V with SPD*
Height Less than 40 mm
* SPD stands for Serial Prese nce Detect, a chip residing on the memory mo dule
that contains information about the size, speed, and other specifications of
the memory as well as manufacturer information that can be retrieved by
the motherboard through electronic signals.
Caution:
Before you install a memory module, be sure to discharge any
c
static electricity by touching a grounded piece of metal.
Otherwise, you may damage static-sensitive components.
Warning:
Be careful when working inside the printer as some components
w
are sharp and may cause injury.
1. Hold the memory module above the Memory slot and insert
it into the slot. Do not apply too much force.
Memory Module (SDRAM DIMM)
PC 100 compliant
24
Installing Options
Page 29

2. Push the DIMM straight into the slot, until the clips come up
to hold the memory module securely in place.
Caution:
❏ Do not force the DIMM into the slot.
c
❏ Be sure to insert the DIMM facing the correct way.
❏ Do not remove any modules from the circuit board.
Otherwise, the printer will not work.
❏ Be sure that one module is installed in S0 slot.
If you do not install other options, skip to “Replacing the circuit
board tray” on page 27.
Installing a ROM Module
Depending on the country of purchase, optional ROM modules
that expand your printer’s features may be available.
Caution:
Before you install a ROM module, be sure to discharge any static
c
electricity by touching a grounded piece of metal. Otherwise, you
may damage static-sensitive components.
Warning:
Be careful when working inside the printer as some components
w
are sharp and may cause injury.
Installing Options
25
Page 30

1. Hold the ROM module above the slot and insert it into slot A
in the orientation shown below, until the clip comes up to hold
the ROM module securely in place.
Caution:
❏ Do not force the ROM module into the slot.
c
❏ Be sure to insert the ROM facing the correct way.
❏ Do not remove any modules from the circuit board.
Otherwise, the printer will not work.
2. Replace the circuit board tray as explained in the next section.
26
Installing Options
Page 31

Replacing the circuit board tray
1. Slide the circuit board tray into the printer.
2. Fasten the circuit board tray with the two screws.
To confirm that the options are installed correctly, print a status
sheet. For instructions on how to print a status sheet, see “Printing
a status sheet” on page 32.
Installing Options
27
Page 32

Installing an Interface Card
Your printer comes with a Type B interface slot. Various optional
interface cards are available to expand your printer’s interface
options. See the Reference Guide on the printer software CD-ROM
for more details on optional interface cards.
Caution:
Before you install the interface card, be sure to discharge any
c
static electricity by touching a grounded piece of metal.
Otherwise, you may damage static-sensitive components.
1. Make sure the printer is turned off and the power cord is
unplugged.
OFF
2. Make sure any switches and jumpers on the card are set as
necessary. See the interface card’s manual for specifications.
28
Installing Options
Page 33

3. Remove the screws and the interface slot cover from the back
of the printer.
Note:
Keep the slot cover in a safe place. You will need to reattach it if you
remove the interface card later.
Warning:
Removing other screws and covers will expose high voltage
w
areas.
4. Slide and push the interface card into the slot firmly, making
sure that the connector at the back of the interface card is fully
inserted into the printer’s internal socket.
5. Secure the interface card by fastening the retaining screws.
To confirm that the interface card is installed correctly, print a
status sheet. For instructions on how to print a status sheet, see
“Printing a status sheet” on page 32.
Installing Options
29
Page 34

Testing and Connecting the
5
Plugging in the Printer
Printer
1. Make sure that you have the correct power cord for your
power source.
Caution:
It is not possible to change the printer’s voltage. If the
c
required voltage and your outlet voltage do not match,
contact your dealer for assistance. Do not plug in the power
cord.
2. Attach the power cord as shown below.
30
OFF
Caution:
Avoid using an electrical outlet that is controlled by wall
c
switches or automatic timers. Accidental disruption of power
can erase valuable information in your computer’s and
printer’s memories.
Testing and Connecting the Printer
The required
voltage is
indicated here
AC inlet
Page 35

3. Plug the power cord into a properly grounded electrical
outlet.
Testing the Printer
Loading paper
1. Open the MP tray, and pull out the expansion tray.
MP tray
expansion tray
2. Fan a stack of A4 or Letter size paper, then tap it on a flat
surface to even the edges. Load the paper in the MP tray.
printable surface down
Testing and Connecting the Printer
slide the guides
31
Page 36

Printing a status sheet
1. Turn on the printer. After about 30 seconds, the display shows
Ready.
Note:
The time may vary depending on the amount of memory installed.
2. Press the Enter button three times. The printer starts
printing a status sheet.
Enter button
3. Check that information on the options installed in the printer
is correct. If the printer properly recognizes an installed
option, the option’s name appears under Hardware
Configurations. If not, try reinstalling the option.
If the printer cannot print a status sheet, or if you are unable to
get the printer to print a correct status sheet, contact your dealer.
32
Testing and Connecting the Printer
Page 37

Checking color registration
After assembling the printer, you need to check the color
registration for possible misalignment.
Follow these steps to check the color registration.
1. Turn on the printer.
2. Load paper into the MP tray.
3. Make sure the LCD panel displays Ready or Standby, then
press the Enter button on the control panel twice.
4. Press the Down button several times to display Color
Regist Sheet.
5. Press the Enter button. The printer prints a color
registration sheet.
Testing and Connecting the Printer
33
Page 38

6. The arrow (
indicated by the arrows (
l) point to the current settings. Check the patterns
l). If the color segment of the line is
in alignment with the black segments on either side to make
one straight line, you do not need to adjust the registration for
that color. If the line segments are not aligned, adjust the
registration as explained below.
Adjusting color registration alignment
1. Make sure the LCD panel displays Ready or Standby, then
press the Enter button to access the control panel menus.
2. Press the Down button several times until the LCD panel
displays Setup Menu, then press the Enter button.
3. Press the Up button several times until the LCD displays
the XXXX Regist item for the color (Cyan, Magenta, or Yellow)
you need to adjust, then press the Enter button. For
example, to adjust the cyan registration, scroll up to Cyan
Regist, then press the Enter button.
34
Testing and Connecting the Printer
Page 39

4. On the color registration sheet, find the line segments that are
most closely aligned, then use the Up or Down
button to display the number that corresponds to that pattern.
Press the Enter button to complete the adjustment.
5. If necessary, print the Color Registration Sheet for
confirmation.
Connecting to the Computer
To connect your computer to the printer’s built-in parallel
interface, you need a shielded, twisted-pair parallel interface
cable that is IEEE-1284 compatible.
Note:
If you want to connect the printer to your computer through an installed
optional interface card, you need a different type of cable. See the optional
interface card’s manual.
1. Make sure that both the printer and the computer are turned
off.
2. Attach the parallel or USB interface cable to the printer as
shown.
parallel
USB
3. Plug the other end of the cable into the computer’s parallel or
USB interface connector.
Testing and Connecting the Printer
35
Page 40

Installing the Printer Software
6
When you install the printer software, the following components
are installed.
❏ Printer driver
A printer driver for Microsoft
2000, and Windows NT
provided. This software lets you make a variety of settings
such as print quality and paper size.
❏ EPSON Status Monitor 3
EPSON Status Monitor 3 allows you to view printer status
information such as the amount of toner remaining and to
check for any printer errors.
Note:
❏ To install other software, see the Reference Guide on the printer
software CD-ROM.
❏ EPSON Network Utility installation is for administrators.
To install the printer software, follow the instructions for
Windows or for Macintosh in this section.
®
®
Windows® XP, Me, 98, 95,
4.0, and for the Macintosh is
36
Installing the Printer Software
Page 41

For Windows Users
1. Turn on your computer.
2. Insert the CD-ROM that comes with your printer in your
CD-ROM drive. The following screen appears.
Note:
If the EPSON Installation Program screen does not appear
automatically, double-click the My Computer icon, right-click the
CD-ROM icon, and click Open in the menu that appears. Then
double-click Setup.exe.
3. Double-click Install Printer Driver / Utility.
4. Follow the on-screen instructions.
Installing the Printer Software
37
Page 42

Note for Windows XP users:
While you install the printer driver, the following dialog box may
appear. If this happens, click Continue Anyway to continue the
installation.
About an additional driver
When the printer is shared with other computers (clients) on a
network and the print server’s OS is Windows 2000 or Windows
NT 4.0, you can install the printer driver for the client’s OS in the
server as an additional driver. This allows the clients to download
the appropriate printer driver from the printer server if necessary.
See “Using an Additional Driver” in the Reference Guide for details.
38
Installing the Printer Software
Page 43

For Macintosh Users
Your Macintosh must meet the following requirement to use the
driver included with the printer:
Mac OS 8.1 or later* (Except for Mac OS X)
* To turn off QuickDraw GX , first make sure the Caps Lock key is unlocked. Then,
while holding down the spacebar, restart your Macintosh. The Extensions
Manager will open. Clear the QuickDraw GX check box, then close the
Extensions Manager.
Caution:
Turn off any anti-virus software before installing the printer
c
driver.
1. Make sure that the printer is turned off. Insert the CD-ROM
that comes with your printer in your CD-ROM drive.
2. Double-click the Install Software folder.
3. Double-click the Installer icon.
4. Click Continue. When the software license agreement screen
appears, read the statement and then click Accept.
Installing the Printer Software
39
Page 44

5. Click Install and follow the on-screen instructions.
Selecting your printer in the Chooser
After you have installed the printer driver, you need to open the
Chooser to select your printer. This procedure is necessary the
first time you use a printer and when you want to switch to
another printer. Your Macintosh will always print using the last
printer selected.
40
Installing the Printer Software
Page 45

Printing Quick Reference
7
After you install the printer driver, print the Quick Reference
guide included on the printer software CD-ROM. The Quick
Reference guide describes how to clear paper jams and other
common problems.
For Windows users
1. Insert the CD-ROM that comes with your printer in the
CD-ROM drive.
Note:
Acrobat Reader 4.0 or later must be installed in your computer to
open and read the Quick Reference guide.
2. Double-click User Guides in the EPSON Installation Program
screen.
3. Click the arrow next to View Quick Reference. The Quick
Reference guide opens Acrobat Reader.
4. Select Print from the File menu and click OK. The Quick
Reference guide is printed.
5. Store the printed Quick Reference guide near the printer to
troubleshoot printer problems.
Printing Quick Reference
41
Page 46

For Macintosh users
1. Insert the CD-ROM that comes with your printer in the
CD-ROM drive.
Note:
Acrobat Reader 4.0 or later must be installed in your computer to
open and read the Quick Reference guide.
2. Double-click the User Guides folder.
3. Double-click the View Quick Reference icon in the User
Guides folder. The Quick Reference guide opens Acrobat
Reader.
4. Select Print from the File menu.
5. Click Print. The Quick Reference guide is printed.
6. Store the printed Quick Reference guide near the printer to
troubleshoot problems.
42
Printing Quick Reference
Page 47

EPSON OVERSEAS MARKETING LOCATIONS
Epson America, Inc.
3840 Kilroy Airport Way
Long Beach, CA 90806
Phone: (562) 981-3840
Fax: (562) 290-5220
EPSON DEUTSCHLAND GmbH
Z lpicher Stra e 6,
40549 D sseldorf Germany
Phone: (0211) 56030
Fax: (0211) 5047787
EPSON AUSTRALIA PTY. LTD.
70 GIBBES STREET,
CHATSWOOD 2067 NSW.
Phone: 2-9903-9000
Fax: 2-9903-9177
EPSON HONG KONG LTD.
Rooms 4706-10, 47/F,
China Resources Bldg.,
26 Harbour Road, Wanchai, Hong Kong
Phone: 2585-4300
Fax: 2827-7083
EPSON ITALIA S.p.A.
V.le F.lli Casiraghi 427
20099 Sesto S.Giovanni
MI, Italy
Phone: +3902262331
Fax: +39022440750
EPSON UK LTD.
Campus 100, Maylands Avenue,
Hemel Hempstead, Herts,
HP2 7TJ, U.K.
Phone: (+44) 01442 261144
Fax: (+44) 01442 227227
EPSON FRANCE S.A.
68 bis, rue Marjolin
92300, Levallois-Perret, France
Phone: 33.1.41.86.26.56
Telex: 610657
EPSON SINGAPORE PTE. LTD.
No. 1 Temasek Avenue #36-00
Millenia Tower, Singapore 039192
Phone: (065) 33 77 911
Fax: (065) 33 41 185
EPSON TAIWAN TECHNOLOGY &
TRADING LTD.
10F, No. 287 Nanking E. Road, Sec. 3,
Taipei, Taiwan, R.O.C.
Phone: (02) 717-7360
Fax: (02) 712-9164
EPSON IBERICA S.A.
Av. de Roma, 18-26
08290 Cerdanyola del Valles
Barcelona, Spain
Phone: 582. 15.00
Fax: 582. 15.55
SEIKO EPSON CORPORATION
(Hirooka Office)
80 Harashinden, Hirooka
Shiojiri-shi, Nagano-ken
399-0785 Japan
EPSON PORTUGAL, S.A.
R. do Progresso, 471, 1 Perafita
4460 Matosinhos, Portugal
Phone: (02) 996 14 02
Fax: (02) 996 14 11
2001 January
Page 48

Color Laser Printer
Setup Guide
 Loading...