

Page 1
Printed on recycled paper with at least 10% post-consumer content
i
Page 2

Copyright Notice
All rights reserved. No part of this publication may be reproduced, stored in a
retrieval system, or transmitted in any form or by any means, electronic,
mechanical, photocopying, recording, or otherwise, without the prior written
permission of SEIKO EPSON Corporation. No patent liability is assumed with
respect to the use of the information contained herein. Neither is any liability
assumed for damages resulting from the use of the information contained herein.
Neither SEIKO EPSON Corporation nor its affiliates shall be liable to the
purchaser of this product or third parties for damages, losses, costs, or expenses
incurred by purchaser or third parties as a result of: accident, misuse, or abuse of
this product or unauthorized modifications, repairs, or alterations to this product.
SEIKO EPSON Corporation and its affiliates shall not be liable against any
damages or problems arising from the use of any options or any consumable
products other than those designated as Original EPSON Products or EPSON
Approved Products by SEIKO EPSON Corporation.
EPSON is a registered trademark and EPSON Stylus is a trademark of SEIKO
EPSON Corporation. Expression and ActionScanner are trademarks of Epson
America, Inc.
General Notice:
and may be trademarks of their respective companies. EPSON disclaims any and all rights
in those marks.
Copyright © 1996 by Epson America, Inc. 9/96
Torrance, California, USA
Other product names used herein are for identification purposes only
ii
Page 3

Contents
Introduction
System Requirements . . . . . . . . . . . . . . . . . . . . . . . . . . . . . . . . . . . . . Intro-3
How to Use This Manual. . . . . . . . . . . . . . . . . . . . . . . . . . . . . . . . . . . Intro-4
Cautions, Tips, and Notes . . . . . . . . . . . . . . . . . . . . . . . . . . . . . . . . . . Intro-5
Where to Get Help . . . . . . . . . . . . . . . . . . . . . . . . . . . . . . . . . . . . . . . . Intro-5
Electronic Support Services . . . . . . . . . . . . . . . . . . . . . . . . . . . . . . . . Intro-6
Chapter 1
Getting Ready to Install Your Software . . . . . . . . . . . . . . . . . . . . . . . . . .1-1
Installing the Scanning Utilities . . . . . . . . . . . . . . . . . . . . . . . . . . . . . . . . .1-2
Chapter 2
Calibrating Your Monitor to Your Scanner . . . . . . . . . . . . . . . . . . . . . . .2-1
Performing Screen Calibration . . . . . . . . . . . . . . . . . . . . . . . . . . . . . .2-2
Enabling Screen Calibration . . . . . . . . . . . . . . . . . . . . . . . . . . . . . . . .2-3
Calibrating Your Printer to Your Scanner . . . . . . . . . . . . . . . . . . . . . . . .2-4
Performing the Printer Calibration. . . . . . . . . . . . . . . . . . . . . . . . . . .2-4
Scanning Using Calibration . . . . . . . . . . . . . . . . . . . . . . . . . . . . . . . . . . . .2-7
Chapter 3
Accessing EPSON TWAIN . . . . . . . . . . . . . . . . . . . . . . . . . . . . . . . . . . . . .3-2
Using the Easy Screen . . . . . . . . . . . . . . . . . . . . . . . . . . . . . . . . . . . . . . . . .3-4
Selecting the Document Source . . . . . . . . . . . . . . . . . . . . . . . . . . . . . .3-5
Selecting the Image Type . . . . . . . . . . . . . . . . . . . . . . . . . . . . . . . . . . .3-5
Selecting the Destination . . . . . . . . . . . . . . . . . . . . . . . . . . . . . . . . . . .3-6
Using the Advanced Screen . . . . . . . . . . . . . . . . . . . . . . . . . . . . . . . . . . . .3-7
Modifying an Image Type . . . . . . . . . . . . . . . . . . . . . . . . . . . . . . . . . .3-7
Modifying the Destination. . . . . . . . . . . . . . . . . . . . . . . . . . . . . . . . .3-12
Previewing and Adjusting the Image . . . . . . . . . . . . . . . . . . . . . . .3-16
Scanning the Image . . . . . . . . . . . . . . . . . . . . . . . . . . . . . . . . . . . . . . . . . .3-20
Scanning Text . . . . . . . . . . . . . . . . . . . . . . . . . . . . . . . . . . . . . . . . . . . . . . .3-21
Installing Your Software
Calibrating Your System
Capturing Images From Within Applications
iii
Page 4

Chapter 4 Using Special Effects
Modifying the TWAIN Configuration . . . . . . . . . . . . . . . . . . . . . . . . . . 4-2
Using the Image Controls . . . . . . . . . . . . . . . . . . . . . . . . . . . . . . . . . . . . . 4-3
Adjusting the Tone Correction . . . . . . . . . . . . . . . . . . . . . . . . . . . . . . . . . 4-6
Adjusting Colors . . . . . . . . . . . . . . . . . . . . . . . . . . . . . . . . . . . . . . . . . . . . 4-8
Setting the Gray Balance Intensity. . . . . . . . . . . . . . . . . . . . . . . . . . . 4-9
Changing Saturations . . . . . . . . . . . . . . . . . . . . . . . . . . . . . . . . . . . . . 4-9
Using Color Filters . . . . . . . . . . . . . . . . . . . . . . . . . . . . . . . . . . . . . . . 4-10
Inverting an Image . . . . . . . . . . . . . . . . . . . . . . . . . . . . . . . . . . . . . . . . . . 4-10
Using Automatic Features . . . . . . . . . . . . . . . . . . . . . . . . . . . . . . . . . . . 4-11
Using Auto Exposure . . . . . . . . . . . . . . . . . . . . . . . . . . . . . . . . . . . . 4-11
Using Auto Locate . . . . . . . . . . . . . . . . . . . . . . . . . . . . . . . . . . . . . . . 4-11
Chapter 5 Using EPSON Scan! II
Saving a Scanned Image . . . . . . . . . . . . . . . . . . . . . . . . . . . . . . . . . . . . . . . 5-1
Exporting an Image . . . . . . . . . . . . . . . . . . . . . . . . . . . . . . . . . . . . . . . . . . 5-2
Acquiring and Exporting an Image . . . . . . . . . . . . . . . . . . . . . . . . . . . . . 5-4
Copying an Image . . . . . . . . . . . . . . . . . . . . . . . . . . . . . . . . . . . . . . . . . . . . 5-6
Resizing an Image . . . . . . . . . . . . . . . . . . . . . . . . . . . . . . . . . . . . . . . . . . . . 5-6
Exiting EPSON Scan! II. . . . . . . . . . . . . . . . . . . . . . . . . . . . . . . . . . . . . . . . 5-7
Chapter 6 Troubleshooting
Problems Using the EPSON Scanning Utilities . . . . . . . . . . . . . . . . . . . 6-1
Problems With Image Quality . . . . . . . . . . . . . . . . . . . . . . . . . . . . . . . . . 6-9
Appendix A
Appendix B
Default Settings
Expression 636 Scanner Settings
Resolution. . . . . . . . . . . . . . . . . . . . . . . . . . . . . . . . . . . . . . . . . . . . . . . . . . . B-2
Size or Scale . . . . . . . . . . . . . . . . . . . . . . . . . . . . . . . . . . . . . . . . . . . . . . . . . B-2
Data Format . . . . . . . . . . . . . . . . . . . . . . . . . . . . . . . . . . . . . . . . . . . . . . . . . B-3
Brightness . . . . . . . . . . . . . . . . . . . . . . . . . . . . . . . . . . . . . . . . . . . . . . . . . . . B-5
Color Mode . . . . . . . . . . . . . . . . . . . . . . . . . . . . . . . . . . . . . . . . . . . . . . . . . B-5
Halftoning Mode . . . . . . . . . . . . . . . . . . . . . . . . . . . . . . . . . . . . . . . . . . . . . B-6
Gamma Correction . . . . . . . . . . . . . . . . . . . . . . . . . . . . . . . . . . . . . . . . . . B-10
Color Correction . . . . . . . . . . . . . . . . . . . . . . . . . . . . . . . . . . . . . . . . . . . . B-11
iv
Page 5

Scanner Setting Guidelines . . . . . . . . . . . . . . . . . . . . . . . . . . . . . . . . . . . B-12
Judging Image Quality . . . . . . . . . . . . . . . . . . . . . . . . . . . . . . . . . . . . . . B-18
Equipment . . . . . . . . . . . . . . . . . . . . . . . . . . . . . . . . . . . . . . . . . . . . . B-19
Icon Glossary
Term Glossary
Index
v
Page 6

vi
Page 7

Introduction
The EPSON® Scanning Utilities let you perform the following
functions with your EPSON scanner:
❏ Read images in color, grayscale, or black-and-white, and
save the scanned images to disk as a file
❏ Convert the image files to various formats so you can use
them with your application software
❏ Calibrate your scanner to your monitor and your printer
❏ Capture scanned images from within your application
❏ Automatically locate, expose, and scan an image
❏ Adjust individual settings and preview the effects before
you scan
❏ Choose single- or triple-pass scanning
❏ Save and reuse scanning settings that work well in your
environment
❏ Use the automatic area segmentation and text enhancement
technology features built into some EPSON scanners
❏ Scan transparencies and slides and scan negative film into
positive photo images (with scanners that have a
transparency unit)
❏ Take advantage of the multipage scanning feature available
with scanners that have an automatic document feeder
(ADF).
Introduction 1
Page 8

The Scanning Utilities include two integrated programs:
❏ EPSON Scan! II32 and EPSON TWAIN32 (for 32-bit
scanning with Microsoft
®
Windows® 95 or Windows NT®)
❏ EPSON Scan! II and EPSON TWAIN (for 16-bit scanning
with Windows 3.1).
Note:
This guide refers to the 32-bit programs as EPSON Scan! II and EPSON
TWAIN to reduce confusion.
EPSON Scan! II calibrates your scanner with your monitor and
color printer to produce images whose colors match the
originals. It can also capture images and then save and export
them in a variety of file formats.
EPSON TWAIN is the interface between most of your software
and your scanner. The interface has two screens: easy and
advanced. To take advantage of your scanner’s features, you can
access either screen from within any software that supports the
TWAIN standard or from EPSON Scan! II.
Note:
The top line of the screen identifies whether you are using EPSON
Scan! II or EPSON TWAIN.
2 Introduction
Page 9

System Requirements
For the EPSON Scanning Utilities to work properly, your system
must have at least the following configuration:
❏ One of the following EPSON scanners:
ES-600C
ES-800C
ES-1000C
ES-1200C
Expression
ActionScanner
Some features are not available or are restricted for some
scanners.
™
636
™
II
❏ A 486-based (or higher) IBM
IBM PS/2
®
®
compatible computer or an
❏ DOS 5.0 or higher
❏ Microsoft Windows 95, Windows 3.1x, Windows for
Workgroups 3.1x, or Windows NT 3.5x or higher
Note:
To use 32-bit scanning features, your system must be running
Windows 95 or Windows NT.
❏ A bidirectional parallel interface (either the standard
bidirectional parallel interface or a PS/2 standard printer
port) or an Adaptec
®
SCSI adapter
Note:
❏ EPSON supports some Adaptec-compatible SCSI adapters.
Introduction 3
Page 10

❏ If you do not have Windows 95 or Windows NT and you are
using an Adaptec SCSI adapter, you need to install the
Adaptec EZ-SCSI software, as described in your Adaptec
documentation.
❏ Video Graphics Array (VGA) or higher monitor
Note:
The quality of color or tone reproduction depends on the display
capability of your computer system, including the video controller,
monitor, and software.
❏ At least 50MB of free hard disk space for scanner
applications and images
❏ At least 8MB of available RAM (more for Windows 95).
How to Use This Manual
This User’s Guide contains information you need to install and
use the EPSON Scanning Utilities with your EPSON scanner.
Chapter 1 describes installing your EPSON Scanning Utilities
software. Be sure to read this first. Chapter 2 describes how to
calibrate your system. Chapter 3 provides basic information on
how to scan from within your application. Chapter 4 describes
using the special effects features of your software. Chapter 5
tells you how to use EPSON Scan! II to work with images.
Chapter 6 contains troubleshooting tips, and Appendix A lists
the software’s default settings. Appendix B provides
information on the scanner settings for the Expression 636.
This manual also includes two glossaries—an icon glossary that
describes how each icon works, and a term glossary that
describes common scanning terms. The index helps you find
needed information quickly.
4 Introduction
Page 11

Cautions, Tips, and Notes
This manual displays important information as follows:
Cautions
c
should be followed carefully to ensure your scanner operates
correctly.
Tips
r
contain helpful ideas for using these utilities.
Notes contain important information about these utilities.
Where to Get Help
EPSON provides customer support and service through a
network of Authorized EPSON Customer Care Centers. Dial
(800) 922-8911 for the nearest location or the following services:
❏ Fax-on-Demand access to EPSON’s technical information
library
❏ Literature on current and new products
❏ The location of your nearest Authorized EPSON Reseller or
Customer Care Center
❏ Technical information on installation, configuration, and
operation of EPSON products
❏ Customer relations.
For answers to commonly asked questions about EPSON
products 24 hours a day, 7 days a week, call EPSON Sound
Advice at (800) 442-2110.
Introduction 5
Page 12

You can purchase manuals, accessories, or parts from EPSON
Accessories at (800) 873-7766 (U.S. sales only). In Canada, please
call (800) 463-7766 for dealer referral.
If you need help using software with an EPSON product, see the
documentation for that program for technical support
information.
Electronic Support Services
You can access helpful tips, specifications, notes, DIP switch or
jumper settings, drivers, FAQs, sample files, application notes,
and EPSON product bulletins 24 hours a day, 7 days a week,
using a modem and one of the online services below.
World Wide Web
From the Internet, you can reach EPSON’s Home Page at
http://www.epson.com.
EPSON Internet FTP Site
If you have Internet FTP capability, use your Web browser (or
other software for FTP downloading) to log onto ftp.epson.com
with the user name anonymous and your E-mail address as the
password.
EPSON Download Service
You can call the EPSON Download Service BBS at
(800) 442-2007. Set your communications software to 8 data bits,
1 stop bit, no parity. Modem speed can be up to 28.8 Kbps.
6 Introduction
Page 13

EPSON Fax-on-Demand Service
You can access EPSON’s technical information library by calling
(800) 442-2110 or (800) 922-8911 and selecting the appropriate
phone option. You must provide a return fax number to use Faxon-Demand.
EPSON Forum on CompuServe
®
Members of CompuServe can type GO EPSON at the menu
prompt to reach CompuServe’s Epson America Forum. As an
owner of an EPSON product, you are eligible for a free
introductory CompuServe membership, which entitles you to an
introductory credit, and your own user ID and password. To
take advantage of this offer in the U.S. or Canada, call
(800) 848-8199 and ask for representative #529.
Introduction 7
Page 14

8 Introduction
Page 15

Chapter 1
Installing Your Software
The EPSON Scanning Utilities come with installer software that
makes them easy to install with Windows 95 or Windows 3.1.
Getting Ready to Install Your Software
Before you install the EPSON Scanning Utilities, make sure you
have set up your scanner and connected it to your computer as
described in the User’s Guide that comes with your scanner. If
you are using a SCSI interface, make sure the interface settings—
such as the SCSI IDs and terminators—are set properly, and that
you installed the SCSI software if necessary.
You must install the EPSON Scanning Utilities as described in
the next section before you use your scanner. It is also best to
install the EPSON Scanning Utilities before you install your
application software. Check that you have the two 3.5-inch
diskettes that come with the scanner and contain the EPSON
Scanning Utilities (EPSON Scan! II, EPSON TWAIN, the
calibration utilities, and other related files). It is best to make
backup copies of the diskettes, work with the copies, and keep
the original diskettes in a safe place. (To make backup copies, see
your computer or operating system manual.)
After you install the EPSON Scanning Utilities, you can calibrate
your system as described in Chapter 2. Then install your
application software by following the instructions in the
application’s documentation.
Installing Your Software 1-1
Page 16
Installing the Scanning Utilities
Follow the steps below to install the EPSON Scanning Utilities
for Windows 95, Windows NT, Windows 3.1, or Windows for
Workgroups 3.1. The installer program automatically detects
your operating system and installs 32-bit or 16-bit files as
necessary.
Note: For Windows NT 4.X, follow the Windows 95 instructions. For
Windows NT 3.5X and Windows for Workgroups, follow the Windows
3.1 instructions.
1. Start Windows 95 or Windows 3.1.
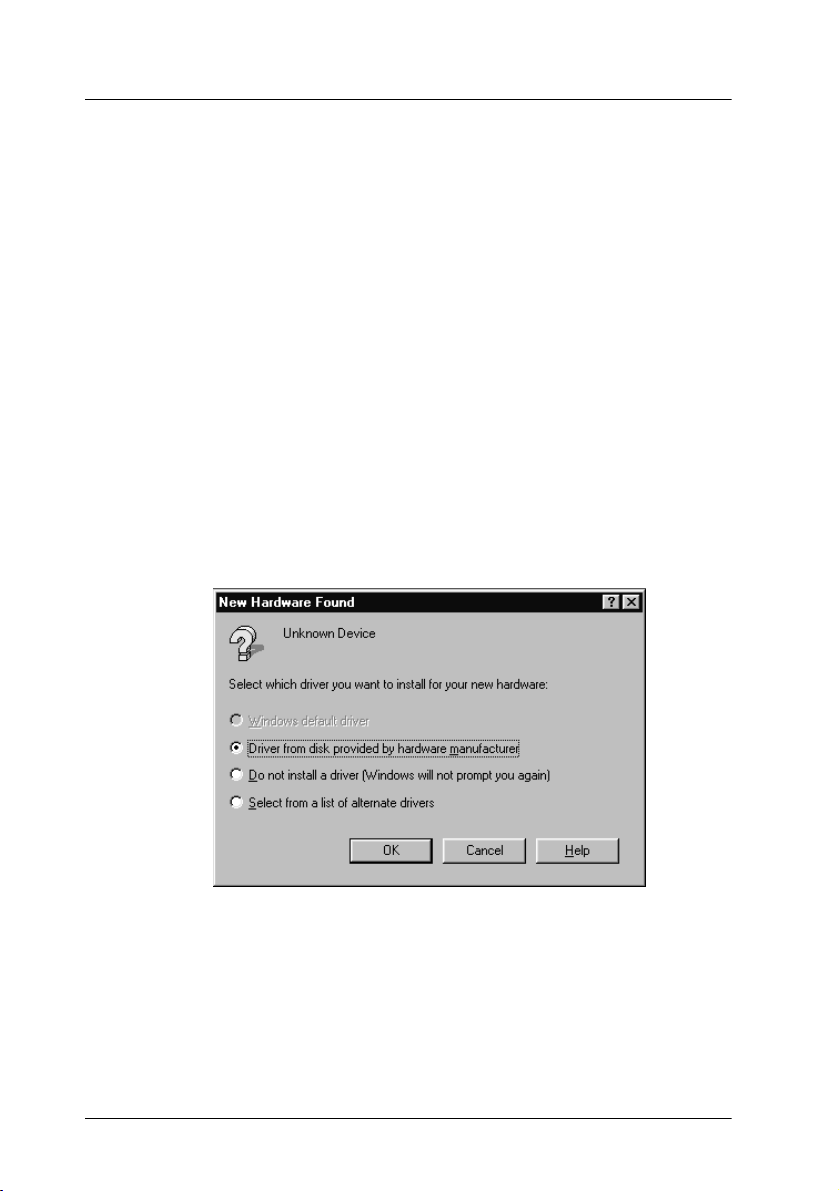
Note for Windows 95 SCSI users:
After you connect your scanner to your computer, you see the screen
below when you install or start Windows 95, or when you select
Add New Hardware in the Control Panel.
1-2 Installing Your Software
Page 17

OK
Choose Do not install a driver and click
install EZ-SCSI, even if you are using an Adaptec SCSI card, if the
card is already set up. See your Adaptec documentation for
instructions on how to set up this card. If you are using a
bidirectional card, you only need to install the card—no software
configuration is needed.
2. Insert the EPSON Scan! II program diskette 1 in a diskette
drive.
3. From Windows 95, click Start and then Run.
From the Windows 3.1 Program Manager, open the File
menu and select Run.
4. Type A:\SETUP (or B:\SETUP if you inserted the diskette in
drive B) and click OK. After a few moments, you see the
initial setup screen.
5. Click OK to continue. A dialog box displays the path in
which the installer software will install the EPSON Scan! II
program. The default path is C:\EPSCAN32 for Windows 95
or C:\EPSCAN2 for Windows 3.1.
. You do not need to
6. Click OK to accept the default pathname, or enter a new path
and click OK.
7. The next dialog box displays the path in which the installer
software will install the EPSON TWAIN program. The
default path is C:\WINDOWS. Click OK to accept the
default pathname, or enter a new path and click OK.
8. The installer software copies the Scanning Utilities to your
hard disk drive and prompts you for diskette 2 when
necessary.
Installing Your Software 1-3
Page 18
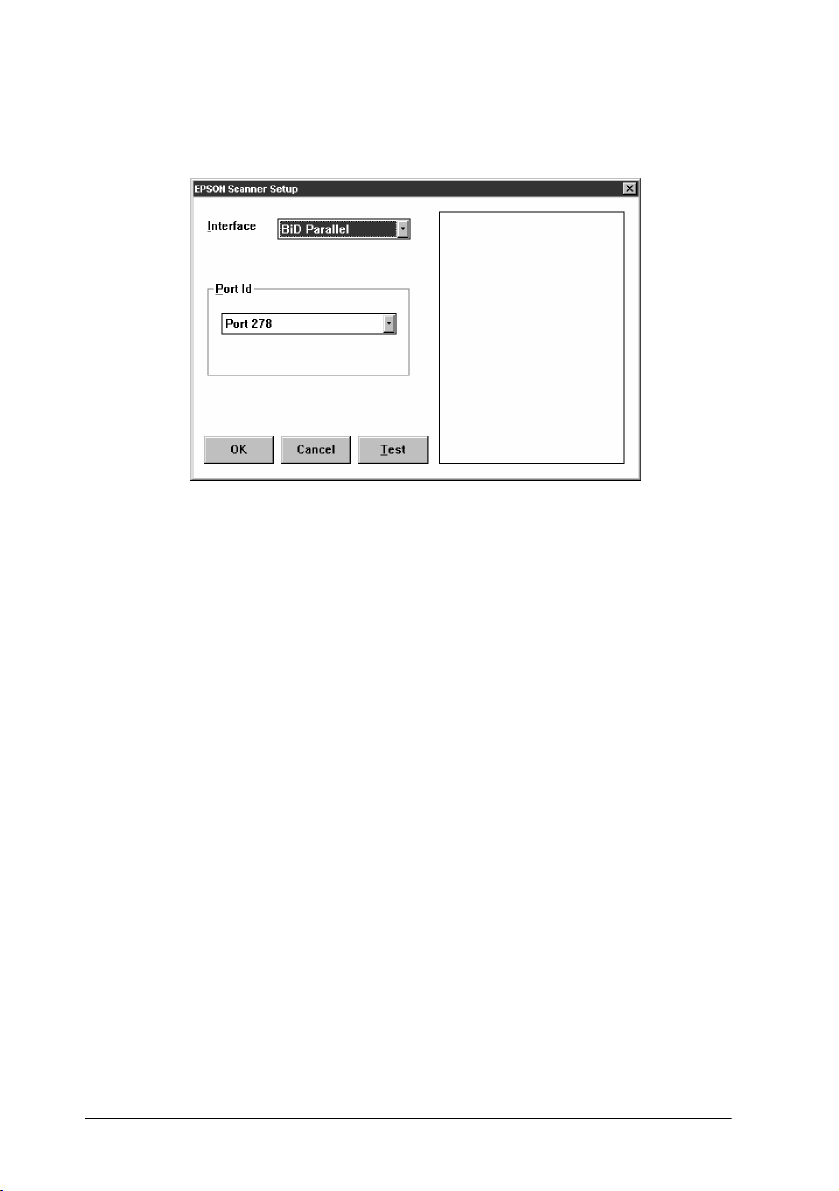
9. After a few moments, you see the EPSON Scanner Setup
dialog box.
From the Interface pull-down menu, choose SCSI if your
scanner is connected to a SCSI interface or BiD Parallel if it is
connected to a bidirectional parallel interface.
10. If necessary, select the port ID of the interface board from the
Port ID pull-down menu. Normally, you do not need to
change the default port ID setting. If the scanner is connected
to a SCSI interface, the port ID is selected automatically. If
the scanner is connected to a parallel interface, select the port
ID of the interface: port 378 is your computer’s built-in
parallel port (lpt1) and port 278 is the port on a bidirectional
parallel card installed in your computer (lpt2).
Note:
If you selected SCSI from the Interface menu and no SCSI ID
number appears, make sure no other SCSI device has the same ID
number as the scanner.
11. Now test your scanner. Turn the scanner on and raise the
cover. Place an image face down on the glass surface. Then
carefully close the cover.
1-4 Installing Your Software
Page 19

12. Click the Test button. If the scanner, interface, and EPSON
Scanning Utilities are set up correctly, the scanner scans the
image. After a few moments, you see the image in the
EPSON Scanner Setup dialog box, as shown below.
Photograph by Claire Bergen
13. Click OK to close the EPSON Scanner Setup dialog box.
14. Remove the EPSON Scan! II program diskette from the
drive.
15. If you are using Windows 3.1, exit Windows and then restart
it.
The installer creates an EPSON Scanner program group or folder
in Windows.
Before you can acquire an image from within your application
for the first time, you need to select EPSON Scanners as your
TWAIN data source; see your application documentation for
instructions.
Installing Your Software 1-5
Page 20

1-6 Installing Your Software
Page 21

Chapter 2
Calibrating Your System
Sometimes the colors of your original image do not match the
colors you see on your screen and in the final printed output.
This is because of the different color processes your scanner,
monitor, and printer use to produce color.
The scanner and the monitor both create a range of colors by
adding red, green, and blue in different proportions and
intensities (an additive color process). Printers, on the other
hand, produce colors by combining cyan (C), magenta (M),
yellow (Y), and black (K) inks (CMYK) to create the desired
hues. This is a subtractive color process.
When you print a scanned image, the image goes through both
the additive and subtractive interpretive processes to acquire
color—the first when it is scanned, and the second when it is
printed on your color printer. As a result, the printed colors may
not match the colors in the original.
Calibration allows you to fine-tune your scanner, monitor, and
printer to produce colors that are very close to those in the
originals. Use the procedures in this chapter to:
❏ Calibrate your monitor to your scanner
❏ Calibrate your printer to your scanner
❏ Use the calibration profiles when you scan an image.
Calibrating Your Monitor to Your Scanner
To calibrate your monitor, you must first perform a screen
calibration using EPSON Scan! II, and then enable screen
calibration in TWAIN.
Calibrating Your System 2-1
Page 22
Performing Screen Calibration
Follow these steps to perform a screen calibration:
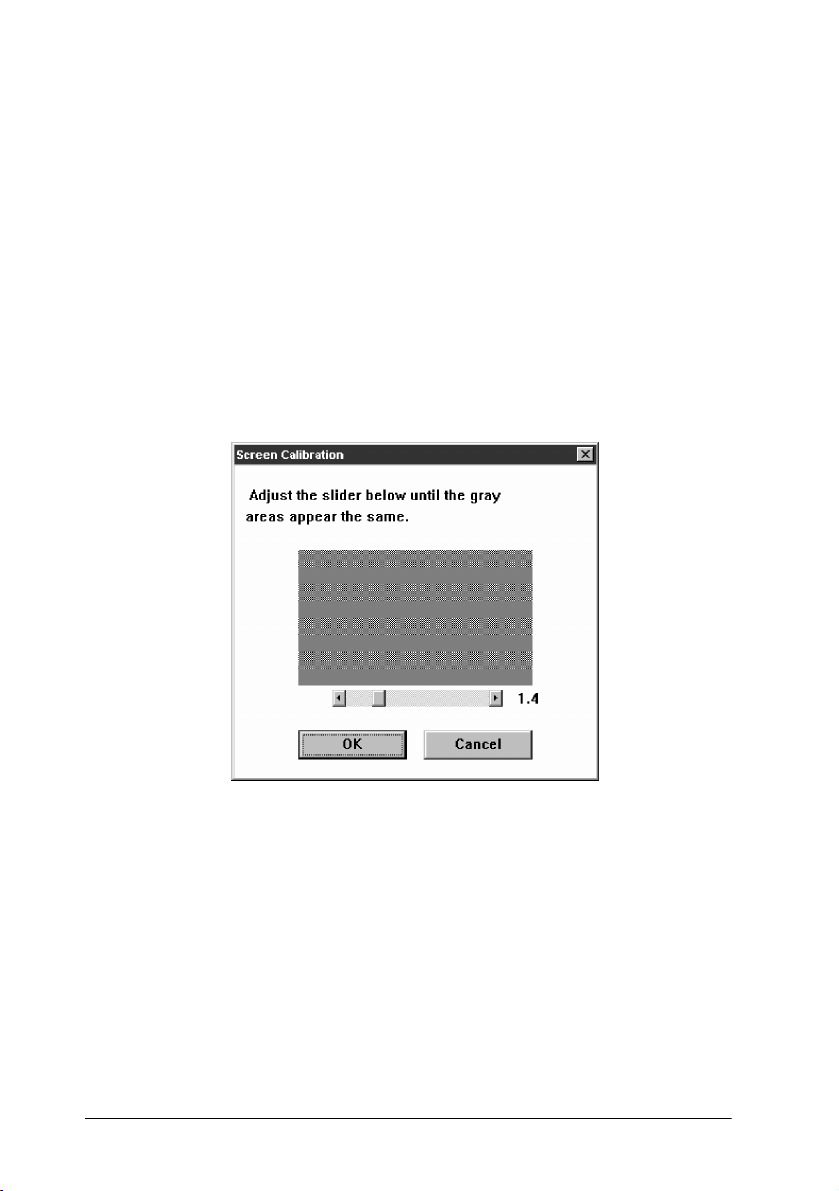
1. From Windows 95, click the Start button, point to Programs,
point to EPSON Scanner, and then click EPSON Screen
Calibration.
From the Windows 3.1 Program Manager, double-click the
EPSON Screen Calibration icon in the EPSON Scanner
program group.
You see this screen:
2. Look at the display from a distance and adjust the slide bar
until the separate rows have the same basic color intensity.
Tip:
r
If the rows don’t look the same after you adjust the slide bar,
increase the number of colors your monitor displays using
Windows 95 Display or Windows 3.1 Setup. See your Windows
documentation or online help for more information.
2-2 Calibrating Your System
Page 23

4. Click OK. Your setting is automatically saved as a new screen
calibration profile.
If you use a different monitor or change your video display
resolution, calibrate your screen again.
Enabling Screen Calibration
Once you have calibrated your screen, you need to make sure
screen calibration is enabled. Follow these steps:
1. Start EPSON Scan! II, if necessary.
2. From the File menu, choose Acquire. You see the TWAIN
screen.
If the screen is fairly small and has an Advanced button, it
is the easy screen (pictured on page 3-3). Click Advanced
to switch to the advanced screen. If the screen is large and
has a Configuration button, it is the advanced screen
(pictured on page 3-3).
3. Click Configuration to open the Configuration dialog box.
4. Make sure the Enable Screen Calibration checkbox is
selected. If it isn’t, select it to enable screen calibration.
5. Click OK.
6. Close the EPSON TWAIN screen.
When screen calibration is enabled, TWAIN uses it as it scans
images until you change this setting.
Calibrating Your System 2-3
Page 24

Calibrating Your Printer to Your Scanner
If you print color images, you must choose or create a calibration
profile for each color printer you use. Using printer calibration
profiles ensures that printed colors closely match the colors of
the original image.
If you have one of these EPSON Stylus
Scan! II provides printer calibration profiles for you so you do
not have to create them:
EPSON Stylus COLOR Stylus 1500
EPSON Stylus COLOR II Stylus COLOR 500
EPSON Stylus COLOR IIs Stylus COLOR 200
EPSON Stylus Pro
EPSON Stylus Pro XL
For these printers, you simply select the correct printer
calibration profile before you scan an image. See “Scanning
Using Calibration” on page 2-7.
If you have a color printer that is not a color EPSON Stylus, you
must create a printer calibration profile using the instructions in
this section. It is also best to create additional profiles for
different printer settings, as described below.
™
ink jet printers, EPSON
Performing the Printer Calibration
Follow these steps:
1. From Windows 95, click the Start button, point to Programs,
point to EPSON Scanner, and then click EPSON Printer
Calibration.
From the Windows 3.1 Program Manager, double-click on
the EPSON Printer Calibration icon in the EPSON Scanner
program group.
2-4 Calibrating Your System
Page 25
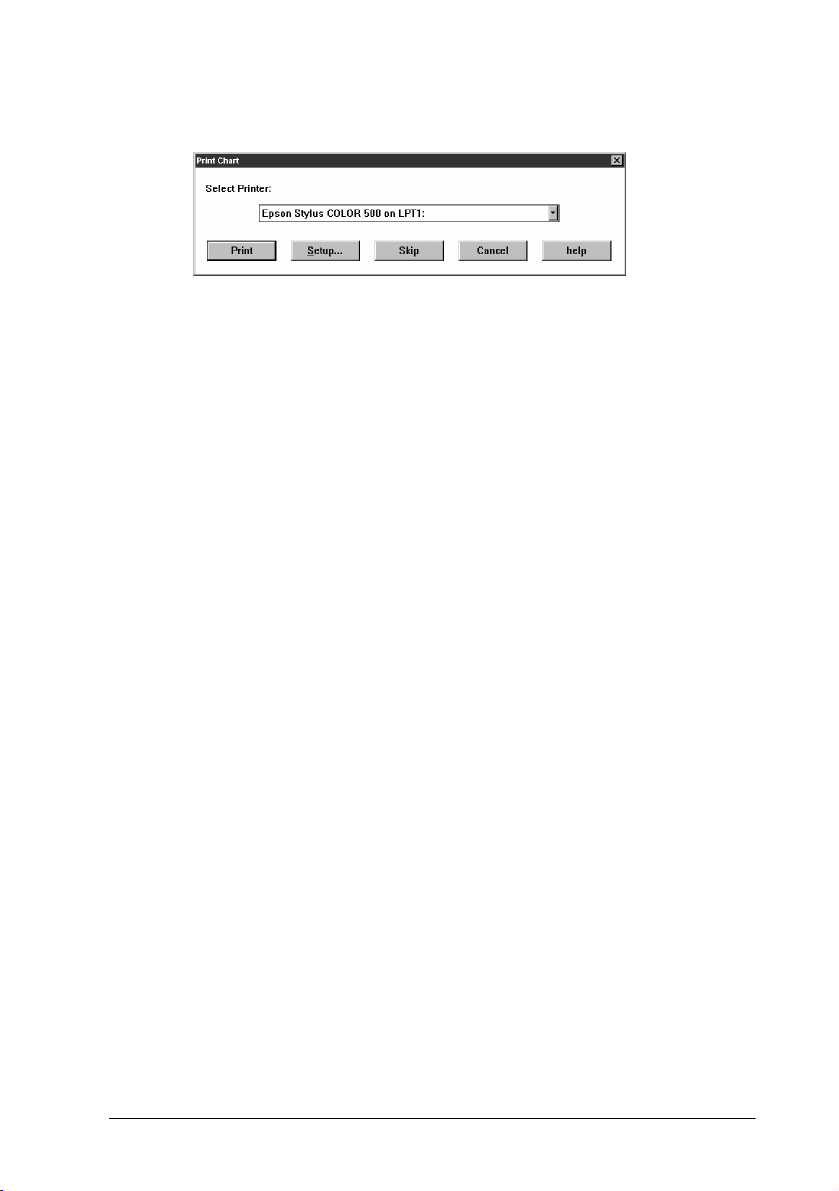
You see the Print Chart dialog box.
2. Select the printer you want to calibrate from the drop-down
menu.
Note:
You must generate a specific profile for each of your printer’s
settings. For example, the profile for your printer’s coated paper
setting and for its plain paper setting may not be the same. To change
the printer settings, click the Setup button before printing the
calibration chart.
3. Click the Print button to print the calibration chart. (If you
have printed the calibration chart before with the same
printer, click the Skip button.)
Note:
To print images on more than one color printer, print a calibration
chart on each printer you’ll use. If you plan to print the image on a
service bureau’s color printer, have them print the calibration chart
on their printer so you can create a calibration profile for it.
Tip:
r
When you label the printed charts to help you identify which
printer produced them, don’t write on the chart itself. Write on
the back of the page.
Tip:
r
If you plan to print your image on a printing press that requires
a four-color separation, you’ll need to ask your service bureau or
printer to create a color sample using your calibration chart. You
can then use that color sample to create a calibration profile.
Calibrating Your System 2-5
Page 26
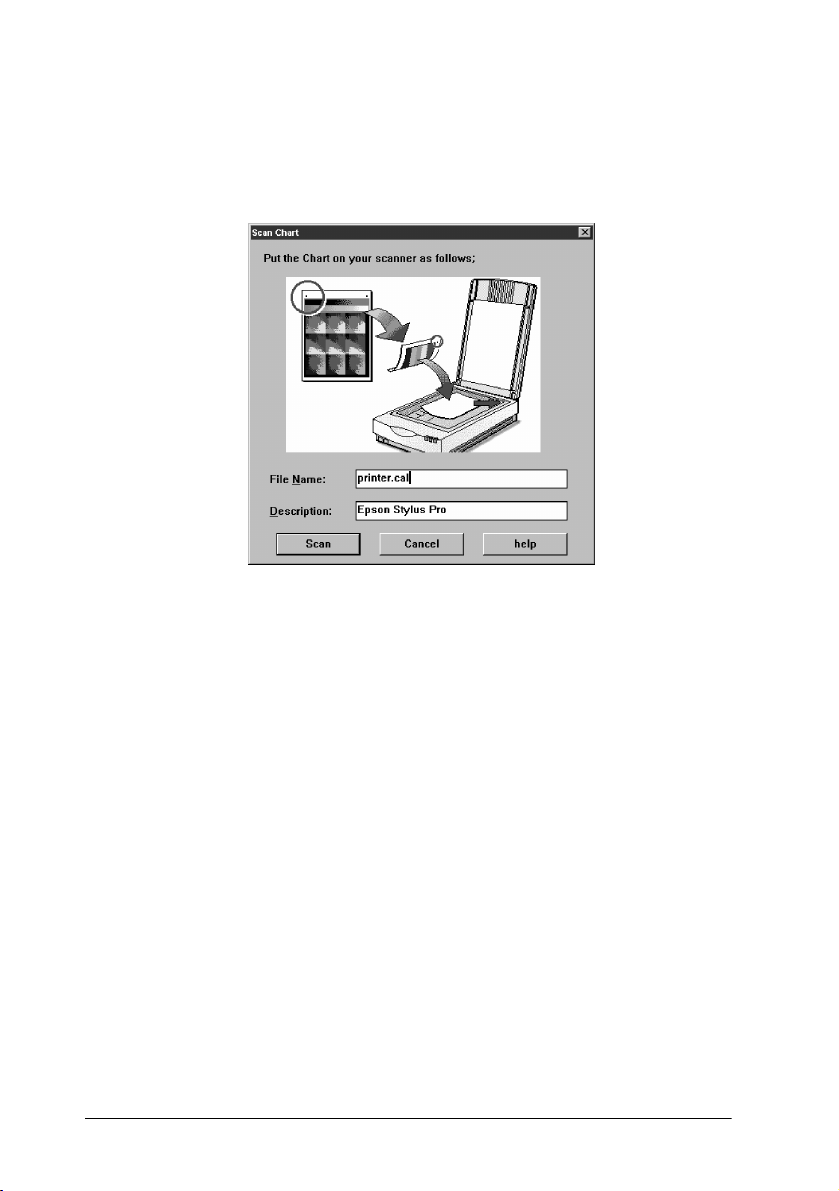
4. You see a message box. Click OK when the chart is printed.
5. Place the printed calibration chart on your scanner, as shown
by the illustration on the screen.
Align the guide mark on the upper left corner of the chart
with the triangular origin mark on your scanner’s document
table. Then close the scanner’s cover.
Note:
Make sure the calibration chart is not skewed on the bed of the
scanner; if it is, the scanner cannot scan the chart.
6. If you want to change the default filename and profile
description, enter your changes in the File Name and
Description fields.
Tip:
r
If you are creating more than one calibration profile (for instance,
if you have more than one color printer), make sure you assign
unique descriptions to each calibration profile so you can
distinguish between them.
2-6 Calibrating Your System
Page 27

7. Click the Scan button. The scanner scans the chart and the
calibration utility sends the profile to EPSON TWAIN.
When calibration is finished, the message Calibration
profile completed appears on the screen.
8. Click OK to exit the calibration utility.
The profile data is saved with the filename you entered, and
the description is added to the Calibration list in EPSON
TWAIN’s Destination dialog box, described on page 3-12.
Scanning Using Calibration
If you are using one of the predefined printer calibration
profiles, such as one of the EPSON Stylus printer profiles, or you
have created a custom calibration profile for your printer, you
can now use that profile to scan and print your image.
Follow these steps to use a calibration profile when you scan:
1. Select your scanner. For example, choose Acquire from the
File menu within your application, and choose Select
TWAIN_32 Source (in Windows 95) or Select TWAIN
Source (in Windows 3.1). Then select EPSON Scanners (32
bit) in Windows 95, or EPSON Scanners in Windows 3.1.
Note:
You usually need to perform this step only once, when you use the
scanner with your software for the first time.
2. Next select EPSON TWAIN. For example, choose Acquire
from the File menu within your application; then choose
TWAIN_32 (in Windows 95) or TWAIN (in Windows 3.1).
3. You see either the easy or the advanced screen. If you see the
easy screen, click Advanced.
Calibrating Your System 2-7
Page 28

4. Click Destination to display the Destination dialog box.
5. In the Destination Name field, select the name of your
output device. If you have one of the EPSON Stylus printers
listed on page 2-4, select the printer from the Destination
Name menu. The Calibration description is assigned
automatically. Go to step 8.
If you created a custom calibration profile for your printer,
type a unique name for the profile in the Destination Name
field. Go to step 6.
6. From the Calibration pull-down menu, select the profile
name you assigned when you created the profile.
7. Click Save.
8. Click OK. You see the EPSON TWAIN advanced screen.
You can now preview or scan your image using the calibration
profile for your color printer.
Tip:
r
If the colors in your printed image do not closely match the
original, recalibrate your monitor and your printer and try again.
2-8 Calibrating Your System
Page 29

Chapter 3
Capturing Images From Within Applications
When you scan an image from within an application using
EPSON TWAIN, you follow these basic steps:
1. Turn on your scanner.
2. Access TWAIN from your application’s File menu.
3. Choose either the easy or advanced TWAIN screen.
4. Select the correct image type and destination settings.
5. Preview the image and select the scan area (advanced screen
only).
6. Scan the image.
7. Close TWAIN and edit the image in your application.
This chapter provides guidelines for performing each of these
basic steps.
If you don’t need to preview the image you are scanning and
want to specify only the document source (if available), image
type, and destination, you can use the easy screen; see page 3-4.
To set the image resolution, size, or scale, preview the image,
select a calibration profile, or add, delete, or modify an image or
destination before you scan, you must use the advanced screen;
see page 3-7. (To use the special effects features in the advanced
screen, see Chapter 4.)
Capturing Images From Within Applications 3-1
Page 30

Note:
If your application does not support TWAIN, you can use EPSON
Scan! II to scan an image and export it in a format your image editing
software can use. See Chapter 5 for more information.
Accessing EPSON TWAIN
Follow these steps to access EPSON TWAIN from within your
application:
1. Turn on your scanner and place a document on the scanner’s
document table.
Note:
If you start the software before turning on your scanner, the software
may not be able to detect the scanner.
2. Select your scanner. For example, choose Acquire from the
File menu within your application, and choose Select
TWAIN_32 Source (in Windows 95) or Select TWAIN
Source (in Windows 3.1). Then select EPSON Scanners(32
bit) in Windows 95, or EPSON Scanners in Windows 3.1.
Note:
You usually need to perform this step only once, when you use the
scanner with your software for the first time.
3. Next select EPSON TWAIN. For example, choose Acquire
from the File menu within your application; then choose
TWAIN_32 (in Windows 95) or TWAIN (in Windows 3.1).
When TWAIN opens, you see either the easy or the
advanced screen, depending on which was opened last.
3-2 Capturing Images From Within Applications
Page 31

The easy screen allows you to select the document source (if
available), type, and destination of your image. When you scan
with this screen, your entire image is captured and scanned.
The advanced screen lets you select the same basic settings as the
easy screen, plus you can modify, add to, or delete these settings.
The advanced screen also lets you set the image resolution, size,
or scale, preview your image, and select the portion of it you
want to scan. As described in Chapter 4, you can change special
effects settings from the advanced screen as well.
Capturing Images From Within Applications 3-3
Page 32

Note:
To close an active TWAIN window, click the Close button.
Using the Easy Screen
The following basic settings are available on the TWAIN easy
screen:
❏ Document source
❏ Image type
❏ Destination.
You must select the appropriate option for each of these settings
as described in this section to successfully scan your image. Then
see “Scanning the Image” on page 3-20 to scan your image.
3-4 Capturing Images From Within Applications
Page 33

Selecting the Document Source
If you have the optional automatic document feeder (ADF) or
transparency unit installed on your scanner, you can select the
option you want to use from the Document Source pull-down
menu. Otherwise, leave the Document Source set to Flatbed.
The following table describes the available options:
Document Source options
Source option Function
Flatbed Scans the image from the document table
Auto Document Feeder
TPU for Pos. Film
TPU for Neg. Film* Scans a negative image from the
* These options are available only when the option is installed on the
scanner.
*
Note:
When the automatic document feeder is installed, the easy and advanced
screens contain checkboxes for selecting one page or all pages in a
document.
*
Scans images as they feed through the ADF
(multipage scanning)
Scans a positive image from the transparency
unit
transparency unit
Selecting the Image Type
To scan images with satisfactory results, you must select the
correct image type option from the Image Type pull-down
menu. The following options are available:
Color Photo Color Drawing
256 Colors Black & White Halftone
Black & White Photo Line Art
Color Halftone OCR
Copy/Fax
Capturing Images From Within Applications 3-5
Page 34

If you haven’t changed any of the settings for these options, the
image type you select uses the default settings listed in
Appendix A. To add a new Image Type option or modify any
existing settings, see “Using the Advanced Screen” on page 3-7.
To scan text, select OCR (for Optical Character Recognition)
from the Image Type pull-down menu. Leave the Image Type
settings for the OCR option at their defaults, listed in
Appendix A.
Selecting the Destination
You select the destination or output device to indicate where
you want to display or print the scanned image. You can select
one of the following options from the Destination pull-down
menu:
General Stylus COLOR
Screen Stylus Pro XL
Impact Dot Printer Stylus Pro
Thermal Printer Stylus COLOR II
Inkjet Printer Stylus COLOR IIs
Laser Printer Stylus 1500
Laser 600dpi Stylus COLOR 500
Fax Stylus COLOR 200
OCR
Calibration Profile
If you haven’t changed any of the settings for these options, the
destination you select uses the default settings listed in
Appendix A. To add a new Destination option or modify any
existing settings, see “Using the Advanced Screen” on page 3-7.
To scan text, select OCR (for Optical Character Recognition)
from the Destination pull-down menu. Leave the Destination
settings for the OCR option at their defaults, listed in
Appendix A.
3-6 Capturing Images From Within Applications
Page 35

Using the Advanced Screen
The TWAIN advanced screen allows you to select the same basic
settings as the easy screen, and also to add new options and
modify existing ones. In addition, you can select calibration
profiles, enable the text enhancement technology or automatic
area segmentation features, preview an image, and alter it before
you scan.
Note:
For information about using the basic settings, see
Screen” on page 3-4
To access the advanced screen, click the Advanced button on the
easy screen, if necessary. Then see the sections below to modify
settings, work with calibration profiles, or preview your image.
Note:
Some options on the advanced screen may be dimmed and cannot be
selected because of the capabilities of your scanner or your choice of
settings for other options.
.
Modifying an Image Type
“Using the Easy
To modify the Image Type settings, click the Image Type button.
Capturing Images From Within Applications 3-7
Page 36

You see the Image Type dialog box:
For the default settings for the predefined image types, see
Appendix A.
3-8 Capturing Images From Within Applications
Page 37

Not all options in the Image Type dialog box are available with
all scanners, image types, or Pixel Depth settings. See page 3-11
for more information on when the Pixel Depth settings are
available. The table below describes the Image Type advanced
options.
Image Type advanced options
Category Option Function
Pixel Depth Black & White Uses a data format of 1 bit/pixel to
16 Gray Uses a data format of 4 bits/pixel to
256 Gray Uses a data format of 8 bits/pixel to
8 Color Uses a data format of 1 bit/pixel/color to
256 Color Uses a data format of 8 bits/pixel/color to
16 Million Colors Uses a data format of 8 bits/pixel/color to
Halftone* None Determines tones based on data format
Mode A Converts image into a hard tone to
Mode B Converts image into a softer tone; most
Mode C Represents images in the same way as
Dither A Expresses halftone in a 4 × 4 bayer dither
Dither B Expresses halftone in a 4 × 4 spiral pattern
Dither C Expresses halftone in a 4 × 4 net screen
Dither D Expresses halftone in 8 × 8 net screen
produce black and white images
produce 16 shades of gray
produce 256 shades of gray
produce images in 8 colors
produce images in 256 colors
produce images in 16 million colors
produ ce a distinct image (1 an d
2 bits/pixel/color)
suited for images containing large areas
of similar tones (1 bit/pixel/color)
the net screen commonly used for
newspaper photographs
(1 bit/pixel/color)
pattern
dither pattern
dither pattern
Capturing Images From Within Applications 3-9
Page 38

Image Type advanced options (continued)
Category Option Function
Dropout None Includes all color values in a
Red Drops out reds so red areas are white in a
Green Drops out greens so green areas are
Blue Drops out blues so blue areas are white in
Quality &
descreening
Scanning
Sequence
B/W Options Text
Draft & fast Provides faster scanning at a lower
Best &
de-screening
1 pass Scans the image with a single pass (line
3 pass Scans the image with three passes (page
Enhancement
Technology
Auto Area
Segmentation
None Selects no special black and white
monochrome scan
monochrome scan
white in a monochrome scan
a monochrome scan
resolution
Produces the best quality scan and, on
some scanners**, removes unwanted
moiré (interference) patterns from
scanned images
sequence)
sequence); available only in 16 million
colors
Eliminates the document background
and raises the recognition accuracy
during OCR (Optical Character
Recognition) scanning. See page 3-21 for
more information.
Separates text from graphics so that
†
grayscale images are clearer and text
recognition is more accurate
options
* When possible, let your image editing software perform halftoning.
** ActionScanner II, ES-1000C, ES-1200C, and Expression 636.
† The Text Enhancement Technology and Auto Area Segmentation options
are not available if your scanner does not support these features. The
ActionScanner II, ES-1000C, ES-1200C, and Expression 636 scanners support
Text Enhancement Technology. The Expression 636 scanner supports Auto
Area Segmentation.
3-10 Capturing Images From Within Applications
Page 39

The following table identifies the options available with each
Pixel Depth setting. Since both the Draft & fast and Best &
de-screening Quality options are available with all the Pixel
Depth settings, the table does not include these options. The
table also does not include the Text Enhancement Technology
and Auto Area Segmentation options; these are available only
when Pixel Depth is set to Black & White.
Pixel Depth option selection matrix
Scanning
Pixel Depth Halftone Dropout
Black & White None
Mode A (Hard tone)
Mode B (Soft tone)
Mode C (Net Screen)
Dither A (4 × 4 Bayer)
Dither B (4 × 4 Spiral)
Dither C (4 × 4 Net Screen)
Dither D (8 × 8 Net Screen)
16 Gray None None
256 Gray None None
8 Color None
Mode A (Hard tone)
Mode B (Soft tone)
Mode C (Net Screen)
Dither A (4 × 4 Bayer)
Dither B (4 × 4 Spiral)
Dither C (4 × 4 Net Screen)
Dither D (8 × 8 Net Screen)
256 Color None None 1 pass
16 Million Colors None None 1 pass
None
Red
Green
Blue
Red
Green
Blue
Red
Green
Blue
None 1 pass
Sequence
1 pass
1 pass
1 pass
3 pass*
* When you choose 3 pass, your application does not use the Calibration,
Color Filter, or Saturation features in TWAIN; see Chapter 4 for more
information.
Capturing Images From Within Applications 3-11
Page 40

Saving and deleting an image type
To modify an existing image type, select it from the Image Type
Name menu and change the necessary settings. Click Save and
then click OK.
To add a new image type, select an existing type that closely
resembles the one you want to create. Then delete the existing
name from the Image Type Name field and type a new name.
Change the displayed Image Type settings as necessary. Click
Save and then click OK.
Note:
If you don’t click Save before you click OK, the image type settings are
not changed.
To delete an existing image type, select it from the Image Type
Name menu and click Delete; then click OK.
Modifying the Destination
The Destination dialog box allows you to define different
resolutions for each destination output device. You can also use
it to modify, add, or delete a calibration profile for your output
device.
3-12 Capturing Images From Within Applications
Page 41

To modify the Destination settings, click the Destination button.
You see the Destination dialog box:
The Destination Name menu lists the names of the predefined
and custom destination output devices. For the default settings
for the predefined destination output devices, see Appendix A.
Selecting resolution settings
Use the Resolution pull-down menus to select scanning
resolutions that produce the best results for your image type and
output device. In the Destination dialog box, you can select one
resolution for line drawings and halftones and a separate
resolution for photographs.
Note:
You can also select a resolution setting from the Resolution pull-down
menu on the advanced screen.
Capturing Images From Within Applications 3-13
Page 42

The best resolution setting for your image depends on the type
of image you are scanning and your final output device, as well
as the capabilities of your scanner. The following table shows the
best scanning resolutions for most needs.
Optimum scanning resolutions
Output device Line art Grayscale Color
Monochrome printer 300-600 80-170 —
Desktop or office
color printer
Printing press or
imagesetter
Computer Screen 72 72 72
300-720 150-240 150-240
600-1200 150-350 150-350
The Resolution setting depends on the Pixel Depth setting in the
Image Type dialog box. When Pixel Depth is set to 8 Color or
Black & White, you can set the Drawing/Halftone resolution.
For other Pixel Depth settings, you can set the Photo resolution.
Note:
The Resolution setting is closely related to the Image Size and Scale
settings (described in this chapter). If you change them arbitrarily, the
resulting image may not be what you expected.
The higher the resolution you select, the larger the resulting
image file. For example, an 8.5 × 11 photograph scanned at
300 dpi can produce a 24MB file. The same photograph scanned
at 72 dpi creates only a 1.36MB file. Large files take longer to
process and print, so consider the limitations of your computer
system and hard disk drive when you select a resolution. To
keep file sizes manageable, select the lowest possible resolution
that gives acceptable quality.
3-14 Capturing Images From Within Applications
Page 43

Tip:
r
As a rule of thumb for any image except line art, use scanning
resolutions that are one third of your output resolution. For
example, use a scanning resolution of up to 110 with a 300 dpi
laser printer and up to 170 with a 600 dpi laser printer. For the
color EPSON Stylus printers, choose a resolution from 100 to
240 dpi for 720 dpi output and from 100 to 150 dpi for 360 dpi
output.
Tip:
r
For printing on a commercial printing press, multiply the lines
per inch (lpi) the press prints by 2 to determine your scanning
resolution. For example, if your lpi is 150, try scanning at 300
dpi. (If the file size is too large, multiply the lpi by 1.5 to determine
the scanning resolution.)
Tip:
r
If you plan to enlarge an image when you print it, scan it at a
higher resolution than you normally would.
Selecting a calibration profile
Use the Calibration pull-down menu to select a predefined or
custom calibration profile that matches your output device.
TWAIN can then use the profile as it scans to create the best
quality image.
EPSON TWAIN provides the following predefined calibration
profiles:
General Stylus Pro
Screen Stylus Pro XL
Impact Dot Printer Stylus 1500
Thermal Printer Stylus COLOR
Inkjet Printer Stylus COLOR II
Laser Printer Stylus COLOR 200
Laser Printer 600 Stylus COLOR 500
Stylus COLOR IIs
Capturing Images From Within Applications 3-15
Page 44

In addition to the calibration profiles provided with the
Scanning Utilities, you can create your own calibration profiles
for any output device you use. For more information, see
Chapter 2.
Note:
The scanner uses the calibration profile you select only when the Pixel
Depth is set to 8 Color, 256 Color, or 16 Million Colors, and the
Scanning Sequence is set to 1 pass. For more information on the Pixel
Depth and Scanning Sequence settings, see “Modifying an Image Type”
on page 3-7.
Saving and deleting a destination
To modify an existing destination, select it from the Destination
Name menu and change the necessary settings. Click Save and
then click OK.
To add a new Destination, select an existing one with similar
settings to the one you want to create. Then delete the existing
name from the Destination Name field and type a new name.
Change the displayed Destination settings and click Save; then
click OK.
Note:
If you don’t click Save before you click OK, the Destination settings are
not changed.
To delete an existing destination, select it from the Destination
Name menu and click Delete; then click OK.
Previewing and Adjusting the Image
Once you have selected the Image Type and Destination
settings, you can preview and adjust your image before you scan
it. (To use the special effects features available on the advanced
screen, see Chapter 4.)
3-16 Capturing Images From Within Applications
Page 45

The TWAIN advanced screen provides two icons that allow you
to preview your image: the Preview icon and the Zoom Preview
icon:
Preview icon Zoom Preview icon
Click the Preview icon to preview the entire document table in
the preview window.
Click the Zoom Preview icon to preview an area you have
selected with the mouse. See the next section for instructions on
selecting the preview area.
If you click the Zoom Preview icon before you select an area, the
preview includes the entire document table.
Note:
You cannot preview an image that exceeds available memory or disk
space.
Tip:
r
If you cannot see the image clearly after you preview it, change
your video display settings in Windows 95 Display or Windows
3.1 Setup to a lower resolution with more colors. Then perform a
screen calibration again.
Adjusting the preview area
Once you see a preview of the image on the screen, you can
define the area you want to scan or select the entire image area.
Capturing Images From Within Applications 3-17
Page 46

To define a specific area, position the mouse pointer at a corner
of the area; the pointer changes to a +. Hold down the mouse
button as you drag the pointer across the image. When you
release the mouse button, a rectangle on the screen identifies the
scan area.
To adjust the size of your selected area, move the mouse pointer
to the edge of the selection rectangle; the pointer changes to a
double arrow. Hold down the mouse button and drag the edge
of the rectangle to the new location.
You can also move the position of the selected area. Place the
mouse pointer inside the selection rectangle; the pointer changes
to a hand. Hold down the button to drag the selection rectangle
to the new location.
Click the preview image to cancel the selection. Double-click the
image to select the entire image.
If your image is smaller than the document table, you can click
the Auto Locate icon, , to select the entire image and crop out
everything on the document table except the image. See “Using
Automatic Features” in Chapter 4 for more information about
using the Auto Locate icon.
Adjusting the source and target image sizes
The vertical and horizontal rulers along two sides of the preview
window provide the measurements for the image you are
previewing. You can change the unit of measure for these rulers
by selecting inches, pixels, or cm (centimeters) from the Units
pull-down menu.
The size of the full image or the selected area appears in the
Width and Height fields in the Source area. You can type new
values in these fields to define a selection area of a specific size.
3-18 Capturing Images From Within Applications
Page 47

As you modify your selection area or other image settings, you
see the file size of the image change in the Target field. The
Target Width and Height values change as well. You can also
type new values in the Target Width and Height fields to specify
the size of the output image.
To keep specific values in the Target Width and Height fields,
select the Lock icon. Click the Lock icon once to lock the values
in place; the Lock icon shows a closed lock. Click it again to
unlock the values.
Note:
❏ Some applica tio ns convert the image to full 2 4-bit data, so the
actual size of the image may be larger than the value displayed in
the Target field.
❏ The image size settings a re closely related to the Resolu tion and
Scale settings. If you change them arbitrarily, the resulting image
may not be what you expected.
Setting the image scale
The Scale value (in the Target area) displays the amount by
which an image is enlarged or reduced during a scan. To change
this value, move the slide bar, click the left or right arrow to
change the image size in 1% increments, or type the value you
want into the % field.
❏ Note:
If you increase the Scale size, the Target value also increases to
indicate a larger file size.
You can use the Lock icon to keep the Scale value constant. Click
the Lock icon once to lock the value; the icon shows a closed
lock. Click it again to unlock the value.
Capturing Images From Within Applications 3-19
Page 48

Note:
❏ The range of possible Scale settings varies depending on the
current Resolution setti ng.
❏ For ES 600C, ES 800C, and ES 1200C scanners, the possible Scale
settings are limited to this range: half the normal size (50%) to
twice the normal s ize (200%) . The Scale sett ing does not depend on
the Resolution setting.
❏ The Scale setting is closely related to the Resolution and image size
settings. If you chang e th em arbitrarily, the resulting image may
not be what you expected.
Scanning the Image
When you are finished selecting settings on the easy or
advanced screen, you can scan the image by choosing the Scan
button.
If you click Scan from the easy screen, TWAIN automatically
selects the entire image, adjusts the exposure, and scans it.
If you are using the advanced screen, you can check that the
image you are scanning looks just right in the preview window
before you click the Scan button.
If you are scanning from the advanced screen and have not
previewed the image or selected a preview area for it, be sure to
click the Auto Locate icon before choosing Scan. Otherwise, the
entire document table is scanned.
When you close the TWAIN screen, you can further modify your
image using the features of your image editing software.
3-20 Capturing Images From Within Applications
Page 49

Note:
❏ You cannot scan an image that exceeds available memory or disk
space.
❏ Before you start scanning, you should calibrate your scanner,
monitor, and printer as described in Chapter 2.
❏ After you scan an image, be sure to save it. For information on
saving and exporting image files, see Chapter 5.
Scanning Text
For best results when scanning text, use EPSON’s Text
Enhancement Technology. This feature filters out background
“noise” in text images, such as background colors, and increases
the threshold levels so that your OCR (optical character
recognition) software can recognize text more easily.
If your scanner supports Text Enhancement Technology, select
OCR from the Image Type Name menu. This automatically
activates the Text Enhancement Technology feature. Then select
OCR from the Destination Name menu.
Note:
If your scanner does not support Text Enhancement Technology, this
option is not available.
Capturing Images From Within Applications 3-21
Page 50

3-22 Capturing Images From Within Applications
Page 51

Chapter 4
Using Special Effects
The EPSON TWAIN advanced screen gives you many options
for editing images before you scan them. If you have image
editing software, you can achieve all of the special effects
described in this chapter—and more—using that software.
However, if you don’t have image editing software, EPSON
TWAIN allows you to create a broad range of special effects
using these options:
❏ TWAIN configuration
❏ Image controls
❏ Tone correction
❏ Color adjustments
❏ Invert image feature
❏ Automatic features.
Using Special Effects 4-1
Page 52

Modifying the TWAIN Configuration
When you click the Configuration button on the TWAIN
advanced screen, you see the following dialog box:
If you have performed a screen calibration (as described in
Chapter 2), you can enable it by selecting the Enable Screen
Calibration option.
To save the preview image so it reappears in the preview
window when you next open the advanced screen, select the
Save Preview Image and Settings option.
Use the Number of comparison samples pull-down menu to
select the number of samples (either 3 or 5) to display in the
preview area when you select the Comparison icon for any of the
special effects features described in this chapter. Comparison
samples let you select the image you prefer from a group of
preview images that use different settings.
You can also define the amount of variation between the settings
displayed in the comparison samples by selecting small,
medium, or large from the Variation between samples pull-
down menu.
4-2 Using Special Effects
Page 53

Using the Image Controls
The image controls available when you click the Image Controls
icon, , let you adjust the following options:
❏ Exposure changes the intensity of light
❏ Gamma determines the gradation between highlights and
shadows
❏ Highlight adjusts the lightest areas
❏ Shadow adjusts the darkest areas
❏ Sharpness adjusts the focus
❏ Threshold adjusts the point at which the gray values change
to either black or white. This option is available only when
the Pixel Depth setting is Black & White and the Halftone
setting is None in the Image Type dialog box. When
Threshold is available, the other image control settings are
not available.
Follow these steps to use the image controls:
1. From the advanced screen, click the Preview icon, , to
display your image in the preview window.
Tip:
r
To scan only a portion of the image displayed in the preview
window, define the area you want to scan and click the Zoom
Preview icon, , to display only that area. This makes your
comparison previews larger and easier to see.
Using Special Effects 4-3
Page 54

2. Click the Image Controls icon. You see the following dialog
box:
Comparison
icons
Color
buttons
Slide
bars
4-4 Using Special Effects
Page 55

3. Adjust the settings until you are satisfied with the
appearance of the image in the preview window. See the
following table for guidelines on changing these settings.
Method Description
Value fields Type the value you want for the current option.
Slide bars Move the slide bar until the preview looks correct.
Comparison
icons
Highlight
and Shad ow
Color
buttons*
* You cannot choose the Highlight and Shadow Color buttons when the preview
window is dis playing comparison samples.
Click the Comparison icon next to the slide bar to
display 3 or 5 comparison samples using different
settings. In the preview window, click the sample that
most closely reflects the image you want. That sample
is selected and placed in the middle position,* and a
different set of samples is displayed based on the
image you selected. Repeat this process until the
image sample you want is displayed in the middle
position; then double-click it and it reappears alone.
Click the Color button below the Highlight or Shadow
slide bar; the mouse pointer changes to an
eyedropper. Select the color you want to represent
the highlights or shadows from the preview image.
When you select the color in the preview window, the
button turns that color.
Note:
Appendix A lists the available ranges for the image controls.
4. When the image in the preview window looks the way you
want, click OK.
5. You can now scan the image into your application.
You can reset any preview image you’ve modified by choosing
the Reset button below the Image Controls icon on the advanced
screen.
Using Special Effects 4-5
Page 56
Adjusting the Tone Correction
Adjusting the tone levels lets you change the pixel brightness in
the midtones, highlights, and shadows of an image without
dramatically changing it. This modifies the contrast in image
tones so they reproduce with greater detail.
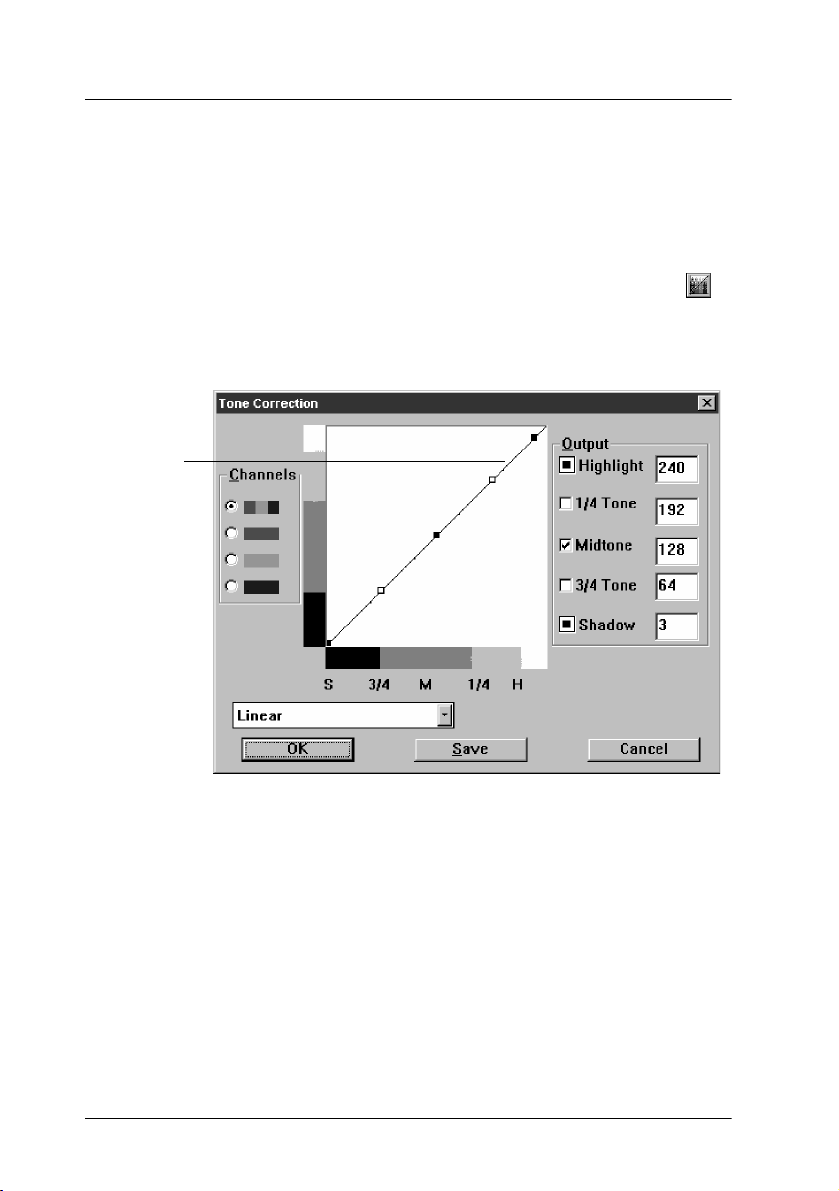
To adjust the tone correction, click the Tone Correction icon, ,
from the advanced screen when the preview window displays
your image. You see the following dialog box:
Tone
curve
You can adjust the tone values by dragging points on the tone
curve. You see the effect of your new settings in the preview
window.
Using the Channels radio buttons, select the color(s) you want
to modify the tone correction for. You can select all colors (RGB)
or only red, green, or blue.
4-6 Using Special Effects
Page 57

Each Output checkbox corresponds to the point next to it on the
tone curve. When you click the checkbox for a specific point, you
can move that point, but it is not affected by the movement of
other points. If the box is not checked, the point moves
depending on the movement of the other points.
If you modify the tone correction setting, you can save it for
future use by choosing the Save button. You see the following
dialog box:
To save your tone correction setting, type the name you want to
assign to the setting in the Tone Correction Name field and click
Save. Then click OK. The name for your new setting is now
available in the pull-down menu.
You can also delete an existing setting by selecting it from the
Tone Correction Name field and clicking Delete. Then click OK
to return to the Tone Correction dialog box.
You can reset any preview image you’ve modified by choosing
the Reset button below the Tone Correction icon on the
advanced screen.
Using Special Effects 4-7
Page 58

Adjusting Colors
After you have previewed the image, click the Color Adjustment
icon, . You see the following dialog box:
Comparison
icons
Note:
If the Image Type is set for grayscale or bl ack-and-white images, the Color
Adjustment icon is dimmed and cannot be selected.
The Color Adjustment dialog box lets you change the following
settings:
❏ Gray Balance Intensity
❏ Saturation
❏ Color Filter.
You can reset any preview image you’ve modified by choosing
the Reset button below the Color Adjustment icon on the
advanced screen.
4-8 Using Special Effects
Page 59

Setting the Gray Balance Intensity
Neutral shades of gray are produced by mixing the three colors
in the image in approximately equal proportions. Sometimes,
however, the resulting gray shades are not truly neutral. To
create a more neutral gray, adjust the Gray Balance Intensity
setting.
Click the left Color button below the Gray Balance Intensity slide
bar; the mouse pointer changes to an eyedropper. Select the
color in the preview image you want to neutralize. Then either
move the slide bar to adjust the color, or click the Comparison
icon next to the slide bar to choose the coloring you want from
the comparison samples. The rectangle to the right of the Color
button shows the result of your color adjustment.
Changing Saturations
Changing the saturation level of a color increases or decreases
the amount of color in a specific hue. Less saturated colors are
more pale while saturated colors are richer.
You can change the saturation levels in the preview image by
adjusting the Saturation slide bar. You can also click the
Comparison icon next to the slide bar to choose the saturation
level you want from the comparison samples.
To completely remove color from an image, move the Saturation
slide bar all the way to the left.
Note:
The Saturation setting is ignored if 3 pass is selected as the Scanning
Sequence in the Image Type dialog box.
Using Special Effects 4-9
Page 60

Using Color Filters
Color filters can help eliminate color tinges (or an undesirable
overall color tone) that exist in the original. You can also use
filters to give your image a specific color effect.
Click any point in the Color Filter wheel to increase that color in
the image. Numerical values for the amount of red, green, and
blue are shown to the right of the color wheel. You can also click
the radio button for a color (red, green, or blue) to set the value
of that color to zero. Then you can type in the values you want
for the other two colors.
Click the Comparison icon for Color Filter to select the color
filter you want from the comparison samples.
Note:
The Color Filter setting is ignored if 3 pass is selected as the Scanning
Sequence in the Image Type dialog box.
Inverting an Image
The Invert icon, , creates a negative of an image. You can use
this icon to turn a positive image into a negative or to create a
positive image from a negative.
Note:
To scan a negative image and invert it, your scanner must have a
transparency unit installed and you must select Transparency Unit
as your Document Source option.
To invert an image, preview the image and click the Invert icon.
You see the inverted image in the preview window.
4-10 Using Special Effects
Page 61

Using Automatic Features
The TWAIN advanced screen offers two automatic features:
❏ Auto Exposure, which automatically adjusts the exposure of
an image and sets the Highlight and Shadow settings
❏ Auto Locate, which locates and selects the target image in
the preview window.
Note:
When you scan using the easy screen, these automatic features are always
in effect.
Using Auto Exposure
After you preview an image, click the Auto Exposure icon, ,
to automatically adjust the exposure of the image and the
Highlight and Shadow settings in the Image Controls dialog
box.
Using Auto Locate
After you preview an image, click the Auto Locate icon, , to
crop out everything on the document table except the image.
If a document contains more than one image, use the mouse to
roughly define the scan area, then click the Auto Locate icon.
Auto Locate defines the image area to include only the images or
portions of the image you’ve selected.
Using Special Effects 4-11
Page 62

4-12 Using Special Effects
Page 63

Chapter 5
Using EPSON Scan! II
You can always scan an image using your TWAIN-compliant
image editing application. However, if your application is not
TWAIN-compliant, you can use EPSON Scan! II to scan the
image and export it in a format your application can open. You
can also copy all or part of your image to the clipboard and
resize the displayed image for easier viewing.
Saving a Scanned Image
Before you export an image, you need to save it in its original
EPSON Scan! II format. Otherwise, you will not be able to
retrieve it again in EPSON Scan! II. Follow these steps:
1. Turn on your scanner and place a document on the scanner’s
document table.
Note:
If you start the software before turning on your scanner, the software
may not be able to detect the scanner.
2. Start EPSON Scan! II.
3. Select Acquire from the File menu.
4. Click Scan to scan your image.
Using EPSON Scan! II 5-1
Page 64

5. Choose Save As from the File menu. You see the following
dialog box:
6. Choose the drive and directory where you want to save the
image.
7. Type a filename for your image in the File Name field. Make
sure to use the file extension .org.
8. Click OK.
The image is saved in the EPSON Scan! II file format. You can
now open this file in EPSON Scan! II and export it in a different
format, as described below.
Exporting an Image
EPSON Scan! II allows you to export an image in a file format
your application software can use. For information on file
formats your software can open, see your software manual.
Note:
Your application software cannot open images saved in the EPSON
Scan! II file format and EPSON Scan! II cannot open an exported image
file. Always save an image in EPSON Scan! II before exporting it.
5-2 Using EPSON Scan! II
Page 65

Follow these steps to export a scanned image from EPSON
Scan! II:
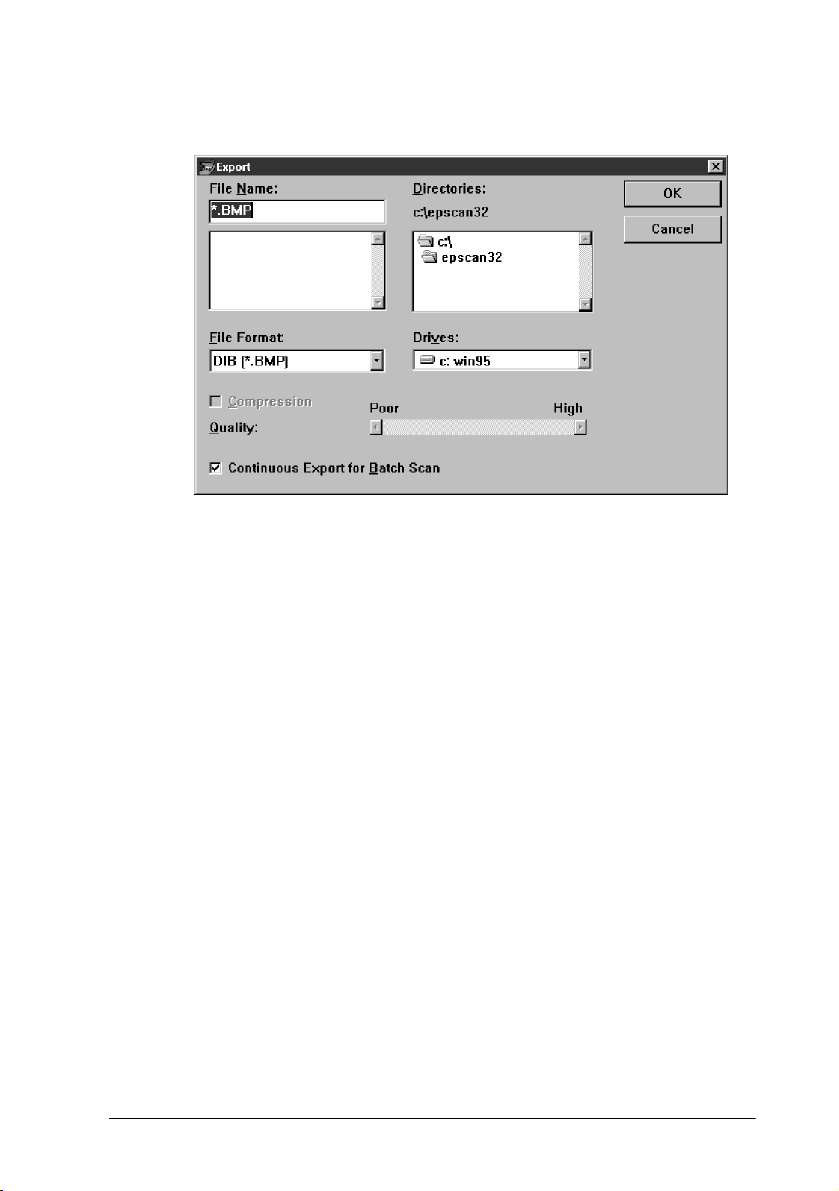
1. Choose Export from the File menu. You see the following
dialog box:
2. Choose the drive and directory where you want to save the
image.
3. Type a filename for your image in the File Name field.
4. You can choose one of these formats from the File Format
pull-down menu: DIB, EPSF, TIFF5.0, TIFF6.0, JPEG, and PCX.
(For a description of these file formats, see the Term
Glossary.)
Note:
You can select the TIFF6.0 or JPEG format only if you selected
16 Million Colors or 256 Gray for the Pixel Depth setting in the
Image Type dialog box when you scanned the image. You cannot
select the PCX format if you selected 16 Million Colors.
Using EPSON Scan! II 5-3
Page 66

5. If you selected the TIFF6.0 or JPEG format, EPSON Scan! II
allows you to choose the image quality. Since JPEG uses a
Lossy compression scheme, selecting higher quality gives
you less compression. To choose the image quality, move the
Quality slide bar to the desired setting.
6. Click OK.
The image is saved in the selected file format. You can now
import this file into your application software; see your software
manual for instructions.
Acquiring and Exporting an Image
EPSON Scan! II allows you to scan and export an image directly
into a selected file format, without displaying it on the screen.
Since the image is not displayed, you can perform scanning
operations more quickly.
Note:
EPSON Scan! II cannot open an image file after it is exported.
Follow these steps:
1. Start EPSON Scan! II, if necessary.
2. Choose Acquire & Export from the File menu. You see the
TWAIN screen. (If you see the easy screen, click
Advanced.)
5-4 Using EPSON Scan! II
Page 67
3. Click Scan. You see the following dialog box:
4. Choose the directory and drive where you want to save the
exported image.
5. Type a filename for your image in the File Name field.
6. You can choose one of these formats from the File Format
pull-down menu: DIB, EPSF, TIFF5.0, TIFF6.0, JPEG, and PCX.
(For a description of these file formats, see the Term
Glossary.)
Note:
You can select the TIFF6.0 or JPEG format only if you selected
16 Million Colors or 256 Gray for the Pixel Depth setting in the
Image Type dialog box when you scanned the image. You cannot
select the PCX format if you selected 16 Million Colors.
7. If you selected the TIFF6.0 or JPEG format, EPSON Scan! II
allows you to choose the image quality. Since JPEG uses a
Lossy compression scheme, selecting higher quality gives
you less compression. To choose the image quality, move the
Quality slide bar to the desired setting.
Using EPSON Scan! II 5-5
Page 68

8. Click OK.
The image is scanned and exported in the selected file format.
You can now import this file into your application software; see
your software manual for instructions.
Copying an Image
You can copy all or part of an image to the clipboard. Follow
these steps:
1. Select the area of the image to be copied by defining it with
the mouse or by choosing Select All from the Edit menu.
2. Choose Copy from the Edit menu.
You can now paste the copied image into other software.
Note:
The clipboard holds images in DIB format.
Resizing an Image
Choose All Dots 1:1 from the View menu to display a scanned
image so that each pixel corresponds to one display dot on the
screen. The higher the image resolution, the larger the displayed
image.
Choose Fit in Window from the View menu to change the size of
the scanned image to match the size of the active window.
5-6 Using EPSON Scan! II
Page 69

Exiting EPSON Scan! II
To exit EPSON Scan! II, make sure you have saved or exported
your image file. Then choose Exit from the File menu.
Using EPSON Scan! II 5-7
Page 70

5-8 Using EPSON Scan! II
Page 71

Chapter 6
Troubleshooting
If you have problems using the EPSON Scanning Utilities, or
with the quality of your printed or scanned images, check the
two sections in this chapter for possible solutions.
Problems Using the EPSON Scanning Utilities
Note:
You cannot select dimmed settings in EPSON TWAIN; these settings
are not available because of your scanner’s capabilities or your choice of
other settings.
When you select a TWAIN data source, EPSON Scanners is not listed.
Either the EPSON Scanning Utilities were not installed or they
were not installed correctly. Reinstall the EPSON Scanning
Utilities; see Chapter 1 for instructions.
Nothing happens when you select Acquire.
Make sure your scanner is turned on and the cables are
connected properly.
EPSON Scanners may not be selected as the TWAIN data source
in your application. You’ll usually find the Select TWAIN
Source option under the File menu in your application.
If you are running Windows 3.1, you may not have restarted it
after you installed the EPSON Scanning Utilities. Restart
Windows 3.1 and try again.
Troubleshooting 6-1
Page 72

The EPSON TWAIN data source file, or the SCSI support
software may not be installed correctly. Reinstall the EPSON
Scanning Utilities from your installation diskettes; see Chapter 1
for instructions.
You may have selected the wrong port number or SCSI ID
during setup. Check the settings for your scanner and any other
SCSI devices you may have. Then reinstall the EPSON Scanning
Utilities.
You may have changed the interface from parallel to SCSI or
from SCSI to parallel without reinstalling the EPSON Scanning
Utilities. Reinstall the Utilities for the correct interface.
You may have tried to install the EPSON Scanning Utilities
using the EZ-SCSI Setup software when you were using an
interface card that does not support EZ-SCSI. The EPSON
Scanning Utilities supports only SCSI host adapter interface
cards that support EZ-SCSI, or are Adaptec compatible.
An error condition may have caused your application or the
TWAIN data source in the EPSON Scanning Utilities to stop
working correctly. Save any documents in process, close any
open applications, and exit Windows. Restart Windows to
restore the TWAIN data source, then start your application and
try again.
Sometimes an error condition may cause the computer to
display a message telling you that your scanner is not
recognized. If this happens, reset your scanner by turning it off
and on or pushing the Reset button. Then restart your computer
and try again.
If you are using Windows 95, its hardware detection utility may
not have correctly detected the SCSI controller. Restart
Windows 95 and see the Windows 95 online Help utility for
instructions on detecting new hardware.
6-2 Troubleshooting
Page 73

The system fails or an error message appears when you choose
Acquire from your application software.
You may have more than one TWAIN screen open at once. Reset
your computer and use only one active TWAIN screen.
Your scanned image may be too big. Reset your system and
reduce the size of the scanned image or install more memory.
The EPSON Scanning Utilities do not start.
Make sure you are using a system with the minimum
requirements for the EPSON Scanning Utilities. See the
Introduction in this manual.
Check that the system requirements are correct for your
application software and that your software supports your
scanner model.
Be sure that you have correctly installed and set up your
application software.
See if your computer has enough memory to run your software.
If you are running other software at the same time, using RAM
resident programs, or have many device drivers installed, the
computer may not have enough memory left to run the software.
See the section on memory allocation in your computer manual.
Troubleshooting 6-3
Page 74

The scanner does not start scanning.
See that the scanner’s READY light is on.
Reinstall the EPSON Scanning Utilities and be sure to select the
correct interface port and settings; see Chapter 1 for instructions.
Also make sure the interface board on your computer is properly
installed.
If you connected the scanner with the SCSI interface, see that the
termination switch and SCSI ID are correctly set up.
If you have other expansion cards in your computer, see that
they are not set at the same interrupt level or I/O address as the
interface card for your scanner. See your computer manual and
interface card manual.
After choosing the Preview icon, the image does not appear in the
preview window.
Press Enter or click on the TWAIN preview window.
The scan is not the full width you selected in the preview area.
Some scanners--for example, the EPSON ES-600C--restrict the
scan width to 4096 pixels at high resolutions. Choose a lower
resolution for a wider scan.
After scanning and opening several scanned images, your
application software fails and your scanned image is lost.
Save and close the scanned images before scanning a new one.
6-4 Troubleshooting
Page 75

The size of your image increases after scanning it into your image
editing application.
Your image editing software may be converting the image to full
24-bit data, which requires more disk space. See your application
software manual for more information.
An error in the scanner or a paper jam in the Automatic Document
Feeder causes an error message.
Remove the jammed paper or reset the scanner to clear the error
condition; then try scanning again.
The Sharpness setting is grayed out in the Image Controls dialog box.
Your scanner does not support the Sharpness feature.
The Document Source setting is grayed out in the EPSON TWAIN
screen.
This is normal. You must first connect an optional automatic
document feeder or transparency unit to the scanner for any
Document Source option other than Flatbed.
The Preview button is grayed out when the Automatic Document
Feeder is selected under Document Source.
The preview feature is disabled when Automatic Document
Feeder is selected because the document would have to be fed
through the feeder for the preview scan and then reinserted into
the feeder for the final scan. If necessary, use the document table
for previewing your document.
Troubleshooting 6-5
Page 76

Auto Locate does not work when scanning two or more originals.
Make sure none of the documents are touching one another on
the document table.
If you have multiple images on a page, Auto Locate selects the
whole page.
When you scan a monochrome image, the scanned image is reversed
like a negative image.
If your application has an invert function, use it to reverse the
image, or use the Invert feature on the TWAIN advanced screen.
Some applications misinterpret the scanner data; check with
your application’s manufacturer for an updated program
version.
The default settings for Image Type and Destination don’t meet your
specific scanning requirements.
You can define your own settings; see Chapter 3 of this manual.
The Halftone setting in the Image Type dialog box is grayed out.
Halftone settings on most EPSON scanners are available only
when the Pixel Depth setting is set to Black & White or 8 Colors
(1 or 2 bits per pixel per color). Halftone settings are available
only with the following default Image Type settings: Color
Halftone, Black & White Halftone, and Copy /Fax.
6-6 Troubleshooting
Page 77

The application software displays an error message, freezes, or fails
after scanning.
Make sure you close the TWAIN screen before switching to your
application software. (Do not use the Windows Minimize
button.)
The image you scanned may be oversized. Try reducing its file
size by changing its resolution or dimensions; then scan it again.
If you selected 16 Gray as the Pixel Depth setting, change to 256
Gray and try scanning again.
If you scanned an image at high resolution (such as 800 dpi) and
at the maximum allowable width and using the Color Photo
Image Type setting, restart Windows and reduce the resolution
and the width of the scanned image. Then try scanning again.
If your application contains a scan manager feature, you may
have closed it before closing the EPSON TWAIN screen. Scan
your image again, but close the TWAIN screen before closing
your application’s scan manager.
If you selected three-pass scanning on the TWAIN screen, you
may need to free some space on your hard disk to scan.
After scanning with an image editing application, the scanned image
disappears.
Make sure you close the TWAIN screen before switching to your
application software. (Do not use the Windows Minimize
button.)
Troubleshooting 6-7
Page 78

The rows in the screen calibration dialog box never seem to match
closely enough.
Try adjusting your monitor’s brightness and contrast settings.
The TWAIN screen changed its color settings after a preview scan.
Increase the number of colors or decrease the resolution your
monitor displays using Windows 3.1 Setup or Windows 95
Display.
The colors in the Color Filter wheel do not reflect the graduated
“rainbow” spectrum of colors.
Increase the number of colors or decrease the resolution your
monitor displays using Windows 95 Display or Windows 3.1
Setup.
You may be using an outdated video display driver. Check with
your computer manufacturer for an updated driver.
After changing video display resolutions, the computer display
seems smaller or different.
You need to adjust your monitor; see the manual that came with
it.
After starting a multipage scan using the Automatic Document
Feeder, the image editing application freezes, displays an error
message, or fails.
Reset the system and reduce the number of pages you are
scanning with the Automatic Document Feeder.
6-8 Troubleshooting
Page 79

After closing the EPSON TWAIN screen, a partial image of an
application window appears over the scanned image.
Use the Up or Down arrow or the mouse to scroll the
application’s frame and clear the partial image.
Check the application software to see if it has viewing or
window size options.
After you select a part of an image to scan, the scanner does not scan
the image correctly.
Scan the whole image instead of a portion of it.
After changing the Windows video display setting to 1024 × 768
pixels, some icons, boxes, or slide bars in the TWAIN screen look out
of proportion.
Reset your Windows video display to 800 × 600 pixels.
Problems With Image Quality
The entire image is distorted or blurred.
Make sure that the document is placed flat against the document
table.
You may have moved the document during scanning. Check the
position of the document.
See that the scanner is not tilted or placed on an unstable surface.
Troubleshooting 6-9
Page 80

Part of the image is distorted or blurred.
Part of the original may be wrinkled, warped, or not in contact
with the document table. Be sure the document is flat.
Caution:
c
Do not place heavy objects on the document table.
The edges of the document are not scanned.
The document table has non-readable areas around the edges.
Adjust your document’s position so that the image fits inside the
readable area.
Color is patchy or distorted at the edges of the document.
If the original is very thick or warped at the edges, the edges of
the image may be discolored. Cover the edges of the original
with opaque paper to avoid interference from outside light.
If part of the original is outside the document table, the edge
may not be in contact with the document table and may be
discolored. Change the position of the original.
The image is faint or out of focus.
Make sure the document is placed flat on the document table.
Check your Tone Correction setting.
Make the Exposure setting darker.
Make sure you have calibrated your monitor and printer to your
scanner, and that you are using the resulting calibration profile.
See Chapter 2 for more information.
6-10 Troubleshooting
Page 81

Check your monitor’s brightness and contrast settings.
The image is too dark and without details.
When the Pixel Depth setting is Black & White or 8 Color, check
that the halftone mode is selected in the Image Type dialog box.
Adjust the Exposure, Tone Correction, and Shadow settings to
lighter values and scan the image again. Also check your
monitor’s brightness and contrast settings.
Check that the Destination output device is set correctly. If it is
set to Screen, output on the printer may be too dark.
Straight lines in the image are jagged.
The document may be placed at an angle on the document table.
Position it so that the horizontal and vertical lines are carefully
aligned with the rulers on the document table.
The image does not look the same as the original.
Make sure you have performed the calibration procedures and
selected the correct printer profile; see Chapter 2 for more
information.
Try different combinations of scanner settings.
Check that your software is correctly installed.
If you are importing an image file into your application
software, see if the file format is acceptable for your software.
Also check that your application settings are appropriate for
your image. See your application software manual.
Troubleshooting 6-11
Page 82

A line of dots is always missing on the scanned image.
If this happens on your printed image, your printer or its print
head may have a problem or need cleaning; see your printer
manual.
If this happens on both your screen and printout, the scanner’s
sensor may be malfunctioning. Consult your dealer.
Using halftoning, textured dot patterns appear in the image.
This is normal. See Appendix B in this manual (if you have an
Expression 636) or your scanner manual (if you have another
EPSON scanner) for examples of halftoning.
The colors on the video display seem different from those of the
original image.
Depending on your monitor, its resolution/color settings, and
your EPSON TWAIN settings, the screen colors may be different
from the original colors. This may be normal, especially if the
colors in the printed image more closely match the original.
Make sure you have correctly performed the screen calibration
process in EPSON Scan! II. Recalibrate and then try scanning
again. (See Chapter 2 for calibration instructions.
Check your scanner settings—such as Pixel Depth, Tone
Correction, and Color Adjustment—or try a different
combination of these settings.
6-12 Troubleshooting
Page 83

The colors on your printout seem different from those of the original
image.
Check that you have correctly performed the printer calibration
process in EPSON Scan! II using the correct printer profile.
Recalibrate and then try scanning your image again. (See
Chapter 2 for calibration instructions.)
The colors in the printed image may not match the colors of the
original image exactly because the scanning and printing
processes use two different color interpreting technologies.
The printed image is larger or smaller than the size of the original.
Check the image size settings in your application and TWAIN.
You may also have used the Zoom Preview icon. Do not use the
size of the image on your monitor to judge the printed size.
The printer cannot print the image, the printout is garbled, or the
printout is not an image.
Check that the printer is properly connected to the computer and
is correctly set up; see your printer manual.
Check that your software is properly installed and set up for
your printer; see your software manual.
Troubleshooting 6-13
Page 84

Images cannot be scanned at all or only a few dots appear in the
scanned image.
Try different EPSON TWAIN settings. Be aware that some
settings disable others. Also, depending on your scanner, some
features may not be available.
Set the Exposure, Highlight, or Tone Correction to darker
settings and scan the image again.
If you selected Line Art as the Image Type setting and any
setting other than Screen as your Destination setting, try
increasing the Threshold setting to a higher value.
Moiré (interference) patterns appear in the scanned image.
Moiré patterns commonly occur when you scan images that
include halftone screens. To minimize this effect, try any of the
following solutions:
❏ Move or angle the original slightly
❏ Change the Sharpness setting to slightly defocus the image
❏ Place a transparent sheet between the document and the
document table
❏ Change the Scale setting slightly
❏ Scan in three-pass mode.
When you select 16 Gray for the Pixel Depth setting, the scanned
image appears black in your application software.
Choose 256 Gray for the Pixel Depth setting and try scanning
your image again.
6-14 Troubleshooting
Page 85

The image appears upside down and truncated in your application
software after scanning.
Before you scan the image, reduce its file size to less than 1MB
(for line art) or less than 5MB (for color) by adjusting the settings
on the TWAIN advanced screen.
When you select 256 Color for the Pixel Depth setting, the scanned
image does not match the preview image.
Select Color Photo as the Image Type and try scanning again.
Select 16 Million Colors for Pixel Depth and try scanning again.
The image looks corrupted.
Check your printer driver settings. If the paper size is set larger
than Letter or A4, select a smaller paper size or the maximum
paper size your scanner can support. See your scanner
documentation for more information.
You may need to choose a lower resolution for the video display
setting using Windows 95 Display or Windows 3.1 Setup. See
your Windows documentation or online help for more
information.
If you change the Windows video display setting, make sure to
perform another screen calibration. (See Chapter 2 for calibration
instructions.)
Troubleshooting 6-15
Page 86

You are scanning a transparency or slide using the transparency unit,
and the scanned image is all black.
If the reflective document mat is in place, remove it; lift up the
transparency unit and slide the mat up and out of the slots on
the transparency unit.
The transparency unit is installed, you are scanning a normal
reflective (paper) document, and the scanned image is a picture of the
document table.
The reflective document mat is not in place; lift up the
transparency unit and insert the reflective document mat. (See
your scanner manual for instructions.)
6-16 Troubleshooting
Page 87

Appendix A
Default Settings
This appendix lists the default settings for the Image Type
Destination options in EPSON TWAIN.
It also provides the ranges
and
of settings available for the TWAIN Image Controls.
Default Image Type settings
Image type Default setting
Color Photo 16 million colors, best quality, and 1 pass scanning
256 Colors 256 colors, best quality, and 1 pass scanning
Black & White
Photo
Color Halftone 8 colors, Mode A (Hard tone) halftone, draft quality,
Color Drawing 8 colors, draft quality, and 1 pass scanning
Black & White
Halftone
Line Art Black-and-white, draft quality, and 1 pass scanning
OCR Black-and-white, draft quality, 1 pass scanning, and
Copy/Fax Black-and-white, Mode A (Hard tone) halftone, draft
256 grays, best quality, and 1 pass scanning
and 1 pass scanning
Black-and-white, Mode A (Hard tone) halftone, draft
quality, and 1 pass scanning
Text Enhancement Technology
quality, 1 pass scanning, and Auto Area Segmentation
Default Destination settings
Destination Default setting
General 300 dpi resolution for line drawings and halftone images,
72 dpi resolution for photos, and general calibration
Screen 72 dpi resolution for line drawings and halftone images,
72 dpi resolution for photos, and calibration for display
monitor screens
Impact Dot
Printer
360 dpi resolution for line drawings and halftone images,
120 dpi resolution for photos, and calibration for impact
dot printers
Default Settings A-1
Page 88

Default Destination settings (continued)
Destination Default setting
Thermal Printer 360 dpi resolution for line drawings and halftone images,
Inkjet Printer 360 dpi resolution for line drawings and halftone images,
Laser Printer 300 dpi resolution for line drawings and halftone images,
Laser 600dpi 600 dpi resolution for line drawings and halftone images,
Fax 200 dpi resolution for line drawings and halftone images,
OCR 300 dpi resolution for line drawings, halftone images, and
Stylus COLOR 800 dpi resolution for line drawings and halftone images,
Stylus Pro XL 800 dpi resolution for line drawings and halftone images,
Stylus Pro 800 dpi resolution for line drawings and halftone images,
Stylus COLOR II 800 dpi resolution for line drawings and halftone images,
Stylus COLOR IIs 800 dpi resolution for line drawings and halftone images,
Stylus 1500 800 dpi resolution for line drawings and halftone images,
120 dpi resolution for photos, and calibration for thermal
printers
120 dpi resolution for photos, and calibration for inkjet
printers
100 dpi resolution for photos, and calibration for laser
printers
200 dpi resolution for photos, and calibration for 600 dpi
laser printers
200 dpi resolution for photos, and calibration for inkjet
printers
photos, with general calibration
240 dpi resolution for photos, and calibration for EPSON
Stylus COLOR printers
240 dpi resolution for photos, and calibration for EPSON
Stylus Pro XL printers
240 dpi resolution for photos, and calibration for EPSON
Stylus Pro printers
240 dpi resolution for photos, and calibration for EPSON
Stylus COLOR II printers
240 dpi resolution for photos, and calibration for EPSON
Stylus COLOR IIs printers
240 dpi resolution for photos, and calibration for EPSON
Stylus 1500 printers
A-2 Default Settings
Page 89

Default Destination settings (continued)
Destination Default setting
Stylus COLOR
500
Stylus COLOR
200
Calibration
Profile
800 dpi resolution for line drawings and halftone images,
240 dpi resolution for photos, and calibration for EPSON
Stylus COLOR 500 printers
800 dpi resolution for line drawings and halftone images,
240 dpi resolution for photos, and calibration for Stylus
COLOR 200 printers
180 dpi resolution for line drawings, halftone images, and
photos, with general calibration
Image Control setting ranges
Image control Range of settings available
Exposure -10 (darkest) to 20 (brightest)
Gamma -50 (lowest) to 300 (highest)
Highlight 60 (darkest) to 980 (lightest)
Shadow 0 (lightest) to 50 (darkest)
Sharpness -2 (least focused) to 2 (sharpest)
Threshold 0 (darkest) to 255 (lightest)
Default Settings A-3
Page 90

A-4 Default Settings
Page 91

Appendix B
Expression 636 Scanner Settings
This appendix contains technical information about the various
image processing functions built into the Expression 636
scanner. All functions must be controlled from the scanner
software, and most functions can be combined with others to
produce a variety of effects.
The table below summarizes the scanner functions and the
settings available on your scanner. Each of them is explained in
the following pages. All of these functions are controlled from
your scanner software.
Scanner functions and settings
Function Available settings
Resolution 29 settings from 50 to 2400 dpi (hardware only)
Scale 50% to 200% in 1% steps
Data format 1 to 8 bits/pixel/color
Color mode Color line sequence mode, color page sequence
Brightness 7 levels
Halftoning mode 3 modes and disabled
Gamma correction 5 settings for output devices plus 1 user-defined
Color correction 4 settings for output devices plus 1 user-defined
Software interpolates to 4800
Captures up to 12 bits/pixel/color. When it captures
over 8 bits, it converts the information to
8 bits/pixel/color.
mode and monochrome mode (dropout color
selectable)
4 dither patterns
2 user-defined dither patterns
Expression 636 Scanner Settings B-1
Page 92

You may need to do some trials by yourself to find out your
preferred settings because the original images and the output
methods you use can vary greatly.
Resolution
The output resolution determines how many pixels are used for
scanning and reproducing an image. Resolution is measured in
units of dpi (dots per inch), spi (samples per inch), or ppi (pixels
per inch). All are equivalent units of measure. As the resolution
value increases, the image is read and reproduced in finer detail.
At 600 dpi, for example, an image of one square inch is
represented by 360,000 dots.
The 29 resolution settings allow you to choose the best resolution
for most types of printers. The settings available are 50, 60, 72,
75, 80, 90, 100, 120, 133, 144, 150, 160, 175, 180, 200, 216, 240, 300,
320, 360, 400, 480, 600, 800, 900, 1200, 1600, 1800, and 2400 dpi. To
find a matching resolution for your particular output device,
follow the guidelines starting on page B-13.
Size or Scale
The size or scale function allows you to reduce or enlarge the
size of the output image. The value can be set in the range of 50%
to 200% in increments of 1%.
When the scale is set to 100%, the image is scanned at the actual
size for the current resolution. The scale values determine the
vertical and horizontal lengths of the image. When the scale is
set to 200% the image is enlarged four times the original size.
When the scale is set to 50%, the image is reduced to one fourth
of the original size.
B-2 Expression 636 Scanner Settings
Page 93

The scale function affects the number of dots scanned. An image
scanned at 180 dpi and 200% has the same number of dots as an
image scanned at 360 dpi and 100%.
To enlarge or reduce the image size, use the scanner’s scale
function through your software at the time of scanning. Avoid
increasing the image size after scanning because the image
quality deteriorates. The default scale value is 100%.
Data Format
The data format specifies the number of bits used to represent
the tone of a pixel. The data format can be set in the range of 1 bit
to 8 bits per pixel per color.
As the value increases, more tones and colors can be captured in
the scanned image. In monochrome, 1 bit/pixel (bi-level data)
can represent only two levels of tones, black (0) or white (1).
With 2 bits/pixel (quad-level data), four levels of tones can be
represented by the binary values of 00, 01, 10 and 11. Using
8 bits/pixel corresponds to 256 shades of gray, producing near
photographic quality results.
In color, the data format defines tones for each of the three
primary colors of green, red, and blue. One bit/pixel/color can
represent eight colors (2 × 2 × 2), and 2 bits/pixel/color can
represent 64 colors (4 × 4 × 4). Eight bits/pixel/color (total 24 bits
for a pixel) can represent over 16 million colors.
Expression 636 Scanner Settings B-3
Page 94

The scanner can read up to 12 bits/pixel/color. Above
8 bits/pixel/color the scanner converts the image data to
8 bits/pixel/color and sends it to the computer. This gives much
higher quality.
Data format Monochrome Color
1 bit/pixel/color 2 grays 8 colors
2 bits/pixel/color 4 grays 64 colors
3 bits/pixel/color 8 grays 512 colors
4 bits/pixel/color 16 grays 4,096 colors
5 bits/pixel/color 32 grays 32,768 colors
6 bits/pixel/color 64 grays 262,144 colors
7 bits/pixel/color 128 grays 2,097,152 colors
8 bits/pixel/color 256 grays 16,777,216 colors
8 bits 2 bits 1 bit
To reproduce an image of more than 2 bits/pixel/color the
output device should be capable of producing the same tones.
Many displays and printers cannot do this and are limited to
monochrome without gradations, or to 8 or 16 or 256 colors.
The data format chosen also affects the amount of data necessary
for scanning and storing an image. The larger the bits per pixel
value chosen, the larger the amount of image data becomes.
B-4 Expression 636 Scanner Settings
Page 95

Brightness
Lightest setting
Image input
D
You can choose one of seven brightness levels for scanning.
Medium is the normal setting.
It is better to use darker settings for line art or faint original
images, and to use lighter settings for darker original images.
The brightness can be combined with any other function.
The graph below shows the differences between the brightness
settings when the gamma correction is set for the CRT Display A
setting.
Normal (center)
Darkest setting
Lighter
ata output
Color Mode
Lighter
Darker
The color mode specifies color reading or monochrome reading.
In color reading, you can choose either page sequence reading or
line sequence reading. In monochrome reading, you can specify
a dropout color (green, red, or blue).
Expression 636 Scanner Settings B-5
Page 96

❏ Color page sequence reading
The scanner scans the document three times (one each for
green, red, and blue), and produces three pages of image
data that combine to give full color image data. Since the
image data can be divided into three sets, a computer with
limited memory or processing speed can handle it more
easily.
❏ Color line sequence reading
The scanner scans the document with one pass of the
carriage, reading green, red, and blue for every line. This
yields more accurate color separation. Because the color for
each pixel can be determined as soon as it is read, the color
correction function can be used.
❏ Monochrome reading (standard)
The scanner scans the same way as in the color line sequence
reading until information is stored into image memory. Then
the scanner makes the monochrome image data from three
primary color image data by using the control circuitry.
❏ Dropout colors (monochrome reading only)
The dropout color is the color you tell the scanner not to
read. You can choose green, red or blue for the dropout
color. Use a dropout color when you do not want to read one
of these colors—for example, when scanning an image on a
colored background.
Halftoning Mode
Halftoning is a process of changing an image to a pattern of dots.
This is required because a printing press produces images in a
different way than photography does.
B-6 Expression 636 Scanner Settings
Page 97

Photographs have an almost infinite number of tones, with an
almost infinite number of colors for color photographs, but
printing uses only individual single-color dots. Black and white
images use black dots, and color images use only four colors of
dots: cyan (blue-green), magenta, yellow, and black. The size
and spacing of these dots is varied to simulate photographic
continuous tones. In some halftoning, the dots are quite
noticeable. If the dots are fine enough, however, the printed
image appears to have continuous tones.
You can choose various types of halftoning at the time you scan,
but it is nearly always best to choose the halftoning setting “off”
or “none” and have the halftoning done by the image editing
software or by the output device (such as a laser printer).
You will always get better results scanning from a photograph
than from a printed image, such as a picture in a newspaper or
magazine, because printed images have already been halftoned
and you may see a conflict in the halftone methods.
You can select from three types of halftoning, as well as enable
or disable the halftoning process itself. When halftoning is
disabled, the tones that the data can represent are determined
by the data format. Halftoning is not available when
3 bits/pixel/color or more are selected as the data format, since
halftoning is not necessary for such data. Halftoning modes B
and C are not available with color line sequence reading.
Your scanner also provides four typical dither patterns for 1- or
2-bits/pixel/color data format. With suitable software, you can
define two more dither patterns.
Note:
Usually your scanner software or printing method can perform the
halftoning. Therefore, you should usually not use halftoning or dither
patterns when you scan.
Expression 636 Scanner Settings B-7
Page 98
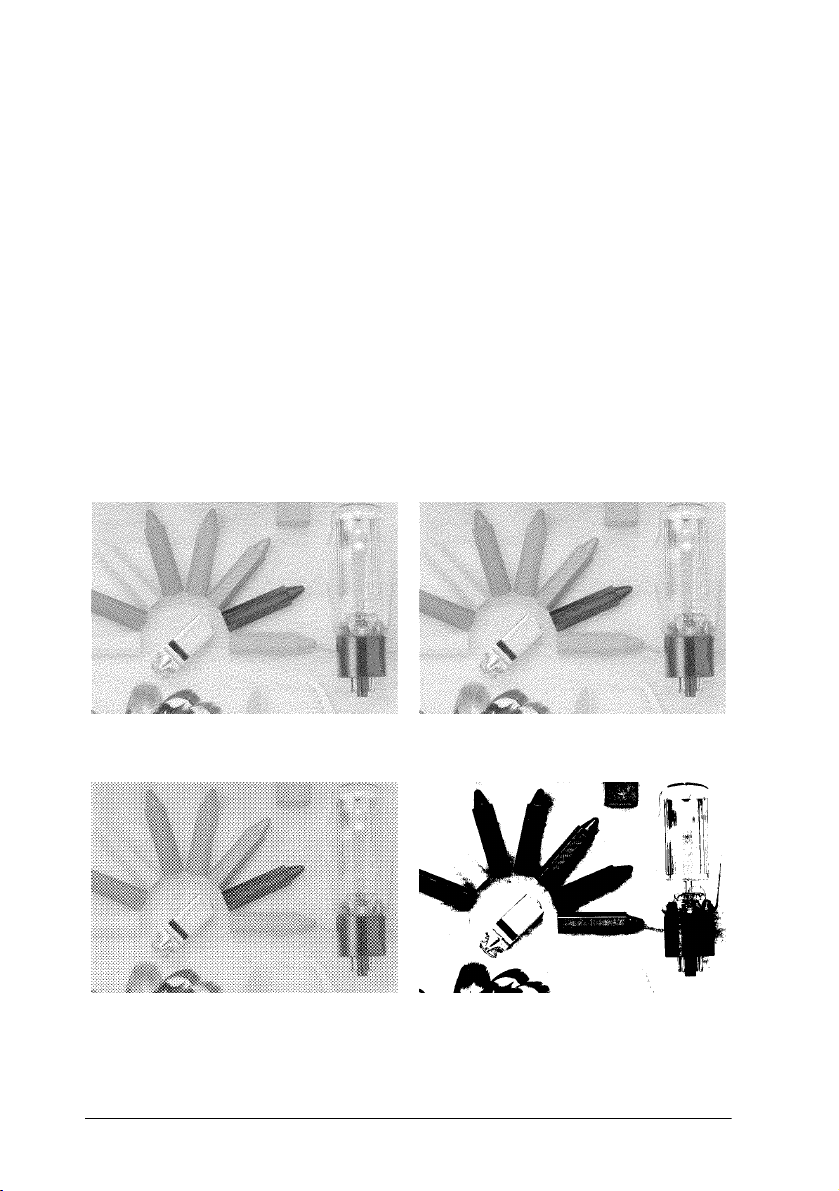
❏ Halftoning mode A
This is the standard halftoning mode. The image is
converted into a hard tone to produce a distinct image, and
is suitable for most purposes. (1 and 2 bits/pixel/color)
❏ Halftoning mode B
With this mode, the image is converted into a softer tone.
This mode is suited for images which contain large areas of
similar tones. (1 bit/pixel/color)
❏ Halftoning mode C
With this mode, the image is represented in a way similar to
the screen commonly used for newspaper photographs. The
gradations of the tones are represented by clusters of
different numbers of dots. (1 bit/pixel/color)
Halftoning mode A Halftoning mode B
Halftoning mode C None
B-8 Expression 636 Scanner Settings
Page 99

❏ Dither pattern A
Halftone is expressed in 4 by 4 bayer dither pattern.
❏ Dither pattern B
Halftone is expressed in 4 by 4 spiral pattern.
❏ Dither pattern C
Halftone is expressed in 4 by 4 net screen dither pattern.
❏ Dither pattern D
Halftone is expressed in 8 by 8 net screen dither pattern.
Dither pattern A Dither pattern B
Dither pattern C Dither pattern D
Note:
Changing the size of a halftone-processed image with your application
software may degrade the image. Instead use the scanner’s scale function
at the time of scanning to select your desired image size.
Expression 636 Scanner Settings B-9
Page 100

Gamma Correction
Lighter
D
Gamma, or tone, correction, adjusts the light intensity ratio
between the original image and the output data. It brings out
more detail in areas of both highlight and shadow. When the
image is reproduced on certain types of output devices, the
tones of the image will be closer to those of the original. The term
“gamma” (γ) means the shape and slant of the line on the graph
that shows the ratio, as shown below.
CRT Display A
CRT Display B
ata output
Printer Output A
Printer Output B
Printer Output C
Darker
Image input
Lighter
Gamma correction provides five settings, and can be combined
with all other scanner functions. Choose an appropriate setting
from the five modes below.
❏ CRT Display A
The output data is in proportion to the original image, as
shown in the above graph. This setting is suited for most
types of computer displays which can display an image in
1-bit/pixel/color format. This mode is also suited for images
without continuous tones, such as line art (γ = 1).
B-10 Expression 636 Scanner Settings
 Loading...