

Page 1
SERVICE MANUAL
Large Format Color Inkjet Printer
EPSON Stylus Pro 7400/7450/7800/7880/7880C
9400/9450/9800/9880/9880C
SEIJ05002
Page 2

Notice:
All rights reserved. No part of this manual may be reproduced, stored in a retrieval system, or transmitted in any form or by any means, electronic,
mechanical, photocopying, recording, or otherwise, without the prior written permission of SEIKO EPSON CORPORATION.
The contents of this manual are subject to change without notice.
All effort have been made to ensure the accuracy of the contents of this manual. However, should any errors be detected, SEIKO EPSON would greatly
appreciate being informed of them.
The above not withstanding SEIKO EPSON CORPORATION can assume no responsibility for any errors in this manual or the consequences thereof.
EPSON is a registered trademark of SEIKO EPSON CORPORATION.
General Notice: Other product names used herein are for identification purpose only and may be trademarks or registered trademarks of their
respective owners. EPSON disclaims any and all rights in those marks.
Copyright © 2007 SEIKO EPSON CORPORATION.
Imaging Product CS,PL & Environmental Management
Page 3

PRECAUTIONS
Precautionary notations throughout the text are categorized relative to 1) Personal injury and 2) Damage to equipment.
DANGER Signals a precaution which, if ignored, could result in serious or fatal personal injury. Great caution should be exercised in performing
procedures preceded by DANGER Headings.
WARNING Signals a precaution which, if ignored, could result in damage to equipment.
The precautionary measures itemized below should always be observed when performing repair/maintenance procedures.
DANGER
1. ALWAYS DISCONNECT THE PRODUCT FROM THE POWER SOURCE AND PERIPHERAL DEVICES PERFORMING ANY MAINTENANCE OR
REPAIR PROCEDURES.
2. NO WORK SHOULD BE PERFORMED ON THE UNIT BY PERSONS UNFAMILIAR WITH BASIC SAFETY MEASURES AS DICTATED FOR ALL
ELECTRONICS TECHNICIANS IN THEIR LINE OF WORK.
3. WHEN PERFORMING TESTING AS DICTATED WITHIN THIS MANUAL, DO NOT CONNECT THE UNIT TO A POWER SOURCE UNTIL
INSTRUCTED TO DO SO. WHEN THE POWER SUPPLY CABLE MUST BE CONNECTED, USE EXTREME CAUTION IN WORKING ON POWER
SUPPLY AND OTHER ELECTRONIC COMPONENTS.
WARNING
1. REPAIRS ON EPSON PRODUCT SHOULD BE PERFORMED ONLY BY AN EPSON CERTIFIED REPAIR TECHNICIAN.
2. MAKE CERTAIN THAT THE SOURCE VOLTAGES IS THE SAME AS THE RATED VOLTAGE, LISTED ON THE SERIAL NUMBER/RATING
PLATE. IF THE EPSON PRODUCT HAS A PRIMARY AC RATING DIFFERENT FROM AVAILABLE POWER SOURCE, DO NOT CONNECT IT TO
THE POWER SOURCE.
3. ALWAYS VERIFY THAT THE EPSON PRODUCT HAS BEEN DISCONNECTED FROM THE POWER SOURCE BEFORE REMOVING OR
REPLACING PRINTED CIRCUIT BOARDS AND/OR INDIVIDUAL CHIPS.
4. IN ORDER TO PROTECT SENSITIVE MICROPROCESSORS AND CIRCUITRY, USE STATIC DISCHARGE EQUIPMENT, SUCH AS ANTI-STATIC
WRIST STRAPS, WHEN ACCESSING INTERNAL COMPONENTS.
5. REPLACE MALFUNCTIONING COMPONENTS ONLY WITH THOSE COMPONENTS BY THE MANUFACTURE; INTRODUCTION OF SECONDSOURCE ICs OR OTHER NON-APPROVED COMPONENTS MAY DAMAGE THE PRODUCT AND VOID ANY APPLICABLE EPSON WARRANTY.
6. WHEN AIR DUSTER IS USED ON THE REPAIR AND THE MAINTENANCE WORK, THE USE OF THE AIR DUSTER PRODUCTS CONTAINING
THE INFLAMMABLE GAS IS PROHIBITED.
Page 4
About This Manual
This manual describes basic functions, theory of electrical and mechanical operations, maintenance and repair procedures of the printer. The instructions and procedures included
herein are intended for the experienced repair technicians, and attention should be given to the precautions on the preceding page.
Manual Configuration
This manual consists of six chapters and Appendix.
CHAPTER 1.PRODUCT DESCRIPTIONS
Provides a general overview and specifications of the product.
CHAPTER 2.OPERATING PRINCIPLES
Describes the theory of electrical and mechanical operations of the
product.
CHAPTER 3.TROUBLESHOOTING
Describes the step-by-step procedures for the troubleshooting.
CHAPTER 4.DISASSEMBLY / ASSEMBLY
Describes the step-by-step procedures for disassembling and assembling
the product.
CHAPTER 5.ADJUSTMENT
Provides Epson-approved methods for adjustment.
CHAPTER 6.MAINTENANCE
Provides preventive maintenance procedures and the lists of Epsonapproved lubricants and adhesives required for servicing the product.
APPENDIX Provides the following additional information for reference:
• Connector pin assignments
• Electric circuit boards components layout
• Electrical circuit boards schematics
• Exploded diagram & Parts List
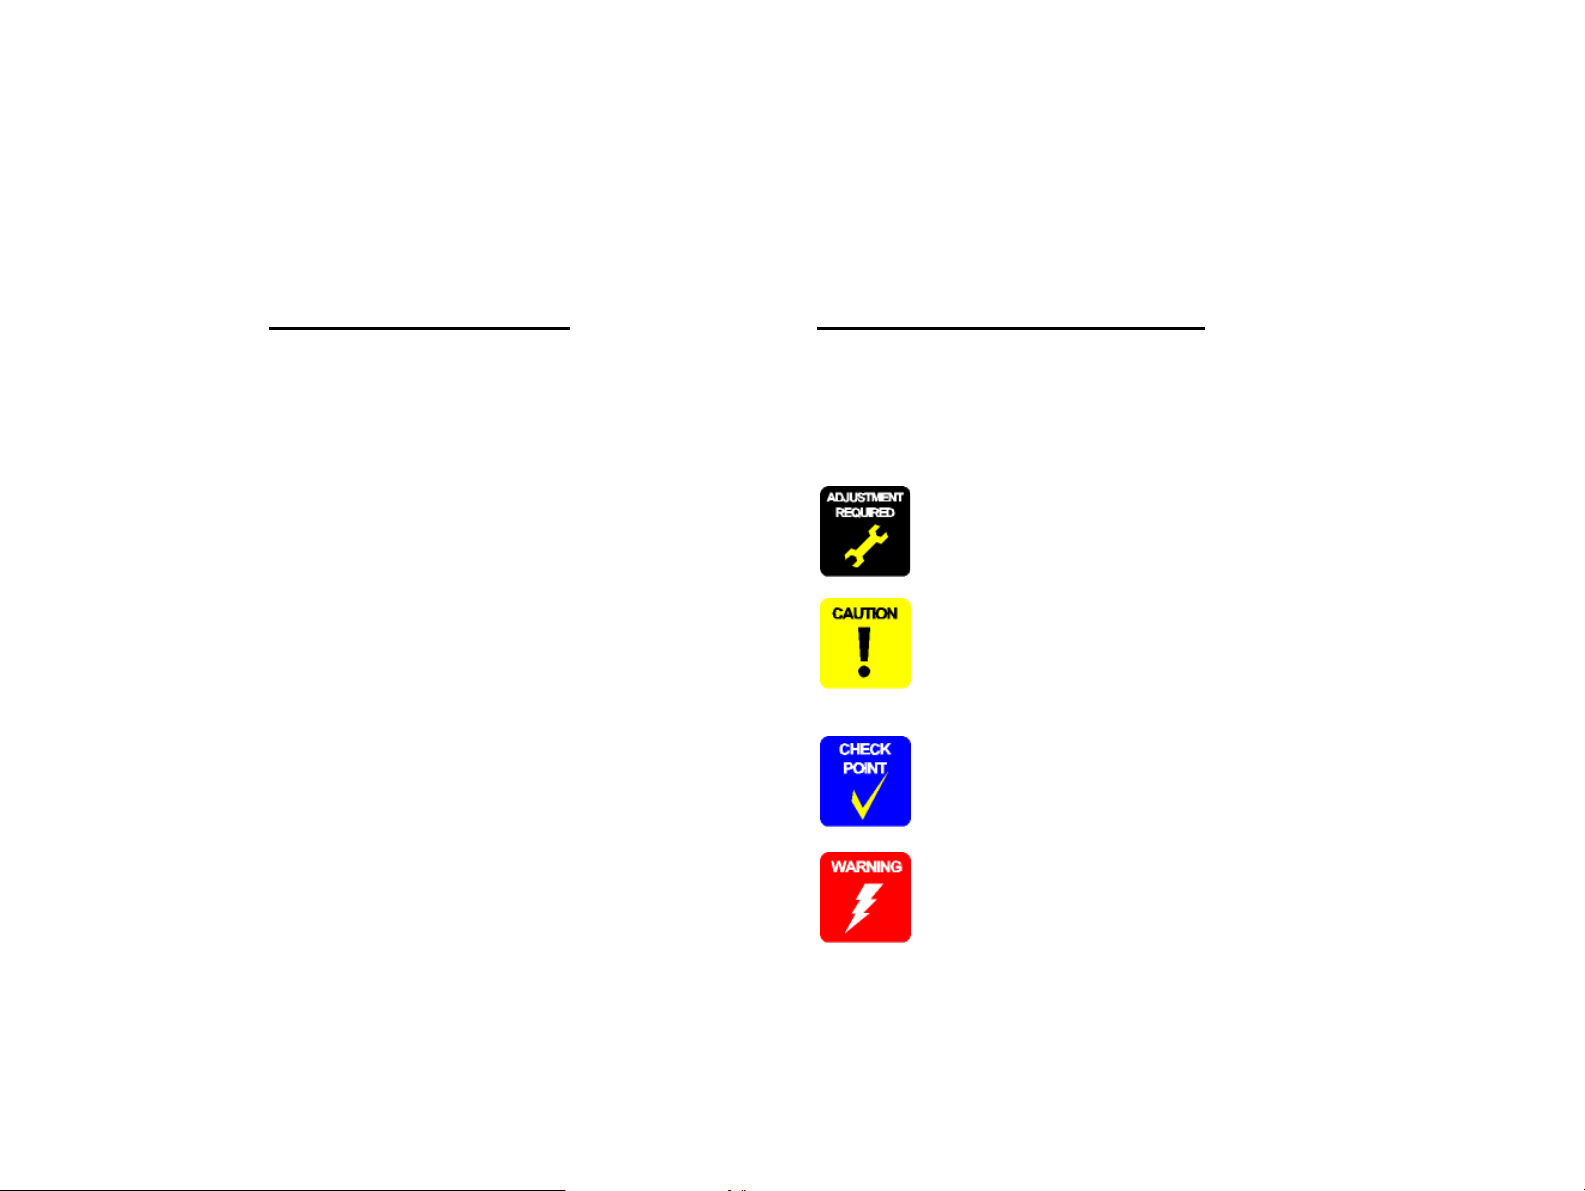
Symbols Used in this Manual
Various symbols are used throughout this manual either to provide additional
information on a specific topic or to warn of possible danger present during a
procedure or an action. Be aware of all symbols when they are used, and always read
NOTE, CAUTION, or WARNING messages.
Indicates an operating or maintenance procedure, practice or condition
that is necessary to keep the product’s quality.
Indicates an operating or maintenance procedure, practice, or condition
that, if not strictly observed, could result in damage to, or destruction of,
equipment.
May indicate an operating or maintenance procedure, practice or
condition that is necessary to accomplish a task efficiently. It may also
provide additional information that is related to a specific subject, or
comment on the results achieved through a previous action.
Indicates an operating or maintenance procedure, practice or condition
that, if not strictly observed, could result in injury or loss of life.
Page 5

Revision Status
Revision Date of Issue Description
A July 29, 2005 First release
B September 2, 2005 Revised Contents
[All chapters]
• “Weight” has been changed to “mass”.
[Chapter 1]
• “Service Personnel Mode” has been changed to “SERVICEMAN MODE”.
• Descriptions have been added in 1.4.4.35 Power Cleaning (Page 99).
•“CAUTION” in Edge Sensor Level Measurement (Page 118) has been deleted.
[Chapter 2]
• Made changes in 2.2.4 Cleaning Mechanism (Page 171) .
• 2.5 Colorimetric Calibration (Color ID) Overview (Page 178) has been added.
[Chapter 4]
• “ADJUSTMENT REQUIRED” has been added in 4.2.4.2 P/S BOARD ASSY. (Page 243).
• “ADJUSTMENT REQUIRED” has been added in 4.2.4.4 BOARD ASSY., SUB (Page 245).
• Made changes and added “REASSEMBLY” in 4.2.5.2 CR MOTOR ASSY. (Page 252).
• “CAUTION” has been added in 4.2.7.4 PUMP CAP ASSY. (Page 298).
Page 6
Revision Date of Issue Description
B September 2, 2005 [Chapter 5]
• Descriptions have been added in Table 5-1. Parts and Units that Require Adjustments (Page 307).
• Descriptions have been added in Table 5-2. Required Adjustments in the Order of Execution (Page 308).
• Descriptions have been added in Basic Adjustment (Page 311).
• Made changes in Table 5-3. Tools for Adjustments (Page 313).
• Made changes in “System Requirements” in 5.1.7 Adjustment Program Basic Operations (Page 314).
• Made changes in 5.2.2 Cutter Position/Height Adjustment (Page 316).
• Made changes in 5.2.3 Paper Thickness Sensor Position Adju stment (Page 318).
• “Shield Cap” has been changed to “Seal Cap” in 5.2.8 Air Leak Check (Page 324).
• Made changes in 5.3.4 T&B&S (Roll Paper) (Page 334).
• Made changes in 5.3.5 T&B&S + 980mm Band Feed (Page 336).
• Made changes in 5.3.7 Nozzle Bi-D Adjustment (Page 339).
• Made changes in 5.3.8 Print Head Slant Adjustment (PF) (Page 340).
• Made changes in 5.3.9 Print Head Slant Adjustment (CR) (Page 343).
• Made changes in 5.3.10 Ink Mark Sensor Level Adjustment (Page 346).
• Made changes in 5.3.11 Auto Uni-D Adjustment (Page 347).
• Made changes in 5.3.12 Auto Bi-D Adjust ment (P.G. 0.8/1.6) (Page 348).
• Made changes in 5.3.13 Ink Mark Sensor Adjustment for Au to Nozzle Check (Page 349).
• Made changes in 5.3.14 Skew Check (Page 351).
• Made changes in 5.3.15 Platen Position Adjustment (Page 352).
• Made changes in 5.3.16 980mm Band Feed Adjustment (Page 354).
• 5.3.22 Colorimetric Calibration (Color ID) (Page 359) have been added.
• Made changes in 5.4.1 Auto Bi-D Adjustme nt (Page 375).
• Made changes in 5.4.2 Manual Bi-D Adjustment (Page 376).
• Made changes in 5.5.1 Check Nozzle (Page 380).
• Made changes in 5.5.2 Check Alignment (Page 381).
• Made changes in 5.5.3 Print Adjustment Check Pattern (Page 382).
• Made changes in 5.5.4 Check Cutting (Page 383).
• 5.8 Model Setting (when replacing the Main Board) (Page 390) have been added.
Page 7

Revision Date of Issue Description
C December 15, 2006 Revised Contents
[Chapter 1]
• Table 1-28. Button Functions (Page 35) was modified.
[Chapter 4]
• 4.2.5.8 CARRIAG E UN IT (Page 26 1) was added.
[Chapter 7]
• 7.2 Circuit Diagrams (Page 405) was revised.
D June 15, 2007 Revised Contents
[All chapters]
• T.B.D. items have been determined.
[Chapter 2]
• Figure 2-2. Carriage Mechanism (Page 159) was modified.
• Figure 2-3. Carriage Mechanical Unit and PG Adjustment Unit (Page 161) was modified.
[Chapter 3]
• Remedy (Page 188) was revised.
[Chapter 4]
• REASSEMBLY was added in 4.2.7.1 PRINT HEAD (Page 281)
[Chapter 5]
• 5.1.4 Required Adjustments by Part or Unit (Page 308) was changed.
• 5.1.6 Tools for Adjustments (Page 313) was changed.
• A misdescription was corrected in 5.2.3 Paper Thickness Sensor Position Adjustm e nt (Page 318)
• A misdescription was corrected in 5.3.6 Cutter Pressure Adjustment (Page 338)
• Required Tool was added in 5.3.16 980mm Band Feed Adjustment (Page 354)
• “Tiny mode” was changed to “F/W update mode” in 5.3.18 NVRAM Back Up and Write (Page 356)
• A misdescription was corrected in 5.3.21 Rear Sensor Adjustment (Page 358)
• 5.8 Model Setting (when replacing the Main Board) (Page 390) was changed.
E September 12, 2007 Revised Contents
[All chapters]
• Information on Stylus Pro 7880/7880C/7450/9880/9880C/9450 has been added.
Page 8

EPSON Stylus Pro 7400/7450/7800/7880/7880C/9400/9450/9800/9880/9880C Revision E
Contents
Chapter 1 Product Description
1.1 Product Description ............................................................................................ 12
1.1.1 Features ...................................................................................................... 12
1.1.2 Difference between 8 color and 4 color machines ..................................... 15
1.2 Basic Specifications ........................................... ... ....................................... ... .... 16
1.2.1 Print Specifications .................................................................................... 16
1.2.2 Character Specifications ............................................................................ 17
1.2.3 Operability Specifications ......................................................................... 17
1.2.4 Paper Specifications ................................................................................... 18
1.2.5 Mechanism Specifications ......................................................................... 20
1.2.6 Electrical Related Information ................................................................... 24
1.2.7 Reliability .................................................................................................. 24
1.2.8 Environmental Conditions ......................................................................... 26
1.2.9 Overall Dimensions ................................................................................... 27
1.2.10 Accessories/Options/Consumables .......................................................... 29
1.3 External View and Parts Names ......................................................................... 32
1.4 Control Panel .............................................................. ....................................... . 34
1.4.1 Buttons and Functions ............................................................................... 34
1.4.2 Panel Display ............................................................. ................................ 37
1.4.3 Job Information .......................................................................................... 46
1.4.4 Panel Setting .......................................... ........................................ ............ 48
1.4.5 Maintenance Mode .................................................................................. 105
1.4.6 SERVICEMAN MODE ........................................................................... 111
1.4.7 MIB Function ........................................................................................... 142
1.4.8 Function to Prevent Irregular Printing ..................................................... 142
1.4.9 Initialization ............................................................................................. 143
1.4.10 Default Setup Values ............................................................................. 143
1.5 Controller .......................................................................................................... 144
1.6 Interface ............................................................................................................ 145
1.6.1 USB interface ........................................................................................... 145
1.6.2 IEEE1394 Interface ................................................................................. 146
1.6.3 Optional Interface .................................................................................... 147
1.6.4 Network Interface .................................................................................... 149
1.6.5 Received Buffer Full Operation .............................................................. 150
1.6.6 Interface Selection ................................................................................... 150
1.7 Optional Units and Consumables ........................................................... .......... 151
1.7.1 Ink Cartridge ............................................................................................ 151
1.7.2 Cleaning Cartridge .............................................................. ..................... 152
1.7.3 Conversion Cartridge .......................................................... ..................... 152
1.7.4 Maintenance Tank ............................... .......................................... .......... 153
Chapter 2 Operating Principles
2.1 Overview ................................................ ........................................ ... ............... 155
2.2 Print Mechanism Components ............................................................... .......... 156
2.2.1 Print Mechanism (Print Head) .......................................................... ....... 157
2.2.2 Carriage (CR) Mechanism ....................................................................... 159
2.2.3 Paper Feed Assembly .............................................................................. 168
2.2.4 Cleaning Mechanism ............................................................................... 171
2.2.5 Ink Supply Mechanism ............................................................................ 173
2.2.6 Others .......................................... ........................................ ..................... 174
2.3 Outline of Main Board ......................................... ............................................ 175
2.4 Outline of Power Supply Circuit Board ........................................................... 177
2.5 Colorimetric Calibration (Color ID) Overview ................................................ 178
8
Page 9

EPSON Stylus Pro 7400/7450/7800/7880/7880C/9400/9450/9800/9880/9880C Revision E
Chapter 3 Troubleshooting
3.1 Overview .......................................................................................................... 180
3.1.1 Preliminary Check ................................................................................... 180
3.1.2 Troubleshooting Procedure ...................................................................... 180
3.2 Troubleshooting based on Panel Messages ...................................................... 181
3.2.1 List of Panel Messages ............................................................................ 181
3.2.2 Remedies for Warning Messages ............................................................ 187
3.2.3 Remedies for Error Messages .................................................................. 190
3.2.4 Remedies for Service Call Errors ............................................................ 197
3.3 Troubleshooting based on Printed Result ......................................................... 212
Chapter 4 Disassembly & Assembly
4.1 Overview .......................................................................................................... 217
4.1.1 Precautions ............................................................................................... 217
4.1.2 Recommended Tools ............................................................................... 219
4.1.3 Recommended Screws ............................................................................. 220
4.2 Disassembly Procedure .................................................................................... 221
4.2.1 Basic Operations ...................................................................................... 223
4.2.2 Consumables ............................................................................................ 225
4.2.3 Removing the Panel Unit and Housing ................................................... 229
4.2.4 Removing the Circuit Boards .................................................................. 241
4.2.5 Removing the Carriage Mechanism ........................................................ 249
4.2.6 Removing the Paper Feed Mechanism .................................................... 266
4.2.7 Removing the Ink System Mechanism .................................................... 281
Chapter 5 Adjustment
5.1 Overview ................................................ ........................................ ... ............... 307
5.1.1 Precautions ............................................................................................... 307
5.1.2 Adjustment Workflow ....................................... ...................................... 307
5.1.3 Parts and Units that Require Adjustments ............................................... 307
5.1.4 Required Adjustments by Part or Unit .................................................... 308
5.1.5 Description of Adjustments ..................................................................... 310
5.1.6 Tools for Adjustments ............................................................................. 313
5.1.7 Adjustment Program Basic Operations ......................................... .......... 314
5.2 Mechanical Adjustment .................................................................................... 315
5.2.1 Ink Mark Sensor Height Adjustment ....................................................... 315
5.2.2 Cutter Position/Height Adjustment ......................................................... 316
5.2.3 Paper Thickness Sensor Position Adjustment ......................................... 318
5.2.4 CR Timing Belt Tension Adjustment ...................................................... 320
5.2.5 PF Timing Belt Tension Adjustment ....................................................... 321
5.2.6 CR Encoder Sensor Adjustment .............................................................. 322
5.2.7 PF Encoder Sensor Adjustment ............................................................... 323
5.2.8 Air Leak Check ........................................................ ... ............................. 324
5.2.9 PG Adjustment .................................... .................................................... 327
5.3 Basic Adjustment ...................................... ....................................................... 331
5.3.1 RTC&USB ID&IEEE1394 ID ................................................................ 331
5.3.2 Head Rank ID ...................................... ....................................... ............. 332
5.3.3 Input Serial Number ................................................................................ 333
5.3.4 T&B&S (Roll Paper) ............................................................................... 334
5.3.5 T&B&S + 980mm Band Feed ................................................................. 336
5.3.6 Cutter Pressure Adjustment ........................................................ ............. 338
5.3.7 Nozzle Bi-D Adjustment ....................................................... .................. 339
5.3.8 Print Head Slant Adjustment (PF) ........................................................... 340
5.3.9 Print Head Slant Adjustment (CR) .......................................................... 343
5.3.10 Ink Mark Sensor Level Adjustment ....................................................... 346
5.3.11 Auto Uni-D Adjustment ........................................................................ 347
5.3.12 Auto Bi-D Adjustment (P.G. 0.8/1.6) .................................................... 348
5.3.13 Ink Mark Sensor Adjustment for Auto Nozzle Check .......................... 349
5.3.14 Skew Check ........................................................................................... 351
5.3.15 Platen Position Adjustment ................................................................... 352
5.3.16 980mm Band Feed Adjustment ............................................................. 354
5.3.17 Initial Ink Charge Flag ON/OFF ............................................ ............... 355
5.3.18 NVRAM Back Up and Write ................................................................ 356
5.3.19 Initial Ink Charge ................................................................................... 357
9
Page 10

EPSON Stylus Pro 7400/7450/7800/7880/7880C/9400/9450/9800/9880/9880C Revision E
5.3.20 Cleaning ................................................................................................. 357
5.3.21 Rear Sensor Adjustment ........................................................................ 358
5.3.22 Colorimetric Calibration (Color ID) ...................................................... 359
5.4 Advanced Adjustment ...................................................................................... 375
5.4.1 Auto Bi-D Adjustment ............................................................................. 375
5.4.2 Manual Bi-D Adjustment ........................................................................ 376
5.4.3 Destination Setting ................................................................................... 378
5.4.4 PF Micro Feed Adjustment (Bi-D) .......................................................... 379
5.5 Check Results ................................................................................................... 380
5.5.1 Check Nozzle ........................................................................................... 380
5.5.2 Check Alignment ..................................................................................... 381
5.5.3 Print Adjustment Check Pattern .............................................................. 382
5.5.4 Check Cutting .......................................................................................... 383
5.5.5 Print Image ............................................................................................... 384
5.6 Reset Counters .................................................................................................. 385
5.6.1 Reset PG Switching Counter ................................................................... 385
5.6.2 Reset PF Motor Counter .......................................................................... 385
5.6.3 Reset When CR Unit Change .................................................................. 386
5.6.4 Reset When Cleaning Unit Change ......................................................... 386
5.6.5 Reset When PrintHead Change ............................................................... 387
5.6.6 Reset When Cutter Solenoid Change ...................................................... 387
5.6.7 Reset Pump Counter ................................................................................ 388
5.6.8 Reset Ink Information .............................................................................. 388
5.7 Installing Firmware .......................................................................................... 389
5.8 Model Setting (when replacing the Main Board) ............................................. 390
5.9 Writing MAC Address ..................................................................................... 392
Chapter 6 Maintenance
6.1 Overview ................................................ ........................................ ... ............... 394
6.1.1 Product Life Information ......................................................................... 395
6.1.2 Required Maintenance Items ............................................................ ....... 396
6.2 Lubrication .............................................................. ......................................... 397
Chapter 7 Appendix
7.1 Connectors ............................................................... ... ...................................... 401
7.2 Exploded Diagrams ................................... ....................................................... 406
7.3 ASP List (Parts List) ......................................................................................... 462
7.3.1 ASP List for Stylus Pro 7400/7800 ................................. ........................ 462
7.3.2 ASP List for Stylus Pro 9400/9800 ................................. ........................ 465
7.3.3 ASP List for Stylus Pro 7450/7880/7880C .............................................. 469
7.3.4 ASP List for Stylus Pro 9450/9880/9880C .............................................. 472
10
Page 11

PRODUCT DESCRIPTION
CHAPTER
1
Page 12
EPSON Stylus Pro 7400/7450/7800/7880/7880C/9400/9450/9800/9880/9880C Revision E
1.1 Product Description
1.1.1 Features
Large sheet
Table 1-1. Large sheet
Model name Large sheet
Stylus Pro 7400 610 mm (Approx. 24 inches), A1+ response
Stylus Pro 7450
Stylus Pro 7800
Stylus Pro 7880
Stylus Pro 7880C
Stylus Pro 9400 1118 mm (Approx. 44 inches), B0 + response
Stylus Pro 9450
Stylus Pro 9800
Stylus Pro 9880
Stylus Pro 9880C
Super-high definition
Super-high resolution of 2880 x 1440 dpi
Smallest droplet size: 3.5 picoliter
Variable droplet technology can produce multiple different sizes per print line
Low running cost
Independent ink cartridges for each color with large capacity of 110 ml
Optional ink cartridge with larger capacity of 220ml can be used
Media handling
Various types of media can be used
Built-in automatic cutting system and a manual media cutter
Accurate automatic loading of cut sheet media
Borderless printing (full-bleed print on all four sides) with roll paper
Up to 1.5 mm thick paper can be used
Compatibility with other large sheet printers
Upper compatibility with;
Stylus Pro 7400
Stylus Pro 7800
Stylus Pro 9400
Stylus Pro 9800
• Stylus Pro 4000
• Stylus Pro 7000
• Stylus Pro 9000
• Stylus Pro 10000
• Stylus Pro 4400
• Stylus Pro 7500
• Stylus Pro 9500
• Stylus Pro 10600
• Stylus Pro 4800
• Stylus Pro 7600
• Stylus Pro 9600
Stylus Pro 7450
Stylus Pro 7880
Stylus Pro 7880C
Stylus Pro 9450
Stylus Pro 9880
Stylus Pro 9880C
• Stylus Pro 4000
• Stylus Pro 7000
• Stylus Pro 7600
• Stylus Pro 9400
• Stylus Pro 9800
• Stylus Pro 4400
• Stylus Pro 7400
• Stylus Pro 7800
• Stylus Pro 9500
• Stylus Pro 10000
• Stylus Pro 4800
• Stylus Pro 7500
• Stylus Pro 9000
• Stylus Pro 9600
• Stylus Pro 10600
The latest RIP
Genuine: NorthFlight Plus ver. 3
Others: Stylus Rip Profeshinal 3
Product Description Product Description 12
Page 13

EPSON Stylus Pro 7400/7450/7800/7880/7880C/9400/9450/9800/9880/9880C Revision E
High-speed throughput
Stylus Pro 7400/7800/9400/9800:
Table 1-2. Throughput
Throughput
Ink type Paper Image quality Dot Size
Pigment
8 color
Plain paper Economy VSD1 360 x 360 Bi-D MF 320CPS 2.2 Minutes 5.1 Minutes
Fast VSD1 360 x 360 Bi-D FD 320CPS 4.2 Minutes 10.9 Minutes
Quality VSD2 720 x 360 Bi-D MW 240CPS 5.0 Minutes 13.6 Minutes
High quality VSD3 720 x 720 Bi-D FOL 240CPS 9.9 Minutes 29.0 Minutes
Matte paper Fast VSD1 720 x 360 Bi-D FOL 320CPS 4.2 Minutes 10.9 Minutes
Quality VSD2 720 x 720 Bi-D FOL 240CPS 9.9 Minutes 29.0 Minutes
High quality VSD3 1,440 x 720 Bi-D FD4 pass 240CPS 14.3 Minutes 42.5 Minutes
Super fine detail VSD3 1,440 x 720 Bi-D FD8 pass 240CPS 25.7 Minutes 78.1 Minutes
Glossy photo paper,
FA paper
Quality VSD2 720 x 720 Bi-D FOL 240CPS 9.9 Minutes 29.0 Minutes
High quality 1440 VSD3 1,440 x 720 Bi-D FD4 pass 240CPS 14.3 Minutes 42.5 Minutes
Resolution
(dpi)
Mode
Stylus Pro 7800 /
Stylus Pro 7400
(Time for printing on A1 cut sheet)
Stylus Pro 9800 /
Stylus Pro 9400
(Time for printing on B0 cut sheet)
High quality 2880 VSD3_HR 2,880 x 1,440 Bi-D 4 pass 240CPS 26.9 Minutes 81.7 Minutes
Pigment
4 color
Plain paper Economy VSD1 360 x 360 Uni-D band 320CPS 1.8 Minutes 4.3 Minutes
Fast VSD1 360 x 360 Bi-D MW 320CPS 2.7 Minutes 6.6 Minutes
Quality VSD2 720 x 360 Bi-D FOL 240CPS 3.2 Minutes 8.3 Minutes
High quality VSD3 720 x 720 Bi-D FOL 240CPS 6.4 Minutes 18.5 Minutes
Matte paper Fast VSD1 360 x 720 Bi-D FD 320CPS 3.9 Minutes 10.4 Minutes
Quality VSD2 720 x 720 Bi-D FOL 240CPS 6.4 Minutes 18.5 Minutes
High quality VSD3 1,440 x 720 Bi-D FD4 pass 240CPS 9.4 Minutes 27.7 Minutes
Super fine detail VSD3 1,440 x 720 Bi-D FD8 pass 240CPS 13.1 Minutes 39.0 Minutes
Glossy photo paper,
FA paper
Quality VSD2 720 x 720 Bi-D FOL 240CPS 6.4 Minutes 18.5 Minutes
High quality VSD3 1,440 x 720 Bi-D FD4 pass 240CPS 9.4 Minutes 27.7 Minutes
Super fine detail VSD3 1,440 x 720 Bi-D FD8 pass 240CPS 13.1 Minutes 39.0 Minutes
Product Description Product Description 13
Page 14
EPSON Stylus Pro 7400/7450/7800/7880/7880C/9400/9450/9800/9880/9880C Revision E
Stylus Pro 7450/7880/7880C/9450/9880/9880C:
Table 1-3. Throughput
Throughput
Ink type Paper Image quality Dot Size
Pigment
8 color
Plain paper Economy VSD1 360 x 360 Bi-D MF 320CPS 2.0 Minutes 4.6 Minutes
Fast VSD1 360 x 360 Bi-D FD 320CPS 3.8 Minutes 9.7 Minutes
Quality VSD2 720 x 360 Bi-D MW 240CPS 4.5 Minutes 12.1 Minutes
High quality VSD3 720 x 720 Bi-D FOL 240CPS 8.9 Minutes 25.7 Minutes
Matte paper Fast VSD1 720 x 360 Bi-D FOL 320CPS 3.8 Minutes 9.7 Minutes
Quality VSD2 720 x 720 Bi-D FOL 240CPS 8.9 Minutes 25.7 Minutes
High quality 1440 VSD3 1,440 x 720 Bi-D FD4 pass 240CPS 12.9 Minutes 38.0 Minutes
High quality 2880 VSD3_HR 2,880 x 1,440 Bi-D FD8 pass 240CPS 24.5 Minutes 73.6 Minutes
Glossy photo paper,
FA paper
Quality VSD2 720 x 720 Bi-D FOL 240CPS 8.9 Minutes 25.7 Minutes
High quality 1440 VSD3 1,440 x 720 Bi-D FD4 pass 240CPS 12.9 Minutes 38.0 Minutes
Resolution
(dpi)
Mode
Stylus Pro 7400/7450/7800/
7880/7880C
(Time for printing on A1 cut sheet)
Stylus Pro 9400/9450/9800/
9880/9880C
(Time for printing on B0 cut sheet)
High quality 2880 VSD3_HR 2,880 x 1,440 Bi-D 4 pass 240CPS 24.5 Minutes 73.6 Minutes
Pigment
4 color
Plain paper Economy VSD1 360 x 360 Uni-D band 320CPS 1.7 Minutes 4.0 Minutes
Fast VSD1 360 x 360 Bi-D MW 320CPS 2.0 Minutes 4.6 Minutes
Quality VSD2 720 x 360 Bi-D FOL 240CPS 3.8 Minutes 9.9 Minutes
High quality VSD3 720 x 720 Bi-D FOL 240CPS 6.1 Minutes 17.1 Minutes
Matte paper 1 (Fast) VSD1 360 x 720 Bi-D FD 320CPS 3.2 Minutes 8.0 Minutes
2 (POP Print) VSD2 720 x 720 Bi-D FOL 1POL 240CPS 4.5 Minutes 12.2 Minutes
3 (Quality) VSD2 720 x 720 Bi-D FOL 3POL 240CPS 6.1 Minutes 17.1 Minutes
4 ( - ) VSD3 1,440 x 720 Bi-D 4 pass 1POL240CPS 7.2 Minutes 20.6 Minutes
5 (High quality) VSD3 1,440 x 720 Bi-D 4 pass 3POL240CPS 8.7 Minutes 25.1 Minutes
Glossy photo paper,
FA paper
1 (POP Print) VSD2 720 x 720 Uni-D FOL 1POL 240CPS 6.5 Minutes 19.2 Minutes
2 (Quality) VSD2 720 x 720 Uni-D FOL 3POL 240CPS 9.2 Minutes 27.5 Minutes
3 ( - ) VSD3 1,440 x 720 Uni-D 4 pass 1POL240CPS 11.1 Minutes 33.5 Minutes
4 (High quality) VSD3 1,440 x 720 Uni-D 4 pass 3POL240CPS 13.6 Minutes 41.4 Minutes
Product Description Product Description 14
Page 15
EPSON Stylus Pro 7400/7450/7800/7880/7880C/9400/9450/9800/9880/9880C Revision E
1.1.2 Difference between 8 color and 4 color machines
Item
Stylus Pro 7800/7880/7880C/9800/9880/9880C Stylus Pro 7400/7450/9400/9450
8 color machine 4 color machine
Ink configuration LLk, Lm, Lc, Lk, Pk (Mk), C, M, Y Mk, M, C, Y
Ink Type
PX-P/K3 ink
with following improvements:
Consistent gray balance
Accurate color control
Minimized metamerism
Extremely fine blends and photographic
PX-Pink
Rick color reproduction
Extremely wide color gamut
Lightfastness and ozone-proof has
improved
transitions
The maximum density level is raised
Glossiness has improved
Product Description Product Description 15
Page 16
EPSON Stylus Pro 7400/7450/7800/7880/7880C/9400/9450/9800/9880/9880C Revision E
1.2 Basic Specifications
1.2.1 Print Specifications
Print method: On-demand Ink Jet Method
Nozzle configuration:
Table 1-4. Nozzle Configuration
Mode Ink Number of Nozzles
8 color machine
(Stylus Pro 7800/9800)
8 color machine
(Stylus Pro 7880/7880C/
9880/9880C)
4 color machine
(Stylus Pro 7400/7450/
9400/9450)
Note "*": Photo Black and Matte Black can be changed by the user.
Black Photo Black / Matte Black * 180
Light Light Black 180
Light Black 180
Color Cyan 180
Magenta 180
Light Cyan 180
Light Magenta 180
Yellow 180
Black Photo Black / Matte Black * 180
Light Light Black 180
Light Black 180
Color Cyan 180
Vivid Magenta 180
Light Cyan 180
Vivid Light Magenta 180
Yellow 180
Black Matte Black 360 (180 x 2)
Color Cyan 360 (180 x 2)
Magenta 360 (180 x 2)
Yellow 360 (180 x 2)
Ink configuration
As for 4-color models, two each ink cartridges are installed for every color.
As for 8-color models, the standard of black is Photo Black. Matt Black is
optional and user-replaceable.
Table 1-5. Ink Configuration
Ink Cartridge
Mode
8 Color mode
(Stylus Pro 7800/
9800)
8 Color mode
(Stylus Pro 7880/
7880C/9880/9880C)
4 Color mode
(Stylus Pro 7400/
7450/9400/9450)
1st
column
LLk Lm Lc Lk Pk / Mk C M Y
LLk VLm Lc Lk Pk / Mk C VM Y
MK MK M M C C Y Y
Left Slot Right Slot
2nd
column
3rd
column
4th
column
5th
column
6th
column
7th
column
Print direction:
Bidirectional with logic seeking (high speed return and high speed skip only)
Resolution:
Maximum 2880 x 1440 dpi
Control code
ESC/P Raster Photographic Driver
Paper feed method:
Friction feed (roll and cut sheet)
Line spacing:
1/6 inch (default). Programmable in 1/1440-inch increments
Paper path:
Roll paper or cut sheets with manual insertion
Paper feed speed:
245 ± 10 milliseconds per 1/4-inch line
8th
column
Nozzle pitch: 0.141mm (1/180 inch) for each color
Product Description Basic Specifications 16
Page 17
EPSON Stylus Pro 7400/7450/7800/7880/7880C/9400/9450/9800/9880/9880C Revision E
Printing speed
Text print mode
• Maximum 320 CPS (characters per second)
(1 CPS = 2.54 mm/s)
• Maximum 10 CPI (characters per inch)
Graphic print mode
Table 1-6. Graphics Modes (Stylus Pro 7400/7450/7800/7880/7880C)
Horizontal Definition
(dpi)
360 617.6mm (24.31inch) 8,753 320cps
720 617.6mm (24.31inch) 17,506 240cps
1440 617.6mm (24.31inch) 35,013 210cps
2880 617.6mm (24.31inch) 70,027 210cps
Note : The printing ranges shown in the table include max. 8mm (bleeding width for printing
off both left and right edges)
Printing range
Table 1-7. Graphics Modes (Stylus Pro 9400/9450/9800/9880/9880C)
Horizontal Definition
(dpi)
360 1125.6mm (44.31inch) 15,953 320cps
Printing range
Printable number of
dots
Printable number of
dots
Printing
speed
Printing
speed
1.2.2 Character Specifications
Character code:
Alphanumeric characters extension graphics (PC437)
Multilingual (PC850)
Typeface:
EPSON original typeface
Alphanumeric characters Courier
1.2.3 Operability Specifications
Initialize time when power supply is switch ed ON:
Within 60 seconds (Excluding TLC etc Wait Time)
Initial charging time:
Less than 9 minutes 30 seconds
(* Time from lowering the lever to completion of initial charging)
720 1125.6mm (44.31inch) 31,906 240cps
1440 1125.6mm (44.31inch) 63,813 210cps
2880 1125.6mm (44.31inch) 127,627 210cps
Note : The printing ranges shown in the table include max. 8mm (bleeding width for printing
off both left and right edges)
Product Description Basic Specifications 17
Page 18
EPSON Stylus Pro 7400/7450/7800/7880/7880C/9400/9450/9800/9880/9880C Revision E
1.2.4 Paper Specifications
1.2.4.1 Roll Paper
The allowable roll paper dimensions are shown in the table below.
Paper size *:
Table 1-8. Roll Paper Sizes
Core Model Paper size
2-inch core Stylus Pro 7400/7450/7800/7880/7880C 203mm~610mm (W) x ~45m (H)
Stylus Pro 9400/9450/9800/9880/9880C 203mm~1,118mm (W) x ~45m (H)
3-inch core Stylus Pro 7400/7450/7800/7880/7880C 203mm~610mm (W) x ~220m (H)
Stylus Pro 9400/9450/9800/9880/9880C 203mm~1,118mm (W) x ~220m (H)
Note : The core sizes are their interior diameters.
Note "*": Auto nozzle check cannot be carried out on paper with a width less than 210mm.
Roll paper size:
2 Inch core: Outer diameter within 103mm/
1 roll set possible
3 Inch core: Outer diameter within 150mm/
1 roll set possible
Paper thickness:
Special paper: 3.15 to 19.67 mi l (0.08 to 0.50 mm)
Plain paper: 3.15 to 4.33 mil (0.08 to 0.11 mm)
Paper basis mass:
Special paper: 64 to 260 gf/m
Plain paper: 64 to 90 gf/m
2
2
1.2.4.2 Cut Sheet
The allowable cut sheet paper dimensions are shown in the table below.
Paper size *:
Table 1-9. Cut Sheet Sizes
Core Model Paper size
Paper width Stylus Pro 7400/7450/7800/7880/7880C 203mm~610mm
Stylus Pro 9400/9450/9800/9880/9880C 203mm~1,118mm
Paper length Stylus Pro 7400/7450/7800/7880/7880C 279mm~1,580mm
Stylus Pro 9400/9450/9800/9880/9880C 279mm~1,580mm
Note "*": Auto nozzle check cannot be carried out on paper with a width less than 210mm.
Paper thickness:
Paper length more than 279 mm up to 728 mm:
3.15 to 59 mil (0.08 to 1.50 mm)
Paper length exceeding 728 mm up to 1580 mm:
3.15 to 19.67 mil (0.08 to 0.50 mm)
Plain paper: 3.15 to 4.33 mil (0.08 to 0.11 mm)
Paper basis mass:
Special paper: 64 to 260 gf/m
Plain paper: 64 to 90 gf/m
NOTE • Basically, portrait printing only.
• Do not use curled, folded, or deckle-edge paper.
• For best resul t, use paper under the followi ng conditions:
Temperature: 59 to 77 ºF (15 to 25 ºC)
Humidity: 40 to 60 % RH
2
2
NOTE • Do not use curled, folded, or deckle-edge paper.
• Be sure to use the Type 3 adapter included in the package when using the 3-
inch core roll paper.
• For best result, use paper under the following conditions:
Temperature: 59 to 77 ºF (15 to 25 ºC)
Humidity: 40 to 60 % RH
Product Description Basic Specifications 18
Page 19
EPSON Stylus Pro 7400/7450/7800/7880/7880C/9400/9450/9800/9880/9880C Revision E
1.2.4.3 Selectable Paper Size
The following paper sizes can be selected in the driver for Roll paper/cut sheet. *
Table 1-10. Selectable Paper Size
Paper Size Size (W x H) Paper Size Size (W x H)
Letter 8 1/2 x 11 in B4 257 x 364 mm
US B 11 x 17 in 11 x 17 in B3 364 x 514 mm
US B 17 x 24 in 17 x 24 in B2 515mm x 728mm
US C 17 x 22 in 17 x 22 in B1 728 mm x 1,030 mm
US D 22 x 34 in 22 x 34 in B1 (Landscape)
US E 34 x 44 in 34 x 44 in B0 1,030 mm x 1,456 mm
A4 210 x 297 mm Super B0 1,118 mm x 1,580 mm
A3 297 x 420 mm 30 x 24 in 30 x 24 in
Super A3 / B 329 x 483 mm 3.5 x 4.5 in*
A2 420 x 59 4mm 8 x 10 in 8 x 10 in
A1 594 x 841 mm 11 x 14 in 11 x 14 in
Super A1 24 x 36 in 16 x 20 in 16 x 20 in
A0 841 mm x 1,189 mm 60 x 90 cm 60 x 90 cm
2
*
728 mm x 1,030 mm
3
3.5 x 4.5 in
1
Super A0 914 mm x 1,292 mm 40 x 60 cm 40 x 60 cm
B5 182 x 257 mm 30 x 40 cm 30 x 40 cm
Note : The sizes in bold type are for the Stylus Pro 9400/9450/9800/9880/9880C.
Note "*1": Basically, load cut sheet on the printer in portrait orientatio n. And the paper grain
direction should run vertically for best result.
"*2": When using media other than paper loading it in landscape orientation, the allowable
media thickness is 3.15 to 59 mil (0.08 to 1.5 mm).
"*3": The printer does not support this sized media. Note that the sizes given in the table
are printable area sizes, not media sizes.
Product Description Basic Specifications 19
Page 20
EPSON Stylus Pro 7400/7450/7800/7880/7880C/9400/9450/9800/9880/9880C Revision E
1.2.5 Mechanism Specifications
1.2.5.1 Printable Area
Table 1-11. Printable Area
Item
PW
(Paper width)
PL
(Paper length)
TM
(Top margin)
BM
(Bottom margin)
LM
(Left margin)
RM
(Right margin)
Roll paper
/Cut Sheet
1
Roll paper *
Cut Sheet Stylus Pro 7400/7450/7800/
Roll paper All models Maximum 202m
Cut Sheet All models 279mm~1,580mm
Roll paper All models 3mm / 15mm / 35mm*
Cut Sheet All models 3mm
Roll paper All models 3mm / 15mm
Cut Sheet All models 14mm
Roll paper All models 0mm / 3mm / 15mm
Cut Sheet All models 0mm / 3mm
Roll paper All models 0mm / 3mm / 15mm
Cut Sheet All models 0mm / 3mm
Stylus Pro 7400/7450/7800/
Stylus Pro 9400/9450/9800/
Stylus Pro 9400/9450/9800/
Model Dimension
7880/7880C
9880/9880C
7880/7880C
9880/9880C
203mm~610mm
203mm~1,118mm
203mm~610mm
203mm~1,118mm
3: When printing off both left and right edges of the media, the bleed on both sides is set to
3 mm as the automatic skew detection functio n can sense 3 mm or more horizontal shift
of the media during printing. If the printer detects that the bleeding width (from left or
right edge of media to the platen edge) is less than 3 mm, it reduces the bleed print
amount to avoid printing on the platen.
2
Paper Feed Direction
Printable Area
Note "*1": The printer automatically detects paper width when the paper is set if the automatic
detection function is set to ON.
"*2": Some types of roll paper have exceptional TM of over 15mm.
Note • Images that exceed the detected paper width, or exceed the specified printing range in
the size settings, are not printed.
(If the paper width detection settings are OFF, the printer may print to the platen.)
*At this time, a rainbow phenomenon is not generated.
• The margin settings can be changed using the panel as shown below for roll paper.
TM, BM 15mm LM, RM 3mm/ TM, BM, LM, RM 3mm/ TM, BM, LM, RM 15mm/
TM 35mm BM 15mm LM, RM 3mm
*In the special conditions below, it is possible to set the lef t and right margins (LM,
RM) to zero.
Figure 1-1. Printable Area
Product Description Basic Specifications 20
Page 21
EPSON Stylus Pro 7400/7450/7800/7880/7880C/9400/9450/9800/9880/9880C Revision E
1.2.5.2 Borderless Printing Specifications
BORDERLESS PRINTING WIDTH
The printer is capable of printing off both left and right edges of roll or cut sheet
media with widths shown in the table below.
Table 1-12. Paper Width
Size
inches mm
10” 254mm --- {{
--- 300mm --- {{
13” 329mm A3+ {{
16” 406.4mm --- {{
17” 431.8mm --- {{
--- 515mm B2 {{
--- 594mm A1 {{
24” 609.6mm --- {{
--- 728mm B1 --- {
36” 914.4mm --- --- {
44” 1,117.6mm --- --- {
Note • The borderless printing is not guaranteed for all types of media, and it cannot be made
properly under some conditions. See “Borderless printing guarantee conditions (p.22)”
for more information.
• Print data extend off the borderless printable area is aut o ma tically cut off.
regular
size
Stylus Pro 7400/7450/
7800/7880/7880C
Stylus Pro 9400/9450/
9800/9880/9880C
BORDERLESS PRINTING MODE
The following borderless printing modes are supported by command transmission from
the driver.
Table 1-13. Borderless Printing Mode
Mode Operation
Right/left borderless
(default) *
4 sides borderless/
Single Cut *
4 sides borderless/
Double Cut *
Note "*1": When the roll paper cutter is OFF and cut line printing is ON, a cut line is printed on
1
1, *2, *3
1, *2, *3
each cut position including the one for cutting the top edge.
"*2": After the 4 sides borderless cut, the actual printed size is approximately 2mm smaller
in the vertical direction.
"*3": When roll paper borderless print for 4 sides is performed on the media types shown
below, irregular coloring may occur when the edges are cut.
• Double Weight Matte Paper
• Single Weight Matte Paper
• Enhanced Matte Paper
• Textured Fine Art Paper
• Ultra Smooth Fine Art Paper
Left and right margins can be set to zero. In this case the upper and
lower margins are set by the roll paper margin settings.
Cuts the top and bottom edges in the way as described below to
create a printout without margins on all four sides:
• The top edge of the first page is cut off leaving “minimum cut
margin”.during the printing.
• No margin is created between pages and the printer cuts on the
boundary to separate the pages.
• The bottom edge of the last page is cut off after the printing is
complete.
Cuts the top and bottom edges in the way as described below to
create a printout without margins on all four sides.
• The top edge of the first page is cut off leaving “auto refresh
margin” during the printing.
• Each time printing one page is complete, the bottom edge is cut
off and the paper is fed a little (create a minimum cut margin
between pages), and the top edge of the next page is cut off
during printing. This mode is more accurate than the Single Cut
mode as it cuts the paper twice to separate pages.
Product Description Basic Specifications 21
Page 22
EPSON Stylus Pro 7400/7450/7800/7880/7880C/9400/9450/9800/9880/9880C Revision E
BORDERLESS PRINTING SETTING PROCEDURES BORDERLESS PRINTING GUARANTEE CONDITIONS
Table 1-14. Borderless Printing Setting
Borderless
print mode
Printer
operation
Driver
setting
Remarks Defined as default • As the top edge of the
Right/left borderless
Borderless print • Borderless print
4 sides borderless
Single Cut
• Single Cut
first page is cut by
interrupting the printing
operation, off-registration
may occur causing
irregular color on the
printed image depending
on the print job.
• As this mode cuts the
paper on the boundary of
pages, slight amount of
image of the previous or
the next page may be left
on the top or bottom edge
of the printout due to
cutter position deviation.
4 sides borderless
Double Cut
• Borderless print
• Double Cut
• As the top edge of the
first page is cut by
interrupting the printing
operation, off-registration
may occur causing
irregular color on the
printed image depending
on the print job.
• The cutting position is set
to a line 1 mm inside from
the actual top and bottom
edges allowing for cutter
position deviation. So the
length of the printout
becomes about 2mm
smaller than the specified
size.
Borderless printing guarantee conditions
Environmental:
Temperature: 59 to 77ºF (15 to 25 ºC), Humidity: 40 to 60 % RH
Media type *
Media size *
• Photo type media: 10”, 300mm, 13”, 16”, 17 ”, 24”, 36”, 44”
• POP • poster type media: A1, B1, B2
3
: Photo type media (roll paper),
POP • poster type media (roll paper)
3
*1, *2
NOTE "*1": There are no borderless printing guarantees for cut sheet paper.
"*2": Borderless printing is not guaranteed if a number of outer layers of th e
roll surface have stretched due to moisture absorption.
"*3": Borderless printing on media and sizes other than those listed above are
guaranteed the same way as the Stylus Pro 7600/9600 do. However, if
media that has been stretched by humidity and other environmental
conditions is used, it is possible that borders on the right and left hand
sides may occur.
Bleeding print width for pri nti ng off both left and right edges
The bleeding print width for the left and right edges can be selected among the
following settings using the printer driver.
Left (opposite home side) = 1.5mm/ Right (home side) = 1.5mm
Left (opposite home side) = 3.0mm/ Right (home side) = 3.0mm (Default)
Left (opposite home side) = 5.0mm/ Right (home side) = 3.0mm *
NOTE "*1": If humid environmental conditions have caused the media to stretch,
“Left (opposite home side) = 5.0mm/ Right (home side) = 3.0mm”
selection is recommended to prevent left and right edge margins
occurring.
"*2": The “Left (opposite home side) = 5.0mm/ Right (home side) = 3.0mm”
setting shifts the center position of the image 1 mm away from that of
the print data.
1, *2
Product Description Basic Specifications 22
Page 23
EPSON Stylus Pro 7400/7450/7800/7880/7880C/9400/9450/9800/9880/9880C Revision E
1.2.5.3 Cut Specifications
Both automatic and manual cut are available on this printer.
C A U T I O N
ROLL PAPER AUTOMATIC CUT
This function is enabled by setting “Roll Auto Cut” in the Panel Setting menu to ON.
Mechanical condition
Distance between the cutting position and paper setting position:L0 = 187mm
Distance between the cutting position and cutter mark: L1 = 34mm
Minimum cut length: L2 = 127mm
Sheet edge standby location: L3 = 130mm
ROLL PAPER MANUAL CUT
The automatic cutting prohibited media can be cut manually following the procedure
described below.
1. Press the [Paper Select ] button to select the [Roll Auto Cut Off ] and press
the [Enter ] button.
2. Paper is automatically fed to the cutter guide, then the printer will go offline. At
this point, “PAUSE” will be displayed on the panel.
3. If required, fine adjustments on the cut position can be performed using the [Paper
feed ( )] buttons.
4. The user can then use the manual cutter unit and cut the paper along the cutter
guide.
There are some types of media which are not allowed to be cut
automatically. Be sure not to perform the automatic cutting with
them, or may result in damaging the printhead.
1.2.5.4 Paper Set Lever
Table 1-15. Paper Set Lever
Lever Position Description
Backward Position for paper setting
(Paper holding is released, and paper can be set.)
Forward Ready-to-print position
(Paper is fixed, and it becomes ready to be printed.)
5. After cutting the paper, cancel the pause status (press the [Pause] button). The
paper will back feed and the printer will go back online.
C H E C K
P O I N T
For manual cutting of roll paper, use the manual cutter available as
an option.
Product Description Basic Specifications 23
Page 24

EPSON Stylus Pro 7400/7450/7800/7880/7880C/9400/9450/9800/9880/9880C Revision E
1.2.6 Electrical Related Information
Rated voltage: 100 to 240 VAC
Input voltage range: 90 to 264 VAC
Rated frequency range: 50 to 60 Hz
Input frequency range: 49 to 61 Hz
Rated current: 1.0 to 0.5 A
Power consumption
Operating:
• Stylus Pro 7400/7450/7800/7880/7880C: 50 W
• Stylus Pro 9400/9800: 55 W
• Stylus Pro 9450/9880/9880C: 58 W
Power off mode: Less than 6 W
(Shifting time 15 minutes)
When power switch is OFF:
Less than 1 W
Insulation resistance: More than 10 M ohms
(500 VDC between AC line and chassis)
Dielectric strength: AC1.0 kV rms 1minute or AC1.2 kVrms 1 second
(between AC line and chassis)
Leakage: Less than 0.25 mA [Adapts Japan National Electronics
Development Incorporated Association “Personal
Computer Industry Standard” (PC-11-1988)].
Energy conservation:
International Energy Star Program compliant
(Measure for harmonic component suppression guideline)
Electromagnetic interference standards compliance
VCCI class B
1.2.7 Reliability
1.2.7.1 Main Body Life
Stylus Pro 7400/7450/7800/7880/7880C:
6,300,000 carriage movement cycles
(Approx. 20,000 pages of A1-size plain paper in “Quality” (Bi-D FOL) mode)
Stylus Pro 9400/9450/9800/9880/9880C:
3,700,000 carriage movement cycles
(Approx. 20,000 pages of B0-size plain paper in “Quality” (Bi-D FOL) mode)
1.2.7.2 Print Head Life
Monochrome: 8 billion segment/nozzle
Color: 8 billion segment/nozzle
1.2.7.3 Maintenance Tank Life-span Guide
Stylus Pro 7800/7880/7880C:
Approx. 1,300 sheets
(A1+ size plain paper, Quality mode, Continuous printing)
Stylus Pro 7400/7450:
Approx. 2,000 sheets
(A1+ size plain paper, Quality mode, Continuous printing)
Stylus Pro 9800/9880/9880C
CR HP side: Approximately 1,000 sheets
(B0+ size plain paper, Quality mode, Continuous printing)
Anti HP side:Approximately 7,800 sheets
(B0+ size plain paper, Quality mode, Continuous printing)
Stylus Pro 9400/9450
CR HP side: Approximately 1,700 sheets
(B0+ size plain paper, Quality mode, Continuous printing)
Anti HP side:Approximately 26,000 sheets
(B0+ size plain paper, Quality mode, Continuous printing)
Product Description Basic Specifications 24
Page 25
EPSON Stylus Pro 7400/7450/7800/7880/7880C/9400/9450/9800/9880/9880C Revision E
1.2.7.4 Cutter Life-span
Table 1-16. Cutter Life-span
Stylus Pro 7400/7450/7800/
Paper type
Coated paper Approximately 2000 sheets Approximately 2000 sheets
Film Approximately 1000 sheets Approximately 1000 sheets
When performing 4 stage cut
7880/7880C
on 24” standard roll paper
Stylus Pro 9400/9450/9800/
9880/9880C
When performing 4 stage cut
on 44” standard roll paper
1.2.7.5 Replacement Parts Life-span
Table 1-17. Replacement Parts Life-span
Replacement parts
RTC backup battery Approx. from 5 to 10 years or more
Cleaning unit
• Cap assembly
• Pump assembly
• Flashing box
•Wiper
CR Motor Approx. 20,000 sheets
• Driven pulley
• Carriage unit
• Tubes
• FFC
Note "*1": A1 size plain paper, "Quality mode, Continuous printing)
"*2": B0 size plain paper, "Quality mode, Continuous printing)
Stylus Pro 7800/
7880/7880C*
Approx.
17,000 sheets
Stylus Pro
1
7400/7450*
Approx.
25,000 sheets
Stylus Pro 9800/
1
9880/9880C*
Approx.
11,000 sheets
Approx. 20,000 sheets
Stylus Pro
2
9400/9450*
Approx.
18,000 sheets
1.2.7.6 MTBF (Mean Time Between Failures)
20,000 POH (with no malfunction of electric parts and fans)
Table 1-18. Conditions
Item
Environment Normal room temperature and humidity
Printing Duty • Approx. 18%
2
1.2.7.7 MPBF (Mean Pages Between Failure)
Stylus Pro 7400/7450/7800/
7880/7880C
• Power supply ON time:
11.0 hours/day
• Operation (printing) time:
2.0 hours/day
Stylus Pro 7400/7450/7800/7880/7880C:
More than 22 sheets of A1 by continuous printing
Stylus Pro 9400/9450/9800/9880/9880C:
More than15 sheets of B0 by continuous printing
NOTE: Without running a cleaning, no dot missing, and no skew.
Table 1-19. Conditions
Item
Printing mode • 720 x 720dpi FOL, Bi-D
• 7 sheets/day x 3days
• 7 sheets/day x 22 sheets/day
Print ratio Single color 5%, and single color 30%
Environment Under the following three kinds of
environmental conditions:
• Temperature: 10 °C, Humidity: 20%
• Normal room temp. and humidity
• Temperature: 35 °C, Humidity: 20%
Stylus Pro 9400/9450/9800/
9880/9880C
• Approx. 32%
• Power supply ON time:
11.0 hours/day
• Operation (printing) time:
3.5 hours/day
All Models
Product Description Basic Specifications 25
Page 26
EPSON Stylus Pro 7400/7450/7800/7880/7880C/9400/9450/9800/9880/9880C Revision E
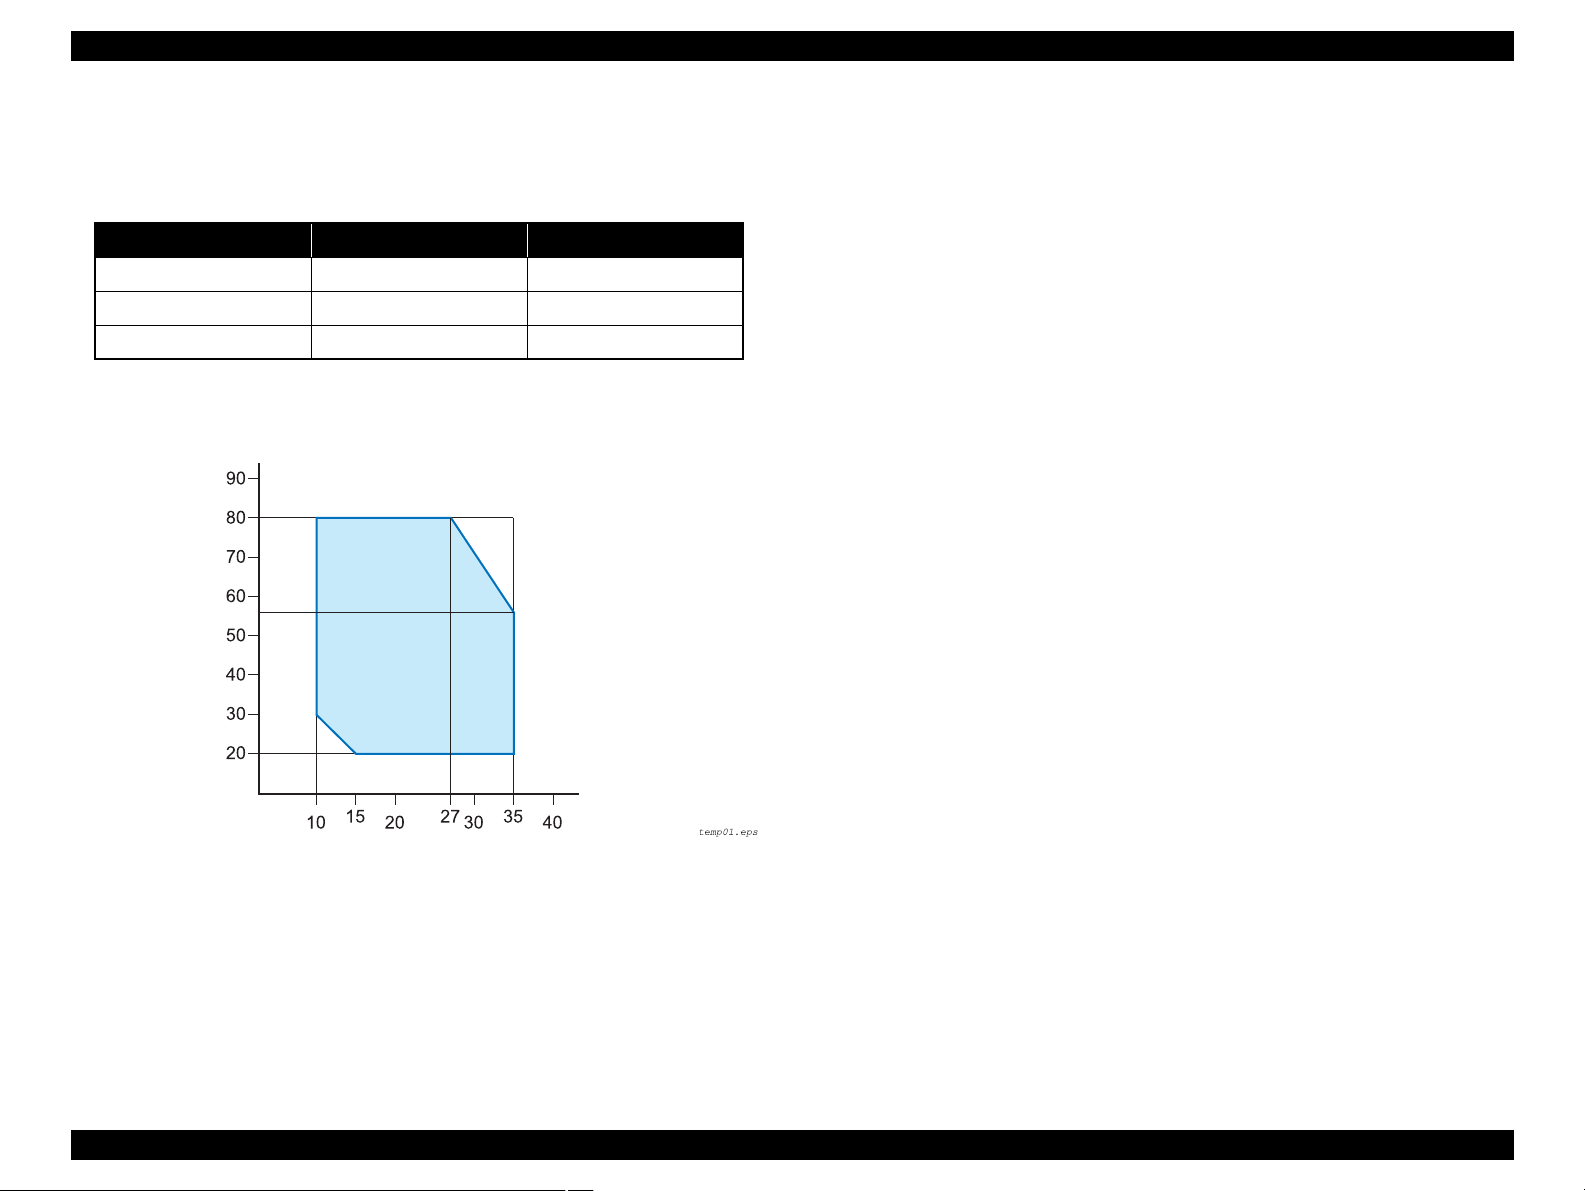
1.2.8 Environmental Conditions
1.2.8.1 Temperature/Humidity
Table 1-20. Temperature/Humidity
Condition Temperature*
Operating 10 το 35 °C 20 to 80 %
Storage –20 το 40 °C 20 to 85 %
Transporting –20 το 60 °C 5 to 85 %
Note "*1": 40°C is for less than 1 month, 60°C is for less than 120 hours)
"*2": Should be no condensation and be within the range shown on the graph below.
Humidity (%)
1
Humidity*
1.2.8.2 Vibration Resistance
Operating: 0.15 G, 10 to 55 Hz in X, Y, Z direction
Store: 0.50 G, 10 to 55 Hz in X, Y, Z direction
2
1.2.8.3 Shock Resistance
Operating: 1G within 1 mi llisecond in X, Y, Z direction
Store: 2G within 2 milliseconds in X, Y, Z direction
NOTE • Check that the printhead is capped when storing the printer for a long
period of time.
• When transporting the printer, check that the printhead is capped, all ink
cartridges are removed, and the ink cartridges covers are closed and fixed.
• If the printhead are not capped, turn the power back ON with the ink
cartridges installed, and then turn the power OFF again after confirming
the capping operation is complete.
• If the printer is left under an ambient temperature of minus 15
the printhead and ink cartridges will freeze.
If this happens, move the printer, or heat the room so that the ambient
temperature is 25
°
C, and leave the printer under the temperature for
approximately 3 hours to melt the ink.
°
C, ink inside
Temperature (°C)
Figure 1-2. Allowable Range of Temperature and Humidity
Product Description Basic Specifications 26
Page 27
EPSON Stylus Pro 7400/7450/7800/7880/7880C/9400/9450/9800/9880/9880C Revision E
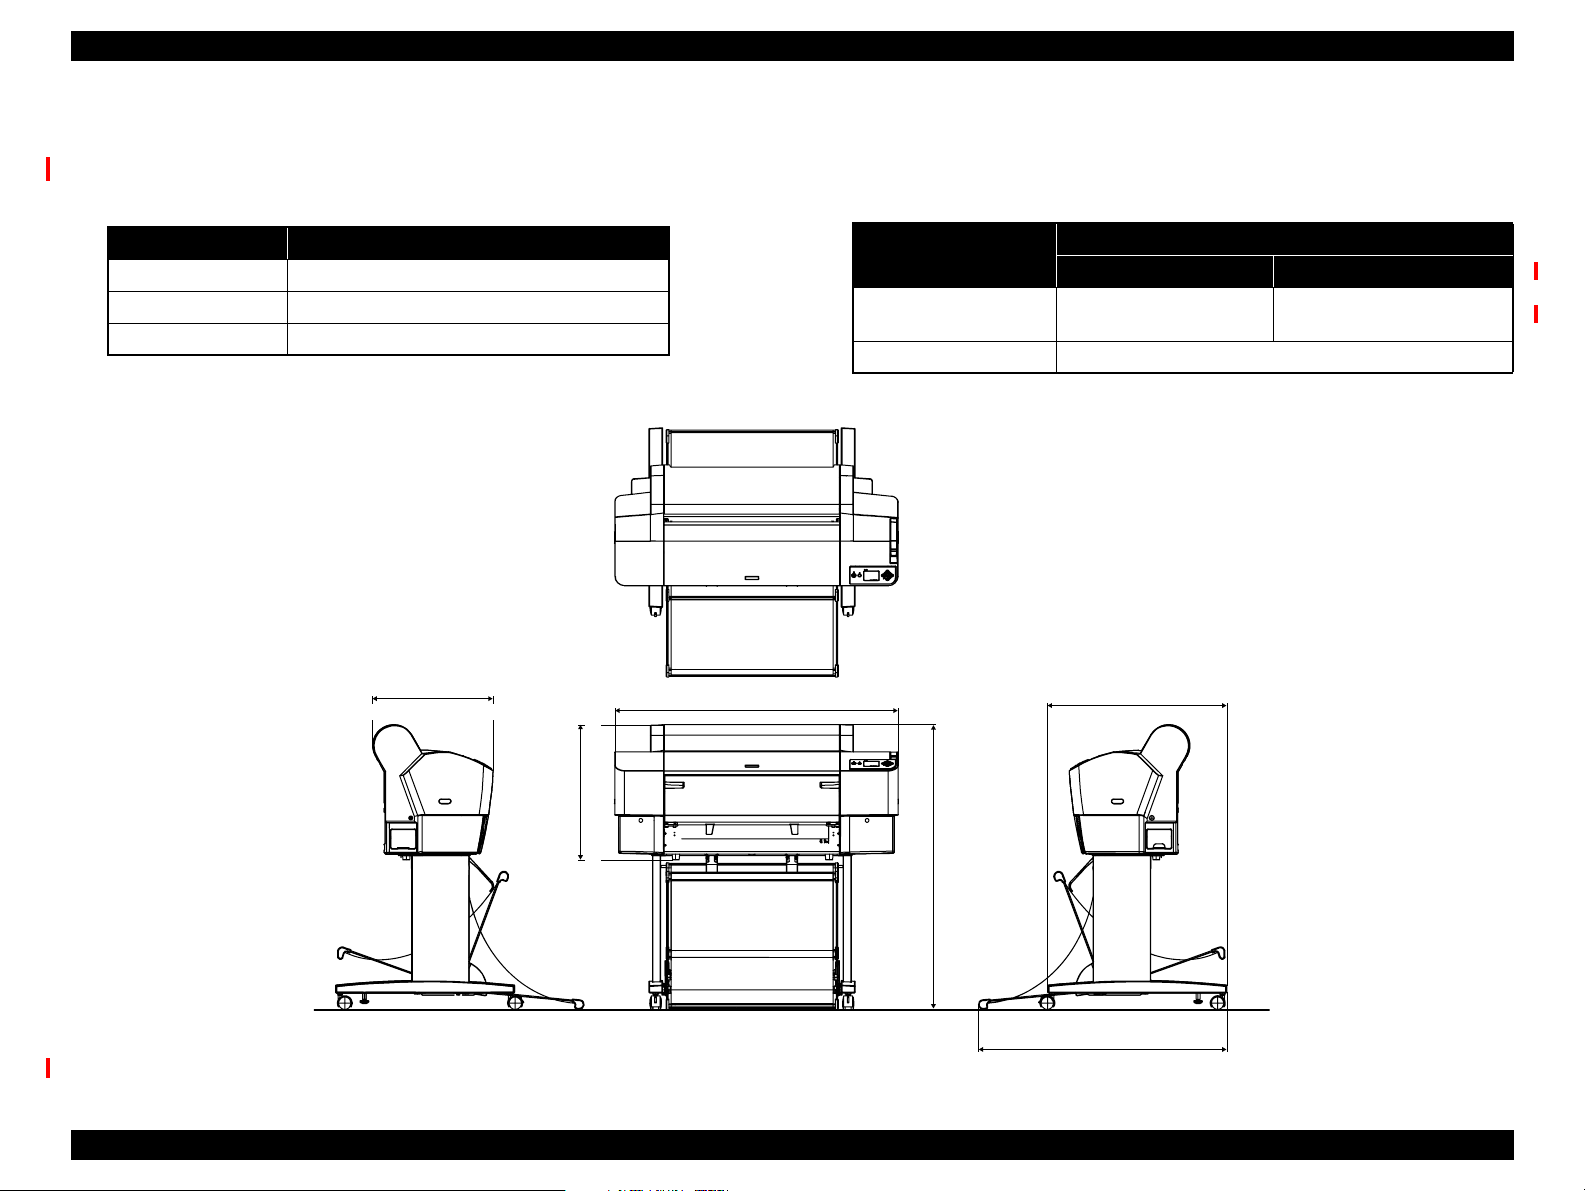
1.2.9 Overall Dimensions
1.2.9.1 Stylus Pro 7400/7450/7800/7880/7880C Overall Dimensions
Dimensions of Unit
Mass
Conditions Width (W) x Depth (D) x Height (H) (mm)
Printer body 1,178 x 501 x 560
Rearward paper eject 1,178 x 745 x 1,180
Frontward paper eject 1,178 x 1,035 x 1,180
Note • For “rearward paper eject”, the paper exit tray is brought down toward the rear.
• For “frontward paper eject”, the paper exit tray is brought down toward the front.
501
(When no base is mounted)
560
1,178
Conditions
Main body
(without base mounted)*
Base Approx. 10.5kg
Note "*": Excluding ink cartridges and papers
Stylus Pro 7400/7800 Stylus Pro 7450/7880/7880C
Approx. 48.9kg Approx. 49.1kg
745
Mass
(When no base is mounted)
1,181
1,033
Figure 1-3. External Dimension of the Stylus Pro 7400/7450/7800/7880/7880C
Product Description Basic Specifications 27
Page 28
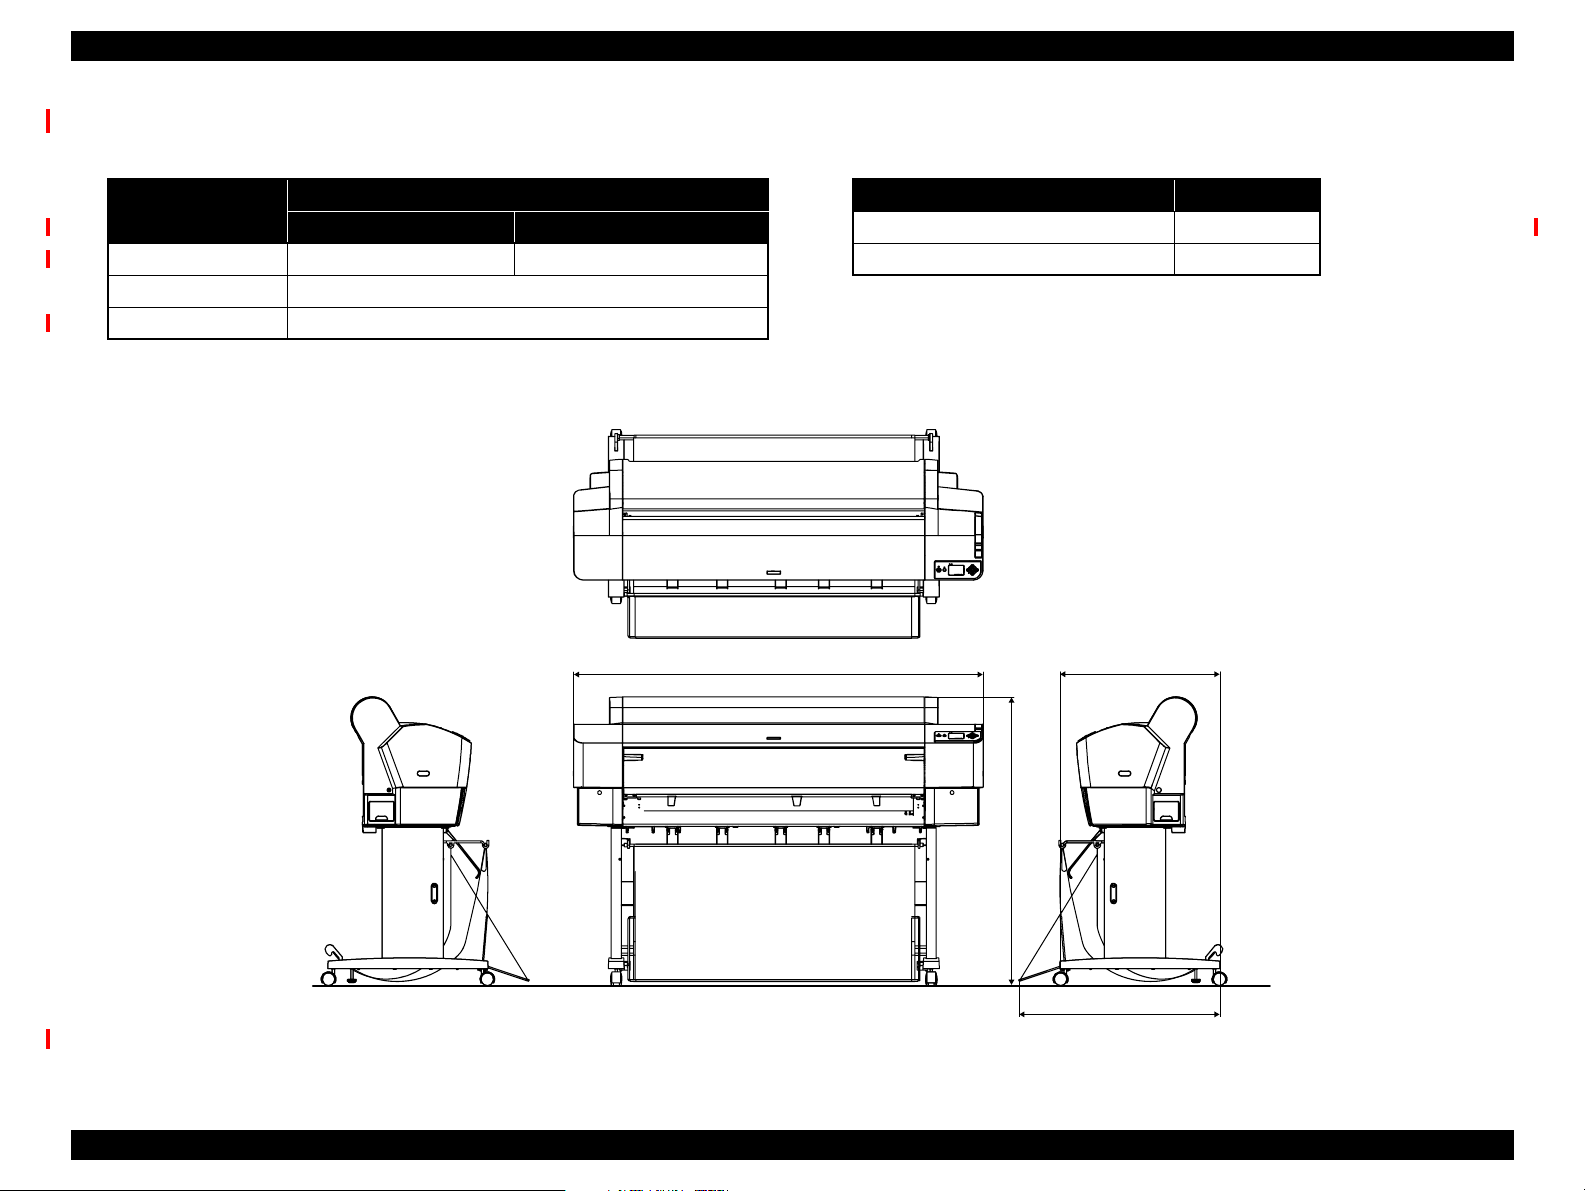
EPSON Stylus Pro 7400/7450/7800/7880/7880C/9400/9450/9800/9880/9880C Revision E
1.2.9.2 Stylus Pro 9400/9450/9800/9880/9880C Overall Dimensions
Outer dimensions
Mass
Conditions
Printer body 1,702 x 667 x 1,196 1,702 x 678 x 1,196
Rearward paper eject 1,702 x 681 x 1,196
Frontward paper eject 1,702 x 849 x 1,196
Note • For “rearward paper eject”, the paper exit tray is brought down toward the rear.
• For “frontward paper eject”, the paper exit tray is brought down toward the front.
Width (W) x Depth (D) x Height (H) (mm)
Stylus Pro 9400/9800 Stylus Pro 9450/9880/9880C
1,702
Conditions Mass
Main body (without base mounted)* Approx. 90.2kg
Base Approx. 22.5kg
Note "*": Excluding ink cartridges and papers
667
1,196
838
Figure 1-4. External Dimension of the Stylus Pro 9400/9450/9800/9880/9880C
Product Description Basic Specifications 28
Page 29
EPSON Stylus Pro 7400/7450/7800/7880/7880C/9400/9450/9800/9880/9880C Revision E
1.2.10 Accessories/Options/Consumables
Accessories/Options (Stylus Pro 740 0/7800/9400/9800)
Table 1-21. Accessories/Options
Item
Standard accessories Power cord --- {{{{
Specialized Stand (base unit) --- { --- --- ---
2/3 inch Dual Roll Feed Spindle (24”) --- {{--- ---
2/3 inch Dual Roll Feed Spindle (44”) --- --- --- {{
Test roll paper (MC matte paper: Shared) --- {{{{
Roll Paper Belt --- {{{{
1
2
Options common with
other models
Ink Cartridge (110ml)*
Maintenance Tank*
Instruction Manual --- {{{{
Printer Software CD-ROM (Printer driver, maintenance utilities) --- {{{{
Application CD-ROM (Bundled software) --- {{{{
Guarantee Issuance Invoice --- {{{{
Business Card Holder --- {{{{
Individual Packaging --- {{{{
Specialized Stand (base unit) C12C84408 {{--- ---
2/3 inch Dual Roll Feed Spindle (24”) C12C811161 {{--- ---
2/3 inch Dual Roll Feed Spindle (44”) C12C811151 --- --- {{
2/3 inch Dual Roll Feed Spindle (High Tension) (24”) C12C811155 {{--- ---
2/3 inch Dual Roll Feed Spindle (High Tension) (44”) C12C811152 --- --- {{
Manual Cutter Unit (24”) C12C815231 {{--- ---
Manual Cutter Unit (44”) C12C815182 --- --- {{
Auto Take-Up Reel Unit C12C815251 --- --- {{
Auto Cutter Spare Blade C12C815241 {{{{
EpsonNet 10/100 Base Tx Int. Print Server 5 C12C82434 {{{{
Part No.
--- {{{{
--- {{{{
Stylus Pro 7800 Stylus Pro 7400 Stylus Pro 9800 Stylus Pro 9400
Note "*1":
Stylus Pro 7800, Stylus Pro 9800 (1 of each color Pk, Mk, Lk, LLk, C, M, Lc, Lm, Y)
Stylus Pro 7400, Stylus Pro 9400 (2 of each color Mk, C, M, Y)
"*2": Stylus Pro 7400/7800: 1 tank,
Stylus Pro 9400/9800: 2 tanks
Product Description Basic Specifications 29
Page 30
EPSON Stylus Pro 7400/7450/7800/7880/7880C/9400/9450/9800/9880/9880C Revision E
Accessories/Options (Stylus Pro 7450/7880/7880C/9450/9880/9880C)
Table 1-22. Accessories/Options
Item
Standard accessories Power cord --- {{{{
2/3 inch Dual Roll Feed Spindle (24”) --- {{--- ---
2/3 inch Dual Roll Feed Spindle (44”) --- --- --- {{
Test roll paper (MC matte paper: Shared) --- {{{{
Roll Paper Belt --- {{{{
Ink Cartridge (110ml)*
Maintenance Tank*
Instruction Manual --- {{{{
Printer Software CD-ROM (Printer driver, maintenance utilities) --- {{{{
Application CD-ROM (Bundled software) --- {{{{
Guarantee Issuance Invoice --- {{{{
Business Card Holder --- {{{{
Individual Packaging --- {{{{
Conversion cartridge kit --- { --- { ---
Special option Conversion cartridges (C, M, Y) --- {{{{
Options common with
other models
Note "*1":
Stylus Pro 7880/7880C/9880/9880C (1 of each color Pk, Mk, Lk, LLk, C, VM, Lc, VLm, Y)
Stylus Pro 7450/9450 (2 of each color Mk, C, M, Y)
"*2": Stylus Pro 7450/7880/7880C: 1 tank,
Stylus Pro 9450/9880/9880C: 2 tanks
Specialized Stand (base unit) C12C84408 {{--- ---
2/3 inch Dual Roll Feed Spindle (24”) C12C811161 {{--- ---
2/3 inch Dual Roll Feed Spindle (44”) C12C811151 --- --- {{
2/3 inch Dual Roll Feed Spindle (High Tension) (24”) C12C811155 {{--- ---
2/3 inch Dual Roll Feed Spindle (High Tension) (44”) C12C811152 --- --- {{
Manual Cutter Unit (24”) C12C815231 {{--- ---
Manual Cutter Unit (44”) C12C815182 --- --- {{
Auto Take-Up Reel Unit C12C815251 --- --- {{
Auto Cutter Spare Blade C12C815241 {{{{
Roll paper fixation holder --- {{{{
EpsonNet 10/100 Base Tx Int. Print Server 5 C12C82434 {{{{
1
2
Part No.
--- {{{{
--- {{{{
Stylus Pro 7800/
7880/7880C
Stylus Pro
7400/7450
Stylus Pro 9800/
9880/9880C
Stylus Pro
9400/9450
Product Description Basic Specifications 30
Page 31

EPSON Stylus Pro 7400/7450/7800/7880/7880C/9400/9450/9800/9880/9880C Revision E
Consumables
Ink cartridge (110 ml/220 ml)
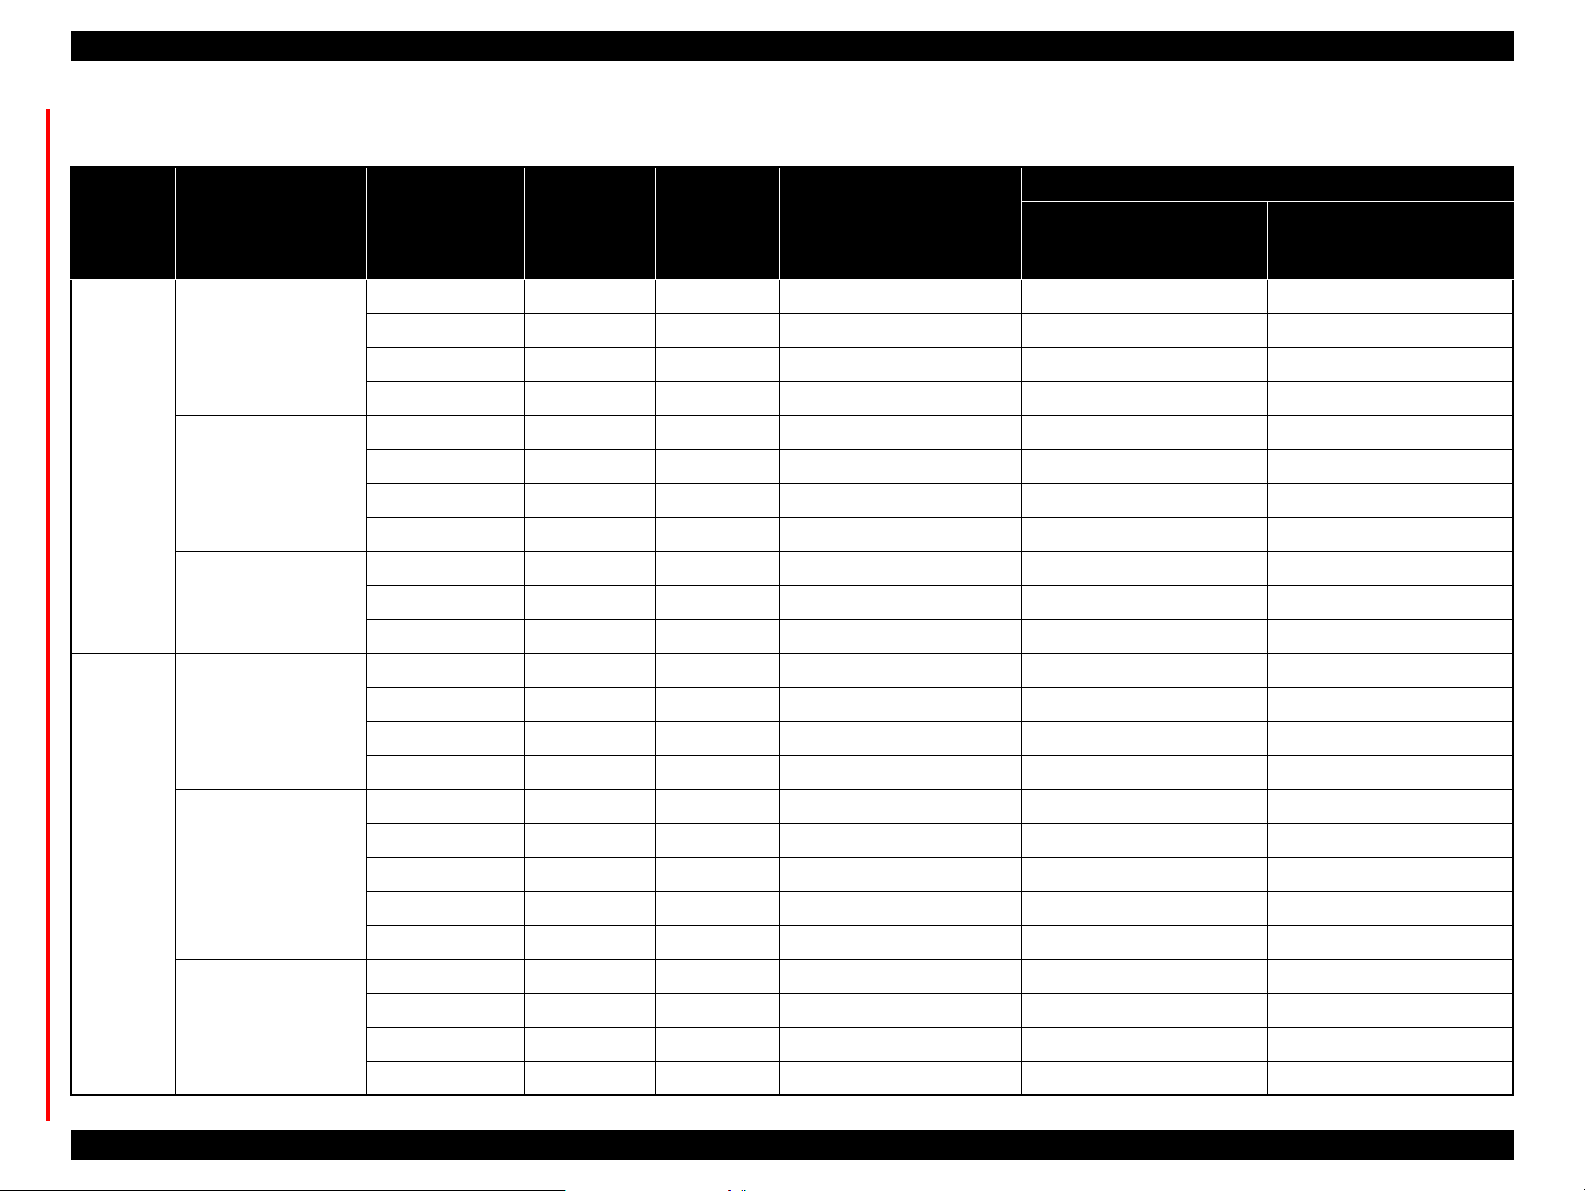
Table 1-23. Ink Cartridges of Stylus Pro 7800/9800
Part Number
Cartridge
110 ml (Standard) 220 ml (Option)
Photo Black (Pk) C13T562130 C13T563130
Matte Black (Mk) C13T566830 C13T567830
Light Black (Lk) C13T562730 C13T563730
Light Light Black (LLk) C13T562930 C13T563930
Cyan (C) C13T562230 C13T563230
Magenta (M) C13T562330 C13T563330
Light Cyan (Lc) C13T562530 C13T563530
Light Magenta (Lm) C13T562630 C13T563630
Yellow (Y) C13T562430 C13T563430
Table 1-24. Ink Cartridges of Stylus Pro 7400/9400
Part Number
Cartridge
110 ml (Standard) 220 ml (Option)
Matte Black (Mk) C13T566830 C13T567830
Cyan (C) C13T566230 C13T567230
Magenta (M) C13T566330 C13T567330
Yellow (Y) C13T566430 C13T567430
Table 1-25. Ink Cartridges of Stylus Pro 7880/7880C/9880/9880C
Part Number
Cartridge
110 ml (Standard) 220 ml (Option)
Photo Black (Pk) C13T602100 C13T603100
Matte Black (Mk) C13T611800 C13T612800
Light Black (Lk) C13T602700 C13T603700
Light Light Black (LLk) C13T602900 C13T603900
Cyan (C) C13T602200 C13T603200
Vivid Magenta (VM) C13T602300 C13T603300
Light Cyan (Lc) C13T602500 C13T603500
Vivid Light Magenta (VLm) C13T602600 C13T603600
Yellow (Y) C13T602400 C13T603400
Table 1-26. Ink Cartridges of Stylus Pro 7450/9450
Part Number
Cartridge
110 ml (Standard) 220 ml (Option)
Matte Black (Mk) C13T611800 C13T612800
Cyan (C) C13T611200 C13T612200
Magenta (M) C13T611300 C13T612300
Yellow (Y) C13T611400 C13T612400
Special paper for paper type and size.
Maintenance tank
Product Description Basic Specifications 31
Page 32

EPSON Stylus Pro 7400/7450/7800/7880/7880C/9400/9450/9800/9880/9880C Revision E
1.3 External View and Parts Names
EXTERNAL VIEW
Stylus Pro 7400/7800 /9400/9800
Optional Interface Card Slot Cover
Paper Feed Slot
Ink Cartridge
Compartment (left)
Front Cover
Roll Paper Spindle
Paper Lever
Releases paper
Sets paper
Control Panel
Ink Cartridge
Compartment (right)
Roll Paper
Cover
IEEE1394 Interface
Connector
USB Interface
Connector
AC Inlet
Maintenance Tank
Stylus Pro 7400/7800: only one on the right side
Stylus Pro 9400/9800: one each on the left and right side
Figure 1-5. External View and Parts Names (Stylus Pro 7400/7800/9400/980 0)
Product Description External View and Parts Names 32
Page 33

EPSON Stylus Pro 7400/7450/7800/7880/7880C/9400/9450/9800/9880/9880C Revision E
Stylus Pro 7450/7880/7880C/9450/9880/9880C
Paper Feed Slot
Ink Cartridge
Compartment (left)
Front Cover
Roll Paper Spindle
Paper Lever
Releases paper
Sets paper
Control Panel
Ink Cartridge
Compartment (right)
Network Interface
Connector
Roll Paper
Cover
USB Interface
Connector
AC Inlet
Maintenance Tank
Stylus Pro 7450/7880/7880C: only one on the right side
Stylus Pro 9450/9880/9880C: one each on the left and right side
Figure 1-6. External View and Parts Names (Stylus Pro 7450/7880/7880C/9450/9880/9880C)
Product Description External View and Parts Names 33
Page 34

EPSON Stylus Pro 7400/7450/7800/7880/7880C/9400/9450/9800/9880/9880C Revision E
1.4 Control Panel
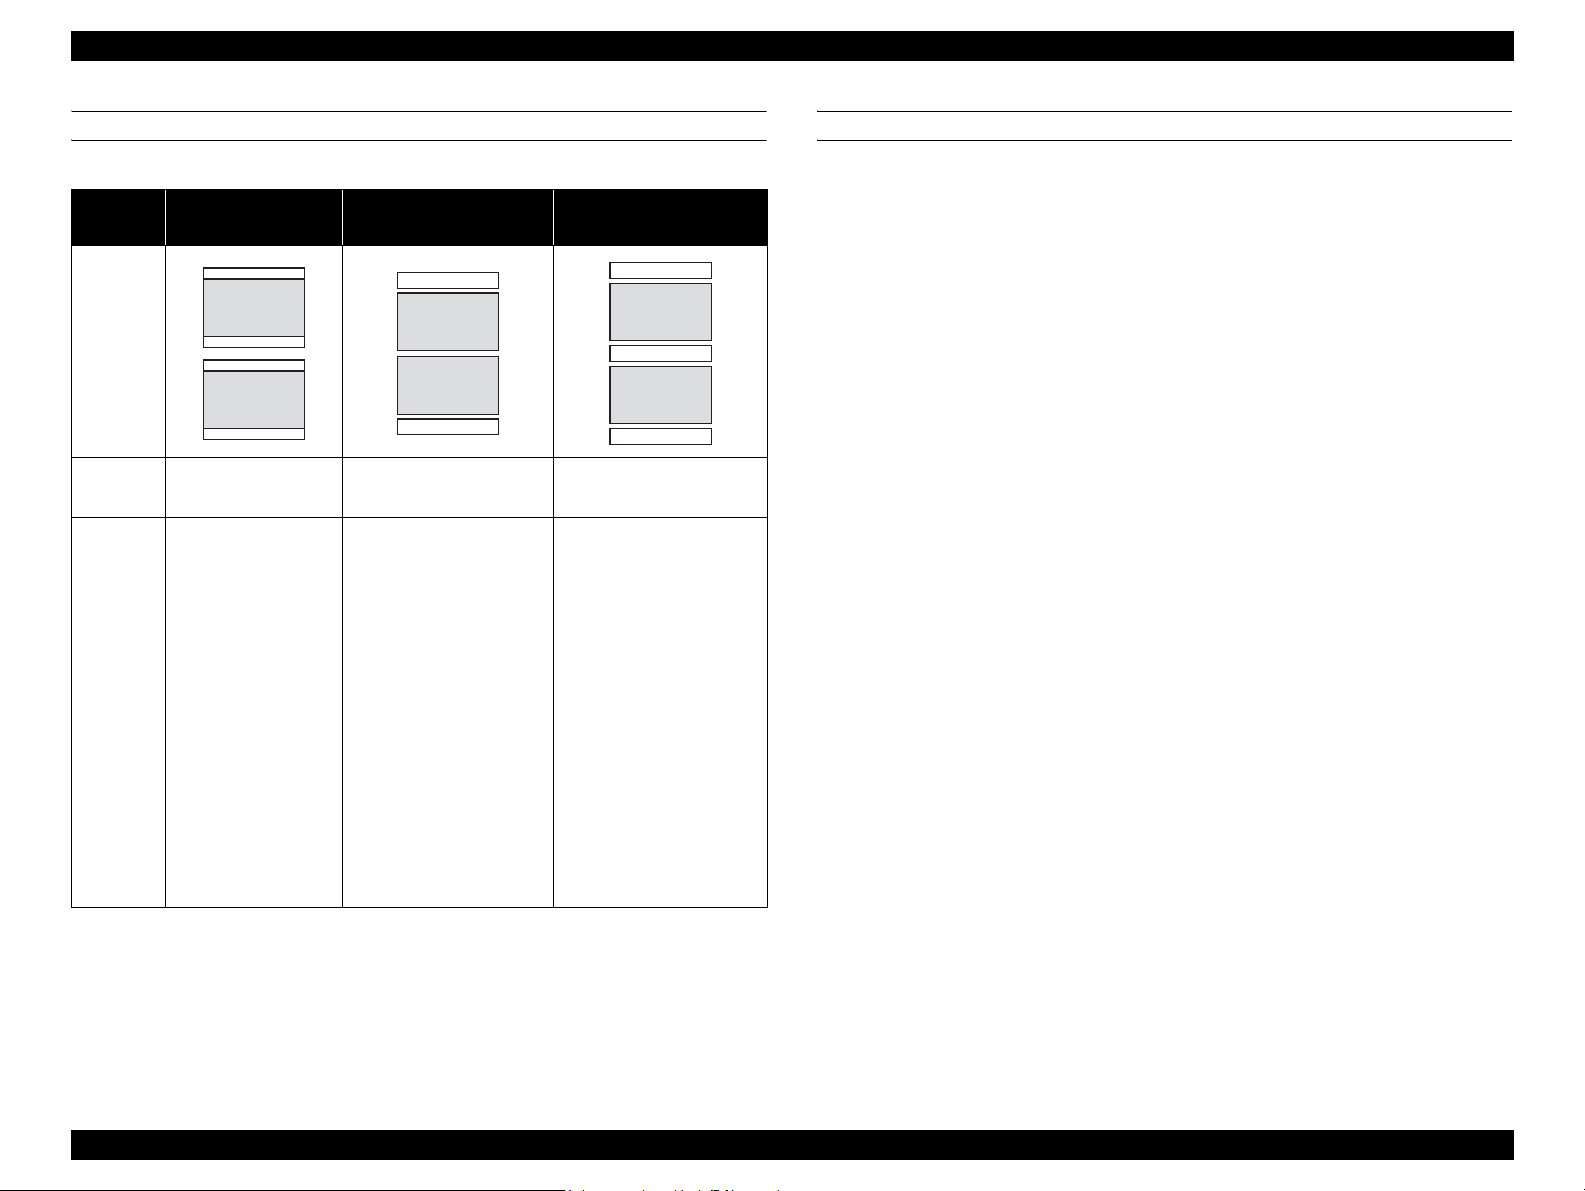
1.4.1 Buttons and Functions
LED
Power Pause Menu
Pause
LED
Paper check
LED
Ink check LED
Figure 1-7. Panel Design
Paper Feed Enter Power
Paper Feed Paper Source LCD
1.4.1.1 LED
The following table describes the LED displays and status.
Table 1-27. LED
LED Color Displays Status
Power Green ON The power is ON.
1
Flashing*
OFF The power is OFF.
Pause Yellow ON*
Flashing*
OFF Ready for printing.
Paper
Check
Red ON Impossible to make a print due to the paper status
Flashing*
OFF The papers are in normal condition without an error or
Ink
Check
Red ON An ink-related error is occurring
Flashing*
2
Receiving data or executing power off sequence
Temporarily stopping the operation (The yellow light also
turns on when an error occurs).
1
---
1
• A paper feeding or ejecting error is occurring
• The Paper Near-End warning is occurring
• A maintenance call error is occurring.
warning.
1
An ink-related warning is occurring
OFF The inks are in normal condition without an error or
Message
Roll Paper Margin
Custom Paper No.
Paper Source
Roll Paper Counter
Note "*1": Alternately turns On and Off every 500 ms. In the case of maintenance call error,
they light for 100 ms at intervals of five seconds.
"*2": When a printer error occurs, printing operation is disabled and the Pause LED turns
ON.
warning.
Note : When a service call error occurs, the all LEDs flash.
Platen Gap setting Ink Counter
Maintenance Tank Counter
(One bar is displayed on Stylus
Pro 7400/7450/7800/7880/7880C)
Figure 1-8. LCD Panel
Product Description Control Panel 34
Page 35

EPSON Stylus Pro 7400/7450/7800/7880/7880C/9400/9450/9800/9880/9880C Revision E
1.4.1.2 Buttons
Table 1-28. Button Functions
Button
Normal One Press Hold Down for Three Seconds*
Power Turns the power ON or OFF *
Pause
Menu
Stops or restarts the printer operation*
Waiting for paper initialization trigger*
During printing
Changes the panel display to the Status Menu*
When Not printing
Shifts the printer into the Panel Setting Mode *
Paper Select
During printing
Does not function
When Not printing
Changes the paper type
Paper Feed *
6
When roll paper is set
Back-feeds the roll paper
*Does not work when roll paper is not set
When releasing the paper set lever
Increases suction of the Paper Suction fan
Paper Feed *
6
When roll paper is set
Feeds the roll paper
*Does not work when roll paper is not set
When releasing the paper set lever
Decreases suction of the Paper Suction fan
When A4 to A3+ size d cut shee t is manually loaded
Feeds the cut sheet
When a cut sheet is set
Ejects the cut sheet
Functions
1
2
3
3
3
3
Reset Interrupts panel
When the paper thickness sensor detects less than 0.8mm.
Runs a head cleaning*
When the paper thickness sensor detects 0.8mm or more
Runs a cleaning after a cleaning unavailable error is
--- Power OFF ---
4
removed.
* When the paper thickness sensor detects 0.8mm or more
during printing.
Does not function
Execute the Cutter Replacement Sequence*
5
When roll paper is set
Performs high-speed back-feeding of the roll paper
*Does not work when roll paper is not set
When roll paper is set
Performs high-speed feeding of the roll paper
*Does not work when roll paper is not set
Function at the
panel setting
setting
Moves to the next
menu item
Moves to the
previous menu
item
Increases the
setting value
Decreases the
setting value
Continued to next page
Function
(+ Power On)
Maintenance
mode
---
---
---
---
Product Description Control Panel 35
Page 36

EPSON Stylus Pro 7400/7450/7800/7880/7880C/9400/9450/9800/9880/9880C Revision E
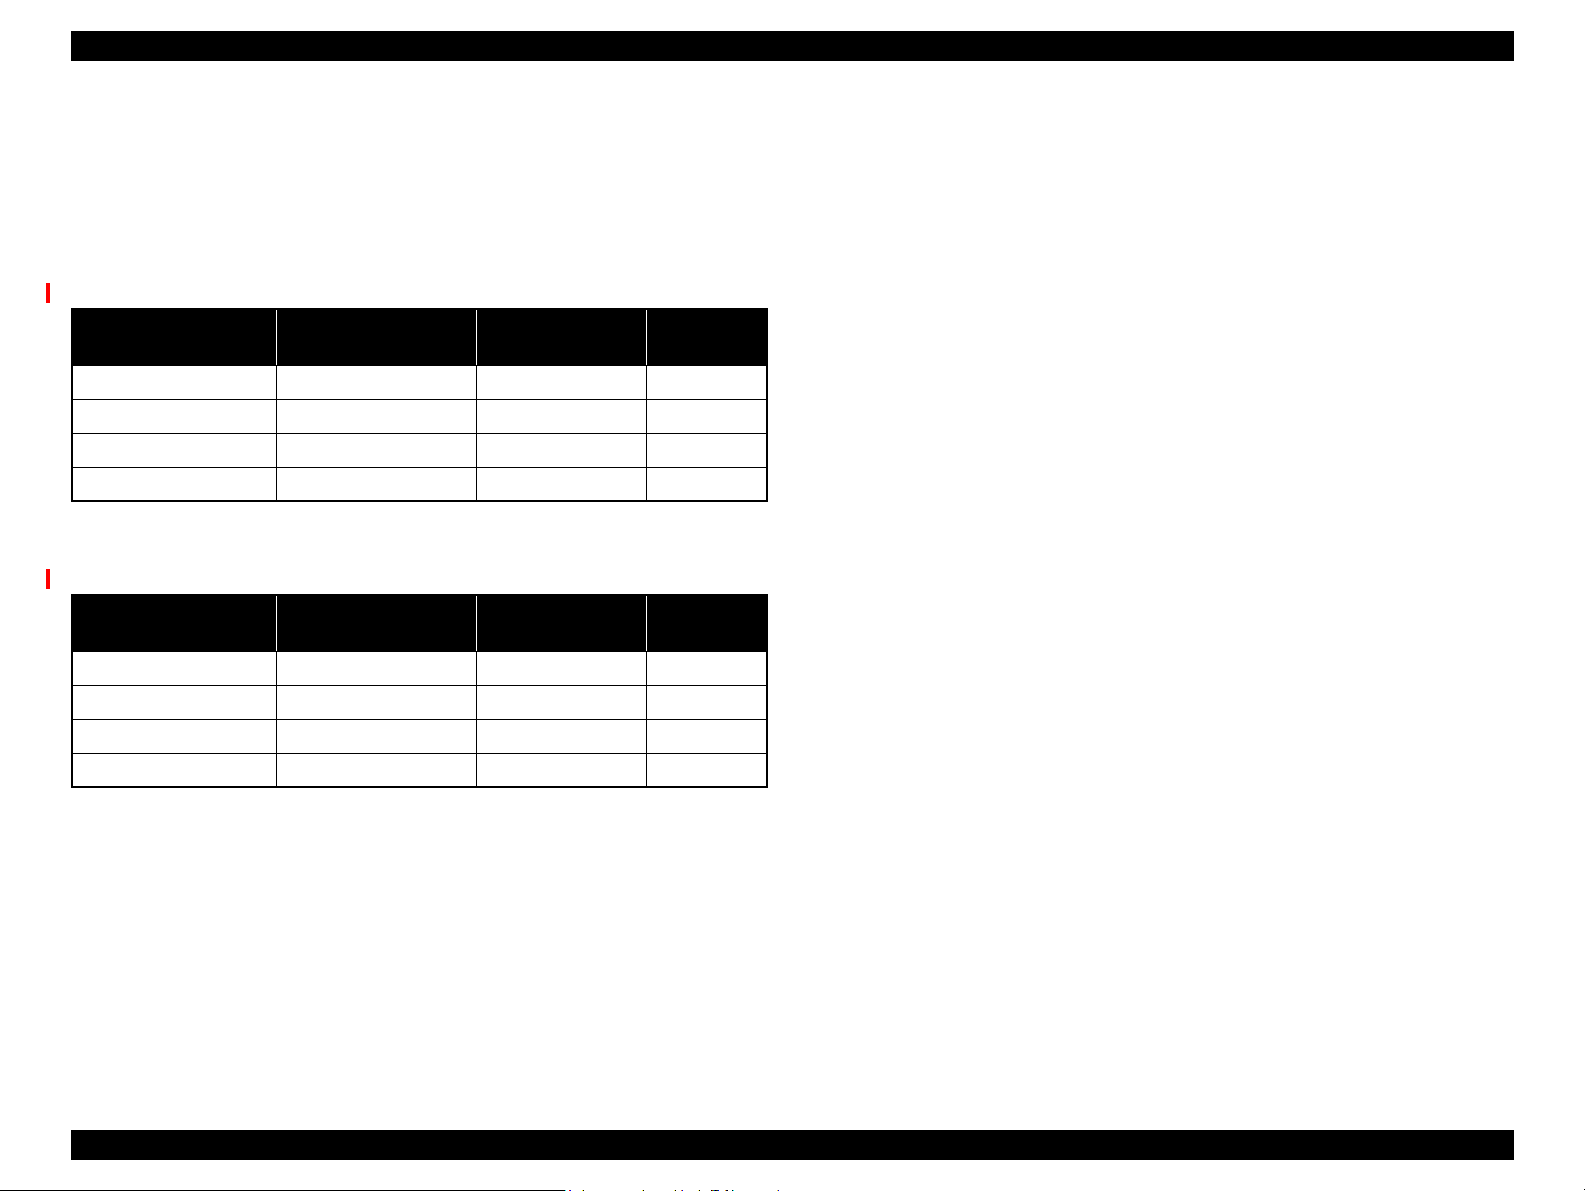
Table 1-28. Button Functions (continued)
Button
Normal One Press Hold Down for Three Seconds*
Enter Ejects a cut sheet when it is loaded after printing
*Does not function under conditions other than above.
When paper is loaded during printing with no error.
Roll paper: Cuts and ejects the paper
Cut sheet: Ejects the paper
During drying ink on paper
1
Stops drying ink and ejects the paper
*Does not function under conditions other than above.
Functions
Pause + Paper Select Enables or disables the Roll Paper Counter function when the
printer is in “Ready” mode.*
Menu + Paper Feed +
7
--- --- --- SERVICEMAN
--- --- ---
Pause
Menu + Paper Select +
--- --- --- F/W UPDATE
Paper Feed + Paper Feed
Note "*1": In actual operation, two seconds are enough. (It does not mean that the printer works immediately after the two seconds.)
"*2": The printer is always turned OFF regardless of operation status.
"*3": The printer starts to function within 3 seconds after the switch is released.
"*4": The cleaning is conducted when the printer is idling during printing.
"*5": The Cutter Replacement Sequence can be executed in “Ready” status, and even when a warning error or Paper Out error is occurring.
"*6": During two seconds after the button is released, the printer feeds the paper at 5cps. Then the feeding speed is increased to 52 cps after a lapse of the two seconds.
The maximum back-feed amount that can be performed by pressing the button one time is less than 37 cm.
"*7": This works when REMAINING PPR SETUP in the Maintenance mode has been set to ROLL and the Roll Paper Counter setting has been made.
Function at the
panel setting
Accepts the
change of
setting
Executes the
selected
operation
Saves the setting
Function
(+ Power On)
---
MODE
MODE
Product Description Control Panel 36
Page 37

EPSON Stylus Pro 7400/7450/7800/7880/7880C/9400/9450/9800/9880/9880C Revision E
1.4.2 Panel Display
1.4.2.1 Panel Display (LCD and LED)
Note : Explanation of marks used in the following table
{: Functions
X: Does Not function
---: The display is in accordance with the display of printer status under operation.
Table 1-29. Panel Display
LED Status Panel Button Function
Printer Status Messages on the LCD
Priority
Printable (idle status)/
Low
Data processing
Printing PRINTING Flashing OFF OFF --- X X X X {{{{
Unable to print UNABLE TO PRINT
Unable to execute
sequence
Maintenance tank nearly
full
1
Ink low*
Paper out PAPER OUT
Maintenance request MAINTENANCE REQUEST
Paper low PAPER LOW --- --- --- Flashing --- --- --- --- --- --- --- --Ink drying*
Paper initializing PLEASE WAIT ON OFF --- OFF X X X X X X X {
High Pause PAUSE ON ON --- --- --- X X X X {{{
3
READY
MAKE SURE PAPAR IS
LOADED
UNABLE TO OPERATE
UNABLE TO EXECUTE THE
SELECTED OPERATION
MAINTENANCE TANK
NEARLY FULL
INK LOW --- --- Flashing --- --- --- --- --- --- --- --- ---
LOAD PAPER
XXXX
INK DRYING
NNNN SEC
Power Pause Ink Paper
ON ON ON ON { X {{{{{{
ONON------XXXXXXXX
--- ON --- --- --- --- --- --- --- --- --- ---
--- --- Flashing --- --- --- --- --- --- --- --- ---
ON ON --- ON --- X X X {{ X {
--- --- --- Flashing*
Flashing OFF --- OFF X X { X { X {{
Paper
Select
2
--- --- --- --- --- --- --- ---
Enter
Paper
ejection
(3 sec.)
Paper feed Menu
Cleaning
(3 sec.)
Pause
Continued to next page
Reset
(3 sec.)
Product Description Control Panel 37
Page 38

EPSON Stylus Pro 7400/7450/7800/7880/7880C/9400/9450/9800/9880/9880C Revision E
Table 1-29. Panel Display (continued)
LED Status Panel Button Function
Printer Status Messages on the LCD
Priority
In hexadecimal dump
Low
mode
PRINTING
Power Pause Ink Paper
Flashing OFF --- OFF X X X X X {{X
Paper
Select
Enter
Printing of internal data PRINTING Flashing OFF --- OFF X X X X X {{{
Initial cutting CUTTING PAPER
PLEASE WAIT
Waiting for paper
PRESS PAUSE BUTTON
initialization trigger
Cleaning unavailable CLEANING ERROR
REMOVE THICK PAPER
5
Initializing operation*
PLEASE WAIT FlashingOFF---OFFXXXXXXX{
Cleaning failure CLEANING ERROR
PRESS PAUSE BUTTON
Ink mark sensor
SN gain error
SENSOR ERROR
LOAD DIFFERENT PAPER
ONOFF---OFFXXXXXXX{
ON ON --- OFF { X { X *
ONON---ONXXXXXXX{
ONON---FlashingXXXXXX{{
ONON---Flashing---XXXXXX{
Paper recognition error
Paper eject error PAPER EJECT ERROR
REMOVE PAPER FROM
ONON---Flashing---XXXXXX{
PRINTER
Roll paper out PAPER OUT
LOAD PAPER
Borderless printing
unavailable
BORDERLESS ERROR
LOAD CORRECT SIZE
ON ON --- ON --- X X X X { X {
ON ON --- Flashing X X X { XXX{
PAPER
Paper recognition PAPER ERROR
LOAD PAPER PROPERLY
Paper skew/
Cut sheet loading error
Paper cut error*
7
PAPER SKEW
LOAD PAPER PROPERLY
PAPER CUT ERROR
REMOVE UNCUT PAPER
ON ON --- Flashing --- X X { XXX{
ON ON --- Flashing --- X X { XXX*
ON ON --- Flashing --- X X { XXX{
Paper
ejection
(3 sec.)
Paper feed Menu
4
XX{{
Cleaning
(3 sec.)
Pause
Reset
(3 sec.)
6
{
Command error COMMAND ERROR
High
CHECK DRIVER SETTINGS
FlashingONFlashingFlashingXXXXXXX{
Continued to next page
Product Description Control Panel 38
Page 39
EPSON Stylus Pro 7400/7450/7800/7880/7880C/9400/9450/9800/9880/9880C Revision E
Table 1-29. Panel Display (continued)
LED Status Panel Button Function
Printer Status Messages on the LCD
Priority
IK command error MISMATCH ERROR
Low
Wrong roll paper path PAPER SETTING ERROR
Wrong cut sheet path PAPER SETTING ERROR
Cleaning*
Executing ink sequence PLEASE WAIT Flashing OFF --- OFF X X X X X X X {
Executing ink sequence
(Confirming to run a
Timer Cleaning)
Confirming to execute an
initial ink charge*
Initial charging CHARGING INK
Cutting by cut switch CUTTING PAPER
Conversion cartridge
near end of service life
Conversion cartridge life
error
Ink out*
High
8
10
MAKE SURE THAT THE INK
CARTRIDGE AND DRIVER
SETTINGS MATCH
LOAD ROLL PAPER
LOAD CUT SHEET
CLEANING
PLEASE WAIT
POWER CLEANING
YOU MUST MOVE INK
LEVERS WHEN CLEANING
NO EXECUTE? YES
PRESS PAUSE BUTTON TO
9
START CHARGING INK.
PLEASE DO NOT LEAVE
OPERATION IS NEEDED
WHILE INK IS CHARGING
NN%
PLEASE WAIT
CONVERSION CRTG LIFE
CONVERSION CRTG NEAR
END OF SERVICE LIFE
CONVERSION CRTG LIFE
REPLACE CONVERSION
CRTG WITH A NEW ONE.
INK OUT
INSTALL NEW CARTRIDGE
Power Pause Ink Paper
Flashing ON Flashing Flashi ng X X X X X X {{
ON ON --- ON { XXXXXX{
ON ON --- ON { XXXXXX{
FlashingOFF------XXXXXXX{
Flashing OFF --- OFF { XXX{ XXX
Flashing OFF --- --- X X X X X X { X
FlashingOFF------XXXXXXX{
FlashingOFF---OFFXXXXXXX{
Flashing ON ON OFF --- X X X X X { X
Flashing ON ON OFF --- X X X X X X X
ON ON ON OFF --- X X X { XX{
Paper
Select
Enter
Paper
ejection
(3 sec.)
Paper feed Menu
Cleaning
(3 sec.)
Pause
Continued to next page
Reset
(3 sec.)
Product Description Control Panel 39
Page 40

EPSON Stylus Pro 7400/7450/7800/7880/7880C/9400/9450/9800/9880/9880C Revision E
Table 1-29. Panel Display (continued)
LED Status Panel Button Function
Printer Status Messages on the LCD
Priority
PK/MK error INK CARTRIDGE ERROR
Low
Wrong cartridge INK CARTRIDGE ERROR
Wrong destination INK CARTRIDGE ERROR
Unusable cartridge INK CARTRIDGE ERROR
Incorrect logo error INK CARTRIDGE ERROR
Ink cartridge failure
CSIC contact error
No ink cartridge NO CARTRIDGE
Maintenance tank full
(Left)
(Stylus Pro 9400 and
Stylus Pro 9800)
CHECK CARTRIDGE
CHECK CARTRIDGE
CHECK CARTRIDGE
INSTALL CORRECT
CARTRIDGE
INSTALL CORRECT
CARTRIDGE
INK CARTRIDGE ERROR
INSTALL CORRECT
CARTRIDGE
INSTALL INK CARTRIDGE
MAINT TANK FULL
REPLACE THE
LEFT SIDE
MAINTENANCE
TANK
Power Pause Ink Paper
ON ON ON OFF --- X X X X X {{
ON ON ON OFF --- X X X X X {{
ON ON ON OFF --- X X X X X {{
ON ON ON OFF --- X X X X X X {
ON ON ON --- --- X X X X X {{
ON ON ON OFF --- X X X { XX{
ON ON ON --- --- X X X { XX{
ON ON ON --- --- X X X X X X {
Paper
Select
Enter
Paper
ejection
(3 sec.)
Paper feed Menu
Cleaning
(3 sec.)
Pause
Reset
(3 sec.)
Maintenance tank full
(Right)
(Stylus Pro 9400 and
Stylus Pro 9800)
Maintenance tank full
(Stylus Pro 7400 and
High
Stylus Pro 7800)
MAINT TANK FULL
REPLACE THE
RIGHT SIDE
MAINTENANCE
TANK
MAINT TANK FULL
REPLACE THE
MAINTENANCE
TANK
ON ON ON --- --- X X X X X X {
ON ON ON --- --- X X X X X X {
Continued to next page
Product Description Control Panel 40
Page 41
EPSON Stylus Pro 7400/7450/7800/7880/7880C/9400/9450/9800/9880/9880C Revision E
Table 1-29. Panel Display (continued)
LED Status Panel Button Function
Printer Status Messages on the LCD
Priority
Remaining capacity of
the left Maintenance
Tank is insufficient
Low
(Stylus Pro 9400/9800)
Remaining capacity of
the right Maintenance
Tank is insufficient
(Stylus Pro 9400/9800)
Remaining capacity of
the Maintenance Tank is
insufficient
(Stylus Pro 7400/7800)
MAINT TANK NEAR FULL
REPLACE THE
LEFT SIDE
MAINTENANCE
TANK
MAINT TANK NEAR FULL
REPLACE THE
RIGHT SIDE
MAINTENANCE
TANK
MAINT TANK NEAR FULL
REPLACE THE
MAINTENANCE
TANK
Power Pause Ink Paper
ONONFlashing---XXXXXXX{
ONONFlashing---XXXXXXX{
ONONFlashing---XXXXXXX{
Paper
Select
Enter
Paper
ejection
(3 sec.)
Paper feed Menu
Cleaning
(3 sec.)
Pause
Reset
(3 sec.)
Releasing left ink lever
10
*
Releasing right ink lever
10
*
Printer cover open COVER OPEN
Releasing paper set lever LEVER RELEASED
Releasing paper set lever
in operation
Replacing ink cartridge INK CARTRIDGE
High
INK LEVER
LOWER THE
LEFT INK
LEVER
INK LEVER
LOWER THE
RIGHT INK
LEVER
CLOSE COVER
LOAD PAPER
LEVER RELEASED
LOWER THE
PAPER SET
LEVER
INSTALL INK CARTRIDGE
ON ON ON --- --- X X X X X X {
ON ON ON --- --- X X X X X X {
ON ON --- --- --- X X X X X X {
ON ON --- ON --- X X { XXX{
ONON---ON---XXXXXX{
ON ON ON OFF --- X X X X X X {
Continued to next page
Product Description Control Panel 41
Page 42

EPSON Stylus Pro 7400/7450/7800/7880/7880C/9400/9450/9800/9880/9880C Revision E
Table 1-29. Panel Display (continued)
LED Status Panel Button Function
Printer Status Messages on the LCD
Priority
Paper jam PAPER JAM
Low
No maintenance tank
(Left)
(Stylus Pro 9400/9800)
No maintenance tank
(Right)
(Stylus Pro 9400/9800)
No maintenance tank
(Stylus Pro 7400/7800)
REMOVE PAPER
NO MAINTENANCE TANK
INSTALL THE
LEFT SIDE
MAINTENANCE
TANK
NO MAINTENANCE TANK
INSTALL THE
RIGHT SIDE
MAINTENANCE
TANK
NO MAINTENANCE TANK
INSTALL THE
MAINTENANCE
TANK
Power Pause Ink Paper
ONONOFFFlashingXXXXXXXX
ON ON ON --- --- X X X X X X {
ON ON ON --- --- X X X X X X {
ON ON ON --- --- X X X X X X {
Paper
Select
Enter
Paper
ejection
(3 sec.)
Paper feed Menu
Cleaning
(3 sec.)
Pause
Reset
(3 sec.)
Resetting RESETTING
PLEASE WAIT
F/W updating UPDATING FIRMWARE OFF OFF OFF OFF X X X X X X X X
F/W update completed
successfully
F/W update failure F/W INSTALL ERROR
Executing power off
sequence
Type B option I/F error I/F CARD ERROR
Restart request PRINTER ERROR
High
FIRMWARE UPDATE
COMPLETE
UPDATE FAILED
RESTART THE PRINTER
POWER OFF
PLEASE WAIT
CHECK CARD TYPE
RESTART THE PRINTER
ONONONONXXXXXXXX
OFFOFFOFFOFFXXXXXXXX
Flashing Flashing Flashing Flashing X X X X X X X X
FlashingON------XXXXXXXX
Flashing Flashing Flashing Flashing X X X X X X X X
Flashing Flashing Flashing Flashing X X X X X X X X
Continued to next page
Product Description Control Panel 42
Page 43
EPSON Stylus Pro 7400/7450/7800/7880/7880C/9400/9450/9800/9880/9880C Revision E
Table 1-29. Panel Display (continued)
LED Status Panel Button Function
Printer Status Messages on the LCD
Priority
CR unreleased error CARRIAGE LOCKED
Low
Service call SERVICE CALL ERROR
High
Confirming to execute a
black ink replacement
---
sequence
RELEASE THE CARRIAGE
LOCK
NNNNNNNNN
INK CARTRIDGE ERROR
BK INK CHANGE
NO EXECUTE? YES
Power Pause Ink Paper
Flashing Flashing Flashing Flashing X X X X X X X X
Flashing Flashing Flashing Flashing X X X X X X X X
ON ON ON --- { XXX{ X {{
Paper
Select
Enter
Paper
ejection
(3 sec.)
Paper feed Menu
Cleaning
(3 sec.)
Pause
Reset
(3 sec.)
Note "*1": If INK LOW and INK OUT errors occur at the same time, the corresponding indicators flashes
for “LOW” state, and turns ON for “OUT” state.
"*2": The LED lights for 100 ms at intervals of 5 seconds.
"*3": The counter counts down every one second while drying ink.
"*4": The [Paper Feed ] button is available for feeding paper while performing automatic loading
of a cut sheet media.
"*5": EPSON logo and a progress bar are displayed while running the power-on initialization
sequence.
"*6": Returning the printer forcedly to its normal state from a cut sheet loading error can be made by
pressing the [Pause] button.
"*7": When a cut error occurs for the first time after replacing the cutter, the printer runs the Cutter
Replacement Sequence. See “1.4.4.33 Cutter Replacement” (p.98) for more information.
With the Stylus Pro 7800/7880/7880C/9800/9880/9880C, an error of the
"*8":
maintenance tank on the anti-home side during cleaning does not interrupt the
cleaning operation. The error message is displayed when the cleaning is complete.
When the printer detects a cleaning flag at power-on, it displays “Maintenance Tank Full” error
for the anti-home side tank, and the remaining capacity is displayed after finishing the required
cleaning.
"*9": The message is displayed immediately before the printer executes the initial ink charge to
inform the user that the charging operation cannot be made without the assistance of an
attendant. If an error has occurred before the initial ink charge, the confirming message is
displayed after the error is removed. The printer displays the message only for the first initial
ink charge after power-on. (If the charging operation is interrupted by an error, and restarted
without turning the power OFF, the message is not displayed.)
"*10":When the Ink Lever is released for replacing the cart ridge after “INK OUT” error occurs, the
“INK OUT” and “INK LEVER” messages displayed alternately at intervals of three seconds.
Note • icon is displayed with error messages.
• When the printer is in an error status, the PG setting and Roll Paper Counter are not
displayed in order to display instruction messages to recover from the error.
• A request to reboot the printer due to a paper jam is indicated only by the flashing of the
Paper Check LED.
•See “3.2.1 List of Panel Messages” (p.181) for more information on the error display.
Product Description Control Panel 43
Page 44

EPSON Stylus Pro 7400/7450/7800/7880/7880C/9400/9450/9800/9880/9880C Revision E
1.4.2.2 Icons on the LCD
Paper Source
An icon corresponds to the selected media type (roll or cut sheet) is displayed.
Table 1-30. Paper Source Icon
Paper type LCD
Roll paper auto cut ON
Roll paper auto cut OFF
Cut sheet
Custom Paper No.
The user-defined paper setting number created by the CUSTOM PAPER function in
the panel setting menu is displayed. See “1.4.4.31 EDM Status”
information on the CUSTOM PAPER.
Table 1-31. User Paper Setting No. Icon
User Paper
Setting No.
1
2
…
9
10
LCD
…
(p.91)
for more
Platen Gap Setting
The platen gap setting made by the PLATEN GAP function in the panel setting menu
is indicated. It does not appear when using the CUSTOM PAPER setting.
Table 1-32. Platen Gap Location Setting Icon
Platen Gap Location Setting LCD
Widest
Wider
Wide
Narrow
Roll Paper Margin
Margin setting for roll paper is indicated. It does not appear when the setting is default.
Table 1-33. Roll Paper Margin Icon
Platen Gap Location Setting LCD
TOP/BOTTOM 15mm
TOP 35mm /BOTTOM 15mm
3mm
15mm
Roll Paper Counter
The remaining amount of the roll paper is indicated. This icon appears when REMAINING
PPR SETUP in the Maintenance mode has been set to ROLL and the Roll Paper Counter
setting has been made.
Roll paper counter icon:
Product Description Control Panel 44
Page 45

EPSON Stylus Pro 7400/7450/7800/7880/7880C/9400/9450/9800/9880/9880C Revision E
Ink Counter and Maintenance Tank Counter
The remaining amount of ink in each cartridge and the free space of the
Maintenance Tanks are indicated.
Table 1-34. Ink and Maintenance Tank Counter Icons
Remaining Ink
100 to 81 %
80 to 61 %
60 to 41 %
40 to 21 %
Maintenance Tank
Free Space
Icon
Light Light Black (Matte Black)
Light Magenta/Vivid Light Magenta
(Matte Black)
Light Cyan (Magenta)
Light Black (Magenta)
Photo Black/Matte Black (Cyan)
Cyan (Cyan)
Magenta/Vivid Magenta (Yellow)
Yellow (Yellow)
Note : Ink names within parenthesis are for Stylus Pro 7400/7450/9400/9450
Maintenance Tank Left Side
Maintenance Tank Right Side
This is not displayed on
Stylus Pro 7400/7450/7800/
7880/7880C
Figure 1-9. Ink and Maintenance Tank Counter Icons
20 % or less
(Until the Ink Low status occurs)
Ink Low Maintenance Tank Near Full
Ink Out Maintenance Tank Full
Cartridge error
No cartridge
20 % or less
(Until the Near-Full status occurs)
Maintenance tank error
No maintenance tank
Product Description Control Panel 45
Page 46

EPSON Stylus Pro 7400/7450/7800/7880/7880C/9400/9450/9800/9880/9880C Revision E
Paper Suction
The suction power to attract paper can be adjusted when the Paper Set Lever is
released, and when a paper is detected by the Rear Manual Feed sensor and the PE
sensor. The suction level is indicated by an icon as shown below.
Table 1-35. Paper Suction Icon
C H E C K
P O I N T
Suction Power
High 168%
Middle 60%
Low 0%
When rewinding roll paper to align its top edge with the guide line,
setting the suction power to its maximum makes the work easier
and accurately.
Icon
1.4.3 Job Information
Job Definition
Each print job is defined as a “Job”* and the printer stores a variety of information
on each job as job history. The following flowchart shows the storing procedure
inside the printer.
NOTE: As cleaning can be executed during printing, it is not defined as a job.
Stores the job information
Ready status
Count Start
JS
Stores the job information
The job is canceledThe job finished normally
Count End
JE (Cancel)
Printing
Figure 1-10. Storing Job Information
Count End
JE (Cancel)
Product Description Control Panel 46
Page 47

EPSON Stylus Pro 7400/7450/7800/7880/7880C/9400/9450/9800/9880/9880C Revision E
Job Information
The job information (68 bytes x 10 jobs) is stored on the NVRAM on the main
board and can be checked by JOB INFORMATION in the panel setting menu. The
information includes the following items.
Table 1-36. Job Information
Parameter Information Remarks
xx1 The Quantity of
Saved Job
Information
xx2 Saving No. 0 to 9
xx3, xx4 ID No. 1 to 65535 (0 not used.)
xx5 Using I/F 01 to 05 (Parallel* / USB / OptionIF1 / OptionIF2*
xx6 Job Status 01 to 05 (Pending / Printing / Complete / Cancel /
xx7~xx8 Character String
Code
xx9~xx24 User name (16 byte) In case of less than maximum length, fill
xx25~xx56 Document name
(32byte)
xx57~xx72 Host name Saves 16-byte out of 32-byte sent from the driver
xx73 Media ID Media ID specified by the driver
xx74 Impression value 01-02, the value is 2 when DP=ON is specified in
xx75~xx90 Ink used [xxx.xx ml] Reply in the order of ink cartridge
xx91~xx94 Paper Used H:xxxx mm W:xxxx mm
xx95~xx100 Print Start Tim YYMMDDhhmmss, Time of JS
xx101~xx106 Time Used for Print YYMMDDhhmmss, Time of JE (Time of
xx107 Ink set information Same as IK
xx108 Paper path Same as PP
xx109~xx110 Page number ---
0 to 10
/ IEEE1394) *
FF: not use
Abort)
Currently reserved as 00h 00h fixed.
<SP>(20h).
*2
the job.
alignment
Complete/Cancel/Abort)
1
Note "*1": Currently reserved as 00h 00h fixed.
"*2": As the printer is not equipped with a parallel I/F, 01h is reserved.
NOTE: The saving values for each item when printing internal adjustment
patterns are as shown below.
Table 1-37. Job Information for Adjustment Pattern Printings
Pattern Type Use I/F
Nozzle Check Pattern Print FFh 00h Printer Nozzle Check
Status Print FFh 00h Printer Status Sheet
Job Information Print FFh 00h Printer Job Information
User Paper Setting Print FFh 00h Printer Custom Paper
Bi-D Adjustment FFh 00h Printer Head Alignment
Uni-D Adjustment FFh 00h Printer Head Alignment
Paper Thickness Detection FFh 00h Printer Detect Paper Thickness
Cutter Position Adjustment FFh 00h Printer Cutter Position
Character
Code
User
Name
Document Name
Product Description Control Panel 47
Page 48

EPSON Stylus Pro 7400/7450/7800/7880/7880C/9400/9450/9800/9880/9880C Revision E
1.4.4 Panel Setting
1.4.4.1 Outline
Entering the Panel Setting Mode
The printer can go into the Panel Setting mode by the [Menu ] button when it is
in “Ready” status, and even when a warning error, Paper Out error, or ink cartridge
error (except the cartridge destination error) is occurring. Printing operation is
disabled while the printer is in the mode.
Using the Panel Setting Menu
1. When the [Menu ] button is pressed under the condition described above,
the top menu of the Panel Setting menu is displayed.
2. Use the [Paper Feed ( ) ] buttons to select (highlight) the menu item.
When a target item is highlighted, press the [Menu ] button to display the
menu screen of the selected item.
3. Select an item in the menu screen using the [Paper Feed ( ) ] buttons and
press the [Menu ] button. A list of selectable settings is displayed.
4. A setting displayed with * (asterisk) is the current setting. Use the [Paper Feed
( ) ] buttons to change the setting.
5. After highlighting your choice, press the [Enter ] button to accept the
setting or execute the function. If you press the [Enter ] button when the
current setting (with asterisk) is highlighted, nothing happens.
6. To back to the previous screen, press the [Paper Select ] button.
Exiting from the Panel Setting Mode
Any one of the following operations returns the printer to “ready for printing”
status.
Press the [Pause] button.
Press the [Paper Select ] button while the top menu is displayed.
When the INITIALIZE SETTINGS in the PRINTER SETUP menu is
executed and finished.
When any one of items in the TEST PRINT menu is executed and finished.
When the BK INK CHANE (changing black ink between Photo black and
Matte black) in the MAINTENANCE menu is executed and finished. (Stylus
Pro 7800/7880/7880C/9800/9880/9880C)
When the CUTTER REPLACEMENT in the MAINTENANCE menu is
executed and finished.
NOTE:
While the printer running or executing the selected function in the Panel
Setting menu, it cannot be returned to the ready status.
Product Description Control Panel 48
Page 49

EPSON Stylus Pro 7400/7450/7800/7880/7880C/9400/9450/9800/9880/9880C Revision E
Panel display
Top menu
NOTE: Pressing the [Pause] button returns the printer to the ready
status regardless which menu screen is displayed.
READY
MENU
PRINTER SETUP
TEST PRINT
PRINTER STATUS
MENU
[ ]
PRINTER SETUP
TEST PRINT
PRINTER STATUS
MENU
[ ]
TEST PRINT
PRINTER STATUS
CUSTOM PAPER
MENU
[ ]
PRINTER STATUS
CUSTOM PAPER
MAINTENANCE
MENU
[ ]
CUSTOM PAPER
MAINTENANCE
HEAD ALIGNMENT
Printer Setup menu
MENU
PRINTER SETUP
TEST PRINT
PRINTER STATUS
PRINTER SETUP
ROLL PAPER COUNTER
PLATEN GAP
PAGE LINE
PRINTER SETUP
PLATEN GAP
PAGE LINE
INTERFACE
PRINTER SETUP
PLATEN GAP
PAGE LINE
INTERFACE
PRINTER SETUP
PAGE LINE
INTERFACE
CODE PAGE
PRINTER SETUP
INTERFACE
CODE PAGE
ROLL PAPER MARGIN
PRINTER SETUP
CODE PAGE
ROLL PAPER MARGIN
PAPER SIZE CHECK
PRINTER SETUP
ROLL PAPER MARGIN
PAPER SIZE CHECK
PAPER SKEW CHECK
PRINTER SETUP
PAPER SIZE CHECK
PAPER SKEW CHECK
TIME OUT
PRINTER SETUP
PAPER SKEW CHECK
TIME OUT
CUTTER ADJUSTMENT
PRINTER SETUP
TIME OUT
CUTTER ADJUSTMENT
REFRESH MARGIN
PRINTER SETUP
CUTTER ADJUSTMENT
REFRESH MARGIN
AUTO NOZZLE CHECK
PRINTER SETUP
REFRESH MARGIN
AUTO NOZZLE CHECK
AUTO CLEANING
PRINTER SETUP
AUTO NOZZLE CHECK
AUTO CLEANING
QUIET CUT
PRINTER SETUP
AUTO CLEANING
QUIET CUT
INITIALIZE SETTINGS
MENU
[ ]
CUSTOM PAPER
MAINTENANCE
HEAD ALIGNMENT
PRINTER SETUP
AUTO CLEANING
QUIET CUT
INITIALIZE SETTINGS
Note : The “Roll paper counter” item appears when REMAINING PPR SETUP in the
Maintenance mode has been set to ROLL.
Product Description Control Panel 49
Page 50

EPSON Stylus Pro 7400/7450/7800/7880/7880C/9400/9450/9800/9880/9880C Revision E
Test Print menu Printer Status menu
MENU
PRINTER SETUP
TEST PRINT
PRINTER STATUS
[ / ]
[ ]
[ ]
[ ]
TEST PRINT
NOZZLE CHECK
STATUS SHEET
JOB INFORMATION
TEST PRINT
NOZZLE CHECK
STATUS SHEET
JOB INFORMATION
TEST PRINT
STATUS SHEET
JOB INFORMATION
CUSTOM PAPER
TEST PRINT
STATUS SHEET
JOB INFORMATION
CUSTOM PAPER
MENU
TEST PRINT
PRINTER STATUS
CUSTOM PAPER
[ / ]
PRINTER STATUS
VERSION
PRINTABLE PAGES
INK LEVEL
PRINTER STATUS
[ ]
VERSION
PRINTABLE PAGES
INK LEVEL
PRINTER STATUS
[ ]
PRINTABLE PAGES
INK LEVEL
MAINTENANCE TANK
PRINTER STATUS
[ ]
INK LEVEL
MAINTENANCE TANK
USAGE COUNT
PRINTER STATUS
[ ]
MAINTENANCE TANK
USAGE COUNT
CLEAR USAGE COUNT
PRINTER STATUS
[ ]
USAGE COUNT
CLEAR USAGE COUNT
JOB HISTORY
PRINTER STATUS
[ ]
CLEAR USAGE COUNT
JOB HISTORY
TOTAL PRINTS
PRINTER STATUS
[ ]
JOB HISTORY
TOTAL PRINTS
SERVICE LIFE
PRINTER STATUS
[ ]
JOB HISTORY
TOTAL PRINTS
SERVICE LIFE
Product Description Control Panel 50
Page 51

EPSON Stylus Pro 7400/7450/7800/7880/7880C/9400/9450/9800/9880/9880C Revision E
Custom Paper menu
MENU
PRINTER STATUS
CUSTOM PAPER
MAINTENANCE
[ / ]
CUSTOM PAPER nn
PAPER NUMBER (1-10)
PLATEN GAP
THICKNESS PATTERN
CUSTOM PAPER nn
[ ]
PAPER NUMBER (1-10)
PLATEN GAP
THICKNESS PATTERN
CUSTOM PAPER nn
[ ]
PLATEN GAP
THICKNESS PATTERN
CUT METHOD
CUSTOM PAPER nn
[ ]
THICKNESS PATTERN
CUT METHOD
PAPER FEED ADJUST
CUSTOM PAPER nn
[ ]
CUT METHOD
PAPER FEED ADJUST
DRYING TIME
CUSTOM PAPER nn
[ ]
PAPER FEED ADJUST
DRYING TIME
PAPER SUCTION
CUSTOM PAPER nn
[ ]
DRYING TIME
PAPER SUCTION
M/W ADJUSTMENT
Maintenance menu
MENU
CUSTOM PAPER
MAINTENANCE
HEAD ALIGNMENT
MAINTENANCE
CUTTER REPLACEMENT
BK INK CHANGE
POWER CLEANING
MAINTENANCE
CUTTER REPLACEMENT
BK INK CHANGE
POWER CLEANING
MAINTENANCE
BK INK CHANGE
POWER CLEANING
CLOCK SETTING
MAINTENANCE
POWER CLEANING
CLOCK SETTING
CONTRAST ADJUSTMENT
CUSTOM PAPER nn
[ ]
DRYING TIME
PAPER SUCTION
M/W ADJUSTMENT
Note : A custom paper number which is currently selected is indicated at the “nn” position.
Note : Stylus Pro 7400/7450/9400/9450 are not equipped with the BK Ink Change menu.
MAINTENANCE
POWER CLEANING
CLOCK SETTING
CONTRAST ADJUSTMENT
The number does not appear when custom paper is not used.
Product Description Control Panel 51
Page 52

EPSON Stylus Pro 7400/7450/7800/7880/7880C/9400/9450/9800/9880/9880C Revision E
Head Alignment menu
MENU
CUSTOM PAPER
MAINTENANCE
HEAD ALIGNMENT
HEAD ALIGNMENT
PAPER SELECT
ALIGNMENT
HEAD ALIGNMENT
[ ]
PAPER SELECT
ALIGNMENT
Product Description Control Panel 52
Page 53

EPSON Stylus Pro 7400/7450/7800/7880/7880C/9400/9450/9800/9880/9880C Revision E
1.4.4.2 Panel Setting Mode Items List
Table 1-38. Panel Setting Mode Items List
Top menu (Panel display) Item menu Panel display Set value (Underline: Default) Ref.
Printer Setting Menu
(PRINTER SETUP)
Test Print Menu
(TEST PRINT)
Remaining paper detection function (Roll paper)
PG setting PLATEN GAP NARROW, STANDARD
Page line PAGE LINE ON
IF switching INTERFACE
Code Page Switching CODE PAGE PC437
Roll Paper Margin Setting
Paper Width Detection
Skew Error Detection
Job Time Out Setting TIME OUT OFF
Cutter Position Adjustment
Auto Margin Refresh REFRESH MARGIN ON
Auto Nozzle Check Pattern for Each Job
Cleaning when nozzle checked AUTO CLEANING ON
Super Low Speed Cut Mode QUIET CUT OFF
Printer Setup Value Initialization
Nozzle Check Pattern Print NOZZLE CHECK PRINT
Status Print STATUS SHEET PRINT
Job Information Print JOB INFORMATION PRINT
User Paper Print CUSTOM PAPER PRINT
ROLL PAPER
COUNTER
ROLL PAPER
MARGIN
PAPER SIZE
CHECK
PAPER SKEW
CHECK
CUTTER
ADJUSTMENT
AUTO NOZZLE
CHECK
INITIALIZE
SETTINGS
ROLL PAPER LENGTH
ROLL LENGTH ALERT
, OFF
Stylus Pro 7400/7800/9400/9800
AUTO
, USB, IEEE1394, OPTIONAL I/F CARD
Stylus Pro 7450/7880/7880C/9450/9880/9880C
AUTO
, USB, NETWORK
, PC850
DEFAULT
3mm, 15mm
ON
ON
EXEC
OFF
EXEC
, TOP/BOTTOM 15mm, TOP 35/ /BOT TO M 15m m,
, OFF
, OFF
, 30sec, 60sec, 180sec, 300sec
, OFF
, ON
, OFF
, ON
---, 5.0~20
---, 15~60
1~2
3~7
, WIDE, WIDER, WIDEST
~15m
~50ft
~99.5m
~300ft
p.60
p.61
p.63
p.63
p.64
p.65
p.67
p.67
p.68
p.68
p.70
p.70
p.71
p.71
p.72
p.72
p.75
p.79
p.81
Product Description Control Panel 53
Page 54

EPSON Stylus Pro 7400/7450/7800/7880/7880C/9400/9450/9800/9880/9880C Revision E
Table 1-38. Panel Setting Mode Items List (continued)
Top menu (Panel display) Item menu Panel display Set value (Underline: Default) Ref.
p.82
p.82
p.82
p.82
Printer Status Menu
(PRINTER STATUS)
Printer Status Menu
(PRINTER STATUS)
Firmware Version VERSION
1st row
2nd row LIGHT MAGENTA xxxxxxPAGES
Printing Page per Ink
Cartridge
(Stylus Pro 7800/9800)
Printing Page per Ink
Cartridge
(Stylus Pro 7880/7880C/
9880/9880C)
Remaining Ink Display
(Stylus Pro 7400/7450/
9400/9450)
3rd row LIGHT CYAN xxxxxxPAGES
4th row LIGHT BLACK xxxxxxPAGES
5th row PHOTO BLACK (MATTE BLACK) xxxxxxPAGES
6th row CYAN xxxxxxPAGES
7th row MAGENTA xxxxxxPAGES
8th row YELLOW xxxxxxPAGES
1st row
2nd row VIVID LIGHT MAGENTA xxxxxxPAGES
3rd row LIGHT CYAN xxxxxxPAGES
4th row LIGHT BLACK xxxxxxPAGES
5th row PHOTO BLACK (MATTE BLACK) xxxxxxPAGES
6th row CYAN xxxxxxPAGES
7th row VIVID MAGENTA xxxxxxPAGES
8th row YELLOW xxxxxxPAGES
1st row
2nd row MATTE BLACK 2 xxxxxxPAGES
3rd row MAGENTA xxxxxxPAGES
4th row MAGENTA 2 xxxxxxPAGES
5th row CYAN xxxxxxPAGES
6th row CYAN 2 xxxxxxPAGES
7th row YELLOW xxxxxxPAGES
8th row YELLOW 2 xxxxxxPAGES
PRINTABLE PAGES
PRINTABLE PAGES
PRINTABLE PAGES
Stylus Pro 7400/7800
SN0xxxx.ICBS
Stylus Pro 9400/9800
SW0xxxx.ICBS
Stylus Pro 9450/9880/9880C
TN0xxxx-y.yy.ICBS
Stylus Pro 7450/7880/7880C
TW0xxxx-y.yy.ICBS
LIGHT LIGHT BLACK xxxxxxPAGES
LIGHT LIGHT BLACK xxxxxxPAGES
MATTE BLACK xxxxxxPAGES
Product Description Control Panel 54
Page 55
EPSON Stylus Pro 7400/7450/7800/7880/7880C/9400/9450/9800/9880/9880C Revision E
Table 1-38. Panel Setting Mode Items List (continued)
Top menu (Panel display) Item menu Panel display Set value (Underline: Default) Ref.
Printer Status Menu
(PRINTER STATUS)
Remaining Ink Display
(Stylus Pro 7800/9800)
Remaining Ink Display
(Stylus Pro 7880/7880C/
9880/9880C)
1st row
2nd row
3rd row
4th row
5th row
6th row
7th row
8th row
1st row
2nd row
3rd row
4th row
5th row
6th row
7th row
8th row
INK LEVEL
INK LEVEL
LIGHT LIGHT BLACK XXXXXXX
(XXXXXXX is any of the following)
(0%, nn%, E* F, E** F, E*** F, E**** F, E*****F)
LIGHT MAGENTA XXXXXXX
(XXXXXXX is any of the following)
(0%, nn%, E* F, E** F, E*** F, E**** F, E*****F)
LIGHT CYAN XXXXXXX
(XXXXXXX is any of the following)
(0%, nn%, E* F, E** F, E*** F, E**** F, E*****F)
LIGHT BLACK XXXXXXX
(XXXXXXX is any of the following)
(0%, nn%, E* F, E** F, E*** F, E**** F, E*****F)
PHOTO BLACK (MATTE BLACK) XXXXXXX
(XXXXXXX is any of the following)
(0%, nn%, E* F, E** F, E*** F, E**** F, E*****F)
CYAN XXXXXXX (XXXXXXX is any of the following)
(0%, nn%, E* F, E** F, E*** F, E**** F, E*****F)
MAGENTA XXXXXXX (XXXXXXX is any of the following)
(0%, nn%, E* F, E** F, E*** F, E**** F, E*****F)
YELLOW XXXXXXX (XXXXXXX is any of the following)
(0%, nn%, E* F, E** F, E*** F, E**** F, E*****F)
LIGHT LIGHT BLACK XXXXXXX
(XXXXXXX is any of the following)
(0%, nn%, E* F, E** F, E*** F, E**** F, E*****F)
VIVID LIGHT MAGENTA XXXXXXX
(XXXXXXX is any of the following)
(0%, nn%, E* F, E** F, E*** F, E**** F, E*****F)
LIGHT CYAN XXXXXXX
(XXXXXXX is any of the following)
(0%, nn%, E* F, E** F, E*** F, E**** F, E*****F)
LIGHT BLACK XXXXXXX
(XXXXXXX is any of the following)
(0%, nn%, E* F, E** F, E*** F, E**** F, E*****F)
PHOTO BLACK (MATTE BLACK) XXXXXXX
(XXXXXXX is any of the following)
(0%, nn%, E* F, E** F, E*** F, E**** F, E*****F)
CYAN XXXXXXX (XXXXXXX is any of the following)
(0%, nn%, E* F, E** F, E*** F, E**** F, E*****F)
VIVID MAGENTA XXXXXXX (XXXXXXX is any of the
following)
(0%, nn%, E* F, E** F, E*** F, E**** F, E*****F)
YELLOW XXXXXXX (XXXXXXX is any of the following)
(0%, nn%, E* F, E** F, E*** F, E**** F, E*****F)
p.84
p.84
Product Description Control Panel 55
Page 56

EPSON Stylus Pro 7400/7450/7800/7880/7880C/9400/9450/9800/9880/9880C Revision E
Table 1-38. Panel Setting Mode Items List (continued)
Top menu (Panel display) Item menu Panel display Set value (Underline: Default) Ref.
Printer Status Menu
(PRINTER STATUS)
1st row
2nd row
3rd row
Remaining Ink Display
(Stylus Pro 7400/7450/
9400/9450)
Maintenance Tank Count
(Stylus Pro 7800/7880/
7880C/9800/9880/9880C)
Maintenance Tank Count (Stylus Pro 7400/7450/9400/9450)
Consumables usage
counters
Clear the usage counters
Job History (10 jobs) JOB HISTORY No.0~No.9
Total Print Pages
4th row
5th row
6th row
7th row
8th row
Left
Right
Ink
Paper PAPER xxxxx.xcm
Ink
Paper PAPER EXEC
INK LEVEL
MAINTENANCE
TANK
MAINTENANCE
TANK
USAGE COUNT
CLEAR USAGE
COUNT
TOTAL PRINT
PAGES
MATTE BLACK XXXXXXX
(XXXXXXX is any of the following)
(0%, nn%, E* F, E** F, E*** F, E**** F, E*****F)
MATTE BLACK 2 XXXXXXX
(XXXXXXX is any of the following)
(0%, nn%, E* F, E** F, E*** F, E**** F, E*****F)
MAGENTA XXXXXXX (XXXXXXX is any of the following)
(0%, nn%, E* F, E** F, E*** F, E**** F, E*****F)
MAGENTA 2 XXXXXXX (XXXXXXX is any of the following)
(0%, nn%, E* F, E** F, E*** F, E**** F, E*****F)
CYAN XXXXXXX (XXXXXXX is any of the following)
(0%, nn%, E* F, E** F, E*** F, E**** F, E*****F)
CYAN 2 XXXXXXX (XXXXXXX is any of the following)
(0%, nn%, E* F, E** F, E*** F, E**** F, E*****F)
YELLOW XXXXXXX (XXXXXXX is any of the following)
(0%, nn%, E* F, E** F, E*** F, E**** F, E*****F)
YELLOW 2 XXXXXXX (XXXXXXX is any of the following)
(0%, nn%, E* F, E** F, E*** F, E**** F, E*****F)
LEFT XXXXXXX (XXXXXXX is any of the following)
(0%, nn%, E* F, E** F, E*** F, E**** F, E*****F)
RIGHT XXXXXXX (XXXXXXX is any of the following)
(0%, nn%, E* F, E** F, E*** F, E**** F, E*****F)
XXXXXXX (XXXXXXX is any of the following)
(0%, nn%, E* F, E** F, E*** F, E**** F, E*****F)
INK xxxxx.xml
INK EXEC
nnnnnn (6 digits at maximum) pages
p.84
p.86
p.86
p.86
p.87
p.87
p.88
Product Description Control Panel 56
Page 57

EPSON Stylus Pro 7400/7450/7800/7880/7880C/9400/9450/9800/9880/9880C Revision E
Table 1-38. Panel Setting Mode Items List (continued)
Top menu (Panel display) Item menu Panel display Set value (Underline: Default) Ref.
Printer Status Menu
(PRINTER STATUS)
User Paper Setting Menu
(CUSTOM PAPER)
Maintenance Menu
(MAINTENANCE)
Cutter Life
CR Motor Life Monitor
PF Motor Life Monitor
Commodity Life
EDM Status EDM STATUS
Paper select PAPER NUMBER (1~10) STANDARD
PG setting PLATEN GAP NARROW, STANDARD
Paper Thickness Detection Pattern Print THICKNESS PATTERN PRINT
Select Paper Thickness Number THICKNESS NUMBER (1~15) 1~15
Select Cutting Method CUT METHOD
Paper Feed Adjustment Setting PAPER FEED ADJUST -0.70%~0%
Ink Drying Time (Pass delay) DRYING TIME 0.0 sec
Paper Suction PAPER SUCTION STANDARD
Print Adjustment (MW) M/W ADJUTMENT STANDARD
Cutter Replacement
K Ink Replacement Execute Sequence BK INK CHANGE EXEC
Powerful Cleaning POWERFUL CLEANING EX EC
Date Setting DATE SETTING YY/MM/DD HH:MM
Contrast Adjustment
Head Unit Life Monitor
Cleaning Unit Life Monitor
Pressurization Pump Monitor
Execute sequence CUTTER REPLACEMENT EXEC
Cover Open
Cutter Replacement
Cutter Close CLOSE FRONT COVER –
Consumables life
OPEN FRONT COVER TO
SEE CUTTER REPLACEMENT
LABEL
SEE LABEL TO REPLACE
CUTTER
CONTRAST
ADJUSTMENT
Cutter XXXXXXX (XXXXXXX is any of the following)
(0%, nn%, E* F, E** F, E*** F, E**** F, E*****F)
CR MOTOR XXXXXXX (XXXXXXX is any of the following)
(0%, nn%, E* F, E** F, E*** F, E**** F, E*****F)
PF MOTOR XXXXXXX (XXXXXXX is any of the following)
(0%, nn%, E* F, E** F, E*** F, E**** F, E*****F)
HEAD UNIT XXXXXXX (XXXXXXX is any of the following)
(0%, nn%, E* F, E** F, E*** F, E**** F, E*****F)
CLEANING UNIT XXXXXXX
(XXXXXXX is any of the following)
(0%, nn%, E* F, E** F, E*** F, E**** F, E*****F)
PRESSURE MOTOR XXXXXXX
(XXXXXXX is any of the following)
(0%, nn%, E* F, E** F, E*** F, E**** F, E*****F)
ENABLED, DISABLED
LAST_UPLOADED:
(NotUploaded), MM/DD/YY_HH:MM_GMT
, 1~10
STANDARD
THICK PAPER and SLOW
-20[dec]~0
, THIN PAPER, THICK PAPER and FAST,
~0.70%
.~10.0 sec.
, -1, -2, -3, -4
, 1, 2
~+20[dec]
, WIDE, WIDER, WIDEST
–
–
p.88
p.88
p.89
p.89
p.90
p.90
p.91
p.92
p.98
p.99
p.99
p.99
p.99
Product Description Control Panel 57
Page 58
EPSON Stylus Pro 7400/7450/7800/7880/7880C/9400/9450/9800/9880/9880C Revision E
Table 1-38. Panel Setting Mode Items List (continued)
Top menu (Panel display) Item menu Panel display Set value (Underline: Default) Ref.
Gap Adjustment Menu
(GAP ADJUSTMENT)
Paper Thickness (in 0.1mm units) *1
Select and Print Adjustment Pattern ALIGNMENT
PAPER
THICKNESS
STANDARD
AUTO
MANUAL
, 0.1mm~1.5mm
UNI-D
BI-D 2 COLOR
BI-D ALL
BI-D #1
BI-D #2
BI-D #3
UNI-D
BI-D 2
COLOR
BI-D 2
COLOR
#1 C 1~5
::
#1 LLK 1~5~9
#2 C 1~5
::
#2 LLK 1~5~9
#3 C 1~5
::
#3 LLK 1~5~9
#1 LC 1~5
#1 LM 1~5
#2 LC 1~5
#2 LM 1~5
#3 LC 1~5
#3 LM 1~5
#1 C 1~5
#1 M 1~5
#2 C 1~5
#2 M 1~5
#3 C 1~5
#3 M 1~5
~9
~9
~9
~9
~9
~9
~9
~9
~9
~9
~9
~9
~9
~9
~9
p.100
Product Description Control Panel 58
Page 59
EPSON Stylus Pro 7400/7450/7800/7880/7880C/9400/9450/9800/9880/9880C Revision E
Table 1-38. Panel Setting Mode Items List (continued)
Top menu (Panel display) Item menu Panel display Set value (Underline: Default) Ref.
Gap Adjustment Menu
(GAP ADJUSTMENT)
Network Setting Menu Network Setting
Select and Print Adjustment Pattern (continued) ALIGNMENT (continued)
#1 MK/PK 1~5
::
#1 LLK 1~5~9
#2 MK/PK 1~5
BI-D ALL
MANUAL
(continued)
BI-D ALL
Network Setting NETWORK SETUP DISABLE, ENABLE p.104
IP Adress Setting IP ADDRESS SETTING AUTO, PANEL
IP Adress
Subnet Mask Subnet Mask
Default Gateway Default Gateway
Bonjour BONJOUR ON, OFF
Initialized Network Setting INIT NETWORK SETTING EXECUTE
IP,SM,DG SETTING
IP Adress
::
#2 LLK 1~5~9
#3 MK/PK 1~5
::
#3 LLK 1~5~9
#1 C 1~5
::
#1 M2 1~5~9
#2 C 1~5
::
#2 M2 1~5~9
#3 C 1~5
::
#3 M2 1~5~9
000,000,000,000~192,168,192,16
8~255,255,255,255
~9
~9
~9
~9
~9
~9
p.100
Product Description Control Panel 59
Page 60

EPSON Stylus Pro 7400/7450/7800/7880/7880C/9400/9450/9800/9880/9880C Revision E
1.4.4.3 Roll Paper Counter
This menu appears when REMAINING PPR SETUP in the Maintenance mode has been set to
ROLL. The menu allows you to specify the length of roll paper within the range from 15 ft. (5.0
m) to 300 ft. (99.5 m) in increments of 1 ft. (0.5 m)
If you hold down one of the buttons for two seconds, the length is increased or
decreased in 10 ft. (10 m) increments.
Roll Paper Counter Menu
Setting the Length of Roll Paper
PRINTER SETUP
ROLL PAPER COUNTER
PLATEN GAP
PAGE LINE
using the [Paper Feed ( ) ] buttons.
ROLL PAPER LENGTH
99.5m
ROLL PAPER LENGTH
99.0m
ROLL PAPER LENGTH
20.0m
Setting
Setting
Setting
Setting the Warning Length of Roll Paper
When the Roll Paper length is set, an asterisk (*) is displayed beside the set
value for two seconds and then the Roll Length Alert screen appears. The alert
menu allows you to set a length to be informed as a warning when remaining
length of roll paper becomes the set value. It can be set within the range from
3 ft. (15 m) to 50 ft. (15 m) in 1 ft. (1 m) increments.
When the alert setting is accepted, an asterisk (*) appears beside the set value
for two seconds and then the screen returns to the Printer Setup menu screen.
PRINTER SETUP
ROLL PAPER COUNTER
PLATEN GAP
PAGE LINE
ROLL LENGTH ALERT
15m
ROLL LENGTH ALERT
14m
ROLL LENGTH ALERT
2m
Setting
Setting
Setting
ROLL PAPER LENGTH
5.0m
ROLL PAPER LENGTH
---
Setting
Note 1: If the unit is changed, the roll paper length setting and the Roll Paper Counter are reset
to their default.
Setting
ROLL LENGTH ALERT
1m
Setting
Note 1: If the unit is changed, the roll paper length setting and the Roll Paper Counter are reset
to their default.
Product Description Control Panel 60
Page 61

EPSON Stylus Pro 7400/7450/7800/7880/7880C/9400/9450/9800/9880/9880C Revision E
1.4.4.4 Platen Gap
This function allows you to select a gap between the printhead and paper (platen) from
the five options (narrow, standard, wide, wider, widest). The platen gap set in the
Custom Paper menu for the user-defined paper type (other than standard) has the
higher priority than that made by this Platen Gap menu. If, however, the paper
thickness sensor detects the paper as over 0.81mm, the platen gap is automatically set
to the Widest. The table below shows the details of the five option.
Table 1-39. Platen Gap Settings
Paper thickness
sensor
0.3mm or less 00H*-08H Narrow Minimum 04 Minimum 0.8
PH command Panel SN command: m2
Small 03 Minimum 0.8
Middle 02 Small 1.2
Big 01 Middle 1.6
Maximum 05 Big 2.1
Standard Minimum 04 Minimum 0.8
Small 03 Small 1.2
Middle 02 Middle 1.6
Big01Big2.1
Maximum 05 Maximum 2.6
Wide*
Wider*
Widest Minimum 04 Big 2.1
09H-10H --- --- --- Maximum 2.6
Minimum 04 Small 1.2
Small 03 Middle 1.6
Middle 02 Big 2.1
Big 01 Maximum 2.6
Maximum 05 Maximum 2.6
Minimum 04 Middle 1.6
Small 03 Big 2.1
Middle 02 Maximum 2.6
Big 01 Maximum 2.6
Maximum 05 Maximum 2.6
Small 03 Maximum 2.6
Middle 02 Maximum 2.6
Big 01 Maximum 2.6
Maximum 05 Maximum 2.6
Actual PG location
(mm)
Table 1-39. Platen Gap Settings
Paper thickness
sensor
0.3mm or more
0.8mm or less
0.81mm or more --- --- --- --- Maximum 2.6
Note "*": Only in this case, SN command is ignored. When paper thickness is 0.15mm, it is
operated with minimum Bi-D value and minimum SN (PG).
Note : The platen setting is automatically reset at power-OFF and returns to the “Standard” (default)
when the printer is turned ON.
PH command Panel SN command: m2
00H-08H Narrow Minimum 04 Small 1.2
Small 03 Small 1.2
Middle 02 Small 1.2
Big 01 Middle 1.6
Maximum 05 Big 2.1
Standard Minimum 04 Small 1.2
Small 03 Small 1.2
Middle 02 Middle 1.6
Big01Big2.1
Maximum 05 Maximum 2.6
Wide*
Wider*
Widest Minimum 04 Big 2.1
09H-12H --- --- --- Maximum 2.6
Minimum 04 Small 1.2
Small 03 Middle 1.6
Middle 02 Big 2.1
Big 01 Maximum 2.6
Maximum 05 Maximum 2.6
Minimum 04 Middle 1.6
Small 03 Big 2.1
Middle 02 Maximum 2.6
Big 01 Maximum 2.6
Maximum 05 Maximum 2.6
Small 03 Maximum 2.6
Middle 02 Maximum 2.6
Big 01 Maximum 2.6
Maximum 05 Maximum 2.6
Actual PG location
(mm)
Product Description Control Panel 61
Page 62

EPSON Stylus Pro 7400/7450/7800/7880/7880C/9400/9450/9800/9880/9880C Revision E
The following 5 positions are available in the actual platen gap setting.
Table 1-40. Actual Platen Gap Setting
Position Gap width Use
Maximum 2.6mm For thick paper
Big 2.1mm Reduce the smearing on the printed image of thin paper.
Middle 1.6mm For certain easy-rubbed thin paper (Default)
Small 1.2mm For thin paper (Default)
Minimum 0.8mm For thin film (Film, glossy media)
Platen Gap Determining Sequence
The following flowchart shows the sequence to determine the platen gap.
Start
Is custom paper set?
Received by
RM command?
PG used by RM command
PG used by media ID
PG used by custom paper
setting
Platen Gap Setting menu
PRINTER SETUP
PLATEN GAP
PAGE LINE
INTERFACE
PLATEN GAP
NARROW
STANDARD
WIDE
PLATEN GAP
NARROW
STANDARD
WIDE
PLATEN GAP
STANDARD
WIDE
WIDER
PLATEN GAP
WIDE
WIDER
WIDEST
PLATEN GAP
WIDE
WIDER
WIDEST
Setting
Setting
Setting
Setting
Setting
Printer reflects PG set
value
Determination by thick
paper sensor
End
Product Description Control Panel 62
Page 63

EPSON Stylus Pro 7400/7450/7800/7880/7880C/9400/9450/9800/9880/9880C Revision E
1.4.4.5 Page Lines
This menu allows you to print or not print a page lines (cutoff lines). The page line, a
black solid line with 1 dot width, cannot be printed on cut sheet media (only for roll
paper). This setting, however, is ignored when a print job is made by the printer driver
(printer driver settings has the priority). If the paper width setting of the printer driver
is narrower than that of roll paper loaded on the printer, a vertical page line is printed
on the paper as the right edge of the paper size specified by the driver.
The page line is printed in the same resolution with the image.
NOTE: The vertical page line is not printed when the print job is sent without
specifying the paper size (horizontal page lines can be printed.)
Page Line menu
PRINTER SETUP
PLATEN GAP
PAGE LINE
INTERFACE
PAGE LINE
ON
OFF
PAGE LINE
ON
OFF
Setting
Setting
1.4.4.6 Interface
This menu allows you to switch the interface setting between auto-detection, USB,
IEEE1394, and optional interface.
Interface menu
Stylus Pro 7400/7800/9400/9800
PRINTER SETUP
PAGE LINE
INTERFACE
CODE PAGE
INTERFACE
AUTO
USB
IEEE1394
INTERFACE
AUTO
USB
IEEE1394
INTERFACE
USB
IEEE1394
OPTION I/F CARD
Setting
Setting
Setting
INTERFACE
USB
IEEE1394
OPTION I/F CARD
Setting
Product Description Control Panel 63
Page 64
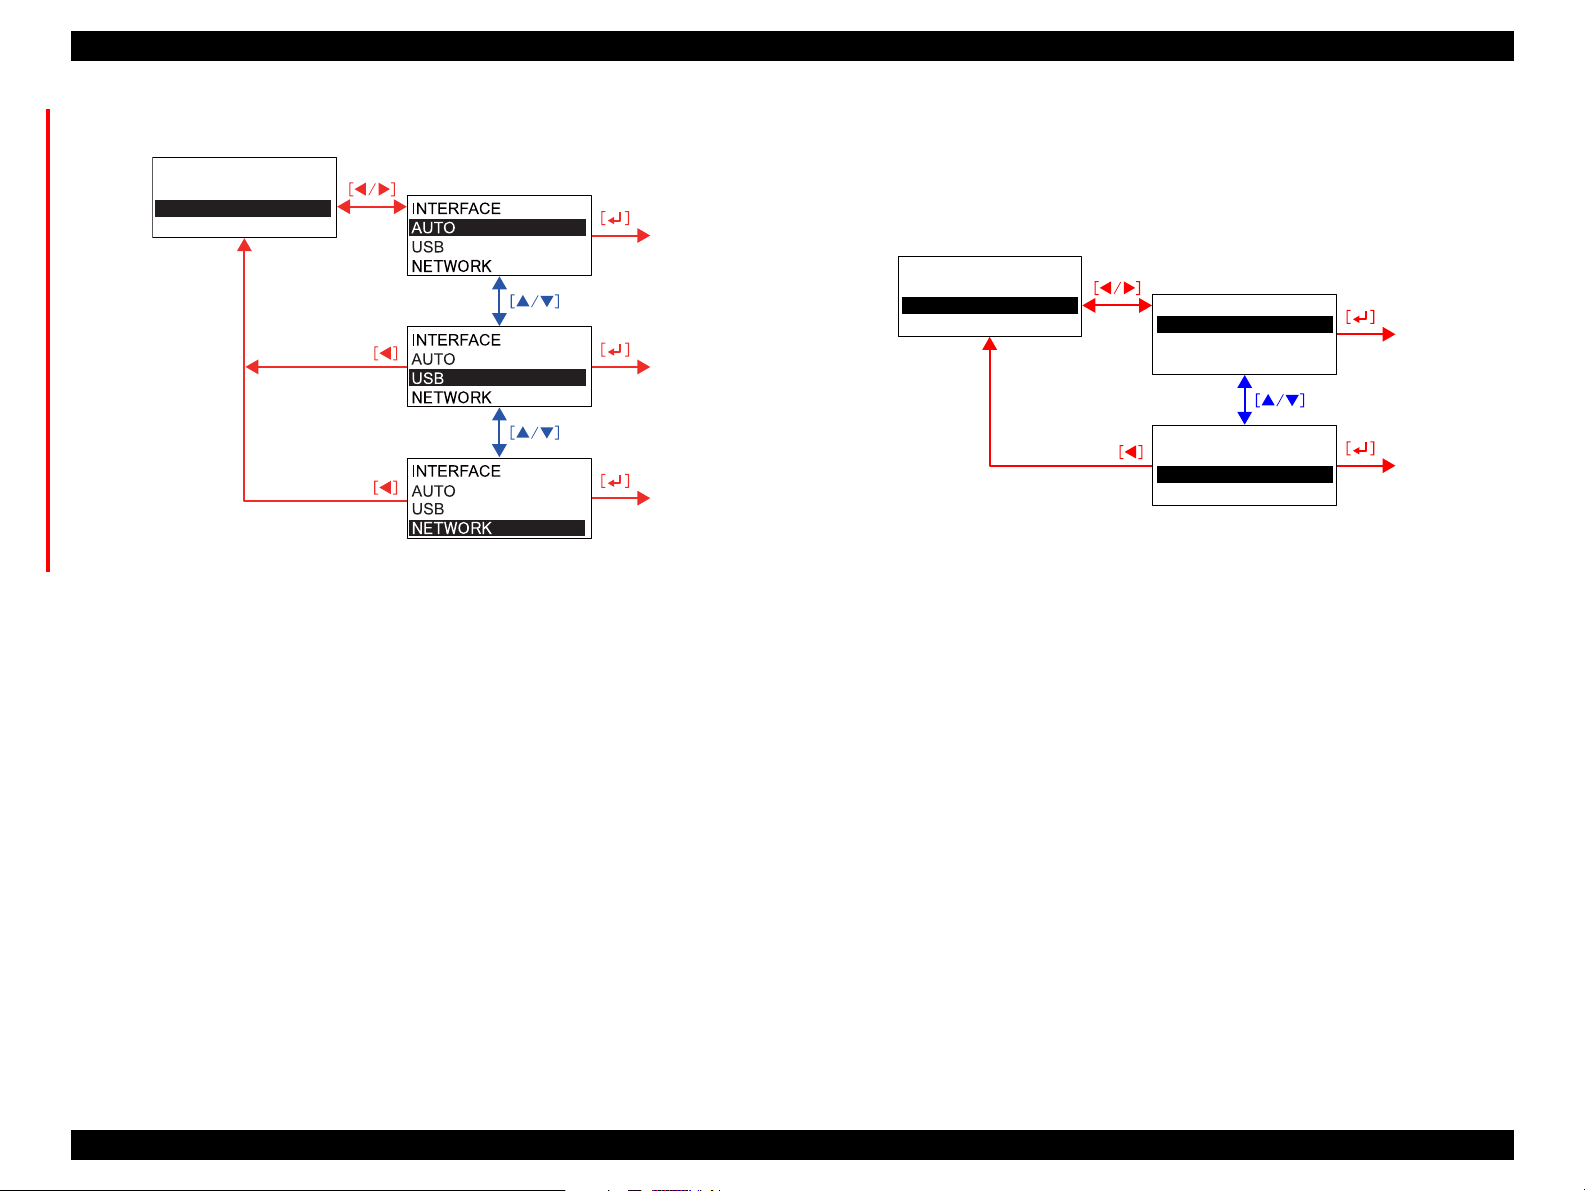
EPSON Stylus Pro 7400/7450/7800/7880/7880C/9400/9450/9800/9880/9880C Revision E
Stylus Pro 7450/7880/7880C/9450/9880/9880C
PRINTER SETUP
PAGE LINE
INTERFACE
CODE PAGE
Setting
Setting
Setting
1.4.4.7 Code Page
The Code Page for the printer can be switched between PC437 (extended graphics) and
PC850 (multilingual).
Code Page menu
PRINTER SETUP
INTERFACE
CODE PAGE
ROLL PAPER MARGIN
CODE PAGE
PC437
PC850
CODE PAGE
PC437
PC850
Setting
Setting
Product Description Control Panel 64
Page 65

EPSON Stylus Pro 7400/7450/7800/7880/7880C/9400/9450/9800/9880/9880C Revision E
1.4.4.8 Roll Paper Margin
Margin setting for roll paper can be selected from the following settings:
DEFAULT: Left/Right=3 mm. Top and bottom are
depends on media type
TOP/BOTTOM 15 mm: Left/Right=3 mm, Top/Bottom=15 mm
TOP 35/BOTTOM 15 mm: Left/Right=3 mm, Top=35 mm, Bottom=15 mm
15 mm: 15 mm for all four sides.
3 mm: 3 mm for all four sides.
Note that the margins specified by this setting are created without reducing or
enlarging image size.
When “3 mm” is selected
Vertical and horizontal page lines are printed along the specified page size.
When “15mm”, or “Top/Bottom15mm” is selected
Vertical and horizontal page lines are printed along a line 12 mm outside of all
four edges or top and bottom edges of the specified page size.
See “Fig 1-11 Roll Paper Margin (1)” (p.65).
When “TOP 35/BOTTOM 15 mm” is selected
Vertical and horizontal page lines are printed along a line 12 mm outside of
the top edge of the specified page size.
See “Fig 1-11 Roll Paper Margin (1)” (p.65).
Roll Paper Width X
X *
X
Printable Area
X
Vertical
Line
If the width of image is larger than that of the specified printable area, the extended
width of the image is clipped off from its right side. In such case, a vertical page line is
not printed.
Roll Paper Width X
X *
X
Printable Area
X
Cut Position or Border
Clipped Area
X
Figure 1-12. Roll Paper Margin (2)
Note "*": Top margin of roll paper can be set with “Set the paper top margin” (SN command).
When the printer receives the command, it determines the top margin as follows:
• When the “Roll Paper Margin” is set to other than Default
The printer creates a top margin according to the panel setting.
• When the “Roll Paper Margin” is set to Default
The printer creates a top margin according to the SN command.
If a top margin information is not included in the SN commands, the printer adopts
the default top margin setting.
X
Cut Position or Border
Figure 1-11. Roll Paper Margin (1)
Product Description Control Panel 65
Page 66
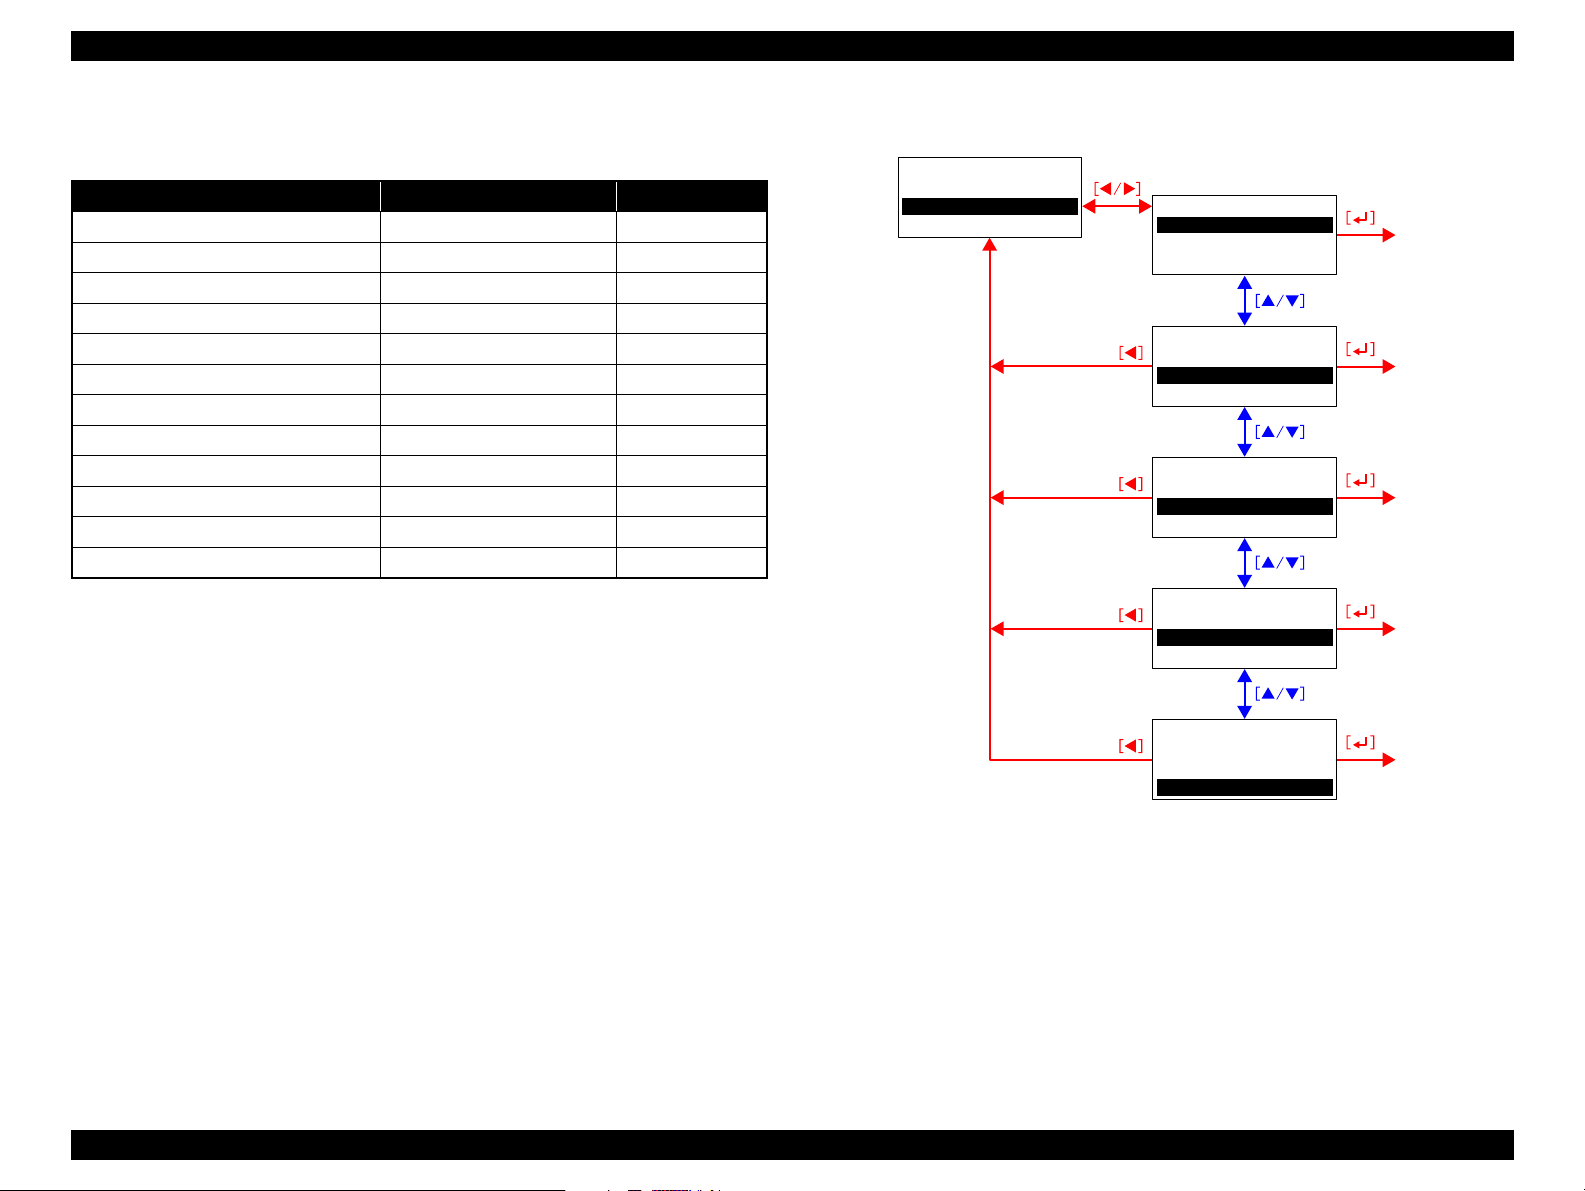
EPSON Stylus Pro 7400/7450/7800/7880/7880C/9400/9450/9800/9880/9880C Revision E
Note 1: Using the Borderless Print function, left and right margins can be set to 0.
2: When the following patterns are printed, left and right margins are fixed to 3mm.
Adjustment Patterns Menu Command
Nozzle Check Pattern Test Printing Menu NC Command
Auto Nozzle Check Pattern
Status Print
Job Information Print
User Paper Print
Paper Thickness Detection Pattern User Paper Setting Menu
Cutter Position Adjustment PRINTER SETUP
Auto Nozzle Check for each job
↑↑
↑
↑↑
↑↑
↑↑
SS Command
↑
↑
Manual Uni-D GAP Adjustment Menu DT/DC Command
Manual Bi-D K
Manual Bi-D
↑↑
↑↑
F/W ROM Version Print --- VI Command
Roll Paper Margin menu
PRINTER SETUP
CODE PAGE
ROLL PAPER MARGIN
PAPER SIZE CHECK
ROLL PAPER MARGIN
DEFAULT
TOP/BOTTOM 15mm
TOP 35/BOTTOM 15mm
ROLL PAPER MARGIN
DEFAULT
TOP/BOTTOM 15mm
TOP 35/BOTTOM 15mm
ROLL PAPER MARGIN
TOP/BOTTOM 15mm
TOP 35/BOTTOM 15mm
15mm
ROLL PAPER MARGIN
TOP 35/BOTTOM 15mm
15mm
3mm
Setting
Setting
Setting
Setting
ROLL PAPER MARGIN
TOP 35/BOTTOM 15mm
15mm
3mm
Setting
Product Description Control Panel 66
Page 67

EPSON Stylus Pro 7400/7450/7800/7880/7880C/9400/9450/9800/9880/9880C Revision E
1.4.4.9 Page Size Check
The printer automatically detects the width of loaded media if this function is set to
ON. Disabling this (setting it to OFF) is not recommended especially when performing
a Borderless printing because the printer performs a print job even if the specified print
size (width) is bigger than the width of the loaded paper and result in printing directly
on the platen.
When paper initializing or print starting, for distance between grid roller and #1 nozzle,
paper is fed unconditionally. The print starts from the position. (N o back-feed with
other sequences) Although the paper that is under grid roller will be wasteful, place
emphasis on printing even for low reflection paper.
Cut sheets and auto loading have same specification.
The above paper width detection OFF sequence is just for the first page in case of roll
paper. Paper auto cutting is not checked whether it cuts off or not.
If this function is set to OFF, the Paper Skew Check for a cut sheet at the time it is
loaded is not performed.
Paper Size Check menu
PRINTER SETUP
ROLL PAPER MARGIN
PAPER SIZE CHECK
PAPER SKEW CHECK
PAPER SIZE CHECK
ON
OFF
Setting
1.4.4.10 Paper Skew Check
When this is set to “ON”, the printer automatically detects that a paper is loaded or fed
at an angle and causes a paper skew error. If this is set to OFF, the error does not occur
and printing is continued even if the paper is loaded at an angle or skewed during
printing causing a off-paper printing. Although this menu is disabled when “cut sheet”
is selected as paper source, the printer can detect a skewed cut sheet when starting
printing if the Paper Size Check function is set to ON. If a cut sheet is skewed during
printing, however, it cannot be detected.
Paper Skew Check menu
PRINTER SETUP
PAPER SIZE CHECK
PAPER SKEW CHECK
TIME OUT
PAPER SKEW CHECK
ON
OFF
PAPER SKEW CHECK
ON
OFF
Setting
[ ]
Setting
PAPER SIZE CHECK
ON
OFF
Setting
Product Description Control Panel 67
Page 68

EPSON Stylus Pro 7400/7450/7800/7880/7880C/9400/9450/9800/9880/9880C Revision E
1.4.4.11 Time Out
This menu allows you to select a time period for job time out from five options. When
a transmission of print job from the host is interrupted for the set time period, the
printer judges that the job is finished and ejects the paper.
This setting is ignored when the host sends a duplex print job with the interface
specified.
Time Out menu
PRINTER SETUP
PAPER SKEW CHECK
TIME OUT
CUTTER ADJUSTMENT
TIME OUT
OFF
30sec
60sec
TIME OUT
OFF
30sec
60sec
TIME OUT
30sec
60sec
180sec
Setting
Setting
Setting
1.4.4.12 Cutter Adjustment
This menu is provided to adjust a position to cut top and bottom edges of media to
produce a full-bleed print on all four sides (Borderless print). So, the menu is enabled
only when the “Roll Auto Cut ON” is selecte d as paper source.
When you press the [Enter] button with the EXECUTE highlighted, the printer prints a
cutter position adjustment pattern and cuts the pattern at its center. The adjustment can
be made simply by entering a number printed with the most accurately cut block
pattern into the entry screen.
If you select this menu with the paper source set to other than the “Roll Auto Cut ON”,
the printer stops to operate displaying a message "Commanded Function Can Not Be
Executed” for three seconds, and then returns to the Printer Setup menu screen.
Cutter position adjust ment pattern
The pattern is comprised of 17 two-toned blocks as shown in the figure below. The
blocks of exactly the same size are neatly aligned and the boundary of the two
colors on them is slightly shifted by each block. They are cut off at their horizontal
center. The difference in color between the upper and lower portions of each block
makes it easier to find out which one is most accurately cut on the boundary of the
two colors.
<Stylus Pro 7800/9800>
<Stylus Pro 7400/9400>
TIME OUT
60sec
180sec
300sec
Setting
Figure 1-13. Cutter position adjustment pattern
TIME OUT
60sec
180sec
300sec
Setting
Product Description Control Panel 68
Page 69

EPSON Stylus Pro 7400/7450/7800/7880/7880C/9400/9450/9800/9880/9880C Revision E
Cutter Adjustment menu
PRINTER SETUP
TIEM OUT
CUTTER ADJUSTMENT
REFRESH MARGIN
CUTTER ADJUSTMENT
EXECUTE
CUTTER ADJUSTMENT
CUTTER ADJUSTMENT
CUTTER ADJUSTMENT
PRINTING
17
16
2
Setting
Setting
Setting
CUTTER ADJUSTMENT
1
Setting
Product Description Control Panel 69
Page 70
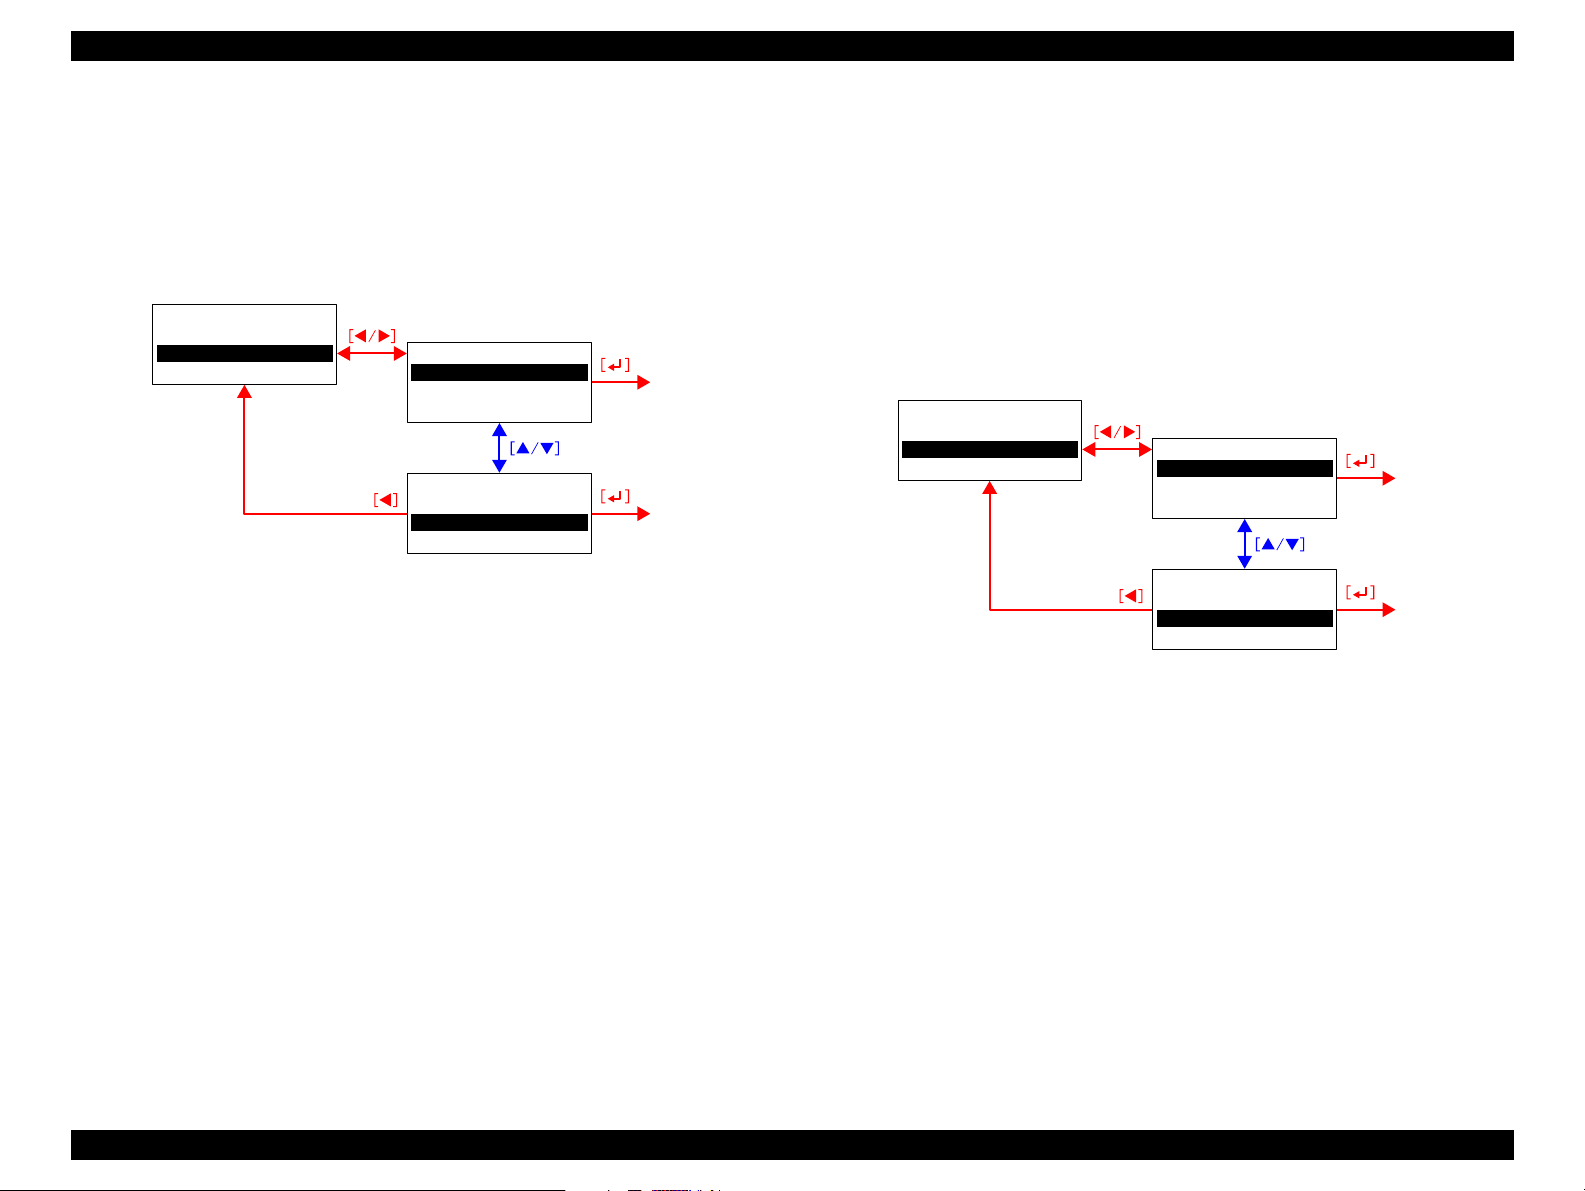
EPSON Stylus Pro 7400/7450/7800/7880/7880C/9400/9450/9800/9880/9880C Revision E
1.4.4.13 Refresh Margin
This function is used to feed paper by the amount of “minimum cut length” and cut it
before starting the next print job after making a 4-side borderless print. Ink smudges or
printed image left on the top edge of the paper due to the 4-side borderless printing are
cut off to “refresh” the top edge for the next job.
Refresh Margin menu
PRINTER SETUP
CUTTER ADJUSTMENT
REFRESH MARGIN
AUTO NOZZLE CHECK
REFRESH MARGIN
ON
OFF
REFRESH MARGIN
ON
OFF
Setting
Setting
1.4.4.14 Auto Nozzle Check
The printer automatically checks nozzles for clogging before starting each print job
when this is set to ON with the “1.4.4.15 Auto Cleaning” (p.71) also set to ON. This
function is useful when performing a lot of print jobs taking many hours or a day and
the user has no time to check the nozzle clogging.
A JS command triggers the “Auto Nozzle Check”. The printer does not perform the
check if the print job does not include the JS command. When the printer runs out of
paper at the time of the “Auto Nozzle Check”, it causes “Paper Out” error and waits
paper for being loaded.
Auto Nozzle Check menu
PRINTER SETUP
REFRESH MARGIN
AUTO NOZZLE CHECK
AUTO CLEANING
AUTO NOZZLE CHECK
OFF
ON
AUTO NOZZLE CHECK
OFF
ON
Setting
Setting
Product Description Control Panel 70
Page 71

EPSON Stylus Pro 7400/7450/7800/7880/7880C/9400/9450/9800/9880/9880C Revision E
1.4.4.15 Auto Cleaning
The printer automatically runs a head cleaning when this is set to ON. If the “Auto
Nozzle Check” is also set to ON, the printer prints an Auto Nozzle Check pattern to
examine the pattern and runs the cleaning depending on the result before starting each
job. If you perform the Nozzle Check function in the TEST PRINT of the Panel Setting
menu with the Auto Cleaning set to ON, the automatic cleaning sequence; printing an
Auto Nozzle Check pattern, examining the pattern, and running a head cleaning, is
performed. If the Auto Cleaning is set to OFF when you conduct the Nozzle Check, a
pattern for manual nozzle check is printed. When performing the Nozzle Check using
the printer driver or utility, automatic cutting operation after printing the check pattern
is performed according to the Auto Cut setting of the printer.
NOTE: If the width of media loaded in the printer is smaller than that of A4-size,
the Auto Nozzle Check pattern is printed but not examined automatically.
Table 1-41. Nozzle Check and Cleaning Settings
Auto Cleaning Nozzle Check
OFF OFF Manual None Manual
ON OFF Auto None Auto
OFF ON Manual None Manual
ON ON Auto Execute Auto
Nozzle Check in
Test Print menu
Auto Nozzle
Check Before
Each Job
Nozzle Check
by command
“NC” m1 = 80h
1.4.4.16 Quiet Cut
The “Quiet Cut” enables the slowest cutting mode (20 CPS). The default is OFF. This
is effective to cut thick media and reduces cutting noise and paper dust.
For cutting operation to create a 4-side borderless print, however, this setting cannot be
used because the slower the cutting speed is the more likely to cause off-registration.
Quiet Cut menu
PRINTER SETUP
AUTO CLEANING
QUIET CUT
INITIALIZE SETTINGS
QUIET CUT
OFF
ON
QUIET CUT
OFF
ON
Setting
Setting
Auto Cleaning menu
PRINTER SETUP
AUTO NOZZLE CHECK
AUTO CLEANING
QUIET CUT
AUTO CLEANING
ON
OFF
AUTO CLEANING
ON
OFF
Setting
Setting
Product Description Control Panel 71
Page 72

EPSON Stylus Pro 7400/7450/7800/7880/7880C/9400/9450/9800/9880/9880C Revision E
1.4.4.17 Initialize Settings
This function allows you to return all settings in the PRINTER SETUP menu to their
default except the Roll Paper Counter (both the roll paper settings and the usage
counter).
The table below shows the target setting items and their default.
Table 1-42. Printer Setup Value Initialization
Setting Item After Initialization
PLATEN GAP STANDARD
PAGE LINE ON
INTERFACE AUTO
CODE PAGE PC437
ROLL PAPER MARGIN DEFAULT
PAPER SIZE CHECK ON
PAPER SKEW CHECK ON
TIME OUT OFF
CUTTER ADJUSTMENT (Manufacture set ting)
REFRESH MARGIN ON
AUTO NOZZLE CHECK ON
AUTO CLEANING ON
QUIET CUT OFF
1.4.4.18 Printing Nozzle Check Pattern (Test Print Menu)
The nozzle check pattern printed by executing the Nozzle Check in the TEST PRINT
menu has two types; one for automatic checking and the other one for manual
checking. Switching between the automatic and manual nozzle checking is made by
the Auto Cleaning setting. Both patterns are printed with the following information; the
firmware version, available capacity of the Maintenance Tank, and usage counters for
paper and ink.
Auto Nozzle Check pattern.
Order of colors (Stylus Pro 7800 and Stylus Pro 9800: from left)
Photo Black / Matte Black→Cyan→Magenta→Yellow→Light Light Black→
Light Magenta→Light Cyan→Light Black
Version :SW<Z><xxxx>.IBCS
MaintenanceTank Left:<yyy >% Maitenan ce Tan k Ri gh t:< yy y> %
Cur.InkCount :<aaaaa.a>ml Pre.InkCount :<bbbbb.b>ml C-P:<ccccc.c>ml
Cur.PaperCount:<ddddd.d>cm Pre.PaperCount:<eeeee.e>cm C-P:<fffff.f>cm
Figure 1-14. Auto Nozzle Check Pattern (Stylus Pro 9800)
Order of colors (Stylus Pro 7400 and Stylus Pro 9400: from left)
Initialize Settings menu
PRINER SETUP
AUTO CLEANING
QUIET CUT
INITIALIZE SETTINGS
INITIALIZE SETTINGS
EXECUTE
PLEASE WAIT
Version :SW<Z><xxxx>.IBCS
MaintenanceTank Left:<yyy >% Maitenan ce Tan k Ri gh t:< yy y> %
Cur.InkCount :<aaaaa.a>ml Pre.InkCount :<bbbbb.b>ml C-P:<ccccc.c>ml
Cur.PaperCount:<ddddd.d>cm Pre.PaperCount:<eeeee.e>cm C-P:<fffff.f>cm
Matte Black→Cyan→Magenta→Yellow→Matte Black→Cyan→
Magenta→Yellow
Figure 1-15. Auto Nozzle Check Pattern (Stylus Pro 9400)
Product Description Control Panel 72
Page 73

EPSON Stylus Pro 7400/7450/7800/7880/7880C/9400/9450/9800/9880/9880C Revision E
Order of colors (Stylus Pro 7880/7880C/9880/9880C: from left)
Photo Black / Matte Black→Cyan→Vivid Magenta→Yellow→Light Light
Black→Vivid Light Magenta→Light Cyan→Light Black
Version :TW<Z><xxxx>-<y.yy>.IBCS
MaintenanceTank Left:<yyy>% MaitenanceTank Right:<yyy>%
Cur.InkCount :<aaaaa.a>ml Pre.InkCount :<bbbbb.b>ml C-P:<ccccc.c>ml
Cur.PaperCount:<ddddd.d>cm Pre.PaperCount:<eeeee.e>cm C-P:<fffff.f>cm
Figure 1-16. Auto Nozzle Check Pattern (Stylus Pro 9880)
Order of colors (Stylus Pro 7450/9450: from left)
Matte Black→Cyan→Magenta→Yellow→Matte Black→Cyan→
Magenta→Yellow
Version :TW<Z><xxxx>-<y.yy>.IBCS
MaintenanceTank Left:<yyy>% MaitenanceTank Right:<yyy>%
Cur.InkCount :<aaaaa.a>ml Pre.InkCount :<bbbbb.b>ml C-P:<ccccc.c>ml
Cur.PaperCount:<ddddd.d>cm Pre.PaperCount:<eeeee.e>cm C-P:<fffff.f>cm
Manual Nozzle Check pattern
Order of colors (Stylus Pro 7800 and Stylus Pro 9800: from left)
Photo Black / Matte Black→Cyan→Magenta→Yellow→Light Black→Light
Cyan→Light Magenta→Light Light Black
Version :SW<Z><xxxx>.IBCS
MaintenanceTank Left:<yyy >% Maitenan ce Tan k Ri gh t:< yy y> %
Cur.InkCount :<aaaaa.a>ml Pre.InkCount :<bbbbb.b>ml C-P:<ccccc.c>ml
Cur.PaperCount:<ddddd.d>cm Pre.PaperCount:<eeeee.e>cm C-P:<fffff.f>cm
Figure 1-18. Manual Nozzle Check Pattern (Stylus Pro 9800)
Order of colors (Stylus Pro 7400 and Stylus Pro 9400: from left)
Matte Black x 2→Magenta x 2→Cyan x 2→Yellow x 2
Version :SW<Z><xxxx>.IBCS
MaintenanceTank:<yyy>%
Cur.InkCount :<aaaaa.a>ml Pre.InkCount :<bbbbb.b>ml C-P:<ccccc.c>ml
Cur.PaperCount:<ddddd.d>cm Pre.PaperCount:<eeeee.e>cm C-P:<fffff.f>cm
Figure 1-19. Manual Nozzle Check Pattern (Stylus Pro 9400)
Figure 1-17. Auto Nozzle Check Pattern (Stylus Pro 9450)
Product Description Control Panel 73
Page 74

EPSON Stylus Pro 7400/7450/7800/7880/7880C/9400/9450/9800/9880/9880C Revision E
Order of colors (Stylus Pro 7880/7880C/9880/9880C: from left)
Photo Black / Matte Black→Cyan→Magenta→Yellow→Light Black→Light
Cyan→Light Magenta→Light Light Black
Version :TW<Z><xxxx>-<y.yy>.IBCS
MaintenanceTank Left:<yyy>% MaitenanceTank Right:<yyy>%
Cur.InkCount :<aaaaa.a>ml Pre.InkCount :<bbbbb.b>ml C-P:<ccccc.c>ml
Cur.PaperCount:<ddddd.d>cm Pre.PaperCount:<eeeee.e>cm C-P:<fffff.f>cm
Figure 1-20. Manual Nozzle Check Pattern (Stylus Pro 9880)
Order of colors (Stylus Pro 7450/9450: from left)
Matte Black x 2→Magenta x 2→Cyan x 2→Yellow x 2
Version :TW<Z><xxxx>-<y.yy>.IBCS
MaintenanceTank:<yyy>%
Cur.InkCount :<aaaaa.a>ml Pre.InkCount :<bbbbb.b>ml C-P:<ccccc.c>ml
Cur.PaperCount:<ddddd.d>cm Pre.PaperCount:<eeeee.e>cm C-P:<fffff.f>cm
Figure 1-21. Manual Nozzle Check Pattern (Stylus Pro 9450)
Explanation of information pri nted under the pattern
<Z>: 0 (other than “0” indicates special specification)
<xxxx>: Firmware version
<y.yy>: Network Firmware version
I: Number of colors (four or eight) used for printing
B: Business system setting
C: Custom version setting
S: Development stage
<yyy>: Available space in the Maintenance Tank
<aaaaa.a>: Ink consumption counter detected immediately before
printing the pattern. (5.1-digit)
<bbbbb.b>: Ink consumption counter detected immediately before
printing the previous pattern. (5.1-digit)
<ccccc.c>: Value obtained by subtracting <bbbbb.b> from <aaaaa.a>
(5.1-digit)
<ddddd.d>: Paper consumption counter detected immediately before
printing the pattern (5.1-digit)
<eeeee.e>: Paper consumption counter detected immediately before
printing the previous pattern (5.1-digit)
<fffff.f>: Value obtained by subtracting <eeeee.e> from <ddddd.d>.
(5.1-digit)
NOTE • “-” is printed instead of ink or paper counter value if the corresponding
value does not exits.
• When printing the check pattern on Premium Glossy Photo Paper or
Premium Semigloss Photo Paper, the top margin is automatically set to 20
mm regardless of the margin setting made by the panel setting menu to
ensure proper print of the pattern.
Product Description Control Panel 74
Page 75
EPSON Stylus Pro 7400/7450/7800/7880/7880C/9400/9450/9800/9880/9880C Revision E
1.4.4.19 Printing Status Sheet
The “Status Sheet” in the TEST PRINT menu allows you to print a Status Sheet (a list
of information on current panel settings and ink cartridges).
The following two items are required to print the sheet.
Print paper size: A4
Font: Built-in font (Print all in alphanumeric characters)
Procedure:
1. Press the [Menu ] button on the control panel to enter the panel setting
menu.
2. Press the [Paper Feed ] to display "TEST PRINT” menu.
3. Press the [Menu ] button to select the “TEST PRINT” and highlight the
“STATUS SHEET” using the [Paper Feed ] button.
4. Press the [Menu ] button again to select “PRINT”.
5. Press the [Enter ] button to execute status sheet printing.
Type B : Installed
- Current Setting +-----------------+- Printer Status -+---------------Platen Gap :Standard |Version :SW0xxxx.IBCS
Page Line :On |Total Prints :xxxxxx PG
Interface :Auto |Use Ink :xxxxxx.xml
Code Page :PC437 |Use Paper :xxxxxx.xcm
Margine :Default |Mainte Tank Left :E[*****]F
Paper Size Check :ON |Mainte Tank Right :E[*****]F
Paper Align Check :ON |Cutter Life :E[*****]F
Time Out :30sec |CR Motor :E[*****]F
Refresh Margin :ON |PF Motor :E[*****]F
Auto Nozzle Check :OFF |Head :E[*****]F
Auto Cleaning :ON |Cleaner :E[*****]F
Quiet Cut :OFF |Pressure Motor :E[*****]F
- Ink Cartridge --+-----------------+------------------+----------------Manufacturer :INK by EPSON INK by EPSON INK by EPSON
Ink Type : Pigment Pigment Pigment
Ink Color : Light Light Black Light Magenta Light Cyan
Ink Capacity : 110ml 110ml 110ml
Ink Left : E[*****]F E[*****]F E[*****]F
Production Date : `02/03 `02/03 `02/03
Expire Date : `03/10 `03/10 `03/10
Ink Life : 6 month 6 month 6 month
Passed : 2 month 2 month 2 month
Printable Sheet : 120 pages 120 pages 120 pages
------------------+------------------+-----------------+----------------Manufacturer :INK by EPSON INK by EPSON INK by EPSON
Ink Type : Pigment Pigment Pigment
Ink Color : Light Black Photo Black Cyan
Ink Capacity : 110ml 110ml 110ml
Ink Left : E[*****]F E[*****]F E[*****]F
Production Date : `02/03 `02/03 `02/03
Expire Date : `03/10 `03/10 `03/10
Ink Life : 6 month 6 month 6 month
Passed : 2 month 2 month 2 month
Printable Sheet : 120 pages 120 pages 120 pages
------------------+------------------+-----------------+----------------Manufacturer :INK by EPSON INK by EPSON
Ink Type : Pigment Pigment
Ink Color : Magenta Yellow
Ink Capacity : 110ml 110ml
Ink Left : E[*****]F E[*****]F
Production Date : `02/03 `02/03
Expire Date : `03/10 `03/10
Ink Life : 6 month 6 month
Passed : 2 month 2 month
Printable Sheet : 120 pages 120 pages
------------------+------------------+-----------------+-----------------
Figure 1-22. Status Sheet of the Stylus Pro 9800
Product Description Control Panel 75
Page 76

EPSON Stylus Pro 7400/7450/7800/7880/7880C/9400/9450/9800/9880/9880C Revision E
Type B : Installed
- Current Setting +-----------------+- Printer Status -+---------------Platen Gap :Standard |Version :SN0xxxx.IBCS
Page Line :On |Total Prints :xxxxxx PG
Interface :Auto |Use Ink :xxxxxx.xml
Code Page :PC437 |Use Paper :xxxxxx.xcm
Margine :T/B15mm |Mainte Tank :E[*****]F
Paper Size Check :ON |Cutter Life :E[*****]F
Paper Align Check :ON |CR Motor :E[*****]F
Time Out :30sec |PF Motor :E[*****]F
Refresh Margin :ON |Pressure Motor :E[*****]F
Auto Nozzle Check :OFF |Head :E[*****]F
Auto Cleaning :ON |Cleaner :E[*****]F
Quiet Cut :OFF |
- Ink Cartridge --+-----------------+------------------+----------------Manufacturer :INK by EPSON INK by EPSON INK by EPSON
Ink Type : Pigment Pigment Pigment
Ink Color : Matte Black Matte Black 2 Magenta
Ink Capacity : 110ml 110ml 110ml
Ink Left : E[*****]F E[*****]F E[*****]F
Production Date : `02/03 `02/03 `02/03
Expire Date : `03/10 `03/10 `03/10
Ink Life : 6 month 6 month 6 month
Passed : 2 month 2 month 2 month
Printable Sheet : 120 pages 120 pages 120 pages
------------------+------------------+-----------------+----------------Manufacturer :INK by EPSON INK by EPSON INK by EPSON
Ink Type : Pigment Pigment Pigment
Ink Color : Magenta 2 Cyan Cyan 2
Ink Capacity : 110ml 110ml 110ml
Ink Left : E[*****]F E[*****]F E[*****]F
Production Date : `02/03 `02/03 `02/03
Expire Date : `03/10 `03/10 `03/10
Ink Life : 6 month 6 month 6 month
Passed : 2 month 2 month 2 month
Printable Sheet : 120 pages 120 pages 120 pages
------------------+------------------+-----------------+----------------Manufacturer :INK by EPSON INK by EPSON
Ink Type : Pigment Pigment
Ink Color : Yellow Yellow 2
Ink Capacity : 110ml 110ml
Ink Left : E[*****]F E[*****]F
Production Date : `02/03 `02/03
Expire Date : `03/10 `03/10
Ink Life : 6 month 6 month
Passed : 2 month 2 month
Printable Sheet : 120 pages 120 pages
------------------+------------------+-----------------+-----------------
- Current Setting +-----------------+- Printer Status -+---------------Platen Gap :Standard |Version :TW0xxxx-y.yy.IBCSxxxx
Page Line :On |Total Prints :xxxxxx PG
Interface :Auto |Use Ink :xxxxxx.xml
Code Page :PC437 |Use Paper :xxxxxx.xcm
Margine :Default |Mainte Tank Left :E[*****]F
Paper Size Check :ON |Mainte Tank Right :E[*****]F
Paper Align Check :ON |Cutter Life :E[*****]F
Time Out :30sec |CR Motor :E[*****]F
Refresh Margin :ON |PF Motor :E[*****]F
Auto Nozzle Check :OFF |Head :E[*****]F
Auto Cleaning :ON |Cleaner :E[*****]F
Quiet Cut :OFF |Pressure Motor :E[*****]F
- Ink Cartridge --+-----------------+------------------+----------------Manufacturer :INK by EPSON INK by EPSON INK by EPSON
Ink Type : Pigment Pigment Pigment
Ink Color : Light Light Black Vivid Light Magenta Light Cyan
Ink Capacity : 110ml 110ml 110ml
Ink Left : E[*****]F E[*****]F E[*****]F
Production Date : `02/03 `02/03 `02/03
Expire Date : `03/10 `03/10 `03/10
Ink Life : 6 month 6 month 6 month
Passed : 2 month 2 month 2 month
Printable Sheet : 120 pages 120 pages 120 pages
------------------+------------------+-----------------+----------------Manufacturer :INK by EPSON INK by EPSON INK by EPSON
Ink Type : Pigment Pigment Pigment
Ink Color : Light Black Photo Black Cyan
Ink Capacity : 110ml 110ml 110ml
Ink Left : E[*****]F E[*****]F E[*****]F
Production Date : `02/03 `02/03 `02/03
Expire Date : `03/10 `03/10 `03/10
Ink Life : 6 month 6 month 6 month
Passed : 2 month 2 month 2 month
Printable Sheet : 120 pages 120 pages 120 pages
------------------+------------------+-----------------+----------------Manufacturer :INK by EPSON INK by EPSON
Ink Type : Pigment Pigment
Ink Color : Vivid Magenta Yellow
Ink Capacity : 110ml 110ml
Ink Left : E[*****]F E[*****]F
Production Date : `02/03 `02/03
Expire Date : `03/10 `03/10
Ink Life : 6 month 6 month
Passed : 2 month 2 month
Printable Sheet : 120 pages 120 pages
------------------+------------------+-----------------+-----------------
Figure 1-23. Status Sheet of the Stylus Pro 7400
Figure 1-24. Status Sheet of the Stylus Pro 9880
Product Description Control Panel 76
Page 77

EPSON Stylus Pro 7400/7450/7800/7880/7880C/9400/9450/9800/9880/9880C Revision E
- Current Setting +-----------------+- Printer Status -+---------------Platen Gap :Standard |Version :TW0xxxx-y.yy.IBCSxxxx
Page Line :On |Total Prints :xxxxxx PG
Interface :Auto |Use Ink :xxxxxx.xml
Code Page :PC437 |Use Paper :xxxxxx.xcm
Margine :T/B15mm |Mainte Tank :E[*****]F
Paper Size Check :ON |Cutter Life :E[*****]F
Paper Align Check :ON |CR Motor :E[*****]F
Time Out :30sec |PF Motor :E[*****]F
Refresh Margin :ON |Pressure Motor :E[*****]F
Auto Nozzle Check :OFF |Head :E[*****]F
Auto Cleaning :ON |Cleaner :E[*****]F
Quiet Cut :OFF |
- Ink Cartridge --+-----------------+------------------+----------------Manufacturer :INK by EPSON INK by EPSON INK by EPSON
Ink Type : Pigment Pigment Pigment
Ink Color : Matte Black Matte Black 2 Magenta
Ink Capacity : 110ml 110ml 110ml
Ink Left : E[*****]F E[*****]F E[*****]F
Production Date : `02/03 `02/03 `02/03
Expire Date : `03/10 `03/10 `03/10
Ink Life : 6 month 6 month 6 month
Passed : 2 month 2 month 2 month
Printable Sheet : 120 pages 120 pages 120 pages
------------------+------------------+-----------------+----------------Manufacturer :INK by EPSON INK by EPSON INK by EPSON
Ink Type : Pigment Pigment Pigment
Ink Color : Magenta 2 Cyan Cyan 2
Ink Capacity : 110ml 110ml 110ml
Ink Left : E[*****]F E[*****]F E[*****]F
Production Date : `02/03 `02/03 `02/03
Expire Date : `03/10 `03/10 `03/10
Ink Life : 6 month 6 month 6 month
Passed : 2 month 2 month 2 month
Printable Sheet : 120 pages 120 pages 120 pages
------------------+------------------+-----------------+----------------Manufacturer :INK by EPSON INK by EPSON
Ink Type : Pigment Pigment
Ink Color : Yellow Yellow 2
Ink Capacity : 110ml 110ml
Ink Left : E[*****]F E[*****]F
Production Date : `02/03 `02/03
Expire Date : `03/10 `03/10
Ink Life : 6 month 6 month
Passed : 2 month 2 month
Printable Sheet : 120 pages 120 pages
------------------+------------------+-----------------+-----------------
Explanation of information printed on the status sheet
Type B Whether optional Type-B I/F is mounted or not *
Current Setting Setting content of "PRINTER SETUP" menu in Panel Setting menu. *
Version Netw ork firmware version
Total Print Total number of printed sheets
Ink usage counter value (total cumulative amount of ink used
for printing, flushing and cleaning)
Paper usage counter value (total cumulative amount (length)
of paper used for printing)
Available space in the Maintenance Tank (Left)
(Stylus Pro 7800/7880/7880C/9800/9880/9880C) *
Available space in the Maintenance Tank (Right)
(Stylus Pro 7800/7880/7880C/9800/9880/9880C) *
Available space in the Maintenance Tank
(Stylus Pro 7400/7450/9400/9450) *
Printer Status
Use Ink
Use Paper
Mainte Tank Left
Mainte Tank Right
Mainte Tank
Cutter Life Remaining life of the cutter *
CR Motor Remaining life of the CR motor *
PF Motor Remaining life of the PF motor *
Head Remaining life of the Printhead *
Cleaner Remaining life of the Cleaning Unit *
Pressure Motor Remaining life of the Pressure motor *
Manufacture Name of the manufacturer
Ink Type Ink type name
Ink Color Name of the ink color
Ink Capacity Capacity of the ink cartridge
Ink Left Remaining amount of ink *
Ink Cartridge *
6
Production Date The year and month of manufacture
Expire Date Expire date of warranty
Ink Life Guaranteed period for use after unpacking
Passed Time having elapsed after unpacking
Printable Sheet
Number of sheets which can be printed with the remaining
ink (calculated value)
1
3
4
4
4
4
4
4
5
2
3
3
Figure 1-25. Status Sheet of the Stylus Pro 7400
Product Description Control Panel 77
Page 78

EPSON Stylus Pro 7400/7450/7800/7880/7880C/9400/9450/9800/9880/9880C Revision E
Note "*1": Only Stylus Pro 7400/7800/9400/9800.
"*2": In Stylus Pro 7880/7880C/7450/9880/9880C/9450's case, the network firmware
version is printed.
"*3": Available space in the Maintenance Tank is indicated as shown below.
100 to 81% E∗∗∗∗∗F
80 to 61% E∗∗∗∗ F
60 to 41% E∗∗∗ F
40 to 21% E∗∗ F
20 to 10% E∗ F
Less than 10% nn%
0% (Maintenance tank full) 0%
"*4": Remaining lives of the cutter, CR motor, PF motor, Head unit, Cleaning unit and
Pressure motor are indicated as shown below.
100 to 81% E∗∗∗∗∗F
80 to 61% E∗∗∗∗ F
60 to 41% E∗∗∗ F
40 to 21% E∗∗ F
20 to 1% E∗ F
Less than 1% FF
"*5": Remaining amount of ink is indicated as shown below.
100 to 81% E∗∗∗∗∗F
80 to 61% E∗∗∗∗ F
60 to 41% E∗∗∗ F
40 to 21% E∗∗ F
20% ~ just before near end E∗ F
After near end ~ just before ink end nn%
0% (ink end) 0%
"*6": The ink cartridge information is displayed based on the information stored in the
CSIC of the ink cartridge.
Product Description Control Panel 78
Page 79

EPSON Stylus Pro 7400/7450/7800/7880/7880C/9400/9450/9800/9880/9880C Revision E
1.4.4.20 Printing Job Information
A job history report (up to 10 jobs) stored on the printer can be printed using the “Job
Information” in the TEST PRINT menu.
The “job” includes the following operations;
A print job sent by a host computer
Printing an adjustment pattern
(includes Gap Adjustment, Nozzle Check, Cutter Adjustment, and Paper
Thickness patterns)
Printing a Status Sheet or Job Information
The following two items are required to print the Job Information. For more
information, see “1.4.3 Job Information (p.46)”.
Print paper size: A4
Font: Built-in font (Print all in alphanumeric characters)
NOTE • 2-byte characters in user name and document name is “?”.
• “-” is printed if th e correspo nding value does not exits.
• “? ” is printed if the corresponding value is unknown.
- Job No.0 - User Name: XXXXXXXXXXXXXXXX Host Nam e: XX XXX XXX XXX XX XXX
Doc Name : XXXXXXXXXXXXXXXXXXXXXXXXXXXXXXXX I/F Type: Unknown
Job State : Processing Start: 00/00/00 00:00:00 End: 00/00/00 00:00:00
Paper Used: W xxxxxmm * H xxxxxmm Page Count: xxxxx
Ink Used : LLK xxx.xxml LM xxx.xxml LC xxx.xxml LK xxx.xxml
PK xxx.xxml C xxx.xxml M xxx.xxml Y xxx.xxml
- Job No.1 - User Name: XXXXXXXXXXXXXXXX Host Nam e: XX XXX XXX XXX XX XXX
Doc Name : XXXXXXXXXXXXXXXXXXXXXXXXXXXXXXXX I/F Type: Unknown
Job State : Processing Start: 00/00/00 00:00:00 End: 00/00/00 00:00:00
Paper Used: W xxxxxmm * H xxxxxmm Page Count: xxxxx
Ink Used : LLK xxx.xxml LM xxx.xxml LC xxx.xxml LK xxx.xxml
PK xxx.xxml C xxx.xxml M xxx.xxml Y xxx.xxml
- Job No.2 - User Name: XXXXXXXXXXXXXXXX Host Nam e: XX XXX XXX XXX XX XXX
Doc Name : XXXXXXXXXXXXXXXXXXXXXXXXXXXXXXXX I/F Type: Unknown
Job State : Processing Start: 00/00/00 00:00:00 End: 00/00/00 00:00:00
Paper Used: W xxxxxmm * H xxxxxmm Page Count: xxxxx
Ink Used : LLK xxx.xxml LM xxx.xxml LC xxx.xxml LK xxx.xxml
PK xxx.xxml C xxx.xxml M xxx.xxml Y xxx.xxml
- Job No.3 - User Name: XXXXXXXXXXXXXXXX Host Nam e: XX XXX XXX XXX XX XXX
Doc Name : XXXXXXXXXXXXXXXXXXXXXXXXXXXXXXXX I/F Type: Unknown
Job State : Processing Start: 00/00/00 00:00:00 End: 00/00/00 00:00:00
Paper Used: W xxxxxmm * H xxxxxmm Page Count: xxxxx
Ink Used : LLK xxx.xxml LM xxx.xxml LC xxx.xxml LK xxx.xxml
PK xxx.xxml C xxx.xxml M xxx.xxml Y xxx.xxml
- Job No.4 - User Name: XXXXXXXXXXXXXXXX Host Nam e: XX XXX XXX XXX XX XXX
Doc Name : XXXXXXXXXXXXXXXXXXXXXXXXXXXXXXXX I/F Type: Unknown
Job State : Processing Start: 00/00/00 00:00:00 End: 00/00/00 00:00:00
Paper Used: W xxxxxmm * H xxxxxmm Page Count: xxxxx
Ink Used : LLK xxx.xxml LM xxx.xxml LC xxx.xxml LK xxx.xxml
PK xxx.xxml C xxx.xxml M xxx.xxml Y xxx.xxml
- Job No.5 - User Name: XXXXXXXXXXXXXXXX Host Nam e: XX XXX XXX XXX XX XXX
Doc Name : XXXXXXXXXXXXXXXXXXXXXXXXXXXXXXXX I/F Type: Unknown
Job State : Processing Start: 00/00/00 00:00:00 End: 00/00/00 00:00:00
Paper Used: W xxxxxmm * H xxxxxmm Page Count: xxxxx
Ink Used : LLK xxx.xxml LM xxx.xxml LC xxx.xxml LK xxx.xxml
PK xxx.xxml C xxx.xxml M xxx.xxml Y xxx.xxml
- Job No.6 - User Name: XXXXXXXXXXXXXXXX Host Nam e: XX XXX XXX XXX XX XXX
Doc Name : XXXXXXXXXXXXXXXXXXXXXXXXXXXXXXXX I/F Type: Unknown
Job State : Processing Start: 00/00/00 00:00:00 End: 00/00/00 00:00:00
Paper Used: W xxxxxmm * H xxxxxmm Page Count: xxxxx
Ink Used : LLK xxx.xxml LM xxx.xxml LC xxx.xxml LK xxx.xxml
PK xxx.xxml C xxx.xxml M xxx.xxml Y xxx.xxml
- Job No.7 - User Name: XXXXXXXXXXXXXXXX Host Nam e: XX XXX XXX XXX XX XXX
Doc Name : XXXXXXXXXXXXXXXXXXXXXXXXXXXXXXXX I/F Type: Unknown
Job State : Processing Start: 00/00/00 00:00:00 End: 00/00/00 00:00:00
Paper Used: W xxxxxmm * H xxxxxmm Page Count: xxxxx
Ink Used : LLK xxx.xxml LM xxx.xxml LC xxx.xxml LK xxx.xxml
PK xxx.xxml C xxx.xxml M xxx.xxml Y xxx.xxml
- Job No.8 - User Name: XXXXXXXXXXXXXXXX Host Nam e: XX XXX XXX XXX XX XXX
Doc Name : XXXXXXXXXXXXXXXXXXXXXXXXXXXXXXXX I/F Type: Unknown
Job State : Processing Start: 00/00/00 00:00:00 End: 00/00/00 00:00:00
Paper Used: W xxxxxmm * H xxxxxmm Page Count: xxxxx
Ink Used : LLK xxx.xxml LM xxx.xxml LC xxx.xxml LK xxx.xxml
PK xxx.xxml C xxx.xxml M xxx.xxml Y xxx.xxml
- Job No.9 - User Name: XXXXXXXXXXXXXXXX Host Nam e: XX XXX XXX XXX XX XXX
Doc Name : XXXXXXXXXXXXXXXXXXXXXXXXXXXXXXXX I/F Type: Unknown
Job State : Processing Start: 00/00/00 00:00:00 End: 00/00/00 00:00:00
Paper Used: W xxxxxmm * H xxxxxmm Page Count: xxxxx
Ink Used : LLK xxx.xxml LM xxx.xxml LC xxx.xxml LK xxx.xxml
PK xxx.xxml C xxx.xxml M xxx.xxml Y xxx.xxml
Figure 1-26. Job information print pattern
(Stylus Pro 7800/9800)
Product Description Control Panel 79
Page 80

EPSON Stylus Pro 7400/7450/7800/7880/7880C/9400/9450/9800/9880/9880C Revision E
- Job No.0 - User Name: XXXXXXXXXXXXXXXX Host Na me: XXXX XXX XXX XXX XX X
Doc Name : XXXXXXXXXXXXXXXXXXXXXXXXXXXXXXXX I/F Type: Unknown
Job State : Processing Start: 00/00/00 00:00:00 End: 00/00/00 00:00:00
Paper Used: W xxxxxmm * H xxxxxmm Page Count: xxxxx
Ink Used : LLK xxx.xxml VLM xxx.xxml LC xxx.xxml LK xxx.xxml
PK xxx.xxml C xxx.xxml VM xxx.xxml Y xxx.xxml
- Job No.1 - User Name: XXXXXXXXXXXXXXXX Host Na me: XXXX XXX XXX XXX XX X
Doc Name : XXXXXXXXXXXXXXXXXXXXXXXXXXXXXXXX I/F Type: Unknown
Job State : Processing Start: 00/00/00 00:00:00 End: 00/00/00 00:00:00
Paper Used: W xxxxxmm * H xxxxxmm Page Count: xxxxx
Ink Used : LLK xxx.xxml VLM xxx.xxml LC xxx.xxml LK xxx.xxml
PK xxx.xxml C xxx.xxml VM xxx.xxml Y xxx.xxml
- Job No.2 - User Name: XXXXXXXXXXXXXXXX Host Na me: XXXX XXX XXX XXX XX X
Doc Name : XXXXXXXXXXXXXXXXXXXXXXXXXXXXXXXX I/F Type: Unknown
Job State : Processing Start: 00/00/00 00:00:00 End: 00/00/00 00:00:00
Paper Used: W xxxxxmm * H xxxxxmm Page Count: xxxxx
Ink Used : LLK xxx.xxml VLM xxx.xxml LC xxx.xxml LK xxx.xxml
PK xxx.xxml C xxx.xxml VM xxx.xxml Y xxx.xxml
- Job No.3 - User Name: XXXXXXXXXXXXXXXX Host Na me: XXXX XXX XXX XXX XX X
Doc Name : XXXXXXXXXXXXXXXXXXXXXXXXXXXXXXXX I/F Type: Unknown
Job State : Processing Start: 00/00/00 00:00:00 End: 00/00/00 00:00:00
Paper Used: W xxxxxmm * H xxxxxmm Page Count: xxxxx
Ink Used : LLK xxx.xxml VLM xxx.xxml LC xxx.xxml LK xxx.xxml
PK xxx.xxml C xxx.xxml VM xxx.xxml Y xxx.xxml
- Job No.4 - User Name: XXXXXXXXXXXXXXXX Host Na me: XXXX XXX XXX XXX XX X
Doc Name : XXXXXXXXXXXXXXXXXXXXXXXXXXXXXXXX I/F Type: Unknown
Job State : Processing Start: 00/00/00 00:00:00 End: 00/00/00 00:00:00
Paper Used: W xxxxxmm * H xxxxxmm Page Count: xxxxx
Ink Used : LLK xxx.xxml VLM xxx.xxml LC xxx.xxml LK xxx.xxml
PK xxx.xxml C xxx.xxml VM xxx.xxml Y xxx.xxml
- Job No.5 - User Name: XXXXXXXXXXXXXXXX Host Na me: XXXX XXX XXX XXX XX X
Doc Name : XXXXXXXXXXXXXXXXXXXXXXXXXXXXXXXX I/F Type: Unknown
Job State : Processing Start: 00/00/00 00:00:00 End: 00/00/00 00:00:00
Paper Used: W xxxxxmm * H xxxxxmm Page Count: xxxxx
Ink Used : LLK xxx.xxml VLM xxx.xxml LC xxx.xxml LK xxx.xxml
PK xxx.xxml C xxx.xxml VM xxx.xxml Y xxx.xxml
- Job No.6 - User Name: XXXXXXXXXXXXXXXX Host Na me: XXXX XXX XXX XXX XX X
Doc Name : XXXXXXXXXXXXXXXXXXXXXXXXXXXXXXXX I/F Type: Unknown
Job State : Processing Start: 00/00/00 00:00:00 End: 00/00/00 00:00:00
Paper Used: W xxxxxmm * H xxxxxmm Page Count: xxxxx
Ink Used : LLK xxx.xxml VLM xxx.xxml LC xxx.xxml LK xxx.xxml
PK xxx.xxml C xxx.xxml VM xxx.xxml Y xxx.xxml
- Job No.7 - User Name: XXXXXXXXXXXXXXXX Host Na me: XXXX XXX XXX XXX XX X
Doc Name : XXXXXXXXXXXXXXXXXXXXXXXXXXXXXXXX I/F Type: Unknown
Job State : Processing Start: 00/00/00 00:00:00 End: 00/00/00 00:00:00
Paper Used: W xxxxxmm * H xxxxxmm Page Count: xxxxx
Ink Used : LLK xxx.xxml VLM xxx.xxml LC xxx.xxml LK xxx.xxml
PK xxx.xxml C xxx.xxml VM xxx.xxml Y xxx.xxml
- Job No.8 - User Name: XXXXXXXXXXXXXXXX Host Na me: XXXX XXX XXX XXX XX X
Doc Name : XXXXXXXXXXXXXXXXXXXXXXXXXXXXXXXX I/F Type: Unknown
Job State : Processing Start: 00/00/00 00:00:00 End: 00/00/00 00:00:00
Paper Used: W xxxxxmm * H xxxxxmm Page Count: xxxxx
Ink Used : LLK xxx.xxml VLM xxx.xxml LC xxx.xxml LK xxx.xxml
PK xxx.xxml C xxx.xxml VM xxx.xxml Y xxx.xxml
- Job No.9 - User Name: XXXXXXXXXXXXXXXX Host Na me: XXXX XXX XXX XXX XX X
Doc Name : XXXXXXXXXXXXXXXXXXXXXXXXXXXXXXXX I/F Type: Unknown
Job State : Processing Start: 00/00/00 00:00:00 End: 00/00/00 00:00:00
Paper Used: W xxxxxmm * H xxxxxmm Page Count: xxxxx
Ink Used : LLK xxx.xxml VLM xxx.xxml LC xxx.xxml LK xxx.xxml
PK xxx.xxml C xxx.xxml VM xxx.xxml Y xxx.xxml
Figure 1-27. Job information print pattern
(Stylus Pro 7880/7880C/9880/9880C)
- Job No.0 - User Name: XXXXXXXXXXXXXXXX Host Nam e: XX XXX XXX XXX XX XXX
Doc Name : XXXXXXXXXXXXXXXXXXXXXXXXXXXXXXXX I/F Type: Unknown
Job State : Processing Start: 00/00/00 00:00:00 End: 00/00/00 00:00:00
Paper Used: W xxxxxmm * H xxxxxmm Page Count: xxxxx
Ink Used : MK xxx.xxml MK2 xxx.xxml M xxx.xxml M2 xxx.xxml
C xxx.xxml C2 xxx.xxml Y xxx.xxml Y2 xxx.xxml
- Job No.1 - User Name: XXXXXXXXXXXXXXXX Host Nam e: XX XXX XXX XXX XX XXX
Doc Name : XXXXXXXXXXXXXXXXXXXXXXXXXXXXXXXX I/F Type: Unknown
Job State : Processing Start: 00/00/00 00:00:00 End: 00/00/00 00:00:00
Paper Used: W xxxxxmm * H xxxxxmm Page Count: xxxxx
Ink Used : MK xxx.xxml MK2 xxx.xxml M xxx.xxml M2 xxx.xxml
C xxx.xxml C2 xxx.xxml Y xxx.xxml Y2 xxx.xxml
- Job No.2 - User Name: XXXXXXXXXXXXXXXX Host Nam e: XX XXX XXX XXX XX XXX
Doc Name : XXXXXXXXXXXXXXXXXXXXXXXXXXXXXXXX I/F Type: Unknown
Job State : Processing Start: 00/00/00 00:00:00 End: 00/00/00 00:00:00
Paper Used: W xxxxxmm * H xxxxxmm Page Count: xxxxx
Ink Used : MK xxx.xxml MK2 xxx.xxml M xxx.xxml M2 xxx.xxml
C xxx.xxml C2 xxx.xxml Y xxx.xxml Y2 xxx.xxml
- Job No.3 - User Name: XXXXXXXXXXXXXXXX Host Nam e: XX XXX XXX XXX XX XXX
Doc Name : XXXXXXXXXXXXXXXXXXXXXXXXXXXXXXXX I/F Type: Unknown
Job State : Processing Start: 00/00/00 00:00:00 End: 00/00/00 00:00:00
Paper Used: W xxxxxmm * H xxxxxmm Page Count: xxxxx
Ink Used : MK xxx.xxml MK2 xxx.xxml M xxx.xxml M2 xxx.xxml
C xxx.xxml C2 xxx.xxml Y xxx.xxml Y2 xxx.xxml
- Job No.4 - User Name: XXXXXXXXXXXXXXXX Host Nam e: XX XXX XXX XXX XX XXX
Doc Name : XXXXXXXXXXXXXXXXXXXXXXXXXXXXXXXX I/F Type: Unknown
Job State : Processing Start: 00/00/00 00:00:00 End: 00/00/00 00:00:00
Paper Used: W xxxxxmm * H xxxxxmm Page Count: xxxxx
Ink Used : MK xxx.xxml MK2 xxx.xxml M xxx.xxml M2 xxx.xxml
C xxx.xxml C2 xxx.xxml Y xxx.xxml Y2 xxx.xxml
- Job No.5 - User Name: XXXXXXXXXXXXXXXX Host Nam e: XX XXX XXX XXX XX XXX
Doc Name : XXXXXXXXXXXXXXXXXXXXXXXXXXXXXXXX I/F Type: Unknown
Job State : Processing Start: 00/00/00 00:00:00 End: 00/00/00 00:00:00
Paper Used: W xxxxxmm * H xxxxxmm Page Count: xxxxx
Ink Used : MK xxx.xxml MK2 xxx.xxml M xxx.xxml M2 xxx.xxml
C xxx.xxml C2 xxx.xxml Y xxx.xxml Y2 xxx.xxml
- Job No.6 - User Name: XXXXXXXXXXXXXXXX Host Nam e: XX XXX XXX XXX XX XXX
Doc Name : XXXXXXXXXXXXXXXXXXXXXXXXXXXXXXXX I/F Type: Unknown
Job State : Processing Start: 00/00/00 00:00:00 End: 00/00/00 00:00:00
Paper Used: W xxxxxmm * H xxxxxmm Page Count: xxxxx
Ink Used : MK xxx.xxml MK2 xxx.xxml M xxx.xxml M2 xxx.xxml
C xxx.xxml C2 xxx.xxml Y xxx.xxml Y2 xxx.xxml
- Job No.7 - User Name: XXXXXXXXXXXXXXXX Host Nam e: XX XXX XXX XXX XX XXX
Doc Name : XXXXXXXXXXXXXXXXXXXXXXXXXXXXXXXX I/F Type: Unknown
Job State : Processing Start: 00/00/00 00:00:00 End: 00/00/00 00:00:00
Paper Used: W xxxxxmm * H xxxxxmm Page Count: xxxxx
Ink Used : MK xxx.xxml MK2 xxx.xxml M xxx.xxml M2 xxx.xxml
C xxx.xxml C2 xxx.xxml Y xxx.xxml Y2 xxx.xxml
- Job No.8 - User Name: XXXXXXXXXXXXXXXX Host Nam e: XX XXX XXX XXX XX XXX
Doc Name : XXXXXXXXXXXXXXXXXXXXXXXXXXXXXXXX I/F Type: Unknown
Job State : Processing Start: 00/00/00 00:00:00 End: 00/00/00 00:00:00
Paper Used: W xxxxxmm * H xxxxxmm Page Count: xxxxx
Ink Used : MK xxx.xxml MK2 xxx.xxml M xxx.xxml M2 xxx.xxml
C xxx.xxml C2 xxx.xxml Y xxx.xxml Y2 xxx.xxml
- Job No.9 - User Name: XXXXXXXXXXXXXXXX Host Nam e: XX XXX XXX XXX XX XXX
Doc Name : XXXXXXXXXXXXXXXXXXXXXXXXXXXXXXXX I/F Type: Unknown
Job State : Processing Start: 00/00/00 00:00:00 End: 00/00/00 00:00:00
Paper Used: W xxxxxmm * H xxxxxmm Page Count: xxxxx
Ink Used : MK xxx.xxml MK2 xxx.xxml M xxx.xxml M2 xxx.xxml
C xxx.xxml C2 xxx.xxml Y xxx.xxml Y2 xxx.xxml
Figure 1-28. Job information print pattern
(Stylus Pro 7400/7450/9400/9450)
Product Description Control Panel 80
Page 81

EPSON Stylus Pro 7400/7450/7800/7880/7880C/9400/9450/9800/9880/9880C Revision E
1.4.4.21 Printing Custom Paper Information
User-defined paper settings stored on the printer using the CUSTOM PAPER menu
can be printed out by executing the “Custom Paper” in the TEST PRINT menu.
The following two items are required to print the Custom Paper information.
Print paper size: A4
Font: Built-in font (Print all in alphanumeric characters)
NOTE: “?” is printed out for the settings made by two-byte characters.
Paper No.1
Custom Name : XXXXXXXXXXXXXXXXXXXXXXXXXXXXXX
Platen Gap : Standard Drying Time : 10.0 sec Suction : Standard
Cut Method : ThickPaperFast M/W Adj. : Standard
Ppr Thick. : 0.2mm Ppr Feed Adj. : -0.70 %
Paper No.2
Custom Name : XXXXXXXXXXXXXXXXXXXXXXXXXXXXXX
Platen Gap : Standard Drying Time : 10.0 sec Suction : Standard
Cut Method : ThickPaperFast M/W Adj. : Standard
Ppr Thick. : 0.2mm Ppr Feed Adj. : -0.70 %
Paper No.3
Custom Name : XXXXXXXXXXXXXXXXXXXXXXXXXXXXXX
Platen Gap : Standard Drying Time : 10.0 sec Suction : Standard
Cut Method : ThickPaperFast M/W Adj. : Standard
Ppr Thick. : 0.2mm Ppr Feed Adj. : -0.70 %
Paper No.4
Custom Name : XXXXXXXXXXXXXXXXXXXXXXXXXXXXXX
Platen Gap : Standard Drying Time : 10.0 sec Suction : Standard
Cut Method : ThickPaperFast M/W Adj. : Standard
Ppr Thick. : 0.2mm Ppr Feed Adj. : -0.70 %
Paper No.5
Custom Name : XXXXXXXXXXXXXXXXXXXXXXXXXXXXXX
Platen Gap : Standard Drying Time : 10.0 sec Suction : Standard
Cut Method : ThickPaperFast M/W Adj. : Standard
Ppr Thick. : 0.2mm Ppr Feed Adj. : -0.70 %
Paper No.6
Custom Name : XXXXXXXXXXXXXXXXXXXXXXXXXXXXXX
Platen Gap : Standard Drying Time : 10.0 sec Suction : Standard
Cut Method : ThickPaperFast M/W Adj. : Standard
Ppr Thick. : 0.2mm Ppr Feed Adj. : -0.70 %
Paper No.7
Custom Name : XXXXXXXXXXXXXXXXXXXXXXXXXXXXXX
Platen Gap : Standard Drying Time : 10.0 sec Suction : Standard
Cut Method : ThickPaperFast M/W Adj. : Standard
Ppr Thick. : 0.2mm Ppr Feed Adj. : -0.70 %
Paper No.8
Custom Name : XXXXXXXXXXXXXXXXXXXXXXXXXXXXXX
Platen Gap : Standard Drying Time : 10.0 sec Suction : Standard
Cut Method : ThickPaperFast M/W Adj. : Standard
Ppr Thick. : 0.2mm Ppr Feed Adj. : -0.70 %
Paper No.9
Custom Name : XXXXXXXXXXXXXXXXXXXXXXXXXXXXXX
Platen Gap : Standard Drying Time : 10.0 sec Suction : Standard
Cut Method : ThickPaperFast M/W Adj. : Standard
Ppr Thick. : 0.2mm Ppr Feed Adj. : -0.70 %
Paper No.10
Custom Name : XXXXXXXXXXXXXXXXXXXXXXXXXXXXXX
Platen Gap : Standard Drying Time : 10.0 sec Suction : Standard
Cut Method : ThickPaperFast M/W Adj. : Standard
Ppr Thick. : 0.2mm Ppr Feed Adj. : -0.70 %
Figure 1-29. Custom Paper Information
Product Description Control Panel 81
Page 82

EPSON Stylus Pro 7400/7450/7800/7880/7880C/9400/9450/9800/9880/9880C Revision E
1.4.4.22 Firmware Version
The “Version” in the PRINTER STATUS menu displays the version of the installed
firmware on the LCD panel.
Table 1-43. Firmware Version Display
Model Display
Stylus Pro 7400/7800 VERSION
SN0xxxx.IBCS
Stylus Pro 9400/9800 VERSION
SW0xxxx.IBCS
Stylus Pro 7450/7880/7880C VERSION
TN0xxxx-y.yy.IBCS
Stylus Pro 9450/9880/9880C VERSION
TW0xxxx-y.yy.IBCS
Note • SW0 and SN0:0 are firmware versions for special destination
• xxxx: version of firmware (last 4 characters)
• y.yy: Network firmware version
• I: “4” is displayed for the four-color model, and “8” is displayed for the eight-color
model.
• B: Business system setting
In accordance with the result of calculation of the following printer conditions, a
character to be displayed (1 to F) is determined.
If all bits are 0, “0” is displayed.
• Bit0: Restraint on graphic print function
0: Restraint on graphic print function is not available.
1: Restraint on graphic print function is available.
• Bit1: Credit function
0: Credit function is not available.
1: Credit function is available.
• Bit2: Credit counter
0: Credit No. is 0 or credit function is OFF.
1: Credit No. is 1 or more with credit function ON.
•Bit3: Reserved
• C: If a special setting is made for custom operation, the custom number is displayed.
If a custom operation is not set, “0” is displayed.
• S: Not displayed on the mass-produced machines
1.4.4.23 Printable Pages
The “Printable Pages” in the PRINTER STATUS menu displays estimated pages that
can be printed with the remaining ink per cartridge.
The estimation is performed as follows:
Remaining amount of ink after printing ÷ Amount of ink used to print a page
Note • A whole number which can be specified by the printer driver is displayed as the result
of the calculation.
• “---” is displayed if the corresponding value cannot be obtained.
Printable Pages menu
Stylus Pro 7800/9800
PRINTER STATUS
VERSION
PRINTABLE PAGES
INK LEVEL
Note "*": “MATTE BLACK” is displayed if it is installed instead of the “PHOTO BLACK”.
PRINTABLE PAGES
LIGHT LIGHT BLACK
nnnnnnn PAGES
PRINTABLE PAGES
LIGHT MAGENTA
nnnnnnn PAGES
PRINTABLE PAGES
LIGHT CYAN
nnnnnnn PAGES
PRINTABLE PAGES
LIGHT BLACK
nnnnnnn PAGES
PRINTABLE PAGES
PHOTO BLACK
nnnnnnn PAGES
PRINTABLE PAGES
CYAN
nnnnnnn PAGES
PRINTABLE PAGES
MAGENTA
nnnnnnn PAGES
PRINTABLE PAGES
YELLOW
nnnnnnn PAGES
*
Product Description Control Panel 82
Page 83

EPSON Stylus Pro 7400/7450/7800/7880/7880C/9400/9450/9800/9880/9880C Revision E
Stylus Pro 7880/7880C/9880/9880C Stylus Pro 7400/7450/9400/9450
PRINTER STATUS
VERSION
PRINTABLE PAGES
INK LEVEL
PRINTABLE PAGES
LIGHT LIGHT BLACK
nnnnnnn PAGES
PRINTABLE PAGES
VIVID LIGHT MAGENTA
nnnnnnn PAGES
PRINTABLE PAGES
LIGHT CYAN
nnnnnnn PAGES
PRINTABLE PAGES
LIGHT BLACK
nnnnnnn PAGES
PRINTABLE PAGES
PHOTO BLACK
nnnnnnn PAGES
PRINTABLE PAGES
CYAN
nnnnnnn PAGES
PRINTABLE PAGES
VIVID MAGENTA
nnnnnnn PAGES
PRINTABLE PAGES
YELLOW
nnnnnnn PAGES
*
PRINTER STATUS
VERSION
PRINTABLE PAGES
INK LEVEL
PRINTABLE PAGES
MATTE BLACK
nnnnnnn PAGES
PRINTABLE PAGES
MATTE BLACK 2
nnnnnnn PAGES
PRINTABLE PAGES
MAGENTA
nnnnnnn PAGES
PRINTABLE PAGES
MAGENTA 2
nnnnnnn PAGES
PRINTABLE PAGES
CYAN
nnnnnnn PAGES
PRINTABLE PAGES
CYAN 2
nnnnnnn PAGES
PRINTABLE PAGES
YELLOW
nnnnnnn PAGES
PRINTABLE PAGES
YELLOW 2
nnnnnnn PAGES
Product Description Control Panel 83
Page 84

EPSON Stylus Pro 7400/7450/7800/7880/7880C/9400/9450/9800/9880/9880C Revision E
1.4.4.24 Ink Level
The “Ink Level” in the PRINTER STATUS menu displays remaining amount of ink
per ink cartridge.
Table 1-44. Ink Level Display
Remaining Ink Level Panel display Ink Check LED
100 to 81 % E∗∗∗∗∗FOFF
80 to 61 % E∗∗∗∗ FOFF
60 to 41 % E∗∗∗ FOFF
40 to 21 % E∗∗ FOFF
20 % or less
(Until the Ink Low error occurs)
Ink Low status
(Until the Ink Out error occurs)
Ink Out 0% ON
Note • The remaining counter is converted to percentage after the Ink Low error occurs.
• An amount of ink consumed for performing initial ink charge for newly attached ink
cartridges is not included in the 100 % amount. The remaining amount of ink after the
initial ink charge is regarded as full status (100 %) and then the ink usage counter starts.
E∗ FOFF
nn% Flashing
Ink Level Menu
Stylus Pro 7800/9800
PRINTER STATUS
PRINTABLE PAGES
INK LEVEL
MAINTENANCE TANK
INK LEVEL
LIGHT LIGHT BLACK
E*****F
INK LEVEL
LIGHT MAGENTA
E*****F
INK LEVEL
LIGHT CYAN
E*****F
INK LEVEL
LIGHT BLACK
E*****F
INK LEVEL
PHOTO BLACK
INK LEVEL
CYAN
INK LEVEL
MAGENTA
*
E*****F
E*****F
E*****F
INK LEVEL
YELLOW
E*****F
Note "*": MATTE BLACK” is displayed if it is installed instead of the “PHOTO BLACK”.
Product Description Control Panel 84
Page 85

EPSON Stylus Pro 7400/7450/7800/7880/7880C/9400/9450/9800/9880/9880C Revision E
Stylus Pro 7880/7880C/9880/9880C Stylus Pro 7400/7450/9400/9450
PRINTER STATUS
PRINTABLE PAGES
INK LEVEL
MAINTENANCE TANK
INK LEVEL
LIGHT LIGHT BLACK
E*****F
INK LEVEL
VIVID LIGHT MAGENTA
E*****F
INK LEVEL
LIGHT CYAN
E*****F
INK LEVEL
LIGHT BLACK
E*****F
INK LEVEL
PHOTO BLACK
INK LEVEL
CYAN
INK LEVEL
VIVID MAGENTA
INK LEVEL
YELLOW
*
E*****F
E*****F
E*****F
E*****F
PRINTER STATUS
PRINTABLE PAGES
INK LEVEL
MAINTENANCE TANK
INK LEVEL
MATTE BLACK
INK LEVEL
MATTE BLACK 2
INK LEVEL
MAGENTA
INK LEVEL
MAGENTA 2
E*****F
E*****F
E*****F
E*****F
INK LEVEL
CYAN
E*****F
INK LEVEL
CYAN 2
E*****F
INK LEVEL
YELLOW
E*****F
INK LEVEL
YELLOW 2
E*****F
Product Description Control Panel 85
Page 86

EPSON Stylus Pro 7400/7450/7800/7880/7880C/9400/9450/9800/9880/9880C Revision E
1.4.4.25 Maintenance Tank Counter
The “Maintenance Tank” in the PRINTER STATUS menu displays available space in
the Maintenance Tank.
NOTE: Maintenance Tank total capacity = 1300 g
Table 1-45. Available Space of the Maintenance Tank
Free space Panel display Ink Check LED
100 to 81 % E∗∗∗∗∗FOFF
80 to 61 % E∗∗∗∗ FOFF
60 to 41 % E∗∗∗ FOFF
40 to 21 % E∗∗ FOFF
20 to 10 % E∗ FOFF
Less than 10 % nn % Flashing
Maintenance tank full 0 % ON
Warning
If the remaining capacity of the tank becomes less than 10 %, the printer causes
“Maintenance Tank Near Full” error flashing the Ink Check LED.
Error
A “Maintenance Tank Full” error occurs when the available capacity becomes 0 %
and the Ink Check LED lihgts.
1.4.4.26 (Ink and Paper) Usage Counter
The “Usage Count” in the PRINTER STATUS menu displays a cumulative amount of
consumed ink or paper.
Ink usage counter
A cumulative amount of ink consumed by the following operations is displayed by
the milliliter.
Performing print jobs (regardless of completion/interruption of the jobs)
Flashing operations
Cleaning operations
NOTE • The printer sums up the amount of ink consumed by IR command.
• “---” is displayed if the corresp onding value cannot be obtained.
Paper usage counter
A cumulative amount of paper used for printing (includes automatic paper feed
amount, not includes the amount of manual feed) is displayed by the centimeter.
NOTE • The printer sums up paper feed amounts performed by JS to JE commands.
• “---” is displayed if the corresp onding value cannot be obtained.
Counter clear
It is cleared by replacing maintenance tank.
Product Description Control Panel 86
Page 87

EPSON Stylus Pro 7400/7450/7800/7880/7880C/9400/9450/9800/9880/9880C Revision E
1.4.4.27 Clear Usage Counter
Clear Usage Count - INK
Resets the “Ink usage counter” to 0.
Clear Usage Count - PAPER
Resets “Paper usage counter” to 0.
Clear Usage Count menu
PRINTER STATUS
USAGE COUNT
CLEAR USAGE COUNT
JOB HISTORY
[ / ]
CLEAR USAGE COUNT
INK EXEC
PAPER EXEC
CLEAR USAGE COUNT
[ ]
INK EXEC
PAPER EXEC
[ ]
[ ]
Executes
the operation
Executes
the operation
1.4.4.28 Job History
The “Job History” displays job history report (up to 10 jobs) stored on the printer.
Job No.
A number assigned to each job report in reverse chronological order. The number
of the latest job is 0.
Paper usage
A total area of paper consumed for each job is displayed (height x width = cm
NOTE: The printer sums up paper feed amounts performed by JS to JE
commands.
Ink usage
An amount of ink consumed for each job is displayed by the milliliter.
NOTE • The printer sums up the amount of ink consumed by IR command, or JS to
JE commands.
• If IR or JS/JE commands are not specified in the job, ink usage is not
counted.
• "---" is displayed if the corresponding value cannot be obtained.
Job History menu
PRINTER STATUS
CLEAR USAGE COUNT
JOB HISTORY
TOTAL PRINTS
JOB HISTORY
NO.0
INK xml
PAPER xxxxxxxcm
2
2
)
JOB HISTORY
NO.1
INK xml
PAPER xxxxxxxcm
JOB HISTORY
NO.8
INK xml
PAPER xxxxxxxcm
JOB HISTORY
NO.9
INK xml
PAPER xxxxxxxcm
2
2
2
Product Description Control Panel 87
Page 88

EPSON Stylus Pro 7400/7450/7800/7880/7880C/9400/9450/9800/9880/9880C Revision E
1.4.4.29 Total Prints
The “Total Prints” displays a cumulative number of printed pages by decimal number
up to 6-digit.
1.4.4.30 Service Life
Cutter life
Calculation method
The cutter life is guaranteed for 2,000 times of cutting operations. Each
cutting operation is counted as one time regardless of the paper size.The
remaining life is indicated based on the usage counter and the guaranteed
2,000 times of life.
Panel Display (remaining ratio of the life)
100 to 81 % E∗∗∗∗∗F
80 to 61 % E∗∗∗∗ F
60 to 41 % E∗∗∗ F
40 to 21 % E∗∗ F
20 to 1 % E∗ F
less than 1 % EF
Maintenance call
Not occurs due to the following reasons.
• The cut result shows the degree of cutter consumption.
• No fatal accident is caused.
• The user can replace cutters easily.
Fatal error
Not occurs
Counter clear
Cleared by replacing the cutter using the “Cutter Replacement” in the
MAINTENANCE menu.
C H E C K
P O I N T
This life counter should be used as a guideline. As the actual life of
the cutter varies depending on various factors, it must be replaced
on the basis of observed conditions.
CR Motor life
Calculation method
The life of the CR motor is regarded as that of the Ink Supply Tube because a
malfunction of the tube due to its wear can cause a serious failure of the CR
motor. The guaranteed life of the Ink Supply Tube is defined by the number of
Carriage movement cycles, so the remaining amount of the CR motor life is
obtained based on the Carriage movement cycles.
Table 1-46. Reference Values
Model CR Movement Cycles
Stylus Pro 7400/7450/7800/7880/7880C 1,820,000
Stylus Pro 9400/9450/9800/9880/9880C 3,150,000
Panel Display (remaining ratio of the life)
100 to 81 % E∗∗∗∗∗F
80 to 61 % E∗∗∗∗ F
60 to 41 % E∗∗∗ F
40 to 21 % E∗∗ F
20 to 1 % E∗ F
less than 1 % EF
Maintenance call
Occurs when the remaining life becomes less than 4%.
Fatal error
A service call error occurs when the remaining life becomes 0 to inform that
the Ink Supply Tube must be checked for any damage.
Counter clear
Cleared by executing the “Reset When CR Unit Change” in the Adjustment
Program.
C H E C K
P O I N T
These values are intended to assist service personnel only.
Do not explain the meaning of the display to users.
Product Description Control Panel 88
Page 89

EPSON Stylus Pro 7400/7450/7800/7880/7880C/9400/9450/9800/9880/9880C Revision E
PF Motor life
Calculation method
The PF motor and any other parts or components in the paper feed mechanism
are not required to be replaced within the lifespan of the printer. This counter
can be used to troubleshoot a problem when the printer is used beyond its
service life. The remaining ratio is obtained based on a cumulative travel
distance of the PF motor.
Panel Display (remaining ratio of the life)
100 to 81 % E∗∗∗∗∗F
80 to 61 % E∗∗∗∗ F
60 to 41 % E∗∗∗ F
40 to 21 % E∗∗ F
20 to 1 % E∗ F
less than 1 % EF
Maintenance call
Does not occur because the service is not required within the lifespan of the
printer.
Fatal error
Does not occur because the failure mode is not fatal.
Counter clear
Cleared by executing the “Reset PF Motor Counter” in the Adjustment
Program.
Continuity of counter
Continues to count even after the remaining life becomes 0% until the fulldigit of 32 bits counter reaches the maximum positive integers.
C H E C K
P O I N T
These values are intended to assist service personnel only.
Do not explain the meaning of the display to users.
Head Unit life
Calculation method
The total life of the unit is calculated by multiplying the guaranteed number of
shots for each color nozzle by 180 nozzles. The printer counts the shooting
number of times by each color rounding the value by 2
calculates the remaining ratio of the unit life based on the total life and the
maximum cumulative shots among the all color nozzles.
Panel Display (remaining ratio of the life)
100 to 81 % E∗∗∗∗∗F
80 to 61 % E∗∗∗∗ F
60 to 41 % E∗∗∗ F
40 to 21 % E∗∗ F
20 to 1 % E∗ F
less than 1 % EF
Maintenance call
Does not occur for the head unit.
Fatal error
Does not occur for the head unit.
Counter clear
Cleared by executing the “Reset When PrintHead Change” in the Adjustment
Program.
Continuity of counter
Continues to count even after the remaining life becomes 0% until the fulldigit of 32 bits counter reaches the maximum positive integers.
C H E C K
P O I N T
These values are intended to assist service personnel only.
Do not explain the meaning of the display to users.
20
per every page, and
Product Description Control Panel 89
Page 90
EPSON Stylus Pro 7400/7450/7800/7880/7880C/9400/9450/9800/9880/9880C Revision E
Cleaning Unit life
Calculation method
The life of the cleaning unit is judged by the life of the pump motor. When
replacing the cap assy., pump assy., flashing box, and the wiper, the cleaning
unit must be replaced together with them.
Panel Display (remaining ratio of the life)
100 to 81 % E∗∗∗∗∗F
80 to 61 %d E∗∗∗∗ F
60 to 41 % E∗∗∗ F
40 to 21 % E∗∗ F
20 to 1 % E∗ F
less than 1 % EF
Maintenance call
Occurs when the remaining life ration becomes less than 4%.
Fatal error
A service call error occurs when the remaining life becomes 0 because a paper
suction failure can occur.
Counter clear
Cleared by executing the “Reset When Cleaning Unit Change” in the
Adjustment Program.
C H E C K
P O I N T
These values are intended to assist service personnel only.
Do not explain the meaning of the display to users.
Pressure Motor life
Calculation method
The life of the Pressure Pump Unit is judged by the life of the Pressure Pump.
Replace the Pressure Pump Unit when the Pressure Motor life error occurs.
Panel Display (remaining ratio of the life)
100 to 81 % E∗∗∗∗∗F
80 to 61 % E∗∗∗∗ F
60 to 41 % E∗∗∗ F
40 to 21 % E∗∗ F
20 to 1 % E∗ F
less than 1 % EF
Maintenance call
Occurs when the remaining life ration becomes less than 4%.
Fatal error
A service call error occurs when the remaining life becomes 0 because a
pressurizing failure can occur.
Counter clear
Cleared by executing the “Reset Pump Counter” in the Adjustment Program.
C H E C K
P O I N T
These values are intended to assist service personnel only.
Do not explain the meaning of the display to users.
Product Description Control Panel 90
Page 91
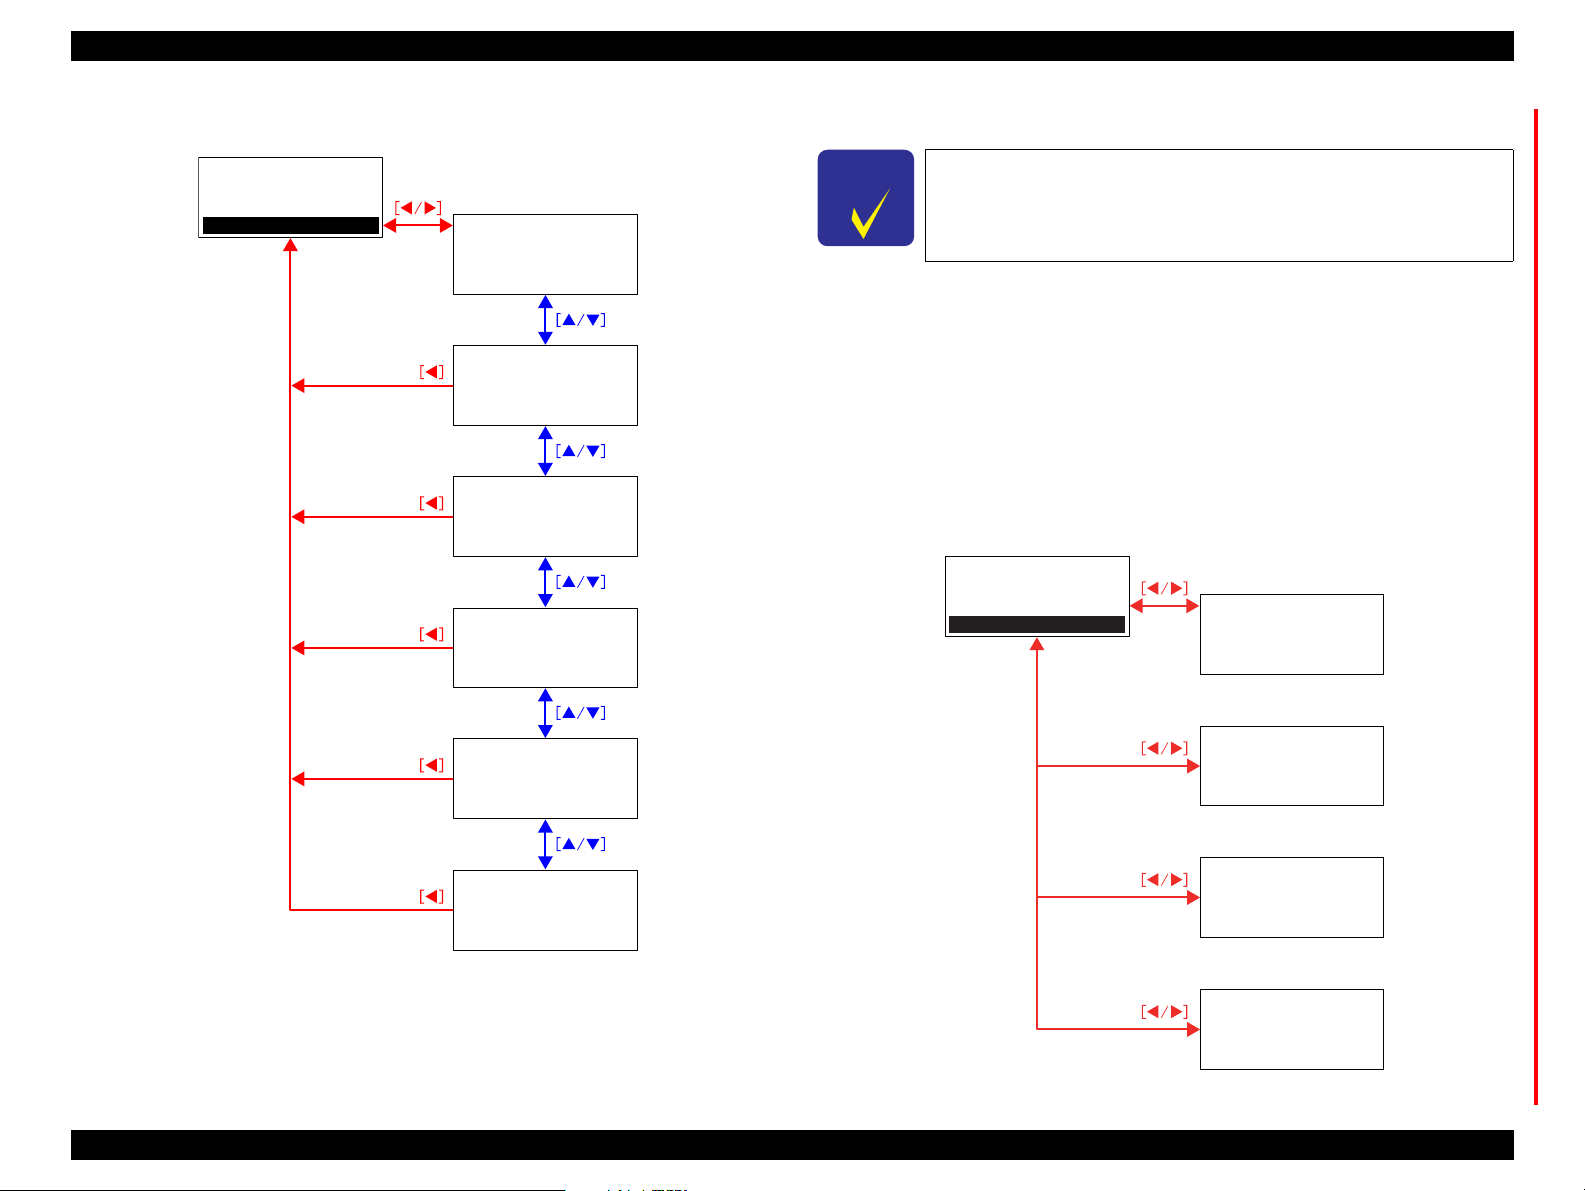
EPSON Stylus Pro 7400/7450/7800/7880/7880C/9400/9450/9800/9880/9880C Revision E
Service Life Menu
1.4.4.31 EDM Status
PRINTER STATUS
JOB HISTORY
TOTAL PRINTS
SERVICE LIFE
SERVICE LIFE
CUTTER
SERVICE LIFE
CR MOTOR
SERVICE LIFE
PF MOTOR
SERVICE LIFE
HEAD UNIT
SERVICE LIFE
CLEANING UNIT
E*****F
E*****F
E*****F
E*****F
E*****F
C H E C K
P O I N T
Stylus Pro 7450/7880/7880C/9450/9880/9880C only.
By executing this mode, the EDM status can be confirmed. The following information
is displayed according to the data acquired from the EDM Agent.
1st line: Validity (enabled/disabled) of EDM is displayed. If the data cannot be
acquired, "INITIALIZING" is displayed.
2nd line: When the EDM is enabled, the lastly uploaded time is displayed.
3rd line: When the EDM is enabled, the lastly uploaded time is displayed.
When the EDM is enabled but it is not updated, "ENABLED (NOT UPLOADED)" is
displayed.
PRINTER STATUS
TOTAL PRINTS
SERVICE LIFE
EDM STATUS
EDM STATUS
INITIALIZING
EDM STATUS
DISABLED
SERVICE LIFE
PRESSURE MOTOR
E*****F
EDM STATUS
ENABLED
LAST UPLOADED:
MM/DD/YY HH:MM GMT
EDM STATUS
ENABLED
(NOT UPLOADED)
MM/DD/YY HH:MM GMT
Product Description Control Panel 91
Page 92

EPSON Stylus Pro 7400/7450/7800/7880/7880C/9400/9450/9800/9880/9880C Revision E
1.4.4.32 Custom Paper
This function allows the user to store the user-defined paper settings up to 10. Once the
paper setting is made, the user can retrieve the setting just by specifying the assigned
number. The user can refer to, save, delete or set the Custom Paper also by the
“EPSON Service Utility”.
Setting Method
1. Enter the Custom Paper menu in the panel setting mode.
2. Select a number for the paper setting. (Standard, 1 - 10)
3. Select the PG (Platen Gap).
4. Print the paper thickness detection pattern
(It is not printed when the “Standard” is selected.)
5. Check the printed patterns and select the number of the pattern with the least
displacement.
6. Select the cutting method.
7. Enter paper feed adjustment value.
8. Enter the ink drying time for each pass.
9. Select the paper suction.
10. Select the MW (Micro Wave) print quality setting.
NOTE • In despite of paper number, it is possible to set paper related setting
independently.
• For details of the pattern, see “Paper thickness detection pattern (p.97)”.
• When “STD” is selected for paper number, above 3.-10. are not displayed
and cannot be set.
• “PRINTING” is displayed during printing the detection pattern.
• The default display for paper thickness number selection is the number
corresponding to paper thickness when gap adjustment is performed.
• The Platen Gap may be automatically set to Wider or Standard depends on
the result of detection by the paper thickness sensor.
Custom Paper setting handling
Paper setup Operation
Standard When each setting item values are set by commands, the printer follows
the command settings.
1 to 10 User-defined paper setting is used regardless of settings specified by
commands.
Note : When the Custom Paper is set to 1 to 10, the setting (PG position) is prioritized and PG
settings made using commands or printer setting menu are ignored. And the Platen Gap
Setting icon does not appear on the LCD panel. See “Platen Gap Setting (p.44)”.
Custom Paper setting items
Table 1-47. Custom Paper Settings
Item Details Setting value
PLATEN
GAP
CUT
METHOD
PAPER
FEED
ADJUST
DRYING
TIME
Platen gap (gap between
paper and the printhead)
can be selected from the
five options.
There are four preset
settings for cutting
operation to be easily
selected for the target
paper type.
Paper feed amount can be
selected. The printer
recognizes this setting as
the absolute value.
Time period for drying ink
can be specified in the
range of 0 to 10,000 ms.
The Carriage stops at its
anti-home side during the
specified time period.
(DR m1=40h)
SN m1 = 01h
Widest m2=05h (2.6 mm)
Wider m2=01h (2.1 mm)
Wide m2=02h (1.5 mm)
Standard m2=03h (1.2 mm)
Narrow m2=04h (0.8 mm)
SN m1 = 80h SN m1 = 81h
Standard m2 = 03h *
Thin Paper m2 = 02h m2 = 49h
Thick Paper, Fast m2 = 01h m2 = 7Eh
Thick Paper, Slow m2 = 06h m2 = 65h
-0.7% ≤ ±0% ≤ 0.7% SN m1 = 04h
At 0% SN m2 = 65h
-At 70% SN m2 = 1Fh
At 70% SN m2 = ABh
0 to 10000 msecs (in increments of 100 msecs) *
0000h to 01F4h
1
m2 = 65h
2
Product Description Control Panel 92
Page 93

EPSON Stylus Pro 7400/7450/7800/7880/7880C/9400/9450/9800/9880/9880C Revision E
Table 1-47. Custom Paper Settings (continued)
Item Details Setting value
PAPER
SUCTION
MW
ADJUSTMENT
Note "*1": The parameters for the Cut Method differs between the panel setting and the printer
Cut Method SN m1=80h (Cut Method) SN m1=81h (Cutting Pressure)
Standard m2=00h (Main unit table) m2=00h (Main unit table)
Thin Paper m2=02h (Medium speed rough edge) m2=49h (Duty:70% 300gf)
Thick Paper, Fast m2=01h (Standard second level) m2=7Eh (Duty:125% 700gf)
Thick Paper, Slow m2=06h (Low speed rough edge) m2=65h (Duty:100% 500gf)
Paper suction level to
ensure stable paper feeding
can be selected from five
options. “-1” is suitable for
thin paper (film, etc.). It is
normally better to decrease
Standard m2 = 33h (100%)
-1 m2 = 2Bh (84%)
-2 m2 = 22h (66%)
-3 m2 = 1Ah (50%)
-4 m2 = 12h (34%)
SN m1 = 05h
(-2, -3, or -4) according to
the paper thickness.
Micro-weave mode can be
adjusted.
See “ M/W Setting List (p94)” for the information
on the selectable MW modes.
Decrease the value to put
print speed above the
quality, and increase it to
put the quality above the
speed.
driver. The table below shows the parameters set by the printer driver.
"*2": The EX1B command sends the value in 1-msec units and the media table area in the
printer also records in 1-msec units. However, with the printer utility or the panel
setting, the unit is 100 msec. So even when the value is specified in 1-msec or 10msec, the panel displays the value in 100-msec unit rounding it down to the nearest
hundredth of a millisecond.
Note • The values set by EX 1B commands are the same as the parameters shown in the table.
• When invalid parameters are set by EX 1B commands, they are automatically changed
to the following settings:
• PLATEN GAP: Standard m2=03h (1.2 mm)
• CUT METHOD: Standard m2=03h m2=65h
• PAPER FEED ADJUST: 0% SN m2 = 65h
•DRYING TIME: 0sec
• PAPER SUCTION: Standard m2=33h (100%)
• MW ADJUSTMENT: n2:00h
Product Description Control Panel 93
Page 94

EPSON Stylus Pro 7400/7450/7800/7880/7880C/9400/9450/9800/9880/9880C Revision E
M/W Setting List
Table 1-48. M/W (Print Mode) Settings
Raster
resolution
setting
Dot size setting
VSD1/VSD2/
VSD3_N
Bit/
Pixel
2 DMW 360 x 180 --- --- Standard /1/2 10 8 360 180 0 ---
OL
Output
resolution
DS range Remarks
360x360 M/F setting
is recommended to
this setting
Supports driver of
conventional model
Equivalent to 8 pass
Not supported by
standard driver
Not supported by
standard driver
Not supported by
standard driver /
Monochrome only
Panel
setting
Standard /1/2 30 8 360 360 1 ---
Standard /1/2 30 8 360 360 1 ---
--- 93 8 1440 720 3 ---
Standard /1/2 B0 8 1440 1440 0
Standard /1/2 C0 8 2880 2880 0
Standard /1/2 C1 8 2880 2880 1
UNIT
No.
Color
No.
Mode ID
Horizontal
resolution
Vertical
resolution
Restrictions
No.
Borderless
print is N/A
Borderless
print is N/A,
Upper and
lower margin
enlarge
Borderless
print is N/A,
Upper and
lower margin
enlarge
Continued to next page
Color
number
8
M/W mode setting
ESC (i
n1 n2 ESC (D ESC (e
00h --- 360 x 180
00h --- 720 x 180 VSD3_HR 1 DMW 720 x 180 --- --- Standard /1/2 20 8 720 180 0 ---
01h 10h 360 x 360 VSD1 (ECO) 1 M/F 360 x 360 ---
00h 00h 360 x 360 VSD1 (ECO) 1 M/F 360 x 360 --01h 00h 360 x 360 VSD1 2 FD+36POL 360 x 360 --- --- Standard /1/2 40 8 360 360 0 ---
01h 00h 360 x 720 VSD1 2 FD+21POL 360 x 720 --- --- Standard /1/2 50 8 360 720 0 --01h 00h 720 x 360 VSD1 2 FOL+36POL 720 x 360 --- --- Standard /1/2 60 8 720 360 0 --01h 00h 720 x 360 VSD2 2 FOL+36POL 720 x 360 --- --- Standard /1/2 70 8 720 360 0 --01h 10h 720 x 720 VSD2 2 FOL+21POL 720 x 720 --- --- 1 80 8 720 720 0 --01h 00h 720 x 720 VSD2 2 FOL+48POL 720 x 720 0±3 --- Standard 81 8 720 720 1 --01h 20h 720 x 720 VSD2 2 FOL+46POL 720 x 720 0±5 --- 2 82 8 720 720 2 --01h 00h 1440 x 720 VSD3_N 2 FOL+11POL 1440 x 720 --- --- Standard 90 8 1440 720 0 --01h 10h 1440 x 720 VSD3_N 2 FOL+28POL 1440 x 720 --- --- 1 91 8 1440 720 1 --01h 20h 1440 x 720 VSD3_N 2 FOL+11POL 1440 x 720 --- --- 2 92 8 1440 720 2 --01h 30h 1440 x 720 VSD3_N 2 FOL+90POL 1440 x 720 --01h 00h 2880 x 1440 VSD3_HR 1 FOL+6POL 2880 x 1440 --- --- Standard /1/2 A0 8 2880 1440 0 ---
01h 00h 1440 x 1440 VSD3_N 2 FOL+6POL 1440 x 1440 ---
01h 00h 2880 x 2880 VSD3_HR 1 FOL 2880 x 2880 ---
01h 10h 2880 x 2880 VSD3_HR 1 FOL 2880 x 2880 ---
Product Description Control Panel 94
Page 95
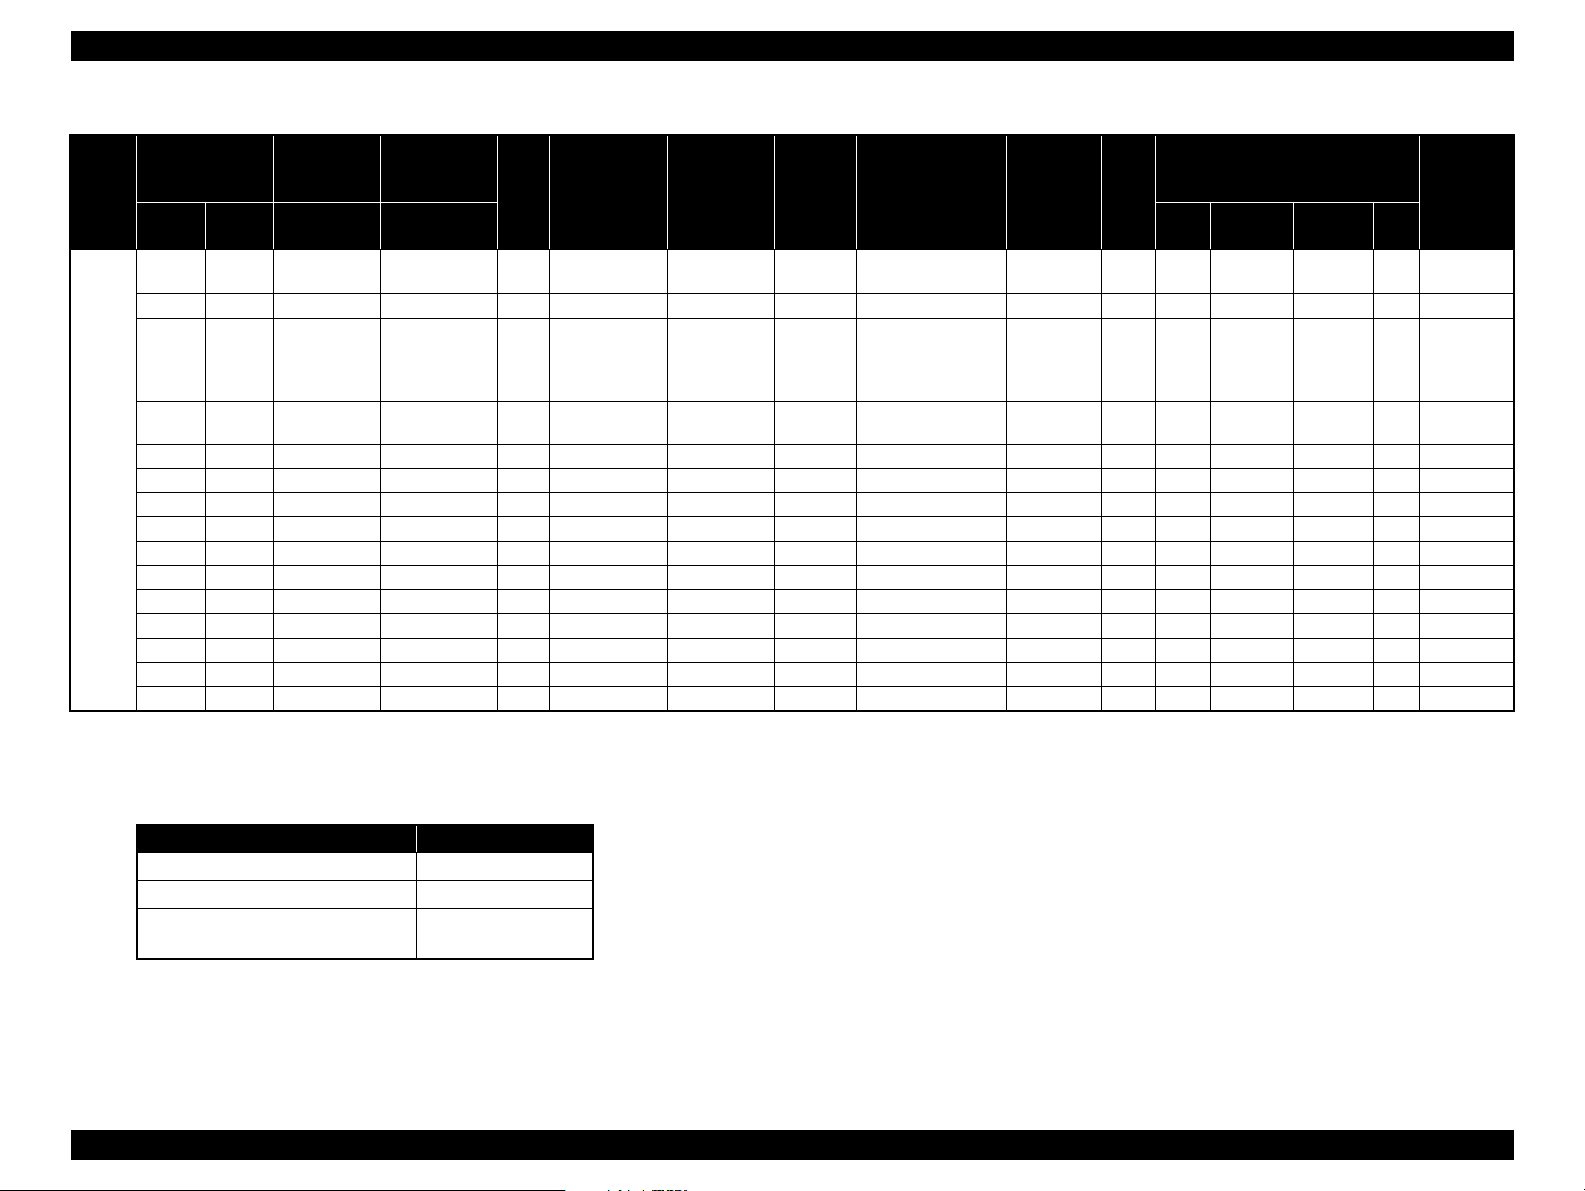
EPSON Stylus Pro 7400/7450/7800/7880/7880C/9400/9450/9800/9880/9880C Revision E
Table 1-48. M/W (Print Mode) Settings(continued)
Raster
resolution
setting
Dot size setting
VSD1/VSD2/
VSD3_N
Bit/
Pixel
2 DMW 360 x 180 --- --- Standard /1/2 10 4 360 180 0 ---
OL
Output
resolution
DS range Remarks
360x360 BAND
setting is
recommended to this
setting
Supports driver of
conventional model
H720 adjustment
For CAD line drawing
Correspond to 8 pass
Panel
setting
Standard /1/2 30 4 360 360 1 ---
Standard /1/2 30 4 360 360 1 ---
Standard /1/2 50 4 360 720 0 --Standard /1/2 51 4 360 720 1 ---
--- 93 4 1440 720 3 ---
UNIT
No.
Color
No.
Mode ID
Horizontal
resolution
Vertical
resolution
Restrictions
No.
Color
number
4
M/W mode setting
ESC (i
n1 n2 ESC (D ESC (e
00h --- 360 x 180
00h --- 720 x 180 VSD3_HR 1 DMW 720 x 180 --- --- Standard /1/2 20 4 720 180 0 ---
01h 10h 360 x 360 VSD1 (ECO) 1 BAND 360 x 360 ---
00h 00h 360 x 360 VSD1 (ECO) 1 BAND 360 x 360 --01h 00h 360 x 360 VSD1 2 FD+117POL 360 x 360 --- --- Standard /1/2 40 4 360 360 0 -- -
01h 00h 360 x 720 VSD1 2 FD+72POL 360 x 720 --01h 10h 360 x 720 VSD1 2 FD+72POL 360 x 720 --01h 10h 720 x 360 VSD2 2 FOL+117POL 720 x 360 --- --- Standard /1/2 70 4 720 360 0 --01h 10h 720 x 720 VSD2 2 FOL+72POL 720 x 720 --- --- 1 80 4 720 720 0 --01h 20h 720 x 720 VSD2 2 FOL+146POL 720 x 720 0±4 --- 2 81 4 720 720 1 --01h 00h 720 x 720 VSD2 2 FOL+148POL 720 x 720 0±4 --- Standard 82 4 720 720 2 --01h 10h 1440 x 720 VSD3_N 2 FOL+41POL 1440 x 720 --- --- 1 90 4 1440 720 0 --01h 00h 1440 x 720 VSD3_N 2 FOL+99POL 1440 x 720 --- --- Standard 91 4 1440 720 1 --01h 20h 1440 x 720 VSD3_N 2 FOL+100POL 1440 x 720 --- --- 2 92 4 1440 720 2 --01h 30h 1440 x 720 VSD3_N 2 FOL+178POL 1440 x 720 ---
Note 1: The printer switches to M/F or BAND VSD1 mode when none of the modes shown in
the table matches with the job.
2: Dot size control specification
Dot name Replacement dot
Micro Dot VSD2-M
Normal Dot VSD2-L
Normal Dot 2
VSD1 (ECO) VSD1-L
3: When specifying the dot sizes shown in the above table, the raster data should be
binary.
Product Description Control Panel 95
Page 96

EPSON Stylus Pro 7400/7450/7800/7880/7880C/9400/9450/9800/9880/9880C Revision E
Custom Paper menu
* When the Custom Paper No.1 to
10 are used.
MENU
PRINTER STATUS
CUSTOM PAPER
MAINTENANCE
* When the "Standard"
is specified.
CUSTOM PAPER
PAPER NUMBER
PAPER NUMBER
PAPER NUMBER
PAPER NUMBER
STANDARD
[ ]
[ ]
Setting
Setting
10
1
CUSTOM PAPER nn
PAPER NUMBER
PLATEN GAP
THICKNESS PATTERN
CUSTOM PAPER nn
PAPER NUMBER
PLATEN GAP
THICKNESS PATTERN
CUSTOM PAPER nn
PLATEN GAP
THICKNESS PATTERN
CUT METHOD
CUSTOM PAPER nn
THICKNESS PATTERN
CUT METHOD
PAPER FEED ADJUST
CUSTOM PAPER nn
CUT METHOD
PAPER FEED ADJUST
DRYING TIME
CUSTOM PAPER nn
PAPER FEED ADJUST
DRYING TIME
PAPER SUCTION
* The "nn" indicates the specified number.
PAPER NUMBER
STANDARD
STANDARD, 1 to 10
PLATEN GAP
NARROW
STANDARD
WIDE
NARROW, STANDARD, WIDE, WIDER, WIDEST
THICKNESS PATTERN
PRINT
CUT METHOD
STANDARD
THIN PAPER
THICK PAPER, FAST
STANDARD / THIN PAPER / THICK PAPER, FAST / THICK PAPER, SLOW
PAPER FEED ADJUST
-0.70% ~ 0% ~ 0.70%
DRYING TIME
0.00%
0.0sec
[ ]
Setting
[ ]
Setting
[ ]
PRINTING
[ ]
THICKNESS NUMBER
[ ]
Setting
[ ]
Setting
* When a value other than the selectable values in the
panel setting is specified using the printer utility, the
value is indicated instead of the "-0.70%" or "0.70%".
The asterisk (*) does not appear at that time.
[ ]
Setting
1 to 15
[ ]
1
Setting
CUSTOM PAPER nn
DRYING TIME
PAPER SUCTION
M/W ADJUSTMENT
CUSTOM PAPER nn
DRYING TIME
PAPER SUCTION
M/W ADJUSTMENT
0.0sec ~ 10.0sec
PAPER SUCTION
STANDARD
STANDARD, -1, -2, -3, -4
M/W ADJUSTMENT
STANDARD
1
2
STANDARD, 1, 2
[ ]
[ ]
Setting
Setting
Product Description Control Panel 96
Page 97

EPSON Stylus Pro 7400/7450/7800/7880/7880C/9400/9450/9800/9880/9880C Revision E
Paper thickness detection pattern
Printing specifications
Head speed 240cps
Pattern height 64 Dot
Dot size VSD2 Large
Color Black
Print direction Uni-D
Pattern interval Upper row: Regular intervals
Lower row: One of the 16 lines reflects the current PG setting. The gap
between the line and the upper line becomes the center value.
The gaps between the other 15 lines and their corresponding
upper lines are changed from the center value by a set
amount and the all gaps are different from each other.
Other When printing from the edge of the paper, feed 90mm of roll paper or
50mm of cut sheet before starting printing.
10mm
9mm (64dot)
9mm (64dot)
A4 narrow side width
9.0mm(64dot)
feed amount
Pattern numbers and paper thickness
Figure 1-30. Paper thickness detection pattern
Number during pattern printing 1 2 3 ... ... 15
Paper thickness (mm) 0.1 0.2 0.3 ... ... 1.5
Product Description Control Panel 97
Page 98

EPSON Stylus Pro 7400/7450/7800/7880/7880C/9400/9450/9800/9880/9880C Revision E
Shifting amount of the lower lines
The following illustrates and explains the shifting amount of the lower lines
printed on the pattern assuming that the shift amount is “x” micrometers when
the paper thickness is changed by 0.1mm.
1.4.4.33 Cutter Replacement
The “Cutter Replacement” in the MAINTENANCE menu displays instructions for
replacing the cutter on the LCD panel in accordance with operations made by the user.
Procedure for replacing the cutter
Head
Paper thickness when adjusting gap + 0.1mm
Paper thickness when adjusting gap
Paper thickness when adjusting gap - 0.1mm
ABCD
Figure 1-31. Shifting Amount of the Lower Lines on the Pattern
Note : AB: Gap adjustment value when paper thickness is +0.1mm
AC: Present gap adjustment value
AD: Gap adjustment value when paper thickness is -0.1mm
Given that the gap regularly corresponds to the change in paper thickness;
X* = AC - AB = AD - AC
1. Enter the “Cutter Replacement” menu using the panel.
(You can also access the menu just by holding down the [Paper Select ]
button for three seconds)
2. Open the front cover following the instruction displayed on the LCD.
3. Follow the next instruction to replace the cutter.
4. Close the front cover when the instruction is displayed.
NOTE: The cutter replacing work can be interrupted by the following
errors. The printer displays the error message for three seconds
and returns to the MAINTENANCE” menu screen.
• Ink end.
• Ink cart ridge mo del wrong.
• CSIC cont act error.
• Ink cartridge failure.
• No ink cartridge.
• When th ick paper is set .
Correcting improper cutter installation
* The “x” value is 240 cps or 14.42 micron meters in VSD2 mode.
The value is saved on the NVRAM, and is left changeable.
Example) Gap adjustment when paper thickness is 0.2mm
The printer runs a cutter failure confirmation sequence (displays confirmation
messages or instructions to inform the user to check the cutter) under the following
conditions.
When a cutting error is detected for the first time after replacing the cutter.
Pattern
number
1 +2X 9 -6X
2 +1X 10 -7X
3± 011-8X
4 -1X 12 -9X
5 -2X 13 -10X
6 -3X 14 -11X
7 -4X 15 -12X
8 -5X 16 -13X
Gap between the Upper
and Lower lines
Pattern
number
Gap between the Upper
and Lower lines
When a cutting error is detected for the first time after a paper jam-related
service call error occurs.
When a cutting error is detected for the first time after the printer runs the
cutter failure confirmation sequence. If the sequence is carried out two times
in a row, a cutting error message is displayed until the corrective action is
taken.
Product Description Control Panel 98
Page 99

EPSON Stylus Pro 7400/7450/7800/7880/7880C/9400/9450/9800/9880/9880C Revision E
1.4.4.34 BK Ink Change
This menu is provided for the Stylus Pro 7800/7880/7880C/9800/9880/9880C. The
printer displays instructions for replacing the Photo or Matte black cartridge with the
other one on the LCD panel in accordance with operations made by the user.
NOTE: The Stylus Pro 7400/7450/9400/9450 are not equipped with this
function. However, replacing the Matte black cartridge with Photo black
one is available. (the printers display a confirmation message when the
Photo black is inserted.) Note that the panel display and the status sheet
do not reflect the ink change. The name of the black ink remains as
“Matte black” even after replacing it with Photo black.
1.4.4.35 Power Cleaning
The “Power Cleaning” is a function to clean the printhead more powerfully than
normal head cleaning. As this includes cleaning the choke, an operator is required to
move the ink lever in accordance with the panel message.
Power Cleaning Triggers
“Power Cleaning” is displayed on the LCD when any one of the following
conditions are met.
After executing manual cleaning three times in a row.
When the printer is turned On after a lapse of 20 days or longer from the last
Power Cleaning.
When the printer is turned On after an interval of one month or longer.
1.4.4.36 Clock Setting
This menu allows the user to set current date and time to correct the time difference.
The set time is compared to the absolute control time maintained by the RTC power
source, and the printer maintains the set time by keeping the difference between them.
The set time is used for the Job Information.
This time setting is disabled if the time synchronization is adopted by the TypeB
interface. And it is also disabled when the NTP is using the time synchronization
(when date and time is entered, an error message is displayed for three seconds and the
printer returns to the MAINTENANCE menu screen .)
1.4.4.37 Contrast Adjustment
The contrast of the LCD panel can be adjusted by this menu. The adjustable range is
plus or minus 20 levels from the center value. The level decreases or increases by 1
level each time the [Paper Feed ( )] button is pressed.
NOTE: If a “Maintenance Tank Near Full” or “Ink Low” error occurs after
performing the cleaning, press the [Enter ] button. The printer displays
the error message for three seconds and then returns to the menu screen.
If the Maintenance Tank error occurs during the cleaning, the cleaning is
interrupted and cannot be continued unless taking a corrective action
(replacing the tank or etc.).
Product Description Control Panel 99
Page 100
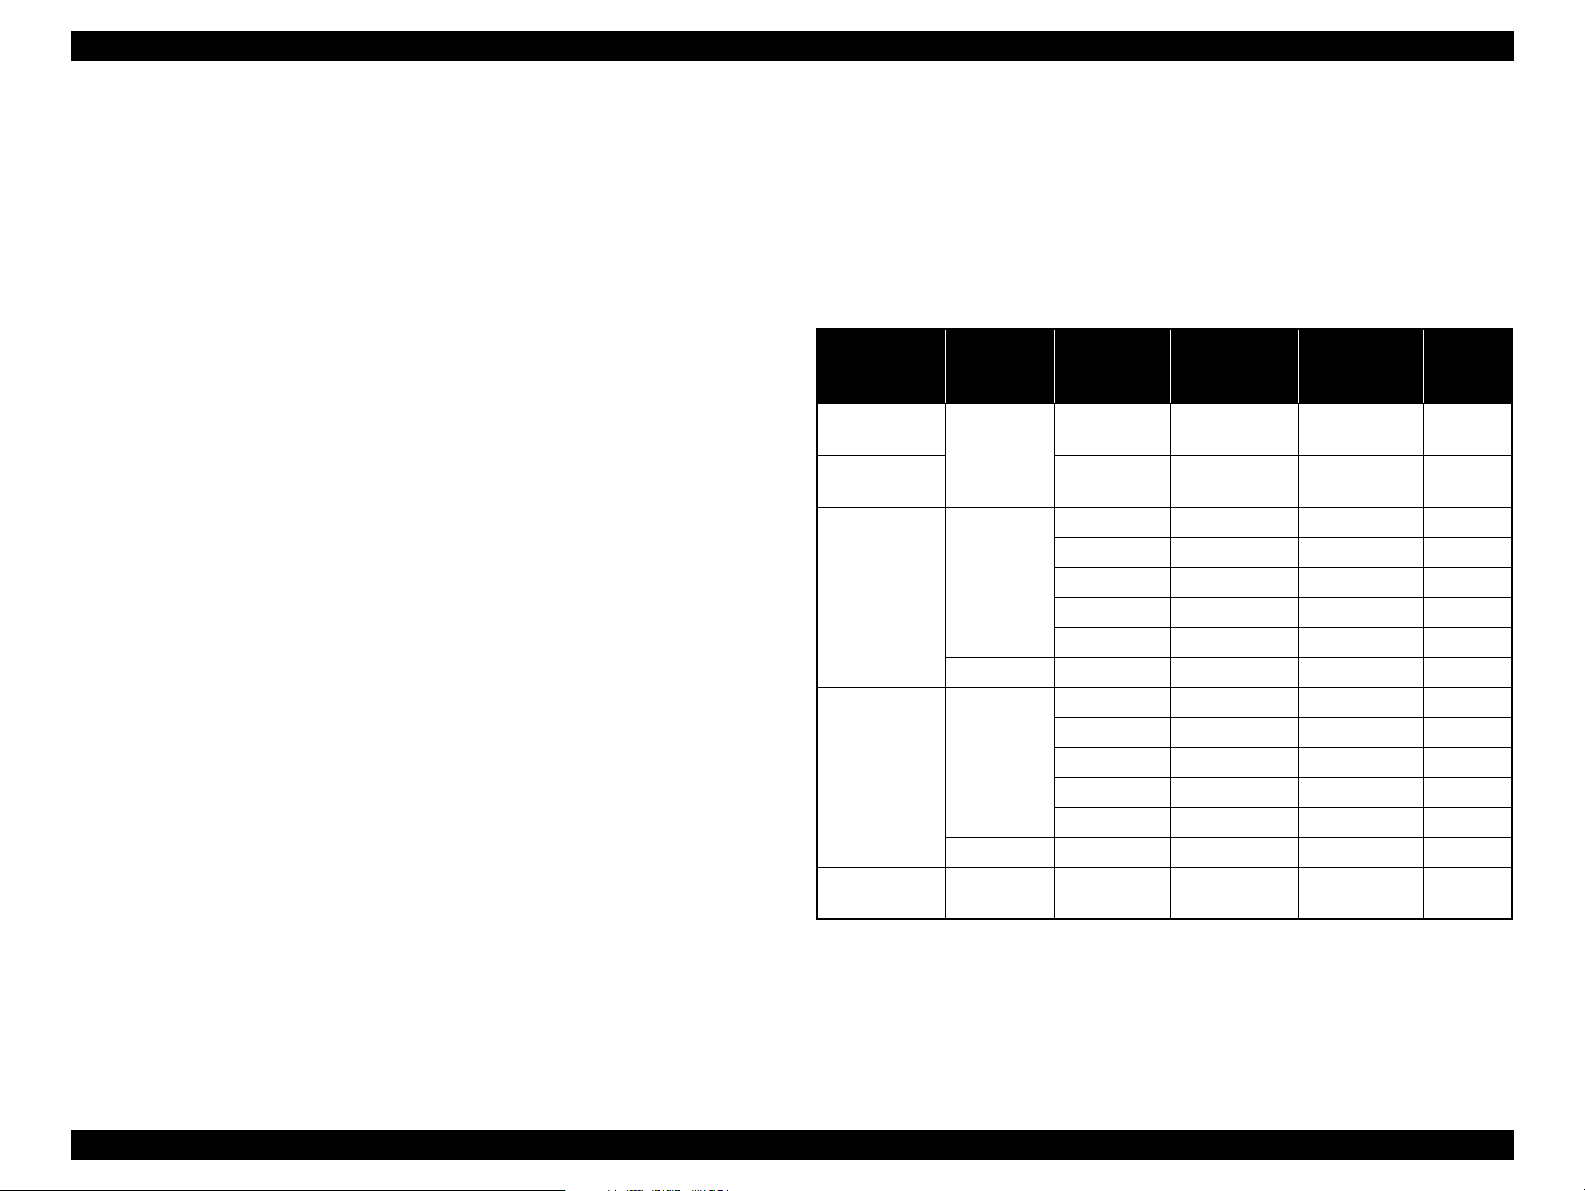
EPSON Stylus Pro 7400/7450/7800/7880/7880C/9400/9450/9800/9880/9880C Revision E
1.4.4.38 Head Alignment (Bi-D Adjustment, Uni-D Adjustment)
This function allows the user to make the Bi-D and Uni-D adjustments in accordance
with the thickness of paper to be used. The adjustments can be carried out
automatically by selecting the “Auto” in the “Alignment” menu. When the “Auto” is
selected, the printer prints an adjustment pattern, checks the pattern, and make the
adjustments according to the detected result automatically.
Procedure
1. Set the paper.
2. Select the “Head Alignment” menu from the panel.
3. Select the “Standard” in the “Paper Thickness” menu if the paper is EPSON
paper with thickness of 0.2 or 1.2 mm. If the paper does not fit the
requirements, the thickness can be entered in increments of 0.1 mm.
4. Select “Auto” or “Manual” in the “Alignment” menu.
5. Select the pattern from “Uni-D”, Bi-D 2 Color”, and “Bi-D All” and execute
it. “Printing” will be displayed on the LCD.
6. Check the printed adjustment pattern and enters the number of the line or
block with the least displacement for each color.
7. Repeat Step 5 to 6 until the all three adjustments are completed.
NOTE: For details on the adjustment patterns, see “Head Alignment
adjustment patterns (p. 103)”.
Adjustment Method
The printer calculates the Uni-D and Bi-D correction values based on the “Head
Alignment” result, Platen Gap setting and the paper thickness.The correction
values are classified by five Platen Gap settings (0.8mm/1.2mm/1.5mm/2.1mm/
2.6mm) and stored on the NVRAM to create a table to be referred to from that
time. The setting table is rewritten each time the adjustments are made.
The table below shows how the printer stores the settings.
Table 1-49. Storing the Correction Values
Paper
Thickness
Sensor
Less than
0.8 mm
0.8 mm or
more
Less than
0.3 mm
0.3 mm or
more
Less than
0.8 mm
0.8 mm or
more
Paper
Thickness
Input
Standard --- PG1.2 or
0.1 - 0.8 mm NARROW PG 0.8 mm For PG0.8 mm ---
0.9 - 1.5 mm --- PG 2.6 mm For PG2.6 mm *2
0.1 - 0.8 mm NARROW PG 1.2 mm For PG1.2 mm ---
0.9 - 1.5 mm --- PG 2.6 mm For PG2.6 mm *2
0.0 - 1.5 mm --- PG 2.6 mm For PG2.6 mm *3
PG Settings
--- PG 2.6 mm For PG2.6 mm *3
STANDARD PG 1.2 mm For PG1.2 mm ---
WIDE PG 1.6 mm For PG1.5 mm ---
WIDER PG 2.1 mm For PG2.1 mm ---
WIDEST PG 2.6 mm For PG2.6 mm ---
STANDARD PG 1.2 mm For PG1.2 mm ---
WIDE PG 1.6 mm For PG1.5 mm ---
WIDER PG 2.1 mm For PG2.1 mm ---
WIDEST PG 2.6 mm For PG2.6 mm ---
PG by
adjustment
pattern
PG1.6mm
Saved as Remarks
Depends on
the condition
*1
Product Description Control Panel 100
 Loading...