

Page 1
How do you want to get images to the projector?
To connect computer or video equipment,
see the instructions below and on the right.
To project over an 802.11b network, see
“If projecting wirelessly” on the back of this sheet.
To give a presentation stored on a memory card,
see Chapter 5 in your User’s Guide.
For details on any of these topics, see your User’s Guide.
If connecting a computer...
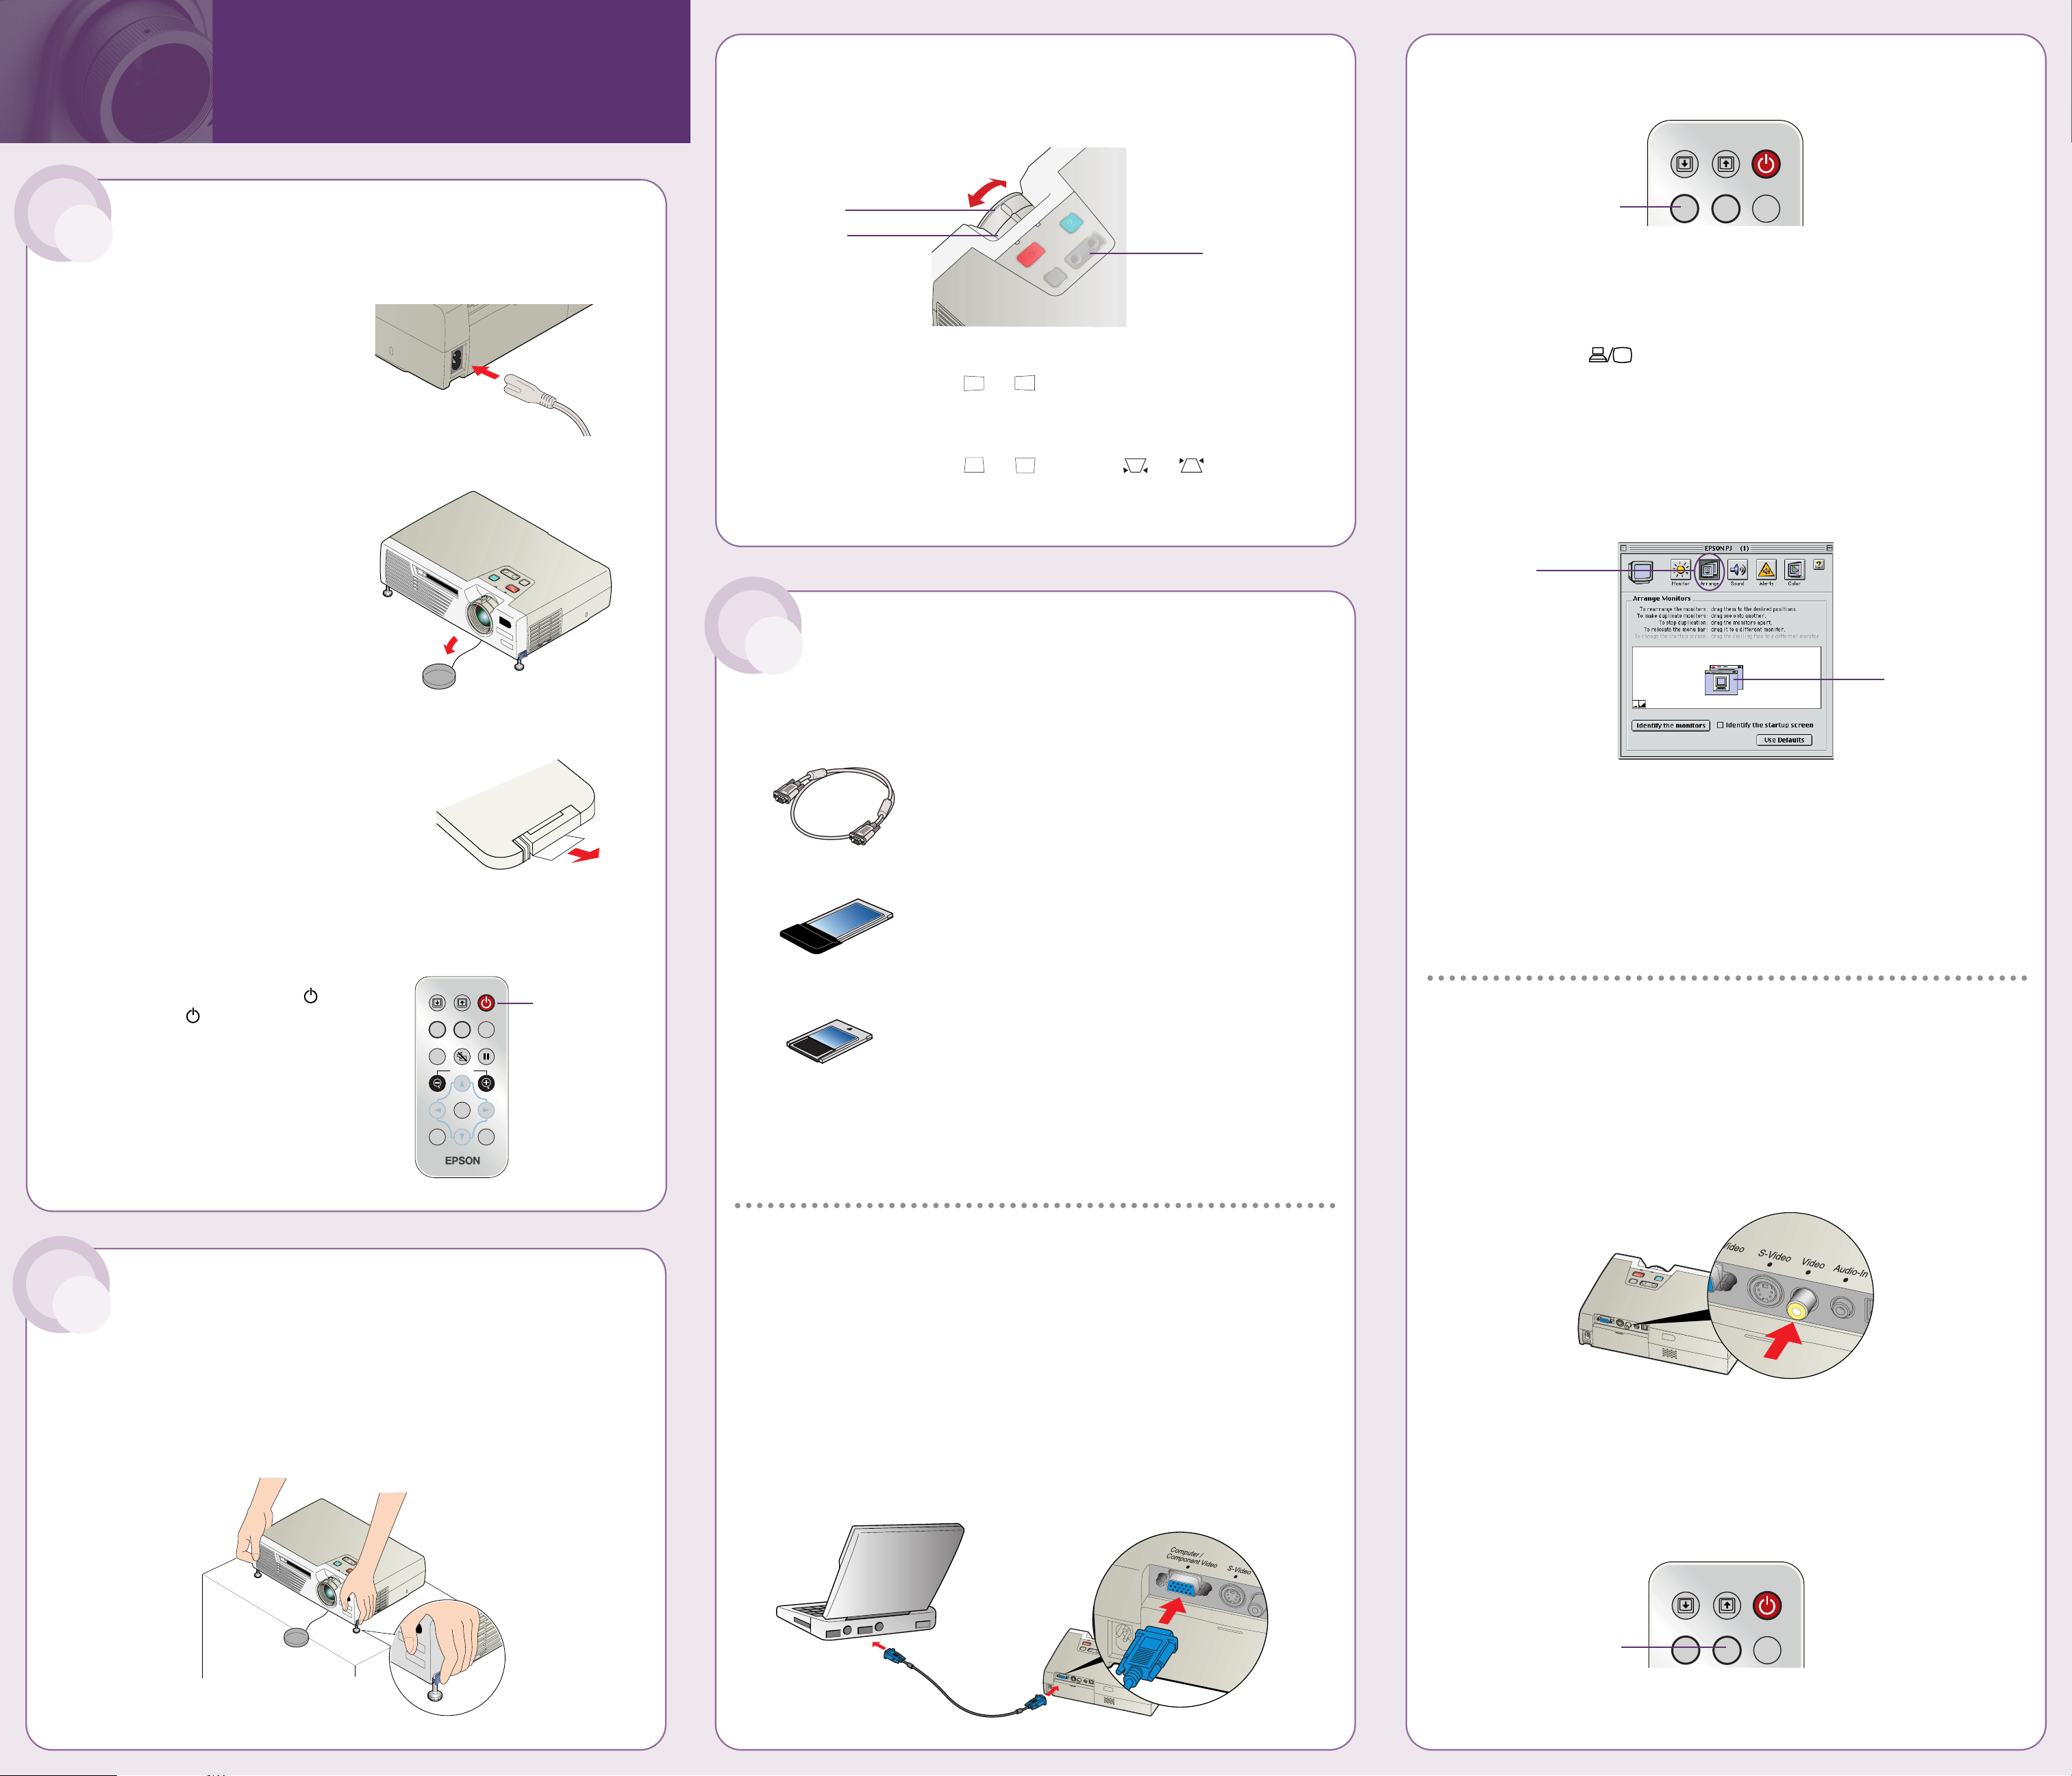
1 Make sure you’ve turned on the projector and adjusted the image
as described at left.
2 Locate the VGA cable that came with the projector. Connect one end
to the projector’s Computer/Component Video port.
Connect the other end to your laptop’s video-out port. (If you’re using
a desktop model, first disconnect the monitor cable from the computer,
then plug in the projector cable.)
EPSON®PowerLite®735c
Quick Setup
3 Choose a
Presentation Method
1 Turn On the Projector
1 Connect the power cord to
the back of the projector
and plug the other end into
a grounded outlet.
2 Remove the lens cover.
3 Locate the projector’s remote control.
Before using it for the first time, pull
out the plastic tape from the battery
tray (you don’t have to open the tray).
4 Aim the remote control at the
projector and press the red Power
button. The Power light flashes
green and the projector lamp comes
on in about 40 seconds.
Menu
A/V Mute
E-Zoom
Freeze
S-Video/Video
Color Mode
Page upPage down
Power
ESCAuto
Enter
Comp/EasyMP
3 Press the Comp/EasyMP button on the remote control until your
computer image is displayed.
4 If you’re using a laptop and you see a blank screen, you may need to
adjust its display settings:
Windows
®
: Hold down the Fn button on the keyboard and press the
function key that lets you display on an external monitor. It may have
an icon such as , or it may be labeled CRT/LCD. You may have to
use the Display utility in the Control Panel to enable both the LCD
screen and the external monitor port.
Macintosh
®
OS 9 or earlier: From the Apple menu, select Control
Panels, then click Monitors or Monitors and Sound. Click the
Arrange icon, then drag one monitor icon on top of the other;
this lets you display on both the projection screen and the LCD
screen. If this option isn’t available, click the Monitor icon and
select a Simulscan resolution.
Macintosh OS X: From the Apple menu, select System Preferences,
then click Displays. Select the VGA Display or Color LCD dialog box,
click the Arrange (or Arrangement) tab, and make sure Mirror
Displays is checked.
5 If you see an image but it’s not displayed correctly, press the Auto
button on the remote control to automatically readjust it.
If connecting video equipment...
1 Make sure you’ve turned on the projector and adjusted the image
as described on the far-left.
2 Locate the RCA-style video cable that came with the projector.
Connect one end to the projector’s Video port.
3 Connect the other end to the video-output connector on your
video equipment.
4 Press the S-Video/ Video button on the remote control until your
video image is displayed.
S-Video/Video
Color Mode
Page upPage down
Power
Comp/EasyMP
S-Video/Video
Color Mode
Page upPage down
Power
Comp/EasyMP
2 Rotate the focus ring to sharpen the image.
Rotate the zoom ring to reduce or enlarge the image.
3 If your image looks like or , you’ve placed the projector off
to one side of the screen at an angle. Place it directly in front of the
center of the screen, facing the screen squarely.
4 If your image looks like or , press the or side of the
Keystone button on the projector.
Power button
Focus ring
Zoom ring
Comp/EasyMP button
S-Video/Video button
1 To raise the image, press the blue foot release buttons on each side
of the projector and lift the front. Release the buttons to lock the
feet in position.
You can fine-tune the height by rotating the feet.
2 Adjust the Image
continued
continued
Keystone
button
Click here
Drag one monitor
icon onto the other
Page 2
EPSON is a registered trademark and EasyMP is a trademark of SEIKO EPSON CORPORATION. PowerLite is a registered
trademark of Epson America, Inc.
General Notice: Other product names are for identification purposes only and may be trademarks of their respective owners.
EPSON disclaims any and all rights in those marks.
Copyright © 2003 by Epson America, Inc. 1/03 CPD-15676
Printed on recycled paper. Printed in USA
If projecting wirelessly...
Follow the steps in this section to project over an 802.11b wireless network.
NOTE: These instructions tell you how to connect a single computer
to the projector using Ad Hoc mode. To connect multiple computers
using Infrastructure mode, see your User’s Guide.
Install the software
Before installing the projector’s EasyMPTMsoftware, make sure your computer
meets these requirements:
• Must be running Windows 98, 2000, Me, or XP (Macintosh not supported)
• Must have an 802.11b network card or transmitter already
installed (to project over a wireless network)
1 Insert the EasyMP software CD-ROM in your
computer’s CD-ROM drive and wait a few
seconds for it to be recognized.
You see this screen:
2 Click the button to advance
to the next screen.
3 Make sure the option to install EMP NS
Connection is highlighted, then click the
button. Follow the instructions on the
screen to finish installing it.
4 If you want to use your projector’s memory card feature, select the
option for EMP SlideMaker2 and install it the same way. For more
information on using a memory card, see your User’s Guide.
5 If you want to be able to monitor the projector remotely from this
computer, select the option for EMP Monitor to install it on your
system. See your User’s Guide for details.
6 When done installing the software, click the button to exit.
Start EasyMP
1
Make sure you’ve turned on the projector and adjusted the image as
described in sections 1 and 2 on the front of this sheet.
2 Select EasyMP as the source by pressing the Comp/EasyMP button
on the remote control.
3 Insert the EPSON 802.11b card face-up
as shown.
NOTE: Use only the EPSON 802.11b card.
Other brands may not be compatible and
are not guaranteed to work.
Once the card is inserted, you see a screen like this:
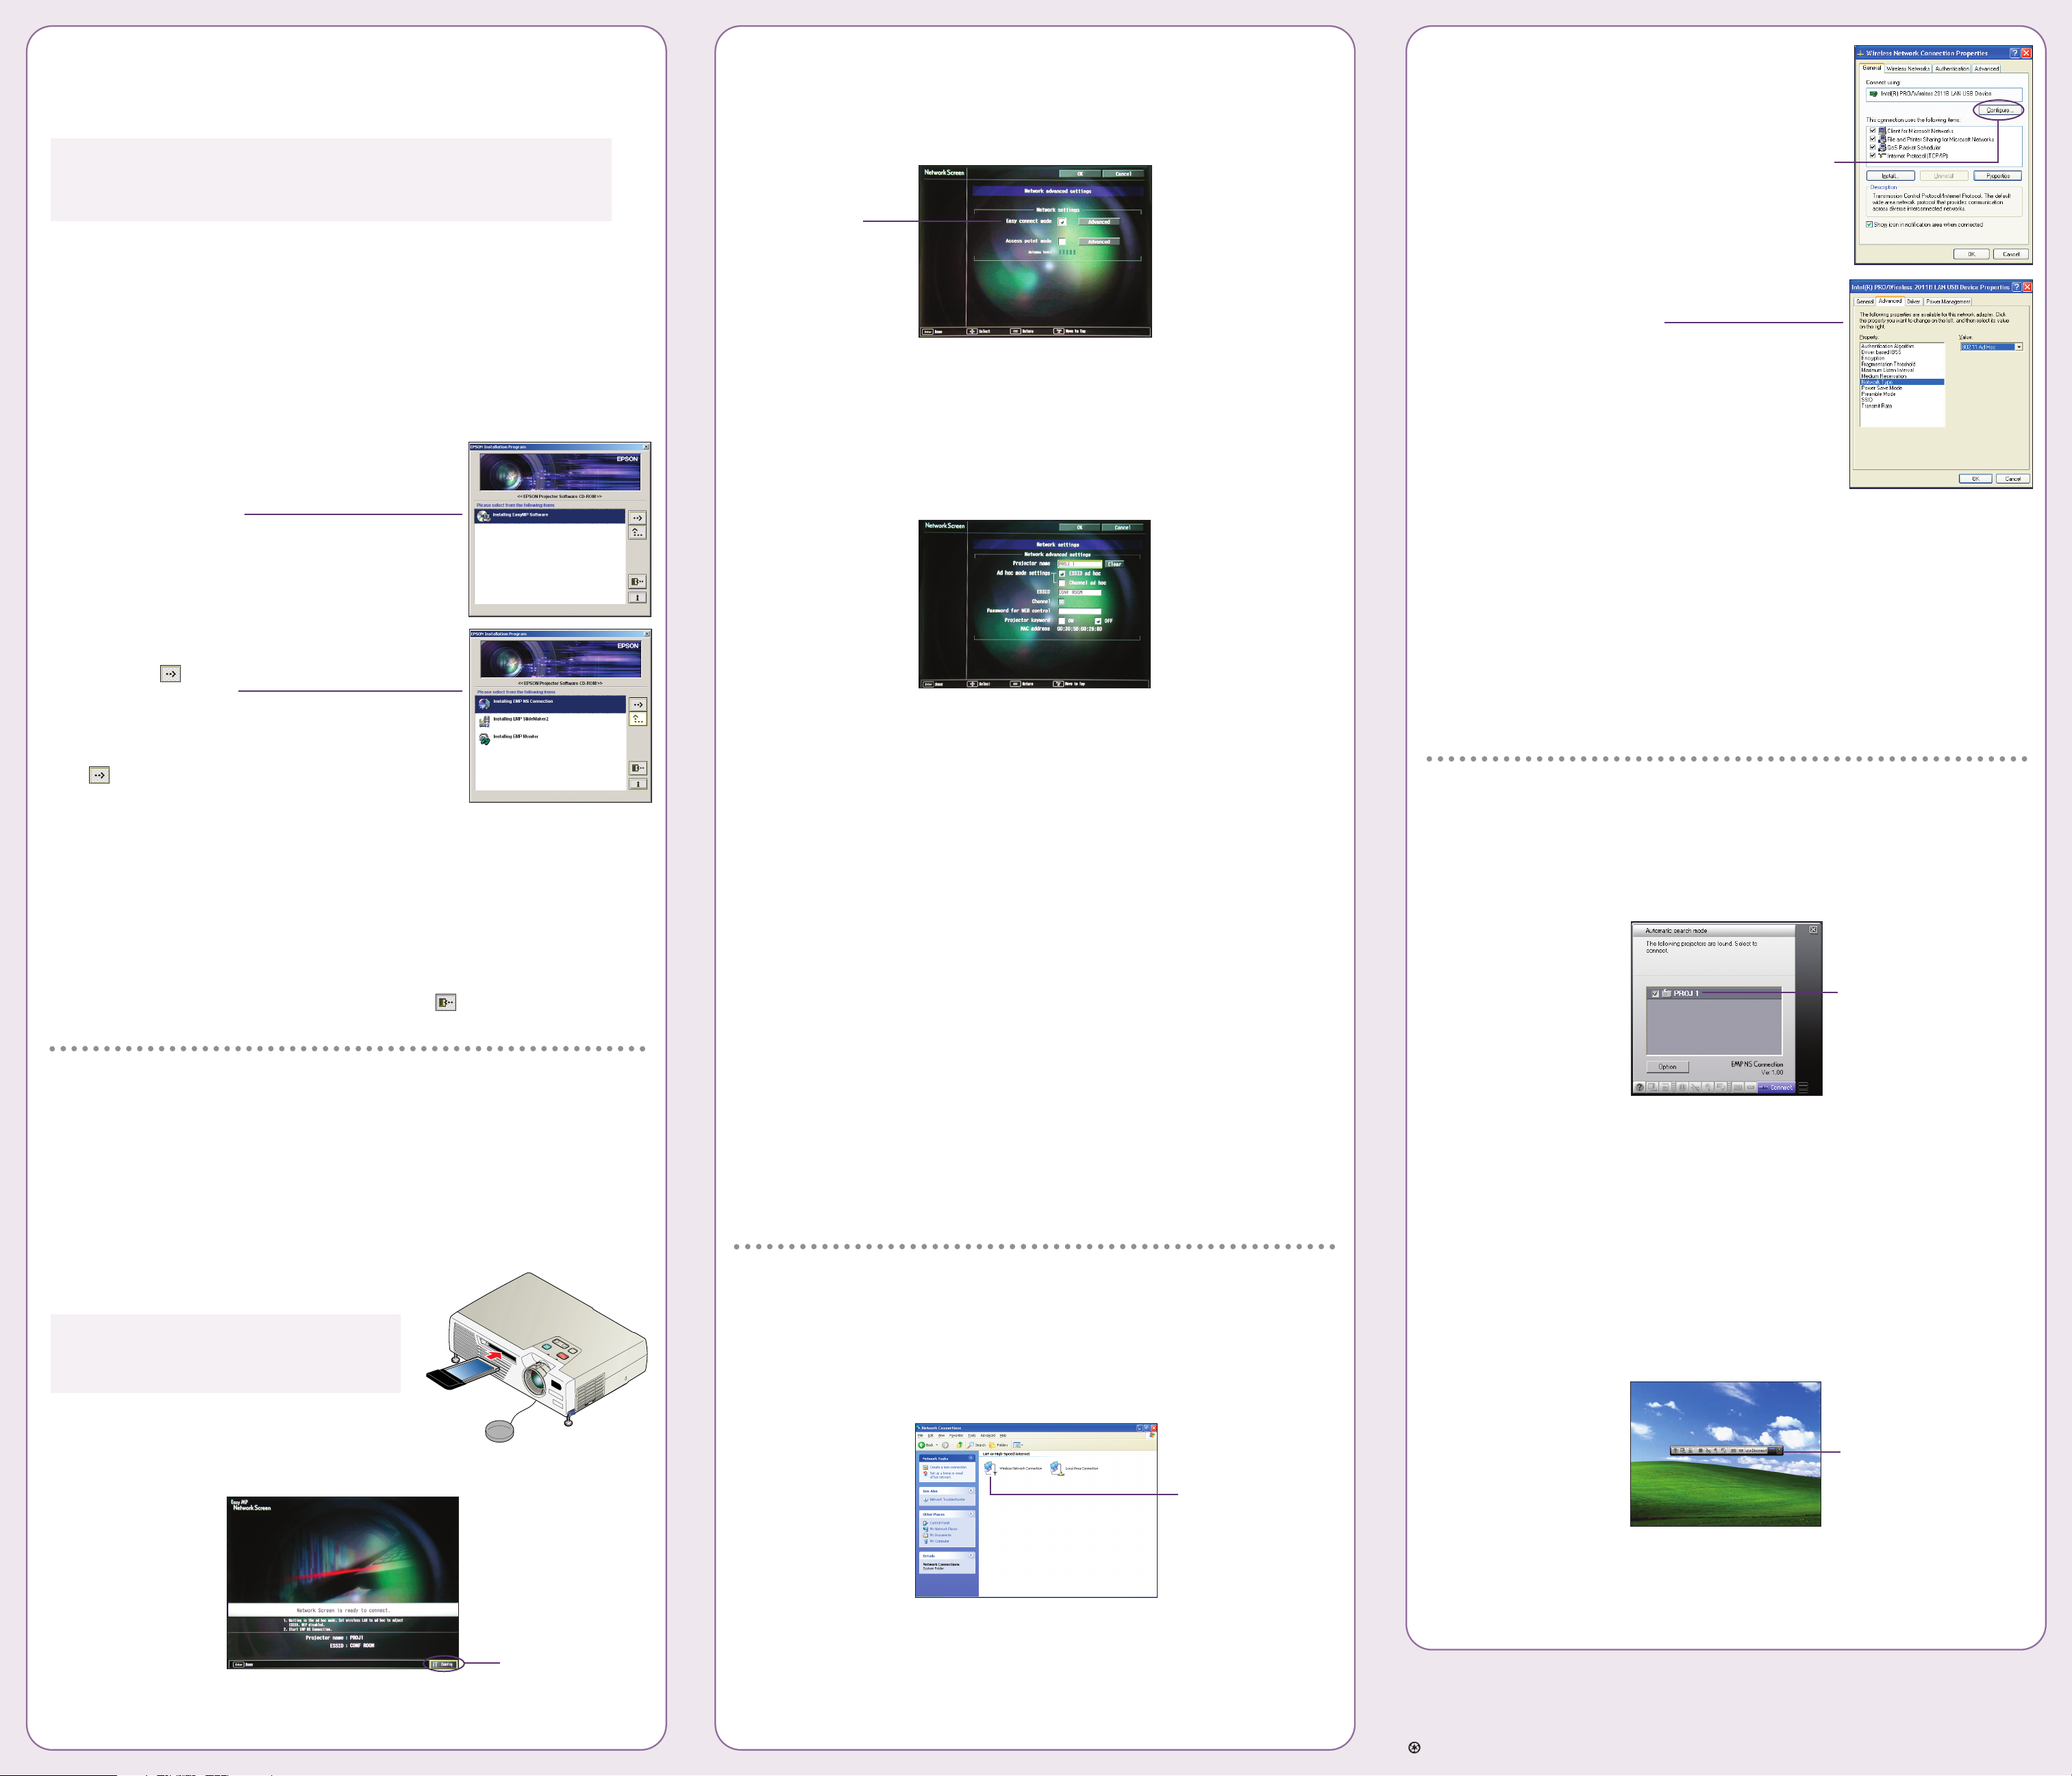
Configure the projector
1
On the EasyMP Network Screen, the Config button is already
highlighted. To select Config, press the Enter button on the
remote control. You see this screen:
2 Make sure Easy connect mode is selected, as shown above. If not,
use the arrow buttons on the remote control to highlight the checkbox
next to Easy connect mode, then press Enter to select it.
3 Use the arrow buttons on the remote control to highlight Advanced
(next to Easy connect mode), then press Enter to select it. You see
this screen:
4 Make sure the projector has a unique name, such as PROJ 1,
so you can identify it from your computer.
If you need to rename it, highlight the Clear button next to Projector
name, then press Enter to clear the text box. Then highlight the text
box and press Enter. Use the up and down arrows to select individual
characters (if you want to insert a blank space, it comes before capital
‘A’); use the right arrow to move to the next character position. When
done typing, press Enter.
5 To enable your computer to find the projector on the network,
select the appropriate Ad hoc mode settings:
• Select ESSID ad hoc if your computer’s network card supports
an SSID or ESSID identifier. Then enter a name (for example,
“CONF ROOM”) in the ESSID text box and press Enter.
• Select Channel ad hoc if your network card supports using
channels instead of ESSID names to identify devices on the
network. Then select a channel number in the Channel text
box and press Enter.
6 When done making these settings, highlight the OK button at the top
of the screen (use the arrow buttons on the remote control or press
ESC to highlight it), then press Enter. Highlight the OK button again
and press Enter to return to the main EasyMP Network Screen.
Configure the computer
1
Access your wireless network Properties window. For example, in
Windows XP you would click Start > Control Panel > Network and
Internet Connections. Then click the Network Connections icon.
You see a screen similar to this:
2 Right-click the Wireless Network
Connection icon and select Properties.
You see a screen like this.
3 Click the Configure button.
4 Click the Advanced tab.
You see a screen like this:
5 Check your network card’s device settings.
(Depending on the type of card or wireless
transmitter you’re using, some of the setting
names may be different from those listed here.)
• Set the network type to 802.11 Ad Hoc.
• Set the SSID to match the name you
assigned to the projector’s ESSID—for example, CONF ROOM.
(If your network card uses channel mode instead, set the correct
channel, 1 to 11, so it matches that of the projector.)
• Make sure encryption is Disabled.
6 Click the General tab to make sure the network card or wireless
network device is enabled.
7 When done making these settings, click OK as needed to close any
open dialog boxes.
Run NS Connection
Now you’re ready to launch NS Connection and project wirelessly.
1 From the Start menu, select EMP NS Connection. You see this screen:
If the connection is working properly, you see your projector listed
as shown.
If you don’t see your projector, click Option, then click Switch LAN.
Verify that the correct wireless network device is selected. Sometimes
another network device, such as an Ethernet card, may be selected
instead. If you don’t see your wireless device listed, but you’re sure
you’ve enabled it as described in “Configure the computer,” you may
need to restart your computer.
2 Once the name of your projector appears, select it and click Connect.
You see your computer’s image transmitted to the projector, and a
floating control bar appears on the screen:
3 If necessary, drag the control bar out of the way, or minimize it by
clicking it as shown above.
4 When done with your presentation, click Disconnect on the control bar.
Select your projector
Click here
to minimize
Config button
Easy connect
mode
Right-click
and select
Properties
Configure
button
continued
 Loading...