

Page 1

®
PowerLite
Home Cinema
725HD/730HD User's Guide
Page 2

Page 3

Contents
PowerLite Home Cinema 725HD/730HD User's Guide ............................................................................. 9
Introduction to Your Projector ................................................................................................................. 10
Setting Up the Projector ........................................................................................................................... 21
Projector Features.............................................................................................................................. 10
Product Box Contents.................................................................................................................... 11
Additional Components ................................................................................................................ 11
Optional Equipment and Replacement Parts................................................................................. 12
Warranty and Registration Information .......................................................................................... 13
Notations Used in the Documentation ................................................................................................ 13
Where to Go for Additional Information .............................................................................................. 14
Projector Part Locations ..................................................................................................................... 14
Projector Parts - Front/Top ............................................................................................................ 15
Projector Parts - Rear .................................................................................................................... 16
Projector Parts - Base.................................................................................................................... 17
Projector Parts - Control Panel ...................................................................................................... 18
Projector Parts - Remote Control................................................................................................... 19
Projector Placement........................................................................................................................... 21
Projector Setup and Installation Options ....................................................................................... 21
Projection Distance........................................................................................................................ 23
Projector Connections........................................................................................................................ 24
Connecting to Video Sources ........................................................................................................ 25
Connecting to an HDMI Video Source ...................................................................................... 25
Connecting to a Component-to-VGA Video Source .................................................................. 26
Connecting to an S-Video Video Source................................................................................... 27
Connecting to a Composite Video Source ................................................................................ 27
Connecting to a Video Source for Sound .................................................................................. 28
Connecting to External Speakers.............................................................................................. 29
Connecting to Computer Sources.................................................................................................. 31
Connecting to a Computer for USB Video and Audio................................................................ 31
Connecting to a Computer for VGA Video................................................................................. 32
3
Page 4

Connecting to a Computer for HDMI Video and Audio .............................................................. 33
Connecting to a Computer for USB Mouse Control................................................................... 34
Connecting to a Computer for Sound........................................................................................ 34
Connecting to External USB Devices ............................................................................................ 35
USB Device Projection.............................................................................................................. 35
Connecting a USB Device or Camera to the Projector.............................................................. 36
Selecting the Connected USB Source ...................................................................................... 36
Disconnecting a USB Device or Camera From the Projector .................................................... 36
Installing Batteries in the Remote Control .......................................................................................... 37
Opening the Lens Cover .................................................................................................................... 38
Using the Projector on a Network ............................................................................................................ 40
Wireless Network Projection .............................................................................................................. 40
Installing the Wireless LAN Module ............................................................................................... 41
Using Quick Wireless Connection (Windows Only) ....................................................................... 42
Selecting Wireless Network Settings Manually.............................................................................. 44
Wireless LAN Menu Settings .................................................................................................... 46
Selecting Wireless Network Settings in Windows.......................................................................... 48
Selecting Wireless Network Settings in Mac OS X ........................................................................ 48
Setting Up Wireless Network Security ........................................................................................... 48
Wireless Security Menu Settings .............................................................................................. 49
Setting Up Projector Network E-Mail Alerts ........................................................................................ 51
Network Projector E-mail Alert Messages ..................................................................................... 52
Setting Up Monitoring Using SNMP ................................................................................................... 52
Controlling a Networked Projector Using a Web Browser .................................................................. 53
Using Basic Projector Features ............................................................................................................... 56
Turning On the Projector .................................................................................................................... 56
Turning Off the Projector .................................................................................................................... 58
Selecting the Language for the Projector Menus................................................................................ 60
Adjusting the Image Height ................................................................................................................ 61
Image Shape...................................................................................................................................... 63
Correcting Image Shape with the Keystone Buttons...................................................................... 63
Correcting Image Shape with the Horizontal Keystone Slider ....................................................... 64
Correcting Image Shape with Quick Corner .................................................................................. 65
4
Page 5

Resizing the Image With the Zoom Ring ............................................................................................ 67
Focusing the Image Using the Focus Ring......................................................................................... 67
Remote Control Operation ................................................................................................................. 68
Using the Remote Control as a Wireless Mouse ........................................................................... 69
Using the Remote Control as a Pointer.......................................................................................... 70
Selecting an Image Source ................................................................................................................ 71
Projection Modes ............................................................................................................................... 72
Changing the Projection Mode Using the Remote Control ............................................................ 73
Changing the Projection Mode Using the Menus........................................................................... 73
Image Aspect Ratio ............................................................................................................................ 74
Changing the Image Aspect Ratio ................................................................................................. 75
Available Image Aspect Ratios ...................................................................................................... 75
Color Mode......................................................................................................................................... 76
Changing the Color Mode.............................................................................................................. 76
Available Color Modes................................................................................................................... 77
Turning On Auto Iris....................................................................................................................... 77
Controlling the Volume with the Volume Buttons................................................................................ 78
Projecting a PC Free Presentation ..................................................................................................... 79
Supported PC Free File Types ...................................................................................................... 79
Starting a Slide Show from an External Device ............................................................................. 81
PC Free Display Options........................................................................................................... 83
Starting a Movie from an External Device...................................................................................... 84
Adjusting Projector Features ................................................................................................................... 86
Shutting Off the Picture and Sound Temporarily ................................................................................ 86
Stopping Video Action Temporarily .................................................................................................... 87
Zooming Into and Out of Images ........................................................................................................ 87
Projector Security Features................................................................................................................ 88
Password Security Types .............................................................................................................. 88
Setting a Password ................................................................................................................... 89
Selecting Password Security Types.......................................................................................... 90
Entering a Password to Use the Projector................................................................................. 91
Saving a User's Logo Image to Display..................................................................................... 92
Locking the Projector's Buttons ..................................................................................................... 94
5
Page 6

Unlocking the Projector's Buttons ............................................................................................. 95
Installing a Security Cable ............................................................................................................. 95
Adjusting the Menu Settings .................................................................................................................... 96
Using the Projector's Menus............................................................................................................... 96
Image Quality Settings - Image Menu ................................................................................................ 98
Input Signal Settings - Signal Menu.................................................................................................... 99
Projector Feature Settings - Settings Menu...................................................................................... 102
Projector Setup Settings - Extended Menu....................................................................................... 104
Projector Network Settings - Network Menu..................................................................................... 106
Projector Setup Settings - ECO Menu .............................................................................................. 108
Projector Information Display - Info Menu ........................................................................................ 109
Event ID Code List....................................................................................................................... 110
Projector Reset Options - Reset Menu ............................................................................................. 112
Maintaining and Transporting the Projector ......................................................................................... 113
Projector Maintenance ..................................................................................................................... 113
Cleaning the Lens........................................................................................................................ 113
Cleaning the Projector Case ........................................................................................................ 114
Air Filter and Vent Maintenance .................................................................................................. 114
Cleaning the Air Filter and Vents............................................................................................. 115
Replacing the Air Filter ............................................................................................................ 115
Projector Lamp Maintenance....................................................................................................... 118
Replacing the Lamp ................................................................................................................ 118
Resetting the Lamp Timer....................................................................................................... 122
Replacing the Remote Control Batteries ..................................................................................... 123
Transporting the Projector................................................................................................................ 125
Solving Problems .................................................................................................................................... 126
Projection Problem Tips ................................................................................................................... 126
Projector Light Status ....................................................................................................................... 126
Using the Projector Help Displays .................................................................................................... 129
Solving Image or Sound Problems ................................................................................................... 130
Solutions When No Image Appears............................................................................................. 130
Solutions When Image is Incorrect Using the USB Display Function .......................................... 131
Solutions When "No Signal" Message Appears........................................................................... 132
6
Page 7

Displaying From a PC Laptop ................................................................................................. 132
Displaying From a Mac Laptop ............................................................................................... 133
Solutions When "Not Supported" Message Appears ................................................................... 133
Solutions When Only a Partial Image Appears ............................................................................ 133
Solutions When the Image is Not Rectangular ............................................................................ 134
Solutions When the Image Contains Noise or Static ................................................................... 134
Solutions When the Image is Fuzzy or Blurry .............................................................................. 135
Solutions When the Image Brightness or Colors are Incorrect .................................................... 136
Solutions to Sound Problems ...................................................................................................... 137
Solving Projector or Remote Control Operation Problems ............................................................... 137
Solutions to Projector Power or Shut-Off Problems ..................................................................... 138
Solutions to Problems with the Remote Control........................................................................... 138
Solutions to Password Problems ................................................................................................. 139
Solving Network Problems ............................................................................................................... 140
Solutions When You Cannot Access the Projector Through the Web ......................................... 140
Solutions When Network Alert E-Mails are Not Received............................................................ 140
Where to Get Help............................................................................................................................ 141
Technical Specifications ........................................................................................................................ 142
General Projector Specifications ...................................................................................................... 142
Projector Lamp Specifications.......................................................................................................... 144
Remote Control Specifications ......................................................................................................... 144
Projector Dimension Specifications.................................................................................................. 144
Projector Electrical Specifications .................................................................................................... 145
Projector Environmental Specifications............................................................................................ 145
Projector Safety and Approvals Specifications................................................................................. 146
Supported Video Display Formats.................................................................................................... 146
USB Display System Requirements................................................................................................. 148
Notices ..................................................................................................................................................... 150
Recycling.......................................................................................................................................... 150
Important Safety Information ............................................................................................................ 150
Important Safety Instructions............................................................................................................ 151
Restriction of Use ........................................................................................................................ 153
FCC Compliance Statement............................................................................................................. 154
7
Page 8

Trademarks...................................................................................................................................... 155
Open Source Software License........................................................................................................ 155
Copyright Notice............................................................................................................................... 197
A Note Concerning Responsible Use of Copyrighted Materials................................................... 197
Copyright Attribution.................................................................................................................... 198
8
Page 9

PowerLite Home Cinema 725HD/730HD User's Guide
Welcome to the PowerLite Home Cinema 725HD/730HD User's Guide.
9
Page 10

Introduction to Your Projector
Refer to these sections to learn more about your projector and this manual.
Projector Features
Notations Used in the Documentation
Where to Go for Additional Information
Projector Part Locations
Projector Features
The PowerLite Home Cinema 725HD/730HD projector includes these special features:
Bright, high-resolution projection system
• 725HD: Up to 2800 lumens of brightness (white light output and color light output)
730HD: Up to 3000 lumens of brightness (white light output and color light output)
• 720p HD resolution
Flexible connectivity
• HDMI port for computer or video device connection
• Plug-and-play 3-in-1 USB projection, audio, and mouse control for instant setup
• PC Free photo slide shows via connected USB memory devices
Easy-to-use setup and operation features
• Innovative horizontal keystone correction slider for flexible projector placement
• Built-in closed captioning decoder
• 1.2× optical zoom ratio for improved zooming capability
• Low total cost of ownership with longer lamp life
• Epson's Instant Off and Direct Power On features for quick setup and shut down
Product Box Contents
Additional Components
Optional Equipment and Replacement Parts
Warranty and Registration Information
Parent topic: Introduction to Your Projector
10
Page 11
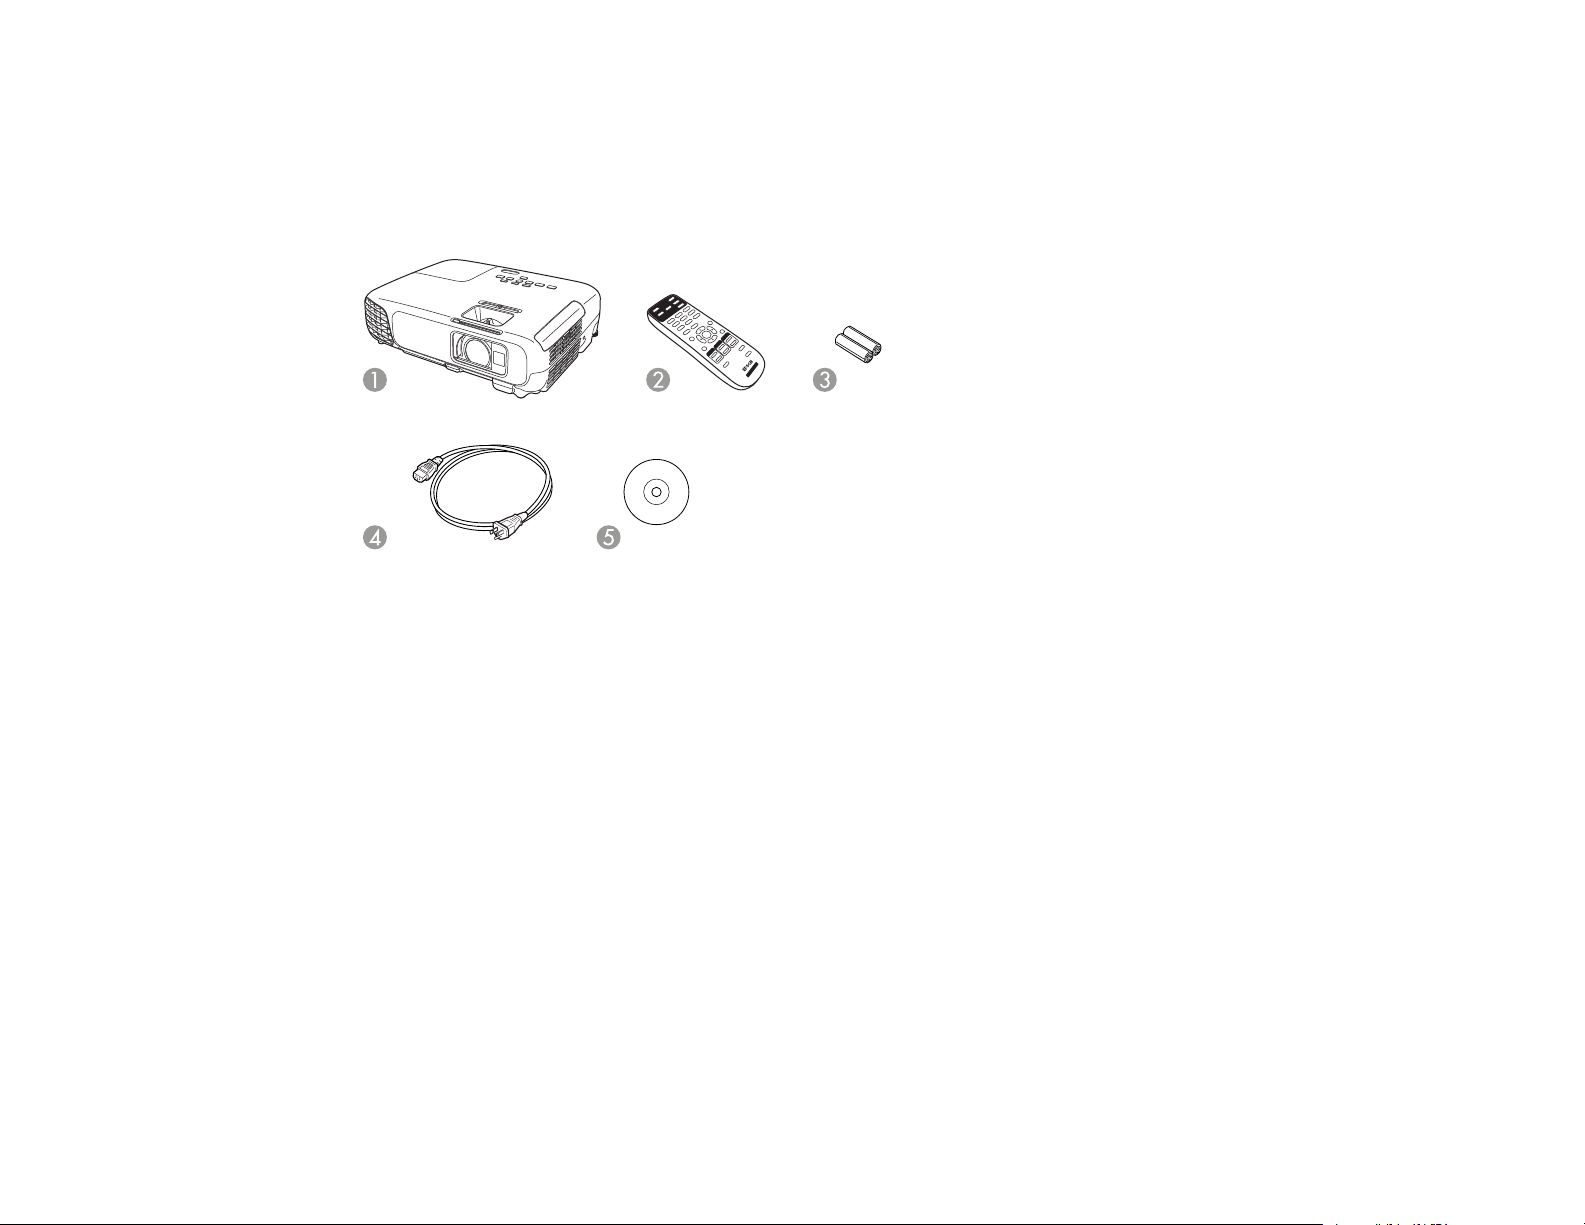
Product Box Contents
Save all the packaging in case you need to ship the projector. Always use the original packaging (or
equivalent) when shipping.
Make sure your projector box included all of these parts:
1 Projector
2 Remote control
3 Remote control batteries (two AA alkaline)
4 Power cord
5 Projector documentation CD
Parent topic: Projector Features
Additional Components
Depending on how you plan to use the projector, you may need to obtain the following additional
components:
• To receive an S-Video signal, you need an S-Video cable compatible with your device. See your local
computer or electronics dealer for purchase information.
• To receive an HDMI signal, you need a compatible HDMI cable. You can purchase one from Epson or
an authorized Epson reseller.
11
Page 12
Note: To connect a Mac that includes only a Mini DisplayPort, Thunderbolt port, or Mini-DVI port for
video output, you need to obtain an adapter that allows you to connect to the projector's HDMI port.
Contact Apple for compatible adapter options. Older Mac computers (2009 and earlier) may not
support audio through the HDMI port.
• To project with audio from certain ports, you may need a commercially available audio cable
compatible with your device. See your local computer or electronics dealer for purchase information.
• To connect a Mac that includes only a Mini DisplayPort, Thunderbolt port, or Mini-DVI port for video
output to the projector's VGA video port, you need to obtain an adapter. Contact Apple for compatible
adapter options.
• To add additional sound, you need speakers, an audio video receiver or a video source with speaker
connections, and the cables necessary to connect to the speakers and the projector. See your local
computer or electronics dealer for purchase information.
Parent topic: Projector Features
Optional Equipment and Replacement Parts
You can purchase screens, other optional accessories, and replacement parts from an Epson authorized
reseller. To find the nearest reseller, call 800-GO-EPSON (800-463-7766). Or you can purchase online
at epsonstore.com (U.S. sales) or epson.ca (Canadian sales).
Epson offers the following optional accessories and replacement parts for your projector:
Option or part Part number
Genuine Epson Replacement lamp (ELPLP78) V13H010L78
Air filter replacement set (ELPAF32) V13H134A32
Wireless LAN module (ELPAP07) V12H418P12
Quick Wireless Connection USB key (ELPAP09) V12H005M09
Universal projector ceiling mount ELPMBPJF
Kensington security lock ELPSL01
Accolade Duet ultra portable projector screen ELPSC80
ES1000 ultra portable tabletop projection screen V12H002S4Y
ES3000 ultra portable tabletop projection screen V12H002S3Y
Belkin PureAV HDMI audio video cable, 3 ft (0.9 m) AV22300-03
12
Page 13
Option or part Part number
Belkin PureAV HDMI audio video cable, 6 ft (1.8 m) AV22300-06
Belkin PureAV HDMI audio video cable, 12 ft (3.6 m) AV22300-12
Component-to-VGA video cable ELPKC19
Belkin Pro Series VGA/SVGA cable, 6 ft (1.8 m) F3H982-06
Belkin Pro Series VGA/SVGA cable, 10 ft (3.0 m) F3H982-10
Belkin Pro Series VGA/SVGA cable, 25 ft (7.6 m) F3H982-25
Remote control 1599176
Soft carrying case ELPKS63
In addition to the accessories listed above, 1-year and 2-year extended service plans are available.
Parent topic: Projector Features
Warranty and Registration Information
Your projector comes with a basic warranty that lets you project with confidence. For details, see the
warranty brochure that came with your projector.
In addition, Epson offers free Extra Care Home Service. In the unlikely event of an equipment failure,
you won’t have to wait for your unit to be repaired. Instead, Epson will ship you a replacement unit
anywhere in the United States, Canada, or Puerto Rico. See the Extra Care Home Service brochure for
details.
Register your product online using the projector CD or at this site: epson.com/webreg
Registering also lets you receive special updates on new accessories, products, and services.
Parent topic: Projector Features
Notations Used in the Documentation
Follow the guidelines in these notations as you read your documentation:
• Warnings must be followed carefully to avoid bodily injury.
• Cautions must be observed to avoid damage to your equipment.
• Notes contain important information about your projector.
• Tips contain additional projection information.
13
Page 14

Parent topic: Introduction to Your Projector
Where to Go for Additional Information
Need quick help on using your projector? Here's where to look for help:
• Built-in help system
Press the Help button on the remote control or projector to get quick solutions to common problems.
• epson.com/support (U.S) or epson.ca/support (Canada)
View FAQs (frequently asked questions) and e-mail your questions to Epson technical support 24
hours a day.
• For detailed instructions on monitoring your projector in a network environment (Windows only), see
the EasyMP Monitor Operation Guide.
• If you still need help after checking this manual and the sources listed above, you can use the Epson
PrivateLine Support service to get help fast. For details, see "Where to Get Help".
Parent topic: Introduction to Your Projector
Related references
Where to Get Help
Related tasks
Using the Projector Help Displays
Projector Part Locations
Check the projector part illustrations to learn about the parts on your projector.
Projector Parts - Front/Top
Projector Parts - Rear
Projector Parts - Base
Projector Parts - Control Panel
Projector Parts - Remote Control
Parent topic: Introduction to Your Projector
14
Page 15
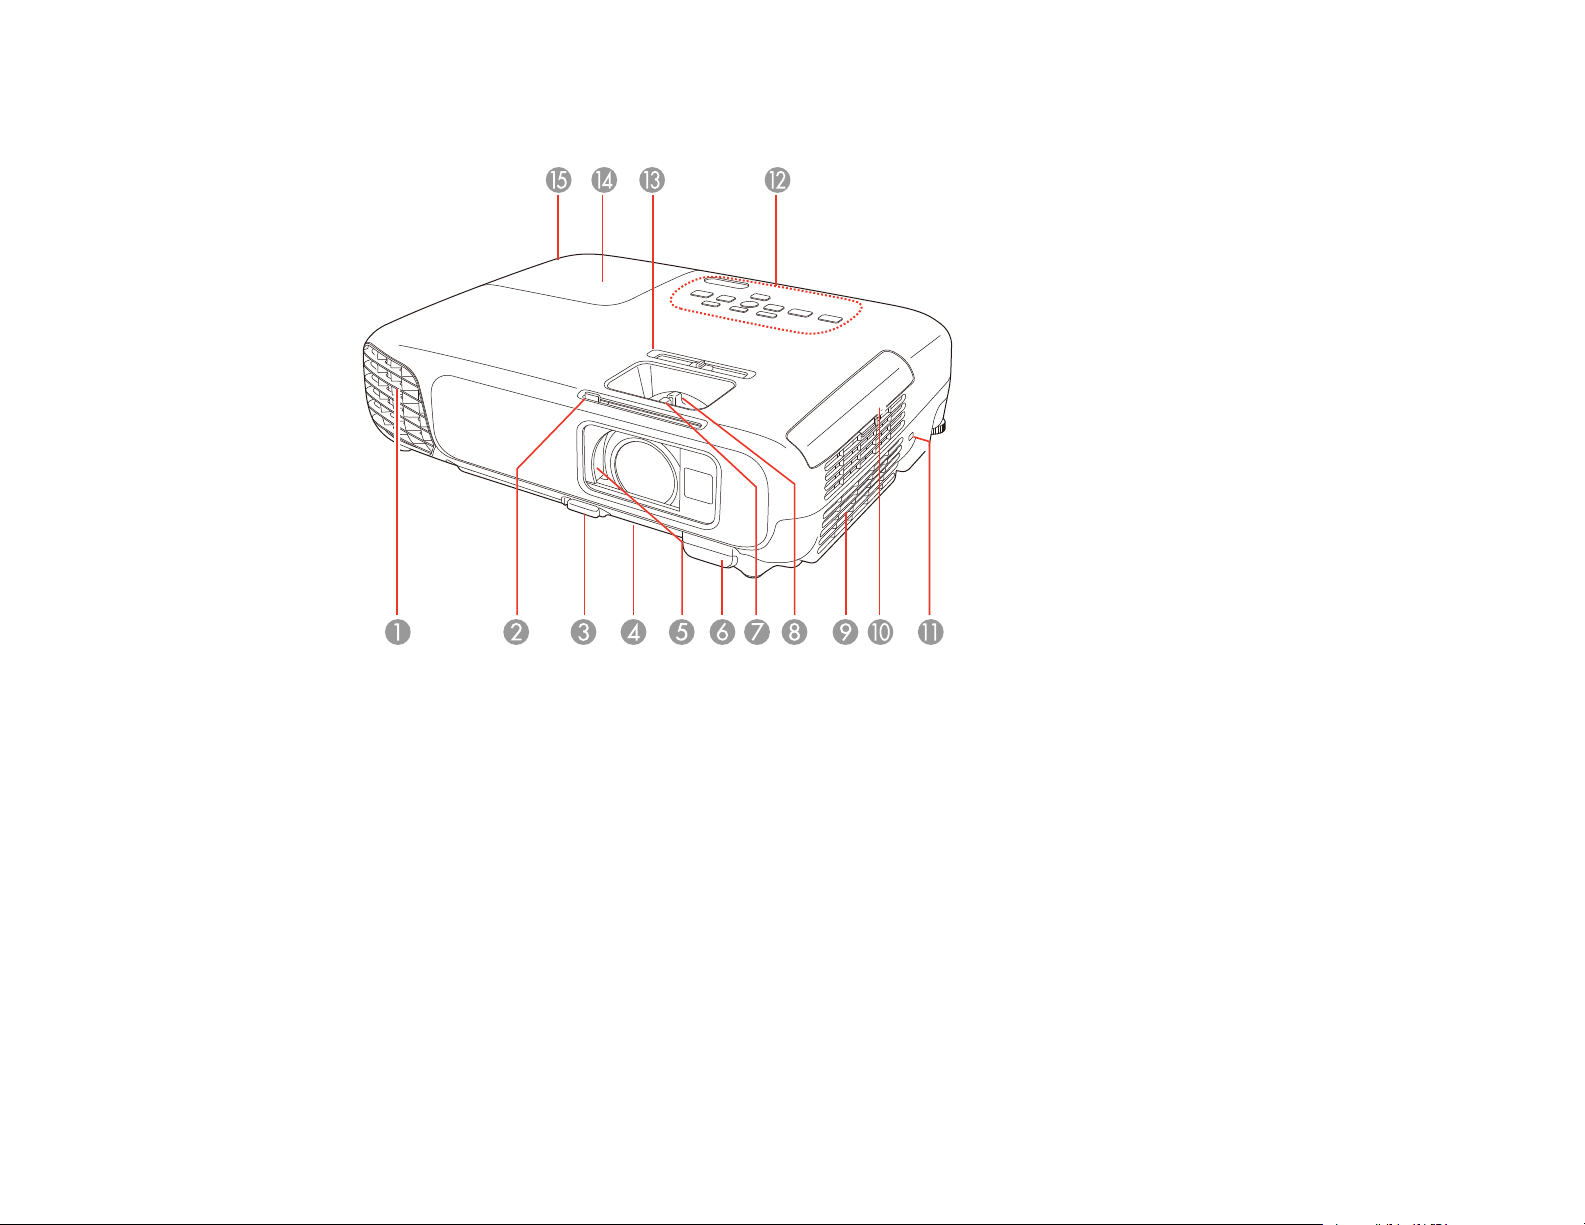
Projector Parts - Front/Top
1 Exhaust vent
2 A/V Mute slide lever
3 Foot release lever
4 Front adjustable foot
5 A/V Mute slide (lens cover)
6 Remote receiver
7 Focus ring
8 Zoom ring
9 Intake vent
10 Air filter cover
15
Page 16

11 Kensington security lock slot
12 Control panel
13 Horizontal keystone slider
14 Lamp cover
15 Lamp cover screw
Parent topic: Projector Part Locations
Projector Parts - Rear
1 AC input port
2 USB-A/USB flash drive/wireless LAN module port
3 Wireless LAN module cover screw
4 USB-B port
5 Audio ports
6 Video port
7 Remote receiver
8 Speaker
9 HDMI port
16
Page 17
10 Computer (VGA) port
11 S-Video port
Parent topic: Projector Part Locations
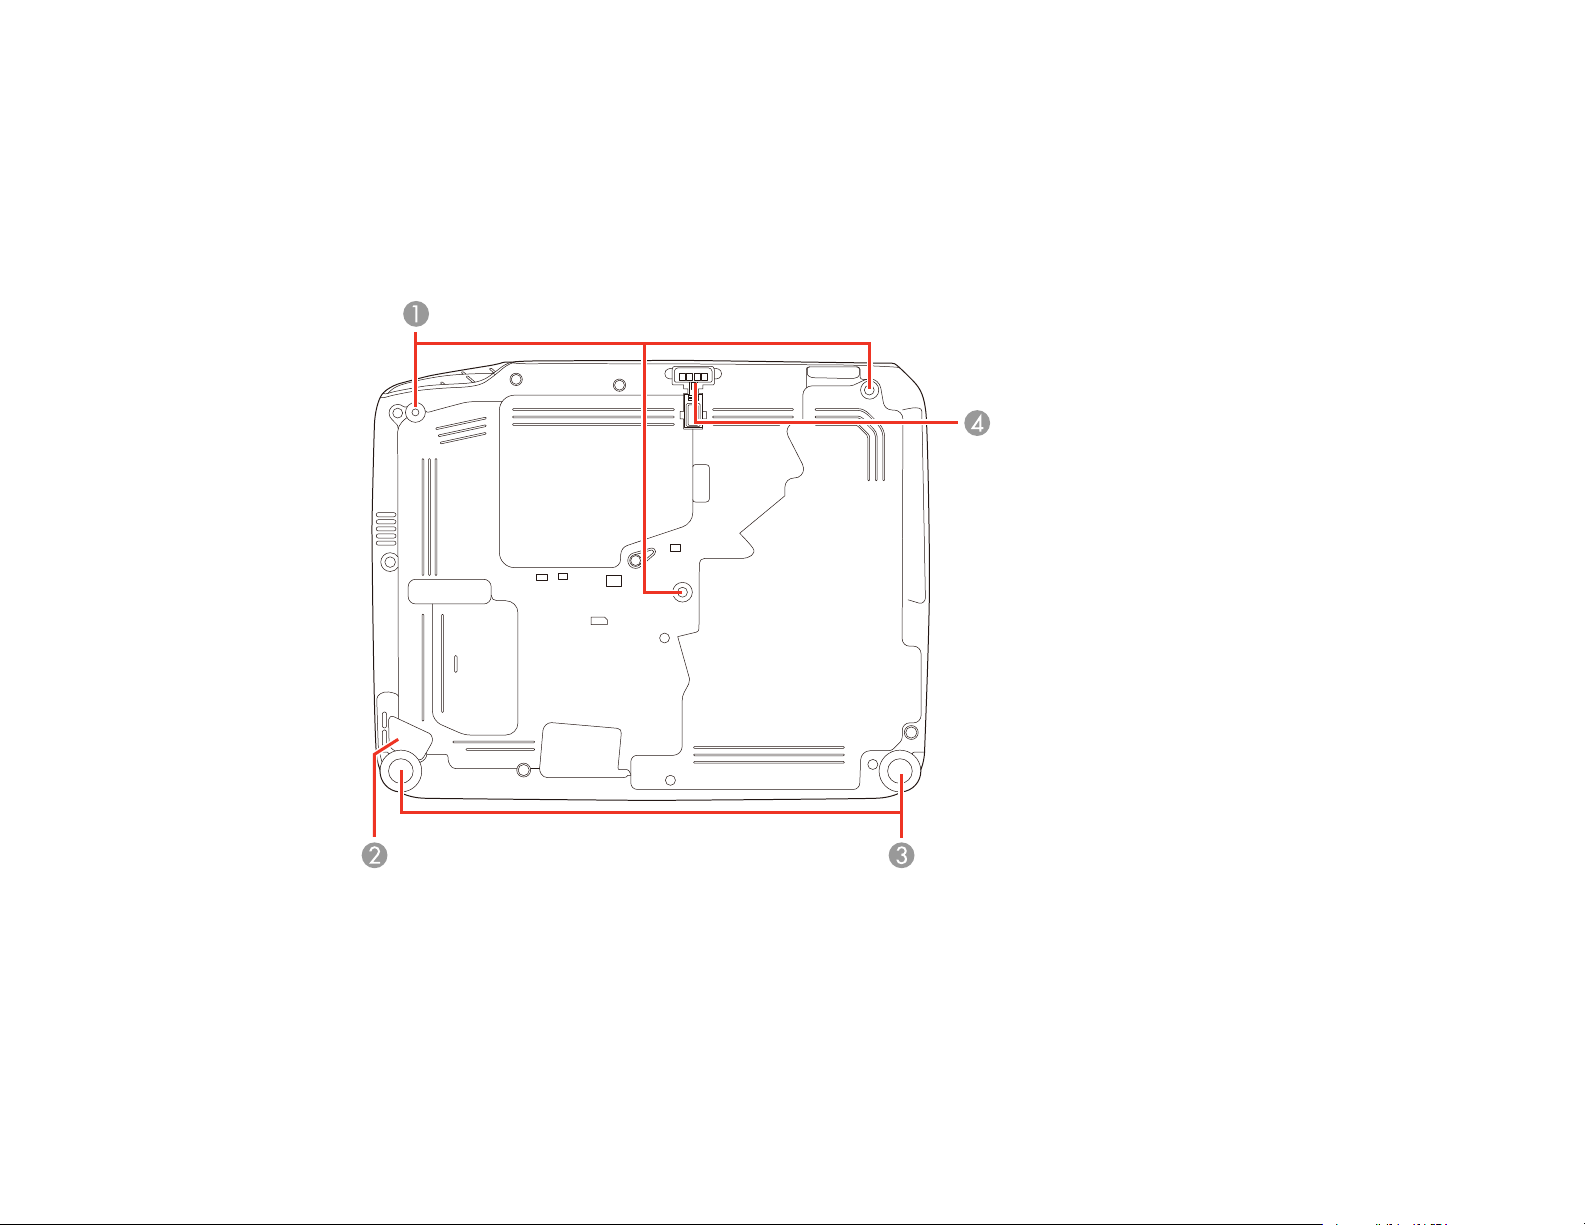
Projector Parts - Base
1 Mounting bracket holes
2 Security cable attachment point
3 Rear adjustable feet
4 Front adjustable foot
17
Page 18
Parent topic: Projector Part Locations
Related tasks
Installing a Security Cable
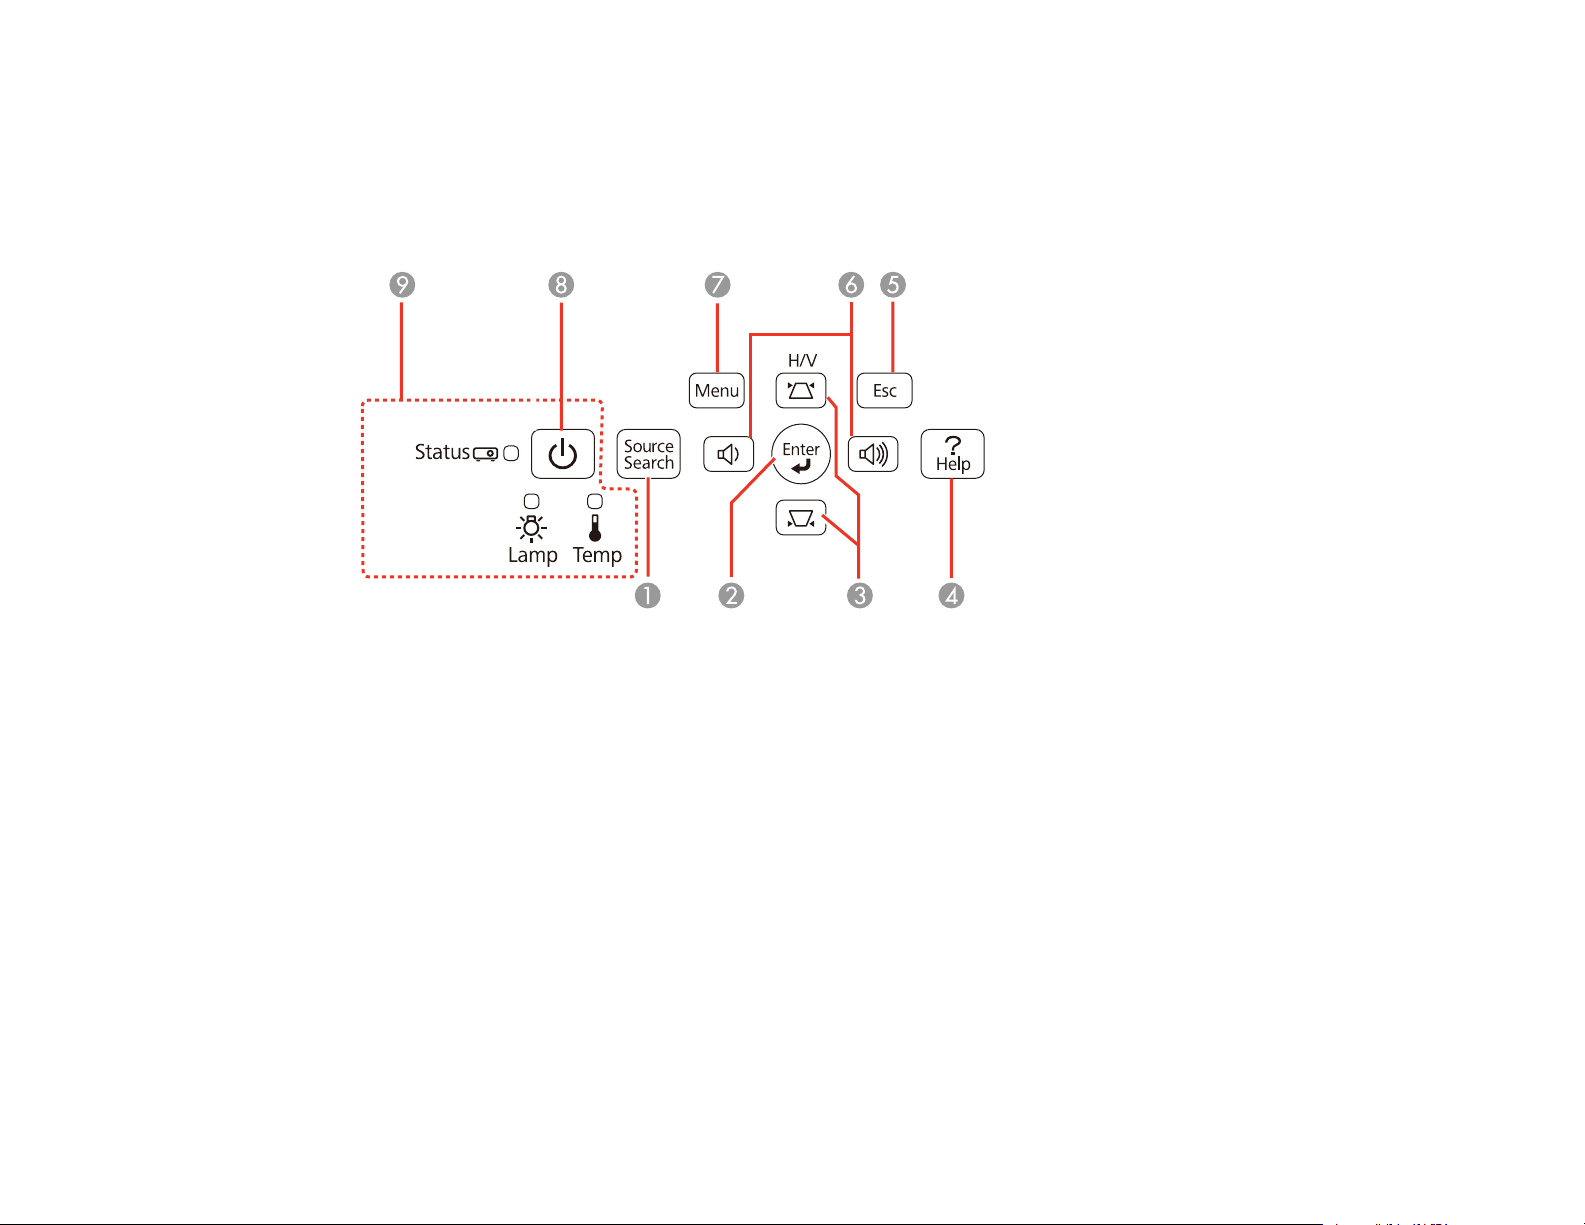
Projector Parts - Control Panel
1 Source Search button (searches for connected sources)
2 Enter button (selects options)
3 Vertical keystone adjustment buttons (adjust screen shape) and arrow buttons
4 Help button (accesses projector help information)
5 Esc button (cancels/exits functions)
6 Volume control buttons, horizontal keystone adjustment buttons (adjust screen shape), and arrow
buttons
7 Menu button (accesses projector menu system)
8 Power button/light
9 Projector status lights
Parent topic: Projector Part Locations
18
Page 19

Related references
Projector Light Status
Projector Parts - Remote Control
19
Page 20

1 Power button
2 Computer button (cycles through connected computer sources)
3 Video button (cycles through connected video sources)
4 Numeric buttons (enter numbers)
5 Auto button (automatically adjusts position, tracking, and sync settings)
6 Aspect button (selects the image aspect ratio)
7 Num button (when held down, switches numeric buttons to number function)
8 Menu button (accesses projector menu system)
9 Arrow buttons (move through on-screen options and control wireless mouse functions)
10 Enter button (selects options and controls wireless mouse functions)
11 User button (customizable for different functions)
12 Page up/down buttons (control presentation slides)
13 E-Zoom +/– buttons (zoom into and out of the image)
14 A/V Mute button (turns off picture and sound)
15 Help button (accesses projector help information)
16 Freeze button (stops video action)
17 Volume up/down buttons (adjust speaker volume)
18 Pointer button (activates on-screen pointer)
19 Esc button (cancels/exits functions and controls wireless mouse functions)
20 Color Mode button (selects display modes)
21 LAN button (switches to LAN source for wireless LAN)
22 USB button (cycles through connected USB sources)
23 Source Search button (searches for connected sources)
Parent topic: Projector Part Locations
20
Page 21
Setting Up the Projector
Follow the instructions in these sections to set up your projector for use.
Projector Placement
Projector Connections
Installing Batteries in the Remote Control
Opening the Lens Cover
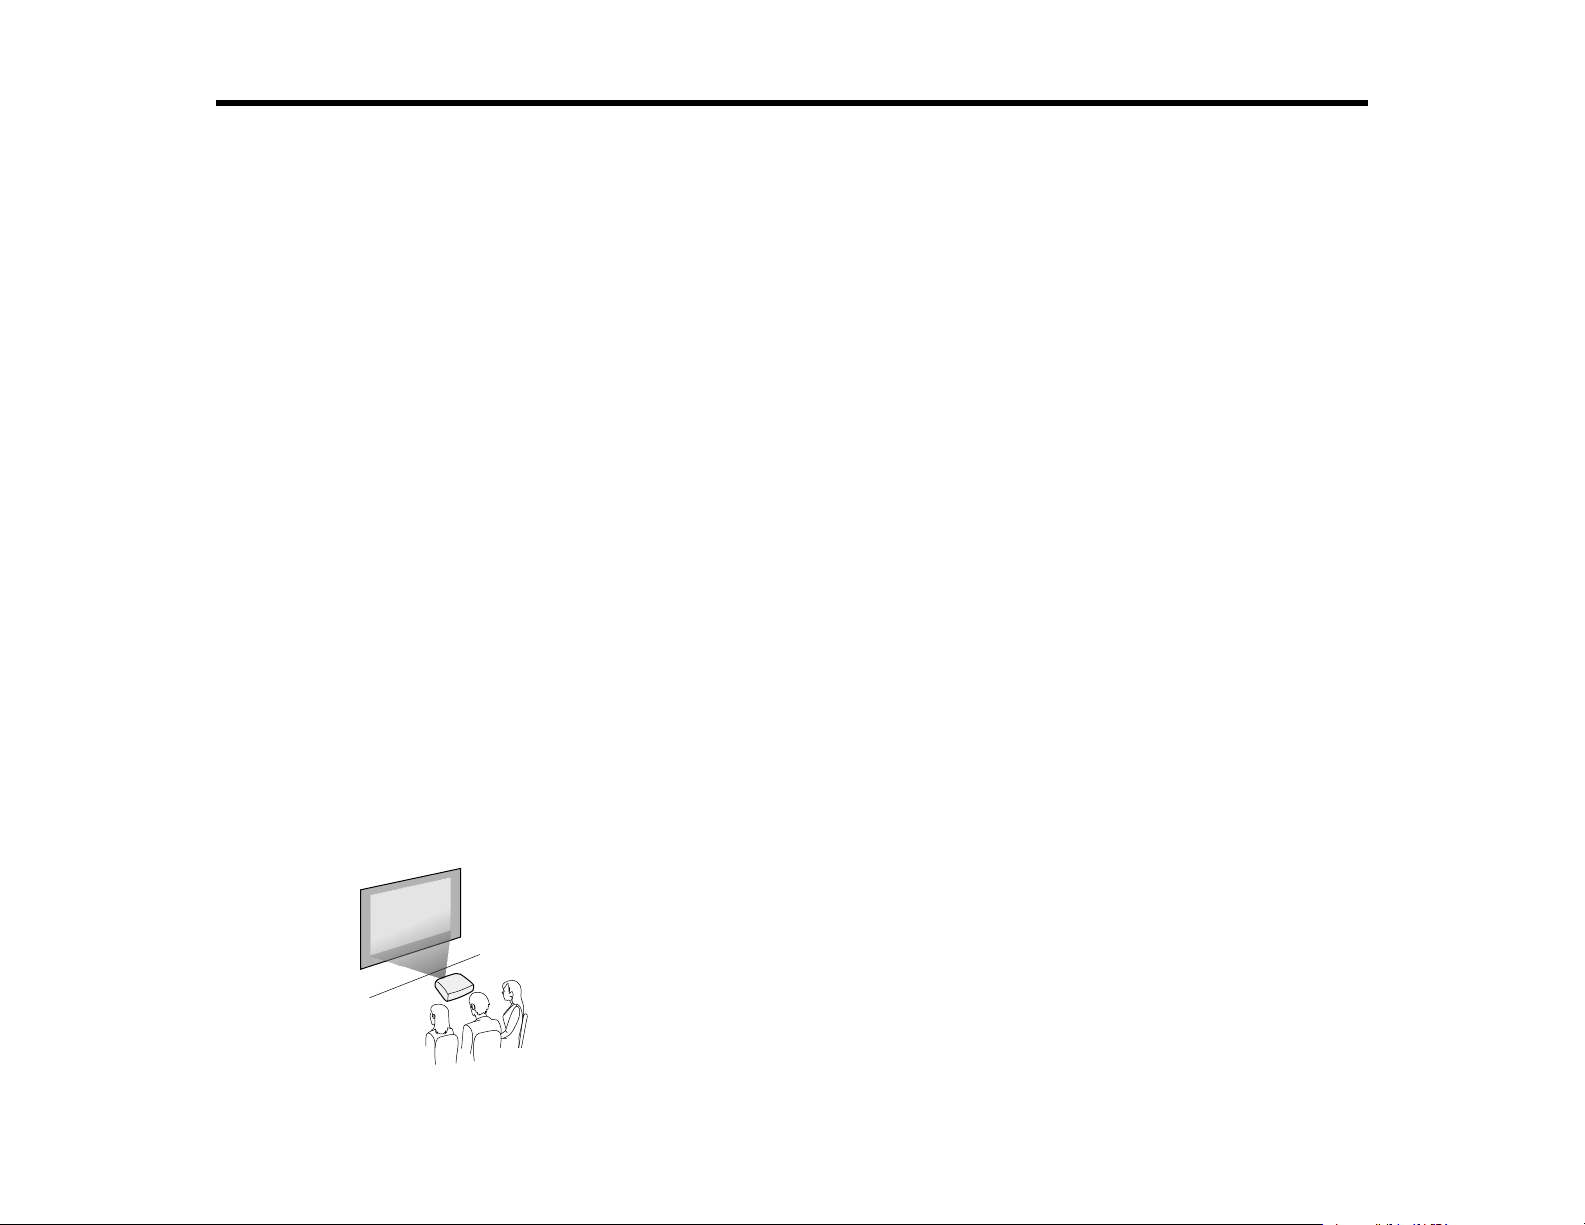
Projector Placement
You can place the projector on almost any flat surface to project an image.
You can also install the projector in a ceiling mount if you want to use it in a fixed location.
Keep these considerations in mind as you select a projector location:
• Place the projector on a sturdy, level surface or install it using a compatible mount.
• Leave plenty of space around and under the projector for ventilation, and do not place it on top of or
next to anything that could block the vents.
• Position the projector within reach of a grounded electrical outlet or extension cord.
Projector Setup and Installation Options
Projection Distance
Parent topic: Setting Up the Projector
Projector Setup and Installation Options
You can set up or install your projector in the following ways:
Front
21
Page 22

Rear
Front Ceiling
Rear Ceiling
Wherever you set up the projector, make sure to position it squarely in front of the center of the screen,
not at an angle, if possible.
If you project from the ceiling or from the rear, be sure to select the correct Projection option in the
projector's menu system.
Parent topic: Projector Placement
22
Page 23
Related references
Projector Setup Settings - Extended Menu
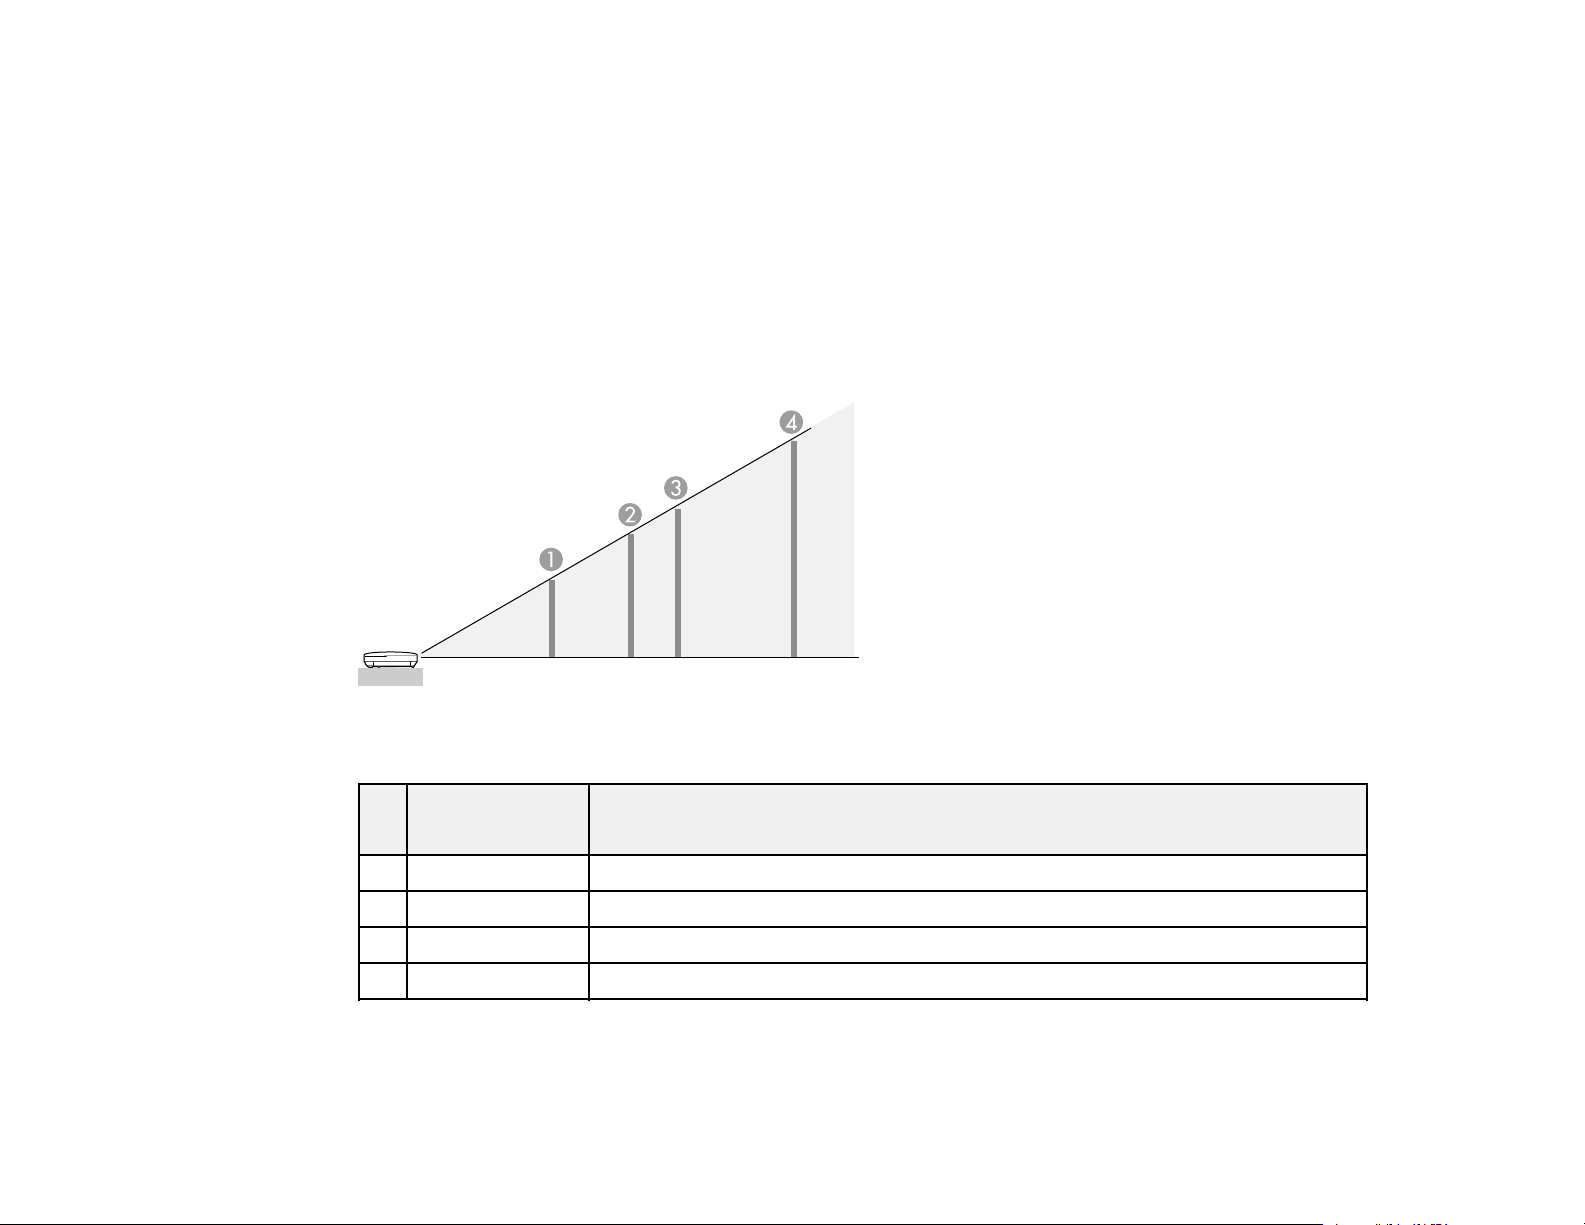
Projection Distance
The distance at which you place the projector from the screen determines the approximate size of the
image. The image size increases the farther the projector is from the screen, but can vary depending on
the zoom factor, aspect ratio, and other settings.
Use the tables here to determine approximately how far to place the projector from the screen based on
the size of the projected image. (Conversion figures may have been rounded up or down.) You can also
use the projector Throw Distance Calculator at epson.com/support (U.S.) or epson.ca/support (Canada).
16:10 Aspect Ratio
Screen or Projection distance
image size
1 50 inches 55 to 66 inches (139 to 168 cm)
2 80 inches 88 to 106 inches (225 to 270 cm)
3 100 inches 111 to 133 inches (281 to 338 cm)
4 150 inches 167 to 200 inches (424 to 509 cm)
16:9 Aspect Ratio
Wide to Tele
23
Page 24
Screen or Projection distance
image size
1 50 inches 56 to 68 inches (143 to 172 cm)
2 80 inches 91 to 109 inches (231 to 278 cm)
3 100 inches 114 to 137 inches (289 to 348 cm)
4 150 inches 171 to 206 inches (435 to 523 cm)
4:3 Aspect Ratio
Screen or Projection distance
image size
1 50 inches 62 to 75 inches (158 to 190 cm)
2 80 inches 100 to 121 inches (255 to 306 cm)
3 100 inches 126 to 151 inches (319 to 383 cm)
4 150 inches 189 to 227 inches (480 to 577 cm)
Parent topic: Projector Placement
Projector Connections
Wide to Tele
Wide to Tele
You can connect the projector to a variety of computer, video, and audio sources to display
presentations, movies, or other images, with or without sound.
• Connect any type of computer (Windows or Mac OS X) that has a USB port, standard video output
(monitor) port, or HDMI port.
• For video projection, connect devices such as DVD players, gaming consoles, digital cameras, and
smartphones with compatible video output ports.
• If your presentation or video includes sound, you can connect audio input cables, if necessary.
• For slide shows without a computer, you can connect USB devices such as a flash drive or camera
(must be a USB mass storage device).
Caution: If you will use the projector at altitudes above 4921 feet (1500 m), turn on High Altitude Mode
to ensure the projector's internal temperature is regulated properly.
24
Page 25
Connecting to Video Sources
Connecting to Computer Sources
Connecting to External USB Devices
Parent topic: Setting Up the Projector
Related references
Projector Setup Settings - Extended Menu
Connecting to Video Sources
Follow the instructions in these sections to connect video devices to the projector.
Connecting to an HDMI Video Source
Connecting to a Component-to-VGA Video Source
Connecting to an S-Video Video Source
Connecting to a Composite Video Source
Connecting to a Video Source for Sound
Connecting to External Speakers
Parent topic: Projector Connections
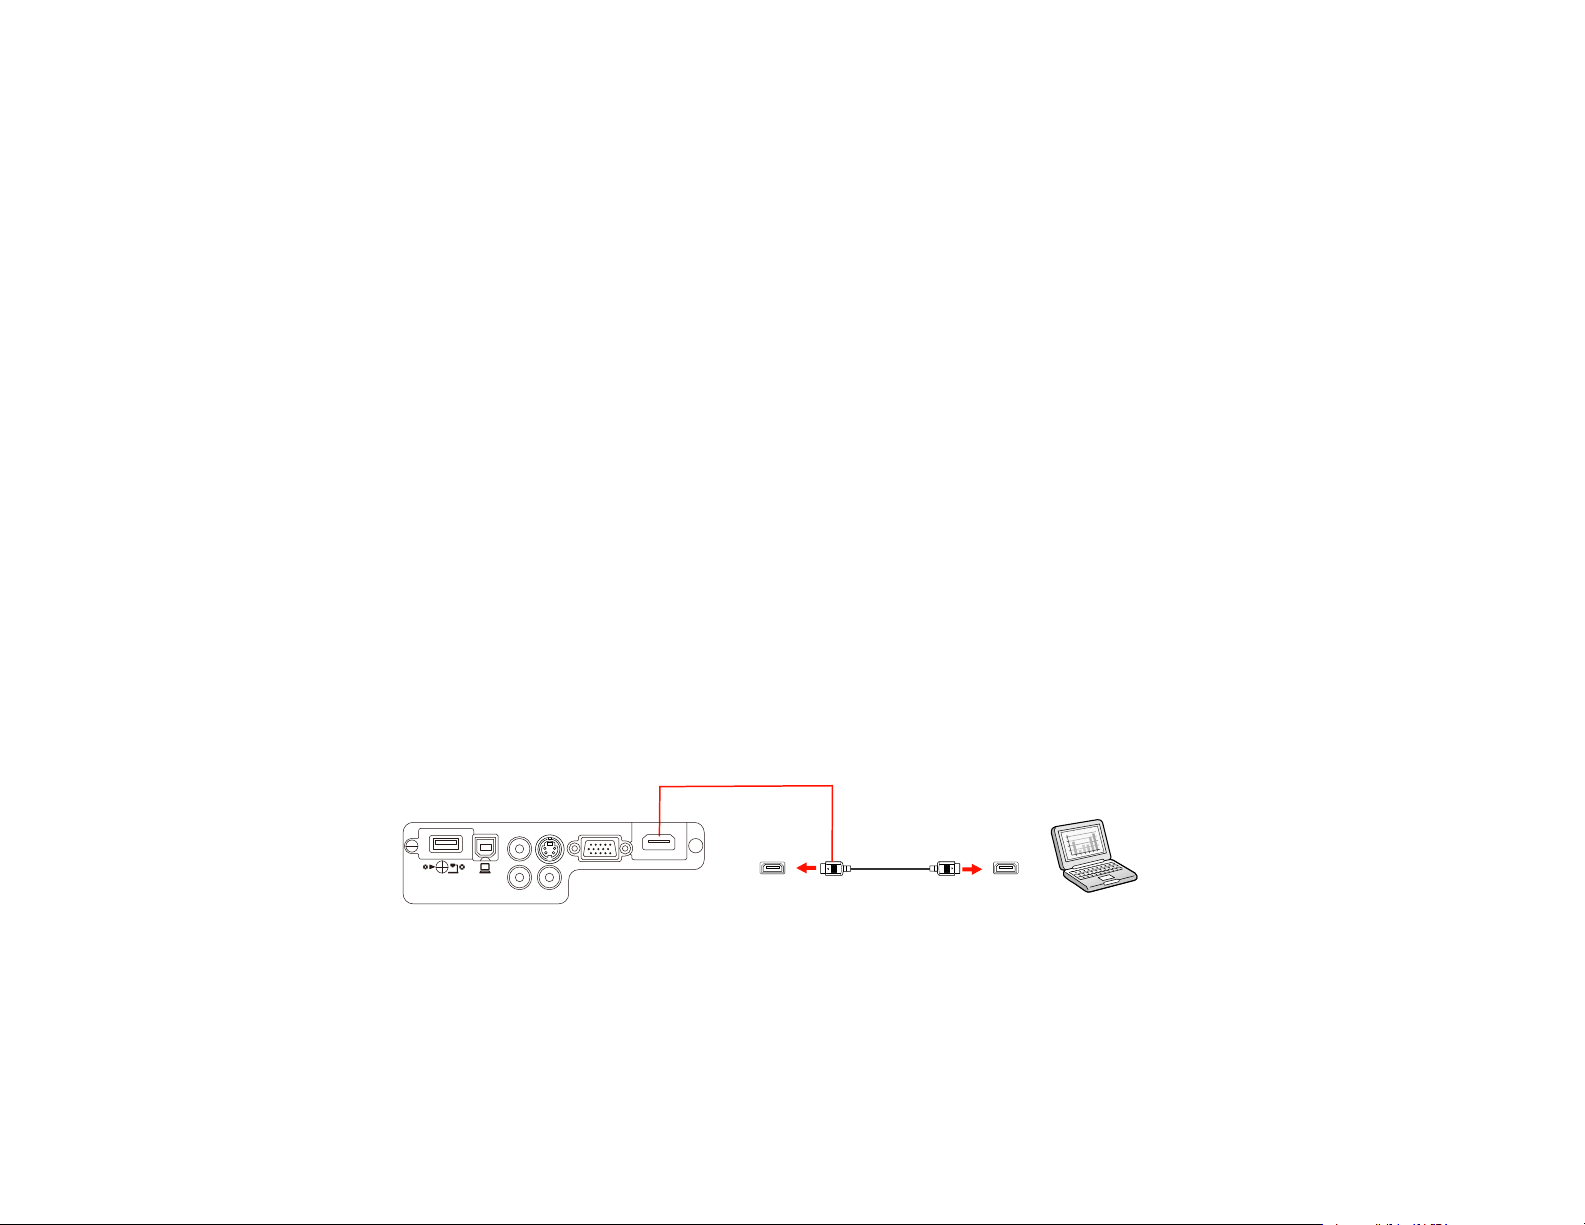
Connecting to an HDMI Video Source
If your video source has an HDMI port, you can connect it to the projector using an optional HDMI cable.
The HDMI connection provides the best image quality.
1. Connect the HDMI cable to your video source's HDMI output port.
2. Connect the other end to the projector's HDMI port.
Note: The projector converts the digital audio signal sent from your video source into a mono analog
signal for the internal speaker.
25
Page 26
Note: If you connected a game console, it may take a few seconds for your image to appear. To reduce
the lag time, set your game console's output signal to a progressive signal of 480p or 720p. See your
game console documentation for instructions.
Parent topic: Connecting to Video Sources
Connecting to a Component-to-VGA Video Source
If your video source has component video ports, you can connect it to the projector using an optional
component-to-VGA video cable. Depending on your component ports, you may need to use an adapter
cable along with a component video cable.
1. Connect the component connectors to your video source's color-coded component video output
ports, usually labeled Y, Pb, Pr or Y, Cb, Cr. If you are using an adapter, connect these connectors
to your component video cable.
2. Connect the VGA connector to a Computer port on the projector.
3. Tighten the screws on the VGA connector.
If your image colors appear incorrect, you may need to change the Input Signal setting in the projector's
Signal menu.
Note: If you connected a game console, it may take a few seconds for your image to appear. To reduce
the lag time, set your game console's output signal to a progressive signal of 480p or 720p. See your
game console documentation for instructions.
Parent topic: Connecting to Video Sources
Related references
Input Signal Settings - Signal Menu
26
Page 27
Related tasks
Connecting to a Video Source for Sound
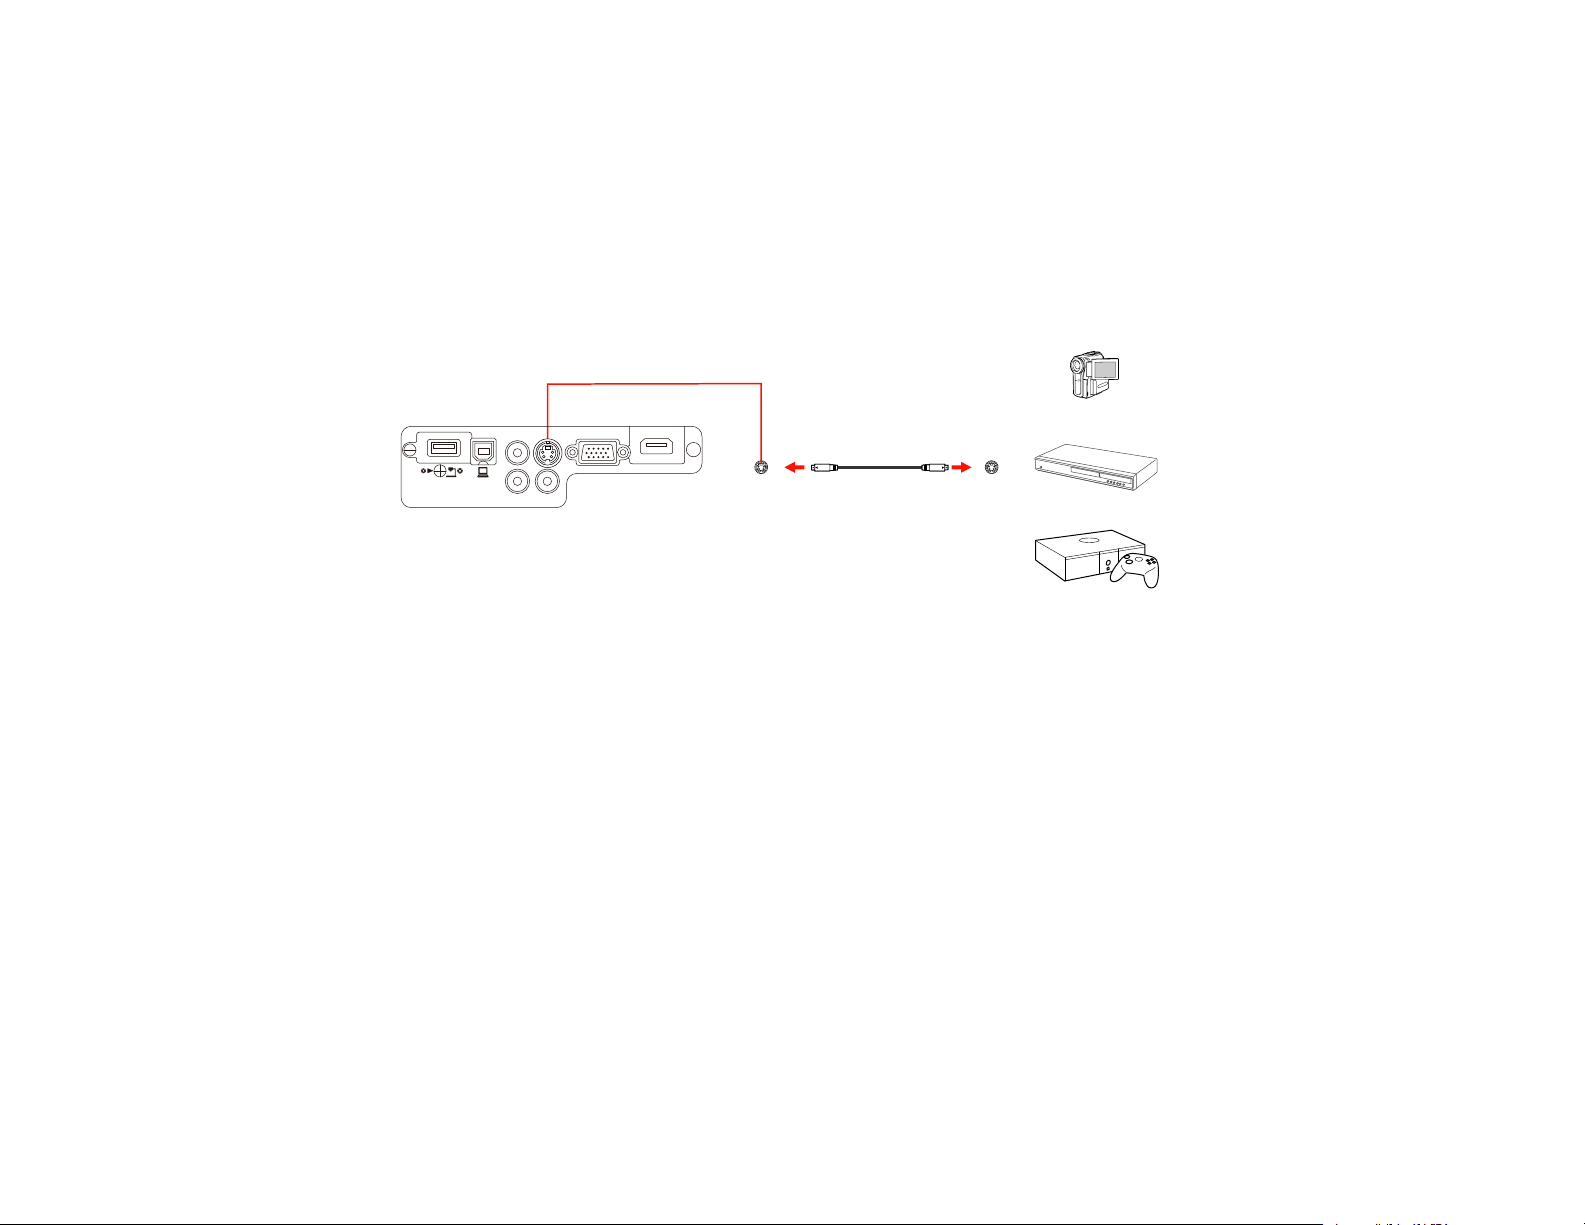
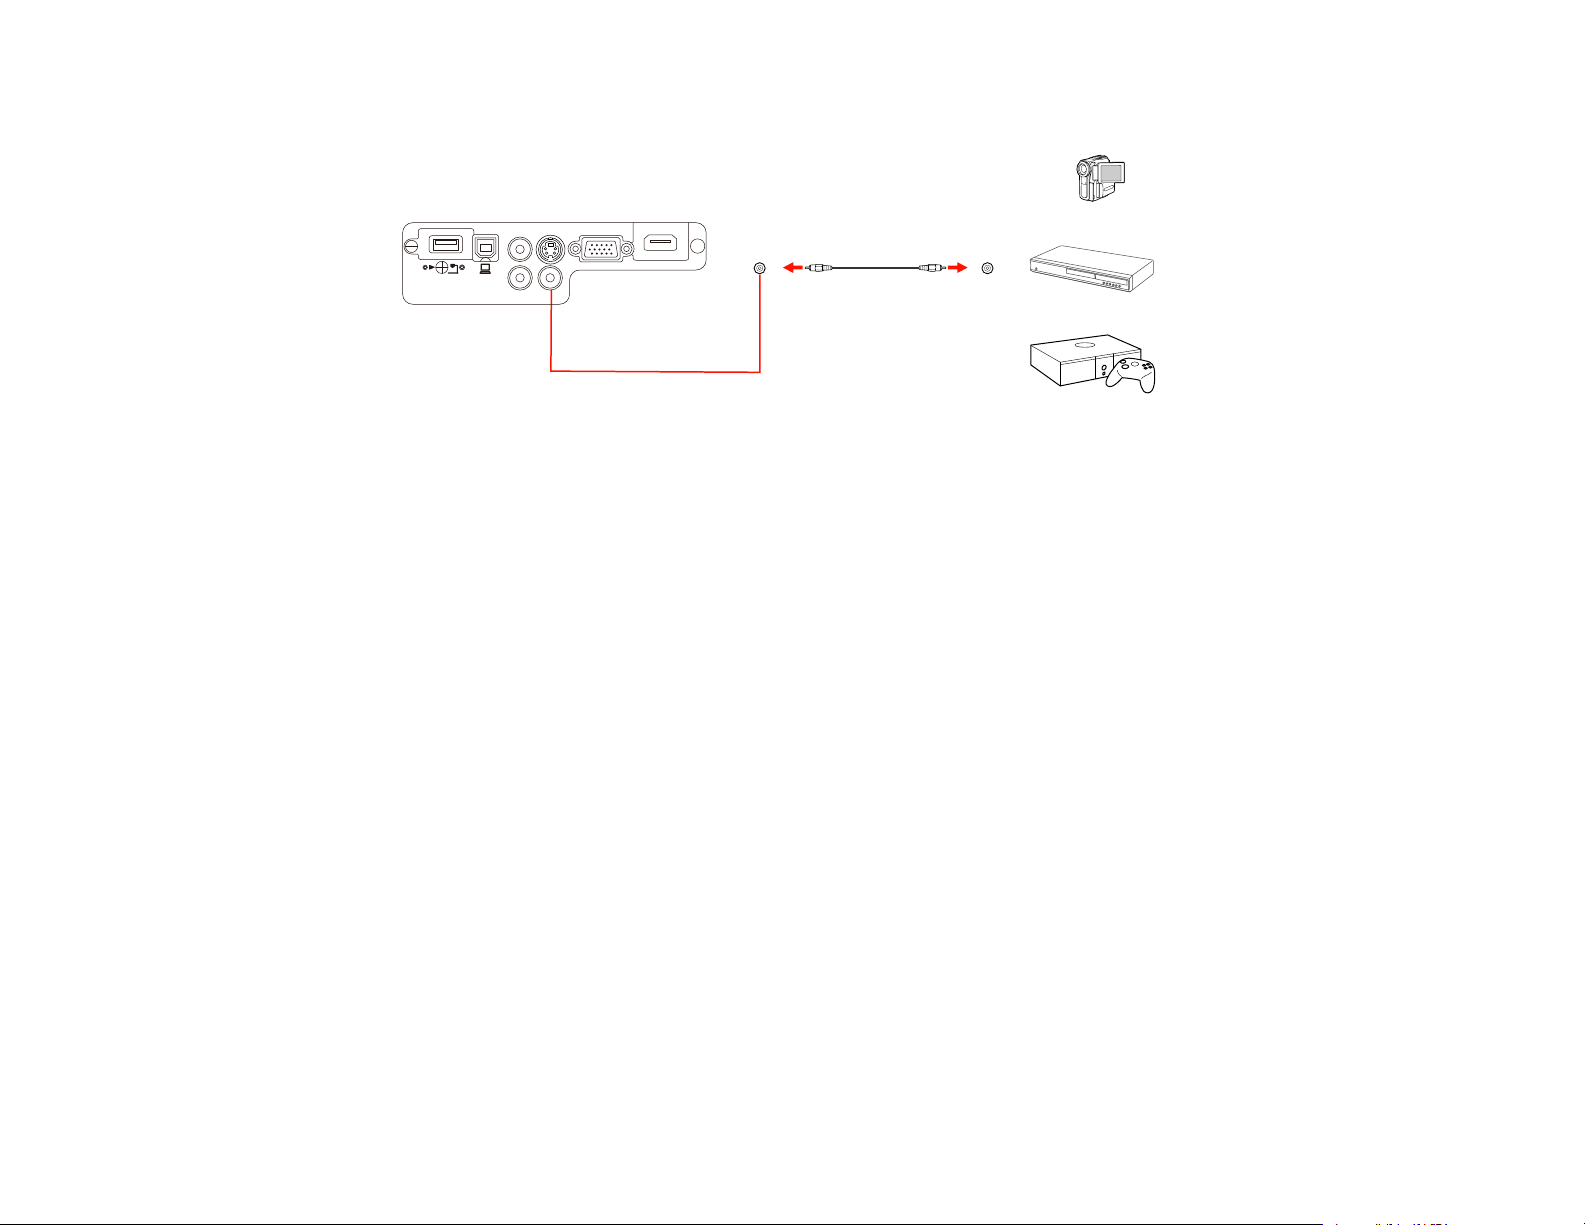
Connecting to an S-Video Video Source
If your video source has an S-Video port, you can connect it to the projector using an optional S-Video
cable.
1. Connect the S-Video cable to your video source's S-Video output port.
2. Connect the other end to the projector's S-Video port.
Note: If you connected a game console, it may take a few seconds for your image to appear. To reduce
the lag time, set your game console's output signal to a progressive signal of 480p or 720p. See your
game console documentation for instructions.
Parent topic: Connecting to Video Sources
Related tasks
Connecting to a Video Source for Sound
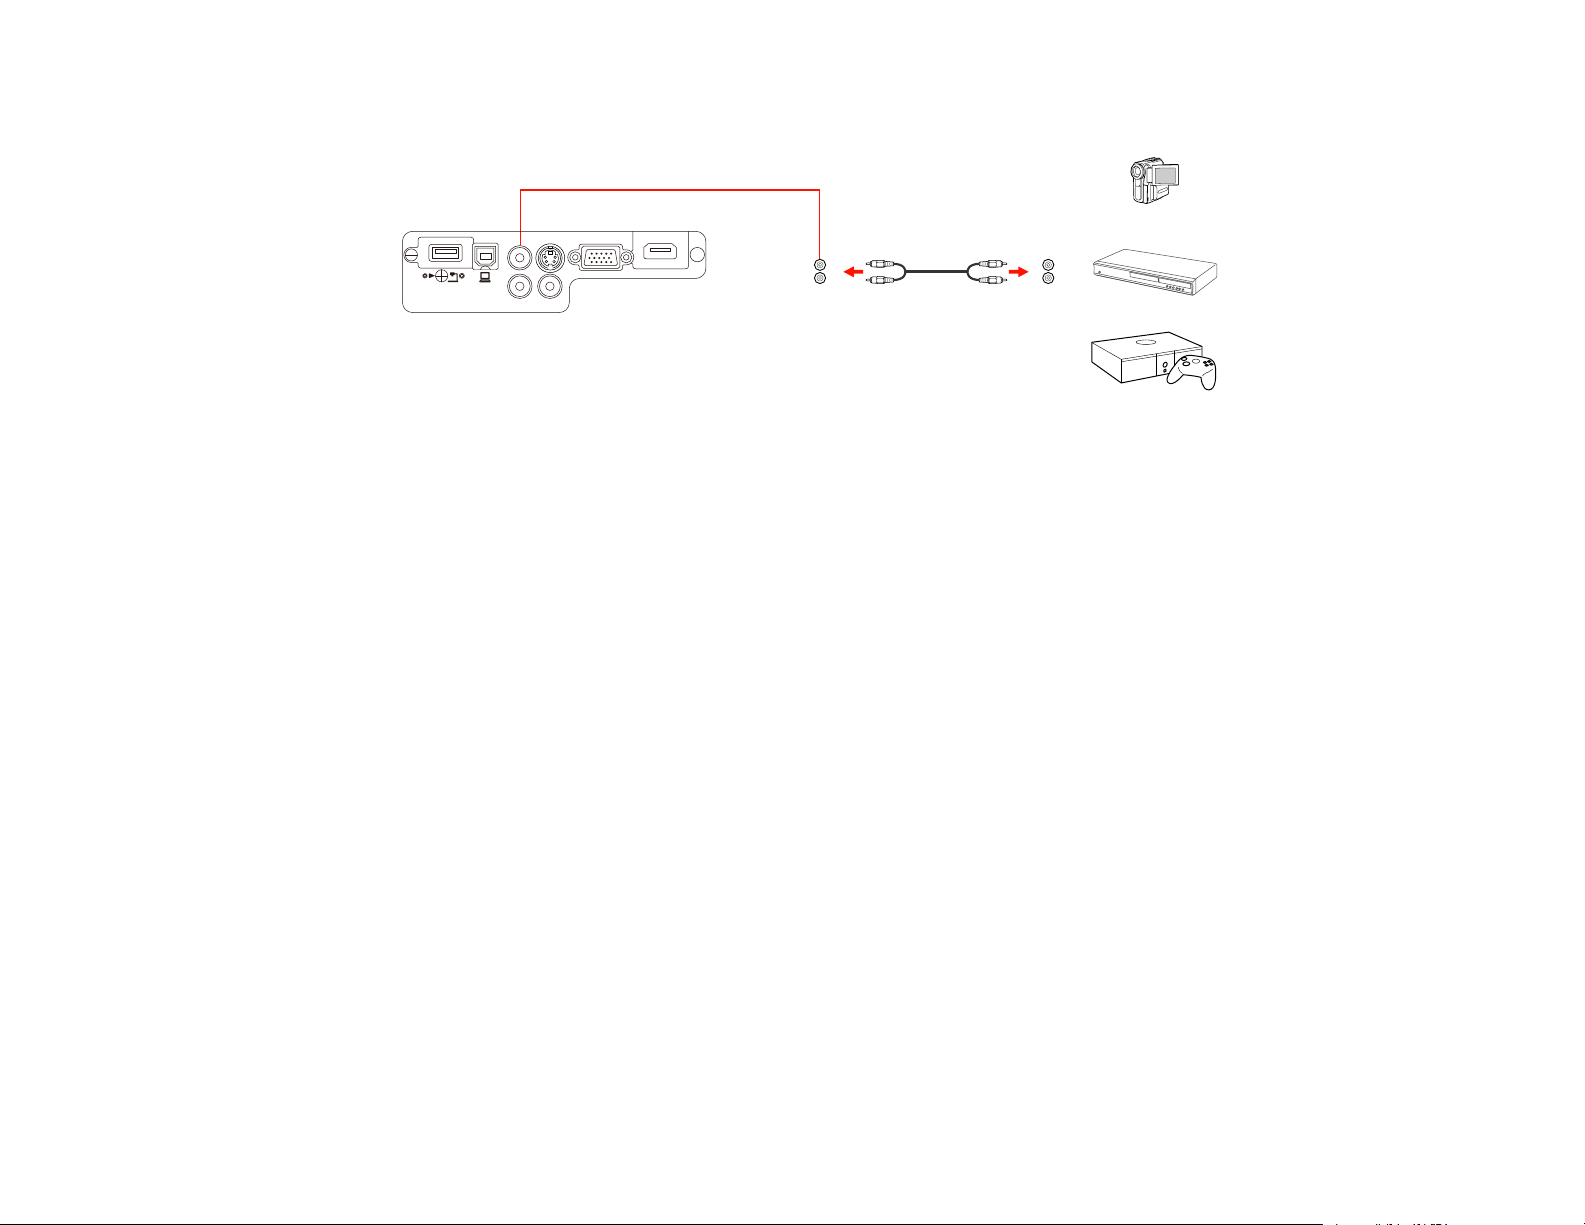
Connecting to a Composite Video Source
If your video source has a composite video port, you can connect it to the projector using an optional
RCA-style video or A/V cable.
1. Connect the cable with the yellow connector to your video source's yellow video output port.
27
Page 28
2. Connect the other end to the projector's Video port.
Note: If you connected a game console, it may take a few seconds for your image to appear. To reduce
the lag time, set your game console's output signal to a progressive signal of 480p or 720p. See your
game console documentation for instructions.
Parent topic: Connecting to Video Sources
Related tasks
Connecting to a Video Source for Sound
Connecting to a Video Source for Sound
You can play sound through the projector's speaker system if your video source has audio output ports.
Connect the projector to the video source using an RCA audio cable.
Note: If you connected your video source to the projector using an HDMI cable, the audio signal is
transferred with the video signal; you do not need an additional cable for sound.
1. Connect the audio cable to your video source's audio-out ports.
28
Page 29
2. Connect the other end of the cable to the projector's Audio port or ports.
Note: To add additional sound, connect your video source and speakers to an audio video receiver,
then connect the receiver to the projector using one of the receiver's compatible video outputs (an
HDMI connection provides the best image quality, if available). You can also connect speakers to
any video source that has its own speaker connections.
Parent topic: Connecting to Video Sources
Connecting to External Speakers
To add additional sound, you can connect your video source and speakers to an audio video receiver,
then connect the receiver to the projector using one of the receiver's compatible video outputs (an HDMI
connection provides the best image quality, if available). You can also connect speakers to any video
source that has its own speaker connections.
Note: If you are using an HDMI connection to the projector, you may need to reduce the projector
speaker volume to zero (0), or make sure that the correct audio output is selected on your device.
29
Page 30
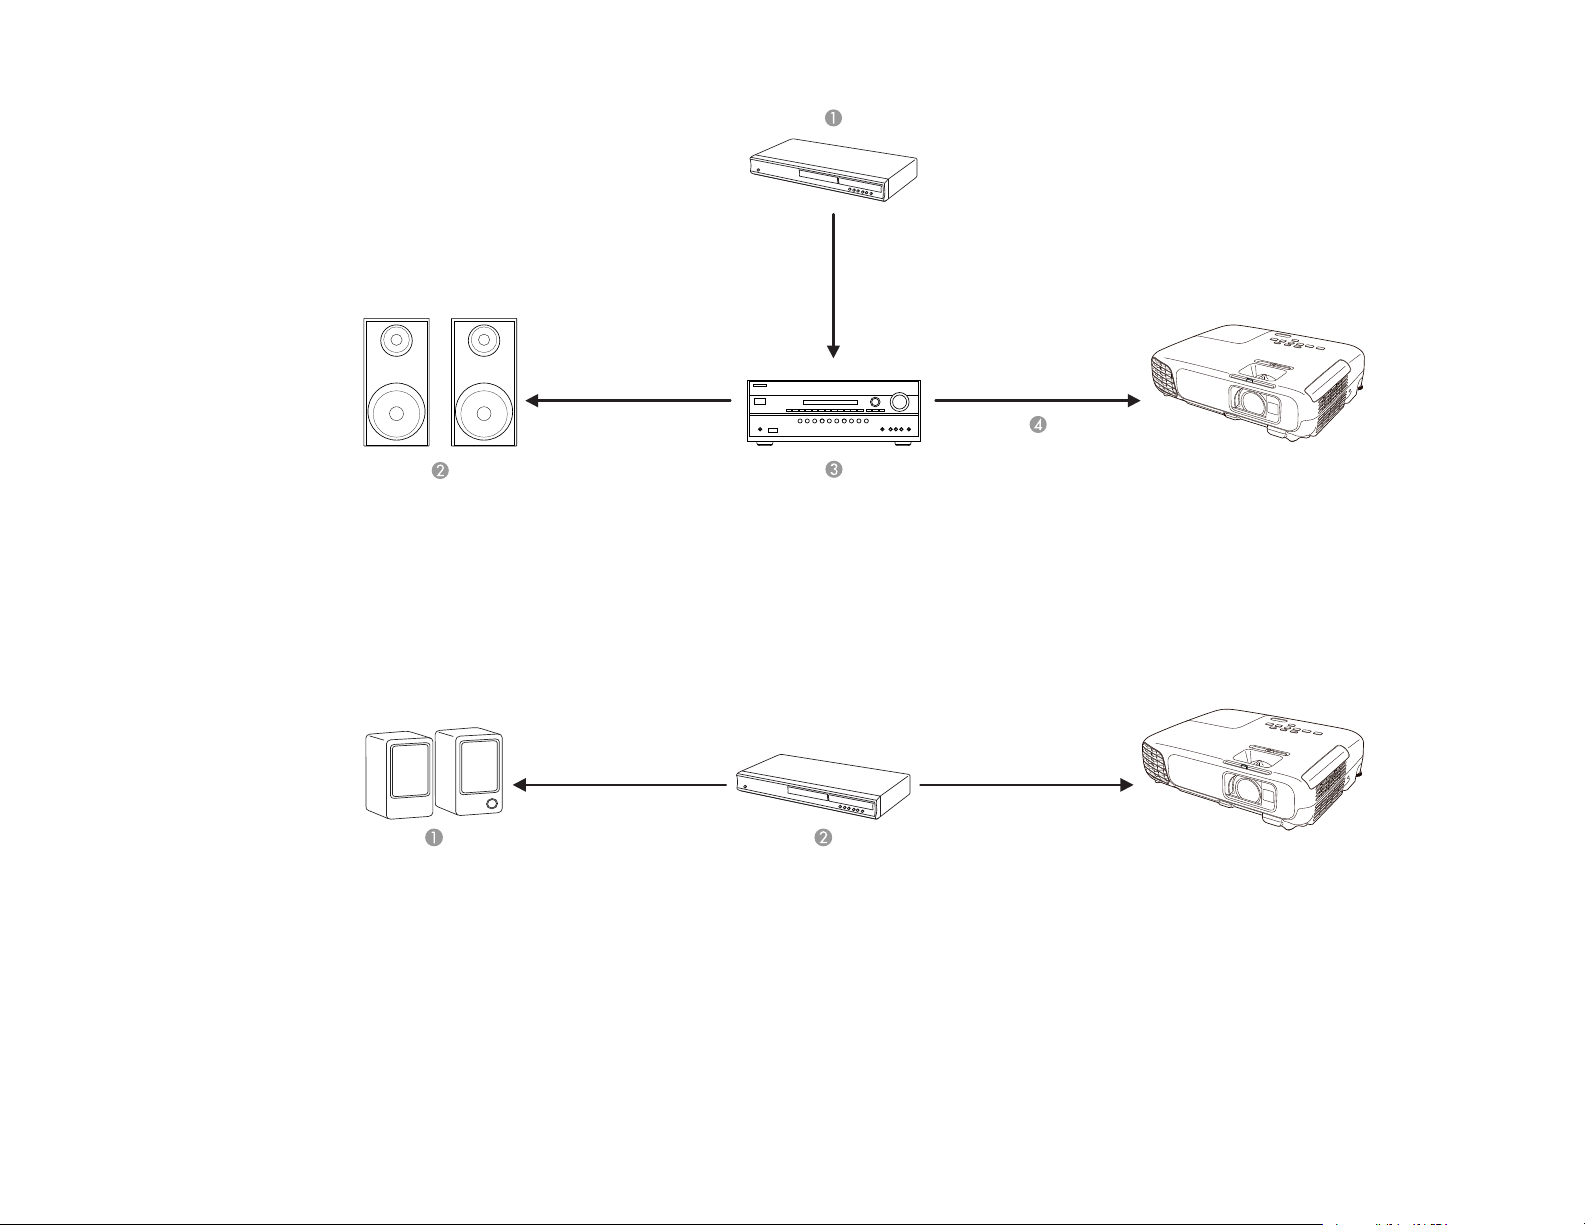
1 Video source
2 Surround sound
3 Receiver
4 Video cable
1 External speakers
2 Video source
Note: The projector's built-in speaker system is disabled when you connect external speakers.
Parent topic: Connecting to Video Sources
30
Page 31

Connecting to Computer Sources
Follow the instructions in these sections to connect a computer to the projector.
Connecting to a Computer for USB Video and Audio
Connecting to a Computer for VGA Video
Connecting to a Computer for HDMI Video and Audio
Connecting to a Computer for USB Mouse Control
Connecting to a Computer for Sound
Parent topic: Projector Connections
Connecting to a Computer for USB Video and Audio
If your computer meets the system requirements, you can send video and audio output to the projector
through the computer's USB port (preferably USB 2.0). Connect the projector to your computer using a
USB cable.
Note: A USB connection may cause a delay for content requiring high bandwidth, such as movies. An
HDMI connection is recommended for projecting movies, video games, and other home entertainment
content.
1. In the projector's Extended menu, set the USB Type B setting to USB Display.
2. Turn on your computer.
3. Connect the cable to your projector's USB-B port.
4. Connect the other end to any available USB port on your computer.
5. Do one of the following:
• Windows 8: Click EPSON_PJ_UD in the upper right-corner, then select Run EMP_UDSE.EXE in
the dialog box that appears to install the Epson USB Display software.
• Windows 7/Windows Vista: Select Run EMP_UDSE.EXE in the dialog box that appears to
install the Epson USB Display software.
31
Page 32

• Windows XP: Wait as messages appear on your computer screen and the projector installs the
Epson USB Display software on your computer.
• Windows 2000: Select Computer, EPSON_PJ_UD, and EMP_UDSE.EXE to install the Epson
USB Display software.
• Mac OS X: The USB Display setup folder appears on your screen. Select USB Display Installer
and follow the on-screen instructions to install the Epson USB Display software.
Follow any on-screen instructions. You need to install this software only the first time you connect
the projector to the computer.
Note: If you are using Windows XP or Windows 2000 and you see a message asking if you want to
restart your computer, select No.
The projector displays the image from your computer's desktop and outputs sound, if your presentation
contains audio.
Parent topic: Connecting to Computer Sources
Related references
USB Display System Requirements
Related tasks
Connecting to a Computer for HDMI Video and Audio
Connecting to a Computer for VGA Video
You can connect the projector to your computer using a VGA computer cable.
Note: To connect a Mac that includes only a Mini DisplayPort, Thunderbolt port, or Mini-DVI port for
video output, you need to obtain an adapter that allows you to connect to the projector's VGA video port.
Contact Apple for compatible adapter options.
1. If necessary, disconnect your computer's monitor cable.
2. Connect the VGA computer cable to your computer's monitor port.
32
Page 33

3. Connect the other end to a Computer port on the projector.
4. Tighten the screws on the VGA connector.
Parent topic: Connecting to Computer Sources
Related tasks
Connecting to a Computer for Sound
Connecting to a Computer for HDMI Video and Audio
If your computer has an HDMI port, you can connect it to the projector using an optional HDMI cable.
Note: To connect a Mac that includes only a Mini DisplayPort, Thunderbolt port, or Mini-DVI port for
video output, you need to obtain an adapter that allows you to connect to the projector's HDMI port.
Contact Apple for compatible adapter options. Older Mac computers (2009 and earlier) may not support
audio through the HDMI port.
1. Connect the HDMI cable to your computer's HDMI output port.
2. Connect the other end to the projector's HDMI port.
Note: The projector converts the digital audio signal sent from your computer into a mono analog signal
for the internal speaker.
Parent topic: Connecting to Computer Sources
33
Page 34

Connecting to a Computer for USB Mouse Control
If you connected your computer to a Computer (VGA), USB-B, or HDMI port on the projector, you can
set up the remote control to act as a wireless mouse. This lets you control projection at a distance from
your computer. To do this, connect the projector to your computer using a USB cable, if it is not
connected already.
1. Connect the USB cable to your projector's USB-B port.
2. Connect the other end to any available USB port on your computer.
3. If necessary, configure your computer to work with an external USB mouse. See your computer
documentation for details.
Parent topic: Connecting to Computer Sources
Related tasks
Using the Remote Control as a Wireless Mouse
Connecting to a Computer for Sound
If your computer presentation includes sound and you did not connect it using the projector's USB-B or
HDMI port, you can still play sound through the projector's speaker system. Just connect an optional
stereo mini-jack adapter cable (with one 3.5 mm mini-plug and two RCA plugs).
1. Connect the audio cable to your laptop's headphone or audio-out jack, or your desktop's speaker or
audio-out port.
2. Connect the other end to the projector's Audio ports.
34
Page 35

Parent topic: Connecting to Computer Sources
Connecting to External USB Devices
Follow the instructions in these sections to connect external USB devices to the projector.
USB Device Projection
Connecting a USB Device or Camera to the Projector
Selecting the Connected USB Source
Disconnecting a USB Device or Camera From the Projector
Parent topic: Projector Connections
USB Device Projection
You can project images and other content without using a computer or video device by connecting any of
these devices to your projector:
• USB flash drive
• Digital camera or smartphone
• USB hard drive
• Multimedia storage viewer
• USB memory card reader
Note: Digital cameras or smartphones must be USB-mounted devices, not TWAIN-compliant devices,
and must be USB Mass Storage Class-compliant.
Note: USB hard drives must meet these requirements:
• USB Mass Storage Class-compliant (not all USB Mass Storage Class devices are supported)
• Formatted in FAT or FAT32
• Self-powered by their own AC power supplies (bus-powered hard drives are not recommended)
• Avoid using hard drives with multiple partitions
You can project slide shows from image files on a connected USB device or memory card reader.
Parent topic: Connecting to External USB Devices
Related topics
Projecting a PC Free Presentation
35
Page 36

Connecting a USB Device or Camera to the Projector
You can connect your USB device or camera to the projector's USB-A port and use it to project images
and other content.
1. If your USB device came with a power adapter, plug the device into an electrical outlet.
2. Connect the USB cable (or USB flash drive or USB memory card reader) into the projector's USB-A
port shown here.
Note: Do not connect a USB hub or a USB cable longer than 10 feet (3 m), or the device may not
operate correctly.
3. Connect the other end of the cable (if applicable) to your device.
Parent topic: Connecting to External USB Devices
Related topics
Projecting a PC Free Presentation
Selecting the Connected USB Source
You can switch the projector's display to the source you connected to the USB-A port.
1. Make sure the connected USB source is turned on, if necessary.
2. Press the USB button on the remote control.
3. Press the button again to cycle through other USB sources, if available.
Parent topic: Connecting to External USB Devices
Disconnecting a USB Device or Camera From the Projector
When you finish presenting with a connected USB device or camera, you must prepare to disconnect the
device from the projector.
1. If the device has a power button, turn off and unplug the device.
36
Page 37

2. Disconnect the USB device or camera from the projector.
Parent topic: Connecting to External USB Devices
Installing Batteries in the Remote Control
The remote control uses the two AA batteries that came with the projector.
Caution: Use only the type of batteries specified in this manual. Do not install batteries of different types,
or mix new and old batteries.
1. Open the battery cover.
2. Insert the batteries with the + and – ends facing as shown.
37
Page 38

3. Close the battery cover and press it down until it clicks into place.
Warning: Dispose of used batteries according to local regulations. Do not expose batteries to heat
or flame. Keep batteries out of the reach of children; they are choking hazards and are very
dangerous if swallowed.
Parent topic: Setting Up the Projector
Related references
Remote Control Specifications
Opening the Lens Cover
1. To open the projector's lens cover, slide the A/V Mute slide lever until it clicks into the open position.
38
Page 39

2. To cover the lens or temporarily turn off the projected picture and sound, slide the A/V Mute slide
cover until it clicks into the closed position.
Parent topic: Setting Up the Projector
39
Page 40

Using the Projector on a Network
Follow the instructions in these sections to set up your projector for use on a network.
Wireless Network Projection
Setting Up Projector Network E-Mail Alerts
Setting Up Monitoring Using SNMP
Controlling a Networked Projector Using a Web Browser
Wireless Network Projection
You can send images to your projector through a wireless network. To do this, you must install the
Epson 802.11b/g/n wireless LAN module, and then set up your projector and computer for wireless
projection.
There are two ways to connect the projector to your wireless network:
• Using the optional Quick Wireless Connection USB Key (Windows only)
• Configuring the connection manually using the projector's Network menus
After installing the module and setting up the projector, install the network software. You can download
the latest software and documentation from the Epson web site. Go to epson.com/support (U.S.) or
epson.ca/support (Canada) and select your projector. Use the following software and documentation to
set up, control, and monitor wireless projection:
• EasyMP Network Projection software sets up your computer for wireless network projection.
• EasyMP Monitor software (Windows only) lets you monitor and control your projector through the
network.
Installing the Wireless LAN Module
Using Quick Wireless Connection (Windows Only)
Selecting Wireless Network Settings Manually
Selecting Wireless Network Settings in Windows
Selecting Wireless Network Settings in Mac OS X
Setting Up Wireless Network Security
Parent topic: Using the Projector on a Network
Related references
Optional Equipment and Replacement Parts
40
Page 41

Installing the Wireless LAN Module
To use the projector over a wireless network, install the Epson 802.11b/g/n wireless LAN module in the
projector. Do not install any other type of wireless module.
1. Remove the wireless LAN module cover screw.
2. Insert the wireless LAN module into the USB-A port.
41
Page 42

3. Attach the wireless LAN module cover and secure it using the screw you removed.
The light on the wireless LAN module turns on when the module is installed and operating. The light
flashes when the module is communicating over the network.
Parent topic: Wireless Network Projection
Related references
Optional Equipment and Replacement Parts
Using Quick Wireless Connection (Windows Only)
You can use the Quick Wireless Connection USB key to quickly connect your computer to the projector
wirelessly. Then you can project your presentation and remove the key when you are done.
Note: The Quick Wireless Connection USB key is not included with your projector.
Note: Make sure the wireless LAN module is installed.
1. Turn on the projector.
2. Press the LAN button on the remote control.
You see a screen like this:
42
Page 43

3. Verify that an SSID and IP address are displayed, then remove the wireless LAN module from the
projector.
4. Insert the Quick Wireless Connection USB key into the same port used for the wireless LAN module.
You see a projected message that the network information update is complete.
5. Remove the USB key.
6. Reinsert the wireless LAN module into the projector.
7. Now connect the USB key to a USB port on your computer or notebook.
Note: In Windows Vista, if you see the AutoPlay window, select Run LaunchQWRD.exe, then
select Allow on the next screen.
43
Page 44

8. Follow the on-screen instructions to install the Quick Wireless Connection driver.
Note: If you see a Windows Firewall message, click Yes to disable the firewall for this application.
After a few minutes, your computer image is displayed by the projector. If it does not appear, press
the LAN button on your projector remote control or restart your computer.
9. Run your presentation as necessary.
10. When you finish projecting wirelessly, select the Safely Remove Hardware option in the Windows
taskbar, then remove the USB key from your computer.
Note: You may need to restart your computer to reactivate your wireless LAN connection.
Parent topic: Wireless Network Projection
Related references
Optional Equipment and Replacement Parts
Selecting Wireless Network Settings Manually
Before you can project from your wireless network, you must select the network settings for the projector
using its menu system.
1. Turn on the projector.
2. Press the Menu button.
3. Select the Network menu and press Enter.
44
Page 45

4. Select Network Configuration and press Enter.
5. Select the Basic menu and press Enter.
6. Select the following basic options as necessary:
• Projector Name lets you enter a name up to 16 alphanumeric characters long to identify the
projector over the network.
• Web Control Password lets you enter a password up to 8 alphanumeric characters long for
accessing the projector over the web. (Default user name is EPSONWEB; default password is
admin.)
• Projector Keyword lets you turn on a security password to prevent access to the projector by
anyone not in the room with it. You must enter a displayed, randomized keyword from a computer
using the EasyMP Network Projection software to access the projector.
Note: Use the displayed keyboard to enter the name, passwords and keyword. Press the arrow
buttons on the remote control to highlight characters and press Enter to select them.
45
Page 46

7. Select the Wireless LAN menu and press Enter.
8. Select the settings on the Wireless LAN menu as necessary for your network.
9. When you finish selecting settings, select Complete and follow the on-screen instructions to save
your settings and exit the menus.
After you complete the wireless settings for your projector, you need to select the wireless network on
your computer.
Wireless LAN Menu Settings
Parent topic: Wireless Network Projection
Wireless LAN Menu Settings
Setting Options Description
Wireless LAN Power On Turns on wireless LAN support
Off
46
Page 47

Setting Options Description
Connection Mode Quick Selects the type of wireless
Advanced
connection:
Quick: lets you quickly connect
to one computer or use the
optional Quick Wireless
Connection USB Key to connect
Advanced: lets you connect to
multiple computers via a wireless
network access point
Channel 1ch In Quick connection mode,
6ch
11ch
selects the frequency band
(channel) used by the wireless
LAN
Wireless LAN Sys. 802.11b/g Sets the type of wireless LAN
802.11b/g/n
system the projector is
connecting to
SSID Auto Setting On Turns on automatic SSID
Off
searching in Quick connection
mode; set to Off when
connecting to multiple projectors
at the same time
SSID Up 32 alphanumeric characters Sets the SSID (network name) of
the wireless LAN system the
projector is connecting to
IP Settings DHCP (On or Off) Selects DHCP if your network
IP Address
Subnet Mask
Gateway Address
assigns addresses automatically,
or turns off DHCP so you can
enter the network's IP address,
subnet mask, and gateway
address as needed
SSID Display On Selects whether to display the
Off
47
SSID on the network standby
screen
Page 48

Setting Options Description
IP Address Display On Selects whether to display the IP
Off
Parent topic: Selecting Wireless Network Settings Manually
Selecting Wireless Network Settings in Windows
Before connecting to the projector, select the correct wireless network on your computer.
1. To access your wireless utility software, double-click the network icon on the Windows taskbar.
2. Do one of the following:
• If your projector is set up on an existing network (Advanced mode), select the network name
(SSID).
• If your projector is configured for Quick mode, select the SSID or name you assigned to the
projector.
3. Click Connect.
Parent topic: Wireless Network Projection
Selecting Wireless Network Settings in Mac OS X
Before connecting to the projector, select the correct wireless network in Mac OS X.
address on the network standby
screen
1. Click the AirPort icon on the menu bar at the top of the screen.
2. Make sure AirPort is turned on, then do one of the following:
• If your projector is set up on an existing network (Advanced mode), select the network name
(SSID).
• If your projector is configured for Quick mode, select the SSID or name you assigned to the
projector.
Parent topic: Wireless Network Projection
Setting Up Wireless Network Security
You can set up security for your projector to use on the wireless network. Set up one of the following
security options to match the settings used on your network:
• WEP encryption
48
Page 49

• WPA security
Note: Check with your network administrator for guidance on entering the correct information.
1. Press the Menu button.
2. Select the Network menu and press Enter.
3. Select Network Configuration and press Enter.
4. Select the Security menu and press Enter.
5. Select the security settings as necessary to match your network settings.
6. When you finish selecting settings, select Complete and follow the on-screen instructions to save
your settings and exit the menus.
Wireless Security Menu Settings
Parent topic: Wireless Network Projection
Wireless Security Menu Settings
Settings on the Security menu let you select the type of security and security settings that match the
network you are connecting the projector to.
49
Page 50

Setting Options Description
Security WEP and WPA types available Selects the type of security used
on the wireless network
WEP Encryption 128Bit For WEP security, selects the
64Bit
type of encryption coding
Format ASCII For WEP security, selects the
HEX
encryption input method:
ASCII: enables text input
HEX: enables hexadecimal input
Key ID 1 to 4 For WEP security, selects the
WEP encryption key ID
Encryption Key 1 to Various characters depending on For the selected WEP Key ID
Encryption Key 4
selected WEP Encryption and setting, enter the key used for
Format settings WEP encryption:
128 bit ASCII: 13 alphanumeric
characters
128 bit HEX: 26 characters (0 to
9 and A to F)
64 bit ASCII: 5 alphanumeric
characters
64 bit HEX: 10 characters (0 to 9
and A to F)
Authentication Type Open For WEP security, selects the
Shared
type of WEP authentication used
Passphrase Various keys from 8 to 32 For WPA-PSK or WPA2-PSK
characters security, selects the pre-shared
key used on the network
Parent topic: Setting Up Wireless Network Security
50
Page 51

Setting Up Projector Network E-Mail Alerts
You can set up the projector to send you an e-mail alert over the network if there is a problem with the
projector.
1. Press the Menu button.
2. Select the Network menu and press Enter.
3. Select Network Configuration and press Enter.
4. Select the Mail menu and press Enter.
5. Turn on Mail Notification.
6. Enter the IP address for the SMTP Server option.
Note: To enter the IP address using the numeric keys on the remote control, press and hold the
Num button. Do not use these addresses: 127.x.x.x or 224.0.0.0 through 255.255.255.255 (where x
is a number from 0 to 255).
7. Select a number for the SMTP server Port Number, from 1 to 65535 (default is 25).
8. Choose an Address field, enter the e-mail address, and select the alerts you want to receive there.
Repeat for up to three addresses.
Note: Your e-mail address can be up to 32 alphanumeric characters long.
51
Page 52

9. When you finish selecting settings, select Complete and follow the on-screen instructions to save
your settings and exit the menus.
Note: If a critical problem causes a projector to shut down, you may not receive an e-mail alert.
Network Projector E-mail Alert Messages
Parent topic: Using the Projector on a Network
Network Projector E-mail Alert Messages
When a problem occurs with a networked projector, and you selected to receive e-mail alerts, you
receive an e-mail containing the following information:
• Epson Projector on the subject line
• The name of the projector experiencing a problem
• The IP address of the affected projector
• Detailed information about the problem
Note: If a critical problem causes a projector to shut down, you may not receive an e-mail alert.
Parent topic: Setting Up Projector Network E-Mail Alerts
Setting Up Monitoring Using SNMP
Network administrators can install SNMP (Simple Network Management Protocol) software on network
computers so they can monitor projectors. If your network uses this software, you can set up the
projector for SNMP monitoring.
1. Press the Menu button.
2. Select the Network menu and press Enter.
3. Select Network Configuration and press Enter.
52
Page 53

4. Select the Others menu and press Enter.
5. Enter up to two IP addresses to receive SNMP notifications, using 0 to 255 for each address field.
Note: To enter the IP address using the numeric keys on the remote control, press and hold the
Num button. Do not use these addresses: 127.x.x.x or 224.0.0.0 through 255.255.255.255 (where x
is a number from 0 to 255).
6. If you are connecting to a network using Bonjour, turn on the Bonjour setting.
7. If you want this projector to receive broadcasted messages over the network, turn on the Message
Broadcasting setting. Administrators can broadcast messages over the network using the Message
Broadcasting plug-in for EasyMP Monitor (Windows only).
8. When you finish selecting settings, select Complete and follow the on-screen instructions to save
your settings and exit the menus.
Parent topic: Using the Projector on a Network
Controlling a Networked Projector Using a Web Browser
Once you have connected your projector to your network, you can select projector settings and control
projection using a compatible web browser. This lets you access the projector remotely.
53
Page 54

Note: The web setup and control features support Microsoft Internet Explorer 8.0 or later, and Safari on
networks that do not use a proxy server for connection. You cannot select all of the projector menu
settings or control all projector functions using a web browser.
Note: If you set Standby Mode to Communication On, you can use a web browser to select settings
and control projection even if the projector is in standby mode.
1. Make sure the projector is turned on.
2. Start your web browser on a computer connected to the network.
3. Type the projector's IP address into the browser's address box and press the computer's Enter key.
You see the Web Control screen.
Note: You may need to log in before you see the Web Control screen. If you see a log in window,
enter your user name and password. (The default user name is EPSONWEB and the default
password is admin.)
4. To select projector menu settings, select the name of the menu and follow the on-screen instructions
to select settings.
5. To control projection remotely, select the Web Remote option.
You see a screen like this:
54
Page 55

1 Power button control
2 Selects Computer port source
3 Selects Video, S-Video, and HDMI port sources
4 Freeze button control
5 A/V Mute button control
6 Page Up and Page Down button controls
7 Searches for sources
8 Selects the network source
9 Selects the USB Display or USB device source
10 Volume button controls
11 Closed Caption control
6. Select the icon corresponding to the projector function you want to control.
Parent topic: Using the Projector on a Network
Related references
Projector Setup Settings - ECO Menu
55
Page 56

Using Basic Projector Features
Follow the instructions in these sections to use your projector's basic features.
Turning On the Projector
Turning Off the Projector
Selecting the Language for the Projector Menus
Adjusting the Image Height
Image Shape
Resizing the Image With the Zoom Ring
Focusing the Image Using the Focus Ring
Remote Control Operation
Selecting an Image Source
Projection Modes
Image Aspect Ratio
Color Mode
Controlling the Volume with the Volume Buttons
Projecting a PC Free Presentation
Turning On the Projector
Turn on the computer or video equipment you want to use before you turn on the projector so it can
display the image source.
1. Slide the projector's lens cover until it clicks into the open position.
56
Page 57

2. Connect the power cord to the projector's power inlet.
3. Plug the power cord into an electrical outlet.
The projector's power light turns blue. This indicates that the projector is receiving power.
Note: With Direct Power On turned on, the projector turns on as soon as you plug it in.
4. Press the power button on the projector or the remote control to turn on the projector.
The projector beeps and the Status light flashes blue as the projector warms up. Once the projector
is warmed up, the Status light stops flashing and turns blue.
Warning: Never look into the projector lens when the lamp is on. This can damage your eyes and is
especially dangerous for children.
If you do not see a projected image right away, try the following:
• Verify the lens cover is open all the way.
• Turn on the connected computer or video device.
57
Page 58

• Insert a DVD or other video media, and press the play button (if necessary).
• Press the Source Search button on the projector or remote control to detect the video source.
Parent topic: Using Basic Projector Features
Related references
Projector Setup Settings - Extended Menu
Related tasks
Selecting an Image Source
Turning Off the Projector
Before turning off the projector, shut down any computer connected to it so you can see the computer
display during shutdown.
Note: Turn off this product when not in use to prolong the life of the projector. Lamp life will vary
depending upon mode selected, environmental conditions, and usage. Brightness decreases over time.
1. Press the power button on the projector or the remote control.
The projector displays a shutdown confirmation screen.
2. Press the power button again. (To leave it on, press any other button.)
The projector beeps twice, the lamp turns off, and the Status light turns off.
Note: With Epson's Instant Off technology, there is no cool-down period so you can pack up the
projector for transport right away (if necessary).
Caution: Do not turn the projector on immediately after turning it off. Turning the projector on and off
frequently may shorten the life of the lamp.
58
Page 59

3. To transport or store the projector, make sure the Status light is off, then unplug the power cord.
Caution: To avoid damaging the projector or lamp, never unplug the power cord when the Status
light is on or flashing.
59
Page 60

4. Slide the projector's lens cover until it clicks into the closed position.
Parent topic: Using Basic Projector Features
Selecting the Language for the Projector Menus
If you want to view the projector's menus and messages in another language, you can change the
Language setting.
1. Turn on the projector.
2. Press the Menu button.
60
Page 61

3. Select the Extended menu and press Enter.
4. Select the Language setting and press Enter.
5. Select the language you want to use and press Enter.
6. Press Menu or Esc to exit the menus.
Parent topic: Using Basic Projector Features
Adjusting the Image Height
If you are projecting from a table or other flat surface, and the image is too high or low, you can adjust
the image height using the projector's adjustable feet.
1. Turn on the projector and display an image.
61
Page 62

2. To adjust the front foot, pull up on the foot release lever and lift the front of the projector.
The foot extends from the projector.
3. Release the lever to lock the foot.
4. If the image is tilted, rotate the rear feet to adjust their height.
If the projected image is unevenly rectangular, you need to adjust the image shape.
Parent topic: Using Basic Projector Features
Related concepts
Image Shape
62
Page 63

Image Shape
You can project an evenly rectangular image by placing the projector directly in front of the center of the
screen and keeping it level. If you place the projector at an angle to the screen, or tilted up or down, or off
to the side, you may need to correct the image shape for the best display quality.
When you turn on automatic keystone correction in your projector's Settings menu, your projector
automatically corrects vertical keystone effects when you reposition the projector.
Correcting Image Shape with the Keystone Buttons
Correcting Image Shape with the Horizontal Keystone Slider
Correcting Image Shape with Quick Corner
Parent topic: Using Basic Projector Features
Correcting Image Shape with the Keystone Buttons
You can use the projector's keystone correction buttons to correct the shape of an image that is
unevenly rectangular on the sides.
1. Turn on the projector and display an image.
Note: You can display a pattern to aid in adjusting the projected image using the Settings menu.
2. Press one of these keystone buttons on the control panel to display the Keystone adjustment
screen.
63
Page 64

3. Press a keystone button on the projector's control panel to adjust the image shape.
After correction, your image is slightly smaller.
Note: If the projector is installed out of reach, you can also correct the image shape with the remote
control using the Keystone settings in the projector menus.
Parent topic: Image Shape
Related references
Projector Feature Settings - Settings Menu
Correcting Image Shape with the Horizontal Keystone Slider
You can use the projector's horizontal keystone slider to correct the shape of an image that is unevenly
rectangular horizontally, such as when the projector is placed to the side of the projection area.
64
Page 65

1. Turn on the projector and display an image.
Note: You can display a pattern to aid in adjusting the projected image using the Settings menu.
2. Adjust the slider until the image is evenly rectangular.
After correction, your image is slightly smaller.
Parent topic: Image Shape
Related references
Projector Feature Settings - Settings Menu
Correcting Image Shape with Quick Corner
You can use the projector's Quick Corner setting to correct the shape and size of an image that is
unevenly rectangular on all sides.
1. Turn on the projector and display an image.
Note: You can display a pattern to aid in adjusting the projected image using the Settings menu.
2. Press the Menu button.
65
Page 66

3. Select the Settings menu and press Enter.
4. Select the Keystone setting and press Enter.
5. Select the Quick Corner setting and press Enter. Then press Enter again.
You see the Quick Corner adjustment screen:
6. Use the arrow buttons on the projector or the remote control to select the corner of the image you
want to adjust. Then press Enter.
66
Page 67

7. Press the arrow buttons to adjust the image shape as necessary.
8. When you are finished, press Esc.
Parent topic: Image Shape
Related references
Projector Feature Settings - Settings Menu
Resizing the Image With the Zoom Ring
1. Turn on the projector and display an image.
Note: You can display a pattern to aid in adjusting the projected image using the Settings menu.
2. To enlarge or reduce the image size, rotate the projector's zoom ring.
Parent topic: Using Basic Projector Features
Related references
Projector Feature Settings - Settings Menu
Focusing the Image Using the Focus Ring
1. Turn on the projector and display an image.
Note: You can display a pattern to aid in adjusting the projected image using the Settings menu.
67
Page 68

2. To sharpen the image focus, rotate the projector’s focus ring.
Parent topic: Using Basic Projector Features
Related references
Projector Feature Settings - Settings Menu
Remote Control Operation
The remote control lets you control the projector from almost anywhere in the room. You can point it at
the screen, or the front or back of the projector.
Make sure that you aim the remote control at the projector's receivers within the distance and angles
listed here.
68
Page 69

1 19.7 feet (6 m)
2 ± 30°
3 ± 15°
Note: Avoid using the remote control in conditions with bright fluorescent lights or in direct sunlight, or
the projector may not respond to commands. If you will not use the remote control for a long time,
remove the batteries.
Using the Remote Control as a Wireless Mouse
Using the Remote Control as a Pointer
Parent topic: Using Basic Projector Features
Related tasks
Replacing the Remote Control Batteries
Using the Remote Control as a Wireless Mouse
You can use the projector's remote control as a wireless mouse so you can control projection at a
distance from the computer.
1. Connect the projector to a computer using the projector's USB-B, Computer, or HDMI port to
display video.
2. If you connected your computer to the Computer or HDMI port, also connect a USB cable to the
projector's USB-B port and to a USB port on your computer (for wireless mouse support).
3. Start your presentation.
4. Use the following buttons on the remote control to control your presentation:
• To move through slides or pages, press the up or down Page buttons.
69
Page 70

• To move the cursor on the screen, use the arrow buttons.
• To left-click, press the button once (press it twice to double-click).
• To right-click, press the Esc button.
• To drag-and-drop, hold the button as you move the cursor with the arrow buttons, then release
at the destination.
Parent topic: Remote Control Operation
Related tasks
Connecting to a Computer for USB Mouse Control
Using the Remote Control as a Pointer
You can use the projector's remote control as a pointer to help you call out important information on the
screen. The default pointer shape is an arrow, but you can select an alternative shape using the Settings
menu.
1. Press the Pointer button on the remote control.
70
Page 71

2. Use the arrow buttons on the remote control to move the pointer on the screen.
3. Press Esc to clear the pointer from the screen.
Parent topic: Remote Control Operation
Related references
Projector Feature Settings - Settings Menu
Selecting an Image Source
If you connected multiple image sources to the projector, such as a computer and DVD player, you may
want to switch from one image source to the other.
1. Make sure the connected image source you want to use is turned on.
2. For video image sources, insert a DVD or other video media and press its play button (if necessary).
3. Do one of the following:
• Press the Source Search button on the projector or remote control until you see the image from
the source you want.
71
Page 72

• Press the button for the source you want on the remote control. If there is more than one port for
that source, press the button again to cycle through the sources.
1 Computer port source
2 Video and HDMI sources
3 USB port sources (computer display and external devices)
Parent topic: Using Basic Projector Features
Projection Modes
Depending on how you positioned the projector, you may need to change the projection mode so your
images project correctly.
• Front (default setting) lets you project from a table in front of the screen.
• Front/Ceiling flips the image over top-to-bottom to project upside-down from a ceiling or wall mount.
• Rear flips the image horizontally to project from behind a translucent screen.
• Rear/Ceiling flips the image over top-to-bottom and horizontally to project from the ceiling and behind
a translucent screen.
72
Page 73

Changing the Projection Mode Using the Remote Control
Changing the Projection Mode Using the Menus
Parent topic: Using Basic Projector Features
Changing the Projection Mode Using the Remote Control
You can change the projection mode to flip the image over top-to-bottom.
1. Turn on the projector and display an image.
2. Hold down the A/V Mute button on the remote control for five seconds.
The image disappears briefly and reappears flipped top-to-bottom.
3. To change projection back to the original mode, hold down the A/V Mute button for five seconds
again.
Parent topic: Projection Modes
Changing the Projection Mode Using the Menus
You can change the projection mode to flip the image over top-to-bottom and/or left-to-right using the
projector menus.
1. Turn on the projector and display an image.
2. Press the Menu button.
73
Page 74

3. Select the Extended menu and press Enter.
4. Select the Projection setting and press Enter.
5. Select a projection mode and press Enter.
6. Press Menu or Esc to exit the menus.
Parent topic: Projection Modes
Image Aspect Ratio
The projector can display images in different width-to-height ratios called aspect ratios. Normally the
input signal from your video source determines the image's aspect ratio. However, for certain images
you can change the aspect ratio to fit your screen by pressing a button on the remote control.
If you always want to use a particular aspect ratio for a certain video input source, you can select it using
the projector's menus.
Changing the Image Aspect Ratio
Available Image Aspect Ratios
Parent topic: Using Basic Projector Features
Related references
Input Signal Settings - Signal Menu
74
Page 75

Changing the Image Aspect Ratio
You can change the aspect ratio of the displayed image to resize it.
1. Turn on the projector and switch to the image source you want to use.
2. Press the Aspect button on the remote control.
The shape and size of the displayed image changes, and the name of the aspect ratio appears
briefly on the screen.
3. To cycle through the available aspect ratios for your input signal, press the Aspect button
repeatedly.
Parent topic: Image Aspect Ratio
Available Image Aspect Ratios
You can select the following image aspect ratios, depending on the input signal from your image source.
Note: Black bands and cropped images may project in certain aspect ratios, depending on the aspect
ratio and resolution of your input signal.
Aspect ratio setting Description
Auto Automatically sets the aspect ratio according to the input signal.
Normal Displays images using the full projection area and maintains the
aspect ratio of the image.
16:9 Converts the aspect ratio of the image to 16:9.
Full Displays images using the full width of the projection area, but does
not maintain the aspect ratio.
75
Page 76

Aspect ratio setting Description
Zoom Displays images using the full width of the projection area and
Native Displays images as is (aspect ratio and resolution are maintained).
Note: The Auto aspect ratio setting is available only for HDMI image sources.
Parent topic: Image Aspect Ratio
Color Mode
The projector offers different Color Modes to provide optimum brightness, contrast, and color for a
variety of viewing environments and image types. You can select a mode designed to match your image
and environment, or experiment with the available modes.
If you always want to use a particular color mode for a certain video input source, you can select it using
the projector menus.
Changing the Color Mode
Available Color Modes
Turning On Auto Iris
Parent topic: Using Basic Projector Features
Related references
Image Quality Settings - Image Menu
maintains the aspect ratio of the image.
Changing the Color Mode
You can change the projector's Color Mode using the remote control to optimize the image for your
viewing environment.
1. Turn on the projector and switch to the image source you want to use.
2. If you are projecting from a DVD player or other video source, insert a disc or other video media and
press the play button, if necessary.
76
Page 77

3. Press the Color Mode button on the remote control to change the Color Mode.
The image appearance changes and the name of the Color Mode appears briefly on the screen.
4. To cycle through all the available Color Modes for your input signal, press the Color Mode button
repeatedly.
Parent topic: Color Mode
Available Color Modes
You can set the projector to use these Color Modes, depending on the input source you are using:
Color Mode Description
Dynamic Best for projecting in a bright room
Living Room Best for projecting in a room with closed curtains
Cinema Best for movies projected in a dark room
Game Best for games projected in a bright room
Parent topic: Color Mode
Turning On Auto Iris
In certain color modes, you can turn on the Auto Iris setting to automatically optimize the image based on
the brightness of the content you project.
1. Turn on the projector and switch to the image source you want to use.
2. Press the Menu button.
77
Page 78

3. Select the Image menu and press Enter.
4. Select the Auto Iris setting and choose one of the following:
• High Speed to adjust brightness as soon as the scene changes.
• Normal for standard brightness adjustment.
Note: You can set Auto Iris for each Color Mode that supports the feature. You cannot change the
Auto Iris setting when you are using a Closed Caption setting.
5. Press Menu or Esc to exit the menus.
Parent topic: Color Mode
Controlling the Volume with the Volume Buttons
You can use the Volume buttons on the remote control to adjust the volume as you project a
presentation with audio. You can also use the volume buttons on the projector's control panel.
The volume buttons control the projector’s internal speaker system. You must adjust the volume
separately for each connected input source.
1. Turn on the projector and start a presentation that includes audio.
2. Press the Volume buttons as necessary to lower or raise the volume.
78
Page 79

A volume gauge appears on the screen.
3. To set the volume to a specific level for an input source, use the projector menus.
Parent topic: Using Basic Projector Features
Related references
Projector Parts - Control Panel
Projector Feature Settings - Settings Menu
Projecting a PC Free Presentation
You can use your projector's PC Free feature whenever you connect a USB device that contains
compatible image or movie files. This lets you quickly and easily display and control them using the
projector's remote control. You can also display a slide show of the images.
Supported PC Free File Types
Starting a Slide Show from an External Device
Starting a Movie from an External Device
Parent topic: Using Basic Projector Features
Related concepts
USB Device Projection
Related tasks
Connecting a USB Device or Camera to the Projector
Supported PC Free File Types
You can project these types of files using the projector's PC Free feature.
Note: For best results, place your files on media that is formatted in FAT16/32. If you have trouble
projecting from media formatted for non-Windows file systems, try formatting the media for Windows
79
Page 80

instead. You may not be able to use the security features on certain USB storage devices with PC Free
features.
Graphic and Text File Formats
File contents File type Details
(extension)
Image .jpg Make sure the file is not:
• CMYK format
• Progressive format
• Highly compressed
• Above 8192 × 8192 resolution
• Over 12MB in size
• Named with a .jpeg extension
.bmp Make sure the file resolution is not above 2048 × 2048
.gif Make sure the file is not:
• Above 2048 × 2048 resolution
• Animated
.png Make sure the file resolution is not above 2048 × 2048
Scenario .fse Main format for files converted from PowerPoint using EasyMP Slide
Converter
.sit Compressed format for files converted from PowerPoint using
EasyMP Slide Converter (also called scenario files)
PDF .pdf Make sure the file is not:
• Saved in PDF version 1.7 or earlier format
• Encrypted
Movie File Formats
80
Page 81

File type Movie codec Audio codec Recording quality
(extension)
.mpg MPEG-2 MPEG-1 Layer 1/2 Maximum bit rate: 12 Mbps
You can play back audio from Maximum resolution: 1280 ×
MPEG contents. 720
You cannot play back audio
from Linear PCM and AC-3
content.
Make sure the file is not
named with an .mpeg
extension.
.mp4 MPEG-4 ASP MPEG-4 AAC-LC
MPEG-4 AVC
.wmv WMV9 WMA
.avi Motion JPEG Linear PCM
ADPCM
Note: For best results, do not use a USB storage device with a slow access speed or the movies may
not play back correctly. You cannot project files to which DRM (Digital Rights Management) is applied.
Parent topic: Projecting a PC Free Presentation
Starting a Slide Show from an External Device
After connecting a USB device or digital camera to the projector, you can switch to the USB input source
and start your slide show.
1. Press the USB button on the projector remote control.
The PC Free screen appears.
81
Page 82

2. Do the following as necessary to locate your files:
• If you need to display files inside a subfolder on your device, press the arrow buttons to highlight
the folder and press the Enter button.
• To move back up a folder level on your device, highlight Back to Top and press Enter.
• To view additional files in a folder, highlight Next page or Previous page and press Enter, or
press the Page up or down buttons on the remote control.
3. Do one of the following:
• To display an individual image, press the arrow buttons to highlight the image and press Enter.
(Press the Esc button to return to the file list screen.)
• To display a slide show of all the images in a folder, press the arrow buttons to highlight the
Slideshow option at the bottom of the screen and press Enter.
Note: If any file names are longer than 8 characters or include unsupported symbols, the file names
may be shortened or changed only in the screen display.
4. While projecting, use the following commands to control the display as necessary:
• To rotate a displayed image, press the up or down arrow button.
82
Page 83

• To move to the next or previous image, press the left or right arrow button.
5. To stop the display, follow the on-screen instructions or press the Esc button.
PC Free Display Options
Parent topic: Projecting a PC Free Presentation
Related tasks
Connecting a USB Device or Camera to the Projector
Disconnecting a USB Device or Camera From the Projector
PC Free Display Options
You can select these display options when using the projector's PC Free feature.
Setting Options Description
Display Order Name Order Displays files in name order
Date Order Displays files in date order
Sort Order In Ascending Sorts files in first-to-last order
In Descending Sorts files in last-to-first order
Continuous Play On Displays a slide show continuously
Off Displays a slide show one time through
83
Page 84

Setting Options Description
Screen Switching No Does not display the next file automatically
Time
Effect Wipe Transitions between images with a wipe effect
Parent topic: Starting a Slide Show from an External Device
1 Second to 60 Seconds Displays files for the selected time and
Dissolve Transitions between images with a dissolve
Random Transitions between images using a random
Starting a Movie from an External Device
After connecting a USB device or digital camera to the projector, you can switch to the USB input source
and start your movie.
1. Press the USB button on the projector remote control.
The PC Free screen appears.
switches to the next file automatically; high
resolution images may switch at a slightly
slower rate
effect
variety of effects
84
Page 85

2. Do the following as necessary to locate your files:
• If you need to display files inside a subfolder on your device, press the arrow buttons to highlight
the folder and press the Enter button.
• To move back up a folder level on your device, highlight Back to Top and press Enter.
• To view additional files in a folder, highlight Next page or Previous page and press Enter, or
press the Page up or down buttons on the remote control.
3. To play back a movie, press the arrow buttons to highlight the file and press Enter.
Note: If any file names are longer than 8 characters or include unsupported symbols, the file names
may be shortened or changed only in the screen display. If you want to play back all the movies in a
folder in sequence, select the Slideshow option at the bottom of the screen.
4. To stop movie playback, press the Esc button, highlight Exit, and press Enter.
Parent topic: Projecting a PC Free Presentation
Related tasks
Connecting a USB Device or Camera to the Projector
Disconnecting a USB Device or Camera From the Projector
85
Page 86

Adjusting Projector Features
Follow the instructions in these sections to use your projector's feature adjustments.
Shutting Off the Picture and Sound Temporarily
Stopping Video Action Temporarily
Zooming Into and Out of Images
Projector Security Features
Shutting Off the Picture and Sound Temporarily
You can temporarily turn off the projected picture and sound if you want to redirect your audience's
attention during a presentation. Any sound or video action continues to run, however, so you cannot
resume projection at the point that you stopped it.
If you want to display an image such as a company logo or picture when the presentation is stopped, you
can set up this feature using the projector's menus.
Note: If the picture and sound are off for more than 30 minutes, the power automatically turns off. You
can turn this setting on and off using the projector's Eco menu.
1. Press the A/V Mute button on the remote control to temporarily stop projection and mute any sound.
2. To turn the picture and sound back on, press A/V Mute again.
Note: You can also stop projection using the A/V Mute slide lever on the projector.
Parent topic: Adjusting Projector Features
Related references
Projector Setup Settings - ECO Menu
86
Page 87

Related tasks
Saving a User's Logo Image to Display
Stopping Video Action Temporarily
You can temporarily stop the action in a video or computer presentation and keep the current image on
the screen. Any sound or video action continues to run, however, so you cannot resume projection at the
point that you stopped it.
1. Press the Freeze button on the remote control to stop the video action.
2. To restart the video action in progress, press Freeze again.
Parent topic: Adjusting Projector Features
Zooming Into and Out of Images
You can draw attention to parts of a presentation by zooming into a portion of the image and enlarging it
on the screen.
1. Press the E-Zoom + button on the remote control.
You see a crosshair on the screen indicating the center of the zoom area.
87
Page 88

2. Use the following buttons on the remote control to adjust the zoomed image:
• Use the arrow buttons to position the crosshair in the image area you want to zoom into.
• Press the E-Zoom + button repeatedly to zoom into the image area, enlarging it as necessary.
Press and hold the E-Zoom + button to zoom in more quickly.
• To pan around the zoomed image area, use the arrow buttons.
• To zoom out of the image, press the E-Zoom – button as necessary.
• To return to the original image size, press Esc.
Parent topic: Adjusting Projector Features
Projector Security Features
You can secure your projector to deter theft or prevent unintended use by setting up the following
security features:
• Password security to prevent the projector from being turned on, and prevent changes to the startup
screen and other settings.
• Button lock security to block operation of the projector using the buttons on the control panel.
• Security cabling to physically cable the projector in place.
Password Security Types
Locking the Projector's Buttons
Installing a Security Cable
Parent topic: Adjusting Projector Features
Password Security Types
You can set up these types of password security using one shared password:
• Power On Protection password prevents anyone from using the projector without first entering a
password.
• User's Logo Protection password prevents anyone from changing the custom screen the projector
can display when it turns on or when you use the A/V Mute feature. The presence of the custom
screen discourages theft by identifying the projector’s owner.
• Network Protection password prevents anyone from changing the network settings in the projector
menus.
Setting a Password
Selecting Password Security Types
88
Page 89

Entering a Password to Use the Projector
Saving a User's Logo Image to Display
Parent topic: Projector Security Features
Setting a Password
To use password security, you must set a password.
1. Hold down the Freeze button on the remote control for about five seconds until you see this menu.
2. Press the down arrow to select Password and press Enter.
You see the prompt "Change the password?".
3. Select Yes and press Enter.
4. Hold down the Num button on the remote control and use the numeric buttons to set a four-digit
password.
The password displays as **** as you enter it. Then you see the confirmation prompt.
89
Page 90

5. Enter the password again.
You see the message "Password accepted."
6. Press Esc to return to the menu.
7. Make a note of the password and keep it in a safe place in case you forget it.
Parent topic: Password Security Types
Selecting Password Security Types
After setting a password, you see this menu, allowing you to select the password security types you want
to use.
If you do not see this menu, hold down the Freeze button on the remote control for five seconds until the
menu appears.
1. To prevent unauthorized use of the projector, select Power On Protection, press Enter, select On,
press Enter again, and press Esc.
2. To prevent changes to the User's Logo screen or related display settings, select User's Logo
Protection, press Enter, select On, press Enter again, and press Esc.
3. To prevent changes to network settings, select Network Protection, press Enter, select On, press
Enter again, and press Esc.
Note: Be sure to keep the remote control in a safe place; if you lose it, you will not be able to enter the
password required to use the projector.
Parent topic: Password Security Types
90
Page 91

Entering a Password to Use the Projector
If a password is set up and a Power On Protection password is enabled, you see a prompt to enter a
password whenever you turn on the projector.
You must enter the correct password to use the projector.
1. Hold down the Num button on the remote control while you enter the password using the numeric
buttons.
The password screen closes.
2. If the password is incorrect, the following may happen:
• You see a "wrong password" message and a prompt to try again. Enter the correct password to
proceed.
91
Page 92

• If you enter an incorrect password several times in succession, the projector displays a request
code and a message to contact Epson Support. When you contact Epson Support, provide the
displayed request code and proof of ownership for assistance in unlocking the projector.
Parent topic: Password Security Types
Related references
Where to Get Help
Saving a User's Logo Image to Display
You can transfer an image to the projector and then display it whenever the projector turns on. You can
also display the image when the projector is not receiving an input signal or when you temporarily stop
projection (using the A/V Mute feature). This transferred image is called the User's Logo screen.
The image you select as the User's Logo can be a photo, graphic, or company logo, which is useful in
identifying the projector's owner to help deter theft. You can prevent changes to the User's Logo by
setting up password protection for it.
1. Display the image you want to project as the User's Logo.
2. Press the Menu button, select the Extended menu, and press Enter.
3. Select the User's Logo setting and press Enter.
You see a prompt asking if you want to use the displayed image as a user's logo.
4. Select Yes and press Enter.
You see a selection box overlaying your image.
92
Page 93

5. Use the arrow buttons on the remote control to surround the image area you want to use as the
User's Logo and press Enter.
You see a prompt asking if you want to select this image area.
6. Select Yes and press Enter. (If you want to change the selected area, select No, press Enter, and
repeat the last step.)
You see the User's Logo zoom factor menu.
7. Select a zoom percentage and press Enter.
You see a prompt asking if you want to save the image as the User's Logo.
8. Select Yes and press Enter.
Note: It takes a few moments for the projector to save the image; do not use the projector, its remote
control, or any connected equipment until it is finished.
You see a completion message.
9. Press Esc to exit the message screen.
10. Select the Extended menu and press Enter.
11. Select Display and press Enter.
12. Select when you want to display the User's Logo screen:
• To display it whenever there is no input signal, select Display Background and set it to Logo.
• To display it whenever you turn the projector on, select Startup Screen and set it to On.
• To display it whenever you press the A/V Mute button, select A/V Mute and set it to Logo.
93
Page 94

To prevent anyone from changing the User's Logo settings without first entering a password, set a
password and enable User's Logo security.
Parent topic: Password Security Types
Related tasks
Shutting Off the Picture and Sound Temporarily
Setting a Password
Selecting Password Security Types
Locking the Projector's Buttons
You can lock the buttons on the projector's control panel to prevent anyone from using the projector. You
can lock all the buttons or all the buttons except the power button.
1. Press the Menu button.
2. Select the Settings menu and press Enter.
3. Select the Control Panel Lock setting and press Enter.
4. Select one of these lock types and press Enter:
• To lock all of the projector's buttons, select Full Lock.
• To lock all buttons except the power button, select Partial Lock.
You see a confirmation prompt.
94
Page 95

5. Select Yes and press Enter.
Unlocking the Projector's Buttons
Parent topic: Projector Security Features
Unlocking the Projector's Buttons
If the projector's buttons have been locked, hold the Enter button on the projector's control panel for
seven seconds to unlock them.
Parent topic: Locking the Projector's Buttons
Installing a Security Cable
You can install two types of security cables on the projector to deter theft.
• Use the security slot on the projector to attach a Kensington Microsaver Security system, available
from Epson.
• Use the security cable attachment point on the projector to attach a wire cable and secure it to a room
fixture or heavy furniture.
Parent topic: Projector Security Features
Related references
Optional Equipment and Replacement Parts
Projector Parts - Front/Top
95
Page 96

Adjusting the Menu Settings
Follow the instructions in these sections to access the projector menu system and change projector
settings.
Using the Projector's Menus
Image Quality Settings - Image Menu
Input Signal Settings - Signal Menu
Projector Feature Settings - Settings Menu
Projector Setup Settings - Extended Menu
Projector Network Settings - Network Menu
Projector Setup Settings - ECO Menu
Projector Information Display - Info Menu
Projector Reset Options - Reset Menu
Using the Projector's Menus
You can use the projector's menus to adjust the settings that control how your projector works. The
projector displays the menus on the screen.
1. Press the Menu button on the control panel or remote control.
96
Page 97

You see the menu screen displaying the Image menu settings.
2. Press the up or down arrow buttons to move through the menus listed on the left. The settings for
each menu are displayed on the right.
Note: The available settings depend on the current input source.
3. To change settings in the displayed menu, press Enter.
4. Press the up or down arrow button to move through the settings.
5. Change the settings using the buttons listed on the bottom of the menu screens.
6. To return all the menu settings to their default values, select Reset.
7. When you finish changing settings on a menu, press Esc.
8. Press Menu or Esc to exit the menus.
97
Page 98

Parent topic: Adjusting the Menu Settings
Image Quality Settings - Image Menu
Settings on the Image menu let you adjust the quality of your image for the input source you are currently
using. The available settings depend on the currently selected input source.
To change settings for an input source, make sure the source is connected and select that source.
Setting Options Description
Color Mode See the list of available Color Adjusts the vividness of image
Modes colors for various image types
and environments
Brightness Varying levels available Lightens or darkens the overall
image
Contrast Varying levels available Adjusts the difference between
light and dark areas of the image
Color Saturation Varying levels available Adjusts the intensity of the image
colors
Tint Varying levels available Adjusts the balance of green to
magenta tones in the image
98
Page 99

Setting Options Description
Sharpness Varying levels available Adjusts the sharpness or
softness of image details
Color Temp. (color temperature) High Sets the overall color tone; High
Medium
Low
Color Adjustment Slider bars for each color Adjusts the intensity of individual
Auto Iris Off Adjusts the projected luminance
Normal
High Speed
Note: The Brightness setting does not affect lamp brightness. To change the lamp brightness mode,
use the Power Consumption setting.
Parent topic: Adjusting the Menu Settings
Related references
Available Color Modes
Projector Setup Settings - ECO Menu
tints the image blue and Low
tints the image red
hues in the image
based on the image brightness
when certain Color Modes are
selected; High Speed sets faster
luminance correction for fastmoving images
Input Signal Settings - Signal Menu
Normally the projector detects and optimizes the input signal settings automatically. If you need to
customize the settings, you can use the Signal menu. The available settings depend on the currently
selected input source.
99
Page 100

Note: You can restore the default settings of the Position, Tracking, and Sync settings by pressing the
Auto button on the remote control.
To change settings for an input source, make sure the source is connected and select that source.
Setting Options Description
Auto Setup On Automatically optimizes computer
Off
image quality (when On)
Resolution Auto Sets the input signal resolution if
Normal
not detected automatically using
the Auto option
Wide
Tracking Varying levels available Adjusts signal to eliminate vertical
stripes in computer images
Sync. Varying levels available Adjusts signal to eliminate
fuzziness or flickering in
computer images
Position Up, down, left, right Adjusts the image location on the
screen
100
 Loading...