

Page 1

EPSON® USB/Parallel Adapter
User’s Guide
EPSON Stylus COLOR 440 EPSON Stylus COLOR 800
EPSON Stylus COLOR 600 EPSON Stylus COLOR 850
EPSON Stylus COLOR 640 EPSON Stylus COLOR 1520
EPSON Stylus Photo EX EPSON Stylus COLOR 3000
EPSON Stylus Photo 700
IMPORTANT: To use the USB/Parallel Adapter with your Apple®
c™,
iMa
Apple at http://swupdates.info.apple.com.
you must download and install the iMac Update 1.0 from
CPD 7424R1
Page 2

EPSON and EPSON Stylus are registered trademarks of SEIKO EPSON
CORPORATION.
General Notice: Other product names used herein are for identification
purposes only and may be trademarks of their respective owners. EPSON
disclaims any and all rights in those marks.
Copyright © 1998 by Epson America, Inc. 10/98
ii
Page 3

FCC Compliance Statement
For United States Users
This equipment has been tested and found to comply with the limits for a
Class B digital device, pursuant to Part 15 of the FCC Rules. These limits
are designed to provide reasonable protection against harmful interference
in a residential installation. This equipment generates, uses, and can
radiate radio frequency energy and, if not installed and used in accordance
with the instructions, may cause harmful interference to radio or television
reception. However, there is no guarantee that interference will not occur in
a particular installation. If this equipment does cause interference to radio
and television reception, which can be determined by turning the equipment
off and on, the user is encouraged to try to correct the interference by one
or more of the following measures.
◗ Reorient or relocate the receiving antenna.
◗ Increase the separation between the equipment and receiver.
◗ Connect the equipment into an outlet on a circuit different from that to
which the receiver is connected.
◗ Consult the dealer or an experienced radio/TV technician for help.
iii
Page 4

WARNING
The connection of a non-shielded equipment interface cable to this
equipment will inv alidate the FCC Certification of this de vice and ma y cause
interference levels which exceed the limits established by the FCC for this
equipment. It is the responsibility of the user to obtain and use a shielded
equipment interface cable with this device. If this equipment has more than
one interface connector, do not leave cables connected to unused
interfaces. Changes or modifications not expressly approved by the
manufacturer could void the user’s authority to operate the equipment.
For Canadian Users
This Class B digital apparatus meets all requ irements of the Canadian
Interference-Causing Equipment Regulations.
Cet appareil numérique de la classe B resp ecte toutes les exigences du
Règlement sur le materiel brouilleur du Canada.
iv
Page 5

Contents
Introduction 7
Setting Up the Printer 8
Getting Started on an iMac 8
Connecting the Cable 10
Installing the USB Printer Software 13
Getting Started on a Windows 98 System 15
Connecting the Cable 16
Installing the USB Printer Software 19
Setting Up Your System to Print 29
Appendix A: Using Monitor3 31
Setting Up Monitor3 31
Monitoring Print Jobs with Monitor3 32
Appendix B: Specifications 35
USB/Parallel Adapter Specifications 35
System Requirements 36
v
Page 6

vi
Page 7

Introduction
The EPSON USB/Parallel Adapter allows you to use smart cable
technology to connect your EPSON printer to your Apple iMac or
Windows
◗ EPSON Stylus
◗ EPSON Stylus COLOR 640 ◗ EPSON Stylus COLOR 850
◗ EPSON Stylus COLOR 600 ◗ EPSON Stylus COLOR 1520
◗ EPSON Stylus Photo EX ◗ EPSON Stylus COLOR 3000
◗ EPSON Stylus Photo 700
Note: The USB/Parallel Adapter supports the EPSON Stylus
COLOR 3000 for Macintosh only
To use the EPSON USB/Parallel Adapter, you’ll need to:
◗ Install iMac Update 1.0 if you have an iMac
◗ Connect the cable
◗ Install the printer software
If you have any prob lems with the instructions in this guide, see the
Where to Get Help section in your printer user’s guide.
®
98 computer. It supports the following printers:
®
COLOR 440 ◗ EPSON Stylus COLOR 800
.
7
Page 8

Setting Up the Printer
If you’ve been using your EPSON printer with your computer, the printer is
probably set up already. If so, turn it off and disconnect it from the computer.
Then go to the section explaining how to connect the cable to your system.
If you’re setting up a new printer , see the documentation that came with your
printer for instructions on unpacking, installing ink cartridges, and loading
paper. Then return to this booklet for instructions on connecting the cable
and installing the USB printer software.
Getting Started on an iMac
The instructions on the next few pages explain how to connect the USB/
Parallel Adapter cable to your iMac and how to install the printer software
that came on the USB Printer Software CD-ROM.
IMPORTANT:
You can’t use the adapter with the printer driver software that came with your
printer. You must use the USB/Parallel Adapter printer driver software.
To use the adapter with the iMac, you must download and install the
iMac Update 1.0 from Apple at http://swupdates.info.apple.com before
you install the USB printer software. Contact Apple Computer if you
have problems installing this update.
8
Page 9

For instructions on using the printer software, see the following:
◗ If you have an EPSON Stylus COLOR 440 or EPSON Stylus
COLOR 640, locate the electronic
Driver Software Guide for Macintosh
USB Printer Software CD-ROM. Copy the manual to your hard driv e and
view it using Adobe
Reader on your computer, you can install it using the Acrobat Reader
3.01 Installer on your USB Printer Software CD-ROM.)
◗ If you ha v e an y other supported printer, see the
with your printer.
®
Acrobat Reader 3.01. (If you don’t have Acrobat
EPSON Stylus COLOR 440/640
in the Manual directory on your
User’s Guide
that came
Note:
The USB/Parallel Adapter printer software is slightly different from the
printer driver software documented in your User’s Guide. First, there is
no Status Monitor Utility for Windows. Second, the Monitor2 utility for
Macintosh has been upgraded to Monitor3. (Some printers, such as the
EPSON Stylus Photo 700 and EPSON Stylus COLOR 850, already use
Monitor3.) For information on using Monitor3, see Appendix A in this
guide.
9
Page 10

Connecting the Cable
2
1
You can connect the USB/Parallel Adapter directly to a USB port on your
iMac or to a USB hub connected to a port on the iMac. If you have any
printing problems when the printer is connected via a USB hub, try
connecting the printer directly to the USB port on the iMac instead.
1 To connect the adapter to the USB port on the side of the iMac, first
open the port door. Hold the adapter’s USB connector so the icon
faces up and connect it to the available USB port.
available USB port
USB/Parallel adapter
optional USB hub
If you’re using a USB hub, plug it into the USB port on your iMac, then
connect the adapter to an available USB port on the hub.
OR
10
Page 11
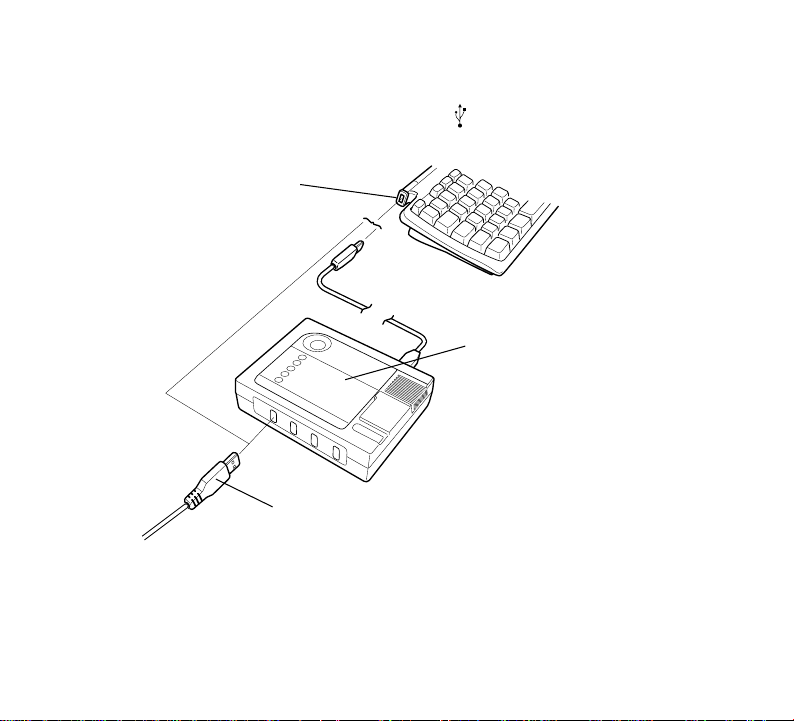
To connect the adapter to one of the USB ports on the iMac keyboard,
hold the adapter’s USB connector so the icon faces away from you
and connect it to the USB port.
available USB port
optional USB hub
OR
USB/Parallel adapter
If you’re using a USB hub, plug it into the USB port on the iMac
keyboard, then connect the adapter to an av ailable USB port on the hub.
11
Page 12
2 Connect the adapter’s parallel connector to the parallel port on the back
of the printer, then secure it with the wire clips.
parallel connector
3 Now follow the instructions in the next section to install the printer driver
software from the USB/Parallel Adapter CD-ROM.
12
Page 13

Installing the USB Printer Software
IMPORTANT:
You can’t use the adapter with the printer driver software that came with your
printer. You must use the printer driver software that came on the USB
Printer Software CD-ROM.
Before you begin this procedure, you must install the iMac Update 1.0
from Apple at http://swupdates.info.apple.com. Contact Apple
Computer if you have any problems installing this update.
Follow these steps to install the USB printer driver software:
1 Turn on your iMac and wait until you see your desktop icons. (
turn on your computer
one) and your EPSON printer.
2 You see a message that the computer can’t find the software it needs
for your device. Click OK.
3 Insert the EPSON USB Printer Software CD-ROM.
4 Double-click the
5 Click
6 After installation is complete, click
7 Open the Chooser from the Apple menu.
Install
and follow the on-screen instructions to install the printer
driver and utilities, and select a default paper size.
first
Installer
.) Then turn on the USB hub (if you’re using
icon for your printer, then click
Restart
to restart your iMac.
13
Always
Continue
.
Page 14

8 Click the printer icon for your printer. Printer icons are labeled as
follows:
SC 440
◗
SC 600
◗
SC 640
◗
SPEX
◗
SP 700
◗
SC 800
◗
SC 850
◗
SC 1520
◗
SC 3000
◗
9 Click the
the same model, the port is numbered).
10 Turn on background printing if you want, then close the Chooser.
If you don’t see your printer icon in the Chooser, make sure your USB
port and parallel port connections are secure and your printer is turned on.
Check the MacOS Info Center on your iMac desktop for additional
information on USB connections.
If your EPSON printer came with other application software, see your printer
documentation for instructions on installing it from the printer’s CD-ROM.
(EPSON Stylus COLOR 440)
(EPSON Stylus COLOR 600)
(EPSON Stylus COLOR 640)
(EPSON Stylus Photo EX)
(EPSON Stylus Photo 700)
(EPSON Stylus COLOR 800)
(EPSON Stylus COLOR 850)
(EPSON Stylus COLOR 1520)
(EPSON Stylus COLOR 3000)
USB Port
icon (if you’ve connected more than one printer of
14
Page 15

Getting Started on a Windows 98 System
The instructions on the next few pages explain how to connect the USB/
Parallel Adapter cable to your Windows 98 system and how to install the
printer software. If you’re connecting to an EPSON Stylus COLOR 600 or
EPSON Stylus COLOR 800 printer, you’ll also find instructions on how to set
up your system to use Windows Print Manager.
For instructions on using the printer software, see the documentation that
came with your printer.
IMPORTANT:
You can’t use the adapter with the printer driver software that came with your
printer. You must use the printer software that came on the USB Printer
Software CD-ROM.
However, you can use the USB printer software to connect the printer to your
computer via the parallel port, if you want.
15
Page 16

Connecting the Cable
You can connect the USB/Parallel Adapter directly to a USB port on your
computer, or you can connect it to a USB hub connected to a port on your
computer. If you have any printing problems when the printer is connected
via a USB hub, try connecting your printer directly to the USB port on the
computer instead.
1 Locate an available USB port on your computer (your USB ports may be
in a different location than shown in the illustration on page 17).
2 Hold the adapter’s USB connector so the icon faces to the right and
connect it to the USB port, or
If you’re using a USB hub, plug it into the USB port on your computer,
then connect the adapter to an available USB port on the hub.
16
Page 17

USB ports
optional USB hub
17
OR
USB/Parallel
adapter
Page 18

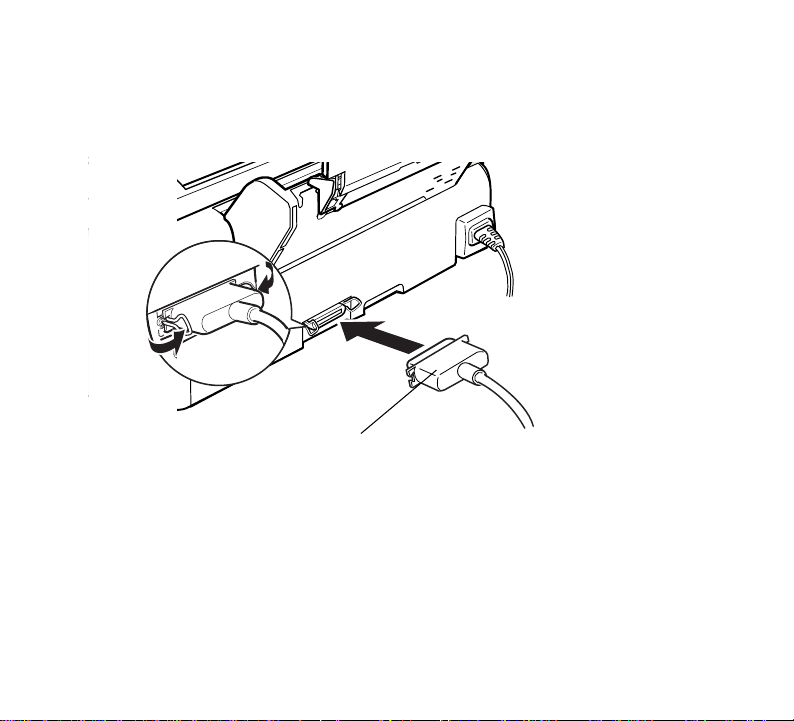
3 Connect the adapter’s parallel connector to the parallel port on the back
of the printer, then secure it with the wire clips.
parallel connector
4 Now follow the instructions in the next section to install the printer driver
software.
18
Page 19

Installing the USB Printer Software
If you’ve already installed printer driver software f or y our printer, you need to
delete the old printer driver’s INF file before you install the USB printer driver.
Begin with the instructions on the next page, “Deleting the INF file for the old
printer driver”.
If you’re performing a new installation, begin with “Installing the USB printer
driver software” on page 22.
Note:
The USB printer driver software works best with a Windows 98 system that
has not been upgraded from Windows 95.
19
Page 20

Deleting the INF file for the old printer driver
1 C lick
2 Open your Windows directory. If you see an Inf folder, go to step 5.
3 From the Windows Explorer View menu, select
4 Click the View tab. Under Hidden files, select
Start
, point to
Otherwise, continue with step 3.
Folder Options dialog box opens.
Apply
to save the setting, then click OK to close the Folder Options
dialog box.
Programs
20
, and select
Windows Explorer
Folder Options
Show all files
. Click
.
. The
Page 21

5 Open the Inf folder, then locate and select the INF file corresponding to
your installed printer driver:
EPSON Stylus Photo EX
EPSON Stylus COLOR 600
EPSON Stylus COLOR 440
EPSON Stylus COLOR 640
EPSON Stylus Photo 700
EPSON Stylus COLOR 800
EPSON Stylus COLOR 850
EPSON Stylus COLOR 1520
6 Click
Now you’re ready to install the USB printer driver software. Continue with
“Installing the USB printer driver software” on page 22.
Delete
Explorer.
to delete the old printer driver’s INF file. Close Windows
EPSONEPIIFE2J.INF
EPSONEPS600.INF
EPSONEPIIFE3P.INF
EPSONEPIIFE3O.INF
EPSONEPIIFE3K.INF
EPSONEPS800.INF
EPSONEPIIFE2M.INF
EPSONEPS152.INF
21
Page 22

Installing the USB printer driver software
Don’t install the printer driver software that came with your printer.
can’t use this driver software with your USB/Parallel adapter. However, you
can use the USB printer software to connect the printer to your computer via
the parallel port, if you want.
Note:
If you install the printer driver software by mistake, see page 20 for
instructions on deleting the driver’s INF file.
1 Restart your computer. Then turn on the USB hub (if you’re using one)
and your EPSON printer. You see the Add New Hardware Wizard
screen.
2 Insert the USB Printer Software CD-ROM in your CD-ROM drive.
3 Click
your device
Next
. At the next screen, select
and click
Next
.
Search for the best driver for
22
You
Page 23

4
Specify a location
Select
software. The software is located in your printer’s folder on the CD-ROM
, then click
Browse
to locate the USB printer
23
.
Page 24

5 Click
Next
Conversion Cable
. The Add New Hardware Wizard now displays
.
EPSON USB
6 Click
Next
. The installer copies the USB printer files to your system. At
the final screen, click
Finish
.
24
Page 25

Windows 98 detects your printer and displays a screen similar to the
following:
7 Click
Next
to install your printer driver. At the next screen, select
Search for the best driver for your device
25
and click
Next
.
Page 26

8 Follow the on-screen instructions to install your printer driver. Be sure to
click the
printer. At the last screen, click
9 When you see a message that installation is complete, click OK.
If you want to install the creative software that came with your printer,
continue with “Installing creative software” on page 27.
Yes
radio button to set your printer as the Windows default
Finish
.
Note:
The EPSON Stylus COLOR 800 and EPSON Stylus COLOR 1520 do not
come with creative software.
If you’ve installed driver software for the EPSON Stylus COLOR 600 or
EPSON Stylus COLOR 800, you need to set up your system to use
Windows Print Manager. See “Setting Up Your System to Print” on page 29.
26
Page 27

Installing creative software
If your printer came with creative software, follow these steps to install it:
1 Locate the software installation instructions that came with your printer.
(They may be in a document called
Setup
.)
2 Follow the instructions to begin installation of your printer software.
When you see a screen similar to the following, click
printer driver installation.
Note:
The installation programs for the EPSON Stylus Photo EX and EPSON
Stylus Photo 700 install the creative software before they prompt you to
install the printer driver software. Be sure to cancel printer driver
software installation whenever you see this screen. If you don’t,
you’ll install the old printer driver over the USB printer driver.
Start Here, Getting Started
27
Cancel
, or
Quick
to cancel
Page 28

3 Continue with the instructions to install your creative software
applications.
4 When you’ve finished installing the creative software, restart
your system.
Checking your installation
To verify that your USB software installed properly, check the
Device Manager. Click
Panel
. Then click
You should see the device
Devices
EPSON USB Conversion Cable (EPXUSB1:)
listed. Click the + next to the device; you should see
Start
System
, point to
and click the
EPSON USB Conversion Cable
Note:
If you’ve installed more than one USB printer device, each new
installation will increase the last digit of the USB conversion cable
device name by a factor of one. For example, a second installed
USB printer device would be listed as EPSON USB Conversion
Cable (EPXUSB2:), and a third installation would be listed as
EPSON USB Conversion Cable (EPXUSB3).
28
Settings
, and click
Device Manager
listed too.
Control
tab.
Page 29

If the printer doesn’t work correctly, uninstall the USB printer driver
software. (Use the procedure described in your printer
documentation for uninstalling the printer driver.) Then reinstall the
USB printer driver software as described in “Installing the USB
printer driver software” on page 22 of this guide. If you still have
problems, contact your EPSON dealer or EPSON technical
support, as described in your printer documentation.
If you’ve installed USB printer driver software for the EPSON Stylus
COLOR 600 or EPSON Stylus COLOR 800, continue with the
procedure below.
Setting Up Your System to Print
The EPSON Stylus COLOR 600 and EPSON Stylus COLOR 800
printer driver software require that you use the Windows Print
Manager when printing to the USB/Parallel Adapter.
Follow these steps to enable the Windows Print Manager:
1 Click
2 In the EPSON Spool Manager window, select the icon for your
3 From the
Start
, point to
Manager4
printer.
box appears.
.
Queue
Programs, Epson
menu, select
29
, and select
Setup
. The Queue Setup dialog
Spool
Page 30

4 Select
5 Close the Spool Manager window.
Use Print Manager
Setup dialog box.
, then click OK to close the Queue
30
Page 31

Appendix A: Using Monitor3
The Monitor3 utility lets you continue to work on your iMac while
your document is printing (though printing and processing may be
slower). The Monitor3 dialog box lets you check on your print jobs
and cancel, pause, or restart them.
See the next section to turn on background printing and increase
the memory allocation for Monitor3.
Setting Up Monitor3
1 Open the Chooser from the Apple menu and select the icon for
your printer. Then select the USB Port.
2 Under
3 To increase the memory allocation, select
Now see the next section for instructions on using Monitor3.
Background Printing
the Extensions folder in your System folder. Then choose
Info
from the File menu and set the
2000 or 3000, depending on your system’s available RAM.
, click On and close the Chooser.
EPSON Monitor3
Memory Requirements
31
in
Get
to
Page 32

Monitoring Print Jobs with Monitor3
While you’re printing, click the
Application menu at the right end of the menu bar. You see the
following dialog box:
Job currently
printing
Jobs queued for
printing
Click to set priorities or
print times for waiting
print jobs
You can track the printer’s progress with the current job, or doubleclick a job and use these command buttons:
◗ click to delete
◗ click to restart
◗ click to pause
EPSON Monitor3
icon on the
32
Page 33

To set priorities for jobs waiting to print, click the job, then click the
Show details
Settings selected for
the highlighted print
job
arrow at the bottom of the window.
Priority list box
Note:
If you see a stop sign icon and the message “Print queue on hold”
in the EPSON Monitor3 dialog box, select Start print queue from
the Printer menu to release the queue and resume printing.
33
Page 34

Priority
The
the following settings:
list becomes active. Click the arrow and select one of
Normal
◗
Urgent
◗
print queue
Hold
◗
release it for printing by clicking the restart icon
Print Time
◗
and time for printing.
prints the job in the order it is received
moves the job before any Normal priority jobs in the
holds the job in the print queue until you’re ready to
opens this dialog box so you can set a specific day
34
Page 35

Appendix B: Specifications
USB/Parallel Adapter Specifications
USB connector: USB series A; compliant with USB
Specification Revision 1.0
Parallel connector: IEEE-1284-B; Compatibility, Nibble, and
ECP mode supported
Cable: 2-meter, 5-conductor, insulated, shielded,
USB compliant
Temperature: Operating: 32 to 158 °F
(0 to 70 °C)
Non-operating: –4 to 212 °F
(–20 to 100 °C)
Storage: –67 to 257 °F
(–55 to 125 °C)
Operating humidity: 10 to 80% relative humidity, no condensation
Input voltage: 4.40 to 5.25 V
Power consumption: During operation: 38 mA
During suspend mode: 650 µA
Weight: 5 ounces (140 grams)
35
Page 36

System Requirements
Macintosh
Computer: Apple iMac
Operating system: Macintosh OS 8.1 with iMac Update 1.0
Memory: 32MB RAM
Storage: At least 50MB of free hard disk space for
storing images (100MB or more
recommended)
Display: 13-inch RGB display or better
CD-ROM drive: 24-speed CD-ROM drive
Printer cable: EPSON USB/Parallel Adapter cable
36
Page 37

Windows
Computer: An IBM® compatible PC with at least a 486/
66 MHZ processor (Pentium
recommended)
Operating system: Windows 98
Memory: At least 16MB of RAM (32MB
recommended)
Storage: At least 50MB or free hard disk space for
storing images (100MB recommended)
Display: VGA, Super VGA, or better display adapter
and monitor
CD-ROM drive: Double-speed CD-ROM drive (quad-speed
or faster recommended) for installing the
printer software
Printer cable: EPSON USB/Parallel Adapter cable
37
®
processor
Page 38

38
 Loading...