

Page 1
EPSON COLOR INKJET PRINTER
Stylus Pro XL
SERVICE MANUAL
EPSON
4004677
Page 2

Chapter 1 Product Description
Table of Contents
1.1 FEATURES 1-1
1.2 SPECIFICATIONS 1-3
1.2.1 PrintingSpecifications........................................1-3
1.2.2 PaperHandlingSpecifications..................................1-5
1.2.3 PaperSpecifications..........................................1-5
1.2.4 InkCartridgeSpecifications....................................1-7
1.2.5 ElectricalSpecifications.......................................1-8
1.2.6 EnvironmentalConditions .....................................1-8
1.2.7 Reliability ..................................................1-9
1.2.8 SafetyApprovals ............................................1-9
1.2.9 PhysicalSpecifications........................................1-9
1.3 INTERFACE SPECIFICATIONS 1-10
1.3.1 SerialInterfaceSpecifications.................................1-10
1.3.2 ParallelInterfaceSpecifications................................1-12
1.4 OPERATIONS 1-13
1.4.1 ControlPanel..............................................1-13
1.4.2 PanelOperationatPowerOn .................................1-14
1.4.3 Defaultsettings.............................................1-15
1.4.3.1 DefaultSettingItems..................................1-15
1.4.3.2 ChangingtheDefaultSettings...........................1-16
1.4.4 ErrorConditions............................................1-18
1.4.5 PrinterInitialization..........................................1-18
1.4.5.1 HardwareInitialization.................................1-18
1.4.5.2 SoftwareInitialization..................................1-18
1.4.5.3 PanelInitialization....................................1-18
1.5 MAIN COMPONENTS 1-19
1.5.1 MainControlBoard(C162MAINBoard).........................1-19
1.5.2 PowerSupplyBoard(C137PSB/PSEBoard).....................1-20
1.5.3 ControlPanel(C137PNLBoard)...............................1-20
1.5.4 PrinterMechanism(M-4A60)..................................1-21
1.5.5 Housing ..................................................1-21
Rev.-A 1-i
Page 3

List of Figures
Figure 1-1. Exterior View of the Stylus Pro XL
Figure 1-2. Nozzle Configuration
Figure 1-3. Printable Area for Cut Sheet
Figure 1-4. Printable Area for Envelope
Figure 1-5. Adjustment Lever Setting
Figure 1-6. Temperature/Humidity Range
Figure 1-7. Data Transmission Timing
Figure 1-8. Control Panel Appearance
Figure 1-9. C162 MAIN Board Component Layout
Figure 1-10. C137 PSB/PSE Board Component Layout
Figure 1-11. Printer Mechanism (M-4A60)
List of Tables
Table 1-1. Interface Cards
Table 1-2. Print Speed and Printable Columns
Table 1-3. Character Table
Table 1-4. Cut Sheet Paper Specifications
Table 1-5. Envelope Specifications
Table 1-6. Adjust Lever Setting
Table 1-7. Rated Electrical Ranges
Table 1-8. Acceptable Environmental Conditions
Table 1-9. Signal and Connector Pin Assignments for Parallel Interface
Table 1-10. DTR and X-ON/X-OFF Protocol
Table 1-11. Signal and Connector Pin Assignments for Serial Interface
Table 1-12. Printer Condition Panel Status
Table 1-13. Default Setting Items
Table 1-14. Characteristics of Print Direction Mode
Table 1-15. Printing Direction and ESC U Command
Table 1-16. Language Selection
Table 1-17. Feature Selection
Table 1-18. Character Table Selection
Table 1-19. Error Indications
1-ii Rev.-A
Page 4
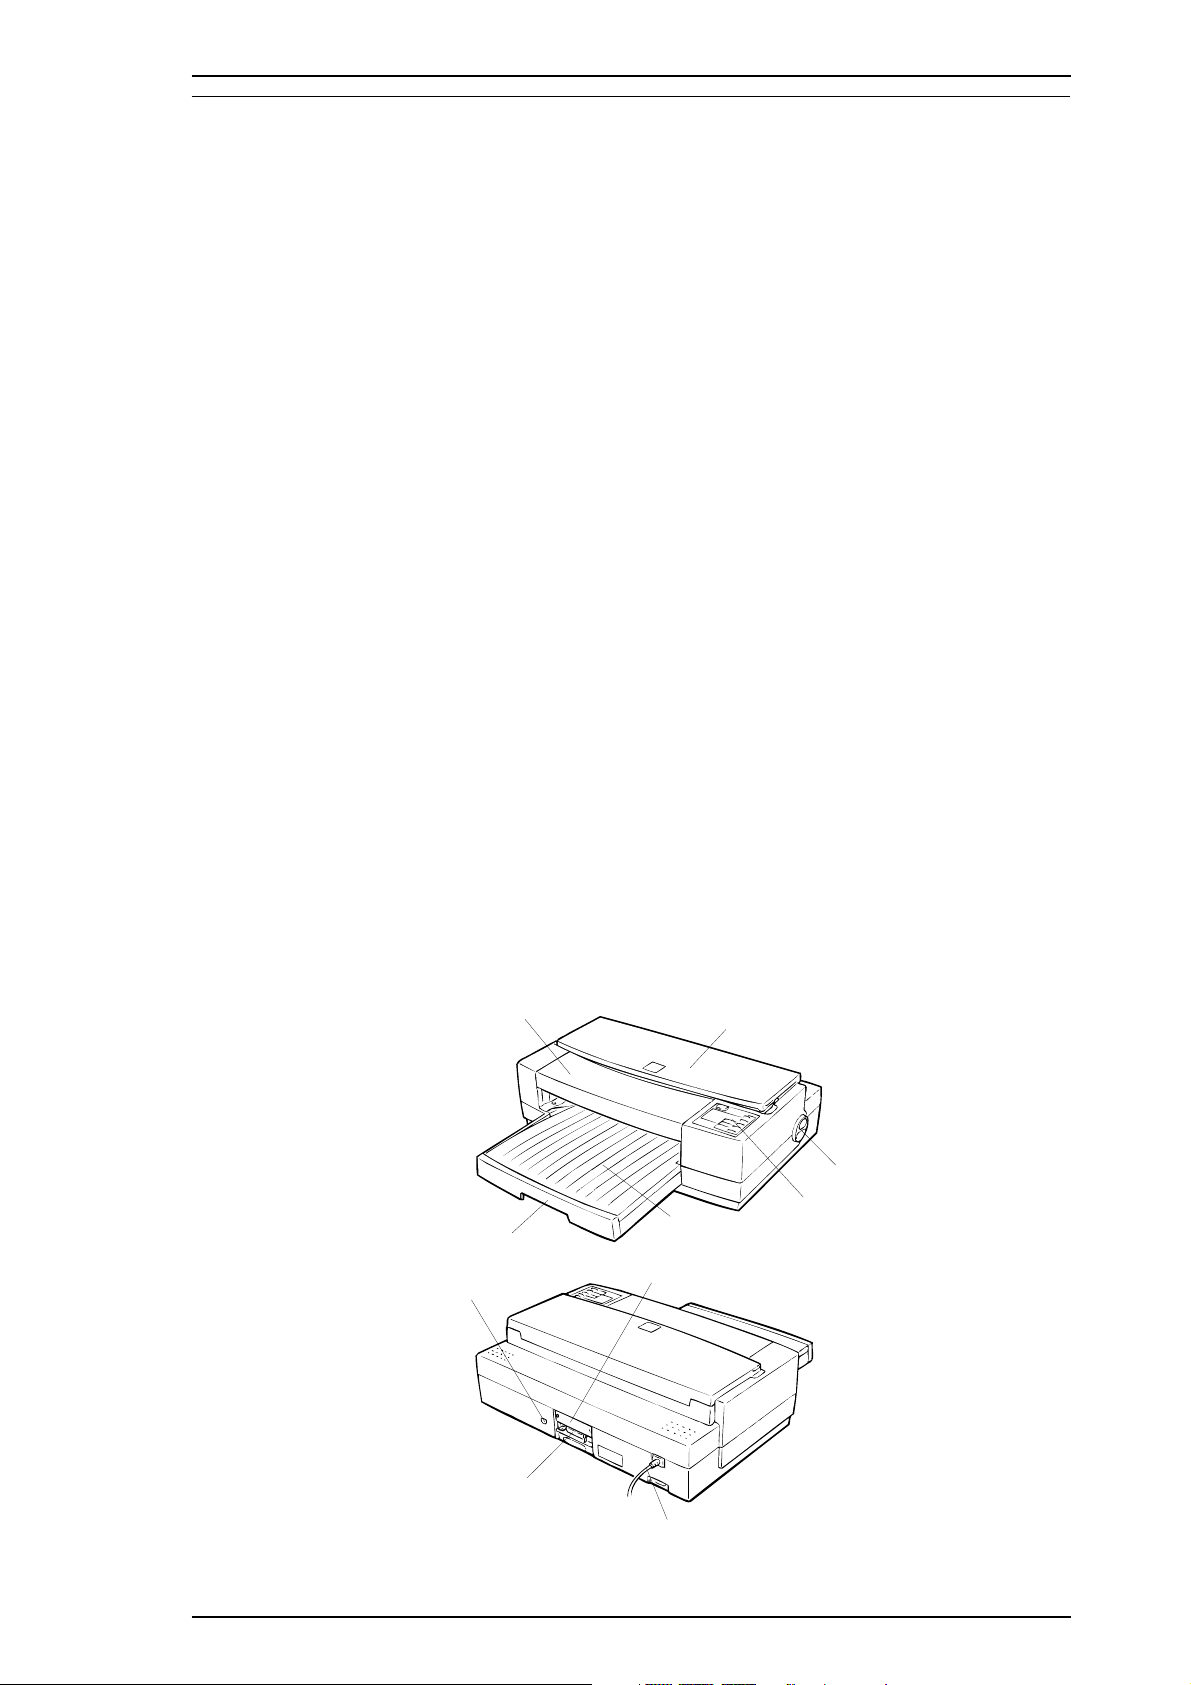
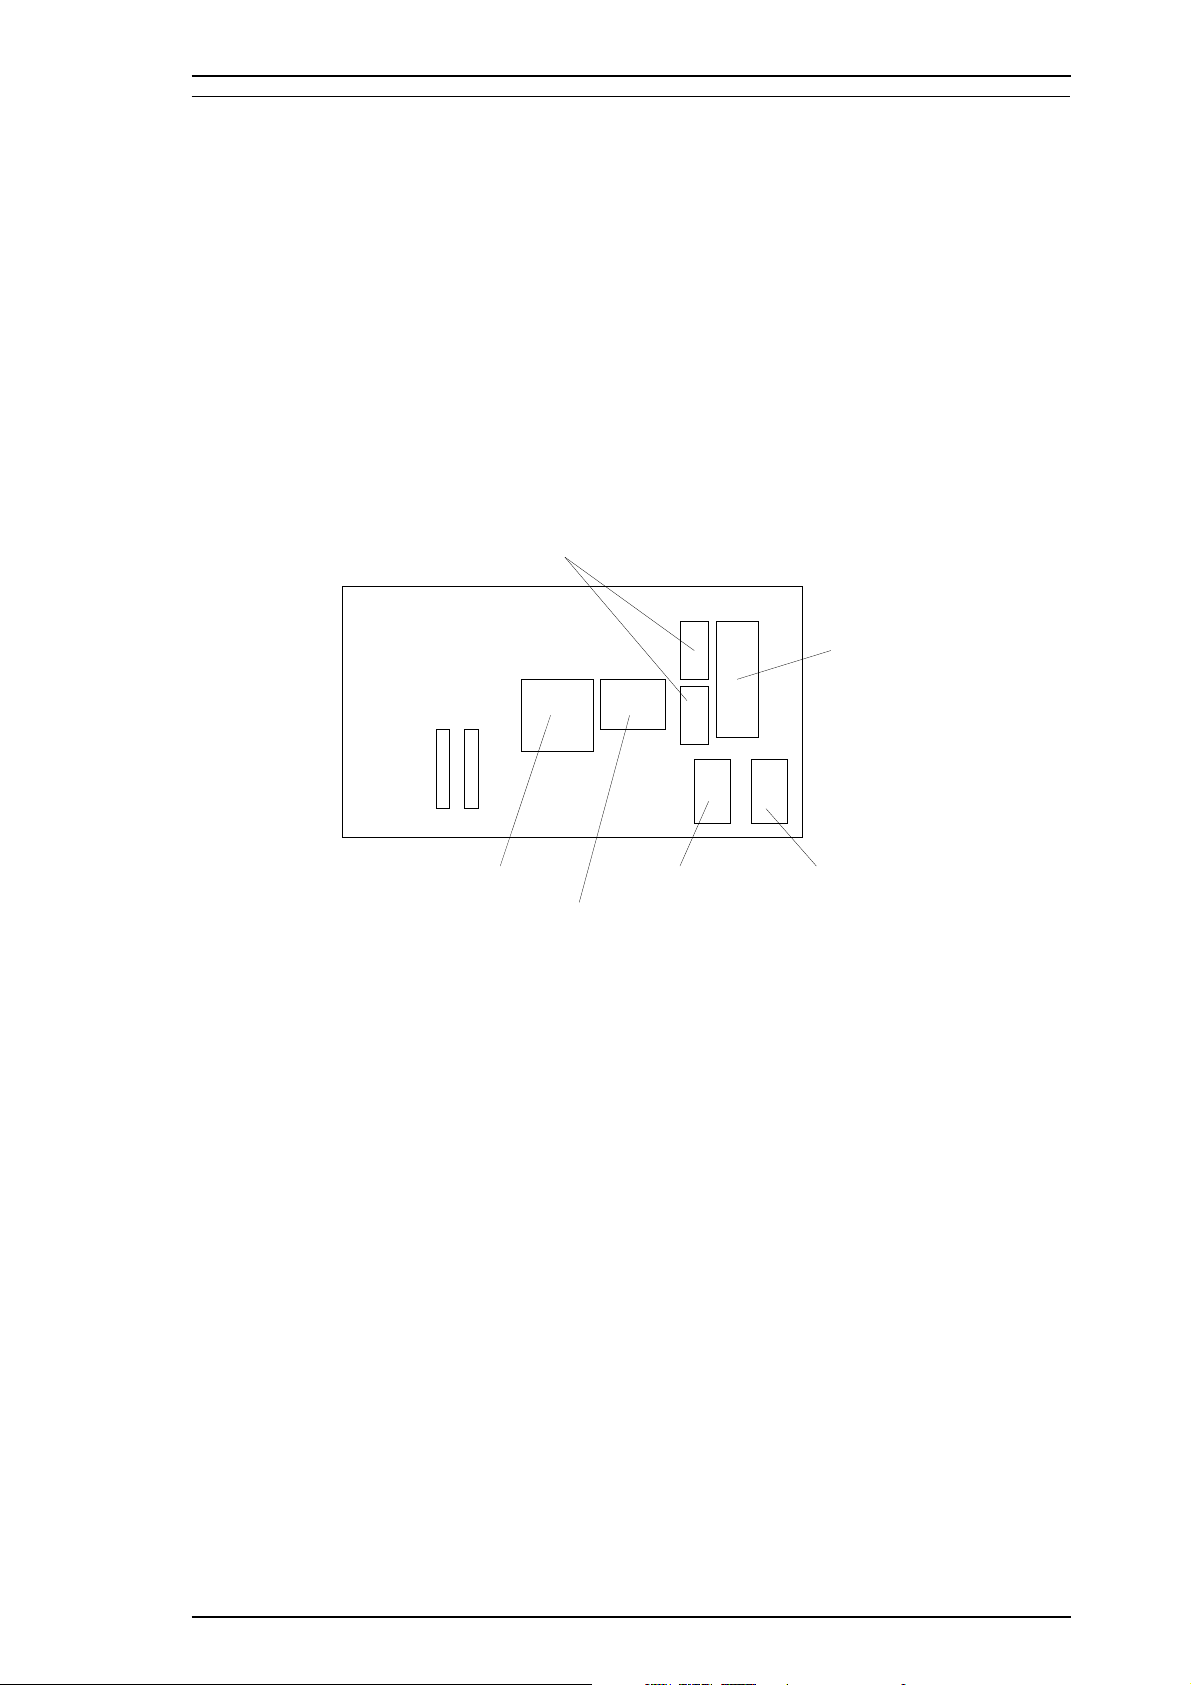
Printer
Cover
Front
Cover
Knob
Control
Panel
Paper Supply
Tray
Paper C atch
Tray
Interface Card
Cover
Serial In ter fa c e
Connector
Parallel Interface
Connector
AC Inlet
Stylus Pro XL Product Description
1.1 FEATURES
The Stylus Pro XL is a 64 + 48-nozzle (monochrome and CMY) color ink jet dot matrix printer.
The major features of this printer are:
❏ High-quality color print
-Micro Dot 720 dpi printing
-Plain paper 720 dpi printing
-Special coated paper 720 dpi printing
❏ High print speed
-LQ 200 cps
❏ Built-in auto sheet feeder
-Holds 100 cut sheets (64 g/m2)
-Holds 10 envelopes
-Holds 50 transparency films
-Hold 70 special paper
❏ Built-in 3 I/
-Mac serial I/F
-Parallel I/F
-Type B I/F (option)
❏ Easy setup.
-No dip-switches
-Multi-lingual setting messages (5 languages)
❏ 4 scalable fonts and 5 LQ fonts standard.
-Roman T, Sans Serif H, Roman, Sans Serif (scalable)
-Roman, Sans Serif, Courier, Prestige, Script (LQ)
❏ 21 character tables
Italic, PC437, PC850, PC860, PC863, PC865, PC437, Greek,
PC852, PC853, PC858, PC857, PC866, PC869, PC861,
BRASCII, Abicomp, MAZOWIA, Code MJK, ISO 8859-7, ISO Latin 1T, Bulgaria
❏ Low running cost
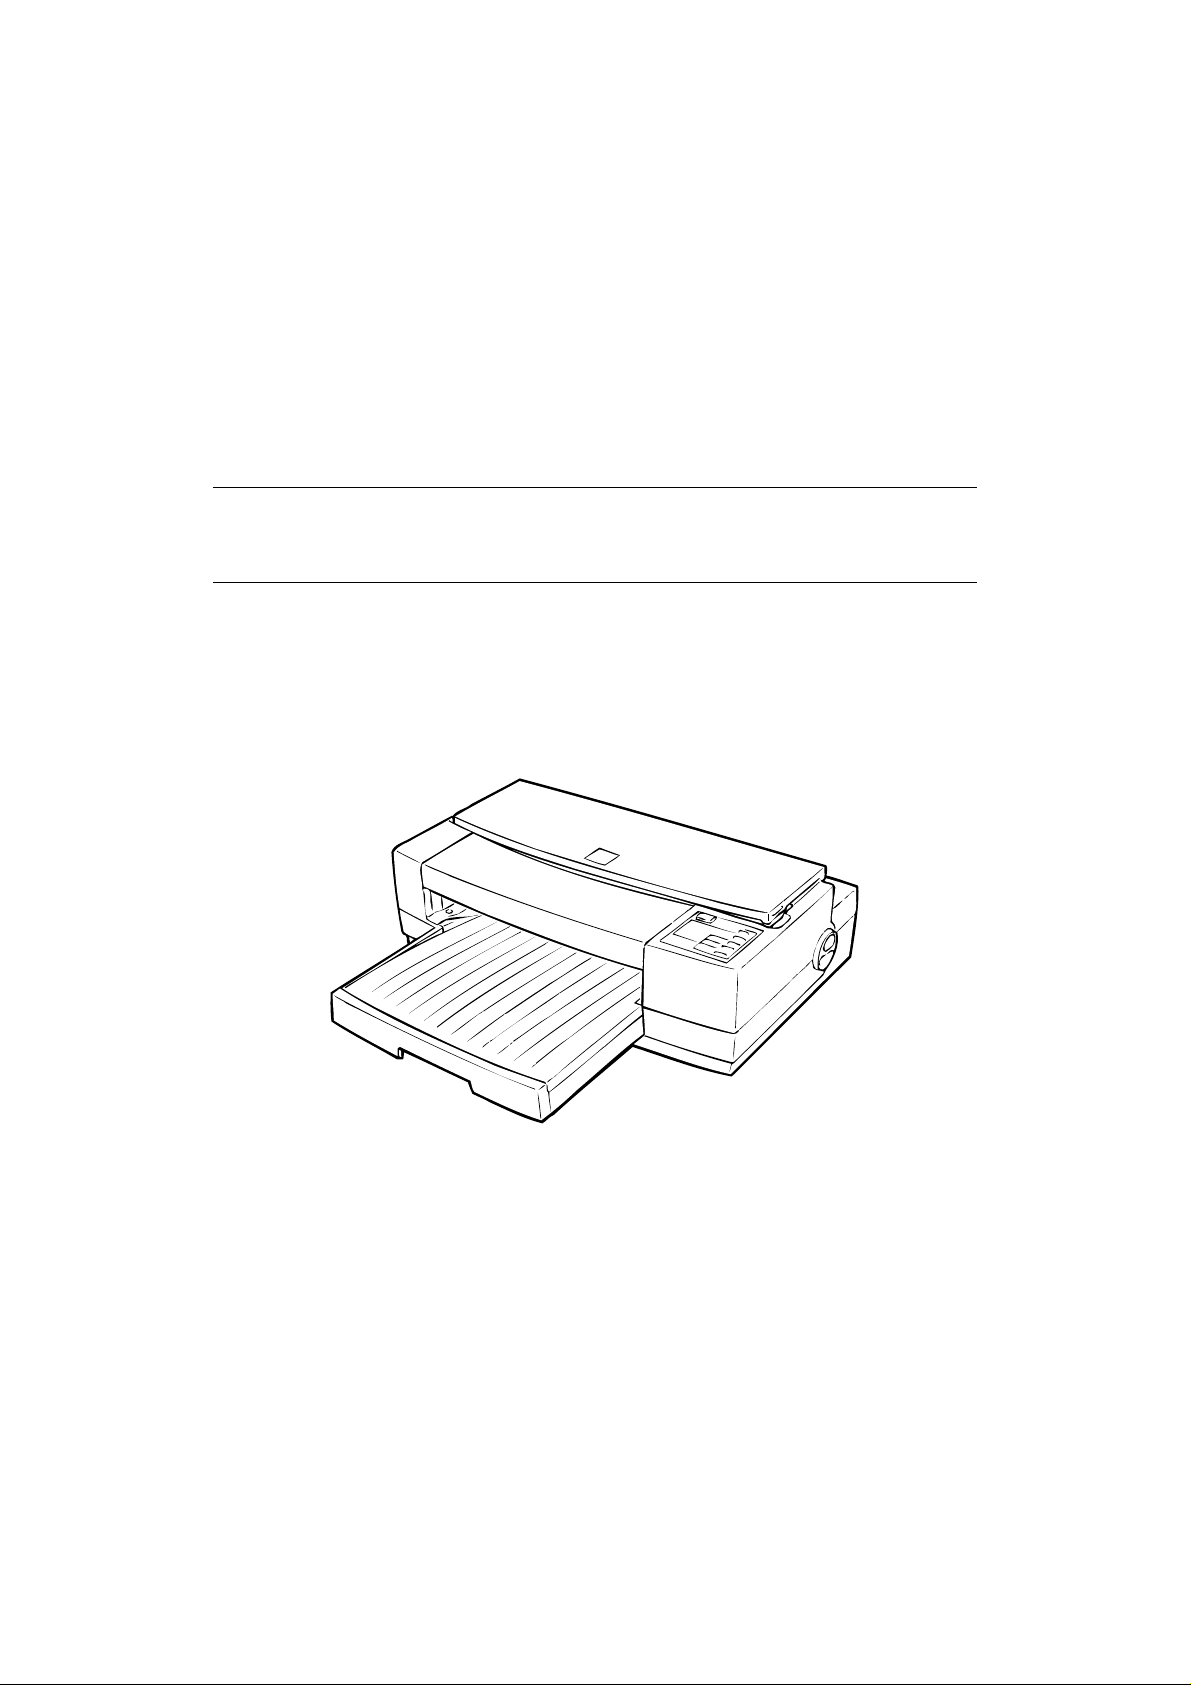
The figure below shows the Stylus Pro XL.
Figure 1-1. Exterior View of the Stylus Pro XL
Rev.A 1-1
Page 5

Product Description Stylus Pro XL
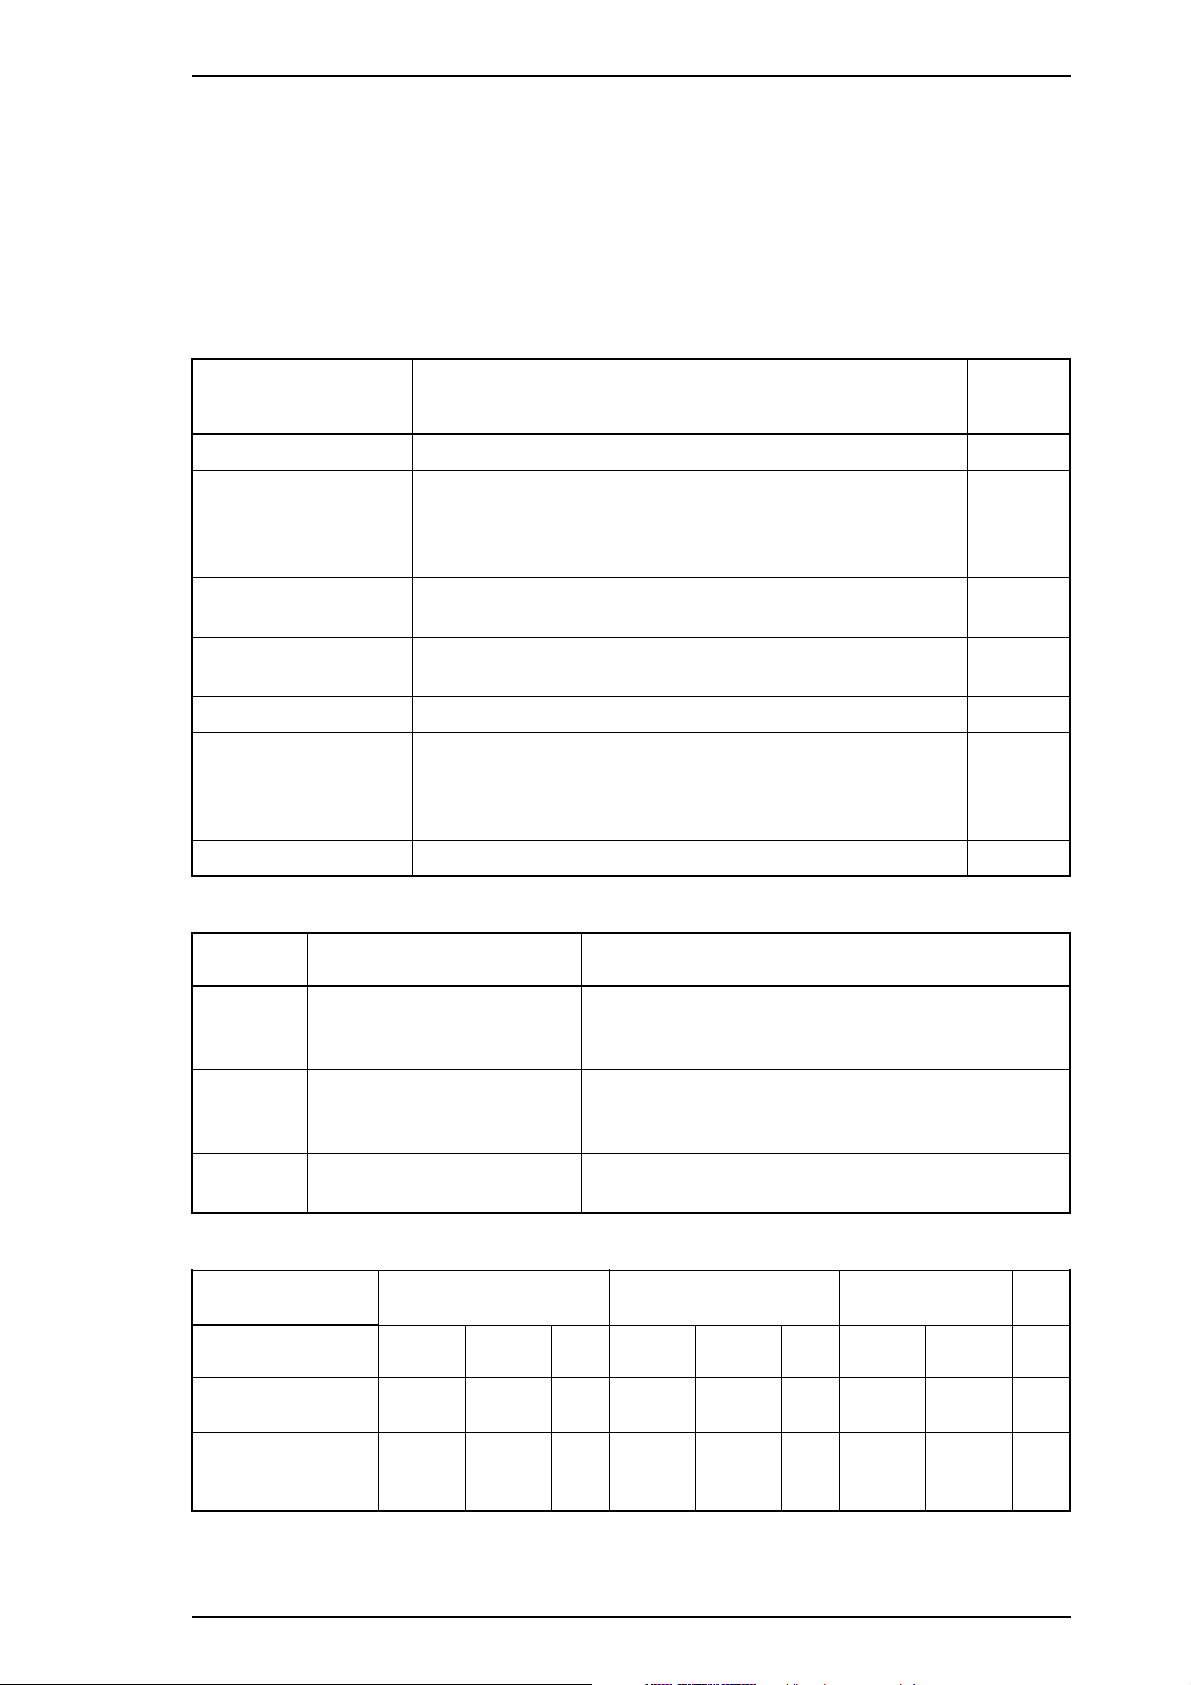
Table 1-1. Interface Cards
Interface Card Model Number
Serial interface card C823051/C823061
32KB serial interface card C823071/C823081
32KB parallel interface card C82310✽
32KB IEEE-488 interface card C82313✽
LocalTalk
Twinax interface card C82315✽
Coax interface card C82314✽
The asterisk represents the last digit, which varies by country.
✽
®
interface card C82312✽
1-2 Rev.A
Page 6
Row CRow D
#2
#3
#7
#6
#62
#63
1/360"
20/360"
20/360"
72/360"
#1
MagentaCyan
Yellow
#2
#3
#1
#2
#3
#1
#2
#3
#16#16
1/90"
#16
64/360"
#1
Row ARow B
#4
#5
#8
#61
#64
1/90"
Stylus Pro XL Product Description
1.2 SPECIFICATIONS
This section provides statistics and other detailed information for the printer.
1.2.1 Printing Specifications
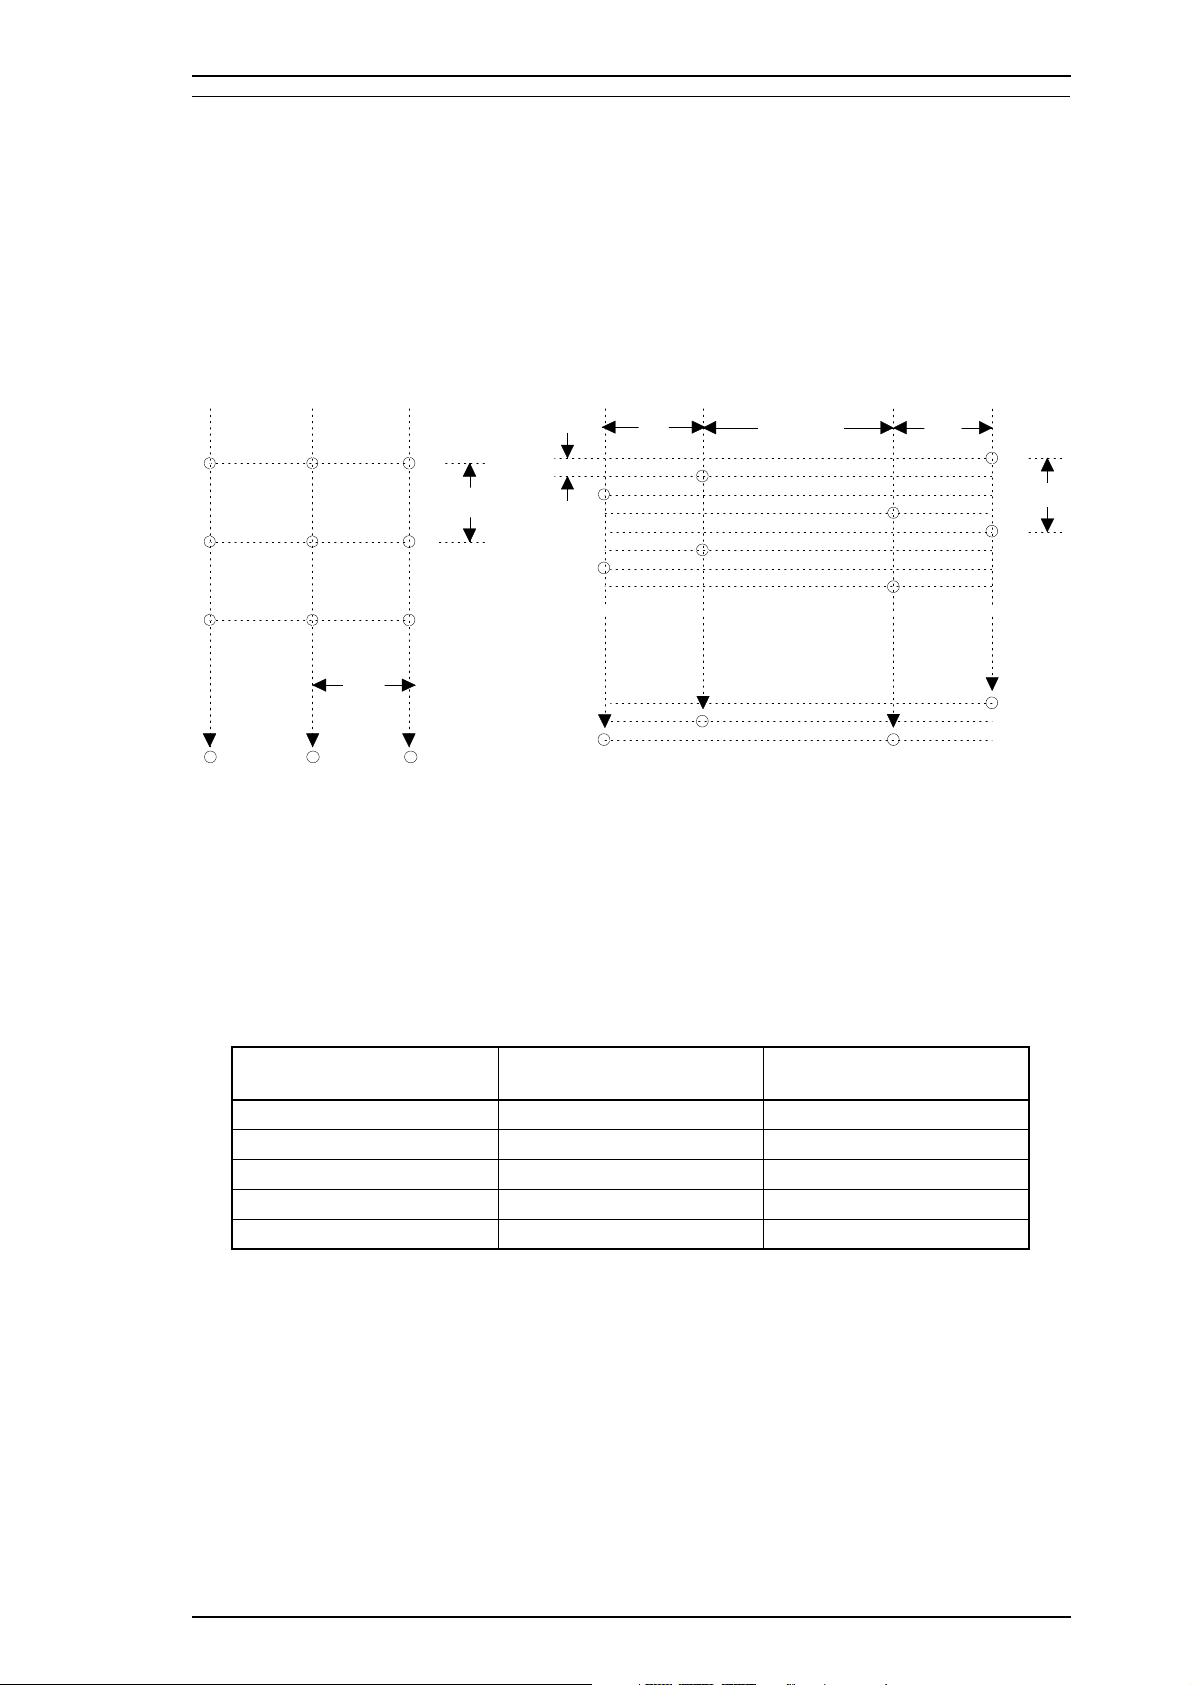
Print system: On demand ink jet system
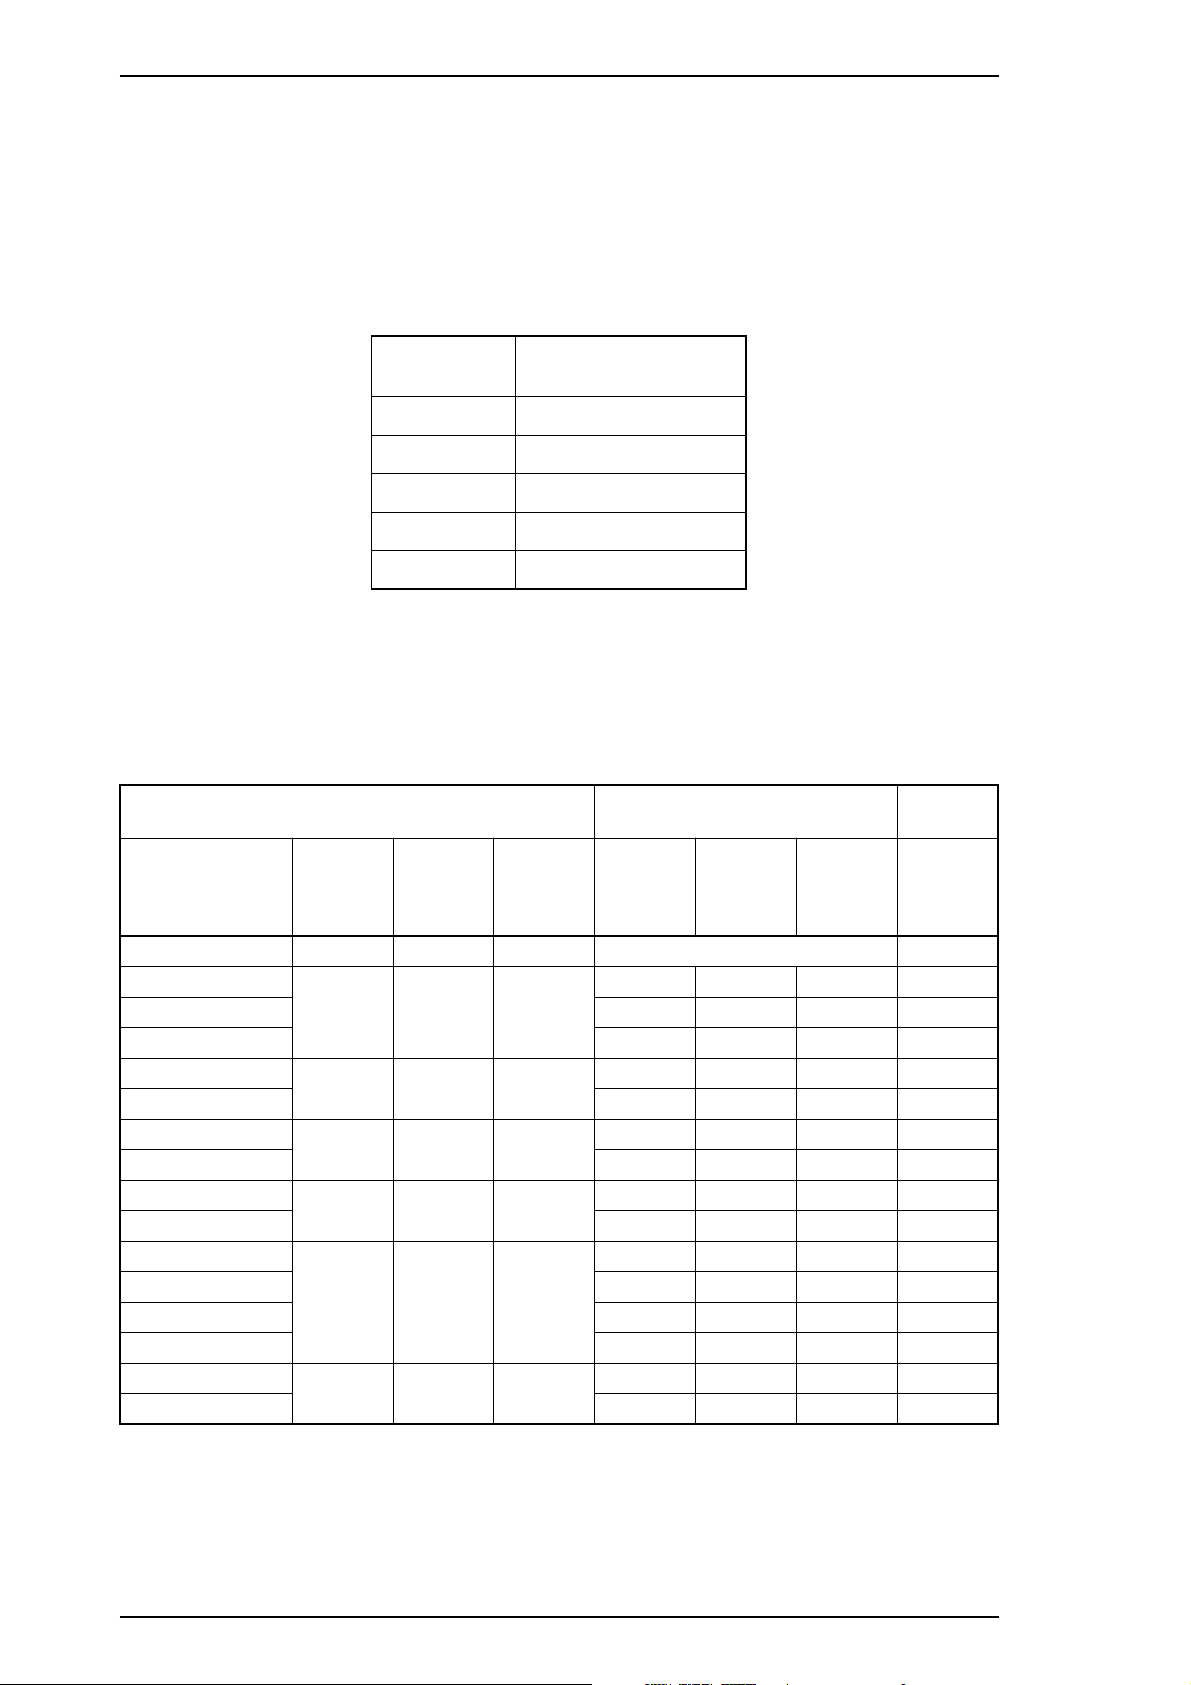
Nozzle configuration:
64 nozzles (16 × 4 staggered): monochrome
48 nozzles (16 × 3 staggered): color
Figure 1-2. Nozzle Configuration
Printing direction: Bidirectional with logic-seeking
Print speed: See Table 1-2.
Printable columns: See Table 1-2.
Table 1-2. Print Speed and P rintable Columns
Character Pitch Printable Columns Print Speed (LQ)
10 cpi (Pica) 127 200 cps
12 cpi (Elite) 152 240 cps
15 cpi 190 300 cps
17 cpi (Pica condensed) 218 340 cps
20 cpi (Elite condensed) 254 400 cps
Rev.A 1-3
Page 7
Product Description Stylus Pro XL
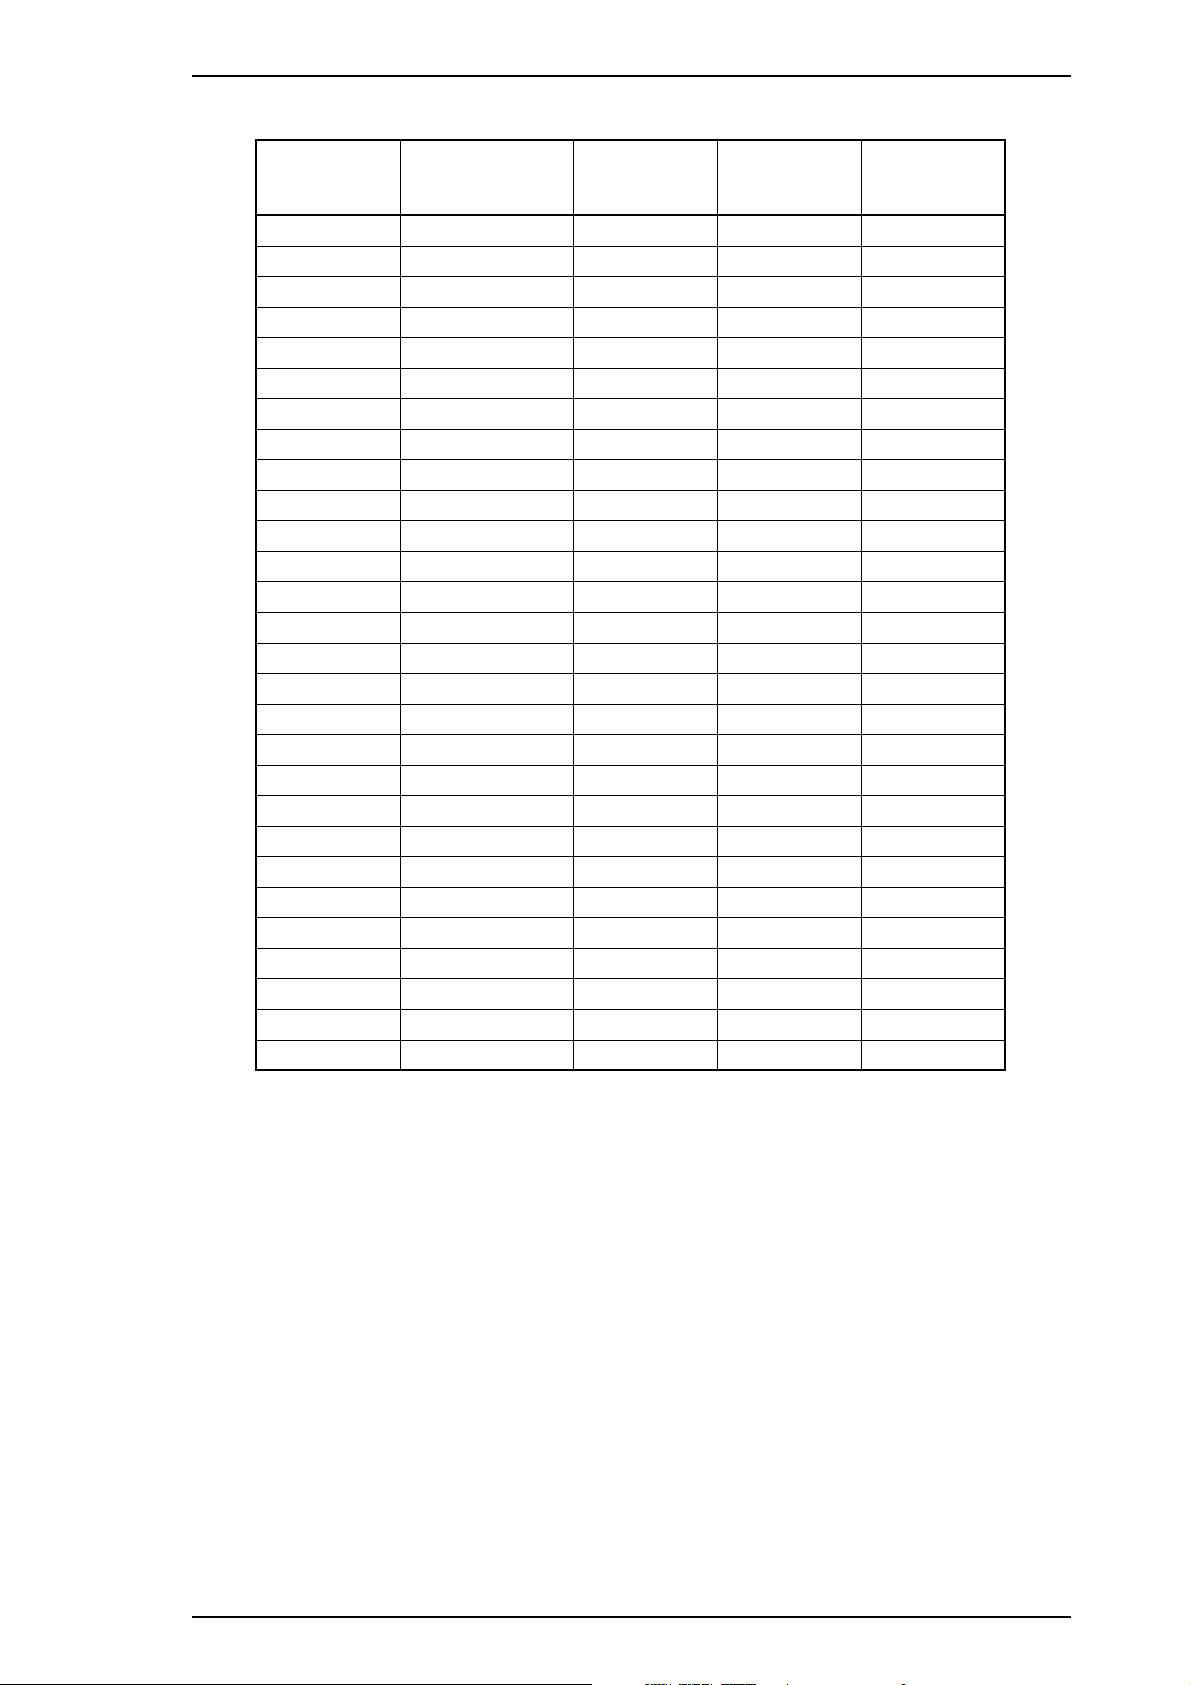
Character sets: Legal and 14 international character sets.
Character tables: See Table 1-3.
Table 1-3. Character Tables
Bit map font Scalable font
EPSON Roman
EPSON Sans Serif
Character Tables
Italic ❍❍m
PC437 (U.S./Standard Europe)
PC850 (Multilingual) ❍❍m
PC860 (Portuguese)
PC861 (Iceland) ❍❍m
PC863 (Canadian-French)
PC865 (Nordic) ❍❍m
Abicomp
BRASCII ❍ mm
PC437 (Greek)
PC852 (East Europe)
PC853 (Turkish) ❍ m
PC855 (Cyrillic) ❍ m
PC857 (Turkish)
PC866 (Russian) ❍ m
PC869 (Greek)
MAZOWIA (Poland) ❍ m
Code MJK (Czecho/Slovakia)
ISO 8859-7 (Greek) ❍ m
ISO Latin 1T (Turkish)
Bulgaria (Bulgaria) ❍ m
EPSON Courier
EPSON Prestige
EPSON Script
❍❍m
❍❍m
❍❍m
❍ mm
❍ m
❍
❍ m
❍ m
❍ m
❍ m
EPSON Roman
EPSON Sans Serif
❍
EPSON Roman
EPSON Sans Serif
H
×
×
×
×
×
×
×
×
×
×
×
×
❍ Supported ×
Fonts: [Bitmap LQ fonts]
Control codes: ESC/P 2 and expanded raster graphics code
Input data buffer: 64KB
Not supported
- EPSON Roman (10 cpi/12 cpi/15 cpi/Proportional)
- EPSON Sans Serif (10/12/15/Proportional)
- EPSON Courier (10/12/15)
- EPSON Prestige (10/12/15)
- EPSON Script (10/12/15)
[Scalable fonts]
- EPSON Roman 10.5 points, 8 ∼32 points (in units of 2 points)
- EPSON Sans Serif 10.5 points, 8 ∼32 points (in units of 2 points)
- EPSON Roman T 10.5 points, 8 ∼32 points (in units of 2 points)
- EPSON Sans Serif H 10.5 points, 8 ∼ 32 points (in units of 2 points)
1-4 Rev.A
Page 8
Stylus Pro XL Product Description
1.2.2 Paper Handling Specifications
Feeding method: Friction feed paper is fed from the built-in auto sheet feeder (ASF).
Notes: The following operations are not allowed.
1. Reverse feeding within 3 mm (0.12 in.) from the top edge of the paper or 16 mm
(0.63 in.) from the bottom edge of the paper.
2. Reverse feeding beyond 7.9 mm (0.3 in.).
Line spacing: 1/6 inch feed, 1/8 inch feed, or programmable with a 1/360 inch minimum
increment.
Paper path: Cut sheet: Built-in auto sheet feeder (ASF) (front entry)
Feeding speed: 89 msec. (at 1/6-inch feed pitch)
1.2.3 Paper Specifications
Table 1-4. Cut Sheet Paper Specifications
A3+/US B+: 329 mm (13.0 in.) × 483 mm (19.0 in.)
A3: 297 mm (11.7 in.) × 420 mm (16.5 in.)
US B: 279 mm (11.0 in.) × 432 mm (17.0 in.)
Size (W × L)
Thickness
Weight
Quality Plain paper, Special coated paper for 720dpi, Special coated paper for 360dpi,
Note:
• Special coated paper for 720dpi, Special coated paper for 360dpi, Transparency film
• High Quality Glossy paper printing are only available at normal temparature.
Legal: 216 mm (8.5 in.) × 356 mm (14.0 in.)
Letter: 216 mm (8.5 in.) ×279 mm (11.0 in.)
A4: 210 mm (8.3 in.) × 297 mm (11.7 in.)
Executive: 184 mm (7.25 in.) × 267 mm (10.5 in.)
Statemrnt: 140 mm (5.5 in.) ×216 mm (8.5 in.)
0.08 mm (0.003 in.) ∼ 0.11 mm (0.004 in.)
2
64g/m
Transparency film, High Quality Glossy paper, Glossy paper
(17 lb.) ∼ 90 g/m
2
(24 lb.)
Table 1-5. Envelope Specifications
Size (W × L) No. 10:240 mm (91⁄2in.) × 104 mm (41⁄
DL:220 mm (8.7 in.) × 110 mm (4.3 in.)
C5: 229 mm (9.0 in.) × 162 mm (6.4 in.)
Thickness Less than 0.52 mm (0.020 in.)
Weight
Quality Plain paper
Note:
•
Envelope Printing is only available at normal temperature.
•
Keep the longer side of the envelopes horizontal at setting.
75 g/m
2
(20 lb) ∼ 90 g/m
2
(24 lb)
8
in.)
Rev.A 1-5
Page 9
Product Description Stylus Pro XL
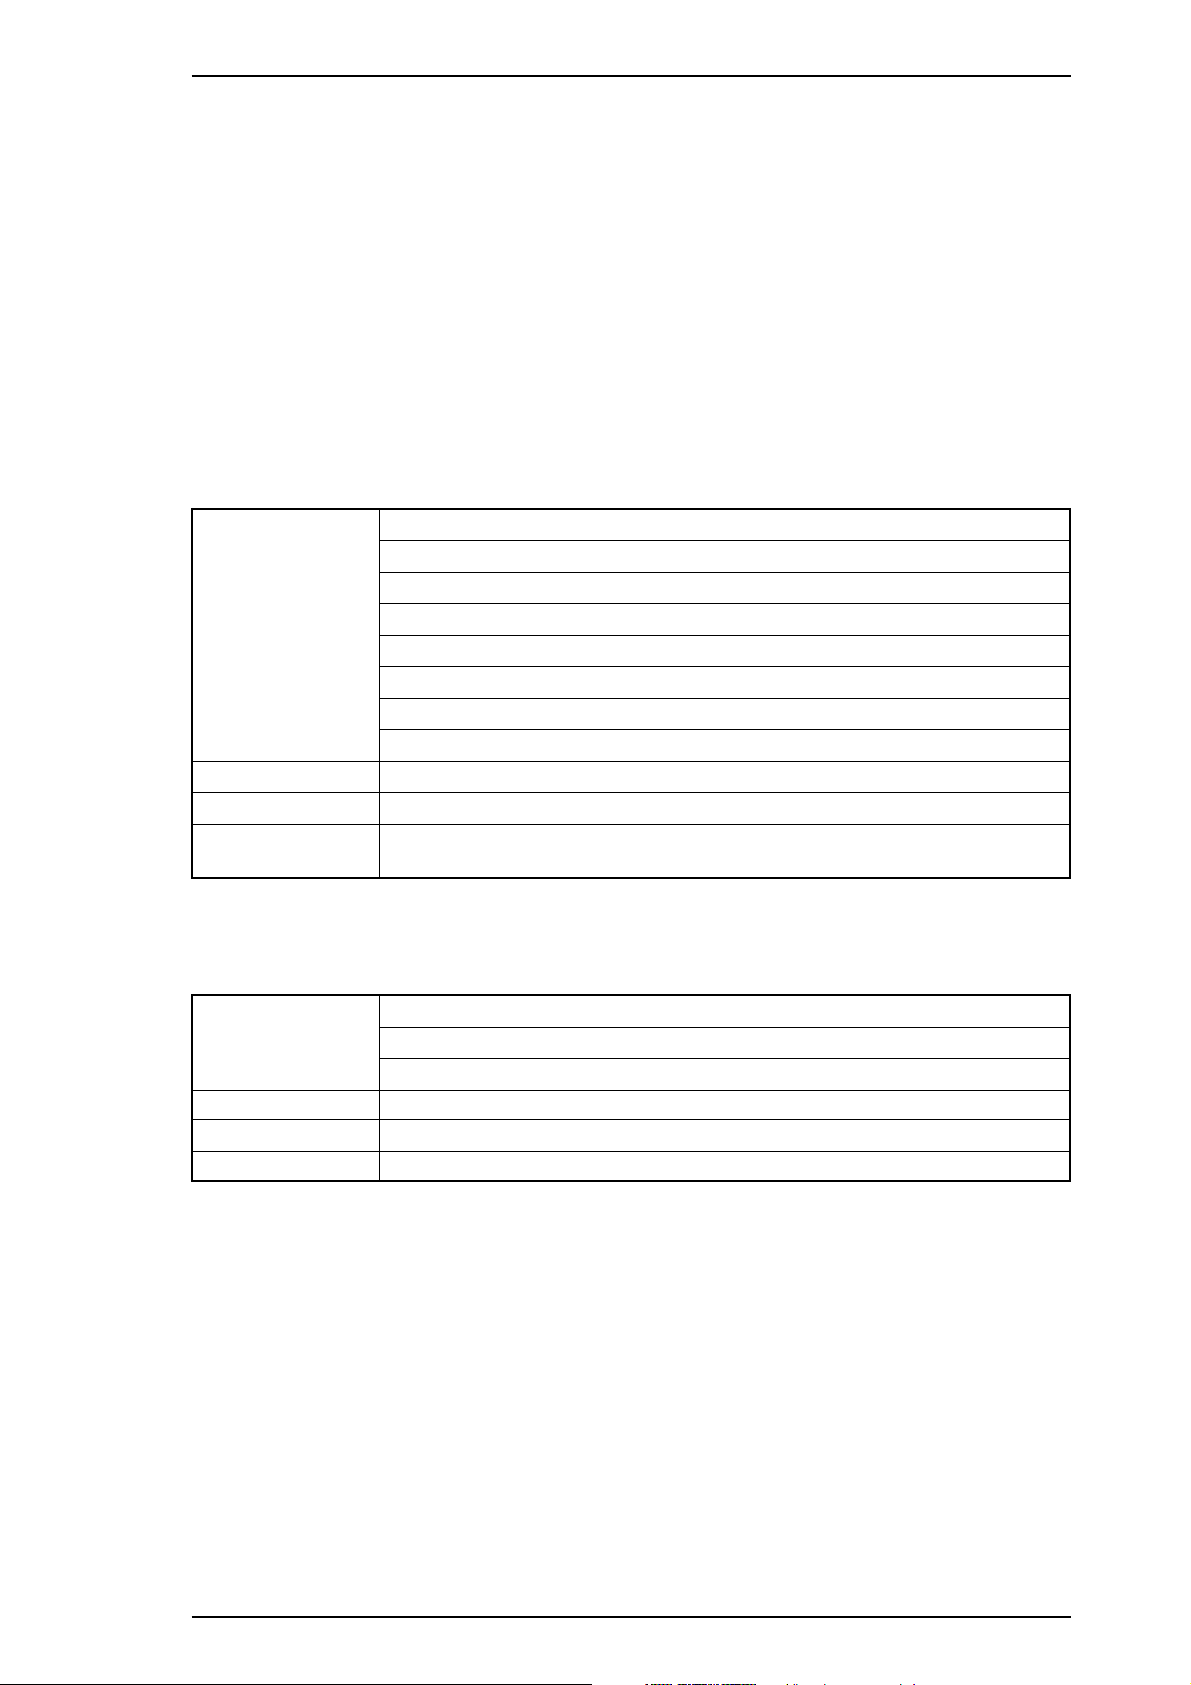
Printable area: Cut sheets
B
(Left Margin)
B
(Left Margin)
C
(Right Margin)
A
(Top Margin)
Printable Area
D
(Bottom Margin)
Figure 1-3. Printable Area for Cut Sheets
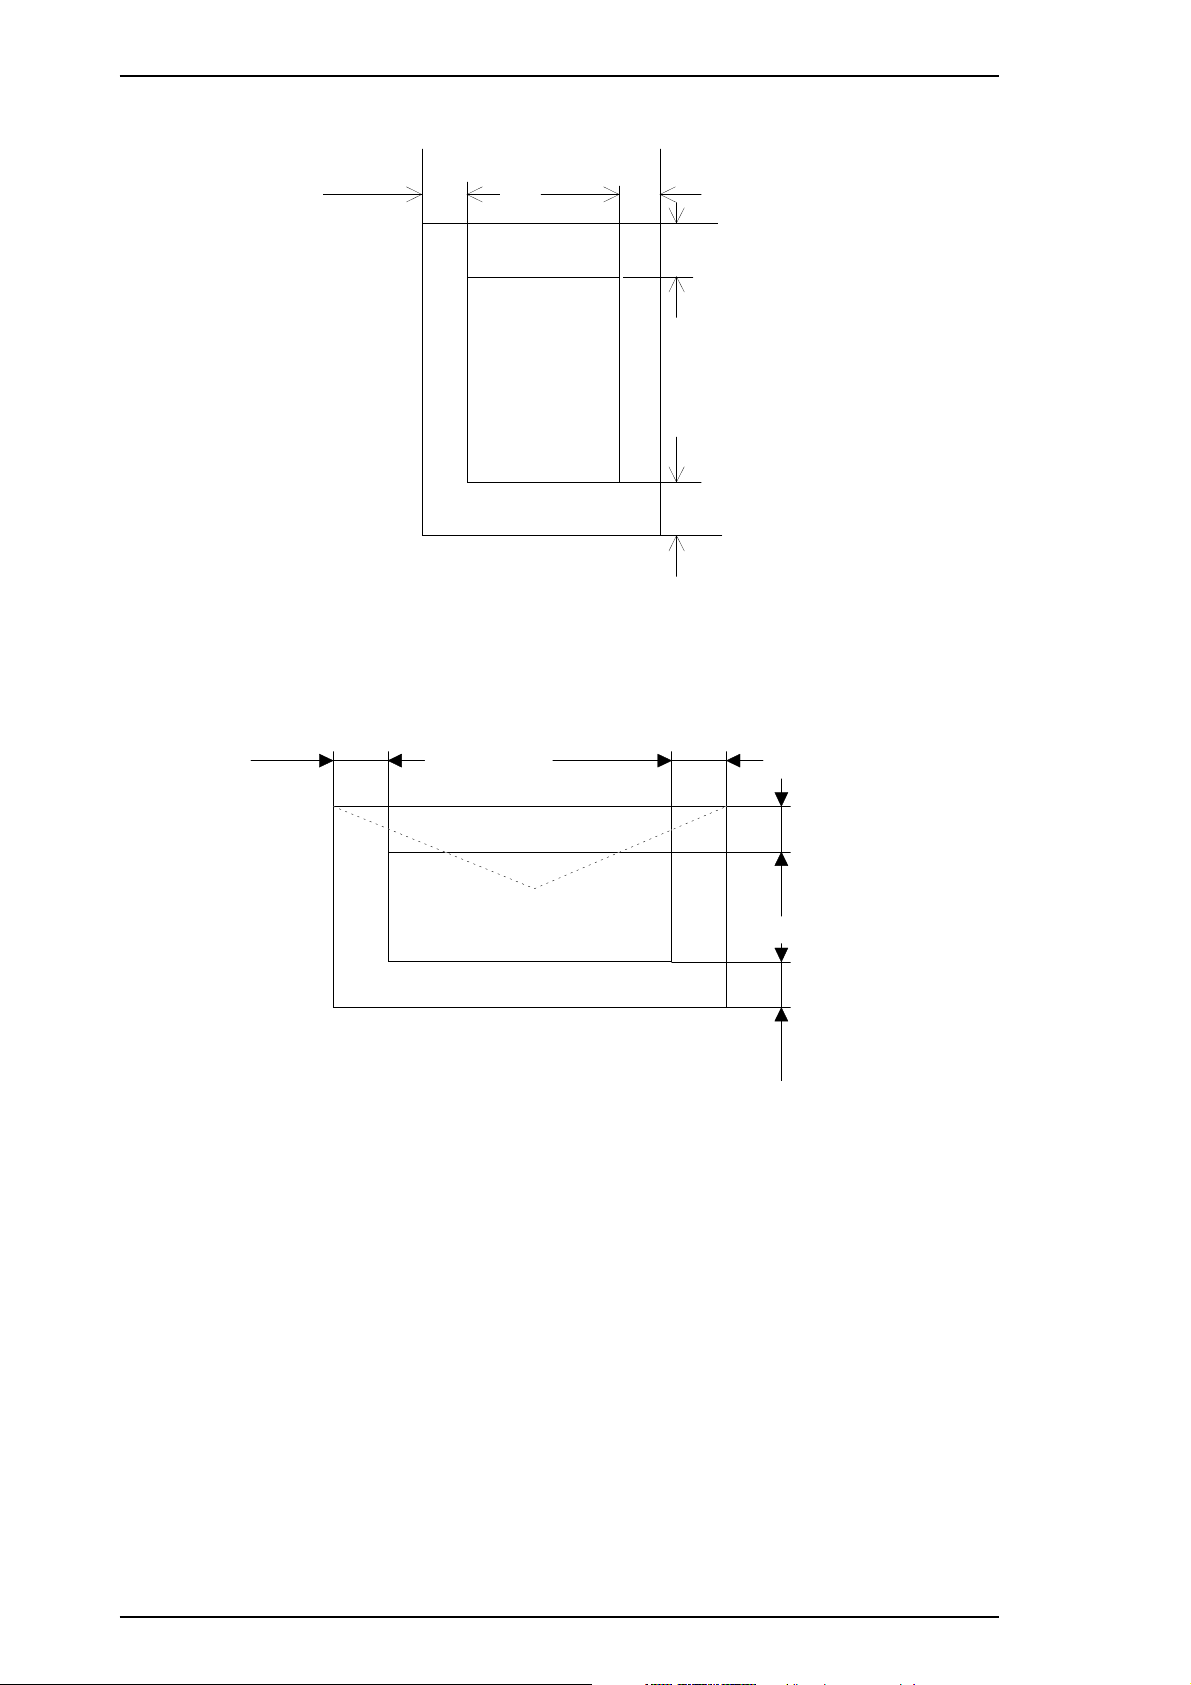
Envelopes
C
(Right Margin)
Printable Area
Figure 1-4. Printable Area for Envelopes
Notes: A:Theminimumtopmargin=3mm(0.12in.)
B: The minimum left margin = 3 mm (0.12 in.)
C:The minimum right margin is:
A3+/US B+ size: 3mm (0.12 i n.)
A3 size: 3 mm (0.12 in.)
A4 size: 3 mm (0.12 in.)
A4
(Landscape)size:3 mm (0.12 in.)
USB size: 9 mm (0.35 in.)
Legal size: 9 mm (0.35 in.)
Letter size: 9 mm (0.35 in.)
Letter size
(Landscape)size:9 mm (0.35 in.)
Executive size: 9 mm (0.35 in.)
Statement size: 9 mm (0.35 in.)
Envelopes: 3 mm (0.12 in.)
D: The minimum bottom margin = 14 mm (0.55 in.)
A
(Top Margin)
D
(Bottom Margin)
1-6 Rev.A
Page 10
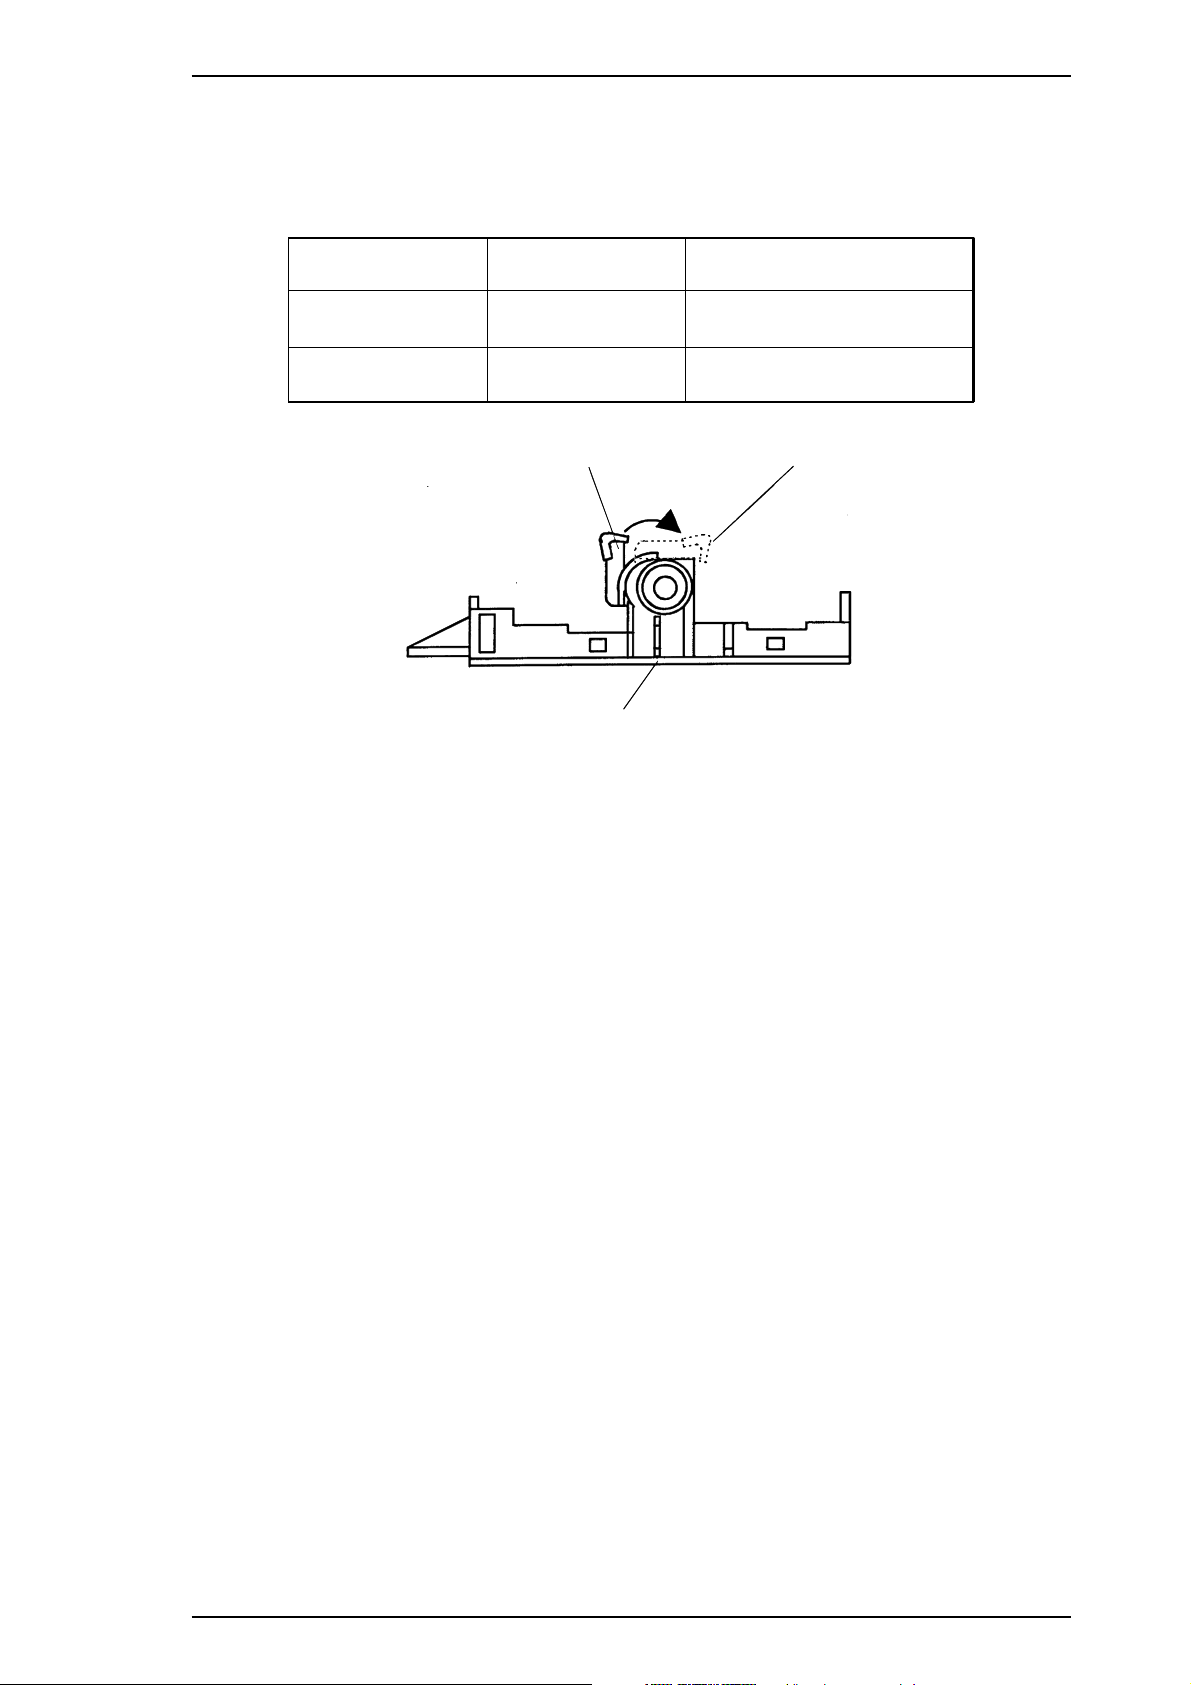
Cut Sheets Envelopes
Carriage Un it
Stylus Pro XL Product Description
Setting the
adjust lever: The adjust lever on the carriage unit must be set to the proper position for
the paper thickness, as shown in Table 1-6.
Table 1-6. Adjust Lever Settings
Lever Position Paper Paper Thickness
LEFT
(Vertical)
RIGHT
(Horizontal)
Cut Sheets
Envelopes Less than 0.5 mm (0.020 in.)
Figure 1-5. Setting the Adjust Lever
1.2.4 Ink Cartridge Specifications
Black
Type: Exclusive cartridge
0.08 ∼ 0.11 mm
(0.003 ∼ 0.004 in.)
Color: Black
Print capacity: 1.2 million characters (315 dots/character, Roman 10 cpi)
Life: The effective life from the indicated production date is 2 years.
Storage temperature:
Dimension (W × D × H): 26.9 ×67.4 × 41.8 mm (1.06 × 2.65 × 1.65 in.)
Color
Type: Exclusive cartridge
Colors: Cyan, magenta, yellow
Print capacity:
Life: The effective life from the indicated production date is 2 years.
Storage temperature:
Dimension (W × D × H): 54.0 ×67.4 × 41.8 mm (2.13 × 2.65 × 1.65 in.)
Notes: The ink cartridge cannot be refilled; it is the only consumable article.
Do not attempt to use an ink cartridge that has exceeded its ink life.
Ink freezes at
−3°
−30 ∼ 40° C(−22 ∼ 104° F)(Storage:amonthorlessat40°C (104° F))
−30 ∼ 60° C(−22 ∼ 140° F) (Transit: a month or less at 40°C (104° F))
−30 ∼ 60° C(−22 ∼ 140° F) (Transit: 120 hours or less at 60° C (140° F))
28 sheets/color (A4 or letter, full-image printing at 360 dpi)
−30 ∼ 40° C(−22 ∼ 104° F)(Storage:amonthorlessat40°C (104° F))
−30 ∼ 60° C(−22 ∼ 140° F) (Transit: a month or less at 40°C (104° F))
−30 ∼ 60° C(−22 ∼ 140° F) (Transit: 120 hours or less at 60° C (140° F))
C(37°F); however, it can be used after it returns to room temperature.
Rev.A 1-7
Page 11
Product Description Stylus Pro XL
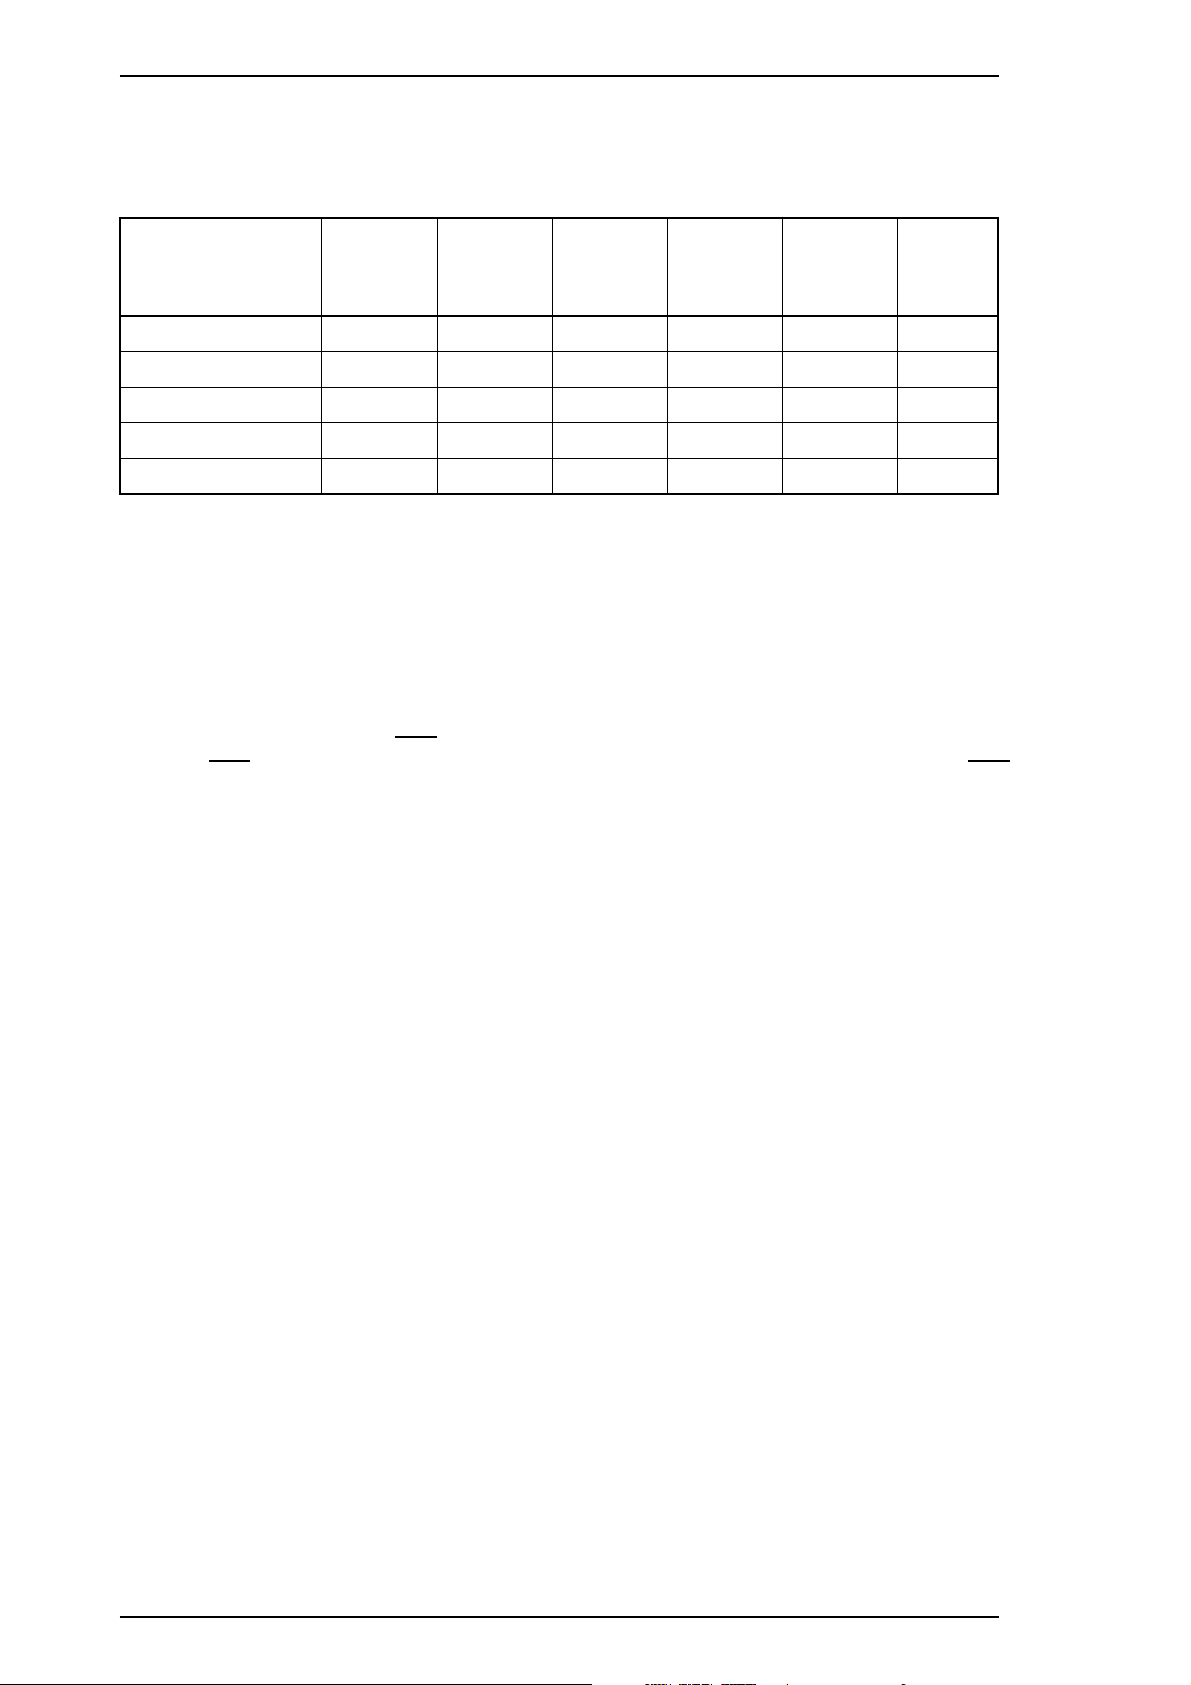
1.2.5 Electrical Specifications
Table 1-7. Rated Electrical Ranges
Specification 120 V Version 220 - 240 V Version
Rated voltage 120 VAC 220 - 240 VAC
Input voltage range
Rated frequency range
Input frequency range
103.5 ∼ 132 V 198 ∼ 264 V
50 ∼ 60 Hz 50 ∼ 60 Hz
49.5 ∼ 60.5 Hz 49.5 ∼ 60.5 Hz
Rated current 0.6 A 0.4 A
Power consumption
Insulation resistance
Dielectric strength
Approx. 20 W
(self-test with 10-cpi LQ characters)
10 MΩ, minimum
(applying 500 VDC between AC line
and chassis)
1000 VAC rms - 1 minute or
1200 VAC rms - 1 second
(between AC line and chassis)
(self-test with 10-cpi LQ characters)
(applying 500 VDC between AC line
(between AC line and chassis)
Approx. 20 W
10 MΩ,minimum
and chassis)
1500 VAC rms - 1 minute
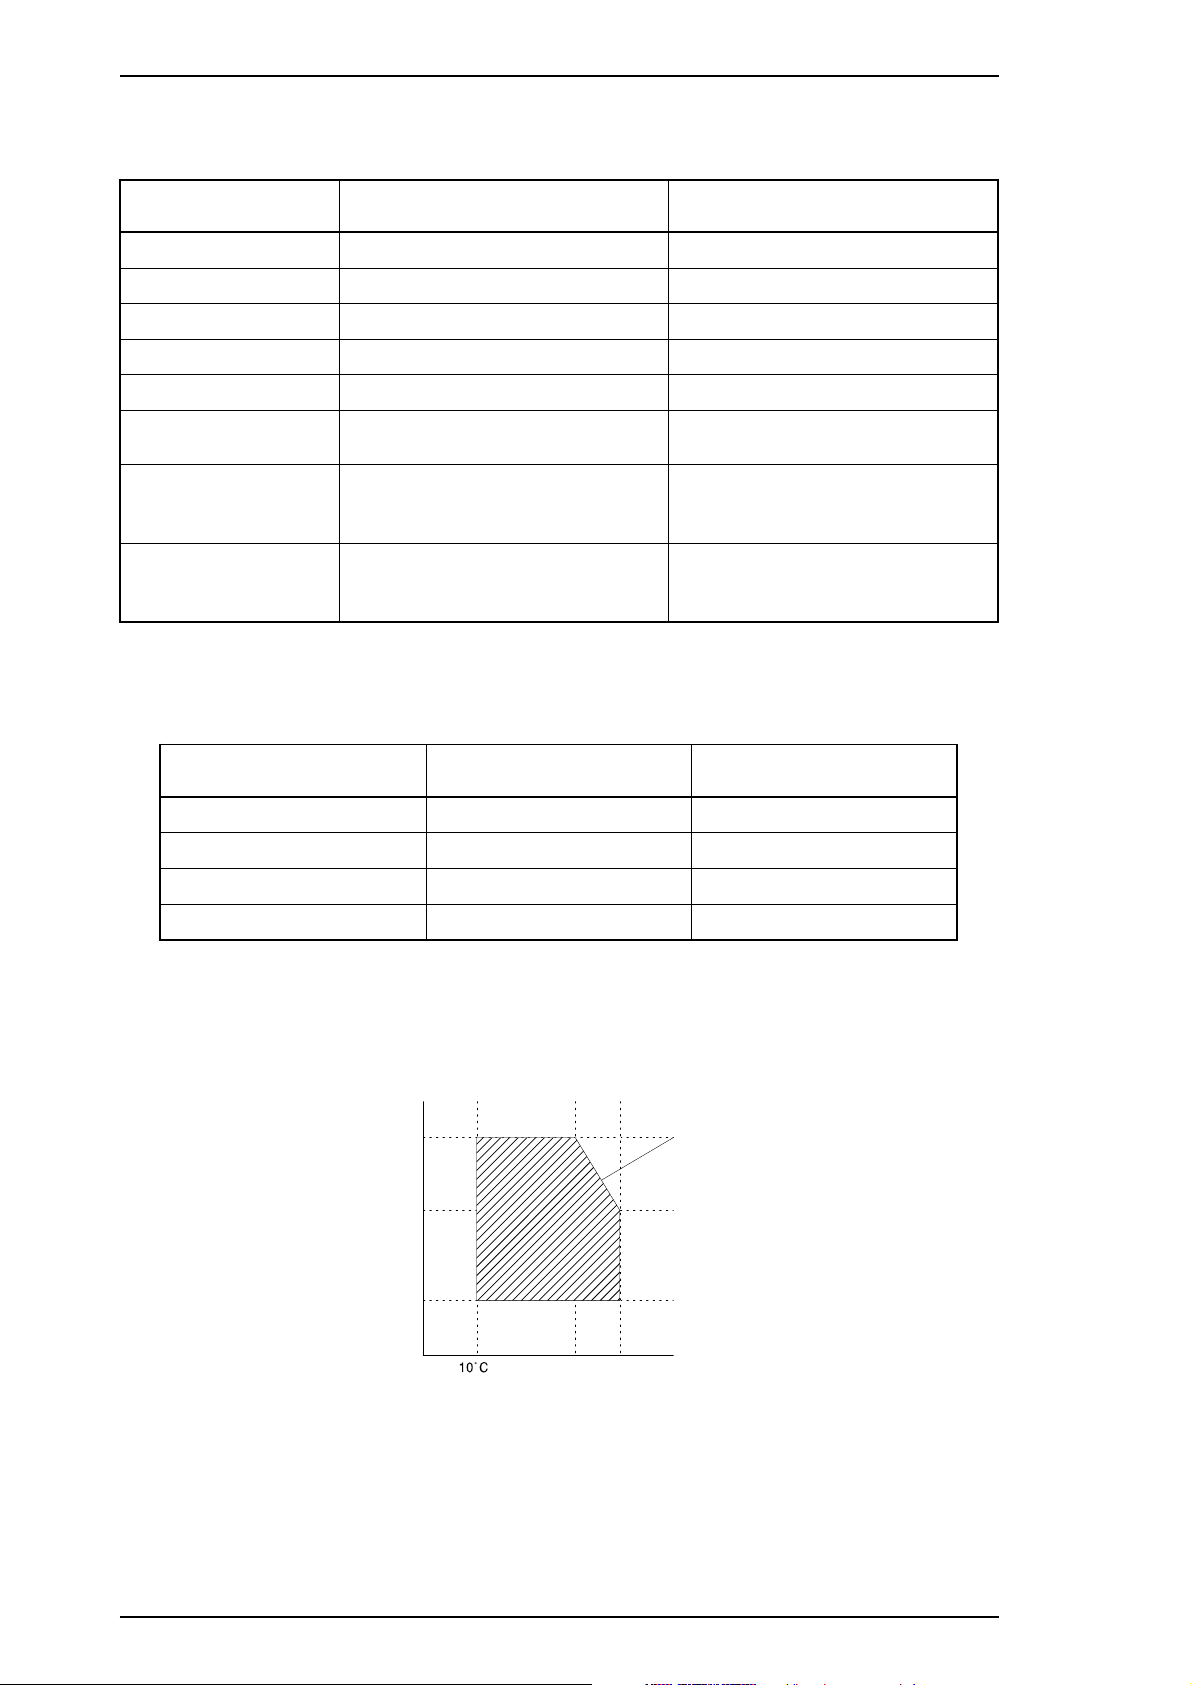
1.2.6 Environmental Conditions
Table 1-8. Acceptable Environmental Conditions
Condition Operating Non Operating
*1,3
*1
−20 ∼ 60° C(−4∼122° F)
5 ∼ 85% RH
Temperature
Humidity
10 ∼ 35° C(50∼ 95° F)
20 ∼ 80% RH
Shock resistance 1G (within 1 msec.) 2G (within 2 msec.)
Vibration resistance 0.15 G 0.50 G
*1
: For printer operation, conditions must be in the range shown in the figure below.
*2
: These conditions are applicable when the printer is in its shipping container.
*3
: Without condensation.
*2
*2,3
*2
2
Humid ity
(% RH)
80%
55%
20%
(50˚F)
27˚C 35˚C
(80˚F)
(95˚F)
Guaranteed
˚C
(˚ F)
Figure 1-6. Temperature / Humidity Range
1-8 Rev.A
Page 12

Stylus Pro XL Product Description
1.2.7 Reliability
Total print volume: 75,000 pages (A4, letter)
Printhead life: 1,000 million dots/nozzle
1.2.8 Safety Approvals
Safety standards: 120 V version: UL1950 with D3,
CSA22.2 #950 with D3
220-240 V version: EN 60950 (TÜV, SEMKO, DEMKO,
NEMKO, SETI)
Radio frequency interference (RFI): 120 V version: FCC Part 15 Subpart B Class B
220-240 V version: Vfg.243 (VDE0878 part 3, part 30)
EN55022 (CISPR PUB. 22) class B
1.2.9 Physical Specifications
Dimensions (W × D × H): 580 ×597 × 182 (mm) (22.8 × 23.5 × 7.17 in.)
Weight: About 10 Kg (22 lb)
Rev.A 1-9
Page 13
Product Description Stylus Pro XL
1.3 INTERFACE SPECIFICATIONS
The Stylus Pro XL is standard-equipped with an 8-bit parallel and serial interface.
1.3.1 Parallel Interface Specifications
Data format: 8-bit parallel
Synchronization: By
Handshaking: By BUSY and
STROBE pulse synchronization
ACKNLG signals
Signal level: TTL compatible level
Adaptable connector: 36-pin 57-30360 (Amphenol) or equivalent
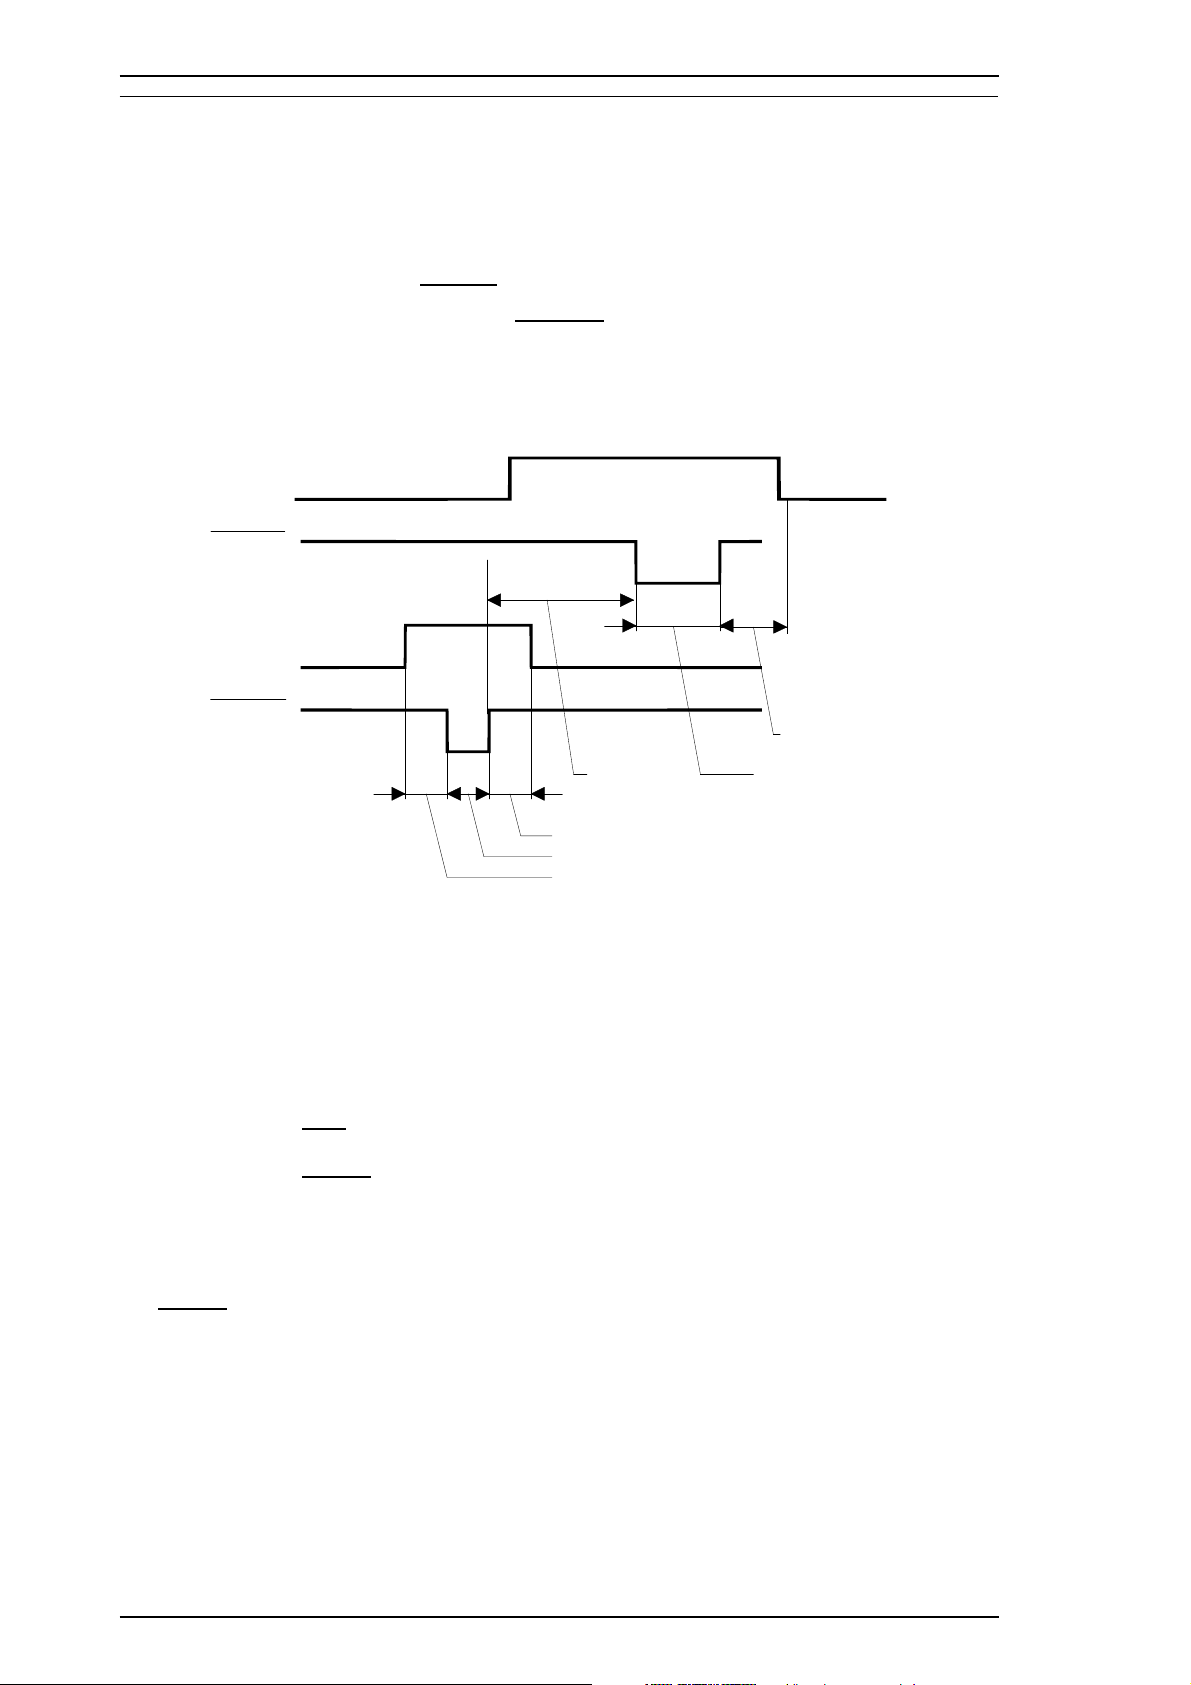
Data transmission timing: See Figure 1-7.
BUSY
ACKNLG
DATA
STROBE
0 µsec
(minimum)
0.5 µsec (minimum)
0.5 µsec (minimum)
0.5 µsec (minimum)
0 µsec (minimum)
5 µsec (typical)
Figure 1-7. Data Transmission Timing
Note:
The Busy signal is active (HIGH) under the following conditions:
The
The PE signal is active (HIGH) under the following conditions:
Transition time (rise time and fall time) of every input signal must be less than 0.2
❏ During data reception (See Figure 1-7.)
❏ When the input buffer is full
❏ When the
INIT input signal is active
❏ During initialization
❏ When the
ERROR or PE signal is active
❏ During the self-test mode
❏ During the demonstration mode
❏ During the default setting mode
❏ When a fatal error occurs
ERROR signal is active (LOW) under the following conditions:
❏ When a paper-out error occurs
❏ When a no ink cartridge error occurs
❏ When a fatal error occurs
❏ When a paper-out error occurs
❏ When a fatal error occurs
µ
s.
1-10 Rev.A
Page 14
Stylus Pro XL Product Description
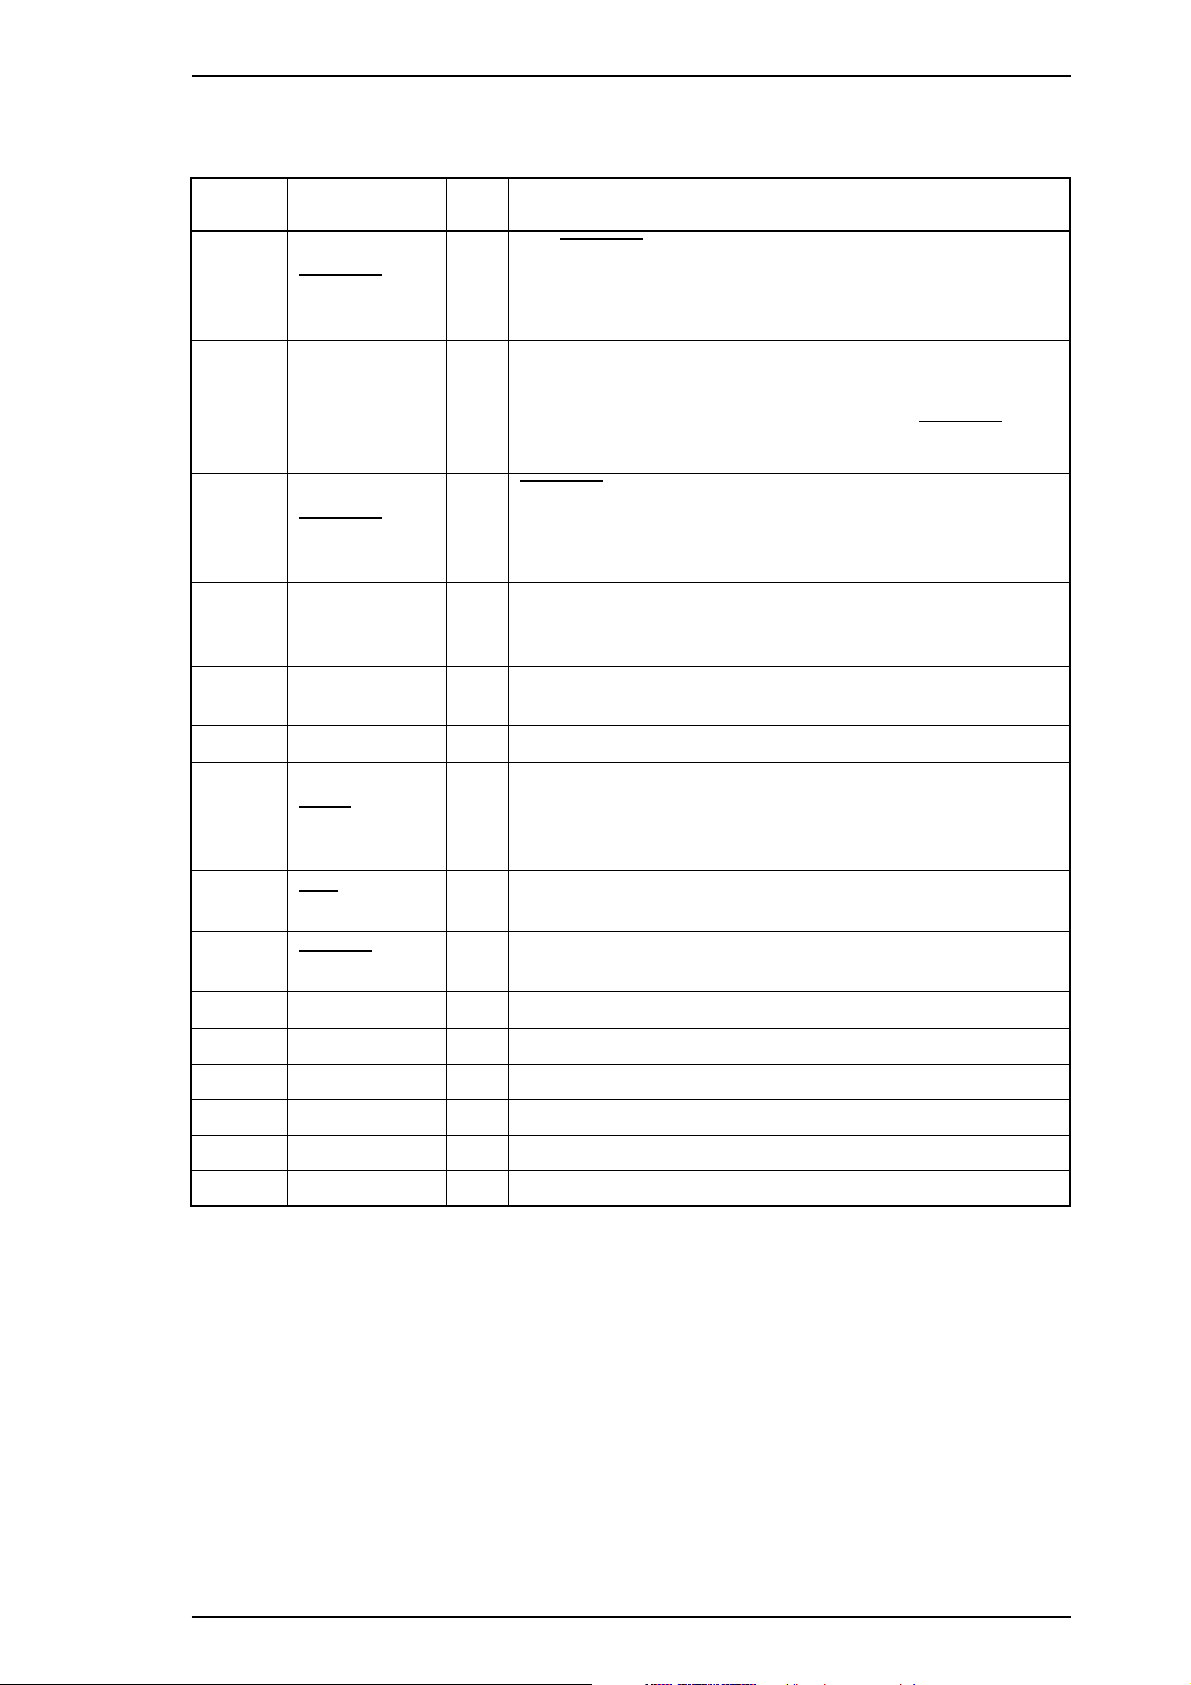
Table 1-9 shows the connector pin assignments and signal functions of the 8-bit parallel interface.
Table 1-9. Signal and Connector Pin Assignments for Parallel Interface
Pin No. Signal Name I/O* Description
The
STROBEpulseisusedtoreaddatafromthehost
1
2-9 DATA 1-8 I
10
11 BUSY O
STROBE I
ACKNLG
computer. The pulse width must be 0.5 µs or more. Normally,
it is HIGH, and data is latched with the rising edge of this
signal.
DATA 1-8 are parallel data bits. When one of these signals is
HIGH, the data bit is 1; when LOW, the data bit is 0. The
most significant bit (MSB) is DATA 8. The signal state must
be maintained for 0.5 µs on either side of the
signal’s active edge.
ACKNLG is an acknowledge pulse with a width of
approximately 10 µs. This signal goes LOW upon the
O
completion of data reception to indicate that the printer is
ready to receive further data.
The BUSY signal informs the host computer of the printer’s
status. When this signal is HIGH, the printer cannot accept
any more data.
STROBE
12
13 SLCT O
14
31
32
35 +5 V —
17 CHASSIS — Chassis ground.
16 GND — Signalground.
19-30 — — —
33,36
15,18,34 — — —
PE
AFXT I
INIT
ERROR
—
This signal indicates whether paper is available in the printer
O
or not. A HIGH level indicates no paper.
Pulledupto+5Vthrougha1.0KΩresistor in the printer.
If this signal is set to LOW, the printer automatically performs
one line feed upon receipt of a CR (carriage return) code. The
status of this signal is checked only at power on and
initialization.
If this signal goes LOW, the printer is initialized. The pulse
I
width of this signal must be 50 µsormore.
This signal goes LOW if the printer has a fatal error or runs
O
out of paper.
Pulledupto+5Vthrough1.0KΩresistor in the printer.
—
Not used.
* The I/O column indicates the direction of the signal as viewed from the printer.
Rev.A 1-11
Page 15
Product Description Stylus Pro XL
1.3.2 Serial Interface Specifications
Data format: RS-422 serial
Synchronization: Asynchronous
Handshaking: By DTR signal and X-ON/X-OFF protocol
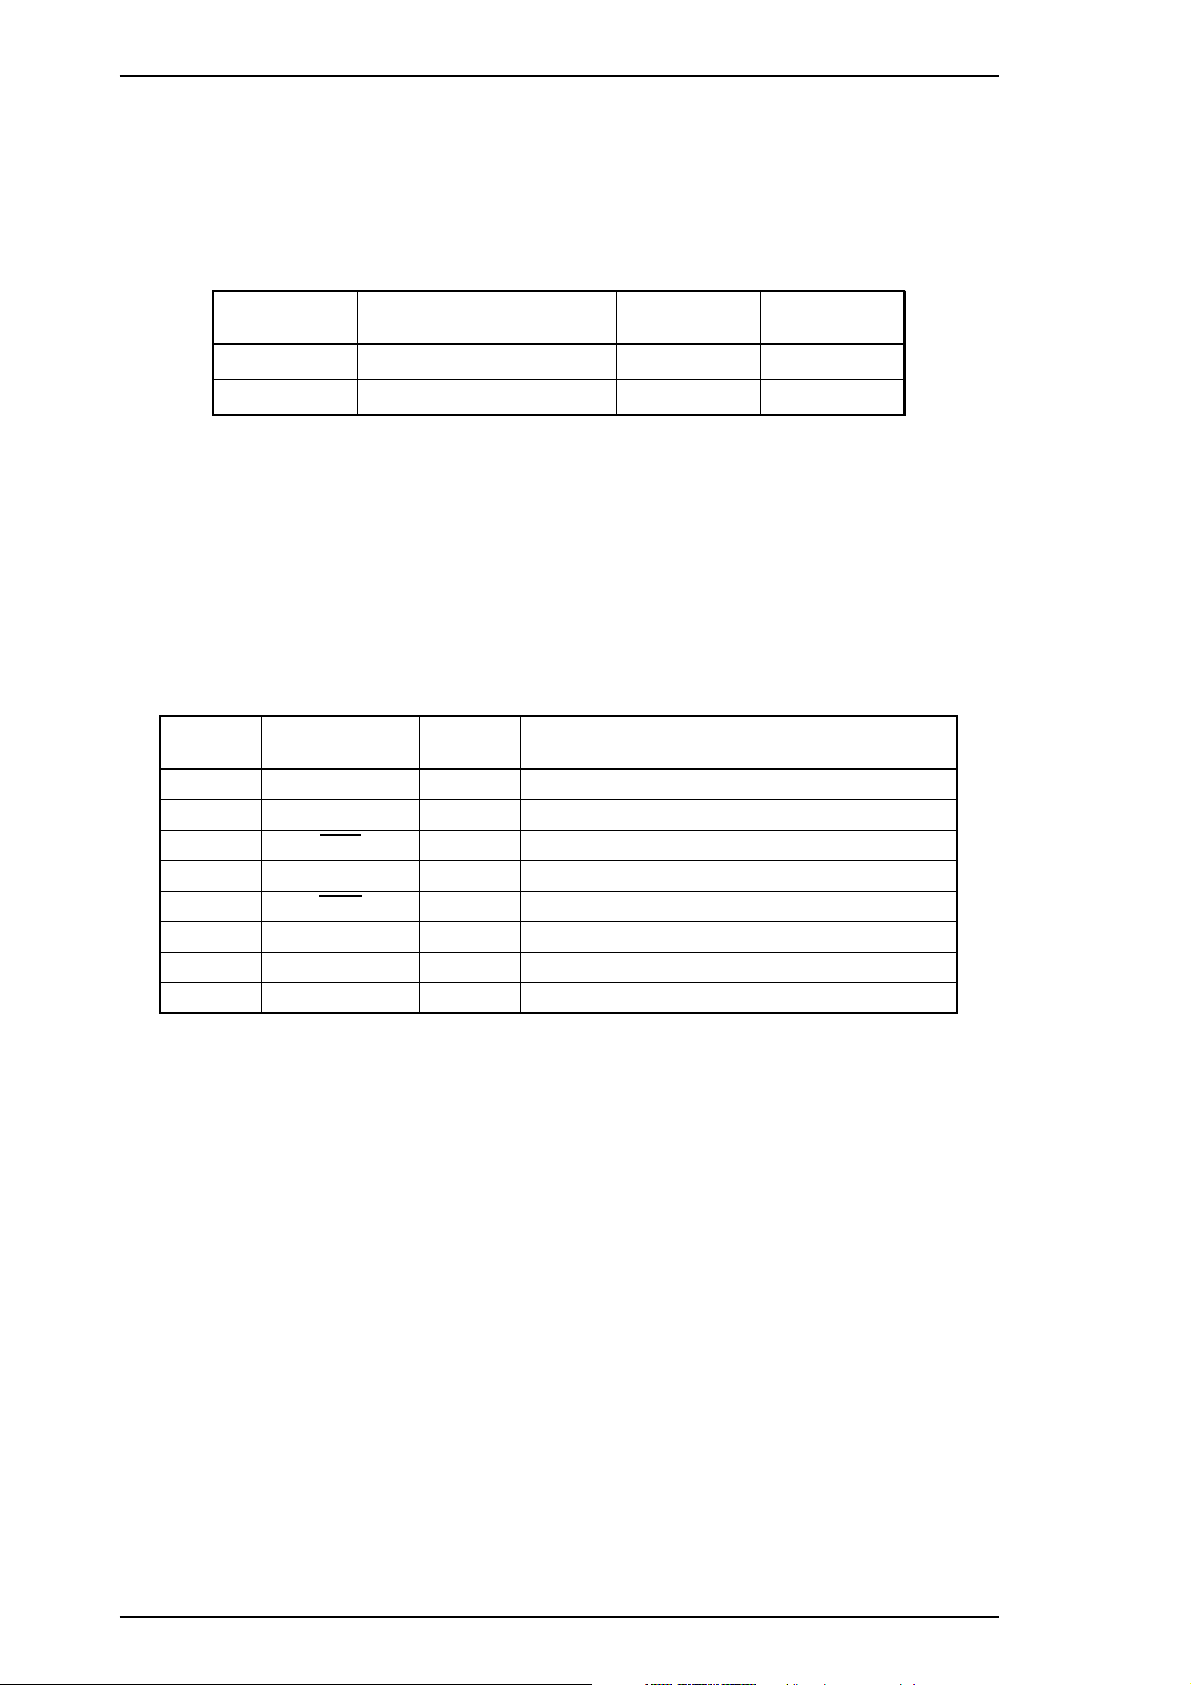
Table 1-10. DTR and X-ON/X-OFF Protocol
State
Busy
Ready
Word length
Start bit:
Data bit:
Parity bit:
Stop bit:
Bit rate: 57.6K bps /230.4 Kbps
Adaptable connector: 8-pin mini-circular connector
Recommended I/F cable: Apple
Buffer Space DTR X-ON/X-OFF
Less than 512 bytes Off X-OFF
More than 1,024 bytes On
1bit
8bit
none
1bit
®
System Peripheral-8 cable
X-ON
Table 1-11. Signal and Connector Pin Assignments for Serial Interface
Pin No.
1
2
3
4
5
6
7
8
Signal Name I/O* Description
DTR Out Data terminal ready
NC — No connection
TXD
SG In Signal ground
RXD
TXD Out Balanced transmit
NC — No connection
RXD In Balanced receive
Out Transmit data
In Receive data
* The I/O column indicates the data flow as viewed from the printer.
1-12 Rev.A
Page 16
Operate
Alt
Font
Economy/
Condensed
Load/Eject
Pause
Stylus Pro XL Product Description
1.4 OPERATIONS
This section describes the basic operations of the printer.
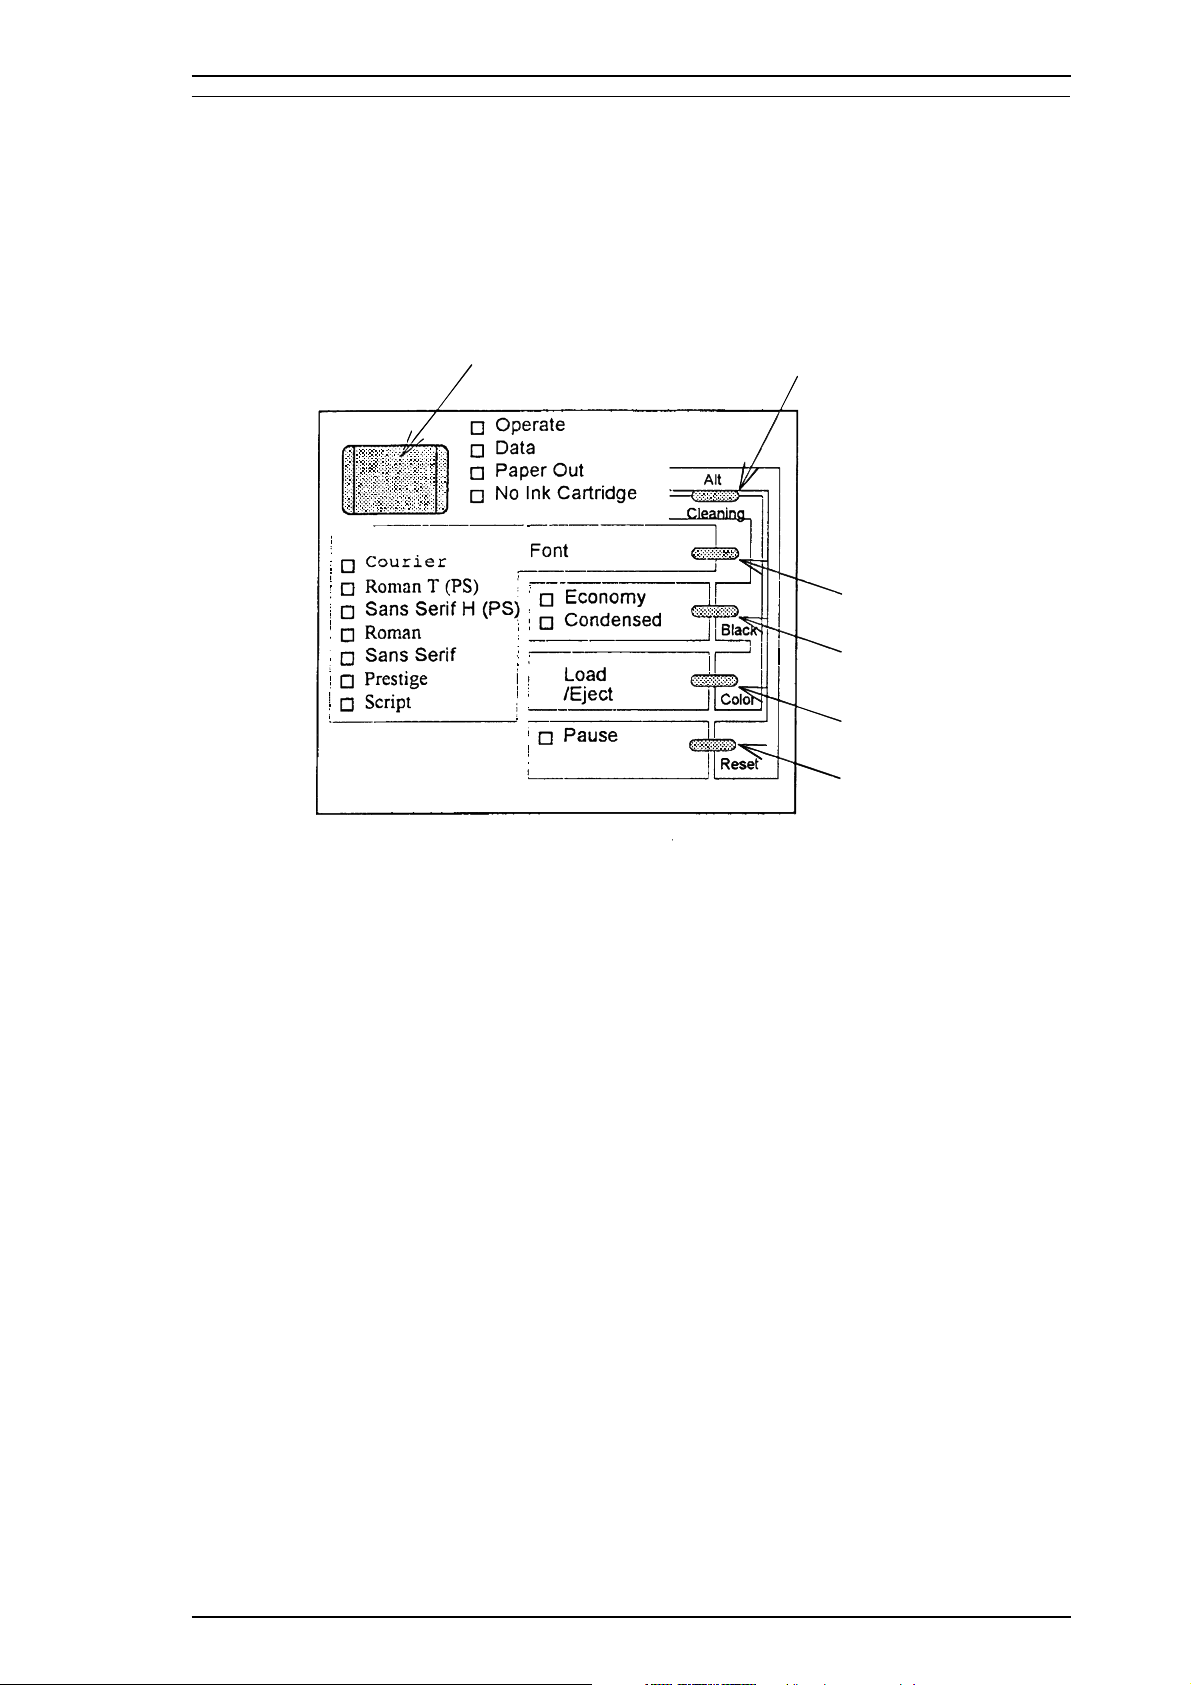
1.4.1 Control Panel
The control panel for this printer has 1 lock-type, 5 non-lock-type push buttons, and 14 LED indicators for
easy operation of the various printer functions.
Figure 1-8. Control Panel Appearance
Buttons
Operate
Alt
Font Cycles through the font choices. Pressing the Font button, while holding
Economy/Condensed
Load/Eject
Pause
Turns the printer on or off.
Modifies the function of other buttons. Holding down this button for
3 seconds causes the printer to move the carriage to the ink cartridge
installation position. Pressing Alt again causes the carriage to return to the
home position.
down the Alt button causes the carriage to move to the gap adjustment
position. Pressing the Alt button again causes the carriage to return to the
home position.
Selects either economy or condensed printing mode. Pressing the
Economy/Condensed button while holding down the Alt button starts
the color printhead cleaning cycle.
Either loads a new sheet into the printer or ejects paper currently in the
paper path. Pressing the Load/Eject button while holding down the Alt
button starts the black printhead cleaning cycle.
Stops printing temporarily or resumes printing if it has been stopped
temporarily. Pressing Pause while holding down the Alt button resets the
printer.
Rev.A 1-13
Page 17

Product Description Stylus Pro XL
Indicators
Operate
Data On when print data is in the input buffer. Data and Pause lights blink if
Paper Out
No Ink Cartridge
Economy
Condensed
Font
Pause
On when the printer is on. Blinks during power on and off sequence.
an error occurs.
On when the printer is out of paper. Blinks when a paper jam occurs.
On when ink cartridge is out.
On when economy printing mode is selected.
On when condensed printing mode is selected.
These LEDs indicate the selected font.
On when printing is paused.
1.4.2 Panel Operation at Power On
You can activate the following modes by doing the following:
Self-test mode
Hex dump mode
Demonstration mode
Default setting mode
Initialize EEPROM
Turn on the printer while holding down the Load/Ejectbutton.
Turn on the printer while holding down the Font and Load/Eject
buttons. Once this mode is selected, the printer prints all received data in
hexadecimal format.
Turn on the printer while holding down the Altbutton.
Turn on the printer while holding down the Economy/ Condensed
button. For more information about the mode, see Section 1.4.3.
Turn on the printer while holding the Alt, Font, Load/Eject,andPause
buttons.
Table 1-12. Printer Condition Panel Status
Printer status
^
Power on condition
Data exit
Economy mode
Condensed mode
Pause condition
Power on/off sequence
Ink sequence
Ink cartridge change mode
Head gap adjust mode
Paper out
No ink cartrdige
Paper jam condition
Maintenance request
Cartidge error
Operate
On
—
—
—
—
Blinks
—
—
—
—
—
—
—
—
Indicators
Data
—— — — — —
On — — — — —
—— — On — —
—— — — On —
—— — — — On
—— — — — —
—— — — —Blinks
—— — — —Blinks
Blinks — — — — —
—On — — — —
—— On — — —
— Blinks — — — —
Blinks Blinks Blinks — — Blinks
Blinks — — — — Blinks
Paper
Out
No Ink
Cartridge
Economy Condensed Pause
+
—don’tcare
1-14 Rev.A
Page 18
Stylus Pro XL Product Description
1.4.3 Default Settings
The printer can save some printer setting parameters that define its functions at initialization. You can
change these parameters by using the printer’s default setting mode.
1.4.3.1 Default Setting Items
You can use the default setting mode to change settings listed in the table below. Activate default-setting
mode by holding down Economy/Condensed while turning on the printer.
Table 1-13. Default Setting Items
Menu Contents
Character table
Print direction
Network I/F mode
Auto line feed
Loading position
Interface mode
Auto I/F wait mode
Mode
Black and White Printing Color (CMYK) Printing
Description
Selects the character table —
Controls the print direction. (See Tables 1-12 and 1-13)
Auto
Bi-D
Uni-D
Off: For normal environments.
On: For network environments.
On: Valid
Off: Invalid
3.0/8.5 mm (0.12/0.33 in.) 3.0 mm
Auto I/F mode
Parallel I/F mode
Serial I/F mode
Optional I/F mode
10/30 seconds 10 sec.
Table 1-14. Characteristics of Print Direction Mode
Factory
Setting
—
Off
—
—
Throughput is better.
Color quality with special paper is worse.
(Color correction depends on the printing direction.)
Throughput is better.
Color quality with special paper is worse.
(Color correction depends on the printing direction.)
Throughput is worse.
Color quality is best.
Auto
Bi-D
Uni-D
Throughput and quality is
better.
Throughput is best.
Print quality may be down.
Throughput is worse.
Print quality is better.
Table 1-15. Printing Direction and ESC U Command
Default Setting
Mode
^
Character mode
(for MS-DOS
Raster graphics
mode
(for Windows
®
)
™
)
ESC U0 ESC U1 None ESC U0 ESC U1 None ESC U0 ESC U1 None
Auto Auto Auto Bi-D Uni-D Bi-D Uni-D Uni-D Uni-D
Bi-D Uni-D Auto Bi-D Uni-D Bi-D Bi-D Uni-D Uni-D
Note: Printing direction is controlled by driver in Windows environment.
Auto Bi-D Uni-D +
Rev.A 1-15
Page 19
Product Description Stylus Pro XL
1.4.3.2 Changing the Default Settings
To change the printer’s default settings:
1.
Hold down the Economy/Condensed button and turn on the printer. The printer prints a sheet
that shows the firmware version and describes how to select the language used to print messages.
2.
Press the Font button until the appropriate font LED is selected. The following table shows which
language corresponds to which font LED.
Table 1-16. Language Selection
Language
English
Français
Deutsch
Italiana
Español
3.
Press the Alt button. The printer prints the current settings using the selected language. It also prints a
table showing how to change the printer settings.
4.
Press the Font button to advance through the setting menu. The current printer settings are indicated
by the Courier, Roman T (PS), and San Serif H (PS) LEDs. Each time you press the Font button, you
adance to the next setting, and the three font LEDs change according to the selection.
Font LED
Courier
Roman T (PS)
Sans Serif H (PS)
Roman
Sans Serif
Table 1-17. Feature Selection
Menu
Feature/Menu
Courier
LED
Roman T
(PS) LED
Sans
Serif H
(PS) LED
Setting
Setting Value
Operate
LED
Data
LED
+
Paper Out
LED
Character table
Print direction
^
^
Network I/F mode
^
Auto line feed
^
Loading position
^
Interface mode
^
^
^
Auto I/F wait time
^
5.
Change the setting value by pressing Alt button. Pressing the Alt button changes the setting for the
current menu. The status of the LEDs will be changed as the button is pressed.
On On On See Table 1-18 +
Auto On Off Off
On Off Off
Off On Off
On On Off
Off Off On
On Off On
Off On On
Bi-D Off On Off
Uni-D On On Off
Off Off Off Off
On On Off Off
Off Off Off Off
On On Off Off
3 mm Off Off Off
8.5 mm On Off Off
Auto On Off Off
Parallel Off On Off
Serial On On Off
Option Off Off On
10 sec. Off Off Off
30 sec. On Off Off
1-16 Rev.A
Page 20
Stylus Pro XL Product Description
Table 1-18. Character Table Selection
Version
Common
^
^
^
^
^
^
^
^
^
Standard
^
^
^
^
^
NLSP
^
^
^
^
^
^
^
^
^
^
^
6. Repeat steps 4 and 5 to change other printer settings. The setting menu selection will return to the first
menu after the last menu selection is over.
7. Turn off the printer. The setting is stored in non-volatile memory.
Settings
Italic U.S.A.
Italic France
Italic Germany
Italic U.K.
Italic Denmark 1
Italic Sweden
Italic Italy
Italic Spain 1
PC437
PC850
PC860
PC863
PC865
PC861
BRASCII
Abicomp
PC437 Greek
PC853
PC855
PC852
PC857
PC866
PC869
MAZOWIA
Code MJK
ISO 8859-7
ISO Latin 1T
Bulgaria
Operate LED Data LED
Off
On
Blinks
Off
On
Blinks
Off
On
Blinks
Off
On
Blinks
Off
On
Blinks
Off
Off
Blinks
Off
On
Blinks
Off
On
Blinks
Off
On
Blinks
Off
Off Off
Off Off
Off Off
On Off
On Off
On Off
Blinks Off
Blinks Off
Blinks Off
Off On
Off On
Off On
On On
On On
On On
Blinks On
Off On
Off On
On On
On On
On On
Blinks On
Blinks On
Blinks On
Off Blinks
Off Blinks
Off Blinks
On Blinks
Paper Out
LED
Rev.A 1-17
Page 21
Product Description Stylus Pro XL
1.4.4 Error Conditions
The printer can detect various errors and indicate them with LEDs.
Table 1-19. Error Indications
No Ink
Cartridge
LED
Economy
LED
Condensed
LED
Pause
LED
Error
Paper out
No ink cartridge
Paper jam
Maintenance request
Carriage error
Data LED
Off
Off Off On Off Off Off
Off Blinks Off Off Off Off
Blinks Blinks Blinks Blinks Blinks Blinks
Blinks
Paper Out
LED
On Off Off Off Off
Off Off Off Off Blinks
1.4.5 Printer Initialization
There are three initialization methods: hardware initialization, software initialization, and panel
initialization.
1.4.5.1 Hardware Initialization
Hardware initialization is performed by:
- Turning on the printer.
- Sending the parallel interface
INIT signal is active when the printer is turned on, hardware initialization is started when the INIT
(If the
signal becomes inactive.)
INIT signal.
When the hardware initialization is performed:
- The printer mechanism is initialized.
- Input data buffer is cleared.
- Downloaded character definitions are cleared.
- Print buffer is cleared.
- Default values are set.
1.4.5.2 Software Initialization
Software initialization is performed upon receipt of the control code ESC @.
When the software initialization is performed:
- Print buffer is cleared.
- Default values are set.
1.4.5.3 Panel Initialization
This printer is initialized by pressing the Load/Eject button while pressing the Alt button.
When the panel initialization is performed:
- Input data buffer is cleared.
- Print buffer is cleared.
- Default values are set.
1-18 Rev.A
Page 22
GA E05B09 (IC2)
CPU (IC1)
4M DRAMs
(IC5, 6)
Program
ROM (IC3)
Mask ROM
M160A69
(IC16)
Mask ROM
M80B00
(IC17)
Stylus Pro XL Product Description
1.5 MAIN COMPONENTS
The main components of the Stylus Pro XL are:
❏ Printer mechanism (M-4A60)
❏ Main control board (C162 MAIN Board)
❏ Power supply unit (C137 PSB/PSE Board)
❏ Control panel board (C137 PNL Board)
❏ Housing
1.5.1 Main Control Board (C162 MAIN Board)
The Main Control Board (C162 MAIN Board) consists of an H8/3003 16-bit CPU, E05A96 gate array, a
program ROM (4M), a dynamic RAM (4M), a mask ROM (4M or 8M), an EEPROM (1K), and a lithium
battery for powering the protect counters. The reset IC (M51955 and PST 592) is equipped with both a logic
system and a power system. The 8M program ROM is used only for the NLSP (National Language Support
Printer) specification.
Figure 1-9. C162 MAIN Board Component Layout
Rev.A 1-19
Page 23
Product Description Stylus Pro XL
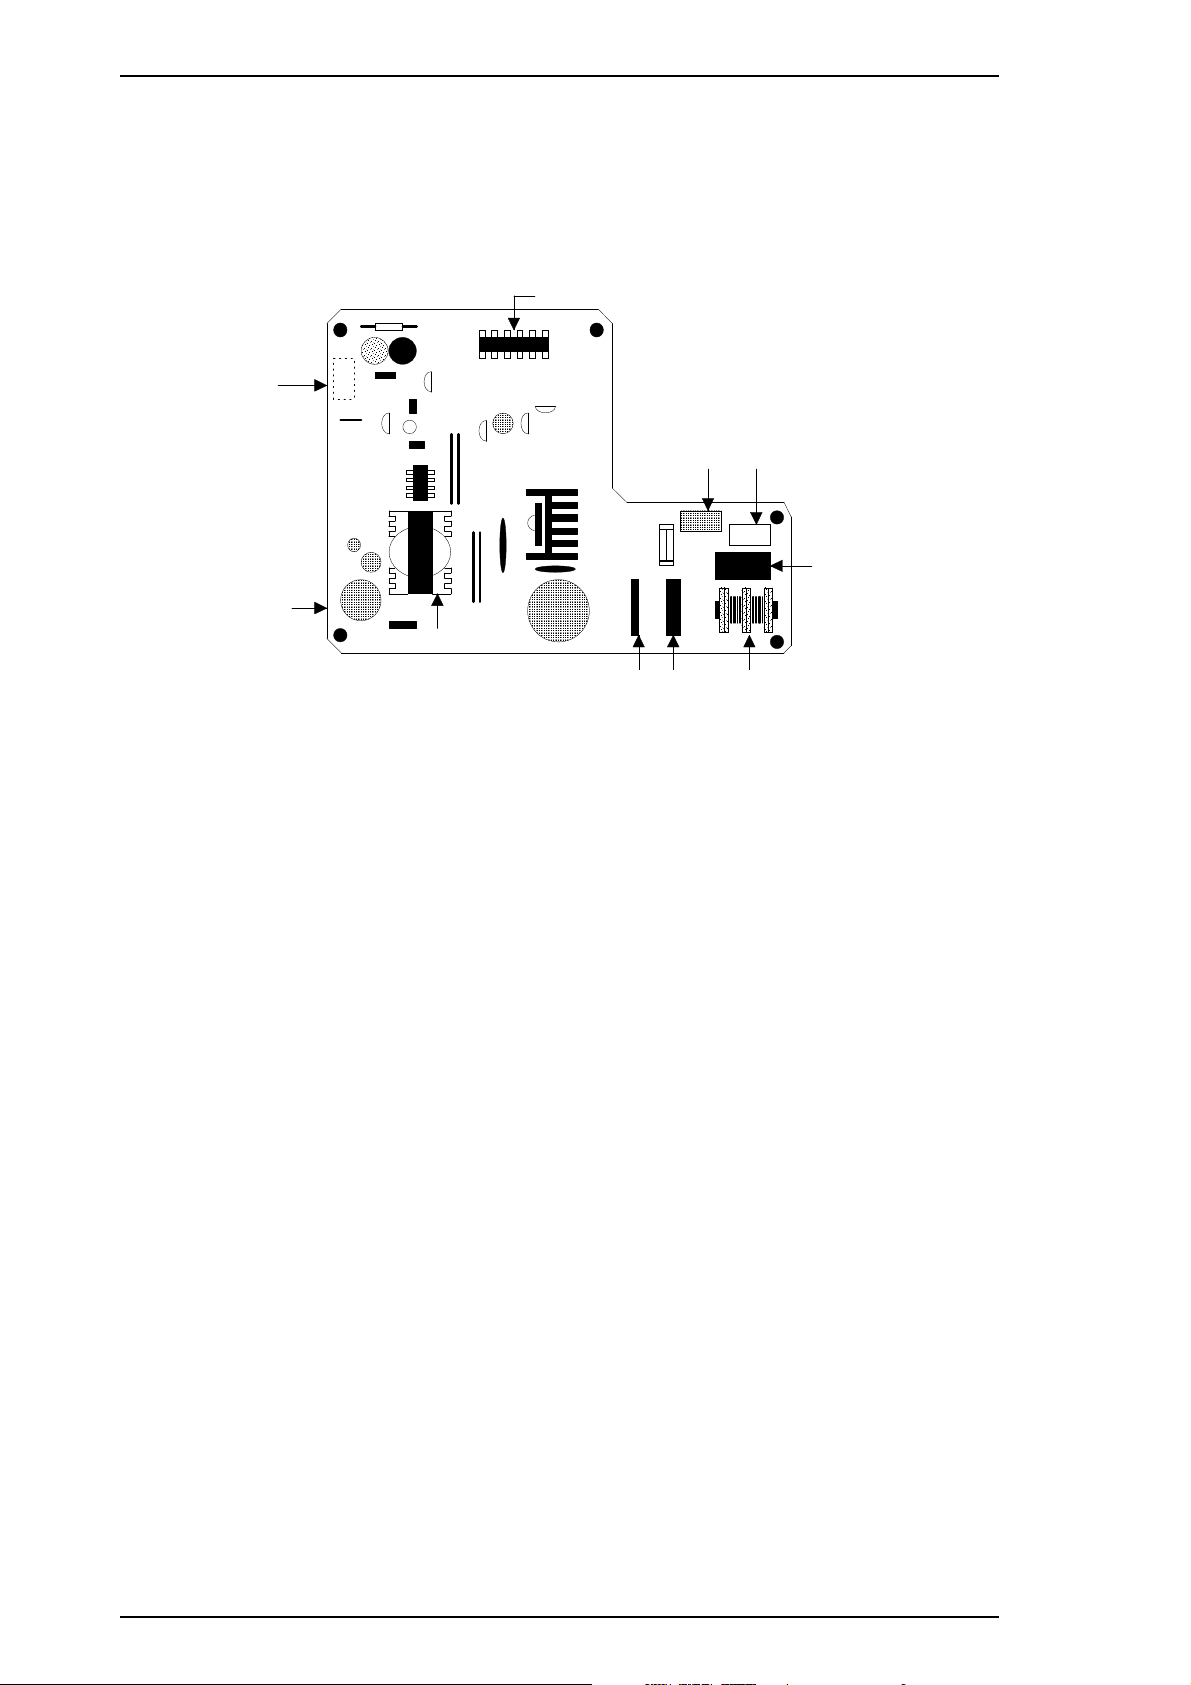
1.5.2 Power Supply Board (C137 PSB/PSE Board)
The power supply board (C137 PSB/PSE Board) consists of an RCC switching regulator circuit. This board is
equipped with a power switch connected to the secondary circuit. Thus, if the printer is turned off, it can
continue to operate in order to eject the paper and perform the head capping operation. The power on/off
signal is always monitored by the E05A96 gate array on the C162 MAIN Board, and the logic system
recognizes the power switch status.
IC51 (TL494)
CN2
Q51
C51
C82
PC1
D51
T1
Q1
F1
C11
DB1
C3
CN1
R2
C1
L1
Figure 1-10. C137 PSB / PSE Board Component Layout
1.5.3 Control Panel (C137 PNL Board)
The 14 LEDs on this board indicate the error status (there is no buzzer system); by using the 6 switches in
combination with one another, the printer can operate in each protect operation (color or black cleaning,
cartridge exchanging, self-test, default setting value exchanging, reset, and EEPROM clear operation).
1-20 Rev.A
Page 24
Stylus Pro XL Product Description
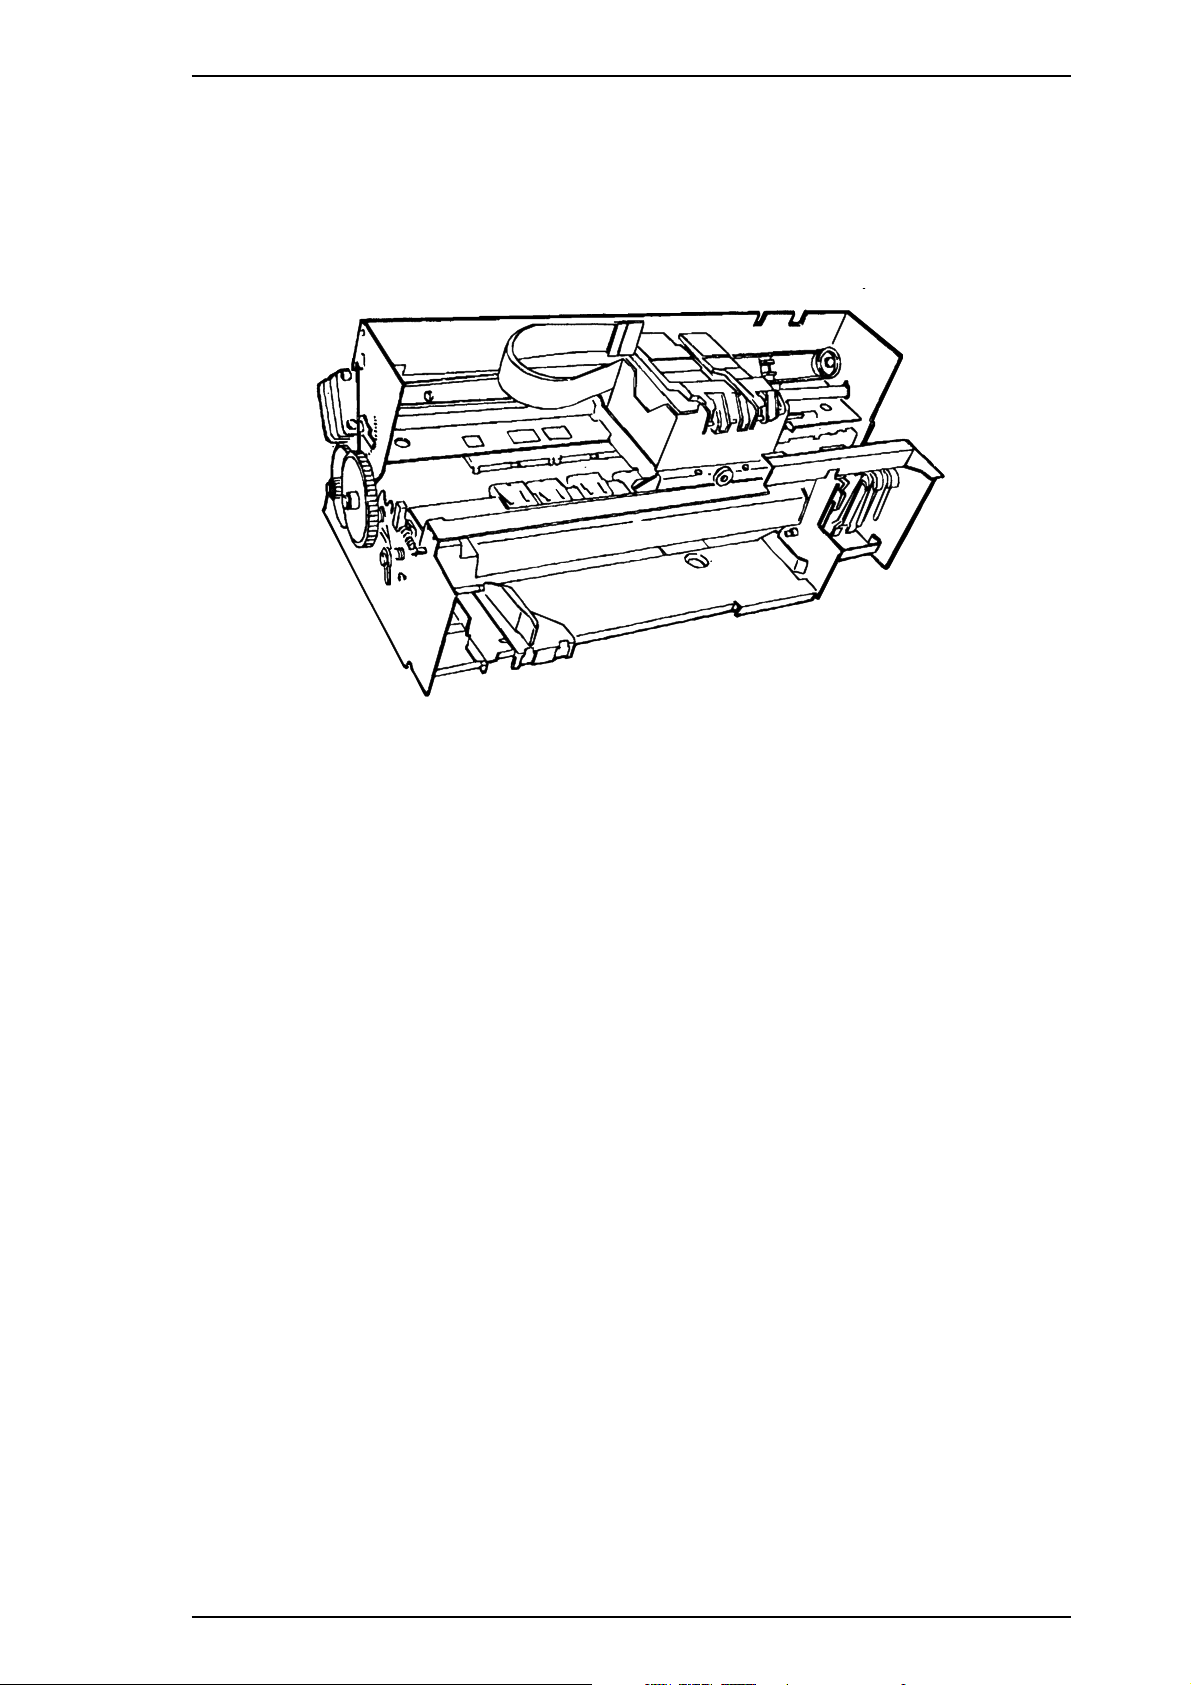
1.5.4 Printer Mechanism (M-4A60)
The M-4A60 printer mechanism is equipped with a 64-nozzle black printhead and 48-nozzle color (CMY)
printhead on the carriage unit. Resolution of 720 dpi is possible with special (non-absorbent) paper.
The ink system has both a black pump unit and a color pump unit. Waste ink from each printhead is made to
flow into the individual caps. Power for the pump system and paper feed system is supplied from the paper
feed motor.
Figure 1-11. Printer Mechanism (M-4A60)
1.5.5 Housing
The Stylus Pro XL housing consists of the printer cover, upper case, and the lower case. Attached to the
housing are the front paper support and the ejected paper support with paper separator.
Rev.A 1-21
Page 25

Chapter 2 Operating Principles
Table of Contents
2.1 OVERVIEW 2-1
2.2 OPERATING PRINCIPLES OF THE PRINTER MECHANISM 2-1
2.2.1 PrinterMechanism...........................................2-2
2.2.2 CarriageDriveMechanism.....................................2-5
2.2.2.1 PlatenGapAdjustLever................................2-6
2.2.3 PaperFeedMechanism.......................................2-6
2.2.4 ImkSystem.................................................2-8
2.2.5 PumpMechanism............................................2-9
2.2.6 CapMechanism............................................2-12
2.2.7 WipingMechanism..........................................2-12
2.3 OPERATING PRINCIPLES OF THE ELECTRICAL CIRCUITS 2-13
2.3.1 Operating Principles of the Power Supply Circuit . . . . . . . . . . . . . . . . . . 2-13
2.3.2 OperatingPrinciplesoftheMainControlCircuit ...................2-15
2.3.2.1 ResetCircuit ........................................2-16
2.3.2.2 SensorCircuit .......................................2-16
2.3.2.3 Carriage Motor Drive Circuit . . . . . . . . . . . . . . . . . . . . . . . . . . . . 2-17
2.3.2.4 PaperFeedMotorDriveCircuit..........................2-19
2.3.2.5 PrintheadDriveCircuit.................................2-20
2.3.2.6 DMAController ......................................2-22
2.3.2.7 D-RAMRefreshmentController..........................2-23
2.4 INK SYSTEM MANAGEMENT 2-24
2.4.1 InkOperations.............................................2-25
2.4.2 TimerandCounter..........................................2-27
2.4.2.1 Refresh Timer (Monochrome and YMC Head) . . . . . . . . . . . . . . 2-27
Rev.-A 2-i
Page 26

List of Figures
Figure2-1. PrinterMechanismBlock................................. 2-1
Figure2-2. StructureofPrinthead................................... 2-2
Figure2-3. PrinciplesofthePrintingOperation......................... 2-3
Figure 2-4. Carriage Drive Mechanism . . . . . . . . . . . . . . . . . . . . . . . . . . . . . . . 2-5
Figure2-5. PlatenGapLeverOperation.............................. 2-6
Figure2-6. PaperFeedMechanism.................................. 2-7
Figure2-7. InkSystemBlock....................................... 2-8
Figure2-8. PumpMechanismBlock ................................. 2-9
Figure2-9. SwitchLeverSet....................................... 2-9
Figure2-10. PaperFeedMechanismBlock........................... 2-10
Figure2-11. SwitchLeverReset................................... 2-10
Figure2-12. PumpOperation...................................... 2-11
Figure2-13. CapMechanism...................................... 2-12
Figure2-14. WipingMechanism.................................... 2-12
Figure2-15. BlockDiagramoftheElectricalCircuit..................... 2-13
Figure2-16. PowerSupplyCircuitBlockDiagram...................... 2-14
Figure2-17. MainControlCircuitBlockDiagram....................... 2-15
Figure2-18. ResetCircuitBlockDiagram............................ 2-16
Figure2-19. SensorCircuitBlockDiagram........................... 2-16
Figure 2-20. Carriage Motor Circuit Block Diagram. . . . . . . . . . . . . . . . . . . . . 2-17
Figure2-21. SerialDataTransferProcedure.......................... 2-18
Figure 2-22. Paper feed Motor Drive Circuit Diagram . . . . . . . . . . . . . . . . . . . 2-19
Figure 2-23. Normal/Micro Dot Mode Switch Block . . . . . . . . . . . . . . . . . . . . . 2-20
Figure2-24. TrapezoidalDriveWaveForm........................... 2-21
Figure 2-25. Printhead Drive Circuit Block Diagram . . . . . . . . . . . . . . . . . . . . 2-21
Figure2-26. DMAControllerOperation.............................. 2-22
Figure2-27. D-RAMCycleTimings................................. 2-23
Figure2-28. JunctionMethod(CPU-DRAM).......................... 2-23
List of Tables
Table 2-1. Carriage Drive Motor Specifications . . . . . . . . . . . . . . . . . . . . . . . . . 2-5
Table 2-2. Drive Terms. . . . . . . . . . . . . . . . . . . . . . . . . . . . . . . . . . . . . . . . . . . . 2-5
Table2-3. PlatenGapAdjustLeverPosition........................... 2-6
Table2-4. PaperFeedDriveMotorSpecifications ...................... 2-6
Table 2-5. Drive Terms. . . . . . . . . . . . . . . . . . . . . . . . . . . . . . . . . . . . . . . . . . . . 2-7
Table2-6. PumpMechanismOperation ............................. 2-11
Table2-7. DCVoltageDistribution.................................. 2-13
Table2-8. SerialDataContents.................................... 2-17
Table2-9. PaperFeedMotorDriveModes........................... 2-19
Table2-10. JunctionMethod(CPU-2CASDRAM) ..................... 2-23
2-ii Rev.-A
Page 27
Stylus Pro XL Operating Principles
2.1 OVERVIEW
This section describes the operating principles of the printer mechanism and the electrical circuits
of the Stylus Pro XL.
2.2 OPERATING PRINCIPLES OF THE PRINTER MECHANISM
The Stylus Pro XL printer mechanism is composed of the printhead unit, paper feed mechanism,
carriage drive mechanism, pump mechanism, and various sensors. The figure below shows a
functional block diagram of the printer mechanism.
ASF Plunger Disengage Lever
ASF Pickup Mechanism Paper Feed Mechanism
Paper Feed Motor
Carriage Motor
Figure 2-1. Printer Mechanism Block Diagram
Pump Unit Drive Mechanism
Carriage Unit
Color Bla c k
REV.-A 2-1
Page 28
Operating Principles Stylus Pro XL
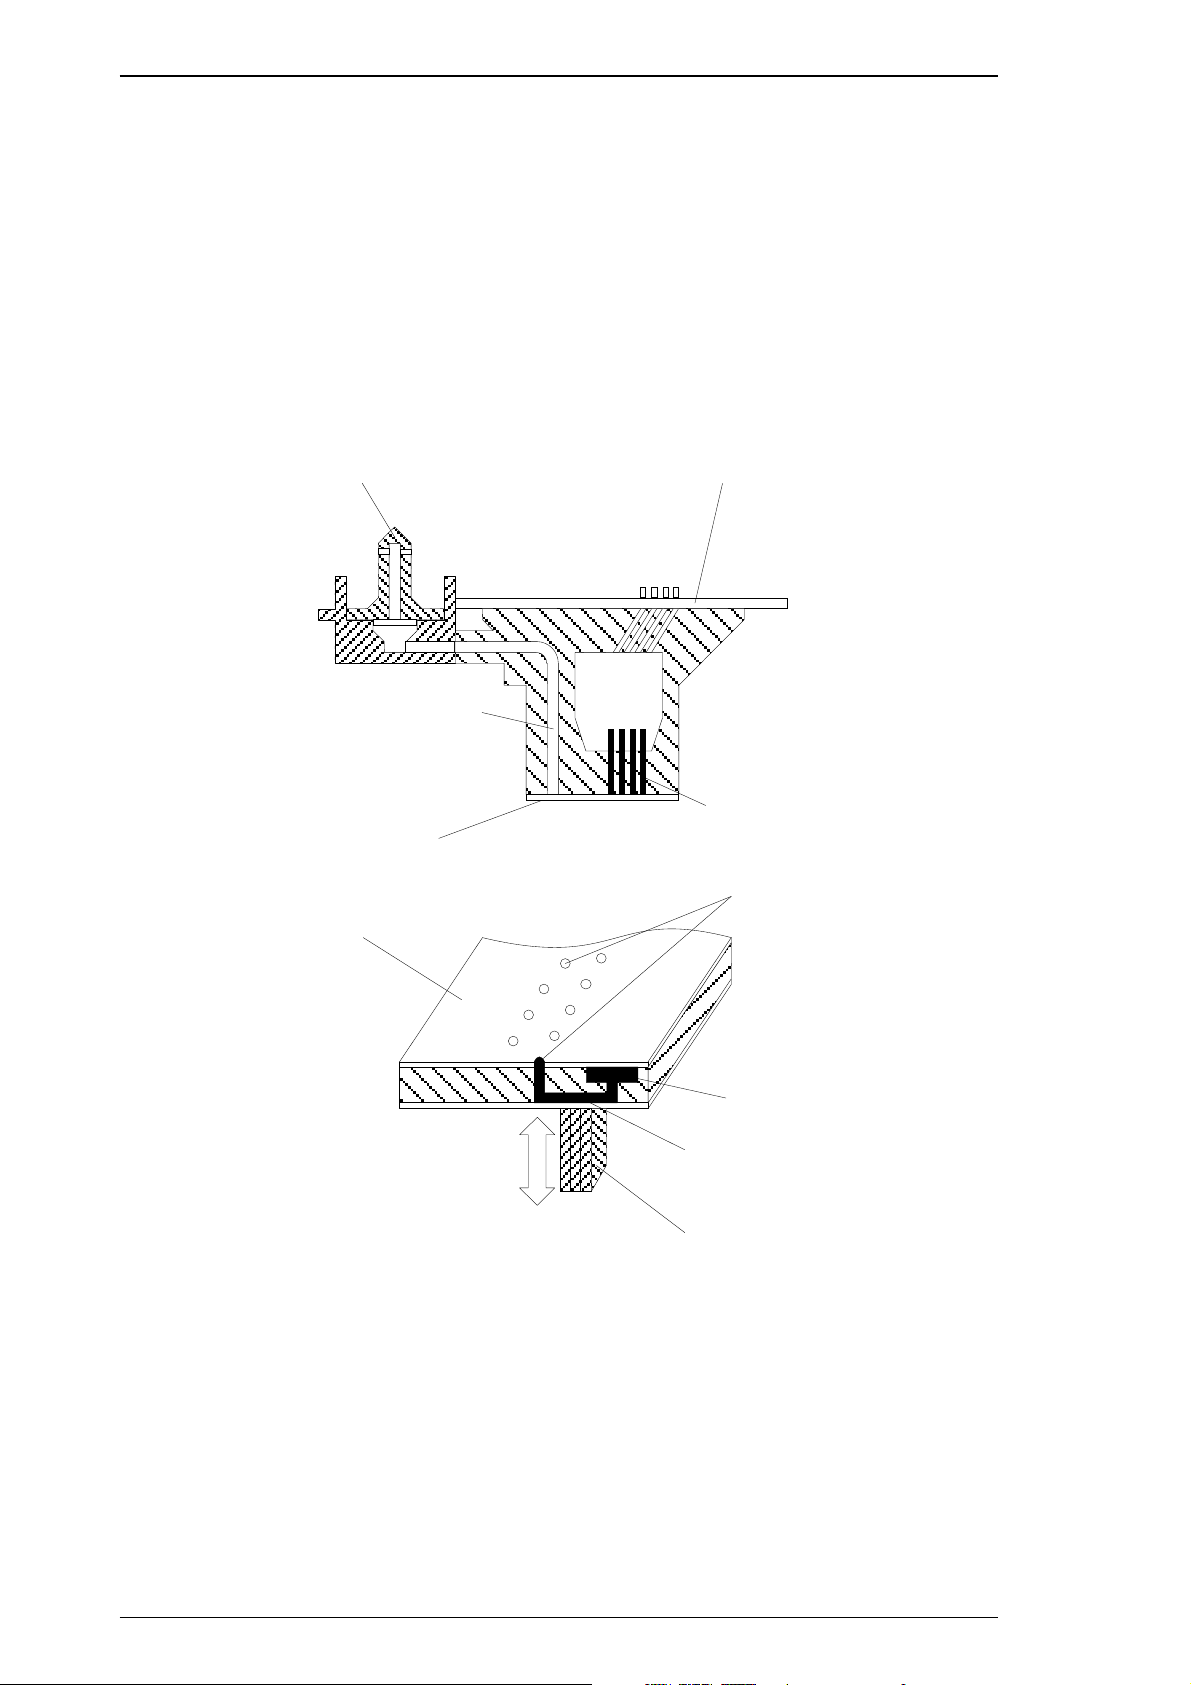
2.2.1 Printer Mechanism
The printer mechanism of this printer uses a drop-on-demand ink jet system similar to the system
used on all other EPSON ink jet printers. However, the printhead in this system is completely
redesigned to make it more compact and ensure a high level of reliability. The figure below shows
the structure of the printhead and ink supply system.
❏Piezo When a drive pulse (voltage) is applied, this element pushes the vibration plate,
compressing the cavity for ink injection from the nozzle.
❏ Cavity Ink supplied from the ink cartridge is stored in this space and is ejected fr
om the nozzles when the vibration plate compresses this area.
❏ Nozzles These eject ink against the paper’s surface in response to the application of the
print signal. There are 64 (black head) or 48 (color head) individual nozzles
making up the printhead.
Cartridge Needle
Ink Supply Tube
Nozzle Plate
Nozzle Plate
Printhead Driver Board
Piezo
Nozzle
Ink Supply Tank
Cavit y
Piezo
Figure 2-2. Structure of Printhead
2-2 REV.-A
Page 29
Cavity
Nozzle
Vibration Plate
Normal
State
Piezo
Cavity
Nozzle
Ejecting
State
Ink Dot
Piezo
Stylus Pro XL Operating Principles
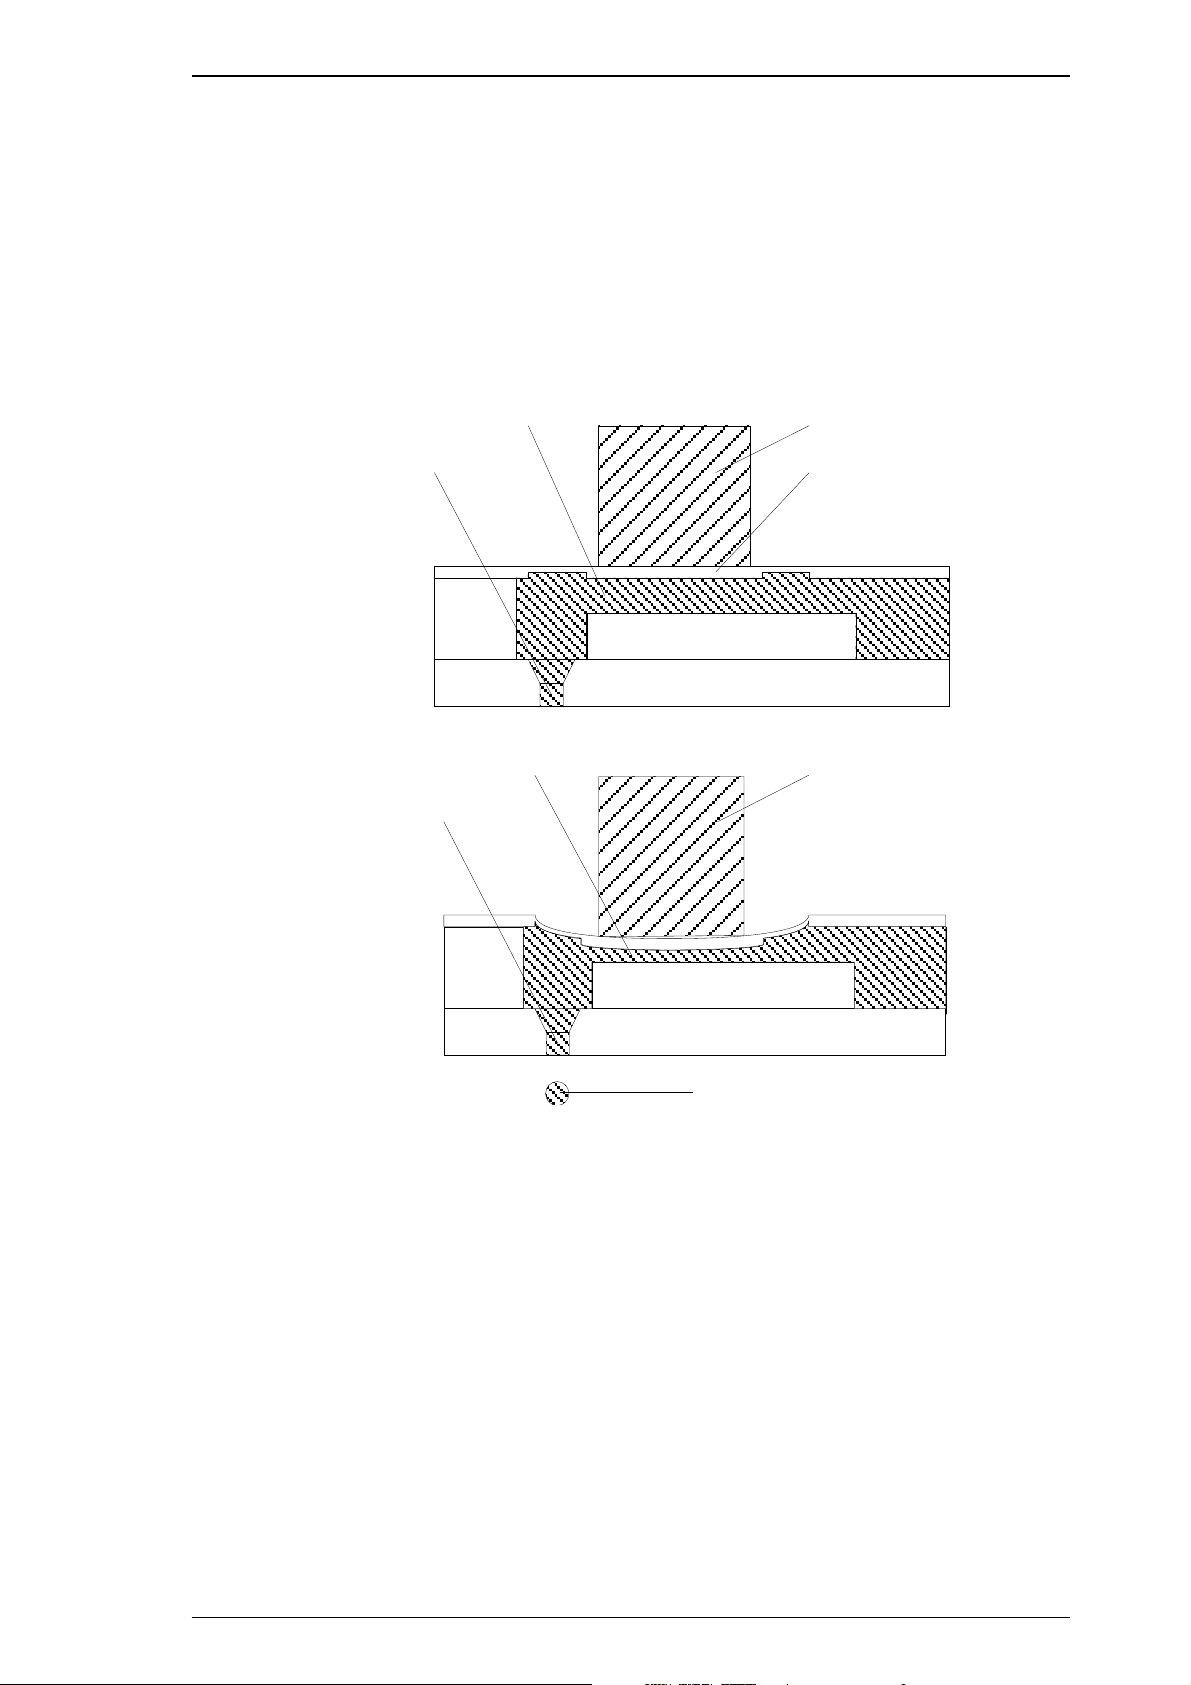
Principles of the Printing Operation
The printhead operates in one of two modes to eject ink from each nozzle:
❏ Normal state
No electrical charge is applied to the MLP (Multi-Layer Piezoelectric) element attached to the
back of the cavity, and pressure inside the cavity is kept at a constant level.
❏ Ejecting state
The head data signal is applied to the specific nozzle control line to select the active nozzle for
printing, and the MLP element is gradually charged by the drive voltage. By charging the MLP
element, the vibration plate is bent to compress the cavity. Then, ink is ejected from the nozzle.
Figure 2-3. Principles of the Printing Operation
When the ink charge or printhead cleaning operation is performed, the ink in the cavity is
vacuumed out with the pump mechanism. During printing, on the other hand, the ink is
simultaneously supplied from the ink cartridge and ejected from the nozzle, according to the
change of volume in the cavity.
A thermistor is attached to the side of the color printhead drive board to monitor the temperature,
because the viscosity of the ink varies, depending on the temperature. The detected temperature
level is fed back to the printhead drive voltage control circuit to change the timing of the Tc pulse.
(The Tc pulse is shown in Section 2.3.2.5.)
REV.-A 2-3
Page 30

Operating Principles Stylus Pro XL
Micro Dot Printing mode
The Stylus Pro XL printer has a special printing mode, called “Micro Dot Printing mode”. This
printing mode can be selected by a command from the host computer. Using the Micro Dot
printing mode can improve the quality of output. In Micro Dot Printing mode, the ink dot size
became to be smaller than the normal dot size.
2-4 REV.-A
Page 31

CR Motor
CR HP Sensor
Carriage Guide Shaft
Belt Pulley
Stylus Pro XL Operating Principles
2.2.2 Carriage Drive Mechanism
The timing belt attached to the base of the carriage unit is driven by the carriage motor, causing the
carriage unit to move along the carriage guide shaft left to right, or vice versa. The carriage drive
motor on this printer is a 4-phase, 200-pole, hybrid-type stepping motor mechanism, allowing the
printer to stop the carriage or change the carriage movement at any position. The position of the
carriage is recognized by the home position sensor, and position information is fed back to the
carriage drive control circuit. This carriage motor is driven by the motor driver IC SLA7041 (see
Section 2.3.2.3 for more information).
Table 2-1. Carriage Drive Motor Specifications
Item Description
Motor Type 4-phase / 200-pole hybrid-type stepping motor
Drive Voltage
Coil Resistance
Drive Frequency 960 ~ 4800 PPS
Excitation Mode Constant current unipolar drive, micro step drive
In the following table, 2 W1-2 phase means the 1/8 2-2 phase drive control. Values in parentheses
( ) are for the 2-2 phase.
+35 VDC ± 5%
10.0 Ω±7%
Table 2-2. Drive Terms
Acceleration/
CR Speed Frequency Phase Drive Method
Mode 1
(200 CPS)
Mode 2
(100 CPS)
Mode 3
(40 CPS)
4800 (2400)
2400 (1200)
960 (480)
❏ Acceleration/Deceleration Area:
2 W1-2 phase + 1-2 phase
❏ Constant Area: 1-2 phase
❏ Acceleration/Deceleration Area:
2W1-2 phase + 1-2 phase
❏ ConstantArea: 1-2 phase
❏ Acceleration/Deceleration Area:
2W1-2 phase
❏ Constant Area: 2 W1-2 phase
Deceleration
Step
Acceleration
40 (5)+110 (55)
Deceleration
32 (4)+112 (56)
40 (5)+40 (20)
16 (2)
REV.-A 2-5
Figure 2-4. Carriage Drive Mechanism
Page 32

(A)
(B)
0.6 mm
Platen Gap Adjust Lever
(Plain Paper or Bond Paper)
(Envelope or Transparency)
Gap
Operating Principles Stylus Pro XL
2.2.2.1 Platen Gap Adjust Lever
The platen gap adjust lever, which is attached to the carriage unit, needs to be set to an appropriate
position for the paper thickness. To change the platen gap, put the printer in the PAUSE state; then
press the Font button, while holding down the Alt button. The carriage unit moves the platen gap
position automatically.
Table 2-3. Platen Gap Adjust Lever Position
Paper Type Lever Position
Cut sheets
Envelopes Vertical (B) (+0.6 mm)
Figure 2-5. Platen Gap Adjust Lever Operation
2.2.3 Paper Feed Mechanism
Horizontal (A) (± 0 mm)
This printer’s paper feed mechanism can feed paper only from the built-in ASF (auto sheet feeder).
The paper feed drive motor is a 4-phase, 96-pole, hybrid-type stepping motor that directly drives
the paper feed mechanism (paper advancing operation, paper pickup operation). This motor also
drives the pump mechanism, but only when the printer is in the cleaning state. The paper feed
drive method is driven by the 2-2 phase drive method, except the paper feed drive sequence
(2 W1-2 phase).
Table 2-4. Paper Feed Drive Motor Specification
Item Description
Motor Type 4-phase, 96-pole, hybrid-type
Drive Voltage
Coil Resistance
Drive Frequency 300 ~ 1800 PPS
Excitation Mode Paper feed / pump drive: 2-2 phase, 2 W1-2 phase
+35 VDC ± 5%
11.5 Ω±1.1Ω
2-6 REV.-A
Page 33

PF Transmission Gear
Quenchin g Ro ller
PF Pinch Roller Unit
Pickup Roller
Paper
PF Motor Pinion Gear
Platen Dr ive Ge ar
Paper Pickup Lever
Tension Spring
Plunger Hopper Frame
Left Side Frame
Stylus Pro XL Operating Principles
Table 2-5. Drive Terms
Current Value (mA)
Mode
Paper loading 1600 970/750 750 750 240
ASF feed 1600 970/750 750 750 240
Paper feed 391 — / — 970 — 240
Pump drive 1 1800 1380/1380 1380 750 240
Pump drive 2 300 — / — 1380 — 240
Frequency
(pps)
Acceleration/
Deceleration
Constant Rush Hold
Figure 2-6. Paper Feed Mechanism
REV.-A 2-7
Page 34

Air Valve
Black Head
Color Head
Pump 1
Pump 2
Ink Ab sor ber
Waste Ink Drain Tank
Cleaning Blade
(for Color / Black Head)
Pump Unit
Friction Clutch
Disengage Unit
Platen Rolle r
PF Motor
Operating Principles Stylus Pro XL
2.2.4 Ink System
This printer’s ink system is composed of the following mechanisms:
❏ Ink cartridge
❏ Pump mechanism
❏ Cap mechanism
❏ Waste ink drain tank
❏ Wiping mechanism
The figure below shows a diagram of the ink system.
Figure 2-7. Ink System Block Diagram
2-8 REV.-A
Page 35

Carriage
D/E Set Lever
D/E Reset Lever
D/E Lever
Stylus Pro XL Operating Principles
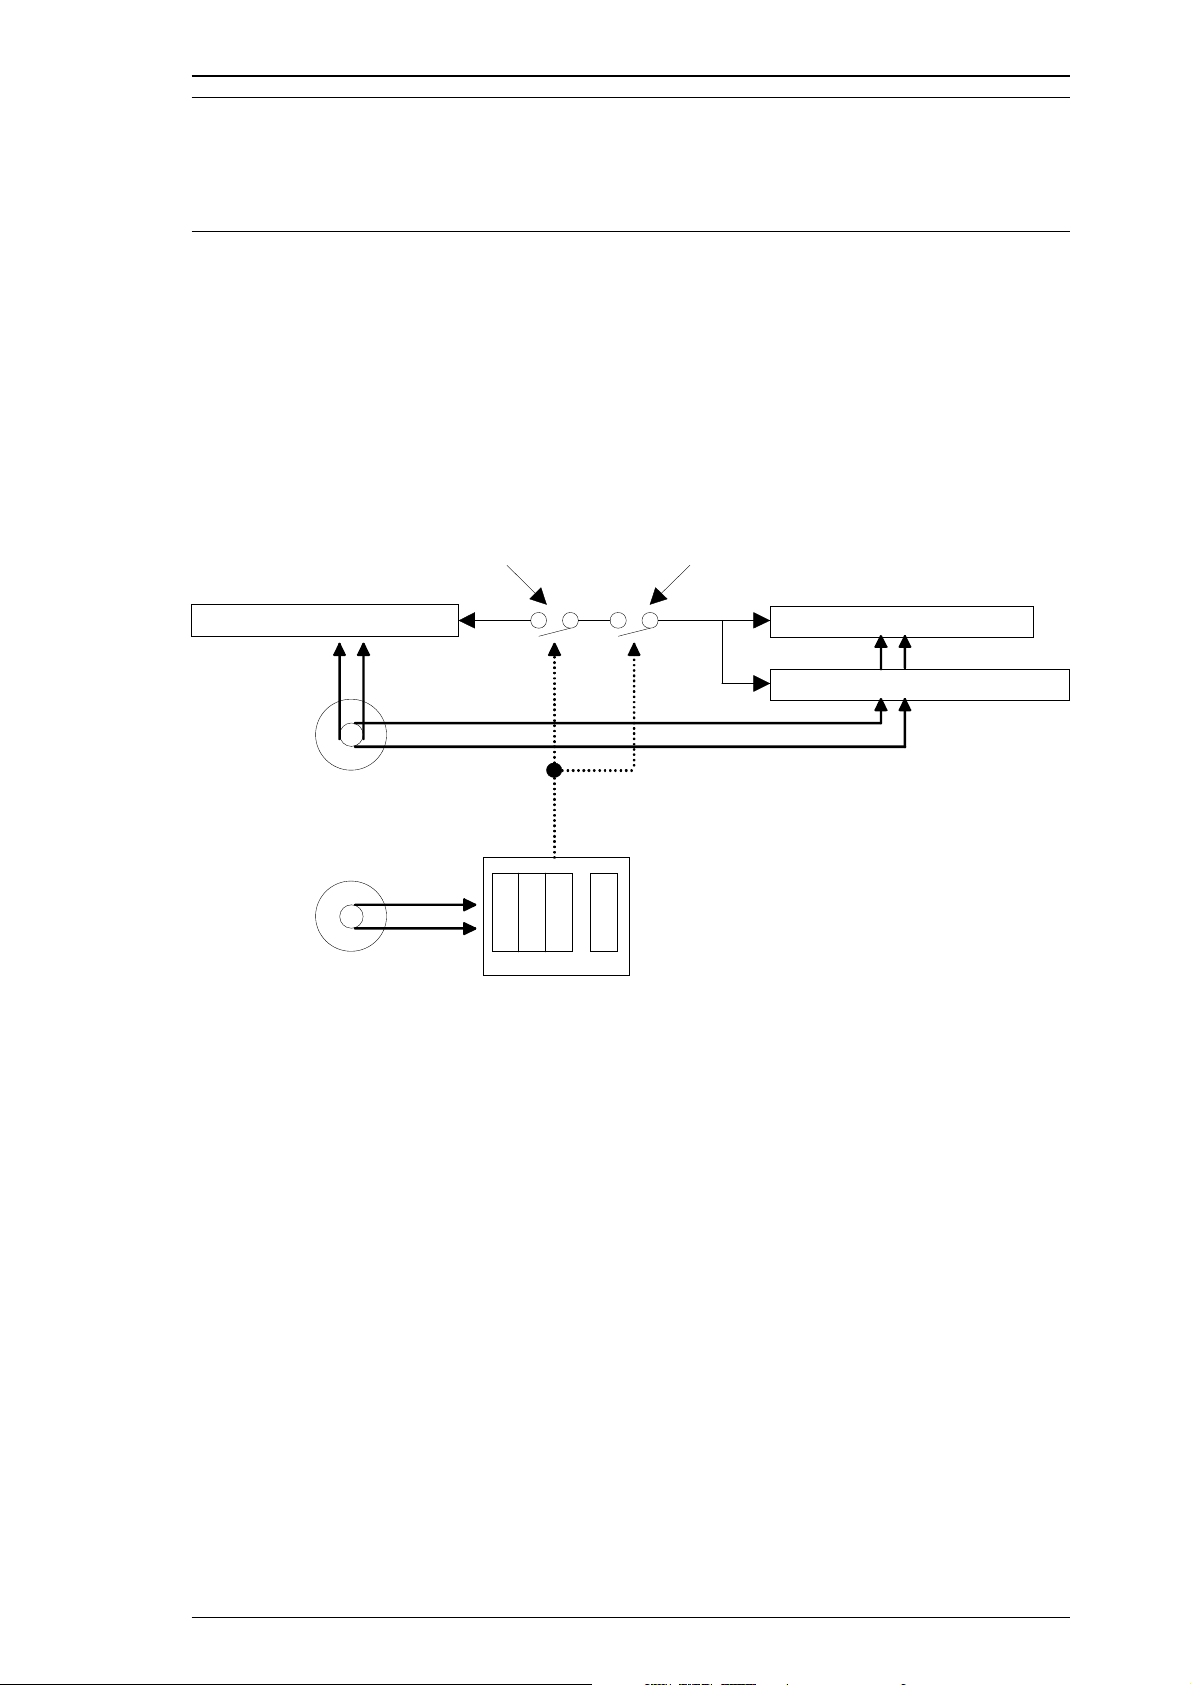
2.2.5 Pump Mechanism
The paper feed motor drives the pump mechanism when the transmission gear is moved to the
position where the paper feed motor engages the pump mechanism gear trains, when the carriage
unit is at the ink system home position. The figure below shows a block diagram of the pump
mechanism. Pump system operation depends on the rotational direction of the paper feed drive
motor, as shown in Table 2-6.
Drive: Pump Mechanism
Left Frame
Platen Drive Gear
PF Motor
Drive: Switch Lever Set
Carria ge
Spring
Hook
Platen
Disenga ge
Lever
Rele as e
Clutc h
Sub Fram e
Figure 2-8. Pump Mechanism Block
Pump
Drive Gear
Right Frame
Pump Unit
Figure 2-9. Switch Lever Set
REV.-A 2-9
Page 36

Operating Principles Stylus Pro XL
Drive: Paper Feed Mechanism
Carriage
Figure 2-10. Paper Feed Mechanism Block Diagram
Switch Lever: Reset
Carria ge
D/E Reset Le ver
D/E Lever
Figure 2-11. Switch Lever Reset
2-10 REV.-A
Page 37

Stylus Pro XL Operating Principles
Table 2-6. Pump Mechanism Operation
PF Motor Rotational Direction Oper ation
Clockwise (CW)
forward rotation
❏Color absorption
❏Color micro absorption
❏Color false absorption
❏Wiper reset
❏Carriage lock reset
Counterclockwise (CCW)
backward rotation
❏Monochrome absorption
❏Monochrome micro absorption
❏Monochrome false absorption
❏Wiper set
❏Carriage lock set
The pump draws ink from the printhead nozzles and drains it to the waste ink drain tank. The
printer performs this operation to eliminate dust or bubbles in the nozzles. Figure 2-12 illustrates
pump operation. When the paper feed drive motor rotates CW (forward), the color pulley pumps
in the wheel pump unit rotate in the direction of the arrow while squeezing the ink tube to push the
ink inside the tube out to the waste ink drain tank. When the motor rotates CCW (backward), the
black pulley pumps in the wheel pump unit rotate in the direction of the arrow while squeezing the
ink tube to push the ink inside the tube out to the waste ink drain tank.
There are two pump rollers in the pump unit, and the drive power is supplied from the paper feed
motor via the pump drive gear (D/E gear), which is moved by carriage operation. In the pump
unit, the transmission gear drives both the black and color pulley, which are rotated by the
movement of the other.
Ink Draini ng
Vacuuming
Pump Moto r (CW): Colo r Pump ing
No Ink Draining
No Vacuuming
Pump Motor (CW): Black Not Pumping
Figure 2-12. Pump Operation
Ink Draini ng
Vacuuming
Pump Motor (CCW): Black Pumping
No Ink Draini ng
No Vacuumi ng
Pump Motor (CCW): Color Not Pumping
REV.-A 2-11
Page 38

Cap 1 Cap 2
1'
1
Col or Ca rtrid ge
Bl ack Cart ridg e
Cap Ho lder
Air Valve
Air Tube
Valve Sp ri n g
Ca rriage
Operating Principles Stylus Pro XL
2.2.6 Cap Mechanism
The cap mechanism prevents the printhead nozzles from drying and keeps bubbles from forming
inside the nozzle while the printer is not in use. The printer performs this operation automatically
when print data is not received or when the printer power is turned off during printing or ink
system operations. (The secondary circuit for the power switch allows this operation to be
performed.) Also this printer has two caps, one for the black head and one for the color head.
Figure 2-13. Cap Mechanism
2.2.7 Wiping Mechanism
The wiping mechanism cleans the surface of the printhead nose when the printer is in the ink
system sequence. The wiper drive gear transmits power from the paper feed motor via the clutch
gear. When the wiper is raised (against the printhead surface), the hook for securing the carriage to
the home position is raised, too. When the wiper goes down toward the bottom frame, the hook
goes down, too. Both black and color heads are cleaned by this wiper.
Hook
Hook Lev er
Wiper (Cleaning Blade)
Wiper Drive Gear
Platen
Clutch
Wiper Drive Gear Frame
Figure 2-14. Wiping Mechanism
2-12 REV.-A
Page 39

C137 PSB
+5 VDC
+35 VDC
C162 MAIN
C137 PNL
R-T0 2 Head
M-4A60 Printer Mechanism
YMC Head
Driver
Black He ad
Driver
R-T0 1 Head
CR/PF Motor
Stylus Pro XL Operating Principles
2.3 OPERATING PRINCIPLES OF THE ELECTRICAL CIRCUITS
The Stylus Pro XL contains the following circuit board units:
❏ C162 MAIN Board (main control circuit board)
❏ C137 PSB/PSE Board (power supply circuit board)
❏ C137 PNL (control panel board)
In addition to the circuit boards above, part of the printhead drive circuit is built on a separate
circuit board installed in the carriage unit; the printhead is attached directly to this board. The
figure below shows a block diagram of the electrical circuitry.
Figure 2-15. Block Diagram of the Electrical Circuitry
2.3.1 Operating Principles of the Power Supply Circuit
The power supply circuitry for this printer is provided either by the C137 PSB Board (120 VAC) or
the C137 PSE Board (220-240 VAC). Both boards are identical in design and functionality, except for
the components in the primary circuit that accommodate the specified input voltage. The input
voltage and the application of output voltages are summarized in the table below.
Table 2-7. DC Voltage Distribution
Voltage Application
+35 VDC
+5 VDC
Motor drive (carriage and paper feed)
Printhead (through the drive voltage generation circuit)
C137 MAIN Board
Sensors (home position, paper end, no ink cartridge, head thermistor)
Control panel, head nozzle selector
REV.-A 2-13
Page 40

Operating Principles Stylus Pro XL
The figure below shows a block diagram of the power supply circuit (C137 PSB/PSE). The power
switch is equipped with a secondary circuit that allows the CPU to remain active for a while after
the printer is turned off. This allows the printhead to return to the capping position after power is
off. The CPU mounted on the C137 MAIN Board always monitors the PSC (power on/off) signal. If
this signal becomes LOW, the CPU resets each device after performing the head capping sequence.
Also, this board employs the RCC (ringing choke converter) switching system. This AC voltage is
first input to the filter circuit for higher harmonics absorption, and then input to the rectification
and smoothing circuit, converting it into DC voltage. This DC voltage is then input to the switching
circuit for the switching operation. Along with the switching operation on the primary side, +35
VDC is generated after passing through the +35 V line voltage detection circuit. This +35 VDC
output level is stabilized. This +35 VDC is also input to the +5 VDC generation circuit to generate a
stable +5 VDC.
DB1 C11
Full-wave
Rectifier C ircuit
L1, R1 C1-C4
Filter C irc uit
F1
Fuse
Q1
Main Sw itc hin g
Circuit
Feedback
Circuit
Figure 2-16. Power Supply Circuit Block Diagram
Smoothing
Circuit
C51
T1
Transformer
Smoothing
Circuit
ZD51, 81-84
P-OFF Detection
and Delay Circuit
ZD86,
C82
Drop Protection
Circuit
Over Voltage
Protection Circuit
Photo
Coupler
PC1
+35 VDC
+5 VDC
TL 494
ZD52
ZD53
Over Voltage
Protection Circuit
P-OF F Sig na l
1) +5 VDC line over voltage protection circuit
The output voltage level of +5 V line is monitored by a Zener diode (ZD53). If the voltage level
exceeds +7 V, the status is fed back to the primary switching circuit through a photocoupler (PC1)
to stop the +35 V generation.
2) +5 VDC line over current / over voltage control circuit.
The output current is monitored by a detection resistor (R53) and fed back to the +5 VDC
generation switching control IC (IC51), which monitors the output voltage. This information is
input to the internal comparater and outputs the high signal to turn off the transistor (Q51) when
the voltage or the current becomes abnormal.
3) +35 VDC line over voltage protection circuit
The output level is monitored by a Zener diode (ZD36). If the voltage level exceeds +36 V, a
photocoupler (PC1) is activated; stopping the primary switching circuit operation.
4) +35 VDC line drop protection circuit
The output level of +35 VDC line is monitored by a detection circuit that consists of a Zener diode
(ZD51 and ZD81 to 84). This circuit feeds back the output voltage level status through a photocoupler to the primary switching circuit to control the ON/OFF time of the switching transistor for
contast output voltage.
2-14 REV.-A
Page 41

Stylus Pro XL Operating Principles
2.3.2 Operating Principles of the Main Control Circuit
The main control circuit of this printer is the C162 MAIN Board. This circuit is controlled by the
16-bit CPU H8/3003 (IC1), running at 14.7456 MHz. This CPU has a unique architecture capable of
handling data on the data bus at either an 8-bit or 16-bit bus width. Because of this, a 16-bit or 8-bit
data bus width-type ROM is used on this board, increasing the internal processing speed. Also, the
CPU has a unique architecture capable of the refresh control function. A 4M DRAM (2 CAS
method) on this board is controlled by the CPU itself. The CPU controls the serial interface control
(RS-422 for Mac).
®
Gate array E05A96 (IC2) manages printhead drive control, external Centronics
extension CG board and the control panel, and the controls that create the 4-bit signal for the
carriage or the paper feed motor. (The carriage and paper feed motor are controlled by the current
duty data.)
This board also is equipped with EEPROM 93C46 (IC12) to store certain parameters, such as the
printer mechanism control parameter, default setting parameters, as well as a special counter value
used for printhead (ink management) protection.
The timer, IC NJU6355E (IC7), counts each time the printer is cleaned and keeps track of how long
the printer is not used, thereby allowing the printer to be cleared only when necessary.
parallel I/F,
PROM (4M)
(IC3)
Type B I/F
EEPROM
Reset
(Power)
RS-422 Serial I/F
Note 1
PROM (8M)
(IC4)
(IC12)
93C46
(IC8)
M51955B
C162 MAIN Board
DRAM (4M)
(IC5)
Refre sh
CPU
H8/3003
(IC1)
SD I/O
CLK
(IC7)
NJU6355E
(Timer
Coun ter)
DRAM (4M)
(IC6)
DMAREQ
Battery
Carriage
CG-ROM (4M)
(IC16)
Vx
Parallel I/F
(Centronics)
E05A96
(IC2)
To B
Carriage / Paper Feed
Drive Signal
Note 2
CG-ROM (8M)
(IC17)
Data Bus
Address Bus
(IC13)
PST592D
Panel
To A
Black / Color Head
Common and Nozzle
Selector Drive Signal
Reset
(Logic)
From A
From B
Black / Colo r He ad
Common Driver Circuit
SLA7041MS (IC14, 15)
Carriage / Paper Feed
Motor Driver
Note 1:
IC4 is a 32 -pin IC so cke t only .
Note 2:
IC17 is an IC socke t only .
(IC17 is only installed in JAPAN version.)
SED5620
(U1,U2 )
Black 64 Nozzles
Color 48 Nozzles
Figure 2-17. Main Control Circuit Block Diagram
REV.-A 2-15
Page 42

1
2
1
2
3
TH
10
9
+5 V
AN3
89
86
(CN12)
CCO
8
AN5
91
CPU (IC1)
AN1
AN0
HP
PE
+5 V
(CN8)
(CN9)
AN4
8
90
BCO
(CN11)
87
9
Operating Principles Stylus Pro XL
2.3.2.1 Reset Circuits
The C162 MAIN Board contains 2 reset circuits: the +5 V monitor reset circuit and the +35 V
monitor reset circuit. The +5 V monitor reset circuit monitors the voltage level of the +5 V line,
using reset IC PST592D (IC12), and outputs a reset signal to the E05A96 gate array (IC2) when the
voltage level drops below +4.2 V. The +35 V monitor reset circuit monitors the voltage level of the
+35 V line, using reset IC M51955B (IC8), and outputs a reset signal to the CPU. The reset signal is
generated when the voltage level drops below +28 V, and this causes a non-maskable interrupt
(NMI).
+35 V
M51955B
(IC8)
+5 V
PST592D
(IC13)
6
1
+5 V
72
68
71
135
CPU (IC1)
NMI
P62
RES
E05A96 (IC2)
RESET
PA8
55
RST
Type B
Figure 2-18. Reset Circuit Block Diagram
2.3.2.2 Sensor Circuits
The following sensor circuits enable the C162 MAIN Board to monitor printer mechanism status:
HP sensor The photocoupler-type home position (HP) sensor is attached to the surface of the
printer mechanism to detect the carriage home position. A LOW level from the
signal indicates that the carriage is in home position.
PE sensor The mechanical switch paper end (PE) sensor is built into the printer mechanism to
determine whether there is paper in the printer or not. A LOW level from the signal
indicates that no paper is loaded.
BCO sensor,
CCO sensor
Thermistor A thermistor is attached to the color printhead driver board to monitor its
The cartridge out (CO) sensor is micro switch attached to the bottom of each ink
cartridge holder in the carriage unit. When the ink cartridge is installed, these
switches are pressed and a LOW level from the signal indicates that the ink
cartridge is installed into the ink cartridge holder.
temperature by thermister’s resistance value (at 25°C approx. 10kΩ). The CPU
changes the printhead drive signal’s pulse width (charge pulse width) based on the
temperature level.
Figure 2-19. Sensor Circuit Block Diagram
2-16 REV.-A
Page 43

NPN Tr
(Q27, 28)
E05A96
(IC2)
28
25
30
29
CRB
CRSTB
CLKA
5
16
2
13
CRA
SLA7041MS
(IC 15 )
CLK B
STBA
STBB
DATA A
DATA B
6
17
CRVRF
REF A
REF B
CRHLD
RSA
RSB
3
14
9
10
CRCLK
(PB0-PB7)
BE
C
C
A
A
B
B
1
8
11
18
1
2
3
4
+35 V
5
(CN6)
31-38
56
Stylus Pro XL Operating Principles
2.3.2.3 Carriage Motor Drive Circuit
The carriage motor drive IC SLA7041MS (IC15) outputs a constant current to drive the carriage
motor for the printer mechanism. Gate array E05A96EA (IC2) decides the motor phase and speed
and then sends a signal to the carriage motor driver IC (SLA7041MS) using the 4-bit serial
transmission line.
The first bit indicates the direction of the motor rotation. The other three bits are current duty
data for the motor speed of each printing sequence. SLA7041MS can select the reference voltage
itself based on these three current duty data. Also, it receives these signals by 2 serial
transmission lines for 2 motor’s phases (phase A and phase B). Due to this, the carriage motor
can drive the micro step sequence (min. 1/720 inches).
Figure 2-20. Carriage Motor Circuit Block Diagram
Four-bit serial data is read by the SLA7041MS motor driver with four clock counts from the
E05A96 (IC2) clock. Each bit is read at the falling edges of these clock pulses. Due to this,
received serial data is placed in the shift register and then shifts the latch register. When the
STROBE pulse becomes active from the E05A96 (IC2), the serial data is moved into the reference
voltage selection circuit, and the voltage is changed. Therefore, when the printer is in the
constant speed mode, this
current duty of each carriage motor speed mode.
STROBE pulse becomes inactive. The following table indicates the
Table 2-8. Serial Data Contents
Mode
0
1
2
3
REV.-A 2-17
4
5
6
7
c b a Vref (typical) +
000
001
010
011
100
101
110
111
(Vref = +5 V)
Vref × 1/3
× 0%
×20%
×40 %
×55.5%
×71.4%
×83%
×91%
×100%
Page 44

Operating Principles Stylus Pro XL
The following figure shows the contents of the four-bit serial data and how this data transacts
with the SLA7041MS driver. The step time of the reference voltage is determined by the interval
time of the
STROBE pulse.
Vref
+5 V
SLA704 1MS
Vref
To M ot or
(Phase Signal)
STRB
4-bit Serial Data
CLK
CLK
STRB
Vref Voltage Selection
Circuit
1-bit 2-bit 3-bit 4-bit
Phase
1-bit 2-bit 3-bit 4-bit
abc
abc
Latch
4-bit Shi ft Re gisterPhase
Reading of serial data from the
Phase signal in order
At this time, the reference voltage selection
circuit checks phase signal outputs
Figure 2-21. Serial Data Transfer Procedure
2-18 REV.-A
Page 45

Stylus Pro XL Operating Principles
2.3.2.4 Paper Feed Motor Drive Circuit
The paper feed motor for this printer drives the following mechanisms:
❏ Paper feed mechanism
❏ Paper pickup mechanism
❏ Pump mechanism
Driver IC SLA7041MS (IC14) drives the paper feed motor by a constant current. Its principle of
operation is same as for the carriage motor drive circuit. But the driving method is different for
paper feed and the pump.
Table 2-9. Paper Feed Motor Drive Modes
Mode Phase Excitation Drive Frequency
Paper feed 2-2 phase or 2 W1-2 phase 391 or 1600 pps
Pump drive 2-2 phase 300 or 1800 pps
E05A96
(IC2 )
SLA7041MS
(IC14)
PFCLK
PFSTB
PFA
PFB
PFVRF
(PB8-PB13)
PFHLD
42
43
41
40
44-48, 39
57
BE
NPN Tr
(Q25, 26)
5
CLKA
16
CLKB
2
STBA
13
STBB
6
DATA A
17
DATA B
3
REF A
14
REF B
9
RSA
10
RSB
C
1
A
8
A
11
B
18
B
+35 V
Figure 2-22. Paper Feed Motor Drive Circuit Diagram
1
2
3
(CN7)
4
5
REV.-A 2-19
Page 46

Operating Principles Stylus Pro XL
2.3.2.5 Printhead Drive Circuit
The printhead drive circuit for this printer is composed of the following two parts:
❏ Common drive circuit (trapezoidal drive pulse generation)
❏ Head drive circuit (nozzle control built on the printhead)
SED5620D, the 64-bit thermal head driver in the head drive circuit on the carriage, is used as a
nozzle selector to drive the printhead nozzles selectively. Print data is converted into serial data by
gate array E05A96 (IC2) and is output from port BSO (pin 20) to the black head drive circuit or
output from port CSO (pin 24) to the color head drive circuit. Then, head driver SED5620D latches
the head data when gate array E05A96BA outputs the BLAT or CLAT signal, and the latched data
becomes 64-bit parallel data for the black head, or 48-bit parallel data for the color head. One bit
corresponds to each nozzle.
When data transfer and nozzle selection is complete, gate array E05A96 outputs the common drive
pulse BPWC or CPWC (charge pulse) and BPWD or CPWD (discharge pulse) to the common drive
circuit. The common drive circuit then generates the trapezoidal pulse and applies it to the
printhead as a common drive pulse. After this, the nozzle selected by the head data is activated to
inject ink.
In the Micro Dot Printing mode, the gate array E05B09 arranges the puise width of CPWC and
CPWD to became small size of injection ink dot.
SELM Pu lse
Common Driver
Drive Pu lse
Figure 2-23. Normal / Micro Dot Mode Switch Block
SELN Pulse
Block Resistor
Normal
Micro
Normal Dot Mode
Drive Waveform
Head
Micro Dot Mode
Drive Waveform
2-20 REV.-A
Page 47

Stylus Pro XL Operating Principles
Micro Dot Printing Mode
The Stylus Pro XL printer has a special printing mode, called “Micro Dot Printing Mode.” This
printing mode can be selected by command from computer. Using Micro Dot Printing Mode can
improve the quality of output. In Micro Dot Printing Mode, the ink dot size becomes smaller than
the normal dot size.
E05A96 (IC2)
COM
GND
BPWC
CPWC
BPWD
CPWD
Tc: Charge Time
Th: Idle Time
Td: Discharge Time
Figure 2-24. Trapezoidal Drive Waveform
BPWC
BPWD
BLAT
BCLK
BCLKIN
BSO
CPWC
CPWD
CLAT
CCLK
CCLKIN
CSO
13
14
19
18
17
20
15
16
23
22
21
24
Tc
Pc
Pc: Charge Pulse
Ph: Idle Pulse
Pd: Discharge Pulse
Commo n Drive r
Common D riv er
17-22
18-22
4
Th
Td
VH
Ph
Pd
COM1-8
SED5620D (U1)
68
4
CN11
2
4
2
6
2
CN1
6
4
CN12
2
CN2
LAT
69
CLK
67
SI
COM1-6
SED5620D (U2)
68
LAT
69
CLK
67
SI
DO64-49
DO48-33
DO32-17
DO16-1
DO64-49
DO48-33
DO32-17
DO16-1
Row A
Row B
Row C
Row D
Not Connected
Row R (Magenta)
Row S (Cyan)
Row T (Yellow)
C162 MA IN
On Carriage (Head Driver Board)
Figure 2-25. Printhead Drive Circuit Block Diagram
REV.-A 2-21
Page 48

Operating Principles Stylus Pro XL
2.3.2.6 DMA Controller
Data from the host computer is received automatically by the STB signal via the external Centronics
interface. The data is input to the input buffer on the DRAM (IC5). At this time, E05A96 detects the
rising edge of the external
CPU. When the CPU detects this signal, the DMA controller in the CPU sends a bus request to the
bus controller in the CPU, and then the CPU releases the bus line. Due to this, external data is
transported into the memory, bypassing the CPU.
STB signal and outputs the STBDMA (strobe DMA request) signal to the
STB
ACK
BUSY
E05A96 (I C2)
166
161
162
CPU H8 (I C1)
STBDMA
DMARQ
128 14
9129
DREQ 1
DREQ 2
BAREQ
Figure 2-26. DMA Controller Operation
BACDMAC
Memory
2-22 REV.-A
Page 49

CPU H8 (IC1) DRAM (IC5)
CAS
RAS
WE
OE
23
8
7
22
79
80
78
101
DRAM (IC6)
23
CS3
RD
CAS
RAS
WE
OE
8
7
22
Stylus Pro XL Operating Principles
2.3.2.7 DRAM Refresh Controller
The H8 CPU is equipped with a refresh controller in the internal controller. This CPU can contact
the 16-bit-long IC5 DRAM, which is a 2 CAS type. The following table lists the junction method
between the H8 CPU and the 2 CAS DRAM.
Table 2-10. Junction Method (CPU — 2 CAS DRAM)
CPU 2 CAS DRAM
HWR UCAS
LWR LCAS
CS3 RAS
RD WR
The method of the DRAM refresh is used only for the CAS before RAS cycle method. The following
figure shows the timing for each cycle.
CAS
RAS
WE
AS
CAS
RAS
Read Cycle
WE
Write Cycle
AS
(Read / Write Cycle) (Refresh Cycle)
Figure 2-27. DRAM Cycle Timing
Figure 2-28. Junction Method (CPU — DRAM)
REV.-A 2-23
Page 50

Operating Principles Stylus Pro XL
2.4 INK SYSTEM MANAGEMENT
This section explains how the ink system is controlled to protect the printhead and ink supply
system and to ensure high-quality output. Ink system control is composed of the following
operations:
❏ Power On ❏ Wiping Operation 1
❏ Cleaning Selection ❏ Wiping Operation 2
❏ Micro Absorbing Cleaning ❏ Rubbing Operation
❏ Power Off ❏ Disengage On
❏ Print Start ❏ Disengage Off
❏ Refresh ❏ Micro Absorbing
❏ Standby ❏ Carriage Lock Set
❏ False Absorbing ❏ Carriage Lock Reset
❏ Ink Cartridge Replacement ❏ Refresh (when loading or ejecting paper)
❏ Forwarding (not described)
These ink system operations are controlled by the following counters and timers:
❏ Refresh Timer ❏ Monochrome / Color Head Timer
❏ Flushing Counter ❏ Ink Level Counter R
❏ CL Counter K ❏ Protect Counter
2-24 REV.-A
Page 51

Stylus Pro XL Operating Principles
2.4.1 Ink Operations
Various ink operations can be performed selectively by the printer.
1 Power On Operation
This operation is performed when power is turned on.
2 Cleaning Selection Mode
This operation cleans each nozzle to ensure that the nozzle fires and that no dots are skipped
during printing. Cleaning selection is performed by pressing the cleaning switch (Alt +
Load/Eject or Economy/Condensed) while the printer is in PAUSE status.
3 Micro Absorbing Cleaning Operation
This operation prevents an increase in the viscosity of the ink inside the printhead by ink
absorbing discharge.
4 Power Off Operation
This operation ensures the carriage is in the home position when the printer turns off, and
prevents the disengage gear from turning continuously when the printer turns off. Power off
operation is performed when the secondary side switch is turned off.
5 Print Start Operation
This operation eliminates ink from the nozzle surface, and is performed when the printer
receives print data while in the standby state.
6 Refresh Operation
This operation prevents an increase in the viscosity of the head ink.
7 Standby Operation
This operation prevents an increase in the viscosity of the head ink.
8 False Absorbing Operation
This operation absorbs ink inside the cap, and eliminates ink from the nozzle plate.
9 Ink Cartridge Replacement Operation
This operation is performed when the Alt button is pressed for more than 3 seconds; the carriage
then moves to the ink cartridge replacement position.
10 Wiping Operation 1
This operation eliminates dust from the nozzle plate before performing the ink absorption.
11 Wiping Operation 2
This operation eliminates dust or ink from the nozzle plate after performing the ink absorption.
12 Rubbing Operation
This operation removes dust or ink that adheres to the head surface.
13 Disengage ON Operation
This operation sets the switch lever to the position where it transmits the PF motor drive to the
pump mechanism. It also moves the carriage to the home position where the lever is set to the
specified position.
REV.-A 2-25
Page 52

Operating Principles Stylus Pro XL
14 Disengage Off Operation
This operation resets the switch lever to the position where it transmits the PF motor drive to the
pump mechanism. It also moves the carriage to the flushing position, where the lever is reset to
the specified position.
15 Micro Absorbing Operation
When the cartridge is removed, it is possible for a small amount of air to form small air bubbles
that can block the ink from the nozzle. This operation eliminates small air bubbles from the
cavity of the printhead.
16 Carriage Lock Set
This operation prevents the carriage from moving out of the home position if the printer is
turned off or is pauesd. This operation is performed when the carriage is in the ink system home
position and no paper is loaded.
17 Carriage Lock Reset
This operation resets the carriage lock lever.
18 Refresh Operation (Performed when Loading or Ejecting Paper)
This operation prevents an increase in the viscosity of ink inside the black head while paper is
being loaded or ejected. When paper is loaded or ejected, just the black head is ready, and the
color head is capped. The refresh flushes the black head only.
19 Adjust Lever Position Moving Sequence
This operation is performed when the Alt and Font buttons are pressed simultaneously while the
printer is paused.
20. Transportation Sequence
This sequence is performed to clean the printhead when the printer is transported to the market.
2-26 REV.-A
Page 53

Stylus Pro XL Operating Principles
2.4.2 Timer and Counter
EEPROM LE93C46 (IC12) on the main board stores certain counter and timer values used for
controlling ink system operation.
2.4.2.1 Protect Counter
Protect counter A and Ink Amount Counter R values are stored in the EEPROM on the main
board, and while the printer is on, this data is saved in the RAM on the main board.
❏ Protect Counter A This counter is used to manage the total amount of drained ink. If
the counter value is equal to or exceeds 51000, the printer indicates
an error on the control panel and maintenance is required. This
counter is incremented by the following every sequence. (Values
in parentheses ( ) mean only the color head. 1 point = 0.025 cc.)
1. Power On
(Micro): 40 steps × 6 (5) 2 points
40 steps × 10 (9) 3 points
40 steps × 15 (12) 5 (4) points
2. CL 1: 3600 (4800) steps 16 (20) points
40 steps × 12 absorption 4 points
3. CL 2: 720 steps 4 points
7800 (8200) steps 40 points
40 steps × 12 4 points
4. CL 3: 40 steps × 12 4 points
5. I/C Replacement: 8900 (14000) steps 48 (72) points
8900 (8800) steps 48 (44) points
40 steps × 12 4 points
6. Fixed time
False Absorption: Monochrome and CMY = 2
7. Power On
(Normal): 3600 (4800) steps 16 (20) points
40 steps × 12 4 points
Note for Service
Also, protect counter A resets when:
1. The printer is shipped from the factory.
2. After the maintenance is performed.
(When the ink drain tank (ink-eject porous pad, part number 130) is replaced.)
REV.-A 2-27
Page 54

Chapter 3 Disassembly and Assembly
Table of Contents
3.1 OVERVIEW 3-1
3.1.1 PrecautionsforDisassemblingthePrinter.........................3-1
3.2 DISASSEMBLY AND ASSEMBLY 3-2
3.2.1 UpperCaseRemoval.........................................3-3
3.2.2 Power Supply Unit (C137 PSB/PSE Board) Removal . . . . . . . . . . . . . . . . 3-4
3.2.3 MainController(C162MAINBoard)Removal......................3-5
3.2.4 PrinterMechanism(M-4A60)Removal...........................3-7
3.2.5 PrinterMechanismDisassembly................................3-8
3.2.5.1 PrintheadUnitRemoval.................................3-8
3.2.5.2 Carriage Unit Removal . . . . . . . . . . . . . . . . . . . . . . . . . . . . . . . . 3-12
3.2.5.3 PumpUnitRemoval...................................3-13
3.2.5.4 CleanerHeadReplacement ............................3-14
3.2.5.5 CRMotorRemoval...................................3-15
3.2.5.6 PFMotorRemoval....................................3-15
3.2.5.7 Carriage Home Position (HP) Sensor Removal . . . . . . . . . . . . . 3-16
3.2.5.8 PaperEnd(PE)SensorRemoval........................3-16
3.2.5.9 PaperFeedRollerAssemblyRemoval....................3-17
3.2.5.10 UpperFrameRemoval ...............................3-18
Rev.-A 3-i
Page 55

List of Figures
Figure3-1. DisassemblyFlowchart.................................. 3-2
Figure3-2. C137PNLControlPanelRemoval ......................... 3-3
Figure3-3. UpperCaseRemoval.................................... 3-3
Figure3-4. PowerSupplyUnitRemoval.............................. 3-4
Figure3-5. MainControllerRemoval................................. 3-5
Figure 3-6. Printer Mechanism (M-4A60) Removal . . . . . . . . . . . . . . . . . . . . . . 3-7
Figure3-7. InkCartridgeClampRemoval............................. 3-8
Figure3-8. InkCartridgeHolderremoval.............................. 3-9
Figure3-9. PrintheadRemoval ..................................... 3-9
Figure3-10. HeadSpacerPosition ................................. 3-11
Figure3-11. FrontFrameRemoval................................. 3-12
Figure3-12. CarriageUnitRemoval................................. 3-12
Figure3-13. PumpUnitRemoval................................... 3-13
Figure3-14. CleanerHeadReplacement ............................ 3-14
Figure3-15. CRMotorRemoval ................................... 3-15
Figure3-16. PFMotorRemoval.................................... 3-15
Figure3-17. HPSensorRemoval .................................. 3-16
Figure3-18. PESensorRemoval................................... 3-16
Figure3-19. TensionRollerAssemblyRemoval....................... 3-17
Figure 3-20. Paper Feed Roller Assembly Removal . . . . . . . . . . . . . . . . . . . . 3-17
Figure3-21. UpperFrameRemoval................................. 3-18
Figure3-22. AttachingtheTorsionSpring............................ 3-18
List of Tables
Table3-1. InsertLocationoftheBlockResistor ........................ 3-7
Table3-2. InsertLocationoftheBlockResistor ....................... 3-10
3-ii Rev.-A
Page 56

Stylus Pro XL Disassembly and Assmbly
3.1 OVERVIEW
This section describes procedures for disassembling the main components of this printer. Unless
otherwise specified, disassembled units or components can be reassembled by reversing the
disassembly procedure. Therefore, no assembly procedures are included. Precautions for any
disassembly or assembly procedure are described under the heading “Disassembly/Assembly
Points.” Adjustments required after assembling the unit are described under the heading “Required
Adjustments.”
3.1.1 Precautions for Disassembling the Printer
See the precautions below when disassembling the printer.
WARNING
❏ Disconnect the power cable before disassembling or assembling the printer.
❏ Wear protective goggles to protect your eyes from ink. If ink gets in your eye, flush the
eye with fresh water and see a doctor immediately.
❏ If ink comes into contact with your skin, wash it off with soap and water. If irritation
occurs, contact a physician.
❏ A lithium battery is installed on the C162 MAIN Board of this printer. Be sure to observe
the following instructions when servicing the battery:
1. Keep the battery away from any metal or other batteries so that electrodes of the
opposite polarity do not come in contact with each other.
2. Do not heat the battery or put it near fire.
3. Do not solder on any part of the battery. (Doing so may result in leakage of electrolyte
from the battery, burning, or explosion. The leakage may affect other devices close to
the battery.)
4. Do not charge the battery. (An explosive gas may be generated inside the battery, and
cause burning or explosion.)
5. Do not dismantle the battery. (The gas inside the battery may hurt your throat.
Leakage, burning, or explosion may also result.)
6. Do not install the battery in the wrong direction. (This may cause burning or explosion.)
CAUTION
Danger of explosion if battery is incorrectly replaced. Replace only with the same or
equivalent type recommended by the manufacturer. Dispose of used batteries according to
government’s laws and regulations.
ATTENTION
Risque d’explosion si la pile est remplacée incorrectement. Ne remplacer que par une pile
du même type ou d’un type équivalent recommandé par le fabricant. Elminer les piles
déchargées selon les lois et les règles de sécurité en vigueur.
CAUTION
❏ Never remove the ink cartridge from the carriage unless manual instructions specify to
do so.
❏ When transporting the printer after installing the ink cartridge, be sure to pack the
printer for transportation without removing the ink cartridge.
❏ Use only recommended tools for disassembling, assembling, or adjusting the printer.
❏ Apply lubricants and adhesives as specified. (See Chapter 6.)
❏ Make specified adjustments when you disassemble the printer. (See Chapter 4.)
REV.-A 3-1
Page 57

START
3.2.1
3.2.2
3.2.4
3.2.3
3.2.5.1
3.2.5.2
3.2.5.3
3.2.5.4
3.2.5.5
3.2.5.6
3.2.5.7-8
3.2.5.9
3.2.5.10
Uppe r Cas e
Removal
Page 3-3
Power Supply Unit
Removal
Page 3-4
Main Controller
Removal
Page 3-5
Printer Mechanism
Remova l
Page 3-7
Printhead Unit
Remova l
Page 3-8
Carriage Unit
Remova l
Page 3-12
Pump Unit
Removal
Page 3-13
Clerner Head
Remova l
Page 3-14
CR Motor
Removal
Page 3-15
PF Motor
Removal
Page 3-15
HP,PE
Sensor Removal
Page 3-16
Removal
Page 3-17
Upper Frame
Removal
Page 3-18
PF Roller Assembly
Disassembly and Assembly Stylus Pro XL
3.2 DISASSEMBLY AND ASSEMBLY
Follow the precautions in Section 3.1.1 when disassembling the printer.
This section consists of the subheads shown in the diagram below. See the exploded view of the
printer in the Appendix, if necessary.
WARNING
Figure 3-1. Disassembly Flowchart
3-2 REV.-A
Page 58

C137 PNL Board
Cable
Carriage Lock Lever
CBB (M3x11)
Stylus Pro XL Disassembly and Assmbly
3.2.1 Upper Case Removal
1.1. Remove the printer cover (center of top) by releasing the 2 tabs holding it to the upper case.
2. Remove the front cover (front of top) by releasing the 2 tabs holding it to the lower case.
3. Remove the paper guide by releasing the 2 tabs holding it to the printer mechanism.
4. Move the carriage to the middle of the printer while pressing the hook that fixes the carriage
unit to the home position.
5. Remove the control panel. (Release the tab by inserting a screwdriver into the hole in the upper
case, as shown in the figure below.) At this time, disconnect the connector on the C137 PNL
Board.
Figure 3-2. C137 PNL Control Panel Removal
5.
Remove the 2 CBB (M3 × 11) screws securing the upper case to the lower case.
6. Release 1 tab by inserting a flathead screwdriver into the holes at the bottom of the lower case,
as shown in the figure below.
7. Remove the upper case by lifting the front side. At the same time release 1 tab, located in the
center front of the lower case.
DISASSEMBLY/ASSEMBLY POINT
Hold the upper case firmly and pull it to remove it, while you release the tabs.
Figure 3-3. Upper Case Removal
REV.-A 3-3
Page 59

Disassembly and Assembly Stylus Pro XL
3.2.2 Power Supply Unit (C137 PSB/PSE Board) Removal
1. Remove the upper case (see Section 3.2.1).
2. Disconnect the cables from connectors CN1 on the C137 PSB /PSE Board and CN5 on the C162
MAIN Board.
3.
Remove the 2 screws, 1 CBN (M3×8)and1CBB(M3×12), securing the shield plate to the lower
case via the C137 PSB/PSE Board.
4.
Remove the 3 screws, 2 CBB (M3×12) and 1 CBN (M3×8), securing the C137 PSB/PSE Board to
the lower case, and remove a CBN (O) (M3×6) screw fixing the earth line from the AC cable to
the earth plate.
5. Remove the wire harness for the motors in the locking tab on the shield plate, and take the
shield plate out by pulling upward toward the back of the printer.
6. Remove the power supply unit by pulling it upward toward the back of the printer.
CAUTION
The shield plates of C137 PSB/PSE and C162 MAIN boards have sharp edges, so take care
in handling them.
CBS (M3x8)
C162 MAIN Boar d
C137 PSB Board
CBB (M3x12)
CBS(O) (M3x6)
Figure 3-4. Power Supply Unit Removal
3-4 REV.-A
Page 60

CBB (M3x12)
CBB (M3x12)
CBS (M3x8)
Grounding Plate
Grounding Plate
Shield Plate
Stylus Pro XL Disassembly and Assmbly
3.2.3 Main Controller (C162 MAIN Board) Removal
1. Remove the upper case (see Section 3.2.1).
2. Remove the grounding plate from the shield plate.
3.
Remove the 4 CBB (M3×12) screws securing the shield plate to the lower case.
4.
Remove the 2 CBB (M3×12) screws securing the Type-B interface cover to the lower case.
5. Disconnect the cables from connectors CN5, CN6, CN7, CN8, CN9, CN10, CN11, CN12, and
CN13 of the C162 MAIN Board.
6
Remove the 4 CBB screws, 2 (M3×12)and2(M3×8), securing the main controller to the lower
case and then remove the C162 MAIN Board.
Figure 3-5. Main Controller Removal
REV.-A 3-5
Page 61

Disassembly and Assembly Stylus Pro XL
ASSEMBLY POINT
❏ When you replace the main board, initialize EEPROM contents as follows:
1. Reassemble the printer.
2. Turn the printer on while holding down the Alt, Font, Load/Eject ,andPause buttons
on the control panel.
❏ It is possible to misconnect the cables. When reconnecting the cables from connectors
CN6, CN7 and connectors CN11, CN12 of the C162 MAIN board, see the following
instructions.
1. CN11: Printhead FFC cable (white mark: rear direction)
CN12: Printhead FFC cable (blue mark: rear direction)
2. CN6: Carriage motor cable (red mark: the red mark indicates pin 1 of CN6.)
CN7: Paper feed motor cable (black mark: the black mark indicates pin 1 of CN7.)
REQUIRED ADJUSTMENT
❏ When replacing the main controller board, adjust both the head gap and the
bidirectional adjustment alignment, and save the adjusted parameters into the
EEPROM on the C162 MAIN Board. (See Chapter 4.)
❏ When you replace the main board, the parameters in the internal timer are all reset.
Therefore, it is possible for printing to become abnormal. At this time, perform the
cleaning operation using the control panel or command (Refer to Chapter 4) until the
printing becomes normal.
CAUTION
The shield plates for the C162 MAIN Board and C137 PSB/PSE Board have sharp edges,
so take care in handling them.
3-6 REV.-A
Page 62

CBB (M4x13)
Stylus Pro XL Disassembly and Assmbly
3.2.4 Printer Mechanism (M-4A10) Removal
1. Remove the upper case (see Section 3.2.1).
2. Remove the power supply unit (see Section 3.2.2).
3. Remove the main controller (see Section 3.2.3).
4.
Remove the 4 CBN (M4×13) screws and take out the printer mechanism.
DISASSEMBLY/ASSEMBLY POINT
Wipe off any ink around the end of the ink drain tube when you remove the printer
mechanism.
❏ When reinstalling the printer mechanism, check that the waste ink drain tube is properly
inserted between the lower case and the waste ink absorbing material.
Figure 3-6. Printer Mechanism (M-4A60) Removal
CAUTION
When you replace the printhead or printer mechanism, you must replace the block
resistor at location RM4 (for Micro Mode - Color (R-No.)), RM5 (for Normal Mode -
Color (M-No.)), RM11 (for Micro Mode - Monochrome (R-No.)), and RM12 (for Normal
Mode - Monochrome (M-No.)) on the C162 MAIN Board. (Every spare printhead or
spare printer mechanism comes with a block resistor that is specifically selected for
each printhead.) Refer to Table 3-1.
❏ Adjust both the head gap and bidirectional alignment when replacing the printer
mechanism.
Table 3-1. Insertion Location for Block Resistors
Mode
Normal
^
Micro
Head Indication No. Location
Monochrome
Color
Monochrome
M-××
M-××
R-×× ×
RM12
RM5
RM11
^
REV.-A 3-7
Color
R-×× ×
RM4
Page 63

Disassembly and Assembly Stylus Pro XL
3.2.5 Printer Mechanism Disassembly
The procedures described in this section explain how to remove the components within the
printer mechanism.
3.2.5.1 Printhead Unit Removal
1. Remove the printer mechanism (see Section 3.2.4).
2. Move the carriage to the middle of the printer while pressing the hook that fixes the carriage
unit to the home position.
3. Pull the ink cartridge clamp toward you and remove the ink cartridge.
CAUTION
When removing the ink cartridge, always install a new cartridge immediately after
removing the old one.
❏ When the ink cartridge is replaced, the printer performs the ink cartridge replacement
operation automatically.
The exclusive cartridge is: Monochrome: 1020626
YMC: 1020627
❏ Ink cartridges should never be kept longer than 6 months.
4. Push the 2 hooks from the inside of ink cartridge holder with tweezers, and push down the
ink cartridge clamp (monochrome/color) to remove the clamps from ink cartridge holder.
5.
Remove the 3 CBB (M3×11) screws and 3 plain washers securing the ink cartridge holder to
the carriage base, and then lift the ink cartridge holder out of the carriage base sliding a little
toward left.
Ink Cart ridge
Fixing Lever
Cartridge Holder
Figure 3-7. Ink Cartridge Clamp Removal
Note: The head flexible flat cables (FFCs) are secured to the ink cartridge holder with adhesive
tape. Tear the cables off the ink cartridge holder before removing the ink cartridge
holder from the cartridge base.
3-8 REV.-A
Page 64

Color Head
Black Head
Stylus Pro XL Disassembly and Assmbly
6.
Remove the CBB (M3×11) screw (under the CR cap cover) and plain washer securing the
monochrome and color printheads to the carriage base.
Rubber Cap
CBB (M3x11)
Head Fixing Sczew
CBB (M 3x 11)
Figure 3-8. Ink Cartridge Holder Removal
7 Pull the black or color head toward you, and disconnect the head FFC cable on the head driver
board (nozzle selector). Then remove the black or color head.
Figure 3-9. Printhead Removal
REV.-A 3-9
Page 65

Disassembly and Assembly Stylus Pro XL
CAUTION
❏ Take proper measures to protect the printhead unit from static electricity, because the
driver IC is directly attached to the printhead unit.
❏ Never touch the printhead’s metallic nozzle cover surface. Handle it only by holding the
edges of the printhead.
❏ When you replace the printhead or the printer mechanism, you must replace the block
resistor at location RM4 (for Micro Mode - Color (R-No.)), RM5 (for Normal Mode -
Color (M-No.)), RM11 (for Micro Mode - Monochrome (R-No.)), and RM12 (for Normal
Mode - Monochrome (M-No.)) on the C162 MAIN Board. (Every spare printhead or
spare printer mechanism comes
with a block resistor that is specifically selected for each printhead. (Refer to Table 3-2.)
Table 3-2. Insertion Location of the Block Resistors
Mode Head Indication No. Location
Normal
Micro
Monochrome
Color
Monochrome
Color
M-××
M-××
R-×× ×
R-×× ×
RM12
RM5
RM11
RM4
3-10 REV.-A
Page 66

Spacer Setting Locations
Spacer
Head Nose
(For Black Head)
Stylus Pro XL Disassembly and Assmbly
REQUIRED ADJUSTMENT
❏ When removing or changing the black head, the following adjustments are needed.
1. Black head angle adjustment (see Section 4.1.4).
2. Black - Color head vertical adjustment (see Section 4.1.5).
3. Head gap adjustment (see Section 4.1.3).
4. Bidirectional alignment adjustment (see Section 4.1.2).
❏ When removing or changing the color head, the following adjustments are needed.
1. Color head angle adjustment (see Section 4.1.6).
2. Black - Color head vertical adjustment (see Section 4.1.5).
3. Head gap adjustment (see Section 4.1.3).
4. Bi-D alignment adjustment (see Section 4.1.2).
❏ When removing or changing both heads, the following adjustments are needed.
1. Color head angle adjustment (see Section 4.1.6).
2. Black head angle adjustment (see Section 4.1.4).
3. Black - Color head vertical adjustment (see Section 4.1.5).
4. Head gap adjustment (see Section 4.1.3).
5. Bidirection alignment adjustment (see Section 4.1.2).
WARNING
❏ When removing the color or black head, do not lose the spacer attached to each head.
This spacer modifies the angle error that occurs during manufacturing. Also, this spacer
is different from the linear spacer or angular spacer. (See Chapter 4.)
Figure 3-10. Head Spacer Position
REV.-A 3-11
Page 67

Disassembly and Assembly Stylus Pro XL
3.2.5.2 Carriage Unit Removal
1. Remove the printer mechanism (see Section 3.2.4).
2. Move the carriage to the left side of the printer while pressing the hook that fixes the carriage
to the home position.
3.
Remove the 2 CBN (O) (M3× 6) screws securing the eject frame to both side frames.
CBS(O) (M3x6)
CBS(O) (M30x11)
Eject Frame
Figure 3-11. Front Frame Removal
4. Remove the cartridge holder with ink cartridge from the carriage unit (see Section 3.2.5.1).
5. Release the carriage timing belt from the belt pulley while pressing the pulley lever.
6. Remove the grounding wire from the left side frame.
7. Remove the 2 parallelism adjustment bushings from both side frames.
8. Lift the carriage unit with the carriage guide shaft out of the printer mechanism.
Pulley Lever
Grounding Wire
Para llelism
Adjust Bushing
Parallelism
Adjust Bushi ng
Figure 3-12. Carriage Unit Removal
CAUTION
❏ Take proper measures to protect the printhead unit from static electricity, because the
driver IC is directly attached to the printhead unit.
❏ Never touch the printhead’s metallic nozzle cover surface. Handle it only by holding the
edges of the printhead.
❏ When you replace the printhead or the printer mechanism, you must replace the block
resistor. (see Table 3-2).
ADJUSTMENT REQUIRED
Platen gap adjustment (see Chapter 4).
3-12 REV.-A
Page 68

CBS (M3x6)
Bottom F rame
Pump Unit
(1)
(2)
(2)
Disassembly and Assembly Stylus Pro Service Manual
3.2.5.3 Pump Unit Removal
1. Remove the printer mechanism. (See Section 3.2.4.)
2. Remove the carriage unit. (See Section 3.2.5.2.)
3. Remove the CBS (M3×6) screw securing the pump unit to the bottom frame.
4. Push the pump unit outward while releasing the tab at the bottom side of the pump unit, and then lift
up the pump unit.
Figure 3-14. Pump Unit Removal
3-12 Rev.A
Page 69

Disassembly and Assembly Stylus Pro XL
3.2.5.4 Cleaner Head Replacement
1. Remove the printer mechanism (see Section 3.2.4).
2. Use tweezers to unhook the cleaner head from the hook on the cleaning lever.
CAUTION
Keeping the cleaner head clean is extremely important to keep the ink injection system
working properly in the printhead, and it directly affects printing quality.
Therefore, handle the cleaner head very carefully, and observe the following precautions.
■ Never touch the cleaner head with your bare hands.
■ When attaching the cleaner head to the pump unit, wear gloves and use clean tweezers
to handle it.
Cleaner Head
Hook
Cleaner Le ver
Figure 3-14. Cleaner Head Replacement
3-14 REV.-A
Page 70

CBS (M3x6)
PF Motor
Stylus Pro XL Disassembly and Assmbly
3.2.5.5 CR Motor Removal
1. Remove the printer mechanism (see Section 3.2.4).
2. Release the timing belt (see section 3.2.5.2).
3. Remove the 3 screws securing the CR motor to the upper frame, and then remove the CR
motor.
Screws
CR Motor
Figure 3-15. CR Motor Removal
3.2.5.6 PF Motor Removal
1. Remove the printer mechanism (see Section 3.2.4).
2.
Remove the 2 CBN (M3×6) screws and then remove the PF motor.
Figure 3-16. PF Motor Removal
REV.-A 3-15
Page 71

Sensor Cable
Carriage Home
Position Sensor
Sensor Cable
PE Sensor
Botto m Frame
Stylus Pro Service Manual Disassembly and Assembly
3.2.5.7 Carriage Home Position Sensor Removal
1. Remove the printer mechanism. (See Section 3.2.4.)
2. Disconnect the sensor cable from the carriage home position sensor.
3. Unhook the 3 notches securing the carriage home position sensor to the upper frame. Then remove
the carriage home position sensor.
Figure 3-18. Carriage Home Position Sensor Removal
3.2.5.8 PE Sensor Removal
1. Remove the printer mechanism. (See Section 3.2.4.)
2. Disconnect the connector for the PE sensor.
3. Rotate the printer mechanism upside down; use tweezers to release the 2 hooks securing the PE sensor
to the paper feed roller assembly. Then remove the PE sensor.
Figure 3-19. PE Sensor Removal
Rev.A 3-15
Page 72

CBB (M3 x8)
Tension
Wire
Tensi o n R oll er
Assem bl y
Eject Paper
Roller
Tension
Wire
Paper Feed Roller
Stylus Pro XL Disassembly and Assmbly
3.2.5.9 Paper Feed Roller Assembly Removal
1. Remove the printer mechanism (see Section 3.2.4).
2. Remove the carriage unit (see Section 3.2.5.2).
3. Remove the pump unit (see Section 3.2.5.3).
4. Remove the tension spring holding the tension roller assembly to the sub frame.
5. Remove the tension wire on the left side frame holding the tension roller assembly to the left
side frame.
6.
Remove a CBB (M3×8) screw securing the tension roller assembly to the sub frame and remove
the tension roller assembly.
Figure 3-19. Tension Roller Assembly Removal
7. Release the 2 bushings securing the paper feed roller assembly to both the left side frame and
the sub frame. Then remove the paper feed roller assembly.
REV.-A 3-17
Figure 3-20. Paper Feed Roller Assembly Removal
Page 73

Disassembly and Assembly Stylus Pro XL
3.2.5.10 Upper Frame Removal
1. Remove the printer mechanism (see Section 3.2.4).
2. Remove the carriage unit (see Section 3.2.5.2).
3. Remove the E-ring securing the knob shaft to the sub frame; then remove the knob with the
knob shaft from the right side frame.
4.
Remove the 5 CBN (M3×5) screws securing the upper frame to both side frames or the sub
frame. Then remove the upper frame with 4 PF support rollers.
5. Remove the upper frame with 4 PF support rollers.
Upper Frame
CBS (M3x5)
E-ring
CBS (M3x5)
Tension Spring
Knob
Figure 3-21. Upper Frame Removal
ASSEMBLY POINT
Assemble each straight end of torsion spring 6700s to attach to the center of the driven
roller support.
Base Fram e
PF Support Roller
Tension Spring
Figure 3-22. Attaching the Torsion Spring
3-18 REV.-A
Page 74

Chapter 4 Adjustments
Table of Contents
4.1 OVERVIEW 4-1
4.1.1 DestinationDataWritingOperation..............................4-2
4.1.2 Bi-D(BidirectionalPrinting)AlignmentAdjustment..................4-3
4.1.3 HeadGapAdjustment(BlackandColorHead).....................4-4
4.1.4 BlackHeadAngleAdjustment..................................4-5
4.1.5 Black-ColorHeadVerticalAdjustment............................4-9
4.1.6 ColorHeadAngleAdjustment.................................4-12
4.1.7 PlatenGapAdjustment ......................................4-16
4.1.8 InternalTimerResetOperation................................4-17
List of figures
Figure4-1. HeadGapAdjustmentSample.............................4-4
Figure4-2. B-HeadAngleandLinear,AngularSpacer....................4-5
Figure 4-3. Spacer Kinds & Relation of the Shape and Thickness. . . . . . . . . . . 4-5
Figure4-4. BlackHeadAngleAdjustmentSample.......................4-6
Figure4-5. SpacerSlection.........................................4-6
Figure4-6. RemovingtheRubberCap................................4-7
Figure4-7. SpacerAngularReplacementMethod.......................4-8
Figure4-8. Black-ColorHeadVerticalAdjustConception .................4-9
Figure4-9. SpacerLinearSelectionSample............................4-9
Figure4-10. RemovingtheRubberCap..............................4-10
Figure4-11. SpacerLinearreplacementMethod.......................4-11
Figure 4-12. C-Head Angle and Spacer Angular Position. . . . . . . . . . . . . . . . . 4-12
Figure4-13. ColorHeadAngleConfirmationSample....................4-12
Figure 4-14. Relationship of the Shape and Thickness . . . . . . . . . . . . . . . . . . 4-13
Figure4-15. SpacerSelectjudgement...............................4-13
Figure4-16. RemovingtheRubberCap..............................4-14
Figure 4-17. Spacer Angular Replacement Method (YMC) . . . . . . . . . . . . . . . 4-15
Figure4-18. AdjustingthePaperGap................................4-16
Figure4-19. ConfirmingtheGap....................................4-17
List of Table
Table4-1. RequiredAdjustments....................................4-1
Table4-2. GapandAdjustmentDirection.............................4-16
Rev.-A 4-i
Page 75

Stylus Pro XL Adjustments
4.1 OVERVIEW
This section describes adjustments required when the printer is disassembled and assembled after
repair. Since this printer has both a black and color head, it needs new adjustments not required for
previous printers. Refer to the following table to perform the appropriate adjustments.
WARNING
❏ Always perform the adjustments in the order indicated.
❏ After performing steps 1-5, perform a cleaning operation for the black and color
printheads. the cleaning operation is needed because printing sample patterns for the
head angle, Bi-D alignment, and the head gap increases the viscosity of the ink, and the
printer will not print the correct value. For instance if you replace the black head, you
must do the following adjustments in the order shown:
(1) Black head angle, (2) black-color head vertical, (3) head gap, (4) Bi-D alignment.
❏ After removing an ink cartridge, always install a new cartridge immediately. During
adjustments and testing, use cartridges designed exclusively for service
(Monochrome: 1020626, CMY: 1020627).
Table 4-1. Required Adjustments
Service Performed Adjustment Needed
When replacing the
M-4A60 printer mechanism
When replacing or
disassembling the
C162 MAIN board or
printer mechanism
When replacing or
disassembling the
black head (board)
When replacing or
disassembling
the color head (board)
When replacing or
disassembling both the
color and black head
1. Bi-D alignment adjustment (see Section 4.1.2).
2. Head gap adjustment (see Section 4.1.3).
3. Internal timer reset operation (see Section 4.1.8).
1. Destination data writing operation (see Section 4.1.1).
2. Bi-D alignment adjustment (see Section 4.1.2).
3. Head gap adjustment (see Section 4.1.3).
1. Black h ead angle adjustment (see Section 4.1.4).
2. Black - Color head vertical adjustment (see Section 4.1.5).
3. Head gap adjustment (see Section 4.1.3).
4. Bi-D alignment adjustment (see Section 4.1.2).
1. Color head angle adjustment (see Section 4.1.6).
2. Black - Color head vertical adjustment (see Section 4.1.5).
3. Head gap adjustment (see Section 4.1.3).
4. Bi-D alignment adjustment (see Section 4.1.2).
1. Color head angle adjustment (see Section 4.1.6).
2. Black h ead angle adjustment (see Section 4.1.4).
3. Black - Color head vertical adjustment (see Section 4.1.5).
4. Head gap adjustment (see Section 4.1.3).
5. Bi-D alignment adjustment (see Section 4.1.2).
When replacing or
disassembling
the carriage unit
Rev. A 4-1
1. Platen gap adjustment (see Section 4.1.7).
Page 76

Adjustments Stylus Pro XL
4.1.1 Destination Data Writing Operation
The setup value that specifies the printer destination is stored in the EEPROM on the C162 MAIN
board. Therefore, this setup value must be written into the EEPROM when the MAIN board or
EEPROM chip is replaced.
CAUTION
Before writing the destination data writing, set the interface to parallel.
1. Connect the PC to the target printer using a parallel interface cable and turn the printer on.
2. Execute BASIC on the PC, and run the program “VERxxx.BAS.” You see the following menu.
1. Destination Setting
2. Head Angle Confirmation Pattern Printing
(Black Head Spacer Selection)
3. Head Vertical Position Confirmation
4. Head Gap Adjustment
5. Bi-D Adjustment
6. Internal Timer Reset
7. END
3. When the main menu appears, choose “Destination Setting” by typing 1 and Enter.
4. The main menu immediately disappears briefly and then reappears. (At this time, specific
destination parameters, including the destination, interface mode, TOF value, and
economy/condensed, are automatically written to the EEPROM.)
5. Choose “END” by typing 7 and ENTER. The next message appears on the display.
All parameters that you have specified so far
are written to EEPROM upon power off.
Turn the printer OFF, Now!
6. Turn off the printer.
4-2 Rev. A
Page 77

Stylus Pro XL Adjustments
4.1.2 Bi-D (Bidirectional Printing) Alignment Adjustment
The bidirectional alignment is required when the printer mechanism, main board, or printhead
(board) is replaced. Performing this adjustment determines a compensation value to rectify any
deviation in the print position. This deviation could be caused by the different print speeds, which
are due to tolerances in the mechanical components, or to differences in print timing between
odd-numbered lines and even-numbered lines in bidirectional printing. The printer stores the
compensation data in the EEPROM on the C162 MAIN board and refers to this data when
performing bidirectional printing.
1. Connect the PC to the target printer, and turn the printer on.
2. Execute BASIC on the PC and run the program “VERxxx.BAS.”
1. Destination Setting
2. Head Angle Confirmation Pattern Printing
(Black Head Spacer Selection)
3. Head Vertical Position Confirmation
4. Head Gap Adjustment
5. Bi-D Adjustment
6. Internal Timer Reset
7. END
3. When the main menu appears, choose “Bi-D Adjustment” by typing 5 and ENTER.(Theprinter
prints a check pattern with a sample compensation value.)
4. The next menu appears on the display.
Input Bi-D value No. (-30=≤ No. ≤=30,If O.K, input [Y] key.)? _
5. If the sample print is not vertically aligned for both the odd-numbered and even-numbered
lines, enter a compensation value in the range from −30 to +30.
❏ Positive compensation value: Shifts the 2nd line to the left
❏ Negative compensation value: Shifts the 2nd line to the right
When the sample print becomes vertically aligned for both lines, press Y and ENTER;this
returns you to the main menu.
6. Choose “END” by typing 7 and ENTER. The next message appears on the display.
All parameters that you have specified so far
arewrittentoEEPROMuponpoweroff.
Turn the printer OFF, Now!
7. Turn off the printer.
Rev. A 4-3
Page 78

Adjustments Stylus Pro XL
4.1.3 Head Gap Adjustment (Black and Color Head)
The head gap adjustment is required when the printer mechanism, main board, or printhead
(board) is replaced or diassembled. This adjustment calibrates the head drive timing between the
black and color head. If this adjustment is not made, the vertical alignment will not be completed.
1. Connect the PC to the target printer, and turn the printer on.
2. Execute BASIC on the PC and run the program “VERxxx.BAS.”
1. Destination S etting
2. Head Angle Confirmation Pattern P rinting
(Black Head Spacer Selection)
3. Head Vertical Position Confirmation
4. Head Gap Adjustment
5. Bi-D Adjustment
6. Internal Timer Reset
7. END
3. When the main menu appears, choose “Head Gap Adjustment” by typing 4 and ENTER.(The
printer prints a check pattern with a sample compensation value.)
4. The printer prints a sample like the one shown in Figure 4-1.
5. If the sample print is not vertically aligned for both odd-numbered lines (black lines) and
even-numbered lines (magenta lines), enter a compensation value in the range from −16 to
+16.
❏ Positive compensation value: Shifts the 2nd line to the left
❏ Negative compensation value: Shifts the 2nd line to the right
When both the black and magenta lines are vertically aligned, press Y and ENTER; this returns
you to the main menu.
6.6. Choose “END” by typing 7 and ENTER. The next message appears on the display.
All parameters that you have specified so far
arewrittentoEEPROMuponpoweroff.
7. Turn off the printer.
Head Gap Adjustment No. 0
Color (Magenta ) Line
Turn the printer OFF, Now!
Black Line
Figure 4-1. Head Gap Adjustment Sample
4-4 Rev. A
Page 79

Black Head
(Angle Adjustment Concept)
Black Head
(Reverse Side)
Head Base
Carriage
Angular Spacer
Linear Spacer
(Spacer Setting Position)
Stylus Pro XL Adjustments
4.1.4 Black Head Angle Adjustment
The black head angle adjustment is required when the black head is replaced or disassembled. If
this adjustment is not correct, a white banding problem may occur, or the color head timing may
not match the black head timing. The following figure illustrates the black head angle adjustment.
The black head angle is adjusted with linear and angular spacers. A linear spacer is attached to both
sides of the head base, and an angular spacer is attached only to the right side of the head base.
Spacers for the black head come in different shapes for the thickness needed. The following figure
shows the relationship between the shape and thickness.
Figure 4-2. Black Head Angular and Linear Spacers
Angular Spacers (For Black Head)
Spacer Name Spacer NameThickness Thickness
angular spacer BK
angular spacer BK:B
angular spacer BK:C
angular spacer BK:D
angular spacer BK:E
0.05
0.10
0.15
0.20
0.25
Shape
Linear Spacers (Only Use for Black Head)
linear spacer K
linear spacer J
linear spacer I
linear spacer
linear spacer B
linear spacer C
linear spacer D
linear spacer E
linear spacer F
Shape
0.05
0.12
0.19
0.26
0.33
0.40
0.47
0.54
0.61
Rev. A 4-5
linear spacer G
linear spacer H
0.68
0.75
Figure 4-3. Types of Spacers and Relationship between
Shape and Thickness
Page 80

AB
Black Head Angle Adjustment
Adjustments Stylus Pro XL
1. Connect the PC to the target printer, and turn the printer on.
2. Execute BASIC on the PC and run the program “VERxxx.BAS.”
1. Destination S etting
2. Head Angle Confirmation Pattern P rinting
(Black Head Spacer Selection)
3. Head Vertical Position Confirmation
4. Head Gap Adjustment
5. Bi-D Adjustment
6. Internal Timer Reset
7. END
3. When the main menu appears, choose “Head Angle Confirmation Pattern Printing” by typing
2 and ENTER. (The printer prints the check pattern, along with the sample name. )
WARNING
❏ When replacing both the black and color heads, always adjust the color head angle first.
The black head angle is based on the color head angle.
❏ After you replace the black head and print the black head angle pattern, you only have
to insert an angular spacer if the pattern is incorrect.
4. The printer prints a pattern like one in the following sample. Only the nozzles in rows A and
D are fired (making it is easy to see the angle of the black head).
Figure 4-4. Black Head Angle Adjustment Sample
5. In the figure above, pay attention to position A. (Do not look at position B.)
6. Using the following flowchart, replace the angular spacer for the black head, which is under
the right linear spacer. The procedure for this replacement is explained beginning with step 7.
Check p osit ion A.
Position A Position A
4-6 Rev. A
Replace the right
angular spacer with
a thinner one.
Figure 4-5. Spacer Selection
Replace the right
angular spacer with
a thicker one.
Page 81

1: Push
Carriage Unit
Platen Gap
Adjust Lev er
Linear Spac er
Black Head
Head Ba se
Angular Spacer
2: Replace
(Angular Spacer
Replacement Position)
Stylus Pro XL Adjustments
7. Turn the printer power off now.
8. Manually move the carriage to the center while pressing the carriage lock lever, and remove
the two ink cartridges.
9. Remove the rubber cap covering the head screw at the side of color ink cartridge. Then loosen
(but do not remove) 3 screws. (Refer to Figure 4-6.)
Figure 4-6. Removing the Rubber Cap
WARNING
After replacing the spacer, always install new ink cartridges before returning the printer to
the user. During this adjustment, use ink cartridges exclusively for service (Monochrome:
1020626, CMY: 1020627). You can reuse old ink cartridges for other purposes.
10. Replace the angular spacer for the black head with a new one, referring Figure 4-7.
(Replace the angular spacer by using tweezers to push the head base toward the rear.)
Rev. A 4-7
Page 82

1: Push
Carriage Unit
Platen Gap
Adjust Lev er
Linear Spac er
Black Head
Head Ba se
Angular Spacer
2: Replace
(Angular Spacer
Replacement Position)
Adjustments Stylus Pro XL
11. After replacing the angular spacer, reassemble the ink cartridge holder and reinstall the ink
cartridges. Use the BASIC program to verify the angle of the black head. Confirm the angle by
performing the steps 1 to 6 again, and if the angle is wrong, perform the adjustment again
until the head angle is correct.
WARNING
❏ The angular spacer comes in five thicknesses. Continue performing this adjustment, by
changing the black head angle is correct.
❏ When inserting an angular spacer, always place the angular spacer on the linear spacer.
Figure 4-7. Angular Spacer Replacement Method
4-8 Rev. A
Page 83

#1
#2
#16
#1#2
#4
#5
#6
#3
#8
#9
#61
#62
#63
#64
#7
Carriage Unit
Adjust
Color Head
Black Head
Vertical Position
Vertical Position
Magenta
Cyan
Yellow
Stylus Pro XL Adjustments
4.1.5 Black - Color Head Vertical Adjustment
This adjustment calibrates the vertical position between the black head and the color head. Align
the top nozzles (both nozzle #1 on the black head and nozzle #1 on the color head). You can make
this adjustment by using only the linear spacers for the black head. This adjustment is required
when the black head or the color head is replaced or disassembled. The following figure illustrates
this adjustment.
Figure 4-8. Black-Color Head Vertical Adjustment Concept
1. Connect the PC to the target printer, and turn the printer on.
2. Execute BASIC on the PC and run the program “VERxxx.BAS”.
1. Destination Setting
2. Head Angle Confirmation Pattern P rinting
(Black Head Spacer Selection)
3. Head Vertical Position Confirmation
4. Head Gap Adjustment
5. Bi-D Adjustment
6. Internal Timer Reset
7. END
3. When the main menu appears, choose “Head Vertical Position Confirmation” by typing 3 and
ENTER. (The printer prints the check pattern, along with the sample name.)
WARNING
When replacing the black head, always adjust the black head angle first, because the blackcolor head vertical adjustment is based upon the black head angle.
2-3 BLACK HEAD SPACER SELECTION
Magenta
-5 -4
-3 -2
-1
OK (0)
Black
+1 +2 +3 +4
Figure 4-9. Linear Spacer Selection Sample
Rev. A 4-9
+5
Page 84

Adjustments Stylus Pro XL
4. In Figure 4-10, the vertical position is correct when both the magenta line and the black line
are aligned (as shown in position OK (0)). If the vertical position is correct, turn off the
printer. If the black and magenta lines are not aligned, perform the vertical adjustment as
described in steps 5-10.
WARNING
❏ The number shown in the sample indicates the thickness level compared to the current
linear spacer. (See * .) There are 11 linear spacers with 11 different thicknesses.
❏ The linear spacer is attached by two pieces, one on each side of the head base. Therefore,
when you need to replace one linear spacer, always replace both linear spacers at the
same time.
❏ When replacing the linear spacer, place it under the angular spacer.
* If necessary, replace the linear spacer. For instance, if your pattern is similar to the pattern
shown under –2, replace the linear spacer with a thinner linear spacer. If your pattern is similar
to the pattern shown under 2, replace the linear spacer with a thicker spacer.
5. Turn the printer off.
6. Move the carriage to the center while pressing the carriage lock lever, and remove the two ink
cartridges.
Rubber Cap
Screw 1
Screw 2
Screw 3
Figure 4-10. Removing the Rubber Cap
7. Remove the rubber cap that covering a head screw at the side of color ink cartridge and then
loosen (but do not remove) 3 screws. (Refer to the figure below.)
WARNING
After replacing the spacer, always install new ink cartridges before returning the printer to
the user. During adjustment, use the ink cartridges exclusively for service (Monochrome:
1020626, CMY: 1020627). You can reuse the old ink cartridges for other purposes.
4-10 Rev. A
Page 85

1: Push
Carriage Un it
Platen G ap
Adjust Lever
2: Replace
Black Head
Head Base
Linear Spacer x 2
(Linear Spacer
Replacement Position)
Angular Spacer
Stylus Pro XL Adjustments
8. Change the linear spacers (2 spacers for the monochrome head only) with new ones, referring
the figure below. (Replace linear spacers using tweezers to push the head base toward the
rear.)
Figure 4-11. Linear Spacer Replacement Method
9. Rerun the BASIC program, and choose the “Head Vertical Position Confirmation” by typing 3
and ENTER; then confirm that the sample print is correct. If the sample is incorrect, change the
thickness of the linear spacer and perform this adjustment again until the two black and
magenta lines are aligned at the position “OK (0).”
10. When you complete this adjustment, exit the BASIC program and turn off the printer.
Rev. A 4-11
Page 86

4.1.6 Color Head Angle Adjustment
The color head angle adjustment is required when the color head is replaced or disassembled.
If this adjustment is not correct, a white banding problem may occur, or the black head timing may
not match the color head timing. The following figure illustrates the color head angle adjustment.
The color head angle is adjusted by the angular spacer. The angular spacer is attached only to the
left side of the head base.
1. Connect the PC to the target printer, and turn the printer on.
2. Execute BASIC on the PC and run the program “VERxxx.BAS”.
1. Destination S etting
2. Head Angle Confirmation Pattern P rinting
(Black Head Spacer Selection)
3. Head Vertical Position Confirmation
4. Head Gap Adjustment
5. Bi-D Adjustment
6. Internal Timer Reset
7. END
3. When the main menu appears, choose “Head Angle Confirmation Pattern Printing” by typing
2 and ENTER. (The printer prints the check pattern with the sample name.)
WARNING
When replacing both the black head and color head, always adjust the color head angle
first. The black head angle and the black-color head vertical position adjustments are based
on the color head angle adjustment.
Page 87

0.30
0.35
0.40
0.45
0.50
Angular Spacer (for Color Head)
Spacer Name
Thickness
Shape
angular spacer YMC
angular spacer YMC-B
angular spac er YM C-C
angular spacer YMC-D
angular spacer YMC-E
(A) (B ) (A) (B)
Check
positions A, B
Positio n A, B
Position A, B
Replace the right
angular spacer
with a thicker one.
Replace the right
angular spacer
with a thinner one
Magenta
Cyan
Magenta
Cyan
Stylus Pro XL Adjustments
Angular spacers for the color head come in five thicknesses, each having its own shape. The
following figure shows the relationship between the shape and thickness. Since the color head is
not equipped with a linear spacer, the angle adjustment is decided only by the angular spacer
(specifically designed for the color head), which is placed under the left side of the head base.
Figure 4-14. Relationship between the Shape and Thickness
4. In Figure 4-13, pay attention to the position of A and B while you reset the left angular spacer.
The replacement procedure is explained beginning in step 5.
5. Turn off the printer now.
6. Move the carriage to the center manually, and loosen (but do not remove) the screw securing
the color head to the carriage.
Rev. A 4-13
Figure 4-15. Spacer Selection
Page 88

Adjustments Stylus Pro XL
7.
Rubber Cap
Screw 1
Screw 2
Screw 3
Figure 4-16. Removing the Rubber Cap
Remove the rubber cap covering the head screw at one side of color ink cartridge. Then loosen
(but do not remove) 3 screws. (Refer to the figure below.)
8. Replace the angular spacer on the left side with a new one, referring the figure below. (Replace
the angular spacer using tweezers to push the head base toward the rear.)
4-14 Rev. A
Page 89

Stylus Pro XL Adjustments
9. Rerun the BASIC program and choose “Head Angle Confirmation Pattern” again by typing 2
and ENTER. Then verify that the confirmation sample is correct.
Carriage Unit
1: Push
Head Base
Color H ead
Angular Spacer
(one side on ly)
Platen Gap Adjust Lever
2: Replace
Figure 4-17. YMC Angular Spacer Replacement
10. If the sample is incorrect, repeat steps 5-9 until the upper lines in the sample are aligned with
one another and the lower lines in the sample are exactly equidistant to one another (as shown
at B in Figure 4-15).
11. When you complete this adjustment, turn off the printer.
Rev. A 4-15
Page 90

Attach the thickness gauge
under the PF pinch roller unit.
Left Adjustment Position
Right Adjustment Position
Paper Guide P late
Bushing
Pump Un it
Eject Frame
Thickness Gau ge
Thickness Gauge
Front
Fron t Frame
PF Pinch Roller
Unit
Attach ment Point
Tension Roller
Thickness Gau ge
Paper G uide
Platen
Adjustments Stylus Pro XL
4.1.7 Platen Gap Adjustment
This adjustment is required when the carriage unit is replaced or removed from the printer
mechanism. Adjust the distance between the printhead nose and the paper surface to 1.1 mm.
1. Attach a thickness gauge (commercially available) to the left side adjustment position on the
paper guide plate, as shown in the figure below, so that one side hooks the paper feed pinch
roller unit.
2. Move the carriage unit manually onto the thickness gauge.
Table 4-2. Gap and Adjustment Direction
Gap between Head Nose and Gauge Surface Left Bushing Right Bushing
Narrow CW CCW
Spread CCW CW
3. Rotate the parallelism adjustment bushing, attached to the left and right ends of the carriage
guide shaft, when the black and color printheads contact the thickness gauge.
4. After attaching the printheads to the gauge surface, verify that the gap between the carriage
roller and the front frame is less than 0.04 mm. (See Figure 4-16.)
5. Attach the 1.1 mm thickness gauge to the right side adjustment position on the paper guide
plate, as shown below, so that one side hooks the paper feed pinch roller unit.
Note: When checking the gap between the carriage roller and the front frame, use the thickness
gauge or the paper guide plate. If the gap is correct the gauge cannot be installed into the
gap. If the gap is incorrect, the gauge can be inserted in the gap.
4-16 Rev. A
Figure 4-18. Adjusting the Platen Gap
Page 91

0.04 mm
Carriage Roller
Thickness
Gauge
Gap
Eject Frame
Stylus Pro XL Adjustments
6. Move the carriage manually to the right adjustment position and repeat steps 3 and 4,
referring to Figures 4-18 and 4-19.
Figure 4-19. Confirming the Gap
4.1.8 Internal Timer Reset Operation
This operation is required when the M-4A60 printer mechanism is replaced. There are 6 timers in
this printer:
1. Refresh timer
2. Timer (monochrome and CMY)
3. Flushing level decision timer
4. False absorbing timer
5. Total print timer
6. PAUSE timer
When the printer mechanism is replaced, reset the timers as described here:
1. Connect the PC to the target printer, and turn on the printer.
2. Execute BASIC on the PC and run the VERxxx.BAS program.
1. Destination Setting
2. Head Angle Confirmation Pattern Printing
(Black Head Spacer Selection)
3. Head Vertical Position Confirmation
4. Head Gap Adjustment
5. Bi-D Adjustment
6. Internal Timer Reset
7. END
3. When the main menu appears, choose “Internal timer reset” by typing 6 and ENTER.This
resets the internal timer. The following message then appears.
All parameters of the internal timer
are now reset. Press Y and ENTER
to return to the main menu.
4. Press Y and ENTER.
5. Press 7 and ENTER.
6. Turn off the printer.
Rev. A 4-17
Page 92

Chapter 5 Troubleshooting
Table of Contents
5.1 OVERVIEW 5-1
5.2 UNIT LEVEL TROUBLESHOOTING 5-3
5.2.1 Printer Does Not Operate at Power on. . . . . . . . . . . . . . . . . . . . . . . . . . 5-4
5.2.2 Error is Detected. . . . . . . . . . . . . . . . . . . . . . . . . . . . . . . . . . . . . . . . . . . . 5-5
5.2.3 Failure Occurs During Printing. . . . . . . . . . . . . . . . . . . . . . . . . . . . . . . . 5-6
5.2.4 Printer Does Not Feed the Paper Correctly . . . . . . . . . . . . . . . . . . . . . . 5-7
5.2.5 Control Panel Operation is Abnormal . . . . . . . . . . . . . . . . . . . . . . . . . . 5-8
5.3 UNIT REPAIR - C137 PSB/PSE BOARD 5-9
5.4 UNIT REPAIR - C164 MAIN BOARD 5-10
5.5 UNIT REPAIR - PRINTER MECHANISM (M-4A11) 5-12
LIST OF FIGURES
Figure 5-1. Troubleshooting Process Flowchart. . . . . . . . . . . . . . . . . . . . . . . 5-1
LIST OF TABLES
Table 5-1. Motor Coil Resistance Test Points. . . . . . . . . . . . . . . . . . . . . . . . . 5-1
Table 5-2. Sensor Status . . . . . . . . . . . . . . . . . . . . . . . . . . . . . . . . . . . . . . . . . . 5-1
Table 5-3. Sensor Test Points . . . . . . . . . . . . . . . . . . . . . . . . . . . . . . . . . . . . . . 5-2
Table 5-4. Error Codes . . . . . . . . . . . . . . . . . . . . . . . . . . . . . . . . . . . . . . . . . . . 5-2
Table 5-5. Symptoms and Problems . . . . . . . . . . . . . . . . . . . . . . . . . . . . . . . . 5-3
Table 5-6. Repair of the C137 PSB/PSE . . . . . . . . . . . . . . . . . . . . . . . . . . . . . . 5-9
Table 5-7. Repair of the C164 MAIN . . . . . . . . . . . . . . . . . . . . . . . . . . . . . . . . 5-10
Table 5-8. Repair of the Printer Mechanism . . . . . . . . . . . . . . . . . . . . . . . . . 5-12
Page 93

Rev.-A 5-i
Page 94

START
UNIT LEVEL T R OUBL ESHOOT ING
UNIT REPAI R
[C13 7 PSB/PS E BOAR D]
UNIT REPAIR
[C162 MAI N BOARD]
UNIT REPAIR
[M-4A60 MECHANISM]
ASSEMBLY
AND
ADJUS TM EN T
END
Stylus Pro XL Troubleshooting
5.1 OVERVIEW
The printer may exhibit different symptoms for the same problem, which makes troubleshooting
more difficult. However, this section provides simple and effective ways to facilitate
troubleshooting. The following flowchart illustrates the main steps of the troubleshooting process.
Figure 5-1. Troubleshooting Process Flowchart
Sensor Point Signal Level Status
PE Sensor
BCO Sensor
CCO Sensor
HP Sensor
TH Sensor
Table 5-1. Motor Resistances
Motor Resistance Range Temperature
CR Motor
PF Motor
10.0Ω±10% At 25 °C(77°F)
11.5Ω±10% At 25 °C(77°F)
Table 5-2. Sensor Status
CN8
Pin1(PE)toPin2
(GND)
CN11
Pin 8 (BCO) to
Pin7(GND)
CN12
Pin8(CCO)to
Pin7(GND)
CN9
Pin3(HPV)to
Pin2(GND)
CN10
Pin10(SW0-5)to
Pin1(GND)
H(5V)
L (GND)
Paper exists
No paper (paper end)
L (GND) Black cartridge exists
H (5 V) No black cartridge
L (GND)
H(5V)
Color cartridge exists
No color cartidge
L At home position (HP)
H
Out of HP
Change the pulse width of
Analog data
the charge pulse for the
common driver circuit
Rev. -A 5-1
Page 95

Troubleshooting Stylus Pro XL
Table 5-3. Error Codes
LED
Error
Status
Paper out On On
Data
Paper
Out
No Ink
Cartridge
Economy Condensed Pause
Recovery
Load paper in the
tray, press Load/
Eject, and then the
Pause button.
No ink
cartridge
Paper jam Blinks
Maintenance
request
Carriage
error
Blinks Blinks Blinks Blinks Blinks Blinks
Blinks Blinks
On On
Install the new ink
cartridge and press
the Pause button.
Load paper and
press Pause and
Load/Eject buttons.
Service maintenance
request. (Change the
waste ink drain tank
and reset the counter.)
Turn off the printer
andturnitonagain.
5-2 Rev. -A
Page 96

Stylus Pro XL Troubleshooting
5.2 UNIT LEVEL TROUBLESHOOTING
When a problem occurs, you can identify the defective unit based on the symptoms exhibited. The
table below lists the symptoms of certain problems. Once the problem is identified, refer to the
flowchart that corresponds to the problem.
Table 5-4. Symptom and Problem
Symptom Problem Flowchart No.
Printer does not operate at power on
Error is detected ❏ Error is indicated by LED indication.
Failure occurs during printing
Printer does not feed the paper
correctly
Control panel operation is abnormal ❏ No response to button access.
❏ LEDs do not light up.
❏ Printer mechanism does not operate.
❏ Printing is not performed.
❏ Abnormal printing (missing dots, etc.)
❏ Print quality is poor
❏ No paper is fed.
❏ Paper feed is irregular.
❏ Paper jam occurs.
5.2.1
5.2.2
5.2.3
5.2.4
5.2.5
Rev. -A 5-3
Page 97

Troubleshooting Stylus Pro XL
5.2.1 Printer does not operate at power on.
START
Is the AC
input voltage
correct?
YES
Has fuse
(F1) on the C137
PSB/PSE
blown?
NO
Check the ou tput
voltage of the C137
PSB/PSE at CN 2.
NO
YES
Use the correc t
input voltage.
Replace the fuse
and disc onnect
CN5 on t he C162
MAIN board.
NO
Does the
fuse blow again
at power on?
YES
Is the output
voltage correct?
YES
Replace the C1 62
MAIN board.
Is the problem
corrected
YES
END
NO
Replace the
C137 PSB/P SE
board
NO
Check motors and drivers.
Refer to the section describing
repair of the printer mechanism.
5-4 Rev. -A
Page 98

Stylus Pro XL Troubleshooting
5.2.2 Error is detected.
START
Identify the type
of error indicated.
(See Table 5-3.)
Turn the printer
Carriage error
YES
off and try to
move the carriage
manually.
NO
No ink cartriage
NO
Waste ink drain
tank overflow
Replace the waste
ink absorbing
material, and reset
the protect counter.
(See Chapter 6.)
YES
YES
Check ink cartridge
sensor and, if bad,
replace.
Replace the ink
cartridge with a
new one.
Does error
occur again?
NO
carriage mo ve
Check CR motor
and dr iver s. If t hey
are OK, replace the
C162 MAIN b oar d.
YES
Refer to the section
describing repair of
the printer mechanism.
Does th e
smoothly?
YES
Is the
problem
corrected?
NO
NO
END
END
Rev. -A 5-5
Page 99

Replace the C162
MAIN board.
START
END
END
YES
YES
YES
NO
NO
NO
YES
YES
YES
NO
NO
NO
Run the
self-test .
Connect the cables
correctly.
Perform the color or
black head cleanin g .
Adjust the
bidirectional
print alignment or
readjust the head
arrangement
adjustment .
(See Chapter 4.)
See the section
describing repair of
the printer mechanism.
Check all motors,
drivers, and printhead
for shorts. If they are
OK, replace the C162
MAIN board.
Is the problem
corr ected?
Is print
quality bad?
Does the self-
test print?
Is the problem
corr ected?
Is the pro blem
corr ect ed?
Are all cables
connected to the C162
MAIN board firmly?
Troubleshooting Stylus Pro XL
5.2.3 Failure occurs during printing.
5-6 Rev. -A
Page 100

Stylus Pro XL Troubleshooting
5.2.4 Printer does not feed the paper correctly.
START
Is paper loaded
in the sheet feeder
correctly?
YES
Does a
paper jam
occur?
NO
Check the PF motor
and driver. If OK,
replace the C162
MAIN board.
Is the problem
corr ected?
YES
NO
YES
NO
Load the paper
correctly.
Verify that the
paper path is clear.
Also conf ir m that
there ar e n o foreig n
object s t h a t m ay
interf e r e with p aper
moveme n t.
Perform the PF
roller cleaning with
the cleaning sheet.
Is the problem
corrected?
NO
YES
END
YES
See the section
describing
repair of the
printer mechanism.
Is the problem
corr ected?
NO
END
Rev. -A 5-7
 Loading...