

Page 1
Color Digital Camera
User's Guide
4014069
-00
Page 2

Where to Find Information
This User’s Guide
Provides detailed information to help you set up and use your EPSON PhotoPC 3100Z and the optional products
available from EPSON. Also contains information on troubleshooting, and instructions on installing the software
included on the EPSON PhotoPC 3100Z Software CD-ROM included with your PhotoPC 3100Z.
Online EPSON Digital Camera Software User’s Guide
Included in the EPSON PhotoPC 3100Z Software CD-ROM, this guide provides information on installing and using
the EPSON Photo!4 software, which allows you to download photos from your camera to your computer and to
manage your photos. Includes instructions for the other software utilities included on the software CD-ROM, such as
EPSON AutoDownloader which helps you download files in a quick and organized way, and EPSON File Converter,
which prepares photos to be uploaded to your camera. Also includes information on contacting customer support.
Online EPSON PhotoQuicker Reference Guide
Provides information on using the EPSON PhotoQuicker software to print your photos. This guide is installed on your
computer when you install the EPSON PhotoQuicker software.
Online Help
Provides detailed information and instructions for using EPSON Photo!4 and EPSON Auto Downloader. Online help
is automatically installed when you install EPSON Photo!4. See the online EPSON Digital Camera Software User’s Guide
for details on accessing online help.
Page 3
®
COLOR DIGITAL CAMERA
User’s Guide
Page 4

IMPORTANT NOTICE
All rights reserved. No part of this publication may be reproduced,
stored in a retrieval system, or transmitted in any form or by any means,
electronic, mechanical, photocopying, recording, or otherwise, without
the prior written permission of SEIKO EPSON CORPORATION. No
patent liability is assumed with respect to the use of the information
contained herein. Neither is any liability assumed for damages
resulting from the use of the information contained herein.
Neither SEIKO E PSON CORPORATION nor its af filiates shall be liable
to the purchaser of this product or third parties for damages, losses,
costs, or expenses incurred by the purchaser or third parties as a result
of: accident, misuse, or abuse of this product or unauthorized
modifications, repairs, or alterations to this product, or (excluding the
U.S.) failure to strictly comply with SEIKO EPSON CORPORATION's
operating and maintenance instructions.
SEIKO EPSON CORPORATION shall not be liable against any
damages or problems arising from the use of any options or any
consumable products other than those designated as Original EPSON
Products or EPSON Approved Products by SEIKO EPSON
CORPORATION.
EPSON is a registered trademark of SEIKO EPSON CORPORATION.
PhotoPC is a trademark of SEIKO EPSON CORPORATION.
Macintosh is a registered trademark of Apple Computer, Inc.
Microsoft and Windows are registered trademarks of Microsoft
Corporation.
CompactFlash is a trademark of SanDisk Corporation and has been
licensed to CFA (CompactFlash Association).
General Notice:
purposes only and may be trademarks of their respective owners. EPSON
disclaims any and all rights in those marks.
Copyright © 2001 by SEIKO EPSON CORPORATION, Nagano, Japan.
Other product names used herein are for identification
This product conforms to the following Directive(s) and Norm(s):
Directive 89/336/EEC:
EN 55022 Class B
EN 55024
A NOTE CONCERNING RESPONSIBLE USE OF
COPYRIGHTED MATERIALS
Like photocopiers, digital cameras can be misused by improperly
photographing copyrighted material. Unless acting on the advice of a
knowledgeable attorney, be responsible and respectful by obtaining the
permission of the copyright holder before photographing published
material.
ii
Page 5

Contents
Introduction
PhotoPC 3100Z Features . . . . . . . . . . . . . . . . . . . . . . . . . 1
Options. . . . . . . . . . . . . . . . . . . . . . . . . . . . . . . . . . . . . . . . 2
For United Kingdom users - use of options . . . . 3
Safety Instructions . . . . . . . . . . . . . . . . . . . . . . . . . . . . . . 4
When using the camera. . . . . . . . . . . . . . . . . . . . . 4
When using the strap. . . . . . . . . . . . . . . . . . . . . . . 5
When using the batteries. . . . . . . . . . . . . . . . . . . . 5
Safety information for United Kingdom
users. . . . . . . . . . . . . . . . . . . . . . . . . . . . . . . . . . . 7
Warnings, Cautions, and Notes . . . . . . . . . . . . . . . . . . . 7
Chapter 1 Getting Started
Unpacking Your PhotoPC 3100Z. . . . . . . . . . . . . . . . . . 1-2
Camera Parts. . . . . . . . . . . . . . . . . . . . . . . . . . . . . . . . . . . 1-2
Using the Batteries . . . . . . . . . . . . . . . . . . . . . . . . . . . . . . 1-5
Installing the batteries . . . . . . . . . . . . . . . . . . . . . . 1-5
Replacing the batteries. . . . . . . . . . . . . . . . . . . . . . 1-6
Cleaning the batteries . . . . . . . . . . . . . . . . . . . . . . 1-7
Storing the batteries . . . . . . . . . . . . . . . . . . . . . . . . 1-8
Disposing of the batteries . . . . . . . . . . . . . . . . . . . 1-9
Setting Up Your Camera . . . . . . . . . . . . . . . . . . . . . . . . . 1-9
Attaching the strap to your camera . . . . . . . . . . . 1-9
Attaching the lens cap to your camera. . . . . . . . . 1-10
Installing and removing a CompactFlash
Card . . . . . . . . . . . . . . . . . . . . . . . . . . . . . . . . . . .1-11
Turning on your camera for the first time. . . . . . 1-12
Chapter 2 Taking Pictures
Getting Ready . . . . . . . . . . . . . . . . . . . . . . . . . . . . . . . . . .2-1
Your camera’s picture-taking and flash
range. . . . . . . . . . . . . . . . . . . . . . . . . . . . . . . . . . . 2-2
Turning the camera on and off . . . . . . . . . . . . . . . 2-2
Using the display panel . . . . . . . . . . . . . . . . . . . . . 2-3
Using the dial switch . . . . . . . . . . . . . . . . . . . . . . . 2-4
Making basic settings . . . . . . . . . . . . . . . . . . . . . . . 2-5
Using the LCD monitor buttons . . . . . . . . . . . . . . 2-5
Taking Pictures Using the Viewfinder. . . . . . . . . . . . . . 2-6
Using the optical zoom feature . . . . . . . . . . . . . . . 2-7
Using the self timer. . . . . . . . . . . . . . . . . . . . . . . . .2-8
Taking Pictures Using the LCD monitor . . . . . . . . . . . . 2-9
Using the basic playback feature . . . . . . . . . . . . . 2-10
Using the digital zoom . . . . . . . . . . . . . . . . . . . . . . 2-12
Using the macro setting to take close-ups. . . . . . 2-13
iii
Page 6

Taking Multiple Exposures . . . . . . . . . . . . . . . . . . . . . . .2-13
Recording video clips . . . . . . . . . . . . . . . . . . . . . . .2-13
Using the continuous shooting feature. . . . . . . . .2-15
Using the time lapse feature. . . . . . . . . . . . . . . . . .2-15
Using the stitch assist feature. . . . . . . . . . . . . . . . .2-17
Making Audio Recordings for Photos . . . . . . . . . . . . . .2-19
Recording audio immediately after taking
photos . . . . . . . . . . . . . . . . . . . . . . . . . . . . . . . . . .2-20
Recording audio for existing photos. . . . . . . . . . .2-21
Audio playback using the built-in speaker . . . . .2-21
Chapter 3 Playing Back and Managing Images With
Your Camera
Viewing Images Using the LCD Monitor. . . . . . . . . . . .3-1
Displaying one, four, or nine photos at once. . . .3-1
Magnifying photos. . . . . . . . . . . . . . . . . . . . . . . . . .3-2
Viewing a slide show of your photos . . . . . . . . . .3-3
Viewing photo information . . . . . . . . . . . . . . . . . .3-4
Selecting a folder in the CompactFlash Card. . . .3-5
Playing back video clips . . . . . . . . . . . . . . . . . . . . .3-5
Managing Images with the LCD Monitor . . . . . . . . . . .3-6
Locking and unlocking photos . . . . . . . . . . . . . . .3-6
Erasing images . . . . . . . . . . . . . . . . . . . . . . . . . . . . .3-7
Erasing audio recordings . . . . . . . . . . . . . . . . . . . .3-7
Erasing video clips. . . . . . . . . . . . . . . . . . . . . . . . . .3-8
Viewing Pictures on a Television . . . . . . . . . . . . . . . . . .3-9
Viewing Pictures with an EPSON Projector . . . . . . . . .3-10
Chapter 4 Making Settings
Making Image Capture Settings. . . . . . . . . . . . . . . . . . . 4-1
Adjusting the image quality . . . . . . . . . . . . . . . . . 4-1
Setting the flash. . . . . . . . . . . . . . . . . . . . . . . . . . . . 4-4
Making camera mode settings . . . . . . . . . . . . . . . 4-6
Changing the color/monochrome setting. . . . . . 4-7
Making manual focus settings . . . . . . . . . . . . . . . 4-8
Adjusting the sensitivity setting. . . . . . . . . . . . . . 4-8
Adjusting the white balance setting. . . . . . . . . . . 4-9
Making exposure settings . . . . . . . . . . . . . . . . . . . 4-11
Changing the metering system. . . . . . . . . . . . . . . 4-16
Selecting slow synchro timing . . . . . . . . . . . . . . . 4-17
Selecting the internal or external flash. . . . . . . . . 4-18
Making Camera Settings . . . . . . . . . . . . . . . . . . . . . . . . . 4-19
Setting the time and date. . . . . . . . . . . . . . . . . . . . 4-19
Using the automatic shut-off feature . . . . . . . . . . 4-20
Setting the LCD monitor’s brightness level . . . . 4-20
Adjusting the speaker volume . . . . . . . . . . . . . . . 4-21
Setting the beep and shutter sound . . . . . . . . . . . 4-21
Selecting the signal system and language. . . . . . 4-21
Making Print Settings. . . . . . . . . . . . . . . . . . . . . . . . . . . . 4-22
Selecting images and specifying the number
of prints . . . . . . . . . . . . . . . . . . . . . . . . . . . . . . . . 4-23
Making settings to print an index . . . . . . . . . . . . 4-24
Making print quality settings . . . . . . . . . . . . . . . . 4-24
iv
Page 7

Chapter 5 Using Images on Your Computer
Chapter 6 Camera Options and Accessories
System Requirements . . . . . . . . . . . . . . . . . . . . . . . . . . . 5-1
For Windows. . . . . . . . . . . . . . . . . . . . . . . . . . . . . . 5-1
For Macintosh . . . . . . . . . . . . . . . . . . . . . . . . . . . . . 5-2
The Included Software. . . . . . . . . . . . . . . . . . . . . . . . . . . 5-2
Installing the Software for Windows Users . . . . . . . . . 5-3
Installing the Software for Macintosh Users . . . . . . . . 5-5
Installing EPSON Photo!4 and other
software . . . . . . . . . . . . . . . . . . . . . . . . . . . . . . . 5-5
Installing QuickTime 4 . . . . . . . . . . . . . . . . . . . . . 5-6
Installing Acrobat Reader . . . . . . . . . . . . . . . . . . . 5-7
Setting Up EPSON CameraStarter. . . . . . . . . . . . . . . . . 5-7
Connecting and Disconnecting the Camera. . . . . . . . . 5-8
Connecting the camera to your computer . . . . . 5-9
Disconnecting the camera from your
computer. . . . . . . . . . . . . . . . . . . . . . . . . . . . . . . 5-10
Transferring Images to Your Computer . . . . . . . . . . . . 5-12
Using EPSON digital camera software. . . . . . . . 5-12
Copying files directly from the memory
card . . . . . . . . . . . . . . . . . . . . . . . . . . . . . . . . . . . 5-13
Viewing the Software User’s Guides on
Your Computer . . . . . . . . . . . . . . . . . . . . . . . . . . . . . . 5-14
Accessing the EPSON Digital Camera
Software User’s Guide . . . . . . . . . . . . . . . . . . . 5-14
Accessing the EPSON PhotoQuicker
User’s Guide. . . . . . . . . . . . . . . . . . . . . . . . . . . . 5-15
Using Memory Cards . . . . . . . . . . . . . . . . . . . . . . . . . . . . 6-1
Inserting a memory card into your computer. . . 6-2
Formatting memory cards . . . . . . . . . . . . . . . . . . . 6-3
Using Rechargeable Batteries . . . . . . . . . . . . . . . . . . . . . 6-4
Using the AC Adapter . . . . . . . . . . . . . . . . . . . . . . . . . . . 6-5
Using the Lens Adapter . . . . . . . . . . . . . . . . . . . . . . . . . . 6-6
Chapter 7 Maintenance and Troubleshooting
Maintenance. . . . . . . . . . . . . . . . . . . . . . . . . . . . . . . . . . . . 7-1
Handling the camera . . . . . . . . . . . . . . . . . . . . . . . 7-1
Cleaning the camera . . . . . . . . . . . . . . . . . . . . . . . . 7-2
Storing the camera . . . . . . . . . . . . . . . . . . . . . . . . . 7-2
Problems and Solutions . . . . . . . . . . . . . . . . . . . . . . . . . . 7-2
Camera problems . . . . . . . . . . . . . . . . . . . . . . . . . . 7-2
Picture problems . . . . . . . . . . . . . . . . . . . . . . . . . . . 7-7
v
Page 8

Appendix A Specifications
Camera. . . . . . . . . . . . . . . . . . . . . . . . . . . . . . . . . . . . . . . . .A-1
Physical dimensions . . . . . . . . . . . . . . . . . . . . . . . .A-1
Product type . . . . . . . . . . . . . . . . . . . . . . . . . . . . . . .A-1
Recorded image . . . . . . . . . . . . . . . . . . . . . . . . . . . .A-2
Optical . . . . . . . . . . . . . . . . . . . . . . . . . . . . . . . . . . . .A-3
Functional . . . . . . . . . . . . . . . . . . . . . . . . . . . . . . . . .A-4
Interface. . . . . . . . . . . . . . . . . . . . . . . . . . . . . . . . . . .A-4
Power. . . . . . . . . . . . . . . . . . . . . . . . . . . . . . . . . . . . .A-4
CompactFlash Card. . . . . . . . . . . . . . . . . . . . . . . . . . . . . .A-5
Optional PCMCIA Adapter . . . . . . . . . . . . . . . . . . . . . . .A-6
Optional AC Adapter . . . . . . . . . . . . . . . . . . . . . . . . . . . .A-6
Appendix B Dial Position Settings
Index
Available Settings in the
Available Settings in the Dial Position. . . . . . . . . . . .B-3
Available Settings in the Dial Position. . . . . . . . . . .B-4
Available Settings in the
When using the Program camera mode. . . . . . . .B-5
When using the Manual camera mode. . . . . . . . .B-5
Available Settings in the Dial Position . . . . . . . . . .B-6
When using the Program camera mode. . . . . . . .B-6
When using the Manual camera mode. . . . . . . . .B-6
Glossary
Dial Position. . . . . . . . .B-2
Dial Position . . . . . . . . .B-5
vi
Page 9

Introduction
Your EPSON® PhotoPC™ 3100Z is a revolutionary,
easy-to-use digital camera that enables you to take
full-color pictures that you can edit, manipulate, and
print using your computer. Create professional letters,
documents, and presentations from your desktop
using stunning, lifelike images. Share photos with
business colleagues or friends over the Internet. Add
color and visual appeal to your newsletters, flyers, and
brochures. Improve the look of any document using
images taken with your PhotoPC 3100Z.
The PhotoPC 3100Z comes with everything you need
to get started, including EPSON Photo!4 software that
lets you transfer photos from the camera to your
computer’s hard disk. You can then edit, enhance, or
organize your photos, or insert them into your
documents. For instructions on using and installing
EPSON Photo!4, see the online EPSON Digital Camera
Software User’s Guide.
PhotoPC 3100Z Features
The PhotoPC 3100Z has the following features.
❏ 3.3 megapixel CCD
❏ 24-bit color image capture
❏ High resolution, up to 2544 × 1904 pixels
(equivalent to 4.8 megapixels) using HyPict
❏ PRINT Image Matching support, which allows
you to achieve enhanced results when printing
your photos with a printer that supports the
PRINT Image Matching system
❏ Built-in color LCD monitor for previewing and
playing back pictures
❏ Built-in microphone and speaker for audio
recording and playback
❏ Macro photo format
❏ Optical ×3 and seamless digital ×2 zoom
Introduction
1
Page 10

❏ Continuous shooting of up to 47 pictures
(approximately)
❏ Automatic, predefined, or manual white balance
adjustment
❏ Automatic, predefined and adjustable exposure
settings (-2.0 to + 2.0 EV, in increments of 0.5 or
0.2)
❏ Automatic date and time recording for each
picture
❏ Built-in flash with automatic flash, forced flash,
flash off, red-eye reduction, and leading or
trailing slow synchro flash (for taking pictures at
night or in dark places) options
❏ EPSON File Converter software to convert images
and audio recordings stored on your computer to
EPSON Photo file format for uploading to your
camera
❏ Other EPSON software to help you organize your
downloads, stitch together photos to create
panoramas, and print your photos
❏ DPOF file format support, which lets you specify
in advance which photos to print and how many
prints of each photo to make
❏ File formats compatible with both Windows
Macintosh
®
applications
®
and
❏ Built-in hot sync flash shoe for an external flash
(sold separately), which can be used for photo
shooting in the Manual camera mode. (For
information on external flashes, contact your
EPSON dealer.)
❏ Self-timer (ten second delay)
❏ Automatic shut-off to save battery power
❏ EPSON Photo!4 software to manage and transfer
photos to your computer
2
Introduction
Options
The following options are available from EPSON for
the PhotoPC 3100Z.
❏ CompactFlash™ Card
(for information, contact your EPSON dealer)
❏ PCMCIA adapter (B867041)
Page 11

❏ AC Adapter (B867081, B867091, B867101,
B867111, B867121, B867131, B867141, B867151,
B867161, B867171) for use with a standard
electrical outlet
❏ Power Pack (B81817✽, B818181, B818182) which
includes:
Ni-MH Battery Charger
Four Ni-MH Rechargeable Batteries
❏ Package of four Ni-MH Rechargeable Batteries
(B81811✽)
Note:
❏ The asterisk acts as a substitute for the last digit of the
product number, which varies by country.
❏ The PhotoPC 3100Z comes with a 16 MB
CompactFlash Card. For details on using this option,
see “Using Memory Cards” on page 6-1.
❏ The AC Adapter model EU-40 and Battery Charger
model EU-38 conform to CE marking requirements in
accordance with EC Directives 73/23/EEC and 89/
336/EEC.
For United Kingdom users - use of options
EPSON (UK) LTD shall not be liable against any
damages or problems arising from the use of any
options or consumable products other than those
designated as Original EPSON Products or EPSON
Approved Products by EPSON (UK) LTD.
Introduction
3
Page 12

Safety Instructions
❏ Do not use the camera outdoors during a
thunderstorm.
Read all of these instructions before using the camera,
and keep them handy for later reference. Follow all
warnings and instructions marked on the camera and
options.
When using the camera
Note the following when using the camera.
❏ To reduce the risk of electric shock, do not remove
the cover of the camera or options. Do not open
any compartments except as instructed in this
User's Guide.
❏ Do not insert objects into any openings.
❏ To prevent fire or electric shock, do not expose the
camera or options to rain or moisture.
❏ To prevent fire or electric shock, do not cover the
camera with a blanket or other covering that may
give off an electric charge.
❏ To prevent fire or explosion, do not use the
camera where flammable or volatile gas is stored.
❏ If the camera or option emits unusual noises,
odors, or smoke, cancel the current operation and
turn the device off immediately. Remove the
batteries and/or disconnect the AC adapter from
the camera, then unplug the AC adapter from the
electrical outlet. Then contact your EPSON dealer.
❏ To prevent possible injury, do not take flash
pictures in close proximity to anyone’s eyes.
❏ Only use the type of power source specified in this
User's Guide.
❏ Do not use damaged or frayed power cords.
❏ Remove the batteries and/or plug from the
camera and refer servicing to qualified service
personnel in the following circumstances:
The power cord or plug is damaged; liquid has
entered the camera or options; the camera or
options have been dropped or the case is
damaged; the camera or options do not operate
normally or exhibit a distinct change in
performance.
4
Introduction
Page 13

❏ Never adjust controls that are not mentioned in
the operating instructions.
❏ Do not touch your camera’s flash with your
fingers, or any other object, or allow the flash to
become dirty. Using the camera under any of
these conditions can damage the flash.
If you accidentally touch the flash, or if it becomes
dirty, be sure to clean it with a soft, dry cloth
before using the camera.
When using the strap
Note the following when using the camera strap.
❏ Do not swing the camera about. This can damage
the camera or other objects, or cause injury.
❏ Do not pull or tighten the strap too much when
wearing it; this can cause serious injury.
❏ Keep the strap away from children.
❏ If you plan to use the camera and options in
Germany, observe the following:
To provide adequate short-circuit protection and
over-current protection for these products, the
building installation must be protected by a 10 or
16 Amp circuit breaker.
Bei Anschluss des Produkts an die
Stromversorgung muss sichergestellt werden,
dass die Gebäudeinstallation mit einem 10 Aoder 16 A-Sicherung abgesichert ist.
❏ If the liquid crystal solution contained in the
display panel or in the LCD monitor leaks out and
gets on your hands, wash them thoroughly with
soap and water. If it gets into your eyes, flush
them immediately with water.
When using the batteries
Note the following when using and batteries.
❏ Read all relevant safety and operating
instructions before using the batteries.
❏ Do not use manganese batteries (IEC R6).
❏ Do not charge primary (non-rechargeable)
batteries.
❏ To avoid fire or electric shock, do not use batteries
that are leaking or damaged in any way.
❏ Only use EPSON Ni-MH batteries according to
the directions in this manual.
Introduction
5
Page 14

❏ Be aware of electrical shock hazard.
❏ Do not handle the batteries with wet hands or use
them near water.
❏ Do not expose the batteries to water or high
humidity.
❏ Keep batteries away from heat sources.
❏ Do not drop, puncture, disassemble, mutilate, or
short-circuit batteries. Do not place the batteries
near to or into fire or water.
❏ To protect against short-circuiting, do not remove
the outside sleeves of the batteries.
❏ Do not insert objects into any openings as they
may touch dangerous voltage points or shortcircuit components.
❏ Prevent the batteries from coming into contact
with metal objects which could short-circuit the
batteries, such as coins or keys.
❏ Do not insert batteries into wall outlets or other
power sources such as car cigarette lighter
sockets.
❏ If battery acid gets into your eyes o r on you r skin,
immediately rinse the affected area thoroughly
with water and seek medical treatment. If a
battery is swallowed, seek medical treatment
immediately.
❏ Do not solder lead wires or terminals directly to a
battery.
6
Introduction
Page 15

Safety information for United Kingdom users
Warning:
w
the rating plate for voltage and check that the
appliance voltage corresponds to the supply voltage.
This appliance must be earthed. Refer to
Warnings, Cautions, and Notes
must be followed carefully to avoid bodily
w
Warnings
injury.
Important: The wires in the mains lead fitted to this
appliance are coloured in accordance with the
following code:
Blue — Neutral
Brown — Live
As the colours of the wires in the mains lead of
this appliance may not correspond with the
coloured markings identifying the terminals in
your plug, proceed as follows:
The blue wire must be connected to the terminal
in the plug marked with the letter N.
The brown wire must be connected to the terminal
in the plug marked with the letter L.
If damage occurs to the plug, replace the cord set
or consult a qualified electrician.
Replace fuses only with a fuse of the correct size
and rating.
Cautions
c
equipment.
contain important information and useful tips for
Notes
the operation of your camera and options.
must be observed to avoid damage to your
Introduction
7
Page 16

8
Introduction
Page 17

Chapter 1
Getting Started
This chapter helps you to set up your PhotoPC 3100Z and covers the following topics:
❏ Unpacking your PhotoPC 3100Z
❏ Getting familiar with the camera parts
❏ Installing and replacing batteries
❏ Attaching the camera strap and lens cap
❏ Installing the CompactFlash Card
❏ Setting the language, date, and time for your camera
1
Getting Started
1-1
Page 18
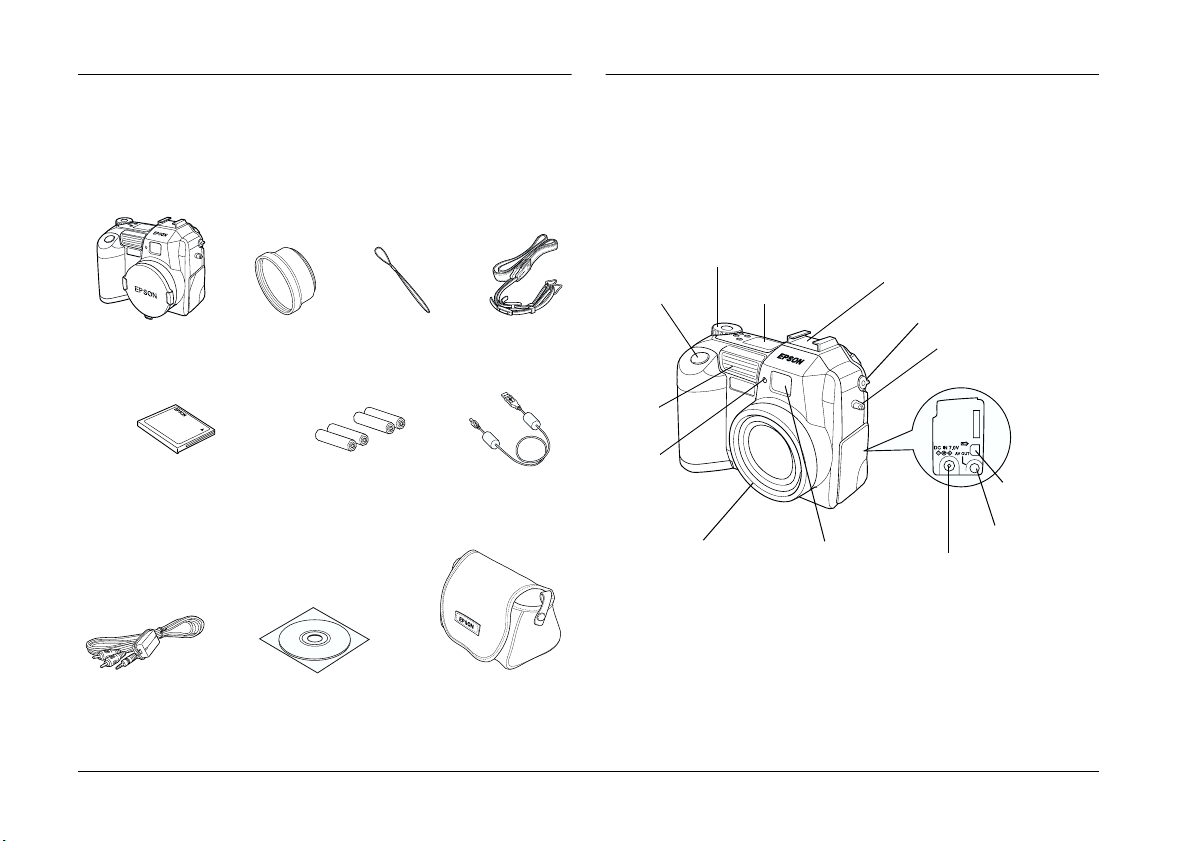
Unpacking Your PhotoPC 3100Z
Camera Parts
Make sure that your camera box contains all of the
items shown below.
camera
(with lens cap
attached)
16 MB CompactFlash Card
(installed in the camera)
AV cable
lens adapter lens cap string
alkaline batteries (4)
CD-ROM and/or floppy disks
(media type and quantity
vary by location)
camera case
strap
USB cable
After unpacking your PhotoPC 3100Z, take a few
minutes to learn about the components shown below.
Front view
dial switch
shutter button display panel
built-in
flash
timer
light
lens
viewfinder
hot shoe
(external flash attachment)
diopter correction
eyelet for
attaching strap
AC adapter
connector
USB interface
connector
AV connector
1-2
Getting Started
Page 19
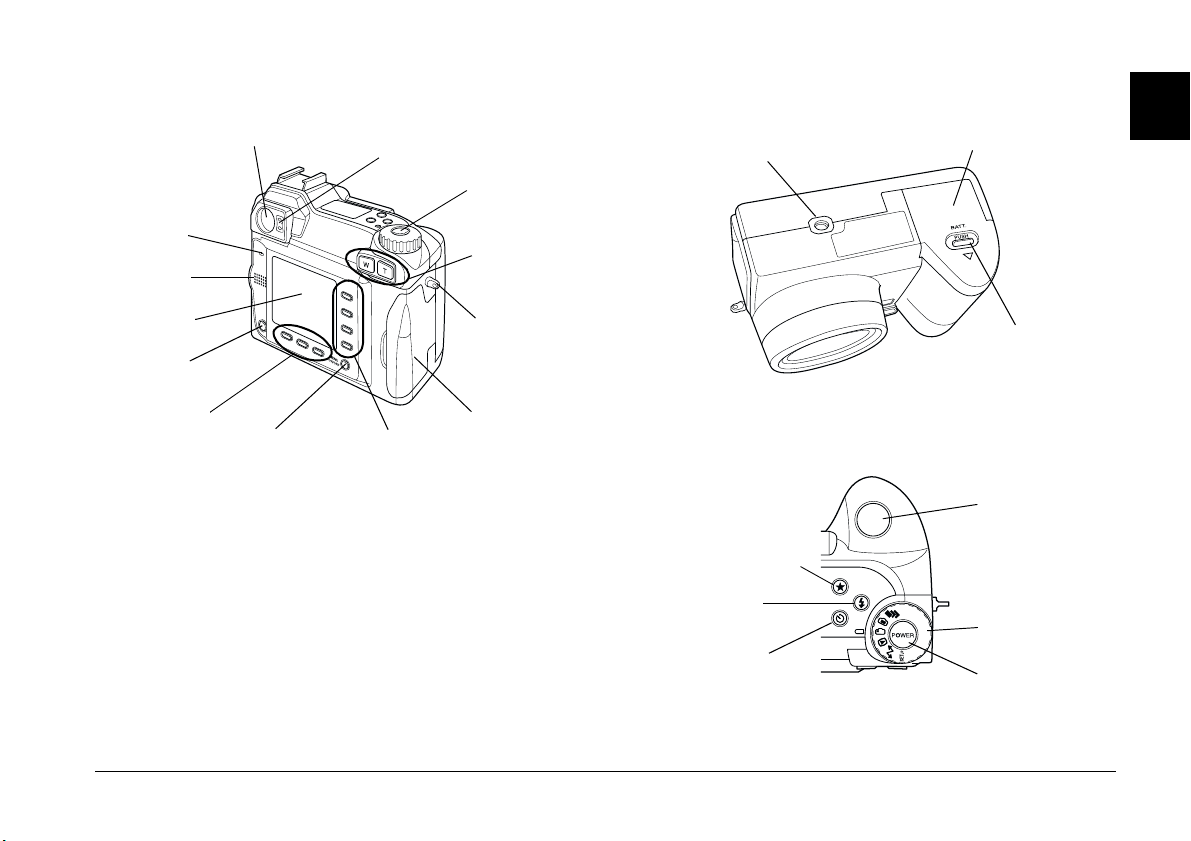
Back view
Bottom view
microphone
speaker
LCD monitor
print button
LCD monitor
buttons
viewfinder
MENU ON/OFF
button
indicator lights
LCD monitor
buttons
POWER button
zoom buttons
eyelet for
attaching strap
memory card
cover
Note:
In this User’s Guide, the LCD monitor buttons are named
after the corresponding indicators on the LCD monitor,
which vary depending upon the dial switch position and the
screen displayed.
Warning:
w
The speaker uses a magnet. Keep important magnetic
objects, such as credit cards and floppy disks, away
from the speaker. EPSON shall not be held liable for
any damages or lost information.
tripod mount
Top view
image quality button
(see page 4-1)
flash button
(see page 4-4)
self timer button
(see page 2-8)
battery cover
shutter button
dial switch
(see page 2-4)
POWER button
(see page 2-2)
1
battery cover
release button
Getting Started
1-3
Page 20
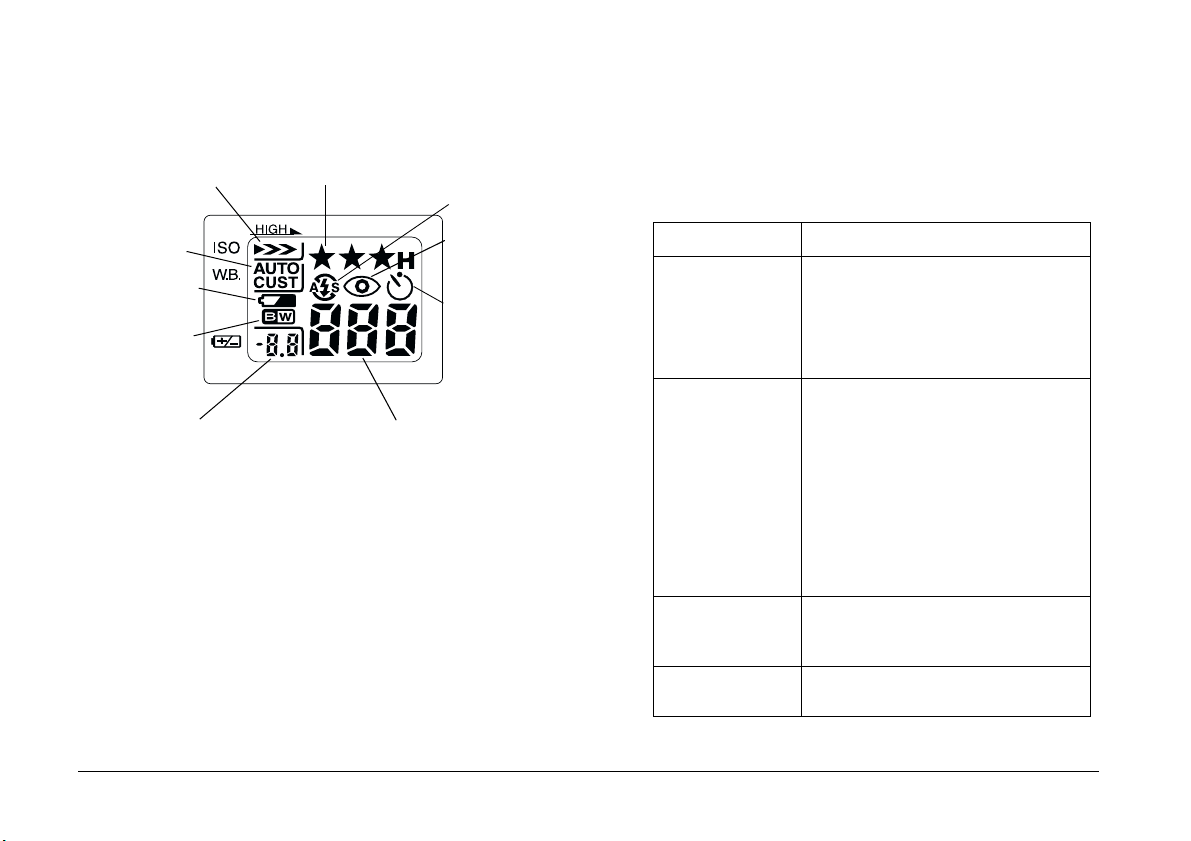
Display panel Indicator lights
The camera has one red and one green indicator light
sensitivity
(see page 4-8)
image quality
(see page 4-1)
flash
(see page 4-4)
beside the viewfinder. They turn on or blink to guide
you through the picture-taking process, or to indicate
the camera status. See the following chart for details.
white balance
(see page 4-9)
low battery icon
(see page 1-6)
monochrome
(see page 4-7)
exposure (see page 4-11)
or
aperture* (see page 4-15)
* The shutter speed is displayed when the shutter button is
depressed halfway and the camera is in Program or Manual
mode.
1-4
Getting Started
number of pictures remaining
(see page 2-3)
or
shutter speed*
red-eye reduction
(see page 4-4)
self timer
(see page 2-8)
Light Indication
Green (On) Camera is warmed up and ready for
Green (Blinking) Camera is warming up (immediately
Red (Blinking) Insufficient space in memory card to
Red (On) Error. Contact your EPSON dealer for
shooting.
Auto focus is locked (when shutter
button is depressed halfway).
Camera is taking picture using self
timer.
after camera is turned on).
Camera is auto focussing (when
shutter button is depressed halfway).
Camera is taking a video clip.
Memory card is not installed.
Lens cap is on.
Camera is establishing a connection
with the computer.
Files are being transferred to and
from the memory card.
take a picture or video clip.
Low battery power.
servicing.
Page 21
Using the Batteries
Your PhotoPC 3100Z comes with four AA (IEC LR6)
alkaline batteries. See the following sections for details
on installing, replacing, cleaning, storing, and
disposing of the batteries.
Caution:
c
Do not use manganese batteries (IEC R6).
Note:
❏ Do not leave batteries in the camera for a long time
without using them. See “Storing the batteries” on
page 1-9 for storage instructions.
❏ You can also use the optional Ni-MH rechargeable
batteries (Model EU-24). For more information on
rechargeable batteries, see “Using Rechargeable
Batteries” on page 6-4.
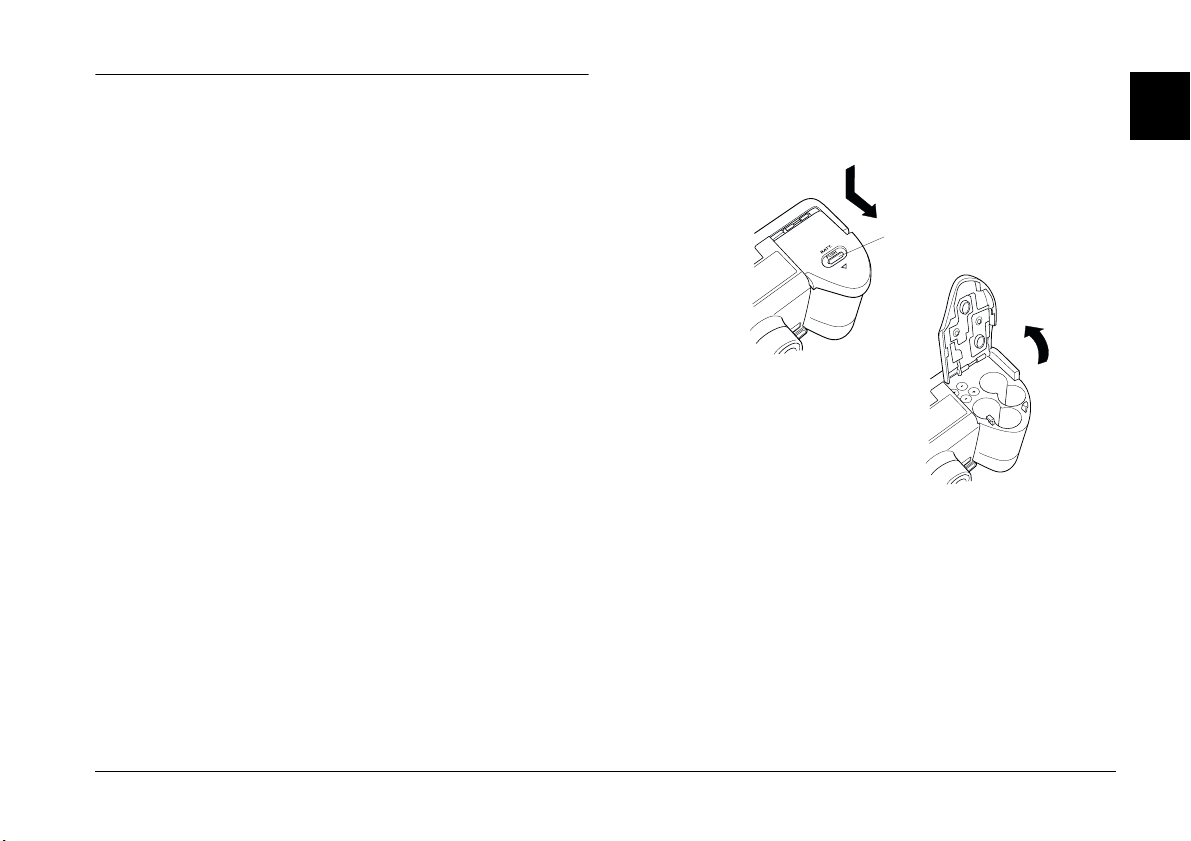
Installing the batteries
Before installing the batteries, be sure to read the
safety instructions outlined in “When using the
batteries” on page 5.
1. Turn the camera upside down with the lens facing
you. Hold down the battery cover release button
and slide the battery cover as shown below.
battery cover
release button
1
Make sure that the camera is off, and follow the steps
below to install or replace the batteries.
Getting Started
1-5
Page 22
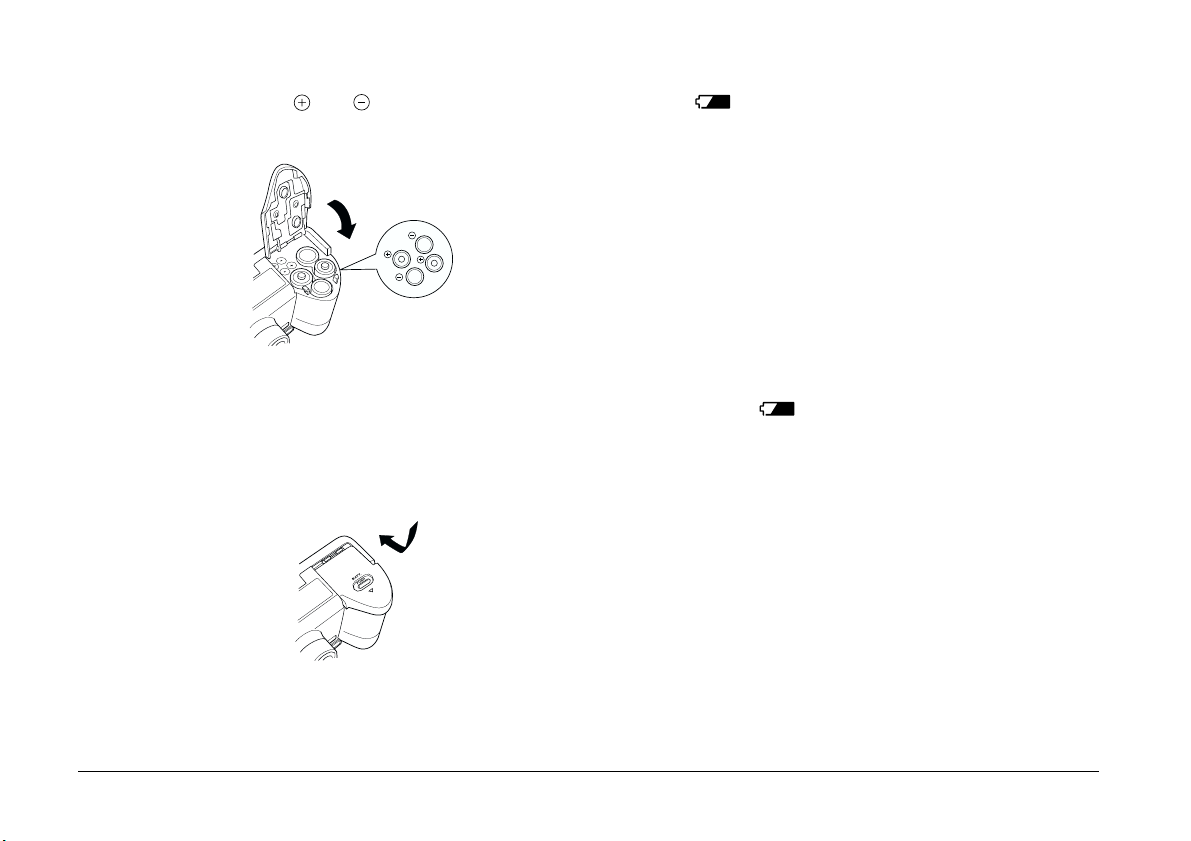
2. Insert four batteries into the compartment,
positioning the and ends as shown below.
Then lower the battery cover.
Warning:
w
Do not use different types of batteries together;
this can cause fire or explosion.
3. Swing the battery cover shut and hold it down
while you slide it back to lock it, as shown below.
When the battery power is almost out, a low battery
icon appears on the display panel. When the
battery power runs out, this icon blinks and the
camera turns off automatically. Remove the old
batteries, then insert new ones.
Note:
When the battery level is low, the LCD monitor turns off
while the flash is being charged. When the charging is
complete, the LCD monitor turns back on.
Replacing the batteries
Replace your PhotoPC 3100Z batteries when the low
battery icon appears on the camera’s display
panel. Be sure to replace all four batteries at the same
time. You can replace them with either of the
following battery types.
Single-use AA (IEC LR6) alkaline batteries
Rechargeable AA Ni-MH batteries
1-6
Getting Started
Page 23
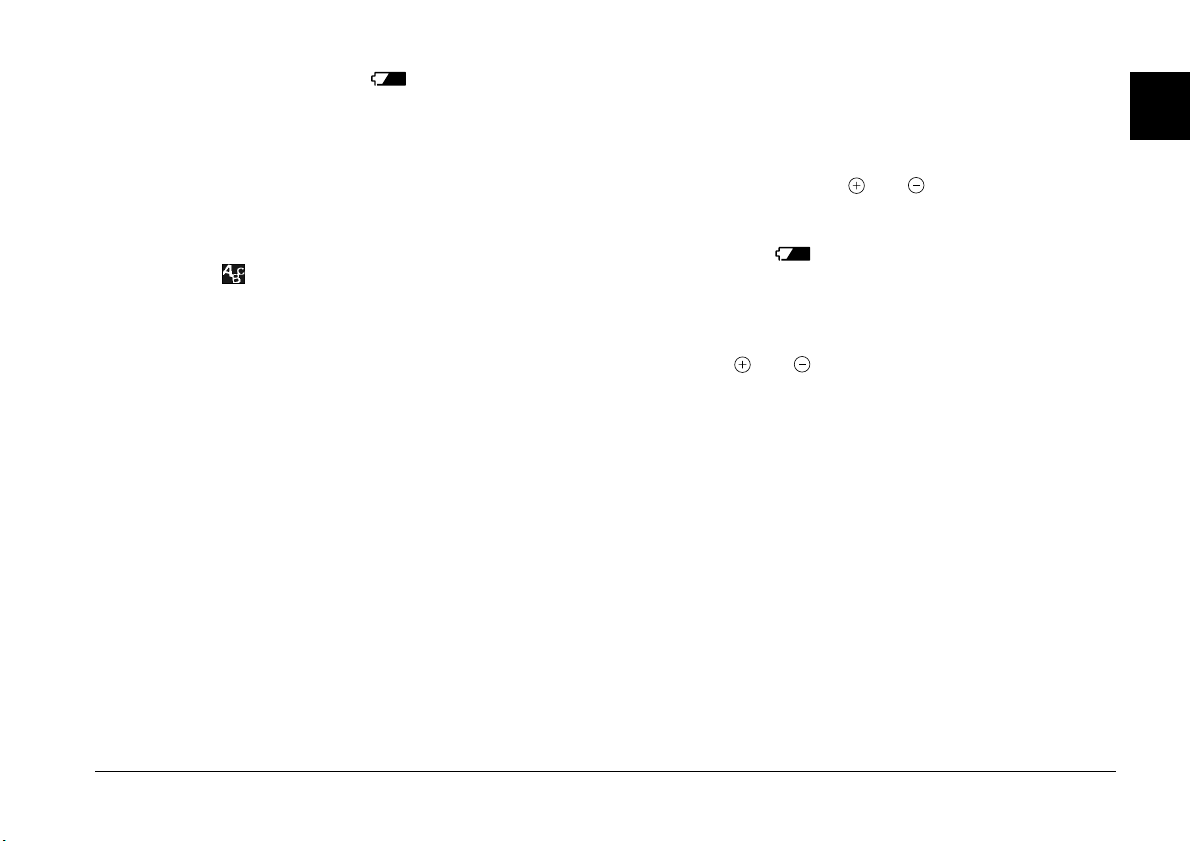
When the low battery icon appears, the buttons
listed below are unavailable.
When playing back photos and audio recordings:
Delete
SOUND
VIDEO CLIP
When making settings:
(language and signal system selection)
Memory SETUP
MEMORY CARD FORMAT
Note:
❏ Battery life varies depending on the battery type and
the manufacturer.
Cleaning the batteries
Follow the instructions in this section when cleaning
the batteries.
Dirty contact points ( and ) on the batteries and
inside the battery cover can obstruct the flow of
electricity in your camera. This can cause the low
battery icon to flash and your camera to turn off
automatically, even if there is still power remaining in
your batteries.
To prevent this kind of power loss, keep the contact
points ( and ) on the batteries and inside the
battery cover clean. When necessary, wipe them with
a soft, dry cloth.
1
❏ If you use rechargeable Ni-MH batteries in the
PhotoPC 3100Z, make sure that all four batteries are
fully charged when you replace them. If you find that
your batteries run out soon after recharging them a
number of times, make sure that you discharge them
completely before recharging.
❏ Ni-MH rechargeable batteries with a battery charger
are available for purchase from EPSON.
If you are using a battery charger, clean the terminals
of the battery charger with a soft, dry cloth before use
to ensure that your batteries charge fully.
Caution:
c
❏ Do not use detergents or chemical solvents such
as thinner, benzine, or alcohol-based solutions to
clean your camera, batteries, or battery charger.
Doing so can damage your equipment.
❏ Never attempt to clean the inside of the battery
compartment of your camera. Doing so can
damage your camera.
Getting Started
1-7
Page 24

Keep the battery ends clean by wiping them with a dry
cloth.
Warning:
w
❏ Do not apply heat or force to batteries, and do
not disassemble, drop, short-circuit, or put
batteries into contact with fire or water.
❏ Do not carry batteries loose in your pockets.
❏ Do not use different types of batteries together;
this can cause fire or an explosion.
❏ Always use batteries from the same package as a
set. Do not mix old and new batteries.
Storing the batteries
If you do not plan to use the camera for a long period
of time, remove the batteries and store them in a dry
location at a low temperature.
Warning:
w
❏ Do not store batteries together with metal
objects, which could short-circuit the batteries.
❏ Avoid storing batteries in extremely hot or
humid locations.
❏ Store batteries out of reach of children.
❏ Always remove the batteries from the camera
and charger before storing. Batteries left in your
camera and charger for a long time may leak and
cause damage.
1-8
Getting Started
Page 25
Disposing of the batteries
Before disposing of batteries, make sure you discharge
them completely.
Warning:
w
❏ Be sure to securely cover the + end of each
battery with tape when disposing of them to
prevent combustion or an explosion.
❏ Dispose of used batteries according to the
manufacturer’s instructions and in compliance
with all applicable laws. Contact your local
government agency for information about
battery recycling and disposal.
Setting Up Your Camera
1
This section explains how to attach the lens cap and
strap to your camera, install a memory card, and make
a few basic camera settings.
Attaching the strap to your camera
Before attaching the strap, be sure to read the safety
instructions outlined in “When using the strap” on
page 5.
To attach the strap, follow these steps.
For users in The Netherlands:
Do not dispose of the batteries as ordinary refuse.
Instead, dispose of them as small chemical waste in
accordance with local laws and the following Dutch
Government Gazette 45, KCA Marking:
Bij dit produkt zijn batterijen geleverd.
Wanneer deze leeg zijn, moet u ze niet
weggooien maar inleveren als KCA.
For users in Germany:
Do not dispose of batteries as ordinary refuse. Instead,
dispose of them in a recycle box in accordance with
local laws.
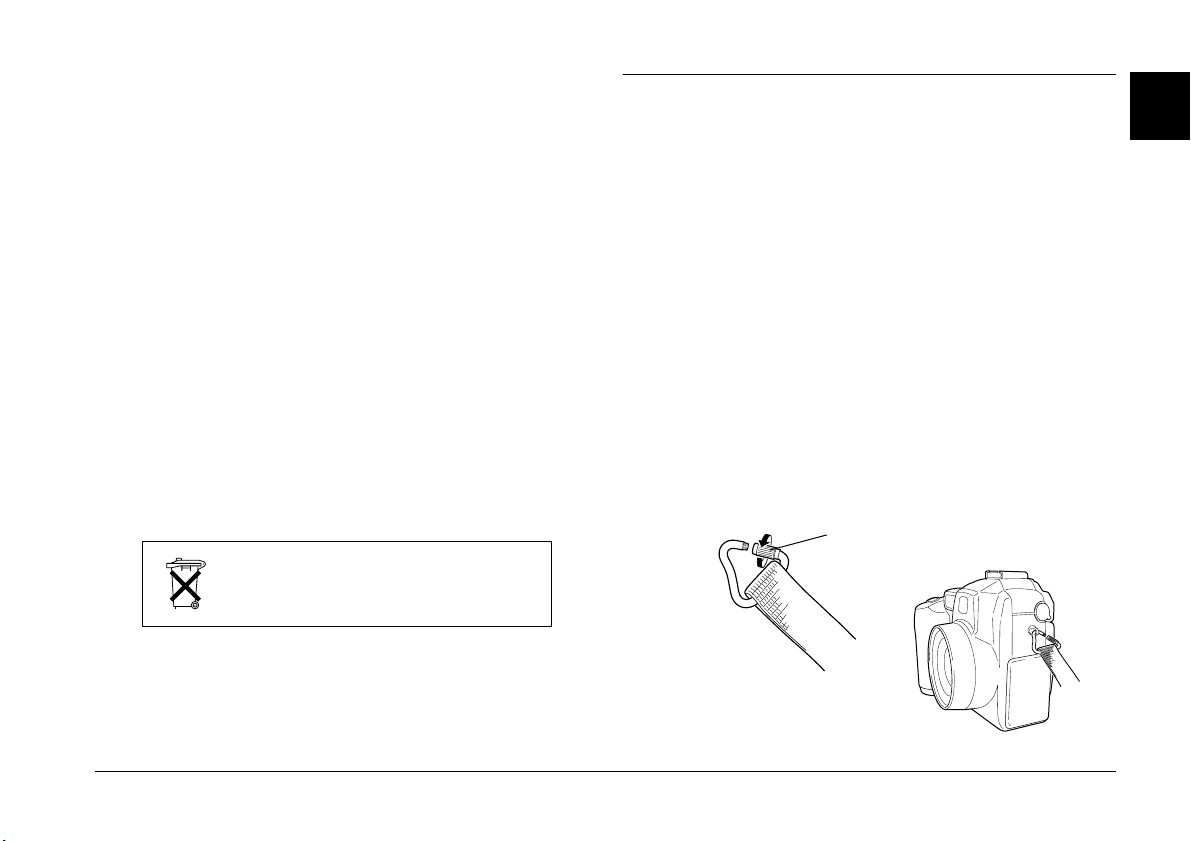
1. Unscrew the screw sleeve on the triangular
fastener at the end of the strap. Then attach the
fastener to the camera by passing it through an
eyelet on one side of the camera as shown below.
unscrew sleeve
to open
Getting Started
1-9
Page 26

2. Tighten the screw sleeve on the fastener as shown
below to close it.
screw shut to secure
3. After securely closing the fastener, turn it so that
the screw sleeve is covered by the strap, as shown
below.
Attaching the lens cap to your camera
After you have attached the camera strap, you can
attach the lens cap to your camera using the lens caps
string. To attach the string to the lens cap and then to
the camera, follow these steps.
1. Pass the end of the string with the smaller loop
through the eyelet on the edge of the lens cap, then
pass the other end of the string through the
smaller loop and pull it tight as shown below.
4. Repeat steps 1 through 3 to attach the other end
of the strap to the other side of the camera.
1-10
Getting Started
Page 27
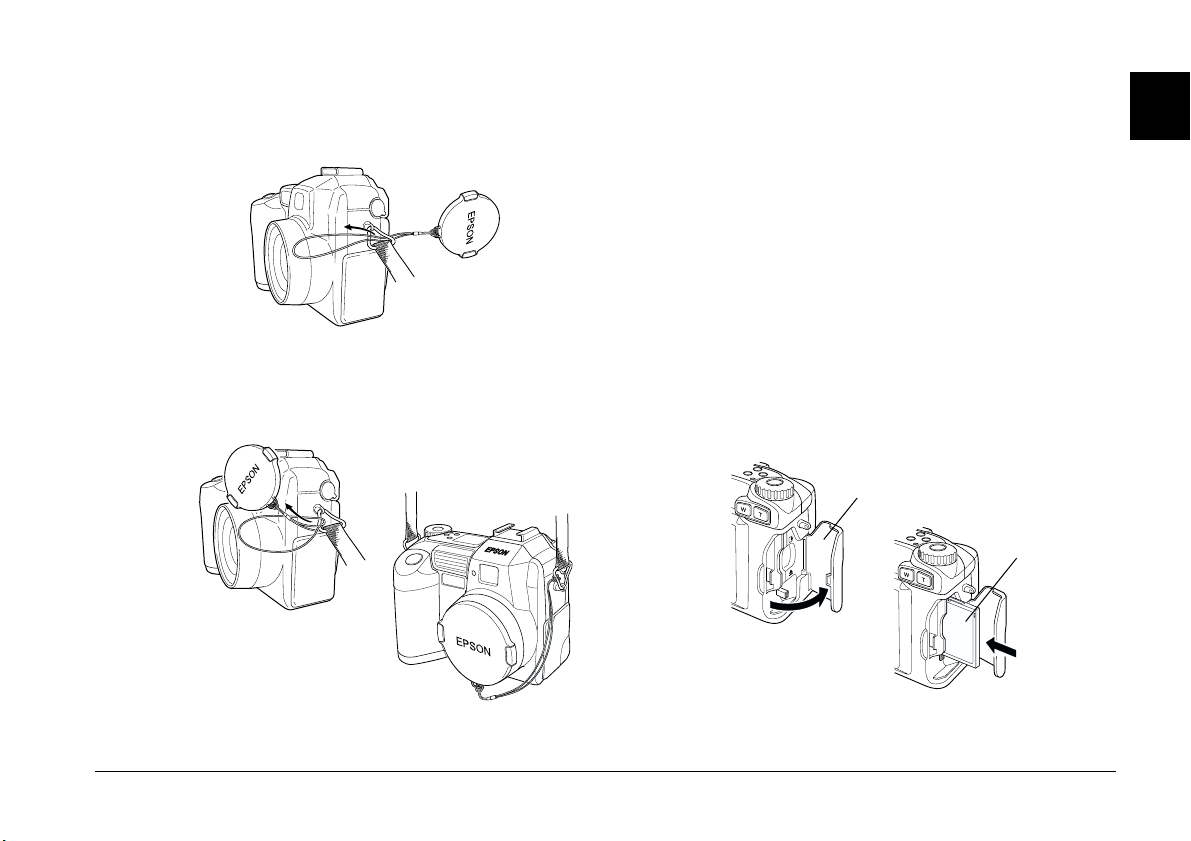
2. Pass the end of the string with the larger loop
through the camera strap’s triangular fastener as
shown below.
Installing and removing a CompactFlash Card
You cannot take photos unless a CompactFlash Card
is installed in your camera.
Your camera comes with the memory card already
installed. If you need to install or remove the memory
card, follow these steps.
1. Make sure the camera is off.
2. Open the memory card cover.
1
3. Then gently pull the lens cap through the string’s
larger loop until the string is securely attached to
the camera.
To install the card, make sure that the front of the
card and the front of the camera are facing the
same direction, then insert the card all the way
into the memory card slot.
memory card
cover
back of
the card
Getting Started
1-11
Page 28
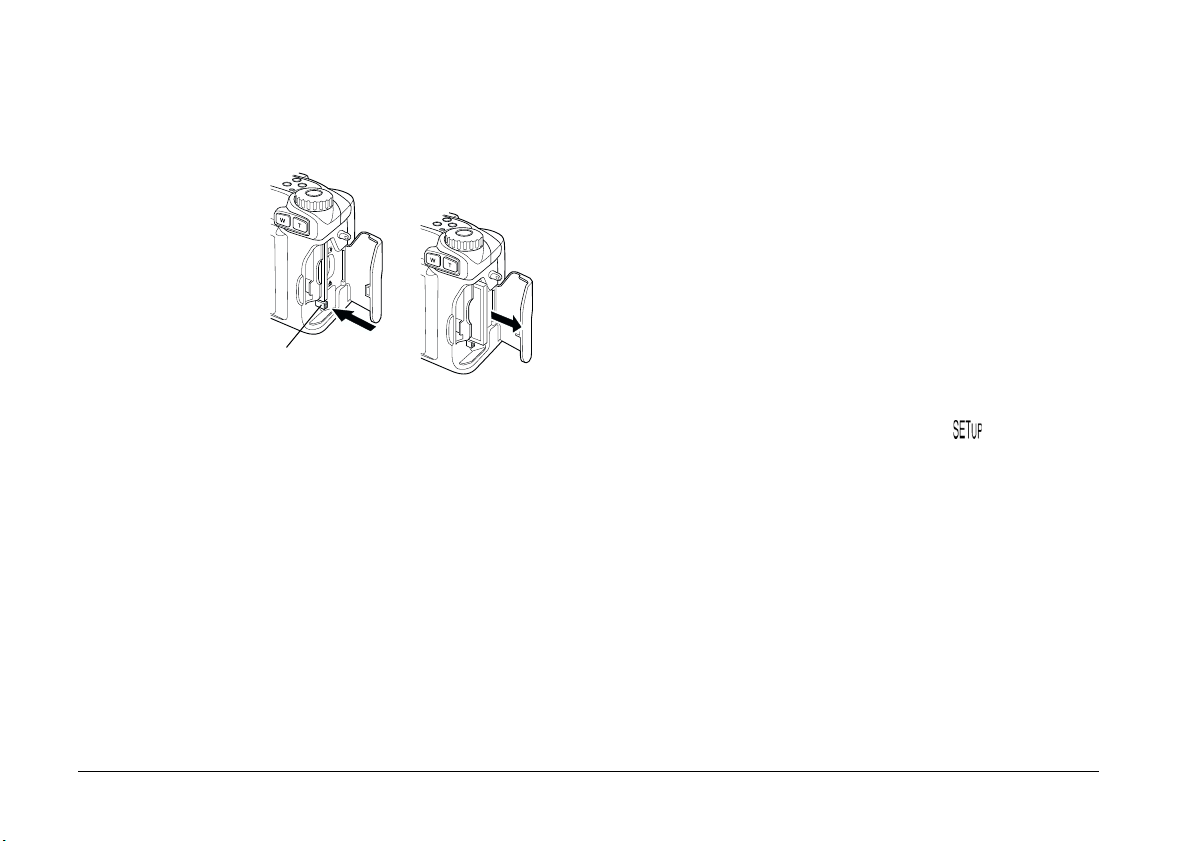
To remove the card, push in the eject button below
the memory card slot. Then, remove the card and
close the cover.
eject button
Caution:
c
❏ Never remove the memory card while the
camera is on. Data in the card may be lost
or damaged.
❏ Avoid using or storing the card in direct
sunlight, or in places that are extremely hot,
humid, or dusty.
Turning on your camera for the first time
The first time you turn on your camera, you must
select the default language for messages displayed on
the LCD monitor and set the date and time before you
can use the camera to take pictures. See the sections
below.
Setting the language
Follow these steps to specify the language the first
time you turn on the camera. Depending on the
country of purchase, you can choose from English,
Japanese, French, German, Italian, Portuguese,
Spanish, or Chinese.
1. Turn the camera’s d ial switch to and press the
POWER button to turn on the camera. A message
appears on the LCD monitor instructing you to set
the language.
2. Press the arrow icon buttons to select the
appropriate language.
3. Press the BACK button to save your selection.
If you need to change the language setting, see
“Selecting the signal system and language” on page
4-21.
1-12
Getting Started
Page 29

Setting the date and time
The first time you turn on the camera, after setting the
language you must set the date (month, day, and year)
and time (hours and minutes). Once these settings are
made, the camera automatically records the date and
time that each image is taken.
Follow the steps below to set the clock using the LCD
monitor.
1. After you finish making the language settings in
the previous section, a screen appears with the
month setting highlighted in red.
To change the order of the date display, press the
top button on the right side of the LCD monitor.
You can make the following settings: M.D.Y (for
month/day/year); D.M.Y (for day/month/year);
and Y.M.D (for year/month/day).
2. To adjust the value of the highlighted item, use
the up and down arrow icon buttons.
To change which item is highlighted, use the right
and left arrow icon buttons.
3. After setting the correct time and date, save the
settings by pressing the BACK button.
You are now ready to take pictures using your
PhotoPC 3100Z. Proceed to Chapter 2, “Taking
Pictures,” for simple, step-by-step instructions.
If you need to change the date and time settings, see
“Setting the time and date” on page 4-19.
After taking photos, you can transfer the images to
your computer using EPSON Photo!4 and EPSON
AutoDownloader. See Chapter 5, “Using Images on
Your Computer.”
1
Getting Started
1-13
Page 30

1-14
Getting Started
Page 31

Chapter 2
Taking Pictures
Using the PhotoPC 3100Z to take pictures is similar to
using a traditional “point and shoot” camera. This
chapter explains the procedures for taking photos
with the camera and covers the following topics.
❏ Determining the picture-taking range
❏ Checking the display panel
❏ Making basic settings
❏ Taking different kinds of pictures, including still
pictures and video clips
❏ Making audio recordings
2
Getting Ready
This section prepares you to take pictures with your
PhotoPC 3100Z. It includes information on your
camera’s picture-taking range and explains how to
make image quality and flash control settings, and
how to use the self timer.
Note:
EPSON is not responsible for any images you may lose
while using our products and software. Make sure that your
camera is working normally before taking important
pictures.
Taking Pictures
2-1
Page 32

Your camera’s picture-taking and flash range
Turning the camera on and off
The camera should be held at least 50 centimeters
away from the subject when composing a shot
through the viewfinder, unless you are using the
macro setting.
When using the macro setting, close-up photos can be
taken when the camera is 6 to 50 centimeters away
from the subject. For instructions on using this feature,
see “Using the macro setting to take close-ups” on
page 2-13.
The flash has the following effective ranges,
depending upon the optical zoom ratio and whether
or not the macro setting is used.
Wide (minimum zoom): 50 - 420 centimeters
Tele (maximum zoom): 50 - 340 centimeters
Macro: 20 - 50 centimeters
The effective flash range varies, depending on the
sensitivity setting. See page A-3 for more details.
Before turning the camera on, be sure to remove the
lens cap from the camera. Use the POWER button in
the center of the camera’s dial switch to turn the
camera on and off.
POWER button
If the dial switch is set to a red icon, the lens extends
from the camera when you turn on the camera. The
lens retracts when you turn the camera off.
Note:
❏ If the dial switch is not positioned to an icon when you
press the POWER button, the power will not turn on.
Be sure the dial is set to an icon before you press the
POWER button.
❏ If the camera’s shut-off feature turns the camera off
while the lens is protruding, the lens does not retract.
To retract the lens, press the POWER button once to
turn the camera on, and again to turn it back off.
2-2
Taking Pictures
Page 33

Using the display panel
The large number in the lower right
corner of the display panel shows the
approximate number of remaining
pictures that you can take.
This number is affected by the image quality setting.
When you adjust the image quality, the number of
remaining pictures is altered accordingly.
When you take photos, the number of remaining
photos and the total number of photos that you can
save in the memory card are displayed on the LCD
monitor. When you play back photos, the LCD
monitor displays the number of the photo that you are
viewing and the total number of photos that you have
taken.
Note:
❏ If there are any audio recordings stored on your
memory card, the number shown on the display panel
may be greater than the actual number of remaining
photos.
❏ The number of remaining photos displayed does not
include video clips.
When the memory card is full, the number on the
display panel reads 0 (zero), the red indicator light on
the back of the camera blinks, and the shutter button
does not work. Before you can take any more pictures,
you must erase some or all of the images in the
memory card. See “Erasing images” on page 3-7 for
instructions. If you want to save your photos before
erasing them, transfer them to your computer using
the EPSON Photo!4 or EPSON Auto Downloader
software with the PhotoPC 3100Z connected to your
computer, or insert the memory card into a PC Card
slot of a different device.
When in the Program and Manual
camera modes, the exposure value
appears at the left side of the display
panel and the shutter speed appears
at the right when you depress the
shutter button halfway.
When the camera’s dial switch is set
to , SEt is shown on the display
panel.
While making an audio recording,
rEc is shown on the display panel.
When taking photos using the time
Int
lapse feature,
display panel.
is shown on the
2
Taking Pictures
2-3
Page 34

Using the dial switch
The camera’s dial switch has
six different positions which
determine how the camera works.
This section gives an overview of
each dial position.
Dial positions for taking pictures
When you want to take pictures, turn the dial switch
so that one of the red icons on the top of the dial is
selected. The three red dial positions are described
below.
For taking multiple exposures, including
video clips. See “Taking Multiple Exposures”
on page 2-13 for details.
For using the LCD monitor to take pictures
and make audio recordings. See “Taking
Pictures Using the LCD monitor” on page 2-9
for details.
For using the viewfinder to take pictures. See
“Taking Pictures Using the Viewfinder” on
page 2-6 for details.
Other dial positions
To perform other camera operations, turn the dial
switch so that one of the following icons is selected.
For playing back and managing photos, audio
recordings, and video clips. See Chapter 3,
“Playing Back and Managing Images With
Your Camera,” for details.
For connecting the camera to your computer,
and making print settings. See “Connecting
the camera to your computer” on page 5-9 and
“Making Print Settings” on page 4-22 for
details.
For viewing information and setting up the
camera. See Chapter 4, “Making Settings,” for
details.
2-4
Taking Pictures
Page 35

Making basic settings
The three small buttons on the top of the camera allow
you to easily make some basic settings. You can use
these buttons when the dial switch is set to one of the
red icons. The buttons are described below.
Changes the image quality setting. See
“Adjusting the image quality” on page 4-1 for
details.
Changes the flash setting. See “Setting the
flash” on page 4-4 for details.
Turns the self timer on and off. See “Using the
self timer” on page 2-8 for details.
Using the LCD monitor buttons
There are nine buttons on the back of your PhotoPC
3100Z. These buttons are for making various settings
and for using the different features of the PhotoPC
3100Z.
With the exception of the round MENU ON/OFF
button at the lower right corner, and the round
print button at the lower left corner, these buttons
are not named. Throughout this manual, these buttons
are often referred to by the icon or words that appear
on the LCD monitor next to or above the button. For
example, the button below Menu Change is called the
MENU CHANGE button. As you use the camera, the
icon or words that correspond to each button change,
and accordingly the name of the button in the manual
also changes.
Other times, the LCD monitor buttons may be referred
to only by their location.
2
Taking Pictures
2-5
Page 36

Taking Pictures Using the Viewfinder
Using the viewfinder instead of
the LCD monitor to take pictures
saves battery power and helps you
hold the camera steady while
pressing the shutter button.
Follow the steps below.
1. Remove the lens cap, set the dial switch to ,
then turn on the camera. Then wait until the green
indicator light beside the viewfinder comes on.
2. Look straight through the viewfinder and center
your subject in the cross-hairs. If you cannot see
clearly, adjust the diopter by turning the
correction dial beside the viewfinder.
shutter button
diopter
correction
dial
Note:
❏ Hold the camera firmly with both hands and keep
it still for a few moments after you press the
shutter button.
❏ Make sure that you are not blocking the lens with
your finger, the strap, clothing, or other objects.
❏ The visible frame in the viewfinder indicates the
approximate area that is captured in the photo.
3. Hold the shutter button halfway down to lock the
auto focus. The green indicator light beside the
viewfinder stops blinking when the lens locks in
focus. If you wish, you can now reposition the
camera, so that your subject is off-center, without
losing focus.
4. Depress the shutter button fully to take the photo.
2-6
lens
Taking Pictures
Page 37
5. Hold the camera still until the green indicator
light beside the viewfinder comes back on, or until
the camera makes a clicking sound. Then release
the shutter button.
After you take a picture, the green indicator light
blinks. This signals that the image has been
captured and the camera is processing it. When
the light stops blinking, the image is saved. Saved
images remain in the memory card even when the
camera is turned off, the batteries are removed, or
the memory card is removed from the camera.
When the indicator light next to the viewfinder
stops blinking, the camera is ready to take another
picture.
Using the optical zoom feature
You can capture a smaller portion of the subject at a
higher magnification using the optical (x3) zoom
feature.
Using the optical zoom
Your PhotoPC 3100Z’s optical zoom feature allows
you to increase the magnification of your images by
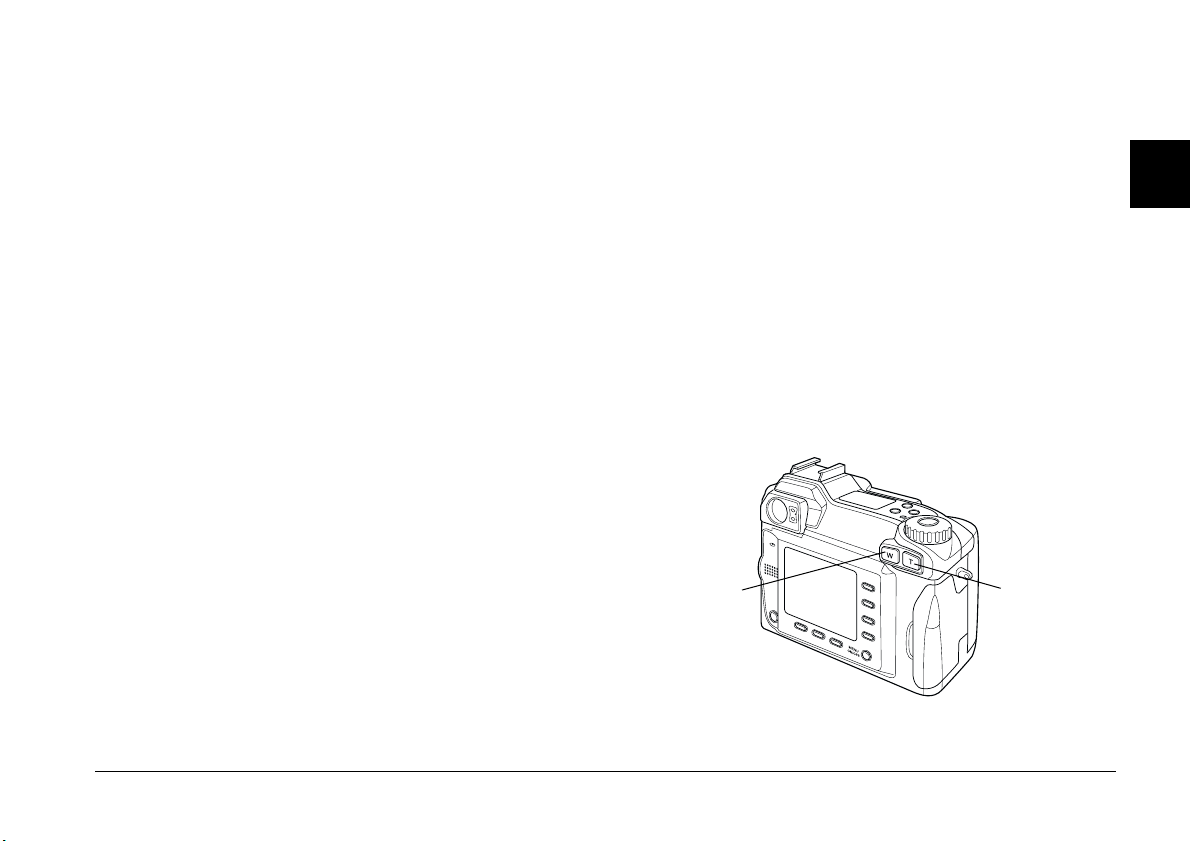
as much as three times. To use the optical zoom
feature, press the W and T buttons on the back of the
camera under the dial switch. To zoom out, press the
W button. To zoom in, press the T button. You can use
the optical zoom feature at any time when taking
photos.
2
zoom out
(wide)
zoom in
(telephoto)
Taking Pictures
2-7
Page 38

When using the zoom feature in the or dial
position, the following zoom indicator appears at the
top of the LCD monitor.
2. Remove the lens cap, turn on the camera, and set
the dial switch to . Wait until the green
indicator light comes on.
A yellow slider indicates the
current zoom stat us, moving to the
yellow slider
Note:
The PhotoPC 3100Z also has a digital zoom feature that
allows you to enlarge the image up to six times the original
size when used together with the optical zoom. For more
information on the digital zoom feature, see “Using the
digital zoom” on page 2-12.
right when you zoom in on your
subject and to the left when you
zoom out.
Using the self timer
Turning on the self timer creates a 10-second
delay between the time you press the shutter
button and the moment the image is captured,
allowing you include yourself in photographs. The
timer icon appears on the display panel when you turn
on the timer. Follow the steps below.
1. Place the camera on a flat surface or a tripod.
Note:
You can also use the self timer when taking photos or
video clips using the LCD monitor. For more
information on taking photos with the LCD monitor,
see “Taking Pictures Using the LCD monitor” on page
2-9. For more information on taking video clips, see
“Recording video clips” on page 2-13.
3. Press the timer button on the top of the camera.
The timer icon appears on the display panel.
4. Take a picture. The timer icon and the red timer
light on the front of the camera flash slowly for
eight seconds, t hen rapidly for two seconds before
the shutter releases.
If the Beep setting is set to Always, the camera
makes a steady beeping sound. For information
on the Beep setting, see “Setting the beep and
shutter sound” on page 4-21.
To take another picture using the self timer, press
the timer button again.
2-8
Taking Pictures
Page 39

Note:
❏ To stop the self timer after pressing the shutter button,
press the shutter button again, or press the timer
button.
❏ You can use the self timer when taking photos using
the continuous shooting feature. The camera takes up
to approximately 47 pictures in sequence, beginning
ten seconds after you press the shutter button. To turn
continuous shooting on, see “Using the continuous
shooting feature” on page 2-15.
Taking Pictures Using the LCD monitor
By using the LCD monitor, you can
get a good idea of what the image
will look like before shooting and
confirm image quality
immediately after shooting. Use
the LCD monitor when you want
to take pictures using digital zoom feature or when
taking close-ups.
Note:
❏ You can turn the LCD monitor’s text display on and
off by pressing the MENU ON/OFF button.
❏ You can make audio recordings when taking pictures
using the LCD monitor. See “Making Audio
Recordings for Photos” on page 2-19.
❏ You can use the basic playback feature when the dial
switch is set to . See “Using the basic playback
feature” on page 2-10.
Follow these steps to take pictures using the LCD
monitor.
1. Remove the lens cap, set the dial switch to , then
turn on the camera. You will see a live preview
displayed on the LCD monitor. Center the subject
of your photo in the monitor.
2
Taking Pictures
2-9
Page 40

Note:
❏ Hold the camera firmly with both hands and keep
it still for a few moments after you press the
shutter button.
❏ Make sure that you are not blocking the lens with
your finger, the strap, clothing, or other objects.
2. Hold the shutter button halfway down to lock the
auto focus. A small green circle appears in the
upper-right corner of the monitor. If you wish,
you can now reposition the camera, so that your
subject is off-center, without losing focus.
When you are in the Program or Manual camera
mode, the shutter speed and aperture settings are
shown on the display panel on the top of the
camera.
3. Depress the shutter button completely to take the
photo.
4. Hold the camera still until the camera makes a
clicking sound. Then release the shutter button.
After the picture is taken, it remains displayed on
the monitor until the camera finishes processing
it. After the green indicator light comes on, you
can take another photo or display or manage your
photos. See “Playing Back and Managing Images
With Your Camera” on page 3-1.
Using the basic playback feature
When you take photos using the LCD monitor, you
can view the photos that you have already taken using
the basic playback feature. Using this feature, you can
view your photos without having to turn the dial
switch to the position after taking a photo. You can
use this feature when the LCD monitor is displaying
a preview image, or immediately after taking a
picture. See the appropriate section below.
Note:
❏ When using the basic playback feature, you can use the
print button to make print settings. See “Making
Camera Settings” on page 4-19 for details on using the
print button.
2-10
❏ You cannot view video clips using the basic playback
feature.
Taking Pictures
Page 41

When a preview image is being displayed
To use the basic playback feature when the LCD
monitor is displaying a preview image, follow the
steps below.
1. Remove the lens cap, set the dial switch to and
turn on the camera. A preview image is displayed
on the LCD monitor.
2. When the camera is in Manual mode, press the
MENU CHANGE button. When the camera is in
Program mode or Full Auto mode, go on to step 3.
Note:
See “Making camera mode settings” on page 4-6 for
information about the camera mode.
3. Press the icon to playback your photos.
During playback, you can enlarge or erase photos,
view multiple photos, and play back audio recordings.
Refer to the appropriate section below.
❏ To change the number of photos that you can view
on the LCD monitor at a time, see “Displaying
one, four, or nine photos at once” on page 3-1.
❏ To play back audio recordings, see “Audio
playback using the built-in speaker” on page 2-21.
To return to the preview image when the camera is in
Manual mode, press the BACK button twice. To return
to the preview image when the camera is in Program
mode or Full Auto mode, press the BACK button once.
Immediately after taking a picture
You can also use the basic playback feature
immediately after taking a picture. You must first
make some settings. Follow these steps.
Note:
Using this feature increases the amount of time that you
must wait after taking a picture before you can take the next
one.
2
❏ To enlarge photos, see “Magnifying photos” on
page 3-2.
❏ To erase photos, see “Erasing images” on page
3-7.
1. Remove the lens cap, set the dial switch to ,
and turn on the camera.
2. Press the Shot SETUP button on the back of the
camera.
3. Press the Confirmation button to select On.
Taking Pictures
2-11
Page 42

4. Turn the dial switch to and take a picture.
5. After the camera processes the photo, the icon
appears briefly next to the top-right LCD monitor
button. Press this button while the icon is
displayed to playback your photos.
To delete the photo you just took, press the
Delete button. Before taking more photos, press
the BACK button or press the shutter button to
return to the previewed image.
Using the digital zoom
You can capture a smaller portion of your subject at a
higher magnification using the zoom feature. When
taking pictures with the LCD monitor, you can use
the digital zoom in addition to the optical zoom to
seamlessly magnify the image by as much as six times.
To use the digital zoom, you must first make a setting
to turn the feature on. Follow these steps.
Note:
For details on using the optical zoom without using the
digital zoom, see “Using the optical zoom feature” on page
2-7.
1. Make sure the camera is on and set the dial switch
to .
2. Press the Shot SETUP button.
3. Press the D-ZOOM button to turn the digital zoom
On or Off, then press the BACK button.
To take a picture using digital zoom, set the dial switch
to the or dial position.
Press the T button on the back of the camera under the
dial switch.
A yellow slider indicates the
current zoom status, moving
yellow slider
When the yellow
slider passes this
point, digital zoom
is used.
to the right when you push the
T button to zoom in on your
subject, and to the left when
you push the W button to
zoom out.
Hold the button down until DIGITAL ZOOM appears
briefly on the center of the LCD monitor, and a yellow
frame appears around the previewed image.
Frame your subject in the LCD monitor and take a
picture.
2-12
Taking Pictures
Page 43

Using the macro setting to take close-ups
The macro feature allows you to take
pictures of subjects 6 to 50 centimeters
away from the camera.
Note:
You may need to be more than 6 centimeters away from the
subject when using the optical zoom feature. See “Using the
optical zoom feature” on page 2-7 for details.
Follow the steps below to use the macro feature.
1. Remove the lens cap, set the dial switch to , and
turn on the camera.
2. Press the button once. A green frame
appears around the previewed image and
MACRO is displayed briefly at the center of the
monitor.
To use the video clip recording feature, the
continuous shooting feature, the time lapse
feature or the stitch assist feature, select MACRO
and turn the dial switch to . Then press the
MODE CHANGE button to select the feature you
want to use.
Taking Multiple Exposures
To record video clips, use the
continuous shooting feature, time
lapse feature, or the stitch assist
feature, turn the camera’s dial
switch to .
Recording video clips
You can record video clips with sound (up to
25 seconds) or without sound (up to 35 seconds).
Follow these steps to record a video clip.
Note:
❏ The image quality setting is disabled when taking video
clips.
❏ You can record sound with your video clips only while
you are taking the clip. You cannot make an associated
audio recording for existing video clips.
❏ The flash is disabled when recording video clips.
2
3. Frame your subject in the LCD monitor and take
a picture.
Taking Pictures
2-13
Page 44

1. Remove the lens cap, set the dial switch to , and
press the POWER button to turn on the camera.
VIDEO CLIP appears at the top of the LCD
monitor, a white frame appears around the
previewed image, and the total available amount
of recording time is displayed at the upper-left
corner of the LCD monitor.
Note:
❏ The amount of recording time available depends
on Sound setting you make in the next step, and
the amount of space available in your camera’s
memory card.
❏ To use the macro feature when recording a video
clip, first turn the dial switch to and press the
button. Then set the dial switch to and
proceed to the next step.
2. To record audio with your video clip, press the
Sound button to select On. The maximum
recording time for this setting is 25 seconds.
To take a video clip with no audio, select Off.
The maximum recording time for this setting is
35 seconds.
Note:
For an explanation on using the buttons on the back of
the camera, see “Using the LCD monitor buttons” on
page 2-5.
3. Frame your subject in the LCD monitor, then
press the shutter button to begin recording the
video clip.
The amount of time remaining for recording is
displayed at the upper-left corner of the LCD
monitor. REC is displayed in red directly below
the remaining seconds to indicate that you are
recording.
4. You can stop recording a clip at any time by
pressing the shutter button again, or you can
continue recording until recording time runs out.
2-14
Taking Pictures
Page 45

Using the continuous shooting feature
You can use the continuous shooting feature to break
down a complex motion into photos containing a
series of easy-to-see steps. You can also use it to take
a number of consecutive pictures and then choose the
ones that you like best. When the image quality is set
to Standard, you can take almost two photos per
second, up to approximately 47 photos. When Fine is
selected, you can take almost one photo per second,
up to approximately 13 photos. When Super Fine is
selected, you can take one photo per second, up to
approximately seven photos.
Note:
❏ When using the continuous shooting feature, you
cannot use the flash or select the HyPict or TIFF image
quality settings.
1. Remove the lens cap, set the dial switch to , and
turn on the camera.
2. Press the MODE CHANGE button. A red frame
appears around the previewed image and
CONTINUOUS is displayed on the LCD monitor.
3. If necessary, adjust the image quality and activate
the self timer using the buttons on the top of the
camera. The self timer creates a ten second delay
between the time you press the shutter button and
the moment the actual image is captured.
4. Depress the shutter button halfway to lock the
focus, then depress it fully and hold it down to
begin taking a series of photos.
5. Release the shutter button to stop taking pictures.
2
❏ You cannot make an audio recording while using the
continuous shooting feature.
❏ Settings made in other dial positions remain effective
when you use the continuous shooting feature. Before
using the continuous shooting feature, turn the dial
switch to the appropriate position and make your
settings.
Follow these steps to take pictures using the
continuous shooting feature.
Using the time lapse feature
You can use the time lapse feature to take pictures
automatically at a preset time interval. Use this feature
creatively to capture scenes that change over time,
such as sunsets, plant life, or a busy street corner. The
time interval can be set from five seconds to 24 hours.
Taking Pictures
2-15
Page 46

Note:
❏ The settings that you make in the dial position
remain when you use the time lapse feature. To change
these settings, turn the dial switch to and make the
appropriate settings before using the time lapse feature.
❏ You cannot take TIFF files when using the time lapse
feature.
1. Secure the camera on a flat surface or tripod.
2. Remove the lens cap, turn the dial switch to ,
and turn on the camera.
3. Press the MODE CHANGE button until INTERVAL
is displayed at the top of the LCD monitor.
4. The hours, minutes, and seconds appear in the
center of the screen with the seconds highlighted.
Press the up and down arrow icon buttons to
change the value of the highlighted time unit. To
highlight a different time unit, press the left and
right arrow icon buttons.
If you wish to quickly select either the longest or
the shortest available interval, you can toggle
between 24 hours and the shortest available
interval by pressing the Max/Min button.
Note:
The shortest available interval varies depending on the
current image quality, shutter speed, audio recording,
and flash settings.
5. Once you have set the desired interval, frame the
subject in the LCD monitor and press the shutter
button to begin taking photos.
Note:
❏ The camera may turn off automatically after you
take the first picture. It automatically turns back
on to take pictures at the specified time.
❏ When using the self timer feature, the camera
takes a photo ten seconds after you press the
shutter button, then continues taking photos at
the specified time lapse interval.
6. To turn off the time lapse feature, press the
Int
POWER button while
camera’s display panel.
appears on the
2-16
Taking Pictures
Page 47

Using the stitch assist feature
You can use the PhotoPC 3100Z’s stitch assist feature
to help take a series of overlapping pictures that can
be easily combined into a panorama image with the
EPSON Panorama Boutique Light EP included on
your CD-ROM.
Taking one row of overlapping photos
To take one row of overlapping photos, take a photo
of the left part of the image first, then turn the camera
to the right to take subsequent photos.
2
Follow the steps below.
This feature allows you to take one or two rows of
overlapping photos.
an example of two rows of overlapping photos
The procedure for taking one level of overlapping
pictures is different from the procedure for taking two
levels of overlapping pictures.
Note:
❏ You cannot use the stitching feature with HyPict or
TIFF files.
❏ For best results, EPSON recommends using a tripod
when using the stitch assist feature.
321
1. Remove the lens cap, set the dial switch to , and
turn on the camera.
2. Press the MODE CHANGE button until
STITCHING appears at the top of the LCD monitor.
3. Take a picture.
Immediately after taking the picture, the photo
displays briefly on the screen for confirmation.
During this time, you can erase the photo by
pressing the Delete button.
Taking Pictures
4
2-17
Page 48

4. The right side of the previously taken photo
displays on the left of the LCD monitor. Align this
section with the left side of the image currently
displayed on the LCD monitor so the images
overlap, and then take the photo.
If you press the upper right button where the
number and left arrow are displayed, the
previously taken photo is displayed. If you press
the Delete button at this screen, the photo will be
deleted. If you press the upper right number
where the number and right arrow are displayed,
you return to the preview image.
5. To add more pictures, repeat step 4. Press the
Finish button when you are done adding pictures.
Taking two rows of overlapping photos
To take two rows of overlapping photos, start by
taking a photo of the upper left part of the image. To
take subsequent photos in the top row, turn the
camera to the right before taking each photo. After you
finish taking photos in the top row, take the first photo
of the bottom row directly below the last photo of the
top row. Then turn the camera to the left to take the
remaining photos of the bottom row.
321
4
4
5
2-18
Taking Pictures
678
1. Follow steps 1 to 4 from “Taking one row of
overlapping photos” on page 2-17.
2. After you finish taking photos in the top row,
press the button below the arrow displayed in the
lower left corner of the LCD monitor.
5
Page 49

Note:
You can return to the previous screen by pressing the
button next to the arrow displayed in the upper right
corner of the LCD monitor. This will allow you to
continue taking pictures in the top row.
3. The bottom section of the previously taken photo
displays on the top of the LCD monitor. Align this
section with the top of the image currently
displayed on the LCD monitor so the images
overlap, and take the picture.
4. The left side of the previously taken photo
displays on the right of the LCD monitor. Align
this section with the right side of the image
currently displayed on the LCD monitor so the
images overlap, and take the picture.
If you press the upper right button where the
number and left arrow are displayed, the
previously taken photo is displayed. If you press
the Delete button at this screen, the photo will be
deleted. If you press the upper right number
where the number and right arrow are displayed,
you return to the preview image.
5. When you are finished taking photos in the
bottom row, press the Finish button.
If you want to view the photos you just took, you
can display them on the LCD monitor. For
information on displaying photos on the LCD
monitor, see “Viewing Images Using the LCD
Monitor” on page 3-1.
Making Audio Recordings for Photos
Your PhotoPC 3100Z has a built-in microphone that
can record messages to attach to your images. You can
make audio recordings up to ten seconds long
immediately after taking photos using the LCD
monitor. You can also make recordings for photos that
were taken previously.
Note:
❏ To play back audio recordings using your camera, see
“Audio playback using the built-in speaker” on page
2-21.
❏ You can also play back audio recordings from your
computer using EPSON Photo!4. See the online
EPSON Digital Camera Software User’s Guide for
instructions.
❏ To erase audio recordings, see “Erasing audio
recordings” on page 3-7.
2
Taking Pictures
2-19
Page 50

Recording audio immediately after taking photos
To make audio recordings immediately after taking
photos, you must first make a few settings. Follow
these steps.
1. Remove the lens cap, set the dial switch to ,
and turn on the camera.
2. Press the Shot SETUP button on the back of the
camera.
Note:
For an explanation on using the buttons on the back of
the camera, see “Using the LCD monitor buttons” on
page 2-5.
3. Press the Confirmation button to select On.
4. Turn the dial switch to .
Note:
❏ To make recordings while using the time lapse
feature, turn the dial switch to , press the
MODE CHANGE button twice, then press the
SOUND button to select On. See “Using the time
lapse feature” on page 2-15 for more information.
❏ You cannot make recordings when taking pictures
using the viewfinder.
5. Frame your subject in the LCD monitor and take
a picture.
6. The captured image is displayed on the LCD
monitor momentarily, and Rec Sound is
displayed at the right. To begin recording, press
the Rec Sound button. The camera begins
making the audio recording.
Note:
When making recordings while using the time lapse
feature, Rec Sound is not displayed and the camera
automatically records audio after the photo is taken.
7. A ten-second countdown is displayed on the
screen. You can record audio until the time runs
out by speaking into the built-in microphone on
the back of the camera. To stop recording before
ten seconds is up, press the Stop button.
Note:
When making recordings while using the time lapse
feature, Stop does not appear on the LCD monitor.
2-20
Taking Pictures
Page 51

Recording audio for existing photos
To make audio recordings for previously taken
photos, follow these steps.
To stop recording before ten seconds is up, press
the Stop button.
5. Press the BACK button twice to exit.
Note:
You cannot make an audio recording for existing video clips.
1. Set the dial switch to , then turn on the camera.
2. Press the arrow icon buttons to select the image to
which you want to attach an audio recording. If a
photo already has an audio recording associated
with it, a microphone icon is displayed in the
upper-left corner of the photo.
3. Press the MENU CHANGE button, then press the
SOUND button.
4. To begin making the recording, press the Sound
Rec button. You can record audio until the time
runs out by speaking into the built-in microphone
on the back of the camera.
If there is already an audio recording associated
with the current photo, a confirmation message
appears. To erase the old recording and make a
new one, press Yes. Press No to cancel recording.
2
Audio playback using the built-in speaker
You can play back the audio files recorded for photos
and video clips using the built-in speaker. Follow
these steps.
1. Set the dial switch to , then turn on the camera.
2. Press the arrow icon buttons to select an image
that has an audio recording associated with it.
These images have a microphone icon displayed
in the upper-left corner.
3. Press the MENU CHANGE button, then press the
SOUND button.
4. Press the Sound Play button to play back the
recording.
Press the Sound Stop button to cancel playback.
5. Press the BACK button twice to return to the first
screen.
Taking Pictures
2-21
Page 52

Note:
To adjust the speaker volume, see “Adjusting the speaker
volume” on page 4-21.
2-22
Taking Pictures
Page 53

Chapter 3
Playing Back and Managing Images With Your Camera
This chapter explains how to view photos on your
camera’s LCD monitor, or a television set. It also
includes explanations for locking and erasing photos,
and for displaying photo information using the
controls on your camera.
This chapter covers the following topics.
❏ Displaying photos on your camera
❏ Playing back video clips on your camera
❏ Erasing photos and video clips
❏ Preventing images from being erased
❏ Viewing photo information
❏ Viewing images on your computer, television,
or projector
Viewing Images Using the LCD Monitor
When your camera’s dial switch is in the position,
you can use the camera’s LCD monitor to view your
photos and video clips in a variety of ways. You can
also view detailed information about each photo.
Note:
❏ When viewing images with the LCD monitor, you can
use the print button to make print settings for
photos. See “Making Camera Settings” on page 4-19
for details on using the print button.
❏ Only DCF (Design rule for Camera File system) image
files can be magnified, have audio recordings attached,
or display photo information. Images taken with your
EPSON camera are DCF image files.
Displaying one, four, or nine photos at once
The PhotoPC 3100Z’s monitor can display one, four,
or nine photos at a time. To change the number of
photos displayed, follow these steps.
3
Playing Back and Managing Images With Your Camera
3-1
Page 54

1. Set the dial switch to , then turn on the camera.
A photo is displayed on the LCD monitor.
Note:
No Images is displayed when there are no photos
saved on the camera’s memory card.
2. To display four photos at a time, press the Multi
button once. Multi changes to 1/9, and small
“thumbnails” of the last four photos you took
appear on the screen, with the currently selected
photo framed in white.
Press the 1/9 button to display nine photos at a
time. 1/9 changes to 1/1.
3. Press the arrow icon buttons to select a photo with
the white frame. Hold the button down to move
through the photos quickly.
When the frame reaches the first or last photo in
the current group, the previous or next group of
photos is displayed.
Magnifying photos
You can view a magnified version of the photos saved
in your camera on the LCD monitor. Follow the steps
below.
1. Set the dial switch to , then turn on the camera.
2. To enlarge the view of the currently displayed
photo, press the T button on the back of the camera
under the dial switch.
A number appears at the top center of the LCD
monitor, and an icon appears in the top left corner
of the LCD monitor that indicates the portion of
the photo which is currently displayed.
Press the T
button to
magnify the
image.
4. To display only the currently selected photo,
press the 1/1 button. 1/1 changes to Multi.
3-2
Playing Back and Managing Images With Your Camera
Hold down the T button to continue magnifying
the photo. You can magnify the photo until the
number at the top center of the LCD monitor
reaches x3.0.
Page 55

Press the W button to decrease the level of
magnification.
3. Scroll the screen up, down, right, or left using the
arrow icon buttons. You can scroll quickly
through the screen by holding down any one of
the arrow icon buttons.
4. Press the BACK button to exit the magnification
screen.
Viewing a slide show of your photos
The slide show feature plays back a series of photos
on your camera’s LCD monitor. To use the slide show,
follow the steps below.
Note:
To adjust the brightness of the LCD monitor, see “Setting
the LCD monitor’s brightness level” on page 4-20.
Note:
The Sound button is only available when there are
audio recordings saved on the memory card in your
camera.
4. To rotate a photo, press the arrow icon buttons to
select the photo that you want to rotate.
To make selecting photos easier, you can display
e it h er f ou r or n in e ph o to s at a ti m e b y pr e ss i ng the
Multi button once or twice. A white frame appears
around the selected photo.
To rotate the photo 90 degrees to the left from its
original orientation, press the Rotate button
once. Press it again to rotate the photo 90 degrees
to the right from its original orientation. Press the
button again to return the photo to its original
orientation.
To rotate other photos, repeat this step.
3
1. Set the dial switch to , then turn on the camera.
2. Press the MENU CHANGE button, then press the
SLIDE SHOW button.
3. Press the Sound button to turn the playback of
audio recordings on or off.
5. When you are ready to begin the slide show, press
the Start button.
To pause the slide show, push the Pause button.
When the slide show is paused, you can view the
previous photo by pressing the Rev button, or
view the next photo by pressing the Fwd button.
Playing Back and Managing Images With Your Camera
3-3
Page 56

Press the Restart button to continue viewing the
slide show.
Exposure
Adjustment:
+2.0 to -2.0
6. To cancel the slide show before it is finished, press
the Quit button, then press the BACK button
twice.
Note:
If the slide show finishes before you press the Quit
button, the camera goes into the power save mode.
Viewing photo information
You can view the following information about the
currently displayed photo on the LCD monitor.
Image Number: Folder name and image number in
the memory card.
Note:
(e) indicates that the photo is based on
the Design rule for camera file system,
which is a recording standard for image
files.
Date: Date and time
Shutter Speed: 1/1000 to 8
Aperture: F2 to F10.1
Flash: ON or OFF
An icon indicates the flash setting
that was used when the photo was
taken.
White Balance: Auto, Fixed, or Custom
Others: Icons indicate the sensitivity and
metering system settings.
An icon indicates whether the
macro feature was used.
D-ZOOM indicates that the digital
zoom was used.
To display photo information for a photo, follow these
steps.
1. Set the dial switch to , then turn on the camera.
2. Press the MENU CHANGE button.
3. Use the arrow icon buttons to select a photo for
which you want to view information, then press
the INFO button.
4. Press the BACK button twice to return to the first
screen.
3-4
Playing Back and Managing Images With Your Camera
Page 57

Selecting a folder in the CompactFlash Card
If there is more than one folder on your CompactFlash
Card that your PhotoPC 3100Z can access, you can
change the folder that your camera accesses. To
change the folder, follow these steps.
1. Set the dial switch to , then press the POWER
button to turn on the camera.
2. Press Memory SETUP. The name of the folder
currently being used appears on the right side of
the LCD monitor, between the up and down
arrow icons.
3. Press the up and down arrow icon buttons to
change the folder, then press the BACK button.
Playing back video clips
The PhotoPC 3100Z allows you to view your video
clips in a variety of ways. You can play them forward
or in reverse, in slow motion, or one frame at a time in
either direction, and you can fast forward or rewind
them. Follow the steps below.
1. Set the dial switch to , then turn on the camera.
2. Press the MENU CHANGE button, then press the
VIDEO CLIP button. The first frame of the last
video clip you took appears on the screen.
Note:
When there are no video clips saved on the camera’s
memory card, the VIDEO CLIP button is disabled, or
the message There is no video clip is displayed.
To display frames from four video clips at a time,
press the Multi button once. Multi changes to 1/9,
and small “thumbnail” images of the first frames
from the last four video clips you took appear on
the screen, with the currently selected video clip
framed in white.
Press the 1/9 button to display nine frames at a
time. 1/9 changes to 1/1.
3 . T o se l ec t th e vi deo c l ip t ha t yo u wa nt to play b ac k ,
press the up and down arrow icon buttons.
4. To play the clip, press the Play button.
Note:
The camera’s built-in speaker replays the audio during
video playback. To adjust the volume of the built-in
speaker, see “Adjusting the speaker volume” on page
4-21.
3
Playing Back and Managing Images With Your Camera
3-5
Page 58

To play the clip in reverse, from the last frame to
the first, press the Fwd button. The last frame of
the video clip is displayed and Fwd changes to
Rev. Then, press the Play button.
To play the clip in slow motion, press the
Change Speed button during playback.
5. To pause the clip during playback, press the
Pause button.
To move forward through the clip one frame at a
time while the clip is paused, press the Fwd
button. To move through the clip one frame at a
time in reverse, press the Rev button. Hold down
one of the up and down arrow icon buttons to fast
forward or rewind through the clip.
Press the Restart button to resume playback of the
clip.
6. When you are finished playing back the video
clip, press the Quit button, then press the Back
button.
Managing Images with the LCD Monitor
This section provides instructions to help you manage
your images using the LCD monitor.
Locking and unlocking photos
Use the lock feature to protect your photos from being
accidentally erased. If you try to erase a locked photo,
a message appears asking you to confirm deletion.
Locked files are also erased when you format the
memory card.
To lock or unlock selected photos stored on the
memory card in your camera, follow these steps.
1. Set the dial switch to , then turn on the camera.
2. Press the arrow icon buttons to move the white
frame until the appropriate photo is selected.
To make selecting photos easier, you can display
e it h er f ou r or n in e ph o to s at a ti m e b y pr e ss i ng the
Multi button once or twice. Multiple photos are
displayed and a white frame appears around the
selected photo.
3-6
3. To lock that photo, press the Lock button. A lock
icon appears in the upper-left corner of the photo.
Playing Back and Managing Images With Your Camera
Page 59

To unlock a locked photo, press the Unlock
button. The lock icon is removed from the upperleft corner of the photo.
4. To lock or unlock other photos, repeat steps 2
and 3.
4. A confirmation message is displayed. Press Yes
to erase the photo. Press No to cancel.
Erasing all of the photos
To erase all of the photos stored on the memory card
in your camera at once, follow these steps.
Erasing images
You can erase one photo, several photos, or all of the
photos at once using the LCD monitor.
Erasing individual photos
To erase photos saved in your memory card one at a
time, follow the steps below.
1. Set the dial switch to , then turn on the camera.
2. Press the arrow icon buttons to display the photo
that you want to erase.
To make selecting photos easier, you can display
either four or nine photos at once by pressing the
button below Multi once or twice. A white frame
is displayed around the selected photo.
3. Press the Delete button to erase the photo.
1. Set the dial switch to , then turn on the camera.
2. Press the Delete All button to erase all of the
photos at once.
3. A confirmation message appears. Press Yes to
erase all of the photos. Press No to cancel.
Note:
If any photos are locked, a message is displayed
confirming that you want to erase the locked photos.
Press No to erase only the unlocked photos. Press Yes
to erase all photos, including those that are locked. For
information on locking and unlocking photos, see
“Locking and unlocking photos” on page 3-6.
Erasing audio recordings
To erase audio recordings from the memory card in
your camera, follow the steps below.
Playing Back and Managing Images With Your Camera
3
3-7
Page 60

Note:
To make audio recordings, see “Making Audio Recordings
for Photos” on page 2-19.
1. Set the dial switch to , then turn on the camera.
2. Use the arrow icon buttons to select a photo with
an attached audio recording that you want to
erase (a microphone icon is displayed in each
photo that has an attached recording).
3. Press the MENU CHANGE button.
4. Press the SOUND button.
5. To erase the selected photo’s audio recording,
press the Delete Sound button.
If the selected photo is locked, a message appears
informing you that the photo is locked. To erase
the locked photo, press Yes. For details on locking
and unlocking photos, see “Locking and
unlocking photos” on page 3-6.
Erasing video clips
To erase video clips saved on your memory card,
follow the steps below.
1. Set the dial switch to , then turn on the camera.
2. Press the MENU CHANGE button, then press the
VIDEO CLIP button. The first frame of the last
video clip you took appears on the screen.
3. Use the arrow icon buttons to select the video clip
that you want to erase.
To make selecting video clips easier, you can
display the first frame from either four or nine
clips at a time by pressing the Multi button once
or twice. Multiple frames are displayed and a
white frame appears around the selected clip.
4. After selecting the video clip, press the Delete
button. Press the Yes button to erase the video
clip.
6. A message is displayed to confirm whether you
want to erase the audio recording. Press Yes to
erase the recording, or No to cancel.
7. Press the BACK button twice to exit.
3-8
Playing Back and Managing Images With Your Camera
To cancel erasing the clip, press the No button.
Page 61

Viewing Pictures on a Television
You can display images and play back audio
recordings saved on the camera’s memory card on a
regular television simply by connecting the camera to
the television using the AV cable that came with your
PhotoPC 3100Z.
Note:
Television telecasting specifications vary by country. Select
NTSC or PAL to meet the video signal specifications in your
country. See “Selecting the signal system and language” on
page 4-21.
Follow the steps below to connect the PhotoPC 3100Z
to your television.
1. Make sure the camera and television are turned
off.
2. Open the connector cover on the side of the
camera.
connector cover
3. Connect the AV cable to the AV OUT port on the
camera as shown below.
3
Playing Back and Managing Images With Your Camera
3-9
Page 62

4. Connect the other end of the AV cable to the audio
and video input ports on the television.
VIDEO
(yellow)
AUDIO
(white)
5. Turn on the television and switch it to video
mode.
6. Set the dial switch to
, then turn on the camera.
The image displayed on the LCD monitor displays on
the television. If the camera is connected to the AC
adapter, the image is also displayed on the LCD
monitor. If the camera is not connected to the AC
adapter, the image only displays on the television.
You can use all of the operations and procedures for
viewing or managing images on the LCD monitor to
view or manage images on the television. For more
information on viewing the images, see “Viewing
Images Using the LCD Monitor” on page 3-1. For more
information on managing the images, see “Managing
Images with the LCD Monitor” on page 3-6.
Viewing Pictures with an EPSON Projector
You can display images stored on your camera’s
memory card using an EPSON Projector that is
connected to your camera via the video cable that
came with your PhotoPC 3100Z.
See your EPSON Projector documentation for details.
3-10
Playing Back and Managing Images With Your Camera
Page 63

Chapter 4
Making Settings
You can make a variety of settings for your PhotoPC
3100Z. The available settings depend on the camera’s
dial switch position. This chapter explains how to
make the following settings.
❏ Settings that directly affect the quality of the
photos that you take with your camera, such as
image quality, flash, exposure, sensitivity, white
balance, switching between color and
monochrome, switching between internal and
external flash, and other advanced settings.
❏ General camera settings that do not affect the
quality of images, such as the date and time, the
language, the LCD monitor’s brightness level, the
speaker volume level, the beep and shutter
sounds, and the automatic shut-off time.
❏ Settings that affect the way your pictures are
printed.
Making Image Capture Settings
Read this section to make settings that directly affect
the quality of the photos that you take with your
camera.
4
You can make all image capture settings while is
selected as the dial switch position. By pressing the
camera’s MENU ON/OFF button, you can also make
some image capture settings while is selected as
the dial switch position. This turns on the LCD
monitor and allows you to access and change some of
the settings.
Adjusting the image quality
The PhotoPC 3100Z has four basic image quality
settings. You can also take high quality uncompressed
TIFF images.
Making Settings
4-1
Page 64

Making basic image quality adjustments
While your PhotoPC 3100Z’s dial switch is set to ,
, or , you can cycle through the image quality
settings by pressing the image quality button on
the top of the camera. The currently selected image
quality setting is displayed on the display panel. You
can toggle freely between these settings, and take and
save pictures with various quality settings on the same
CompactFlash Card. The CompactFlash Card’s image
capacity will vary accordingly.
Fine
Super fine (default setting)
HyPict (or TIFF file format)
The image quality settings are as follows:
Standard
Images are captured at 640 × 480 pixels
and the included 16 MB CompactFlash
Card holds approximately 199 standard
compression photos, or 122 low
compression photos, without audio
recordings. Images are less detailed than
those taken using other settings.
Fine
Images are captured at 1600 × 1200 pixels.
These pictures have moderate detail and
the included 16 MB CompactFlash Card
holds approximately 56 standard
compression photos, or 29 low
compression photos, without audio
recordings.
4-2
Making Settings
Standard
Super fine
Images are captured at 2048 × 1536 pixels.
These pictures are highly detailed and the
included 16 MB C ompactFlash Card holds
approximately 29 standard compression
photos, or 15 low compression photos,
without audio recordings.
Page 65

HyPict
When these icons are shown on the
display panel, you can take HyPict or TIFF
photos.
HyPict images are captured at 2544 × 1904 pixels.
These pictures have even higher detail than super fine
images, and the included 16 MB CompactFlash Card
stores approximately 12 HyPict photos without audio
recordings.
For information on TIFF photos, see “Taking photos
in the TIFF file format” on page 4-4.
Note:
❏ The image quality setting is retained when the camera
is turned off.
❏ The number of photos that you can take varies
depending on the complexity of the photo and the
number and length of audio recording files saved on the
memory card.
❏ For more information on image compression, see
“Making image compression settings” on page 4-3.
❏ HyPict is not available when using the continuous
shooting feature.
Making image compression settings
With your PhotoPC 3100Z, you can set image
compression to standard or low. The default setting is
standard.
Photos taken at the low image compression setting
take up more memory than those taken at the standard
setting. This means you can take fewer pictures at the
low setting. For more information about the number
of pictures you can take at these settings, see “Making
basic image quality adjustments” on page 4-2.
Note:
Image compression settings only apply to images with the
Standard, Fine, or Super fine image quality settings.
To make the compression setting, follow these steps.
1. Remove the lens cap, turn on the camera, and set
the dial switch to .
4
❏ After you take a picture using the HyPict setting, the
camera takes approximately 18 seconds to process the
image.
2. Press the Shot SETUP button.
3. Press the second button from the top on the right
of the LCD monitor, and select either
Std.compression or Low compression.
Making Settings
4-3
Page 66

4. Press the Back button.
Taking photos in the TIFF file format
In addition to the four basic image quality settings,
your PhotoPC 3100Z allows you to take
uncompressed images in the TIFF file format. These
images are captured at 2048 × 1536 and offer the
highest image quality, but have a much larger file size
and take longer to process. The included 16 MB
CompactFlash Card stores approximately one TIFF
photo.
To take TIFF photos, follow these steps.
Note:
❏ To take a TIFF photo, you must use a CompactFlash
Card that has at least 9.1 MB of memory available.
❏ The continuous shooting feature is disabled when
taking TIFF photos.
1. Remove the lens cap, turn on the camera, and set
the dial switch to .
2. Press the Shot SETUP button.
3. Press the Image button to select TIFF.
Note:
Selecting JPEG allows you to take photos using the
HyPict image quality setting, instead of the TIFF file
format.
4. Turn the camera’s dial switch to or , then
press the image quality button on the top of the
camera until appears on the display panel.
5. Press the shutter button to take a TIFF photo.
Note:
After you take a TIFF photo, the camera takes
approximately 22 seconds to process the image.
Setting the flash
The flash has the following effective ranges,
depending upon the optical zoom ratio and whether
or not the macro setting is used.
Wide (minimum zoom): 50-420 centimeters
Tele (maximum zoom): 50-340 centimeters
Macro: 20-50 centimeters
The effective flash range varies depending on the
sensitivity setting (see page A-3 for details).
4-4
Making Settings
Page 67

Turn on the camera and press the flash button on the
top of the camera to cycle through the flash settings.
The settings appear on the display panel as shown
below.
Red-eye reduction
The flash flickers briefly before firing to
reduce the red-eye effect in flash photos of
people. As with the Automatic setting, the
flash fires automatically whenever it’s
needed for adequate lighting.
Automatic (default setting)
Red-eye reduction
Forced flash
Flash off
Slow synchro
(Program and Manual modes only)
The flash settings are as follows:
Automatic
The flash fires automatically whenever more
lighting is needed.
Forced flash
The flash fires with every picture you take.
Use this setting to compensate for
backlighting; for example, when you are
facing the sun.
Flash off
The flash is disabled even when adequate
lighting is not available. Use this setting for
special effects or when using a flash is
prohibited.
Slow synchro
The camera’s shutter speed slows to enhance
the clarity of background details in the photo
when taking pictures at dawn or twilight, or
in places with an illuminated background.
Making Settings
4-5
4
Page 68

Note:
❏ After turning on the camera and taking a flash photo,
the flash icon and the green indicator light beside the
viewfinder blink until the flash is fully recharged.
❏ When you use the external flash, the internal flash is
disabled and the flash button does not work.
Choosing a camera mode
Choose from the camera modes described below.
Full Auto
Allows you to take photos without having to make
complex settings. The available settings include:
❏ Slow synchro is only available in the Program or
Manual camera modes. To change the camera mode, see
“Making camera mode settings” on page 4-6.
❏ You can select a leading or trailing slow synchro
setting. To select a slow synchro setting, see “Selecting
slow synchro timing” on page 4-17.
❏ The flash is disabled when taking video clips or using
the continuous shooting feature.
Making camera mode settings
The PhotoPC 3100Z has three camera modes to suit
your photographic needs. Each mode gives you a
different degree of control over the camera settings,
whether you are taking photos using the viewfinder
or the LCD monitor. Read this section to choose the
appropriate mode, and to change the mode if
necessary.
4-6
Making Settings
❏ Flash, including auto, red-eye reduction,
forced, and off
❏ Self timer
❏ Image quality
❏ Optical zoom
❏ Digital zoom
(when using the LCD monitor)
❏ Macro
(when using the LCD monitor)
❏ Quick playback of photos and messages
(when using the LCD monitor)
Program
For users who want a moderate amount of control
over the camera’s features. Available settings include:
❏ All of the settings that are available in the Full
Auto camera mode
❏ Slow synchro flash
Page 69

❏ Sensitivity
❏ Predefined exposure
❏ Fine exposure adjustment
(in increments of 0.5 EV)
❏ Auto, custom, or fixed white balance
Manual
For experienced users who want complete control
over the camera’s wide array of features. Available
settings include:
❏ All of the settings that are available in the Full
Auto camera mode
❏ Slow synchro flash
❏ Sensitivity
❏ Fine exposure adjustment
(in increments of 0.2 EV)
❏ Manual exposure adjustment using the auto
exposure, manual exposure, aperture
priority, and shutter priority
❏ Manual focus features
❏ Spot and divided brightness metering
systems
❏ Auto, custom, or fixed white balance
Changing the camera mode
To change the camera mode, follow these steps.
1. Set the dial switch to and turn on the camera.
The current camera mode is displayed at the right
side of the LCD monitor, below the date and time
settings.
2. Press the LCD monitor button next to the current
camera mode to change the setting.
4
Changing the color/monochrome setting
You can take both color and monochrome photos
using the PhotoPC 3100Z. To select color or
monochrome, follow the steps below.
Note:
❏ The file size is the same for both color and monochrome
photos.
❏ When taking photos with Monochrome selected, the
icon is shown on the camera’s display panel.
1. Set the dial switch to and turn on the camera.
2. The current setting is displayed at the right side
of the LCD monitor. Press the LCD monitor
button next to the current setting to toggle
between Color and Monochrome.
Making Settings
4-7
Page 70

Making manual focus settings
When in the Manual camera mode, you can make
focus settings manually. Follow these steps.
1. Make sure that Manual is selected as the camera
mode. (See “Making camera mode settings” on
page 4-6.)
2. Remove the lens cap, set the dial switch to , and
turn on the camera.
Note:
You cannot make manual focus settings when taking
pictures using the viewfinder.
3. If you want to make focus settings manually when
using the macro feature, press the button.
4. Press the MENU CHANGE button.
5. Press the up and down arrow icon buttons to
select a manual focus setting.
You can choose between AF for automatic focus,
for when the subject is about one meter away,
for when the subject is about three meters
away, and for when the subject is more than
three meters away.
When using the macro feature, you can choose
between M1 for when the subject is about
0.2 meters away, M2 for when the subject is about
0.5 meters away, or AF for automatic focus. The
smaller the value, the closer the subject should be
to the camera.
Adjusting the sensitivity setting
Your PhotoPC 3100Z has the following sensitivity
settings.
Standard sensitivity, equivalent to ISO 100
High sensitivity, equivalent to ISO 200
Super high sensitivity, equivalent to ISO
400
4-8
Making Settings
Page 71

When to adjust the sensitivity
Set the sensitivity to high or super high when taking
photos in the following situations:
❏ If the subject is fast moving (useful for indoor
sports)
❏ If the subject is far away when using a flash
3. In the Program camera mode, press the ISO
button to toggle between standard, high, and
super high sensitivity.
In the Manual camera mode, press the MENU
CHANGE button. Then press the ISO button to
toggle between standard, high, or super high
sensitivity.
❏ If it is dark and you are not using a flash (useful
when flash photography is prohibited)
EPSON recommends setting the sensitivity to
standard at a ll other times, as image quality is lower
when using higher sensitivity settings.
How to adjust the sensitivity
Follow the steps below to change the sensitivity.
1. Make sure that Program or Manual is selected as
the camera mode. (See “Making camera mode
settings” on page 4-6.)
2. Remove the lens cap, set the dial switch to or
, and turn on the camera.
If the dial switch is set to , press the
MENU ON/OFF button on the back of the
camera to turn on the LCD monitor.
Note:
The selected sensitivity setting is displayed under
ISO on the LCD monitor.
Adjusting the white balance setting
The PhotoPC 3100Z has three white balance settings
that are accessible when the Program or Manual
camera mode is selected, one of which is a custom
setting that you can make yourself.
When to adjust the white balance
Your camera’s white balance default setting is AUTO.
When AUTO is selected, the camera adjusts the white
balance automatically. At certain times you may want
to manually adjust the white balance setting so that
the colors in your images appear more realistic.
Making Settings
4
4-9
Page 72

For example, make FIX the white balance setting when
taking pictures at dusk to increase the reddish color
tones in your images. However, keep the white
balance set to AUTO when taking pictures under white
light to avoid a green tone in your images.
If you are an experienced user, and you want to make
your own custom white balance settings, see “Making
a custom white balance setting” on page 4-10.
Changing the white balance setting
Follow these steps to change the white balance setting.
1. Make sure that the Program or Manual camera
mode is selected. To change the camera mode
setting, see “Making camera mode settings” on
page 4-6.
2. Remove the lens cap, set the dial switch to or
, and turn on the camera.
3. In the Program camera mode, press the W/B
button to toggle between AUTO, FIX and
CUSTOM.
In the Manual camera mode, press the Menu
Change button. Then press the W/B button to
toggle between AUTO, FIX, and CUSTOM and
press BACK to save your setting.
Note:
The selected white balance setting is shown beneath
W/B on the LCD monitor.
Making a custom white balance setting
Follow the steps below to create your own white
balance setting.
Note:
A custom white balance setting remains saved when the
camera is turned off.
4-10
If you set the dial switch to , press the
MENU ON/OFF button on the back of the camera
to turn on the LCD monitor.
Making Settings
1. Remove the lens cap, turn the dial switch to
and turn on the camera.
2. Press the Shot SETUP button.
3. Press the New W/B button. A confirmation
message is displayed. Press Yes to continue
making settings.
Page 73

4. Place a white sheet in front of the camera lens so
that it fills the entire LCD monitor.
Note:
❏ You can also use a colored sheet. For example, to
create a sepia hue, use a blue sheet. To create a blue
hue, use a yellow sheet. Experiment with other
colors for different effects.
❏ To quit without making a custom white balance
setting, press BACK.
5. Press the shutter button to make the new setting.
To use your custom white balance setting, see
“Changing the white balance setting” on page
4-10.
Making exposure settings
The PhotoPC 3100Z allows you to make many levels
of exposure settings in a variety of ways. The
following sections explain how to make predefined
exposure settings when in the Program camera mode,
and how to manually make basic or advanced
exposure settings in the Program or Manual camera
mode.
Making basic exposure adjustments
Exposure refers to the amount of light the
camera captures when a photo is taken.
The camera’s default exposure setting is AUTO.
When AUTO is selected, the exposure is adjusted
automatically. However, you can manually adjust the
exposure to change the darkness or brightness of your
photos to compensate for certain conditions.
When to make basic exposure adjustments
Increase the exposure setting when:
❏ You want to make your photos lighter.
❏ You are taking pictures of a white object which
may tend to look grayish in photos.
❏ You are taking pictures of an object with a bright
background, such as a chair in front of a sunlit
window.
❏ You are taking photos at the beach or in the snow
on a sunny day.
4
Making Settings
4-11
Page 74

Decrease the exposure setting when:
❏ You want to make your photos darker.
❏ You are taking pictures of a black object which
may tend to look grayish in photos.
3. Press the LCD monitor buttons next to to raise
or lower the exposure value.
In the Program camera mode, you can make nine
dif fere nt set ting s i n inc reme nt s of 0 .5, f rom -2 .0 to
2.0 EV.
❏ You are taking pictures of an object with a black
background.
How to make basic exposure adjustments
Follow the steps below to change the exposure setting.
1. Make sure that Program or Manual is selected as
the camera mode. To change the camera mode
setting, see “Making camera mode settings” on
page 4-6.
2. Remove the lens cap, set the dial switch to or
, and turn on the camera.
If the dial switch is set to , press the
MENU ON/OFF button on the back of the
camera to turn on the LCD monitor.
4-12
Making Settings
When in the Manual camera mode, you can adjust
the exposure when Auto Exposure or Aperture
Priority is selected. You can make 21 different
settings in increments of 0.2, from -2.0 to 2.0 EV.
Note:
❏ The selected exposure setting is shown at the right
side of the LCD monitor.
❏ Photographic knowledge and experience is
necessary to correctly adjust the exposure. Be sure
the exposure settings are appropriate when taking
important photos.
❏ When shooting under poor photographic
conditions, EPSON recommends taking several
photos of the same subject using different
exposures.
Page 75

Making predefined exposure settings
The PhotoPC 3100Z has four predefined exposure
settings available when the Program camera mode is
selected.
When to use a predefined exposure setting
Refer to the descriptions below to make the
appropriate settings.
Normal
For taking basic photographs. Uses the following
settings:
Portrait
For photographing portraits. Uses the following
settings:
❏ Wide aperture setting
❏ Spot metering system
Landscape
For photographing landscapes or scenery. Uses the
following settings:
❏ Aperture priority
❏ Divided brightness metering system
4
❏ Auto exposure
❏ Divided brightness metering system
Sports
For photographing fast-moving subjects. Uses the
following settings:
❏ High shutter speed
❏ Automatic sensitivity
❏ Divided brightness metering system
How to change the predefined exposure setting
Follow the steps below to make the predefined
exposure setting.
1. Make sure the Program camera mode is selected.
See “Making camera mode settings” on page 4-6
for details
2. Remove the lens cap, set the dial switch to or
, and turn on the camera.
If the dial switch is set to , press the
MENU ON/OFF button on the back of the
camera to turn on the LCD monitor.
.
Making Settings
4-13
Page 76

3. Press the Program button to toggle between
Normal, Sports, Portrait, or Landscape.
Making advanced exposure adjustments
When the Manual camera mode is selected, you can
manually set the correct exposure by changing the
shutter speed and the aperture. Select Auto Exposure,
Aperture Priority, Shutter Priority or Manual
Exposure as the exposure mode. Although these
exposure modes are similar to the predefined
program modes available in the Program camera
mode, you can manually make advanced exposure
adjustments when in the Manual mode.
Note:
Photographic experience and knowledge is necessary to
make proper shutter speed and the aperture adjustments. Be
sure to make appropriate settings before taking important
photos.
Auto exposure
Auto exposure is an easy-to-use feature that
automatically adjusts the shutter speed and the
aperture to achieve the correct exposure. Select the
auto exposure feature as follows.
1. Make sure that Manual is selected as the camera
mode. (See “Making camera mode settings” on
page 4-6.)
2. Remove the lens cap, set the dial switch to or
, and turn on the camera.
If the dial switch is set to , press the
MENU ON/OFF button on the back of the
camera to turn on the LCD monitor.
3. Press the button at the top-right of the LCD
monitor repeatedly until Auto Exposure is
displayed.
You can specify shutter speeds from 8 to 1/1000
seconds. You can specify an aperture of F2, F2.3, F2.8,
F4.0, F5.6, or F8.0.
4-14
Making Settings
4. To make fine exposure adjustments, press the
LCD monitor buttons next to to raise or lower
the exposure value.
Page 77

Aperture priority
Aperture priority allows you to select the aperture
first, so that the camera automatically adjusts the
shutter speed for the correct exposure. Select the
aperture priority feature as follows.
Shutter priority
Shutter priority allows you to select the shutter speed
first, so that the camera automatically adjusts the
aperture for the correct exposure. Select the shutter
priority feature as follows.
1. Make sure that Manual is selected as the camera
mode See “Making camera mode settings” on
page 4-6 for details.
2. Remove the lens cap, set the dial switch to or
, and turn on the camera.
If the dial switch is set to , press the
MENU ON/OFF button on the back of the
camera to turn on the LCD monitor.
3. Press the button at the top-right of the LCD
monitor repeatedly until Aperture Priority is
displayed.
4. To change the aperture value, press the left and
right arrow icon buttons.
To adjust the exposure, press the buttons next to
at the right side of the LCD monitor.
1. Make sure that Manual is selected as the camera
mode See “Making camera mode settings” on
page 4-6 for details.
2. Remove the lens cap, set the dial switch to or
, and turn on the camera.
If the dial switch is set to , press the
MENU ON/OFF button on the back of the
camera to turn on the LCD monitor.
3. Press the button at the top-right of the LCD
monitor repeatedly until Shutter Priority is
displayed.
4. To change the shutter speed, press the left and
right arrow icon buttons.
To adjust the exposure, press the buttons next to
at the right side of the LCD monitor.
Making Settings
4-15
4
Page 78

Manual exposure
Manual exposure allows you to manually adjust the
shutter speed and the aperture to set the exposure.
Make the manual exposure setting as follows.
Note:
You cannot make manual exposure settings when taking
pictures with the viewfinder.
1. Make sure that Manual is selected as the camera
mode. See “Making camera mode settings” on
page 4-6 for details.
Changing the metering system
Your camera uses the divided brightness metering
system by default. When in the Manual camera mode,
you can switch freely between the divided brightness
and spot metering systems.
Note:
When taking photos using the portrait exposure setting, the
camera automatically uses the spot metering system. To
select Portrait as the exposure setting, see “Making
predefined exposure settings” on page 4-13.
2. Remove the lens cap, turn on the camera, and set
the dial switch to .
3. Press the button at the top-right of the LCD
monitor repeatedly until Manual Exposure is
displayed.
4. To adjust the aperture, press the left and right
arrow icon buttons.
To adjust the shutter speed, press the up and
down arrow icon buttons.
4-16
Making Settings
When to change the metering system
Use the spot metering system in most photographic
situations.
Use the divided brightness metering system in the
following situations:
❏ When taking pictures of objects that have a bright
background, such as a chair in front of a sun-lit
window
❏ When there is a clear contrast in shading between
the upper and lower part of the frame
Page 79

How to change the metering system
Follow the steps below to change the metering system.
1. Make sure that Manual is selected as the camera
mode. See “Making camera mode settings” on
page 4-6 for details.
2. Remove the lens cap, set the dial switch to or
, then turn on the camera.
If the dial switch is set to , press the
MENU ON/OFF button on the back of the
camera to turn on the LCD monitor.
3. Press the MENU CHANGE button.
4. To change the metering system, press the
Metering button.
Selecting slow synchro timing
You can set the flash timing to slow synchro. Leading
synchro, the default slow synchro setting, is suitable
for most situations. Trailing synchro is a special
setting for expressing motion. Follow the steps below
to specify the slow synchro setting.
Note:
You cannot select slow synchro timing when using an
external flash, or when Full Auto is selected as the camera
mode.
1. Set the dial switch to , then turn on the camera.
2. Make sure that Manual or Program is selected as
the camera mode. See “Making camera mode
settings” on page 4-6 for details.
4
When the divided brightness metering
system is selected, a square-shaped icon
with nine squares inside it appears in the
lower-right corner of the LCD monitor.
When the spot metering system is selected,
a square icon with a small circle inside it
appears in the lower-right corner of the
LCD monitor.
3. Press the Shot SETUP button. Leading, Trailing,
or Ext Flash (if you are using an external flash) is
displayed at the right side of the LCD monitor.
4. Press the button next to this setting to choose
between Leading and Trailing.
5. Set the dial switch to or .
Making Settings
4-17
Page 80

6. Make sure that slow synchro is selected as the
flash setting. Press the flash button on the top
of the camera until the slow synchro icon
appears on the display panel on the top of the
camera.
Note:
For details on making the flash setting, see “Setting the
flash” on page 4-4 for details.
Selecting the internal or external flash
The PhotoPC 3100Z has a convenient built-in flash
which satisfies ordinary flash needs. If you need more
light, you can attach an external flash (sold separately
as a camera accessory) to the PhotoPC 3100Z.
Note:
When using the external flash, the internal flash setting is
disabled and the button does not work.
Slide the flash into the hot
shoe and make sure that
the connection is secure.
To mount the external flash, turn off the flash and your
camera, slide the mounting foot of the flash into the
hot-shoe attachment on the top of the PhotoPC 3100Z,
and secure the lock mechanism. For details about
using the flash, refer to its documentation.
Warning:
w
Be sure to turn off the camera and flash before
connecting them.
4-18
Making Settings
Follow the steps below to specify an internal or
external flash.
1. Make sure that the camera is in the Manual
camera mode. To change the camera mode
setting, see “Making camera mode settings” on
page 4-6.
Note:
The external flash works only works in the Manual
camera mode. To change the camera mode setting, see
“Making camera mode settings” on page 4-6.
Page 81

2. Set the dial switch to and turn on the camera.
Setting the time and date
3. Press the Shot SETUP button.
4. Leading or Trailing appears at the right side of the
LCD monitor. Press the button next to this setting
until Ext Flash is displayed.
5. Press the BACK button to return to the previous
screen.
Making Camera Settings
When the camera’s dial switch is in the position,
you can make certain camera settings, including
setting the internal clock and changing the camera
mode, the beep and shutter sound, the LCD monitor’s
brightness level, the speaker volume, and the
automatic shut-off time. You can also set the display
language.
Follow the instructions in this section to set the time
and date.
1. Set the dial switch to and turn on the camera.
2. The date (month, day, and year) and the time
(hour and minute) appear at the upper-right
corner of the LCD monitor. Press the button next
to the date and time.
4
3. To change the order in which the date is
displayed, press the top button on the right side
of the LCD monitor. You can make the following
settings: M.D.Y (for month/day/year); D.M.Y (for
day/month/year); and Y.M.D (for
year/month/day).
4. To adjust the value of the highlighted item, use
the up and down arrow icon buttons.
To change which item is highlighted, use the right
and left arrow icon buttons.
5. After setting the correct time and date, save the
settings by pressing the BACK button.
Making Settings
4-19
Page 82

Note:
❏ You must reset the time if the camera is unplugged and
the batteries are removed for more than one week.
2. Press the Camera SETUP button. The current
setting appears at the top-right corner of the LCD
monitor.
❏ You can also set the time and date using your
computer. See the online EPSON Digital Camera
Software User’s Guide for details.
Using the automatic shut-off feature
When using this feature, your camera saves battery
power by automatically shutting off when idle for a
designated period of time. You can have the camera
shut off after thirty seconds, one minute, or five
minutes. This feature is only enabled when using
batteries to power the camera.
Note:
If the camera is connected to a computer, the power does not
turn off.
Changing the setting
To change t he automatic shut- off interval, foll ow these
steps.
1. Set the dial switch to and turn on the camera.
3. Press the Power Save button. You can select
30 seconds, 1 minute, or 5 minutes as the interval.
4. Press BACK to save your setting.
Turning the camera back on
When the dial switch is set to a red icon, you can turn
the camera back on by pressing the shutter button or
the POWER button.
When the dial switch is set to , , or , you can
turn the camera back on by pressing any button on the
back of the camera, or the POWER button.
Setting the LCD monitor’s brightness level
Follow these steps to change the LCD monitor’s
brightness level.
1. Set the dial switch to and turn on the camera.
2. Press the Camera SETUP button.
3. Press the arrow icon buttons to increase or
decrease the brightness level.
4-20
Making Settings
Page 83

4. Press the BACK button to return to the previous
screen.
Note:
To adjust the volume of the built-in speaker, see the previous
section.
Adjusting the speaker volume
Follow these steps to adjust the volume of the built-in
speaker.
1. Set the dial switch to and turn on the camera.
2. Press the Camera SETUP button.
3. Press the Volume button to adjust the speaker
volume level.
4. Press BACK to return to the previous screen.
Setting the beep and shutter sound
You can choose to have the camera beep whenever
you press an LCD monitor button and make a shutter
sound whenever you take a picture, only make a
shutter sound when you take a picture, or never make
a sound. You can also set the camera to beep when
using the self timer if Beep is set to Always. Follow
these steps to change the sound setting.
1. Set the dial switch to and turn on the camera.
2. Press the Camera SETUP button.
3. Press the button below Beep to select Always,
Shutter, or Never. Then press the BACK button
to return to the previous screen.
4
Selecting the signal system and language
In order to view your photos and video
clips on a television, you need to choose
either the NTSC or PAL signal system to
meet your local television broadcasting standards.
You can also choose English, Japanese, French,
German, Italian, Portuguese, or Spanish (and Chinese
in some areas), as the language used to display camera
information on the LCD monitor.
To select the signal system and language, follow the
steps below.
1. Set the dial switch to and turn on the camera.
2. Press the button.
Making Settings
4-21
Page 84

3. Press the arrow icon buttons to move the cursor
to the language of your choice.
4. Press the TV button to select NTSC or PAL.
5. Press the BACK button to save your selection.
Making Print Settings
You can use your PhotoPC 3100Z to make settings that
determine how your photos are printed. After you
select which photos you want to print, you can make
the following settings:
❏ The number of prints for each selected photo
❏ Whether to print an index of the selected photos
Settings for the number of prints and for index
prints are saved in a Digital Print Order Format
(DPOF) file on the camera's memory card. You
can apply these settings when using a printer or
printing application that supports the DPOF
standard. Also, in some countries you will find
print shops that support this standard and can
print according to the settings in your DPOF file.
Using the DPOF file to relay these settings to your
printer, printing application, or print shop helps
make printing quick and easy.
❏ Brightness settings
❏ Sharpness settings
These brightness and sharpness settings are
recorded in each image file as PRINT Image
Matching information. This information can be
used by printers that support the PRINT Image
Matching system for enhanced printing results.
4-22
Making Settings
Page 85

PRINT Image Matching is a new standard that
allows digital cameras to record special
information about the photos it takes and relay
that information seamlessly to a printer
compatible with this standard. Your PhotoPC
3100Z records this special information in each
JPEG photo it takes. By using a printer that is also
compatible with the PRINT Image Matching
system, you can achieve printing results that were
until now unattainable.
Note:
PRINT Image Matching information does not change
the image data or the way the image is displayed on a
computer screen.
To make these settings, see the following sections.
Note:
❏ You cannot make print settings for video clips.
❏ To print the images in your memory card, see the
online EPSON Digital Camera Software User’s
Guide.
Selecting images and specifying the number of prints
When the camera’s dial switch is set to the position,
you can use the print button on the back of the
camera to select a photo to be printed. You can also
use the print button to specify the number of prints,
from zero to nine prints. Follow the steps below.
1. Remove the lens cap, set the dial switch to ,
then turn on the camera.
2. Press the arrow icon buttons to select the photo
that you want to print.
To make selecting photos easier, you can display
e it h er f ou r or n in e ph o to s at a ti m e b y pr e ss i ng the
Multi button once or twice. A white frame appears
around the selected photo.
3. Press the print button once to specify one print
for that photo. Press the button again to increase
the number of specified prints. The number of
prints appears with a green background in the left
corner of the photo. You can specify up to nine
prints per photo.
4
You can specify zero prints by holding down the
print button, or by pushing the button when
there are nine prints specified.
Making Settings
4-23
Page 86

Making settings to print an index
To make settings for printing an index of all photos
saved in the memory card, follow the steps below.
1. Select the photos you want to be included in the
index as described in the previous section.
2. Turn the dial switch to the position.
3. To make the setting for printing an index, press
the Index button to select On.
❏ These settings do not affect the image data, or the
quality of the image when it is displayed on a computer
monitor.
1. Turn the dial switch to the position, then turn
on the camera if necessary.
2. Press the ADJUST button.
3. To change the print setting for sharpness, press
the Sharpness button. You can choose between
Std. (standard), High, and Low.
To change the setting, press the Index button
again to select Off.
Making print quality settings
You can make settings that affect the brightness and
the sharpness of the image when it is printed. First,
select the images you want to print as explained in
“Selecting images and specifying the number of
prints” on page 4-23, then follow the steps in the
appropriate section below.
Note:
❏ These settings only affect the quality of the printout
when you use a printer that supports the PRINT Image
Matching system.
4-24
Making Settings
To change the print setting for brightness, press
the Brightness button. You can choose between
Std. (standard), High, and Low.
Note:
❏ The brightness of the image on the LCD monitor
changes when you change the brightness setting.
This approximates the effect the setting will have
when printed by a printer that supports the
PRINT Image Matching system.
❏ You can also specify the number of prints for the
selected photo by pressing the arrow buttons.
❏ You can make print quality settings only for JPEG
images taken with your PhotoPC 3100Z. You
cannot make print quality settings for TIFF
images.
4. Push the BACK button to save your settings.
Page 87

Chapter 5
Using Images on Your Computer
This chapter prepares you to transfer your photos,
video clips, and audio recordings from the camera’s
memory card to your computer. The following topics
are covered.
❏ System requirements for your computer
❏ Installing the included EPSON software
❏ Connecting the camera to your computer
❏ Transferring image and audio recording files to
your computer from the camera’s memory card
❏ Viewing the software User's Guides
Note:
For information on using the EPSON camera software, see
the online EPSON Digital Camera Software User’s Guide.
For information on printing photos with EPSON
PhotoQuicker, see the online EPSON PhotoQuicker User’s
Guide.
System Requirements
To connect the PhotoPC 3100Z digital camera to your
computer and run the digital camera software, refer
to this section for the system requirements.
For Windows
The system requirements for Windows computers
when connecting the PhotoPC 3100Z are as follows:
486 processor or higher
USB port (TYPE A receptacle)
At least 48 MB RAM
(64 MB when using EPSON PhotoQuicker)
Hard disk drive with at least 50 MB of free space
(170 MB when using EPSON PhotoQuicker)
VGA monitor with at least 256-color display
5
Using Images on Your Computer
5-1
Page 88

Microsoft
Millennium Edition, or Windows 2000 pre-installed
®
Windows 98 pre-installed, Windows
The Included Software
QuickTime 4.1.2 or later
For Macintosh
The system requirements for Macintosh computers
when connecting the PhotoPC 3100Z with a USB cable
are as follows:
Power PC G3 processor or higher
Apple Macintosh with built-in USB port
48 MB RAM
(128 MB when using EPSON PhotoQuicker together
with EPSON Photo!4)
Hard disk drive with at least 50 MB free space
(170 MB when using EPSON PhotoQuicker)
Monitor with a minimum resolution of 640 × 480
Macintosh OS 8.5.1 to OS 9.1
(Panorama Stitcher Light EP requires
Macintosh OS 8.6 to OS 9.1)
QuickTime 4.1.2 or later
Note:
The included software cannot be used with the Multiple
Users function of Mac OS 9.
The EPSON Camera Software CD-ROM that comes
with your PhotoPC 3100Z digital camera contains the
following EPSON software.
❏ PhotoPC 3100Z USB driver
Driver necessary to connect your camera to your
computer (except for Windows 2000 users and
Macintosh OS 9).
❏ EPSON Photo!4
Software for viewing and managing the images
you capture with your PhotoPC 3100Z.
❏ EPSON CameraStarter
Utility that starts automatically when you connect
your camera to your computer and provides you
with a convenient way to launch EPSON
AutoDownloader and EPSON PhotoQuicker.
(Automatically installed with EPSON Photo!4.)
❏ EPSON AutoDownloader
Utility that provides you with a quick and
organized way to transfer your photos, video
clips, and audio recordings from the camera to
your computer.
(Automatically installed with EPSON Photo!4.)
5-2
Using Images on Your Computer
Page 89

❏ EPSON CardMonitor
Utility that enables EPSON CameraStarter to start
automatically by detecting when the camera is
connected to your computer, or when the
memory card is inserted into a PC Card slot.
❏ EPSON PhotoQuicker
Software for printing your images.
❏ Panorama Stitcher Light EP
Software for creating panoramas by combining
overlapping images, especially those taken using
your PhotoPC 3100Z’s stitch assist feature.
❏ EPSON File Converter
Software for converting files so that they can be
uploaded (with EPSON Photo!4) and used on
your camera.
❏ QuickTime 4
Software necessary for viewing video clips.
❏ Adobe Acrobat Reader
Software for viewing the PDF online manuals
contained in the included CD-ROMs.
Installing the Software for Windows Users
Follow the steps below to install the USB driver and
other software on the included PhotoPC 3100Z
Camera Software CD-ROM.
Note:
Do not connect your camera to your computer before you
install the software.
1. Turn on the computer and insert the included
Camera Software CD into the CD-ROM drive.
If a dialog box prompts you to select a language,
click the appropriate language, then click
2. The EPSON Installation Program dialog box
appears. Select Install Digital Camera Software,
then click
Note:
If the EPSON Installation Program dialog box does not
appear, double-click the My Computer icon. Click
the CD-ROM icon, then select Open from the File
menu. Then double-click Setup.exe.
.
5
.
Using Images on Your Computer
5-3
Page 90

3. The following dialog box containing a list of
software appears.
Note for Windows 2000 users:
The PhotoPC 3100Z uses the USB driver included
with Windows 2000. Therefore, EPSON PhotoPC
3100Z storage driver does not appear in the list of
software and does not need to be installed.
4. Click OK, then follow the on-screen instructions.
5. After installing the first software, click Finish. The
installation process begins automatically for the
next software that you selected in step 3.
5-4
Software with a check mark next to it will be
installed on your PC in the order listed. Click a
software title in the list to remove or add a check
mark.
Note:
❏ Be sure to install all the software when installing
software for the first time.
❏ EPSON AutoDownloader and EPSON
CameraStarter are automatically installed when
you install EPSON Photo!4.
❏ For a short description of each software, see “The
Included Software” on page 5-2.
Using Images on Your Computer
6. Follow the on-screen instructions until all the
software are installed.
7. When you finish installing the last software, the
following dialog box is displayed.
Click OK, then restart your computer.
Note:
Be sure to restart your computer after you are finished
installing software from the Camera Software CD-ROM.
Page 91
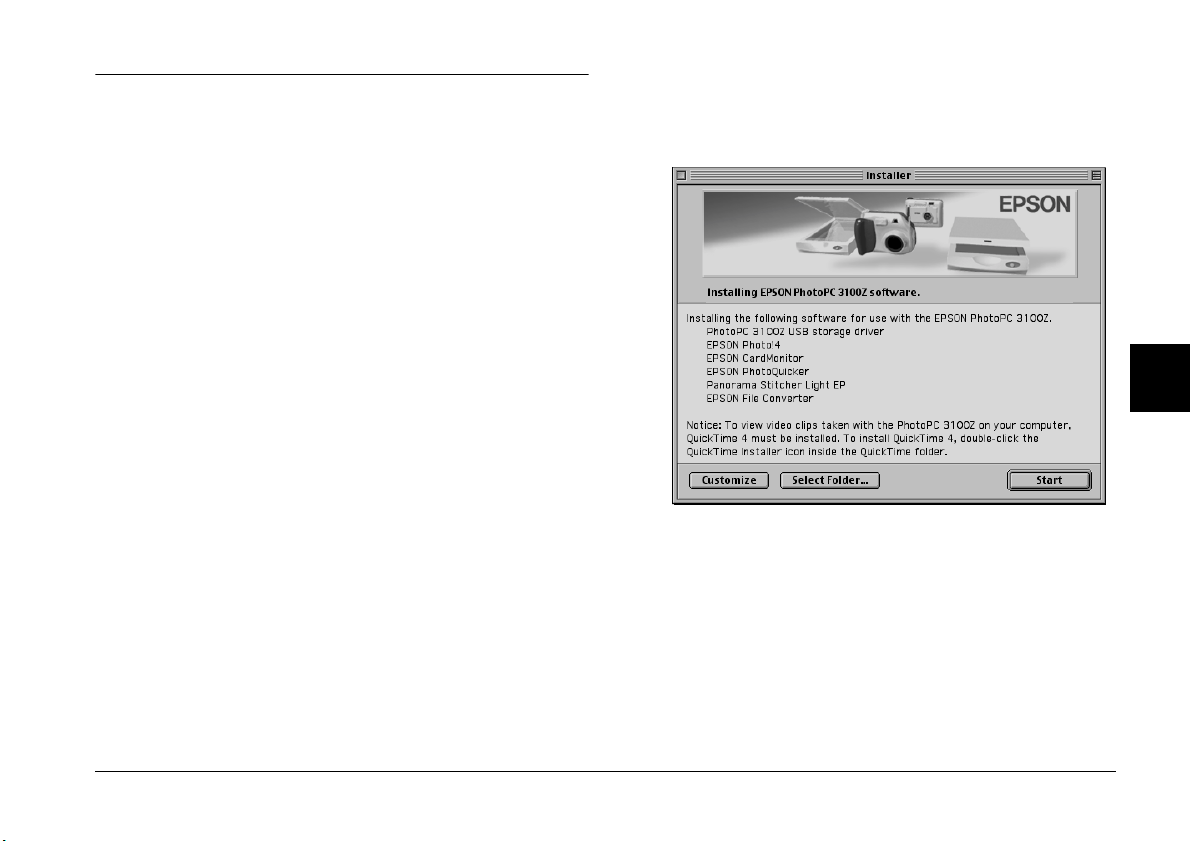
Installing the Software for Macintosh Users
Follow the steps in the sections below to install the
USB driver and other software on the included
PhotoPC 3100Z Camera Software CD-ROM.
Installing EPSON Photo!4 and other software
1. Turn on the computer and insert the included CD
in the CD-ROM drive.
2. In the EPSON folder that appears on your
computer’s desktop, double-click the icon of your
preferred language.
Note:
If the EPSON folder does not appear on your desktop,
double-click the EPSON icon on your desktop.
3. Double-click the Installer icon. The following
dialog box appears with a list of the software that
will be installed.
5
Note:
❏ EPSON AutoDownloader and EPSON
CameraStarter are automatically installed when
you install EPSON Photo!4.
❏ Be sure to install all the software when installing
software for the first time.
Using Images on Your Computer
5-5
Page 92

❏ On the Macintosh OS 9, the USB driver is not
installed. The PhotoPC 3100Z uses the USB
driver included in Macintosh OS 9.
After your computer restarts, go to the next
section to install QuickTime 4.
4. To begin installing the software, click the Start
button. Follow the on-screen instructions.
Note for Macintosh OS 8.5.x users:
Panorama Stitcher Light EP is not available and will
not be installed.
5. After you finish installing the software, the
following message appears.
Click Restart to restart your computer.
Note:
Be sure to restart your computer after you finish
installing the software.
Installing QuickTime 4
QuickTime 4 is necessary for viewing video clips
taken with your PhotoPC 3100Z on your computer.
Follow the steps below to install QuickTime 4.
Note:
If QuickTime 4.1.2 or later is already installed on your
computer, skip to the next section to install Acrobat
Reader.
1. Turn on the computer and insert the included CD
in the CD-ROM drive.
2. In the EPSON folder that appears on your
computer’s desktop, double-click the icon of your
preferred language.
Note:
If the EPSON folder does not appear on your desktop,
double-click the EPSON icon on your desktop.
3. Double-click the QuickTime folder, then doubleclick the QuickTime Installer icon.
4. Follow the on-screen instructions.
5-6
Using Images on Your Computer
Page 93

Installing Acrobat Reader
Acrobat Reader is necessary for viewing the online
EPSON Digital Camera Software Users Guide. Follow the
steps below to install Acrobat Reader.
Note:
If Acrobat Reader is already installed on your
computer, skip to the next section to set up EPSON
CameraStarter.
1. Turn on the computer and insert the included CD
in the CD-ROM drive.
2. In the EPSON folder that appears on your
computer’s desktop, double-click the English
icon.
After you finish installation, go to the next section to
set up EPSON CameraStarter.
Setting Up EPSON CameraStarter
EPSON CameraStarter provides a convenient way to
launch EPSON AutoDownloader and EPSON
PhotoQuicker so that you can transfer files from your
memory card to a computer, print your images, or do
both in one session.
You can set up EPSON CameraStarter to open
automatically when you connect your camera to your
computer, or when you insert the card into a PC Card
slot. To make these settings, follow the steps below.
5
Note:
If the EPSON folder does not appear on your desktop,
double-click the EPSON icon on your desktop.
3. Double-click the Manual folder.
4. Double-click the Acrobat Reader folder. Then
double-click the Acrobat Installer icon.
5. Follow the on-screen instructions.
Note:
❏ You must use the memory card with your PhotoPC
3100Z before inserting it into a PC Card slot if you
want EPSON CameraStarter to open automatically.
❏ To start CameraStarter automatically when a memory
card is inserted, CardMonitor must be installed. For
instructions on installing CardMonitor, see
“Installing the Software for Windows Users” on page
5-3 or “Installing the Software for Macintosh Users”
on page 5-5.
Using Images on Your Computer
5-7
Page 94

1. Start EPSON CameraStarter as described below.
In Windows
Click Start, point to Programs, then to EPSON
Camera and then to ESPON Photo!4, then click
EPSON CameraStarter.
Note:
Never insert or remove a memory card from your
camera while the camera is on. For instructions on
connecting your camera to your computer, see
“Connecting the camera to your computer” on page
5-9.
On a Macintosh
Double-click the EPSON Photo!4 folder, then
double-click the EPSON CameraStarter icon.
The EPSON CameraStarter dialog box appears.
2. Click the Settings button.
3. To make EPSON CameraStarter open
automatically when you connect a PhotoPC
3100Z containing a memory to your computer, or
when you insert your memory card into your
EPSON printer’s PC Card slot, click the Show
EPSON CameraStarter button.
If you want CameraStarter to open automatically
when you insert your memory card into a PC
Car d slo t of a d evic e oth er than your print er, s uch
as your computer or a memory card reader, select
the Monitor card insertion into Card Reader
slots check box.
5-8
Using Images on Your Computer
If you do not want EPSON CameraStarter to open
automatically, click the Ignore the Event button.
4. Click OK, then click Exit.
Note:
The Settings button is unavailable if EPSON
CardMonitor is not installed.
Connecting and Disconnecting the Camera
Use the included USB cable to connect the camera to
the computer. When you camera is connected, you can
download or copy image and audio recording files to
the computer, or upload photo and audio recording
files saved in the computer to the memory card. Be
sure to properly disconnect your camera after you
finish using it. Follow the steps below.
Page 95

Connecting the camera to your computer
You can connect your PhotoPC 3100Z to a Windows
or Macintosh computer using the included USB cable.
❏ If the EPSON software does not recognize the camera
when it is connected, see the Troubleshooting chapter
in the online EPSON Digital Camera Software User’s
Guide included on your CD-ROM.
Before connecting your camera, make sure that the
USB driver is installed in your computer (except for
Windows 2000 and Macintosh OS 9). For installation
instructions, see “Installing the Software for Windows
Users” on page 5-3 or “Installing the Software for
Macintosh Users” on page 5-5.
Note:
❏ Make sure the camera’s batteries have enough power
before connecting the camera to your computer. If the
PhotoPC 3100Z turns off automatically while
connected because of low battery power, your computer
may function improperly. EPSON highly recommends
using the optional AC adapter whenever you connect
the camera to your computer.
❏ When the camera is connected to the computer, you
cannot use the buttons on the camera, and the camera’s
automatic power save feature is disabled.
❏ Although you can connect the USB cable at any time,
EPSON recommends connecting it in the manner
described below to secure the connection.
To connect the camera, follow the steps below.
1. Turn on your computer.
2. Plug the cable connector into the USB port on your
computer or USB hub.
USB port on
computer
Caution:
c
Be sure to use the USB cable that comes with
your camera to avoid damaging the camera’s
interface connector.
USB cable
5
Using Images on Your Computer
5-9
Page 96

3. Open the connector cover on the side of the
camera. Insert the other end of the USB cable into
the interface connector. Make sure that the shape
of the cable connector corresponds to the shape of
the interface connector.
connector cover
If you have not yet installed the USB driver, a message
asking you to locate the driver will appear. If this
happens, cancel the operation and disconnect the
camera from the computer. Close all applications, then
install the USB driver following the instructions in
“Installing the Software for Windows Users” on page
5-3 or “Installing the Software for Macintosh Users”
on page 5-5.
When you connect the camera, the green indicator
light next to the viewfinder blinks while the
connection is being established. While the camera is
connected, stars move across the display panel at the
top of the camera.
Caution:
c
Be sure to position the cable correctly before
inserting it into the connector. Otherwise, the
cable and connector may be damaged.
4. Set the camera’s dial switch to and turn the
camera on.
The first time you connect your camera to your
computer, the computer may display some windows
while it associates the USB driver to the camera. This
is normal and only happens the first time the camera
is connected.
5-10
Using Images on Your Computer
Caution:
c
Keep your camera and computer away from potential
sources of electromagnetic interference, such as
loudspeakers or the base units of cordless telephones.
Disconnecting the camera from your computer
After you are finished using the camera with the
computer, be sure to disconnect the camera properly.
Follow the steps in the appropriate section below.
Page 97

Caution:
c
Be sure to follow these steps when disconnecting the
camera. Doing otherwise may damage the camera or
memory card, and could cause your computer to
function improperly.
Disconnecting the camera in Windows Me and 98
1. Double-click the My Computer icon on the
desktop. The My Computer window appears.
The Unplug or Eject Hardware dialog box
appears.
Note:
You can also right-click the eject icon in the task bar,
then click Unplug or eject hardware to display the
Unplug or Eject Hardware dialog box.
2. Click the Stop button. The Stop a Hardware
device dialog box appears.
2. Right-click the Removable Disk icon, then click
Eject.
Note:
If there is more than one Removable Disk icon, be sure
to right-click the icon corresponding with the PhotoPC
3100Z. To check this, you can use the icon's Properties
dialog box. See your Windows documentation for
details.
3. Remove the USB cable, or turn off the camera.
Disconnecting the camera in Windows 2000
1. Double-click the eject icon in the task bar.
the eject icon
3. Select USB Mass Storage Device, then click the
OK button.
4. A confirmation message appears. Click OK.
Note:
If the Problem Ejecting USB Mass Storage Device
window appears, click the OK button and redo the
operation from step 1.
5. Remove the USB cable, or turn off the camera.
Note:
You can also disconnect the camera by clicking the eject icon
on the task bar once, then clicking Stop USB Mass
Storage Device, and clicking OK.
Using Images on Your Computer
5-11
5
Page 98

Disconnecting the camera from a Macintosh
1. On the desktop, move the EPSON_DSC icon into
the Trash.
2. Remove the USB cable, or turn off the camera.
Transferring Images to Your Computer
The EPSON software that came with your PhotoPC
3100Z allows you to transfer image and audio
recording files taken with your camera to your
computer’s hard drive in a convenient and organized
way. You can also copy files to your computer directly
from your memory card drive. To transfer images, the
camera’s memory card must be accessible in one of the
following ways.
❏ The camera must be properly connected to your
computer’s USB port, and the CompactFlash
memory card must be inserted in the camera.
❏ The memory card must be properly inserted into
a PC Card slot in your computer.
❏ The memory card must be properly inserted into
a PC Card slot in your printer, card reader, or
other device that is connected to your computer.
For instructions on transferring images to your
computer, see the following sections.
Using EPSON digital camera software
You can use the following software included with
your PhotoPC 3100Z to download files to your
computer’s hard disk.
❏ EPSON AutoDownloader
Use this software to automatically transfer files
into a specified folder. You can also make a
variety of download settings that help you further
organize your files and simplify the download
process.
❏ EPSON Photo!4
Use this software to move and copy files between
windows, folders or applications via the drag &
drop method, or from the memory card.
For details on using these applications, see the online
EPSON Digital Camera Software User’s Guide included
in the software CD-ROM. Also, refer to the online help
for these applications.
5-12
Using Images on Your Computer
Page 99

Copying files directly from the memory card
To copy files to your computer, follow these steps.
2. For photos, find and double-click the DCIM folder
on the memory card drive. Then double-click the
100EPSON folder. Your image files are listed.
Note:
❏ When inserting the memory card into a Macintosh
using the optional PCMCIA adapter, you must enable
the PC Exchange extension software to access files on
memory cards. See your Macintosh documentation for
more information.
❏ You can also access the files on your memory card using
the included EPSON Photo!4 software. For
instructions, see the online EPSON Digital Camera
Software User’s Guide.
1. Connect the camera to your computer, or insert
the memory card into the PC Card slot in your
computer or other device.
Note:
For instructions on connecting your camera, see
“Connecting the camera to your computer” on page
5-9. To insert the memory card into your computer, see
“Inserting a memory card into your computer” on page
6-2. To insert the memory card into a different device,
see the documentation for that device.
For video clips, find and double-click the Movie
folder on the memory card drive. Your video clip
files are listed.
Note:
❏ The PhotoPC 3100Z saves audio recording files
with the photo files in the automatically generated
100EPSON folder.
❏ Photos, audio recordings, and video clips that you
have taken are automatically named in the order
in which they were saved to the memory card. For
example, Epsn0012 is the name of the twelfth
photo that was saved. Photo files use the JPG or
TIFF extension, audio recording files use the
WAV extension, and video clip files use the MOV
extension.
3. Double-click a file to view its thumbnail image.
4. Copy the images to the desired folder on your
hard drive.
5
Using Images on Your Computer
5-13
Page 100

Viewing the Software User’s Guides on Your Computer
For information on using the included software, you
can view the following user’s guides on your
computer.
EPSON Digital Camera Software User’s Guide
EPSON PhotoQuicker User’s Guide
See the sections below to view these manuals.
Accessing the EPSON Digital Camera Software User’s Guide
Follow the steps below to view the online digital
camera software manual.
For Windows
1. Turn on the computer and insert the included
PhotoPC 3100Z Camera Software CD into the CDROM drive.
If a dialog box prompts you to select a language,
click the appropriate language, then click
.
2. The EPSON Installation Program dialog box
appears. Select View PDF Manual, then click
Note:
If the EPSON Installation Program dialog box does not
appear, double-click the My Computer icon. Click
the CD-ROM icon, then select Open from the File
menu. Then double-click Setup.exe.
3. Follow the on-screen instructions to view the
manual.
Note:
If Acrobat Reader is not installed in your computer, or
an out-of-date version is installed, the on-screen
instructions will guide you through installation of a
current version of Acrobat Reader.
For Macintosh
1. Turn on the computer and insert the included
PhotoPC 3100Z Camera Software CD into the CDROM drive.
In the EPSON folder that appears on your
computer’s desktop, double-click the English
icon.
.
5-14
Using Images on Your Computer
 Loading...