

Page 1
Epson MovieMate™ 30s Series
Quick Setup
Quick Setup
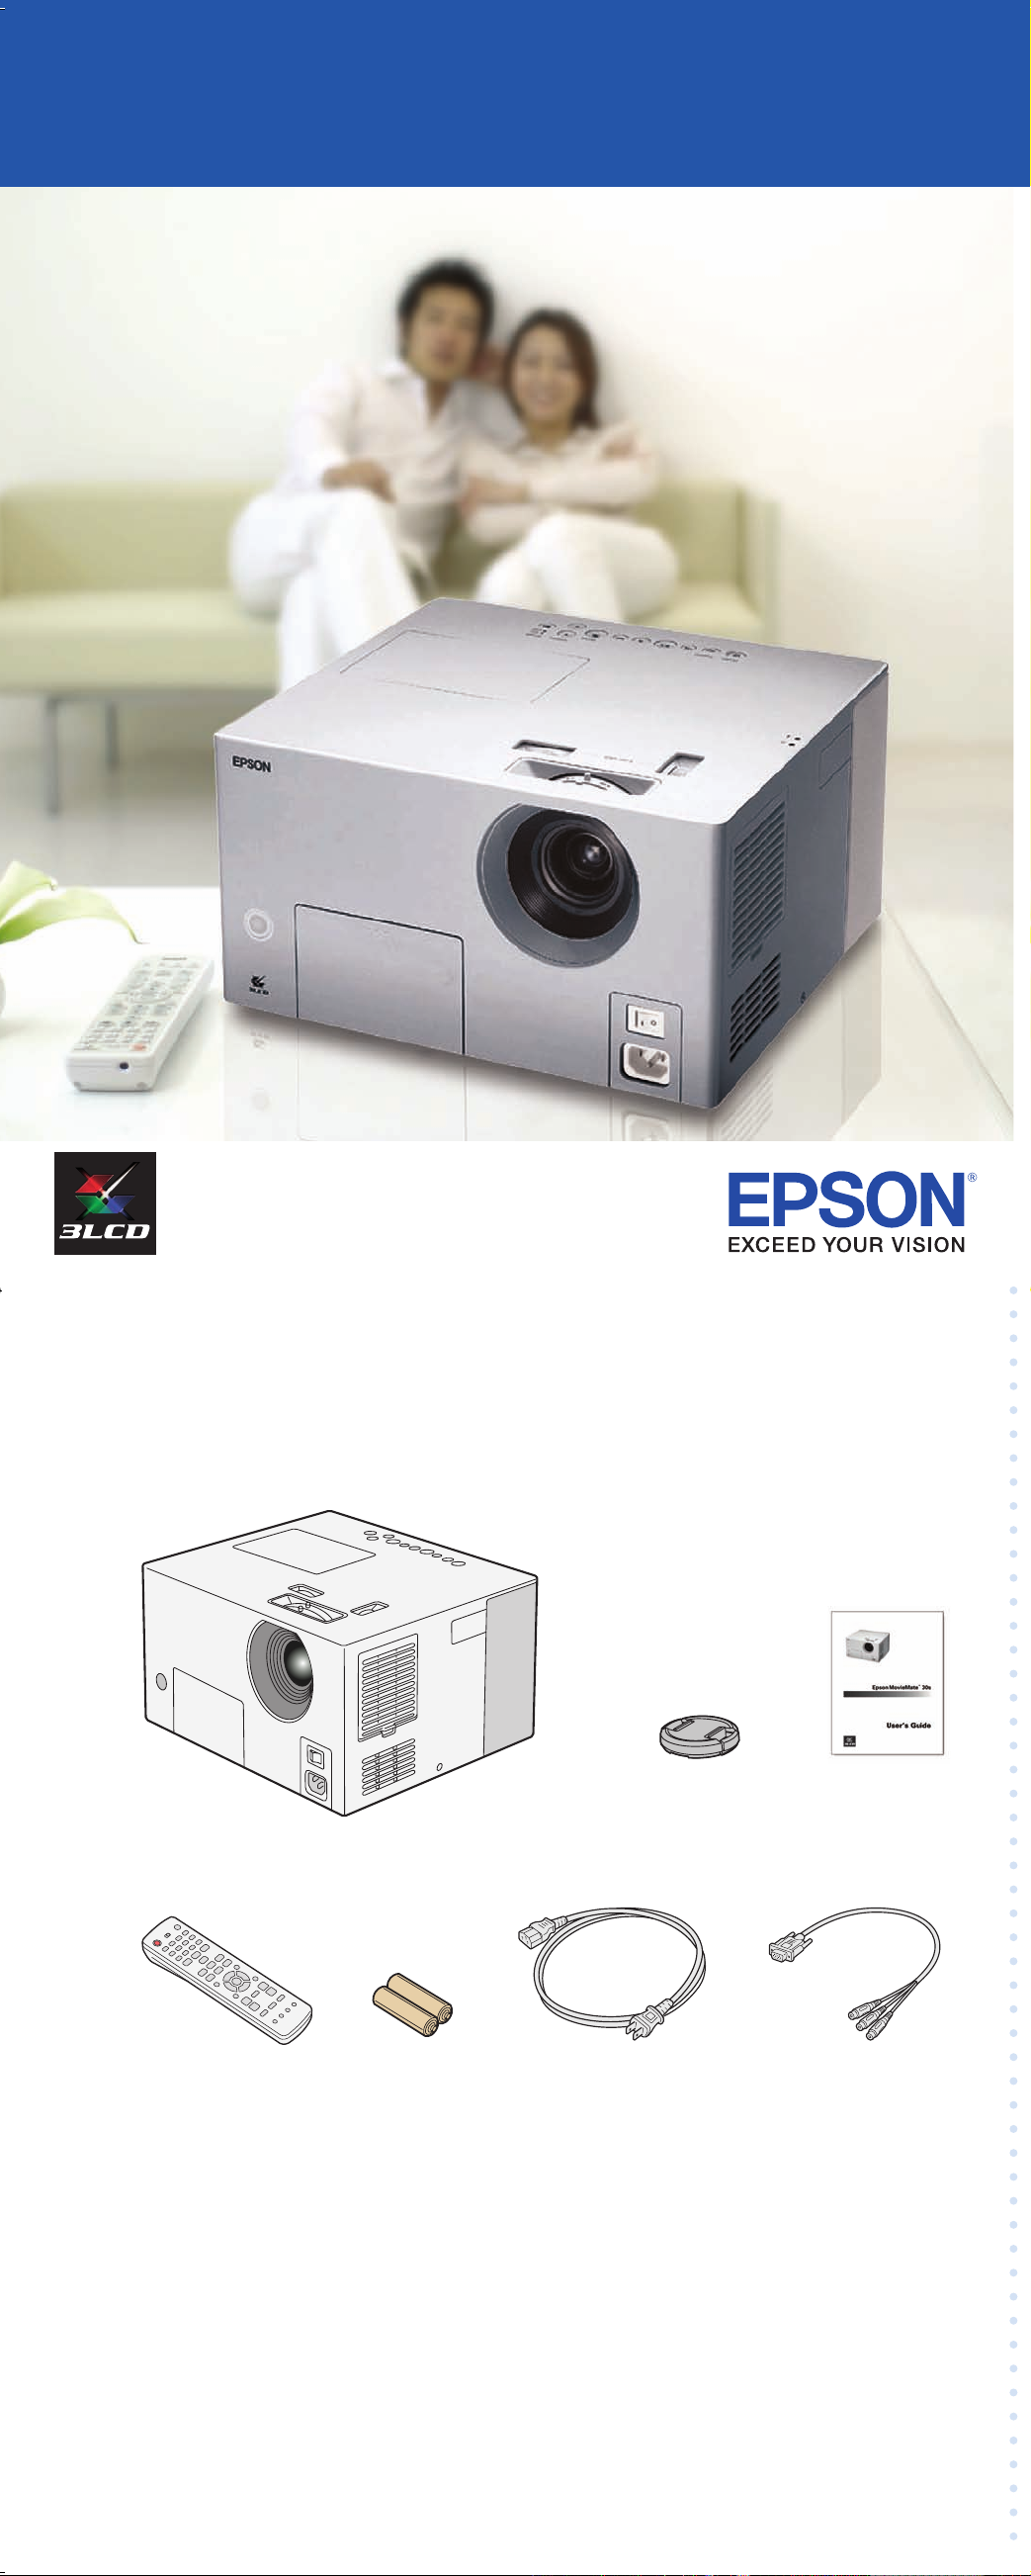
1 Unpack your MovieMate
MovieMate
Lens cap User’s Guide
The Epson MovieMate projector is designed for use virtually anywhere at
home. However, MovieMate and its accessories should not be exposed
to water, smoke, direct heat or sunlight, or left outside for long periods
of time. As with typical electronic equipment, please avoid exposure of
MovieMate to moisture, dust, smoke, and other environmental factors
which may result in damage to internal electronics over time. See the
Epson America, Inc. Limited Warranty in your User’s Guide for additional
details on the use of your MovieMate 30s Series.
Remote control VGA-to-component
Power cordBatteries
video cable adapter
Page 2
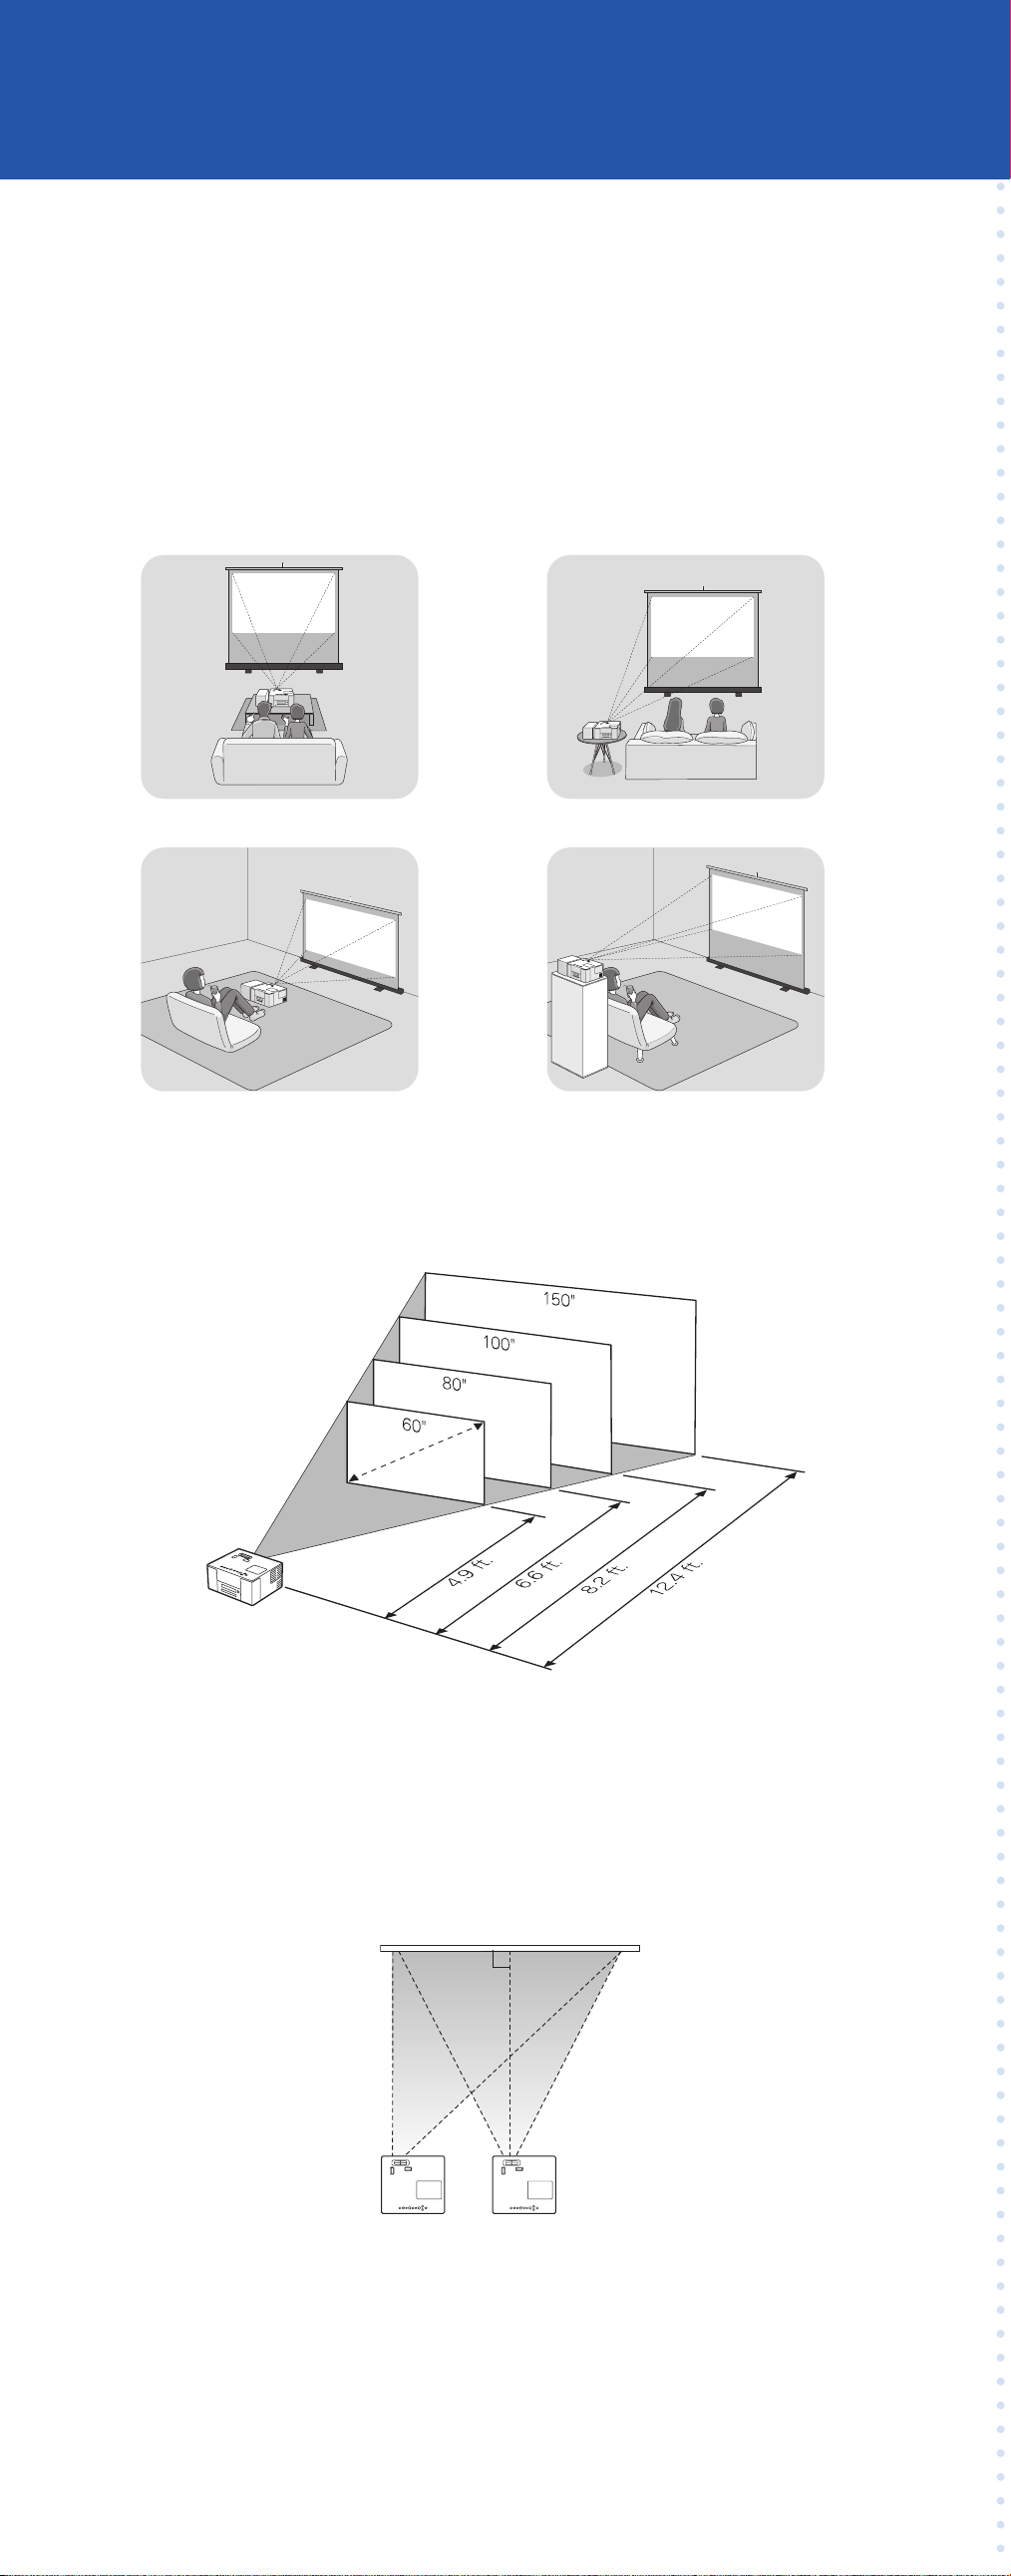
2 Choose a location
You can use your MovieMate just about anywhere—in the living room, bedroom,
or even outside. You can use it with an optional subwoofer and screen, or simply
project on a wall and use the built-in audio system.
The following pictures show four different setups.
If you want an 80-inch diagonal size image, place MovieMate about
1
⁄
6
2 feet away from the wall or screen. The following diagram shows the
approximate image size (measured diagonally) at various distances.
If you want to project against a wall, choose a flat white wall with a smooth
surface for best results.
MovieMate doesn’t have to be directly in front of the screen or wall, but it
has to face straight ahead (at a 90-degree angle to the projection surface).
If the image is too low, too high, or off to the side, you can use the quick
image adjustment dials to adjust the position. See section 5 on the back
of this sheet.
Make sure you have a grounded electrical outlet, power strip, or extension
cord to plug MovieMate into.
Page 3

3 Set up MovieMate
1 If you have an optional screen, set it up following the instructions
included in the screen box. If you have an optional subwoofer,
set it up as described in the User’s Guide.
2 Put the batteries in the remote control.
3 The remote control buttons can glow in the dark. Expose the remote
control to light for several minutes so the buttons can absorb light
before using it.
4 Plug in MovieMate and turn it on using the power switch.
The Power and Image Off lights turn on orange.
Lights
Power switch
4 Start a DVD movie
1 Press the button to open the DVD tray.
2 Insert the DVD and close the tray. If the movie doesn’t start
automatically, press the Power button or
the Image On/Off button.
3 Adjust the volume if necessary.
Turn over
Page 4

5 Adjust the image
1 If the image is too low, too high, or off to the side, use the quick
image adjustment dials to adjust its position.
If the picture looks like this or this
straight ahead. Make sure you position MovieMate at a 90-degree
angle to the screen or wall. You can then use the left/right quick
image adjustment dial to center the image.
Left/right dialUp/down dial
2 Use the zoom ring to adjust the size of the image.
Zoom ring
3 Use the focus ring to sharpen the image.
Focus ring
4 To enlarge or reduce the aspect of the ratio of the image,
press the button on the remote control.
6 End a DVD movie
1 Press to stop playing the DVD.
2 Press to open the tray and remove the DVD. Close the tray.
3 Press the Power button to turn off the lamp.
Page 5

4 When you hear two beeps, turn off the MovieMate power switch.
5 Unplug MovieMate.
6 Attach the lens cover when you’re not using MovieMate.
Any problems?
If you don’t find the solution to your problem here, see your
MovieMate 30s Series User’s Guide for more troubleshooting tips.
No picture appears on the screen
Make sure MovieMate is turned on and warmed up. Turn on the main
power switch on the front and then press the Power button.
Make sure the lens cover is off.
The image may be off the screen. Use the up/down and left/right lens
shift dials to adjust its position. See section 5 at the left.
Make sure MovieMate is not tilted. Tilting it more than 5 degrees up
or down may cause problems. Use the up/down lens shift dial
to adjust the image position.
The picture is blurry or out of focus
Adjust the focus using the focus ring. See section 5 at the left.
Make sure the lens cover is off.
Make sure MovieMate is placed the correct distance from the screen:
no closer than 2.4 feet and no farther than 37 feet.
The picture is taller on the left or right side
Make sure MovieMate is level and facing straight ahead, at a 90-degree
angle to the screen or wall.
The remote control doesn’t work
Make sure the toggle switch is in the
correct position: set it to -123 to
use the numeric buttons, or to Func.-
to use the other functions of these buttons.
Check the batteries.
Function/numerics
toggle switch
Page 6

Epson is a registered trademark and Exceed Your Vision is a trademark of Seiko Epson Corporation.
Epson MovieMate is a trademark and PrivateLine is a registered trademark of Epson America, Inc.
General notice: Other product names used herein are for identification purposes only and may be trademarks
of their respective owners. Epson disclaims any and all rights in those marks.
© 2006 Epson America, Inc. 6/06
Printed in XXX
CPD-22196
Any questions?
Look here for answers:
MovieMate 30s Series User’s Guide
Instructions for all MovieMate features, including connecting a cable or
satellite TV receiver, game console, MP3 player, sound system, optional
subwoofer, and more.
Telephone Support Services
To use the Epson PrivateLine® Support service, call (800) 637-7661
and enter the PIN on the Epson PrivateLine Support card that came
with your MovieMate. This is the fastest way of speaking to a live
representative, and it’s free. This service is available 6 AM to 6 PM, Pacific
Time, Monday through Friday, for the duration of your warranty period.
You can also speak with a projector support specialist by dialing one of
these numbers:
U.S.: (562) 276-4394, 6 AM to 6 PM, Pacific Time,
Monday through Friday
Canada: (905) 709-3839, 6 AM to 6 PM, Pacific Time,
Monday through Friday
Toll or long distance charges may apply.
Electronic Support Services
Epson provides technical assistance through electronic support
services 24 hours a day at http://support.epson.com.
 Loading...