

Page 1

Scanner Software
All rights reserved. No part of this publication may be reproduced , stored in a retrieval
system, or transmitted in any form or by any means, electronic, mechanical, photocopying,
recording, or otherwise, without the p rior written permiss ion of SEIKO EPSON
CORPORATION. No patent liability is assumed with respect to the use of the information
contained herein. Neither is any liability assumed for damages resulting from the use of the
information contain e d herein.
Neither SEIKO EPSON CO RPORATION nor its affiliates sh all be liable to the purchaser of
this product or third parties for damages, losses, costs, or expenses incurred by the purchaser
or third parti e s as a result of: ac cident, misuse, or abuse of this product or unau t horized
modifications, repairs, or alterations to this product.
SEIKO EPSON CORPORATION and its affiliates shall not be liable against any damages or
problems arising from the use of any options or any consumable products other than those
designated as Original EPSON Products or EPSON Approved Products by SEIKO EPSON
CORPORATION.
EPSON is a registered trademark of SEIKO EPSON CORPORATION.
IBM and PS/2 are regi stered trademarks of Internat ional Business Machines Corporation.
Macintosh is a registered trademark of Apple Computer, Inc.
Microsoft and Win dows are registered tradem arks of Microsoft Corporat ion in the United
States of America and other count ri es.
Presto! is a trademark of New S oft T e ch n ol og y Corporation.
General Notice: Other product names used herein are for identification purposes only and may be
trademarks of their respective companies.
Copyright © 2000 by SEIKO EPSON CORPORATION, Nagano, Japan.
Reference Guide
Page 2

Contents
Introduction
Features. . . . . . . . . . . . . . . . . . . . . . . . . . . . . . . . . . . . . . . . . . . . . . . .1
About This Guide . . . . . . . . . . . . . . . . . . . . . . . . . . . . . . . . . . . . . . .2
Chapter 1 Scanning Basics
Main Window and Preview Window. . . . . . . . . . . . . . . . . . . . . . .1-2
Main window . . . . . . . . . . . . . . . . . . . . . . . . . . . . . . . . . . . . . .1-2
Preview window. . . . . . . . . . . . . . . . . . . . . . . . . . . . . . . . . . . .1-3
Optimizing Image Scanning . . . . . . . . . . . . . . . . . . . . . . . . . . . . . .1-4
Manually optimizing images . . . . . . . . . . . . . . . . . . . . . . . . .1-5
Displaying a preview image. . . . . . . . . . . . . . . . . . . . . . . . . .1-6
Adjusting the Highlight Setting . . . . . . . . . . . . . . . . . . . . . . . . . . .1-7
Adjusting the Shadow Setting. . . . . . . . . . . . . . . . . . . . . . . . . . . . .1-8
Adjusting the Gamma Setting . . . . . . . . . . . . . . . . . . . . . . . . . . . . .1-9
Applying a Preset Tone Curve . . . . . . . . . . . . . . . . . . . . . . . . . . . .1-10
Adjusting the Gray Balance Intensity Setting . . . . . . . . . . . . . . . .1-13
Adjusting the Saturation Setting. . . . . . . . . . . . . . . . . . . . . . . . . . .1-15
Using the Tone Curve. . . . . . . . . . . . . . . . . . . . . . . . . . . . . . . . . . . .1-15
Saving your own tone curve. . . . . . . . . . . . . . . . . . . . . . . . . .1-18
Deleting a customized tone curve . . . . . . . . . . . . . . . . . . . . .1-19
Closing the Tone Correction dialog box . . . . . . . . . . . . . . . .1-19
Optimizing OCR Scanning. . . . . . . . . . . . . . . . . . . . . . . . . . . . . . . .1-19
Scanning text. . . . . . . . . . . . . . . . . . . . . . . . . . . . . . . . . . . . . . .1-19
Improving character recognition . . . . . . . . . . . . . . . . . . . . . .1-20
If you still have problems.... . . . . . . . . . . . . . . . . . . . . . . . . . .1-21
Text difficult to recognize . . . . . . . . . . . . . . . . . . . . . . . . . . . .1-22
Contents 1
Page 3

Chapter 2 Understanding EPSON TWAIN Pro Features
Overview . . . . . . . . . . . . . . . . . . . . . . . . . . . . . . . . . . . . . . . . . . . . . . 2-3
EPSON TWAIN Pro Main Window . . . . . . . . . . . . . . . . . . . . . . . 2-4
Document Sources . . . . . . . . . . . . . . . . . . . . . . . . . . . . . . . . . . . . . . 2-5
Image Types . . . . . . . . . . . . . . . . . . . . . . . . . . . . . . . . . . . . . . . . . . . 2-7
Image Type list. . . . . . . . . . . . . . . . . . . . . . . . . . . . . . . . . . . . . 2-7
Image Type button . . . . . . . . . . . . . . . . . . . . . . . . . . . . . . . . . 2-8
Destinations. . . . . . . . . . . . . . . . . . . . . . . . . . . . . . . . . . . . . . . . . . . . 2-12
Destination list. . . . . . . . . . . . . . . . . . . . . . . . . . . . . . . . . . . . . 2-13
Destination button. . . . . . . . . . . . . . . . . . . . . . . . . . . . . . . . . . 2-14
Changing Resolution . . . . . . . . . . . . . . . . . . . . . . . . . . . . . . . . . . . . 2-16
Source and Target image sizes. . . . . . . . . . . . . . . . . . . . . . . . . . . . 2-16
Preview Window . . . . . . . . . . . . . . . . . . . . . . . . . . . . . . . . . . . . . . . 2-19
Preview Buttons . . . . . . . . . . . . . . . . . . . . . . . . . . . . . . . . . . . . . . . . 2-21
Zoom preview button. . . . . . . . . . . . . . . . . . . . . . . . . . . . . . . 2-21
Return to full preview button . . . . . . . . . . . . . . . . . . . . . . . . 2-22
Return to zoom preview button . . . . . . . . . . . . . . . . . . . . . . 2-22
Marquees and Marquee Buttons . . . . . . . . . . . . . . . . . . . . . . . . . . 2-23
Making and modifying marquees . . . . . . . . . . . . . . . . . . . . 2-23
Delete marquee button. . . . . . . . . . . . . . . . . . . . . . . . . . . . . . 2-25
Duplicate marquee button. . . . . . . . . . . . . . . . . . . . . . . . . . . 2-26
Auto locate button. . . . . . . . . . . . . . . . . . . . . . . . . . . . . . . . . . 2-26
Marquee number indicator . . . . . . . . . . . . . . . . . . . . . . . . . . 2-28
Adjust Buttons . . . . . . . . . . . . . . . . . . . . . . . . . . . . . . . . . . . . . . . . . 2-29
Auto Exposure. . . . . . . . . . . . . . . . . . . . . . . . . . . . . . . . . . . . . 2-30
Image Controls. . . . . . . . . . . . . . . . . . . . . . . . . . . . . . . . . . . . . 2-30
Tone Correction. . . . . . . . . . . . . . . . . . . . . . . . . . . . . . . . . . . . 2-33
Color Adjustment . . . . . . . . . . . . . . . . . . . . . . . . . . . . . . . . . . 2-35
Reset Button . . . . . . . . . . . . . . . . . . . . . . . . . . . . . . . . . . . . . . . 2-36
Auto Focus . . . . . . . . . . . . . . . . . . . . . . . . . . . . . . . . . . . . . . . . 2-37
Manual Focus. . . . . . . . . . . . . . . . . . . . . . . . . . . . . . . . . . . . . . 2-37
Settings Button . . . . . . . . . . . . . . . . . . . . . . . . . . . . . . . . . . . . . . . . . 2-40
Configuration Button. . . . . . . . . . . . . . . . . . . . . . . . . . . . . . . . . . . . 2-42
Scan Button . . . . . . . . . . . . . . . . . . . . . . . . . . . . . . . . . . . . . . . . . . . . 2-45
Scan All Button . . . . . . . . . . . . . . . . . . . . . . . . . . . . . . . . . . . . . . . . . 2-45
2 Contents
Page 4

Chapter 3 Calibrating Your System
Overview . . . . . . . . . . . . . . . . . . . . . . . . . . . . . . . . . . . . . . . . . . . . . .3-2
Calibrating Your Screen . . . . . . . . . . . . . . . . . . . . . . . . . . . . . . . . . .3-3
For Windows 2000 and 98 users. . . . . . . . . . . . . . . . . . . . . . .3-3
For Windows 95 and NT 4.0 users: . . . . . . . . . . . . . . . . . . . .3-5
For Macintosh users. . . . . . . . . . . . . . . . . . . . . . . . . . . . . . . . .3-7
Using ICM (For Windows 2000, 98, and 95 Users). . . . . . . . . . . .3-8
For Windows 2000 and 98 users. . . . . . . . . . . . . . . . . . . . . . .3-8
For Windows 95 users . . . . . . . . . . . . . . . . . . . . . . . . . . . . . . .3-9
Using ColorSync (For Macintosh Users) . . . . . . . . . . . . . . . . . . . .3-10
Chapter 4 Maintenance and Troubleshooting
Maintenance. . . . . . . . . . . . . . . . . . . . . . . . . . . . . . . . . . . . . . . . . . . .4-2
Cleaning the scanner . . . . . . . . . . . . . . . . . . . . . . . . . . . . . . . .4-2
Replacing the fluorescent lamp . . . . . . . . . . . . . . . . . . . . . . .4-3
Transporting the Scanner and the Transparency Unit. . . . . . . . .4-4
Problems and Solutions . . . . . . . . . . . . . . . . . . . . . . . . . . . . . . . . . .4-5
Error indicator. . . . . . . . . . . . . . . . . . . . . . . . . . . . . . . . . . . . . .4-6
Operating problems. . . . . . . . . . . . . . . . . . . . . . . . . . . . . . . . .4-7
Quality problems . . . . . . . . . . . . . . . . . . . . . . . . . . . . . . . . . . .4-8
Software setup problems. . . . . . . . . . . . . . . . . . . . . . . . . . . . .4-12
Scanning problems. . . . . . . . . . . . . . . . . . . . . . . . . . . . . . . . . .4-14
Software operation problems . . . . . . . . . . . . . . . . . . . . . . . . .4-15
Paper jams . . . . . . . . . . . . . . . . . . . . . . . . . . . . . . . . . . . . . . . . .4-16
Changing the SCSI ID number or SCSI board . . . . . . . . . . .4-16
Changing USB connections ports. . . . . . . . . . . . . . . . . . . . . .4-18
Recovering from scanner software installation problems
on Windows 2000 and Windows 98 . . . . . . . . . . . . . . . . .4-19
Sizing up your system . . . . . . . . . . . . . . . . . . . . . . . . . . . . . . .4-23
Contents 3
Page 5

Appendix A Technical Specifications
Scanning. . . . . . . . . . . . . . . . . . . . . . . . . . . . . . . . . . . . . . . . . . . . . . . A-2
Electrical. . . . . . . . . . . . . . . . . . . . . . . . . . . . . . . . . . . . . . . . . . . . . . . A-4
Environmental . . . . . . . . . . . . . . . . . . . . . . . . . . . . . . . . . . . . . . . . . A-4
Safety Approvals . . . . . . . . . . . . . . . . . . . . . . . . . . . . . . . . . . . . . . . A-5
CE marking . . . . . . . . . . . . . . . . . . . . . . . . . . . . . . . . . . . . . . . . . . . . A-5
SCSI Interface . . . . . . . . . . . . . . . . . . . . . . . . . . . . . . . . . . . . . . . . . . A-6
USB Interface. . . . . . . . . . . . . . . . . . . . . . . . . . . . . . . . . . . . . . . . . . . A-7
Option Interface Connector . . . . . . . . . . . . . . . . . . . . . . . . . . . . . . A-8
Initialization Methods . . . . . . . . . . . . . . . . . . . . . . . . . . . . . . . . . . . A-9
Transparency Unit . . . . . . . . . . . . . . . . . . . . . . . . . . . . . . . . . . . . . . A-10
Automatic Document Feeder . . . . . . . . . . . . . . . . . . . . . . . . . . . . . A-11
IEEE 1394 Scanner I/F Card. . . . . . . . . . . . . . . . . . . . . . . . . . . . . . A-12
Appendix B Contacting Customer Support
Glossary
Index
4 Contents
Page 6

Introduction
Features
The CD-ROM that comes with your scanner contai ns the EPSON
scanner software suite, including EPSON TWAIN Pro and
TWAIN Pro Network (The network version of EPSON TWAIN
Pro). The software suite is the perfect companion for your EPSON
scanner. Using your scanner and the software on the CD-ROM,
you can scan images in color, grayscale, or black and white, and
save them as files or print them out. Other software such as
EPSON Scanner Monitor and PageManager for EPSON support
the Start Button feature to make scanning much easier. EPSON
Scan Server allows your scanner to be used over a network.
❏ The software supports the following EPSON scanners:
EPSON EXPRESSION 1640XL
❏ EPSON TWAIN Pro and EPSON TWAIN Pro Network
directly control all of the features of your EPSON scanner.
This program is the standard cross-platform interface for
other applications.
The CD-ROM also contains other applications that let you use
your scanner in exciting new ways. For detailed information , refer
to the supporting documentation.
❏ EPSON Scanner Monitor allows your scanner to access
software that supports the Start Button feature.
❏ EPSON Screen Calibration utili ty allows you to calibrate your
scanner and monitor to reproduce images identical to the
originals.
Introduction 1
Page 7

❏ PageManager for EPSON is TWAIN-compliant sof tware that
supports the Start Button feature. This feature allows you to
scan and send data to a target application with a single push
of the Start button. For more information on PageManager,
see your PageManager documentation.
About This Guide
The information in this guide is divi ded into si x chapters, wi th a
glossary and index provided for your reference.
❏ Chapter 1 explains the basic steps of scanning.
❏ Chapter 2 provides a comp lete description of EPSON TWAIN
Pro and TWAIN Pro Network features. Refer to Chapter 2
when making scanning settings.
❏ Chapter 3 explains how to calibrate your monitor to match
your EPSON scanner. If you notice that colors on your screen
or in your printout do not match the original image, see this
chapter.
❏ Chapter 4 contains maintenance and troubleshooting
information. If your software does not operate properly or
scanned images are not what you expect, see this chapter.
❏ Appendix A contains various specification information.
❏ Appendix B contains customer support information.
Notes contain important information and useful tips about your
scanner and software.
To set up and use the scanner, see your scanner’s User’s Guide.
EPSON TWAIN Pro and EPSON TWAIN Pro Network online
help can also provide you with information on making settings
in EPSON TWAIN Pro or EPSON TWAIN Pro Network.
2 Introduction
Page 8

Chapter 1
Scanning Basics
Main Window and Preview Window. . . . . . . . . . . . . . . . . . . . . . .1-2
Main window . . . . . . . . . . . . . . . . . . . . . . . . . . . . . . . . . . . . . .1-2
Preview window. . . . . . . . . . . . . . . . . . . . . . . . . . . . . . . . . . . .1-3
Optimizing Image Scanning . . . . . . . . . . . . . . . . . . . . . . . . . . . . . .1-4
Manually optimizing images . . . . . . . . . . . . . . . . . . . . . . . . .1-5
Displaying a preview image. . . . . . . . . . . . . . . . . . . . . . . . . .1-6
Adjusting the Highlight Setting . . . . . . . . . . . . . . . . . . . . . . . . . . .1-7
Adjusting the Shadow Setting. . . . . . . . . . . . . . . . . . . . . . . . . . . . .1-8
Adjusting the Gamma Setting . . . . . . . . . . . . . . . . . . . . . . . . . . . . .1-9
Applying a Preset Tone Curve . . . . . . . . . . . . . . . . . . . . . . . . . . . .1-10
Adjusting the Gray Balance Intensity Setting . . . . . . . . . . . . . . . .1-13
Adjusting the Saturation Setting. . . . . . . . . . . . . . . . . . . . . . . . . . .1-15
Using the Tone Curve. . . . . . . . . . . . . . . . . . . . . . . . . . . . . . . . . . . .1-15
Saving your own tone curve. . . . . . . . . . . . . . . . . . . . . . . . . .1-18
Deleting a customized tone curve . . . . . . . . . . . . . . . . . . . . .1-19
Closing the Tone Correction dialog box . . . . . . . . . . . . . . . .1-19
Optimizing OCR Scanning. . . . . . . . . . . . . . . . . . . . . . . . . . . . . . . .1-19
Scanning text. . . . . . . . . . . . . . . . . . . . . . . . . . . . . . . . . . . . . . .1-19
Improving character recognition . . . . . . . . . . . . . . . . . . . . . .1-20
If you still have problems.... . . . . . . . . . . . . . . . . . . . . . . . . . .1-21
Text difficult to recognize . . . . . . . . . . . . . . . . . . . . . . . . . . . .1-22
Scanning Basics 1-1
Page 9
Main Window and Preview Wind ow
EPSON TWAIN Pro and EPSON TWAIN Pr o Network have two
main windows. The EPSON TWAIN Pr o windo w or the EPS ON
TWAIN Pro Network window (main window) and the Preview
window.
Note:
All settings and functions available from the two main windows are the
same for both EPSON TWAIN Pro and EPSON TWAIN Pro Network.
Although most of the illustrations and explanations in this guide are for
the EPSON TWAIN Pro, they also apply to EPSON TWAIN Pro
Network.
Main window
1-2 Scanning Basics
Page 10
The main window gives you a ccess to the controls, where you can
make basic settings, such as Document Source, the type of the
material you are scanning, how you are scanning, output
destination, scanned image size, and so on. If you want to specify
the areas of the images to scan or you want to see the effects of
your settings before scanning , click Preview to open t he Preview
window and display the preview images in the window.
Preview window
In the Preview window, there are more options ava ilable to give
you greater controls ove r your scanning image. Powerful tools are
available to help you adjust tones, colors, focus and other
elements to optimize your images.
Scanning Basics 1-3
Page 11
Optimizing Image Scanning
EPSON TWAIN Pro can automatically adjust and optimize the
exposures and colors of scanned images during scanning. You can
also make adjustments manually with the image quality
adjustment tools in EPSON TW AIN Pro’s Preview window. This
section provides general information on optimizi ng images with
these tools.
EPSON TWAIN Pro Preview window
Note for Macintosh users:
Most illustrations shown in this section are for Windows, so they may
vary in appearance from what actually appears on your screen. The
instructions are the same, except as noted.
1-4 Scanning Basics
Page 12

Manually optimizing images
To optimize images manua lly, adjust the following EPSON
TWAIN Pro settings in the order specified below:
Adjust the brightness and contrast
1. Adjust the Highlight and Shadow settings in the Image
Controls dialog box. See “Adjusting the Hi ghlight Setting” on
page 1-7 and “Adjusting the Shadow Setting” on page 1-8.
2. Adjust the Gamma setting in the Image Controls dialog box.
See “Adjusting the Gamma Setting” on page 1-9.
3. Adjust the tone curve with a predefined tone correction
setting in the Tone Correction dialog box. See “Applying a
Preset Tone Curve” on page 1-10.
Make color adjustme n ts
4. Adjust the Gray Balance Intensity setting in the Color
Adjustment dialog box. See “Adjusting the Gray Balance
Intensity Setting” on page 1-13.
5. Adjust the Saturation setting in the Color Adjustment dialog
box. See “Adjusting the Saturation Setting” on page 1-15.
6. Manually adjust the tone curve for individual colors in the
Tone Correction dialog box. See “Using the Tone Curve” on
page 1-15.
To make the following adjustments in EPSON TWAIN Pro, you
need to display a preview image in the Pr eview window. See the
following section for details.
Scanning Basics 1-5
Page 13
Displaying a preview image
The EPSON TWAIN Pro Preview window shows you how your
adjustments will affect the image as you make them. The Preview
window is also the starting p oint for accessing the Image Controls,
Tone Correction, and Color Adjustment dialog boxes that contai n
tools for optimizing your image.
Note:
See “Preview Window” on page 2-19 for Preview window options, and
“Configuration Button” on page 2-42 for information about how to
control preview image quality.
1. After selecting the Docum e nt Source, Image Ty pe, and
Destination in the main window, click Preview to start
prescanning. If the Preview window is not open, it opens and
begins prescanning. A preview image of the document
appears on your screen.
Note:
Make sure the Fast Preview check box is clear in the Configuration
dialog box to ensure a high-quality preview.
2. Click one of the buttons below to open the d ialog box with the
image optimization tools you need.
1-6 Scanning Basics
Image Controls button
Color Adjustment button
Tone Correction button
Page 14
Adjusting the Highlight Setting
Highlights are the brightest areas of an image.
1. In the Image Controls dialo g box, click the eyedropper button
under Highlight.
The pointer changes to an eyedropper, with movement
restricted to within the Preview window.
2. Move the eyedropper t o the location you want to select as the
highlight point and clic k it.
The brightness of the pixel at the point you click is set as the
highlight level, and the other p arts of the i mage are ad justed
accordingly.
3. To change the highlight level (brightness) of the point you
selected, move the Highlight slider left or right, or enter a
value in the text box. You can enter a value between 61 and
490 for the highlight.
Scanning Basics 1-7
Page 15
Note:
See “Image Controls” on page 2-30 for further information on
adjusting the highlight level.
Adjusting the Shadow Setting
Shadows, the darkest areas of an image, are the opposite of
highlights.
1. In the Image Controls dial og box, click the eyedropper butt on
under Shadow.
The pointer changes to an eyedropper, with movement
restricted to within the Preview window.
2. Move the eyedropper to the l ocation you want to sel ect as the
shadow point, and then click.
1-8 Scanning Basics
Page 16
The brightness of the pixel at the point you click is set as the
shadow level, and the other parts of the image are adjusted
accordingly.
3. To change the shadow level (darkness) of the point you
selected, move the Shadow slider left or right, or enter a value
in the text box. You c an enter a value betwe en 0 and 60 for the
shadow.
Note:
See “Image Controls” on page 2-30 for further information on
adjusting the shadow level.
Adjusting the Gamma Setting
Gamma is the difference in contrast between the light tones and
dark tones of an image. Any change you make i n the gamma level
only affects the mid-tones of the image.
To change the gamma level of the image, move the Gamm a slider
left or right, or enter a value in the text box.
Scanning Basics 1-9
Page 17
You can enter a value between 50 and 500 for the gamma.
Note:
See “Image Controls” on page 2-30 for further information on adjusting
the gamma level.
Applying a Preset Tone Curve
You can finely adjust the contrast within an image by applying
one of the preset tone curves. This allows more control over the
image when used in conjunction with the Auto Exposure funct ion
or settings in the Preview Window. The Tone Curve Name list in
the Tone Correction dialog box provides the six most common
tone correction curves, described below.
Linear
A linear tone curve has no tone cor rection. Use this sett ing if you
are satisfied with the tone of the preview image.
1-10 Scanning Basics
Page 18
Lighten
Adjusts dark er images (like underexposed film) to make them
slightly brighter.
Darken
Adjusts brighter images (like overexposed film) to make them
slightly darker.
Scanning Basics 1-11
Page 19
Flat Contrast
Flattens high contrast images to make them look more natural.
High Contrast
Increases the contrast of dull images.
1-12 Scanning Basics
Page 20

Open Shadow
Improves details in the dark areas of images.
Note:
See “Using the Tone Curve” on page 1-15 and “Tone Correction” on
page 2-33 for more information on tone correction.
Adjusting the Gray Balance Intensity Setting
Gray balance makes it possible to remove a cast (tint) from a
specific color.
Scanning Basics 1-13
Page 21
1. In the Color Adjustment dialog box, click the eyedropper
button under Gray Balance Intensity.
The pointer changes to an eyedropper, with movement
restricted to within the Preview window.
2. Move the eyedropper to a location that contains the color
whose gray balance intensity you want to adjust, and then
click.
The color you selected appears in the two boxes below the
Gray Balance Inten si ty slider.
3. To change the gray balance intensity level of the color you
selected, move the slider left or right, or enter a value in the
text box.
You can enter a value between 0 and 100. Chang ing the value
causes the color in the r ight hand box t o change accord ingly.
Your changes are also reflected in the image in the Preview
window.
Note:
See “Color Adjustment” on page 2-35 for more information on
adjusting the gray bala nce intensity level.
1-14 Scanning Basics
Page 22
Adjusting the Saturation Setting
Saturation is the density of a color. Higher saturation makes the
color appear richer, while lower saturation makes it appear paler.
To change the saturation lev el of the image, move the Saturation
slider left or right, or input a value in the text box.
You can enter a value between -100 (lowest color density) and 100
(highest color density).
Note:
See “Color Adjustment” on page 2-35 for more information on adjusting
the saturation level.
Using the Tone Curv e
The tone curve provides you wit h a versatile means for adjus ting
the intensity of the colors of the image being scanned. You can
adjust the shadow, mid-tone, and highlight values, which helps
to ensure well-balanced coloring of the image.
Scanning Basics 1-15
Page 23
Note:
❏ Use of the tone curve is recommended for fine adjustments after you
have previewed the image and adjusted the highlights and the
shadows using Auto Exposure and the Image Controls dialog box.
Use of the tone curve to make initial settings is not recommended.
❏ The Tone Correction button is unavailable whenever Black &
White is selected as the Pixel Depth and None is selected for the
Halftone.
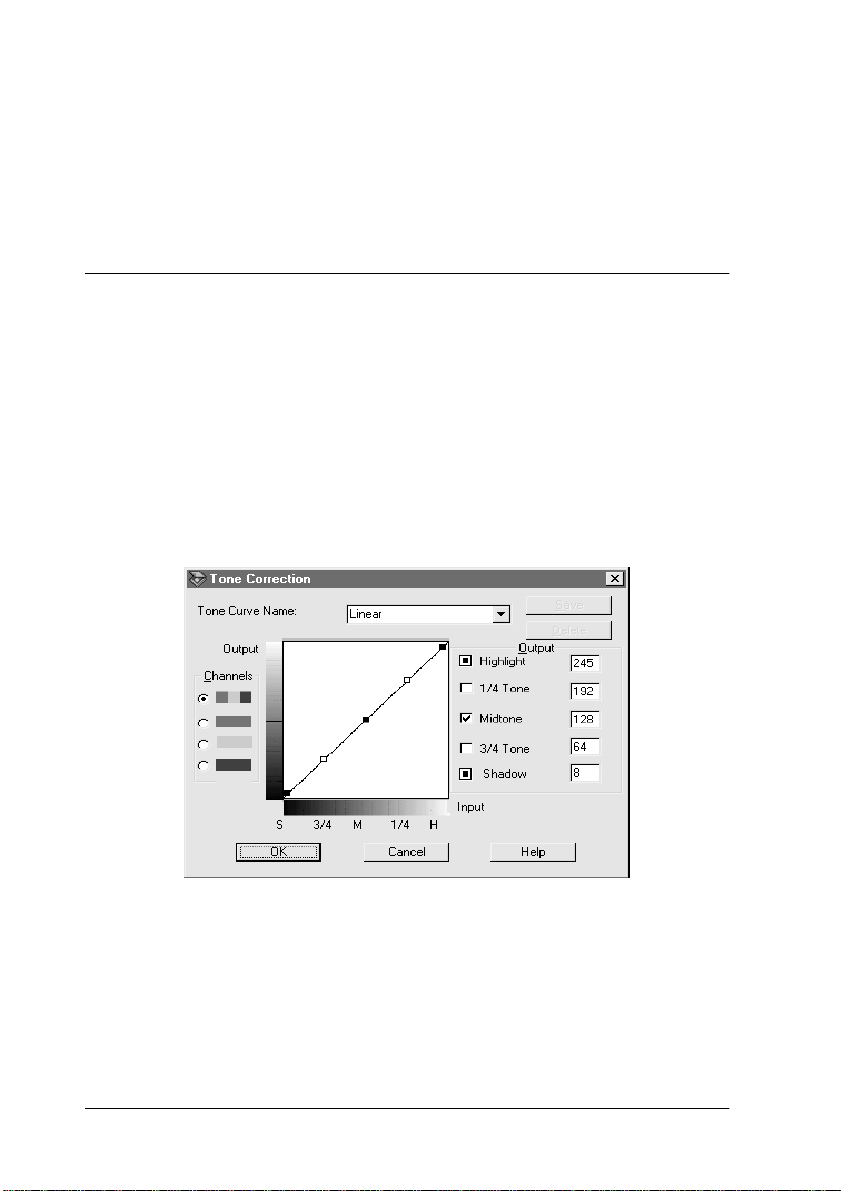
The tone curve is loca ted in the Tone Correction d ialog box, which
appears when you click the T one Correction button in the EPSON
TWAIN Pro’s Preview Window. How to use each of the c ontrol s
in the Tone Correction dialog box is described below.
Tone Correction button
1-16 Scanning Basics
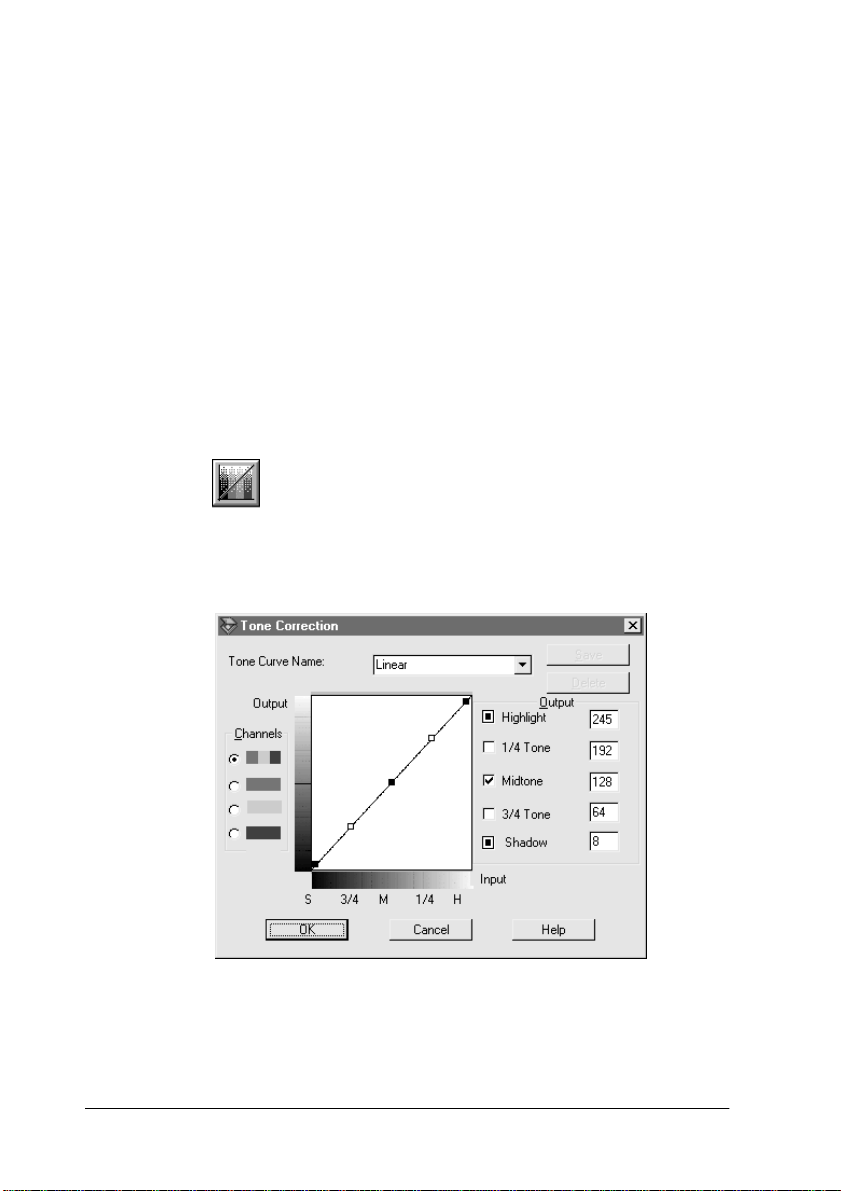
Tone Correction dialog box
Page 24

Tone Curve Name list
Use this list box to select a pre set tone curve. There ar e six preset
tone curves shown below, and you can add your own curves to
the list using the procedure in the next secti on, “Saving your own
tone curve.”
Curve
Name
Linear 245 192 128 64 8 Default curve
Lighten 245 193 133 74 4 Lightens dark
Darken 245 152 82 38 11 Darkens
Flat
Contrast
High
Contrast
Open
Shadow
Highlight1/4
Tone
245 182 129 72 2 Reduces
245 204 129 51 2 Increases
245 193 129 80 5 Lightens dark
Midtone 3/4
Tone
Shadow Description
When you select a curve from the Tone Curve Name list, the
settings in the Tone Correction dialog box change accordingly.
Channels
Click an option button under channels to select the color whose
tone curve you want to adjust. When the master channel at the
top is selected, your adjustment s affect a ll three colors. Selecting
one of the other channels allows you to adjust red, green, or blue
only.
image
bright image
contrast
contrast
shadows
Tone curve editor
Moving the mouse pointer into t he t one curve editor causes it to
change to a finger. Use this pointer to dra g any of the five poin ts
in the curve and change its shape. The x-axis of the curve is the
brightness of the original (input values) while the y-axis is the
brightness of the scanned image (output values).
Scanning Basics 1-17
Page 25

To change the tone curve back to its default, select Linear in the
Tone Curve Name list.
Output valu es
These are the current values for output data in accordance with
the current locations of the points inside the tone curve editor.
These values change when you drag points in the tone curve
editor, or you can enter i n values here t o change t he shape of t he
tone curve. Each value can be ad justed within the range of 0 to 25 5.
Note:
❏ Each output value name has a check box to the left of it. Highlight
and Shadow are always selected, but you can select or clear 1/4 Tone,
Midtone, and 3/4 Tone by clicking their check boxes.
❏ When a value’s check box is clear, its point on the tone curve editor
automatically shifts to smooth out the tone curve when one of the
other points is moved.
❏ When a value’s check box is selected, it means that its point is fixed
and it will not shift when other points are moved.
Saving your own tone curve
Use the following procedure to assign a name to a tone curve you
customized an d to save it for lat er use:
1. Make the tone curve settings you want. This c auses the name
shown in the Tone Curve Name list to change to User
Defined.
2. After customizing the tone curve, enter a name for the new
curve (up to 32 characters) in the list box.
3. Click Save to save your new tone curve settings under the
name you specified.
1-18 Scanning Basics
Page 26

Deleting a customized tone curve
Use the following procedure to delete a custom tone curve. You
cannot delete the six preset tone patterns.
1. Use the Tone Curve Name list to sele ct the custom tone curve
you want to delete.
2. Click Delete.
3. In the confirmation dialog box that appears, click Yes to
delete the curve.
Closing the Tone Correction dialog box
You can close the Tone Correction dialog box by clicking either
OK or Cancel.
❏ Clicking OK applies the current Tone Correction dialog box
settings and closes the dialog box.
❏ Clicking Cancel closes the dialog box without applying the
current dialog box settings.
Optimizing OCR Scanning
This section gives you suggestions and r ecommended settings in
order to improve OCR (optical character recognition) scanning
results.
Scanning text
Make sure you select OCR for b oth Image Type and Destination
in the EPSON TWAIN Pro main window.
Scanning Basics 1-19
Page 27

If the recognition rate is not satisfactory with the def ault settings,
follow these steps to change settings:
Improving character recognition
1. In the EPSON TWAIN Pro main window, mak e sure OCR is
selected in both the Image Type and Destination list boxes.
Then click the Image Type button. The Image Type dialog
box appears.
2. In the Image Type dialog box, select None for B/W Option,
and then click OK.
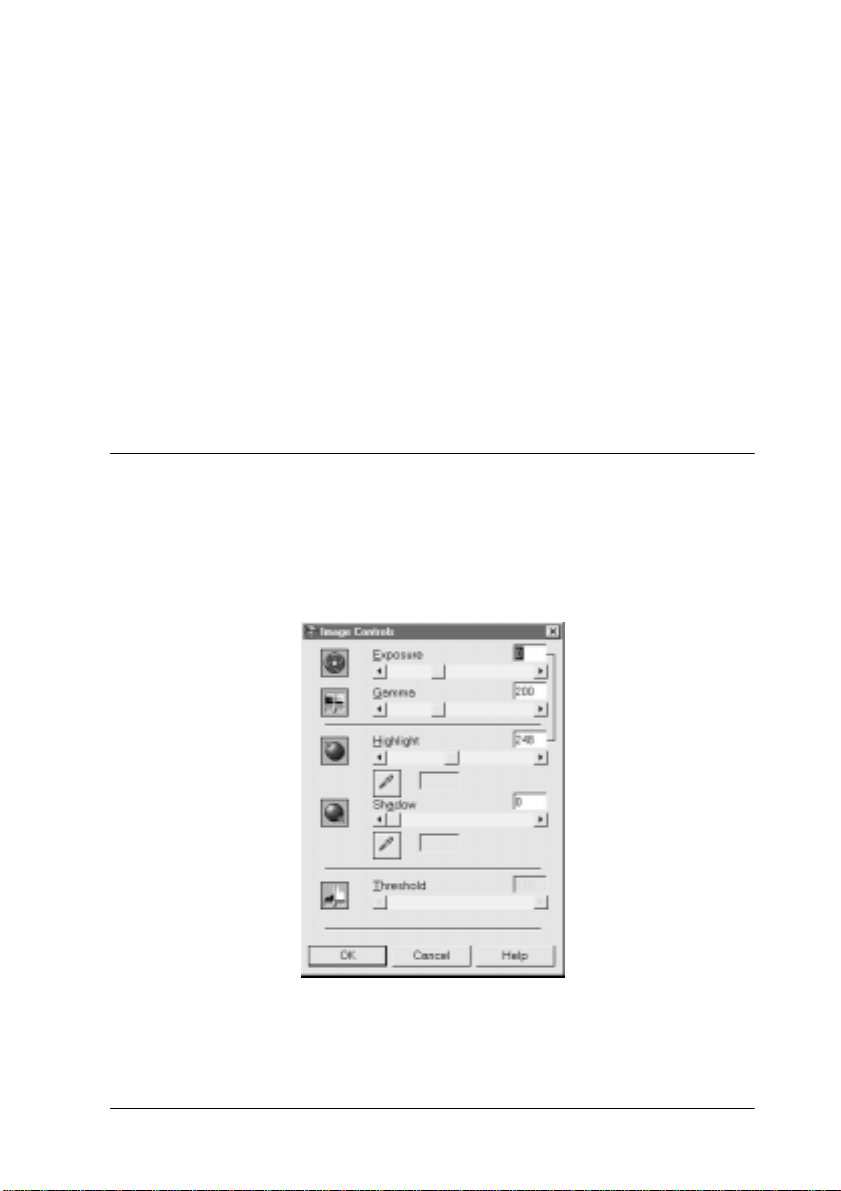
3. In the EPSON TWAIN Pro window, click Preview . Then click
the Image Controls button to display the Image Controls
dialog box.
Image Controls button
1-20 Scanning Basics
Page 28
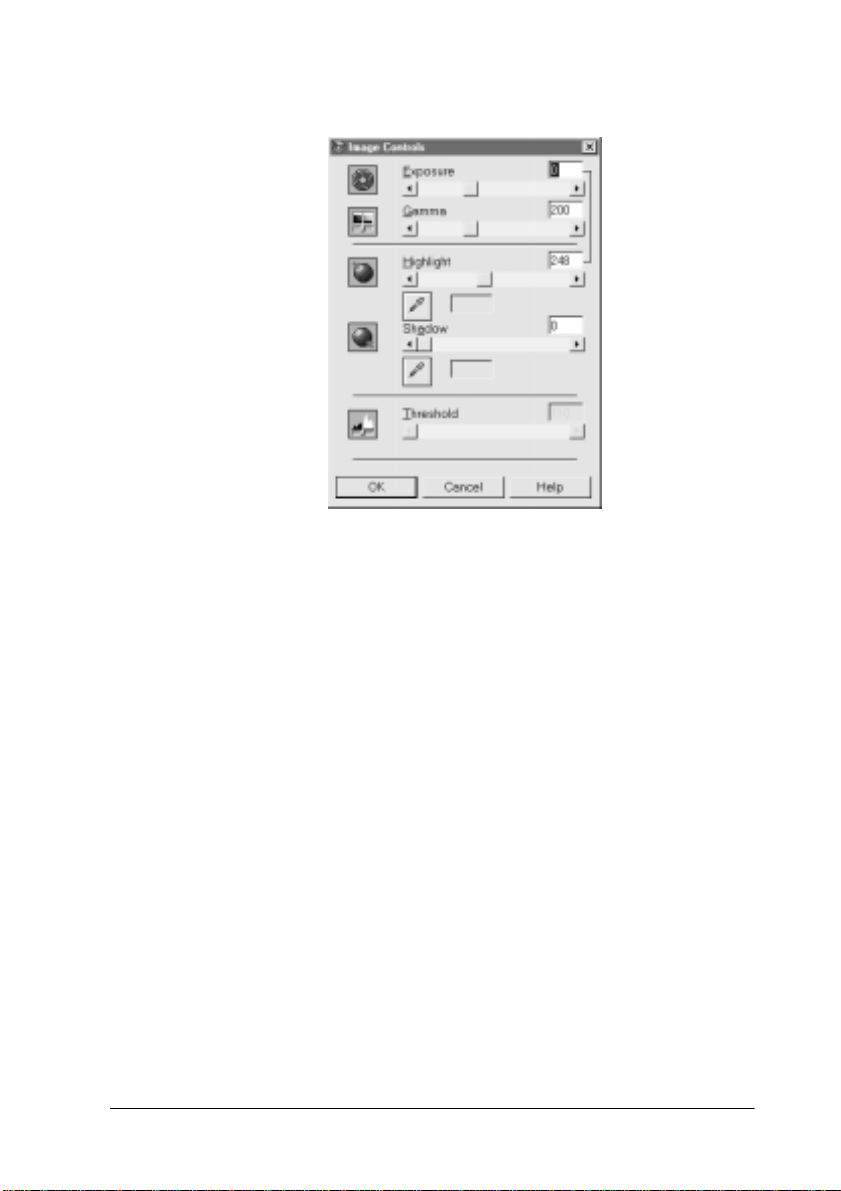
Image Controls dialog box
4. Use the Threshold slider to change the threshold value,
monitoring the results of your changes in the Preview
window. Adjusting the thre shold value can make it easier for
OCR to recognize characters.
If you still have problems...
1. In the EPSON TWAIN Pro window, increase the Resolution
value to 400. Remember that scanning at higher resolution
takes longer and may not great ly increase the recognition rate.
2. If you still have problems, try us ing the enhancement tools in
your OCR software to make adjustments.
Scanning Basics 1-21
Page 29

Text difficult to recognize
The quality of the text in your original document greatly effects
OCR results.
The following types of origin als can make reco gnition difficult
and should be av oided if possible:
❏ Items that have been copied from other copies
❏ Faxes
❏ Text with tightly-spaced characters or line pitch
❏ Text that is in tables or underlined
❏ Cursive or italic fonts, and font sizes less than 8 points
Remember that OCR software cannot recognize handwritten
characters.
1-22 Scanning Basics
Page 30

Chapter 2
Understanding EPSON TWAIN Pro Features
Overview . . . . . . . . . . . . . . . . . . . . . . . . . . . . . . . . . . . . . . . . . . . . . .2-3
EPSON TWAIN Pro Main Window . . . . . . . . . . . . . . . . . . . . . . . .2-4
Document Sources. . . . . . . . . . . . . . . . . . . . . . . . . . . . . . . . . . . . . . .2-5
Image Types . . . . . . . . . . . . . . . . . . . . . . . . . . . . . . . . . . . . . . . . . . . .2-7
Image Type list . . . . . . . . . . . . . . . . . . . . . . . . . . . . . . . . . . . . .2-7
Image Type button. . . . . . . . . . . . . . . . . . . . . . . . . . . . . . . . . .2-8
Destinations . . . . . . . . . . . . . . . . . . . . . . . . . . . . . . . . . . . . . . . . . . . .2-12
Destination list . . . . . . . . . . . . . . . . . . . . . . . . . . . . . . . . . . . . .2-13
Destination button . . . . . . . . . . . . . . . . . . . . . . . . . . . . . . . . . .2-14
Changing Resolution. . . . . . . . . . . . . . . . . . . . . . . . . . . . . . . . . . . . .2-16
Source and Target image sizes. . . . . . . . . . . . . . . . . . . . . . . . . . . . .2-16
Preview Window. . . . . . . . . . . . . . . . . . . . . . . . . . . . . . . . . . . . . . . .2-19
Preview Buttons. . . . . . . . . . . . . . . . . . . . . . . . . . . . . . . . . . . . . . . . .2-21
Zoom preview button . . . . . . . . . . . . . . . . . . . . . . . . . . . . . . .2-21
Return to full preview button. . . . . . . . . . . . . . . . . . . . . . . . .2-22
Return to zoom preview button. . . . . . . . . . . . . . . . . . . . . . .2-22
Marquees and Marquee Buttons. . . . . . . . . . . . . . . . . . . . . . . . . . .2-23
Making and modifying marquees . . . . . . . . . . . . . . . . . . . . .2-23
Delete marquee button . . . . . . . . . . . . . . . . . . . . . . . . . . . . . .2-25
Duplicate marquee button . . . . . . . . . . . . . . . . . . . . . . . . . . .2-26
Auto locate button . . . . . . . . . . . . . . . . . . . . . . . . . . . . . . . . . .2-26
Marquee number indicator. . . . . . . . . . . . . . . . . . . . . . . . . . .2-28
Adjust Buttons . . . . . . . . . . . . . . . . . . . . . . . . . . . . . . . . . . . . . . . . . .2-29
Auto Exposure . . . . . . . . . . . . . . . . . . . . . . . . . . . . . . . . . . . . .2-30
Image Controls . . . . . . . . . . . . . . . . . . . . . . . . . . . . . . . . . . . . .2-30
Tone Correction . . . . . . . . . . . . . . . . . . . . . . . . . . . . . . . . . . . .2-33
Understanding EPSON TWAIN Pro Features 2-1
Page 31

Color Adjustment . . . . . . . . . . . . . . . . . . . . . . . . . . . . . . . . . . 2-35
Reset Button . . . . . . . . . . . . . . . . . . . . . . . . . . . . . . . . . . . . . . . 2-36
Auto Focus . . . . . . . . . . . . . . . . . . . . . . . . . . . . . . . . . . . . . . . . 2-37
Manual Focus. . . . . . . . . . . . . . . . . . . . . . . . . . . . . . . . . . . . . . 2-37
Settings Button . . . . . . . . . . . . . . . . . . . . . . . . . . . . . . . . . . . . . . . . . 2-40
Configuration Button. . . . . . . . . . . . . . . . . . . . . . . . . . . . . . . . . . . . 2-42
Scan Button . . . . . . . . . . . . . . . . . . . . . . . . . . . . . . . . . . . . . . . . . . . . 2-45
Scan All Button . . . . . . . . . . . . . . . . . . . . . . . . . . . . . . . . . . . . . . . . . 2-45
2-2 Understanding EPSON TWAIN Pro Features
Page 32

Overview
When you start EPSON TWAIN Pro or EPSON TWAIN Pro
Network through a TWAIN-compliant applicat ion, the following
window appears on the screen:
Note for Macintosh users:
Most illustrations shown in this section are for Windows, so they may
vary in appearance from what actually appears on your screen. The
instructions are the same, except as noted
Note for EPSON TWAIN Pro Network users:
Although most illustrations and explana tions of settings and functions
in this guide are for EPSON TWAIN Pro, they also apply to EPSON
TWAIN Pro Network.
The following sections describe the features of EPSON TWAIN
Pro and EPSON TWAIN Pro Network.
Note:
Some settings may appear dimmed depending on your choice of settings
and the features supported by your scanner.
Understanding EPSON TWAIN Pro Features 2-3
Page 33

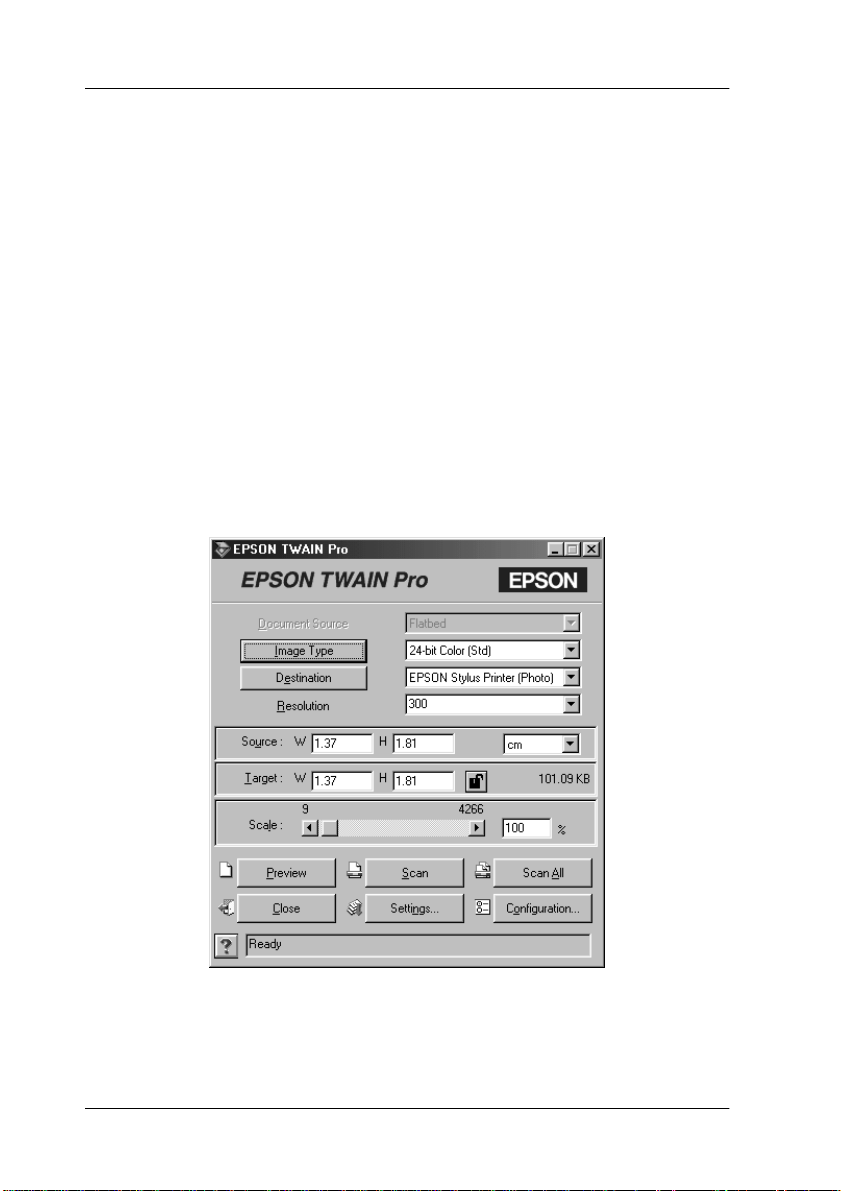
EPSON TWAIN Pro Main Window
The main window
The main window is the starting point to make detailed settings.
You can select parameters for a setting or select special func tions
provided with EPSON TWAIN Pro to attain the highe st quality
scanned images.
Note:
❏ Online help also provides you with information on settings. Click
the ? button to access online help.
❏ You cannot scan an image tha t exceeds the available memory or d isk
space. If you attempt to scan an image that is too large, an alert
appears on the screen.
❏ Before you begin scanning, you should calibrate your screen. For
details, see Chapter 3, “Calibrating Your System.”
2-4 Understanding EPSON TWAIN Pro Features
Page 34

❏ After an image is scanned, be sure to save or export it.
Document Source s
When scanning a reflective document placed on the document
table of the scanner, leave the Document Source set to Flatbed.
Other selections are available depending on what options are
installed. These are the optional Automatic Document Feeder,
and TPU for Neg. Film, or TPU for Pos. Film.
Note:
Uninstalled options are not displayed.
Flatbed:
Choose this setting to use the document table of the scanner.
ADF-Single-sided, ADF-Double-sided:
Select one of these settings when using the optional
Automatic Document Feeder. I f you are scanning single sid ed
documents, select ADF-Single-sided, and if you are scanning
double sided documents, select the ADF-Double-sided
setting.
Multi-page support with the Automatic Document Feeder
Understanding EPSON TWAIN Pro Features 2-5
Page 35

If you select Auto Document Feeder as the Docu ment Source
and click the Scan button, the following dialog box appears.
If you select Single Page, only one page is fed from the
Automatic Document Feeder and scanned.
If you select All Pages (default), all the pages are fed from the
Automatic Document Feeder and scanned. The All Pages
option may not work with some applications.
TPU for Neg. Film, TPU for Pos. Film:
Select one of these settings when using the Transparenc y Unit.
If you are scanning negative film, select TPU for Neg. Film,
and if you are scanning positive film (or slides), select the TPU
for Pos. Film sett ing.
2-6 Understanding EPSON TWAIN Pro Features
Page 36

Image Types
Use the Image Type list or button to select the type of image to be
scanned.
Image Type list
The Image Ty pe list provides the following predefined sett ings.
EPSON recommends you use the predefined settings first, then
later improve the quality of the scanned image manually by
making the detailed setting s descri b ed i n the foll owi n g pag es, if
necessary. Click the arrows on the right to view al l of the available
settings.
42-bit Color (HiFi):
42-bit colors, best quality
Note:
This setting is available only with certain applications, such as
®
Adobe
Photoshop®.
24-bit Color (Std):
24-bit colors, high quality
24-bit Color De-screening:
24-bit colors, high quality with de-screening to remove moiré
patterns
Understanding EPSON TWAIN Pro Features 2-7
Page 37

Note:
A moiré is a cross-hatch pattern that appears on scanned images
when scanning printed material. It is a result of interference that
occurs due to the difference between the pitches of the scanning and
the halftone screens.
14-bit Gray (HiFi):
14-bit gray, best quality
Note:
This setting is available only with certain applications, such as
Adobe Photoshop.
8-bit Gray (Std):
256 grays, high quality
Line Art:
Black and white, draft quality
OCR:
Black and white, best quality, Text En hancement Technolog y
Copy & Fax:
Black and white, hard halftone, draft quality, Auto Area
Segmentation
Image Type button
The Image Type button al lows yo u to cu stomize t he Image T ype
settings. If you want to make detailed settings manually, use this
feature.
2-8 Understanding EPSON TWAIN Pro Features
Page 38

Click the Image Type but ton. The fol lowin g di al og box appe ar s.
Image Type Name:
The names of predefined settings and any custom sett ings you
have saved appear in the Image Type Name list.
Pixel Depth:
Select the scanning depth from:
42-bit Color, 24-bit Color, 14-bit Gray, 8-bit Gray, and
Black & White.
Scanning Mode:
Use this setting to select between speed and quality. Best
provides the best quality image, while Draft provides faster
scanning with some loss of quality. Note that you can also
change the scanning mode of the preview image using the
procedure under "Configuration".
Understanding EPSON TWAIN Pro Features 2-9
Page 39

De-screening:
Select either On or Off. When On is selected, moiré patterns
are automatically removed from scanned images, but
scanning takes longer.
Note:
❏ A moiré is a cross-hatch pattern that appears on scanned images
when scanning printed material. It is a result of interference
that occurs due to the difference between the pitches of the
scanning and the halftone screens.
❏ This setting is available when the reso lution is less than 800 dpi.
❏ When On is selected, it takes longer to scan.
Dropout:
Select a color to subtract from a black and white scan of a
colored original. Proper use of dropout can improve the
quality of your black and white scans. Available dropout
options are:
None, Red, Green, and Blue.
Note:
❏ Dropout is available only when Pixel Depth i s set to 8-bit Gray
or Black & White.
❏ Depending on the image you scan, you may need to adjust the
Threshold setting in the Image Controls dialog box to enable
this feature.
B/W Options:
Select from:
Text Enhanceme nt Technology, Auto Area Segmentation,
or None.
2-10 Understanding EPSON TWAIN Pro Features
Page 40

Text Enhancement Technology
To improve recognition accuracy during OCR (Optical
Character Recognition) scanning, select this option. This
function eliminates the document background from scans.
Auto Area Segmentation
To make grayscale images clearer and text recogni ti on more
accurate, select this option. This function separates text from
graphics.
Note:
❏ The B/W Option setting is available only when Black & White
❏ When you need neither TET nor AAS, select None.
❏ Default is set to None.
Halftone:
Select a halftone or dither setti ng to repr od uce i mages usin g
special dot patterns:
Mode A (Hard Tone), Mode B (Soft Tone), M ode C (Net
Screen), Dither A (4 × 4 Bayer), Dither B (4 × 4 Spiral),
Dither C (4 × 4 Net Screen), Dither D (8 × 4 Net Screen), or
None.
is selected as the Pixel Depth setting.
Note:
Halftone is available only when Pixel Depth is set to Black &
White.
To cancel the settings, click Cancel.
To save the settings you made as a group of custom settings, type
a new name in the Image Type Name box, then click Save.
To delete an Image Type setting, select the setting name to b e
deleted in the Image Type Name menu, then click Delete.
Understanding EPSON TWAIN Pro Features 2-11
Page 41

To apply the settings you made, click OK. The Preview window
displays the effects of the current settings except for TET (Text
Enhancement Technology) and AAS (Auto Area Segmentation)
settings.
Destinations
Select the destination, or output dev ice, where the scanned image
is to be printed or displayed using the Destination list or butt on.
2-12 Understanding EPSON TWAIN Pro Features
Page 42

Destination list
The Destination list contains the following predefined settings
and any custom settings you have saved i n the Destination dialog
box. Click the arrows on the right to view al l the available settings.
Destination
name
Screen/
Web
Prepress
175 lpi
Prepress
150 lpi
Prepress
133 lpi
Prepress
120 lpi
LineWork
Scan
EPSON
Stylus
Printer (Fine)
EPSON
Stylus
Printer
(Photo)
Resolution Unsharp
Line drawings and
halftone images
96 dpi (for Windows)
72 dpi (for Macintosh)
350 dpi 350 dpi off
300 dpi 300 dpi off
266 dpi 266 dpi off
240 dpi 240 dpi off
1200 dpi 600 dpi on
360 dpi 150 dpi on
720 dpi 300 dpi on
Photos
96 dpi (for Windows)
72 dpi (for Macintosh)
Mask
on
Laser Printer 600 dpi 200 dpi on
Fax 200 dpi 200 dpi off
OCR 300 dpi 300 dpi off
Understanding EPSON TWAIN Pro Features 2-13
Page 43

If you are using an EPSON Stylus printer and are printing scanned
images with the Economy, Normal, or Fine Print Quality settings
in your printer software, selecting EPSON Stylus Printer (Fine) is
recommended. If you are printing with the SuperFine or Photo
Print Quality settings, select EPSON Stylus Printer (Photo).
Note:
The effects of the Destination settings cannot be viewed in the Preview
window.
Destination button
The Destination button allows you to customize the Destination
settings. To make your own settings, su ch as scanning resolution,
click this button .
The following dialog box appears.
Destinat ion Name:
Predefined and custom setting names appear in the
Destination menu.
Resolution:
Specify a scanning resolution for line drawing and halftone
images, or photos.
2-14 Understanding EPSON TWAIN Pro Features
Page 44

Note:
❏ When the Pixel Depth setting in the Image Type dialog box is
set to Black & White, the Drawing/Halftone setting takes
effect and the Photo setting becomes irrelevant. For other Pixel
Depth settings, the Photo setting takes effect and the
Drawing/Halftone setting becomes irrelevant.
❏ To print your scanned document when Resolution is set to
Drawing/Halftone, select the same resolution setting from the
list as you select in the printer driver. To print your scanned
document when Resolution is set to Photo, select a resolution
between 150 and 300 dpi. If you select a higher resolution, the
Photo setting requires longer to print, but does not improve
the output quality
❏ The Resolution setting is closely related to the Image Size and
Scale settings. If you change them arbitrarily, the resulting
image may not be what you expected.
❏ The range of resolution values depends on your scanner.
Unsharp Mask
You can select or deselect the Unsharp Mask setting. Selecting
the check box improves image sharpness.
.
To apply the settings you made, c lick OK. To cancel the set tings,
click Cancel.
To save the settings you made, type a new name in the Destination
Name box, and then click Save.
To delete a Destination setting, select the target setting name to
be deleted in the Destination Name menu, then click Delete.
Understanding EPSON TWAIN Pro Features 2-15
Page 45

Changing Resolution
The resolution for the current scanning operation can be changed
by selecting a resolution or typing in the valu e. This setting
overrides the resolution setting you make in the Destination
dialog box.
Source and Target image sizes
The Source fields indicate the size of the image that is displayed
or selected in the Preview window.
The Target fields indicate what size the image will be when it is
output.
Note:
The image size setting is closely related to the Resolution. If you change
either setting arbitrarily, the resulting image may not be what you
expect.
2-16 Understanding EPSON TWAIN Pro Features
Page 46

Width and Height menu :
The width and height of an image are i ndicated in the selected
unit of measure. You can type new values directly in the
indicator fields, or you can change the image area in the
Preview window by creating a marquee, or fra me. Do this by
dragging the mouse over the desired area. See“Preview
Window” on page 2-19 for more information on marquees.
Units menu:
Select a unit of measurement. You can select either pixels,
inches, or cm.
Storage size indicator:
The storage size of an image is indicated in KB or MB. As you
change the image area in the Preview window, this value also
changes.
Understanding EPSON TWAIN Pro Features 2-17
Page 47

Lock button:
The current size of width-to-heigh t of the target image can be
locked, allowing the ratio of width-to-height of the Source
image to change according to the scale value, or the scale
value to change according to the ratio of width-to-height of
the Source image. This is especiall y useful in cases whe re the
size of an image does not fit the size of the paper on which
you want to print the image, but you want to keep the image’ s
original proportion s. Enter t he size of th e paper in t he Width
and Height fields of the Target box and then click the lock
button. The scale value is automatically chan ged, maintaining
the current ratio of width-to-height to fit the paper.
Scale slider:
locked
unlocked
An image can be reduced or enlarged by moving the Scale
slider. You can also click the left or right arrow to change the
image size in 1% increments.
The range of possible reduction or enlargement varies
depending on the current reso lution setting.
Scale indicator:
The percentage of enlargement or reduction is shown in the
Scale indicator field. You can type a new value directly into
this field, or use the Scale slider to determine the value.
2-18 Understanding EPSON TWAIN Pro Features
Page 48

Preview Window
Before you scan and save an image, you can preview it in the
Preview window. The Previe w feature displays your i mage in the
Preview window and allo ws you to see the effects o f your settings
before scanning. You can also use the Preview feature to
determine the width and height of the scanning image and the file
size of the image to be saved. See the secti on on Image Size in thi s
chapter.
Note:
You cannot preview an image that exceeds available memory or disk
space.
To preview an image, click Preview in the EPSON TWAIN Pro
main dialog box.
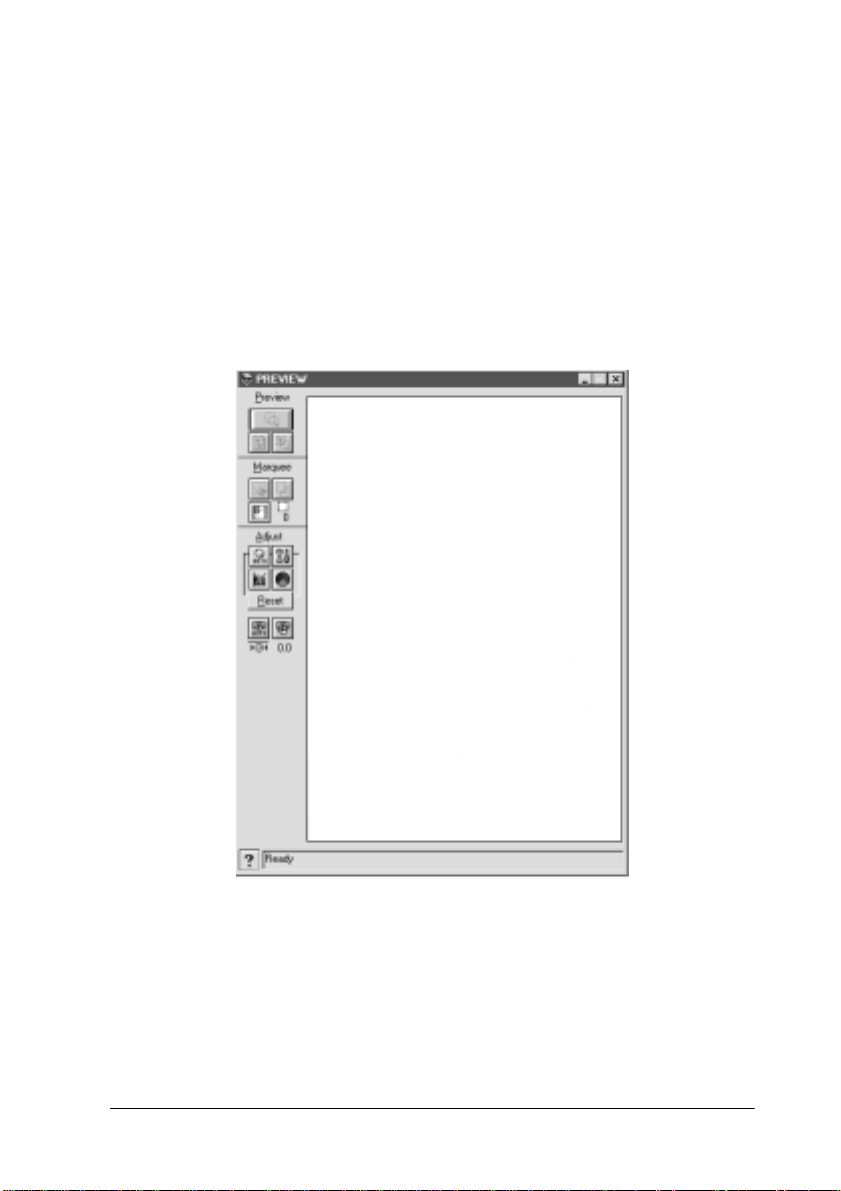
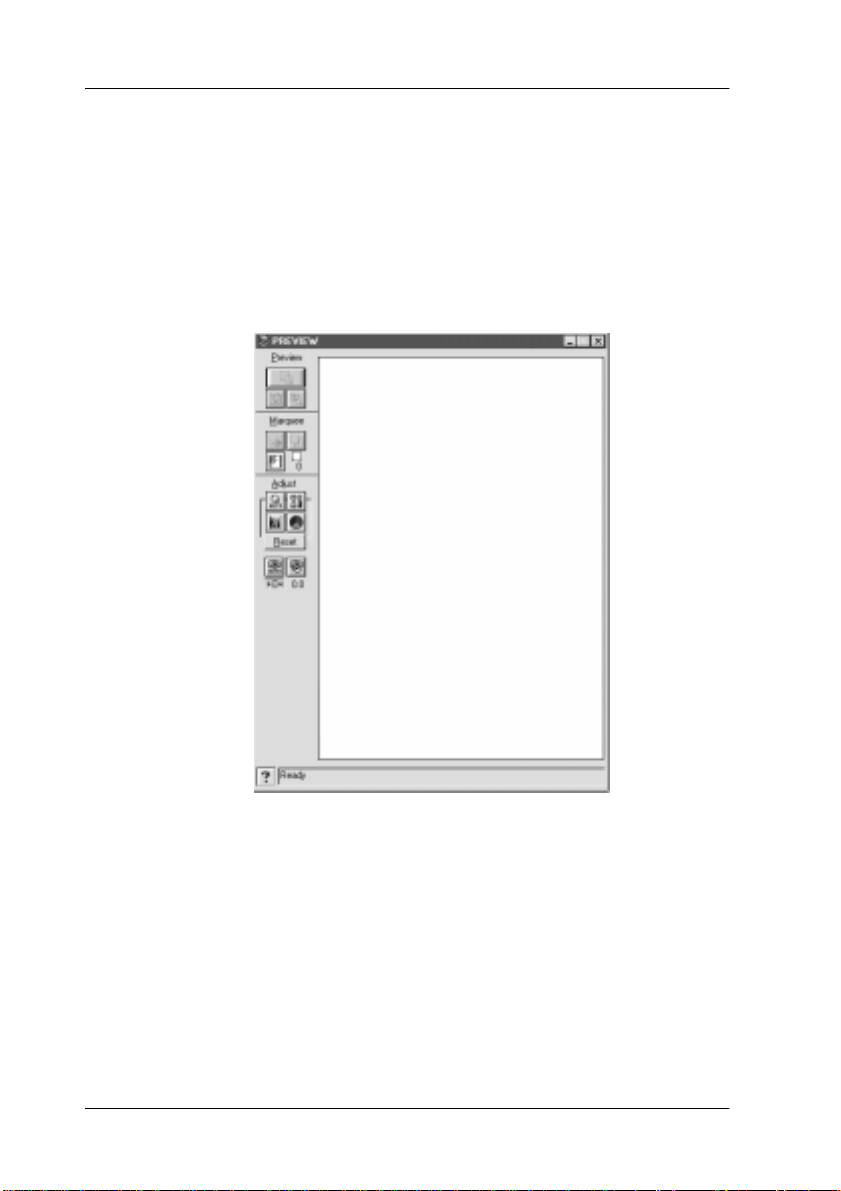
Understanding EPSON TWAIN Pro Features 2-19
Page 49

The window shown below appears.
preview window
You can see the effects on the preview image of any of the
following settings.
❏ Pixel Depth, Halft one, and Dropout in the Imag e Type dialog
box
❏ Unsharp Mask in the Destination dialog box
❏ Exposure, Gamma, Highlight, Shadow, and Threshold in the
Image Controls dialog box
❏ Tone Correction in the Tone Correction dialog box
2-20 Understanding EPSON TWAIN Pro Features
Page 50

❏ Gray Balance Intensity, and Saturation in the Color
Adjustment dialog box
❏ Focus position on the Prev i ew wi nd ow when zoom pr evi ew
is carried out
Note:
Although the image in the Preview window changes as you make
settings, the settings do not affect the real image until you scan or rescan
the image.
For more information on image settings , see “Image Controls ” on
page 2-30, “Tone Correction” on page 2-33, “Color Adjustment”
on page 2-35, and “Configuration Button” on page 2-42.
Preview Buttons
Zoom preview button
To preview a part of the image that is already in the Preview
window, click and drag the mouse to create a marquee over the
area you want to see in detai l, then click the zoom preview button.
See “Marquees and Marquee Buttons” on page 2-23 for
information about marquees.
Understanding EPSON TWAIN Pro Features 2-21
Page 51

Return to full preview button
Clicking the return to full previe w button restores the image to a
full preview. This button is available only when the marquee is
zoomed as described above.
Return to zoom preview button
Clicking the return to zoom preview button rest ores the image to
the previous zoom. This button is av ailable only when a marquee
has been previously zoomed. This restores the zoom preview
from memory, which is quicker than rescanning the same zoomed
area by clicking the zoom preview button again.
2-22 Understanding EPSON TWAIN Pro Features
Page 52

Marquees and Marquee Buttons
There are buttons available on the preview window to help you
manage the marquees.
A marquee is a frame around an image, or a part of an image.
Marquees are often used in scanning and image-editing so ftware
to select only the most import ant part of an image.
Making and modifying marquees
Move the pointer over the image in the Preview window. The
pointer becomes a set of cross-hairs. Drag (move the mouse while
holding down the mouse button) the cross-hairs over any ar ea of
the image, and a dotted frame appears. The point where you first
clicked is anchored, but the rest of the frame is sizable and
movable. After you finish creating a marquee, you can resiz e and
move it as described below.
Multiple marquees
You can make multiple marquees in one image to scan the most
important parts while ignoring the rest. It is also useful to set
several items on the document table and scan all of them in one
time. Marquees can be different si zes, and they can over lap. Extra
marquees can be made anywhere except on the frame of another
marquee. You can make settings on each marquee.
Understanding EPSON TWAIN Pro Features 2-23
Page 53

You can begin a marquee anywhere the pointer appears as cross-
hairs. To distinguish the active marquee from other marquees,
look at the marquee frames. The active marquee has moving
dotted line of the fra me as shown below. If you created mul ti ple
marquees and want to make a inactive marquee active, just point
the cursor at the edge of the marquee and click. The marquee
becomes active.
Resizing marquees
When you move the pointer over the edge of the acti ve marquee,
the pointer will change to a double-headed arrow as shown
below. You can then resize the marquee to the direction of the
arrow is pointing, up, down, sideways, or diagonally, by
dragging the arrow. The double-headed arrows only appear on
the active marquee.
If you drag an arrow while pressing the Shift key, the marquee
will be resized proportionally .
2-24 Understanding EPSON TWAIN Pro Features
Page 54

Moving marquees
To move an active marquee, move the pointer in the frame of the
marquee, and when the pointer changes into a hand, drag the
marquee to move it.
If you drag the marquee while pr essing the Shift key, the marquee
will be limited to vertical or horizontal movement.
Note:
If you want to create a marquee inside the active marquee, first make a
marquee outside the active marquee. The newly created marquee becomes
the active marquee and you can move it inside the other marquee.
Delete marquee button
Clicking the delete marquee button removes the acti v e marquee.
Note:
You can also delete the active marquee by pressing the Delete key on
your keyboard.
Understanding EPSON TWAIN Pro Features 2-25
Page 55

Duplicate marquee button
Clicking the duplicate marquee button creates another marquee
the same size as the active marquee. Use this button to make
multiple marquees.
Clicking the duplicate marquee button while holding down the
keys noted in the table below causes t he dupl icate marquee(s) t o
appear in a specific direction next to the original marquee.
Horizontal Vertical
Windows Ctrl key Alt key
Macintosh Command key option key
Auto locate button
2-26 Understanding EPSON TWAIN Pro Features
Page 56

Click the Auto Locate button to make the scanner automati cally
locate and select the target image. The image appears without
white borders in the Preview window.
entire preview area located image
Note:
The Auto Locate feature is automatically activated when scanning
without previewing.
If a document contains more th an one image, select a target image
by placing the mouse pointer over the image and clicking the
Auto Locate button
. The selected target image is located
automatically.
target image and other image located and
non-located images
Understanding EPSON TWAIN Pro Features 2-27
Page 57

Note:
Create a marquee only on the target image. If the marquee covers other
images, the Auto Locate feature is disabled.
Marquee number indicator
This shows the number of marquees in the Preview window. To
create more marquees, see “Duplicat e marqu ee bu tt on” o n pag e
2-26.
2-28 Understanding EPSON TWAIN Pro Features
Page 58

Adjust Buttons
Before you scan an image, you can make adjustments manually
with the powerful image quality adjustment tools on the Preview
window. The following adjust buttons are available.
Auto Exposure button
Image Controls button
Tone Correction button
Color Adjustment button
Auto Focus button
Manual Focus button
Understanding EPSON TWAIN Pro Features 2-29
Page 59

Auto Exposure
Click the Auto Exposure button on the Previe w window to
automatically optimize the exposure for an image. The Gamma,
Highlight and Shadow setting s in the Image Controls dial og box
are automatically set.
Note:
❏ The Auto Exposure button appears dimmed and is not available
when the Pixel Depth is set to Black & White and AAS is not
selected
❏ The Auto Exposure feature is automatically activated when
scanning without previewing.
in the Image Type dialog box.
Image Controls
2-30 Understanding EPSON TWAIN Pro Features
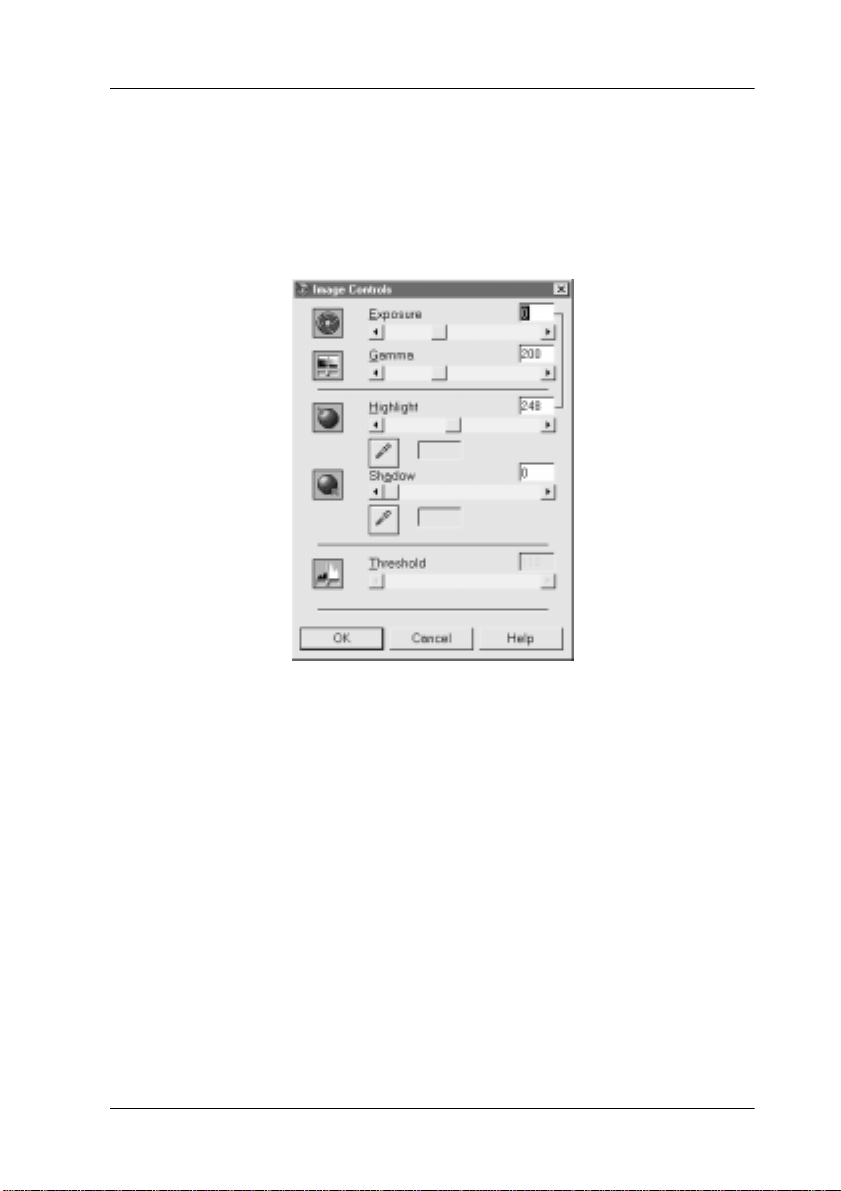
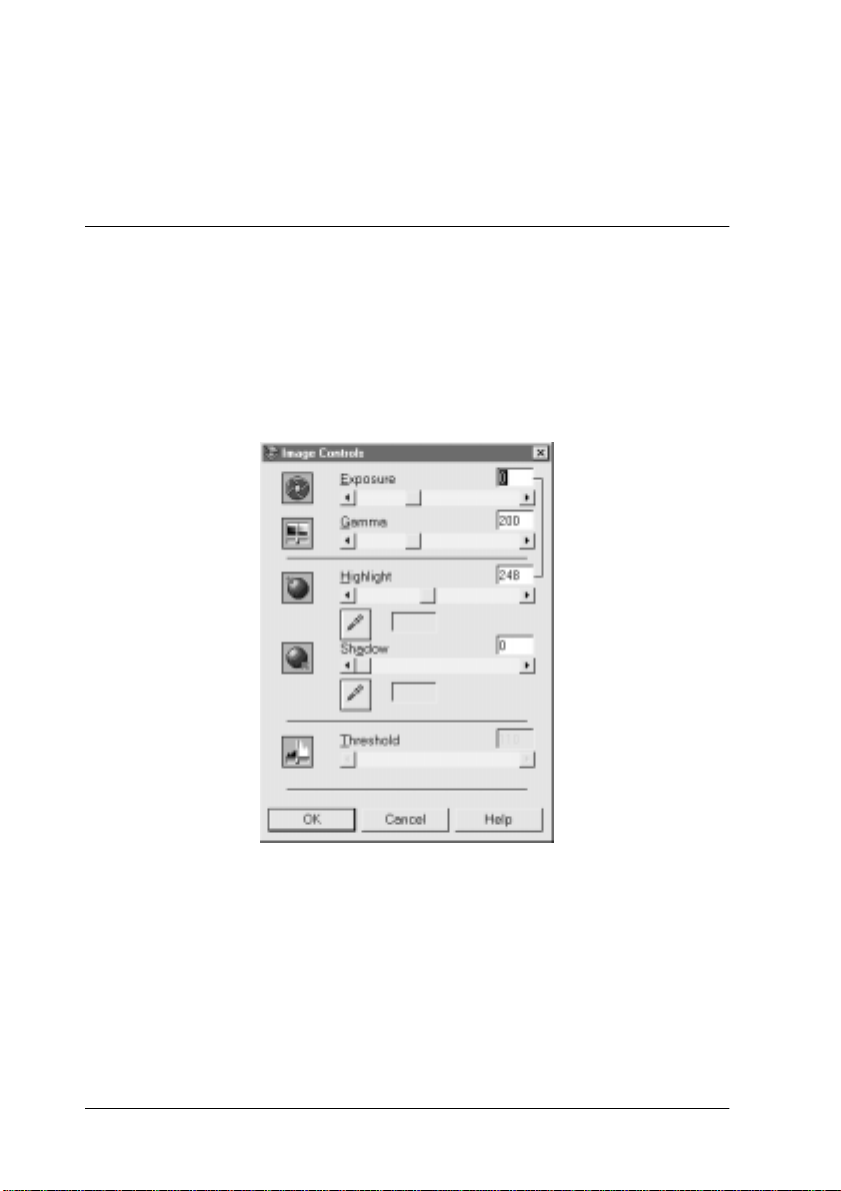
Page 60

Click the Image Controls button on the Preview window to view
the following dialog box.
Note:
❏ The Image Controls button appears dimmed and is not available
when TET (Text Enhancement Technology) is selected in the Image
Type dialog box.
❏ The Image Controls settings are optimized automatically when you
scan without previewing.
❏ If Pixel Depth is set to Black & Whit e and Halftone is set to None
in the Image Type dialog box, all the settings except Threshold
appear dimmed and cannot be selected.
❏ You can see the effects of the Image Controls settings in the Preview
window .
Exposure:
The Exposure setting lightens or darkens an image. You can
select from -10 (darkest) to 20 (brightest) by moving the slider.
Understanding EPSON TWAIN Pro Features 2-31
Page 61

The Exposure and Highlight controls are related. When the
Exposure setting is changed, the Highlight value is
automatically set.
Gamma:
The Gamma control allows you to adjust the mid-tones in an
image. You can select from 50 (darkest) to 500 (brightest) by
moving the slider.
Highlight:
The Highlight control allows you to adjust the brightness
level of the brightest parts of an image. You can select from
61 to 490 by moving the slider.
Click the eyedropper button beneath the slider, and the
mouse pointer changes to an eyedropper. Move the
eyedropper over the preview image, and click a bright area.
The eyedropper “picks up” the col or from that area, and uses
it as the highlight for the entire image. This effect appears
immediately in the preview image. Click Cancel to restore
the original image.
Shadow:
The Shadow control allows you to adjust the darkness level
of the darkest parts of an image. You can select from 0 to 60
by moving the slider.
Click the eyedropper button beneath the slider, and the
mouse pointer changes to an eyedropper. Move the
eyedropper over the preview image, and click a dark area.
The eyedropper “picks up” the col or from that area, and uses
it as the shadow for the entire image. This effect appears
immediately in the preview image. Click Cancel to restore
the original image.
2-32 Understanding EPSON TWAIN Pro Features
Page 62

Threshold:
Available only when Pixel D epth is set to Black & White and
Halftone is set to None in the Image Type dialog box. The
scanner scans gray shades as ei th er bl ack or whit e u sing this
setting.
You can select from 0 (lightest) to 255 (darkest) by moving the
slider.
Tone Correction
Click the Tone Corr ection button in the Pr eview window to view
the following dialog box.
Note:
❏ The default Tone Correction settings are the Linear.
Understanding EPSON TWAIN Pro Features 2-33
Page 63

❏ The Tone Correction button appears dimmed and is not available
when Pixel Depth is set to Black & White, Halftone is set to None,
and TET (Text Enhancement Technology) is selected in the Image
Type dialog box.
❏ You can see the effects of the Tone Correction settings in the Preview
window.
The tone value represents the contrast in the tonal relationship
between an original image and its reproduction on a monitor or
printer.
Tone Curve Name l i st:
Select a tone correction setting from this list. The custom
settings you have saved appear in this list.
Tone Curve editor:
The editor allows you to customize tone correction. Drag
points on the tone curve to adjust th e tone value. You can edit
up to five tonal elements.
Output opti ons:
If you select the check box for a specific point, such as 1/4
Tone or Midtone, you can move th at point and it will remain
where you leave it; it will not be affected by the movement of
other points on the curve. If the check box is cleared, the point
will be affected by the movement of other points.
Channels options:
You can select the combined red, green, and blue (RGB)
channel to modify all colors, or sel ect these colors sepa ratel y.
2-34 Understanding EPSON TWAIN Pro Features
Page 64

Note:
If Pixel Depth is set to Black & White or 8-bit Gray in the Image
Type dialog box, you can only select the combined RGB channel
option.
OK/Save/Delete/Cancel buttons:
To accept the defining T one Correction or close the dial og box,
click OK.
After you correct tone , t ype a name for your custom settings
in the tone correction list and click Save.
To delete a setting, select the na me of the setting y ou want to
delete in the tone correction list and click Delete.
To cancel the operation, click Cancel.
Color Adjustment
Click the Color Adjustment button in the Preview window to
view the following dialog box.
Understanding EPSON TWAIN Pro Features 2-35
Page 65

Note:
❏ If Image Type setting is not 24-bit Color (Std) or 24-bit Color
De-screening, or Pixel Depth is set to 8-bit Gray or Black &
White, the Color Adjustment button appears dimmed and these
settings cannot be selected.
❏ You can see the effects of the Color Adjustment settings in the
Preview window.
Gray Balance Intensity:
Gray Balance Intensity removes unwanted color casts and
tints by balancing color saturation.
Click the eyedropper button beneath the slider. The mouse
pointer changes to an eyedropper. Click the color you want
to represent gray. The eyedropper “picks up” the color and
displays it in the box beside the eyedropper butt on. You can
then correct the cast level for that color from 0 to 100 by
moving the slider. The corrected color appears i n the box on
the right, and the effect shows up immediately in t he preview
image. Click Cancel to restore the original image.
Saturation:
Saturation is the property that defines color depth. Select a
saturation level from -100 (less color) to 100 (more color) by
moving the slider.
Reset Button
Use the Reset Button to retur n any image control settings you
made back to their default settings. If you did not alter any
image control settings, this button appears dimmed and is not
available.
2-36 Understanding EPSON TWAIN Pro Features
Page 66

Auto Focus
Click the Auto Focus button on the Preview window to set the
focus position.
Manual Focus
Click the Manual Focus button on the Preview window to
determine where the focus should be . This may help improve the
quality of your image. When you click this button, the followin g
window appears.
Understanding EPSON TWAIN Pro Features 2-37
Page 67

Auto Focus:
Clicking this button adjust the focus position automatically.
This works exa ctly the same wa y the Auto Focus button in
the Adjust dialog box works.
Focus Position:
You can select from-3.0 (Lowest) to 9.0 (highest) by moving
the slider, clicking the left or righ t arrow, or ty ping a valu e
from -3.0 to 9.0 in increments of 0.1 in the Focus Position box.
By adjusting the focus position, you can reduce the occurrence
of moire patterns when scanning.
Note:
❏ If TPU (for Neg. Film or for Pos. Film) is selected as the
Document Source, the value of the focus position is
automatically set to 2.5. If Flatbed or ADF (Single-sided or
Double-sided) is selected, the value is automatically set to 0.
❏ If you set the film to be scanned using film holders, you do no t
need to change the focus setting. If you set the film directly on
the scanner’s document table, it is recommended to change the
focus position to 0.0.
Selected area for focusing window:
This window shows a preview image of the active marquee.
If there is no marquee in the Preview window, the focus
marquee window shows a full p review image. To c hange the
image in the focus marquee window, change the marque e or
the image in the Preview window.
2-38 Understanding EPSON TWAIN Pro Features
Page 68

Focus Line:
The focus line appears at the center of the focus marquee
window (default). If you move the cursor o ver the focus line,
the cursor will change to a “hand ” cursor. You can then move
the focus line by clicking and dragging the “hand” cursor to
a new part of the image.
Confirm:
Click this button to compare the new image that you just
modified image (shown in the Result window) with the
unmodified image (shown in the Before window).
Result window:
This window shows the image whose focu s line position you
just modified.
Before wind ow:
This window shows the image with the focus line in the
default position. The focus l ine deter mines what p oint o f the
image is used.
Understanding EPSON TWAIN Pro Features 2-39
Page 69

Settings Button
Click the Settings button on the main window to view the
following dialog box. You can view all the settings for th e current
preview image in this dialog box. Also, you can save all of the
currently selected settings as a group of custom settings with a
name you specify. Later, you can apply any cus tom setting s you
have saved. Note that only user defined settings related to the
Document Source currently selected will appear in the User
defined settings field.
Depending on your scanner model, the preset settings for using
film holders with positive films may appear in the User defined
settings field when the optional Transparency Unit is installed.
To save the currently selected settings, type a new name in the
User defined settings field, then click Save.
To apply saved settings, select a setting name from the list, then
click OK. The preview image will reflect the settings you saved.
2-40 Understanding EPSON TWAIN Pro Features
Page 70

To restore the previous settings, click Cancel.
To delete a setting, select the setting name in the list, then click
Delete.
Understanding EPSON TWAIN Pro Features 2-41
Page 71

Configuration Button
Click the Configuration button on the main window to view the
following dialog box. You can make settings that affect the
Preview window.
Windows
Macintosh
2-42 Understanding EPSON TWAIN Pro Features
Page 72

Preview Window Size:
Select the size of the Preview window. Your ch oices are Large,
Medium, and Small.
Save Preview Image and Settings:
Select this check box to automatically save the pr eview image
and all the image settings when y ou exit EPSON TWAIN (quit
scanning). The next time you restart EPSON TWAIN, the
image and settings will reappear.
Fast Preview:
Enables high -speed loading of the preview image. If this is
selected, the preview image is scanned i n Dr aft mo de. If t h is
is not selected, the preview image is scanned in Best mode,
and you can get accurate v alues for the H ighlight, Sh adow,
and Gray Balance Intensity by sampling with the ey edropper
in the preview image.
Do not select the check box when quality is more important
than speed.
Auto Exposure on Preview:
Displays the preview im age with automatically optimized
exposure settings. The result is the same as if you clicked the
Auto Exposure button.
ICM (for Windows 2000, 98, and 95 Users):
Depending on your Win dows version, this sett ing may not be
available or may have options. Select ICM to reproduce the
colors in your image using the Windows ICM color
management system.
Understanding EPSON TWAIN Pro Features 2-43
Page 73

For Windows 2000 and 98 users:
When the sRGB option is selected, the sRGB profile is used to
reproduce colors. When the Display option is selected, the
color profile selected for your monitor in the Display
Properties dialog box is used to reproduce colors.
Note:
❏ If your printer and monitor do not support ICM, be sure this
check box is cleared.
❏ See “Using ICM (For Windows 2000, 98, and 95 Users)” on
page 3-8 for more details.
ColorSync (for Macintos h):
Reproduces the colors in your image using ColorSync color
management system. ColorSync uses a special co lor matching
scheme to make sure the colors in your output match the
colors in the original image. This setting appears only in
Macintosh.
Note:
If your printer and monitor do not support ColorSync, leave this
check box clear.
Eyedropper Sampling Area:
Allows you to select one of the three following size settings
for the Eyedropper Sampling Area: 1 × 1 pixel, 3 × 3 pixel, and
5 × 5 pixel. The Eyedropper feature can sample the average
Highlight, Shadow, and Gray Bala nce Intensity val ues of the
target area.
2-44 Understanding EPSON TWAIN Pro Features
Page 74

Scan Button
Clicking the Scan button scans the image or active marquee in
the Preview window. The scanned image is transferred to the
application software you used to open EPSON TWAIN Pro so that
you can wo rk with the image from within that applica tion.
While scanning, a progress indicator appears. If necessary, click
the Cancel button to cancel the operation.
Note:
❏ You cannot scan an image whose size exceeds ava ilable memory or
disk space. If you attempt to scan an image that is too large, an error
message appears on the screen.
❏ Before you begin scanning, you should calibrate your display
monitor. For more information, see Chapter 3, “Calibrating Your
System.”
❏ After an image is scanned, be sure to save it.
Scan All Button
Clicking the Scan All button scans all of the marquees as separ ate
images, one at a time. This button is availabl e only when there are
multiple marquees.
Understanding EPSON TWAIN Pro Features 2-45
Page 75

Chapter 3
Calibrating Your System
Overview . . . . . . . . . . . . . . . . . . . . . . . . . . . . . . . . . . . . . . . . . . . . . .3-2
Calibrating Your Screen . . . . . . . . . . . . . . . . . . . . . . . . . . . . . . . . . .3-3
For Windows 2000 and 98 users. . . . . . . . . . . . . . . . . . . . . . .3-3
For Windows 95 and NT 4.0 users: . . . . . . . . . . . . . . . . . . . .3-5
For Macintosh users. . . . . . . . . . . . . . . . . . . . . . . . . . . . . . . . .3-7
Using ICM (For Windows 2000, 98, and 95 Users). . . . . . . . . . . .3-8
For Windows 2000 and 98 users. . . . . . . . . . . . . . . . . . . . . . .3-8
For Windows 95 users . . . . . . . . . . . . . . . . . . . . . . . . . . . . . . .3-9
Using ColorSync (For Macintosh Users) . . . . . . . . . . . . . . . . . . . .3-10
Calibrating Your System 3-1
Page 76

Overview
When you install EPSON TWAIN Pro, the EPSON Screen
Calibration utility is automatically installed.
EPSON Screen Calibration calibrates your monit or to ensure the
tone and contrast on yo ur screen match the original image. Be sure
to calibrate your screen before using your scanner.
For more in formation reg arding color and output de vice
calibration, see the Color Guide
.
3-2 Calibrating Your System
Page 77

Calibrating Your Screen
You need to calibrate your screen when you first install the
scanner software, and anytime you switch t o a d ifferent monit or.
For Windows 2000 and 98 users
1. Double click the Scanners and Cameras icon in Control
Panel. The Scanners and Cameras Properties dialog box
appears. Click the Properties button .
Calibrating Your System 3-3
Page 78

2. Click the Utility tab, then click the Screen Calibration Utility
icon. The Screen Calibration dialog box appears.
3-4 Calibrating Your System
Page 79

The gray stripes will not blend together perfectly; however,
try to make the different tones match as closely as possible.
3. Click OK to finish calibrating your scanner and monitor.
The setting is automatically saved as the Screen profile in the
Calibration list in EPSON TWAIN’s Destination dialog box. The
screen profile contains calibration information for the preview
image as well as the scanned image.
For Windows 95 and NT 4.0 users:
1. Double-click the EPSON TWAIN Pro icon in the Control
Panel window. The EPSON TWAIN Pro setup dialog box
appears.
Calibrating Your System 3-5
Page 80

2. Click Screen Calibration Utility. The following screen
appears:
3. Look at the screen and move the sli der to the right or left unt il
the two tones almost match.
4. Click OK to finish calibrating your scanner and monitor.
Note:
The gray stripes will not blend together perfectly; however, you should
try to make the different tones match as closely as possible.
3-6 Calibrating Your System
Page 81

For Macintosh users
1. Click the EPSON Screen Calibration icon in the EPSON
Scanner folder to view the Screen Calibration dialog box.
2. Look at the screen from a distance and move the slider right
or left until the two tones almost match.
3. Click OK to finish calibrating your scanner and monitor.
Note:
The gray stripes will not blend together perfectly; however, you should
try to make the different tones match as closely as possible.
Calibrating Your System 3-7
Page 82

Using ICM (For Windows 2000, 98, and 95 Users)
If you use Windows 2000, 98 or 95 and your output devices
(printer and monitor) support t he ICM color management system,
you can use the ICM calibration method.
For Windows 2000 and 98 users
Note:
If your output devices do not support sRGB, leave the check box empty.
Follow the steps below:
1. Run PageManager for EPSON or TWAIN-compliant software
and select Acquire or similar command from the File menu
to start EPSON TWAIN Pro.
2. Click Configuration. Select ICM in the Configuration dialog
box.
3. Select either the sRGB or Display option.
When the sRGB option is selected, the sRGB profile is used to
reproduce colors. When the Display option is selected, the
color profile selected for your monitor in the Display
properties dialog box is used to reproduce colors.
4. Make any other settings you want.
5. Click Scan.
3-8 Calibrating Your System
Page 83

For Windows 95 users
Note:
If your output devices do not support ICM, leave the check box empty.
Follow the steps below:
1. Run PageManager for EPSON or TWAIN- compliant software
and select Acquire or similar command from the File menu
to start EPSON TWAIN Pro.
2. Click Configuration. Select ICM in the Configuration dialog
box.
3. Make any other settings you want.
4. Click Scan. The scanner scans an image using the ICM profile.
Calibrating Your System 3-9
Page 84

Using ColorSync ( For Macintosh Users)
If your output devices (printer and monitor) support the Apple
ColorSync color management system, you can use the ColorSync
calibration method.
Note:
If your output devices do not support ColorSync, leave the check box
empty.
Follow the basic steps below:
1. Run PageManager for EPSON or TWAIN-compliant software
and select Acquire or a similar command to start EPSON
TWAIN Pro.
2. Click Configuration. Select the ColorSync check box in the
Configuration dialog box.
3. Make any other settings you want.
4. Click Scan. The scanner scans an image using the ColorSync
profile.
When the scanned image is printed or displ ayed wit h an out pu t
device calibrated for the scanner, the image reproduced is
identical to the original.
3-10 Calibrating Your System
Page 85

Chapter 4
Maintenance and Troubleshooting
Maintenance. . . . . . . . . . . . . . . . . . . . . . . . . . . . . . . . . . . . . . . . . . . .4-2
Cleaning the scanner . . . . . . . . . . . . . . . . . . . . . . . . . . . . . . . .4-2
Replacing the fluorescent lamp . . . . . . . . . . . . . . . . . . . . . . .4-3
Transporting the Scanner and the Transparency Unit. . . . . . . . .4-4
Problems and Solutions . . . . . . . . . . . . . . . . . . . . . . . . . . . . . . . . . .4-5
Error indicator. . . . . . . . . . . . . . . . . . . . . . . . . . . . . . . . . . . . . .4-6
Operating problems. . . . . . . . . . . . . . . . . . . . . . . . . . . . . . . . .4-7
Quality problems . . . . . . . . . . . . . . . . . . . . . . . . . . . . . . . . . . .4-8
Software setup problems. . . . . . . . . . . . . . . . . . . . . . . . . . . . .4-12
Scanning problems. . . . . . . . . . . . . . . . . . . . . . . . . . . . . . . . . .4-14
Software operation problems . . . . . . . . . . . . . . . . . . . . . . . . .4-15
Paper jams . . . . . . . . . . . . . . . . . . . . . . . . . . . . . . . . . . . . . . . . .4-16
Changing the SCSI ID number or SCSI board . . . . . . . . . . .4-16
Changing USB connections ports. . . . . . . . . . . . . . . . . . . . . .4-18
Recovering from scanner software installation problems
on Windows 2000 and Windows 98 . . . . . . . . . . . . . . . . .4-19
Sizing up your system . . . . . . . . . . . . . . . . . . . . . . . . . . . . . . .4-23
Maintenance and Troubleshooting 4-1
Page 86

Maintenance
Cleaning the scanner
To keep your scanner operating at its best, you should clean it
periodically, as described below.
1. Unplug the power cord.
2. Clean the outer case with mild detergent and water.
3. If the glass of the document table gets dirty, clean it with a
soft dry cloth. If the glass is soiled with grease or some other
hard-to-remove substance, use a small amount of glass
cleaner and a soft cloth to remove it. Wipe off all remaining
liquid.
Be sure that there is no dust on the glass of the document table.
Dust can cause spots in your scanned image.
Warning:
❏ Be careful not to scratch or damage the glass of the document
w
table, and do not use a hard or abrasive brush to clean it. A
damaged glass surface can decrease scanning quality.
❏ Never use alcohol, thinner, or corrosive solvent to c lea n th e
scanner. These chemicals can damage the scanner
components as well as the case.
❏ Be careful not to spill liquid into the scanner mechanism or
electronic components. This could permanently damage the
mechanism and circuitry.
❏ Do not spray lubricants inside the scanner.
❏ Never open the scanner case.
4-2 Maintenance and Troubleshooting
Page 87

Replacing the fluorescent lamp
The luminosity of the fluorescent lamp decli nes over t ime. If t he
lamp breaks or becomes too dim to operate normally, t he scanner
stops working and both the READY and ERROR
rapidly. When this happens, the l amp assembly must be replaced.
For detail s, contact you r dealer.
Caution:
c
Never open the case of the scanner. If repairs or adjustments are
necessary, consult your dealer.
lights flash
Maintenance and Troubleshooting 4-3
Page 88

Transporting the Scanner and the Transparency Unit
When transporting the scanner or the Transparency Unit a long
distance, or storing t hem for an extended period, lo ck the scanner
carriage and the Transparency Unit’s lamp assembly to prevent
damage. Follow the procedures below.
For the scanner
1. Turn on the scanner and wait unt il th e carriage mov es left t o
the home position.
2. Turn off the scanner.
3. Turn the transportation lock to the locked position by using
a coin or similar disc and secure the carriage.
For the optional Transparency Unit
1. With the Transparency Unit attached, turn on the scanner and
wait until the unit’s lamp assembly moves to its home
position. Turn off the scanner and remov e the T ransp are ncy
Unit.
2. Install the shipping screw in it s original shipping h ole.
4-4 Maintenance and Troubleshooting
Page 89

Problems and Solutions
This section divides problems into seven categories:
Error indicator . . . . . . . . . . . . . . . page 4-6
Operating problems . . . . . . . . . . page 4-7
Quality problems. . . . . . . . . . . . . page 4-8
Software setup problems . . . . . . page 4-12
Scanning problems . . . . . . . . . . . page 4-14
Software operation problems. . . page 4-15
Paper jams. . . . . . . . . . . . . . . . . . . page 4-16
See the table in “Error indicator” on page 4-6 first, then go to the
appropriate section for your problem and follow the
recommended steps.
Note:
If some settings appear dimmed in EPSON TWAIN Pro, they cannot be
selected because of the capability of your scanner or your c hoice of other
settings.
If you cannot solve a pro b lem after reading and following the
information in this section, contact your dealer or a qualified
customer support person for assistance.
Maintenance and Troubleshooting 4-5
Page 90

Error indicator
When an error occurs, the scanner stops operating and the
ERROR and READY lights indicate the error type as described
below.
ERROR Light READY Light Error Type
On On Com mand error
Flashing Off Interface error
Flashing Flashing Fatal error
Off Off Option error
Command error
Rescan the document. The scanner returns to normal when it
receives correct commands. Normally you do not need to reset
the scanner when this type of error occurs.
Interface error
Check the interface connection and then press the RESET button
P
OPERATE button to turn the scanner off and then back on
or
again to reset it.
Fatal error
❏ Check the fluorescent lamp, and replace it if needed.
❏ Make sure that the transportation lock is released.
❏ Check that the scanner is malfunctioning.
❏ Check that the transpor tation lock lever i s released and check
any installed options for problems. Next, turn the scanner off
and then back on again. If this does not correct the problem,
consult your dealer.
4-6 Maintenance and Troubleshooting
Page 91

Option error
Check the option and correct the cause of the problems such as;
❏ paper jam
❏ an empty document feeder
❏ an open cover
Operating problems
Problems you may have while using the scanner often i nvolve the
operation of your software and computer. Operation problems
usually occur because of:
❏ Incorrect setup of the interface.
❏ Inappropriate selection of the scanner functions.
❏ Incorrect setup of your computer or software.
❏ Incorrect operation of your software.
See the documentation that came with your computer and
software for possible solutions.
The
OPERATE
❏ Make sure the scanner is turned on. Press the P OPERATE
button.
❏ Make sure the power cord is connected to the scanner and
plugged into a power outlet.
light does not come on
The scanner does not scan
❏ Make sure the scanner is ready for scanning. Wait until the
READY light stops flashing and remains on.
Maintenance and Troubleshooting 4-7
Page 92

❏ Make sure your interface port and software settings are
correct. Also make sure that you r computer’s int erface board
is installed properly .
❏ For SCSI interface Users
Make sure the scanner’s SCSI ID and terminator are set
correctly. Also if you have other expansion boards in your
computer, make sure that their interrupt settings are not
interfering with your SCSI board. See your computer’s
documentation for details.
❏ For USB interface users
Try connecting the scanner directly to the compu ter’s USB
port, or use an EPSON USB cable.
Try connecting your scanner to a different port on your
hub, or a different hub, if one is available.
❏ For Macintosh and IEEE 1394 interface users
Make sure that the following Extensions are selected in
the Extensions Manager.
EPSON FW Scanner Enabler
EPSON FW Scanner Expert
EPSON FW Scanner Lib
Quality problems
The entire image is distorted or blurred
❏ Make sure the document is flat against the document table.
❏ Make sure you do not accidentally move the document
during scanning.
❏ Make sure the scanner is on a flat, stable surface.
4-8 Maintenance and Troubleshooting
Page 93

Part of the image is distorted or blurred
make sure the document is uniformly flat against the document
table. A document that is wrinkled or warped may not scan well.
Caution:
c
Do not place heavy objects on the document table.
Edge of the document are not scanned
Position the document so the area y ou want t o scan is wi thin th e
edge guide limits of the document table.
Colors are patc hy or distorted at the edge of the image
❏ A document that is very thick or warped at the edges can
cause discoloration. Cover the edges of the document with
paper to block outside light.
❏ Make sure the document is flat against the document table.
The image is faint or out of focus.
❏ Make sure the document is flat against the document table.
❏ Adjust your software’s Exposure setting. See“Image
Controls” on page 2-30.
❏ Adjust your software’s Gamma setting. See “Adjusting the
Gamma Setting” on page 1-9.
The image is too dark.
❏ Check your software’s Brightness setting.
❏ Check the brightness and contrast settings of your computer
display.
Maintenance and Troubleshooting 4-9
Page 94

Straight lines in the image come out jagged
Make sure the document orientation is perfectly straight on the
document table. Align vertical and horizontal lines with the scales
at the top and side of the document table.
The image does not look the same as the original
❏ Try different image setting combinations on your scanner
software.
❏ Your software may not have sufficient color matching and
color management features, or these components may not be
installed correctly. See the documentation that comes with
your software and computer.
❏ If you are importing an image file, make sure the file format
is one your software can read. Also, make sure the image
settings of your soft ware are appropriate for t he type of image
you want to scan.
A line of dots is always missing from the scanned image
❏ See your printer manual. Print head malfunction is indi cated
when a line is missing on printouts only.
❏ Scanner sensor malfunction is indicated when a line is
missing on both screen images and printouts. Contact your
dealer.
Moiré (cross-hatch) patterns appear in the scann ed image
❏ Change the Image Type settings. Turn the De-screening
setting On in the Image Type dialog box.
❏ Place a transparency sheet between the document and
document table.
❏ Reposition the document slightly.
4-10 Maintenance and Troubleshooting
Page 95

❏ Make the Image Size setting slightly smaller.
❏ Change the focus position setting.
Colors differ from the original.
❏ Calibrate the screen. See “Calibrating Your Screen” on page
3-3.
❏ Change the Image Type and Destination settings. See “Image
Types” on page 2-7 and “Destinations” on page 2-12 to make
sure your settings are correct.
❏ Printed colors will not exactly match the colo rs on your
monitor, since printers and monitors use different color
systems: monitors use RGB (red, green, and blue), while
printers ty pically use C MYK (cyan, magenta, yello w, and
black).
Colors on your monitor are differ ent from those in the
original image
❏ Check the image settings of yo ur scanner software, especial ly
data format (bits, pixel, color), gamma correction, and color
correction. Try different combinations of these settings.
❏ Check the color matching a nd color management cap abilities
of your computer, display adapter, and software. Some
computers can change the color palet te to adjust the colors on
your screen.
❏ Exact color matching is very difficult. Check your software
and monitor documentation for information on color
matching and calibration. Also see your Color Guide.
Printed colors are different from those in the original image
Exact color matching is very difficult. Check your software or
contact your printer company for informati on on color matching
and calibration.
Maintenance and Troubleshooting 4-11
Page 96

The printed image is larger or smaller than the or iginal
The image size sett ings of your so ftware determine the size of the
printed image. Do not use the size o f the monitor image to j udge
the printed size.
Scanned images cannot be printed or come out garbled
when printed
❏ Make sure your printer is properly connected to the
computer, correctly set up, and maintained. See your pr inter
manual for details.
❏ Check that your software is properl y instal led an d set up for
your printer.
The colors of negative film preview images look strange
❏ Make sure the EPSON TWAIN Pro Document Source setting
is TPU for Neg. Film.
❏ The dark area around the film, such as the frame of the film
holder, is perceived as white, whi ch alters the exposure of the
scanning area and causes scans to appear darker. See the
correct color by clicking and draggi ng the mouse over an area,
and then clicking the zoom preview button.
Software setup problems
You cannot install EPSON TWAIN Pro
❏ Check if your computer and operating system meet the
system requirements. See your scanner manual.
❏ Make sure your computer has enough memory to run the
application.
4-12 Maintenance and Troubleshooting
Page 97

The scanner does not appear in the Port list of the EPSON
TWAIN Pro dialog box in the Control Panel when you
connect your scanner using the SCSI interface to your PC
running Windows other than Windows 98 or 2000
❏ Turn off the computer and scanner and check the connection
between your hardware.
❏ Change the SCSI ID number to one that is not being used by
any other SCSI devices.
❏ When the scanner is connected in a daisy chain, check the
connections of all the devices in the chain, and make sure that
the scanner’s terminator switch is set appropriately for its
position in the chain.
The Scanner Status does not indicate “Device Ready” after
you click Test in the EPSON TWAIN Pro dialog box
(Windows 95 and NT 4.0) or the Scanner’s Properties dialog
box (Windows 98 and Windows 2000) in the Control Panel
❏ Make sure the interface cable meets the requ irements of yo ur
interface board. See the manual th at comes with the int erface
board.
❏ Turn off the scanner and computer a nd check the c onnection
between the scanner and computer.
❏ Make sure the SCSI interface board is installed correctly.
❏ Make sure the power on sequence is correct.
❏ Make sure the SCSI driver is properly installed.
❏ Change the scanner’s SCSI ID nu mber to one that is not being
used by any other SCSI device.
❏ When the scanner is connected in a daisy chain, check the
connections of all the devices in the chain, and make sure that
the scanner's terminator switch is set appropriately for its
position in the chain.
Maintenance and Troubleshooting 4-13
Page 98

Scanning problems
Image is dark, with little or no detail.
❏ Calibrate the screen as described in “Calibrating Your Screen”
on page 3-3.
❏ Change the Destination setting. Select Screen/Web as the
“Destination”. Selecting a print er may cause on-screen colors
to be different from the colors of the original, however colors
will be reproduced correctly when it is printed.
You cannot sca n an image or yo u only get a f ew dots for t he
scanned image
❏ Make sure you have placed a document on the document
table of the scanner.
❏ Change the Threshold setting. When OCR is selected as the
Image Type, change Text Enhancement Technology to None
from the B/W Option in the Image Type dialog box. Then
change the Threshold setting in the Image Controls dialog
box.
Or change OCR to Line Art, then change the Threshold setting
in the Image Control dialog box. See “Image Controls” on
page 2-30.
Scanned image is too large.
Change the Destination setting. Se lect Screen/Web as described
in “Destinations” on page 2-12. If you select a printer as the
Destination setting, the print size will be correct, although the
image may appear enlarged on the screen of some applications.
Poor character recognition during OC R scan ning .
❏ Change the Image Type setting. Select OCR as described in
“Image Types” on page 2-7.
4-14 Maintenance and Troubleshooting
Page 99

❏ Try adjusti ng the Threshold setting in the Im age Controls
dialog box.
❏ Select Text Enhancement Technology from B/W Option in
the Image Type dialog box to eliminate background noise.
❏ See “Optimizing Image Scanning” on page 1-4 for more
information.
Software operation problems
You cannot start EPSON TWAIN Pro.
❏ Make sure the scanner is turned on.
❏ Make sure the interface cable meets the requ irements of yo ur
interface board. See the manual th at comes with the int erface
board.
❏ Turn off the scanner and computer a nd check the c onnection
between the scanner and the computer.
❏ Make sure the interface board is installed correctly.
❏ Make sure that EPSON TWAIN Pro is selected in your
application.
❏ For Windows 2000 and 98 users
Check if your scanner name appears under Imaging Device
hardware type without a ? or ! mark in the Device Manager
menu. To view this menu, right-click the My Computer icon on
the Desktop, click Properties, then click the Device Manager
tab. If your scanner appears with a ? or ! mark, or appears as an
Unknown devices hardware type, click Remove while your
scanner is connected and turned on to remove it from the Device
Manager menu. Then reinstall EPSON TWAIN Pro.
Maintenance and Troubleshooting 4-15
Page 100

Pressing the Start button does not start Scanning.
❏ For Windows 2000 and 98
Click the Events tab in your scanner’s Properties dialog box
and make sure the Dis able device events check box is clear.
And make sure the Start button is selected as the Scanner
events, and at least one scanner event recognizable
application in the Send to this application box is selected.
❏ For Windows 95, NT 4.0, and Macintosh
Make sure the Scanner Monitor soft ware is running and check
the Scanner Monitor’s Launch Application path is set
correctly.
You can’t select optional equipment (Auto Document Feeder
or Transparency Unit).
Make sure the optional equipment is instal led correctly. See your
scanner manual.
Paper jams
Remove the jammed paper. See your scanner manual.
Changing the SCSI ID number or SCSI board
If you are using your scanner with Windows 98 or 20 00 and you
want to change the scanner’s SCSI ID number or replace the SCSI
board with a new one, follow the steps below.
4-16 Maintenance and Troubleshooting
 Loading...