

Page 1

®
Macintosh OS X
Supplement
4032770-01
EUL
Page 2

Page 3

Installing the Printer Software
Follow these steps to install the Printer Software.
Caution:
Turn off all virus protection programs before you install the
c
printer software.
1. Insert the printer software CD in the CD-ROM drive.
2. Double-click the Mac OS X Driver folder, and then
double-click the SP1290.pkg icon inside it.
If the Authorization window opens, click the key icon, enter
the administrator’s name and password, click OK, and then
click Continue.
3. Follow the on-screen instructions to install the printer
software.
4. After installing the software, follow the instruction below to
select your printer:
Double-click Macintosh HD (by default setting). →
Double-click the Application folder. → Double-click the
Utilities folder. → Double-click the Printer Center icon. →
Click Add. → Select EPSON USB. → Select your printer. →
Click Add.
Accessing the Online Reference Guide
Follow these steps to access the online Reference Guide.
1. Double-click the English folder, and then double-click the
User Guides folder.
1
Page 4
2. Double-click the REF_G folder, and then double-click
INDEX.HTM.
Accessing the Printer Driver Settings Dialog
Box
The printer driver settings appear in the following dialog boxes.
The settings in the Print dialog box change depending on the
option selected on the pop-up menu in the Print dialog box. The
settings in the Page Setup dialog box change depending on
settings selected in the Page Setup dialog box.
Dialog Box Settings
Print Common in all options:
Page Setup Page Attributes setting:
Printer, Saved Settings or Presets
Copies & Pages option:
Copies, Collated, Pages
Layout option:
Pages per Sheet, Layout Direction, Border
Output Options option:
Save as File, Format
Print Settings option:
Media Type, Ink, Mode
Color Management option:
Color Management
Summary option:
Summary of current settings
Settings, Format for, Paper Size, Orientation, Scale
Summary setting:
Summary of current settings
2
Page 5

These dialog boxes can be accessed as described below.
Dialog Box How to Access
Print Click Print on the File menu of your application.
Page Setup Click Page Setup on the File menu of your application.
Making Settings in the Print Dialog Box
You can make Media Type, Mode, Ink, Copies, and Pages settings
in the Prin t dialog box. From this dialo g box, you can preview the
document before printing. Refer to the appropriate section below.
Making the Media Type setting
The Media Type setting determines what other settings are
available, so you should always make this setting first.
In the Print dialog box with the Print Settings option selected,
select the Media Type setting that matches the paper that is loaded
in the printer. To find out what media type you are using, find
your media in the Media Type Settings list in the online Reference
Guide, and refer to the corresponding media type under which it
is grouped (shown in bold larger type). For some media, there are
several Media Type settings from which to choose.
3
Page 6
Making the Mode setting
The Mode settings in the Print dialog box with the Print Settings
option selected give you three levels of control over the printer
software, as explained below:
Automatic This mode provides the quickest and easiest
way to start printing. See “Using the
Automatic mode” on page 5 for details.
Custom This mode lets you choose from a list of
Advanced Settings In this mode, it is possible to make more
ready-made or personalized settings suited
to the kind of document that you want to
print. When Custom is selected, the
Advanced button is enabled, allowing you
to access the Advanced dialog box. See
“Using the Custom mode” on page 6 for
details.
detailed settings for printing. See “Using the
Advanced Settings mode” on page 7 for
details.
In addition to making comprehensive Mode settings that affect
overall print quality, you can also modify individual aspects of
your printout using the settings contained in the Page Setup
dialog box. See “Making Settings in the Page Setup Dialog Box”
on page 15.
4
Page 7
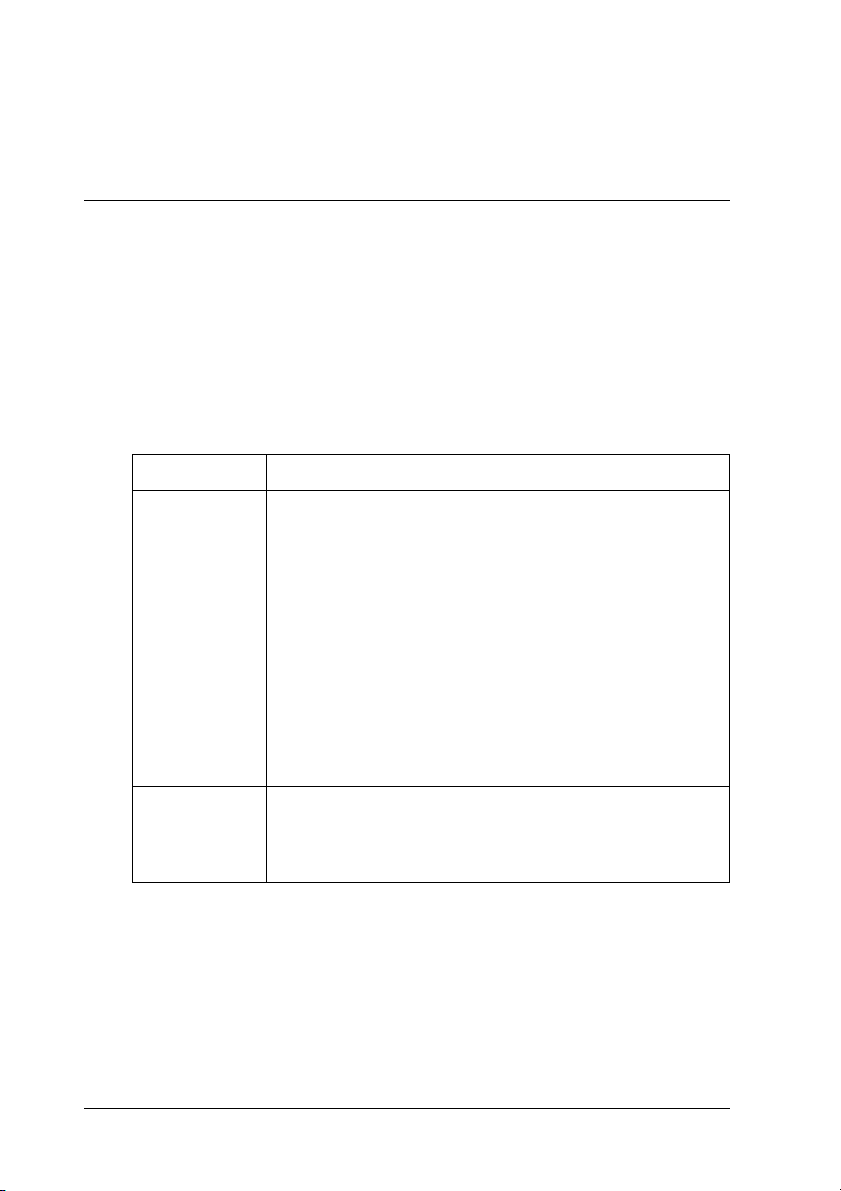
Using the Automatic mode
When Automatic is selected as the Mode setting in the Print
dialog box in which the Print Settings option is selected, the
printer software takes care of all detailed settings based on the
current Media Type and Ink settings. To make the Ink setting, see
“Making the Ink setting” on page 9. To make the Media Type
setting, see “Making the Media Type setting” on page 3.
Note:
Depending on the media selected in the Media Type list (while
Automatic is selected), a slider appears to the right of the Mode options
that lets you choose Quality or Speed. Select Quality when print
quality is more important than speed.
5
Page 8
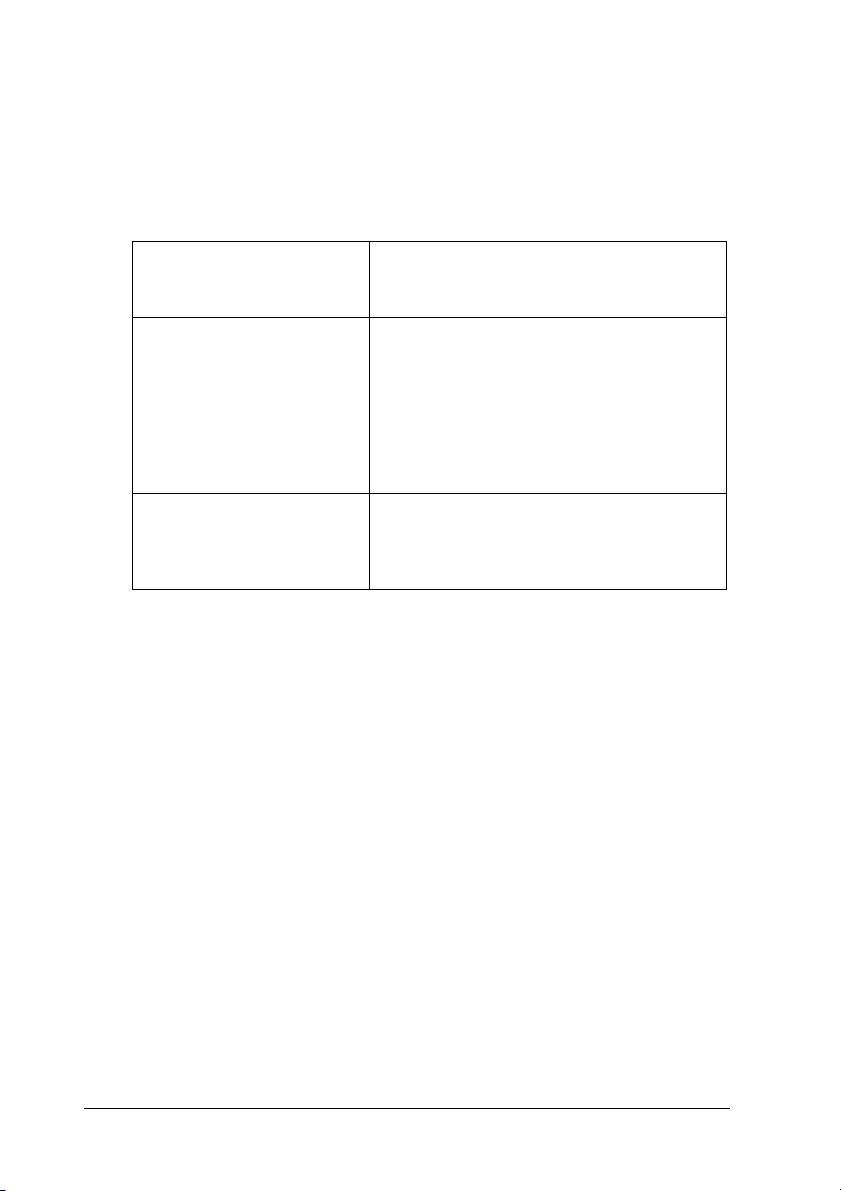
Using the Custom mode
Selecting Custom as the Mode option enables the Custom
Settings list, from which you can choose a ready-made setting
designed for printing text and graphs. Or, you can select
ColorSync, a color-matching method. You can also create and
save your own custom settings. For details on making your own
custom settings see “Using the Advanced Settings mode” on page
7.
By default, you can choose from the following:
Color-matching
method
Economy This setting is best for printing drafts of text.
ColorSync This method automatically adjusts printout colors to
Description
match the colors on your screen.
6
Page 9

When you select a custom setting, other settings such as Print
Quality, and Color Management are made automatically.
Changes to these settings are reflected in the display at the left
side of the Print dialog box.
Follow the steps below to select a custom setting.
1. Select the Print Settings option from the pop-up menu in the
Print dialog box.
2. Select Custom as the Mode setting in the Print dialog box.
This enables the Custom Settings list, located to the right of
the Custom radio button.
3. From the Custom Settings list, select the most appropriate
setting for the type of document or image that you want to
print.
4. Confirm that the Media Type and Ink settings in the Print
dialog box are correct. For details, see “Making the Ink
setting” on page 9 or “Making the Media Type setting” on
page 3.
Using the Advanced Settings mode
Selecting Advanced Settings as the Mode option gives you
complete control over your printing environment. Use these
settings to experiment with new printing ideas or to fine-tune a
range of print settings to meet your individual needs.
Follow the instructions below to make Advanced settings.
1. Select the Print Settings from the pop-up menu in the Print
dialog box.
7
Page 10

2. Select Advanced Settings as the Mode option in the Print
dialog box.
3. Choose Color
4. Specify a Print Quality setting.
5. Make other settings as necessary. For details, see online help.
Note:
Some settings may be unavailable, depending on the Media Type,
Ink, and Print Quality settings that you make.
or Black as the Ink setting.
Making the Copies setting
To make the Copies setting, select Copies & Pages from the
pop-up menu, and then enter the number of copies that you want
to print in the Copies text box.
8
Page 11

Making Print Order settings
To make print order setting, select Copy & Pages from the
pop-up menu, and then select Collated to print one complete
document set at a time when printing multiple copies.
Making the Pages setting
To make the Pages setting, select Copies & Pages from the
pop-up menu, and then select either All or From and to. If you
select From and to, enter the first page of the appropriate range
of pages in the From text box and the last page in the to text box.
Making the Ink setting
To make the Ink setting, select Print Settings from the pop-up
menu, and then click Color to print in color, or Black to print in
black-and-white or grayscale.
Previewing your printout
The Preview feature allows you to see how your document will
look before actually printing it. Follow these steps to preview
your document.
1. Make your printer driver settings.
9
Page 12

2. Click the Preview button in the Print dialog box. The Preview
dialog box appears and displays a preview of your document.
10
Note:
Preview is a standard feature of Mac OS X.
Page 13

Making N-up settings
Select Layout from the pop-up menu as the Multi-Page setting to
print multiple pages of your document on one sheet of paper.
When Layout is selected, you can make the following settings:
Pages per Sheet Prints multiple pages of your document on a
single piece of paper. You can select from 1, 2,
4, 6, 9, or 16.
Layout Direction Allows you to specify the order in which the
pages will be printed on the sheet of paper.
Border Prints a border around the pages printed on
each sheet. You can select from None, Single
hairline, Single thin line, Double hairline, or
Double thin line.
Note:
The Layout settings available are a standard feature of Mac OS X.
11
Page 14

Saving the document as a PDF file
You can save the document as a PDF file by selecting Output
Options from the pop-up menu in the Print dialog box. Follow
the steps below.
1. Make your printer driver settings.
2. Select Output Options from the pop-up menu. The Print
button changes into the Save button.
3. Click the Save button. The following dialog box appears.
4. Select the location where you want to save the file, type a file
name in the Save As text box, and then click Save.
Note:
The Save as File setting is a standard feature of Mac OS X.
Making the Color Management setting
Selecting Color Management from the pop-up menu gives you
control over the color matching and adjustment methods
provided with the printer driver.
Follow the instructions below to make Color Management
settings.
12
Page 15

1. Select Color Management from the pop-up menu in the
Print dialog box. The following dialog box appears.
2. Make the settings as necessary. For details, see online help.
Showing the current settings in the Print dialog box
In the Print dialog box with the Summary option selected, you
can confirm the current settings in the Print dialog box.
13
Page 16

Select Summary from the pop-up menu. The following dialog box
appears.
The current settings of Copies & Pages, Layout, Output Options,
and Print Settings are displayed in the list.
Note:
The Summary option is a standard feature of Mac OS X.
Saving and using your settings in the Print dialog box
Saving your settings in the Print dialog box
To save your settings in the Print dialog box, select Save Custom
Setting from the pop-up menu.
Your settings will be saved as Custom in the Presets list. You can
save up to only one set of custom settings.
14
Page 17

Using your saved settings in the Print dialog box
To use your saved settings, select Custom as the Presets in the
Print dialog box.
If you change the Media Type or Ink settings while your
customized setting is selected in the Presets list, your saved
setting is not affected by the change. To return to your saved
setting, simply reselect it in the list.
Note:
The Custom Setting option is a standard features of Mac OS X.
Making Settings in the Page Setup Dialog Box
In the Page Setup dialog box, you can change the paper size,
specify the paper orientation, and reduce or enlarge your
printout.
Choose Page Setup from the File menu of your application. The
Page Setup dialog box appears.
15
Page 18

You can make the following settings in the Page Setup dialog box.
Settings Select Page Attributes or Summary. When Page
Format for Select the printer to be set up in the Page Setup
Paper Size Select the paper size that you want to use.
Orientation Select Portrait (tall) or Landscape (wide) to change
Scale Use this setting to reduce or enlarge the size of your
Attributes is selected, the page setting items will be
displayed. When Summary is selected, a list of the
current settings will be displayed. For more
information on Summary, see “Showing the current
settings in the Print dialog box” on page 13.
dialog box.
the orientation of your printout.
image.
Showing the current settings in the Page Setup dialog box
In the Page Setup dialog box with the Summary option selected
under Settings, you can confirm the current settings in the Page
Setup box.
Select Summary as Settings. The following dialog box appears.
16
Page 19

The current settings of Format for, Document size, Orientation,
and Scale are displayed in the list.
Note:
The Summary option is a standard feature of Mac OS X.
Accessing the EPSON Printer Utility Dialog Box
Follow the steps below to access the EPSON Printer Utility dialog
box.
1. Double-click Macintosh HD (by default setting), double-click
the Application folder, and then double-click the EPSON
Printer Utility icon. The Printer List window appears.
2. Select your printer, and then click OK. The EPSON Printer
Utility dialog box appears.
Using EPSON Status Monitor
EPSON Status Monitor monitors the printer. If it detects a printer
error, it will inform you with an error message.
17
Page 20

When the ink runs low or out, a How to button appears. Click
How to and EPSON StatusMonitor will lead you step-by-step
through the ink cartridge replacement procedure.
You can also use this utility to check ink levels before printing.
When open, EPSON StatusMonitor displays the amount of ink
remaining at the time it was opened. To update the ink level
information, click the Update
button.
Getting Information Through Online Help
Your printer software has an extensive online help feature, which
provides you with instructions on printing, making printer driver
settings, and using the printer utilities.
To access online help, choose Print from the File menu of your
application. Next, select Print Settings or Color Management
from the pop-up menu, and then click the Help button.
18
Page 21

Cancelling Printing
If you encounter problems while printing, you may need to cancel
printing. Follow the steps to cancel a print job.
1. Click the Print Center icon in Dock.
2. Press the P power button to turn off the printer.
3. In the Document Name list, select the document which is
printing, and then click the Delete button to cancel the print
job.
Unavailable Features with Mac OS X
The following features are unavailable with Mac OS X.
19
Page 22

❏ PhotoEnhance mode
❏ Edge smoothing
❏ Custom paper sizes
❏ Paper source selections
❏ Printable area options
❏ Fit to page printing
❏ Poster printing
❏ Watermark printing
❏ Double-sided printing
❏ Reverse order printing
❏ High speed copies printing
❏ Print time
❏ Configuration Settings dialog box
❏ Printer sharing
❏ Reduce banding problem mode
❏ Saving ESC/P command file
❏ Error handling while printing
❏ Uninstalling the printer driver
20
Page 23

System Requirements for Using the Printer
To connect this printer to Apple® Macintosh® computers, you
must use a USB cable.
Your Macintosh must also meet the following system
requirements.
Minimum System Requirements Recommended System
Mac OS X 10.1 Mac OS X 10.1 or later
128 MB RAM 256 MB RAM or more
Note:
To see how much memory is available, choose About This Mac (for
Mac OS X users)
In addition to these system and memory requirements, you need
20 MB of free hard disk space to install your printer software. To
print, you also need extra hard disk space amounting to about
twice the size of the file that you want to print.
from the Apple menu.
21
Page 24

Copyright © 2002 by SEIKO EPSON CORPORATION Nagano, Japan
Printed in xxxx xx.xx_xx
 Loading...