

Page 1

User Manual (English)
FreeStyl V2
Digital Long Range Cordless Phone
~2~
Table of Contents
Safety Instructions ............................................................................. 4
General Safety Instructions............................................................ 4
Product Safety Instructions............................................................ 4
Battery Safety Instructions ............................................................ 6
Regulatory Information...................................................................... 7
Equipment Checklist ........................................................................ 10
Handset Illustration.......................................................................... 11
Handset Features ............................................................................. 13
Basic Handset Features................................................................ 13
Additional Handset Features ....................................................... 15
Base Illustration ............................................................................... 21
Base Features................................................................................... 21
Base Features................................................................................... 22
Basic Base Station Features ......................................................... 22
Charger Illustration .......................................................................... 23
Charger Features.............................................................................. 24
Getting Started................................................................................. 25
Base Station Installation .............................................................. 25
Handset and Charger Installation ................................................ 26
Basic Operations .............................................................................. 27
Operation Modes......................................................................... 27
A. Base Operation Modes ........................................................ 27
B. Handset Operation Modes................................................... 27
Making a Telephone Call.............................................................. 29
Making an 2-Way/ Intercom Call ................................................. 29
Making a Broadcast...................................................................... 30
A. Handset to Handset Calls..................................................... 30
Redial............................................................................................ 31
Receiving a Telephone Call .......................................................... 31
Receiving an Intercom Call........................................................... 32
Ending a Call................................................................................. 33
Adjusting Handset Receiver (Earpiece) Voice Volume ................ 33
Page 2

~3~
Adjusting Handset Speakerphone Voice Volume ........................ 33
Placing a Call On Hold .................................................................. 33
Mute............................................................................................. 34
Do Not Disturb (Silent Ring)......................................................... 34
Key Guard..................................................................................... 34
Battery Recharge and Replacement ............................................ 35
Advanced Operations....................................................................... 36
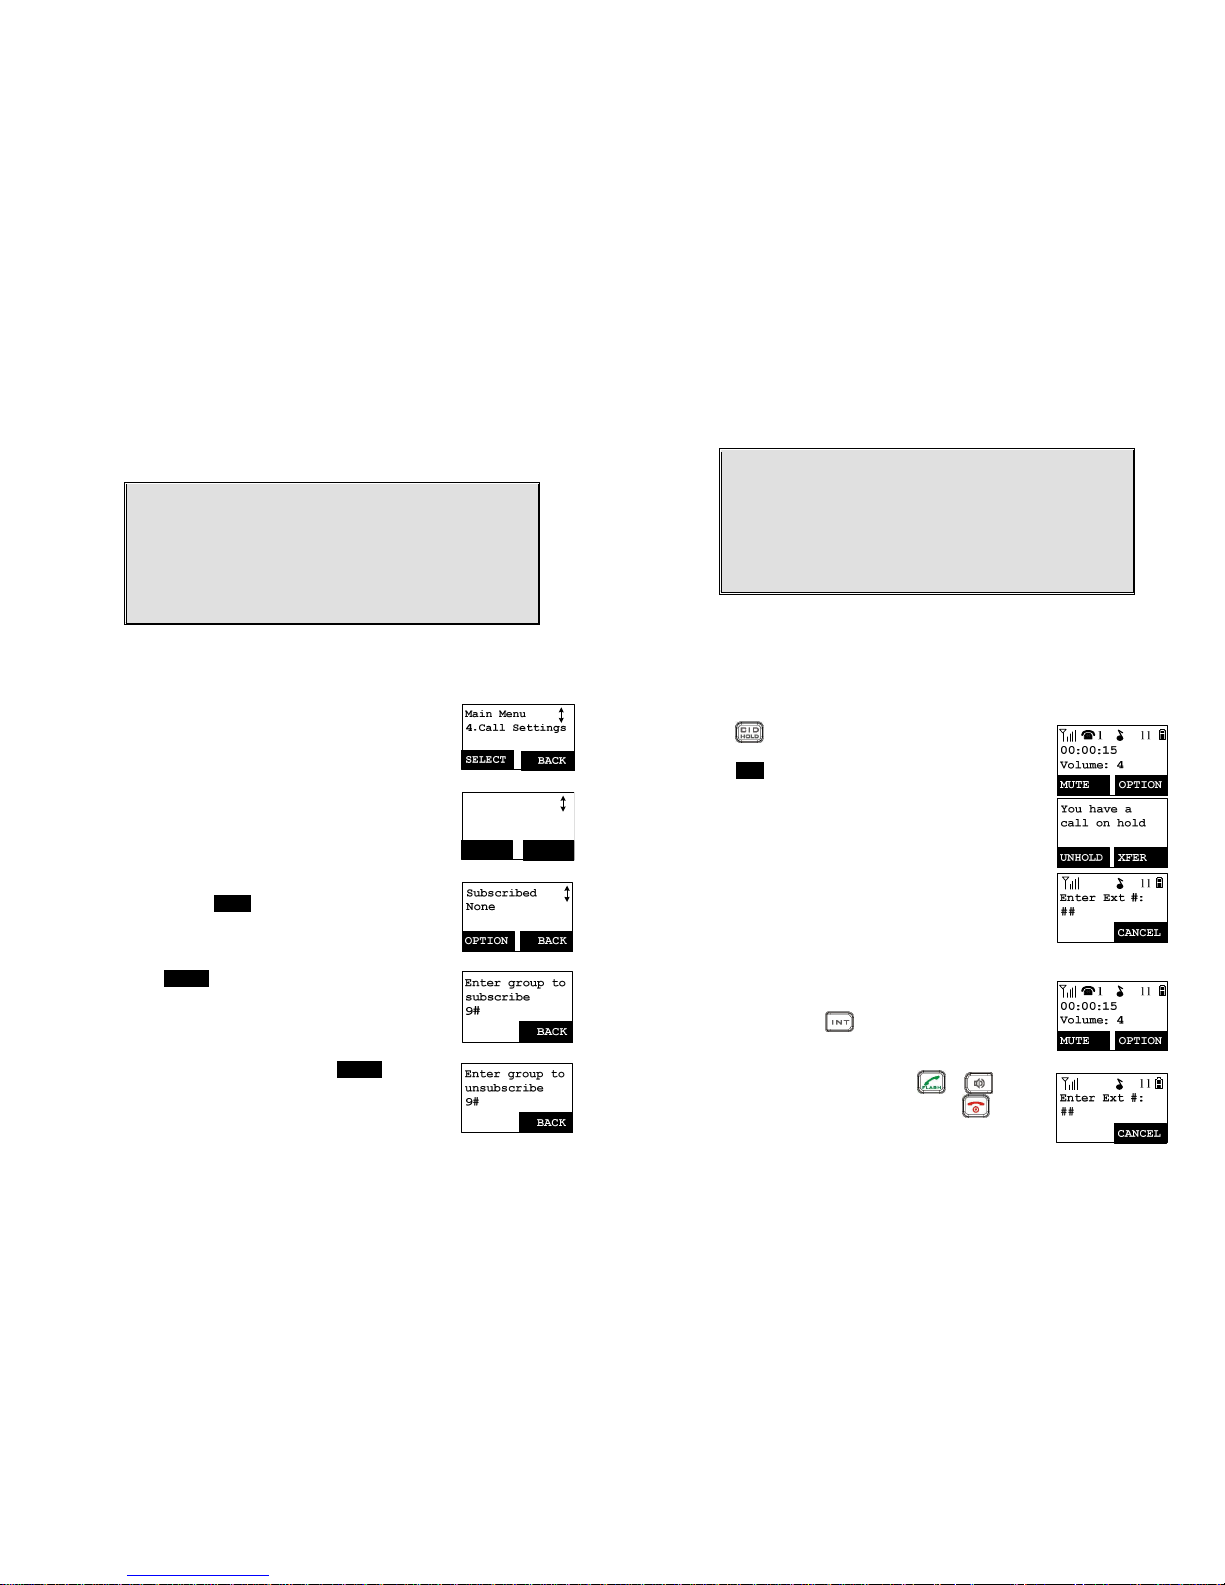
Handset Registration ................................................................... 36
Handset Group Subscription........................................................ 37
Call Transfer ................................................................................. 38
Phonebook Operations ................................................................ 39
Call Barring ................................................................................... 43
Programmable Feature Call ......................................................... 45
Caller ID........................................................................................ 47
Visual Message Waiting Indicator (VMWI) .................................. 48
Adjust Handset Microphone Gain (sensitivity)............................ 49
Adjust Headset Ring..................................................................... 49
Baby Monitor ............................................................................... 49
Index................................................................................................. 57
Technical Specifications ................................................................... 61
~4~
Safety Instructions
Caution: Your wireless telephone gives you freedom and flexibility to
stay in touch while you move around. However, when using your phone
equipment, safety instructions should be followed to avoid the risks of
fire, electric shock, injury to person, and damage to property.
General Safety Instructions
1. When using your wireless phone, ensure your safety and the safety of others:
a. Always watch where you are walking and standing.
b. Don’t let a phone call distract you from working safely.
c. If power goes out, it won’t work, so back-up power is recommended.
2. In an emergency:
a. If an emergency occurs, dial the emergency phone number. Remember: if
you are in an area where your phone does not have a clear signal from the
base, it is highly probable that the call may not go through. Locate the
nearest landline telephone or other communications device to call for help.
b. Emergency calls may not automatically provide emergency personnel with
your name, phone number or location.
3. Notice to Hearing Aid Users: This phone system is compatible with inductively
coupled hearing aids.
4. Notice to Cardiac Pacemaker Users: Preliminary studies done by the US FDA
and others have shown that, although interference to the implanted cardiac
pacemaker may occur when operating very closely, wireless telephones “do not
seem to pose a significant problem for pacemaker wearers.” However, until
more is known, FDA suggests that people with pacemakers may want to take
precautions when using or carrying a wireless telephone to ensure that there is
ample distance between the telephone and the pacemaker. Do not carry the
handset in a breast pocket. If you have any reason to suspect that interference
is taking place, turn off your handset immediately.
Product Safety Instructions
1. Read and understand all instructions.
2. Follow all warnings and instructions including those marked on the product.
Page 3

~5~
3. Changes or modifications to this product not expressively approved by the
manufacturer will void the warranty and the FCC authorization to operate the
equipment. Use only manufacturer provided accessories.
4. Do not use the telephone near water. Never spill liquid of any kind on this
product.
5. Unplug the product from the wall telephone jack and power outlet before
cleaning. Do not use liquid or aerosol cleaners. Use damp cloth for cleaning.
6. Do not place this product on an unstable cart, stand, or table. The product may
fall and cause personal injury or damage to the product or other property.
7. Power Outage: In the event of a power outage, your handset charger will not
recharge the handset battery, and the base station will not allow you to make
an outgoing call or take an incoming call. Both the charger and the base station
require electricity for operation. You should have a telephone that does not
require electricity available for use during power outage, or have a temporary
backup power supply.
8. Slots or openings in the product’s housing are provided for ventilation. These
openings must not be blocked or covered. Placing the product on a bed,
carpeting, or other similar surface may block these openings and should be
avoided. This product should never be placed near or over a radiator or heat
register, or in a built-in installation unless proper ventilation is provided.
9. Never push objects of any kind into this product through housing
slots/openings as they may damage the product, touch dangerous voltage
points or short out parts that could result in fire, electric shock, or injury.
10. This product should be operated only from the type of power source indicated
on the marking label. If you are not sure of the type of power supply to your
home, consult your dealer or local power company.
11. Do not overload wall power outlets and extension cords as this may result in
fire or electric shock.
12. To avoid electric shock or burn, do not disassemble this product. Send this
product to an authorized service center when service or repair work is required.
Opening or removing covers may expose you to dangerous voltages, electrical
currents or other risks. Incorrect reassembling of the product may cause
electric shock when the product is subsequently used.
13. Avoid using the product during a storm. There may be a risk of electric shock
from lightning.
14. Do not place the product where persons can step, trip, or fall on it.
15. Do not place conductive objects over or near the antenna.
16. Do not use the product to report a gas leak while in the vicinity of the leak.
~6~
17. Do not install the base station or the handset charger near microwave ovens,
radios, TV sets, speakers, or other electrical equipment. These appliances may
cause interference to the product or experience interference from the product.
18. Unplug the base station or the charger adaptor from the power outlet and refer
to an authorized service center under the following conditions:
a. If liquid has been spilled into the product.
b. When the power supply cord or plug is damaged or frayed.
c. If the product has been exposed to rain or water.
d. If the product does not operate normally by following the operating
instructions.
e. If the product has been dropped or housing has been damaged.
f. If the product shows a distinct change in performance.
Battery Safety Instructions
1. Use only manufacturer approved Li-ion rechargeable batteries and charger. Do
not use other types of rechargeable batteries or non-rechargeable batteries.
The batteries could short-circuit, and the battery enclosure may be damaged
causing a hazardous condition.
2. Follow the charging instruction in this manual and instruction labels and
markings in the handset and charger compartments.
3. The battery should not be charged in the place where the temperature is less
than 0℃ or greater than 40℃
4. Battery must be recycled or disposed of properly. Do not dispose the battery in
a fire. The cells may explode.
5. Do not dispose of the battery in municipal waste. Check with local codes for
disposal instructions.
6. Exercise care in handling the batteries in order not to short-circuit the battery
with conductive materials such as rings, bracelets, keys, pocketknife, and coins.
The battery or conductive material may overheat and cause burn or fire.
7. Do not expose batteries to rain or water.
8. Do not open or mutilate the battery. Released electrolyte is corrosive and may
cause injury to eyes or skin. The electrolyte may be toxic if swallowed.
9. During charging, the battery heats up. This is normal and is not dangerous.
Page 4

~7~
Regulatory Information
FreeStyl V2
FCC ID:U2M-FSV2
IC:3616C-FSV2
This device complies with Part 15 of the FCC Rules. Operation is subject to
the following two conditions:
1) this device may not cause harmful interference, and
2) this device must accept any interference received, including
interference that may cause undesired operation.
Base Station
Federal Communication Commission Interference Statement
This equipment has been tested and found to comply with the limits for a Class
B digital device, pursuant to Part 15 of the FCC Rules. These limits are designed
to provide reasonable protection against harmful interference in a residential
installation. This equipment generates radio frequency energy and, if not
installed and used in accordance with the instructions, may cause harmful
interference to radio communications. However, there is no guarantee that
interference will not occur in a particular installation. If this equipment does
cause harmful interference to radio or television reception, which can be
determined by turning the equipment off and on, the user is encouraged to try
to correct the interference by one of the following measures:
- Reorient or relocate the receiving antenna.
- Increase the separation between the equipment and receiver.
- Connect the equipment into an outlet on a circuit different from that to
which the receiver is connected.
- Consult the dealer or an experienced radio/TV technician for help.
FCC Caution: Any changes or modifications not expressly approved by the party
responsible for compliance could void the user's authority to operate this
equipment.
This device complies with Part 15 of the FCC Rules. Operation is subject to the
following two conditions: (1) This device may not cause harmful interference,
and (2) this device must accept any interference received, including
interference that may cause undesired operation.
~8~
IMPORTANT NOTE:
FCC Radiation Exposure Statement:
This equipment complies with FCC radiation exposure limits set forth for an
uncontrolled environment. This equipment should be installed and operated
with minimum distance 20cm between the radiator & your body.
This transmitter must not be co-located or operating in conjunction with any
other antenna or transmitter.
Industry Canada statement:
This device complies with RSS-210 of the Industry Canada Rules. Operation is
subject to the following two conditions:
(1) This device may not cause harmful interference, and (2) this device must
accept any interference received, including interference that may cause
undesired operation.
IMPORTANT NOTE:
Radiation Exposure Statement:
This equipment complies with IC radiation exposure limits set forth for an
uncontrolled environment. This equipment should be installed and operated
with minimum distance 20cm between the radiator & your body.
This device has been designed to operate with an antenna having a maximum
gain of 2 dBi. Antenna having a higher gain is strictly prohibited per regulations
of Industry Canada. The required antenna impedance is 50 ohms.
Portable Handset
Federal Communication Commission Interference Statement
This equipment has been tested and found to comply with the limits for a Class
B digital device, pursuant to Part 15 of the FCC Rules. These limits are designed
to provide reasonable protection against harmful interference in a residential
installation. This equipment generates, uses, and can radiate radio frequency
energy and, if not installed and used in accordance with the instructions, may
cause harmful interference to radio communications. However, there is no
guarantee that interference will not occur in a particular installation. If this
equipment does cause harmful interference to radio or television reception,
which can be determined by turning the equipment off and on, the user is
encouraged to try to correct the interference by one of the following measures:
- Reorient or relocate the receiving antenna.
- Increase the separation between the equipment and receiver.
Page 5

~9~
- Connect the equipment into an outlet on a circuit different from that to
which the receiver is connected.
- Consult the dealer or an experienced radio/TV technician for help.
FCC Caution: Any changes or modifications not expressly approved by the party
responsible for compliance could void the user's authority to operate this
equipment.
This device complies with Part 15 of the FCC Rules. Operation is subject to the
following two conditions: (1) This device may not cause harmful interference,
and (2) this device must accept any interference received, including
interference that may cause undesired operation.
IMPORTANT NOTE:
Radiation Exposure Statement:
This equipment complies with FCC radiation exposure limits set forth for an
uncontrolled environment. End users must follow the specific operating
instructions for satisfying RF exposure compliance. To maintain compliance
with FCC RF exposure compliance requirements, please follow operation
instruction as documented in this manual.
This transmitter must not be co-located or operating in conjunction with any
other antenna or transmitter.
Industry Canada statement:
This device complies with RSS-210 of the Industry Canada Rules. Operation is
subject to the following two conditions: (1) This device may not cause harmful
interference, and (2) this device must accept any interference received,
including interference that may cause undesired operation.
IMPORTANT NOTE:
Radiation Exposure Statement:
This equipment complies with IC radiation exposure limits set forth for an
uncontrolled environment. End users must follow the specific operating
instructions for satisfying RF exposure compliance. To maintain compliance
with IC RF exposure compliance requirements, please follow operation
instruction as documented in this manual.
This device has been designed to operate with an antenna having a maximum
gain of 2dBi. Antenna having a higher gain is strictly prohibited per regulations
of Industry Canada. The required antenna impedance is 50 ohms.
~10~
Equipment Checklist
1. In a Base + Handset package, please find the following components:
a. Base Station x 1 (antenna installed)
b. Base AC/DC Adaptor x 1
c. Handset x 1 (antenna installed)
d. Desktop Charger x 1
e. Charger AC/DC Adaptor x 1
f. 1100mA Li-ion Battery Pack x 1
g. Telephone Cord x 1
h. CD (User’s Manual), Quick Guide
i. Belt clip x 1
2. In a Handset package, please find the following components:
a. Handset x 1 (antenna installed)
b. 1100mA Li-ion Battery Pack x 1
c. Desktop Charger x 1
d. Charger AC/DC Adaptor x 1
e. Quick Guide
f. Belt clip x 1
3. Optional Accessories
a. Outdoor External Antenna Kit for Base Station (including antenna and
cable)
b. Indoor External Antenna Kit for Base Station (including antenna and
cable)
c. Lightning Protection Kit
d. High-gain handset antenna (Long antenna)
e. Headset
f. Antenna Splitter
Page 6
~11~
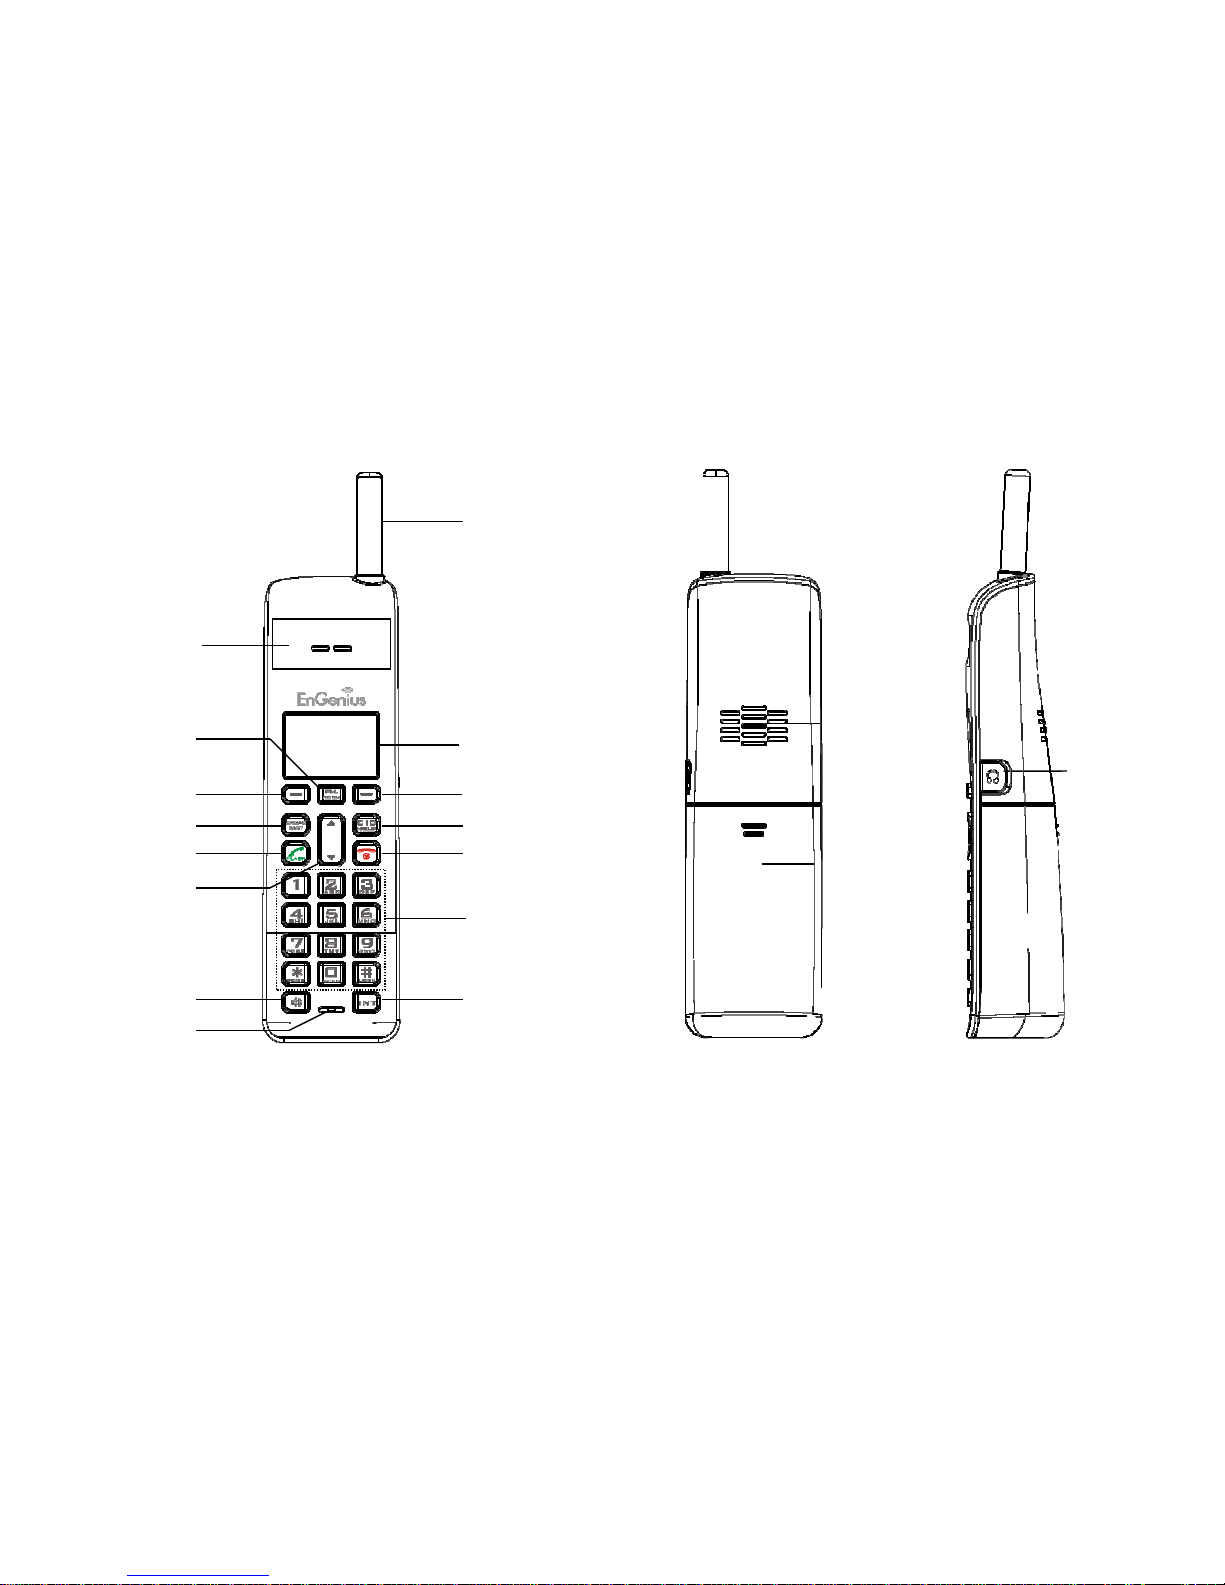
Handset Illustration
Soft key
Display
Caller ID / Hold
End / Power Off
Dialing key
Intercom
Antenna
Receiver
(Earpiece)
Talk / Flash
Speakerphone
Broadcast
Soft key
Microphone
Up / Down
Phonebook
~12~
Speaker
Battery Cover
(2.5mm)
Headset Jack
Page 7
~13~
Handset Features
Basic Handset Features
1. 4-line LCD (Liquid Crystal Display)
a. The LCD display has LED (Light Emitting Diode) for backlighting.
b. The 1st line of LCD consists of icons.
c. Icons explanation from left to right
(1) RSSI level (Receive Signal Strength Indicator)
During a call, the number of bars is
proportional to the radio signal strength
received.
(2)
Link mode
(2.1) Call in-progress (ON/OFF-Hook)
The phone symbol indicates the phone line is
active when making incoming or outgoing call.
(2.2) Intercom in-progress
Indicates if Intercom mode is active
Indicate the Handset ID which is making intercom with.
(3) Speech mode
(3.1) Speaker Indicator
Indicate if the speaker is active
(3.2) Headset mode
(4) Sound and Indication
(4.1) Enable ringer
(4.2) Disable ringer
(4.3) Ringer and vibrate mode
(4.4) Vibrate mode
(4.5) Message waiting indicator
(5) Disable PA
Indicate if the incoming broadcast is disabled.
(6)
11
Two-Digit Handset ID
Displays the 2-digit Handset ID of own.
(7)
Battery Strength
Number of bars is proportional to the amount of battery time
remaining.
d. The 2nd and 3rd lines of the LCD, maximum 16 characters each, display
status, message, menu selections, or user-editable alphanumerical
characters.
e The last line displays the left and right soft keys.
~14~
2. Ringer
a. Rings to an incoming call and intercom call.
b. Distinctive alert sounds indicating various events:
(1) Single beep: successful key entry.
(2) Double beep: indicates power on/off.
(3) Triple beep: failed operation.
(4) Periodic 1-Long-2-Short beep (every 1 minute): low battery
warning、out of range or call on hold
Re: No any beep for invalid key entry.
3.
TALK/FLASH ( )
a. Places or answers a telephone or intercom call
b. Sends a Flash signal to phone line to retrieve a dial tone after the call ends,
or to perform the call waiting feature provided by local phone companies
during a call. See page 18 for more information.
Re: Default flash time is 600ms.
4.
SPEAKERPHONE ( )
Press the key to enable/disable the speakerphone during incoming, outgoing or
intercom call.
5.
2-WAY INTERCOM ( )
a. Places an intercom call to another handset, a group handset (group paging)
or all registered handsets.
b. Intercom calls are digital, full duplex, and are conducted without the
assistance from the base station.
6.
BROADCAST ( )
a. Half duplex broadcasting to handsets for immediate announcement
b. Half duplex broadcasting to base stations
Re:Press the key on the left top corner of handset to activate the
broadcast function.
7.
Left/Right Soft Keys (
)
a. Make menu selection.
8.
Up( ) /Down( ) Scrolling Keys
a. Scroll through records and menu selections.
Page 8

~15~
b. Adjust receiver voice volume when in the Talk mode.
c.
Press to adjust ringer volume when in the Standby mode.
d.
Press to enter phonebook when in the Standby mode.
9.
END; On/Off Key ( )
a.
Ends a call.
b. Leaves current menu operation, up one level.
c. Press for 3 seconds to turn off the handset.
10.
CALLER ID Key ( )
a.
Review caller ID list.
b. Including received and missed caller ID.
Additional Handset Features
1. Multiple handsets registration
a.
Up to 9 handsets can be registered to a base station
b. ID 11-19: individual Handset IDs.
c. ID 91-99: Group IDs. Handsets can “subscribe” from the handset menu to
group(s) and be paged when an intercom caller enters a Group ID.
2. Ringer Vibrator
a. Two options for Line (incoming call) ringing & Intercom ringing.
b. Six-level ringer volume selections (Off/Low/Medium/High/Vibrate/ Vibrate
& High) for each option.
c.
Eight ringer type selections for each option.
3. Caller ID
Displays incoming call phone number and name on the LCD (needs Caller ID
service from local telephone company or PBX/Key phone system analog port).
4. Call waiting with caller ID
Displays 2nd incoming call information on the same phone line when 1st call is in
progress (needs Call Waiting with Caller ID service from local telephone
company or PBX/Key phone system analog port).
5. Name tagging with caller ID
Match the caller ID with the phone book entries; once matched, the LCD screen
will display the name or nickname instead of pure caller ID info (needs Call
Waiting with Caller ID service from local telephone company or PBX/Key phone
system analog port).
~16~
6. DND (Do Not Disturb, i.e., Silent Ring)
7. Call Logs
a. Redial: Stores 10 phone numbers (up to 26 digits each) dialed most
recently. Can perform last-number redial on all 10 numbers.
b. Received & New Call Log: Total 50 entries (16-digit phone number, 16-
character names, and Date/Time stamp), needs Caller ID service from local
telephone company.
c. Phone numbers and names can be saved into phonebook while in display.
8. Call Barring: Block outgoing calls and incoming calls.
a. Outgoing call:
a-1. Block the users from dialing long distance calls or international calls
a-2. Up to 5 digits of each call barring setting; up to 5 entries allowed.
b. Incoming call:
b-1. PA On/Off: Enable or disable the broadcast from other handsets or
base station. When PA is Off, the handset can’t receive broadcast from
base station or other registered handsets, but it can broadcast to base
station or other registered handsets.
b-2. Line On/Off: Enable or disable the capability to receive incoming call
from telephone line. When Line is Off, the handset can’t receive incoming
call from telephone line, but it can still make outgoing call.
b-3. Int. On/Off: Enable or disable the intercom from other handsets or
base station. When Int. is Off, the handset can’t receive intercom from base
station or other registered handsets, but it can intercom to base station or
other registered handsets.
c. This changing requires to entering the “Call Settings” (MENU-4-3).
[Note] You need to key in the accurate user ID and password to perform this
feature. The default password is 0000.
9.
Any Key Answer (except and SILENT Soft Key)
10. Key-guard
a. When the keyguard is selected, all keys will be locked.
Press UNLOCK (Left) soft key followed by * to release it.
b. The keyguard will be automatically enabled once returning back to idle
mode for 15 seconds.
Page 9

~17~
11. Dialing Prefix
a. Up to 14 digits, including pause(s), one access code can be pre-
programmed to be added automatically in front of the dialed number
when dialing from call logs, phonebook, and dial-and-send dialing. See
page 51 for more details.
12. Call Hold
a. Places call on hold.
13. Mute
a. Press MUTE (Left) soft key during talk, the handset microphone will be
muted.
Press UNMUTE (Left) soft key to release it.
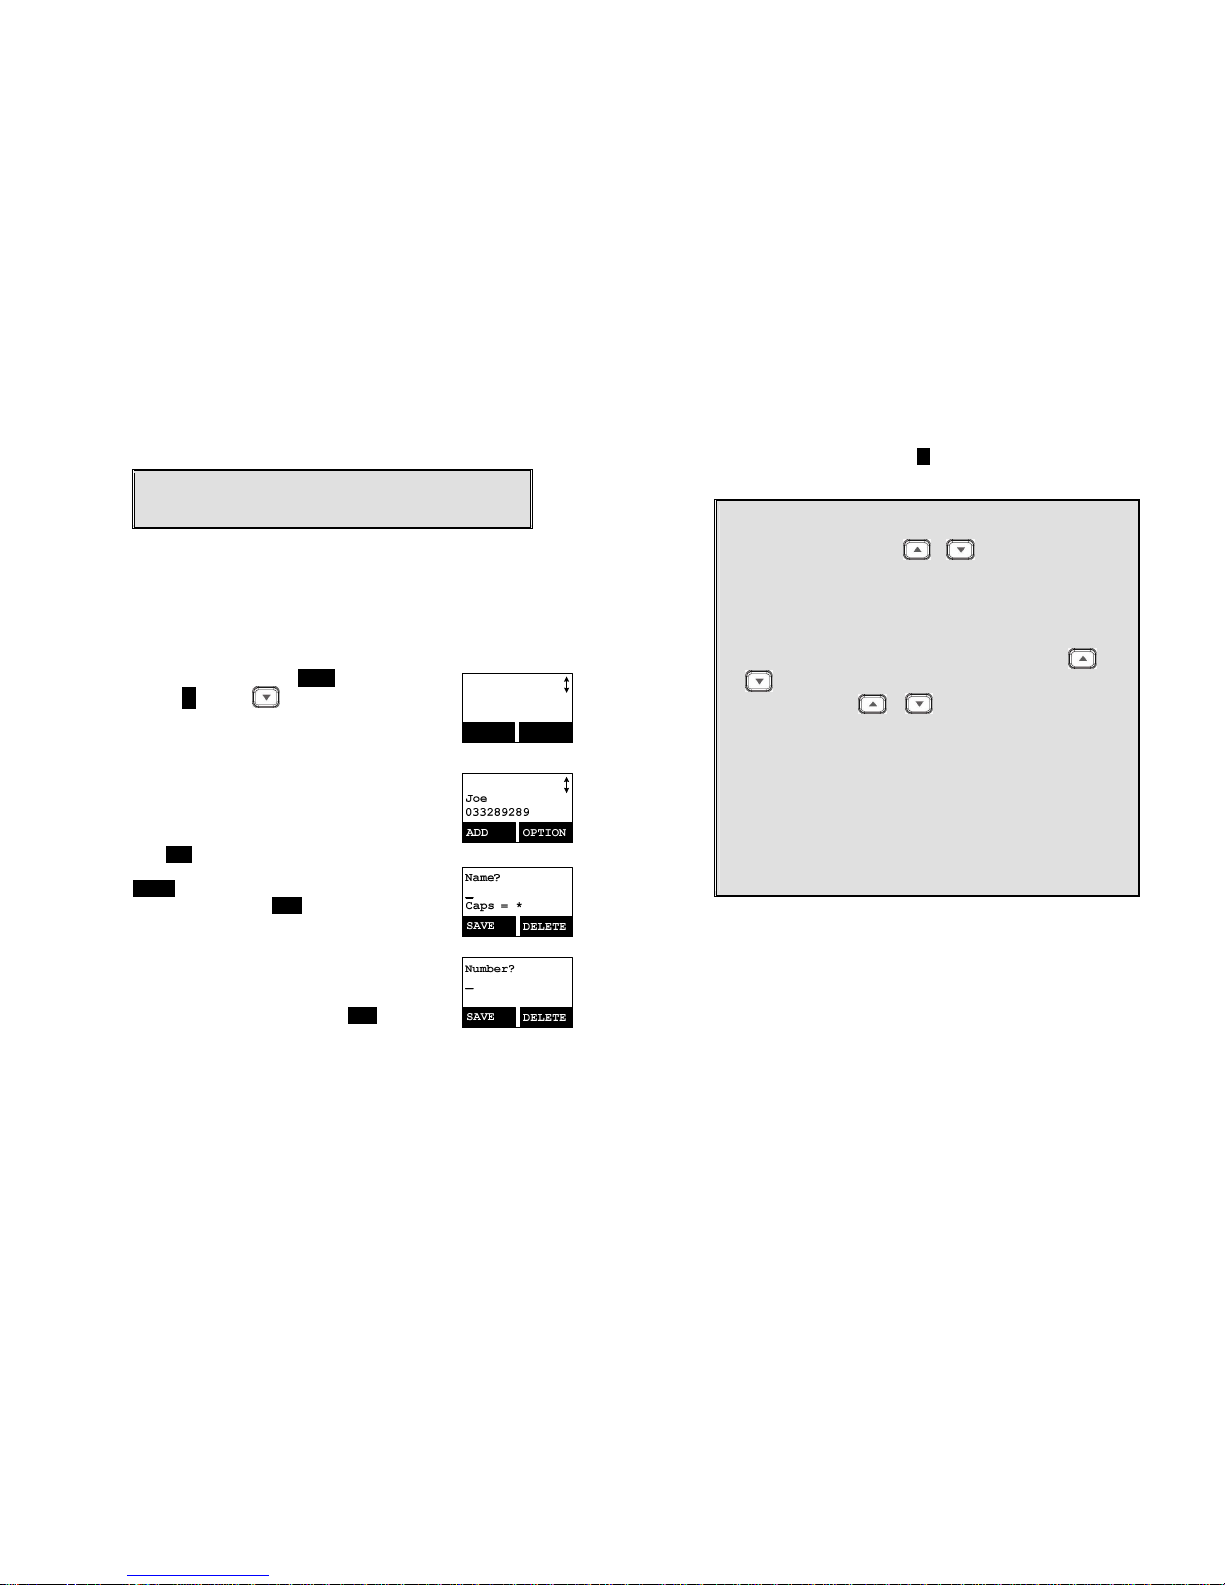
14. Phonebook
a. 50 entries, each stores a phone number or handset ID (up to 26 digits) and
name (up to16 characters)
b. Alphabetically sorted display and search by letter.
c. Dial from display.
d. During the stand-by mode, you can enter the phone book by pressing
scrolling key.
e. Phone book transfer via air
i. Transfer specific phonebook to one handset or all registered handsets.
ii. Transfer all phonebooks to one handset or all registered handsets.
15. Key tone
a. Four-level key tone volume selections (Off/Low/Medium/High).
b. Four key tone type selections.
16. Call Timers
a. Display call time duration for current call during and immediately after the
call.
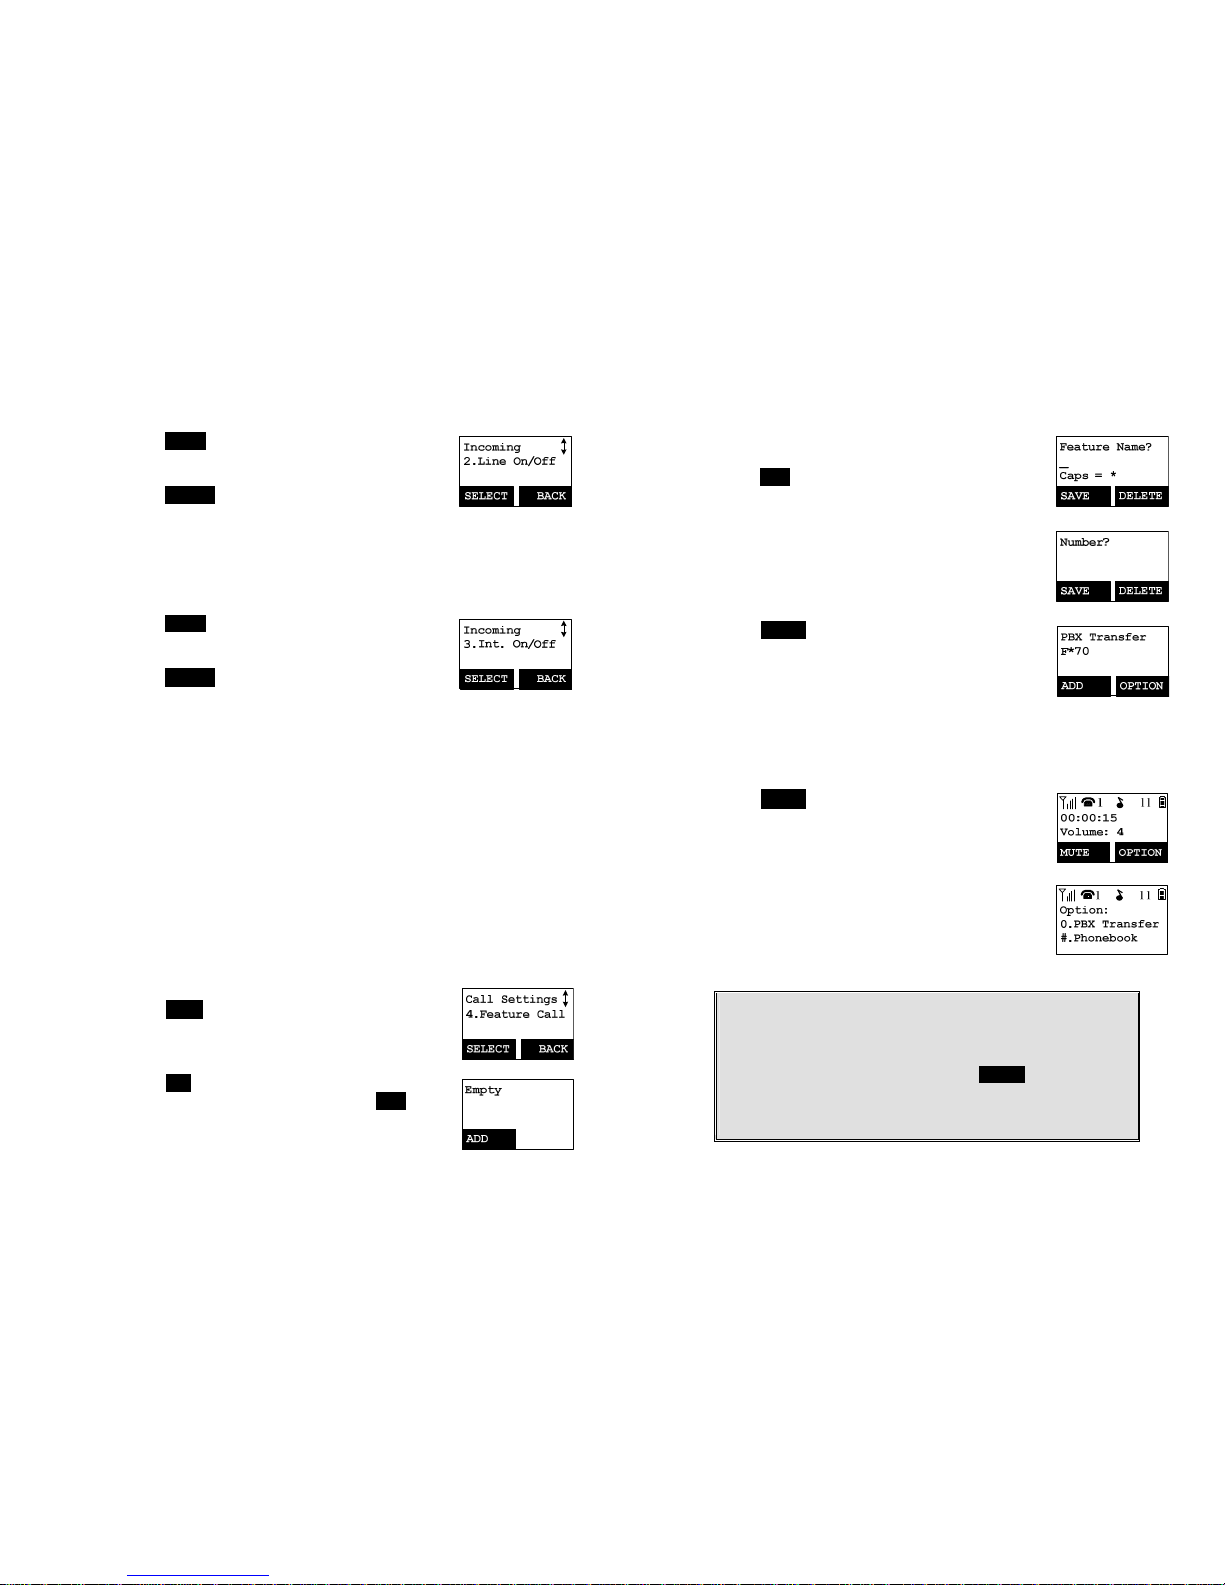
17. Programmable Feature Call
a. Allows user to pre-program the most frequently used Feature code into
FREESTYL V2.
b. Up to 10 entries can be saved.
c. Once the feature code is programmed, you can quickly perform those
functions during the active call by pressing OPTION soft key.
18. Menu Display
a. To avoid making errors, in the “Call Settings”(MENU-4), “Phone Settings”
(MENU-5) and “Base Settings” (MENU-6), these settings can be hidden.
~18~
b. Handset password is required before enter Menu Display (MENU-8), the
default handset password is 0000.
c. When disabling the settings, these setting will no longer be displayed,
unless enabled by entering the Menu Display again.
19. PA On/Off
a. Enable or disable the broadcast function.
b. When PA is Off, the handset can’t receive broadcast from base station or
other registered handsets; But it can broadcast to base station or other
registered handsets.
20. Group Setting
a. Allow handset to subscribe to one or several groups.
Re: Up to 9 groups (91~99) can be subscribed.
21. Custom Name
a. Allow changing the “FREESTYL V2” screen to the desired wording or info,
such as the user’s name.
Re: Up to 32 characters can be entered.
22. Change Pwd
a. Allow changing the handset password which requires entering in Call
Barring (MENU-4-3) and Menu Display (MENU-8) .
Re:Default is 0000.
23. Adjusting DTMF Duration
a. From MENU-6-1 to select variable duration of DTMF tone.
b. Default is 100ms.
c. When entering the Base Settings, PIN is required. Default is 0000.
Re: First verify the line or PBX port is not the issue by testing with another
known good analog telephone. Change this setting only when you have
verified that indeed DTMF digits are not being recognized by the PBX/Key
system. Also, check into adjusting parameters in the PBX as this may
prove more successful in getting DTMF digits to be recognized.
24. Changing the flash time
a. From MENU-6-2 to select flash key timing
b. 9-level (100 ms - 900 ms) timing selections, default= 600 ms.
c. The default value (600 ms) works in most areas. Change only when you are
certain of the new value would work.
Page 10

~19~
d. When entering the Base Settings, PIN is required. Default is 0000.
Re: Do not change this setting unless you have issues with either answering
inbound calls, or transferring calls. Many newer IP-PBX’s/VOIP Server
type phone systems want a shorter flash time of 200ms or 300ms.
25. Assign next handset ID for new handset
a. Using registered handset from MENU-6 -<enter the password> -3, to assign
a next handset ID to a new handset.
b. If do not assign the next handset ID, the system will automatically assign a
handset ID to a new handset.
c. When entering the Base Settings, PIN is required. Default is 0000.
Re: Handset ID range is 11-19, if all ID’s are taken you will need to reset the
base to start the ID numbering over again. See page 22 for resetting the
base.
26. Clear Handset
a. Using a registered handset, press MENU-6-<then enter the password> -4
to remove the other registered handset. (Use this if you are unable to
deregister a handset from the system (a damaged handset for example)
b. Once removing the other registered handset, you will be able to register a
new handset with that ID.
c. When entering the Base Settings, PIN is required. Default is 0000.
27. Change the PIN
To change the base PIN, you will need to go to “Base Settings” (MENU-6-5).
a. Use a registered handset to change PIN from MENU-6-5.
b. When entering the Base Settings, PIN is required. Default is 0000.
28. Auto Hang Up feature
a. Use a registered handset, press MENU-6-<then enter the password> -6 to
turn on/off the auto hang up feature. Default password is 0000.
The default of auto hang up is OFF.
b. When enabling the auto-hang up feature, the handset will automatically
hang up the call when the far-end hangs up the call.
Note: Use this feature with caution. The phone will end the call if a line-
reversal signal (momentary open signal) is detected. Sometimes this
signal is detected erroneously. If this happens often, you may need to
keep this feature turned off.
29. Set Time
The set time function allows user to set date/time to support the DTMF caller
ID (DTMF caller ID doesn’t attach date/time when receiving from PSTN, using
this setting, user is able to review the date/time when the caller ID received).
~20~
a. Enter MENU-6 to set Base Settings.
b. Enter “7” to enter Set Time.
c. Enter 4 digits for MM/DD(Month/Day), then enter 4 digits for hr:mm
(Hour:Minute)
d. Press SAVE (left soft key) to finish the setting.
30. Mic Gain
Allow(s) changing the handset microphone gain based on the handset in
different environment(s) - Quiet, Normal and Noisy environment.
This requires entering the “Phone Settings” (MENU-5-1).
31. Headset Ring
Allow changing the ringer emitted either from handset speaker or receiver of
headset.
This requires entering the “Phone Settings” (MENU-5-9).
32. Baby Monitor
This setting will change the handset to act as a baby monitor via an intercom
call.
When setting Baby Monitor ON, this dedicated handset will not answer any
incoming calls except the 2-way intercom.
This requires entering the “Call Settings” (MENU-4-5).
Page 11
~21~
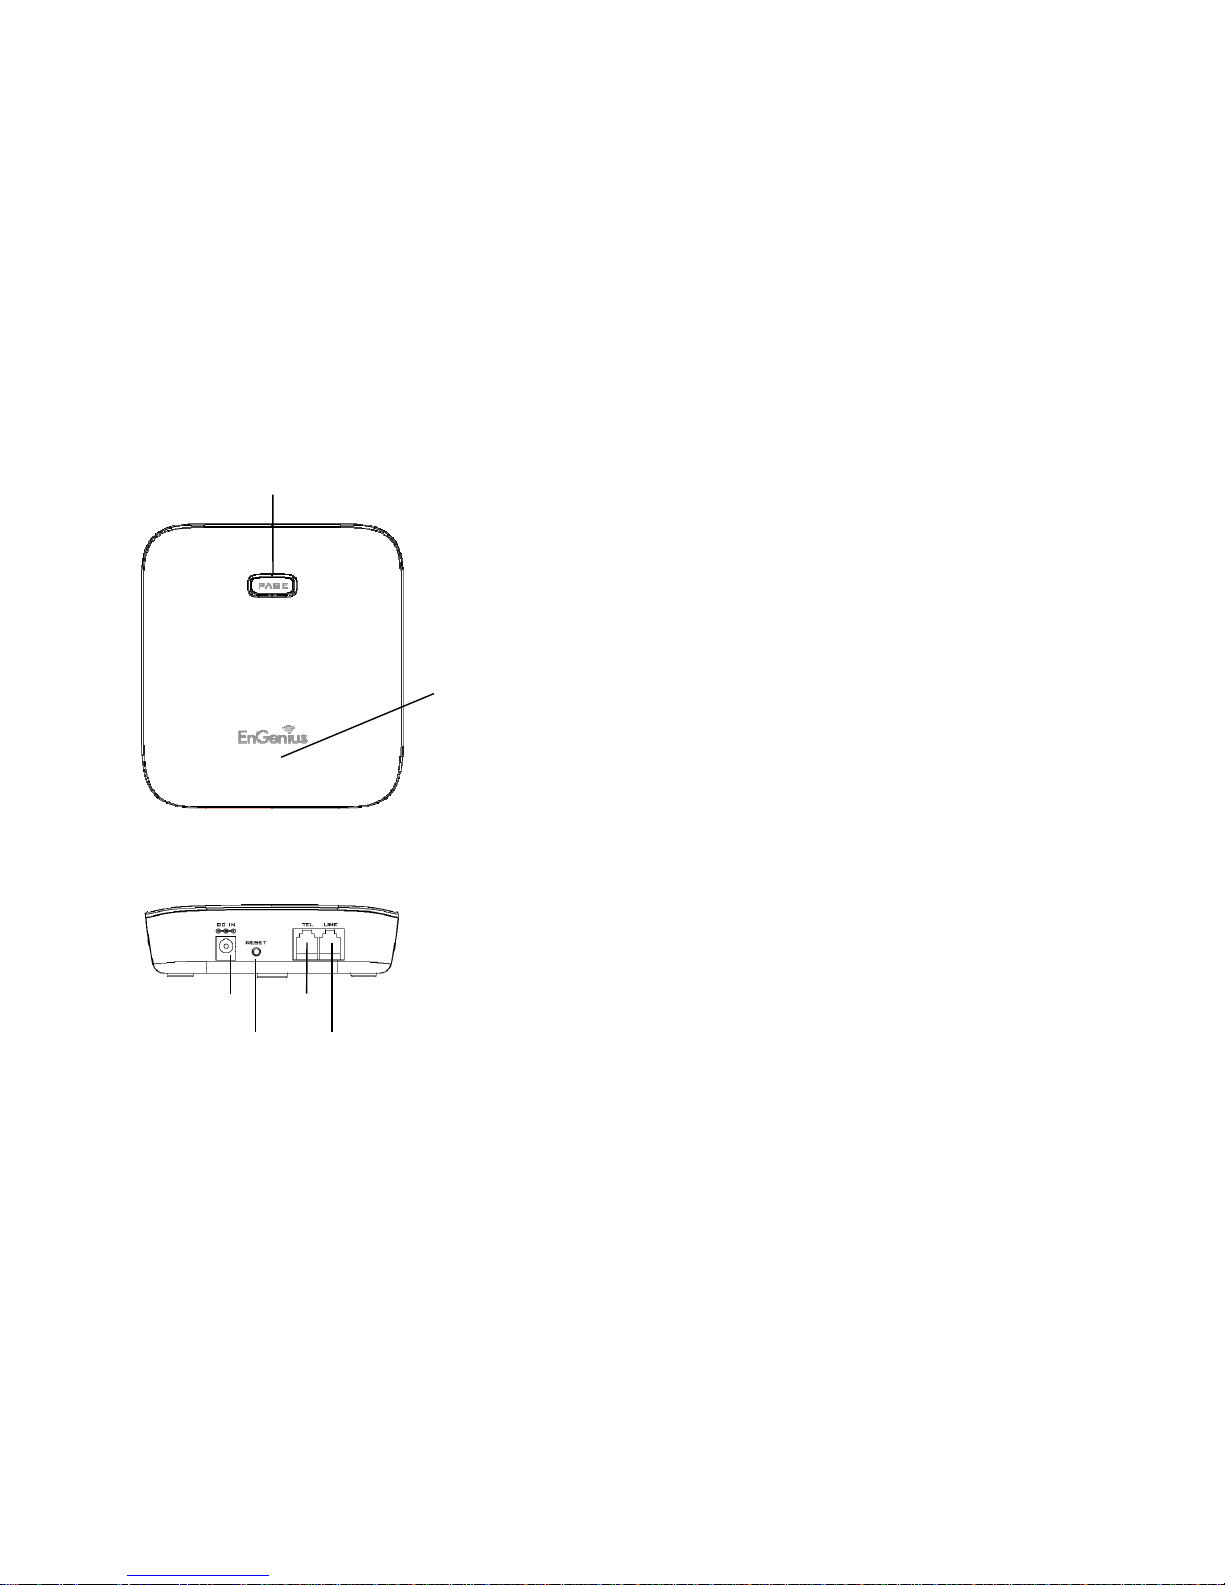
Base Illustration
Base unit Diagram
Page
(handset loc
ator)
/
Registration
Power LED: blue color
In use LED: white
Reset Button
DC Jack
Phone Jack
Line Jack
~22~
Base Features
Basic Base Station Features
1. Antenna
a. The antenna port has a reversed thread connector; to remove antenna or
cable, turn counterclockwise; to install, turn clockwise. Improper
installation may damage the connector.
b. When using an outdoor antenna, locate the antenna (not the base station
itself) as high as possible for a clear transmission path.
2. LED
a. Power (blue color): indicates base station has power.
b. In-Use (white color): indicates an active telephone line.
3. RESET Button
a. Restores base station to factory settings
b. Reset button is intended to prevent accidental system reset.
c. All handsets (including administrator) need to be re-registered after a base
station reset.
4. Page Button (Locate handset)
To find a misplaced handset; press “PAGE” and all registered handsets will beep
for 30 seconds.
Press “PAGE” again or any key on handset to stop.
5. Registration Button (PAGE)
Enters registration mode along with handset, assigns handset ID (11-19).
6. Line Jack
Standard RJ-11C/CA-11A connector to plug in the telephone line
7. Telephone Jack
Another RJ-11C to plug in the optional answering machine
8. DC In: to plug in the power adaptor
Page 12
~23~
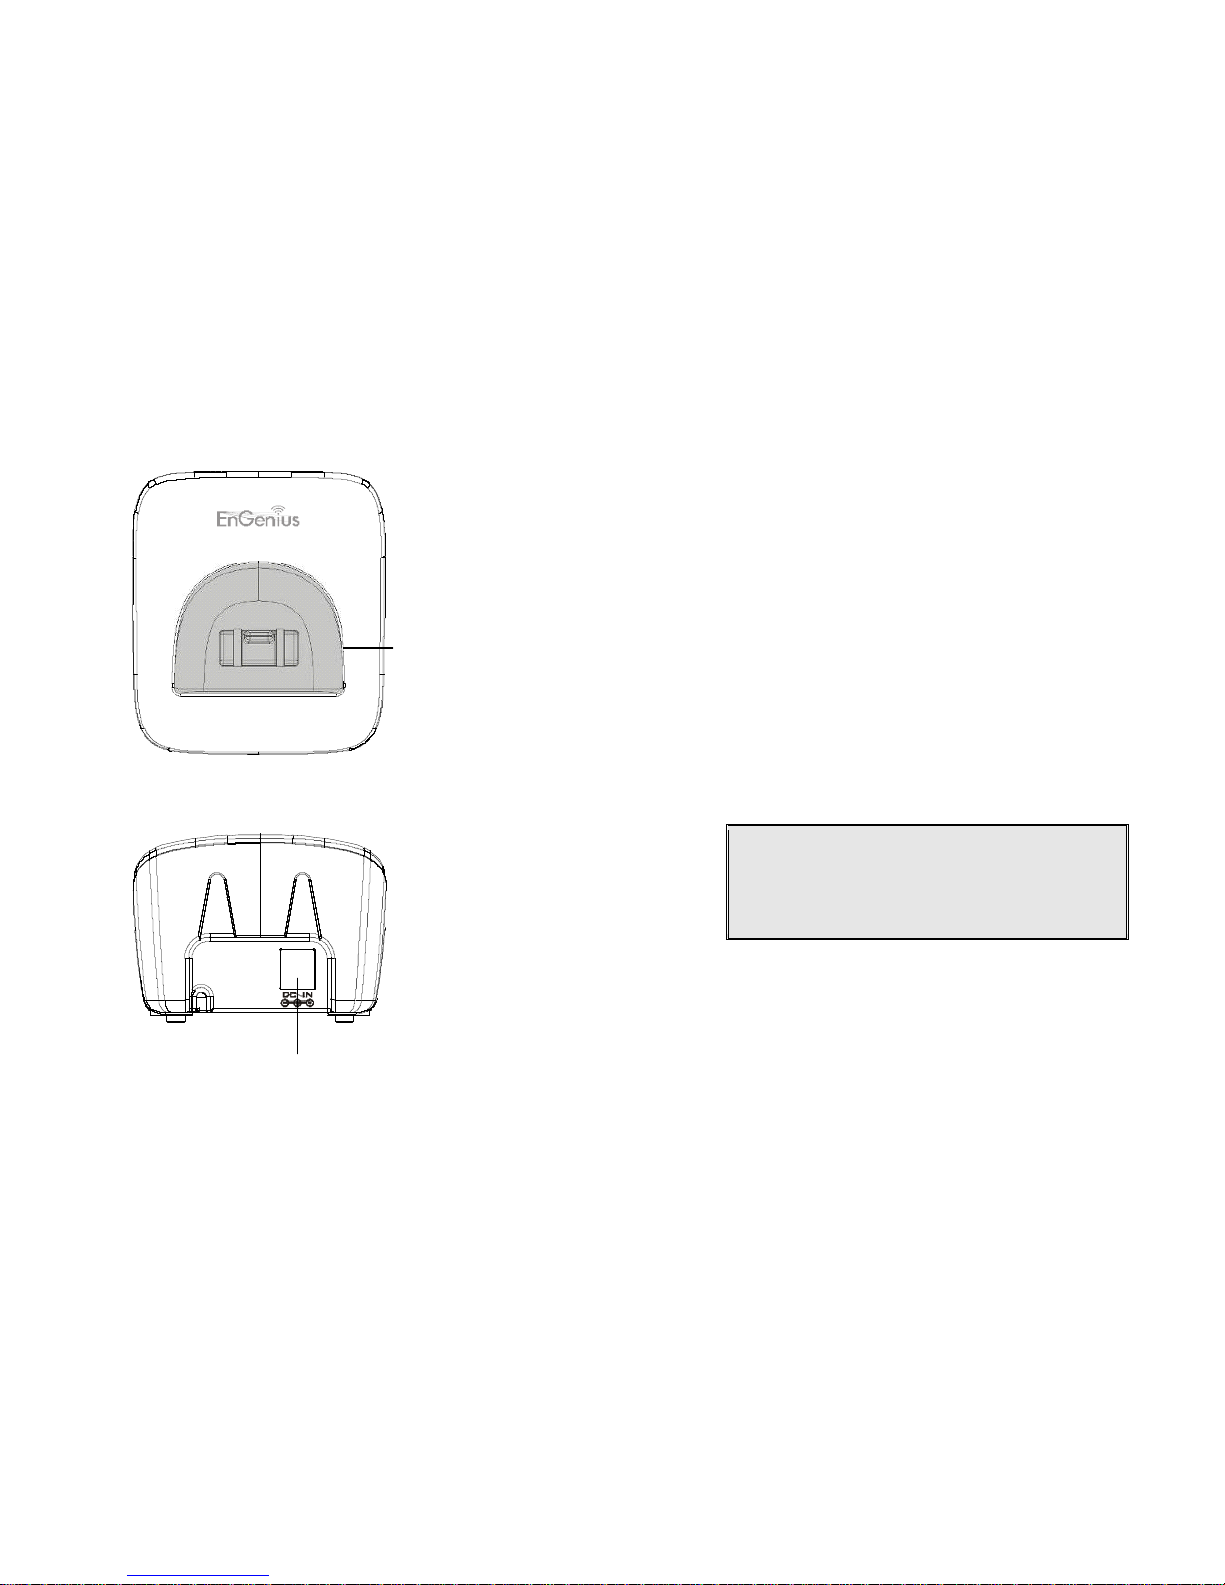
Charger Illustration
Handset charging slot
DC in
~24~
Charger Features
1. DC In
Connects to Charger AC Adaptor.
2. Handset Charging Slot
a. Charge handset battery when handset is placed in cradle.
b. Refer to the handset LCD for charging status
(1) Charging: battery status bar is running and the LCD screen will show :
“Charging”.
(2) Fully Charged: battery status bar stands still and the LCD screen will
display “Charge Complete”
(3) Charge Fail: If there are any errors during charging mode, the LCD
screen will display “Charge Fail”
3. It is impossible to overcharge the battery using this charger.
4. The adaptor for the charging station can be used as travel charger as well.
However, you can’t turn off the power while you charge the handset via travel
charger. A warning message” “Unplug Travel Charger then OFF” will be shown
on the LCD.
Notes:
1.
Fully charge battery packs before first use.
2.
Handset will “power on” automatically when placed in the
charging slot.
3.
However if you fully drain the battery, it will take around one
minute for the handset to auto power on.
Page 13
~25~
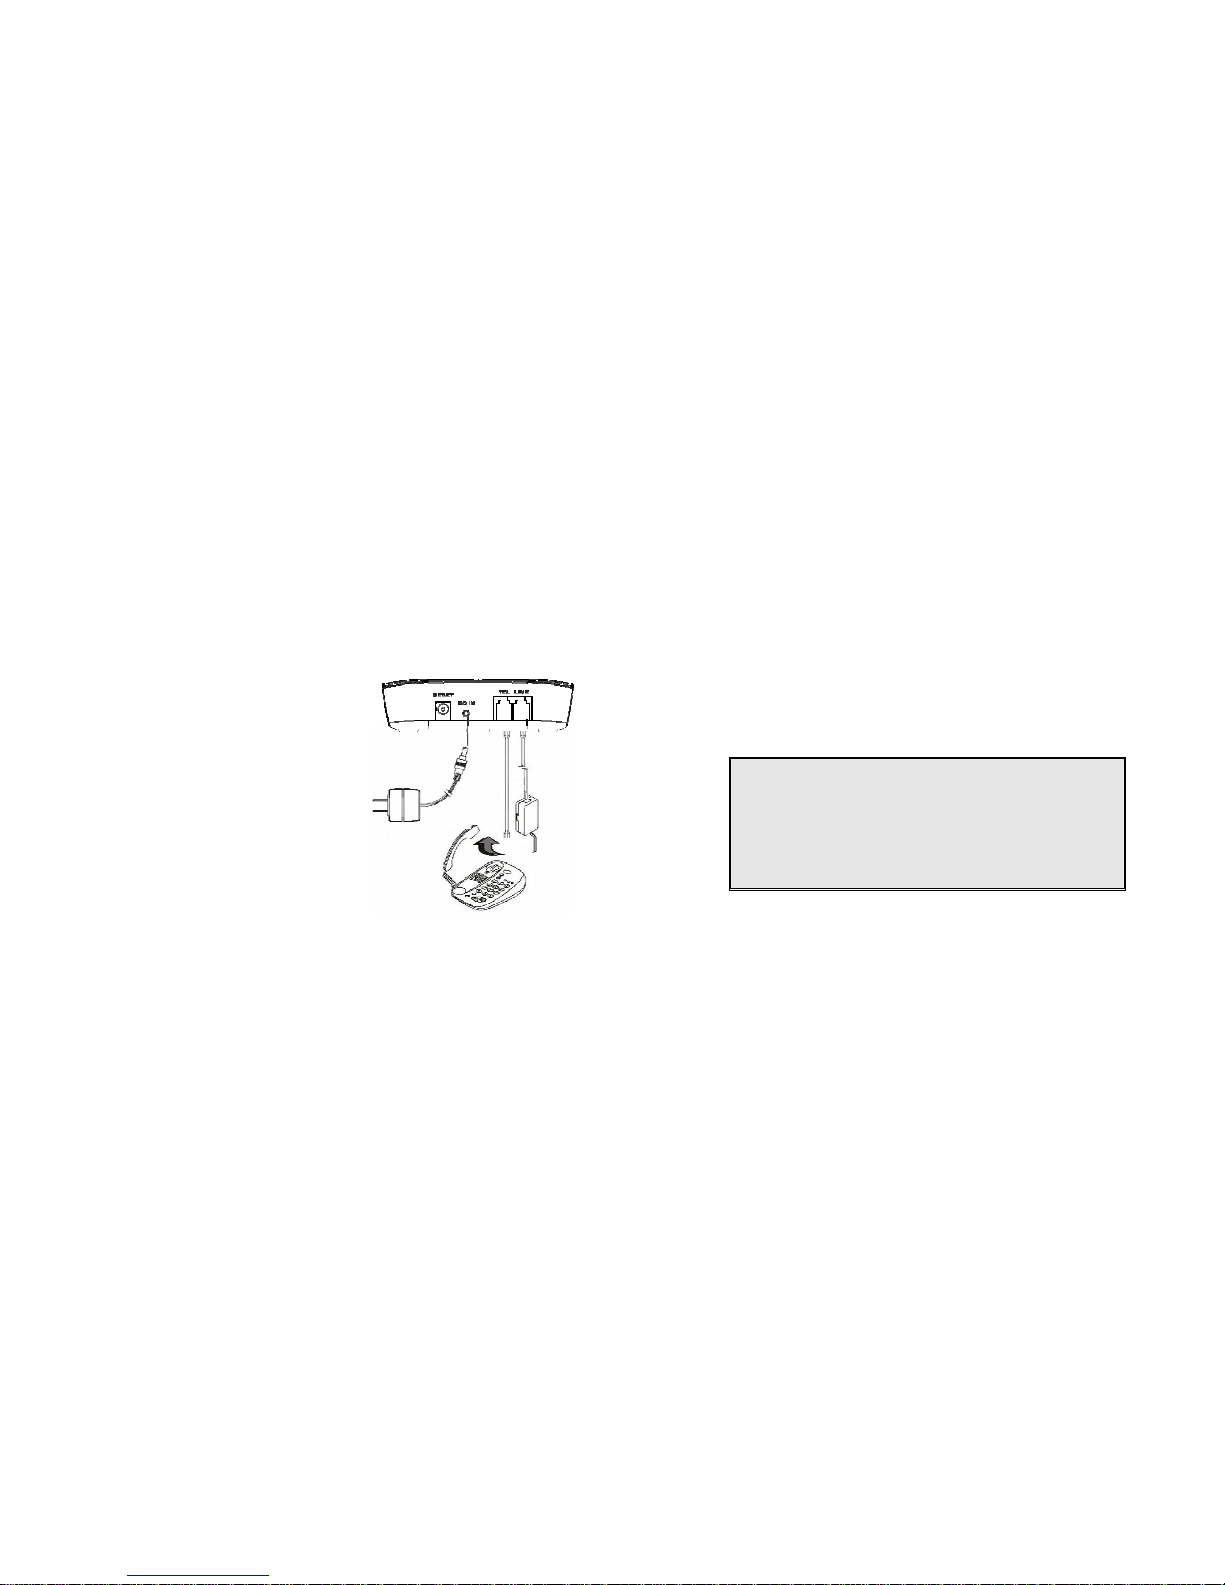
Getting Started
Base Station Installation
There are three possible base station setups:
Base station alone
Base station plus telephone answering device
Base station plus standard telephone
For best performance, maintain at least a distance of 1 meter (about 3 feet)
between the base station and other electronic devices (e.g., TV, computer, stereo,
fax machine, answer machine, cordless phone, etc.)
1. Install base station antenna.
The base station’s antenna port has a
Reversed-thread connector; to install
antenna or cable, turn clockwise; to
remove, turn counter-clockwise. Improper
installation may damage the connector.
2. Plug the transformer end of the base
station AC/DC adaptor into a standard AC
electrical power outlet, plug the other end
into the “DC In” jack on the back of the
base station.
a. The base adaptor’s DC plug is same
dimension as the charger’s DC plug.
The charger adaptor’s DC plug can fit
into the base’s DC In jack.
3. Plug phone cord into the “LINE” Jack
4. A standard telephone or answering machine can be plugged into the adjacent
jack on the back of the base station marked TEL
~26~
Handset and Charger Installation
1. Plug the transformer end of the Charger AC/DC adaptor into a standard AC
electric power outlet, plug the other end into the “DC In” jack on the back of
the Charger.
2. Install battery pack onto the handset.
3. Install handset antenna.
4. Place handset onto the charger slot.
5. Fully charge the battery for three hours before use.
6. The phone system is now ready to perform basic functions such as making and
receiving phone calls and intercom calls. No base station or handset
programming is needed for basic operations.
Note:
1.
Handset(s) packaged along with a Base Station are preregistered at the factory. If you have a new handset, you will
need to register the handset with the base station in order to
be recognized as a member handset by the base(s) and by
other handsets. See Handset Registration.
2.
Fully charge battery packs before the first usage.
Page 14

~27~
Basic Operations
Operation Modes
Both the base station and handset have levels of operation at which time only
certain procedures of functions can be performed.
A. Base Operation Modes
1. STANDBY mode- this is the default mode. The page key is active in standby
mode only. The base “Power” (blue color) LED will light up during this mode.
2. TALK mode- the base station operates in this mode during phone call. The “In
Use” (white color) LED will light up during this mode.
3. REGISTRATION mode- the base station enters this mode by pressing the PAGE
button for three seconds. The “Power” (blue color) LED will be blinking in
“Registration” mode, also a prompt sound will be emitted.
B. Handset Operation Modes
1. STANDBY mode- this is the default mode.
a. If there is no on-going activity, the handset
automatically goes into SLEEP/STANDBY mode to save
battery power.
b.
The handset can be turned off completely by holding
Down the key for 3 seconds.
c. The standby screen display (custom name) can be
edited.
d. The 2-dight number represents the handset ID
2. MENU mode
a. Press the Right soft function key to activate Menu
mode.
b. In Menu mode, the handset settings and information
contained in memory can be changed.
c. The functions available through the Menu selection
are covered in greater detail from page 53.
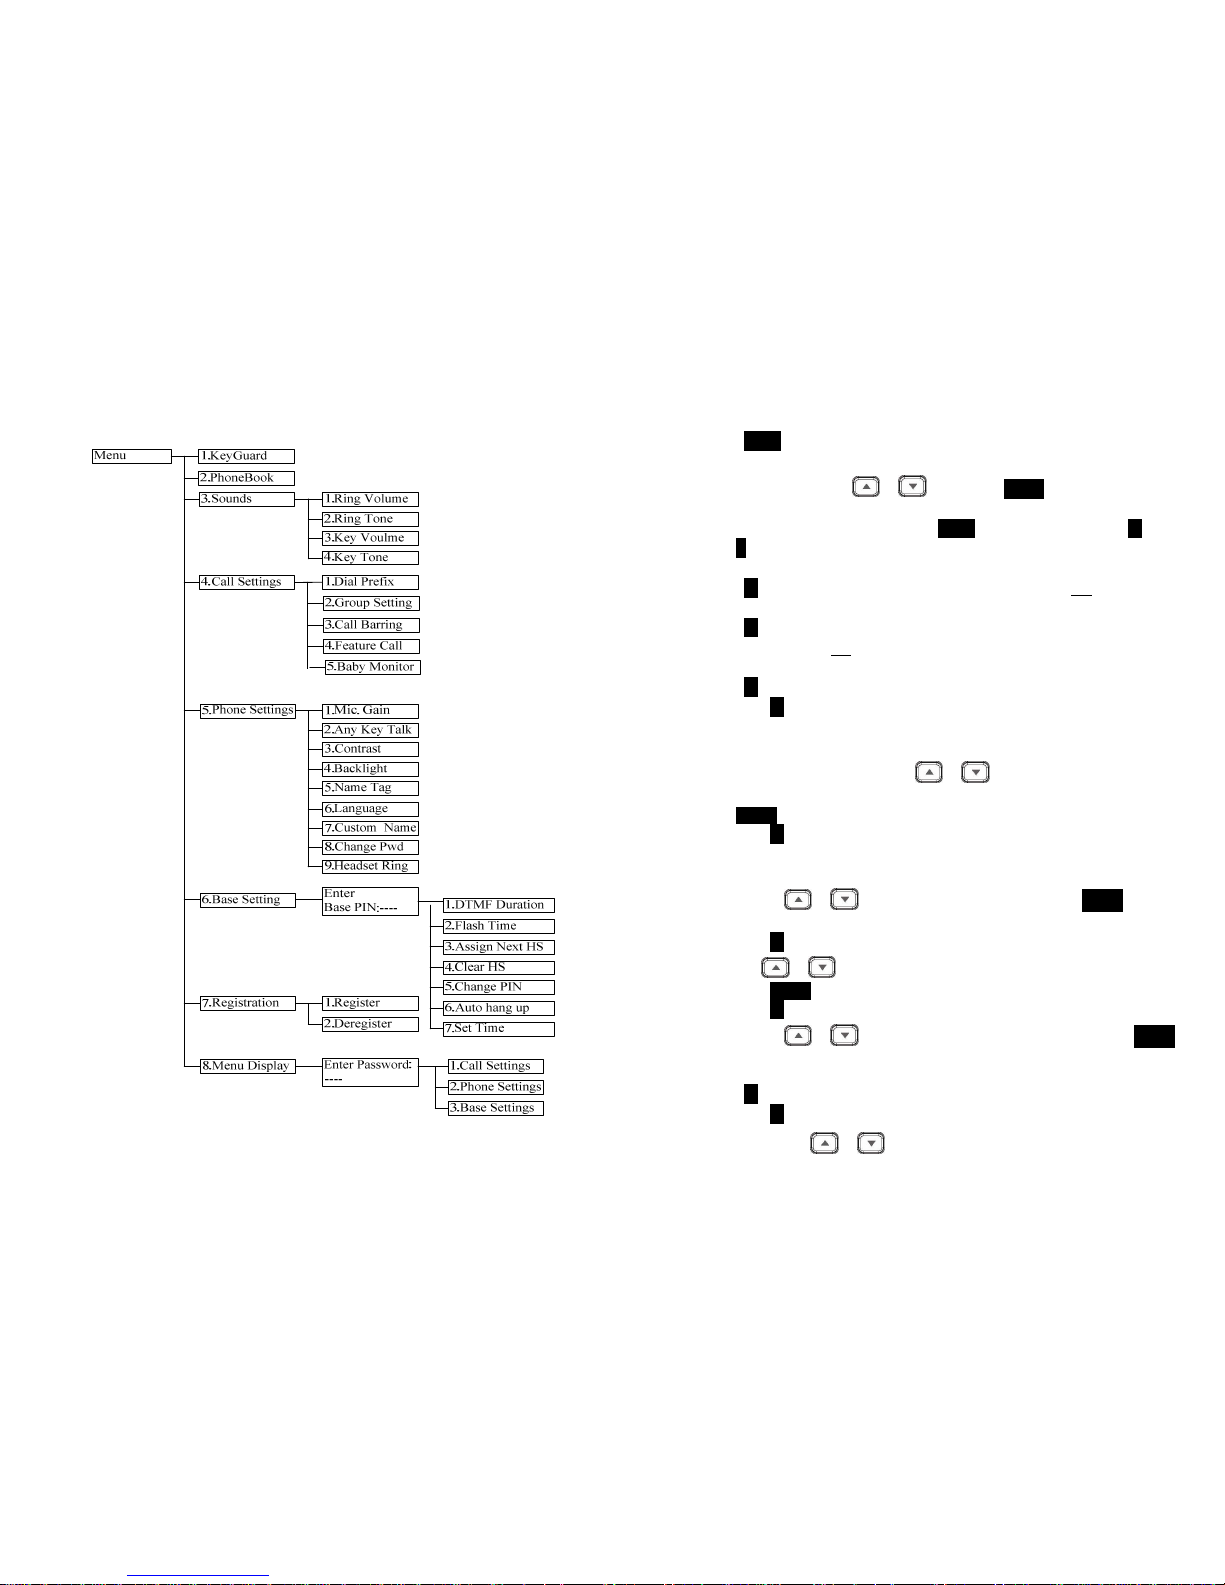
Main Menu
1.KeyGuard
SELECT BACK
d. The Menu structure display as below:
~28~
3. Menu Tree
Page 15

~29~
Making a Telephone Call
1.
Press , wait for dial tone, and then enter phone
number.
2. Alternatively, you can enter phone number first then press
key.
When using this method, you can use the CLEAR (Left) and
DELETE (Right) soft keys to edit the number entered.
“Delete” erases the last digit entered. “Clear” erases the
entire line but remains in the dial-and send dialing.
3. Speed dial by accessing the entries in the phone book
(Menu2)
a.
Press or scrolling key to enter the phone book
b.
Press to dial out the number
4.
To abort dialing, press key.
Notes:
1. If a link cannot be established, the LCD will show “Base not
found” after a 6-second time out.
2. A call duration timer will start displaying the length of the call
after link is established.
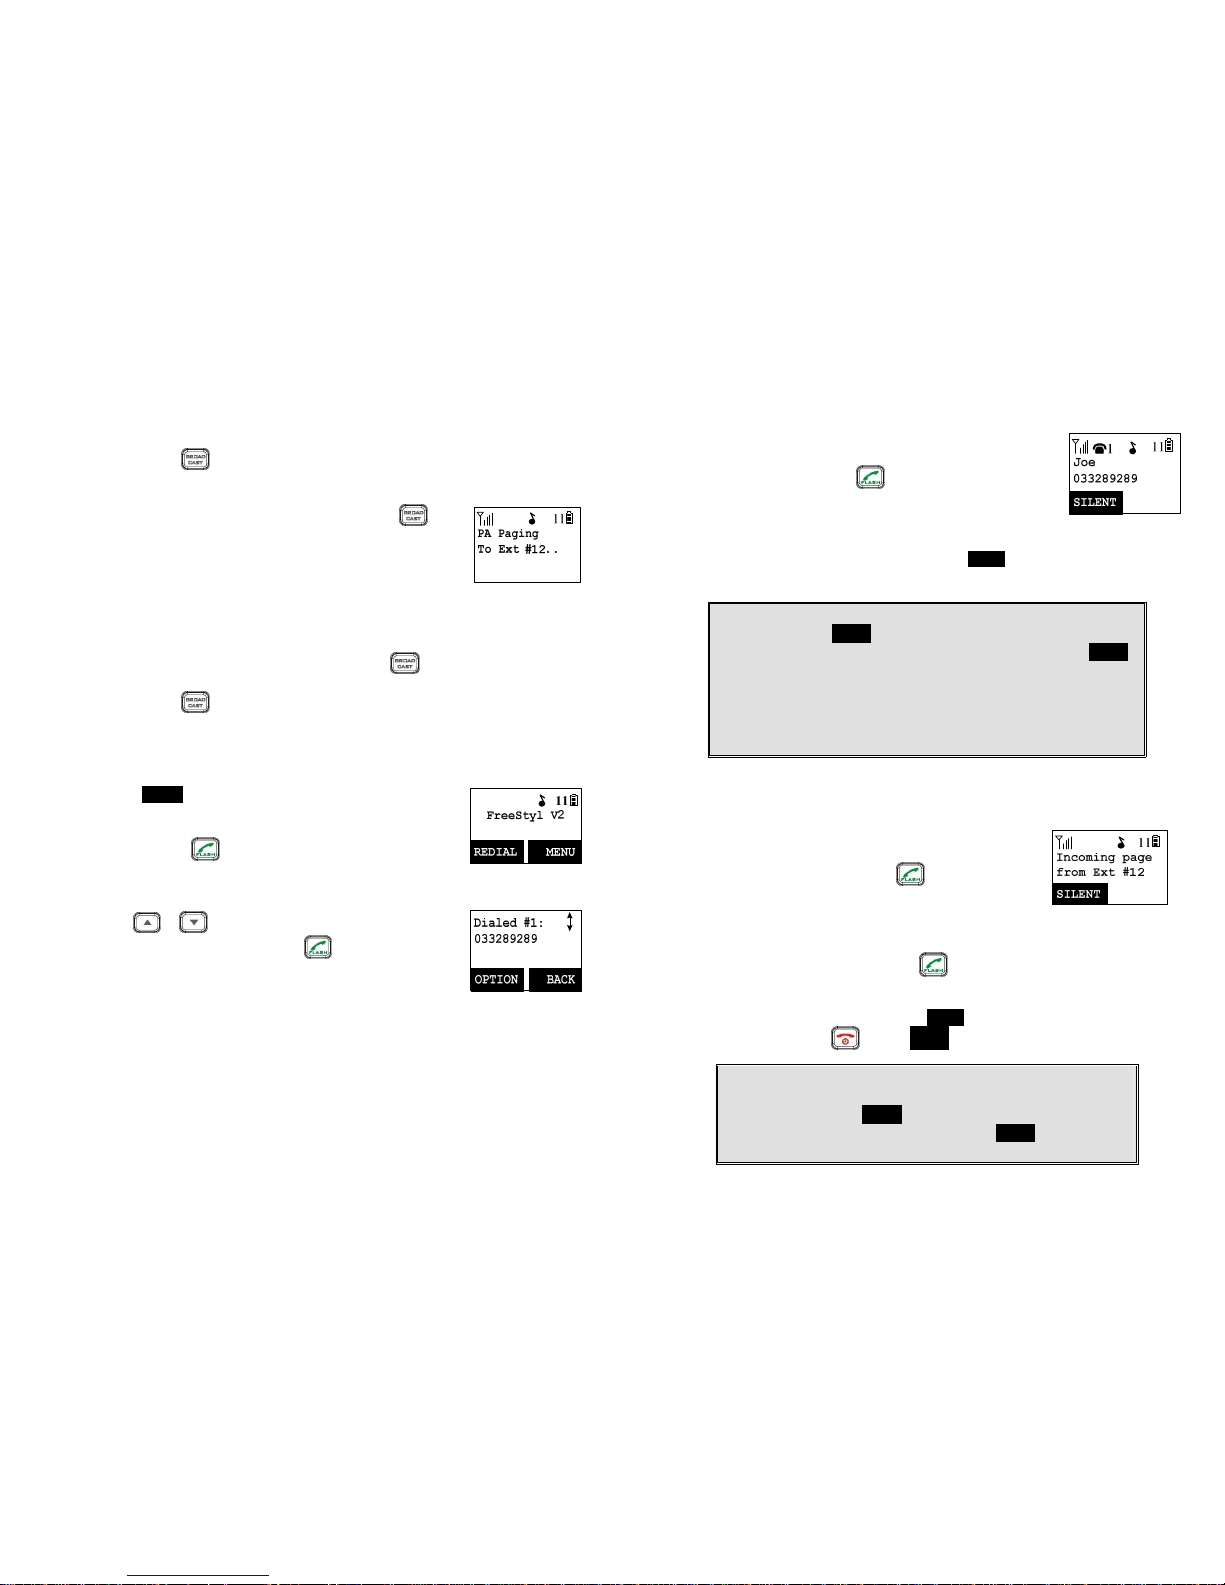
Making an 2-Way/ Intercom Call
The FREESTYL V2 Cordless Phone System offers private, Intercom/ 2-way radio calls
independent of base station. Intercom/ 2-way communication can be placed
between handsets.
~30~
1.
Press key followed by a two-digit handset ID or
Group ID.
2.
Press key to end the call.
Notes:
1. Intercom calls can be made regardless if the Base Station is
present.
2. If a Group ID is entered, the first handset (belonging to that
group) that answers will establish a link with the caller. See
Handset Group Subscription.
3. If a link cannot be established, the LCD shows “Paging timeout”
after a 35-second time out.
Making a Broadcast
A. Handset to Handset Calls
1. Broadcasting all handsets
a.
Press and hold key (left top corner of keys) from
one handset.
b. Hear a long “Du…” sound while the initiating handset
broadcasts to all handsets within communication
coverage.
c. Speak the message to be broadcasted once you hear the “Du Du” sound; the
speakerphone of destination handsets will open if it receives a voice.
Re: Pressing and holding the key is needed during the speaking of the
broadcast.
d.
Release key to end the broadcasting.
2. Broadcasting to only a group of handsets
a.
Enter the Group ID and then press and hold key
(left top corner of keys). See page 37 for instructions on
creating groups
b. Hear a long “Du…” sound while the initiating handset
broadcasting to all handsets.
c.
Start to speak the message to be broadcasted once you hear the “Du Du”
sound; the speakerphone of destination handsets will open if it receives a
voice.
Re: the initiating handset press and hold the key is needed during the
Page 16
~31~
speaking of the broadcast.
d.
Release key to end the broadcasting.
3. Broadcasting to an individual handset
a.
Enter the Handset ID and then press and hold key
(left top corner of keys).
b. Hear a long “Du…” sound while the initiating handset
broadcast all handsets within communication coverage.
c. Start to speak the message to be broadcasted once you hear the “Du Du”
sound; the speakerphone of destination handsets will be opened if it received
a voice.
Re: the initiating handset press and hold the key is needed during the
speaking of the broadcast.
d.
Release key to end the broadcasting.
Redial
1. Press REDIAL (Left) soft key.
2.
The LCD shows the last phone number dialed. To dial this
number, press key.
3.
Use or key to scroll through the last 10 phone
numbers dialed. Select and press key to dial the
selected number.
[Note] Intercom numbers (Handset ID) are not stored in the
last 10 numbers dialed log.
Receiving a Telephone Call
When an incoming call arrives, the LCD will show the caller ID
message, and the ringer will ring or vibrate unless the ringer
has been turned off.
~32~
If the handset is on the charger cradle (ringer will be
temporarily switched to “Ring” if it has been set to “Vibrate”),
lift the handset and press key to start conversation.
Re: You can turn on the “Any Key Talk” from MENU-5-2 which will allow you to
press any key instead of just the talk key, to answer an incoming call.
Notes:
1. You can press SILENT (Left) soft key if you choose to ignore the call.
Unlike turning off the ringer (from the handset menu), the SILENT
key operation is valid only when the phone is actually ringing.
2. If Caller ID service is available, the LCD will display the incoming call
information. If the LCD shows “Private” or “Unknown”, the caller’s
information may have been blocked by the caller or the originating
phone company.
Receiving an Intercom Call
1.
When an intercom call arrives (called from other handsets,
ex. Handset 12), the ringer will ring or vibrate unless the
ringer has been turned off. Press to answer the
intercom call.
2.
If the handset is on the charger cradle (ringer will be
temporarily switched to “Ring” if it has been set to
“Vibrate”), lift the handset and press key to start
conversation.
3.
If the handset is not on the cradle and MENU-6-2 “Any Key Talk” setting is “On”,
press any key (except and the SILENT soft key) to answer.
Notes:
1. The LCD displays the caller’s Handset ID.
2. You can press the SILENT (Left) soft key if you choose to ignore
the call. Unlike turning off the ringer the SILENT key operation is
valid only for the current incoming call.
Page 17
~33~
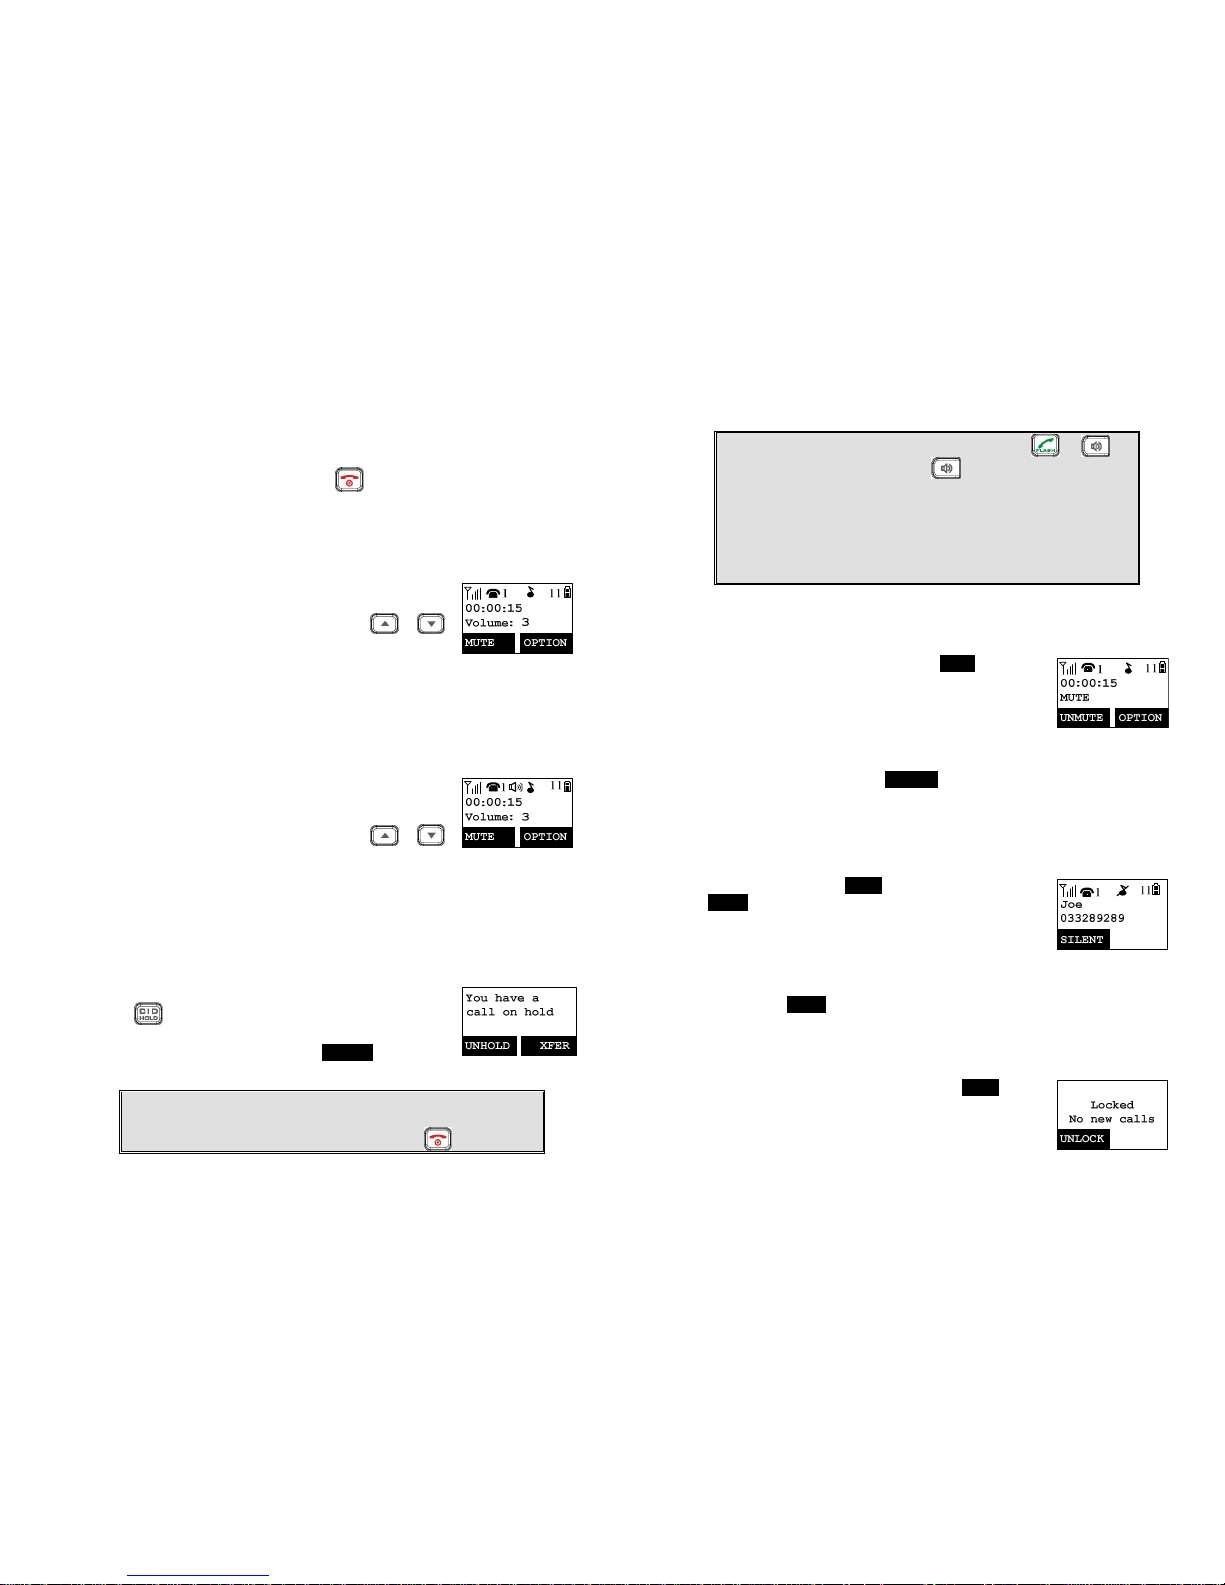
Ending a Call
To end a telephone or intercom call, press key, or place handset into charger
cradle.
Adjusting Handset Receiver (Earpiece) Voice Volume
1. Voice volume can only be adjusted during a call.
2.
There are 6 levels of volume selections. Use or
key to adjust
3. The new setting remains effective for all future calls until
changed.
Adjusting Handset Speakerphone Voice Volume
1. Voice volume can only be adjusted during a call (in
speakerphone mode).
2.
There are 6 levels of volume selections. Use or
key to adjust
3. The new setting remains effective for all future calls until
changed.
Placing a Call On Hold
1.
When a call is in progress, it can be put on hold by pressing
the key.
2.
To return to the conversation, press UNHOLD (Left) soft key
Notes:
1. The call being placed on hold can be “un-hold” by the handset
that puts it on hold. But if after you press the key to go
~34~
back to standby, then other handsets can press or to
pick this held call (If you press on the base, you can also
pick up this held call).
2. Handset LCD displays a call is on hold. An alert tone (double
beep) will occur every 30 seconds to remind the handset user
that a call is still on hold.
3. If the operation (e.g., call transfer) after putting a call on-hold
fails, the held call may be dropped.
Mute
1. After a link is established, you can press MUTE (Left) soft
key to mute the handset microphone.
2.
When mute is active, the other end will not hear your
voice, but still can speak to you.
3. To leave the mute state, press UNMUTE (Left) soft key. Mute is effective only
for the current call.
Do Not Disturb (Silent Ring)
1. Enter the key sequence MENU-3-1, then select “Off”. Press
SELECT (Left) soft key to confirm your choice. This will turn
off the ringer until it is turn on again from the menu.
Re: When setting the ringer “Off”, the standby screen will
show “Ringer off”.
2.
For temporary silencing the ringer when an incoming call
arrives, press SILENT (Left) soft key.
Key Guard
1. To prevent accidental dialing, you can press MENU (Right)
soft key, then press“1” to select the KeyGuard option. The
handset keypad is locked. No key entry will be accepted.
Page 18
~35~
2.
To unlock the keypad, press the UNLOCK (Left) soft key,
then, within 2 seconds, press the digit “*” to unlock.
3.
Once returning back to standby mode for 15 seconds, the
Keyguard will automatically re-enable.
4. Key Guard is in effect until unlocked.
Battery Recharge and Replacement
1. Charge the battery when one or several of the following things happen:
a. Phone beeps twice (every 60 seconds in talk mode, every 10 minutes in
standby mode).
b. Battery icon is empty.
c.
Phone does not respond when a power on/off key is pressed.
d. LCD and backlighting become dim.
e. Talk range shortfall is experienced.
2.
You can replace the handset battery even while on an active phone call by
putting the call on-hold first and then by pressing the key. To retrieve the
call on hold, press the talk key again after replacing the battery and powering
the handset on.
3. Battery talk time and standby time vary depending on the talk/standby pattern
and the operating distance. Putting the handset back in the charger cradle as
often as possible is recommended for best performance.
Use only
manufacturer provided battery and charger!
~36~
Advanced Operations
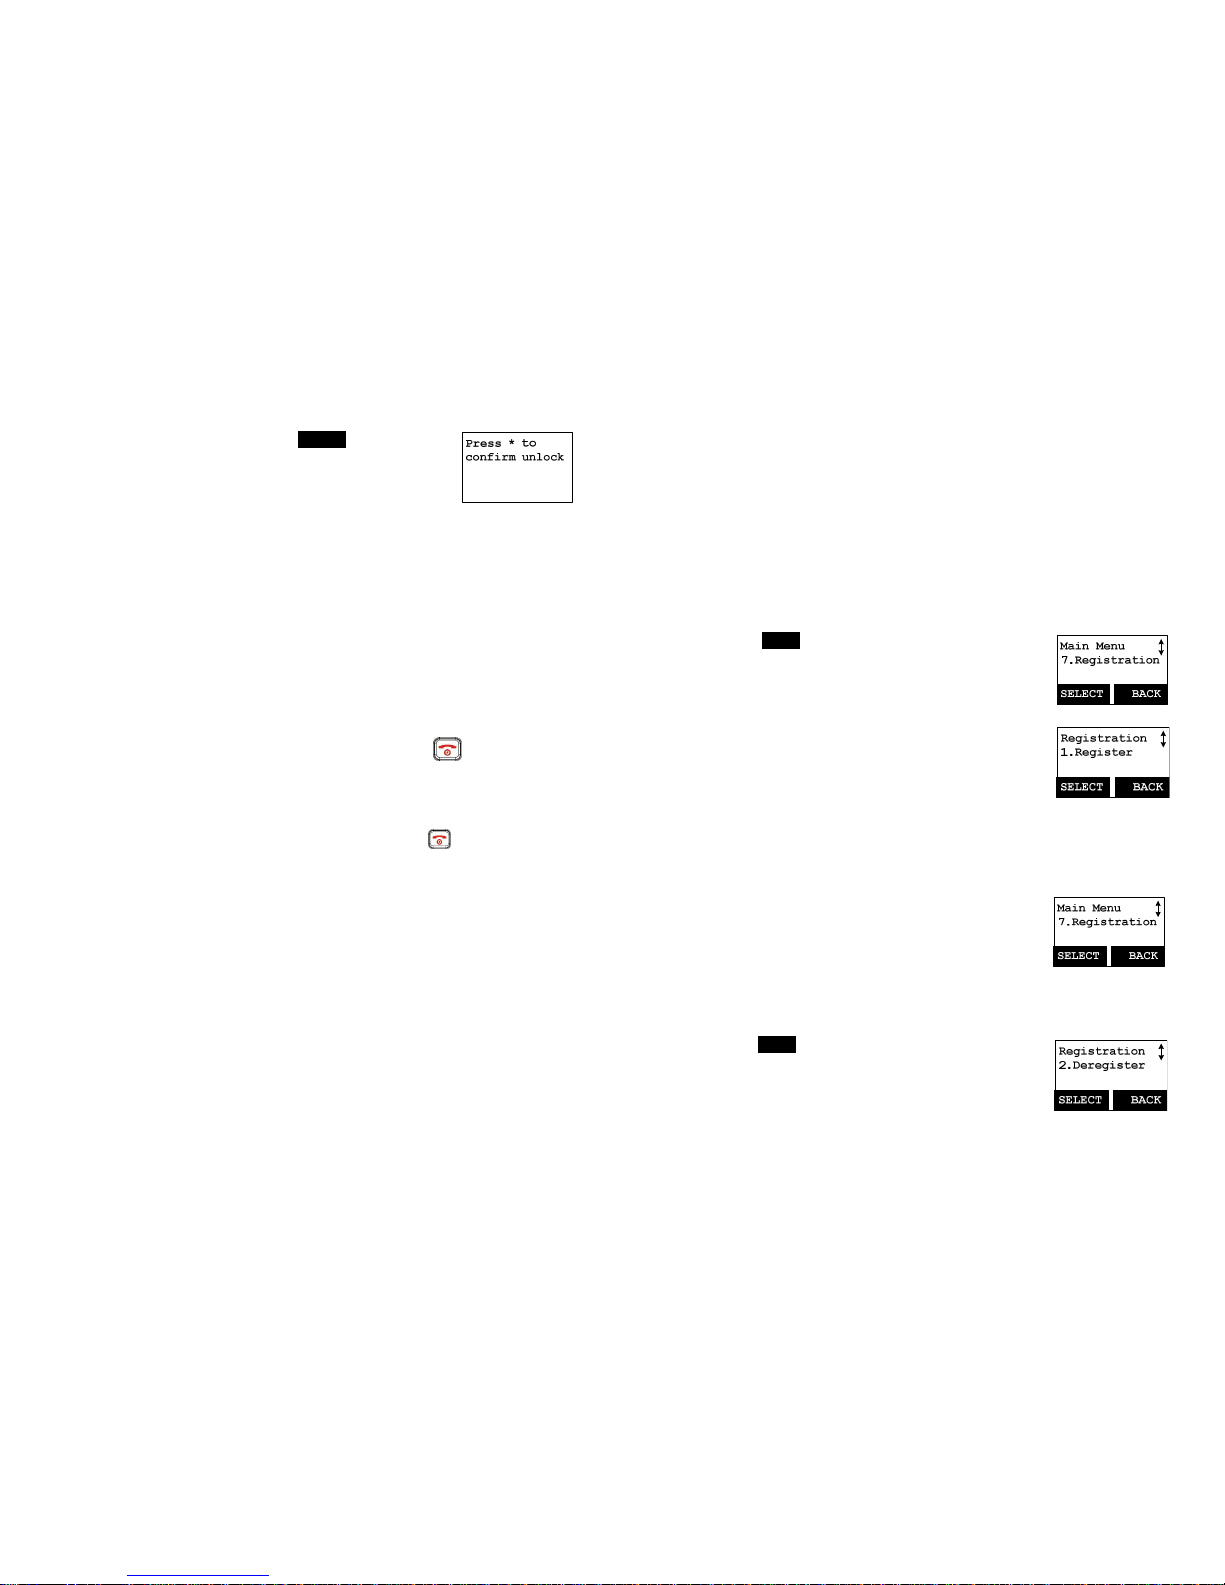
Handset Registration
1. If your handset(s) is purchased as part of a system, it has been pre-registered
with the base station at the factory.
2. If Handset ID shows “00,” that means it is a new handset or the ID has been
erased. You need to register the handset with the base station.
3. Registering Handsets:
a. Press MENU-7 to enter the registration section.
b.
Press and hold the base’s PAGE button for 3 seconds
until the In Use LED (white color) lights up and flashes;
The base station will produce a sound to remind you
the base station is in the registration mode.
c. Press handset key “1”. This completes the registration
process. The base station will assign a handset ID
between 11 and 19 automatically. The assigned ID will
be displayed on the handset LCD, indicating successful
registration. If you get a “base has no available ID”
prompt, you will need to reset the base (see page 22).
d. Repeat above steps for all additional handsets.
4. De-registration:
a. You can de-register the handset you’re using from the
base station. De-registration will reset the Handset ID
to 00, erase the system security code, and free up the
handset ID for future registration.(registrations of other
handsets)
b. After deregistration, the handset will not be able to use
the base station to make or receive phone calls, nor can
it intercom other handsets.
c. Press MENU-7 to enter the registration section.
d.
Press and hold the base’s PAGE button for 3 seconds
until the In Use LED (white color) lights up and flashes;
The base station will produce a sound to remind you
the base station is in the registration mode.
e. Press the handset number key “2”. This completes the
de-registration process. Upon successful de-
Page 19
~37~
registration, the handset display will show “Please
register”.
Notes:
1. The base station has a 30 second registration timeout starting
from pressing the PAGE button. The handset has a 6 second
registration timeout starting from the registration or deregistration option has been selected. The base station and
handset will automatically exit registration mode after
timeout.
2. Repeat registration or de-registration process if unsuccessful.
Handset Group Subscription
1. Up to nine handset groups (91-99) can be defined and
handsets can decide which group(s) they want to be in.
2. For example, Group 1 represents the Customer Service
Group, Group 2 represents the Sales Group, and Group 3 is
the Marketing Group. Suppose that Handset 11 wants to
receive incoming rings for all Sales and Marketing related
calls. Then handset 11 will need to “subscribe” to Group 2
and Group 3.
Re: the above wording is in regards to intercom <or
broadcast>, not incoming calls.
Call Settings
2.Group Setting
SELECT
BACK
3. Group Selections:
a.
b.
Press handset MENU-4 to enter the Call Settings menu
Press number “2”, handset enters group setting menu.
c. Press OPTION soft key and followed by “1” key to
subscribe the group (“9#”, #:1~9). Enter 1~9.
d. Repeat for all desired groups.
e. Delete group selections by pressing OPTION soft key
and followed by “2” to Unsubscribe the group.
~38~
Notes:
1. The handset can change group affiliations at any time.
2. The base station is not responsible for group assignments.
Consequently, it cannot de-subscribe a handset from a group.
3. When an intercom caller enters a group ID, all handsets
subscribed to this group will ring. The first handset to answer
will establish a link with the caller. Afterward, it is a one-to-one
call, not a one-to-many call.
Call Transfer
While a telephone call is in progress, you can transfer it between different
handsets.
Direct transfer (Unannounced Transfer)
1.
Press key to put the call on hold.
2. Press XFER (Right) soft key, followed by the destination
handset ID, then the held call will be transferred directly.
After the call transferred to the destination handset, the
original handset will go back to standby mode automatically.
Indirect transfer (Announced Transfer)
If you want to talk to the destination handset before the call is
transferred, you can follow the method below:
1.
During the call, press key, followed by entering the
destination handset ID.
2.
At the destination handset, press the or to
answer the intercom call. After talking, press to end
the intercom call. After an intercom call is ended, the phone
on the other end will also go back to standby mode
Page 20
~39~
automatically.
Notes: If the destination handset does not answer after handset
paging or transferring times out, the call is routed back to the
originating handset.
Phonebook Operations
1. You can store up to 50 entries in the phonebook. Each
entry can contain a phone number or handset ID (up to 26
digits) and a name (up to16 characters).
2.
To access the phonebook, press MENU (Right) soft key,
followed by 2 ; or press scrolling key while the
handset is in standby mode.
Main Menu
2.PhoneBook
SELECT BACK
3. To add a new entry:
a. Press ADD (Left) soft key.
b. Enter the name when LCD prompts “Name?” Use
DELETE (Right) soft key to delete the last digit entered.
When completed, press SAVE (Left) soft key to save.
Re: Up to 16 characters can be entered as the name.
c. You will then be prompted to enter a number for the
name just entered.
Re: Up to 26 digits can be entered as the number.
d. After entering the number, press the SAVE (Left) soft
key to save this entry into phonebook.
e. If you enter a phonebook entry without a name, all
records without a name will be placed on the top of the
phonebook list.
f. To enter the name, press the corresponding keypad
number one or more times according to the order of
the character on the key.
~40~
See table below for a list of available characters and
their orders. For example, press 2 once for the
character “A”, twice for “B”, etc.
Notes:
1. When entering a phone number, the cursor automatically advances
to the next digit field. Use or scrolling key to move the
cursor backward or forward to insert or delete (the digit above the
cursor, or left of the cursor if cursor is on the right of the last digit).
2. When entering a name, the cursor automatically advances to the
next character field if you press a different key for the next
character. If you need to enter consecutive characters from the
same key, you can wait for the cursor to advance or use or
scrolling key to move the cursor backward or forward
manually. Also use or to move the cursor to insert (to
the left of the cursor) or delete (the character above the cursor, or
left of the cursor if cursor is on the right of the last character).
3. By default, all letters are entered in upper case. Use the * key to
toggle between upper and lower cases.
4. A “Pause” entry represents a 1 second delay in dialing the following
digits, which is useful when calling a sequence of segmented
numbers (e.g., access code, credit card number, auto-attendant
entries, etc.) Pause is entered by pressing the #### key twice (LCD
displays P). Entering pause twice (PP) will result in 2 seconds pause
in the dialing.
Page 21
~41~
5. Character Table:
Key Characters and Orders
1 ‘ + , . * ( ) & 1
2 A B C 2
3 D E F 3
4 G H I 4
5 J K L 5
6 M N O 6
7 P Q R S 7
8 T U V 8
9 W X Y Z 9
0 0
*
Caps – when in character editing.
*– when in number editing.
#
Space & # – when in character editing
# & P (Pause) – when in number editing
4. The entries are alphabetically sorted and stored as a list in an ascending order
(A to Z) from the top of the list.
5. The first line of LCD display shows name and the 2nd line shows the phone
number. If the phone number is longer than 16 digits, press OPTION (Right)
soft key and select Option 3 “View Number” to view the complete number.
6. To search for a record:
a.
Use scrolling key to enter Phone Book mode.
b. Press a key that corresponds to the first character of the name you are
looking for.
c. For example, if you are looking for “EnGenius”, press the number 3 key
once.
d.
Use or scrolling key to locate the exact record you are looking
for.
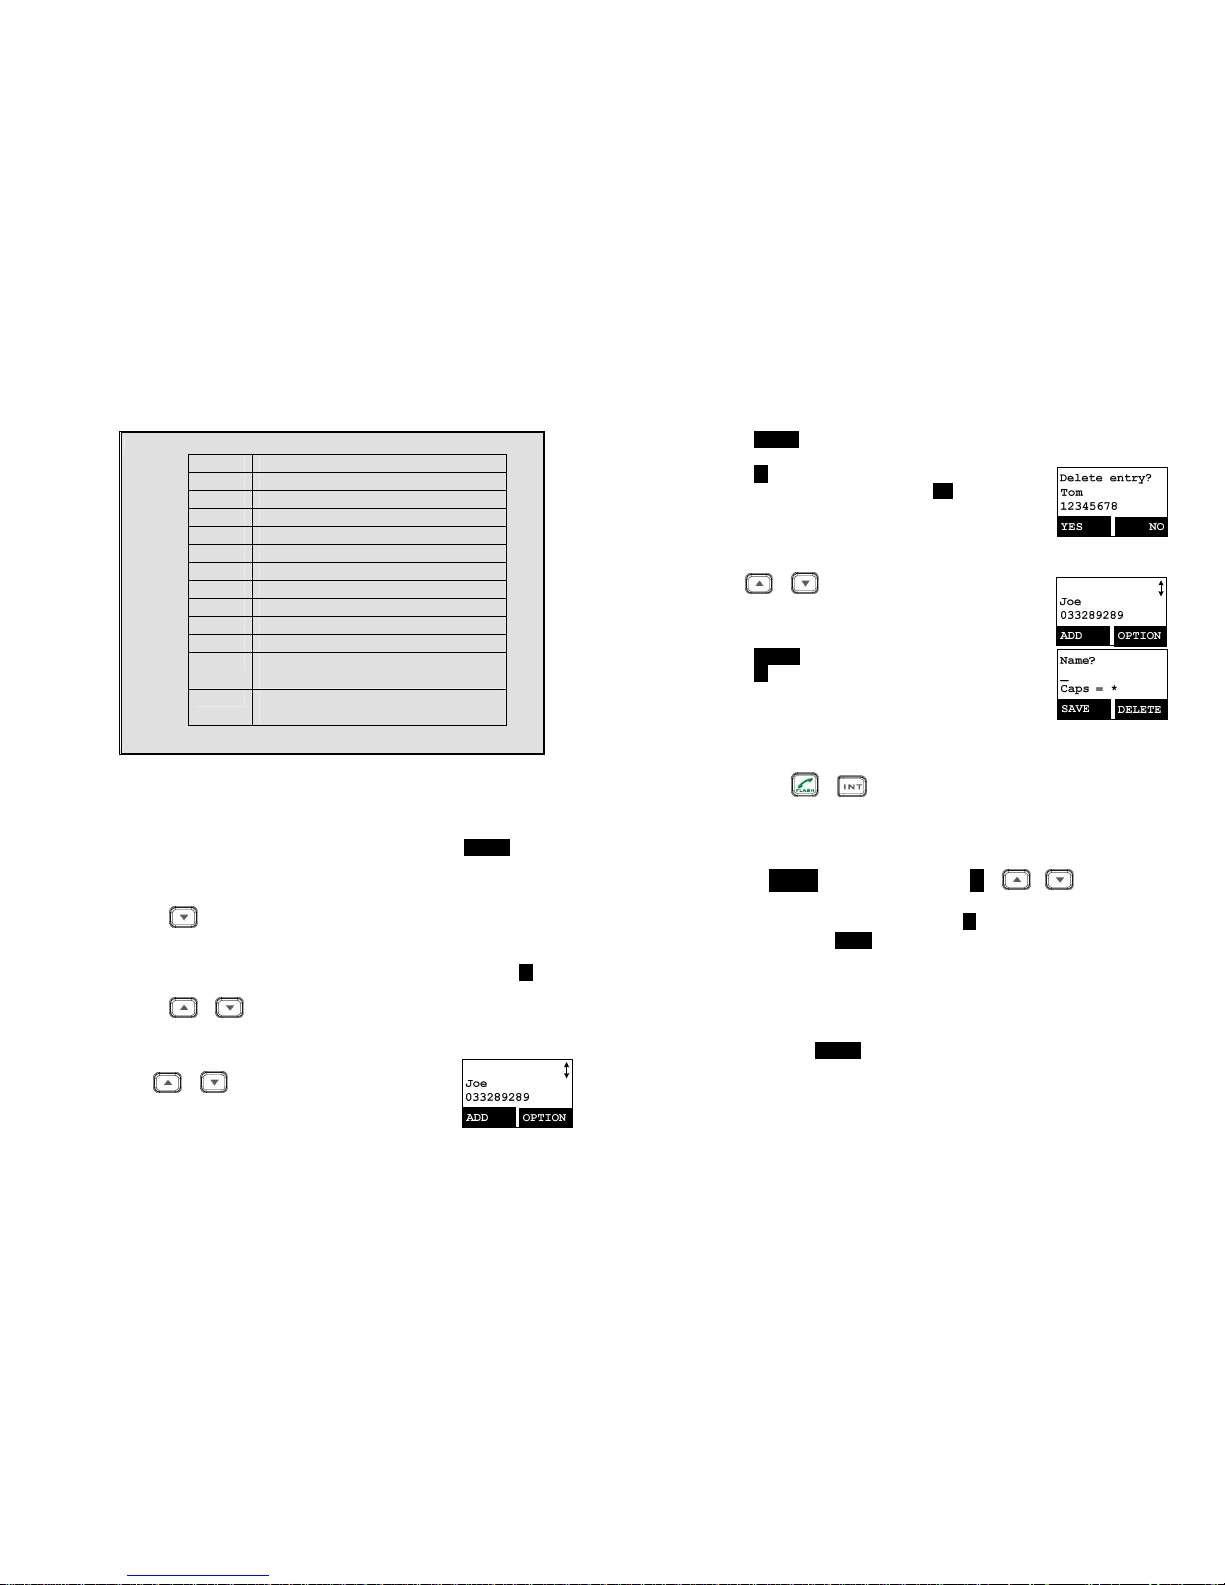
7. To erase a phonebook entry:
a.
Use or scrolling key or the alphabetical search
method to locate the record to be erased or edited.
~42~
b. Press OPTION (Right) soft key to enter the option menu.
c. Press 1 to erase the intended phone entry.
d. LCD will show “Delete entry?” Press YES
(Left) soft key to
confirm your change.
8. To edit a phonebook entry:
a.
Use or scrolling key or the alphabetical search
method to locate the record to be erased or edited.
b. Press OPTION (Right) soft key to enter option menu.
c. Press 2 to edit the intended phone entry.
9. Dial from display:
a.
Press or to dial the phone number or Handset ID displayed.
10. To transfer the phonebook to another handset:
To transfer phonebook, both parties have to enter the phonebook transfer
mode first by following below:
a.
Press OPTION right soft key followed by 5 or or scrolling key to
transfer while handset is in phonebook mode.
b. For the phone doing the sending, press 1 to enter sending mode.
i. Either press TX ALL(left softkey) to transfer all phonebook entries to
another handset(s)
Note: if you want to transfer all entries from an handset but the entry
is not from beginning (entry #1), it will only transfer the
remaining entries. For example, if you are have 10 entries, and
you start at entry #5, then it only transfers #5 through #10.
ii. Or press TX ONE (right softkey) to transfer just one entry to another
handset(s).
Note: you will need to at the desired entry before going to the TX
ONE option for that particular entry to be transferred.
iii. Press the 2-digit handset ID or group ID, then select all phonebook
entries or one entry to be transferred.
Page 22
~43~
Re : “00” means all handsets
iv. During phonebook transferring, LCD shows “Sending” and 2-digit
countdown on the LCD will indicate the remaining phonebook
numbers which are still pending to be sent.
c. For the phone that is to receive the phonebook, press 2 to enter receiving
mode.
i. When entering the receiving mode, the LCD will show “Ready”.
ii. To start to receiving the phonebook, the LCD will show “Get
phonebook from Ext. # : xx” (the handset ID that will be doing the
sending).
iii. A beep will be emitted when receiving each phonebook entry.
iv. While receiving phone book entries, a 2-digit countdown on the LCD
will indicate the number of phonebook numbers remaining.
Re: Note: The phonebook transfer is via a wireless interface so there can be
times where some entries are not transferred due to interference. It
is recommended to have handsets in very close range during
transfers.
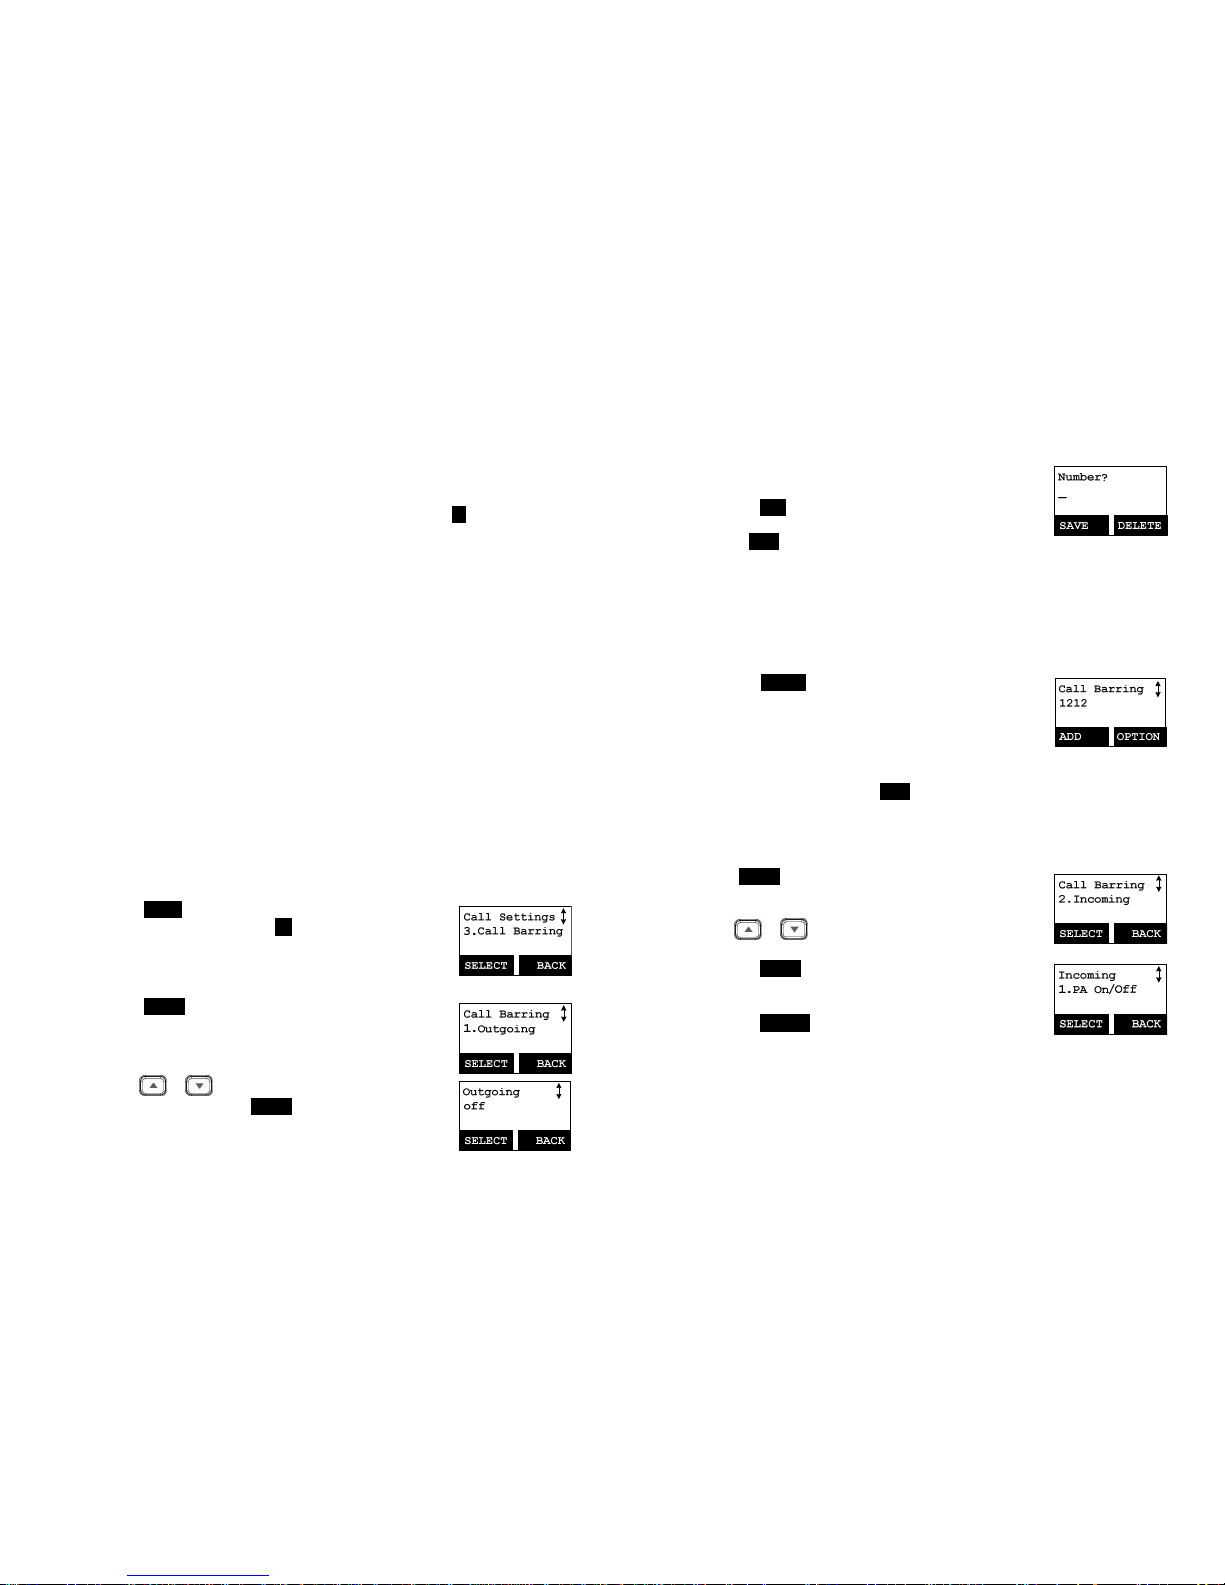
Call Barring
1. Block the users from dialing long distance or international calls. Call barring can
also be used to block incoming calls from an outside line or other registered
handset.
Note: Entering a password is required (default password is 0000).
2.
Press MENU-4-3 to enter Call Barring. Enter the password
of the handset, followed by OK (Left) soft key
Block Outgoing Call
1.
Press SELECT left soft key to select “Outgoing” and confirm
your selection.
2.
Use or scrolling key to switch between On and
Off of this setting. Press SELECT left soft key to confirm
your selection.
Re::::The default setting of Call Barring is “Off”.
~44~
3. To enter a Call Barring code
a. Once the Call Barring feature is turned on, you can key
in the “Call Barring” code.
Press ADD (Left) soft key then start entering the Call
Barring code after the number is entered, then press
the SAVE (Left) soft key to save.
(1) Up to 5 digits can be entered in as a Barring code. For
example, if you want to block all call dialing to
Manhanttan, NY area, you can enter 1212 as the Call
Barring code.
(2) If the base station is connected behind a PBX system, be
sure to include the outside dial tone digit as well
(example, 9 to dial out).
b. Press OPTION right soft key to delete or edit Call
Barring codes.
c. Up to 5 sets of Call Barring codes can be programmed.
d. If you want to block all outgoing calls, enter ****
* keys followed by, press SAVE (Left) soft key to save.
Doing so will cause all outgoing calls to be restricted.
Block Incoming Calls and blocking intercom or broadcasts
from handsets.
1. Press SELECT left soft key to confirm your selection for
“Incoming”.
Use or scrolling key to select blocking item.
a.
Press SELECT left soft key to confirm your selection to
block broadcasts.
Press CHANGE left soft key to switch between On and
Off of this setting.
Re: “On” means to be able to receive broadcast from
other hansets or base station. “Off” means to restrict
the broadcast from other handsets or base station. The
default setting is “On”.
Page 23
~45~
b.
Press SELECT left soft key to confirm your selection for
receiving or blocking line calls.
Press CHANGE left soft key to switch between On and
Off of this setting.
Re: “On” means to be able to receive calls from outside
line; “Off” means to restrict calls from outside line.
The default setting is “On”.
c,
Press SELECT left soft key to confirm your selection for
receiving or blocking intercom calls.
Press CHANGE left soft key to switch between On and
Off of this setting.
Re: “On” means to be able to receive intercom calls
from other handsets or base station; “Off” means to
restrict intercom calls from other handset or base
station. Default setting is “On”.
Programmable Feature Call
1. If the FREESTYL V2 base station is installed behind a PBX system, you may want
to pre-program some feature calls along with the PBX’s feature codes into the
handset(s).
2. Up to 10 most frequently used feature call codes can be pre-programmed.
3.
Naming and entering feature call codes:
a.
Press MENU (Right) soft key while the handset is in
standby mode.
b.
Press “4”, followed by “4” to enter the “Feature Call”
menu.
c.
Press ADD (Left) soft key to add a new entry.
d.
Key in the name for the feature call, press SAVE (Left)
soft key to confirm.
~46~
e.
Key in the feature call code of the correspondence PBX
feature i.e. F*70 (Nortel transfer code).
Press SAVE (Left) soft key to confirm.
Re: “F” represent the Flash signal.
Note: To enter “F” press the talk key.
f.
The 1st feature call and correspondence feature call
code you entered will appear on the LCD screen.
g.
Press OPTION (Right) soft key to delete or edit the
feature call you programmed into the handset.
h.
Repeat the same operation to enter additional (up to
ten) feature call entries.
4.
How to use a pre-programmed feature call during an active
phone call.
a.
Press OPTION (Right) soft key while the handset is in
talk mode.
b. Press the corresponding number of the feature call of
which you want to use, i.e. press “0” to perform the
“PBX Transfer” in the example.
Notes:
1. This feature call would be useful if the FREESTYL V2 base station is
connected behind a PBX system.
2. If you have not pre-programmed any feature calls into the system,
only the “#.Phonebook” will show in the OPTION menu.
3. The FREESTYL V2’s programmable feature call may not function
with all PBX or Key phone systems due to the diversity of various
proprietary systems.
Page 24
~47~
Caller ID
1. Contact with your local phone company to subscribe to this feature. The phone
system receives and displays Caller ID information transmitted by your local
phone company. This information may include the calling phone number, name,
date, and time. This unit can store up to 50 calls of caller ID information.
2. The display will show the date and time of call on the first line, followed by the
name on the second line, and the phone number on the third line. An unread
record will display “NEW” at the end of the first line of display.
3. When viewing a call record, the number can be dialed, stored to the phonebook, or
deleted.
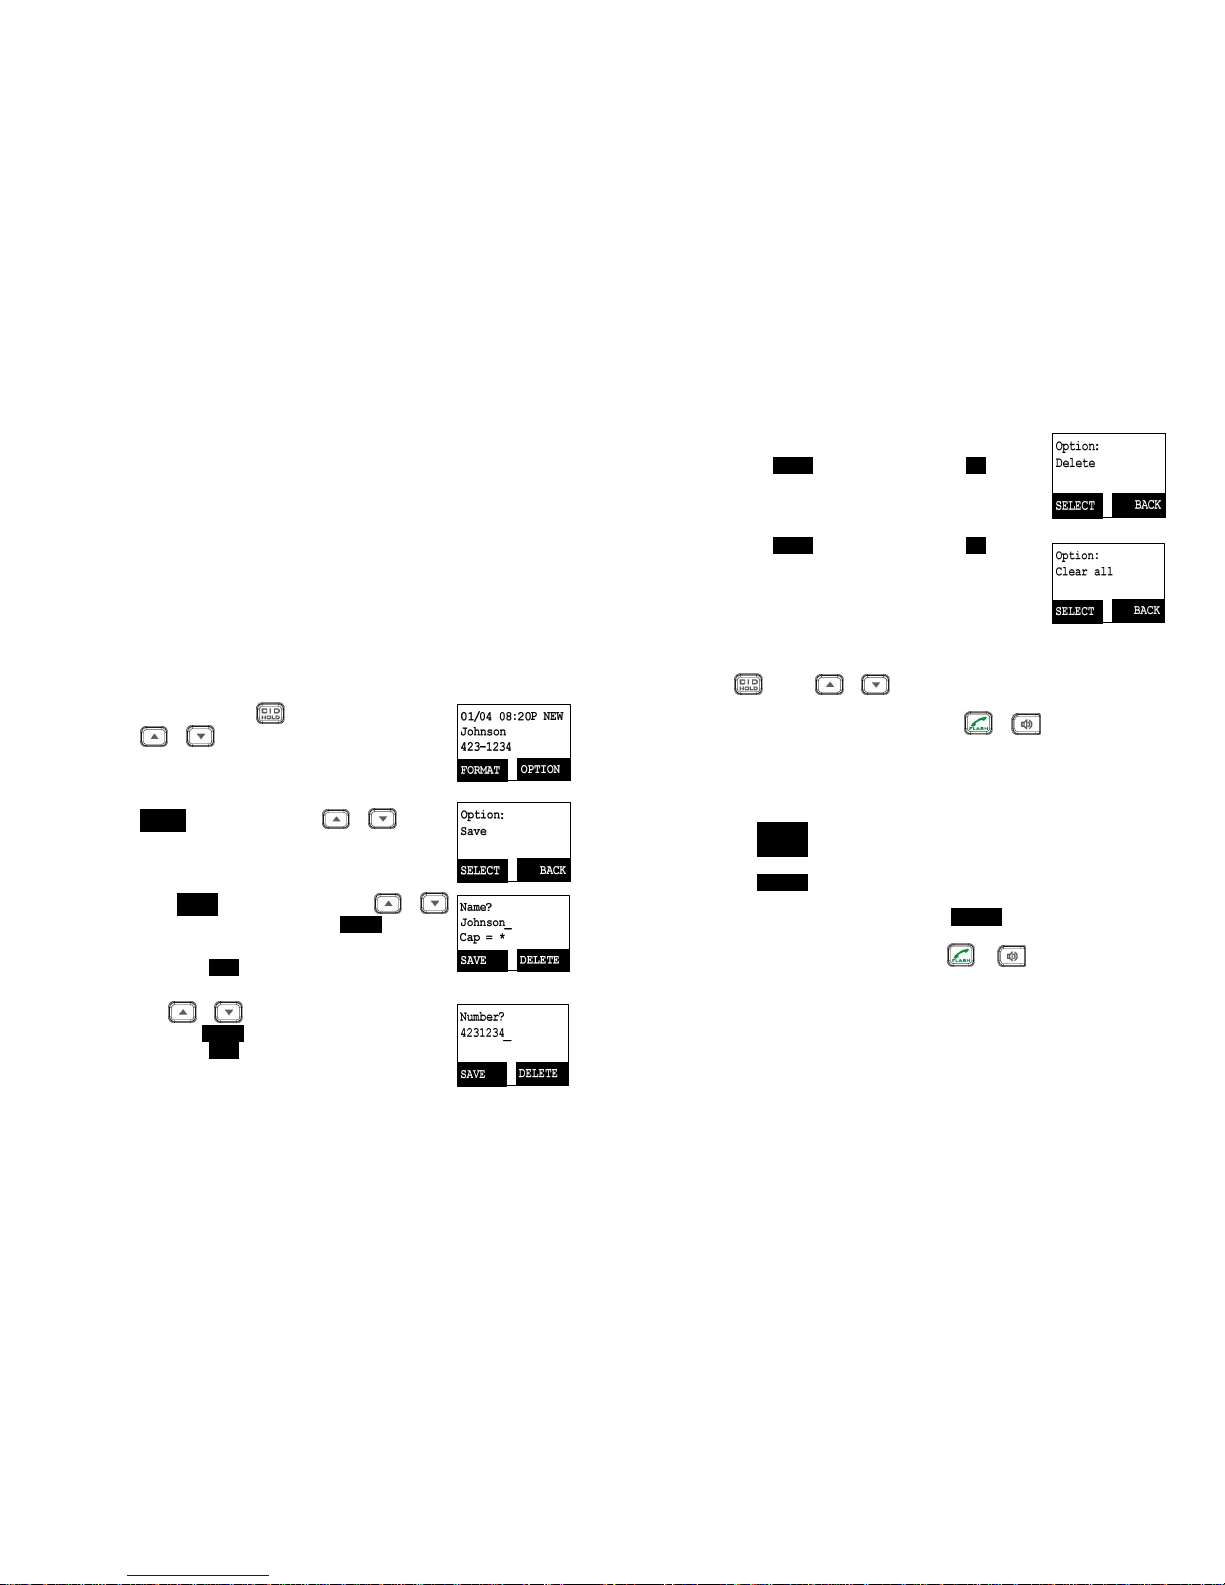
View Call Log
1.
To view the call log, press to enter the Call Log.
Press or key to scroll through the numbers and
names when available.
2.
Press OPTION right soft key, you can or key to
choose save, delete, or clear all.
a. Save call log:
(1)
Press SELECT right soft key, you can use or
key to scrool the name, and press DELETE to edit the
name.
Then press SAVE left soft key to save the name.
(2)
Use or key to scroll through the numbers,
and press DELETE to edit the number.
Then press SAVE left soft key to save the number.
(3) After the above process, the call log number will be
saved into the phonebook.
~48~
b. Delete call log:
(1) Press SELECT right soft key followed by YES left soft
key to confirm deleting.
c. Clear All:
(1) Press SELECT right soft key followed by YES left soft
key to confirm clearing all caller ID records.
Call a Caller ID
1.
Press key, use or key to scroll through the call log.
2.
When at the display of a caller ID entry, Press or to dial this number.
3. The displayed CID number in most cases will be a 10-digit number with
the 3-digit area code followed by the 7-digit telephone number. If the
area code is unnecessary for calling back, you can follow below rule to
adjust the calling back number:
a. Press FORMAT key once, the 3-digit area code will be removed.
b. Press FORMAT key twice, “1” will be added in front of the displayed
number
c. Press FORMAT key three times, it will loop back original displayed
number.
Re. The CID default is 10 digits, when press FORMAT key, it will be
7-digit 11-digit 10-digit in circle.
4.
After the displayed number chosen, press
or
key to call back.
Visual Message Waiting Indicator (VMWI)
VMWI feature is supported via FSK message signaling when received from the
phone company telephone line or PBX system; It will activate a message icon on the
handset display and flash the VOICE MESSAGE LED on the base.
Notes:
1. A subscription to the telephone company voice mail service is required.
Page 25

~49~
2. If the handset still indicates the icon even after you have listened to all
messages, turn it off by pressing and holding the “Caller ID” key on the
handset.
Adjust Handset Microphone Gain (sensitivity)
The microphone gain setting option is provided so you can adjust microphone
sensitivity custom to your workplace environment (such as a loud, noisy
environment etc.). Note: You may also want to adjust earpiece settings as well if
the workplace environment is extremely loud.
a. Press MENU right soft key while the handset is in standby mode.
b. Press “5” (Phone Settings), followed by “1” to enter the “Mic. Gain”
menu.
c.
Use or key to scroll the “Standard”, “Medium” and “Low”
options.
d.
If you are using the handset in a quiet environment, like office or
meeting room, the level of “Standard” is recommended.
If you are using the handset in a noisy environment, like a factory or
outdoor place, the level of “Medium” or “Low” is recommended.
Adjust Headset Ring
When using a headset, you can avoid missing a call due to the ringer ringing inside
the headset rather than outside the phone, by changing the ringer to the outside
speaker.
a. Press MENU right soft key while the handset is in standby mode.
b. Press “5” (Phone Settings), followed by “9” to enter the “Headset Ring”
menu.
c. Select “On”, the ringer will be heard in the headset.
Select “Off”, the ringer will be heard from the outside speaker.
Note: Default setting is “On”.
Baby Monitor
You can set any one handset as a “baby unit” to monitor a baby or older person.
~50~
When enabling baby monitor mode, the “baby unit” will automatically enter the
monitoring mode via 2-way intercom.
For example, if you set handset A as a “baby unit”, when making an intercom call
from handset B, handset A will automatically enter monitoring mode without
ringing. You will be able to hear all movements around handset A via handset B.
a. Press MENU right soft key while the handset is in standby mode.
b. Press “4” (Call Settings), followed by “5” to enter the “Baby Monitor”
menu.
c. Press “CHANGE” to switch ON or OFF (default is OFF).
Re: To avoid any interruptions while monitoring is active, the handset in
baby monitor mode will not ring from incoming calls, except intercom.
Page 26
~51~
Menu Operations
Note: Default base pin or password is 0000.
~52~
1. Press MENU right soft key to enter menu mode while the phone is in standby
mode.
Re: You can either press or , followed by SELECT left soft key to
confirm the selected menu. Or Press the digit directly to confirm the
selected menu. For example, press MENU right soft key followed by 4 and
1 to select Ring Volume.
2. Press 1 to select KeyGuard (see Key Guard operation on page 34 ).
3. Press 2 to add, delete, edit, view and edit the phonebook (see Phonebook
instructions on page 39 ).
4. Press 3 to set Sound settings:
a. Press 1 to select Ring Volume:
There are two options for ring volume: Line (for incoming call) and Intercom
(for intercom calls). Set each option respectively.
When setting each option, use or to scroll through 6 options:
“Off”, “Low”, “Medium”, “High”, “Vibrate” and “Vibrate & High”. Press
SELECT left soft key to save selection. Default = Medium.
b. Press 2 to select Ring Tone:
There are two options for ring tone: Line (ring tone for incoming call) and
Intercom (ringer for intercom call). Set each option respectively.
Use the or to scroll through 8 ringer types, press SELECT left soft
key to save the selection. Default = 1.
c. Press 3 to select Key Volume for when a key is pressed:
Use or to scroll through 4 options: Off, Low, Medium, and High.
Press SELECT left soft key to save selection. Default = Medium.
d. Press 4 to select Key Tone for when a key is pressed:
Use the or to scroll through 4 options: 1, 2, 3 and 4. Press SELECT
left soft key to save selection. Default = 1.
5. Press 4 to set Call Settings:
a. Press 1 to set Dial Prefix:
(1)
Press or to turn on or off the dial prefix feature. Default =
Page 27

~53~
Off.
(2) If “On” is selected, the handset is prompted to enter the prefix
number (up to 14 digits can be entered).
(3) Use Delete right soft key to delete the prefix number.
(4) Press SAVE left soft key to confirm the selection.
(5) When this feature is turned on, the LCD will prompt the user “Dial
Prefix? Yes or No”. On each outgoing phone call from call logs,
phonebook, and dial-and-send dialing, the current prefix is also
displayed.
Re: the prefix number will be added automatically in front of the
dialed number if the YES left soft key is pressed.
(6) This feature is useful for access code (PBX code for outside dial tone),
a calling card, or credit card calls, etc.
b. Press 2 to set Group Select: see Handset Group Subscription on page 37 .
c. Press 3 to set Call Barring: see Call Barring operation on Page 43.
d. Press 4 to set Feature Call: see Feature Call operation on Page 45.
e. Press 5 to set Baby Monitor: see Baby Monitor operation on Page 49.
6. Press 5 to set Phone Settings:
a. Press 1 to set Mic Gain: See Mic Gain operation on Page 49.
b. Press 2 to set Any Key TALK (answering a call by pressing any key versus
only the talk key):
Use CHANGE left soft key to select and confirm “On” or “Off".
Default is “Off”.
Re: When set to “on”, press any key (except and SILENT key) to
answer the incoming call.
c. Press 3 to set LCD Contrast:
(1)
Use or to scroll through option 1~8. Default is 6.
(2)
Press SAVE left soft key to confirm selection.
d. Press 4 to set LCD Backlight:
(1)
Use or to scroll through option 1~3 (1.8 seconds 2.On
3.Off ). Default is 8 seconds.
(2)
Press SAVE left soft key to confirm selection.
e. Press 5 to set Name Tag:
~54~
(1)
Use CHANGE left soft key to select and confirm “On” or “Off". Default is
“Off”.
(2)
Press SAVE left soft key to confirm selection.
Re: When Set to “On”, the handset will match the caller ID with the phone
book entries. Once matched, the LCD screen will display the name or
nickname instead of pure caller ID info (needs Call Waiting with Caller
ID service from local telephone company along with PBX system if a PBX
system is used).
f. Press 6 to set Language:
(1)
Use or to scroll through option 1~10 (1.English 2.Spanish
3.French 4.Italian 5.German 6.Dutch 7.Polish 8.Czech 9.Hungary
10.Romanian).
Default is “English”.
(2)
Press SAVE (Left) soft key to confirm selection.
g. Press 7 to set Custom Name:
(1) Enter characters using the Character Table and method discussed in the
Phonebook section (On page 41).
(2)
Use or to move the cursor backward or forward to insert (to
the left of the cursor) or delete (the character above the cursor, or left
of the cursor if cursor is on the right of the last character).
(3) Press SAVE (Left) soft key to confirm setting.
Re: Once entering the custom name, the greeting of LCD in standby mode
will be changed to what you have entered.
Default greeting is “FREESTYL V2”.
h. Press 8 to Change Password:
(1)
Enter original password (4 digits) of handset then press OK left soft key
when enter this menu (default password is 0000).
(2)
Enter new password (4 digits) then press SAVE left soft key to confirm
new password.
i. Press 9 to set Headset Ring: See Headset Ring operation on Page 49.
7. Press 6 to set Base Settings:
When entering this menu, you must enter the Base PIN code first (4 digits).
Re: The PIN code is for Base Settings. Default is 0000.
Page 28

~55~
a. Press 1 to set DTMF Duration.
(1)
Enter the DTMF duration (90~200ms), press OK left soft key to confirm
the setting. Default is 100ms.
Re: Please check with your dealer before changing. If the duration does not
match with the PSTN or PBX setting, some or all of the DTMF digits you
press may not be recognized.
b. Press 2 select flash key timing. Default is 600ms.
(1)
Use or to scroll through option 1~9 (100~900ms). Or press
digit key (1~9) directly.
(2)
Press SELECT left soft key to confirm selection.
Re: The default value (600 ms) works in most areas. Changing this setting
may cause the flash-hook signal to not be recognized properly by the
PSTN line or PBX system. You may need to change this setting if you find
you are unable to properly answer incoming calls, or are unable to
transfer calls. Many of the newer IP-PBX (VOIP server type) systems do
require a flash time of 200ms or 300ms.
c. Press 3 to set Assign Next HS
(1)
Enter the 2-digit handset ID followed by pressing OK left soft key.
(2)
Normally when registering a handset, the base will give a handset the
next available registration ID. Assign next will allow you to customize
the next registration ID (as long as it is available and between 11 and
19).
d. Press 4 to set Clear HS
(1)
Enter the 2-digit handset ID followed by pressing OK left soft key.
(2)
The base will erase the handset ID from the system.
e. Press 5 to Change PIN:
(1)
Enter the new Base PIN followed by OK left soft key.
Re: Default Base PIN is 0000.
f. Press 6 to set Auto Hang Up:
(1)
Use CHANGE left soft key to select and confirm on or off. The
Re: When setting “on”, the FREESTYL V2 will automatically hang up if the far
end caller has hung up. However, this function depends on if there is a
“dial tone or busy tone” signal sent out by PBX or PSTN, after the call is
hung up. Default = OFF
g. Press 7 to Set Time to support DTMF Caller ID:
(1)
Use SAVE left soft key to select and confirm the Date and Time you
have set (see Set Time operation on page 20).
8. Press 7 to register and de-register handsets: see Handset Registration operation
on Page 36.
~56~
9. Press 8 to set Menu Display:
To avoid users changing phone settings such as Call Settings (MENU-4), Phone
Settings (MENU-5) and Base Settings (MENU-6), you can hide these menus.
Re: When entering the Menu Display, you have to enter a password first.
a. Press 1 to set hiding/un-hiding of the Call Settings menu.
(1)
Use CHANGE left soft key to select and confirm on or off.
b. Press 2 to set hiding/un-hiding of the Phone Settings menu.
(1)
Use CHANGE left soft key to select and confirm on or off.
c. Press 3 to set hiding/un-hiding of the Base Settings menu.
(1)
Use CHANGE left soft key to select and confirm on or off.
Re: Select “On” means the menu will be displayed on screen. Select “Off” means
the menu will be hidden.
Page 29

~57~
Index
2
2-Way Intercom, 14, 29
A
Adjusting Receiver (Earpiece) Voice Volume, 33
Adjusting Handset Speakerphone Voice Volume, 33
Adjust Handset Microphone Gain, 50
Adjust Headset Ring, 51
B
Base ID, 48
Base Illustration, 21
Base Operation, 27
Base PIN, 18, 19, 20
Base Station, 5, 6, 9, 10, 14, 15, 20, 22, 25, 26, 27, 28, 30, 36, 43
Base Station Features, 22
Base Station Installation, 25
Battery, 5, 7, 10, 24, 26, 27, 35
Battery Recharge and Replacement, 35
Battery Safety Instructions, 7
Battery Strength, 13
Block Incoming Call, 43
Block Outgoing Call, 43
Broadcast, 14, 16, 18, 31, 44, 49
Broadcasting a Group of Handsets, 30
Broadcasting all Handsets, 30
Broadcasting an Individual Handset, 31
BS Selection, 49
C
Call Barring, 16, 18, 42, 43, 54
Call Log, 16, 17, 46, 47
Call Timer, 17
Call Transfer, 33, 37
Call Hold, 17
Caller ID, 15, 20, 31, 32, 46, 47, 50, 55, 56
Call in-progress, 13
Call Manager, 49, 50, 54
Call Settings, 16, 18, 20, 37, 49, 50, 51, 54, 57
Call Waiting, 14, 15
~58~
Call Waiting with Caller ID, 15, 55
Cardiac Pacemaker, 4
Change PIN, 18, 19, 56
Charger Features, 24
Charger Illustration, 23
D
De-registration, 36
DND, 15
Do Not Disturb (Silent Ring), 15, 34
DTMF Tone, 18
DTMF Duration, 18, 56
E
Electric Shock, 4, 5, 6
Emergency, 4
Equipment Checklist, 10
F
Flash, 14, 19, 36, 45, 48, 50, 56
Feature Call, 17, 45, 54
G
General Safety Instructions, 4
Group ID, 15, 30, 38, 42
Group Setting, 18, 37
Group Selections, 37, 54
H
Handset and Charger Installation, 26
Handset Charging Slot, 24
Handset Features, 13, 15
Handset Group Subscription, 37, 54
Handset ID, 13, 15, 17, 19, 22, 27, 30, 31, 32, 36, 38, 39, 42, 48, 56
Handset Registration, 36, 57
Handset to Handset Call, 30
Hearing Aid, 4
I
IDLE Mode, 17, 27, 35
K
Page 30

~59~
Key Guard, 34, 53
Key Tone, 17, 53
Key Volume, 53
L
Line Jack, 22
Lithium-Ion (Li-Ion), 7, 10
Line Reversal, 56
M
Making a Broadcast, 30
Making a Telephone Call, 29
Making an 2-Way/ Intercom Call, 29
Memory, 27
Menu Display, 18, 57
Menu Mode, 27, 53
Multiple Handsets Registration, 15
Mute, 17, 33
N
Name Tagging, 15, 55
O
Outdoor Antenna, 10, 22
P
Phonebook, 14, 16, 17, 39, 45, 46, 47, 53, 55
Phone Settings, 18, 20, 50, 51, 54, 57
Placing a Call On Hold, 33
Power Outage, 5, 9, 25, 26
Product Safety Instructions, 5
Programmable Flash, 19
Programmable feature call, 17, 45, 46
R
Receiving a Telephone Call, 31
Receiving an Intercom Call, 32
Redial, 16, 31
REG, 22, 37, 48
Registration Key, 22
Registration Mode, 22, 27, 36, 48
~60~
Regulatory Information, 8
REN
, 8
Reset Button, 22
Ringer, 14, 15, 20, 31, 32, 34, 51, 53
Ringer Volume, 14, 15
RSSI, 13
S
Safety Instructions, 4
Set Time, 20
SILENT, 15, 32, 34
Spare Battery, 10
Speed Dial, 29
Speakerphone, 14, 30, 31, 33, 48
Subscribe BS, 49
T
Talk Mode, 14, 27, 46
Talk/Flash, 14
Technical Specifications, 62
Transformer, 25, 26
Two-Digit Address Index, 13
V
Vibrator, 15
View Call log, 46
Visual Message Waiting Indicator, 50
W
Warning Message, 24
Page 31

~61~
Technical Specifications
Electrical Specifications Base Station Portable Handset
Frequency 902-928 MHz 902-928 MHz
RF Output Power
Peak: 27 dBm
Average: 21 dBm
Peak: 26 dBm
Average: 20 dBm
Channel Spacing 101 kHz 101 kHz
Number of Channels 252 252
Modulation Differentially Encoded MSK Differentially Encoded MSK
Multiple Access Frequency Hopping TDD Frequency Hopping TDD
Frequency Hopping Rate 100 per second 100 per second
TDD Frame Length 10 ms 10 ms
Number of Slots/Frame 4 4
Receiver Sensitivity
<-111dBm (@ BER 10-2) <-111dBm (@ BER 10-2)
Antenna Gain 2 dBi Long: 2.5 dBi; Short: 1.5 dBi
Antenna Connector Reversed TNC Proprietary
Telephone Interface RJ11 x 2 NA
Channel Coding 8 kbps Convolutional + CRC 8 kbps Convolutional + CRC
Transmission Data Rate 85.333 kbps 85.333 kbps
Speech Coding 8 kbps G.729AB 8 kbps G.729AB
User Data Rate 64kbps duplex 64kbps duplex
Duplex Time Division Duplex (TDD) Time Division Duplex (TDD)
Number of System ID 65,536 65,536
Ring Signal 20-50 Hz, 30-90 Vrms NA
Flash Time 100-900 ms programmable
NA
Power Source AC/DC 5V/1A Adapter 3.7V/1100mAh Li-Ion Battery
550mA
Charger Current
NA
(550/850mA for desktop
charger)
Charge Time NA 3hours
Regulation Compliance
FCC Part 15, Part 68
Canada RSS-210, CS03
FCC Part 15, Part 68
Hearing Aid Compatible
Canada RSS-210, CS03
Operating Temperature 0 – 50 °C -10 – 60 °C
Storage Temperature
-40 – 70 °C -40 – 70 °C
Humidity 20 – 75 % 20 – 75 %
Notes:
1.
NA = Not Applicable.
2.
The manufacturer reserves the right to change designs and specifications without
notice.
Page 32

Manuel d'utilisation (Française)
FreeStyl V2
Téléphone sans fil numérique longue portée
~2~
Table des matières
Instructions relatives à la sécurité ..................................................... 4
Instructions relatives à la sécurité ................................................. 4
Instructions relatives à la sécurité des produits............................ 5
Instructions relatives à la sécurité ................................................. 7
Information réglementaires............................................................... 8
Liste de contrôle des équipements.................................................. 10
Illustration du combiné.................................................................... 11
Caractéristiques du combiné ........................................................... 13
Caractéristiques de base du combiné.......................................... 13
Caractéristiques du combiné supplémentaire............................. 15
Illustration de la base....................................................................... 21
Caractéristiques de la base .............................................................. 22
Caractéristiques principales de la station de base ...................... 22
Illustration du chargeur ................................................................... 23
Caractéristiques du chargeur........................................................... 24
Mise en route................................................................................... 25
Installation de la station de base................................................. 25
Installation du chargeur et du combiné....................................... 26
Fonctionnement de base ................................................................. 27
Modes de fonctionnement .......................................................... 27
A. Modes de fonctionnement de la base.................................. 27
B. Modes de fonctionnement du combiné ............................... 27
Passer un appel téléphonique ..................................................... 29
Faire un appel Double sens / Intercom........................................ 29
A. Appels combiné vers combiné.............................................. 30
Effectuer une diffusion ................................................................ 30
A. Appels combiné vers combiné.............................................. 30
Recomp. ....................................................................................... 31
Recevoir un appel téléphonique.................................................. 31
Recevoir un appel Intercom......................................................... 32
Mettre fin à un appel. .................................................................. 32
Page 33

~3~
Réglage du volume de la voix dans le récepteur (écouteur) du
combiné ....................................................................................... 33
Réglage du volume de la voix dans le haut-parleur du combiné. 33
Mettre un appel en attente ......................................................... 33
Muet............................................................................................. 34
Ne pas déranger (Sonnerie silencieuse) ...................................... 34
Garde-touches.............................................................................. 34
Recharge et remplacement de la batterie................................... 35
Fonctionnement avancé .................................................................. 36
Enregistrement du combiné ........................................................ 36
Enregistrement d'un combiné dans un groupe. .......................... 37
Mise en attente d'appel............................................................... 38
Fonctionnement de l'annuaire .................................................... 39
Interdi. appel................................................................................ 43
Fonction appel programmable .................................................... 45
ID appelant................................................................................... 46
Indicateur visuel de message en attente (VMWI) ....................... 48
Régler le gain de microphone du combiné.................................. 48
Réglez la sonnerie des écouteurs ................................................ 49
Bébé Moniteur ............................................................................. 49
Index................................................................................................. 55
Spécifications techniques ................................................................ 59
~4~
Instructions relatives à la sécurité
Précaution : Votre téléphone sans fil vous donne la liberté et la flexibilité
de rester joignable quand vous vous déplacez. Toutefois, lorsque vous
utilisez votre appareil téléphonique, certaines instructions relatives à la
sécurité sont à respecter pour éviter les risques d'incendie,
d'électrocution, de blessure corporelle ou de dégâts matériels.
Instructions relatives à la sécurité
1. Lorsque vous utilisez votre téléphone sans fil, assurez-vous de votre sécurité et
de celle des autres :
a. Regardez toujours où vous marchez et où vous vous tenez.
b. Ne laissez pas un coup de téléphone vous distraire d'un travail en toute
sécurité.
2. En cas d'urgence :
a. Si une urgence survient, composez le numéro de téléphone d'urgence.
Souvenez-vous : Si vous êtes dans une zone où votre téléphone ne dispose
pas d'un signal clair de la base, il est fort probable que l'appel ne passe pas.
Repérez le téléphone fixe ou un autre appareil de communication le plus
proche pour appeler du secours.
b. Les appels d'urgence ne fournissent pas systématiquement aux
interlocuteurs vos nom, numéro de téléphone ou emplacement.
3. Avertissement aux personnes porteuses d'un appareil auditif : Ce système
téléphonique est compatible avec les aides auditives couplées de façon
inductive.
4. Avertissement aux personnes porteuses de stimulateur cardiaque : Bien que
des interférences puissant se produire avec un stimulateur cardiaque implanté
à très faible distance, les téléphones sans fil ne semblent pas poser de
problème significatif aux porteurs de stimulateur cardiaque.” Cependant, en
l'état actuel des connaissances, nous recommandons aux personnes porteuses
de stimulateur cardiaque de prendre des précautions lors de l'utilisation ou du
transport d'un téléphone sans fil, pour s'assurer qu'il y a assez de distance
entre le téléphone et le stimulateur. Ne portez pas le combiné dans une poche
à la poitrine. Si vous avez une raison de soupçonner que des interférences ont
lieu, éteignez immédiatement votre combiné.
Page 34

~5~
Instructions relatives à la sécurité des produits
1. Lisez et comprenez toutes les instructions.
2. Suivez tous les avertissements et toutes les instructions y compris ce qui est
indiqué sur le produit.
3. Les changements et les modifications apportés à ce produit et non
expressément approuvés par le fabricant annulent la garantieet l'autorisation
CE d'utiliser cet appareil. Utilisez uniquement les accessoires fournis par le
fabricant.
4. N'utilisez pas le téléphone près de l'eau. Ne jamais répandre de liquide sur le
téléviseur.
5. Débranchez le produit de la prise téléphonique murale et de la prise secteur
avant nettoyage. N'utilisez pas de nettoyant liquide ou aérosol. Utilisez un
chiffon humide pour le nettoyage.
6. Ne placez pas ce produit sur un chariot, un support ou une table instable. Le
produit peut tomber et provoquer des blessures personnelles et des dégâts au
produit ou à d'autres biens.
7. Panne d'alimentation : En cas de panne d'alimentation, le chargeur de votre
combiné ne recharge plus la batterie du combiné, et la station base ne vous
permet plus de passer ni de recevoir d'appel. Le chargeur et la station base
nécessitent tous deux de l'électricité pour fonctionner. Vous devez disposer
d'un téléphone qui ne requiert pas d'électricité pour une utilisation lors de
panes de courant, ou avoir une alimentation électrique de secours.
8. Les fentes et les ouvertures sur le boîtier du produit sont destinées à la
ventilation. Ces ouvertures ne doivent être ni obstruées ni couvertes. Le fait de
placer le produit sur un lit, un tapis ou une autre surface similaire peut bloquer
ces ouvertures, et il faut l'éviter. Ce produit ne doit jamais être place près ou
au-dessus d'un radiateur ou d'un convecteur, ou d'une installation intégrée, à
moins de fournir une ventilation adéquate.
9. N'enfoncez jamais d'objet d'aucune sorte dans ce produit à travers les
fentes/ouvertures du boîtier, car cela pourrait endommager le produit, toucher
des points exposés à des tensions dangereuses ou court-circuiter des pièces et
provoquer un incendie, une électrocution ou des blessures.
10. Ce produit doit être utilisé qu'avec le type d'alimentation indiqué sur
l'étiquette. Si vous n'êtes pas sûr du type d'alimentation de votre domicile,
consultez votre revendeur ou votre compagnie d'électricité locale.
11. Ne surchargez pas les prises de courant secteur ni les rallonges car cela peut
causer un incendie ou une électrocution.
12. Pour éviter une électrocution ou une brûlure, ne démontez pas ce produit.
Envoyez ce produit à un centre de service autorisé lorsqu'un entretien ou une
réparation est nécessaire. Appelez le service clientèle pour connaitre les
~6~
emplacements près de chez vous. Le fait d'ouvrir ou d'enlever les capots vous
expose à des Le fait d'ouvrir ou d'enlever les capots vous expose à des tensions
et des courants électriques dangereux ou à d'autres risques. Un remontage
incorrect du produit peut provoquer une électrocution lorsque le produit est
ensuite utilisé.
13. Évitez d'utiliser le produit pendant un orage. Il peut y avoir un risque
d'électrocution par la foudre.
14. Ne placez pas le produit là où des personnes peuvent piétiner, passer ou
tomber sur lui.
15. Ne placez pas d'objets conducteurs au-dessus ou près de l'antenne.
16. N'utilisez pas le produit pour signaler une fuite de gaz au voisinage de la fuite.
17. N'installez pas la station de base ni le chargeur du combiné près de fours micro-
ondes, de radios, de téléviseurs, de haut-parleurs ou autres appareils
électriques. Ces appareils peuvent provoquer des interférences avec le produit
ou recevoir des perturbations de la part du produit.
18. Dans les situations suivantes, débranchez la station de base ou l'adaptateur du
chargeur de la prise de courant et référez-vous à un centre de service autorisé :
a. Si du liquide a été renversé dans le produit.
b. Lorsque le cordon d'alimentation ou sa fiche est endommagé ou effiloché.
c. Si le produit a été exposé à la pluie ou à l'eau.
d. Si le produit ne fonctionne pas normalement en suivant les instructions
d'utilisation.
e. Si le produit est tombé ou si le boîtier a été endommagé.
f. Si le produit affiche une nette diminution de ses performances.
Page 35

~7~
Instructions relatives à la sécurité
1. N'utilisez que des batteries Li-ion rechargeables et un chargeur approuvés par
le fabricant. N'utilisez pas d'autres types de piles rechargeables ou des piles
non rechargeables. Les batteries peut provoquer un court-circuit, et
l'enveloppe de la batterie peut être endommagés entraînant une situation
dangereuse.
2. Suivez les instructions de chargement de ce manuel et les étiquettes et
inscriptions d'instructions dans le combiné et les compartiments du chargeur.
3. La batterie ne doit pas être chargée à l'endroit où la température est inférieure
à 0 ℃ ou supérieur à 40 ℃.
4. La batterie doit être recyclée ou éliminée de façon appropriée. Ne jetez pas la
batterie dans un feu. Les cellules peuvent exploser.
5. Ne jetez pas la batterie avec les déchets municipaux. Vérifiez les
réglementations locales pour vous en débarrasser.
6. Faites attention en manipulant les batteries afin de ne pas provoquer de court-
circuit avec les matériaux conducteurs comme les bagues, les bracelets, les clés,
les canifs ou les pièces de monnaie. La batterie ou le matériau conducteur peut
surchauffer et provoquer des brûlures ou un incendie.
7. N'exposez pas les batteries à la pluie ou l'eau.
8. N'ouvrez pas et ne découpez pas la batterie. L'électrolyte libéré est corrosif et
peut causer des blessures aux yeux ou à la peau. L'électrolyte peut être
toxique s'il est ingéré.
9. Pendant la charge, la batterie se réchauffe. Ceci est normal et n'est pas
dangereux.
~8~
Information réglementaires
FreeStyl V2
FCC ID:U2M-FSV2
IC:3616C-FSV2
Cet appareil est conforme à la réglementation FCC. Son utilisation est
soumise aux deux conditions suivantes :
1) cet appareil ne doit pas causer d'interférence nuisible, et
2)
cet appareil doit accepter toute interférence reçue, y compris celles
qui peuvent causer un fonctionnement non souhaité.
1.
Ce système téléphonique est conforme aux réglementations de l'EN 301 357-2
(RF)、EN 301 489 (EMC)、EN 60950 (Sécurité) and EN 50371 (Sécurité RF).
2.
Le REN est utile pour déterminer la quantité d'appareils que vous pouvez
connecter à votre ligne téléphonique et en maintenant la sonnerie de tous les
appareils lorsque votre numéro de téléphone est appelé. Dans la plupart des
zones, mais pas toutes, la somme des REN de tous les appareils connectés à
une ligne ne doit pas dépasser 5.0. Pour être sûr du nombre d'appareils que
vous pouvez connecter à votre ligne téléphonique, vous devez contacter votre
compagnie de téléphone locale pour connaître le REN maximum dans votre
région.
3.
Si votre équipement téléphonique cause des problèmes au réseau
téléphonique, la compagnie de téléphone peut vous demander de débrancher
votre système téléphonique de la ligne jusqu'à ce que le problème ait été
corrigé. Consultez votre compagnie de téléphone locale pour connaître vos
droits le cas échéant.
4.
Votre compagnie de téléphone peut apporter des modifications à ses
installations, équipements, opérations ou procédures, qui peuvent affecter le
bon fonctionnement de votre système téléphonique. Consultez votre
compagnie de téléphone locale pour connaître vos droits le cas échéant.
5.
Ce système téléphonique ne peut pas être affecté à un service à pièces de
monnaie fourni par la compagnie de téléphone. Le raccordement aux lignes est
soumis à tarification régionale.
6.
Ce système téléphonique a été testé et déclaré conforme aux limites de la
réglementation des EN 301 357-2 (RF)、EN 301 489 (EMC)、EN 60950
(Sécurité) et EN 50371 (Sécurité RF ). Ces limites sont conçues pour fournir une
protection raisonnable contre les interférences nuisibles dans une installation
publique générale. Le fonctionnement de ces appareils peut toutefois
Page 36

~9~
rencontrer des interférences de / vers la télévision, les magnétoscopes, les
radios, les ordinateurs ou autres appareils électroniques alentours. Pour
minimiser ou éviter ces interférences, le système téléphonique ne doit pas être
placé ni fonctionner près d'autres appareils électroniques.
7.
Il n’y a toutefois aucune garantie qu’il ne se produira pas d’interférences dans
une installation particulière. Si ce système téléphonique provoque des
interférences avec d'autres appareils électroniques, ce qui peut être déterminé
en mettant allumant et en éteignant le système, l'utilisateur est encouragé à
essayer de corriger l'interférence par une ou plusieurs des mesures suivantes :
a.
Nous recommandons au moins 20 pieds entre le système et d'autres
appareils électroniques.
b.
Connectez la station de base sur une prise secteur d'un circuit séparé de
celui utilisé par l'appareil qui reçoit des interférences. Consultez un
revendeur ou un technicien expérimenté en électronique pour de l'aide.
~10~
Liste de contrôle des équipements
1. Dans l'emballage combiné + base, veuillez trouver les composants suivants :
a. Station de base x 1 (l'antenne a installé)
b. Adaptateur CA/CC de la base x 1
c. Combiné x 1 (l'antenne a installé)
d. Chargeur de bureau x 1
e. Adaptateur CA/CC du chargeur x 1
f. 1100mA Li-ion Pack batterie x 1
g. Cordon téléphonique x 1
h. CD (Manuel d'utilisation), Guide rapide
2. Dans l'emballage combiné, veuillez trouver les composants suivants :
a. Combiné x 1 (l'antenne a installé)
b. 1100mA Li-ion Pack batterie x 1
c. Chargeur de bureau x 1
d. Adaptateur CA/CC du chargeur x 1
e. Guide rapide
3. Accessoire en option
a. Kit d'antenne extérieure (y compris antenne et câble)
b. Kit de protection foudre
c. Antenne de combiné à haut élevé
d. Combiné
e. Répartiteur d'antenne
Page 37

~11~
Illustration du combiné
Annuaire
~12~
Parleur
Couvertur
e de pile
Prise casque
Page 38

~13~
Caractéristiques du combiné
Caractéristiques de base du combiné
1. LCD (Liquid Crystal Display) 4 lignes
a. L'écran LCD comprend des DEL (Diodes électroluminescentes) pour le
rétroéclairage.
b. La 1
ère
ligne du LCD comprend les icônes.
c. Explication des icônes de gauche à droite
(1) RSSI (Indicateur de force de signal de réception)
Pendant un appel, le nombre de barres est
proportionnel à la puissance du signal radio reçu.
(2)
Mode lien
(2.1) Le symbole du téléphone indique que la
ligne téléphonique est active.
(2.2) Intercom en cours
Indique si le mode intercom est actif
Indique l'ID du combiné avec lequel l'intercom est en communication.
(3) Mode conversation
(3.1) Indicateur de haut-parleur
Indique si le haut-parleur est actif
(3.2) Mode combiné
(4) Son et indication
(4.1) Activer la sonnerie
(4.2) Désactiver la sonnerie
(4.3) Mode sonnerie et vibreur
(4.4) Mode vibreur
(4.5) Indicateur de message en attente
(5) Désactiver PA
Indique si le haut-parleur est désactivé
(6)
11
Index d'adresse à deux chiffres
Affiche l'ID du combiné à2 chiffres.
(7) Force de la batterie
Le nombre de barres est proportionnel à l'autonomie batterie restante.
d. Les 2
ème
et 3
ème
lignes du LCD, d'un maximum de 16 caractères chacune,
affichent l'état, les messages, les choix de menu, ou les caractères
alphanumériques modifiables par l'utilisateur.
e. La dernière ligne affiche les touches soft gauche et droite.
2. Sonnerie
~14~
a.
Sonne
sur un appel entrant ou intercom.
b.
Des sons d'alerte distincts indiquent différents événements :
(1) Simple bip : saisie de touche réussie.
(2) Double bip : indique la marche/l'arrêt.
(3) Triple bip : échec de fonctionnement.
(4) Périodique 1-Long-2-Court bip (toutes les 1 minutes) : avertissement de
batterie faible、hors plage、appel en attente
Re : Aucun bip pour une entrée de touche non valide
3.
CONVERSATION/FLASH ( )
a.
Passe
ou répond à un appel téléphonique ou intercom
b. Envoie un signal Flash à la ligne téléphonique pour récupérer une
tonalité
de numérotation une fois l'appel terminé, ou pour utiliser la
fonction
de
mise en attente offerte par la compagnie téléphonique locale pendant un
appel.
4.
HAUT-PARLEUR( )
a.
Appuyez
sur la touche pour activer / désactiver le haut-parleur
pendant
un
appel entrant, sortant ou par intercom.
5.
INTERCOM DOUBLE SENS ( )
a. Passe un appel intercom vers un autre combiné, un combiné de
groupe
(recherche de groupe ) ou tous les combinés enregistrés.
b. Les appels intercom sont numériques, duplex intégral, et sont
effectués
sans l'aide de la base.
6.
DIFFUSION ( )
a.
Diffusion
semi duplex vers les combinés pour annonce immédiate
b.
Diffusion
semi duplex vers les stations de base
Re :
Appuyez
sur la touche sur le côté du combiné pour activer la fonction
de diffusion.
7.
Touches gauche/droite (
)
a. Faire un choix de menu.
8.
Touches de défilement Haut( ) /Bas( )
a.
Faire
défiler des enregistrements et des choix de menu.
b.
Règle
le volume de la voix du récepteur en mode Conversation.
c.
Appuyez sur pour régler le volume de la sonnerie en mode Veille.
d.
Appuyez sur pour entrer dans l'annuaire téléphonique en mode
Veille.
9.
FIN; touche MARCHE/ARRÊT ( )
a. Met fin à un appel.
Page 39

~15~
b.
Quitte
l'utilisation du menu actuel, remonte de un niveau.
c. Appuyez pendant 3 secondes pour éteindre l'alimentation
10.
Touche ID APPELANT ( )
a. Revoir la liste des ID Appelants.
b. Comprend les ID appelants reçus et manqués.
Caractéristiques du combiné supplémentaire
1. Enregistrement de plusieurs combinés
a. Jusqu'à 9 combinés téléphoniques peuvent être enregistrés sur une station
de base
b. ID 11-19 : ID individuels des combinés.
c. ID 91-99 : IDgroupe. Les combinés peuvent "s'enregistrer", à partir du
menu du combiné, à des groupe(s) et être recherchés lorsqu'un appelant
par ligne fixe ou par intercom saisit un ID de groupe.
2. Sonnerie vibreur
a. Deux options pour la sonnerie de ligne (appel entrant) et la sonnerie de
l'intercom.
b. Choix du volume de sonnerie sur six niveaux (éteint
/bas/moyen/haut/vibreur/ vibreur et haut ) pour chacune des deux
options.
c.
Huit choix de type de sonnerie pour chaque option.
3. ID appelant
a. Affiche le numéro de téléphone et le nom de l'appel entrant sur le LCD
(requiert le service ID appelant de votre compagnie de téléphonie locale)
4. Appel en attente avec ID appelant
a. Affiche les informations sur le 2
ème
appel entrant sur la même ligne
téléphonique lorsque le 1er appel est en cours (requiert le service de mise
en attente avec ID appelant auprès de votre compagnie de téléphonie
locale)
5. Nom avec ID appelant
a. Fait correspondre l'ID appelant avec les entrées du répertoire, et une fois
la correspondence faite, l'écran LCD affiche le nom ou le diminutif au lieu
des simples infos d'ID appelant (requiert le service de mise en attente avec
ID appelant auprès de votre compagnie de téléphonie locale).
6. DND (Ne pas déranger, c.-à-d., Sonnerie silencieuse)
7. Journaux d'appels
a. Rappel : Mémorise les 10 numéros de téléphone (jusqu'à 26 numéros
chacun) composés le plus récemment. Peut effectuer la renumérotation
~16~
du dernier numéro sur chacun des 10 numéros.
b. Journal des appels reçus et nouveaux : Total 50 entrées (numéro de
téléphone sur 16chiffres, noms sur 16caractères, et Date/Heure), requiert
le service ID appelant de votre compagnie de téléphone locale.
c. Les numéros de téléphone et les noms peuvent être sauvegardés dans le
répertoire téléphonique pendant l'affichage.
8.
Blocage d'appel : bloque les appels sortants et les appels entrants.
a. Appels sortants :
a-1. Empêche les utilisateurs de composer des appels interurbains ou
internationaux
a-2. Jusqu'à 5 chiffres pour chaque paramètre de limitation des appels ;
jusqu'à 5 entrées autorisées.
a-3. Si vous avez besoin de composer un numéro spécifique pour obtenir la
tonalité, vous devez saisir ce numéro en définissant les limitations d'appels
b. Appels entrants :
b-1. PA On/Off (Marche/Arrêt) : Active ou désactive la diffusion d'autres
combinés ou de la base. Lorsque PA est désactivé (Off), le combiné ne peut
pas recevoir de diffusion de la base ni d'autres combinés enregistrés, mais
il peut diffuser vers la base ou vers d'autres combinés enregistrés.
b-2. Ligne On/Off (Marche/Arrêt) : Active ou désactive la capacité de
recevoir les appels entrants de la ligne téléphonique. Lorsque la ligne est
désactivée (Off), le téléphone ne peut pas recevoir les appels entrants de
la ligne téléphonique, mais il peut encore passer des appels.
b-3. Int. On/Off (Marche/Arrêt) : Active ou désactive l'interphone depuis
les autres combinés ou la base. Lorsque Int. est désactivé (Off), le combiné
ne peut pas recevoir d'appels par interphone de la base ni des autres
combinés enregistrés, mais il peut appeler par interphone la base ou les
autres combinés enregistrés.
c. Cette modification exige d'entrer dans les "Paramètres d'appel" (MENU-4-
3).
[Remarque] Il vous faut saisir l'ID utilisateur précise et le mot de passe pour
effectuer cette fonction. Le mot de passe par défaut est "0000".
9.
Réponse toute touche (sauf et la touche soft SILENC)
10. Garde-touches
a. Lorsque le garde-touches est sélectionné, toutes les touches sont
verrouillées.
Appuyez sur la touche soft DÉVER. (gauche) suivie de “*” pour libérer.
b. Le verrouillage des touches est automatiquement activé une fois de retour
au mode inactif pendant 15 secondes.
Page 40

~17~
11. Préfixe de numérotation
a. Jusqu'à 14 chiffres, y comris les pauses, un code d'accès peut être
préprogrammé pour s'ajouter automatiquement devant le numéro
composé lors de la numérotation à partir des journaux d'appels, du
répertoire et de la numérotation pour envoi.
12. Mise en attente d'appel
a. Met un appel en attente
13. Muet
a. Appuyez sur la touche soft MUET (gauche) pendant la conversation, le
microphone du combiné est coupé.
Appuyez sur la touche soft MICRO (gauche) pour libérer.
14. Annuaire
a. 50 entrées, chacune stocke un numéro de téléphonique ou un ID de
combiné(jusqu'à 26 chiffres) et un nom (jusqu'à 16 caractèress)
b. Affichage trié par ordre alphabétique et recherche par lettre.
c. Numéroter à partir de l'affichage.
d. Au cours du mode veille, vous pouvez entrer dans l'annuaire en appuyant
sur la touche de défilement .
e. Transfert du répertoire téléphonique sans fil
i. Transfert du répertoire spécifique vers un combiné ou vers tous les
combinés enregistrés
ii. Transfert de tous les répertoires vers un combiné ou vers tous les
combinés enregistrés
15. Tonalité des touches
a. Choix de volume de tonalité des touches sur quatre niveaux
(Arrêt/faible/moyen/élevé).
b. Choix parmis quatre types de tonalité de touches.
16. Minuteries d'appels
a. Affiche la durée d'appel pour l'appel en cours, pendant et immédiatement
après l'appel.
17. Fonction appel programmable
a. Permet à l'utilisateur de préprogrammer le code de fonction le plus utilisé
dans le FREESTYL V2 qui est un ajout au système autocommutateur.
b. Jusqu'à 10 entrées peuvent être enregistrées.
c. Une fois le code de function programmé, vous pouvez lancer cette
fonction rapidement pendant l'appel en appuyant sur la touche soft
OPTION.
18. Marche/Arrêt PA
a. Activer ou désactiver la fonction de diffusion.
b. Lorsque PA est éteint, le combiné ne peut pas recevoir de diffusion de la
~18~
base ni de combinés enregistrés ; Mais il peut diffuser vers la base et les
autres combinés enregistrés.
19. Affichage du Menu
a. Pour éviter une mauvaise configuration dans “Réglages appel”(MENU-4),
“Réglages téléph” (MENU-5), “Réglage base” (MENU-6) et réglage Multibase (MENU-7-3), ces réglages peuvent être masqués.
b. Un mot de passe est requis avant d'entrer dans Affichage menu (MENU-8),
le mot de passe par défaut du combiné est “0000”.
c. Lorsque vous activez ces réglages, ils ne s'affichent plus, à moins d'êtrre
désactivés en entrant de nouveau dans l'Affichage menu.
20. Réglage groupe
a. Permet au combiné de s'enregistrer sur un ou plusieurs groupes.
Re : Jusqu'à 9 groupes peuvent être souscrits.
21. Nom personnalisé
a. Permet de modifier l'écran du “FREESTYL V2” pour avoir les mots ou les
infos souhaitées, comme par exemple le nom de l'utilisateur.
Re : Jusqu'à 32 caractères peuvent être entrés.
22. Changer le mot de passe
a. Permet de modifier le mot de passe du combiné, qui est requis pour entrer
dans Interdi. appel (MENU-4-3) et dans Affichage menu (MENU-8) .
Re : Par défaut, c'est "0000".
23. Durée DTMF
a. A partir de MENU-6-1 pour choisir la durée variable de la tonalité DTMF.
b. Par défaut, c'est 100ms.
c. Lorsque vous entrez dans le Réglage base, le PIN est requis. Par défaut,
c'est "0000".
Re: Il vaut mieux verifier d'abord auprès de votre compagnie de telephone
avant de modifier.
24. Durée de touche Flash programmable
a. A partir de MENU-6-2 pour choisir la durée de touche flash
b. Choix de durée sur 9 niveaux (100 ms-900 ms), par défaut=600 ms.
c. La valeur par défaut (600 ms) fonctionne dans la plupart des régions. La
modification de ce paramètre peut provoquer un non fonctionnement de
la clé Flash. Ne modifiez que si vous êtes certain que la nouvelle valeur
fonctionne.
d. Lorsque vous entrez dans le Réglage base, le PIN est requis. Par défaut,
c'est "0000".
25. Alloue l'ID combiné suivant au nouveau combiné
a. Utilisation du combiné enregistreé à partir de MENU-6-3 pour allouer un
ID de combiné suivant à un nouveau combiné.
b. Si l'ID de combiné suivant n'est pas alloué, le système alloue
automatiquement un ID de combiné à un nouveau combiné.
Page 41

~19~
c. Lorsque vous entrez dans le Réglage base, le PIN est requis. Par défaut,
c'est "0000".
26. Effacer le combiné
a. Utilisation d'un combiné enregistré à partir de MENU-6-4 pour supprimer
l'autre combiné enregistré, dans le cas ou l'autre combiné enregistré est
défectueux.
b. Une fois l'autre combiné effacé, l'utilisateur peut enregistrer un nouveau
combiné à la place.
c. Lorsque vous entrez dans le Réglage base, le PIN est requis. Par défaut,
c'est "0000".
27. Changer le PIN
Permet de modifier le PIN de la base, qui est requis pour entrer dans "Réglage
base" (MENU-6-5).
a. Utilisation du combiné enregistré pour modifier le PIN à partir de MENU-6-
5.
b. Par défaut, le PIN est “0000”.
c. Lorsque vous entrez dans le Réglage base, le PIN est requis. Par défaut,
c'est "0000".
28. Fonction Raccroch. auto
a. Utilisation du combiné enregistré à partir de MENU-6-6 pour
activer/désactiver la fonction Raccroch. auto.
b. Si vous activez cette fonction, le combiné raccroche automatiquement
lorsque l'interlocuteur raccroche.
c. Lorsque vous entrez dans le Réglage base, le PIN est requis. Par défaut,
c'est "0000".
29. Réglage de l'heure (Régler l'heure)
La fonction de réglage de l'heure (Régler l'heure) permet à l'utilisateur de
régler la date/l'heure pour prendre en charge l'ID appelant DTMF (L'ID appelant
DTMF ne contient pas la date/l'heure lors de la réception du PSTN ; avec ce
réglage, l'utilisateur peut revoir la date/l'heure à réception de l'ID appelant).
a. Entrez dans MENU-6 pour régler les Réglages de la base.
b.
Appuyez sur la touche de défilement ou pour choisir la base
souhaitée.
c. Entrez le PIN de la base (Par défaut, c'est "0000").
d. Entrez “7” pour entrer dans le Réglage de l'heure (Régler l'heure).
e. Entrez 64 digits for AA/MM/JJ(année/Mois/Jour), puis entrez 4 chiffres
pour hh:mm (Heures:Minutes)
f. Appuyez sur ENREG. (touche soft gauche) pour terminer le réglage.
30. Gain micro
Permet de modifier le gain du microphone du combiné en fonction de
l'environnement du combiné - Environnement calme, normal et bruyant.
Il faut pour cela entrer dans les "Paramètres du téléphone" (MENU-5-1).
~20~
Permet de modifier le gain du microphone du combiné en fonction de
l'environnement du combiné - Environnement calme, normal et bruyant.
Il faut pour cela entrer dans les "Paramètres du téléphone" (MENU-5-1).
31. Sonnerie écouteurs
Permet de modifier la sonnerie émise soit par le haut-parleur du téléphone
soit par le récepteur des écouteurs.
Il faut pour cela entrer dans les "Paramètres du téléphone" (MENU-5-9).
32. Bébé Moniteur
Permet de régler le combiné surveillant la chambre du bébé par appel
d'interphone.
Lorsque l'interphone bébé est réglé sur ON (MARCHE), ce combiné dédié ne
répond à aucun appel entrant, sauf pour l'interphone bidirectionnel.
Ceci nécessite d'entrer dans les “Réglages d'appels” (MENU-4-5).
Page 42

~21~
Illustration de la base
Diagramme de l'unité de base
R
éinitialisation
Prise
tél
Prise ligne
Prise Entrée CC
Page / Registre
~22~
Caractéristiques de la base
Caractéristiques principales de la station de base
1. Antenne
a. Le port antenne comprend un connecteur fileté normal ; pour enlever
l'antenne ou le câble, tournez dans le sens antihoraire ; pour installer,
tournez dans le sens horaire. Une mauvaise installation peut endommager
le connecteur.
b. Lorsque vous utilisez une antenne extérieure, placez l'antenne (pas la
station de base elle-même) aussi haut que possible pour un chemin de
transmission dégagé.
2. DEL
a. Alimentation : ceci indique que la station de base est alimentée.
b. En cours d'utilisation : ceci indique une ligne téléphonique active.
3. Bouton de RÉINITIALISATION
a. Restaure la station de base aux réglages d'usine
b. Le bouton de réinitialisation est en retrait pour éviter une réinitialisation
accidentelle du système.
c. Tous les combinés (y compris l'administrateur) et les bases
supplémentaires doivent être réenregistrés après une réinitialisation de la
station de base.
4.
Touche Page (PAGE)
Pour rechercher un combiné égaré; appuyez sur "Page "le bouton, tous les
combinés enregistrés bip pendant 30 secondes.
Appuyez sur "PAGE" ou encore sur n'importe quelle touche du combiné pour
arrêter.
5. Boutonn d'Enregistrement (PAGE)
Entre dans le mode d'enregistrement avec le combiné, et alloue une ID de
combiné (11-19).
6. Prise ligne
Connecteur standard RJ-11C/CA-11A pour brancher sur une ligne téléphonique
7. Prise télephone
Une autre RJ-11C pour brancher sur le répondeur optionnel
8. Prise Entrée CC : pour brancher l'adaptateur d'alimentation
Page 43

~23~
Illustration du chargeur
Slot d
e chargement
du combin
é
Entr é
e CC
~24~
Caractéristiques du chargeur
1. Entrée CC
Se connecte sur l'adaptateur CA du chargeur.
2. Slot de chargement du combiné
a. Charge la batterie du combiné lorsque celui-ci est placé sur sa station
d'accueil.
b. Référez-vous au LCD du combiné pour connaitre l'état de charge
(1) Chargement: la barre d'état de la batterie fonctionne et l'écran LCD affiche :
Chargement
(2) Complètement chargée : la barre d'état de la batterie reste immobile et
l'écran LCD affiche “Charge complète”
(3) Échec chargement : En cas d'erreur survenant pendant le mode de
chargement, l'écran LCD afficherait "Échec chargement"
3. Il est impossible de surcharger la batterie avec ce chargeur.
4. L'adaptateur pour recharger la station peut servir comme chargeur de voyage
également. Toutefois, vous ne pouvez pas éteindre l'appareil pendant le
chargement du combiné via le chargeur de voyage. Un message
d'avertissement "Débranchez le chargeur de voyage puis coupez
l'alimentation" s'affiche sur le LCD.
Remarques :
1. Chargez complètement les packs batterie avant la première
utilisation.
2. Le combiné est automatiquement “allumé” lorsqu'il est placé
sur le slot de chargement.
3. Toutefois, si vous videz la batterie, il faut environ une minute
pour que le combiné s'allume automatiquement.
Page 44

~25~
Mise en route
Installation de la station de base
Il y a trois configurations possibles pour la station de base :
Station de base seule
Station de base plus répondeur téléphonique
Station de base plus téléphone
Pour de meilleures performances, maintenez une distance d'au moins 1 mètre
(environ 3 pieds) entre la station de base et d'autres appareils éléctroniques (ex:
téléviseur, ordinateur, chaîne stéréo, télécopieur, répondeur, téléphone sans fil,
etc.)
1. Installeez l'antenne de la station de base.
Le port antenne comprend un connecteur
fileté normal ; pour installer, tournez dans
le sens horaire ; pour enlever l'antenne ou le
câble, tournez dans le sens antihoraire. Une
mauvaise installation peut endommager le
connecteur.
2. Branchez l'extrémité transformateur de
l'adaptateur CA/CC de la station de base dans
une prise secteur standard, branchez l'autre
extrémité dans la prise "Entrée CC" à l'arrière
de la station de base.
a. La prise CC de l'adaptateur de base est plus grande en dimensions que la
prise CC du chargeur. La prise CC de l'adaptateur du chargeur ne s'insère
pas dans la prise Entrée CC de la base.
b. L'alimentation électrique de la station de base (Adaptateur CC) et la ligne
téléphonique doivent être branchées sur un onduleur avec protection de
la ligne téléphonique.
3. Branchez le cordon téléphonique sur la prise “LIGNE”
4. Un téléphone standard ou un répondeur peuvent être branchés sur la prise
adjacente au fond de la station de base marquée TEL
~26~
Installation du chargeur et du combiné
1. Branchez l'extrémité transformateur de l'adaptateur CA/CC du chargeur dans
une prise secteur standard, branchez l'autre extrémité dans la prise "Entrée
CC" à l'arrière du chargeur.
2. Installez le pack batterie dans le combiné.
3. Installez l'antenne du combiné.
4. Placez le combiné sur le slot du chargeur.
5. Chargez complètement la batterie pendant trois heures avant utilisation.
6. Le système téléphonique est maintenant prêt à réaliser les fonctions de base
telles que passer et recevoir des appels téléphoniques et des appels intercom.
Aucune programmation de la station de base ou du combiné n'est nécessaire
pour les opérations de base.
Remarque :
1.
Les combinés livrés aec la station de base sont préenregistrés
en usine. Si vous avez un nouveau combiné, vous devrez vous
enregistrer le combiné avec la station de base afin qu'il soit
reconnu comme
un combiné membre par la(les) base(s) et par
les autres combinés. Voir Enregistrement du combiné.
2.
Chargez complètement les packs batterie avant la première
utilisation.
Page 45

~27~
Fonctionnement de base
Modes de fonctionnement
La station de base et le combiné ont tous deux des niveaux de fonctionnement
pendant lesquels seules certaines procédures de fonctions peuvent être exécutées.
A. Modes de fonctionnement de la base
1. Mode INACTIF- ceci est le mode par défaut. Le page sont actifs en mode
INACTIF.
La LED «Power» s'allume.
2. Mode PARLER-la base fonctionne dans ce mode lors d'un appel téléphonique.
Le "en cours d'utilisation"LED s'allume.
3. Mode ENREGISTREMENT- la base entre dans ce mode en appuyant sur le
bouton PAGE pendant l'un seconde. Les « Power » LED seront allumées en
haut dans le mode d' « Enregistrement », aussi une sonnerie prompte sera
émise.
B. Modes de fonctionnement du combiné
1. Mode Veille- ceci est le mode par défaut.
a. En l'absence d'activité, le combiné passe
automatiquement en mode SOMMEIL/INACTIF pour
économiser de la puissance batterie.
b. Le combiné peut être complètement éteint en
appuyant sur la touche FIN pendant 3 secondes.
c. L'affichage de l'écran d'inactivité (nom personnalisé) peut être modifié.
d. Le numéro à 2 chiffres représent l'ID du combiné
2. Mode Menu
a. Appuyez sur la touche soft droite pour active le mode
Menu.
b. En mode menu, les paramètres du combiné et des
informati
ons contenues dans la mémoire peuvent être
modifiés.
c. Les fonctions disponibles via le choix de Menu sont
traitées plus en détail à la page 38.
d. La structure de Menu s'affiche comme ci-dessous :
~28~
3.Arborescence de Menu
Page 46

~29~
Passer un appel téléphonique
1.
Appuyez sur , attendez la tonalité, puis entrez le
numéro de téléphone.
2. Sinon, vous pouvez saisir d'abord le numéro de telephone
puis appuyer sur la touche .
Quand vous utilisez cette méthode, vous pouvez utiliser les
touches soft EFFAC. (gauche) et SUPPR (droite) pour
modifier le numéro saisi. "SUPPR" efface le dernier chiffre
entré. "EFFAC." efface la ligne entière, mais reste en mode
numérotation.
3. Numérotation abrégée par accès aux entrée de l'annuaire
téléphonique (Menu 2)
a.
Appuyez sur la touche de défilement ou pour
entrer dans l'annuaire.
b.
Appuyez sur pour composer le numéro
4. Pour interrompre la numérotation, appuyez sur la touche
.
Remarques :
1. Si la ligne est occupée, le LCD affiche “Pas de ligne
disponible” et le combiné retourne en mode veille.
2. Si le lien ne peut pas être établi, le LCD affiche “Pas de base”
après un délai de 12 secondes.
3. Une minuterie de durée d'appel commence à afficher la
durée de l'appel une fois le lien établi.
Faire un appel Double sens / Intercom
Le système téléphonique sans fil FREESTYL V2 permet l'indépendance des appels
radio privés, Intercom/ double sens par rapport à la station de base. La
communication Intercom/ Double sens peut être faite depuis ou vert des stations
de base et des combinés.
~30~
A. Appels combiné vers combiné
1.
Appuyez sur la touche suivie par un ID de combiné
ou un ID de groupe à 2 chiffres.
2.
Appuyez sur la touche pour mettre fin à l'appel.
Remarques :
1. Les appels Intercom peuvent être passes que la station de
base soit présente ou non.
2. Si vous saisissez un ID de groupe, le premier combiné
(appartenant à ce groupe) qui répond établit un lien avec
l'appelant. Voir Enregistrement d'un combiné dans un groupe.
3. Si le lien ne peut pas être établi, le LCD affiche “Pas de
connex.” après un délai de 12 secondes.
Effectuer une diffusion
A. Appels combiné vers combiné
1. Diffusion vers tous les combinés
a.
Appuyez et maintenez la touché (côté gauche de
l'appareil) à partir d'un combiné.
b. Vous entendez bi-bi-bip pendant que le combiné
initiateur diffuse vers tous les combinés à portée de
communication.
c. Commencez à dire le message à diffuser une fois que vous entendez le son
“bip” ; le haut-parleur des combinés de destination s'allume.
d.
Communiqué de touché pour mettre fin à la diffusion.
2. Diffusion vers un groupe de combinés
a.
Entrez l'ID de groupe, puis appuyez et maintenez
touche (côté gauche du combiné).
b. Vous entendez bi-bi-bip pendant que le combiné
initiateur diffuse vers tous les combinés à portée de
communication.
c.
Commencez à dire le message à diffuser une fois que vous entendez le son
“bip” ; le haut-parleur des combinés de destination s'allume.
d.
Communiqué de touché pour mettre fin à
la diffusion.
Page 47

~31~
3. Diffusion vers un combiné en particulier
a.
Entrez l'ID de groupe, puis appuyez et maintenez
touche (côté gauche du combiné).
b. Vous entendez bi-bi-bip pendant que le combiné
initiateur diffuse vers tous les combinés à portée de
communication.
c. Commencez à dire le message à diffuser une fois que vous entendez le son
“bip” ; le haut-parleur des combinés de destination s'allume.
d.
Communiqué de touché pour mettre fin à la diffusion.
Recomp.
1. Appuyez sur la touche soft RECOMP.. (gauche).
2.
Le LCD affiche le dernier numéro de téléphone composé.
Pour composer ce numéro, appuyez sur la touche .
3.
Utilisez la touche ou pour faire défiler parmi les
10 derniers numéros de téléphone composés. Choisissez et
appuyez sur la touche .
[Remarque]Les numéros Intercom (ID combiné) ne sont pas
stockés dans le journal des 10 derniers numéros composés.
Recevoir un appel téléphonique
1. Lorsqu'un appel arrive, le LCD affiche le message de l'ID
appelant, et la sonnerie ou le vibreur se déclenche, sauf s'il
a été coupé.
2.
Si le combiné est sur la station de charge (la sonnerie passe
momentanément sur "Sonnerie" si elle été réglée sur
“Vibreur”), soulevez le combiné et appuuyez sur la touche
pour démarrer la conversation.
~32~
Re : Vous pouvez activer “Toutes touches” à partir de MENU-5-2
Remarques :
1. Vous pouvez appuyer sur la touche soft SILENC (gauche) si vous
choisissez d'ignorer l'appel. Contrairement à éteindre la
sonnerie (à partir du menu du combiné), l'utilisation de la
touche SILENC est valide uniquement pour l'appel en cours.
2. Si le service ID appelant est disponible, le LCD affiche les
informations sur l'appel entrant. Si le LCD affiche "Privé" ou
"Inconnu", les informations de l'appelant ont peut-être été
bloquées par l'appelant ou par la compagnie de téléphone
d'origine.
Recevoir un appel Intercom
1.
Lorsqu'un appel intercom arrive (provenant d'autres
combinés, ex. Combiné 12), la sonnerie ou le vibreur se
déclenche, sauf s'il a été coupé. Appuyez sur pour
répondre à l'appel intercom.
2.
Si le combiné est sur la station de charge (la sonnerie passe
momentanément sur "Sonnerie" si elle été réglée sur
“Vibreur”), soulevez le combiné et démarrez la
conversation.
3.
Si le combiné n'est pas sur la station, appuyez sur toute touche (sauf et la
touche soft SILENT) pour répondre.
Remarques :
1. Le LCD affiche l'ID du combiné de l'appelant.
2. Vous pouvez appuyer sur la touche soft SILENC (gauche) si vous
choisissez d'ignorer l'appel. Contrairement à éteindre la
sonnerie, l'utilisation de la touche SILENC est valide uniquement
pour l'appel en cours.
Mettre fin à un appel.
Pour mettre fin à un appel téléphonique ou intercom, appuyez sur la touche
Page 48

~33~
ou placez le combiné sur sa station de charge.
Réglage du volume de la voix dans le récepteur (écouteur) du
combiné
1. Le volume de la voix ne peut être réglé que pendant un
appel.
2. Il y a 6 niveaux de choix pour le volume. Par défaut = 3.
Utilisez la touche ou pour régler
3. Le nouveau paramètre reste effectif pour tous les appels à
venir jusqu'à modification.
Réglage du volume de la voix dans le haut-parleur du combiné
1. Le volume de la voix ne peut être réglé que pendant un
appel.
2. Il y a 6 niveaux de choix pour le volume. Par défaut = 3.
Utilisez la touche ou pour régler
3. Le nouveau paramètre reste effectif pour tous les appels à
venir jusqu'à modification.
Mettre un appel en attente
1.
Lorsqu'un appel est en cours, il peut être mis en attente
en appuyant sur la touche .
2.
Pour retourner à la conversation, appuyez sur la touche
soft LACHER (gauche)
Remarques :
1. La mise en attente d'un appel peut être “annulée” par le
combiné qui l'a initiée.Mais si le combiné appuie sur la touche
pour sortir de veille, alors les autres combinés peuvent
appuyer sur ou sur pour prendre cet appel en
~34~
attente (En cas d'appui sur sur la base, elle peut
également prendre l'appel en attente).
2. Le LCD du combiné affiche qu'un appel est en attente. Une
tonalité d'alerte (double bip) toutes les 30 secondes rappelle
au combiné qu'un appel est en attente.
3. Si l'opération (ex: transfert d'appel) échoue après avoir mis un
appel en atttente, l'appel en attente peut être perdu.
Muet
1. Une fois qu'un lien est établi, vous pouvez appuyer sur la
touche soft MUET (gauche) pour couper le microphone du
combiné.
2.
Lorsque Muet est actif, l'interlocuteur n'entend pas votre
voix, mais peut toujours vous parler.
3. Pour quitter l'état muet, appuyez sur la touche soft MICRO (gauche). Muet
n'est effectif que pour l'appel en cours.
Ne pas déranger (Sonnerie silencieuse)
1.
Entrez la séquence de touches MENU-3-1, puis choisissez
“Arrêt”. Appuyez sur SÉLEC. (gauche) pour confirmer votre
choix. Ceci va éteindre la sonnerie jusqu'à ce qu'elle soit
rallumée à partir du menu.
Re : Lorsque la sonnerie est réglée sur "Arrêt", l'écran de
veille affiche "Sonnerie désac.".
2. Pour couper temporairement la sonnerie lorsqu'un appel
arrive, appuyez sur la touche soft SILENC (gauche).
Garde-touches
1.
Pour éviter de composer un numéro par accident, vous
pouvez appuyer sur la touche soft MENU (droite), puis
appuyer sur “1” pour choisir l'option Garde-touches. Le
cl
avier du combiné est verrouillé. Aucune entrée de touche
n'est acceptée.
Page 49

~35~
2.
Pour déverrouiller le clavier, appuyez sur la touche soft
DÉVER. (gauche), puis, dans les 2 secondes, appuyez sur le
chiffre “*” pour déverrouiller.
3.
Une fois de retour au mode inactif pendant 15 secondes, le
verrouillage des touches est automatiquement activé.
4. Le Garde-touches est effectif jusqu'au déverrouillage.
Recharge et remplacement de la batterie
1. Chargez la batterie lorsqu'un l'un ou plusieurs des effets suivants survient :
a. Le téléphone bipe deux fois toutes les deux secondes.
b. L'icône de batterie est vide.
c. Le téléphone ne répond pas quand une touche est enfoncée.
d. Le LCD et le rétroéclairage deviennent sombres.
e. Vous ressentez des réductions de portée de communication.
2.
Vous pouvez remplacer la batterie du combiné après avoir mis l'appel en cours
en attente.
3. L'autonomie en conversation et en veille de la batterie depend du motif
conversation/veille et de la distance d'utilisation. Il est recommandé de
remettre le combiné sur la station de charge aussi souvent que possible pour
de meilleurs performances. N'utilisez que la batterie et le chargeur fournis
par le fabricant !
~36~
Fonctionnement avancé
Enregistrement du combiné
1. Si vos combinés on été achetés comme faisant partie du système, ils ont été
préenregistrés avec la station de base en usine.
2. Un ID combiné à “00” indique que c'est un nouveau combiné ou que l'ID a été
effacé. Vous devez enregistrer le combiné avec la station de base.
3. Enregistrement :
a. Apuyez sur MENU-7 pour entrer dans le mode
Enregistrement
b.
Maintenez enfoncé le bouton PAGE de la base pendant
1 secondes jusqu'à ce que les LED s'allument et
clignotent, la base émettant également une sonnerie
pour vous rappeler qu'elle est en mode enregistrement.
c. Appuyez sur la touche “1” du combiné, ceci termine le
processus d'enregistrement. La station de base
attribue un ID de combiné entre 12 et 19. L'ID attribué
s'affiche sur le LCD du combiné, ce qui indique que
l'enregistrement a réussi.
d. Répétez les étapes ci-dessus pour tous les combinés
supplémentaires.
4. Annuler l'enregistrement :
a. Vous pouvez annuler l'enregistrement du combiné que
vous utilisez à partir de la base. L'annulation de
l'enregistrement réinitialise l'ID du combiné à 00, efface
le code de sécurité système et libère l'ancien ID pour un
futur enregistrement.
b. Après annulation de l'enregistrement, le combiné ne
peut plus utiliser la base pour passer ou recevoir des
appels, ni pour communiqué par intercom avec les
autres combinés.
c. Apuyez sur MENU-7 pour entrer dans le mode
Enregistrement
d.
Maintenez enfoncé le bouton PAGE de la base pendant
1 secondes jusqu'à ce que les LED s'allument et
clignotent.
e. Appuyez sur la touche "2" du combiné, ceci termine le
processus d'annulation de l'enregistrement. En cas de
succès de l'annulation de l'enregistrement, le combiné
affiche "S'enregistrer".
Page 50

~37~
Remarques :
1. La base a un délai d'expiration de l'enregistrement de 30
secondes à compter de l'appui sur le bouton REG. Le combiné
a un délai d'expiration de l'enregistrement de 12 secondes à
partir du choix de l'option d'enregistrement ou d'annulation de
l'enregistrement. La base et le combiné quittent
automatiquement le mode d'enregistrement après le délai
d'expiration.
2. Répétez le processus d'enregistrement ou d'annulation de
l'enregistrement en cas d'échec.
Enregistrement d'un combiné dans un groupe.
1. Jusqu'à neuf groups de combinés (91-99) peuvent être
définis et les combinés peuvent décider de quels groupes ils
souhaitent faire partie.
2. Par exemple, Groupe 1 représente le groupe de service
client, Groupe 2 représente le groupe de vente,
et Groupe 3 est le groupe de marketing. Supposons que le
combiné 11 souhaite recevoir des sonneries entrantes pour
tous les appels liés aux ventes et au marketing. Alors le
combiné 11 doit "s'enregistrer" aux groupes 2 et 3.
Réglages appel
2.Réglage groupe
SÉLEC.
RETOUR
3. Choix de groupes :
a.
b.
Appuyez sur le combiné pour le MENU-4 pour entrer
dans le menu de Réglages appel
Appuyez sur le numéro “2”, le combiné entre dans le
menu de réglage du groupe.
c. Appuyez sur la touche soft OPTION suivie par la touche
“1” pour s'enregistrer au groupe (“9#”, #:1~9).
Entrez 1~9.
d. Répétez pour tous les groupes souhaités.
e. Supprimez les choix de groupes en appuyant sur la
touche soft OPTION suivie par la touche “2” pour
annuler l'enregistrement au groupe.
Remarques :
1. Le combiné peut changer d'affiliations de groupes à tout
moment.
2. La base n'est pas responsable des affectations de groupes. Par
conséquent, elle ne peut pas annuler l'enregistrement d'un
combiné dans un groupe.
~38~
3. Quand une ligne extérieure ou un appelant intercom entre un
ID de groupe, tous les combinés enregistrés dans ce groupe
sonnent. Le premier combiné à répondre établit un lien avec
l'appelant. Ensuite, il s'agit d'un appel entre deux personnes, et
non plus de un vers plusieurs personnes.
Mise en attente d'appel
Quand un appel téléphonique est en cours, vous pouvez le transférer entre
différents combinés.
Transfert direct
1.
Appuyez sur la touche pour mettre l'appel en attente.
2. Appuyez sur la touche soft XFER (droite) , suivie par l'ID du
combiné de destination (gauche), l'appel en attente est
alors transféré directement.
Une fois l'appel transféré vers le combiné de destination, le
combiné initial revient automatiquement en mode veille.
Transfert indirect
Si vous voulez parler au combiné de destination avant de
transférer l'appel, vous pouvez utiliser la méthode ci-dessous :
1.
Pendant l'appel, appuyez sur la touche , suivie par la
saisie de l'ID du combiné de destination (gauche).
2.
Appuyez sur le ou le du combiné de destination
ou appuyez sur la pour répondre à l'appel intercom, vous
pouvez maintenant parler au combiné de destination. Après
la conversation, appuyez sur pour terminer l'appel
intercom, puis le combiné de destination est en mesure de
prendre l'appel entrant.
Une fois l'appel transféré vers le combiné de destination, le combiné initial
revient automatiquement en mode veille.
Page 51

~39~
Remarques : Si le combiné de destination ne répond pas une fois le
délai d'expiration de la recherche passé, l'appel est re-routé vers le
combiné d'origine.
Fonctionnement de l'annuaire
1. Vous pouvez stocker jusqu'à 50 entrées dans l'annuaire.
Chacune permet de stocker un numéro de téléphonique ou
un ID de combiné(jusqu'à 26 chiffres) et un nom (jusqu'à 16
caractères.
2.
Pour accéder à l'annuaire, appuyez sur la touche soft
MENU (droite), suivie de “2”; ou appuyez sur la touche de
défilement quand le combiné est en mode veille.
3. Pour ajouter une nouvelle entrée :
a. Appuyez sur la touche soft AJOUT (gauche).
b. Entrez le nom à l'invite LCD “Nom?” Utilisez la touche
soft SUPPR (droite) pour supprimer le dernier chiffre
entré. Une fois terminé, appuyez sur la touche soft
ENREG. (gauche) pour enregistrer.
Re : Jusqu'à 16 caractères peuvent être entrés en tant
que nom.
Nom?
_
Majuscules = *
ENREG.
SUPPR
c. Il vous est alors demandé de saisir un numéro pour le
nom à peine entré.
Re : Jusqu'à 26 chiffres peuvent être entrés pour le
numéro.
d. Après avoir entré un numéro, appuyez sur la touche
soft ENREG.(gauche) pour enregistrer cette entrée dans
l'annuaire.
Numéro?
_
ENREG.
SUPPR
e. Entrez une donnée d'annuaire sans nom, tous les enregistrements sansout
nom sont placés en haut de la liste d'annuaire.
f. Pour entrer le nom, appuyez sur le chiffre du clavier correspondant une ou
plusieurs fois selon l'ordre du caractère sur la touche.
Voir le tableau ci-dessous pour une liste des caractères disponibles et leurs
commandes. Par exemple, appuyez sur "2" une fois pour le caractère "A",
deux fois pour "B", etc.
~40~
Remarzque :
1. Quand vous entrez un numéro de téléphone, le curseur avance
automatiquement à la zone du chiffre suivant. Utilisez la touche de
défilement ou pour déplacer le curseur d'avant en
arrière pour insérer ou supprimer (le chiffre avant le curseur, ou à
gauche du curseur si le curseur est sur la droite du dernier chiffre).
2. Lorsque vous entrez un nom, le curseur avance automatiquement
au champ de caractère suivant si vous appuyez sur une touche
différente pour le caractère suivant. Si vous devez saisir des
caractères consécutifs à partir de la même touche, vous pouvez
attendre que le curseur avance ou utiliser la touche de défilement
ou pour déplacer le curseur vers l'arrière ou vers l'avant
manuellement. Utilisez également ou pour déplacer le
curseur afin d'insérer (à gauche du curseur) ou supprimer (le
caractère au-dessus du curseur, ou à gauche du curseur s'il est à
droite du dernière caractère).
3. Par défaut, toutes les lettres sont entrées en majuscule. Utilisez la
touche * pour basculer entre les majuscules et minuscules.
4. Une entrée “Pause” représente un délai de 1 seconde dans la
composition des chiffres suivants, ce qui est utile pour composer
une suite de numéros segmentés (ex code d'accès, numéro de
carte de crédit, enregistrement d'avion automatique, etc.. La pause
est saisie en appuyant deux fois sur la touche #(Le LCD affiche P).
La saisie de deux pauses (PP) provoque 2 secondes de pause dans
la numérotation.
Page 52

~41~
5. Table de caractères :
Touche
Caractères et commandes
1 ‘ + , . * ( ) & 1
2 A B C 2
3 D E F 3
4 G H I 4
5 J K L 5
6 M N O 6
7 P Q R S 7
8 T U V 8
9 W X Y Z 9
0 0
*
Caps – en édition de caractères.
*– en édition de numéro.
# Espace – en mode d'édition de
caractères.
# & P (Pause) – en édition de numéro
4. Les entrées sont classées par ordre alphabétique et stockées sous forme de
liste dans un ordre croissant (de A à Z) du haut de la liste.
5. La première ligne de l'écran LCD affiche le nom et la 2
ème
ligne indique le
numéro de téléphone. Si le numéro de téléphone est plus long que 16,
appuyez sur la touche soft OPTION (droite) et choisissez l'Option 3 pour
afficher le numéro complet.
6. Pour rechercher un enregistrment :
a.
Utilisez la touche de défilement pour entrer dans le mode annuaire.
b. Appuyez sur la touche qui correspond au premier caractère du nom que
vous recherchez.
c. Par exemple, vous recherchez “EnGenius”, appuyez alors une fois sur le
numéro “3”.
d.
Utilisez la touche de défilement ou pour repérer
l'enregistrement exact que vous recherchez.
7. Pour effacer l'anuaire :
a.
Utilisez la touche de défilement ou ou la
méthode de recherche alphabétique pour repérer
l'enregistrement que vous recherchez.
~42~
b. Appuyez sur la touche soft OPTION (droite) pour entrer
dans le menu d'édition.
c. Appuyez sur “1” pour effacer l'entrée de téléphone
désignée.
d. Le LCD affiche “Supp. entrée?” Appuyez sur la touche
soft OUI (gauche) pour confirmer votre modification.
8. Pour éditer l'anuaire :
a.
Utilisez la touche de défilement ou ou la
méthode de recherche alphabétique pour repérer
l'enregistrement à effacer ou modifier.
b. Appuyez sur la touche soft OPTION (droite) pour entrer
dans le menu d'édition.
c. Appuyez sur “2” pour effacer l'entrée de téléphone
désignée.
Nom?
_
Majuscules = *
ENREG.
SUPPR
9. Numéroter à partir de l'affichage :
a.
Appuyez sur ou pour composer le numéro de téléphone ou l'ID
de combiné affiché.
10. Pour transférer le répertoire :
Pour le transfert du répertoire, les deux parties doivent d'abord entrer dans le
mode de transfert du répertoire en suivant ce qui suit :
a.
Appuyez sur OPTION suivie de 5 ou de ou de la touche de
défilement lorsque le combiné est en mode répertorie.
b. Pour le téléphone émetteur, appuyez sur 1 pour entrer en mode d'envoi.
i. Appuyez soit sur TX ALL (touche soft de gauche) pour transférer
toutes les entrées du répertoire vers un ou plusieurs autres
combinés.
ii. Ou appuyez sur TX ONE (touche soft de droite) pour transférer une
entrée du répertoire vers un ou plusieurs autres combinés.
iii. Appuyez sur l'ID du combiné ou sur l'ID du groupe à 2 chiffres, puis
sélectionnez toutes les entrées du répertoire ou une entrée à
transférer.
Re : "00" signifie tous les combinés
iv. "Pendant le transfert du répertoire, écran LCD affiche "Envoi" et
compte à rebours à 2 chiffres sur l'écran LCD pour indiquer les
numéros du répertoire qui sont en attente d'envoi."
Page 53

~43~
c. Pour le téléphone récepteur, appuyez sur 2 pour entrer en mode de
réception.
i. "En entrant dans le mode de réception, écran LCD affiche "Prêt"."
ii. Vous commencez à recevoir le répertoire, l'écran LCD affiche
"Obtention du répertoire depuis N° poste : xx”.
iii. Un bip sonore et émis lors de la réception de chaque répertoire.
iv. Lorsque de la réception du répertoire, le compte à rebours à 2
chiffres sur l'écran LCD indique les numéros du répertoire en attente
de réception.
Re : L'annuaire téléphonique se transfère via l'interface sans fil, il peut
partiellement manquer des transmissions en raison d'interférences.
Interdi. appel
1. Empêche les utilisateurs de composer des appels interurbains ou
internationaux. Et bloque également les appels entrants de la ligne extérieure
ou d'autres combinés enregistrés.
Vous avez besoin du mot de passe pour entrer le paramètre. Le mode de passe
par défaut est "0000".
2.
Appuyez sur MENU-4-3 pour entrer dans Interdi. appel.
Entrez le mot de passe, suivi de la touche soft OK (gauche)
Bloquer les appels sortants
1.
Utilisez la touche de défilement ou pour
basculer entre Marche et Arrêt pour ce réglage. Appuyez
sur SÉLEC. pour confirmer votre choix.
Re:Par défaut l'interdiction d'appel est sur “Arrêt”.
2. Pour ajouter le mode d'interdit d'appel
a. Une fois la fonction Interdi. appel activée, vous pouvez
saisir le code "Interdi. appel".
Appuyez sur la touche soft AJOUT (gauche) puis
commencez à saisir le code d'interdit d'appel. Une fois
le numéro saisi, appuyez sur la touche soft ENREG.
(gauche) pour l'enregistrer.
(1) Vous pouvez utiliser jusqu'à 5 chiffres comme code
d'interdit d'appel. Par exemple, si vous voulez
bloquer tous les appels numérotés vers
~44~
Manhanttan, région de NY, vous pouvez entrer
1212 comme code d'interdiction d'appel.
(2) Si votre station de base est reliée à un
autocommutateur privé, veuillez également inclure
le numéro spécifique pour retrouver la tonalité
PSTN.
b. Appuyez sur OPTION pour supprimer ou éditer les
codes d'interdiction d'appels.
c. Vous pouvez programmer jusqu'à 5 codes
d'interdictions d'appels.
d. Si vous voulez bloquer tous les appels sortants, entrez
“*****”, appuyez sur la touche soft ENREG.
(gauche) pour l'enregistrer, tous les appels sortants
sont limités.
Bloquer les appels entrants
1. Appuyez sur SELECT pour confirmer votre sélection pour
“Entrant”.
Utilisez la touche de défilement ou pour choisir
l'élément à bloquer.
a.
Appuyez sur SELECT pour confirmer votre sélection
pour recevoir ou bloquer la diffusion.
Appuyez sur CHANGE pour basculer entre On (Marche)
et Off (Arrêt) pour ce réglage.
Re : "On" signifie être en mesure de recevoir de la
radiodiffusion de hansets d'autres, ou la base." "Off"
indique la restriction de diffusion à partir d'autres
combinés ou de la base.
b.
Appuyez sur SELECT pour confirmer votre sélection
pour recevoir ou bloquer les appels sur la ligne.
Appuyez sur CHANGE pour basculer entre On (Marche)
et Off (Arrêt) pour ce réglage.
Re : "On" indique la capacité à recevoir des appels de la
Page 54

~45~
ligne extérieure, "Off" indique la restriction des appels
depuis la ligne extérieure.
c,
Appuyez sur SELECT pour confirmer votre sélection
pour recevoir ou bloquer les appels intercom.
Appuyez sur CHANGE pour basculer entre On (Marche)
et Off (Arrêt) pour ce réglage.
Re : "On" indique la capacité à recevoir des appels
intercom d'autres combinés ou de la base ; "Off"
indique la restriction des appels intercom d'autre
combiné ou de la base.
Fonction appel programmable
1. Si l'unité de base FREESTYL V2 est installée derrière un autocommutateur privé,
il est possible de préprogrammer certaines fonctions d'appel avec le code de
fonction de l'autocommutateur dans le système.
2. Vous pouvez préprogrammer jusqu'à 10 fonctions d'appel les plus utilisées.
3.
Nommez et saisissez les codes de fonction d'appel :
a. Appuyez sur la touche soft MENU (droite), quand le
combiné est en mode veille.
b. Appuyez sur “4”, suivi de “4” pour entrer dans le menu
“Fonction appel”.
c. Appuyez sur la touche soft AJOUT (gauche) pour ajouter
une nouvelle entrée de fonction d'appel.
d. Saisissez le nom de la fonction appel, comme pour
éditer une entrée de l'annuaire téléphonique, c.-à-d.
"Transférer PBX".
Appuyez sur la touche soft ENREG. (gauche) pour
confirmer.
e. Saisissez le code de la fonction d'appel dans la fonction
d'autocommutateur correspondante c.-à-d. F*70.
Appuyez sur la touche soft ENREG. (gauche) pour
confirmer.
Re : "F" représente le signal Flash.
~46~
f. La 1
ère
fonction appel et le code de fonction appel
correspondant apparaissent sur l'écran LCD.
g. Appuyez sur la touche soft OPTION (droite) pour
supprimer ou éditer la fonction appel que vous avez
programmée dans le système.
h. Répétez les mêmes opérations au 2nd programme et
aux autres fonctions d'appel que vous utilisez
fréquemment.
4. Utilisation de fonction appel préprogrammée pendant
l'appel.
a. Appuyez sur la touche soft OPTION (droite), quand le
combiné est en mode conversation.
b. Appuyez sur le numéro de correspondance de la
fonction d'appel que vous voulez effectuer c.-à-d.
appuyez sur "0" pour effectuer "Transférer PBX".
Remarques :
1. Cette fonction appel est utile si l'unité de base FREESTYL V2 est
reliée à un autocommutateur privé,
2. Si vous n'avez pas préprogrammé de fonction appel dans le
système, seul “#.Annuaire télép.” dans le menu OPTION.
3. La fonction appel programmable de l'FREESTYL V2 peut ne pas
fonctionner avec tous les autocommutateurs ou systèmes de
téléphone principaux en raison de la diversité des systèmes des
différents systèmes propriétaires.
ID appelant
1. Contactez votre compagnie de téléphone locale pour vous abonner à cette
fonctionnalité. Le système de téléphone reçoit et affiche les informations d'ID
appelant transmises par votre compagnie de téléphone locale. Ces informations
peuvent inclure le numéro de téléphone, la date, l'heure. Cet appareil peut
stocker jusqu'à 50 appels.
2. L'écran affiche la date et l'heure de l'appel sur la première ligne, suivi par le nom
figurant sur la deuxième ligne, et le numéro de téléphone sur la troisième ligne.
Page 55

~47~
Un enregistrement non lu comprend "NOUVEAU" à la fin de la première ligne de
l'affichage.
3. Lorsque vous affichez un enregistrement d'appel, le numéro peut être composé, stocké
dans l'annuaire ou supprimé.
Visualiser le journal d'appels
1.
Pour afficher le journal d'appels, appuyez sur pour
entrer dans le journal d'appels.
Appuyez sur la touche ou pour faire défiler les
numéros et les noms lorsque disponibles.
2.
Appuyez sur la touche soft OPTION (droite), vous pouvez
utiliser la touche ou
pour choisir d'enregistrer, de
supprimer ou de tout effacer.
a. Enregistrer le journal d'appels :
(1)
Appuyez sur la touche soft SELEC. (droite), vous
pouvez utiliser la touche ou pour faire
défiler le nom, et appuyer sur SUPPR pour éditer le
nom.
Appuyez ensuite sur la touche soft ENREG. (gauche)
pour enregistrer le nom.
(2)
Utilisez la touche ou pour faire défiler le
numéro, et appuyer sur SUPPR pour éditer le
numéro.
Appuyez ensuite sur la touche soft ENREG. (gauche)
pour enregistrer le numéro.
(3) Après le processus ci-dessus, le journal d'appels est
enregistré dans l'annuaire téléphonique.
b. Supprimer le journal d'appels :
(1) Appuyez sur la touche soft SELEC. (droite) suivie de la
touche soft OUI (gauche) pour confirmer la
suppression.
c. Effacer tout :
(1) Appuyez sur la touche soft SELEC. (droite) suivie de la
touche soft OUI (gauche) pour confirmer
l'effacement de tous les enregistrements d'ID
appelants.
Appeler un ID appelant
1.
Appuyez sur la touche , utilisez la touche ou
pour faire défiler le journal d'appels.
~48~
2.
Lors de l'afficahge d'un ID appelant, appuyez sur ou
pour composer ce numéro.
3. Le numéro affiché CID dans la plupart des cas sera un numéro à 10 chiffres avec
l'indicatif régional à 3 chiffres suivi du numéro de téléphone à 7 chiffres. Si l'
l'indicatif régional est inutile d'appeler le dos, vous pouvez suivre ci-dessous
règle ajuster le nombre de retour d'appel:
a. Appuyez sur la touche FORMAT fois, l'indicatif régional à 3 chiffres seront
supprimés.
b. Appuyez sur la touche FORMAT deux fois, "1" sera ajouté devant la valeur
affichée Nombre.
c. Appuyez sur FORMAT clés à trois reprises, il fera une boucle de retour
originale affichée nombre.
Re. La valeur par défaut est de 10 chiffres CID, quand la touche FORMAT de
presse, il sera 7-chiffres 11 chiffres 10 chiffres dans le cercle.
4.
Après le numéro affiché choisie, appuyez sur la touche ou de rappeler.
Indicateur visuel de message en attente (VMWI)
La fonction VMWI prend en charge le message FSK, qui est reçu de la ligne
téléphonique; Il va activer une icône de message sur le combiné et faire clignoter la
DEL MESSAGE VOCAL de la base.
Remarques :
1 Un abonnement au service de messagerie vocale de la compagnie de
téléphone est nécessaire.
2. Si le combiné affiche encore l'icône, même après avoir écouté tous les
messages, éteignez-la en appuyant sur la touche "Caller ID" (ID appelant) du
combiné.
Régler le gain de microphone du combiné
Dans le cas où vous utilisez le combiné dans différents lieux de travail ou sous
différents environnements, pour obtenir une meilleure qualité de voix pour
l'interlocuteur, vous pouvez régler le gain du microphone du combiné pour
l'adapter au lieu.
a. Appuyez sur la touche soft MENU (droite) lorsque le combiné est en mode
veille.
b. Appuyez sur "5" (Paramètres du téléphone), suivi de "1" pour entrer dans le
menu "Gain micro".
Page 56

~49~
c.
Utilisez la touche ou pour faire défiler les options "Standard",
"Moyen" et "Bas".
d.
"Si vous utilisez le combiné dans un environnement calme, comme bureau
ou salle de réunion, le niveau de "Standard" est recommandé."
"Si vous utilisez le combiné dans un environnement bruyant, comme l'usine
ou à l'extérieur, le niveau de "moyen" ou "Low" est recommandé."
Réglez la sonnerie des écouteurs
Lorsque vous utilisez les écouteurs, pour éviter de manquer l'appel parce que la
sonnerie est émise par le récepteur des écouteurs, vous pouvez modifier la
sonnerie du haut-parleur émise soit par le combiné soit par le récepteur des
écouteurs.
a. Appuyez sur la touche soft MENU (droite) lorsque le combiné est en mode
veille.
b. "Appuyez sur "5" (Paramètres du téléphone), suivie par «9» pour entrer
dans le «Casque Ring" menu."
c. Sélectionnez "On", la sonnerie sera émise par le récepteur des écouteurs ; si
vous sélectionnez "Off", la sonnerie sera émise par me haut-parleur du
combiné.
Bébé Moniteur
Vous pouvez régler n'importe lequel des combinés comme “appareil bébé” pour
surveiller les mouvements du bébé ou d'une personne âgée.
En activant l'interphone bébé, “l'appareil bébé” entre automatiquement en mode
surveillance via l'interphone bidirectionnel.
Par exemple, si le combiné A est réglé comme “appareil bébé”, lorsqu'on passe un
appel interphone depuis le combiné B, le combiné A entre automatiquement en
mode surveillance sans sonner ; vous pouvez également entendre tous les
mouvements autour du combiné A via le combiné B.
a. Appuyez sur la touche MENU (droite) lorsque le combiné est en mode
veille.
b. Appuyez sur "4" (Paramètres d'appel), puis sur "5" pour entrer dans le
menu "Surveillance bébé".
c. Appuyez sur "MODIFIER" pour mettre sur ON (MARCHE) ou OFF (ARRÊT)
(La valeur par défaut est OFF).
Re : Pour éviter toute perturbation, au cours de la surveillance, le combiné
dédié ne répond à aucun appel entrant, à l'exception de l'interphone.
~50~
Fonctionnement du Menu
Page 57

~51~
1. Appuyez sur la touche soft MENU (droite) pour entrer dans le mode menu
quand le téléphone est en mode veille.
Re : Vous pouvez soit appuyer sur ou , suivi par la touche soft SELEC.
(gauche) pour confirm le menu choisi. Ou appuyez sur le chiffre
directement pour confirmer le menu choisi. Par exemple, appuyez sur la
touche soft MENU (droite) -3-1 pour choisir le volume sonnerie.
2. Appuyez sur “1” pour choisir Garde-touches, (voir utilisation des Gardetouches à la page 34 ).
3. Appuyez sur “2” pour ajouter, supprimer, éditer, visualiser et modifier
l'annuaire (voir instructions de l'annuaire à la page 39 ).
4. Appuyez sur “3” pour régler le son :
a.
Appuyez sur “1” pour choisir le volume de la sonnerie :
Deux options pour le volume de la sonnerie : Ligne (pour les appels
entrants) et Intercom (Pour un appel Intercom). Réglez chaque option,
respectivement.
Lors du réglage de chaque option, utilisez ou pour faire défiler
les 6 options : “Éteint”, “Bas”, “Moyen”, “Haut”, “Vibreur” et “Vibreur et
haut”. Appuyez sur la touche soft SELECT (Gauche) pour enregistrer le
choix. Par défaut = Moyen.
b.
Appuyez sur “2” pour choisir la tonalité de la sonnerie :
Deux options pour la tonalité de la sonnerie : Line (tonalité de sonnerie
pour les appels entrants) et Intercom (sonnerie pour un appel Intercom).
Réglez chaque option, respectivement.
Utilisez les ou pour faire défiler les 8 sonneries, appuyez sur la
touche soft SELECT (Gauche) pour enregistrer le choix. Par défaut = 1.
c. Appuyez sur “3” pour choisir le volume des touches lors des appuis sur les
touches :
Utilisez ou pour faire défiler les 4 choix : Arrêt, Faible, Moyen, et
Élevé. Appuyez sur la touche soft SELEC. (gauche) pour
enregistrer le choix.
Par défaut =Moyen.
d. Appuyez sur “4” pour choisir la tonalité des touches :
Utilisez ou pour faire défiler les 4 choix : 1, 2, 3 et 4. Appuyez
sur la touche soft SELEC. (gauche) pour enregistrer le choix. Par défaut = 1.
5. Appuyez sur “4” pour régler les Réglages appel :
a.
Appuyez sur “1” pour composer le préfixe :
~52~
(1)
Appuyez sur ou pour activer ou désactiver la fonction de
préfixe. Par défaut = Arrêt.
(2) Si “Marche” est choisi, le combiné invite à saisir le numéro préfixe ,
jusqu'à 14 chiffres peuvent être saisis.
(3) Utilisez la touche soft SUPPR (droite) pour éditer le numéro de préfixe.
(4) Appuyez sur la touche soft ENREG. (gauche) pour confirmer le choix.
(5) Lorsque cette fonction est activée, le LCD invite l'utilisateur à chaque
appel téléphonique sortant, le préfixe actuel s'affiche aussi.
(6) Cette fonction est utile pour le code d'accès, les cartes d'appel, les
appels par cartes de crédit, etc.
b. Appuyez sur “2” pour choisir le groupe : voir Enregistrement d'un combiné
dans un groupe à la page 37.
c. Appuyez sur “3” pour régler les Interdi. appel : voir Utilisation des Interdi.
appel à la Page 42.
d. Appuyez sur “4” pour régler la fonction appel : voir Utilisation des
fonctions appel à la Page 45.
e. Appuyez sur "5" pour régler bébé moniteur : Voir le fonctionnement de
l'interphone bébé à la page 51.
f. Appuyez sur “6” pour régler le code région :
La fonction de code de région permet de numéroter sans préfixe pour les
codes de zone locaux et nationaux.
(1) Régler le code région local :
Appuyez sur MENU-4-6-1 pour régler le LAC. Entrez le code région
local (3 chiffres) puis appuyez sur la touche soft ENREG. (gauche) pour
confirmer le choix.
(2) Régler le code région du pays :
Appuyez sur MENU-4-6-2 pour régler le code région du pays. Entrez le
code (3 chiffres) puis appuyez sur la touche soft ENREG. (gauche) pour
confirmer le choix.
6. Appuyez sur “5” pour régler les Réglages téléph :
a. Appuyez sur "1" pour régler le Gain micro : Voir le fonctionnement du
Gain micro à la page 50 .
b. Appuyez sur “2” pour régler Toutes touches :
Utilisez la touche soft MODIF (gauche) pour choisir et confirmer marche ou
arrêt.
Re : a. Lorsque sur “marche”, appuyez sur toute touche (sauf ) pour
répondre à un appel entrant.
b. Lorsqu'il est réglé sur "ON", le combiné sera automatiquement
répondre à l'appel tout en soulevez le combiné du berceau.
c. Appuyez sur “3” pour régler le contraste LCD :
(1)
Utilisez ou pour défiler parmis les choix 1~8. La valeur par
Page 58

~53~
défaut est 4.
(2) Appuyez sur la touche soft ENREG. (gauche) pour confirmer le choix.
d. Appuyez sur “4” pour régler le rétroéclairage LCD :
(1)
Utilisez ou pour défiler parmis les choix 1~3 (1.8 secondes
2.Marche 3.Arrêt ). Par défaut, c'est "8 secondes".
(2) Appuyez sur la touche soft ENREG. (gauche) pour confirmer le choix.
e. Appuyez sur “5” pour régler le porte-nom :
(1)
Utilisez ou pour faire défiler les choix marche ou arrêt. Par
défaut, c'est "arrêt".
(2) Appuyez sur la touche soft ENREG. (gauche) pour confirmer le choix.
Re : Lorsque réglé sur "marche", s'il y a correspondance entre l'ID appelant
et les entrées du répertoire, et une fois la correspondence faite,
l'écran LCD affiche le nom ou le diminutif au lieu des simples infos
d'ID appelant (requiert le service de mise en attente avec ID appelant
auprès de votre compagnie de téléphonie locale)
f. Appuyez sur “6” pour régler la langue :
(1)
Utilisez ou pour défiler parmis les choix (Anglais, Espagnol,
Français, Italien, Allemand, Néerlandais, Polonais, Tchèque, La
Hongrie, La Roumanie, Turque). Par défaut, c'est "Anglais".
(2) Appuyez sur la touche soft ENREG. (gauche) pour confirmer le choix.
g. Appuyez sur “7” pour régler le nom personnalisé :
(1) Entrez les caractères à l'aide de la table des caractères et de la
méthode décrite dans la partie Annuaire.
(2)
Utilisez ou pour déplacer le curseur afin d'insérer (à gauche
du curseur) ou supprimer (le caractère au-dessus du curseur, ou à
gauche du curseur s'il est à droite du dernière caractère).
(3) Appuyez sur la touche soft ENREG. (gauche) pour confirmer le réglage.
Re : Une fois le nom personnalisé saisi, le message d'accueil du LCD en
mode veille est modifié selon la saisie.
h. Appuyez sur “8” pour changer le mot de passe :
(1) Entrez le mot de passe initial (4 chiffres) en entrant dans ce menu.
(2) Entrez le nouveau mot de passe puis appuyez sur la touche soft
ENREG. (gauche) pour confirmer le nouveau mot de passe.
i. Appuyez sur "9" pour régler Sonnerie écouteurs : Voir le fonctionnement
de la sonnerie écouteurs à la page 51.
7. Appuyez sur “6” pour régler les Réglages de la base :
En entrant dans ce menu, vous devez d'abord saisir le code PIN (4 chifffres).
Re : Le code PIN sert aux réglages de la base.
a. Appuyez sur “1” pour régler la durée DTMF.
(1) Entrez la durée DTMF (90~200ms), appuyez sur la touche soft OK
(gauche) pour confirmer le réglage. Par défaut, c'est 100ms.
Re : Veuillez vérifier avec votre revendeur avant de modifier. Si la durée ne
~54~
correspond pas au réglage PSTN ou PBX , le fonctionnement peut
être défaillant.
b. Appuyez sur “2” pour choisir la durée de touche flash. Par défaut, c'est
600ms.
(1)
Utilisez ou pour faire défiler les choix 1~9 (100~900ms).
(2) Appuyez sur la touche soft ENREG. (gauche) pour confirmer le choix.
Re : La valeur par défaut (600 ms) fonctionne dans la plupart des régions.
La modification de ce paramètre peut provoquer un non
fonctionnement de la clé Flash. Ne modifiez que si vous êtes certain
que la nouvelle valeur fonctionne.
c. Appuyez sur “3” pour Assign Suivant HS (Assigner HS)
(1) Entrez l'ID du combiné à 2 chiffres, suivi de la touche soft OK (gauche.
(2) Lors de l'enregistrement d'un nouveau combiné, la base alloue l'ID de
combiné spécifique qui est pré-assigné au nouveau combiné.
d. Appuyez sur “4” pour régler Effacer HS
(1) Entrez l'ID du combiné à 2 chiffres, suivi de la touche soft OK (gauche.
(2) La base efface l'ID du combiné du système.
e. Appuyez sur “5” pour changer le PIN :
(1) Entrez le nouveau PIN, suivi de la touche soft OK (gauche.
Re : Par défaut, le PIN est “0000”.
8. Appuyez sur “7” pour enregsitrer, annuler l'enregistrement du combiné et
régler le Multi-Base : Voir utilisation de l'Enregistrement du combiné à la page
36, and Paramétrage multi-base à la Page 48.
9. Appuyez sur “8” pour régler l'affichage menu :
Pour éviter une mauvaise configuration des Réglage appel (MENU-4), des
réglages téléphone (MENU-5) et des réglages de la base (MENU-6), vous
pouvez masquer ces menus, de sorte que les autres utilisateurs de combinés
n'aient pas de risque d'y toucher par mégarde.
Re : En entrant dans le menu affichage, vous devez d'abord saisir le mot de
passe.
a. Appuyez sur “1” pour masquer/révéler le menu des Réglages appel.
(1) Utilisez la touche soft MODIF (gauche) pour choisir et confirmer
marche ou arrêt.
b. Appuyez sur “2” pour masquer/révéler le menu des Réglages téléphone.
(1) Utilisez la touche soft MODIF (gauche) pour choisir et confirmer
marche ou arrêt.
c. Appuyez sur “3” pour masquer/révéler le menu des Réglages de la base.
(1) Utilisez la touche soft MODIF (gauche) pour choisir et confirmer
marche ou arrêt.
Re : Le choix de “Marche” signifie que le menu est affiché à l'écran. Le choix de
“Arrêt” signifie que le menu est masqué.
Page 59

~55~
Index
• A
Affichage du menu, 18, 57
Annuaire téléphonique, 14, 16, 17, 39, 45, 46, 47, 53, 55
Annulation de l'enregistrement, 36, 37
Antenne extérieure, 22
Appel combiné vers combiné, 30
Appel en cours, 13, 17, 32, 33, 35
• B
Batterie secours, 10
Batterie, 5, 7, 10, 24, 26, 27, 35
Bouton de réinitialisation, 22
• C
Caractéristiques du chargeur, 24
Caractéristiques du combiné, 13
Caractéristiques techniques, 62
Changer le PIN, 18, 19, 56
Choix BS, 49
Choix de groupe, 37, 54
Clé d'enregistrement, 22
Conversation/flash, 14
• D
Décharge électrique, 4, 5, 6
Diffusion vers tous les combinés, 30
Diffusion vers un combiné en particulier, 31
Diffusion vers un groupe de combinés, 30
Diffusion, 14, 16, 18, 31, 44, 49
DND, 15
Double sens/intercom, 14, 29
Durée DTMF, 18, 56
• E
Effectuer une diffusion, 30
Enregistrement de combinés multiples, 15
Enregistrement du combiné dans un groupe, 37, 54
Enregistrement du combiné, 36
~56~
• F
Flash programmable, 19
Flash, 14, 19, 36, 45, 48, 50, 56
Fonction appel programmable, 17, 45
Fonction appel, 45, 54
Fonctionnement de la base, 27
Force de la batterie, 13
• G
Garde-touches, 17, 34, 53
Gestionnaire d'appel, 49
• H
Haut-parleur, 13, 14, 20, 30, 31, 33, 48, 51
• I
ID appelant, 15, 16, 20, 31, 32, 46, 47, 50, 55, 57
ID de groupe, 15, 30, 31, 38
ID de la base, 48
ID du combiné, 13, 27, 32, 36, 38, 42, 48, 56
Illustration de la base, 21
Illustration du chargeur, 23
Index d'adresse à deux chiffres, 13
Indicateur visuel de message en attente, 50
Informations réglementaires, 8
Installation de la station de base, 25
Installation du combiné et du chargeur, 26
Instructions générales relatives à la sécurité, 4
Instructions relatives à la sécurité de la batterie, 7
Instructions relatives à la sécurité des produits, 5
Instructions relatives à la sécurité, 4
Interdiction d'appel, 43
Inversion de ligne, 56
• J
Journal d'appels, 16, 17, 46, 47
• L
Liste de contrôle des équipements, 10
Lithium-Ion (Li-Ion), 7, 10
• M
Page 60

~57~
Mémoire, 27
Message d'avertissement, 24
Mettre un appel en attente, 33
Minuterie d'appel, 17
Mise en attente d'appels, 14, 15
Mode conversation, 13, 14, 46
Mode enregistrement, 27, 36
Mode INACTIF, 17, 27, 35
Mode menu, 27, 53
Muet, 17, 34
• N
Ne pas déranger (sonnerie silencieuse), 15, 34
Numérotation abrégée, 29
• P
Panne de courant, 5, 9, 25, 26
Passer un appel double sens/ Intercom, 29
Passer un appel téléphonique, 29
PIN de la base, 18, 19, 20
Porte-nom, 55
Prise ligne, 22
Prothèse auditive, 4
• R
Rappel, 16, 33, 36
Recevoir un appel intercom, 32
Recevoir un appel téléphonique, 31
Recharge et remplacement de la batterie, 35
REG, 22, 37, 48
Réglage de groupe, 18, 37
Réglage du volume de la voix dans le haut-parleur du combiné, 33
Réglage du volume de la voix dans le récepteur (écouteur), 33
Réglage Multi-Base, 18, 48, 57
Réglages d'appels, 16, 18, 20, 37, 49, 50, 51, 54, 57
Réglages du téléphone, 18, 20, 50, 51, 54, 57
Régler l'heure, 20
REN, 8
RSSI, 13
• S
Signal d'appel avec ID appelant, 15, 55
~58~
Signal d'appel, 14, 15
SILENCE, 15, 32, 34
Slot de chargement du combiné, 24
Sonnerie, 13, 14, 15, 20, 27, 31, 32, 34, 36, 37, 48, 51, 53, 55
Souscrire BS, 49
Station de base, 10, 15, 22, 25, 26, 27, 29, 30, 36, 43
Stimulateur cardiaque, 4
• T
Tonalité des touches, 17, 53
Tonalité DTMF, 18
Transfert d'appel, 34, 49
Transformateur, 25, 26
• U
Urgence, 4
• V
Vibreur, 15
Visualiser le journal d'appels, 46
Volume de sonnerie, 15
Volume des touches, 53
Page 61

~59~
Spécifications techniques
Spécifications électriques Base Station Combiné Portable
Fréquence 902-928 MHz 902-928 MHz
RF Power Peak: 27 dBm
Moyenne: 21 dBm
Peak: 26 dBm
Moyenne: 20 dBm
Channel Spacing 101 kHz 101 kHz
Nombre de voies 252 252
Modulation Différentiellement Encoded
MSK
Différentiellement Encoded
MSK
Multiple Access Frequency Hopping TDD Frequency Hopping TDD
Frequency Hopping Noter 100 par seconde 100 par seconde
TDMA trame de longueur 10 ms 10 ms
Nombre d'emplacements /
Frame
4 4
Sensibilité du récepteur < -111 dBm (@ BER 10-2) < -111 dBm (@ BER 10-2)
Connecteur d'antenne Reverse TNC Non-standard
Gain d'antenne 2 dBi
1.5 dBi (Antenne courte)
2.5 dBi (de longue antenne)
TX Power Control Range 19~27dBm 19~26dBm
Interface téléphonique RJ11 x 2 NA
Codage de la parole 8 kbps G.729AB 8 kbps G.729AB
Codage canal 8 kbps à convolution + CRC 8 kbps à convolution + CRC
Transmission Data Rate 85.333 kbps 85.333 kbps
User Data Rate 64 kbps duplex 64 kbps duplex
Duplex Time Division Duplex (TDD) Time Division Duplex (TDD)
Voice Quality TIA/EIA-470B TIA/EIA-470B
Nombre de ID système 65,536 65,536
Sonnerie 20-50 Hz, 30-90 Vrms NA
Flash Time 100-900 ms programmable NA
Power Source AC/DC 100~240V/12V,1A SW
Adapter
3.7V/1100 mAh Li-Ion Battery
Optional: 3.7V/1700mAh
Chargeur actuel NA 550 mA
(850 mA pour Spare Battery
Slot)
Temps de charge NA 3 hours
Conformité aux
réglementations
FCC Part 15, Part 68
FCC Part 15, Part 68
Hearing Aid Compatible
Température de
fonctionnement
0 – 50 °C -10 – 60 °C
Température de stockage
-40 – 70 °C -40 – 70 °C
Humidité 20 – 75 % 20 – 75 %
Dimension 190 x 160 x 208 mm 167 x 47 x 28 mm
Poids 500g 130g
~60~
Remarques :
1. NA = Non Applicable.
2. Le fabricant se réserve le droit de toute modification de conception ou de
spécification sans préavis.
Page 62

Manual de usuario (Español)
FreeStyl V2
Teléfono inalámbrico digital de largo alcance
~2~
Tabla de contenido
Instrucciones de seguridad ................................................................ 4
Instrucciones generales de seguridad ........................................... 4
Instrucciones relacionadas con la seguridad del producto ........... 5
Instrucciones relacionadas con la seguridad de la batería............ 7
Información sobre normativas........................................................... 8
Lista de comprobación del equipo................................................... 10
Ilustración del portátil...................................................................... 11
Características del portátil............................................................... 13
Características básicas del portátil .............................................. 13
Características adicionales del portátil........................................ 15
Ilustración de la base ....................................................................... 21
Características de la base................................................................. 22
Características básicas de la estación base.................................. 22
Ilustración del cargador ................................................................... 23
Características del cargador de sobremesa..................................... 24
Procedimientos iniciales .................................................................. 25
Instalación de la estación base .................................................... 25
Instalación del portátil y el cargador ........................................... 26
Funcionamiento básico.................................................................... 27
Modos de funcionamiento........................................................... 27
A. Modos de funcionamiento de la base.................................. 27
B. Modos de funcionamiento del portátil ................................ 27
Realizar una llamada de teléfono ................................................ 29
Realizar una llamada bidireccional o interna............................... 29
Realizar un mensaje radiado (megafonía) ................................... 30
A. Mensaje radiado entre portátiles ........................................ 30
Rellamada..................................................................................... 31
Recibir una llamada de teléfono.................................................. 31
Recibir una llamada interna......................................................... 32
Terminar una llamada.................................................................. 33
Ajustar el volumen de voz del receptor (auricular) del portátil .. 33
Ajustar el volumen de voz del altavoz del portátil ...................... 33
Page 63

~3~
Retener una llamada.................................................................... 34
Silencio ......................................................................................... 34
No molestar (timbre desactivado)............................................... 34
Bloqueo del teclado ..................................................................... 35
Recargar y cambiar la batería ...................................................... 35
Funcionamiento avanzado............................................................... 36
Registro de portátiles................................................................... 36
Suscripción de portátiles a grupos............................................... 37
Transferencia de llamadas ........................................................... 38
Operaciones con la agenda.......................................................... 39
Restricción de llamadas ............................................................... 43
Llamada con prestación programable ......................................... 45
Identificación del llamante .......................................................... 46
Indicador visual de mensaje pendiente (VMWI) ......................... 48
Ajustar la Ganancia del Microfóno del Terminal ......................... 49
Ajustar el Timbre de los Auriculares............................................ 49
Vigilabebés................................................................................... 49
Índice................................................................................................ 57
Especificaciones técnicas ................................................................. 61
Instrucciones de seguridad
Precaución: el teléfono inalámbrico proporciona libertad y flexibilidad
para estar comunicado mientras se mueve por el lugar. No obstante,
cuando se utiliza ese tipo de equipos,se deben seguir ciertas
instrucciones de seguridad para evitar el riesgo de incendio, descargas
eléctricas y daños personales o materiales.
Instrucciones generales de seguridad
1. Cuando utilice el teléfono inalámbrico, garantice su seguridad y la de los que le
rodean:
a. Vigile siempre el lugar por el que ande o en el que permanezca.
b. No permita que el teléfono le distraiga y le impida trabajar de forma
segura.
2. En una llamada de emergencia:
a. Si se produce una emergencia, marque el número de teléfono de
emergencia. Recuerde: si se encuentra un área en la que el teléfono no
tiene una señal clara, es muy probable que la llamada no se curse. Busque
el teléfono fijo más cercano u otro dispositivo de comunicación para llamar
y pedir ayuda.
b. Simplemente llamar a un número de emergencia no informará al personal
de emergencia acerca de su nombre, número de teléfono y ubicación.
Asegúrese de indicar esos datos.
3. Aviso para usuarios con audífonos: este teléfono es compatible con audífonos
de acople inductivo.
4. Aviso para usuarios con marcapasos: aunque se pueden producir interferencias
a los marcapasos implantados cuando se usan teléfonos inalámbricos muy
cerca, “parece ser que estos aparatos no suponen un problema significativo
para las personas que utilizan marcapasos”. No obstante, hasta que no se
tenga más información, es recomendable que las personas que usan
marcapasos tomen precauciones cuando utilicen o lleven un teléfono
inalámbrico para asegurarse de que hay una amplia distancia entre dicho
teléfono y el marcapasos. No lleve el portátil en el bolsillo de la pechera. Si
tiene alguna razón para sospechar que hay interferencias, apague el portátil
inmediatamente.
Page 64

~5~
Instrucciones relacionadas con la seguridad del producto
1. Lea y comprenda todas las instrucciones.
2. Siga todas las advertencias e instrucciones, incluidas las indicadas en el
producto.
3. Los cambios o modificaciones realizadas en este producto y no aprobadas
expresamente por el fabricante anularán la garantía y la autorización CE para
utilizar el equipo. Utilice únicamente accesorios proporcionados por el
fabricante.
4. No utilice el teléfono cerca del agua. Nunca derrame líquidos de ningún tipo
sobre este producto.
5. Desenchufe el producto de la roseta de teléfono y de la toma de corriente
antes de limpiarlo. No utilice productos de limpieza líquidos ni aerosoles. Utilice
un paño húmedo para limpiar.
6. No coloque este producto sobre una mesa, una superficie o un lugar inestable, el
producto puede fallar y causar daños personales o materiales, ya sea al propio
teléfono o a otras propiedades.
7. Corte de energía: si se produce un corte de corriente eléctrica, el cargador del
portátil no recargará la batería del mismo y la estación base no le permitirá
realizar ni atender llamadas. Tanto el cargador como la estación base necesitan
electricidad para funcionar. Debe tener un teléfono que no necesite
electricidad disponible durante un corte de la corriente eléctrica o disponer de
una batería de repuesto temporal cargada.
8. Las ranuras o aberturas de la carcasa del producto sirven para ventilarlo. Estas
aberturas no se deben bloquear ni obstruir. Si coloca el producto sobre una
cama, alfombra u otra superficie similar, estas aberturas se pueden bloquear.
Evite estas situaciones. No coloque nunca este producto cerca de un radiador o
fuente de calor, o sobre ellos, ni en una instalación empotrada a menos que se
proporcione la ventilación adecuada.
9. Nunca coloque objetos de ningún tipo en este producto a través de las ranuras
y aberturas de la carcasa, ya que pueden dañar el producto, entrar en contacto
con puntos con voltaje peligrosos o causar un cortocircuito en las piezas que
podría derivar en un incendio, descargas eléctricas o daños personales.
10. Sólo se debe aplicar al producto el tipo de corriente eléctrica indicado en el
etiquetado. Si no está seguro del tipo de alimentación de su domicilio, póngase
en contacto con su distribuidor o con la compañía eléctrica local.
11. No sobrecargue la toma de corriente ni los alargadores ya que puede provocar
un incendio o descargas eléctricas.
12. Para evitar descargas eléctricas o quemaduras, no desmonte este producto.
Envíe este producto a un centro de servicio autorizado cuando sea necesario
~6~
realizar tareas de servicio o reparación. Llame al lugar donde adquirió el
producto para conocer las ubicaciones más próximas. Si abre o retira las tapas
puede quedar expuesto a voltajes peligrosos, a corrientes eléctricas y a otros
riesgos. Si vuelve a ensamblar el producto y lo hace de forma incorrecta, puede
causar descargas eléctricas cuando se utilice posteriormente.
13. Evite el uso del producto durante una tormenta. Existe riesgo potencial de que
se produzca una descarga eléctrica a consecuencia de los rayos.
14. No coloque el producto en lugares por los que las personas puedan transitar o
caerse sobre él.
15. No coloque objetos conductores sobre la antena o cerca de ella.
16. No utilice el producto para notificar un escape de gas cuando se encuentre en
las cercanías de la fuga.
17. No instale la estación base o el cargador del portátil cerca de hornos
microondas, radios, televisores, altavoces u otros equipos eléctricos. Estos
aparatos pueden causar interferencias al producto o sufrir las interferencias
provocadas por este.
18. Si se producen las siguientes situaciones, desenchufe la estación base o el
adaptador del cargador de la toma de corriente eléctrica y consulte a un centro
de servicio autorizado:
a. Se ha derramado líquido dentro del producto.
b. El cable de alimentación o el enchufe está dañado o desgastado.
c. El producto se ha expuesto a la lluvia o al agua.
d. El producto no funciona con normalidad y, sin embargo, se han seguido las
instrucciones de funcionamiento.
e. El producto se ha caído o la carcasa se ha dañado.
f. El producto muestra un cambio claro en su rendimiento.
Page 65

~7~
Instrucciones relacionadas con la seguridad de la batería
1. Utilice baterías de ion-litio recargables y un cargador aprobados por el
fabricante. No utilice ningún otro tipo de baterías recargables ni baterías no
recargables. Las baterías podrían cortocircuitarse y el compartimento de las
mismas podría resultar dañado, lo que provocaría una condición peligrosa.
2. Siga las instrucciones de carga de este manual y las etiquetas y marcas de
instrucciones que figuran en los compartimentos del portátil y el cargador.
3. La batería no se debe cargar en el lugar donde la temperatura es inferior a 0 ℃
o superior a 40 ℃.
4. Debe reciclar la batería o deshacerse de ella adecuadamente. No arroje la
batería al fuego. Las celdas podrían explotar.
5. No arroje la batería a la basura municipal. Consulte las normas locales para
obtener instrucciones sobre cómo deshacerse de la batería.
6. Extreme las precauciones cuando manipule las baterías para no
cortocircuitarlas con materiales conductores como, por ejemplo, anillos,
brazaletes, llaves, navajas y monedas. La batería o el material conductor puede
sobrecalentarse y causar quemaduras o un incendio.
7. No exponga las baterías a la lluvia o al agua.
8. No abra ni mutile las baterías. El electrolito liberado es corrosivo y puede dañar
los ojos y la piel. El electrolito puede ser tóxico si se lo traga.
9. Durante la carga, la batería se calienta. Esto es normal y no es peligroso.
~8~
Información sobre normativas
FreeStyl V2
FCC ID:U2M-FSV2
IC:3616C-FSV2
Este dispositivo cumple las normas CE. El funcionamiento está sujeto a las
siguientes dos condiciones:
1) este dispositivo no puede generar interferencias perjudiciales, y
2)
este dispositivo debe aceptar cualquier interferencia recibida,
incluidas aquellas interferencias que pudieran provocar un
funcionamiento no deseado
1. Este dispositivo cumple las normas EN 301 357-2 (RF), EN 301 489 (EMC), EN
60950 (seguridad) y EN 50371 (seguridad de RF).
2. El producto objeto de este manual de usuario cumple totalmente las leyes y
regulaciones aplicables en cada país donde se venda o promocione. El
fabricante del producto y los vendedores del mismo, no son en ningún caso
responsables de cualquiera de las modificaciones que pudieran realizarse a los
ajustes protegidos por contraseña del fabricante hechas por los usuarios o por
terceras partes no autorizadas que resulten
ser una violación o el incumplimiento de las leyes o regulaciones de cualquier
país. Cualquier usuario o tercera parte no autorizada que hiciera dichas
modificaciones será el único responsable de cualquier daño al producto,
personal o a la propiedad de cualquier tipo, las sanciones impuestas por la
autoridad vigente y cualquier otra consecuencia que de ello resulte.
3. El número de equivalencia del llamante (REN, Ringer Equivalence Number) es
útil para determinar la cantidad de dispositivos que puede conectar a la línea
telefónica y que todos los dispositivos suenen cuando se llama al número de
teléfono. En la mayoría de las áreas, pero no en todas ellas, la suma de los REN
de todos los dispositivos conectados a una línea no debe ser superior a 5. Para
estar seguro del número de dispositivos que puede conectar a la línea
telefónica, debe ponerse en contacto con el operador de telefonía para saber el
REN máximo de su área.
4. Si el equipo telefónico causa problemas a la red telefónica, el operador de
telefonía puede pedirle que lo desconecte de la línea hasta que el problema se
haya resuelto. Si se produce esta situación, consulte a el operador de telefonía
local para conocer sus derechos.
Page 66

~9~
5. El operador de telefonía puede realizar modificaciones en las instalaciones, el
equipamiento, las operaciones o los procedimientos que podrían afectar al
propio funcionamiento del dispositivo. Si se produce esta situación, consulte el
operador de telefonía local para conocer sus derechos.
6. Este dispositivo no se puede utilizar en un servicio de monedas proporcionado
por el operador de telefonía. La conexión a líneas colectivas está sujeta a las
tarifas estatales.
7. Este dispositivo se ha probado y se ha demostrado que cumple los límites de
las normas EN 301 357-2 (RF), EN 301 489 (EMC), EN 60950 (seguridad) y EN
50371 (seguridad de RF). Estos límites están diseñados para proporcionar una
protección razonable contra las interferencias perjudiciales en una instalación
pública general. Durante su uso, estos dispositivos pueden seguir recibiendo
interferencias procedentes de televisores, grabadoras de vídeo, radios, PCs u
otros equipos electrónicos cercanos, o causárselas a todos estos aparatos. Para
minimizar o evitar tales interferencias, el dispositivo no se debe colocar ni
utilizar cerca de otros dispositivos electrónicos.
8. Sin embargo, no se puede garantizar que la interferencia no ocurrirá en una
instalación en particular. Si este dispositivo provoca interferencias a otros
dispositivos electrónicos, lo que puede determinarse encendiéndolo y
apagándolo, es recomendable intentar corregir las interferencias mediante una
o varias de las siguientes medidas:
a.
Es recomendable que haya una distancia de al menos 6,1 metros (20 pies)
entre el sistema y otros dispositivos electrónicos.
b.
Conecte la estación base en una toma de corriente eléctrica independiente
de la que utiliza el dispositivo que sufre interferencias. Consulte a un
distribuidor o un técnico electrónico especialista si necesita ayuda.
~10~
Lista de comprobación del equipo
1. En un paquete de tipo Base + Portátil, deben estar los siguientes
componentes:
a. Estación base ×1 (La antena instaló)
b. Portátil ×1 (La antena instaló)
c. Adaptador de CA/CC para la base ×1
d.
e.
Adaptador de CA/CC para el cargador ×1
Cargador de sobremesa ×1
f. Batería de ion-litio de 1100 mA ×1
g. Cable para el teléfono ×1
h. Manual de usuario (documento digital en CD) , Guía rápida
2. En un paquete de tipo Portátil, debe estar los siguientes componentes:
a. Portátil ×1 (La antena instaló)
b. Batería de ion-litio de 1100 mA ×1
c. Cargador de sobremesa ×1
d. Adaptador de CA/CC para el cargador
e. Guía rápida
3. Accesorios opcionales
a. Kit de antena para exterior (antena y cable incluidos)
b. Kit de protección contra rayos
c. Antena de alta ganancia para el portátil
d. Auricular manos libres
e. Splitter de antena
Page 67

~11~
Ilustración del portátil
Antenna
Guía
telefónica
~12~
Orador
Cobertura
de batería
Jack para auriculares
Page 68

~13~
Características del portátil
Características básicas del portátil
1. Pantalla de cristal líquido (LCD, Liquid Crystal Display) de 4 líneas
a.
La pantalla LCD tiene diodos emisores de luz (LED, Light Emitting Diode)
para la retroiluminación.
b.
La 1ª línea de la pantalla LCD está compuesta de iconos.
c.
Explicación de los iconos de izquierda a derecha
(1)
RSSI (Receive Signal Strength Indicator, es
decir, Indicador de Intensidad de Señal de
Recepción)
Durante una llamada, el número de barras
indica la intensidad de la señal de radio que
se recibe.
(2)
Modo de llamada
(2.1) El símbolo de un teléfono indica la línea
de teléfono está activo.
(2.2) Llamada interna en curso
Indica si el portátil está realizando una llamada interna y el número
del portátil del otro interlocutor.
(3)
Modo Conversación
(3.1) Indicador del altavoz
Indica si está activo el altavoz manos libres.
(3.2) Modo Teléfono
Indica que se esta utilizando el auricular del portátil.
(4)
Sonido e indicación
(4.1) Timbre habilitado
(4.2) En silencio (sin timbre)
(4.3) Modo Timbre y vibrar
(4.4) Modo sólo vibrar
(4.5) Indicador de mensaje en espera
(5) Deshabilitar Mensajes Radiados ON/OFF
Indica si el portátil puede recibir anuncios radiados de otros
portátiles.
(6)
11
Número del portátil de 2 dígitos
Indica el número con el que el portátil se ha registrado en la base.
(7)
Carga de la batería
El número de barras indica a la cantidad restante de batería.
d. La 2ª y 3ª línea de la pantalla LCD, con un máximo de 16 caracteres cada
una de ellas, muestran estados, mensajes, selecciones de menú o
caracteres alfanuméricos que puede seleccionar el usuario.
e. La última línea muestra los botones en pantalla Izquierdo y Derecho.
2. Timbre
a.
Suena en llamadas entrantes o en llamadas internas.
~14~
b.
También hay una alerta distintiva que indica varios eventos:
(1) Tono único: entrada de botón correcta.
(2) Tono doble: indica apagado y encendido del portátil.
(3) Tono triple: error de operación.
(4)
Tono periódico 1 largo y 2 cortos (cada minuto): advertencia de
carga baja de la batería, fuera de alcance y/o llamada retenida
Nota:
Las pulsaciones de teclas no válidas no emiten ningún tono,
simplemente se ignoran.
3.
Botón HABLAR/FLASH (‘R’) ( )
a.
Realiza una llamada telefónica o interna, o responde a ella.
b. Su uso durante la conversación envía un micro corte (‘R’) a la línea
telefónica para retener la llamada en la centralita, para recuperar el tono
de marcación después de terminar la llamada o también para llevar a cabo
la función de “llamada en espera” que proporciona el operador de
telefonía durante una llamada en las líneas analógicas.
4.
Botón ALTAVOZ ( )
a. Pulse el botón para activar o desactivar el altavoz manos libres durante una
llamada entrante, saliente o interna.
5.
Botón LLAMADA INTERNA BIDIRECCIONAL ( )
a. Realiza una llamada interna a otro portátil, a un portátil de grupo
(megafonía de grupo) o a todos los portátiles registrados.
b. Las llamadas internas son digitales, bidireccionales simultáneas y se
realizan sin necesidad de la base.
6.
Botón MENSAJE RADIADO (Push To Talk) ( )
a. Transmisión bidireccional no simultánea a los portátiles para anuncios
radiados (similar a la megafonía).
b. Transmisión bidireccional no simultánea a las estaciones base.
Nota: Pulse y sostenga el botón del lateral del portátil para usar la función.
Tarda unos segundos y emite un tono para evitar el uso accidental.
7.
Botones en pantalla Izquierdo y Derecho ( )
a.
Seleccionan un menú o bien ejecutan la función indicada
8.
Botones de desplazamiento Arriba( ) / Abajo( )
a.
Recorrer los registros y las selecciones de menú.
b.
Ajustar el volumen de voz del receptor en el modo conversación.
c.
Pulse para ajustar el volumen del timbre en el modo reposo.
d.
Pulse para entrar en la agenda en el modo reposo.
Page 69

~15~
9.
Botón FIN; Encender / Apagar ( )
a.
Termina una llamada.
b.
Sale de la operación del menú actual, permite subir un nivel.
c. Pulse este botón durante 3 segundos para apagar el portátil.
10.
Botón IDENTIFICACIÓN DEL LLAMANTE ( )
a.
Revisar la lista de llamadas.
b.
Incluye las llamadas recibidas y perdidas.
Características adicionales del portátil
1. Registro de varios portátiles
a.
Se pueden registrar hasta 9 portátiles en una estación base.
b.
Números del 11 a 19: identificadores de portátiles individuales.
c. Números del 91 a 99: identificadores de grupo. Desde el menú, los portátiles
se pueden “suscribir” a los grupos y timbrarán cuando un llamante externo o
un llamante interno marquen el número del grupo.
2. Función de timbre y vibración
a. Dos opciones para el tono de la Línea (llamada entrante) e interfón.
b. Seisopciones para el volumen del timbre (Apagado/Bajo/Medio/Alto/Vibrar/
Vibrar y Alto) para cada opción.
c.
Ocho selecciones de tipo de timbre para cada opción. Variedades 1 a 4 con
vibrar y timbre simultáneo y variedades 5 a 8 con vibrar sólo en primer
timbre.
3. Identificación del llamante
a. Muestra el número de teléfono y el nombre de la llamada entrante en la
pantalla LCD (es necesario contratar el servicio de identificación de llamadas
al operador de telefonía).
4. Llamada en espera con identificador del llamante
a. Muestra información de la 2ª llamada entrante en la misma línea telefónica
cuando la 1ª llamada está en curso (se necesita contratar el servicio de
llamada en espera con identificación del llamante al operador de telefonía
local).
5. Etiquetar la identificador del llamante con un nombre
a. Permite relacionar el número con las entradas de la agenda; una vez
encontrada la coincidencia, en la pantalla LCD se mostrará el nombre o el
alias en lugar del número del llamante (puede ser necesario contratar el
servicio de llamada en espera con identificación del llamante al operador de
telefonía local).
6. DND (“no molestar”, es decir, timbre desactivado)
~16~
7. Registro de llamadas
a. Rellamada: almacena los 10 números de teléfono (de hasta 26 dígitos cada
uno) marcados recientemente. Permite volver a marcar el último número en
cada uno de los 10 números.
b. Registro de llamadas recibidas y nuevas: 50 entradas en total (números de
teléfono de 16 dígitos, nombres de 16 caracteres y marca de fecha y hora).
Se necesita contratar el servicio de identificación del llamante al operador de
telefonía local.
c. Los números de teléfono y los nombres se pueden guardar en la agenda
mientras permanecen en pantalla.
8. Bloqueo de llamadas: bloquear llamadas salientes y entrantes.
a.
Llamada saliente:
a-1. Bloquear llamadas a larga distancia o internacionales por parte de los
usuarios.
a-2. Hasta 5 dígitos para cada configuración de bloqueo de llamadas;
permitidas hasta 5 entradas.
a-3. Si necesita marcar un número específico para obtener un tono de
marcado, necesitará introducir este número al configurar el bloqueo de
llamadas.
b.
Llamada entrante:
b-1. PA (Sistema de megafonía) Activado/Desactivado: Habilitar o
deshabilitar la transmisión desde otros terminales o desde la base. Cuando el
sistema de megafonía está Desactivado, el terminal no puede recibir
transmisiones desde la base o desde otros terminales registrados, pero sí
puede transmitir a la base o a otros terminales registrados.
b-2. Línea Activada/Desactivada: Habilitar o deshabilitar la capacidad de
recibir llamadas entrantes desde la línea de teléfono. Cuando la línea está
Desactivada, el terminal no puede recibir llamadas entrantes desde la línea
de teléfono, pero sí puede realizar llamadas salientes.
b-3. Meg. Activado/Desactivado: Habilitar o deshabilitar el interfón desde
otros terminales o desde la base. Cuando el Interfón está Desactivado, el
terminal no puede recibir transmisiones desde la base o desde otros
terminales registrados, pero sí puede transmitir a la base o a otros terminales
registrados.
c.
Para realizar este cambio, es necesario entrar en las “Configuraciones de
Llamada” (MENÚ-4-3).
Nota: es necesario introducir la contraseña de la base para activar esta función.
La contraseña predeterminada es “0000”.
9.
Responder con cualquier tecla (excepto y el botón en pantalla SILEN)
a. Esta función es opcional y se activa desde el menú de ajustes del portátil.
10. Bloqueo del teclado
a. Cuando el bloqueo del teclado está seleccionado, todos los botones se
bloquean. Pulse el botón en pantalla Izquierdo DESBLO seguido de “*” para
Page 70

~17~
activar el teclado.
b. Se habilitará el bloqueo de teclado automáticamente si permanece inactivo
durante 15 segundos.
11. Prefijo de marcación
a. Se puede programar un código de acceso de hasta 14 dígitos (pausas
incluidas) para que se agregue automáticamente delante del número
marcado cuando se llama desde el registro de llamadas, la agenda y con la
marcación en bloque.
12. Retener llamada
a.
Retiene la llamada en la base (función Hold). Esta función no retiene la
llamada en la línea ni en la extensión de centralita (no es como ‘R’ o ‘Flash’)
13. Silencio
a.
Pulse el botón en pantalla Izquierdo MUTE durante una conversación y el
micrófono del portátil se silenciará.
Pulse el botón en pantalla Izquierdo NOMUTE para desactivar el silencio.
14. Agenda
a. 50 entradas, cada una almacena un número o identificador de portátil(de
hasta 26 dígitos) y un nombre (de hasta 16 caracteres)
b. Visualización ordenada alfabéticamente y búsqueda por letra.
c. Marcar desde la pantalla.
d.
En el modo de espera, puede entrar en la agenda presionando o el
botón de desplazamiento .
e.
Transferencia de agenda por aire
i. Transferir una agenda específica a un terminal o a todos los terminales
registrados.
ii. Transferir todas las agendas a un terminal o a todos los terminales
registrados.
15.
Tono de los botones del teclado
a. Ajusta el volumen para el tono que suena al pulsar el teclado
(Off, Bajo, Medio y Alto).
16. Temporizadores de llamada
a. Visualización de la duración de la llamada actual durante y a la finalización de
la llamada.
17. Llamada con prestación
a. Permite al usuario preprogramar los códigos de las funciones más
frecuentemente utilizadas en líneas analógicas especiales o centralitas para
usarlos cómodamente desde el EP-801.
b. Puede guardar hasta 10 entradas.
c. Una vez programado el código de las funciones, puede seleccionar y ejecutar
~18~
rápidamente las funciones correspondientes durante la llamada presionando
el botón OPCIÓN en pantalla y eligiendo la prestación.
18. Mens Radi On/Off
a. Habilitar o deshabilitar la función de recibir mensajes radiados.
b. Cuando la función está desactivada, el portátil no recibirá los mensajes
radiados por la base o por otros portátiles registrados. Sin embargo, el
portátil aun podrá enviar sus propios mensajes radiados a la base o a otros
portátiles registrados.
19. Bloqueo de los menús
a.
Para evitar el uso incorrecto o indebido de los menús “Ajuste
Llamada”(MENÚ-4), “Ajust Teléfono” (MENU-5), “Ajuste Base” (MENÚ-6) y
Multibase (MENÚ-7-3), puede ocultarlos.
b.
Se requiere una contraseña para entrar en la opción Bloq. De Menú (MENÚ-
8). La contraseña predeterminada del portátil es“0000”.
c. Para volver a mostrar los menús, tendrá que entrar de nuevo en la opción
Bloq. De Menú (MENÚ-8).
20. Configuración de grupo
a. Permitir al portátil suscribirse a uno o varios grupos.
Nota: se puede suscribir hasta 9 grupos.
21. Nombre personalizado
a. Permitir cambiar la pantalla del sistema “FREESTYL V2” para que muestre el
texto o mensaje que desea, como por ejemplo el nombre del usuario.
Nota: puede insertar hasta 32 caracteres.
22. Cambiar contraseña
a. Permitir cambiar la contraseña del portátil que se requiere para entrar en las
opciones Restr. llamadas (MENÚ-4-3) y Menú Pantalla (MENÚ-8).
Nota: la contraseña predeterminada es “0000”.
23. Duración DTMF
a. En MENÚ-6-1 puede seleccionarla duración variable del tono DTMF.
b.
El valor predeterminado es 100 ms.
c.
Para entrar en la opción Ajuste Base se necesita un PIN. El PIN de fábrica es
“0000”.
Nota: es mejor que lo compruebe con su operador de telefonía antes de
cambiarlo.
24. Tiempo de Flash (‘R’) programable
a. En MENÚ-6-2 puede cambiar la temporización del botón flash (‘R’).
b. Hay 9 niveles de selección (100 ms - 900 ms). El valor adecuado para España
es 100 ms y el predeterminado son 600 ms.
c. El cambio de este valor puede hacer que el botón Flash no haga nada o bien
que cuelgue la llamada. Si tiene una centralita, pruebe con los distintos
valores hasta encontrar el que funcione bien.
d. Para entrar en la opción Ajuste Base se necesita un PIN. El PIN de fábrica es
“0000”.
Page 71

~19~
25. Seleccionar el número con el que se registrará el siguiente portátil
a. Utilice un portátil registrado para ir al menú MENÚ-6-3 y asignar el número
con el que se registrará el siguiente portátil que dé de alta.
b.
Si no selecciona ningún número, la base asignará automáticamente el
número basándose en el que utilizó para el portátil anterior (pred. 11 ~ 19)
c.
Para entrar en la opción Ajuste Base se necesita un PIN. El PIN de fábrica es
“0000”.
26. Dar un portátil de baja
a. Utilice un portátil registrado para ir al MENÚ-6-4 para dar de baja otro
portátil registrado que se haya averiado o perdido.
b. Una vez dado de baja, el usuario podrá registrar un nuevo portátil con el
mismo número identificador que el anterior.
c. Para entrar en la opción Ajuste Base se necesita un PIN. El PIN de fábrica es
“0000”.
27. Cambiar PIN
Permite cambiar el PIN de la base que se utiliza para entrar en el menú "Ajuste
Base" (MENÚ-6-5).
a. Utilice un portátil registrado para cambiar el PIN en el MENÚ-6-5.
b. El PIN predeterminado es “0000”.
28. Función de colgado automático
a. Utilice un portátil registrado de MENÚ-6-6 para activar o desactivar la
función colgado automático.
b. Si se activa la función, el portátil colgará automáticamente la llamada cuando
el extremo opuesto haga lo propio.
c. Para entrar en la opción Ajuste Base se necesita un PIN. El PIN
predeterminado es “0000”.
29. Establecer la hora
La función de establecimiento de hora permite al usuario establecer la fecha y la
hora en el sistema para admitir la identificación de llamadas del estándar DTMF.
Dicho estándar no proporciona la información sobre la fecha y la hora cuando
se recibe de la red telefónica, por lo que configurar correctamente esta función
permite al usuario ver la fecha y la hora en las que se recibió la llamada).
a. Entre en MENÚ-6 para acceder a la función Ajuste Base.
b.
Pulse el botón de desplazamiento o para seleccionar la base en la
que desee ajustar la hora.
c. Introduzca el PIN de la base (el valor predeterminado es “0000”).
d. Marque “7” para establecer la hora.
e. Teclee 6 dígitos para AA/MM/DD (Año/Mes/Día) y, a continuación marque
otros 4 dígitos para hh:mm (Horas : Minutos)
f. Pulse el botón en pantalla Izquierdo GUARDA para guardar el cambio.
~20~
30. Ganancia de Micrófono
Permite cambiar la ganancia del micrófono del terminal, de acuerdo con el
ambiente dónde está el terminal - ambiente Silencioso, Normal o Ruidoso.
Es necesario entrar en las “Configuraciones de Teléfono” (MENÚ-5-1).
31. Timbre de los Auriculares
Permite cambiar la emisión del timbre entre el altavoz del terminal y el receptor
de los auriculares.
Es necesario entrar en las “Configuraciones de Teléfono” (MENÚ-5-9).
32. Baby Monitor
Permitir establecer el auricular el control de la habitación del bebé a través de
llamada de intercomunicación.
Al ajustar el monitor infantil, este teléfono específico no responder a ninguna
llamada, excepto la de 2 vías de intercomunicación.
Para ello es necesario entrar en los "Ajustes de llamadas" (MENÚ -4-5)
Page 72

~21~
Ilustración de la base
Ilustración de la base
Página /
Registrar
Restablecer
Conector
Entrada DE CC
Conector telefónico
Conector de línea
~22~
Características de la base
Características básicas de la estación base
1. Antena
a. El puerto de antena tiene un conector de rosca directa; para quitar la
antena o el cable, gírelo en sentido contrario a las agujas del reloj; para
instalarlo, gírelo en el sentido de las agujas del reloj. La instalación
inadecuada o forzada puede dañar el conector.
b. Si utiliza una antena para exterior, coloque dicha antena (no la propia
estación base) tan alto como sea posible para conseguir una trayectoria
de transmisión despejada.
2. Indicador LED
a.
Alimentación: indica si la estación base recibe alimentación.
b.
En uso: indica una línea telefónica activa.
3. Botón RESTABLECER
a.
Restaura la configuración predeterminada de fábrica de la estación base.
b.
Este botón está pensado para evitar el uso accidental del mismo, por lo
que será necesario mantenerlo pulsado hasta que la base emita un tono.
c.
Todos los portátiles (incluido el principal) y bases adicionales deberán
registrarse de nuevo después de usar esta función en la base.
4. Botón Page (PAGE)
Para buscar un auricular extraviado, pulse botón "PAGE", todos los teléfonos
registrados pitido durante 30 segundos.
Pulse el botón "PAGE" otra vez o cualquier tecla en el auricular para detener.
5. Botón Registro (PAGE)
Pone la base en modo registro para dar de alta un nuevo portátil (11~19).
6. Conector de línea
Conector RJ-11C/CA-11A estándar para enchufar la línea telefónica.
7. Conector de teléfono
Conector RJ-11C para enchufar, por ejemplo, un contestador automático.
8. Entrada de CC:
a. Conector para el transformador de corriente.
Page 73

~23~
Ilustración del cargador
Ra
nura para cargar
el port á til
Entrada
de CC
~24~
Características del cargador de sobremesa
1. Entrada de CC
Permite conectar el transformador de corriente del cargador.
2. Ranura para cargar portátil
a. Carga la batería del portátil cuando este se coloca en la plataforma.
b. Consulte la pantalla del portátil para conocer el estado de la carga.
(1) Cargando: la barra de estado de la batería está en ejecución y en la
pantalla se muestra el mensaje Cargando batería.
(2) Totalmente cargada: la barra de estado permanece fija y en la pantalla
LCD se muestra el mensaje “Carga completa”.
(3) Error en la carga: se ha producido algún error en el modo de carga. La
pantalla muestra el mensaje “Fallo de carga”.
3. No es posible sobrecargar las baterías con este cargador.
4. El transformador del cargador de sobremesa también se puede utilizar como
cargador “de viaje”. No obstante, no podrá apagar el portátil mientras lo carga
con el cargador de viaje. En la pantalla del portátil se mostrará un mensaje de
advertencia “Desenchufe el cargador de viaje”.
Notas:
1.
Cargue las baterías completamente antes de utilizar el aparato por primera
vez.
2.
El portátil se encenderá automáticamente cuando se coloque en la base de
carga.
3.
No obstante, si la batería se agota completamente, el portátil tardará
alrededor de un minuto en encenderse una vez puesto en carga, ya que
necesita una carga mínima de batería para iniciar.
Page 74

~25~
Procedimientos iniciales
Instalación de la estación base
La base se puede instalar de tres formas posibles:
Estación base sola.
Estación base más un dispositivo (como un contestador telefónico)
Estación base más un teléfono analógico como supletorio.
Para conseguir el mejor rendimiento, mantenga una distancia de al menos
2 metros entre la estación base y otros dispositivos electrónicos, como por ejemplo
televisores, PCs, equipos estéreos, faxes, contestadores automáticos, teléfonos
inalámbricos, etc.)
1. Instale la antena de la estación base.
El puerto de antena de la estación base
tiene un conector de rosca directa; para
instalar la antena o el cable, gírela en el
sentido de las agujas del reloj; para
quitarla, gírela en sentido contrario. La
instalación inadecuada o forzada puede
dañar el conector.
2. Enchufe el extremo del transformador del
adaptador de CA/CC de la estación base a
una toma de CA estándar y el otro extremo
al conector “Entrada de CC” situado en la
parte posterior de la estación base.
a. El enchufe de CC del adaptador de la
base es más grande que el enchufe de
CC del cargador por lo que el
transformador del cargador no
encajará en el conector de la base.
b. La fuente de alimentación de la
estación base (Adaptador de CC) y la
línea telefónica se deben proteger
contra picos de tensión.
3. Enchufe el cable telefónico al conector “LÍNEA”.
4. Podrá enchufar un teléfono estándar o un contestador automático en la toma
adyacente situada en la parte inferior de la estación base marcada con la
inscripción TEL.
~26~
Instalación del portátil y el cargador
1. Enchufe el extremo del transformador del adaptador de CA/CC del cargador a
una toma de corriente estándar y el otro extremo al conector “Entrada de CC”
situado en la parte posterior del cargador.
2. Instale la antena del portátil.
3. Instale la batería en el portátil.
4. Coloque el portátil en la ranura del cargador.
5. Cargue completamente la batería durante tres horas antes de utilizarla.
6. El equipo ahora estará listo para realizar las funciones básicas, como realizar y
recibir llamadas externas o internas. No es necesario configurar de forma
especial la estación base o los portátiles para
estas funciones básicas.
Nota:
1.
El portátil incluido en el paquete junto con la estación base ya viene
registrado de fábrica. Si tiene un portátil nuevo, tendrá que
registrarlo con la estación base para que sea reconocido por las otras
bases y portátiles. Consulte la sección “Registro de portátiles”.
2.
Cargue las baterías completamente antes de utilizar el aparato por
primera vez.
Page 75

~27~
Funcionamiento básico
Modos de funcionamiento
Tanto la estación base como el portátil tienen niveles de funcionamiento, de forma
que algunas funciones sólo se pueden utilizar en ciertos momentos.
A. Modos de funcionamiento de la base
1. Modo REPOSO: es el modo predeterminado. Los botones del page están
habilitados en el modo REPOSO. El "Power" se iluminará
2. Modo CONVERSACIÓN- la base está en este modo durante operaciones de
llamada. Los LEDS “In Use” (En Uso) se iluminarán.
3. Modo REGISTRO: la base entra en este modo al presionar el botón PAGE
durante uno segundos. Los Power LED iluminarán en el modo Registro y
sonará un timbre distintivo.
B. Modos de funcionamiento del portátil
1. Modo Reposo: es el modo predeterminado.
a. Si no hay actividad, el portátil pasará automáticamente a
este modo para ahorrar energía.
b. El portátil se puede apagar completamente
manteniendo presionado el botón FIN durante tres
segundos.
c. En la pantalla se puede poner un nombre personalizado.
d. El número de 2 dígitos representa el número
identificador del portátil.
2. Modo Menú
a. Pulse el botón en pantalla Derecho para activar el modo
Menú.
b. En el modo Menú, se puede cambiar la configuración e
información del portátil almacenadas en memoria.
c. Las funciones disponibles a través de la selección del
menú se tratan más detalladamente a partir de la página
38.
d. A continuación se muestra la estructura del menú:
~28~
3. Árbol de menús
Page 76

~29~
Realizar una llamada de teléfono
1.
Pulse , espere al tono de invitación a marcar y, a
continuación, teclee el número de teléfono.
2. También puede especificar el número de teléfono primero
y, a continuación, presionar el botón .
Si utiliza este método, puede usar los botones en pantalla
izquierdo LIMPIA y derecho BORRAR para editar el número
insertado. “Borrar” elimina el último dígito insertado.
“Limpia” borra toda la línea pero dejando el modo de
marcación activo.
3.
La marcación rápida se realiza accediendo a las entradas de
la agenda (MENU 2)
a.
Pulse el botón de desplazamiento o para
entrar en la agenda.
b.
Pulse para marcar el número.
4.
Para anular la marcación, Pulse el botón .
Notas:
1. Si la línea está ocupada, la pantalla LCD mostrará el mensaje “No
hay línea disponible” y el portátil volverá al modo de espera.
2. Si no se puede establecer un enlace, la pantalla LCD mostrará “No
hay base” cuando transcurran 12 segundos.
3. El temporizador de la duración de la llamada comenzará a contar
una vez establecido el enlace.
Realizar una llamada bidireccional o interna
El teléfono FREESTYL V2 ofrece llamadas internas privadas y bidireccionales
independientes de la base. La comunicación se puede realizar entre portátiles,
desde las bases a los portátiles o en sentido contrario.
~30~
1.
Pulse el botón y, a continuación, marque el número
de dos dígitos del portátil o del grupo.
2.
Pulse el botón para terminar la llamada.
Notas:
1. Mientras se está en una conversación entre portátiles, las
llamadas entrantes a la línea de la base sólo se notificarán en
la propia base o en los portátiles que estén en reposo, excepto
si los portátiles en reposo están configurados para no notificar
llamadas de la base.
2. Las llamadas internas se pueden realizar aunque se esté fuera
de la cobertura de la base.
3. Si se marca un número de grupo, el primer portátil de dicho
grupo que descuelgue atenderá al llamante. Consulte la
sección “Suscripción a grupos de portátiles”.
4. Si no se puede establecer un enlace, la pantalla LCD mostrará
“Sin conexión” cuando transcurran 12 segundos.
Realizar un mensaje radiado (megafonía)
A. Mensaje radiado entre portátiles
1. Radiar mensaje a todos los portátiles
a.
Pulse el botón (lateral izquierdo) de un portátil.
b.
Escuchará un tono en forma de “bi-bi-beep” mientras se
inicia la transmisión a todos los portátiles que se
encuentren dentro de la cobertura del portátil de origen.
c. Cuando termine el tono de aviso comience a hablar; el altavoz de los
portátiles llamados se activará automáticamente.
d.
Pulse el botón para terminar la transmisión.
2. Radiar mensaje a un grupo de portátiles
a.
Marque el número del grupo y, a continuación, Pulse el
botón (lado izquierdo del portátil).
b. Escuchará un tono en forma de “bi-bi-beep” mientras
se inicia la transmisión del portátil a todos los portátiles
que se encuentren dentro de la cobertura de
comunicación.
c. Comience a dictar el mensaje que se va a transmitir cuando escuche el
sonido de “tono”; el altavoz de los portátiles de destino se activará.
d.
Pulse el botón para terminar la transmisión.
Page 77

~31~
3. Radiar un mensaje a un portátil individual
a.
Marque el número del portátil y, a continuación, Pulse
el botón (lado izquierdo del portátil).
b. Escuchará un tono en forma de “bi-bi-beep” mientras
se inicia la transmisión del portátil.
c. Comience a dictar el mensaje que se va a transmitir cuando termine el tono
de aviso; el altavoz del portátil de destino se activará automáticamente.
d.
Pulse el botón para terminar la transmisión.
Rellamada
1. Pulse RELLAM (botón en pantalla Izquierdo).
2.
La pantalla LCD mostrará el último número de teléfono
marcado. Para marcar este número, Pulse el botón .
3.
Utilice el botón o para recorrer los últimos 10
números de teléfono marcados. Seleccione uno de ellos y
Pulse el botón .
Nota: las llamadas internas (a números de portátiles o
grupos) no se almacenan en el registro de los últimos
10 números marcados.
Recibir una llamada de teléfono
1. Cuando se recibe una llamada entrante, la pantalla LCD
mostrará el número del llamante y el timbre se manifestará
en forma de sonido o vibración, excepto si ha sido
previamente desactivado.
~32~
2.
Si el portátil se encuentra en la plataforma del cargador
(cuando se pone en la plataforma, se desactiva
temporalmente el vibrador ), levante el portátil y Pulse el
botón para iniciar la conversación.
Nota: puede activar la opción “Cualq tecl resp” en MENÚ-5-2
Notas:
1. Puede presionar el botón en pantalla Izquierdo SILEN si opta por
ignorar la llamada. A diferencia de desactivar el timbre (desde el
menú del portátil), la función del botón, SILEN solamente es válida
para la llamada actual.
2. Si el servicio de identificación del llamante está disponible, la
pantalla LCD mostrará la información de la llamada entrante. Si la
pantalla LCD muestra “Privada” o “Desconocido”, la información
del llamante puede haber sido bloqueada por dicho llamante o por
el operador de telefonía originaria.
Importante:
Cuando se recibe una llamada entrante en la base y todos los portátiles
están en conversación interna (intercom), la llamada sólo se señalizará en
la base hasta que uno de los portátiles quede liberado de la conversación
y siempre y cuando dicho portátil esté configurado para señalizar llamadas
entrantes desde la base o bien el llamante cuelgue.
Recibir una llamada interna
1.
Cuando se recibe una llamada interna (realizada desde
otros portátiles, como por ejemplo el Portátil 12), el timbre
se manifestará en forma de sonido o vibración, a menos
que se haya desactivado. Pulse para responder a la
llamada interna.
2.
Si el portátil se encuentra en la base o el cargador (cuando
se pone en la plataforma, se desactiva temporalmente el
vibrador), levante el portátil e inicie la conversación.
3.
Si el portátil no se encuentra en la base, pulse cualquier botón (excepto el botón
en pantalla SILEN ó ) para responder.
Page 78

~33~
Notas:
1. La pantalla LCD muestra el número de portátil del llamante.
2. Puede presionar el botón en pantalla Izquierdo SILEN si opta por
ignorar la llamada. A diferencia de desactivar el timbre, la función
del botón SILEN solamente es válida para la llamada actual.
Terminar una llamada
Para terminar una llamada de teléfono o interna, pulse el botón , o coloque el
portátil en la plataforma del cargador.
Ajustar el volumen de voz del receptor (auricular) del portátil
1. El volumen de voz solamente se puede ajustar durante la
llamada.
2. Hay 6 niveles de volumen disponibles: Valor
predeterminado = 3. Utilice el botón o para
realizar el ajuste.
3. El nuevo ajuste se aplicará a todas las llamadas hasta que
se cambie otra vez
Ajustar el volumen de voz del altavoz del portátil
1. El volumen de voz solamente se puede ajustar durante una
llamada.
2. Hay 6 niveles de volumen disponibles: Valor
predeterminado = 3. Utilice el botón o para
realizar el ajuste.
3. El nuevo ajuste se aplicará a todas las llamadas hasta que
se cambie otra vez
~34~
Retener una llamada
1.
Cuando una llamada está en curso, se puede retener
presionando el botón .
2.
Para volver a la conversación, pulse el botón en pantalla
Izquierdo RECUPE.
Notas:
1. El portátil que retiene la llamada puede “recuperar” dicha llamada.
Pero si se presiona en el portátil para volver al estado de
espera, en el resto de los portátiles se puede presionar o
para atender esta llamada retenida (si presiona en la base,
también se recuperará la llamada retenida).
2. La pantalla LCD del portátil muestra la lamada retenida. Un tono de
alerta (tono doble) cada 30 segundos recordará al portátil que hay
una llamada retenida.
3. Si la operación (p. ej: una transferencia de llamada) falla después de
retener una llamada, la llamada retenida podría ser desconectada.
Silencio
1. Una vez en conversación, puede presionar el botón en
pantalla Izquierdo MUTE para silenciar el micrófono del
portátil.
2.
Cuando el silencio está activo, el otro portátil no escuchará
su voz, pero usted sí le escuchará.
3. Para desactivar el silencio, Pulse el botón en pantalla Izquierdo NOMUTE. El
silencio solamente se aplicará a la llamada actual.
No molestar (timbre desactivado)
1. Entre en MENÚ-3-1 y seleccione “Off”. Pulse el botón en
pantalla Izquierdo SELECC para confirmar la elección
realizada. El timbre se desactivará hasta que se vuelva a
activar de nuevo desde el menú.
Page 79

~35~
Nota: cuando el timbre se establezca en “Off”, la pantalla
de espera mostrará “Timbre desactiva”.
2. Para silenciar temporalmente el timbre cuando se recibe
una llamada entrante, pulse el botón en pantalla Izquierdo
SILEN.
Bloqueo del teclado
1. Para no marcar ningún número de forma accidental, puede
presionar el botón en pantalla Derecho MENÚ y, a
continuación, presionar “1” para seleccionar la opción
“Bloq. Teclado”. El teclado portátil se bloqueará. En este
estado el teclado no funcionará.
2.
Para desbloquear el teclado, pulse el botón en pantalla
Izquierdo DESBLO y, a continuación, antes de que
transcurran 2 segundos, pulse “*” (asterisco).
3. Se habilitará el bloqueo de teclado automáticamente si
permanece inactivo durante 15 segundos.
4. El bloqueo del teclado estará activo hasta que se desactive,
pero permite recibir llamadas sin tener que desbloquearlo.
A la finalización de la conversación, el teclado volverá a
bloquearse.
Recargar y cambiar la batería
1. Cargue la batería cuando se produzca alguna o varias de las situaciones
siguientes:
a. El teléfono emite un tono dos veces cada dos segundos.
b. El icono de pantalla que representa la batería está vacío.
c. El teléfono no responde al pulsar los botones.
d. La pantalla LCD y la retroiluminación son tenues.
e. Se observa una disminución en el alcance de conversación.
2.
Puede cambiar la batería del portátil después de retener una llamada en curso.
3. El tiempo de conversación y el tiempo de espera de la batería pueden variar en
función del patrón conversación/espera y de la distancia de funcionamiento.
Para conseguir el máximo rendimiento, es recomendable volver a colocar el
portátil en la plataforma del cargador tan pronto como sea posible.
¡Utilice solamente las baterías y los cargadores proporcionados por el
fabricante!
~36~
Funcionamiento avanzado
Registro de portátiles
1. El portátil que acompaña a la base en el paquete ya viene registrado de
fábrica.
2. Si el identificador del portátil es “00”, significa que es un portátil nuevo o que
el número se ha borrado. En ambos casos es necesario registrar el portátil con
la estación base.
3. Registro:
a. Pulse MENÚ-7 para entrar en el modo de registro
b.
Pulse y mantenga pulsado el botón PAGE de la base
durante 1 segundos hasta que los LED se iluminen y
parpadeen. Asimismo, la base emitirá un sonido para
recordarle que la base se encuentra en el modo de
registro..
c. Pulse el botón “1” del portátil para completar el
proceso de registro. La estación base asignará un
identificador de portátil comprendido entre 12 y 19. El
identificador asignado se mostrará en la pantalla LCD
del portátil, lo que indicará que el registro se ha
realizado correctamente.
d. Repita los pasos anteriores para todos los portátiles adicionales.
4. Anulación del registro:
a. Es posible anular el registro del portátil que se está
utilizando. La anulación del registro restablecerá el
identificador del portátil a 00, borrará el código de
seguridad del sistema y liberará el identificador antiguo
para futuros registros.
b. Después de anular el registro, el portátil no podrá
utilizar la base para realizar o recibir llamadas de
teléfono, ni para comunicarse internamente con otros
portátiles hasta que lo vuelva a registrar.
c. Pulse MENÚ-7 para entrar en el modo de registro
d. Pulse y mantenga pulsado el botón PAGE de la base durante 1 segundos
hasta que los LED se iluminen y parpadeen.
e. Pulse el botón “2” del portátil para completar el proceso de anulación del
registro. Cuando la anulación del registro se haya realizado correctamente,
el portátil mostrará el mensaje “Registr portátil”.
Page 80

~37~
Notas:
1. La base tiene un tiempo de espera de registro de 30 segundos
que empieza a contar desde que se presiona el botón REG. El
portátil tiene un tiempo de espera de registro de 12 segundos
que empieza a contar desde que se selecciona la opción de
registro o anulación del registro. La base y el portátil saldrán
automáticamente del modo de registro cuando el tiempo de
espera se cumpla.
2. Repita el proceso de registro y anulación del registro si no se
realiza correctamente.
Suscripción de portátiles a grupos
1. Hay nueve grupos de portátiles (91-99) y cada portátil
pueden decidir a qué grupos desea pertenecer.
2. Por ejemplo, el grupo 1 representa el servicio de “atención
al cliente”, el grupo 2 el de “ventas” y
el grupo 3 el de de “Marketing”.
Suponga que el portátil 11 quiere recibir todas las llamadas
entrantes relacionadas con Ventas y Marketing. Entonces,
el portátil 11 necesitará “suscribirse ” a los grupos 2 y 3.
Ajuste Llamada
2.Ajustes grupo
Selecc
Atrás
3. Selecciones de grupo:
a.
b.
Pulse MENÚ-4 en el portátil para entrar en el menú
Ajuste Llamada.
Pulse el número “2”. El portátil entrará en el menú de
configuración de grupo.
c. Pulse el botón en pantalla OPCIÓN seguido del botón
“1” para suscribirse al grupo (“9#”, #=1~9). Marque
un dígito del 1 al 9.
d. Repita la operación para todos los grupos a los que
desee registrarse
e. También puede eliminar las selecciones de grupo
presionando el botón en pantalla OPCIÓN seguido de
“2” para anular la suscripción al grupo.
Marque un dígito del 1 al 9.
~38~
Notas:
1. El portátil puede cambiar la suscripción a los grupos en
cualquier momento.
2. La base no se responsabiliza de las asignaciones de grupo. Por
tanto, no puede anular la suscripción de un portátil a un grupo.
3. Cuado un llamante interno o de una línea exterior marque el
número de un grupo, todos los portátiles suscritos a ese grupo
timbrarán. El primer portátil en responder atenderá al
llamante..
Transferencia de llamadas
Cuando hay una llamada de teléfono en curso, puede transferirla entre diferentes
portátiles.
Transferencia directa
1.
Pulse el botón para retener la llamada en la base.
2. Pulse el botón en pantalla Derecho TRNSFE , seguido del
identificador del portátil de destino, a continuación, la
llamada retenida se transferirá directamente.
Una vez transferida la llamada al portátil de destino, el
portátil original volverá al modo de espera
automáticamente.
Transferencia indirecta
Si quiere hablar con el portátil de destino o la base antes de
transferir la llamada, puede hacerlo usando el siguiente
método:
1.
Durante la llamada, pulse el botón , seguido del
número del portátil de destino.
2.
Pulse el botón o en el portátil de destino para
responder a la llamada interna. Ahora podrá hablar con el
portátil de destino. Después de la conversación, Pulse
para terminar la llamada interna. El portátil de destino o la
base atenderán la llamada recibida.
Page 81

~39~
Una vez transferida la llamada al portátil de destino, el
portátil de origen volverá al modo de espera
automáticamente.
Notas: Si el portátil de destino no responde, al cabo de un tiempo
la llamada se devolverá al portátil que la originó.
Operaciones con la agenda
1. Puede almacenar hasta 50 entradas en la agenda. Cada
una de ellas puede contener un número de teléfono o de
portátil (de hasta 26 dígitos) y un nombre (de hasta 16
caracteres).
2.
Para acceder a la agenda, Pulse el botón en pantalla
Derecho MENÚ seguido de “2”; o bien, Pulse el botón de
desplazamiento mientras el portátil se encuentra en
el modo de espera.
3. Para agregar una nueva entrada:
a. Pulse el botón en pantalla Izquierdo AÑADIR.
b. Inserte el nombre cuando en la pantalla LCD se
muestre el mensaje “Nombre?” Utilice el botón en
pantalla Derecho BORRAR para eliminar el último dígito
insertado. Cuando termine, Pulse el botón en pantalla
Izquierdo GUARDA para guardar el nombre.
Nota: el nombre puede tener hasta 16 caracteres.
Nombre?
_
Mayúsculas = *
Guarda
Borrar
c. El sistema le pedirá que especifique un número para el
nombre que acaba de insertar.
Nota: el número puede tener hasta 26 dígitos.
d. Después de insertar el número, Pulse el botón en
pantalla GUARDA para guardar esta entrada en la
agenda.
Número?
_
Guarda
Borrar
e. Puede insertar entradas sin nombre en la agenda. Todos los registros sin
nombre se colocarán en la parte superior de la lista de la agenda.
f. Para insertar el nombre, Pulse el número del teclado correspondiente una o
varias veces conforme al orden del carácter que figura en el botón.
~40~
Consulte la tabla siguiente para obtener una lista de caracteres disponibles
y sus órdenes. Por ejemplo, Pulse el “2” una vez para obtener el carácter
“A”, dos veces para obtener el carácter “B”, etc.
Notas:
1. Cuando inserte un dígito, el cursor avanzará automáticamente a la
siguiente posición. Utilice el botón de desplazamiento o para
mover el cursor hacia atrás o hacia delante para insertar o eliminar (el
dígito situado por delante del cursor o a la izquierda del cursor cuando éste
se encuentra a la derecha del último dígito).
2. Cuando introduzca un nombre, si presiona un botón diferente para el
siguiente carácter el cursor avanzará automáticamente al siguiente campo
de carácter. Si necesita insertar caracteres consecutivos que se encuentran
en el mismo botón, puede esperar a que el cursor avance o utilizar el botón
de desplazamiento o para mover el cursor hacia atrás o hacia
delante manualmente. También puede utilizar o para mover el
cursor para realizar una inserción a la izquierda del mismo, o para eliminar
el carácter situado delante del cursor o a la izquierda de él si dicho cursor
se encuentra a la derecha del último carácter.
3. De forma predeterminada, todos los caracteres se introducen en
mayú
sculas. Utilice el botón * para alternar entre mayúsculas y minúsculas.
4. Una entrada “Pausa” representa un retardo de 1 segundo en la marcación
de los dígitos posteriores, lo que es muy útil cuando se marca una
secuencia de números segmentados (por ejemplo, código de acceso a una
prestación, para retrasar la marcación en bloque, entradas para sistemas
de atención automática, etc.). La pausa se inserta presionando el botón
“#“dos veces (la pantalla LCD muestra P). Si inserta una doble pausa (PP) el
resultado será una pausa de 2 segundos en la marcación.
Page 82

~41~
5. Tabla de caracteres:
Botón Caracteres y órdenes
1 ‘ + , . * ( ) y 1
2 A B C 2
3 D E F 3
4 G H I 4
5 J K L 5
6 M N O 6
7 P Q R S 7
8 T U V 8
9 W X Y Z 9
0 0
*
MAYUSCULAS/minusculas: en el estado de edición
de nombre
*: en el estado de edición de número.
#
Espacio y #: en el estado de edición de nombre.
# y P (Pausa): en el estado de edición de número.
4. Las entradas se ordenan y almacenan alfabéticamente como una lista en
orden ascendente (A a Z) desde la parte superior de la lista.
5. La primera línea de la pantalla LCD muestra el nombre y la 2ª línea muestra el
número de teléfono. Si el número de teléfono tiene más de 16 dígitos, pulse el
botón en pantalla Derecho OPCIÓN y seleccione la opción 3 para ver el
número completo.
6. Para buscar un registro:
a.
Utilice el botón de desplazamiento para entrar en el modo Agenda.
b. Pulse el botón correspondiente al primer carácter del nombre que esté
buscando.
c. Por ejemplo, si está buscando “EnGenius” Pulse el número “3” una vez.
d.
Utilice el botón de desplazamiento o para buscar el registro
exacto que está buscando.
7. Para borrar entradas de la agenda:
a.
Utilice el botón de desplazamiento o , o el
método de búsqueda alfabético para buscar el registro
que desea borrar o editar.
b. Pulse el botón en pantalla Derecho OPCIÓN para entrar
en el menú de edición.
~42~
c. Pulse “1” para borrar la entrada de teléfono designada.
d. La pantalla LCD mostrará el mensaje “Borrar entrada?”
Pulse el botón en pantalla Izquierdo SÍ para confirmar el
cambio.
8. Para editar la agenda:
a.
Utilice el botón de desplazamiento o , o el
método de búsqueda alfabético para buscar el registro
que desea borrar o editar.
b. Pulse el botón en pantalla Derecho OPCIÓN para entrar
en el menú de edición.
c. Pulse “2” para editar la entrada de teléfono designada.
Nombre?
_
Mayúsculas = *
Guarda
Borrar
9. Marcar desde la pantalla:
a.
Pulse o para marcar el número de teléfono o del identificador
del portátil.
10. Para transferir una agenda:
Para transferir una agenda, ambas partes deben primero entrar en modo de
transferencia de agenda, como se describe a continuación.
a.
Pulse OPTION (Opción), seguido por 5 o o el botón de
desplazamiento cuando el terminal esté en modo agenda.
b. La parte que desea enviar la agenda debe pulsar 1 para entrar en
modo envío.
i. Pulse TX ALL (botón programable izquierdo) para transferir todas
las entradas de la agenda al (los) otro(s) terminal(es).
ii. Alernativamente, pulse TX ONE (botón programable derecho)
para transferir una entrada al (los) otro(s) terminal(es).
iii. Pulse el Código de 2 cifras del terminal o del grupo y luego
seleccione todas las entradas de la agenda o una entrada para
transferir.
Nota : “00” significa todos los terminales
iv. Durante la transferencia de la agenda, la pantalla LCD mostrará
“Sending” (Enviando) y un temporizador de cuenta atrás de 2
cifras en la pantalla LCD para indicar los números de la agenda
pendientes de envío.
c. La parte que desea recibir la agenda debe pulsar 2 para entrar en
modo recibir.
Page 83

~43~
i. Cuando entra en modo recepción, la pantalla LCD mostrará
"Ready" (Listo).
ii. Cuando empieza a recibir la agenda, la pantalla LCD mostrará “Get
phonebook from Ext. # : xx” (Recibir la agenda desde Ext. # : xx").
iii. Se emitirá un pitido al recibir cada agenda.
iv. Durante la recepción de la agenda, la pantalla LCD mostrará un
temporizador de cuenta atrás de 2 cifras para indicar los números
de la agenda pendientes de recepción.
Nota : Transferencias de agendas realizadas mediante interfaces inalámbricas
pueden resultar en transmisiones incompletas, debido a interferencias.
Restricción de llamadas
1. Bloquear llamadas a larga distancia o internacionales por parte de los usuarios.
También, bloquear llamadas entrantes desde líneas externas o desde otros
terminales registrados.
Necesitará saber la contraseña para entrar en la configuración. La contraseña
por defecto es “0000”.
2. Pulse MENÚ-4-3 para entrar en la opción Restring llamada.
Inserte la contraseña seguida del botón en pantalla
Izquierdo OK
Bloquear Llamadas Salientes
1.
Utilice el botón de desplazamiento o para
activar o desactivar esta configuración. Pulse SELECC para
confirmar la selección.
Nota: el valor predeterminado de la opción Restr. llamadas
es “Off”.
2. Para agregar el código de restricción de llamadas
a. Una vez activada la función de restricción de llamadas,
puede especificar el código de dicha función.
Pulse el botón en pantalla Izquierdo AÑADIR y, a
continuación, inserte el código de restricción de
llamadas. Una vez especificado el número, Pulse el
botón en pantalla Izquierdo GUARDA para guardarlo.
(1) Puede introducir hasta 5 dígitos por prefijo.
Por ejemplo, si desea bloquear todas las llamadas
que se realicen a móviles puede insertar 6 como
código de restricción de llamadas, pero tambien
~44~
puede restringir llamadas internacionales poniendo
el “00” o a paises concretos, como por ejemplo
“0034”.
(2) Si la estación base está conectada a una centralita o
similar, debe incluir también el dígito (o código) de
acceso a línea, o no podrá llamar.
b. Pulse OPCIÓN para eliminar o editar los prefijos de
restricción de llamadas.
c. Se pueden programar hasta 5 prefijos diferentes de
restricción de llamadas.
d. Si desea bloquear todas las llamadas salientes, inserte
“*****” y Pulse el botón en pantalla Izquierdo
GUARDA para guardarlo. Todas las llamadas salientes
se restringirán.
Bloquear Llamadas Entrantes
1. Pulse SELECT (Seleccionar) para confirmar su selección para
llamadas “Entrantes”.
Utilice o el botón de desplazamiento para
seleccionar el elemento que desea bloquear.
a. Pulse SELECT (Seleccionar) para confirmar su selección
de recepción o bloqueado de transmisiones.
Pulse CHANGE (Cambiar) para seleccionarentre Activado
y Desactivado con respecto a esta configuración.
Nota : "Activado" significa que puede recibir
transmisiones desde otros terminales o desde la base.
“Desactivado” significa que desea restringir las
transmisiones desde otros terminales o desde la base.
b. Pulse SELECT (Seleccionar) para confirmar su selección
de recepción o bloqueado de llamadas de línea.
Pulse CHANGE (Cambiar) para seleccionarentre Activado
y Desactivado con respecto a esta configuración.
Nota : "Activado" significa que puede recibir llamadas
desde líneas externas; "Desactivado" significa que desea
Page 84

~45~
restringir las llamadas de líneas externas.
c. Pulse SELECT (Seleccionar) para confirmar su selección
de recepción o bloqueado de llamadas de interfón.
Pulse SELECT (Cambiar) para seleccionarentre Activado y
Desactivado con respecto a esta configuración.
Nota : “Activado” significa que puede recibir llamadas de
interfón desde otros terminales o la base;
“Desactivado” significa que desea restringir las llamadas
de interfón desde otros terminales o la base.
Llamada con prestación programable
1. Si la base del sistema FREESTYL V2 se instala detrás de una centralita, es posible
preprogramar algunas de las funciones mas habituales de las centralitas para su
cómodo uso desde el menú.
2. Se pueden preprogramar un total de 10 códigos de llamada de función , los que
mas frecuentemente utilice.
3. Asigne un nombre a los códigos de llamada de función para
identificarlos y prográmelos :
a. Pulse el botón en pantalla Derecho MENÚ mientras el
portátil se encuentra en el modo de espera.
b. Pulse “4” dos veces para entrar en el menú “Llam con
prestac”.
c. Pulse el botón en pantalla Izquierdo AÑADIR para
agregar una nueva entrada de llamada de función.
d. Teclee el nombre de la función (de la misma forma que
si creara una entrada de la agenda), por ejemplo “Trans.
A 70” (transferir a la ext. 70).
Pulse el botón en pantalla Izquierdo GUARDA para
confirmar la operación.
e. Inserte el código de llamada de función de la función de
centralita correspondiente, por ejemplo F70
Pulse el botón en pantalla Izquierdo GUARDA para
confirmar la operación.
~46~
Nota: “F” representa la tecla Flash (R).
f. La 1ª función y su código correspondiente aparecerán
en la pantalla LCD.
g. Pulse el botón en pantalla Derecho OPCIÓN para
eliminar o editar la llamada de función que programó
en el sistema.
h. Repita las mismas operaciones para programar la 2ª (y
sucesivas) funciónes que desee utilizar con más
frecuencia.
4. Comos usar la función durante la llamada.
a. Mientras está en conversación, pulse el botón en
pantalla Derecho OPCIÓN
b. Pulse el número correspondiente a la función que desee
realizar.. En el ejemplo, pulsando “0” para ejecutar la
función “Trans. A 70” (transferir a la ext. 70).
Notas:
1. Esta función es de gran utilidad cuando la base del sistema FREESTYL
V2 está conectado a una centralita.
2. Si no ha preprogramado ninguna llamada de función en el sistema,
solamente aparecerá “Nº.Agenda” en el menú OPCIÓN.
3. La función programable del FREESTYL V2 puede no funcionar con
todas las centralitas o teléfonos con teclado debido a la gran
diversidad de sistemas patentados.
Identificación del llamante
1. En caso necesario, póngase en contacto con su operador de telefonía local para
solicitar esta función. El dispositivo recibe y muestra la información del llamante
transmitida por el operador de telefonía local. Esta información puede incluir el
Page 85

~47~
número de teléfono, la fecha y la hora.
El FREESTYL V2 puede almacenar hasta 50 llamadas.
2. La pantalla mostrará la fecha y hora de la llamada en la primera línea, el nombre
en la segunda línea y el número de teléfono en la tercera línea.
Si hay un registro no leído se mostrará la palabra “NUEVO” al final de la primera
línea de la pantalla.
3. Cuando vea un registro de llamada, podrá marcar el número, guardarlo en la
agenda o eliminarlo.
Ver un registro de llamada
1.
Para ver el registro de llamadas, pulse .
Pulse el botón o para recorrer los números y
nombres (si están disponibles).
2. Pulse el botón en pantalla Derecho OPCIÓN.
Podrá elegir la opción de guardar, eliminar el registro o
borrarlos todos con los botones o .
a. Guardar el registro de llamadas:
(1) Pulse el botón en pantalla Derecho SELECC. A
continuación, podrá utilizar el botón o
para desplazarse hasta el nombre y presionar
BORRAR para editarlo.
A continuación, Pulse el botón en pantalla Izquierdo
GUARDA para guardar el nombre.
(2)
Utilice el botón o para desplazarse hasta el
número y Pulse BORRAR para editar el número.
A continuación, Pulse el botón en pantalla Izquierdo
GUARDA para guardar el número.
(3) Después de realizar el proceso anterior, el registro de
llamada se guardará en la agenda.
b. Eliminar un registro de llamada:
(1) Pulse el botón en pantalla Derecho SELECC seguido
del botón en pantalla Izquierdo SÍ para confirmar la
eliminación.
~48~
c. Eliminar todo:
(1) Pulse el botón en pantalla Derecho SELECC seguido
del botón en pantalla Izquierdo SÍ para confirmar la
eliminación de todos los registros.
Llamar a uno de los números
1.
Cuando se muestre el número del llamante, pulse o
para marcar este número.
2. El número del llamante se mostrará como un número de 9
dígitos con un código de área de 3 dígitos seguido del
número de teléfono de 6 dígitos.
El número del registro de llamada se puede modificar para
que cumpla las normas de marcación locales.
3.
Pulse el botón y utilice el botón o para
desplazarse al registro de llamada.
4. Para mostrar el número de teléfono sin “1” o sin el código
de área, Pulse el botón en pantalla Izquierdo FORMAT.
5. Por ejemplo, si el número almacenado en el registro de
llamada es “1-555-423-1234”, Pulse el botón en pantalla
Izquierdo FORMAT una vez y el número mostrado cambiará
a “423-1234”.
Pulse el botón en pantalla Izquierdo FORMAT una vez más y
el número cambiará a “555-423-1234”.
Pulse el botón en pantalla Izquierdo FORMAT por tercera
vez y el número cambiará al número original “1-555-4231234”.
6.
Pulse o para marcar este número mostrado, el cual cumple las
normas de marcación.
Nota: normalmente, el formato estándar del número de teléfono es de 10 u 11
dígitos. Si el número no tiene ese formato (por ejemplo, tiene más de 11
dígitos), entonces el número mostrado no se modificará según se indica en el
elemento 5 anterior cuando se pulse el botón en pantalla Izquierdo FORMAT.
Indicador visual de mensaje pendiente (VMWI)
La función VMWI es compatible con mensajes FSK recibidos a través de la línea
telefónica; Activará un icono en el terminal y el LED de parpadeará en la base.
Page 86

~49~
Notas:
1. Es necesario tener una suscripción a un servicio de buzón de voz con su
compañía telefónica.
2. Si el terminal sigue mostrando el icono incluso después de que ha escuchado
todos los mensajes, apáguelo manteniendo pulsado el botón “Caller ID”
(Identificador de Llamadas) en el terminal.
Ajustar la Ganancia del Microfóno del Terminal
Si desea utilizar el terminal en otro lugar de trabajo o ambiente, para mejorar la
calidad de voz para la otra parte, puede ajustar la ganancia del micrófono del
terminal para adaptarse al nuevo lugar.
a. Pulse el botón MENÚ (botón programable derecho) mientras el terminal
está en modo de espera.
b. Pulse “5” (Configuraciones de Teléfono), seguido por “1” para entar en el
menú "Mic. Gain" (Ganancia de Micrófono).
c.
Utilice el botón o para desplazarse por las opciones: “Standard"
(Estándar), “Medium" (Medio) y “Low" (Bajo).
d. Si está utilizando el terminal en un ambiente silencioso o en una sala de
reuniones, se recomienda el nivel "Standard" (Estándar).
Si está utilizando el terminal en un ambiente ruidoso, como una fábrica o en
exteriores, se recomienda el nivel "Medium" (Medio) o "Low" (Bajo).
Ajustar el Timbre de los Auriculares
Para evitar la pérdida de una llamada debido a que suena a través de los auriculares,
puede cambiar el timbre para que suene desde el altavoz del terminal o desde el
receptor de los auriculares.
a. Pulse el botón MENÚ (botón programable derecho) mientras el terminal
está en modo de espera.
b. Pulse “5” (Configuraciones de Teléfono), seguido por “9” para entar en el
menú "Headset Ring" (Timbre de Auriculares).
c. Seleccione "Activado" y el timbre sonará desde el receptor de los
auriculares; Si selecciona "Desactivado", sonará desde el altavoz del
terminal.
Vigilabebés
Permite configurar cualquiera de los terminales como "unidad de bebé" para vigilar
el movimiento del bebé o de un anciano.
~50~
Cuando se habilita el vigilabebés, la “unidad de bebé” entra inmediatamente en
modo vigilancia mediante un intercomunicador de doble dirección.
Por ejemplo, si se configura el terminal A como “unidad de bebé”, cuando se
efectúe una llamada de intercomunicador desde el terminal B, el terminal A entrará
automáticamente en modo vigilancia sin sonar; además, usted puede escuchar todo
movimiento cercano al terminal A mediante el terminal B.
a. Pulse la tecla programable MENU (MENÚ) (Derecha) mientras el terminal
está en modo espera.
b. Pulse “4” (Configuraciones de llamada), y a continuación “5” para
acceder al menú “Vigilabebés”.
c. Pulse “CHANGE” (CAMBIAR) para alternar entre ON (ACTIVADO) y OFF
(DESACTIVADO). La posición por defecto es OFF.
Recuerde: Para evitar molestias durante la vigilancia, el terminal exclusivo
no aceptará ninguna llamada entrante, a excepción del
intercomunicador.
Page 87

~51~
Funcionamiento del menú
~52~
1.
Pulse el botón en pantalla Derecho MENÚ para entrar en el modo de menú
mientras el teléfono se encuentra en el modo de espera.
Nota: puede presionar o , seguido del botón en pantalla Izquierdo
SELECC para confirmar el menú seleccionado. O bien, Pulse el dígito
directamente para confirmar el menú seleccionado. Por ejemplo, Pulse el
botón en pantalla Derecho MENÚ seguido de 3 y 1 para seleccionar la opción
Volumen timbre.
2. Pulse “1” para seleccionar Bloq. teclado (consulte el funcionamiento de esta
opción en la página 34 ).
3. Pulse “2” para agregar, eliminar, editar y ver la agenda (consulte las instrucciones
de la agenda en la página 39 ).
4. Pulse “3” para establecer la configuración de la opción Ajuste Sonido:
a.
Pulse “1” para seleccionar el Volumen del Timbre:
Hay dos opciones para el volumen del timbre: Línea (para llamadas
entrantes) e Interfón (para llamadas de interfón). Configure cada opción
de la forma correspondiente.
Al configurar cada opción, utilice o para desplazarse por las 6
opciones: “Off” (Desactivado), “Low” (Bajo), “Medium” (Medio), “High”
(Alto), “Vibrate” (Vibrar) y “Vibrate & High” (Vibrar y Alto). Pulse SELECT
(Seleccionar) (botón programable izquierdo) para guardar la selección. Por
defecto = Medio.
b.
Pulse “2” para seleccionar el Tono del Timbre:
Hay dos opciones para el tono del timbre: Línea (para llamadas entrantes)
e Interfón (para llamadas de interfón). Configure cada opción de la forma
correspondiente.
Utilice o para desplazarse por los 8 tonos y pulse SELE (botón
programable izquierdo) para guardar su selección. Por defecto = 1.
Nota: Los timbres 1 a 4 vibran y timbran simultáneamente, los timbres 5 a
8 vibran en el primer timbre, después sólo timbran.
c. Pulse “3” para seleccionar Volumen teclado para establecer el volumen
cuando se presiona un botón:
Utilice o para recorrer las 4 opciones: Off, Bajo, Medio y Alto.
Pulse el botón en pantalla Izquierdo SELECC para guardar la selección.
Valor predeterminado = Medio.
d. Pulse “4” para seleccionar la opción Tono de teclas:
Utilice o para recorrer las 4 opciones: 1, 2, 3 y 4. Pulse el botón
en pantalla Izquierdo SELECC para guardar la selección. Valor
predeterminado = 1.
Page 88

~53~
5. Pulse “4” para acceder a la función Ajuste llamada:
a. Pulse “1” para acceder a la función Marcar prefijo:
(1)
Pulse o para activar o desactivar la función de marcar
prefijo. Valor predeterminado: Off.
(2) Si selecciona “On”, el portátil solicita el prefijo . Puede insertar
hasta 14 dígitos.
(3) Utilice el botón en Pantalla BORRAR para editar el prefijo.
(4) Pulse el botón en pantalla Izquierdo GUARDA para confirmar la
selección.
(5)
Cuando esta función está activada, la pantalla LCD le pedirá al
usuario la información correspondiente en cada llamada saliente.
El prefijo actual también se muestra en pantalla.
(6) Esta función es útil para códigos de acceso, tarjetas de llamadas,
tarjetas de llamadas de crédito, etc.
b. Pulse “2” para acceder a la función Ajustes grupo. Consulte la sesión
Suscripción a grupos de portátiles en la página 37 .
c. Pulse “3” para seleccionar la opción “Restr llamada”. Consulte la sección
Restricción de llamadas en la página 42.
d. Pulse “4” para acceder a la función “Llam con prestac”. Consulte la sección
Llamada de función programable en la página 45.
e. Pulse “5” para configurar el Vigilabebés: consulte el funcionamiento del
Vigilabebés en la página 51.
6. Pulse “5” para acceder a la función Ajust Teléfono:
a. Pulse “1” para configurar la Ganancia del Micrófono: Consulte la operación
de la Ganancia del Micrófono en la Página 50 .
b. Pulse “2” para acceder a la opción Cualq tecl resp.:
Utilice el botón en pantalla Izquierdo CAMBIA para seleccionar y confirmar
el valor de activación o desactivación de la opción.
Nota: si esta opción está activada, Pulse cualquier botón (excepto )
para responder a una llamada entrante.
c. Pulse “3” para acceder a la función Contraste para la pantalla LCD:
(1)
Utilice o para recorrer los 8 valores disponibles (1 a 8). El
valor predeterminado es 4.
(2)
Pulse el botón en pantalla Izquierdo GUARDA para confirmar la
selección.
d. Pulse “4” para acceder a la función “Ilum. Pantalla” para la pantalla LCD:
(1)
Utilice o para recorrer las 3 opciones disponibles (1~3):
1, 8 segundos; 2, activada; 3, desactivada. El valor predeterminado
es “8 segundos”.
~54~
(2)
Pulse el botón en pantalla Izquierdo GUARDA para confirmar la
selección.
e. Pulse “5” para acceder a la opción Tag de nombre:
(1)
Utilice o para recorrer las opciones disponibles: On u Off.
El valor predeterminado es “Off” (desactivar).
(2)
Pulse el botón en pantalla Izquierdo GUARDA para confirmar la
selección.
Nota: Cuando está activada, relaciona el número del llamante con las
entradas de la agenda; si hay coincidencia, la pantalla LCD mostrará
el nombre en lugar de la simple información del número del
llamante (puede ser necesario contratar el servicio de llamada en
espera con identificación del llamante al operador de telefonía
local).
f. Pulse “6” para acceder al menú de Idioma:
(1)
Utilice o para recorrer las 3 opciones disponibles ( Inglés,
Español, Francés, Italiano, Alemán, Neerlandés, Polaco, Checo,
Hungría, Rumania, Turco). El valor predeterminado es “Inglés”.
(2)
Pulse el botón en pantalla Izquierdo GUARDA para confirmar la
selección.
g. Pulse “7” para acceder a la opción Nombre Usuario:
(1)
Inserte los caracteres utilizando la tabla de caracteres y el método
comentados en la sección Operaciones con la agenda.
(2)
También puede utilizar o para mover el cursor hacia
atrás y hacia delante para realizar una inserción a la izquierda del
mismo, o para eliminar el carácter situado sobre el cursor o a la
izquierda de él si dicho cursor se encuentra a la derecha del último
carácter).
(3)
Pulse el botón en pantalla Izquierdo GUARDA para confirmar la
configuración.
Nota:
Una vez insertado el nombre personalizado se mostrará en pantalla
cuando el portátil esté en el modo de espera.
h. Pulse “8” para acceder la opción Cambiar contraste:
(1)
Esta función permite cambiar el contraste de la pantalla.
(2)
A continuación, pulse el botón en pantalla Izquierdo GUARDA para
guardar el nuevo ajuste del contraste.
i. Pulse “9” para configurar elTimbre de los Auriculares: Consulte la
operación del Timbre de los Auriculares en la Página 51 .
7. Pulse “6” para acceder la función Ajuste Base:
Para entrar en este menú es necesario insertar antes un código PIN
(4 dígitos). Nota: el código PIN es para la configuración de la base, el
predeterminado es “0000”.
Page 89

~55~
a. Pulse “1” para acceder la función Duración DTMF.
(1) Inserte la duración DTMF (90~200 ms) y pulse el botón en pantalla
Izquierdo OK para confirmar la configuración. El valor
predeterminado es 100 ms.
Nota: consulte a su distribuidor antes de realizar el cambio. Si la duración
no coincide con la configuración de la red telefónica pública conmutada o
de la centralita, el sistema puede funcionar de forma incorrecta. Siempre
puede volver a poner el valor predeterm.
b. Pulse “2” para seleccionar una temporización de la tecla R (flash). El valor
predeterminado es 600 ms y el adecuado para España
es 100 ms.
(1)
Utilice o para recorrer las 9 opciones: 100~900 ms.
(2) Pulse el botón en pantalla Izquierdo SELECC para confirmar la
selección.
Nota: el valor predeterminado (600 ms) no funciona en todos los paises o
centralitas. El cambio de este valor puede hacer que el botón Flash no
funcione o cuelque la llamada. Pruebe con los diferentes valores hasta
encontrar el que funcione bien.
c. Pulse “3” para acceder a la función Asig Nº Portat
(1) Marque el número de portátil de 2 dígitos y Pulse el botón en pantalla
Izquierdo OK.
(2) Esta función establece que número asignará la base al
siguiente portátil que registre. Es útil si se quiere registrar uno o
varios portátiles con números consecutivos.
d. Pulse “4” para acceder a la función Borr. portátil.
(1) Marque el número de portátil de 2 dígitos y Pulse el botón en pantalla
Izquierdo OK.
(2) La base borrará el identificador del portátil del sistema.
e. Pulse “5” para acceder a la función Cambiar PIN:
(1) Inserte el nuevo PIN seguido del botón en pantalla Izquierdo OK.
Nota: el PIN predeterminado es “0000”.
f. Pulse “6” para acceder a la función Auto Colgado:
(1) Utilice el botón en pantalla Izquierdo CAMBIA para seleccionar y
confirmar el valor de activación o desactivación de la opción. El PIN
predeterminado es “0000”.
Nota: si se activa, el dispositivo FREESTYL V2 colgará automáticamente si el
otro extremo cuelga. No obstante, esta función depende de si la
centralita o la red telefónica pública conmutada envía la señal
“Inversión de línea” después de colgar.
g. Pulse “7” para acceder a la función Establecer hora para admitir el formato
de identificación de llamante DTMF:
(1) Utilice el botón en pantalla Izquierdo CAMBIA para seleccionar y
confirmar el valor de activación o desactivación de la opción. El PIN
predeterminado es “0000”.
Nota: si se activa, el dispositivo FREESTYL V2 colgará automáticamente si el
otro extremo cuelga. No obstante, esta función depende de si la
centralita o la red telefónica pública conmutada envía la señal
“Inversión de línea” después de colgar.
~56~
8. Pulse “7” para registrar o anular el registro de portátiles y para establecer la
configuración de multibase. Consulte la sección Registro de portátiles en la
página 36 y la sección Configuración multibase en la página 48.
9. Pulse “8” para acceder a la función Menú Pantalla:
Para evitar un mal uso de los menús “Ajuste Llamada” (MENÚ-4), “Ajust
Teléfono” (MENÚ-5) y “Ajuste Base” (MENÚ-6), puede ocultarlos para que otras
personas que usen el portátil no tengan la oportunidad de realizar
configuraciones incorrectas en dichos menús.
Nota: para entrar en Menú Pantalla es necesario especificar una contraseña.
a. Pulse “1” para establecer la ocultación o visualización del menú Ajuste
Llamada.
(1) Utilice el botón en pantalla Izquierdo CAMBIA para seleccionar y
confirmar el valor de activación o desactivación de la opción.
b. Pulse “2” para establecer la ocultación o visualización del menú Ajuste
Teléfono.
(1) Utilice el botón en pantalla Izquierdo CAMBIA para seleccionar y
confirmar el valor de activación o desactivación de la opción.
c. Pulse “3” para establecer la ocultación o visualización del menú Ajuste
Base.
(1) Utilice el botón en pantalla Izquierdo CAMBIA para seleccionar y
confirmar el valor de activación o desactivación de la opción.
Nota: Seleccione “On” para mostrar el menú en pantalla. Seleccione “Off” para
ocultar el menú.
Page 90

~57~
Índice
A
Agenda, 14, 15, 16, 17, 29, 39, 41, 42, 45, 46, 47, 53, 55
Ajustar el volumen de voz del altavoz del portátil, 33
Ajustar el volumen de voz del receptor (auricular) del portátil, 33
Ajustes de llamadas, 16, 18, 20, 37, 49, 50, 51, 54, 57
Altavoz, 14, 30, 31, 33, 48
Antena para exteriores, 10, 22
Anulación del registro, 36
Audífono, 4
B
Batería de repuesto, 10
Batería, 5, 7, 10, 24, 26, 27, 35
Bloqueo del teclado, 34, 53
Botón de registro, 22
Botón Restablecer, 22
C
Cambiar PIN, 18, 19, 56
Características básicas de la base, 22
Características del cargador, 24
Características del portátil, 13
Carga de la batería, 13
Conector de línea, 22
Configuración de grupo, 18, 37
Configuración del teléfono, 18, 20, 50, 51, 54, 57
Configuración multibase, 18, 48, 57
Conversación/Flash, 14
Corte de energía, 5
D
Descarga eléctrica, 4, 5, 6,
DND, 15
Duración DTMF, 18, 56
E
Emergencia, 4
Especificaciones técnicas, 62
Establecer la hora, 20
~58~
Estación base, 5, 6, 9, 10, 14, 15, 20, 22, 25, 26, 27, 28, 30, 36, 43
Etiquetación de nombres, 15, 55
F
Flash programable, 19
Flash, 14, 19, 36, 45, 48, 50, 56
Funcionamiento de la base, 27
G
Gestor de llamadas, 49, 54
I
Identificador de grupo, 15, 30, 38, 42
Identificador de la base, 48
Identificador del llamante, 15, 20, 31, 32, 46, 47, 50, 55, 56
Identificador del portátil, 27, 36, 38, 42, 56
Ilustración de la base, 21
Ilustración del cargador, 23
Indicador visual de mensaje en espera, 50
Índice de direcciones de dos dígitos, 13
Información sobre normativas, 8
Instalación de la estación base, 25
Instalación del portátil y el cargador, 26
Instrucciones de seguridad, 4
Instrucciones generales de seguridad, 4
Instrucciones relacionadas con la seguridad de la batería, 7
Instrucciones relacionadas con la seguridad del producto, 5
Inversión de línea, 57
Ion-litio, 7, 10
L
Lista de comprobación del equipo, 10
Llamada bidireccional/interna, 14, 29, 30
Llamada de función programable, 17, 45, 46
Llamada de función, 17, 45, 54
Llamada en curso, 35
Llamada en espera con identificador de llamante, 15, 55
Llamada en espera, 14, 55
Llamada entre portátiles, 29, 30
M
Page 91

~59~
Marcación rápida, 29
Marcapasos, 4
Memoria, 27
Mensaje de advertencia, 24
Modo de conversación, 14, 27, 46
Modo de menú, 27, 53
Modo de registro, 22, 27, 36, 48
Modo INACTIVIDAD, 17, 27, 35
N
No molestar (timbre desactivado), 15, 34
P
PIN de la base, 18, 19, 20
R
Ranura para cargar portátiles, 24
Realizar una llamada bidirecional/interna, 29
Realizar una llamada de teléfono, 29
Realizar una transmisión, 33, 37
Recargar y cambiar la batería, 35
Recibir una llamada de teléfono, 31
Recibir una llamada interna, 32
REG, 22, 37, 48
Registrar base, 49
Registro de llamada, 15, 16, 17, 46, 48
Registro de portátiles, 36, 57
Registro de varios portátiles, 15
REN
, 8
Restricción de llamadas, 42, 54
Retener llamadas, 17
Retener una llamada, 33
RSSI, 13
S
Selección de base, 50
Selecciones de grupo, 37
SILENCIO, 15, 32, 34
Suscripción a grupos de portátiles, 30, 54
T
~60~
Temporizador de llamada, 17
Timbre, 14, 15, 20, 27, 31, 32, 34, 48, 51, 53, 55
Tono de los botones, 17
Tono DTMF, 18
Transferencia de llamadas, 38
Transformador, 22, 24, 25
Transmisión, 14, 16, 22, 30, 31
Transmitir a todos los portátiles, 30
Transmitir a un grupo de portátiles, 30
Transmitir a un portátil individual, 31
V
Ver registro de llamada, 46
Vibrador, 15
Visualización del menú, 57
Volumen del timbre, 14, 15
Volver a marcar, 16, 31
Page 92

~61~
Especificaciones técnicas
Especificaciones eléctricas
Estación Base Teléfono portátil
Frecuencia 902-928 MHz 902-928 MHz
Potencia de RF Pico: 27 dBm
Promedio: 21 dBm
Pico: 26 dBm
Promedio: 20 dBm
Separación de canales 101 kHz 101 kHz
Número de Canales 252 252
Modulación MSK codificado
diferencialmente
MSK codificado
diferencialmente
Acceso múltiple Frequency Hopping TDD Frequency Hopping TDD
Frequency Hopping Precio
100 por segundo 100 por segundo
TDMA Largo del marco 10 ms 10 ms
Número de ranuras / Frame
4 4
Sensibilidad del receptor < -111 dBm (@ BER 10-2) < -111 dBm (@ BER 10-2)
Conector de antena Reverse TNC No estándar
Ganancia de la Antena 2 dBi
1.5 dBi (antena más corta)
2.5 dBi (antena de largo)
Potencia TX de control de
gama
19~27bBm 19~26dBm
Interfaz Teléfono RJ11 x 2 NA
Codificación de voz 8 kbps G.729AB 8 kbps G.729AB
Codificación de canal 8 kbps Convolutional + CRC 8 kbps Convolutional + CRC
Tasa de transmisión de
datos
85.333 kbps 85.333 kbps
User Data Rate 64 kbps dúplex 64 kbps dúplex
Dúplex Time Division Duplex (TDD) Time Division Duplex (TDD)
Calidad de voz TIA/EIA-470B TIA/EIA-470B
Número de Identificación
del sistema
65,536 65,536
Número de Identificación
del sistema
20-50 Hz, 30-90 Vrms NA
Tiempo de Flash 100-900 ms programable NA
Fuente de energía AC/DC 100~240V/12V,1A
SW Adaptador
3.7V/1100 mAh Li-Ion Batería
opcional: 3.7V/1700mAh
Cargador actual NA 550 mA
(850 mA for Ranura de la
batería de repuesto)
Tiempo de carga NA 3 hours
Reglamento de
Cumplimiento
FCC Part 15, Part 68
FCC Part 15, Part 68
Compatible con prótesis
auditivas
Temperatura de
funcionamiento
0 – 50 °C -10 – 60 °C
Temperatura de
almacenamiento
-40 – 70 °C -40 – 70 °C
Humedad 20 – 75 % 20 – 75 %
Dimensión
190 x 160 x 208 mm 167 x 47 x 28 mm
Peso
500g 130g
Notas:
1.
NA = No aplicable.
2.
El fabricante se reserva el derecho de cambiar los diseños y especificaciones sin previo
aviso.
 Loading...