

Page 1

Products Solutions Services
EA001164D/06/A2/01.16
71327830
Alteration Instructions
Promag 300, 500
Promass 300, 500
Activate the Software Licence Code
These Instructions are Alteration Instructions; they
do not replace the Operating Instructions included in
the scope of supply.
For detailed information, refer to the Operating
Instructions and other documentation or visit
"www.endress.com/deviceviewer".
Page 2

2
Page 3
Overview Registration key
3
1 Overview Registration key
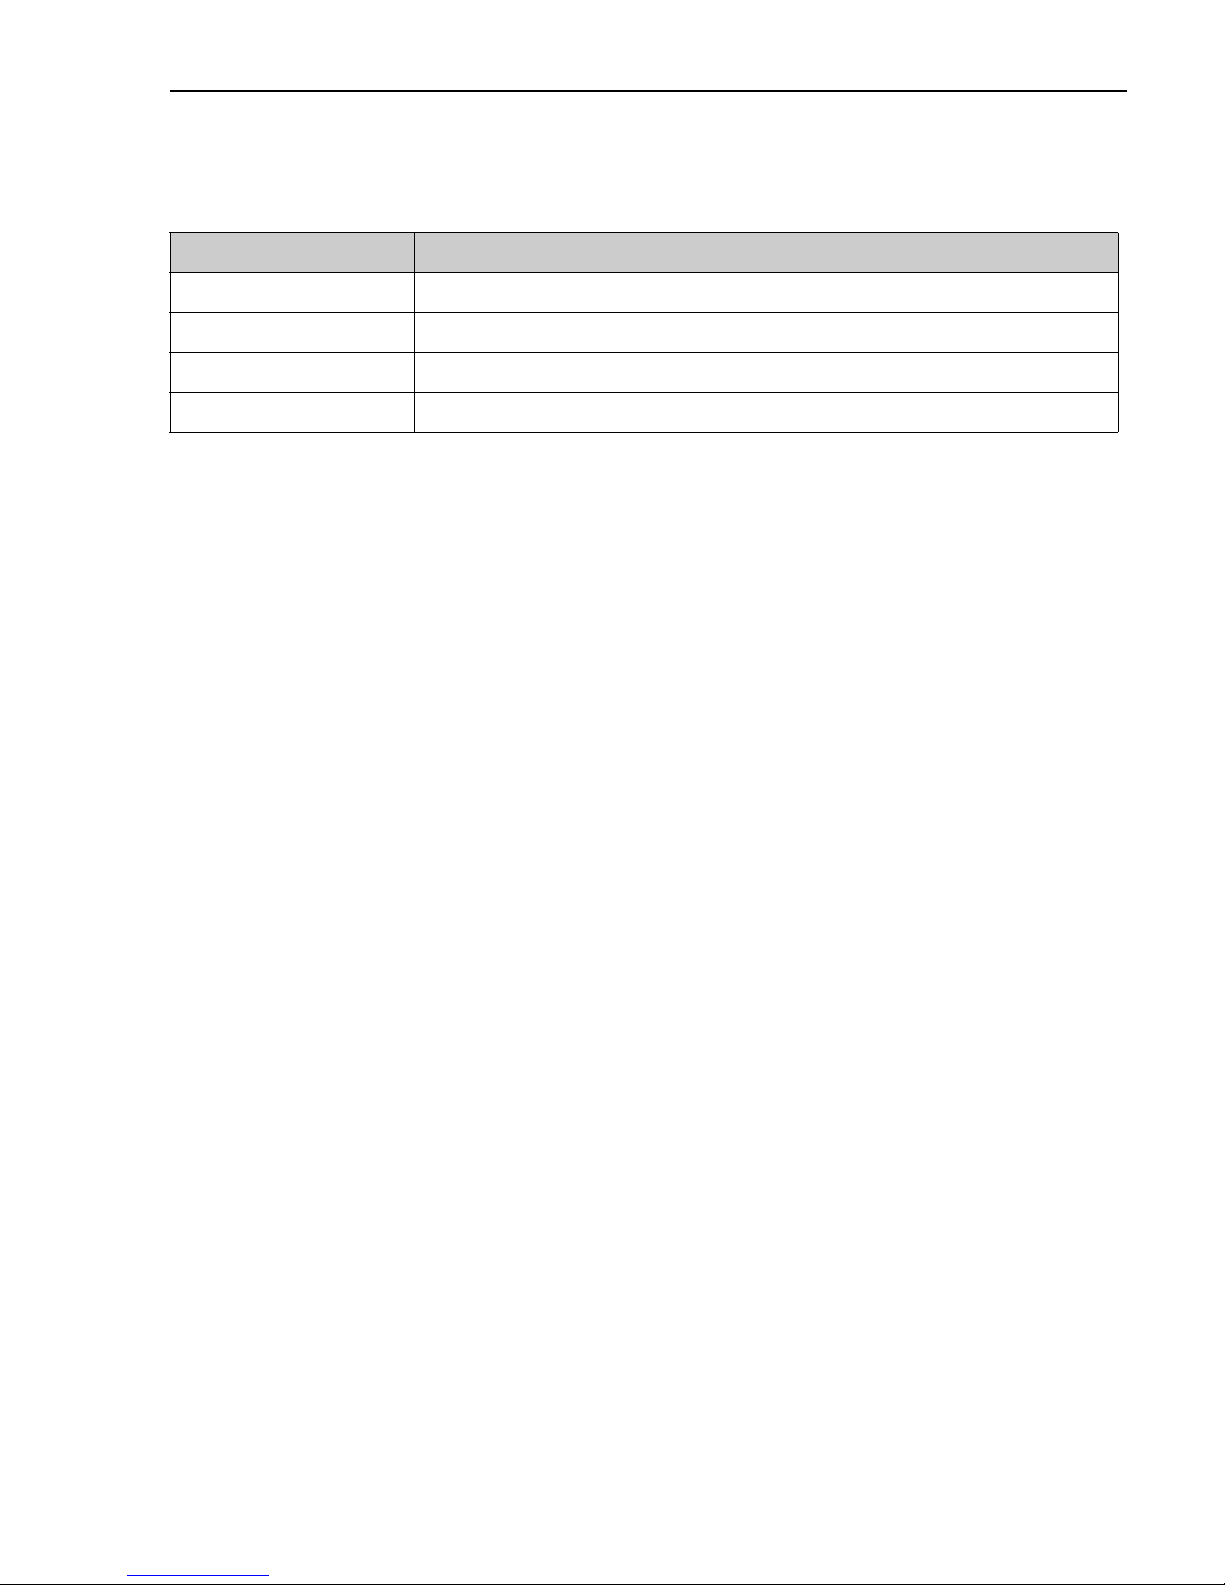
Instruction is valid for the following order codes:
Order Code Application packages
DK8009– for Promass 300
DK8011– for Promass 500
DK5009– for Promag 300
DK5011– for Promag 500
Page 4

Authorized personnel
4
2 Authorized personnel
NOTICE
‣ The person who carries out the alteration is responsible for safety during the work, the qual-
ity of work completed and safety of the device after alteration.
3 Authorized personnel to affix new nameplates
Approval of the measuring device Group of persons authorized to carry out alteration
without approval 1, 2, 3
with approval (for Ex. IECEx, ATEX, FM, CSA, TIIS, NEPSI) 1, 2, 3
1 = Trained customer technician
2 = Service technician authorized by Endress+Hauser
3 = Endress+Hauser (send measuring device back to manufacturer)
Approval of the measuring device Group of persons authorized to affix new nameplate
without approval 1, 2, 3
with approval Endress+Hauser*
1 = Trained customer technician
2 = Service technician authorized by Endress+Hauser
3 = Endress+Hauser (send measuring device back to manufacturer)
* Note: For the change of nameplates, some markets require field inpsection. Please follow your national legislation.
Page 5

Safety instructions
5
4 Safety instructions
• Comply with national regulations governing mounting, electrical installation, commissioning,
maintenance and alteration procedures.
• Requirements with regard to specialized technical staff for the mounting, electrical
installation, commissioning, maintenance and alteration of the measuring devices:
– trained in instrument safety
– familiar with the individual operation conditions of the devices
– for Ex-certified measuring devices: also trained in explosion protection
• The measuring device is energized. Danger: Risk of electric shock! Open the measuring device
in a de-energized state only.
• In the case of Ex-certified measuring devices: Only open in a de-energized state (once a delay
of 10 minutes has elapsed after switching off the power supply) or in environments which do
not have a potentially explosive atmosphere.
• In the case of measuring devices in safety-related applications in accordance with IEC 61508
or IEC 61511: After alteration recommission in accordance with Operating Instructions.
Document the alteration procedure.
• Use genuine parts from Endress+Hauser only.
• Before removing the device: set the process in a safe condition and purge the pipe of
dangerous materials.
• Hot surfaces! Risk of injury! Before commencing work, allow the system and measuring device
to cool down to a touchable temperature.
• Follow the Operating Instructions for the device.
• Risk of damaging electronic components!
Ensure you have a working environment protected from electrostatic discharge.
• Only open housing for a brief period.
Avoid the penetration of foreign bodies, moisture or contaminants.
• Replace defective seal/gaskets with genuine parts from Endress+Hauser only.
• If threads are damaged or defective, the measuring device must be repaired.
• Threads (e.g. of the cover for the electronics and connection compartments) must be
lubricated. Use an acid-free, non-hardening grease if an abrasion resistant dry lubricant
is non-existent.
• If spacing is reduced or the dielectric strength of the measuring device cannot be guaranteed
during alteration work, perform a test on completion of the work (e.g. high-voltage test in
accordance with the manufacturer's instructions).
• Service connector:
– do not connect in potentially explosive atmospheres.
– only connect to Endress+Hauser service devices.
• Observe the instructions for transporting and returning the device outlined in the
Operating Instructions.
• If you have any questions, contact your Endess+Hauser service organization.
Page 6
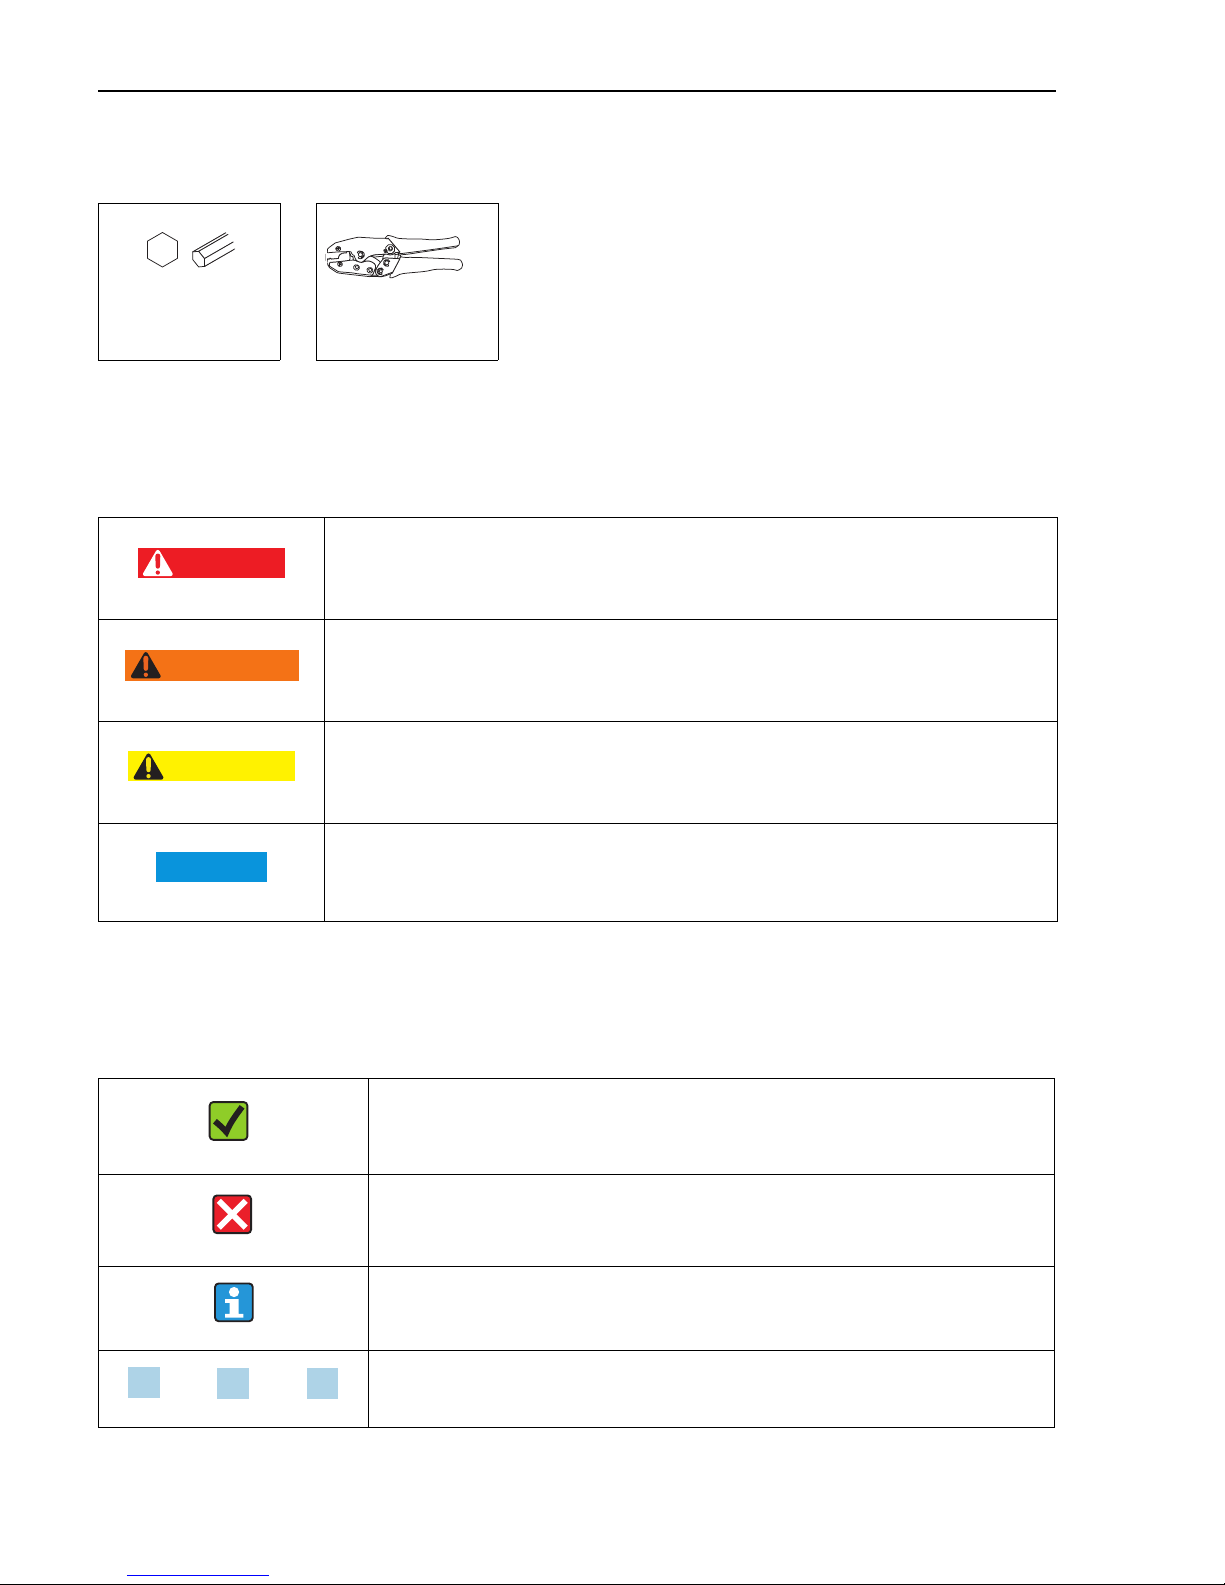
Tool List
6
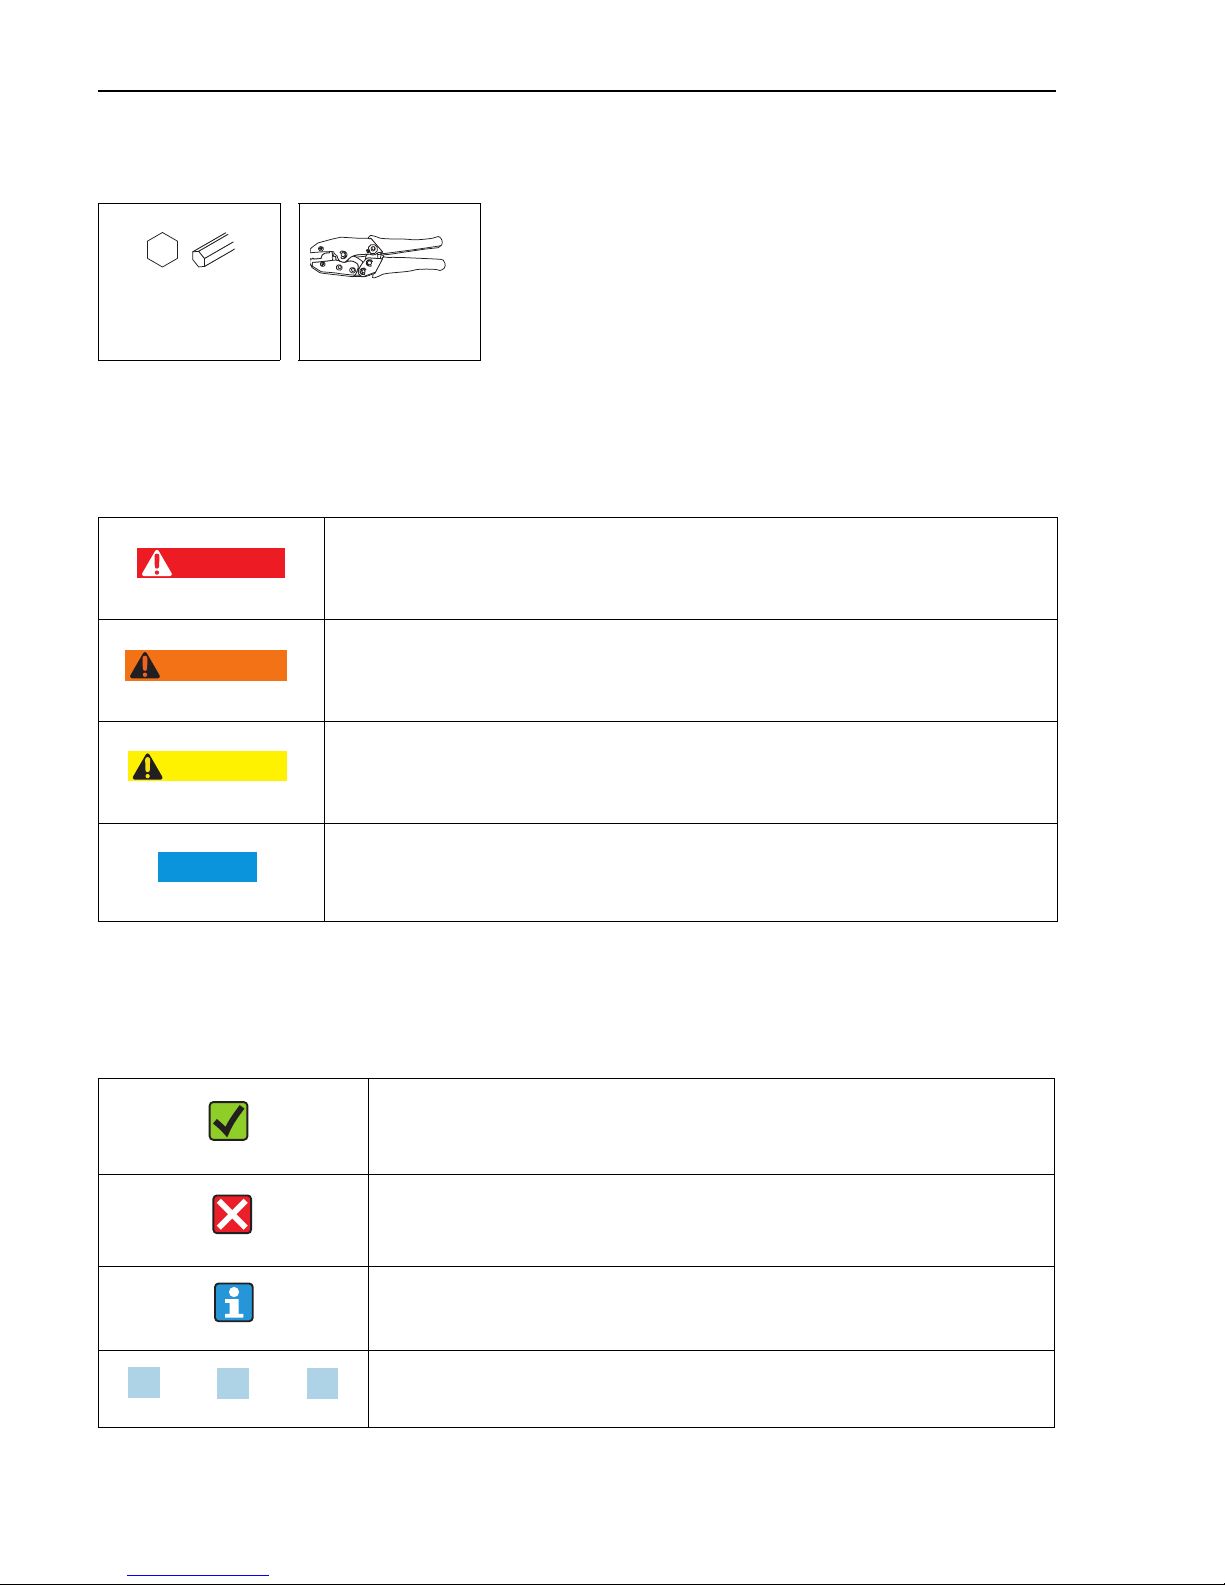
5 Tool List
6 Safety symbols
7 Symbols for certain types of information
3 mm Crimp tool
A0011189-EN
DANGER!
This symbol alerts you to a dangerous situation. Failure to avoid this situation will result in
serious or fatal injury.
A0011190-EN
WARNING!
This symbol alerts you to a dangerous situation. Failure to avoid this situation can result in
serious or fatal injury.
A0011191-EN
CAUTION!
This symbol alerts you to a dangerous situation. Failure to avoid this situation can result in
minor or medium injury.
A0011192-EN
NOTICE!
This symbol contains information on procedures and other facts which do not result in
personal injury.
A0011182
Allowed!
Indicates procedures, processes or actions that are allowed.
A0011184
Forbidden!
Indicates procedures, processes or actions that are forbidden.
A0011193
Tip
Indicates additional information.
Series of steps
DANGER
WARNING
CAUTION
NOTICE
1.
2.
3.
Page 7
Activate the application package via Software Licence Code
7
8 Activate the application package via Software Licence Code
NOTICE
Notice for E+H service technician:
‣ Log into the device with the custom-password via access level "Maintenance".
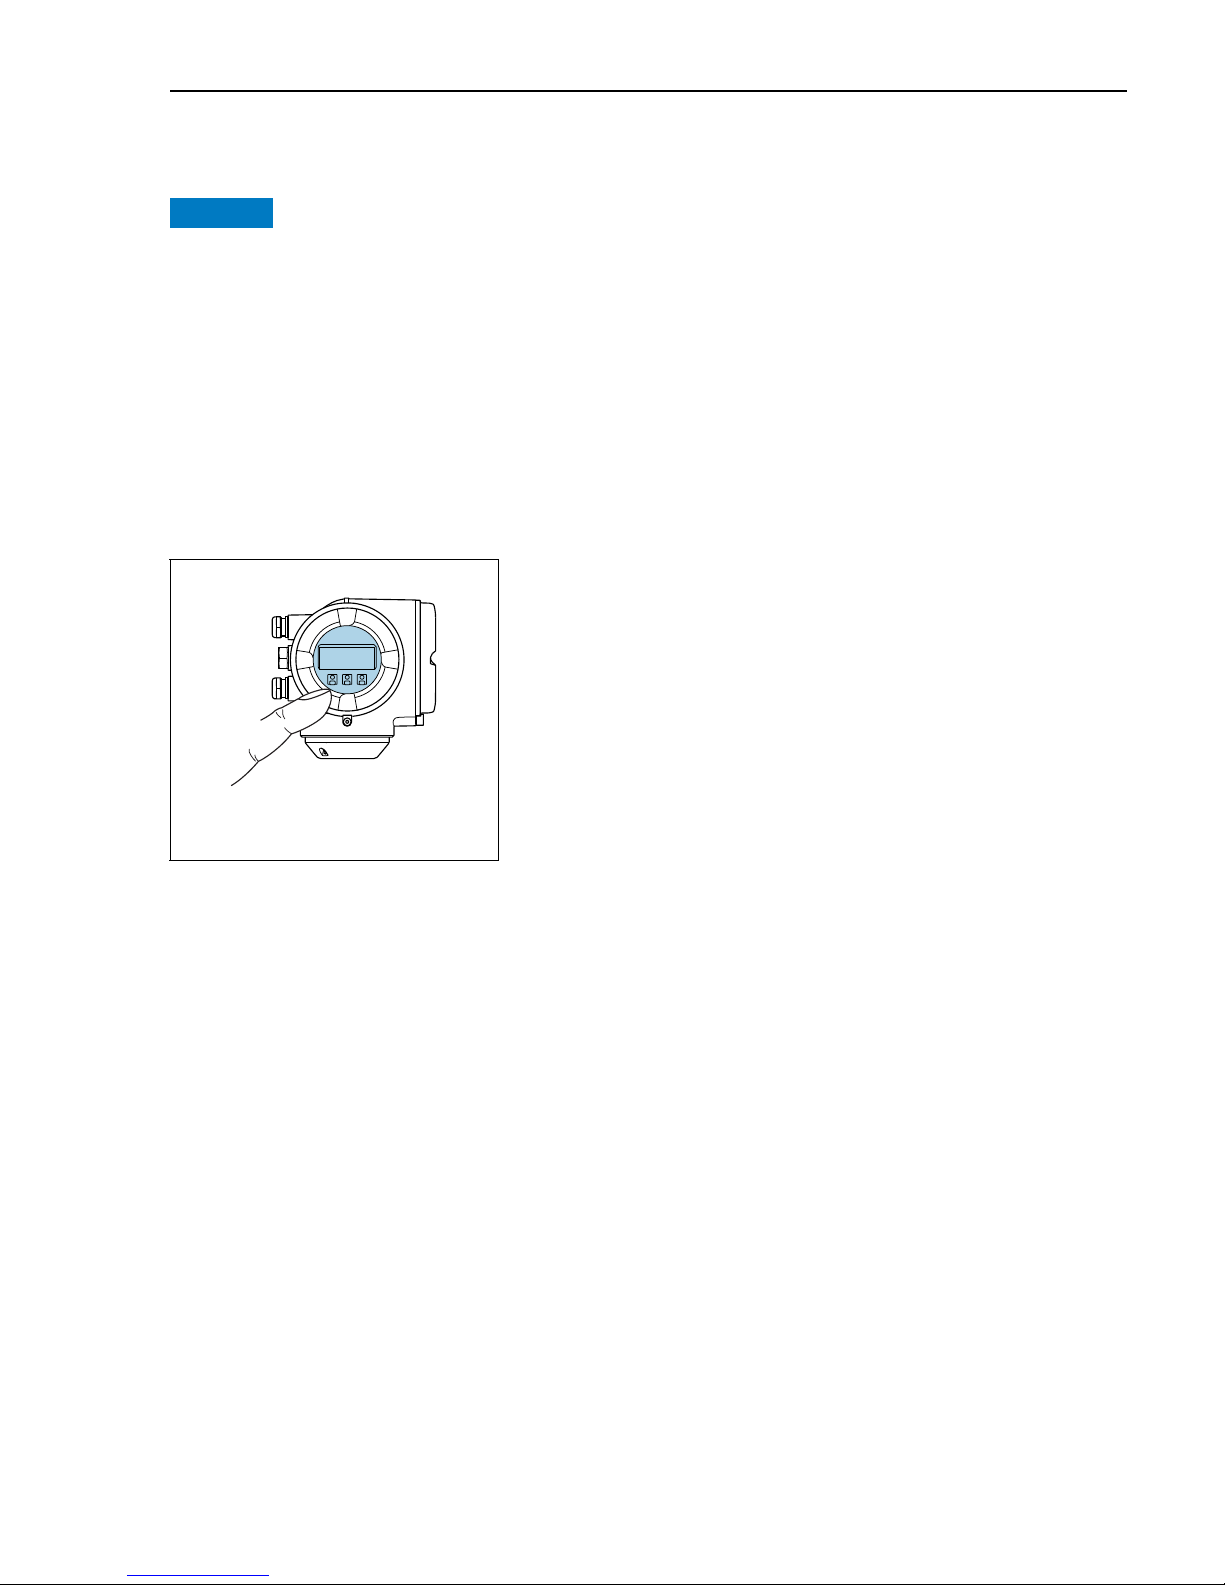
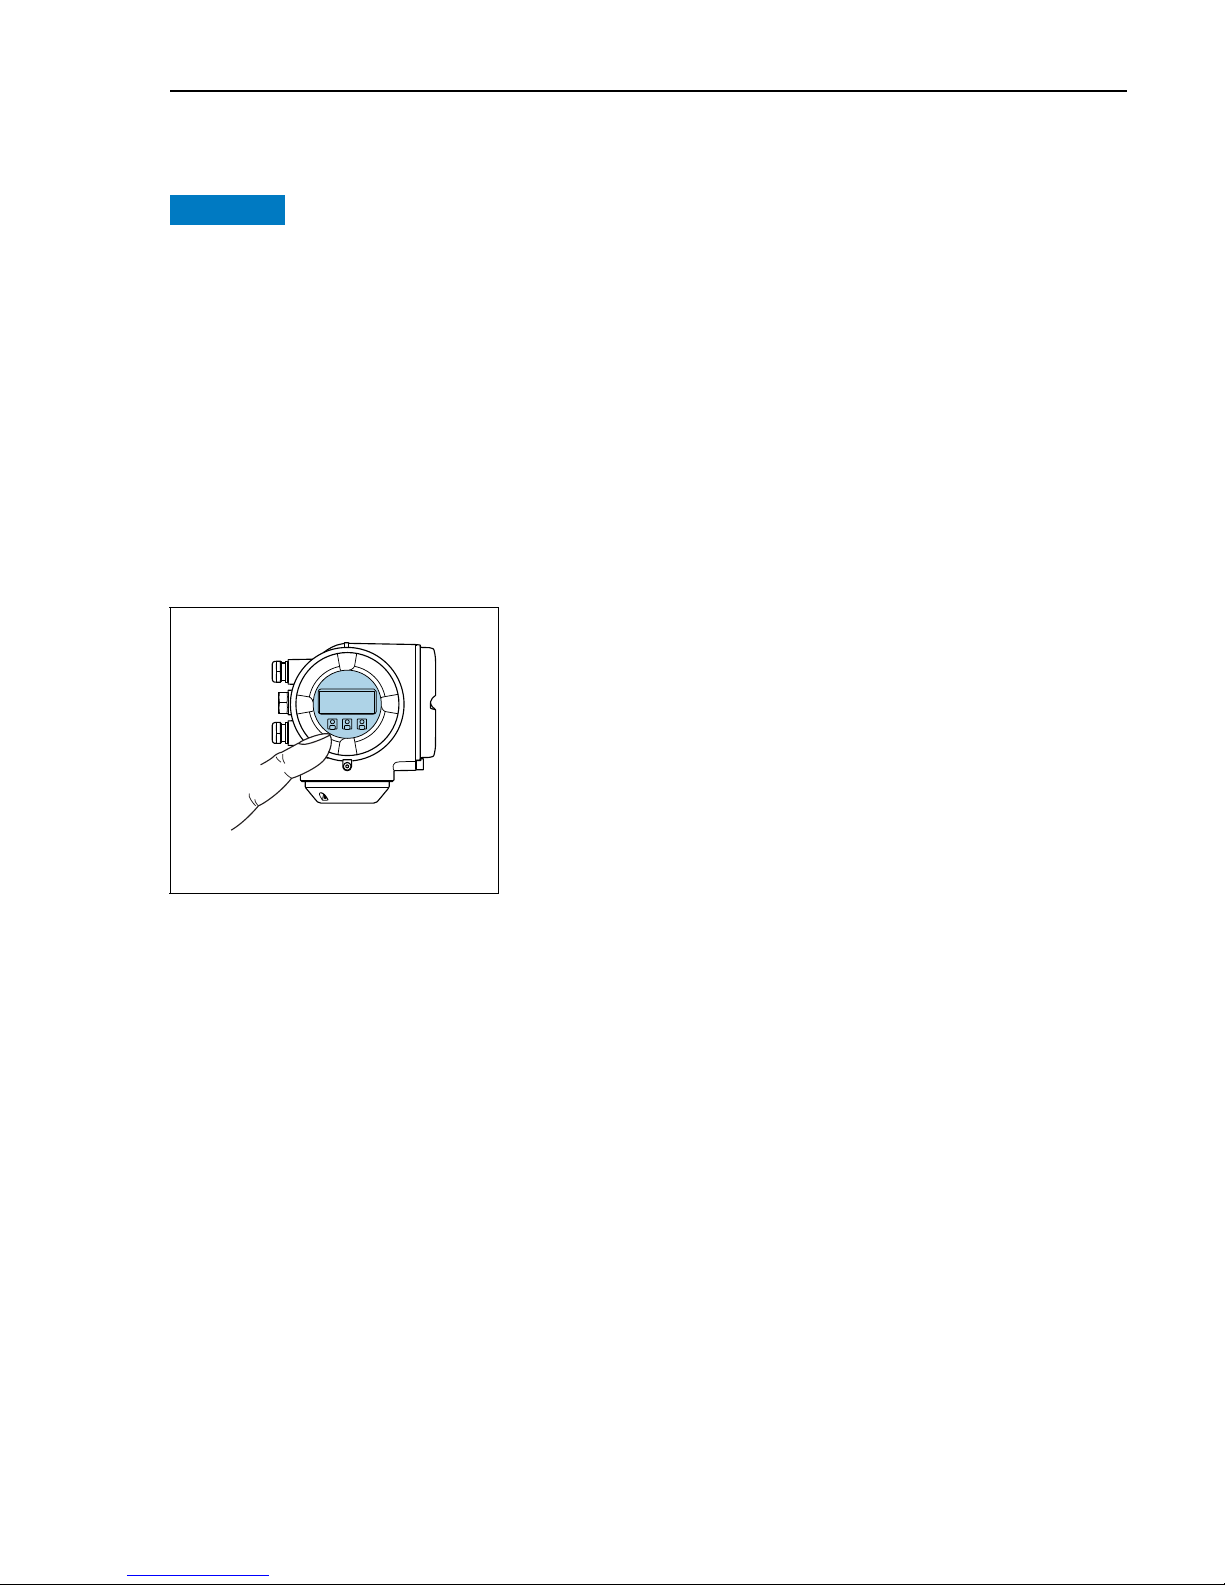
8.1 Enter the software option code: via display
Navigation: Select in the menu of the display:
Enter software-option(s):
1. Remove the keylock (2 sec)
2. Main menu → Display language: Select language
3. Main menu → Expert → Input code factory setting → 0000 or the changed code (customer
code)
4. Expert → System → Administration → Activate software option:
Enter software option code
5. Admininstration → Overview software options: Display of the activated softare option(s)
6. Main Menu → Expert → System → Administration → Overview software options
1.
A0026785
Page 8
Activate the application package via Software Licence Code
8
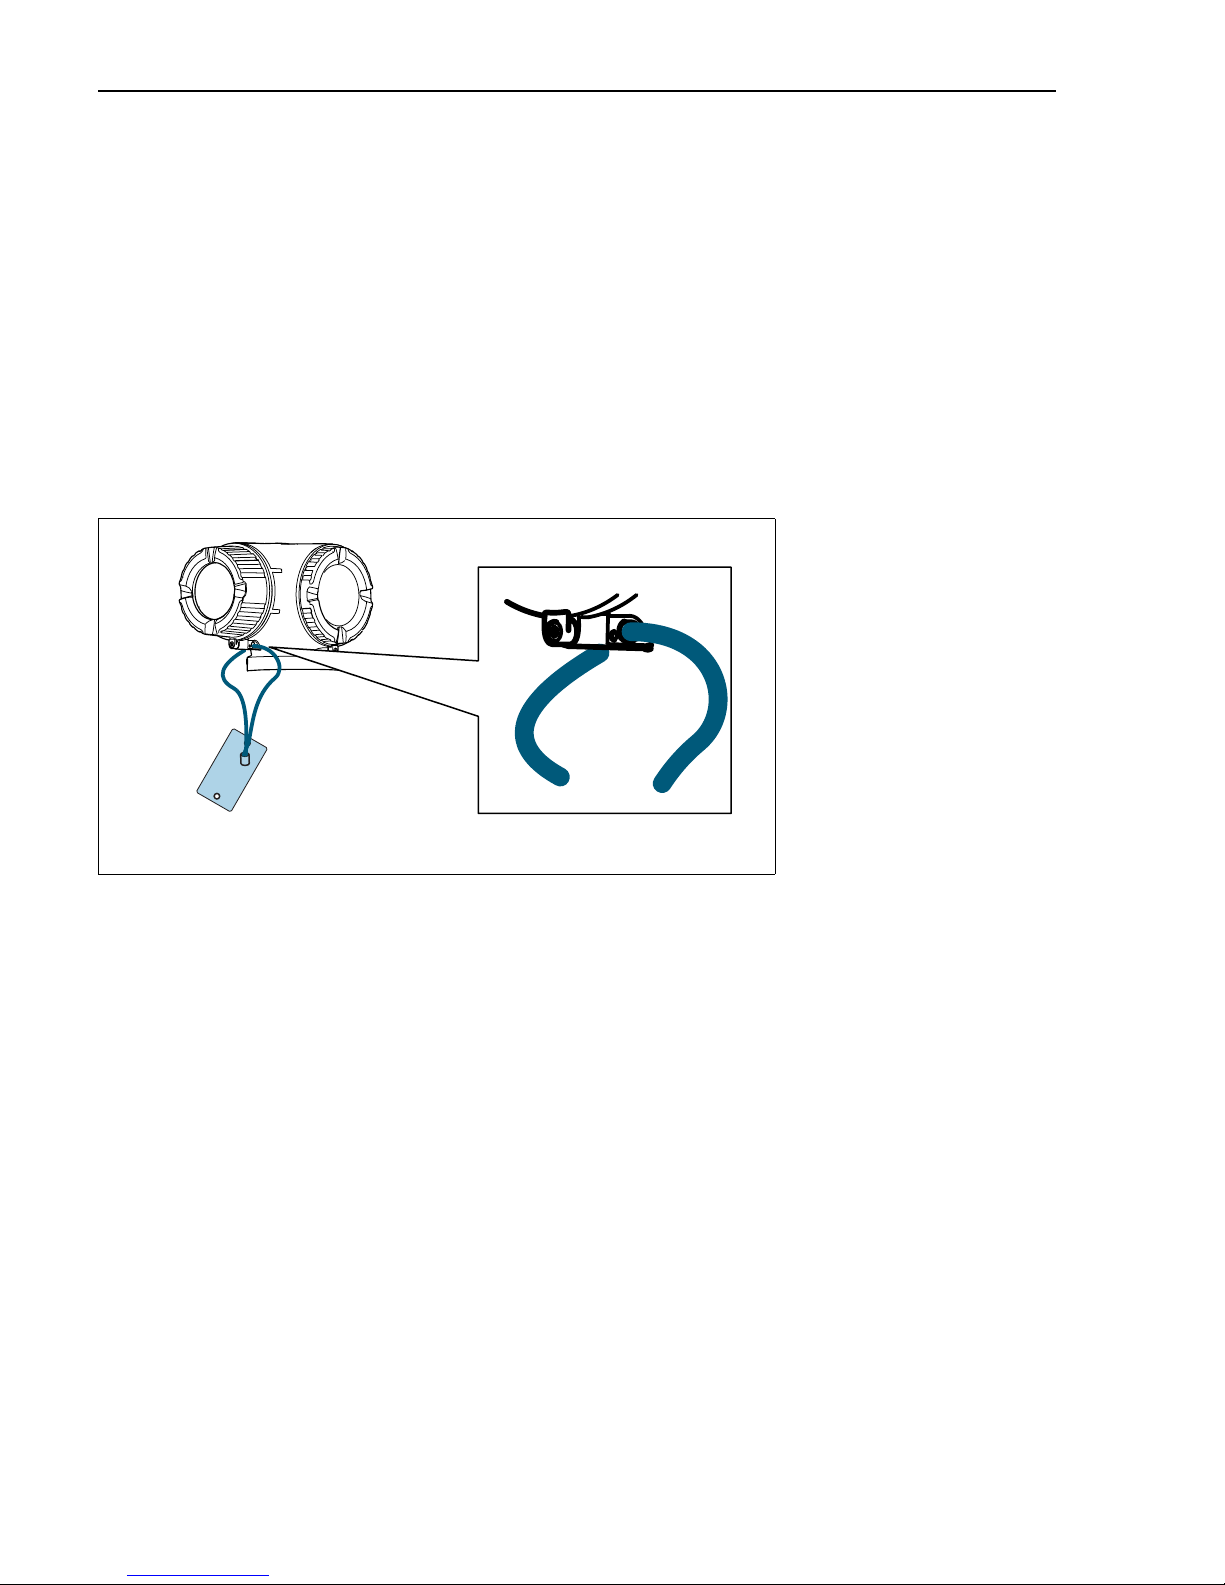
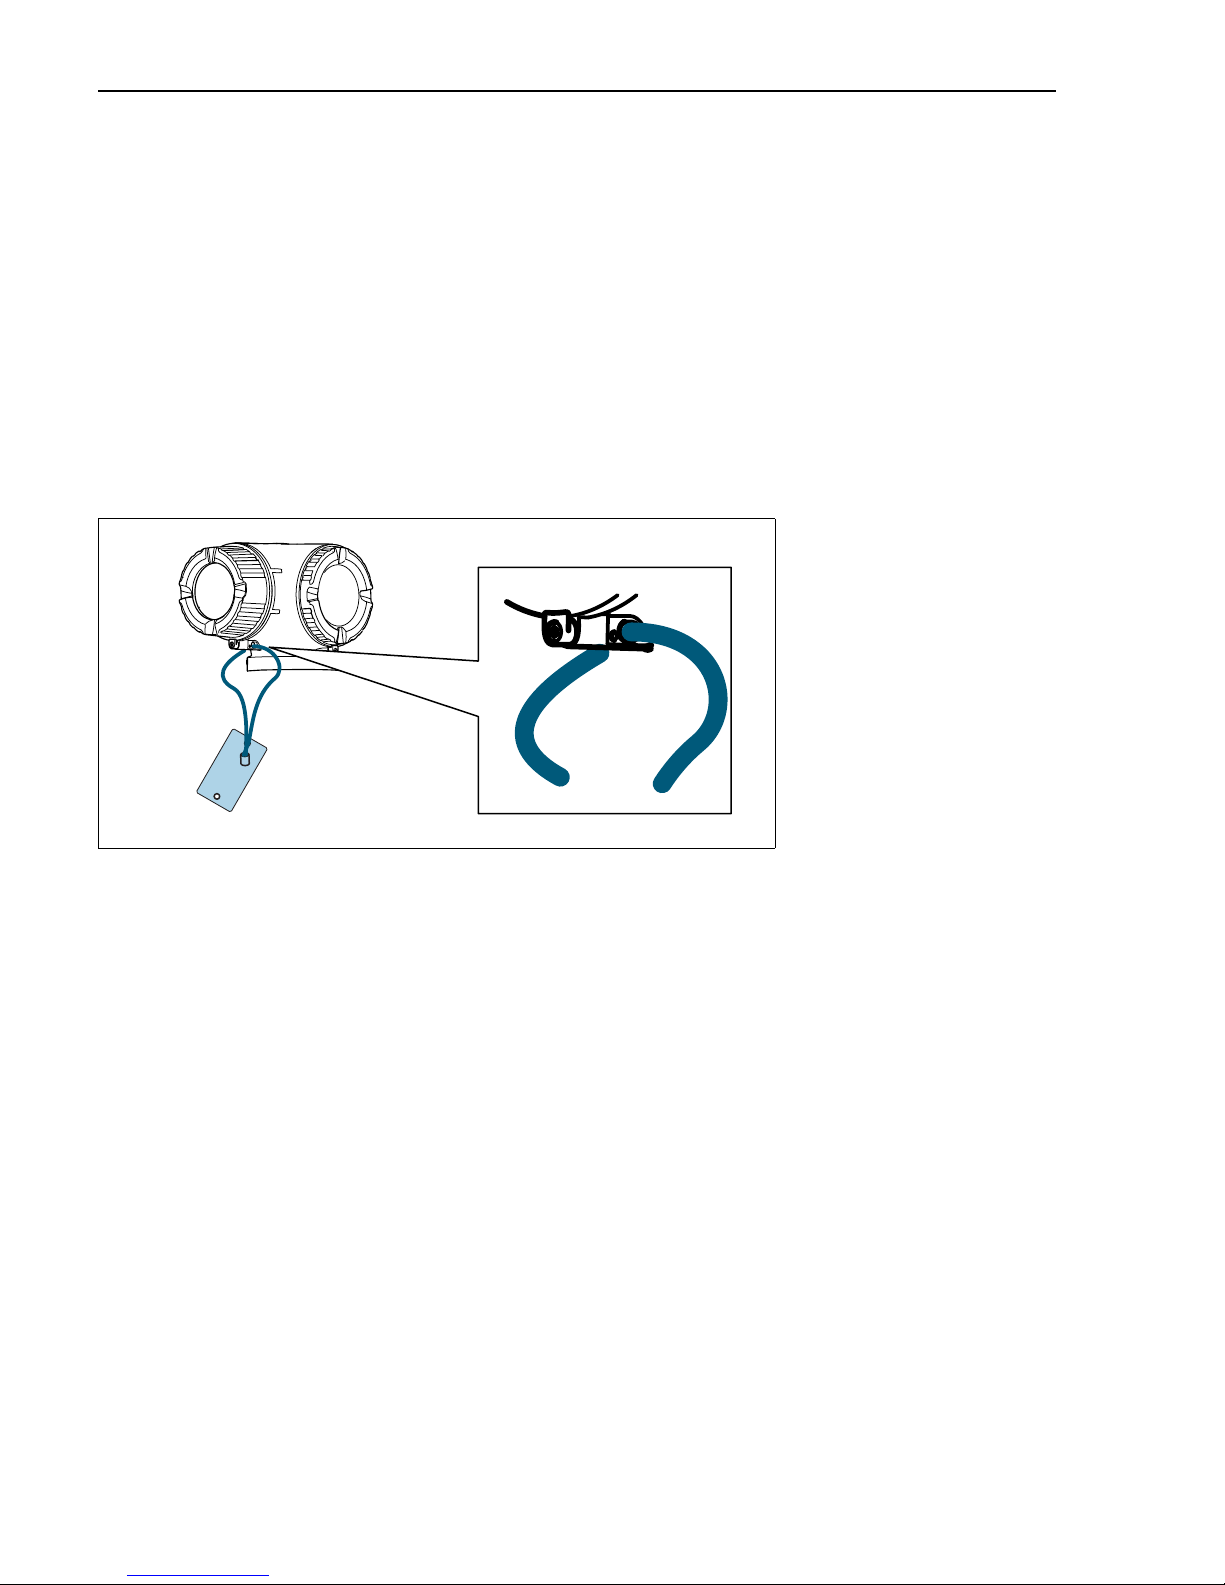
7. Check and note the date on the tag:
• Serial number of the device
• Order code new
• Entered activation code for the software-options (application package code)
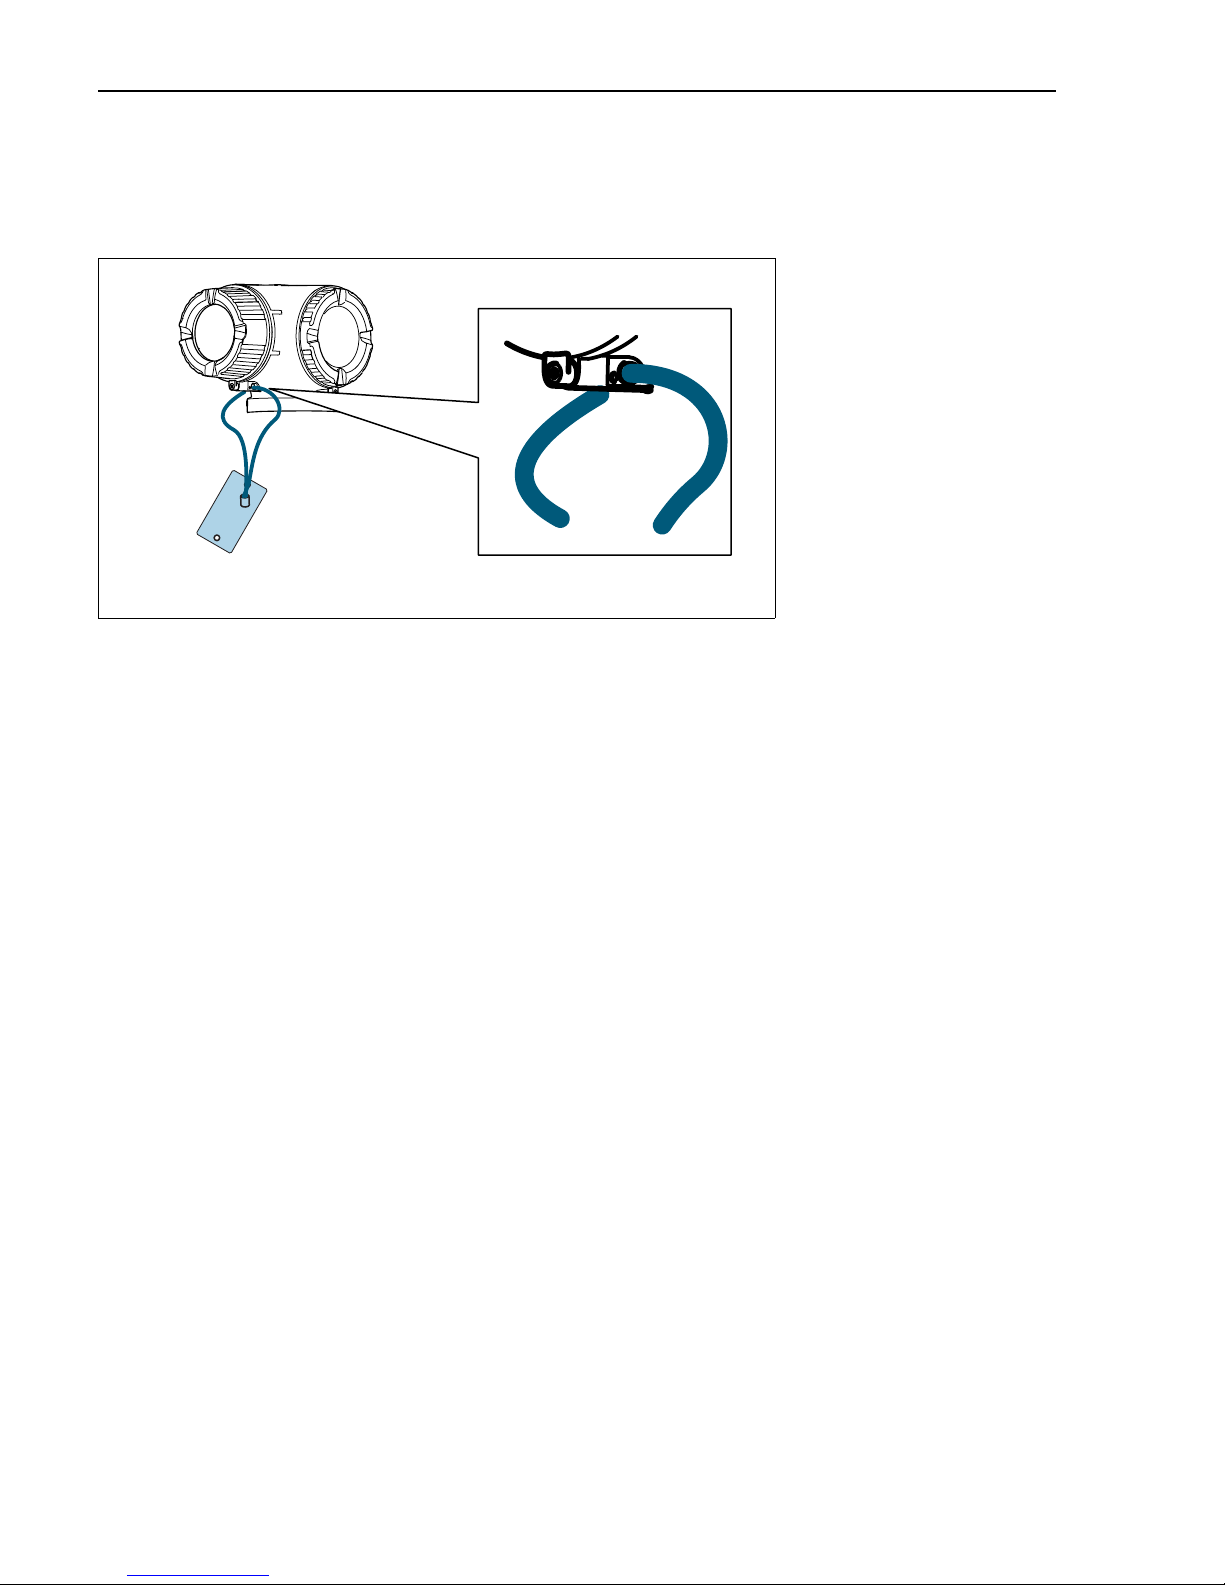
• Affix the tag with the enclosed stainless steel wire and crimp sleeve as indicated in the graphic:
• Affix the nameplate (optional) according to the device labeling (see chapter 3
"Authorized personnel").
1.
A0031061
Page 9

Activate the application package via Software Licence Code
9
8.2 Enter the Software option code via Webserver
Open Webserver:
1. Select language
Login Webserver:
2. Webserver language: Select language
3. Login →
access status → Maintenance → Enter access code: Input code factory setting = 0000
or the changed code (customer code)
4. Menubar menu
5. Main menu
6. Expert
7. System
8. Administration
9. Activate software option: Enter software option code
10. Confirm software option code with "Enter"
11. Overview ot the software option: Display of the activated software option(s)
12.
Check of the date on the tag
:
• Serial number of the device
• Order code new
• Entered activation code for the software-options (application package code)
Page 10
Activate the application package via Software Licence Code
10
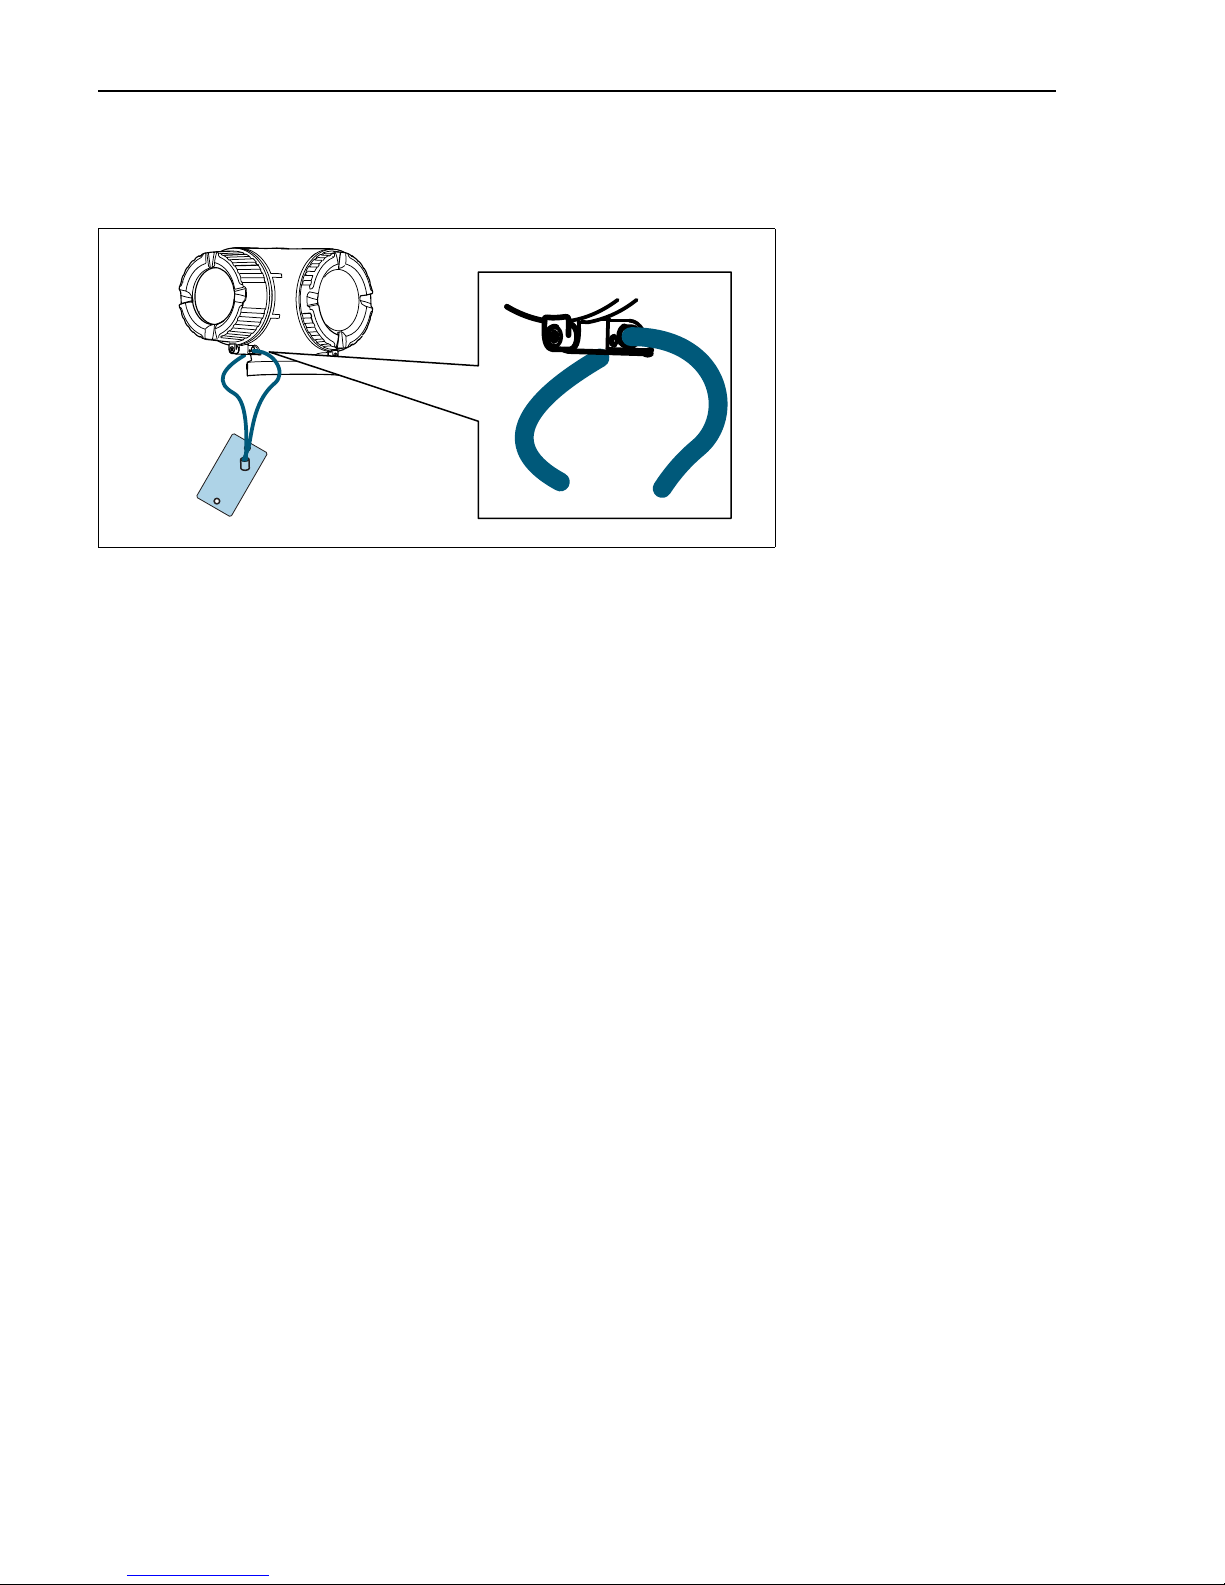
13. Affix the tag with the enclosed stainless steel wire and crimp sleeve as indicated in
the graphic:
• Affix the nameplate (optional) according to the device labeling (see chapter 3
"Authorized personnel").
1.
A0031061
Page 11

Activate the application package via Software Licence Code
11
8.3 Enter the software option code via FieldCare
Open FieldCare:
1. Start FieldCare
2. Select the connection type of the communication interface
3. Check the settings of the interfaces (IP adress)
4. Confirm with “Continue“ → the device is automatically searched
5. Navigation
6. Expert
7. System
8. Administration
9. Activate the software-option: Enter the software-option code
10. Confirm with "Enter"
11. Overview ot the software option: Display of the activated software option(s)
12. Activating the device either with new factory code "0000", or as appropriate customer code.
If unknown enquire at the customer. Entering of the new code only with the role
"Maintenance".
13. Check of the date on the tag
• Serial number of the device
• Order code new
• Entered activation code for the software-options (application package code)
Page 12
Activate the application package via Software Licence Code
12
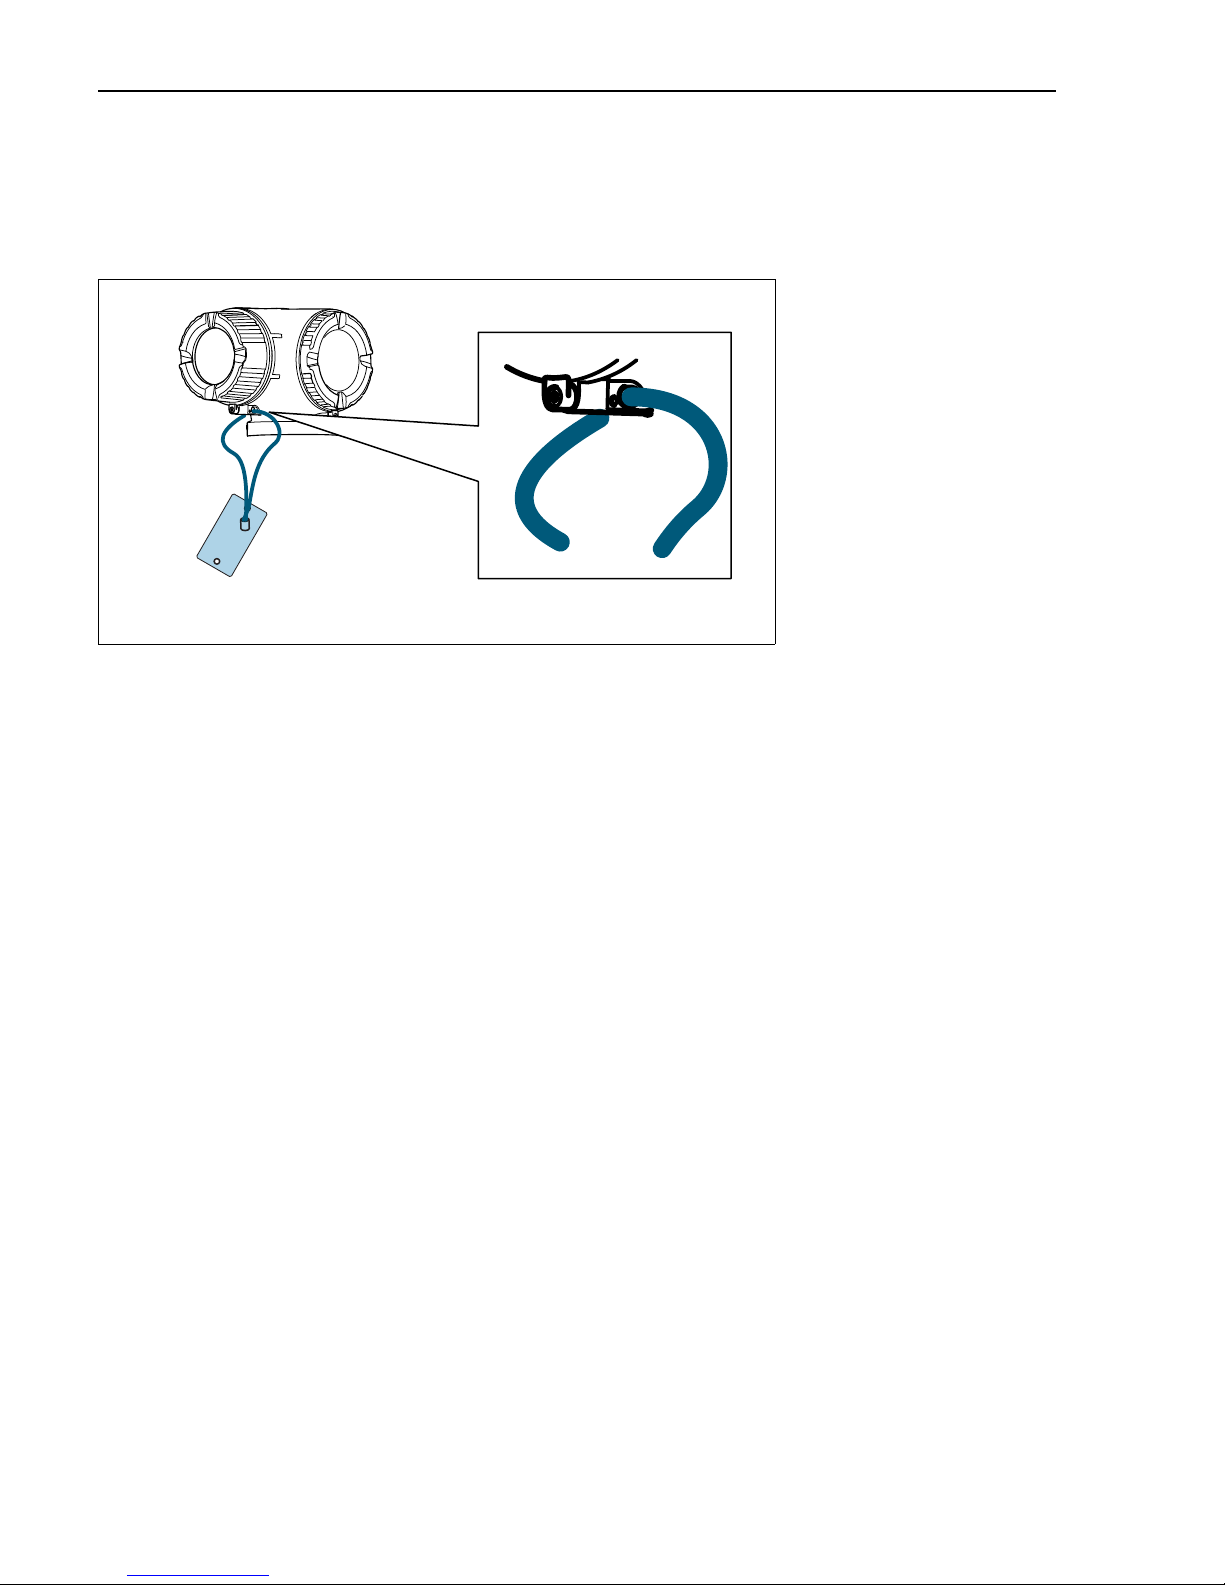
14. Affix the tag with the enclosed stainless steel wire and crimp sleeve as indicated in the
graphic:
• Affix the nameplate (optional) according to the device labeling (see chapter 3
"Authorized personnel").
1.
A0031061
Page 13

Activate the application package via Software Licence Code
13
8.4 Change of device roots and/or order codes extended in
CER database on Engine
NOTICE
For the customer:
To update the device data in the Common Equipment Record (database), contact your
Endess+Hauser service organization. Details under:
Link: http://www.addresses.endress.com
NOTICE
Only for the Service technician
Mandatory instruction
Technical modifications, like upgrades-, alterations of configurations at In-/Outputs or
alterations to Endress+Hauser flow devices, necessarily lead to an adjustment of the device root
(e.g. 5W4B => 5W4C) and/or the order code extended, respectively the order code of an
affected device. Modifications like these therefore require new nameplates which clearly
indicate any technical modification via the correct device data. In addition the responsible
service organization which executes technical modifications to Endress+Hauser flow devices
need to ensure that the changed device data are adjusted accordingly and kept up-to-date in the
Endress+Hauser CER database.
An adjustment is mandatory in order to display the correct device data in CER database on
Engine. This measure ensures a correct delivery of possible spare parts or follow-up orders of
a device modified in the past.
Following possibilities are available:
1. Adjustment of the device root and/or the order code extended directly in the CER database
on Engine. This h as to be p erformed by a person of the respective service organization (SC).
Admin rights are mandatory. For more information about CER admin users please use the
following link on clue.endress.com:
Link: http://clue.endress.com/display/wamwiki/CER+Admins
2. In case admin rights are not at hand please use the following link on clue.endress.com to
get the necessary CER training. After attending the training the admin status will be
assigned.
Link: http://clue.endress.com/display/wamwiki/CER+Admin+training
Page 14

Activate the application package via Software Licence Code
14
Page 15

Activate the application package via Software Licence Code
15
Page 16

www.addresses.endress.com
Page 17

Products Solutions Services
EA001164D/06/A2/01.16
71327830
Umbauanleitung
Promag 300, 500
Promass 300, 500
Anwendungspakete via
Software Lizenz Code freischalten
Diese Anleitung ist eine Umbauanleitung, sie ersetzt
nicht die zum Lieferumfang gehörende
Betriebsanleitung.
Ausführliche Informationen entnehmen Sie der
Betriebsanleitung und den weiteren
Dokumentationen oder unter
"www.endress.com/deviceviewer".
Page 18

2
Page 19
Übersicht Freischalt Codes
3
1Übersicht Freischalt Codes
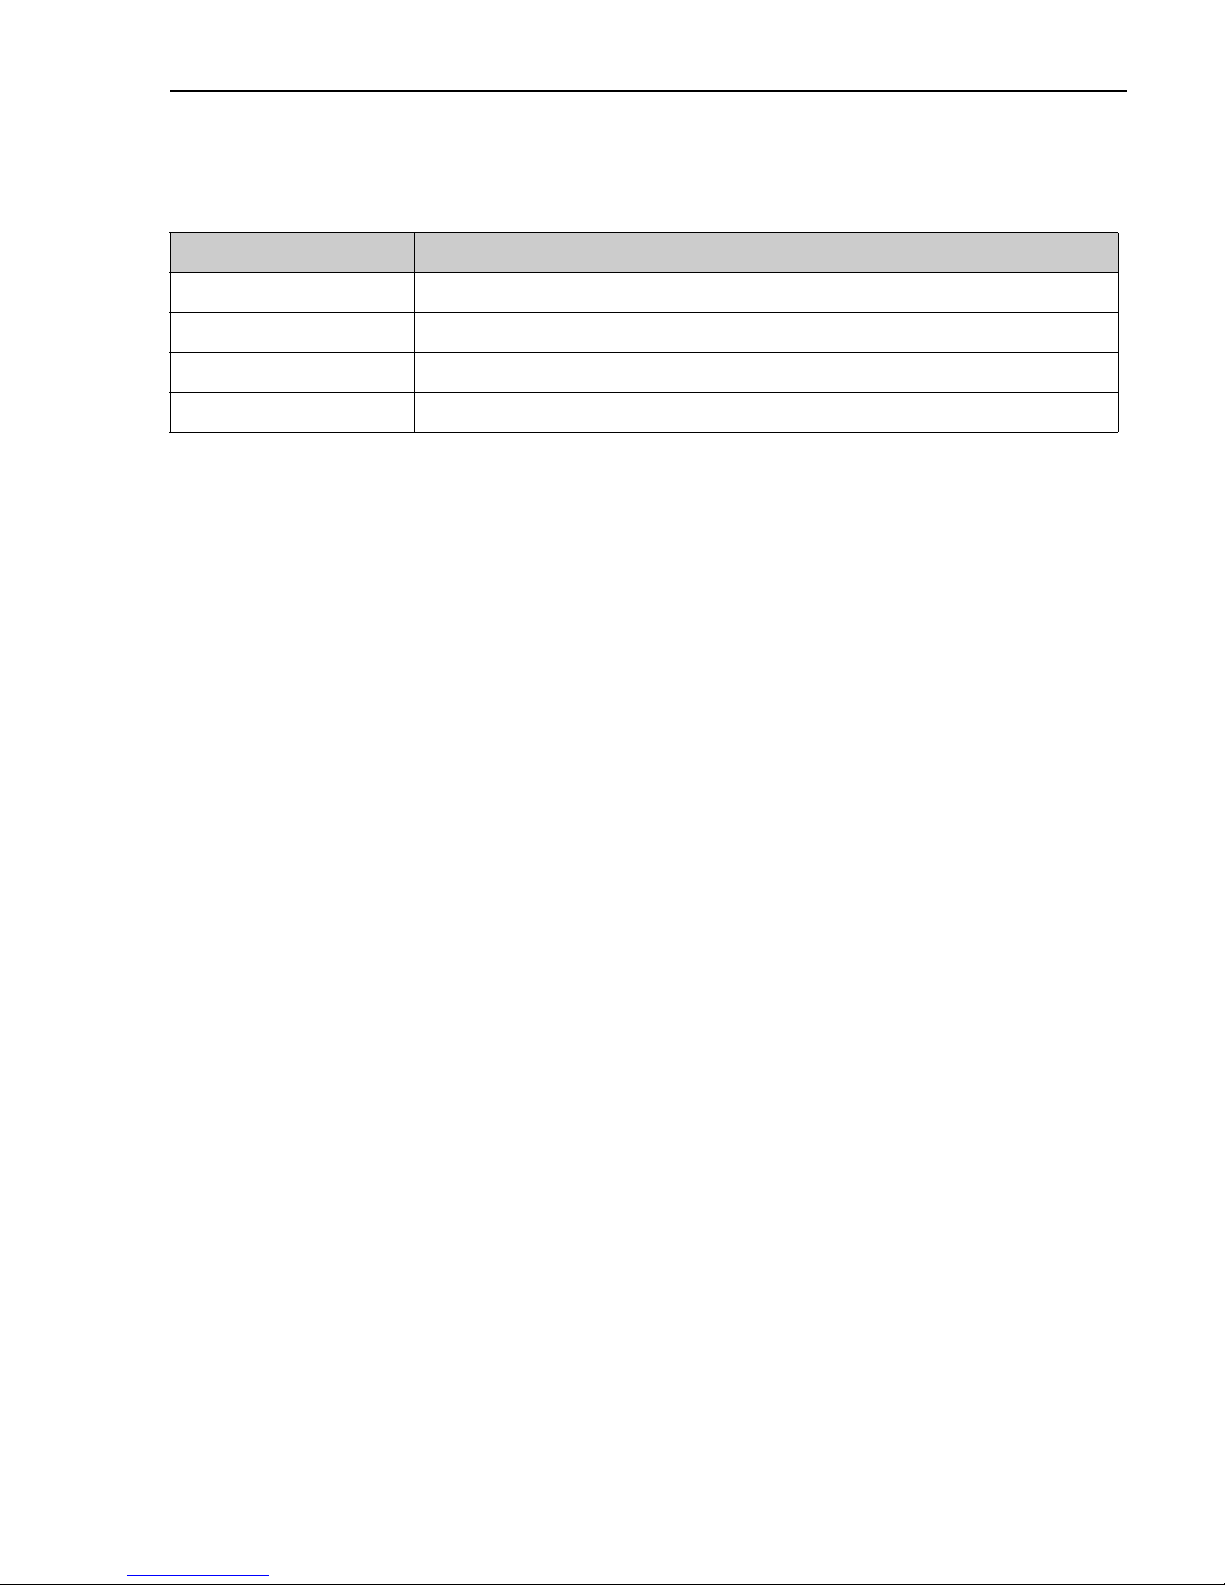
Die Umbauanleitung ist für folgende Bestellstrukturen gültig:
Bestellstruktur Anwendungspakete
DK8009– für Promass 300
DK8011– für Promass 500
DK5009– für Promag 300
DK5011– für Promag 500
Page 20
Umbauberechtigte Personen
4
2 Umbauberechtigte Personen
HINWEIS
‣ Die Person, die einen Umbau vornimmt, übernimmt die Verantwortung für die Sicherheit
während der Arbeiten, die Qualität der Ausführung und die Sicherheit des Geräts nach dem
Umbau.
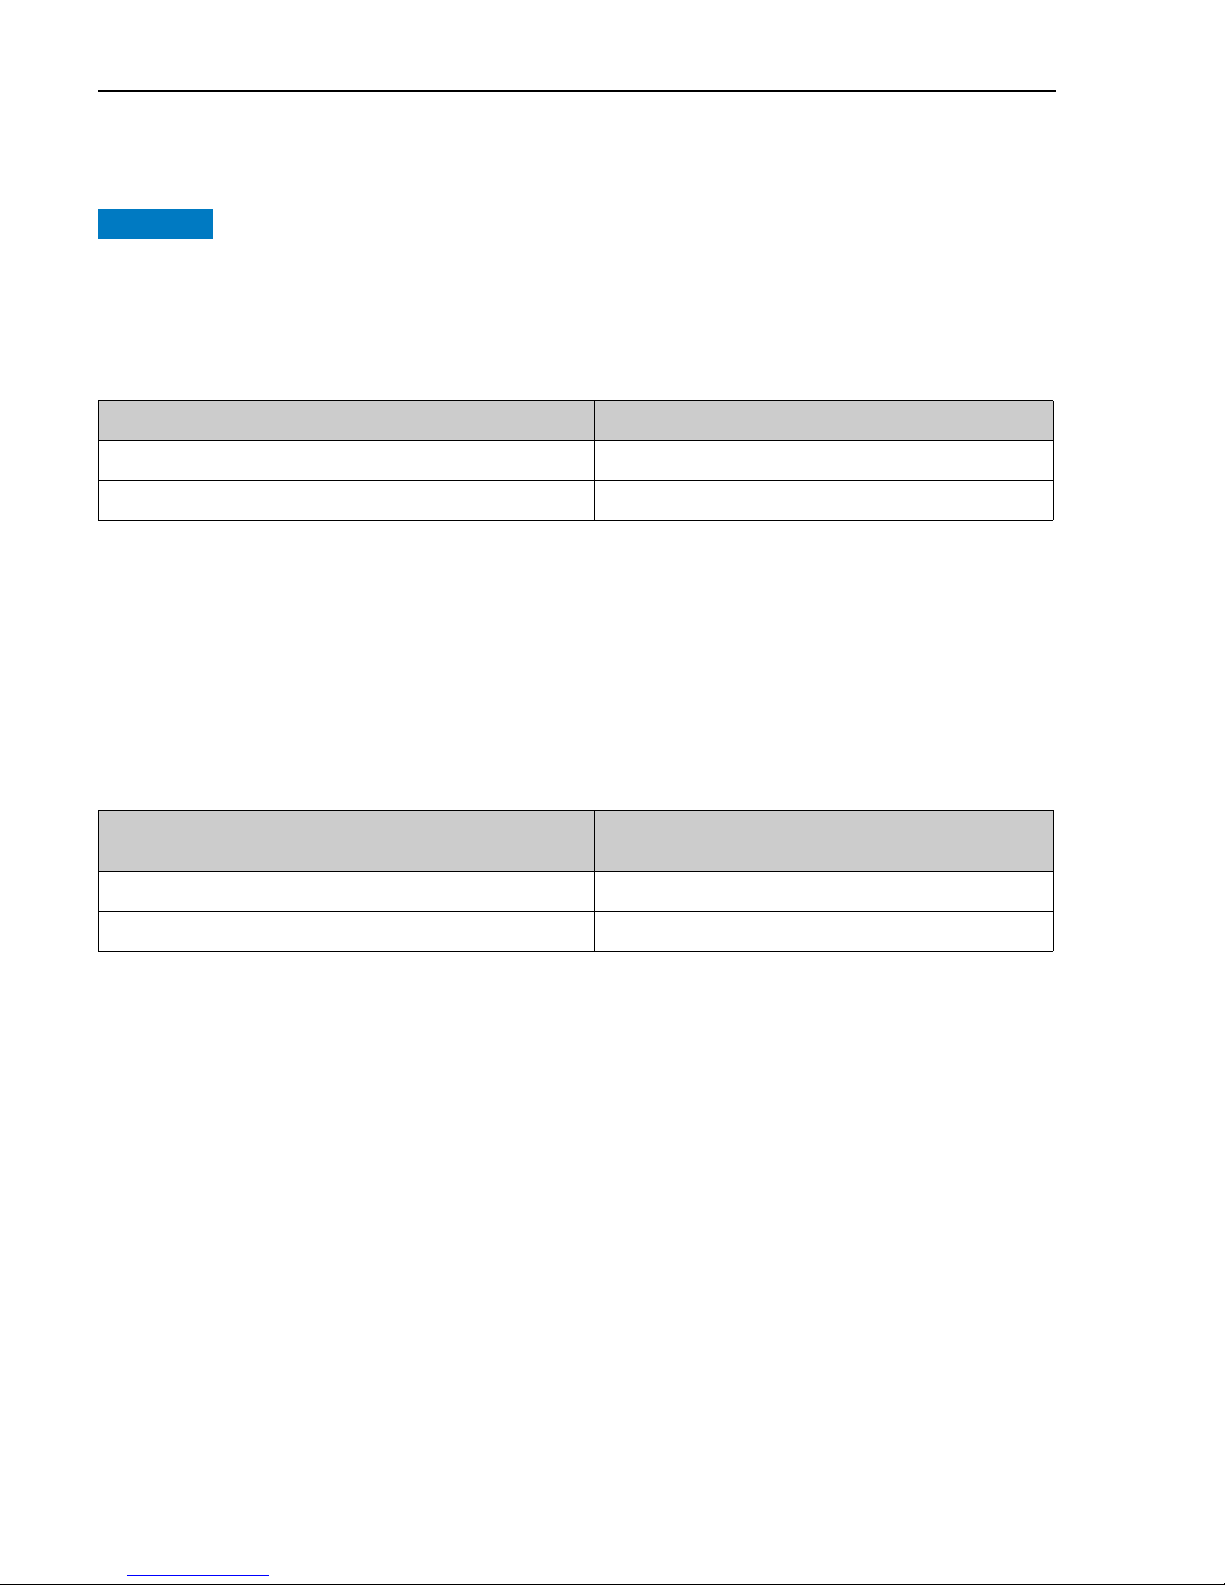
3 Autorisierten Personenkreis zum Anbringen neuer
Typenschilder
Zulassung des Messgeräts Umbauberechtigter Personenkreis
ohne Zulassung 1, 2, 3
mit Zulassung (z. B. Ex. IECEx, ATEX, FM, CSA, TIIS, NEPSI) 1, 2, 3
1 = Ausgebildete Fachkraft des Kunden
2 = Von Endress+Hauser autorisierter Servietechniker
3 = Endress+Hauser (Messgerät an Hersteller zurücksenden)
Zulassung des Messgeräts Zum Anbringen neuer Typenschilder berechtigter
Personenkreis
ohne Zulassung 1, 2, 3
mit Zulassung Endress+Hauser*
1 = Ausgebildete Fachkraft des Kunden
2 = Von Endress+Hauser autorisierter Servietechniker
3 = Endress+Hauser (Messgerät an Hersteller zurücksenden)
* Notiz: Manche Länder/ Märkte erfordern eine Abnahme auf der Baustelle (field inspection), um Typenschilder auszutauschen. Bitte handeln Sie entsprechend Ihrer nationalen Gesetzgebung.
Page 21

Sicherheitshinweise
5
4 Sicherheitshinweise
• Nationale Vorschriften bezüglich der Montage, elektrischen Installation, Inbetriebnahme,
Wartung und Umbau einhalten.
• Folgende Anforderungen an das Fachpersonal für Montage, elektrische Installation, Inbe-
triebnahme, Wartung und Umbau der Messgeräte müssen erfüllt sein:
– In Gerätesicherheit ausgebildet
– Mit den jeweiligen Einsatzbedingungen der Geräte vertraut
– Bei Ex-zertifizierten Messgeräten zusätzlich im Explosionsschutz ausgebildet
• Messgerät unter Spannung! Lebensgefahr durch Stromschlag. Messgerät nur im span-
nungslosen Zustand öffnen.
• Bei Ex-zertifizierten Messgeräten: Nur in spannungslosem Zustand (nach Berücksichtigung
einer Wartezeit von 10 Minuten nach Abschalten der Energiezufuhr) oder in Umgebungen
öffnen, die keine explosionsfähige Atmosphäre enthalten.
• Bei Messgeräten in sicherheitstechnischen Applikationen gemäß IEC 61508 bzw. IEC 61511:
Nach Umbau Neuinbetriebnahme gemäß Betriebsanleitung durchführen.
Umbau dokumentieren.
• Nur Originalteile von Endress+Hauser verwenden.
• Vor einem Geräteausbau: Prozess in sicheren Zustand bringen und Leitung von gefährlichen
Prozessstoffen befreien.
• Verbrennungsgefahr durch heisse Oberflächen! Vor Arbeitsbeginn: Anlage und Messgerät
auf berührungssichere Temperatur abkühlen.
• Die Betriebsanleitung zum Messgerät ist zu beachten.
• Beschädigungsgefahr elektronischer Bauteile!
Eine ESD-geschützte Arbeitsumgebung herstellen.
• Gehäuse nur kurzzeitig öffnen.
Eindringen von Fremdkörpern, Feuchtigkeit oder Verunreinigung vermeiden.
• Defekte Dichtungen nur durch Original-Dichtungen von Endress+Hauser ersetzen.
• Defekte Gewinde erfordern eine Instandsetzung des Messgeräts.
• Gewinde (z.B. von Elektronikraum-und Anschlussraumdeckel) müssen geschmiert sein. Säu-
refreies, nicht härtendes Fett verwenden, sofern keine abriebfeste Trockenschmierung
vorhanden ist.
• Wenn bei den Reparaturarbeiten Abstände reduziert oder die Spannungsfestigkeit des Mess-
geräts nicht sichergestellt werden kann: Prüfung nach Abschluss der Arbeiten durchführen
(z.B. Hochspannungstest gemäß Herstellerangaben).
•Servicestecker:
– nur an Servicegeräte von Endress+Hauser anschließen.
• Die in der Betriebsanleitung aufgeführten Hinweise zum Transport und zur Rücksendung
beachten.
Bei Fragen kontaktieren Sie bitte Ihre zuständige Endress+Hauser Serviceorganisation.
Page 22
Werkzeugliste
6
5 Werkzeugliste
6 Warnhinweissymbole
7 Symbole für Informationstypen
3 mm Crimpzange
A0011189-DE
GEFAHR!
Dieser Hinweis macht auf eine gefährliche Situation aufmerksam, die, wenn sie nicht vermieden wird, zu Tod oder schwerer Körperverletzung führen wird.
A0011190-DE
WARNUNG!
Dieser Hinweis macht auf eine gefährliche Situation aufmerksam, die, wenn sie nicht vermieden wird, zu Tod oder schwerer Körperverletzung führen kann.
A0011191-DE
VORSICHT!
Dieser Hinweis macht auf eine gefährliche Situation aufmerksam, die, wenn sie nicht vermieden wird, zu leichter oder mittelschwerer Körperverletzung führen kann.
A0011192-DE
HINWEIS!
Dieser Hinweis enthält Informationen zu Vorgehensweisen und weiterführenden Sachverhalten, die keine Körperverletzung nach sich ziehen.
A0011182
Erlaubt!
Kennzeichnet Abläufe, Prozesse oder Handlungen, die erlaubt sind.
A0011184
Verboten!
Kennzeichnet Abläufe, Prozesse oder Handlungen, die verboten sind.
A0011193
Tipp
Kennzeichnet zusätzliche Informationen.
Handlungsschritte
GEFAHR
WARNUNG
VORSICHT
HINWEIS
1.
2.
3.
Page 23
Anwendungspakete via Software Lizenz Code freischalten
7
8 Anwendungspakete via Software Lizenz Code freischalten
HINWEIS
Hinweis für E+H Service Techniker:
‣ Via Zugriffslevel "Instandhalter" (="Maintenance" im englischen Menü) mit dem Kun-
den-Passwort ins Gerät einloggen.
8.1 Eingabe des Software Options Codes: via Vor-Ort-Anzeige
Navigation: Im Menü der Anzeige wählen:
Eingabe Software-Option(en):
1. Tastensperre aufheben (2 sec)
2. Hauptmenue → Display language: Sprache auswählen
3. Hauptmenue → Experte → Eingabecode Werkseinstellung → 0000 oder geänderter Code
(Kundencode)
4. Experte → System → Administration → Software-Option aktivieren:
Eingabe Software-Optionscode
5. Admininstration → Software-Optionsübersicht: Anzeige der freigschalteten Software-Option(en)
6. Main Menu → Expert → System → Administration → Software-Optionsübersicht
1.
A0026785
Page 24
Anwendungspakete via Software Lizenz Code freischalten
8
7. Kontrolle der Daten auf dem Anhängeschild:
• Seriennummer Gerät
• Ordercode neu
• Eingegebener Freischaltecode Software-Optionen (Application package code)
• Anhängeschild mittels Drahtseil und Crimphülsen gemäss Abbildung anbringen:
• Typenschildsatz (optional) gemäss bestehender Gerätebeschilderung anbringen (siehe auch
Kapitel 3 " Autorisierter Personenkreis").
1.
A0031061
Page 25

Anwendungspakete via Software Lizenz Code freischalten
9
8.2 Eingabe des Software-Optionscodes via Webserver
Webserver öffnen:
1. Sprache auswählen
Login Webserver:
2. Webserver language: Auswahl der Sprache
3. Login → Zugriffsrecht → Instandhalter → Freigabecode eingeben: Eingabecode Werksein-
stellung = 0000 oder geänderter Code (Kundencode)
4. Menüleiste Menü!
5. Hauptmenü
6. Experte
7. System
8. Administration
9. Software-Option aktivieren: Eingabe Software-Optionscode
10. Software-Optionscode mit "OK" bestätigen
11. Software-Optionsübersicht→: Anzeige der freigschalteten Software-Option(en)
12. Kontrolle der Daten auf dem Anhängeschild:
• Seriennummer Gerät
• Ordercode neu
• Eingegebener Freischaltecode Software-Optionen (Application package code)
Page 26
Anwendungspakete via Software Lizenz Code freischalten
10
13. Anhängeschild mittels Drahtseil und Crimphülsen gemäss Abbildung anbringen:
• Typenschildsatz (optional) gemäss bestehender Gerätebeschilderung anbringen (siehe auch
Kapitel 3 "Autorisierter Personenkreis").
1.
A0031061
Page 27

Anwendungspakete via Software Lizenz Code freischalten
11
8.3 Eingabe des Software-Optionscodes via FieldCare
FieldCare öffnen:
1. FieldCare starten
2. Verbindungsart Kommunikationsschnittstelle auswählen
3. Schnittstelleneinstellungen prüfen (IP-Adresse)
4. Bestätigen mit “Weiter“ → Gerät wird automatisch gesucht
5. Navigation
6. Experte
7. System
8. Administration
9. Softwareoption aktivieren: Eingabe Software-Optionscode
10. Mit “Enter“ bestätigen
11. Software-Optionsübersicht: Anzeige der freigeschalteten Software-Option(en)
12. Freischalten des Grätes entweder mit Werkscode "0000" oder gegebenenfalls Kundencode.
Falls nicht bekannt beim Kunden erfragen. Eingabe des neuen Codes nur über Rolle
"Instandhalter".
13. Kontrolle der Daten auf dem Anhängeschild:
• Seriennummer Gerät
• Ordercode neu
• Eingegebener Freischaltecode für die Software-Optionen (Application package code)
Page 28
Anwendungspakete via Software Lizenz Code freischalten
12
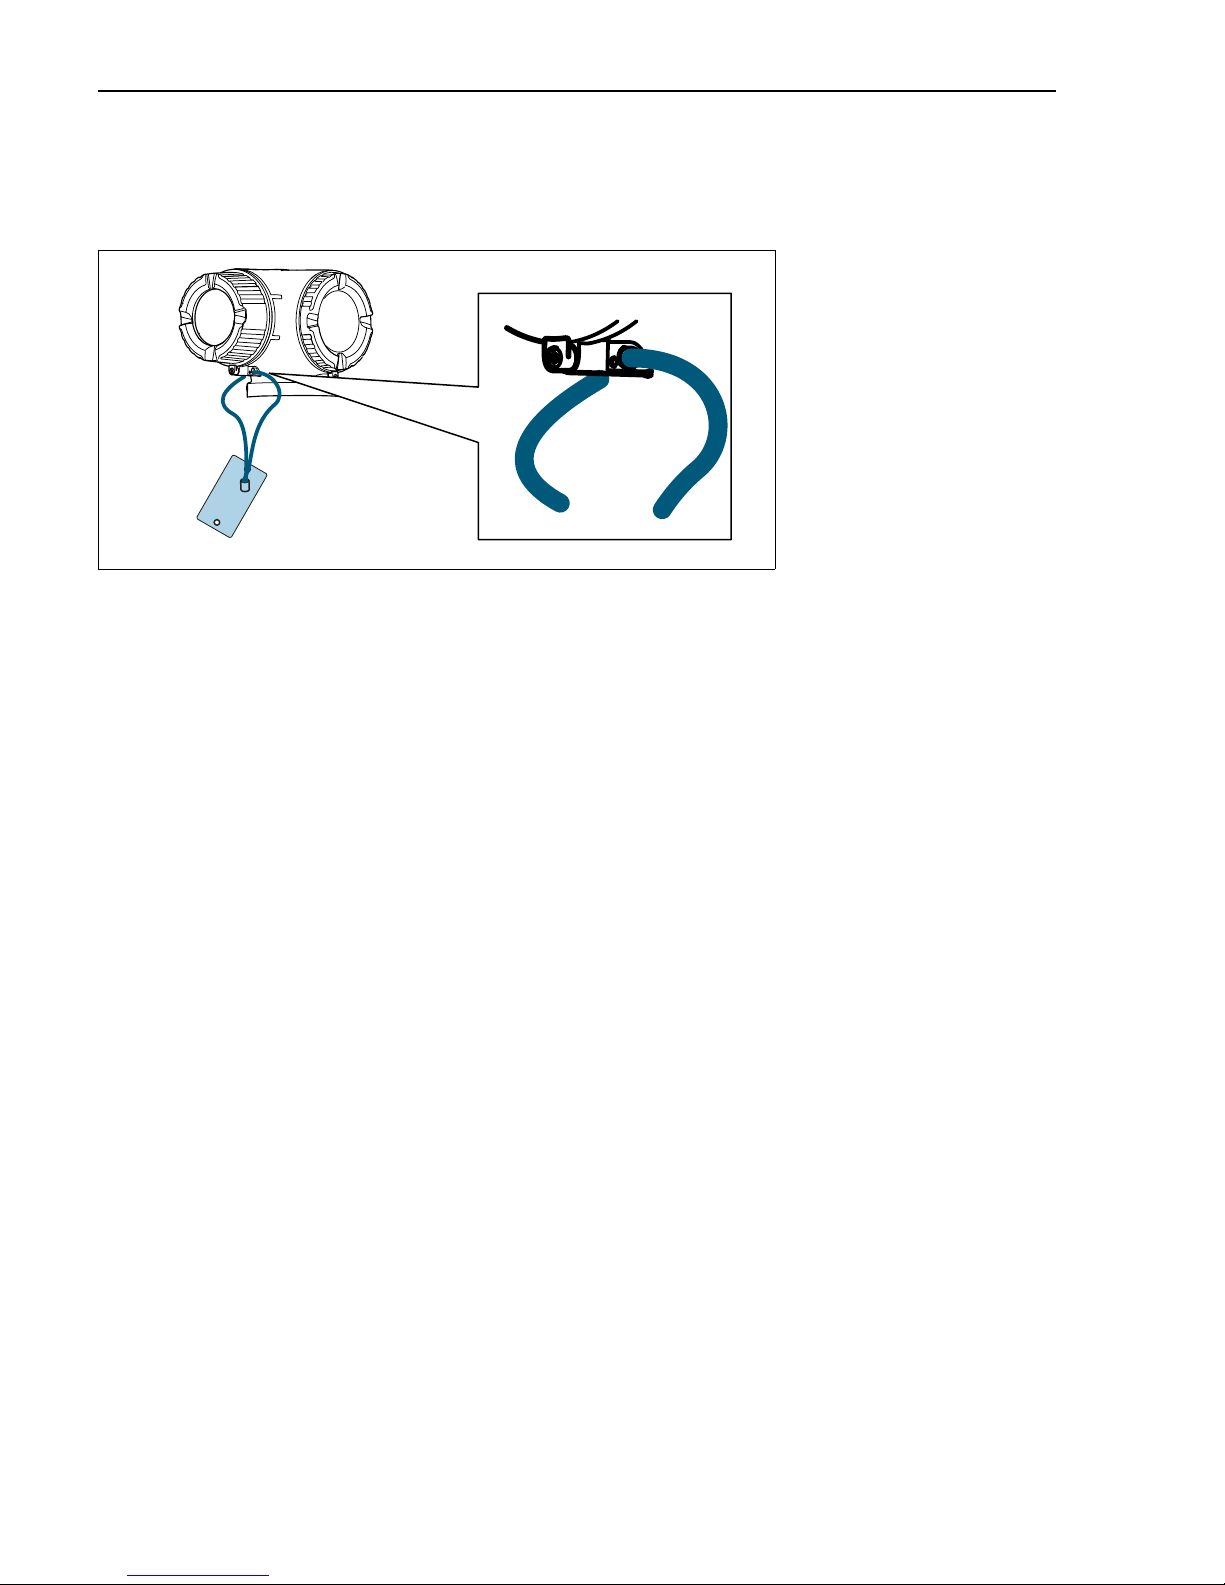
14. Anhängeschild mittels Drahtseil und Crimphülsen gemäss Abbildung anbringen:
• Typenschildsatz (optional) gemäss bestehender Gerätebeschilderung anbringen (siehe auch
Kapitel 3 "Autorisierter Personenkreis").
1.
A0031061
Page 29

Anwendungspakete via Software Lizenz Code freischalten
13
8.4 Anpassungen von Gerätewurzeln und/oder erweiterten
Bestellcodes in der CER Datenbank auf Engine
HINWEIS
Für den Kunden:
Damit Ihre Gerätedaten in der Common Equipment Record (Datenbank) aktualisiert werden,
wenden Sie sich bitte an die für Sie zuständige Endress+Hauser Serviceorganisation.
Kontaktdaten unter:
Link: http://www.addresses.endress.com
HINWEIS
Nur für den Service Techniker:
Verpflichtende Anweisung
Technische Änderungen wie Upgrades-, Änderungen von Konfigurationen an Ein-/ Ausgängen,
sowie Umbauten an Endress+Hauser Durchflussmessgeräten führen zu einer notwendigen
Anpassung der Gerätewurzel (z.B. 5W4B => 5W4C) und/oder des erweiterten Bestellcodes,
bzw. des Bestellcodes des betroffenen Gerätes. Veränderungen dieser Art erfordern somit neue
Typenschilder, welche jede technische Veränderung der genannten Gerätedaten korrekt
anzeigen. Zusätzlich muss die verantwortliche Serviceorganisation, welche technische
Veränderungen an Geräten durchführt, sicherstellen, dass die geänderten Gerätedaten in der
Endress+Hauser CER Datenbank entsprechend angepasst werden.
Diese Anpassung ist zwingend notwendig, damit die korrekten Gerätedaten in der
CER Datenbank auf Engine angezeigt werden. Eine korrekte Ersatzteillieferung, wie auch
Folgebestellungen von Neugeräten über modifizierte Bestellstrukturen, werden zukünftig
sichergestellt.
Folgende Möglichkeiten stehen zur Verfügung:
1. Anpassen der Gerätewurzel und/oder des erweiterten Bestellcodes direkt in der CER
Datenbank auf Engine. Dies muss durch eine Person der jeweiligen Serviceorganisation
(SC) ausgeführt werden. Admin-Rechte sind hierfür zwingend notwendig. Für weitere
Informationen über CER Admin-Benutzer verwenden Sie bitte folgenden Link auf
clue.endress.com:
Link: http://clue.endress.com/display/wamwiki/CER+Admins
2. Sollten Sie keine Adminrechte besitzen, verwenden Sie bitte folgenden Link auf clue.endress.com, um ein CER Training zu erhalten. Nach der Teilnahme an diesem Training wird
der Adminstatus zugeteilt.
Link: http://clue.endress.com/display/wamwiki/CER+Admin+training
Page 30

Anwendungspakete via Software Lizenz Code freischalten
14
Page 31

Anwendungspakete via Software Lizenz Code freischalten
15
Page 32

www.addresses.endress.com
 Loading...